Article

Microstructural and Mechanical Characteristics of Novel 6% Cr Cold-Work Tool Steel

1
Advanced Steel Processing and Products Research Center, Department of Metallurgical and Materials Engineering, Colorado School of Mines, Golden, CO 80401, USA
2
Division of Advanced Materials Engineering, Research Center for Advanced Materials Development, Chonbuk National University, Jeonju 561-756, Korea
*
Author to whom correspondence should be addressed.
Metals 2017, 7(1), 12; https://doi.org/10.3390/met7010012
Submission received: 8 September 2016 / Revised: 16 December 2016 / Accepted: 3 January 2017 / Published: 6 January 2017

Abstract

:
We investigated a new cold-work tool steel with a low Cr content of 6 wt. % which was designed based on thermodynamic calculation to minimize the formation of primary carbide. A smaller particle size and a smaller volume fraction of carbides were observed in this 6% Cr steel. Superior mechanical properties in terms of hardness, impact toughness, tensile strength, and total elongation were achieved in this steel, due to fine secondary carbides precipitated during tempering. These carbide particles were M6C and (Mo,V)C carbides with a diameter below 100 nm.

1. Introduction

The recent trend in the automotive industry is to enhance the use of advanced high-strength steel (AHSS), which reduces the weight of vehicles and improves fuel efficiency. Simultaneously, the use of high-strength tool steels is required for various metal working processes, e.g., press forming or drawing. For an effective metal working process, basically, the strength of tool steels should be higher than that of AHSS which is fabricated using the tool steels. This means that the development of tool steels tends to take precedence over the development of AHSS as there is a huge demand for AHSS with a strength higher than 1 GPa.
The tool steels mainly consist of high C, high Cr, and other carbide-forming elements such as Mo, V, and W [1,2,3]. The mechanical properties of the tool steels can be influenced by altering the tempering condition, which is related to the type and amount of carbides formed during tempering. For instance, a tempered STD11 steel, widely used as a representative of cold-work tool steel, has a high hardness over 58 HRC and a good wear resistance due its high carbide content in the tempered martensite matrix. However, some transition carbides can act as crack initiation sites, which lower the toughness of the product [4,5]. It has been reported that the primary carbide formed and coarsened can be elongated during hot deformation, which causes vacancy formation and crack initiation due to the anisotropy of the elongated shape of the carbide [6].
Recently, the development trend of the cold-work tool steels is to reduce the amounts of C and Cr, to decrease the volume fraction and size of the primary carbides [7,8,9,10,11]. These steels with a lower Cr content have better mechanical properties, because the formation of primary carbide is suppressed, compared to STD11 steel. Kim et al. developed a cold-work tool steel containing 8 wt. % Cr, which was designed based on thermodynamic calculations to avoid the primary carbide [11]. However, they observed some amounts of primary carbide in the proposed 8% Cr steel specimen.
Therefore, in the present work, we developed a new cold-work tool steel with a Cr content of 6 wt. %. The reduced Cr content was designed to inhibit the formation of the primary carbide as much as possible. The expected strength decrease due to the reduction of Cr content was complemented by increasing the amounts of carbide-forming elements, such as Mo, V, and W. The mechanical properties and microstructural features of the developed 6% Cr cold-work steel were evaluated in comparison with those of STD11 steel after a conventional quenching and tempering treatment.

2. Materials and Methods

The chemical composition of the steels used in this study is shown in Table 1. The base contents of C and Cr in the newly designed steel alloy were 0.9 wt. % and 6.0 wt. %, respectively (hereinafter referred to as “Cr6C9” steel). The commercial STD11 steel was used to evaluate the Cr6C9 steel. Then 30 kg of the Cr6C9 steel ingot was fabricated by vacuum induction melting (VIM). The ingot was homogenized at 1150 °C for 1 h and hot-forged to remove the cast structure. The forged plate was annealed at 870 °C for 4 h, followed by furnace cooling for spheroidization. Charpy U-notched specimens and ASTM E8 sub-size tensile specimens with the gauge length of 25.4 mm and the thickness of 1.5 mm were prepared from the spheroidized plate. The machined specimens were austenitized at 1030 °C for 30 min in a vacuum tube furnace under the vacuum condition and then air-cooled to room temperature. The tempering treatment was carried out at 520 °C for 2 h twice, indicating 4 h tempering in total. The microstructure of the tempered specimens was observed under an optical microscope (OM, Leica Co., DM ILM, Wetzlar, Germany) and a field emission emitter scanning electron microscope (FE-SEM, Hitachi Co., SU-70, Tokyo, Japan). The samples were mechanically polished to 1 μm and etched in the Vilella etchant (0.6 g picric acid + 3 mL HCl + 97 mL ethanol). Carbon replica samples were prepared to observe small carbides below 500 nm in diameter by means of a transmission electron microscope (TEM, JEM-2010, JEOL, Ltd, Tokyo, Japan) with an energy dispersive spectrometer (EDS). The volume fraction of retained austenite was determined using X-ray diffraction (XRD, RIGAKU MAX-2500, Rigaku Co., Tokyo, Japan) with Cu Kα radiation. The equation to calculate the volume fraction of retained austenite is mentioned in detail in reference [10]. Room temperature tensile test was carried out with a strain rate of 1 × 10⁻³ s−1 using Instron 5982 testing machine (Instron, Norwood, MA, USA). The hardness of the tempered specimens was measured on the Rockwell hardness C scale. The Charpy U-notch impact test was carried out to evaluate the impact toughness.

3. Results and Discussion

Figure 1 shows the temperature-dependent equilibrium phase volume fractions for the Cr6C9 and STD11 steels determined by means of the MatCalc software [12]. The database of “mc_fe_v2.057.tdb” is used for the thermodynamic calculations in MatCalc. The solidification temperature and the initial temperature required to form the primary carbide were compared. In the STD11 steel, the solidification temperature was 1248 °C, but the primary M7C3 carbide appeared at the higher temperature of 1252 °C. It indicates that the M7C3 carbide can be precipitated before the full solidification and the precipitates easily coarsened during the following thermo-mechanical processing, which had a damaging influence on the mechanical properties. The solidification in the Cr6C9 steel was completed at 1244 °C, similar to the STD11 steel. As the temperature decreased, M6C carbide was precipitated at 1196 °C and M7C3 carbide was precipitated at 1110 °C, successively. The carbide precipitation appeared at a temperature lower than the solidification temperature in the Cr6C9 steel. It is presumed that this temperature gap effectively suppressed the formation of the primary carbide, which appeared during solidification. The main alloy design concept of the Cr6C9 steel was to lower the carbide initiation temperature below the solidification temperature as much as possible in order to minimize the actual volume fraction and size of the primary carbide after quenching and tempering.
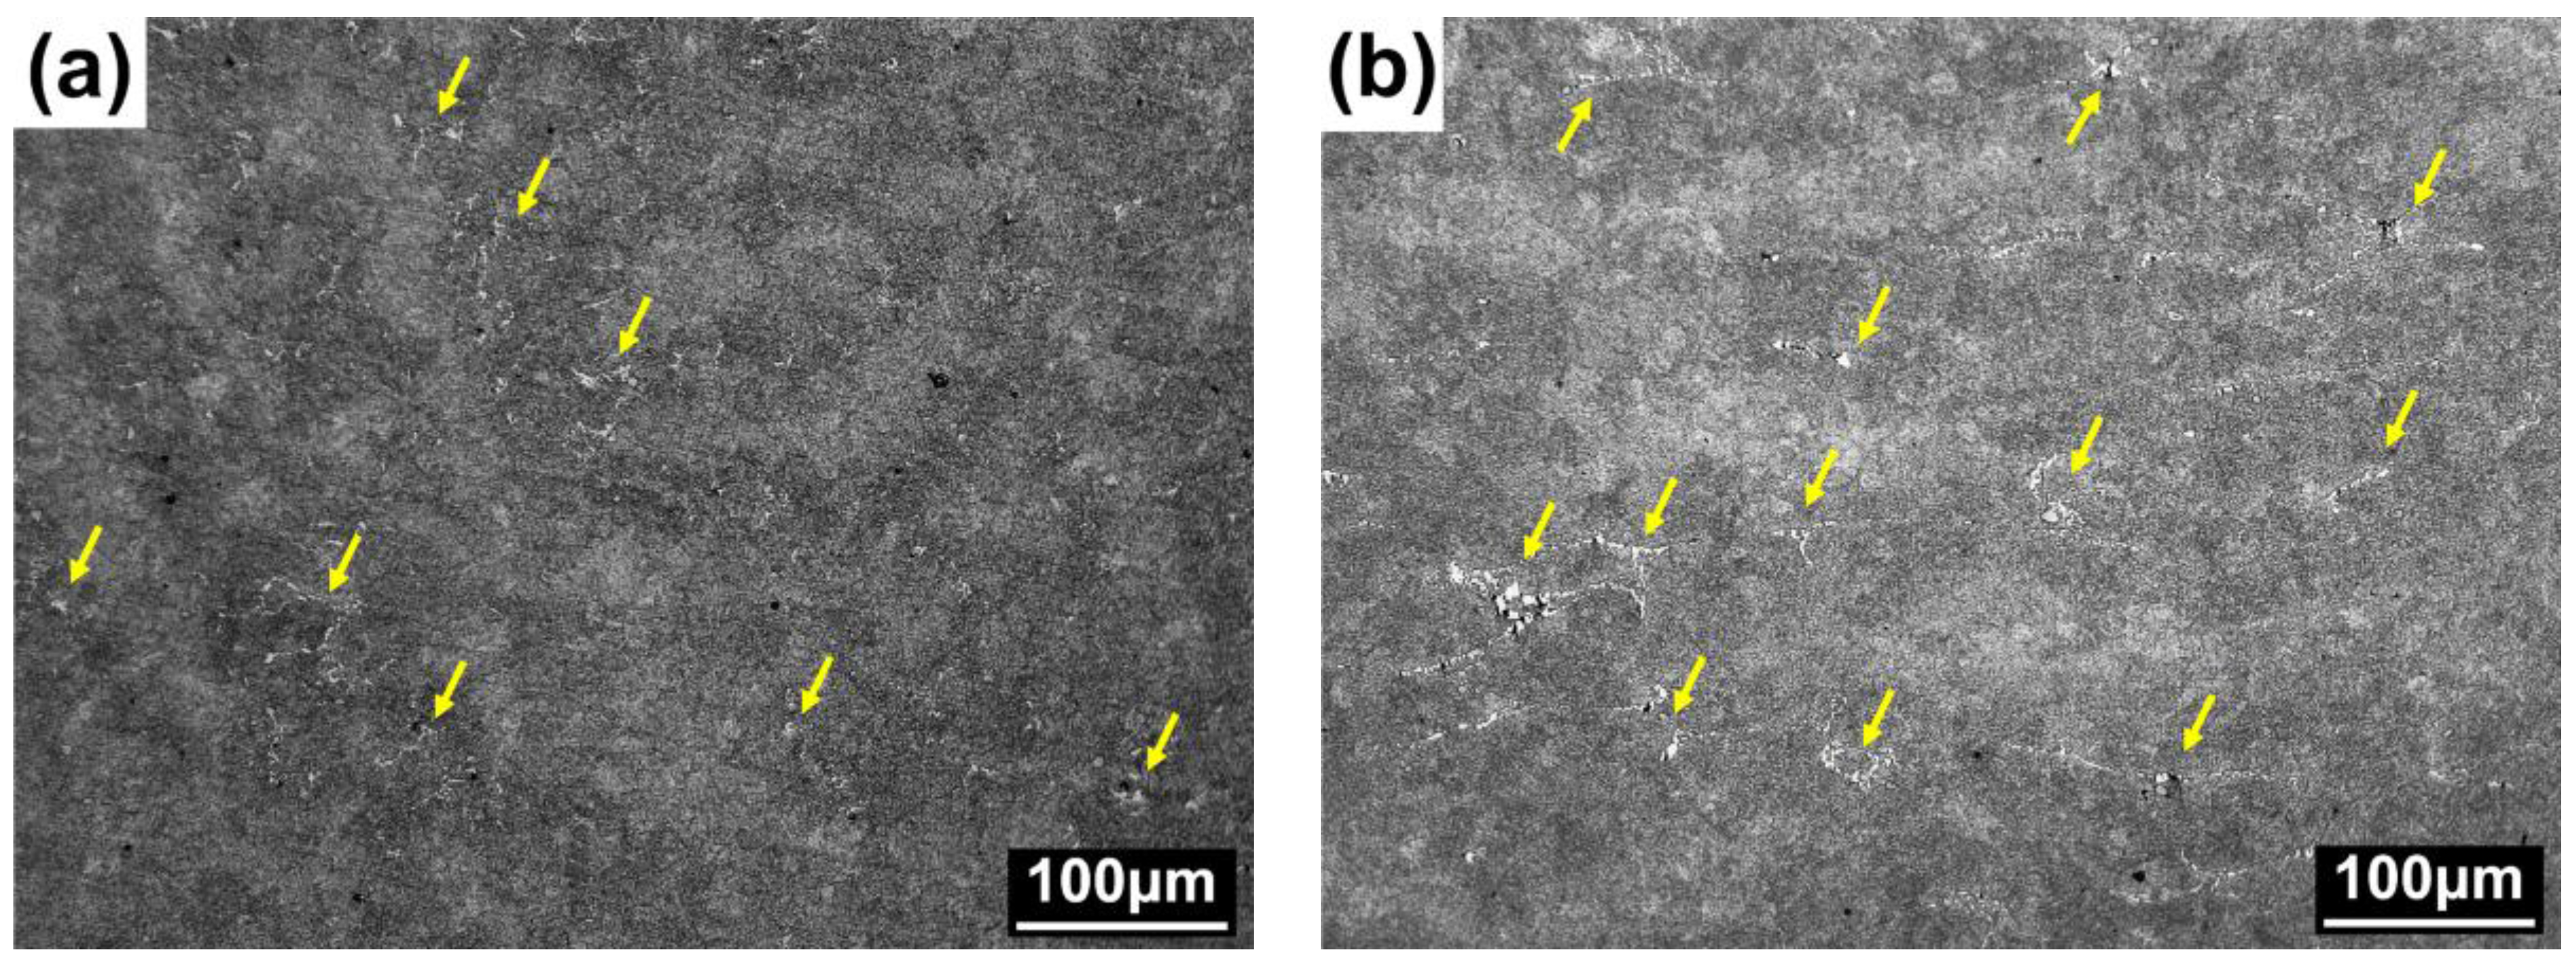
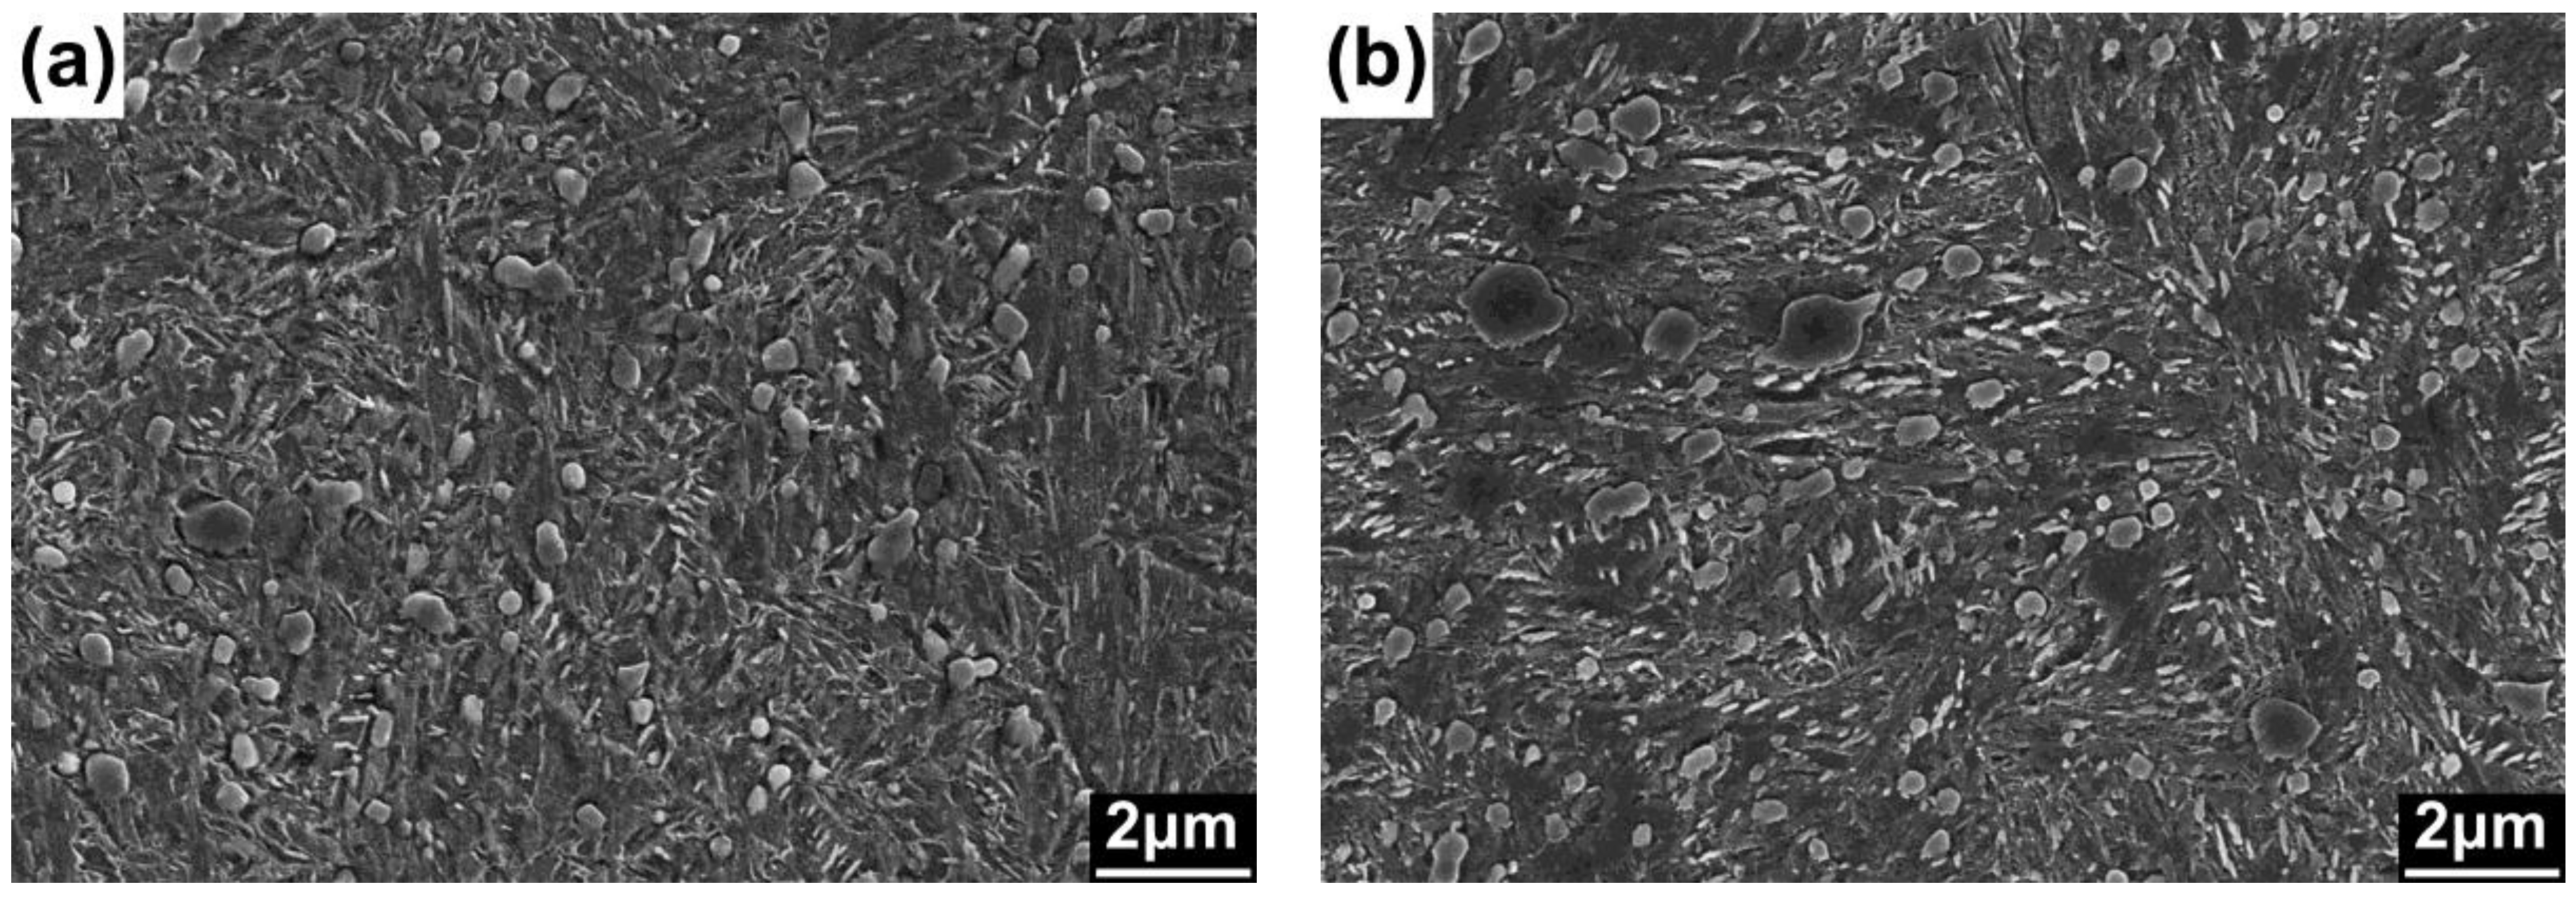
Figure 2 shows the optical micrographs of the tempered Cr6C9 and STD11 specimens. The carbides in white were observed in the tempered martensite matrix. The volume fraction of carbides in the STD11 specimen was relatively larger than that in the Cr6C9 specimen, which is due to the difference in the volume fraction of the primary carbide. According to the calculated phase fraction in Figure 1, no primary carbide should exist in the Cr6C9 specimen. It is thought that a small amount of the primary carbide was precipitated during solidification in the Cr6C9 steel due to the non-equilibrium reaction and alloy segregation [11]. Figure 3 shows the SEM images of the tempered Cr6C9 and STD11 specimens. Spherical carbide particles with a diameter of less than 0.5 μm were observed in the Cr6C9 specimen whereas carbide particles larger than 1 μm in diameter were observed in the STD11 specimen. These large carbide particles seem to come from the precipitation of primary M7C3 carbide in the solidification or austenitization treatment [13,14]. This can be inferred from the equilibrium phase fraction for the STD11 steel as shown in Figure 1b. The smaller size and reduced amount of carbides observed in the Cr6C9 specimen resulted from the reduced amounts of C and Cr [1,11].
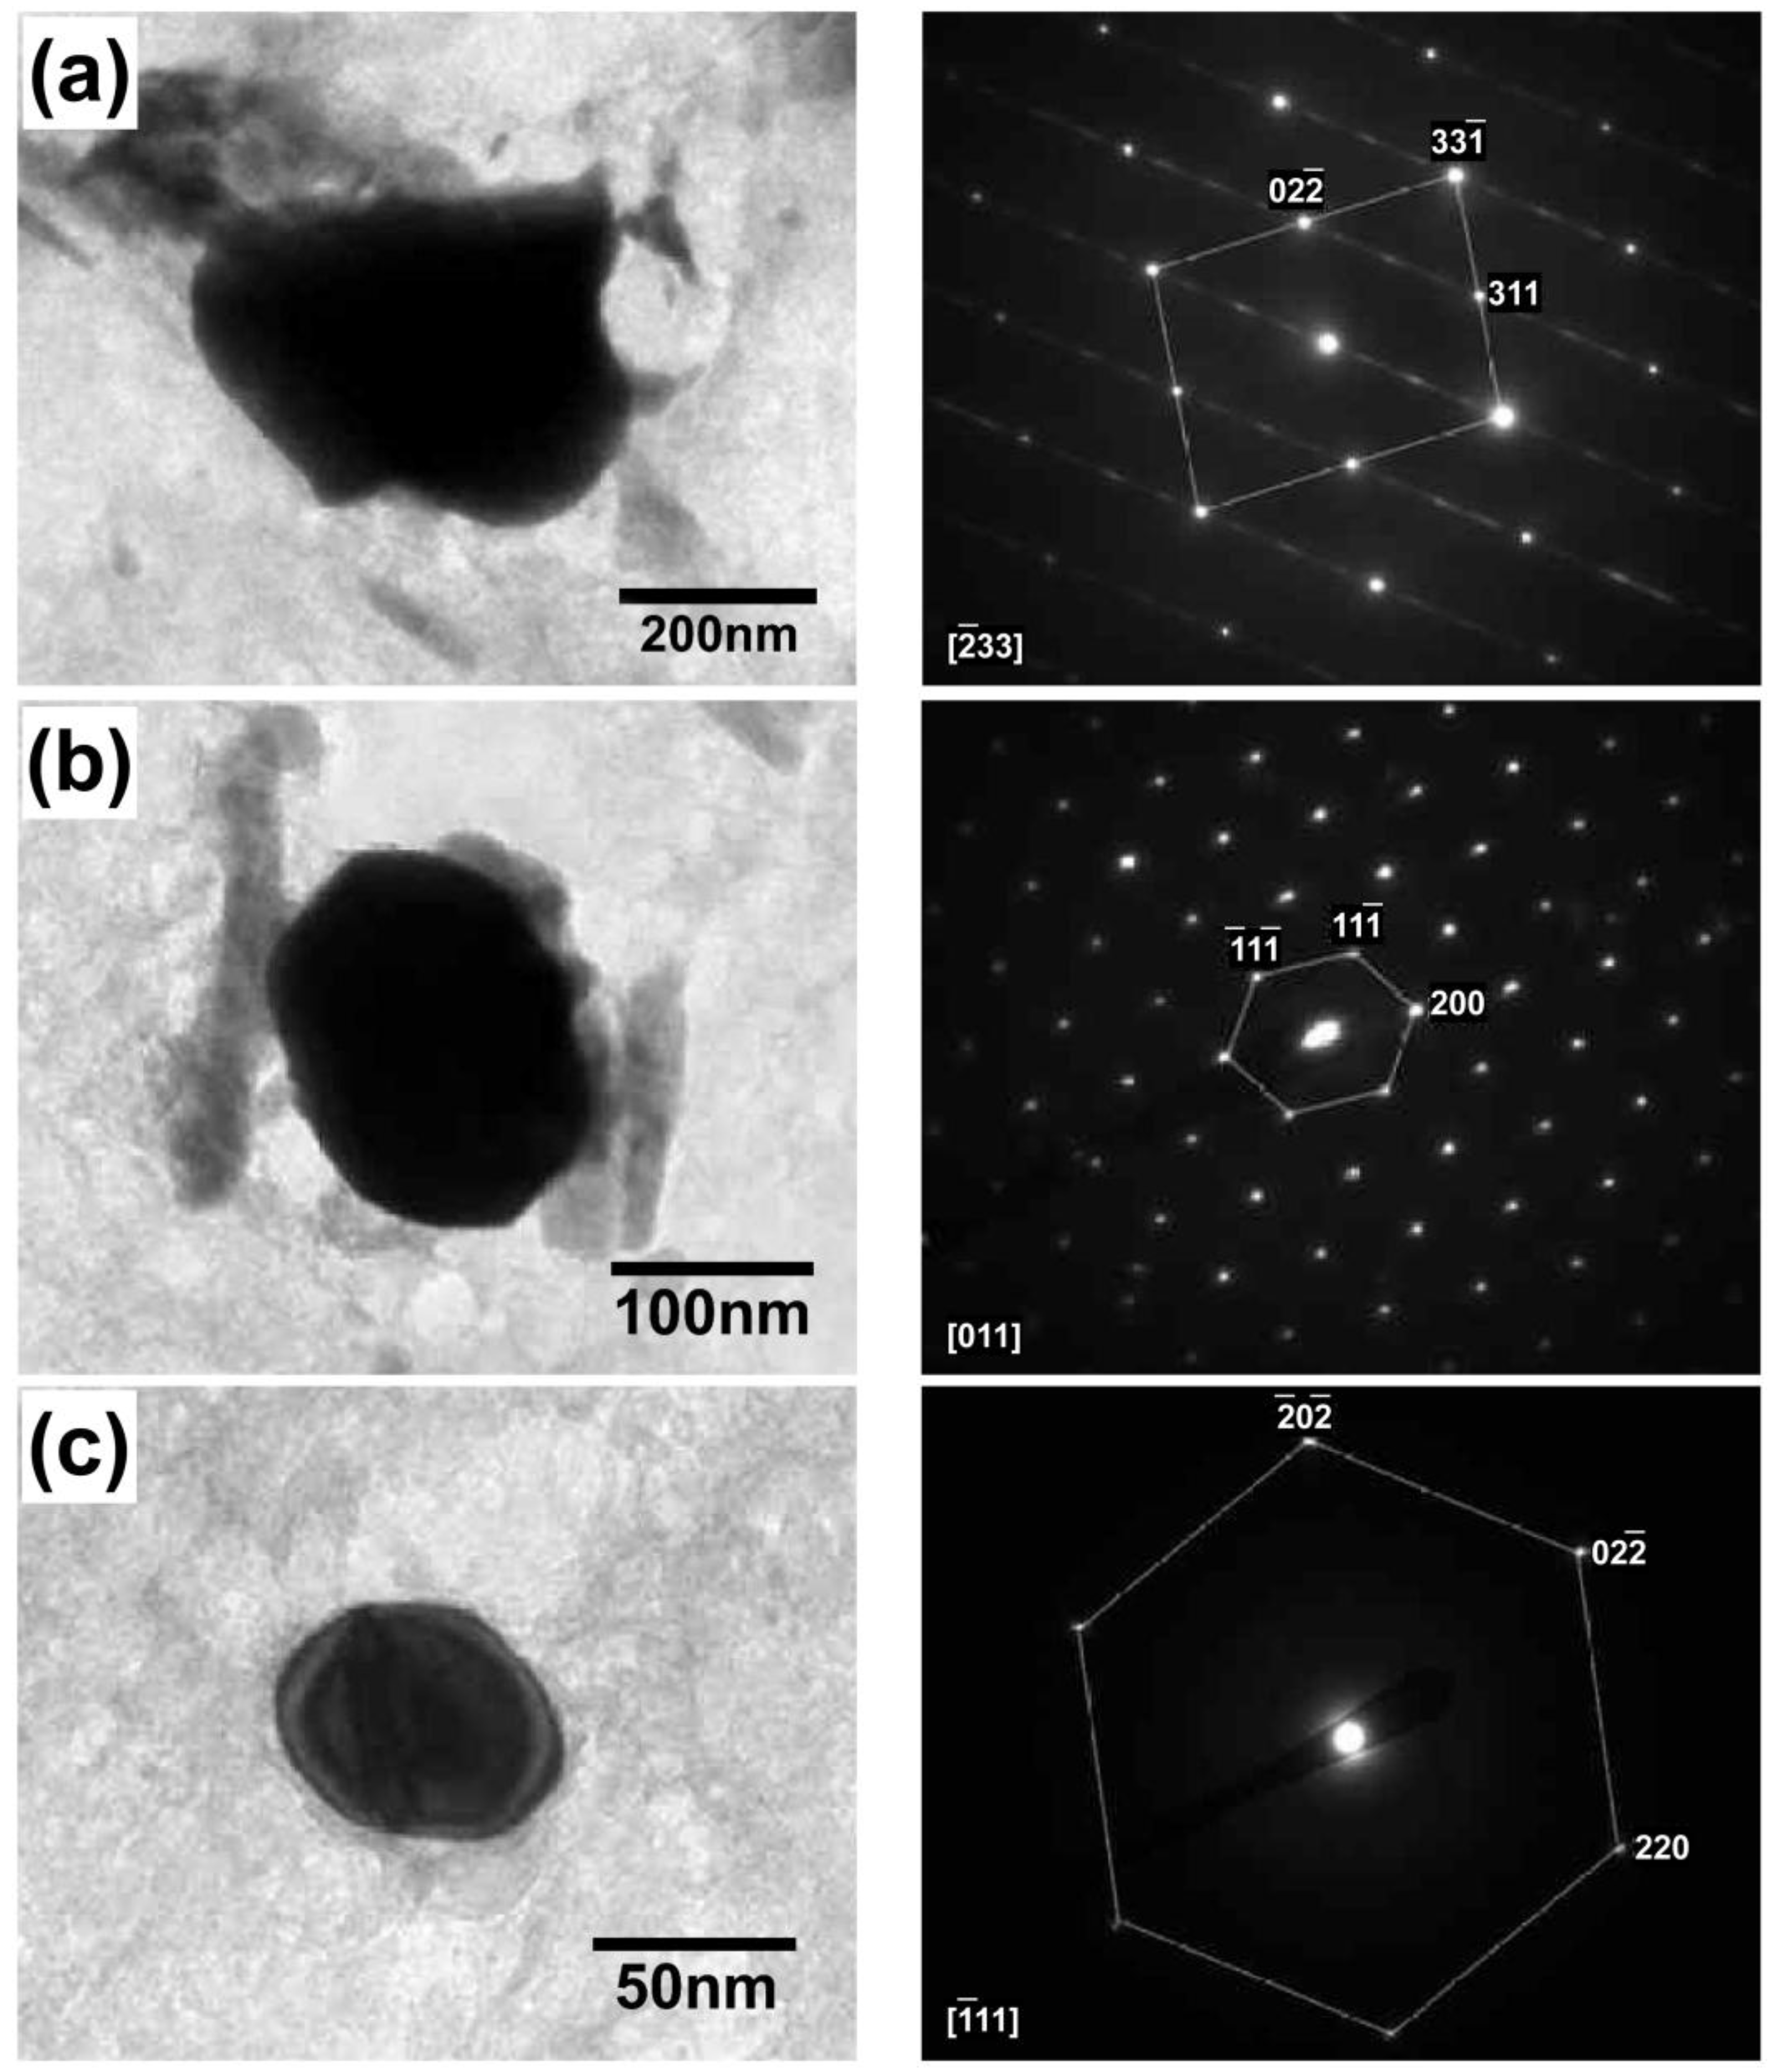
The various carbides with different sizes in the tempered Cr6C9 specimen were investigated by TEM analysis and the results are compared to the corresponding result. The selected area electron diffraction (SAED) pattern and EDS result confirmed that coarse carbide particles larger than 200 nm in diameter had a high Cr level and a trigonal crystal structure, as shown in Figure 4a. It is reported that the M7C3 carbide has enriched Cr content with a trigonal crystal structure [3,15]. This carbide is considered as a M7C3 precipitate. This is typically precipitated during solidification and is relatively more coarsened compared with other carbides; thus, it is hard to fully dissolve in a high-temperature heat treatment. The chemical composition in the M7C3 carbide at 520 °C predicted using MatCalc calculations is 9.8 at. %Fe–53.5 at. %Cr–2.9 at. %Mn–1.1 at. %Mo–2.4 at. %V–0.3 at. %W–30 at. %C. Figure 4b shows a carbide particle with a diameter of about 100 nm, containing high Mo and W contents with a face-centered cubic (FCC) crystal structure confirmed by the SAED pattern and EDS result. This precipitate is considered as the M6C carbide [3]. The chemical composition in the M6C carbide at 520 °C predicted using MatCalc calculations is 29.5 at. %Fe–37.7 at. %Mo–13.2 at. %W–3.0 at. %Cr–2.2 at. %V–0.1 at. %Si–14.3 at. %C. The M23C6 carbide also has a FCC crystal structure, but it has a very high Cr content. The chemical composition in the M23C6 carbide at 520 °C predicted using MatCalc calculations is 24.8 at. %Fe–44.3 at. %Cr–9.8 at. %Mo–0.4 at. %Mn–0.7 at. %C. A small carbide particle with a diameter of less than 50 nm is shown in Figure 4c. The SAED pattern confirms the FCC crystal structure and the EDS result indicates a high concentration of Mo and V, but Cr was undetected. This carbide particle is considered as (Mo,V)C, not M23C6, because it is reported that M23C6 contains the enriched Cr [8,16] and the MatCalc calculation also shows enriched Cr in the M23C6. The equilibrium chemical composition in the (Mo,V)C carbide at 520 °C predicted using MatCalc calculations is 36.1 at. %V–15.0 at. %V–2.3 at. %W–46.6 at. %C. It is thought that carbides with a diameter of less than 100 nm, as observed in Figure 4b,c, are the secondary carbides precipitated during tempering at a high temperature of 520 °C. These fine carbide particles consist of high concentrations of Mo, V, and W, which could contribute to the improvement of strength and hardness.
Figure 5 compares the mechanical properties of the tempered Cr6C9 and STD11 specimens. The Cr6C9 specimen indicated a higher hardness value due to the higher contents of Mo, V, and W, even though the C and Cr contents were decreased. The increase of hardness by forming carbide particles with Mo, V, and W is well known as the secondary hardening effect. The impact toughness of the Cr6C9 specimen was two times higher than that of the STD11 specimen. As confirmed by the microstructure images, a higher volume fraction of coarse primary carbides in the STD11 specimen brought about the lower impact toughness value. The Cr6C9 specimen was superior in the tensile properties to the STD11 specimen because of the work-hardening effect related to the fine secondary carbides, which had strong carbide-forming elements such as Mo, V, and W [17]. Also, it is thought that the better elongation of the Cr6C9 specimen results from the suppressed formation of the primary carbide. The measured volume fraction of retained austenite determined by XRD analysis for both the tempered Cr6C9 and STD11 specimens before deformation was less than 2 vol. % since the tempering temperature of 520 °C was high enough to decompose the retained austenite into ferrite and cementite [6,8,9]. Thus, the effect of the retained austenite on the mechanical properties is negligible depending on the steel alloy composition.
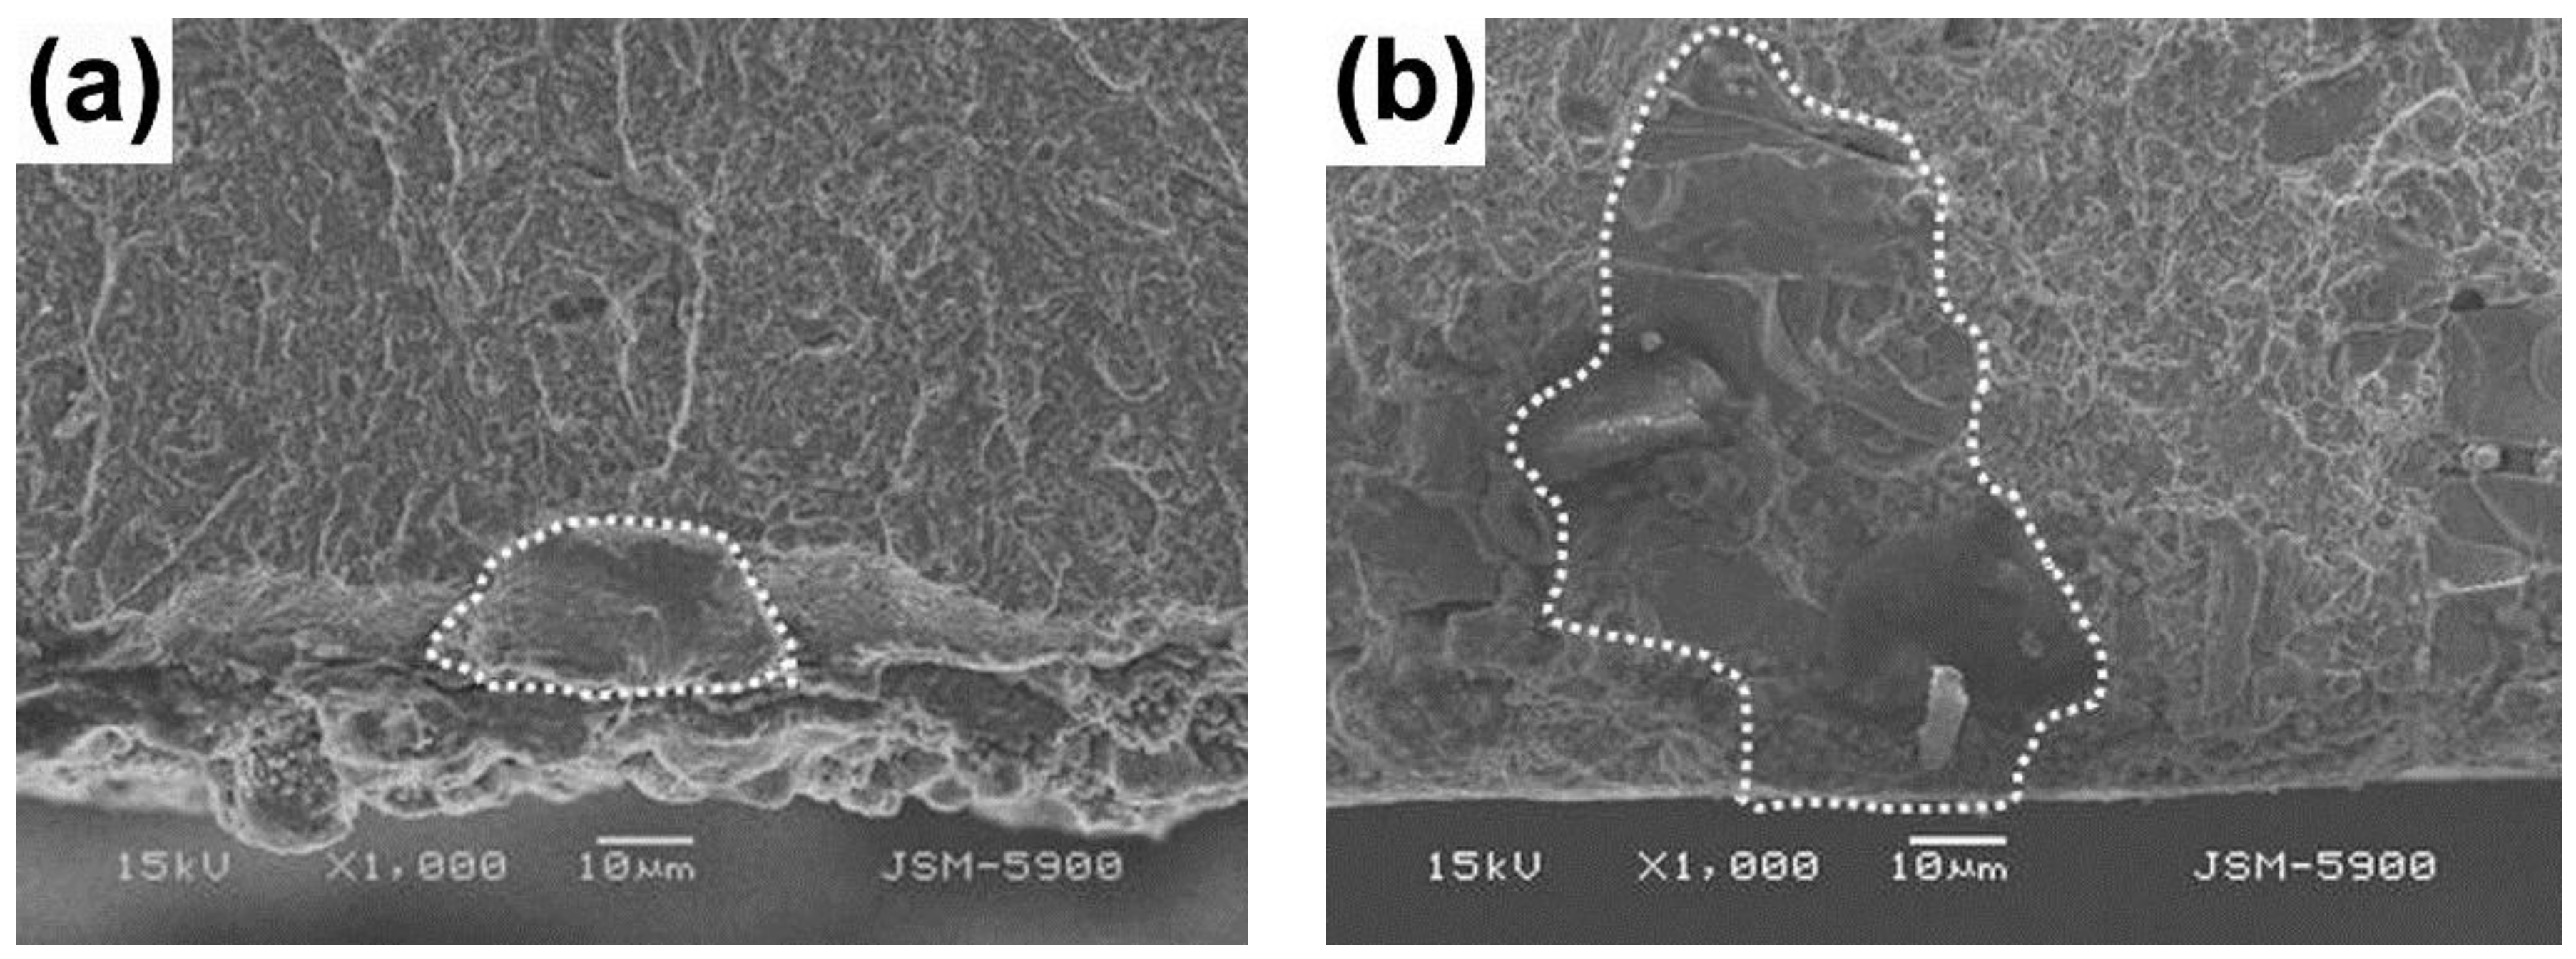
Figure 6 shows the SEM image of the fracture surface of the Charpy impact testing specimen. The fine carbide was observed at the fracture surface in the Cr6C9 specimen whereas the coarse carbide was observed at the fracture surface in the STD11 specimen. It is reported that the crack can easily initiate and propagate near coarse carbide, resulting in fracture, as the stress is applied [18,19]. Hence, the lower impact toughness value was caused by the coarse carbide in the tempered STD11 specimen.

4. Conclusions

A new cold-work tool steel with a reduced Cr content of 6 wt. % has been developed. The alloy composition of the Cr6C9 steel was designed based on thermodynamic calculation in order to avoid the formation of primary carbide as much as possible during solidification. Even though the primary carbide was observed in both the Cr6C9 and STD11 steels, the Cr6C9 steel showed a smaller carbide particle size and a smaller volume fraction of carbides. The tempered Cr6C9 steel showed superior mechanical properties compared to the tempered STD11 steel. The higher values of hardness, impact toughness, tensile strength, and total elongation were the result of the fine secondary carbides’ precipitation during tempering due to the higher contents of Mo, V, and W. From the TEM analysis and the thermodynamic calculation, it is considered that M6C and (Mo,V)C carbides with a diameter below 100 nm contributed to the improved mechanical properties of the tempered Cr6C9 steel.

Acknowledgments

This work (Grant No. 1503002010) was supported by the Business for Academic-industrial Cooperative establishments funded Korea Small and Medium Business Administration in 2015. S.-J.L. appreciates the support by the Ministry of Education through the “Leaders in INdustry-university Cooperation” project.

Author Contributions

Seok-Jae Lee conceived and designed the experiments; Minwook Kim performed the experiments; Singon Kang and Seok-Jae Lee analyzed the data; Singon Kang, Minwook Kim and Seok-Jae Lee contributed reagents/materials/analysis tools; Singon Kang and Seok-Jae Lee wrote the paper.

Conflicts of Interest

The authors declare no conflict of interest.

References

  1. Roberts, G.; Krauss, G.; Kennedy, R. Tool Steel, 5th ed.; ASM International: Materials Park, OH, USA, 1998; pp. 7–28. [Google Scholar]
  2. Totten, G.E. Steel Heat Treatment: Metallurgy and Technologies, 2nd ed.; CRC Taylor & Francis: New York, NY, USA, 2006; pp. 651–694. [Google Scholar]
  3. Krauss, G. Steels: Processing, Structure, and Performance; ASM International: Materials Park, OH, USA, 2005; pp. 535–559. [Google Scholar]
  4. Lee, S.; Kim, S.; Hwang, B.; Lee, B.S.; Lee, C.G. Effect of carbide distribution on the fracture toughness in the transition temperature region of an SA 508 steel. Acta Mater. 2002, 50, 4755–4762. [Google Scholar] [CrossRef]
  5. Casellas, D.; Caro, J.; Molas, S.; Prado, J.M.; Valls, I. Fracture toughness of carbides in tool steels evaluated by nanoindentation. Acta Mater. 2007, 55, 4277–4286. [Google Scholar] [CrossRef]
  6. Hong, K.J.; Kang, W.K.; Song, J.H.; Jung, I.S.; Lee, K.A. Study on the anisotropic size change by austenitizing and tempering heat treatment of STD11 tool steel using dilatometry. Korean J. Met. Mater. 2008, 46, 800–808. [Google Scholar]
  7. Fukaura, K.; Yokoyama, Y.; Yokoi, D.; Tsujii, N.; Ono, K. Fatigue of cold-work tool steels: Effect of heat treatment and carbide morphology on fatigue crack formation, life, and fracture surface observations. Metall. Mater. Trans. A 2004, 35, 1289–1300. [Google Scholar] [CrossRef]
  8. Kokosza, A.; Pacyna, J. Ewaluation of retained austenite stability in heat treated cold work tool steel. J. Mater. Proc. Technol. 2005, 162–163, 327–331. [Google Scholar] [CrossRef]
  9. Yaso, M.; Morito, S.; Ohba, T.; Kubota, K. Microstructure of martensite in Fe–C–Cr steel. Mater. Sci. Eng. A 2008, 481–482, 770–773. [Google Scholar] [CrossRef]
  10. Kang, J.Y.; Heo, Y.U.; Kim, H.Y.; Suh, D.W.; Son, D.M.; Lee, D.H.; Lee, T.H. Effect of copper addition on the characteristics of high-carbon and high-chromium steels. Mater. Sci. Eng. A 2014, 614, 36–44. [Google Scholar] [CrossRef]
  11. Kim, H.Y.; Kang, J.Y.; Son, D.M.; Lee, D.S.; Lee, T.H.; Jeong, W.C.; Cho, K.M. Microstructure and mechanical properties of cold-wok tool steels: A comparison of 8%Cr steel with STD11. J. Korean Soc. Heat Treat. 2014, 27, 242–252. [Google Scholar] [CrossRef]
  12. MatCalc Software. Available online: http://www.matcalc.at (accessed on 31 December 2016).
  13. Hwang, K.C.; Lee, S.H.; Lee, H.C. Effects of alloying elements on microstructure and fracture properties of cast high speed steel rolls: Part I: Microstructural analysis. Mater. Sci. Eng. A 1998, 254, 282–295. [Google Scholar] [CrossRef]
  14. Hong, K.J.; Song, J.H.; Chung, I.S. Carbide behavior in STD11 tool steel during heat treatment. J. Korean Soc. Heat Treat. 2011, 24, 262–270. [Google Scholar]
  15. Shim, J.J.; Kim, Y.H.; Lee, S.Y. A study on the growth characteristics of complex carbides precipitated during spheroidizing in medium chromium steels. Korean J. Met. Mater. 1990, 28, 409–415. [Google Scholar]
  16. Yamasaki, S. Modelling Precipitation of Carbides in Martensitic Steels. Ph.D. Thesis, University of Cambridge, Cambridge, UK, 2004. [Google Scholar]
  17. Dieter, G.E. Mechanical Metallurgy, 3rd ed.; McGraw-Hill: New York, NY, USA, 1990; pp. 95–104. [Google Scholar]
  18. Fukaura, K.; Yokoyama, Y.; Yokoi, D.; Tsuji, N.; Ono, K. Fatigue of cold work tool steels: Effect of heat treatment and carbide morphology on fatigue crack formation, life and fracture surface observations. Metall. Mater. Trans. A 2004, 35A, 1289–1300. [Google Scholar] [CrossRef]
  19. Kubota, K.; Ohba, T.; Morito, S. Frictional properties of new developed cold work tool steel for high tensile strength steel forming die. Wear 2011, 271, 2884–2889. [Google Scholar] [CrossRef]
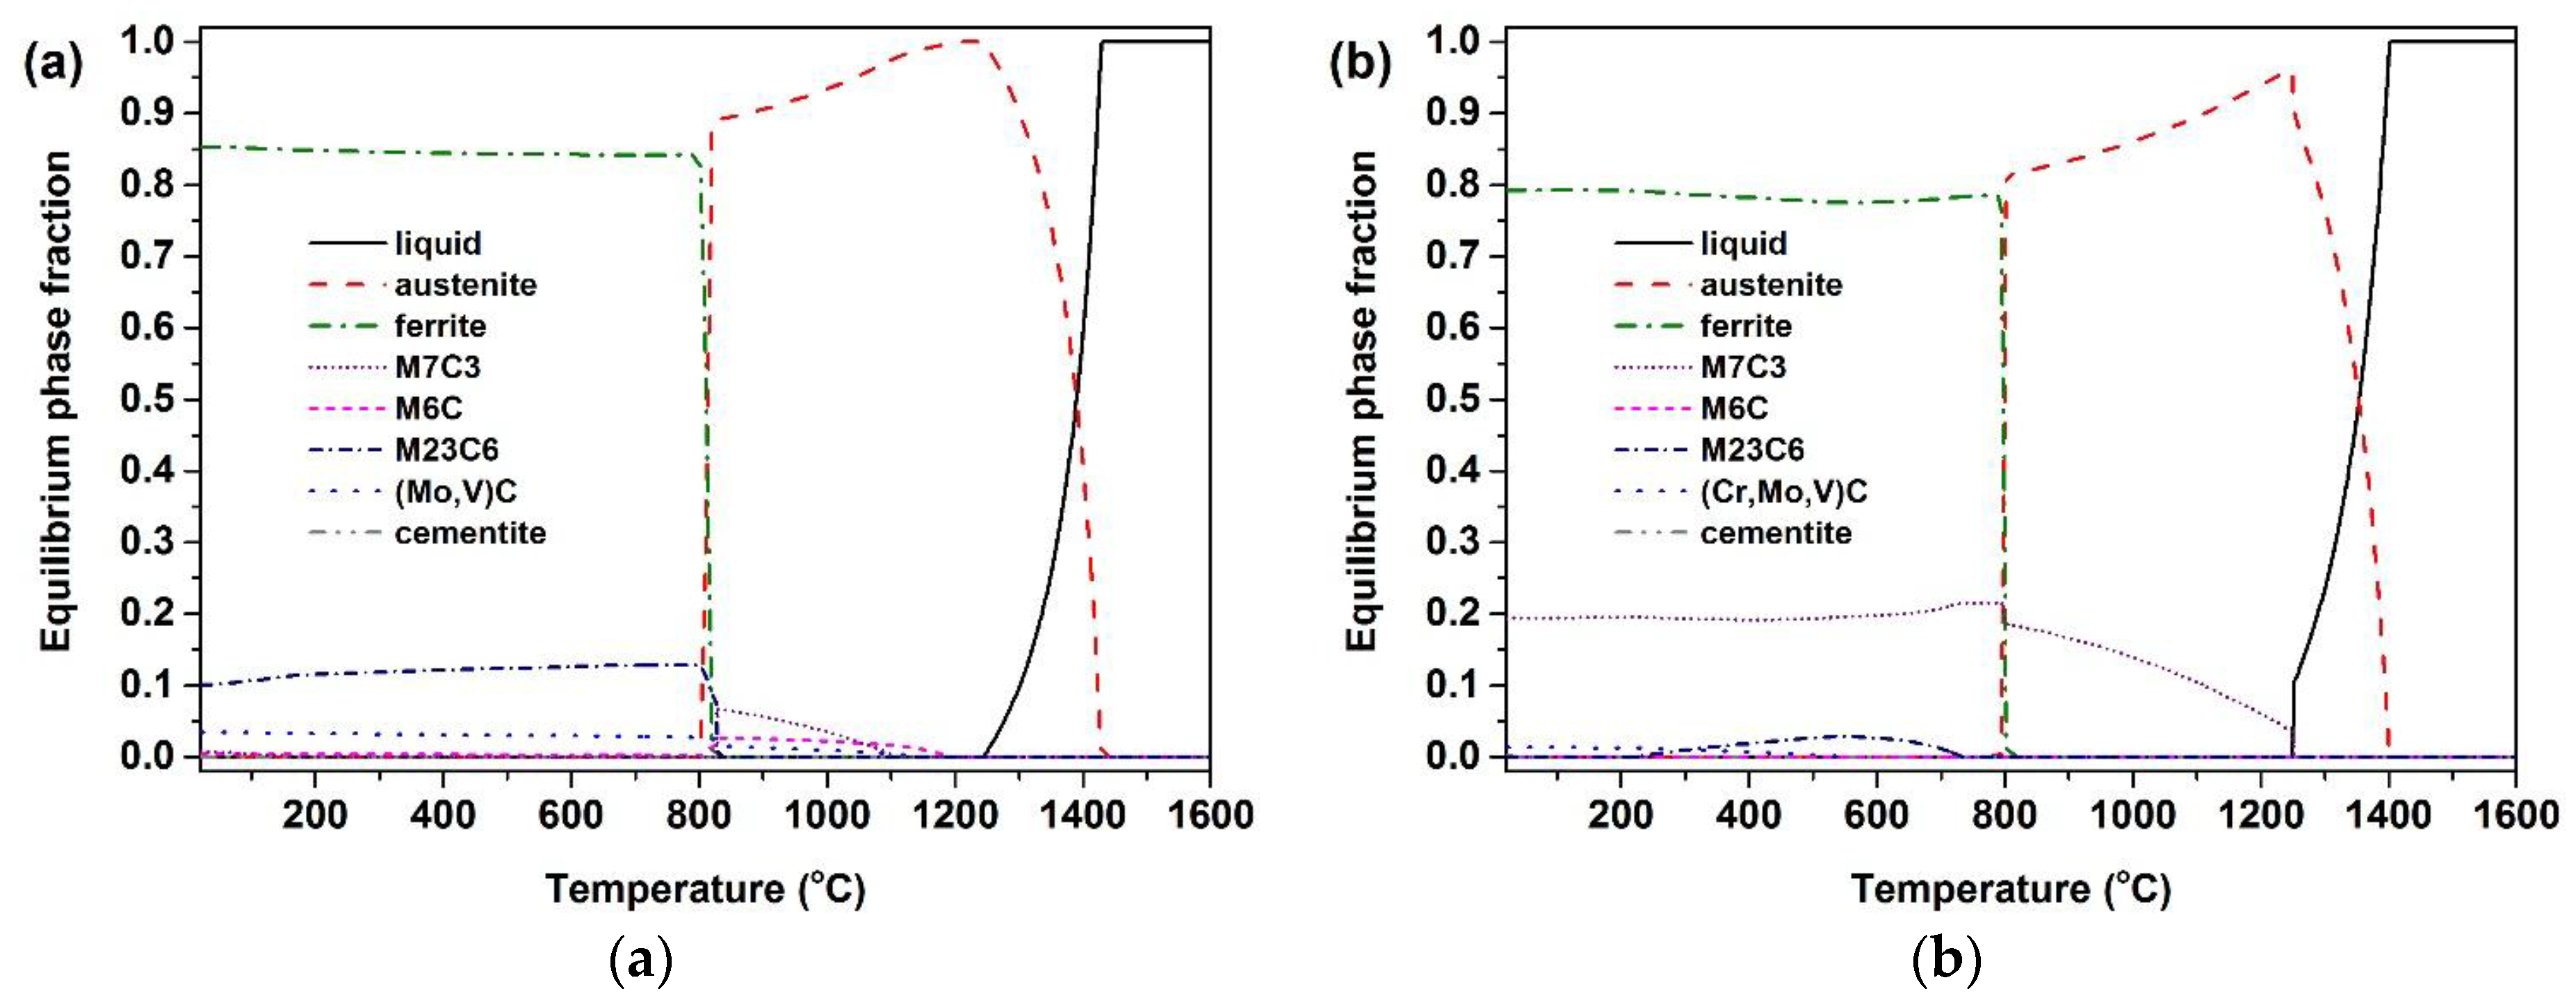
Figure 1. Equilibrium phase fractions calculated by using MatCalc (ver. 5.62) for the two steels: (a) Cr6C9 and (b) STD11.
Metals 07 00012 g001
Figure 2. Optical micrographs of the tempered specimens: (a) Cr6C9 and (b) STD11. The arrows indicate the primary carbide in a bright color.
Metals 07 00012 g002
Figure 3. SEM images of the tempered specimens: (a) Cr6C9 and (b) STD11.
Metals 07 00012 g003
Figure 4. TEM images and the corresponding selected area electron diffraction (SAED) patterns for (a) M7C3 precipitate; (b) M6C precipitate; and (c) (Mo,V)C precipitate.
Metals 07 00012 g004
Figure 5. Comparison of the mechanical properties of the Cr6C9 and STD11 specimens: (a) hardness; impact toughness; and (b) tensile properties (ultimate tensile strength and total elongation).
Metals 07 00012 g005
Figure 6. SEM images of fracture surface of the specimens after the Charpy impact test: (a) Cr6C9 and (b) STD11.
Metals 07 00012 g006
Table 1. Chemical composition of two steels used in the present study in wt. %.
SteelsCSiMnCrMoWVFe
Cr6C90.880.560.566.083.270.520.99Bal.
STD111.480.230.2611.170.74-0.23Bal.