Next Issue
Volume 2, September
Previous Issue
Volume 2, March


J. Manuf. Mater. Process., Volume 2, Issue 2 (June 2018) – 19 articles

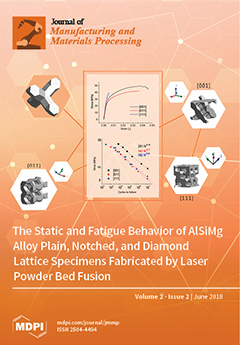
Cover Story (view full-size image): Laser Powder Bed Fusion allows for fabrication of engineered lattice structures from various metallic alloys, which would otherwise be unfeasible or prohibitively expensive. Interest in these materials resides not only in the possibility of improving the stiff/strength-to-weight ratio of critical components but also in the functionality of pre-designed structures for specific applications. The mechanical behavior of lattice structures depends on the selected cell geometry, base material properties, as well as the material microstructure and the level of processing-induced defects. This work deals with the experimental assessment of the tensile static and cyclic mechanical properties of diamond cell lattice structures with different cell orientations in respect to the loading axis. View the paper here.
  • Issues are regarded as officially published after their release is announced to the table of contents alert mailing list.
  • You may sign up for e-mail alerts to receive table of contents of newly released issues.
  • PDF is the official format for papers published in both, html and pdf forms. To view the papers in pdf format, click on the "PDF Full-text" link, and use the free Adobe Reader to open them.
Order results
Result details
Select all
Export citation of selected articles as:
6 pages, 2866 KiB  
Article
Development of a New Forced Cooling Technology Using a High-Pressure Coolant for Machining Difficult-To-Machine Materials
by Ikuo Tanabe and Hideo Hoshino
J. Manuf. Mater. Process. 2018, 2(2), 39; https://doi.org/10.3390/jmmp2020039 - 12 Jun 2018
Cited by 7 | Viewed by 3553
Abstract
In recent years, titanium and nickel alloys have become relevant in the production of aeronautic and astronautic parts. Since both nickel and titanium alloys have a very small thermal conductivity, the used tool will suffer huge damage from the heat generated during a [...] Read more.
In recent years, titanium and nickel alloys have become relevant in the production of aeronautic and astronautic parts. Since both nickel and titanium alloys have a very small thermal conductivity, the used tool will suffer huge damage from the heat generated during a grinding process. Therefore, there is a requirement for a durable tool with excellent cooling capacity. In this research, a new forced cooling technology that uses high-pressure coolant for machining difficult-to-machine materials was developed and evaluated. Here, a through hole on the rake face near the turning tool tip was machined by electrical discharge machining. Then, high-pressure coolant was supplied to the turning tool from the machined hole. Several values of pressure were experimentally performed. It is concluded from the results that the technology could effectively cool the area near the tip of a turning tool, and that the chip was also effectively removed by the high-pressure coolant. Full article
(This article belongs to the Special Issue New Findings and Approaches in Machining Processes)
Show Figures

Figure 1

12 pages, 4836 KiB  
Article
Using (VA)RTM with a Rigid Mould to Produce Fibre Metal Laminates with Proven Impact Strength
by Patrick Hergan, Yanxiao Li, Lasse Zaloznik, Baris Kaynak, Florian Arbeiter, Ewald Fauster and Ralf Schledjewski
J. Manuf. Mater. Process. 2018, 2(2), 38; https://doi.org/10.3390/jmmp2020038 - 11 Jun 2018
Cited by 4 | Viewed by 3726
Abstract
The production of fibre metal laminates (FMLs) is a time consuming and expensive procedure. This paper shows the application of the vacuum assisted resin transfer moulding ((VA)RTM) technique using an injection unit and a rigid mould for the production of FMLs. This processing [...] Read more.
The production of fibre metal laminates (FMLs) is a time consuming and expensive procedure. This paper shows the application of the vacuum assisted resin transfer moulding ((VA)RTM) technique using an injection unit and a rigid mould for the production of FMLs. This processing technique, in combination with a corona discharge activation of the aluminium surface, can lead to enormous reductions to the cycle time. To prove the quality of the produced FML, impact tests were carried out. The influence of the impact energy on the specimen is observed using a deformation scan and ultrasound C-Scan. Furthermore, the peak forces and permanent deflections of the tested specimen were analysed. Full article
(This article belongs to the Special Issue Manufacturing of Polymer Composites)
Show Figures

Figure 1

15 pages, 2044 KiB  
Article
Prediction of Temperature Distribution in Orthogonal Machining Based on the Mechanics of the Cutting Process Using a Constitutive Model
by Jinqiang Ning and Steven Y. Liang
J. Manuf. Mater. Process. 2018, 2(2), 37; https://doi.org/10.3390/jmmp2020037 - 05 Jun 2018
Cited by 34 | Viewed by 5136
Abstract
This paper presents an original method of predicting temperature distribution in orthogonal machining based on a constitutive model of various materials and the mechanics of their cutting process. Currently, temperature distribution is commonly investigated using arduous experiments, computationally inefficient numerical analyses, and complex [...] Read more.
This paper presents an original method of predicting temperature distribution in orthogonal machining based on a constitutive model of various materials and the mechanics of their cutting process. Currently, temperature distribution is commonly investigated using arduous experiments, computationally inefficient numerical analyses, and complex analytical models. In the method proposed herein, the average temperatures at the primary shear zone (PSZ) and the secondary shear zone (SSZ) were determined for various materials, based on a constitutive model and a chip-formation model using measurements of cutting force and chip thickness. The temperatures were determined when differences between predicted shear stresses using the Johnson–Cook constitutive model (J–C model) and those using a chip-formation model were minimal. J–C model constants from split Hopkinson pressure bar (SHPB) tests were adopted from the literature. Cutting conditions, experimental cutting force, and chip thickness were used to predict the shear stresses. The temperature predictions were compared to documented results in the literature for AISI 1045 steel and Al 6082-T6 aluminum in multiple tests in an effort to validate this methodology. Good agreement was observed for the tests with each material. Thanks to the reliable and easily measurable cutting forces and chip thicknesses, and the simple forms of the employed models, the presented methodology has less experimental complexity, less mathematical complexity, and high computational efficiency. Full article
Show Figures

Figure 1

14 pages, 8550 KiB  
Article
Porosity, Surface Quality, Microhardness and Microstructure of Selective Laser Melted 316L Stainless Steel Resulting from Finish Machining
by Yusuf Kaynak and Ozhan Kitay
J. Manuf. Mater. Process. 2018, 2(2), 36; https://doi.org/10.3390/jmmp2020036 - 05 Jun 2018
Cited by 51 | Viewed by 6307
Abstract
Among additive manufacturing (AM) techniques, Selective Laser Melting (SLM) is widely used to fabricate metal components, including biocompatible bone implants made of 316L stainless steel. However, an issue with the components manufactured using this technique is the surface quality, which is generally beyond [...] Read more.
Among additive manufacturing (AM) techniques, Selective Laser Melting (SLM) is widely used to fabricate metal components, including biocompatible bone implants made of 316L stainless steel. However, an issue with the components manufactured using this technique is the surface quality, which is generally beyond the acceptable range. Thus, hybrid manufacturing, including AM and finish machining processes, are being developed and implemented in the industry. Machining processes, particularly finish machining, are needed to improve surface quality of additively manufactured components and performance. This study focuses on the finish machining process of additively manufactured 316L stainless steel parts. Finish machining tests were carried out under dry conditions for various cutting speeds and feed rates. The experimental study reveals that finish machining resulted in up to 88% lower surface roughness of SLMed 316L stainless steel; it also had a substantial effect on microstructure and microhardness of the additively manufactured components by creating smaller grains and strain-hardened layer on the surface and subsurface of the SLMed part. The finish machining process also significantly decreased the density of porosity on the surface and subsurface, compared to an as-built sample. The created strain harden layer with less porosity is expected to increases wear and fatigue resistance of these parts. Full article
(This article belongs to the Special Issue Additive Manufacturing)
Show Figures

Figure 1

11 pages, 1707 KiB  
Article
Analytical Calculation of Cutting Forces in Ball-End Milling with Inclination Angle
by Changfeng Nan and Dongsheng Liu
J. Manuf. Mater. Process. 2018, 2(2), 35; https://doi.org/10.3390/jmmp2020035 - 04 Jun 2018
Cited by 5 | Viewed by 4361
Abstract
The traditional analytical cutting force prediction method for ball-end milling ignores the effect of the inclination angle on cutting forces. In this paper, a new experimental method for cutting force prediction methods considering the inclination angle in the ball-end milling process is proposed. [...] Read more.
The traditional analytical cutting force prediction method for ball-end milling ignores the effect of the inclination angle on cutting forces. In this paper, a new experimental method for cutting force prediction methods considering the inclination angle in the ball-end milling process is proposed. First, the actual immersion ranges of cutter in the ball-end milling process with and without an inclination angle are analyzed by a geometrical method and the cutting force prediction model with an inclination angle is developed by a numerical integration method. Second, considering that entry and exit angles of cutting zones for different cutter layers vary due to the inclination angle, a milling force coefficients identification approach for different cutter layers is established by experimental calibration. Comparing the traditional analytical cutting force prediction method that ignores the inclination angle, the numerical simulation results show that the prediction force values calculated by the proposed method have a better consistency with the measured values. Full article
Show Figures

Figure 1

19 pages, 7756 KiB  
Article
Numerical Simulation of Water Quenching of Large Size Steel Forgings: Effects of Macrosegregation and Grain Size on Phase Distribution
by Mountadar Lyassami, Davood Shahriari, Emna Ben Fredj, Jean-Benoit Morin and Mohammad Jahazi
J. Manuf. Mater. Process. 2018, 2(2), 34; https://doi.org/10.3390/jmmp2020034 - 01 Jun 2018
Cited by 14 | Viewed by 4105
Abstract
In this paper, water quenching of large ingots was simulated using FORGE NxT 1.1® Finite Element code. Simulations were carried out for as-forged medium-carbon low-alloy steel. A novel method is proposed to simulate the different parts of a large size forged block [...] Read more.
In this paper, water quenching of large ingots was simulated using FORGE NxT 1.1® Finite Element code. Simulations were carried out for as-forged medium-carbon low-alloy steel. A novel method is proposed to simulate the different parts of a large size forged block with different chemical compositions and grain sizes using the multiple materials method. The effects of macrosegregation, grain size variation and cooling rate on phase distribution through the volume of the forged block were investigated. The delay in transformation kinetics, which is due to the effect of grain size variation and carbon content, was analyzed. Results show that macrosegregation and grain size variations significantly influence transformation start points and the volume fraction of phases that are present in each location of the forged ingot. The proposed prediction method was validated using high-resolution dilatometry experiments and X-ray diffraction measurements to evaluate accurately the volume fraction of martensite, bainite and the percentage of retained austenite for each condition. Full article
Show Figures

Figure 1

10 pages, 3550 KiB  
Article
Effect of Laser Welding Process Parameters and Filler Metals on the Weldability and the Mechanical Properties of AA7020 Aluminium Alloy
by Saheed B. Adisa, Irina Loginova, Asmaa Khalil and Alexey Solonin
J. Manuf. Mater. Process. 2018, 2(2), 33; https://doi.org/10.3390/jmmp2020033 - 01 Jun 2018
Cited by 17 | Viewed by 4025
Abstract
This research work aims at finding the optimum process parameters for the laser welding of AA7020 aluminium alloys. The use of 7xxx series alloys is limited because of weldability problems, such as hot cracking, porosity, and softening of the fusion zone despite its [...] Read more.
This research work aims at finding the optimum process parameters for the laser welding of AA7020 aluminium alloys. The use of 7xxx series alloys is limited because of weldability problems, such as hot cracking, porosity, and softening of the fusion zone despite its higher specific strength-to-weight ratio. AA7020 aluminium alloy was welded while varying the process parameters so as to obtain optimal welding efficiency. The welded samples were analysed to reveal the microstructure, defects, and mechanical properties of the welded zone. The samples were prepared from a plate of AA7020, which was hot rolled at a temperature of 470 °С to a thickness of 1 mm. The welding was carried out at an overlap of 0.25 mm, duration of 14 ms and argon shield gas flow rate of 15 L/min. Process parameters, such as peak power, welding speed, and pulse shaping, were varied. The samples were welded with Al-5Ti-B and Al-5Mg as filler metals. The welding speed, peak power, and pulse shaping have a great influence on the weldability and hot cracking susceptibility of the aluminium alloy. Al-5Ti-B improves the microstructure and ultimate tensile strength of AA7020 aluminium alloy. Full article
(This article belongs to the Special Issue New Findings and Approaches in Machining Processes)
Show Figures

Figure 1

8 pages, 848 KiB  
Article
Multi-Criteria Assessment of Machining Processes for Turbine Disc Slotting
by Fritz Klocke, Thomas Bergs, Benjamin Doebbeler, Marvin Binder and Martin Seimann
J. Manuf. Mater. Process. 2018, 2(2), 32; https://doi.org/10.3390/jmmp2020032 - 28 May 2018
Cited by 9 | Viewed by 3754
Abstract
Many different process chains are possible to manufacture profiled grooves in turbine discs. Broaching with high speed steel tools is still state of the art today but as a consequence of the rising demand for aero engines, the disc manufacturers are striving for [...] Read more.
Many different process chains are possible to manufacture profiled grooves in turbine discs. Broaching with high speed steel tools is still state of the art today but as a consequence of the rising demand for aero engines, the disc manufacturers are striving for alternative high performance processes to increase both flexibility and productivity in the manufacturing of these safety critical features. Broaching machines are oftentimes at a bottleneck in the production of rotating turbine discs. Several other machining processes have been discussed in the context of slotting, such as broaching with carbide tools, milling, water jet machining, W-EDM and grinding. Within this paper a multi-criteria assessment approach is presented dealing with slotting processes. The assessment comprehends economical, ecological, flexibility and productivity criteria, and is based on data gathered with an aero engine OEM. The technological aspects such as tool life and productivities are based on real machining tests that have been carried out within the project HoFePro. The assessment is conducted for multiple profile shapes that represent different sizes and geometrical complexities of profiled grooves. The manufacturing processes within the assessment include broaching with HSS and carbide, milling with ceramics and carbide (side and end) as well as profile milling with carbide tools. The underlying workpiece material is a nickel-based alloy. Full article
(This article belongs to the Special Issue New Findings and Approaches in Machining Processes)
Show Figures

Figure 1

12 pages, 5410 KiB  
Article
Progressive Tool Wear in Cryogenic Machining: The Effect of Liquid Nitrogen and Carbon Dioxide
by Yusuf Kaynak and Armin Gharibi
J. Manuf. Mater. Process. 2018, 2(2), 31; https://doi.org/10.3390/jmmp2020031 - 21 May 2018
Cited by 37 | Viewed by 5388
Abstract
This experimental study focuses on various cooling strategies and lubrication-assisted cooling strategies to improve machining performance in the turning process of AISI 4140 steel. Liquid nitrogen (LN2) and carbon dioxide (CO2) were used as cryogenic coolants, and their performances [...] Read more.
This experimental study focuses on various cooling strategies and lubrication-assisted cooling strategies to improve machining performance in the turning process of AISI 4140 steel. Liquid nitrogen (LN2) and carbon dioxide (CO2) were used as cryogenic coolants, and their performances were compared with respect to progression of tool wear. Minimum quantity lubrication (MQL) was also used with carbon dioxide. Progression of wear, including flank and nose, are the main outputs examined during experimental study. This study illustrates that carbon dioxide-assisted cryogenic machining alone and with minimum quantity lubrication does not contribute to decreasing the progression of wear within selected cutting conditions. This study also showed that carbon dioxide-assisted cryogenic machining helps to increase chip breakability. Liquid nitrogen-assisted cryogenic machining results in a reduction of tool wear, including flank and nose wear, in the machining process of AISI 4140 steel material. It was also observed that in the machining process of this material at a cutting speed of 80 m/min, built-up edges occurred in both cryogenic cooling conditions. Additionally, chip flow damage occurs in particularly dry machining. Full article
(This article belongs to the Special Issue Precision Manufacturing)
Show Figures

Figure 1

21 pages, 9546 KiB  
Article
Microstructural and Microhardness Evolution from Homogenization and Hot Isostatic Pressing on Selective Laser Melted Inconel 718: Structure, Texture, and Phases
by Raiyan Seede, Ahmad Mostafa, Vladimir Brailovski, Mohammad Jahazi and Mamoun Medraj
J. Manuf. Mater. Process. 2018, 2(2), 30; https://doi.org/10.3390/jmmp2020030 - 16 May 2018
Cited by 50 | Viewed by 6325
Abstract
In this work, the microstructure, texture, phases, and microhardness of 45° printed (with respect to the build direction) homogenized, and hot isostatically pressed (HIP) cylindrical IN718 specimens are investigated. Phase morphology, grain size, microhardness, and crystallographic texture at the bottom of each specimen [...] Read more.
In this work, the microstructure, texture, phases, and microhardness of 45° printed (with respect to the build direction) homogenized, and hot isostatically pressed (HIP) cylindrical IN718 specimens are investigated. Phase morphology, grain size, microhardness, and crystallographic texture at the bottom of each specimen differ from those of the top due to changes in cooling rate. High cooling rates during the printing process generated a columnar grain structure parallel to the building direction in the as-printed condition with a texture transition from (001) orientation at the bottom of the specimen to (111) orientation towards the specimen top based on EBSD analysis. A mixed columnar and equiaxed grain structure associated with about a 15% reduction in texture is achieved after homogenization treatment. HIP treatment caused significant grain coarsening, and engendered equiaxed grains with an average diameter of 154.8 µm. These treatments promoted the growth of δ-phase (Ni3Nb) and MC-type brittle (Ti, Nb)C carbides at grain boundaries. Laves phase (Fe2Nb) was also observed in the as-printed and homogenized specimens. Ostwald ripening of (Ti, Nb)C carbides caused excessive grain growth at the bottom of the HIPed IN718 specimens, while smaller grains were observed at their top. Microhardness in the as-fabricated specimens was 236.9 HV and increased in the homogenized specimens by 19.3% to 282.6 HV due to more even distribution of secondary precipitates, and the nucleation of smaller grains. A 36.1% reduction in microhardness to 180.5 HV was found in the HIPed condition due to   γ phase dissolution and differences in grain morphology. Full article
(This article belongs to the Special Issue Additive Manufacturing)
Show Figures

Figure 1

15 pages, 1434 KiB  
Article
Degradable Nanocomposites for Fused Filament Fabrication Applications
by Andrew V. Healy, Cathal Waldron, Luke M. Geever, Declan M. Devine and John G. Lyons
J. Manuf. Mater. Process. 2018, 2(2), 29; https://doi.org/10.3390/jmmp2020029 - 09 May 2018
Cited by 8 | Viewed by 3980
Abstract
There has been a substantial increase in the use and development of plastics over the last century. However, due to ever-diminishing petroleum feedstocks and growing concern for the environment, there has been a rise in the use of eco-friendly polymers affording similar properties [...] Read more.
There has been a substantial increase in the use and development of plastics over the last century. However, due to ever-diminishing petroleum feedstocks and growing concern for the environment, there has been a rise in the use of eco-friendly polymers affording similar properties to that of their depleting counterparts. Poly(ε-caprolactone) is one such polymer. This present study investigates the possibility of developing a degradable nanocomposite, suitable for fused filament fabrication, utilizing hot melt extrusion technology to blend poly(ε-caprolactone), poly(ethylene) oxide and the nanoclay halloysite at loadings of two and six weight percent. The extruded blends were characterized using common polymer testing techniques. The addition of poly(ε-caprolactone) to the poly(ethylene) oxide matrix provided a plasticizing effect which was apparent with the melt flow index and melting point of the blends reducing with an increase in poly(ε-caprolactone) content. Upon reinforcing the matrix with halloysite, there was a significant improvement in mechanical properties. The addition of halloysite significantly increased Young’s modulus 11% and 25% when the loading was two and six percent respectively. Furthermore, it was also possible to produce a filament with the desired properties, diameter 1.75 mm, for fused filament fabrication, with subsequent studies required to evaluate their printability. Full article
Show Figures

Figure 1

12 pages, 4027 KiB  
Article
Experimental and Modeling Study of Liquid-Assisted—Laser Beam Micromachining of Smart Ceramic Materials
by Mayur Parmar and Sagil James
J. Manuf. Mater. Process. 2018, 2(2), 28; https://doi.org/10.3390/jmmp2020028 - 07 May 2018
Cited by 14 | Viewed by 4036
Abstract
Smart ceramic materials are next generation materials with the inherent intelligence to adapt to change in the external environment. These materials are destined to play an essential role in several critical engineering applications. Machining these materials using traditional machining processes is a challenge. [...] Read more.
Smart ceramic materials are next generation materials with the inherent intelligence to adapt to change in the external environment. These materials are destined to play an essential role in several critical engineering applications. Machining these materials using traditional machining processes is a challenge. The laser beam micromachining (LBMM) process has the potential to machine such smart materials. However, laser machining when performed in air induces high thermal stress on the surface, often leading to crack formation, recast and re-deposition of ablated material, and large heat-affected zones (HAZ). Performing laser beam machining in the presence of a liquid medium could potentially resolve these issues. This research investigates the possibility of using a Liquid Assisted—Laser Beam Micromachining (LA-LBMM) process for micromachining smart ceramic materials. Experimental studies are performed to compare the machining quality of laser beam machining process in air and in a liquid medium. The study reveals that the presence of liquid medium helps in controlling the heat-affected zone and the taper angle of the cavity drilled, thereby enhancing the machining quality. Analytical modeling is developed for the prediction of HAZ and cavity diameter both in air and underwater conditions, and the model is capable of predicting the experimental results to within 10% error. Full article
(This article belongs to the Special Issue Precision Manufacturing)
Show Figures

Figure 1

14 pages, 8198 KiB  
Article
New Observations on High-Speed Machining of Hardened AISI 4340 Steel Using Alumina-Based Ceramic Tools
by Mohamed Shalaby and Stephen Veldhuis
J. Manuf. Mater. Process. 2018, 2(2), 27; https://doi.org/10.3390/jmmp2020027 - 03 May 2018
Cited by 15 | Viewed by 4130
Abstract
High-speed machining (HSM) is used in industry to improve the productivity and quality of the cutting operations. In this investigation, pure alumina ceramics with the addition of ZrO2, and mixed alumina (Al2O3 + TiC) tools were used in [...] Read more.
High-speed machining (HSM) is used in industry to improve the productivity and quality of the cutting operations. In this investigation, pure alumina ceramics with the addition of ZrO2, and mixed alumina (Al2O3 + TiC) tools were used in the dry hard turning of AISI 4340 (52 HRC) at different high cutting speeds of 150, 250, 700 and 1000 m/min. It was observed that at cutting speeds of 150 and 250 m/min, pure alumina ceramic tools had better wear resistance than mixed alumina ones. However, upon increasing the cutting speed from 700 to 1000 m/min, mixed alumina ceramic tools outperformed pure ceramic ones. Scanning electron microscopy (SEM) and X-ray photoelectron spectroscopy (XPS) were used to investigate the worn cutting edges and analyze the obtained results. It was found that the tribo-films formed at the cutting zone during machining affected the wear resistances of the tools and influenced the coefficient of friction at the tool-chip interface. These observations were confirmed by the chip compression ratio results at different cutting conditions. Raising cutting speed to 1000 m/min corresponded to a remarkable decrease in cutting force components in the dry hard turning of AISI 4340 steel. Full article
(This article belongs to the Special Issue New Findings and Approaches in Machining Processes)
Show Figures

Figure 1

15 pages, 5530 KiB  
Article
Application of Finite Element Method to Analyze the Influences of Process Parameters on the Cut Surface in Fine Blanking Processes by Using Clearance-Dependent Critical Fracture Criteria
by Phyo Wai Myint, Seiya Hagihara, Toru Tanaka, Shinya Taketomi and Yuichi Tadano
J. Manuf. Mater. Process. 2018, 2(2), 26; https://doi.org/10.3390/jmmp2020026 - 23 Apr 2018
Cited by 2 | Viewed by 3569
Abstract
The correct choice of process parameters is important in predicting the cut surface and obtaining a fully-fine sheared surface in the fine blanking process. The researchers used the value of the critical fracture criterion obtained by long duration experiments to predict the conditions [...] Read more.
The correct choice of process parameters is important in predicting the cut surface and obtaining a fully-fine sheared surface in the fine blanking process. The researchers used the value of the critical fracture criterion obtained by long duration experiments to predict the conditions of cut surfaces in the fine blanking process. In this study, the clearance-dependent critical ductile fracture criteria obtained by the Cockcroft-Latham and Oyane criteria were used to reduce the time and cost of experiments to obtain the value of the critical fracture criterion. The Finite Element Method (FEM) was applied to fine blanking processes to study the influences of process parameters such as the initial compression, the punch and die corner radii and the shape and size of the V-ring indenter on the length of the sheared surface. The effects of stress triaxiality and punch diameters on the cut surface produced by the fine blanking process are also discussed. The verified process parameters and tool geometry for obtaining a fully-fine sheared SPCC surface are described. The results showed that the accurate and stable prediction of ductile fracture initiation can be achieved using the Oyane criterion. Full article
(This article belongs to the Special Issue Precision Manufacturing)
Show Figures

Figure 1

24 pages, 11086 KiB  
Article
The Static and Fatigue Behavior of AlSiMg Alloy Plain, Notched, and Diamond Lattice Specimens Fabricated by Laser Powder Bed Fusion
by Hugo Soul, Patrick Terriault and Vladimir Brailovski
J. Manuf. Mater. Process. 2018, 2(2), 25; https://doi.org/10.3390/jmmp2020025 - 20 Apr 2018
Cited by 9 | Viewed by 6249
Abstract
The fabrication of engineered lattice structures has recently gained momentum due to the development of novel additive manufacturing techniques. Interest in lattice structures resides not only in the possibility of obtaining efficient lightweight materials, but also in the functionality of pre-designed architectured structures [...] Read more.
The fabrication of engineered lattice structures has recently gained momentum due to the development of novel additive manufacturing techniques. Interest in lattice structures resides not only in the possibility of obtaining efficient lightweight materials, but also in the functionality of pre-designed architectured structures for specific applications, such as biomimetic implants, chemical catalyzers, and heat transfer devices. The mechanical behaviour of lattice structures depends not only the composition of the base material, but also on the type and size of the unit cells, as well as on the material microstructure resulting from a specific fabrication procedure. The present work focuses on the static and fatigue behavior of diamond cell lattice structures fabricated from an AlSiMg alloy by laser powder bed fusion technology. In particular, the specimens were fabricated with three different orientations of lattice cells—[001], [011], [111]—and subjected to static tensile testing and force-controlled pull–pull fatigue testing up to 1 × 10⁷ cycles. In parallel, the mechanical behavior of dense tensile plain and notched specimens was also studied and compared to that of their lattice counterparts. Results showed a significant effect of the cell orientation on the fatigue lives: specimens oriented at [001] were ~30% more fatigue-resistant than specimens oriented at [011] and [111]. Full article
(This article belongs to the Special Issue Additive Manufacturing)
Show Figures

Graphical abstract

13 pages, 42667 KiB  
Article
Additive Manufacturing of Overhang Structures Using Moisture-Cured Silicone with Support Material
by Mohan Muthusamy, Shahriar Safaee and Roland K. Chen
J. Manuf. Mater. Process. 2018, 2(2), 24; https://doi.org/10.3390/jmmp2020024 - 17 Apr 2018
Cited by 20 | Viewed by 6483
Abstract
Additive manufacturing (AM) of soft materials has a wide variety of applications, such as customized or wearable devices. Silicone is one popular material for these applications given its favorable material properties. However, AM of silicone parts with overhang structures remains challenging due to [...] Read more.
Additive manufacturing (AM) of soft materials has a wide variety of applications, such as customized or wearable devices. Silicone is one popular material for these applications given its favorable material properties. However, AM of silicone parts with overhang structures remains challenging due to the soft nature of the material. Overhang structures are the areas where there is no underlying structure. Typically, a support material is used and built in the underlying space so that the overhang structures can be built upon it. Currently, there is no support structure that has been used for AM of silicone. The goal of this study is to develop an AM process to fabricate silicone parts with overhang structures. We first identified and confirmed poly-vinyl alcohol (PVA), a water-soluble material, as a suitable support material for silicone by evaluating the adhesion strength between silicone and PVA. Process parameters for the support material, including critical overhang angle and minimum infill density for the support material, are identified. However, overhang angle alone is not the only determining factor for support material. As silicone is a soft material, it deflects due to its own weight when the height of the overhang structure increases. A finite element model is developed to estimate the critical overhang height paired with different overhang angles to determine whether the use of support material is needed. Finally, parts with overhang structures are printed to demonstrate the capability of the developed process. Full article
(This article belongs to the Special Issue Additive Manufacturing)
Show Figures

Figure 1

28 pages, 6994 KiB  
Article
Towards a Generic Framework for the Performance Evaluation of Manufacturing Strategy: An Innovative Approach
by Tigist Fetene Adane and Mihai Nicolescu
J. Manuf. Mater. Process. 2018, 2(2), 23; https://doi.org/10.3390/jmmp2020023 - 29 Mar 2018
Cited by 12 | Viewed by 5655
Abstract
To be competitive in a manufacturing environment by providing optimal performance in terms of cost-effectiveness and swiftness of system changes, there is a need for flexible production systems based on a well-defined strategy. Companies are steadily looking for methodology to evaluate, improve and [...] Read more.
To be competitive in a manufacturing environment by providing optimal performance in terms of cost-effectiveness and swiftness of system changes, there is a need for flexible production systems based on a well-defined strategy. Companies are steadily looking for methodology to evaluate, improve and update the performance of manufacturing systems for processing operations. Implementation of an adequate strategy for these systems’ flexibility requires a deep understanding of the intricate interactions between the machining process parameters and the manufacturing system’s operational parameters. This paper proposes a framework/generic model for one of the most common metal cutting operations—the boring process of an engine block machining system. A system dynamics modelling approach is presented for modelling the structure of machining system parameters of the boring process, key performance parameters and their intrinsic relationships. The model is based on a case study performed in a company manufacturing engine blocks for heavy vehicles. The approach could allow for performance evaluation of an engine block manufacturing system condition. The presented model enables a basis for other similar processes and industries producing discrete parts. Full article
(This article belongs to the Special Issue Smart Manufacturing Processes in the Context of Industry 4.0)
Show Figures

Figure 1

11 pages, 19101 KiB  
Article
Coating of Ultra-Small Micro End Mills: Analysis of Performance and Suitability of Eight Different Hard-Coatings
by Martin Bohley, Ingo G. Reichenbach, Sonja Kieren-Ehses, Lukas Heberger, Peter A. Arrabiyeh, Rolf Merz, Luisa Böhme, Julian Hering, Benjamin Kirsch, Michael Kopnarski, Eberhard Kerscher, Georg Von Freymann and Jan C. Aurich
J. Manuf. Mater. Process. 2018, 2(2), 22; https://doi.org/10.3390/jmmp2020022 - 29 Mar 2018
Cited by 8 | Viewed by 5079
Abstract
Due to the constant need for better functionalized surfaces or smaller, function integrated components, precise and efficient manufacturing processes have to be established. Micro milling with micro end mills is one of the most promising processes for this task as it combines a [...] Read more.
Due to the constant need for better functionalized surfaces or smaller, function integrated components, precise and efficient manufacturing processes have to be established. Micro milling with micro end mills is one of the most promising processes for this task as it combines a high geometric flexibility in a wide range of machinable materials with low set-up costs. A downside of this process is the wear of the micro end mills. Due to size effects and the relatively low cutting speed, the cutting edge is especially subjected to massive abrasive wear. One possibility to minimize this wear is coating of micro end mills. This research paper describes the performance of eight different hard coatings for micro end mills with a diameter <40 µm and discusses some properties for the best performing coating type. With this research, it is therefore possible to boost the possibilities of micro milling for the manufacture of next generation products. Full article
(This article belongs to the Special Issue Precision Manufacturing)
Show Figures

Figure 1

10 pages, 4012 KiB  
Article
Influence of NC Program Quality and Geometric Errors of Rotary Axes on S-Shaped Machining Test Accuracy
by Ryuta Sato, Keiichi Shirase and Yukitoshi Ihara
J. Manuf. Mater. Process. 2018, 2(2), 21; https://doi.org/10.3390/jmmp2020021 - 21 Mar 2018
Cited by 12 | Viewed by 4814
Abstract
An S-shaped machining test is proposed for the ISO 10791-7 standard to verify the performance of five-axis machining centers. However, investigation of the factor that has the most influence on the geometrical accuracy of finished S-shaped workpieces has not been undertaken. Determination of [...] Read more.
An S-shaped machining test is proposed for the ISO 10791-7 standard to verify the performance of five-axis machining centers. However, investigation of the factor that has the most influence on the geometrical accuracy of finished S-shaped workpieces has not been undertaken. Determination of the influence of NC program tolerance and geometric errors concerning the rotary axes on the accuracy of the finished S-shaped workpiece forms the main objective of the study. Actual cutting experiments as well as simulations were performed during the proposed investigation. Our results clarify that NC-program tolerance has a significant influence on the end quality of the machined surface. Although geometric errors pertaining to rotary axes also have a significant influence on machined-surface quality, it is difficult to evaluate the influence of each individual error, because all geometric errors make glitches at the same point on the machined surface. The proposed S-shaped machining test can be used to provide a complete demonstration of available machining techniques. Full article
(This article belongs to the Special Issue Precision Manufacturing)
Show Figures

Figure 1

Previous Issue
Next Issue
Back to TopTop