Article

Sensors Auto-calibration Method - Using Programmable Interface Circuit Front-end

Laboratoire d’Instrumentation Electronique de Nancy, Université Henri Poincaré Nancy-1, BP 239, 54506 Vandoeuvre, France
*
Author to whom correspondence should be addressed.
Sensors 2003, 3(10), 491-497; https://doi.org/10.3390/s31000491
Submission received: 22 June 2003 / Accepted: 9 September 2003 / Published: 31 October 2003

Abstract

:
In this paper we present a standard auto-calibration method of sensors. The purpose is to correct the accumulated errors at the sensor output. A universal conditioning circuit is used with the sensor, and the transfer function of the measurement chain is periodically corrected according to the progressive correction method. References physical inputs are used to allow the adjustment of the measurement and to calculate the calibration coefficients. Test results obtained using this method present a considerable enhancement of the measurement accuracy and a good handling of cross-sensitivity problem.

Introduction

Most sensors used in measurement systems require periodical calibration, in order to ensure the required measurement accuracy. The existing conventional correction techniques are essentially based either on the hardware adjustment of the sensor response [1], or on lookup tables [2]. The calibration of sensors using these methods is usually of a high cost and time consuming. For different types of sensors, we have used as a conditioning interface a programmable analog circuit (FPAA) that enables cost reduction of the measurement chain production and exploitation [3]. The transfer function of the measurement chain is periodically corrected using an algorithm that can be implemented in a FPGA circuit, to calculate the different calibration coefficients. The analog circuit ispPAC30® (In System Programmable Analogue Array) that is totally reconfigurable [4], was used to interface different types of sensors. All circuit parameters are programmable according to the JTAG mode (using a PC), or the SPI serial mode (using a micro-controller). This allows the circuit to execute auto-test and autoadjustment routines to correcting systematic errors (offset and gain errors) in order to compensate measurement chain drifts. In addition, a periodic calibration of the measurement chain is realized using the proposed polynomial correction and linearization method. Each calibration measurement is used to calculate a coefficient of the correction function, and the corrected output measurement is immediately applied. The next calibration step uses this corrected measurement as well as a new calibration measurement for next correction of the measurement curve. In the same manner, the correction is repeated until an acceptable accuracy is obtained. Each sensor’s measurement is then corrected systematically of the main errors (offset, gain, non-linearity and cross-sensitivity) [5].

Reconfigurable measurement chain

In order to program all aspects of the conditioning circuit, we have developed a program in the graphical programming language HP-VEE®. This program uses the ActiveX Control technique that enable the reconfiguration of the ispPAC30® circuit in an autonomous manner by executing auto-test and auto-adjustment routines to realise a very fine offset and gain corrections of the measurement chain, so that it is able to regain its initial accuracy. Auto-calibration of the measurement chain is therefore realised through two steps:

Auto-test step

This step consists in evaluating the offset error and in verifying if the amplification gain value of the measurement chain did not change. The offset test is carry out by applying a null voltage (Ve=0v) at the input of the measurement chain, after that the acquisition system measures the corresponding output value Voffset, this value is held in memory for compensation in the auto-adjustment step that follows after. The gain auto-test is performed by connecting an internal reference voltage Vref at the measurement chain input, and then the corresponding output value Vout is measured and compared with the awaited output to determine the gain change ΔG, that will be memorized for the gain adjustment.
Δ G = G V o u t V r e f

Auto-Adjustment step

In this step, the offset and gain errors estimated in the auto-test step are corrected as follow (fig.1): A multiplier MDAC can be used to perform a very fine offset adjustment (up to 0.5mV). The input of the MDAC is connected to one of the chosen internal voltage references Vref, and its output is connected to the summation junction of the output amplifier (OA). A code (an integer between 0 and 255) is generated for the MDAC, to output the inverse voltage to compensate the offset voltage Voffset that was determined in the auto-test step.
C o d e M D A C = 2 7 × ( 1 V o f f s e t V r e f )
Another multiplier MDAC is used to perform a very fine gain adjustment (from -1 to +0.99 with 0.008 step). The MDAC input is connected directly into the input of the measurement chain and its output into the summation junction of the amplifier output (OA). By using the gain error calculated previously, it’s possible to generate the code that allows the second MDAC to compensate the gain error.
C o d e M D A C = 2 7 × ( 1 + V o u t V r e f )
Figure 1. Reconfigurable measurement chain.
Sensors 03 00491 g001

Progressive correction and linarization Method

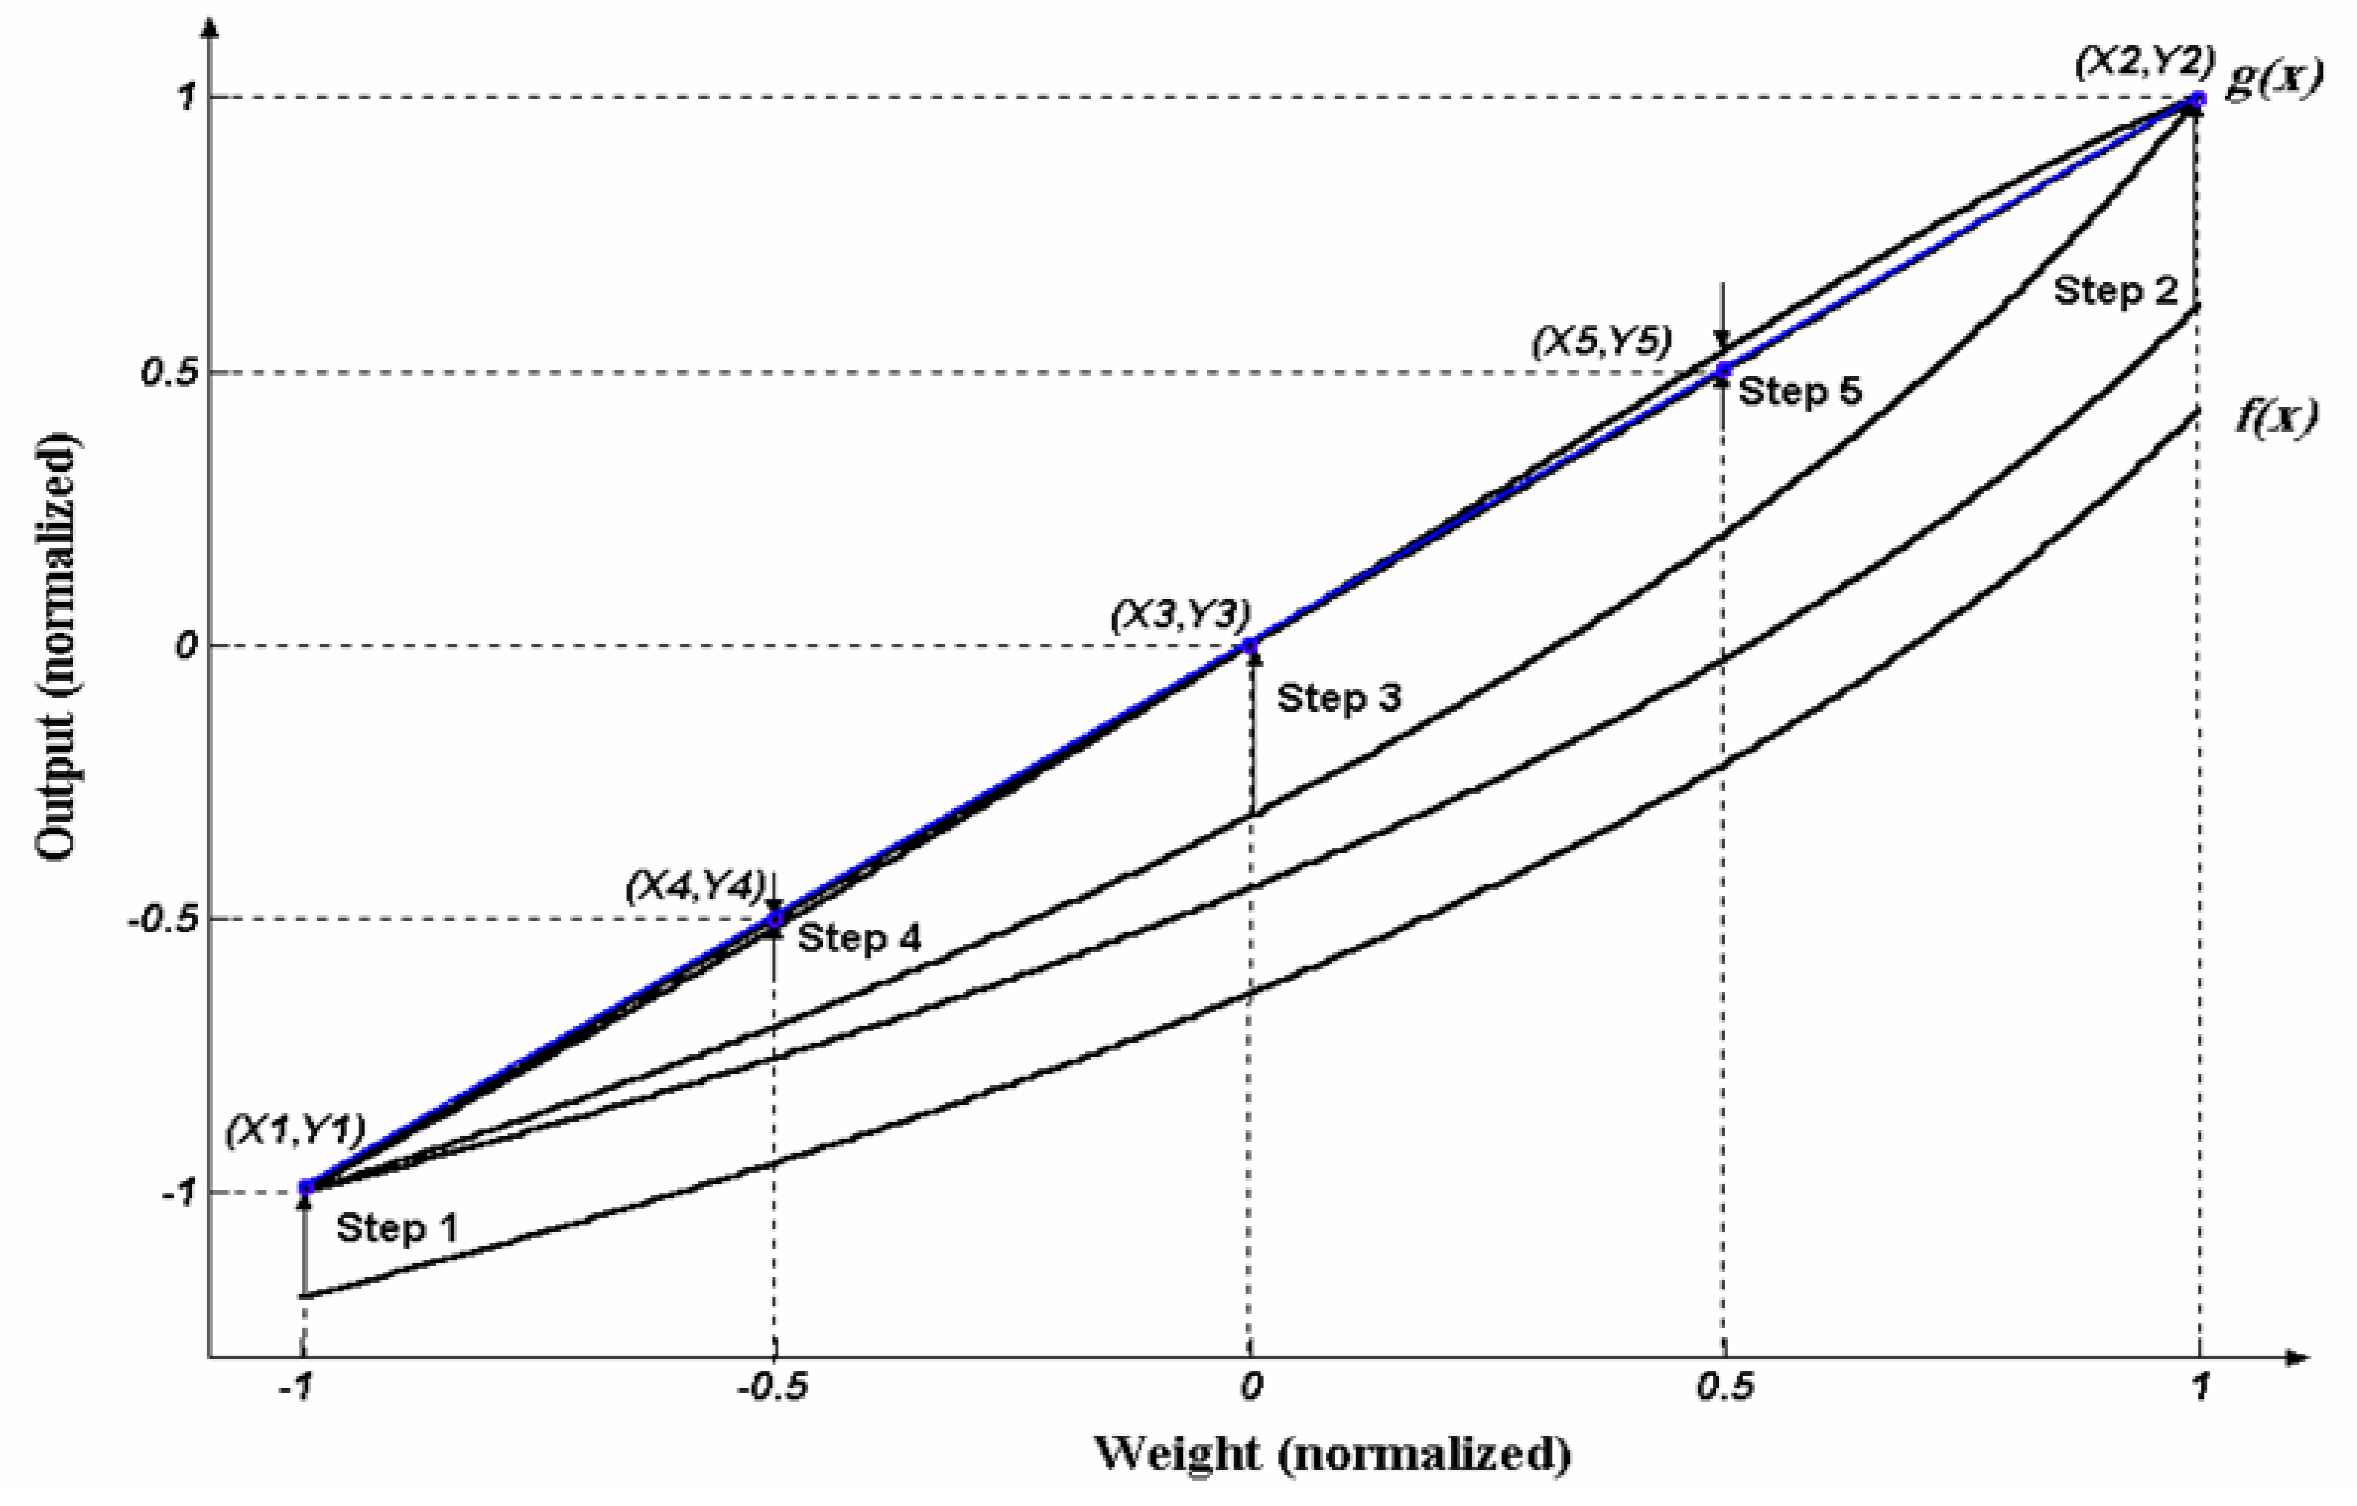
The proposed calibration method allows a progressive correction of the transfer function f(x) of a sensor, which is aimed to converge to the desired curve g(x). For this purpose, we perform calibration measurements yn relative to a set of reference quantities input xn. These measurements will be compared to the desired output values g(xn) in order to calculate a calibration coefficient for each new correction function hn(x) of the sensor’s transfer function. This calibration technique allows us to achieve a successive correction of the sensor’s transfer curve (figure 3). The first calibration point (x1,y1) is used to eliminate the offset error. Then, the second calibration point (x2,y2) allows the compensation of the gain error. After that, every new correction point (xn,yn) is used to correct the nonlinearity of the measurement transfer curve.

One-dimensional calibration function

The progressive calibration method permits the correction of the measurement curve in several steps. In each step, a calibration coefficient an is calculated for each new correction function hn(x). The mathematical aspect of this method is described in table-1 [6].
Table-1. Correction functions and calibration coefficients.
Correction FunctionsCalibration Coefficients
Step 1
(x1,y1)
h1( x )= f( x )+a1a1=y1−f( x1 )
Step 2
(x2,y2)
h2(x)=h1( x )+a2.(h1( x )−y1 ) a 2 = y 2 h 1 ( x 2 ) h 1 ( x 2 ) y 1
Step N
(xn,yn)
h N ( x ) = h N 1 ( x ) + a N . i = 1 N 1 ( h i ( x N ) y i ) a s = y N h N 1 ( x N ) i = 1 N 1 ( h i ( x N ) y i )
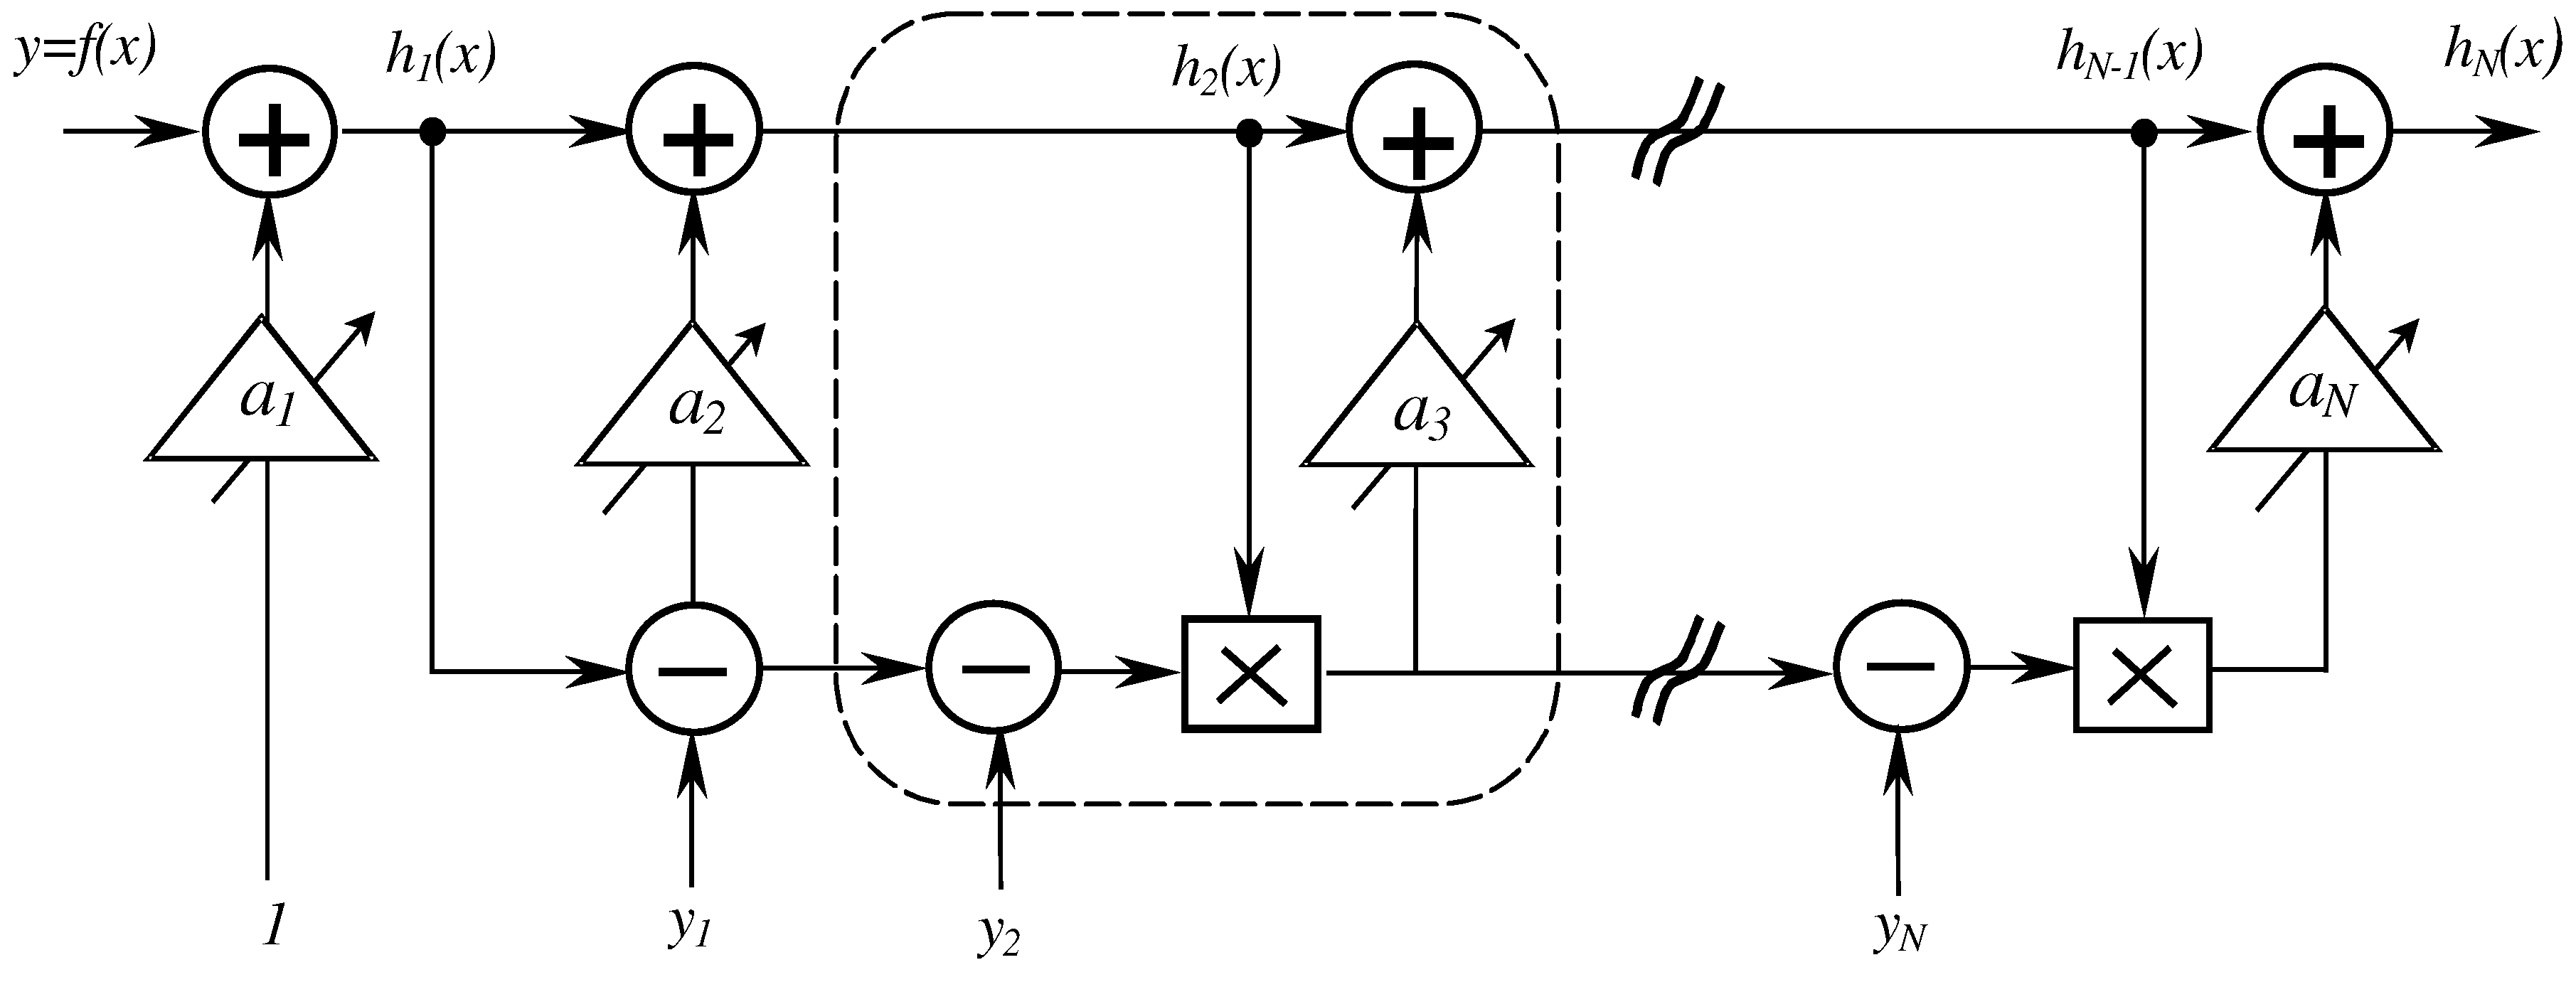
The algorithm of the calibration method presents a repetitive aspect and in each step are used the previous corrected output measurement hn-1(x) and a polynomial product. The signal flow diagram of this method is indicated in (figure 2), it contains essentially, addition and multiplication operations that are easy to implement numerically in a FPGA circuit, or via a software program. We have implemented this algorithm as a program written in the HP-VEE® environment. It allowed us to calculate all the calibration coefficients that serve at correcting the measurement transfer function.
Figure 2. Signal flow diagram of the progressive calibration method.
Sensors 03 00491 g002
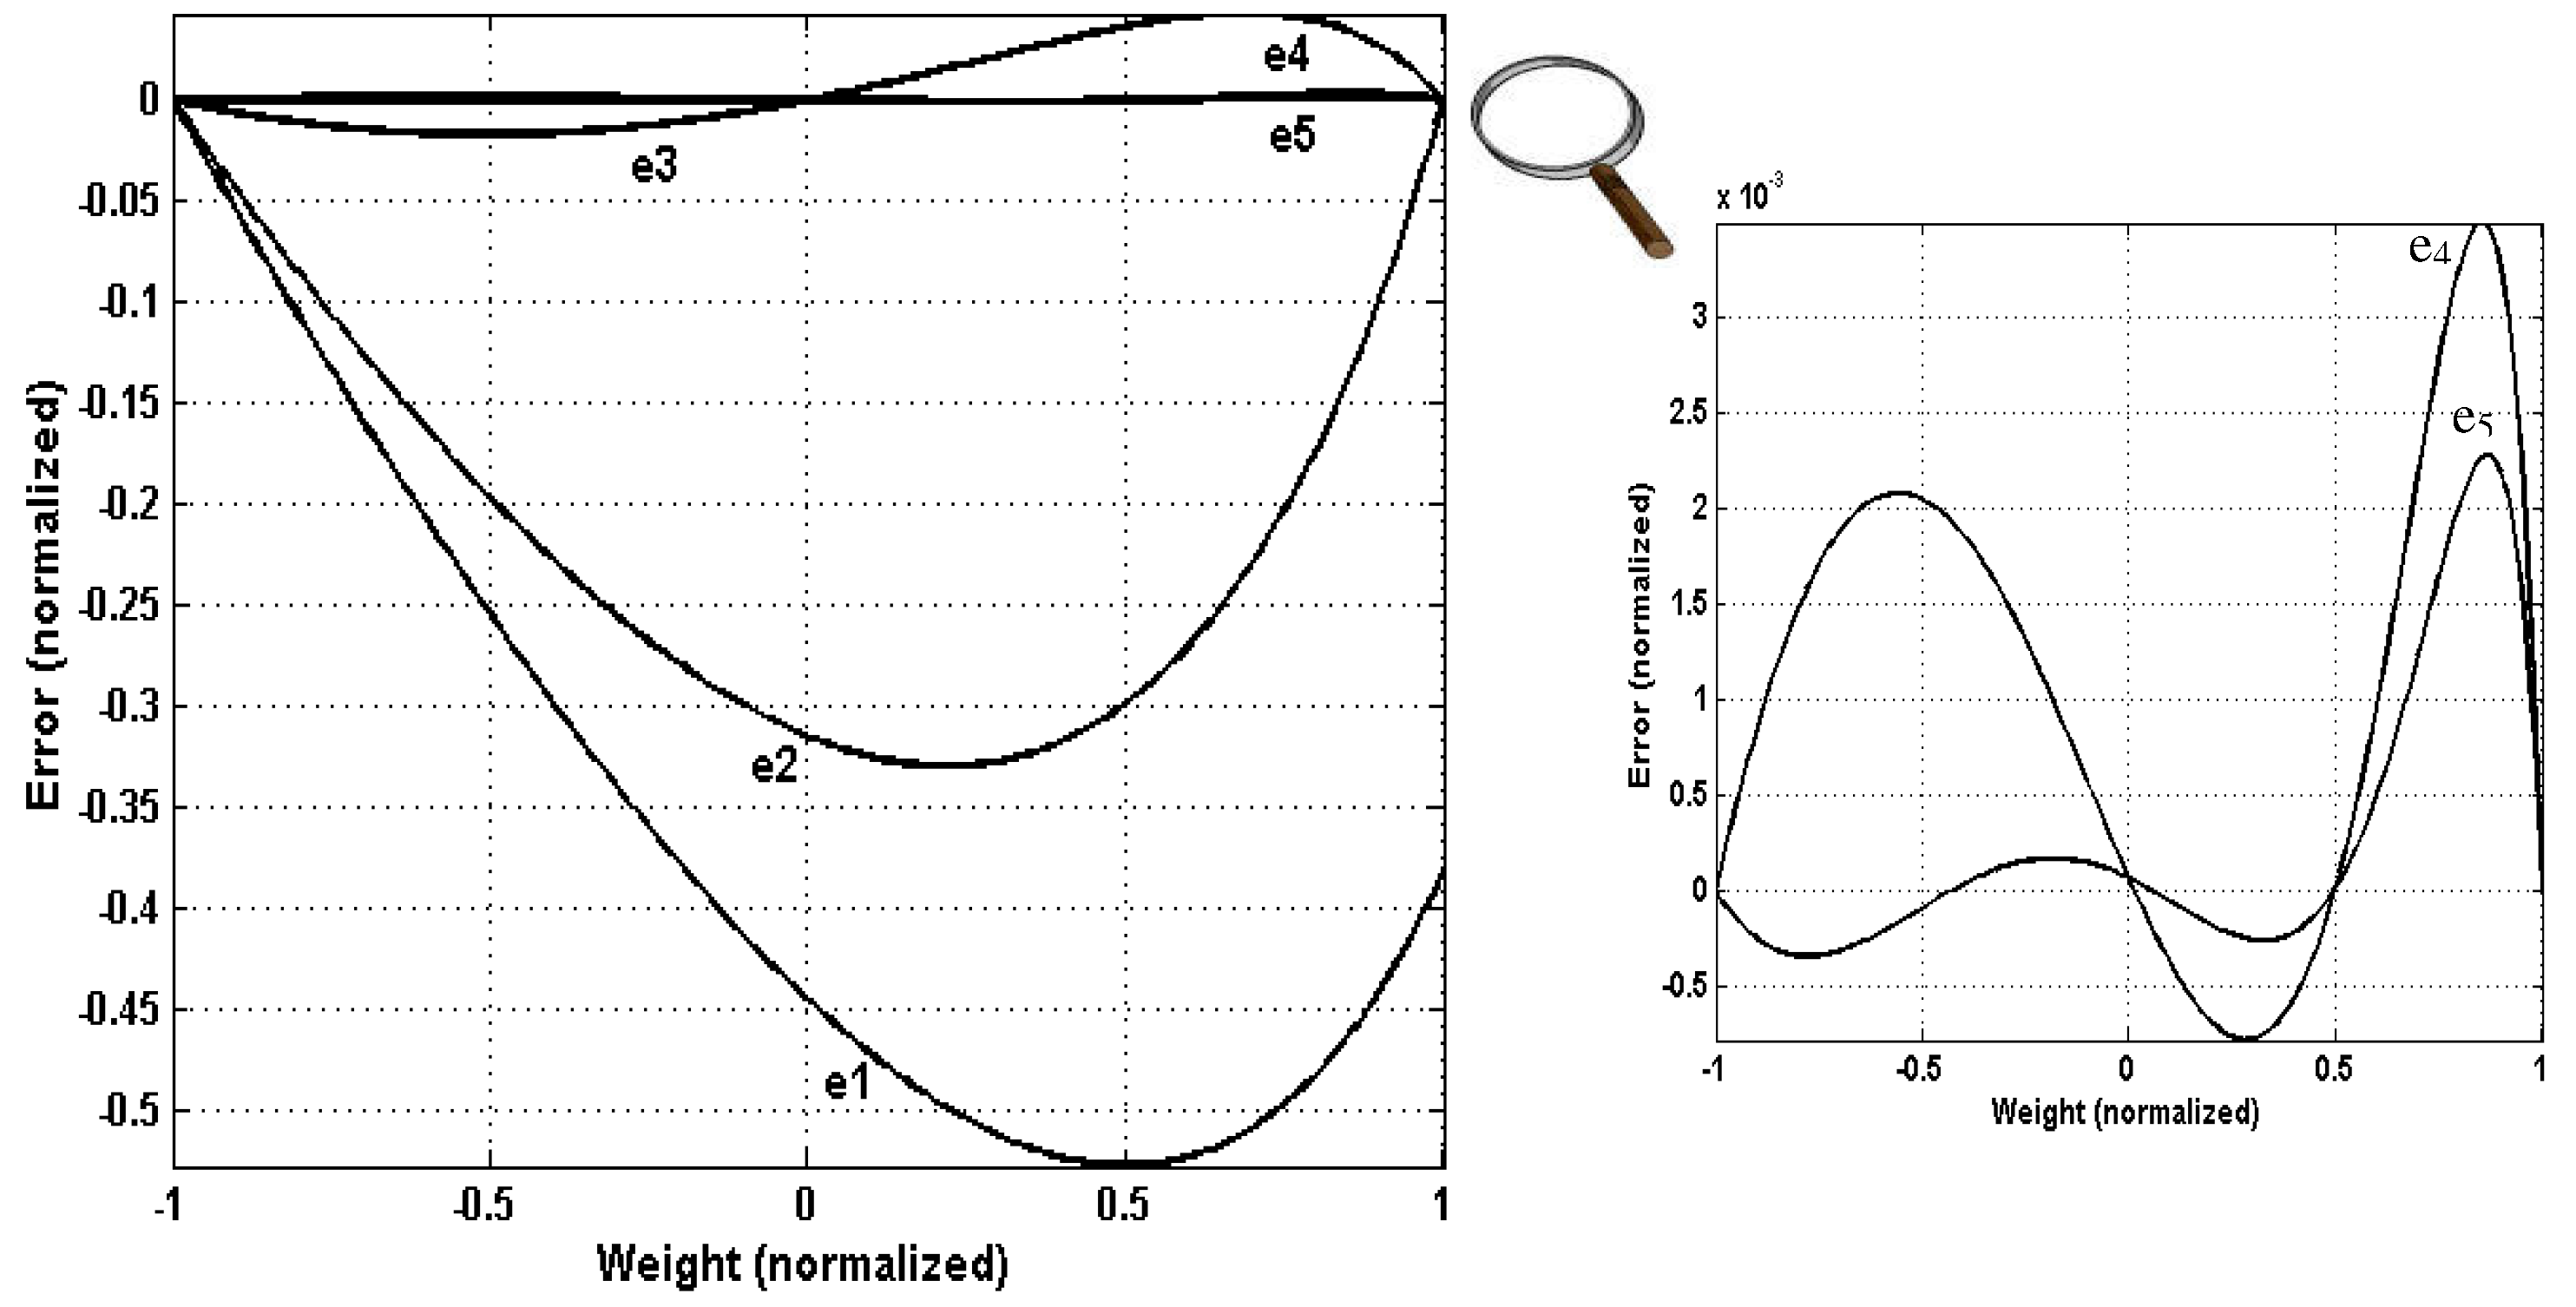
The proposed calibration method has been tested successfully for different sensors types. An example of the correction of a strain gauge measurement curve is indicated in (figure 3). This figure shows the successive correction functions respective to the used calibration points {x1=-1, x2=+1, x3=0, x4=-0.5 and x5=+0.5}. We note from the errors curves (figure 4), that after the offset and gain errors correction, a non linearity error of approximately 33% is reduced considerably to 6% after the first non-linearity correction, then this error is reduced to 0.4% after the second non-linearity correction and finally this error is strongly reduced to 0.2%. We can view a considerable improvement of the measurement accuracy (figure 4), so the obtained corrected curves match clearly the desired linear curve (figure 3).
Figure 3. Successive correction curves of a strain gauge.
Sensors 03 00491 g003
Figure 4. Corresponding errors curves.
Sensors 03 00491 g004

Two-dimensional calibration function
The calibration method can be used for 2-dimensional measurement function, in case where the sensor’s output is sensitive not only to the main measurement x, but also to other physical input z [6]. For this, we must perform an additional correction of the sensor’s sensitivity to the influence inputs. The correction functions and their calibration coefficients are expressed respectively according to the following expressions [6]:
h n , m ( x , z ) = h n , m 1 ( x , z ) + a n m × i = 1 n 1 { h i , m ( x , z ) y i } × j = 1 m 1 ( z ' z j ' ) h n , m ( x , z ) = h n , m 1 ( x , z ) + a n m × i = 1 n 1 { h i , m ( x , z ) y i } × j = 1 m 1 ( z ' z j ' )
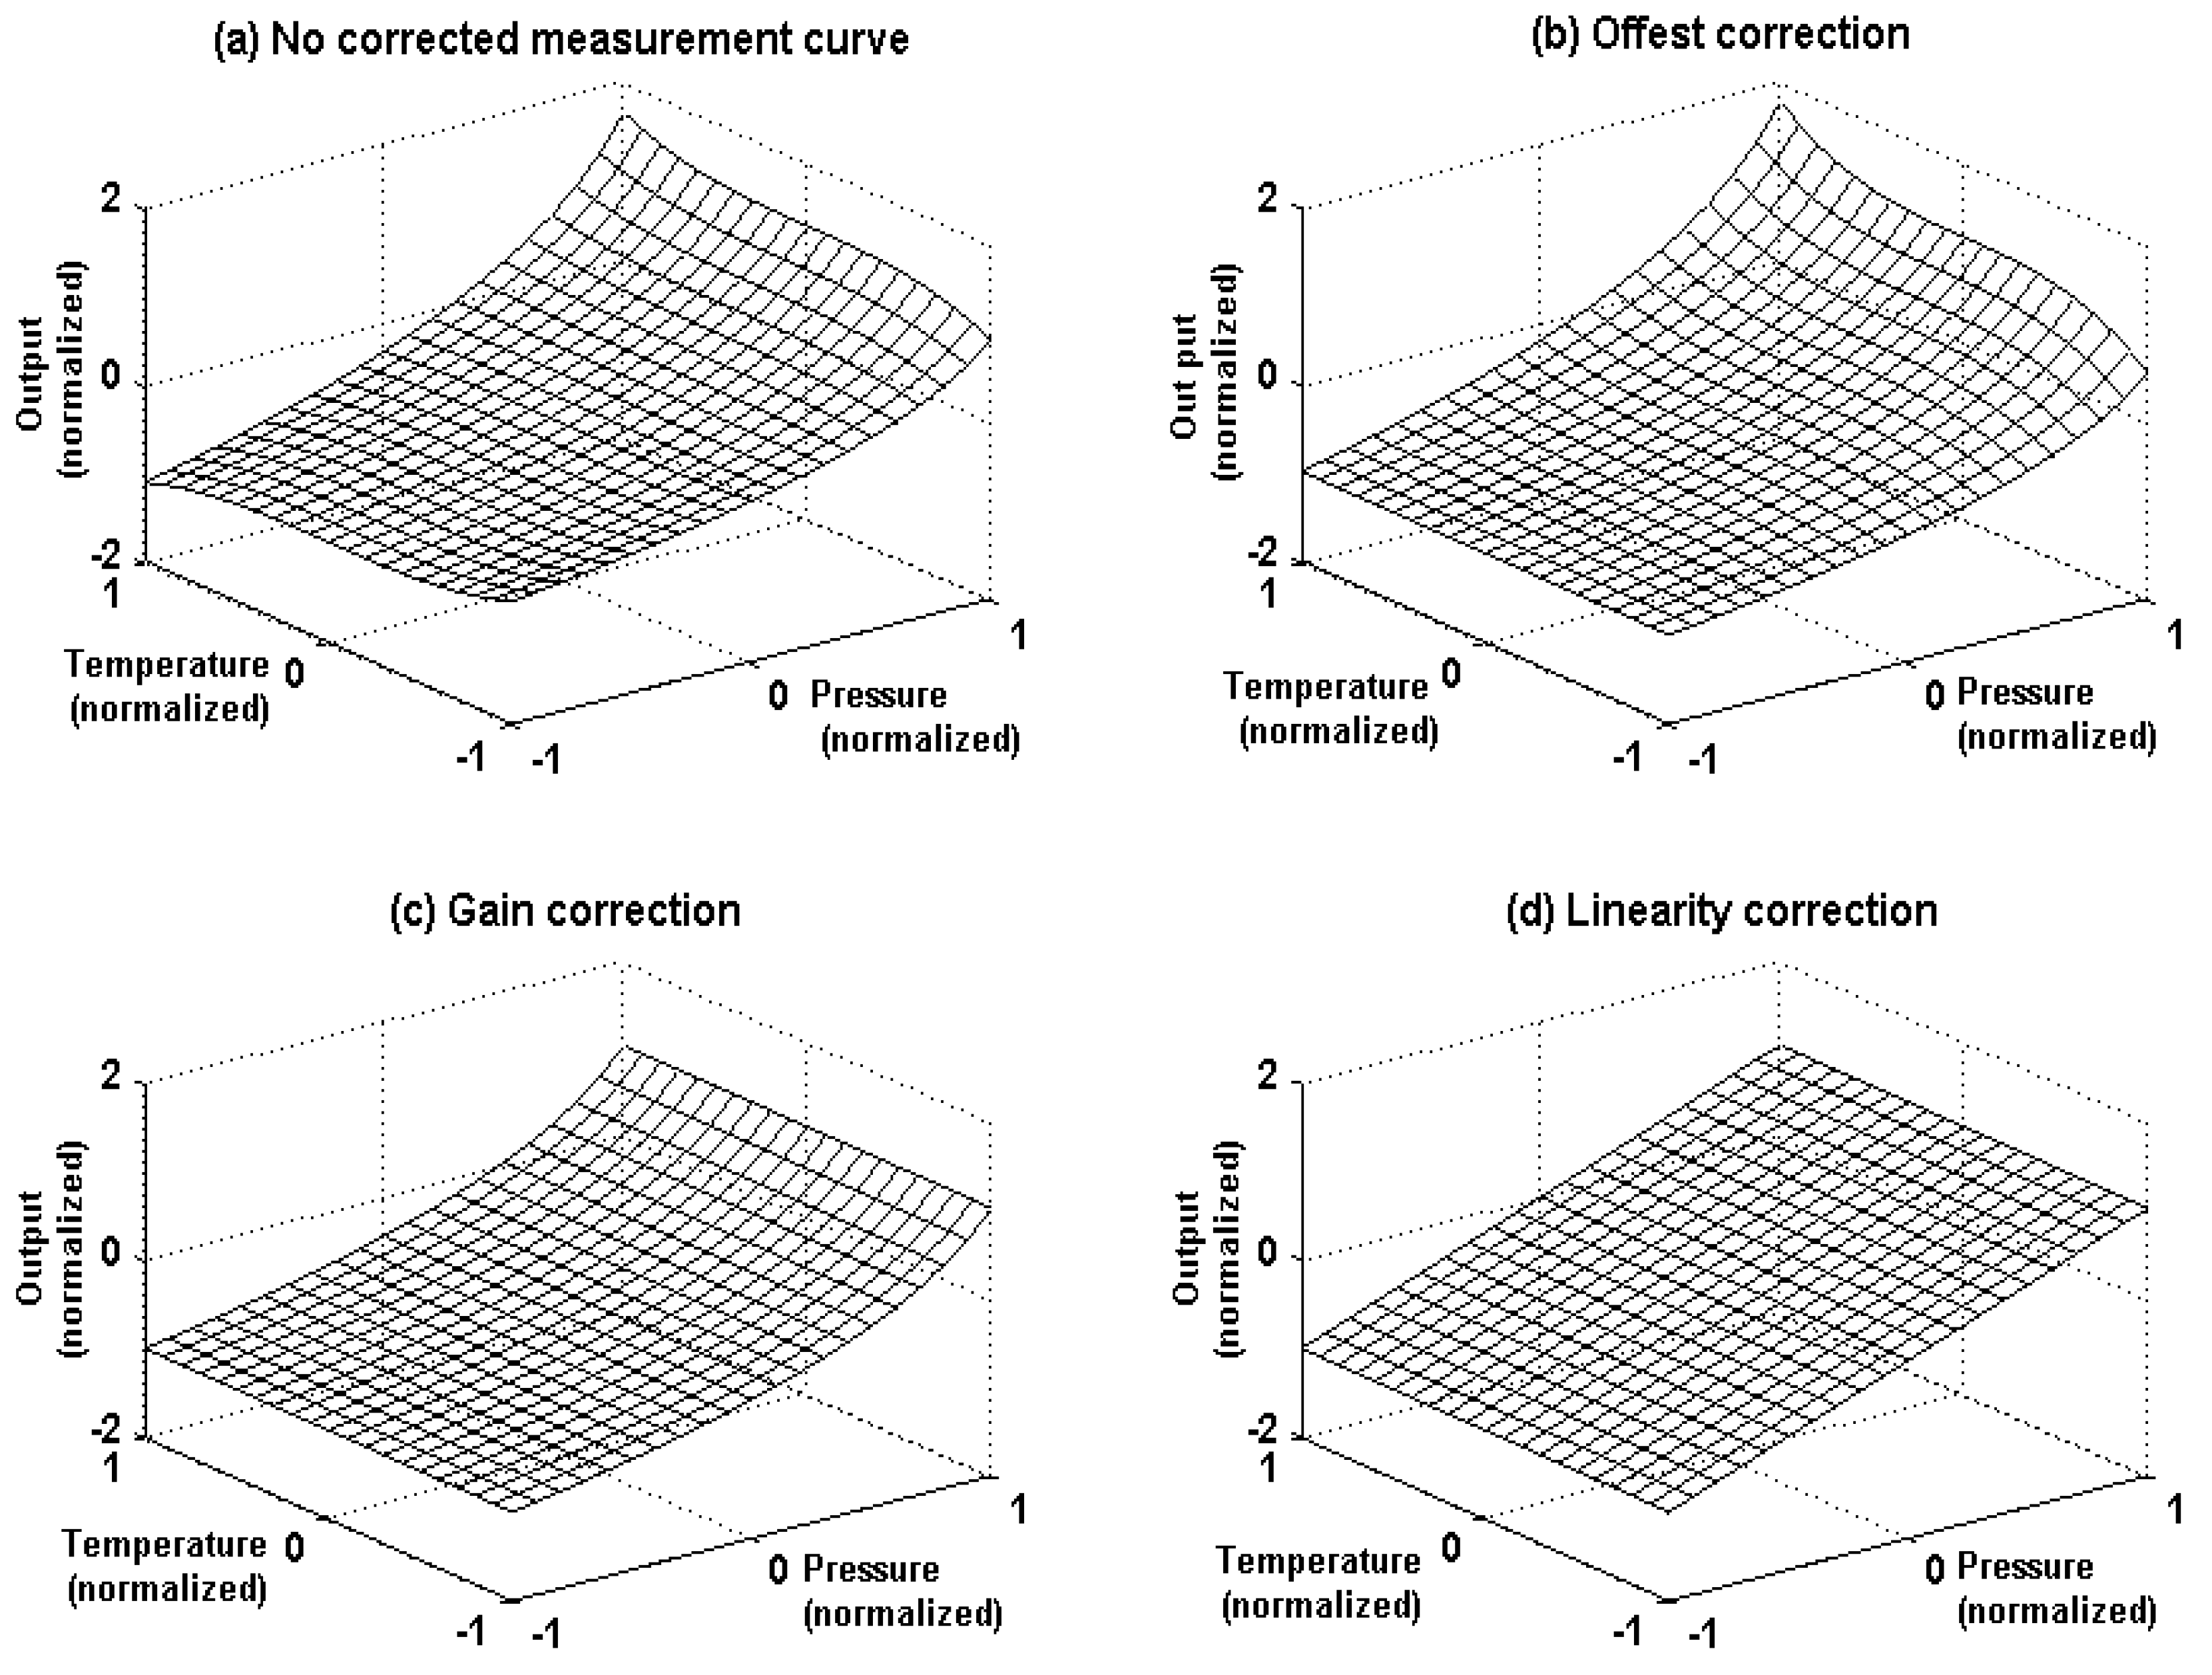
We show in (figure 5-a) an example of a measurement function that simulates the response of a pressure sensor that is cross-sensitive to temperature. The correction of this curve is performed in 5 successive steps and uses 5x5 calibration measurements f(pn,Tm).
Figure 5. Corrections of a 2-dimensional measurement function.
Sensors 03 00491 g005
We proceed first by the correction of the offset error (figure 5-b), by using the calibration measurement f(p1,T1) and then the other measurements {f(p1,Tm)} are used to correct the temperature cross-sensitivity of the offset along the whole axis of this influence input. In the same way, we correct the gain error and then his temperature cross-sensitivity to obtain the corrected curve (figure 5-c). In the last correction step, the linearity of the measurement curve is achieved and the temperature crosssensitivity is eliminated (figure 5-d).

Conclusion

The use of a programmable analog circuit (FPAA) allows a considerable decrease in terms of production and exploitation cost of a measurement chain. On the one hand, this reconfigurable circuit can be interfaced with different kinds of sensors. On the other hand, its auto-calibration is easy to implement. The used calibration method, allowed us to perform in a progressive way, the correction and linearization of a sensor’s response and it only requires a reduced number of calibration data. This method can be applied to different kinds of sensors and permits to take into consideration the influence inputs. The flexibility of this method allows its implementation around a computer configuration or it can be fully integrated in a microprocessor front-end.

References

  1. Pallás-Areny, R.; Webster, J.G. Sensors and Signal Conditioning; John Wiley & Sons: New York, 1991; pp. 32–40. [Google Scholar]
  2. Brignell, J.E. Software techniques for sensor compensation. Sensors and Actuators A 1991, Vol.25-27, 29–35. [Google Scholar]
  3. Dunbar, M.L. Single chip ASICs for smart sensor signal conditioning. In Proceeding Wescon’98, Anaheim, CA, USA, 1998; pp. 44–50.
  4. In-System Programmable Analog Circuit, Lattice analog product. http:\\www.latticesemi.com.
  5. de-Silva, C. Sensors/transducer technology, Part 5A, Instrument error analysis. Measurements-andcontrol October. 1999, 197, 53–62. [Google Scholar]
  6. Horn, G.v.d.; Huijsing, J.H. Programmable analog signal processor for polynomial calibration. In Proceeding ESSCIRC’96, Neuchatel, Switzerland, 1996; pp. 400–403.
  • Sample Availability: Available from the authors.