Self-Calibration Method and Pose Domain Determination of a Light-Pen in a 3D Vision Coordinate Measurement System
Abstract
:1. Introduction
2. Self-Calibration Method of the Stylus Tip Center
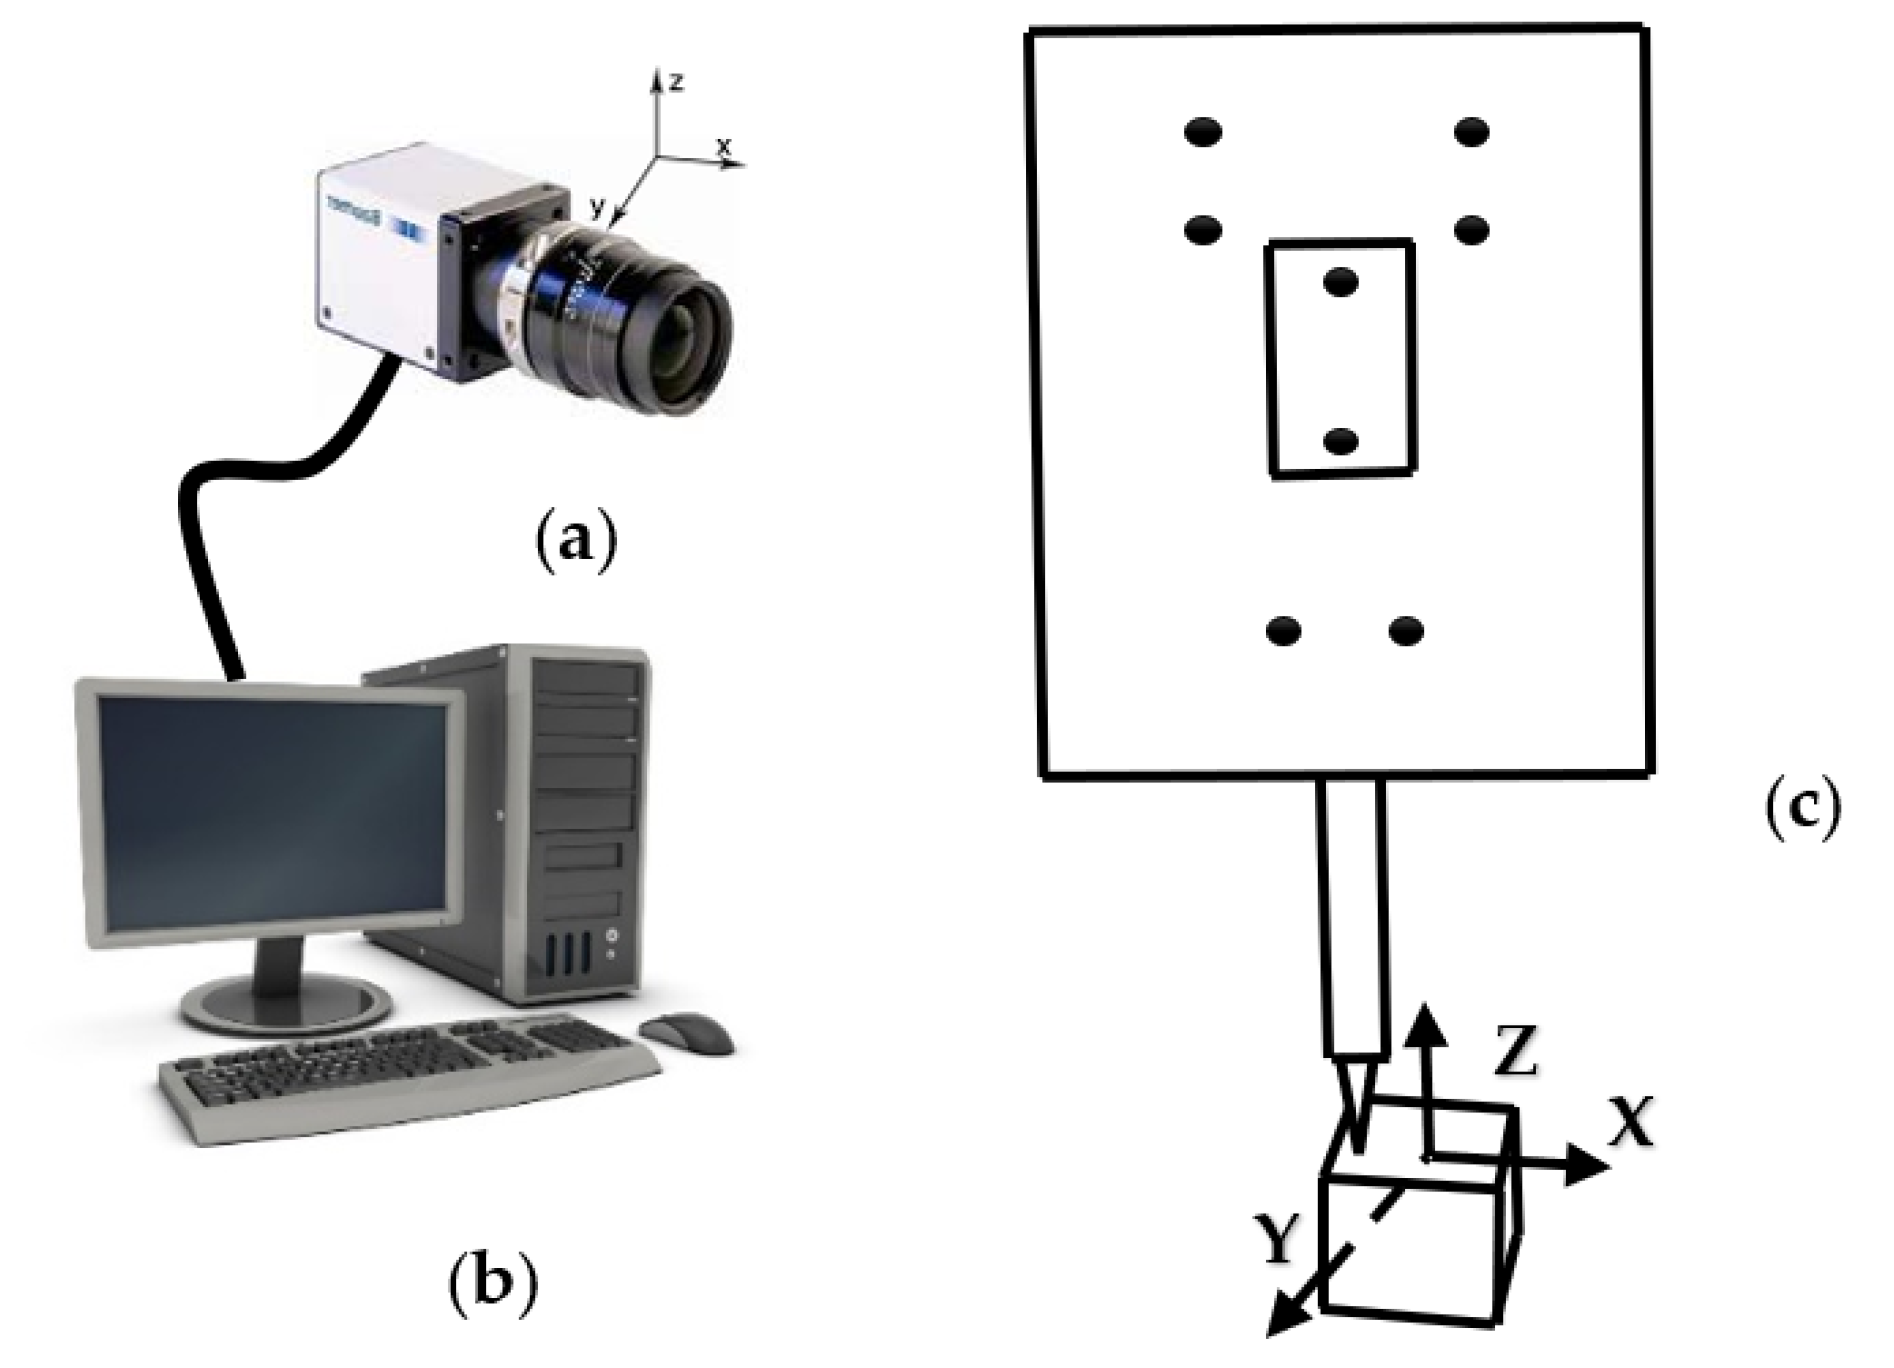
2.1. Light-Pen-Type 3D Vision Measurement System
2.2. Establishment of the Coordinate System
- 1.
- Image coordinate system (O0-XY):
- 2.
- Camera coordinate system (O1-uvw):
- 3.
- Light pen coordinate system (O2-xyz):
2.3. Solve Equations
2.4. Self-Calibration Method of the Stylus Tip Center
2.5. Self-Calibration Steps
- After the measurement system has been built, use the spatial coordinates of the characteristic points of the light pen measured by CMM as the initial value.
- Use the principle of position invariance to shoot images of different poses. Considering the particularity of the self-calibration method, the image pose should be changed as much as possible in the threshold range to make the result more accurate.
- After obtaining at least eight sets of pictures within the threshold range, calculate R and T for each image using Equations (1)–(5).
- After R and T have been determined, construct and solve Equations (6)–(8).
- Obtain the actual position of the stylus tip center coordinate in the light pen coordinate system.
3. Experiment
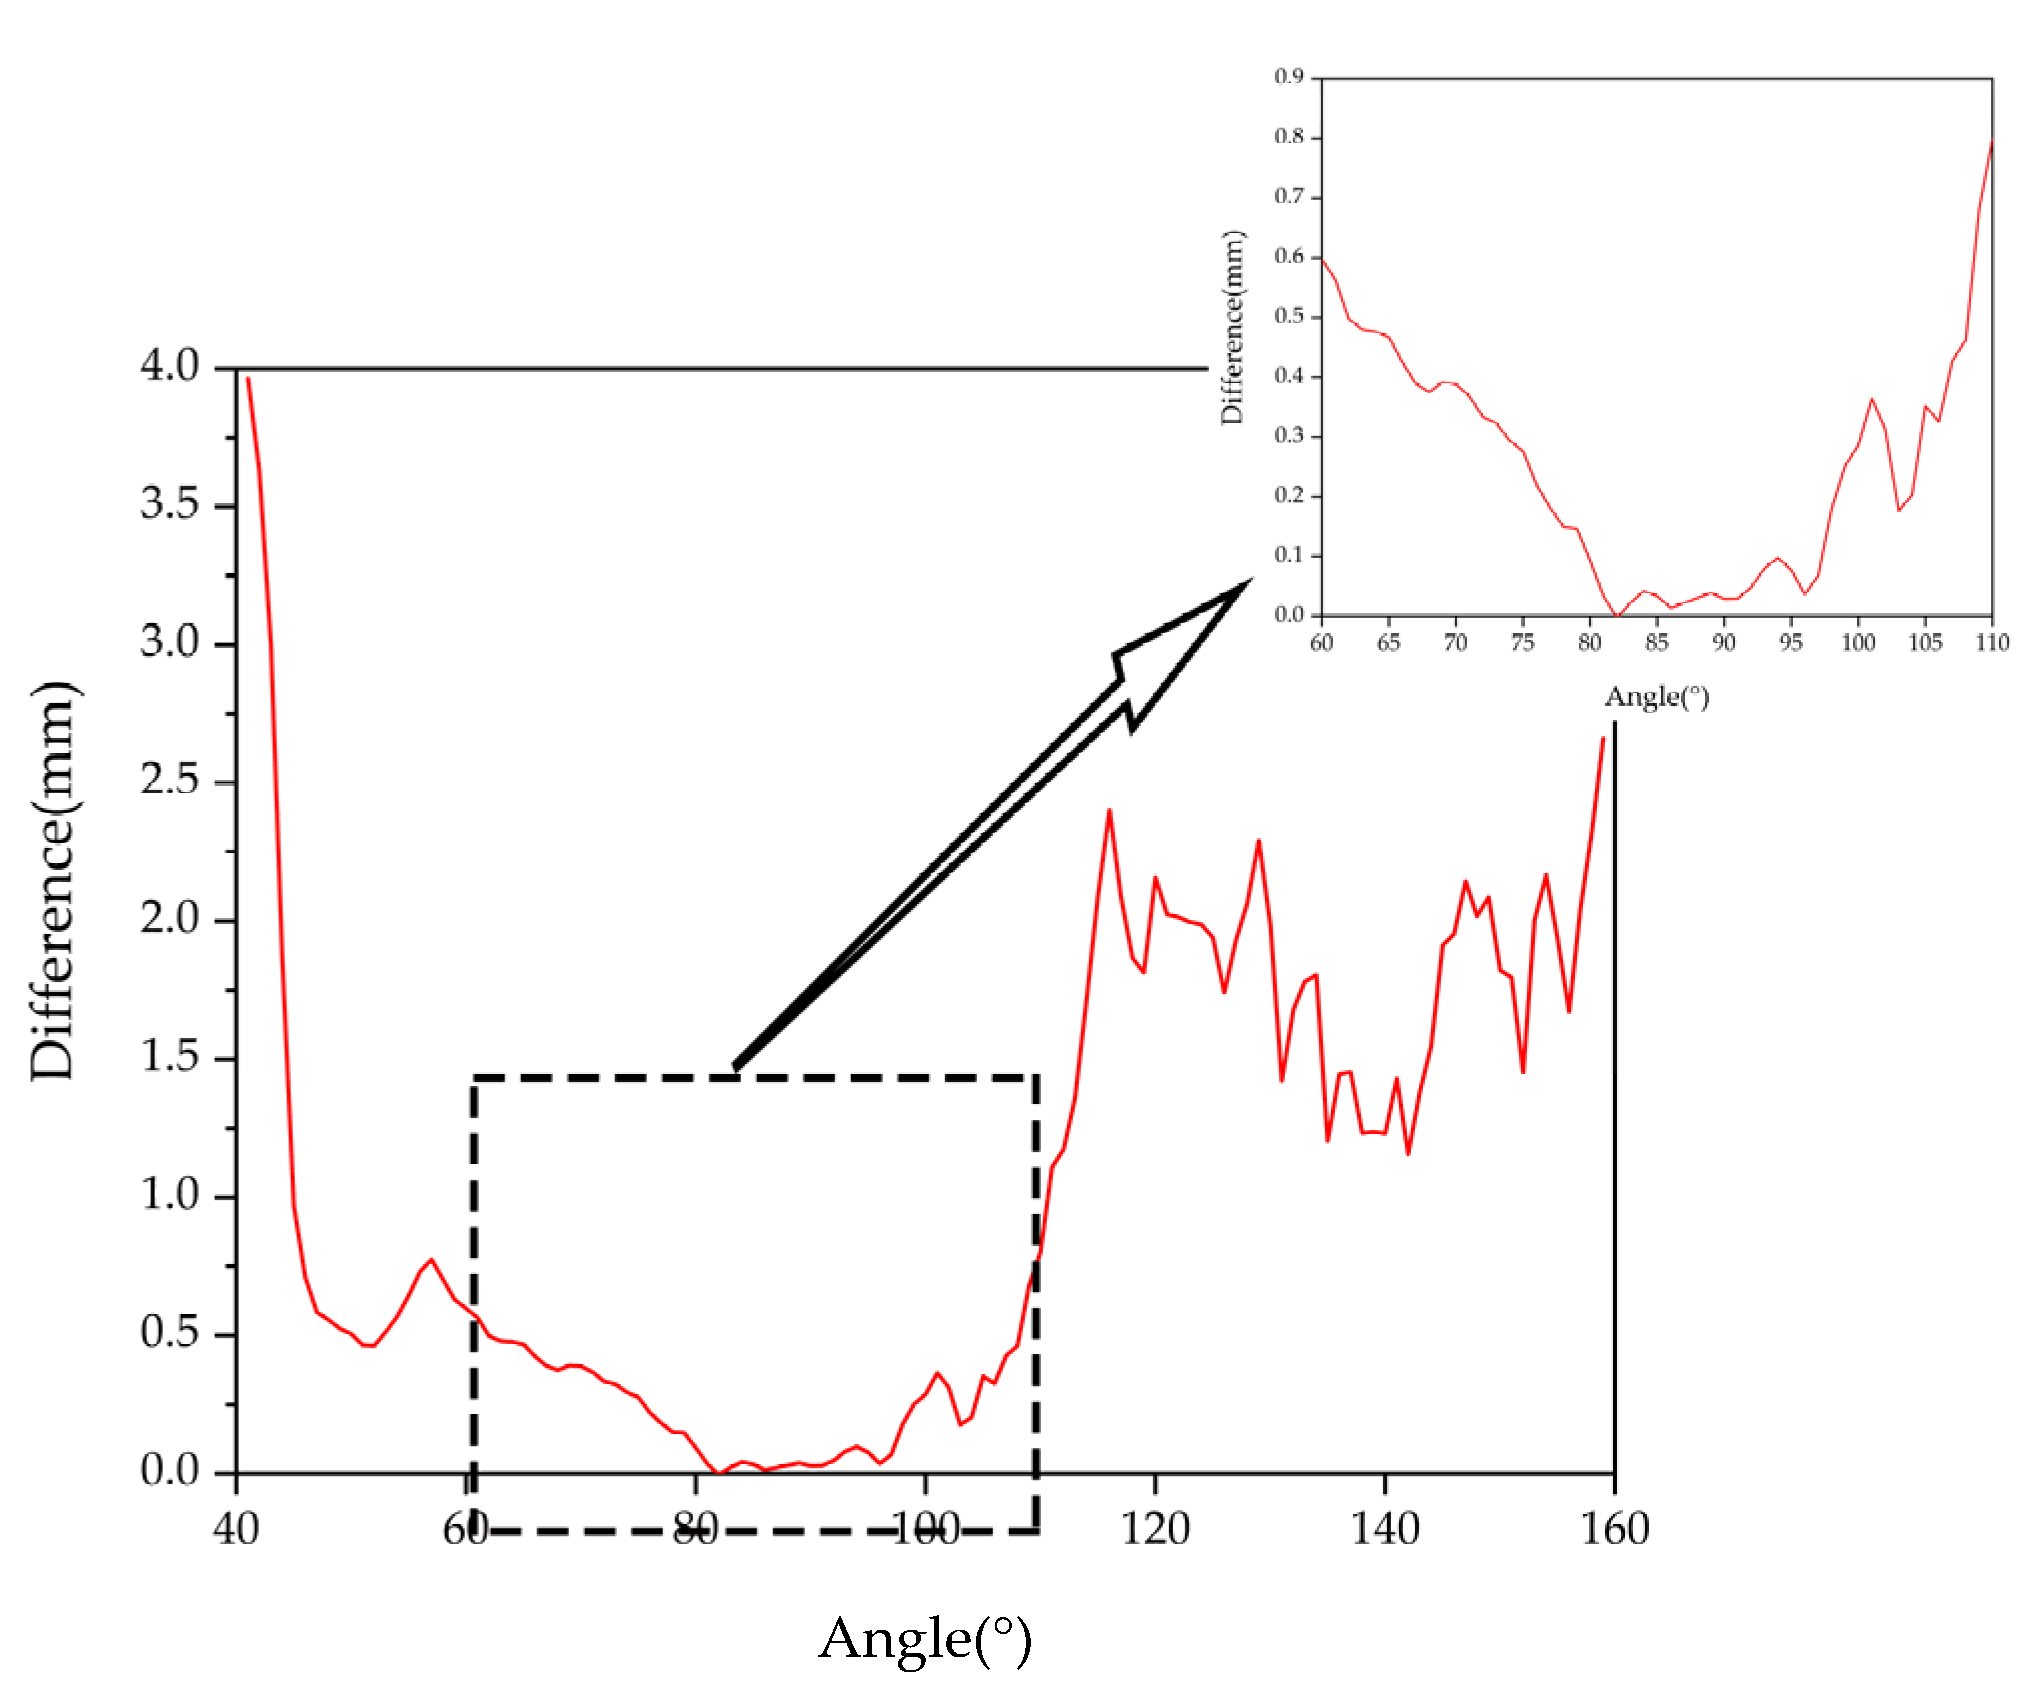
3.1. Pose Domain Experiment
3.2. Self-Calibration Experimental Results
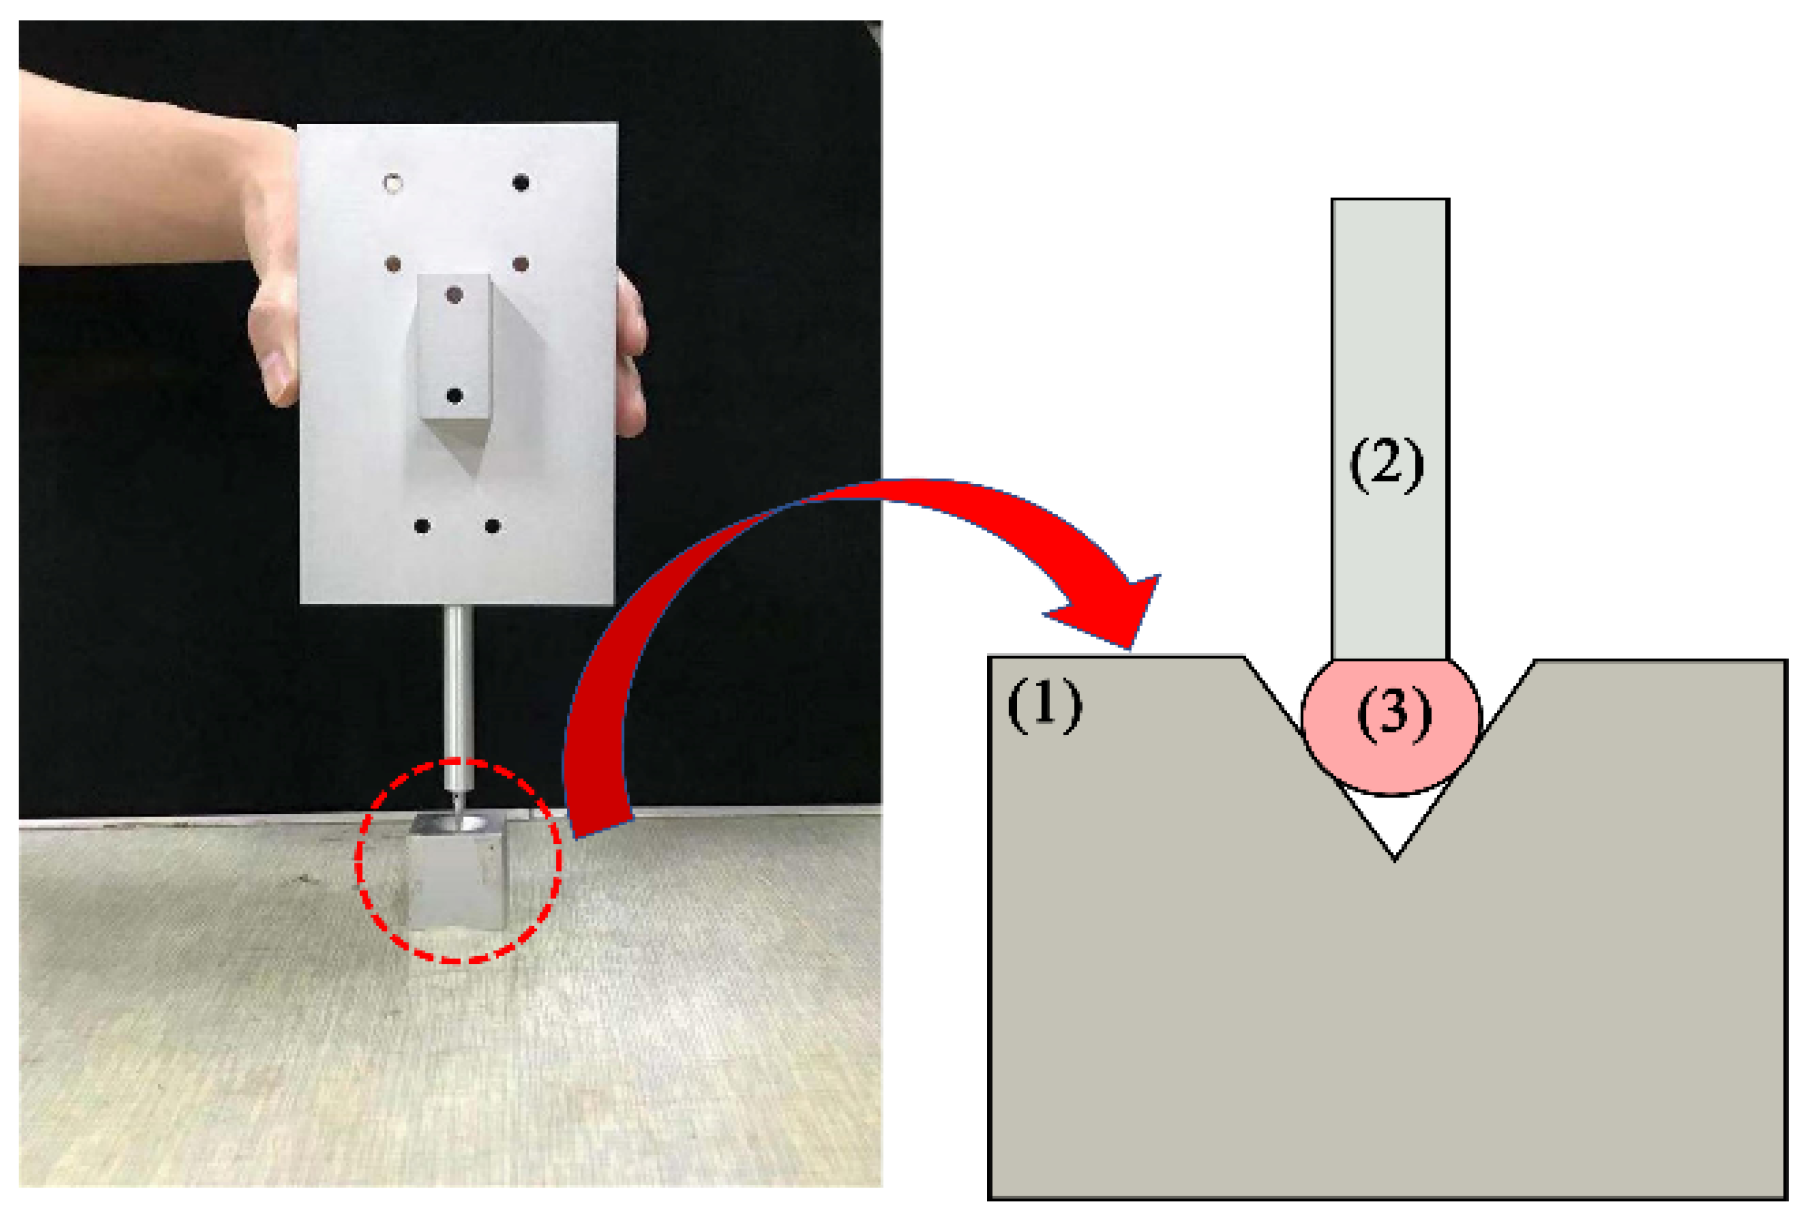
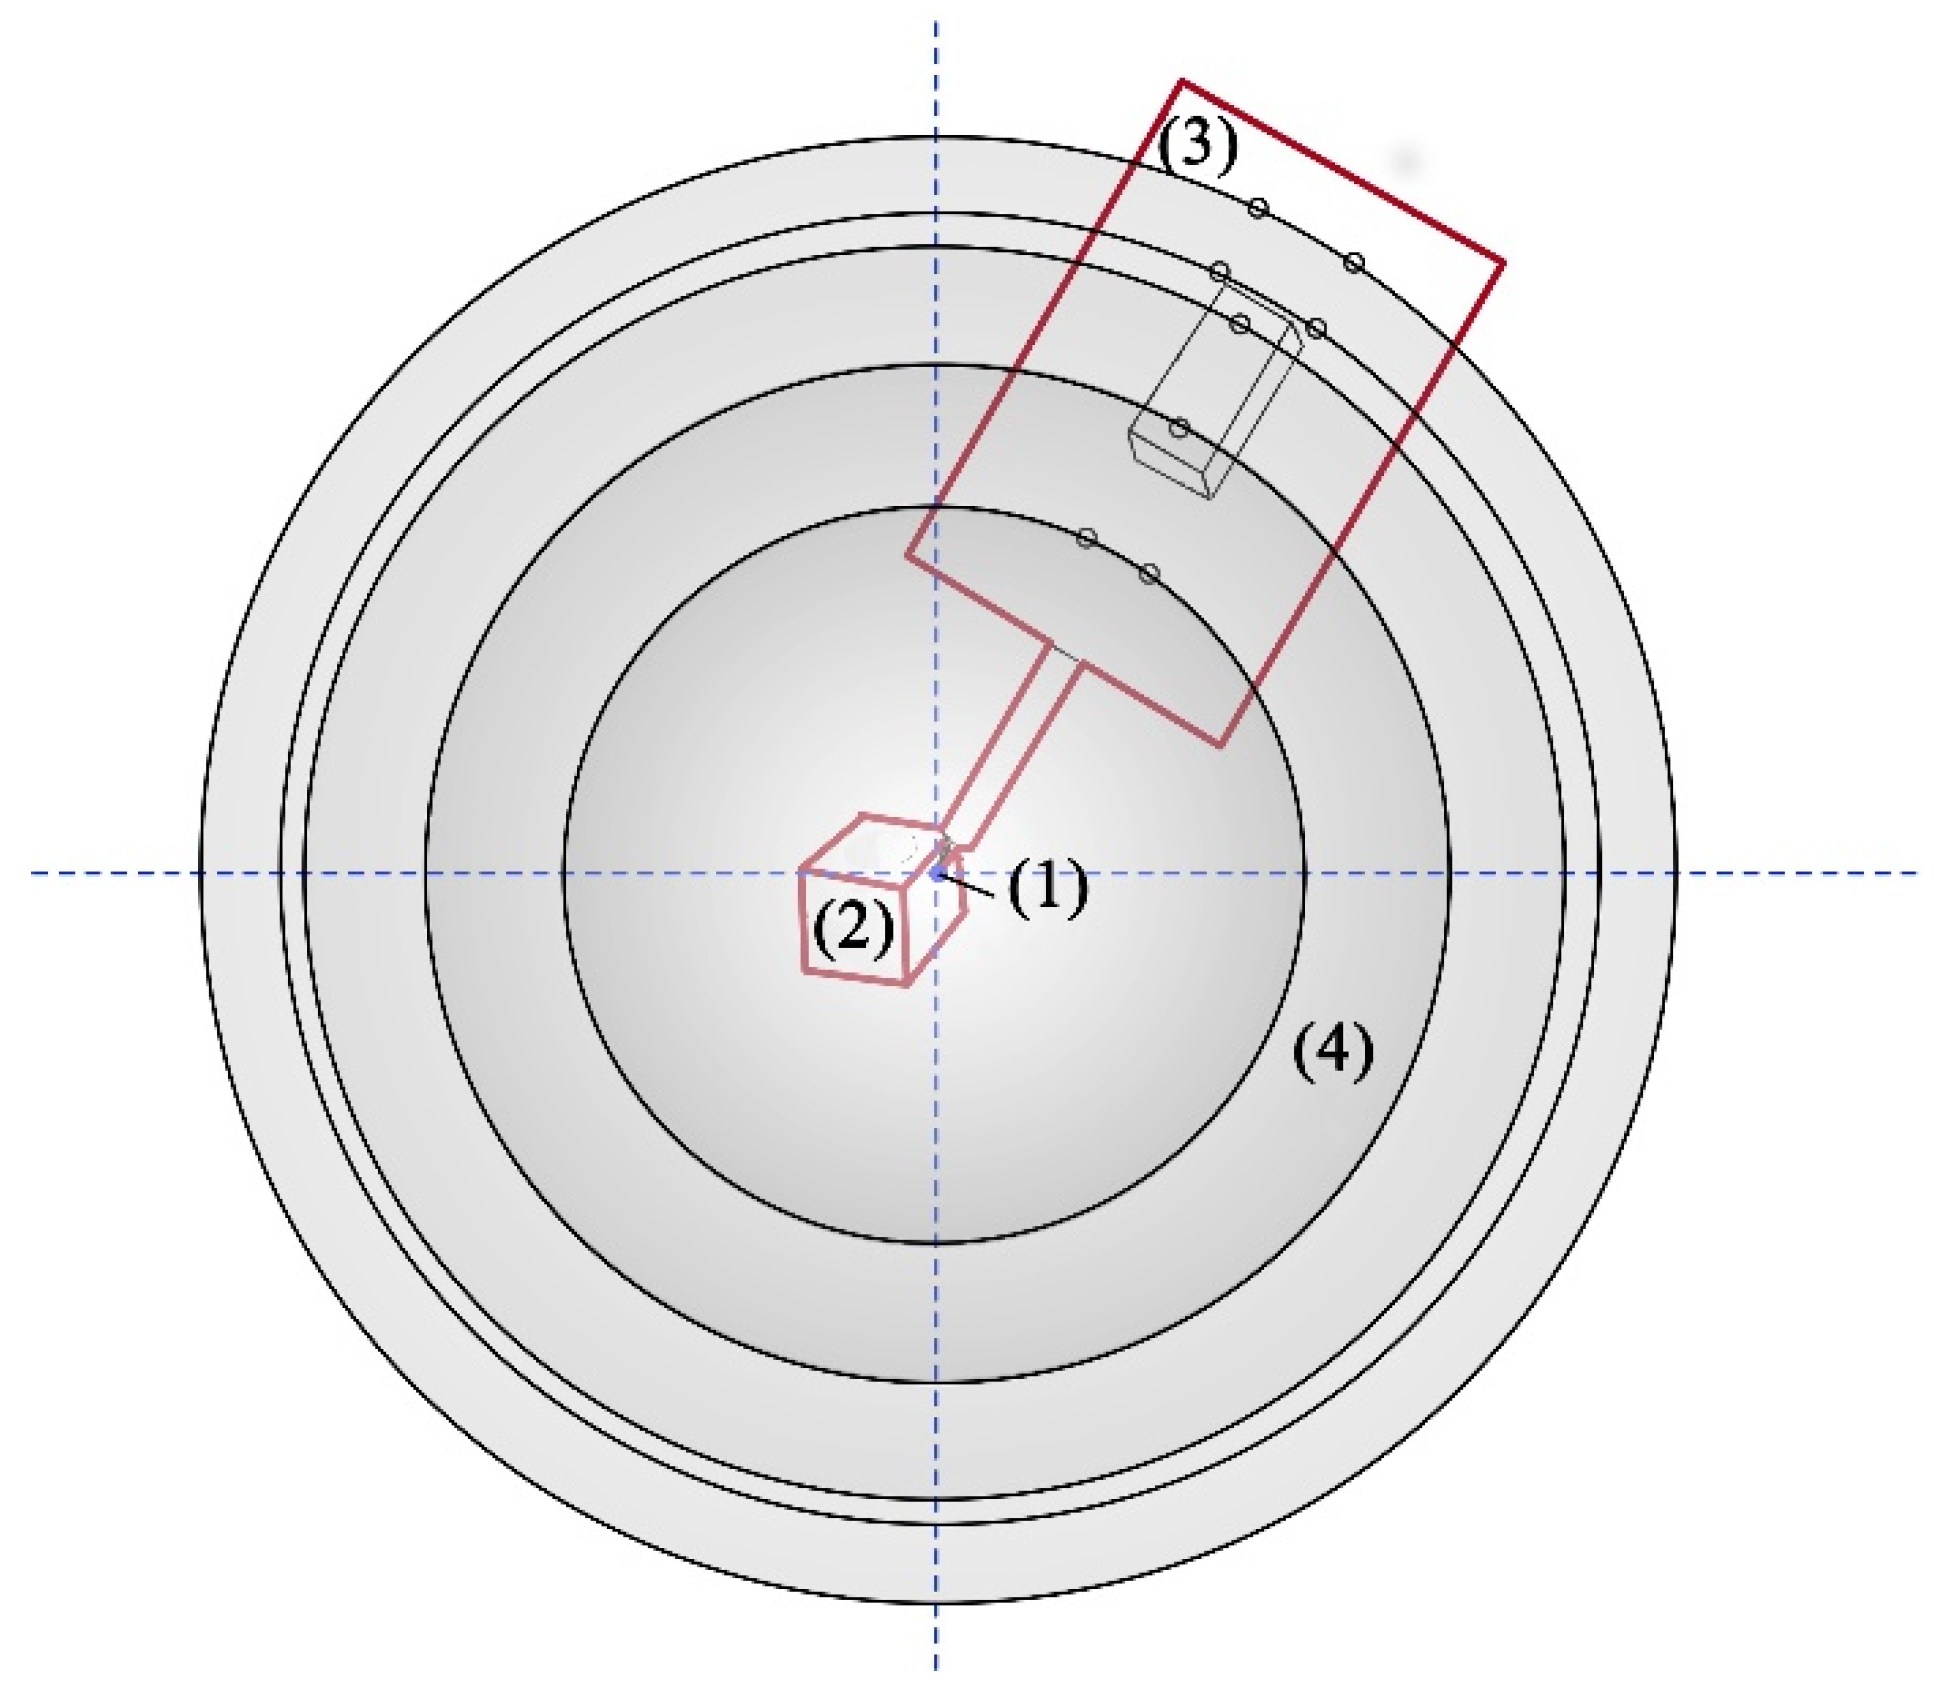
3.2.1. Self-Calibration Measurement Experiment
3.2.2. Single-Point Repeatability Experiment
4. Conclusions
Author Contributions
Funding
Conflicts of Interest
References
- Brezina, I. Coordinate measuring machines and systems: John A. Bosch (Ed.), Marcel Dekker, Inc., New York/Basel/Hong Kong, 1995, 1st Edition, xi + 444 pp., ISBN 0-8247-9581-4, price: 125,00 US$. Measurement 1997, 20, 287. [Google Scholar] [CrossRef]
- Milroy, M.J.; Weir, D.J.; Bradley, C.; Vickers, G.W. Reverse engineering employing a 3D laser scanner: A case study. Int. J. Adv. Manuf. Technol. 1996, 12, 111–121. [Google Scholar] [CrossRef]
- Chen, J.; Wu, X.; Yu Wang, M.; Li, X. 3D shape modeling using a self-developed hand-held 3D laser scanner and an efficient HT-ICP point cloud registration algorithm. Opt. Laser Technol. 2013, 45, 414–423. [Google Scholar] [CrossRef]
- Vincze, M.; Prenninger, J.P.; Gander, H. A Laser Tracking System to Measure Position and Orientation of Robot End Effectors Under Motion. Int. J. Robot. Res. 1994, 13, 305–314. [Google Scholar] [CrossRef]
- Mayer, J.R.R.; Parker, G.A. A portable instrument for 3-D dynamic robot measurements using triangulation and laser tracking. IEEE Trans. Robot. Autom. 1994, 10, 504–516. [Google Scholar] [CrossRef]
- Xie, Z.; Zhang, Z.; Jin, M. Development of a multi-view laser scanning sensor for reverse engineering. Meas. Sci. Technol. 2006, 17, 2319–2327. [Google Scholar] [CrossRef]
- Santolaria, J.; Guillomia, D.; Cajal, C.; Albajez, J.A.; Aguilar, J.J. Modelling and calibration technique of laser triangulation sensors for integration in robot arms and articulated arm coordinate measuring machines. Sensors 2009, 9, 7374–7396. [Google Scholar] [CrossRef] [Green Version]
- Zhou, N.; An, Z.; Li, L.; Zhu, Y. iGPS Measurement Network Multi-Station Arrangement Design. Appl. Mech. Mater. 2013, 443, 223–227. [Google Scholar] [CrossRef]
- Estler, T.; Edmundson, K.; Peggs, G.; Parker, D. Large-Scale Metrology—An Update. Cirp Ann. Manuf. Technol. 2002, 51, 587–609. [Google Scholar] [CrossRef]
- Zhang, Z.; Huang, Q.; Lin, W.; Che, R. Probe imaging vision coordinate measuring system using single camera. In Proceedings of the SPIE 3558, Automated Optical Inspection for Industry: Theory, Technology, and Applications II, Beijing, China, 10 August 1998. [Google Scholar]
- Fraser, C. Innovations in Automation for Vision Metrology Systems. Photogramm. Rec. 2003, 15, 901–911. [Google Scholar] [CrossRef]
- Wang, S.; Liu, S.; Mao, Q. A CMM-Based Method of Control Point Position Calibration for Light Pen Coordinate Measuring System. Sensors 2020, 20, 5592. [Google Scholar] [CrossRef] [PubMed]
- Zhang, R.; Liu, S.G.; Wang, H.Y. Wireless Control for Pointolite in Light-Pen CMMs. Appl. Mech. Mater. 2014, 602–605, 2217–2220. [Google Scholar] [CrossRef]
- Fu, S.; Zhang, L.; Ye, N.; Zhang, W.; Liu, S. A flexible approach to light pen calibration for a monocular-vision-based coordinate measuring system. Meas. Sci. Technol. 2014, 25, 125006. [Google Scholar] [CrossRef]
- Alblalaihid, K.; Kinnell, P.; Lawes, S.; Desgaches, D.; Leach, R. Performance Assessment of a New Variable Stiffness Probing System for Micro-CMMs. Sensors 2016, 16, 492. [Google Scholar] [CrossRef] [Green Version]
- Magdziak, M. Selection of the Best Model of Distribution of Measurement Points in Contact Coordinate Measurements of Free-Form Surfaces of Products. Sensors 2019, 19, 5346. [Google Scholar] [CrossRef] [PubMed] [Green Version]
- Magdziak, M. A New Method of Distribution of Measurement Points on Curvilinear Surfaces of Products. Sensors 2019, 19, 2667. [Google Scholar] [CrossRef] [Green Version]
- Liu, S.G.; Peng, K.; Huang, F.S.; Zhang, G.X.; Li, P. A Portable 3D Vision Coordinate Measurement System Using a Light Pen. Key Eng. Mater. 2005, 295–296, 331–336. [Google Scholar] [CrossRef]
- Liu, S.; Zhang, H.; Dong, Y.; Tang, S.; Jiang, Z. Portable Light Pen 3D Vision Coordinate Measuring System- Probe Tip Center Calibration. Meas. Sci. Rev. 2013, 13, 194–199. [Google Scholar] [CrossRef]
- Zheng, X.; Zhao, M.; Feng, S. Two-Step Calibration of Probe Tip Center of Planar Target. Laser Optoelectron. Prog. 2018, 55, 001201. [Google Scholar] [CrossRef]
- Du, S.-Q.; Gao, Y. The Levenberg-Marquardt-Type Methods for a Kind of Vertical Complementarity Problem. J. Appl. Math. 2011, 2011, 161853. [Google Scholar] [CrossRef] [Green Version]
- Zhang, R.; Liu, S.; Wang, S.; Song, X. Stylus Tip Center Position Self-Calibration Based on Invariable Distances in Light-Pen Systems. Sensors 2017, 17, 131. [Google Scholar] [CrossRef] [PubMed] [Green Version]
- Shan, D.; Bi, X.; Wang, X.; Zhang, P.; Xu, Z.; Han, M.; Liu, Y.; Zhang, C.; Xu, Y. The Impact of Control Point Dispersion on Measurement Accuracy in a New Type of Light-Pen Coordinate Measuring System. IEEE Access 2021, 9, 76015–76023. [Google Scholar] [CrossRef]
- Tsai, R. A versatile camera calibration technique for high-accuracy 3D machine vision metrology using off-the-shelf TV cameras and lenses. IEEE J. Robot. Autom. 1987, 3, 323–344. [Google Scholar] [CrossRef] [Green Version]
- Heikkila, J. Geometric camera calibration using circular control points. IEEE Trans. Pattern Anal. Mach. Intell. 2000, 22, 1066–1077. [Google Scholar] [CrossRef] [Green Version]
- Svoboda, T.; Martinec, D.; Pajdla, T. A Convenient Multicamera Self-Calibration for Virtual Environments. Presence Teleoperators Virtual Environ. 2005, 14, 407–422. [Google Scholar] [CrossRef]
- Zhengyou, Z. Camera calibration with one-dimensional objects. IEEE Trans. Pattern Anal. Mach. Intell. 2004, 26, 892–899. [Google Scholar] [CrossRef]
- Zhang, Z. A flexible new technique for camera calibration. IEEE Trans. Pattern Anal. Mach. Intell. 2000, 22, 1330–1334. [Google Scholar] [CrossRef] [Green Version]
- Yan, K.; Tian, H.; Liu, E.; Zhao, R.; Hong, Y.; Zuo, D. A Decoupled Calibration Method for Camera Intrinsic Parameters and Distortion Coefficients. Math. Probl. Eng. 2016, 2016, 1392832. [Google Scholar] [CrossRef] [Green Version]
- Koszela, W.; Pawlus, P.; Galda, L. The effect of oil pockets size and distribution on wear in lubricated sliding. Wear 2007, 263, 1585–1592. [Google Scholar] [CrossRef]
- Podulka, P. The Effect of Surface Topography Feature Size Density and Distribution on the Results of a Data Processing and Parameters Calculation with a Comparison of Regular Methods. Materials 2021, 14, 4077. [Google Scholar] [CrossRef]
- Tan, Ö.; Schmid, H.; Seyfried, V. A new evaluation method for interferometric surface topography measurements which is robust against environmental disturbances. CIRP J. Manuf. Sci. Technol. 2021, 33, 234–239. [Google Scholar] [CrossRef]

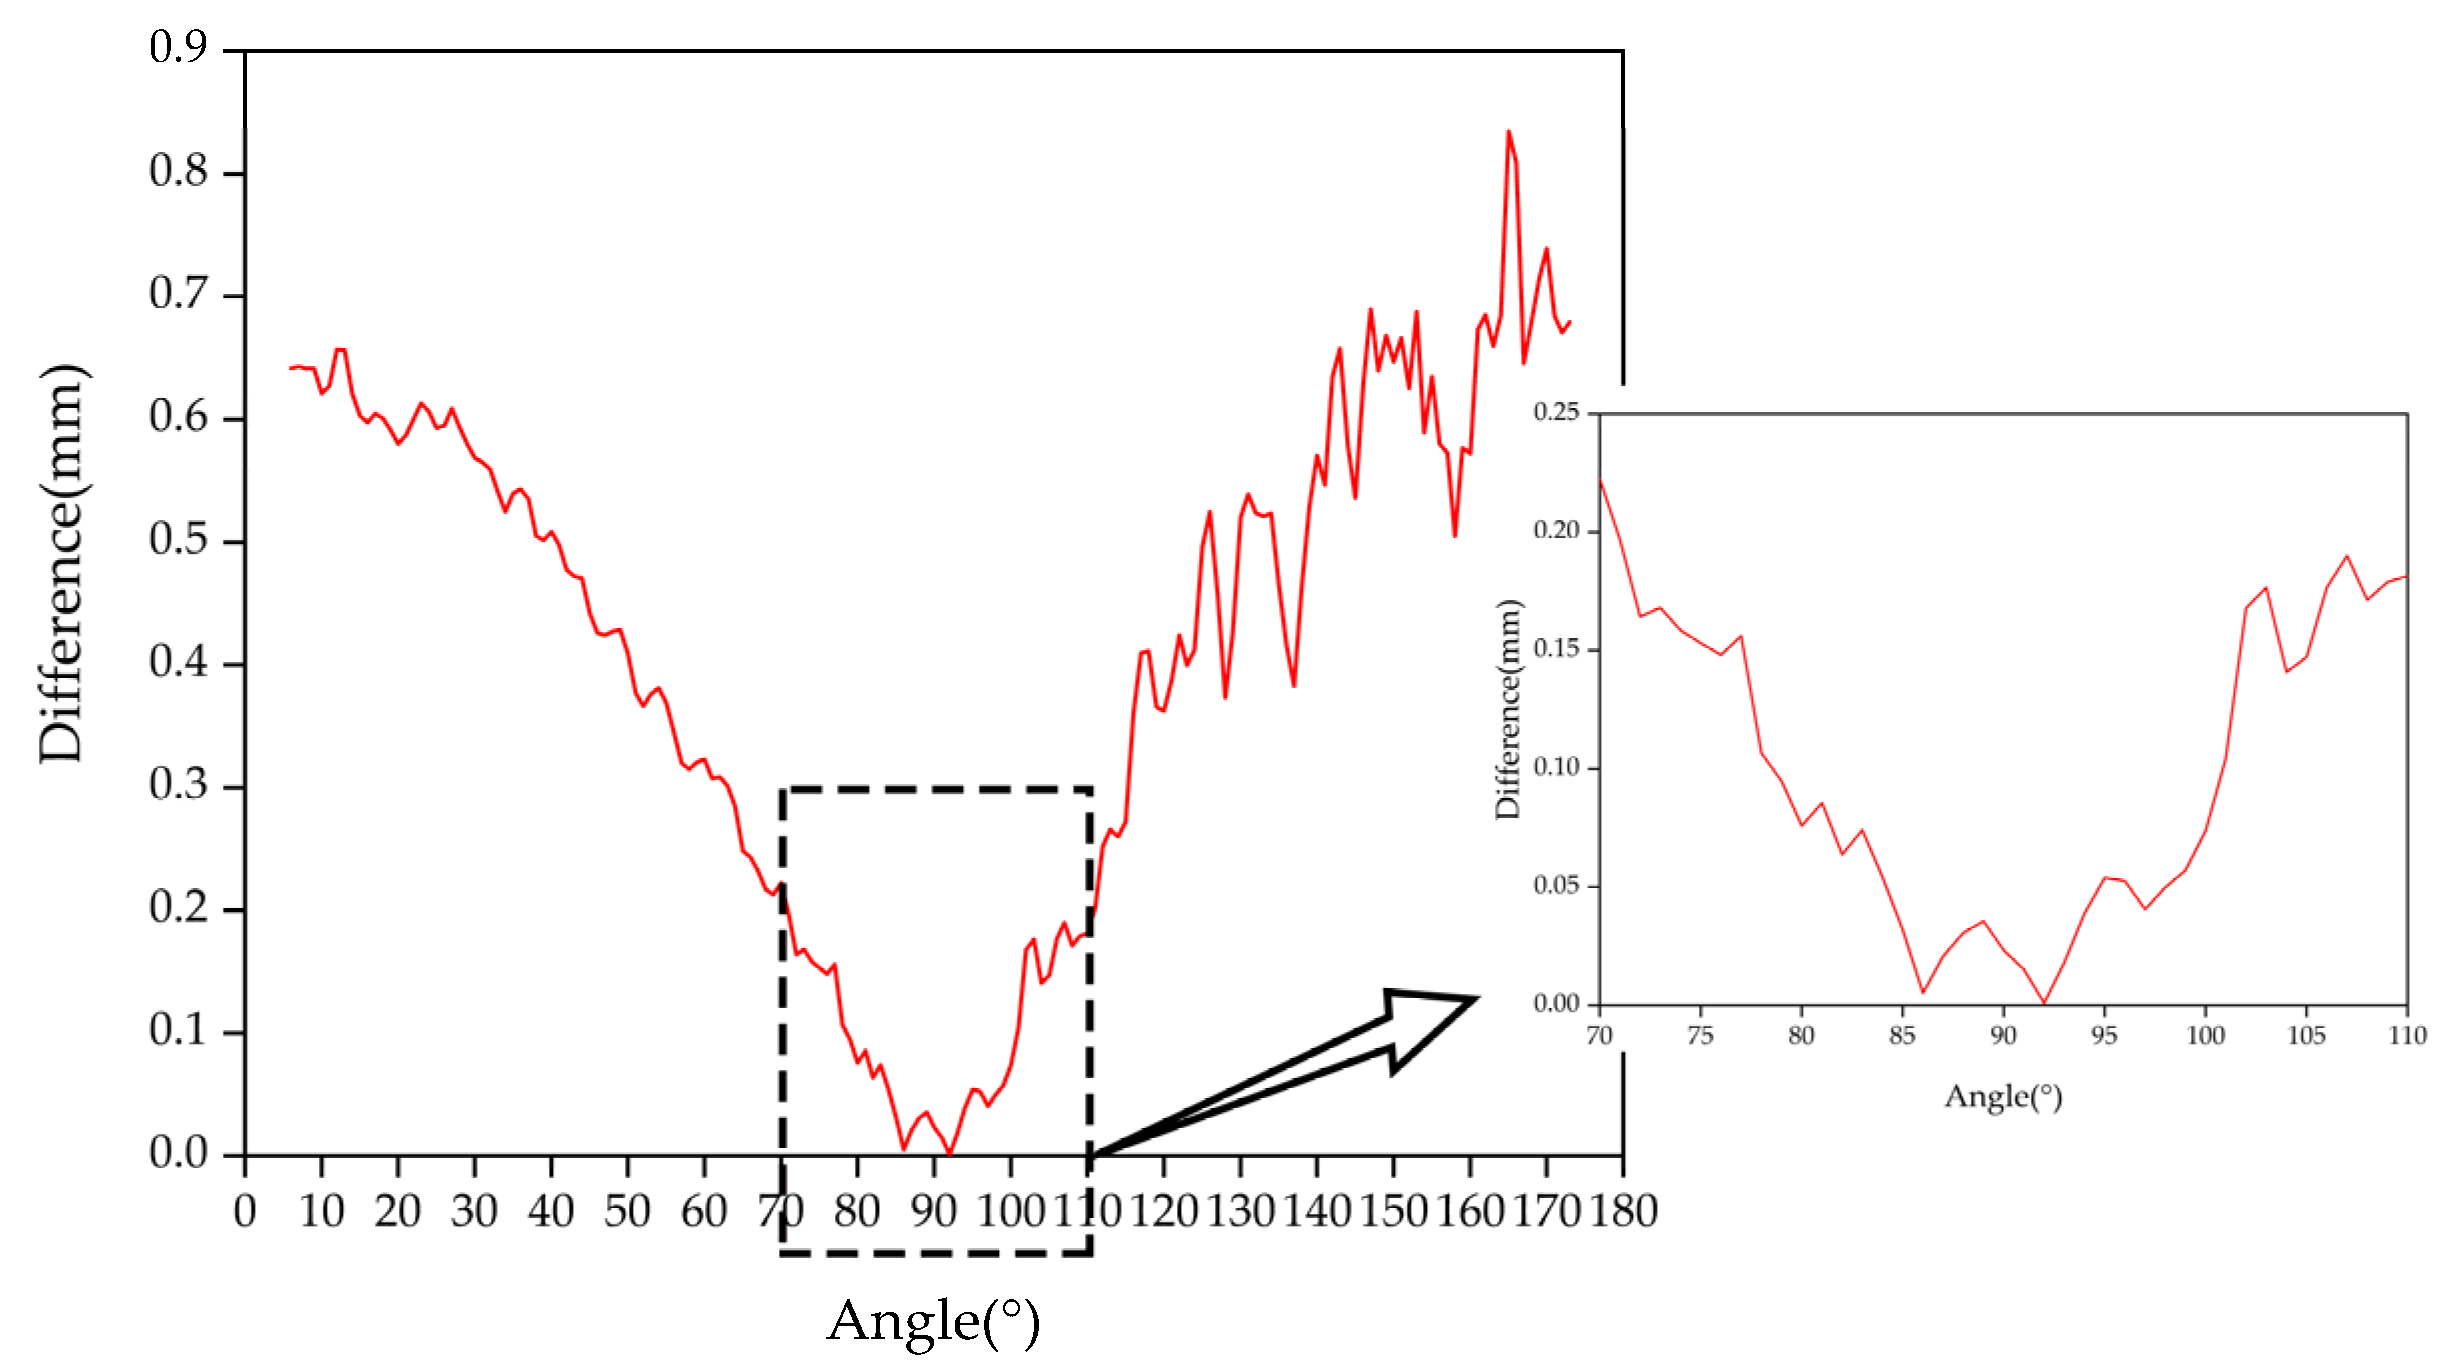
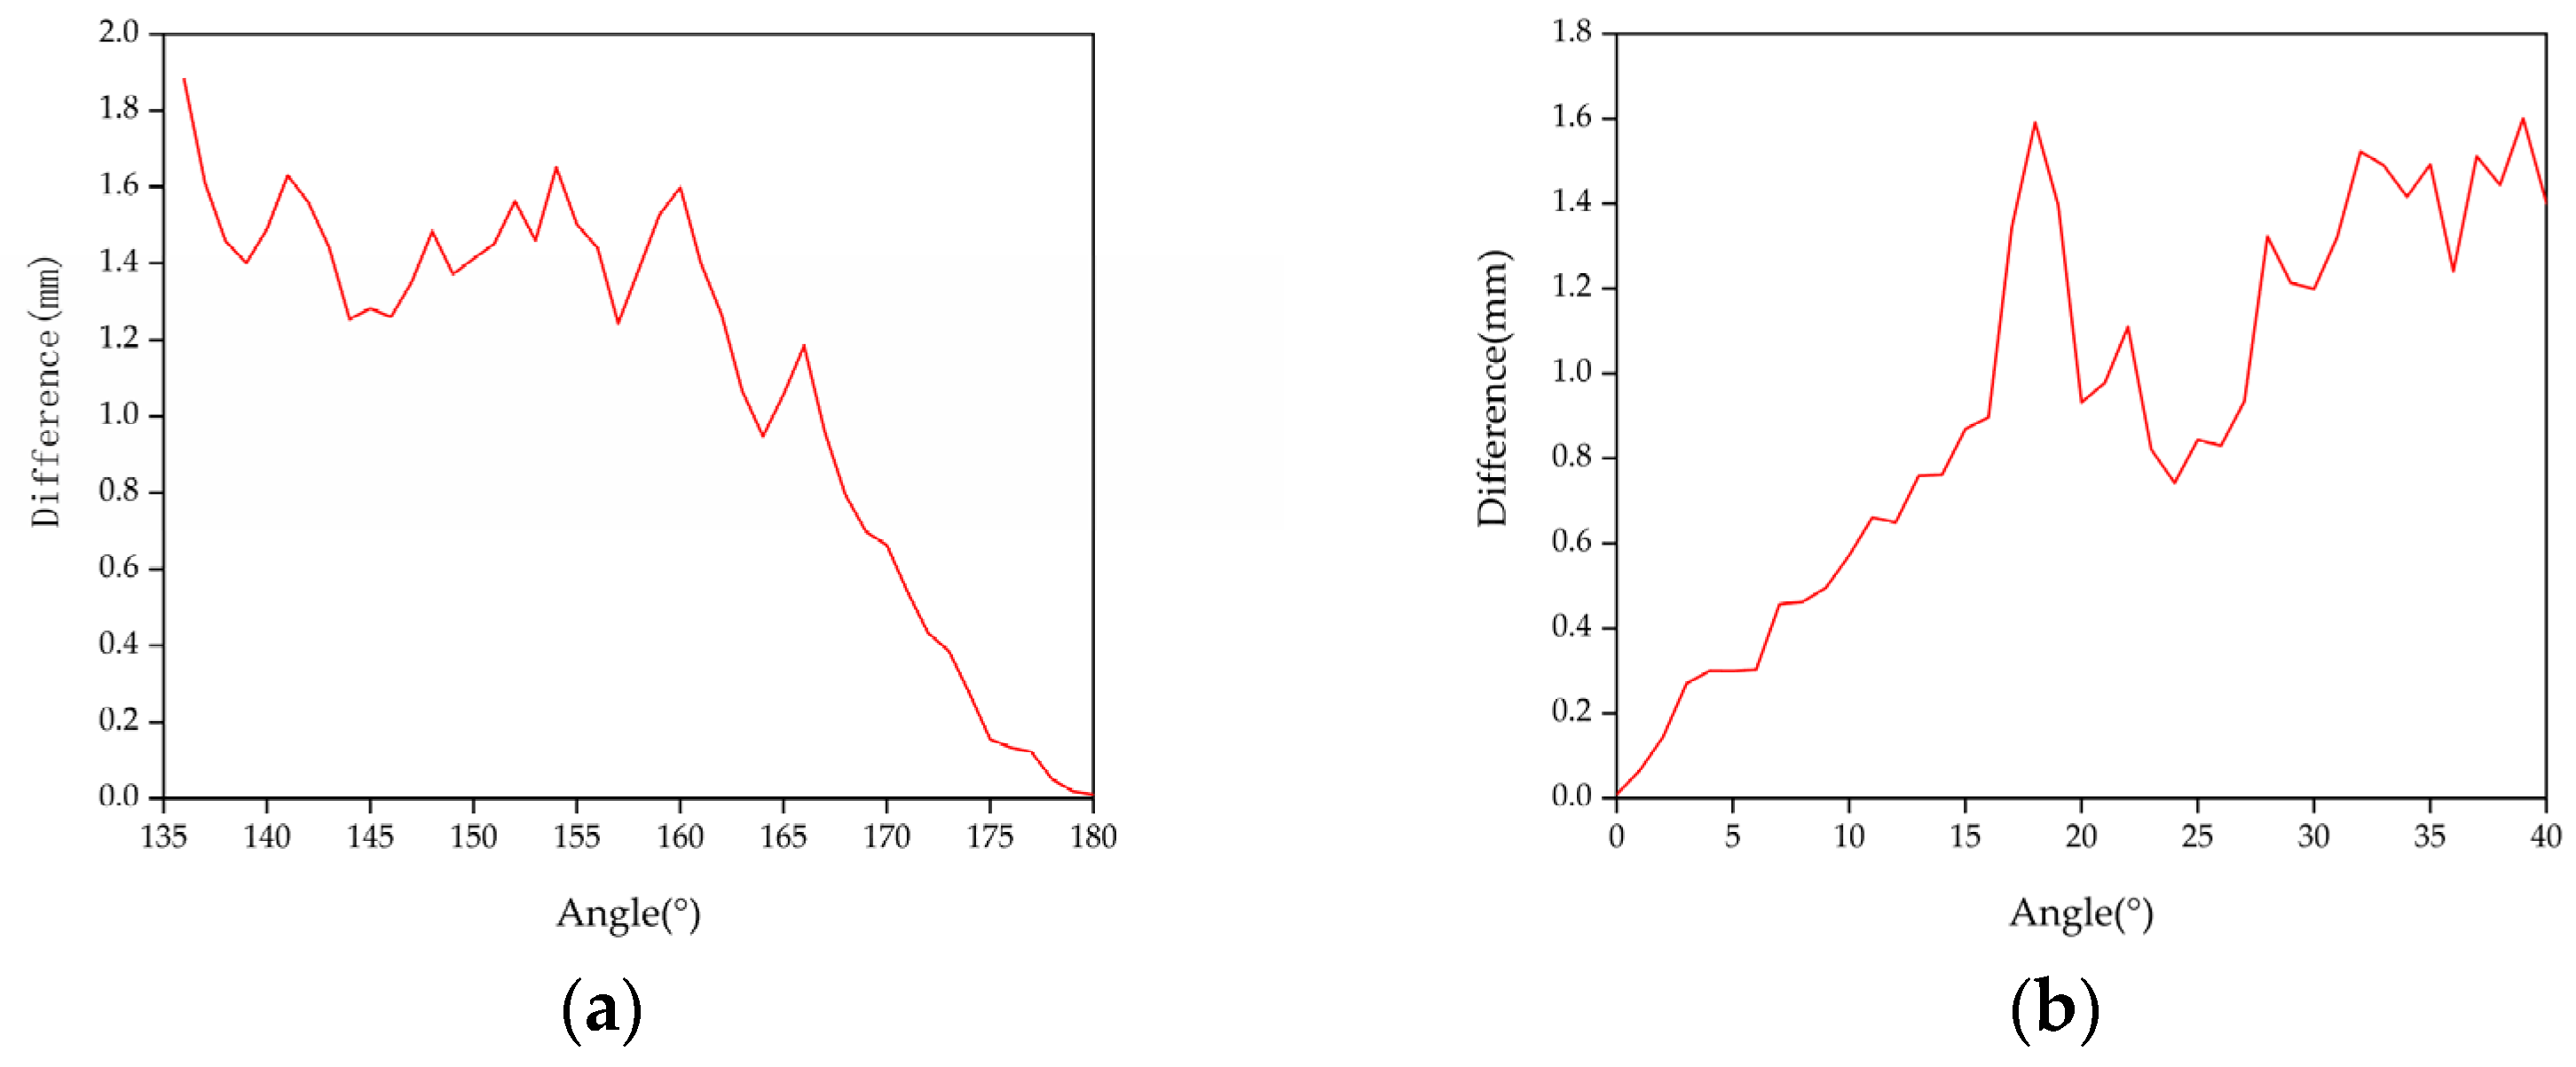
| Stylus Type | A | B | C | D | E |
|---|---|---|---|---|---|
| 1 | 29.989 | 30.331 | 30.272 | 30.242 | 29.923 |
| 2 | 29.870 | 30.305 | 30.248 | 30.214 | 29.853 |
| 3 | 30.083 | 30.294 | 30.254 | 30.244 | 30.058 |
| 4 | 29.733 | 29.865 | 29.828 | 29.820 | 29.750 |
| 5 | 29.905 | 29.792 | 29.770 | 29.794 | 29.939 |
| 6 | 30.135 | 30.058 | 30.051 | 30.080 | 30.127 |
| 7 | 29.994 | 29.773 | 29.764 | 29.801 | 30.018 |
| 8 | 29.877 | 29.560 | 29.561 | 29.609 | 29.869 |
| 9 | 30.187 | 29.892 | 29.900 | 29.956 | 30.209 |
| 10 | 30.036 | 29.948 | 29.931 | 29.958 | 30.046 |
| Average value | 29.981 | 29.982 | 29.958 | 29.972 | 29.979 |
| Absolute error | 0.051 | 0.050 | 0.074 | 0.060 | 0.053 |
| Relative error | 0.17% | 0.17% | 0.25% | 0.20% | 0.18% |
| Test | 1 | 2 | 3 | 4 | 5 | 6 | 7 | 8 | 9 | 10 | AVE | STD | |
|---|---|---|---|---|---|---|---|---|---|---|---|---|---|
| A | u | 78.995 | 78.995 | 79.014 | 79.004 | 78.997 | 78.997 | 78.983 | 79.002 | 78.990 | 78.995 | 78.997 | 0.008 |
| v | 79.967 | 79.975 | 79.965 | 79.968 | 79.961 | 79.964 | 79.982 | 79.956 | 79.979 | 79.980 | 79.970 | 0.009 | |
| w | 790.029 | 789.994 | 790.040 | 790.026 | 790.047 | 790.030 | 789.965 | 790.083 | 789.986 | 789.948 | 790.015 | 0.041 | |
| B | u | 79.061 | 79.074 | 79.054 | 79.066 | 79.068 | 79.071 | 79.056 | 79.064 | 79.068 | 79.047 | 79.063 | 0.008 |
| v | 80.262 | 80.250 | 80.275 | 80.247 | 80.261 | 80.243 | 80.268 | 80.260 | 80.271 | 80.269 | 80.261 | 0.011 | |
| w | 790.209 | 790.262 | 790.205 | 790.261 | 790.220 | 790.271 | 790.236 | 790.277 | 790.216 | 790.219 | 790.238 | 0.028 | |
| C | u | 79.094 | 79.096 | 79.090 | 79.094 | 79.103 | 79.094 | 79.093 | 79.102 | 79.096 | 79.097 | 79.096 | 0.004 |
| v | 80.626 | 80.604 | 80.619 | 80.634 | 80.616 | 80.625 | 80.627 | 80.611 | 80.628 | 80.609 | 80.620 | 0.01 | |
| w | 790.286 | 790.298 | 790.263 | 790.222 | 790.283 | 790.235 | 790.231 | 790.302 | 790.250 | 790.289 | 790.266 | 0.03 | |
| D | u | 78.907 | 78.900 | 78.897 | 78.900 | 78.906 | 78.909 | 78.899 | 78.887 | 78.899 | 78.906 | 78.901 | 0.006 |
| v | 79.347 | 79.352 | 79.352 | 79.348 | 79.340 | 79.340 | 79.345 | 79.357 | 79.349 | 79.342 | 79.347 | 0.005 | |
| w | 789.472 | 789.444 | 789.425 | 789.474 | 789.508 | 789.518 | 789.481 | 789.404 | 789.467 | 789.509 | 789.470 | 0.037 | |
| E | u | 79.155 | 79.166 | 79.166 | 79.159 | 79.178 | 79.167 | 79.175 | 79.167 | 79.164 | 79.169 | 79.167 | 0.007 |
| v | 80.843 | 80.869 | 80.860 | 80.845 | 80.861 | 80.859 | 80.856 | 80.860 | 80.868 | 80.883 | 80.860 | 0.012 | |
| w | 790.859 | 790.855 | 790.882 | 790.908 | 790.881 | 790.845 | 790.909 | 790.907 | 790.864 | 790.843 | 790.875 | 0.026 |
Publisher’s Note: MDPI stays neutral with regard to jurisdictional claims in published maps and institutional affiliations. |
© 2022 by the authors. Licensee MDPI, Basel, Switzerland. This article is an open access article distributed under the terms and conditions of the Creative Commons Attribution (CC BY) license (https://creativecommons.org/licenses/by/4.0/).
Share and Cite
Shan, D.; Zhang, C.; Zhang, P.; Wang, X.; He, D.; Xu, Y.; Zhou, M.; Yu, G. Self-Calibration Method and Pose Domain Determination of a Light-Pen in a 3D Vision Coordinate Measurement System. Sensors 2022, 22, 1029. https://doi.org/10.3390/s22031029
Shan D, Zhang C, Zhang P, Wang X, He D, Xu Y, Zhou M, Yu G. Self-Calibration Method and Pose Domain Determination of a Light-Pen in a 3D Vision Coordinate Measurement System. Sensors. 2022; 22(3):1029. https://doi.org/10.3390/s22031029
Chicago/Turabian StyleShan, Dongri, Chenglong Zhang, Peng Zhang, Xiaofang Wang, Dongmei He, Yalu Xu, Maohui Zhou, and Guoqi Yu. 2022. "Self-Calibration Method and Pose Domain Determination of a Light-Pen in a 3D Vision Coordinate Measurement System" Sensors 22, no. 3: 1029. https://doi.org/10.3390/s22031029
APA StyleShan, D., Zhang, C., Zhang, P., Wang, X., He, D., Xu, Y., Zhou, M., & Yu, G. (2022). Self-Calibration Method and Pose Domain Determination of a Light-Pen in a 3D Vision Coordinate Measurement System. Sensors, 22(3), 1029. https://doi.org/10.3390/s22031029


