
Non-Intrusive Contact Respiratory Sensor for Vehicles

 , ,
, ,  and
and
Abstract
:1. Introduction
2. Analysis
2.1. Respiration Rate Monitoring Methods
2.2. Sensor Selection
2.3. Signal Processing and Data Acquisition
3. Conception and Implementation
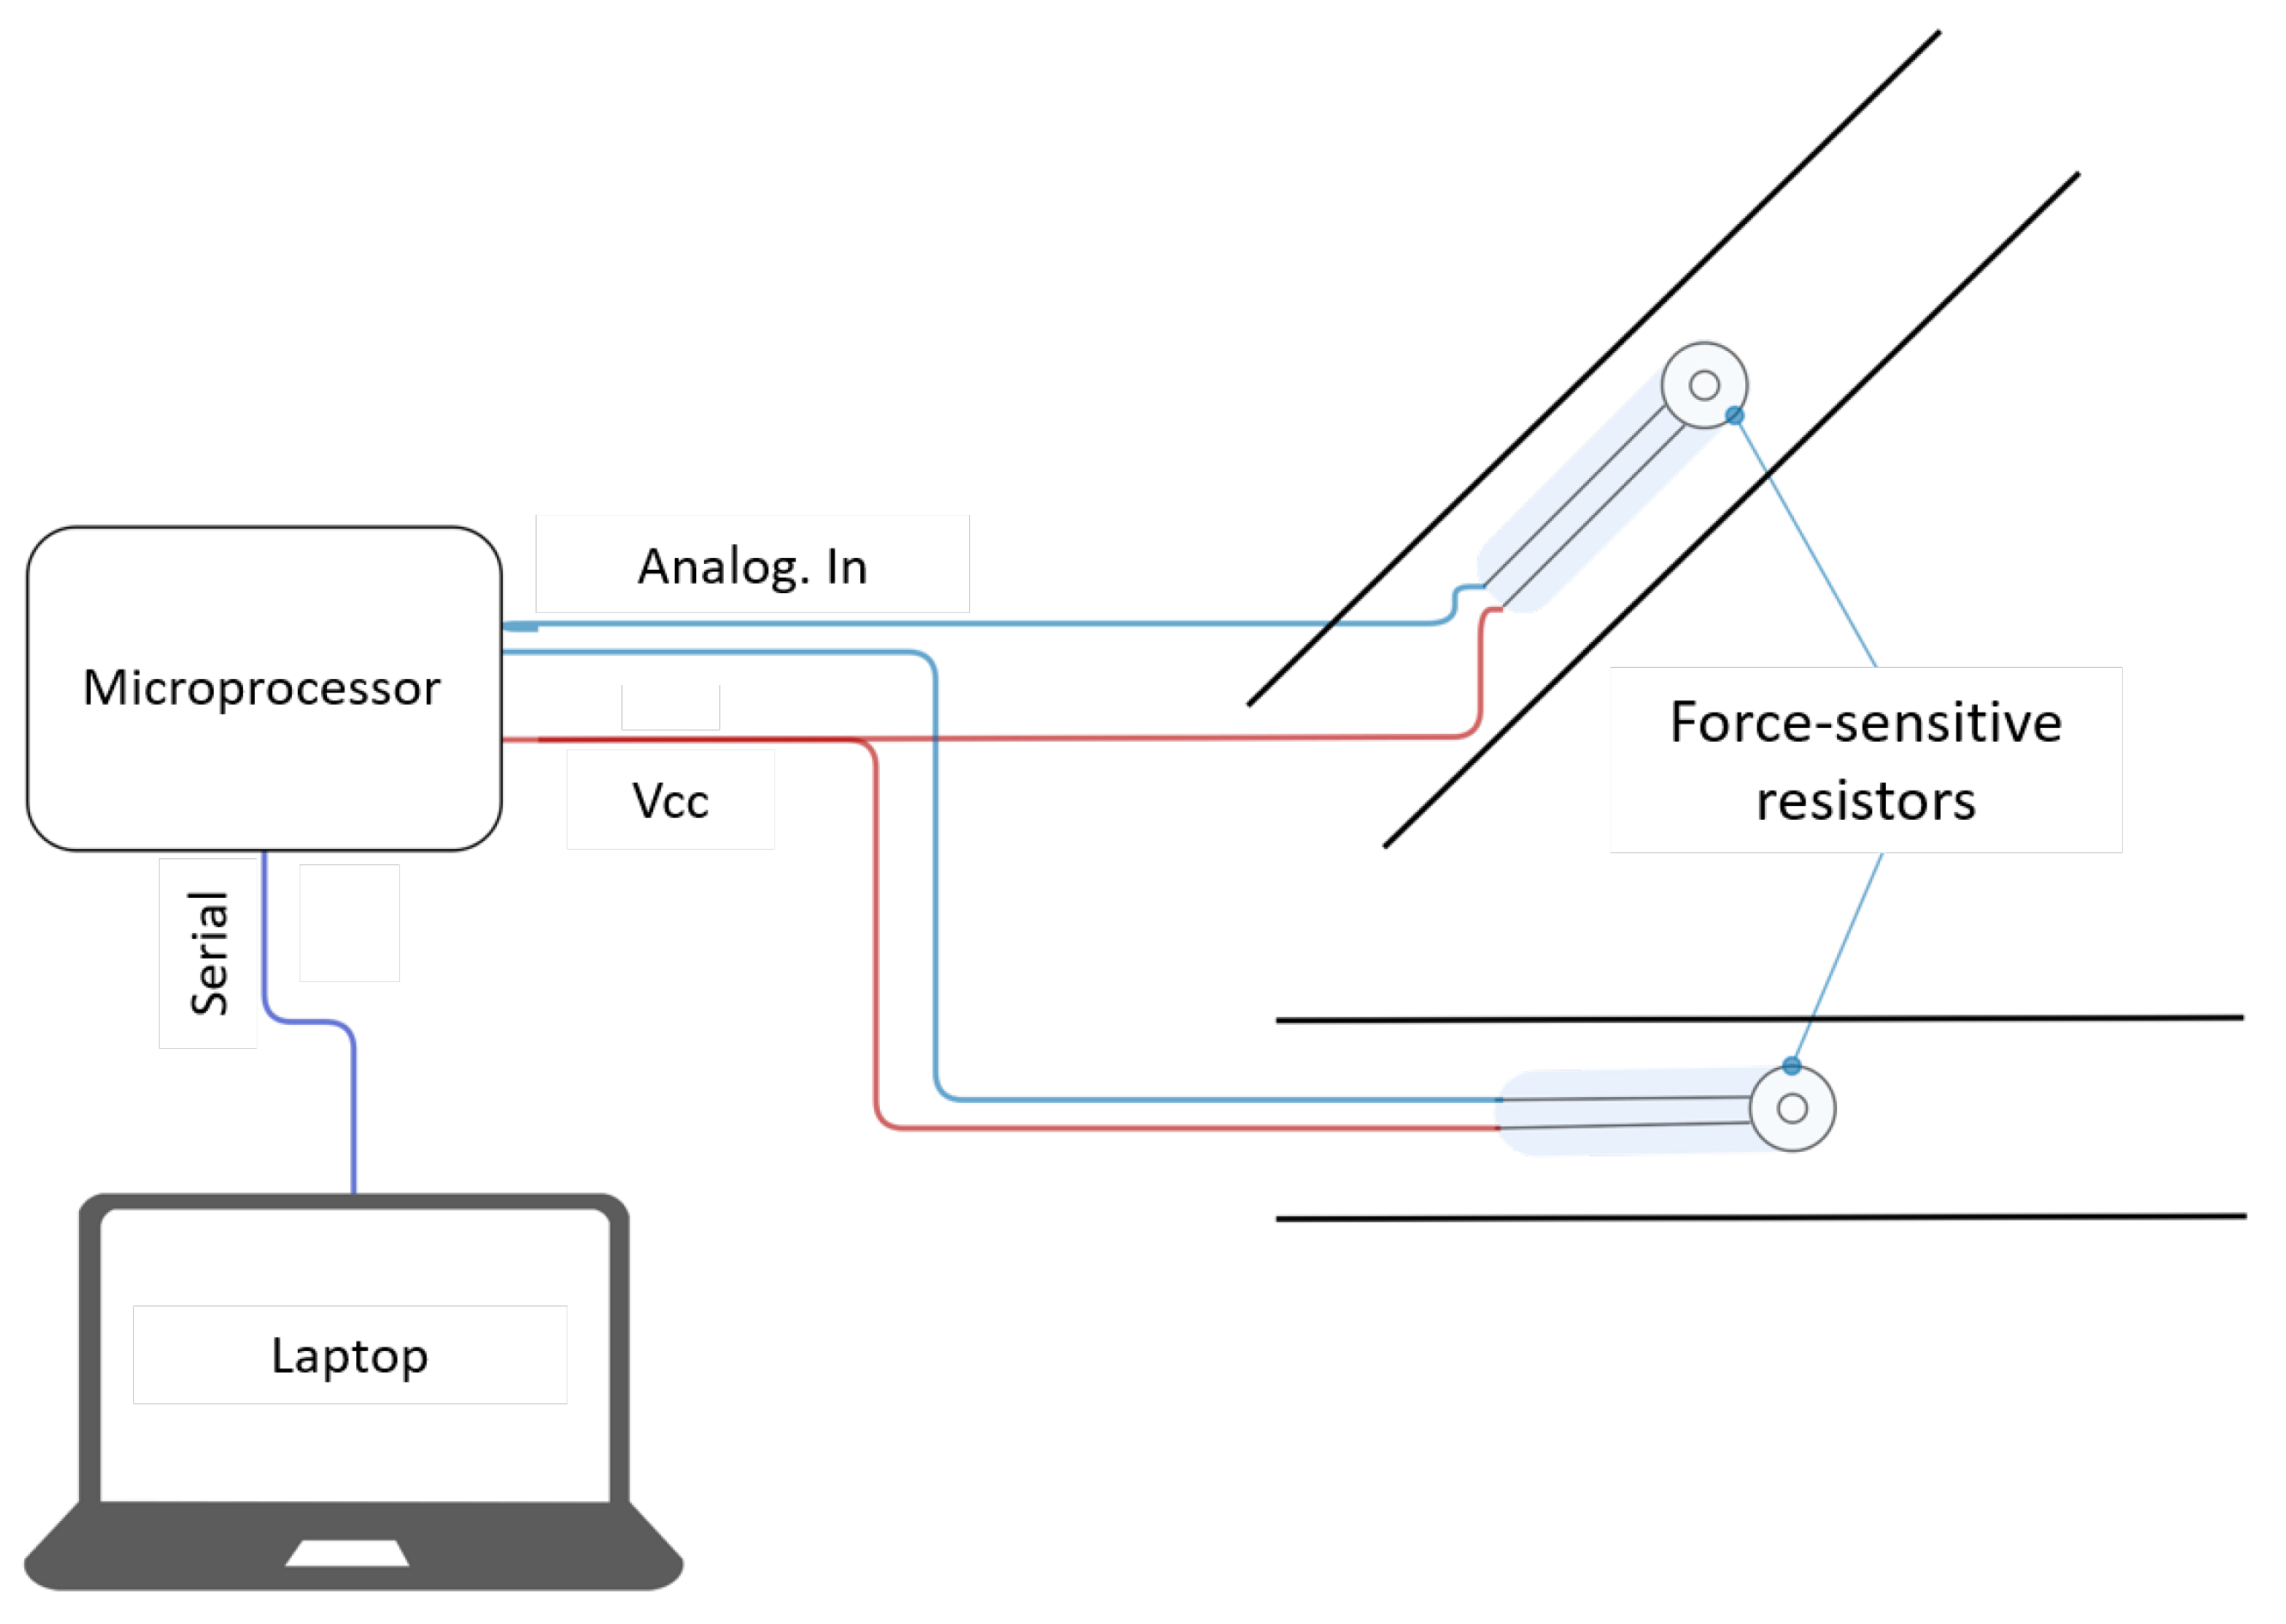
3.1. System Architecture
3.2. Sensor Housing Design
3.3. Electrical Circuitry
3.4. Data Acquisition, Signal Processing and Data Transmission
3.5. Data Reception, Visualization and Storage
3.6. Routine for the Calculation of Respiratory Rate Variability Indicators
4. Results
4.1. Experimental Procedure
4.2. Evaluation
4.2.1. Session 1
4.2.2. Session 2
4.2.3. Session 3
5. Discussion
6. Conclusions
Author Contributions
Funding
Institutional Review Board Statement
Informed Consent Statement
Data Availability Statement
Acknowledgments
Conflicts of Interest
Abbreviations
| ADC | Analog-to-digital converter |
| bpm | breaths per minute |
| CAD | Computer-Aided Design |
| ECG | Electrocardiogram |
| FSR | force sensitive resistor |
| Hz | Hertz |
| MAE | Mean Absolute Error |
| RFID | Radio Frequency IDentification |
| SAE | Society of Automotive Engineers |
References
- International, S. Taxonomy and Definitions for Terms Related to Driving Automation Systems for On-Road Motor Vehicles. 2018. Available online: https://www.sae.org/standards/content/j3016_201806/ (accessed on 7 January 2022).
- de Salis, E.; Capallera, M.; Meteier, Q.; Angelini, L.; Khaled, O.A.; Mugellini, E.; Widmer, M.; Carrino, S. Designing an AI-Companion to Support the Driver in Highly Autonomous Cars. HCI. 2020. Available online: https://link.springer.com/chapter/10.1007/978-3-030-49062-1_23 (accessed on 7 January 2022).
- Rosario, H.D.; Solaz, J.S.; Rodriguez, N.; Bergasa, L.M. Controlled inducement and measurement of drowsiness in a driving simulator. IET Intell. Transp. Syst. 2010, 4, 280–288. [Google Scholar] [CrossRef]
- Awais, M.; Badruddin, N.; Drieberg, M. A Hybrid Approach to Detect Driver Drowsiness Utilizing Physiological Signals to Improve System Performance and Wearability. Sensors 2017, 17, 1991. [Google Scholar] [CrossRef] [PubMed] [Green Version]
- Patel, M.; Lal, S.K.L.; Kavanagh, D.; Rossiter, P. Applying neural network analysis on heart rate variability data to assess driver fatigue. Expert Syst. Appl. 2011, 38, 7235–7242. [Google Scholar] [CrossRef]
- Lee, H.; Lee, J.; Shin, M. Using Wearable ECG/PPG Sensors for Driver Drowsiness Detection Based on Distinguishable Pattern of Recurrence Plots. Electronics 2019, 8, 192. [Google Scholar] [CrossRef] [Green Version]
- Rigas, G.; Goletsis, Y.; Bougia, P.; Fotiadis, D.I. Towards Driver’s State Recognition on Real Driving Conditions. Int. J. Veh. Technol. 2011, 2011, e617210. [Google Scholar] [CrossRef] [Green Version]
- Darzi, A.; Gaweesh, S.M.; Ahmed, M.M.; Novak, D. Identifying the Causes of Drivers’ Hazardous States Using Driver Characteristics, Vehicle Kinematics, and Physiological Measurements. Front. Neurosci. 2018, 12, 568. [Google Scholar] [CrossRef]
- Hogervorst, M.A.; Brouwer, A.M.; van Erp, J.B.F. Combining and comparing EEG, peripheral physiology and eye-related measures for the assessment of mental workload. Front. Neurosci. 2014, 8. [Google Scholar] [CrossRef]
- Mehler, B.; Reimer, B.; Coughlin, J.; Dusek, J. The Impact of Incremental Increases in Cognitive Workload on Physiological Arousal and Performance in Young Adult Drivers. Transp. Res. Rec. J. Transp. Res. Board 2009, 2138, 6–12. [Google Scholar] [CrossRef]
- Mehler, B.; Reimer, B.; Coughlin, J. Sensitivity of Physiological Measures for Detecting Systematic Variations in Cognitive Demand From a Working Memory Task. Hum. Factors J. Hum. Factors Ergon. Soc. 2012, 54, 396–412. [Google Scholar] [CrossRef]
- Meteier, Q.; Capallera, M.; Ruffieux, S.; Angelini, L.; Abou Khaled, O.; Mugellini, E.; Widmer, M.; Sonderegger, A. Classification of Drivers’ Workload Using Physiological Signals in Conditional Automation. Front. Psychol. 2021, 12, 268. [Google Scholar] [CrossRef]
- Son, J.; Oh, H.; Park, M. Identification of driver cognitive workload using support vector machines with driving performance, physiology and eye movement in a driving simulator. Int. J. Precis. Eng. Manuf. 2013, 14, 1321–1327. [Google Scholar] [CrossRef]
- Healey, J.; Picard, R. Detecting Stress During Real-World Driving Tasks Using Physiological Sensors. IEEE Trans. Intell. Transp. Syst. 2005, 6, 156–166. [Google Scholar] [CrossRef] [Green Version]
- Bakker, J.; Pechenizkiy, M.; Sidorova, N. What’s Your Current Stress Level? Detection of Stress Patterns from GSR Sensor Data. In Proceedings of the 2011 IEEE 11th International Conference on Data Mining Workshops, Vancouver, BC, Canada, 11 December 2011; pp. 573–580. [Google Scholar] [CrossRef]
- Chen, L.l.; Zhao, Y.; Ye, P.F.; Zhang, J.; Zou, J.Z. Detecting driving stress in physiological signals based on multimodal feature analysis and kernel classifiers. Expert Syst. Appl. 2017, 85, 279–291. [Google Scholar] [CrossRef]
- Wang, J.S.; Lin, C.W.; Yang, Y.T.C. A k-nearest-neighbor classifier with heart rate variability feature-based transformation algorithm for driving stress recognition. Neurocomputing 2013, 116, 136–143. [Google Scholar] [CrossRef]
- Kiashari, S.E.H.; Nahvi, A.; Bakhoda, H.; Homayounfard, A.; Tashakori, M. Evaluation of driver drowsiness using respiration analysis by thermal imaging on a driving simulator. Multimed. Tools Appl. 2020, 79, 17793–17815. [Google Scholar] [CrossRef]
- Leicht, L.; Vetter, P.; Leonhardt, S.; Teichmann, D. The PhysioBelt: A safety belt integrated sensor system for heart activity and respiration. In Proceedings of the 2017 IEEE International Conference on Vehicular Electronics and Safety (ICVES), Vienna, Austria, 27–28 June 2017; pp. 191–195. [Google Scholar]
- Park, J.; Kim, J.; Lee, J.C. Real Time Driver’s Respiration Monitoring. J. Sens. Sci. Technol. 2014, 23, 142–147. [Google Scholar] [CrossRef] [Green Version]
- Chu, M.; Nguyen, T.; Pandey, V.; Zhou, Y.; Pham, H.N.; Bar-Yoseph, R.; Radom-Aizik, S.; Jain, R.; Cooper, D.M.; Khine, M. Respiration rate and volume measurements using wearable strain sensors. NPJ Digit. Med. 2019, 2, 8. [Google Scholar] [CrossRef]
- Tan, K.S.; Saatchi, R.; Elphick, H.; Burke, D. Real-time vision based respiration monitoring system. In Proceedings of the 2010 7th International Symposium on Communication Systems, Networks Digital Signal Processing (CSNDSP 2010), Newcastle Upon Tyne, UK, 21–23 July 2010; pp. 770–774. [Google Scholar] [CrossRef]
- Yang, C.; Wang, X.; Mao, S. Respiration Monitoring with RFID in Driving Environments. IEEE J. Sel. Areas Commun. 2021, 39, 500–512. [Google Scholar] [CrossRef]
- AL-Khalidi, F.Q.; Saatchi, R.; Burke, D.; Elphick, H.; Tan, S. Respiration rate monitoring methods: A review. Pediatr. Pulmonol. 2011, 46, 523–529. [Google Scholar] [CrossRef] [Green Version]
- Canu, A.; Canu, M.; Marinkovic, S.; Faul, S.; Popovici, E. Respiration rate calculation using low power DSP processor and SpO2 sensor. In Proceedings of the 2011 IEEE International Symposium on Medical Measurements and Applications, Bari, Italy, 30–31 May 2011; pp. 517–520. [Google Scholar]
- Varon, C.; Morales, J.F.; Lázaro, J.; Orini, M.; Deviaene, M.; Kontaxis, S.; Testelmans, D.; Buyse, B.; Borzée, P.; Sörnmo, L.; et al. A Comparative Study of ECG-derived Respiration in Ambulatory Monitoring using the Single-lead ECG. Sci. Rep. 2020, 10. [Google Scholar] [CrossRef]
- Yang, F.; He, Z.; Guo, S.; Fu, Y.; Li, L.; Lu, J.; Jiang, K. Non-Contact Driver Respiration Rate Detection Technology Based on Suppression of Multipath Interference with Directional Antenna. Information 2020, 11, 192. [Google Scholar] [CrossRef] [Green Version]
- Wang, T.; Zhang, D.; Zheng, Y.; Gu, T.; Zhou, X.; Dorizzi, B. C-FMCW Based Contactless Respiration Detection Using Acoustic Signal. Proc. ACM Interact. Mob. Wearable Ubiquitous Technol. 2017, 1, 1–20. [Google Scholar] [CrossRef]
- Paredes-Madrid, L.; Matute, A.; Cruz-Pacheco, A.F.; Vargas, C.A.P.; Veláquez, E.I.G. Experimental characterization, modeling and compensation of hysteresis in force sensing resistors. Dyna 2018, 85, 191–198. [Google Scholar] [CrossRef]
- Andreozzi, E.; Gargiulo, G.D.; Esposito, D.; Bifulco, P. A Novel Broadband Forcecardiography Sensor for Simultaneous Monitoring of Respiration, Infrasonic Cardiac Vibrations and Heart Sounds. Front. Physiol. 2021, 12, 725716. [Google Scholar] [CrossRef] [PubMed]
- Makowski, D.; Pham, T.; Lau, Z.J.; Brammer, J.C.; Lespinasse, F.; Pham, H.; Schölzel, C.; Chen, S.H.A. NeuroKit2: A Python toolbox for neurophysiological signal processing. Behav. Res. Methods 2021. [Google Scholar] [CrossRef]


| Criteria | Weight | Tekscan A-201 | Ohmite FSR03CE | Interlink FSR400 | |||
|---|---|---|---|---|---|---|---|
| Factor | Score | Factor | Score | Factor | Score | ||
| Reliability | 30 | 4 | 120 | 3 | 90 | 3 | 90 |
| Sensitivity | 40 | 5 | 200 | 3 | 120 | 3 | 120 |
| Surface area | 10 | 3 | 30 | 5 | 50 | 4 | 40 |
| Stability | 20 | 3 | 60 | 4 | 80 | 4 | 80 |
| Total | 410 | 340 | 330 | ||||
| Object | Property | Measure | Role | Priority |
|---|---|---|---|---|
| Architecture | n-bit microprocessor | >=32-bit | W | 5 |
| ADC Resolution | Bit depth | >10-bit | R | 15 |
| Processing power | Clock speed | >=16 MHz | R | 10 |
| Input pinout | # analog pins | >=3 | M | 10 |
| Board size | Board surface area | <Arduino | O | 5 |
| Price | Euros | <50 | R | 5 |
| Support | Documentation | Y/N | M | 10 |
| Program memory | Flash memory size | >32 KB | W | 5 |
| CP | CP support | Y/N | W | 10 |
| Wifi + Bluetooth | Integrated | Y/N | W | 10 |
| Hardware connectivity | Jumper/soldering pins | Jumper | W | 5 |
| Criteria | Weight | Arduino Uno | Teensy 3.2 | Metro M4 | Raspberry Pi | ||||
|---|---|---|---|---|---|---|---|---|---|
| F | Score | F | Score | F | Score | F | Score | ||
| Architecture | 5 | 2 | 10 | 5 | 25 | 5 | 25 | 5 | 25 |
| ADC Resolution | 15 | 3 | 45 | 5 | 75 | 4 | 60 | 0 | 0 |
| Processing power | 10 | 2 | 20 | 3 | 30 | 4 | 40 | 5 | 50 |
| Input pinout | 10 | 5 | 50 | 5 | 50 | 5 | 50 | 5 | 50 |
| Board size | 5 | 3 | 15 | 5 | 25 | 3 | 15 | 3 | 15 |
| Price | 10 | 5 | 50 | 4 | 40 | 3 | 30 | 3 | 30 |
| Support | 10 | 5 | 50 | 2 | 20 | 4 | 40 | 5 | 50 |
| Program memory | 5 | 2 | 10 | 3 | 15 | 4 | 20 | 5 | 25 |
| Circuit Python | 10 | 0 | 0 | 0 | 0 | 5 | 5 | 5 | 50 |
| Wifi + Bluetooth | 10 | 0 | 0 | 0 | 0 | 5 | 50 | 5 | 50 |
| Hardware | 5 | 4 | 20 | 0 | 0 | 4 | 20 | 5 | 25 |
| Total | 270 | 280 | 400 | 370 | |||||
| Period | Abdomen | Chest | Sensor Fusion | Sensor Fusion Scaled |
|---|---|---|---|---|
| Baseline | 1.61 | 0.32 | 0.51 | 0.52 |
| Deep breathing | 2.24 | 1.25 | 1.21 | 1.21 |
| Manual driving | 3.56 | 1.25 | 2.08 | 2.39 |
| Automated driving | 2.98 | 0.87 | 1.30 | 1.21 |
| Average | 2.60 | 0.92 | 1.28 | 1.33 |
| Period | Sensor 1 | Sensor 2 | Sensor Fusion | Sensor Fusion Scaled |
|---|---|---|---|---|
| Baseline | 1.91 | 2.57 | 1.24 | 1.48 |
| Deep breathing | 1.64 | 0.72 | 1.24 | 1.40 |
| Manual driving | 1.40 | 2.54 | 2.34 | 3.26 |
| Automated driving | 0.48 | 4.10 | 0.95 | 0.67 |
| Average | 1.36 | 2.48 | 1.44 | 1.70 |
Publisher’s Note: MDPI stays neutral with regard to jurisdictional claims in published maps and institutional affiliations. |
© 2022 by the authors. Licensee MDPI, Basel, Switzerland. This article is an open access article distributed under the terms and conditions of the Creative Commons Attribution (CC BY) license (https://creativecommons.org/licenses/by/4.0/).
Share and Cite
Meteier, Q.; Kindt, M.; Angelini, L.; Abou Khaled, O.; Mugellini, E. Non-Intrusive Contact Respiratory Sensor for Vehicles. Sensors 2022, 22, 880. https://doi.org/10.3390/s22030880
Meteier Q, Kindt M, Angelini L, Abou Khaled O, Mugellini E. Non-Intrusive Contact Respiratory Sensor for Vehicles. Sensors. 2022; 22(3):880. https://doi.org/10.3390/s22030880
Chicago/Turabian StyleMeteier, Quentin, Michiel Kindt, Leonardo Angelini, Omar Abou Khaled, and Elena Mugellini. 2022. "Non-Intrusive Contact Respiratory Sensor for Vehicles" Sensors 22, no. 3: 880. https://doi.org/10.3390/s22030880
APA StyleMeteier, Q., Kindt, M., Angelini, L., Abou Khaled, O., & Mugellini, E. (2022). Non-Intrusive Contact Respiratory Sensor for Vehicles. Sensors, 22(3), 880. https://doi.org/10.3390/s22030880