Article

Study on Microstructure and Properties of NM500/Q345 Clad Plates at Different Austenitization Temperatures

1
Engineering Research Center Heavy Machinery Ministry of Education, Taiyuan University of Science and Technology, Taiyuan 030024, China
2
Shanxi Provincial Key Laboratory of Metallurgical Device Design Theory and Technology, Taiyuan University of Science and Technology, Taiyuan 030024, China
*
Author to whom correspondence should be addressed.
Crystals 2022, 12(10), 1395; https://doi.org/10.3390/cryst12101395
Submission received: 2 September 2022 / Revised: 28 September 2022 / Accepted: 28 September 2022 / Published: 1 October 2022
(This article belongs to the Special Issue Dynamic Behavior of Materials)

Abstract

:
In this paper, the change in the mechanical properties of a composite plate was studied using the heat treatment method, and it was found that the performance of the composite plate was greatly improved under the process of quenching at 900 °C and tempering at 200 °C. The hot-rolled NM500/Q345 clad plates were subjected to heat treatment tests of 860 °C, 900 °C, and 940 °C austenitization + 200 tempering. With the help of an optical microscope, scanning electron microscope, EBSD, and transmission electron microscope, the microstructure, interface element distribution, and defect composition at the composite bonding interface of hot rolling and heat treatment were analyzed. An analysis and friction and wear tests were carried out on the wear resistance of the clad NM500. It was found that the microstructure of the NM500/Q345 clad plate before austenitization was mainly pearlite and ferrite, and both were transformed into lath martensite after austenitization. As the austenitization temperature increased, the size of the martensitic lath bundle also became coarse. After austenitization at 900 °C and tempering at 200 °C, the lath-like martensite structure of NM500 contained high-density dislocations between the laths. With the increase in the austenitization temperature, the surface Rockwell hardness showed a trend of first increasing and then decreasing. The wear was the worst when the material was not quenched. When the clad plate was quenched at 900 °C and tempered at 200 °C, the wear of NM500 was the lightest; the maximum depth of the wear scar was 14 μm; the width was the narrowest, 0.73 mm; and the wear volume was the smallest, 0.0305 mm3.

1. Introduction

With the advancement of science and technology, the operation speed of mechanical equipment has accelerated, and the requirements for the wear resistance of parts have also became increasingly higher. When a piece of equipment and its components are severely worn, not only may it greatly reduce its production efficiency, but it may also cause a huge waste of funds and materials. Serious wear and tear may directly lead to serious casualties and cause disastrous consequences [1,2,3].
Wear-resistant cast iron steel, high-manganese steel, and low-alloy wear-resistant steel, as traditional wear-resistant materials, all have good wear resistance, and they can withstand a large external force impact and high stress at the same time, making them suitable for bad conditions. Manufacturing components made from these materials can significantly increase the life of machinery and equipment. High-manganese steel can produce work hardening under the working conditions of high-impact load, but under low-impact conditions, the work hardening ability of high-manganese steel cannot be fully exerted [4,5,6]. NM500 is the most commonly used material in low-alloy, high-strength, wear-resistant steel. It has the characteristics of high strength, good toughness, a simple production process, a low production cost, and strong weldability and machinability, and it is widely used in the fields of construction machinery, mining, and metallurgy [7,8,9,10].
Traditional wear-resistant steel adds more alloying elements, which greatly increases the production cost. Q345 steel is a low-alloy steel (C < 0.2%) with good comprehensive properties, and good plasticity and weldability, and it is widely used in buildings, bridges, vehicles, ships, pressure vessels, etc. NM500 is a high-strength, wear-resistant steel plate commonly used in critical wear-resistant contact surfaces for friction and impact. Therefore, the relatively cheap Q345 is used as the base layer, and the low-alloy steel NM500 is used as the cladding layer to prepare high-strength, wear-resistant clad plates by vacuum hot rolling. Wear-resistant steel clad plates make full use of the performance advantages of the base cladding metal, make up for their respective deficiencies, and achieve complementary performance. At the same time, they also save a lot of scarce precious metal resources and reduce energy consumption. Construction is of great significance [11].
At present, there are not many studies on as-rolled, wear-resistant, steel–carbon clad plates. Cheng Muhua et al. [12] studied the effect of rolling reduction on the microstructure and tensile fracture of vacuum hot-rolled NM360/Q345R clad sheets. Ref. [13] found that an increase in rolling reduction can promote the metallurgical bonding of NM500 steel and Q345 steel. Qiu Jun et al. [14] found that, after austenitization at 900 °C and tempering at 250 °C, the composite interface of wear-resistant steel and carbon steel Q345 was in good contact. Lan Kun [15] used a thermal simulation tester to study the deformation resistance of the wear-resistant steel–carbon steel clad plate interface under a single pass. Li Jin et al. [16] studied hot-rolled NM360/Q345R clad plates under compression. When the tensile strength reached 70%, the tensile fracture surface was smooth, and no delamination occurred. Liu Pengtao et al. [2] studied the effect of rolling reduction on the microstructure and wear resistance of BTW wear-resistant steel clad plates. At present, there are few studies on the effects of the austenitization process on the microstructure and properties of NM500 clad plates.
In this paper, a hot-rolled NM500/Q345 clad plate was used as the material, austenitization heat treatment at different temperatures was used, and then OM, EBSD, and TEM were used to further study the NM500/Q345 clad plate microstructure. Its mechanical properties were analyzed using a Shimadzu tensile machine, and a corresponding analysis and research on the hardness and wear resistance of the NM500 steel were conducted. Through the use of the heat treatment method in this paper, the performance of the material was greatly improved, providing certain theoretical support for the practical application of wear-resistant steel cladding.

2. Experimental Materials and Procedures

The material used was a vacuum hot-rolled NM500/Q345 composite sheet, and its main components are shown in Table 1 and Table 2. A cuboid sample of 20 mm × 15 mm × 20 mm (length × width × height) was taken by wire cutting, of which the NM500 layer was 8 mm, and the Q345 layer was 12 mm. They were heated to 860 °C, 900 °C, and 940 °C for 20 min; then quenched in a water bath; and finally tempered at 200 °C for 30 min. According to the different austenitization temperatures, the samples were marked as original samples and 860 °C + 200 °C, 900 °C + 200 °C, and 940 °C + 200 °C samples in turn. The experimental process is shown in Figure 1.
The metallographic samples in an unused state were prepared by wire electric discharge cutting, and the observed surface was the RD-ND surface. Sanding was carried out with 400–2000 grit sandpaper, and metallographic mechanical polishing was conducted. Metallographic etching was carried out using 4% nitric acid ethanol solution. Optical microscopy (OM) and a ZIESS SIGMA-300 scanning electron microscope (SEM) were used for microstructure observation. The elemental distribution was analyzed by energy spectroscopy (EDS). Using a 10% perchloric acid alcohol solution, the polished metallographic samples were electropolished at 25 V for 60 s at room temperature, and the grain properties of the clad plates were investigated by electron backscatter diffraction (EBSD; Oxford). Moreover, with TEM preparation, 5% perchloric acid alcohol solution double-jet thinning, a JEOL JEM-F200 transmission electron microscope (TEM) was used to analyze their micro-domain fine structure.
The composite NM500 surface of the quenched + tempered sample was polished and removed, sanded with sandpaper, and metallographically polished to ensure the same roughness, and then it was rinsed with alcohol and dried for use. The test was carried out on the reciprocating sliding friction and wear module of an RTEC (MFT-5000) friction and wear testing machine. Silicon nitride ceramic balls with a diameter of 6 mm were used, the friction test time was 30 min, the frequency was 1 Hz, and the experimental load was 150 N. The friction method was linear reciprocating motion, and the stroke was 6 mm (that is, 12 mm reciprocating in 1 s for a total of 1800 cycles). To reduce errors, all experiments were performed three times.

3. Results and Discussion

3.1. Microstructural Analysis

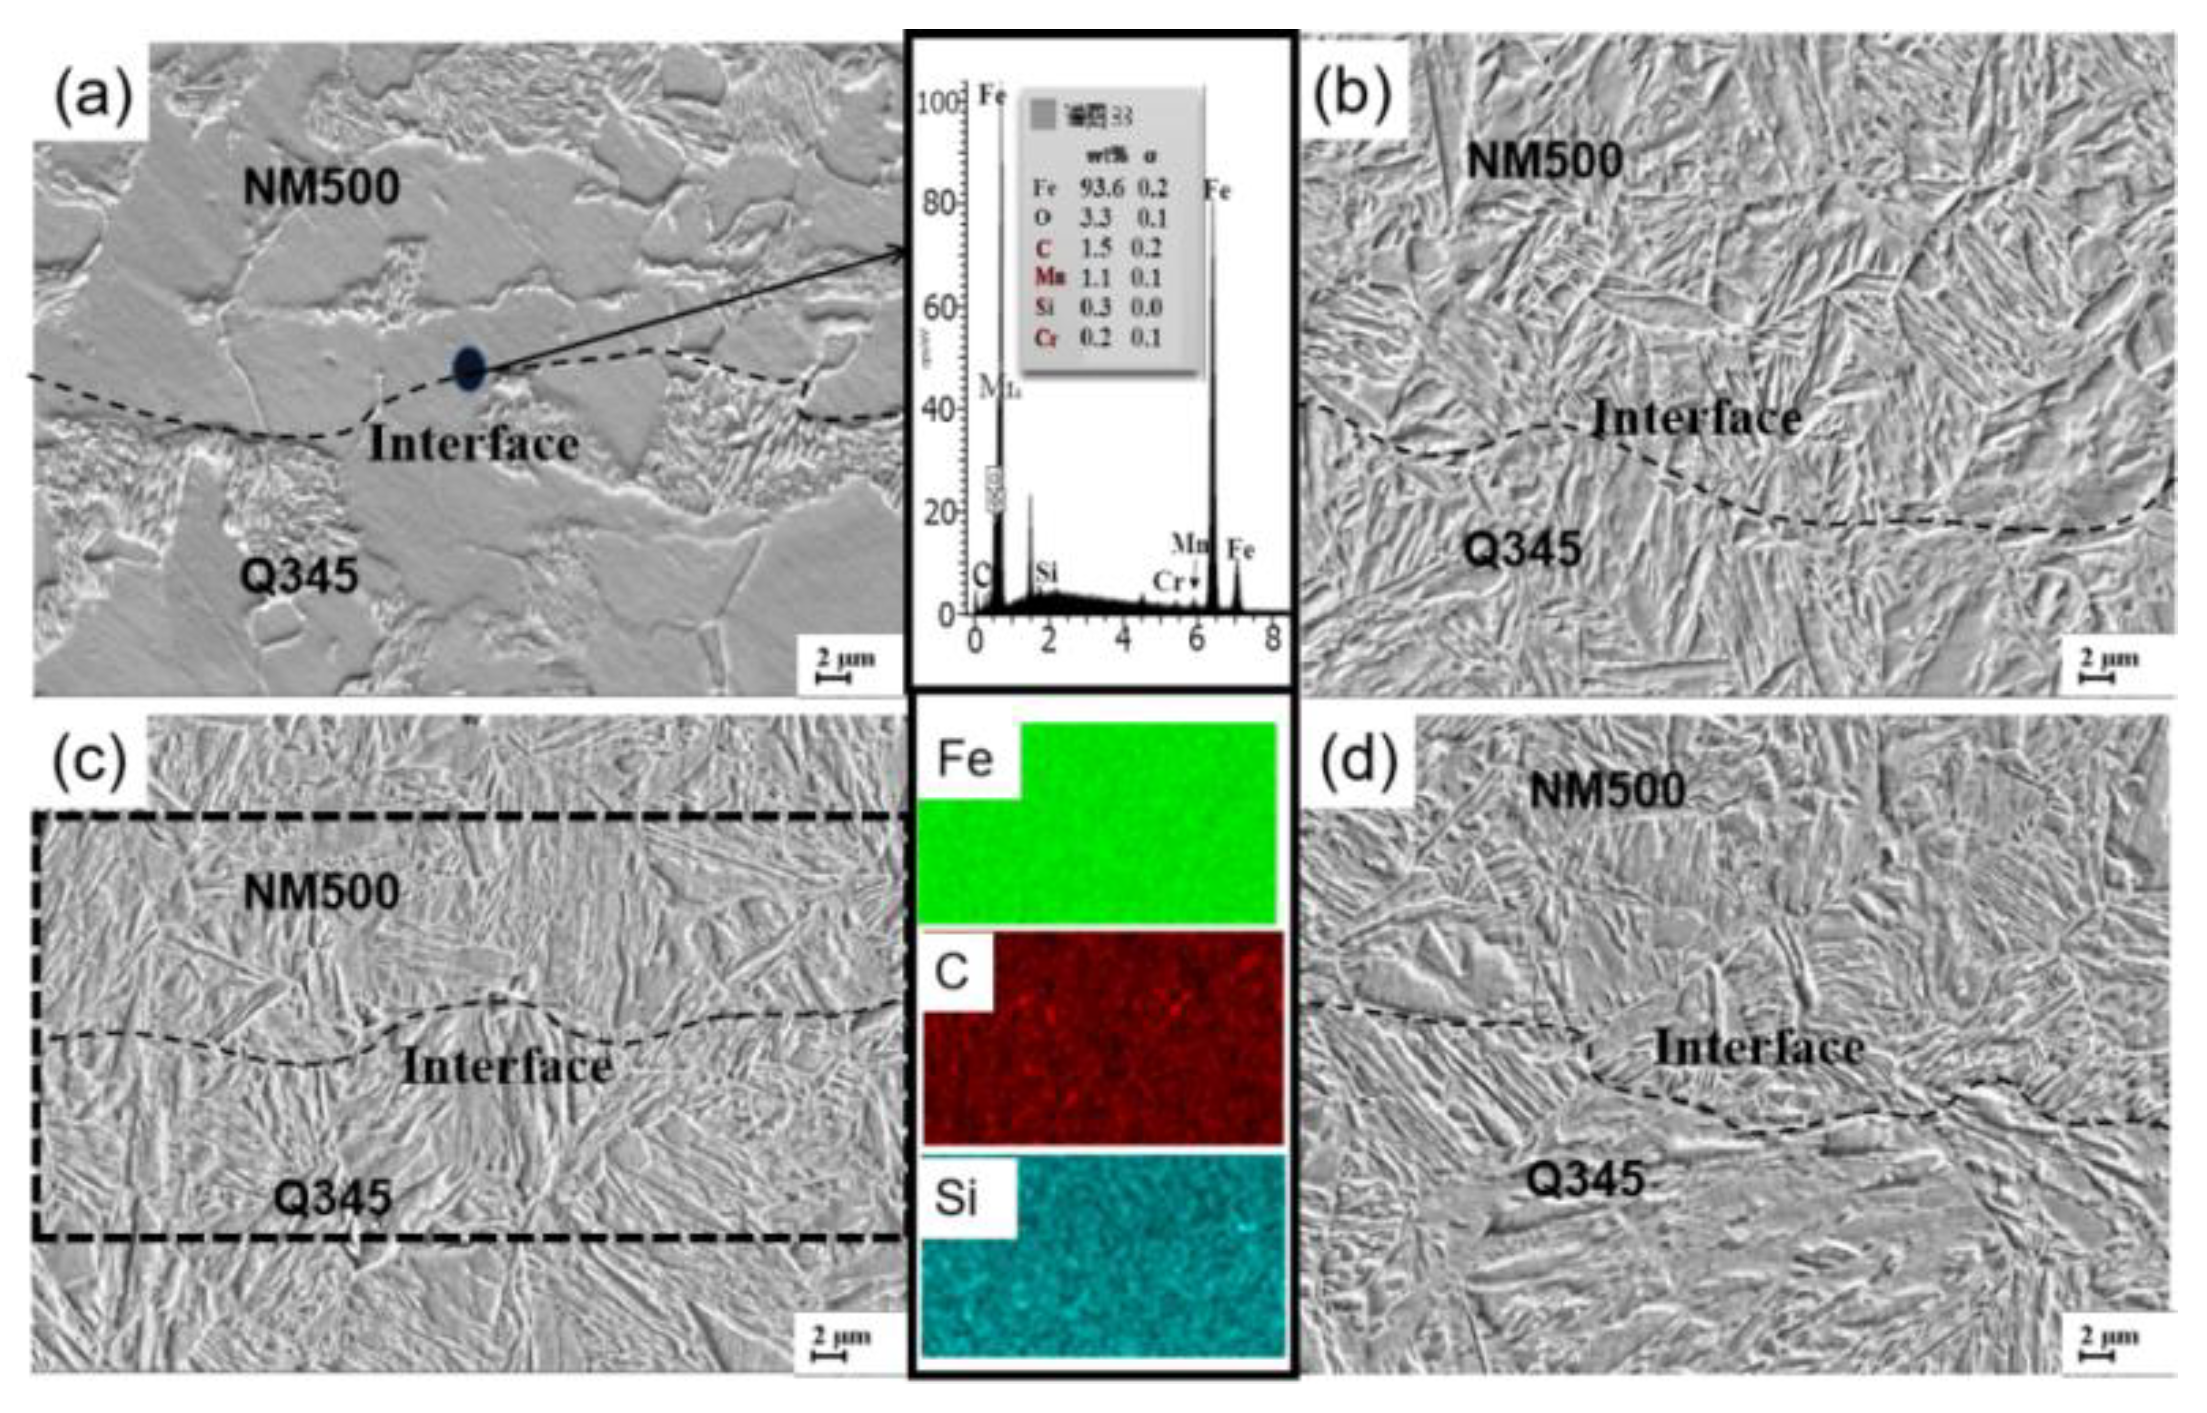
Figure 2a–d show the microstructure changes in the NM500/Q345 clad plate wear-resistant layer (NM500) without austenitization and after austenitization at different temperatures. In Figure 2, the middle layer is the composite interface, the lower layer of the composite interface is carbon steel Q345, the upper layer is NM500, and its microstructure distribution is uniform. At the interface, there are no defects, such as large holes and cracks. Moreover, no Si and Mn segregations are observed near the interface, and the elements are uniformly distributed. The microstructure before austenitization is mainly pearlite and ferrite, and both are transformed into lath martensite after austenitization. The structures obtained at each austenitization temperature are all martensite structures, and the martensite is in the shape of lath. Due to the different austenitization temperatures, the size of the martensite obtained is also different. With an increase in the austenitization temperature, the size of the martensite lath bundle also becomes coarse. Too-high austenitization temperature easily makes the austenitized grains grow, the martensite Ms temperature decrease, and the martensitic structure become coarse. Quenched at 940 °C, the martensitic laths are somewhat coarse.
Figure 3 presents microstructure IPF images of the NM500/Q345 composite board in different states. As shown in Figure 4, after austenitization, the clad plate has no defects, such as cracking, and the grains of the clad plate become very fine. The refined grains help to significantly increase the properties of the clad plate. After austenitization and the tempering of the clad plate, the obtained microstructure is a lath-like martensite structure. The austenitization heating temperature affects the austenite grain size. By adjusting the austenitization temperature, the martensitic lath size of the steel after phase transformation can be changed. At 860 °C, the martensite arrangement is uneven, and the microstructure cannot be completely transformed into austenite. When the austenitization temperature is 900 °C, the structure has relatively clear prior austenite grain boundaries, and the martensite arrangement is relatively neat. When the austenitization temperature is 940 °C, the austenitized grains grow, and large martensite laths are formed during austenitization. Excessive martensite affects the toughness and plasticity of the material, and it affects the mechanical properties of the material.
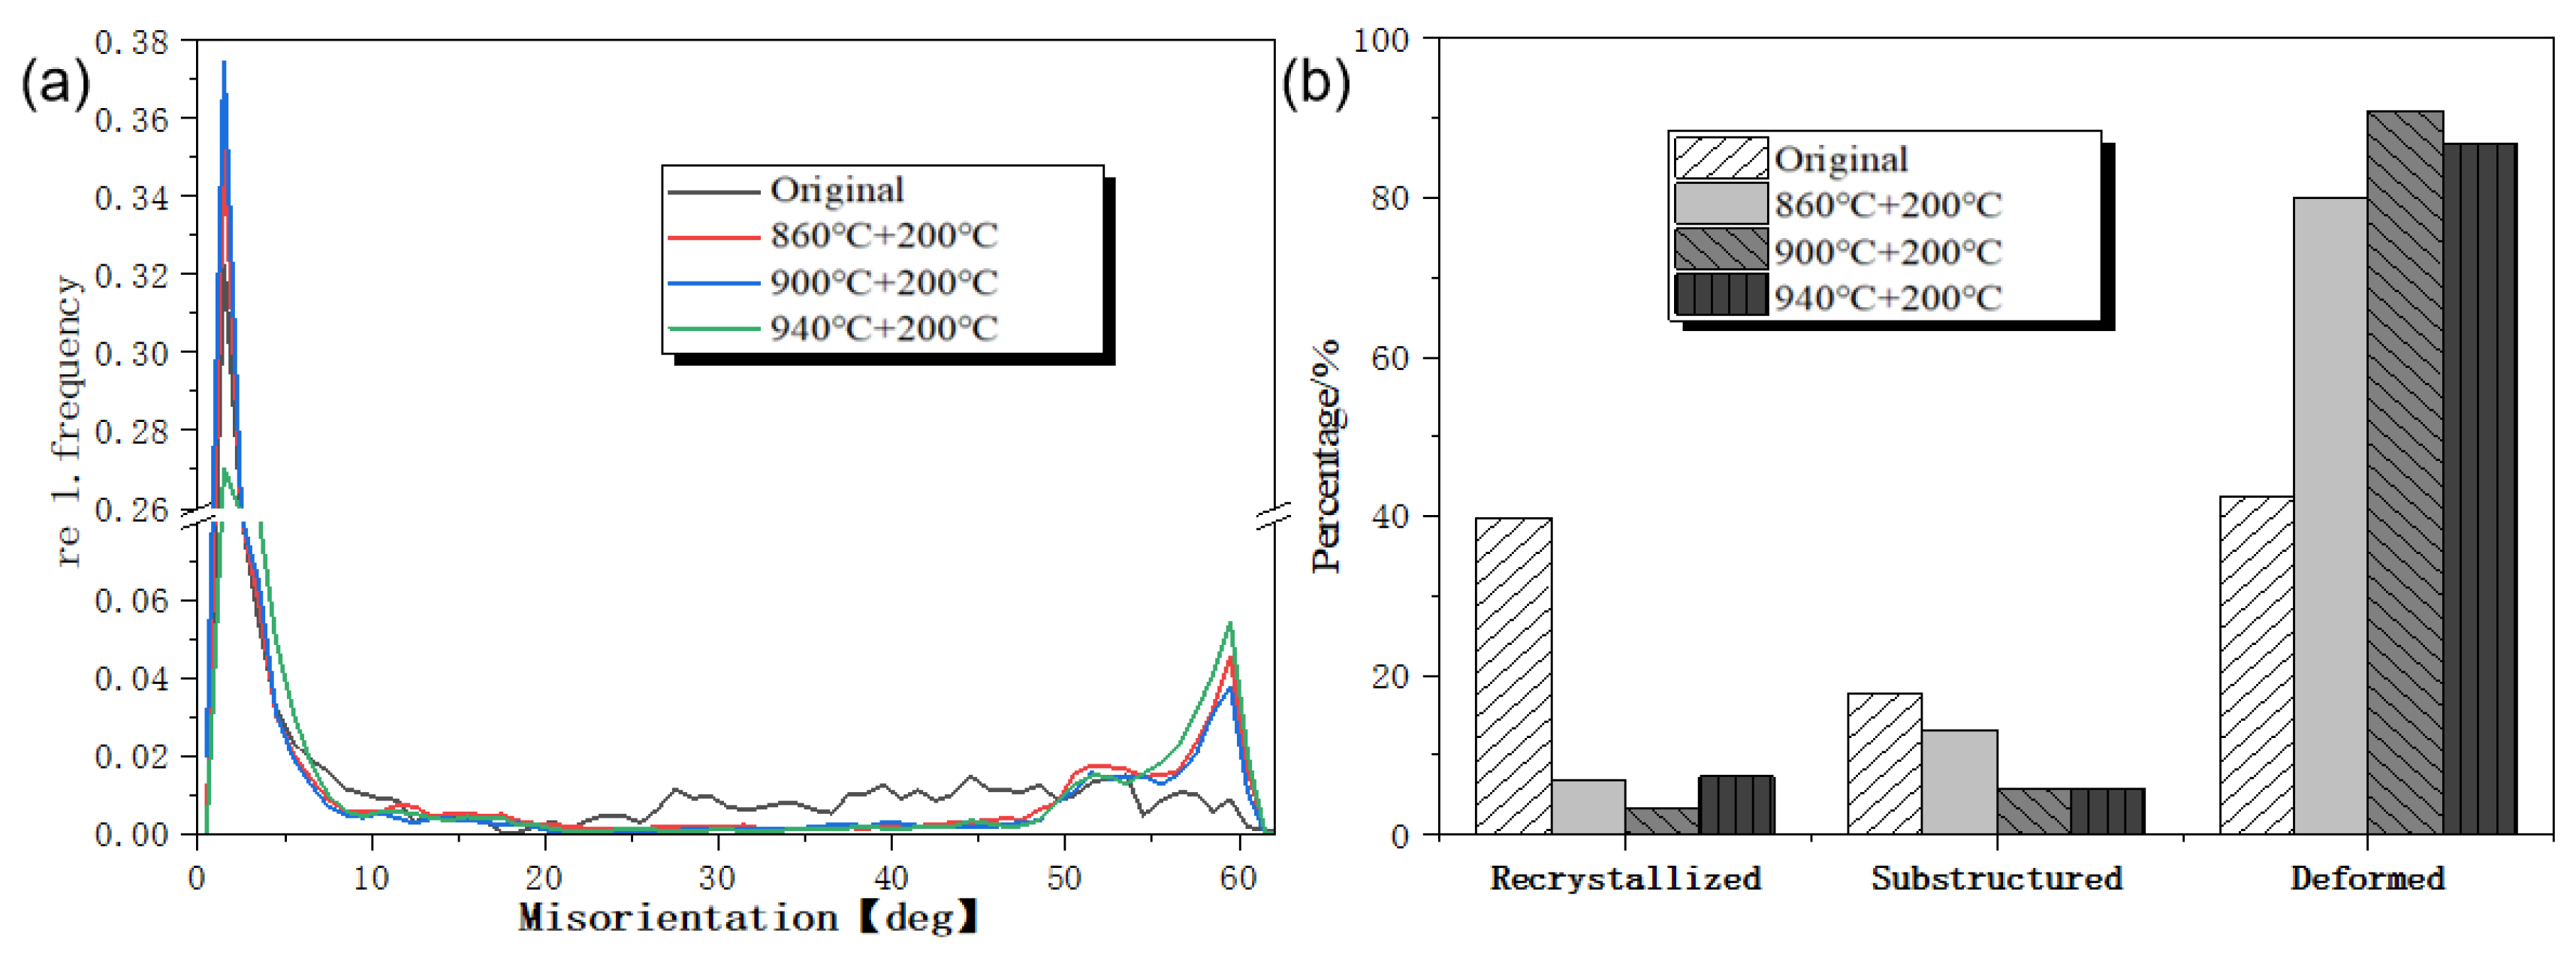
Figure 4 is a statistical graph of the grain boundary misorientation lines and recrystallization statistics of EBSD at different heat treatment temperatures. Compared with the original specimens after rolling, the NM500/Q345 composites at different quenching temperatures have two discontinuous orientation peaks. The average grain boundary orientation difference is 53°. At 940 °C, the small-angle grain boundaries account for less, and there are more twins. However, the proportion of the small-angle grain boundaries at 900 °C is significantly higher than that at other temperatures, and there are relatively few twins at Σ60°. As shown in Figure 5b, a large amount of recrystallization occurs in the structure after rolling, and the deformed grains in the structure after austenitization heat treatment increase, especially at 900 °C.
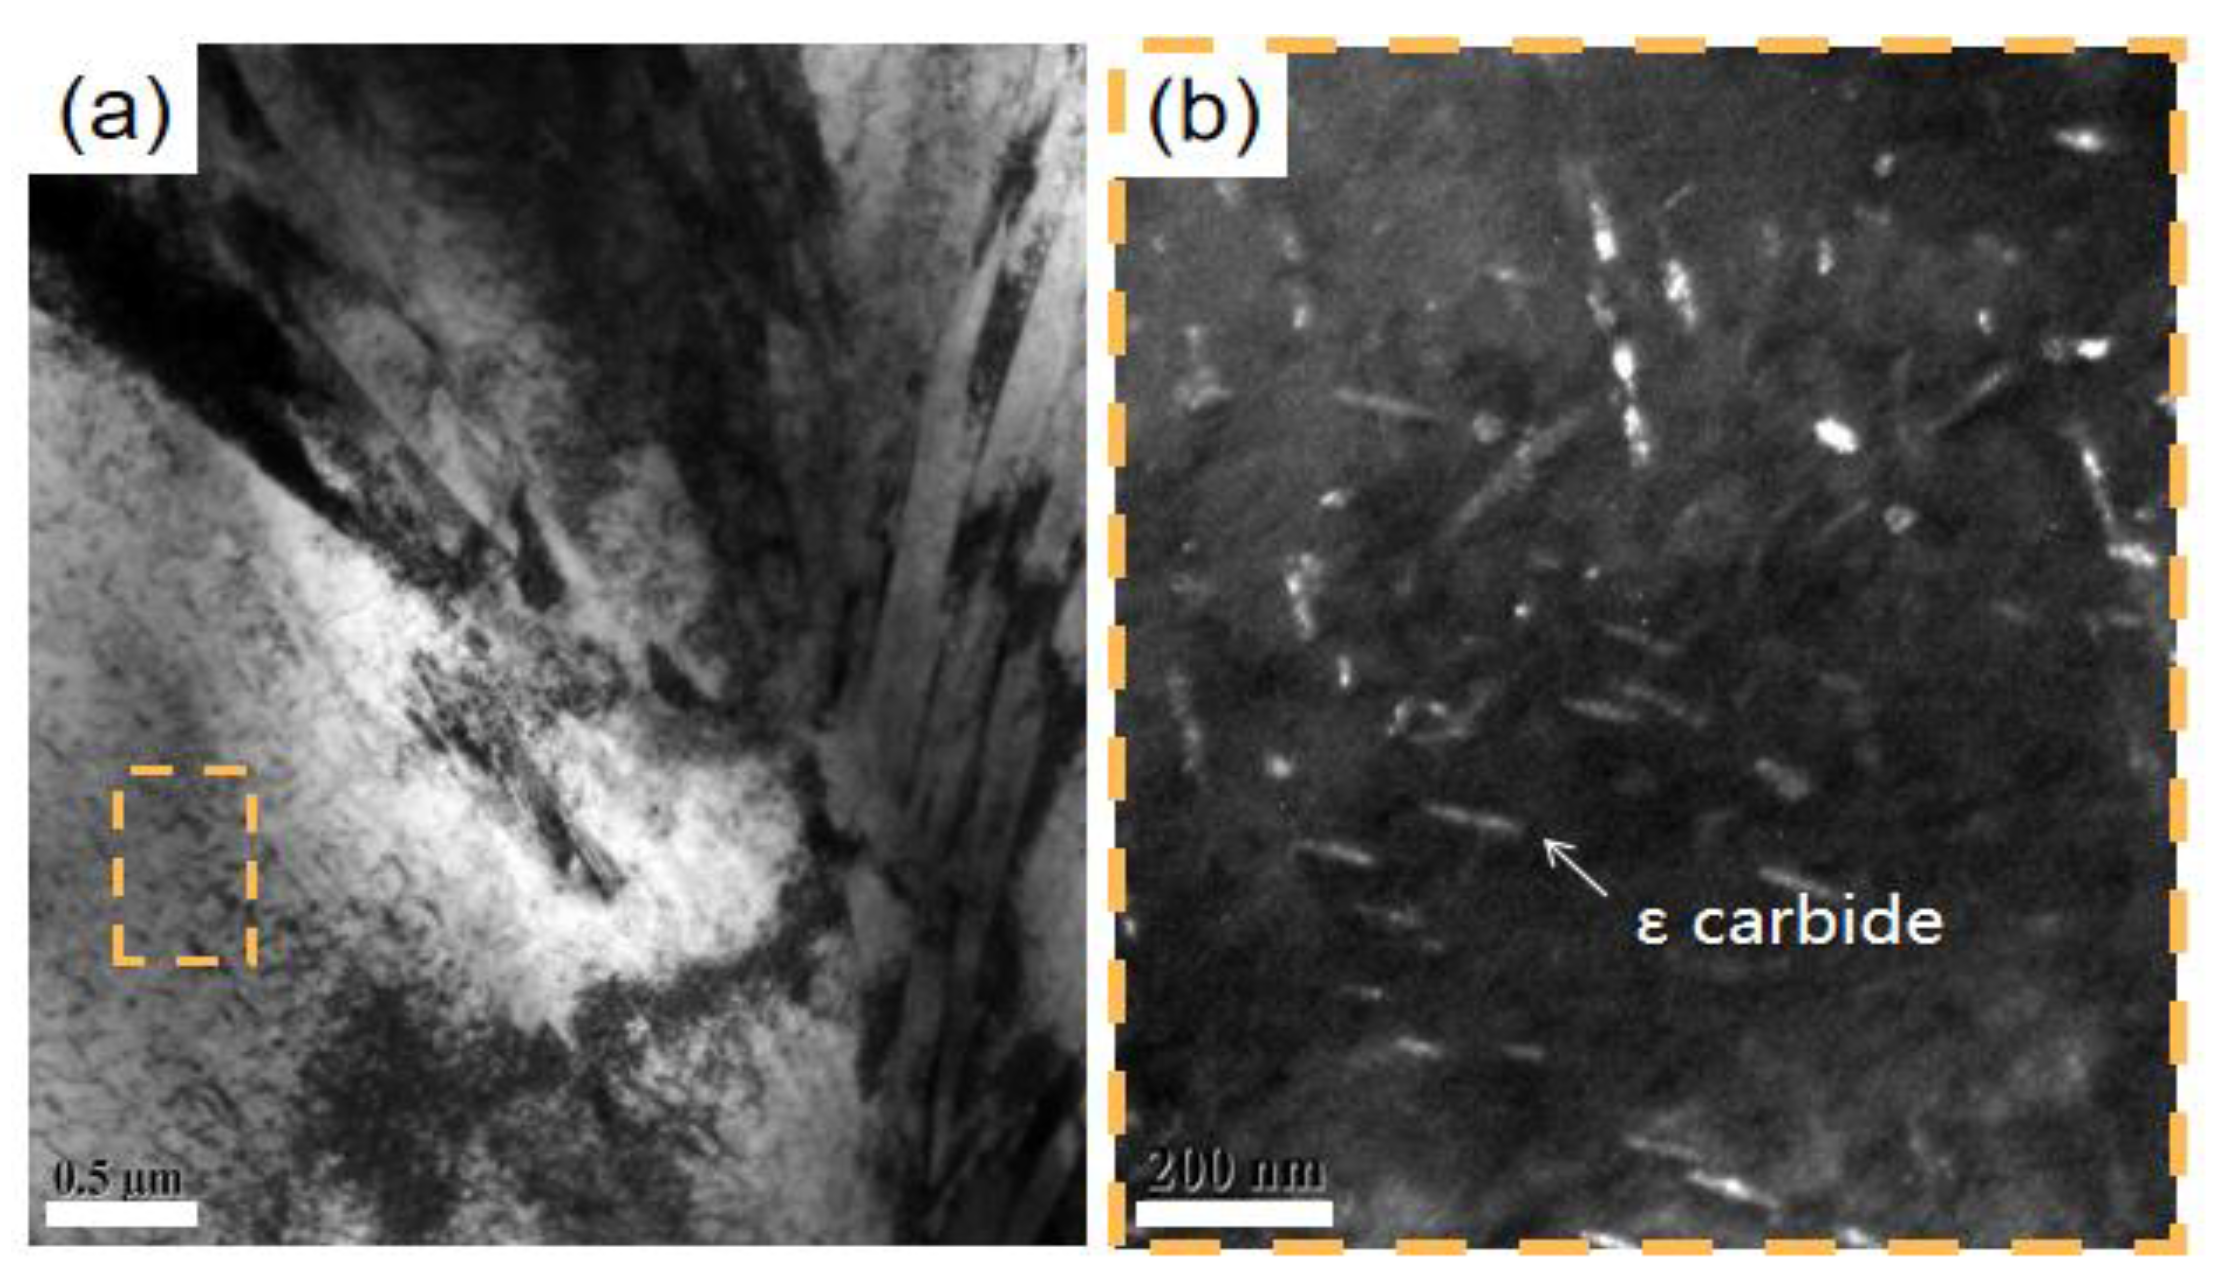
Figure 5 shows a TEM image of the microstructure of the NM500/Q345 clad plate after quenching at 900 °C + tempering at 200 °C. In Figure 5, it can be observed that, after austenitization at 900 °C + tempering at 200 °C, the microstructure of NM500 presents a typical lath-like martensite structure (see Figure 5a), and there are many substructures with a high density of dislocations between the laths. Moreover, it can be seen in the TEM pictures that there are a certain number of needle-like or rod-like precipitates in the lath martensite (see Figure 5b). The length of these precipitates is 50–100 nm; the width is about 10 nm; and the spatial shape is flake-like, in a coherent relationship with the matrix, and usually precipitates on a specific habit surface. Some research data show that such precipitates are ε carbides, namely, Fe2.4C [17]. In Figure 5, spherical precipitates with a size of less than 10 nm can also be observed, and these precipitates are dispersed in the lath. Such precipitates have a certain positive effect on the precipitation strengthening of the material [18,19].

3.2. Mechanical Property Analysis

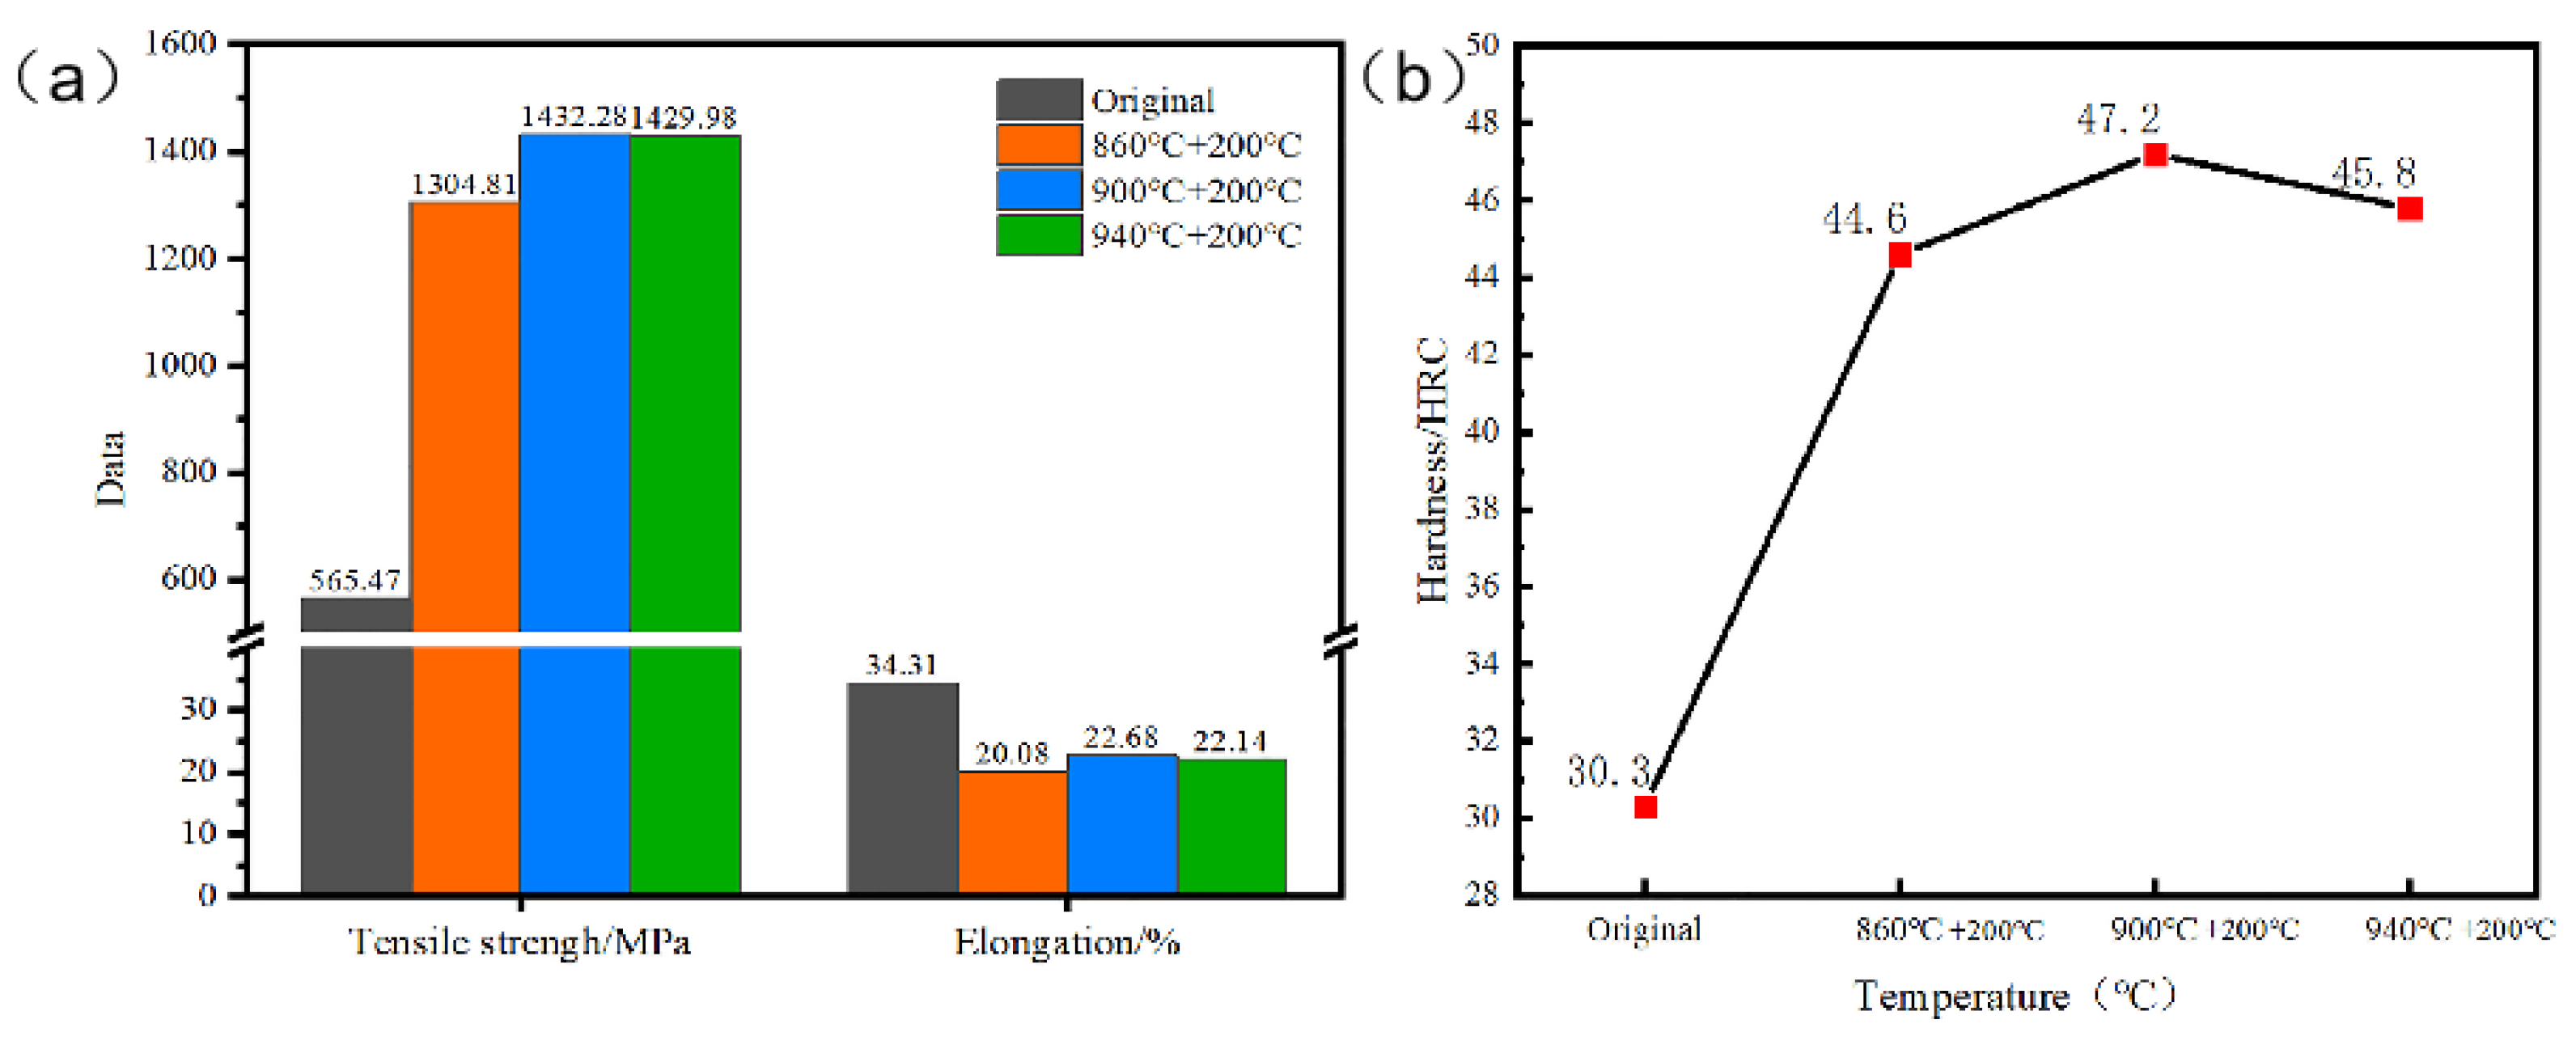
Figure 6 shows the mechanical properties of the clad plates in different states. In Figure 6, the tensile strength and elongation of the NM500 wear-resistant steel clad plate show a trend of first increasing and then decreasing with the increase in the austenitization temperature. When the austenitization temperature is 900 °C + tempering is 200 °C, its elongation and tensile strength are the largest, at 22.68% and 1432.28 Mpa, respectively. As the austenitization temperature increases to 940 °C, the tensile strength and elongation decrease slightly compared with those of the samples at 900 °C. However, the elongation of the specimens at each austenitization temperature is greatly improved compared with that of the single wear-resistant steel. Moreover, the tensile strength exceeds 1250 MPa, which meets the requirements of the national standard for high-strength, wear-resistant steel plates for construction machinery. The hardness of the NM500 surface of the clad plate after austenitization and that of the hot-rolled clad plate are compared and analyzed, as shown in Figure 6b, and the surface hardness is greatly improved. With the increase in the austenitization temperature, the surface Rockwell hardness shows a trend of first increasing and then decreasing. When the austenitization temperature is 900 °C, the hardness reaches the maximum, which is 47.2 HRC. A large number of microscopic defects (such as dislocations, twins, and stacking faults) are generated in it, which strengthens the martensite, so the hardness of the sample after austenitization is greatly improved [20,21,22].
Figure 7 shows a tensile fracture diagram of the samples tempered at different austenitization temperatures. There is obvious necking at the tensile fracture site, and different degrees of cracking and delamination appear at the bonding interface of the clad plate. After quenching at 900 °C, delamination does not occur in any small part of the interface. The reason for delamination is because the elongation of NM500 and Q345 is different. With coordinated deformation during tensile deformation, the composite interface generates a certain shear force, and when the shear force exceeds the bonding force at the interface, delamination of the two metals occurs. With the help of the SEM analysis, the tensile fracture morphology of NM500 and Q345 near the interface is determined. The distribution of dimples is uneven. The dimples are deformed along the necking direction, and there are still white spherical second-phase particles in some dimples, which are related to wear resistance. The dimples on the steel side are smaller in size and shallower in depth. When the quenching temperatures are 860 °C and 940 °C, the fracture morphology has more tear edges besides dimples. When the austenitization temperature is 900 °C, the dimple distribution is relatively uniform. To sum up, it can be judged that the tensile fracture mode of the clad plate after heat treatment is ductile fracture. When the austenitization temperature is 900 °C, each clad plate shows good toughness.

3.3. Friction and Wear Analysis of Clad NM500

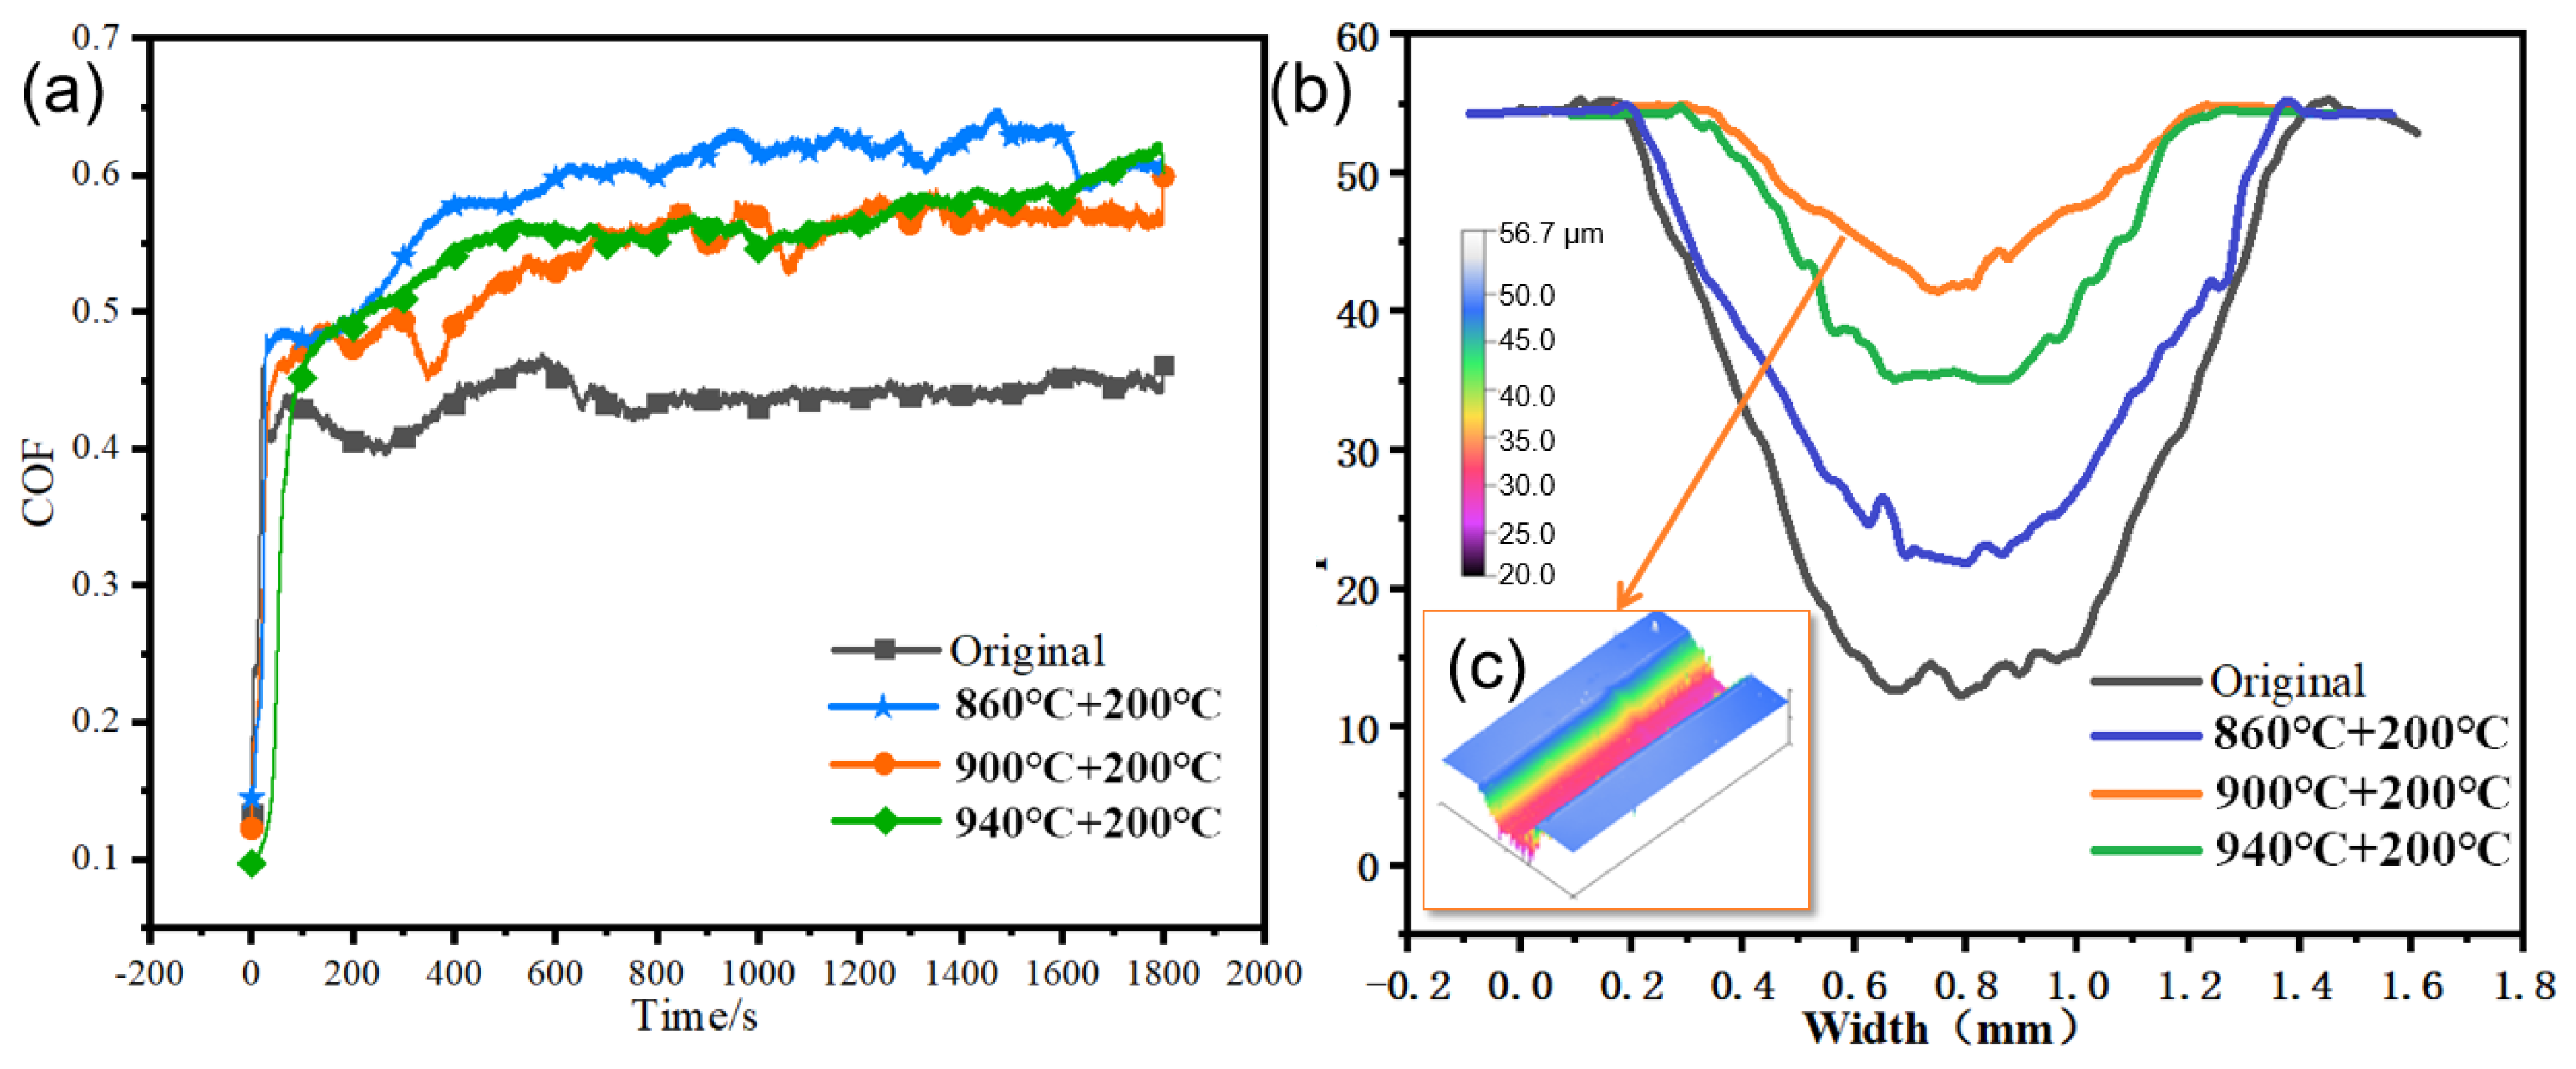
The friction coefficients of the different samples under the same test conditions are shown in Figure 8a for one test cycle. The friction coefficient curve of the sample shows a trend of rapid increase, then decreases to a certain extent, and then slowly increases and gradually stabilizes. In the initial wear stage, the overall friction coefficient shows an upward trend and fluctuates greatly. This is because, at the beginning of the experiment, the surface of the friction pair is uneven, and the contact surface of the friction pair is point contact at the beginning of the sliding phase, the load per unit area is very large, the friction is dry, and the sliding friction surface is not lubricated. Hence, the friction coefficient rises rapidly [23]. During the wear process, the surface temperature of the material rises sharply as the wear continues. Affected by the surface temperature of the material and the direction of the temperature gradient along the depth direction, adhesive wear occurs on the contact surface, and the wear debris sticks to the scratch due to the influence of the temperature. On the marks, the friction coefficient rises but fluctuates greatly. As the wear continues, the adhesive wear decreases, the friction coefficient of the sample is stabilized in a certain range, and the wear experiment enters the stable wear stage.
The friction coefficient of the NM500/Q345 clad plate before and after NM500 austenitization is quite different. The original sample before austenitization has a soft material, and it is easy to produce wear debris on the surface, which reduces the surface roughness and minimizes the friction coefficient. After austenitization + tempering, the hardness of the wear-resistant steel increases, the wear resistance also increases, and the friction coefficient increases with it. After austenitization at 860 °C, the friction coefficient is the largest. This may be due to incomplete austenitization at this temperature, resulting in an uneven structure of the wear-resistant steel and an increased surface roughness during wear. When the austenitization temperatures are 900 °C and 940 °C, the difference in the friction coefficient is not big, and the friction coefficient is slightly smaller at 900 °C. When the austenitization temperature is high (900 °C and 940 °C), austenitization is complete, the structure is a lath-like martensite structure, and the friction coefficient is relatively consistent.
During the sliding friction and wear process, the sample and the counter-abrasive silicon nitride ceramic are subjected to the combined action of shear stress and compressive stress. Due to the different austenitization conditions of the material, the material removal mechanism during the friction and wear process is also different, resulting in a different macroscopic appearance of the wear scar. Figure 8b shows the scratch cross-section curves of the wear surface scratches of the NM500/Q345 clad plate wear-resistant layer (NM500) unquenched and quenched at different temperatures, and the original surface is selected as the reference surface [24]. Figure 8b shows the macroscopic morphology of the middle part of the scratch, and the width and depth of the different samples are quite different. It can be seen in Figure 8b that the maximum depth of the scratches on the unquenched specimen is 43 μm, and the width is 1.30 mm. When the austenitization temperature is 860 °C, the maximum depth of the scratch is 33 μm, decreasing by 23.26%, and the width is 1.15 mm, decreasing by 11.54%. When the austenitization temperature is 900 °C, the maximum depth of the scratch is 14 μm, decreasing by 57.58%, and the width is 0.73 mm, decreasing by 36.52%. When the austenitization temperature is 940 °C, the maximum depth of the scratches is 20 μm, increasing by 42.86%, and the width is 0.78 mm, increasing by 6.85%. When the material is not quenched, the wear is the worst, the value of the maximum depth is the largest, and the width is the widest. After austenitization at 900 °C, the wear condition is greatly improved, the value of the maximum depth is the smallest, the width is the narrowest, and the wear condition is relatively the best.
The amount of wear is one of the important manifestations of wear resistance [25]. The scratch wear volume can be calculated using Gwyddion software. Figure 9 shows the wear volume values for the wear layer of the NM500 raw material and three quenched temperatures. When the austenitization temperature is 860~940 °C, with the increase in the austenitization temperature, the wear volume first decreases and then increases. When the austenitization temperatures are 860 °C, 900 °C, and 940 °C, the average wear volumes are 0.0701 mm3, 0.0305 mm3, and 0.1051 mm3, respectively. Compared with the average wear volume before austenitization of 0.12821mm3, when the austenitization temperature is 900 °C, the decrease is the largest, and the wear amount is the least, which also means the best wear resistance.
The wear amount is the result of the combination of the hardness difference between the friction pairs, the structure of the material, the actual contact area, and other factors. In general, the higher the hardness of a material, the less likely it is for a relatively soft material to have scratches on its surface. In general, the higher the hardness of the material, the better the wear resistance of the material. Therefore, the hardness value is usually used as one of the important indicators to measure the wear resistance of materials. When the austenitization temperature is 900 °C, the wear resistance of the wear-resistant layer NM500 is the best. This may be because the austenitization temperature is not high at this temperature, and the original austenitized grains are small. After austenitization, the strip martensite block is small, so the surface of the wear-resistant layer NM500 has a certain strength and toughness, and the wear resistance is the best.

4. Conclusions

In this paper, a hot-rolled NM500/Q345 clad plate was used as the material, and austenitization heat treatment at different temperatures was used. The microstructure of the NM500/Q345 clad plate was studied using OM, EBSD, and TEM, and its mechanical properties were analyzed using a Shimadzu tensile machine and by examining its hardness and wear resistance. The following conclusions were drawn:
  • The microstructure of the NM500/Q345 clad plate before austenitization was mainly pearlite and ferrite, and both were transformed into lath martensite after austenitization. The structures obtained at each austenitization temperature were all martensite structures, and the martensite was in the shape of lath. As the austenitization temperature increased, the size of the martensitic lath bundle also became coarse. After quenching at 900 °C + tempering at 200 °C, in the lath-like martensite structure of NM500, there were many substructures between the laths, and a certain number of needles were of precipitated shape or rod-shaped ε precipitates.
  • When quenched at 860 °C + tempered at 200 °C, the martensite arrangement was uneven, and the microstructure could not be completely transformed into austenite. When quenched at 900 °C + tempered at 200 °C, the structure had relatively clear prior austenite grain boundaries, and the martensite arrangement was relatively neat. When quenched at 940 °C + tempered at 200 °C, the austenitized grains grew, and large martensitic laths formed during austenitization. Therefore, the trend of the tensile strength and elongation of the composite plate first increased and then decreased with the increase in the quenching temperature.
  • When quenched at 900 °C + tempered at 200 °C, its elongation and tensile strength were the largest, which were 22.68% and 1432.28 Mpa, respectively. As the austenitization temperature increased to 940 °C, the tensile strength and elongation decreased slightly compared with those of the samples at 900 °C. Due to the martensite structure that formed after quenching, the hardness of the wear-resistant layer of the composite plate first increased and then decreased with the increase in the quenching temperature. The Rockwell hardness of the original sample was 30.3 HRC. When the quenching temperature was 860 °C, the hardness increased to 44.6 HRC. When the quenched temperature was 900 °C, the hardness reached the maximum, which was 47.2 HRC, When the quenching temperature was 940 °C, the hardness decreased to 45.8 HRC.
  • The original sample before austenitization had a soft material, and it was easy to produce wear debris on the surface, which reduced the surface roughness and minimized the friction coefficient. After austenitization + tempering, the hardness of the wear-resistant steel increased, the wear resistance also increased, and the friction coefficient increased with it. After quenching at 860 °C and tempering at 200 °C, the friction coefficient was the largest. When the austenitization temperatures were 900 °C and 940 °C, the friction coefficient was not much different. The wear was the worst when the material was not quenched. After austenitization at 900 °C + tempering at 200 °C, the wear of NM500 was the lightest; the maximum depth of the wear scar was 14 μm; the width was the narrowest, 0.73 mm; and the wear volume was the smallest, 0.0305 mm3.

Author Contributions

Conceptualization, G.Z. and J.L.; methodology, G.Z. and R.Z.; formal analysis, G.Z.; investigation, R.Z., H.L. and C.L.; resources, G.Z.; data curation, R.Z., Y.L. and C.L.; writing—original draft preparation, R.Z.; writing—review and editing, G.Z., R.Z. and J.L.; visualization, J.L.; supervision, G.Z. and H.L.; funding acquisition, G.Z., J.L., H.L. and Y.L. All authors have read and agreed to the published version of the manuscript.

Funding

This research was funded by the National Key Research and Development Program of China (2018YFA0707305), the Scientific and Technological Innovation Programs of Higher Education Institutions in Shanxi (2021L292), the Fundamental Research Program of Shanxi Province (20210302124009 and 20210302123207), the Taiyuan University of Science and Technology Scientific Research Initial funding (20212026), and the Shanxi Outstanding Doctorate Award Funding Fund (20222042).

Institutional Review Board Statement

Not applicable.

Informed Consent Statement

Not applicable.

Data Availability Statement

Not applicable.

Acknowledgments

The authors would like to thank the Provincial Special Fund for Coordinative Innovation Center of Taiyuan Heavy Machinery Equipment for providing the facilities for the experimental works.

Conflicts of Interest

The authors declare no conflict of interest.

References

  1. Zhao, D. Study on Tribological Performance of Three Commonly Used Wear-Resistant Steels. Master’s Thesis, China University of Mining and Technology, Xuzhou, China, 2017. [Google Scholar]
  2. Liu, P.T.; Ma, L.F.; Zhi, C.C.; Ma, Z.; Zhou, C.; Zhao, G.; Fan, Q.; Jia, W. Effect of Annealing on Heavy-Load Wear Performance of Wear Resisting Steel-Carbon Steel-Cladded Plate. Tribol. Trans. 2020, 64, 101–110. [Google Scholar] [CrossRef]
  3. Ye, J.; Zhang, H.; Liu, X.; Liu, K. Low Wear Steel Counterface Texture Design: A Case Study Using Micro-pits Texture and Alumina–PTFE Nanocomposite. Tribol. Lett. 2017, 65, 165. [Google Scholar] [CrossRef]
  4. Liang, L.; Yan, L.; Li, G.; Yi, C.; Xiangtao, D.; Zhaodong, W. Effect of Heat Treatment on Microstructure and Mechanical Properties of Low-Alloy Wear-Resistant Steel NM450. Mater. Res. Express 2021, 8, 045606. [Google Scholar] [CrossRef]
  5. Hussein, A.; Ahmed, M.R.; Abid, H.; Alzaid, M.; Farhat, L.B.; Badruddin, I.A. Effects of gating design on structural and mechanical properties of high manganese steel by optimizing casting process parameters. J. Mech. Sci. Technol. 2022, 36, 3931–3937. [Google Scholar]
  6. Pei, W.; Zhang, Y.; Yang, S.; Li, X.; Zhao, A. Study of work-hardening behavior of high manganese steel during compression. Mater. Res. Express 2022, 9, 066503. [Google Scholar] [CrossRef]
  7. Wu, X. Study on Mechanical Properties and Wear Resistance of Microalloyed Low Alloy Wear Resistant Steel. Master’s Thesis, Zhengzhou University, Zhengzhou, China, 2020. [Google Scholar]
  8. Li, H.; Zhao, G.; Ma, L.; Li, J.; Zhi, C. Microstructure analysis of hot-rolled NM500/Q345/NM500 composite interface. Mater. Res. Express 2019, 6, 016548. [Google Scholar] [CrossRef]
  9. Zhao, G.; Zhang, J.; Song, Y.; Li, J.; Li, H.Y.; Shuai, M.R. Study on friction and wear properties of wear-resistant layer of NM500/Q345 composite plate at different quenching temperatures. Precis. Form. Eng. 2021, 13, 35–41. [Google Scholar]
  10. Bao, S.; Yang, G.; Xu, Y.; Han, N.; Zhu, X. Austenite grain growth behavior of medium manganese martensitic NM500 steel. Steel 2022, 57, 152–159. [Google Scholar]
  11. Cheng, M.H. Research on NM500/Q345/NM500 Three Layer Rolling Composite and Heat Treatment Process. Master’s Thesis, Taiyuan University of Science and Technology, Taiyuan, China, 2018. [Google Scholar]
  12. Cheng, M.; Huang, Q.; Zhao, G.; Ma, L.F. Effect of reduction ratio on microstructure and tensile fracture of vacuum hot rolled NM360/Q345R clad plate. Acta Mater. Metall. 2017, 16, 286–292. [Google Scholar]
  13. Li, J.; Liu, C.R.; Song, Y.H.; Zhao, G.; Ma, L.; Huang, Q. Influence of Hot Rolling + Heat Treatment on Microstructure and Mechanical Properties of NM500/Q345/NM500 Composite Plate. J. Mater. Sci. 2021, 56, 6016–6030. [Google Scholar] [CrossRef]
  14. Qiu, J.; Cheng, X.R.; Lan, K.; Lan, D.; Wang, Y.; Huang, D.J. Effect of Rolling and Heat-Treatment on Structure and Properties of Wear-Resistant Steel NM450D-Carbon Steel Q235B Clad Plate. Spec. Steel 2017, 38, 56–59. [Google Scholar]
  15. Lan, K.; Cheng, X.R.; Qiu, J.; Lei, D.; Peng, Y. Influence of Reduction Ratio on Interfacial Bonding Properties of Wear-Resistant Steel and Carbon Steel Composite Plate. Hot Work. Technol. 2017, 46, 121–124. [Google Scholar]
  16. Li, J.; He, Q.Z.; Li, H.; Zhao, G.H.; Cheng, M.H. Research on mechanical properties and interface microstructure of hot-rolled NM360/Q345R composite plate. Hot Work. Technol. 2018, 47, 118–121. [Google Scholar]
  17. Zhu, C.; Cerezo, A.; Smith, G.D.W. Carbide characterization in low-temperature tempered steels. Ultramicroscopy 2009, 109, 545–552. [Google Scholar] [CrossRef] [PubMed]
  18. Ceschini, L.; Marconi, A.; Martini, C.; Morri, A.; Di Schino, A. Tensile and impact behaviour of a microalloyed medium carbon steel: Effect of the cooling condition and corresponding microstructure. Mater. Des. 2013, 45, 171–178. [Google Scholar] [CrossRef]
  19. Jia, T.; Li, M.; Pei, X.; Wang, Z. On the Spheroidizing Annealing Behavior in Cr/Nb Microalloyed Medium Carbon Steels. Steel Res. Int. 2018, 90, 1800353. [Google Scholar] [CrossRef]
  20. Dewangan, S. Effect of heat treatment into tensile strength, hardness and microstructural attributes of TIG welded Ti-6AL-4V titanium alloy. Aust. J. Mech. Eng. 2022, 2059906. [Google Scholar] [CrossRef]
  21. Babaei, H.; Shafyei, A.; Amini, K. The Effect of Heat Treatment on Mechanical Properties and Microstructure of the AISI 422 Martensitic Stainless Steel. Mechanika 2017, 22, 13599. [Google Scholar] [CrossRef] [Green Version]
  22. Dwangan, S.; Nemade, V.V.; Nemade, K.H.; Bohra, P.M.; Kartha, S.R.; Chowrasia, M.K. A discussion on mechanical behaviour of Heat-Treated low carbon steel. Mater. Proc. 2022, 63, 362–367. [Google Scholar] [CrossRef]
  23. Mo, D.Y.; Gong, M.F.; Wu, H.B.; Song, R. Surface Modification of 5Cr5MoWSi Steel and Tribological Properties. Mach. Des. Manuf. 2020, 12, 95–99. [Google Scholar]
  24. Li, Y.L.; Bao, H.S.; Li, Q. Effect of Hardness on Rolling Wear Properties of 95Cr18 Steel. Met. Funct. Mater. 2020, 27, 38–45. [Google Scholar]
  25. Jiang, M.M.; Cao, P.; Zhao, Y.H.; Geng, H.R.; Li, J.; Gong, Z.Y. Effect of Different Load and Rotating Speed on Wear Properties of Vacuum-Quenched Cr12MoV Steel. Hot Work. Technol. 2020, 1, 143–146+150. [Google Scholar]
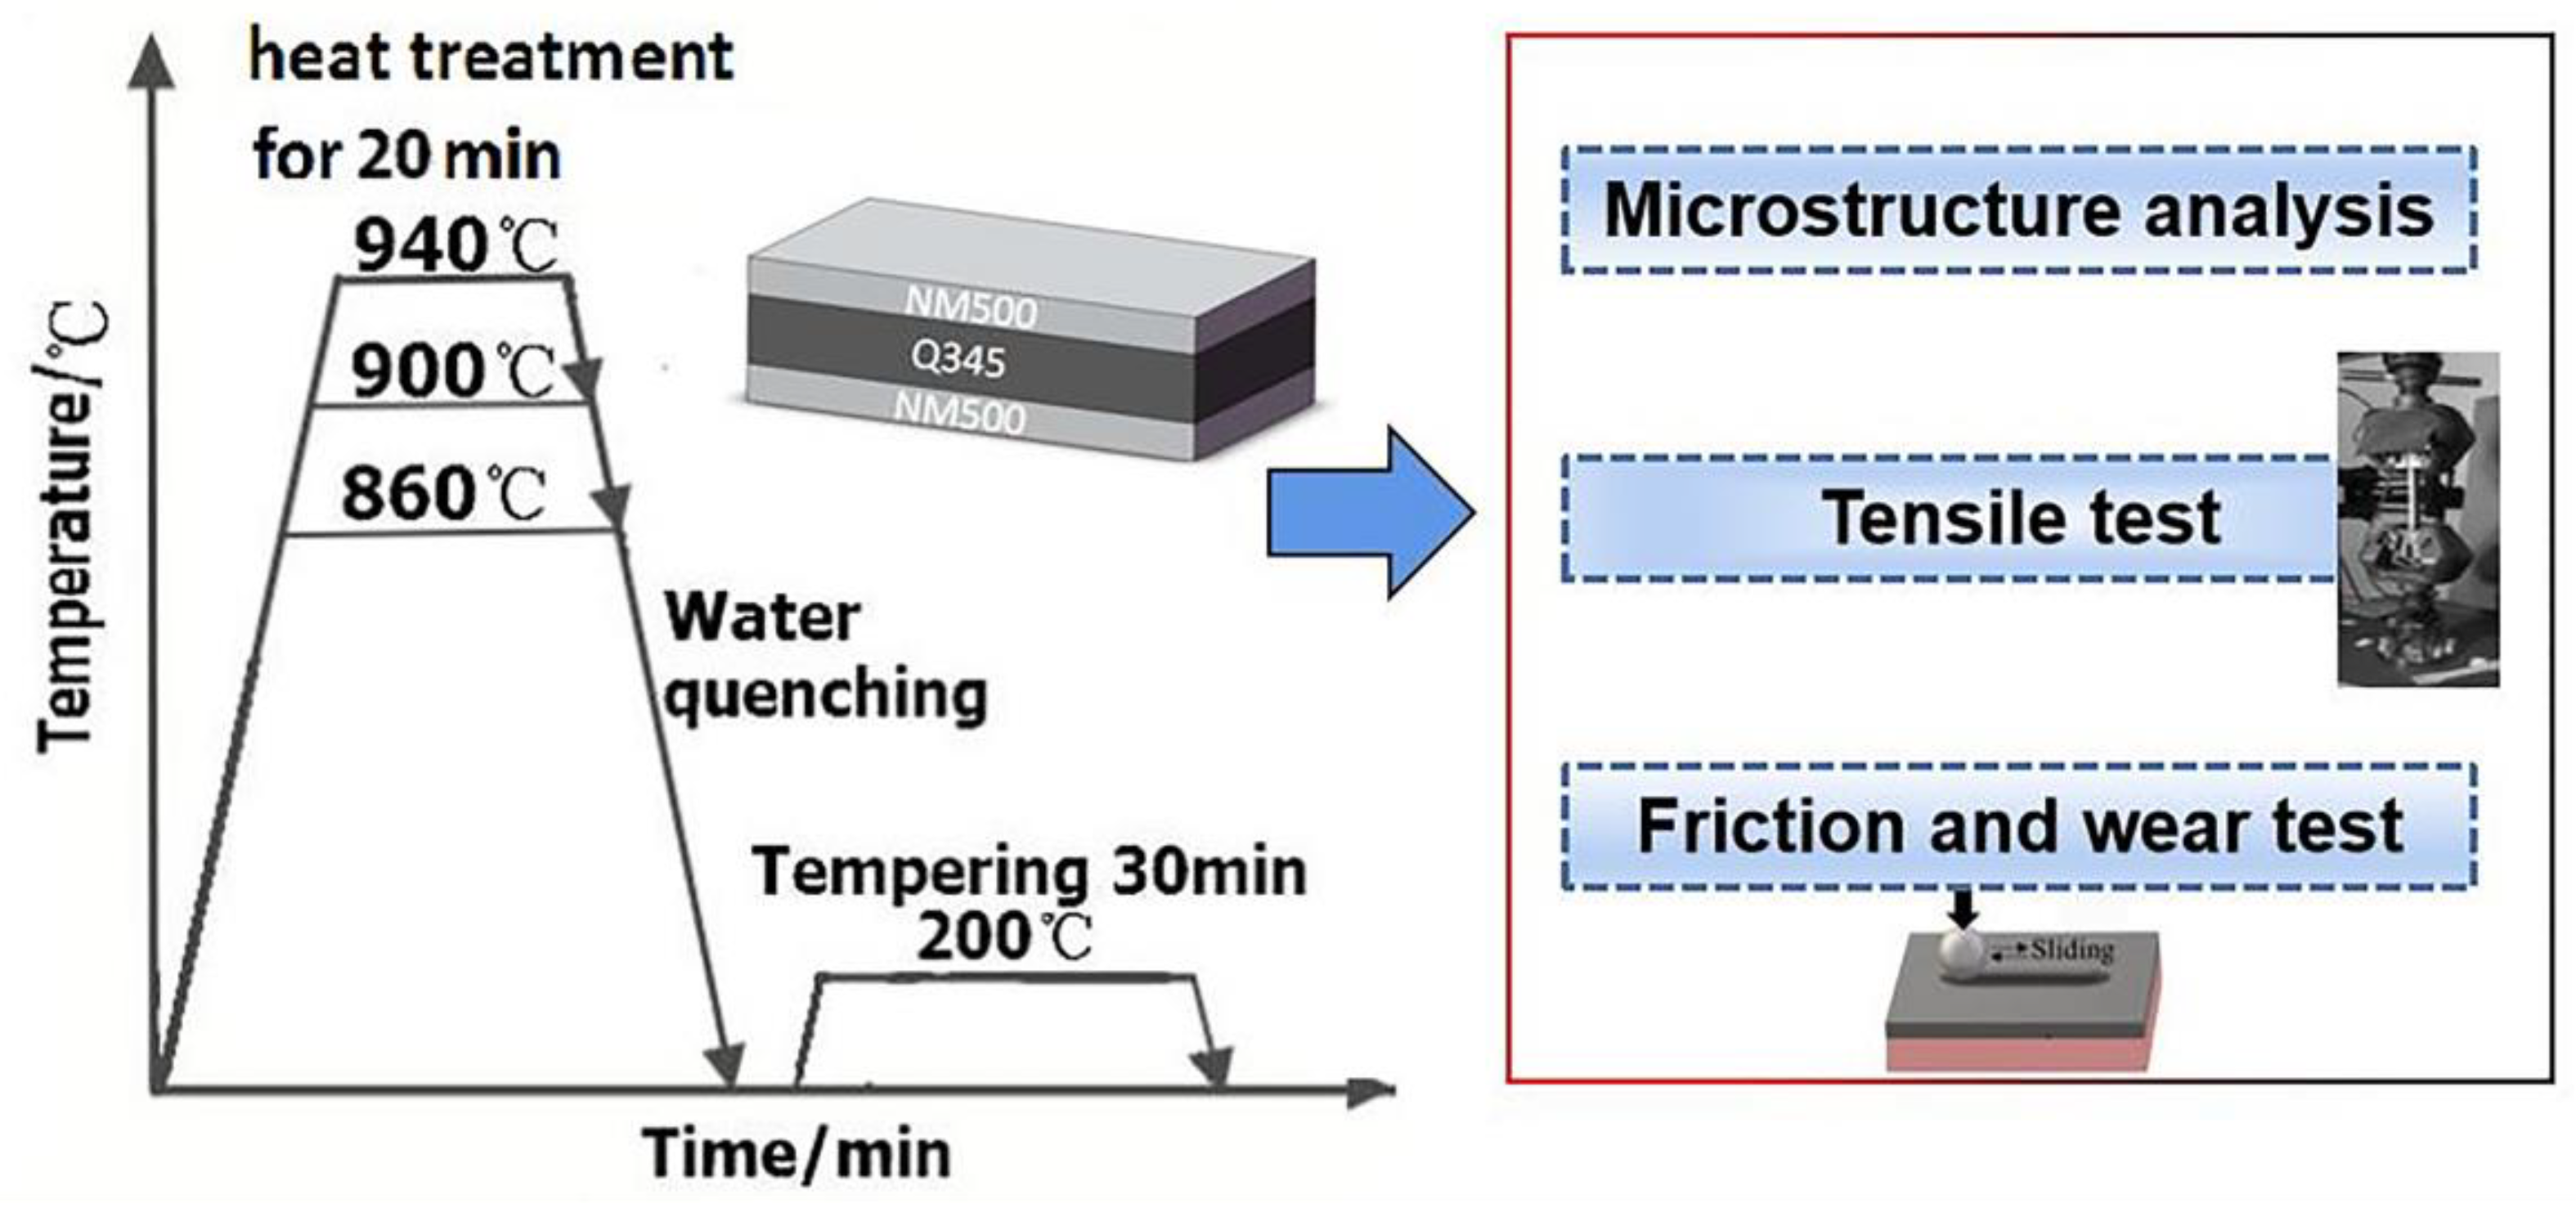
Figure 1. Schematic diagram of the experimental flow.
Crystals 12 01395 g001
Figure 2. Microstructure and EDS of NM500/Q345 composite board in different states: (a) original; (b) 860 °C + 200 °C; (c) 900 °C + 200 °C; (d) 940 °C + 200 °C.
Crystals 12 01395 g002
Figure 3. Microstructure IPF of NM500/Q345 composite board in different states: (a) original; (b) 860 °C + 200 °C; (c) 900 °C + 200 °C; (d) 940 °C + 200 °C.
Crystals 12 01395 g003
Figure 4. Grain boundary dislocation distribution and recrystallization: (a) misorientation scale diagram under different conditions; (b) grain scale diagram in different states.
Crystals 12 01395 g004
Figure 5. TEM image of NM500 of NM500/Q345 composite board at 900 °C + 200 °C: (a) high density dislocations in martensite; (b) acicular and rod-shaped precipitation in martensite.
Crystals 12 01395 g005
Figure 6. Mechanical properties of clad plates tempered at different austenitization temperatures + 200 °C tempering: (a) the data of tensile strength and elongation of clad plate; (b) the hardness of clad plates.
Crystals 12 01395 g006
Figure 7. Fracture morphology of clad plate: (a) 860 °C + 200 °C; (b) 900 °C + 200 °C; (c) 940 °C + 200 °C.
Crystals 12 01395 g007
Figure 8. Friction and wear experimental data of NM500/Q345 clad plate wear—resistant layer (NM500) after austenitization at different temperatures: (a) friction coefficient; (b) wear scar section curve; (c) 3D morphology at 900 °C.
Crystals 12 01395 g008
Figure 9. Wear volume of NM500/Q345 clad plate wear-resistant layer under different states of NM500.
Crystals 12 01395 g009
Table 1. Chemical composition of Q345 (mass fraction) %.
CSiMnPSCrNiMoTiVFe
0.130.441.520.0130.004 Bal
Table 2. Chemical composition of NM500 (mass fraction) %.
CSiMnPSCrNiMoTiBAl
0.380.401.700.0200.0101.201.000.650.0500.000450.010
Publisher’s Note: MDPI stays neutral with regard to jurisdictional claims in published maps and institutional affiliations.