Review

Review on Research and Development of Abrasive Scratching of Hard Brittle Materials and Its Underlying Mechanisms

1
Fair Friend Institute of Intelligent Manufacturing, Hangzhou Vocational & Technical College, Hangzhou 310018, China
2
College of Information and Intelligent Engineering, Zhejiang Wanli University, Ningbo 315100, China
3
School of Energy Science and Engineering, Central South University, Changsha 410083, China
4
College of Mechanical Engineering, Zhejiang University of Technology, Hangzhou 310023, China
5
Key Laboratory of Special Purpose Equipment and Advanced Processing Technology, Zhejiang University of Technology, Ministry of Education, Hangzhou 310023, China
*
Author to whom correspondence should be addressed.
Crystals 2023, 13(3), 428; https://doi.org/10.3390/cryst13030428
Submission received: 16 January 2023 / Revised: 5 February 2023 / Accepted: 6 February 2023 / Published: 2 March 2023
(This article belongs to the Special Issue Processing Technology of Brittle Crystal Materials)

Abstract

:
Hard brittle materials such as ceramics and crystals are commonly utilized in various industries, including information technology, mechanical engineering, and semiconductors. These materials, known for their high brittleness and hardness but low fracture toughness, pose challenges in efficient and high-quality machining. Current abrasive machining techniques involve rough grinding, fine grinding, and polishing processes, with the latter being the most time-consuming and accounting for over half of the total machining time. Improving processing parameters in rough and fine grinding can increase machining efficiency, reduce surface and subsurface damage, and improve workpiece quality, ultimately reducing the polishing time. This paper explores the abrasive scratching of hard brittle materials, examining the nucleation and propagation of cracks causing surface and subsurface damage, and the underlying mechanisms. The research provides suggestions for enhancing abrasive machining efficiency and ensuring the surface quality of hard brittle materials.

1. Introduction

Hard brittle materials, such as ceramics and crystals, have the characteristics of low density, high hardness, and good chemical stability [1], which make them widely used in mechanical engineering, civil engineering, energy, information technology, and other fields, as shown in Figure 1. These materials, known for their high brittleness and hardness but low fracture toughness, pose challenges in efficient and high-quality machining. Abrasive machining technology is one of the commonly used methods to machine these materials.
Currently, abrasive machining of hard brittle materials typically involves rough grinding, fine grinding, and polishing processes. These materials present a complex removal mechanism during grinding due to their disordered network structure at the micro level and homogeneity, continuity, and isotropy at the macro level. Fine grinding and polishing play a crucial role in determining the accuracy and surface quality of the workpiece, which in turn affects its performance. Polishing, which takes up over 60% of the total processing time, is essential for removing the surface and subsurface damage caused by rough and fine grinding [2]. However, hard brittle materials are prone to introducing further damage during grinding, leading to reduced performance and stability, as well as lower coating quality. Hence, it is crucial to obtain workpieces with high surface integrity and low subsurface damage during rough and fine grinding. To achieve this, repeated experimentation and parameter adjustments are required, which can be time-consuming and costly. An alternative approach is abrasive scratching technology, which can efficiently explore the material removal mechanism involved in abrasive grinding and provide guidance for realizing good surface integrity. Molecular dynamics simulation and experimental studies have been used to examine subsurface damage and surface damage, respectively, to validate numerical results and optimize processing parameters [3,4].
Therefore, this paper aims to enhance the machining accuracy and efficiency of hard brittle materials during rough and fine grinding. To achieve this goal, it is essential to comprehend the mechanism behind the formation of surface and subsurface damage in abrasive scratching of these materials, analyze the nucleation and propagation of cracks, investigate the effect of the strain rate and temperature on grinding, and determine the feasible processing parameters for high-speed machining.

2. Abrasive Grinding and Scratching Mechanism of Hard Brittle Materials

The abrasive grinding process, assisted by the grinding wheel, can be seen as a multi-edge cutting process with multiple randomly distributed abrasives on the wheel. However, the different sizes, shapes, uneven distribution, and protrusion heights of these abrasive grains make it challenging to observe and analyze the grinding process through experiments. To understand the mechanism and complexity of the grinding process, a model that discretely views the contact, interaction, and cutting between a single abrasive grain and the workpiece can be utilized to analyze the various physical phenomena involved in the grinding process.
In the grinding of hard brittle materials, there are three stages of contact between the abrasive grain and the workpiece: scratching, ploughing, and cutting [5], as depicted in Figure 2. During the scratching stage, the material experiences elastic deformation without material removal. In the ploughing stage, the material is removed through the plastic removal mode, and in the cutting stage, it is removed through the brittle removal mode. The two forms of material removal are the plastic removal mode and brittle removal mode. The brittle removal mode involves the formation of microcrack chips, resulting in interwoven cracks, but it leaves micro cracks on the workpiece surface and subsurface. Despite this, the brittle removal mode is efficient, as it provides a high material removal rate, particularly for glass materials. Conversely, the plastic removal mode occurs in the plastic domain of the material where the grinding depth is less than the material’s brittle-plastic transition depth. This mode of removal resembles metal processing, producing continuous chips that discharge from the rake face. The plastic removal mode does not cause surface or subsurface damage, making it an ideal method for processing hard brittle materials. In actual grinding processes, both modes are often utilized to reap the benefits of each.
Currently, the investigation of the grinding mechanism for hard brittle materials such as ceramics and crystals is divided into two approaches, one being the mechanical approximation of the indentation process and the other being the approximation of the scratching process [6].
The mechanical approximation of the indentation process views the grinding process between abrasive particles and the workpiece as a pressure by the indenter on the surface of the hard brittle material. This approach, based on indentation fracture mechanics, states that if the normal load applied by the indenter surpasses the workpiece’s critical load capacity, the material will deform and break, resulting in the appearance of brittle cracks. Studies on the generation of cracks during indenter pressing and critical normal loads leading to brittle fractures have been conducted. B. Lawn and D. Marshall established the relationship between the normal load of indenter, material properties, and crack system using contact mechanics and indentation fracture mechanics, and the lateral crack and median/radial crack system were found to induce the elastic/plastic indentation damage in ceramics [7,8]. X. Shi and colleagues obtained the critical normal load value of brittle–ductile transition during indentation experiments on hard brittle materials with a diamond indenter [9]. W. Zhang and team established an Elastic–Plastic–Cracking (EPC) constitutive model to simulate the fracture characteristics of hard brittle materials during indenter pressing, using the Vickers indenter [10]. A. Muchtar and team studied the fracture process of alumina during indentation by the finite element method and analyzed the crack nucleation and propagation under different normal loads, finding that the elastic mismatch between the crack and uncracked zones during unloading is critical for hard brittle materials with minimal plastic deformation [11]. B. Zhang et al. carried out indentation experiments on soda–lime glass using a Vickers indenter and an in-house developed device, discovering that the spacing of the experiments and stress field affect crack nucleation and propagation [12].
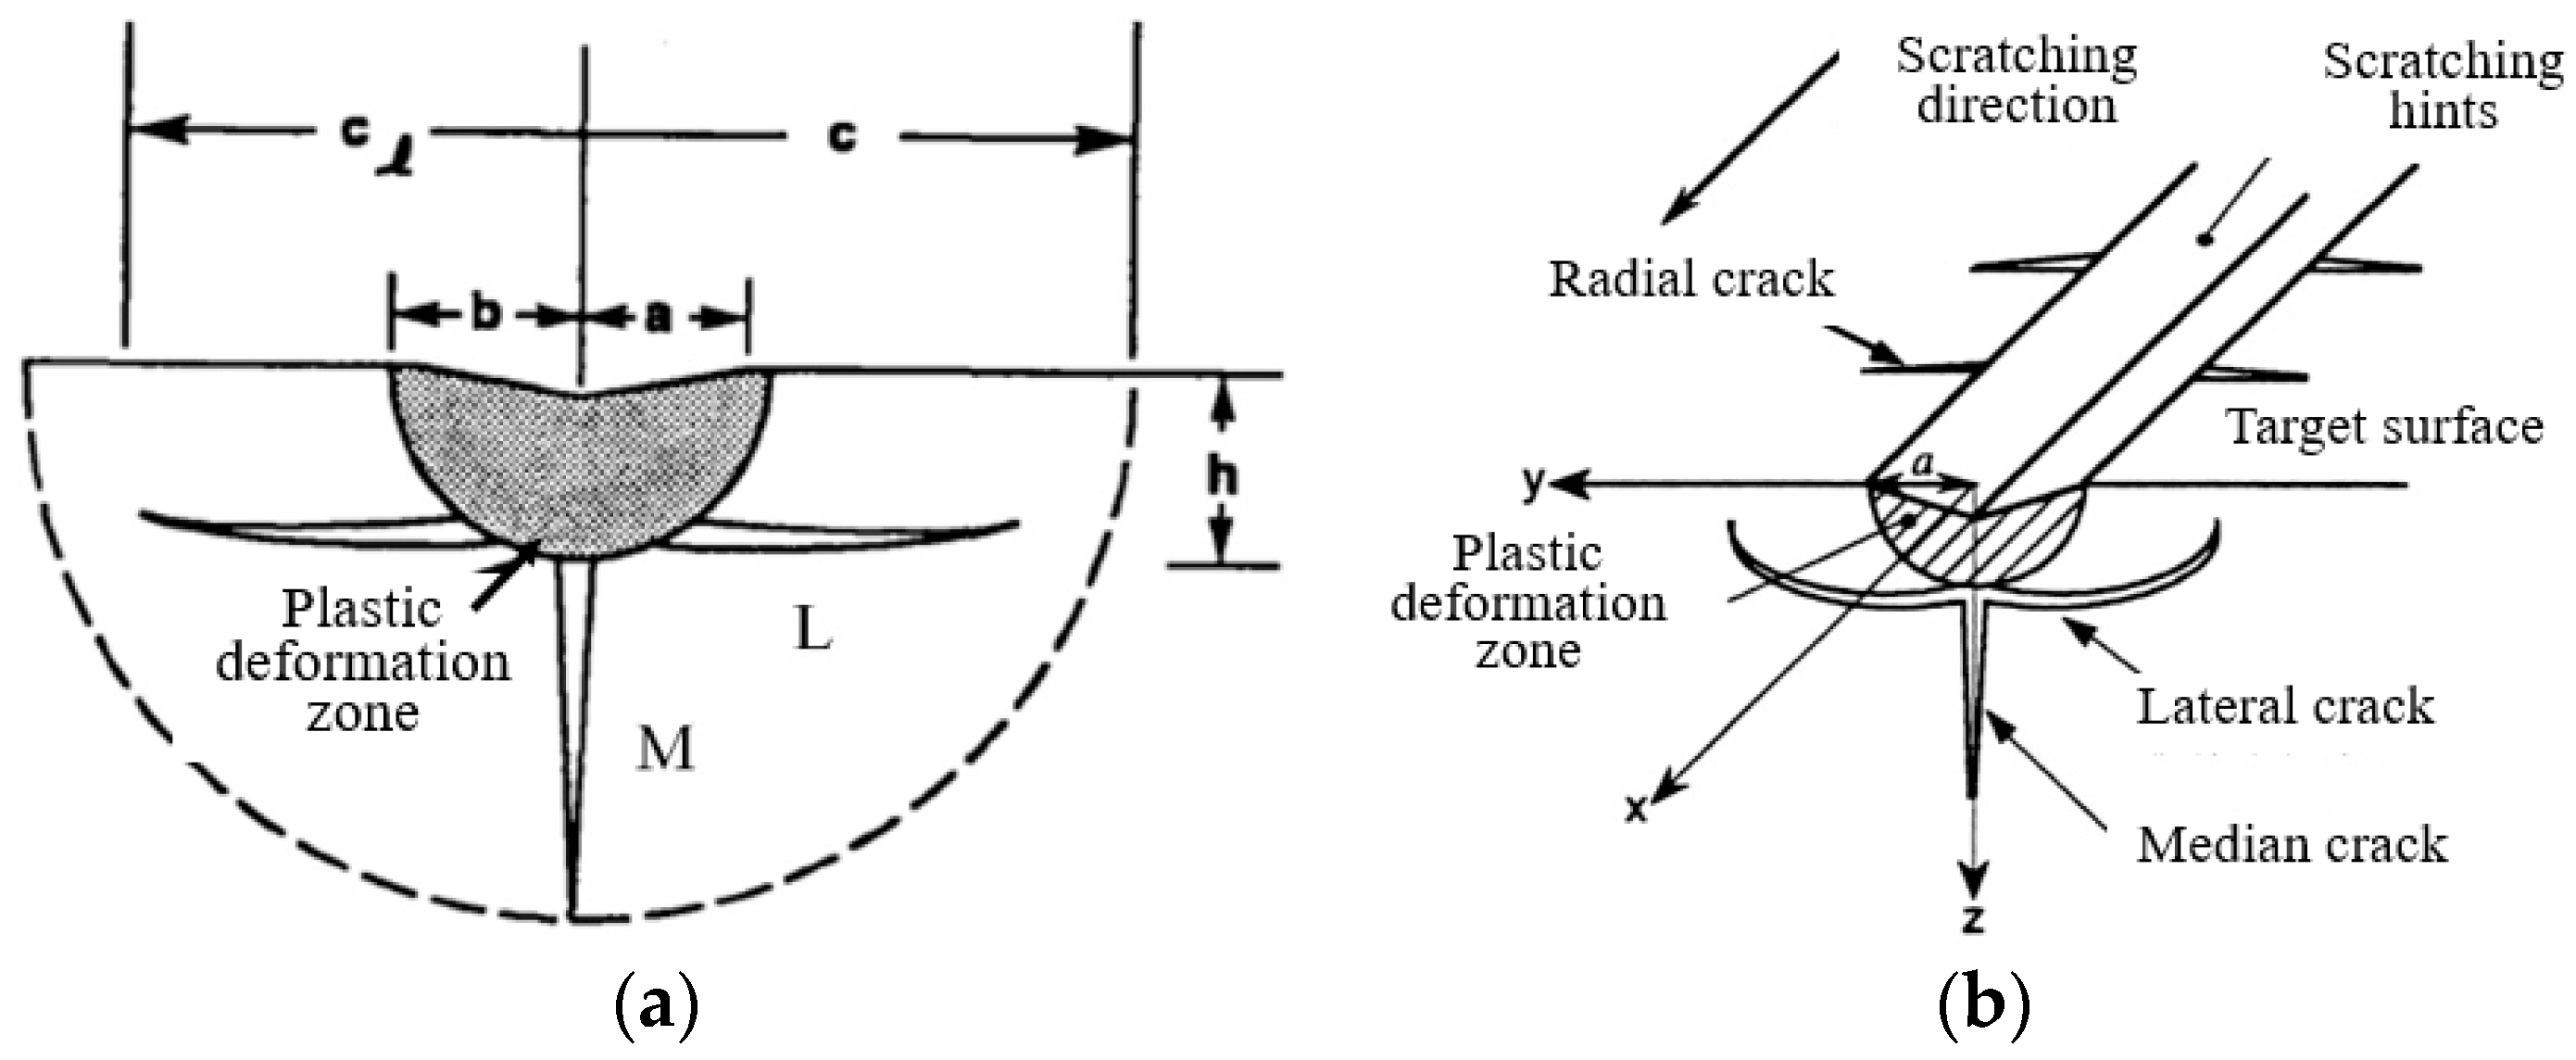
Figure 3a shows that during the indenter pressing process, a plastic deformation zone will form under the indenter, and a median crack (M) and a lateral crack (L) will appear at the edge of the plastic zone [7,8]. Propagation of the median crack will reduce material strength, while migration of the lateral crack to the free surface will result in brittle removal of the material. However, this research approach only takes normal load into account and does not reflect the actual grinding process.
The mechanical approximation of the grinding process views the interaction between the abrasive particles and the workpiece as a process of scratching the hard indenter along the surface of the workpiece with a certain normal force and tangential force. The method is used to study the elastic deformation, plastic flow, and brittle fracture behavior of materials, including hard brittle materials, polymers, and metal materials. Figure 4b shows that the scratches formed by the scratching of the indenter or a single abrasive particle are surrounded by a semi-cylindrical plastic zone, and this zone creates median cracks and lateral cracks at the bottom and radial cracks on the free surface [13].
Research methods for single abrasive grain scratching can be broadly categorized into two types. The first involves simulating abrasive grains on a grinding wheel using regular indenters, such as the Vickers indenter [14,15,16] or Berkovich indenter [17,18], using specialized scratching experimental instruments. The second involves using actual processing tools, such as turning tools, on lathes or five-axis machining centers, to simulate the abrasive grains.
In 1997, V.H. Bulsara et al. [19] conducted scratch experiments on brittle materials, such as soda–lime glass and sapphire, using a Vickers indenter and observed the contact area using a high-definition optical microscope. The experiments revealed the formation of plastic scratches, slip lines, and banded wear particles, and that cracks form in the loading stage and evolve during the loading and unloading stages. K. Li et al. [20] performed similar experiments on soda–lime glass using spherical and conical indenters, finding that the scratch hardness increased and crack density decreased with the increasing scratching speed for the conical indenter. The results for the spherical indenter indicated that the friction was mainly caused by adhesion, with the damage from transitioning from plastic deformation to brittle cracking with the increasing scratch depth. M. Nakamura et al. [21] conducted scratch experiments with varying scratch speeds and depths using a Vickers indenter, observing that subsurface cracks formed before surface cracks and the crack depth increased with the scratch depth. M. Yoshino et al. [22] performed scratch experiments on hard brittle materials, such as soda–lime glass and quartz glass, under hydrostatic pressure using a special experimental device and found that a larger hydrostatic pressure reduced brittle fracture and enhanced plasticity machinability. W. Gu et al. [23] studied the scratch morphology, material removal volume, and depth during scratching by single and double abrasive grains and found that the material removal mechanism varied depending on the removal mode, plastic or brittle. Z. Qiu et al. [24] conducted single-grain and double-grain scratching experiments on glass ceramics and found that the lateral crack extended towards the free surface and the interaction between lateral and radial cracks were the main reasons for material removal. J. Feng et al. [25] performed a single abrasive scratch experiment on BK7 optical glass and found that the half vertex angle of the abrasive particle influenced the number and depth of lateral and radial cracks formed during the scratching process.

3. Elastic Stress Field of Hard Brittle Materials by Single Abrasive Scratching

The single abrasive scratching process is the fundamental of the abrasive machining technology [26]. The relationship between processing parameters in the grinding of hard brittle materials with a grinding wheel and the material removal mechanism is complex. However, the stress state in the grinding wheel–workpiece interaction region is the fundamental factor limiting the process. Researchers frequently employ single-grain scratching tests to examine this process; thus, gaining insight into the stress field during single-grain scratching can deepen our understanding of material removal, crack initiation, and progression in the grinding process.
The elastic stress field generated during scratching can be viewed as an extension of the elastic stress field produced during indentation, incorporating the effect of tangential load. In indentation tests, materials are typically assumed to be incompressible. However, evidence suggests that for hard brittle materials, indenter indentation results in a reduction of material volume through shear deformation and compaction, leading to material densification. The plastic deformation of these materials must consider plastic flow and densification deformation. Plastic flow results in an elastic–plastic mismatch and residual stress, while densification deformation causes volume reduction but no residual stress [27].
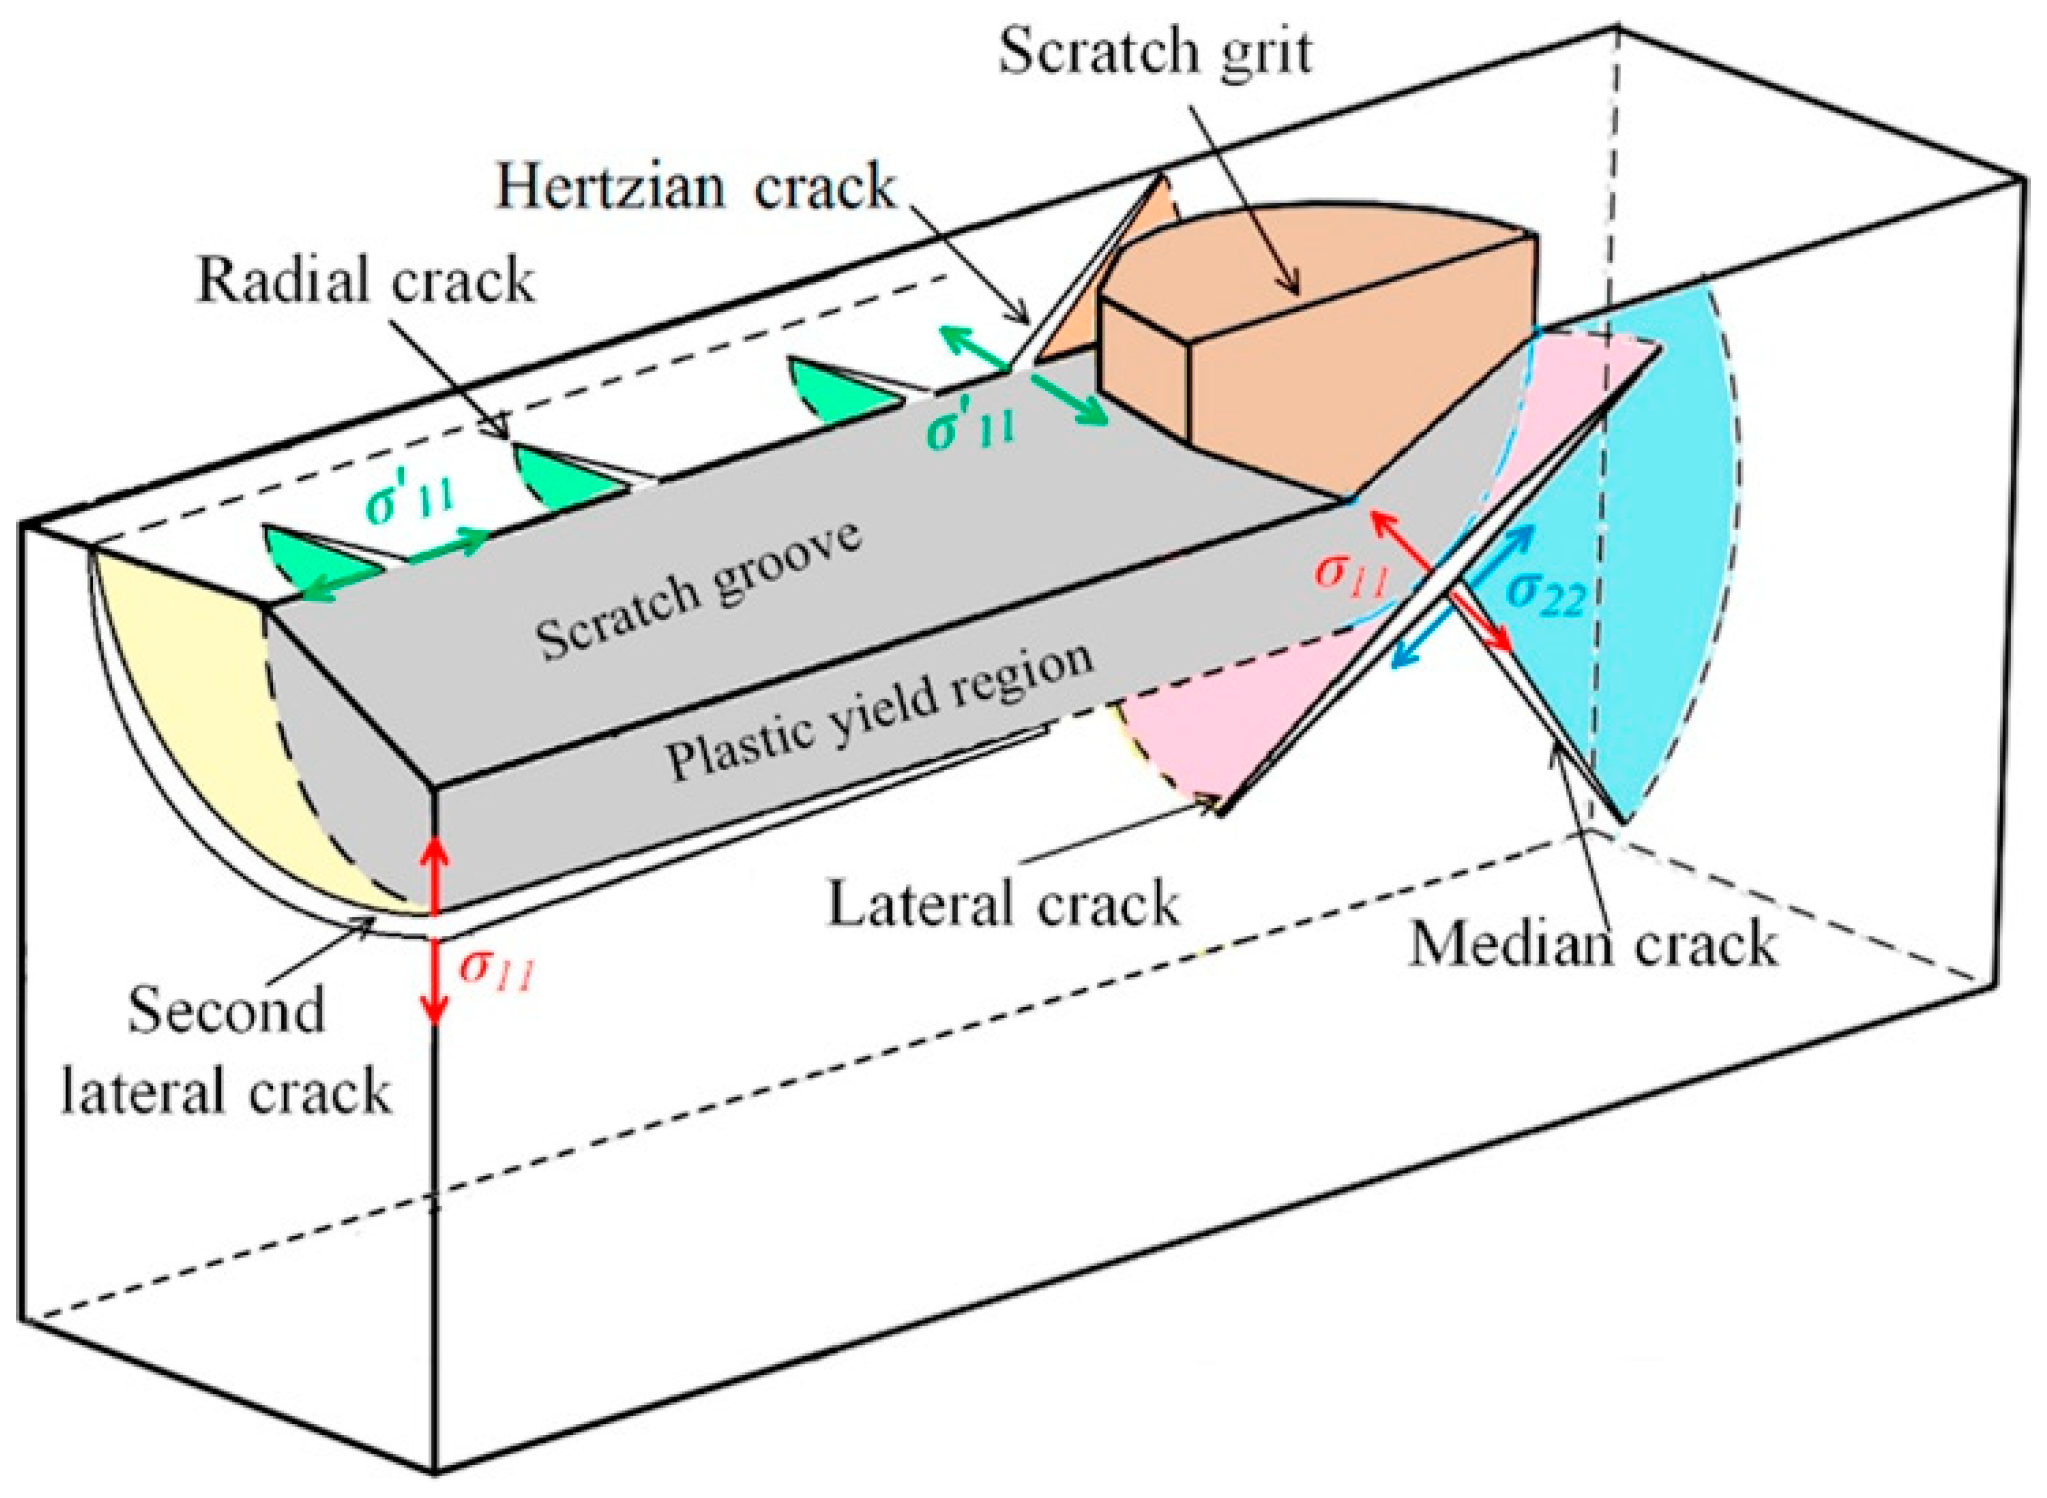
Several studies have explored the elastic stress field during the loading and unloading process of normal loads in contact mechanics. B. Lawn and D. Marshall et al. [7,8,28] considered the contact between a point load and the material surface as an isotropic half-space problem, also known as the Boussinesq problem. E. Yoffe [29] later introduced a model for the elastic stress field in indentation experiments, which takes into account residual stress from densification and shear flow. The model proposes the formation of a rigid plastic core in the material, which generates a strain source, referred to as the Blister stress field. R. Cook and G. Pharr [30] used Yoffe’s model to examine the different types of cracks in brittle materials. Y. Ahn et al. [13] expanded Yoffe’s model to propose the Sliding Blister Field Model (SBFM) for the scratching process of hard brittle materials, considering the superposition of the Boussinesq stress field, the Cerruti stress field, and the moving Blister stress field. B. Lin [31] proposed a similar elastic stress field model for the grinding process of engineering ceramics. X. Jing et al. [32] combined the SBFM with the Expanding Cylindrical Cavity Model (ECCM) to predict the median and lateral cracks in single-abrasive scratching. W. Wang [27] studied the stress state in the contact area during the single abrasive particle scratching experiment. The crack nucleation position and sequence of quartz glass and BK7 glass and its influence on the material removal mechanism were comprehensively studied and the research results of the crack distribution were shown in Figure 4. X. Yang et al. [33] conducted multiple scratching experiments on glass ceramics to examine the effect of the scratching sequence on the material removal mechanism and established a multiple scratching stress field model. They also studied material flow behavior and chip formation during the grinding process of glass-ceramic materials [34].

4. Effect of Strain Rate and Temperature on the Single Abrasive Scratching of Hard Brittle Materials

4.1. Strain Rate

To improve the processing efficiency of hard brittle materials in the grinding stage, it is necessary to improve the grinding speed. Although the existing single-abrasive scratch theoretical models have made great efforts in studying deformation characteristics and the basic mechanism of crack evolution, these analytical models are based on static loading conditions and ignore the influence of the strain rate on plastic deformation, crack nucleation, and propagation. However, the strain rate caused by the scratching speed has a great influence on the material properties, especially the material strength [35,36], and the strength largely determines the deformation behavior and crack evolution of the material [37,38,39].
The strain rate caused by the scratching speed has a significant effect on the material properties. In 2000, C. Gauthier et al. [40] carried out scratching experiments on polymethyl methacrylate (PMMA) at different scratching speeds. The experimental results show that the faster the scratching speed, the higher the scratching hardness of the material. K. Wasmer [41] and P. Haasen [42] consider that the strain rate is related to the plastic deformation of the material and affects the hardness of the material during scratching. In 2020, P. Huang et al. [43] carried out scratch experiments on silicon carbide ceramics at different speeds to study the effect of the strain rate on material behavior and brittle–ductile transition depth. The results show that the microhardness, elastic modulus, and brittle–ductile transition depth of the material increase at high scratching speeds, and the brittle chip and subsurface damage depend on the lateral crack and the median crack, respectively.
Many scholars have also studied the brittle–ductile transition of materials under different strain rates. In 2004, G. Cai et al. [44] carried out ultra-high speed grinding experiments on brittle materials. The results show that under ultra-high speed impacting conditions, brittle materials will undergo plastic flow and lead to material failure. With the increase of grinding speed, the grinding force decreases gradually. They also established a chip formation model under ultra-high speed grinding conditions based on the experimental results. In 2013, P. Feng [45] carried out nano-scratching experiments on Al2O3 and found that the scratch speed has a significant effect on the plastic and brittle deformation characteristics of the material. In 2014, B. Li et al. [46] showed that high-speed grinding can change the contact behavior between brittle materials and abrasive grains, so that the penetration depth increases without brittle cracks. It is proved by simulations and experiments that the brittle–ductile transition depth at a high strain rate is larger than that under quasi-static conditions. In 2017, K. Mukaiyama et al. [47] studied the brittle–ductile transition of monocrystalline silicon at different scratching speeds and found that increasing the scratching speed resulted in a decrease in the transverse force during the brittle–ductile transition.
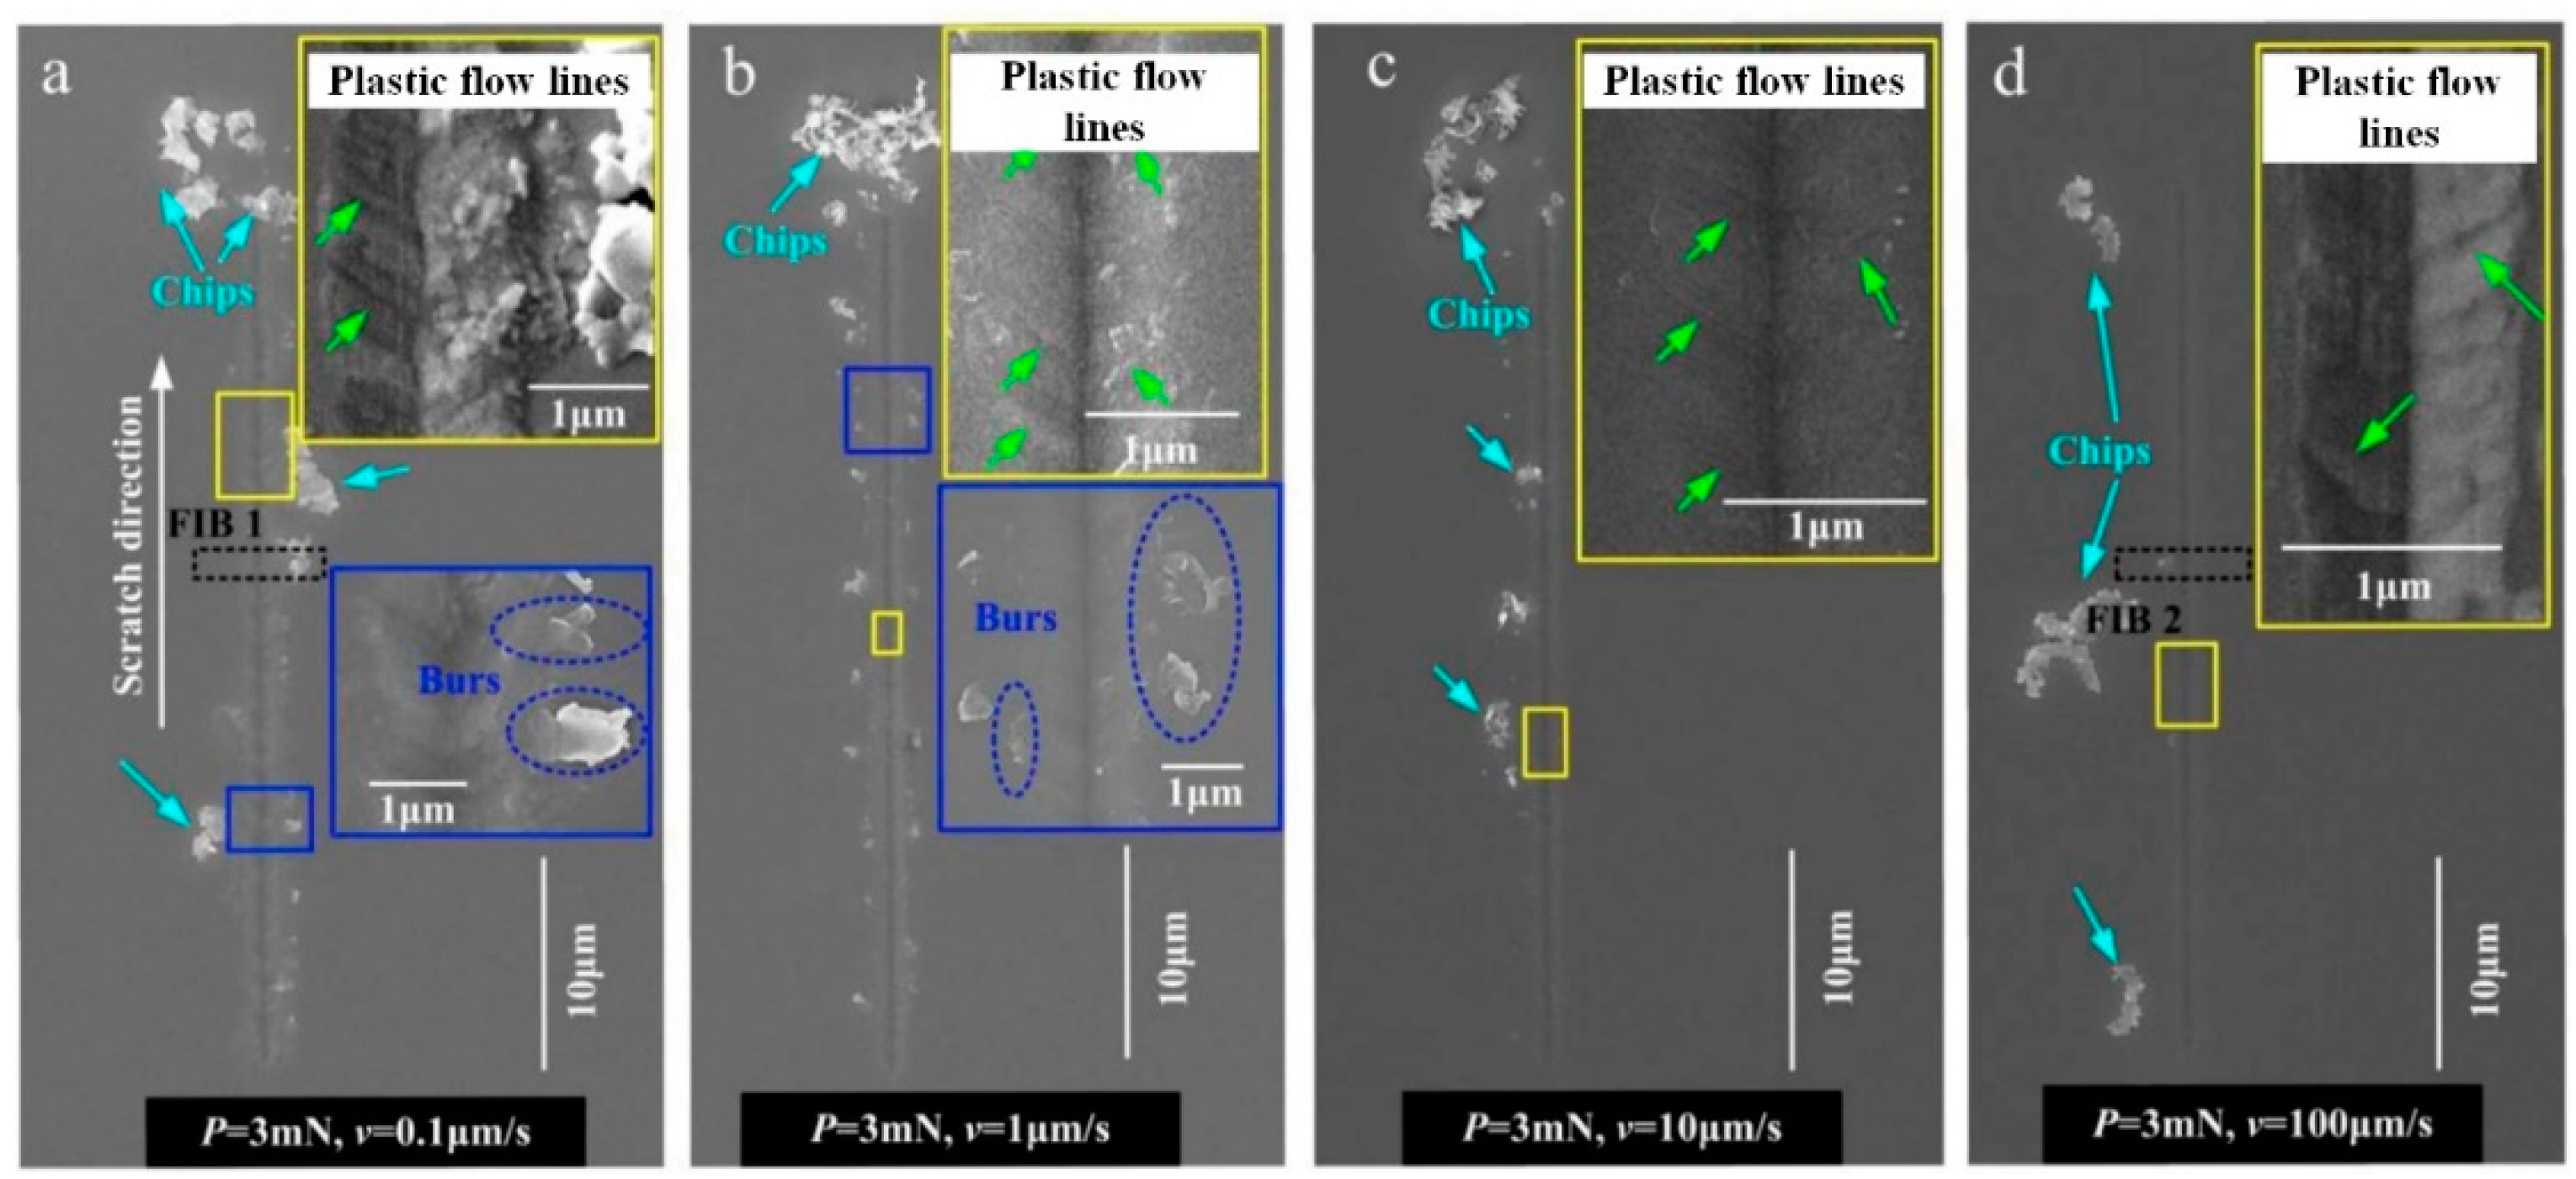
The strain rate has a significant impact on the surface and subsurface damage in hard, brittle materials. In 2017, Yang et al. [48] proposed a new stress field model that considers the relationship between the strain rate and material properties, revealing the effect of scratching speed and strain rate on plastic deformation and crack formation. Scratching experiments on glass ceramics showed that with increasing scratching speed, the radius of plastic deformation and median crack length decrease, while the depth of the brittle–ductile transition increases. In 2019, Li et al. [49] conducted nano-scratching experiments at different speeds on GGG single crystal to study the effect of the strain rate on surface and subsurface deformation, as shown in Figure 5. The results showed that higher scratching speed leads to a shallower penetration depth and larger continuous chips, improving the plasticity of GGG single crystal and reducing the depth of the brittle–ductile transition. The authors also established a penetration depth prediction model incorporating strain rate and material elastic rebound, with results that agree well with experiments.
B. Zhang [50] comprehensively studied the strain rate effect in ultra-high speed machining. They proposed that the depth of the material processing damage decreased with the increase of the processing strain rate, showing a ‘skin effect’. Ultra-high speed machining can improve the strain rate of the material in the machining area, reduce the depth of machining damage, improve the machining surface integrity, and greatly improve the material processing efficiency. The increase of strain rate during loading will lead to the increase of yield strength and hardness of the material, and the decrease of toughness of the material, which leads to the embrittlement of the material. The embrittlement of brittle materials at high strain rates is related to dislocation pile-ups, and the damage introduced in the grinding of ceramic materials at high strain rates is small [51].

4.2. Temperature

The grinding process is essentially a random comprehensive process of material removal caused by scratching, ploughing, and cutting of the material on the target surface by countless randomly distributed abrasive grains on the grinding wheel. Grinding heat will be generated during the contact between these abrasive grains and the workpiece, and the grinding heat will cause the workpiece surface temperature to rise. At this time, all the abrasive grains involved in the grinding of the grinding wheel–workpiece contact area can be regarded as a single point heat source that continuously emits heat, and the result of the combined action of these point heat sources will cause the increase of temperature in the grinding wheel–workpiece contact area. The physical quantities on the grinding temperature include the total temperature rise of the workpiece, temperature of the grinding wheel–workpiece contact surface, the grinding surface temperature of the workpiece, and the grinding point temperature of the abrasive grain. The overall temperature rise of the workpiece is determined by the part of the grinding heat introduced into the workpiece. This part of the grinding heat will cause the thermal expansion and distortion of the workpiece, resulting in a decrease in size and shape accuracy, and may lead to changes in the mechanical properties of the material. The grinding wheel–workpiece contact surface temperature will affect the quality of the workpiece surface, and the surface temperature of the workpiece grinding affects the surface metamorphic layer of parts, such as the surface residual stress, crack distribution, etc. The grinding point temperature of the abrasive grain is the temperature of the small area directly acting on the rake face of the abrasive grain and the workpiece. It is often the area with the highest grinding temperature, which will affect the life of the abrasive grain and the chemical reaction between the abrasive grain and the target material [52].
Many scholars have proposed theoretical models for the heat transfer in the grinding zone to explore the heat generation and transfer process during the grinding process and predict the workpiece temperature to avoid thermal damage. Many theoretical models of grinding heat are based on the moving heat source model proposed by J. C. Jaeger [53]. In 1962, R. Hahn [54] found that most of the grinding heat was generated in the scratching stage during the contact between the abrasive particles and the workpiece. He believed that the contact area between the grinding wheel and the workpiece was a heat source, and the heat flux evenly distributed in the grinding area moved on the adiabatic surface at the workpiece in a given feed rate. In 1995, C. Guo et al. [55] proposed a heat source model with a linear increase in heat flux, and this model assumes that the heat flux is approximately proportional to the undeformed chip thickness, where the heat flux at the rear of the contact area is greater than the heat flux at the front. For high-efficiency deep grinding, in 2001, W.B. Rowe and T. Jin [56] considered that the wheel–workpiece contact surface is a moving heat source with a linear increase in heat flux or a horizontal circular arc distribution, because in high-efficiency deep grinding, the grinding depth tends to reach about 10 mm, and the wheel–workpiece contact area is no longer a horizontal plane. The model proposed by T. Jin and G. Cai [57] regards the heat flux distribution of the moving heat source as an inclined uniform distribution. Compared with other models, this model is more suitable for creep feed grinding, and Rowe’s inclined triangular heat flux density heat source model is more accurate for the temperature prediction of the workpiece surface in high-efficiency deep grinding.
Scholars have also studied the distribution of grinding heat, which includes the percentage of heat flowing into cutting fluid, chips, grinding wheels, and workpieces. In 1970, N. DesRuisseaux and R. Zerkle [58] used the convective heat flux uniformly distributed on the entire workpiece surface to describe the convective cooling effect of the cutting fluid. In 1971, S. Malkin and N. Cook [59] found that the chip will not melt before leaving the workpiece during the grinding process, so the heat flow into the chip will be limited by the melting energy of the chip. In 1994, C. Guo and S. Malkin [60] performed a transient thermal analysis based on the critical temperature of cutting fluid boiling to predict burn heat flux. In 2004, Z. Hou et al. [61] also proposed a micro-scale thermodynamic model, which takes into account the distribution of abrasive grains on the surface of the grinding wheel. The accuracy of the model was verified by experiments as well. In 2013, W. Rowe [62] conducted a shallow grinding experiment to measure these values and verify the related models.
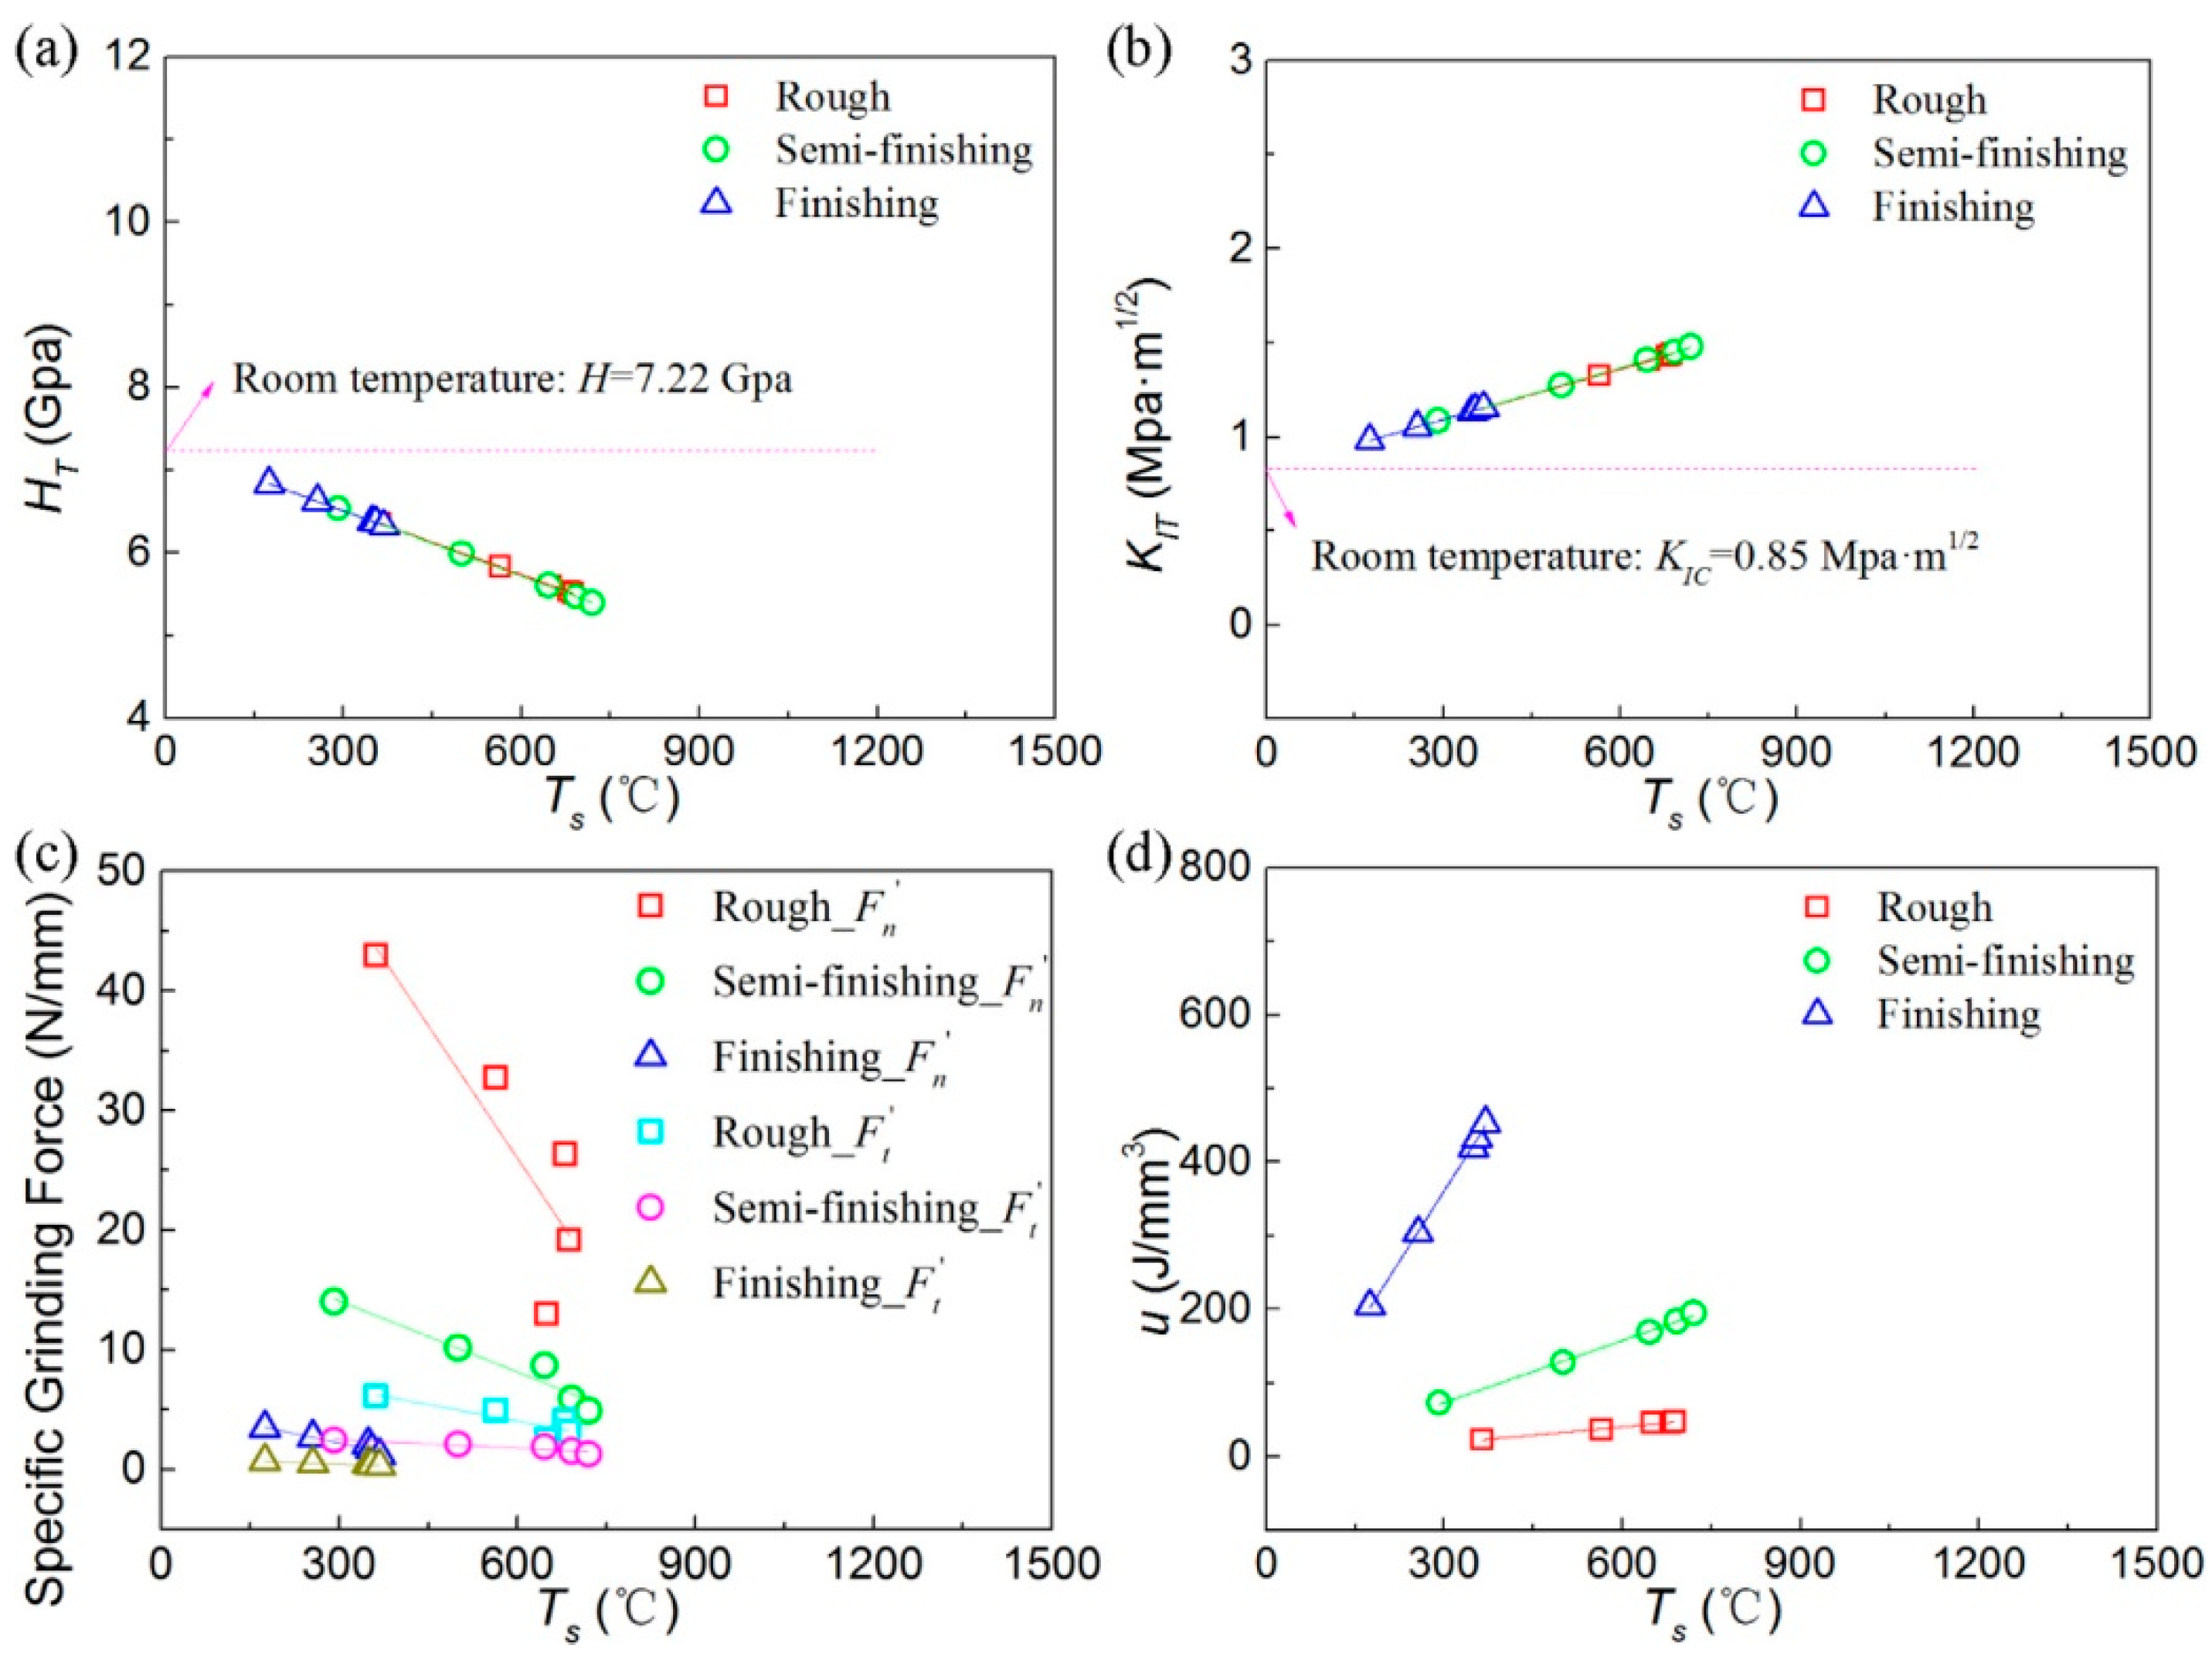
The processing of hard brittle materials at high temperatures is often considered as an effective way to improve the machinability of hard brittle materials. In 2004, M. Michel et al. [63] conducted indentation experiments on soda–lime glass at different temperatures and different loads with a Vickers indenter. The results show that the hardness of the material decreases with the increase of temperature, and the radial crack length increases with the increase of temperature, but high temperatures can inhibit the propagation of the median crack. In 2006, the scholar carried out high temperature indentation experiments and analysis on fused silica glass. The research showed that with the increase of temperature, the load required for radial crack nucleation gradually increased [64]. In 2016, W. Wang et al. [17] carried out high temperature indentation experiments and high temperature grinding wheel experiments on fused silica. The results show that the molecular structure of the fused silica is dense under suitable high temperature conditions. Under the same indentation load, the critical brittle–ductile transition load of the fused silica at a high temperature is higher than that at room temperature, which is beneficial to the plastic domain processing of materials. High temperatures can improve the shear flow of fused silica and prevent crack nucleation and propagation. Under high temperature conditions, a larger grinding thickness is beneficial to directly remove the subsurface cracks generated in the previous machining process at one time, so as to obtain lower surface roughness and better surface integrity. However, excessive grinding thickness will cause grinding wheel burns as well. In 2019, X. Rao et al. [65] carried out the indentation test of reaction sintered silicon carbide RB-SiC ceramics from room temperature to 1200 °C by laser heating, and studied the influence of temperature on the hardness, elastic modulus, and fracture toughness of the material. The results show that with the increase of temperature, the permanent deformation of the material leads to the decrease of the hardness of the material, and the elastic modulus decreases and the fracture toughness increases with the increase of contact depth. After that, they also carried out scratching experiments on a RB-SiC ceramic Vickers indenter at a high temperature, and observed the material removal behavior, scratch hardness, critical depth of the brittle–ductile transition, scratch force, and friction force during scratching. The results show that under high temperature processing conditions, the material deformation and adhesion behavior promote the removal of the plastic zone and increase the friction coefficient [15]. Z. Li et al. [66] used laser-assisted grinding to study the material removal mechanism, grinding force ratio, and surface integrity of RB-SiC ceramics during grinding. The research shows that a higher processing temperature changes the material structure, decreases the hardness, promotes the plastic removal of the material, and obtains better surface integrity. In 2020, P. Li et al. [14] studied the effect of temperature on the subsurface damage of optical glass grinding. The results show that with the increase of abrasive temperature and strain rate in the grinding zone, the fracture toughness of the material increases, the microhardness decreases, and the subsurface damage decreases, as shown in Figure 6. In 2021, Y. Niu et al. [67] simulated the scratch behavior of monocrystalline silicon at different temperatures by molecular dynamics, and studied the subsurface damage mechanism, scratch force, and phase transition. The results show that the scratch force at a high temperature is smaller and the material removal rate is higher. In summary, the above studies on the effect of the strain rate and temperature on the single abrasive scratching of hard brittle materials are generally based on theoretical and experimental methods, limited studies have contributed to the numerical modelling and analysis of this effect, and the numerical method has been extensively used in exploring the abrasive machining process and its underlying mechanisms [68,69,70,71,72]. It is also noted that with the development of the high-tech machining and measuring technologies understanding the abrasive scratching of hard brittle materials and associated mechanisms is beneficial for extending its applications in other aspects [73,74,75,76].

5. Conclusions

Hard brittle materials such as ceramics and crystals are known for their high hardness, brittleness, and low fracture toughness, making them challenging to machines. Common processing methods include rough grinding, fine grinding, and polishing, and it is important to reduce surface and subsurface damage during the grinding stage to improve the processing efficiency and reduce costs. This study examines the stress field distribution in the single abrasive scratching of hard brittle materials and investigates the effect of the scratching speed and grinding temperature on surface and subsurface damage. The feasibility of high-speed grinding of hard brittle materials is also evaluated.
This paper presents an investigation into the stress field distribution in the single abrasive grain scratching of hard brittle materials. It seeks to reduce surface and subsurface damage in the grinding stage to improve the processing efficiency and reduce costs. The study explores the impact of scratching speed and grinding temperature on damage and verifies the feasibility of high-speed grinding. The results suggest that the efficient reduction of damage in the grinding stage can minimize the need for polishing and reduce the time and cost of this process. The paper proposes an elastic stress field model and a principal stress and hardness ratio model to simulate the distribution of stress and the formation of surface and subsurface cracks. The study also indicates that high-speed or ultra-high-speed grinding can improve processing efficiency, reduce surface roughness, and limit crack formation. Finally, the paper proposes a subsurface damage prediction model and highlights the benefits of increasing the grinding speed in reducing normal and tangential grinding forces and extending the processing life of abrasive grains or grinding wheels.
In this review, a stress field model, a ratio model of principal stress to hardness in rectangular coordinates, and a subsurface damage prediction model taking into account the strain rate and grinding temperature for hard brittle materials during single abrasive scratching has been presented. However, there are still areas for further investigation, which include:
(1)
In the calculation of the stress field model and principal stress–hardness ratio model for the single abrasive scratching of hard brittle materials, the abrasive was idealized as a sharp indenter and the force on the workpiece was treated as a point load. However, in actual single abrasive scratching, the contact between the abrasive and the workpiece is usually surface contact between the abrasive rake face and the workpiece surface. Further study is necessary to better understand the nature of this contact and improve the model accordingly.
(2)
This study considered the impact of grinding temperature on the abrasive grain–workpiece contact area. However, the grinding area temperature was not directly measured during the experiments, and the temperature calculation model was not verified, leading to potential inaccuracies in the subsurface damage model calculation. Further research should focus on verifying the temperature calculation model through experimentation.

Author Contributions

Conceptualization, H.Q. (Huina Qian) and Q.T.; data curation, M.C. and H.Q. (Huina Qian); formal analysis, M.C. and Q.T.; funding acquisition, H.Q. (Huan Qi) and X.S.; investigation, M.C. and Z.Q.; project administration, H.Q. (Huan Qi) and L.Z.; supervision, X.S. and L.Z.; writing—original draft, Z.Q. and H.Q. (Huina Qian); writing—review and editing, X.S. All authors have read and agreed to the published version of the manuscript.

Funding

This research was funded by the Key Research and Development Program of Zhejiang Province (2021C04011), and National Natural Science Foundation of China (51575493).

Data Availability Statement

Data sharing not applicable.

Conflicts of Interest

The authors declare that the research was conducted in the absence of any commercial or financial relationships that could be construed as a potential conflict of interest.

References

  1. Li, C.; Piao, Y.; Meng, B.; Hu, Y.; Li, L.; Zhang, F. Phase transition and plastic deformation mechanisms induced by self-rotating grinding of GaN single crystals. Int. J. Mach. Tools Manuf. 2022, 172, 103827. [Google Scholar] [CrossRef]
  2. Evans, C.; Paul, E.; Dornfeld, D.; Lucca, D.; Byrne, G.; Tricard, M.; Klocke, F.; Dambon, O.; Mullany, B. Material removal mechanisms in lapping and polishing. CIRP Ann. 2003, 52, 611–633. [Google Scholar] [CrossRef]
  3. Li, C.; Hu, Y.; Zhang, F.; Geng, Y.; Meng, B. Molecular dynamics simulation of laser assisted grinding of GaN crystals. Int. J. Mech. Sci. 2023, 239, 107856. [Google Scholar] [CrossRef]
  4. Li, C.; Piao, Y.; Zhang, F.; Zhang, Y.; Hu, Y.; Wang, Y. Understand anisotropy dependence of damage evolution and material removal during nanoscratch of MgF2 single crystals. Int. J. Extrem. Manuf. 2023, 5, 015101. [Google Scholar] [CrossRef]
  5. Li, H.N.; Axinte, D. On a stochastically grain-discretised model for 2D/3D temperature mapping prediction in grinding. Int. J. Mach. Tools Manuf. 2017, 116, 60–76. [Google Scholar] [CrossRef]
  6. Qi, H.; Wang, Y.; Qi, Z.; Shi, L.; Fang, Z.; Zhang, L.; Riemer, O.; Karpuschewski, B. A Novel Grain-Based DEM Model for Evaluating Surface Integrity in Scratching of RB-SiC Ceramics. Materials 2022, 15, 8486. [Google Scholar] [CrossRef]
  7. Marshall, D.; Lawn, B.; Evans, A. Elastic/plastic indentation damage in ceramics: The lateral crack system. J. Am. Ceram. Soc. 1982, 65, 561–566. [Google Scholar] [CrossRef]
  8. Lawn, B.R.; Evans, A.G.; Marschall, D. Elastic/plastic indentation damage in ceramics: The median/radial crack system. J. Am. Ceram. Soc. 1980, 63, 574–581. [Google Scholar] [CrossRef]
  9. Shi, X.K.; Teng, L.; Li, Y.Q. The critical condition of ductile grinding of hard brittle materials. Aviat. Precis. Manuf. Technol. 1996, 4, 10–13. [Google Scholar]
  10. Zhang, W.; Subhash, G. An elastic–plastic-cracking model for finite element analysis of indentation cracking in brittle materials. Int. J. Solids Struct. 2001, 38, 5893–5913. [Google Scholar] [CrossRef]
  11. Muchtar, A.; Lim, L.C.; Lee, K.H. Finite element analysis of vickers indentation cracking processes in brittle solids using elements exhibiting cohesive post-failure behaviour. J. Mater. Sci. 2003, 38, 235–243. [Google Scholar] [CrossRef]
  12. Zhang, B.; Yoshioka, M.; Hira, S. Experimental observation and numerical analysis of cracking phenomena in adjoining Vickers indentations on glass surface—ScienceDirect. J. Mater. Process. Technol. 2008, 208, 171–178. [Google Scholar] [CrossRef]
  13. Ahn, Y.; Farris, T.; Chandrasekar, S. Sliding microindentation fracture of brittle materials: Role of elastic stress fields. Mech. Mater. 1998, 29, 143–152. [Google Scholar] [CrossRef]
  14. Li, P.; Chen, S.; Xiao, H.; Chen, Z.; Qu, M.; Dai, H.; Jin, T. Effects of local strain rate and temperature on the workpiece subsurface damage in grinding of optical glass. Int. J. Mech. Sci. 2020, 182, 105737. [Google Scholar] [CrossRef]
  15. Rao, X.; Zhang, F.; Luo, X.; Ding, F.; Cai, Y.; Sun, J.; Liu, H. Material removal mode and friction behaviour of RB-SiC ceramics during scratching at elevated temperatures. J. Eur. Ceram. Soc. 2019, 39, 3534–3545. [Google Scholar] [CrossRef]
  16. Sellappan, P.; Rouxel, T.; Celarie, F.; Becker, E.; Houizot, P.; Conradt, R.J. Composition dependence of indentation deformation and indentation cracking in glass. Acta Mater. 2013, 61, 5949–5965. [Google Scholar] [CrossRef]
  17. Wang, W.; Yao, P.; Wang, J.; Huang, C.; Zhu, H.; Zou, B.; Liu, H.; Yan, J. Crack-free ductile mode grinding of fused silica under controllable dry grinding conditions. Int. J. Mach. Tools Manuf. 2016, 109, 126–136. [Google Scholar] [CrossRef]
  18. Meng, B.; Zhang, F.; Li, Z. Deformation and removal characteristics in nanoscratching of 6H-SiC with Berkovich indenter. Mater. Sci. Semicond. Process. 2015, 31, 160–165. [Google Scholar] [CrossRef]
  19. Bulsara, V.H.; Chandrasekar, S. Direct observation of contact damage around scratches in brittle solids. In Proceedings of the SPIE—The International Society for Optical Engineering, Orlando, FL, USA, 20–25 April 1997; Volume 3060. [Google Scholar]
  20. Li, K.; Shapiro, Y.; Li, J.C.M. Scratch tests of soda-lime glass. Acta Mater. 1998, 46, 5569–5578. [Google Scholar] [CrossRef]
  21. Nakamura, M.; Sumomogi, T.; Endo, T. Evaluation of surface and subsurface cracks on nano-scale machined brittle materials by scanning force microscope and scanning laser microscope. Surf. Coat. Technol. 2003, 169, 743–747. [Google Scholar] [CrossRef]
  22. Yoshino, M.; Ogawa, Y.; Aravindan, S. Machining of hard-brittle materials by a single point tool under external hydrostatic pressure. J. Manuf. Sci. Eng. 2005, 127, 837–845. [Google Scholar] [CrossRef]
  23. Gu, W.; Yao, Z.; Liang, X. Material removal of optical glass BK7 during single and double scratch tests. Wear 2011, 270, 241–246. [Google Scholar] [CrossRef]
  24. Qiu, Z.; Liu, C.; Wang, H.; Yang, X.; Fang, F.; Tang, J. Crack propagation and the material removal mechanism of glass–ceramics by the scratch test. J. Mech. Behav. Biomed. Mater. 2016, 64, 75–85. [Google Scholar] [CrossRef] [PubMed]
  25. Feng, J.; Wan, Z.; Wang, W.; Ding, X.; Tang, Y. Crack behaviors of optical glass BK7 during scratch tests under different tool apex angles. Wear 2019, 430–431, 299–308. [Google Scholar] [CrossRef]
  26. Ji, R.Q.; Qi, Z.J.; Chen, J.C.; Zhang, L.; Lin, K.F.; Lu, S.S.; Li, Y.B. Numerical and experimental investigation on the abrasive flow machining of artificial knee joint surface. Crystals 2023, 13, 430. [Google Scholar]
  27. Wang, W. High Efficiency Controllable Precision Grinding Mechanisms of Fused Silica. Ph.D. Thesis, Shandong University, Jinan, China, 2017. [Google Scholar]
  28. Lawn, B.; Swain, M. Microfracture beneath point indentations in brittle solids. J. Mater. Sci. 1975, 10, 113–122. [Google Scholar] [CrossRef]
  29. Yoffe, E. Elastic stress fields caused by indenting brittle materials. Philos. Mag. A 1982, 46, 617–628. [Google Scholar] [CrossRef]
  30. Cook, R.F.; Pharr, G.M. Direct observation and analysis of indentation cracking in glasses and ceramics. J. Am. Ceram. Soc. 1990, 73, 787–817. [Google Scholar] [CrossRef]
  31. Lin, B. Theoretical and Experimental Studies on the Ultra-precision Grinding of Engineering Ceramics. Doctoral Thesis, Tianjin University, Tianjin, China, 1999. [Google Scholar]
  32. Jing, X.; Maiti, S.; Subhash, G. A new analytical model for estimation of scratch-induced damage in brittle solids. J. Am. Ceram. Soc. 2007, 90, 885–892. [Google Scholar] [CrossRef]
  33. Yang, X.; Qiu, Z.; Li, X. Investigation of scratching sequence influence on material removal mechanism of glass-ceramics by the multiple scratch tests. Ceram. Int. 2019, 45, 861–873. [Google Scholar] [CrossRef]
  34. Yang, X.; Qiu, Z.; Wang, Y. Investigation of material flow behaviour and chip formation mechanism during grinding of glass-ceramics by nanoscratch. Ceram. Int. 2019, 45, 15954–15963. [Google Scholar] [CrossRef]
  35. Yuan, H.Y.; Yang, W.B.; Zhang, L.; Hong, T. Model development of stress intensity factor on 7057T6 aluminum alloy using extended finite element method. Coatings 2023, 13, 581. [Google Scholar]
  36. Xie, X.D.; Zhang, L.; Zhu, L.L.; Li, Y.B.; Hong, T.; Yang, W.B.; Shan, X.H. State of the art and perspectives on surface strengthening process and associated mechanisms by shot peening. Coatings 2023, 13. [Google Scholar]
  37. Qi, H.; Shi, L.; Teng, Q.; Hong, T.; Tangwarodomnukun, V.; Liu, G.; Li, H.N. Subsurface damage evaluation in the single abrasive scratching of BK7 glass by considering coupling effect of strain rate and temperature. Ceram. Int. 2021, 48, 8661–8670. [Google Scholar] [CrossRef]
  38. Shi, H.; Liu, G.; Yang, G.; Bi, Q.; Zhao, Y.; Wang, B.; Sun, X.; Liu, X.; Qi, H.; Xu, W.; et al. Analytical modelling of edge chipping in scratch of soda-lime glass considering strain-rate hardening effect. Ceram. Int. 2021, 47, 26552–26566. [Google Scholar] [CrossRef]
  39. Hu, W.; Teng, Q.; Hong, T.; Saetang, V.; Qi, H. Stress field modeling of single-abrasive scratching of BK7 glass for surface integrity evaluation. Ceram. Int. 2021, 48, 12819–12828. [Google Scholar] [CrossRef]
  40. Gauthier, C.; Schirrer, R. Time and temperature dependence of the scratch properties of poly (methylmethacrylate) surfaces. J. Mater. Sci. 2000, 35, 2121–2130. [Google Scholar] [CrossRef]
  41. Wasmer, K.; Parlinska-Wojtan, M.; Gassilloud, R.; Pouvreau, C.; Tharian, J.; Micher, J. Plastic deformation modes of gallium arsenide in nanoindentation and nanoscratching. Appl. Phys. Lett. 2007, 90, 031902. [Google Scholar] [CrossRef]
  42. Haasen, P. Zur plastischen Verformung von Germanium und InSb. Z. Phys. 1962, 167, 461–467. [Google Scholar] [CrossRef]
  43. Huang, P.; Zhang, J. Strain rate effect on the ductile brittle transition in grinding hot pressed SiC ceramics. Micromachines 2020, 11, 545. [Google Scholar] [CrossRef]
  44. Zhao, H.H.; Cai, G.Q. Model establishment and mechanism research of chip-formation due to shock under ultra-high speed grinding. China Mech. Eng. 2004, 12, 1038–1041. [Google Scholar]
  45. Feng, P.F.; Zhang, C.L.; Wu, Z.J.; Zhang, J.F. Effect of scratch velocity on deformation features of C-plane Sapphire during nanoscratching. J. Mech. Eng. 2013, 59, 367–374. [Google Scholar] [CrossRef]
  46. Li, B.; Ni, J.; Yang, J.; Liang, S.Y. Study on high-speed grinding mechanisms for quality and process efficiency. Int. J. Adv. Manuf. Technol. 2013, 70, 813–819. [Google Scholar] [CrossRef]
  47. Mukaiyama, K.; Ozaki, M.; Wada, T. Study on ductile-brittle transition of single crystal silicon by a scratching test using a single diamond tool. In Proceedings of the 2017 8th International Conference on Mechanical and Aerospace Engineering (ICMAE), Prague, Czech Republic, 22–25 July 2017. [Google Scholar]
  48. Yang, X.; Qiu, Z.; Lu, C.; Li, X.; Tang, J. Modelling the strain rate sensitivity on the subsurface damages of scratched glass ceramics. Ceram. Int. 2017, 43, 12930–12938. [Google Scholar] [CrossRef]
  49. Li, C.; Zhang, F.; Piao, Y. Strain-rate dependence of surface/subsurface deformation mechanisms during nanoscratching tests of GGG single crystal. Ceram. Int. 2019, 45, 15015–15024. [Google Scholar] [CrossRef]
  50. Yang, X.; Zhang, B. Material embrittlement in high strain-rate loading. Int. J. Extrem. Manuf. 2019, 1, 022003. [Google Scholar] [CrossRef]
  51. Qi, H.; Xing, W.; Tan, W.; Lin, H.; Guo, H.J.; Chen, M.Z.; Tang, H.P. Effect of the sintering process on mechanical behaviors of Zirconia ceramics by NanoParticle Jetting. Ceram. Int. 2023. Submitted for Publication. [Google Scholar]
  52. Ji, P.J.; Zhang, J.J.; Xie, X.D.; Ying, R.M.; Zhang, L. Review on Wear Characteristics of Artificial Hip Joint and Associated Physical Training. Front. Mater. 2023, 10. [Google Scholar]
  53. Jaeger, J.C. Moving sources of heat and the temperature of sliding contacts. J. Proc. R. Soc. 1942, 76, 203. [Google Scholar]
  54. Hahn, R.S. On the nature of the grinding process. In Proceedings of the 3rd International Machine Tool Design & Research Conference, Manchester, UK, 18–20 September 1962; pp. 129–154. [Google Scholar]
  55. Guo, C.; Malkin, S. Analysis of energy partition in grinding. J. Eng. Ind. 1995, 117, 55–61. [Google Scholar] [CrossRef]
  56. Rowe, W.B.; Jin, T. Temperatures in high efficiency deep grinding. CIRP Ann. 2001, 50, 205–208. [Google Scholar] [CrossRef]
  57. Jin, T.; Cai, G. Analytical thermal models of oblique moving heat source for deep grinding and cutting. J. Manuf. Sci. Eng. 2001, 123, 185–190. [Google Scholar] [CrossRef]
  58. Desruisseaux, N.R.; Zerkle, R.D. Temperature in semi-infinite and cylindrical bodies subjected to moving heat sources and surface cooling. J. Heat Transf. 1970, 92, 456–464. [Google Scholar] [CrossRef]
  59. Malkin, S.; Cook, N.H. The wear of grinding wheels: Part 2—Fracture wear. J. Eng. Ind. 1971, 93, 1129–1133. [Google Scholar] [CrossRef]
  60. Guo, C.; Malkin, S. Analytical and experimental investigation of burnout in creep-feed grinding. CIRP Ann. 1994, 43, 283–286. [Google Scholar] [CrossRef]
  61. Hou, Z.B.; Komanduri, R. On the mechanics of the grinding process, Part III-thermal analysis of the abrasive cut-off operation. Int. J. Mach. Tools Manuf. 2004, 44, 271–289. [Google Scholar] [CrossRef]
  62. Rowe, W.B. Principles of Modern Grinding Technology, 2nd ed.; Elsevier Inc.: Amsterdam, The Netherlands, 2013. [Google Scholar]
  63. Michel, M.; Mikowski, A.; Lepienski, C.; Foerster, C.; Serbena, F. High temperature microhardness of soda-lime glass. J. Non-Cryst. Solids 2004, 348, 131–138. [Google Scholar] [CrossRef]
  64. Michel, M.D.; Serbena, F.C.; Lepienski, C.M. Effect of temperature on hardness and indentation cracking of fused silica. J. Non-Cryst. Solids 2006, 352, 3550–3555. [Google Scholar] [CrossRef]
  65. Rao, X.; Zhang, F.; Luo, X.; Ding, F. Characterization of hardness, elastic modulus and fracture toughness of RB-SiC ceramics at elevated temperature by Vickers test. Mater. Sci. Eng. A 2019, 744, 426–435. [Google Scholar] [CrossRef]
  66. Li, Z.; Zhang, F.; Luo, X.; Chang, W.; Cai, Y.; Zhong, W.; Ding, F. Material removal mechanism of laser-assisted grinding of RB-SiC ceramics and process optimization. J. Eur. Ceram. Soc. 2019, 39, 705–717. [Google Scholar] [CrossRef]
  67. Niu, Y.; Zhao, D.; Wang, S.; Li, S.; Wang, Z.; Zhao, H. Investigations on thermal effects on scratch behavior of monocrystalline silicon via molecular dynamics simulation. Mater. Today Commun. 2021, 26, 102042. [Google Scholar] [CrossRef]
  68. Zhang, L.; Yuan, Z.; Qi, Z.; Cai, D.; Cheng, Z.; Qi, H. CFD-based study of the abrasive flow characteristics within constrained flow passage in polishing of complex titanium alloy surfaces. Powder Technol. 2018, 333, 209–218. [Google Scholar] [CrossRef]
  69. Qi, H.; Fan, J.; Wang, J.; Li, H. Impact erosion by high velocity micro-particles on a quartz crystal. Tribol. Int. 2015, 82, 200–210. [Google Scholar] [CrossRef]
  70. Qi, H.; Fan, J.; Wang, J.; Li, H. On the erosion process on quartz crystals by the impact of multiple high-velocity micro-particles. Tribol. Int. 2016, 95, 462–474. [Google Scholar] [CrossRef]
  71. Qi, H.; Qin, S.; Cheng, Z.; Teng, Q.; Hong, T.; Xie, Y. Towards understanding performance enhancing mechanism of micro-holes on K9 glasses using ultrasonic vibration-assisted abrasive slurry jet. J. Manuf. Process. 2021, 64, 585–593. [Google Scholar] [CrossRef]
  72. Qi, H.; Cheng, Z.; Cai, D.; Yin, L.; Wang, Z.; Wen, D. Experimental study on the improvement of surface integrity of tungsten steel using acoustic levitation polishing. J. Mater. Process. Technol. 2018, 259, 361–367. [Google Scholar] [CrossRef]
  73. Wang, Y.Y.; Wang, Z.; Ni, P.C.; Wang, D.J.; Guo, S.H.; Chen, Z.Z. Experimental and numerical study on regulation of cutting temperature during the circular sawing of 45 steel. Coatings 2023, 13. [Google Scholar]
  74. Chen, Z.; Wen, D.; Lu, J.; Yang, J.; Qi, H. Surface quality improvement by using a novel driving system design in single-side planetary abrasive lapping. Materials 2022, 14, 1691. [Google Scholar] [CrossRef]
  75. Wu, B.; Li, D.R.; Zhou, Y.; Zhu, D.; Zhao, Y.P.; Qiao, Z.K.; Chen, B.; Wang, X.L.; Lin, Q. Construction of a calibration field of absolute gravity in a cave using the Cold Atom Gravimeter. Sensors 2023, 23. [Google Scholar]
  76. Qi, H.; Qin, S.; Cheng, Z.; Zou, Y.; Cai, D.; Wen, D. DEM and experimental study on the ultrasonic vibration-assisted abrasive finishing of WC-8Co cemented carbide cutting edge. Powder Technol. 2021, 378, 716–723. [Google Scholar] [CrossRef]
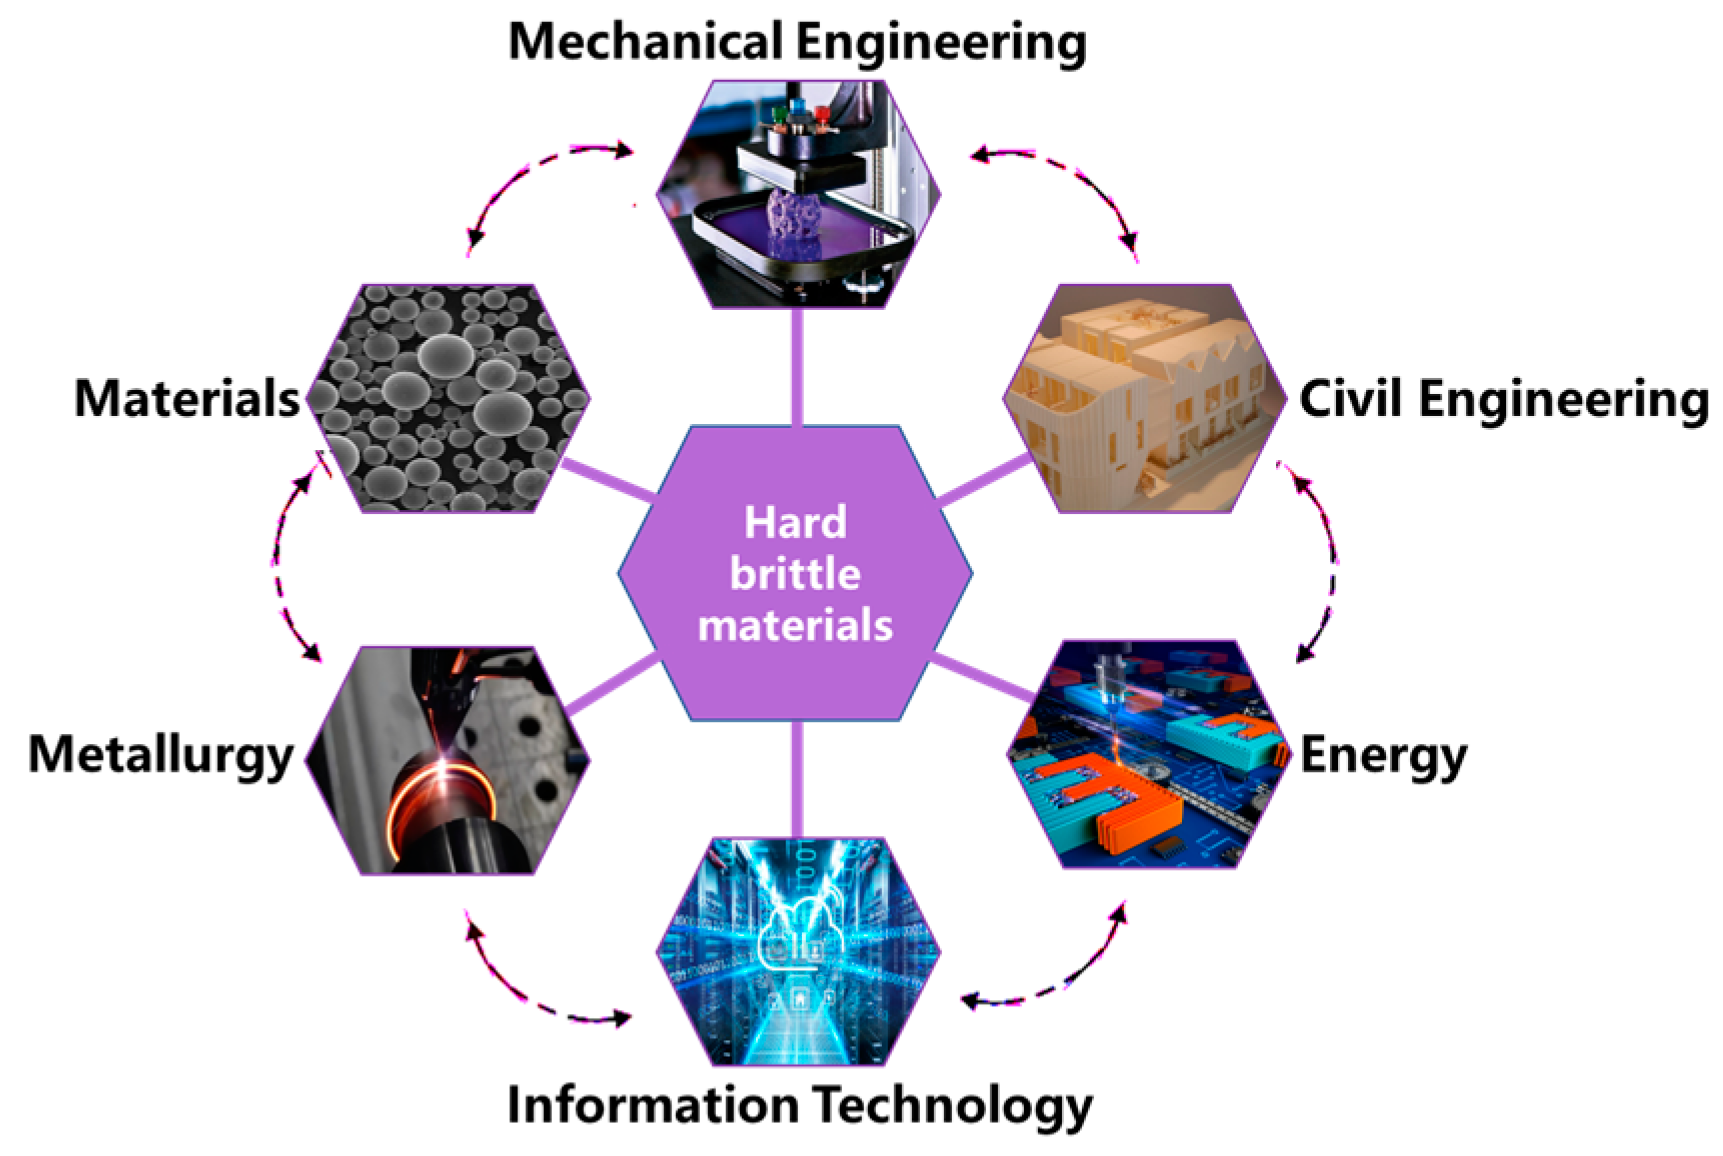
Figure 1. Application of hard brittle materials.
Crystals 13 00428 g001
Figure 2. Schematics of contact stages between the abrasive grit and workpiece during grinding: rubbing, ploughing, and cutting [5].
Crystals 13 00428 g002
Figure 3. Grinding mechanism of hard brittle materials: (a) mechanical approximation of indentation process [7,8], (b) mechanical approximation of scratch process [13].
Crystals 13 00428 g003
Figure 4. Distribution of the stresses and cracks in the single abrasive scratching of fused silica [27].
Crystals 13 00428 g004
Figure 5. Effect of strain rates caused by different scratching speeds on surface morphology [49].
Crystals 13 00428 g005
Figure 6. Effect of temperature on the single abrasive scratching of optical glass: (a) microhardness, (b) fracture toughness, (c) specific grinding force, (d) specific grinding energy [14].
Crystals 13 00428 g006
Disclaimer/Publisher’s Note: The statements, opinions and data contained in all publications are solely those of the individual author(s) and contributor(s) and not of MDPI and/or the editor(s). MDPI and/or the editor(s) disclaim responsibility for any injury to people or property resulting from any ideas, methods, instructions or products referred to in the content.