Abstract
Economy and productivity are the two most important elements of modern manufacturing systems. Economy is associated with energy-efficient operations, which results in an overall high input-to-output ratio, while productivity is related to quality and quantity. This specific work presents experimental investigations of the use of cooling conditions (dry, MQL and wet) as input variables alongside other input parameters, including depth of cut, feed and cutting speed. This research aimed to investigate the variation in output responses including tool wear, specific cutting energy, and surface roughness while machining Inconel 718, a nickel-based super alloy. For experimentation, three levels of depth of cut, feed, and cutting speed were chosen. The Taguchi method was used for the experimental design. The contribution ratio of each input parameter was ascertained through analysis of variance (ANOVA). Use of coolant showed a positive effect on process parameters, particularly MQL. By adapting the optimum machining conditions, specific cutting energy was improved by 27%, whereas surface roughness and tool wear were improved by 15% and 30%, respectively.
1. Introduction
In the past few years, researchers have focused on improving the overall productivity and efficiency of industrial processes. One of the reasons behind these improvements is environmental degradation caused due to CO2 emissions by the industrial sector, which is responsible for 26% of all CO2 emissions [1]. Almost half of these CO2 emissions come from the manufacturing sector. Manufacturing industries account for about 20% of total energy consumption worldwide [2]. This energy consumption is directly related to emissions of greenhouse gases [3]. A 6–40% reduction in energy consumption can be achieved when machining with optimal cutting parameters, tools and tool path designs [4]. In manufacturing processes, sustainability, economy, and productivity are key areas of research due to heightened environmental concerns and the challenges of energy security. These issues have led researchers toward the objective of process optimization, in which input parameters are selected carefully to enhance the output parameters.
Nickel-based alloys constitute almost 70% of all alloys used in aircraft engines [5]. Inconel 718 exhibits superior properties like high hardness, high strength, and resistance to high temperatures, fatigue, and corrosion, as shown in Table 1. In Inconel 718, the presence of iron, chromium, nickel, and other constituents makes it resistant to corrosion and wear [6,7]. Due to these properties, Inconel 718 has found applications in different fields like the aerospace and marine industries. Gas turbine blades for aircraft engines are manufactured from Inconel 718 due to their use in high-pressure and high-temperature environments. Unlike steel and aluminum alloys, which soften under high temperatures, Inconel 718 retains its strength and toughness over a wide range of temperatures [5]. In addition to these properties, low thermal conductivity, high values of work hardening and strain rates leading to high cutting temperatures and forces makes Inconel 718 difficult to machine. Moreover, these properties limit Inconel 718 machining performance with higher tool wear rates, increased power consumption and surface damage [8,9].

Table 1.
Comparison between different aerospace alloys [10].
In manufacturing industries, dry cutting can reduce the manufacturing cost by up to 7–17% as compared to manufacturing with the usage of coolants [11]. Moreover, dry cutting not only lowers the cost of manufacturing but also rules out the negative environmental effects related to the application of lubricants [12]. Although dry cutting is favored over oil-based coolants because of environmental concerns, due to the hard-to-cut status of nickel alloys and in order to improve overall efficiency, quality and productivity of the work piece, usage of cooling media is required. Usage of cutting fluid improves tool life, power consumption, dimensional accuracy and surface roughness in machining when used effectively. Moreover, cutting fluids also protect the machined surfaces from environmental degradation [13]. However, the cost associated with the usage of coolants should be kept in mind as compared to its advantages [14]. Various authors emphasize the importance of this aspect. Kui et al. explains the advantages of flood cutting over dry cutting but also emphasizes the need to address the economic and health issues associated with the usage of coolant [15]. The usage of appropriate coolant along with optimized machining parameters will not only increase the productivity but economy as well. By considering the diverse input parameters, optimization of various output responses was achieved by different researchers on different work pieces [16,17,18]. Khan et al. optimized tool wear, specific cutting energy and surface roughness while machining titanium alloy (Ti-6Al-4V) under three different cutting conditions [19]. Sheheryar et al. considered the feed rate, cutting depth, and cutting speed as input cutting parameters during the micro-milling of Inconel 718 to optimize the surface roughness, burr formation and tool wear using three different tool coatings [20].
Due to various health and environmental issues, researchers have shifted their research toward more sustainable and environmentally friendly machining methods, e.g., minimum quantity lubrication (MQL). It not only reduces the machining cost but also the quantity of coolant consumed. One of the most important advantages of MQL machining is the fast heat transfer due to the evaporation of cutting oil, which reduces pollution, disposal costs, and health issues [21]. MQL is known as micro-lubrication or near-lubrication because, in comparison with the conventional flooded lubrication method, the quantity of lubricant used in MQL is very low [22,23]. In MQL, compressed air is used to spray a small amount of lubricant oil over the cutting zone in the form of aerosol by keeping the flow rate between 10 to 100 mL/h [12,24]. Various researchers have observed significant improvements in results while machining under MQL in comparison with machining under dry and wet conditions [23,25]. Khatri and Jahan et al. observed superior results using MQL conditions in comparison with dry and flooded cutting conditions in terms of tool wear while machining Ti-6Al-4V [26]. Frifita et al., while turning Inconel 718, studied the surface roughness and cutting forces using carbide inserts [16]. Cantero et al. reported the tool wear pattern during finished turning of Inconel 718 [27]. Yazid et al., during turning of nickel alloy, observed the influence on surface quality by input machining parameters and lubrication/cutting conditions and observed better surface finish in MQL in comparison with dry cutting conditions at different flow rates [12].
The current work was undertaken while keeping in view the specific research goals of enhancing sustainability and productivity of manufacturing systems. These research areas were targeted because of their importance in manufacturing productivity, as also underlined by the United Nations Sustainable Development Goals (SDGs) [28]. Output parameters of specific cutting energy and tool wear are vital signs of sustainability, whereas surface roughness is an important aspect of quality representing productivity. Consequently, the sustainability and productivity of manufacturing systems is envisioned to be enhanced by optimization of these machining responses, namely specific cutting energy, tool wear and surface roughness. The goal of sustainability is also served by the use of an appropriate cooling medium, as it promotes clean production and green manufacturing. The method adopted for the optimization approach is based on the Taguchi method of experimental design which is discussed in detail in Section 2.
2. Experimental Methodology
2.1. Experimental Setup
The turning operation on nickel-based superalloy, Inconel 718, was performed on highly precise ML-300 computer numeric controlled (CNC) turning machine with 3500 RPM maximum spindle speed and 26 kW rated power. An Inconel 718 rod with 73 mm diameter and 200 mm length was used during experimentation. Inconel 718 chemical composition is shown in Table 2.

Table 2.
Inconel 718 chemical composition (wt%).
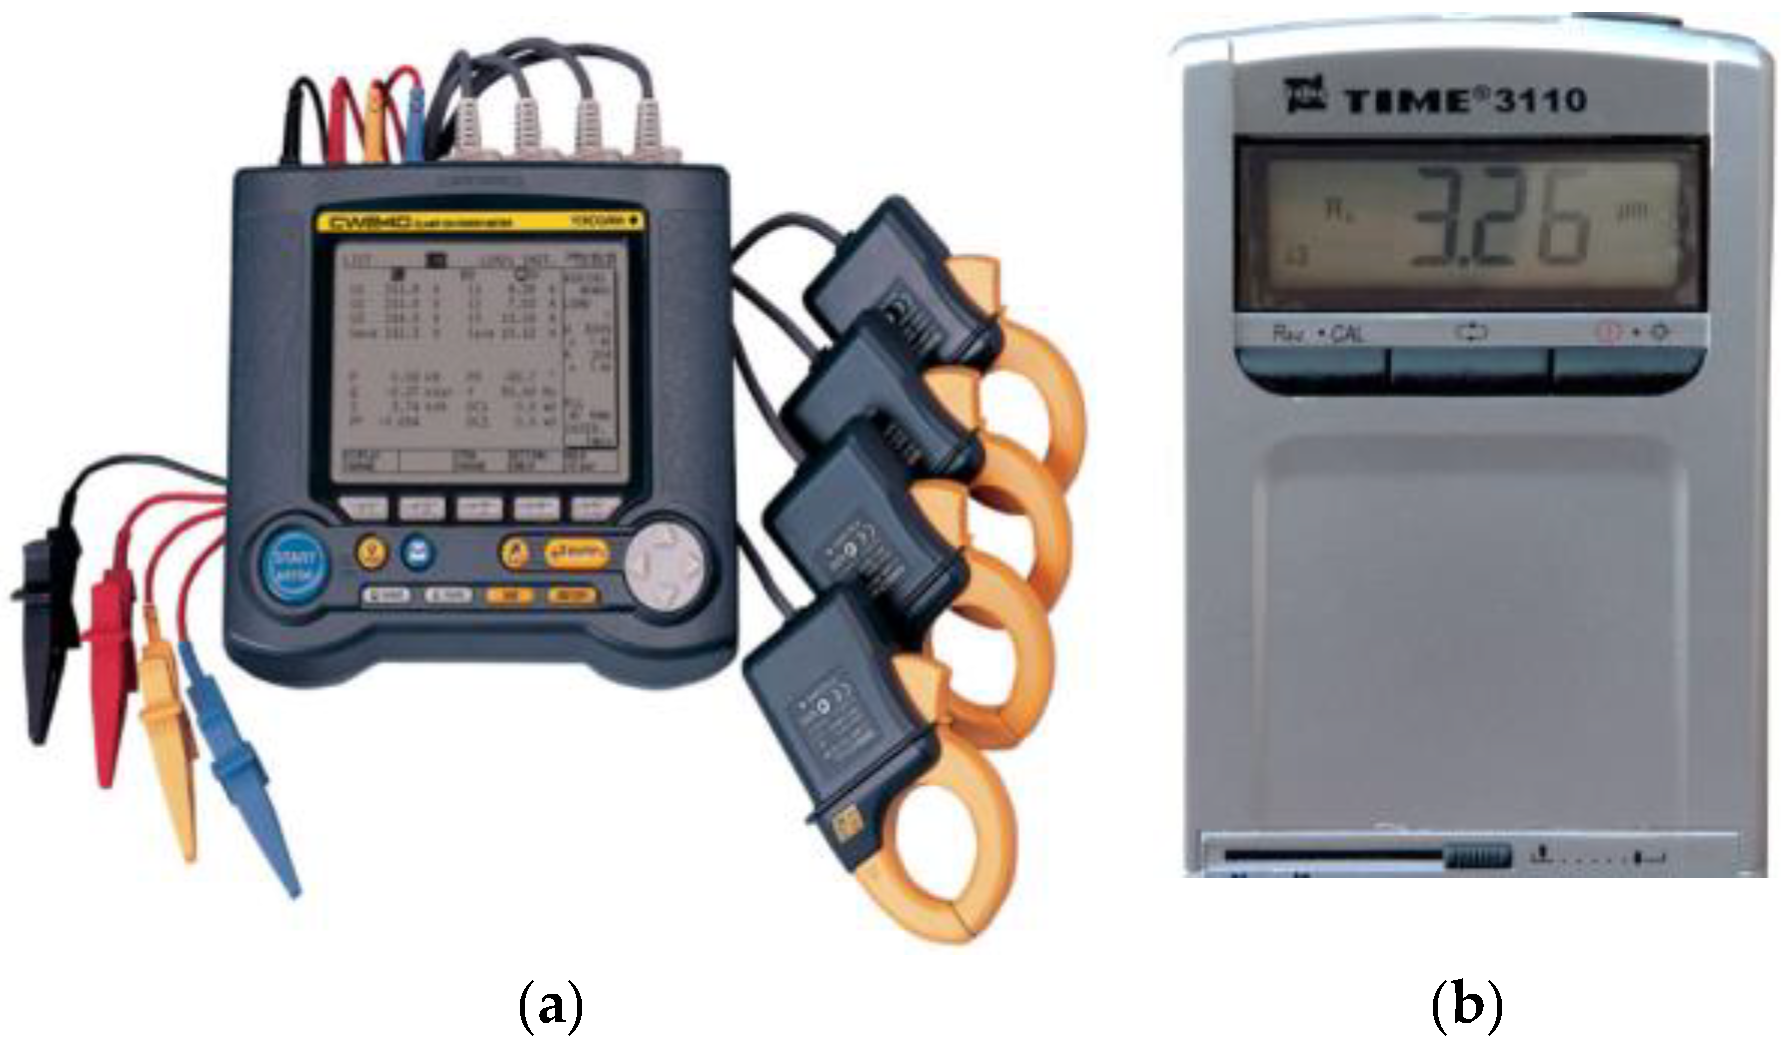
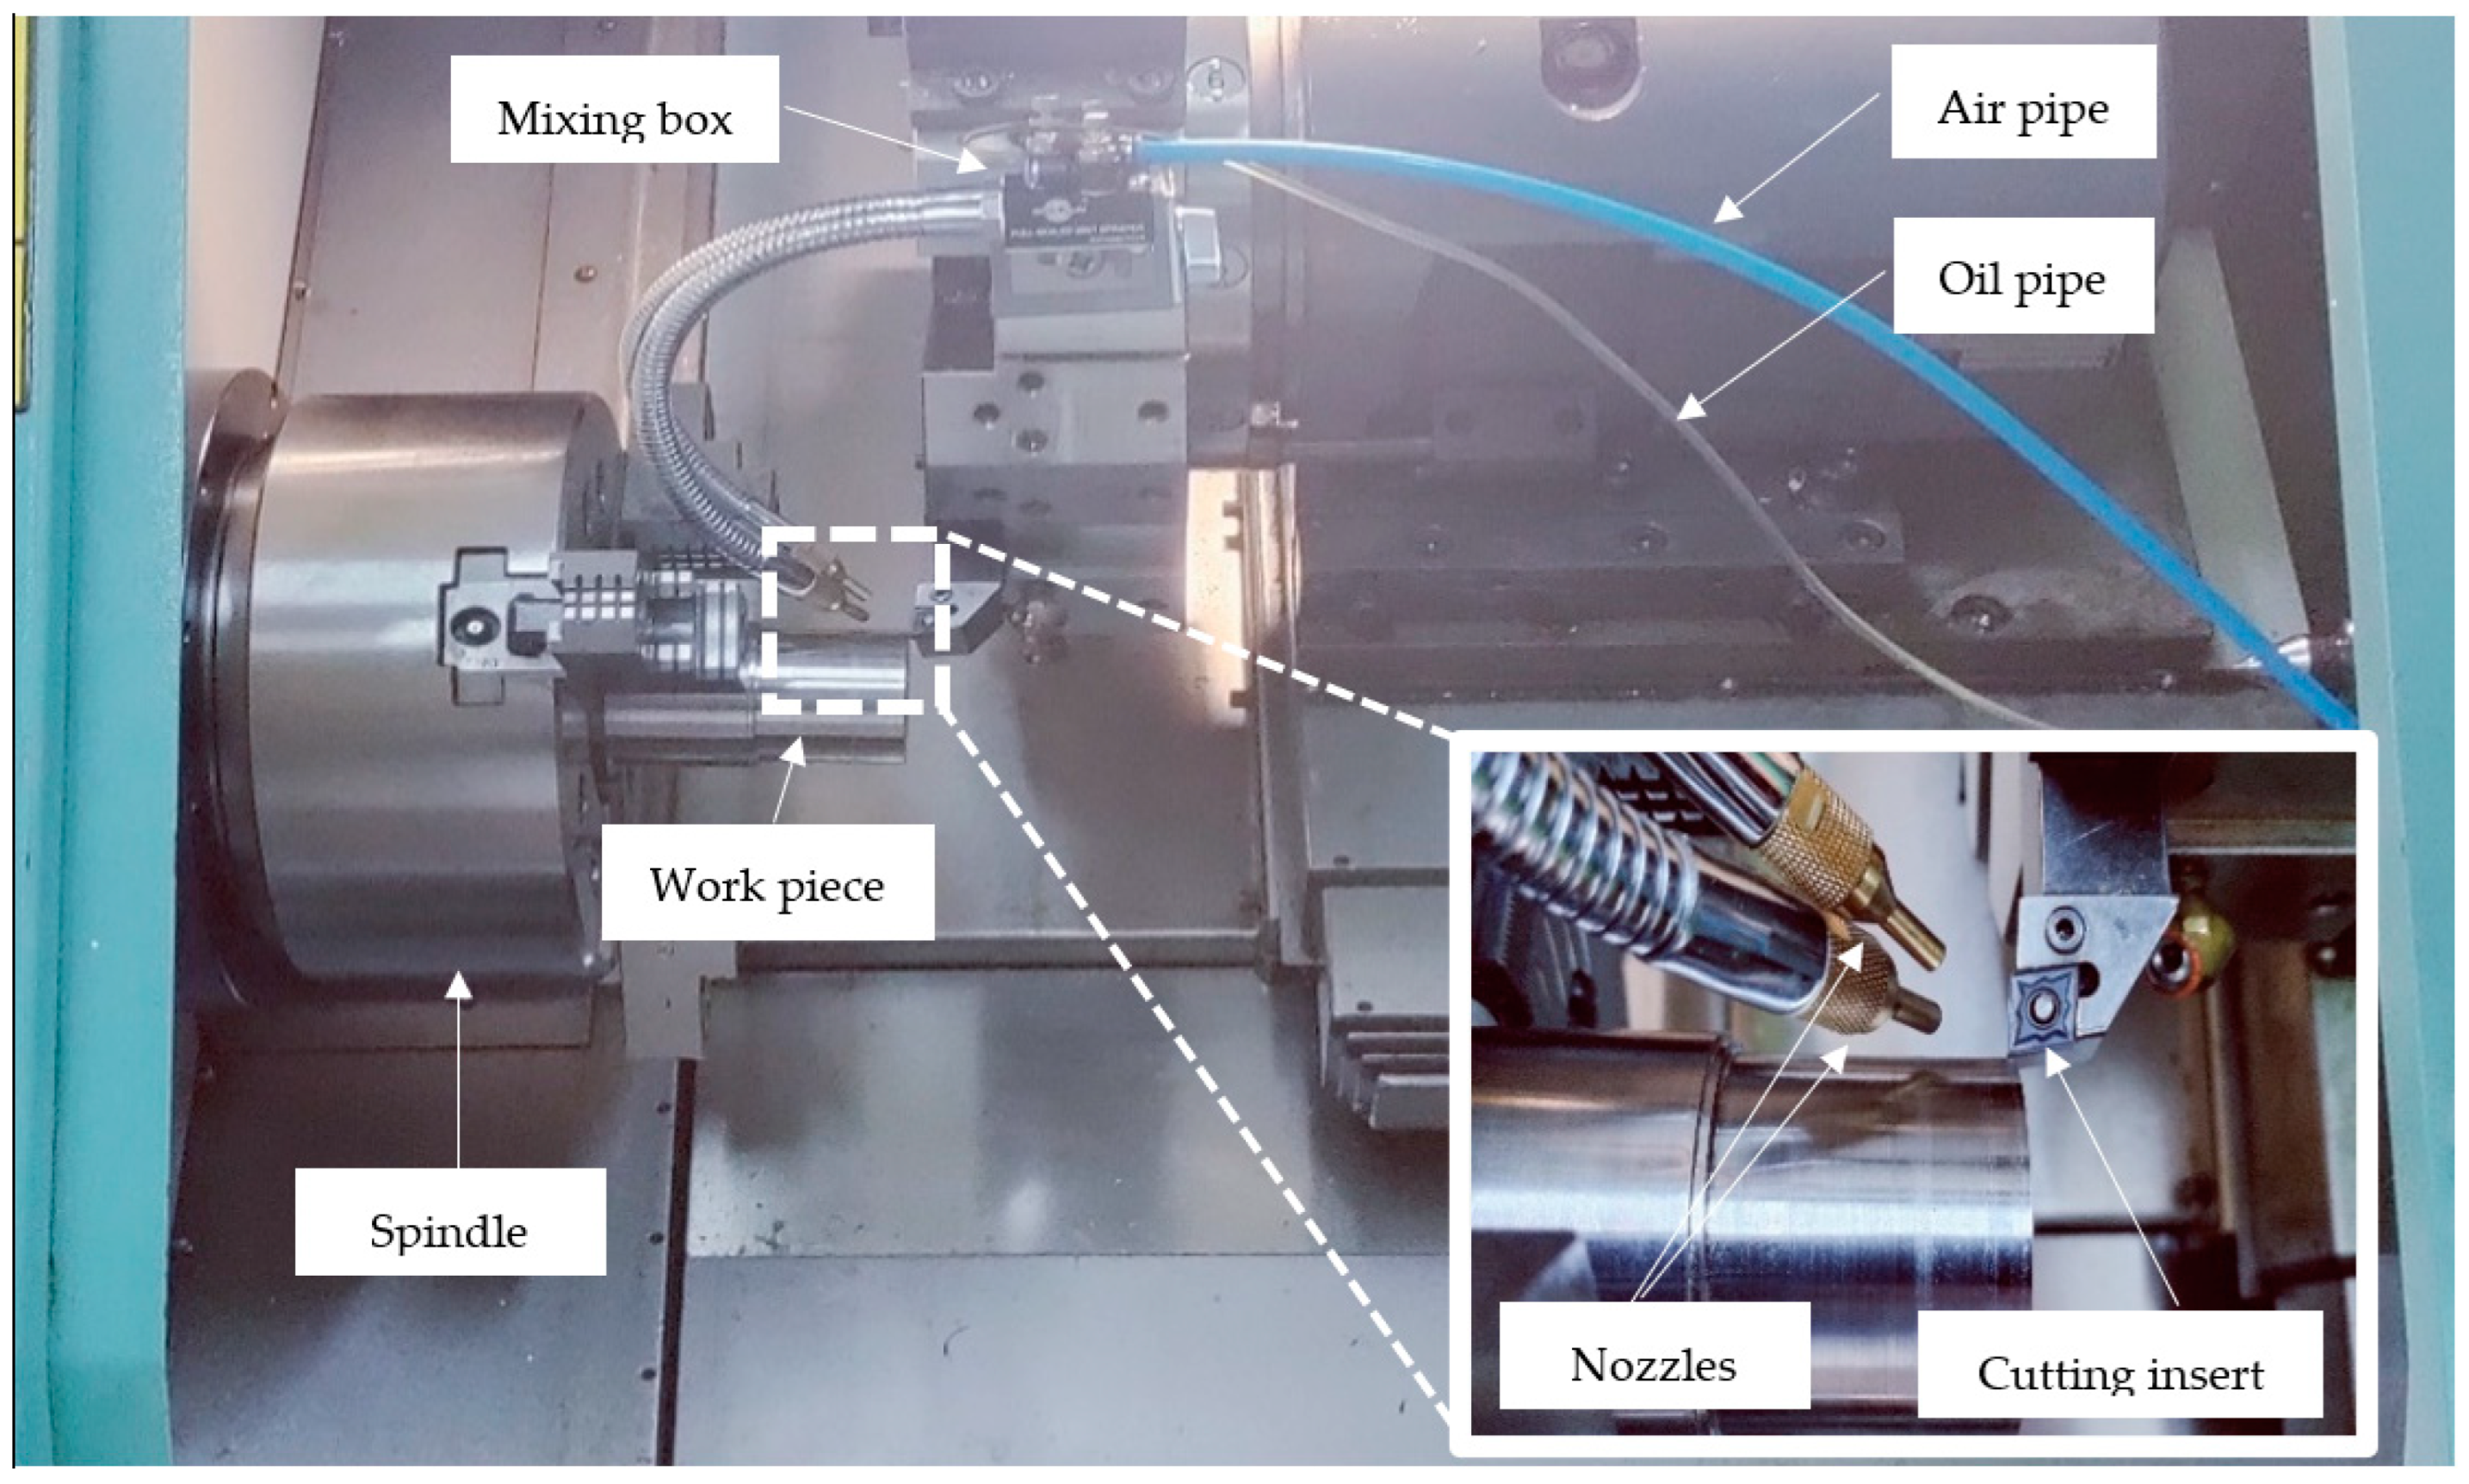
CNMG 120404NN PVD coated TiAlN carbide inserts with a nose radius of 0.4 mm and supplied by Laminar Technologies were selected for experimentation. For machining a nickel-based alloy, a carbide tool is recommended due to its high impact strength and toughness over different temperature ranges [29]. For every experimental run, a new insert was used for inspection and recording. Surface roughness of the work piece was measured with a TR 110 roughness tester meter having a range between 0.05–10 µm. A YOKOGAWA Electric Corporation-manufactured Power Analyzer meter (CW-240-F) was used for power calculations, as shown in Figure 1. During experimentation, three different cutting conditions (dry, MQL and wet) were used. For wet conditions, shell dromus B which is a water-based oil coolant, was fed through the internal cooling system of the CNC machine using a 0.8 kW coolant pump maintaining a 6 L min−1 flow rate. A mist sprayer setup manufactured by COOLRUN was used in MQL experimentation. The system consists of a mixing chamber joined by two flexible pipes with nozzles each at the inlet and outlet. Compressed air is fed through one flexible inlet pipe that is attached to the compressor, and the other pipe is connected to a container filled with coolant. The MQL flow rate was controlled through adjustable buttons present in the mist sprayer. Both flexible nozzles were directed toward the cutting zone, as displayed in Figure 2.

Figure 1.
Response measuring equipment: (a) Yokogawa power analyzer CW-240-F; (b) TR 110 surface roughness tester.
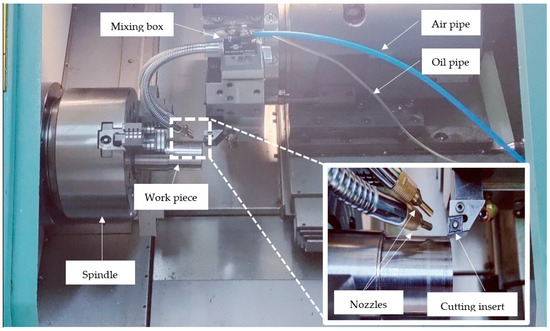
Figure 2.
CNC machine with MQL apparatus.
2.2. Response Measurement
In experimentation, tool wear (R), surface roughness (Ra), and specific cutting energy (SCE) were measured responses. Multiple readings were taken and averaged for accuracy of the results. In the present study, each surface roughness measurement was repeated thrice to ensure repeatability of results, and average values were used for analysis. Cut-off length was kept at 2.5 mm. Tool flank wear measurement was performed with the help of digital microscope Olympus DXS1000 (manufactured by Olympus Corporation, Tokyo, Japan), as indicated in Figure 3. The tool wear rate was calculated using ISO standard 3685:1993 for single point turning, which depicted the flank wear criteria as average of either 0.3 or 0.6 mm. In machining, product quality and accuracy are dependent upon flank wear [19]. Equation (1) was used for tool wear rate calculations. A higher negative value of R symbolizes lower tool wear. [19].
where is the flank wear, l denotes the spiral length of the cut, refers to the cutting speed, and is the cutting time. SCE is the amount of energy consumed to remove a unit volume of the material. SCE is independent of the CNC machine type or efficiency. SCE was calculated using Equation (2).
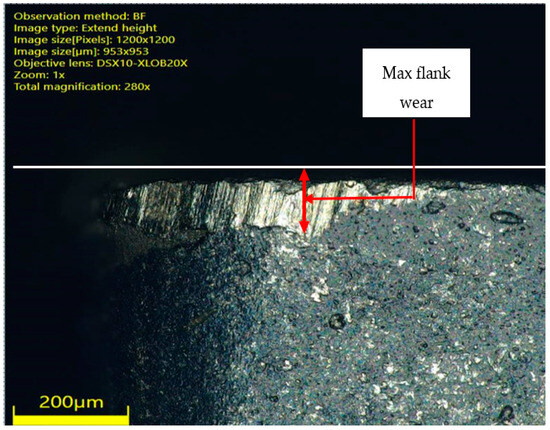
Figure 3.
Digital microscopy image showing maximum VB on tool insert.
A two-cycle approach was used to calculate (W) using Equation (3). In this approach, for the same input parameters, power is measured twice, i.e., and . Power consumed by the machine during offset air cutting is denoted by , and is the actual cutting power consumed by the machine. The difference between and gives us the power consumed during the cutting process and is denoted by . Therefore, is not affected by the type of cutting tool or machine rating. Calculations of and were performed with the utmost care to avoid unnecessary or exaggerated points, which are the results of accelerated tool wear just prior to and following the finish cut. Equation (4) was used to calculate MRR, which is defined as the amount of material removed per unit time.
To calculate the power utilized by the machine during the cutting operation, Equation (3) is an effective approach [30].
2.3. Design of Experiments
Cutting speed (v), feed rate (f), depth of cut (d), and cooling conditions (dry, MQL and wet; abbreviated as CC) were chosen as input cutting parameters because these parameters have a significant influence on surface roughness, tool wear, and specific cutting energy [31,32,33]. Input cutting parameter levels were selected as per manufacturer recommendations (Laminar Technologies) and the ISO standard (1993), as shown in Table 3.

Table 3.
Input cutting parameters.
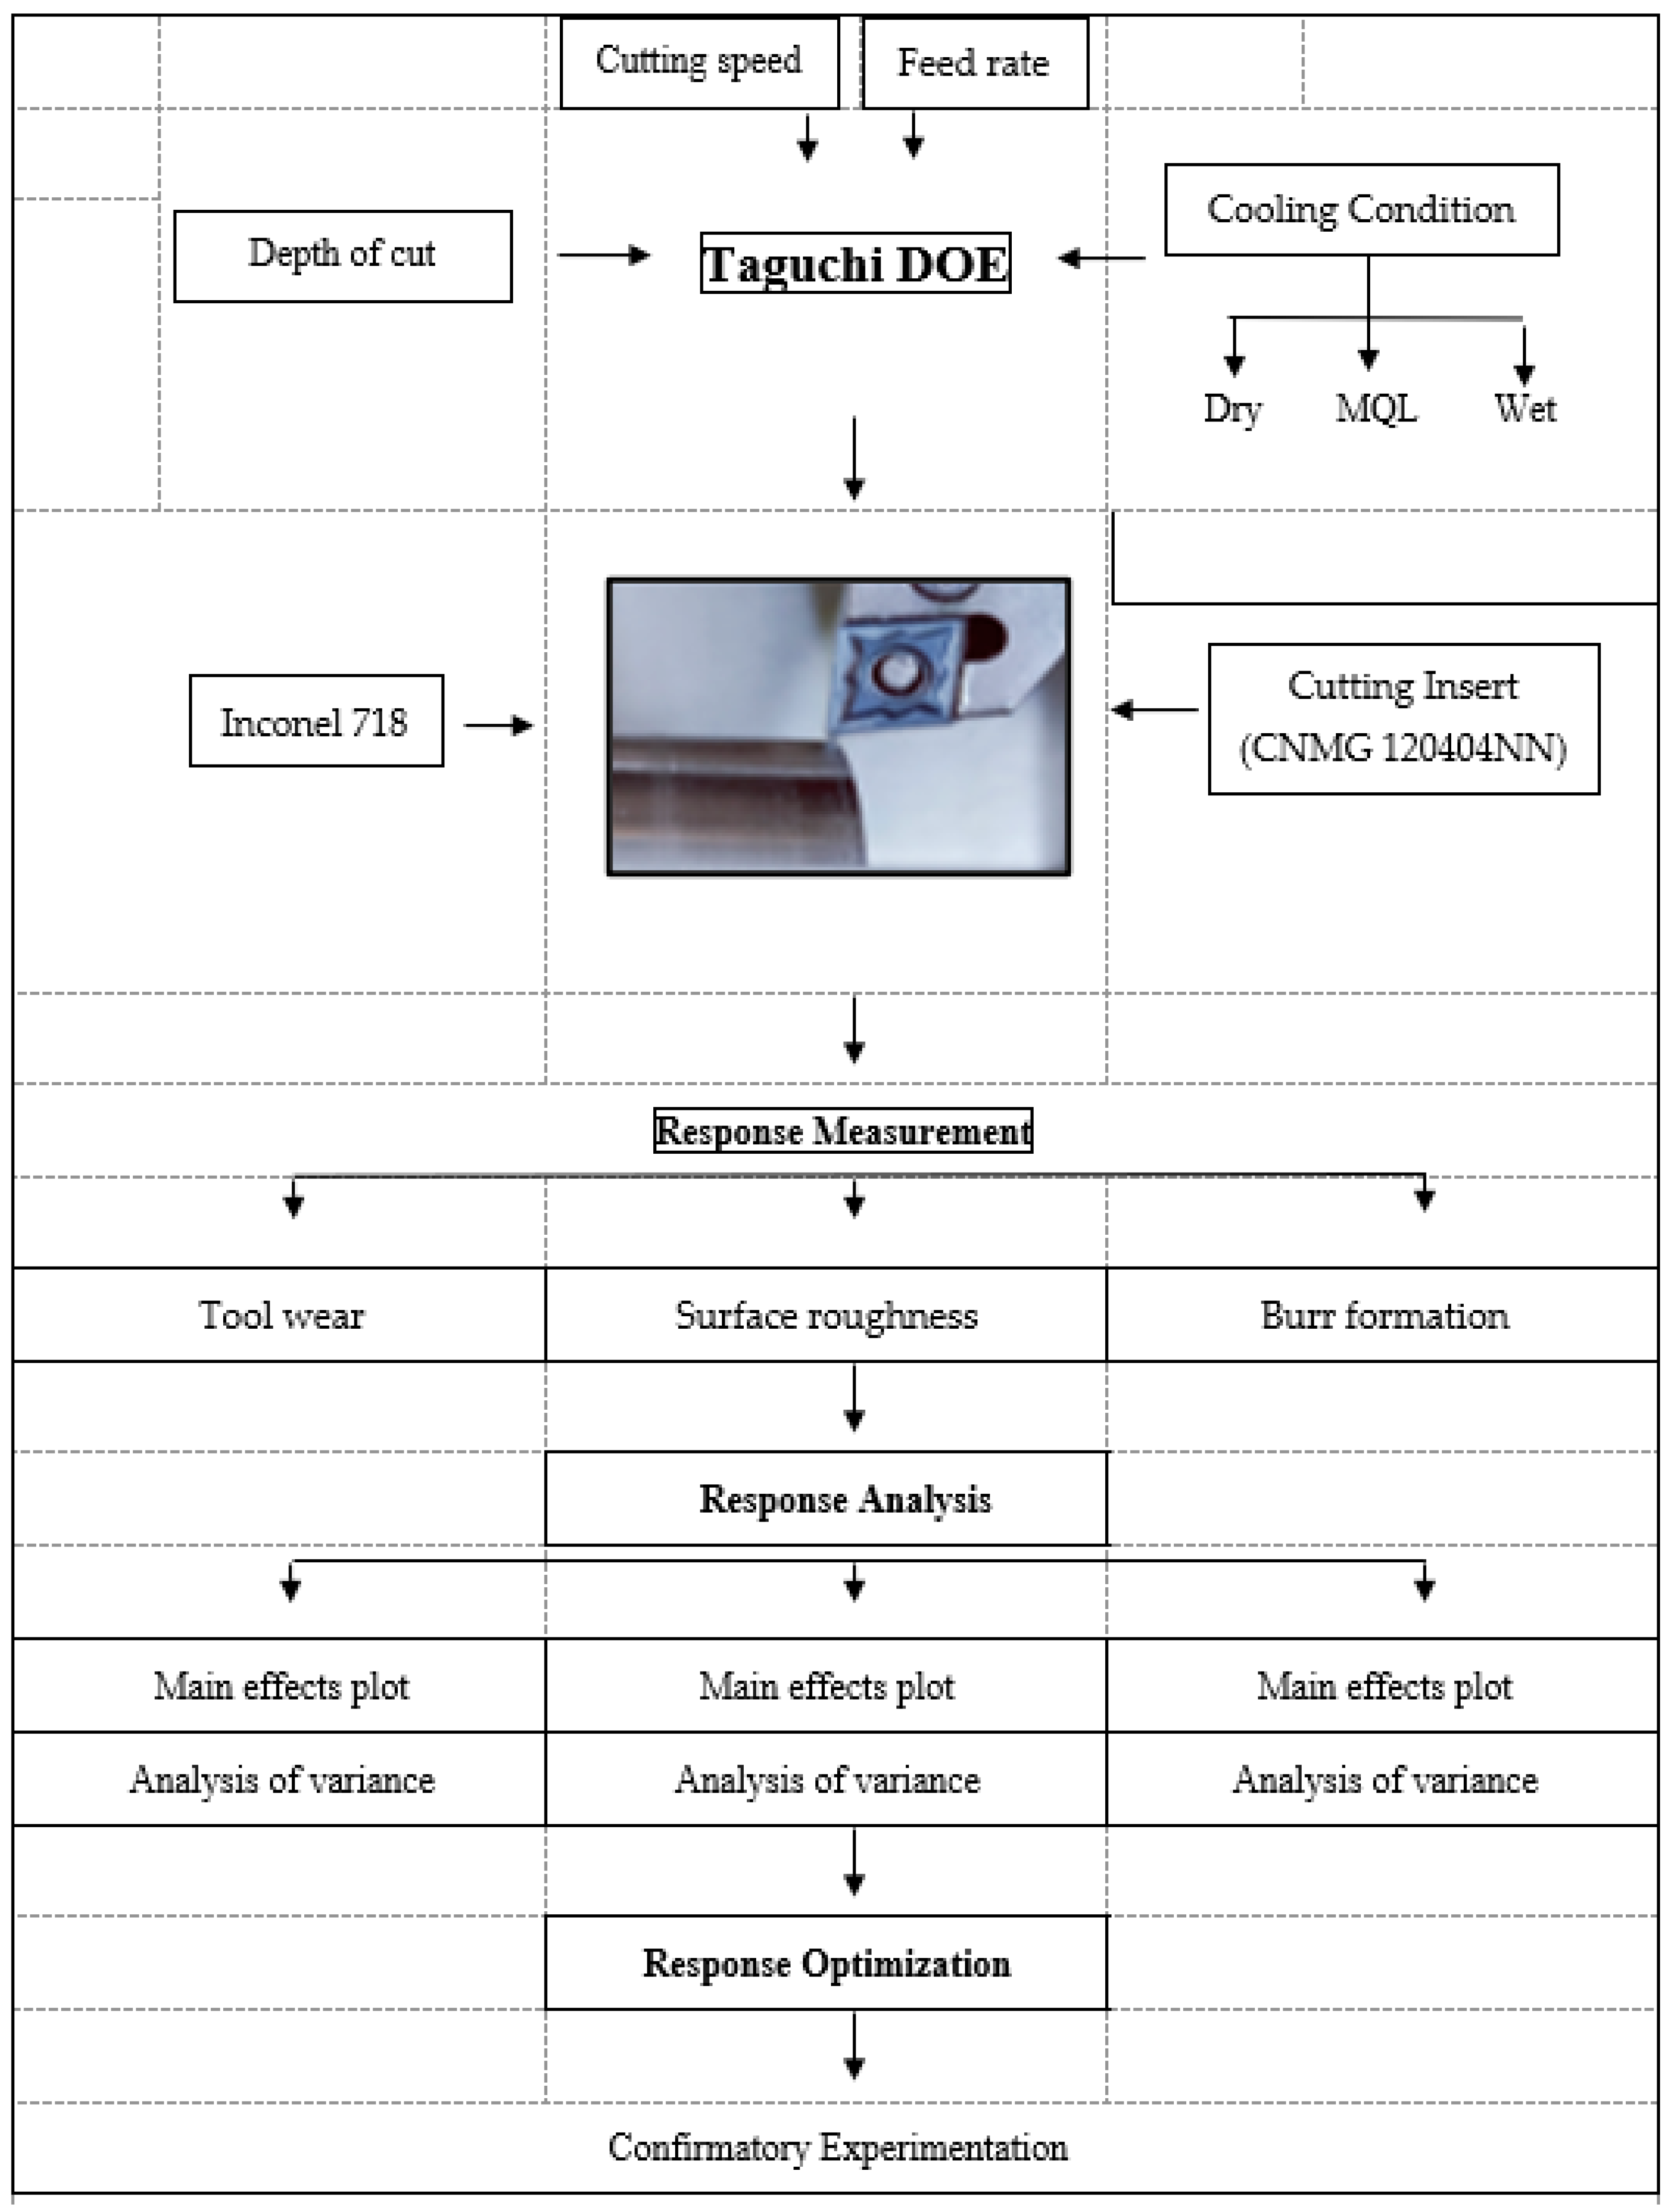
The Taguchi method for the design of experiments was chosen in experimentation over full factorial design due to its overall effectiveness with regard to fewer runs [34,35]. A Taguchi orthogonal array (L9) is shown in Table 4. The research methodology employed in the current research is shown in Figure 4.

Table 4.
L9 Orthogonal array of input cutting parameters.
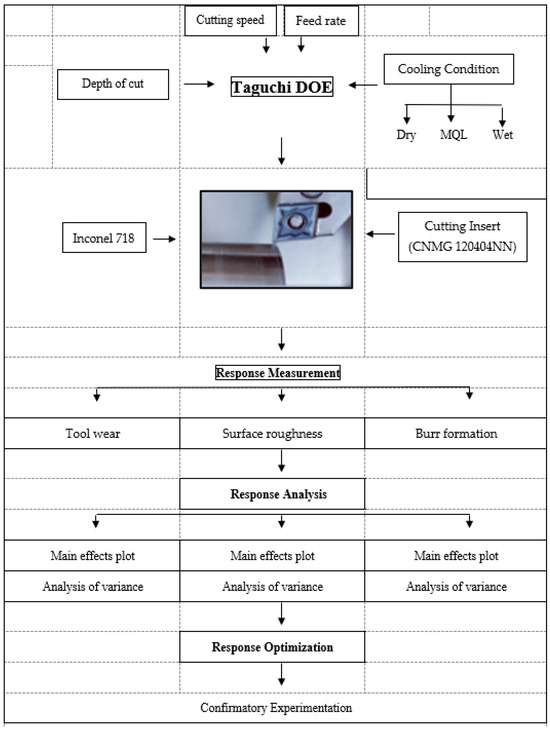
Figure 4.
Research methodology.
3. Results
Table 5 displays the experimental findings of measured responses. All nine tests were repeated twice to ensure repeatability. Output responses were individually plotted and analyzed to draw any useful information from results.

Table 5.
Measured experimental responses.
4. Discussion
4.1. Effects of Input Parameters on R
For every experimental run, VB of cutting insert was measured. Equation (1) was used to calculate the tool wear rate. Figure 5 displays the main effects plot of tool wear (R). As shown in the plot, the wear rate rose with the increase in feed rate and decreased with the cutting speed, while in the case of depth of cut, it first decreased, then increased, showing an inconsistent response. In terms of coolant/lubrication conditions, the value of R was less in MQL in comparison with dry and wet cutting.
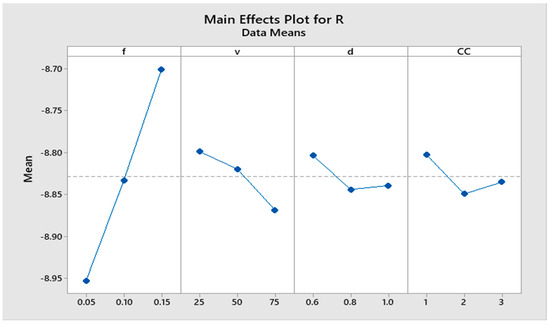
Figure 5.
Tool wear rate main effects plot.
The increase in tool wear with increasing feed is because of the smaller contact area at the tool–chip interface, which leads to an increase in temperature near the cutting edge [36]. Higher tool wear with an increasing feed rate is due to a lower heat dissipation rate [37] and increased vibration at the tool–work piece interface [38]. A decrease in tool wear with cutting speed is because, at higher cutting speeds, the thermal diffusion or heat transfer is reduced between the tool and the workpiece. Moreover, tool wear also decreases due to the reduction in the formation of built-up-edges (BUEs) and thermal softening of Inconel 718 at higher cutting speeds because Inconel 718 can be heated up into a range of 1100 to 1300 °C with the rise in cutting speed [39,40,41]. Anthony et al. also reported better tool life in MQL at low cutting speeds compared to dry and wet conditions [42].
Table 6 presents the results of ANOVA, which were used to check the significance of each input factor on R. S and R-Sq values indicated that experimental data may be utilized to predict the other value points. Table 6 shows that feed (82.63%), followed by cutting speed (6.64%), are the main contributing factors that influence the wear rate (R).

Table 6.
Analysis of variance for R.
4.2. Effects of Input Parameters on SCE
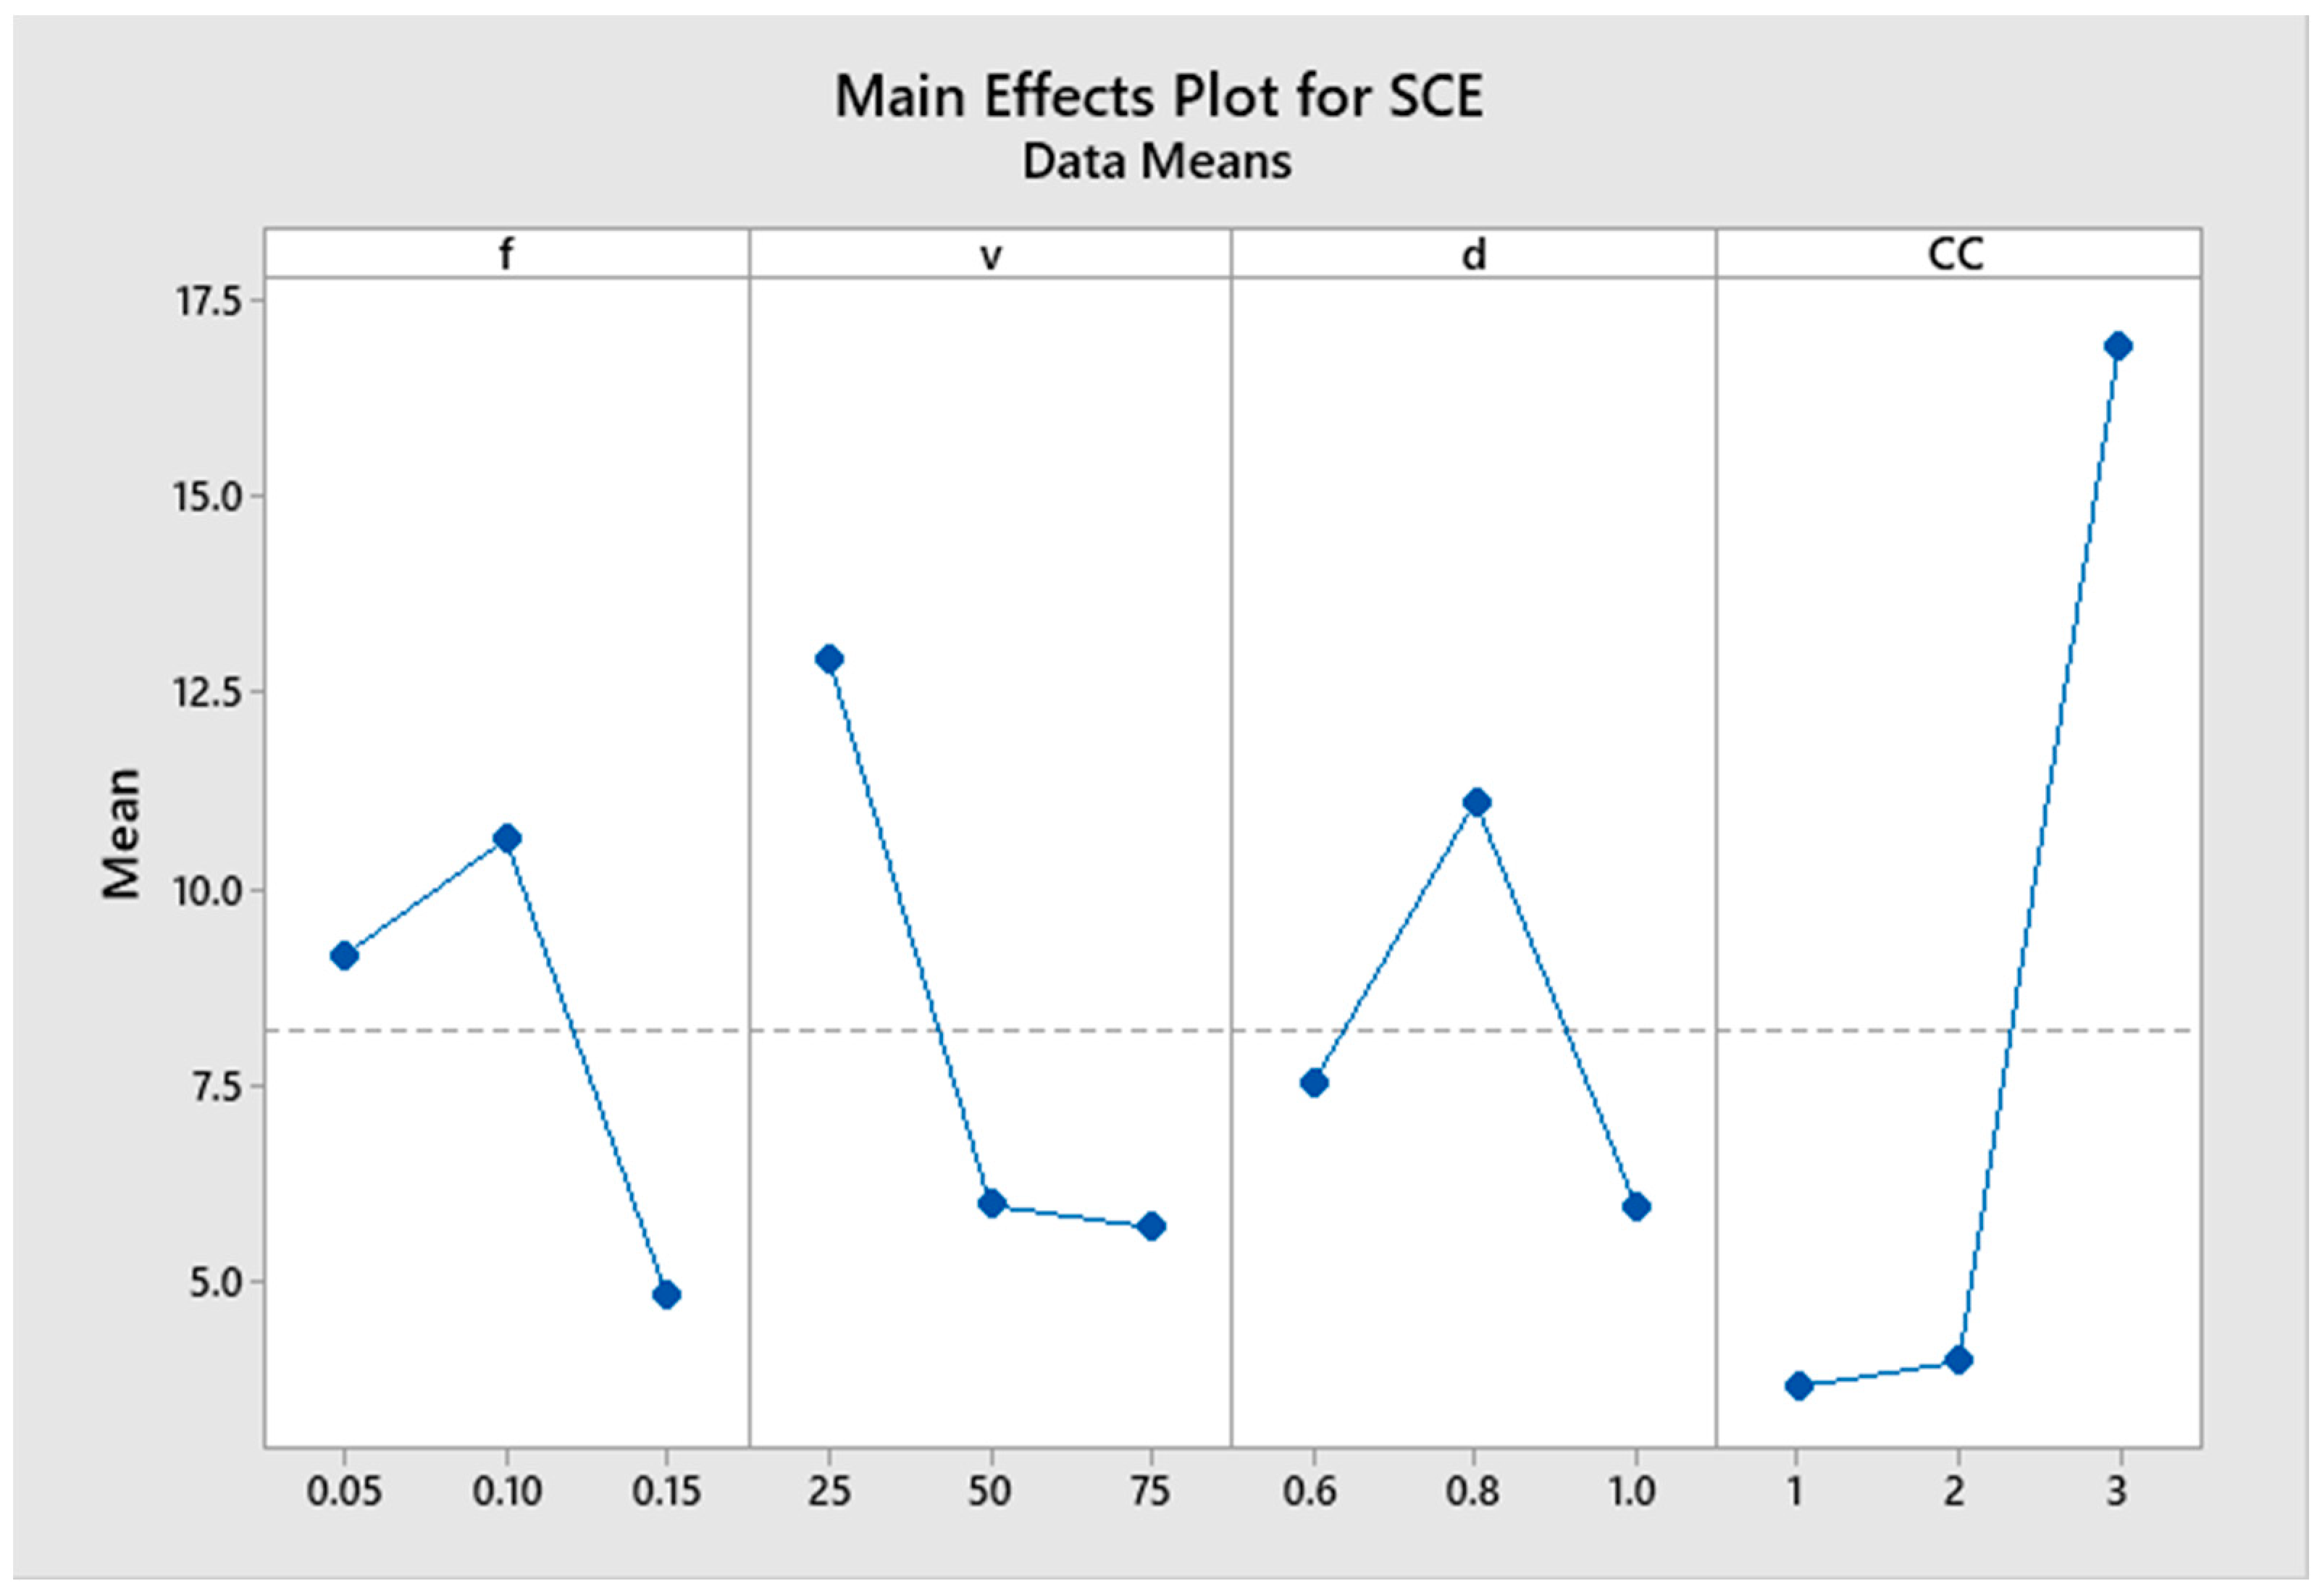
Figure 6 shows main effect plots for SCE (J mm−3) versus input machining parameters. The plot shows that an increase in cutting speed results in reduced SCE. This trend is because of the reduction in cutting forces at the tool–workpiece interface because of the thermal softening of Inconel 718 at elevated temperatures due to the low value of thermal conductivity of nickel alloys. While machining Inconel 718, Parida and Hao et al. also reported a decrease in cutting forces with the increase in cutting speed [43,44]. Cutting forces and SCE are directly related to each other [45]; hence, a reduction in SCE is a result of a decrease in cutting forces. Lower cutting forces are also a result of the increasing shear angle of nickel alloy with increasing speed.
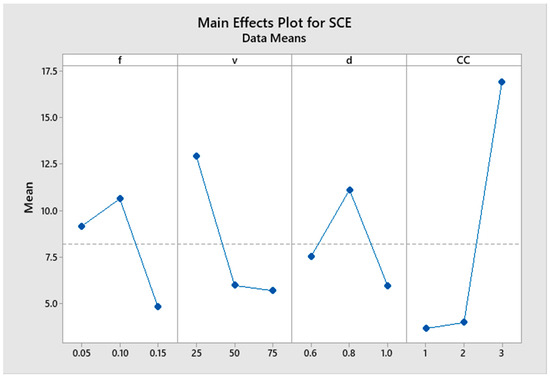
Figure 6.
Specific cutting energy main effects plot.
SCE displayed an inconsistent trend with increases in feed rate by initially increasing and then decreasing, as shown in the main effect plots in Figure 6. At feed rates well below the nose edge radius, the machining is accomplished with a ploughing phenomenon that is a rather inefficient cutting process [45]. Energy consumption increases with feed rate until the point where the cutting mechanism shifts from ploughing to shearing, which is a more efficient cutting process [46,47]. This point is usually reached as the feed rate is increased and approaches the value of the nose edge radius. Currently, this transition point is broadly identified as a 0.10 mm/rev feed rate. Thereafter, the energy consumption decreases with further increases in the feed rate due to the shearing action, which makes the process more energy efficient. Power consumption in MQL is lower than in flooded cooling. Such trends are consistent with the previous work published by Pinherio et al. during turning of nickel alloy (Inconel 718) [48]. In machining processes, cutting force is the main indicator of energy consumption and is influenced by cutting/lubrication conditions. As evident from the experiments, applying MQL yielded low cutting forces as compared to flooded conditions.
To observe the effect of each input cutting parameter on specific cutting energy, ANOVA was performed, as shown in Table 7. All input machining parameters contributed to the output response, as indicated by the p value. Analysis shows that the cooling/lubrication condition is the most significant factor, at 63.43%, followed by cutting speed at 18.56%.

Table 7.
Analysis of variance for SCE.
4.3. Effects of Input Parameters on Ra
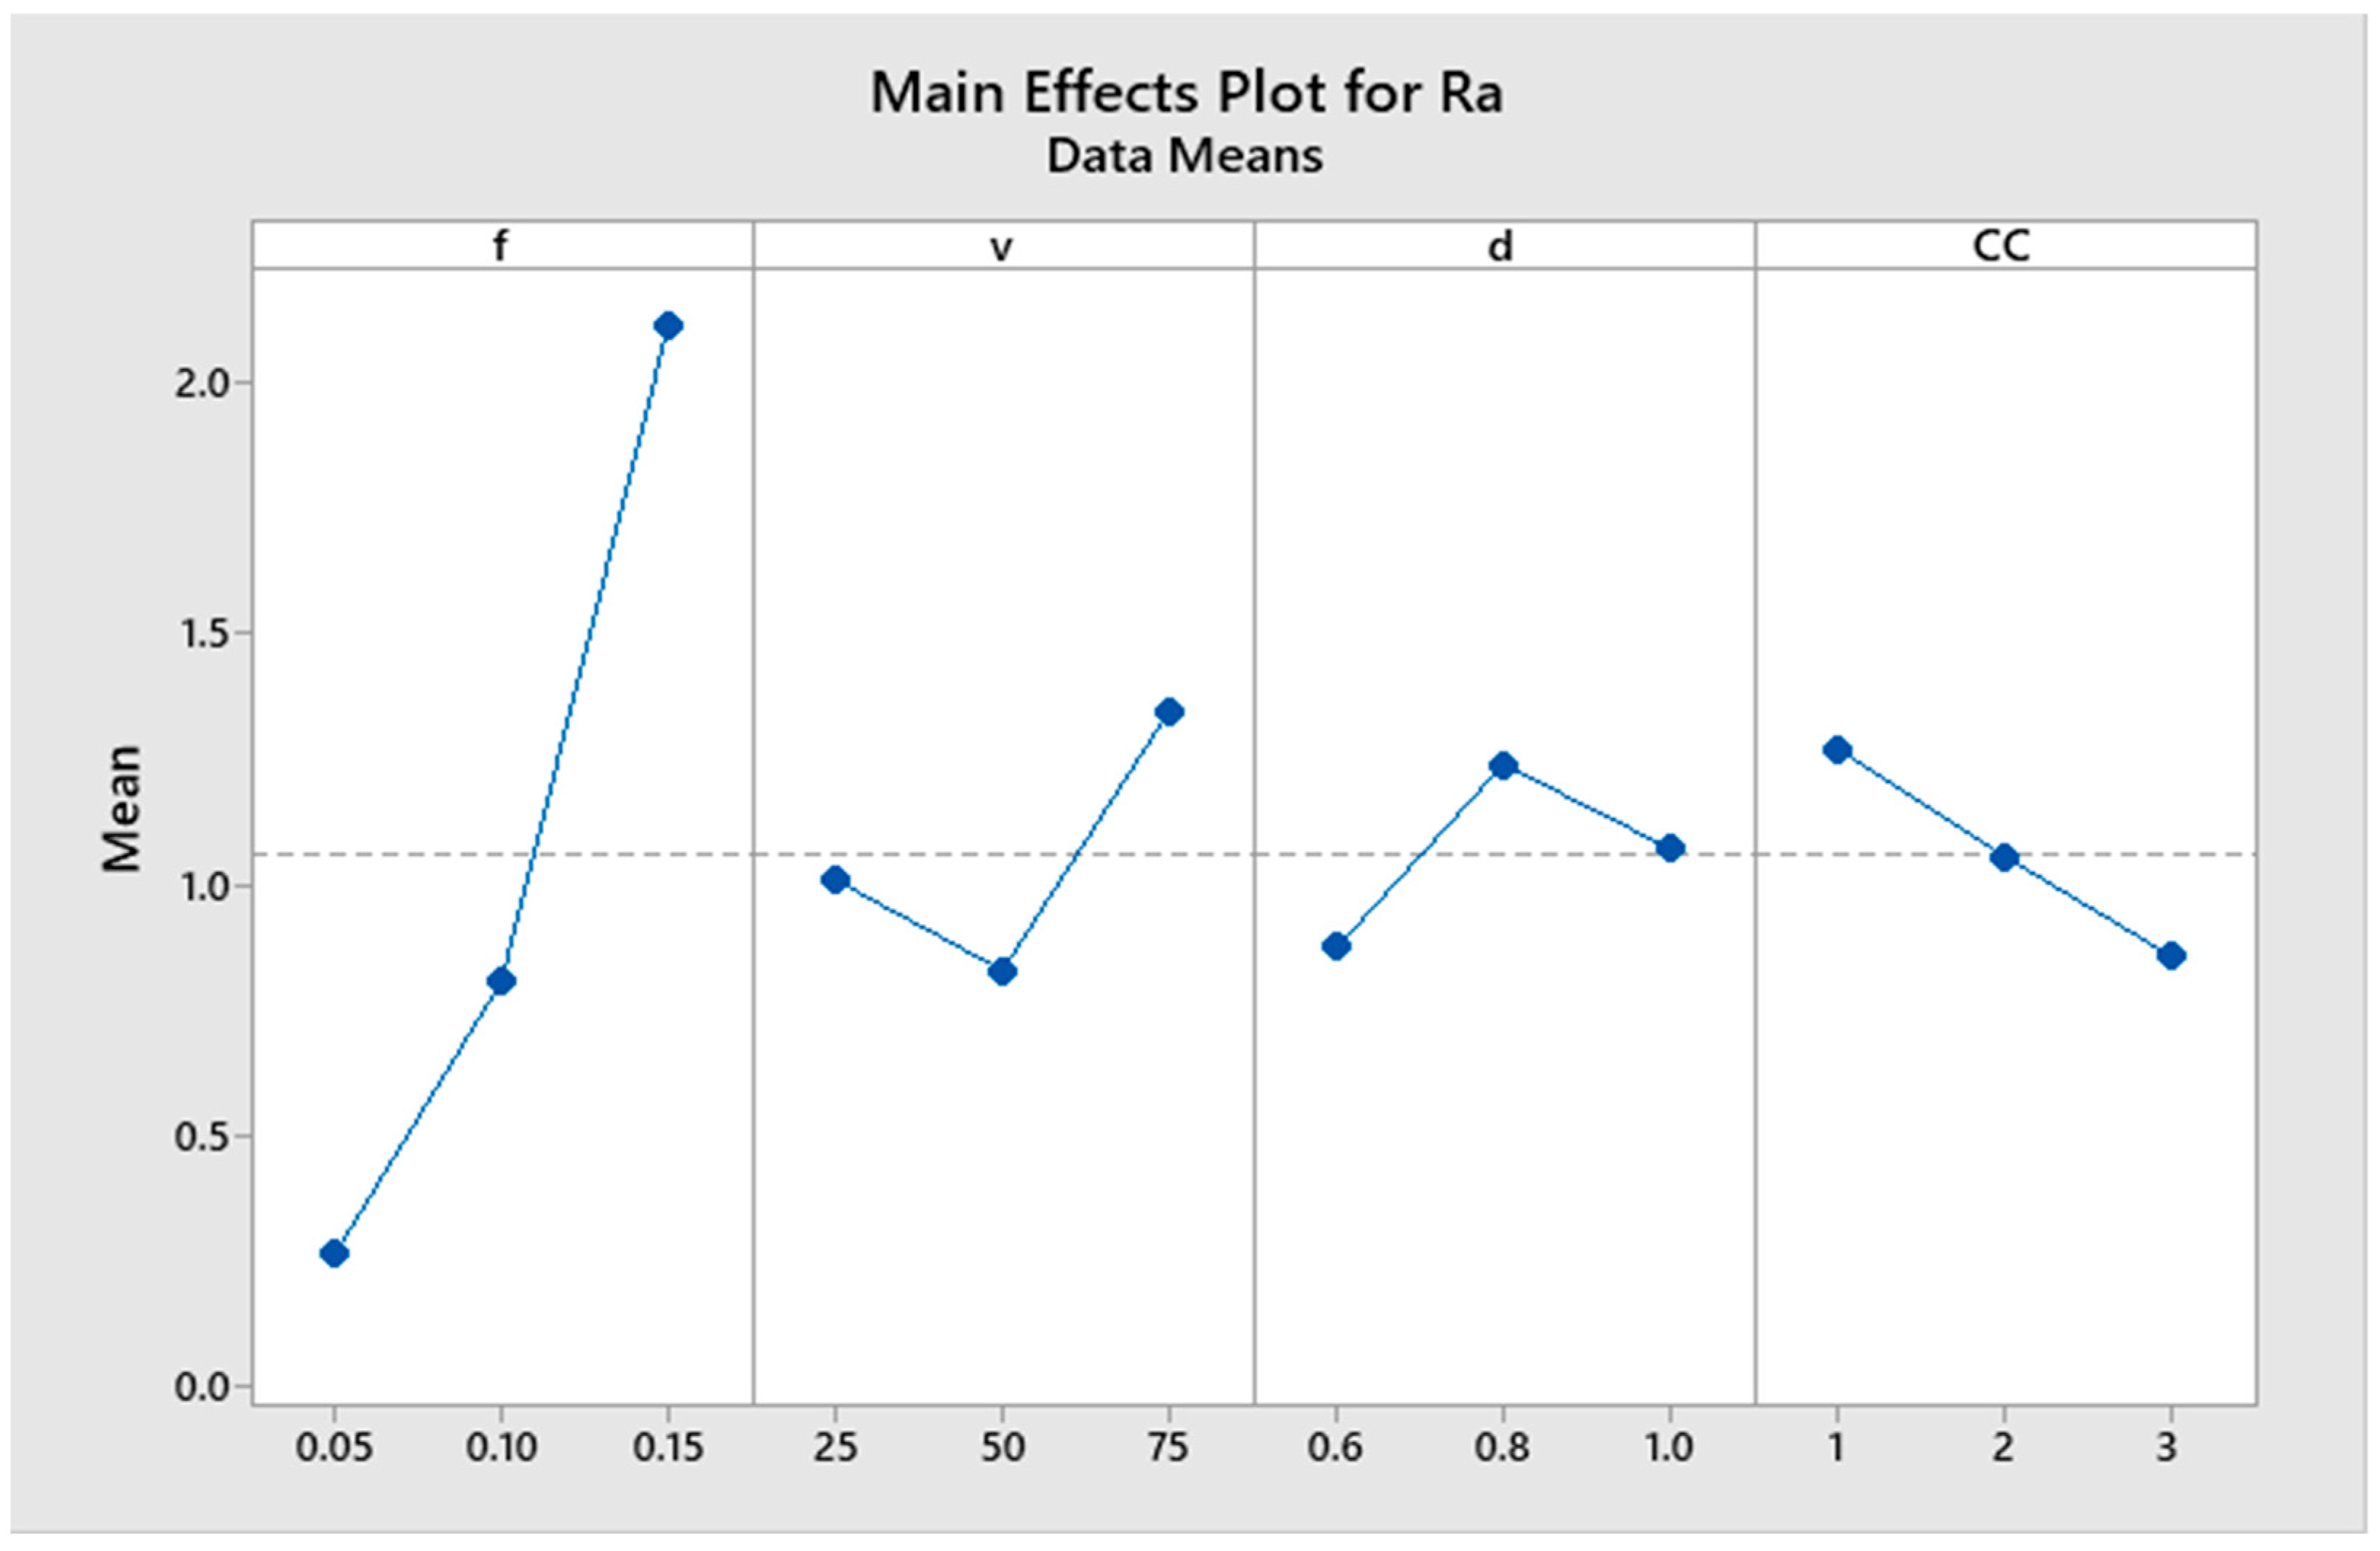
Ra is a very important output response, as it is associated with the overall quality of the product. Figure 7 shows that an increase in the feed rate results in an increase in Ra. The other two input parameters, i.e., cutting speed and depth, showed inconsistent effects on Ra. Increases in Ra with feed were because high feed imparts microgrooves on the surface of the material, which, as a result, stretches and adds to the surface roughness [49]. At greater feed rates, the value of Ra increases due to high peaks and crests formed on the machined surfaces [50]. Moreover, increases in Ra at higher feed values are also a result of increased vibrations [38].
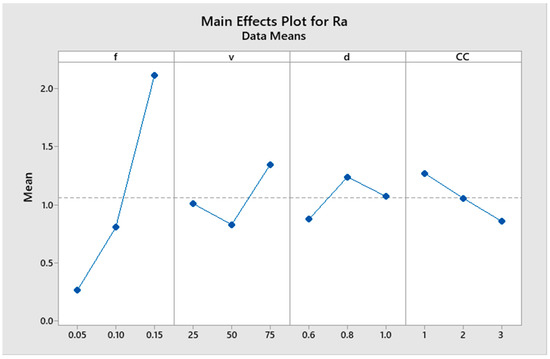
Figure 7.
Surface roughness main effects plot.
Dry conditions produced the highest Ra, while wet conditions produced the lowest Ra value, followed by MQL. Better surface roughness with a coolant is also because of the lubrication effect between sliding surfaces [51]. Moreover, the presence of coolant at the tool–workpiece interface significantly changes the coefficient of friction [52]. Different researchers have reported the same phenomenon of coolant penetration [49,53,54]. Mia et al. reported that one of the reasons for higher Ra in dry cutting is because of increased tool wear, which acts against the gain in thermal softening [55].
Table 8 shows the analysis of contributing factors. Feed was the most significant factor with an 86.09% contribution ratio, followed by cutting speed, cooling conditions, and cutting depth.

Table 8.
Analysis of variance for Ra.
4.4. Confirmatory Experimentation
The present research objective was to investigate the machining response by considering cooling conditions as an input parameter alongside other vital input machining variables. This research methodology first necessitated the identification of the contribution of significant machining inputs followed by the selection of specific values that would contribute toward suitable results. In the present investigation, R, SCE and Ra were chosen as vital output responses that were all based on smaller-the-better model. The main effects plots were used to predict the desired input parameter values, as shown in Table 9.

Table 9.
Best and worst response machining conditions.
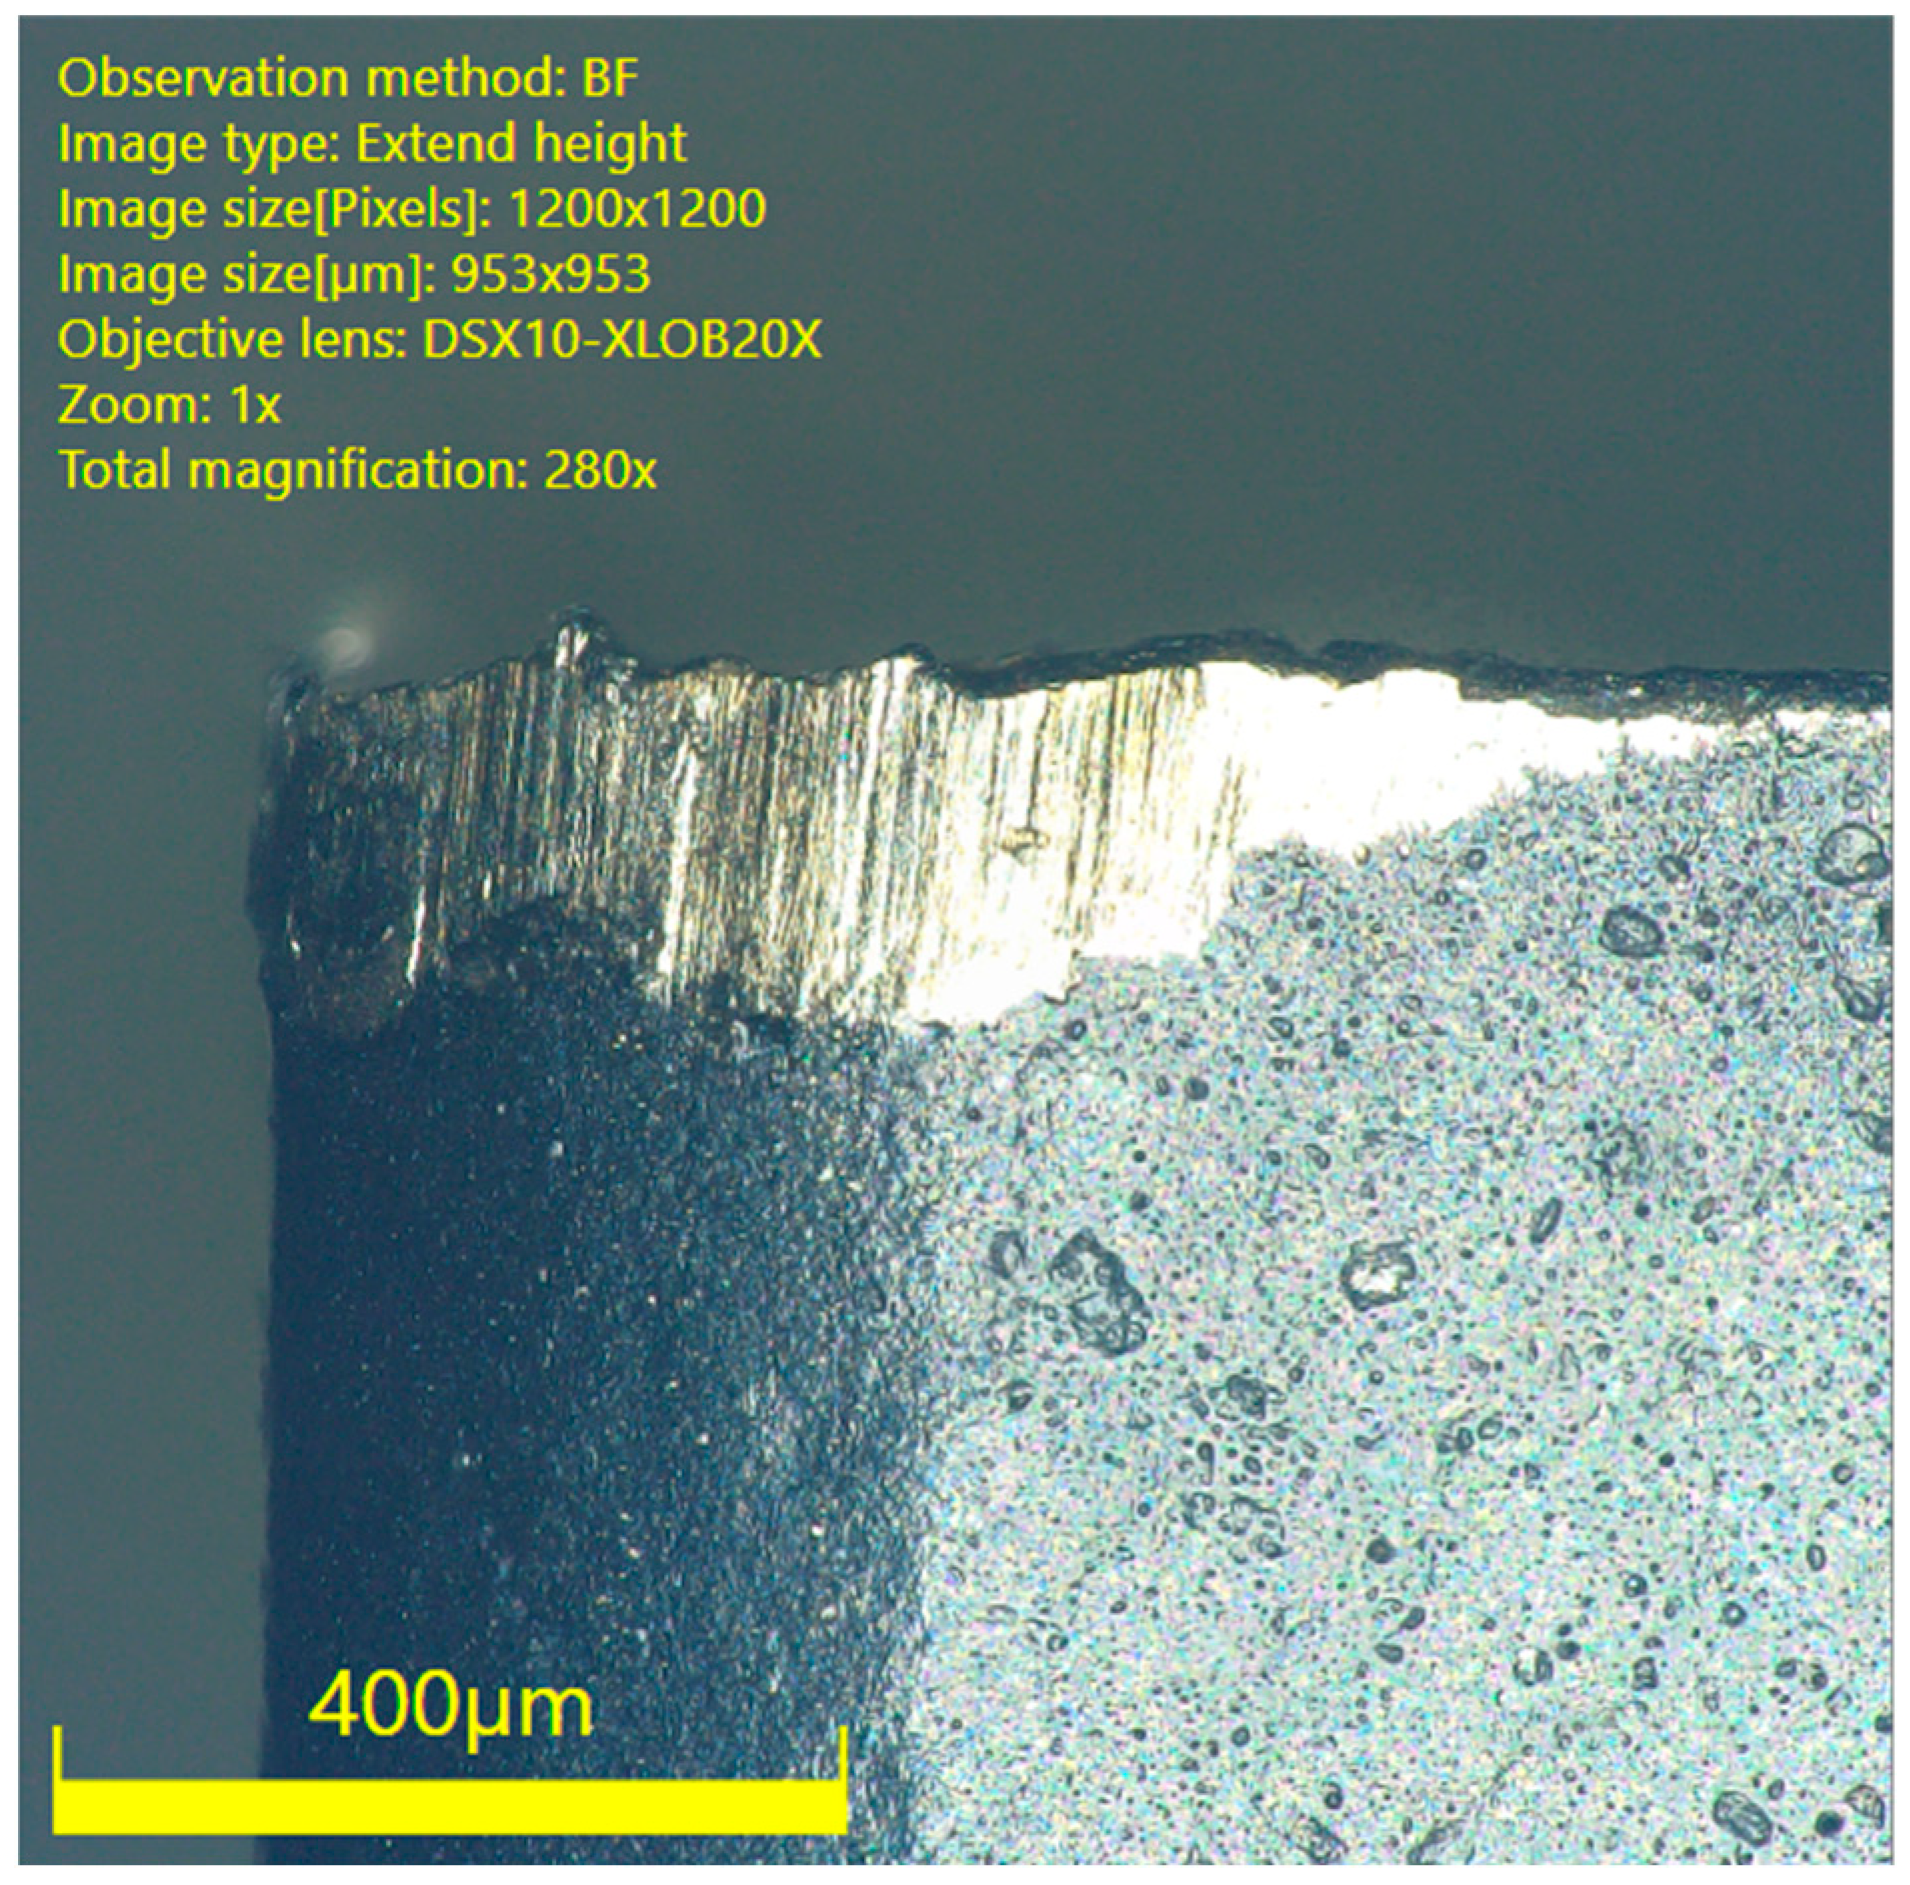
To validate the experimental results as well as to optimize the machining responses, confirmatory experiments were conducted with the best and worst combinations of input machining parameters, as given above. The results of the confirmatory experiments are shown in Table 10. Table 10 presents a comparison of the results for machining responses obtained through confirmatory experimentation with those obtained through initial experimentation given in Section 3. It may also be noted that two out of eight conditions were already included in the initial design of the experiment, as given in Table 4. The remaining six unique conditions, when run, produced results in conformation with trends predicted by Taguchi statistical analysis. The percentage difference column highlights the change in response magnitude in reference to the original results given in Table 5. It is pertinent to mention that comparison of machining responses, other than R, are simple mathematical calculations. In the case of R, inverse log calculations (as shown in Equation (1)) were carried out. R was first converted into tool life (t in seconds), taking into consideration the and the ISO standard for tool life before making comparisons. Microscopic images of the highest and lowest tool wear conditions are given in Figure 8 and Figure 9, respectively.

Table 10.
Comparison of initial run results with the confirmatory test results.
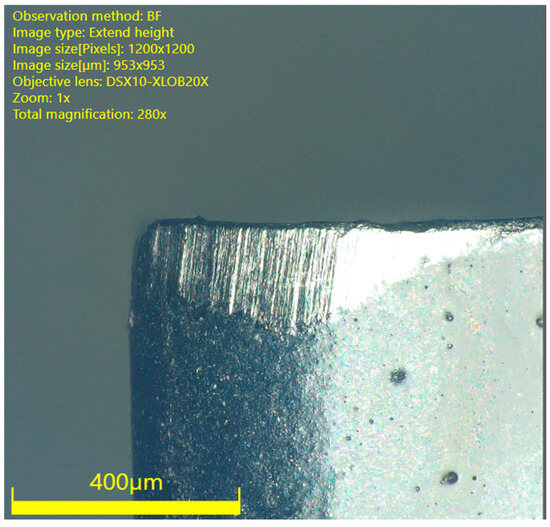
Figure 8.
Optical image of maximum wear ( 0.15 , 25 , 0.6 , dry).
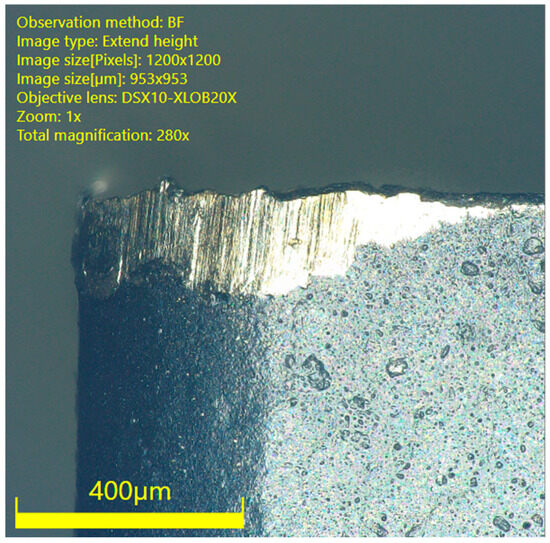
Figure 9.
Optical image of minimum wear ( 0.05 , 75 , 0.8 , MQL).
5. Conclusions
In this research, turning of Inconel 718 was performed under dry, MQL and wet conditions. The focus of the research was on the sustainability, efficiency, and productivity of the machining processes. In terms of sustainability, specific cutting energy was selected as the output parameter, while tool wear and surface roughness were selected in terms of efficiency and productivity. Based on the achieved results, the following conclusions can be drawn.
- During the application of MQL cooling conditions, a significant reduction in tool wear was observed. A further improvement of 30% in tool life was achieved when MQL turning was performed at optimum cutting parameters.
- Tool wear was highly influenced by feed (82.63% contribution ratio), followed by cutting speed (6.64% contribution ratio).
- Compared with wet conditions, MQL machining consumed lower specific cutting energy. When machining was performed under optimum machining parameters, process sustainability was enhanced by about 27%.
- The cooling conditions provided the highest contribution to SCE (63.43%), followed by cutting speed (18.56%) and feed (10.15%), while depth of cut had a minute effect with a 7.78% contribution ratio.
- Surface roughness increased with increasing feed, whereas the application of coolant improved surface integrity due to the lubrication effect. When machining was performed under the wet conditions with optimal machining parameters, surface roughness was improved by 15%.
- Feed provided a significantly high contribution to surface roughness (with an 86.09% contribution ratio) while cooling conditions, cutting depth and speed contribution ratios contributed 4.08%, 3.18% and 6.56%, respectively.
6. Future Recommendations
The efforts performed in the current work identified certain future research targets for the research community in manufacturing fields. Perhaps the next step will lead toward the multi-objective optimization of vital machining responses, as underlined by the statistical analysis results. In addition, the identified highly influential cutting parameters can be employed to draw process maps for tool wear and energy consumption for Inconel 718, as are available for other industrially important alloys. Moreover, the approach used to significantly increase sustainability and productivity, achieved during the machining of Inconel 718 super alloy, can be extended to titanium grade 3 alloy, which is a relatively less researched material. In this regard, comparative analysis of machinability of Inconel 718 at low, moderate and high cutting speeds using appropriate cooling techniques can also give insightful results.
Author Contributions
Conceptualization, M.I.F., S.I.B. and M.A.K.; Data curation, M.I.F., R.K. and M.A.K.; Formal analysis, M.Z.S., M.I.F., R.K., J.P., S.H.I.J. and M.A.K.; Funding acquisition, J.P.; Investigation, A.M.T.; Methodology, M.Z.S., J.P. and M.A.K.; Project administration, A.M.T.; Resources, J.P.; Software, R.K. and S.H.I.J.; Supervision, S.I.B., S.H.I.J. and M.A.K.; Validation, S.I.B.; Visualization, A.M.T.; Writing—original draft, M.Z.S. and M.I.F.; Writing—review & editing, S.H.I.J. and A.M.T. All authors have read and agreed to the published version of the manuscript.
Funding
The work was funded through the Department of Machining, Assembly and Engineering Metrology, Mechanical Engineering Faculty, VŠB-Technical University of Ostrava, 17, Listopadu 2172/15, 708 00 Ostrava, Czech Republic. This work was supported by the Deanship of Scientific Research, Vice Presidency for Graduate Studies and Scientific Research, King Faisal University, Saudi Arabia [Grant No. 4731].
Data Availability Statement
The data for this research are being used for further, extended research and can be made available in due course of time.
Conflicts of Interest
The authors declare no conflict of interest.
Nomenclature
| ANOVA | Analysis of variance |
| CC | Cooling conditions |
| D | Workpiece diameter (mm) |
| d | Depth of cut (mm) |
| f | Feed rate (mm/rev) |
| l | Linear length of cut (mm) |
| ls | Spiral length of cut (mm) |
| MQL | Minimum quantity lubrication |
| MRR | Material removal rate (mm3/s) |
| Pactual | Actual power |
| Pair | Air power (W) |
| Pcut | Cutting power (W) |
| R | Wear rate |
| Ra | Surface roughness (μm) |
| SCE | Specific cutting energy |
| t | Cutting time (s) |
| v | Cutting speed (m/min) |
| VB | Flank wear (mm) |
References
- Birol, F. Key World Energy Statistics; International Energy Agency: Paris, France, 2017. [Google Scholar]
- Zhou, L.; Li, J.; Li, F.; Meng, Q.; Li, J.; Xu, X. Energy consumption model and energy efficiency of machine tools: A comprehensive literature review. J. Clean. Prod. 2016, 112, 3721–3734. [Google Scholar] [CrossRef]
- Wippermann, A.; Gutowski, T.G.; Denkena, B.; Dittrich, M.-A.; Wessarges, Y. Electrical energy and material efficiency analysis of machining, additive and hybrid manufacturing. J. Clean. Prod. 2020, 251, 119731. [Google Scholar] [CrossRef]
- Trifunović, M.; Madić, M.; Janković, P.; Rodić, D.; Gostimirović, M. Investigation of cutting and specific cutting energy in turning of POM-C using a PCD tool: Analysis and some optimization aspects. J. Clean. Prod. 2021, 303, 127043. [Google Scholar] [CrossRef]
- Xavior, M.A.; Patil, M.; Maiti, A.; Raj, M.; Lohia, N. Machinability studies on INCONEL 718. IOP Conf. Ser. Mater. Sci. Eng. 2016, 149, 012019. [Google Scholar] [CrossRef]
- Pervaiz, S.; Samad, W.A. Drilling force characterization during inconel 718 drilling: A comparative study between numerical and analytical approaches. Materials 2021, 14, 4820. [Google Scholar] [CrossRef] [PubMed]
- Bronis, M.; Miko, E.; Nowakowski, L.; Bartoszuk, M. A Study of the Kinematics System in Drilling Inconel 718 for Improving of Hole Quality in the Aviation and Space Industries. Materials 2022, 15, 5500. [Google Scholar] [CrossRef]
- Jadam, T.; Datta, S.; Masanta, M. Influence of cutting tool material on machinability of Inconel 718 superalloy. Mach. Sci. Technol. 2021, 25, 349–397. [Google Scholar] [CrossRef]
- Ezugwu, E.O.; Bonney, J.; Yamane, Y. An overview of the machinability of aeroengine alloys. J. Mater. Process. Technol. 2003, 134, 233–253. [Google Scholar] [CrossRef]
- Jaffery, S.H.I.; Khan, M.; Ali, L.; Mativenga, P.T. Statistical analysis of process parameters in micromachining of Ti-6Al-4V alloy. Proc. Inst. Mech. Eng. B J. Eng. Manuf. 2016, 230, 1017–1034. [Google Scholar] [CrossRef]
- Bedada, B.D.; Woyesssa, G.K.; Jiru, M.G.; Fetene, B.N.; Gemechu, T. Experimental Investigation on the Advantages of Dry Machining over Wet Machining during Turning of AISI 1020 Steel. J. Mod. Mech. Eng. Technol. 2021, 8, 12–25. [Google Scholar] [CrossRef]
- Yazid, M.Z.A.; Ibrahim, G.A.; Said, A.Y.M.; CheHaron, C.H.; Ghani, J.A. Surface integrity of Inconel 718 when finish turning with PVD coated carbide tool under MQL. Procedia Eng. 2011, 19, 396–401. [Google Scholar] [CrossRef]
- Kazeem, R.A.; Fadare, D.A.; Ikumapayi, O.M.; Adediran, A.A.; Aliyu, S.J.; Akinlabi, S.A.; Jen, T.C.; Akinlabi, E.T. Advances in the application of vegetable-oil-based cutting fluids to sustainable machining operations—A review. Lubricants 2022, 10, 69. [Google Scholar] [CrossRef]
- Sreejith, P.S.; Ngoi, B.K.A. Dry machining: Machining of the future. J. Mater. Process. Technol. 2000, 101, 287–291. [Google Scholar] [CrossRef]
- Kui, G.W.A.; Islam, S.; Reddy, M.M.; Khandoker, N.; Chen, V.L.C. Recent progress and evolution of coolant usages in conventional machining methods: A comprehensive review. Int. J. Adv. Manuf. Technol. 2022, 119, 3–40. [Google Scholar] [CrossRef] [PubMed]
- Frifita, W.; Salem, S.B.; Haddad, A.; Yallese, M.A. Optimization of machining parameters in turning of Inconel 718 Nickel-base super alloy. Mech. Ind. 2020, 21, 203. [Google Scholar] [CrossRef]
- Aslantas, K.; Ekici, E.; Cicek, A. Optimization of process parameters for micro milling of Ti-6Al-4V alloy using Taguchi-based gray relational analysis. Measurement 2018, 128, 419–427. [Google Scholar] [CrossRef]
- Kosaraju, S.; Kumar, M.V.; Sateesh, N. Optimization of machining parameter in turning Inconel 625. Mater. Today Proc. 2018, 5, 5343–5348. [Google Scholar] [CrossRef]
- Khan, M.A.; Jaffery, S.H.I.; Khan, M.; Younas, M.; Butt, S.I.; Ahmad, R.; Warsi, S.S. Statistical analysis of energy consumption, tool wear and surface roughness in machining of Titanium alloy (Ti-6Al-4V) under dry, wet and cryogenic conditions. Mech. Sci. 2019, 10, 561–573. [Google Scholar] [CrossRef]
- Sheheryar, M.; Khan, M.A.; Jaffery, S.H.I.; Alruqi, M.; Khan, R.; Bashir, M.N.; Petru, J. Multi-Objective Optimization of Process Parameters during Micro-Milling of Nickel-Based Alloy Inconel 718 Using Taguchi-Grey Relation Integrated Approach. Materials 2022, 15, 8296. [Google Scholar] [CrossRef]
- Salur, E.; Kuntoğlu, M.; Aslan, A.; Pimenov, D.Y. The Effects of MQL and Dry Environments on Tool Wear, Cutting Temperature, and Power Consumption during End Milling of AISI 1040 Steel. Metals 2021, 11, 1674. [Google Scholar] [CrossRef]
- Gupta, K.; Laubscher, R.F. Sustainable machining of titanium alloys: A critical review. Proc. Inst. Mech. Eng. Part B J. Eng. Manuf. 2017, 231, 2543–2560. [Google Scholar] [CrossRef]
- Masoudi, S.; Esfahani, M.J.; Jafarian, F.; Mirsoleimani, S.A. Comparison the effect of MQL, wet and dry turning on surface topography, cylindricity tolerance and sustainability. Int. J. Precis. Eng. Manuf. Green Technol. 2019, 10, 9–21. [Google Scholar] [CrossRef]
- Singh, R. Minimum quantity lubrication turning of hard to cut materials—A review. Mater. Today Proc. 2021, 37, 3601–3605. [Google Scholar] [CrossRef]
- Tian, P.; He, L.; Zhou, T.; Du, F.; Zou, Z.; Zhou, X. Experimental characterization of the performance of MQL-assisted turning of solution heat-treated and aged Inconel 718 alloy. Int. J. Adv. Manuf. Technol. 2023, 125, 3839–3851. [Google Scholar] [CrossRef]
- Khatri, A.; Jahan, M.P. Investigating tool wear mechanisms in machining of Ti-6Al-4V in flood coolant, dry and MQL conditions. Procedia Manuf. 2018, 26, 434–445. [Google Scholar] [CrossRef]
- Cantero, J.L.; Díaz-Álvarez, J.; Miguélez, M.H.; Marín, N.C. Analysis of tool wear patterns in finishing turning of Inconel 718. Wear 2013, 297, 885–894. [Google Scholar] [CrossRef]
- Pradhan, P.; Costa, L.; Rybski, D.; Lucht, W.; Kropp, J.P. A systematic study of sustainable development goal (SDG) interactions. Earths Future 2017, 5, 1169–1179. [Google Scholar] [CrossRef]
- Zhao, Z.; Hong, S.Y. Cryogenic Properties of Some Cutting Tool Materials. J. Mater. Eng. Perform. 1992, 1, 705–714. [Google Scholar] [CrossRef]
- Li, W.; Kara, S. An empirical model for predicting energy consumption of manufacturing processes: A case of turning process. Proc. Inst. Mech. Eng. Part B J. Eng. Manuf. 2011, 225, 1636–1646. [Google Scholar] [CrossRef]
- Behera, B.C.; Alemayehu, H.; Ghosh, S.; Rao, P.V. A comparative study of recent lubri-coolant strategies for turning of Ni-based superalloy. J. Manuf. Process. 2017, 30, 541–552. [Google Scholar] [CrossRef]
- Warsi, S.S.; Agha, M.H.; Ahmad, R.; Jaffery, S.H.I.; Khan, M. Sustainable turning using multi-objective optimization: A study of Al 6061 T6 at high cutting speeds. Int. J. Adv. Manuf. Technol. 2019, 100, 843–855. [Google Scholar] [CrossRef]
- Kumar, R.; Bilga, P.S.; Singh, S. Multi objective optimization using different methods of assigning weights to energy consumption responses, surface roughness and material removal rate during rough turning operation. J. Clean. Prod. 2017, 164, 45–57. [Google Scholar] [CrossRef]
- Ross, P.J. Taguchi Techniques for Quality Engineering: Loss Function, Orthogonal Experiments, Parameter and Tolerance Design; Australian Road Research Board (ARRB): Port Melbourne, Australia, 1988. [Google Scholar]
- Ziegel, E.R. Taguchi Techniques for Quality Engineering; Taylor & Francis: Abingdon, UK, 1997. [Google Scholar]
- Venkatesan, K.; Mathew, A.T.; Devendiran, S.; Ghazaly, N.M.; Sanjith, S.; Raghul, R. Machinability study and multi-response optimization of cutting force, Surface roughness and tool wear on CNC turned Inconel 617 superalloy using Al2O3 Nanofluids in Coconut oil. Procedia Manuf. 2019, 30, 396–403. [Google Scholar] [CrossRef]
- Sarwar, M.; Persson, M.; Hellbergh, H.; Haider, J. Measurement of specific cutting energy for evaluating the efficiency of bandsawing different workpiece materials. Int. J. Mach. Tools Manuf. 2009, 49, 958–965. [Google Scholar] [CrossRef]
- Yan, J.; Li, L. Multi-objective optimization of milling parameters-the trade-offs between energy, production rate and cutting quality. J. Clean. Prod. 2013, 52, 462–471. [Google Scholar] [CrossRef]
- Kaya, E.; Akyüz, B. Effects of cutting parameters on machinability characteristics of Ni-based superalloys: A review. Open Eng. 2017, 7, 330–342. [Google Scholar] [CrossRef]
- Shaw, M.C. Metal Cutting Principles; Oxford University Press: Oxford, UK, 2005. [Google Scholar]
- Fan, Y.; Hao, Z.; Zheng, M.; Yang, S. Wear characteristics of cemented carbide tool in dry-machining Ti-6Al-4V. Mach. Sci. Technol. 2016, 20, 249–261. [Google Scholar] [CrossRef]
- Xavior, M.A.; Manohar, M.; Jeyapandiarajan, P.; Madhukar, P.M. Tool Wear Assessment during Machining of Inconel 718. Procedia Eng. 2017, 174, 1000–1008. [Google Scholar] [CrossRef]
- Parida, A.K.; Maity, K. Effect of nose radius on forces, and process parameters in hot machining of Inconel 718 using finite element analysis. Eng. Sci. Technol. Int. J. 2017, 20, 687–693. [Google Scholar] [CrossRef]
- Hao, Z.; Fan, Y.; Lin, J.; Ji, F.; Liu, X. New observations on wear mechanism of self-reinforced SiAlON ceramic tool in milling of Inconel 718. Arch. Civ. Mech. Eng. 2017, 17, 467–474. [Google Scholar] [CrossRef]
- Groover, M.P. Fundamentals of Modern Manufacturing: Materials, Processes, and Systems; John Wiley & Sons: Hoboken, NJ, USA, 2020. [Google Scholar]
- Balogun, V.A.; Mativenga, P.T. Impact of un-deformed chip thickness on specific energy in mechanical machining processes. J. Clean. Prod. 2014, 69, 260–268. [Google Scholar] [CrossRef]
- Balogun, V.A.; Edem, I.F.; Adekunle, A.A.; Mativenga, P.T. Specific energy based evaluation of machining efficiency. J. Clean. Prod. 2016, 116, 187–197. [Google Scholar] [CrossRef]
- Pinheiro, C.; Kondo, M.Y.; Amaral, S.S.; Callisaya, E.S.; De Souza, J.V.C.; De Sampaio Alves, M.C.; Ribeiro, M.V. Effect of machining parameters on turning process of Inconel 718. Mater. Manuf. Process. 2021, 36, 1421–1437. [Google Scholar] [CrossRef]
- Mia, M. Multi-response optimization of end milling parameters under through-tool cryogenic cooling condition. Measurement 2017, 111, 134–145. [Google Scholar] [CrossRef]
- Mia, M.; Dhar, N.R. Prediction of surface roughness in hard turning under high pressure coolant using Artificial Neural Network. Measurement 2016, 92, 464–474. [Google Scholar] [CrossRef]
- Dhar, N.R.; Kamruzzaman, M. Cutting temperature, tool wear, surface roughness and dimensional deviation in turning AISI-4037 steel under cryogenic condition. Int. J. Mach. Tools Manuf. 2007, 47, 754–759. [Google Scholar] [CrossRef]
- Strano, M.; Chiappini, E.; Tirelli, S.; Albertelli, P.; Monno, M. Comparison of Ti6Al4V machining forces and tool life for cryogenic versus conventional cooling. Proc. Inst. Mech. Eng. B J. Eng. Manuf. 2013, 227, 1403–1408. [Google Scholar] [CrossRef]
- Bagherzadeh, A.; Budak, E. Investigation of machinability in turning of difficult-to-cut materials using a new cryogenic cooling approach. Tribol. Int. 2018, 119, 510–520. [Google Scholar] [CrossRef]
- Yuan, S.M.; Yan, L.T.; Liu, W.D.; Liu, Q. Effects of cooling air temperature on cryogenic machining of Ti-6Al-4V alloy. J. Mater. Process. Technol. 2011, 211, 356–362. [Google Scholar] [CrossRef]
- Mia, M.; Dhar, N.R. Optimization of surface roughness and cutting temperature in high-pressure coolant-assisted hard turning using Taguchi method. Int. J. Adv. Manuf. Technol. 2017, 88, 739–753. [Google Scholar] [CrossRef]
Disclaimer/Publisher’s Note: The statements, opinions and data contained in all publications are solely those of the individual author(s) and contributor(s) and not of MDPI and/or the editor(s). MDPI and/or the editor(s) disclaim responsibility for any injury to people or property resulting from any ideas, methods, instructions or products referred to in the content. |
© 2023 by the authors. Licensee MDPI, Basel, Switzerland. This article is an open access article distributed under the terms and conditions of the Creative Commons Attribution (CC BY) license (https://creativecommons.org/licenses/by/4.0/).

