Review

Mathematical Complexities in Modelling Damage in Spur Gears

School of Aerospace, Transport and Manufacturing, Cranfield University, Bedford MK43 0AL, UK
*
Author to whom correspondence should be addressed.
Machines 2024, 12(5), 346; https://doi.org/10.3390/machines12050346
Submission received: 27 March 2024 / Revised: 6 May 2024 / Accepted: 10 May 2024 / Published: 16 May 2024
(This article belongs to the Special Issue Intelligent Machinery Fault Diagnosis and Maintenance)

Abstract

:
Analytical modelling is an effective approach to obtaining a gear dynamic response or vibration pattern for health monitoring and useful life prediction. Many researchers have modelled this response with various fault conditions commonly observed in gears. The outcome of such models provides a good idea about the changes in the dynamic response available between different gear health states. Hence, a catalogue of the responses is currently available, which ought to aid predictions of the health of actual gears by their vibration patterns. However, these analytical models are limited in providing solutions to useful life prediction. This may be because a majority of these models used single fault conditions for modelling and are not valid to predict the remaining life of gears undergoing more than one fault condition. Existing reviews related to gear faults and dynamic modelling can provide an overview of fault modes, methods for modelling and health prediction. However, these reviews are unable to provide the critical similarities and differences in the single-fault dynamic models to ascertain the possibility of developing models under combined fault modes. In this paper, existing analytical models of spur gears are reviewed with their associated challenges to predict the gear health state. Recommendations for establishing more realistic models are made especially in the context of modelling combined faults and their possible impact on gear dynamic response and health prediction.

1. Introduction

The design of gears incorporates a high factor of safety to ensure long service life [1]. However, gears are still reported to fail in active service which can lead to operational downtime and economic losses [2,3,4,5,6,7,8,9,10,11,12,13]. The reasons for failure in gears before the end of the specified service life can broadly be categorised into three categories: Fault in design (like a low factor of safety, gear geometry errors and poor material selection), Fault in manufacturing (like metallurgical inclusions, improper heat treatment and machining marks) and Fault due to application (like installation errors and poor lubrication) [3]. For gears in operation especially in the absence of the mentioned faults, a few failure modes have been noted. These include bending fatigue/tooth crack or breakage and surface failures like pitting, spalling, abrasive wear, and adhesive wear [14].
Installation errors like misalignment can lead to tooth breakage [15,16]. Tooth breakage is a result of bending fatigue caused by improper installation procedures. It may cause partial or total removal of one or more teeth from the gear system [17]. This can lead to a jam in the gear rotation if the tooth that is broken obstructs the gear mesh. The continuous fluctuation at the tooth root fillet due to the changing magnitude and position of loading at the contact area along the tooth active profile leads to tooth root bending [18]. Tooth breakage is also quite difficult to notice in the early stages by the common monitoring methods. These monitoring methods include oil debris monitoring, vibration monitoring and acoustic emissions [19,20,21]. It is also hard to predict through oil debris monitoring as it shows little or insignificant debris during fault progression. Even dynamic response or vibration patterns in the time and frequency domain only show the possibility of the faults after significant progression [22].
Lubrication issues may lead to pitting and spalling which results when the contact stress exceeds the fatigue strength [15]. Pits are formed when small particles break out from gear flanks. This occurs above the surface durability limits [23]. Pitting and spalling are forms of surface contact fatigue and it is the most common failure in gears [24]. Pitting may be initiated from the surface or subsurface. It is an indication of the end of a gear’s service life [25]. Spalling results in larger and deeper cavities on the gear flank [24,26]. In addition to poor lubrication, excessive loading also causes spalls to break out [27].
Insufficient lubrication leads to adhesive wear [15]. Adhesive wear is also referred to as scuffing. This occurs when the lubrication film breaks down due to high temperature because of the continuous sliding motion of the gear tooth [28]. It results in solid phase welding between the sliding gear teeth [29] This fault is more common in high-load and high-speed gear operations [30]. In contrast to adhesive wear, abrasive wear (also called scoring) can be due to dirt in the lubricant [15]. It can change the gear profile and leave marks on the gear surface [31]. Figure 1 shows views of common gear faults [22,30,31].
These failure modes can cause operation downtime and unsafe conditions in gear systems, and this can be mitigated by proper health monitoring [32]. Among the monitoring techniques, vibration monitoring techniques are versatile for both theoretical and experimental studies. The gear dynamic response due to its vibration is unique to the health state of the gear [14]. Gear dynamic responses can be obtained from experimental models, physics-based models or hybrid models [32,33]. In experimental models, faults are seeded, and the dynamic responses are noted. However, seeding different degrees of fault and evaluating the responses are both time-consuming and expensive [32]. For the physics-based models, there are models based on modulation, the characteristics of amplitude, frequency and phase angle gained from experiments are used to develop these models [34]. Another type of physics-based model is the dynamic model which is developed based on the understanding of gear meshing and dynamics [32]. The dynamic model may be numerical or analytical. Numerical dynamic models commonly employ the use of finite element methods to provide an approximate solution of the gear response, while the analytical models aim to derive complete solutions from the physical laws of the gear responses [35].
Existing reviews related to gear faults and dynamic modelling can provide an overview of fault modes, methods for modelling and health prediction [14,28,31,32,34]. However, these reviews are unable to provide the critical similarities and differences in the single-fault dynamic models to ascertain the possibility of developing models under combined fault modes. In this paper, existing analytical models of spur gears are reviewed with their associated challenges to predict the gear health state. Recommendations for establishing more realistic models are made especially in the context of modelling combined faults and their possible impact on gear dynamic response and health prediction.

2. Analytical Models of Healthy Gears

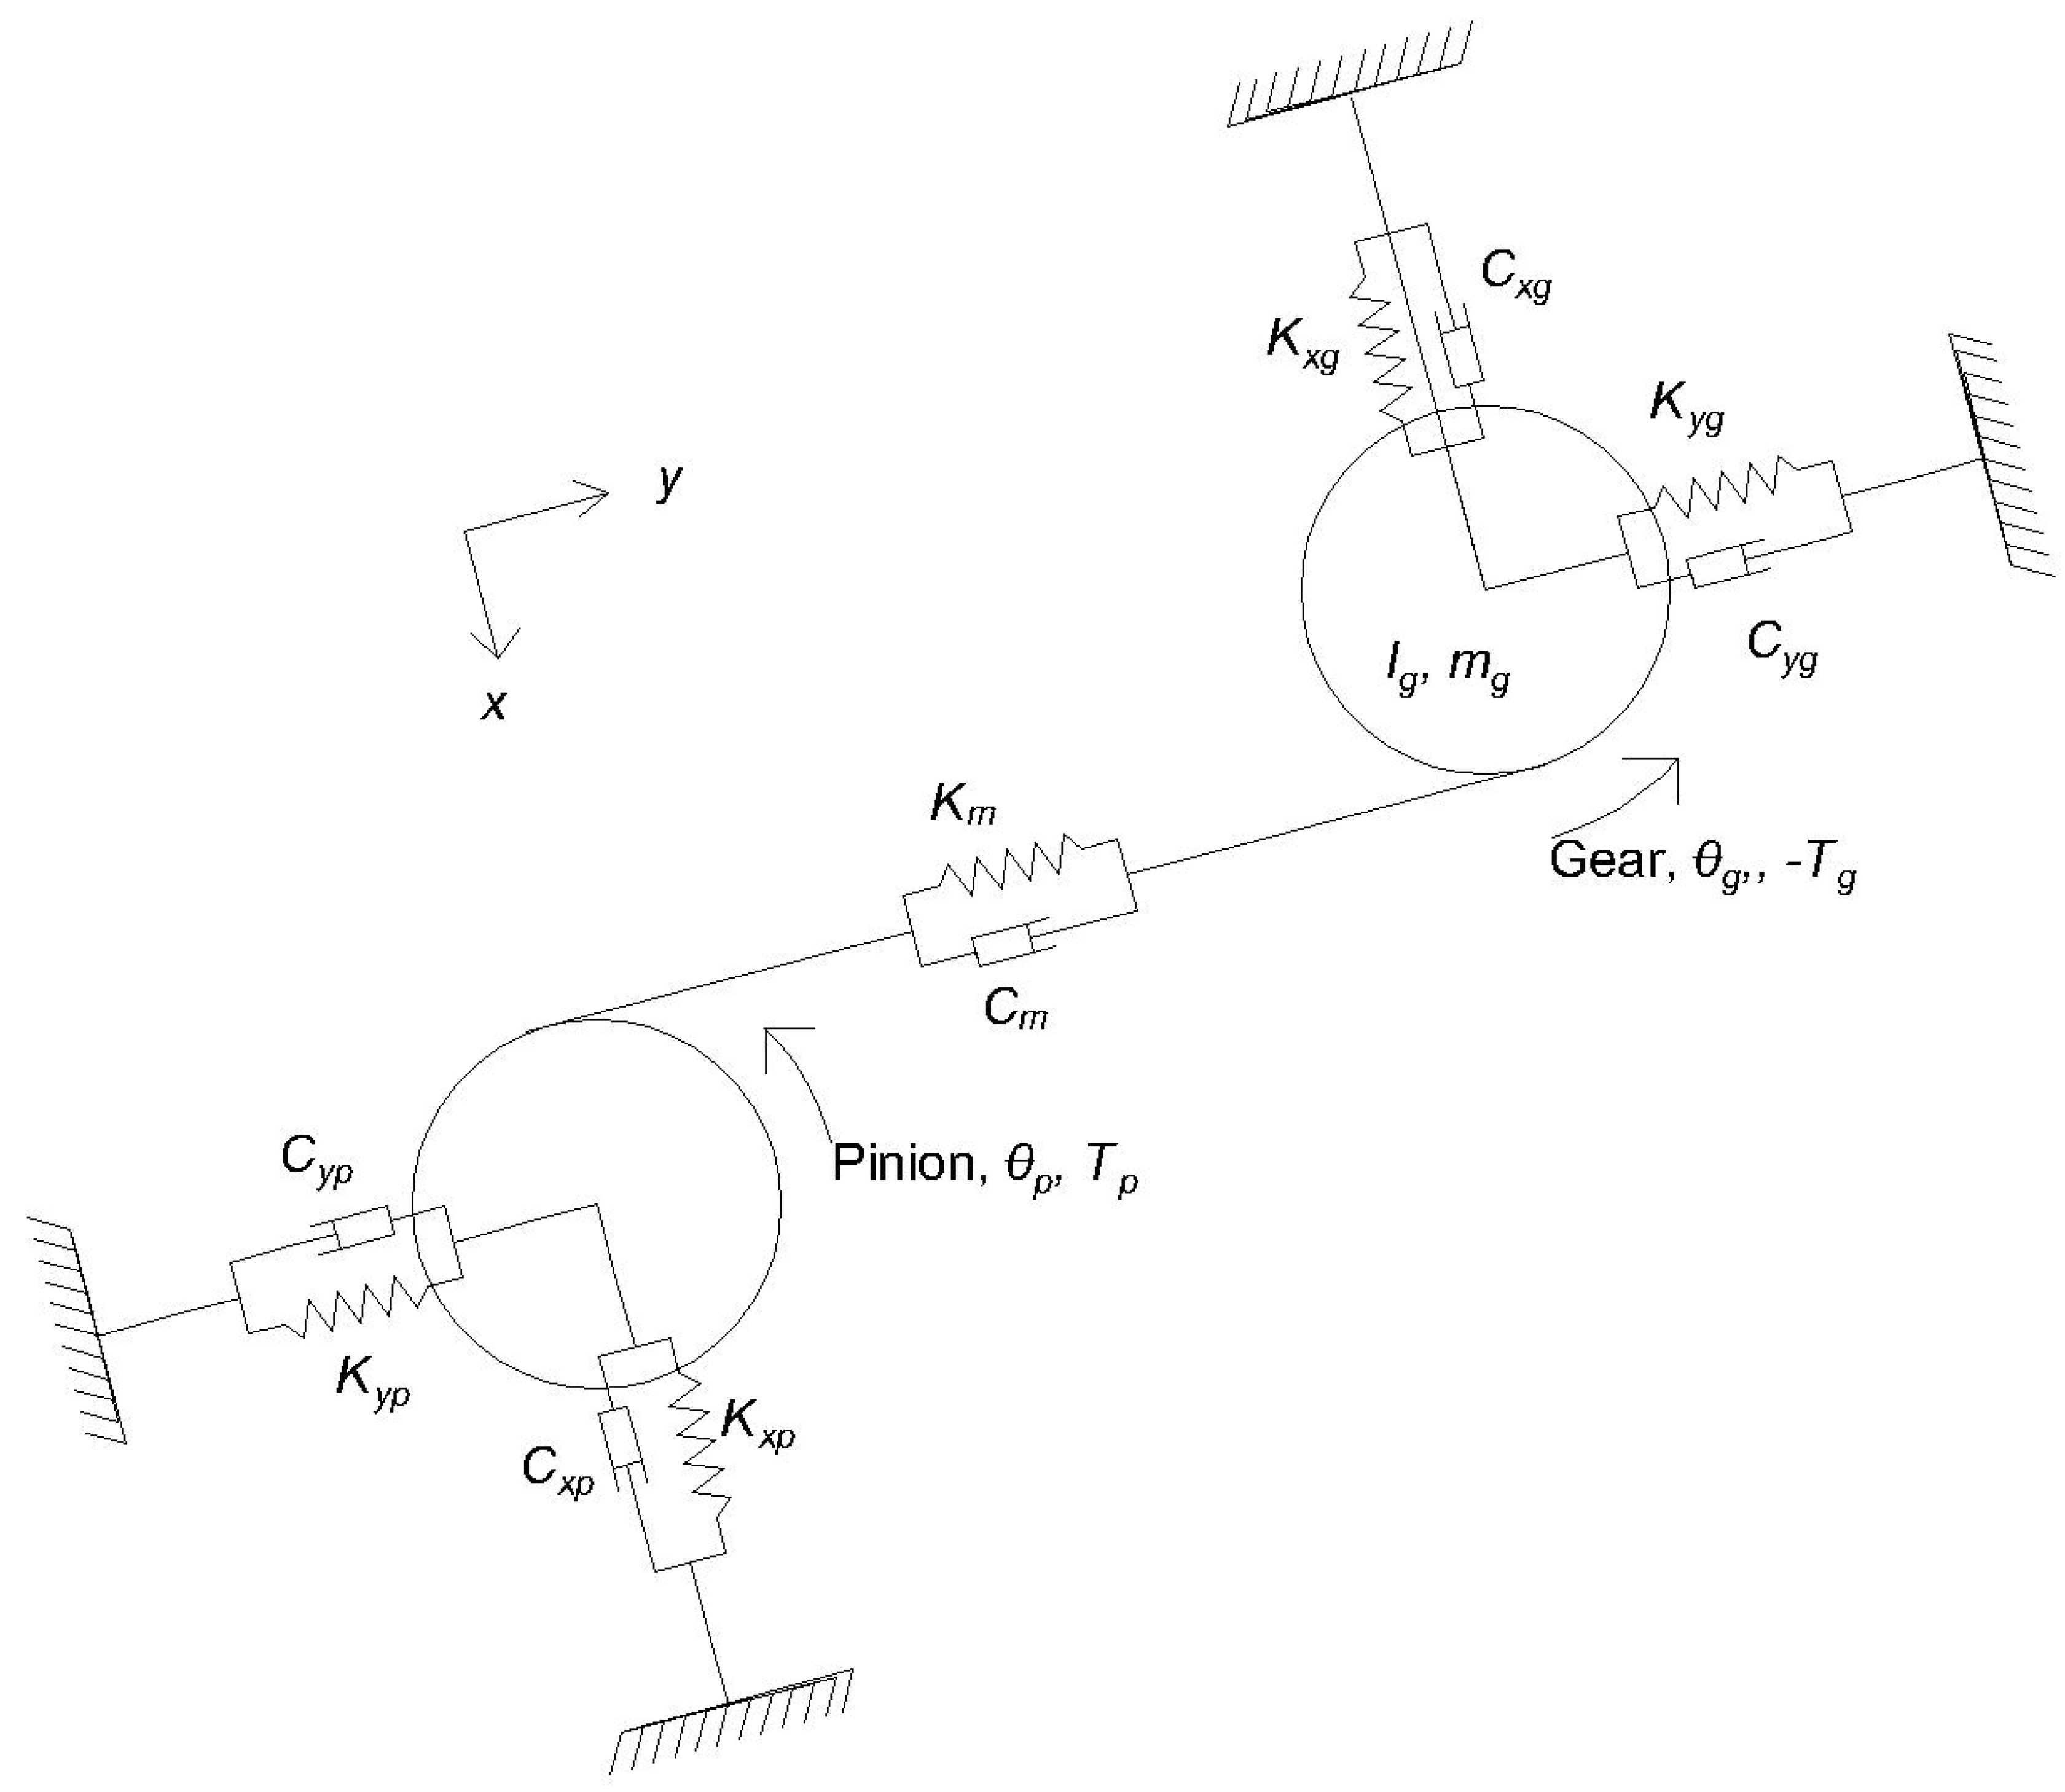
The healthy gear model always serves as a baseline for any failure model. It is useful to understand the dynamic response of the healthy gear to ascertain the deviations that may be observed in faulty gears. The lumped parameter method is used for obtaining analytical dynamic models [35]. In a one-stage gear system, an analytical dynamic model with 6 degrees of freedom (DOF) can define two translational directions and one rotational direction for the pinion and the gear. The schematics of the model and its equations of motion as detailed in [36] are presented in Figure 2 and Equations (1)–(6).
m p x ¨ + K x p x + C x p x ˙ F p = 0
m g x ¨ + K x g x + C x g x ˙ F g = 0
m p y ¨ + K y p y + C y p y ˙ + N = 0
m g y ¨ + K y g y + C y g y ˙ N = 0
    I p θ ¨ p r p N T p M p = 0
  I g θ ¨ g + r g N + T g M g = 0
where;
            N = K m y p y g r p θ p r g θ g + C m y ˙ p y ˙ g r p θ ˙ p r g θ ˙ g
  • p = pinion, g = gear, x and y represent two translational directions, θ represent the rotational direction
  • m = mass (kg)
  • r = Base circle (mm)
  • C = Radial damping (Ns/m)
  • K = Radial stiffness (N/m)
  • F = Frictional Force (N)
  • T = Torque (Nm)
  • M = Moments due to frictional forces (Nm)
  • Km = Total mesh stiffness (N/m) and Cm = mesh damping (Ns/m)
To obtain a solution to the above equations of motion, the total mesh stiffness and the total mesh damping must be evaluated. A reliable analytical method for the evaluation of the mesh stiffness is the potential energy method [37]. This method aggregates the Hertzian, axial, bending, shear and fillet foundation stiffness for the gear pair. The total mesh stiffness for the single tooth engagement region and the double tooth engagement region are obtained using Equations (8)–(10) as given in [36,38,39,40].
For any one pair of gear tooth engagement, where 1 and 2 represent a set of gear tooth engagement each:
1 K t 1 , 2 = 1 K b p + 1 K s p + 1 K a p + 1 K f p + 1 K b g + 1 K s g + 1 K a g + 1 K f g + 1 K h
For a single pair engagement of gear tooth pair 1
K m = K t 1
For a double pair engagement of gear tooth pairs 1 and 2
K m = K t 1 + K t 2
where the stiffness subscripts t, b, s, a, f, and h represent mesh stiffness for a tooth pair bending, shear, axial, fillet foundation and Hertzian stiffness.
The bending, shear, axial, fillet foundation and Hertzian stiffness formulae are as given in Equations (11)–(15) [36].
1 K b = 0 d y c o s α 1 h s i n α 1 2 E I x d y
1 K s = 0 d 1.2 cos 2 α 1 G A x d y
    1 K a = 0 d sin 2 α 1 E A x d y
1 K h = 4 1 ν 2 π E L
      1 K f = δ f F
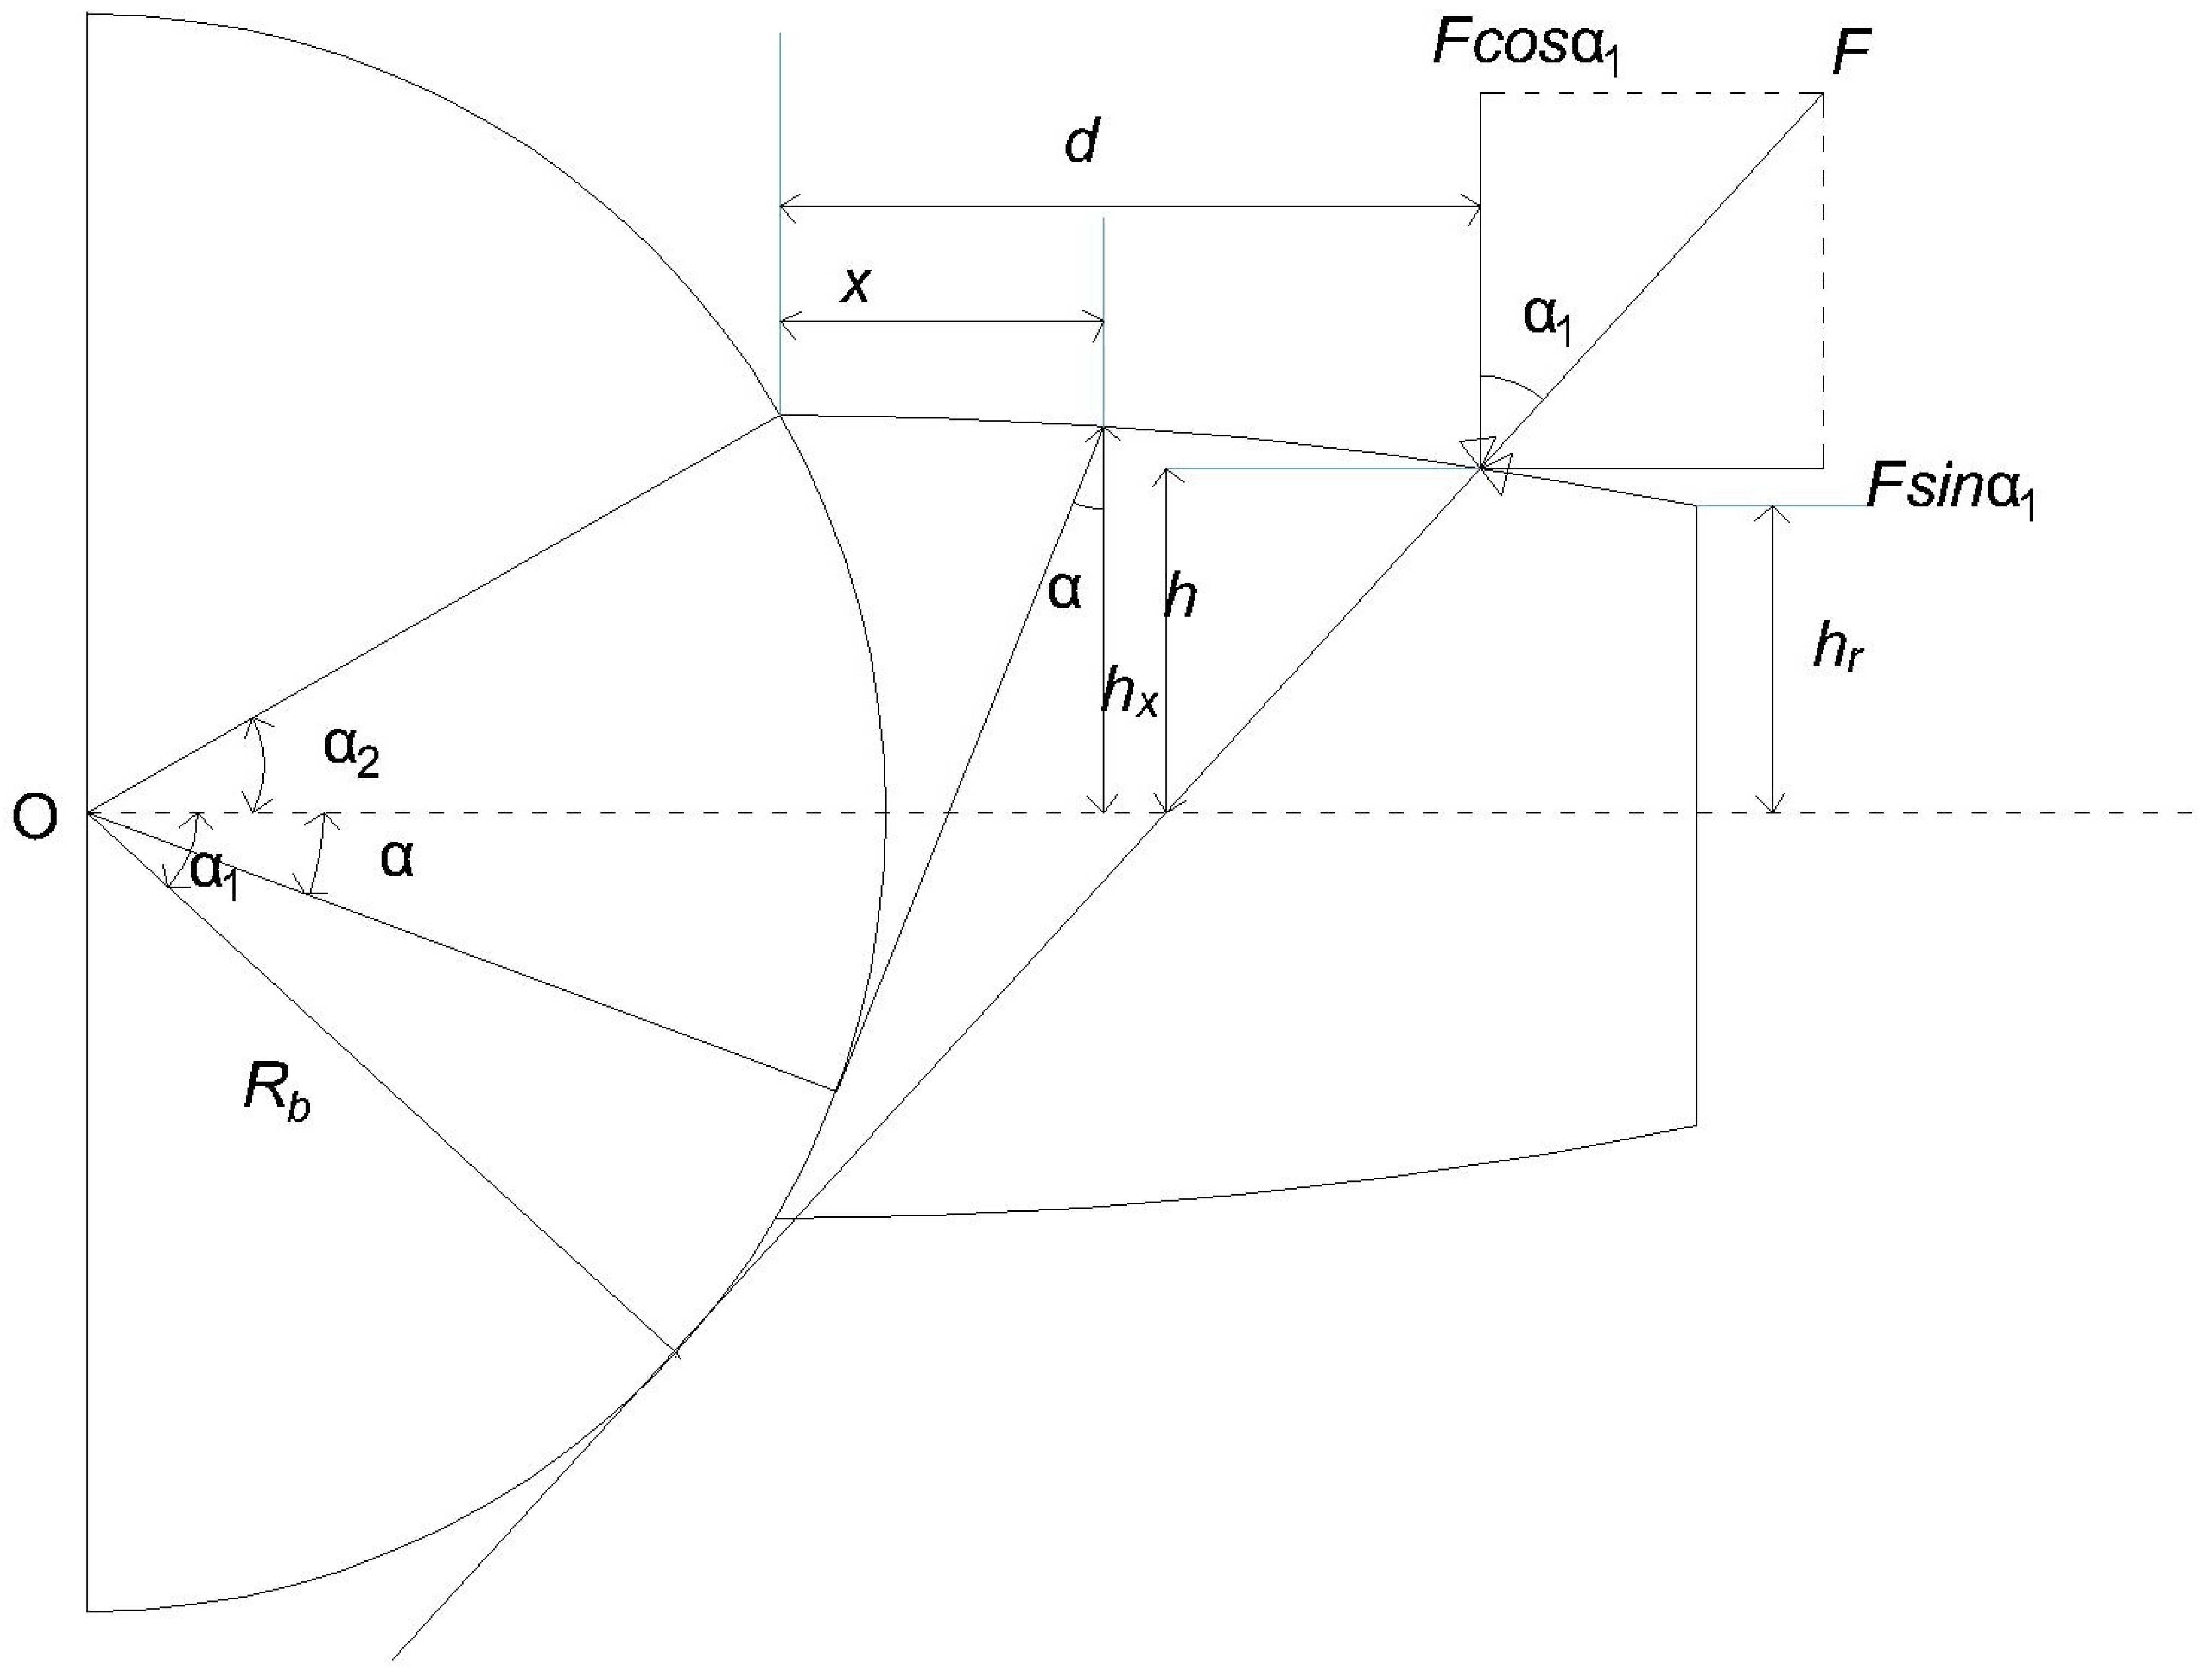
where y, h, d, and α 1 are as shown in Figure 3.
  • G = Shear modulus (N/mm2)
  • Ax = Area moment of inertia = 2 h x L
  • Ix = Moment of inertia = 1 12 2 h x 3 L
  • E = Elastic modulus (N/mm2)
  • L = Tooth width (mm)
  • δ f = Deflection of the tooth fillet
  • F = Force on tooth fillet (N)
When lubrication is considered the comprehensive mesh stiffness derived in [41] is given by
    1 K c = 1 K m + 1 K f i l m
where;
  • K c = the comprehensive mesh stiffness
  • K m = the total mesh stiffness without lubrication
  • K f i l m = stiffness of the lubrication film
The healthy gear tooth parameters as described in [42] are shown in Figure 3.
Figure 3. Gear tooth without fault (Reproduced from original) [42].
Machines 12 00346 g003
These parameters may be slightly different for larger gears, as gears with more than 42 teeth have a base circle with a radius less than the root circle, while gears with less than 42 teeth have a base circle with radii greater than their root circles.
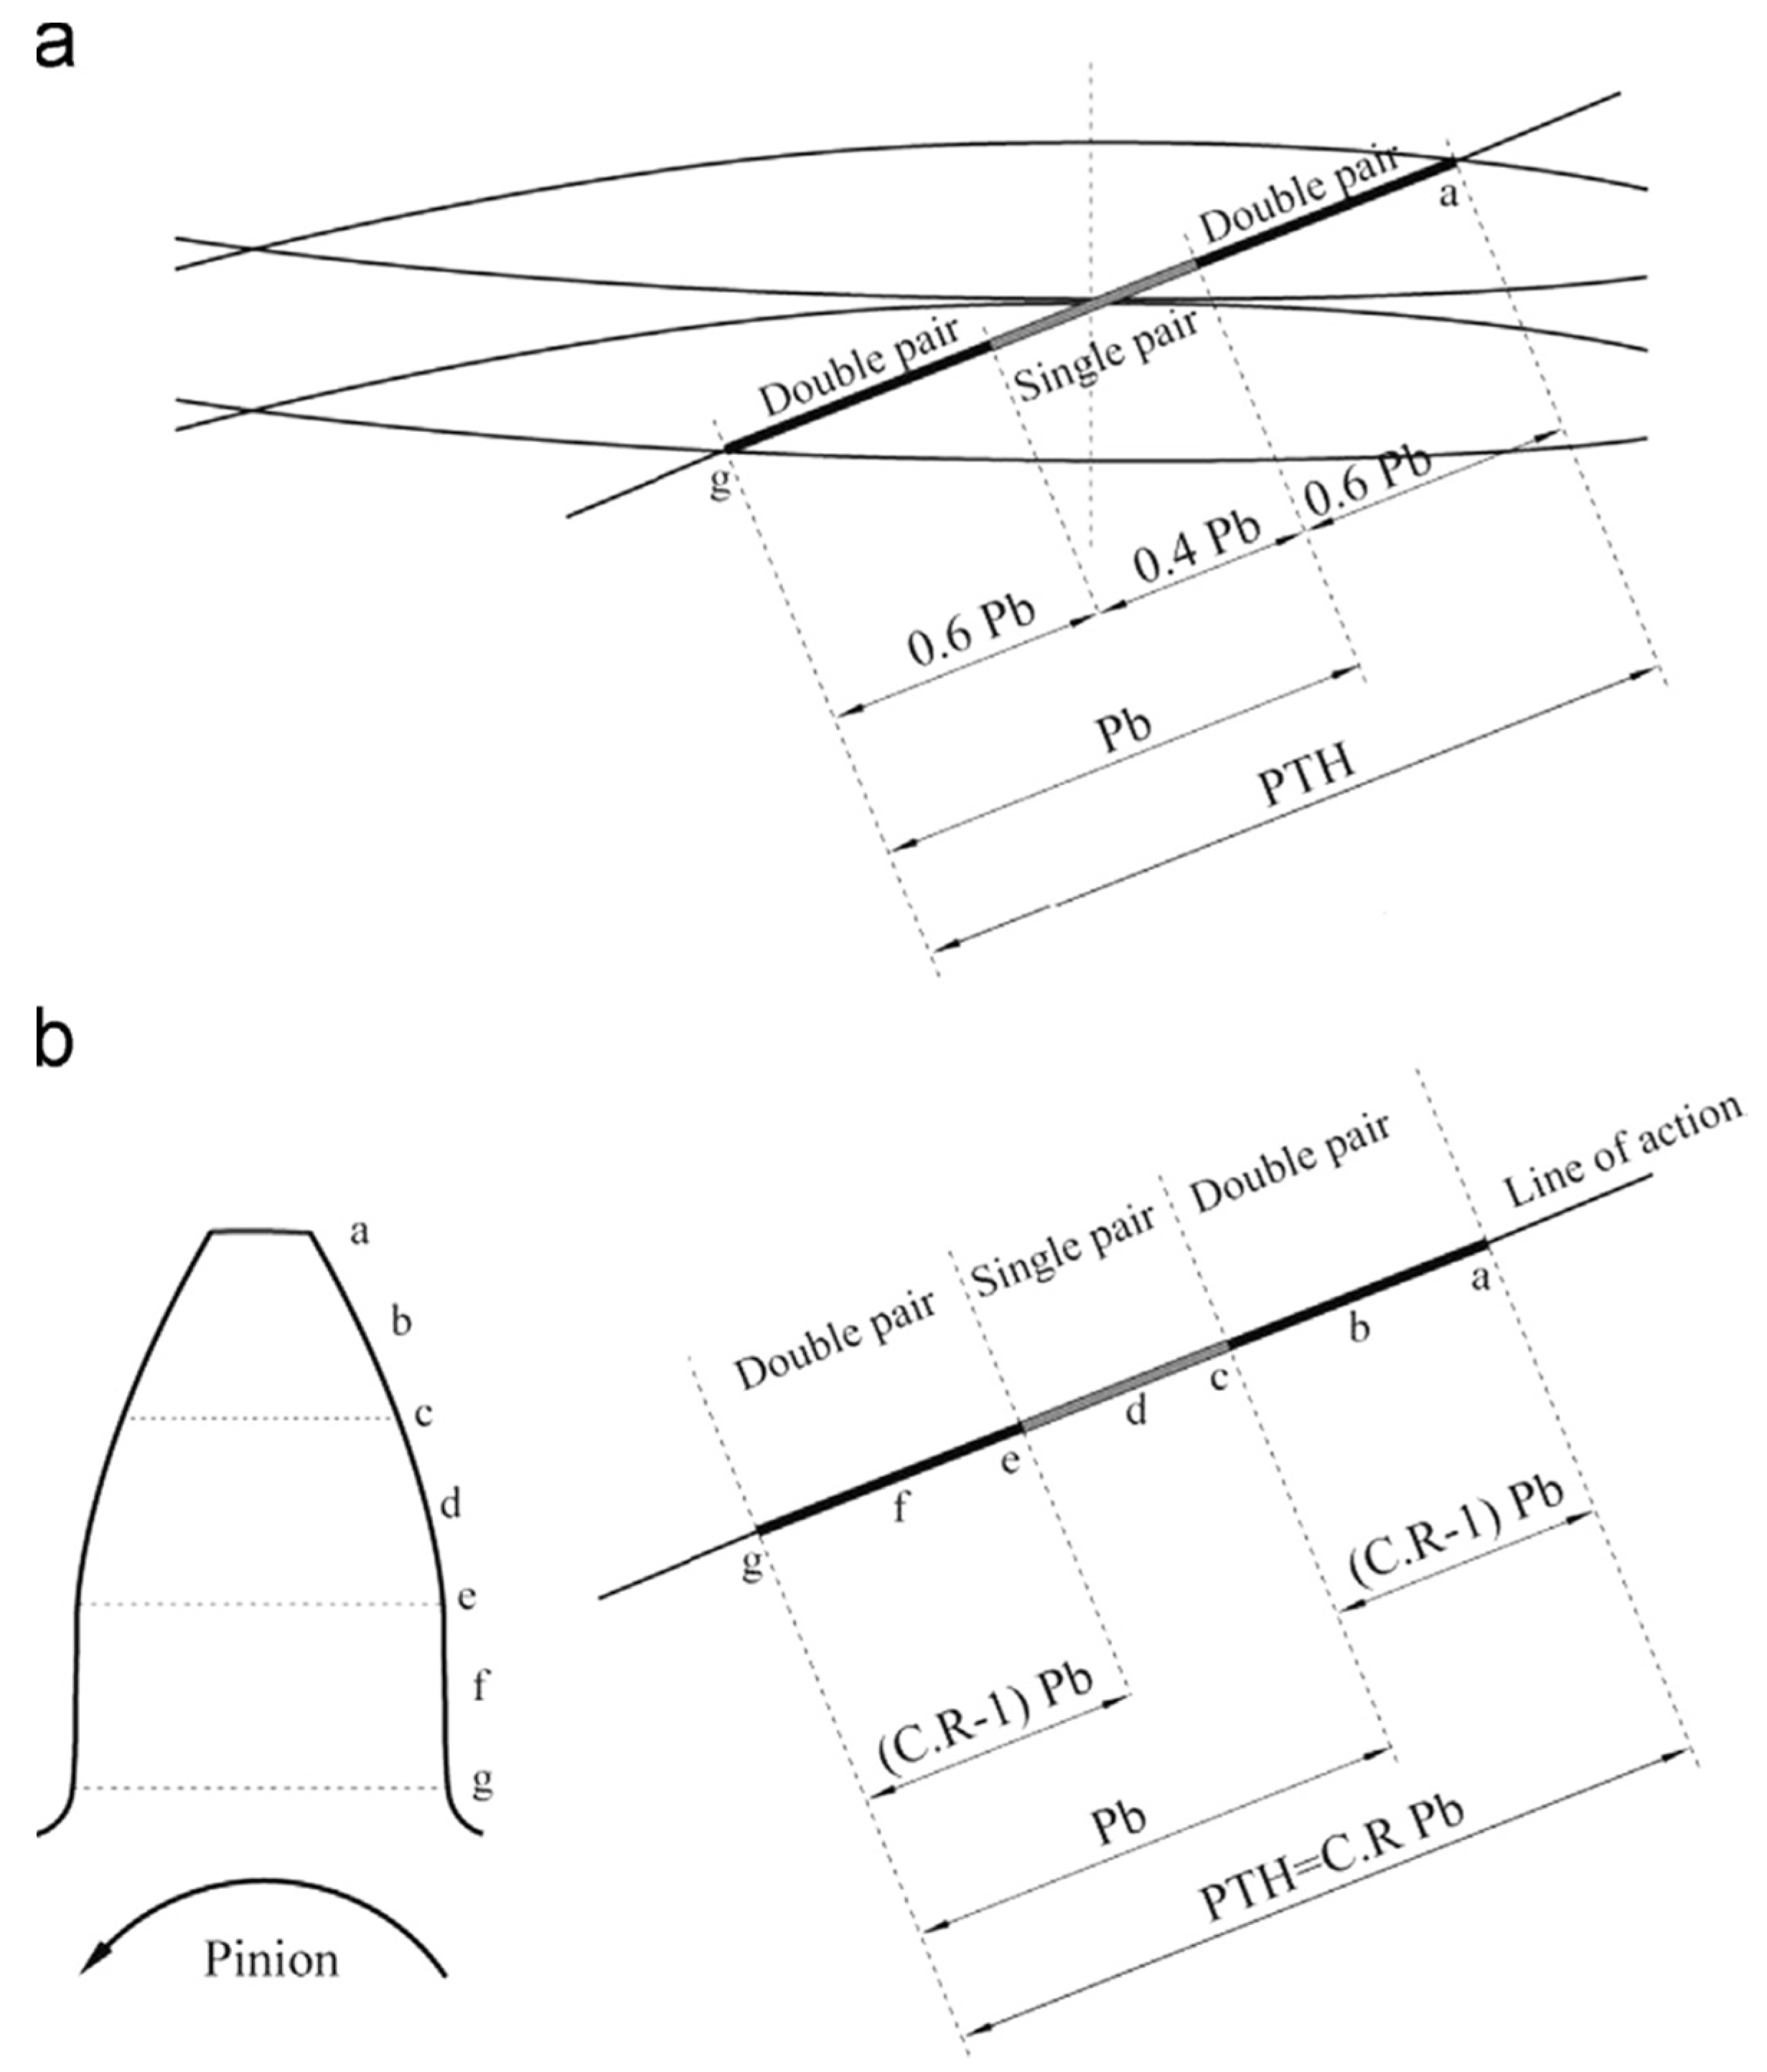
After obtaining the total mesh stiffness, the time-varying mesh stiffness (TVMS) profile is obtained by showing the mesh stiffness at every point of rotation of the gear pair. The regions of single and double contact are obtained using the gear contact ratio as shown in Equation (17) [36].
  C . R . = P T H P b
where;
  • C.R. = Contact ratio
  • PTH = Path of contact
  • Pb = Base circle circular pitch
The regions as determined by a contact ratio of 1.6 on the line of action and the gear profile are shown in Figure 4 [36].
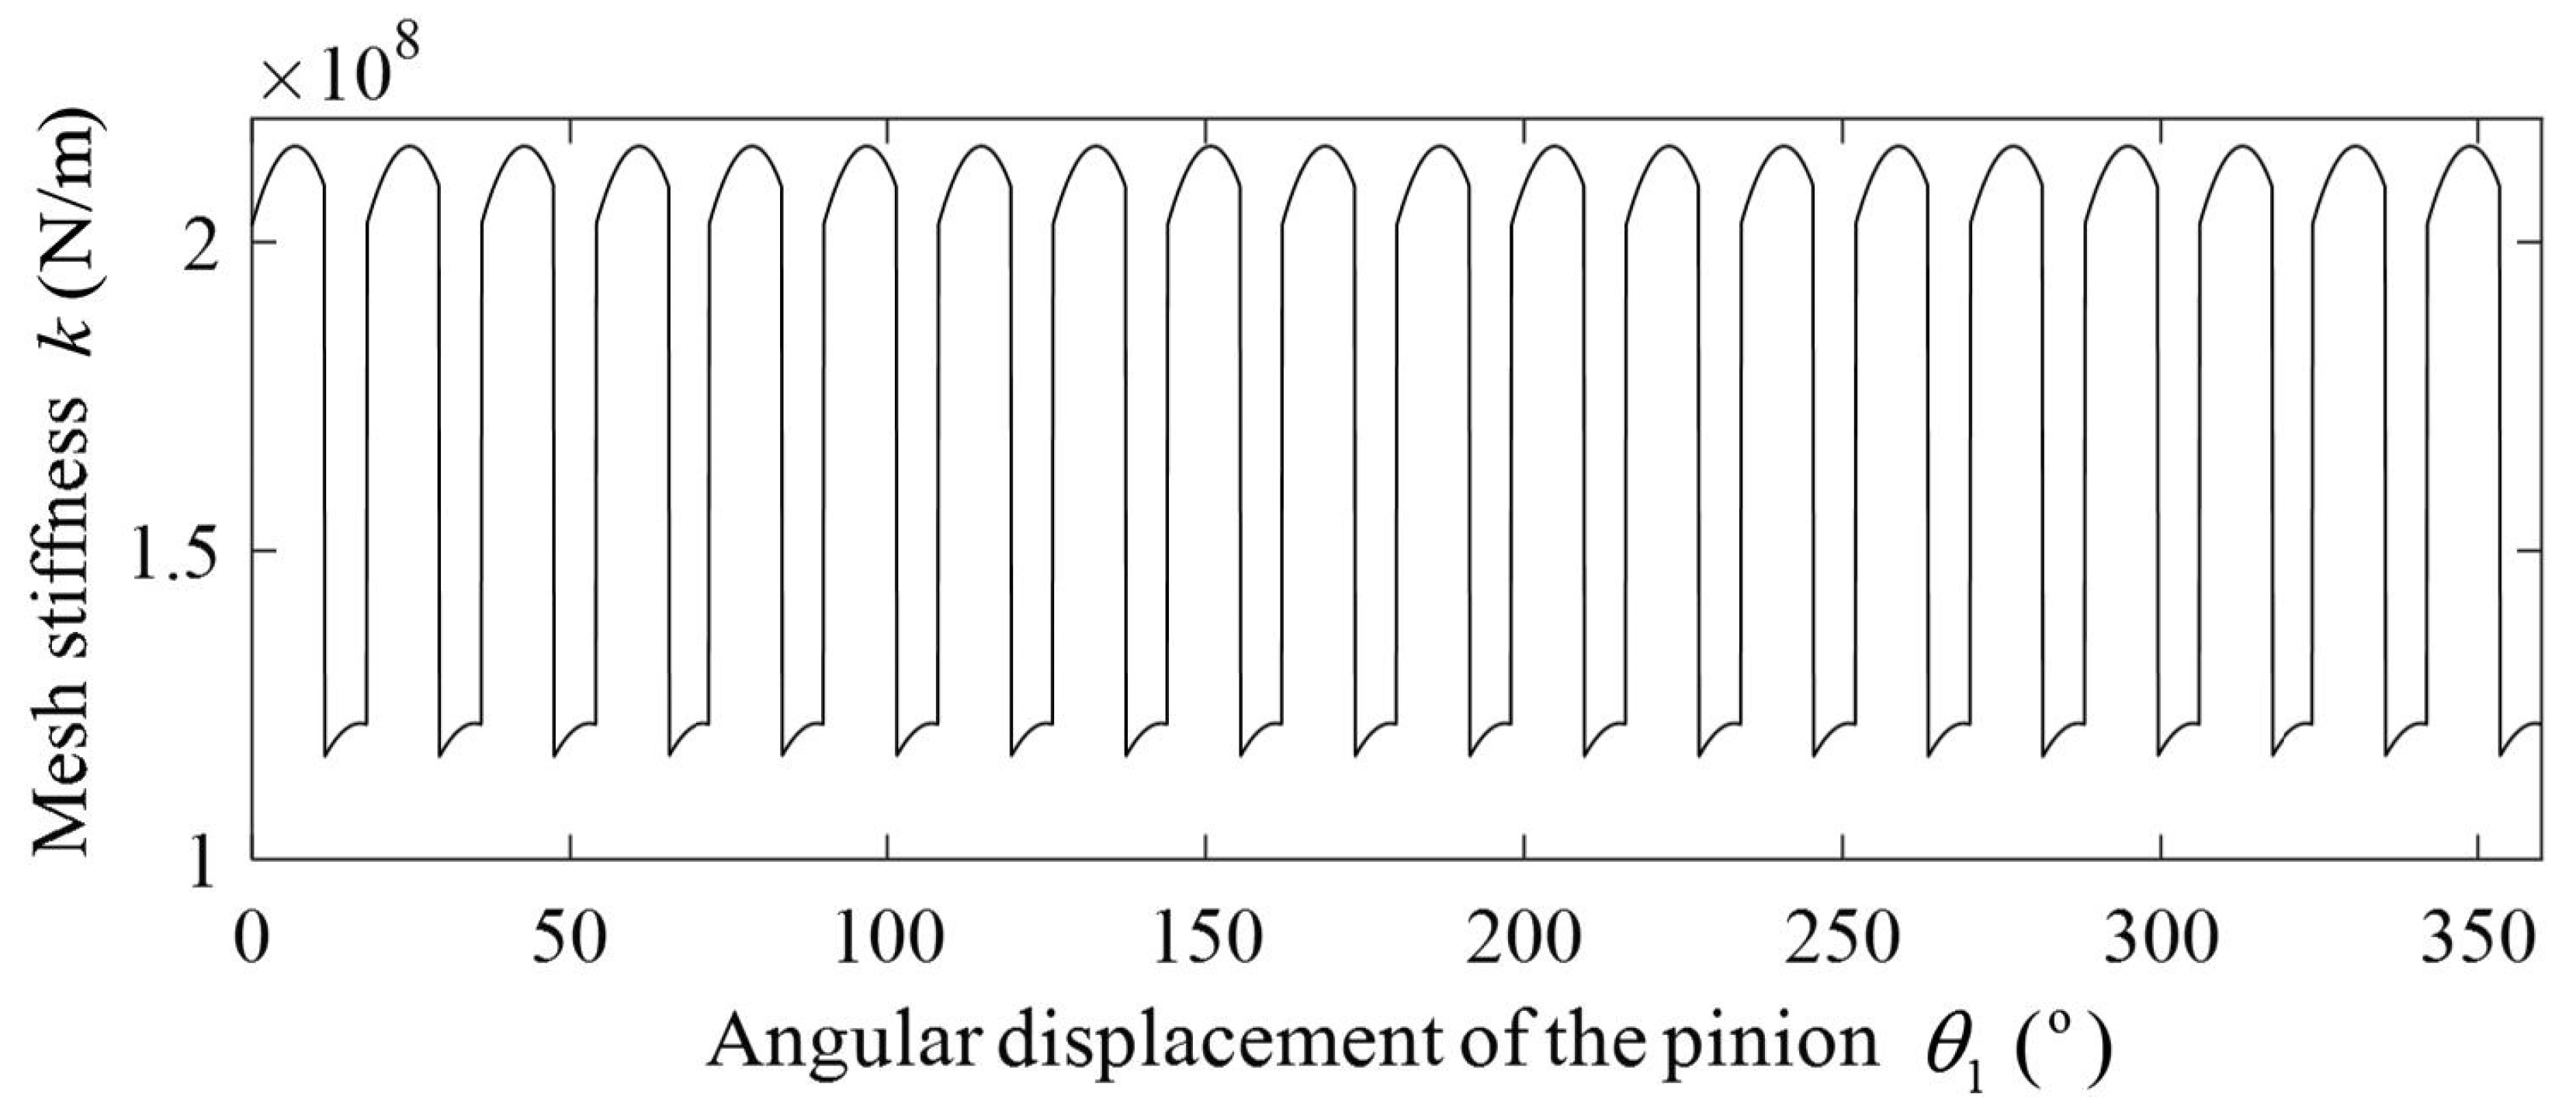
The time-varying mesh stiffness is considered a source of gear excitation and itself can be used to observe changes in gear excitation pattern [43]. The TVMS for a healthy gear is in the form shown in Figure 5 [44].
The mesh damping can be obtained from the stiffness with the relationship [39].
C m = 2 ζ K m 1 m p + 1 m g
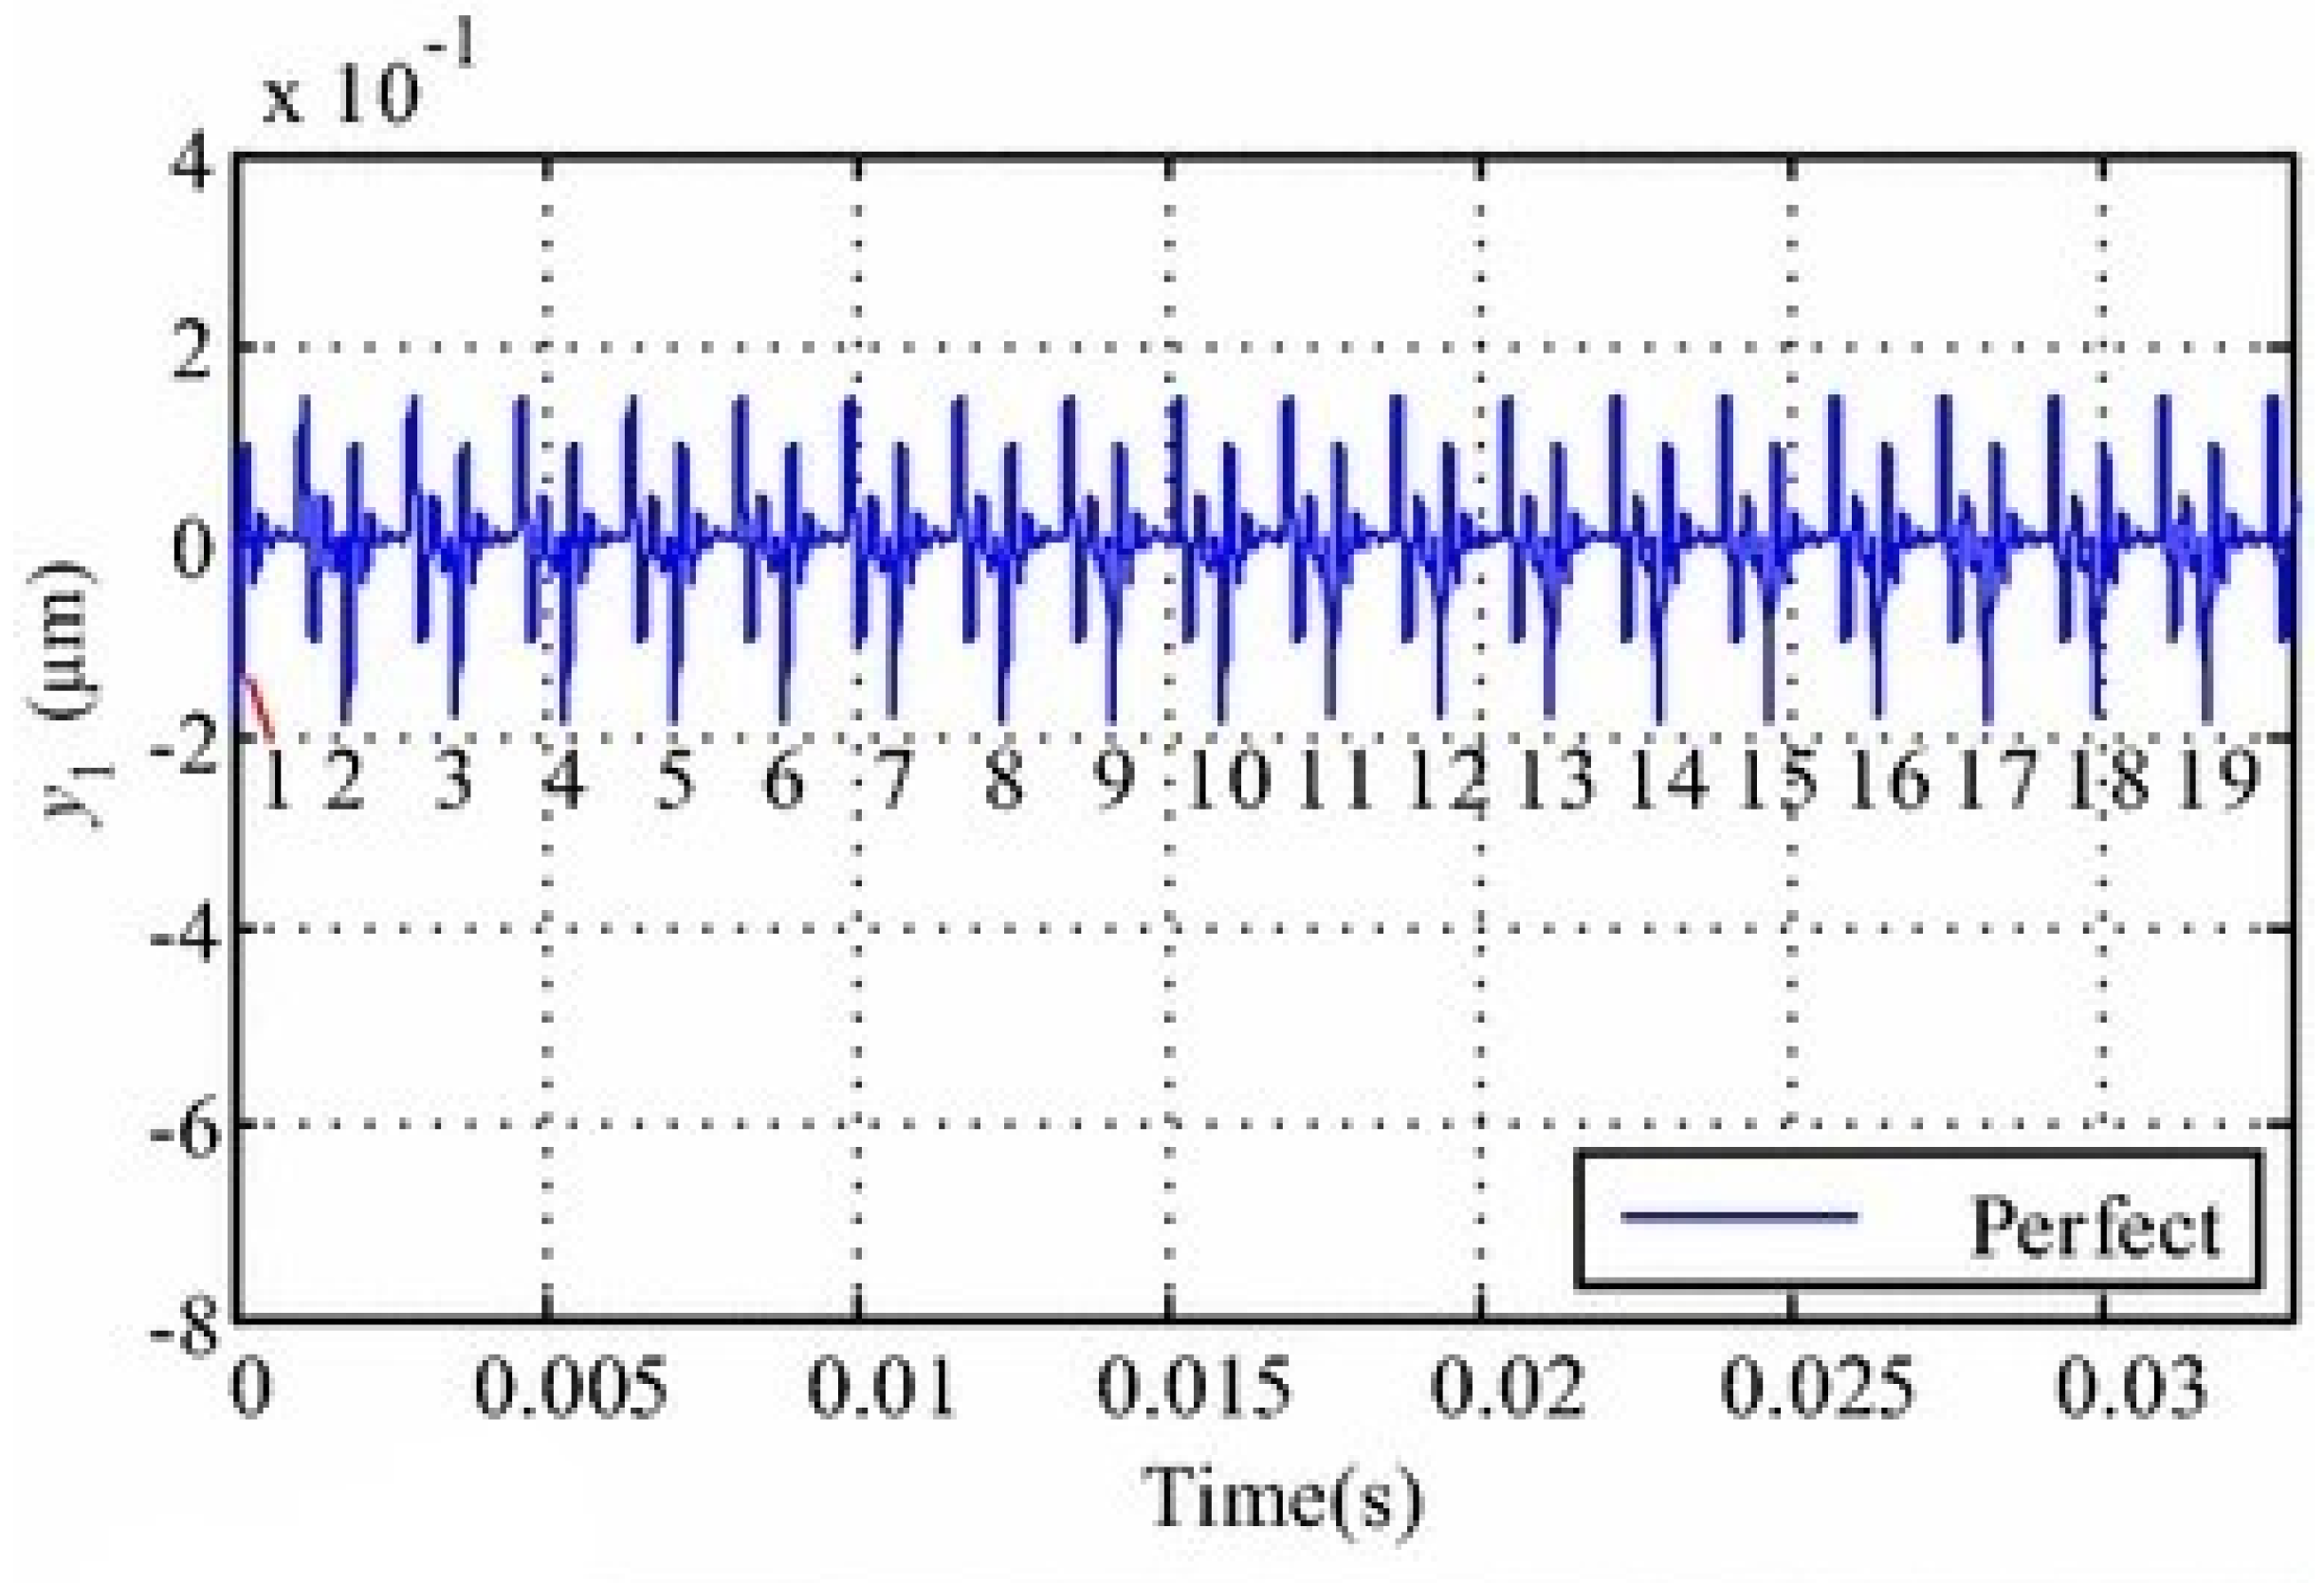
With the values of Km and Cm obtained, equations of motion for the gear system of any degree of freedom can be solved and the dynamic response obtained. Many researchers have obtained the solutions using ODE45 or ODE15s in MATLAB [39,45]. The dynamic response in the form of displacement signals of the motion as the gear rotates for the healthy state in the time and frequency domains as presented in [45] are shown in Figure 6 and Figure 7. In Figure 6, the 19 spikes corresponds to the number of teeth of the pinion, all spikes are even as there are no faults. The red line indicates the position of the first spike.

3. Analytical Models with Single Faults

The analytical models with faults follow the same process as the healthy models. The equations to obtain the dynamic response for a system are the same. The main input that establishes the fault condition can be obtained from Equation (7). To define N in Equation (7) correctly, input like the gear mesh stiffness and/or gear transmission error are evaluated. The required input for each fault mode will be explained in detail in Section 3.1, Section 3.2, Section 3.3, Section 3.4 and Section 3.5.
For simplicity and because the pinions are smaller, and therefore, have a larger number of cycles, the faults are usually presented on a single or multiple tooths on the pinion.
The original signals of the dynamic responses are often not very sensitive for the early detection of faults so more often statistical indicators such as RMS, crest factor, and kurtosis are used on the residual signal. The residual signal is obtained when the healthy signal is removed from the original fault signal.

3.1. Gear Pitting Analytical Models

Pitting models are discussed here in three parts, models for the shapes of pits, stiffness calculations and dynamic responses.
The shape of pits has been modelled as several geometric shapes with the aim of providing a reasonably realistic model. Some researchers have modelled the surface area of a single pit as circular [45,46,47,48,49,50], spherical [51], part of a sphere [52], or part of an elliptic cylinder [53]. As the gear tooth under pitting is likely to have more than one pit, models were defined with pits having any of the defined geometric shapes but with a regular spread on the surface of the gear tooth; the number and sizes of pits were used to define the severity as slight, moderate, or severe [45,53]. It is not likely to have a regular spread of pits on an affected tooth flank in actual gears in operations, so other researchers defined the pitting degree as a defined number of pits randomly placed around the pitch line [52]. A research study presented [44] a probability distribution model in which the pits were uniformly distributed along the tooth width and with normal distribution along the tooth height. The degree of pitting adopted a realistic approach of increasing the size of the old pits and adding new pits to the previously pit-free area. In [54] pits were modelled as parts of an elliptical cluster with a pit at the centre from which stress concentration in the area caused the eruption of other pits (spread pits). The clusters were categorised as slight, medium, or severe depending on the degree of material loss. The clusters were randomly distributed, the centre of pits was in the region of the pitch line and the spread pit followed a two-dimensional Gaussian distribution model in the tooth height and width directions.
In service conditions, pitting may not be restricted to one tooth. This was studied in [45] where the progression of the pitting was classified as slight (nine pits on one tooth and three on the teeth before and after the tooth), moderate (with a pit distribution of 3, 9, 18, 9, 3 on the five nearest teeth) and severe (with a pit distribution of 3, 9, 18, 36,18, 9, 3 on the seven nearest teeth). The pits all lie on the pitch line of the pinion except for severe where 18 of the pits on the tooth with 36 pits lie on the addendum. A detailed evolution of pits was developed and studied in [55], the pits spread to neighboring teeth on the pinion and on the gear. The pit types were described as type A, B, and C, where type A were pits that originated due to asperities boundary lubrication, it was called the origin of pits. Type B was generated under continuous operation causing type A to increase in size and depth. Type C occurred when the stress of type B caused additional pits to grow in the cluster.
The above research assumed a simple geometric shape for the pits; however, pits have no regular shape. Research combining FEM and analytical modelling has been able to model pits with irregular shapes. A matrix method that modelled pits as irregular shapes distributed randomly has also been introduced [56]. Research by B. El Yousfi, et al. [57] explores a model where the entire surface is discretised in the tooth width and tooth length directions. The gear profile is determined analytically using a contact detection algorithm. The gear tooth surface matrix is obtained by double discretisation in the tooth width and height directions.
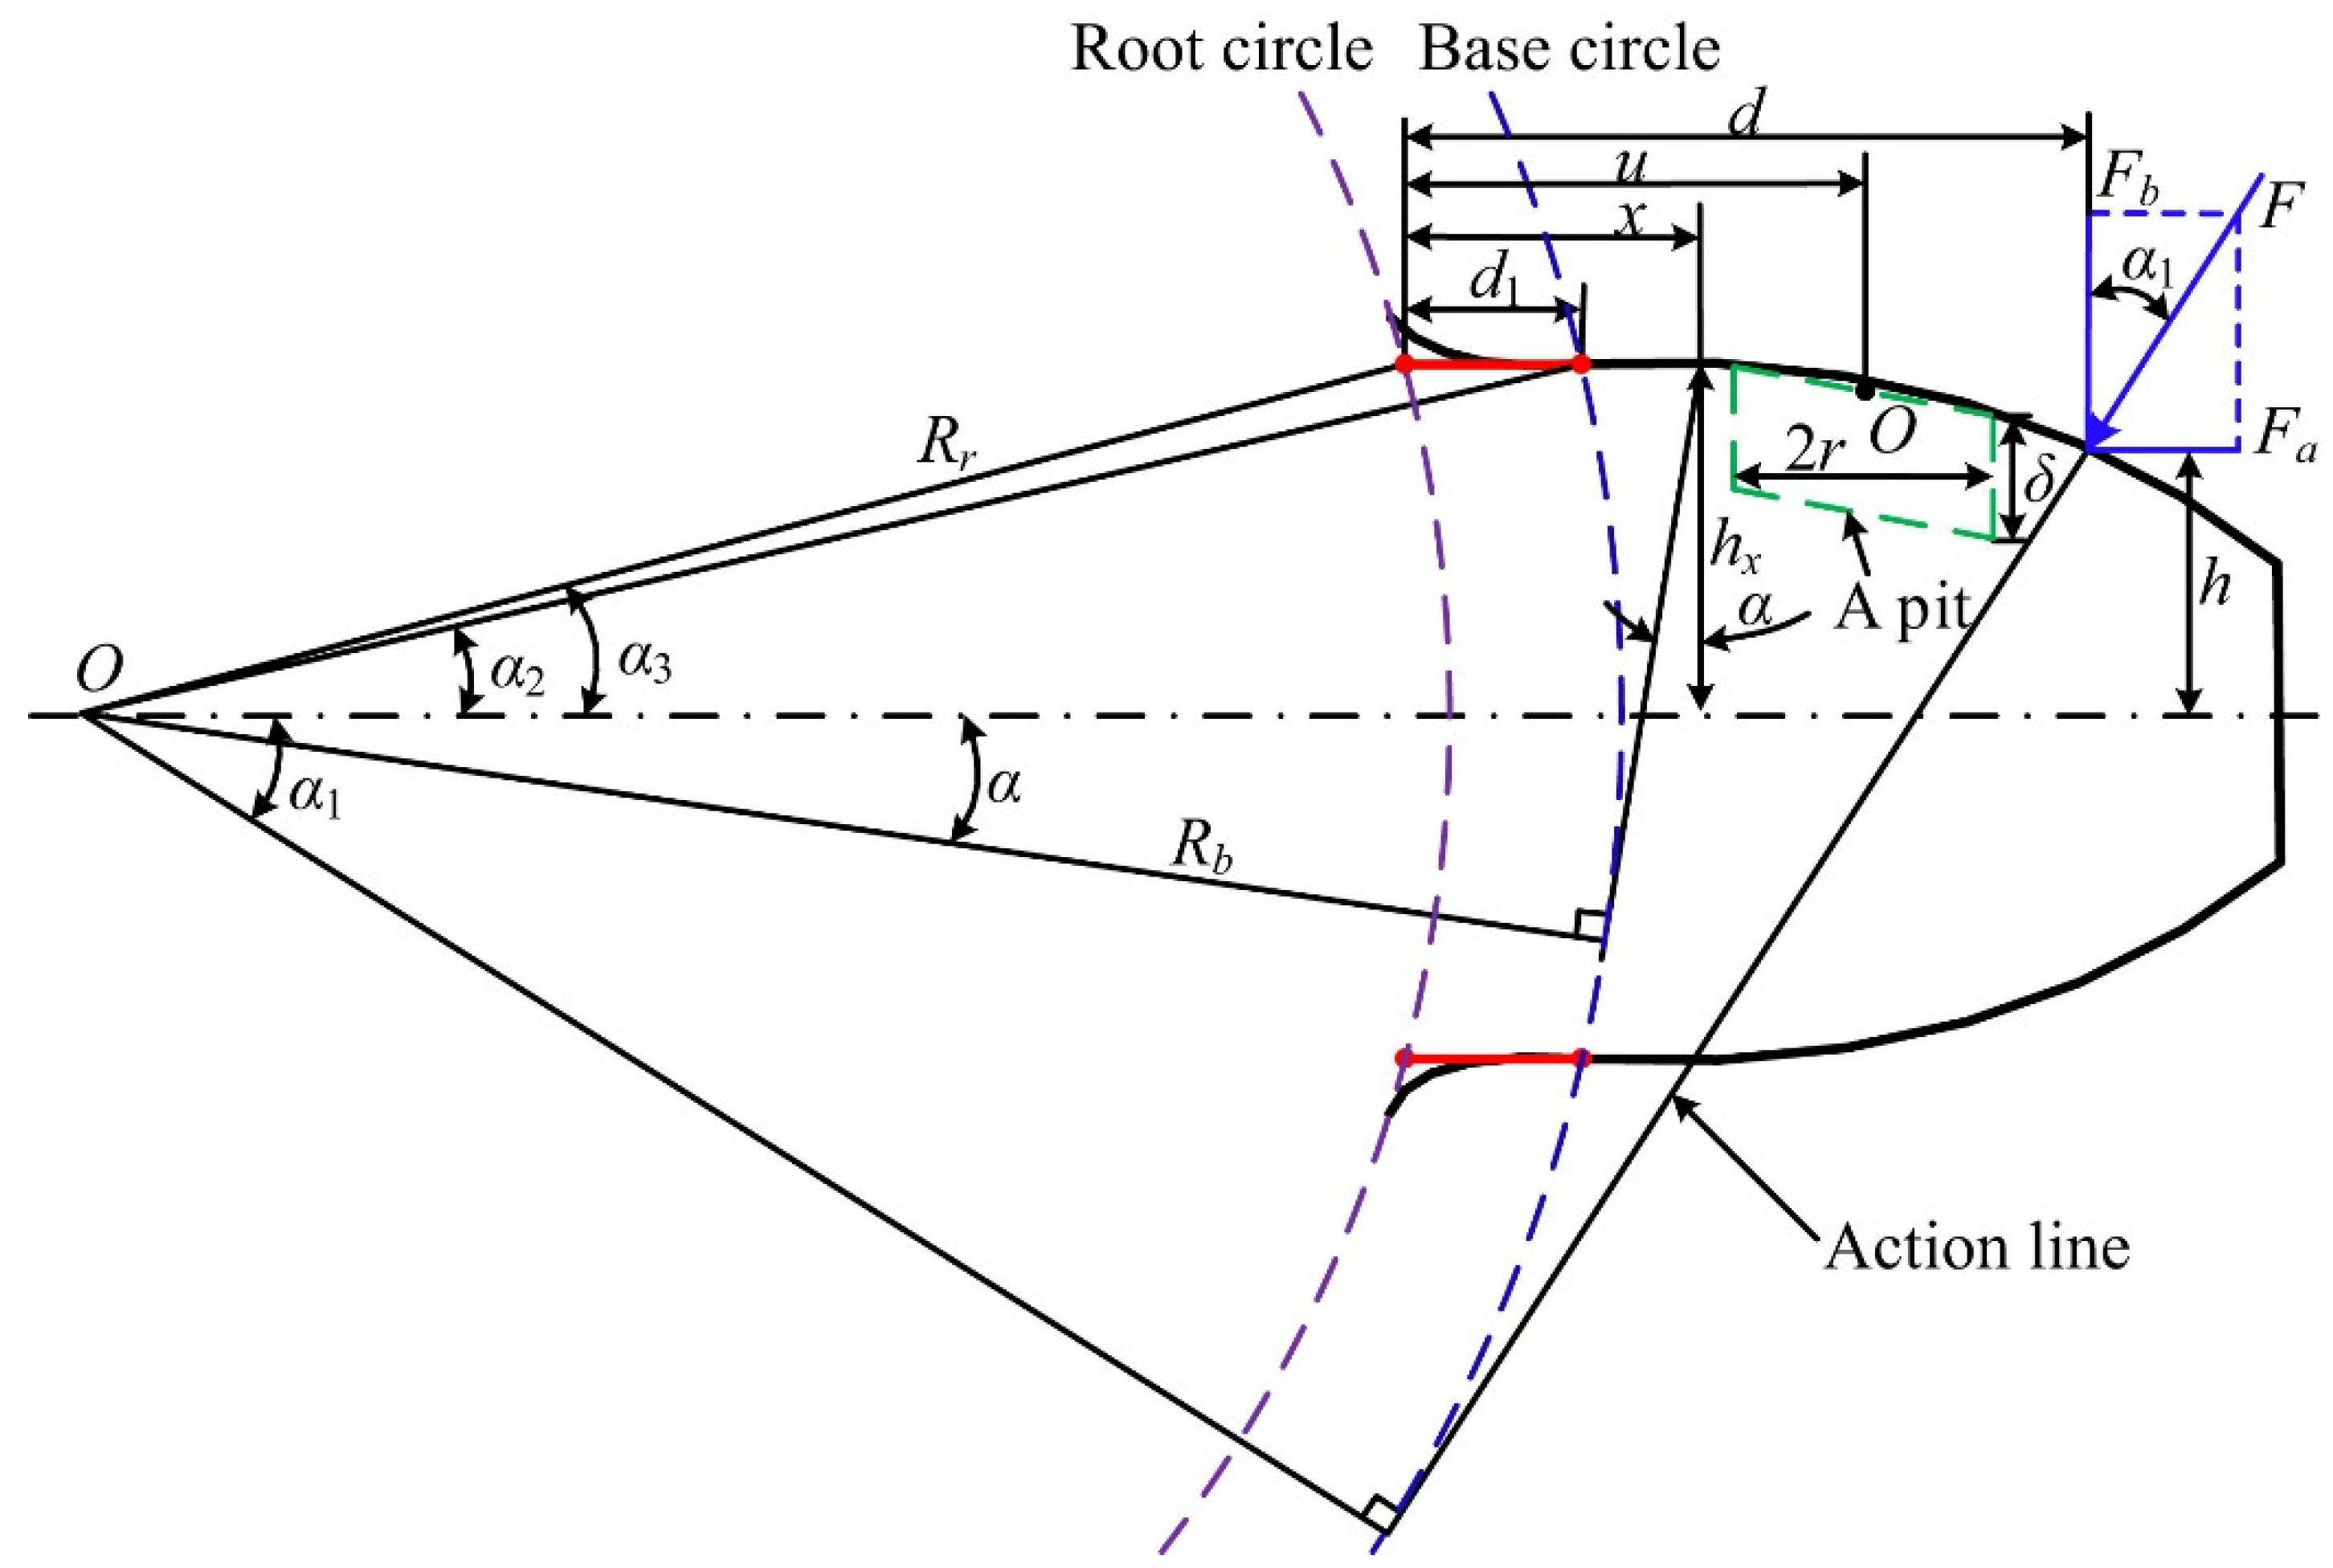
To calculate the time-varying mesh stiffness, the changes caused by the area where pitting has occurred would be noted. To analyze the TVMS, the values of the change in length, change in area and change in area moment of inertia caused by the pitting fault must be calculated. This is used to obtain the fault state mesh stiffness. The equations for evaluating the changes in the contact length, area, and area moment of inertia as detailed in [45] are shown in Equations (19)–(21). Figure 8 [46] shows a single pit of a gear tooth and the equation parameters.
L x = 2 r 2 u x 2 x u r , u + r 0 o t h e r s
A x = L x δ x u r , u + r 0 o t h e r s
I x = 1 12 L x δ 3 + A x A x h x δ 2 2 A x A x x u r , u + r 0 o t h e r s
where,
  • L x = Change in length
  • A x = Change in Area
  • I x = Change in Area Moment of inertia
And r, u, x, δ are as shown in Figure 8.
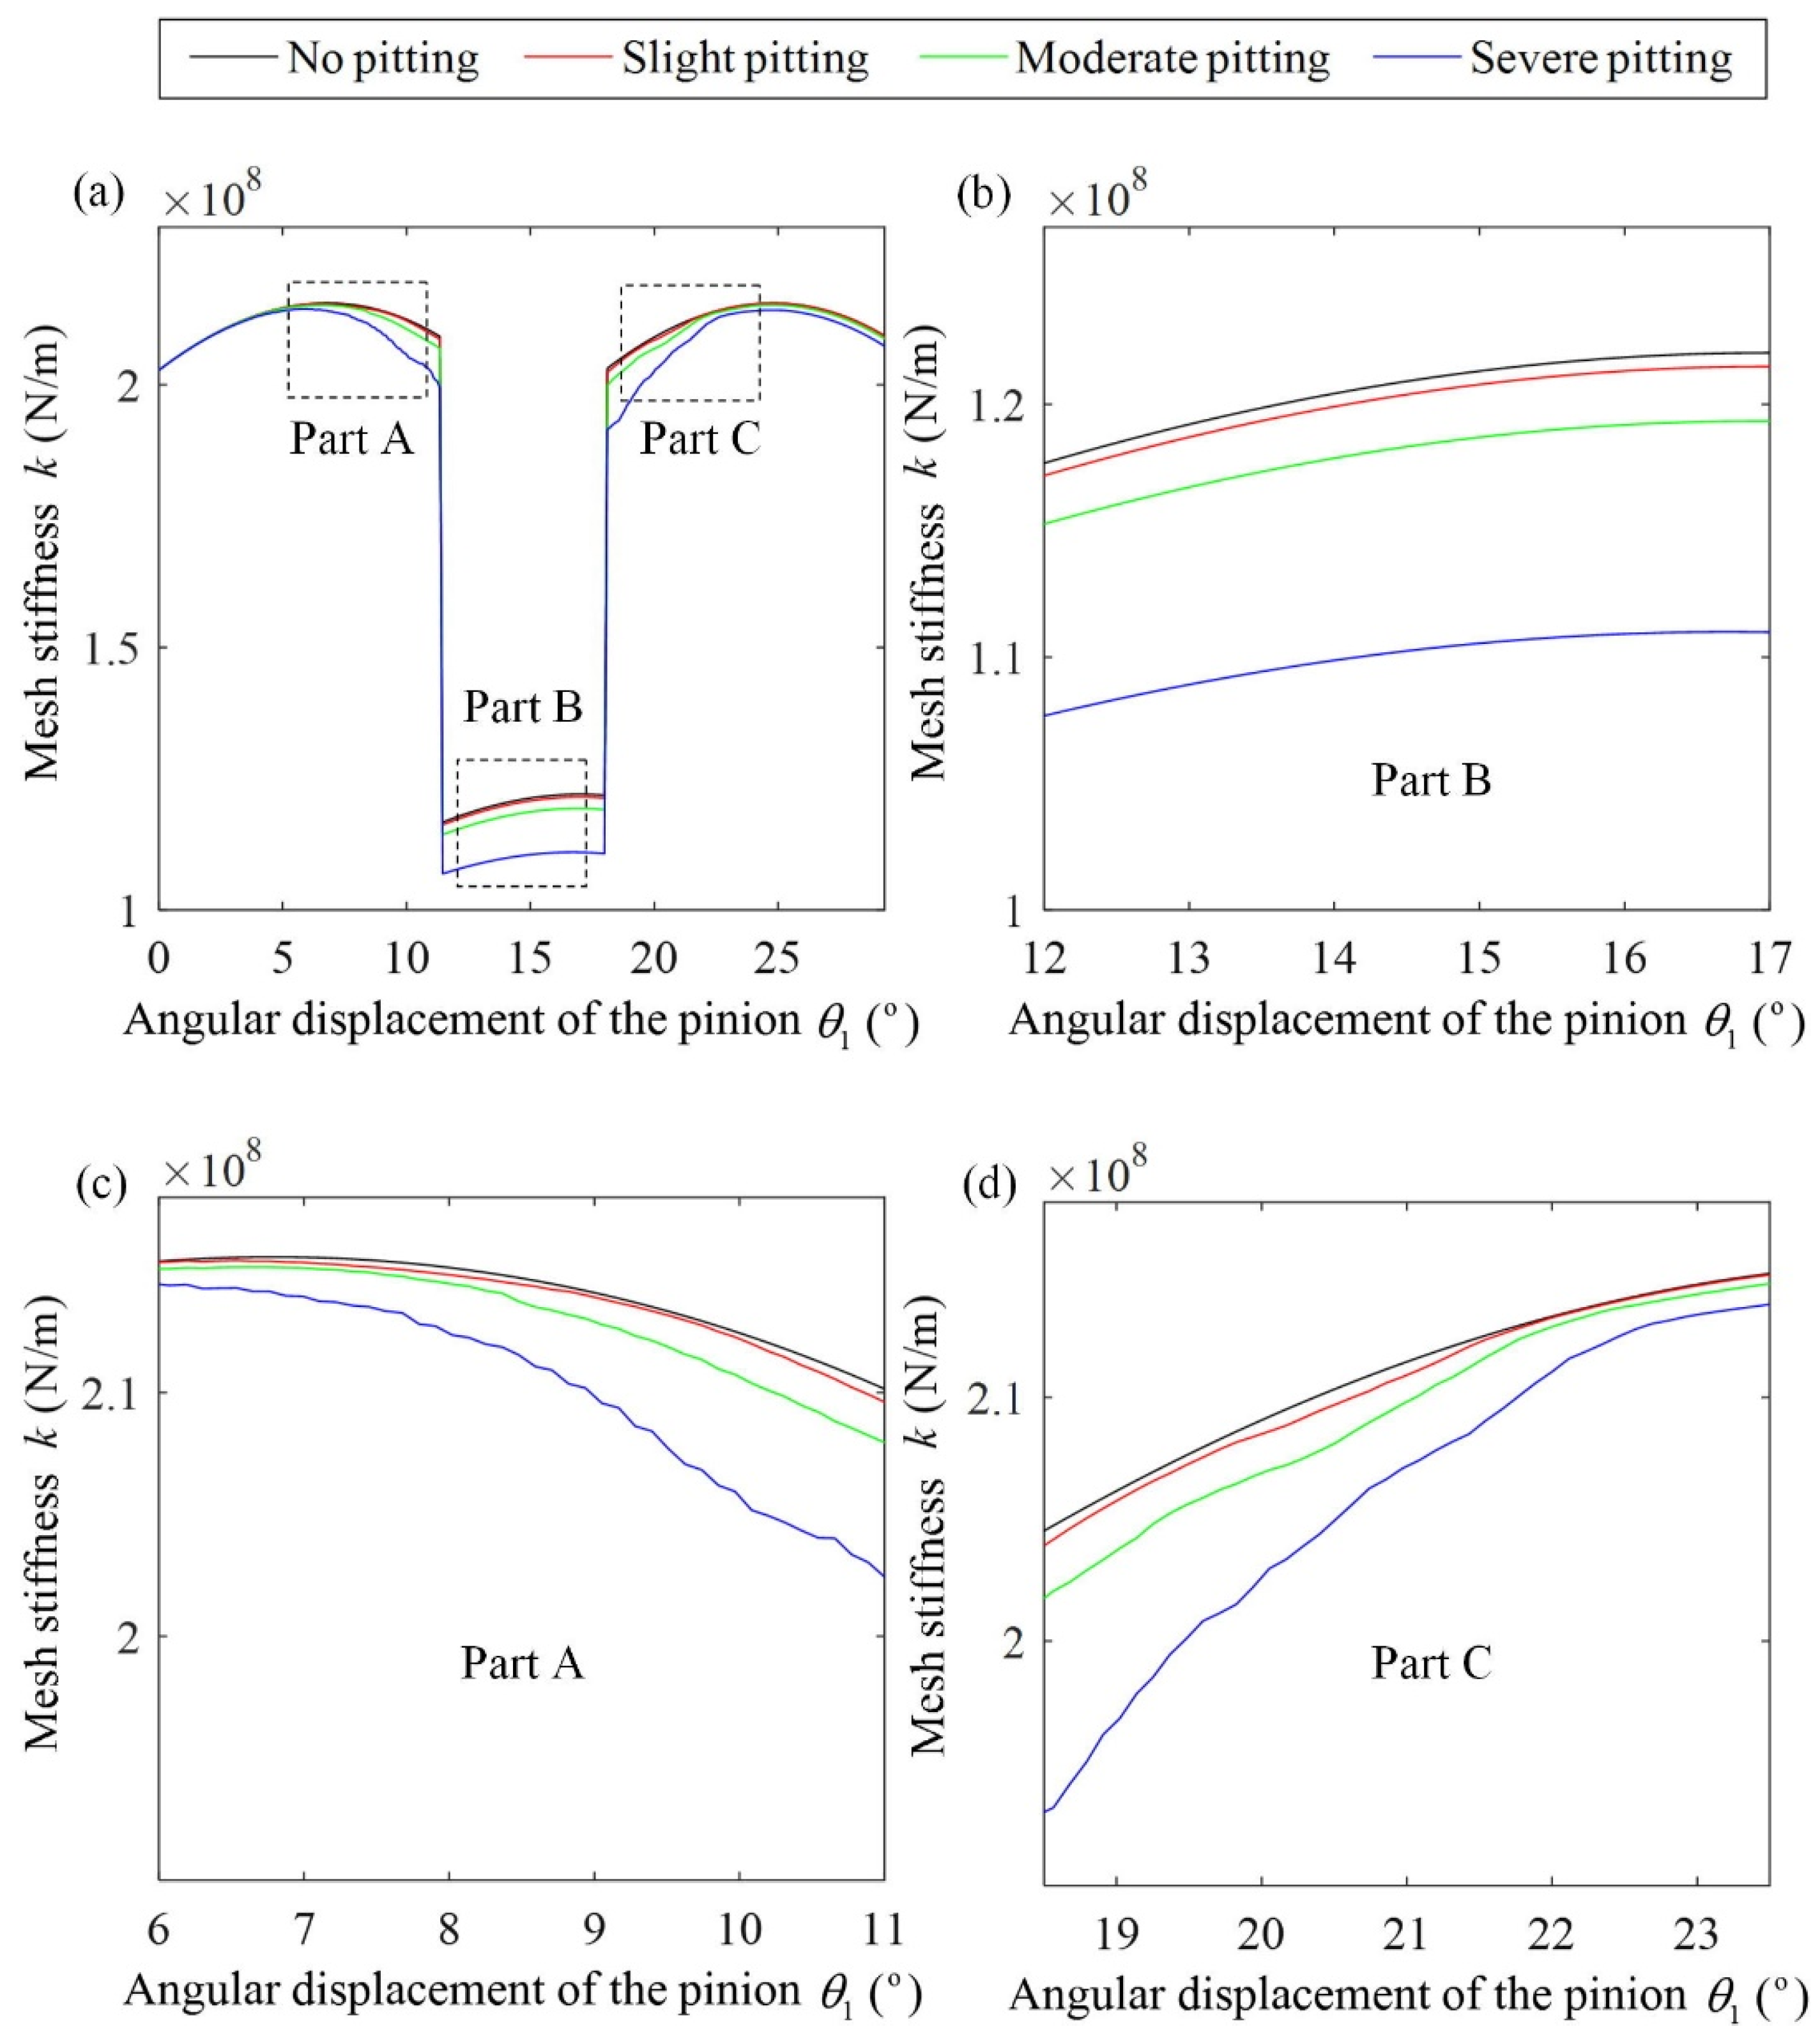
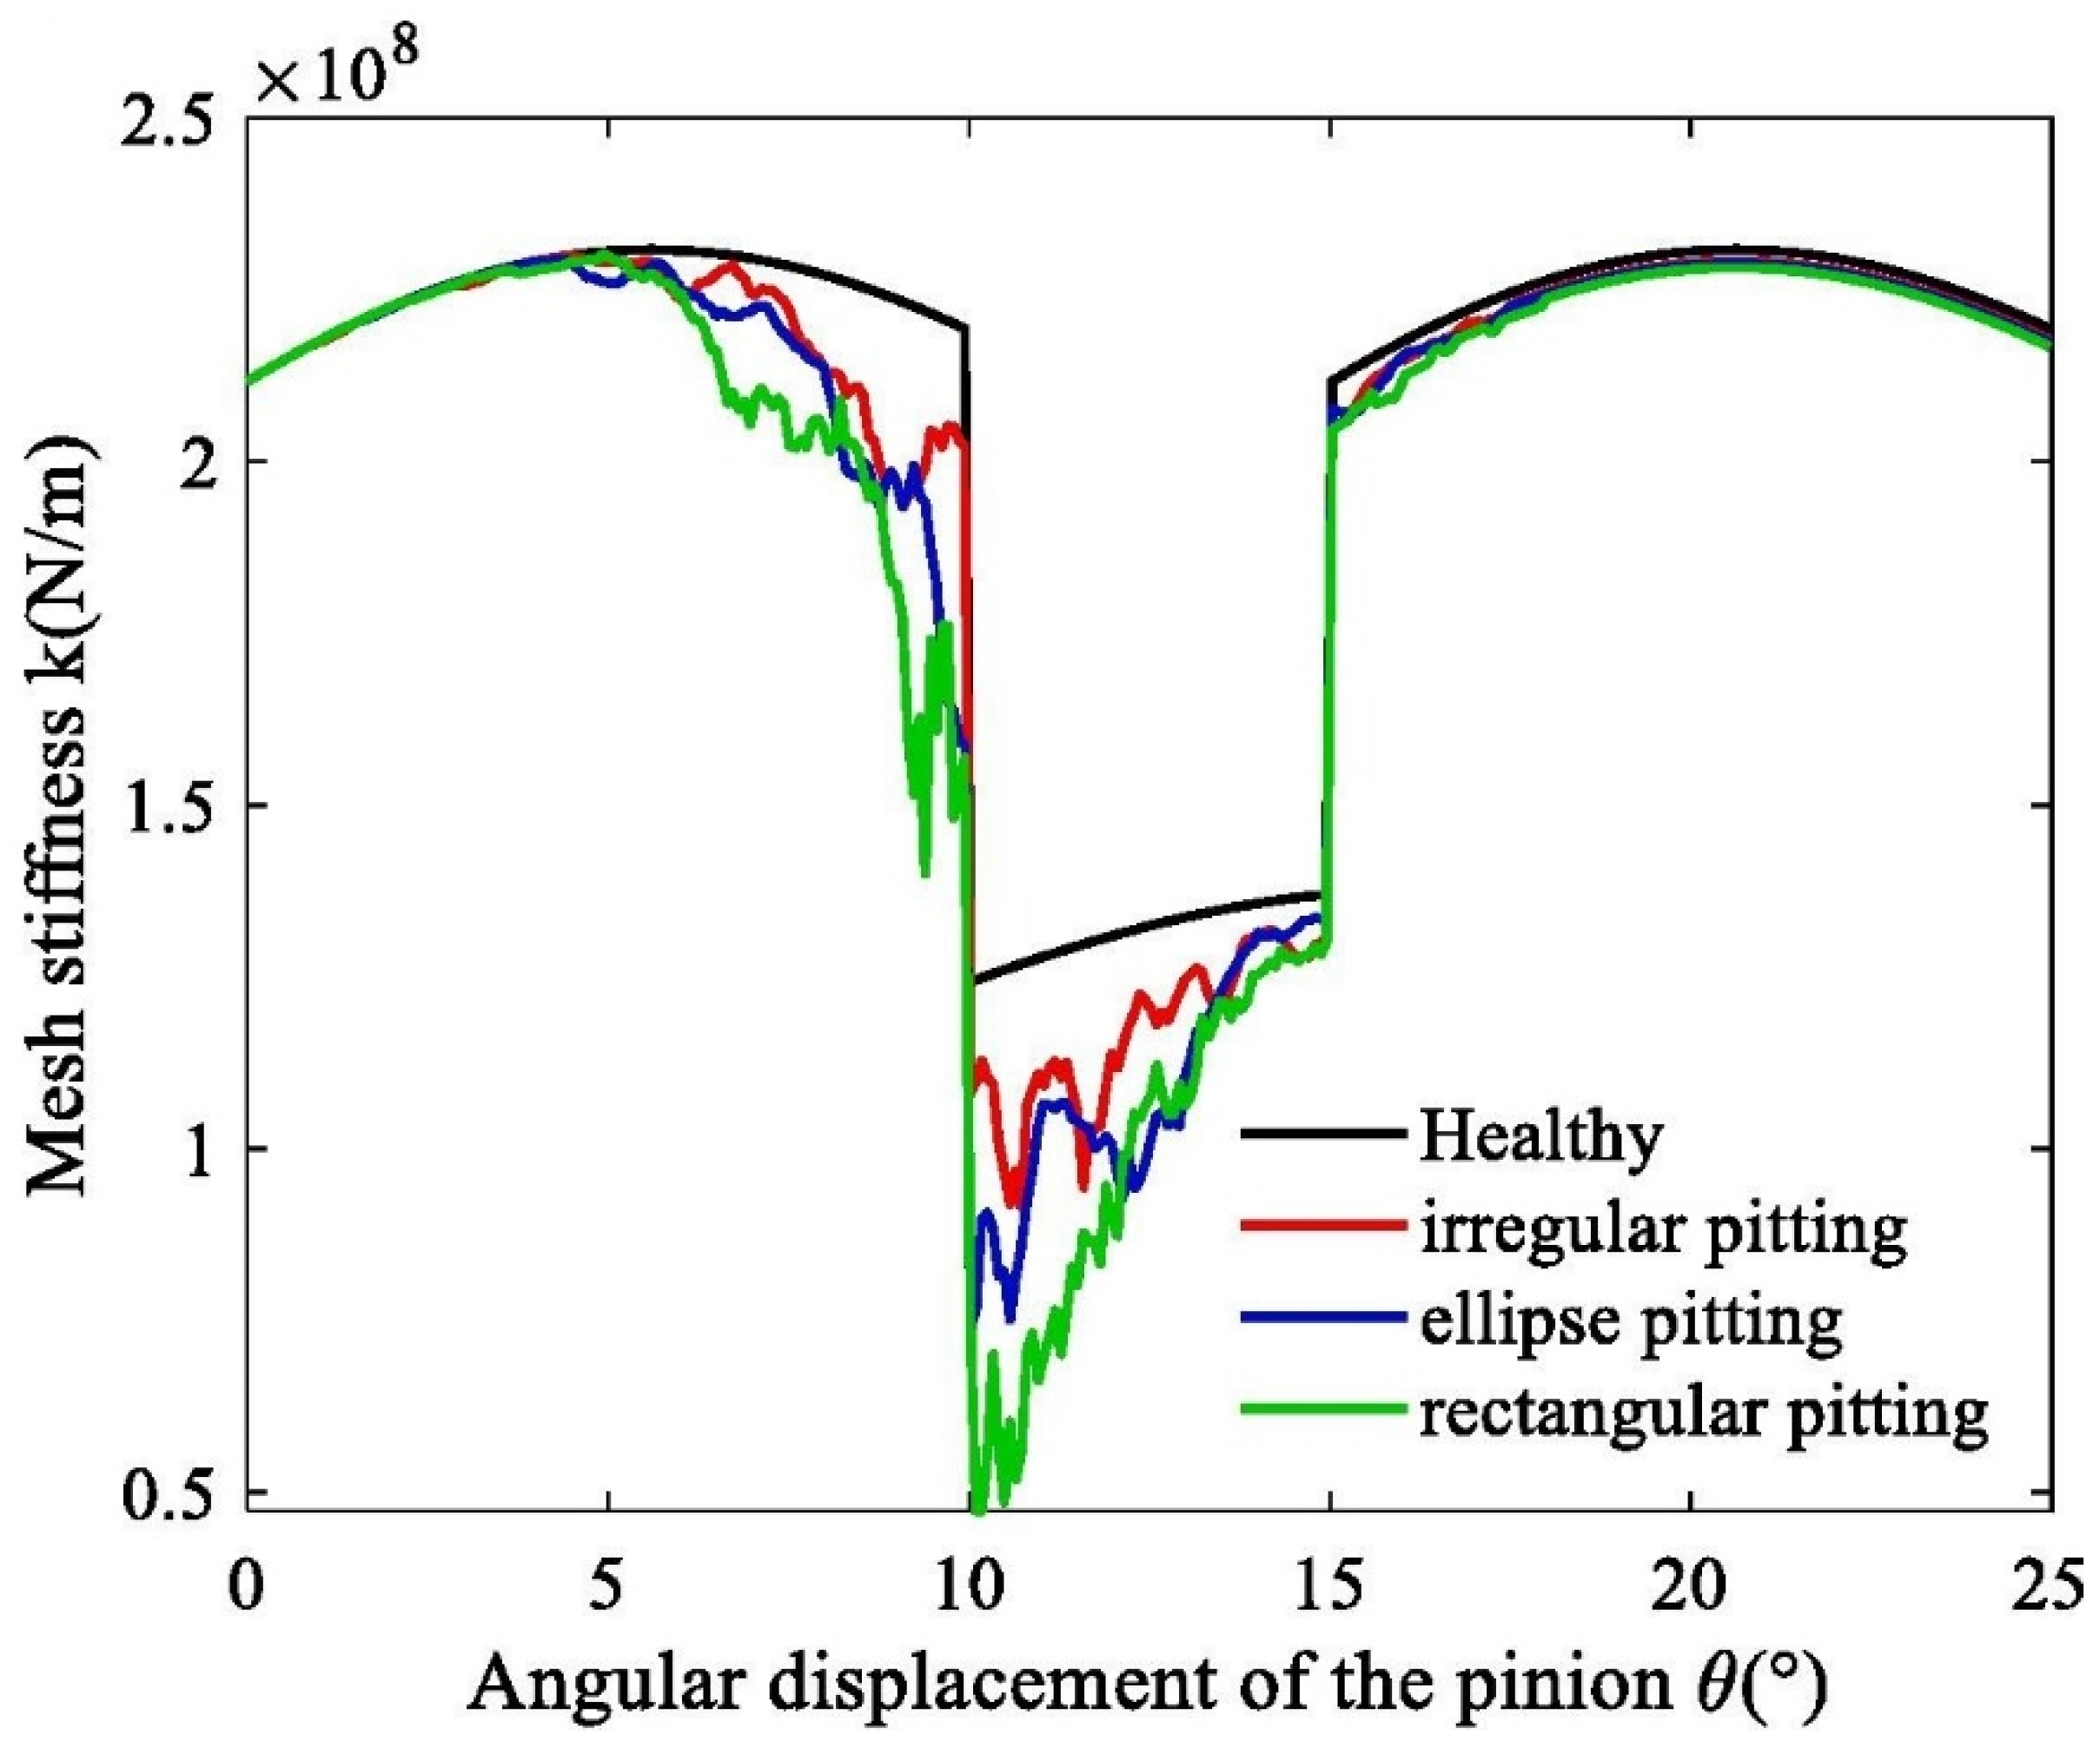
The time-varying mesh stiffness can then be obtained. Figure 9 shows the TVMS for different degrees of pitting as described in [44]. The TVMS diagram showing the fault state of different pitting shapes detailed in [56] is shown in Figure 10. From the diagram, the adopted shape of the pit affects the value of TVMS. Irregular pitting is closer to the healthy state which means that the modelling of the regular shape reports a scenario that is worse than the actual condition of the gear teeth with fault. It also shows that pitting reduces the TVMS and each pit on the tooth drops the value of the stiffness according to its severity as shown in the several downward spikes on the curve.
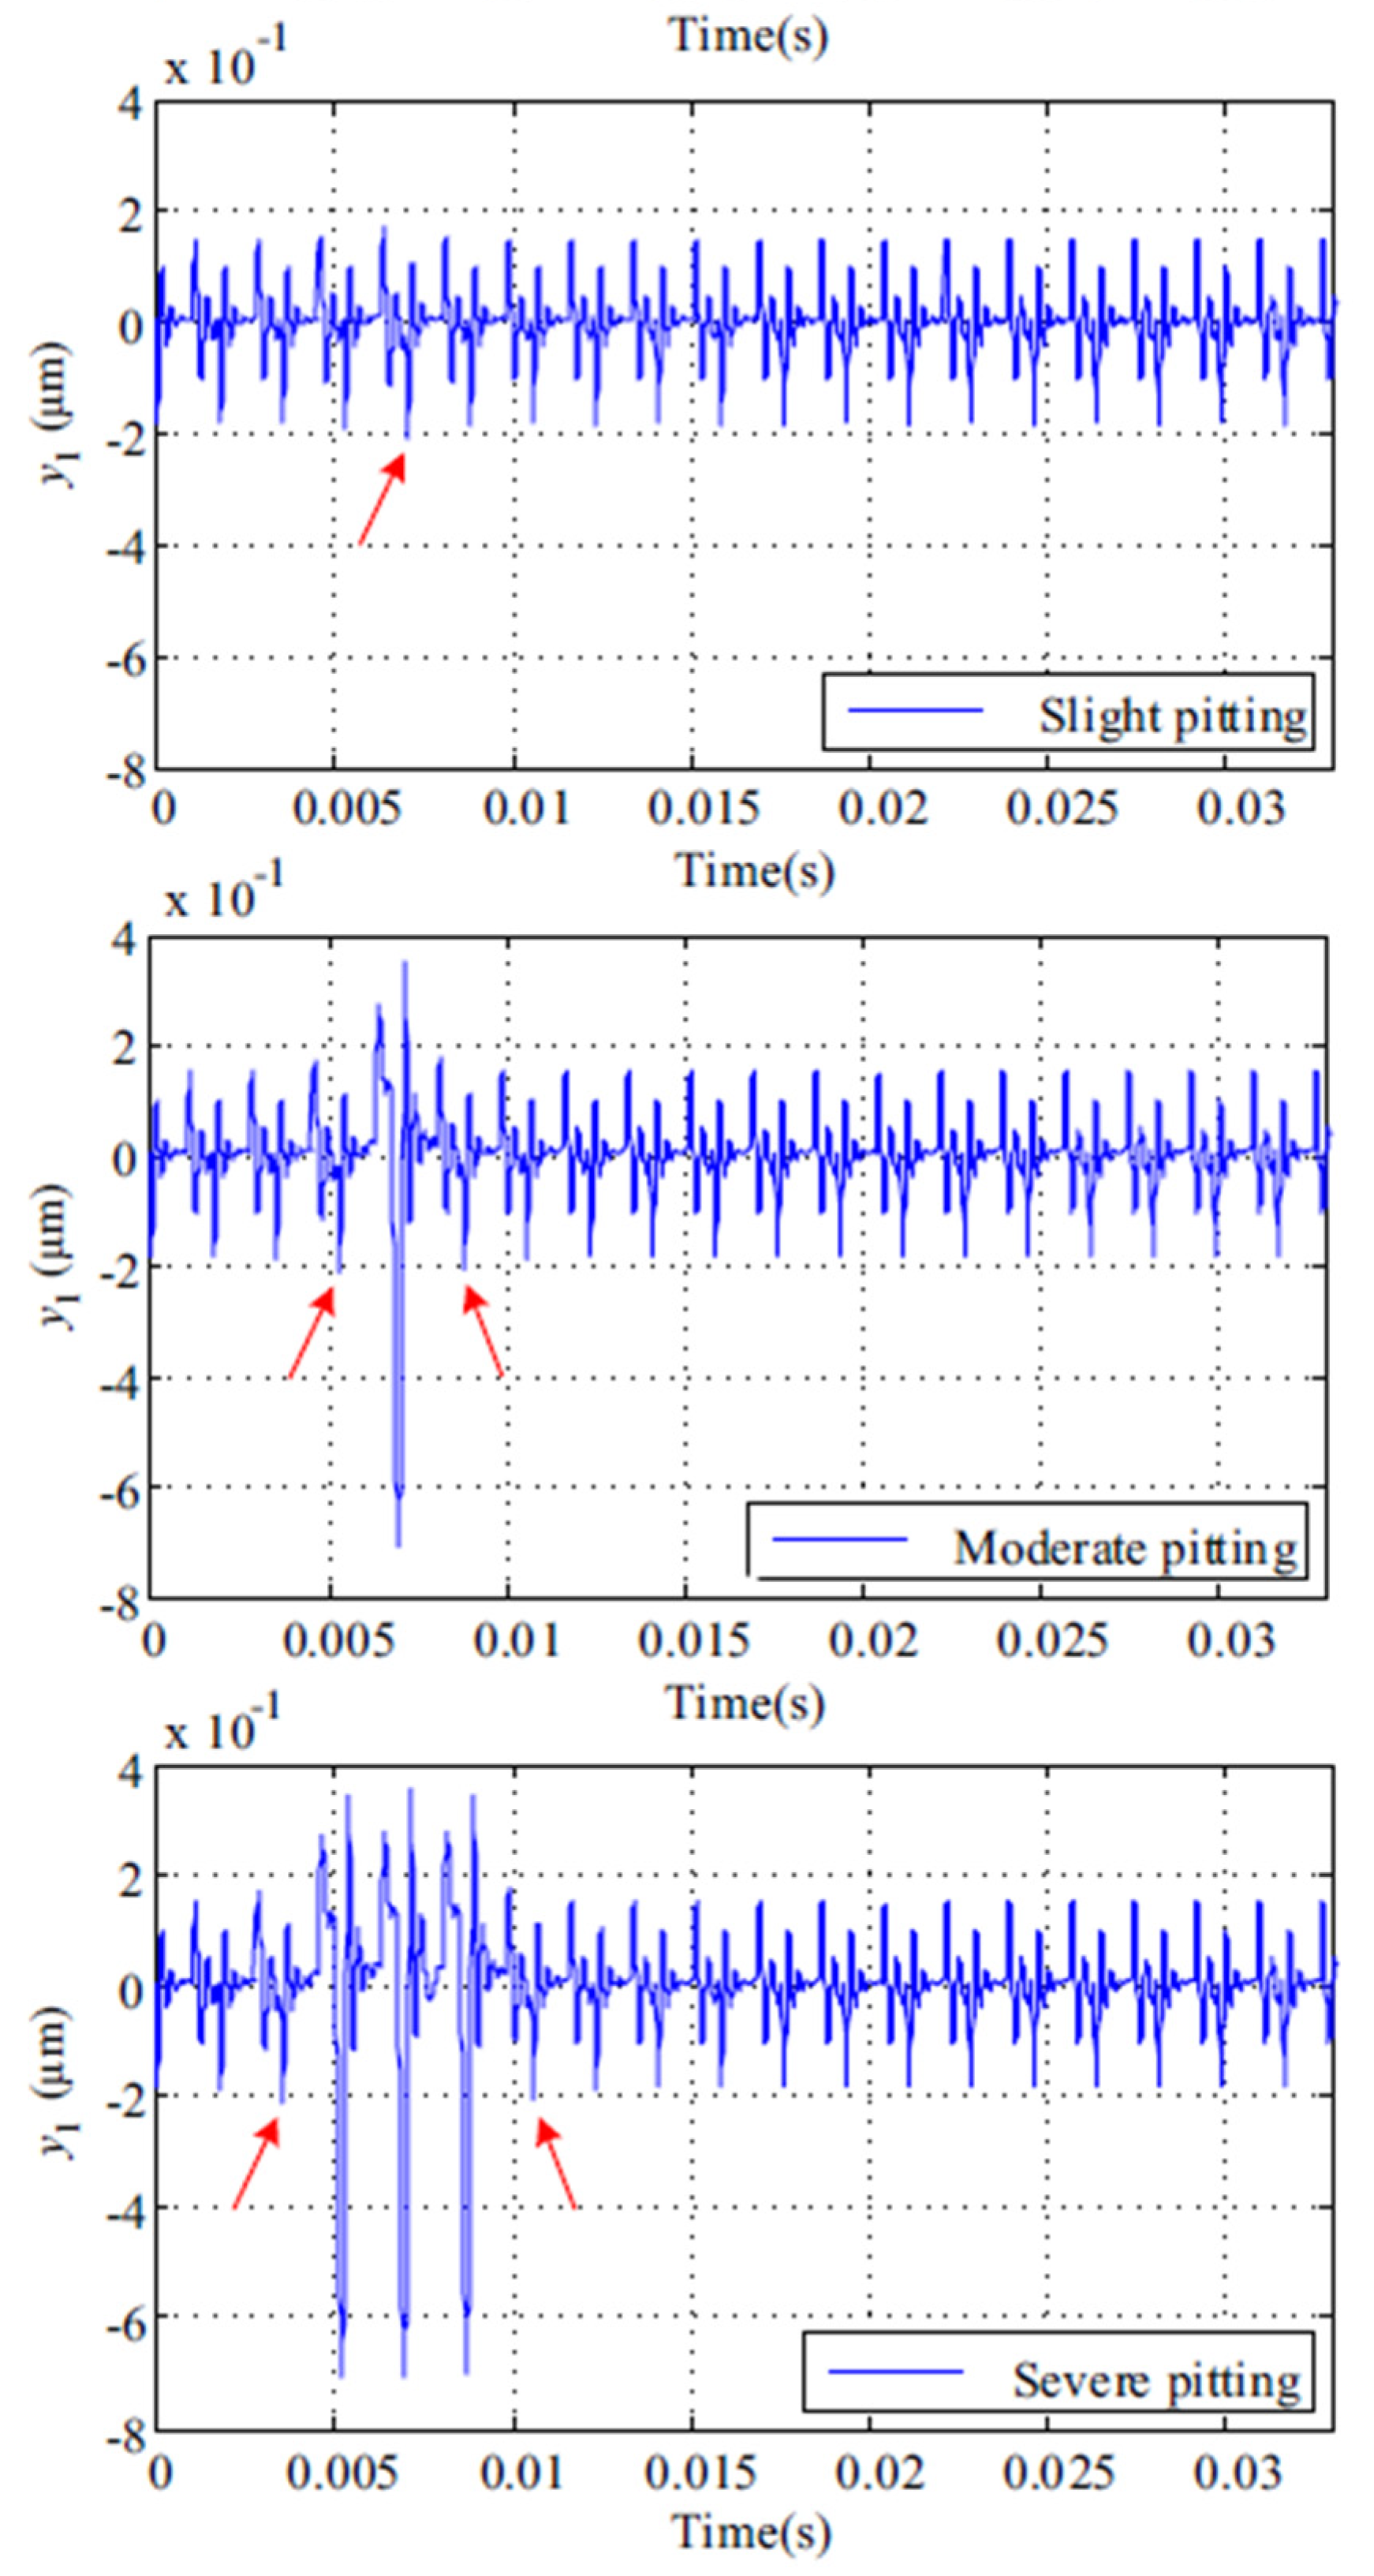
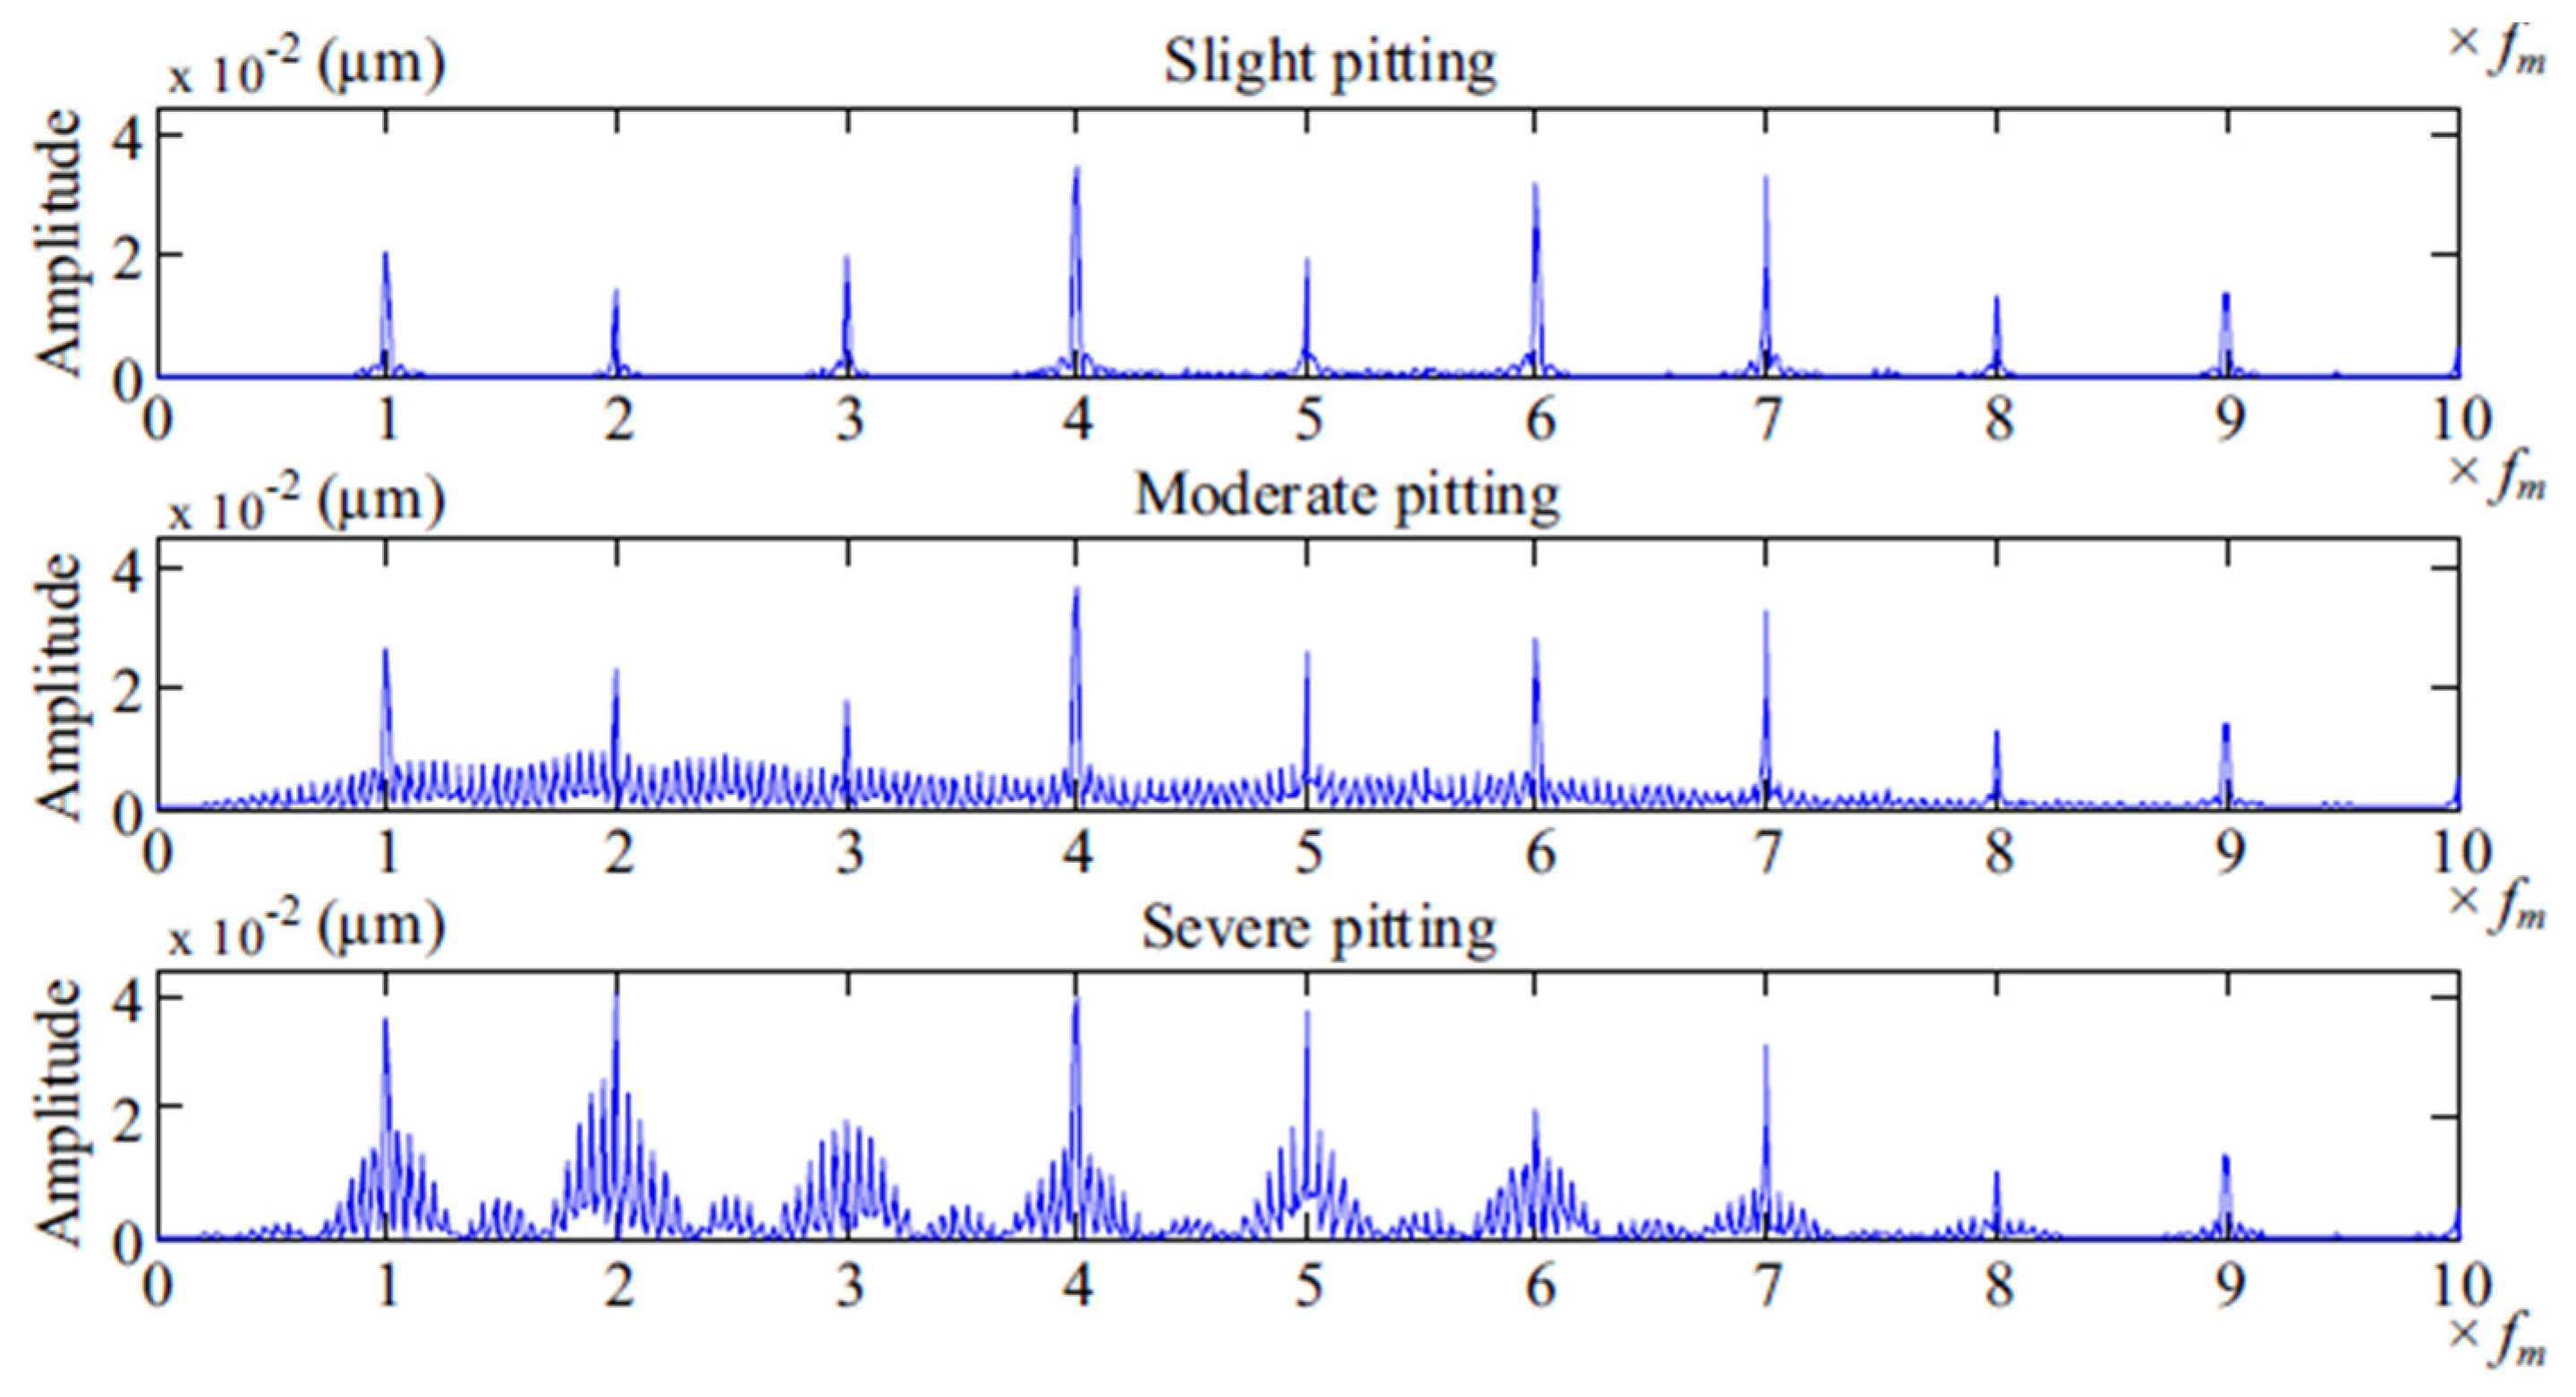
The evaluated mesh stiffness is input in the mathematical models to obtain the dynamic response of the pitted system. The displacement signal of a pitted gear system in the time and frequency domain, as presented in [45], is shown in Figure 11 and Figure 12. It can be observed that the spikes on the time domain increase with fault severity as shown by the red arrow. In the frequency domain, the frequency amplitude increases, and the sidebands also increase with pitting severity.

3.2. Gear Spalling Analytical Models

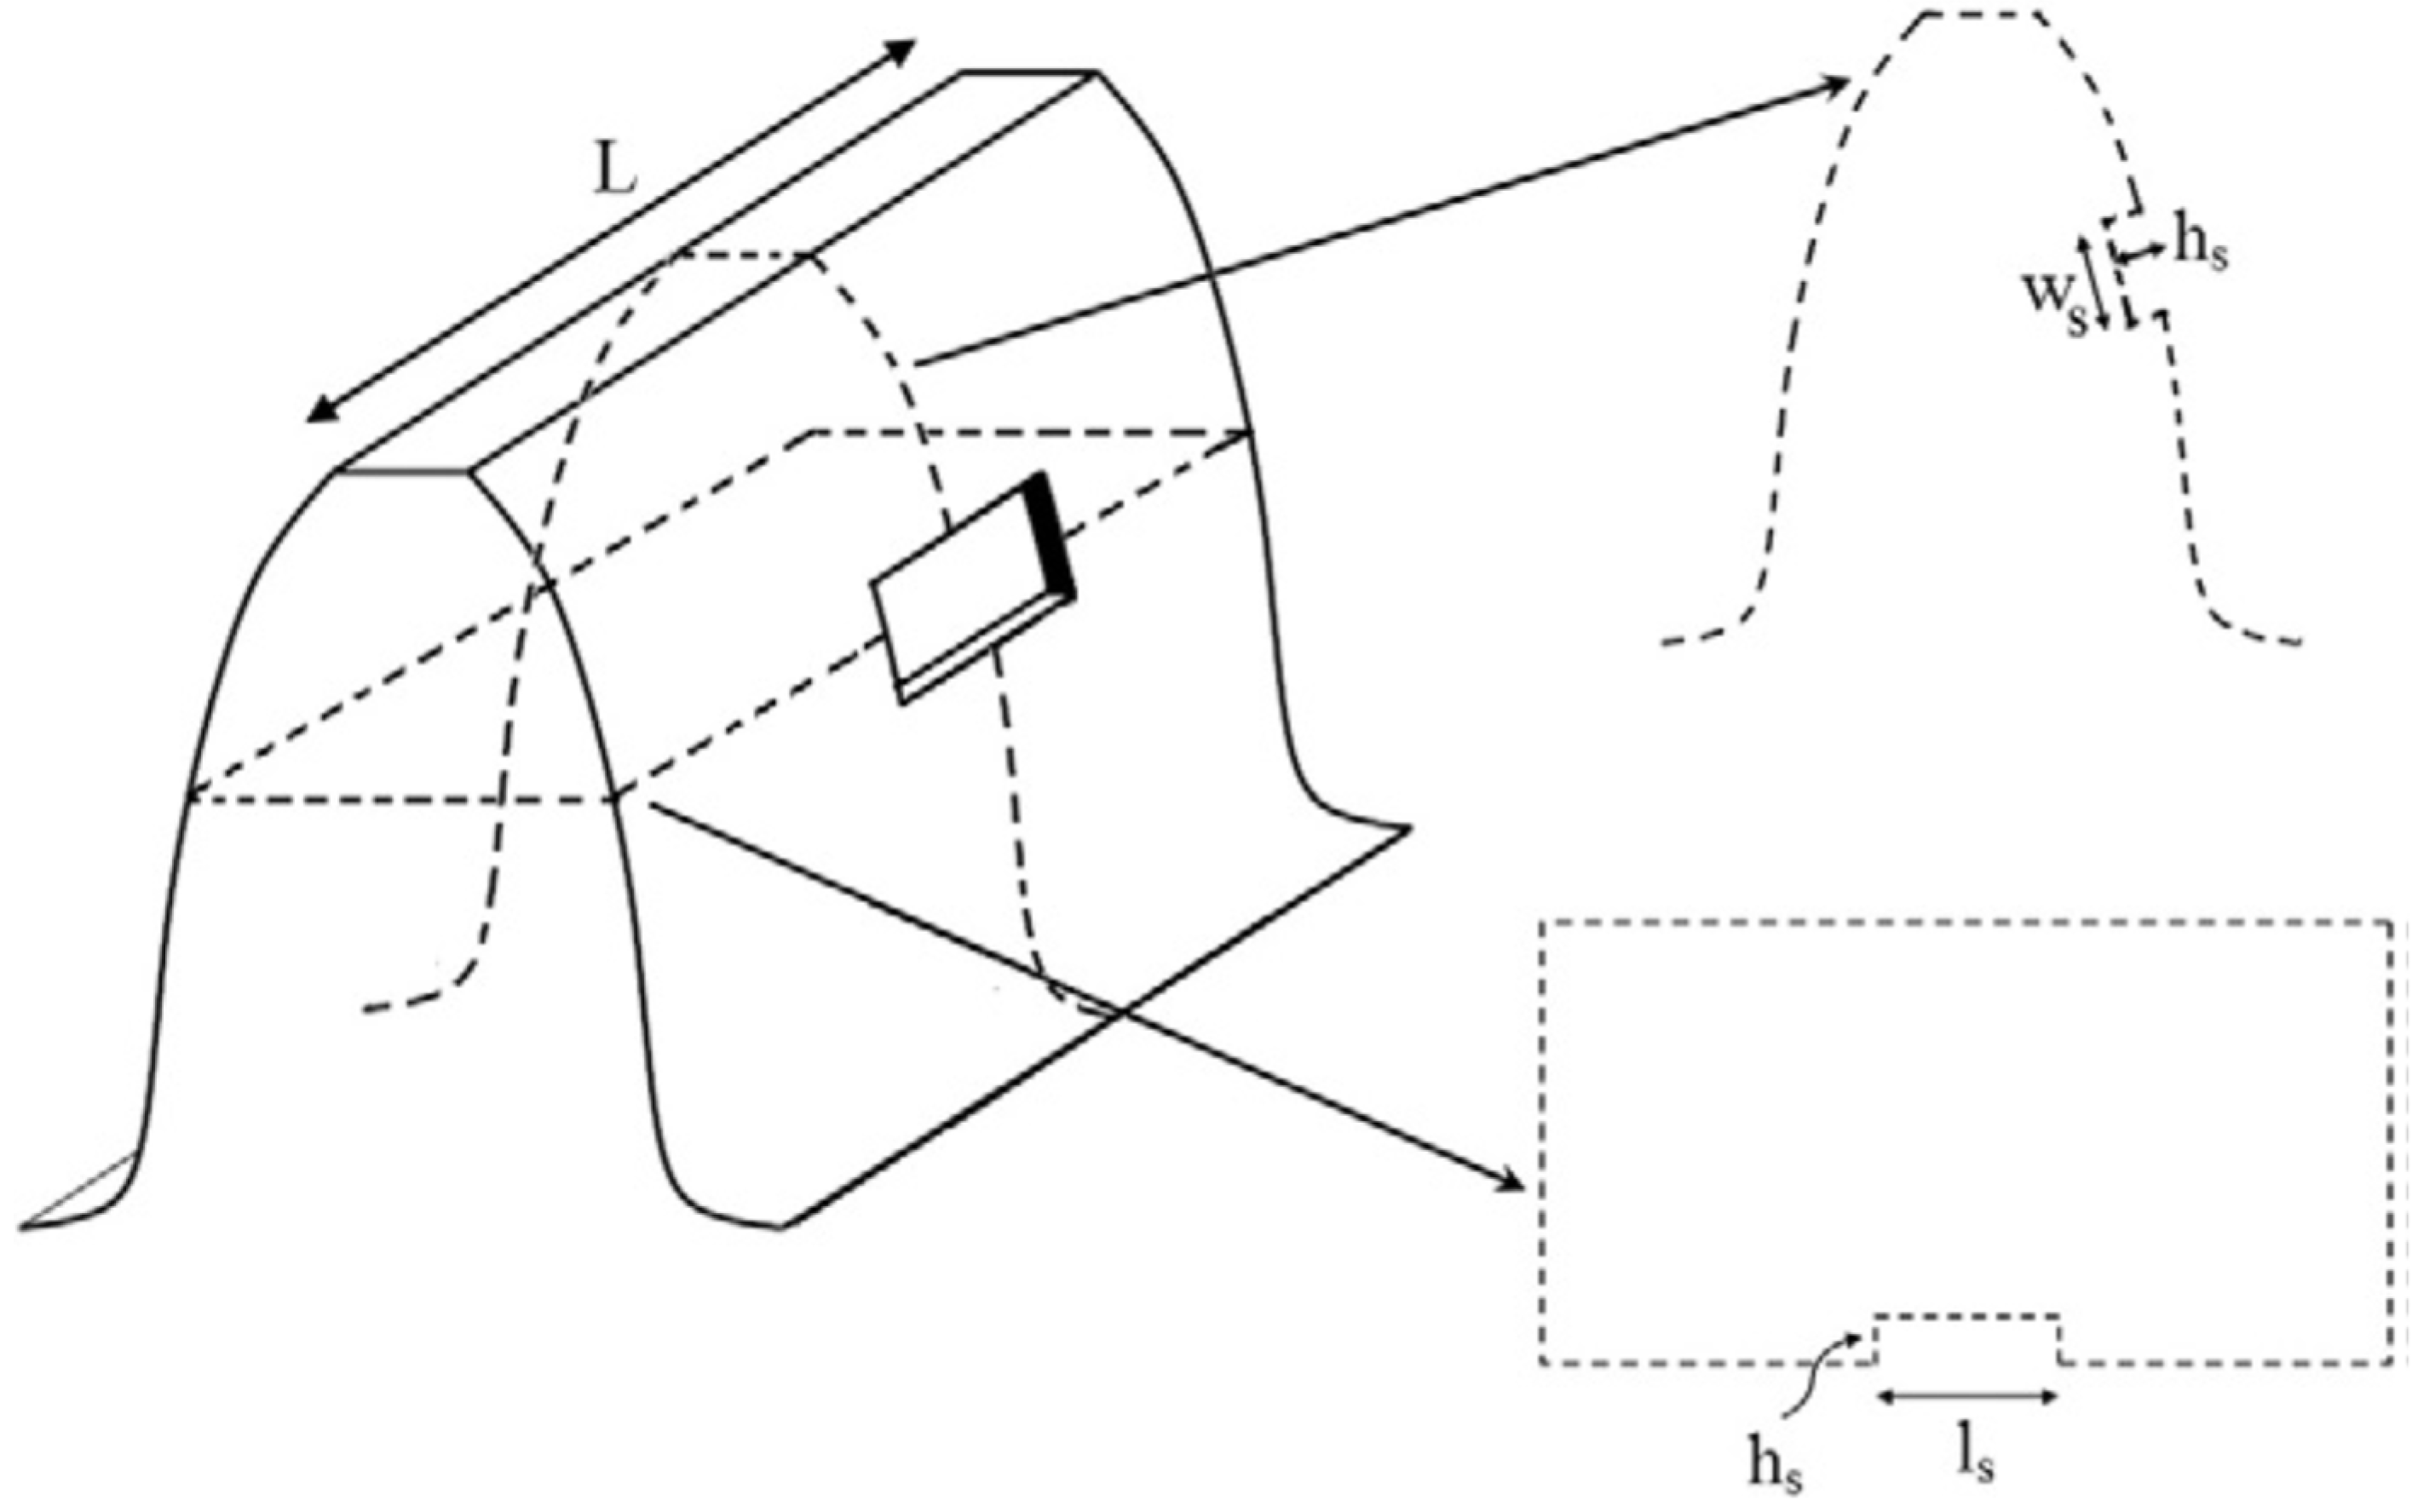
Spalling in gears has been modelled with surface areas that are rectangular [42,58,59,60,61,62,63,64,65,66], circular [42,67], V-shaped [42], elliptical [59,68], the shape of a keyway [69,70], spherical [71], and shaped as an ellipsoid [72,73]. The models usually consider a single spall on the pinion [42,58,59,68,69,70,72,73]. However, spalling may occur on multiple teeth for gears in operations. Research in [67] studied multiple spalls on one tooth and double tooth spalls. Spalling on gears in operations are usually irregular in shape, this has only been modelled by FEM as described in [74]. Figure 13 shows a gear tooth with a rectangular spur as presented in [42].
The fault state is introduced in the dynamic model by calculating the mesh stiffness of the region that contains the spall. The fault will change and reduce the mesh stiffness. The main parameters that change in a gear system with spalling faults are length, area moment of inertia and area and these are recalculated as shown in Equations (22)–(24) [42].
  L s = L l s
I s = 1 12 [ 2 h x 3 L h s 3 l s ]
A s = 2 h x L h s l s
where Ls, Is, and As represent the length, area moment of inertia and area of the spalled region. All parameters in Equations (21)–(23) are shown in Figure 3 and Figure 13. Figure 14 shows the TVMS of a gear system with spalling on the pinion as detailed in [75]. It is observed that there is a regular dip corresponding to the fault. The more severe the fault the more the dip from the healthy curve.
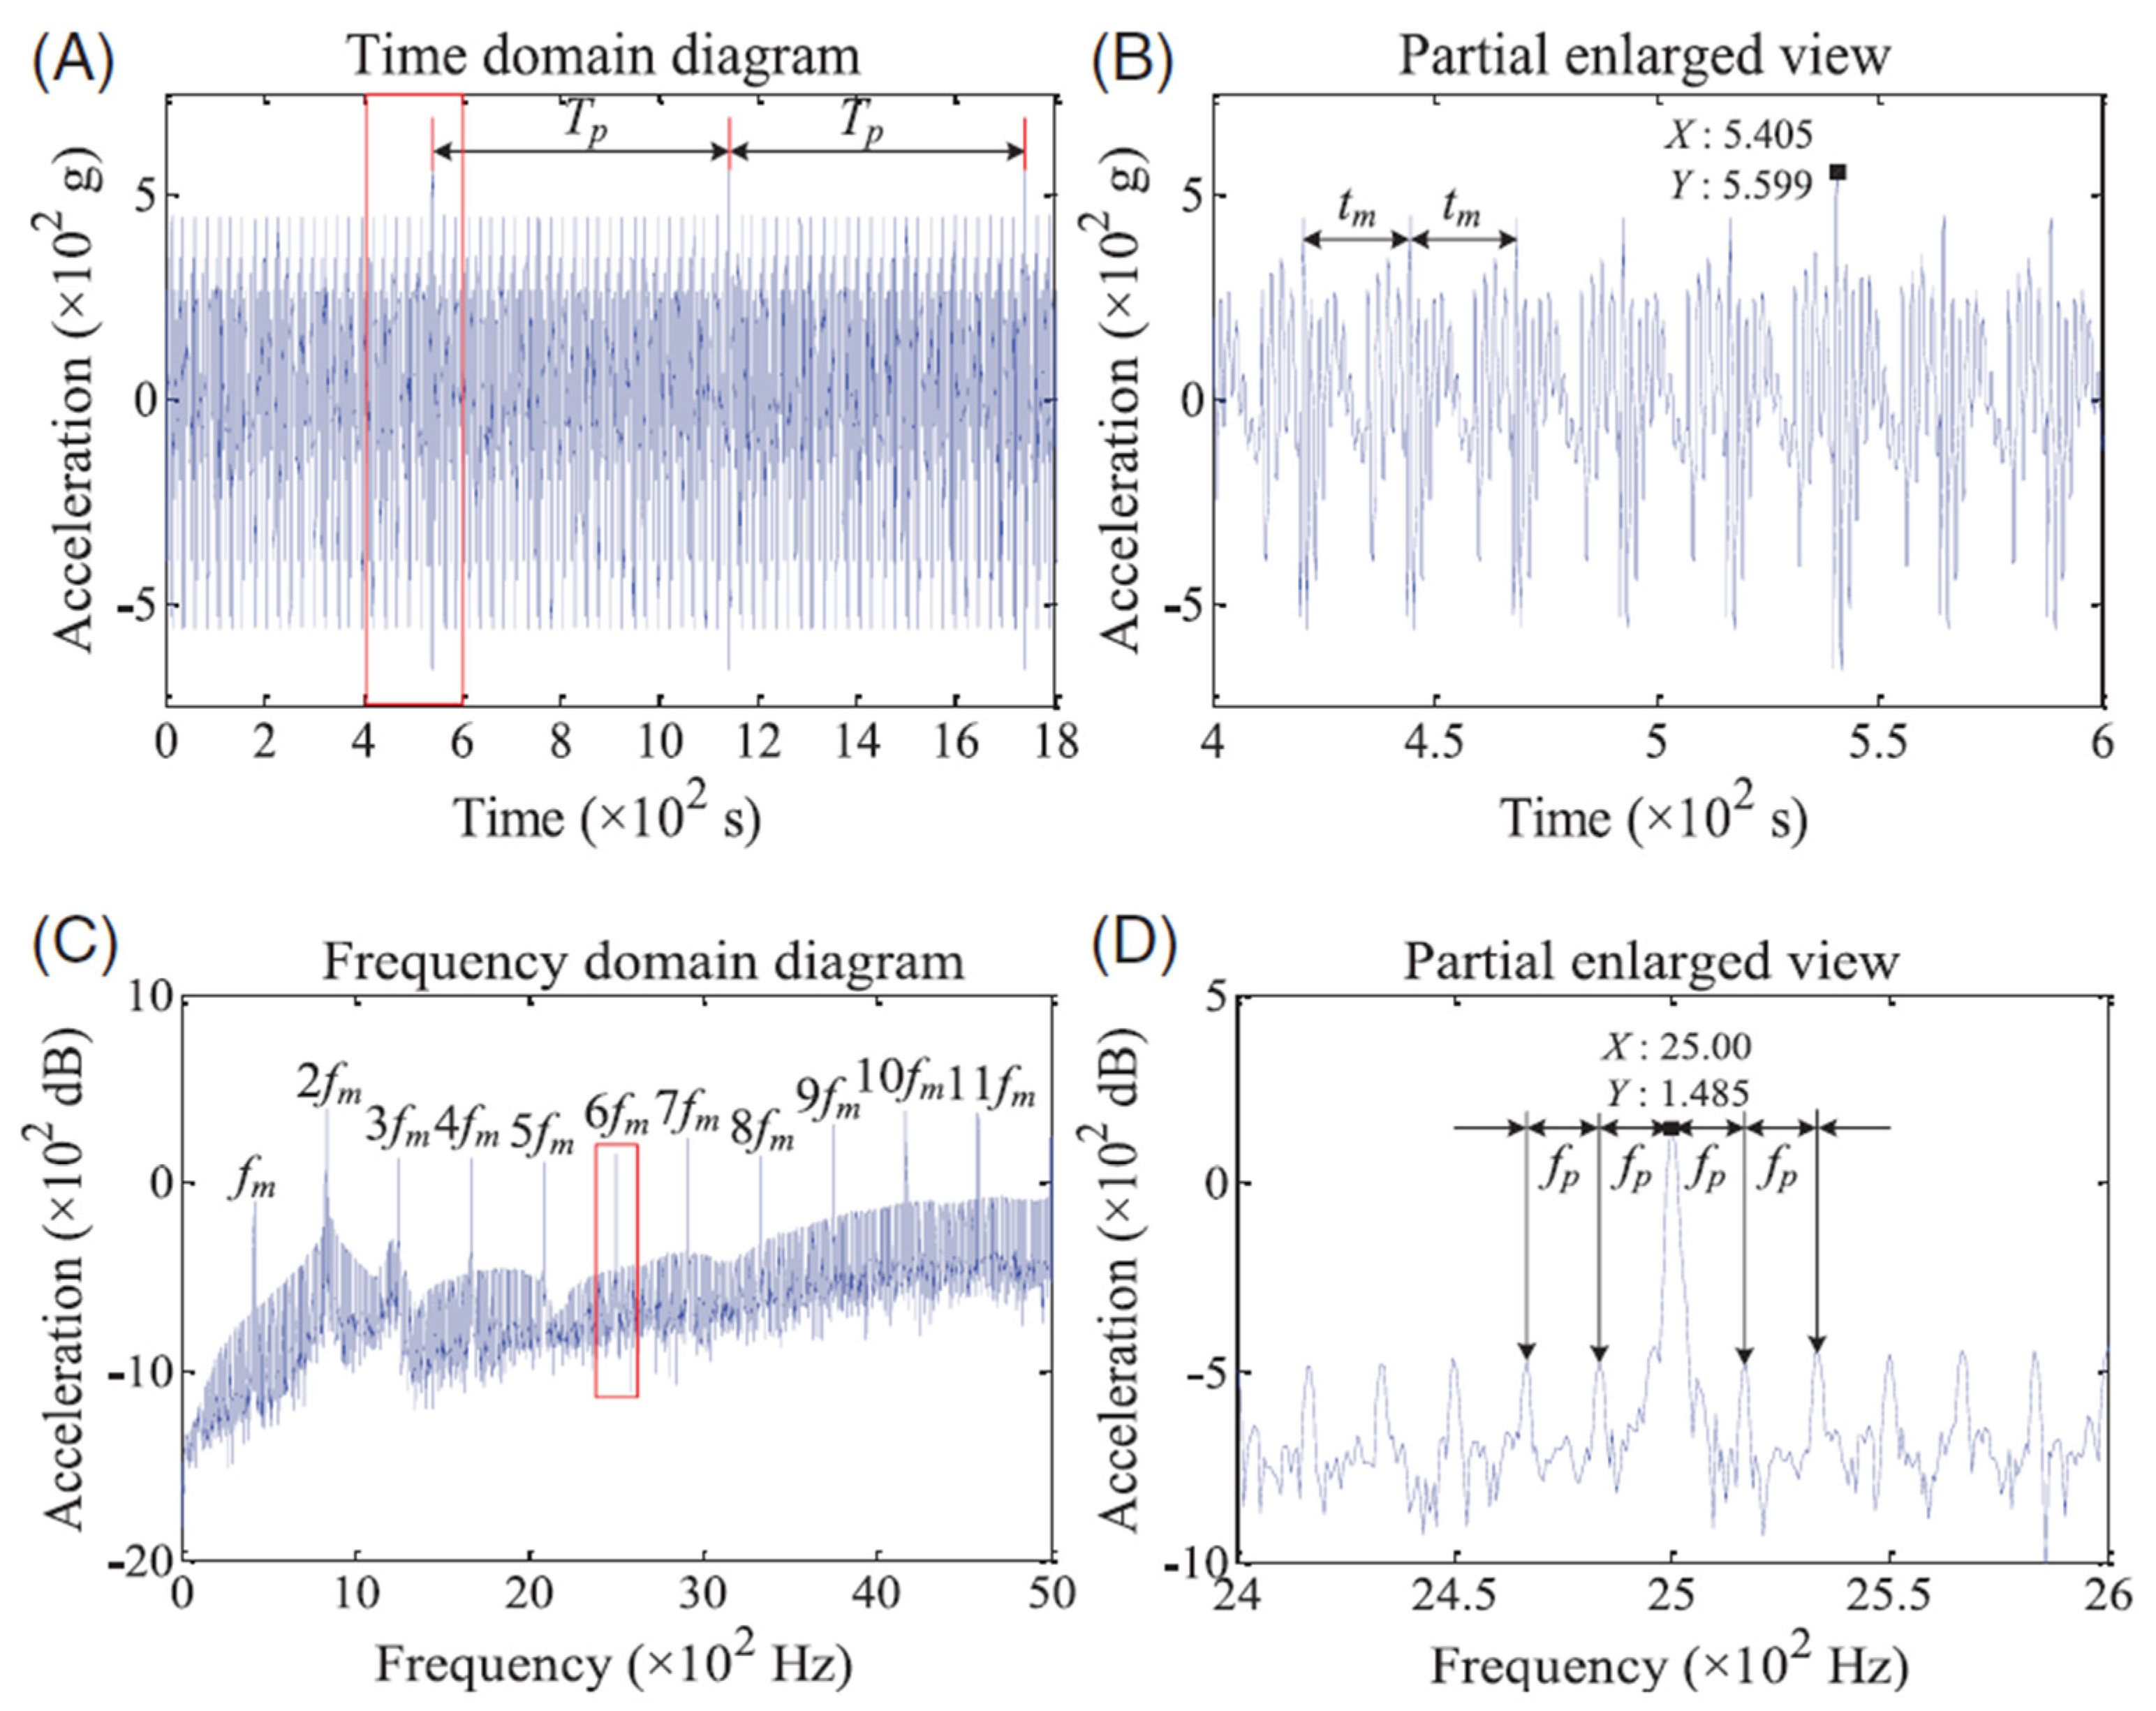
Figure 15 is as presented in [70]. Figure 15A–D show the effect of spalling in the time and frequency domain. Figure 15B,D are enlarged views of the regions marked in red in A and C, respectively. The time domain shows increased amplitude in the region of the spall and the frequency domain shows an increase in sidebands.

3.3. Gear Tooth Breakage Analytical Models

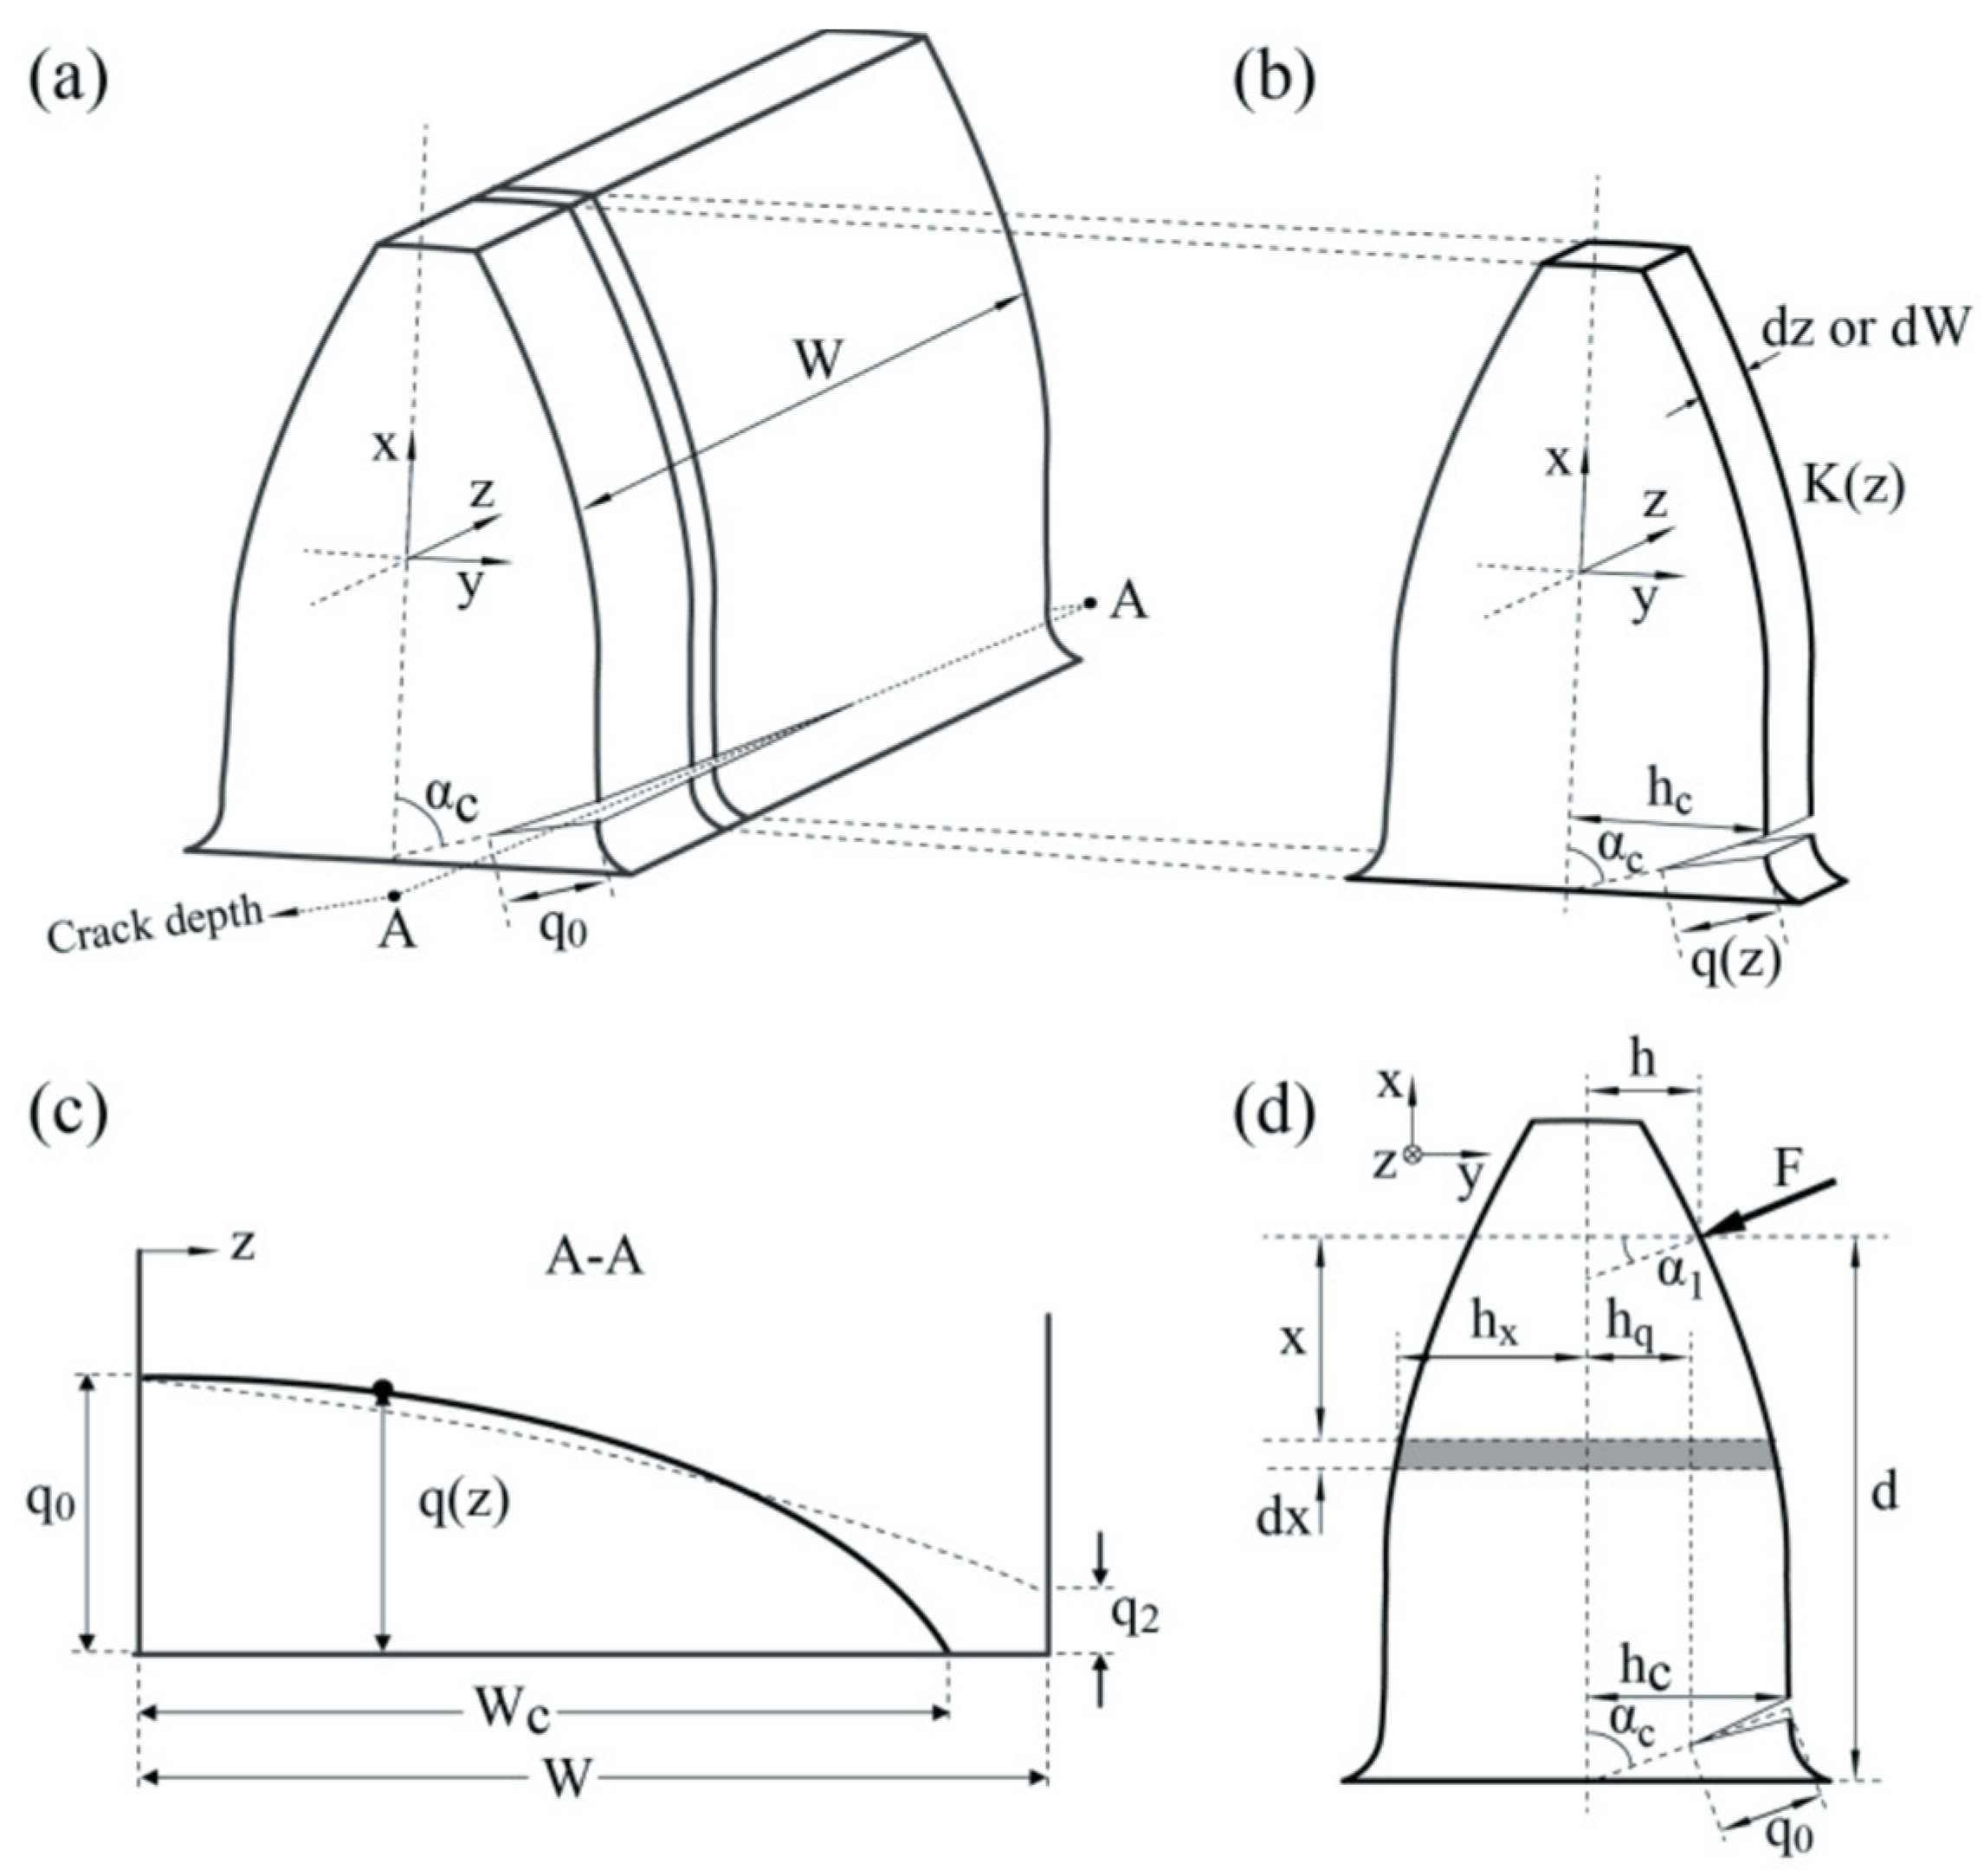
Gear tooth root cracks have been assumed to be at a uniform depth along the tooth width [38,39,76,77]. As cracks tend to begin from a small point and propagate, it is unlikely that the crack along the tooth width would have a constant depth. Some studies [38,78,79] derived a mesh stiffness calculation for cracks with varying depth by using the slice method. Each slice that assumed constant depth was evaluated with the potential energy method. Cracks can lead to total or partial tooth removal. The effect of varying lengths of crack and varying crack angles [80] and full and partial tooth breakage [81] have been studied by researchers. These conditions affect the TVMS and the system’s dynamic response. The schematic of a gear tooth with a crack of constant depth and angle of inclination along the tooth width as presented in [39] is shown in Figure 16. Figure 17 [82] shows a gear tooth with a crack with varying depth along the tooth width.
The area, and area moment of inertia are changed by the presence of a crack and this in turn reduces the value of the mesh stiffness. The area and area moment of inertia presented in [39] are shown in Equations (25) and (26).
I x = 1 12 h x + h q 3 L
  A x = h x + h q L
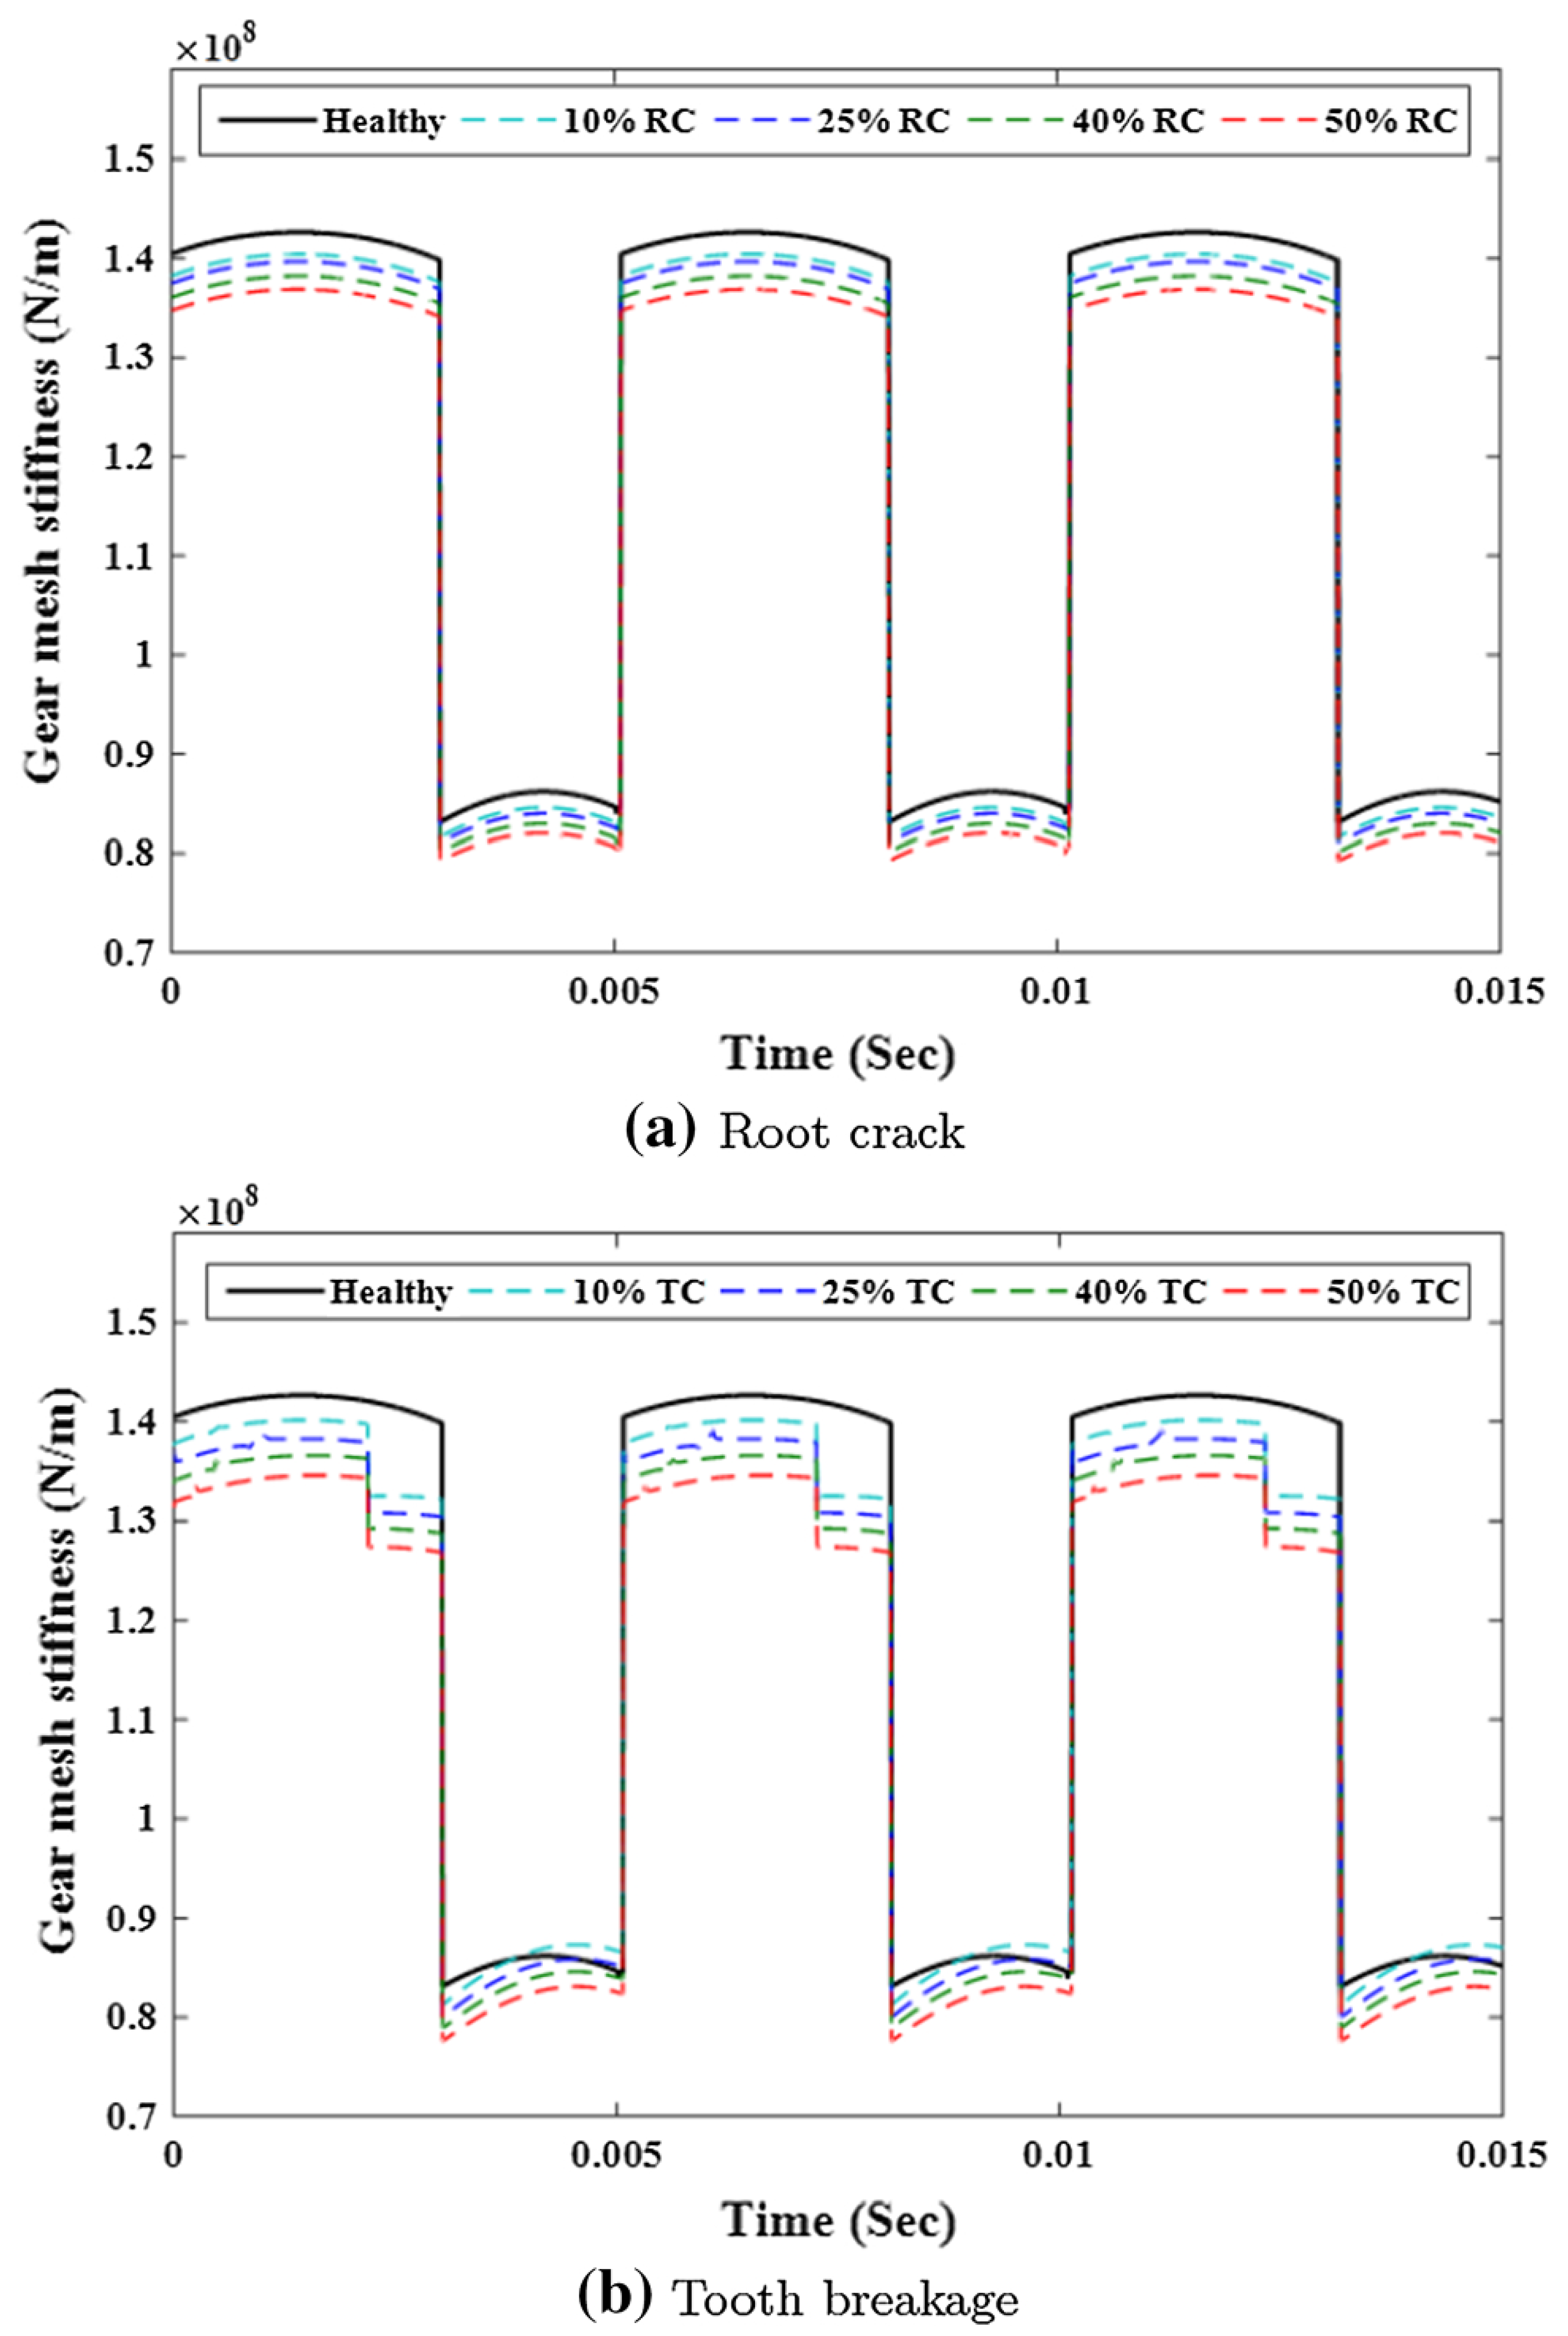
The TVMS for various degrees of crack and tooth breakage as given in [83] is shown in Figure 18. The analytical model was used to evaluate the gear mesh stiffness for a spur gear pair without fault, 50% and 100% root crack, 50% and 100% tooth breakage.
From the TVMS plot, it is noted that root crack reduces the mesh stiffness based on its severity and it reduces more in the case of tooth breakage. The reduction is particularly significant in the region of the broken tooth.
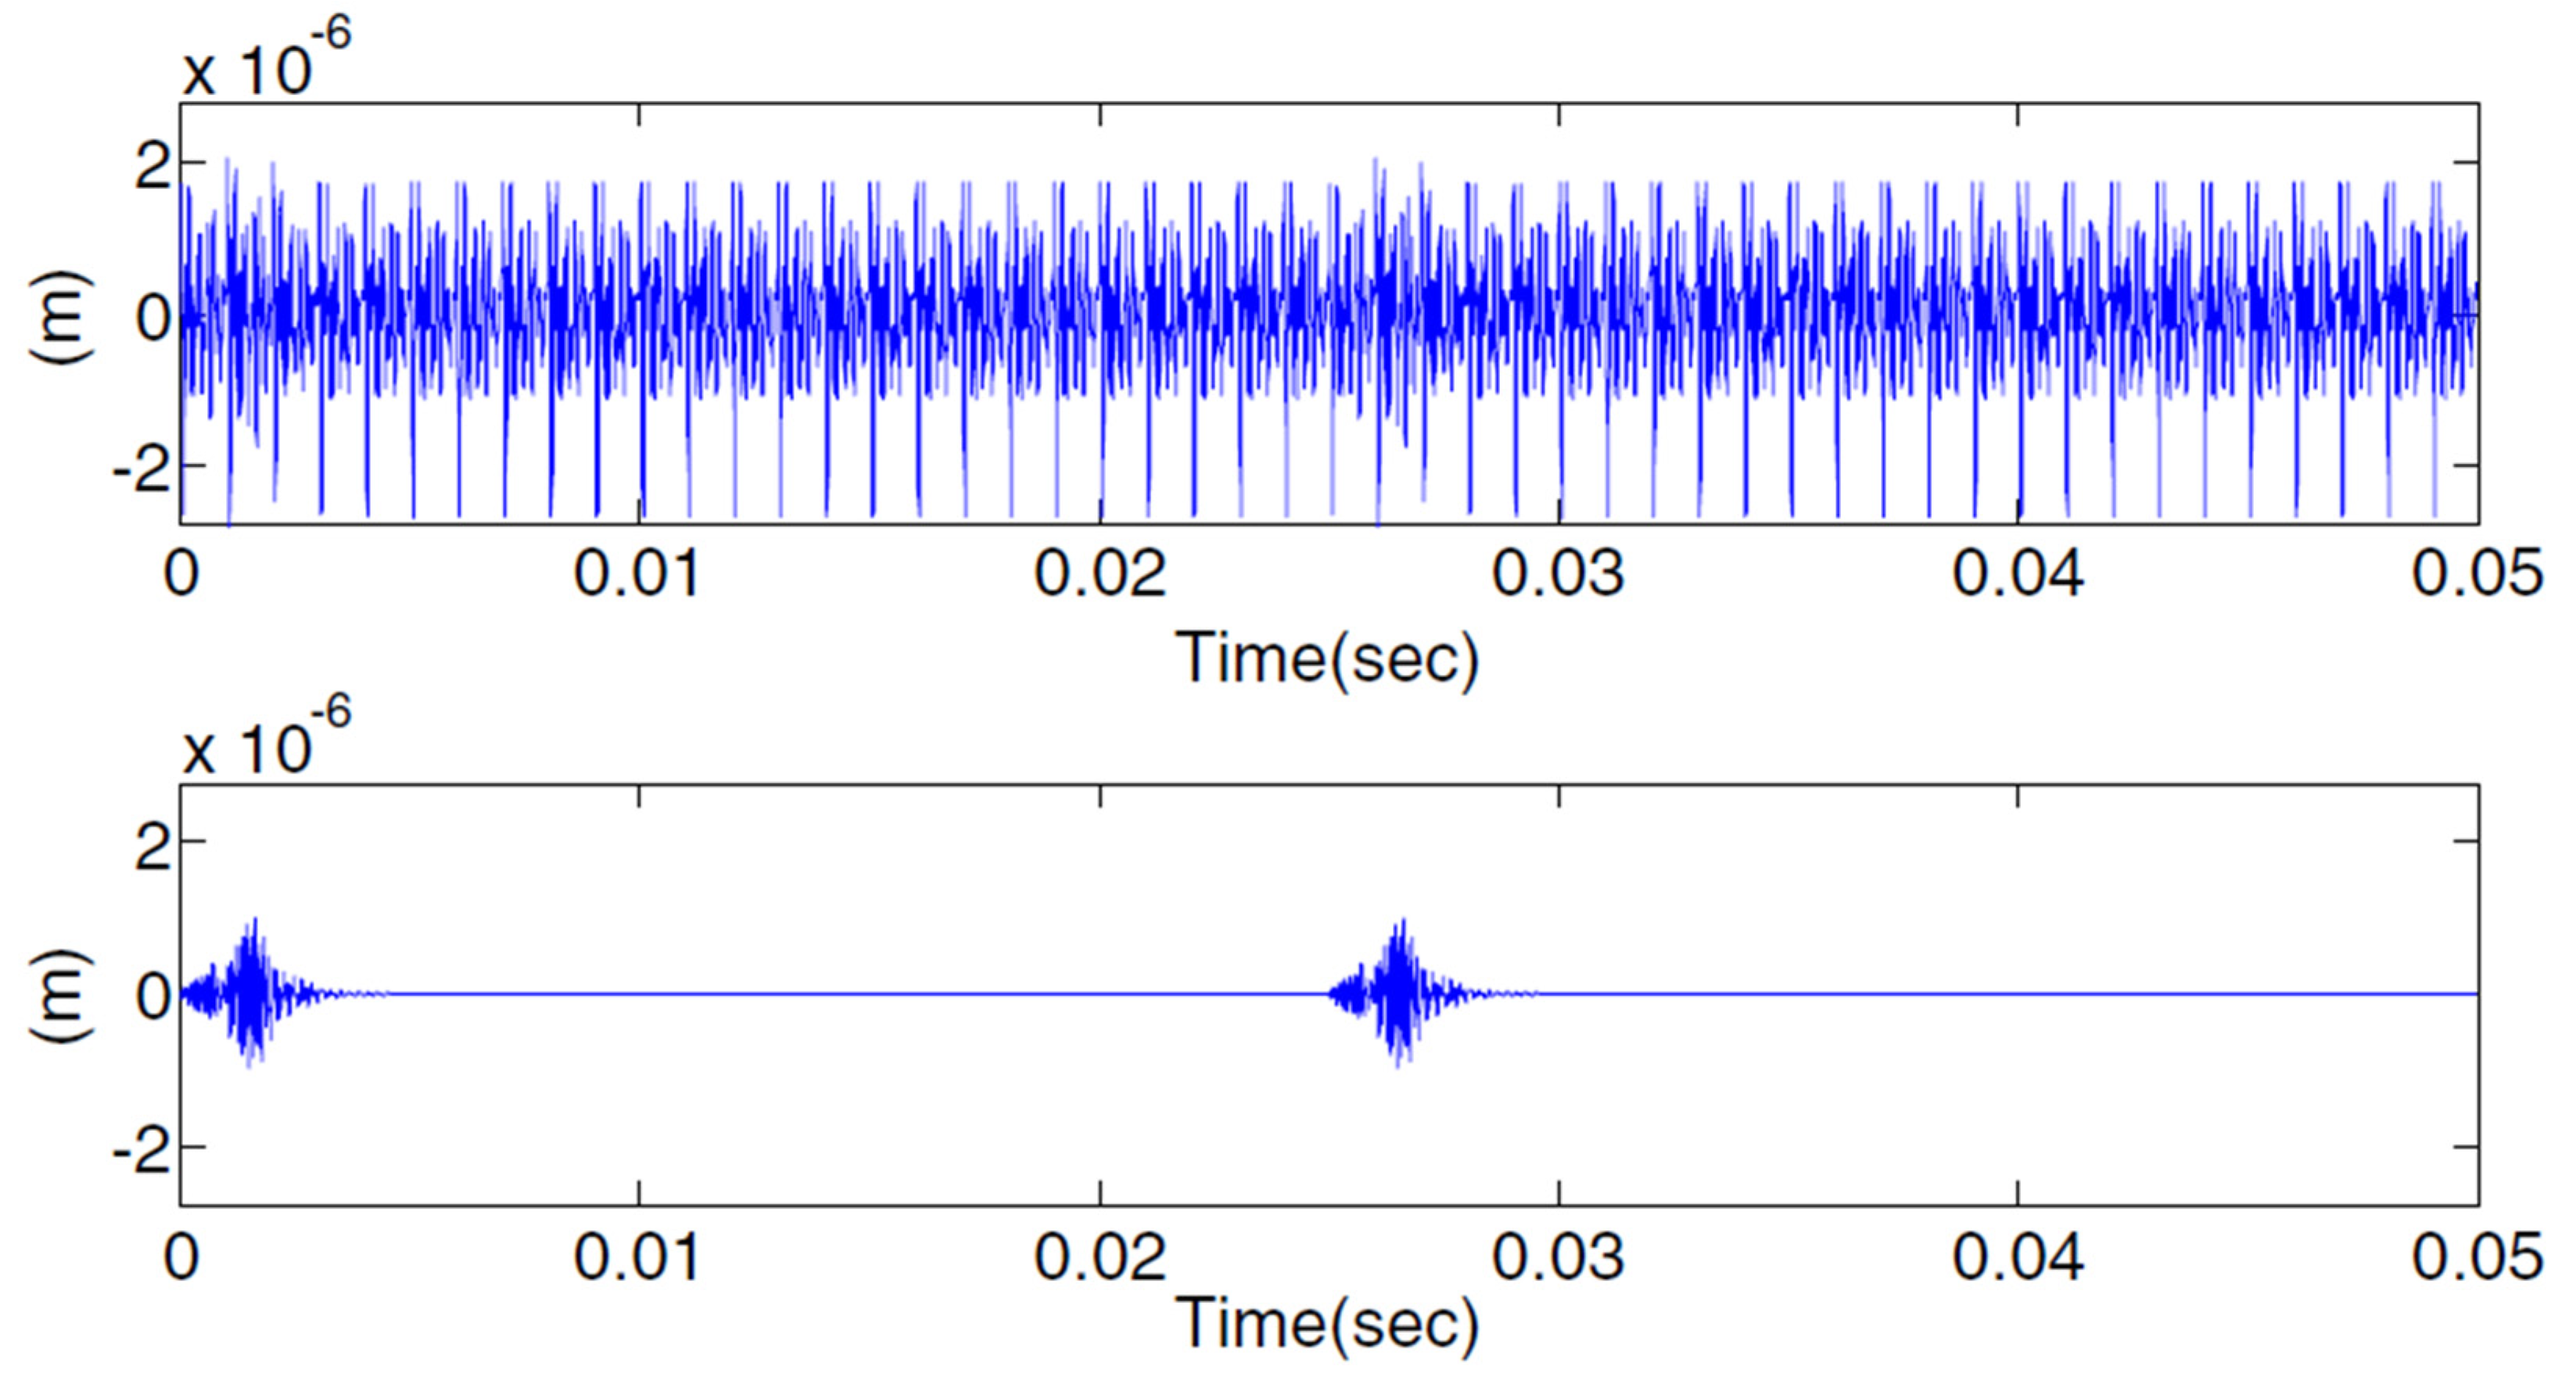
The dynamic response in the time domain of the original and residual signal of the crack with a length of 1.8 mm and at an angle of 50° is shown in Figure 19 [80]. The area of the faulty signal is observed clearly in the residual signal. Figure 20 [80] shows the signal in the frequency domain and a magnified view showing the sidebands. It is also noted that the frequency domain has additional sidebands indicating the presence of a fault.
Other forms of tooth cracks like tooth chipping, and tooth surface cracks show similarities with tooth root crack and their analytical modelling and dynamic simulation were analysed in [84,85,86,87].

3.4. Gear Abrasive Wear Analytical Models

Pitting, spalling, and tooth breakage fault models maintain their original involute profile, but the surface profile and hence the meshing characteristics change constantly in gears under the wear model. The wear process changes the tooth surface profile from a perfect involute profile and this in turn changes the dynamic characteristics of the gear system [88,89]. Also, the contact forces from the gear system dynamics affect the wear process. An approach to predict wear progress in spur gears noting this mutual dependency is the basis of a few surface wear models. These models usually calculate the wear depth using Archard’s wear equation shown in Equation (27) [90].
      d h d t = K w e a r f v
where
h = wear depth
K w e a r = wear coefficient
f = normal load/contact force
v = sliding velocity at time t
Analytical dynamic models were developed in [91,92,93,94,95] which focused on developing a dynamic model that incorporates the wear depth and the TVMS. However, one study [95] noted that the change in TVMS was negligible, and the gear transmission error was more reliable for modelling wear. An eight degree of freedom model was developed which incorporates time-varying load sharing, friction coefficient and time-varying meshing stiffness. The corresponding contact force for the system in Equation (7) is for the six-degree-of-freedom system used for earlier discussions is given in Equation (28).
F t = k m t r p θ p r g θ g + x p x g sin φ + y p y g cos φ + e t + c m t r p θ ˙ p r g θ ˙ g + x ˙ p x ˙ g sin φ + y ˙ p y ˙ g cos φ + e ˙ t
where,
  • φ = Pressure angle
  • e t = Geometric transmission error
All other parameters are as defined for Equation (7). The geometric transmission error gives an indication of the level of surface wear, it shows the geometric deviation of the gear profile from the original involute profile [90]. The dynamic transmission error was defined for a six-degree-of-freedom one-stage gear system by Equation (29) [96].
δ = y p y g + r p θ p r g θ g e
where,
  • δ = Dynamic transmission error (DTE)
  • e = Static transmission error (STE)
and STE is given by
    e = δ g δ p + Δ f Σ + h w e a r
where
  • δ g δ p = Elastic deformation
  • Δ f Σ = Comprehensive error
  • h w e a r = Wear depth
Figure 21 shows the view of a tooth with surface wear [97].
The parameters that affect the TVMS of a gear undergoing wear are area, area moment of inertia, the formulas as given in [97] are presented as Equations (31) and (32).
A x = h x + h x L
  I x = 1 12 h x + h x L
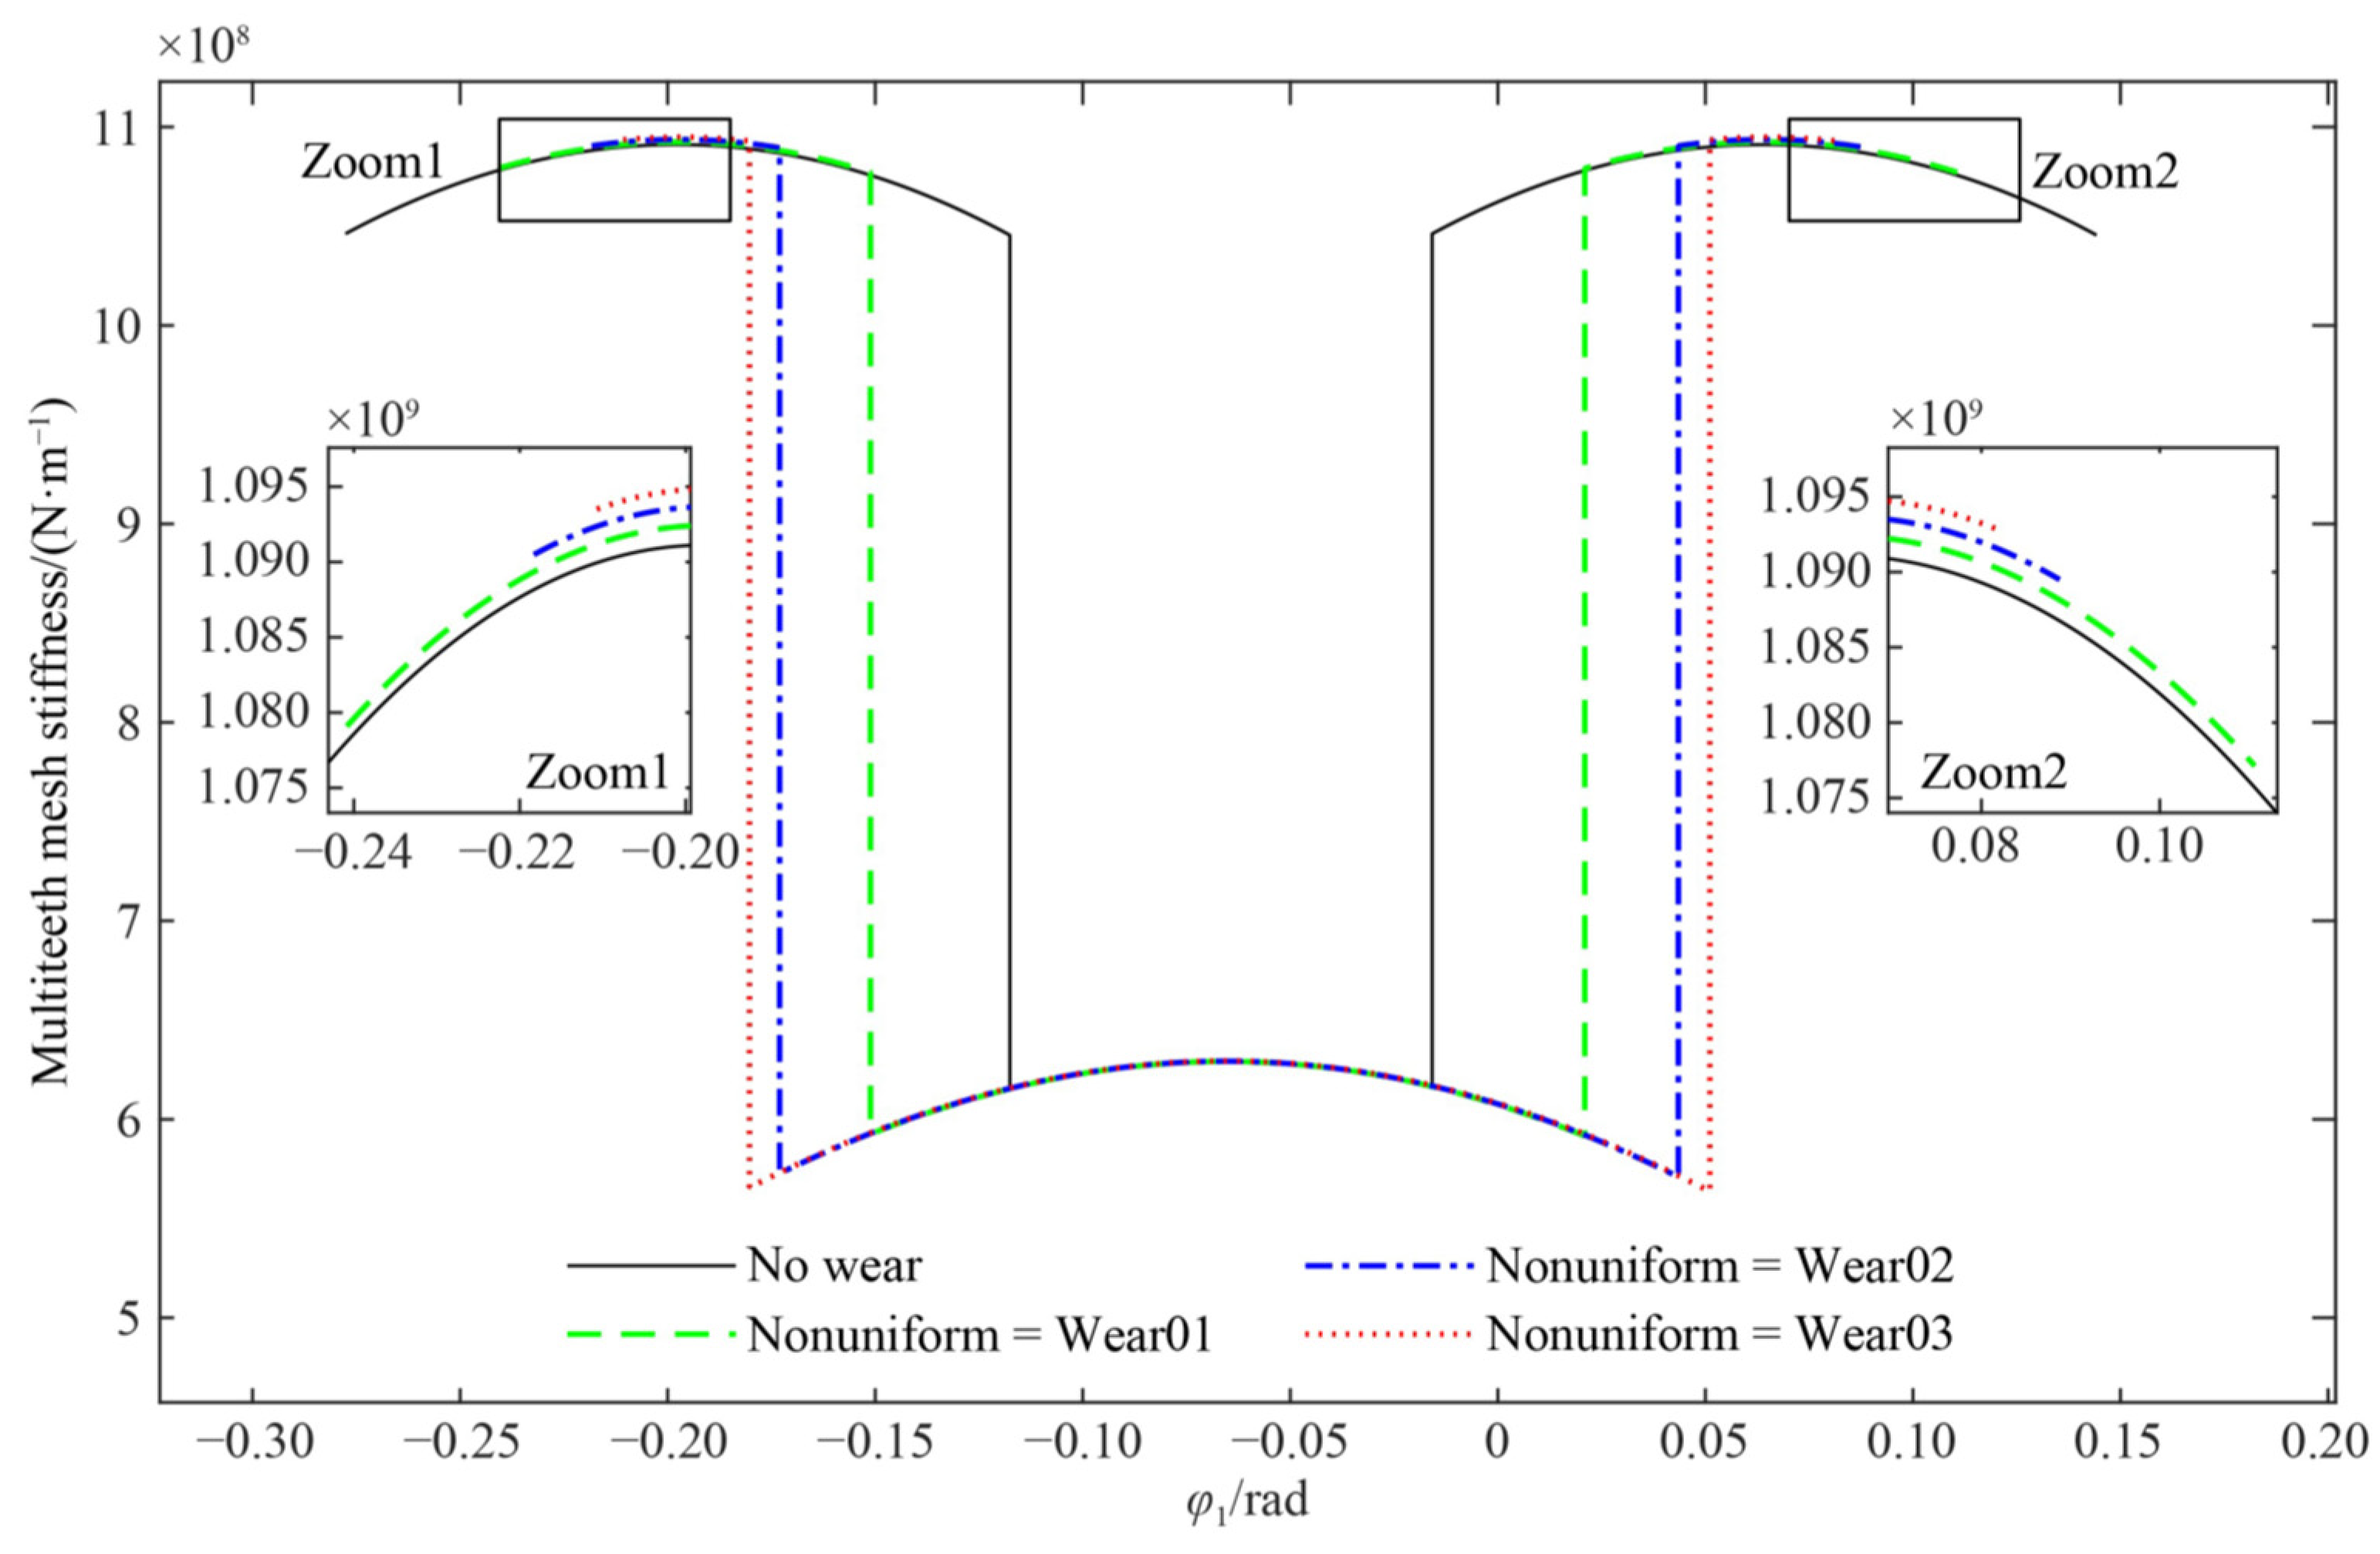
h x is derived in paper [97] The TVMS and STE plots obtained in paper [96] are shown in Figure 22. From the diagram, wear slightly reduces the TVMS uniformly and the reduction is more for dry wear. The static transmission error is higher as teeth begin to mesh and as the mesh engagement ends. This is depicted by the region of 0 m/s and 1.7 m/s on the STE curve. The pitch points correspond to a velocity of 1 m/s, and this point change in wear is minimal. A comparison of the TVMS and STE plots shows that the STE is more sensitive to changes due to wear.
The studies in [97] noted that the TVMS was significant in the double tooth engagement region while other researchers [91] used FEM on external spur gears and [93] used analytical modelling on internal spur gears modelled the gear mesh relationship and calculated the TVMS using the potential energy method noting the new meshing relationship. It was noted that the range of the TVMS increased but the amplitude change was minimal.
Figure 23 and Figure 24 show a schematic for non-uniform wear and the TVMS, respectively, as observed in [91]
The TVMS and the wear depth were incorporated into the dynamic model to obtain the dynamic responses. The wear depth is included using the unloaded static transmission error (USTE). For the dynamic model, the USTE is obtained using the relationship for the relative displacement of two gears in mesh and the USTE is the sum of manufacturing errors, tooth profile errors and tooth failure errors. The tooth failure error is due to tooth wear. The dynamic response in the time and frequency domain as given in [91] is shown in Figure 25 and Figure 26.
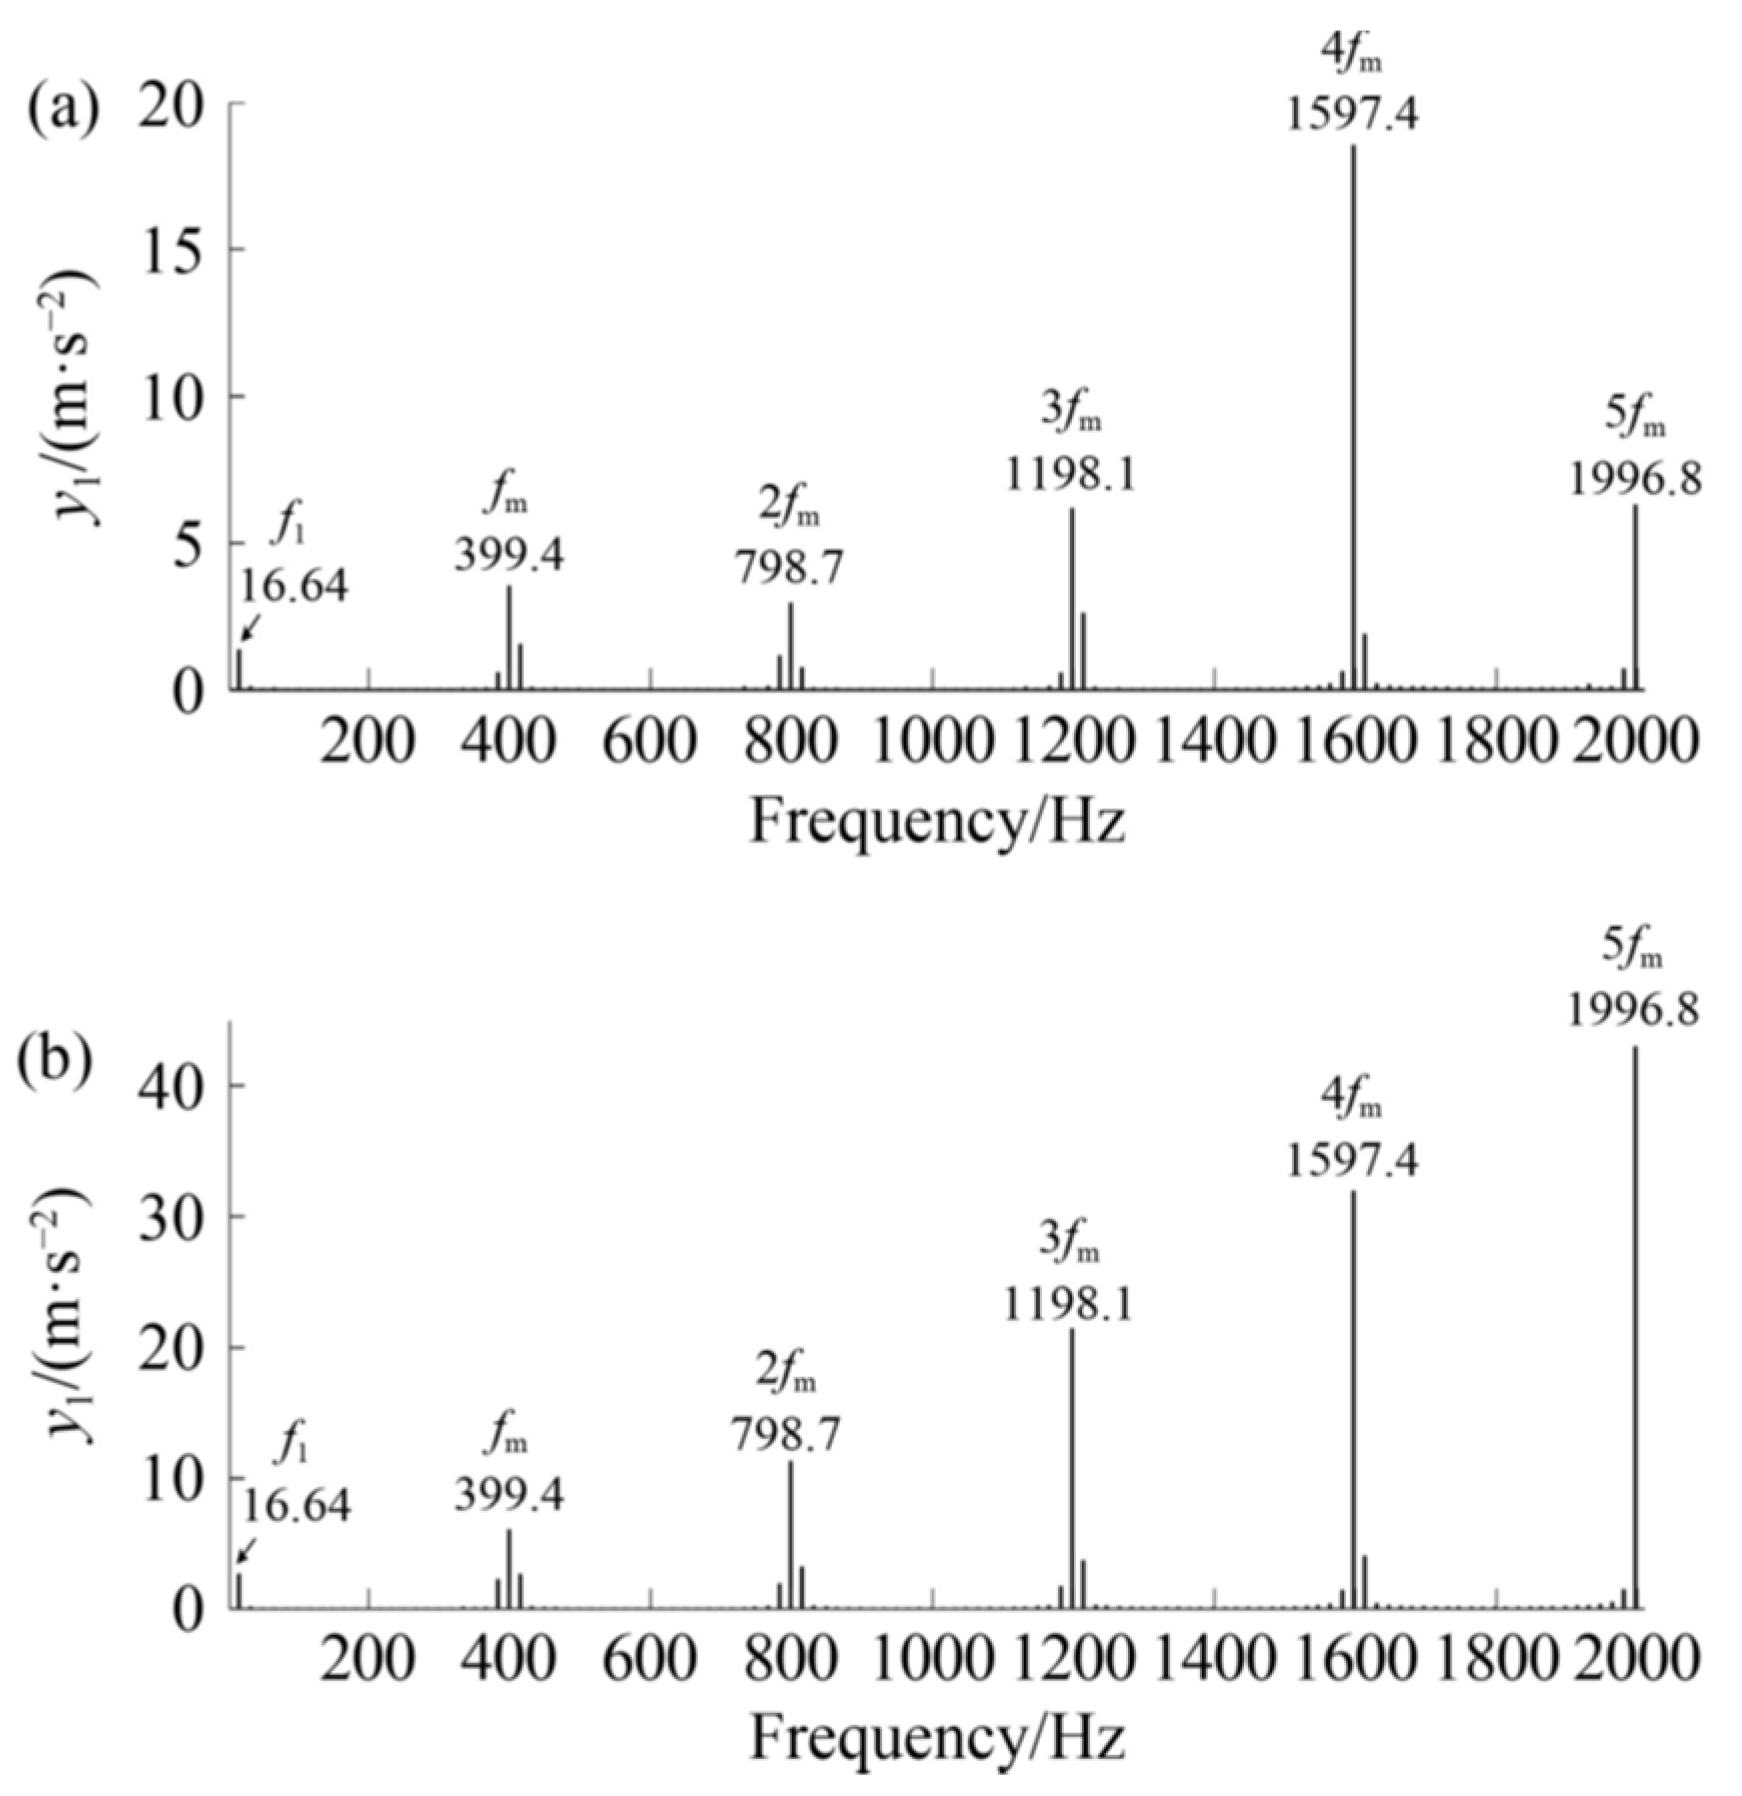
In Figure 25 and Figure 26, the responses for 0 mm wear depth and 0.25 mm wear depth are shown in the time and in the frequency domain. It is noted that the time domain amplitude at 0.25 mm increases due to wear and the meshing interval increases due to the new meshing relationship. The frequency domain shows that the frequency response amplitude increases but there are no changes to the number of sidebands.

3.5. Gear Adhesive Wear Analytical Models

Adhesive wear models for gears primarily focus on the determination of the scuffing temperature [98,99,100]. No work on the effect of scuffing on the TVMS and no dynamic modelling of the system’s response has been noted.
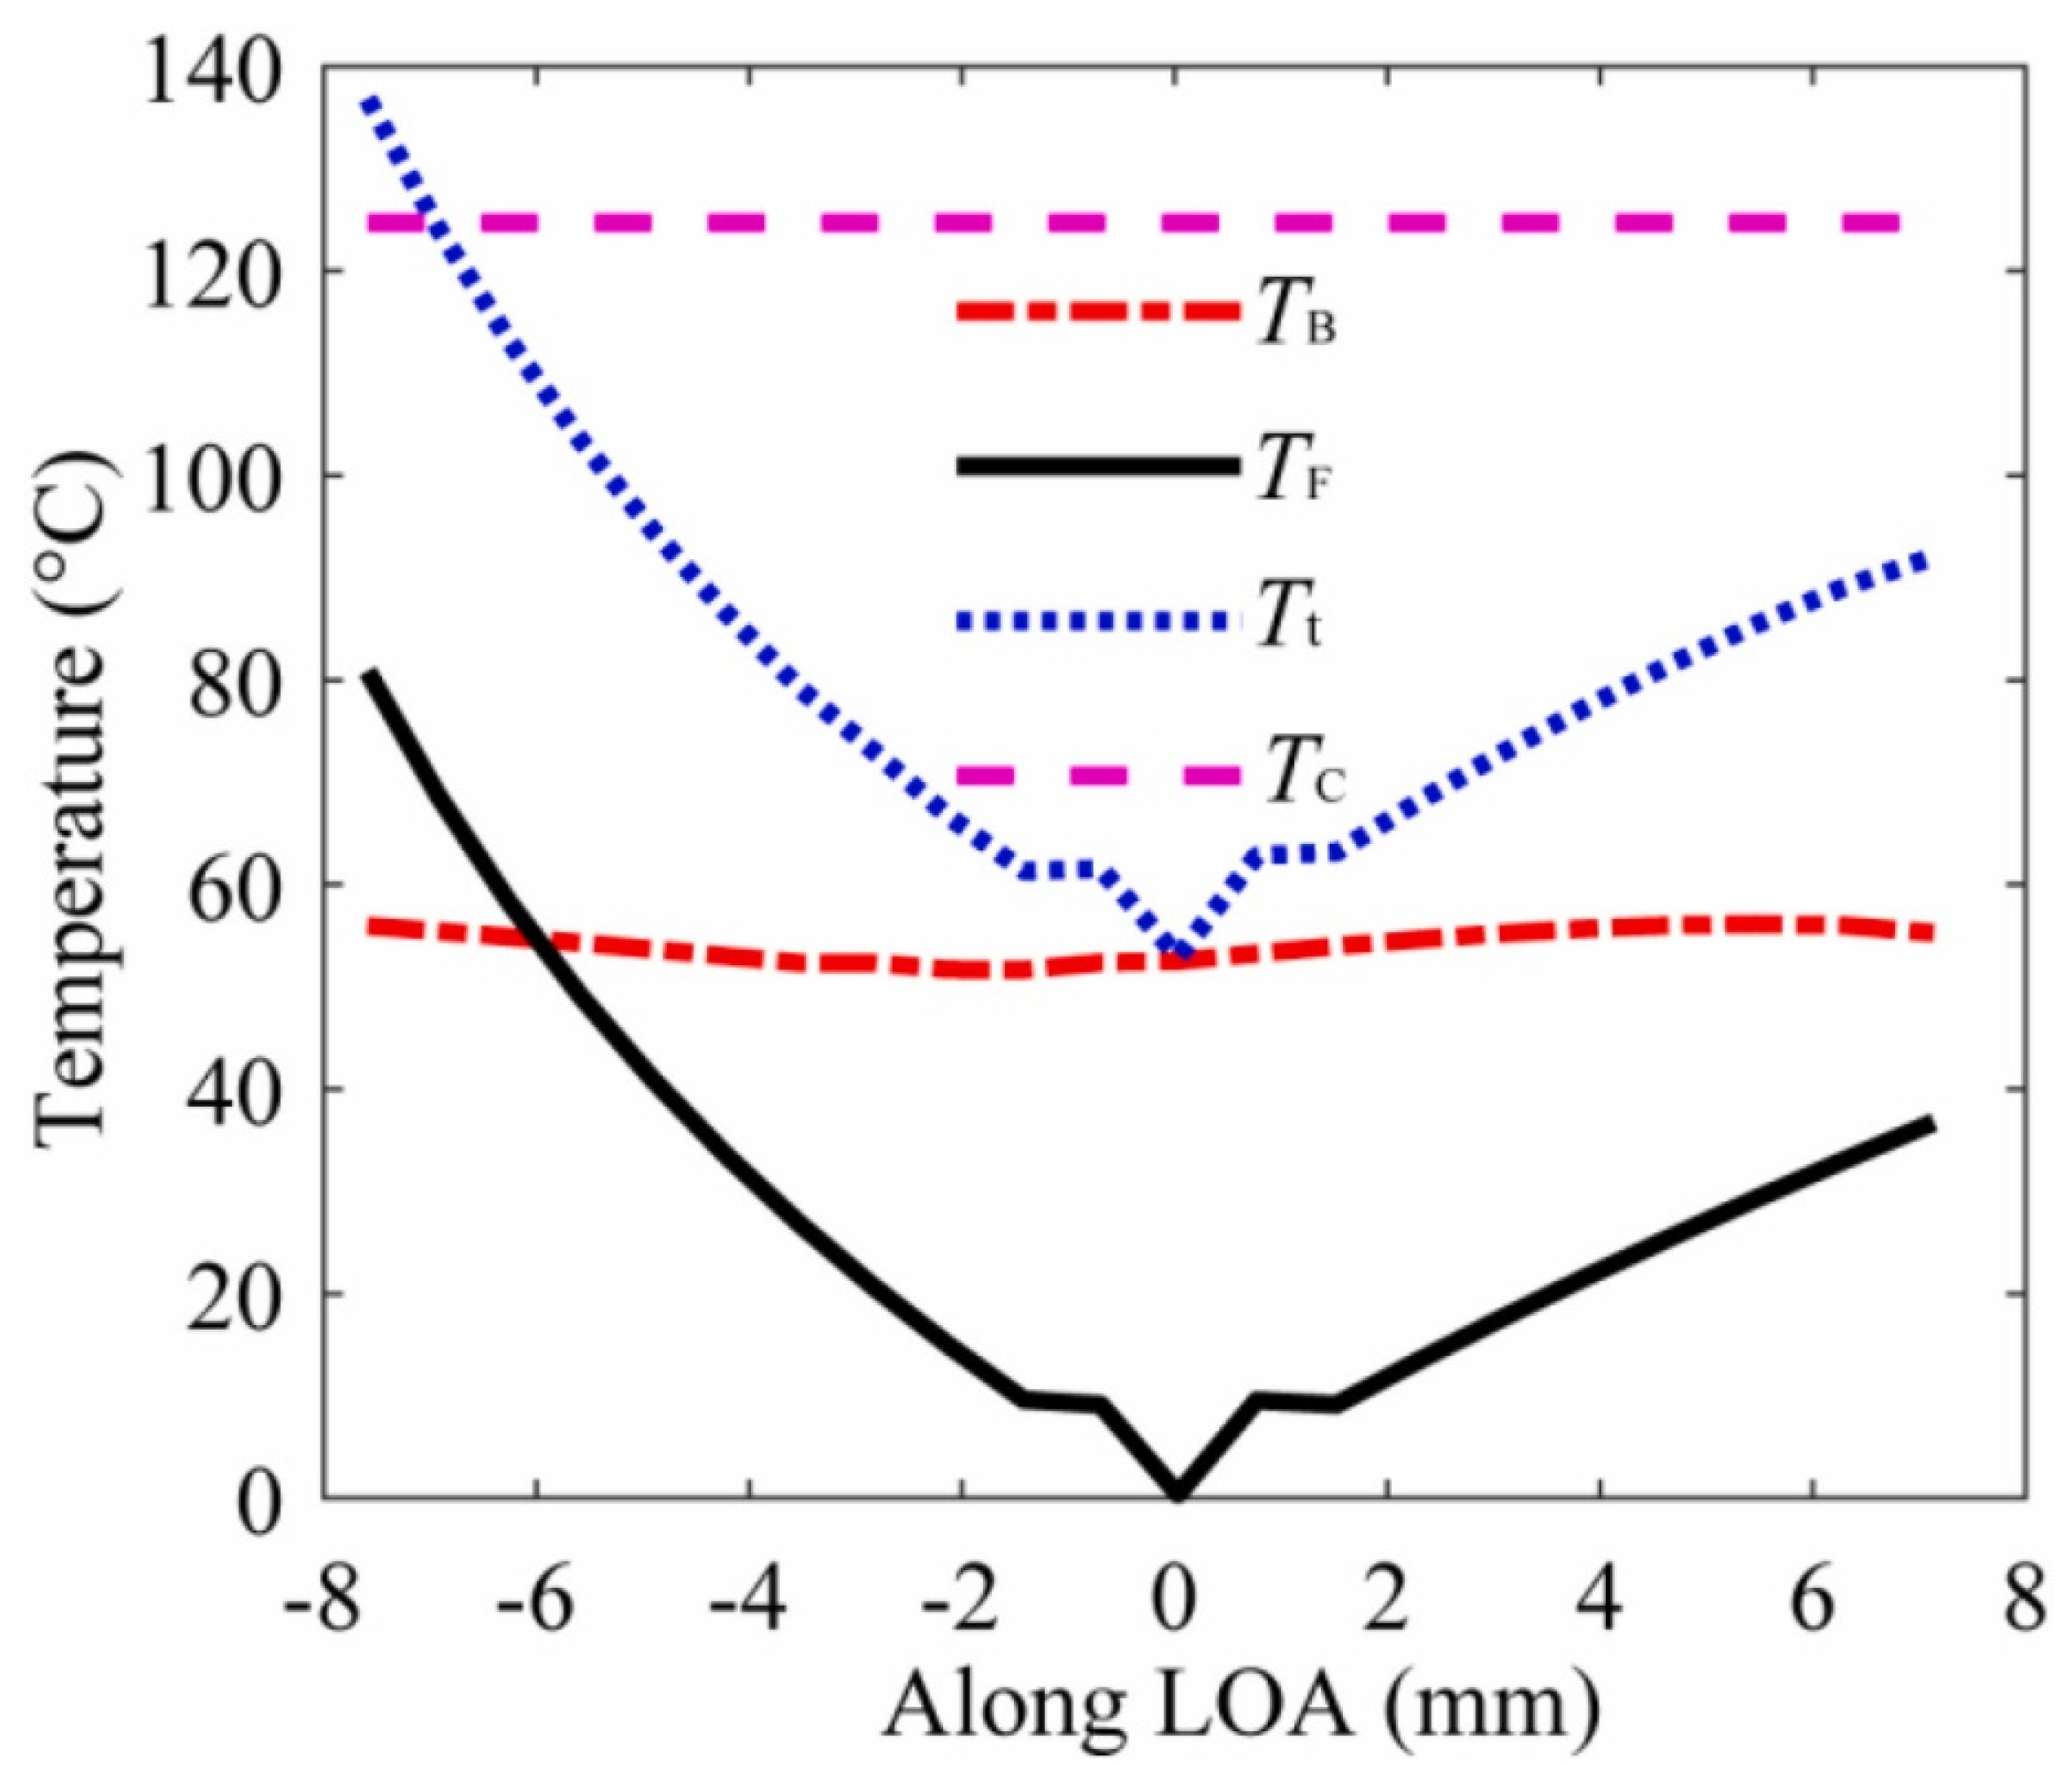
Research by C. Zhou et al. [100] developed a model to calculate gear contact temperature which is the addition of bulk temperature and flash temperature using the thermal network method. The model is validated with FEM. Figure 27 shows the changes in the bulk temperature TB, flash temperature TF, contact temperature Tt and scuffing critical temperature TC along the line of action. It is noted that scuffing would occur at the gear dedendum for the gear parameters plotted.
The effect of geometric parameters—tooth width, pressure angle and module on the contact temperature along the line of action was investigated. Contact temperature was reduced with an increase in each of the parameters. This is shown in Figure 28.
Contact temperature increased with increased with increase in operating parameters—rotational velocity and torque along the line of action as shown in Figure 29.
It is also noted that works on scuffing models using FEM or experimental models are also mainly focused on scuffing temperature, not on the dynamic responses [101,102,103,104,105,106].

4. Analytical Models with Combined Faults

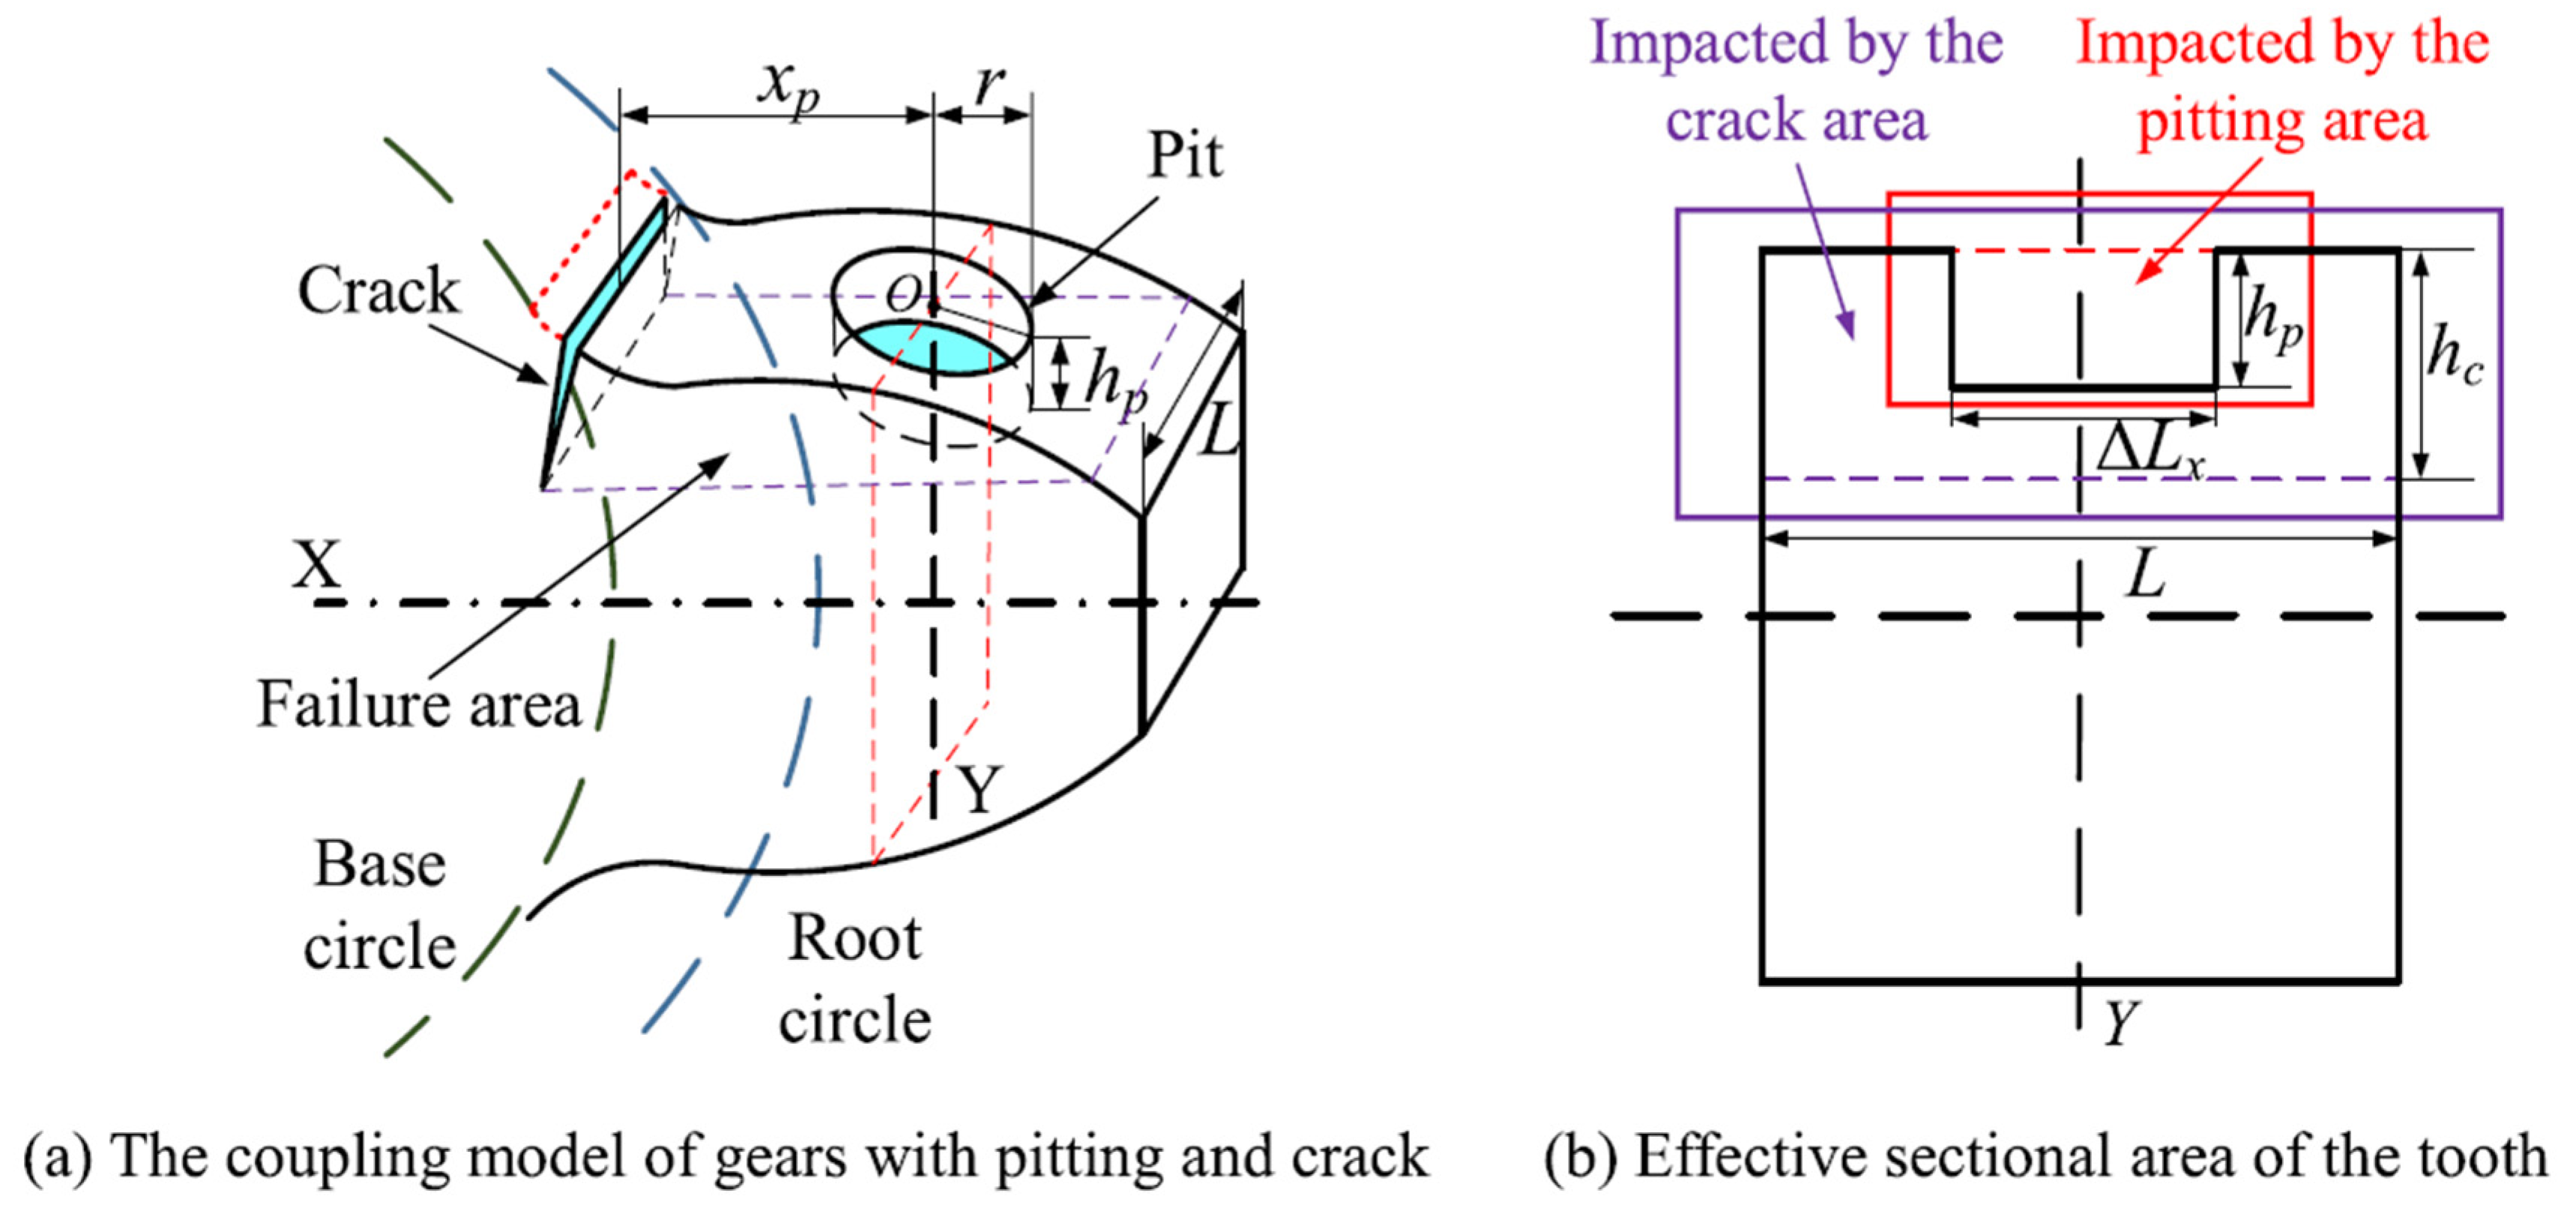
Most gear fault models study only one fault, and gears may fail from the effect of more than one fault. Analytical models that represent the dynamic responses of gears with multiple fault conditions are scarce. However, in [107], the model combined cracks and pitting faults using the cantilever beam method and is commonly available for non-gear applications [108,109,110]. The coupled fault model is shown in Figure 30.
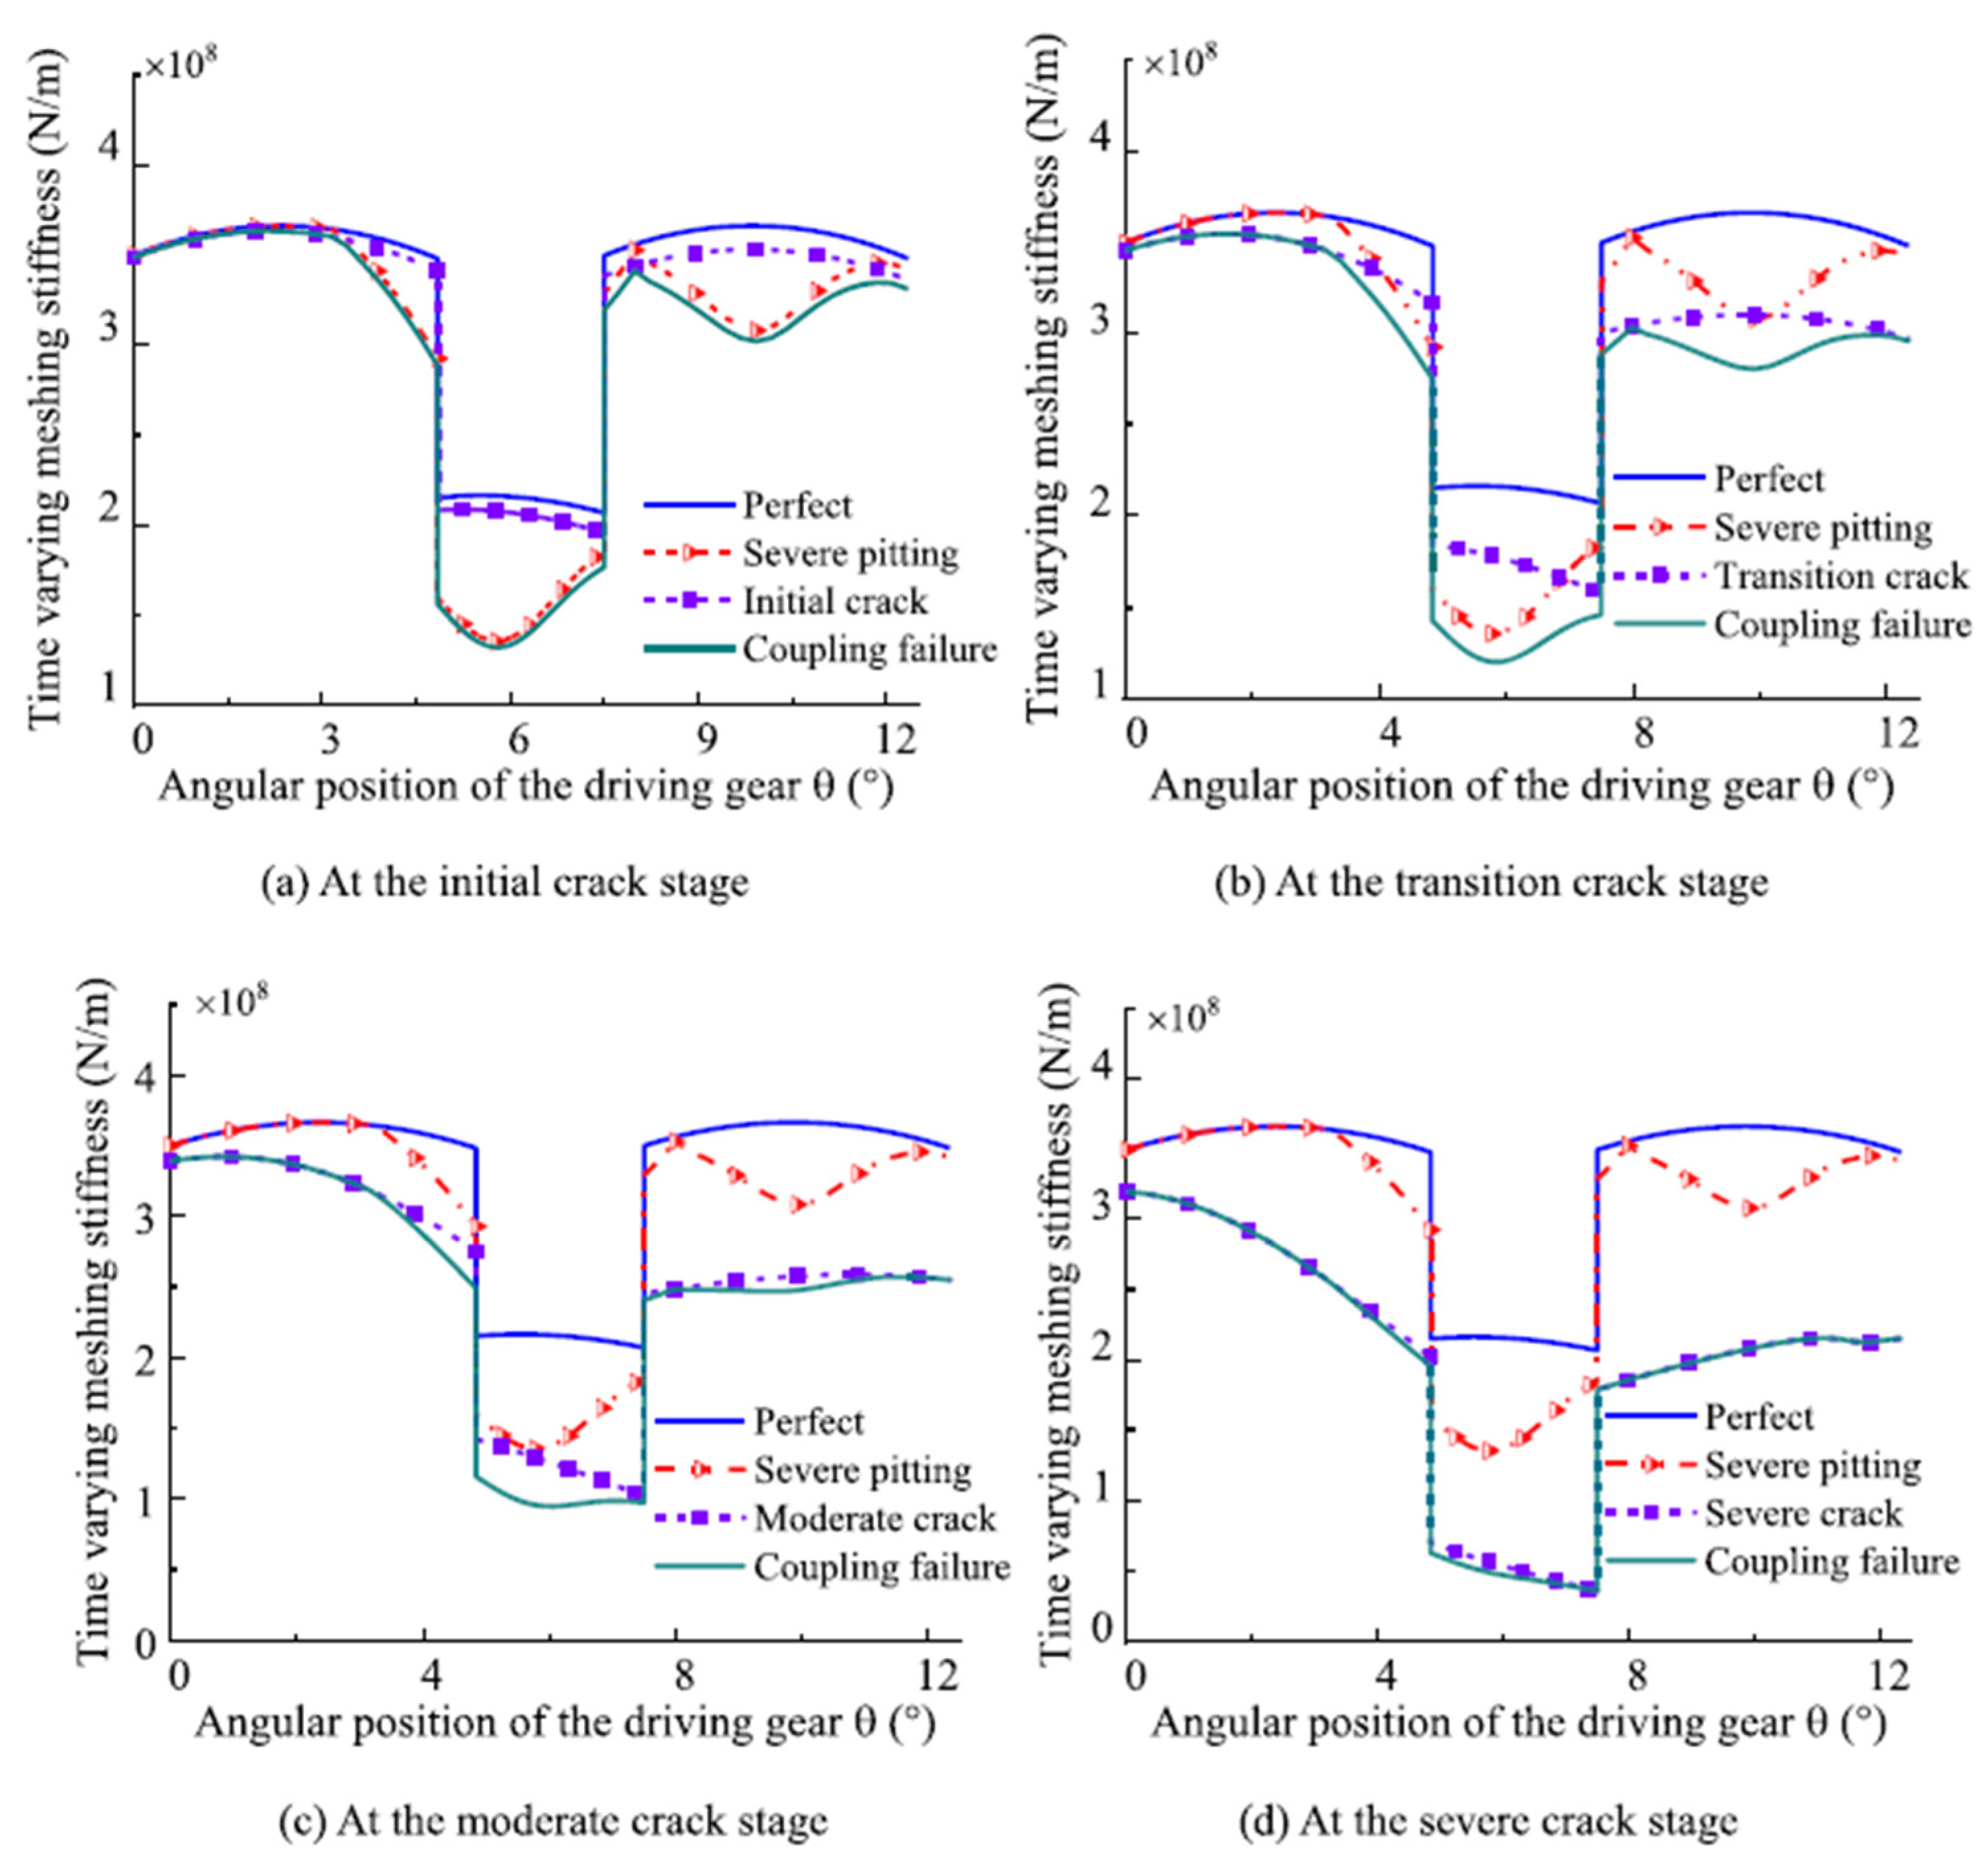
The TVMS for healthy gears was derived using the potential energy method where Hertzian energy, axial compressive energy, shear energy and bending energy were considered. A modified Hertzian stiffness which is nonlinear and described in [111] was used. The TVMS of cracked gears and pitting gears were computed and changes were noted due to the faults caused such as a decrease in the area moments of inertia, contact area, and tooth contact width as provided in Equations (19)–(21) and Equations (25) and (26). The calculations were representing gears with more than 42 teeth (where the root circle is larger than the base circle). Different crack and pitting evolution stages were considered. For a crack, there is an initial, transition, moderate and severe crack. For pitting, there is slight, medium, and severe pitting. The TVMS of severe pitting and different stages of crack in single and coupled modes are shown in Figure 31. From the diagram, severe pitting and all stages of the crack reduce the TVMS. The coupling failure TVMS is also decreased and relatively closer to the crack stage.
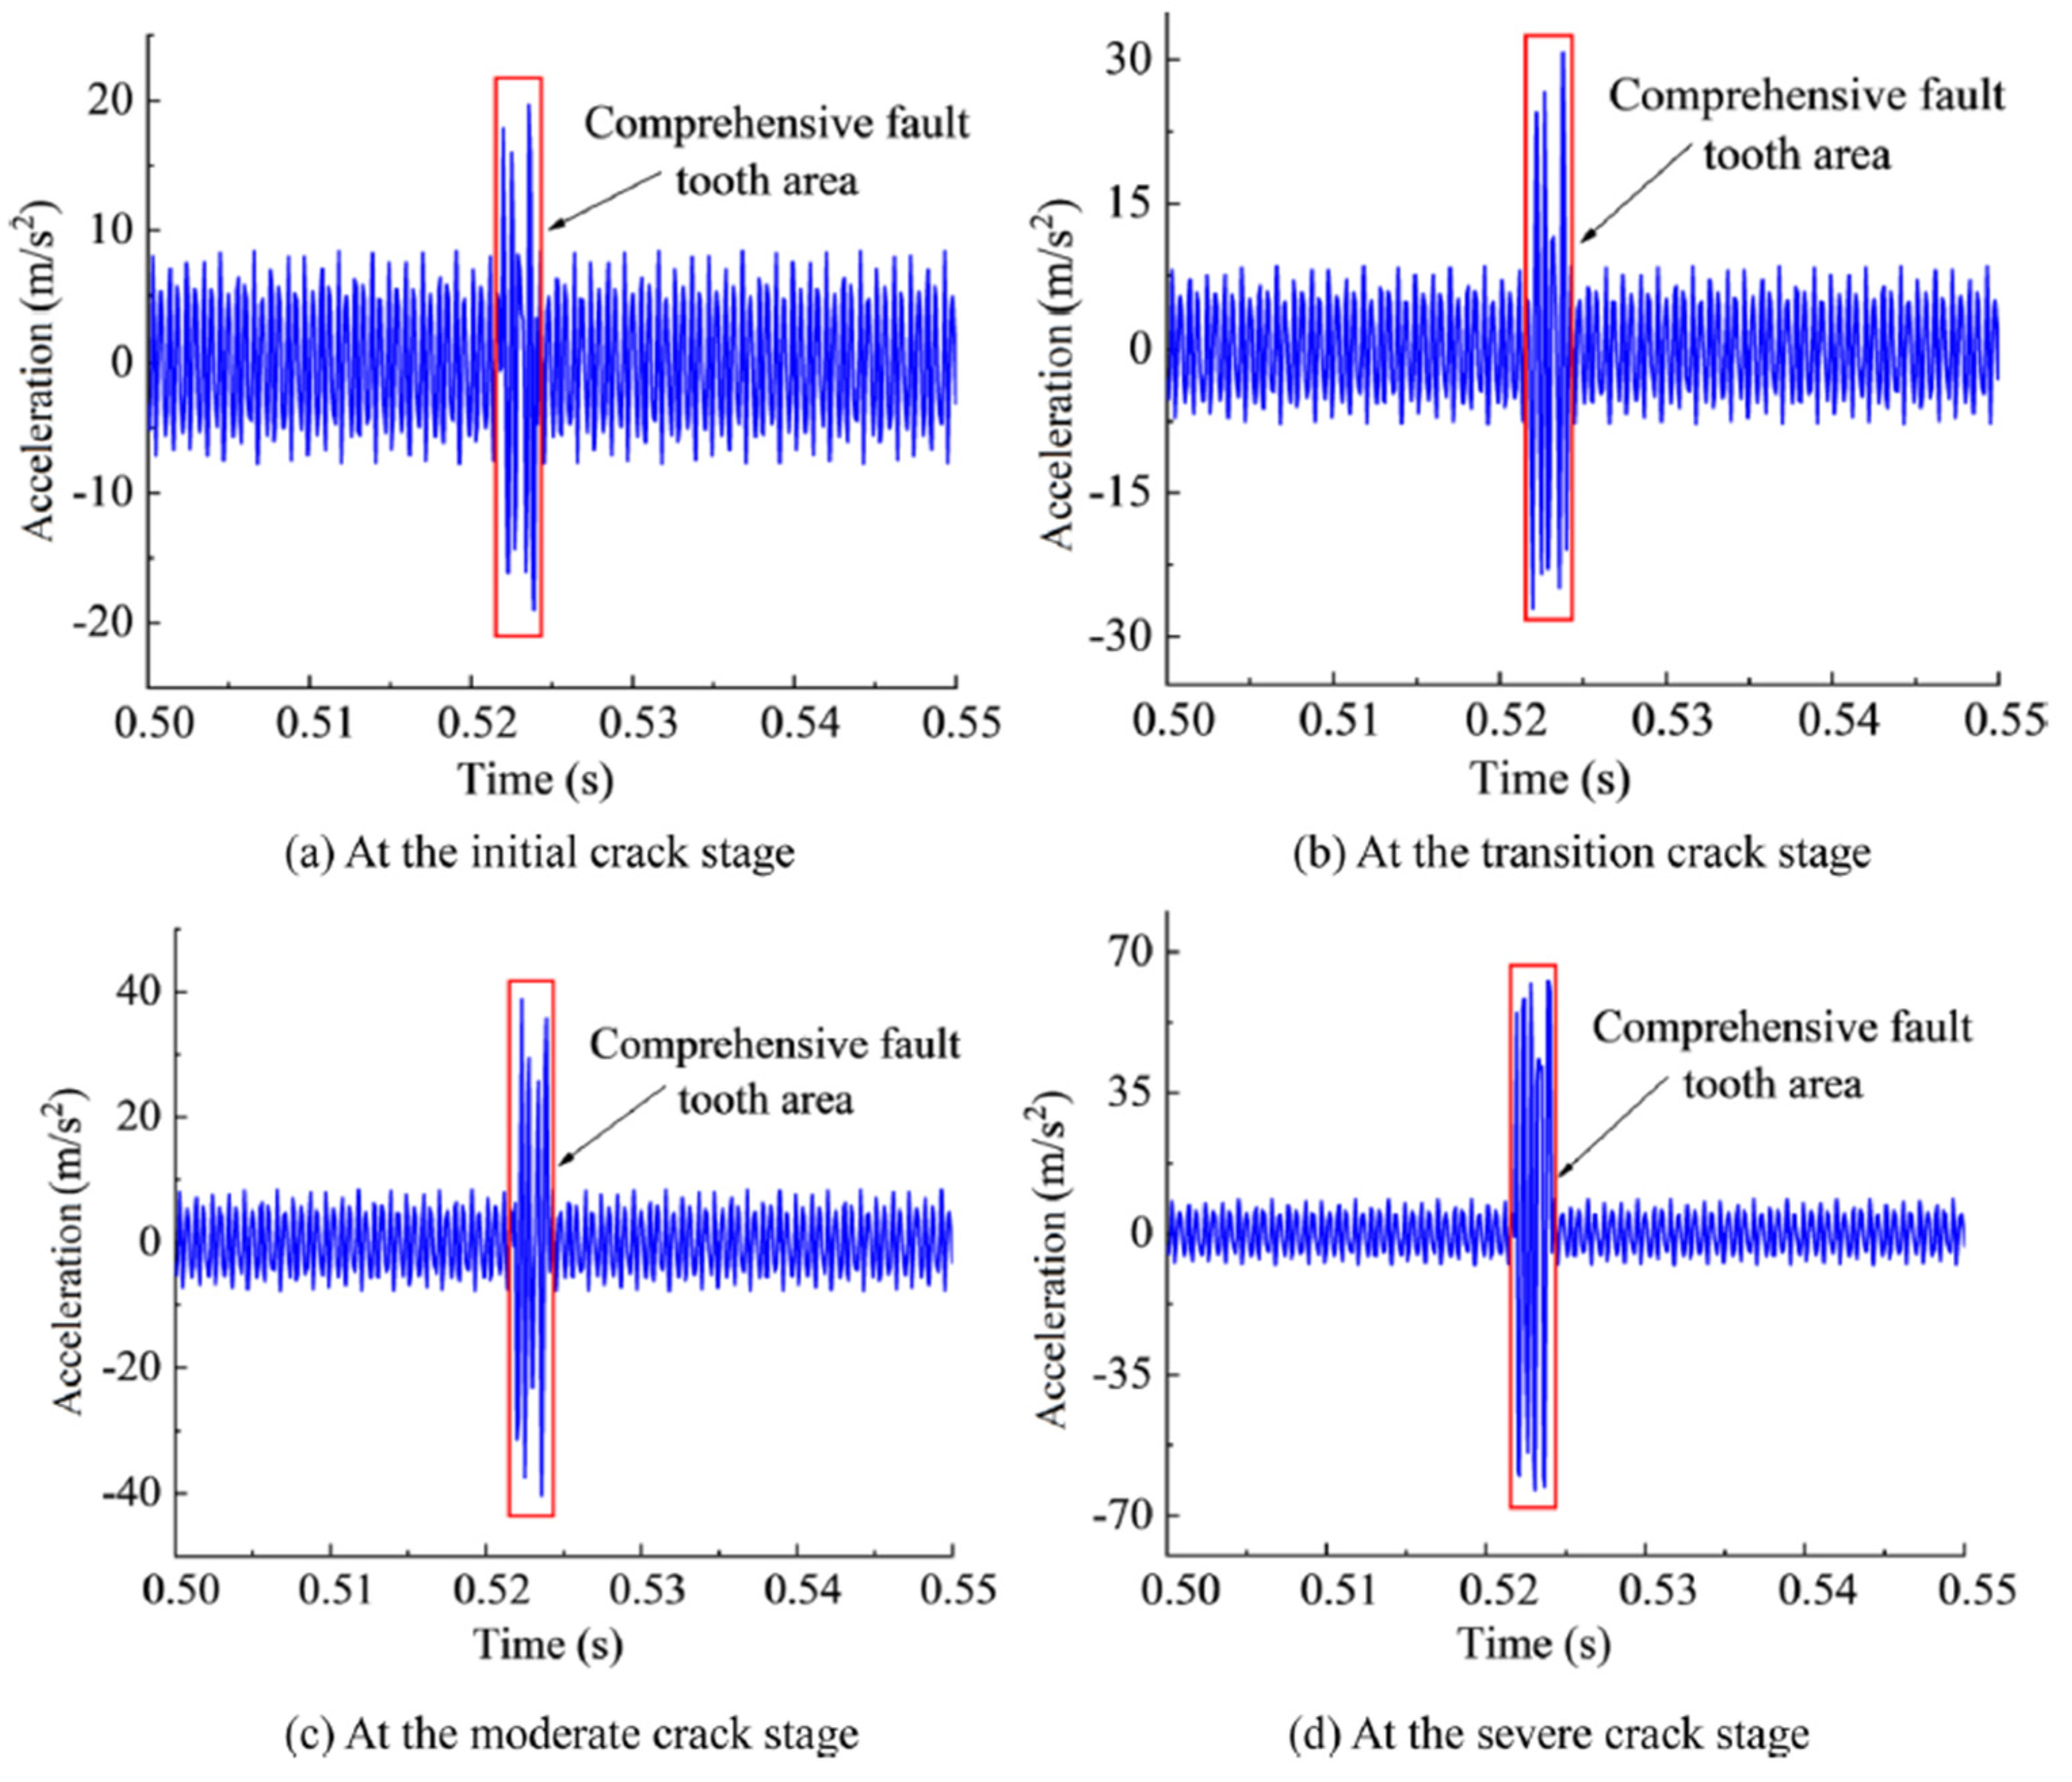
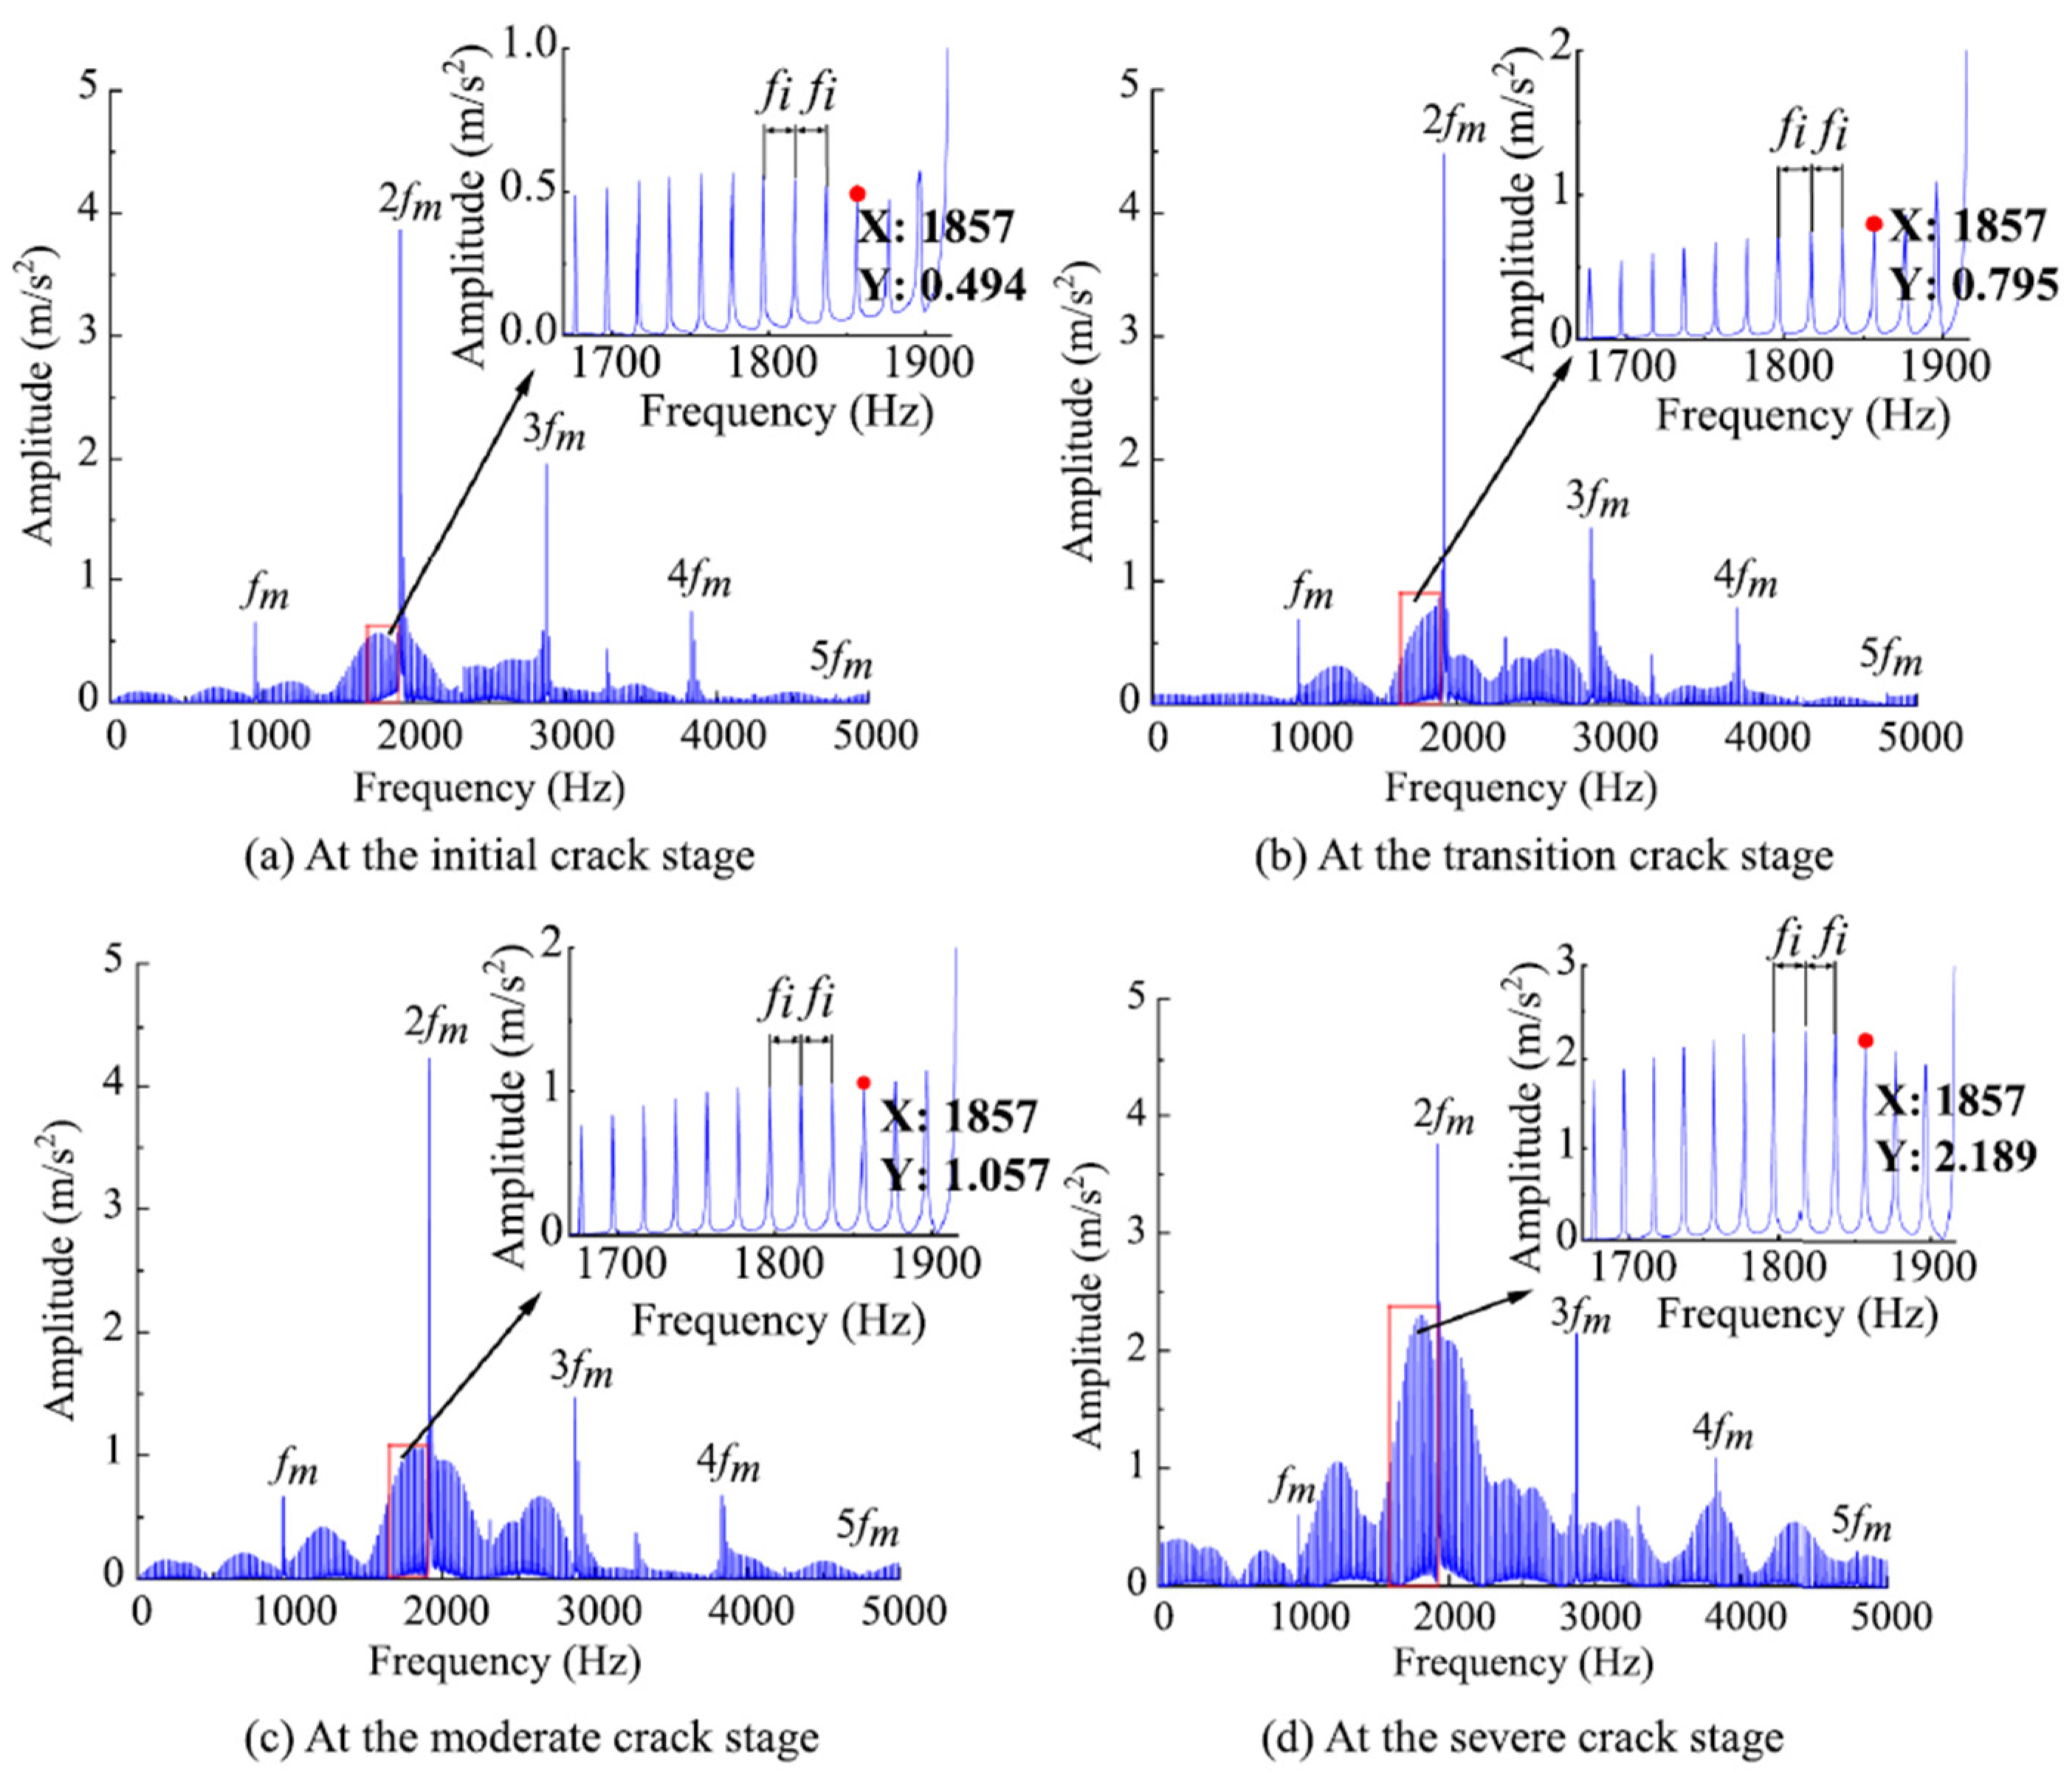
An eight-degree-of-freedom dynamic model was used to obtain the vibration signals for displacement and acceleration for the various conditions and the results were analysed. The acceleration signal in the time domain and frequency domain of severe pitting coupled with different crack stages as presented in [107] is shown in Figure 32 and Figure 33. The amplitude of the time signals around the fault region significantly increases as the fault stage increases. When the time signal is transformed to be analysed in the frequency domain, sidebands occur with the emergence of faults and increase as the fault progresses. The values for the region are marked out in red in Figure 33. X and Y values indicate an increase in the amplitude of the sidebands in the fault region.

5. Failure Models Comparison

From the descriptions given in the models for root crack, pitting, spalling and wear, a comparison of the characteristics of TVMS, time domain responses, and frequency domain responses are examined below.

5.1. Comparison of TVMS

The TVMS plots for the various fault modes show observable differences. Pitting, whether in the region of single or double engagement appears as non-uniform small drops in the TVMS. The frequency of the regular drops in TVMS indicates the level of severity of the pitting damage, that is, the higher the frequency of the irregular drops in TVMS, the higher the severity of the pitting damage. When pits of varying shapes are plotted, the results show a slight variation, indicating that the shape of the pits also affects the TVMS.
In spalling, a large drop in TVMS corresponding to the region of the spall and the shape of the spall on the tooth is noticed on the TVMS curve. This can occur in both or one of the regions of single and double engagement. The area of the region of reduction in TVMS gives an indication of the severity of the spall.
Tooth root crack reduces the TVMS in a curve. The degree of reduction in the TVMS curve is an indication of the severity of the root crack. The tooth breakage TVMS plot shows as a healthy TVMS plot with the broken region entirely removed.
In tooth root crack/breakage, pitting and spalling, the TVMS shows reduction with the fault, but the ranges of the regions of single tooth engagement and double tooth engagement remain the same as in the healthy models.
In wear, there may be a slight decrease in the TVMS, this would be uniform in the case of uniform wear. It is noted from some literature that abrasive wear may change the range of the regions of single and double-tooth engagement from the state of the corresponding healthy TVMS curve.

5.2. Comparison of Time Domain Responses

The time domain response could be the displacement, velocity, or acceleration signals. From the literature, it has been observed that the time domain signals for pitting, root crack, wear and spalling all show similar attributes. The signal represents spikes according to the number of teeth on the pinion or gear whose signal is examined. The tooth with the fault can have a higher spike depending on the severity of the fault.

5.3. Comparison of Frequency Domain Responses

Frequency response is obtained by converting the time domain signals using the fast Fourier transform. The frequency response appears as the gear mesh and its harmonics, each with side bands. The side band increases with an increase in gear fault severity for tooth crack, pitting and spalling. In wear, sidebands do not increase and the amplitude of the frequency spectrum increases with fault.

6. Key Findings and Challenges

6.1. Key Findings from Existing Literature

There are several gear fault analytical models, but they are mainly failure-specific, these models also assume the geometry of fault which is not realistic. Most literature also considers faults on a single tooth of the pinion; a few have considered multiple tooths. The response of combined faulty pinion and wheel has not been addressed.
Only one study has attempted to model coupled pitting and root crack faults. The research assumed the shape of the pit surface area to be circular rather than irregular like in actual cases. It also assumed the number of pits and regular distribution for each degree of severity instead of a random distribution noted in recent single fault models. The crack was assumed to propagate in a straight line rather than a curve. The model was validated with FEM only.
It has also been noted that the dynamic models heavily rely on the gear mesh stiffness which is also considered as a source of gear excitation. The gear mesh stiffness is time-varying and can show the regions of fault if properly calculated. To determine the mesh stiffness analytically, many researchers use the potential energy method. Determining the mesh stiffness of the combined failure mode is key to developing the analytical model for combined failure in gear.
From a preliminary assessment of the literature, the mesh stiffness for calculations of surface failures like pitting and spalling, and for bending failures like tooth crack and breakage require similar inputs. The parameters that determine the change in gear mesh stiffness for the faulty gears in these cases include the change in length, area, and area moment of inertia of the meshing surface. This presents a possibility of defining a combined faulty region.
However, surface failure like abrasive wear and likely adhesive wear provides a different scenario in which the wear causes a new meshing plane as it evolves, as wear distorts the original involute profile of gears. In the review process, it was noticed that there was a certain diversity in results obtained in wear models from different researchers which makes it quite uncertain which set of models are closer to the real situation. Some models established that the change in TVMS in wear is negligible, and the static transmission error is a sensitive parameter to determine the dynamic response. Researchers indicate a slight decrease in the double pair engagement region. Some other researchers note an increase in the range of the TVMS and a slight decrease in the amplitude.
For adhesive wear, models that can provide dynamic response were not found. However, there are models available for determining the scuffing temperature of gear pairs.

6.2. Current Challenges

The analytical models have helped to analyze the dynamic response of gears with single and coupled pitting-crack faults, but these do not solve the requirements of health monitoring completely. These may be due to the following.

6.2.1. The Dynamics of Fault Initiation and Progression

The dynamics of fault initiation and propagation are complex depending on too many factors and cannot be predicted analytically. Failures may occur due to material imperfection, localised stress due to loading, surface irregularities, wrong installation, and a lot more. These causes may be peculiar to each gear system and a direct formulation of when and where a fault erupts may not be clear to predict. Analytical modelling is currently focused on detecting after the fault has occurred and noting the progress of the fault. Noting the fault at the earliest possible stage is one of the key requirements of analytical modelling as predicting the fault is too complex.

6.2.2. Assumptions in Fault Geometry

Analytical models mainly assume fault shapes for pitting and spalls. The crack path for the root crack is also assumed. It has been observed from the work of several researchers that the shape of the fault affects the TVMS plot. This would, in turn, affect the dynamic response of the gear system. Researchers have used FEM to model irregular shapes of spalls and pits, but this has not been achieved analytically. New efforts in gear fault analytical modelling should focus on modelling irregular fault shapes.

6.2.3. Fault Location

Analytical models mainly consider faults on a single tooth of the pinion, a few researchers have considered multiple teeth of the pinion. However, faults also occur on the wheel. The responses from a system with faulty pinion and wheel also need to be examined. Studies to help distinguish if the fault observed is from the pinion or wheel or both will provide good insight for health monitoring.

6.2.4. Reliability of Existing Models for Health Monitoring

As available models are mainly fault-specific, they may not be able to provide dynamic responses that can relate to real gears undergoing multiple fault modes. As seen in case studies, [4,9,10,11,12] gears in operations may undergo more than one fault mode. To aid the reliability of models, developing models that can combine multiple faults is essential. From the review of the literature of different failure models, determining the time-varying mesh stiffness correctly is key to developing an accurate dynamic model. A robust analytical model for gears that would be able to determine the TVMS of any single or multiple faults in the pinion or gear as a single fault may not be accurately modelling real gear conditions. To achieve this, a qualitative study of how the different fault changes the gear parameters required to calculate the TVMS is essential. How these parameters interface in combined fault conditions, and how the TVMS and dynamic response look like in these conditions need to be studied.

6.3. Identified Research Needs

From this study, a few research needs in gear analytical modelling have been identified.
  • Analytical modelling methods that can model the irregular shapes of gear faults are required to be able the provide realistic results. Currently, most models assume regular shapes for gear faults.
  • Mathematical models to obtain responses for gears undergoing scuffing are not available. Research to develop these models by FEM or analytically will provide valuable information for gear health monitoring.
  • Further investigations on the reliability of the TVMS for obtaining dynamic responses for abrasive wear need to be conducted. Current information has conflicting results on how wear affects the TVMS of a gear system.
  • Gear fault models majorly provide responses where there is a fault on a single tooth on the pinion, a few works have been conducted on multiple teeth of the pinion. Responses for gears with faults on multiple teeth of the pinion and wheel will provide useful insight for gear health monitoring.
  • Developing models that can cater to multiple fault conditions would help in estimating the remaining useful life of gears undergoing similar conditions in actual gear operations.

7. Conclusions

This study has reviewed analytical models for spur gears undergoing common faults like tooth root cracks, pitting, spalling, and wear. The mathematical formulations for the healthy gear models were described, and the changes required to obtain the fault models for pitting, spalling, root crack and abrasive wear were investigated. Key findings from the literature and current challenges were observed.
The review’s aim is to observe the relationship between these faults and to establish the possibilities of developing a multiple-fault analytical model. The following key findings were noted:
  • The correct evaluation of the fault state time-varying mesh stiffness and in some cases, the transmission error is the key requirement to providing the dynamic response required.
  • The study has also shown that the geometry and location of the fault are the main inputs to determining the correct time-varying mesh stiffness.
  • The dynamic models for pitting, spalling and tooth root crack share very similar inputs and this indicates a high possibility for developing a combined model for these faults.
  • The determination of TVMS or static transmission error for the case of scuffing needs to be developed as models providing a dynamic response for scuffing are not readily available.
  • Developing multiple fault dynamic models to include abrasive wear and adhesive wear/scuffing may require additional evaluation like determining wear depth or a new meshing plane.
  • Current works in gear analytical modelling are mainly single-fault models. This review recommends that efforts to combine multiple failure modes in gear analytical modelling be focused on in future studies. This would help provide accurate dynamic responses for a wide range of fault conditions that are obtainable for gears in operations. It would furthermore guarantee progress in gear health monitoring.

Author Contributions

Conceptualisation, A.O. and M.K.; methodology, A.O.; writing—original draft preparation, A.O.; writing—review and editing, M.K.; supervision, M.K. All authors have read and agreed to the published version of the manuscript.

Funding

Aselimhe Gabrielle Oreavbiere thanks the Petroleum Technology Development Fund (PTDF), Nigeria for award of scholarship for PhD research with reference number: PTDF/ED/OSS/PHD/AGO/2038/22 and the University of Benin, Nigeria.

Data Availability Statement

Not applicable.

Conflicts of Interest

The authors declare no conflicts of interest.

References

  1. Khan, M.A.; Shahid, M.A.; Ahmed, S.A.; Khan, S.Z.; Khan, K.A.; Ali, S.A.; Tariq, M. Gear misalignment diagnosis using statistical features of vibration and airborne sound spectrums. Measurement 2019, 145, 419–435. [Google Scholar] [CrossRef]
  2. Kishore, K.; Sharma, A.; Mukhopadhyay, G. Failure Analysis of a Gearbox of a Conveyor Belt. J. Fail. Anal. Prev. 2020, 20, 1237–1243. [Google Scholar] [CrossRef]
  3. Feng, W.; Feng, Z.; Mao, L. Failure analysis of a secondary driving helical gear in transmission of electric vehicle. Eng. Fail. Anal. 2020, 117, 104934. [Google Scholar] [CrossRef]
  4. Parey, A.; Jain, N.K.; Koria, S.C. Failure analysis of air cooled condenser gearbox. Case Stud. Eng. Fail. Anal. 2014, 2, 150–156. [Google Scholar] [CrossRef]
  5. Manda, P.; Singh, S.; Singh, A.K. Failure Analysis of Cooler Fan Drive Gear System of Helicopter. Mater. Today Proc. 2018, 5, 5254–5261. [Google Scholar] [CrossRef]
  6. Ghosh, D.; Mondal, A.; Hussain, N.; De, S.K.; Ray, S.; Subramanian, C. Failure analysis of helical gear pinion. Mater. Today Proc. 2022, 66, 3714–3717. [Google Scholar] [CrossRef]
  7. Netpu, S.; Srichandr, P. Failure of a helical gear in a power plant. Eng. Fail. Anal. 2013, 32, 81–90. [Google Scholar] [CrossRef]
  8. Shantiswaroop, P.M.; Savanur, S.A.; Sahoo, B.; Beura, C. Fatigue Failure of a Spiral Bevel Gear in a Typical Low-Bypass Turbofan Engine. In Structural Integrity Assessment; Lecture Notes in Mechanical Engineering; Springer: Singapore, 2020; pp. 639–649. [Google Scholar] [CrossRef]
  9. Salawu, E.Y.; Ajayi, O.O.; Inegbenebor, A.O. Forensic Investigation of a Failed Intermediate Starwheel Spur Gear Tooth in a Filler Machine. Procedia Manuf. 2019, 35, 97–102. [Google Scholar] [CrossRef]
  10. Rajinikanth, V.; Soni, M.K.; Mahato, B.; Rao, M.A. Microstructural investigation of rolling contact fatigue (RCF) on a failed planetary gear of a windmill gearbox. Eng. Fail. Anal. 2021, 121, 105167. [Google Scholar] [CrossRef]
  11. Wang, Q.; Zhu, Y.; Zhang, Z.; Fu, C.; Dong, C.; Su, H. Partial Load: A Key Factor Resulting in the Failure of Gear in the Wind Turbine Gearbox. J. Fail. Anal. Prev. 2016, 16, 109–122. [Google Scholar] [CrossRef]
  12. Rajinikanth, V.; Soni, M.K.; Mahato, B.; Rao, M.A. Study of microstructural degradation of a failed pinion gear at a cement plant. Eng. Fail. Anal. 2019, 95, 117–126. [Google Scholar] [CrossRef]
  13. Jonck, J.; Slabbert, G.A. Analysis of a failed spur gear from a Vibro-Hammer. Eng. Fail. Anal. 2013, 34, 511–518. [Google Scholar] [CrossRef]
  14. Mohammed, O.D.; Rantatalo, M. Gear fault models and dynamics-based modelling for gear fault detection—A review. Eng. Fail. Anal. 2020, 117, 104798. [Google Scholar] [CrossRef]
  15. Khan, M.A.; Cooper, D.; Starr, A. BS-ISO helical gear fatigue life estimation and wear quantitative feature analysis. Strain 2009, 45, 358–363. [Google Scholar] [CrossRef]
  16. Lias, M.R.; Rao, T.V.V.L.N.; Awang, M.; Khan, M.A. The stress distribution of gear tooth due to axial misalignment condition. J. Appl. Sci. 2012, 12, 2404–2410. [Google Scholar] [CrossRef]
  17. Fernandes, P.J.L. Tooth bending fatigue failures in gears. Eng. Fail. Anal. 1996, 3, 219–225. [Google Scholar] [CrossRef]
  18. Bonaiti, L.; Bayoumi, A.B.M.; Concli, F.; Rosa, F.; Gorla, C. Gear root bending strength: A comparison between single tooth bending fatigue tests and meshing gears. J. Mech. Des. 2021, 143, 103402. [Google Scholar] [CrossRef]
  19. Onsy, A.; Bicker, R.; Shaw, B. Predictive Health Monitoring of Gear Surface Fatigue Failure Using Model-Based Parametric Method Algorithms; An Experimental Validation. SAE Int. J. Aerosp. 2013, 6, 1–7. [Google Scholar] [CrossRef]
  20. Loutas, T.H.; Roulias, D.; Pauly, E.; Kostopoulos, V. The combined use of vibration, acoustic emission and oil debris on-line monitoring towards a more effective condition monitoring of rotating machinery. Mech. Syst. Signal Process. 2011, 25, 1339–1352. [Google Scholar] [CrossRef]
  21. Jamadar, I.M.; Nithin, R.; Nagashree, S.; Prasad, V.P.; Preetham, M.; Samal, P.K.; Singh, S. Spur Gear Fault Detection Using Design of Experiments and Support Vector Machine (SVM) Algorithm. J. Fail. Anal. Prev. 2023, 23, 2014–2028. [Google Scholar] [CrossRef]
  22. Ozturk, H.; Yesilyurt, I.; Sabuncu, M. Investigation of effectiveness of some vibration-based techniques in early detection of real-time fatigue failure in gears. Shock Vib. 2010, 17, 741–757. [Google Scholar] [CrossRef]
  23. Khan, M.A.; Starr, A.G. Theoretical and Experimental Working Life Comparison for a Helical Gear under Linear Pitting Failure. Appl. Mech. Mater. 2007, 7–8, 95–100. [Google Scholar] [CrossRef]
  24. Fernandes, P.J.L.; McDuling, C. Surface contact fatigue failures in gears. Eng. Fail. Anal. 1997, 4, 99–107. [Google Scholar] [CrossRef]
  25. Weibring, M.; Gondecki, L.; Tenberge, P. Simulation of fatigue failure on tooth flanks in consideration of pitting initiation and growth. Tribol. Int. 2019, 131, 299–307. [Google Scholar] [CrossRef]
  26. Ding, Y.; Rieger, N.F. Spalling formation mechanism for gears. Wear 2003, 254, 1307–1317. [Google Scholar] [CrossRef]
  27. Wu, X.; Luo, Y.; Li, Q.; Shi, J. A new analytical model for evaluating the time-varying mesh stiffness of helical gears in healthy and spalling cases. Eng. Fail. Anal. 2022, 131, 105842. [Google Scholar] [CrossRef]
  28. Kumar, A.; Gandhi, C.P.; Zhou, Y.; Kumar, R.; Xiang, J. Latest developments in gear defect diagnosis and prognosis: A review. Meas. J. Int. Meas. Confed. 2020, 158, 107735. [Google Scholar] [CrossRef]
  29. Podgornik, B. Adhesive Wear Failures. In Failure Analysis and Prevention; ASM International: Almere, The Netherlands, 2020; pp. 1–20. [Google Scholar] [CrossRef]
  30. Ognjanovic, M. Progressive Gear Teeth Wear and Failure Probability Modelling. Tribol. Ind. 2004, 26, 44–49. [Google Scholar]
  31. Feng, K.; Ji, J.C.; Ni, Q.; Beer, M. A review of vibration-based gear wear monitoring and prediction techniques. Mech. Syst. Signal Process. 2023, 182, 109605. [Google Scholar] [CrossRef]
  32. Goswami, P.; Nandan Rai, R. A systematic review on failure modes and proposed methodology to artificially seed faults for promoting PHM studies in laboratory environment for an industrial gearbox. Eng. Fail. Anal. 2023, 146, 107076. [Google Scholar] [CrossRef]
  33. Cubillo, A.; Perinpanayagam, S.; Esperon-Miguez, M. A review of physics-based models in prognostics: Application to gears and bearings of rotating machinery. In Advances in Mechanical Engineering; SAGE Publications Inc.: Thousand Oaks, CA, USA, 2016; Volume 8. [Google Scholar] [CrossRef]
  34. Kundu, P.; Darpe, A.K.; Kulkarni, M.S. A review on diagnostic and prognostic approaches for gears. In Structural Health Monitoring; SAGE Publications Ltd.: Thousand Oaks, CA, USA, 2021; Volume 20, pp. 2853–2893. [Google Scholar] [CrossRef]
  35. Liang, X.; Zuo, M.J.; Feng, Z. Dynamic modeling of gearbox faults: A review. Mech. Syst. Signal Process. 2018, 98, 852–876. [Google Scholar] [CrossRef]
  36. Mohammed, O.D.; Rantatalo, M.; Aidanpää, J.O.; Kumar, U. Vibration signal analysis for gear fault diagnosis with various crack progression scenarios. Mech. Syst. Signal Process. 2013, 41, 176–195. [Google Scholar] [CrossRef]
  37. Marafona, J.D.M.; Marques, P.M.T.; Martins, R.C.; Seabra, J.H.O. Mesh stiffness models for cylindrical gears: A detailed review. Mech. Mach. Theory 2021, 166, 104472. [Google Scholar] [CrossRef]
  38. Chen, Z.; Shao, Y. Dynamic simulation of spur gear with tooth root crack propagating along tooth width and crack depth. Eng. Fail. Anal. 2011, 18, 2149–2164. [Google Scholar] [CrossRef]
  39. Mohammed, O.D.; Rantatalo, M.; Aidanpää, J.O. Dynamic modelling of a one-stage spur gear system and vibration-based tooth crack detection analysis. Mech. Syst. Signal Process. 2015, 54–55, 293–305. [Google Scholar] [CrossRef]
  40. Kumar, V.; Kumar, A.; Kumar, S.; Sarangi, S. TVMS calculation and dynamic analysis of carburized spur gear pair. Mech. Syst. Signal Process. 2022, 166, 108436. [Google Scholar] [CrossRef]
  41. Luo, Y.; Baddour, N.; Liang, M. Dynamical modeling and experimental validation for tooth pitting and spalling in spur gears. Mech. Syst. Signal Process. 2019, 119, 155–181. [Google Scholar] [CrossRef]
  42. Saxena, A.; Parey, A.; Chouksey, M. Time varying mesh stiffness calculation of spur gear pair considering sliding friction and spalling defects. Eng. Fail. Anal. 2016, 70, 200–211. [Google Scholar] [CrossRef]
  43. Dai, H.; Long, X.; Chen, F.; Xun, C. An improved analytical model for gear mesh stiffness calculation. Mech. Mach. Theory 2021, 159, 104262. [Google Scholar] [CrossRef]
  44. Lei, Y.; Liu, Z.; Wang, D.; Yang, X.; Liu, H.; Lin, J. A probability distribution model of tooth pits for evaluating time-varying mesh stiffness of pitting gears. Mech. Syst. Signal Process. 2018, 106, 355–366. [Google Scholar] [CrossRef]
  45. Liang, X.H.; Liu, Z.L.; Pan, J.; Zuo, M.J. Spur Gear Tooth Pitting Propagation Assessment Using Model-based Analysis. Chin. J. Mech. Eng. (Engl. Ed.) 2017, 30, 1369–1382. [Google Scholar] [CrossRef]
  46. Liang, X.; Zhang, H.; Liu, L.; Zuo, M.J. The influence of tooth pitting on the mesh stiffness of a pair of external spur gears. Mech. Mach. Theory 2016, 106, 1–15. [Google Scholar] [CrossRef]
  47. Yakeu Happi, K.H.; Tchomeni Kouejou, B.X.; Anyika Alugongo, A. Experimental study and comparative analysis of pitting fault in spur gear system. J. Vibroengi. 2023, 25, 1480–1501. [Google Scholar] [CrossRef]
  48. Liang, X.; Zuo, M.J.; Feng, Z.; Liu, L. A mesh stiffness evaluation model to reflect tooth pitting growth of a pair of external spur gears. In Proceedings of the 2016 Prognostics and System Health Management Conference, PHM-Chengdu 2016, Chengdu, China, 19–21 October 2016; Institute of Electrical and Electronics Engineers Inc.: Piscataway, NJ, USA, 2017. [Google Scholar] [CrossRef]
  49. Qu, Y.; Zhang, H.; Hong, L.; Tan, Y.; Zhou, Z. Dynamic Modeling and Fault Feature Analysis of Pitted Gear System. In Proceedings of the 2018 IEEE International Conference on Prognostics and Health Management, ICPHM 2018, Seattle, WA, USA, 11–13 June 2018; Institute of Electrical and Electronics Engineers Inc.: Piscataway, NJ, USA, 2018. [Google Scholar] [CrossRef]
  50. Liang, X.; Pan, J.; Liu, Z.; Zuo, M.J. Dynamic Modeling of Gear Tooth Pitting Propagation to Neighbouring and Mating Teeth; Dynamic Modeling of Gear Tooth Pitting Propagation to Neighbouring and Mating Teeth. In Proceedings of the 2018 IEEE International Conference on Sensing, Diagnostics, Prognostics, and Control, Xi’an, China, 15–17 August 2018. [Google Scholar] [CrossRef]
  51. Liu, J.; Wang, C.; Wu, W. Research on Meshing Stiffness and Vibration Response of Pitting Fault Gears with Different Degrees. Int. J. Rotating Mach. 2020, 2020, 4176430. [Google Scholar] [CrossRef]
  52. Meng, Z.; Wang, F.; Shi, G. A novel evolution model of pitting failure and effect on time -varying meshing stiffness of spur gears. Eng. Fail. Anal. 2021, 120, 105068. [Google Scholar] [CrossRef]
  53. Hou, J.; Yang, S.; Li, Q.; Liu, Y. Effect of a Novel Tooth Pitting Model on Mesh Stiffness and Vibration Response of Spur Gears. Mathematics 2022, 10, 471. [Google Scholar] [CrossRef]
  54. Liu, W.; Zhu, R.; Zhou, W.; Shang, Y. Probability distribution model of gear time-varying mesh stiffness with random pitting of tooth surface. Eng. Fail. Anal. 2021, 130, 105782. [Google Scholar] [CrossRef]
  55. Chen, T.; Wang, Y.; Chen, Z. A novel distribution model of multiple teeth pits for evaluating time-varying mesh stiffness of external spur gears. Mech. Syst. Signal Process. 2019, 129, 479–501. [Google Scholar] [CrossRef]
  56. Meng, F.; Xia, H.; Zhang, X.; Wang, J. A new tooth pitting modeling method based on matrix equation for evaluating time-varying mesh stiffness. Eng. Fail. Anal. 2022, 142, 106799. [Google Scholar] [CrossRef]
  57. El Yousfi, B.; Soualhi, A.; Medjaher, K.; Guillet, F. New approach for gear mesh stiffness evaluation of spur gears with surface defects. Eng. Fail. Anal. 2020, 116, 104740. [Google Scholar] [CrossRef]
  58. Ma, R.; Chen, Y.; Cao, Q. Research on dynamics and fault mechanism of spur gear pair with spalling defect. J. Sound Vib. 2012, 331, 2097–2109. [Google Scholar] [CrossRef]
  59. Wan, Z.; Zheng, J.; Li, J.; Man, Z. Fault feature analysis of gear tooth spalling based on dynamic simulation and experiments. Materials 2021, 14, 6053. [Google Scholar] [CrossRef] [PubMed]
  60. Luo, W.; Qiao, B.; Shen, Z.; Yang, Z.; Cao, H.; Chen, X. Investigation on the influence of spalling defects on the dynamic performance of planetary gear sets with sliding friction. Tribol. Int. 2021, 154, 106639. [Google Scholar] [CrossRef]
  61. Xiang, L.; An, C.; Zhang, Y.; Hu, A. Failure dynamic modelling and analysis of planetary gearbox considering gear tooth spalling. Eng. Fail. Anal. 2021, 125, 105444. [Google Scholar] [CrossRef]
  62. Luo, W.; Qiao, B.; Shen, Z.; Yang, Z.; Chen, X. Time-varying mesh stiffness calculation of a planetary gear set with the spalling defect under sliding friction. Meccanica 2020, 55, 245–260. [Google Scholar] [CrossRef]
  63. Cui, L.; Liu, T.; Huang, J.; Wang, H. Improvement on meshing stiffness algorithms of gear with peeling. Symmetry 2019, 11, 609. [Google Scholar] [CrossRef]
  64. Wang, F.; Dai, P.; Yan, S.; Wang, J.; Niu, L. Investigation on double shock in vibration response of the gear pair with spalling defects. Proc. Inst. Mech. Eng. C J. Mech. Eng. Sci. 2023, 237, 4882–4894. [Google Scholar] [CrossRef]
  65. Wang, S.; Zhu, R. An improved mesh stiffness calculation model of spur gear pair under mixed EHL friction with spalling effect. Vibroeng. Procedia 2020, 33, 176–181. [Google Scholar] [CrossRef]
  66. Chen, Y.; Jin, Y.; Kang, R.; Gong, W.; Yang, Y. The Time-varying Mesh Stiffness Modeling of Gear System with Spalling Defects in Different Positions. In Proceedings of the 2017 4th International Conference on Transportation Information and Safety (ICTIS): Conference Proceedings, Banff, AB, Canada, 8–10 August 2017; pp. 658–663. [Google Scholar]
  67. Shi, L.; Wen, J.; Pan, B.; Xiang, Y.; Zhang, Q.; Lin, C. Dynamic characteristics of a gear system with double-teeth spalling fault and its fault feature analysis. Appl. Sci. 2020, 10, 7058. [Google Scholar] [CrossRef]
  68. Yu, W.; Mechefske, C.K.; Timusk, M. A new dynamic model of a cylindrical gear pair with localized spalling defects. Nonlinear Dyn. 2018, 91, 2077–2095. [Google Scholar] [CrossRef]
  69. Wang, L.; Deng, C.; Xu, J.; Yin, L.; Yu, W.; Ding, X.; Shao, Y.; Huang, W.; Yang, X. Effects of spalling fault on dynamic responses of gear system considering three-dimensional line contact elasto-hydrodynamic lubrication. Eng. Fail. Anal. 2022, 132, 105930. [Google Scholar] [CrossRef]
  70. Yang, L.; Chen, Q.; Yin, L.; Wang, L.; Shao, Y. Dynamic characteristic of spur gear system with spalling fault considering tooth pitch error. Qual. Reliab. Eng. Int. 2022, 38, 2921–2938. [Google Scholar] [CrossRef]
  71. Luo, Y.; Baddour, N.; Liang, M. Evaluation of time-varying mesh stiffness of gears with tooth spalls modeled as spherical shapes. In Proceedings of the Proceedings-2018 Prognostics and System Health Management Conference, PHM-Chongqing 2018, Chongqing, China, 23–25 October 2018; Institute of Electrical and Electronics Engineers Inc.: Piscataway, NJ, USA, 2019; pp. 94–99. [Google Scholar] [CrossRef]
  72. Cheng, Z.; Huang, K.; Xiong, Y.; Sang, M. Dynamic Analysis of a High-Contact-Ratio Spur Gear System with Localized Spalling and Experimental Validation. Machines 2022, 10, 154. [Google Scholar] [CrossRef]
  73. Luo, Y.; Baddour, N.; Han, G.; Jiang, F.; Liang, M. Evaluation of the time-varying mesh stiffness for gears with tooth spalls with curved-bottom features. Eng. Fail. Anal. 2018, 92, 430–442. [Google Scholar] [CrossRef]
  74. Huangfu, Y.; Chen, K.; Ma, H.; Li, X.; Han, H.; Zhao, Z. Meshing and dynamic characteristics analysis of spalled gear systems: A theoretical and experimental study. Mech. Syst. Signal Process. 2020, 139, 106640. [Google Scholar] [CrossRef]
  75. Meng, Z.; Shi, G.; Wang, F. Vibration response and fault characteristics analysis of gear based on time-varying mesh stiffness. Mech. Mach. Theory 2020, 148, 103786. [Google Scholar] [CrossRef]
  76. Doğan, O.; Karpat, F. Crack detection for spur gears with asymmetric teeth based on the dynamic transmission error. Mech. Mach. Theory 2019, 133, 417–431. [Google Scholar] [CrossRef]
  77. Chaari, F.; Fakhfakh, T.; Haddar, M. Analytical modelling of spur gear tooth crack and influence on gearmesh stiffness. Eur. J. Mech.-A/Solids 2009, 28, 461–468. [Google Scholar] [CrossRef]
  78. Chen, Z.; Zhai, W.; Shao, Y.; Wang, K.; Sun, G. Analytical model for mesh stiffness calculation of spur gear pair with non-uniformly distributed tooth root crack. Eng. Fail. Anal. 2016, 66, 502–514. [Google Scholar] [CrossRef]
  79. Ning, J.; Chen, Z.; Wang, Y.; Li, Y.; Zhai, W. Vibration feature of spur gear transmission with non-uniform depth distribution of tooth root crack along tooth width. Eng. Fail. Anal. 2021, 129, 105713. [Google Scholar] [CrossRef]
  80. Cui, L.; Huang, J.; Zhai, H.; Zhang, F. Research on the meshing stiffness and vibration response of fault gears under an angle-changing crack based on the universal equation of gear profile. Mech. Mach. Theory 2016, 105, 554–567. [Google Scholar] [CrossRef]
  81. Onkareshwar, M.; Inturi, V.; Rajendra, S.P.; Penumakala, P.K.; Sabareesh, G.R. Effect of local gear tooth failures on gear mesh stiffness and vibration response of a single-stage spur gear pair. In Proceedings of the 14th International Conference on Vibration Problems, Crete, Greece, 1–4 September 2019; Lecture Notes in Mechanical Engineering. Springer Science and Business Media Deutschland GmbH: Berlin/Heidelberg, Germany, 2021; pp. 1095–1103. [Google Scholar] [CrossRef]
  82. Mohammed, O.D.; Rantatalo, M. Dynamic response and time-frequency analysis for gear tooth crack detection. Mech. Syst. Signal Process. 2016, 66–67, 612–624. [Google Scholar] [CrossRef]
  83. Inturi, V.; Penumakala, P.K.; Sabareesh, G.R. Effect of Multiple Defects and Multi-component Failure on the Dynamic Behaviour of a Wind Turbine Gearbox. Arab. J. Sci. Eng. 2022, 47, 8969–8983. [Google Scholar] [CrossRef]
  84. Yang, L.T.; Shao, Y.M.; Jiang, W.W.; Zhang, L.K.; Wang, L.M.; Xu, J. Effects of tooth surface crack propagation on meshing stiffness and vibration characteristic of spur gear system. Appl. Sci. 2021, 11, 1968. [Google Scholar] [CrossRef]
  85. Liu, Y.; Shi, Z.; Shen, G.; Zhen, D.; Wang, F.; Gu, F. Evaluation model of mesh stiffness for spur gear with tooth tip chipping fault. Mech. Mach. Theory 2021, 158, 104238. [Google Scholar] [CrossRef]
  86. Chaari, F.; Baccar, W.; Abbes, M.S.; Haddar, M. Effect of spalling or tooth breakage on gearmesh stiffness and dynamic response of a one-stage spur gear transmission. Eur. J. Mech. A/Solids 2008, 27, 691–705. [Google Scholar] [CrossRef]
  87. Zhang, L.; Shao, Y. Mesh Stiffness Calculation of Spur Gears with Tooth Surface Crack. In Proceedings of the ASME 2019 International Design Engineering Technical Conferences and Computers and Information in Engineering Conference IDETC/CIE2019, Anaheim, CA, USA, 18–21 August 2019; Available online: http://asmedigitalcollection.asme.org/IDETC-CIE/proceedings-pdf/IDETC-CIE2019/59308/V010T11A011/6454683/v010t11a011-detc2019-97857.pdf (accessed on 18 February 2024).
  88. Onishchenko, V. Tooth wear modeling and prognostication parameters of engagement of spur gear power transmissions. Mech. Mach. Theory 2008, 43, 1639–1664. [Google Scholar] [CrossRef]
  89. Osman, T.; Velex, P. Static and dynamic simulations of mild abrasive wear in wide-faced solid spur and helical gears. Mech. Mach. Theory 2010, 45, 911–924. [Google Scholar] [CrossRef]
  90. Feng, K.; Borghesani, P.; Smith, W.A.; Randall, R.B.; Chin, Z.Y.; Ren, J.; Peng, Z. Vibration-based updating of wear prediction for spur gears. Wear 2019, 426–427, 1410–1415. [Google Scholar] [CrossRef]
  91. Shen, Z.; Yang, L.; Qiao, B.; Luo, W.; Chen, X.; Yan, R. Mesh relationship modeling and dynamic characteristic analysis of external spur gears with gear wear. Front. Mech. Eng. 2022, 17, 9. [Google Scholar] [CrossRef]
  92. Shen, Z.; Qiao, B.; Yang, L.; Luo, W.; Yang, Z.; Chen, X. Fault mechanism and dynamic modeling of planetary gear with gear wear. Mech. Mach. Theory 2021, 155, 104098. [Google Scholar] [CrossRef]
  93. Wang, Y.; Li, K.; Qiao, B.; Shen, Z.; Chen, X. Theoretical Investigation of Mesh Relationship and Mesh Stiffness of Internal Spur Gears with Tooth Wear. Appl. Sci. 2023, 13, 2022. [Google Scholar] [CrossRef]
  94. Dong, N.; Cui, Q.; Zhou, J.; Tong, R.; Wang, H.; Lu, F. Study on wear evolution of spur gears considering dynamic meshing stiffness. J. Mech. Sci. Technol. 2023, 37, 3393–3408. [Google Scholar] [CrossRef]
  95. Ren, J.; Yuan, H. A Dynamic Wear Prediction Model for Studying the Interactions between Surface Wear and Dynamic Response of Spur Gears. Coatings 2022, 12, 1250. [Google Scholar] [CrossRef]
  96. Zhao, J.; Yu, X.; Sheng, W.; Li, Z.; Zhang, H.; Zhu, R. Effect of Machined Tooth Surface Mixed Lubrication Sliding Wear on Gear Dynamic Characteristics. Machines 2023, 11, 25. [Google Scholar] [CrossRef]
  97. Chen, W.; Lei, Y.; Fu, Y.; Hou, L. A study of effects of tooth surface wear on time-varying mesh stiffness of external spur gear considering wear evolution process. Mech. Mach. Theory 2021, 155, 104055. [Google Scholar] [CrossRef]
  98. Chang, L.; Yu, Q.; Jeng, Y.R. Modeling and Analysis of High-Load and High-Speed Involute Spur Gear Systems in Adverse Lubrication. Tribol. Trans. 2018, 61, 325–334. [Google Scholar] [CrossRef]
  99. Li, S.; Kahraman, A. A scuffing model for spur gear contacts. Mech. Mach. Theory 2021, 156, 104161. [Google Scholar] [CrossRef]
  100. Zhou, C.; Xing, M.; Wang, H.; Hu, B. A novel thermal network model for predicting the contact temperature of spur gears. Int. J. Therm. Sci. 2021, 161, 106703. [Google Scholar] [CrossRef]
  101. Chen, T.; Zhu, C.; Liu, H.; Wei, P.; Zhu, J.; Xu, Y. Simulation and experiment of carburized gear scuffing under oil jet lubrication. Eng. Fail. Anal. 2022, 139, 106406. [Google Scholar] [CrossRef]
  102. Li, W.; Tian, J. Unsteady-state temperature field and sensitivity analysis of gear transmission. Tribol. Int. 2017, 116, 229–243. [Google Scholar] [CrossRef]
  103. Xiao, Z.; Zhou, C.; Li, Z.; Zheng, M. Thermo-mechanical characteristics of high-speed and heavy-load modified gears with elasto-hydrodynamic contacts. Tribol. Int. 2019, 131, 406–414. [Google Scholar] [CrossRef]
  104. Li, S.; Kolivand, A.; Wei, J. Determination of Critical Temperature of Scuffing for AISI 8620 Steel Gear Contacts Lubricated by Dexron 6 through Computational Simulation of Experiment. J. Tribol. 2022, 144, 081201. [Google Scholar] [CrossRef]
  105. Ouyang, T.; Huang, H.; Zhang, N.; Mo, C.; Chen, N. A model to predict tribo-dynamic performance of a spur gear pair. Tribol. Int. 2017, 116, 449–459. [Google Scholar] [CrossRef]
  106. Chang, J.; Liu, S.; Hu, X.; Dai, Y. Evolution of surface spur gear tooth temperature based on three-dimensional finite element model. J. Braz. Soc. Mech. Sci. Eng. 2019, 41, 370. [Google Scholar] [CrossRef]
  107. Ouyang, T.; Wang, G.; Cheng, L.; Wang, J.; Yang, R. Comprehensive diagnosis and analysis of spur gears with pitting-crack coupling faults. Mech. Mach. Theory 2022, 176, 104968. [Google Scholar] [CrossRef]
  108. Zai, B.A.; Khan, M.A.; Khan, K.A.; Mansoor, A. A novel approach for damage quantification using the dynamic response of a metallic beam under thermo-mechanical loads. J. Sound Vib. 2020, 469, 115134. [Google Scholar] [CrossRef]
  109. Zai, B.A.; Khan, M.A.; Khan, S.Z.; Asif, M.; Khan, K.A.; Saquib, A.N.; Mansoor, A.; Shahzad, M.; Mujtaba, A. Prediction of Crack Depth and Fatigue Life of an Acrylonitrile Butadiene Styrene Cantilever Beam Using Dynamic Response. J. Test. Eval. 2020, 48, 1520–1536. [Google Scholar] [CrossRef]
  110. He, F.; Thakur, V.K.; Khan, M. Evolution and new horizons in modeling crack mechanics of 3D printing polymeric structures. Mater. Today Chem. 2021, 20, 100393. [Google Scholar] [CrossRef]
  111. Ma, H.; Zeng, J.; Feng, R.; Pang, X.; Wen, B. An improved analytical method for mesh stiffness calculation of spur gears with tip relief. Mech. Mach. Theory 2016, 98, 64–80. [Google Scholar] [CrossRef]
Figure 1. (a) tooth breakage, (b) pitting, (c) spalling, (d) abrasive wear, (e) scuffing [22,30,31].
Machines 12 00346 g001
Figure 2. One-stage gear system with 6 degrees of freedom (Reproduced from original) [36].
Machines 12 00346 g002
Figure 4. Points of single and double tooth engagement on (a) Line of action (b) Gear tooth [36].
Machines 12 00346 g004
Figure 5. TVMS of a healthy gear pair [44].
Machines 12 00346 g005
Figure 6. Healthy gear pair time domain response [45].
Machines 12 00346 g006
Figure 7. Healthy gear pair frequency domain response [45].
Machines 12 00346 g007
Figure 8. View of a gear tooth with pit [46].
Machines 12 00346 g008
Figure 9. TVMS for different pitting degrees [44].
Machines 12 00346 g009
Figure 10. TVMS for different pitting shapes [56].
Machines 12 00346 g010
Figure 11. Time domain response for different pitting degrees [45].
Machines 12 00346 g011
Figure 12. Dynamic response of different pitting degrees in the frequency domain [45].
Machines 12 00346 g012
Figure 13. View of a gear tooth with a rectangular spall [42].
Machines 12 00346 g013
Figure 14. TVMS showing spalls of increasing length [75].
Machines 12 00346 g014
Figure 15. Time and freqyency domain dynamic responses for spall defect [70].
Machines 12 00346 g015
Figure 16. Tooth crack with constant crack depth [39].
Machines 12 00346 g016
Figure 17. Tooth crack with varying crack depth [82].
Machines 12 00346 g017
Figure 18. TVMS for different stages of tooth root crack and breakage for [84].
Machines 12 00346 g018
Figure 19. Time domain signal for root crack [80].
Machines 12 00346 g019
Figure 20. Frequency domain signal for root crack [80].
Machines 12 00346 g020
Figure 21. Gear tooth with wear [97].
Machines 12 00346 g021
Figure 22. (a) TVMS and (b) STE plots for varying wear conditions [96].
Machines 12 00346 g022
Figure 23. Non-uniform wear [91].
Machines 12 00346 g023
Figure 24. TVMS due to wear [91].
Machines 12 00346 g024
Figure 25. Time domain response for (a) 0 mm wear (b) 0.25 mm wear [91].
Machines 12 00346 g025
Figure 26. Frequency domain response for (a) 0 mm wear (b) 0.25 mm wear [91].
Machines 12 00346 g026
Figure 27. Temperature variation along the line of action [100].
Machines 12 00346 g027
Figure 28. Contact temperature along LOA for changes in (a) Tooth Width, (b) Pressure angle, (c) module [100].
Machines 12 00346 g028
Figure 29. Contact temperature along the LOA for changes in (a) rotational velocity, (b) Torque [100].
Machines 12 00346 g029
Figure 30. Coupled root crack and pitting model [107].
Machines 12 00346 g030
Figure 31. TVMS for coupled root crack and pitting [107].
Machines 12 00346 g031
Figure 32. Time domain response for combined root crack and pitting [107].
Machines 12 00346 g032
Figure 33. Frequency domain response for combined root crack and pitting [107].
Machines 12 00346 g033
Disclaimer/Publisher’s Note: The statements, opinions and data contained in all publications are solely those of the individual author(s) and contributor(s) and not of MDPI and/or the editor(s). MDPI and/or the editor(s) disclaim responsibility for any injury to people or property resulting from any ideas, methods, instructions or products referred to in the content.