Communication

Comparative Tribological Properties of Pd-, Pt-, and Zr-Based Bulk Metallic Glasses

1
Department of Mechanical Engineering, University of California Merced, Merced, CA 95343, USA
2
Department of Mechanical Engineering, The University of Texas at Dallas, Richardson, TX 75080, USA
*
Authors to whom correspondence should be addressed.
Lubricants 2020, 8(9), 85; https://doi.org/10.3390/lubricants8090085
Submission received: 18 July 2020 / Revised: 14 August 2020 / Accepted: 19 August 2020 / Published: 21 August 2020
(This article belongs to the Special Issue Applied Tribology in Mechanical Engineering)

Abstract

:
We present a comparative study of the tribological properties of Pd-, Pt-, and Zr-based bulk metallic glasses (BMG-Pd, BMG-Pt, and BMG-Zr, respectively) under unlubricated conditions. In particular, micro-tribometry is utilized with a 52,100 steel ball, showing that BMG-Pt exhibits a significantly higher coefficient of friction (COF) (0.58 ± 0.08) when compared with BMG-Pd (0.30 ± 0.02) and BMG-Zr (0.20 ± 0.03). Topographical roughness on and off wear scars is characterized via atomic force microscopy (AFM), with results that do not correlate with the observed frictional behavior. On the other hand, scanning electron microscopy (SEM) is utilized to reveal contrasting wear mechanisms for the three samples: while BMG-Pd and BMG-Zr exhibit predominantly abrasive wear, there is evidence of adhesive wear on BMG-Pt. Consequently, the occurrence of adhesive wear emerges as a potential mechanism behind the observation of relatively high coefficients of friction on BMG-Pt, suggesting stronger interactions with steel when compared with the other BMG samples.

Graphical Abstract

1. Introduction

Bulk metallic glasses (BMGs) are multicomponent amorphous alloys that have gained interest due to their unusual properties stemming from non-crystalline structure. These properties include high strength, elasticity, wear resistance, and chemical homogeneity [1,2]. Unlike conventional metals, BMGs can be thermoplastically molded into complex shapes in their viscous state at moderately high temperatures [3]. Precise components ranging from nanometers to centimeters with controlled surface morphology and functionality can be manufactured without conventional machining [4]. BMGs are envisioned as potential candidates for applications in biomedical devices, die materials, cutting tools, and surface coatings [1], and also play a key role in emerging research areas such as atomic-scale imprinting [5]. Many of these applications require an understanding of the tribological behavior of BMGs.
In general, BMGs exhibit abrasive wear and friction coefficients in the range of 0.4–1.0 [6]. The tribological properties are strongly composition-dependent among different BMGs and cannot always be directly correlated to their mechanical properties [7,8,9,10,11,12]. Heat generation, oxidation, crystallization, and formation of tribolayers have been reported during wear testing in some BMGs [10,13,14,15]. The mechanisms involved in the wear and friction of BMGs remain poorly understood despite numerous studies involving individual types of BMGs.
In order to contribute to the growing literature focusing on the tribological properties of BMGs, we present here a comparative study of the friction and wear characteristics of Pd-, Pt-, and Zr-based bulk metallic glasses (BMG-Pd, BMG-Pt, and BMG-Zr, respectively) using micro-tribometry, AFM-based roughness measurements, as well as SEM and energy-dispersive X-ray spectroscopy (EDX). To allow a direct comparison between the specimens, the experiments were performed under dry (i.e., unlubricated) conditions, without the presence of liquid or solid lubricants. Results of micro-tribometry experiments reveal that BMG-Pt exhibits the highest COF as it is sliding against steel, while BMG-Zr exhibits the lowest COF. Further characterization efforts enable us to pinpoint a predominantly adhesive wear mechanism for BMG-Pt, pointing toward strong interactions with the steel surface that may also explain the relatively high COF values observed. The results reported here provide useful information for the design of mechanical systems where BMG components are expected to operate under dry contact with steel surfaces.

2. Materials and Methods

2.1. Sample Preparation

Pt57.5Cu14.7Ni5.3P22.5 (BMG-Pt) and Pd43Cu27Ni10P20 (BMG-Pd) ingots were prepared by melting the high-purity elements in vacuum-sealed quartz tubes. The ingots were fluxed with boron oxide and subsequently quenched into 2 mm diameter cylindrical samples. Zr35Ti30Cu8.25Be26.75 (BMG-Zr) was acquired from LiquidMetal Technologies. Amorphous state of all three BMGs was confirmed using differential scanning calorimetry (DSC). BMG discs of 6 mm diameter were prepared by thermoplastic embossing against flat silicon surfaces at 265 °C (BMG-Pt), 365 °C (BMG-Pd), and 400 °C (BMG-Zr), under a load of 1 kN. To eliminate the risk of crystallization during embossing, embossing times were limited to about 1 min., which is more than an order of magnitude shorter than crystallization times at the relevant embossing temperatures for all three samples.

2.2. Coefficient of Friction Measurements via Micro-Tribometry

COF values for BMG-Pd, BMG-Pt, and BMG-Zr samples were measured using a custom micro-tribometer under unlubricated conditions, equipped with a 1/8” diameter 52,100 steel ball. The samples and the steel ball were ultrasonically cleaned in a bath of isopropanol before the experiments. A total of six (BMG-Pt, BMG-Zr) and four (BMG-Pd) tests, each comprising >600 cycles, were completed for each sample, at a constant normal load of 45 mN and a sliding speed of 100 μm/s, over a reciprocating linear stroke length of 600 μm. The mean and standard deviation values of the COF reported for each sample were calculated from the quasi-steady-state regime in each test.

2.3. Roughness Measurements via Atomic Force Microscopy

In order to characterize the roughness of the BMG sample surfaces with high resolution, AFM was utilized. The measurements were performed in tapping mode, using a commercial instrument (Asylum Research, Cypher VRS) and cantilevers (NanoSensors, PPP-NCHR), with normal spring constant values on the order of ~25 N/m. Scans were performed on several areas of 5 μm × 5 μm, both on and off wear scars. Mean and standard deviation values of the root-mean-square (RMS) roughness associated with each BMG sample were extracted from the analysis of these topographical maps.

2.4. Scanning Electron Microscopy and Energy-Dispersive X-ray Spectroscopy Measurements

SEM was utilized to visualize the overall topography of BMG sample surfaces and wear tracks created via micro-tribometry measurements. The imaging experiments were performed with a Zeiss Gemini500 SEM, at a voltage of 1 kV and magnifications ranging from ~200× to ~4000×. EDX spectra were recorded with an FEI Quanta 200 SEM, on a region of the BMG-Pt sample containing a wear scar, to probe the potential transfer of material from the micro-tribometer steel ball to the sample surface.

3. Results and Discussion

3.1. Coefficient of Friction

Figure 1A–C shows representative plots demonstrating the evolution of COF with each test cycle for the three BMG samples, whereas the COF values determined for each sample via multiple tests are reported in Figure 1D. From the data presented in Figure 1D, it is observed that BMG-Pt exhibits the highest COF value (0.58 ± 0.08) while sliding against the 52,100 steel ball of the micro-tribometer, followed by the BMG-Pd (0.30 ± 0.02) and BMG-Zr samples (0.20 ± 0.03). While the determination of the potential reasons behind the observation of this notable difference between the steady-state COF values comprises the main goal of our study, it is also important to observe that all three samples undergo an initial transition period (i.e., “run-in”) before the COF reaches its quasi-steady-state value. Typical mechanisms that lead to an increase in COF in this initial period may involve the wearing off of surface oxides and other surface contaminants, as well as the knocking off of dominant surface asperities. In particular, while the COF for the BMG-Zr samples reach their steady state rather rapidly (typically before 200 cycles, Figure 1C), the BMG-Pt samples exhibit a more gradual increase in COF (Figure 1B), while the BMG-Pd samples may have a prolonged period of low COF values followed by a rapid increase to a new COF plateau (Figure 1A). Despite the fact that unraveling the mechanisms behind the observed differences in temporal evolution of COF is beyond the scope of this paper, it is conceivable that the degree of surface oxidation undergone by each sample could play a major role. On the other hand, it needs to be mentioned that while BMG-Pd and BMG-Pt are oxidation-resistant because Pt and Pd are the major elements in the alloy compositions, the BMG-Zr sample is devoid of any oxidation detectable via X-ray diffraction (XRD) and DSC.

3.2. Surface Roughness

It is known that tribological measurements are generally affected by the topographical roughness of the involved surfaces. As such, in order to investigate whether BMG surface roughness plays a role in the observation of relatively high COF values on BMG-Pt samples compared to BMG-Pd and BMG-Zr, we performed AFM-based topographical measurements on all three samples, the results of which are reported in Figure 2. In order to compare surface roughness both before and after the onset of wear, we performed AFM imaging on and off wear tracks, subsequent to micro-tribometry experiments. The results in Figure 2 reveal that (i) the RMS roughness on wear scars is noticeably lower than the RMS roughness off scars for all three samples and (ii) BMG-Zr exhibits the highest mean roughness, followed by BMG-Pt and BMG-Pd. While the first observation can be understood by considering that the wear process, especially in the abrasive mode, naturally leads to a “smoothing” of the surface topography by eliminating dominant surface asperities, the second observation yields a trend in mean surface roughness that does not follow the observed COF trend for the three samples. Moreover, Tukey’s post-hoc comparisons reveal that the measured differences in roughness are not statistically significant (p > 0.05) between BMG-Pt and BMG-Zr (off scar), between BMG-Pt and BMG-Pd (off scar), as well as between BMG-Pt and BMG-Pd (on scar). As such, it is concluded that a mechanism other than differences in surface roughness should be mainly responsible for the difference in frictional behavior.

3.3. Wear Behavior

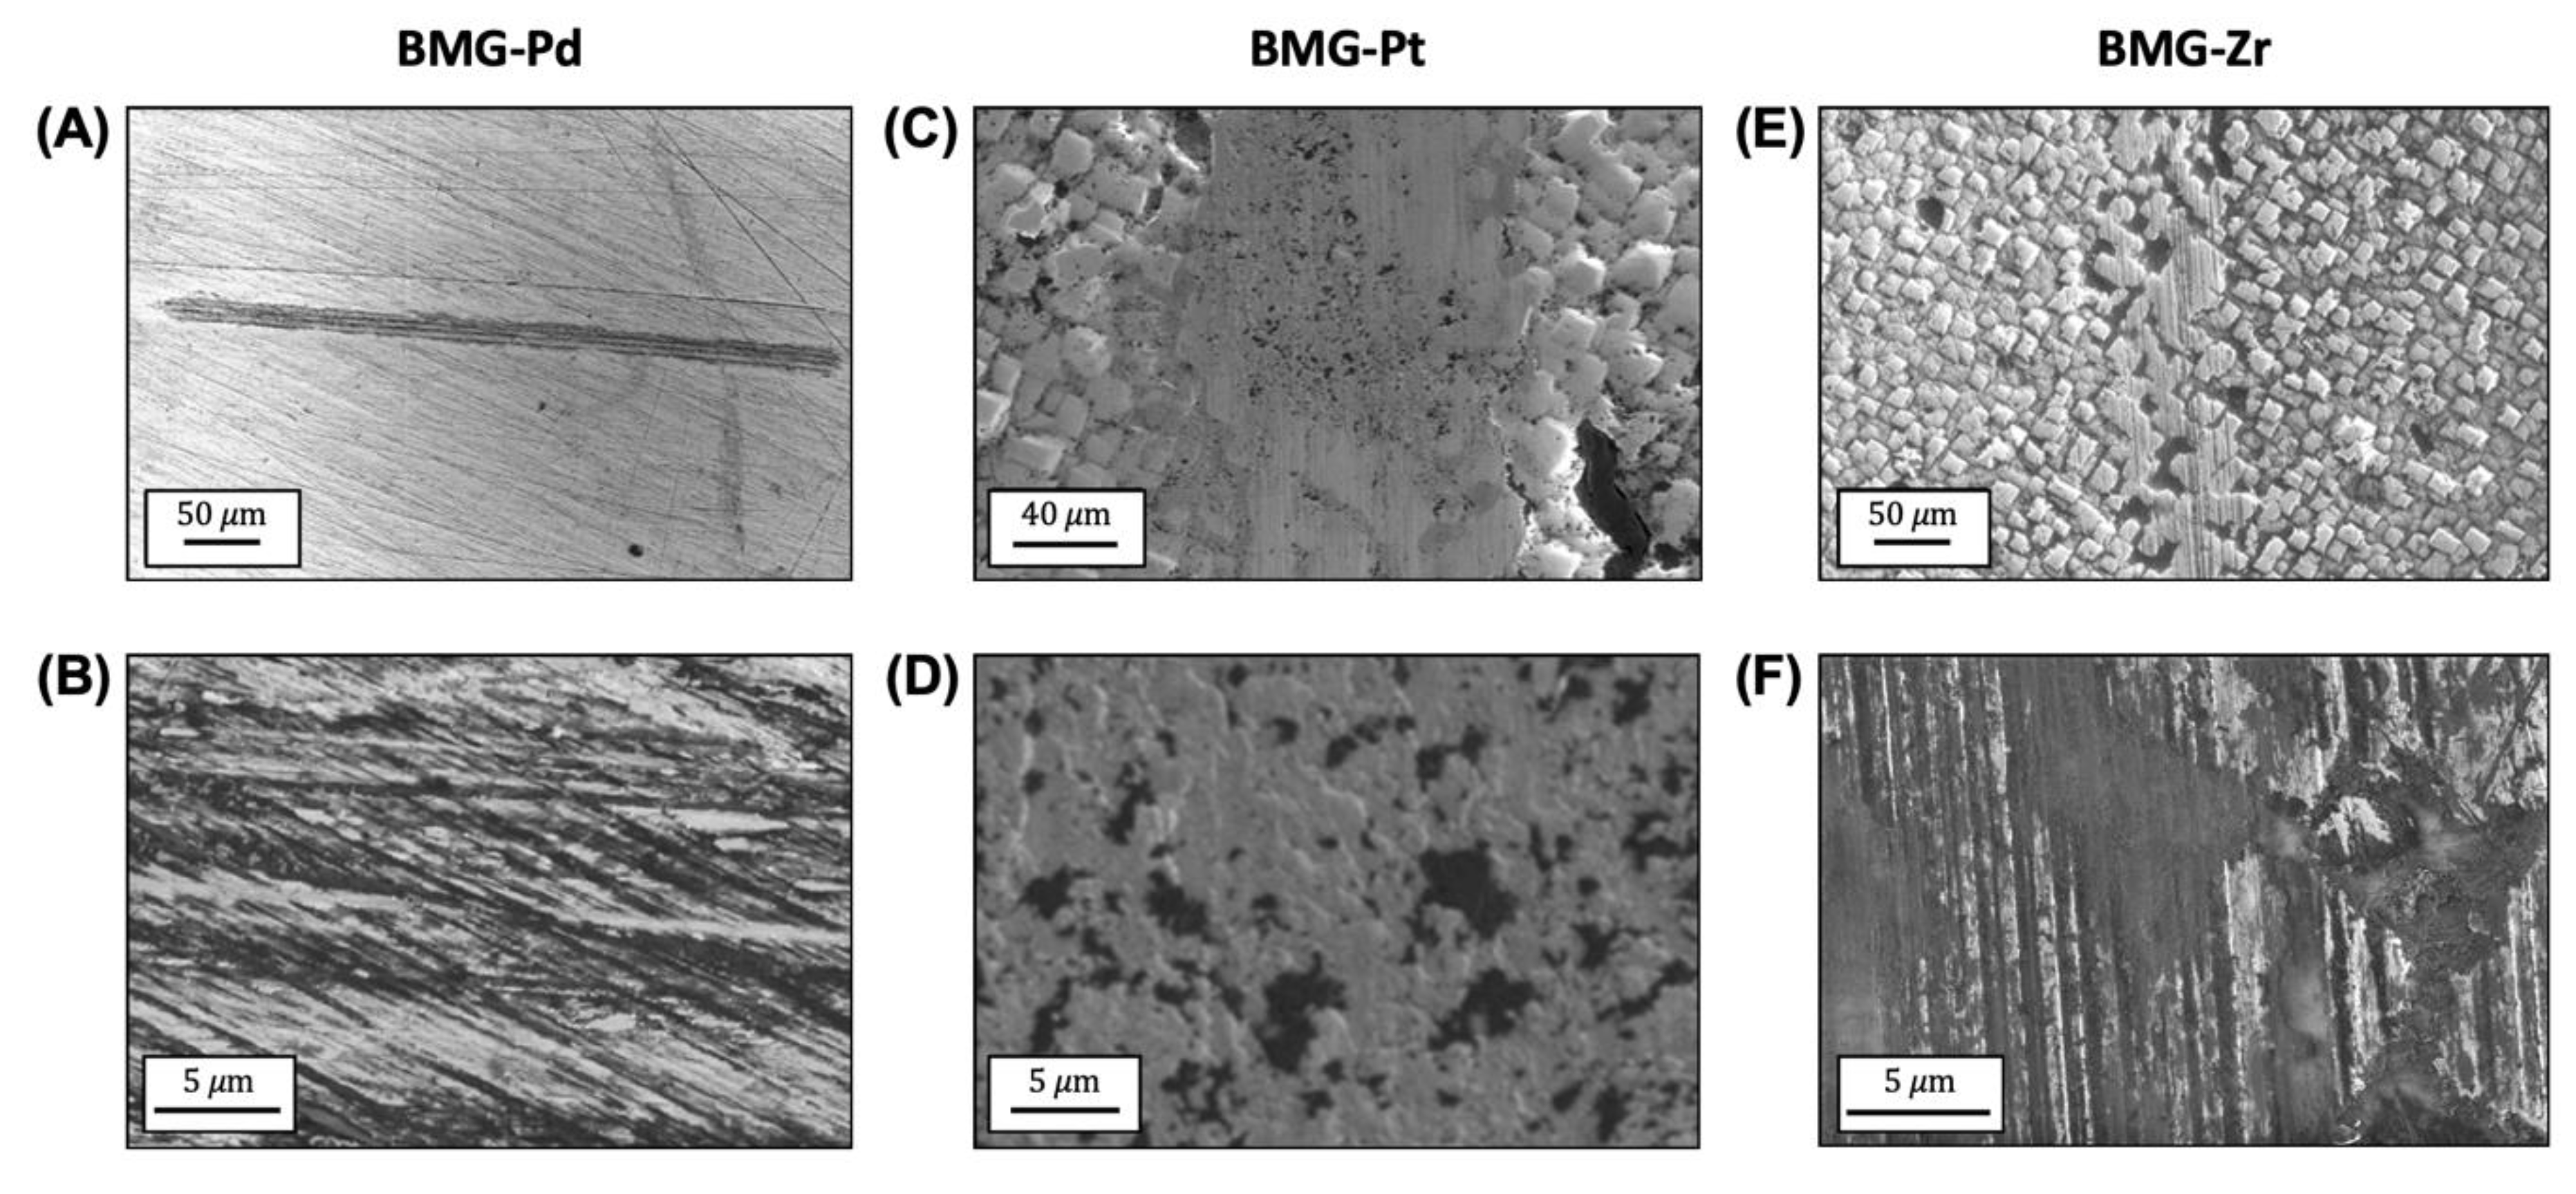
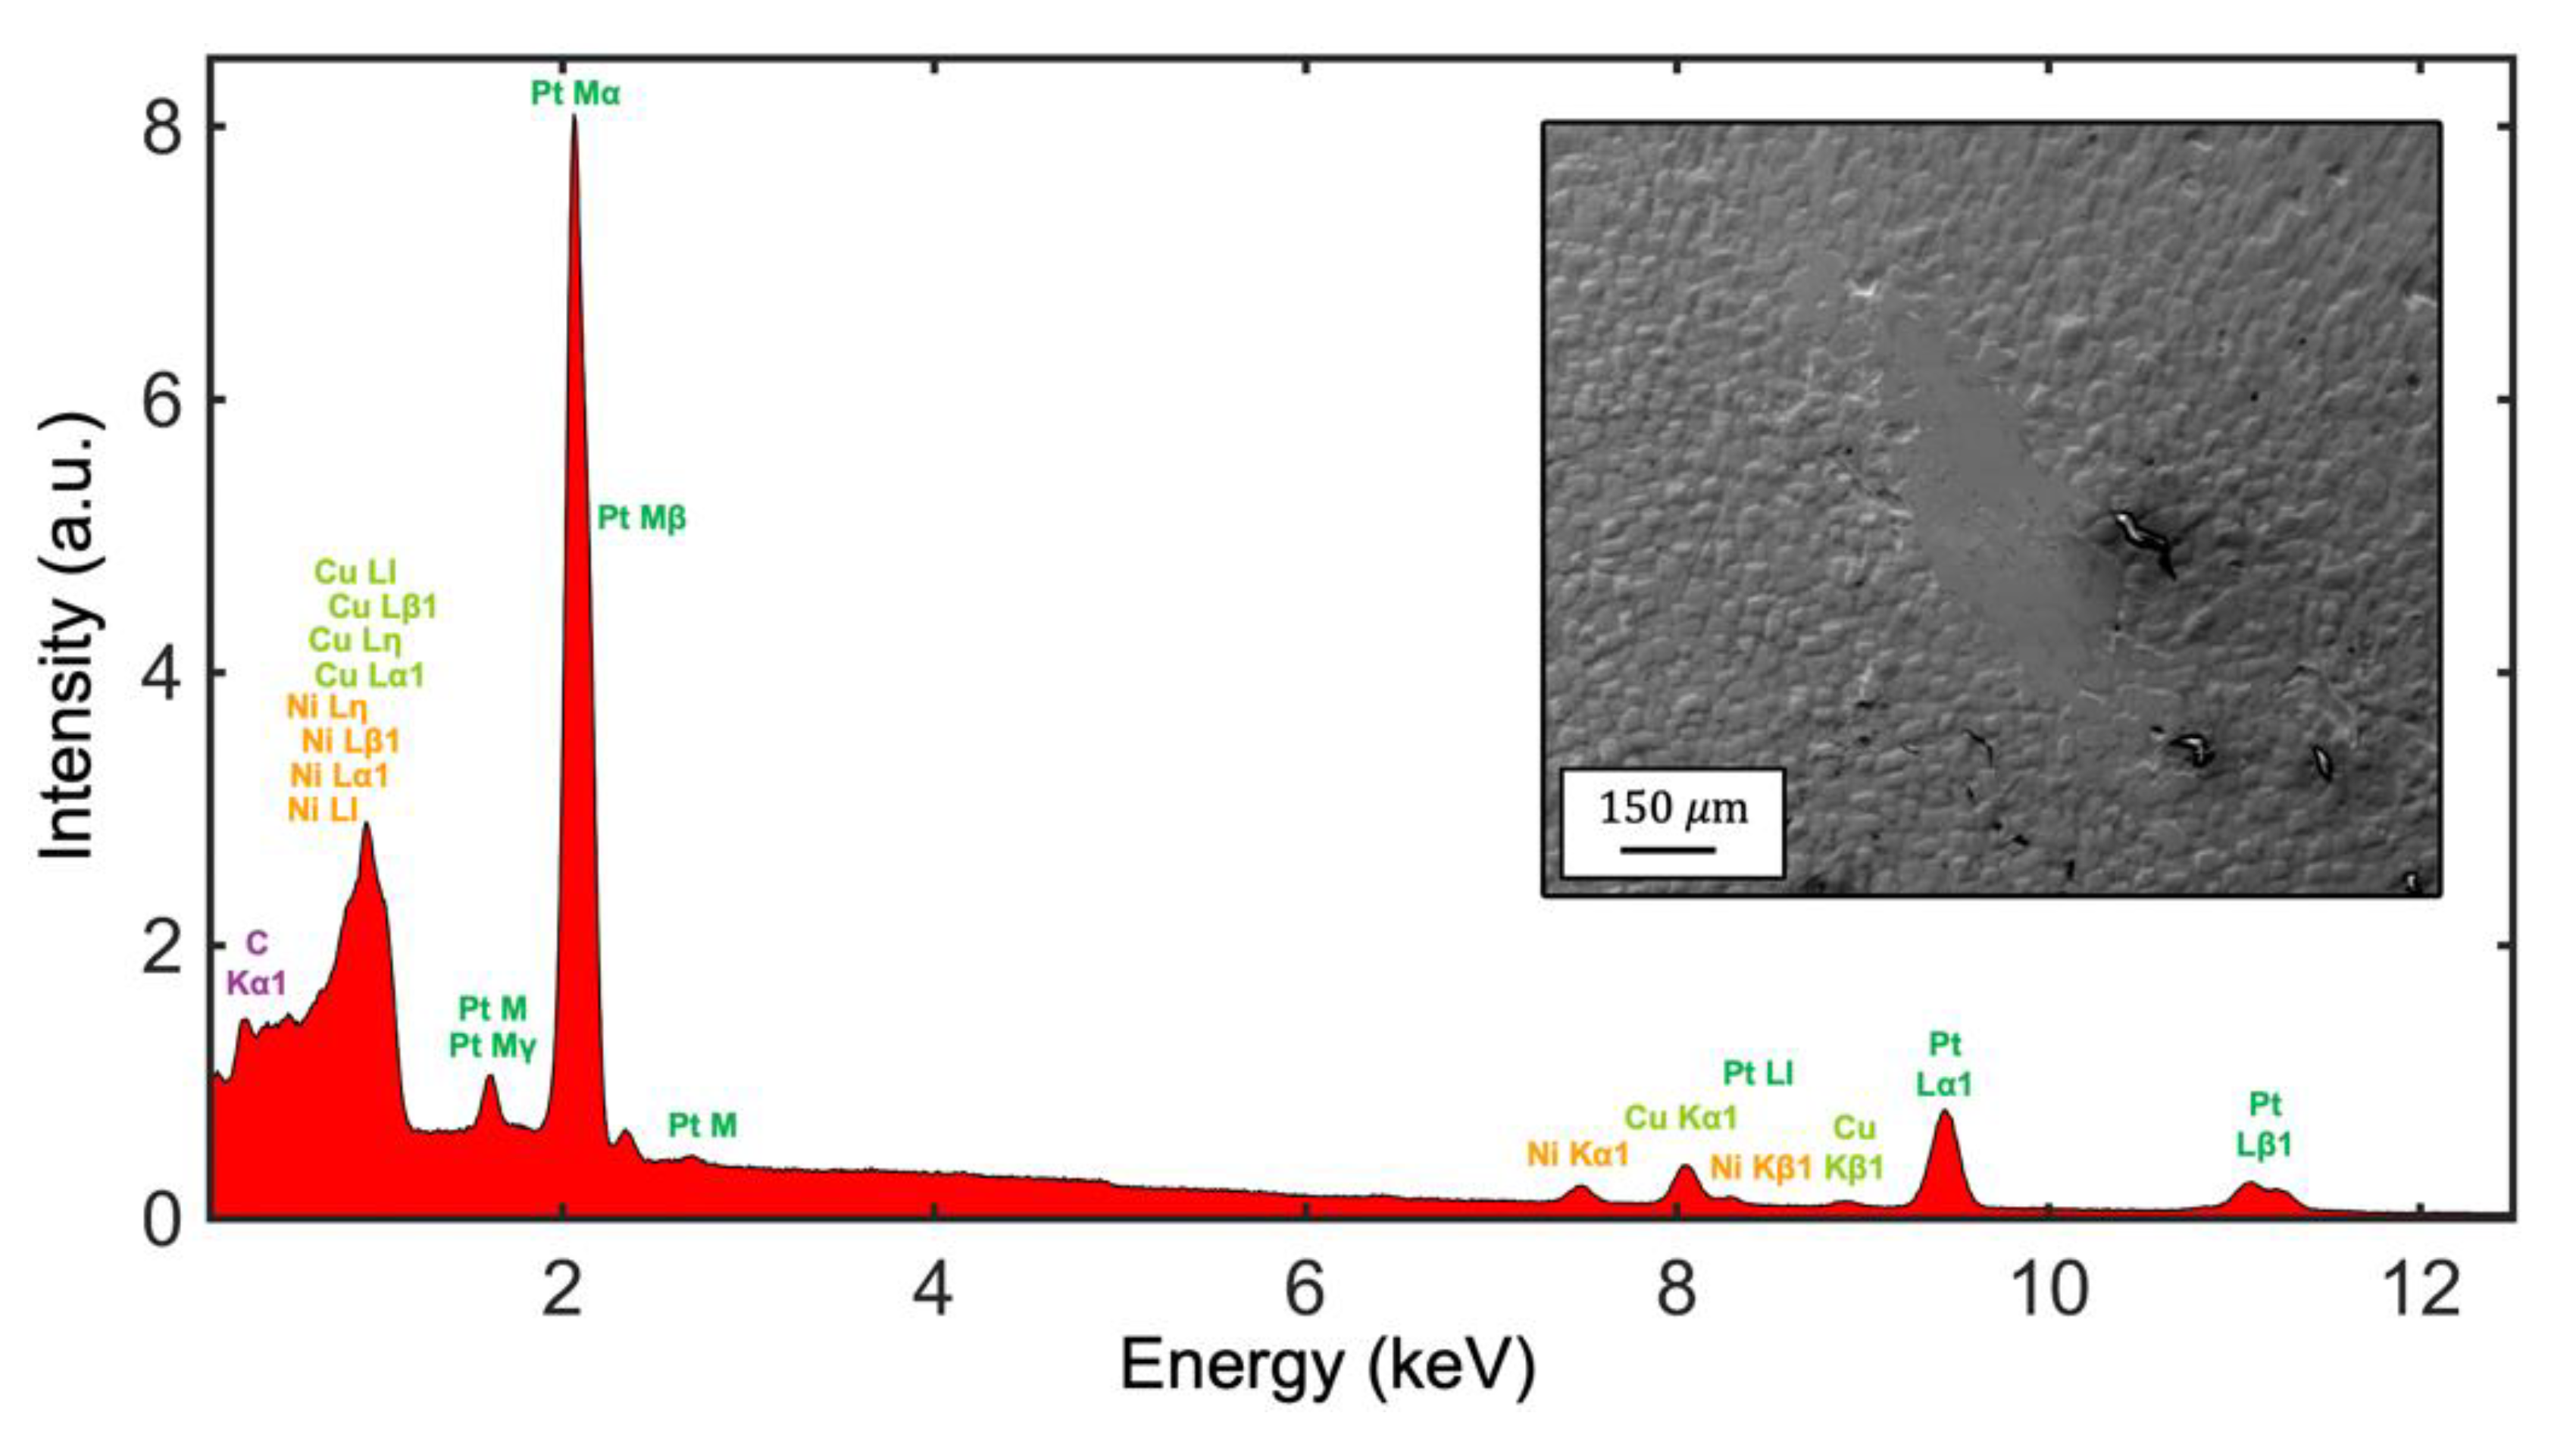
After eliminating surface roughness as the reason behind the observed friction trend on the three BMG samples, we turned our attention to wear behavior. Toward this goal, we performed SEM analysis on wear tracks created by sliding the steel ball of the micro-tribometer on the BMG surfaces at a relatively high normal load of 800 mN for 1000 cycles with a reciprocating linear stroke length of 850 μm. A normal load of 800 mN was utilized here (instead of the 45 mN applied during the COF measurements) in order to induce more defined wear tracks that are straightforward to locate in SEM imaging experiments. The results of SEM imaging experiments, provided for the three BMG samples in Figure 3, reveal contrasting wear characteristics. In particular, while the wear scars for the BMG-Pd (Figure 3A,B) and BMG-Zr (Figure 3E,F) samples are dominated by linearly aligned scratches indicative of abrasive wear, the BMG-Pt sample shows numerous areas where the surface appears to have peeled off (Figure 3C,D), indicative of material removal from the sample due to an adhesive wear mechanism. Consequently, in the absence of other mechanisms uncovered by our experiments, the predominantly adhesive wear exhibited by BMG-Pt (in contrast to the other two samples) points toward enhanced interactions between this material and the steel counter-surface, thereby emerging as the most plausible potential reason leading to relatively high COF values observed in our experiments for this sample. To probe in more detail whether any material transfer has occurred from the steel ball to the BMG-Pt sample during sliding, we additionally performed EDX analysis on an area of the sample surface that includes a wear track (Figure 4). The results present no evidence of iron or other elements originating from the steel ball on the BMG-Pt surface, suggesting the potential occurrence of material transfer in the opposite direction, from the BMG surface to the steel ball.
Finally, it is important to note here that one can observe the presence of square-like features on the BMG-Pt and BMG-Zr surfaces in Figure 3, while the BMG-Pd sample is devoid of such features. The features, with heights between 1 and 2 μm and lateral sizes on the order of 10–20 μm, are replicated from the silicon during the embossing step of sample preparation. On the other hand, the fact that BMG-Zr and BMG-Pt exhibit very different COFs despite both having the square features show that these topographical features do not dominate the observed frictional behavior.

4. Conclusions

We have presented here a comparative study of the tribological properties of BMG-Pd, BMG-Pt, and BMG-Zr, performed via micro-tribometry, AFM-based roughness, and SEM/EDX measurements. Results revealed a relatively high COF for BMG-Pt, compared to the other two samples. Analysis via SEM pointed toward an adhesive wear mechanism and associated stronger interactions with the steel surface as the potential reason behind the observation of high COF values on BMG-Pt. Our findings suggest that the tribological behavior of these complex alloys is sensitive to the composition. For example, BMG-Pd and BMG-Zr could be more suitable for surface coating of metallic microneedles because of lower COF. In contrast, biomedical implant applications could benefit from better adhesion of BMG-Pt. Additional work needs to be performed to determine whether the observed tribological trends translate to scenarios involving solid or liquid lubrication, as well as sliding against BMG counter-surfaces.

Author Contributions

M.Z.B. and G.K. conceived the experiments. M.A.M., O.A., and A.R. performed the experiments. C.S.M. and G.K. prepared the samples. All authors took part in the analysis and interpretation of the data, as well as the writing of the manuscript. All authors have read and agreed to the published version of the manuscript.

Funding

This work was supported by the Merced Nanomaterials Center for Energy and Sensing (MACES) via the National Aeronautics and Space Administration (NASA) Grant No. NNX15AQ01 and the National Science Foundation (NSF) through Award #1919445 and Award #1921435.

Acknowledgments

We thank Ashlie Martini, Azhar Vellore, and Daniel Sanchez Garrido for their generous assistance with micro-tribometry measurements.

Data Availability Statement

The datasets generated for this study are available on request to the corresponding authors.

Conflicts of Interest

The authors declare that the research was conducted in the absence of any commercial or financial relationships that could be construed as a potential conflict of interest.

References

  1. Inoue, A.; Takeuchi, A. Recent development and application products of bulk glassy alloys. Acta Mater. 2011, 59, 2243–2267. [Google Scholar] [CrossRef]
  2. Schuh, C.A.; Hufnagel, T.C.; Ramamurty, U. Mechanical behavior of amorphous alloys. Acta Mater. 2007, 55, 4067–4109. [Google Scholar] [CrossRef]
  3. Schroers, J. Processing of bulk metallic glass. Adv. Mater. 2010, 22, 1566–1597. [Google Scholar] [CrossRef] [PubMed]
  4. Kumar, G.; Desai, A.; Schroers, J. Bulk metallic glass: The smaller the better. Adv. Mater. 2011, 23, 461–476. [Google Scholar] [CrossRef] [PubMed]
  5. Li, R.; Chen, Z.; Datye, A.; Simon, G.H.; Ketkaew, J.; Kinser, E.; Liu, Z.; Zhou, C.; Dagdeviren, O.E.; Sohn, S.; et al. Atomic imprinting into metallic glasses. Commun. Phys. 2018, 1, 75. [Google Scholar] [CrossRef]
  6. Fu, X.Y.; Kasai, T.; Falk, M.L.; Rigney, D.A. Sliding behavior of metallic glass. Part I. Experimental investigations. Wear 2001, 250, 409–419. [Google Scholar] [CrossRef]
  7. Blau, P.J. Friction and wear of a Zr-based amorphous metal alloy under dry and lubricated conditions. Wear 2001, 250, 431–434. [Google Scholar] [CrossRef]
  8. Parlar, Z.; Bakkal, M.; Shih, A.J. Sliding tribological characteristics of Zr-based bulk metallic glass. Intermetallics 2008, 16, 34–41. [Google Scholar] [CrossRef]
  9. Prakash, B. Abrasive wear behaviour of Fe, Co and Ni based metallic glasses. Wear 2005, 258, 217–224. [Google Scholar] [CrossRef]
  10. Rahaman, M.L.; Zhang, L.C.; Ruan, H.H. Understanding the friction and wear mechanisms of bulk metallic glass under contact sliding. Wear 2013, 304, 43–48. [Google Scholar] [CrossRef]
  11. Tariq, N.H.; Hasan, B.A.; Akhter, J.I.; Ali, F. Mechanical and tribological properties of Zr-Al-Ni-Cu bulk metallic glasses. J. Alloys Compd. 2009, 469, 179–185. [Google Scholar] [CrossRef]
  12. Zhang, G.Q.; Li, X.J.; Shao, M.; Wang, L.N.; Yang, J.L.; Gao, L.P.; Chen, L.Y.; Liu, C.X. Wear behavior of a series of Zr-based bulk metallic glasses. Mater. Sci. Eng. A 2008, 475, 124–127. [Google Scholar] [CrossRef]
  13. Lee, J.; He, M.; Yeo, C.D.; Kumar, G.; Hu, Z.; Quitevis, E.L.; Thalangamaarachchige, V.D. Friction and wear of Pd-rich amorphous alloy (Pd43Cu27Ni10P20) under dry and ionic liquid (IL) lubricated conditions. Wear 2018, 408, 190–199. [Google Scholar] [CrossRef]
  14. Lee, J.; Yeo, C.D.; Hu, Z.; Thalangama-Arachchige, V.D.; Kaur, J.; Quitevis, E.L.; Kumar, G.; Koh, Y.P.; Simon, S. Friction and wear of pd-rich amorphous alloy (Pd43Cu27Ni10P20) with ionic liquid (IL) as lubricant at high temperatures. Metals 2019, 9, 1180. [Google Scholar] [CrossRef] [Green Version]
  15. Wang, Y.; Zhang, L.; Wang, T.; Hui, X.D.; Chen, W.; Feng, C.F. Effect of sliding velocity on the transition of wear mechanism in (Zr, Cu)95Al5 bulk metallic glass. Tribol. Int. 2016, 101, 141–151. [Google Scholar] [CrossRef]
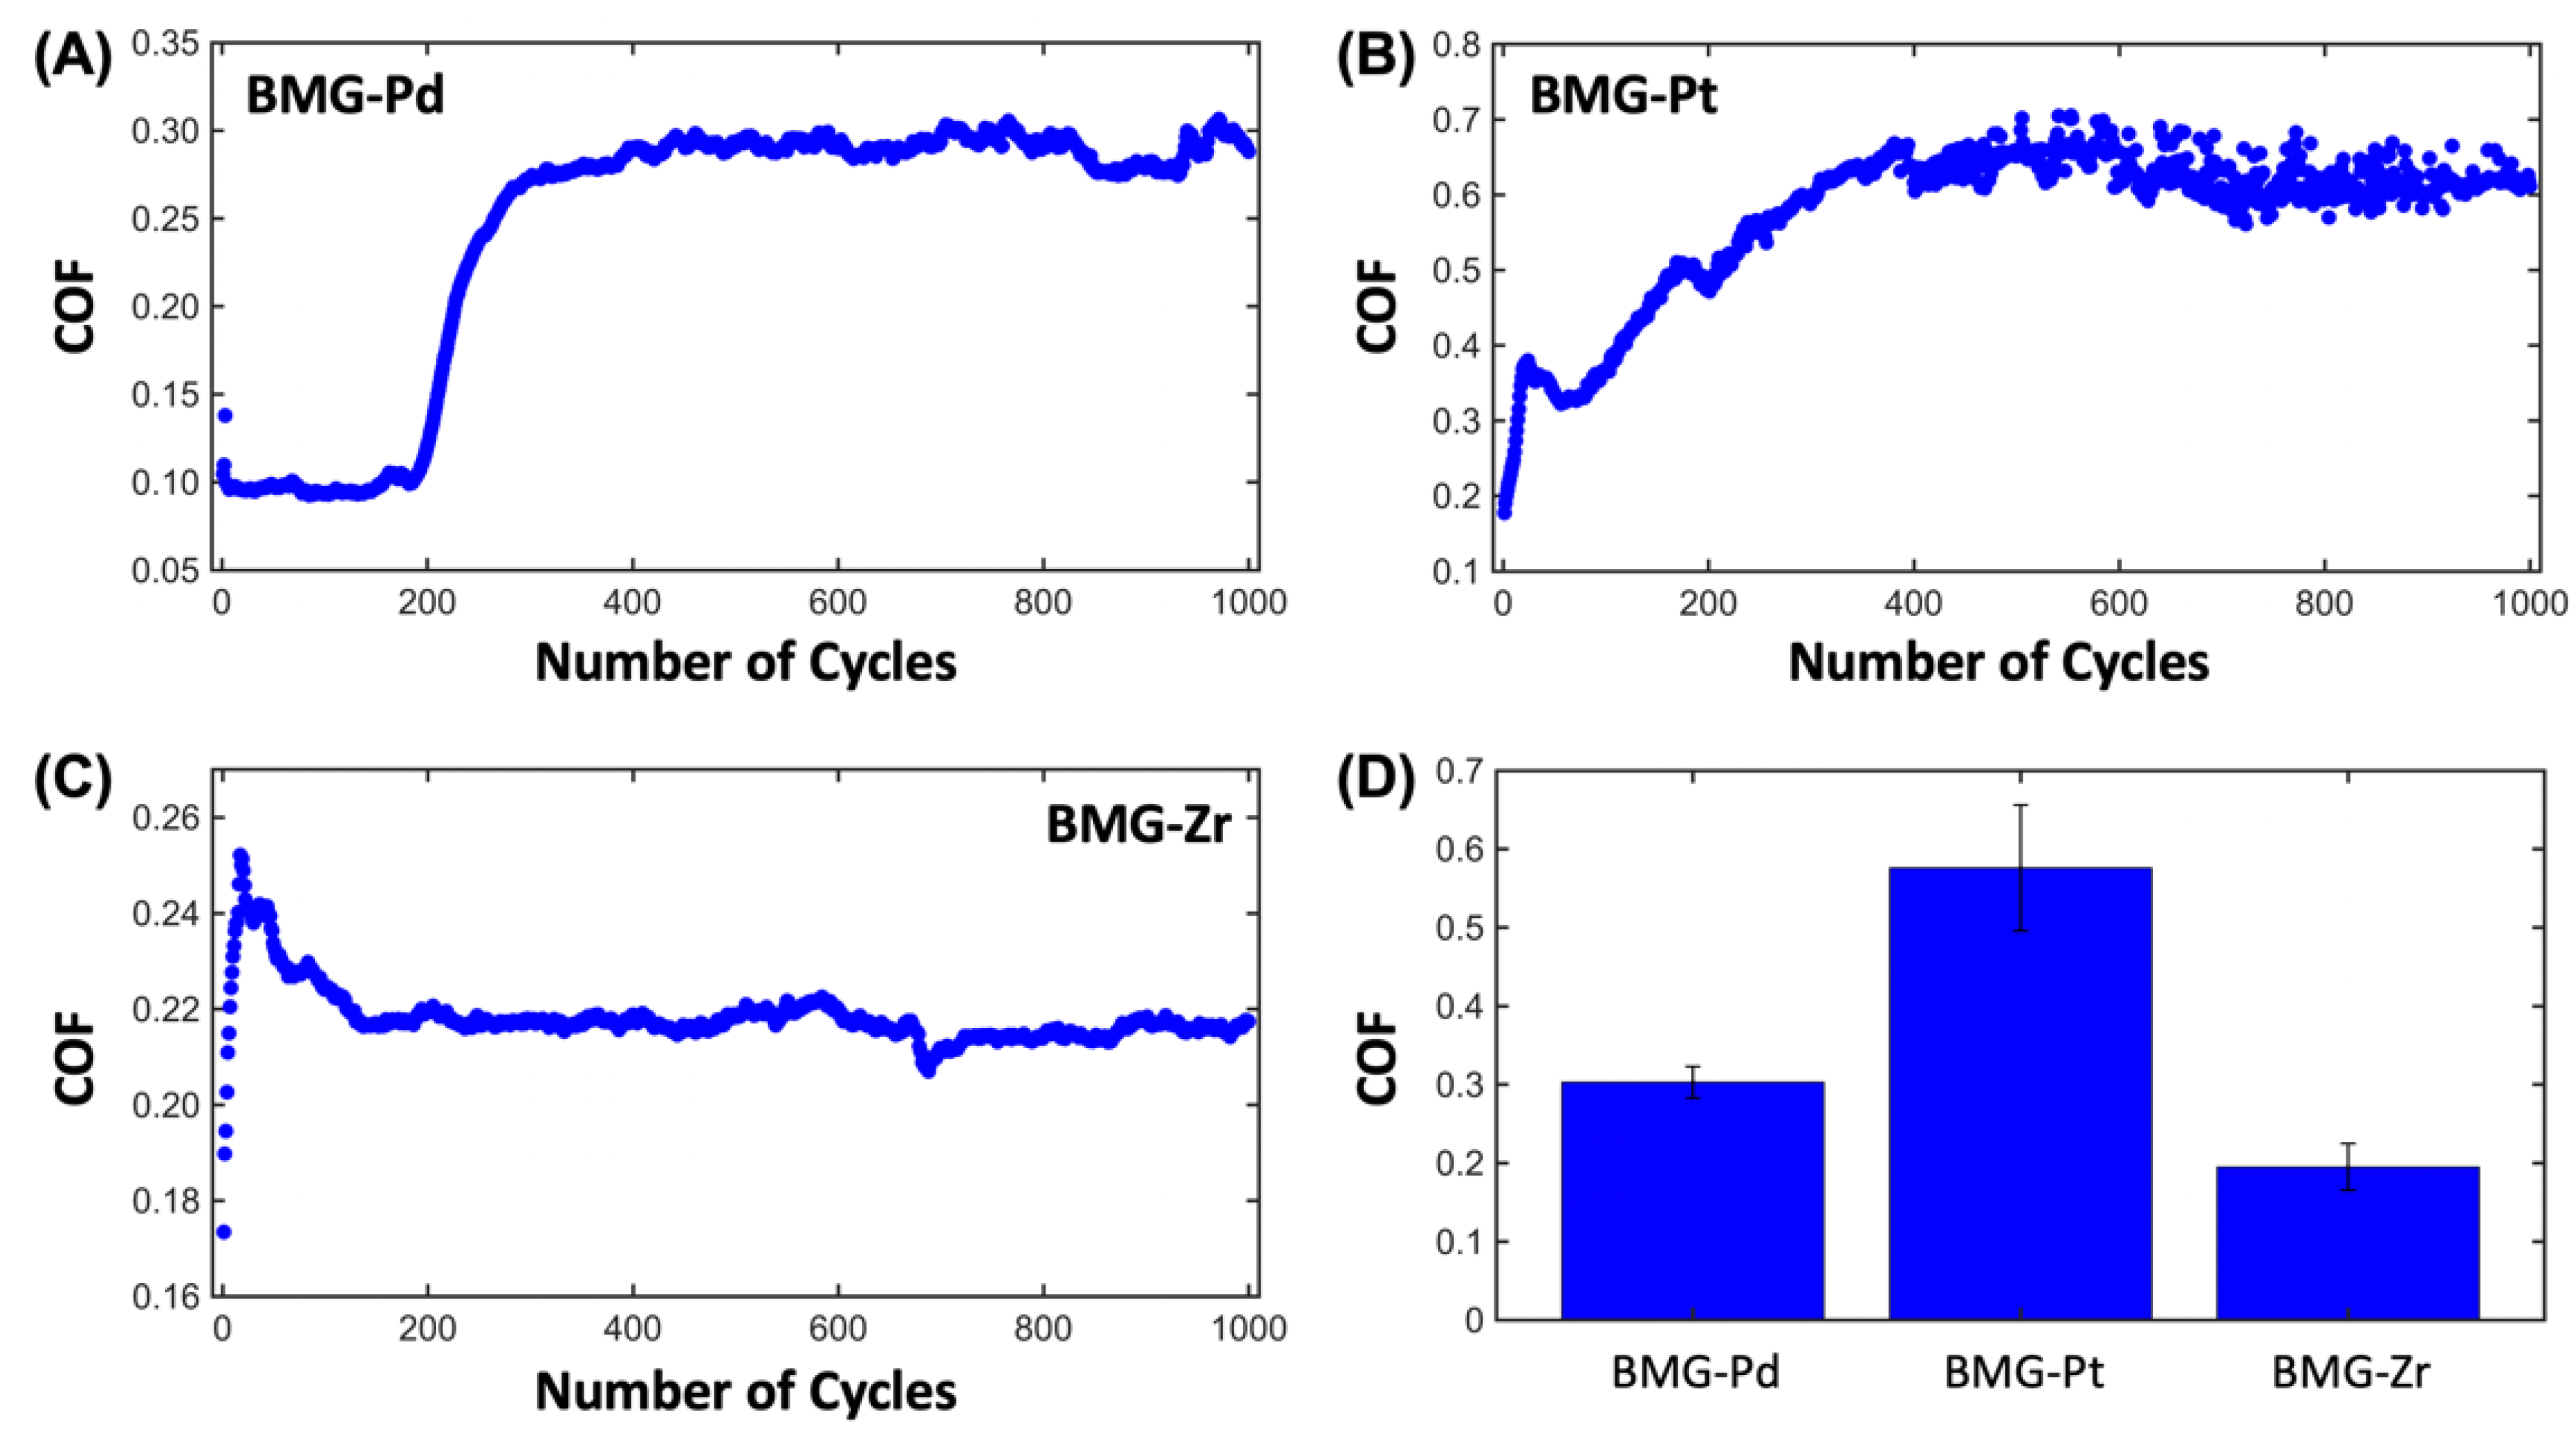
Figure 1. Results of representative micro-tribometry experiments demonstrating the evolution of COF values with increasing number of sliding cycles for Pd-, Pt-, and Zr-based bulk metallic glasses ((A) BMG-Pd, (B) BMG-Pt, and (C) BMG-Zr). (D) Mean values of COF for the three BMG samples extracted from multiple tests. Error bars represent standard deviation. Tukey’s post-hoc comparisons reveal that differences in COF are statistically significant (p < 0.05) between all combinations of samples.
Lubricants 08 00085 g001
Figure 2. Results of AFM-based RMS roughness measurements performed on and off wear scars for the three BMG samples. Error bars represent standard deviation.
Lubricants 08 00085 g002
Figure 3. SEM images of wear scars at different magnification levels for the BMG-Pd (A,B), BMG-Pt (C,D), and BMG-Zr (E,F) samples.
Lubricants 08 00085 g003
Figure 4. Results of EDX analysis performed on an area on the BMG-Pt surface that includes a wear scar (inset). No evidence of iron or other elements originating from the steel ball is found.
Lubricants 08 00085 g004