Article

Evaluation of Stationary Creep Rate in Heat-Affected Zone of Martensitic 9–12% Cr Steels

Institute of Metals and Technology, Lepi pot 11, 1000 Ljubljana, Slovenia
*
Author to whom correspondence should be addressed.
Metals 2020, 10(12), 1612; https://doi.org/10.3390/met10121612
Submission received: 17 September 2020 / Revised: 20 November 2020 / Accepted: 26 November 2020 / Published: 30 November 2020
(This article belongs to the Special Issue Microstructure and Properties of Metallic Heat-Affected Zones)

Abstract

:
The purpose of the present study was to evaluate the contribution of distinct regions of the simulated heat-affected zone (HAZ) to the overall creep behavior of welded joints in the X20 and P91 steels. The HAZ was simulated by means of dilatometry at four peak temperatures (900, 1000, 1200, and 1350 °C) with a consequent tempering at 650 °C. Microstructure features of the four simulated HAZ regions including precipitates, prior austenite grains, and subgrains were quantified by means of electron microscopy. The quantified parameters and the measured hardness were used in three physical models for evaluation of the stationary creep rate ( ε ˙ at 170 MPa and 580 °C. The resulting ε ˙ values fall within the range 10−8–10−7 s−1, being in good agreement with the experimental data with a similar thermal history, but an order of magnitude lower than the measured values for the parent metal of the studied steels (10−7–10−6 s−1). Depending on the model utilized, their output can be linearly related to hardness, subgrain size, or interparticle spacing. The model relating ε ˙ to hardness was the most consistent one in prediction, being always lower for higher peak temperatures.

1. Introduction

Steels with 9–12 wt.% Cr content and microstructure of tempered martensite are used in vital components of thermal power plants such as evaporators, headers, and main steam pipelines, which operate at elevated temperatures and high pressures. Materials operating at such conditions are subjected to a combination of deteriorating mechanisms such as corrosion, erosion, thermal fatigue, and most importantly creep, which is a time-dependent and thermally activated permanent deformation that proceeds mainly by dislocations glide and climb. The rate by which the creep deformation proceeds in a material depends not only on the applied stress and temperature (e.g., the steam pressure and temperature in power plants) but also on the microstructure state, especially at critical locations of power plants’ vital components such as bends and welded joints. The latter are especially susceptible to deterioration because welding strongly influences the microstructure and properties of the parent metal through severe thermal cycles, which induce the creation of the so-called heat-affected zone (HAZ). The resulting microstructure is governed by the welding parameters such as heating- and cooling rate, peak temperature(s), dwell time, effects of multilayer welding, and last but not least, the post-weld heat treatment. HAZ is usually a few millimeters wide and contains a continuous gradient of regions with different prior austenite grain (PAG) and subgrain size, and different precipitates size and distribution, consequently providing different creep resistance [1].
The creep behavior of real and simulated welds in 9–12% Cr steels with a special emphasis on the HAZ has been a subject of extensive investigations by many authors [2,3,4,5,6,7,8]. The dependence of creep resistance on the microstructure of 9–12% Cr steels including PAG and subgrain sizes [9,10,11], dislocation structure and evolution [12,13,14,15], and precipitates size, distribution, and coarsening [16,17,18,19,20,21,22] has been studied extensively. Theoretical calculations of stationary creep rate and/or lifetime prediction of creep-loaded materials using either empirical or physical models, supported by experimental results, were quite successfully accomplished by many authors [23,24,25,26,27]. However, the majority of these models use fitting parameters, which limit their validity to a specific material’s state and specific creep test conditions (temperature and stress).
Therefore, for the present study, three existing physical models [28,29,30] that use no fitting parameters but rather microstructure parameters obtained by quantification and from the literature, will be applied for evaluation of the stationary creep rate in simulated HAZ of the X20 and P91 steels. Microstructure changes in four distinct regions of the simulated HAZ with respective peak temperatures of 900, 1000, 1200, and 1350 °C and a subsequent tempering at 650 °C were characterized by measuring hardness and quantifying the number density, size, and distribution of particles, as well as the size of PAGs and martensite subgrains.

2. Materials and Methods

Thin-walled hollow cylinder specimens of 10 mm in length, with 4 mm outer and 3 mm inner diameter, were machined from the X20 and P91 steels with the chemical composition shown in [21]. Such specimens ensure more uniform heating and cooling by minimizing the temperature gradient during thermal simulations.
Thermal simulations using Bähr DL 805A/D dilatometer (TA Instruments, Inc, New Castle, DE, USA) with temperature programs shown in Figure 1, were performed at different peak temperatures (900, 1000, 1200, and 1350 °C) applying a constant heating rate of 225 K/s, a dwell time of 2 s, and a three-step cooling rate, namely −145 K/s down to 800 °C, −40 K/s down to 500 °C, and −12 K/s down to 20 °C. A consequent tempering for 30 min at 650 °C with a heating and cooling rate of 1 K/s following the simulations at all four peak temperatures was performed. In addition, dual-cycle thermal simulations starting with the highest peak temperature (1350 °C) in the first cycle and continuing with each of the three lower peak temperatures separately in the second cycle were performed, to account for the reheating of an existing HAZ during the multi-pass welding. The thermal simulation program was chosen based on the study where the HAZ of a high-strength steel was simulated [31].
Following the thermal simulations, metallographic samples were prepared for optical- and electron microscopy imaging and analyses, as well as for hardness measurements, by hot mounting the hollow-cylinder samples in Bakelite and grinding longitudinally down to the half-width of the cylinder, as shown in Figure 2. After grinding from 180 to 1200 grade emery paper, samples were polished with 3 and 1 µm abrasive diamond suspensions. Further, samples were completely immersed in ethanol and dried. Finally, etching was performed using ferric chloride acid (5 g FeCl + 10 mL HCl + 100 mL alcohol). Nikon Microphot FXA optical microscope (Nikon Corporation, Tokyo, Japan) with Olympus DP73 digital camera and Stream image analysis software (Olympus Corporation, Tokyo, Japan) was used for determining the size of prior austenite grains (PAG). Scanning electron microscope (SEM) JSM-6500F (Jeol, Tokyo, Japan) was used for secondary electron imaging (SE) of precipitates with the aim to determine their size and distribution. Images were digitally analyzed using FIJI (ImageJ, ver. 1.52p, Bethesda, MD, USA) [32,33] with an appropriate size filter and color threshold. The SE images chosen for the analysis were acquired at a magnification of 20k, in order for the image analyses to be both statistically representative and, from the particles size point of view, as accurate as possible. The smallest particle that could be accurately measured this way was around 0.02 μm. From such analyses, the surface area and distribution (x and y coordinates) of each precipitate could be obtained. The mean interparticle spacing was evaluated by defining the nearest neighbor for each particle separately, calculating the respective center-to-center distance (λi) of each nearest particle couple, and finally calculating the average value (λ), as explained in [20]. Further, to characterize the subgrain structure (size and misorientation), samples were reground, polished, and finalized by colloidal silica emulsion polishing (OPS) for EBSD analysis using SEM with an HKL Nordlys II electron backscatter diffraction (EBSD) camera operated by Channel5 software. The instrument was operated at an accelerating voltage of 15 kV, a probe current of 1.3 nA, and a tilt angle of 70°. Detection was set to 5–7 Kikuchi bands with 4 × 4 binning. A mapping area of 216 × 169 μm2 and a step size of 0.3 μm were applied. Minimal post-processing was performed using ATEX [34], as it was limited to interpolating the unindexed pixels and removing the so-called “wild spikes”. HV0.5 hardness measurements were performed at room temperature with at least three indentations and a holding time of 14 s using Instron Tukon 2100B instrument (Buehler-Illinois Tool Works (ITW), Lake Bluff, IL, USA).

Modeling

Three different models based on physical parameters from the quantitative microstructure analysis and from the literature were chosen for the evaluation of the stationary creep rate. Three models were chosen in order to compare their outcomes and to check the prediction capability and reliability of each model.
The first model is the modified Ashby–Hornbogen creep equation proposed by Vodopivec et al. [35], where two additional parameters were applied: parameter c accounting for the effect of the distribution of carbide particles in 9–12% Cr steels (whether uniform or in form of stringers along the grain and subgrain boundaries) and parameter kvT accounting for the effect of ferrite lattice vacancies [28]. The proposed model is expressed as follows:
ε ˙ = c k v T b 2 σ n ρ m o b D α ( λ s d ) k B T G
where b is the Burgers vector, σ is the applied stress, n is the creep exponent, ρmob is the density of mobile dislocations, λs is the interparticle spacing, d is the particle size expressed as the equivalent circle diameter (ECD), kB is the Boltzmann constant, T is the absolute temperature, G is the shear modulus at temperature T, and Dα is the self-diffusion coefficient in α-iron:
D α = D 0 e Q c R T
D0 is the pre-exponential factor for self-diffusion in α-iron, QC is the activation energy for self-diffusion (creep), and R is the universal gas constant.
The second model we considered was developed by Magnusson and Sandström [29,36,37] and it is based on the time-controlled climbing of dislocations across particles, firstly proposed by Eliasson et al. [38]. The assumption of these models is that the key controlling mechanism for a dislocation to climb across particles is the time it takes, which depends on the size of particles. For this purpose, the concept of critical particle size (rcrit) was introduced to describe the maximum particle radius that the dislocations are able to climb at given stress and temperature. Particles that are larger than the critical size cannot be passed by climbing dislocations and these are the ones that contribute to the creep strength through the Orowan mechanism. The model is based on Norton’s creep equation and the back-stress (σback) concept:
ε ˙ = A N e Q c R T ( σ σ b a c k ) N
where N is the Norton exponent and AN is a constant defined as [29]:
A N = b L e f f m d l o c k n s l i p n s l i p 1 M c l τ L ( α T m G b ) 4 e Q c R T ( σ e f f σ d i s l ) N
where Leff is the average glide distance or the mean free path, which, according to Nes [39], is equal to the subgrain size, nslip is the number of active slip systems, Mcl is the climb mobility of dislocations, τ L = 0.5 G b 2 [40] is the dislocation line tension, dlock = 10b [29] is the critical distance for two nonparallel free dislocations to intersect by locking each other and becoming immobile, αT is the dislocation interaction constant from Taylor’s equation, m is the Taylor factor representing the conversion from shear to tensile strain, and σ e f f = σ σ b a c k is the effective stress. The back stress σback contains the contribution from the work hardening (σdisl) through immobile dislocations (ρim) and the contribution from precipitates (σpart) through the Orowan mechanism, which is based on the interparticle spacing of particles larger than the critical size (λcrit) [29]:
σ b a c k = σ d i s l + σ p a r t = α T m G b ρ i m + 2 m τ L b λ c r i t
The spacing of particles that are larger than the critical size (rcrit) is defined as [36]:
λ c r i t = 1.23 ( r c r i t + 1 β ) ( 2 π 3 f c r i t ) 1 2
where β = 4.33 × 10⁷ is the particles size distribution parameter [36] and fcrit is the volume fraction of particles larger than the rcrit.
The climb mobility of dislocations is defined as [29]:
M c l = k s o l D α b k B T
where ksol = 0.05 is the effect of solute atoms that slow down the climb rate.
The third model was developed by Sui and Sandström [30] for copper-cobalt alloys and, similar to the second one, is based on the time-controlled climbing of dislocations across particles:
ε ˙ = 2 τ L b c L m M m c l ( ρ m o b ) 3 2
where cL is the work hardening parameter defined as [40]:
c L = α T m 2 G ω ( R m σ y )
Rm and σy represent the room-temperature tensile strength and yield stress, respectively, while ω is the dynamic recovery parameter [41] defined as:
ω = m b d l o c k ( 2 1 n s l i p )
Mmcl is the climb mobility [30], which in contrast to the Mcl in Equation (7), is defined here as:
M m c l = D 0 b k B T e σ m d i s l b 3 k b T e Q c R T [ 1 ( σ m d i s l R m ) ]
σmdisl is the work hardening from mobile dislocations (ρmob) [30]:
σ m d i s l = α T m G b ρ m o b = σ σ c r i t
where σcrit is the contribution of particles larger than the rcrit to the overall creep strength through the Orowan mechanism [30]:
σ c r i t = C G b m λ s e r c r i t r 0 2 ( r r 0 )
r0 is the smallest particle size accurately measured from the SEM images, r is the average radius of particles, and λs is the planar square lattice particle spacing [30]:
λ s = r ( 2 π 3 f ) 1 2
with f representing the volume share of particles.
Parameter C in Equation (13) [42] is a constant related to the Poisson’s ratio (ν):
C = 0.509 ( 1 + ν 2 ( 1 ν ) )
The critical radius (rcrit) is defined as [30]:
r c r i t = 2 M m c l b 2 σ λ F ρ m o b ε ˙ m
where Mmcl is in this case calculated so that in Equation (11) the applied stress (σ) is used instead of the σmdisl [30]. The Friedel spacing (λF) [30,43] is defined as:
λ F = λ s ( α c l + 2 C α c l ) 1 3
where αcl is a parameter [30] referred to as the climb resistance:
α c l = ( 2 f 3 π ) 1 2
From Equation (16), it is obvious that there is no simple analytical solution for the rcrit, since it depends on the stationary creep rate ( ε ˙ ), which is something we are trying to evaluate. For this reason, we primarily evaluate the ε ˙ value for the parent metal of the X20 and P91 steels (Table A1) using Equation (8) and the first part of Equation (12). The values for the density of mobile dislocations (ρmob) in Equation (8) are adjusted so that the values of ε ˙ X20 and ε ˙ P91 are as close as possible to the respective experimental values in [20]. The adjusted values of ρmob are within the range (1013–1014 m−2) given in the literature [44,45]. The rcrit can now be evaluated for the four microstructure conditions (four simulation peak temperatures) of both steels, as it depends on the respective volume share of particles (f) and the interparticle spacing (λs). Consequently, parameters depending on the rcrit (σcrit, σmdisl, and Mmcl), those depending on particles size and volume share (αcl, λs, and λF), and parameters obtained from the measured hardness (Rm, σy, and cL) are also evaluated for the four microstructure conditions.
Finally, the stationary creep rate as a function of materials condition (precipitates size, distribution, and volume share, as well as dislocation density and measured hardness) can now be evaluated for both steels and four peak simulation temperatures using Equation (8).
A collection of necessary parameters for evaluation of the stationary creep rate by all three models is given in Table A1 in the Appendix A.

3. Results

3.1. HAZ Simulations

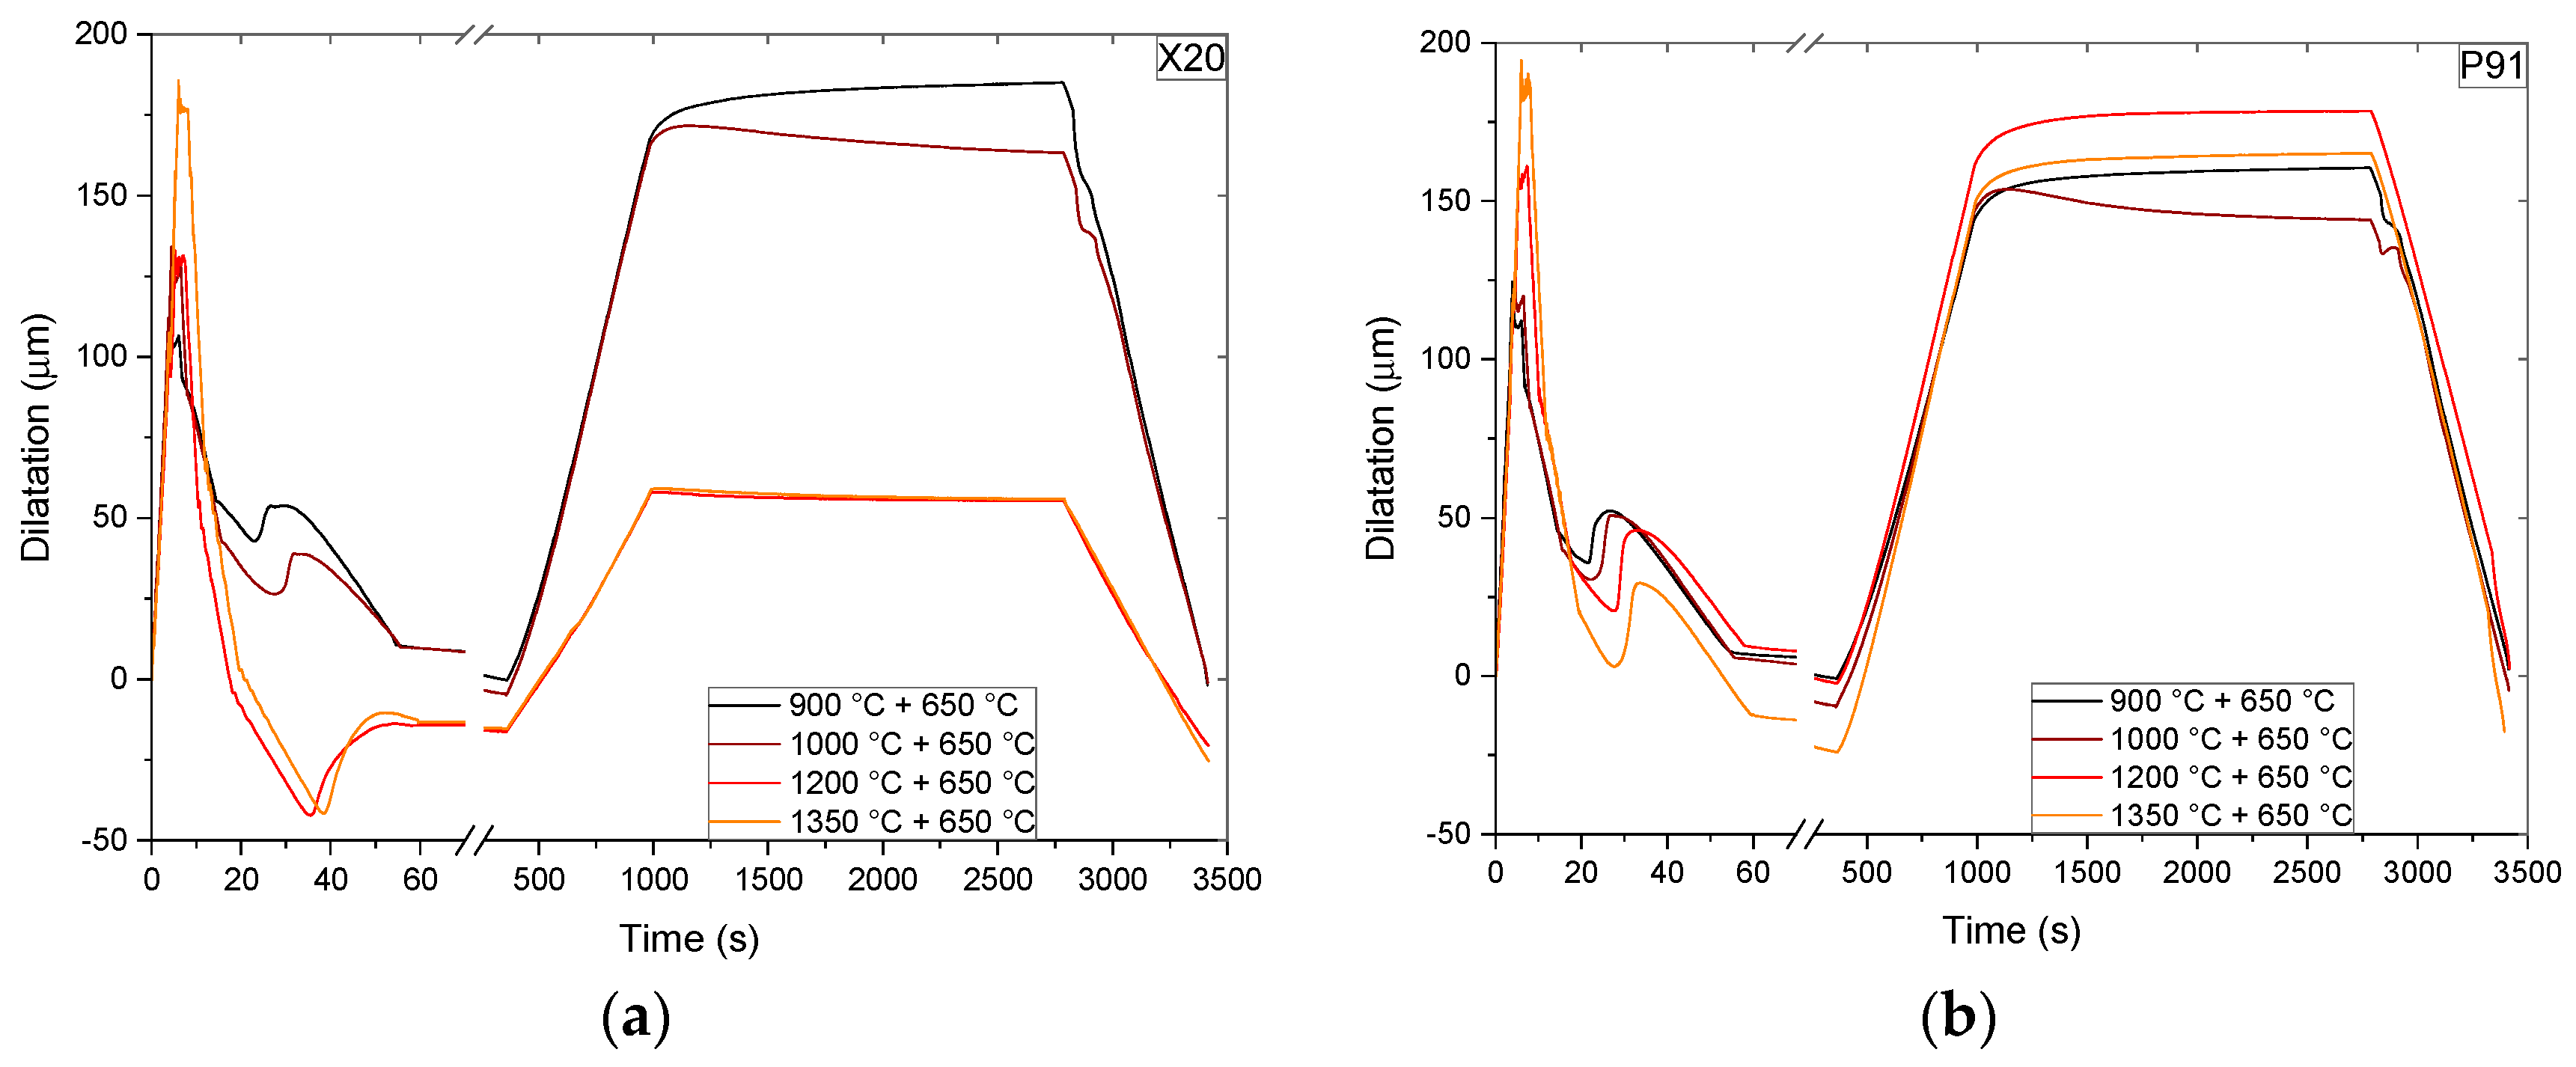
Figure 3 shows dilatation signals recorded during the HAZ simulation at four different peak temperatures followed by tempering. The transformation temperatures obtained from the dilatation curves are Ac1 = 864 °C, Ac3 = 1000 °C for the X20 and Ac1 = 897 °C, Ac3 = 1063 °C for the P91. By rapid cooling, a martensitic transformation is seen on all dilatation curves of the main simulation cycle. In addition, a phase transition can be also noticed on cooling from 650 °C, but only after the lower two simulation peak temperatures (900 and 1000 °C). The simulation at these two temperatures, both being above the Ac3, induces only a partial austenitization in both steels due to rapid heating and short holding time (2 s). For the steel X20, the difference in dilatation between the simulation at the lower temperatures (900 and 1000 °C) and the higher ones (1200 and 1350 °C) can be attributed to the difference in the amount of austenitization. In the steel P91, having a lower percentage of carbon dissolved in austenite than the X20, the austenitization rate changes more uniformly with the simulation peak temperature.

3.2. Prior Austenite Grains (PAG)

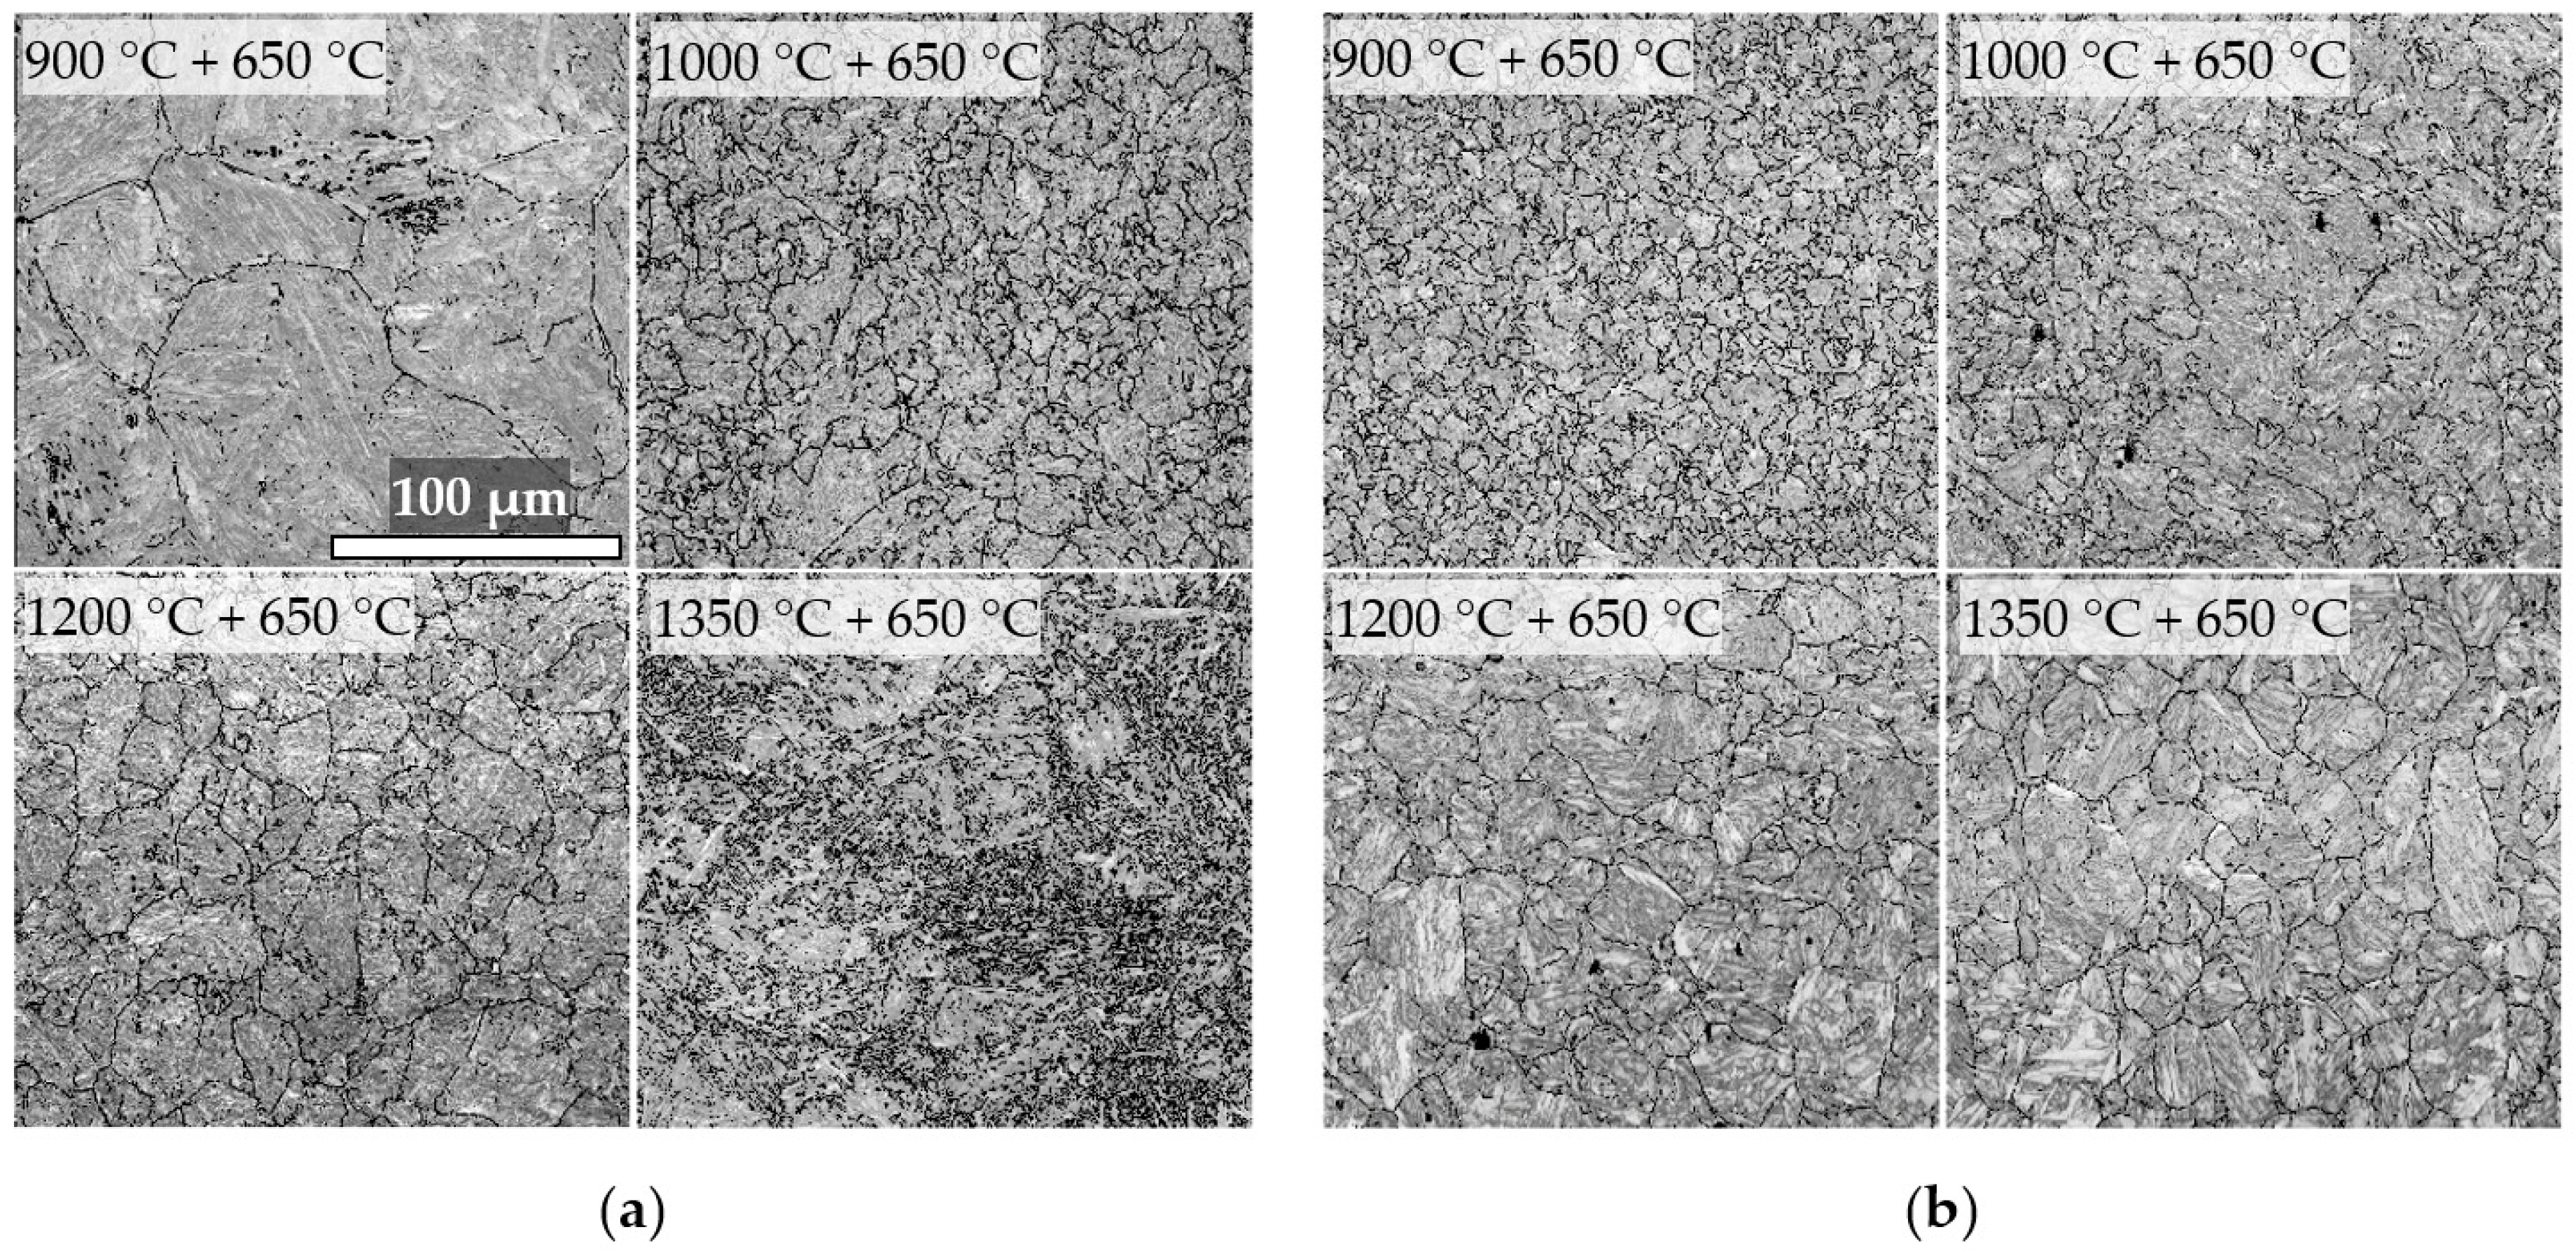
For a reliable PAG size evaluation, according to Altendrof et al. [46], EBSD disorientation maps in the range 15–47° were utilized, as shown in Figure 4.
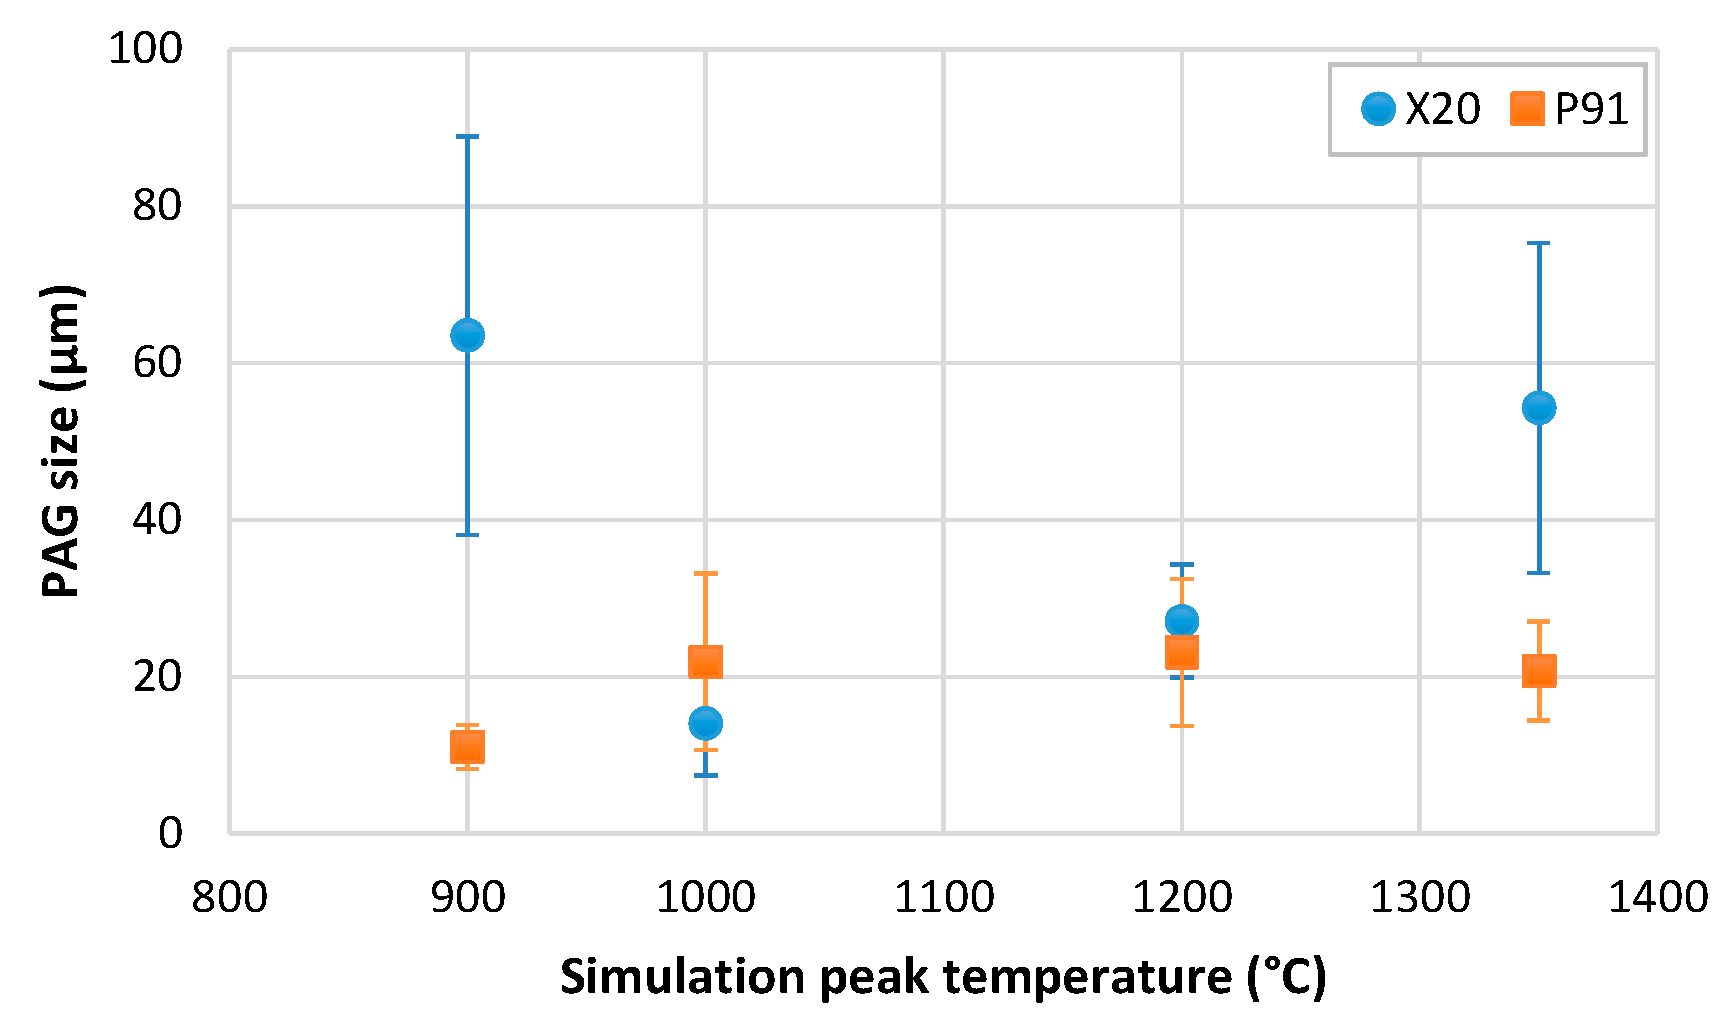
Prior to the HAZ simulations, the PAG sizes are 57 and 23 μm for the steels X20 and P91, respectively. The thermal history of the as-received state for both steels includes homogenization at 1050 °C for 1 h followed by air cooling and then tempering at 760 °C for 1 h followed by slow cooling in the furnace. Figure 5 shows the PAG sizes of the simulated HAZ at four peak temperatures, obtained from the disorientation maps in Figure 4. At 900 °C, the size of PAGs in the X20 is around 63 μm and shows a larger standard deviation, which indicates a non-uniform distribution of the PAG sizes. In the P91 steel, the PAG size at 900 °C is much smaller (11 μm) and quite uniform. The peak temperature of 900 °C is very close to the Ac1 for the P91 and slightly above the Ac1 for the X20 steel, therefore the austenitization has merely begun and the M23C6 carbides cannot be completely dissolved due to the short holding (dwell) time of 2 s. In addition, according to Smith et al. [6], at this temperature, both MX1 and MX2 carbonitrides should be present in both steels.
The peak temperature of 1000 °C is virtually at the Ac3 for the X20 and slightly below the Ac3 for the P91 steel, therefore the austenitization should be almost complete, M23C6 carbides should be virtually dissolved, and the MX1 carbonitrides in the steel P91 and the MX1 and MX2 carbonitrides in the steel X20 should be still present [6]. For the steel X20, a complete austenitization and no grain growth took place (due to the short dwell time of 2 s), resulting in the PAG size of 14 μm, whereas, for the P91, a partial austenitization and slight grain growth (22 μm) took place.
At 1200 °C, where the coarse-grained microstructure of the HAZ is formed [3], the only remaining type of carbonitride in both steels is the MX1. Both X20 and P91 steels undergo full austenitization and grain growth to about 27 and 23 μm, respectively.
Finally, 1350 °C is the temperature where δ + γ phases should be present in both steels, with a complete dissolution of all precipitates [6]. The PAG size of the X20 increases to 54 μm while the PAGs of the P91 are slightly smaller (around 21 μm) as compared to those at the 1200 °C. This could be explained by the fact that the thermally stable NbC precipitates, present in the P91 only, stabilize more of its microstructure at higher temperatures than the VC precipitates do in the steel X20. Therefore, due to the rapid heating and short holding time, the PAG size in the steel P91 at 1350 °C remains virtually unchanged as compared to the 1200 °C, whereas the PAG growth in the X20 continues.

3.3. Martensite Subgrains

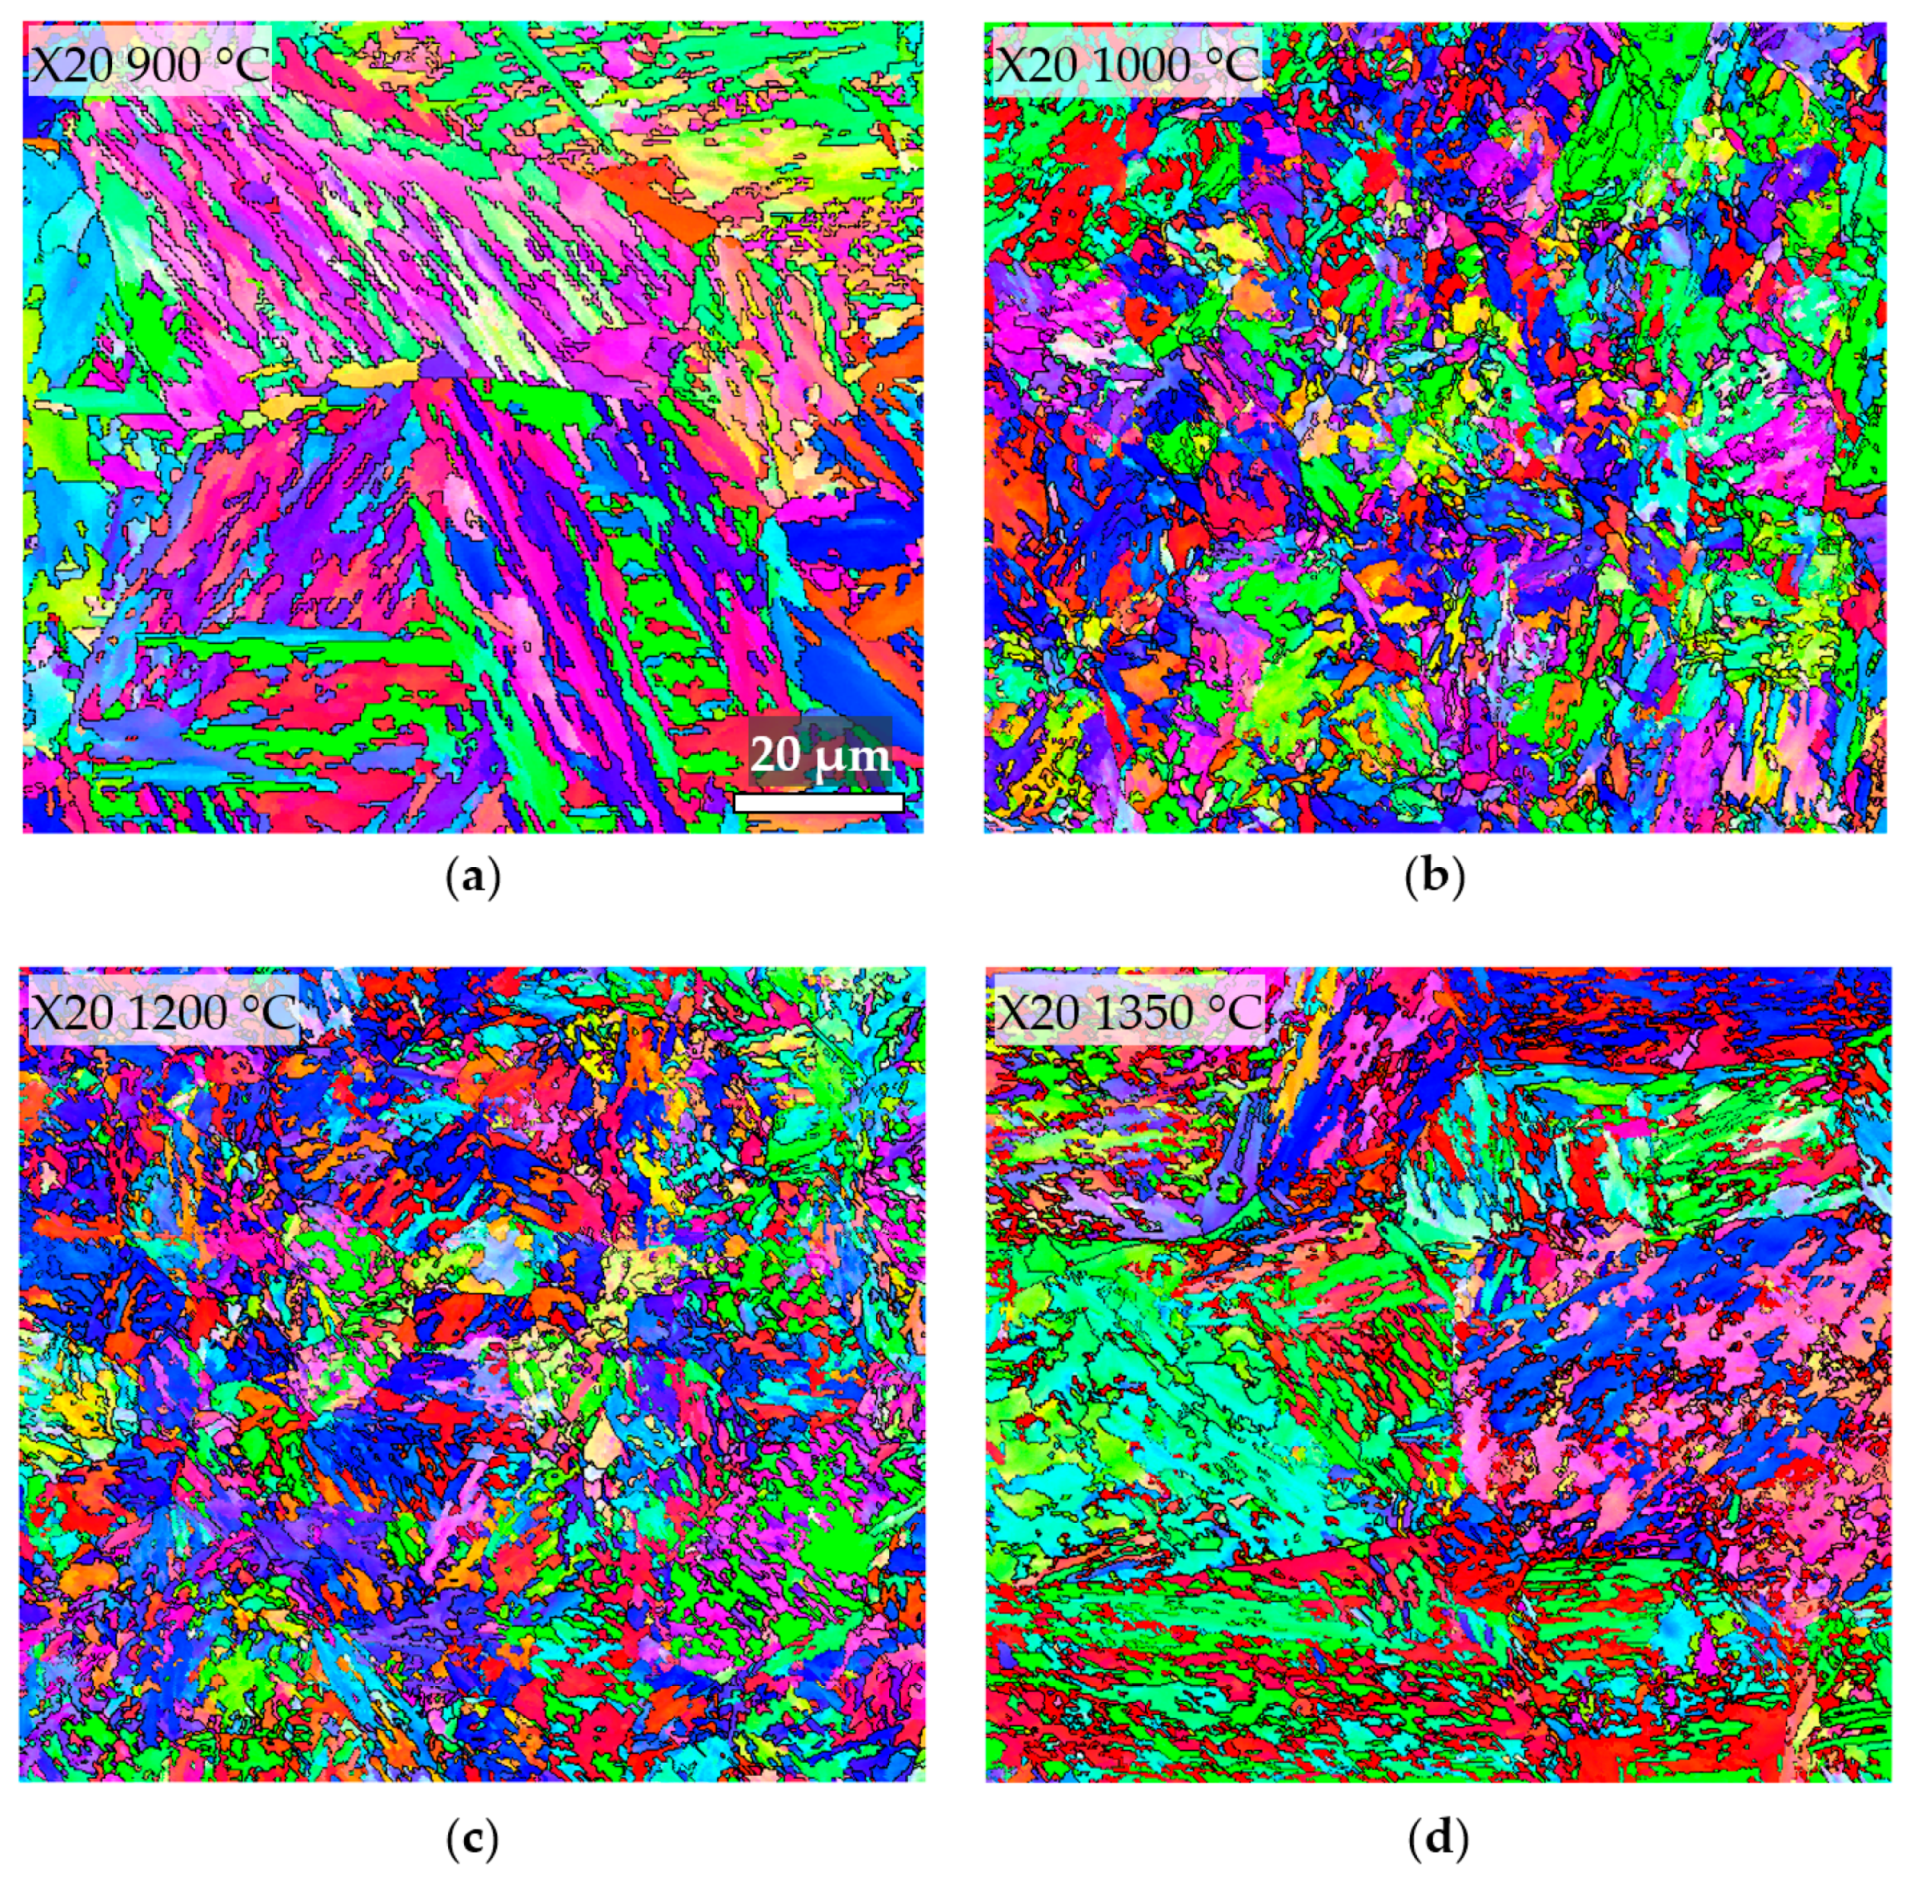
The subgrain structure of martensitic 9–12% Cr steels consists of packets, blocks, and laths. A packet is a region that consists of a number of parallel laths with the same habit planes, whereas a block is a series of laths with similar orientations [47]. Subgrain structure plays a crucial role in the creep resistance of 9–12% Cr steels, since it governs the distribution of M23C6 and MX carbides and the distribution of free and immobile dislocations in tempered martensite. Figure 6 shows the inverse pole figure (IPF) maps with subgrain boundaries (denoted with black lines) having the misorientation angles >15° for the steel X20. The threshold of >15° was chosen because boundaries with smaller misorientation angles are easier for dislocations to cross [47,48].
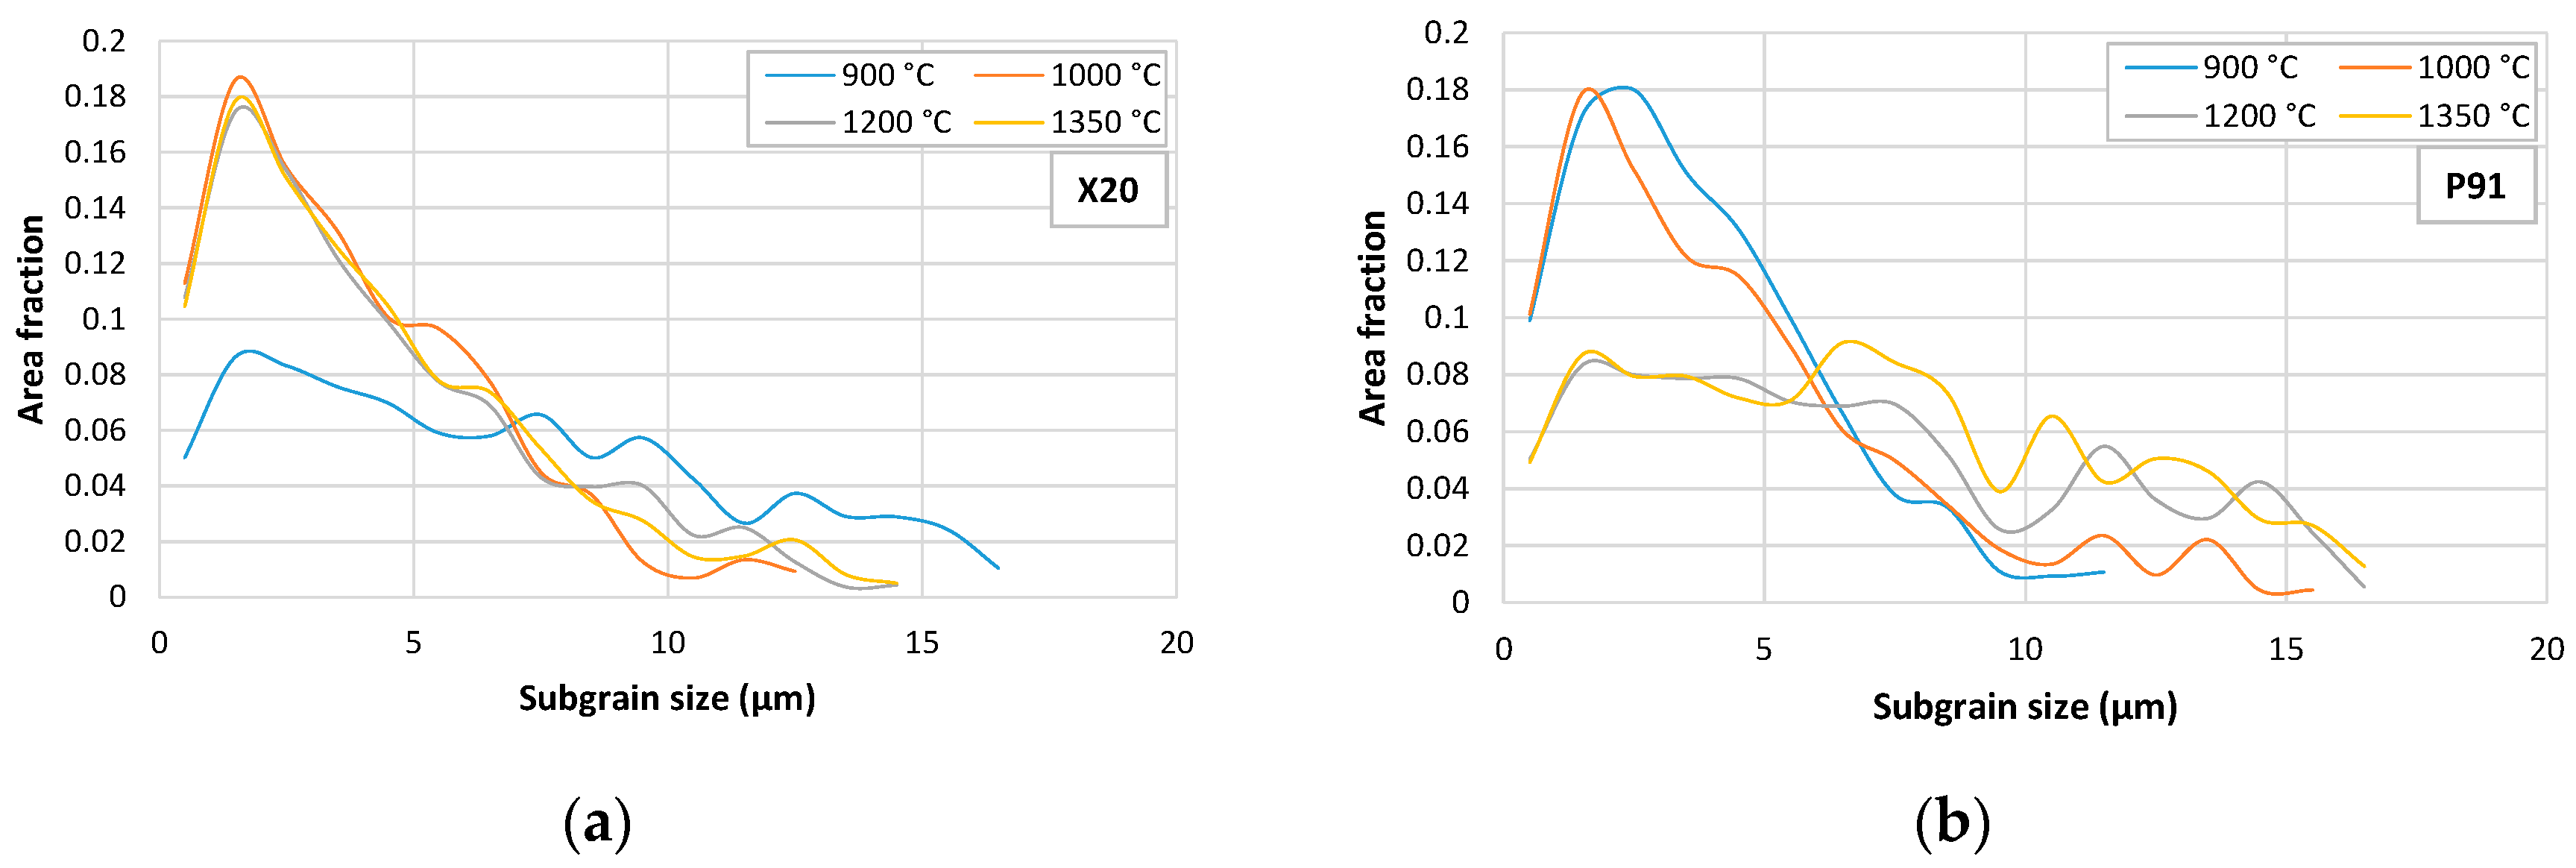
Figure 7 graphically presents the difference in the size of subgrains shown on the IPF maps in Figure 6 and Figure 8 in the form of area fraction-weighted size distribution [49] with the corresponding mean values shown in Figure 9. It can be seen that, for the steel X20, the subgrains are the largest (about 7.9 μm) and elongated (Figure 6a) after the HAZ simulation temperature of 900 °C, whereas, at higher simulation temperatures, the subgrain size drops to the range 4.5–5 μm. In the steel P91, the subgrains are smaller at the simulation temperatures of 900 and 1000 °C, having values of about 4.5 and 5 μm, respectively. After the HAZ simulation at higher peak temperatures, i.e., 1200 and 1350 °C, the subgrain size increases to about 8.6 and 7.8 μm, respectively.
Along with the size of subgrains, the distribution of boundary misorientation angles plays an important role in the structure and density of immobile dislocations, as well as in the mobility of free dislocations. In addition, the M23C6 precipitates are distributed along the low-angle lath boundaries (2–5°), by stabilizing them at high temperatures. Figure 10 shows the distribution of boundary misorientation angles of the microstructures shown on IPF maps in Figure 6 and Figure 8.
From the distribution of misorientation angles in Figure 10, it can be seen that the largest fraction of boundaries consists of those with misorientation angles above 50°. Note that there is a similar distribution of boundaries in the range 0–20° in all microstructure states and in both steels. The misorientation angle distribution of the microstructure obtained after the HAZ simulation at 900 °C in the steel X20 shows the highest peak at the angle of 60°, with a fraction three times higher than the peak of the same microstructure state in the steel P91. This is also true, but to a smaller extent, for the microstructure obtained with the simulation temperature of 1200 °C. Another distinction worth mentioning is the microstructure of the steel X20 after the simulation temperature of 1350 °C, where there are multiple peaks and a higher fraction of misorientation boundaries in the range 25–50°, but a lower peak at the angle of 53° as compared to the other curves. In addition, the microstructure of the steel P91 after the simulation at 900 °C has a distribution curve with a constantly higher fraction in the range 20–50° and the lowest peak at 60°, as compared to the other curves.

3.4. Precipitates

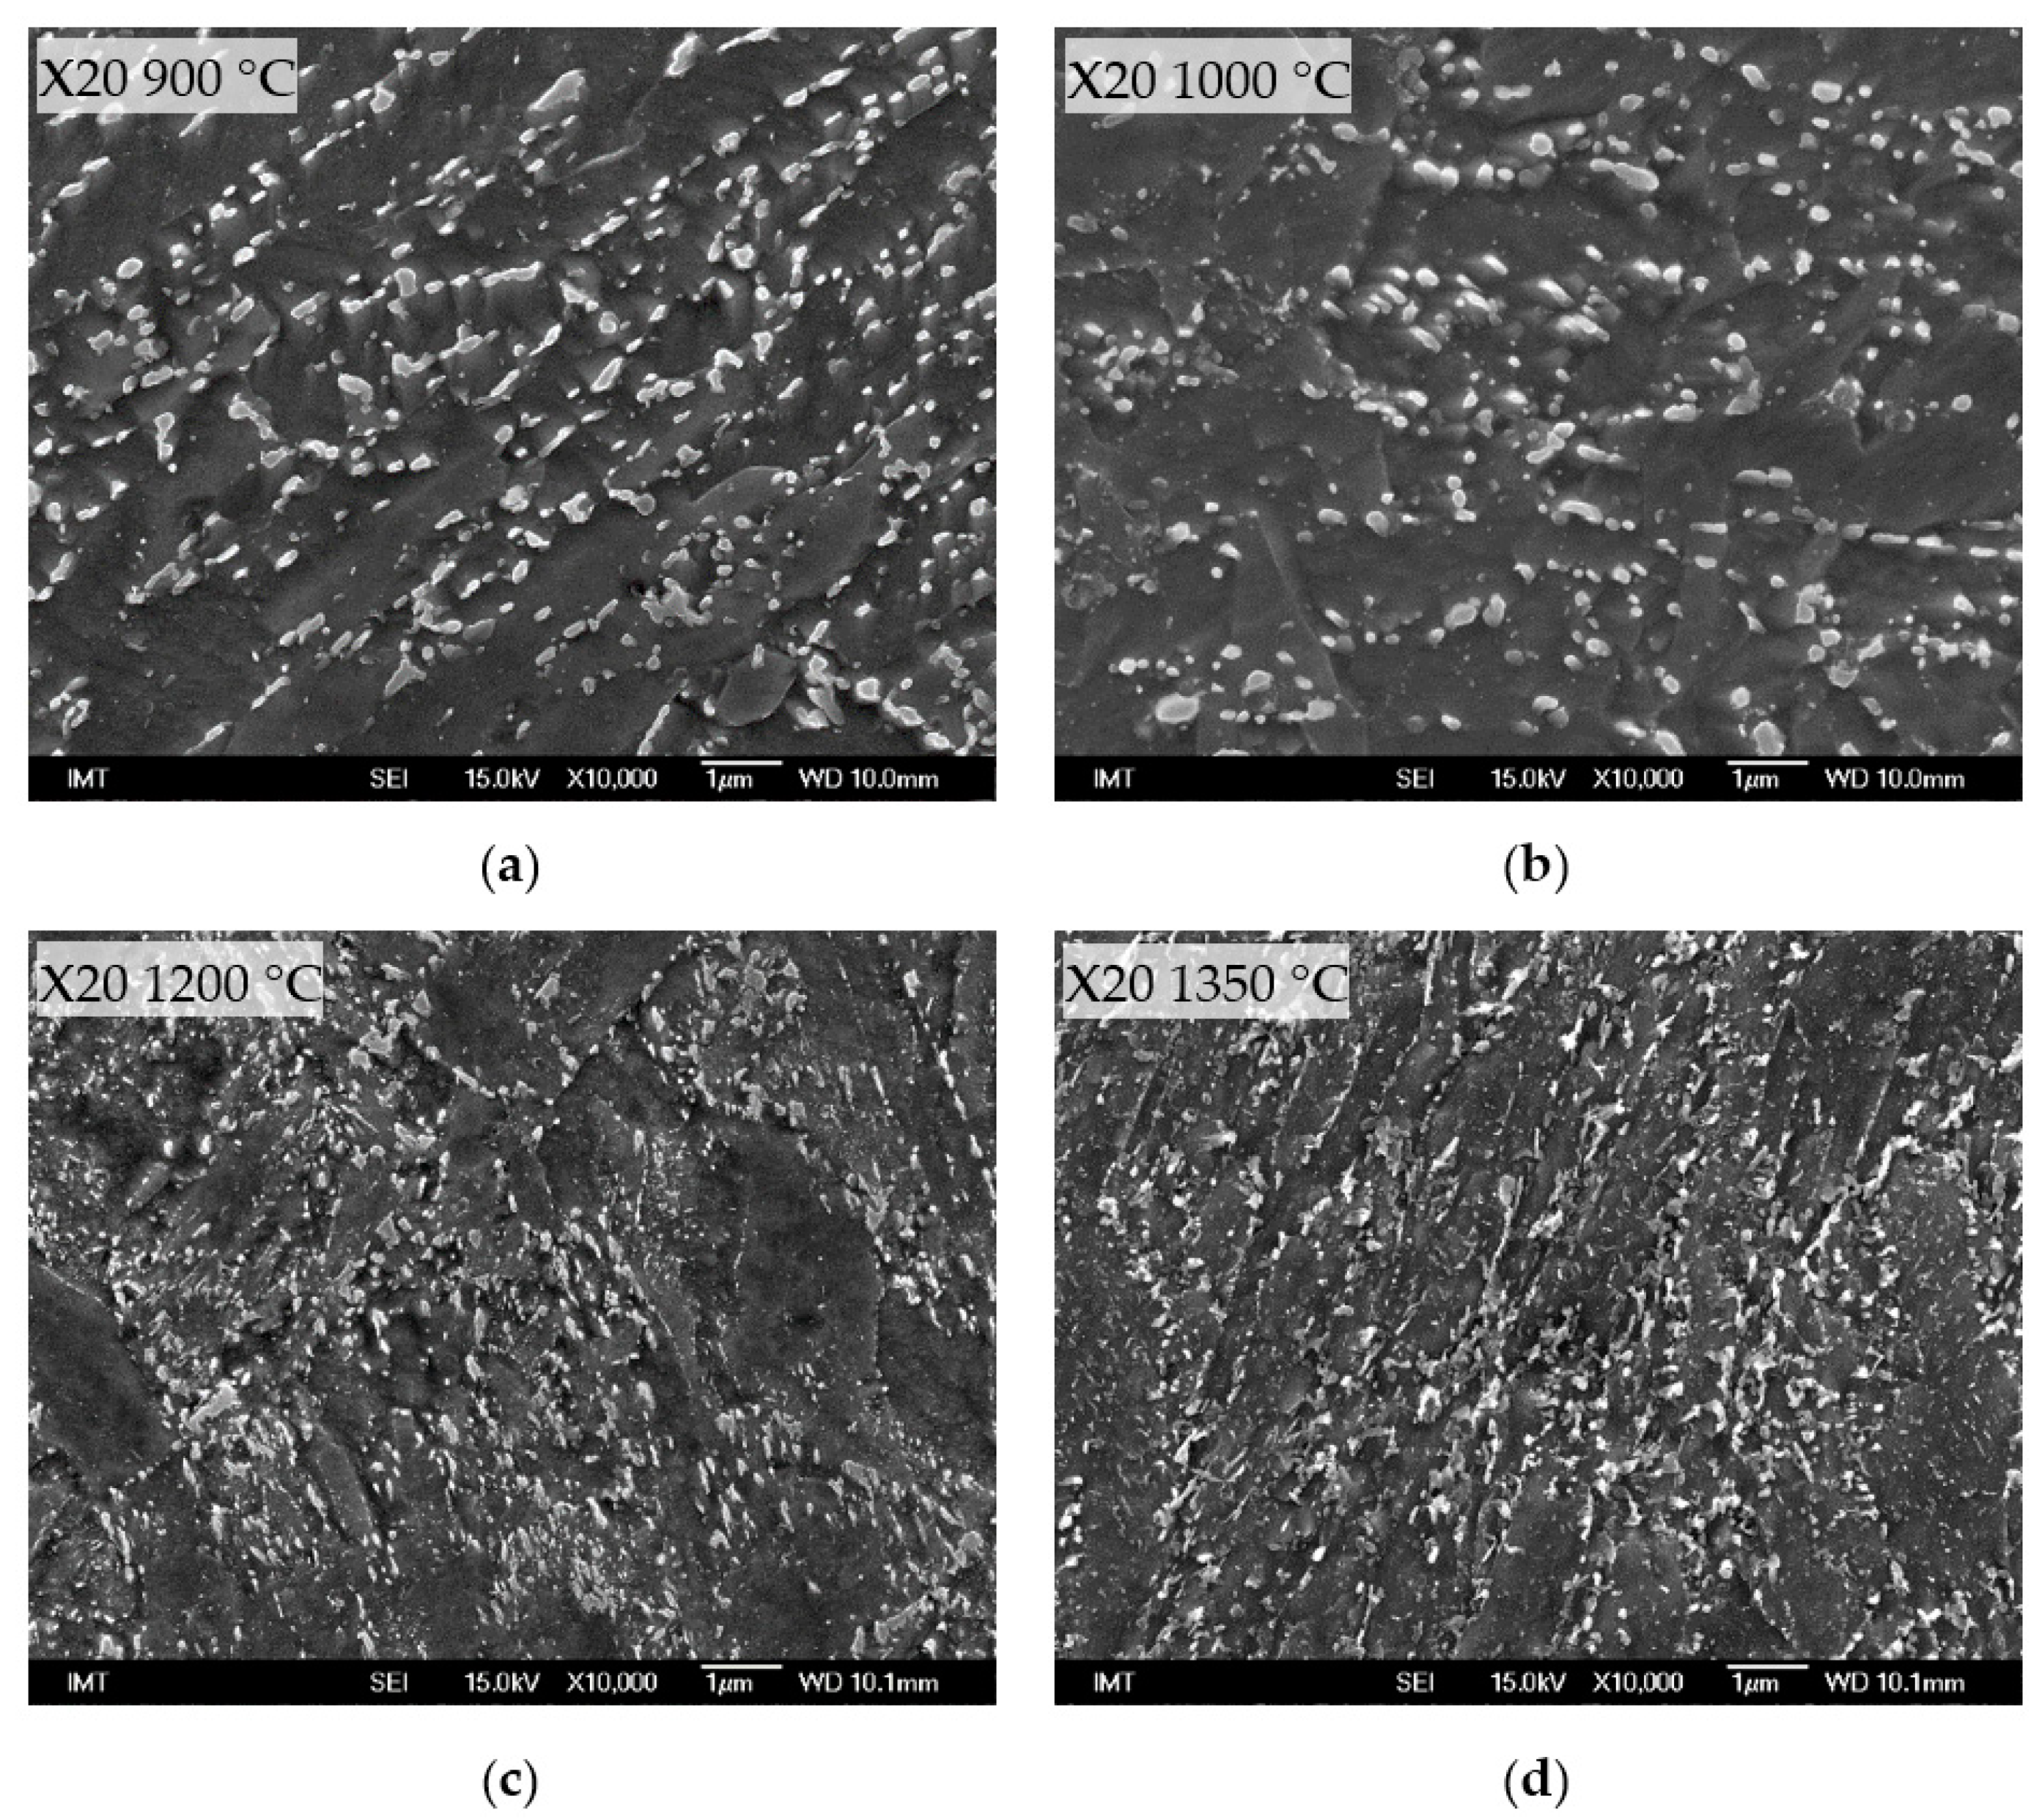
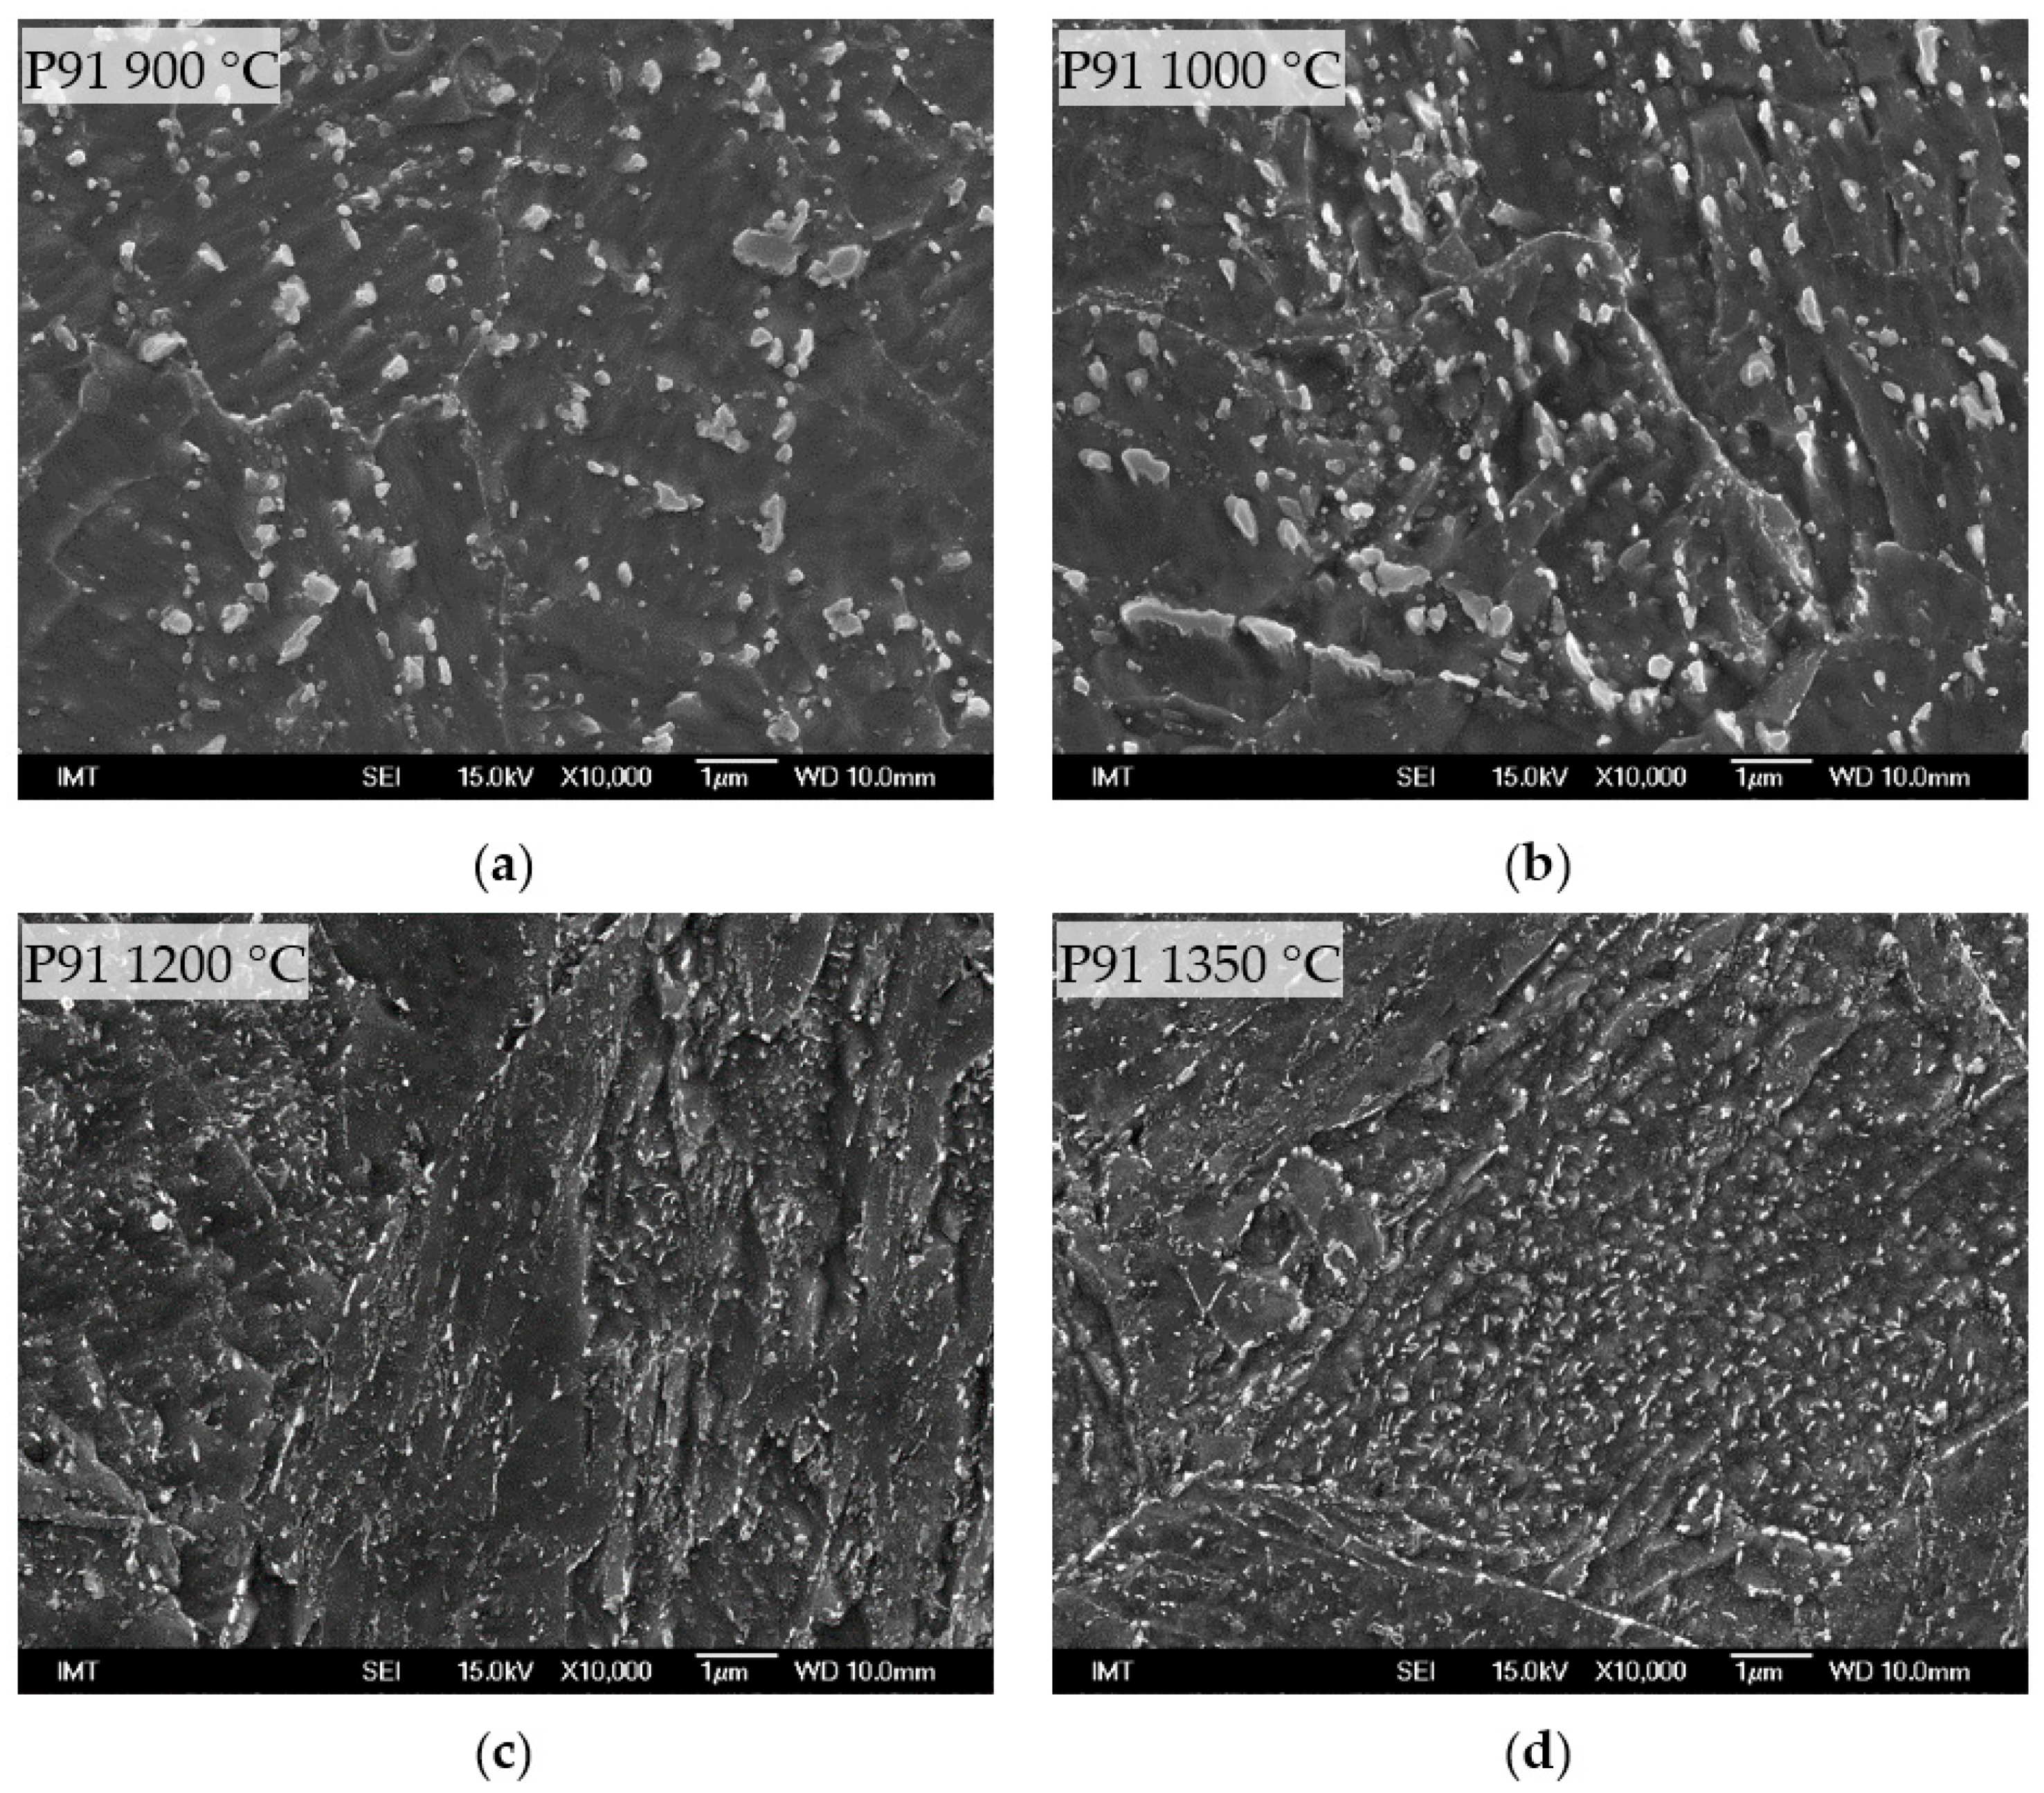
Precipitates in martensitic 9–12% Cr steels play a crucial role in stabilizing the microstructure by pinning the growth of PAGs and subgrains. They are also the building blocks of the most important strengthening mechanism at creep conditions—the well-known precipitation strengthening. Statistical analysis of precipitates was performed through automatic analysis of SE images in Figure 11, applying the morphological classification only, i.e., no distinction between the types of precipitates and no kinetic analysis of precipitate coarsening was carried out.
The size distribution of particles shown in Figure 12a for the steel X20 in the form of relative frequency indicates the number density of particles at a given size range, whereas the area fraction distribution shown in Figure 12b tends to reveal the presence and contribution to the overall volume share of larger particles that are lesser in number than the smaller ones. From both forms of distribution representations, it can be noted that the higher the peak temperature of the HAZ simulation, the higher is the number of fine (re-precipitated) particles.
SE images in Figure 11 and Figure 13 show the morphology, density, and distribution of precipitates in the X20 and P91 steels, respectively, after four different HAZ simulation peak temperatures and a subsequent tempering at 650 °C. A clear distinction in the size of particles can be made between the lower two peak temperatures (900 and 1000 °C), and the higher ones (1200 and 1350 °C). While, at the lower peak temperatures, the precipitates do not dissolve completely in the austenite but undergo a slight coarsening, the higher two temperatures seem to fulfill the thermodynamic conditions to completely dissolve the precipitates in both steels. The re-precipitation takes place with the subsequent tempering at 650 °C, where precipitates in the steel X20 (Figure 11a,b) appear larger than in the P91 (Figure 13a,b) due to higher Cr and C content in the steel X20.
The size distribution of particles of the steel P91 represented by the relative frequency in Figure 14a does not visually coincide with the respective SE images in Figure 13. Here is where the importance of the area fraction distribution of particles (Figure 14b) is clearly expressed. The distribution clearly reveals the presence and contribution to the overall volume share of larger particles in the microstructure of the steel P91 after the HAZ simulations at 900 and 1000 °C.
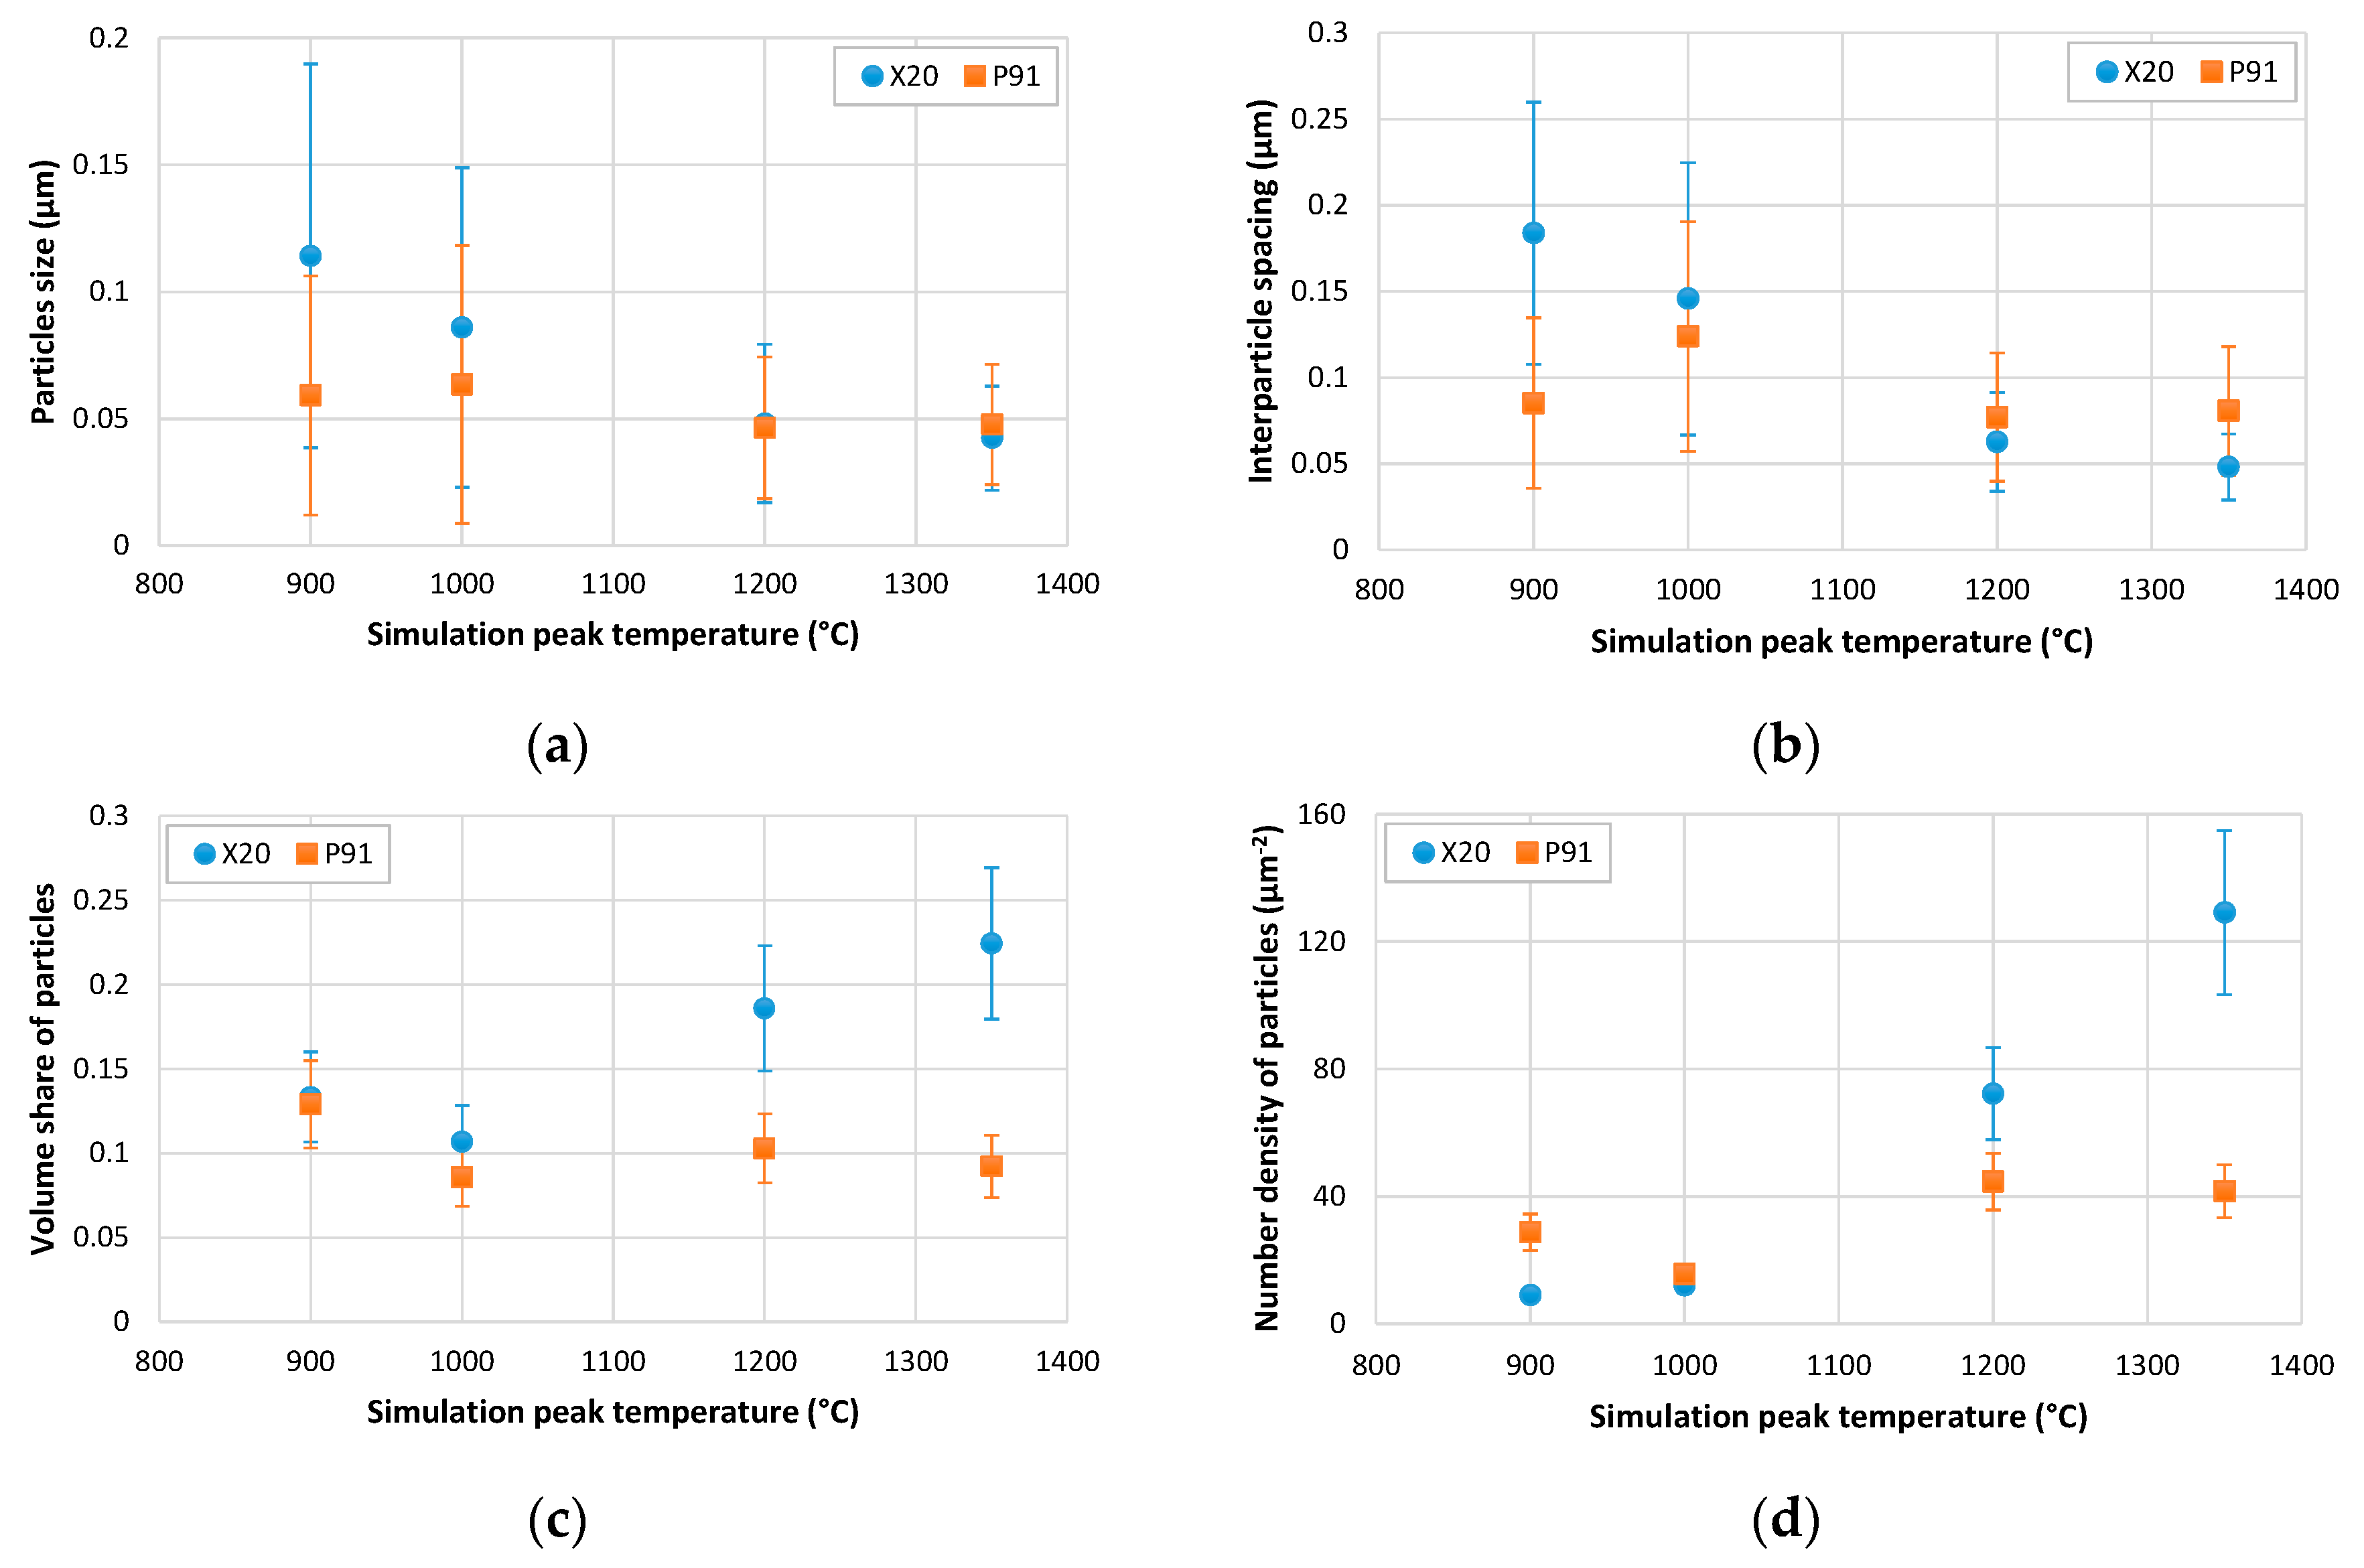
Parameters that are crucial for the present study, obtained from the statistical analysis of particles shown on SE images in Figure 11 and Figure 13, including particles size (d), expressed as the equivalent circle diameter (ECD), interparticle spacing (λ), volume share of particles (f), and number density of particles (n), are collected in Figure 15.
The mean particle size in the steel X20 (Figure 15a) decreases almost linearly from 0.114 to 0.086 μm when increasing the HAZ simulation peak temperature from 900 to 1000 °C. Smaller particles at 1000 °C are a result of the partial dissolution of some particles and re-precipitation of new ones after the tempering at 650 °C. After the higher simulation peak temperatures (1200 and 1350 °C) followed by the tempering at 650 °C, the re-precipitated particles are expectedly smaller (0.042–0.048 μm). Precipitates in the steel P91, however, show higher stability at the lower simulation peak temperatures (900 and 1000 °C) having the size in the range 0.059–0.064 μm. At the higher peak temperatures (1200 and 1350 °C), fine particles in the steel P91 are also a result of complete dissolution and re-precipitation, resulting in the size range of 0.046–0.048 μm. Note that for both steels, the standard deviation values decrease proportionally to the particle size, meaning that in the re-precipitated state, the size distribution of fine particles is more uniform.
The interparticle spacing (Figure 15b) shows a proportional trend to the mean particle size for both X20 and P91 steels. As in the case of particle size, the spatial distribution of re-precipitated particles (simulation peak temperatures of 1200 and 1350 °C) is also more uniform, which is also evident from the SE images in Figure 11 and Figure 13.
The volume share and number density of particles (Figure 15c,d, respectively) show a mutual proportionality in the simulation temperature range of 1000–1350 °C for both steels and an opposite trend to the particles size and spacing. Higher temperature sensitivity of the steel X20 compared to the P91 is revealed again through the volume share and number density of particles, both increasing linearly with the HAZ simulation temperature from 1000 to 1350 °C in the steel X20 while remaining much lower and following a different trend in the steel P91. In addition, the number density of particles shows a much greater difference (over 1000%) between the lowest and the highest HAZ simulating peak temperature as compared to the difference in volume share (around 100%), especially for the steel X20.

3.5. Hardness and Tensile Properties

Hardness values (Figure 16) generally show an increasing trend with the simulation temperature. After the simulation with a single peak temperature, the hardness of the steel X20 is higher and increases more with temperature as compared to the steel P91. A similar difference is also observed after the double peak temperature simulations, where hardness values are higher than those of the single peak simulations. By tempering, the difference in hardness between the X20 and P91 steels is reduced and the hardness values are lower in comparison to the quenched state.
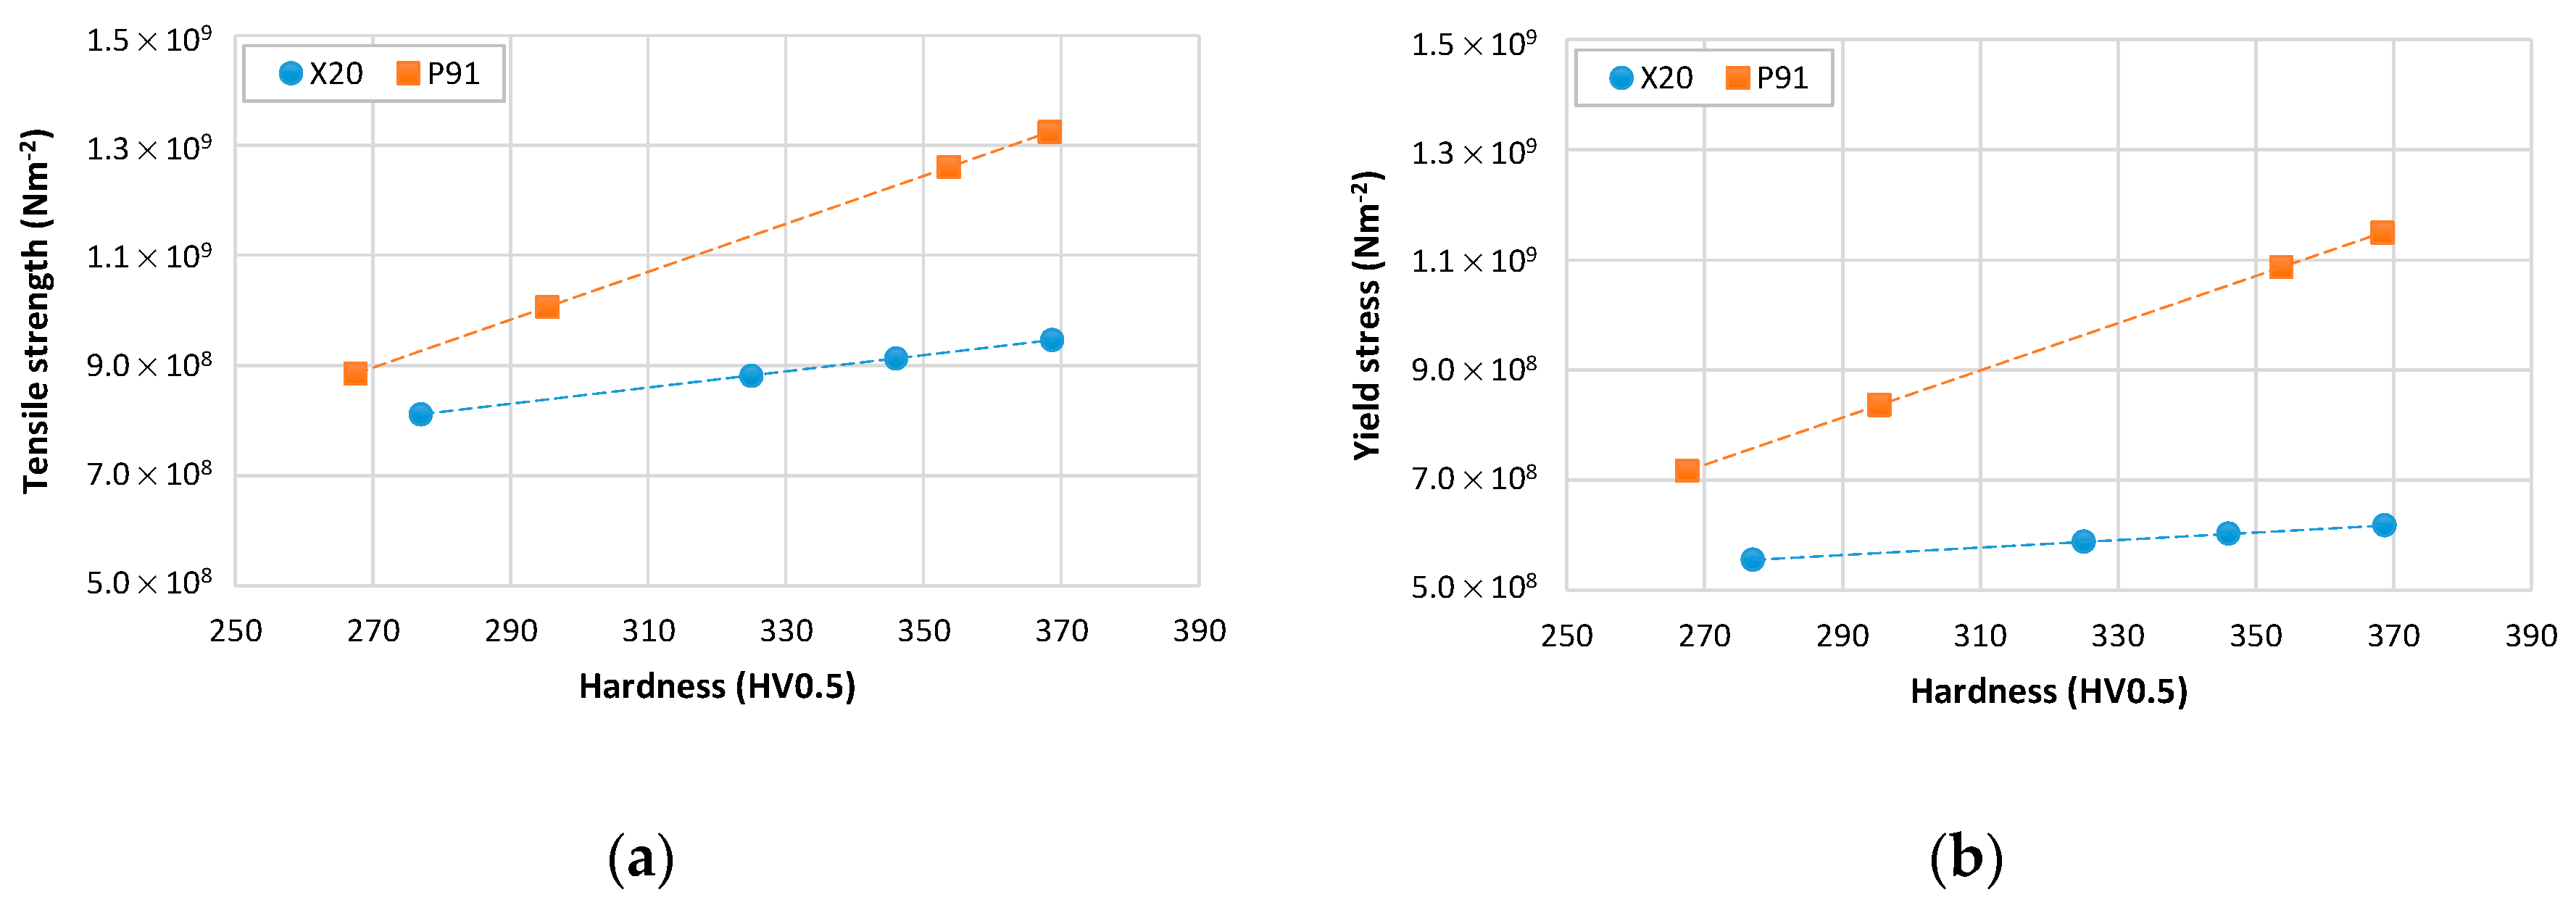
Tensile strength (Rm) and yield stress (σy) in Figure 17 were evaluated by linear regression of experimental values of hardness and the corresponding tensile properties from our previous work [20], and then by extrapolation with the measured hardness in the present work (Figure 16). Being in an indirect correlation to the four simulated HAZ microstructures through the measured hardness, Rm and σy are used for calculation of the parameter cL in Equation (9) and Mmcl in Equation (11).

3.6. Modeling Results: Stationary Creep Rate ( ε ˙ )

The stationary creep rate ( ε ˙ ) evaluated by three different models for the steels X20 and P91 that were subjected to the HAZ simulation peak temperatures of 900, 1000, 1200, and 1350 °C, each followed by the tempering at 650 °C, is given in Figure 18. The evaluated ε ˙ for the accelerated creep test conditions of 170 MPa and 580 °C, taking into account the standard deviations by all three models, are in the range 4.3 × 10⁻⁸–2.5 × 10⁻⁷ s−1. In the steel X20, the ε ˙ values from the models of Sui et al. and Vodopivec et al., although at different levels, decrease linearly with simulation temperature in the range 900–1200 °C. The trend is followed also by the model of Magnusson et al., but only in the range 900–1000 °C. In this range, the difference between the ε ˙ values obtained by three different models is greater for both steels as compared to the higher temperature range of 1200–1350 °C. In general, by all three models, the ε ˙ values are higher in the steel P91, which is contradictory to the experimental data for the parent metal [20], where the steel P91 always outperforms the X20.

4. Discussion

The stationary creep rate ( ε ˙ ) evaluated by all three models fall within the range 4.3 × 10⁻⁸–2.5 × 10⁻⁷ s−1, being in good agreement with the respective experimental values of the P91 and X20 steels (2.81 × 10⁻⁸ and 2.83 × 10⁻⁷ s−1, respectively) [20], where a similar thermal treatment was utilized, i.e., austenitizing at 1000 °C, then quenching, and finally tempering at 650 °C. However, higher experimental values of the ε ˙ were obtained for the parent metal of these steels (4.97 × 10⁻⁷ and 1.22 × 10⁻⁶ s−1, respectively), which is contradictory to the general knowledge where the parent metal is usually superior to the HAZ regarding the creep performance. The reason lies in the fact that the stationary creep rate was evaluated based on parameters obtained by quantitative analysis of the initial microstructure, that is, no creep-induced microstructure evolution is taken into account. In addition, the intercritical region of the HAZ with its characteristic type IV cracking becomes especially troublesome in long-term creep conditions, i.e., lower stresses than the one used in the present work (170 MPa) [50,51]. Also, the PAG size, as an important parameter in the HAZ, was not taken into account in any of the three models.
Differences in the ε ˙ values evaluated by three different models are expected, as each model uses a combination of different parameters, some of which have a greater contribution to the final ε ˙ values than the others. For example, in the first model (Vodopivec et al.), the ε ˙ is related to the applied stress (σ) by a power-law ε ˙ σ n , so the creep exponent (n) is the most influencing parameter in this model. Similarly, in the second model (Magnusson and Sandström), the ε ˙ is equivalent to the effective stress (σeff) and the Norton exponent (N) by a similar power-law, ε ˙ σ e f f N . In the third model by Sui and Sandström, expressed by ε ˙ ρ m o b 3 / 2 , the ρmob is in the range 1013–1014 m−2, so it is the governing parameter here, but to a lesser extent if compared to the exponents n and N.
The stationary creep rate depending on the HAZ simulation peak temperature ε ˙ (Tpeak), can be linearly related to a parameter specific for each model, also depending on the Tpeak, as illustrated in Figure 19.
According to Figure 19, the stationary creep rate ε ˙ (Tpeak), evaluated by the models of Vodopivec et al., Magnusson and Sandström, and Sui and Sandström, is linearly related to the interparticle spacing, subgrain size, and measured hardness, respectively. Notice in Figure 19a when relating the ε ˙ (Tpeak) with λ(Tpeak), even though both have different values for two different steels, the regression lines are almost coincident. In addition, although the first two relations (Figure 19a,b) are strongly linear, the last one (Figure 19c) is of higher practical importance, as the hardness is the easiest property to measure under both industrial and laboratory conditions. Indeed, hardness measurements using portable Vickers hardness-measuring instruments are commonly utilized as a method for checking the condition of the critical locations in vital parts of thermal power plants such as bends and welded joints.

5. Conclusions

Based on the findings in the present study, the following may be concluded:
-
Evaluation of the stationary creep rate ( ε ˙ ) for the creep test conditions of 170 MPa and 580 °C by the chosen models that use measured and predefined microstructure parameters resulted in the range 4.3 × 10⁻⁸–2.5 × 10⁻⁷ s−1, being in good agreement with the experimental data with a similar thermal history (2.81 × 10⁻⁸ and 2.83 × 10⁻⁷ s−1 for the P91 and X20 steels, respectively).
-
The model by Vodopivec et al., which relates the ε ˙ to the interparticle spacing, provided a greater difference in the ε ˙ values between the lowest and the highest peak temperatures for the X20 than for the P91 steel.
-
The difference in the stationary creep rate ( ε ˙ ) for all peak temperatures and both steels was the smallest when using the Magnusson and Sandström model, which relates the ε ˙ to the subgrain size.
-
The model that relates the stationary creep rate to the hardness by Sui and Sandström was the most consistent one in predicting the ε ˙ values, being always lower for higher peak temperatures.
-
Depending on the model utilized, a good linear correlation of the evaluated stationary creep rate to the interparticle spacing, subgrain size, or measured hardness was obtained. The latter is the most crucial from the practical standpoint, as hardness is the easiest property to measure.

Author Contributions

Conceptualization, F.K. and J.B.; methodology, F.K. and J.B.; formal analysis, F.K.; writing—original draft preparation, F.K.; writing—review and editing, J.B.; and visualization, F.K. All authors have read and agreed to the published version of the manuscript.

Funding

This research received no external funding.

Acknowledgments

The authors acknowledge the Institute of Metals and Technology (IMT) for financial coverage of the research. In addition, acknowledgements go to the Laboratory of Mechanical Testing at the IMT for hardness measurements and for providing the material.

Conflicts of Interest

The authors declare no conflict of interest.

Appendix A

Table A1. Parameters used in Equations (1)–(18).
SymbolUnitParameterValueRef.
RJ mol K−1Universal gas constant8.31
kBJ K−1Boltzmann constant1.38 × 10−23
σN m−2Applied stress1.7 × 108
TKAbsolute temperature853.15
ρmob,X20m−2Density of mobile dislocations for the X20 19.01 × 10¹³
ρmob,P91m−2Density of mobile dislocations for the P91 17.51 × 10¹³
νPoisson’s ratio0.3
nThe creep exponent2[28]
nsNumber of slip systems5[26]
NNorton exponent5[23]
mTaylor factor3.06[29]
αTDislocation interaction constant0.3[40]
bmBurger’s vector for α-Iron2.87 × 10−10[23]
D0m2 s−1Self-diffusion pre-exponential factor for α-Iron2.76 × 10−4[52]
QCJ mol−1Activation energy for self-diffusion in α-Iron2.93 × 105[37]
ρimm−2Density of immobile dislocations1.0 × 1011[29]
GX20N m−2Shear modulus of the X20 27.49 × 10¹⁰[53]
GP91N m−2Shear modulus of the P91 26.73 × 10¹⁰[54]
Rm, X20N m−2Room-temperature tensile strength of the X207.53 × 108[55]
Rm, P91N m−2Room-temperature tensile strength of the P917.12 × 108[55]
σy, X20N m−2Room-temperature yield stress of the X205.27 × 108[55]
σy, P91N m−2Room-temperature yield stress of the P915.46 × 108[55]
ε ˙ X20s−1Stationary creep rate of the X201.22 × 10−6[20]
ε ˙ P91s−1Stationary creep rate of the P914.97 × 10−7[20]
1 Adjusted in accordance to the respective ε ˙ X20 and ε ˙ P91 values. 2 Obtained through interpolation of data from the given references.

References

  1. Abe, F. (Ed.) Creep-Resistant Steels; Woodhead Publishing in Materials; CRC Press: Boca Raton, FL, USA, 2008; ISBN 978-1-84569-401-2. [Google Scholar]
  2. Shen, Y.; Chen, B.; Wang, C. In Situ Observation of Phase Transformations in the Coarse-Grained Heat-Affected Zone of P91 Heat-Resistant Steel During Simulated Welding Process. Metall. Mater. Trans. A 2020, 51, 3371–3376. [Google Scholar] [CrossRef]
  3. Mariappan, K.; Shankar, V.; Bhaduri, A.K. Comparative evaluation of tensile properties of simulated heat affected zones of P91 steel weld joint. Mater. High Temp. 2020, 37, 114–128. [Google Scholar] [CrossRef]
  4. Yang, K.; Zhang, Y.; Zhao, J. Elastoplastic Fracture Analysis of the P91 Steel Welded Joint under Repair Welding Thermal Shock Based on XFEM. Metals 2020, 10, 1285. [Google Scholar] [CrossRef]
  5. Lojen, G.; Vuherer, T. Optimization of PWHT of Simulated HAZ Subzones in P91 Steel with Respect to Hardness and Impact Toughness. Metals 2020, 10, 1215. [Google Scholar] [CrossRef]
  6. Smith, A.; Asadikiya, M.; Yang, M.; Chen, J.; Zhong, Y. An Investigation of Creep Resistance in Grade 91 Steel through Computational Thermodynamics. Engineering 2020, 6, 644–652. [Google Scholar] [CrossRef]
  7. Peng, Y.-Q.; Chen, T.-C.; Chung, T.-J.; Jeng, S.-L.; Huang, R.-T.; Tsay, L.-W. Creep Rupture of the Simulated HAZ of T92 Steel Compared to that of a T91 Steel. Materials 2017, 10, 139. [Google Scholar] [CrossRef] [Green Version]
  8. di Gianfrancesco, A. (Ed.) Materials for Ultra-Supercritical and Advanced Ultra-Supercritical Power Plants; Woodhead Publishing Series in Energy; Woodhead Publishing/Elsevier: Amsterdam, The Netherlands, 2016; ISBN 978-0-08-100558-3. [Google Scholar]
  9. Morsdorf, L.; Jeannin, O.; Barbier, D.; Mitsuhara, M.; Raabe, D.; Tasan, C.C. Multiple mechanisms of lath martensite plasticity. Acta Mater. 2016, 121, 202–214. [Google Scholar] [CrossRef]
  10. Shibata, A.; Nagoshi, T.; Sone, M.; Morito, S.; Higo, Y. Evaluation of the block boundary and sub-block boundary strengths of ferrous lath martensite using a micro-bending test. Mater. Sci. Eng. A 2010, 527, 7538–7544. [Google Scholar] [CrossRef]
  11. Morito, S.; Adachi, Y.; Ohba, T. Morphology and Crystallography of Sub-Blocks in Ultra-Low Carbon Lath Martensite Steel. Mater. Trans. 2009, 50, 1919–1923. [Google Scholar] [CrossRef] [Green Version]
  12. Liu, X.; Fan, P.; Zhu, L. Characterization of dislocation evolution during creep of 9Cr 1Mo steel using internal friction measurement. Mater. Charact. 2019, 150, 98–106. [Google Scholar] [CrossRef]
  13. Yadav, S.D.; El-Tahawy, M.; Kalácska, S.; Dománková, M.; Yubero, D.C.; Poletti, C. Characterizing dislocation configurations and their evolution during creep of a new 12% Cr steel. Mater. Charact. 2017, 134, 387–397. [Google Scholar] [CrossRef]
  14. Li, M.; Wang, L.; Almer, J.D. Dislocation evolution during tensile deformation in ferritic–martensitic steels revealed by high-energy X-rays. Acta Mater. 2014, 76, 381–393. [Google Scholar] [CrossRef]
  15. Panait, C.G.; Zielińska-Lipiec, A.; Koziel, T.; Czyrska-Filemonowicz, A.; Gourgues-Lorenzon, A.-F.; Bendick, W. Evolution of dislocation density, size of subgrains and MX-type precipitates in a P91 steel during creep and during thermal ageing at 600C for more than 100,000 h. Mater. Sci. Eng. A 2010, 527, 4062–4069. [Google Scholar] [CrossRef] [Green Version]
  16. Han, H.; Shen, J.; Xie, J. Effects of Precipitates Evolution on Low Stress Creep Properties in P92 Heat-resistant Steel. Sci. Rep. 2018, 8, 15411. [Google Scholar] [CrossRef]
  17. Godec, M.; Skobir Balantič, D.A. Coarsening behaviour of M23C6 carbides in creep-resistant steel exposed to high temperatures. Sci. Rep. 2016, 6, 29734. [Google Scholar] [CrossRef] [Green Version]
  18. Hurtado-Noreña, C.; Danón, C.A.; Luppo, M.I.; Bruzzoni, P. Evolution of Minor Phases in a P91 Steel Normalized and Tempered at Different Temperatures. Procedia Mater. Sci. 2015, 8, 1089–1098. [Google Scholar] [CrossRef] [Green Version]
  19. Isik, M.I.; Kostka, A.; Yardley, V.A.; Pradeep, K.G.; Duarte, M.J.; Choi, P.P.; Raabe, D.; Eggeler, G. The nucleation of Mo-rich Laves phase particles adjacent to M23C6 micrograin boundary carbides in 12% Cr tempered martensite ferritic steels. Acta Mater. 2015, 90, 94–104. [Google Scholar] [CrossRef]
  20. Kafexhiu, F.; Podgornik, B.; Vodopivec, F. Ageing effect on the creep performance of simulated weld HAZ for the steels X20 and P91. MATEC Web Conf. 2018, 188, 03004. [Google Scholar] [CrossRef]
  21. Velkavrh, I.; Kafexhiu, F.; Klien, S.; Diem, A.; Podgornik, B. Tempering-Induced Microstructural Changes in the Weld Heat-Affected Zone of 9 to 12 Pct Cr Steels and Their Influence on Sliding Wear. Metall. Mater. Trans. A Phys. Metall. Mater. Sci. 2017, 48, 109–125. [Google Scholar] [CrossRef]
  22. Vodopivec, F.; Kafexhiu, F.; Žužek, B.; Podgornik, B. Glide Stress by Stationary Creep of Tempered Martensite with Polyhedral Particles. Steel Res. Int. 2017, 88. [Google Scholar] [CrossRef]
  23. Yadav, S.D.; Scherer, T.; Prasad Reddy, G.V.; Laha, K.; Sasikala, G.; Albert, S.K.; Poletti, C. Creep modelling of P91 steel employing a microstructural based hybrid concept. Eng. Fract. Mech. 2018, 200, 104–114. [Google Scholar] [CrossRef]
  24. Murchú, C.Ó.; Leen, S.B.; O’Donoghue, P.E.; Barrett, R.A. A physically-based creep damage model for effects of different precipitate types. Mater. Sci. Eng. A 2017, 682, 714–722. [Google Scholar] [CrossRef] [Green Version]
  25. Yadav, S.D.; Sonderegger, B.; Stracey, M.; Poletti, C. Modelling the creep behaviour of tempered martensitic steel based on a hybrid approach. Mater. Sci. Eng. A 2016, 662, 330–341. [Google Scholar] [CrossRef]
  26. Barrett, R.A.; O’Donoghue, P.E.; Leen, S.B. A dislocation-based model for high temperature cyclic viscoplasticity of 9–12Cr steels. Comput. Mater. Sci. 2014, 92, 286–297. [Google Scholar] [CrossRef] [Green Version]
  27. Oruganti, R.; Karadge, M.; Swaminathan, S. A Comprehensive Creep Model for Advanced 9–10% Cr Ferritic Steels. Procedia Eng. 2013, 55, 727–734. [Google Scholar] [CrossRef] [Green Version]
  28. Vodopivec, F.; Kafexhiu, F.; Žužek, B. Effect of Ferrite Lattice Vacancies on Creep Rate of the Steel X20CrMoV121 in the Range 763–913 K. Steel Res. Int. 2017, 88. [Google Scholar] [CrossRef]
  29. Magnusson, H.; Sandström, R. Creep Strain Modeling of 9 to 12 Pct Cr Steels Based on Microstructure Evolution. Metall. Mat. Trans. A 2007, 38, 2033–2039. [Google Scholar] [CrossRef]
  30. Sui, F.; Sandström, R. Creep strength contribution due to precipitation hardening in copper–cobalt alloys. J. Mater. Sci. 2019, 54, 1819–1830. [Google Scholar] [CrossRef] [Green Version]
  31. Celin, R.; Burja, J.; Kosec, G. A comparison of as-welded and simulated heat affected zone (HAZ) microstructures. Mater. Tehnol. 2016, 50, 455–460. [Google Scholar] [CrossRef]
  32. Schindelin, J.; Arganda-Carreras, I.; Frise, E.; Kaynig, V.; Longair, M.; Pietzsch, T.; Preibisch, S.; Rueden, C.; Saalfeld, S.; Schmid, B.; et al. Fiji: An open-source platform for biological-image analysis. Nat. Methods 2012, 9, 676–682. [Google Scholar] [CrossRef] [Green Version]
  33. Rueden, C.T.; Schindelin, J.; Hiner, M.C.; DeZonia, B.E.; Walter, A.E.; Arena, E.T.; Eliceiri, K.W. ImageJ2: ImageJ for the next generation of scientific image data. BMC Bioinform. 2017, 18, 529. [Google Scholar] [CrossRef]
  34. Beausir, J.-J.F.B. Analysis Tools for Electron and X-ray Diffraction, ATEX—Software; Université de Lorraine: Metz, France, 2017. [Google Scholar]
  35. Vodopivec, F.; Žužek, B.; Jenko, M.; Skobir-Balantič, D.A.; Godec, M. Calculation of stationary creep rate of tempered martensite. Mater. Sci. Technol. 2013, 29, 451–455. [Google Scholar] [CrossRef]
  36. Magnusson, H.; Sandström, R. The Role of Dislocation Climb across Particles at Creep Conditions in 9 to 12 Pct Cr Steels. Metall. Mat. Trans. A 2007, 38, 2428–2434. [Google Scholar] [CrossRef]
  37. Magnusson, H.; Sandström, R. Modeling Creep Strength of Welded 9 to 12 Pct Cr Steels. Metall. Mat. Trans. A 2010, 41, 3340–3347. [Google Scholar] [CrossRef]
  38. Eliasson, J.; Gustafson, Å.; Sandström, R. Kinetic Modelling of the Influence of Particles on Creep Strength. KEM 1999, 171–174, 277–284. [Google Scholar] [CrossRef]
  39. Nes, E. Modelling of work hardening and stress saturation in FCC metals. Prog. Mater. Sci. 1997, 41, 129–193. [Google Scholar] [CrossRef]
  40. Spigarelli, S.; Sandström, R. Basic creep modelling of aluminium. Mater. Sci. Eng. A 2018, 711, 343–349. [Google Scholar] [CrossRef]
  41. Sandström, R.; Hallgren, J. The role of creep in stress strain curves for copper. J. Nucl. Mater. 2012, 422, 51–57. [Google Scholar] [CrossRef]
  42. Hart, E.W. Theory of dispersion hardening in metals. Acta Metall. 1972, 20, 275–289. [Google Scholar] [CrossRef]
  43. Martin, J.W. Precipitation Hardening: Theory and Applications; Elsevier Science: Saint Louis, MO, USA, 2014; ISBN 978-0-08-098489-6. [Google Scholar]
  44. Tamura, M. Verification of Equation for Evaluating Dislocation Density during Steady-state Creep of Metals. J. Mater. Sci. Res. 2017, 6, 20. [Google Scholar] [CrossRef] [Green Version]
  45. Tamura, M. Relation between Sub-grain Size and Dislocation Density During Steady-State Dislocation Creep of Polycrystalline Cubic Metals. J. Mater. Sci. Res. 2018, 7, 26. [Google Scholar] [CrossRef] [Green Version]
  46. Altendorf, H.; Faessel, M.; Jeulin, D.; Latourte, F. Direct estimation of austenitic grain dimensions in heat affected zones of a martensitic steel from EBSD images: Grain size measures from covariance. J. Microsc. 2015, 258, 87–104. [Google Scholar] [CrossRef] [PubMed]
  47. Simm, T.; Sun, L.; McAdam, S.; Hill, P.; Rawson, M.; Perkins, K. The Influence of Lath, Block and Prior Austenite Grain (PAG) Size on the Tensile, Creep and Fatigue Properties of Novel Maraging Steel. Materials 2017, 10, 730. [Google Scholar] [CrossRef] [PubMed] [Green Version]
  48. Abson, D.J.; Jonas, J.J. The Hall–Petch Relation and High-Temperature Subgrains. Metal Sci. J. 1970, 4, 24–28. [Google Scholar] [CrossRef]
  49. Toth, L.S.; Biswas, S.; Gu, C.; Beausir, B. Notes on representing grain size distributions obtained by electron backscatter diffraction. Mater. Charact. 2013, 84, 67–71. [Google Scholar] [CrossRef]
  50. Esposito, L. Type IV creep cracking of welded joints: Numerical study of the grain size effect in HAZ. Procedia Struct. Integr. 2016, 2, 919–926. [Google Scholar] [CrossRef] [Green Version]
  51. Perrin, I.J.; Hayhurst, D.R. Continuum damage mechanics analyses of type IV creep failure in ferritic steel crossweld specimens. Int. J. Press. Vessel. Pip. 1999, 76, 599–617. [Google Scholar] [CrossRef]
  52. Iijima, Y.; Kimura, K.; Hirano, K. Self-diffusion and isotope effect in α-iron. Acta Metall. 1988, 36, 2811–2820. [Google Scholar] [CrossRef]
  53. EPRI X20 CrMoV12-1 Steel Handbook; EPRI: Palo Alto, CA, USA, 2006; p. 70.
  54. Murillo-Marrodán, A.; Puchi-Cabrera, E.; García, E.; Dubar, M.; Cortés, F.; Dubar, L. An Incremental Physically-Based Model of P91 Steel Flow Behaviour for the Numerical Analysis of Hot-Working Processes. Metals 2018, 8, 269. [Google Scholar] [CrossRef] [Green Version]
  55. Kafexhiu, F.; Vodopivec, F.; Turna, J.V. Effect of tempering on the room-temperature mechanical properties of X20CrMoV121 and P91 steels. Materiali Tehnologije 2012, 46, 459–464. [Google Scholar]
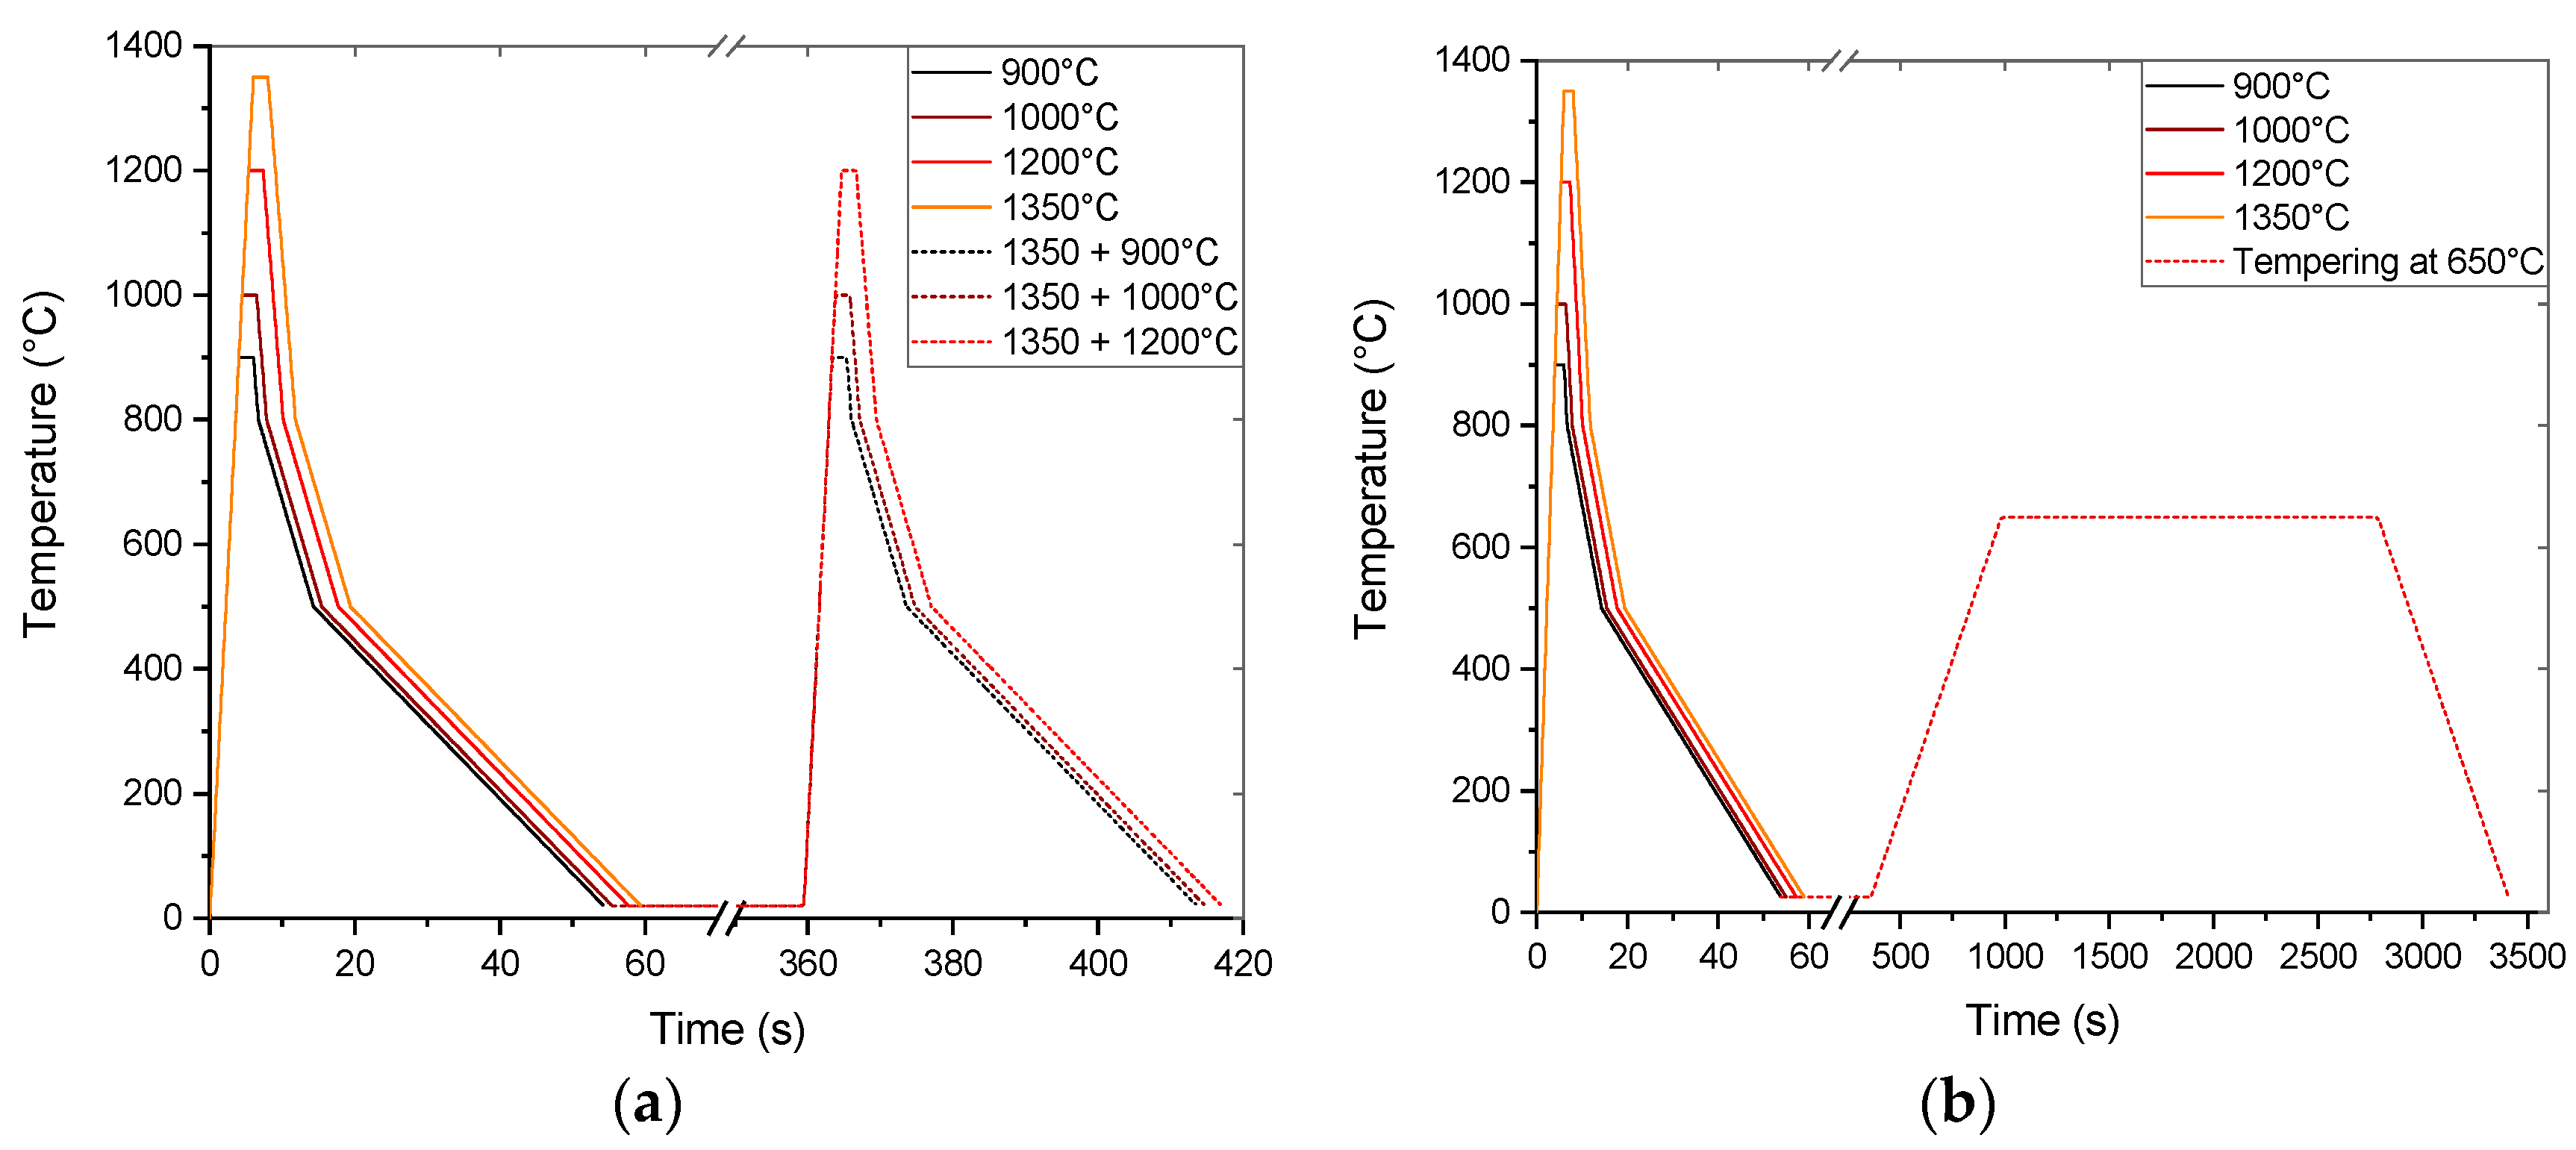
Figure 1. Time-temperature programs with a constant heating rate of 225 K/s and a three-step cooling rate of −145 K/s down to 800 °C, −40 K/s down to 500 °C, and −12 K/s down to 20 °C for: (a) single- and dual-cycle thermal simulations; and (b) single-cycle thermal simulations with tempering at 650 °C.
Metals 10 01612 g001
Figure 2. Metallography sample preparation from a dilatometry specimen (μm).
Metals 10 01612 g002
Figure 3. Time-dilatation curves of thermal simulations at 900, 1000, 1200, and 1350 °C with subsequent tempering at 650 °C for the steels: (a) X20; and (b) P91.
Metals 10 01612 g003
Figure 4. EBSD disorientation maps in the range 15–47° revealing the prior austenite grain (PAG) boundaries for the steels: (a) X20; and (b) P91.
Metals 10 01612 g004
Figure 5. PAG size depending on the HAZ simulation peak temperature for the steel X20 and P91.
Metals 10 01612 g005
Figure 6. IPF maps with black line marked boundaries of misorientation angles >15° for the steel X20, tempered at 650 °C after the HAZ simulation at: (a) 900 °C; (b) 1000 °C; (c) 1200 °C; and (d) 1350 °C.
Metals 10 01612 g006
Figure 7. Area fraction-weighted subgrain size distribution of the steel: (a) X20; and (b) P91.
Metals 10 01612 g007
Figure 8. IPF maps with black line marked boundaries of misorientation angles >15° for the steel P91, tempered at 650 °C after the HAZ simulation at: (a) 900 °C; (b) 1000 °C; (c) 1200 °C; and (d) 1350 °C.
Metals 10 01612 g008
Figure 9. Mean values of subgrain size from the distributions in Figure 7.
Metals 10 01612 g009
Figure 10. Distribution of boundary misorientation angles in four different microstructures shown on IPF maps in Figure 6 and Figure 8 for the steels: (a) X20; and (b) P91.
Metals 10 01612 g010
Figure 11. SE images showing the precipitate size and distribution in the X20 steel, tempered at 650 °C after the HAZ simulation at: (a) 900 °C; (b) 1000 °C; (c) 1200 °C; and (d) 1350 °C.
Metals 10 01612 g011
Figure 12. Size distribution of precipitates in four different simulated HAZ microstructures of the steel X20, shown on the SE images in Figure 11: (a) relative frequency; and (b) area fraction.
Metals 10 01612 g012
Figure 13. SE images showing the precipitate size and distribution in the P91 steel, tempered at 650 °C after the HAZ simulation at: (a) 900 °C; (b) 1000 °C; (c) 1200 °C; and (d) 1350 °C.
Metals 10 01612 g013
Figure 14. Size distribution of precipitates in four different simulated HAZ microstructures of the steel P91, shown on the SE images in Figure 13: (a) relative frequency; and (b) area fraction.
Metals 10 01612 g014
Figure 15. Precipitates statistics of four different simulated HAZ microstructures shown on SE images in Figure 11 and Figure 13 for the steels X20 and P91: (a) particles size (ECD); (b) interparticle spacing; (c) volume share of particles; and (d) number density of particles.
Metals 10 01612 g015
Figure 16. Vickers hardness (HV0.5) of the simulated HAZ with single peak temperature with- and without tempering, and the double peak temperature for the steels: (a) X20; and (b) P91.
Metals 10 01612 g016
Figure 17. Tensile properties of the simulated HAZ by linear regression of data in [20] and extrapolation with the measured hardness in the present work: (a) tensile strength; and (b) yield stress.
Metals 10 01612 g017
Figure 18. Stationary creep rate by three different models, i.e., Vodopivec et al. [28], Magnusson and Sandström [29], and Sui and Sandström [30], evaluated for the accelerated creep test conditions of 170 MPa and 580 °C in the simulated HAZ of the steels: (a) X20; and (b) P91.
Metals 10 01612 g018
Figure 19. Linear relations of interparticle spacing, subgrain size, and measured hardness to the respective stationary creep rate, evaluated using the model of: (a) Vodopivec et al. [28]; (b) Magnusson and Sandström [29]; and (c) Sui and Sandström [30].
Metals 10 01612 g019
Publisher’s Note: MDPI stays neutral with regard to jurisdictional claims in published maps and institutional affiliations.