Article

Influence of Laser Surface Texturing Sequence on Fatigue Properties of Coated Cold Work Tool Steel

by
Marko Sedlaček
*,
Agnieszka Zuzanna Guštin
and
Borut Žužek
Institute of Metals and Technology, Lepi pot 11, 1000 Ljubljana, Slovenia
*
Author to whom correspondence should be addressed.
Metals 2020, 10(12), 1636; https://doi.org/10.3390/met10121636
Submission received: 28 October 2020 / Revised: 2 December 2020 / Accepted: 2 December 2020 / Published: 5 December 2020
(This article belongs to the Special Issue Fatigue and Fracture Mechanics of Metals)

Abstract

:
The aim of this research was to investigate the influence of laser surface texturing sequence on the fatigue properties of cold-work tool steel. For this reason, polished hourglass-type test specimens made from cold-work tool steel (K890) were surface textured using laser texturing. Surface textures were introduced before and after hard coating deposition (TiAlN) with the aim to investigate the sequence of surface-texturing process. It was found that coating deposition prolongs the fatigue life. The fatigue life behaviour can be influenced also by the sequence of surface texturing. In the case when laser texturing is done after coating deposition, it suffers in fatigue life properties. From a lower magnification, a fractured surface looks like a quasi-ductile fracture, but a closer look reveals that there is very little plastic deformation and some small flat regions can be seen with clear evidence of a brittle fracture mechanism with cleavage. Due to low fracture toughness of investigated steel, no fatigue striations of crack growth steps were found on the fractured surfaces.

1. Introduction

In a variety of engineering applications, the contact of different materials and surfaces leads to friction and wear. Wear of different materials in different engineering applications have direct economic and technical consequences. In total, ~23% of the world’s energy consumption originates from tribological contacts [1]. Economic effect of wear of different tools and components is in the range of 1 to 4% of the gross national product of industrialized countries. This effect is more pronounced in the industrial fields such as mining, mineral processing, and earthmoving fields, but also in agriculture. Beside these, wear is also one of the most important problems in many different engineering components and has direct influence on the life cycle of certain components. In metal forming and processing industries, the life cycle is particularly important for tools and dies. Tools used for the extrusion, forging, and blanking are exposed to high tribological, mechanical, and thermal loads. Improving their resistance is a constant task for the researchers and engineers.
Surface laser texturing [2] is more and more popular in recent years as a way of reducing friction and wear of tools. With surface texturing, the surface topography is changed by generating micropores or microchannels. Research suggests various possible mechanisms by which surface texturing can improve lubrication, such as acting as microhydrodynamic bearings, providing additional lubricant supply, inlet suction, reducing lubricant shearing area, etc., as well as acting as a trap for wear debris, reducing contact area, affecting lubricant wettability, etc. [2,3,4,5]. It has been proven that surface texturing can be successfully used in the sliding bearings, machine components in sliding contacts, mechanical seals, and cylinders of internal combustion engines [2,3,4,5]. It was also suggested that laser texturing can contribute to the durability of a cutting tool’s edge [4].
Hard protective coatings are widely used in order to increase wear resistance of tools. In modern industry, especially in the case of high-performance cutting tools, it is practically unavoidable to use hard coatings [6,7,8,9,10]. Life cycle of cutting tools can be improved with a variety of different hard coatings through the improved surface quality, reduced friction and corrosion, improved oxidation resistance, and optimised processing parameters. The prolonged fatigue life of tools can be also obtained by using hard coatings [11].
In the case of tools in the manufacturing industry that are exposed to more severe dynamic loadings, such as fine blanking operation, the use of protective coatings is limited to the simple tool geometries and only to a few coating types. This is due to the demanding conditions of dynamic impact loading, where even the smallest error on the tool surface can be the reason for the premature failure of the tool.
A promising way of reducing the amount of used lubricants and increasing wear resistance of tools is a combining technology of surface texturing and protective coating, which have been already proven in different applications [12,13]. It was proven that the combination of hard coatings on the tools for high-performance cutting and sheet-forming dies with additional surface texturing improve tool properties [14,15,16,17]. Due to the local increase of mixed lubrication film thickness, surface texturing can also lead to a significant increase of contact fatigue life [18]. As also mentioned in a review article by Lu [19], only a few experiments have been conducted on fatigue-life influence of surface texturing. In the research [20,21], it was established that shallow dimples with depth around 0.6 µm could a have beneficial effect on rolling contact fatigue-life enhancement under mixed lubrication. On the other hand, it was observed by Vrbka, et al. [22] that deeper surface features with depths of 1.45 µm result in rolling contact fatigue-life reduction resulting from the lubricant film thickness reduction or film collapse. Until now, very little was known about the behaviour of coated and additional textured tools under dynamic loading, as well as about the influence of different defects and cavities on the dynamic properties of the coated surface. By the implementation of dimples or canals into the surface, we produce artefacts on the surface, which can act as the crack initiation site under the dynamic loading [23], leading to coating failure and loss of tool functionality.
Manufacture of different surface textures on the tool surface has a mutual effect on the tribological behaviour and fatigue life. Tribological aspect was investigated in our previous study [24] where the influence of geometry and the sequence of surface texturing process on tribological properties of contact surfaces was investigated. It was found that the sequence of surface texturing has an effect on tribological behaviour. Since laser surface texturing was proven to be the most efficient in reducing friction, the aim of this work was to investigate the fatigue properties of cold-work tool steel after laser surface texturing using different sequences.

2. Materials and Methods

2.1. Material

Powder metallurgy (PM) cold-work tool steel K890 was used in this investigation. Vacuum heat treatment is described in more details in [16]. Material and heat treatment were chosen based on our previously published investigations where the impact of fracture toughness on surface properties of PVD-coated cold-work tool steel was investigated [16,17]. The steel hardness was between 63 and 64 HRc at a fracture toughness of 11 MPam1/2. TiAlN hard protective coating in a monolayer of ~3 µm thickness and hardness of 3300 HV was deposited using PVD technique. Vacuum-heat-treated and polished samples (Ra = 0.05–0.10 µm) were used for coating deposition at the substrate temperature of 450 °C. Deposition process was approximately 100 °C lower compared to tempering temperature of the steel. All the samples were coated in the same batch as was described in [18]. Due to the fact that P/M cold-work steels have very low fracture toughness, there was the need for a very smooth surface in order to prevent surface crack initiations under dynamic loadings. Used roughness of the steel substrate was selected based on good practice experience.

2.2. Surface Texturing

Based on previous investigations [24,25,26], the surface texturing was designed as spherical dimples with a diameter of 65 ± 2 µm and a depth of 11 ± 1 μm. These dimensions were chosen because they exhibit the best tribological properties [24]. Specimens for fatigue-life testing were textured with a single dimple on the narrowest part of the hourglass-type test specimens (Figure 1). Since this was a model test, only one dimple was made in order to study its impact. If there were more indentations around the circumference, this would affect both the specimen cross-section and the number of possible origin points for crack progression. All hourglass-type test specimens made according to the recommendations of the standard ASTM E466 had radius of curvature of the neck R = 50 mm and minimum diameter of the neck d0 = 6 ± 0.02 mm. Since the depth of the dimples drastically influence the fatigue life, the depth of the dimples was limited by the dynamic fatigue properties [27].
The influence of surface texturing sequence was investigated on the samples that were textured before and after PVD hard coating deposition. The aim was to generate fully coated dimples and dimples where steel substrate was exposed to the surface. It is known that the coatings have different wettability compared to steel, so it is reasonable to expect that this could have an additional effect on the tribological and fatigue properties of specimens. As shown in [24], if texturing is done after coating deposition, so dimples have exposed steel substrate, this results in lower friction. The thickness of the coating was taken into account during the texturing and production of dimples. To achieve the same depth regardless of texturing sequence, the number of laser pulses was modified for a specific sequence. This was achieved with picosecond 100 ± 10 laser shots at energy of 70 µJ. By applying fine polishing before the coating deposition, potential bulges were removed around the dimples. Using the SEM and EDS technique, the presence or absence of the coating in the cavities was established.
Size and depth of textures of all analysed samples before and after the tests were checked using 3D optical profilometry (Alicona InfiniteFocus 4, Bruker Alicona, Graz, Austria). Roughness of dimple walls was also evaluated. For each sample, 10 dimples were evaluated and mean values or Ra were given. Because the dimensions of the dimples were very small, only roughness at the bottom of the dimples was measured. Because roughness sampling length is really short (~40 µm) and thus does not comply with the roughness standard, values should be taken only for mutual comparison.

2.3. Fatigue-Life Testing

In order to investigate if the surface textures can present the crack initiation point in dynamic loading, high cycle fatigue tests at different stress levels were carried out using a servo hydraulic fatigue testing system INSTRON 8802 (Instron, MA, USA). Tests were done at stress levels of 1100, 1200, 1300, and 1400 MPa with stress ratio R = −1. To ensure proper repeatability, for each stress level, at least three tests were repeated. Total number of stress cycles required for a fatigue failure were counted for each specimen. Tests were performed at normal room conditions (T = 23 ± 2 °C; RH = 50 ± 10%).
Obtained experiment results were statistically evaluated using recommendations for a small number of measurements. A confidence interval was also added. Based on the recommendation mean, X ¯ value was calculated from two near measurements. The 100 (1-α)% confidence interval of the mean µ was then calculated by an approximation
X   ¯ T α   * s 3 μ X + T α   * s 3
for the normal distribution when probability α = 0.05, critical value T α * is 4.30 [28].
The results of fatigue tests of untextured and uncoated samples were compared with all textured samples.

2.4. Analysis of Fatigue Fracture Surface

All fractured surfaces after fatigue testing were examined using optical microscope Nikon Microphot FXA (Nikon, Tokyo, Japan) and fractographic examination were done by a scanning electron microscope (JSM-6500F, JEOL, Tokyo, Japan). Before examination, all specimens’ fractured surfaces were cleaned in acetone ultrasonic baths.

3. Results and Discussion

3.1. Fatigue-Life Testing

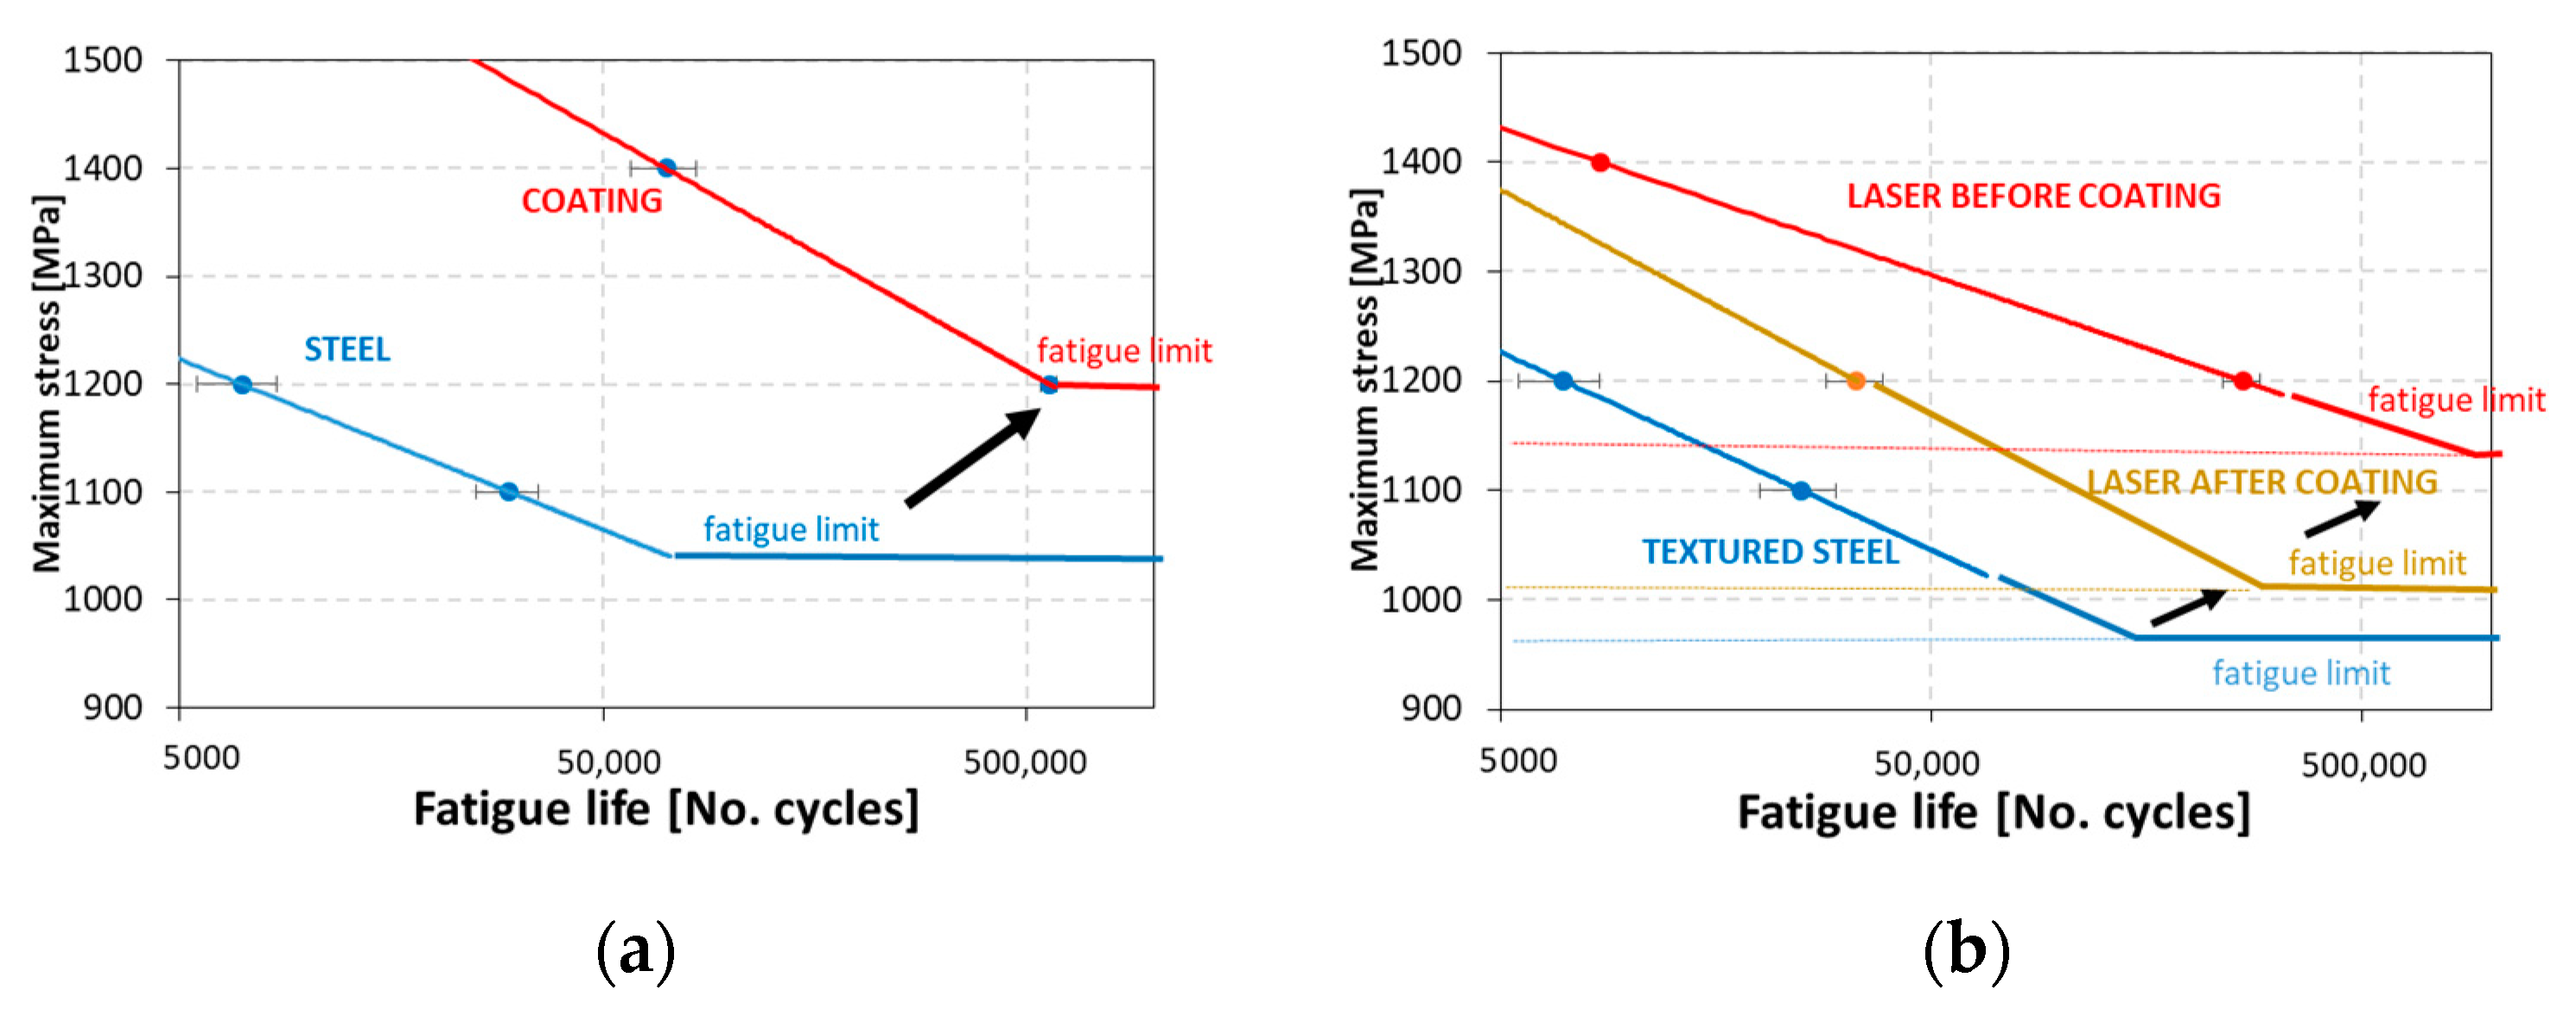
In order to investigate the influence of texturing on the fatigue life, untextured, textured, uncoated, and coated samples were tested for comparison. As seen in Figure 2a, application of the coating significantly increases fatigue life. These findings are consistent with the findings of Sivagnanam, et al. [29], where they investigated the effect of coating thickness on fatigue strength. This can be attributed to the fact that the coating, with its high residual stresses, “closes” the surface and slows down the growth of cracks from the surface. It is generally recognized that compressive stresses in coatings increase the fatigue resistance [30]. Application of the coating not only increases the number of cycles before fatigue but also the stress level where the fatigue limit is reached (Figure 2a). As seen, the application of a coating raises the fatigue limit from 1050 MPa to 1200 MPa.
Implementation of the texture on the surface decreases the fatigue life regardless of the coating application or sequence (Figure 2b), which is also consistent with the findings of Rahmat, et al. [31] that presence of dimples on the surface confirmed the dimple rupture mechanism in the ductile steel substrate in the coated and uncoated specimens. On the other hand, they [31] investigated notched samples and they found out considerable reductions in fatigue life of the coated notched samples. This was understood to be because of the coating’s brittleness, which induces at the notch tip early and frequent fatigue crack initiations, especially in the case of multiple layered coatings. In our case, this is not the case, as the application of the coating prolongs the fatigue life in the non-textured and textured specimens. Textured steel samples result in a lower number of cycles as well as lower fatigue stress, compared to the untextured one. Combining of coating with texturing raises the fatigue life, but it is dependent on the coating sequence. If texturing is done after coating deposition (denoted as laser after coating), where dimple walls are exposing steel substrate, it will result in lower fatigue life. This is consistent with the finding that the coating “closes” the surface and slows down crack propagation.

3.2. Fractographic Analysis

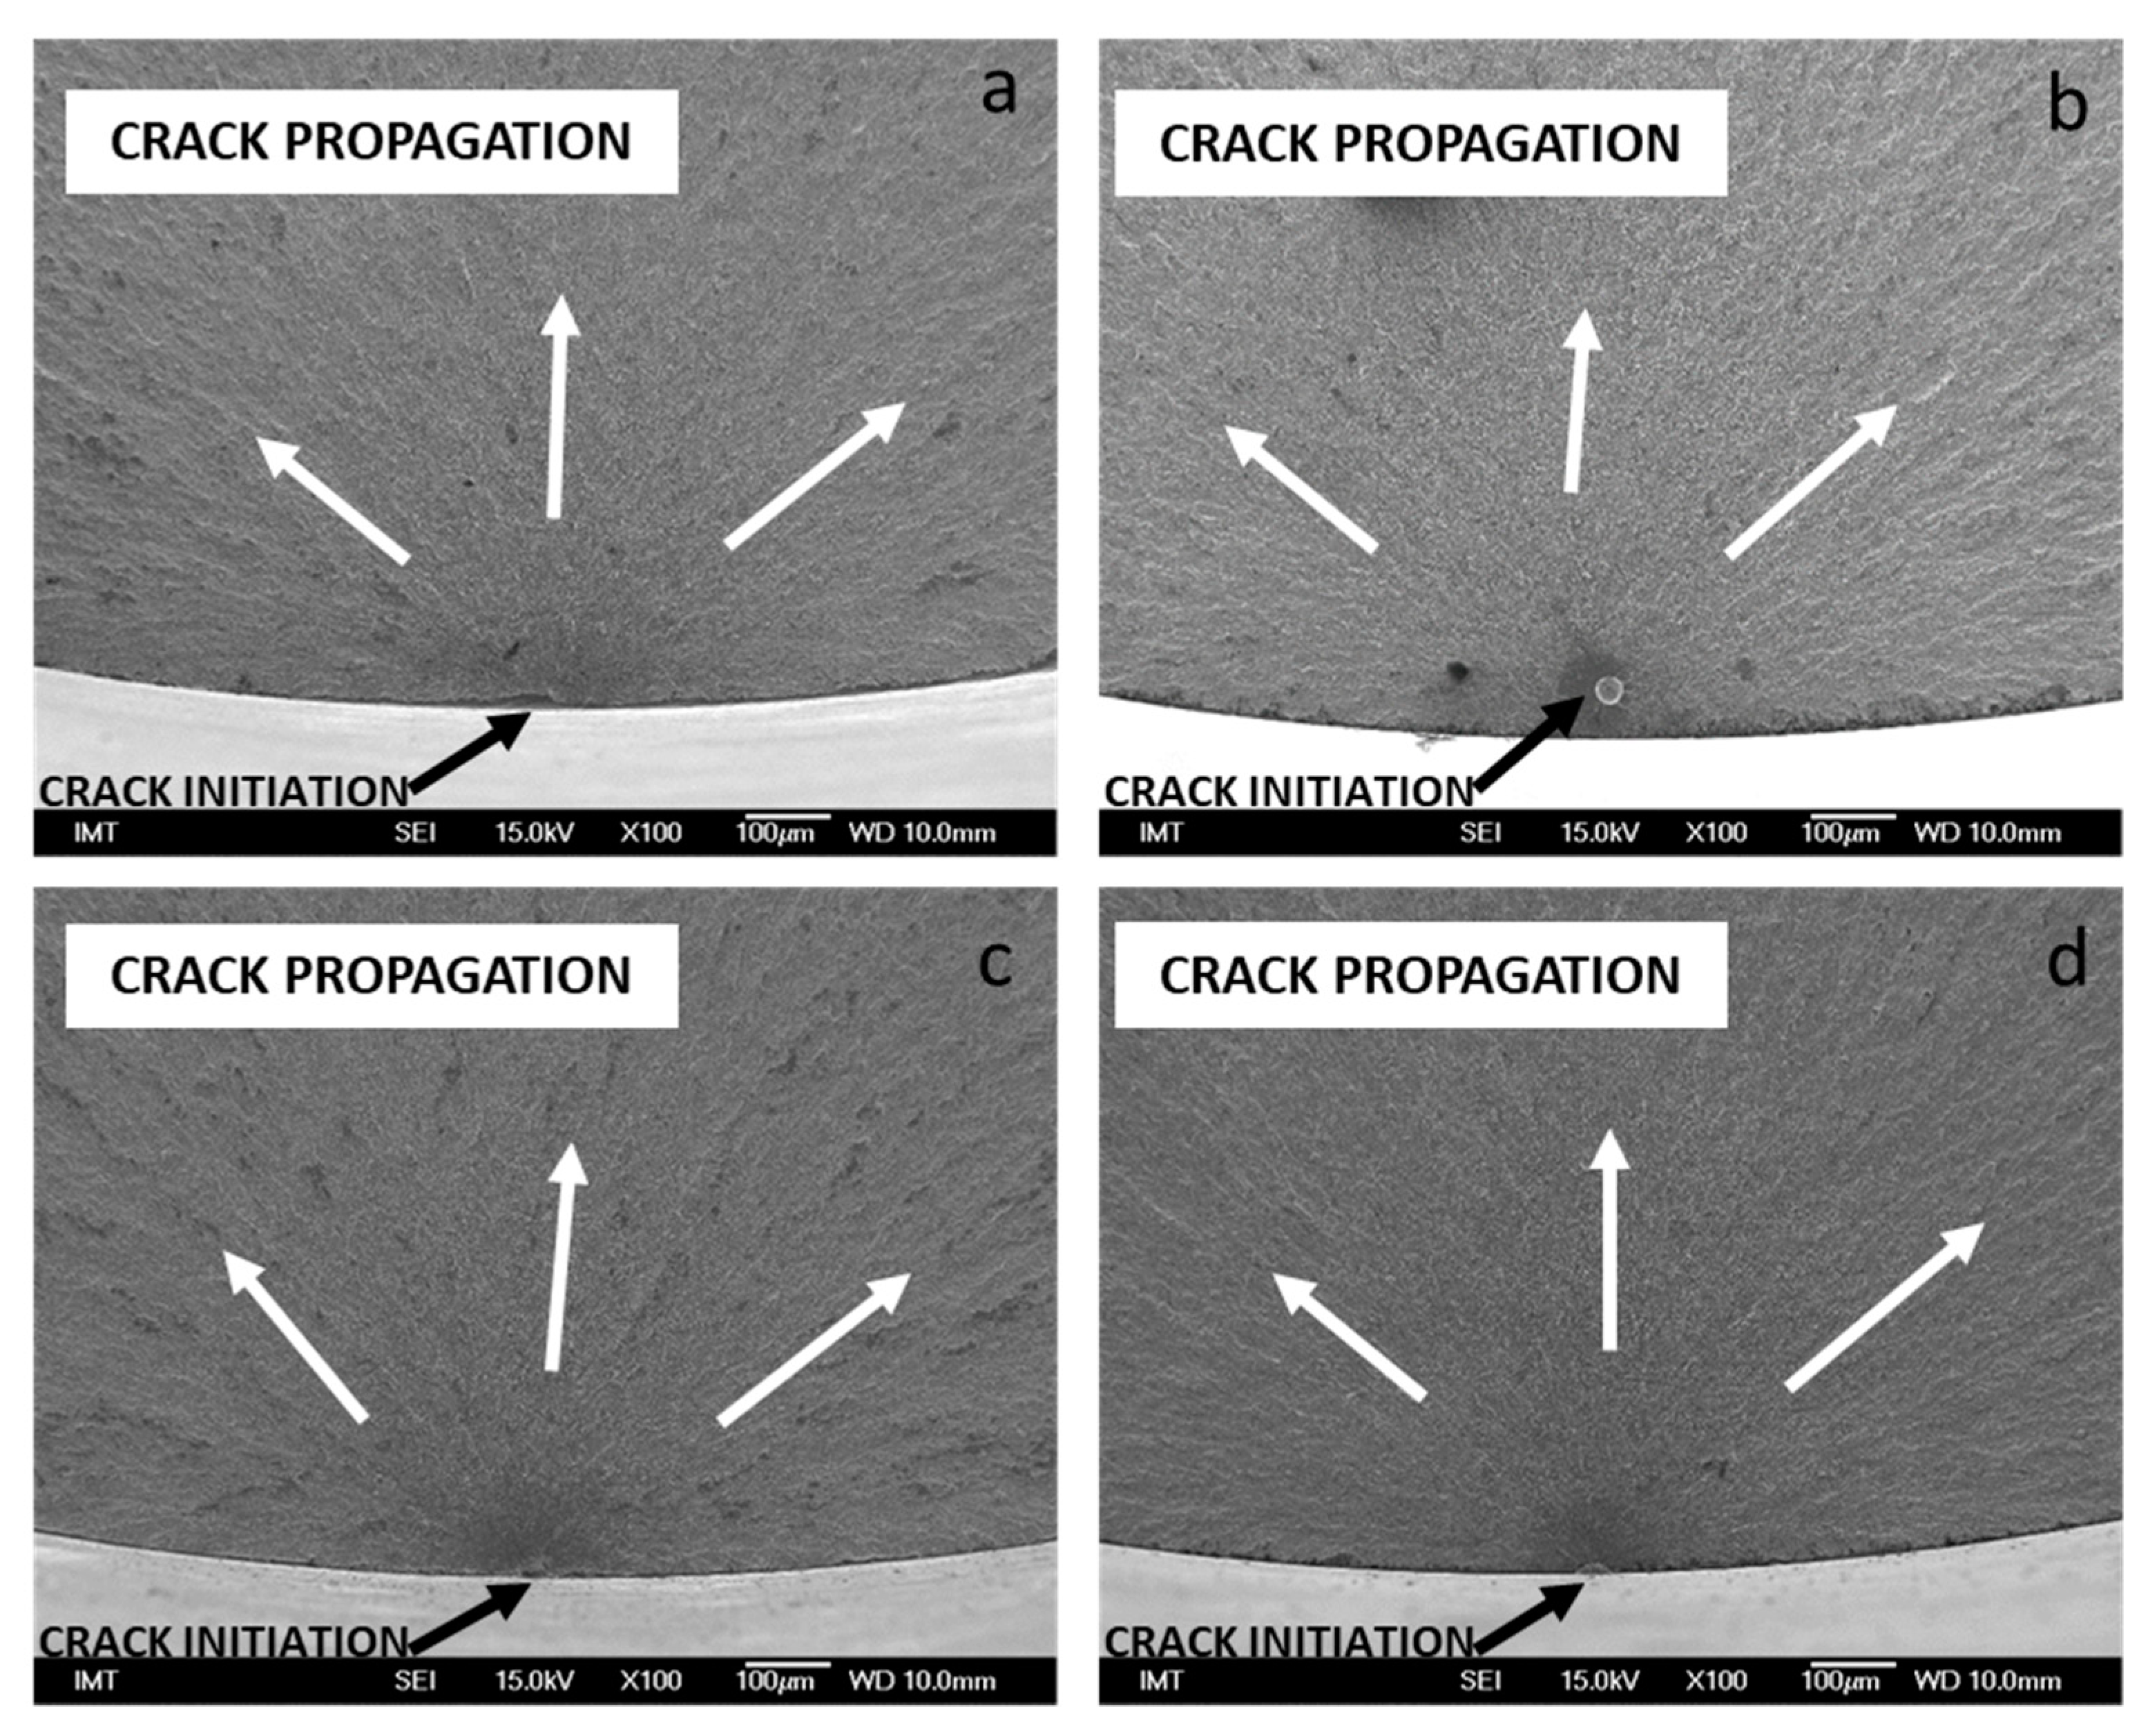
Fractographic analysis using SEM (Scanning Electron Microscope) reveals that on all the samples, regardless of the sequence of texturing, the crack initiated at the surface of the specimens and propagated very quickly through the cross-section of samples in the plane of the highest stresses (Figure 3). The only exception was one of the specimens with the coating and without the texturing (Figure 3b), where the subsurface inclusion in the material was present and the crack initiated from the inclusion. Nevertheless, due to increased fatigue resistance of the same specimen with the inclusion present on the fractured surface, it could be reasonable to assume that the application of the coating which induces the compression stresses in the surface layer of the specimens also covers the surface and strongly decreases the number of potential crack initiation sites on the surface, like surface scratches and other topographic irregularities or stress concentrators. In the opposite case, it would be logical to expect that the specimen with the 20-µm inclusion, present on the smallest cross-section, would fail at lower number of cycles compared to the specimen without the inclusion, but it was not the case.
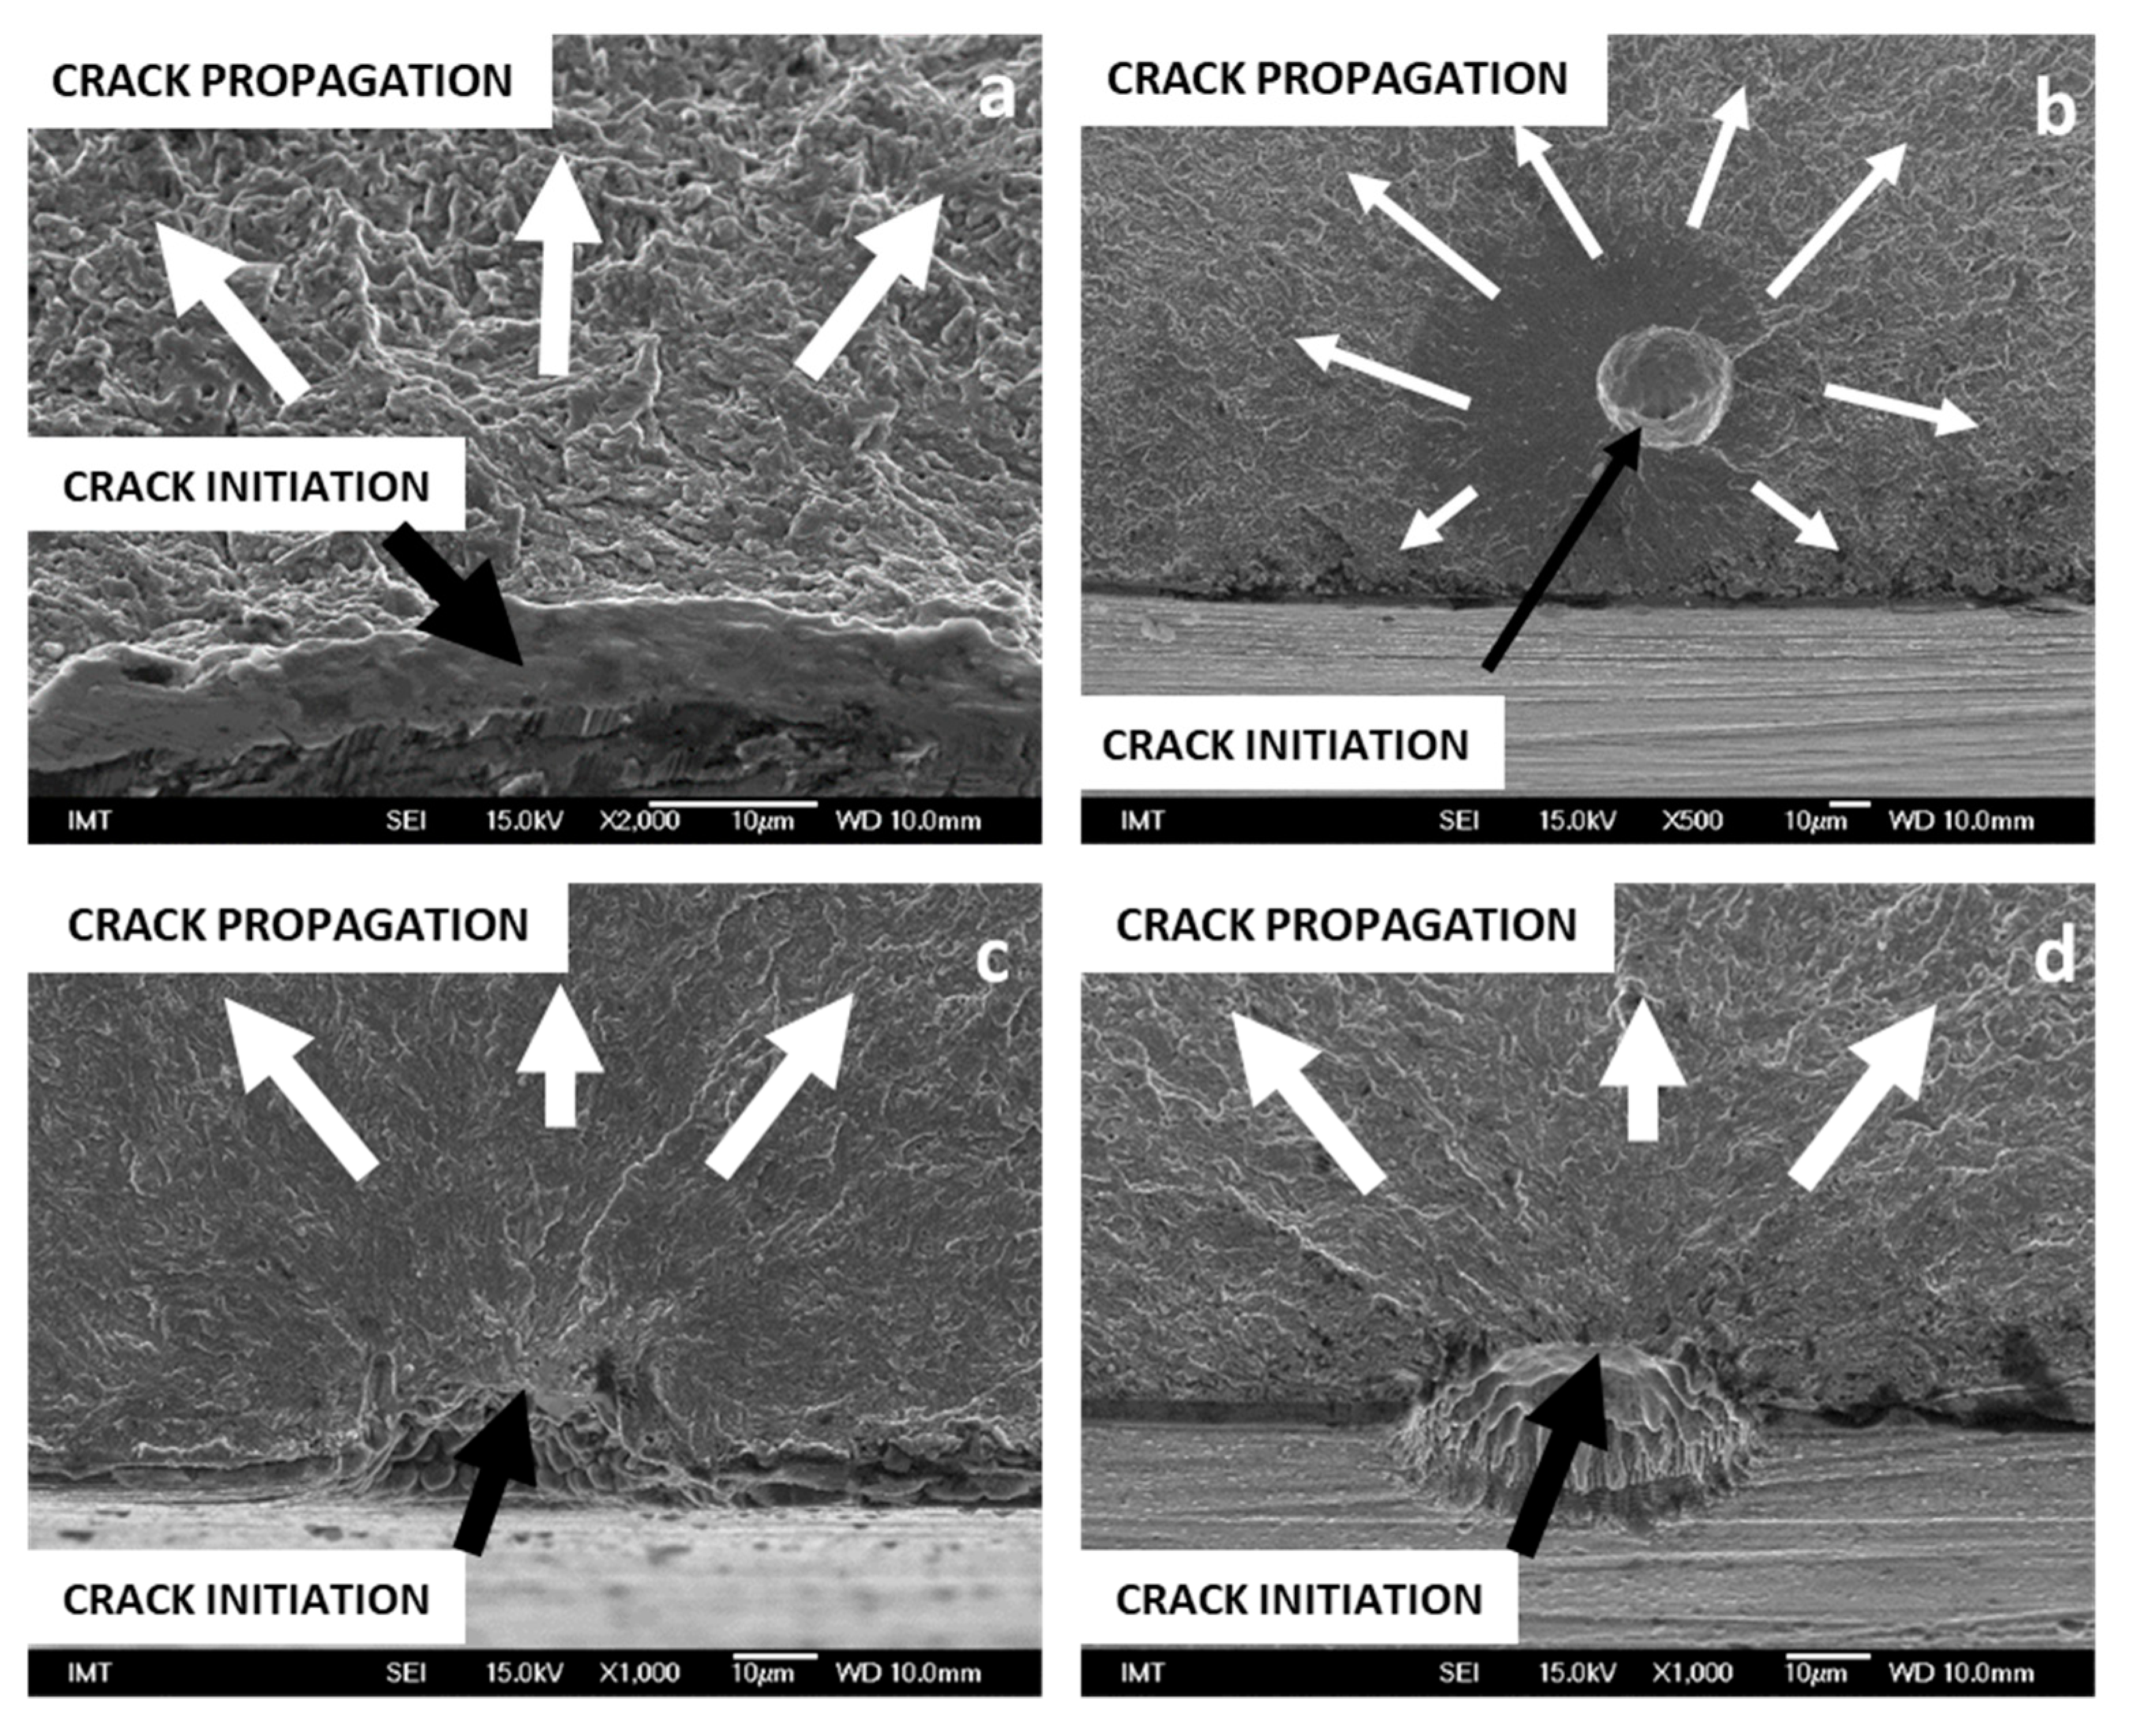
In Figure 4, crack initiation places are shown at bigger magnification. On the specimen surface without any coating and texturing (Figure 4a), a region where on the crack initiation site a fatigue micro-crack was generated in the size of approximately 5 µm before the main crack, suddenly caused the failure of the specimen. Close to the starting micro-crack, other smaller cracks can be observed on the surface of the specimen. As mentioned earlier, on the specimen with the coating and without the texturing, the subsurface inclusion was present and the crack initiated and propagated from the inclusion (Figure 4b). In the case where laser texturing was used, the difference in the depth of textured dimples can be observed. In the case of texturing before the coating (Figure 4c), the dimple walls are rougher. SEM EDS analysis confirmed that roughness came from coating droplets on dimple walls. In the case of texturing after coating (Figure 4d), the dimple walls are much smoother compared to the dimple before the coating. As can be seen from Table 1, where values of surface roughness at the bottom of the dimples are presented, the lowest roughness (Ra = 0.09 µm) was measured at textured steel samples. The roughest surface (Ra = 0.19 µm) was measured at samples where texturing was done before coating deposition, so coating was still present in the dimples. Comparing those results to fatigue test results, we cannot conclude that the fatigue life is affected only by the roughness of dimple halls. The lowest roughness was obtained on the textured steel without coating, which exhibits the worst fatigue life among all investigated samples. On the other hand, samples where coating is still present in the dimples, showing higher roughness of dimple halls, exhibit the best fatigue life among textured samples, indicating the importance of the coating on fatigue life. Those findings are consistent with the findings of Su, et al. [32] that the surface film acts as a protective layer that “seals” crack initiations because of the applied alternating stresses.
From the crack initiation site, there is visibly a clear ˝river pattern˝ indicating the directions of crack propagation (Figure 3 and Figure 4). Although the coating prolongs the fatigue life and the fatigue crack propagation, mechanism in coated specimens seems similar to the one occurring in uncoated specimen. The appearance of a fractured surface on a coated sample textured before coating is presented on Figure 5 using different magnifications. This appearance of fractured surface is also typical of all the investigated specimens, as the fatigue crack propagation mechanism in coated specimens seems similar to the one occurring in uncoated specimens. Fractured surface at 2000× magnification (Figure 5a) looks like a quasi-ductile fracture with dimples and with a very uneven surface where some pores are present. However, at higher magnification (Figure 5b), it is seen that there is very little plastic deformation on the neck of the dimples and some small flat regions can be seen, where brittle fracture with cleavage was the main mechanism. At 30,000× magnification (Figure 5c), there is clear evidence of a brittle fracture mechanism with cleavage. Additionally, some remains of round PM particles can be seen because of incomplete sintering. Due to the low fracture toughness of the investigated steel, no fatigue striations of crack growth steps were found on the fractured surfaces.

4. Conclusions

Application of a hard, protective coating on a tool steel substrate has a positive influence on fatigue-life properties of tool steel. On the other hand, implementation of laser surface texturing on the surface decreases the fatigue life. The sequence of surface texturing has an important effect on the fatigue life. If texturing is done before coating deposition, so coating is also present in the cavity, it results in better fatigue-life properties. Texturing of coated steel, where the steel substrate is exposed in the dimples, results in shortened fatigue life.
The roughness of dimple walls does not show an effect on fatigue life. Samples where coating is still present in the dimples show higher roughness of dimple halls and exhibit the best fatigue life among textured samples, indicating the influence of the coating on fatigue life.
Fracture analysis reveals that laser surface textures in all investigated cases serve as crack initiation points. Although implementation of coating prolongs fatigue life, the fatigue crack propagation mechanism in coated specimens seems similar to the one occurring in uncoated specimens. From a lower magnification, a fractured surface looks like a quasi-ductile fracture. However, at higher magnification, it was found that there was very little plastic deformation and some small flat regions can be seen with clear evidence of a brittle fracture mechanism with cleavage. Due to the low fracture toughness of the investigated steel, no fatigue striations of crack growth steps were found on the fractured surfaces. Based on the findings, we can conclude that life prolongation comes from the deposition of hard protective coating.

Author Contributions

Conceptualization, M.S.; methodology, M.S.; validation, M.S., A.Z.G., and B.Ž.; investigation, M.S.; data curation, M.S. and A.Z.G.; writing—original draft preparation, M.S.; writing—review and editing, A.Z.G. and B.Ž.; All authors have read and agreed to the published version of the manuscript.

Funding

This research was funded by Slovenian Research Agency, research core funding No. P2-0050.

Conflicts of Interest

The authors declare no conflict of interest.

References

  1. Holmberg, K.; Erdemir, A. Influence of tribology on global energy consumption, costs and emissions. Friction 2017, 5, 263–284. [Google Scholar] [CrossRef]
  2. Arumugaprabu, V.; Ko, T.J.; Kumaran, T.; Kurniawan, R.; Uthayakumar, M. A Brief Review on Importance of Surface Texturing in Materials to Improve the Tribological Performance. Rev. Adv. Mater. Sci. 2018, 53, 40–48. [Google Scholar] [CrossRef]
  3. Vencl, A.; Ivanović, L.; Stojanović, B.; Zadorozhnaya, E.; Miladinović, S.; Svoboda, P. Surface Texturing for Tribological Applications: A Review. Proc. Eng. Sci. 2019, 1, 227–239. [Google Scholar] [CrossRef]
  4. Pakuła, D.; Staszuk, M.; Dziekońska, M.; Kožmín, P.; Čermák, A. Laser Micro-Texturing of Sintered Tool Materials Surface. Materials 2019, 12, 3152. [Google Scholar] [CrossRef] [PubMed] [Green Version]
  5. Gropper, D.; Wang, L.; Harvey, T.J. Hydrodynamic lubrication of textured surfaces: A review of modeling techniques and key findings. Tribol. Int. 2016, 94, 509–529. [Google Scholar] [CrossRef] [Green Version]
  6. Leskovšek, V.; Podgornik, B.; Jenko, M. A PACVD duplex coating for hot-forging applications. Wear 2009, 266, 453–460. [Google Scholar] [CrossRef]
  7. Sergejev, F.; Peetsalu, P.; Sivitski, A.; Saarna, M.; Adoberg, E. Surface fatigue and wear of PVD coated punches during fine blanking operation. Eng. Fail. Anal. 2011, 18, 1689–1697. [Google Scholar] [CrossRef]
  8. Podgornik, B.; Hogmark, S.; Sandberg, O. Proper coating selection for improved galling performance of forming tool steel. Wear 2006, 261, 15–21. [Google Scholar] [CrossRef]
  9. Podgornik, B.; Sedlaček, M.; Mandrino, D. Performance of CrN coatings under boundary lubrication. Tribol. Int. 2016, 96, 247–257. [Google Scholar] [CrossRef]
  10. Bar-Hen, M.; Etsion, I. Experimental study of the effect of coating thickness and substrate roughness on tool wear during turning. Tribol. Int. 2017, 110, 341–347. [Google Scholar] [CrossRef]
  11. Misirli, C.; Sahin, M.; Dinc, M. Fatigue properties of ALTiN and TiN-coated high speed steels (HSS) steels. Sci. Res. Essays 2011, 6, 3200–3204. [Google Scholar] [CrossRef]
  12. Pettersson, U.; Jacobson, S. Influence of surface texture on boundary lubricated sliding contacts. Tribol. Int. 2003, 36, 857–864. [Google Scholar] [CrossRef]
  13. Chen, P.; Xiang, X.; Shao, T.; La, Y.; Li, J. Effect of triangular texture on the tribological performance of die steel with TiN coatings under lubricated sliding condition. Appl. Surf. Sci. 2016, 389, 361–368. [Google Scholar] [CrossRef]
  14. Obikawa, T.; Kamio, A.; Takaoka, H.; Osada, A. Micro-texture at the coated tool face for high performance cutting. Int. J. Mach. Tools Manuf. 2011, 51, 966–972. [Google Scholar] [CrossRef]
  15. Soroka, E.B.; Lyashenko, B.; Qiao, S.; Zhang, C. Tribological Behaviour and Cutting Performance of PVD-TiN Coating/Substrate System with Discontinuous Surface Architecture. Rare Met. Mater. Eng. 2011, 40, 580–584. [Google Scholar] [CrossRef]
  16. Podgornik, B.; Sedlaček, M.; Čekada, M.; Jacobson, S.; Zajec, B. Impact of fracture toughness on surface properties of PVD coated cold work tool steel. Surf. Coat. Technol. 2015, 277, 144–150. [Google Scholar] [CrossRef]
  17. Sedlaček, M.; Batič, B.Š.; Česnik, D.; Podgornik, B. Influence of the substrate hardness and fracture toughness on the dynamic wear properties of coated tool steels. Mater. Tehnol. 2019, 53, 565–574. [Google Scholar] [CrossRef]
  18. Panjan, M.; Čekada, M.; Panjan, P.; Zupanič, F.; Kölker, W. Dependence of microstructure and hardness of TiAlN/VN hard coatings on the type of substrate rotation. Vacuum 2012, 86, 699–702. [Google Scholar] [CrossRef]
  19. Lu, P.; Wood, R. Tribological performance of surface texturing in mechanical applications: A Review. Surf. Topogr. Metrol. Prop. 2020, 8, 043001. [Google Scholar] [CrossRef]
  20. Vrbka, M.; Křupka, I.; Svoboda, P.; Šperka, P.; Návrat, T.; Hartl, M.; Nohava, J. Effect of shot peening on rolling contact fatigue and lubricant film thickness within mixed lubricated non-conformal rolling/sliding contacts. Tribol. Int. 2011, 44, 1726–1735. [Google Scholar] [CrossRef]
  21. Akamatsu, Y.; Tsushima, N.; Goto, T.; Hibi, K. Influence of Surface Roughness Skewness on Rolling Contact Fatigue Life. Tribol. Trans. 1992, 35, 745–750. [Google Scholar] [CrossRef]
  22. Vrbka, M.; Šamánek, O.; Šperka, P.; Návrat, T.; Křupka, I.; Hartl, M. Effect of surface texturing on rolling contact fatigue within mixed lubricated non-conformal rolling/sliding contacts. Tribol. Int. 2010, 43, 1457–1465. [Google Scholar] [CrossRef]
  23. Gliha, V.; Maruschak, P.; Vuherer, T. Behaviour of short cracks emanating from tiny drilled holes. Mater. Technol. 2013, 47, 441–446. [Google Scholar]
  24. Sedlaček, M.; Podgornik, B.; Ramalho, A.; Česnik, D. Influence of geometry and the sequence of surface texturing process on tribological properties. Tribol. Int. 2017, 115, 268–273. [Google Scholar] [CrossRef]
  25. Sedlaček, M.; Podgornik, B. Design and Tribological Performance of Textured Surfaces. Mater. Perform. Charact. 2017, 6. [Google Scholar] [CrossRef]
  26. Sedlaček, M.; Gregorčič, P.; Podgornik, B. Use of the Roughness Parameters Ssk and Sku to Control Friction-A Method for Designing Surface Texturing. Tribol. Trans. 2017, 60, 260–266. [Google Scholar] [CrossRef]
  27. Tomazincic, D.; Sedlacek, M.; Podgornik, B.; Klemenc, J. Influence of Different Micro-Imprints to Fatigue Life of Components. Mater. Perform. Charact. 2017, 6. [Google Scholar] [CrossRef]
  28. Horn, P.S. Some Easy t Statistics. J. Am. Stat. Assoc. 1983, 78, 930. [Google Scholar] [CrossRef]
  29. Chandra, N.P.S.; Otsuka, Y.; Mutoh, Y.; Yamamoto, K. Effect of coating thickness on fatigue behavior of TiAlN coated Ti-alloys. Int. J. Fatigue 2020, 140, 105767. [Google Scholar] [CrossRef]
  30. Samanek, O.; Zimmerman, M.; Svoboda, P.; Krupka, I.; Vrbka, M. Influence of surface texturing on lubricant film formation and surface fatigue. Eng. Mech. 2010, 17, 27–36. [Google Scholar]
  31. Rahmat, M.A.; Ibrahim, R.N.; Oskouei, R.H.; Bushroa, A.R. Fatigue life behaviour of TiAlN and TiAlN/CrN coated notched P20 steel specimens. Fatigue Fract. Eng. Mater. Struct. 2016, 39, 57–67. [Google Scholar] [CrossRef]
  32. Su, Y.; Yao, S.; Wei, C.; Wu, C. Evaluation on the tension and fatigue behavior of various PVD coated materials. Thin Solid Films 1998, 322, 218–224. [Google Scholar] [CrossRef]
Figure 1. Schematic presentation of hourglass-type test specimens for fatigue-life investigation with indicated surface texture location.
Metals 10 01636 g001
Figure 2. S-N curves for: (a) untextured samples and (b) laser-textured surface with different texturing sequence.
Metals 10 01636 g002
Figure 3. Fractured surfaces of specimens with marked crack initiation sites and directions of crack propagation: (a) without the coating and without the texturing, (b) with the coating and without the texturing, (c) without the coating and with the texturing, and (d) with the coating and with the texturing.
Metals 10 01636 g003
Figure 4. Crack initiation sites and directions of crack propagation: (a) without the coating and without the texturing, (b) with the coating and without the texturing, (c) texturing before the coating deposition, and (d) texturing after the coating deposition.
Metals 10 01636 g004
Figure 5. Fractured surface from coated sample textured before coating deposition at magnification (a) 2000×, (b) 15,000× and (c) 30,000×. A similar appearance of fractured surface can be found for all the specimens.
Metals 10 01636 g005
Table 1. Roughness at the bottom of the dimples.
Roughness of DimplesRa [µm]St. Dev [µm]
textured steel0.090.05
texturing after coating0.120.05
texturing before coating0.190.09
Publisher’s Note: MDPI stays neutral with regard to jurisdictional claims in published maps and institutional affiliations.