Abstract
The microstructure, mechanical properties, and deformation behavior of wrought and electron beam additive manufactured (EBAM) Ti-6Al-4V samples under scratching were studied. As-received wrought Ti-6Al-4V was subjected to thermal treatment to obtain the samples with microstructure and mechanical characteristics similar to those of the EBAM samples. As a result, both alloys consisted of colonies of α phase laths within prior β phase grains and were characterized by close values of hardness. At the same time, the Young’s modulus of the EBAM samples determined by nanoindentation was lower compared with the wrought samples. It was found that despite the same hardness, the scratch depth of the EBAM samples under loading was substantially smaller than that of the wrought alloy. A mechanism was proposed, which associated the smaller scratch depth of EBAM Ti-6Al-4V with α′→α″ phase transformations that occurred in the contact area during scratching. Ab initio calculations of the atomic structure of V-doped Ti crystallites containing α or α″ phases of titanium were carried out to support the proposed mechanism.
1. Introduction
Additive manufacturing (AM) has been extensively developed in the past decade exhibiting great potential for different applications in the aerospace, automotive, biomedical, power generation industries, etc. [1]. AM of metals provides many significant benefits over traditional manufacturing processes, which include the superior strength of as-built materials, production of complex 3D structures in a single step, substantial shortening of the manufacture time and lowering of the production costs, reduction of the material waste and environmental impact, and surface engineering [2,3]. Titanium alloys, in particular Ti-6Al-4V, are among the most widely used materials in the AM processes [2,3,4,5,6]. This is due to the extensive use of titanium alloys in industrial applications conditioned by their superior properties such as high strength-to-weight ratio, high toughness, excellent corrosion resistance, and biocompatibility [7]. However, the beneficial mechanical properties of titanium make it difficult to machine. In addition, the cost of manufacturing titanium components from the mill products can be very high, since up to 80% of the material is usually consumed to generate machined swarf [8]. This explains the attraction of the additive manufacturing, which tends to produce near-net-shape components.
Generally, the microstructure and mechanical properties of AM Ti-6Al-4V samples are determined by the method of their manufacturing. In particular, the martensitic α′-structure of as-built Ti-6Al-4V samples produced by selective laser melting (SLM) results in high tensile strength (>1100 GPa) and yield strength (>900 GPa) but low ductility [9,10,11,12]. Due to their coarser microstructure, the as-built Ti-6Al-4V samples produced by electron beam melting (EBM) are characterized by somewhat lower strength but higher ductility compared with the SLM ones [13]. The microstructure of Ti-6Al-4V produced by wire-feed electron beam additive manufacturing (EBAM) is characterized by large colonies of α and α′ laths inside columnar prior β grains [14,15]. As a consequence, the strength of such samples is often poorer than that of the samples produced by SLM, EBM, and even by conventional methods such as casting and stamping [4,14,16,17]. The specific microstructure of the Ti-6Al-4V EBAM samples composed of coarse α and α′ laths is due to large dimensions of the molten pool and, consequently, its low cooling rate. Moreover, the as-grown layers are subjected to many repeated cycles of heating and cooling when adding new upper layers [18].
The presence of α and α′ phase in the prior β grains evidences that the cooling rate in the EBAM process varies from 20 to 410 °C/s [19]. It can be also assumed that the martensitic α′ phase forms in the prior β grains, i.e., the cooling rate exceeds 410 °C/s. However, the high-temperature exposure caused by the repeated heating cycles results in the decomposition of the α′ phase into the α laths with β-interlayers in the EBAM Ti-6Al-4V samples [14]. According to [20], full decomposition of the martensite α′ phase resulted from 30 min exposure of the Ti-6Al-4V alloy at ≈550 °C. It is evident that the cooling rate and temperature can significantly vary throughout the samples. If the decomposition does not fully complete, complex microstructures consisting of α, α′, α″, and β phases would be expected. This multiphase metastable microstructure can experience different phase transformations under thermal and mechanical loadings.
Recently, the authors of the present work found scratching-induced phase transformations in metastable surface layers of wrought Ti-6Al-4V alloy subjected to low-energy, high-current pulsed electron beam treatment [21]. It has been shown that the treated Ti-6Al-4V samples, containing the martensitic α′ and α″phases in the uppermost surface layer, have exhibited improved elastic recovery during scratching that was attributed to the development of the direct and reverse α″→α→α″ martensitic transformations. It is interesting to study the scratching behavior of Ti-6Al-4V samples produced by electron beam additive manufacturing, where the metastable phases are present not only in the uppermost surface layer but in the bulk. The present work aimed to study the mechanical behavior of EBAM Ti-6Al-4V samples subjected to scratch testing and to compare it with the mechanical response of conventional wrought Ti-6Al-4V alloy with similar microstructure and mechanical properties.
2. Experimental and Calculation Details
Two types of polycrystalline Ti-6Al-4V alloy samples were studied: wrought and electron beam additive manufactured. The as-received wrought plates were produced by hot rolling. In order to obtain the microstructure of the wrought samples similar to that of the EBAM samples, they were subjected to vacuum annealing during 2 h at a temperature of 980 °C. The rectangular Ti-6Al-4V bars with dimensions of 25 mm × 25 mm × 70 mm (length × width × height) were obtained by wire-feed electron beam additive manufacturing using an EBAM machine 6E400 (ISPMS SB RAS, Tomsk, Russia) in vacuum 1.3 × 10⁻³ Pa. Grade 5 titanium wire 1.6 mm in diameter was used as a build material for the EBAM process. The chemical composition of the wire is given in Table 1. An electron gun with a plasma cathode operated at an accelerating voltage of 30 kV was used to melt the wire. The distance between the source of the electron beam and the titanium substrate with dimensions of 150 mm × 150 mm × 10 mm mounted on the non-heated build platform was 630 mm. The angle between the substrate and wire feed was 35°. The wire feed rate was 2 m/min. A total of 22 layers were formed, each 3.2 mm thick. The first three layers were formed at a beam current of 24 mA followed by its decreasing to 21 mA. The 3D printing of the samples was performed by the movement of the build platform relative to the electron beam according to the meander scanning strategy with a speed of 4 mm/s. The hatch space was ≈3 mm. After welding each layer, the build platform went down by 3 mm. Three-dimensional (3D)-printed bars were separated from the build platform and cut along the growth direction into 2 mm thick plates using spark cutting (see Figure 1).

Table 1.
Chemical composition of grade 5 titanium wire.
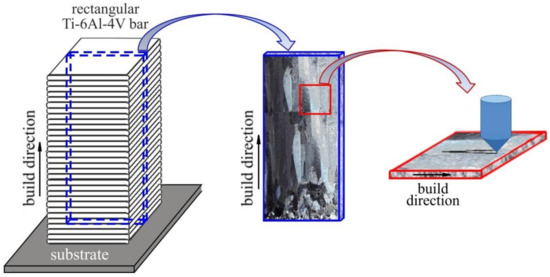
Figure 1.
Schematic of cutting a sample from an as-built EBAM Ti-6Al-4V bar and its scratch testing.
The rectangular samples 10 × 10 mm2 in size and 2 mm thick were cut from wrought plates and EBAM-produced bars. The microstructure of the samples was investigated using an Axiovert 40 Mat optical microscope (Carl Zeiss, Göttingen, Germany) and a JEM-2100 transmission electron microscope (TEM, JEOL, Tokyo, Japan) equipped with an Inca ACT-X energy-dispersive spectroscopy (EDS) detector (Oxford Instruments, Concord, MA, USA) for measurements of the elemental composition of the samples. The samples for the metallographic examination were subjected to mechanical grinding and polishing followed by etching with Kroll’s reagent. The samples for the TEM investigations were prepared at the CCU Innovation Center for Nanomaterials and Nanotechnologies (Tomsk, Russia) by ion milling of rectangular plates, using an Ion Slicer EM-09100IS instrument (JEOL, Tokyo, Japan).
The measurements of the mechanical properties of the samples as well as their scratch testing were carried out using a NanoTest system (Micro Materials Ltd., Wrexham, UK). The nanoindentation measurements were performed in a load-controlled mode with a Berkovich diamond tip at a maximum load of 50 mN. The hardness H and the Young’s modulus E were determined using the Oliver–Pharr method.
The scratch tests were performed using a conical diamond with a tip radius of 25 µm. The wrought and EBAM Ti-6Al-4V samples were scratched along the rolling and build directions, respectively. The scratching was carried out with a constant velocity of 10 µm/s. The 600 μm long scratches were applied to all samples. In the experiment, an initial surface profile of the tested samples was detected by pre-scanning with a very low load of 0.1 μN (no wear occurs at this load). During scratching, the surface profile could be sensed and recorded by the depth sensing system. After scratching, the surface profile of the samples was scanned again to record the deformation recovery. In the second step (scratching), the normal load applied to the indenter was sharply increased to a maximum load of 200 mN and maintained constant thereafter. Five scratches were performed for each sample. After scratching, the surface topography of the samples in the vicinity of the scratches was scanned using a Solver HV atomic force microscope (AFM, NT-MDT Co., Moscow, Russia) operating in a contact mode. A V-shaped silicon nitride cantilever (type SNL-10, Bruker Co., Berlin, Germany) was used with a nominal spring constant of 0.35 N/m and a tip radius of 12 nm. A series of 10 cross-sectional profiles of the scratches were made and averaged to determine the residual scratch depth for each sample.
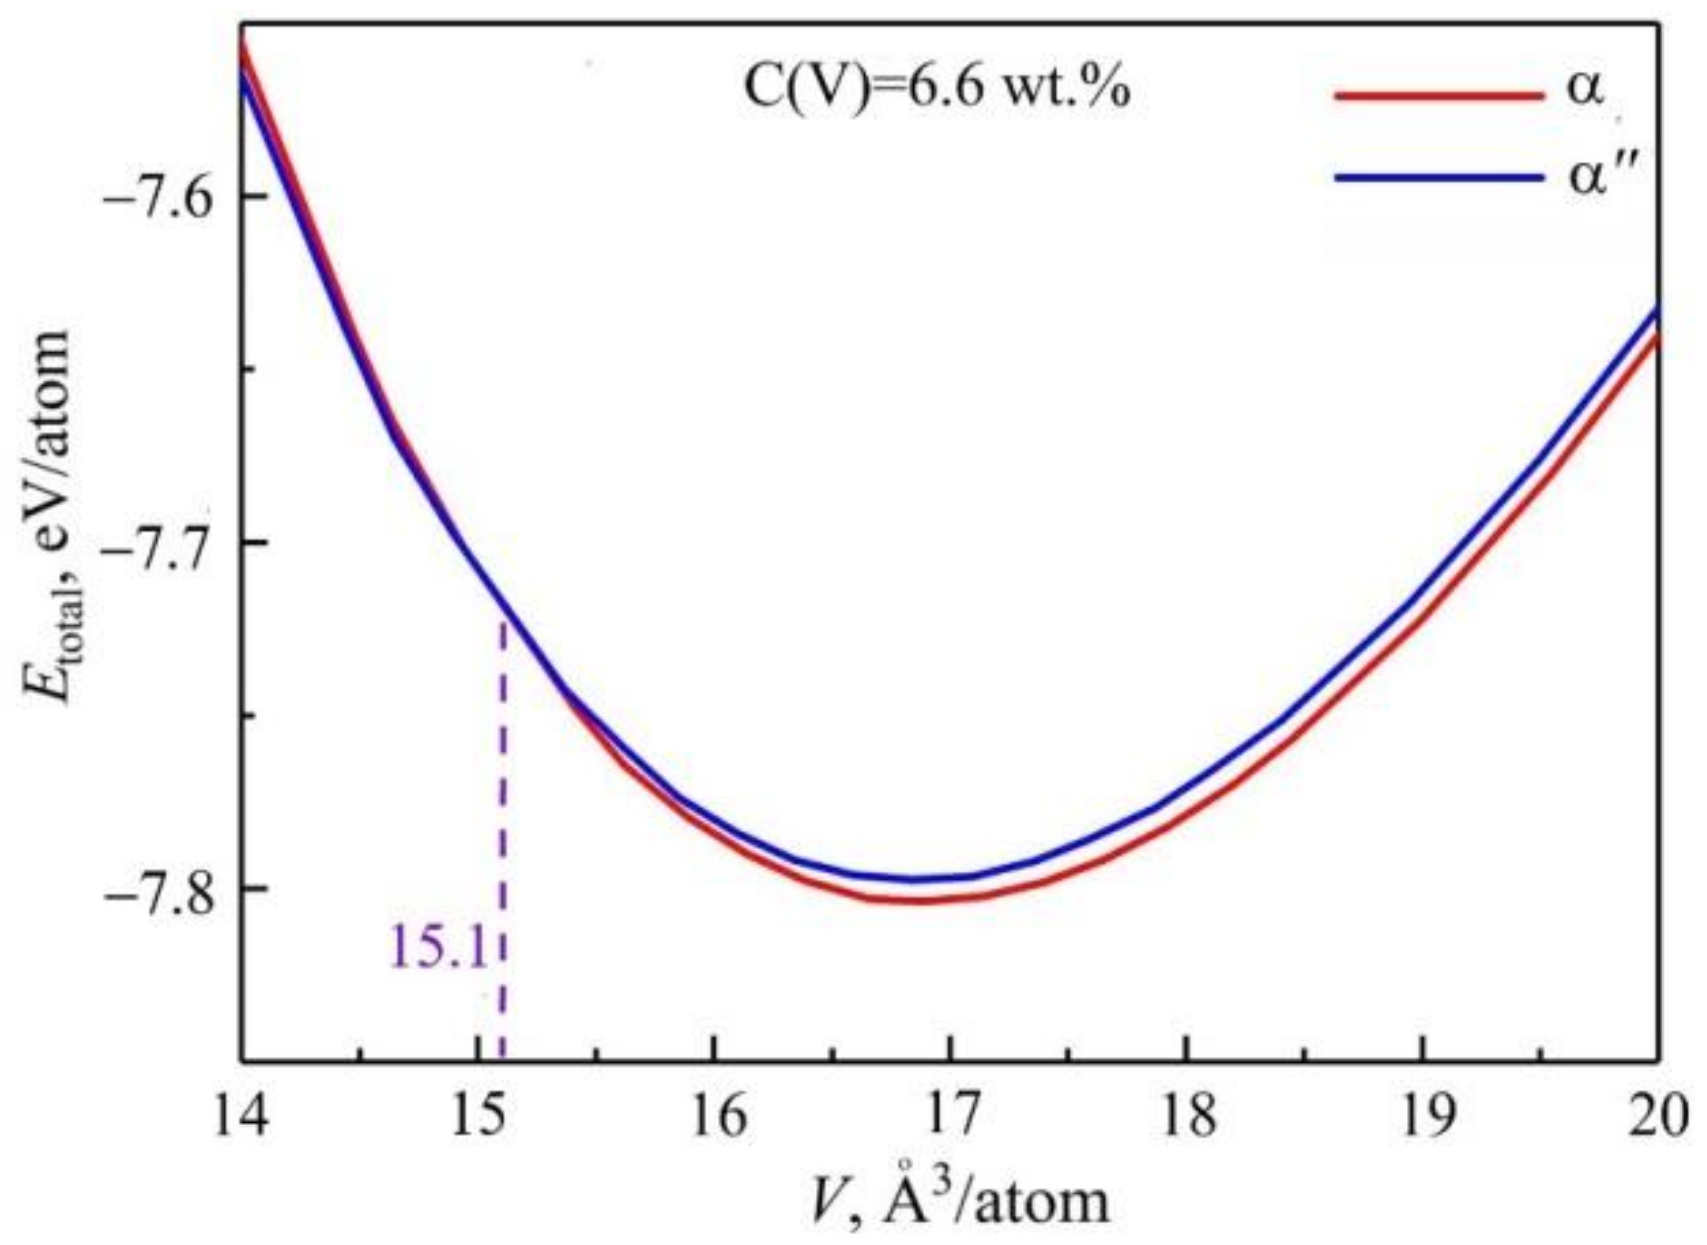
Calculations of atomic structure of α and α″ phases of Ti alloyed with vanadium were performed by the projector augmented-wave within the density functional theory [22,23]. For the exchange-correlation functional, the generalized gradient approximation in the form of GGA-PBE was used [24]. A plane-wave cutoff energy of 300 eV was employed throughout the calculations. Calculations have been performed for metal containing 6.6 wt% of V using a (2 × 2 × 2) supercell, in case of α phase, and a (2 × 1 × 2) supercell, in case of α″ phase. The atomic positions and the volume of the supercells were optimized. Ab initio calculations of the total energy per atom as a function of atomic volume were carried out for Ti crystallites with α and α″ structures to reveal the effect of compression and tension, which develop during scratching.
3. Results
3.1. Microstructure
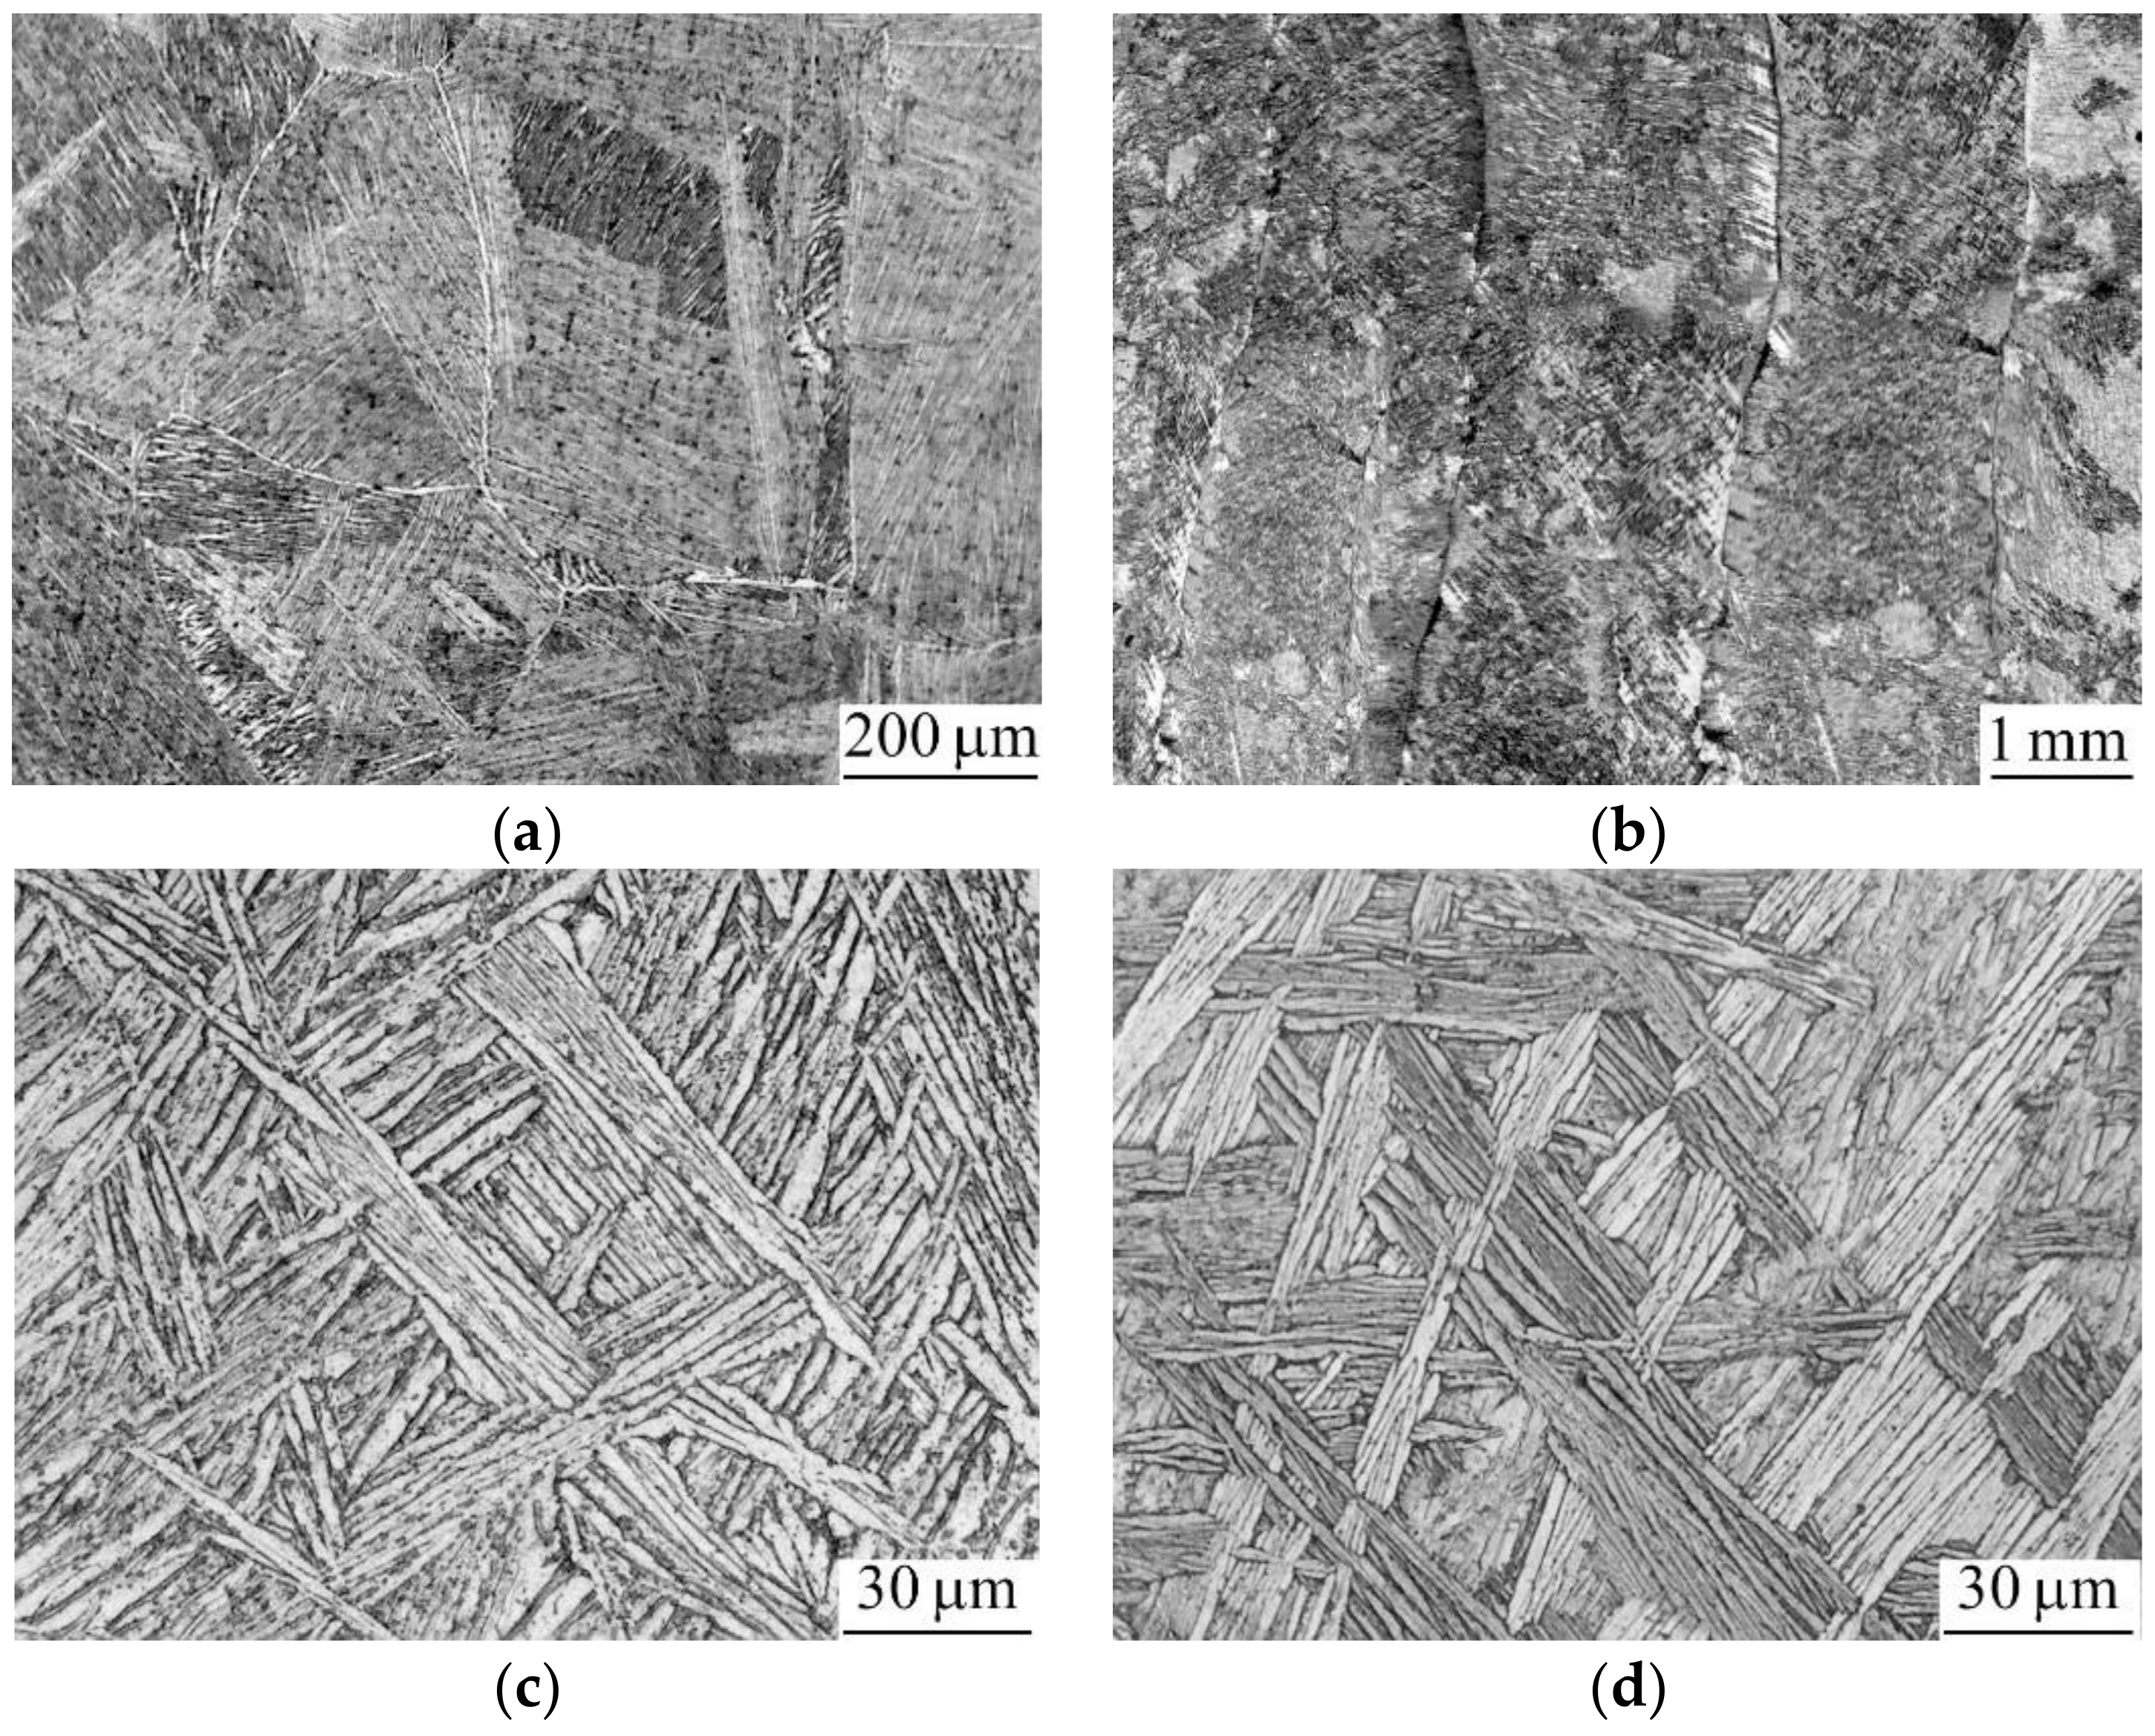
Typical microstructures of the wrought and EBAM Ti-6Al-4V samples are shown in Figure 2. The wrought samples are characterized by equiaxed prior β grains 500 µm in diameter (Figure 2a). In contrast, columnar β grains oriented along the growth direction were formed in the EBAM samples (Figure 2b). The cross-sectional dimensions of the columnar grains vary from 1.5 to 3.0 mm, while their height reaches 20 mm. Disoriented colonies of α laths are observed within the large-body prior β grains in both wrought and EBAM samples (Figure 2c,d). The cross-sectional size of the α laths in the wrought samples varies within 3–5 µm, whereas the α laths in the EBAM samples are somewhat thinner (2–3 µm).
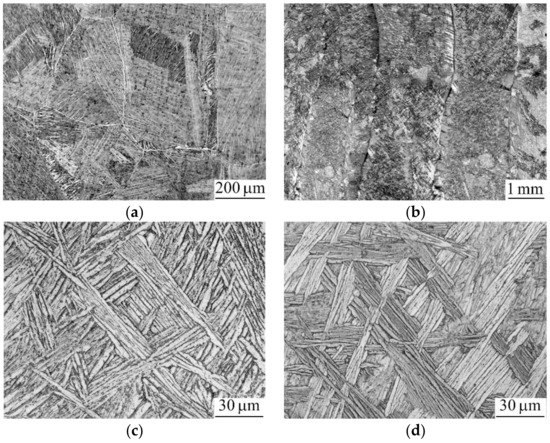
Figure 2.
Typical microstructures of the wrought (a,c) and EBAM Ti-6Al-4V samples (b,d).
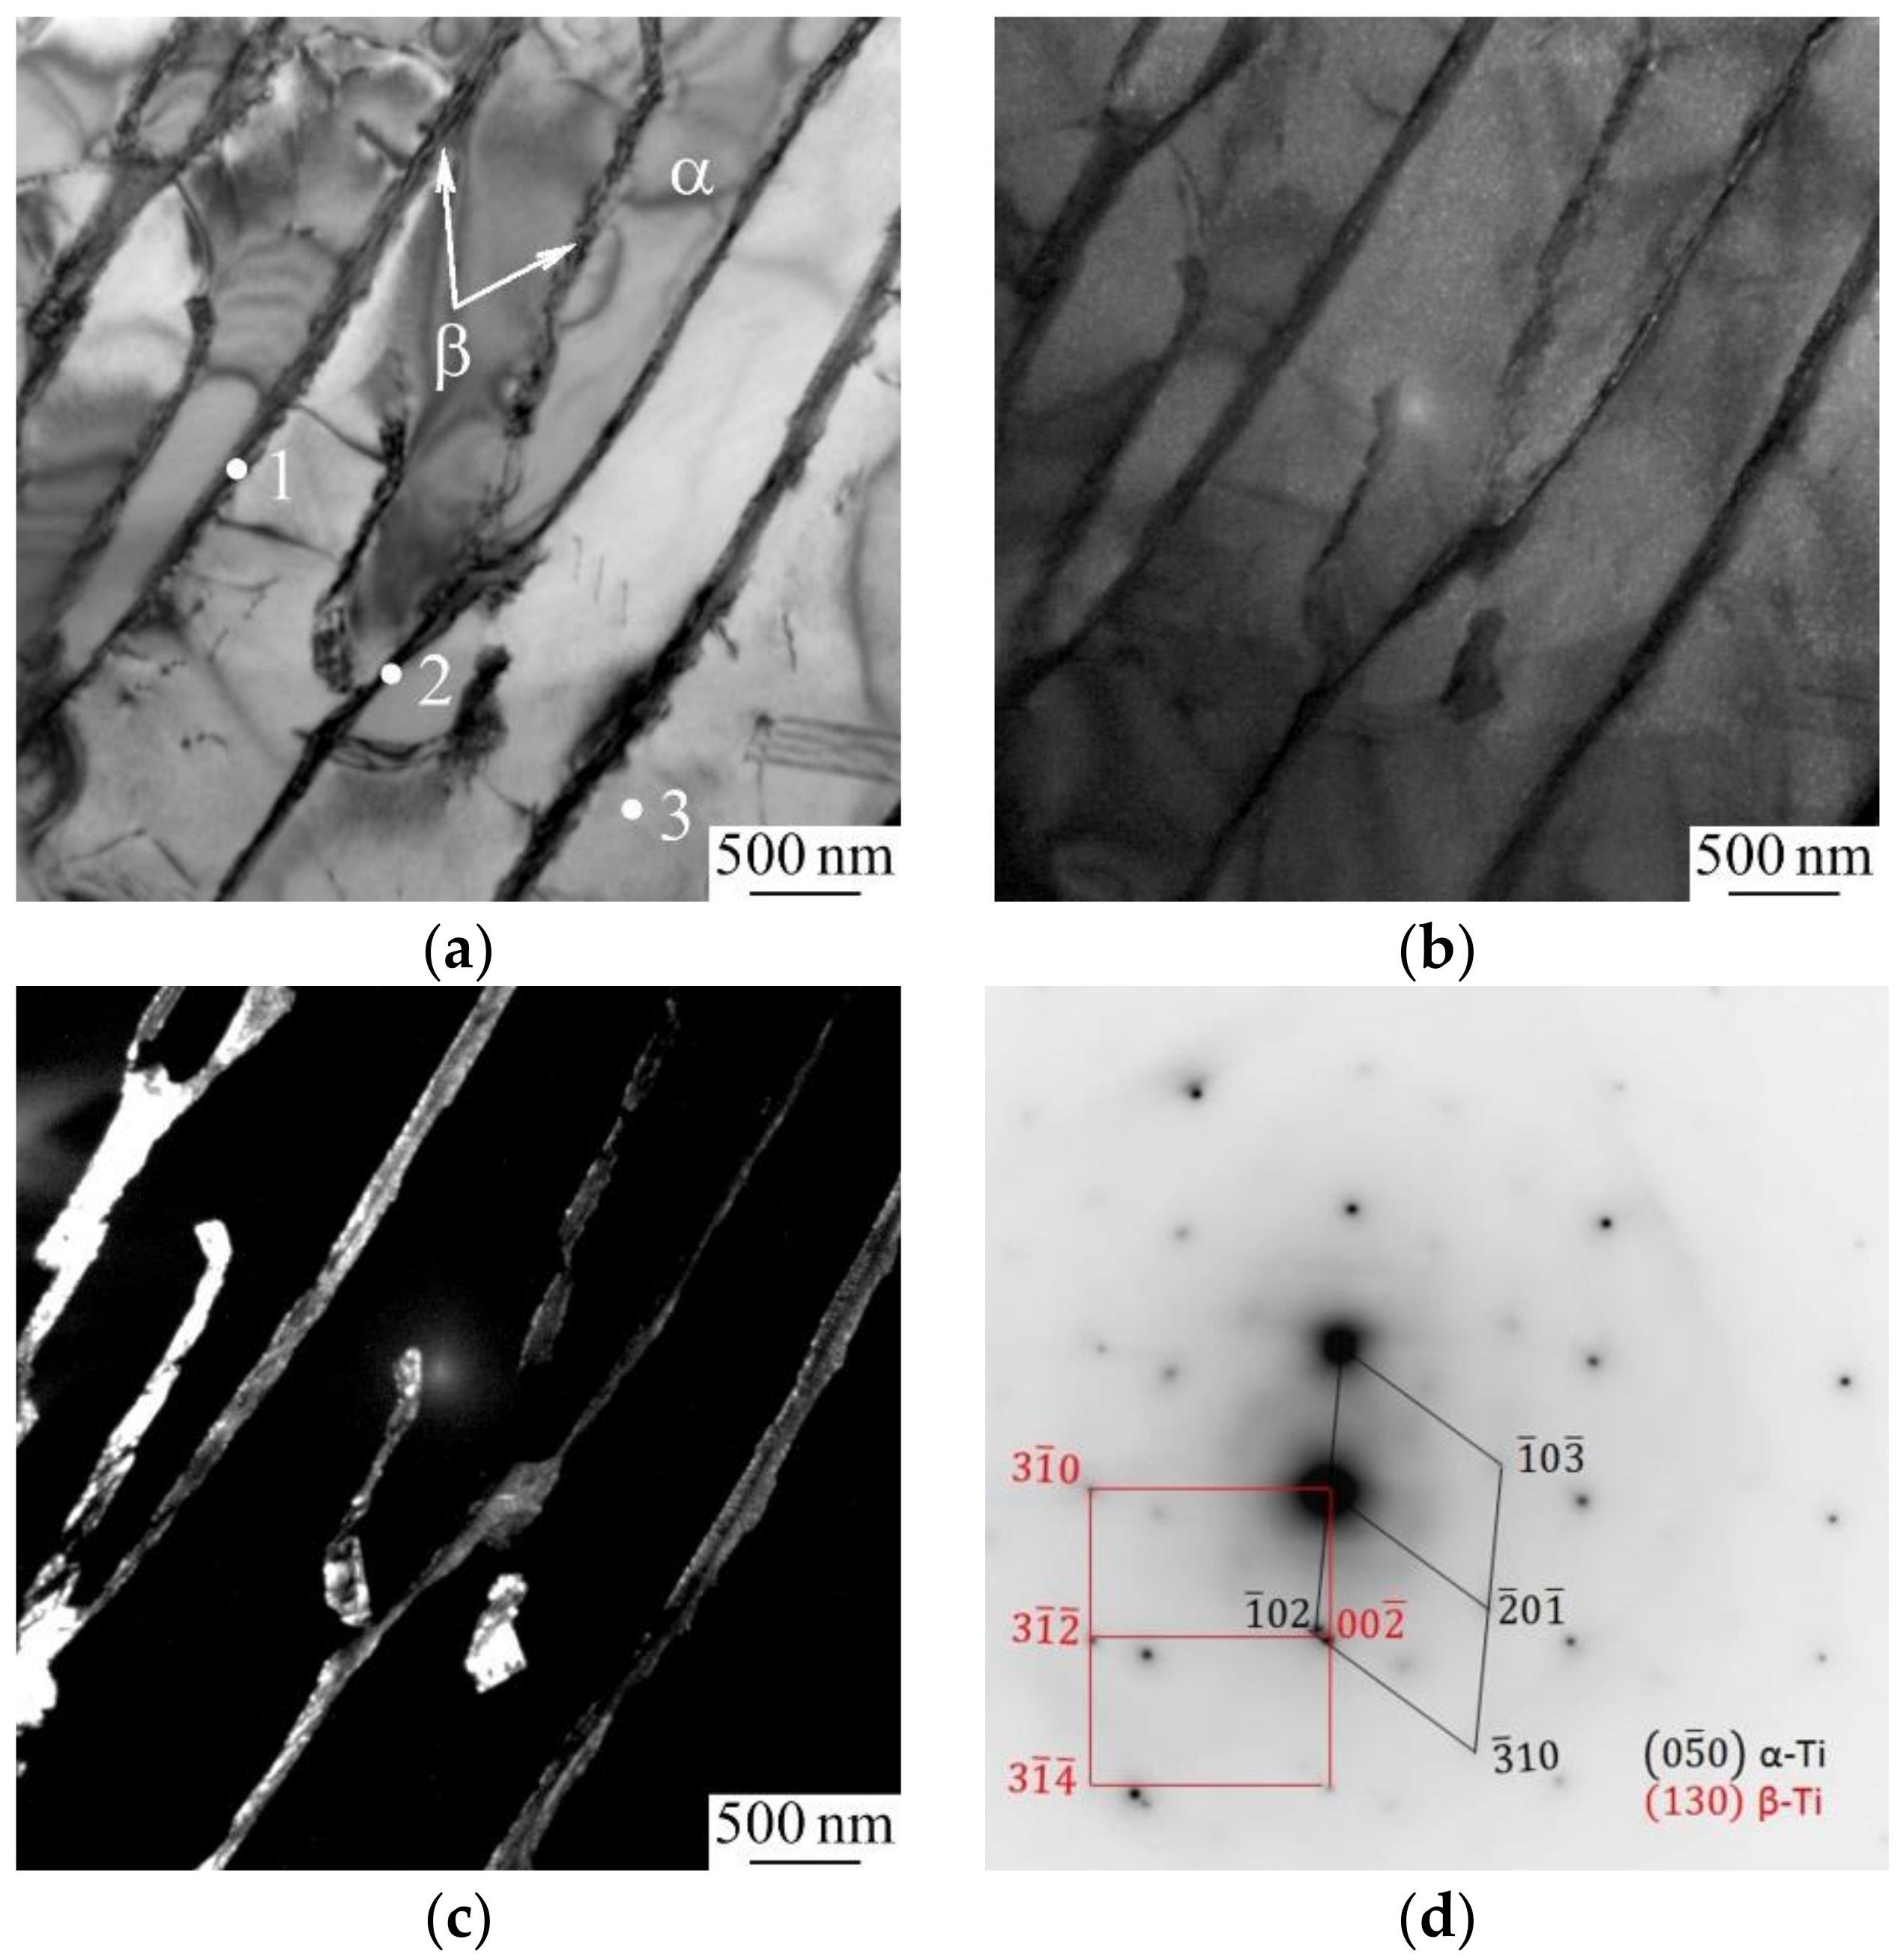
TEM investigations of the wrought Ti-6Al-4V samples revealed thin laths of secondary α phase inside the larger α laths. These 0.7–1 µm thick secondary α laths are characterized by the same orientations and separated by β interlayers (Figure 3). It should be noted a large number of extinction contours exist inside the α laths. It was found that the torsion curvature of the α phase crystal lattice estimated by assessing the bending extinction contours in the TEM images reached 6 deg/μm. EDS measurements showed that the Al and V contents in the α laths are 11.3 and 2.1 wt% (see Table 2). In contrast, the vanadium content in the β interlayers varies from 17.8 to 20.8 wt%.

Figure 3.
TEM bright (a) and dark-field micrographs (b,c) and the associated selected area electron diffraction (SAED) pattern with an indexing scheme (d) of the wrought Ti-6Al-4V sample. The dark-field TEM micrographs were obtained with the α-Ti (b) and β-Ti reflections (c).

Table 2.
Elemental composition of the wrought Ti-6Al-4V sample at the points shown in Figure 3a.
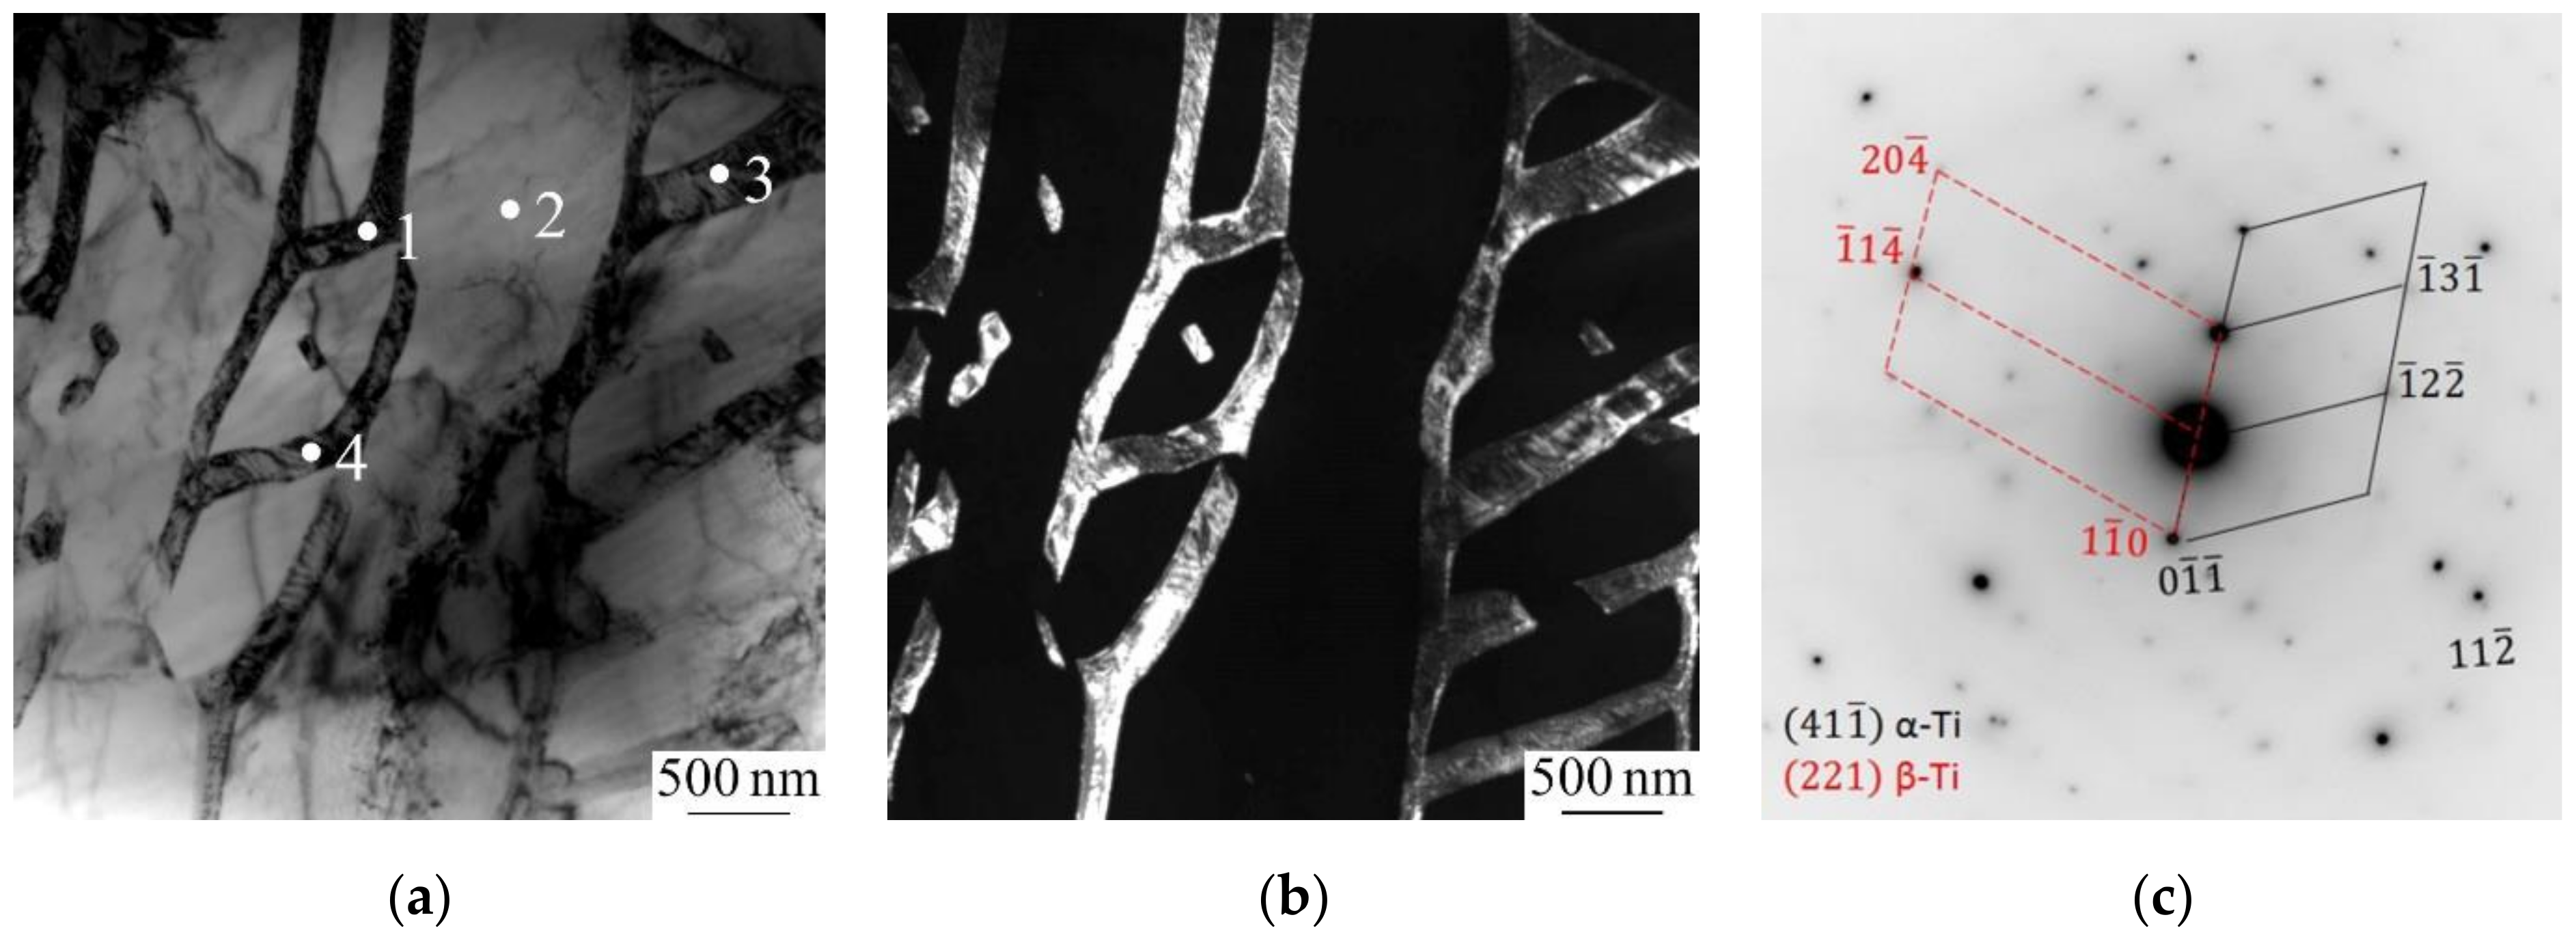
The lamellar structure of the secondary α phase with β interlayers is also observed in the EBAM Ti-6Al-4V samples. In addition, their TEM micrographs exhibit fragmented primary α laths, where the fragments with dimensions of 0.7–1 µm are separated by long disoriented α interlayers ≈200 nm thick consisting of dislocation pile-ups with a dislocation density of 3 × 10⁹ m2 (Figure 4). The vanadium content in the fragments is 4.6 wt%, while in the disoriented α interlayers, it varies within 6.7–10 wt% (see Figure 4a and Table 3), which substantially exceeds the maximum solubility of vanadium in HCP titanium (2.9 wt%). The torsion curvature of the crystal lattice of the fragmented α laths was estimated as 7 deg/μm.
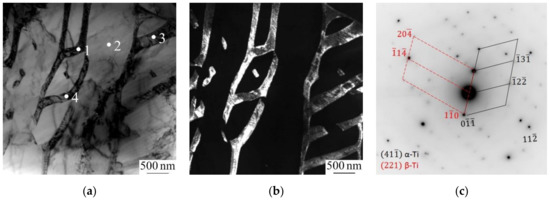
Figure 4.
TEM bright (a) and dark-field micrographs (b) and the associated SAED pattern with indexing schemes (c) of EBAM Ti-6Al-4V sample. The dark-field TEM micrograph was obtained with the closely spaced α-Ti and β-Ti reflections (b).

Table 3.
Elemental composition of the EBAM Ti-6Al-4V sample at the points shown in Figure 4a.
3.2. Mechanical Properties
The hardness and Young’s modulus of the samples are listed in Table 4. It is seen that both samples are characterized by essentially the same hardness, while the EBAM sample has the lower Young’s modulus. This resulted in the higher H/E ratio of the EBAM sample. The latter means the larger ratio of elastic to plastic work done during nanoindentation.

Table 4.
Mechanical properties of the Ti-6Al-4V samples.
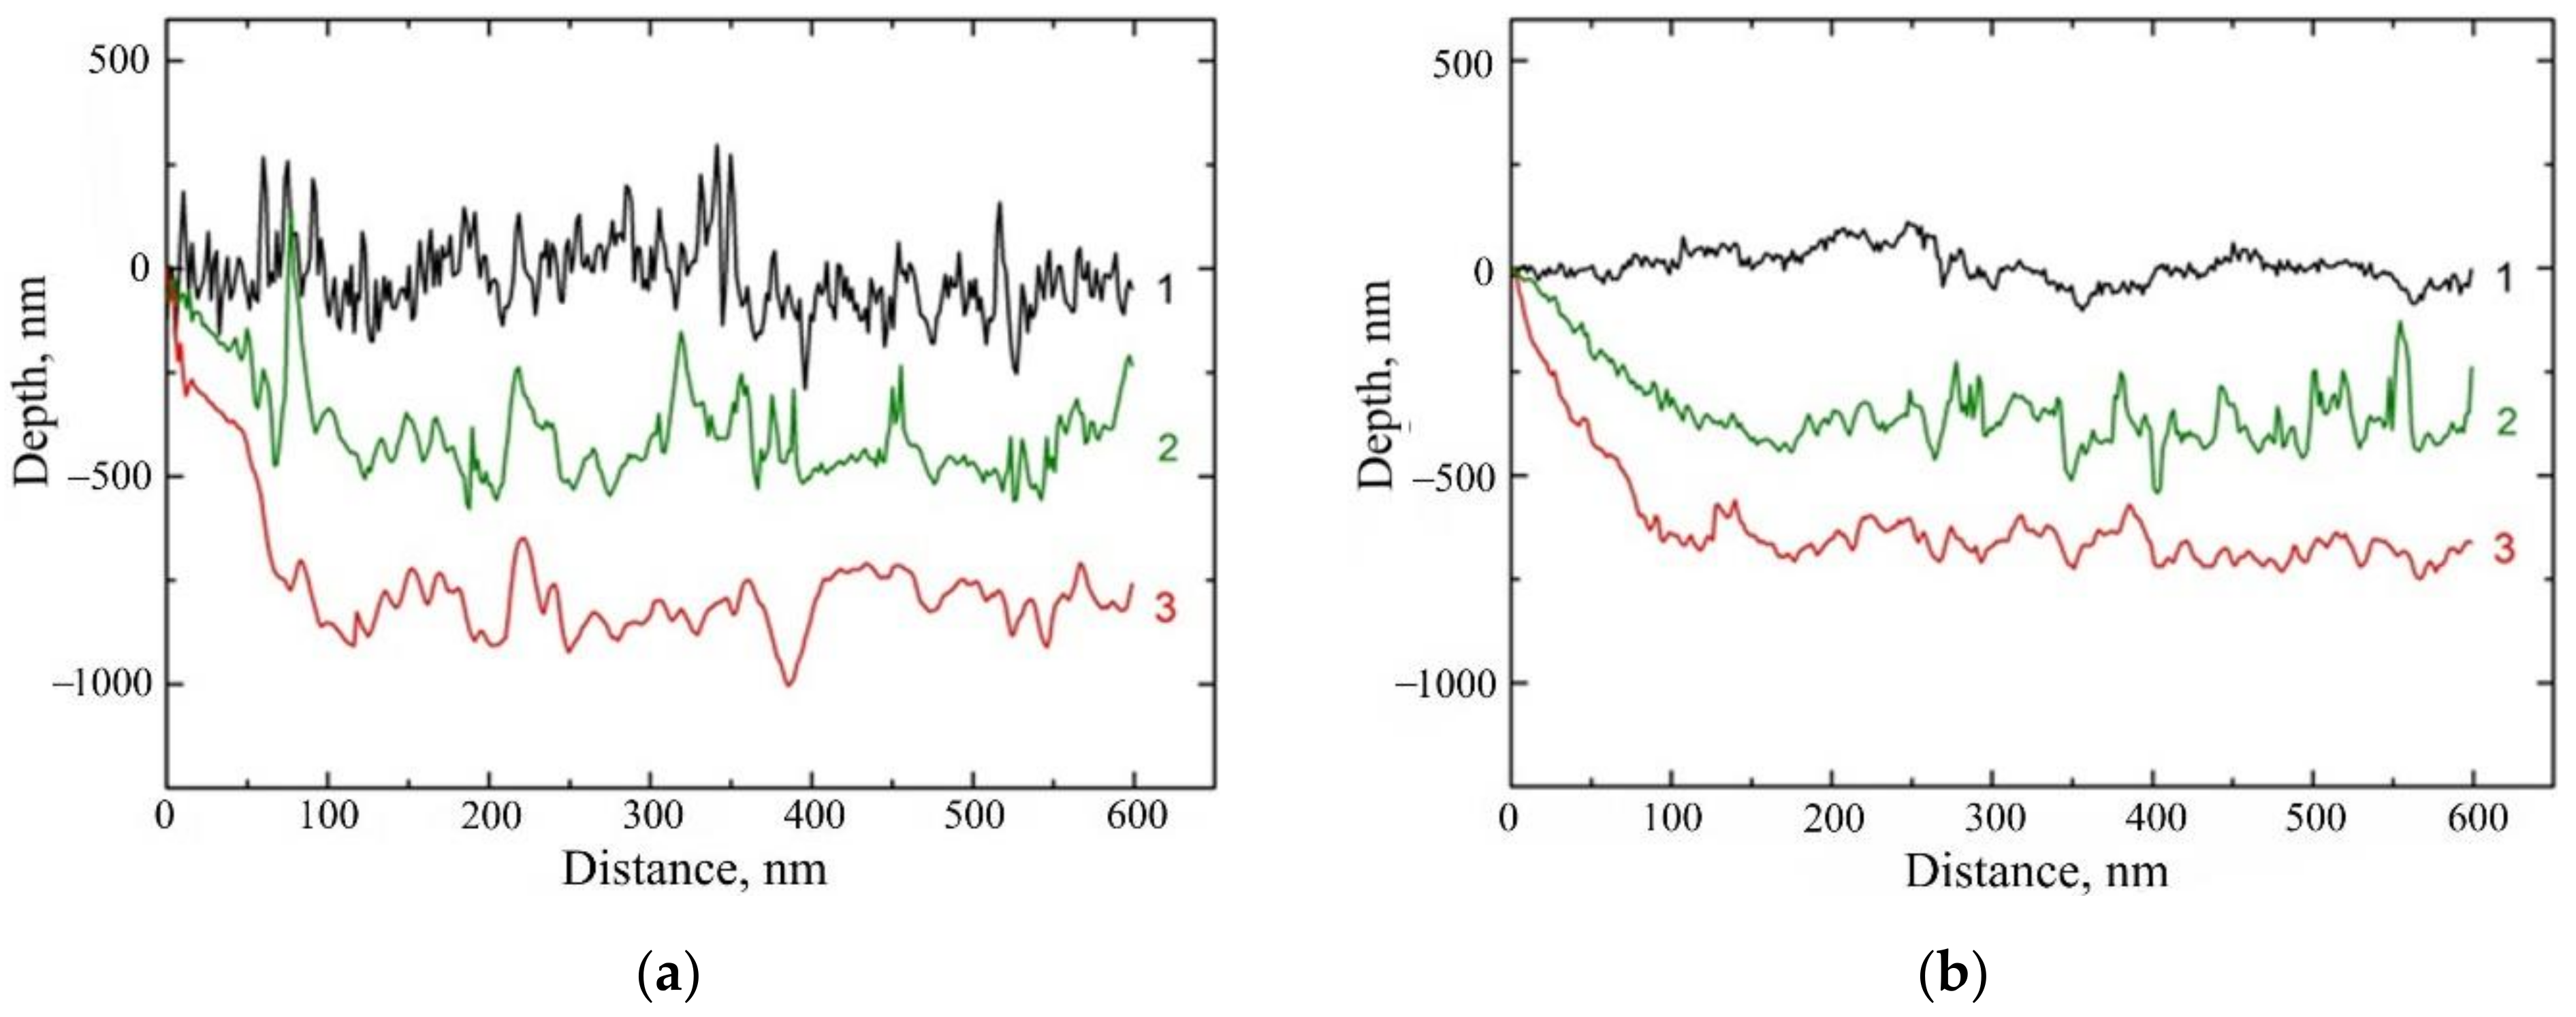
Figure 5 displays longitudinal surface profiles scanned along scratch lines in the Ti-6Al-4V samples before, during, and after scratching. It is seen that despite the similar hardness, the EBAM sample is characterized by the smaller indenter penetration depth during scratching (≈660 nm) and the smaller residual scratch depth (≈390 nm) compared with the wrought sample (≈810 and ≈460 nm, respectively). The AFM images and corresponding cross-sectional surface profiles of the scratch grooves shown in Figure 6 indicate that the scratching of both Ti-6Al-4V samples resulted in their ductile ploughing. Ploughing of the material from the scratch grooves led to the formation of pile-ups along their flanks. Figure 6 clearly indicates that the wrought sample demonstrates wider and deeper scratch groove than the EBAM sample. The residual scratch width measured from the AFM images decreases from 12.1 ± 0.2 µm in the wrought sample to 10.1 ± 0.1 µm in the EBAM sample. The scratch depth is reduced from 496 ± 22 nm to 405 ± 19 nm.
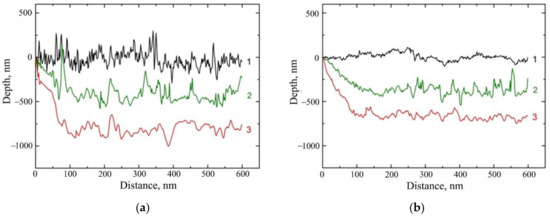
Figure 5.
Longitudinal surface profiles of scratch grooves in the wrought (a) and EBAM (b) Ti-6Al-4V samples: 1—initial surface profile, 2—residual scratch profile, 3—scratch profile under loading.
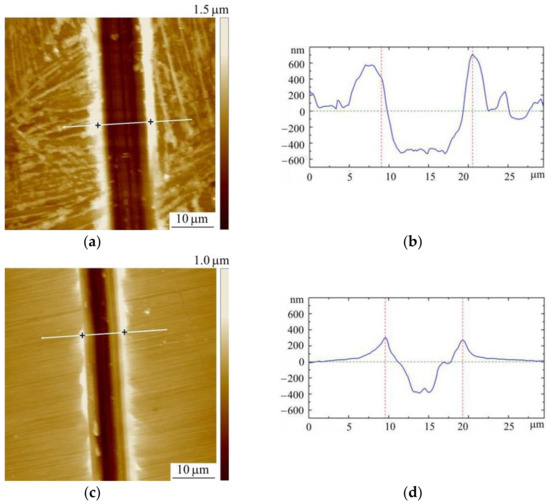
Figure 6.
AFM images (a,c) and corresponding cross-sectional surface profiles (b,d) of scratch grooves formed in the wrought (a,b) and EBAM (c,d) Ti-6Al-4V samples.
4. Discussion
Scratch testing of the Ti-6Al-4V samples showed that they were subjected to ductile ploughing that is a typical deformation mechanism for the scratching of metals [25]. The ploughing resulted from the nucleation of dislocations and their glide along the activated slip systems, which occurred toward the free surface and the bulk of the sample. Since the dislocation movement is primarily hindered by structure and phases interfaces [26], it could be expected that the wrought and EBAM Ti-6Al-4V samples characterized by similar microstructures would have similar scratch groove parameters. It is worth noting that unlike wrought samples, Ti-6Al-4V samples produced by additive manufacturing are usually characterized by a significant anisotropy of microstructure, which affects their mechanical and tribological properties [27,28,29]. However, the effect of anisotropy of the EBAM samples in the present study is negligible, because the scratching was performed along the build direction, and the scratch groove dimensions were less than the dimensions of the prior columnar β grains.
The observed difference in the scratch grooves could be caused by the different crystallographic orientations of the α phase laths. The smaller penetration depth would be observed when the ploughed material is accumulated in the pile-up in front of the indenter that results in more strong strain hardening of the material in the scratch groove. However, in this case, the volume of the material accumulated in the pile-ups along the scratches should be substantially smaller than the volume of the material removed from the scratch groove [30]. Actually, in both samples studied, the volume of the pile-ups along the scratches is close to the volume of the removed material. In the wrought sample, the cross-sectional areas of the pile-ups and scratch grooves are 3.4 µm2 and 4.0 µm2, respectively, while in the EBAM samples, they are 1.5 µm2 and 1.4 µm2, respectively.
A more probable origin of the difference in the scratch depth in the wrought and EBAM samples can be phase transformations developing beneath the indenter under loading. Actually, the intense mass transfer during the ploughing causes the formation of spatial dissipative structures with high lattice distortions [31], which promote different structural and phase transformations in the scratch grove. Since the EBAM process is characterized by the high cooling rate of the molten bath (2 × 10³ K/s [32]), the microstructure of the EBAM Ti-6Al-4V samples is represented by a martensitic α′ phase. The formation of the α′ phase is supported by their lower Young’s modulus compared with the wrought sample [33], as can be seen from Table 4. As mentioned above, the characteristic feature of the EBAM process is heating of the growing layers, which similar to the tempering of any martensite at elevated temperatures favors decomposition of the α′ phase in Ti-6Al-4V alloy and the diffusion-controlled formation of β phase interlayers at α lath boundaries. However, the TEM investigations showed that the decomposition in the EBAM Ti-6Al-4V samples was not completed, so that the areas of vanadium-enriched (6–10 wt%) α′ phase and vanadium-lean β phase were formed. It could be supposed that the contact loading induced by the indenter during scratching is the driving force for the α′→α″ and β→α″ phase transformations, respectively, in these areas. Since the volume of the unit cell of the α″ phase (0.070 nm3) is twice as high as that of the α′ phase (0.035 nm3) and β phase (0.037 nm3), the phase transformations should result in lattice expansion in the contact area and therefore in smaller penetration depth of the indenter into the samples.
Since the volume fraction of the β phase in the EBAM Ti-6Al-4V samples does not exceed 8 wt% [15], it appears that the β→α″ phase transformation does not significantly contribute to the smaller penetration depth of the indenter compared with the wrought sample. In contrast, the α′→α″ phase transformation can obviously provide a substantial expansion of the material in the scratch groove. According to the EDS data, the average vanadium content in the α′ phase of EBAM sample is 6.6 wt%. Ab initio calculations of the total energy per atom carried out for Ti crystallites with α/α′ and α″ structures containing 6.6 wt% of vanadium provide an evidence of possibility of the α′→α″ phase transformation. It is seen from Figure 7 that at such vanadium content, either the α/α′ or α″ phase can be more energetically favorable depending on the applied load. It is well known that compressive stresses arise ahead and underneath the moving indenter and tensile stresses develop behind it [34]. Figure 7 exhibits that the minimum energy of the Ti crystallite in the equilibrium state corresponds to the α/α′ phase; however, the α″ structure becomes more favorable with compression-induced decreasing atomic volume down to 15.1 Å3/atom. At higher vanadium contents, the α″ phase is more favorable at lower compression (this result will be presented elsewhere).
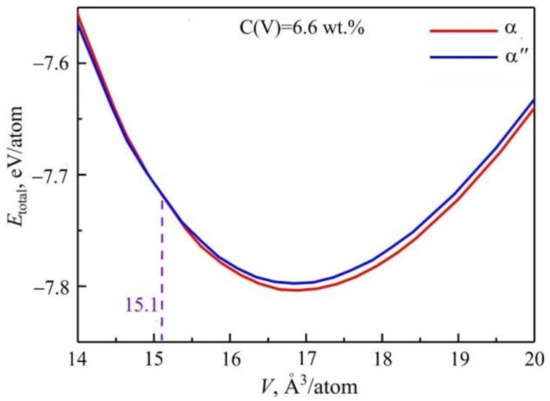
Figure 7.
Energy per atom in α- and α″-Ti with 6.6 wt% of vanadium as a function of atomic volume.
It is well known that the α″ phase is formed in the α + β Ti alloys at high vanadium contents [7]. In particular, according to the ab initio calculations, the formation of the α″ phase in Ti-6Al-4V alloy is energetically favorable; when the content of vanadium ranges from 10.1 to 21.7 wt%, that significantly exceeds the solubility limit of vanadium in α-Ti (2.7 wt%) but is insufficient to form the β-Ti phase [32]. Therefore, in equilibrium conditions, this phase is not observed in Ti-6Al-4V and can be found only in the case of incomplete decomposition of the metastable α′ phase. As mentioned above, the orthorhombic phase appeared in cast Ti-6Al-4V alloy quenched from 920 °C due to decomposition of the α′ phase into the α″ and β phase during aging at 550 °C [20]. The decomposition has been also observed after heat treatment of SLM Ti-6Al-4V samples within the temperature range of 750–900 °C [35,36]. Moreover, in the case of pre-heating the build platform to reduce the temperature gradients between the platform and the 3D-printed part, the α″ phase induced by the α′ phase decomposition has been found in as-built Ti-6Al-4V alloy samples produced by SLM [37] and EBM [38,39].
The mechanism of the formation of the α″ phase during the decomposition of the α′ phase is concerned with a gradual increase in the vanadium content at the periphery of the areas of the α′→α phase transformation. Along with the high vanadium content, the necessary condition for the formation of the orthorombic α″ phase is distortions of the hexagonal crystal lattice of the α′ phase. It is commonly assumed that the distortions of titanium crystal lattice are due to incorporation of a large amount of atoms of β-stabilizing elements. Moreover, according to the TEM investigations, the EBAM Ti-6Al-4V sample is characterized by the significant fragmentation of α and α′ laths caused by the formation of dislocation pile-ups. The latter additionally contribute to the lattice distortions, facilitating the α′→α″ martensite transformation. Although the wrought and EBAM samples are characterized by similar values of the torsion curvature of the crystal lattice of the α/α′ phase, the α phase in the wrought sample is not enriched with vanadium, which prevents the formation of the α″ martensitic phase.
Table 4 shows that the EBAM Ti-6Al-4V sample has a lower H/E ratio due to the lower Young’s modulus than the wrought sample. This also means that the EBAM sample should exhibit higher elastic recovery. Actually, as can be seen from Figure 5, recovery of the scratch groove in the EBAM sample (41%) is even smaller than in the wrought sample (43%). According to the above proposed model, this can be attributed to the reverse α″→α′ phase transformation resulting in volume shrinkage in the scratch groove, which could be induced by tensile stresses behind the moving indenter due to the high value of the coefficient of friction [40].
5. Conclusions
The study of scratching behavior of wrought and EBAM Ti-6Al-4V samples with similar microstructure and hardness showed that their deformation occurred via ploughing the material, which resulted in the formation of scratch grooves with pile-ups along their flanks. However, the samples exhibited a significant difference in their mechanical response; i.e., the penetration depth of the indenter during scratching decreased from 810 nm in the wrought sample to 660 nm in the EBAM sample.
TEM and EDS investigations revealed that due to repeated heating cycles, the decomposition of the α′ phase in the EBAM Ti-6Al-4V samples into the stable α + β phases was not fully completed, which resulted in the formation of the areas of vanadium-enriched (6–10 wt%) α′ phase. The presence of the vanadium-enriched α′ phase in the EBAM samples was also evidenced by their lower Young’s modulus compared with wrought Ti-6Al-4V. Taking into account the metastable microstructure of the EBAM samples, a mechanism was proposed, which attributed the smaller indenter penetration depth to the α′→α″ martensite transformation that occurred in the areas of compression ahead and beneath the moving indenter.
The fairness of the mechanism was supported by ab initio calculations, which demonstrated that for the Ti crystallite alloyed with 6.6 wt% of vanadium, the α″ structure became more favorable at compression-induced decreasing atomic volume down to 15.1 Å3/atom. An additional factor facilitating the α′→α″ martensite transformation in the EBAM Ti-6Al-4V samples under scratching is high lattice distortions, which is confirmed by the torsion curvature as high as 7 deg/μm.
Author Contributions
Conceptualization, A.P.; project administration, A.P.; investigation, A.S., M.K., S.M., A.B., S.K. and L.K.; project administration, A.P.; writing—original draft preparation, A.S. and A.P.; writing—review and editing, A.P. All authors have read and agreed to the published version of the manuscript.
Funding
The work has been carried out at the financial support of the Russian Science Foundation (grant No. 21-19-00795).
Institutional Review Board Statement
Not applicable.
Informed Consent Statement
Not applicable.
Data Availability Statement
The data presented in this study are available on request from the corresponding author.
Conflicts of Interest
The authors declare no conflict of interest.
References
- Sames, W.J.; List, F.A.; Pannala, S.; Dehoff, R.R.; Babu, S.S. The metallurgy and processing science of metal additive manufacturing. Int. Mater. Rev. 2016, 61, 315–360. [Google Scholar] [CrossRef]
- Dutta, B.; Sam Froes, F.H. The additive manufacturing (AM) of titanium alloys. In Titanium Powder Metallurgy: Science, Technology and Applications; Elsevier Science: Amsterdam, The Netherlands, 2015; pp. 447–468. ISBN 9780128009109. [Google Scholar]
- Gorsse, S.; Hutchinson, C.; Gouné, M.; Banerjee, R. Additive manufacturing of metals: A brief review of the characteristic microstructures and properties of steels, Ti-6Al-4V and high-entropy alloys. Sci. Technol. Adv. Mater. 2017, 18, 584–610. [Google Scholar] [CrossRef] [PubMed] [Green Version]
- Herzog, D.; Seyda, V.; Wycisk, E.; Emmelmann, C. Additive manufacturing of metals. Acta Mater. 2016, 117, 371–392. [Google Scholar] [CrossRef]
- Liu, S.; Shin, Y.C. Additive manufacturing of Ti6Al4V alloy: A review. Mater. Des. 2019, 164, 107552. [Google Scholar] [CrossRef]
- Wang, P.; Li, X.; Luo, S.; Nai, M.L.S.; Ding, J.; Wei, J. Additively manufactured heterogeneously porous metallic bone with biostructural functions and bone-like mechanical properties. J. Mater. Sci. Technol. 2021, 62, 173–179. [Google Scholar] [CrossRef]
- Wood, R.A.; Poulsen, E.R.; Froes, F.H. Titanium-Physical Metallurgy, Processing and Applications: History and Extractive Metallurgy; ASM International: Materials Park, OH, USA, 2015; pp. 1–10. ISBN 13:9781627080798. [Google Scholar]
- Bermingham, M.J.; Kent, D.; Zhan, H.; Stjohn, D.H.; Dargusch, M.S. Controlling the microstructure and properties of wire arc additive manufactured Ti-6Al-4V with trace boron additions. Acta Mater. 2015, 91, 289–303. [Google Scholar] [CrossRef]
- Lewandowski, J.J.; Seifi, M. Metal Additive Manufacturing: A Review of Mechanical Properties. Annu. Rev. Mater. Res. 2016, 46, 151–186. [Google Scholar] [CrossRef] [Green Version]
- Xu, W.; Brandt, M.; Sun, S.; Elambasseril, J.; Liu, Q.; Latham, K.; Xia, K.; Qian, M. Additive manufacturing of strong and ductile Ti-6Al-4V by selective laser melting via in situ martensite decomposition. Acta Mater. 2015, 85, 74–84. [Google Scholar] [CrossRef]
- Xu, W.; Lui, E.W.; Pateras, A.; Qian, M.; Brandt, M. In situ tailoring microstructure in additively manufactured Ti-6Al-4V for superior mechanical performance. Acta Mater. 2017, 125, 390–400. [Google Scholar] [CrossRef]
- Khorasani, M.; Ghasemi, A.H.; Awan, U.S.; Hadavi, E.; Leary, M.; Brandt, M.; Littlefair, G.; O’Neil, W.; Gibson, I. A study on surface morphology and tension in laser powder bed fusion of Ti-6Al-4V. Int. J. Adv. Manuf. Technol. 2020, 111, 2891–2909. [Google Scholar] [CrossRef]
- Wang, P.; Goh, M.H.; Li, Q.; Nai, M.L.S.; Wei, J. Effect of defects and specimen size with rectangular cross-section on the tensile properties of additively manufactured components. Virtual Phys. Prototyp. 2020, 15, 251–264. [Google Scholar] [CrossRef]
- Xu, J.; Zhu, J.; Fan, J.; Zhou, Q.; Peng, Y.; Guo, S. Microstructure and mechanical properties of Ti–6Al–4V alloy fabricated using electron beam freeform fabrication. Vacuum 2019, 167, 364–373. [Google Scholar] [CrossRef]
- Panin, A.; Kazachenok, M.; Perevalova, O.; Martynov, S.; Panina, A.; Sklyarova, E. Continuous electron beam post-treatment of EBF3-fabricated Ti–6Al–4V parts. Metals 2019, 9, 699. [Google Scholar] [CrossRef] [Green Version]
- Zhao, X.; Li, S.; Zhang, M.; Liu, Y.; Sercombe, T.B.; Wang, S.; Hao, Y.; Yang, R.; Murr, L.E. Comparison of the microstructures and mechanical properties of Ti-6Al-4V fabricated by selective laser melting and electron beam melting. Mater. Des. 2016, 95, 21–31. [Google Scholar] [CrossRef]
- Panin, A.V.; Kazachenok, M.S.; Panin, S.V.; Berto, F. Scale levels of quasi-static and dynamic fracture behavior of Ti-6Al-4V parts built by various additive manufacturing methods. Theor. Appl. Fract. Mech. 2020, 110, 102781. [Google Scholar] [CrossRef]
- Kulkarni, J.D.; Goka, S.B.; Parchuri, P.K.; Yamamoto, H.; Ito, K.; Simhambhatla, S. Microstructure evolution along build direction for thin-wall components fabricated with wire-direct energy deposition. Rapid Prototyp. J. 2021, 27, 1289–1301. [Google Scholar] [CrossRef]
- Ahmed, T.; Rack, H.J. Phase transformations during cooling in α + β titanium alloys. Mater. Sci. Eng. A 1998, 243, 206–211. [Google Scholar] [CrossRef]
- Zeng, L.; Bieler, T.R. Effects of working, heat treatment, and aging on microstructural evolution and crystallographic texture of α, α′, α″ and β phases in Ti-6Al-4V wire. Mater. Sci. Eng. A 2005, 392, 403–414. [Google Scholar] [CrossRef]
- Sinyakova, E.A.; Panin, A.V.; Perevalova, O.B.; Shugurov, A.R.; Kalashnikov, M.P.; Teresov, D. The effect of phase transformations on the recovery of pulsed electron beam irradiated Ti-6Al-4V titanium alloy during scratching. J. Alloys Compd. 2019, 795, 275–283. [Google Scholar] [CrossRef]
- Blöchl, P.E. Projector augmented-wave method. Phys. Rev. B 1994, 50, 17953–17979. [Google Scholar] [CrossRef] [Green Version]
- Kresse, G.; Joubert, D. From ultrasoft pseudopotentials to the projector augmented-wave method. Phys. Rev. B Condens. Matter Mater. Phys. 1999, 59, 1758. [Google Scholar] [CrossRef]
- Perdew, J.P.; Burke, K.; Ernzerhof, M. Generalized gradient approximation made simple. Phys. Rev. Lett. 1996, 77, 3865–3868. [Google Scholar] [CrossRef] [Green Version]
- Wredenberg, F.; Larsson, P.L. Scratch testing of metals and polymers: Experiments and numerics. Wear 2009, 266, 76–83. [Google Scholar] [CrossRef]
- Dmitriev, A.I.; Nikonov, A.Y.; Shugurov, A.R.; Panin, A.V. The Role of Grain Boundaries in Rotational Deformation in Polycrystalline Titanium under Scratch Testing. Phys. Mesomech. 2019, 22, 365–374. [Google Scholar] [CrossRef]
- Khorasani, A.M.; Gibson, I.; Ghasemi, A.H.; Ghaderi, A. A comprehensive study on variability of relative density in selective laser melting of Ti-6Al-4V. Virtual Phys. Prototyp. 2019, 14, 349–359. [Google Scholar] [CrossRef]
- Shaikh, M.Q.; Graziosi, S.; Atre, S.V. Supportless printing of lattice structures by metal fused filament fabrication (MF3) of Ti-6Al-4V: Design and analysis. Rapid Prototyp. J. 2021, 27, 1408–1422. [Google Scholar] [CrossRef]
- Hu, Y.; Chen, H.; Liang, X.; Lei, J. Titanium fabricated by selective laser melting: Microstructure, wear and corrosion behavior in different orientations. Rapid Prototyp. J. 2021. [Google Scholar] [CrossRef]
- Shugurov, A.R.; Panin, A.V.; Dmitriev, A.I.; Nikonov, A.Y. Recovery of scratch grooves in Ti-6Al-4V alloy caused by reversible phase transformations. Metals 2020, 10, 1332. [Google Scholar] [CrossRef]
- Chausov, M.; Brezinová, J.; Pylypenko, A.; Maruschak, P.; Titova, L.; Guzanová, A. Modification of mechanical properties of high-strength titanium alloys VT23 and VT23m due to impact-oscillatory loading. Metals 2019, 9, 80. [Google Scholar] [CrossRef] [Green Version]
- Panin, A.; Martynov, S.; Kazachenok, M.; Kazantseva, L.; Bakulin, A.; Kulkova, S.; Perevalova, O.; Sklyarova, E. Effects of Water Cooling on the Microstructure of Electron Beam. Metals 2021, 11, 1742. [Google Scholar] [CrossRef]
- Dumontet, N.; Connétable, D.; Malard, B.; Viguier, B. Elastic properties of the α’ martensitic phase in the Ti-6Al-4V alloy obtained by additive manufacturing. Scr. Mater. 2019, 167, 115–119. [Google Scholar] [CrossRef] [Green Version]
- Holmberg, K.; Laukkanen, A.; Ronkainen, H.; Wallin, K.; Varjus, S.; Koskinen, J. Tribological contact analysis of a rigid ball sliding on a hard coated surface. Part I: Modelling stresses and strains. Surf. Coat. Technol. 2006, 200, 3793–3809. [Google Scholar] [CrossRef]
- Kazantseva, N.; Krakhmalev, P.; Thuvander, M.; Yadroitsev, I.; Vinogradova, N.; Ezhov, I. Martensitic transformations in Ti-6Al-4V (ELI) alloy manufactured by 3D Printing. Mater. Charact. 2018, 146, 101–112. [Google Scholar] [CrossRef]
- Kazantseva, N.V.; Krakhmalev, P.V.; Yadroitsava, I.A.; Yadroitsev, I.A. Laser Additive 3D Printing of Titanium Alloys: Current Status, Problems, Trends. Phys. Met. Metallogr. 2021, 122, 6–25. [Google Scholar] [CrossRef]
- Murr, L.E.; Quinones, S.A.; Gaytan, S.M.; Lopez, M.I.; Rodela, A.; Martinez, E.Y.; Hernandez, D.H.; Martinez, E.; Medina, F.; Wicker, R.B. Microstructure and mechanical behavior of Ti-6Al-4V produced by rapid-layer manufacturing, for biomedical applications. J. Mech. Behav. Biomed. Mater. 2009, 2, 20–32. [Google Scholar] [CrossRef] [PubMed]
- Pushilina, N.; Panin, A.; Syrtanov, M.; Kashkarov, E.; Kudiiarov, V.; Perevalova, O.; Laptev, R.; Lider, A.; Koptyug, A. Hydrogen-Induced Phase Transformation and Microstructure Evolution for Ti-6Al-4V Parts Produced by Electron Beam Melting. Metals 2018, 8, 301. [Google Scholar] [CrossRef] [Green Version]
- Sofinowski, K.; Šmíd, M.; Kuběna, I.; Vivès, S.; Casati, N.; Godet, S.; Van Swygenhoven, H. In situ characterization of a high work hardening Ti-6Al-4V prepared by electron beam melting. Acta Mater. 2019, 179, 224–236. [Google Scholar] [CrossRef]
- Trzepieciński, T.; Szpunar, M.; Kaščák, L. Modeling of friction phenomena of Ti-6Al-4V sheets based on backward elimination regression and multi-layer artificial neural networks. Materials 2021, 14, 2570. [Google Scholar] [CrossRef]
Publisher’s Note: MDPI stays neutral with regard to jurisdictional claims in published maps and institutional affiliations. |
© 2021 by the authors. Licensee MDPI, Basel, Switzerland. This article is an open access article distributed under the terms and conditions of the Creative Commons Attribution (CC BY) license (https://creativecommons.org/licenses/by/4.0/).


