Article

Fatigue Behavior of Zr58Cu15.46Ni12.74Al10.34Nb2.76Y0.5 Bulk Metallic Glass Fabricated by Industrial-Grade Zirconium Raw Material

1
The State Key Laboratory for Advanced Metals and Materials, University of Science and Technology Beijing, Beijing 100083, China
2
The New Material Research Institute, Dongguan Eontec Co., Ltd., Dongguan 523662, China
3
The Dongguan Eontec Co., Ltd., Dongguan 523662, China
4
Luoyang Advanced Manufacturing Industrial R&D Center Tianjin Research Institute for Advanced Equipment, Tsinghua University, Luoyang 471000, China
5
Institute of Manufacturing Technology, Guangdong University of Technology, Guangzhou 510006, China
6
Shunde Graduate School of University of Science and Technology Beijing, Foshan 528399, China
*
Author to whom correspondence should be addressed.
Metals 2021, 11(2), 187; https://doi.org/10.3390/met11020187
Submission received: 31 December 2020 / Revised: 17 January 2021 / Accepted: 19 January 2021 / Published: 21 January 2021
(This article belongs to the Special Issue High Entropy Materials: Challenges and Prospects)

Abstract

:
In this work, the fatigue behavior of a low-cost Zr58Cu15.46Ni12.74Al10.34Nb2.76Y0.5 (at%) bulk metallic glass (BMG) fabricated by industrial-grade Zirconium raw material was investigated under three-point bending loading mode. X-ray, fatigue tests under different stress amplitude and fatigue fractography were conducted in order to characterize the amorphous structure, fatigue stress-life (S-N) curve and fracture mechanism, respectively. It is found that the X-ray diffraction (XRD) result showed a fully amorphous structure due to high glass-forming ability, cracks initiated from inclusions near the rectangular corners at tensile surfaces and the fatigue endurance limit (~168 MPa) and fatigue ratio (~0.13) termed as fatigue endurance limit divided by ultimate tensile strength in stress amplitude were comparable to the similar BMG prepared by high pure raw materials.

1. Introduction

First developed some 60 years ago, amorphous alloys, usually namely metallic glasses, have represented an interesting class of potential structural materials due to the lack of long-range orderly arrangement of atoms [1]. The unique microstructure has led to a range of intriguing properties, such as high strength, excellent hardness, large elastic elongation and other functional properties. Prior researchers had attempted to characterize the mechanical properties of thin ribbons and wires because of very high cooling rates necessary to prevent crystallization, until bulk metallic glasses (BMGs) were developed that could be fabricated at low cooling rates due to improved amorphous forming ability. Nevertheless, BMGs are not still widely applied in engineering fields up to date due to the major limitations of the corresponding service behavior, such as fatigue behavior.
As we all know, fatigue behavior for structural materials is very important and approximately 90 percent of all service failures associated with mechanical causes is fatigue [2]. However, compared with other mechanical properties of BMGs, the fatigue behavior studies are few. Starting from 1998, Gilbert et al. first reported the fatigue behavior of BMG and found that the fatigue endurance limit was low as ~8% of ultimate tensile strength [3]. From then, many researchers reported that the fatigue endurance limits of BMGs exhibited a wide range with 8–50%, usually less than 20% of their ultimate strength [2]. Such poor fatigue ratio was attributed to the lack of microstructure barriers such as grain boundaries and other lattice defects that can provide local crack–arrest positions [4,5,6]. Nevertheless, most of those were fabricated with high purity materials, let alone BMGs prepared with industrial raw materials. In fact, there are many factors that could be involved to play roles in fatigue behavior for alloys, such as composition, material quality, specimen geometry, environment, temperature, surface condition, cyclic frequency, stress ration and others [2]. Some of those might play more important roles than others. Hence, it is significant to clarify and understand the fatigue behavior of low-cost BMGs prepared with industrial-grade materials.
Apart from that, low-cost raw materials will promote industrial production and applications for BMGs. In the relevant studies about lowering the cost of BMGs, Jiang et al. [7,8,9,10,11,12] developed low-cost BMGs fabricated with industrial-grade raw materials by introducing a small number of rare earth elements to improve glass-forming ability. Based on this strategy, we designed and fabricated a low-cost Zr58Cu15.46Ni12.74Al10.34Nb2.76Y0.5 (at %) BMG with industrial-grade sponge Zirconium (Zr) and minor Yttrium (Y) addition characterizing remarkable amorphous forming ability and low-cost [13]. Accordingly, this study is focused on the fatigue behavior of a low-cost Zr58Cu15.46Ni12.74Al10.34Nb2.76Y0.5 (at %) BMG prepared by industrial-grade material, with the objective of characterizing the fatigue and fracture mechanisms.

2. Materials and Methods

In this study, the master alloys were firstly fabricated with industrial-grade sponge Zr by vacuum induction melting method. The elements of Cu (99.95%), industrial-grade sponge Zr (99.5%) with an oxygen content of less than 1000 ppm, Ni (99.96%), Al (99.9%), and Nb (99.95%) were adopted for the preparation of the ingots. To achieve a homogeneous distribution of elements, the master alloys were re-melted one time, flipped for each melt. Prior to melting, the furnace chamber was evacuated and then backfilled with high purity Ar. The cooling in the melting was conducted in a water-cooled steel mold. After that, the alloys were produced by high-pressure die-casting and machined into rectangular fatigue test samples with a dimension of 2 mm × 2 mm × 30 mm. The schematic of samples and fatigue test loading conditions are shown in Figure 1. Additional details about the ingot preparation are described elsewhere [13].
Before fatigue testing, the specimens were ground with SiC papers and polished to produce mirror surfaces. Then, specimens were employed to conduct fatigue testing until the specimens failed or 107 cycles. Stresses were calculated from simple beam mechanics theory, using the following equation:
σ   =   3 P S 2 bt 2
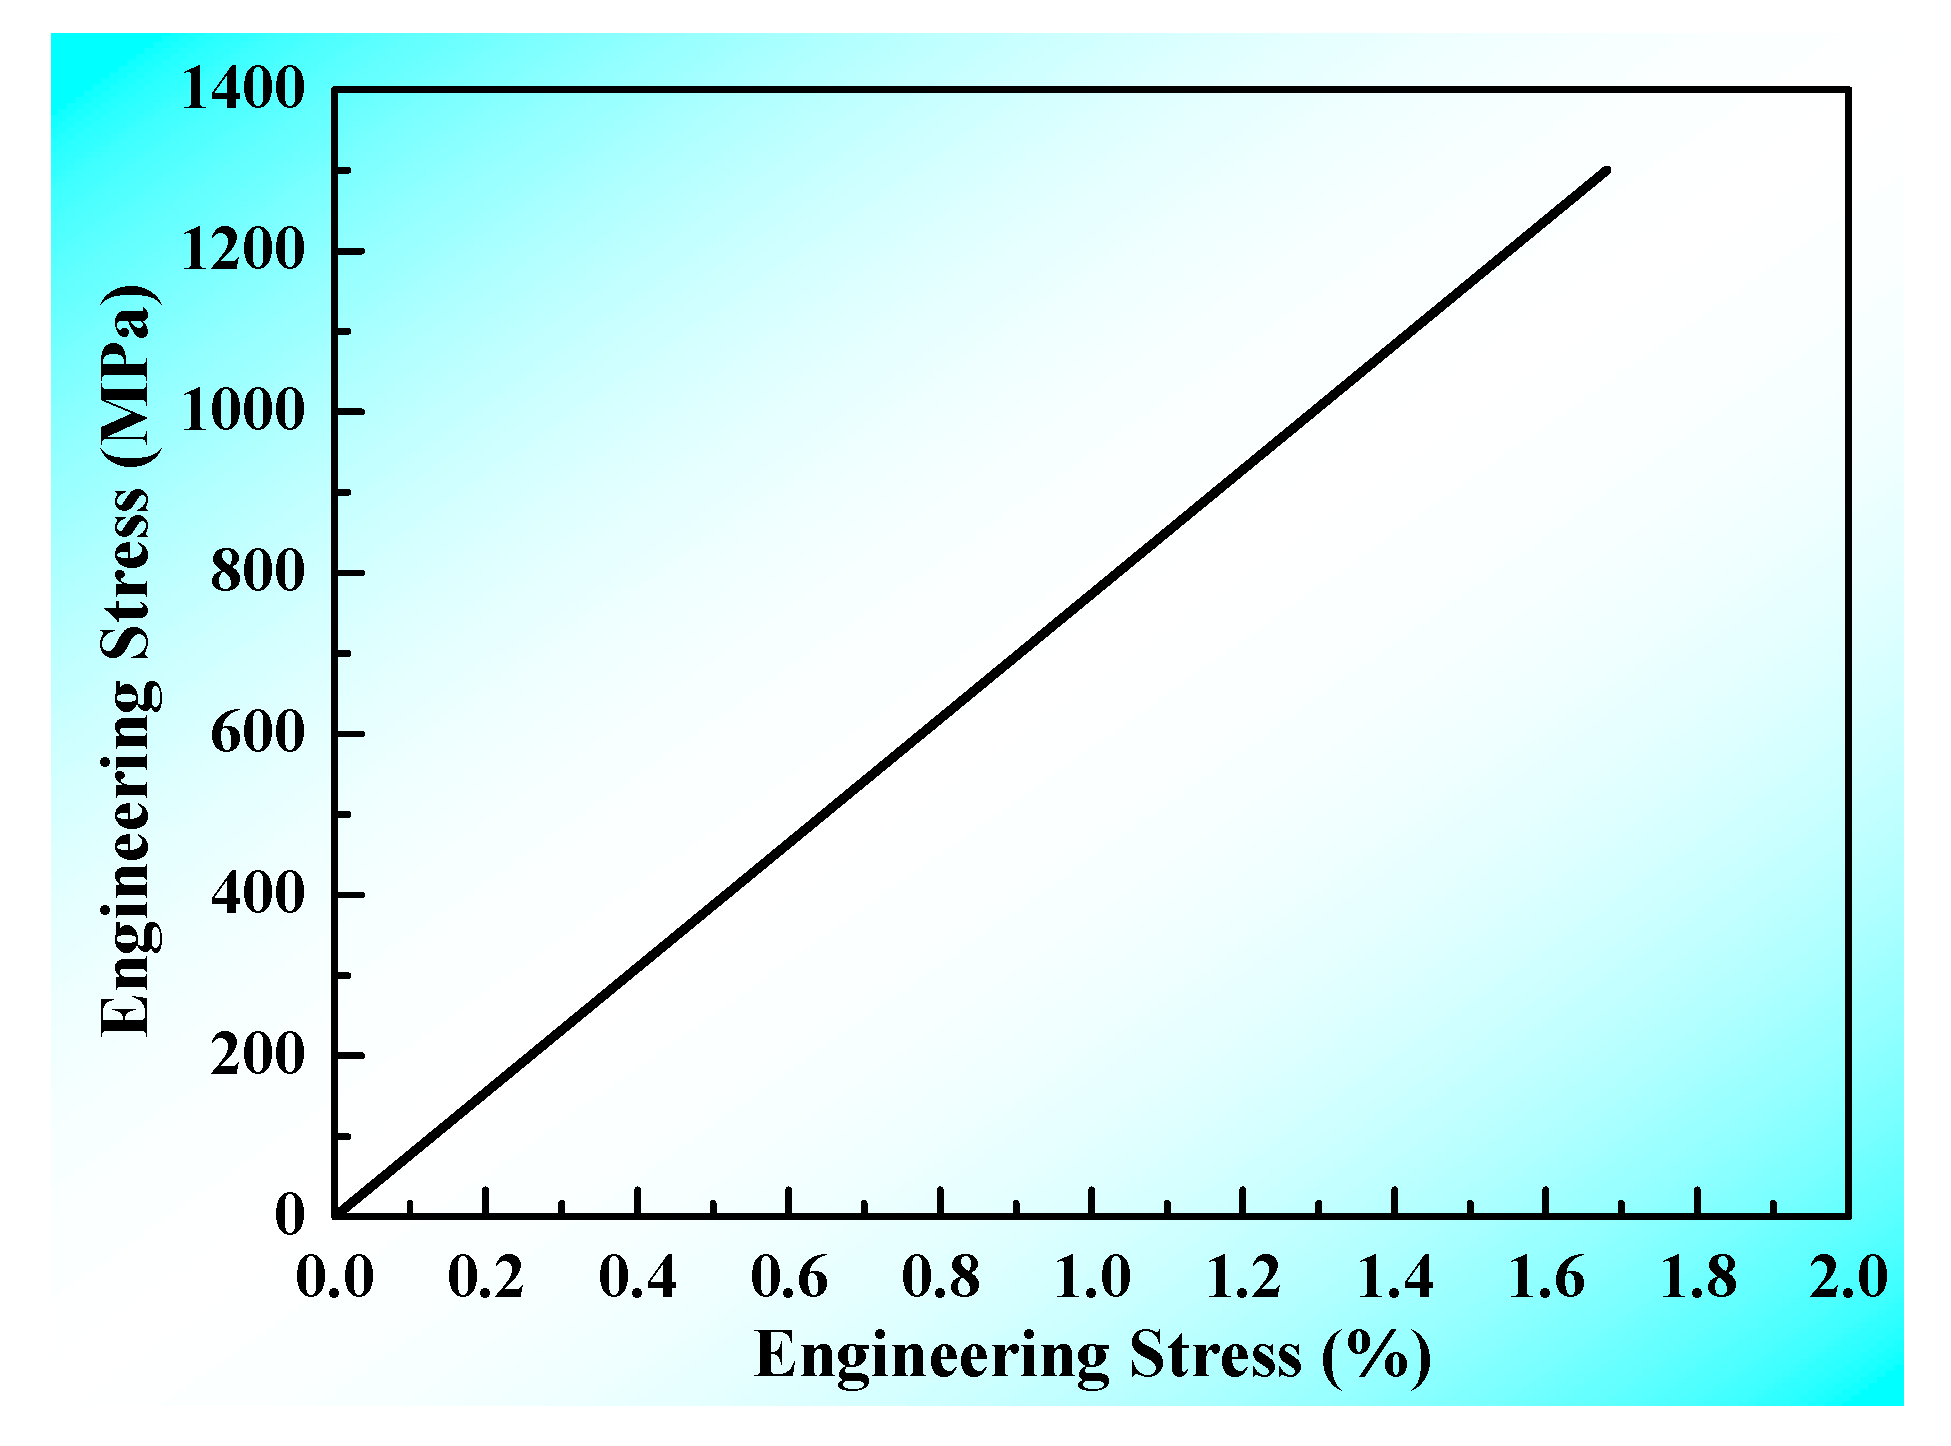
where P, b, t and S are the applied load, width (~2 mm), thickness (~2 mm) and loading span (~20 mm) of fatigue test specimens, respectively. The fatigue tests were conducted by a computer-controlled material test system (MTS Acumen 3) electrohydraulic-testing machine (MTS Systems Corporation, Eden Prairie, MN, USA). In order to obtain the stress–life (S-N) fatigue data, specimens were tested under a wide range of maximum bending stress from 340 MPa to 1000 MPa (just below the ultimate tensile strength) with a constant R ratio (R = σmin/σmax, where σmax and σmin are the applied maximum and minimum stresses, respectively) of 0.1 under a stress-controlled mode in the air at ambient temperature with a sinusoidal waveform at a loading frequency of 60 Hz. To compare fatigue ratio with other alloys, tensile tests were conducted and the tensile stress–strain curve of this BMG at a constant strain rate of 1 × 10⁻³/s under ambient temperature is shown in Figure 2.
The amorphous structure was determined by standard X-ray diffraction (XRD, Rigaku, Tokyo, Japan) with a TTP III (Cu Kα radiation) in the range of 20–80°, with a step-size of 0.02°, a dwelling time of 0.5 s and scan speed 5°/min. The failure surfaces of specimens were observed by scanning electron microscopy (SEM, Carl Zeiss Microscopy Ltd, Jena, Germany) with a Zeiss Supra 55 operated at 20 keV and a working distance of 15 mm.

3. Results

3.1. Calculation for Parameters Ω and δ

Based on the phase formation rule for multi-component alloys proposed by Yang and Zhang [14], relevant ΔSmix, Ω and δ parameters for our BMG were calculated to estimate the glass formation ability. With high ΔSmix (≈1.2R), δ (≈10) and low Ω (≈0.5), this BMG coincides with BMG-formation criterion, indicating high glass-forming ability. Here, ΔSmix, Ω and δ parameters are defined as below:
Δ S m i x   =   R i = 1 n c i ln c i
Ω   =   T m Δ S m i x / | Δ H m i x |
Δ H m i x   =   i = 1 , i j n c i c j Ω i j
Ω i j   =   4 Δ H A B m i x
δ   =   100 i = 1 n c i ( 1     r i r ¯ ) 2
where ci is mole percent of component, R is gas constant (R = 8.314 J·K−1 mol−1), Tm is the melting temperature of the multi-component alloys, Δ H A B m i x is the enthalpy of mixing of binary liquid alloys, ri is atomic radius and r ¯ is the average atomic radius.

3.2. XRD Pattern

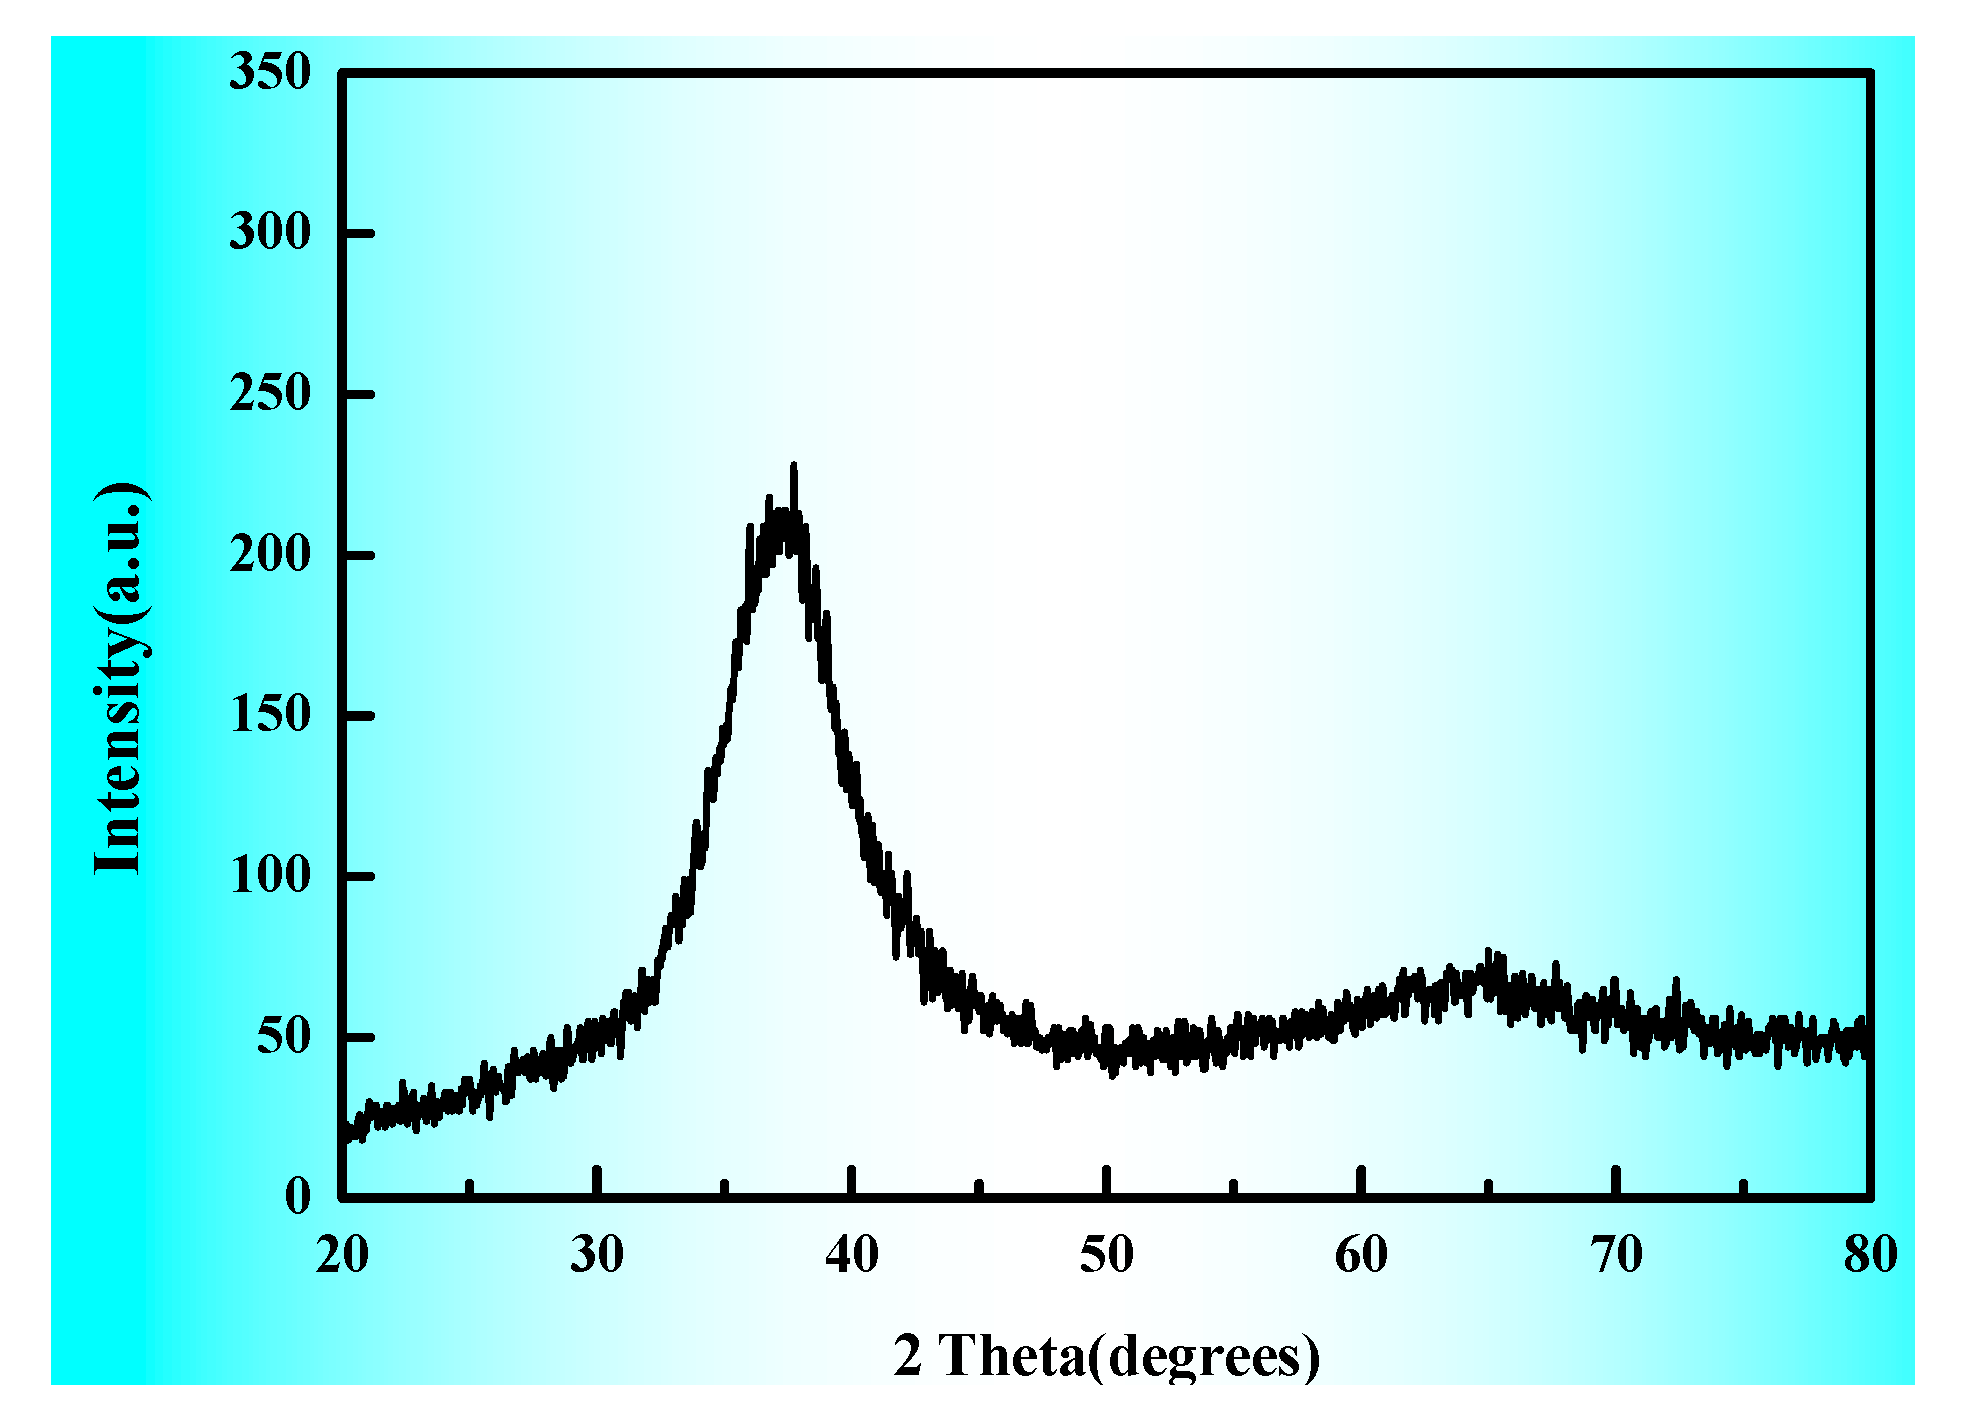
The XRD pattern (Figure 3) shows a fully amorphous structure for our BMG fabricated by industrial-grade sponge Zr, which is also consistent with phase criteria [14].

3.3. Stress–Life (S-N) Fatigue Data

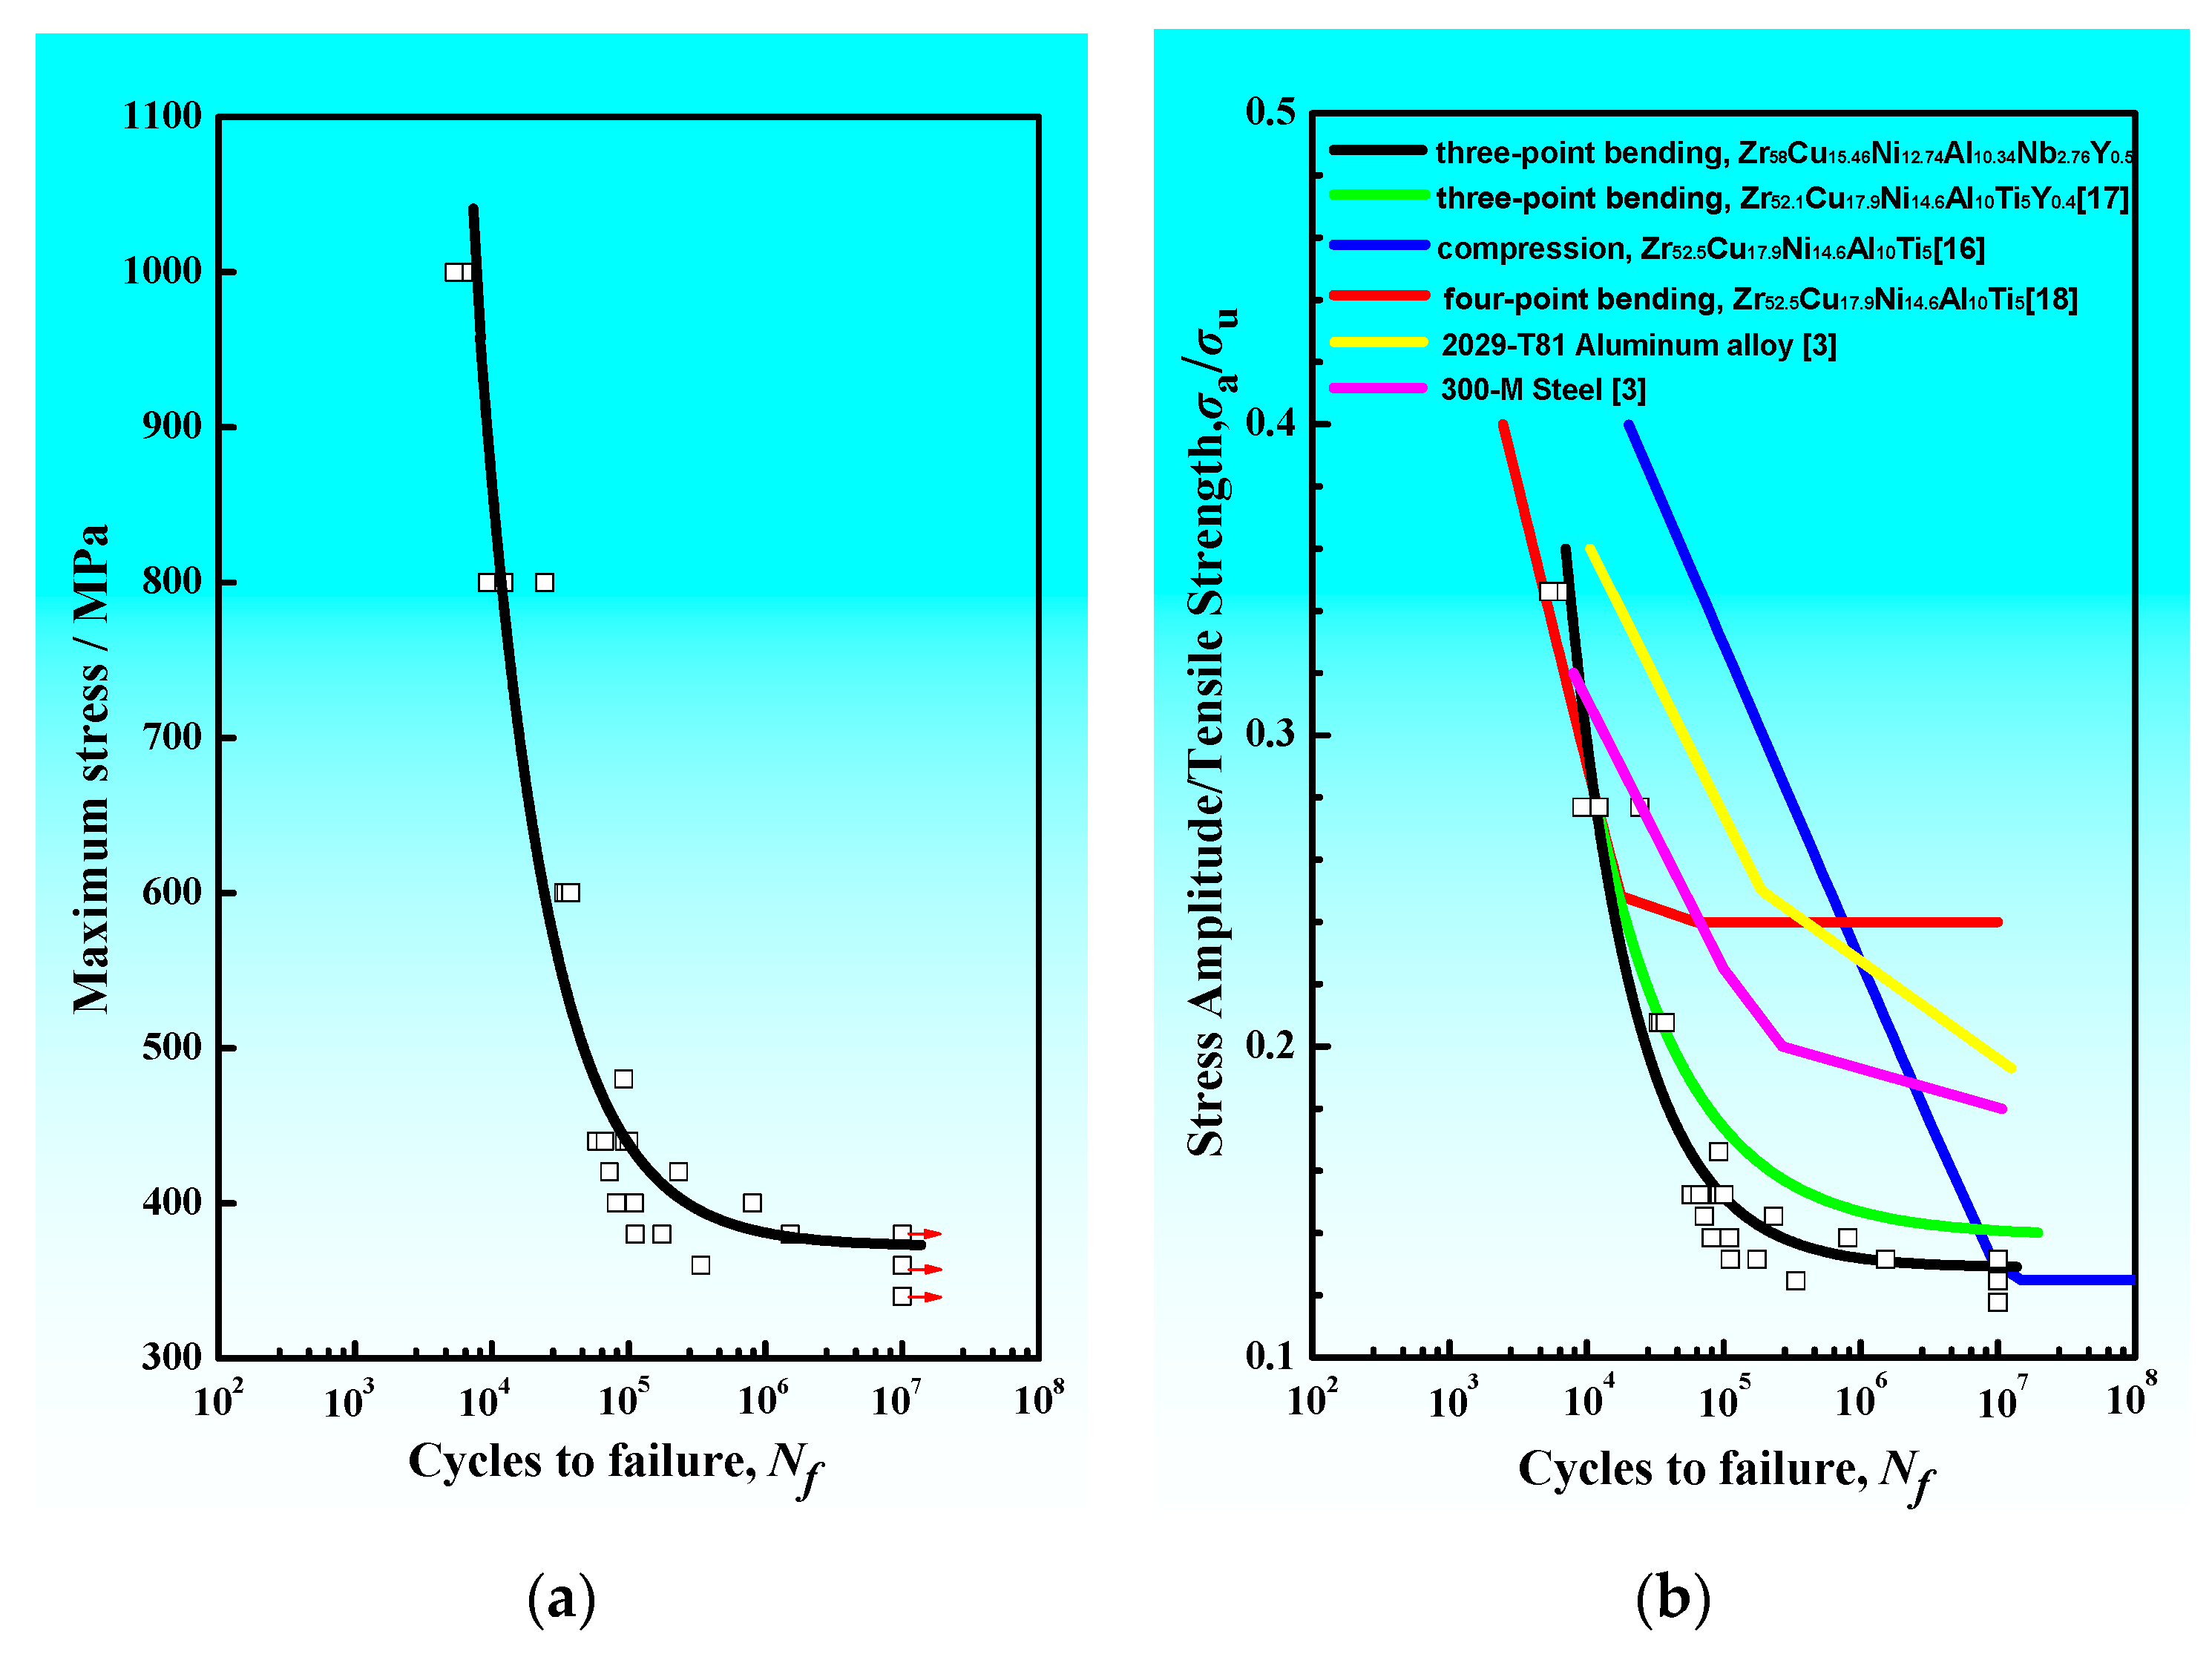
The stress–life (S-N) fatigue data of this BMG is shown in Figure 4. Figure 4a shows S-N curve in the form of applied maximum stress, σmax, versus the number of cycles to failure, Nf. In order to compare fatigue endurance limit with other alloys, as shown in Figure 4b, S-N curves present in terms of Nf versus fatigue ratio (σa/σu), stress amplitude σa (σa = 1/2 (σmax−σmin) normalized by the ultimate fracture strength (σu) of alloys, as shown in Equation (7), where σmax and σmin are the maximum and minimum values of the applied loading cycle [15]. It is worth noting that σu represents ultimate tensile strength under three-point bending, four-point bending and tension–tension fatigue modes, and ultimate compressive strength under compression–compression fatigue mode, respectively. Hence, the fatigue endurance limits (fatigue ration) under different loading modes can be compared with σa/σu. As shown in Figure 4a, the normalized fatigue endurance limit of our BMG is σmax = 373 MPa. The ultimate tensile strength of this BMG is ~1300 MPa at ambient temperature, as seen from Figure 2. As shown in Figure 4b, the normalized fatigue endurance limit of our BMG is σa/σu ≈ 0.13 and σa ≈ 168 MPa (black line). This is comparable to Vitreloy 105 (Zr52.5Ti5Cu17.9Ni14.6Al10, σa/σu ≈ 0.13, blue line) with high purity raw materials under compression–compression mode [16] and Zr52.1Ti5Cu17.9Ni14.6Al10Y0.4 BMG (our previous work, σa/σu ≈ 0.14, green line) with industrial-grade raw Zr material under three-point bending mode [17]. However, it is apparent that all of them are lower than Vitreloy 105 with high purity raw materials under four-point bending mode (σa/σu ≈ 0.24, red line) [18]. Apart from BMGs, commercial aluminum alloy (2020-T81, yellow line) and steel (300-M, pink line) were compared [3]. However, the fatigue endurance limit of our BMG was lower than those. Moreover, the values of σmax and the cycles to failure of our BMGs were fitted for engineering applications, as shown in Equation (8).
σ a / σ u = 1 2 σ m a x σ m i n σ u
log ( N f )   =   7.0861     1.1465 log ( σ max     372.1 )

3.4. Fatigue Fractography

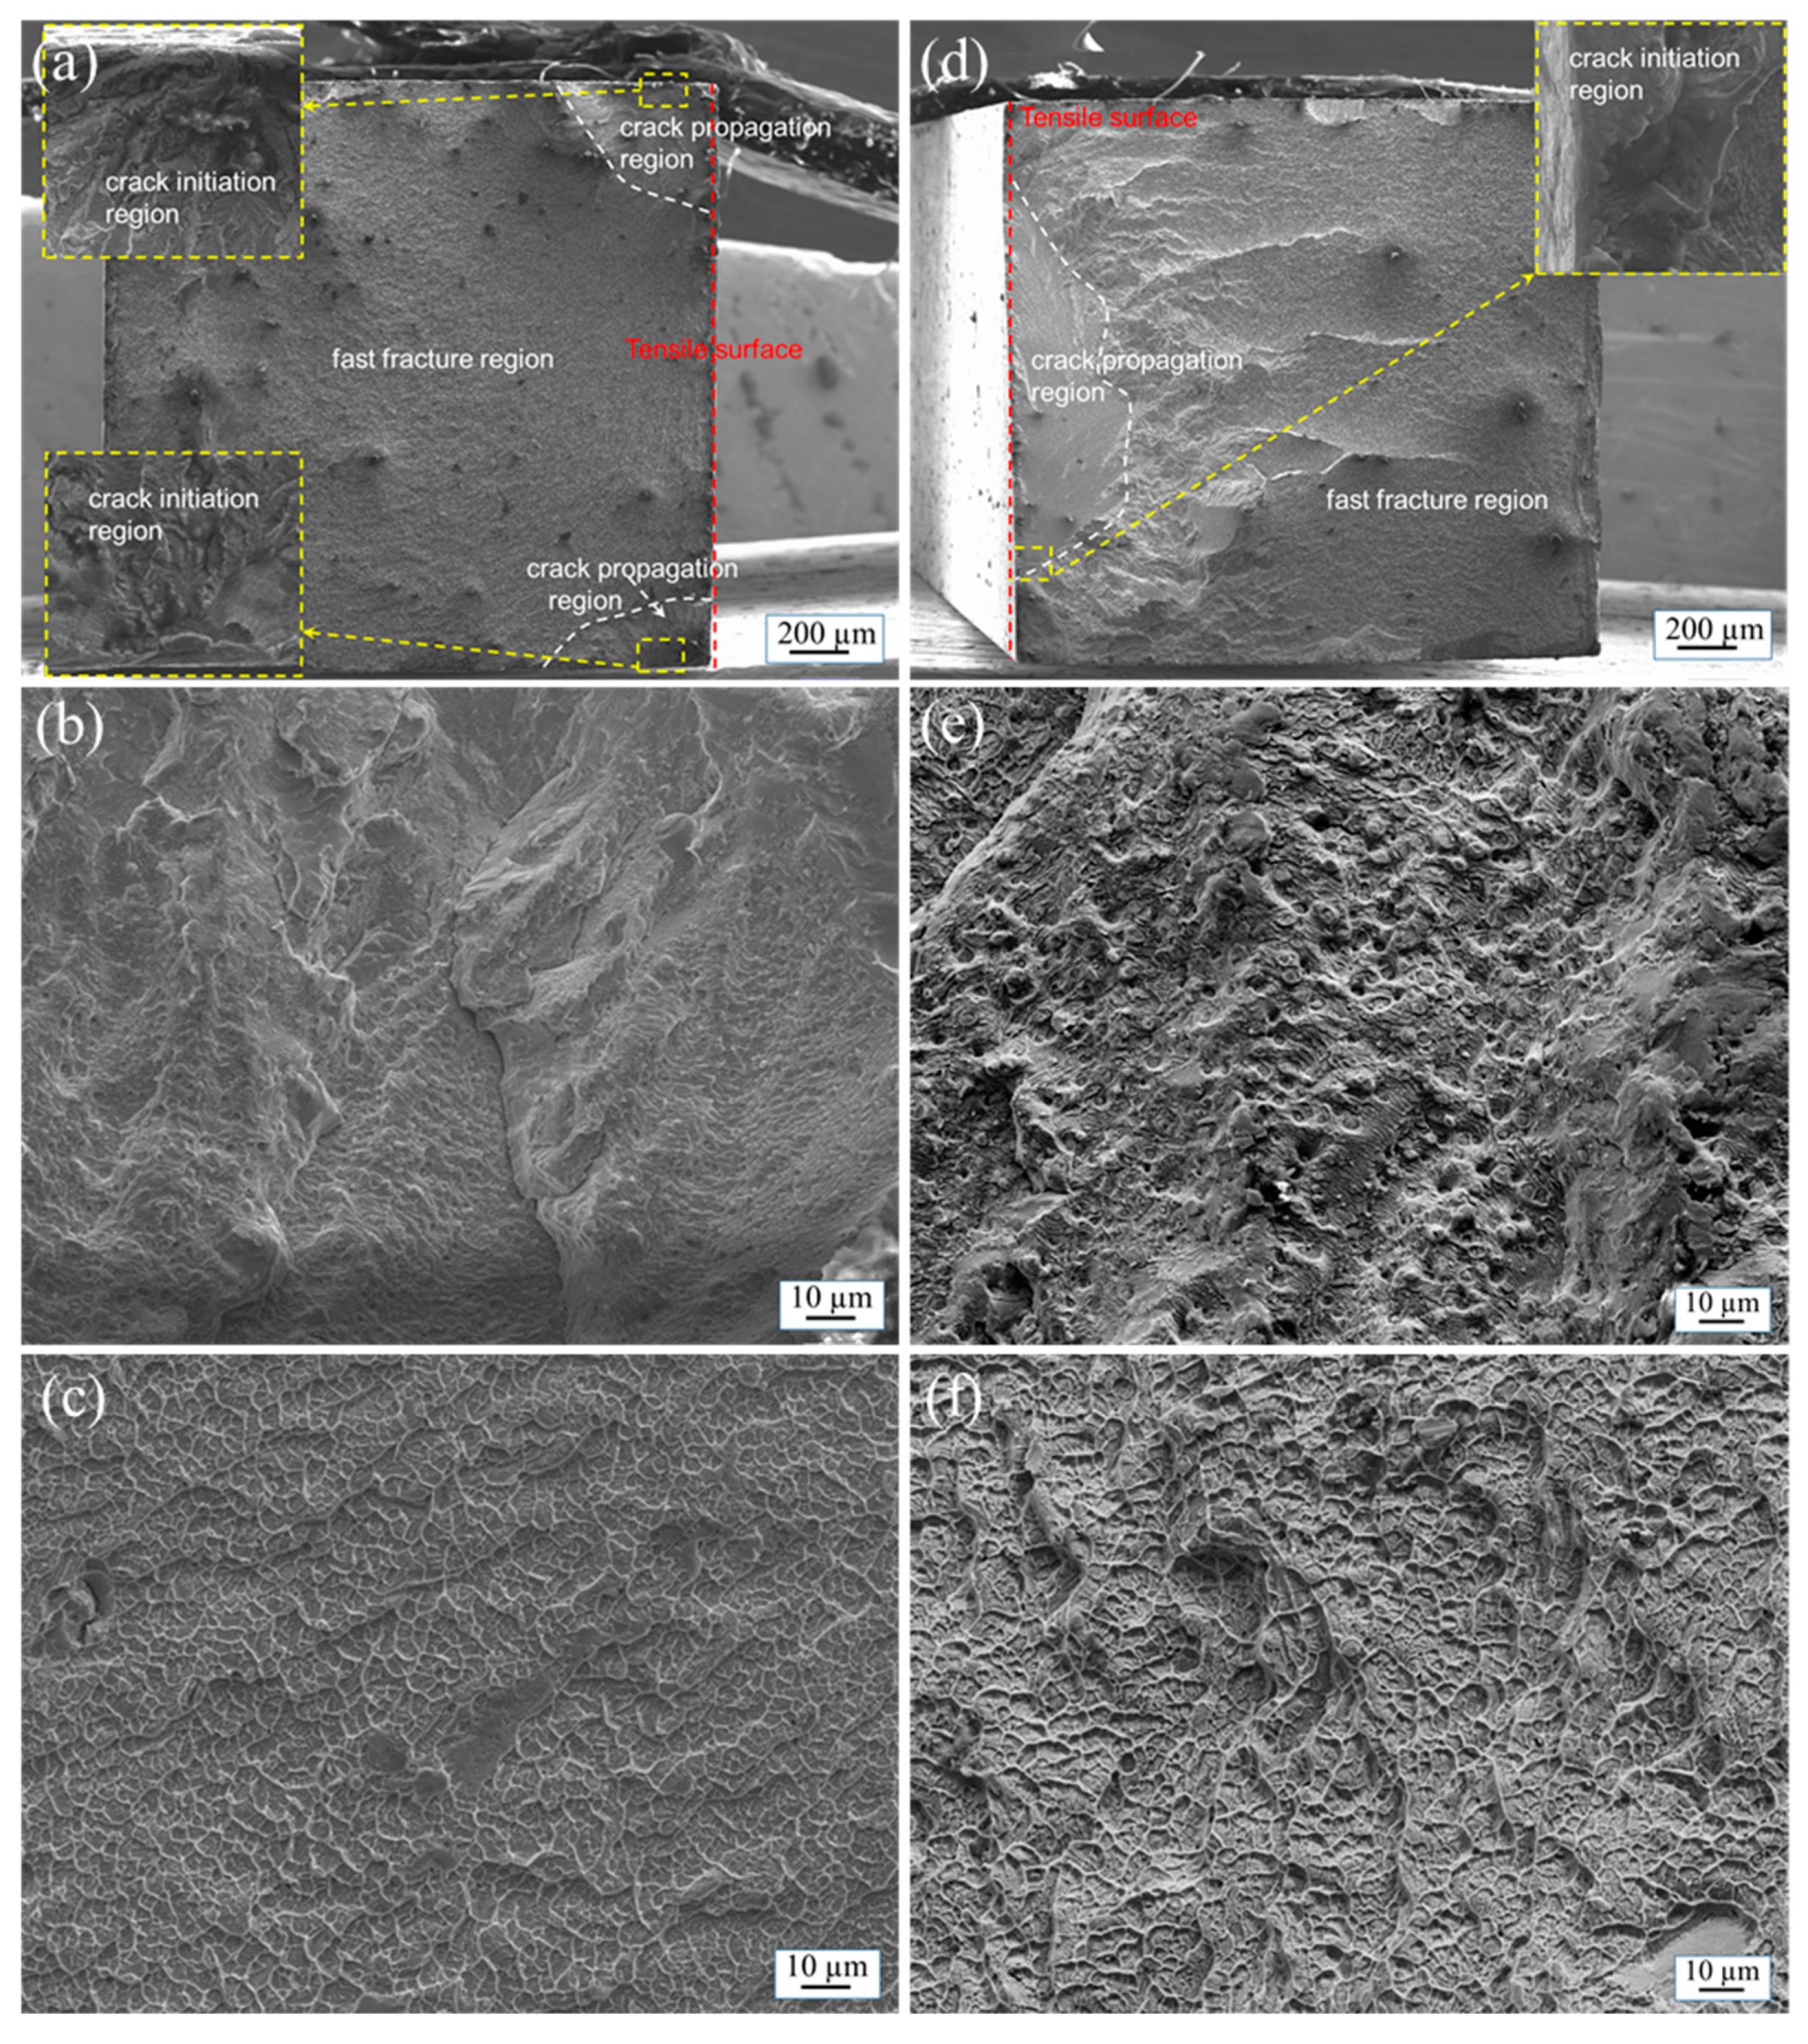
Figure 5 shows the fatigue fractography of our BMG. The fatigue fractography tested at σmax = 800 MPa after Nf = 24,369 are shown in Figure 5a–c and σmax = 400 MPa after Nf = 805,992 are shown in Figure 5d–f, respectively. Both of the fracture surfaces are perpendicular to the tensile stress direction. It is apparent that the fractured surface shows three typical regions: crack initiation region, stable crack propagation region, and final unstable fast fracture region. Figure 5a,d show over fatigue fractography and magnification images of crack initiation region; Figure 5b,c,e,f show magnification images of crack propagation region and fast fracture region, respectively. As shown in Figure 5a,d, the fatigue crack initiated from the tensile side surface (outer side) of specimens and the initiation sites were near the corner of beams. Further detailed observation showed some as-cast defects, inclusions, near the crack initiation sites. In the latter stage, the fatigue crack propagated and then formed an elliptical crack, as shown in Figure 5a,d. The area of this region after long cycles life (Nf = 805,992, as shown in Figure 5d) covered larger than short cycles life (Nf = 24,369, as shown in Figure 5a). In this stable crack propagation region, typical uniform fatigue striations also were observed, as shown in Figure 5b,e. In the final stage, in the fast fracture region, typical vein-like patterns were observed as shown in Figure 5c,f.

4. Discussion

Several factors should be considered in the differences of fatigue endurance limits for BMGs, such as composition, material quality, sample geometry, experiment environment, surface condition, cyclic frequency, ultimate fracture strength and others. Zr58 Cu15.46 Ni12.74 Al10.34 Nb2.76 Y0.5 BMG (this work) and Zr52.1Ti5Cu17.9Ni14.6Al10Y0.4 BMG (our previous work) possessed similar fatigue endurance limits due to similar compositions and ultimate tensile strength. Generally speaking, fatigue endurance limits are positively associated with ultimate tensile/compressive strength. Thus, the two BMGs possess similar S-N curves. In addition, as shown in Figure 4b, the fatigue lifetimes under compression–compression mode (though possessed the lowest fatigue endurance limit) are longer than that under three-point bending and four-point bending mode. According to other research [16], loading mode may be the dominant reason. The fatigue crack initiation and propagation can be impeded under compression–compression mode. It is possible that the fatigue crack propagated under compression–compression mode like a Mode-II crack, but Mode-I crack propagated under bending mode [19]. Mode-I crack is an opening or tensile mode tending to propagate quickly. However, Mode-II crack tends to slid or shear mode and propagates relatively slowly. Therefore, the lifetimes may be diverse due to different loading modes for BMGs. The fatigue endurance limit of Vitreloy 105 BMG under four-point bending mode (red line) is higher than others, as shown in Figure 4b. The major reason for the great variation in fatigue endurance limits under similar loading modes may be specimen geometry and defects [17,19]. Although there are all beam samples, the corners of the samples are different. Rounded corners under four-point bending mode can strongly reduce the stress concentration as opposed to rectangular under three-point bending and compression–compression modes. It is possible that the fatigue cracks in the rectangular samples formed more easily than those in the rounded samples. Then, the inclusions, as shown in Figure 5a,d, played an important role and further enhance stress concentration. The free volume and incompatible deformation could be caused near the interface between inclusions and matrix under cyclic loading due to the composition diversity. Subsequently, the stress concentration was further enhanced, which promoted the formation of cracks. There are two main views about fatigue crack initiation. Cracks may initiate from the shear bands [2,20,21,22,23] or casting defects, such as inclusions and pores. It is apparent that, in our low-cost BMG with industrial-grade Zr raw material, fatigue crack initiated from inclusions due to stress concentration. Typical uniform fatigue striations were obvious on the stable crack propagation region, as shown in Figure 5b,e. For crystalline alloys, the striation formation is associated with the blunting and resharpening of the crack tip during each cyclic loading. Similarly, the striations in BMGs are also associated with the blunting and resharpening process [18]. The vein-like patterns were observed in the unstable fast fracture region, as seen in Figure 5c,f. The abundant vein-like pattern formed in this region is due to the viscosity change suddenly. At the moment of the failure, abundant elastic energy could be released, meanwhile, the temperature rises sharply [24]. Thence, the viscosity greatly reduced and vein-like patterns formed. However, there are no distinct local melting regions observed in other research studies [25,26]. It is possible that the released elastic energy may not provide enough heat to result in local melting.

5. Conclusions

In this study, the fatigue behavior of a low-cost Zr58Cu15.46Ni12.74Al10.34Nb2.76Y0.5 (at%) BMG fabricated by industrial-grade Zr raw material was investigated under three-point bending loading mode. According to the relevant results and discussion above, the following conclusions can be drawn.
With high ΔSmix (≈1.2 R), δ (≈10) and low Ω (≈0.5), Zr58Cu15.46Ni12.74Al10.34Nb2.76Y0.5 BMG possesses high glass-forming ability. The fracture surface shows three typical regions: crack initiation region containing inclusions, stable crack propagation region consisting of striations, and final unstable fast fracture region characterizing vein-like pattern. The crack initiated from inclusions near the rectangular corners due to stress concentration. The fatigue endurance limit (~168 MPa) in stress amplitude and fatigue ratio (~0.13) of this BMG are comparable to the similar BMG (Vitreloy 105) prepared by high pure raw materials.

Author Contributions

S.Z., writing—original draft, data analysis, investigation and methodology; T.Z., preparation for specimens and data analysis; L.L., data analysis; J.Y., investigation; M.Z., methodology and investigation; C.W., editing; Y.Z., conceptualization, supervision. All authors have read and agreed to the published version of the manuscript.

Funding

This work was financially supported by Guangdong Basic and Applied Basic Research Foundation (2019B1515120020); National Natural Science Foundation of China (51735003).

Institutional Review Board Statement

Not applicable.

Informed Consent Statement

Informed consent was obtained from all subjects involved in the study.

Data Availability Statement

The data presented in this study are available on request from the corresponding author.

Conflicts of Interest

The authors declare no conflict of interest.

References

  1. Jun, W.; Willens, R.; Duwez, P. Non-crystalline structure in solidified gold-silicon alloys. Nature 1960, 187, 869–870. [Google Scholar] [CrossRef]
  2. Jia, H.; Wang, G.; Chen, S.; Gao, Y.; Li, W.; Liaw, P. Fatigue and fracture behavior of bulk metallic glasses and their composites. Prog. Mater. Sci. 2018, 98, 168–248. [Google Scholar] [CrossRef]
  3. Gilbert, C.; Lippmann, J.; Ritchie, R. Fatigue of a Zr-Ti-Cu-Ni-Be bulk amorphous metal: Stress/life and crack-growth behavior. Scr. Mater. 1998, 38, 537–542. [Google Scholar] [CrossRef]
  4. Gilbert, C.; Schroeder, V.; Ritchie, R. Mechanisms for fracture and fatigue-crack propagation in a bulk metallic glass. Metall. Mater. Trans. A 1999, 30, 1739–1753. [Google Scholar] [CrossRef]
  5. Guennec, B.; Nobori, T.; Kuwahara, H.; Ueno, K. Effect of the stress ratio on the fatigue behavior of Zr55Al10Ni5Cu30 bulk metallic glass part I—Analysis of the fatigue resistance. Intermetallics 2018, 92, 72. [Google Scholar] [CrossRef]
  6. Menzel, B.; Dauskardt, R. Stress-life fatigue behavior of a Zr-based bulk metallic glass. Acta Mater. 2006, 54, 935–943. [Google Scholar] [CrossRef]
  7. Jiang, F.; Wang, Z.; Zhang, Z.; Sun, J. Formation of Zr-based bulk metallic glasses from low purity materials by scandium addition. Scr. Mater. 2005, 53, 487–491. [Google Scholar] [CrossRef]
  8. Zhang, Y.; Pan, M.; Zhao, D.; Wang, R.; Wang, W. Formation of Zr-based bulk metallic glasses from low purity of materials by yttrium addition. Mater. Trans. 2000, 11, 1410–1414. [Google Scholar] [CrossRef] [Green Version]
  9. Zhang, Y.; Zhou, Y.; Hui, X.; Wang, M.; Chen, G. Minor alloying behavior in bulk metallic glasses and high-entropy alloys. Sci. China. Ser. G 2008, 4, 427–437. [Google Scholar] [CrossRef]
  10. Zhang, Y.; Chen, J.; Chen, G.; Liu, X. Glass formation mechanism of minor yttrium addition in CuZrAl alloys. Appl. Phys. Lett. 2006, 89, 131904. [Google Scholar] [CrossRef]
  11. Zhang, Y.; Li, R. Editorial for special issue on nanostructured high-entropy materials. Int. J. Miner. Metall. Mater. 2020, 27, 1309–1311. [Google Scholar] [CrossRef]
  12. Yang, M.; Liu, X.; Wu, Y.; Wang, H.; Wang, X.; Lu, Z. Unusual relation between glass-forming ability and thermal stability of high-entropy bulk metallic glasses. Mater. Res. Lett. 2018, 6, 495–500. [Google Scholar] [CrossRef] [Green Version]
  13. Zhang, T.; Meng, X.; Wang, C.; Li, L.; Yang, J.; Li, W.; Li, R.; Zhang, Y. Investigations of new bulk metallic glass alloys fabricated using a high-pressure die-casting method based on industrial grade Zr raw material. J. Alloys Compd. 2019, 792, 851–859. [Google Scholar] [CrossRef]
  14. Yang, X.; Zhang, Y. Prediction of high-entropy stabilized solid-solution in multi-component alloys. Mater. Chem. Phys. 2012, 132, 233–238. [Google Scholar] [CrossRef]
  15. Launey, M.; Hofmann, D.; Johnson, W.; Ritchie, R. Solution to the problem of the poor cyclic fatigue resistance of bulk metallic glasses. Proc. Natl. Acad. Sci. USA 2009, 106, 4986–4991. [Google Scholar] [CrossRef] [Green Version]
  16. Wang, X.; Qu, R.; Wu, J.; Liu, Z.; Zhang, Z. Fatigue damage and fracture behavior of metallic glass under cyclic compression. Mater. Sci. Eng. A Struct. 2018, 717, 41–47. [Google Scholar] [CrossRef]
  17. Zhou, S.; Zhang, T.; Zhang, M.; Zhang, Y. Fatigue behavior of a minor yttrium doped ZrCuNi-based metallic glass alloy fabricated by industrial grade raw material. MRS Adv. 2020, 5, 1713–1721. [Google Scholar] [CrossRef]
  18. Naleway, S.; Greene, R.; Gludovatz, B.; Dave, N.; Ritchie, R.; Kruzic, J. A highly fatigue-resistant Zr-based bulk metallic glass. Metall. Mater. Trans. A 2013, 44, 5688–5693. [Google Scholar] [CrossRef] [Green Version]
  19. Wang, G.; Qiao, D.; Yokoyama, Y.; Freels, M.; Inoue, A.; Liaw, P. Effects of loading modes on the fatigue behavior of Zr-based bulk-metallic glasses. J. Alloys Compd. 2009, 483, 143–145. [Google Scholar] [CrossRef]
  20. Wang, X.; Qu, R.; Liu, Z.; Zhang, Z. Shear band-mediated fatigue cracking mechanism of metallic glass at high stress level. Mater. Sci. Eng. A Struct. 2015, 627, 336–339. [Google Scholar] [CrossRef]
  21. Wang, X.; Qu, R.; Liu, Z.; Zhang, Z. Evolution of shear-band cracking in metallic glass under cyclic compression. Mater. Sci. Eng. A Struct. 2017, 696, 267–272. [Google Scholar] [CrossRef]
  22. Qu, R.; Wang, S.; Wang, X.; Wang, Z.; Zhang, Z. Revealing the shear band cracking mechanism in metallic glass by X-ray tomography. Scr. Mater. 2017, 133, 24–28. [Google Scholar] [CrossRef]
  23. Wang, X.; Qu, R.; Wu, S.; Zhu, Z.; Zhang, H.; Zhang, Z. Improving fatigue property of metallic glass by tailoring the microstructure to suppress shear band formation. Materialia 2019, 7, 100407. [Google Scholar] [CrossRef]
  24. Wang, G.; Liaw, P.; Yokoyama, Y.; Freels, M.; Inoue, A. Investigations of the factors that affected fatigue behavior of Zr-based bulk-metallic glasses. Adv. Eng. Mater. 2008, 11, 1030–1033. [Google Scholar] [CrossRef]
  25. Qiao, D.; Fan, G.; Liaw, P.; Choo, H. Fatigue behaviors of the Cu47.5Zr47.5Al5 bulk-metallic glass (BMG) and Cu47.5Zr38Hf9.5Al5 BMG composite. Int. J. Fatigue 2007, 29, 2149–2154. [Google Scholar] [CrossRef]
  26. Zhang, L.; Chen, Z.; Chen, D.; Zhao, X.; Zheng, Q. Four-point-bending-fatigue behavior of the Cu45Zr45Ag7Al3 bulk metallic glass. J. Non-Cryst. Solids 2013, 370, 31–36. [Google Scholar] [CrossRef]
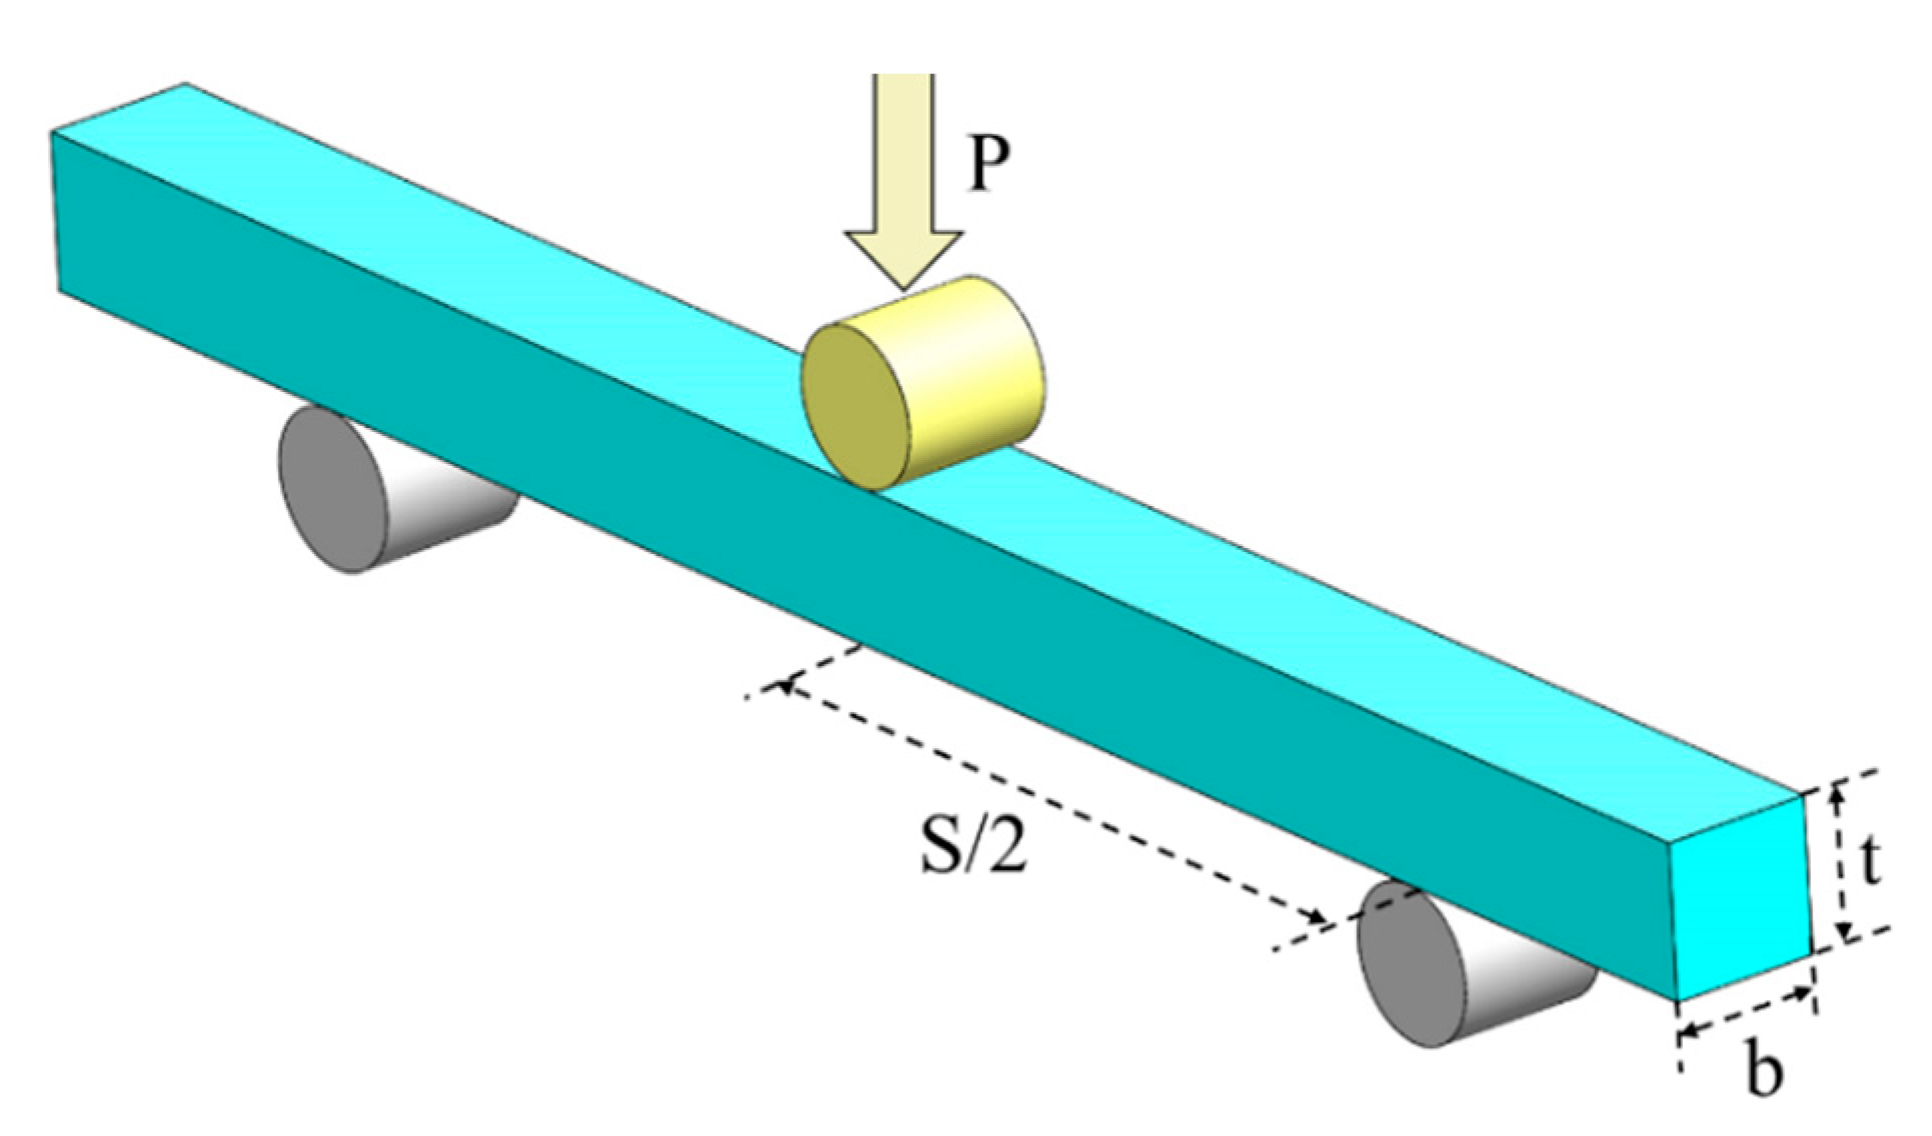
Figure 1. The schematic of samples and fatigue test mode.
Metals 11 00187 g001
Figure 2. Tensile engineering stress–strain curve for Zr58Cu15.46Ni12.74Al10.34Nb2.76Y0.5 bulk metallic glass (BMG).
Metals 11 00187 g002
Figure 3. X-ray diffraction pattern of the Zr58Cu15.46Ni12.74Al10.34 Nb2.76Y0.5 BMG specimen.
Metals 11 00187 g003
Figure 4. Stress–life (S-N) fatigue data for several alloys. (a) Maximum stress (MPa) versus Nf; (b) Stress amplitude/tensile strength (σa/σu).
Metals 11 00187 g004
Figure 5. Fatigue fractography of our bulk metallic glass (BMG) tested at σmax = 800 MPa after Nf = 24,369 as shown in (ac) and σmax = 400 MPa after Nf = 805,992 as shown in (df). (a,d) show over fatigue fractography and magnification images of crack initiation region; (b,e,c,f) show magnification images of crack propagation region and fast fracture region, respectively.
Metals 11 00187 g005
Publisher’s Note: MDPI stays neutral with regard to jurisdictional claims in published maps and institutional affiliations.