Article

Evaluation of Hardness, Sliding Wear and Strength of a Hypoeutectic White Iron with 25%Cr after Heat Treatments

by
Alejandro González-Pociño
1,*,
Juan Asensio-Lozano
1,
Florentino Álvarez-Antolín
1 and
Ana García-Diez
2,*
1
Materials Pro Group, Departamento de Ciencia de los Materiales e Ingeniería Metalúrgica, Universidad de Oviedo, Independencia 13, 33004 Oviedo, Spain
2
Departamento de Ingeniería Naval e Industrial, Escuela Politécnica Superior, Universidad de A Coruña, 15403 Ferrol, Spain
*
Authors to whom correspondence should be addressed.
Metals 2021, 11(6), 947; https://doi.org/10.3390/met11060947
Submission received: 27 April 2021 / Revised: 31 May 2021 / Accepted: 7 June 2021 / Published: 11 June 2021

Abstract

:
Hypoeutectic white cast irons with a high chrome content are commonly used in the industrial mining sector where there is a demand for both high resistance to adhesive wear and an acceptable toughness for the absorption of impacts and falls of diverse materials. Through the application of a design of experiment (DoE) technique, factors related to thermal treatment are analyzed with respect to resistance to sliding wear, maximum rupture stress and toughness. The results show that, in order to increase resistance to adhesive wear, it is convenient to use destabilization temperatures of 1050 °C and tempering of two hours at 400 °C. This foments a very hard martensite and a high proportion of highly alloyed retained austenite, which, with low tempering, achieves a precipitation of carbides from this austenite with hardly any loss of hardness of the martensite. In order to increase the energy which this material is capable of absorbing until breakage, furnace cooling set at 150 °C followed by tempering at 550 °C would be favorable. Slower cooling implies a greater quantity of conditioned retained austenite, so that, following this, it may be transformed into lower bainite with a high density of finely dispersed precipitated carbides. Furthermore, this tempering also allows the transformation of martensite into ferrite with finely dispersed carbides.

1. Introduction

Currently, there are a large number of abrasion-resistant alloys, of which high-chromium Nihard cast irons and Cr–Mo steels are considered materials with excellent resistance to wear [1,2]. Such applications are typical of but not exclusive to the metallurgy and mining industries (waste disposal of by-products, mining excavations, etc.), and they can also be found in coal power plants, management of residues, etc. A few examples of components made of high-Cr cast irons would be jaw crusher liners, mill inner shields, balls for milling, etc. [3,4,5]. Owing to the very expensive price of nickel as a key alloy element in traditional wear-resistant cast irons such as in Ni-hard abrasive resistance (A.R.) alloys, with the passing of time and the ever-increasing price of Ni, their cost has made them unaffordable.
With the toughness, abrasion and occasional corrosion resistance typically sought in mining applications, it is hard to surpass the high-Cr family of A.R. irons. They are often used as liners for ore processing machine components where the prerequisites are not only limited to wear resistance but also to moderate–low toughness conditions. Components are required to deal with frequent impacts during ore processing, as well as from those grinding and crushing elements which also strike armor-plated components [6,7].
In all these applications, a need is specified for high resistance to abrasive wear. However, behind the term ‘abrasive’ is often hidden a combination of abrasive and erosive wear, or abrasive and adhesive wear.
When corrosion resistance is added as a prerequisite to wear and toughness, as is the case with slurry impellers and pump cases, white cast irons with higher Cr content must be used. However, in other ferrous alloys, which are alloyed with Cr, it has been confirmed that this resistance to corrosion could also be influenced by the severity of quenching rate [8,9,10,11]. Once the mechanical and functional properties are known, the next step will be to focus on how to accomplish those targets at the lowest possible energy and manufacturing costs [12,13,14].
Other applications require a high resistance to the adhesive wear mechanism, or a combination of both types of wear mechanisms [15,16]. An example of the principal mechanism of adhesive wear would be the equipment used in the cold forming of materials [17]. In this case, apart from high resistance to wear, toughness of the material in service is also required. The steels of tools normally used in these applications are ledeburitic steels [18]. Depending on the wear mechanisms required, these cast irons could be used for similar requirements or in situations which combine mechanisms of both abrasive and adhesive wear, assuming that the toughness is acceptable. An example of this application could be the interior lining of uniaxial presses for the manufacturing of pieces of refractory material. It was found that both a refined microstructure and less interconnected carbides can improve the fracture toughness and wear resistance of high-Cr cast irons [3,19,20].
In the solidification of commercial hypoeutectic high-chromium cast irons, the first phase to nucleate and increase is that of the austenite forming isolated dendrites in the liquid. Further freezing will cause the eutectic liquid to solidify, giving a non-ledeburitic matrix if the Cr content exceeds 15 %-wt. The eutectic matrix consists of austenite as the continuous constituent and M7C3 carbides (K2 carbides), the latter being the dispersed constituent in the eutectic. In the as-cast state, these highly alloyed white irons exhibit a certain toughness level owing to the presence of high percentages of both pro-eutectic and eutectic retained austenite [21]. This highly alloyed austenite phase in the as-cast state is highly supersaturated in carbon and alloy elements, with values in excess of equilibrium solute contents due to non-equilibrium cooling in the foundry cooling yards. As a result, low Ms and Mf values for austenite will be expected, and thus a high-volume fraction of retained austenite present at room temperature (R.T.). It is to be highlighted that the great hardness found in these high alloy white irons due to the contribution of the hardness of eutectic K2 carbides (1000–1800 HV) is highly significant. These K2 carbides are much harder than the KC (M3C) cementitic carbides (1060–1240 HV) [22].
It is commonly considered that an increase in the weight percent of C in hypoeutectic white irons conveys an increase in the volume fraction of eutectic carbides, which are responsible for an increase in hardness and wear resistance [23,24,25,26]. The volume fraction and size of eutectic carbides seem to play a role in the pro-eutectic austenitic grain size while at high temperature, by inhibiting grain growth. This growth constraint on austenite grains is also of interest in the subsequent destabilization heat treatment of austenite which enables secondary carbide formation. The refinement of the microstructure leads to a homogeneity of mechanical properties and an improvement thereof [27,28,29].
Austenite contains an excess of dissolved carbon with respect to that corresponding to equilibrium which, together with chromium, stabilizes austenite in the as-cast state. The principal objective of a heat treatment applied to the austenite is to destabilize this, by reducing the carbon content through the precipitation of secondary carbides. The precipitation leaves a depleted austenite of excess C and alloy elements in solution, thus raising Ms and Mf temperatures. Therefore, a lower fraction of retained austenite would be expected after destabilization compared to the parent as-cast microstructure [30]. The technical literature indicates that destabilization temperatures vary from 800 °C to 1100 °C, and the usual holding times are between 1 h and 6 h [20,31,32,33,34,35].
Destabilization temperature and time, as well as the cooling rate used after treatment, not only determine the amount of carbide formed, but also its distribution, size and, in some cases, (e.g., for very long holding times) its nature, as well as the relative proportions of martensite to retained austenite [36]. Hardness depends on the amount of martensite and its C content, whereas abrasion resistance depends on the martensite as well as on the fraction and fineness of secondary carbides [37]. When the hardness increases, matrix wear occurs first, and then carbide flakes are formed under alternating stress. The mass loss of the contact surface decreases with increasing hardness for the same sample [15].
Minimizing the amount of retained austenite after treatment and subsequent cooling has been observed to slightly favor impact toughness [38,39]. This is due to the fact that after a destabilization treatment, the austenite is highly alloyed and heavily dislocated by the formation of martensite (α’) as the latter induces plastic deformation due to a volume increase in γ → α’, leaving a highly distorted austenite at the γ/α’ interface [40].
Wear resistance is closely related, on one hand, to the type, morphology, orientation and properties of secondary carbides, and on the other hand to the matrix type that acts as a binder for these carbides [41]. The type of secondary carbides formed during destabilization treatment depends on composition and destabilization temperature. For instance, the presence of molybdenum in the chemistry of the alloy promotes the formation of other hard carbides in addition to the typical M7C3, including M23C6, M6C and M2C, depending on the Cr:C ratio [37,42,43,44]. Some researchers have shown that excellent resistance to abrasive wear of Fe–Cr–C alloys with optimum toughness was obtained when a high- volume fraction of M7C3 carbides was achieved within a martensitic matrix [45,46]. This microstructure can be observed in hypoeutectic and with the Cr:C ratio between 5 and 8 [45,47].
Production casting is generally in one of two conditions: (1) as-cast in the austenitic state or (2) heat treated by destabilization with secondary carbides in a matrix which is mostly martensitic with little retained austenite. They can be used directly in either of both states, yet a tempering treatment of martensite is recommended in order to gain toughness as well as to relieve residual stresses from quenching [45,48,49,50]. Tempering treatment has the additional objective of transforming retained austenite into lower bainite. Usual tempering temperatures for high-Cr white irons vary in the range of 400–600 °C while the tempering time could last between 2 and 6 h [51,52,53].
The purpose of this work consists of the evaluation of the destabilization treatment, the cooling media and the tempering treatment with the aim of optimizing adhesive wear resistance and hardness. At the same time, the stress and the energy absorbed prior to fracture in a three-point bend test were maximized. To achieve this aim, a methodology based on statistical methodology, design of experiments (DoE), was used and the correlation of mechanical properties and microstructure established.

2. Materials and Methods

The objective of the present research was to determine the role that selected heat treatment variables applied to a high-chromium as-cast white iron have on evaluated mechanical responses. In order to do this, the research method followed was that of the application of a fractional design of experiments (DoE) with 4 factors and 8 experiments. The basic chemistry of the alloy is presented in Table 1. These alloys are selected when a combination of hardness and resistance to corrosion are sought.
The analyzed factors relate to the destabilization of the austenite, the severity of the cooling media and the tempering treatment as well. In the statistical analysis, two levels were chosen for each factor. Table 2 shows the factors and levels selected for such factors.
This DoE is framed in the context of former published work by the authors within a sequential research strategy [54]. The application of a design of experiments statistical technique aims to deliberately modify normal working conditions to produce changes in studied responses, for example, resistance to adhesive wear or the toughness of the material. These deliberate changes are applied to certain productive factors, like, for example, destabilization temperature, means of cooling or the tempering temperature. Table 2 shows the factors considered in this study and the deliberate changes applied to these factors. By planning with a design of experiments, a matrix is generated with the experiments to be carried out.
Often in industrial processes, very few factors are responsible for most of the response variations, with the remaining factors being responsible for variations in the responses of lesser importance, often confused with experimental noise. A complete factorial design of experiments requires a large number of experiments to be performed, and when designed at two levels per factor, the number of experiments is equal to 2k, where ‘k’ is the number of factors being analyzed and ‘2′ is the number of levels selected for the variations of each factor. In the present study, 4 factors were studied in eight experiments (Table 2), which is half of the full factorial design. In this simplification, an information loss is assumed owing to ignoring the interaction of more than two factors, which, in industrial practice, is seldom significant. The effect of a factor is defined as the variation of the response function as a consequence of the variation of said factor. The main effects are defined as those effects on the response function derived from each principal factor taken separately, that is to say, the change in the response when said factor varies from its lowest level, −1, to its highest level, +1. Interactions between 2 factors are defined as the variation between the mean effect of one factor with the other factor at its lowest level, −1, and the mean effect of the same factor with the other factor at the highest level, +1, and then dividing the difference by 2. Similarly, the interactions between three or more factors can be defined. The relevance of the principal effects tends to be higher than the interaction of two factors, and the latter higher than the interaction of three factors, etc. This allows for the simplification of a complete factorial analysis into fractions of this analysis.
Table 3 shows the matrix of experiments generated. The last column in the table labelled as ‘Restricted Confounding Patterns’ indicates those second order interactions whose effects are confounded with the main effects. The confounding pattern should include all the effects confounded with each other. However, Table 3 shows a restricted confounding pattern in which only the main effects and 2-factor interactions are represented.
The experimental response is subjected to random variation. This variation follows a normal law, where its standard deviation reflects the experimental error. The effects are linear combinations of the responses, therefore, by application of the central limit theorem, they follow a normal law. It must be taken into account that the linear combination of two normal independent random variables follow a normal law. Each main effect can be considered a random variable where the value obtained is an estimate of its mean μ. If the effects are not significant, they follow a normal law distribution of mean equals zero: N(0, σ), indicating that the sought effects oscillate around zero. From this law of distribution, the associated distribution function can be graphically represented. If this is represented on the scale of a normal probabilistic graph, it appears as a straight line. It appears aligned on a normal probabilistic plot in a representation of the pairs given by the effect and its probability [55]. However, those factors whose representation moves away from the straight line (μ ≠ 0) will be considered significant under two possible scenarios. When they appear to the left side of the straight line, its level −1 increases the response function with respect to its level +1. The other possibility for a factor to be significant is that the point moves away from the straight line to its right side and that its level +1 increases the response function with respect to its level −1.
The analyzed responses were:
  • Volume fraction of eutectic carbides by quantitative metallography by manual point counting on a total of 30 micrographs at a magnification of 400×.
  • Vickers hardness with a load of 30 kgf (~294 N), averaging the results of 12 indentations per experiment.
  • Sliding wear resistance evaluated through a reciprocating pin on disk wear test performed according to the ASTM G133-05 standard, with the following characteristics: ball characteristics: WC 4/7%Co, 4 mm diameter, 1550–1780 HV; applied load: 30 N; stroke length: 40 mm; rotating speed: 250 rev⋅min−1 (equivalent to a linear average speed of 20 m⋅min−1); total distance tested: 10 km.
  • Where the mass loss at the end of testing was weighted and registered.
  • Three-point flexural bending test with the following characteristics: support span, L = 30 mm; width (w) and thickness (t) of tested beams, 14 mm and 3.5 mm, respectively; center roll diameter for load application and support roll diameters: 10 mm; center roll linear speed: 5 mm⋅min−1.
The evolution of the material’s microstructure following these heat treatments was analyzed by means of optical microscopy (Nikon, Tokyo, Japan) and scanning electron microscopy (JEOL, Nieuw-Vennep, The Netherlands). Grinding was carried out with 60, 120, 240, 400 and 600 grit size SiC paper. Subsequently, the samples were polished in two consecutive stages with 6 μm and 1 μm diamond paste, respectively. Fry was used as the chemical reagent to reveal the microstructure of the material.

3. Results

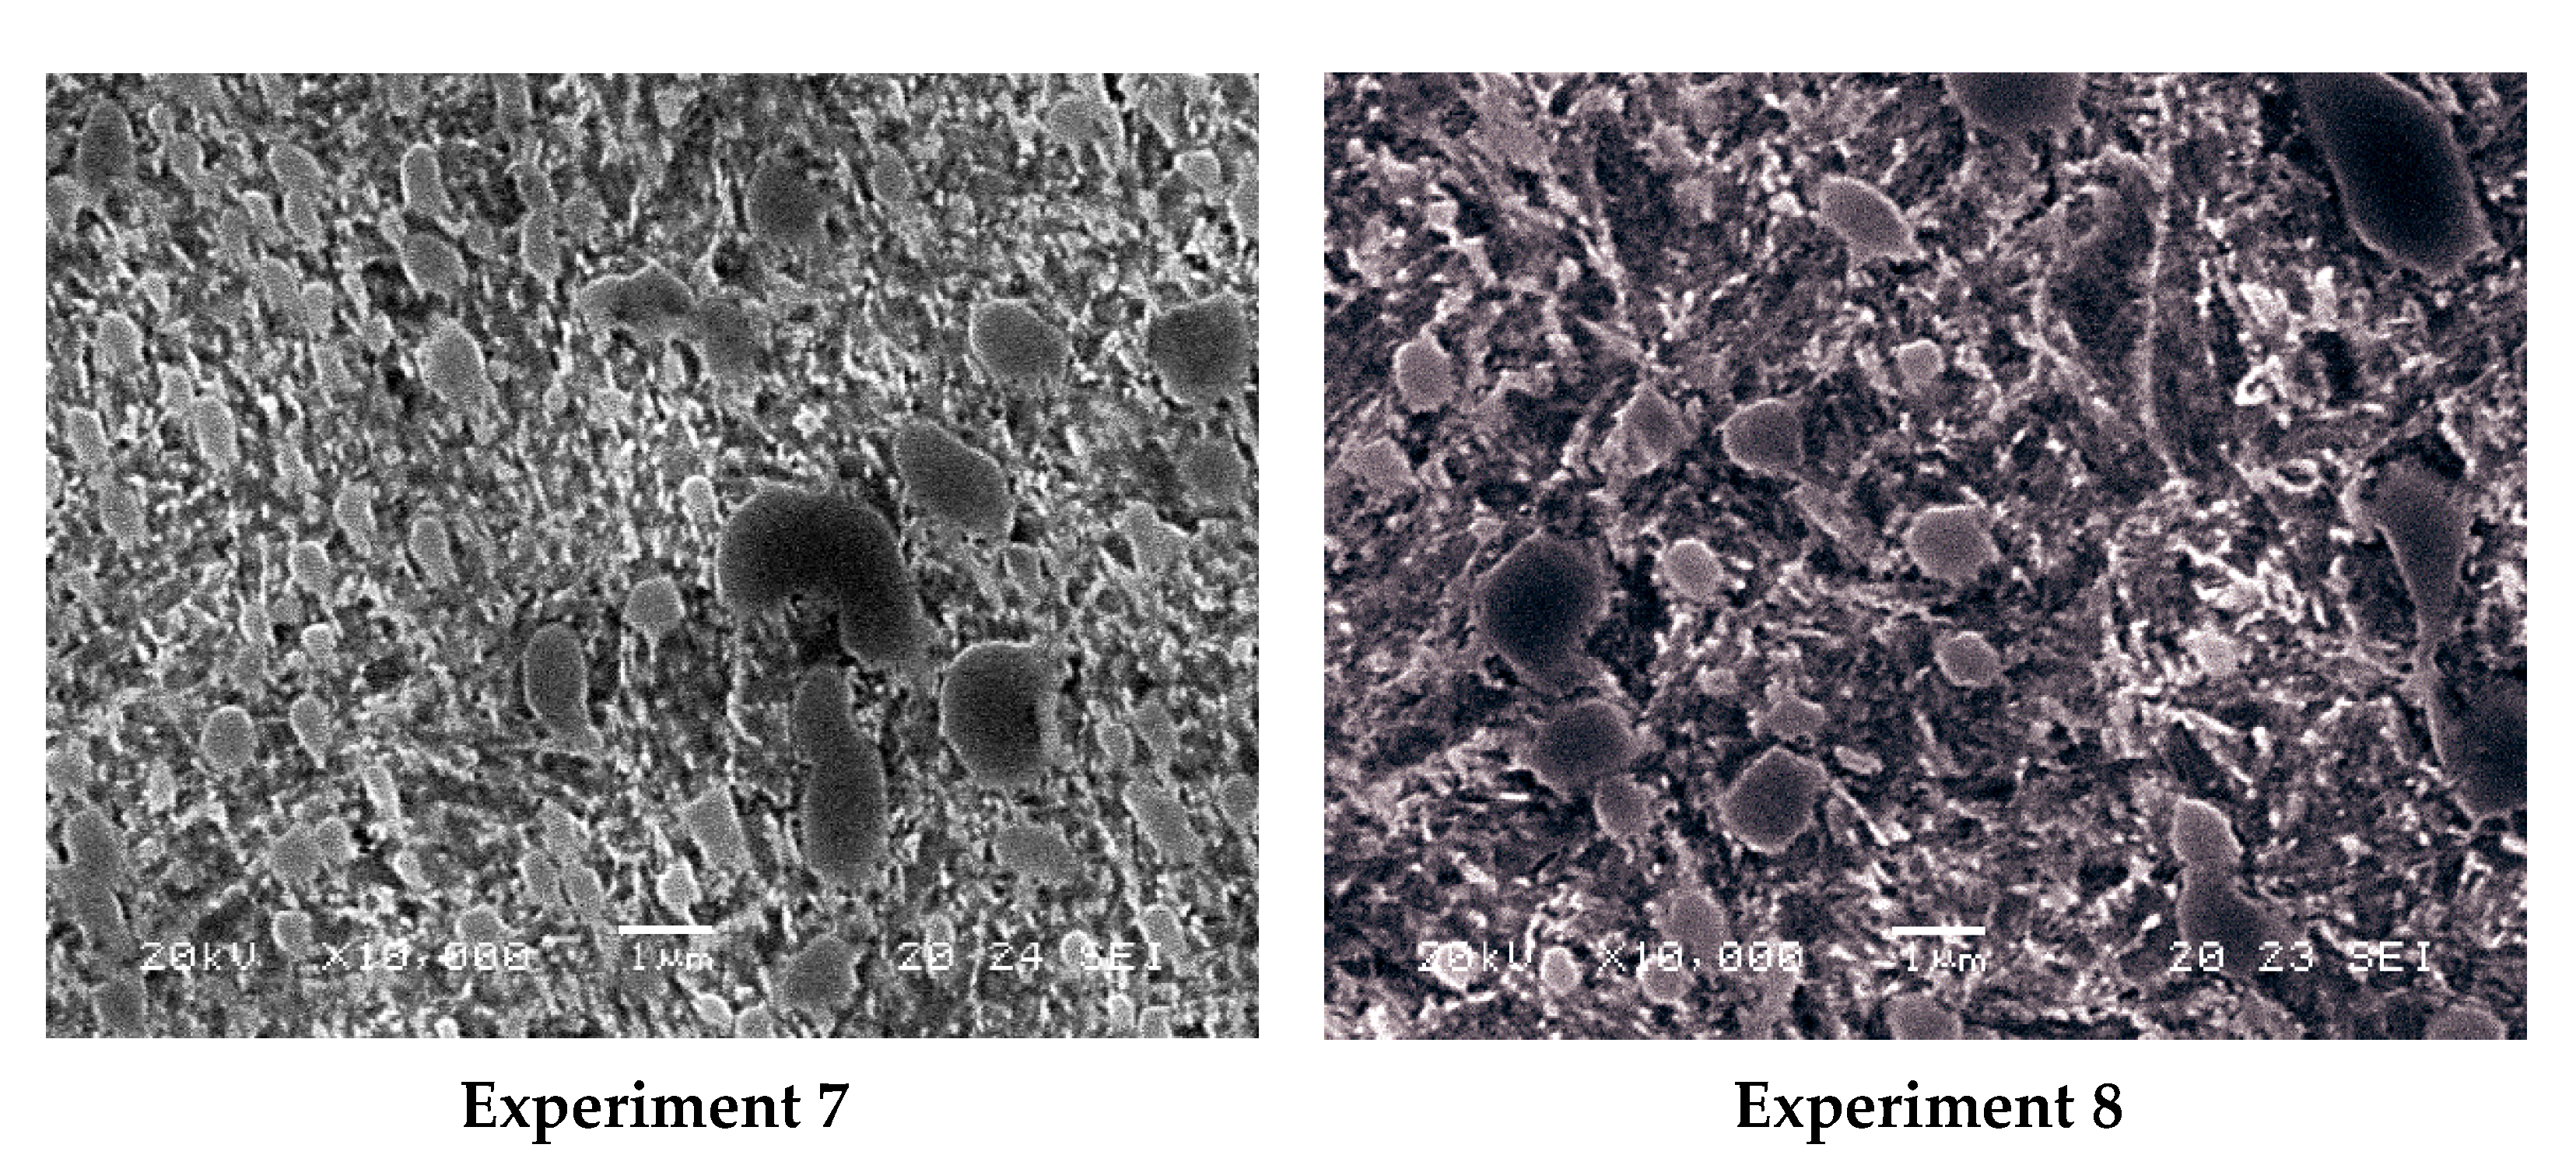
Figure 1 shows SEM micrographs of the most representative microstructural features for the eight experiments. The higher proportion of retained austenite in experiments 2 and 4 can be appreciated. In addition, the typical needle morphology of the already tempered former martensite phase can be distinguished. This is also found in experiments 1 and 3, though less pronounced. These observations seem to coincide when the highest value of the tempering temperature (550 °C) was applied. Dwell times beyond 2 h do not appear to affect the amount of retained austenite being converted, nor the coarsening of carbides.
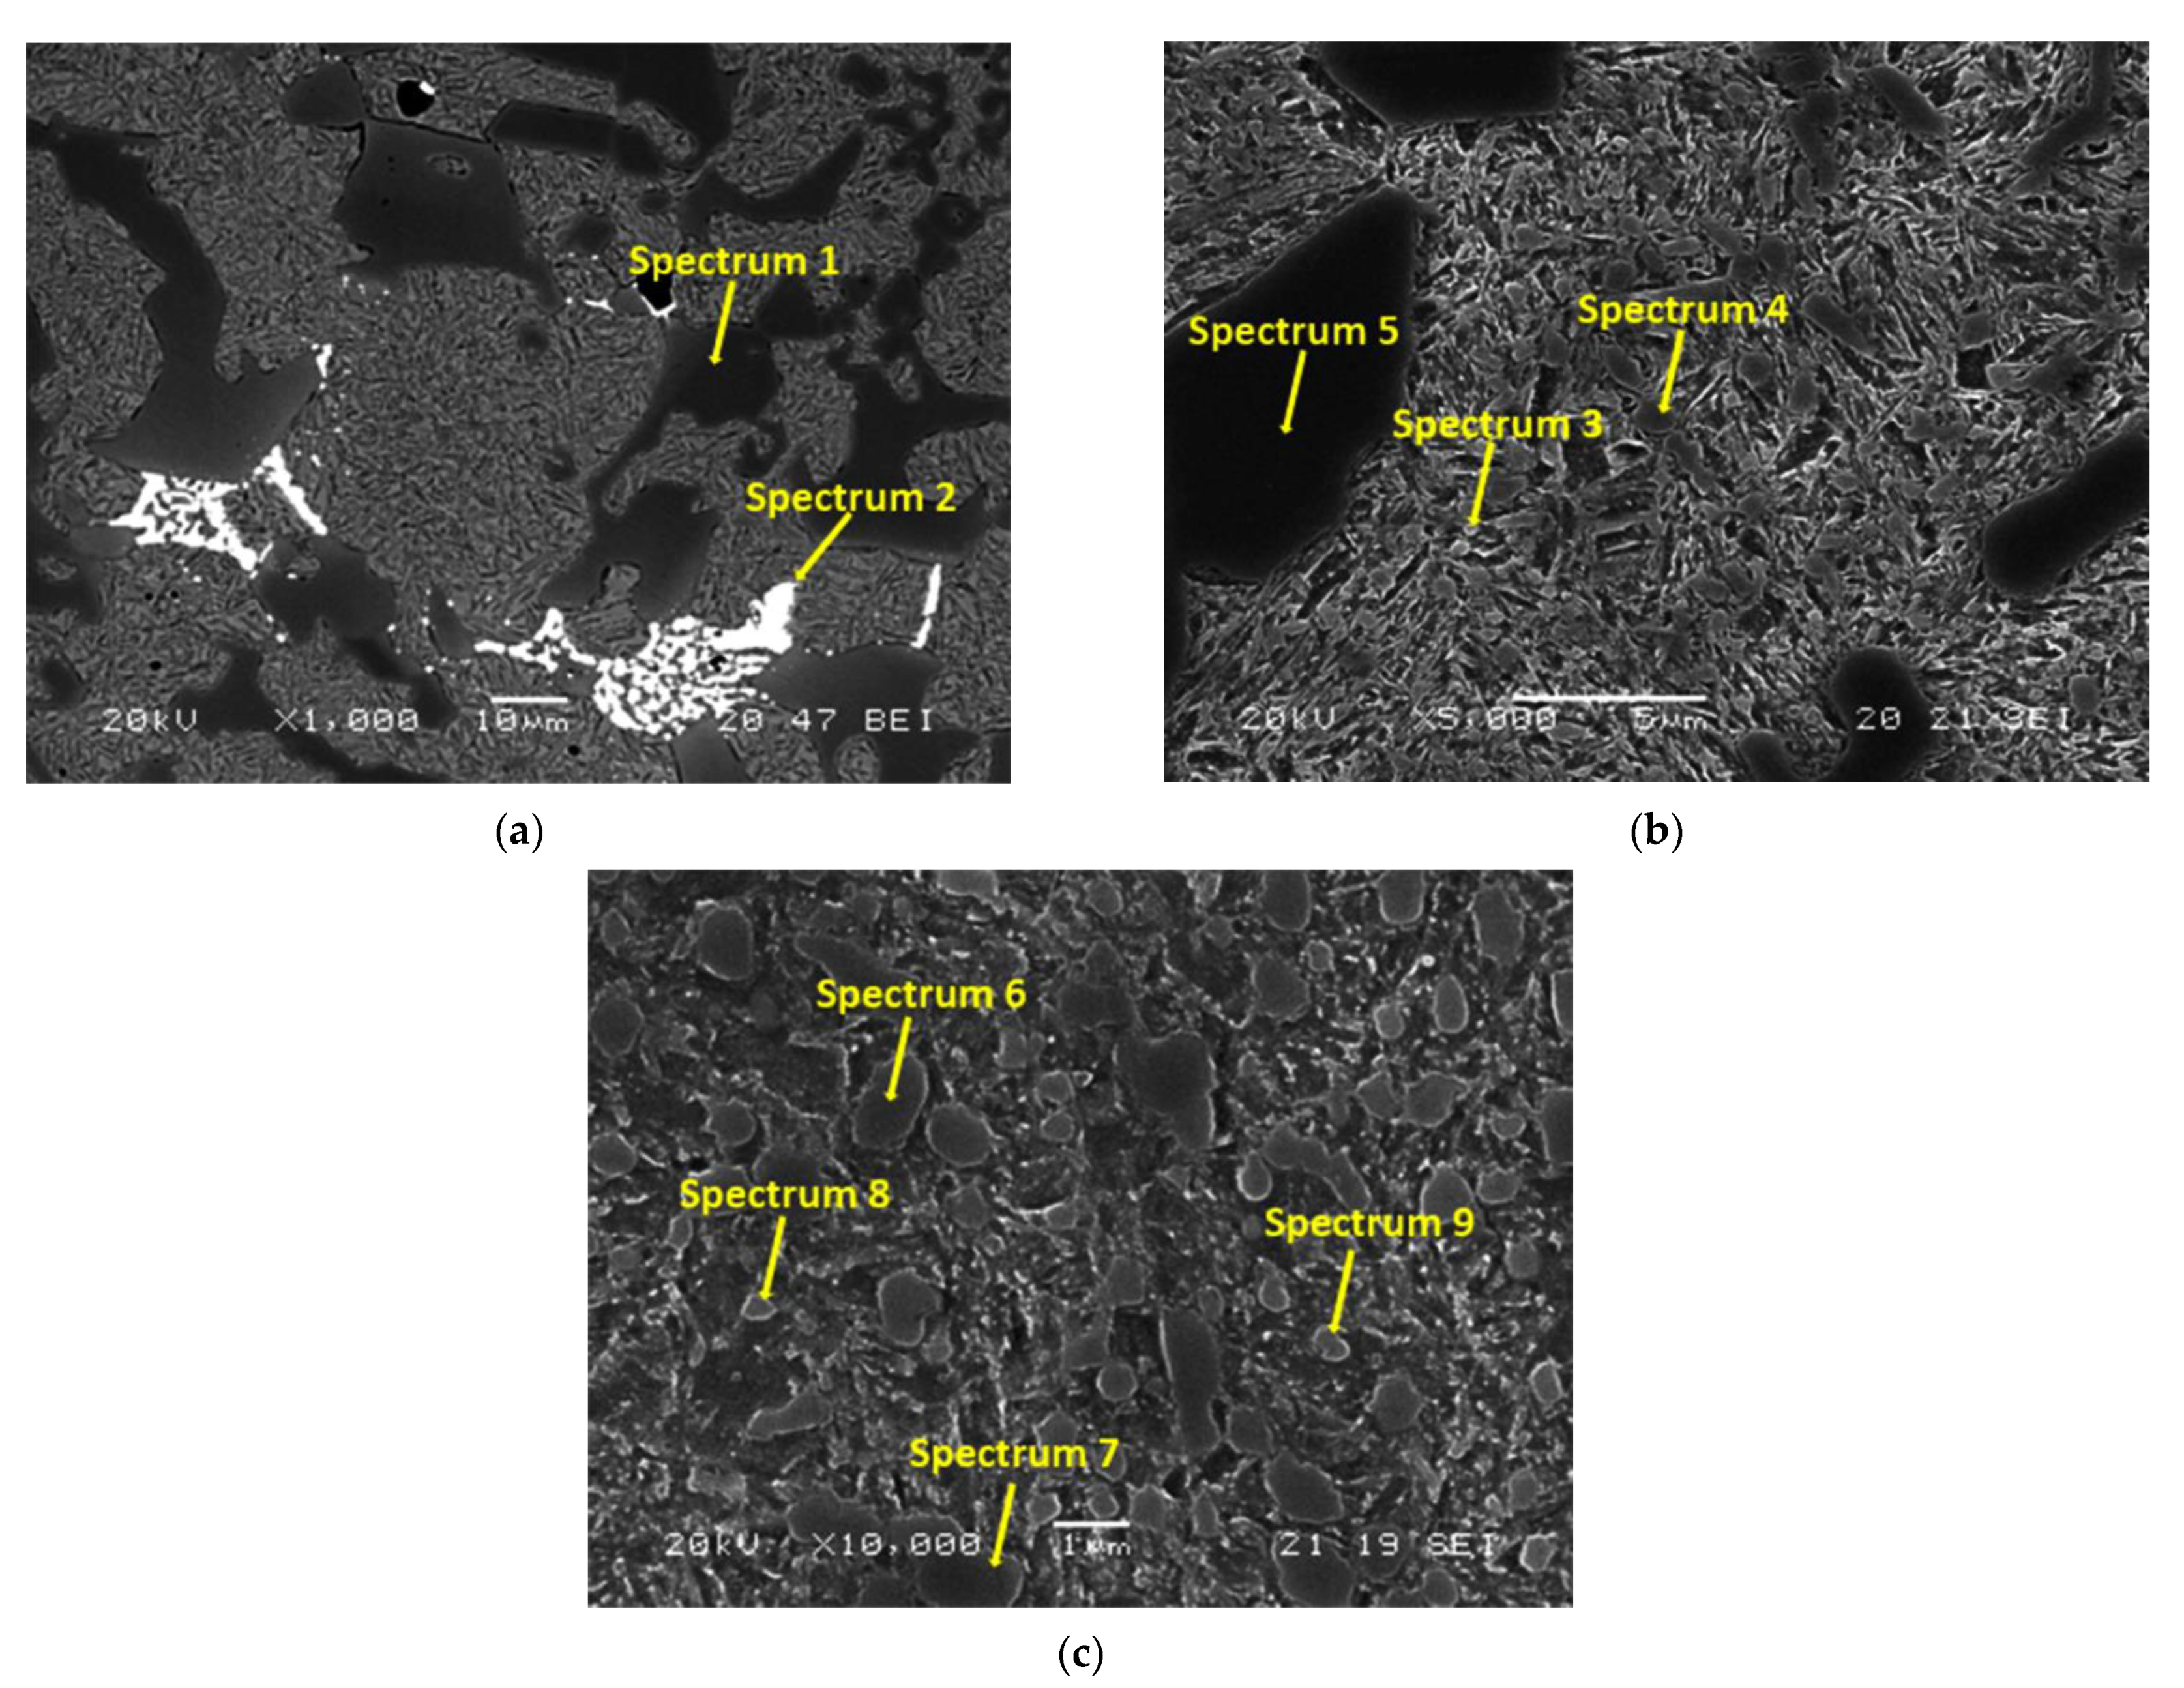
Figure 2 shows three secondary electron SEM micrographs depicting the microstructure of precipitated carbides, typical of this highly alloyed white iron. Selected carbides were chosen for EDX semiquantitative analysis, identified with arrows and labeled with the spectrum number, whose composition and most probable carbide type are listed in Table 4.
Figure 3 shows the volume fraction of eutectic carbides obtained by manual point counting in a total of 30 micrographs at 400×. The results presented are the average of the experiments after oil quenching and after furnace cooling. A small fraction of the volume of eutectic carbides is confirmed when destabilization is carried out at 950 °C. Given that the destabilization of the austenite begins first at a temperature of 950 °C rather than at 1050 °C, it could be the case that the dwell time (5 hrs) was greater than the time necessary for complete destabilization at 950 °C and lower than the time necessary for complete destabilization at 1050 °C. In this case, a greater density of precipitated secondary carbides would be generated at 950 °C. These carbides could again partially dissolve once the necessary time has passed, until reaching 5 h. This would allow its precipitation through ‘coarsening’ the eutectic carbides. Figure 3 shows that the volume fraction of eutectic carbides is lower in the as-cast state than after destabilization of the austenite, which justifies the coarsening of the eutectic carbides.
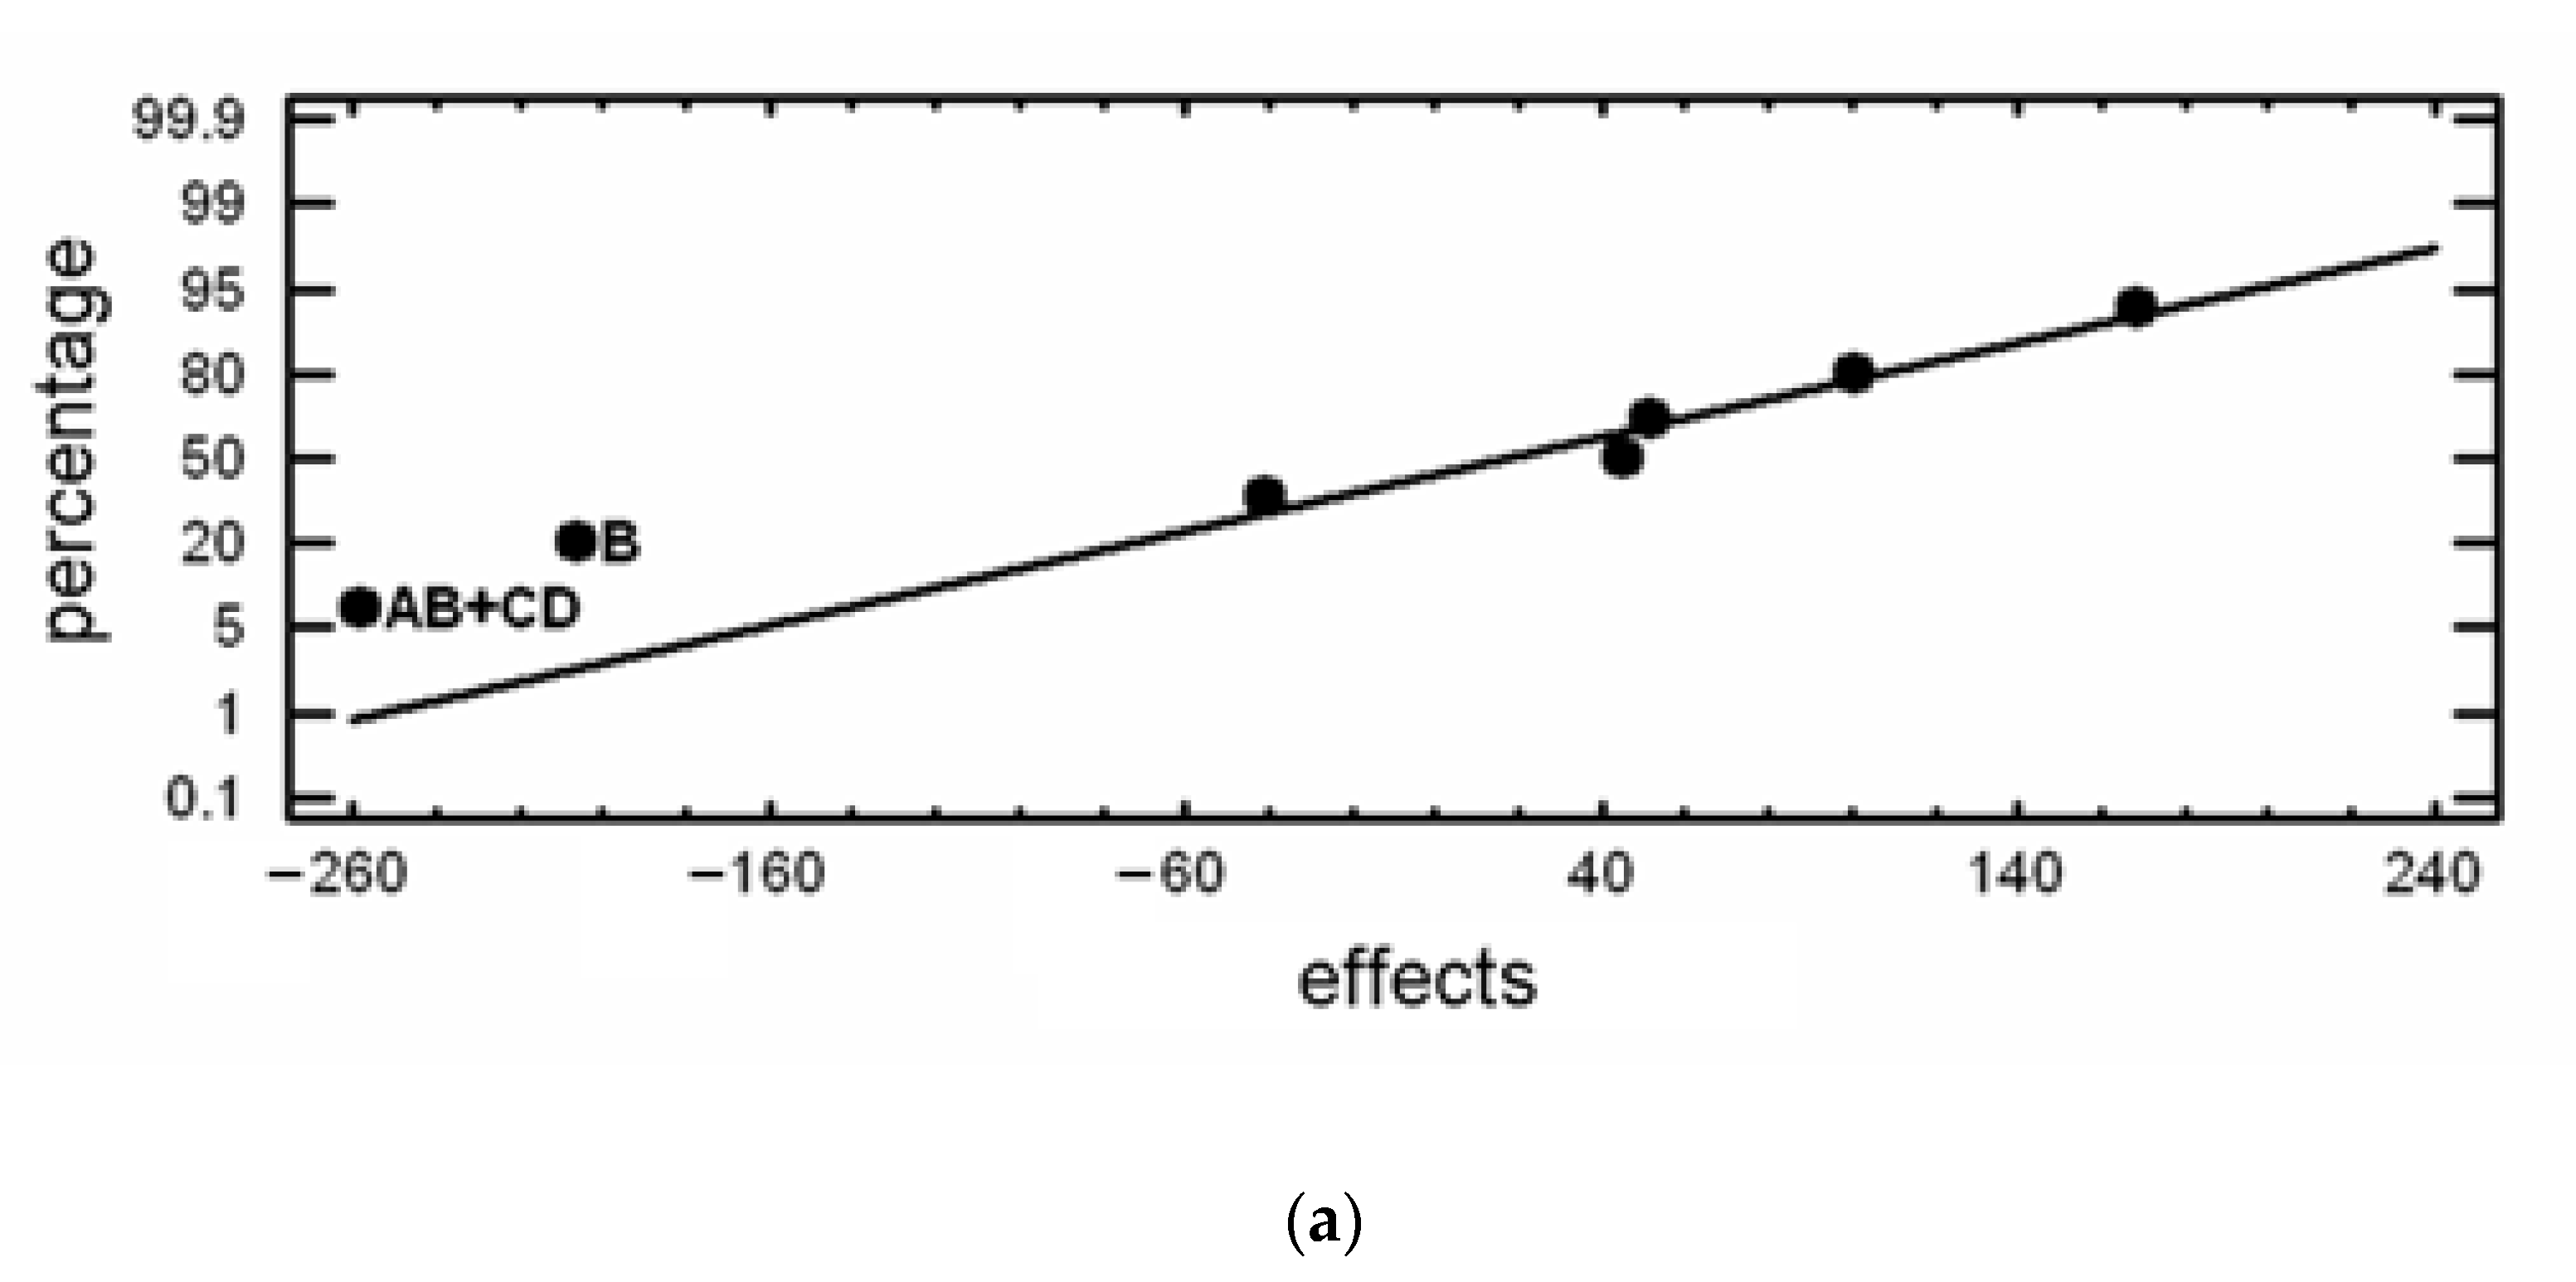
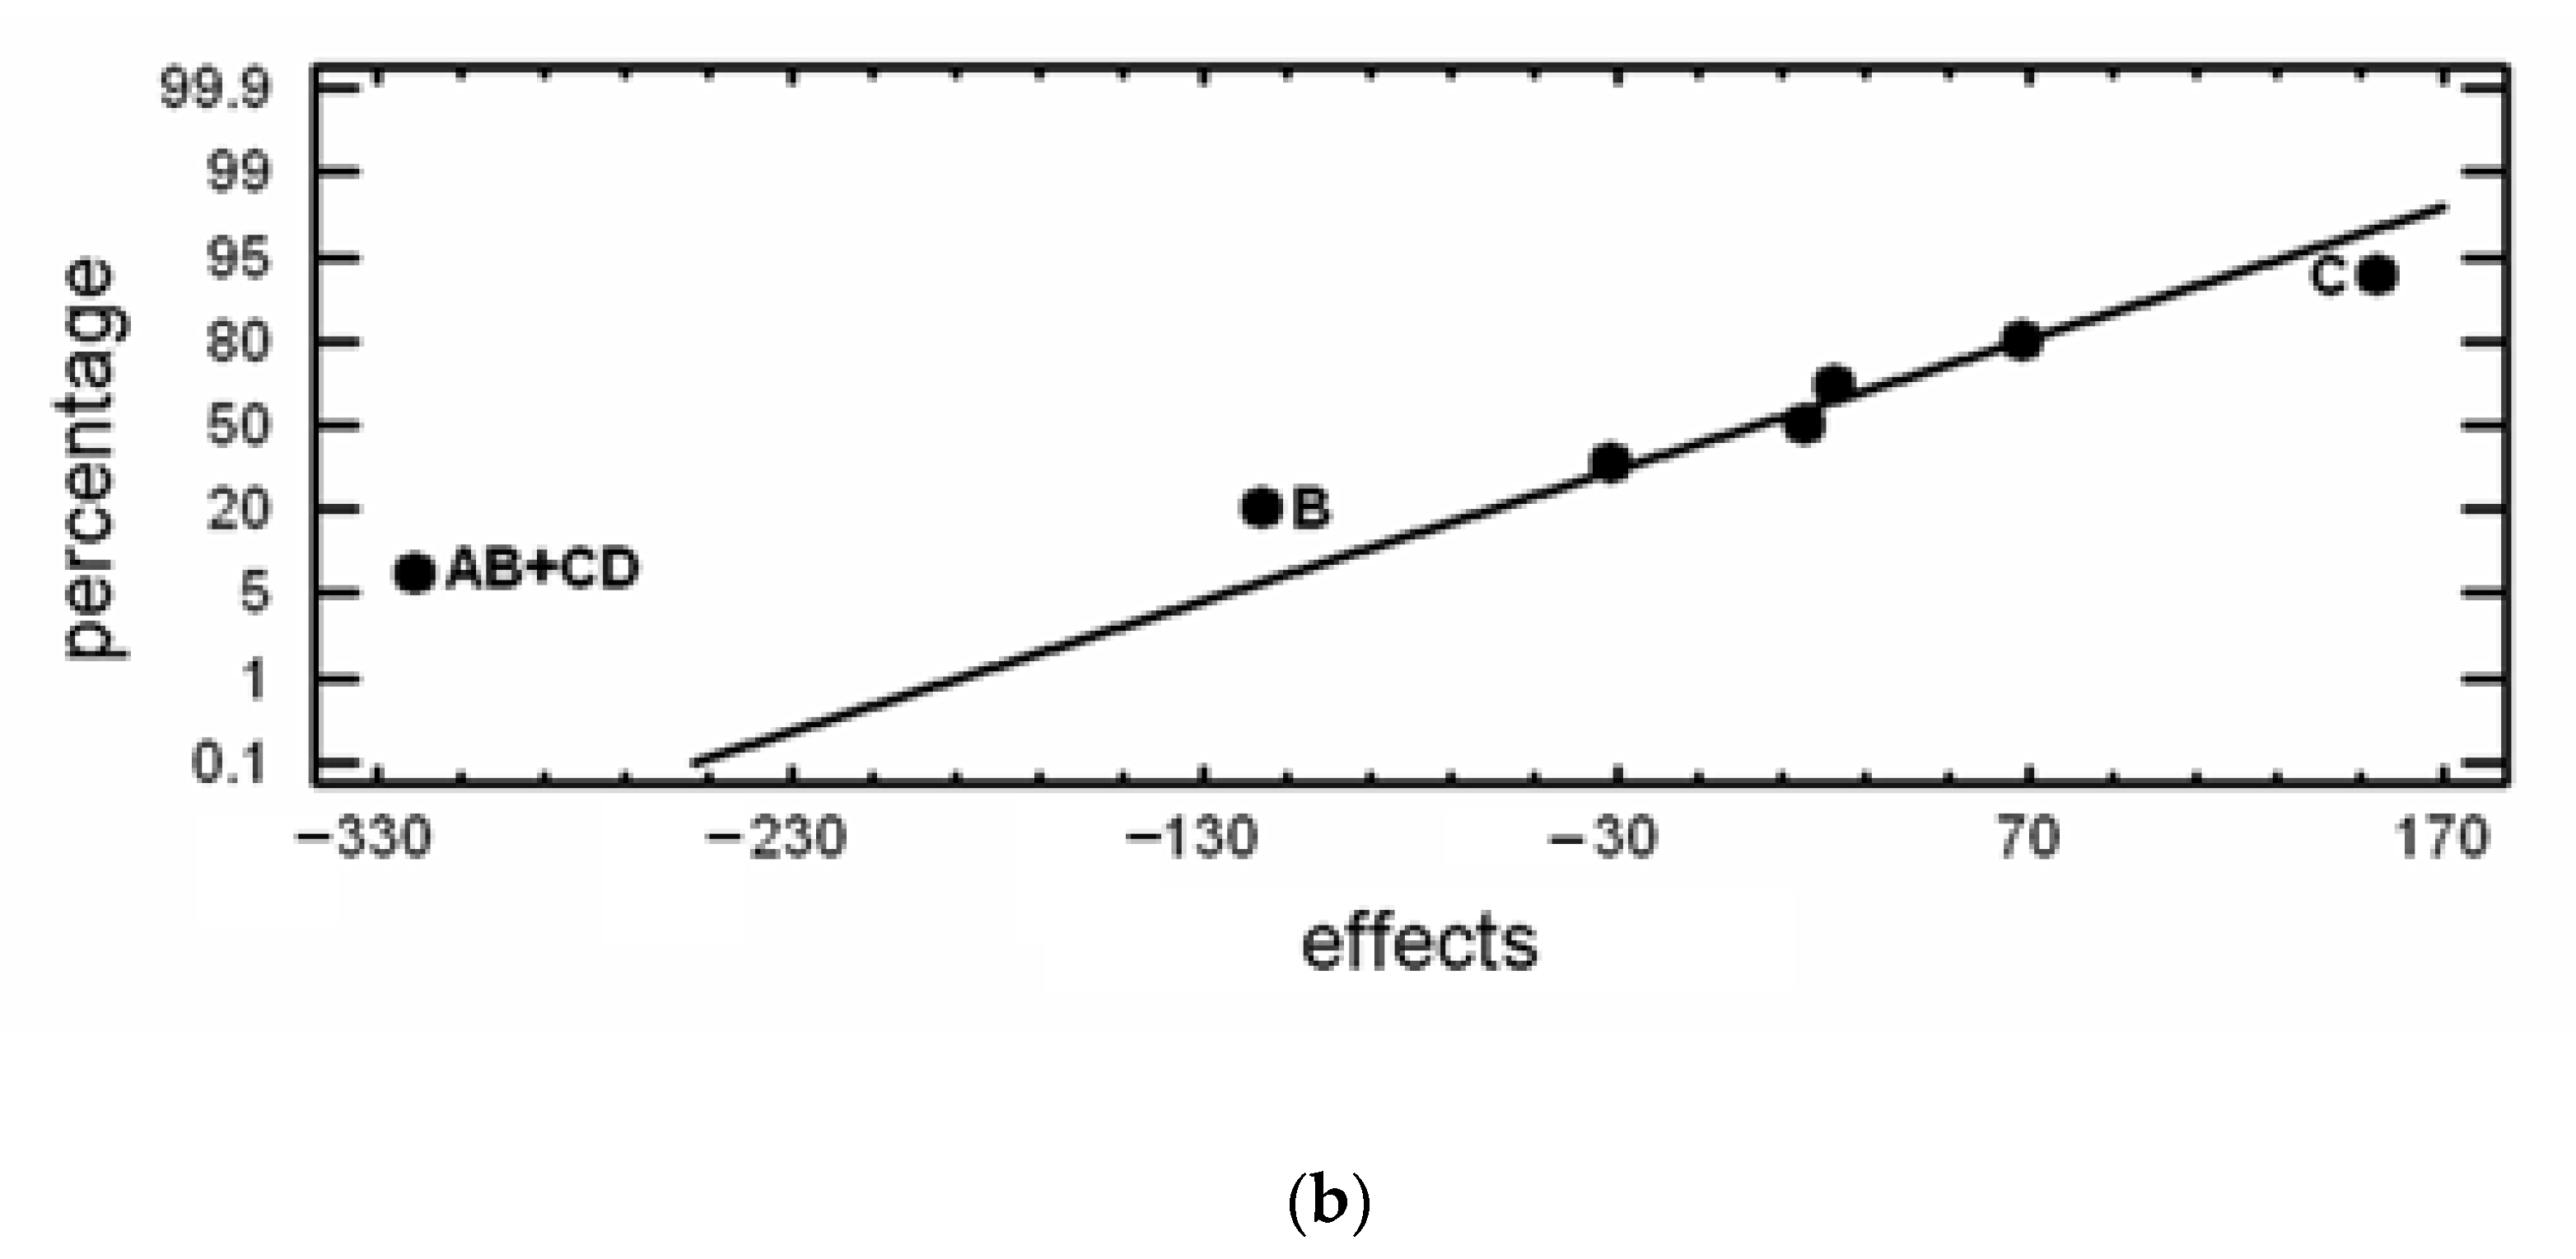
Table 5 shows the results obtained for hardness and adhesive wear by reciprocating testing and its effects. This relates to the restricted confounding pattern presented in the last column, coinciding with the notation and correspondence indicated in Table 3 for the DoE matrix. Figure 4 shows the representation of those effects represented in normal probability paper, highlighting, in the graph, those with a significant factor in the response function.
It must be pointed out that the WC-Co ball is much harder than the material, so, during the experiment, fracturing of some of the eutectic carbides or detachment of secondary carbides could occur. Thus, some abrasive particles could remain trapped between the two bodies of wear. This could transform an initial wear mechanism of two bodies into another of three bodies during the tests. Therefore, the loss of mass might be due to a combination of factors which are not directly related to the hardness of the material.
Figure 4a shows that the principal factors with a significant effect on material hardness are factor A (austenite destabilizing temperature) and factor C (tempering temperature). Additionally, if we aim to increase the hardness, factor A should be placed at its +1 level (1050 °C), and factor C at its −1 level (400 °C). The former could be interpreted as the high destabilizing temperature allowing for high C and Cr in the solution of austenite, leading to high C and hardness of martensite on quenching. Tempering at 400 °C seems insufficient to decompose martensite (α’→α) [50] and, thus, a high hardness value should be expected.
Table 6 shows the interaction AC+BD. The interaction that produces a greater increase in hardness is A×C, with both factors at −1 level, that is to say, when the austenite destabilizing temperature is 950 °C and tempering treatment is carried out at 400 °C. A possible explanation could be that, at 950 °C, it is possible to reach equilibrium from supersaturated austenite in the as-cast state, since this temperature corresponds approximately to the nose of the C curve for secondary M7C3 carbide precipitation [56]. The time chosen of 5 h at the destabilizing of austenite will suffice to complete the precipitation process, after which a depleted austenite in both C and Cr will be left prior to quenching. On quenching, the martensite formation will occur at higher temperatures with the obvious consequence of a higher volume fraction of martensite. The former helps to provide a high hardness in this highly alloyed white iron, despite being a martensite of lower C. Tempering at 400 °C will allow martensite transformation (α’→ α+carbides), and the formation of these carbides shall contribute to structural hardening of the matrix, and thus to a further increase in the total hardness of the alloy.
Figure 4b shows the effects of the factors on sliding wear resistance conducted in a reciprocating wear test. Factors C and D appear to have a significant effect on the increase in weight loss (diminution of wear resistance) when both of them are at its +1 level, that is to say, when tempering temperature is at the higher chosen level (550 °C) and the longest tempering time is chosen (6 h). This shows that high temperatures and high tempering times will first result in a complete precipitation of tempering carbides dispersed in a ferrite matrix. Under these conditions, these will coarsen, giving rise to a phenomenon of coalescence among them. All of this implies a reduction in hardness and an increase in the rate of wear of the material. In the same figure, the interaction given by AC+BD also has a significant effect on the response function when they both operate at their +1 level. The analysis of this interaction is provided in Table 7. They both appeared under identical conditions as individual factors, but here, it may be seen that when both factors operate at their +1 level simultaneously, there is a synergistic role whereby an increase in the wear rate is achieved. Conversely, adhesive wear resistance will be maximized with parameters related to tempering: 400 °C and 2 h.
Table 8 shows the results obtained from a three-point bend test, together with the restricted confounding pattern, previously stated in the DoE matrix. The selected responses for the present test were the maximum flexural strength or fracture strength, and the total area under the load–deflection curve, which represents the total work that the material is capable of absorbing prior to fracture. Figure 5 shows the representation of the significant effects in a normal probability paper.
Figure 5a shows the factors with a significant effect on the increase in flexural strength. It should be noted that all test specimens broke in the elastic domain as it corresponds to a brittle material. In this analysis, it is concluded that factor B (quenching medium) significantly increases the maximum flexural strength at break for its −1 level (cooling from austenitizing temperature in a furnace set at 150 °C). The former suggests that a low-severity medium in quenching helps to minimize the volume fraction of brittle martensite, thus increasing the amount of retained austenite. This austenite will provide a favorable toughness behavior to the matrix, due to the stress relief treatment that such slow cooling represents with regard to the plastic deformation induced by martensite formation.
The analysis of the interactions A×B+C×D is shown in Table 9, and it can be observed that the highest effect corresponds to factor A at its +1 level (1050 °C for the destabilization temperature), while factor B is at its −1 level (cooling in a furnace set at 150 °C). The novelty here is the role played by factor A, since factor B was seen to be individually significant at the same level. The result seems congruent with higher destabilization temperatures, as a temperature increase during destabilization favors an increase in C in the solution of austenite. Thus, a lower MS temperature will be expected and a higher fraction of residual austenite at RT available. The selected AB interaction has a stronger effect on the increase in flexural strength at fracture than factor A individually, thus suggesting a synergic effect of both factors.
Figure 5b shows the principal factors (B and C) and the interaction (AB + CD) with a significant effect on increasing the response function, i.e., the energy absorbed prior to fracture in a three-point bend test. The principal factors with significant effects are B at its −1 level (cooling in an air convection furnace set at 150 °C), and C at its +1 level (tempering temperature of 550 °C). The interpretation of these results could be as follows: slow cooling rates on quenching following the destabilization process serve to homogenize austenite and thus to considerably reduce the martensitic transformation since martensite nucleates at heterogeneities in austenite. As a result, the volume of stress-relieved austenite at RT would be higher and thus the matrix ductility will be increased.
By means of a high tempering temperature, it is possible to further increase ductility and toughness because brittle martensite (α’) will transform into tough ferrite (α) plus alloy carbides. Since alloy carbides do not coarsen easily and tend to remain fine, ductility is not compromised. The austenite, devoid of carbon and alloy elements, is found in favorable conditions for its transformation during this tempering in inferior bainite. This phase contributes to a greater increase in ductility for the matrix than for the martensite.
The interactions A×B and C×D are analyzed in Table 10. It can be seen that the most significant interaction for A×B is obtained with factor A at its +1 level (1050 °C for the destabilization temperature) and with factor B at its −1 level (cooling in a furnace set at 150 °C). Apart from the effect of the low cooling rate on quenching, which was previously discussed, a high destabilization temperature increases the amount of C in austenite, the MS temperature diminishes and the volume fraction of austenite increases. Considering the effect of a higher fraction of retained austenite with high C and alloy elements at RT, prior to its transformation on tempering, the main difference will be favorable for toughness since a very small amount of martensite will form. The austenite will probably remain as ‘conditioned’ austenite, and, because of the higher alloy content, it will develop very finely precipitated high-temperature alloy carbides. At higher temperatures, there is a higher chance for SC dissolution, especially of those that have just reached their critical radius. The combination of both factors in this AB interaction considerably increases the energy absorbed to fracture in a three-point bend test.

4. Conclusions

With regard to the hardness and the resistance to adhesive wear in a reciprocating wear test, the following could be found:
  • Vickers hardness increases when destabilization of austenite takes place at 1050 °C and tempering is conducted at 400 °C. High destabilization temperatures yield a high-C austenite and, on further quenching, provide hard martensite and a high fraction of retained austenite. Low tempering temperature is insufficient to decompose the hard martensite but allows structural strengthening by alloy carbide precipitation from residual austenite.
  • For improved adhesive wear resistance, tempering treatment parameters are critical, the best results being obtained at 400 °C and 2 h. The technical literature underlines the relevance of a high fraction and fineness of secondary carbides from destabilization. Low temperature and short tempering times impede secondary carbide coarsening. Such tempering conditions are also favorable for increased wear resistance of the matrix due to minimal conversion of martensite (α’→α) and possible conditioning of retained austenite giving alloy carbides from tempering.
With regard to the three-point bending test conducted, the following conclusions can be drawn:
  • Maximum flexural strength could be obtained with high destabilization temperatures (1050 °C) and slow quenching rates (samples introduced in an air convection furnace set at 150 °C). These conditions are favorable for maximizing the volume fraction of ductile retained austenite which allows the deflection required for the high strengths registered.
  • The energy absorbed to fracture in bending, measured as the total area below the force–displacement curve in a bend test curve, is a valuable source of information of combined strength and ductility. It has been seen that this energy could be enhanced by slow cooling quenching (an air convection furnace set at 150 °C) followed by a tempering treatment at 550 °C. The novelty here is that high-temperature tempering favors: (a) total conversion of martensite (α’α + alloy carbides), (b) conditioning of austenite (γ rich in C and alloy elements) alloy carbides + depleted-γ); and (c) the possibility of transformation of depleted austenite (depleted-γ → lower bainite). In summary, this provides a ductile matrix.

Author Contributions

J.A.-L. conceived and designed the investigation; A.G.-P. and A.G.-D. performed all laboratory work; F.Á.-A. led the investigation, analyzed the data and wrote the paper. All authors have read and agreed to the published version of the manuscript.

Funding

This research received no external funding.

Institutional Review Board Statement

Not applicable.

Informed Consent Statement

Not applicable.

Data Availability Statement

Data are contained within the article.

Acknowledgments

We want to thank to José María Lobo-Manrique, a master’s student in his second year, for his valuable assistance in the execution of the wear testing while compatibilizing these experiments with his master’s thesis experimental work.

Conflicts of Interest

The authors declare no conflict of interest.

References

  1. Zeytin, H.K.; Yildirim, H.; Berme, B.; Duduoĝlu, S.; Kazdal, G.; Deniz, A. Effect of boron and heat treatment on mechanical properties of white cast iron for mining application. J. Iron Steel Res. Int. 2011, 18, 31–39. [Google Scholar] [CrossRef]
  2. Fu, H.; Xiao, Q.; Fu, H. Heat treatment of multi-element low alloy wear-resistant steel. Mater. Sci. Eng. A 2005, 396, 206–212. [Google Scholar] [CrossRef]
  3. Gasan, H.; Erturk, F. Effects of a Destabilization Heat Treatment on the Microstructure and Abrasive Wear Behavior of High-Chromium White Cast Iron Investigated Using Different Characterization Techniques. Metall. Mater. Trans. A 2013, 44, 4993–5005. [Google Scholar] [CrossRef]
  4. Wieczerzak, K.; BaŁa, P.; Stępień, M.; Cios, G.; KozieŁ, T. The characterization of cast Fe-Cr-C alloy. Arch Metall. Mater. 2015, 60, 779–782. [Google Scholar] [CrossRef] [Green Version]
  5. Jia, X.; Huang, Y.; Zuo, X.; Liu, Y.; Chen, N.; Rong, Y. High hardness-toughness and wear resistance of white cast iron treated by a multicycle quenching-partitioning-tempering process. Heat Treat Surf. Eng. 2019, 1, 57–62. [Google Scholar] [CrossRef] [Green Version]
  6. Lindroos, M.; Apostol, M.; Heino, V.; Valtonen, K.; Laukkanen, A.; Holmberg, K.; Kuokkala, V.T. The deformation, strain hardening, and wear behavior of chromium-alloyed hadfield steel in abrasive and impact conditions. Tribol. Lett. 2015, 57, 1–11. [Google Scholar] [CrossRef]
  7. Lindroos, M.; Ratia, V.; Apostol, M.; Valtonen, K.; Laukkanen, A.; Molnar, W.; Holmberg, K.; Kuokkala, V.T. The effect of impact conditions on the wear and deformation behavior of wear resistant steels. Wear 2015, 328–329, 197–205. [Google Scholar] [CrossRef]
  8. Uygura, I.; Gerengib, H.; Arslanc, Y.; Kurtayb, M. The Effects of Cryogenic Treatment on the Corrosion of AISI D3 Steel. Mater. Res. 2015, 18, 569–574. [Google Scholar] [CrossRef] [Green Version]
  9. Amini, K.; Akhbarizadeh, A.; Javadpour, S. Effect of Carbide Distribution on Corrosion Behavior of the Deep Cryogenically Treated 1.2080 Steel. J. Mater. Eng. Perform. 2016, 25, 365–373. [Google Scholar] [CrossRef]
  10. Hill, H.; Huth, S.; Weber, S.; Theisen, W. Corrosion properties of a plastic mould steel with special focus on the processing route. Werkst. Korros. 2011, 62, 436–443. [Google Scholar] [CrossRef]
  11. Hudakova, M.; Bartkowska, A.; Jurci, P. The effect of conventional heat treatment and sub-zero treatment in liquid nitrogen on corrosion resistance of vanadis 6 steel. In Proceedings of the 28th International Conference on Metallurgy and Materials 2019, Brno, Czech Republic, 22 May 2019; pp. 867–873. [Google Scholar]
  12. Qu, Y.; Xing, J.; Zhi, X.; Peng, J.; Fu, H. Effect of cerium on the as-cast microstructure of a hypereutectic high chromium cast iron. Mater. Lett. 2008, 62, 3024–3027. [Google Scholar] [CrossRef]
  13. Wang, J.; Xiong, J.; Fan, H.; Yang, H.S.; Liu, H.H.; Shen, B.L. Effects of high temperature and cryogenic treatment on the microstructure and abrasion resistance of a high chromium cast iron. J. Mater. Process Technol. 2009, 209, 3236–3240. [Google Scholar] [CrossRef]
  14. Ding, H.; Liu, S.; Zhang, H.; Guo, J. Improving impact toughness of a high chromium cast iron regarding joint additive of nitrogen and titanium. Mater. Des. 2016, 90, 958–968. [Google Scholar] [CrossRef]
  15. Guo, Z.H.; Xiao, F.R.; Lu, S.L.; Liu, R.L.; Liao, B. Effects of heat treatment and counterface on the wear behaviour of Cr21 cast iron. Ironmak. Steelmak. 2018, 45, 257–263. [Google Scholar] [CrossRef]
  16. Zheng, B.C.; Xing, J.D.; Liu, Y.Z.; Li, W. Two-Body Abrasion Behaviors Characterization of White Cast Iron with Various Chromium Concentrations. Tribol. Trans. 2020, 63, 519–527. [Google Scholar] [CrossRef]
  17. Groche, P.; Moeller, N.; Hoffmann, H.; Suh, J. Influence of gliding speed and contact pressure on the wear of forming tools. Wear 2011, 271, 2570–2578. [Google Scholar] [CrossRef]
  18. Jurci, P. Cr-V Ledeburitic cold-work tool steels. Mater. Tehnol. 2011, 45, 383–394. [Google Scholar]
  19. Gao, X.J.; Jiang, Z.Y.; Wei, D.B.; Kosasih, B. Effect of thermomechanical treatment on sliding wear of high-Cr cast iron with large plastic deformation. Tribol. Int. 2015, 92, 117–125. [Google Scholar] [CrossRef]
  20. Efremenko, V.; Shimizu, K.; Chabak, Y. Effect of Destabilizing Heat Treatment on Solid-State Phase Transformation in High-Chromium Cast Irons. Metall. Mater. Trans. 2013, 44, 5434–5446. [Google Scholar] [CrossRef]
  21. Kishore, K.; Kumar, U.; Dinesh, N.; Adhikary, M. Effect of Soaking Temperature on Carbide Precipitation, Hardness, and Wear Resistance of High-Chromium Cast Iron. J. Fail. Anal. Prev. 2020, 20, 249–260. [Google Scholar] [CrossRef]
  22. Pero-Sanz, J.A.; Plaza, D.; Verdeja, J.I.; Asensio, J. Metallographic Characterization of Hypoeutectic Martensitic White Cast Irons: Fe-C-Cr System Experimental procedure and results composition and microstructural development. Mater. Charact. 1999, 43, 33–39. [Google Scholar] [CrossRef]
  23. Mandal, S.S.; Ghosh, K.S.; Mondal, D.K. Correlation between microstructure, hardness, wear and electrochemical behaviour in 8.0%, 16.0% and 20.0% (by wt) chromium white irons. Mater. Chem. Phys. 2017, 193, 401–412. [Google Scholar] [CrossRef]
  24. Wiengmoon, A.; Pearce, J.T.H.; Chairuangsri, T. Relationship between microstructure, hardness and corrosion resistance in 20 wt.%Cr, 27 wt.%Cr and 36 wt.%Cr high chromium cast irons. Mater. Chem. Phys. 2011, 125, 739–748. [Google Scholar] [CrossRef]
  25. Zumelzu, E.; Goyos, I.; Cabezas, C.; Opitz, O.; Parada, A. Wear and corrosion behaviour of high-chromium (14–30% Cr) cast iron alloys. J. Mater. Process Technol. 2002, 128, 250–255. [Google Scholar] [CrossRef]
  26. Tang, X.H.; Chung, R.; Li, D.Y.; Hinckley, B.; Dolman, K. Variations in microstructure of high chromium cast irons and resultant changes in resistance to wear, corrosion and corrosive wear. Wear 2009, 267, 116–121. [Google Scholar] [CrossRef]
  27. Pawlak, K.; Białobrzeska, B.; Konat, Ł. The influence of austenitizing temperature on prior austenite grain size and resistance to abrasion wear of selected low-alloy boron steel. Arch. Civ. Mech. Eng. 2016, 16, 913–926. [Google Scholar] [CrossRef]
  28. Wang, C.C.; Shen, C.G.; Zhang, Z.; Xu, W. Simulation and verification of core–shell MC carbide design in Fe–C–Ni–V–Ti steel. J. Iron Steel Res. Int. 2021, 28, 58–65. [Google Scholar] [CrossRef]
  29. Karantzalis, A.E.; Lekatou, A.; Mavros, H. Microstructural Modifications of As-Cast High-Chromium White Iron by Heat Treatment. J. Mater. Eng. Perform 2009, 18, 174–181. [Google Scholar] [CrossRef]
  30. Bedolla-Jacuinde, A.; Arias, L.; Hernández, B. Kinetics of secondary carbides precipitation in a hiqh-chromium white iron. J. Mater. Eng. Perform 2003, 12, 371–382. [Google Scholar] [CrossRef]
  31. Çöl, M.; Koç, F.G.; Öktem, H.; Kir, D. The role of boron content in high alloy white cast iron (Ni-Hard 4) on microstructure, mechanical properties and wear resistance. Wear 2016, 348–349, 158–165. [Google Scholar] [CrossRef]
  32. Gelfi, M.; Pola, A.; Girelli, L.; Zacco, A.; Masotti, M.; La Vecchia, G.M. Effect of heat treatment on microstructure and erosion resistance of white cast irons for slurry pumping applications. Wear 2019, 428–429, 438–448. [Google Scholar] [CrossRef]
  33. Guitar, M.A.; Nayak, U.P.; Britz, D.; Mücklich, F. The effect of thermal processing and chemical composition on secondary carbide precipitation and hardness in high-chromium cast irons. Int. J. Metalcast. 2020, 14, 465–755. [Google Scholar] [CrossRef] [Green Version]
  34. Karantzalis, A.E.; Lekatou, A.; Diavati, E. Effect of Destabilization Heat Treatments on the Microstructure of High-Chromium Cast Iron: A Microscopy Examination Approach. J. Mater. Eng. Perform. 2009, 18, 1078–1085. [Google Scholar] [CrossRef]
  35. Powell, G.L.F.; Laird, G. Structure, nucleation, growth and morphology of secondary carbides in high chromium and Cr-Ni white cast irons. J. Mater. Sci. 1992, 27, 29–35. [Google Scholar] [CrossRef]
  36. Yang, J.R.; Tsai, M.C.; Du, J.S.; Chiou, C.S. Phase transformations in AISI 410 stainless steel. Jpn. Inst. Met. Proc. 1999, 332, 1605–1608. [Google Scholar]
  37. Kusumoto, K.; Shimizu, K.; Yaer, X.; Zhang, Y.; Ota, Y.; Ito, J. Abrasive wear characteristics of Fe-2C-5Cr-5Mo-5W-5Nb multi-component white cast iron. Wear 2017, 376–377, 22–29. [Google Scholar] [CrossRef]
  38. Wang, M.Q.; Dong, H.; Hui, W.J.; Shi, J. Effect of heat treatment on microstructure and mechanical properties of Cr-Ni-Mo-Nb steel. Mater. Sci. Technol. 2007, 23, 963–969. [Google Scholar] [CrossRef]
  39. Morito, S.; Saito, H.; Maki, T.; Furuhara, T. Effect of PAGS on crystallography and morphology of lath martensite in low carbon steels. ISIJ Int. 2004, 45, 91–94. [Google Scholar] [CrossRef] [Green Version]
  40. Shaeri, M.H.; Saghafian, H.; Shabestari, S.G. Effect of heat treatment on microstructure and mechanical properties of Cr-Mo steels (FMU-226) used in mills liner. Mater. Des. 2012, 34, 192–200. [Google Scholar] [CrossRef]
  41. Coronado, J.J. Effect of load and carbide orientation on abrasive wear resistance of white cast iron. Wear 2011, 270, 823–827. [Google Scholar] [CrossRef]
  42. Tabrett, C.P.; Sare, I.R.; Ghomashchi, M.R. Microstructure-property relationships in high chromium white iron alloys. Int. Mater. Rev. 2014, 41, 59–82. [Google Scholar] [CrossRef]
  43. Imurai, S.; Thanachayanont, C.; Pearce, J.T.H.; Tsuda, K.; Chairuangsri, T. Effects of Mo on microstructure of as-cast 28 wt.% Cr-2.6 wt.% C-(0-10) wt.% Mo irons. Mater. Charact. 2014, 90, 99–112. [Google Scholar] [CrossRef]
  44. Wieczerzak, K.; Bala, P.; Dziurka, R.; Tokarski, T.; Cios, G.; Koziel, T.; Gondek, L. The effect of temperature on the evolution of eutectic carbides and M7C3 → M23C6carbides reaction in the rapidly solidified Fe-Cr-C alloy. J. Alloys. Compd. 2017, 698, 673–684. [Google Scholar] [CrossRef]
  45. Karantzalis, E.; Lekatou, A.; Mavros, H. Microstructure and properties of high chromium cast irons: Effect of heat treatments and alloying additions. Int. J. Cast. Met. Res. 2009, 22, 448–456. [Google Scholar] [CrossRef]
  46. Sabet, H.; Khierandish, S.; Mirdamadi, S.; Goodarzi, M. The microstructure and abrasive wear resistance of Fe-Cr-C hardfacing alloys with the composition of hypoeutectic, eutectic, and hypereutectic at Cr/C 6. Tribol. Lett. 2011, 44, 237–245. [Google Scholar] [CrossRef]
  47. Taşgin, Y.; Kaplan, M.; Yaz, M. Investigation of effects of boron additives and heat treatment on carbides and phase transition of highly alloyed duplex cast iron. Mater. Des. 2009, 30, 3174–3179. [Google Scholar] [CrossRef]
  48. Filipovic, M.; Kamberovic, Z.; Korac, M.; Gavrilovski, M. Microstructure and mechanical properties of Fe-Cr-C-Nb white cast irons. Mater. Des. 2013, 47, 41–48. [Google Scholar] [CrossRef]
  49. Li, D.; Liu, L.; Zhang, Y.; Ye, C.; Ren, X.; Yang, Y.; Yang, Q. Phase diagram calculation of high chromium cast irons and influence of its chemical composition. Mater. Des. 2009, 30, 340–345. [Google Scholar] [CrossRef]
  50. Kim, C.K.; Lee, S.; Jung, J.Y. Effects of heat treatment on wear resistance and fracture toughness of duo-cast materials composed of high-chromium white cast iron and low-chromium steel. Metall. Mater. Trans. A Phys. Metall. Mater. Sci. 2006, 37, 633–643. [Google Scholar] [CrossRef] [Green Version]
  51. Doǧan, Ö.N.; Hawk, J.A.; Laird, G. Solidification structure and abrasion resistance of high chromium white irons. Metall. Mater. Trans. A Phys. Metall. Mater. Sci. 1997, 28, 1315–1328. [Google Scholar] [CrossRef]
  52. Carpenter, S.D.; Carpenter, D.; Pearce, J.T.H. XRD and electron microscope study of a heat treated 26.6% chromium white iron microstructure. Mater. Chem. Phys. 2007, 101, 49–55. [Google Scholar] [CrossRef]
  53. Lai, J.P.; Pan, Q.L.; Wang, Z.B.; Cui, H.R.; Wang, X.D.; Gao, Z.Z. Effects of Destabilization Temperature on the Microstructure and Mechanical Properties of High Chromium Cast Iron. J. Mater. Eng. Perform. 2017, 26, 4667–4675. [Google Scholar] [CrossRef]
  54. González-Pociño, A.; Asensio-Lozano, J.; Álvarez-Antolín, F.; García-Diez, A. Improvement of impact toughness and abrasion resistance of a 3C-25Cr-0.5Mo alloy using a design of experiment statistical technique: Microstructural correlations after heat treatments. Metals 2021, 11, 595. [Google Scholar] [CrossRef]
  55. Prat-Bartés, A.; Tort-Martorell, X.; Grima-Cintas, P.; Pozueta-Fernández, L.; Solé-Vidal, I. Métodos Estadísticos, 2nd ed.; UPC: Barcelona, Spain, 2004; p. 376. [Google Scholar]
  56. Maratray, F.; Usseglio-Nanot, R. Transformation Characteristics of Cr and Cr-Mo White Irons; Climax Molybdenum S.A.: Paris, France, 1969; p. 150. [Google Scholar]
Figure 1. SEI-SEM micrographs illustrating the microstructure of all experiments. The magnification is 10,000×. M: tempered martensite; EC: eutectic carbide; SC: secondary carbide.
Metals 11 00947 g001aMetals 11 00947 g001b
Figure 2. SEM micrographs of increasing magnification, showing the main type and morphology of carbides in selected experiments: (a) experiment 2 (1000×) [54]; (b) experiment 3 (5000×); and (c) experiment 5 (10,000×).
Metals 11 00947 g002
Figure 3. Volume fraction of eutectic carbides after destabilization at the two studied temperatures (%-vol.) and its limit of confidence at 95%.
Metals 11 00947 g003
Figure 4. Normal probability plot showing the factors with significant effect on: (a) Vickers hardness (HV30), and (b) wear resistance measured by the weight loss of high-alloy treated white iron in a sliding test.
Metals 11 00947 g004
Figure 5. Normal probability plot showing the factors with significant effect on: (a) flexural strength to failure (MPa) and (b) absorbed energy to fracture (mJ).
Metals 11 00947 g005aMetals 11 00947 g005b
Table 1. Basic chemistry of the experimental high-chromium cast iron (%-wt.).
CSiMnCrMoCr:C
2.71.20.825.10.59.3
Table 2. Factors and levels.
FactorsLevels
CodeHeat Treatment ParametersLevel −1Level +1
ADestabilization temperature (°C) for 5 h9501050
BCooling media after gamma destabilizingAir convection within a furnace set @150 °CGently stirred in oil at RT
CTempering temperature (°C)400550
DDwell time at tempering temperature (h)26
Table 3. Matrix of experiments.
No.ABCDRestricted Confounding Patterns
1−1−1−1−1A
B
C
D
AB+CD
AC+BD
AD+BC
2+1−1−1+1
3−1+1−1+1
4+1+1−1−1
5−1−1+1+1
6+1−1+1−1
7−1+1+1−1
8+1+1+1+1
Table 4. Semiquantitative analysis of the carbides indicated with arrows in Figure 2. Semiquantitative compositions determined by EDX microprobe analysis, expressed in atomic percent. The most likely stoichiometry type is shown.
Carbide SpectrumCFeCrSiMoMost Likely
Stoichiometry
134.2726.6139.12--M7C3
245.2423.704.885.3420.84M2C
352.8938.817.011.29-M23C6
462.0819.7118.21--M7C3
564.5614.5920.85--M7C3
651.5732.3116.12--M7C3
752.7232.1115.17--M7C3
816.1244.735.001.29-M23C6
915.1735.916.291.14-M23C6
Table 5. Average values and effects obtained for Vickers hardness and for the loss of material in a reciprocating sliding wear test against a WC-Co ball.
Experiment
No.
HardnessMass LossConfounding Pattern
HV30EffectmgEffect
1741668.25103.1102.288Average
270775.541.3−21.025A
3746−42.088.94.675B
4726−123.558.358.775C
5567−2.0195.562.075D
67425.059.977.675AB+CD
7468102.563.725.175AC+BD
8649−54.0207.63.275AD+BC
Table 6. Effect of the interactions AC and BD for hardness analysis.
A(↓)×C(→)−1+1B(↓)×D(→)−1+1
−1743.5517.5−1741.5637
+1716.5695+1597697.5
Table 7. Effect of the interactions AB and CD on the increase in weight loss evaluated by means of an adhesive wear test.
A(↓)×B(→)−1+1C(↓)×D(→)−1+1
1149.376.3180.765.1
+150.6133+161.8201.6
Table 8. Mean values and effects obtained for maximum flexural strength and the energy absorbed to fracture.
No.Maximum Flexural Strength (σmax)Absorbed Energy to Fracture (W)Confounding Pattern
MPaEffectmJEffect
1945.91054.05489.85670.433Average
21286.1−7.4780.8615.99A
31114.4−238.9749.11−115.465B
4602.6133.6352.92154.495C
51117.7135.2629.8522.96D
61344.3−290.81012.1−320.64AB+CD
7105378.4780.9468.58AC+BD
8968.418.6567.83−31.125AD+BC
Table 9. Effect of the interactions AB and CD in the analysis of fracture strength at failure in a 3-point bend testing.
A(↓)×B(→)−1+1C(↓)×D(→)−1+1
11031.81083.71774.31200.3
+11315.2785.5+11198.71043.1
Table 10. Analysis of the interactions AB and CD towards an increase in the energy absorbed to fracture.
A(↓)×B(→)−1+1C(↓)×D(→)−1+1
−1559.9765−1421.4764.9
+1896.5460.4+1895.5598.8
Publisher’s Note: MDPI stays neutral with regard to jurisdictional claims in published maps and institutional affiliations.