Article

An Improvement in Constrained Studded Pressing for Producing Ultra-Fine-Grained Copper Sheet

by
Mohammad M. Kaykha
and
Mohammad R. Dashtbayazi
*
Department of Mechanical Engineering, Faculty of Engineering, Shahid Bahonar University of Kerman Jomohori Boulevard, Kerman P.O. Box 76175-133, Iran
*
Author to whom correspondence should be addressed.
Metals 2022, 12(2), 193; https://doi.org/10.3390/met12020193
Submission received: 24 November 2021 / Revised: 23 December 2021 / Accepted: 29 December 2021 / Published: 20 January 2022

Abstract

:
In this study, constrained studded pressing (CSP) was modified to produce ultra-fine-grained copper sheets and is called modified-CSP. In modified-CSP, due to the selection of asymmetric semicircle studs, the maximum groove depth can increase up to three times the sheet thickness. In the CSP method, the groove depth is selected to be equal to the sheet thickness. To investigate the effective plastic strain, a finite element model (FEM) of modified-CSP was established. For this purpose, DEFORM-3D commercial software was used. A simulation showed that the modified-CSP process was capable of using higher strain, about 0.8 in each pass than in CSP. Copper sheets were deformed up to 10 passes by modified-CSP. The microstructure of the produced samples was analyzed. The results show that the grain size decreases in the first pass. In addition, with increasing plastic strain, the structure of the twins bands was observed. Mechanical properties, including tensile properties and Vickers microhardness, of the samples during the process were investigated. The strain inhomogeneity factor (SIF) and the hardness inhomogeneity factor (HIF) were used to quantitatively express the uniformity of distribution of effective plastic strain and Vickers microhardness, respectively. Compared with CSP and constrained groove pressing (CGP), the results showed that although the ultimate tensile strength (UTS) has significantly increased, the ductility values have remained almost constant. Moreover, in modified-CSP, the load-die stroke diagram increases almost evenly due to the removal of the stud interface area and progressive engagement. Therefore, modified-CSP copper sheets showed superior tensile properties such as good toughness.

1. Introduction

In severe plastic deformation (SPD) methods, an ultra-fine-grained (UFG) structure has been obtained by imposing a large amount of strain on coarse-grained materials [1]. A key feature of SPD processes is that the dimensions of the processed sample are almost constant [2]. According to the geometry of the product, the SPD methods are divided into three general categories, forming bulk materials, sheets, and tubes. The most common SPD methods for producing UFG or nanostructured sheets are accumulative roll bonding (ARB) [3], repetitive corrugation and straightening (RCS) [4], and constrained groove pressing (CGP) [5]. In the CGP method, the various parameters are friction, sheet thickness and die design [6]. Despite similar technique and steps in CGP and RCS, applying SPD by the constraining part of the die in CGP prevents dimension changes. Die design is an effective parameter that affects microstructural, mechanical properties, and strain homogeneity. So, choosing the correct die design is a major achievement in the CGP process [7].
In CGP, Wang et al. [8] indicated the effect of the groove angle on nickel sheets, so that by increasing the groove angle plastic deformation changes from a pure shear mode to a bending mode. The formation of surface micro-cracks occurs as the groove angle increases. Mohammadi Aghbolagh et al. [9] used CGP to produce Al/Cu bimetal sheets. Based on their research, although ductility was reduced by the CGP process, an increase was recorded in both ultimate tensile strength (UTS) and yield strength. A major reason for this reduction in ductility was the presence of a sharper slope angle. Due to reduction of strain hardening exponent in semi-CGP samples, premature necking also occurred. Moreover, they found out that the shape of the CGP dies led to the heterogeneous strain distribution. Sajadi et al. [10] made a comparison between the mechanical properties and microstructural characteristics of aluminum, which were produced by the CGP and covered sheet casing method (called CGP-CSC) in three die groove geometry profiles. It was found that the change in groove geometry in CGP-CSC, which leads to homogeneous distribution of strain, could achieve a fine-grained structure. It was also reported that along with an increase in the groove angle, the tendency for crack formation increased. Moreover, the sharp edges of the grooves were identified as the main cause of formation of micro-cracks and reduction of mechanical properties.
Optimizing die design for the CGP process, Kumar et al. [11] reported the possibility of an increase in the maximum equivalent strain for AA5083 sheets. Further, they showed that by applying optimized dies, the yield strength of AA5083 sheet could be enhanced by about 85% for the first pass. The notion of constrained studded pressing (CSP) was introduced by Torkestani and Dashtbayazi [12]. Due to the geometry of dies in CSP, it is not necessary to rotate the specimen after each deformation step. In the CSP method, each forming pass is consisted of only two stages of pressing. The results show that SPD caused by using the CSP method can reduce grain size, increase UTS, and minimize the ductility of specimens. Generally, two of the most important limitations of the CSP process are the sheet rupture in the initial passes and the application of low strain. Moreover, due to the accumulation of strain, micro-cracks are created in certain areas. However, the amount of effective plastic strain at the interface region between inclined and flat regions of grooves differs. Another point is that the die space is not filled, especially in points with concave and sharp corners. Therefore, several modified CGP methods have been introduced recently, by considering the die design, known as the second generation of CGP processes. Sinusoidal profile [13], CGP-CSC, and CSP processes are some examples that were developed based on the principle of CGP techniques.
In this study, due to the scarcity of research on die designs with curved teeth, it was attempted in the present study to propose an alternative die design called modified-CSP for producing UFG copper sheets. Mechanical properties including tensile properties and Vickers microhardness of samples were studied for the copper sheets, which were produced by modified-CSP. Microstructural variation including grain refinement and the formation of twins bands were also investigated. The required force for deformation of sheets against die stroke during the modified-CSP and CGP processes was studied. The ductility, UTS, strain at the necking point, tensile toughness, and resilience modulus of the samples were also investigated.

2. Illustration of the Proposed Die Design

The presence of sharp edges in the CSP dies was the main cause of stress concentration and local strain in sheets under plastic deformation [14]. So, the amount of plastic deformation of the sheet is limited in the CSP method. Here, applying more strain required an increase in the groove angle, which in turn, led to deep grooves. Another point is that no homogenous distribution occurs in the effective plastic strain. Yet, the higher the groove depth is, the greater the rupture probability is. Therefore, while designing CSP dies, increasing groove depth may experience some limitations. On the other hand, increasing the groove angle prematurely causes surface cracks.
In CSP, preserving the thickness of sheets during severe plastic deformation requires the maximum groove depth not to exceed the sheet thickness. In practice, the groove depth is selected equal to the sheet thickness to apply maximum strain at each stage of corrugating the sheet in the CSP. Thus, in this research, due to using asymmetric semicircular studs for dies, it is called the modified-CSP method. Figure 1 depicts the modified-CSP dies profile. In this method, to preserve the thickness of the sheet (t, based on millimeter) at the maximum plastic strain, two types of asymmetric semicircular studs with different sizes were considered periodically (Figure 1a). The radiuses of the studs were considered twice and equal to the thickness of the sheet, periodically. Since, modified-CSP dies lack sharp edges, the stress and strain are homogeneously distributed. In addition, like in CSP, the strains are applied in three dimensions in modified-CSP, since the strains are applied in two grooves perpendicular to each other. However, in modified-CSP, rotating the sheet after each corrugation and straightening steps is not necessary, so each pass consists of two steps, and this reduction in the formation steps leads to increase productivity.
Unlike CSP where the groove depth is selected to be equal to the sheet thickness, due to the selection of asymmetric semicircle studs in modified-CSP, the maximum groove depth can increase up to three times the sheet thickness. In modified-CSP, the top die will move three times the sheet thickness, and the space between the dies will be exactly equal to the sheet thickness. Finally, in modified-CSP, the sheet dimensions are fixed at the end of the corrugation step.
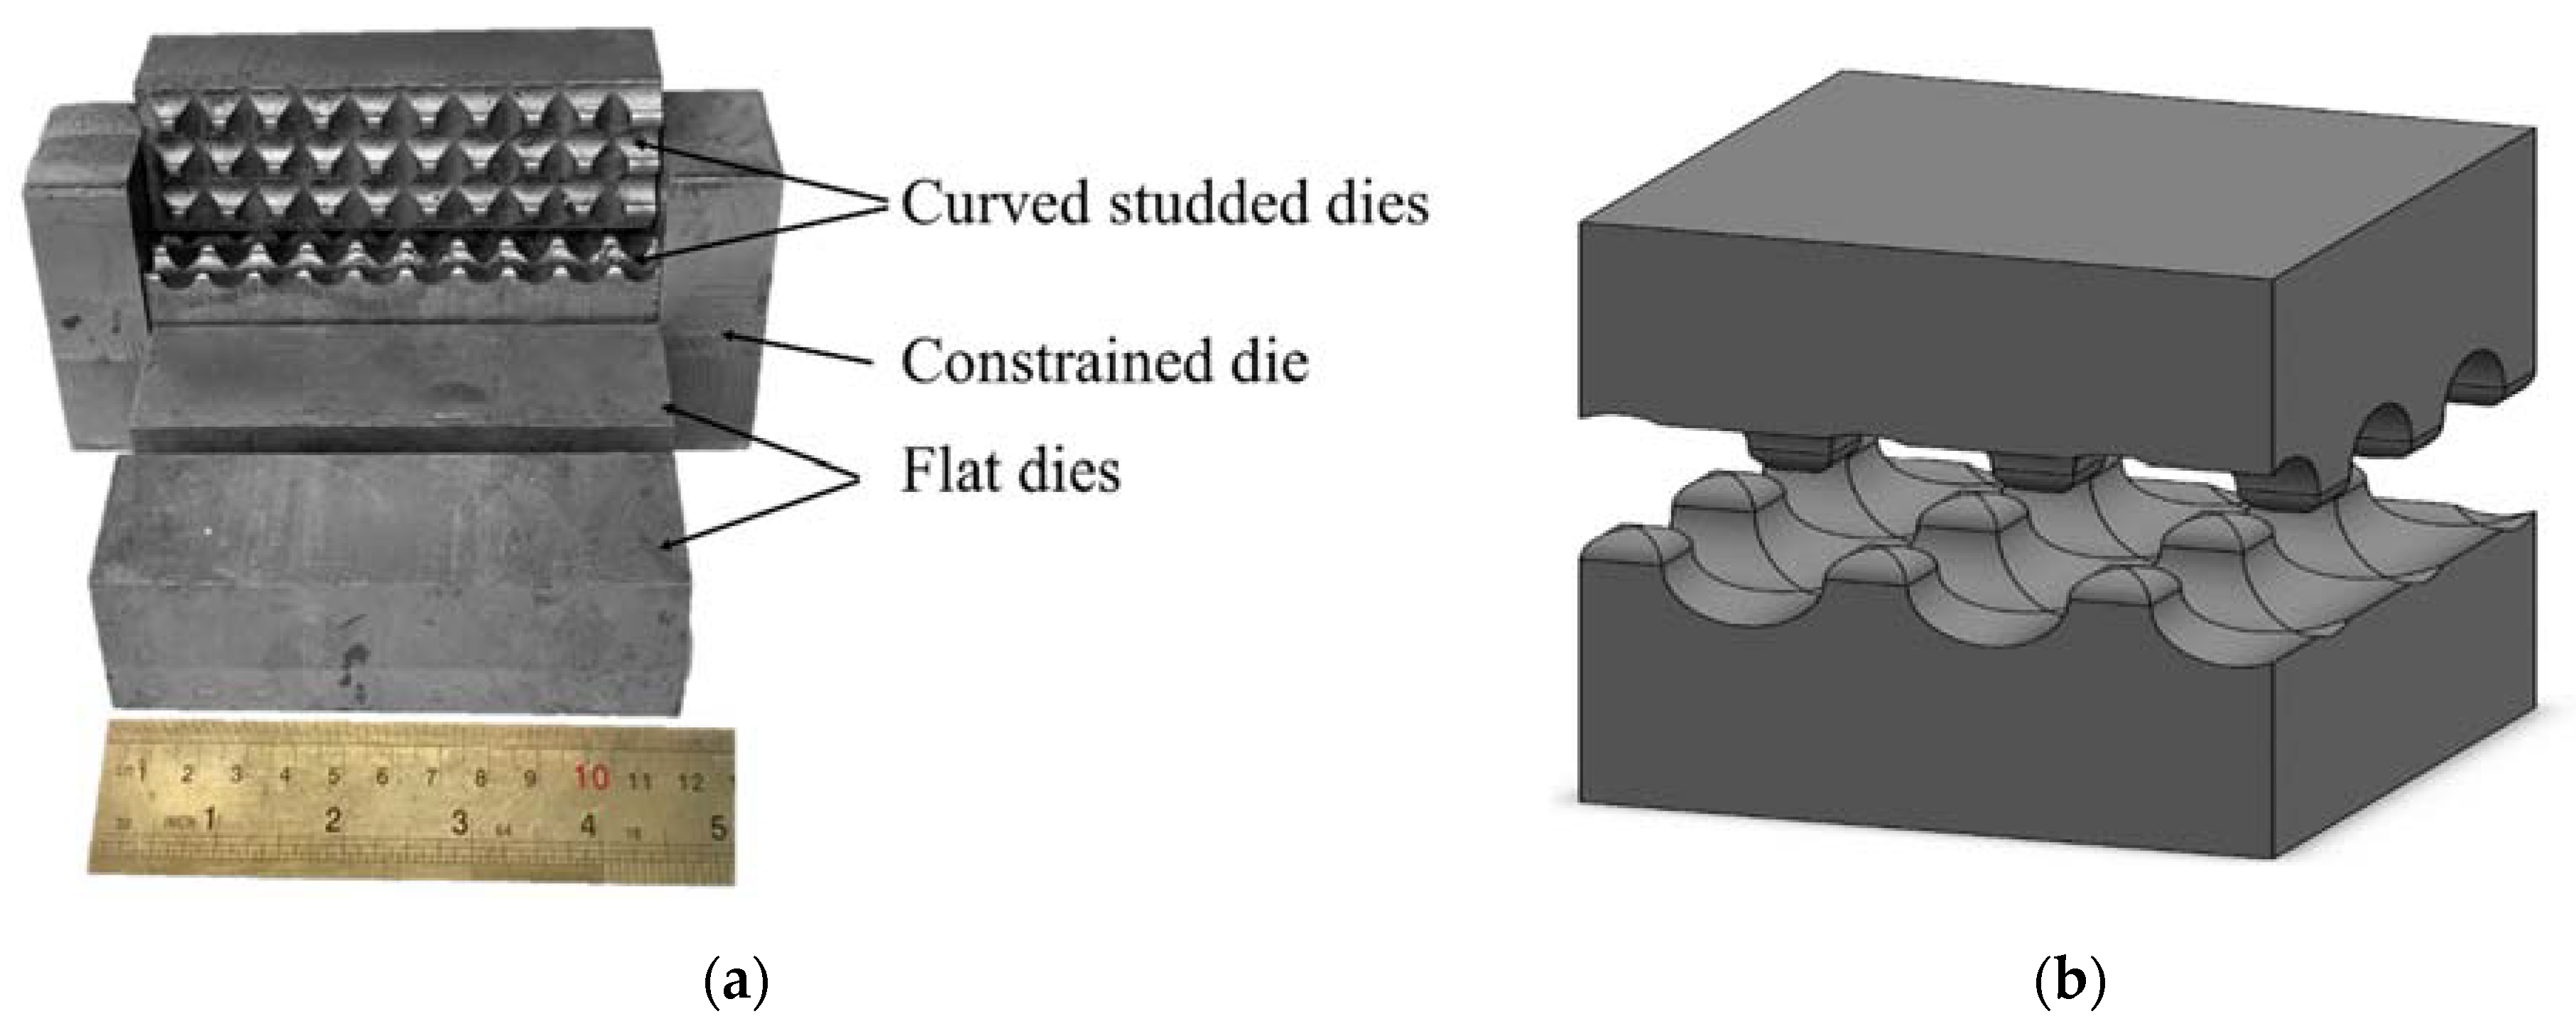
Since the geometry of the sheet must be fixed at the end of the corrugation step, the position of the modified-CSP dies is shown based on the sheet thickness (t) in Figure 1a–d. Figure 1a shows the initial contact of the dies with the surface of the sheet. In Figure 1b, the top die is moved vertically to the sheet thickness. In Figure 1c, the top die is moved twice the sheet thickness. According to Figure 1d, the top die has moved three times the sheet thickness. In fact, according to Figure 1d, the space between the dies will be exactly equal to the sheet thickness. Moreover, the sheet thickness remains constant at the end of the plastic deformation. As a result, the maximum displacement of the upper die will be three times the thickness of the sheet. Figure 2a shows an image of the modified-CSP studded and flat dies. Figure 2b illustrates a 3D image of the modified-CSP dies.

3. Experimental Procedures

Commercial pure copper sheets (99.9%) with dimensions of 150 × 50 × 2 mm were used as raw materials. First, the copper sheet samples were annealed for 2 h to relieve stress and create a homogeneous microstructure at 650 °C. Hydrochloric acid was used to deoxidize and clean the sheet samples. The copper sheets were corrugated by a 20-ton hydraulic press at room temperature at a constant speed of 0.1 mms−1 (initial strain rate of 5 × 10⁻³ 1/s). The corrugation and straightening process, which continued to the eleventh pass, resulted in a complete rupture of the sheet.
Figure 3 shows the corrugation and flattening dies in the modified-CSP method and the sheets produced in this process. The corrugation dies, flattening dies, and the annealed, corrugated, and straightened sheet samples produced in the first pass of the modified-CSP process have been illustrated in Figure 1a,b, respectively. The uniaxial tensile test samples were prepared according to the ASTM-E8M standard (Figure 3c). The testing was performed by an STM-150 device at room temperature and at a speed of 0.1 mms−1 (initial strain rate of 5 × 10⁻³ 1/s). In order to calculate the average results for each pass, each tensile test was performed three times. MH4 Koopa was used to perform Vickers microhardness experiments. The Vickers microhardness test was implemented at equal distances of 1 mm from the edge of the sheet on surface of the sheets. From each pass, one sample was prepared for the Vickers hardness test. A 1kg load was applied for 10 s in all hardness measurements. The obtained hardness number values had an average of at least 10 measurements at different points on the surface of sample.
An optical microscope and a scanning electron microscope (FE-SEM model TESCAN MIRA3) were used to observe the microstructural developments of the samples before and after the pressing operations. Metallography samples of dimensions 1 × 1 × 2 mm were obtained from the middle of the treated sheets and mounted. The surfaces of these specimens were first polished with No. 200, 1000, 2000, and 2500 sandpapers at a speed of 500 RPM and then washed with alcohol. A solution containing 2 mL of HF, 4 mL of HCl, 20 mL of HNO3, and 175 mL of distilled water was used to etch the samples.

4. Finite Element Simulation

In order to study the distribution of effective plastic strain analysis in the modified-CSP process, finite element modeling (FEM) was adopted. DEFORM-3D was used for simulation. The bottom and top dies were considered rigid. The sheet was considered to be made of copper with elastic-plastic behavior. The material model is considered using the Johnson-Cook equation to express the mechanical behavior of sample and the coefficients of which are shown in Table 1 and Table 2. The specimens were meshed by the Tetrahedral element in the 3D simulation. Moreover, during simulation volume loss was taken into account. The coefficient of friction between the sheet and the dies was Coulomb type and 0.1. The top die speed was considered 0.1 mms−1. In order to investigate the convergence and independence of the solutions from the mesh, the simulation was conducted with a different number of meshes. The simulation was performed in two stages, corrugation and straightening.
Table 3 shows the effective plastic strain in all three methods for one pass. The difference between the strain values (resulting from the analytical relationships and calculated by the software) can be explained by the following reasons. Firstly, it is assumed that the deformation during the CGP and CSP process is pure shear type while calculating the analytical relationships; however, the deformation during the steps of this process is not pure shear type and some tensile and compressive strains are applied to the specimens under processing. Secondly, in calculating analytical relationships, it is assumed that parts of the specimen remain unchanged during each stage of the process, and, in fact, the continuity of the different parts is not considered.

Effective Plastic Strain Analysis

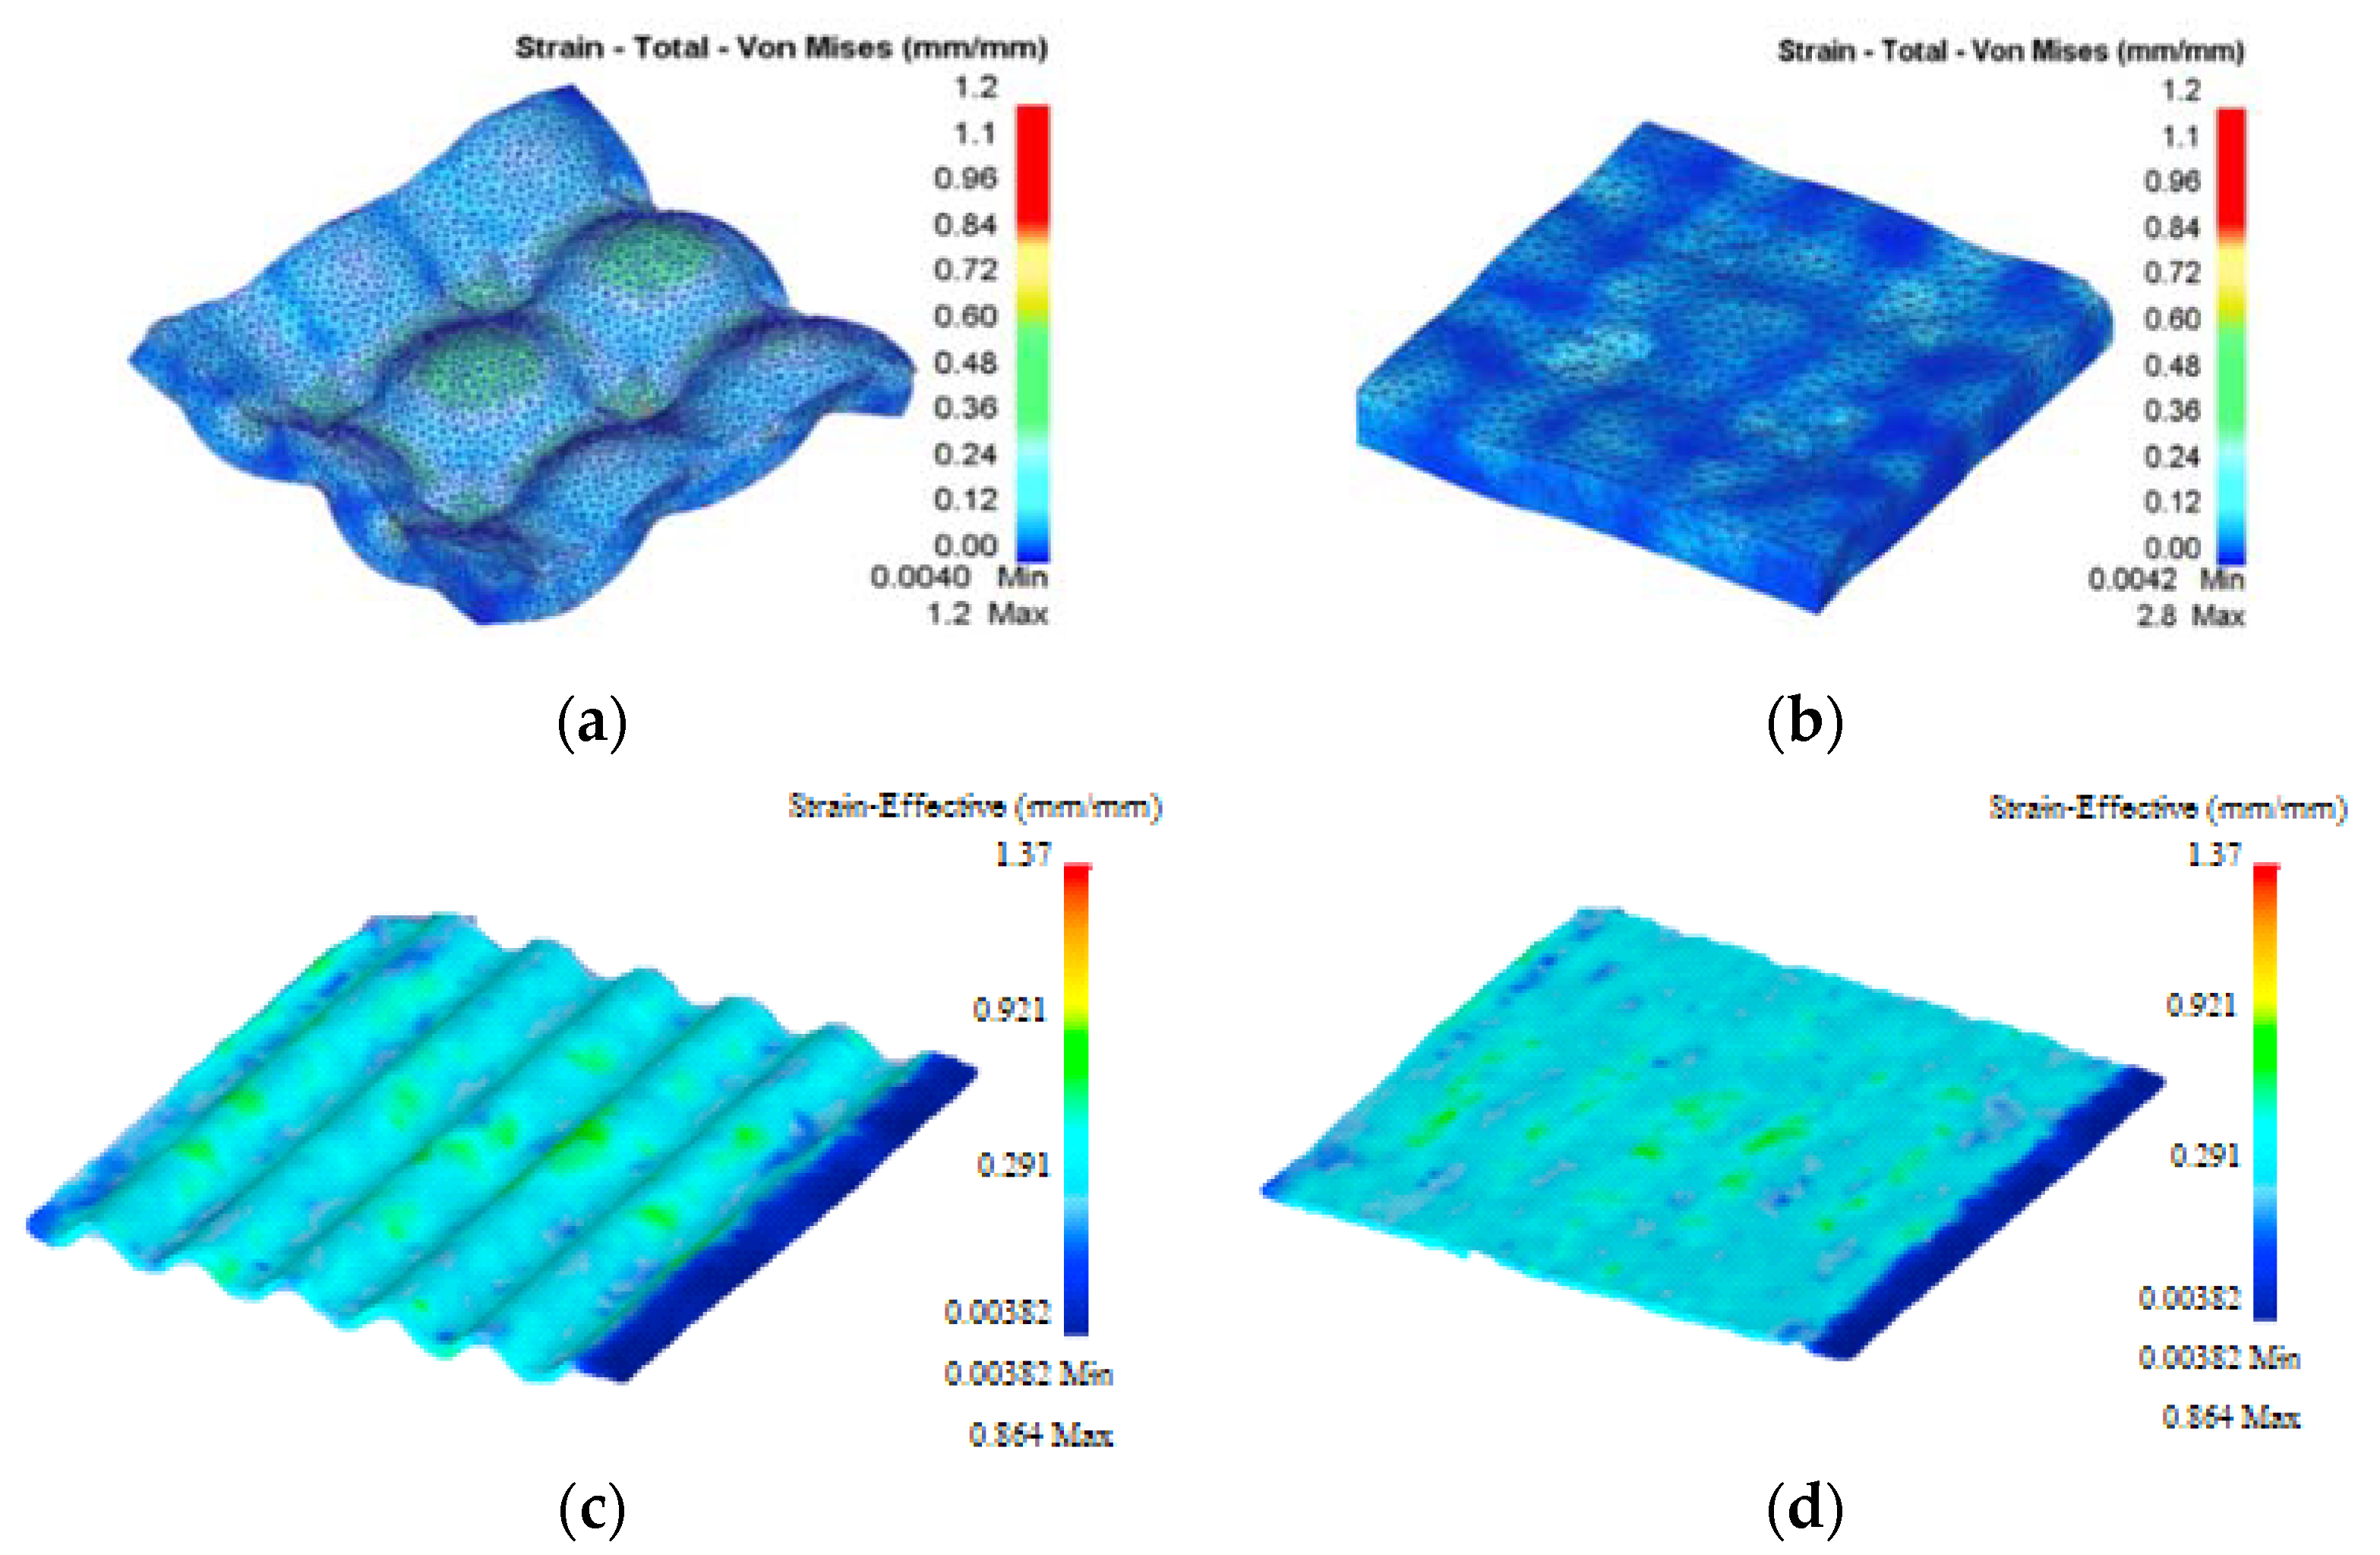
Figure 4 shows the distribution of effective plastic strain for the first pass of the modified-CSP process and CGP process from Ref. [16]. According to Figure 4a,b, the maximum effective plastic strain at the corrugation and straightening steps for the modified-CSP process were about 1.2 and 2.8, respectively. According to Figure 4c,d, the maximum effective plastic strain at the first step for the CGP process from Ref. [16] were about 0.864. As in Figure 4b,d, unlike the CGP process, which occurs in the modified-CSP process, the strain localization will substantially decrease, mainly due to elimination of sharp edges and interface regions. Moreover, in accordance with Figure 4b and compared to the straightening step in the CGP process, strain localization is relieved in modified-CSP dies, so the strain is more homogeneous than it was expected. Furthermore, the maximum and minimum effective plastic strain after the straightening step in modified-CSP were smaller than that in the counterpart straightening step in CGP. It was due to the reduced areas that were associated with strain localization, such as interface regions and sharp edges. According to Figure 4c, the interface region simultaneously suffers stretching and bending deformation. Thus, due to existence of the interface region, it will result in inhomogeneous strain distribution at the CGP sample [16,17].
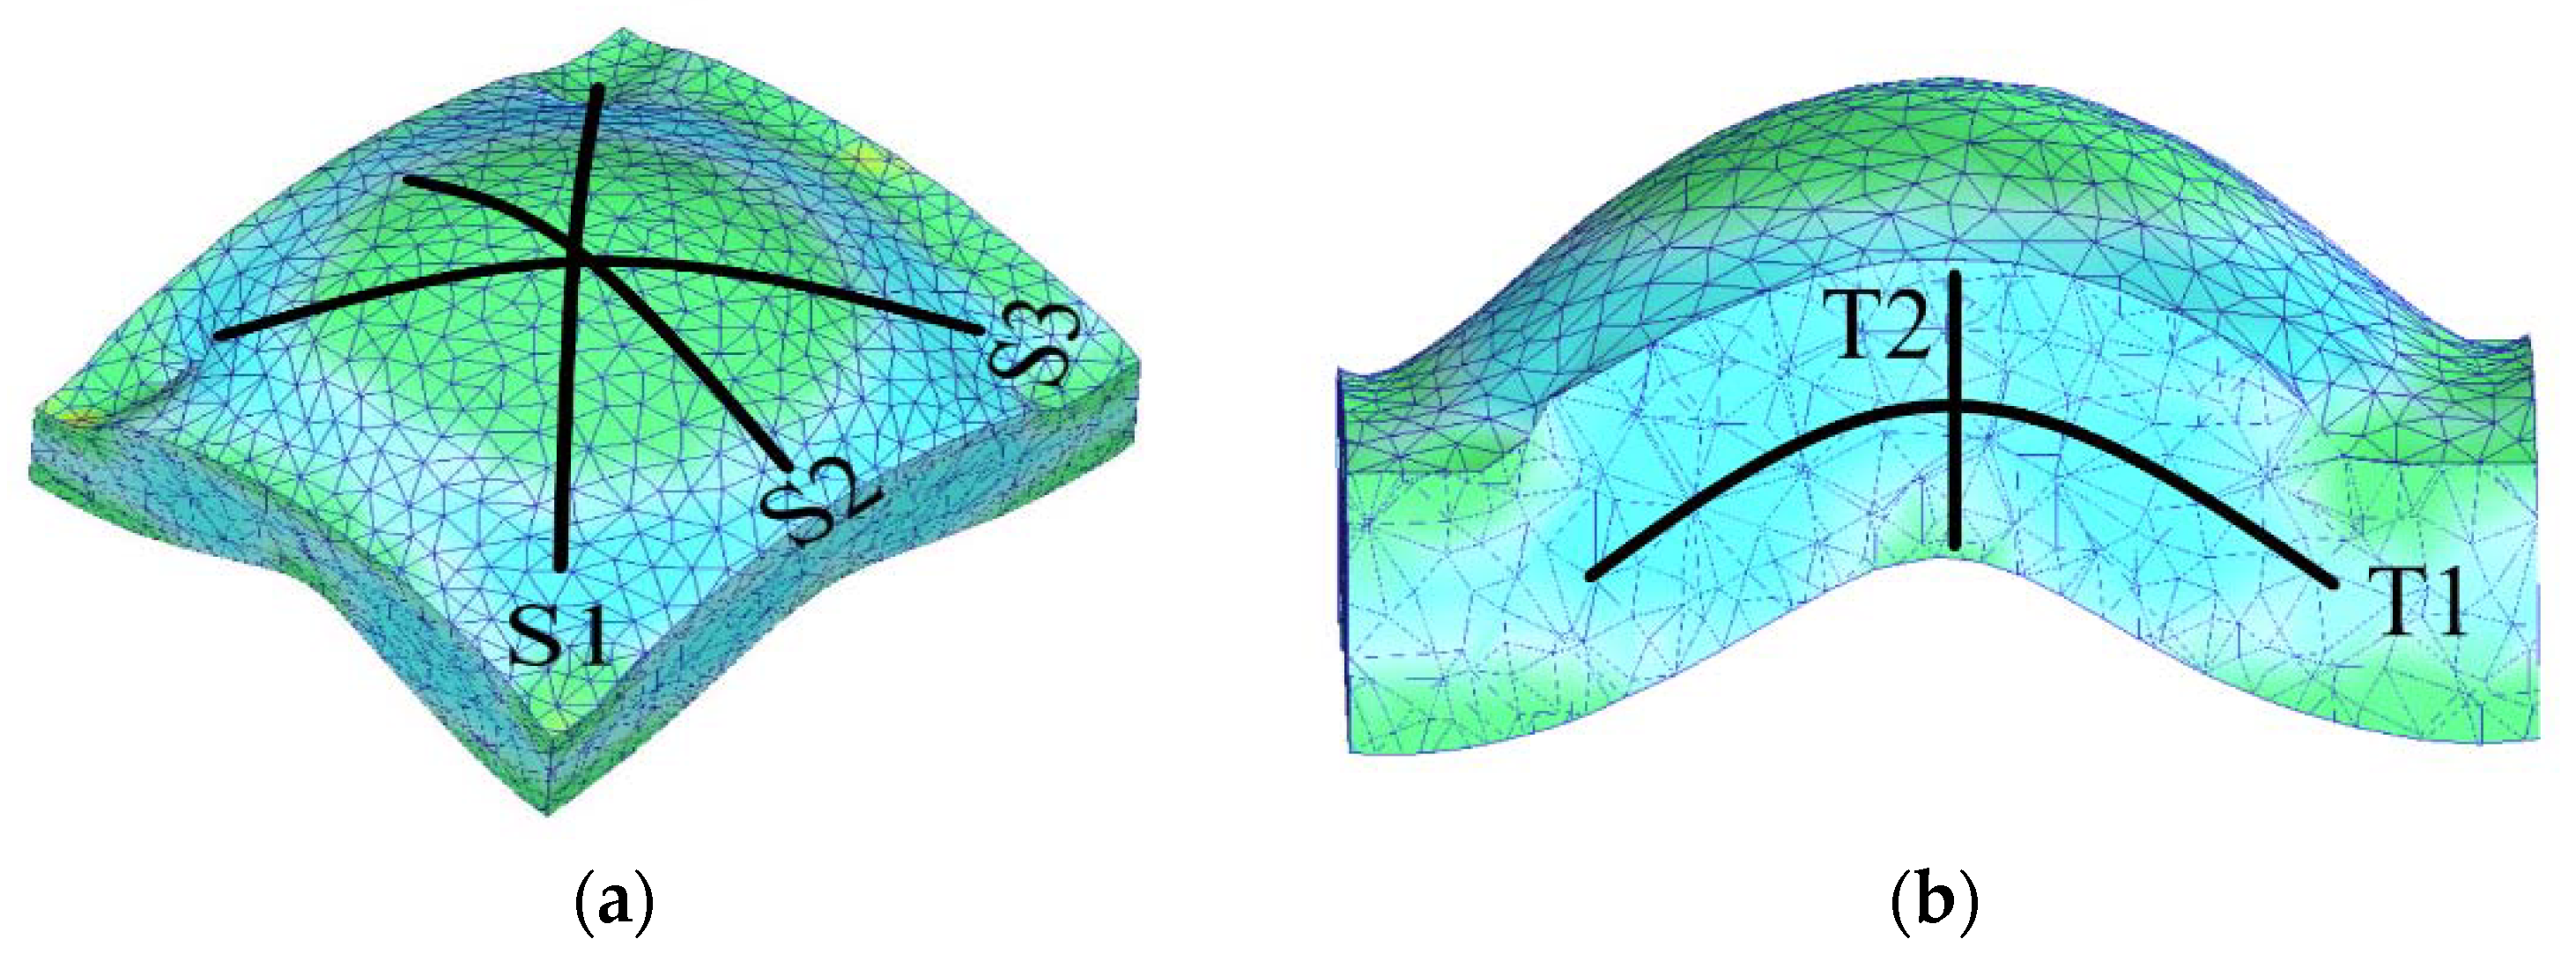
In order to investigate the homogeneity of effective plastic strain during the first pass of the modified-CSP process, which includes the corrugation and straightening steps of the sheets, five directions were considered on the surface and thickness of the sheet. Figure 5a,b represent the directions on the surface and thickness of the sheet, respectively. According to Figure 5a,b, the S1, S2, and S3 directions on the sheet surface as well as T1 and T2 along the center and across the thickness were considered, respectively.
The strain inhomogeneity factor (SIF) was also used to quantitatively express the uniformity of the effective plastic strain for the modified-CSP samples. SIF can be calculated as follows [17]:
S I F = i = 1 n ( ε i ε ¯ ) 2 / n 1 ) / ε ¯
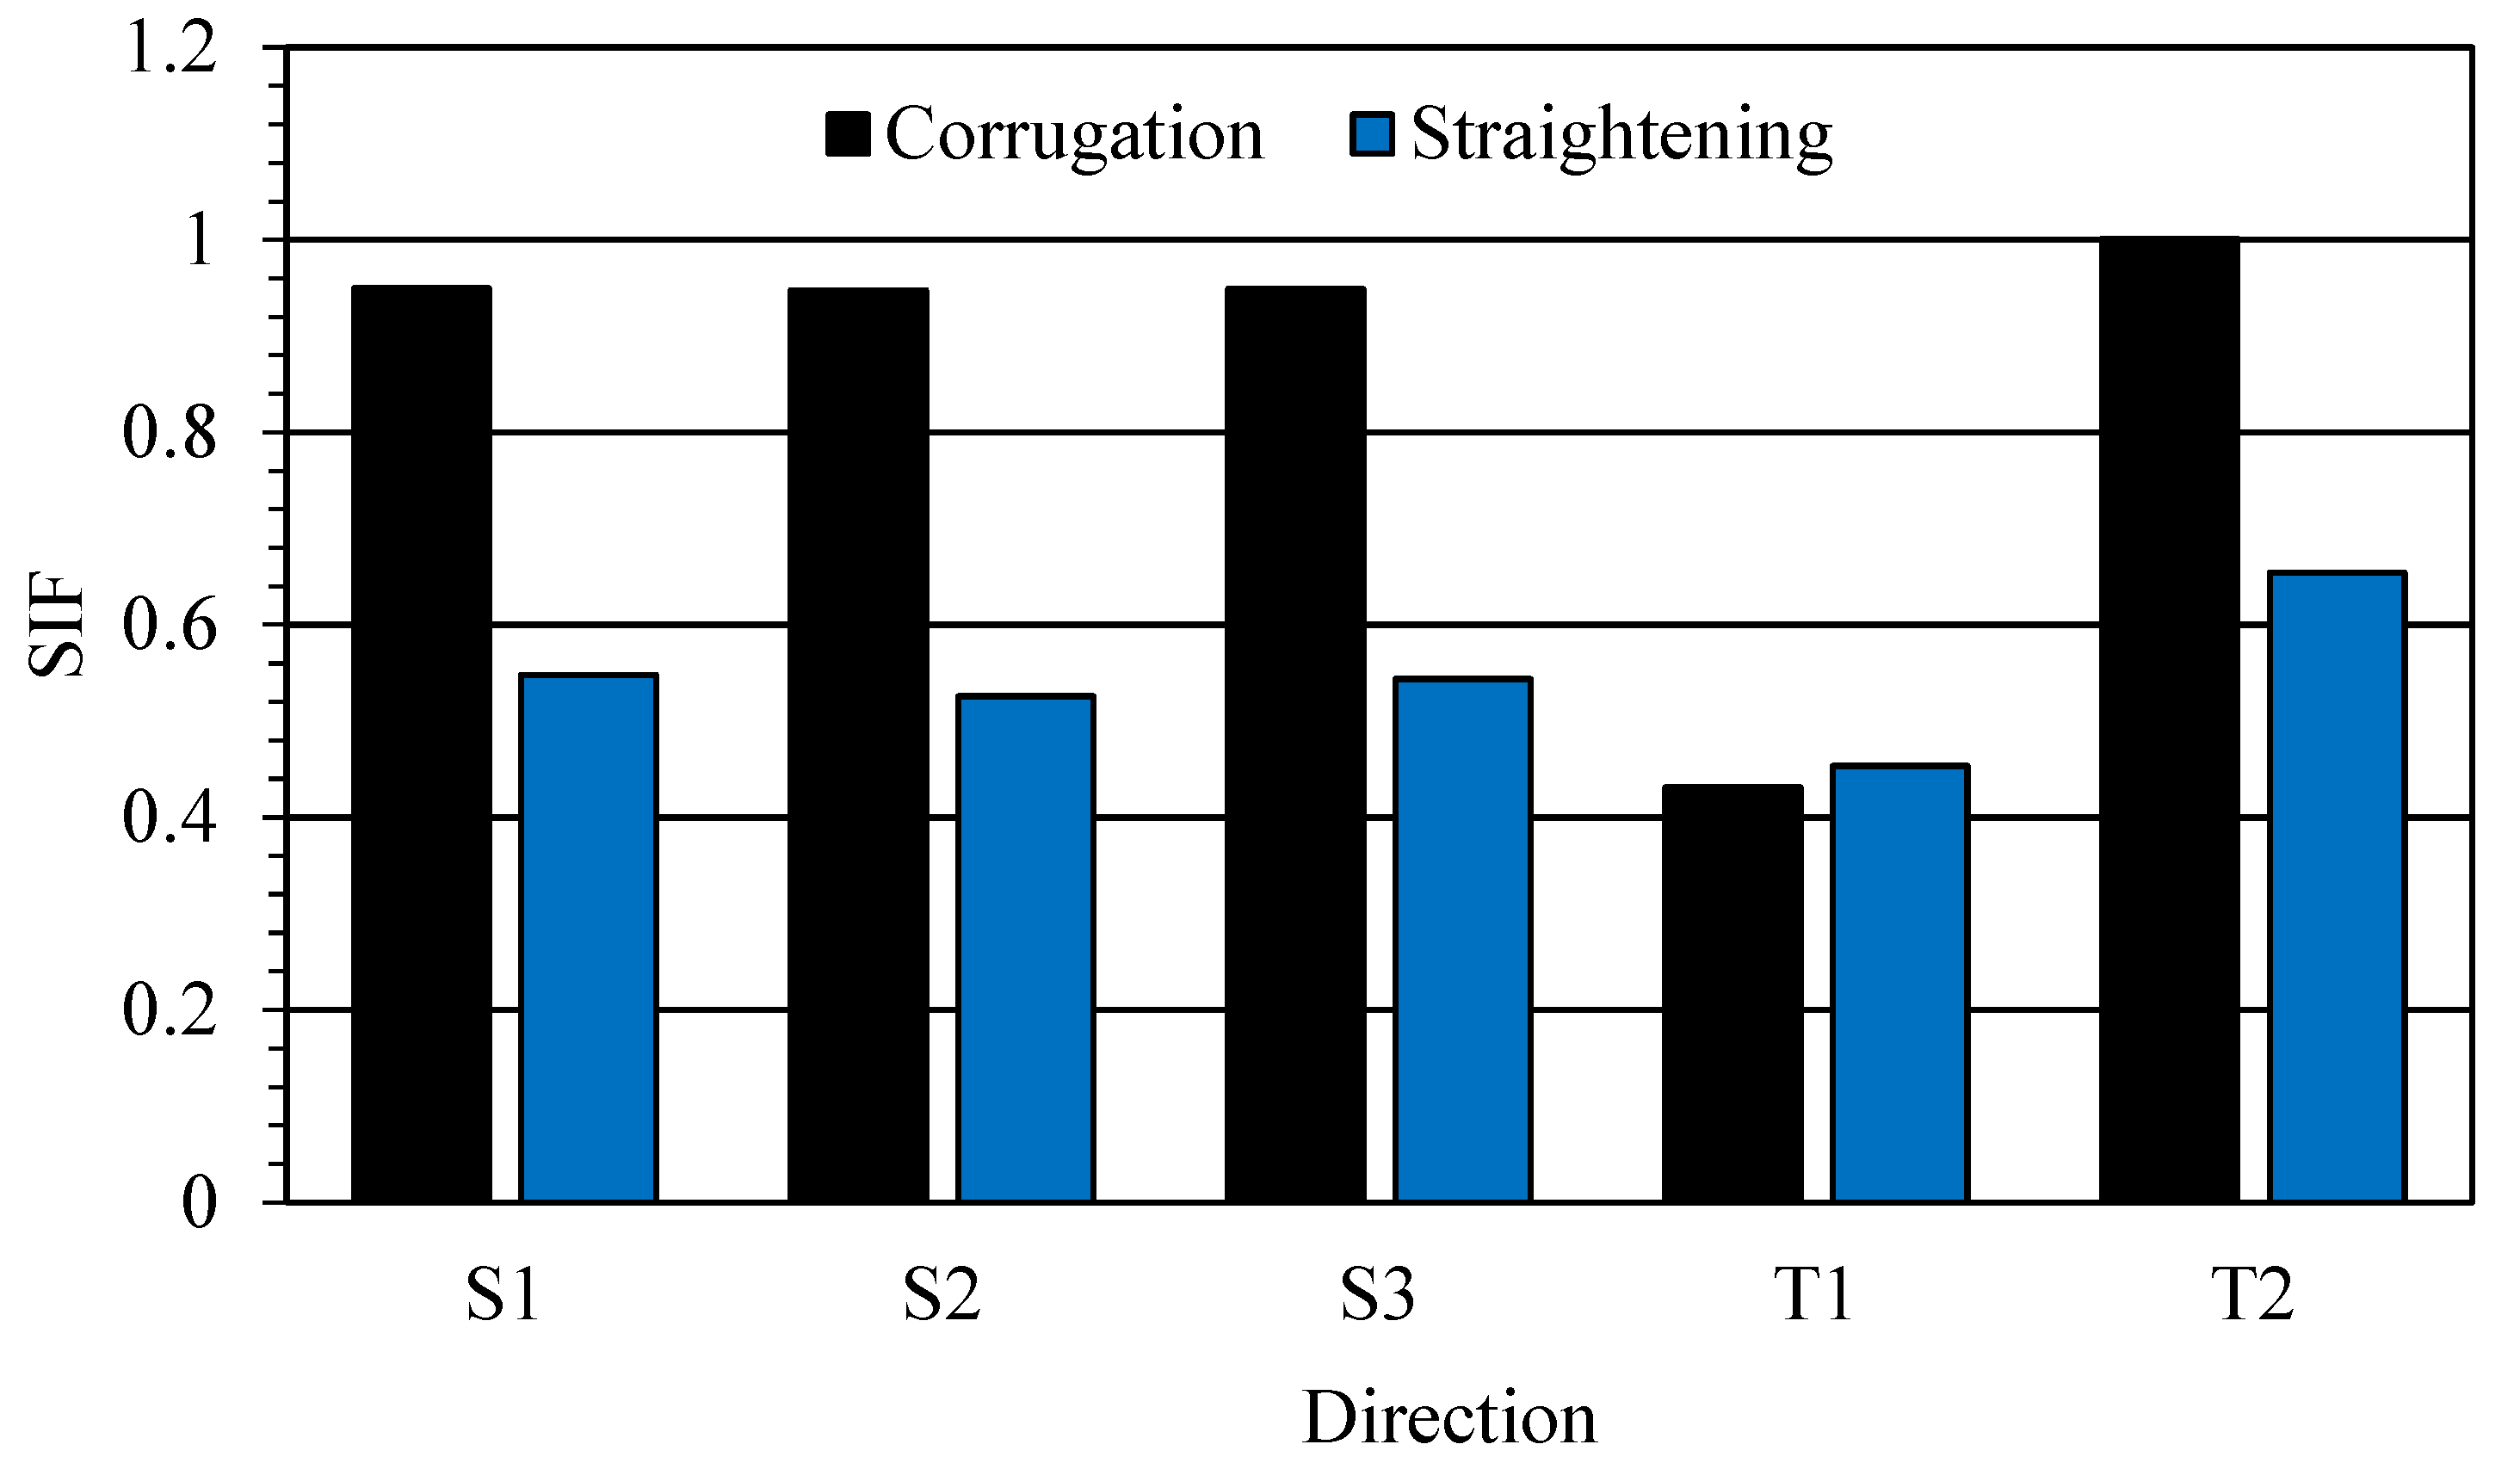
where n is the number of analysis points, ε i is the effective plastic strain of i t h point, and ε ¯ is the average value of strain measurement. Normally, a lower SIF value indicates more homogeneous effective plastic strain. Figure 6 shows the SIF values of effective plastic strain for the first pass of modified-CSP. According to Figure 6, in the corrugation step, SIFs for S1, S2, and S3 are 0.9. In addition, SIFs for the T1 and T2 directions are 0.4 and 1, respectively. According to Figure 6, SIF is almost similar for directions S1, S2, and S3 on the surface and the direction T2 in the corrugation step. It is worth noting that SIF in the center of the sheet thickness (direction T1) is lower than the other directions. SIF variations are mainly due to friction between the dies and the sheet. For the S1, S2, and S3 directions, significant amounts of pressing force are also used to overcome friction, while in the T2 direction, there is no friction. According to Figure 6, in the straightening step, SIF for S1, S2, and S3 is 0.5. Moreover, SIF for the T1 and T2 directions is 0.4 and 0.6, respectively. Noteworthy, SIF for the straightening step, in the center of the sheet thickness (the T1 direction), is lower than those of the other directions. By applying more strain in the straightening step, SIF is continuously decreased and the distribution of effective plastic strain becomes more homogenous. At the end of the first pass, there is no considerable difference between SIFs at five directions, so the effective plastic strain remains uniform.

5. Tensile Properties

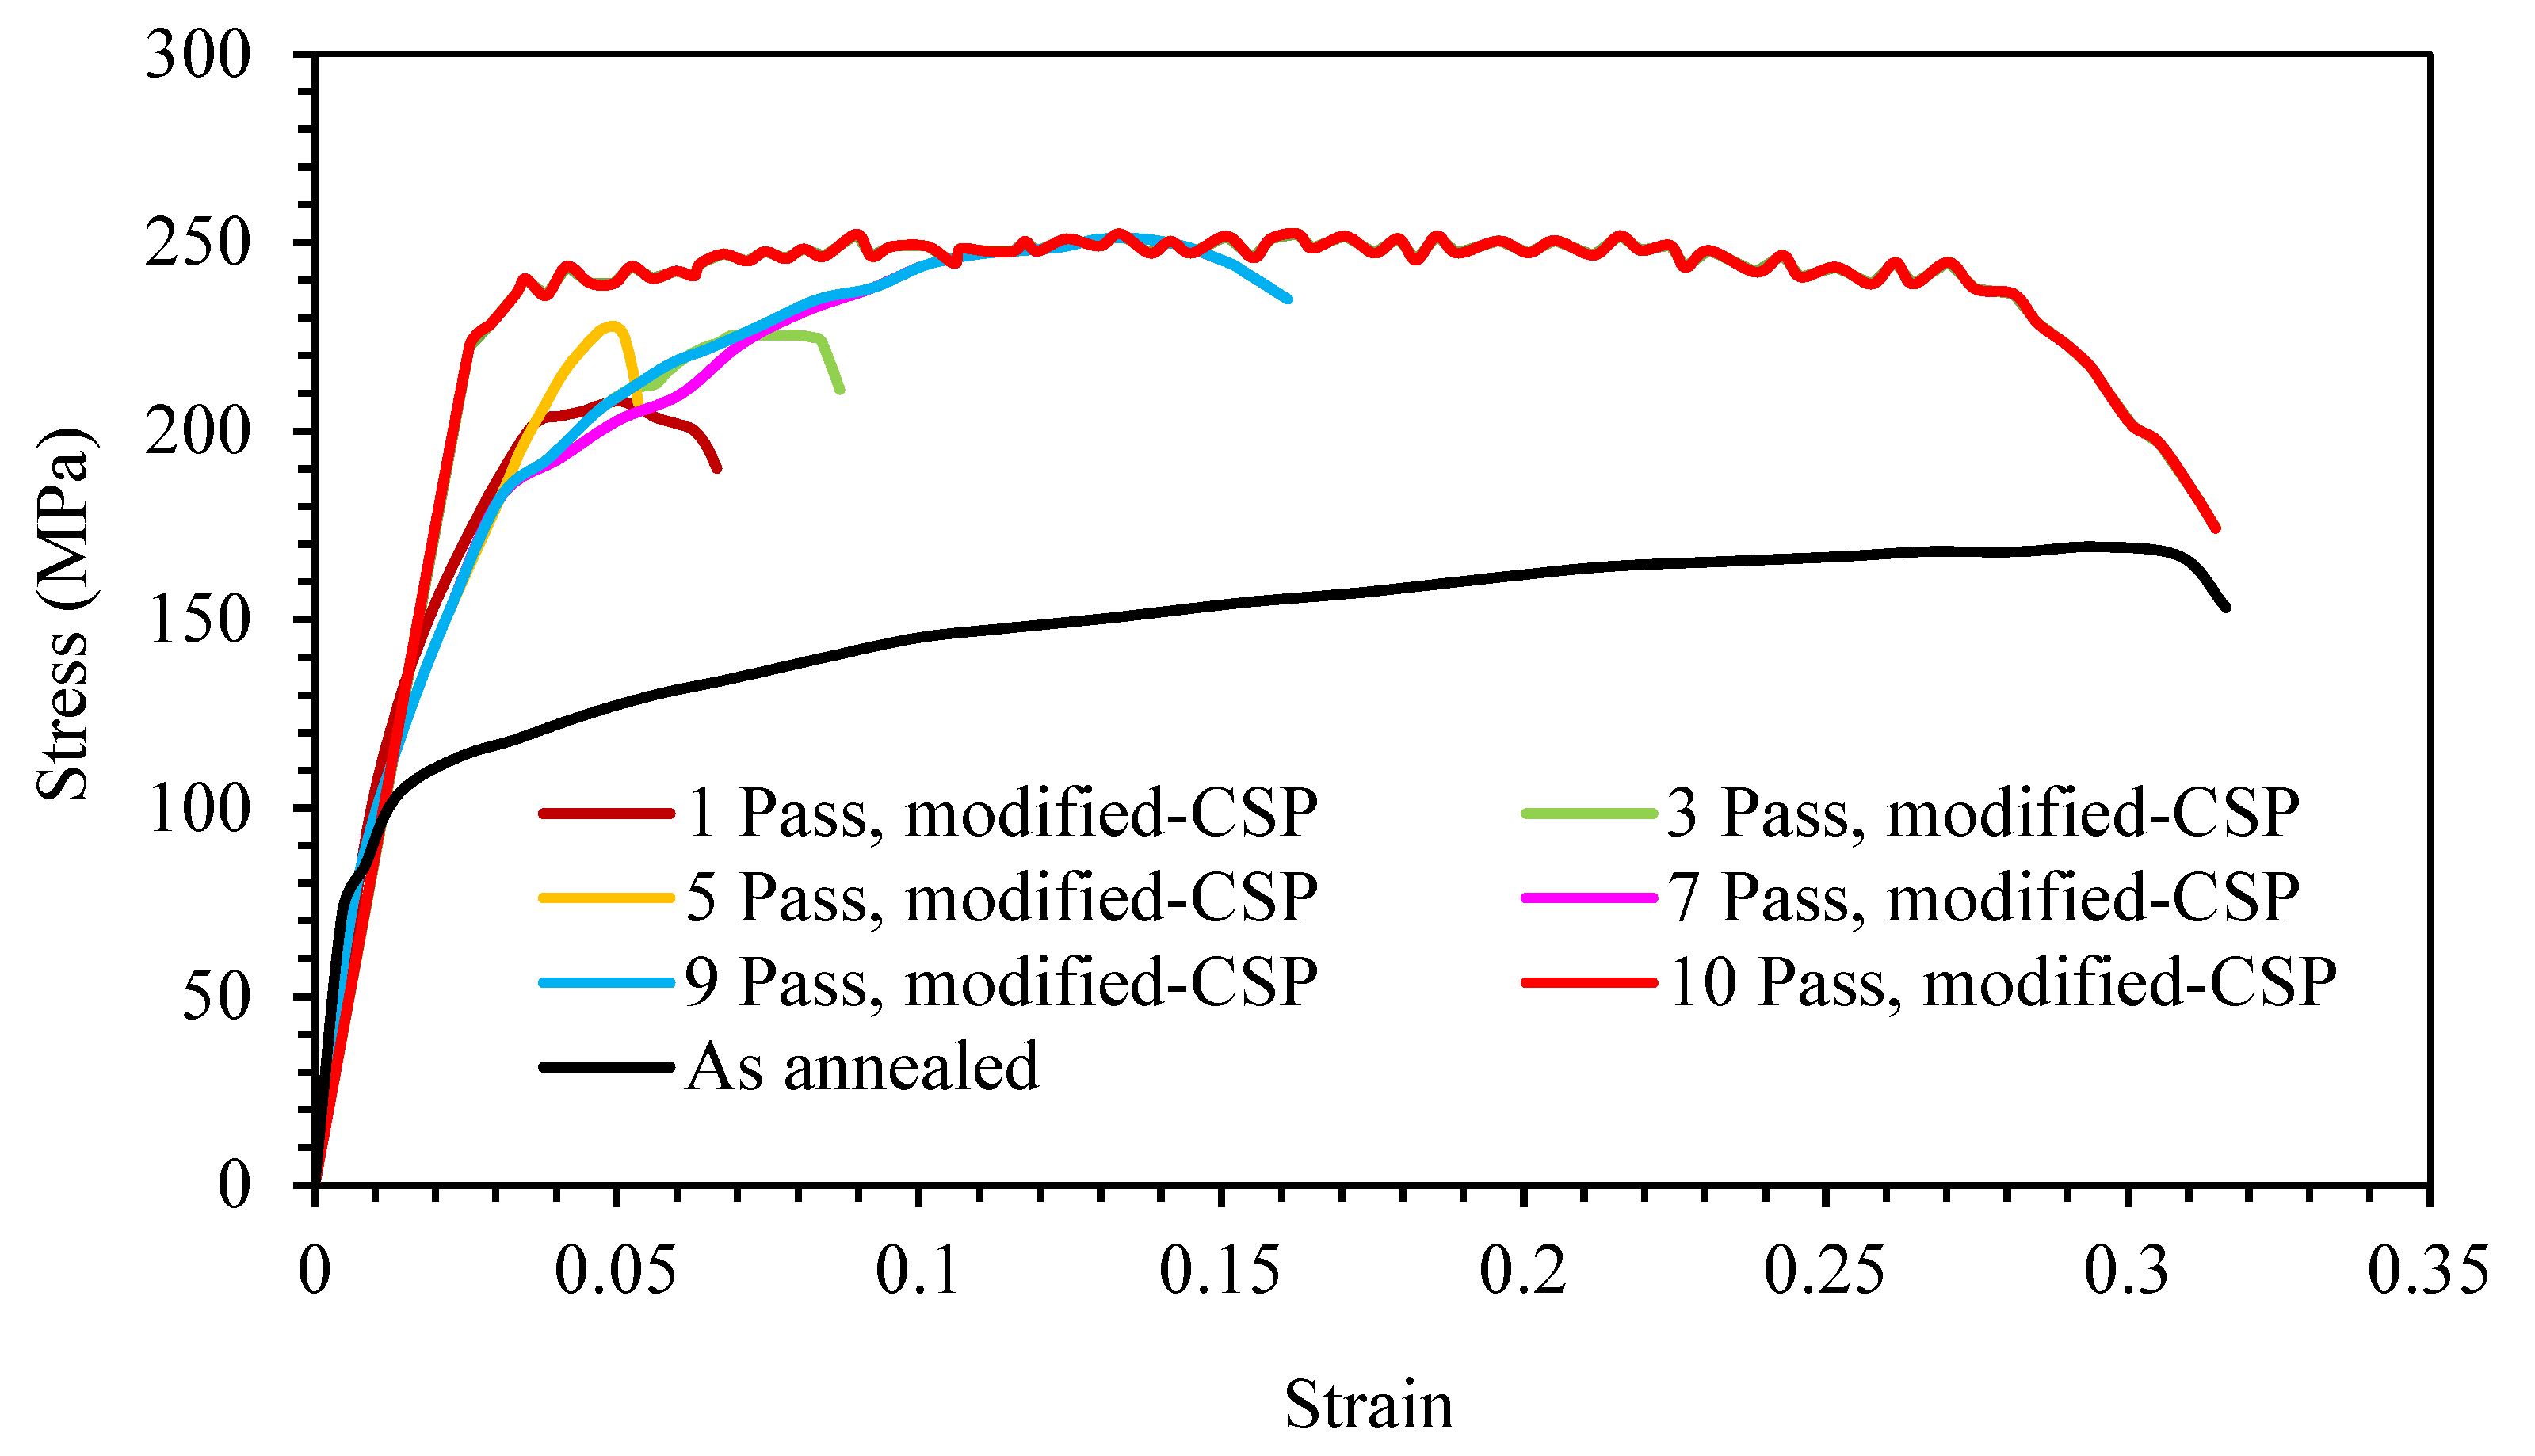
In order to study the effect of the modified-CSP process on the mechanical properties of the copper sheets, stress-strain curves of samples with different passes were compared. Figure 7 shows the stress-strain diagrams for the annealed, first, third, fifth, seventh, ninth, and tenth passes of the modified-CSP samples. According to Figure 7, the UTS of the annealed increased after the first pass of the modified-CSP process while the ductility has a sharp drop. Along with the continuation of the process, the UTS did not significantly increase from the third pass to the seventh pass.
An important phenomenon for the tenth pass (Figure 7) is the presence of the serrated flow behavior in the range of uniform plastic deformation between the yield point and the UTS. Prior to the tenth pass, the predominant mechanism of deformation is the slip one. As the applied strain increases in the tenth pass, the density of the dislocations increases so significantly that the dislocations pile up behind obstacles such as the grain and twin boundaries. According to the Cohen and Weertman model, a simple slip of dislocations behind an obstacle can break them down into two partial dislocations: Shockly and Frank. Since Shockly glides over the {111} planes, the amount of SFE increases and the twining mechanism is activated [18].
Totten [19] reported that in FCC metals and alloys, the twinning stress is directly related to the SFE. In other words, in the early stages, deformation is controlled by dislocation-dislocation interactions. The results show that the strength produced by the deformation is mainly due to both strain hardening and mechanical twinning. Due to mechanical twin boundaries, the strengthening effect is of great significance, especially at high strain. After twinning and changing the orientation of a part of the grain compared to the previous state, it is easier to continue the deformation through cross-slip, because an increase occurs in the slip systems. On the other hand, according to the research done by Mohammed et al. [20], as the grain size decreases the strain on the onset of twinning increases, too. That is, higher stresses are required to form mechanical twins in the fine-grained sample. These results present a relationship for the critical shear strain required for twinning considering the effect of grain size on ambient temperature as follows [20]:
[ ( σ c σ Y S ) / G ] = 77 d 0.92
where σ c is the critical shear stress of twinning, σ Y S is the yield stress, G is the shear modulus, and d is the grain size. This equation, which is a kind of Hall–Petch relationship, indicates that as the critical shear stress of twinning increases, the grain size reduces, and simultaneously, an increase is recorded in the yield stress of the material. Likewise, the greater the applied strain is, the smaller the grain size is. Yet, in turn, the strength of the material increases sharply, and as a result higher amount of stress in the shear deformation is required for twinning. Therefore, due to the intermittent change in the type of deformation mechanism from twining to slip and vice versa, alternating increases and decreases of stress values (serration) occur in the stress-strain diagram for the tenth pass (Figure 7). The twinning occurs significantly at high strain in the microstructure. Therefore, its mechanical properties and, especially, its ductility are improved by delaying localization of the necking. The result is in line with those on the phenomenon of serrated flow behavior reported by other researchers [21,22].
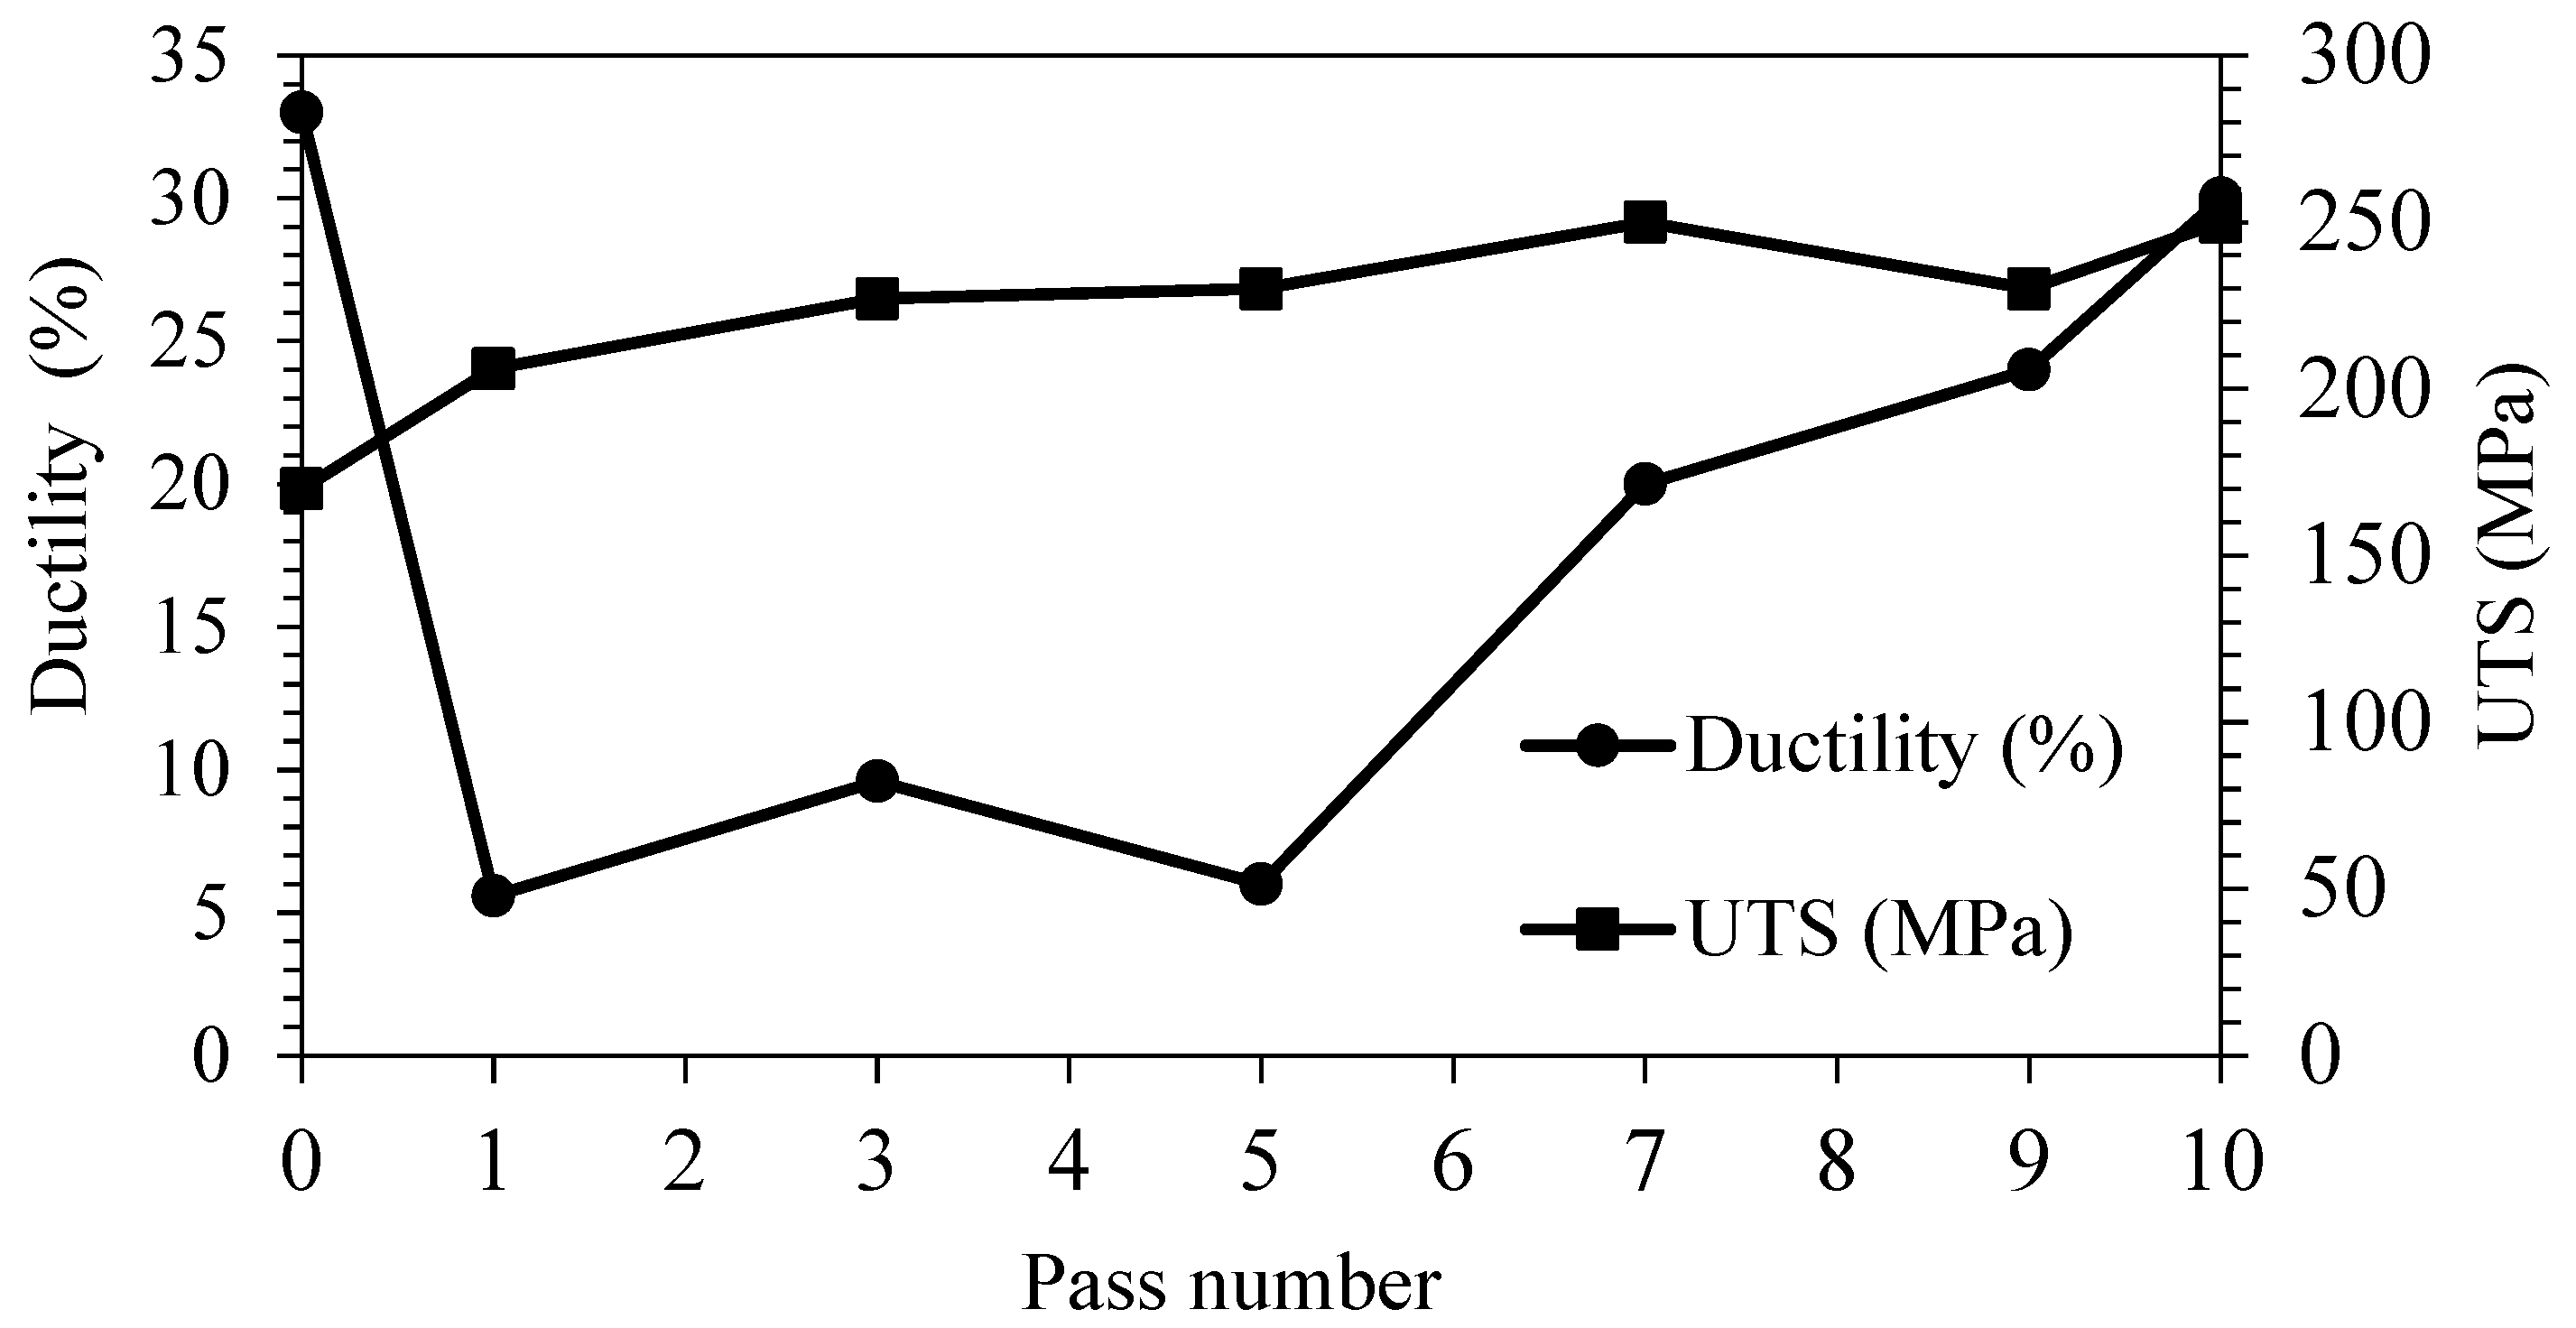
Figure 8 shows the ductility and the UTS in terms of deformation passes for the modified-CSP samples. Here, the UTS of the as annealed sample increases gradually from 170 MPa to 250 MPa for the tenth pass sample. Yet, the ductility reduces sharply for the first pass.
Due to the severe plastic deformation in the first pass on the samples, dislocation density is increased, and as the amount of applied strain increases, the dislocations collide with each other. Moreover, there is also a relationship between the density of dislocation and the strength [23]:
σ = σ 0 + α M G b ρ 1 / 2
where σ is the yield strength, σ 0   is the friction stress, α is a constant, G is the shear modulus, b is the length of the Burgers vector of dislocations, ρ is dislocation density, and M is the Taylor factor (M = 3 for untextured polycrystalline materials). According to the Taylor relationship, increasing the density of dislocation will increase the strength. Therefore, increasing the strength in the first pass of the process reduces the ductility of the sample.
In the third and fifth passes, no significant variation occurs in ductility. As the process continued, the ductility of the seventh to tenth passes increases. It is worth noting, the ductility is approximately equal to that of the annealed one for the tenth pass, but the UTS increased greatly. In other words, one of the most important achievements of the modified-CSP sample is the concurrent improvement of both ductility and UTS. Such simultaneous increases in ductility and tensile strength were also reported by other researchers [24]. Regarding the cause, it is accepted that plastic deformation can be related to the evolution of dislocations and the interaction of dislocations. There are several models suggested that deal with generation and annihilation of dislocations in plastic deformation of polycrystalline metals [14,25]. Moreover, the relationship between the microscopic plastic deformation mechanism and the notion of dislocation is generally accepted.
One of the most important mechanisms associated with ultra-fine-grained structures is the dynamic recrystallization mechanism [26]. These are due to the progressive transformation of the dislocation sub-boundaries produced into ultra-fine grains with high-angle grain boundaries at low strains. This process is known as dynamical recrystallization and is regulated by the evolution of the dislocation structure, which forms new grain boundaries from the dislocation walls. In this model, the multiplication of dislocations is first included, leading to a strain hardening limited to dynamic recovery. Once a critical dislocation density is reached, new grain boundaries are formed by condensation of the dislocation walls. The formation of the new structure is with new grain boundaries with a wall of dislocations. This new structure reduces the free energy of the system. This evolution of the microstructure is continuing, resulting in a gradual decrease in the average grain diameter [27].
Figure 9 shows a comparison of the resilience modulus and tensile toughness of modified-CSP samples for each pass. As seen in Figure 9, the increase in resilience modulus of samples for the first pass is followed by a decrease for the fifth pass. It finally increases from the seventh to the tenth passes. Compared to the annealed sample, the resilience modulus in the tenth pass dropped significantly (~41%). Similarly, the tensile toughness decreased in the first pass compared to the annealed sample. As illustrated by Krishnaiah et al. [28], reduction of the tensile toughness after the third pass may be connected with micro-cracks formation in the sample. From the third to the ninth passes, the tensile toughness did not change significantly. After the tenth pass, the tensile toughness and the annealed sample similarly enhanced. The formation of micro-cracks is an important reason for reducing the mechanical properties used in forming processes. Compared to the dies of CGP and CSP, the possibility of creating surface cracks decreases in modified-CSP with the removal of sharp edges, yet the tensile toughness increases. Delays in crack formation caused by increased sheet surface quality and increased mechanical properties were also reported by Sajadi et al. [10]. Moreover, Liu et al. [29] used surficial cryogenic grinding to obtain ultra-fine-grained microstructures of pure copper. This method provided increased surface quality and delayed cracks propagation via surficial cryogenic grinding.
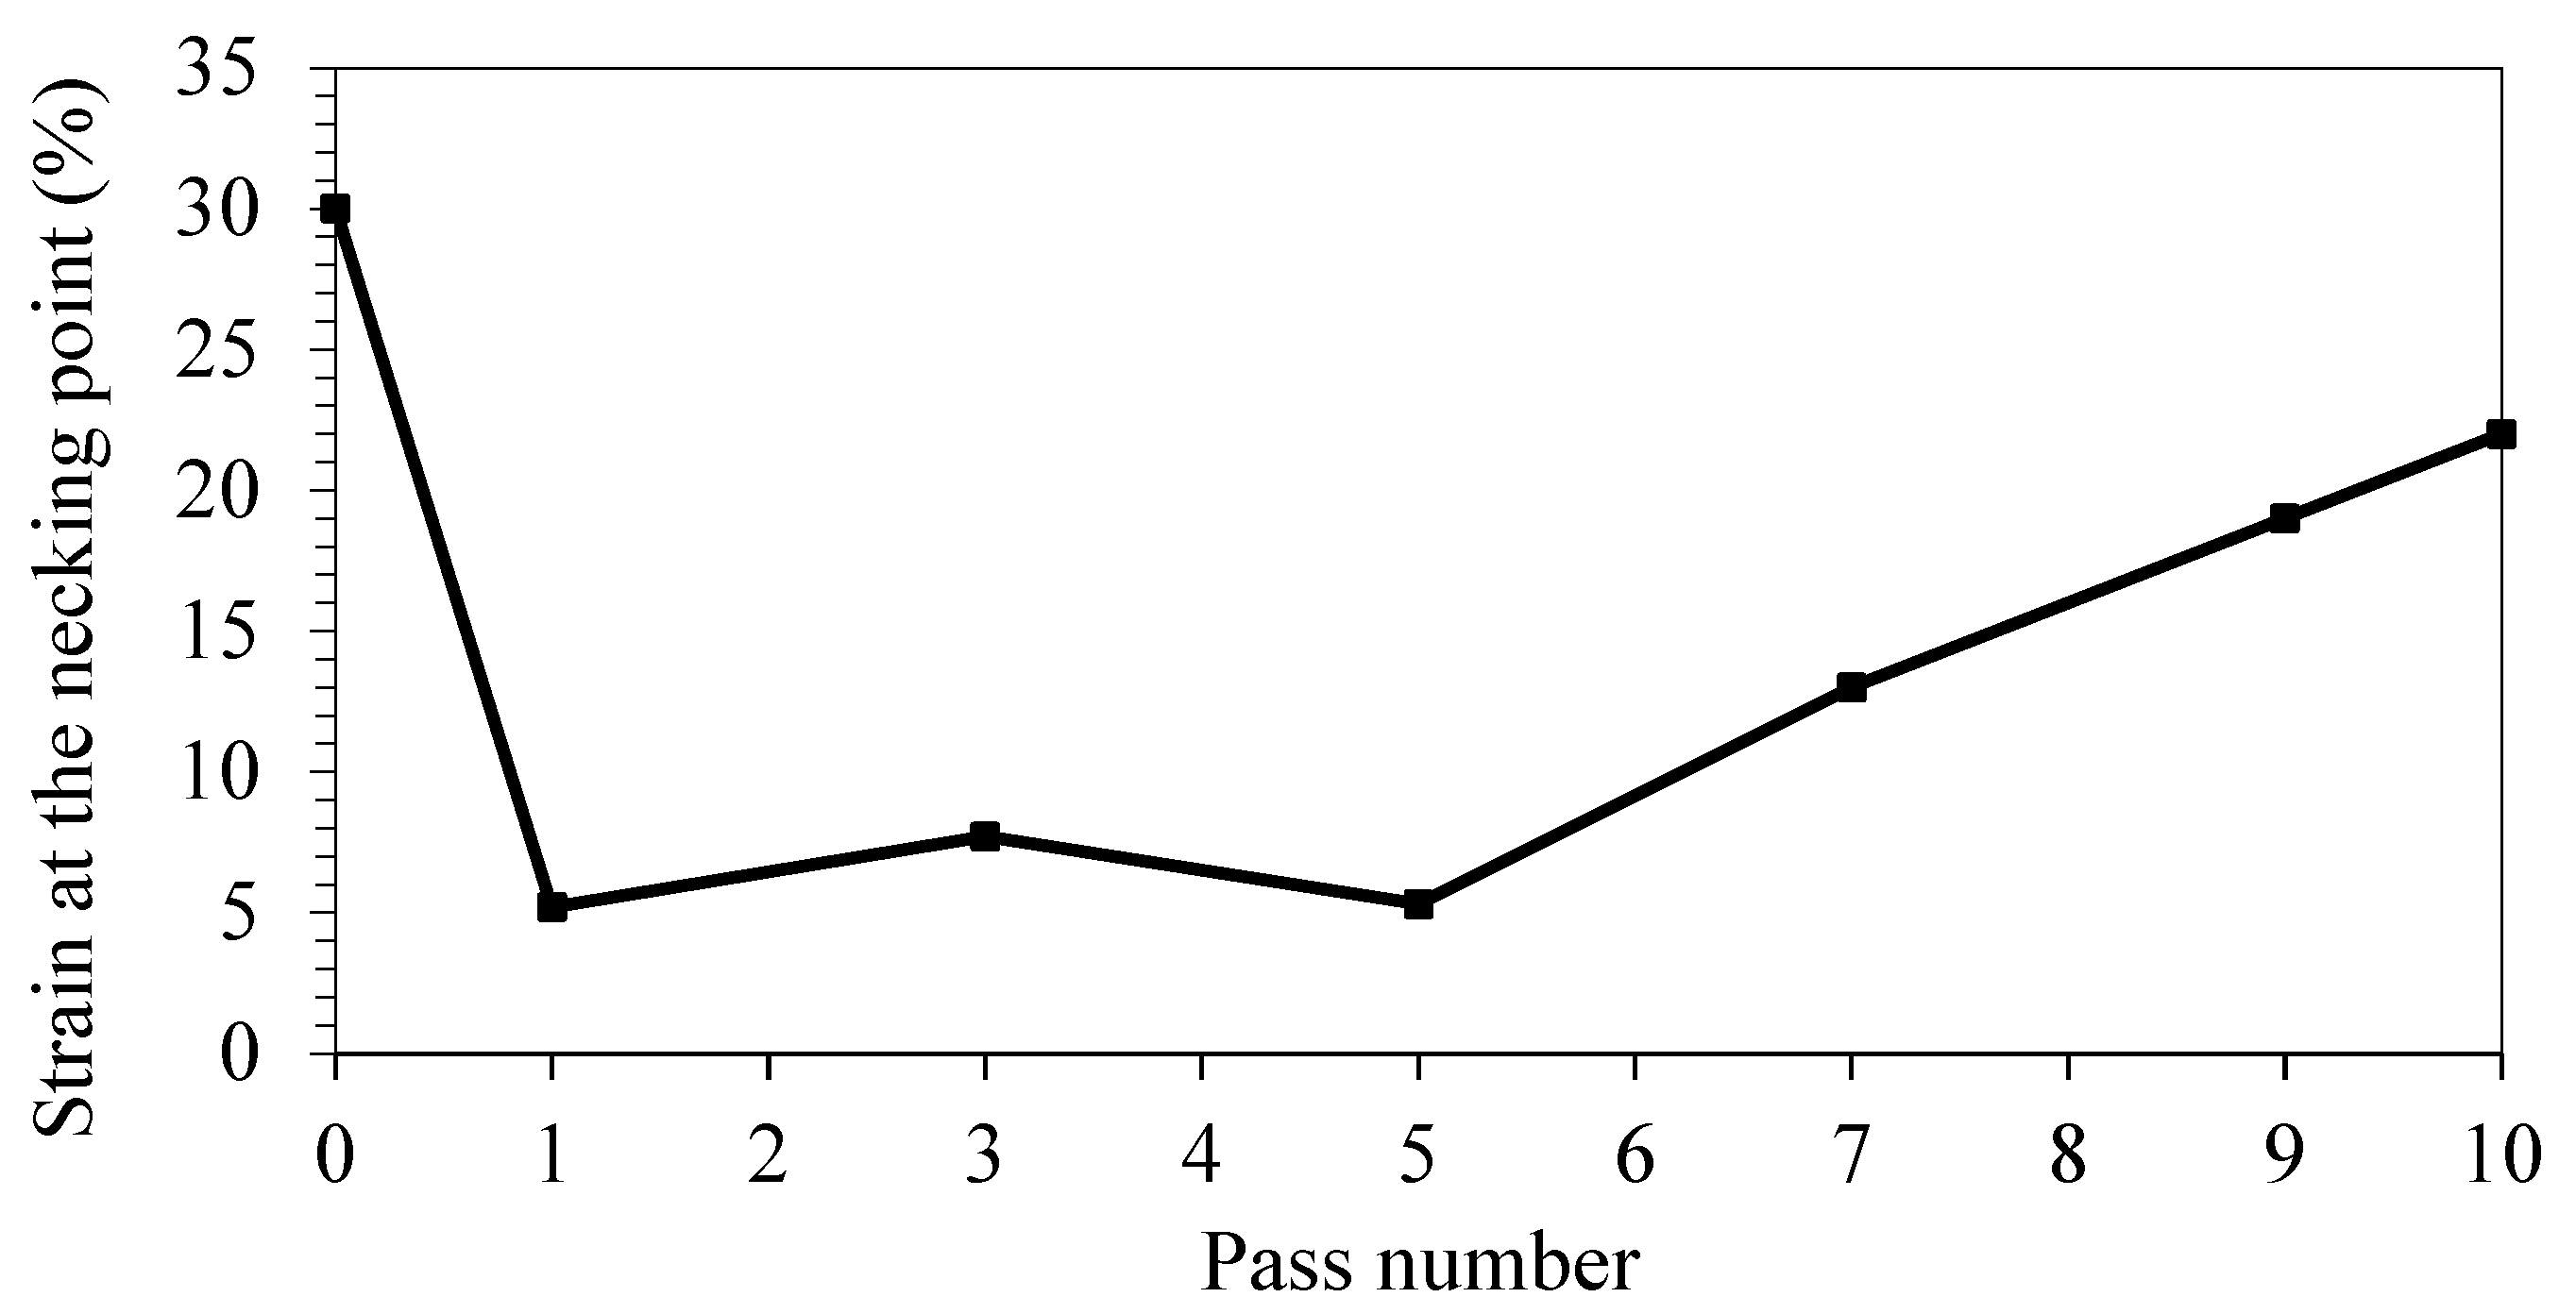
Figure 10 shows the amount of strain at the necking point in the tensile test of modified-CSP samples. In the first pass, strain at the necking point dropped significantly by about 82.6%, as compared to the annealed. The strain values at the necking point from the first to the fifth passes samples did not change significantly; however, the strain values at the necking point of the third and fifth passes were about 7.7% and 5.3%, respectively. Afterwards, the strain values at the necking point in the seventh to the tenth passes increased. The strain value at the necking point shows plastic instability. The onset plastic instability occurs in the weakest region, which is called the necking point. The Considère stability criterion is as follows [1,30]:
σ = K ε n
d σ / d ε = n K ε n 1 = σ
ε = n
where σ and ε are true stress and true strain, respectively, while n is strain hardening coefficient and K is strength coefficient, which is equal to the stress at ε = 1 . Thus, the Considère criterion represents the onset of necking, and the UTS occurring at a strain equals the strain hardening exponent. In general, with an increasing number of passes, necking is delayed.
The Hall–Petch relationship shows the strength of the material, which is the function of the grain size. In this regard, the yield strength of metallic materials is calculated using the grain size d as follows [29]:
σ y = σ 0 + k y / d
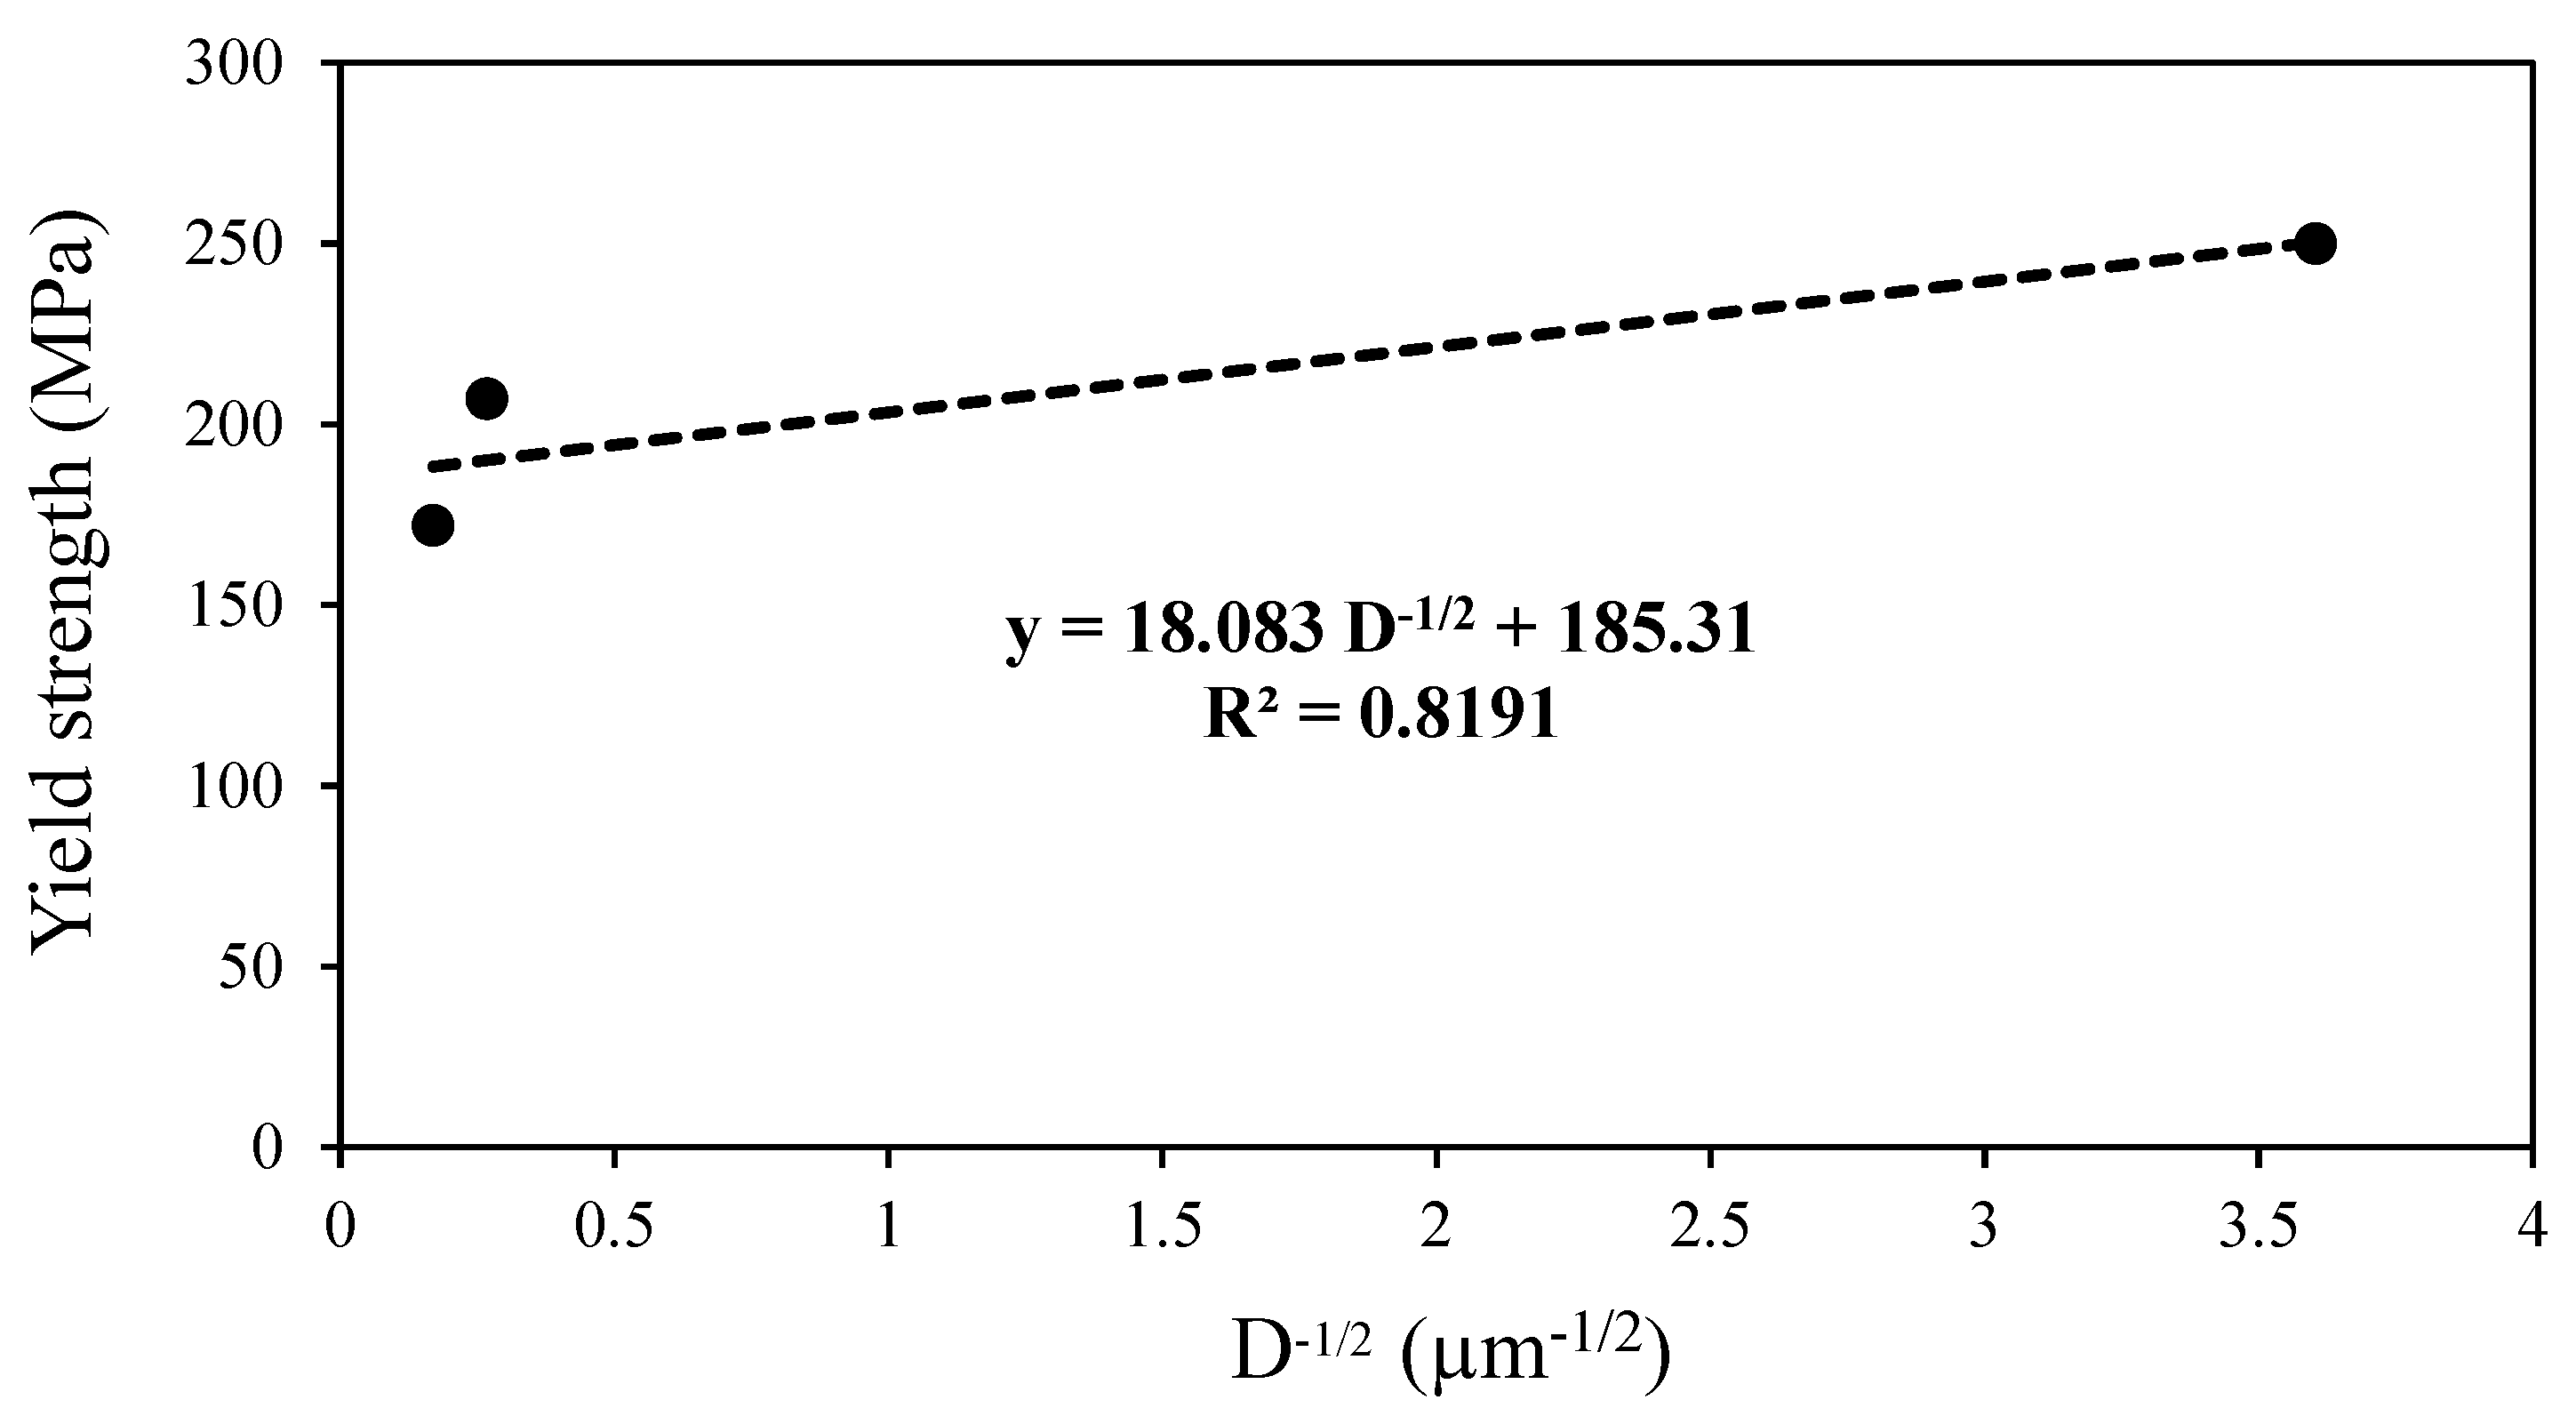
where σ y is the yield strength,   k y is the yield constant, and σ 0 is the frictional stress. According to The Hall–Petch relationship, when the grain size decreases, the yield strength increases. In the Hall–Petch effect, it is assumed that the grain boundaries block the dislocation movement. Figure 11 shows variations of the yield strength versus the reciprocal square root of the grain size. The linear relationship indicates the intercept and the slope are 185.31 MPa and 0.018 MPa.m1/2, respectively.

5.1. Hardness Measurement

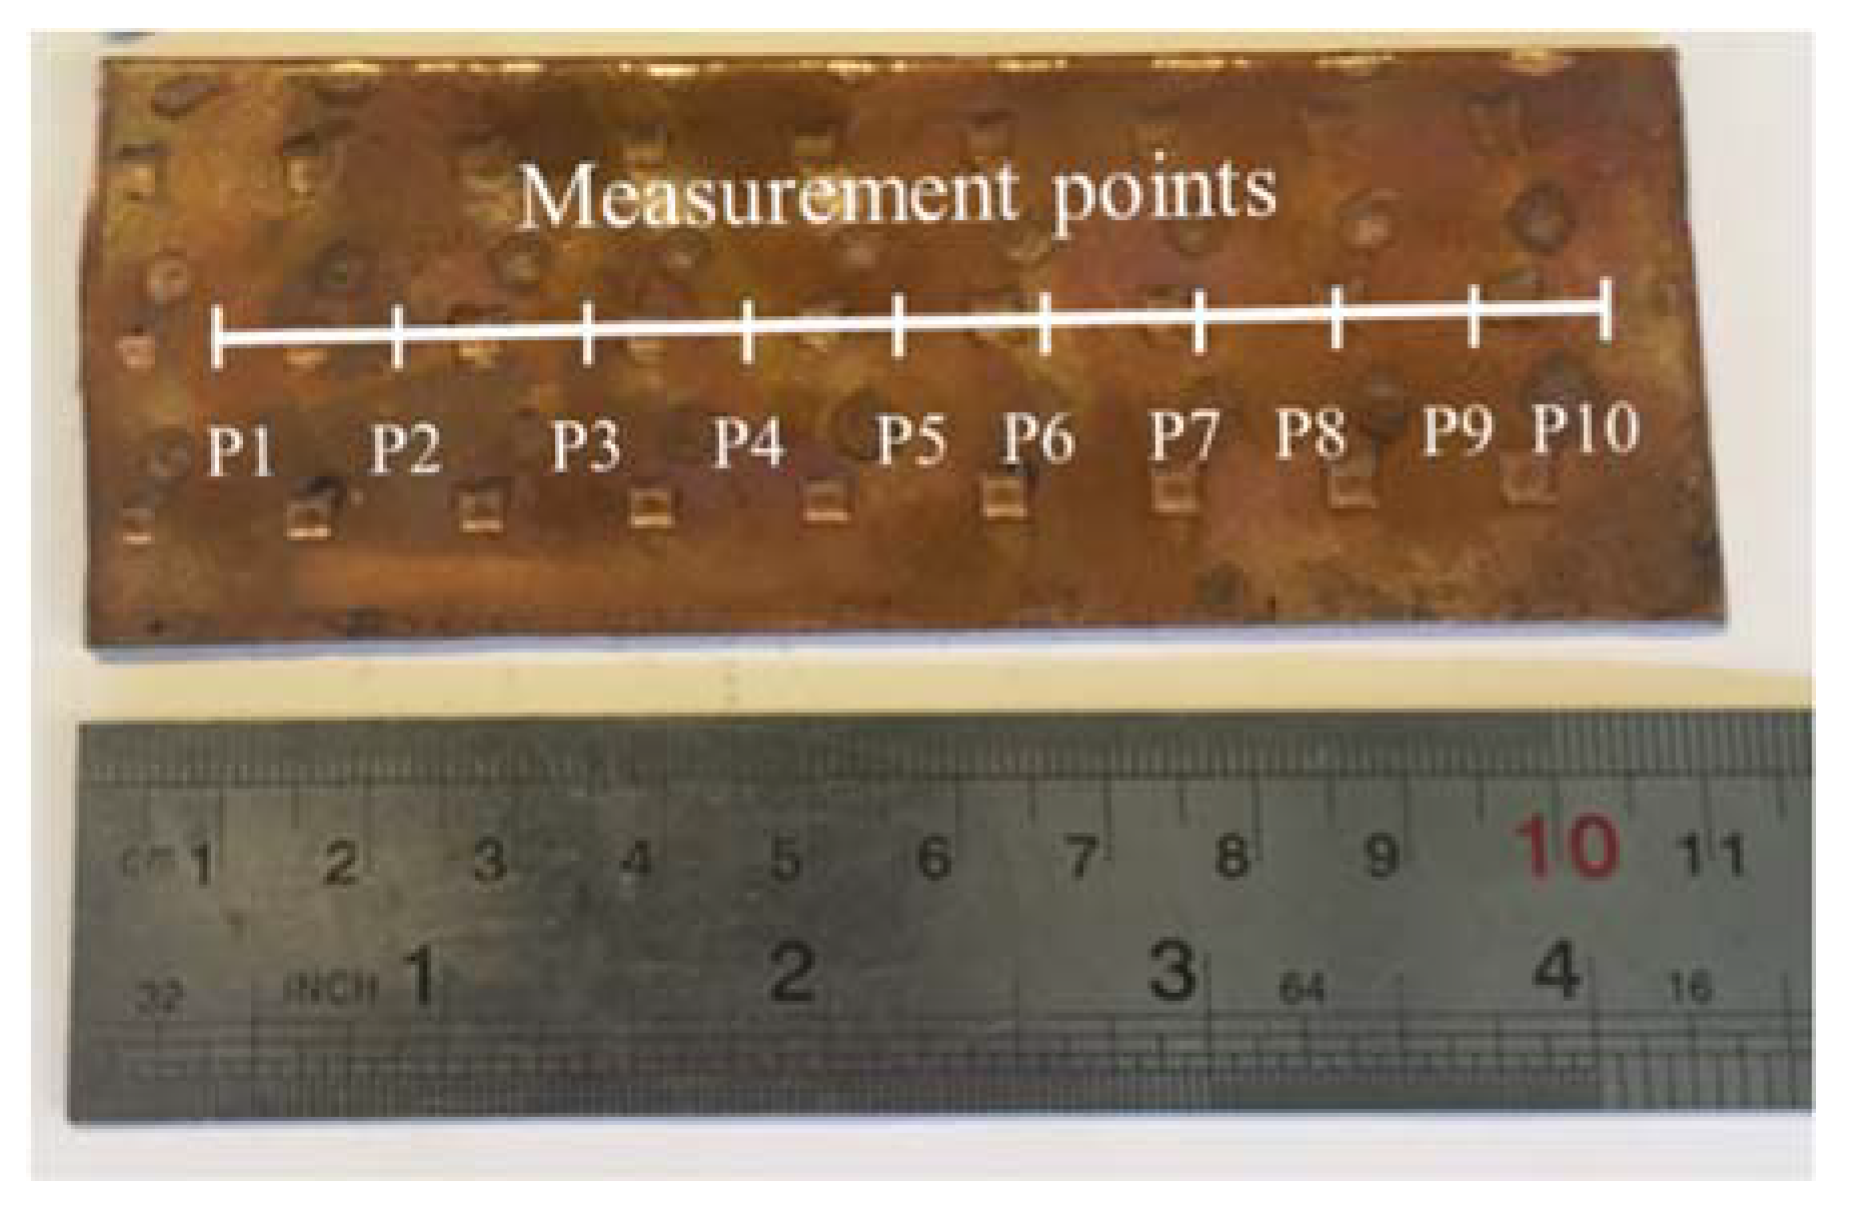
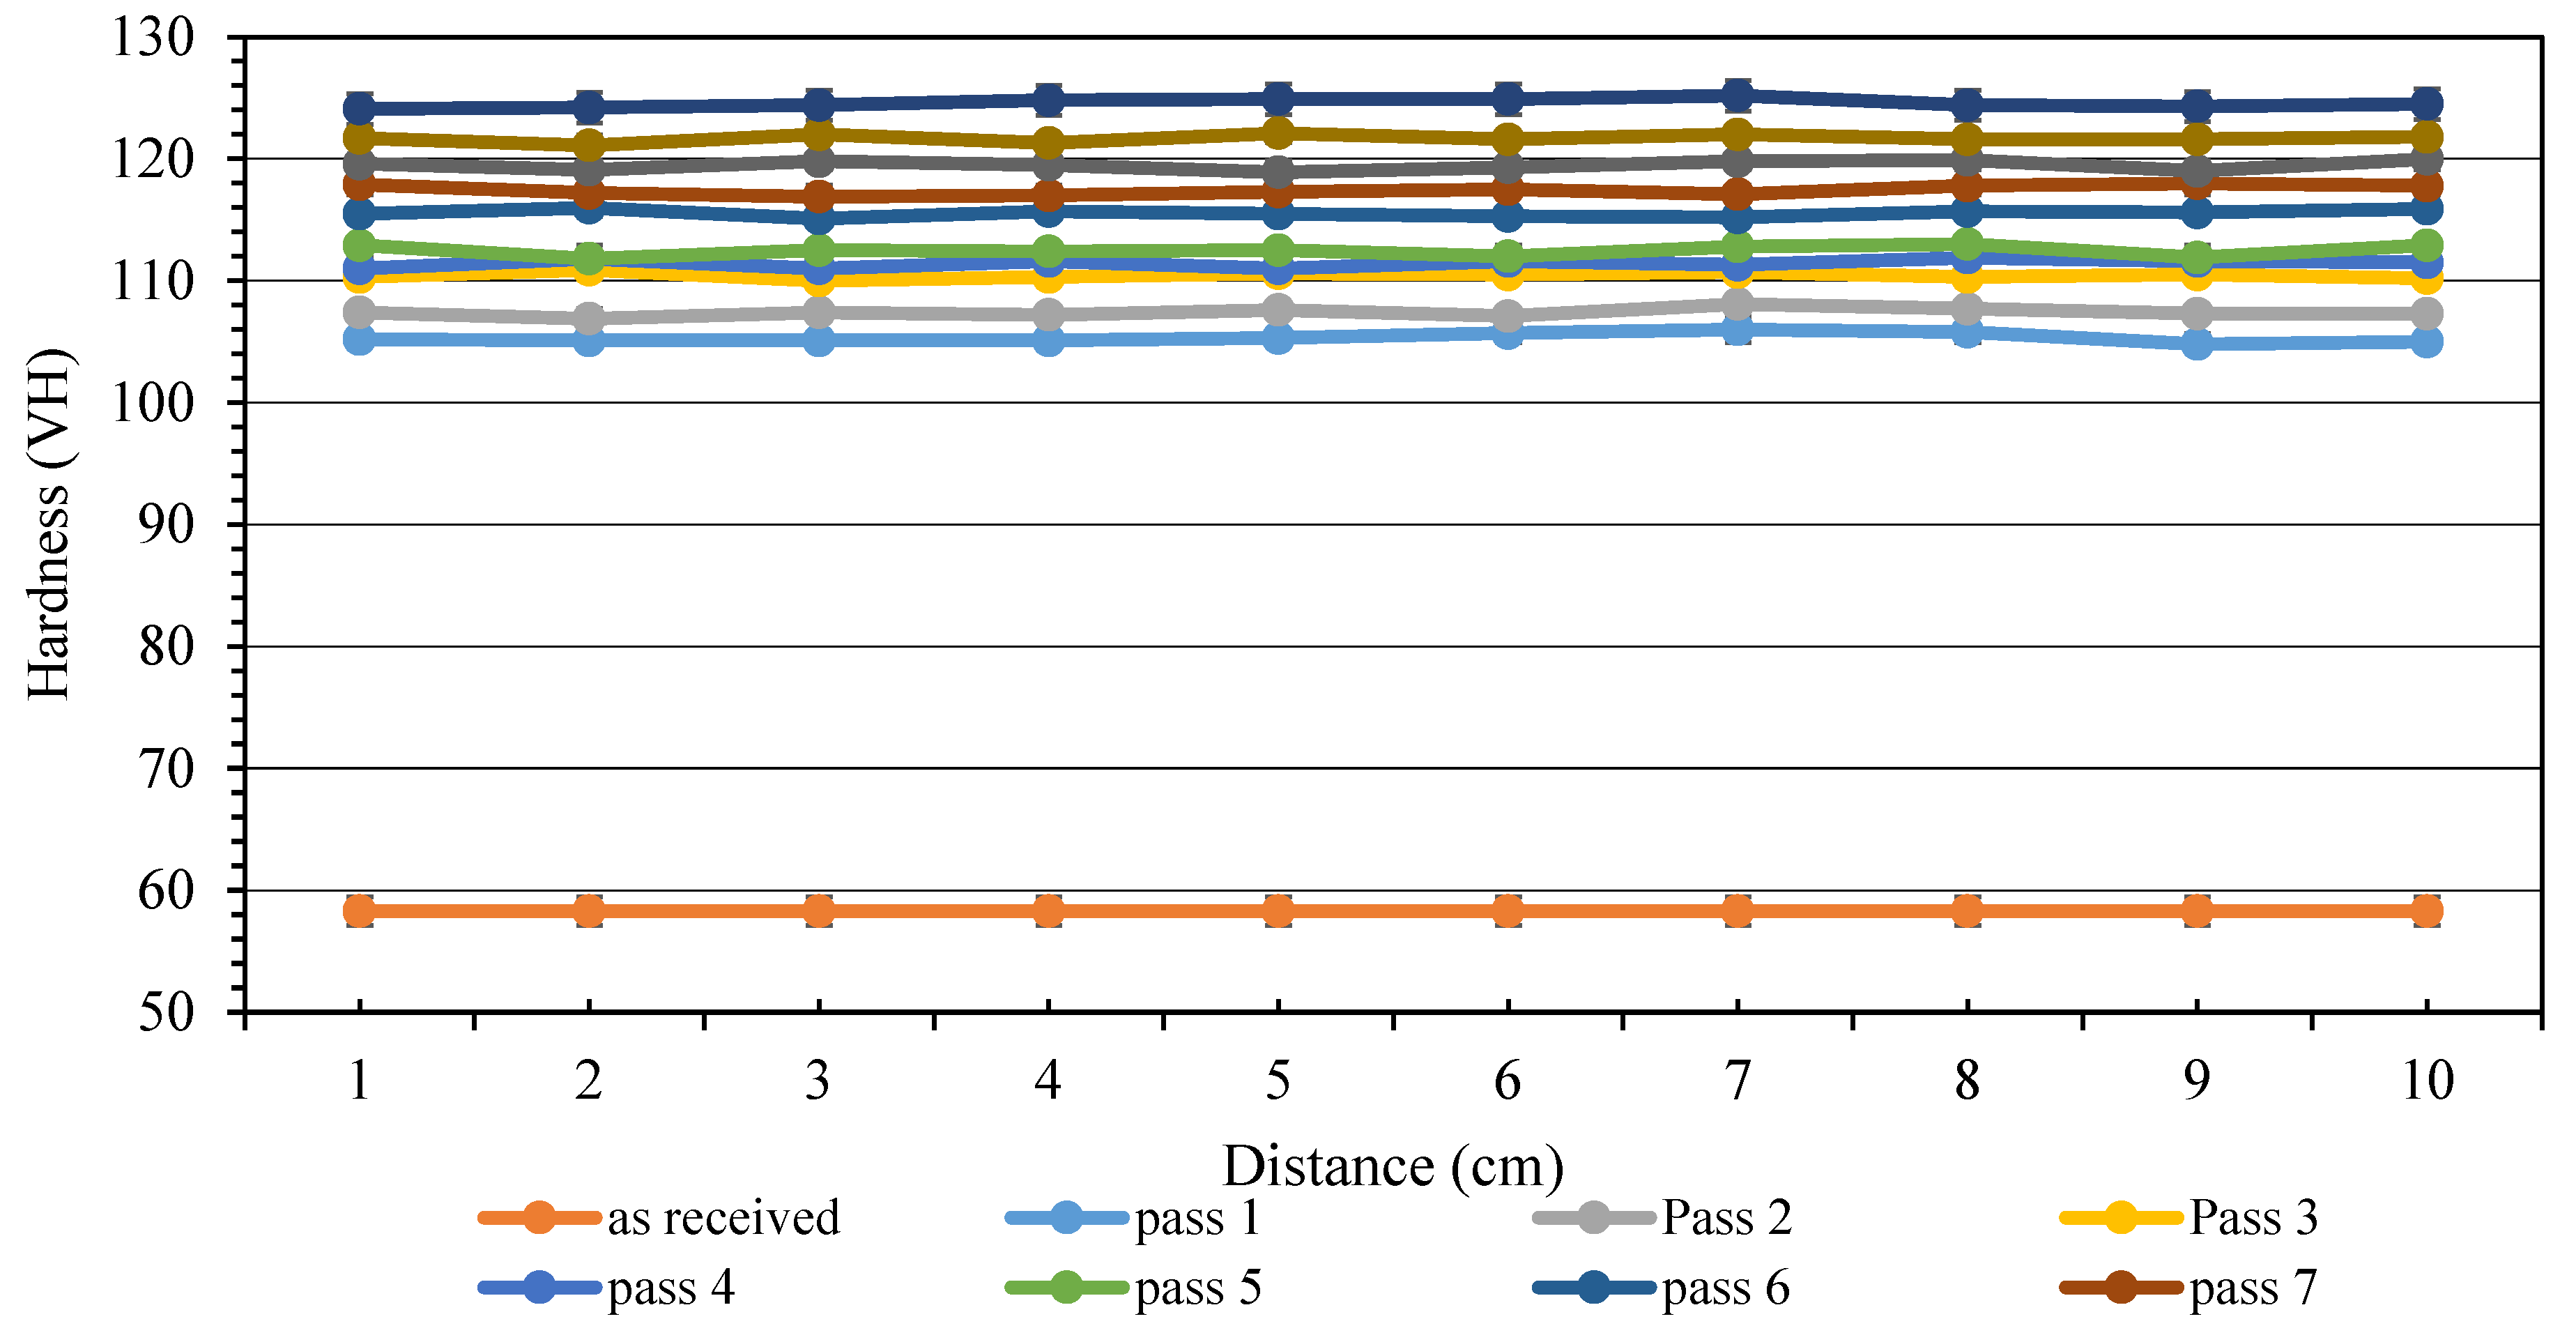
Figure 12 represents the direction of Vickers microhardness measurement with 10 points on surface for the first pass of the modified-CSP sample. A similar path was selected for the annealed and modified-CSP samples from the second to the tenth passes. Figure 13 shows the distribution of Vickers microhardness along the direction illustrated on Figure 12 for the as annealed and modified-CSP samples.
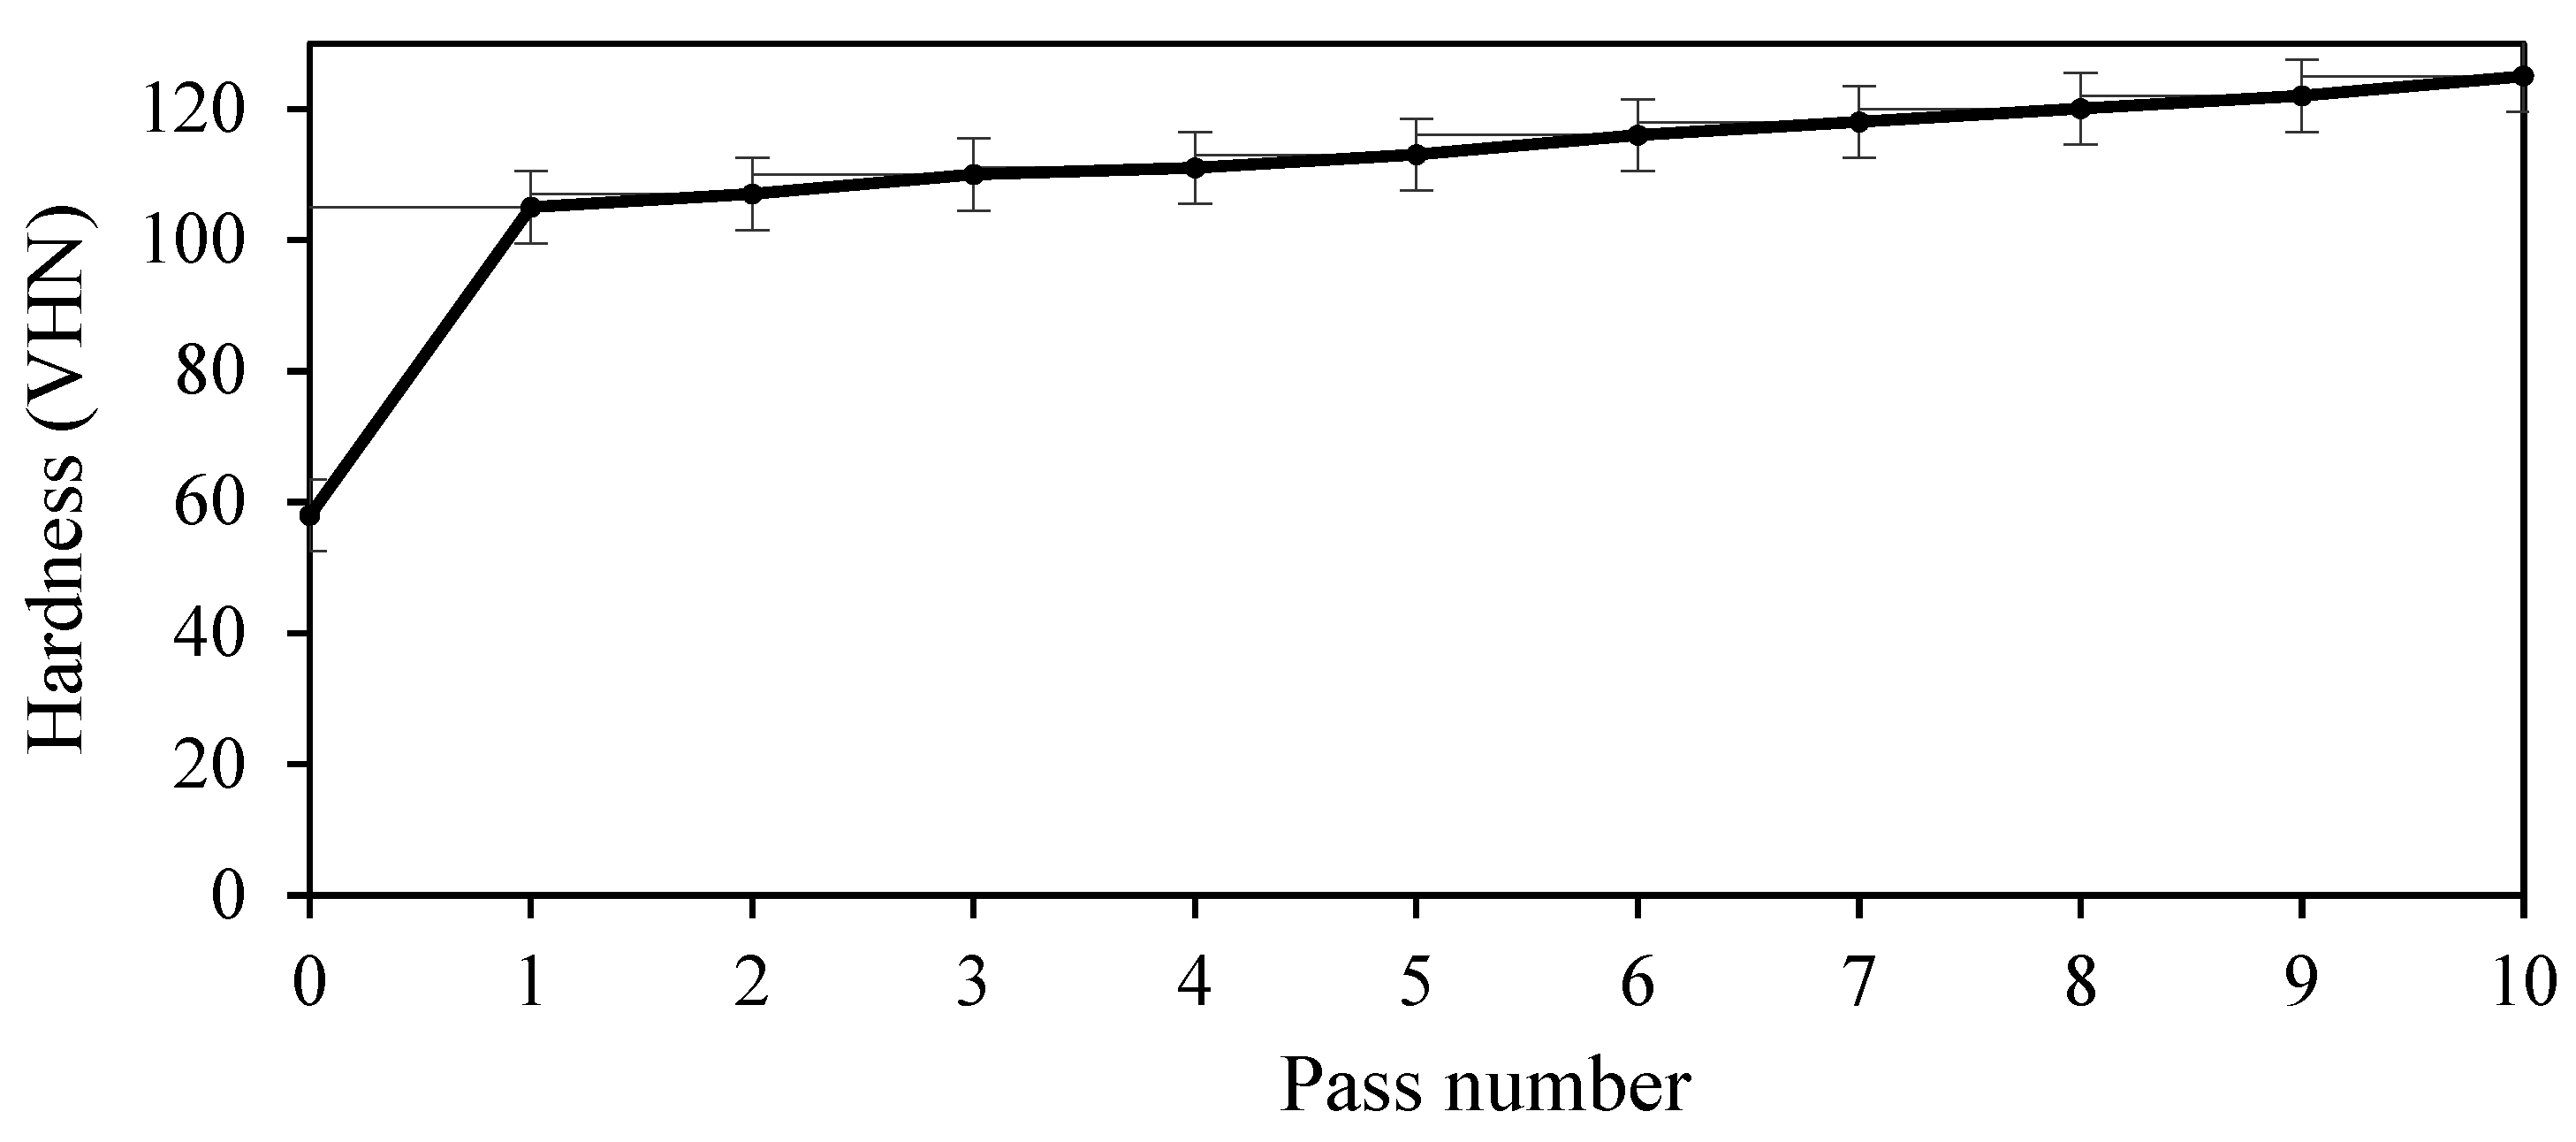
Figure 14 shows the average Vickers microhardness of the as annealed and the modified-CSP samples versus the number of passes. According to Figure 14, when the number of passes increases, the average Vickers microhardness has increased. The average Vickers microhardness of the annealed sample, 58 VHN, reached 105 VHN in the first pass. Such increase in the average Vickers microhardness from the as annealed to the first pass stands for microstructure evolution. In general, plastic deformation can be related to the evolution of dislocations and the interaction of dislocations. There are several proposed models which deal with generation and annihilation of dislocations in plastic deformation of polycrystalline metals [14,25]. The annealed sample has low dislocation density. Seemingly, in the first pass, a significant increase was recorded both in density of dislocation and in intersection of dislocations. In other words, the generation of dislocation occurs in the first pass. In this way, an increase occurs in the average Vickers microhardness from the as annealed to the first pass. However, as the process continues from the first to tenth passes, the process of incremental changes becomes less intense. These changes are caused by simultaneous generation and dislocation annihilation and their collisions with each other. After the first pass to the tenth pass, a gradual increase occurs in the average Vickers microhardness. In comparison with the first pass, in the tenth pass, the Vickers microhardness rose to 125 VHN. Apparently, after first pass changes occurring in hardness are related to the generation and annihilation of dislocations.
In order to investigate the uniformity of hardness of the modified-CSP samples, the hardness inhomogeneity factor (HIF) was used. The HIF value, expressed by the Equation (7), is as follows [31]:
H I F = ( ( i = 1 n ( H i H ¯ ) 2 ) / ( n 1 ) ) / H ¯
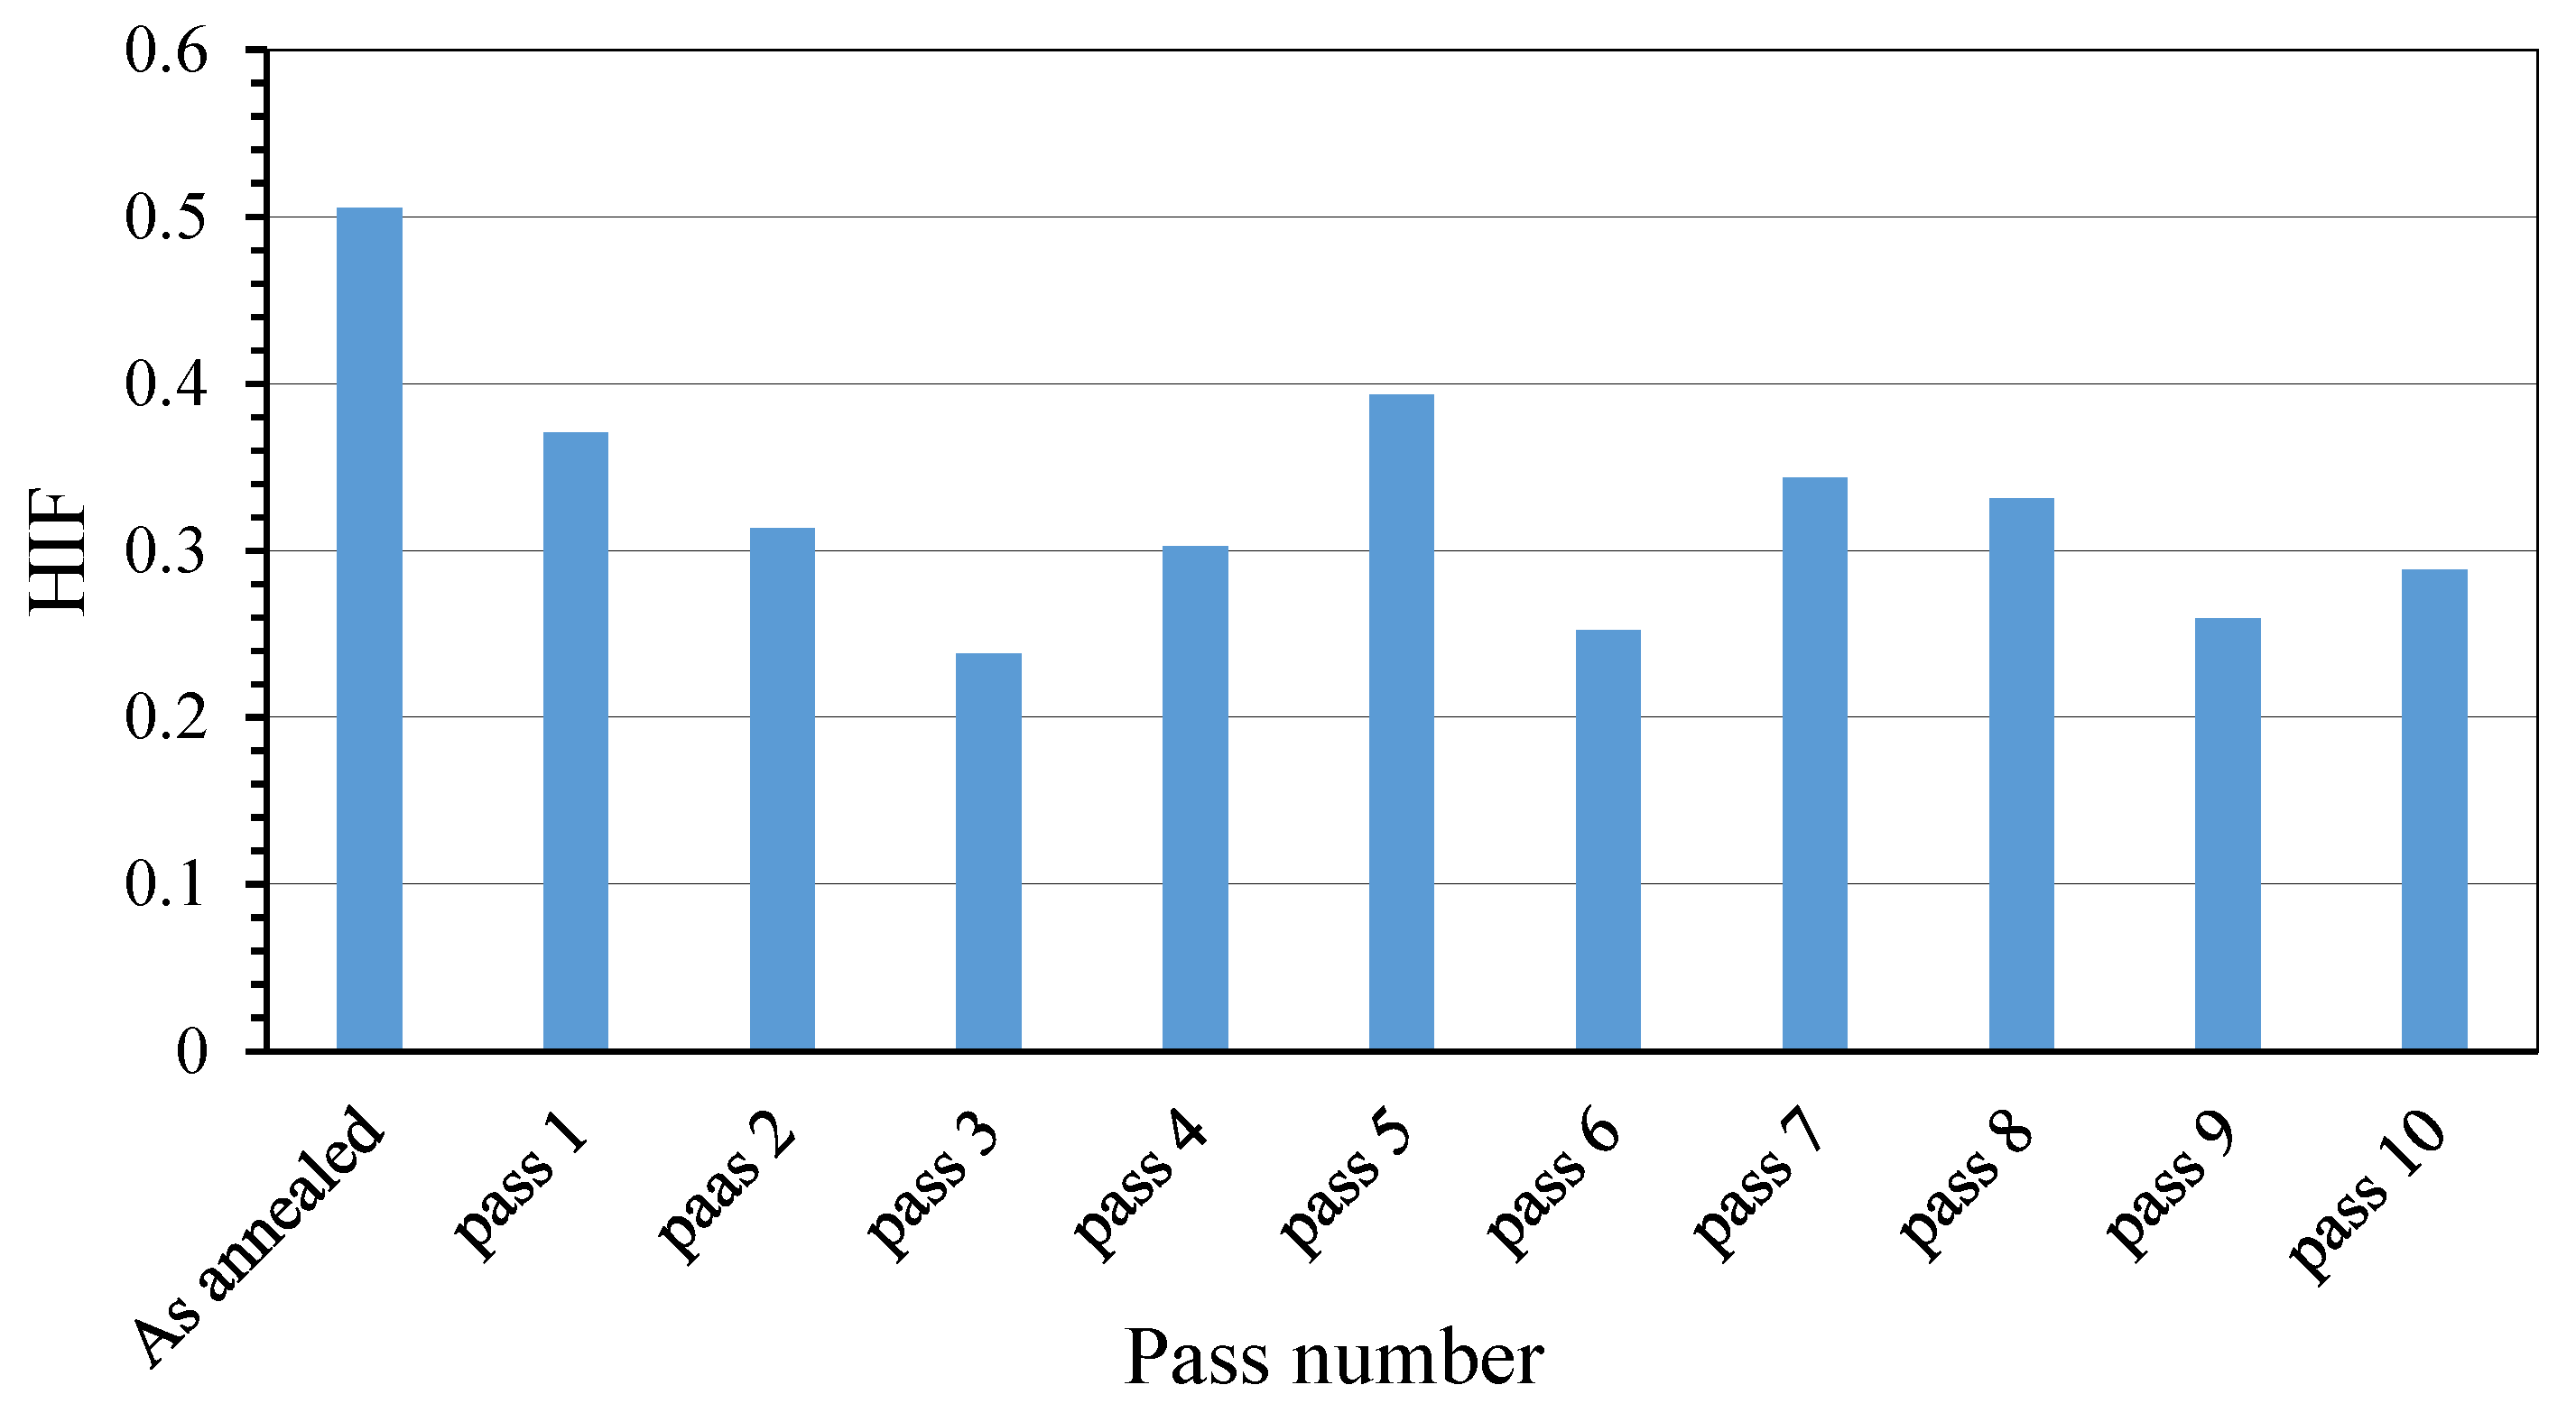
where n is the number of hardness measurements on each pass, H i is the hardness value at i t h measurement, and H ¯ is the mean hardness value. In general, lower HIF determines higher homogeneity of the mechanical properties. Figure 15 illustrates HIF for the as annealed as well as the first to the tenth passes of the modified-CSP. According to Figure 15, the value of HIF for the annealed sample, 0.88, dropped to 0.45 in the first pass, and after the tenth pass, it reached 0.42. Generally, by continuing the process and applying more strain, no considerable differences could be noticed between the HIF values between the first and tenth passes. The most HIF was created in the ninth pass, and the homogeneity improved by 158% more than the first pass. As shown in Figure 15, the HIF values indicated that inhomogeneity in the first pass decreased with the advent of microstructure changes, grain refinement, and severe plastic deformation. Thus, the uniform distribution of the microhardness (Figure 13) suggests that plastic deformation is quite uniform during modified-CSP.

5.2. Force Analysis

Figure 16 shows the required force for deformation of sheets against die stroke during the modified-CSP and CGP processes. Here, three regions in the curves of force-die stroke can be recognized. As in Figure 16a, the deformation force increases uniformly in modified-CSP due to the geometric shape of the studs and the gradual engagement of the dies with the sheet. In modified-CSP, the first region transits gradually to the second and third regions. Due to gradual force transition, the material is able to flow freely along the die studs. The correction of the geometry of the die studs in the modified-CSP process can suddenly eliminate force variation. Similarly, it was confirmed by Shirdel et al. [32] that the required force for the plastic deformation during the first stage of the CGP is divided into three regions. According to Figure 16b, the slope of deformation force in the CGP process varies from the first and the third regions. In the first region for the CGP process, plastic deformation in the sheet occurs around the edges of the die grooves, which, in turn, leads to strain localization. In the second region, the deformation force increases along with different slopes obtained from the first region. In the third region, the sudden increase in deformation force is caused by an increase in contact surfaces of the die grooves with the sheet, yet in the CGP process, the edge of the grooves causes concentration of the strain in the sheet. Moreover, die stroke and deformation force for the modified-CSP include two times that of the CGP process, respectively.

6. Microstructural Evolution

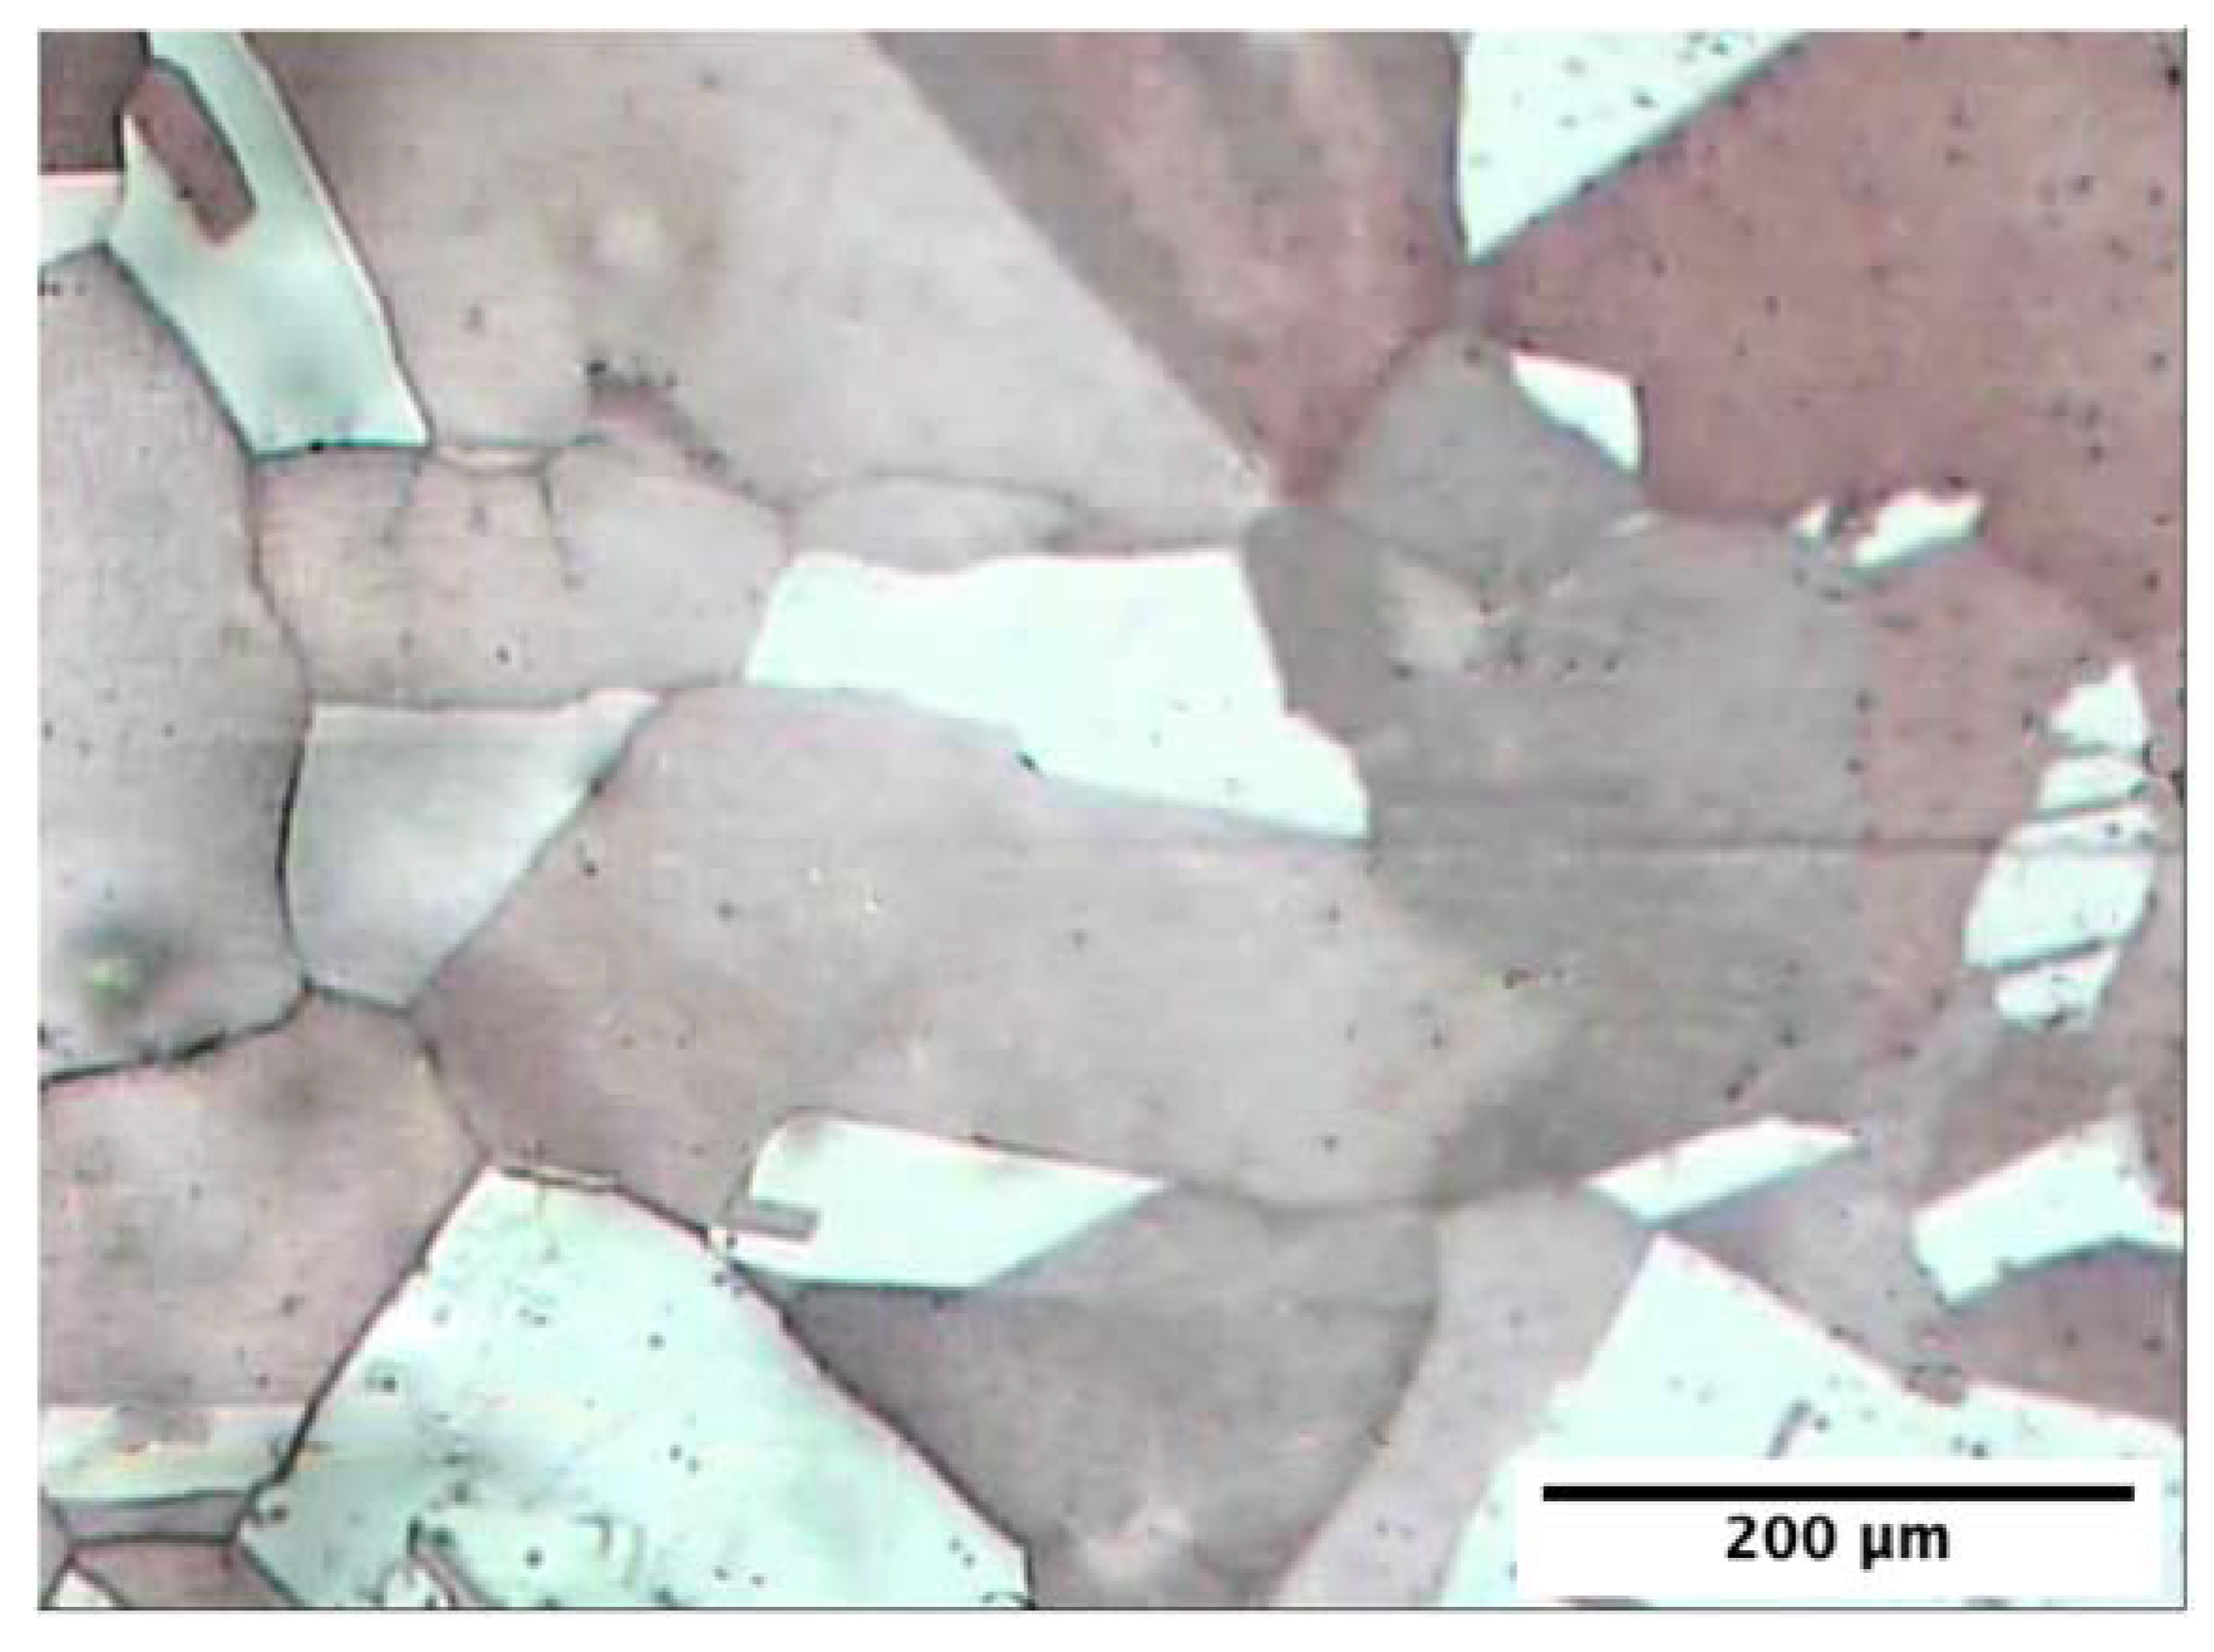
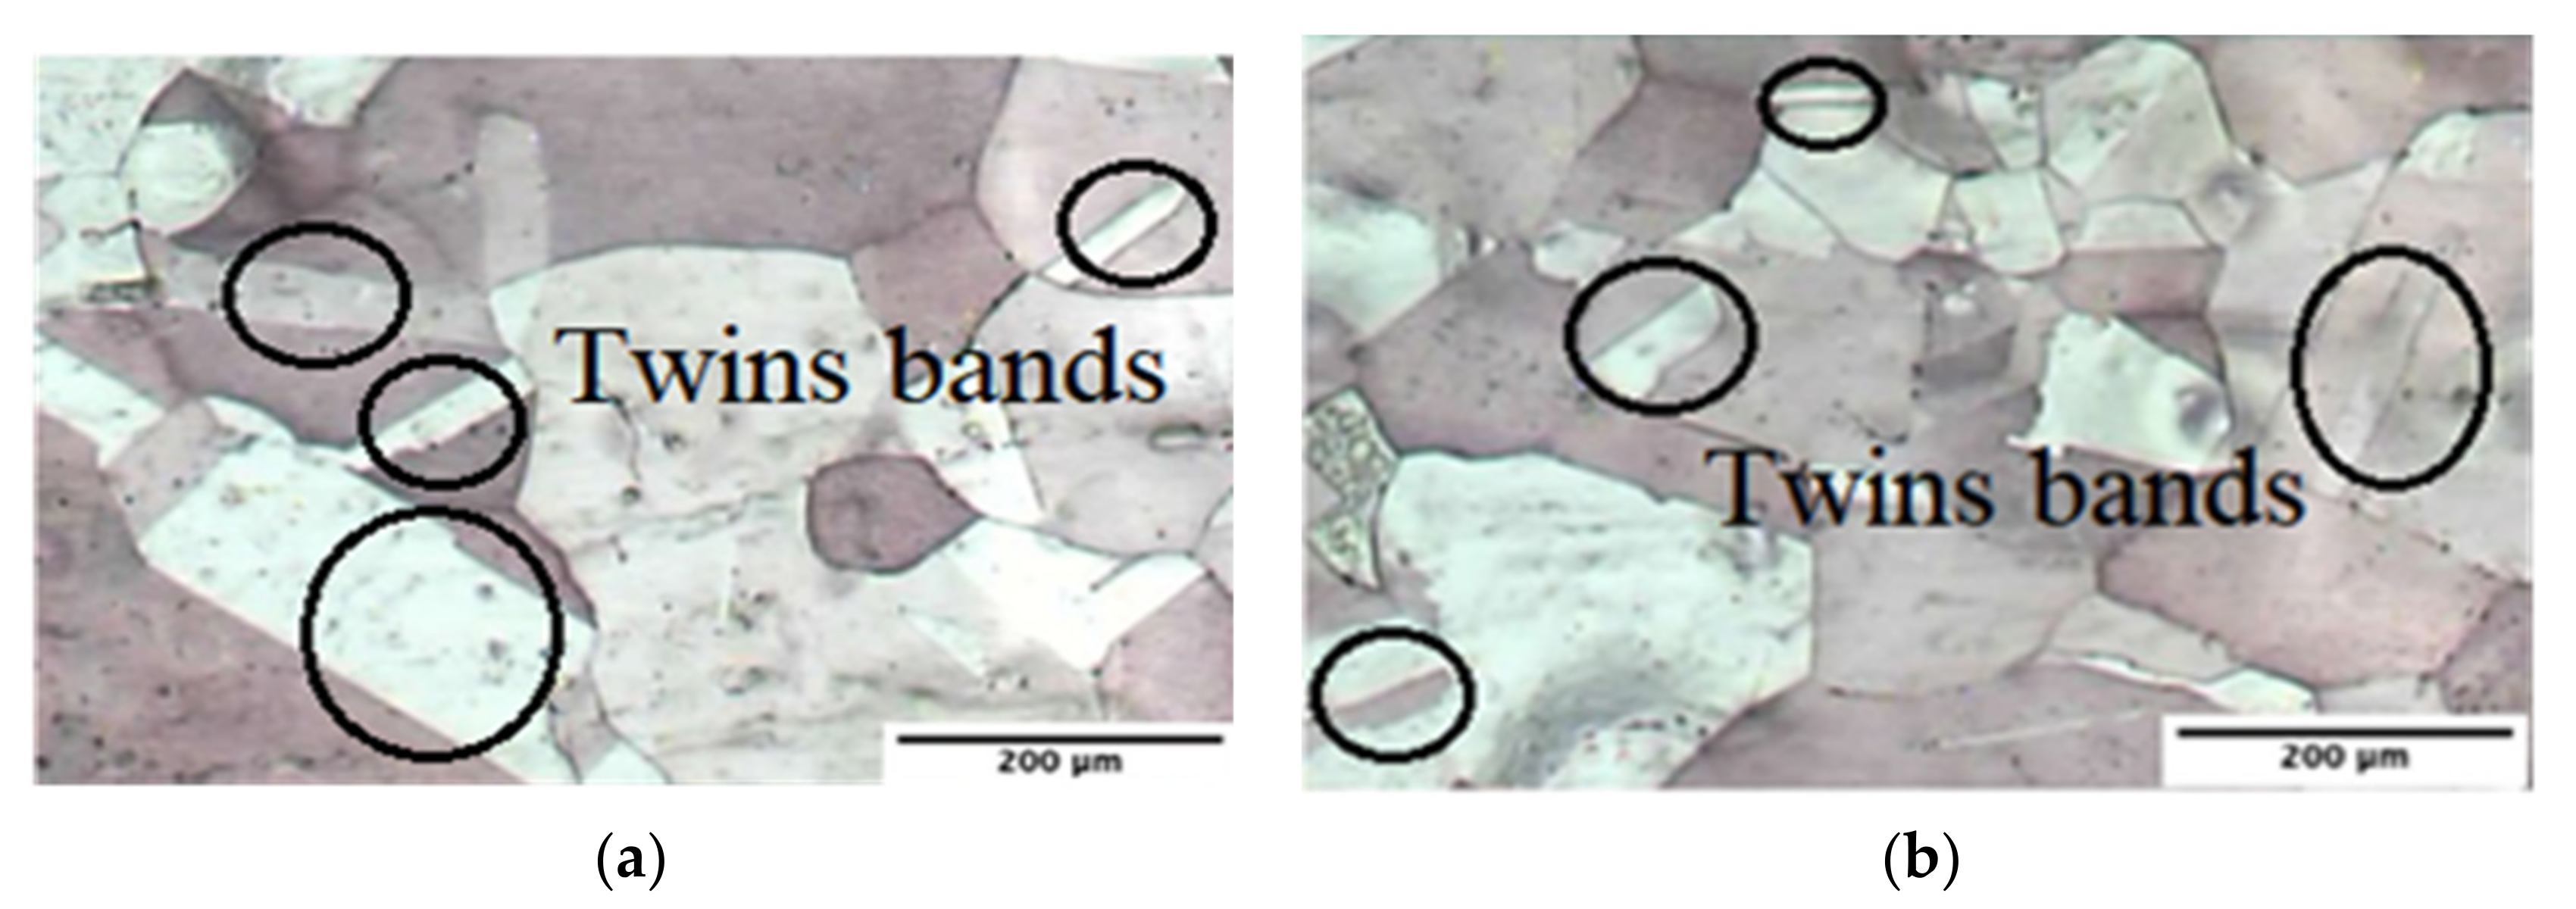
An optical microscope image of the annealed copper sheet has been depicted in Figure 17. The Hyn method has been used to measure the grain size. According to Figure 17, the grains in the annealed sample have an average size of 35 μm and an inhomogeneous distribution. As can be seen in Figure 18a,b, in the first pass, with severe plastic deformation grain refinement has occurred, while in the tenth pass, with an increase in the number of passes, this refinement has increased. Moreover, according to Figure 18b, in the tenth pass, bimodal structures are observed, plus fine and coarse grains are placed next to each other, which is one of the characteristics created in samples under SPD processes [28,33].
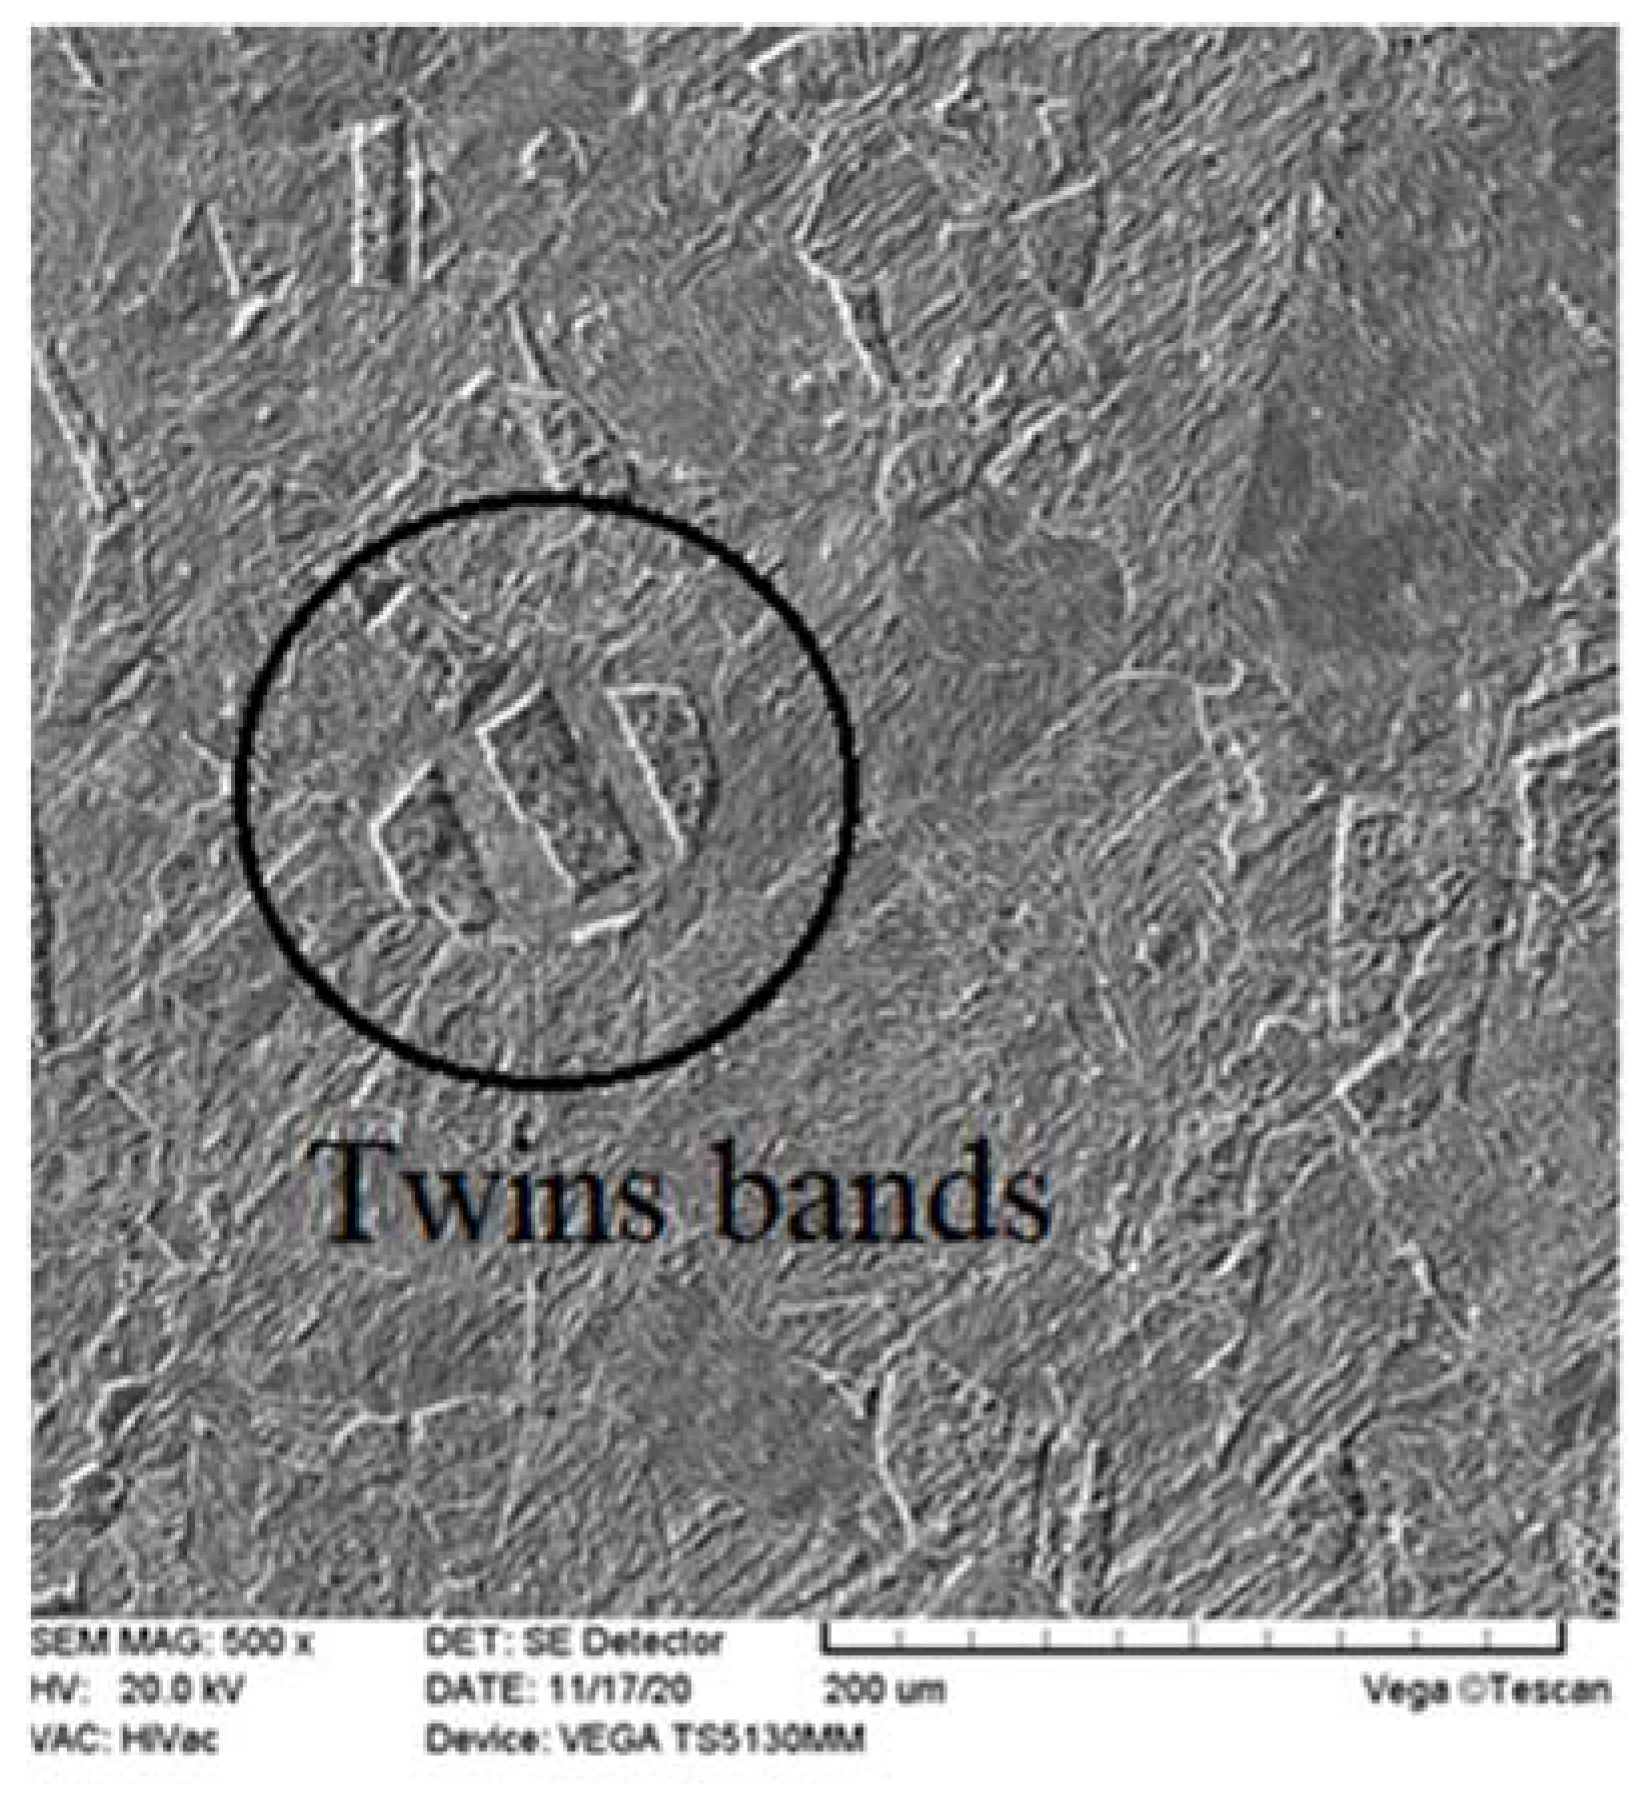
In addition, due to the high strain applied during the process, twinning occurs, which can be seen in optical images. In the tenth pass, with increasing strain, twins are clearly observed, which can be seen in the SEM image taken from the tenth sample. The annealed sample has a low density of dislocations, and by applying severe strain in the first pass, the density of the dislocations in the specimens produced by the modified-CSP technique increases. In the first to tenth passes, the increase in the number of dislocations is accompanied by a reduction of grain size. From the first to tenth passes, there is a growth in the number of dislocations and they block each other’s movement; therefore, a greater force is needed to move the dislocations, and, as a result, there is an increase in the strength of samples. Along with these changes, the grain sizes diminish to a large extent, and the high angle grain boundaries increase in number, which results in the creation of bimodal structures. Based on the bimodal structures, a grain refinement mechanism was presented by Valiev and Langdon for producing microstructural materials with the simultaneous properties of high ductility and high strength [1]. Similar mechanisms were also proposed by Krishnaiah et al. [28].
Figure 19 illustrates the SEM micrograph of the sheet sample produced in the tenth pass by the modified-CSP method. The twins bands have been shown in Figure 19. Sliding and twinning are the two main mechanisms for plastic deformation in materials. In the early stages, grain sliding helps initiate the plastic deformation process. Meyers et al. [19] claimed that for the onset of mechanical twinning in metals with a low Stacking Fault Energy (SFE), such as pure copper, the critical dislocations density has to be reached. The mechanical twinning mechanism is activated by reaching the minimum density of dislocations and the critical shear stress. It should be mentioned that mechanical twins occur at high strains.

7. Conclusions

In this study, the microstructural and mechanical properties of copper sheets were investigated, which were produced by the proposed die design, the modified curved studded pressing (modified-CSP). The most important results are as follows:
  • Due to the use of asymmetric semicircle studs in modified-CSP, the maximum groove depth can be up to three times the sheet thickness, which can impose a higher strain in each pass than CSP.
  • Due to alternation of the deformation mechanism from slip to twinning, serration was observed in the strain-stress curves of the tenth pass of the modified-CSP sample.
  • In the first pass, the average hardness for the annealed sample increased sensitively from 58.4 Vickers to 105.3 Vickers.
  • By applying extreme strain, the grains were refined in the first pass. Twins bands were also formed. Simultaneous formation of bimodal grains and the twins bands has increased the strength and ductility of the sample in the tenth pass.
  • SIF and HIF have a similar trend. At the end of the process, the SIF and HIF values on the surface are minimized, indicating the effect of the curved surface geometry and the reduction of the sharp edge effects of CGP dies. Noteworthy, the SIF in the center of the sheet thickness (direction T1) is lower than other directions.
  • The load-die stroke diagram of CGP and modified-CSP includes three transition steps. CGP has several drastic conversion steps, whereas for modified-CSP the transition steps are quite uniform. In modified-CSP, the load-die stroke diagram increases almost uniformly due to elimination of interface region of the studs and the gradual engagement of dies with the sheet.
  • In the modified-CSP dies, by eliminating the sharp edges, surface cracks will be less likely to form and the produced samples will have a greater tensile toughness.

Author Contributions

Conceptualization, M.R.D.; methodology, M.R.D. and M.M.K.; software, M.M.K.; validation, M.R.D. and M.M.K.; formal analysis, M.M.K.; investigation, M.M.K.; resources, M.M.K.; data curation, M.M.K.; writing—original draft preparation, M.M.K.; writing—review and editing, M.R.D.; visualization, M.M.K.; supervision, M.R.D.; project administration, M.R.D.; funding acquisition, M.R.D. All authors have read and agreed to the published version of the manuscript.

Funding

This investigation has been supported by Shahid Bahonar University of Kerman, grant number [1399].

Institutional Review Board Statement

Not applicable.

Informed Consent Statement

Not applicable.

Data Availability Statement

Not applicable.

Acknowledgments

The authors would like to express their special thanks of gratitude to the experts of the machine tool workshop of Shahid Bahonar University of Kerman, N. Aminzadeh and M.R. Mollazadeh, and the instructor of the milling training workshop of center No. 1 of the IRTVTO (Iran Technical and Vocational Training Organization) in Kerman, M. Sheikhi, for providing experimental and preparation facilities.

Conflicts of Interest

The authors declare no conflict of interest.

References

  1. Asano, M.; Yuasa, M.; Miyamoto, H.; Tanaka, T.; Erdogan, C.; Yalçinkaya, T. Potential of High Compressive Ductility of Ultrafine Grained Copper Fabricated by Severe Plastic Deformation. Metals 2020, 10, 1503. [Google Scholar] [CrossRef]
  2. Wang, Z.; Guan, Y.; Li, L.; Zhu, L. The Fracture Behavior and Thermal Stability of Commercially Pure Nickel Sheets Processed by Constrained Groove Pressing. Metals 2019, 9, 1047. [Google Scholar] [CrossRef] [Green Version]
  3. Saito, Y.; Tsuji, N.; Utsunomiya, H.; Sakai, T.; Hong, R.G. Ultra-fine grained bulk aluminum produced by accumulative roll-bonding (ARB) process. Scripta Mater. 1998, 39, 1221–1227. [Google Scholar] [CrossRef]
  4. Zhu, Y.T.; Jiang, H.; Huang, J.; Lowe, T.C. A new route to bulk nanostructured metals. Metall. Mater. Trans. A 2001, 32, 1559–1562. [Google Scholar] [CrossRef]
  5. Shin, D.H.; Park, J.-J.; Kim, Y.-S.; Park, K.-T. Constrained groove pressing and its application to grain refinement of aluminum. Mater. Sci. Eng. A 2002, 328, 98–103. [Google Scholar] [CrossRef]
  6. Gupta, A.K.; Maddukuri, T.S.; Singh, S.K. Constrained groove pressing for sheet metal processing. Prog. Mater. Sci. 2016, 84, 403–462. [Google Scholar] [CrossRef]
  7. Thangapandian, A.N.; Prabu, S.B.; Padmanabhan, K.A. On the Role of Experimental Variables in the Repetitive Corrugation and Straightening of an Al-Mg Alloy. Procedia Eng. 2017, 207, 1457–1462. [Google Scholar] [CrossRef]
  8. Wang, Z.S.; Guan, Y.J.; Zhong, C.K. Effects of friction on constrained groove pressing of pure Al sheets. Adv. Mater. Res. 2014, 926–930, 81–84. [Google Scholar] [CrossRef]
  9. Mohammadi Aghbolagh, V.; Alimirzaloo, V.; Khamedi, R. Constrained groove pressing process of Al/Cu bimetal sheet. Mater. Manuf. Process. 2020, 35, 130–141. [Google Scholar] [CrossRef]
  10. Sajadi, A.; Ebrahimi, M.; Djavanroodi, F. Experimental and numerical investigation of Al properties fabricated by CGP process. Mater. Sci. Eng. A 2012, 552, 97–103. [Google Scholar] [CrossRef]
  11. Kumar, S.; Hariharan, K.; Digavalli, R. Hybrid optimization of die design in constrained groove pressing. Mater. Manuf. Processes 2020, 35, 687–699. [Google Scholar] [CrossRef]
  12. Torkestani, A.; Dashtbayazi, M. A new method for severe plastic deformation of the copper sheets. Mater. Sci. Eng. A 2018, 737, 236–244. [Google Scholar] [CrossRef]
  13. Ezequiel, M.; Figueroa, I.A.; Elizalde, S.; Cabrera, J.M.; Braham, C.; Morin, L.; Gonzalez, G. Numerical and experimental study of a 5754-aluminum alloy processed by heterogeneous repetitive corrugation and straightening. J. Mater. Res. Technol. 2020, 9, 1941–1947. [Google Scholar] [CrossRef]
  14. Torkestani, A.; Dashtbayazi, M.R. On the evaluation of the constrained studded pressing method for producing nanocrystalline copper sheets. Int. J. Mater. Res. 2020, 111, 594–599. [Google Scholar] [CrossRef]
  15. Asgari, M.; Honarpisheh, M.; Mansouri, H. Experimental and Numerical Investigation of Mechanical Properties in the Ultrasonic Assisted constraint groove pressing process of copper sheets. J. Ultrafine Grained Nanostructured Mater. 2020, 53, 48–59. [Google Scholar] [CrossRef]
  16. Keyvani, A.; Naseri, M.; Imantalab, O.; Gholami, D.; Babaei, K.; Fattahalhosseini, A. Microstructural characterization and electrochemical behavior of nano/ ultrafine grained pure copper through constrained groove pressing (CGP). J. Mater. Res. Technol. 2021, 11, 1918–1931. [Google Scholar] [CrossRef]
  17. Wang, Z.S.; Guan, Y.J.; Song, L.B.; Liang, P. Finite Element Analysis and Deformation Homogeneity Optimization of Constrained Groove Pressing. Appl. Mech. Materials. 2013, 278–280, 505–513. [Google Scholar] [CrossRef]
  18. Liu, J.; Chen, C.; Xu, Y.; Wu, S.; Wang, G.; Wang, H.; Fang, Y.; Meng, L. Deformation twinning behaviors of the low stacking fault energy high-entropy alloy: An in-situ TEM study. Scr. Mater. 2017, 137, 9–12. [Google Scholar] [CrossRef]
  19. Meyers, M.A.; Mishra, A.; Benson, D.J. Mechanical properties of nanocrystalline materials. Prog. Mater. Sci. 2006, 51, 427–556. [Google Scholar] [CrossRef]
  20. Mohammed, A.A.; El-Danaf, E.A.; Radwan, A.-K.A. Equivalent twinning criteria for FCC alloys under uniaxial tension at high temperatures. Mater. Sci. Eng. A 2007, 457, 373–379. [Google Scholar] [CrossRef]
  21. Brechtl, J.; Chen, S.; Lee, C.; Shi, Y.; Feng, R.; Xie, X.; Hamblin, D.; Coleman, A.M.; Straka, B.; Shortt, H.; et al. A review of the serrated-flow phenomenon and its role in the deformation behavior of high-entropy alloys. Metals 2020, 10, 1101. [Google Scholar] [CrossRef]
  22. Tabin, J.; Skoczen, B.; Bielski, J. Strain localization during discontinuous plastic flow at extremely low temperatures. Int. J. Solids Struct. 2016, 97, 593–612. [Google Scholar] [CrossRef]
  23. Gubicza, J.; Chinh, N.Q.; Krallics, G.; Schiller, I.; Ungár, T. Microstructure of ultrafine-grained fcc metals produced by severe plastic deformation. Curr. Appl. Phys. 2006, 6, 194–199. [Google Scholar] [CrossRef]
  24. An, X.H.; Lin, Q.Y.; Wu, S.D.; Zhang, Z.; Figueiredo, R.B.; Gao, N.; Langdon, T.G. The influence of stacking fault energy on the mechanical properties of nanostructured Cu and Cu–Al alloys processed by high-pressure torsion. Scr. Mater. 2011, 64, 954–957. [Google Scholar] [CrossRef]
  25. Valiev, R.Z.; Estrin, Y.; Horita, Z.; Langdon, T.G.; Zehetbauer, M.J.; Zhu, Y. Producing bulk ultrafine-grained materials by severe plastic deformation: Ten years later. JOM 2016, 68, 1216–1226. [Google Scholar] [CrossRef] [Green Version]
  26. Xie, Y.; Meng, X.; Li, Y.; Mao, D.; Wan, L.; Huang, Y. Insight into ultra-refined grains of aluminum matrix composites via deformation-driven metallurgy. Compos. Commun. 2021, 26, 100776. [Google Scholar] [CrossRef]
  27. Bacca, M.; Hayhurst, D.R.; McMeeking, R.M. Continuous dynamic recrystallization during severe plastic deformation. Mech. Mater. 2015, 90, 148–156. [Google Scholar] [CrossRef] [Green Version]
  28. Krishnaiah, A.; Chakkingal, U.; Venugopal, P. Production of ultrafine grain sizes in aluminium sheets by severe plastic deformation using the technique of groove pressing. Scr. Mater. 2005, 52, 1229–1233. [Google Scholar] [CrossRef]
  29. Liu, Y.; Huang, Y.; Guan, M.; Meng, X.; Xie, Y. Grain Refinement in Surficial Cryogenic Grinding. Metall. Mater. Trans. A 2020, 51, 3349–3353. [Google Scholar] [CrossRef]
  30. Lee, H.-W.; Yoo, J.-H.; Kwon, Y.-C.; Kang, J.-H. Calculation Method for Cold Flow Stress of Al6082 Based on Tensile Test and Compression Test Results. Int. J. Precis. Eng. Manuf. 2021, 22, 1337–1344. [Google Scholar] [CrossRef]
  31. Borhani, M.; Djavanroodi, F. Rubber pad-constrained groove pressing process: Experimental and finite element investigation. Mater. Sci. Eng. A 2012, 546, 1–7. [Google Scholar] [CrossRef]
  32. Shirdel, A.; Khajeh, A.; Moshksar, M. Experimental and finite element investigation of semi-constrained groove pressing process. Mater. Des. 2010, 31, 946–950. [Google Scholar] [CrossRef]
  33. Valiev, R.Z.; Langdon, T.G. Principles of equal-channel angular pressing as a processing tool for grain refinement. Prog. Mater. Sci. 2006, 51, 881–981. [Google Scholar] [CrossRef]
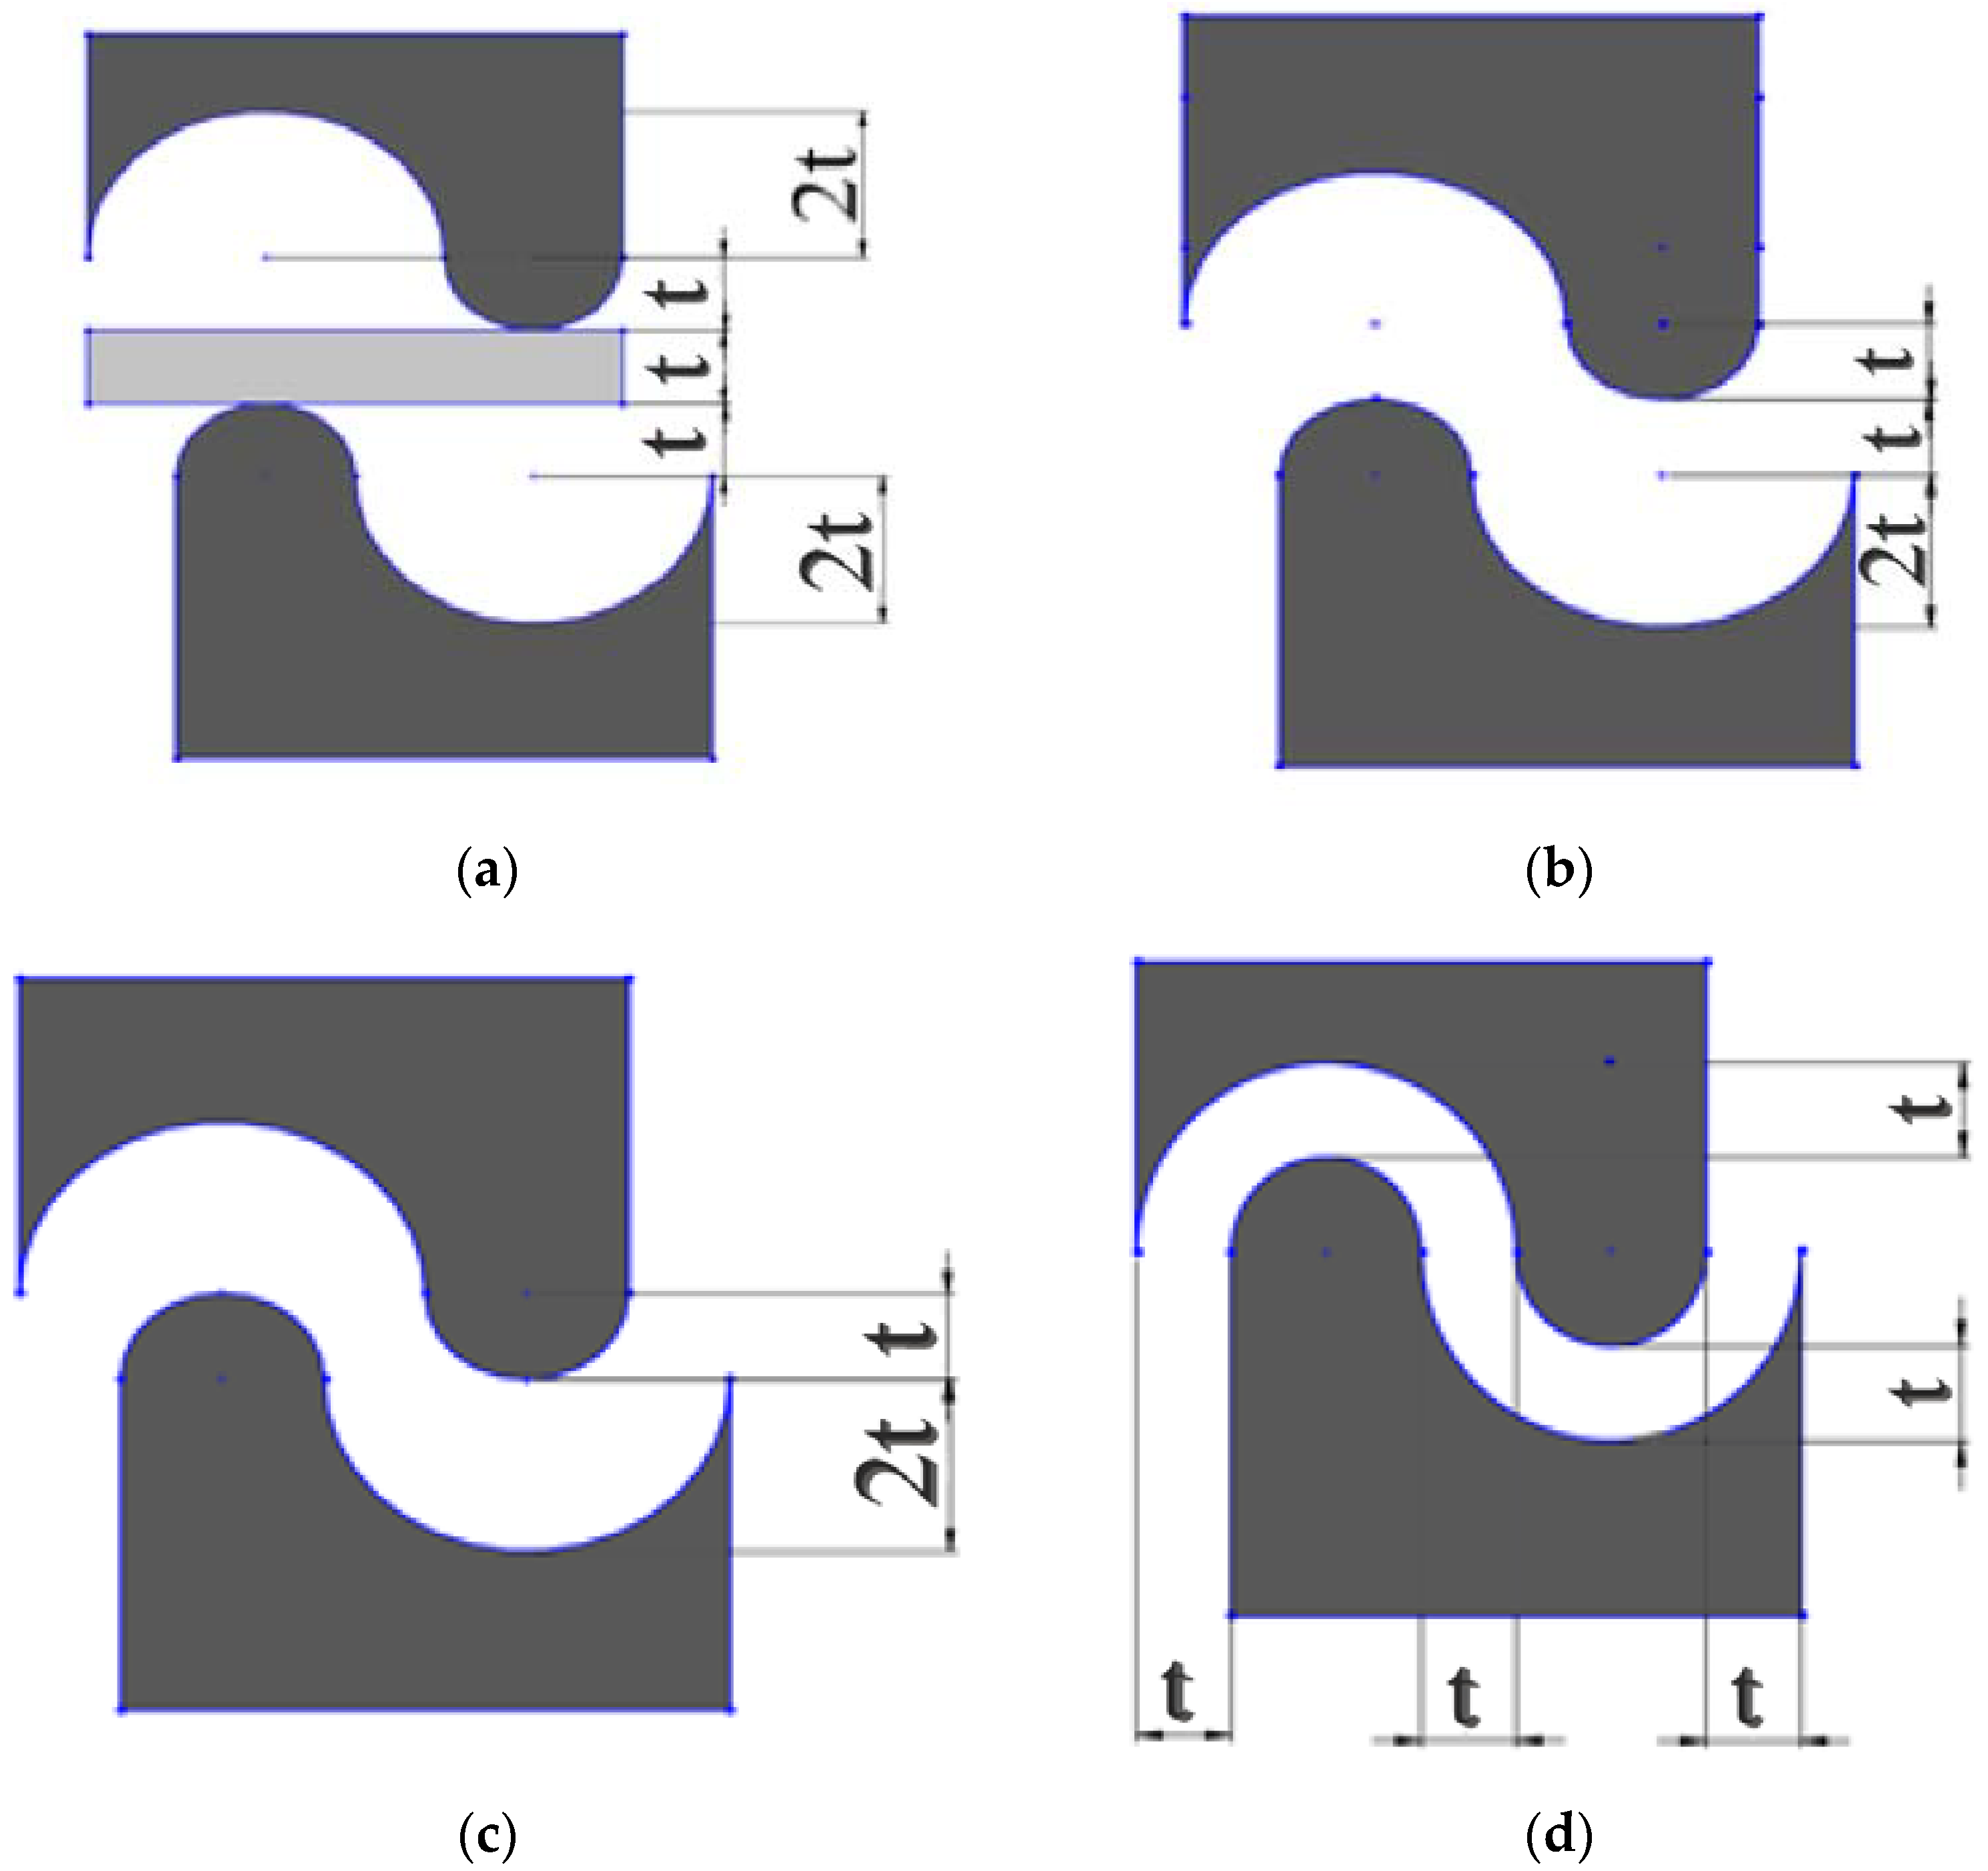
Figure 1. Schematic asymmetric semicircular studs proposed as a modified-CSP method, (a) initial contact with the sheet surface, (b) moving dies as much as the thickness of the sheet, (c) moving dies twice the thickness of the sheet, and (d) moving dies three times the thickness of the sheet. (thickness of the sheet is based on millimeters).
Metals 12 00193 g001
Figure 2. (a) Flat and studded modified-CSP dies, (b) 3D view of modified-CSP dies.
Metals 12 00193 g002
Figure 3. (a) The curved studded corrugation dies and corrugated sheet, (b) the flattening dies and straightened sheet in the modified-CSP method, (c) uniaxial tensile test specimens for the first to tenth passes of the modified-CSP.
Metals 12 00193 g003
Figure 4. Distribution of effective plastic strain for (a) corrugation step and (b) straightening step for modified-CSP, and (c) corrugation step and (d) straightening step for the CGP process from Ref. [16].
Metals 12 00193 g004
Figure 5. Schematic representation of directions (a) S1, S2, and S3 on the top surface and (b) T1 and T2 on thickness in the corrugation step from the first pass of the modified-CSP.
Metals 12 00193 g005
Figure 6. Variations of SIF along five directions (S1, S2, S3, T1, and T2) for the corrugation and straightening steps of the first pass for modified-CSP.
Metals 12 00193 g006
Figure 7. Stress-strain curves for as annealed, first, third, fifth, seventh, ninth, and tenth passes of the modified-CSP samples.
Metals 12 00193 g007
Figure 8. Comparison of the ductility and UTS values vs. the modified-CSP passes.
Metals 12 00193 g008
Figure 9. Comparison of resilience modulus and tensile toughness values of modified-CSP samples for each pass.
Metals 12 00193 g009
Figure 10. The value of strain at the necking point versus pass number in the tensile test of modified-CSP.
Metals 12 00193 g010
Figure 11. Variations of the yield strength vs. the reciprocal square root of the grain size D-1/2 (D is the grain size) in different passes for copper sheets after modified-CSP, according to the Hall–Petch equation.
Metals 12 00193 g011
Figure 12. Direction of Vickers microhardness measurement with 10 points on the surface for the first pass of the modified-CSP sample.
Metals 12 00193 g012
Figure 13. Distribution of Vickers microhardness along the direction on Figure 12 for the as annealed and modified-CSP samples.
Metals 12 00193 g013
Figure 14. Hardness of modified-CSP samples in terms of number of passes.
Metals 12 00193 g014
Figure 15. HIF for the as annealed sample and the first pass to tenth pass.
Metals 12 00193 g015
Figure 16. Diagram of load-stroke for (a) modified-CSP, and (b) CGP during the corrugation step.
Metals 12 00193 g016
Figure 17. Optical microscope image of as annealed copper sheet.
Metals 12 00193 g017
Figure 18. Optical microscope images of the Cu sheet samples produced by the modified-CSP techniques in (a) first pass and (b) tenth pass.
Metals 12 00193 g018
Figure 19. SEM micrograph of the sheet sample produced in the tenth pass by the modified-CSP process.
Metals 12 00193 g019
Table 1. Physical and elastic properties of copper [15].
MaterialDensity (kg/m3)Young Modulus (MPa)Poisson Ratio
Copper8.93125,0000.34
Table 2. Coefficients of Johnson-Cook model for copper [15].
MaterialA (MPa)B (MPa)cnmT Melt (K)
Copper902920.0250.311.091356
Table 3. Effective plastic strain values in all three methods for the first pass of the process.
ProcessCGP [16]CSP [12]Modified-CSP
Effective plastic strain0.861.22.8
Publisher’s Note: MDPI stays neutral with regard to jurisdictional claims in published maps and institutional affiliations.