Article

Fatigue Assessment of Wire and Arc Additively Manufactured Ti-6Al-4V

1
Chair of Mechanical Engineering, Montanuniversität Leoben, 8700 Leoben, Austria
2
Institute of Structural Durability and Railway Technology, Graz University of Technology, 8010 Graz, Austria
3
voestalpine BÖHLER Aerospace GmbH & Co KG, 8605 Kapfenberg, Austria
*
Author to whom correspondence should be addressed.
Metals 2022, 12(5), 795; https://doi.org/10.3390/met12050795
Submission received: 28 March 2022 / Revised: 21 April 2022 / Accepted: 28 April 2022 / Published: 4 May 2022
(This article belongs to the Special Issue Technological Aspects in Fatigue Design of Metallic Structures)

Abstract

:
Wire and arc additively manufactured (WAAM) parts and structures often present internal defects, such as gas pores, and cause irregularities in the manufacturing process. In order to describe and assess the effect of internal defects in fatigue design, this research study investigates the fatigue strength of wire arc additive manufactured structures covering the influence of imperfections, particularly gas pores. Single pass WAAM structures are manufactured using titanium alloy Ti-6Al-4V and round fatigue, tensile specimen are extracted. Tensile tests and uniaxial fatigue tests with a load stress ratio of R = 0.1 were carried out, whereby fatigue test results are used for further assessments. An extensive fractographic and metallographic fracture surface analysis is utilized to characterize and measure crack-initiating defects. As surface pores as well as bulk pores are detected, a stress intensity equivalent K e q v transformation approach is presented in this study. Thereby, the defect size of the surface pore is transformed to an increased defect size, which is equivalent to a bulk pore. Subsequently, the fatigue strength assessment method by Tiryakioğlu, commonly used for casting processes, is applied. For this method, a cumulative Gumbel extreme value distribution is utilized to statistically describe the defect size. The fitted distribution with modified data reveals a better agreement with the experimental data than unmodified. Additionally, the validation of the model shows that the usage of the K modified data demonstrates better results, with a slight underestimation of up to about −7%, compared to unmodified data, with an overestimation of up to about 14%, comparing the number of load cycles until failure. Hence, the presented approach applying a stress intensity equivalent transformation of surface to bulk pores facilitates a sound fatigue strength assessment of WAAM Ti-6Al-4V structures.

1. Introduction

Novel, innovative manufacturing technologies, such as additive manufacturing, have the potential to become a time- and cost-efficient method of producing more or less complex high-tech parts and structures using expensive and hard-to-manufacture materials [1,2,3,4]. In contrast to commonly used powder-bed processes, such as selective laser melting, wire-based technologies offer high deposition rates and high material utilization. Wire arc additive manufacturing is one possible wire-based AM technique particularly used for large components, where the deposition material is fed as a wire, melted by means of an electrical arc and added layer-by-layer on a substrate.
Due to its benefits regarding a buy-to-fly optimization and lightweight design potential, the titanium alloy Ti-6Al-4V is of interest in the aerospace industry [5,6,7,8]. Despite the main advantages and the potentials of WAAM, technological challenges are currently under investigation. For example, some challenges are process stability, component design, formation and simulative prediction of residual stresses and distortion and the mechanical material behavior itself [8,9,10]. Reproducible quasi-static mechanical and fatigue properties are an essential requirement for the use of additively manufactured components in aerospace industry and, therefore, need to be investigated in detail. Studies on the fatigue performance of additively manufactured parts pointed out a comparably large scatter in fatigue life and a reduced fatigue strength compared to conventional manufactured, e.g., forged parts, due to process induced defects, such as pores, as-built surfaces and a different microstructure [8,11,12,13]. Failure critical aerospace components are always machined to avoid a critical, rough surface. Due to the machining of the rough surface, crack initiating defects are found to be on inner areas or surfaces near pores [14].
Preliminary studies showed that the fatigue strength of additively manufactured structures is reduced with the presence of defects to the same extent as traditionally manufactured structures. Basically, the origin of crack initiation does not differ to conventional processes and fatigue failure should occur at the largest defect in the tested volume. Fatigue assessment methods developed for traditional processes, such as casting and using the statistics of extremes, seem to be applicable for AM parts. Therefore, concepts for conventional manufacturing processes using extreme value statistics can be adopted and used for determination of the fatigue strength of AM parts [15,16]. In [12,17,18,19], different statistical extreme value distributions are utilized for the occurring defects in additively manufactured parts and structures.
The objective of this study is to investigate the finite fatigue strength of additively manufactured Ti-6Al-4V structures with the presence of process induced defects. Three structures are manufactured and fatigue tests are carried out of this material followed by a holistic fracture surface analysis. The Gumbel extreme value distribution is fitted to the size of the observed failure critical pores/defects. In order to compare surface defects to inner defects, a concept for the transformation of surface pores to inner pores is utilized using a stress intensity equivalent approach. Finally, the proposed assessment method of Tiryakioğlu is applied and validated with experimental data from fatigue tests out of wire arc additive manufacturing structures.
The scientific contribution of this paper is to extensively investigate the impact of porosity on the finite fatigue strength of additively manufactured Ti-6Al-4V structures, the transformation of surface pores to inner pores by an stress intensity equivalent approach and the application and validation of the fatigue assessment methodology by Tiryakioğlu for material out of a Ti-6Al-4V WAAM structure.

2. Materials and Methods

2.1. Material and Manufacturing

The investigated material within this study is the titanium alloy Ti-6Al-4V, which is commonly used for parts and structures in aerospace industry. Ti-6Al-4V is used for the wire as well as for the substrate. The substrates material condition was conventionally processed by hot-rolling. The nominal chemical composition out of the suppliers data sheets for the wire and the substrate is given in Table 1.
In structure manufacturing, a diameter 1.2 mm wire was added layer-by-layer on a bolt clamped substrate with the dimensions of 250 × 150 × 12.4 mm3. The process is carried out using a Fronius Cold Metal Transfer welding machine combined with a Yaskawa Motoman welding robot, see Figure 1. In order to protect the weld pool and the heat affected zone from oxidation and other undesirable gaseous elements, a local trailing shield purged with 99.9999% pure Argon was used. In Table 2, the process parameters used for the manufacture of the pieces are shown. Dwell times between layers are defined in order to ensure a constant interpass temperature of about 150 °C.
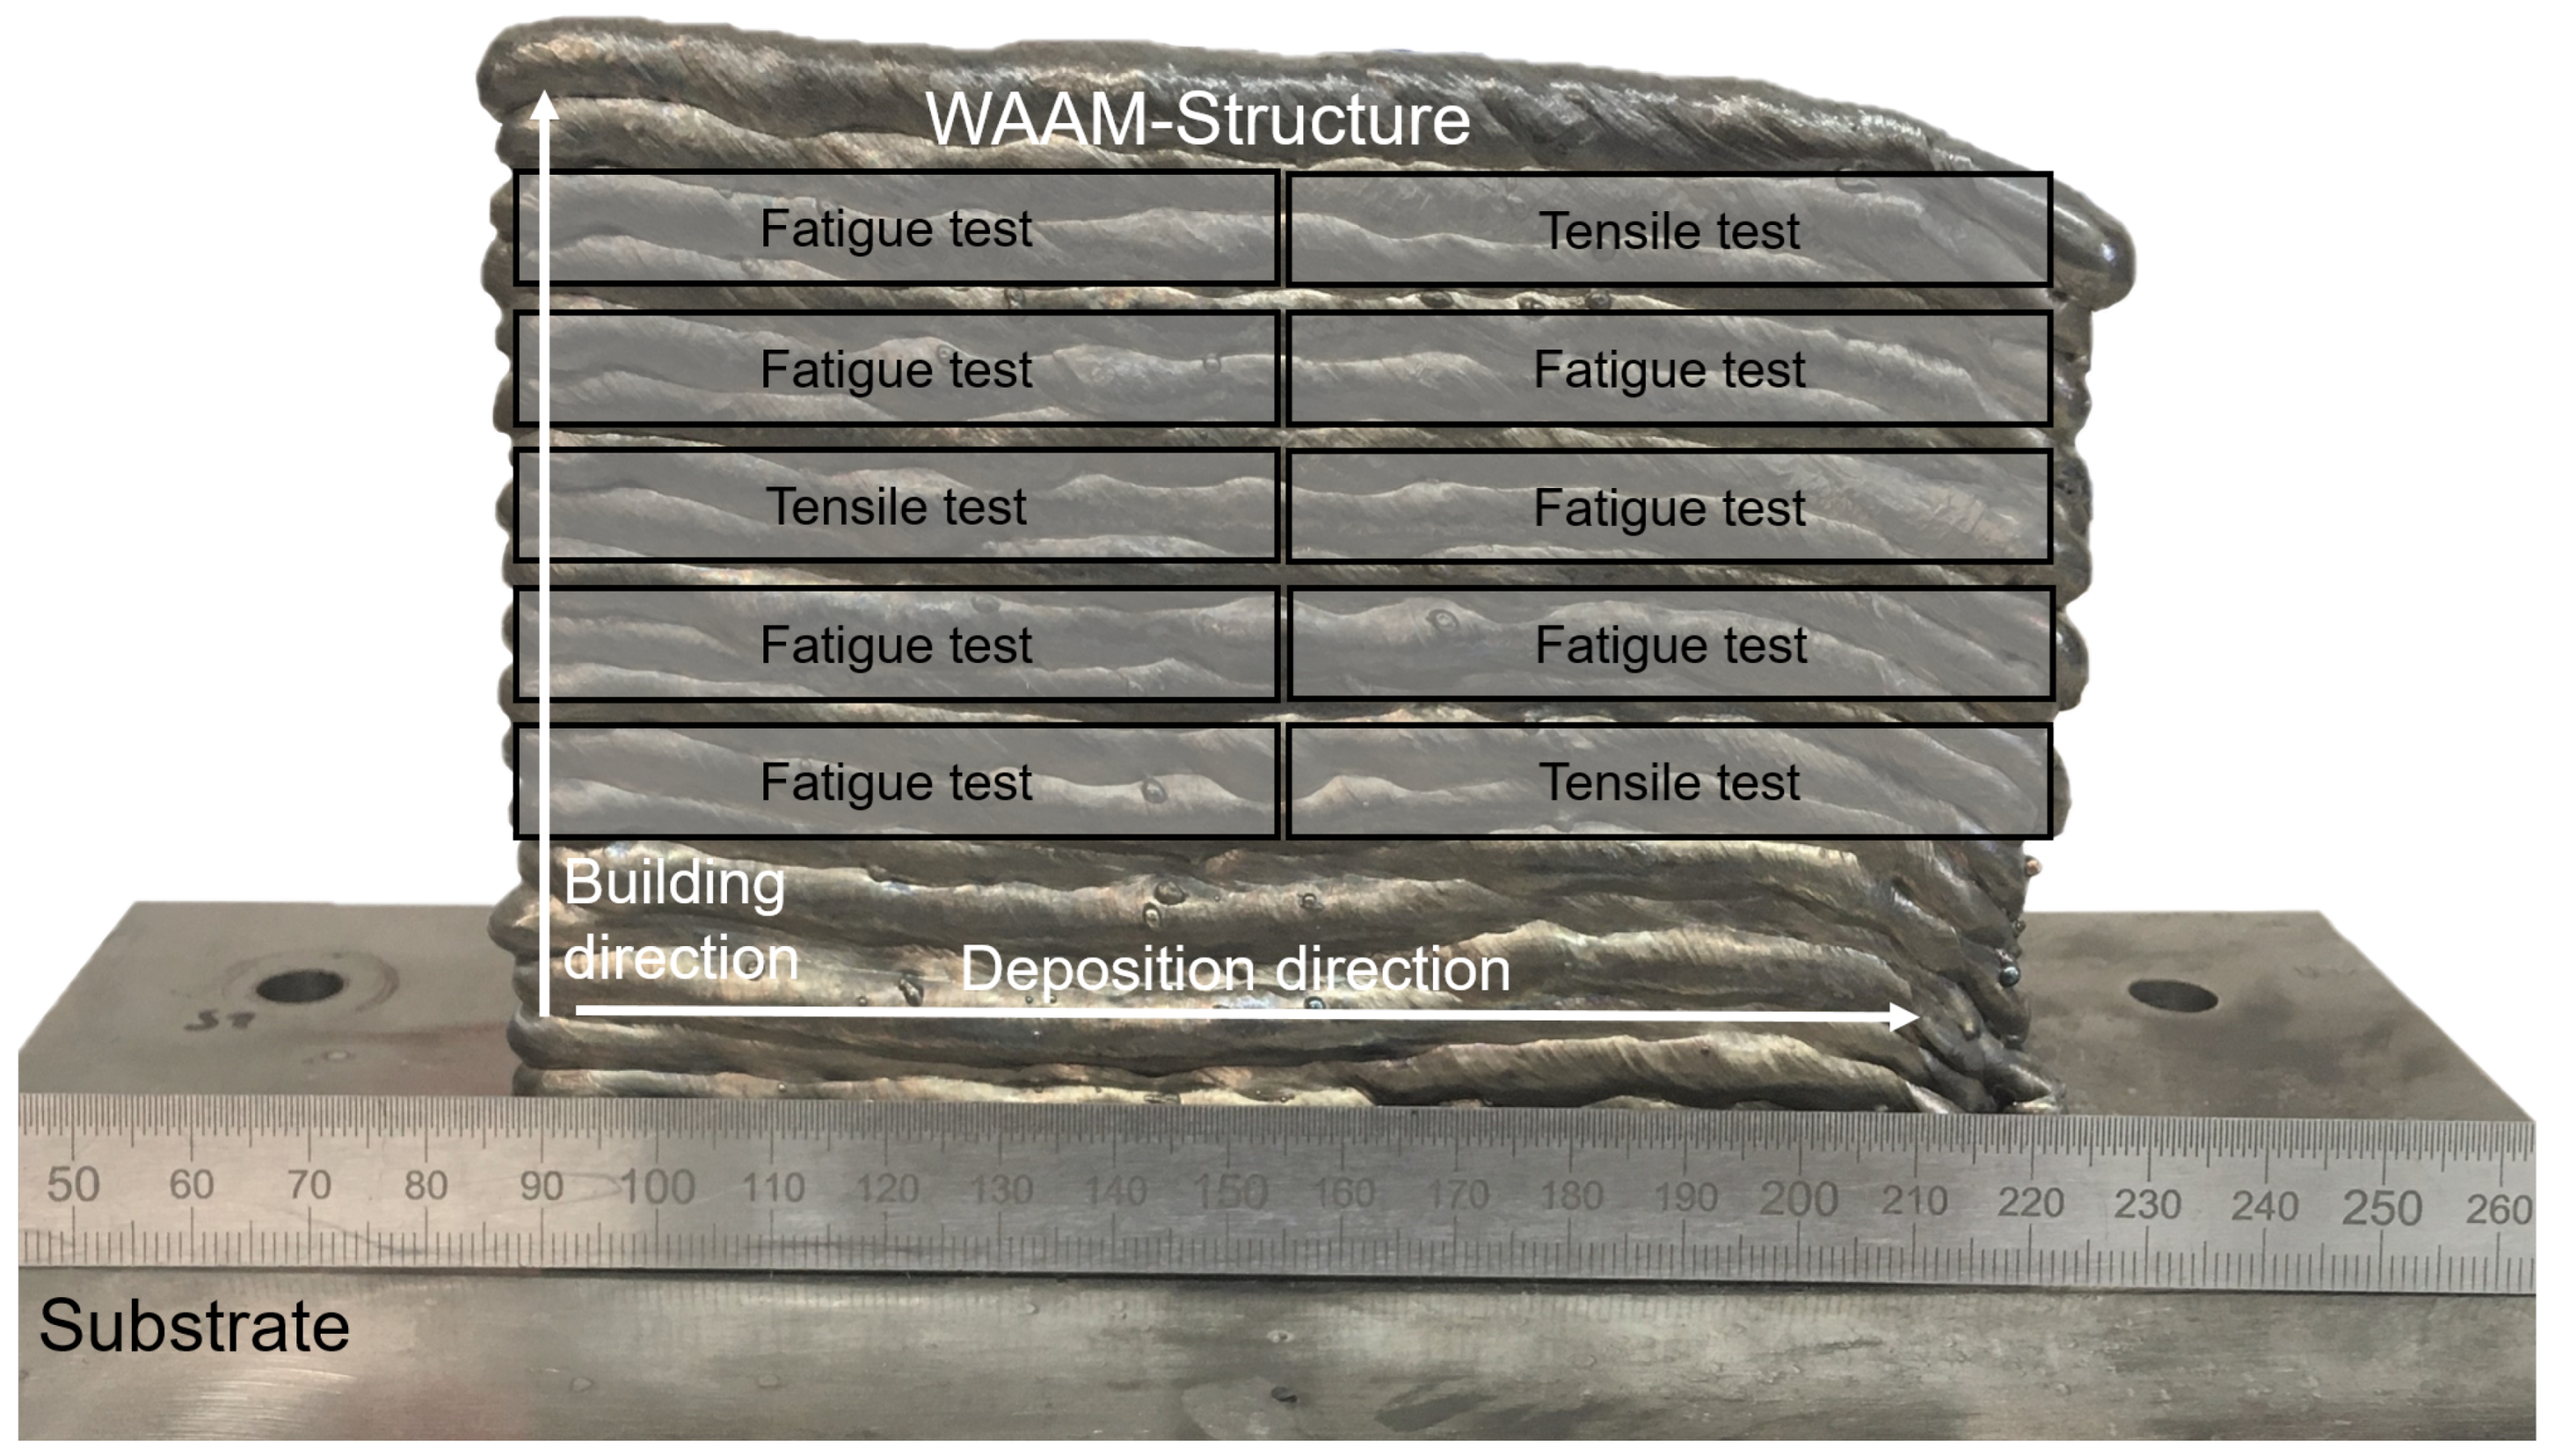
In total, three structures are built, with each structure consisting of twenty layers with a total length of about 130 mm in deposition direction. These walls are manufactured utilizing a single layer strategy without oscillation and with the same deposition direction in each layer. The overall measured height of the WAAM structure is about 110 mm, and the effective wall thickness is measured to be about 8.5 mm. An exemplary twenty layer WAAM structure is shown in Figure 2.
Quasi-static tensile and fatigue test specimens are extracted horizontally, and it is parallel to the deposition direction (see Figure 2). The positions of specimens in building direction are defined in order to neglect any starting effects related to, e.g., heating up the base plate and, hence, obtaining a comparable microstructure within all specimens, starting with extraction above the sixth layer. To statistically evaluate the mechanical material properties and the fatigue strength of this AM material, in total 19 fatigue and six tensile specimen are cut out of the three manufactured WAAM structures. By polishing the surface of the extracted and machined test specimen before testing, any influence of a surface roughness on the experimental investigations can be avoided. Tensile and fatigue tests were conducted at room temperature. The geometry of the tensile test specimens (see Figure 3a), is defined according to the requirements of standard EN ISO 6821 [22] with an initial test length of 25 mm. An uniaxial, servo-hydraulic cylinder from Instron-Schenk with a maximum load capacity of 25 kN is used for the tensile tests. All tests are strain-rate controlled until failure of the specimen and carried out with an touching extensometer and a strain rate of 2.5 × 10⁻³ s−1.
The fatigue tests are utilized on a resonant test machine RUMUL Microtron with a resonance testing frequency of about 130 Hz. The dimensions of the investigated round fatigue specimen geometry are illustrated in Figure 3b, with a diameter of 4 mm in the test area. Specimens are cyclically tested in a pulsating tension load range with a load stress ratio of R = 0.1 . The abort criterion was set to total fracture of the specimen or a defined number of ten million load-cycles without failure. This study focuses on the finite life region; thus, the applied load for the fatigue tests is relatively high. After fatigue tests, an extensive fracture surface analysis was carried out to evaluate the failure origin using a digital optical microscope.

2.2. Assessment Methodology

In order to determine the survival probability of components, it is of utmost importance to consider local pore size distributions in the fatigue assessment process. Different statistical distributions were investigated in [23,24] for crack initiating defects in cast materials. These studies revealed that the defect size can be well described by extreme value statistics using the extreme value distribution of type one, which is also called Gumbel distribution and enables the assessment of the largest values of the distribution [25]. Better fit results are found using a Gumbel extreme value distribution compared to commonly used lognormal or Weibull distributions [26,27]. Further studies [28,29] for cast materials revealed a good agreement of the assessed fatigue strength to the experimental data with the proposed methodology according to Tiryakioğlu. To quantify the size of irregularities or pores, the projected area is measured. A relationship between the projected defect area A p r o j and the equivalent diameter d e q v can be determined using Equation (1), whereby d e q v equals the diameter of a circle, which covers the same area as the defect itself. The size of the critical defects is commonly measured subsequently after fatigue testing by investigations of the fractured surfaces or non-destructive by using X-ray tomography before fatigue testing. At the latter, the minimum detectable defect size has to be considered.
d e q v = 4 π · A p r o j
As mentioned before, the Gumbel distribution can be used to describe the distribution of defects, with the cumulative Gumbel probability P for a defined equivalent defect diameter is given in Equation (2) [25]. There, λ is a pore size dependent location and δ a scale parameter.
P ( d e q v ) = exp exp d e q v λ δ
In order to link the cumulative defect distribution of the failure initiating defect size to the finite fatigue life of parts and structures containing defects, Tiryakioğlu suggests a new methodology. In this fatigue assessment methodology, the crack propagation law of Paris–Erodgan [30] for stable crack growth is combined to the cumulative Gumbel defect distribution (see Equation (3)) [23]. Based on this methodology, failure probability P f can be determined dependent on a specified number of load cycles until failure N f . Because cracks from structural defects start to grow immediately after the first cycle, the number of cycles to initiate a crack is set to 0 in this study [23,31].
P f ( N f ) = 1 exp exp λ δ 2 δ · π N f B · σ a m 2 2 m
Within Equation (3), λ and δ are the previously introduced location and scale parameters of the Gumbel extreme value distribution, σ a is the nominal stress amplitude and B and m are material dependent constants. Crack propagation slope is represented by m in the stable crack growth region and B is a offset parameter. The survival probability P s can be calculated by the following.
P s ( N f ) = 1 P f ( N f )

3. Results

3.1. Quasi-Static and Fatigue Test Results

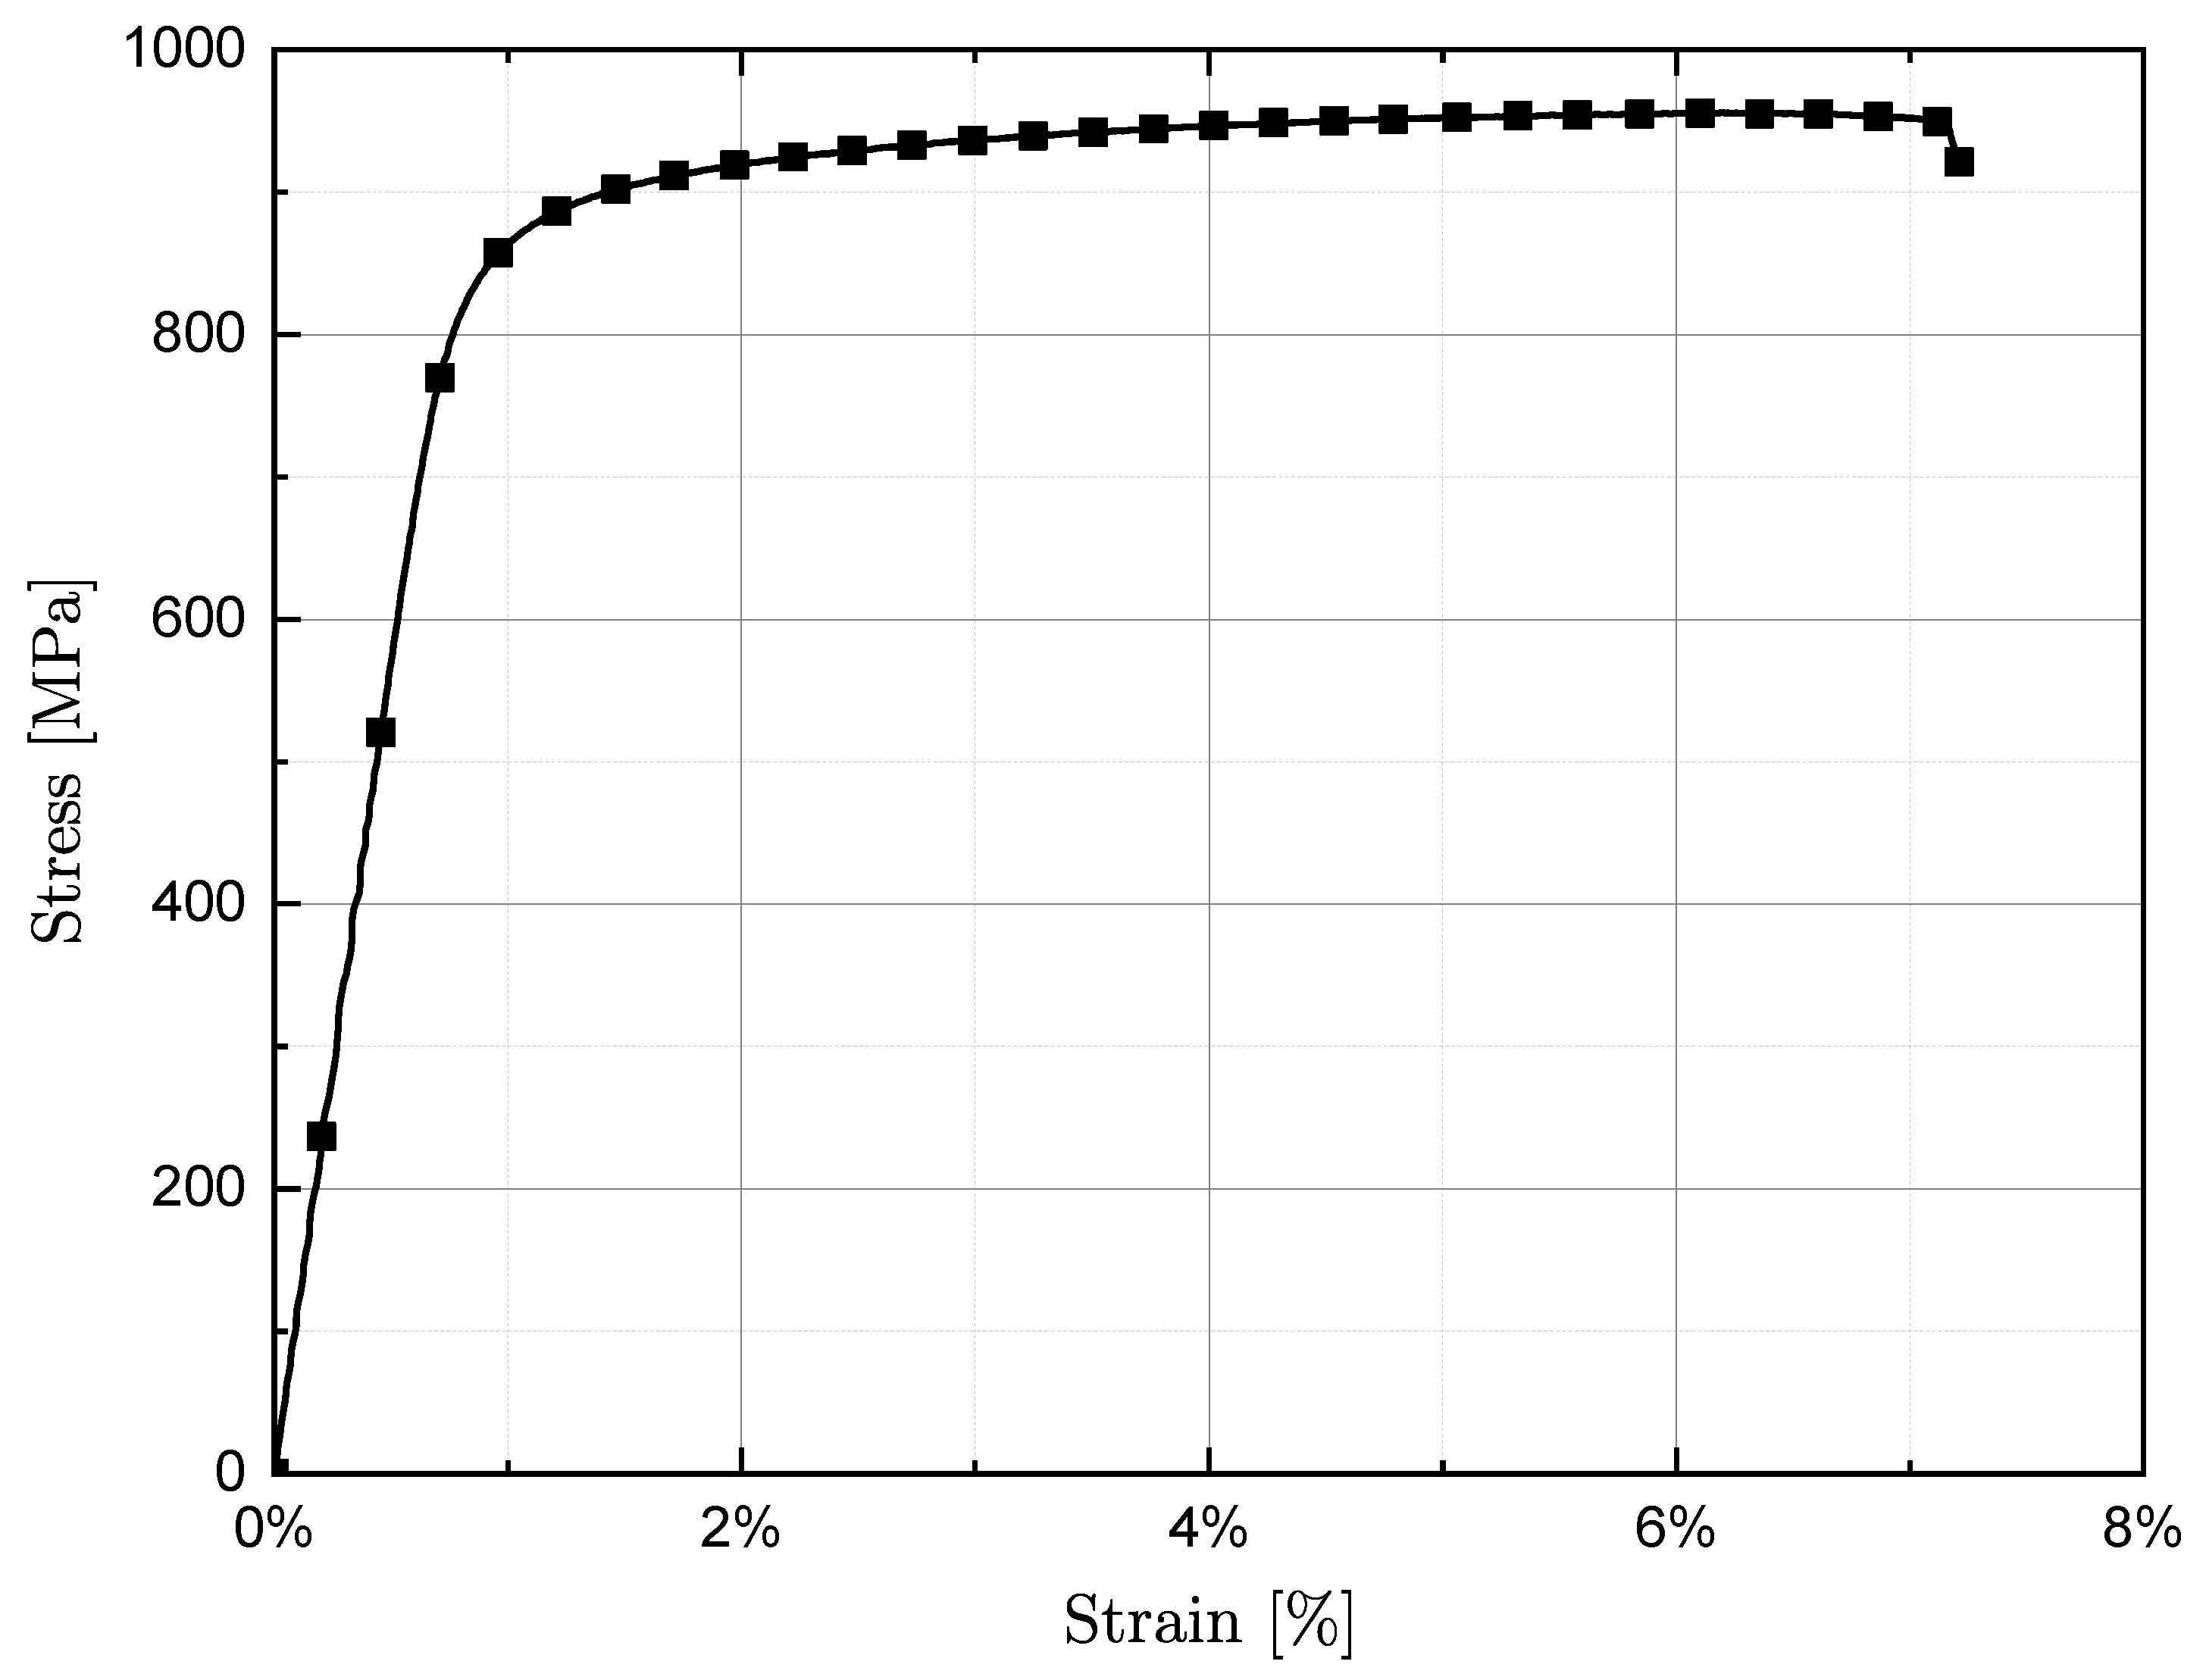
Quasi-static tests are carried out to investigate the mechanical properties of the WAAM material at room temperature. As mentioned in the previous section, all tensile tests are strain controlled. In Figure 4, a representative stress–strain curve of a horizontally extracted tensile test is presented. The exemplary stress–strain curve shows a distinctive plastic deformation with a small amount of work hardening.
All important and necessary mechanical properties are subsequently determined out of the experimental data using a common guideline out of the standard EN ISO 6892-1 for tensile tests [22]. The experimental data of the six static tests are afterward statistically analyzed using simple descriptive statistics. The results of the strain controlled tensile tests are summarized in Table 3. At room temperature, mean YS is found to be about 867 MPa, the mean UTS equals 957 MPa and A equals 6%. A comparison of data from the literature [32,33,34,35] with the material tested in this paper shows a good agreement of the mechanical properties and lays in the same range (see Table 3).
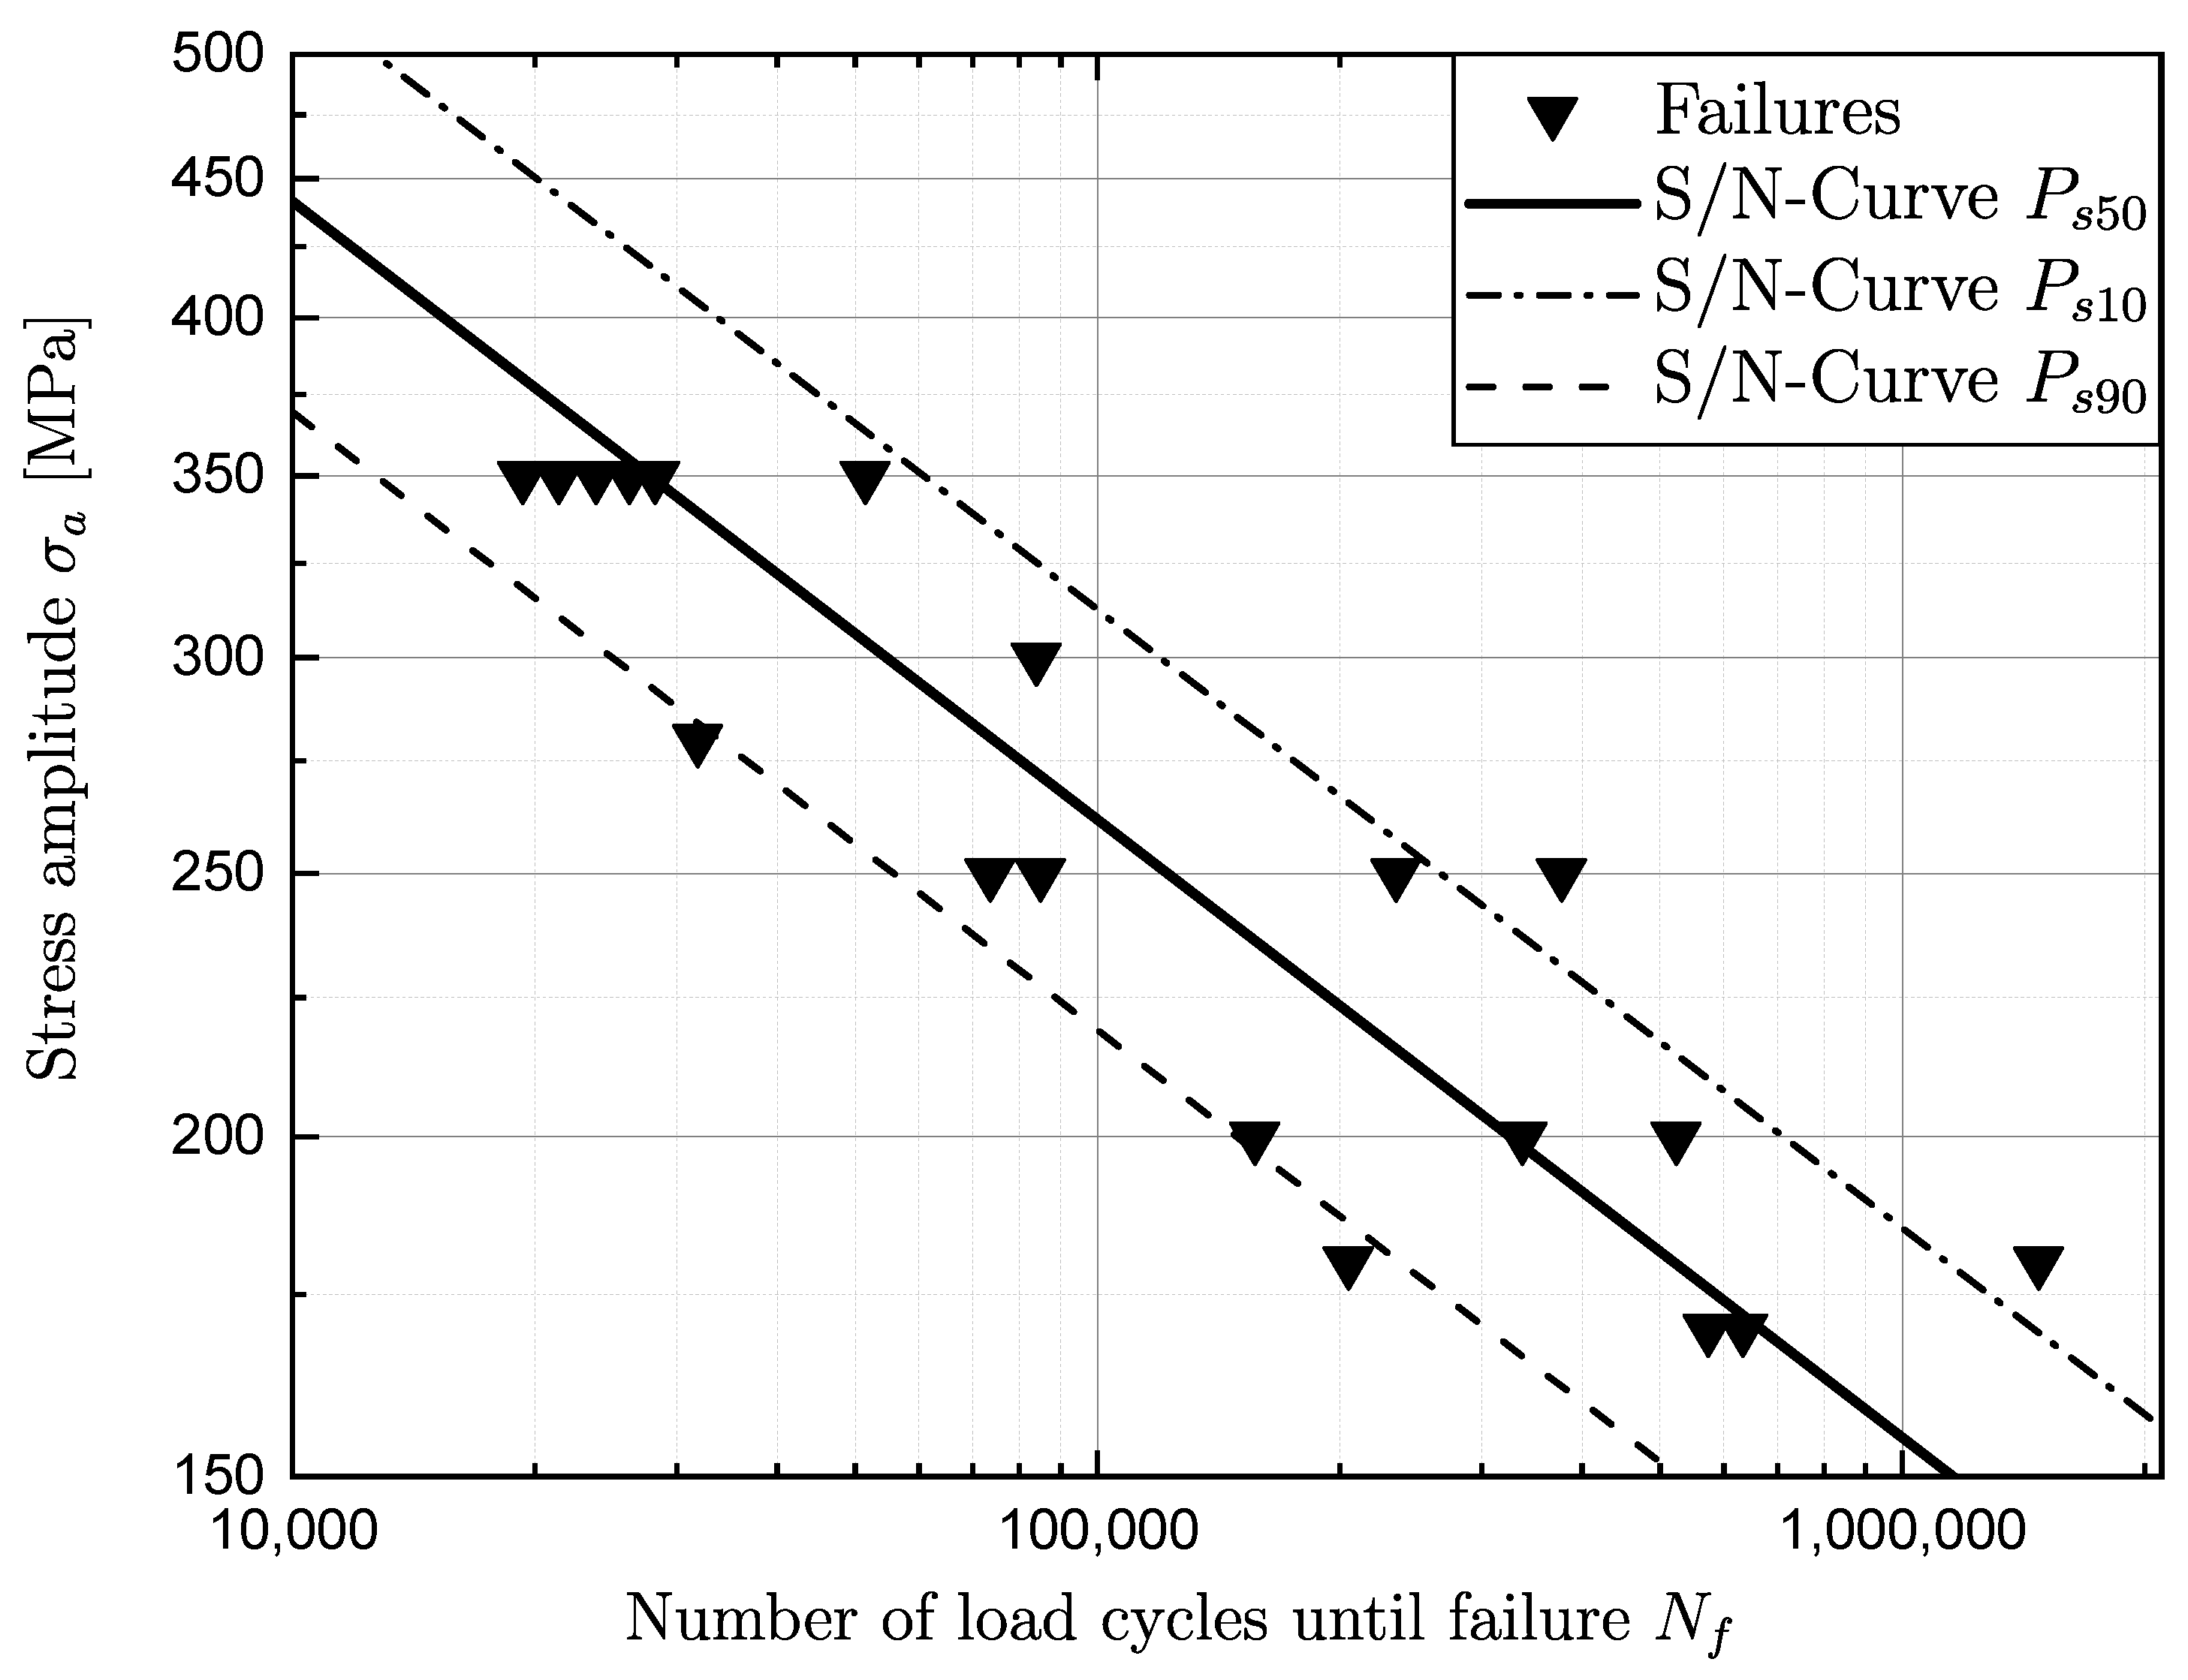
As mentioned in the previous section, uniaxial fatigue tests are utilized on a resonant testing rig. The stress amplitude σ a for the fatigue tests is defined in accordance with the stress–strain curves. Additionally, all specimen are tested in the finite life region in order to assess the fatigue strength with the method of Tiryakioğlu. The experimental fatigue test points in the finite life region are statistically evaluated by applying the standard by ASTM E 739 [36] to determine the S-N curves for the survival probabilities of P s = 10 % , P s = 50 % and P s = 90 % . In Figure 5, the fatigue test results and the statistically evaluated S-N curves for different survival probabilities are presented.
The statistically estimated S-N parameters are given in Table 4, whereby the evaluated S-N curve reveals a stress amplitude of σ a = 261.6 MPa for P s = 50 % at N f = 1 × 10 5 load cycles. Additionally, the comparably high slope of the S-N curve in the finite life region is found to be about k = 4.4, which is in a good agreement with data from the literature [37] and proves the presence of process-induced, crack-initiating defects. In accordance to the common definition in [38], the scatter bands for stress 1: T S and load cycles 1: T N of the S-N curve are evaluated, whereby the ratio of P s = 10 % to P s = 90 % is used. Moreover, the evaluated scatter index reveals the presence of defects, comparable to [37].

3.2. Fractography

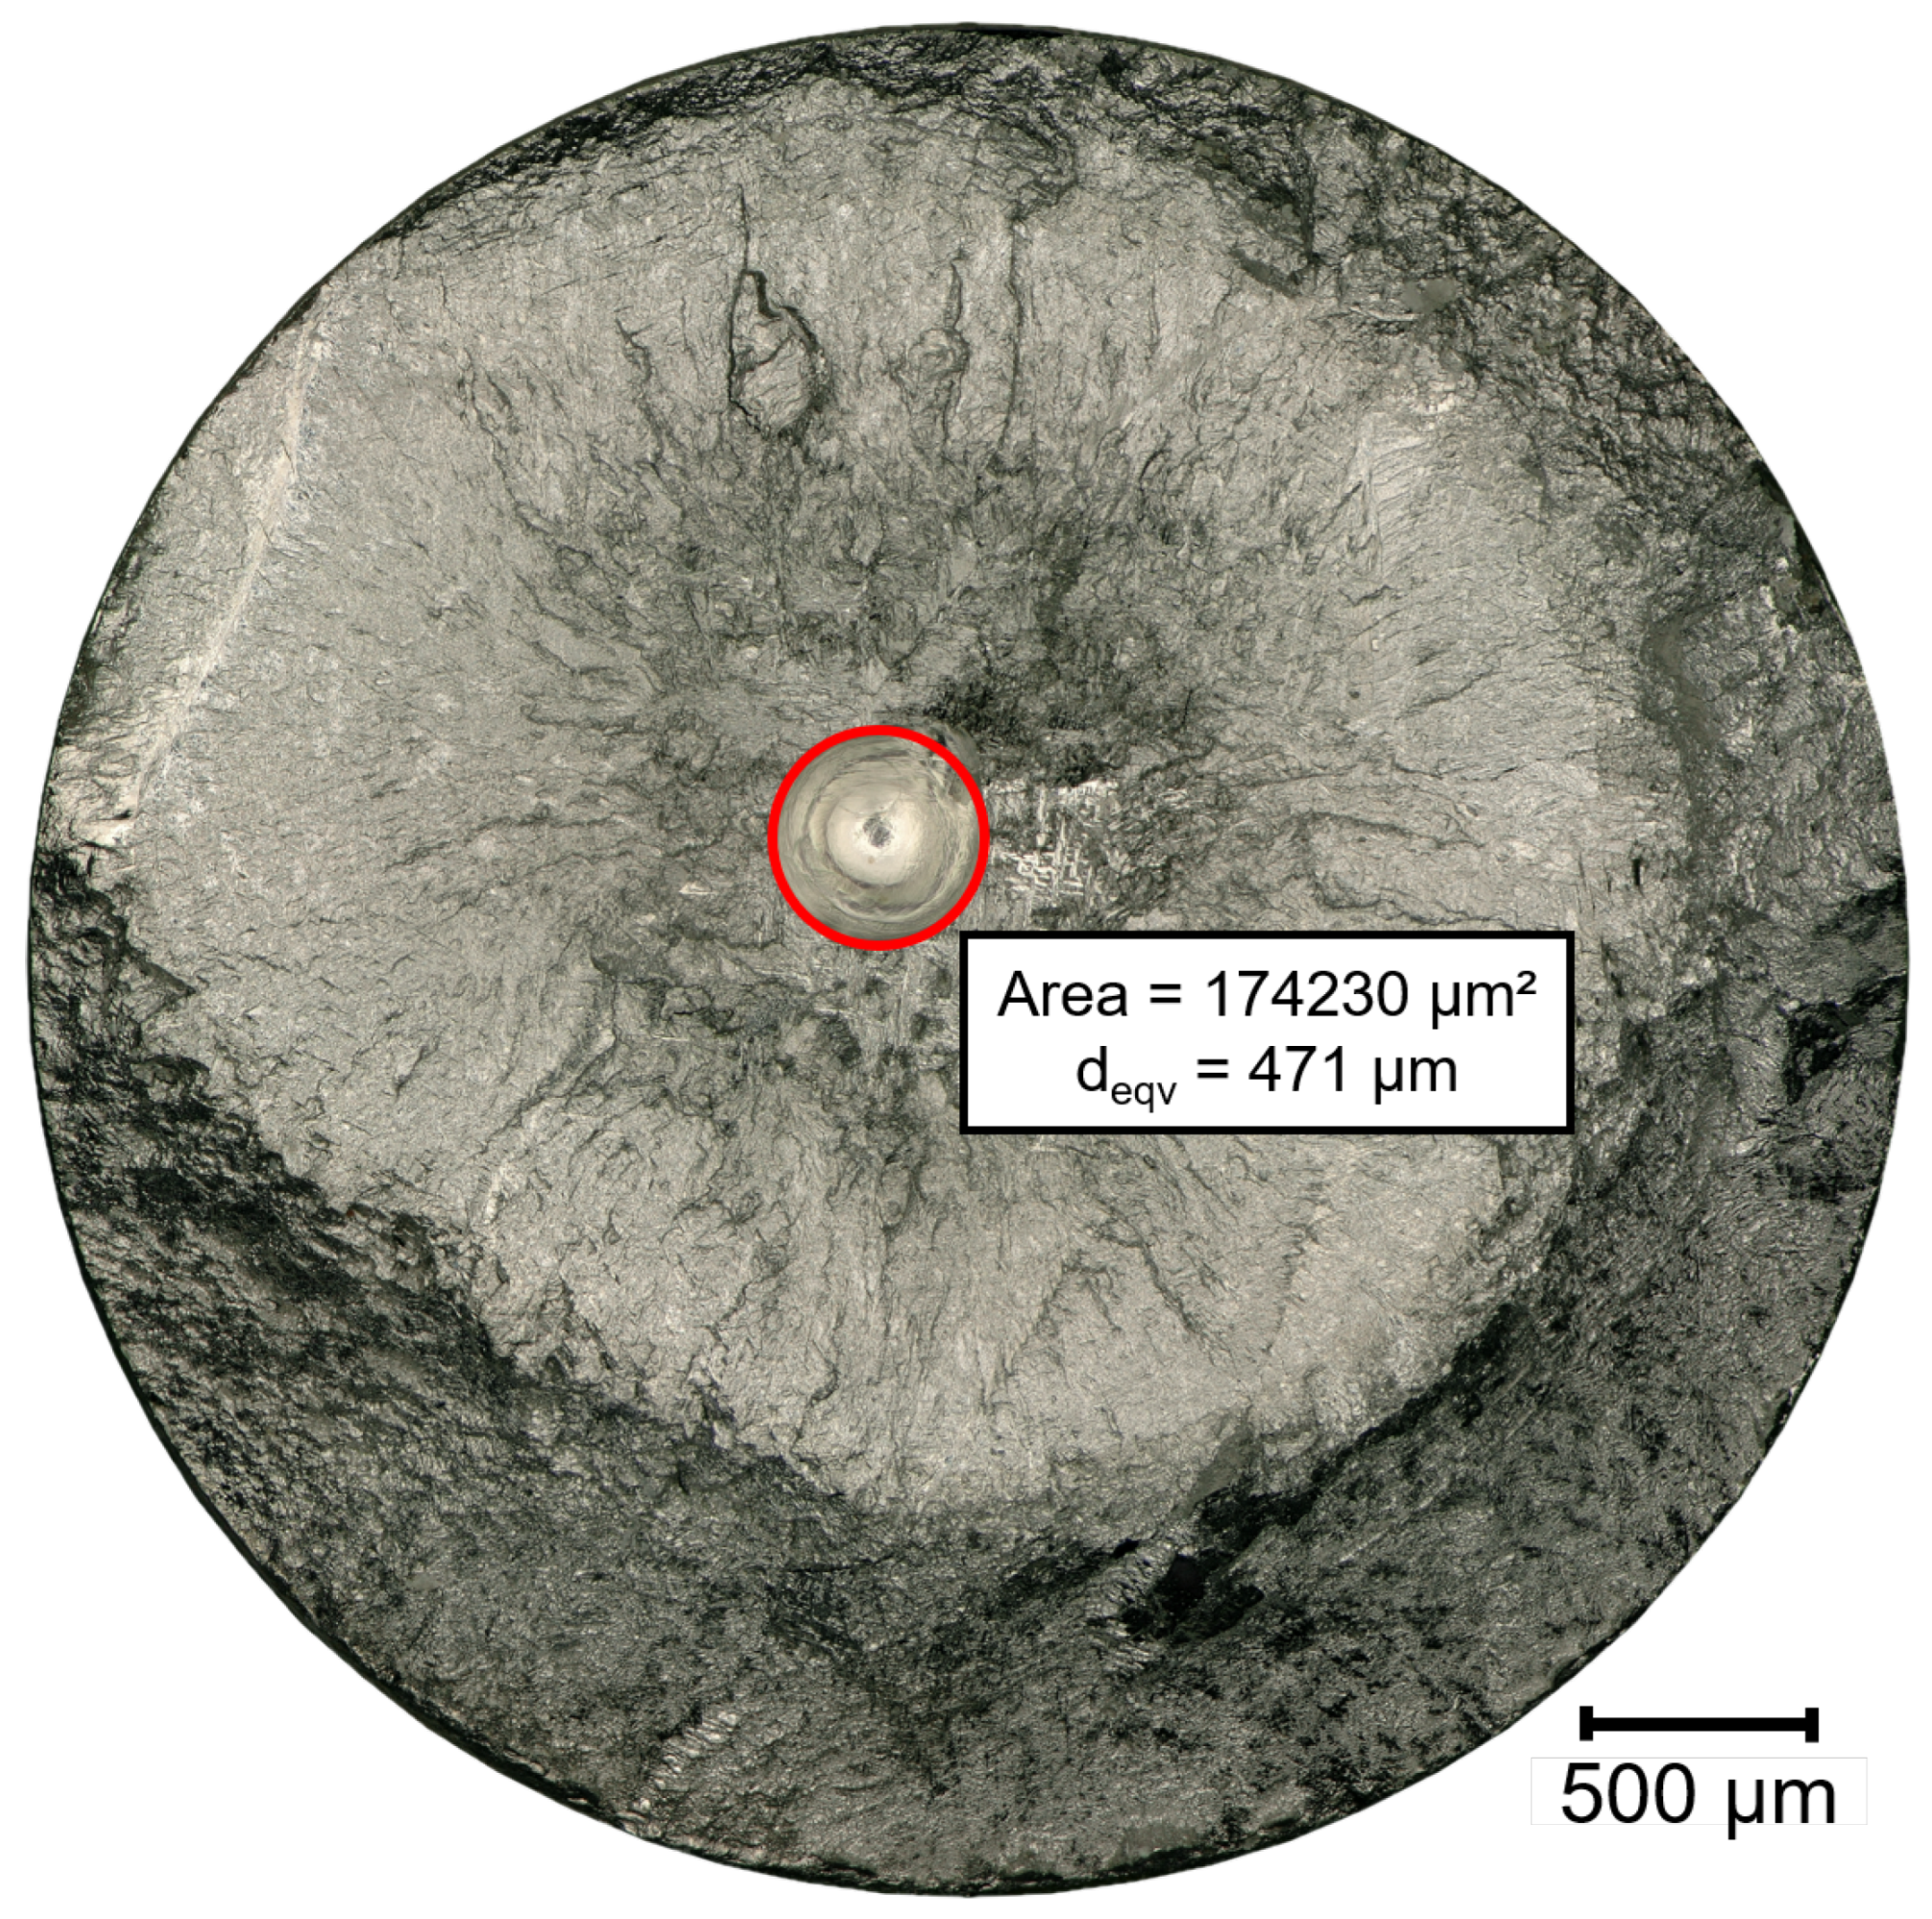
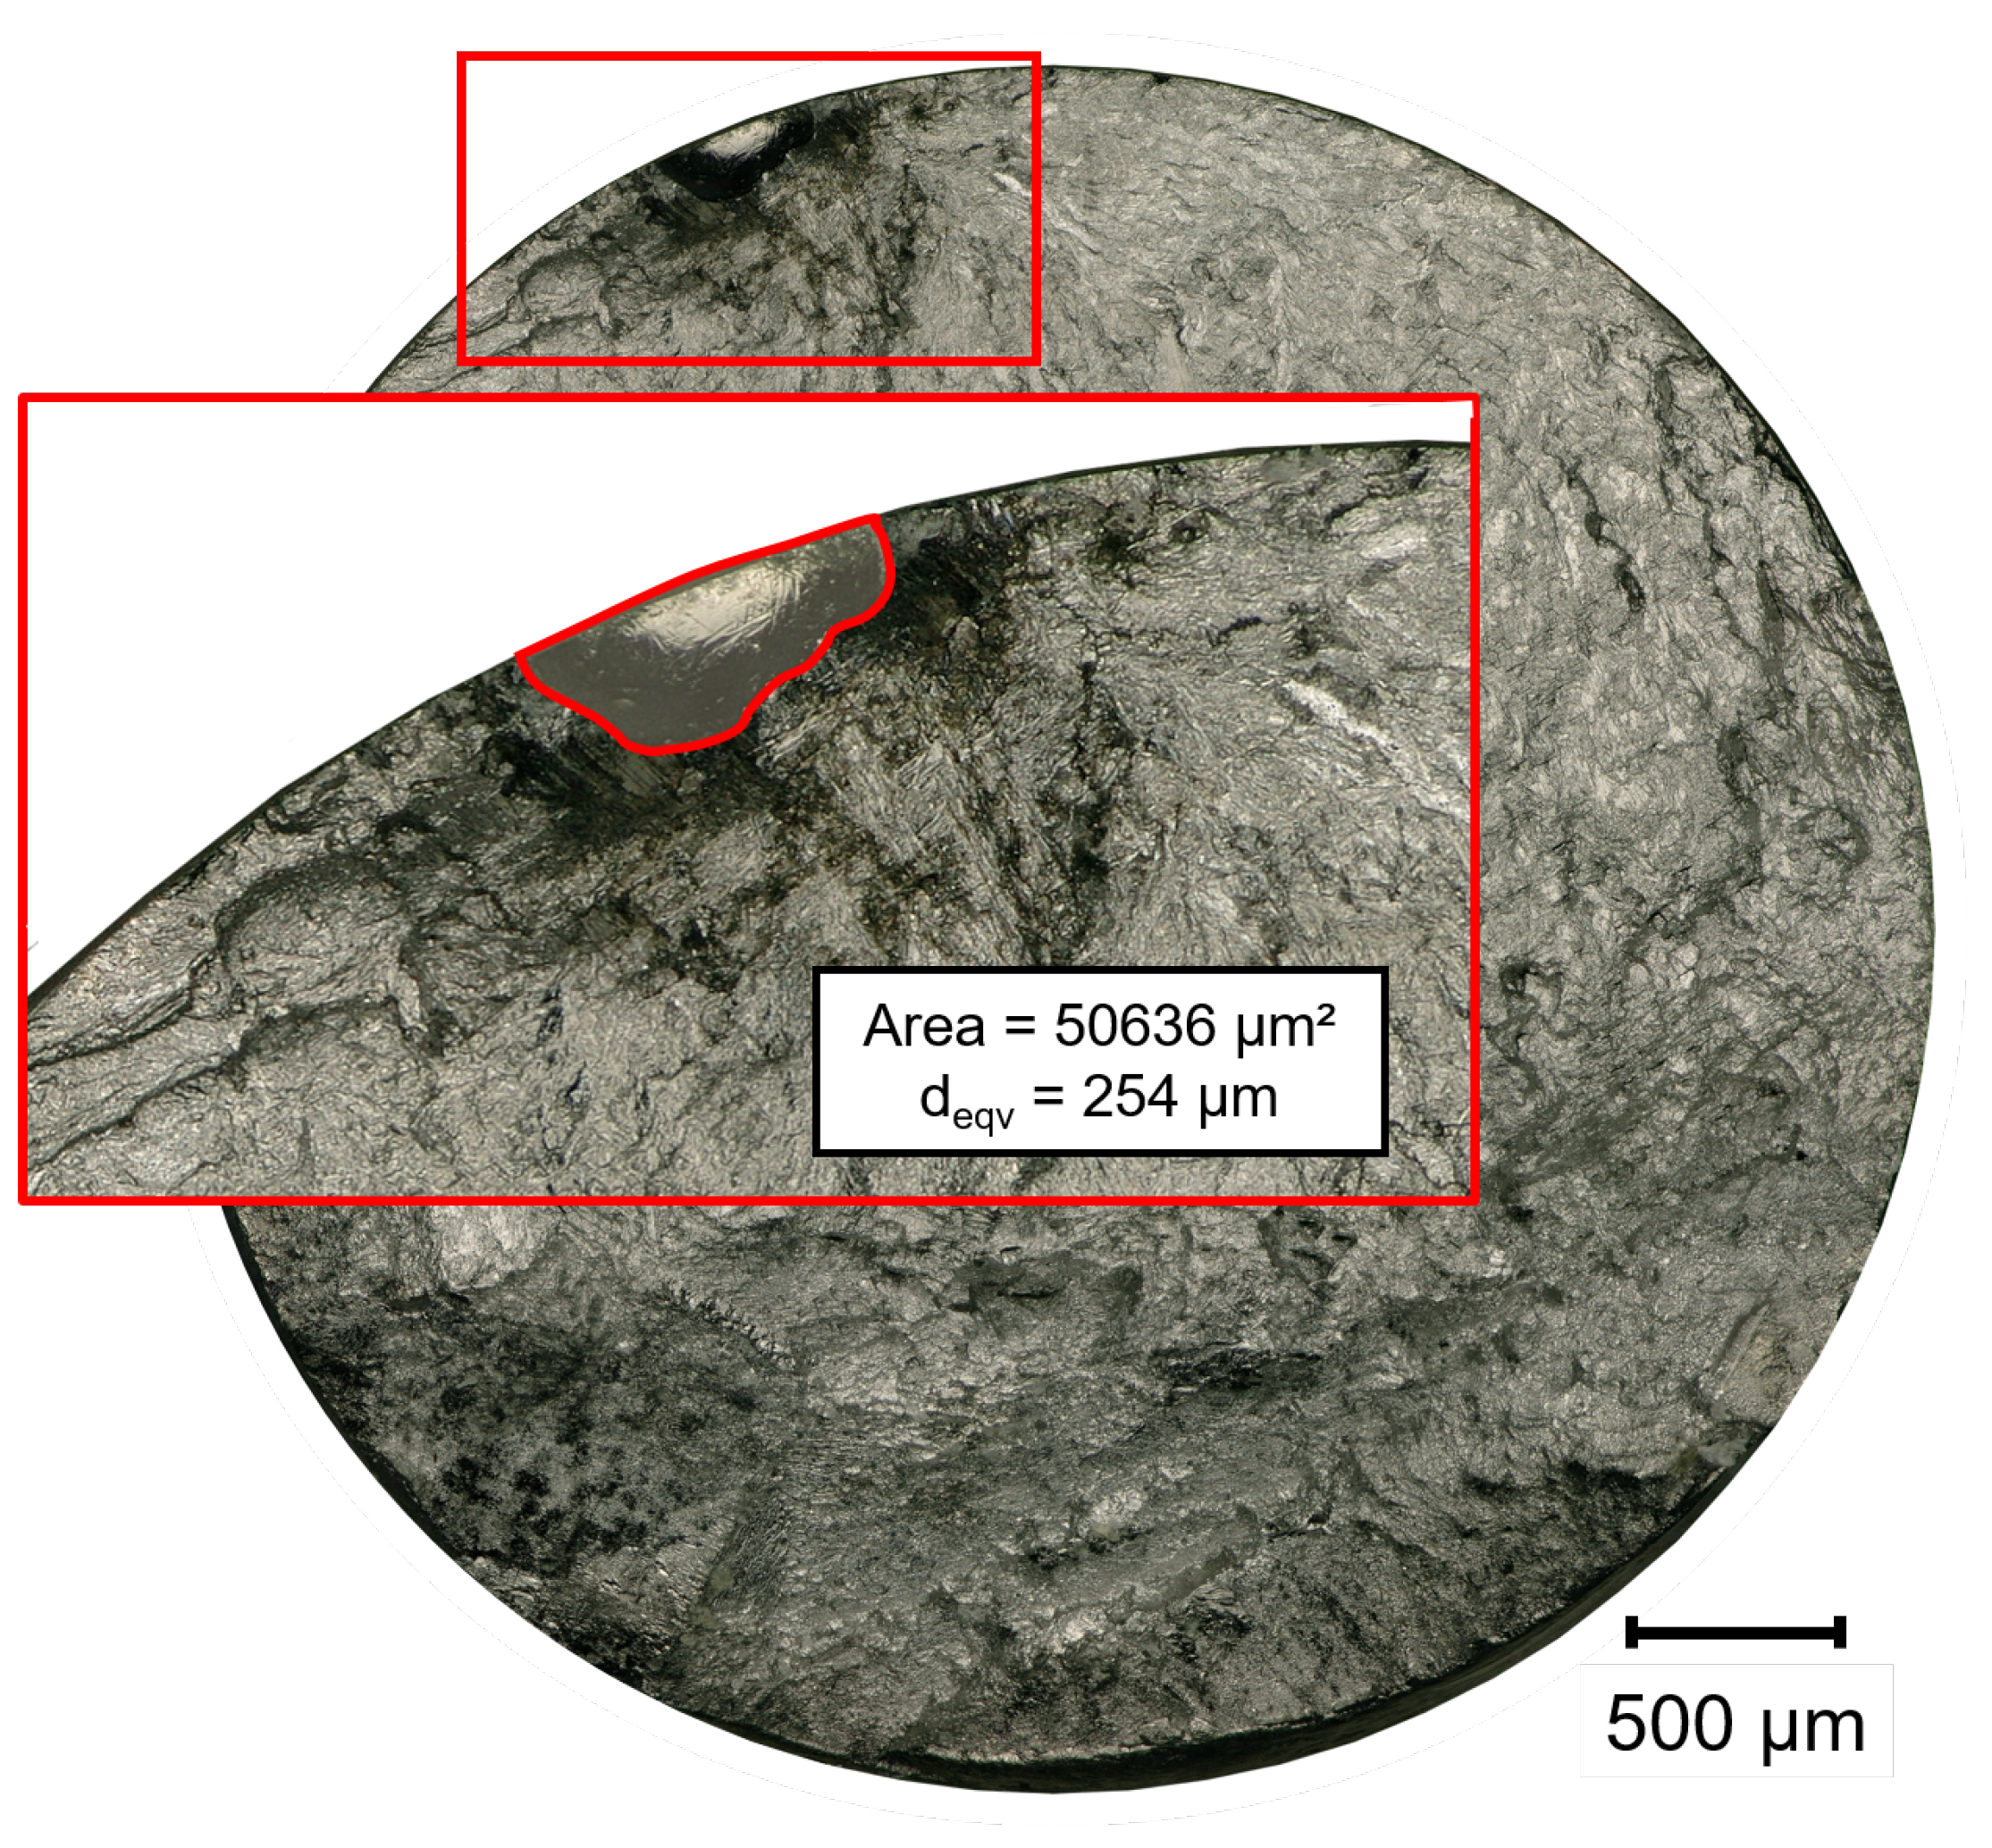
After fatigue testing, all specimens were analyzed by means of an extensive fracture surface analysis using a digital light microscope. Within the analysis, the crack initiating defect of each tested specimen is evaluated and additionally relevant geometric defect parameters, such as area, diameter and position are measured and subsequently determined. In cases of all specimens, gas pores were found as failure critical defects. On the one hand, pores were located inside the specimen; on the other hand, pores at the surface were found. In Figure 6, a characteristic gas pore inside of a specimen is presented, and in Figure 7, a representative gas pore at the surface is shown. A summary of all pores is given in Table 5, whereby the position of the pore is presented as well as the projected area A p r o j , the estimated equivalent diameter d e q v , calculated according to Equation (1), and the stress intensity equivalent defect diameter d K , e q v are shown.
Crack initiating pores are found in the bulk material as well as at the surface of specimens. In fact, surface near pores are more critical than bulk pores in terms of a higher stress intensity factor [15,39]. Experimental data are often divided into two sample batches dependent on the position of the failure. Furthermore, fatigue assessment methods are applied separately for each sample batch dependent on position of the defect. To assess the fatigue strength of the WAAM material by using one approach for bulk and surface pores, a stress intensity equivalent K e q v transformation is applied. This approach is based on the stress intensity, which can be determined using Equation (5) [40]. In Equation (5), σ a is the applied stress amplitude, Y is a defect based geometry factor and a is the defect or initial crack size.
K = 2 · σ a · Y · π · a
It is assumed that the transformed inner pore has the same stress intensity as the surface pore; therefore, the stress intensity of the surface pore K S u r f a c e , m a x equals the stress intensity of the inner pore within the bulk material K B u l k , m a x .
K S u r f a c e , m a x = K B u l k , m a x
The insertion of Equation (5) into Equation (6) and the reduction in the constant stress amplitude σ a leads to Equation (7).
Y S u r f a c e , m a x · π · d e q v = Y B u l k , m a x · π · d K , e q v
After rearranging Equation (7), the stress intensity equivalent diameter d K , e q v can be determined dependent on the square of the ratio between the geometry factor of a surface pore Y S u r f a c e , m a x to the geometry factor of a bulk pore Y B u l k , m a x as shown in Equation (8).
d K , e q v = Y S u r f a c e , m a x Y B u l k , m a x 2 · d e q v
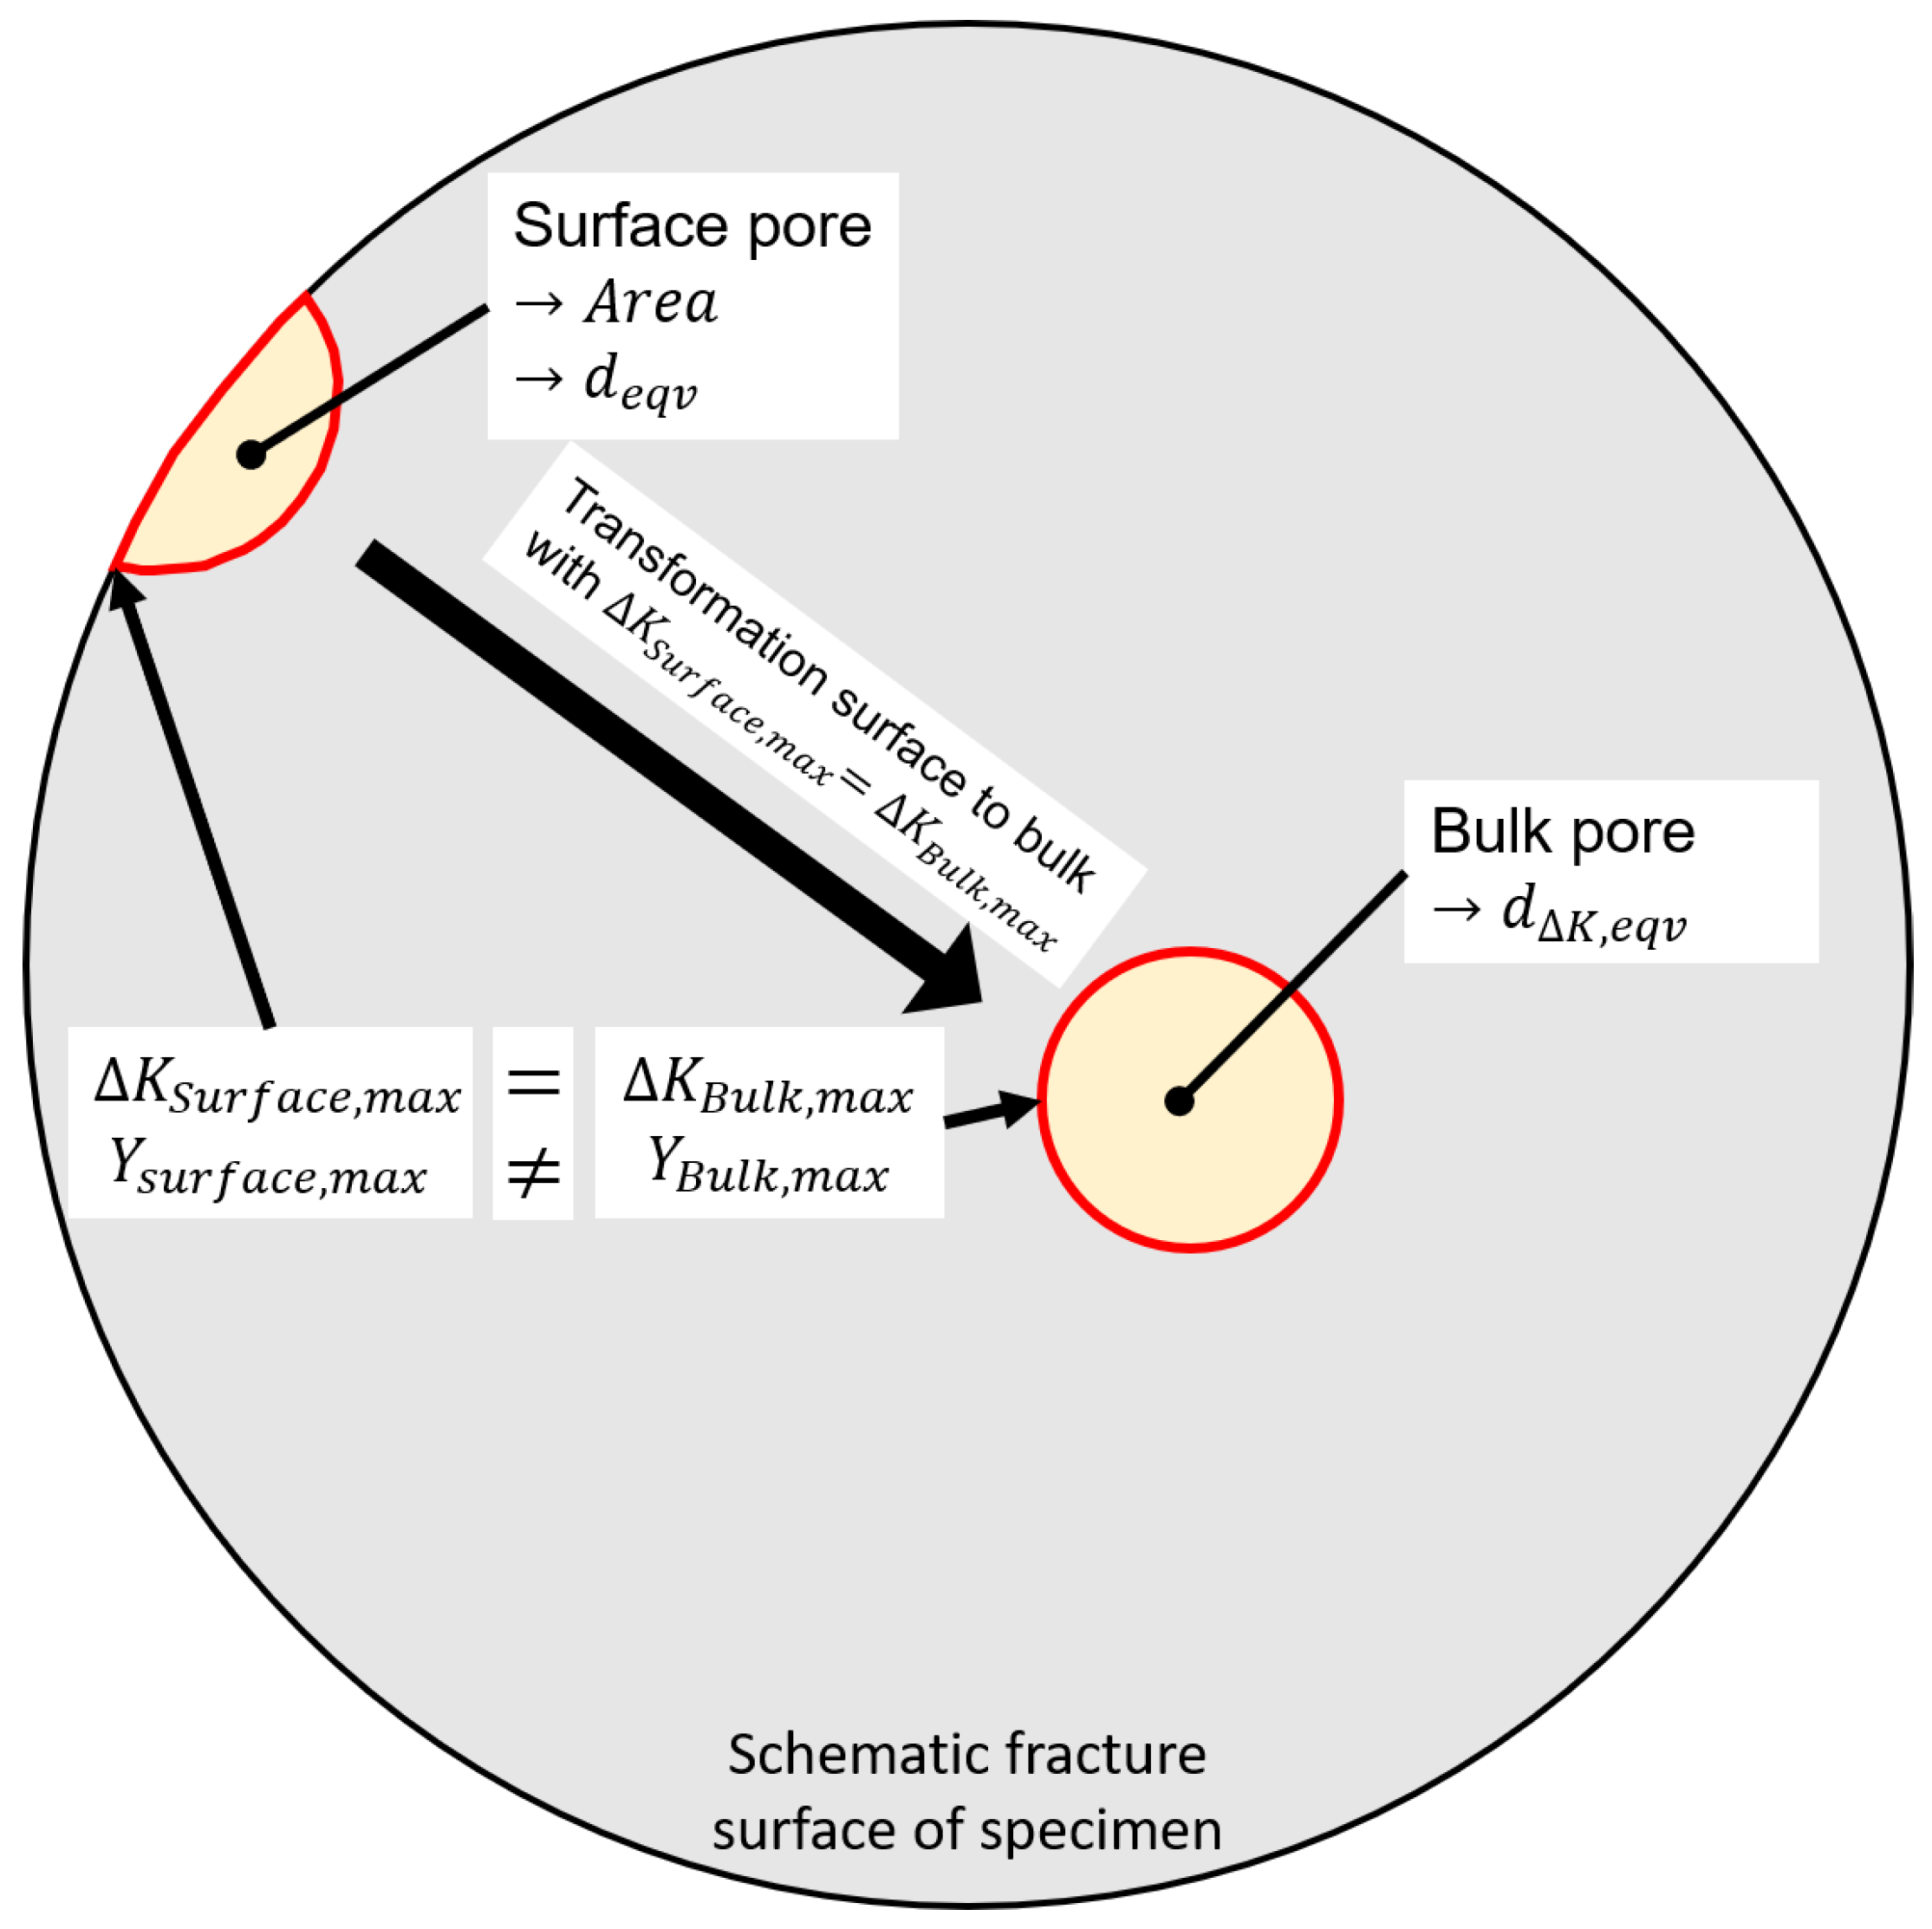
The scheme of the stress intensity equivalent K e q v approach for the transformation of a surface pore to an inner pore is illustrated in Figure 8. To sum this methodology up, when a pore at the surface is detected, the projected area A p r o j is measured and the equivalent diameter d e q v calculated in the same manner as for a bulk pore. Equivalent diameter d e q v is then transformed to d K , e q v with Equation (8). The geometry factors for the surface pore Y S u r f a c e , m a x and the bulk pore Y B u l k , m a x are taken out of the literature and are estimated based on the literature data for surface pore Y S u r f a c e , m a x = 0.75 and for bulk pore Y B u l k , m a x = 2 π [41]. Overall, the transformation factor is determined to be Y S u r f a c e , m a x Y B u l k , m a x 2 = 1.39 .
After extensive characterization of the occurring critical defects, the statistical Gumbel extreme value distribution is fitted to them. To do so, the cumulative extreme value distribution according to Gumbel (see Equation (2)) is fitted to the experimental data and the Gumbel parameters are evaluated by using a maximum likelihood function fit introduced in [42]. In order to evaluate the goodness of the fit and the improvement of the distribution regarding the K e q v modification, two additional fit tests are carried out. On the one hand, Anderson–Darling goodness [43] and Kolmogorov–Smirnov goodness [44] are utilized.
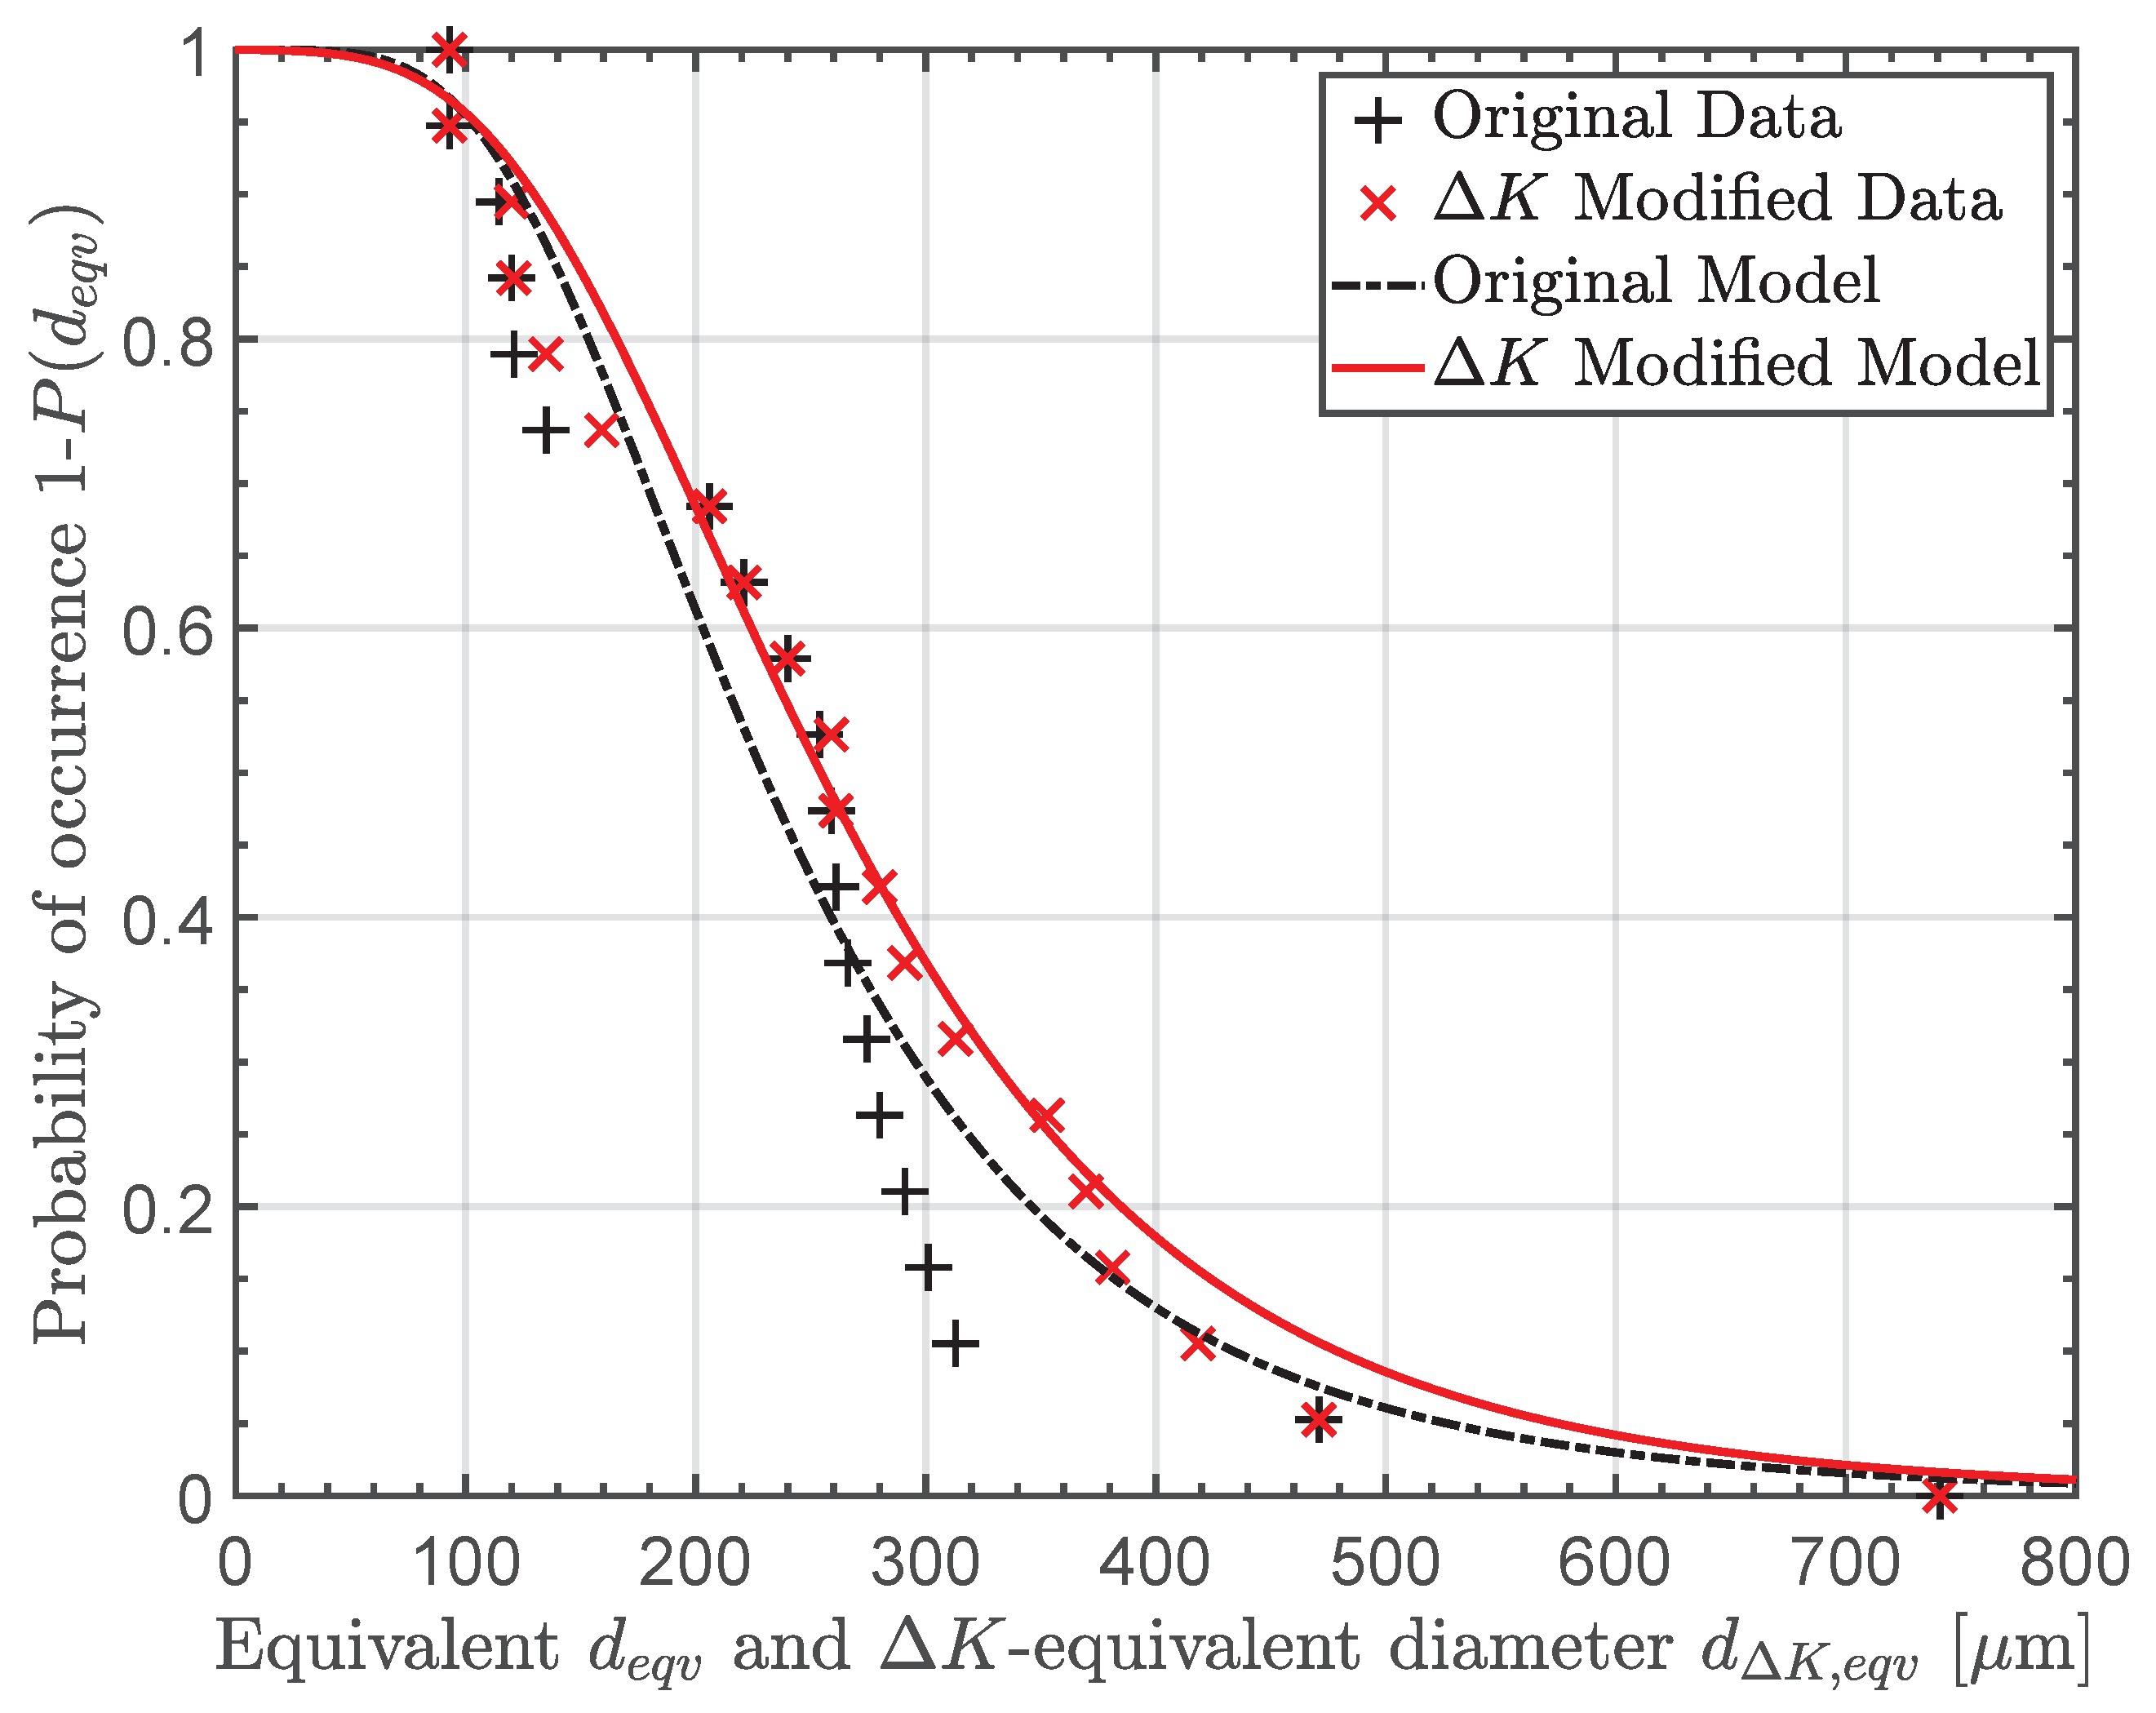
Additionally, to validate the stress intensity equivalent transformation of surface to bulk pores, the distribution fit was performed for two datasets. The first dataset is the original data without transformation and the second dataset is the K e q v modified set with the transformed surface pores. The scale δ and location parameter λ of the cumulative Gumbel distribution for the equivalent defect diameter and the Anderson–Darling A A D 2 and Kolmogorov–Smirnov p k o l goodness-of-fit test results are shown in Table 6. Both goodness of fit tests reveal significantly better results of the Gumbel distribution fit in the case of the K e q v modified dataset. A value of p k o l = 1 means that the distribution perfectly fits the data. Additionally, if the Anderson–Darling test variable is below A A D 2 < 0.75, then the distribution fit is valid [45]. Figure 9 outlines the cumulative probability of occurrence for both data sets and the data points for the fits. Thereby, an equivalent defect diameter of about 237 µm will occur with a 50% probability of occurrence in case of the original dataset and an equivalent defect diameter of about 276 µm in case the K e q v modified set. Hence, the equivalent diameter with 50% occurrence probability increases by about 16% with the use of the surface to bulk pore transformation, and additionally better fit results are found.

3.3. Fatigue Assessment Methodology

In order to estimate the fatigue life in the finite life region, the assessment model according to Tiryakioğlu was utilized, as introduced in Section 1. The necessary constants for the model in Equation (3) are the fitted Gumbel distribution parameters and the material constants B and m. The constant m is estimated to be 4 based on the literature data [46], and parameter B is evaluated to be about 3 × 10 18 by a best-fit approach. The assessment model is used for both datasets to validate the surface to bulk pore transformation, whereby the parameters of the Gumbel distribution are different. To validate assessment methodology, three different load levels and number of load cycles are used and subsequently compared to the experimental S-N data. In cases of a constant stress amplitude, the stress amplitudes are 200 MPa, 300 MPa, and 350 MPa, and in case of a constant number of load cycles, the chosen numbers of load cycles are 1 × 10 5 , 5 × 10 5 and 1 × 10 6 .
The results of the assessment for constant amplitudes are presented in Figure 10. Thereby, the probability of survival P S is calculated in accordance to Equation (3) with a constant amplitude σ a as a function of the number of load cycles until failure N f . Additionally, the experimental S-N data are plotted in Figure 10 to validate the assessment model. A comparison of results of the two different datasets with the experimental data is given in Table 7, whereby the number of cycles until failure for a probability of 50% and the scatter band are compared for different stress amplitude levels. The model with the original data overestimates the number of load cycles until failure. By comparison, the K e q v -modified model provides a slight underestimation. When the scatter bands are compared, the model with the modified data delivers a better agreement when compared with the original data. The assumption can be made that the model with the transformed dataset delivers results in good agreement with the experimental data, and it is necessary to use stress intensity-equivalent pore transformation.
The results of the assessment with a constant number of load cycles until failure are shown in Figure 11. For the evaluation of the survival probability in case of a constant number of load cycles, the stress amplitude is used as control variable. A comparison of the results for the two different datasets with the experimental data is given in Table 8, where the stress amplitudes for a survival probability of 50% and the scatter bands are compared for different numbers of load cycles until failure. The comparison of the assessed stress amplitude with the experimental data points out that the modified dataset delivers better results with a slight deviation of about 2%. Similar behavior as in the previous comparison for a constant stress amplitude arises: the model with the original data overestimates the experimental data, and the modified data delivers better results with a slight underestimation.

4. Discussion

Within fractographic and metallographic investigations, pores are found as failure origins in all specimens. These pores are detected on the surface as well as in the bulk of the specimen. To compare pores independent of their position, a transformation routine was successfully developed. The used Gumbel extreme value distribution is in a good agreement with the experimental measured pore sizes, when the size of surface pores is stress intensity equivalent transformed to a size of an inner pore. For an extended statistical validation of the defect distribution, future work will focus on non-destructive, computer tomographic scans of wire arc additive manufacturing structures. In the presence of defects, the assessment method developed by Tiryakioğlu, validated for cast material, is applicable to additive manufacturing material and delivers well suitable results when the presented surface pore transformation is utilized.
Comparison of assessment results with and without K e q v modification reveals in general an overestimation without modification and an underestimation with modification. In Figure 12, the modeled data are presented dependent on the experimental data. Both evaluations for constant stress amplitude σ a (Figure 12a) and constant number of load cycles until fracture N f (Figure 12b) reveal that the original model lies above the ideal coherence and the K e q v modified model lies slightly below or shows almost ideal coherence. The model without modification delivers an overestimation up to 14% and the model with K e q v modification an slight underestimation of up to −7%. This behavior can be described with the lower occurring defect size (50% probability) of about 237 µm without modification compared to 276 µm with K e q v modification.
For the final application of additive manufacturing components in aerospace, the proof reliability is of utmost importance and must be taken into account. The impact of reliability calculations is investigated in [47,48] for additive manufacturing parts in aerospace. There, a new assessment methodology is proposed taking reliability into account in addition to the probabilistic defect size distribution.

5. Conclusions

Based on the conducted investigations and presented results, we conclude the following:
  • Imperfections, in particular gas pores, significantly influence the fatigue strength of WAAM structures and should be taken into account within fatigue assessment methods.
  • A stress intensity equivalent transformation approach of surface pores to inner bulk material pores is presented and successfully validated.
  • A cumulative extreme value distribution by Gumbel fit extremal pore sizes. The fitted distribution reveals a sound agreement with the experimental defect size data with a goodness of fit test value of p k o l = 0.97, when the K e q v transformation of surface to inner pores is used. In contrast, the distribution fit with the unmodified defect sizes shows a lack of fit to the measured defects sizes with an goodness of fit test value of p k o l = 0.61. Thus, the K e q v transformation of surface to inner bulk pores leads to a significant improvement in the goodness of the distribution’s fit.
  • The used fatigue assessment method according to Tiryakioğlu is well applicable for this defect containing, additive manufacturing system structures. By utilizing the K e q v transformation, the fatigue assessment reveals a sound agreement with an underestimation of up to −7% compared to the experiments. Fatigue assessed with the original data reveals an overestimation of up to 14%. Therefore, fatigue estimation can be significantly improved by considering the K e q v transformation of surface pores to inner bulk pores.
Ongoing research focuses on non-destructive investigations of the defect sizes in WAAM structures, whereby computer tomographic scans are planned and will be used for a better statistical generation of the chosen cumulative extreme value distribution. Additional work is focusing on fracture mechanical crack growth tests to evaluate and validate the necessary parameters for the used assessment methodology. Further research is planned on additional effects on the fatigue strength of structures, such as residual stresses and their impact on the effective load stress ratio as well as the effect of different microstructures and the effect of anisotropy due to the directional solidification during additive manufacturing [49,50].

Author Contributions

Conceptualization, S.S. and M.L. (Martin Leitner); methodology, S.S. and M.L. (Martin Leitner); software, S.S.; validation, S.S. and M.L. (Martin Leitner); formal analysis, S.S. and M.L. (Martin Leitner); investigation, S.S.; resources, F.G., T.G., M.L. (Michael Lasnik) and B.O.; data curation, S.S.; writing—original draft preparation, S.S.; writing—review and editing, S.S., M.L. (Martin Leitner), F.G., T.G., M.L. (Michael Lasnik) and B.O.; visualization, S.S.; supervision, M.L. (Martin Leitner), T.G. and F.G.; project administration, S.S. and T.G.; funding acquisition, M.L. (Martin Leitner), M.L. (Michael Lasnik) and T.G. All authors have read and agreed to the published version of the manuscript.

Funding

This research was funded by the Austrian Federal Ministry for Climate Action, Environment, Energy, Mobility, Innovation and Technology (bmk) and the Federal Ministry for Digital and Economic Affairs (bmdw).

Institutional Review Board Statement

Not applicable.

Informed Consent Statement

Not applicable.

Data Availability Statement

Not applicable.

Acknowledgments

Special thanks are given to the Austrian Research Promotion Agency(FFG; project number 32765288), who funded the research project with funds of the Federal Ministry for Climate Action, Environment, Energy, Mobility, Innovation and Technology (bmk) and the Federal Ministry for Digital and Economic Affairs (bmdw).

Conflicts of Interest

The authors declare no conflict of interest. The funders had no role in the design of the study; in the collection, analyses or interpretation of data; in the writing of the manuscript; or in the decision to publish the results.

Abbreviations

The following abbreviations and symbols are used in this manuscript:
A p r o j                 Projected defect area of pore;
A A D 2                 Goodness of fit test value of the Anderson-Darling test;
a                Crack length;
B                Offset parameter;
d K , e q v                 Stress intensity equivalent diameter of defect;
d e q v                 Equivalent diameter of defect;
δ                 Scale parameter of the Gumbel distribution;
K                 Stress intensity factor;
K e q v                 Equivalent stress intensity factor;
K S u r f a c e , m a x                 Stress intensity factor of surface pore;
K B u l k , m a x                 Stress intensity factor of bulk pore;
k                Slope of S-N curve in finite life region;
λ                 Location parameter of the Gumbel distribution;
m                Slope of crack propagation in stable crack growth region;
N f                 Number of load cycles until failure;
P                Probability;
P O c c                 Probability of occurrence;
P s                 Probability of survival;
P f                 Probability of failure;
p k o l                 Goodness of fit test value of the Kolmogorov–Smirnov test;
R                Load ratio;
σ a                 Stress amplitude;
T N                 Scatter band of load cycles of the S/N-curve;
T S                 Scatter band of stress amplitude of the S/N-curve;
Y                Geometry factor;
Y S u r f a c e , m a x                 Geometry factor of surface pore;
Y B u l k , m a x                 Geometry factor of bulk pore;
A                Elongation at fracture;
UTS                Ultimate tensile strength;
WAAM                Wire arc additive manufacturing;
YS                Yield strength.

References

  1. Baufeld, B.; van der Biest, O.; Gault, R. Additive manufacturing of Ti–6Al–4V components by shaped metal deposition: Microstructure and mechanical properties. Mater. Des. 2010, 31, S106–S111. [Google Scholar] [CrossRef]
  2. Herzog, D.; Seyda, V.; Wycisk, E.; Emmelmann, C. Additive manufacturing of metals. Acta Mater. 2016, 117, 371–392. [Google Scholar] [CrossRef]
  3. Prakash, K.S.; Nancharaih, T.; Rao, V.S. Additive Manufacturing Techniques in Manufacturing—An Overview. Mater. Today Proc. 2018, 5, 3873–3882. [Google Scholar] [CrossRef]
  4. Kruth, J.P.; Leu, M.C.; Nakagawa, T. Progress in Additive Manufacturing and Rapid Prototyping. CIRP Ann. 1998, 47, 525–540. [Google Scholar] [CrossRef]
  5. Singh, S.R.; Khanna, P. Wire arc additive manufacturing (WAAM): A new process to shape engineering materials. Mater. Today Proc. 2020, 67, 1191. [Google Scholar] [CrossRef]
  6. Rodrigues, T.A.; Duarte, V.; Miranda, R.M.; Santos, T.G.; Oliveira, J.P. Current Status and Perspectives on Wire and Arc Additive Manufacturing (WAAM). Materials 2019, 12, 1121. [Google Scholar] [CrossRef] [PubMed] [Green Version]
  7. Frazier, W.E. Metal Additive Manufacturing: A Review. J. Mater. Eng. Perform. 2014, 23, 1917–1928. [Google Scholar] [CrossRef]
  8. Liu, S.; Shin, Y.C. Additive manufacturing of Ti6Al4V alloy: A review. Mater. Des. 2019, 164, 107552. [Google Scholar] [CrossRef]
  9. Martina, F.; Mehnen, J.; Williams, S.W.; Colegrove, P.; Wang, F. Investigation of the benefits of plasma deposition for the additive layer manufacture of Ti–6Al–4V. J. Mater. Process. Technol. 2012, 212, 1377–1386. [Google Scholar] [CrossRef] [Green Version]
  10. Springer, S.; Röcklinger, A.; Leitner, M.; Florian, G.; Gruber, T.; Lasnik, M.; Oberwinkler, B. Implementation of a viscoplastic creep model in the thermomechanical simulation of the WAAM process. Weld. World 2021, 66, 441–453. [Google Scholar] [CrossRef]
  11. de Jesus, J.; Martins Ferreira, J.A.; Borrego, L.; Costa, J.D.; Capela, C. Fatigue Failure from Inner Surfaces of Additive Manufactured Ti-6Al-4V Components. Materials 2021, 14, 737. [Google Scholar] [CrossRef] [PubMed]
  12. Sandell, V.; Hansson, T.; Roychowdhury, S.; Månsson, T.; Delin, M.; Åkerfeldt, P.; Antti, M.L. Defects in Electron Beam Melted Ti-6Al-4V: Fatigue Life Prediction Using Experimental Data and Extreme Value Statistics. Materials 2021, 14, 640. [Google Scholar] [CrossRef] [PubMed]
  13. Greitemeier, D.; Palm, F.; Syassen, F.; Melz, T. Fatigue performance of additive manufactured TiAl6V4 using electron and laser beam melting. Int. J. Fatigue 2017, 94, 211–217. [Google Scholar] [CrossRef]
  14. Akgun, E.; Zhang, X.; Biswal, R.; Zhang, Y.; Doré, M. Fatigue of wire+arc additive manufactured Ti-6Al-4V in presence of process-induced porosity defects. Int. J. Fatigue 2021, 150, 106315. [Google Scholar] [CrossRef]
  15. Beretta, S.; Romano, S. A comparison of fatigue strength sensitivity to defects for materials manufactured by AM or traditional processes. Int. J. Fatigue 2017, 94, 178–191. [Google Scholar] [CrossRef]
  16. Beretta, S.; Gargourimotlagh, M.; Foletti, S.; Du Plessis, A.; Riccio, M. Fatigue strength assessment of “as built” AlSi10Mg manufactured by SLM with different build orientations. Int. J. Fatigue 2020, 139, 105737. [Google Scholar] [CrossRef]
  17. Romano, S.; Brandão, A.; Gumpinger, J.; Gschweitl, M.; Beretta, S. Qualification of AM parts: Extreme value statistics applied to tomographic measurements. Mater. Des. 2017, 131, 32–48. [Google Scholar] [CrossRef] [Green Version]
  18. Romano, S.; Brückner-Foit, A.; Brandão, A.; Gumpinger, J.; Ghidini, T.; Beretta, S. Fatigue properties of AlSi10Mg obtained by additive manufacturing: Defect-based modelling and prediction of fatigue strength. Eng. Fract. Mech. 2018, 187, 165–189. [Google Scholar] [CrossRef]
  19. Romano, S.; Nezhadfar, P.D.; Shamsaei, N.; Seifi, M.; Beretta, S. High cycle fatigue behavior and life prediction for additively manufactured 17-4 PH stainless steel: Effect of sub-surface porosity and surface roughness. Theor. Appl. Fract. Mech. 2020, 106, 102477. [Google Scholar] [CrossRef]
  20. Valbruna Edel Inox GmbH. Material Datasheet Ti-Grade5/Ti-6Al-4V; Valbruna Edel Inox GmbH: Dormagen, Germany, 2021. [Google Scholar]
  21. Voestalpine Böhler Welding GmbH. Material Datasheet 3Dprint AM Ti Grade 5/Ti-6Al-4V; Voestalpine Böhler Welding GmbH: Düsseldorf, Germany, 2021. [Google Scholar]
  22. EN ISO 6892-1; Metallic Materials-Tensile Testing—Part 1: Method of Test at Room Temperature. Committee for Standardization: Brussels, Belgium, 2016.
  23. Tiryakioğlu, M. Statistical distributions for the size of fatigue-initiating defects in Al–7%Si–0.3%Mg alloy castings: A comparative study. Mater. Sci. Eng. A 2008, 497, 119–125. [Google Scholar] [CrossRef]
  24. Tiryakioğlu, M. On the size distribution of fracture-initiating defects in Al- and Mg-alloy castings. Mater. Sci. Eng. A 2008, 476, 174–177. [Google Scholar] [CrossRef]
  25. Gumbel, E.J. Statistics of Extremes; Columbia University Press: New York, NY, USA, 1958. [Google Scholar]
  26. Tiryakioğlu, M. On the relationship between statistical distributions of defect size and fatigue life in 7050-T7451 thick plate and A356-T6 castings. Mater. Sci. Eng. A 2009, 520, 114–120. [Google Scholar] [CrossRef]
  27. Tiryakioğlu, M. Relationship between Defect Size and Fatigue Life Distributions in Al-7 Pct Si-Mg Alloy Castings. Metall. Mater. Trans. A 2009, 40, 1623–1630. [Google Scholar] [CrossRef]
  28. Leitner, M.; Garb, C.; Remes, H.; Stoschka, M. Microporosity and statistical size effect on the fatigue strength of cast aluminium alloys EN AC-45500 and 46200. Mater. Sci. Eng. A 2017, 707, 567–575. [Google Scholar] [CrossRef]
  29. Aigner, R.; Leitner, M.; Stoschka, M.; Hannesschläger, C.; Wabro, T.; Ehart, R. Modification of a Defect-Based Fatigue Assessment Model for Al-Si-Cu Cast Alloys. Materials 2018, 11, 2546. [Google Scholar] [CrossRef] [Green Version]
  30. Paris, P.; Erdogan, F. A Critical Analysis of Crack Propagation Laws. J. Basic Eng. 1963, 85, 528–533. [Google Scholar] [CrossRef]
  31. Richard, H.A.; Sander, M. Ermüdungsrisse: Erkennen, Sicher Beurteilen, Vermeiden, 2nd ed.; Vieweg+Teubner Verlag: Wiesbaden, Germany, 2012. [Google Scholar] [CrossRef]
  32. Lin, J.J.; Lv, Y.H.; Liu, Y.X.; Xu, B.S.; Sun, Z.; Li, Z.G.; Wu, Y.X. Microstructural evolution and mechanical properties of Ti-6Al-4V wall deposited by pulsed plasma arc additive manufacturing. Mater. Des. 2016, 102, 30–40. [Google Scholar] [CrossRef]
  33. Wu, B.; Pan, Z.; Ding, D.; Cuiuri, D.; Li, H. Effects of heat accumulation on microstructure and mechanical properties of Ti6Al4V alloy deposited by wire arc additive manufacturing. Addit. Manuf. 2018, 23, 151–160. [Google Scholar] [CrossRef]
  34. Wang, F.; Williams, S.; Colegrove, P.; Antonysamy, A.A. Microstructure and Mechanical Properties of Wire and Arc Additive Manufactured Ti-6Al-4V. Metall. Mater. Trans. A 2013, 44, 968–977. [Google Scholar] [CrossRef]
  35. Xie, Y.; Gao, M.; Wang, F.; Zhang, C.; Hao, K.; Wang, H.; Zeng, X. Anisotropy of fatigue crack growth in wire arc additive manufactured Ti-6Al-4V. Mater. Sci. Eng. A 2018, 709, 265–269. [Google Scholar] [CrossRef]
  36. ASTM International E 739; Standard Practice for Statistical Analysis of Linear or Linearized Stress-Life (S-N) and Strain Life (E-N) Fatigue Data. ASTM: West Conshohocken, PA, USA, 2015.
  37. Razavi, S.M.J.; Bordonaro, G.G.; Ferro, P.; Torgersen, J.; Berto, F. Fatigue Behavior of Porous Ti-6Al-4V Made by Laser-Engineered Net Shaping. Materials 2018, 11, 284. [Google Scholar] [CrossRef] [PubMed] [Green Version]
  38. Haibach, E. Structural Durability: Procedures and Data for Calculation of Components (Original Title in German: Betriebsfestigkeit: Verfahren und Daten zur Bauteilberechnung), 3rd ed.; VDI-Buch, Springer: Berlin, Germany, 2006. [Google Scholar]
  39. Murakami, Y.; Beretta, S. Small Defects and Inhomogeneities in Fatigue Strength: Experiments, Models and Statistical Implications. Extremes 1999, 2, 123–147. [Google Scholar] [CrossRef]
  40. Irwin, G.R. Analysis of Stresses and Strains Near the End of a Crack Traversing a Plate. J. Appl. Mech. 1957, 24, 361–364. [Google Scholar] [CrossRef]
  41. Aigner, R.; Pusterhofer, S.; Pomberger, S.; Leitner, M.; Stoschka, M. A probabilistic Kitagawa-Takahashi diagram for fatigue strength assessment of cast aluminium alloys. Mater. Sci. Eng. A 2019, 745, 326–334. [Google Scholar] [CrossRef]
  42. Mahdi, S.; Cenac, M. Estimating Parameters of Gumbel Distribution using the Methods of Moments, probability weighted moments and maximum likelihood. Rev. Mat. Teor. Apl. 2005, 12, 151–156. [Google Scholar] [CrossRef] [Green Version]
  43. Anderson, T.W.; Darling, D.A. A Test of Goodness of Fit. J. Am. Stat. Assoc. 1954, 49, 765–769. [Google Scholar] [CrossRef]
  44. Massey, F.J. The Kolmogorov-Smirnov Test for Goodness of Fit. J. Am. Stat. Assoc. 1951, 46, 68–78. [Google Scholar] [CrossRef]
  45. Abidin, N.; Adam, M.; Midi, H. The goodness-of-fit test for Gumbel Distrubution: A comparative study. Matematika 2012, 28, 35–48. [Google Scholar]
  46. Syed, A.K.; Zhang, X.; Davis, A.E.; Kennedy, J.R.; Martina, F.; Ding, J.; Williams, S.; Prangnell, P.B. Effect of deposition strategies on fatigue crack growth behaviour of wire + arc additive manufactured titanium alloy Ti–6Al–4V. Mater. Sci. Eng. A 2021, 814, 141194. [Google Scholar] [CrossRef]
  47. Coro, A.; Abasolo, M.; Aguirrebeitia, J.; López de Lacalle, L.N. Inspection scheduling based on reliability updating of gas turbine welded structures. Adv. Mech. Eng. 2019, 11. [Google Scholar] [CrossRef] [Green Version]
  48. Coro, A.; Macareno, L.M.; Aguirrebeitia, J.; López de Lacalle, L.N. A Methodology to Evaluate the Reliability Impact of the Replacement of Welded Components by Additive Manufacturing Spare Parts. Metals 2019, 9, 932. [Google Scholar] [CrossRef] [Green Version]
  49. Pérez-Ruiz, J.D.; de Lacalle, L.N.L.; Urbikain, G.; Pereira, O.; Martínez, S.; Bris, J. On the relationship between cutting forces and anisotropy features in the milling of LPBF Inconel 718 for near net shape parts. Int. J. Mach. Tools Manuf. 2021, 170, 103801. [Google Scholar] [CrossRef]
  50. Tolosa, I.; Garciandía, F.; Zubiri, F.; Zapirain, F.; Esnaola, A. Study of mechanical properties of AISI 316 stainless steel processed by “selective laser melting”, following different manufacturing strategies. Int. J. Adv. Manuf. Technol. 2010, 51, 639–647. [Google Scholar] [CrossRef]
Figure 1. Experimental setup for additive manufacturing.
Metals 12 00795 g001
Figure 2. Additively manufactured structure for experiments and schematic specimen positions.
Metals 12 00795 g002
Figure 3. Geometry of test specimen in [mm]. (a) Quasi-static tensile test. (b) Fatigue test.
Metals 12 00795 g003
Figure 4. Representative tensile test with specimen extracted in horizontal direction.
Metals 12 00795 g004
Figure 5. Experimental fatigue test results.
Metals 12 00795 g005
Figure 6. Gas pore within bulk material as representative inner defect.
Metals 12 00795 g006
Figure 7. Gas pore at surface as representative surface defect.
Metals 12 00795 g007
Figure 8. Schematic illustration of the surface to bulk pore transformation.
Metals 12 00795 g008
Figure 9. Cumulative probability of occurrence dependent on equivalent and K -equivalent defect size.
Metals 12 00795 g009
Figure 10. Model validation for constant stress amplitude.
Metals 12 00795 g010
Figure 11. Model validation for constant load cycles.
Metals 12 00795 g011
Figure 12. Comparison of results by experimental and model. (a) For constant load stress amplitude σ a . (b) For constant number of load cycles N f .
Metals 12 00795 g012
Table 1. Nominal chemical composition of the used material in weight %, comparable to [20,21].
AlVFeONCHTi
Substrate5.50–6.753.50–4.50<0.30<0.20<0.05<0.08<0.015Balance
Wire6.004.00<0.150.18<0.03<0.05<0.01Balance
Table 2. Used WAAM building parameters.
Process ParameterUnitValue
CurrentA92.0
VoltageV18.1
Travel speedmm/s2.5
Wire feed speedm/min5.0
Wire diametermm1.2
Table 3. Summarized mechanical properties of tensile tests extracted in horizontal directions.
ConditionOrientationUTS [MPa]YS [MPa]A (%)References
As-builtHorizontal957 ± 4867 ± 166 ± 1This study
As-builtHorizontal923–995840–9095–11[32,33,34,35]
Table 4. Evaluated fatigue test data.
ConditionOrientation σ a , P s 50 , N 1 × 10 5 [MPa]Slope k1: T S 1: T N
As-builtHorizontal261.64.401.434.78
Table 5. Position, size and equivalent diameter of the detected pores.
SpecimenPore PositionArea [µm2] d eqv [µm] d Δ K , eqv [µm]
1Bulk38,360221 } = ^
2Bulk14,314135
3Bulk11,310120
4Bulk53,502261
5Bulk76,945313
6Bulk45,239240
7Bulk52,685259
8Surface59,155274381
9Surface50,636253353
10Bulk61,757280 } = ^
11Bulk66,508291
12Surface71,227301418
13Bulk431,247741 } = ^
14Bulk174,234471
15Bulk11,499121
16Surface55,623266370
17Surface10,311114159
18Bulk33,329206 } = ^
19Bulk679393
Table 6. Estimated Gumbel distribution parameters and goodness of fit test.
Dataset λ [µm] δ [µm] A AD 2 p Kol
Original202.396.30.740.61
K e q v Modified232.9119.80.330.97
Table 7. Fatigue assessment model validation for constant stress amplitude.
Dataset σ a = 200 MPa σ a = 300 MPa σ a = 350 MPa
N f , P s = 50 % 1: T N N f , P s = 50 % 1: T N N f , P s = 50 % 1: T N
Experiment 3.3 × 10 5 4.78 5.5 × 10 4 4.78 2.8 × 10 4 4.78
ModelOriginal 3.7 × 10 5 4.39 6.2 × 10 4 4.38 3.2 × 10 4 4.38
Deviation13% 13% 14%
Model K e q v Modified 3.1 × 10 5 5.12 5.1 × 10 4 5.12 2.6 × 10 4 5.12
Deviation−6% −6% −6%
Table 8. Fatigue assessment model validation defined number of load cycles.
Dataset N f = 1 × 10 6 N f = 5 × 10 5 N f = 1 × 10 5
σ a , P s = 50 % [MPa]1: T S σ a , P s = 50 % [MPa]1: T S σ a , P s = 50 % [MPa]1: T S
Experiment 1551.431821.432621.43
ModelOriginal1591.401871.402691.40
Deviation3% 3% 3%
Model K e q v Modified1531.451791.452581.45
Deviation−2% −2% −1%
Publisher’s Note: MDPI stays neutral with regard to jurisdictional claims in published maps and institutional affiliations.