Article

Recrystallization Mechanism and Processing Map of 18CrNiMo7-6 Alloy Steel during Hot Deformation

1
School of Materials Science and Engineering, Shanghai University, Shanghai 200444, China
2
East China Branch of CISRI, Huaian 223007, China
3
School of Materials Science & Engineering, Jiangsu University, Zhengjiang 212013, China
4
School of Materials and Chemical Engineering, Anhui Jianzhu University, Hefei 230601, China
*
Author to whom correspondence should be addressed.
Metals 2022, 12(5), 838; https://doi.org/10.3390/met12050838
Submission received: 10 April 2022 / Revised: 8 May 2022 / Accepted: 12 May 2022 / Published: 13 May 2022
(This article belongs to the Topic Advanced Forming Technology of Metallic Materials)

Abstract

:
In this study, isothermal single-pass forming doformation of forged 18CrNiMo7-6 alloy steel was carried out by Gleeble-3500 thermal simulation testing machine. The constitutive equations and processing maps with parameters of deformation temperature and strain rate were established. The results show that the optimum hot deformation parameters are temperature 1050 °C, strain rate 0.1 s–1 with the peak power efficiency being 0.432. The mechanism of grain refinement during hot compression was also characterized by electron backscatter diffraction (EBSD). The results show that continuous dynamic recrystallization (CDRX), discontinuous dynamic recrystallization (DDRX) and grain growth are the main microstructure evolution mechanisms during hot working. The rotation of sub-grains under CDRX mechanism is the main factor for the formation of new grains. In addition, the DDRX mechanism is formed by the bulging of HAGBs at the grain boundary triple junction of the original grains, and the CDRX mechanism forms finer grains. The study also found that temperature affected the organization evolution mechanism, the DDRX mechanism plays a leading role when the temperature is low. With the increase of deformation temperature, CDRX begins to play a leading role and forms finer grains. When the deformation temperature rises to 1150 °C, the grains continue to grow at a higher temperature.

1. Introduction

The surface hardening 18CrNiMo7-6 steel has the main characteristics of high wear resistance, good fatigue performance and high cost performance [1]. As a widely used carburizing alloy in wind turbine gear, it has industrial application value [2]. Conventional 18CrNiMo7-6 alloys produce fine dispersed AlN and NbC by adding a small amount of aluminum and niobium, pinning grain boundaries to prevent grain boundary from moving so as to achieve the purpose of grain refinement. In addition, Al is insoluble in carbides, which can delay the formation of cementite and stabilize the retained austenite in the matrix. The contents of Cr and Mo are added to the steel, which produces carbides; they hinder C diffusion but they are necessary for the surface hardness and carburizing depth [3,4]. Ni is a stable austenite element, which replaces Mn in steel and reduces austenite transformation temperature, increasing the possibility of C enrichment in austenite [5].
The final grain size of the alloy determines the mechanical properties. During hot working of 18CrNiMo7-6 alloy steel, forming thermodynamic parameters such as temperature, strain rate, and deformation degree has significant influence on the deformation behavior [6,7]. The dynamic recrystallization counteracts strain hardening caused by material machining and results in grain refinement [6,7,8,9,10,11]. However, dynamic recovery occurs during hot deformation, which reduces dislocation density, competes with dynamic recrystallization, and hinders grain refinement.
In recent years, scholars have conducted a lot of research in the field of metal hot deformation behavior. Prasad [12] proposed the instability criterion based on the dynamic material model (DMM) [13], and established the processing map under the corresponding deformation conditions. The process map can clearly point out the instability zone in the process of metal hot deformation, which can optimize the process parameters of heat treatment and ultimately improve the system properties of materials. Therefore, to study the hot working process of metal, it is necessary to establish the process map and study the microstructure evolution behavior in the process of hot deformation. M.G. Jiang [14] believes that the change of matrix texture during extrusion is mainly caused by twins and subsequent CDRX and DDRX, and the process parameters such as temperature in the deformation can also affect them. Therefore, the study of microstructure evolution during hot deformation and the establishment of processing map are the key to the study of metal processing technology. However, previous researches on 18CrNiMo7-6 alloy steel tend to study the influence of its chemical composition on alloy properties, and there are few investigations to report the microstructure evolution of alloy materials during hot deformation. In this paper, the single-pass thermal doformation test of 18CrNiMo7-6 alloy steel were carried out. The constitutive equation of peak stress in the process of hot deformation was established, and the processing map under various strain variables were drawn. The mechanism of dynamic recrystallization (DRX) during hot deformation was observed by electron backscatter diffraction (EBSD). Finally, this paper determined the optimal hot deformation process conditions of alloy materials, and studied the microstructure evolution and recrystallization mechanism during hot deformation.

2. Experimental

The raw materials were machined into cylinders with Φ8 mm × 12 mm and the Gleeble-3500 test machine was used to perform isothermal single-pass doformation experiments, the nominal chemical composition (wt%) of 18CrNiMo7-6 steel is as follows: C 0.17, Si 0.20 Cr 1.66, Ni 1.60, Mo 0.28, Mn 0.69, Cu 0.04, and Nb 0.03; the balance is Fe (mass%). To prevent the oxidation of the sample during high temperature deformation, the test sample was vacuumized before being heated. The tantalum foil with thickness of 0.1 mm is placed on both ends of the specimen to reduce friction between the specimen and the stock and to make the specimen deformation uniform during the test. The specimens were heated to 1200 °C at a heating rate of 10 °C·s−1 and then insulated for 5 min. The experimental specimens was cooled down to the experimental temperature at a cooling rate of 5 °C·s−1 and kept for 30 s, and then the single-pass isothermal doformation experiment was conducted. Figure 1a shows the procedure of hot doformation test. After the doformation test, the specimens were quenched to retain the high temperature deformed microstructure under different deformation conditions. The quenched specimens were cut perpendicular to the doformation axis and then electrolytically polished. JSM-700F SEM scanning electron microscope with Hikari XP EBSD system was used to observe the microstructure of the specimen with a step length of 0.13 μm. Thin plate specimen of alloy 8 mm × 5 mm × 3 mm, processed by molybdenum wire cutting machine. Figure 1b is the schematic diagram of sample size and test direction.

3. Results and Discussion

3.1. Correction of Friction and Temperature

In the process of single-pass doformation, the friction between the specimens and the tungsten carbide indenter cannot be completely eliminated by the tantalum chip, resulting in the detected flow stress value greater than the real value. Therefore, a friction correction model should be introduced to correct the flow curve [15]:
  σ = σ i ( 1 + ( 2 3 3 ) f ( r 0 h 0 ) exp ( 3 ε / 2 ) )
where σ i is the friction correction flow stress; σ is measured flow stress; ε   is the strain, f is the friction factor; r0 and h0 are the initial radius heights of the specimen, respectively. According to Ebrahimi [16], friction factor f can be computed by the following equation:
f = 4 r m r s h 0 h / ( 4 3 2 b 3 3 )
  b = 4 ( r m r s ) h r 0 ( h 0 h ) 3 / 2
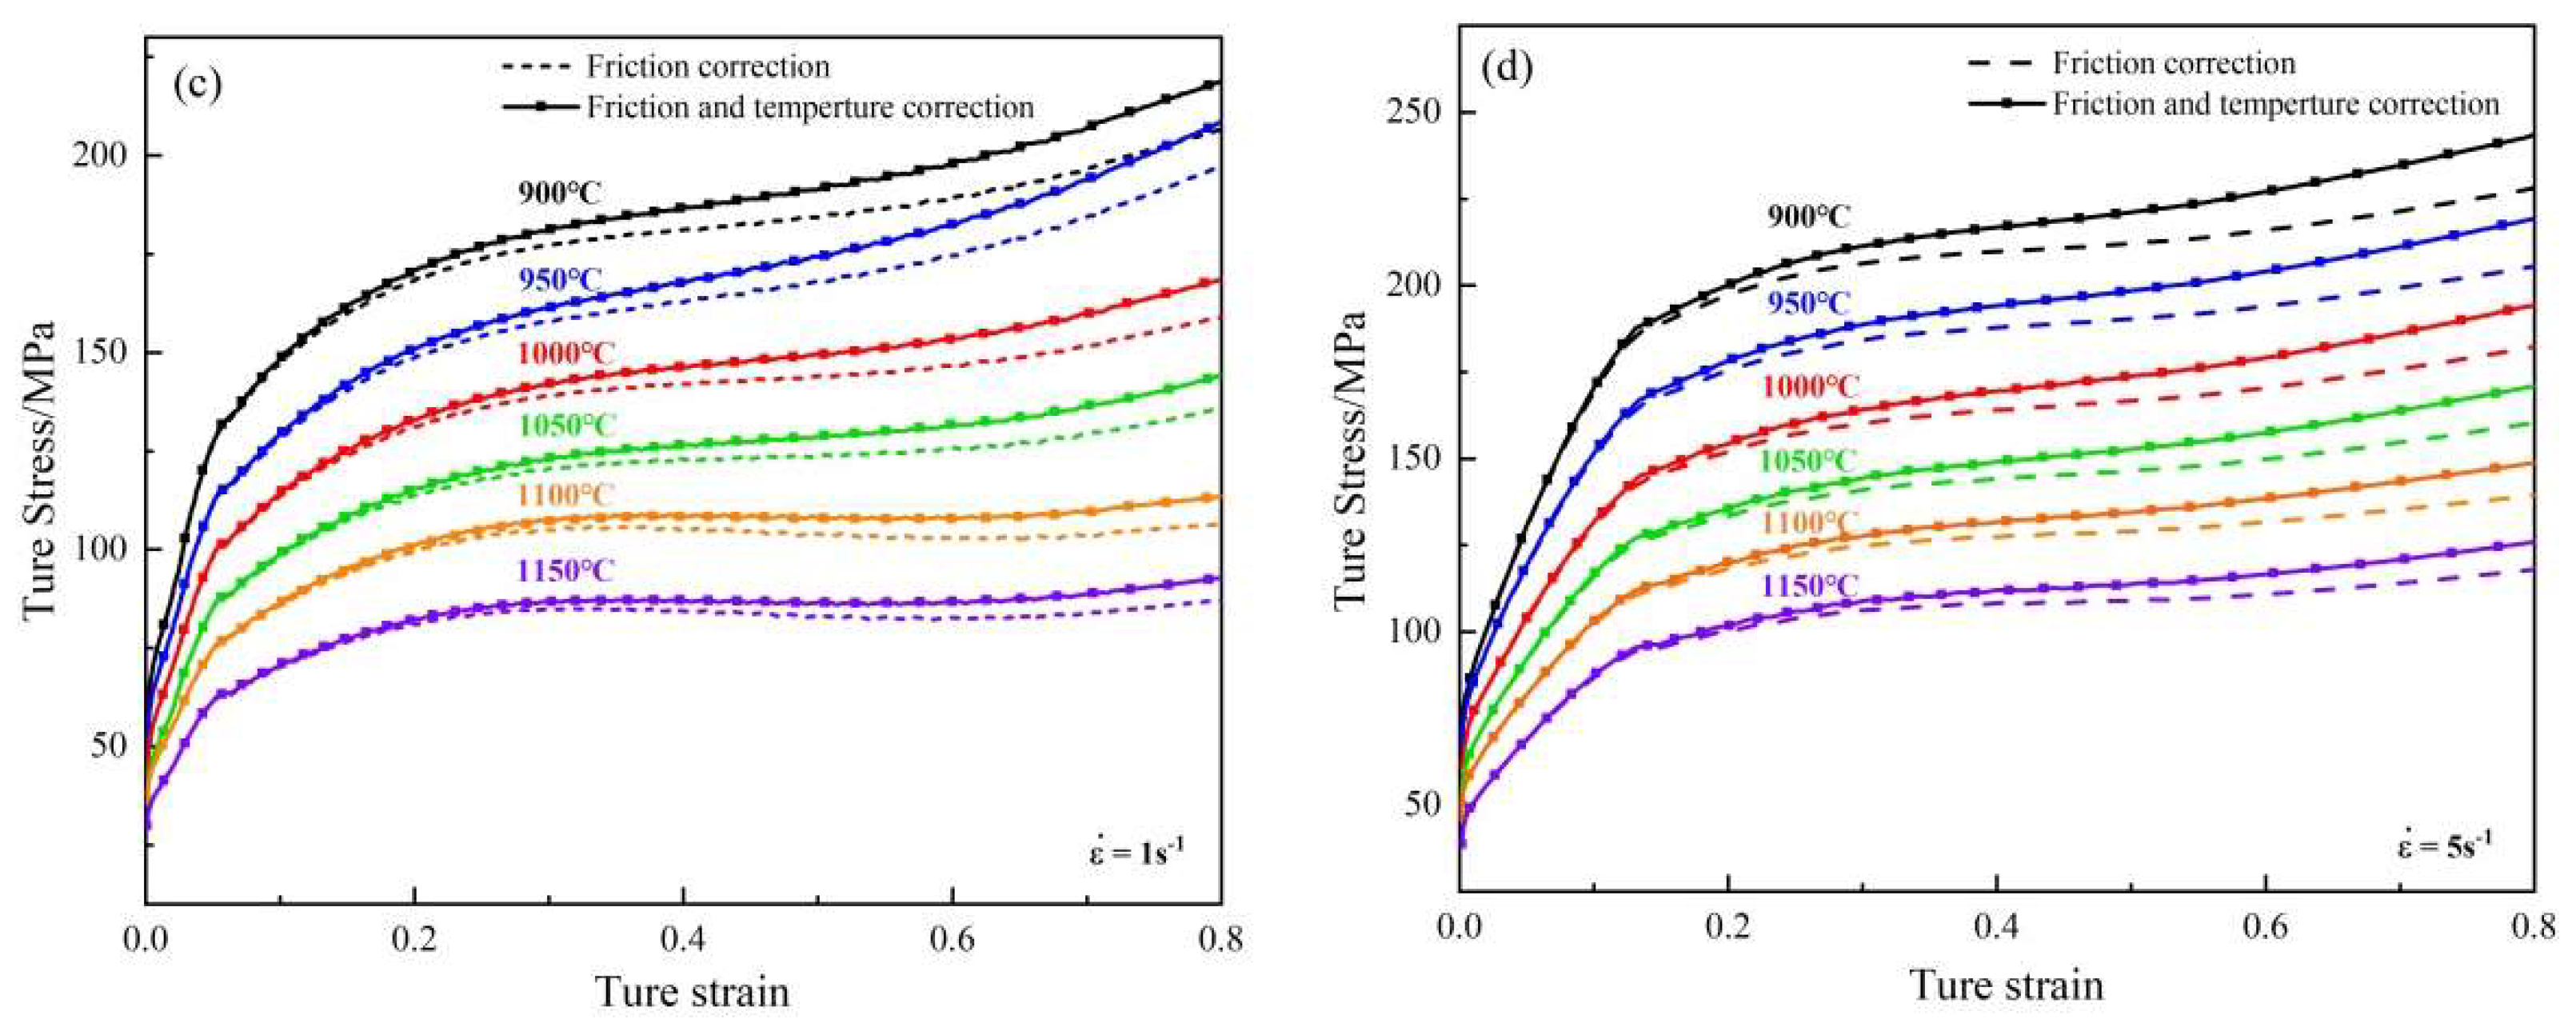
where h is the height of the sample after doformation; r m is maximum radius of the compressed specimen; r s is the section radius of the specimen after doformation; b is the barrel parameter. Figure 2a,b shows the corrected flow stress curve. It can be seen that the flow stress after friction correction is lower than the measured flow stress, and the friction correction value increases with the increase of deformation degree. The decrease of deformation temperature or the increase of strain rate will increase the influence of friction on flow stress.
In the hot deformation experiment, the adiabatic heating phenomenon caused by the rapid thermal deformation process will lead to the measured value of flow stress smaller than the real value. The following equation is used to correct the flow stress value [15]:
σ t   =   σ i   +   0 . 95 η ρ C p ( 0 ε σ i d ε ) ( d σ i dT ) ε ˙ , ε
where ρ is the density of the alloy; C p is the specific heat capacity; η is the adiabatic correction factor. It can be calculated by the following equations [17]:
  η = ( 1 + ( H ε ) / ( x w ρ C p ε ˙ ) ) 1
  H = 1 / [ x w / K w + 1 / HTC + x D / K D ]
where x w is half height value of specimen; x D is the length of the uniform temperature position between the mold surface and inside; K w is specimen thermal conductivity; K D is die thermal conductivities; HTC is the interface heat-transfer coefficient. The parameters in the above formula are shown in Table 1. When the strain rate is lower than 1 s−1, the effect of adiabatic temperature rise can be ignored, but the effect is more obvious at high strain rate [15]. In this paper, the flow stress curve at strain rate 1 s−1 and 5 s−1 will be further corrected on the basis of friction coefficient correction. The revised flow stress curves are shown in Figure 2c,d.

3.2. Flow Behavior

The hot deformation flow stress curves of 18CrNiMo7-6 alloy steel under various temperatures and strain rates were studied experimentally Figure 2 shows the flow curves under various machining parameters, and flow curves show that the value of true stress is correlated with deformation temperature and rate, and is inversely proportional to temperature and directly proportional to rate. This is due to the fact that the increase of strain rate, dislocation density and work hardening, which make the flow stress increase. When the temperature increases, the resistance of dislocation movement affected by thermal activation decreases significantly, resulting in the decrease of flow stress [18].
It is generally believed that dynamic softening and work hardening are two competing complex mechanisms during the process of hot deformation. At the initial stage of machining, the increase of deformation results in greater misorientation, increased dislocation resistance and obvious work hardening. As deformation continues, dynamic recovery and recrystallization mechanisms begin, competing with work hardening, and flow stresses do not increase or decrease [19].
The energy storage of deformation in the material continues to increase with the process of deformation, leading to intensified atomic movement, and the dislocated atoms return to normal arrangement, eliminating lattice distortion, and the material dynamic recovery (RDV) occurs at this time. When the test temperature increases, the dynamic recrystallization (RDX) of the material occurs, and the combined effect of the two makes the work hardening of the material weaken [20].
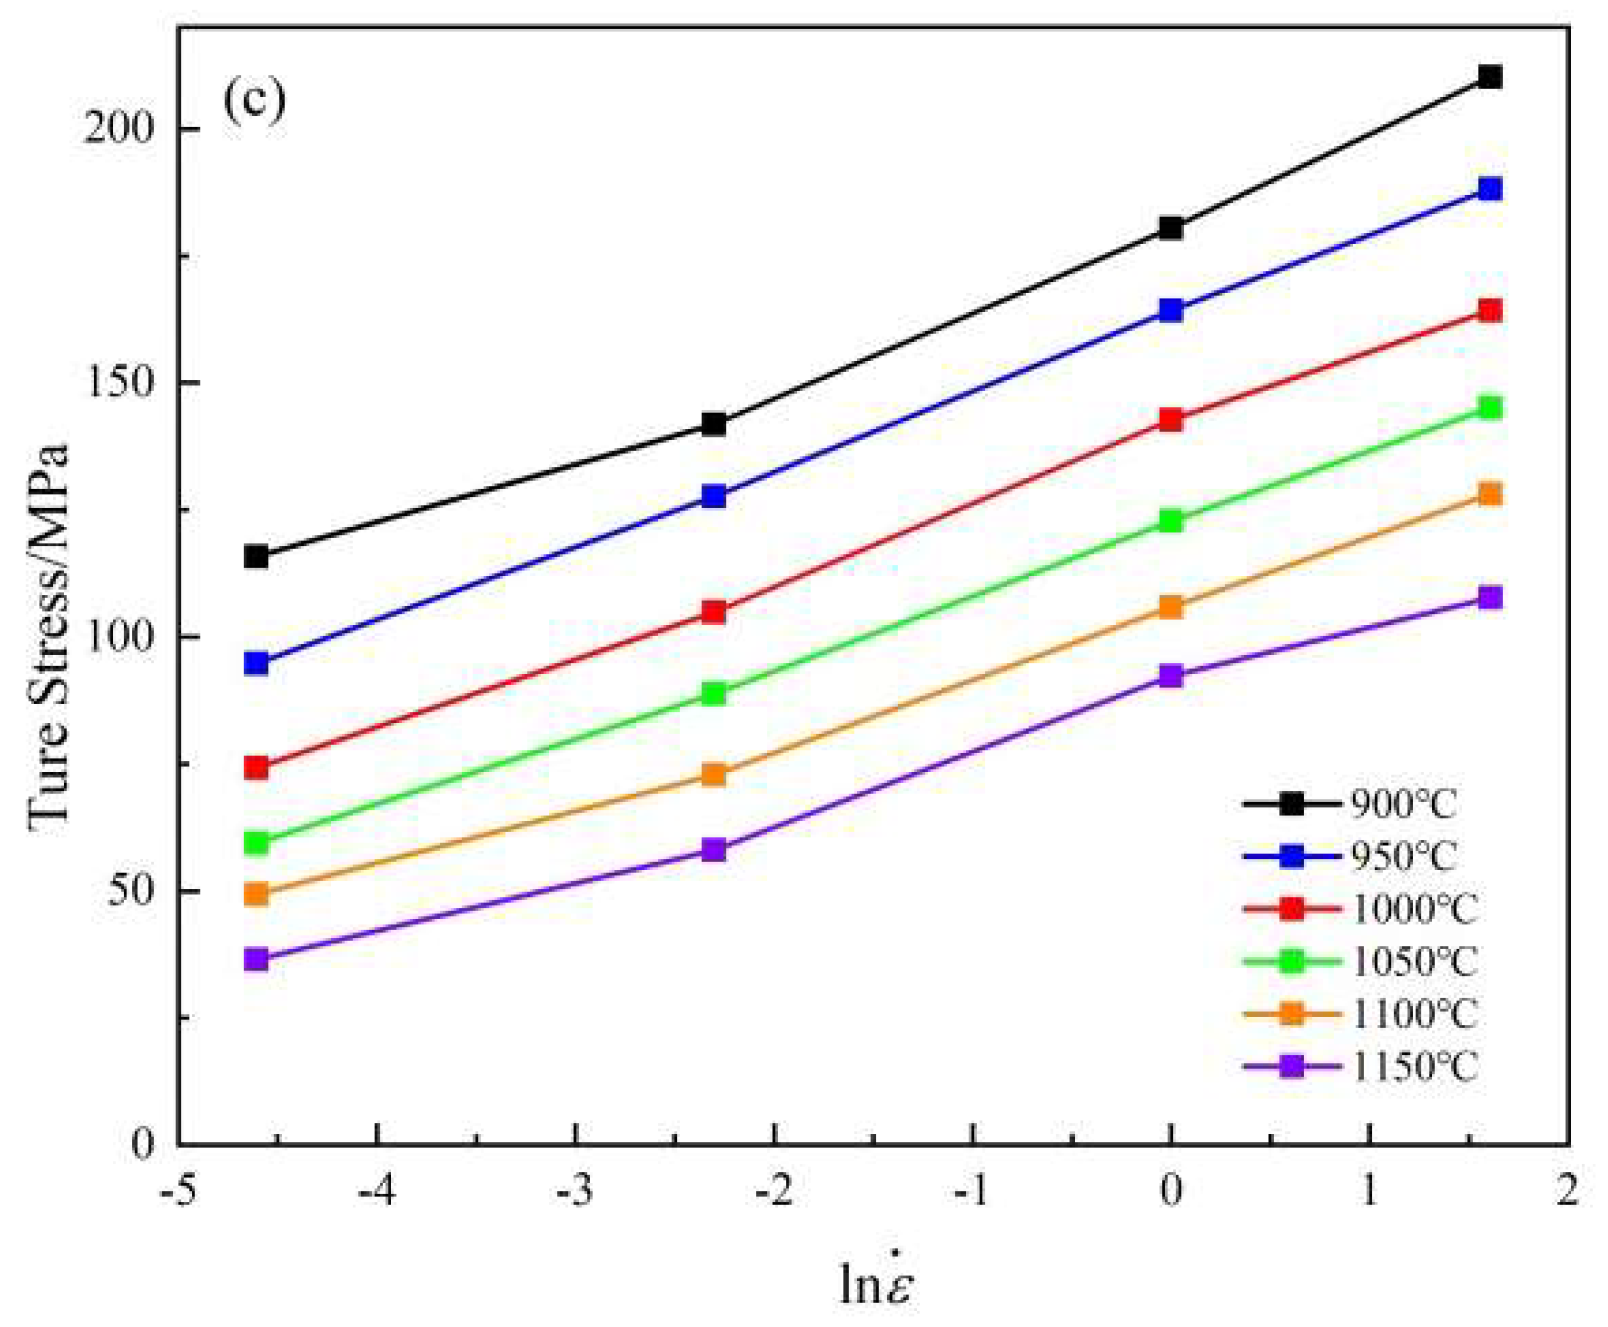
It can be seen from Figure 2 that under the condition of high temperature and low strain rate, The flow curves exhibit the pronounced stress peaks that are indicative of the occurrence of DRX. Figure 3a is the flows stress curve when the deformation temperature is 1050 °C and the deformation rate is 0.01 s−1. The flow stress curve showed obvious dynamic recrystallization characteristics. When the flow stress reached the peak value, the flow stress curve decreased significantly with the increase of strain. From the perspective of slope, the slope of the flow stress curve was 0 when the strain reached the peak strain, and the peak stress was 58.14 MPa. However, in the case of low temperature or high strain rate, Figure 3b shows the flow stress curve when the deformation temperature is 900 °C and the deformation rate is 0.1 s−1. The shapes of the flow curves suggest that the only restoration mechanism in the steel is DRV and that DRX has not been initiated. However, JONAS [21] believes that the strain hardening curve of the specimen was curved, indicating that DRX occurred. The steady state stress is calculated as the peak stress. When the quadratic differential value of the flow stress curve is 0, the change rate is the smallest, and the corresponding stress is the peak stress. At this time, the peak stress is 141.80 mPa.

3.3. Constitutive Equation of Hot Deformation

The establishment of constitutive equations can obviously show the relationship between hot working parameters and high temperature mechanical properties of materials. The hyperbolic sine function Arrhenius equation proposed by Sellars and Tegart [22,23,24,25] is widely used in high temperature deformation of materials. These expressions Equations (7)–(9) are as follows:
ε ˙   =   A σ n 1 exp ( Q R T ) ,   α σ   <   0.8
ε ˙   = A exp ( β σ ) exp ( Q R T ) ,   α σ   >   1.2
ε ˙   = A [ sin h ( α σ ) n ] exp ( Q R T ) ,   ( for   all )
where T is the Kelvin temperature (K), R is the gas constant (8.314 J mol−1•K−1), ε ˙ is the strain rate (s−1), Q is the activation energy (J•mol−1), and σ is the flow stress (mPa) and its value is the peak stress. And A, n1, n, α, and β are material constants, and the strain factor α = β/n1. The following can be obtained by separately calculating the logarithms of the above Equations:
ln ε ˙   =   n 1 ln σ   +   ln B
ln ε ˙   =   β σ +   ln B
ln ε ˙   =   ln A + n ln [ sin h ( α σ ) ]     Q R T
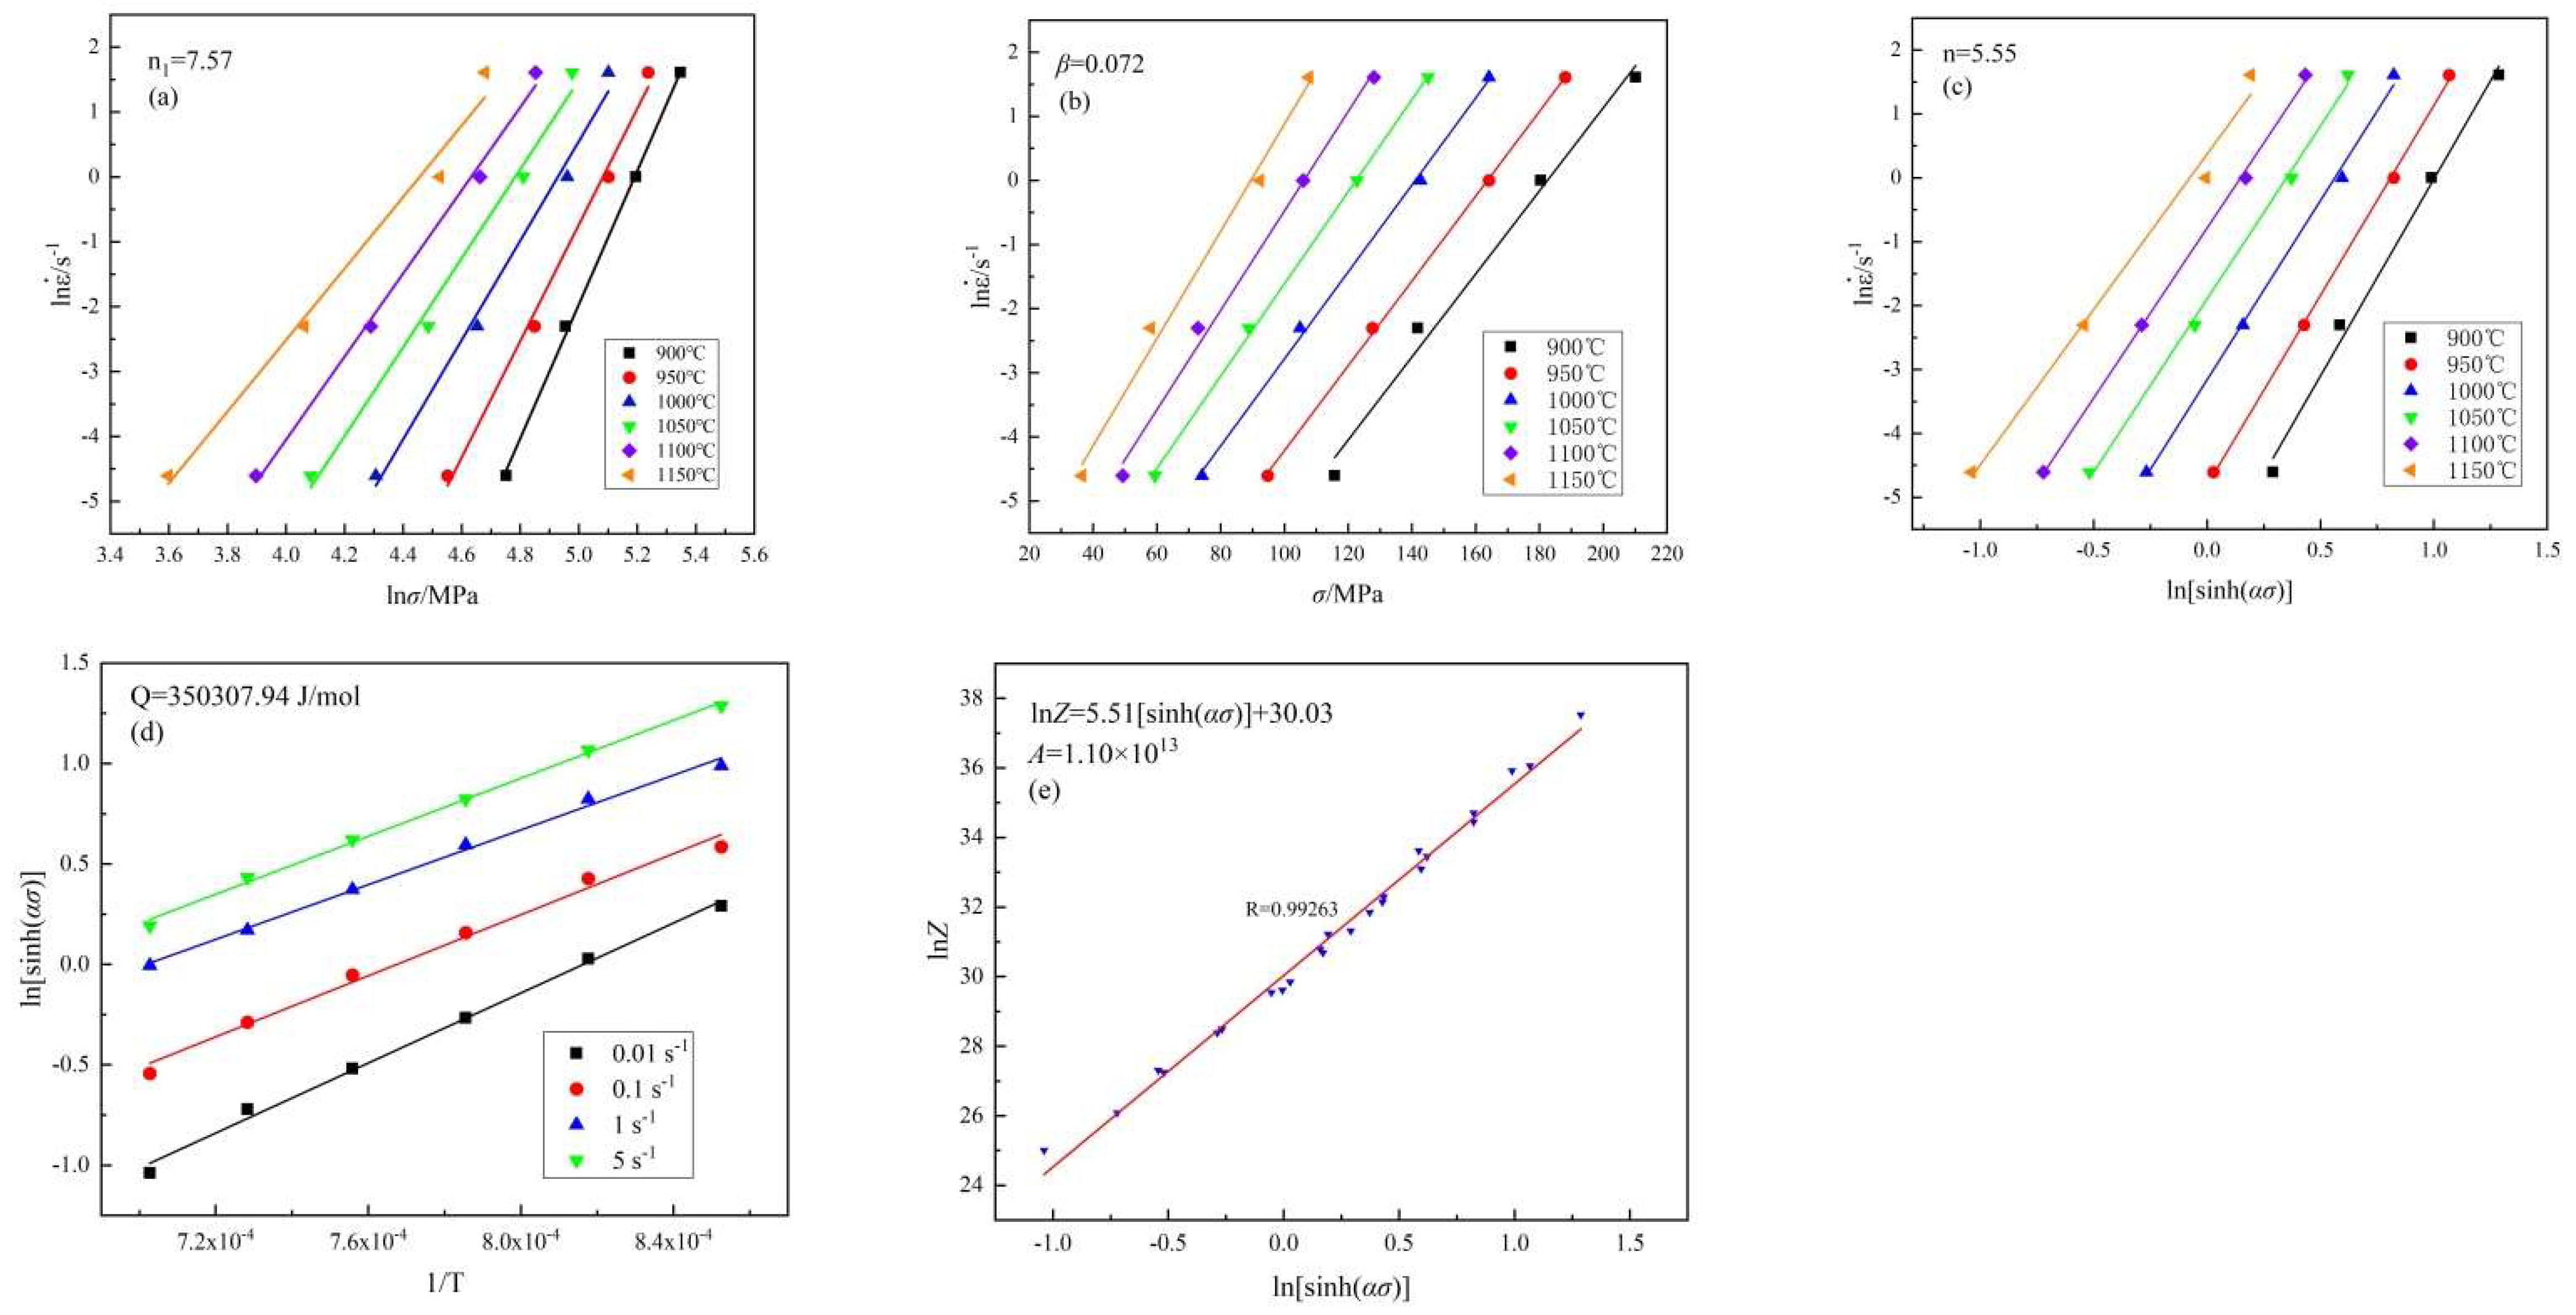
It can be seen from Equations (3)–(5) that   ln ε ˙ ln σ , ln ε ˙ σ and ln ε ˙ ln [ sin h ( α σ ) ] all follows a linear relationship, and constants α, β and n are the slopes of the fitting lines. The activation energy Q can be determined from Equation (13) [26].
  Q = R n { ln [ sin h ( α σ ) ] ( 1 / T ) } ε ˙
The Zener–Hollomon parameter (Z parameter) first proposed by Zener and Hollomo [27,28,29] was used to represent the synergistic effect of deformation temperature and strain rate on deformation behavior:
Z   =   ε   ˙ exp ( Q R T ) = A [ sin h f ( ) ( α σ ) ] n
After taking the logarithm of the above Equations, the following linear relations can be obtained: ln ε ˙ ln σ , ln ε ˙ σ , ln ε ˙ ln [ sin h ( α σ ) ] , ln [ sin h ( α σ ) ] 1000 / T and lnZ [ sin h ( α σ ) ] were displayed in Figure 4.
According to calculations, the values of the material constants are obtained as n1 = 7.57, β = 0.072, α = β/n1 = 0.0095, Q = 350,307.94 J/mol, A = 1.10 × 10¹³. Therefore, the hot deformation constitutive equation of 18CrNiMo7-6 alloy steel can be expressed as follows:
ε ˙   =   1.10   ×   10 13 [ sin h ( 0.0095 σ ) 5.55 ] exp ( 350 , 307.94 R T )
The hyperbolic sine function can be expanded by mathematical transformation and Equation (10) can be written as follows:
σ ( ε ˙ , T )   =   ( 1 α ) ln { ( Z / A ) 1 / n   +   [ ( Z / A ) 2 / n   +   1 ] 1 / 2 }
Equation (16) can be used to estimate the flow stress under high temperature deformation. Parameters in the Arrhenius model established by peak flow stress and corresponding temperature and strain rate data of 18CrNiMo7-6 alloy steel are substituted into the Equation (16) and the Stress prediction Equation can be written as:
σ ( ε ˙ , T )   =   ( 1 0 . 0095 ) ln { ( Z / 1 . 10   ×   10 13 ) 1 / 5 . 55   +   [ ( Z / 1 . 10   ×   10 13 ) 2 / 5 . 55   +   1 ] 1 / 2 }
where   Z = ε ˙ exp ( 350 , 307 . 94 R T ) .
Comparing the predicted peak stress with the experimental peak stress, the error of the fitting degree of each peak stress is less than 1%, and the relative average error Δ AARE can be calculated by Equation (18):
  Δ AARE = 1 n i = 1 n | E σ i P σ i E σ i |   ×   100 %
where E σ i is the experimental peak stress, P σ i is the fitting predicted peak stress, and n is the number point of experimental data. By the calculation Δ AARE = 0.23%.

3.4. Analysis of Processing Map

Based on the dynamic material model (DMM), PRASAD constructed a process map to evaluate the hot working performance of various alloys [30,31,32]. The model regards the work-piece as the power dissipator of the whole processing system, which can predict the plastic processing performance of the material at different temperatures and different strain rates. The power P absorbed by the work-piece during the plastic forging process can be calculated by Equation (19):
  P   =   G   +   J   = 0 ε ˙ σ d ε ˙ +   0 σ ε ˙ d σ
where G is the plastic deformation power; J is the microstructure evolution power. The cubic spline curve fitting result is obtained by Equation (20).
ln σ   =   c 1   +   c 2 ln ε ˙   +   c 3 ( ln ε ˙ ) 2   +   c 4 ( ln ε ˙ ) 3  
m is the strain rate sensitivity, reflecting the allocation ratio of materials used to deal with plastic deformation and microstructure evolution, it can be calculated by the following Equation (21):
  J   = 0 σ ε ˙ d σ   =   m σ ε ˙ m + 1  
J can be obtained by integrating with Equation (22):
  J   = 0 σ ε   ˙ d σ   =   m σ ε   ˙ m + 1  
For an ideal linear dissipative process, m = 1, J max   =   σ ε ˙   / 2 . The influence of J on material plastic flow can be expressed by power dissipation efficiency (η):
  η = J J max = 2 0 σ ε   ˙ d σ σ ε   ˙ =   2 m m   +   1
Power dissipation efficiency η represents the dissipation capacity of the workpiece. A large number of studies [33,34] show that power dissipation efficiency can reflect the evolution of microstructure. The greater the energy dissipation coefficient, the better the heat treatment performance [32]. At the same time, in order to avoid plastic instability phenomena such as adiabatic shear band and cracking, various plastic instability criteria [30,31] are proposed, which are expressed as Equation (24).
  ξ ( ε ˙ )   =   ln [ m m   +   1 ] ln ε ˙   +   m   <   0
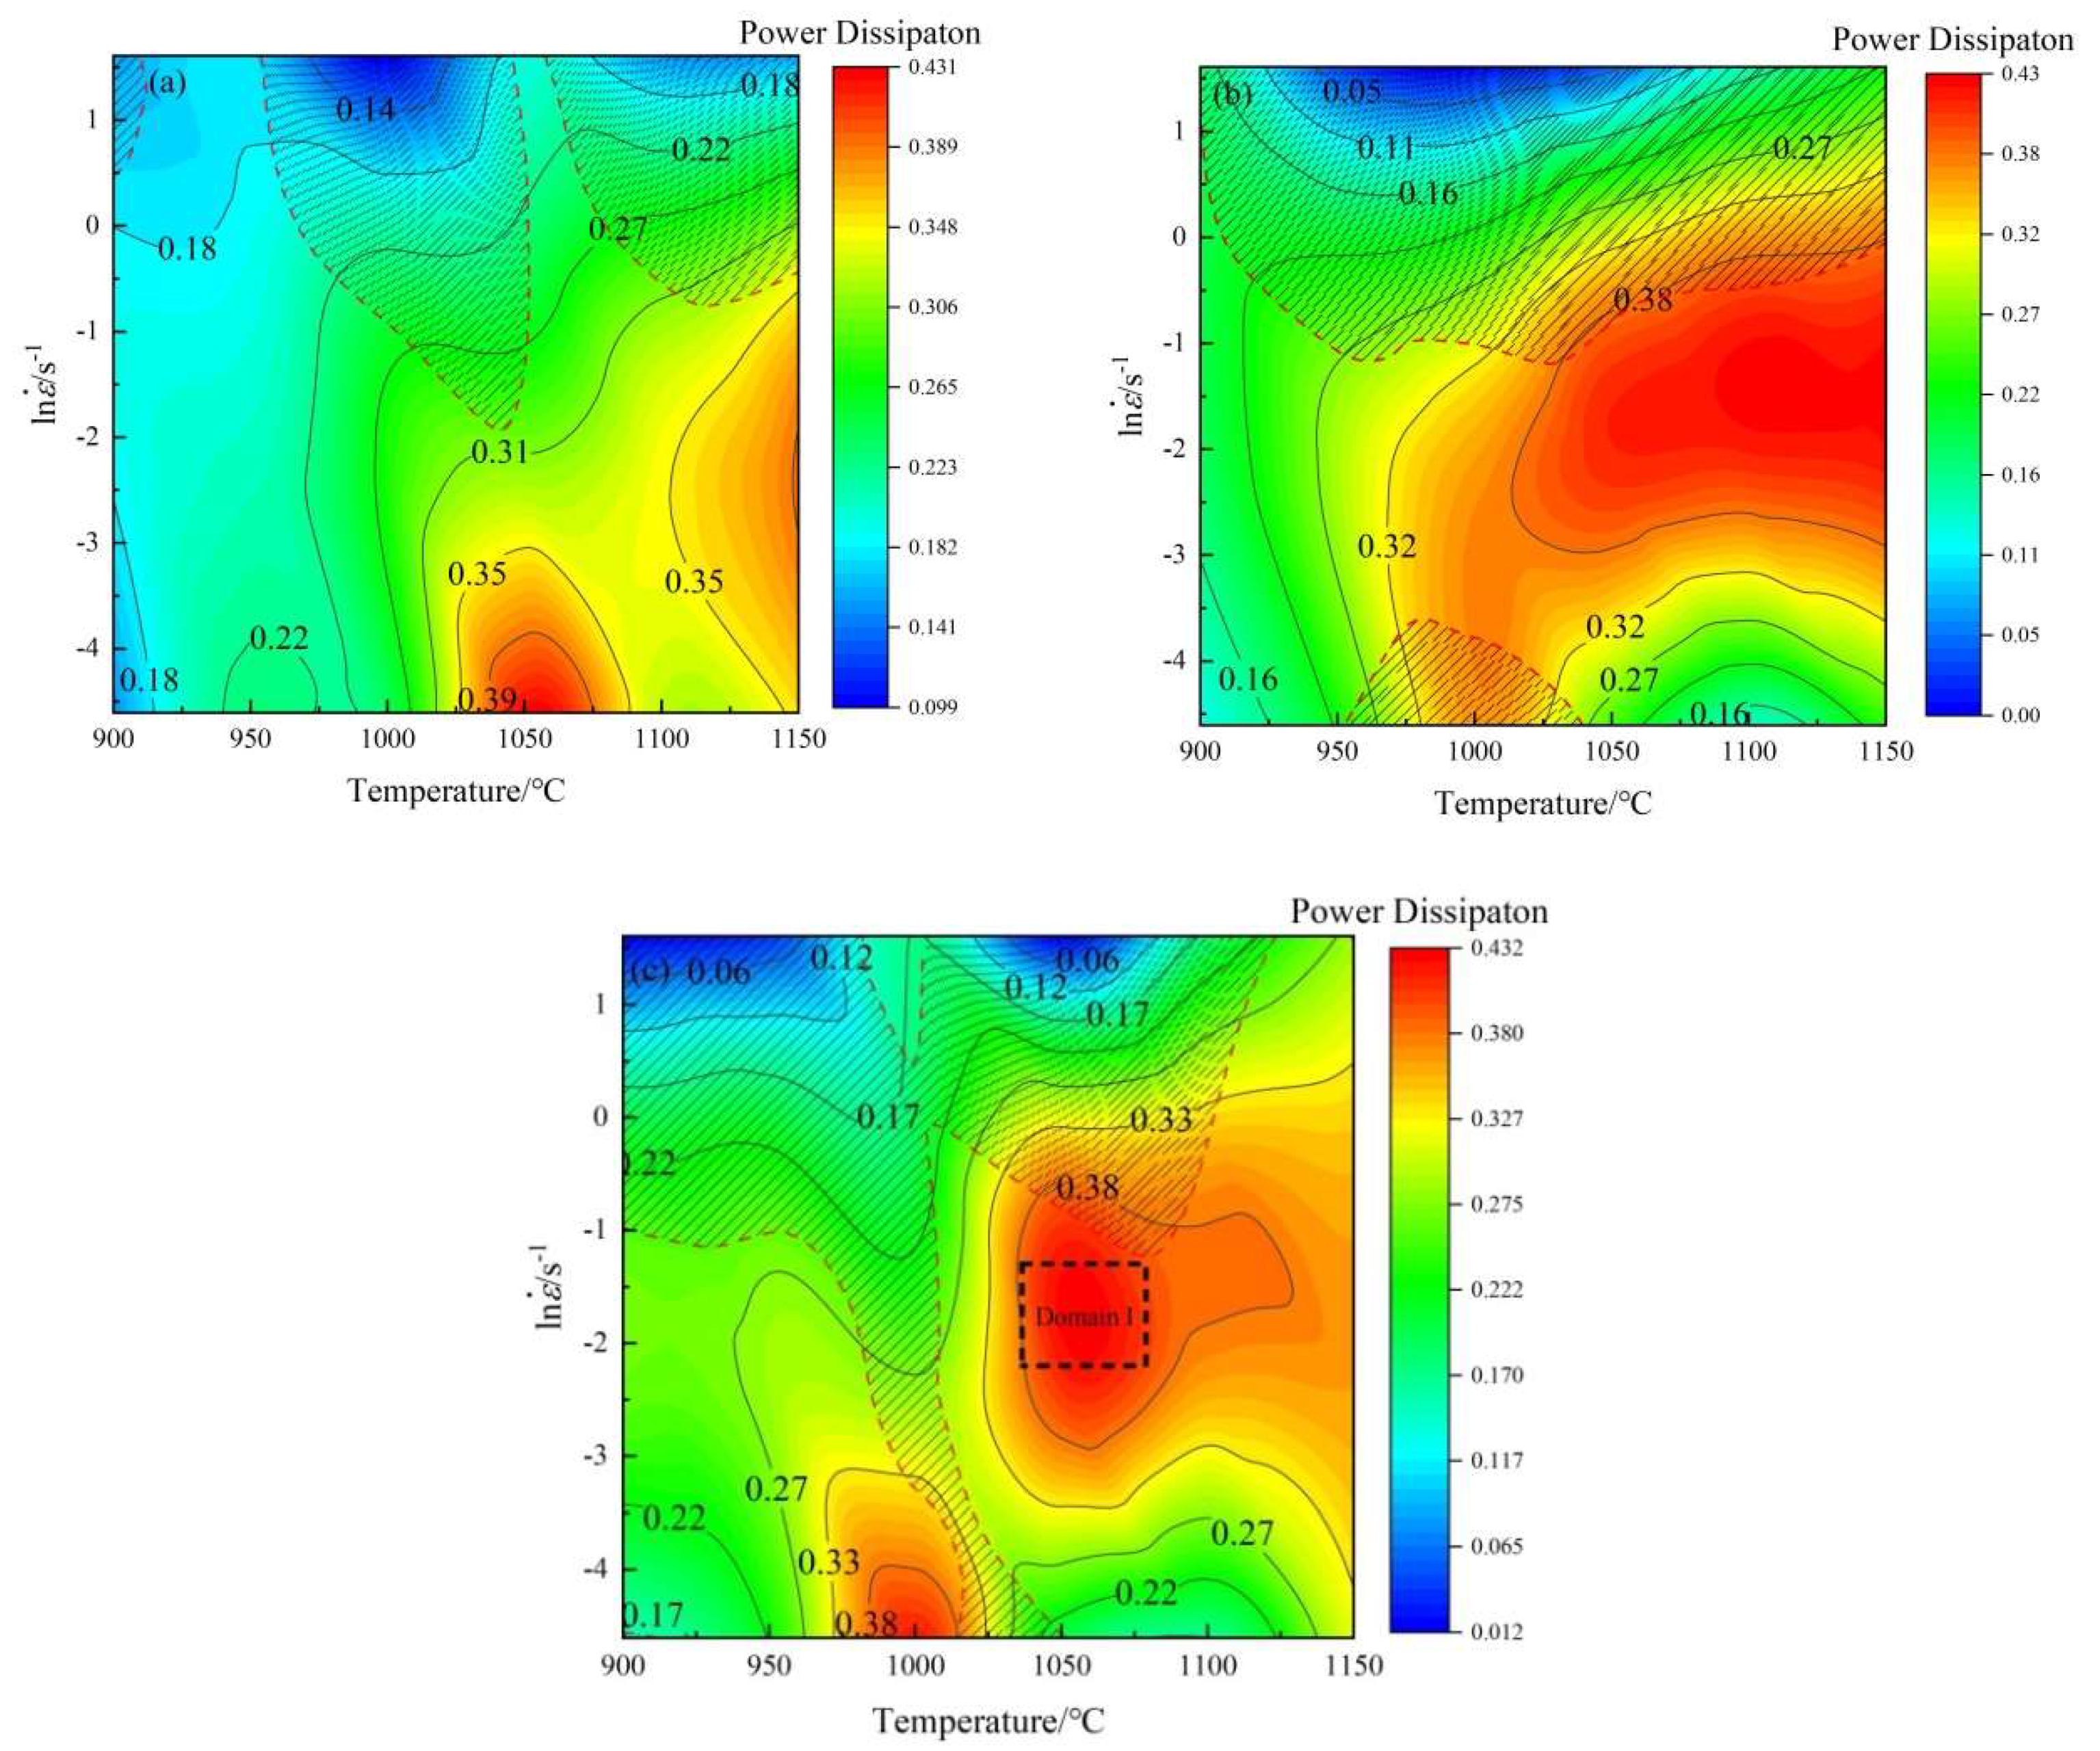
ξ ( ε ˙ ) denotes the relationship among deformation rate, deformation temperature and strain rate during hot deformation. When     ξ ( ε ˙ ) is negative, metallurgical instability occurs. The flow instability map and power dissipation map are superimposed to obtain thermal processing. Figure 5 presents the processing maps of 18CrNiMo7-6 alloy steel at the strain of 0.3, 0.6 and 0.8 (the deformation are 25%, 45%, and 55%), respectively.
The shadow part in the Figure 5 represents the unstable region. It can be seen from the Figure 5 that the power dissipation efficiency and instability region both vary with different strains, and the instability region exists under the deformation conditions of low strain temperature and high strain rate. Previous studies [35] show that when the power dissipation coefficient η is about 0.15–0.25, DRV may occur, and when η is about 0.30–0.60, DRX may occur. It can be seen from the Figure 5 that the instability region is basically coincident with the region with low dissipation efficiency. When the strain increases from 0.2 to 0.5, the instability region has a relatively obvious transformation. Combined with the previous view, in the process of increasing the strain, RDX appears in the region with high doformation temperature, and the dissipation efficiency coefficient increases, which makes the instability region move to the region with low strain temperature and high strain rate. When the strain increases to 0.8, the data shows that when the strain rate is 0.1 s−1, the temperature is 1025–1075 °C (Domain Ι), the peak value of power dissipation efficiency is 0.432. And the instability region is mainly characterized by flow localization, adiabatic shear band formation, twinning, mixing, and cracking.

3.5. EBSD Analysis of the Microstructure Evolution

Constitutive equation and processing map cannot completely determine the hot deformation parameters of 18CrNiMo7-6 alloy steel, so it is necessary to observe and analyze the microstructure of the alloy. Figure 6 shows the IPF maps of 18CrNiMo7-6 alloy steel under different strain parameters. The IPF maps show that the original grain is elongated or bent, and the deformed grain boundary presents sawtooth shape, with the fine recrystallized grain grows up at the grain boundary of deformation grain [36]. Compared with 950 °C and 1150 °C, the average grain size of the specimen at 1050 °C is smaller when the strain rate is 0.01 s−1. The IPF map shows that the deformation temperature has a great influence on the recrystallization. When the temperature increases to 1050 °C, the recrystallization phenomenon is obviously promoted, and the fine recrystallization grains are generated and replaced by the original grains. When the deformation temperature increases to 1150 °C, the average grain size increases again, and the number of fine crystalline grains decreases significantly, which is due to the fact that the growth of recrystallized grains increases with the increase of temperature [37,38]. At a certain deformation temperature, when the strain rate increases from 0.01 s −1 to 0.1 s −1, the average grain size of the specimen decreases, indicating that the strain rate also has a certain influence on the microstructure of the alloy. Since the recrystallization process (DRX) is thermally activated [32], at a low strain rate, DRX grains have more time for nucleation and growth, resulting in the full progress of DRX. However, the grain evolution is determined by the interaction between dislocation, DRX, DRV and grain growth, and the grain size cannot be completely determined by DRX.
Figure 7 shows the grain boundary maps of 18CrNiMo7-6 steel under various strain. The red and green lines represent low-angle grain boundaries (LAGBs, 1–15° misorientation angle), and blue lines represent high-angle grain boundaries (HAGBs, >15° misorientation angle). When the deformation temperature is 950 °C, a mass of deformed grains and LAGBs can be observed in the microstructure of the specimens. At this time, the proportion of HAGBs is low, which is 31.9%. When the temperature increases to 1050 °C, the proportion of HAGBs increases to 35.3%. LAGBs are transformed into HAGBs by sub-grain rotation and recrystallization, resulting in a significant increase in HAGBs. During the deformation process. During deformation, dislocations gather and rearrange at grain boundaries and severe deformation zones to form LAGBs. With the increase of temperature, LAGBs transform into sub-grains by consuming dislocations, and sub-grains grow up to form HAGBs [27]. With the continuous formation of HAGBs in grains during hot deformation, the new RDX mechanism is promoted, which is consistent with the characteristics of CDRX mechanism [39,40]. It is noteworthy that when the deformation temperature increases to 1150 °C, the proportion of HAGBs decreases to 30.0%. When the deformation temperature is determined (1050 °C), the strain rate increases to 1 s−1, and the proportion of HAGBs decreases to 34.7%. This can be understood as a faster strain rate and higher temperature will increase dislocation accumulation and promote the occurrence of DRX [41].
Figure 8 shows the kernel average misorientation (KAM) maps for the 18CrNiMo7-6 alloy steel with different deformation temperature and strain rate, which can reflect the distribution of the dislocation density (local misorientation). A higher KAM value indicates a higher dislocation density [42]. The maximum and minimum values of KAM are shown in blue and red, respectively.
Figure 8 shows that no matter what deformation parameters are adopted, the local misorientation is not uniformly distributed. It can be seen that the misorientation at the grain boundary is higher than that inside the grain, indicating that the dislocation is mainly accumulated at the grain boundary and providing a large deformation energy storage, which provides a driving force for the nucleation and growth of DRX. When the deformation temperature is 950 °C, it can be seen from Figure 8a that the dislocation density of the deformed original grains is low, and there are fine recrystallized grains with higher dislocation density around the grain boundaries of these original grains. After overlaying the KAM maps with the boundary maps, it can be seen that the DRX grains marked by red arrows nucleate and grow at the grain boundary triple junction of the original grains (see Figure 9a). Due to the low dislocation density in the alloy at 950 °C, the strain energy difference between the two original grains is small, and the migration of HAGBs leads to the bulging of grain boundary, accompanied by the evolution of dislocation sub-grain boundaries or twining which formatted by the higher grain boundary mobility, a new DRX grain is formed (see Figure 9b), at this time, DDRX plays a leading role [43]. When the deformation temperature increases to 1050 °C, as shown in Figure 9c, the red arrows point out that there is a higher dislocation density in LAGBs (as shown in the gray line), at this moment, a large number of dislocations accumulated inside the grains, and dislocation rearrangement begins to occur. With the increase of strain, LAGBs transform into sub-grains by consuming dislocations, and the sub-grains grow and rotate to form HAGBs, further forming the RDX grains marked by yellow arrows in the figure (see Figure 9d). This is consistent with the CDRX mechanism. As the deformation temperature increases to 1150 °C, it can be seen from Figure 8b that the dislocation density at 1150 °C is lower than that at 1050 °C, which can be seen from Figure 9e that at higher temperature, the formed coarse grains have low dislocation density. At this moment, the large-angle grain boundary migrates at higher temperature, while swallowing other recrystallized grains, so that the grains continue to grow. And this indicates that the large-angle grain boundary migration plays a leading role at 1150 °C, and driven by higher temperature, the grains grow gradually, which explains the reason for the maximum average grain size at 1150 °C in Figure 6b. When the deformation temperature is 1050 °C, the strain rate increases to 1 s−1. Figure 8d shows that the original deformation grain quantity decreases and the dislocation density increases. When the strain rate is 1 s−1, the red arrows point out that there is still a higher dislocation density in LAGBs, and recrystallization grains can be seen at the high dislocation density, indicating that the CDRX mechanism still dominates the DRX process at this moment (see Figure 9g). and the faster the strain rate increases the dislocation accumulation, which promotes the occurrence of CDRX. The above results show that the recrystallization process of 18CrNiMo7-6 alloy steel is affected by deformation temperature and strain rate. There are two recrystallization mechanisms of DDRX and CRDX during hot deformation, and the CDRX mechanism is beneficial to obtaining finer grains. The appropriate deformation temperature is 1050 °C. Considering the effect of avoiding instability zone, the optimal strain rate should be 0.1 s−1.

4. Conclusions

In this paper, the flow stress during hot working of 18CrNimo7-6 alloy steel was studied, and the microstructure mechanism of recrystallization was analyzed. The conclusions are as follows:
  • The constitutive equation of 18CrNiMo7-6 alloy steel is ε ˙ = 1 . 10   ×   10 13 [ sin h ( 0 . 0095 σ ) 5 . 55 ] exp ( 350307 . 94 R T ) .
  • According to the processing maps and microstructure evolution law, the optimum hot process parameters are temperature 1025–1075 °C and strain rate 0.1 s−1. And the peak value of power dissipation efficiency is 0.432.
  • There are three evolution mechanisms CDRX, DDRX and grain growth during hot deformation. The rotation of sub-grains under CDRX mechanism is the main factor for the formation of new grains. In addition, the DDRX mechanism is formed by the bulging of HAGBs at the grain boundary triple junction of the original grains.
  • The temperature and strain rate have an influence on the DRX process. When the strain temperature is low, DDRX mechanism plays a leading role. With the increase of deformation temperature, CDRX begins to play a leading role and forms finer grains. When the deformation temperature rises to 1150 °C, the grain will continue to grow at higher temperature.

Author Contributions

Data curation, Q.W. and Z.C.; Formal analysis, H.L.; Methodology, X.W.; Writing—original draft, Y.X.; Writing—review & editing, Z.W. All authors have read and agreed to the published version of the manuscript.

Funding

This project is sponsored by National Key R&D Program of China (Nos. 2020YFB2008100).

Data Availability Statement

Not applicable.

Conflicts of Interest

The authors declare that they have no known competing financial interests or personal relationships that could have appeared to influence the work reported in this paper.

References

  1. Mandal, P.; Olasolo, M.; Da Silva, L.; Lalvani, H. Impact of a Multi-step Heat Treatment on Different Manufacturing Routes of 18CrNiMo7-6 Steel. Met. Mater. Trans. A 2020, 51, 3009–3029. [Google Scholar] [CrossRef] [Green Version]
  2. An, X.; Tian, Y.; Wang, B.; Jia, T.; Wang, H.; Wang, Z. Prediction of the formation of carbide network on grain boundaries in carburizing of 18CrNiMo7-6 steel alloys. Surf. Coat. Technol. 2021, 421, 127348. [Google Scholar] [CrossRef]
  3. Bambach, M.D.; Stieben, A.; Bleck, W. 18CrNiMo7-6 with TRIP-Effect for Increasing the Damage Tolerance of Gear Components—Part I: Alloy Design. In Materials Science Forum; Trans Tech Publications: Kapellweg, Switzerland, 2014; Volume 783–786, pp. 633–638. [Google Scholar] [CrossRef]
  4. Papaefthymiou, S.; Bleck, W.; Kruijver, S.; Sietsma, J.; Zhao, L.; Van der Zwaag, S. Influence of intercritical deformation on microstructure of TRIP steels containing Al. Mater. Sci. Technol. Lond. 2004, 20, 201–206. [Google Scholar]
  5. Speer, J.G.; Assunção, F.C.R.; Matlock, D.K.; Edmonds, D.V. The “quenching and partitioning” process: Background and recent progress. Mater. Res. 2005, 8, 417–423. [Google Scholar] [CrossRef] [Green Version]
  6. Zhang, C.; Zhang, L.; Shen, W.; Xu, Q.; Cui, Y. The processing map and microstructure evolution of Ni-Cr-Mo-based C276 superalloy during hot compression. J. Alloy. Compd. 2017, 728, 1269–1278. [Google Scholar] [CrossRef]
  7. Lin, Y.; Wen, D.-X.; Huang, Y.-C.; Chen, X.-M.; Chen, X.-W. A unified physically based constitutive model for describing strain hardening effect and dynamic recovery behavior of a Ni-based superalloy. J. Mater. Res. 2015, 30, 3784–3794. [Google Scholar] [CrossRef]
  8. Al-Saadi, M.; Hulme-Smith, C.; Sandberg, F.; Jönsson, P.G. Hot Deformation Behaviour and Processing Map of Cast Alloy 825. J. Mater. Eng. Perform. 2021, 30, 7770–7782. [Google Scholar] [CrossRef]
  9. Adam, B.M.; Tucker, J.D.; Tewksbury, G. Comparative study of the hot processing behavior in advanced Ni-based superalloys for use in A-USC applications. J. Alloy. Compd. 2020, 818, 152907. [Google Scholar] [CrossRef]
  10. Sui, F.-L.; Xu, L.-X.; Chen, L.-Q.; Liu, X.-H. Processing map for hot working of Inconel 718 alloy. J. Mater. Process. Technol. 2011, 211, 433–440. [Google Scholar] [CrossRef]
  11. Prasad, Y.V.R.K.; Rao, K.P.; Sasidhar, S. (Eds.) Hot Working Guide: A Compendium of Processing Maps; ASM International: Almere, The Netherlands, 2015. [Google Scholar]
  12. Prasad, Y.; Seshacharyulu, T. Processing maps for hot working of titanium alloys. Mater. Sci. Eng. A 1998, 243, 82–88. [Google Scholar] [CrossRef]
  13. Prasad, Y.V.R.K.; Gegel, H.L.; Doraivelu, S.M.; Malas, J.C.; Morgan, J.T.; Lark, K.A.; Barker, D.R. Modeling of dynamic material behavior in hot deformation: Forging of Ti-6242. Metall. Trans. A 1984, 15, 1883–1892. [Google Scholar] [CrossRef]
  14. Jiang, M.; Xu, C.; Yan, H.; Fan, G.; Nakata, T.; Lao, C.; Chen, R.; Kamado, S.; Han, E.; Lu, B. Unveiling the formation of basal texture variations based on twinning and dynamic recrystallization in AZ31 magnesium alloy during extrusion. Acta Mater. 2018, 157, 53–71. [Google Scholar] [CrossRef]
  15. Wan, Z.; Hu, L.; Sun, Y.; Wang, T.; Li, Z. Hot deformation behavior and processing workability of a Ni-based alloy. J. Alloy. Compd. 2018, 769, 367–375. [Google Scholar] [CrossRef]
  16. Ebrahimi, R.; Najafizadeh, A. A new method for evaluation of friction in bulk metal forming. J. Mater. Process. Technol. 2004, 152, 136–143. [Google Scholar] [CrossRef]
  17. Goetz, R.L.; Semiatin, S.L. The Adiabatic Correction Factor for Deformation Heating During the Uniaxial Compression Test. J. Mater. Eng. Perform. 2001, 10, 710–717. [Google Scholar] [CrossRef]
  18. Luo, R.; Zheng, Q.; Zhu, J.J.; Guo, S.; Li, D.S.; Xu, G.F.; Cheng, X.N. Dynamic recrystallization behavior of Fe–20Cr–30Ni–0.6 Nb–2Al–Mo alloy. Rare Met. 2019, 38, 181–188. [Google Scholar] [CrossRef]
  19. Geng, P.; Qin, G.; Zhou, J.; Zou, Z. Hot deformation behavior and constitutive model of GH4169 superalloy for linear friction welding process. J. Manuf. Process. 2018, 32, 469–481. [Google Scholar] [CrossRef]
  20. Sandström, R.; Lagneborg, R. A model for hot working occurring by recrystallization. Acta Met. 1975, 23, 387–398. [Google Scholar] [CrossRef]
  21. Poliak, E.I.; Jonas, J.J. Initiation of Dynamic Recrystallization in Constant Strain Rate Hot Deformation. ISIJ Int. 2003, 43, 684–691. [Google Scholar] [CrossRef] [Green Version]
  22. Sellars, C.; McTegart, W. On the mechanism of hot deformation. Acta Met. 1966, 14, 1136–1138. [Google Scholar] [CrossRef]
  23. Liu, G.; Mao, C.; Ding, R.; Yu, L.; Liu, C.; Liu, Y. The kinetics of dynamic recrystallization and construction of constitutive modeling of RAFM steel in the hot deformation process. J. Nucl. Mater. 2021, 557, 153285. [Google Scholar] [CrossRef]
  24. Zhang, Q.; Li, Q.; Chen, X.; Bao, J.; Chen, Z. Effect of Sn addition on the deformation behavior and microstructural evolution of Mg-Gd-Y-Zr alloy during hot compression. Mater. Sci. Eng. A 2021, 826, 142026. [Google Scholar] [CrossRef]
  25. Lin, H.-B. Dynamic recrystallization behavior of 6082 aluminum alloy during hot deformation. Adv. Mech. Eng. 2021, 13, 16878140211046107. [Google Scholar] [CrossRef]
  26. Zhu, H.; Ou, H. Constitutive modelling of hot deformation behaviour of metallic materials. Mater. Sci. Eng. A 2022, 832, 142473. [Google Scholar] [CrossRef]
  27. An, J.; Zhou, M.; Tian, B.; Geng, Y.; Ban, Y.; Liang, S. Hot deformation behavior of nano-Al2O3-dispersion-strengthened Cu20W composite. Sci. Eng. Compos. Mater. 2021, 28, 500–509. [Google Scholar] [CrossRef]
  28. Medina, S.; Hernandez, C. General expression of the Zener-Hollomon parameter as a function of the chemical composition of low alloy and microalloyed steels. Acta Mater. 1996, 44, 137–148. [Google Scholar] [CrossRef]
  29. ZenerC, H. Effect of strain-rate upon the plastic flow of steel. J. Appl. Phys. 1944, 15, 22–27. [Google Scholar] [CrossRef]
  30. Prasad, Y.V.R.K. Author’s reply: Dynamic materials model: Basis and principles. Met. Mater. Trans. A 1996, 27, 235–236. [Google Scholar] [CrossRef]
  31. Prasad, Y.V.R.K.; Seshacharyulu, T. Modelling of hot deformation for microstructural control. Int. Mater. Rev. 1998, 43, 243–258. [Google Scholar] [CrossRef]
  32. Guan, Y.; Liu, Y.; Ma, Z.; Li, H.; Yu, H. Hot Deformation Behavior and Recrystallization Mechanism in an As-Cast CoNi-Based Superalloy. Met. Mater. Int. 2021, 11, 1–11. [Google Scholar] [CrossRef]
  33. Mokdad, F.; Chen, D.L.; Liu, Z.Y.; Ni, D.R.; Xiao, B.L.; Ma, Z.Y. Three-dimensional processing maps and microstructural evolution of a CNT-reinforced Al-Cu-Mg nanocomposite. Mater. Sci. Eng. A 2017, 702, 425–437. [Google Scholar] [CrossRef]
  34. Zhou, M.; Liu, X.; Yue, H.; Liu, S.; Ren, L.; Xin, Y.; Lyu, L.; Zhao, Y.; Quan, G.; Gupta, M. Hot deformation behavior and processing maps of hybrid SiC and CNTs reinforced AZ61 alloy composite. J. Alloy. Compd. 2021, 868, 159098. [Google Scholar] [CrossRef]
  35. Xi, S.-P.; Gao, X.-L.; Liu, W.; Lu, Y.-L.; Fu, G.-Q.; Tao, H.-C.; Zang, Y.-C. Hot deformation behavior and processing map of low-alloy offshore steel. J. Iron Steel Res. Int. 2021, 29, 474–483. [Google Scholar] [CrossRef]
  36. Geng, Y.; Zhang, Y.; Song, K.; Jia, Y.; Li, X.; Stock, H.-R.; Zhou, H.; Tian, B.; Liu, Y.; Volinsky, A.A.; et al. Effect of Ce addition on microstructure evolution and precipitation in Cu-Co-Si-Ti alloy during hot deformation. J. Alloy. Compd. 2020, 842, 155666. [Google Scholar] [CrossRef]
  37. He, G.; Zhao, Y.; Gan, B.; Sheng, X.; Liu, Y.; Tan, L. Mechanism of grain refinement in an equiatomic medium-entropy alloy CrCoNi during hot deformation. J. Alloy. Compd. 2020, 815, 152382. [Google Scholar] [CrossRef]
  38. Huang, K.; Marthinsen, K.; Zhao, Q.; Logé, R.E. The double-edge effect of second-phase particles on the recrystallization behaviour and associated mechanical properties of metallic materials. Prog. Mater. Sci. 2018, 92, 284–359. [Google Scholar] [CrossRef]
  39. Wang, X.; Brünger, E.; Gottstein, G. Microstructure characterization and dynamic recrystallization in an Alloy 800H. Mater. Sci. Eng. A 2000, 290, 180–185. [Google Scholar] [CrossRef]
  40. Chen, W.; Hu, B.; Jia, C.; Zheng, C.; Li, D. Continuous dynamic recrystallization during the transient deformation in a Ni-30%Fe austenitic model alloy. Mater. Sci. Eng. A 2019, 751, 10–14. [Google Scholar] [CrossRef]
  41. Kumar, N.R.; Blandin, J.; Desrayaud, C.; Montheillet, F.; Suéry, M. Grain refinement in AZ91 magnesium alloy during thermomechanical processing. Mater. Sci. Eng. A 2003, 359, 150–157. [Google Scholar] [CrossRef]
  42. Sun, Y.; Zhang, C.; Feng, H.; Zhang, S.; Han, J.; Zhang, W.; Zhao, E.; Wang, H. Dynamic recrystallization mechanism and improved mechanical properties of a near α high temperature titanium alloy processed by severe plastic deformation. Mater. Charact. 2020, 163, 110281. [Google Scholar] [CrossRef]
  43. Wusatowska-Sarnek, A.; Miura, H.; Sakai, T. Nucleation and microtexture development under dynamic recrystallization of copper. Mater. Sci. Eng. A 2002, 323, 177–186. [Google Scholar] [CrossRef]
Figure 1. (a) Schematic diagram illustrating sequence of hot doformation tests, (b) sample size and test direction.
Metals 12 00838 g001
Figure 2. Flow stress curves of 18CrNiMo7-6 alloy steel at different deformation conditions. (a) 0.1 s−1; (b)1050 °C; (c) 1 s−1; (d) 5 s−1.
Metals 12 00838 g002aMetals 12 00838 g002b
Figure 3. Peak value of flow stress curve (a) T = 1050 °C, ε ˙ = 0.01 s−1 (b) T = 900 °C, ε ˙ = 0.1 s−1, (c) Peak stress under various parameters The above method was used to further study the relationship between different temperatures and strain rates and peak stress. The results are shown in (c). The peak stress increases with the increase of strain rate and decreases with the increase of temperature.
Metals 12 00838 g003aMetals 12 00838 g003b
Figure 4. Relationship of (a) ln ε ˙ ln σ ; (b) ln ε ˙ σ ; (c) ln ε ˙ ln [ sin h ( α σ ) ] ; (d) ln [ sin h ( α σ ) ] 1 / T ; (e) ln Z ln [ sin h ( α σ ) ] .
Metals 12 00838 g004
Figure 5. Processing maps of 18CrNiMo7-6 alloy steel at the strain of (a) ε   =   0 . 3 , (b)   ε   =   0 . 6 , (c)   ε   =   0 . 8 .
Metals 12 00838 g005
Figure 6. IPF maps of 18CrNiMo7-6 alloy steel (a) 950 °C/0.01 s−1; (b) 1150 °C/0.01 s−1; (c) 1050 °C/0.01 s−1; (d) 1050 °C/1 s−1.
Metals 12 00838 g006
Figure 7. Boundary maps of 18CrNiMo7-6 alloy steel (a) 950 °C/0.01 s−1; (b) 1150 °C/0.01 s−1; (c) 1050 °C /0.01 s−1; (d) 1050 °C/1 s−1.
Metals 12 00838 g007
Figure 8. KAM maps of 18CrNiMo7-6 alloy steel (a) 950 °C/0.01 s−1; (b) 1150 °C/0.01 s−1; (c) 1050 °C/0.01 s−1; (d) 1050 °C/1 s−1.
Metals 12 00838 g008
Figure 9. Evolutionary mechanism of recrystallization process (a,b) 950 °C/0.01 s−1; (c,d) 1050 °C/0.01 s−1; (e,f) 1150 °C/0.01 s−1; and (g) 1050 °C/1 s−1.
Metals 12 00838 g009
Table 1. Adiabatic correction parameters [16,17].
ParameterValue
ρ 7870 (kg/cm3)
x D 0.015 (m)
C p 460 (J/kg•K)
K w 38 (W•m/K)
K D 21 (W•m/K)
HTC25,000 (W/m2•K)
Publisher’s Note: MDPI stays neutral with regard to jurisdictional claims in published maps and institutional affiliations.