Article

Nanoindentation Investigation of Chloride-Induced Stress Corrosion Crack Propagation in an Austenitic Stainless Steel Weld

School of Materials Engineering, Purdue University, West Lafayette, IN 47906, USA
*
Author to whom correspondence should be addressed.
Metals 2022, 12(8), 1243; https://doi.org/10.3390/met12081243
Submission received: 24 June 2022 / Revised: 16 July 2022 / Accepted: 21 July 2022 / Published: 23 July 2022
(This article belongs to the Special Issue Advanced Characterization and Testing of Nuclear Materials)

Abstract

:
Transgranular chloride-induced stress corrosion cracking (TGCISCC) is a mounting concern for the safety and longevity of arc welds on austenitic stainless steel (AuSS) nuclear waste storage canisters. Recent studies have shown the key role of crystallography in the susceptibility and propagation of TGCISCC in SS weldments. Given that crystallography underlies mechanical heterogeneities, the mechanical-crystallographic relationship during TGCISCC growth must be understood. In this study, welded SS 304L coupons are loaded in four-point bend fixtures and then boiled in magnesium chloride to initiate TGCISCC. Nanoindentation mapping is paired with scanning electron microscopy (SEM) electron backscatter diffraction (EBSD) to understand the correlation between grain orientation, grain boundaries, and hardening from TGCISCC propagation. The nanoindentation hardness of individual grains is found to not be a controlling factor for TGCISCC propagation. However, intragranular hardness is generally highest immediately around the crack due to localized strain hardening at the crack tip. This work shows that nanoindentation techniques can be useful in understanding CISCC behaviors when paired with electron microscopy.

1. Introduction

Stress corrosion cracking (SCC) is an environmentally assisted degradation mode that occurs when three key factors synergistically interact: electrochemical reactions, mechanical stress, and susceptible materials [1,2]. SCC has been a critical degradation mode for structural alloys in numerous industries and applications, including nuclear reactors [3,4,5], petroleum pipelines [6,7], airplane panels [8], and fusion welding [9,10]. Based on the cracking patterns, SCC can be divided into intergranular SCC (IGSCC) and transgranular SCC (TGSCC) modes. IGSCC is often associated with enhanced grain boundary (GB) susceptibility, typically through precipitation (e.g., carbide sensitization in austenitic stainless steels [11,12]) or segregation (dealloying, or Cr depletion at GBs [13,14,15,16]). On the other hand, TGSCC is not strongly controlled by GBs, but rather by crystallographic and mechanical factors, which are manifested by slip steps [17,18,19] induced during the crack growth.
Chloride-induced SCC (CISCC), which often occurs in a transgranular mode (TGCISCC), is expected to occur in 300 series of austenitic stainless steel (AuSS) welds of nuclear waste storage canisters [20,21]. During service in coastal regions, humid coastal air carrying sea salt constantly cools down the decay heat from the waste contained within the dry storage canisters. Subsequently, the deliquescence of chlorine-rich salt brine can form a corrosive environment on the canister surface, thus leading to pitting [3,22,23,24]. Meanwhile, because the canisters are fabricated and formed into their cylindrical shape using fusion welding, residual tensile stresses are introduced along the vertical weld seam [25,26]. Thus, the chlorine-rich corrosive environment on the canister surface, combined with the residual tensile stress from fabrication, makes the weldment region of nuclear waste storage canisters highly susceptible to TGCISCC. Recently, crystallographic and mechanical factors, i.e., the Schmid factor and Taylor factor, have been found to play a significant role in determining TGCISCC behavior [27,28]. Specifically, the mismatch of the Schmid factor and Taylor factor between adjacent grain pairs controls whether the crack will continue to propagate or will arrest at a GB. However, these crystallographic properties give rise to anisotropic mechanical properties, which can also affect TGCISCC behavior given the role of both crystallography and mechanics in controlling TGSCC.
SCC is commonly characterized using techniques such as scanning electron microscopy (SEM) fractography [29], SEM electron backscatter diffraction (EBSD) [5,27], focused ion beam [30], analytical transmission electron microscopy [31], atom-probe tomography [32], 3D X-ray tomography [33,34], and atomic force microscopy [35]. Meanwhile, nanoindentation has been shown to be a versatile tool for evaluating the mechanical responses of nuclear materials [36,37,38,39,40,41,42,43,44,45,46,47]. Although there has been limited application of nanoindentation to predict or evaluate SCC susceptibility or propagation to date, the role of mechanics in TGSCC creates the possibility of using nanoindentation in this manner.
The objective of this paper is to utilize nanoindentation in parallel with SEM and EBSD to determine whether nanoindentation can be used to assess—at least qualitatively—the SCC susceptibility and propagation. Stainless steel (SS) 304L coupons with a weld seam at the center are bent using a four-point bending fixture to introduce tensile stress on the surface, and then submerged in boiling magnesium chloride solution to emulate an aggressive CISCC environment of the nuclear waste storage canisters. After major CISCC through-cracking appears on the surface, the coupon is sectioned and prepared for post mortem characterization. Eight TGCISCC regions are selected for nanoindentation; five of these regions are indented using a coarse spatial resolution array of indents, whereas the remaining three regions are indented using a finer resolution nanoindentation mapping approach. Afterwards, SEM-EBSD is performed on all of the indented crack regions to reveal the grain structure. Results show that the micromechanical properties measured by the nanoindentation can provide a reasonable qualitative assessment of TGCISCC susceptibility and localized hardening during crack propagation.

2. Materials and Methods

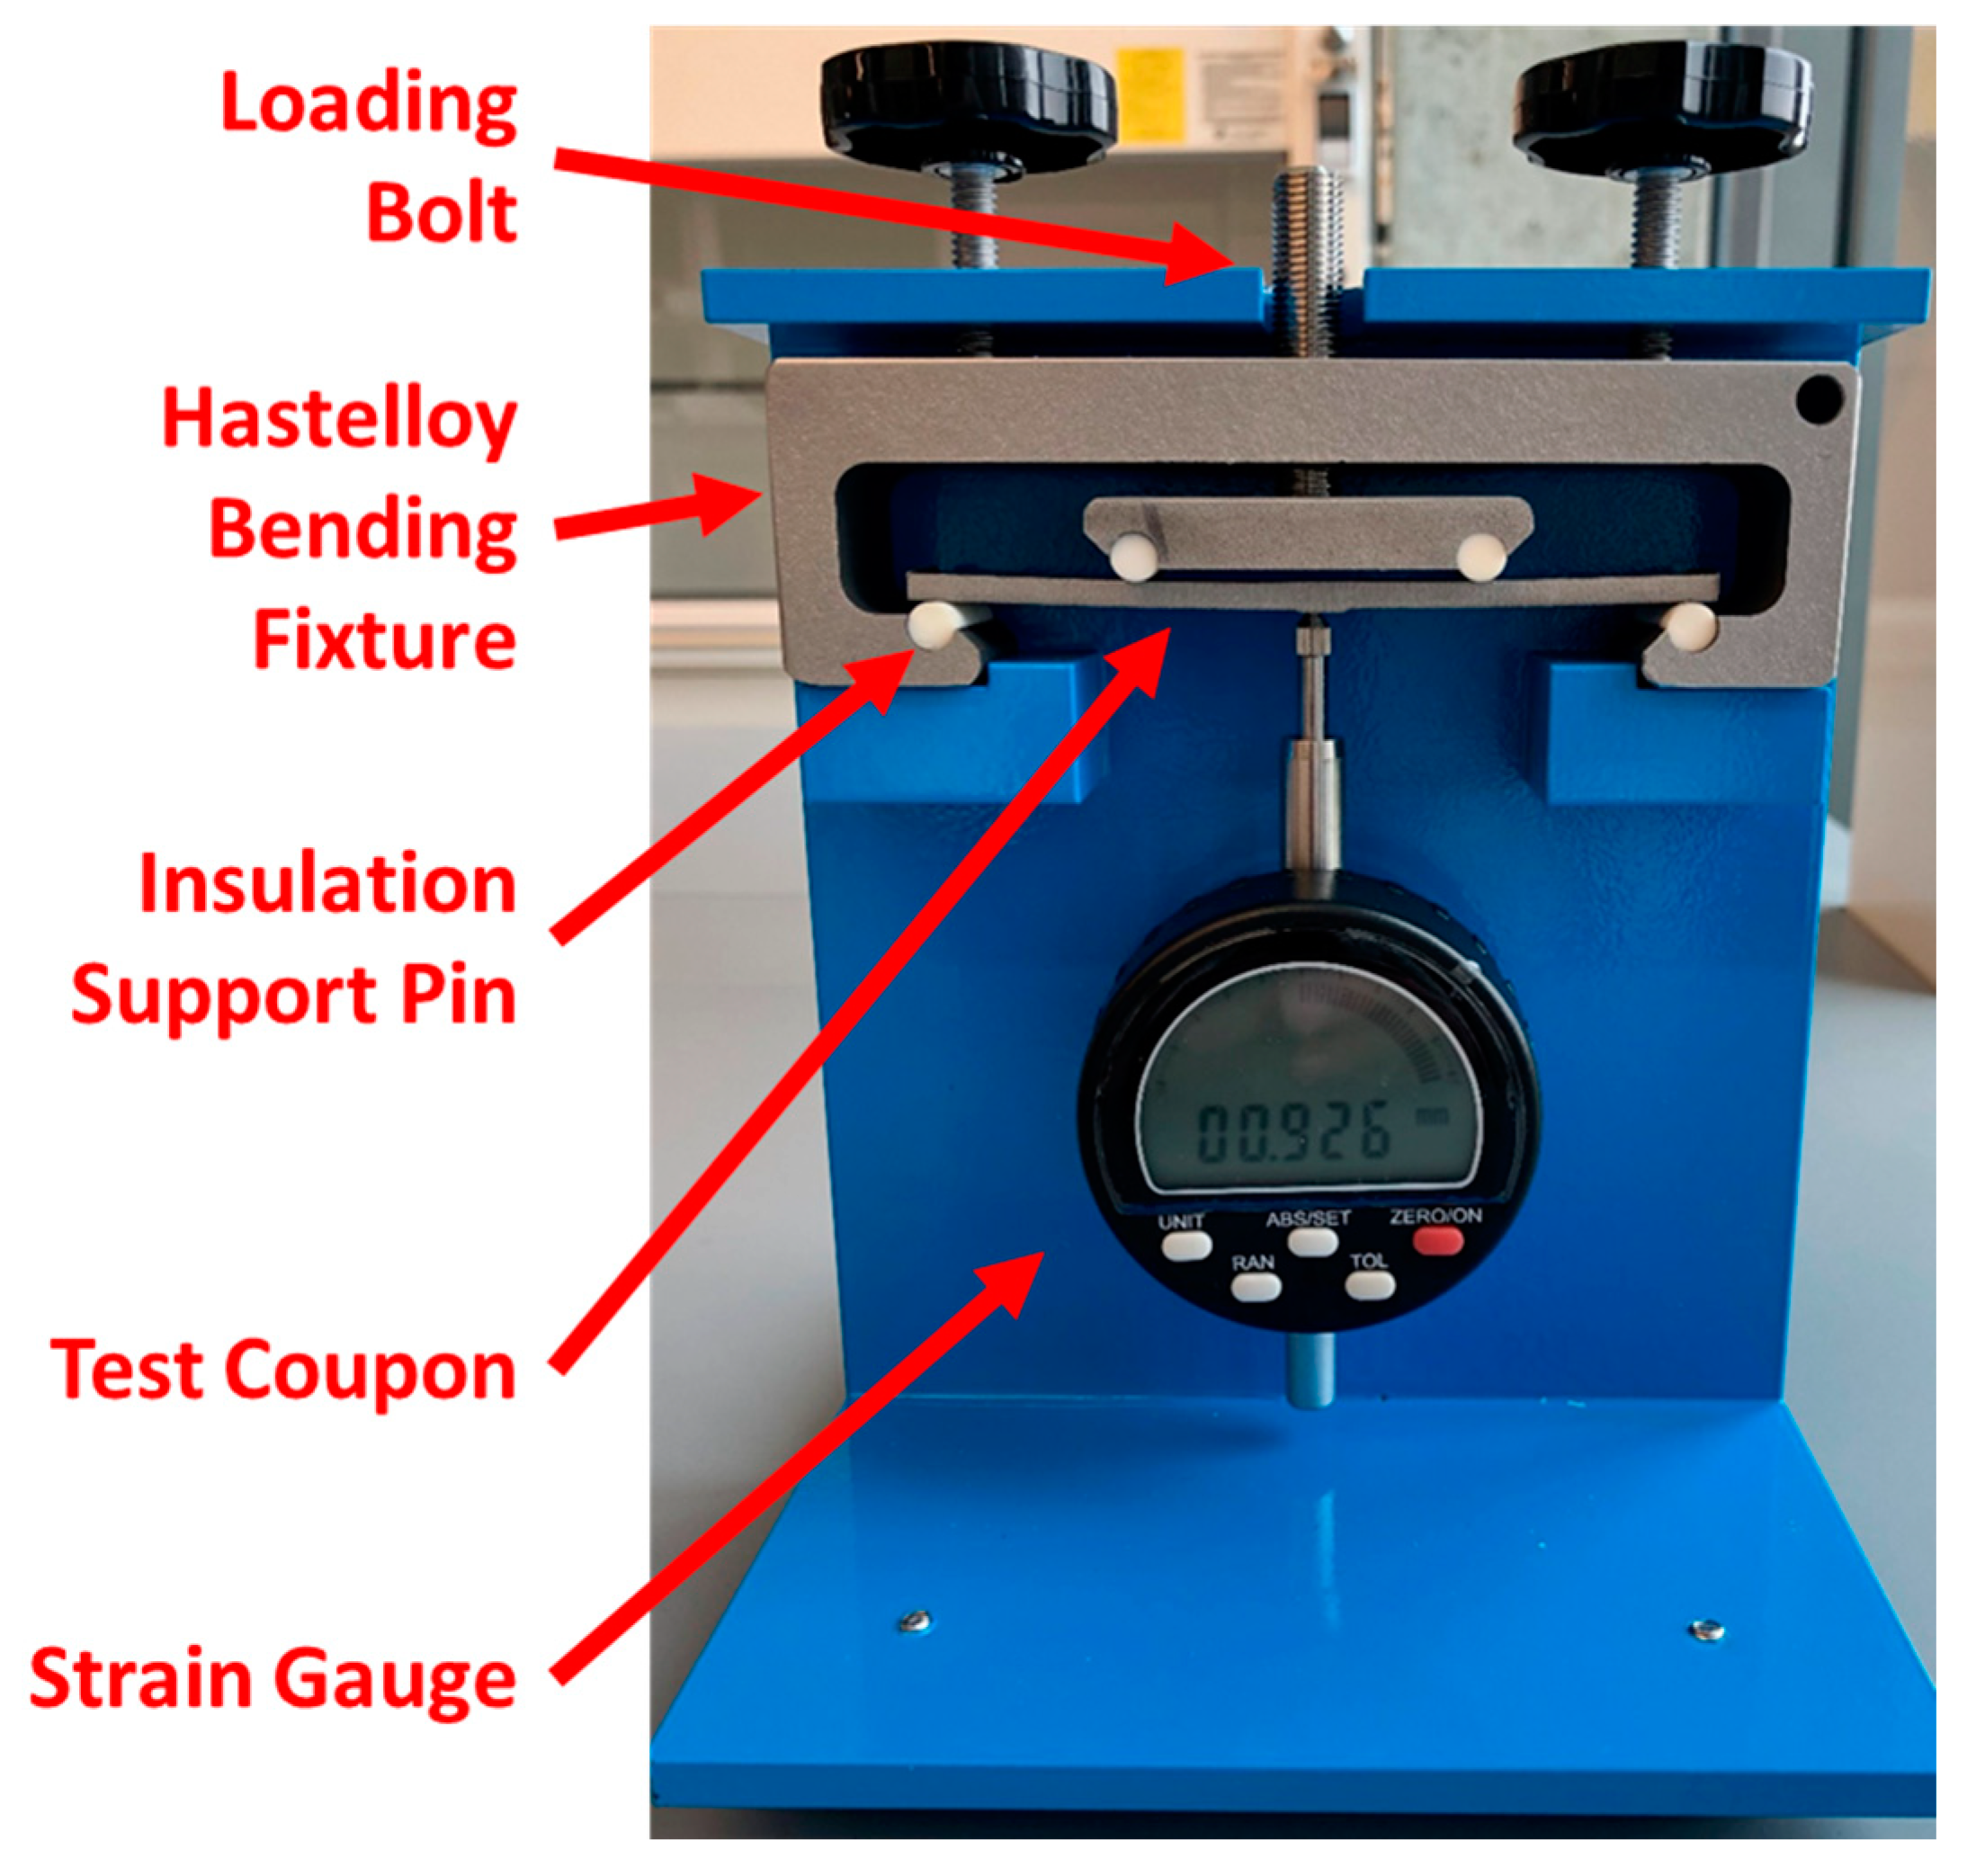
The material studied in this work was commercial-grade stainless steel 304L that was hot rolled and pickled (composition shown in Table 1). Two SS 304L sheets, each 3 mm thick, were gas tungsten arc welded (GTAW) together using SS 308L filler to reproduce the weld seam in spent nuclear fuel (SNF) canisters [48]. The welding was applied with a current of 110 A and voltage of 12 V. The welded sheet was laser cut into coupons with a dimension of 105 mm × 18.5 mm × 3 mm. The weld seam was located at the center of the coupons and ground flat with 100-grit paper on a grinding machine, as shown in Figure 1. In order to emulate the residual stress in the SNF canister weld region [48], the coupons were bent within four-point bend fixtures, as shown in Figure 2. The four-point bend fixtures were specifically designed for corrosion testing, being composed of Hastelloy C-276, and the four points of contact with the coupon were made from zirconia ceramic to galvanically isolate the coupon. The tensile stress was measured with an X-ray residual stress analyzer µ-X360 (Pulstec, Shizuoka, Japan) to be 224 MPa on average on the convex surface of the bent coupon [49].
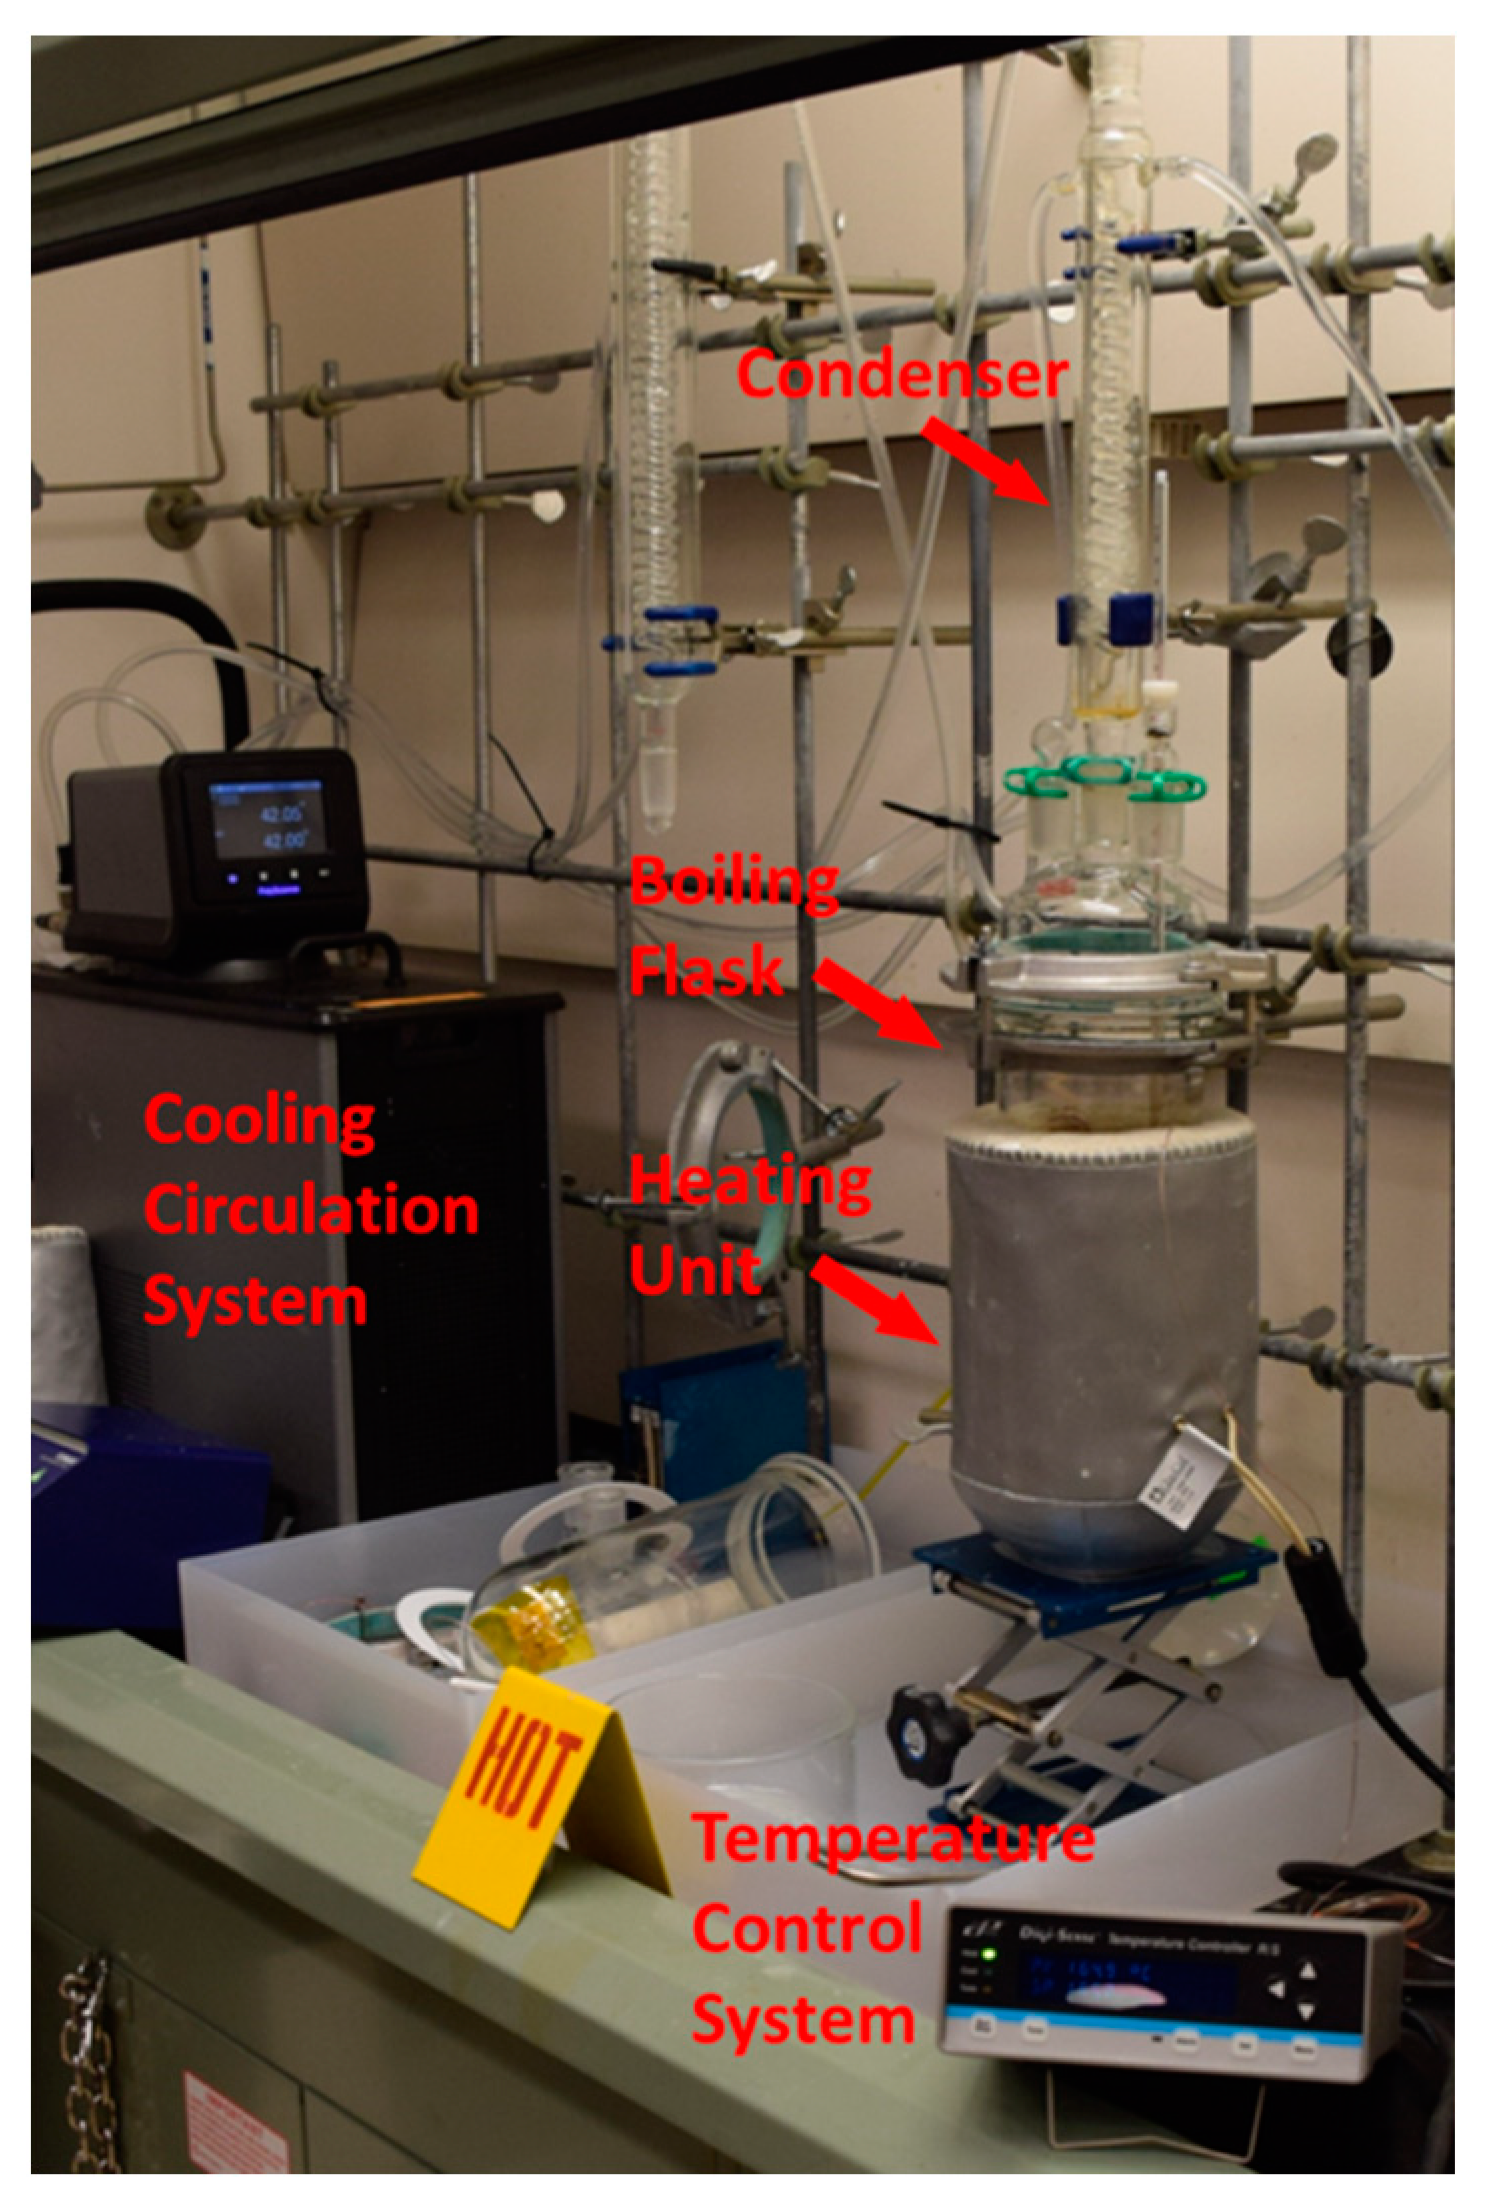
To accelerate the stress corrosion cracking (SCC) initiation and growth, the bent coupons were immersed in boiling magnesium chloride (MgCl2) in the Advanced Materials Laboratory at the University of New Mexico. The experimental setup is shown in Figure 3 [50]. Reagent-grade MgCl2 hexahydrate flake was used to make the boiling solution. The coupon, while loaded in the four-point bending fixture, was fully immersed in the boiling MgCl2 solution and constantly boiled at 155 ± 1 °C following the ASTM G36 standard [51] until a major crack occurred on the sample surface. More details about the sample preparation and corrosion testing can be found in [50].
After a major crack was observed on the coupon surface, post-corrosion analysis was performed to assess the relationship between the nanohardness of individual grains and the cracking tendency. The bent coupon was sectioned by diamond saw into a smaller piece for ease of metallographic polishing; the section piece contained a cross-section of the weld, heat-affected zone (HAZ), and base metal, as represented by the blue dashed lines in Figure 1c. From our earlier study [27], the HAZ was found to be most susceptible to CISCC, and thus, this study focused only on the HAZ. The sectioned piece was polished following standard metallurgical sample preparation processes [50] and finished with 12 h of vibratory polishing.
Nanoindentation was carried out on the cross-section of the specimen with a KLA iMicro Nanoindenter (KLA Corporation, Milpitas, CA, USA) under displacement-controlled mode. The nanoindenter utilized a diamond Berkovich tip with an elastic modulus of 1141 GPa [38]. To understand the hardness distribution in the bulk cracked sample, arrays of nanoindents of a 1000 nm depth and 50 µm spacing were applied around 5 CISCC cracks (henceforth referred to as cracks #1–#5) with a strain rate of 0.2 in the HAZ. Nanohardness and modulus were calculated based on the Oliver–Pharr method [52]. Additionally, the iMicro was operated in NanoBlitz 3D property mapping mode around 3 additional crack tips (henceforth referred to as cracks #6–#8) to assess the hardness distribution at a finer resolution. The NanoBlitz maps were conducted using indentation arrays of 15 × 15 with a target load of 45 mN and depth of 1 µm. The spacing between indents was 10 µm to minimize interactions from neighboring indents [53].
A Quanta 650 FEG Scanning Electron Microscope (SEM) (Thermo Fisher Scientific, Waltham, MA, USA) equipped with an EDAX HikariTM electron backscatter diffraction (EBSD) detector (AMETEK Inc., Mahwah, NJ, USA) was used for microstructure characterization after nanoindentation. The grain structure around the 5 crack regions was revealed by EBSD at 20 kV and 5.5 spot size. The working distance for EBSD was 16 μm. Post-EBSD analysis was conducted with EDAX OIM software (version 8, AMETEK Inc., Mahwah, NJ, USA) to extract individual grain properties. A total of 164 grains were analyzed with nanoindentation and EBSD, with 18 grains located on the crack path and 146 grains in the surrounding uncracked bulk material.

3. Results and Discussion

3.1. Grain Structure Revealed by EBSD for Bulk Analysis

To corroborate the grain structure and crystallographic properties with nanohardness, EBSD maps were resized to match the nanoindentation grid arrays on the SEM images of cracks #1–#5, as shown for crack #1 in Figure 4 and for cracks #2–#5 in Figures S1–S4. The crack regions in the SEM morphology images (Figure 4a and Figures S1a–S4a) were outlined by red boxes. Image quality (IQ) and inverse pole figure (IPF) maps (Figure 4b,c, respectively) reveal the grain structure around the cracks; the colors of grains in the IPF map correspond to the grain orientation per the IPF legend. The indents are visible in the IQ maps to help identify the relative locations of indents to grains and grain boundaries (GBs). In Figure 4d, the hardness of each individual indent was extracted and labeled below the indents. After characterizing the EBSD-IQ maps, the locations of the indents were confirmed and were categorized into three classifications: within grain, within twins (marked by square), and on GBs (marked by circle).

3.2. Harndness Distritbution for the Bulk Analysis

The nanoindentation grid arrays are located around CISCC crack paths, with some indents falling on cracked grains. To investigate whether hardness has an effect on the CISCC path, the hardness distribution in the bulk (uncracked) grains was compared to that in grains that are cracked, shown in Figure 5a. The bulk uncracked grains have an average hardness of 1.94 ± 0.18 GPa collected from 146 indents in the grains around cracks #1–#5, whereas the grains containing a crack have an average hardness of 1.89 ± 0.16 GPa collected from 12 indents. Hence, there is no statistically significant difference in the average hardness between the cracked versus uncracked grains, meaning that hardness is not a meaningful predictor of CISCC cracking susceptibility of grains.
Bulk indents from uncracked grains were categorized into three different classifications: within grains, within twins, and on GBs. The hardness distributions for each of these categories are shown in Figure 5b. For the indents located in normal grains (88 occasions), twins (8 occasions), and on GBs (71 occasions), the average hardness values are 1.92 ± 0.17 GPa, 1.84 ± 0.13 GPa, and 1.95 ± 0.20 GPa, respectively. It is well known that GBs of FCC polycrystalline metals have higher strength [54] and hardness than grain interiors due to the strain gradient [55] and dislocation nucleation [56,57] at GBs from plastic deformation. Nevertheless, the difference in hardness between the GB and grain or twin interiors is not statistically significant either.
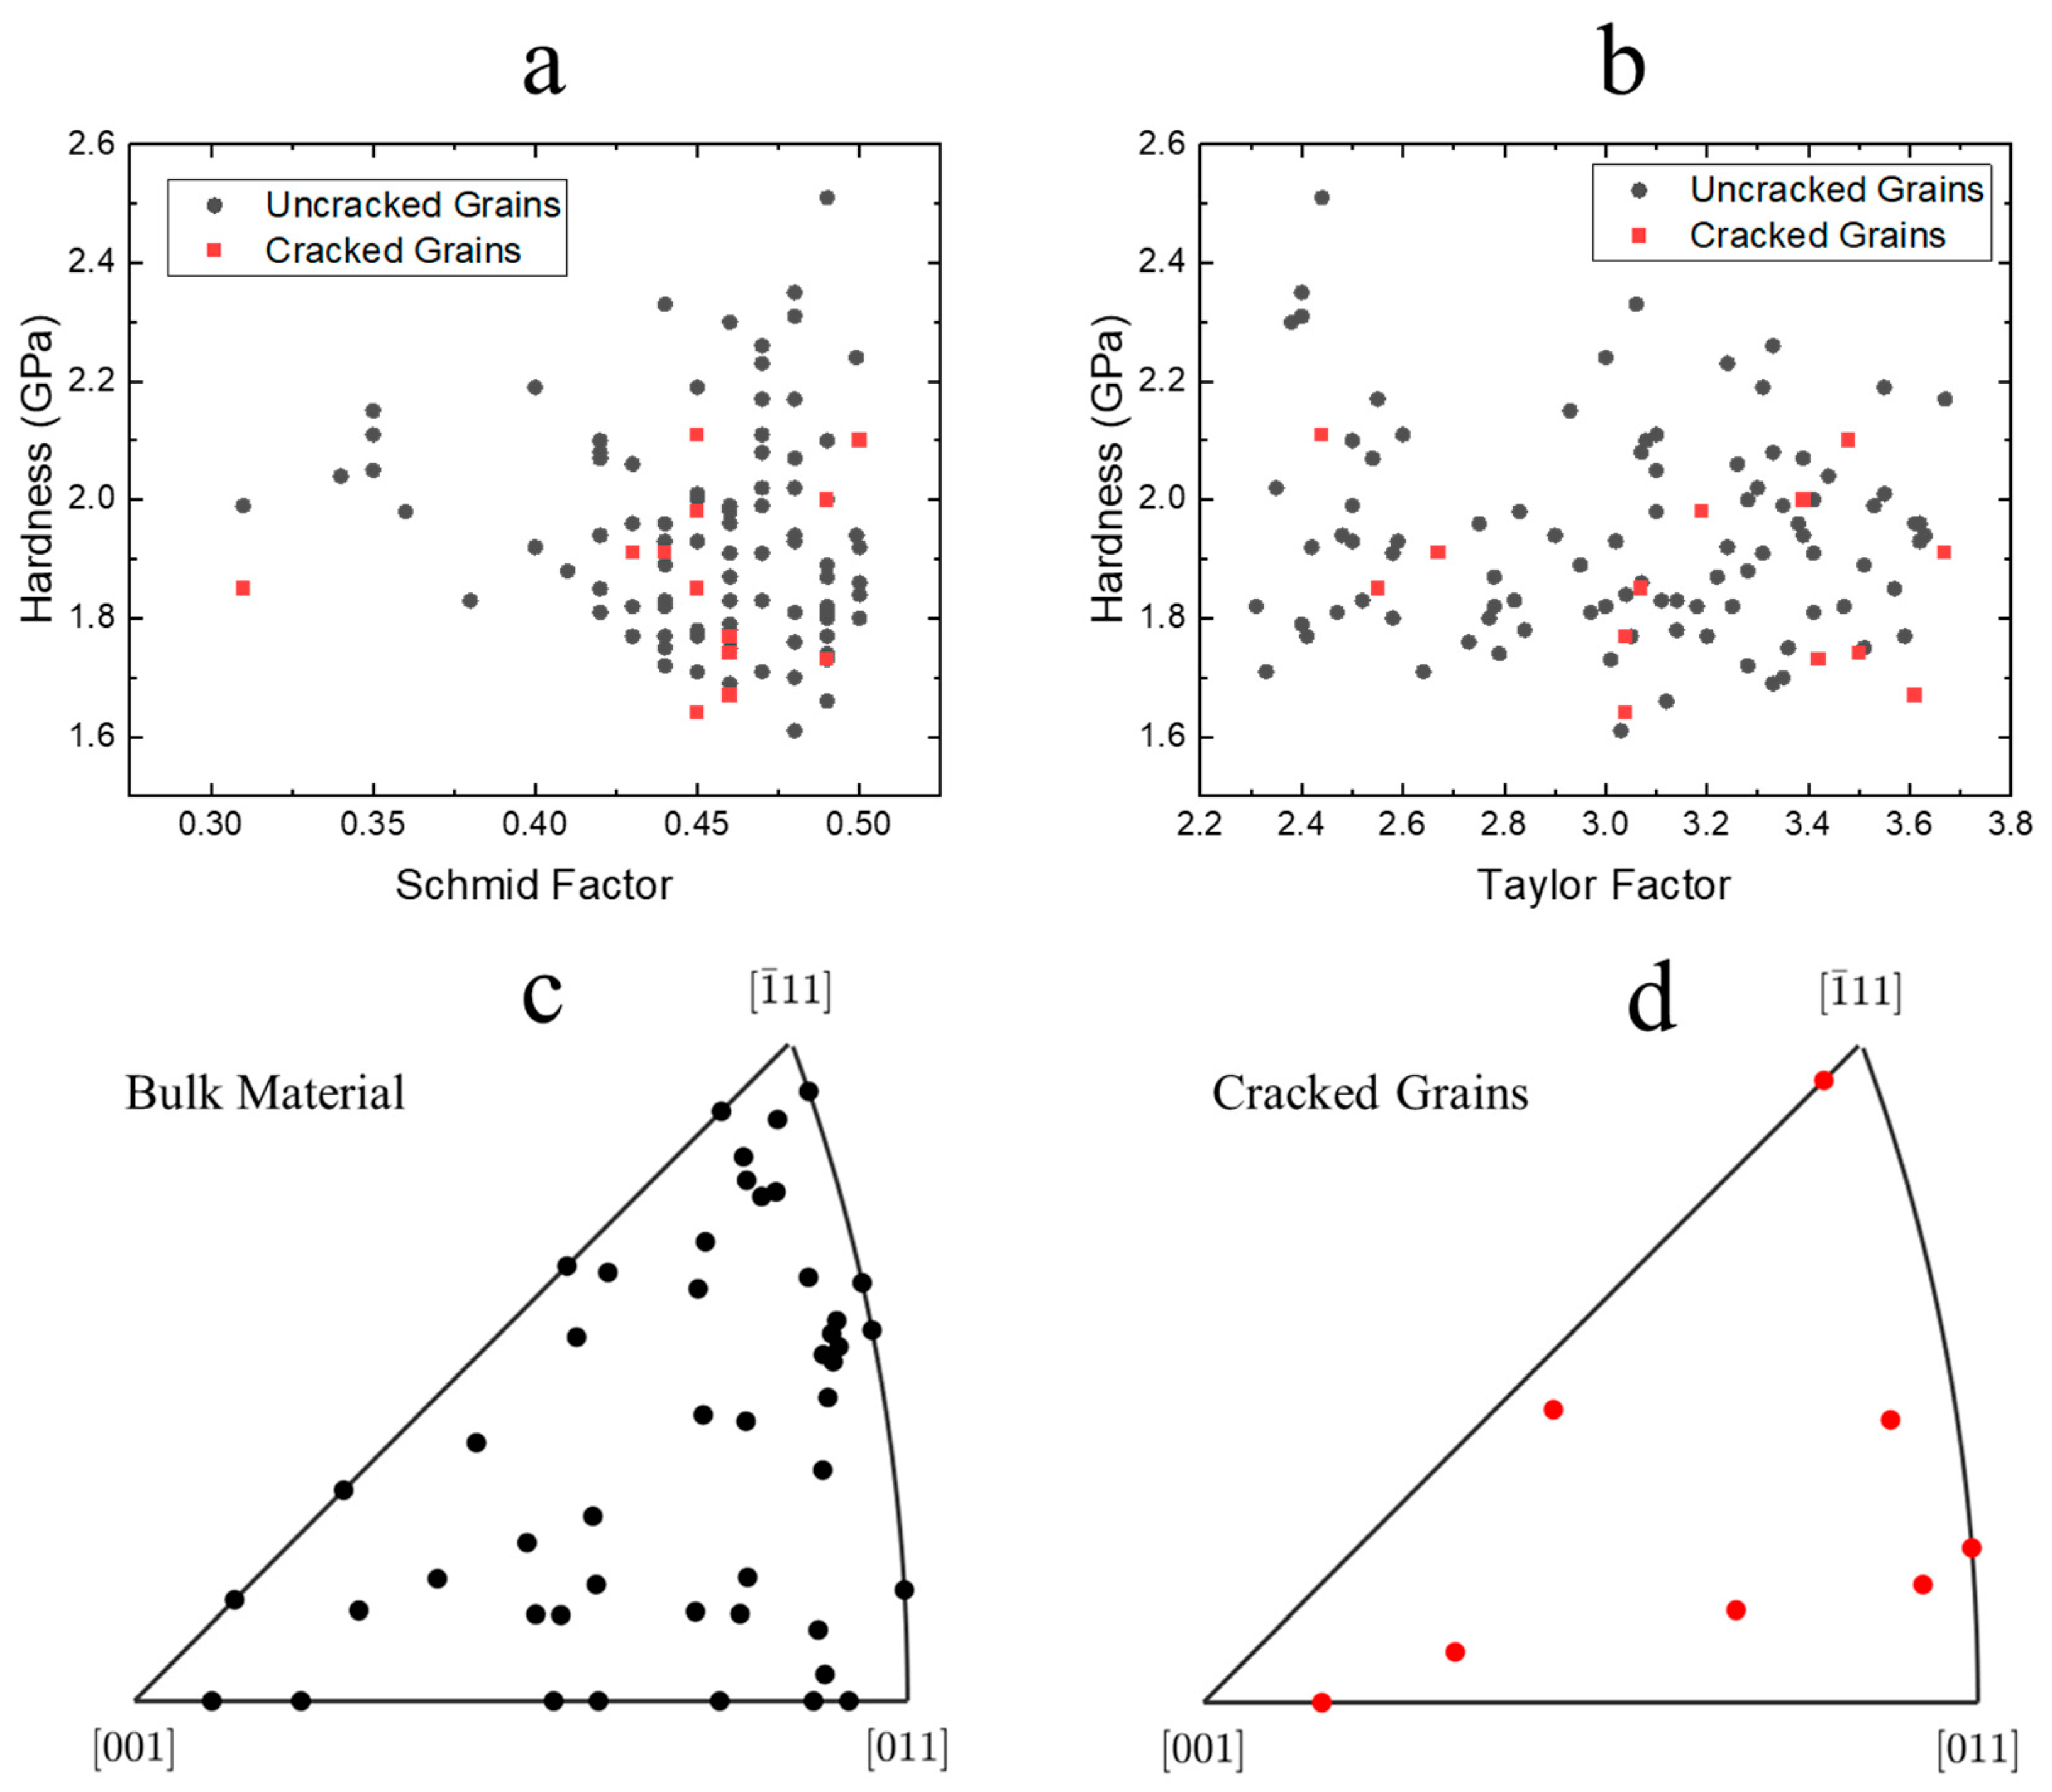
The Schmid factor (m) and Taylor factor (M) are measures of shear stress on the individual grain slip systems when the polycrystalline material is under uniaxial stress. If a grain is oriented in such a way that has a high Schmid factor and low Taylor factor, the higher resolved shear stress promotes easier plastic deformation. The m and M of both uncracked and cracked grains where indents are located are extracted from the EBSD analysis and plotted relative to the corresponding hardness values in Figure 6a,b (note that the indents located on the GBs are omitted from this Schmid factor and Taylor factor analysis). There is no apparent difference in m and M distribution between cracked and uncracked grains, nor is there a significant correlation between hardness and m or M. Figure 6c,d are the IPF maps of the grain orientation distributions of the bulk HAZ and cracked grains. The IPF is plotted from the pole vector that aligns with the crack propagation direction. It can be observed that there is no specific texture developed in the HAZ after exposure to MgCl2 and there is also no preferential grain orientation in which SCC tends to grow. It is thus concluded that individual grain orientation is not a controlling factor that determines TGCISCC propagation.

3.3. Hardness Mapping and Individual Grain Analysis with NanoBlitz

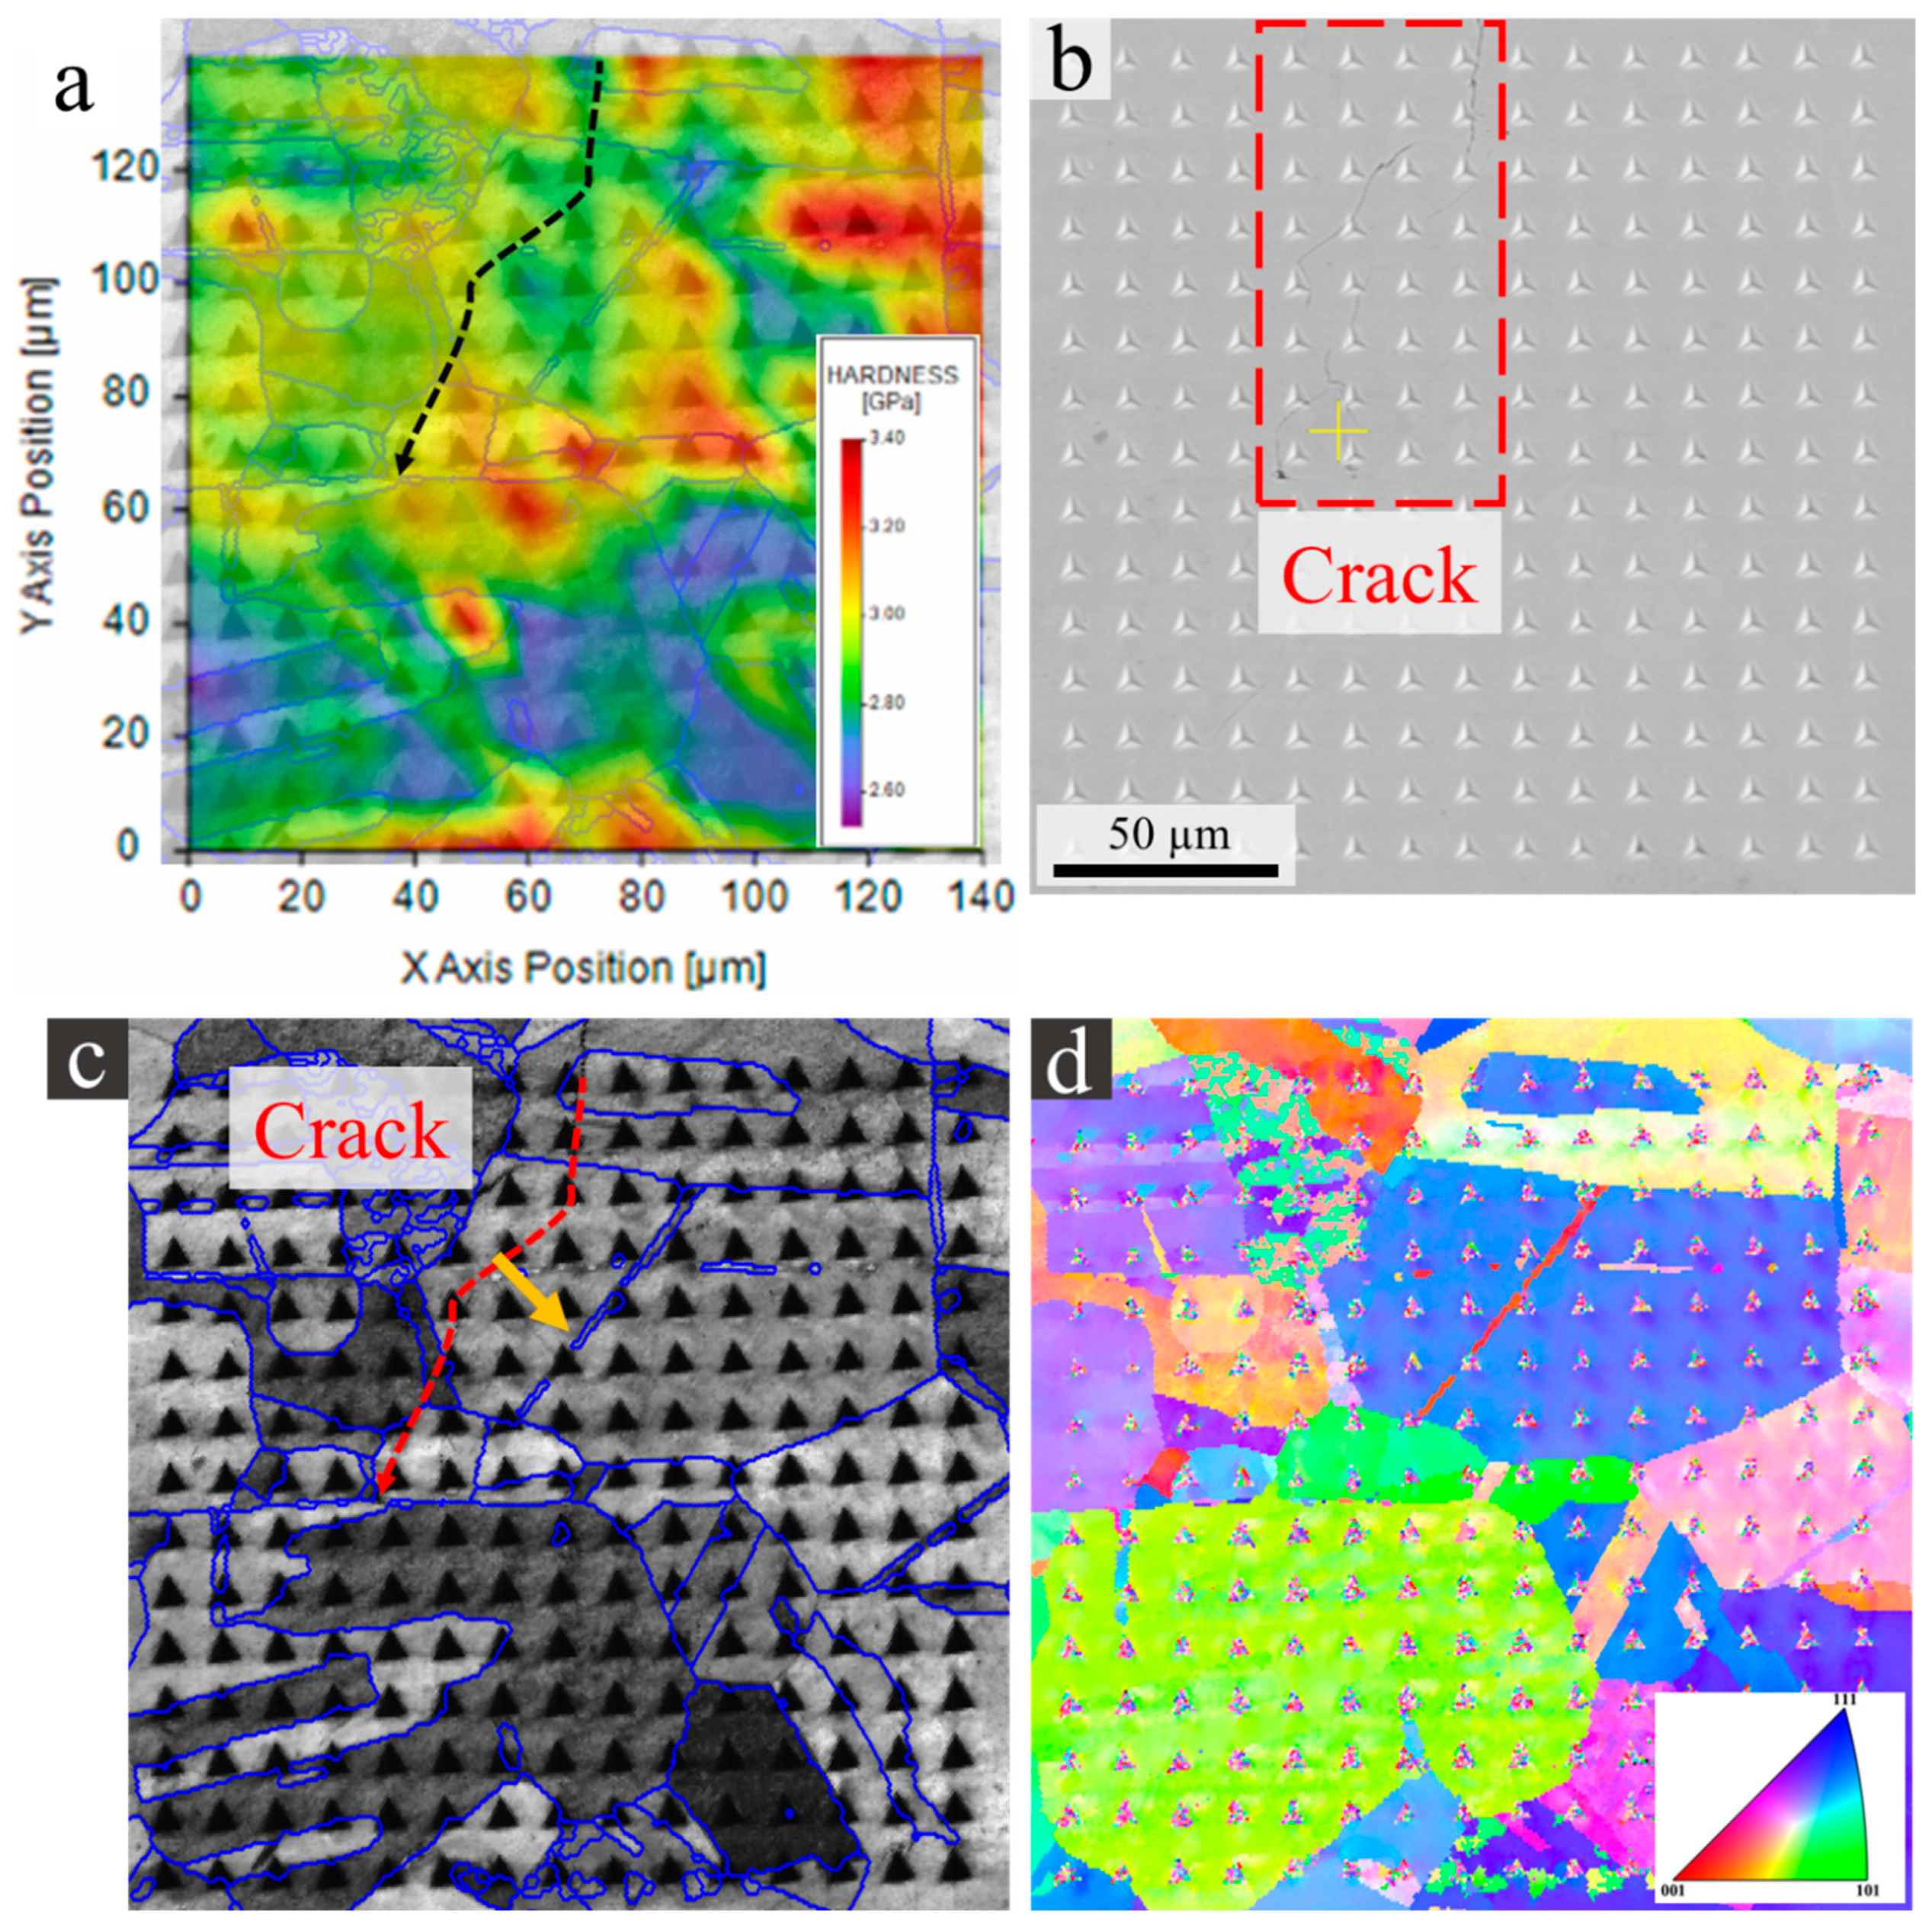
As observed in Section 3.2, there is no significant hardness and orientation difference between the cracked and uncracked grains based on the bulk nanoindentation and EBSD analysis. Thus, NanoBlitz tests were performed around the crack tips to assess the hardness at a finer scale, specifically within the individual cracked grains. NanoBlitz results are summarized in Figure 7 for crack #6 and in Figures S5 and S6 for cracks #7–#8. These figures are all composite figures showing the hardness maps in part (a) for the cracks shown in part (b), and the EBSD IQ and IPF maps with GBs marked in blue in parts (c) and (d). In order to locate the crack path and corresponding grains, the hardness maps were overlayed by the IQ maps, and crack paths were traced with black arrows. Based on the hardness maps, cracks are not always located in solely hard or soft regions.
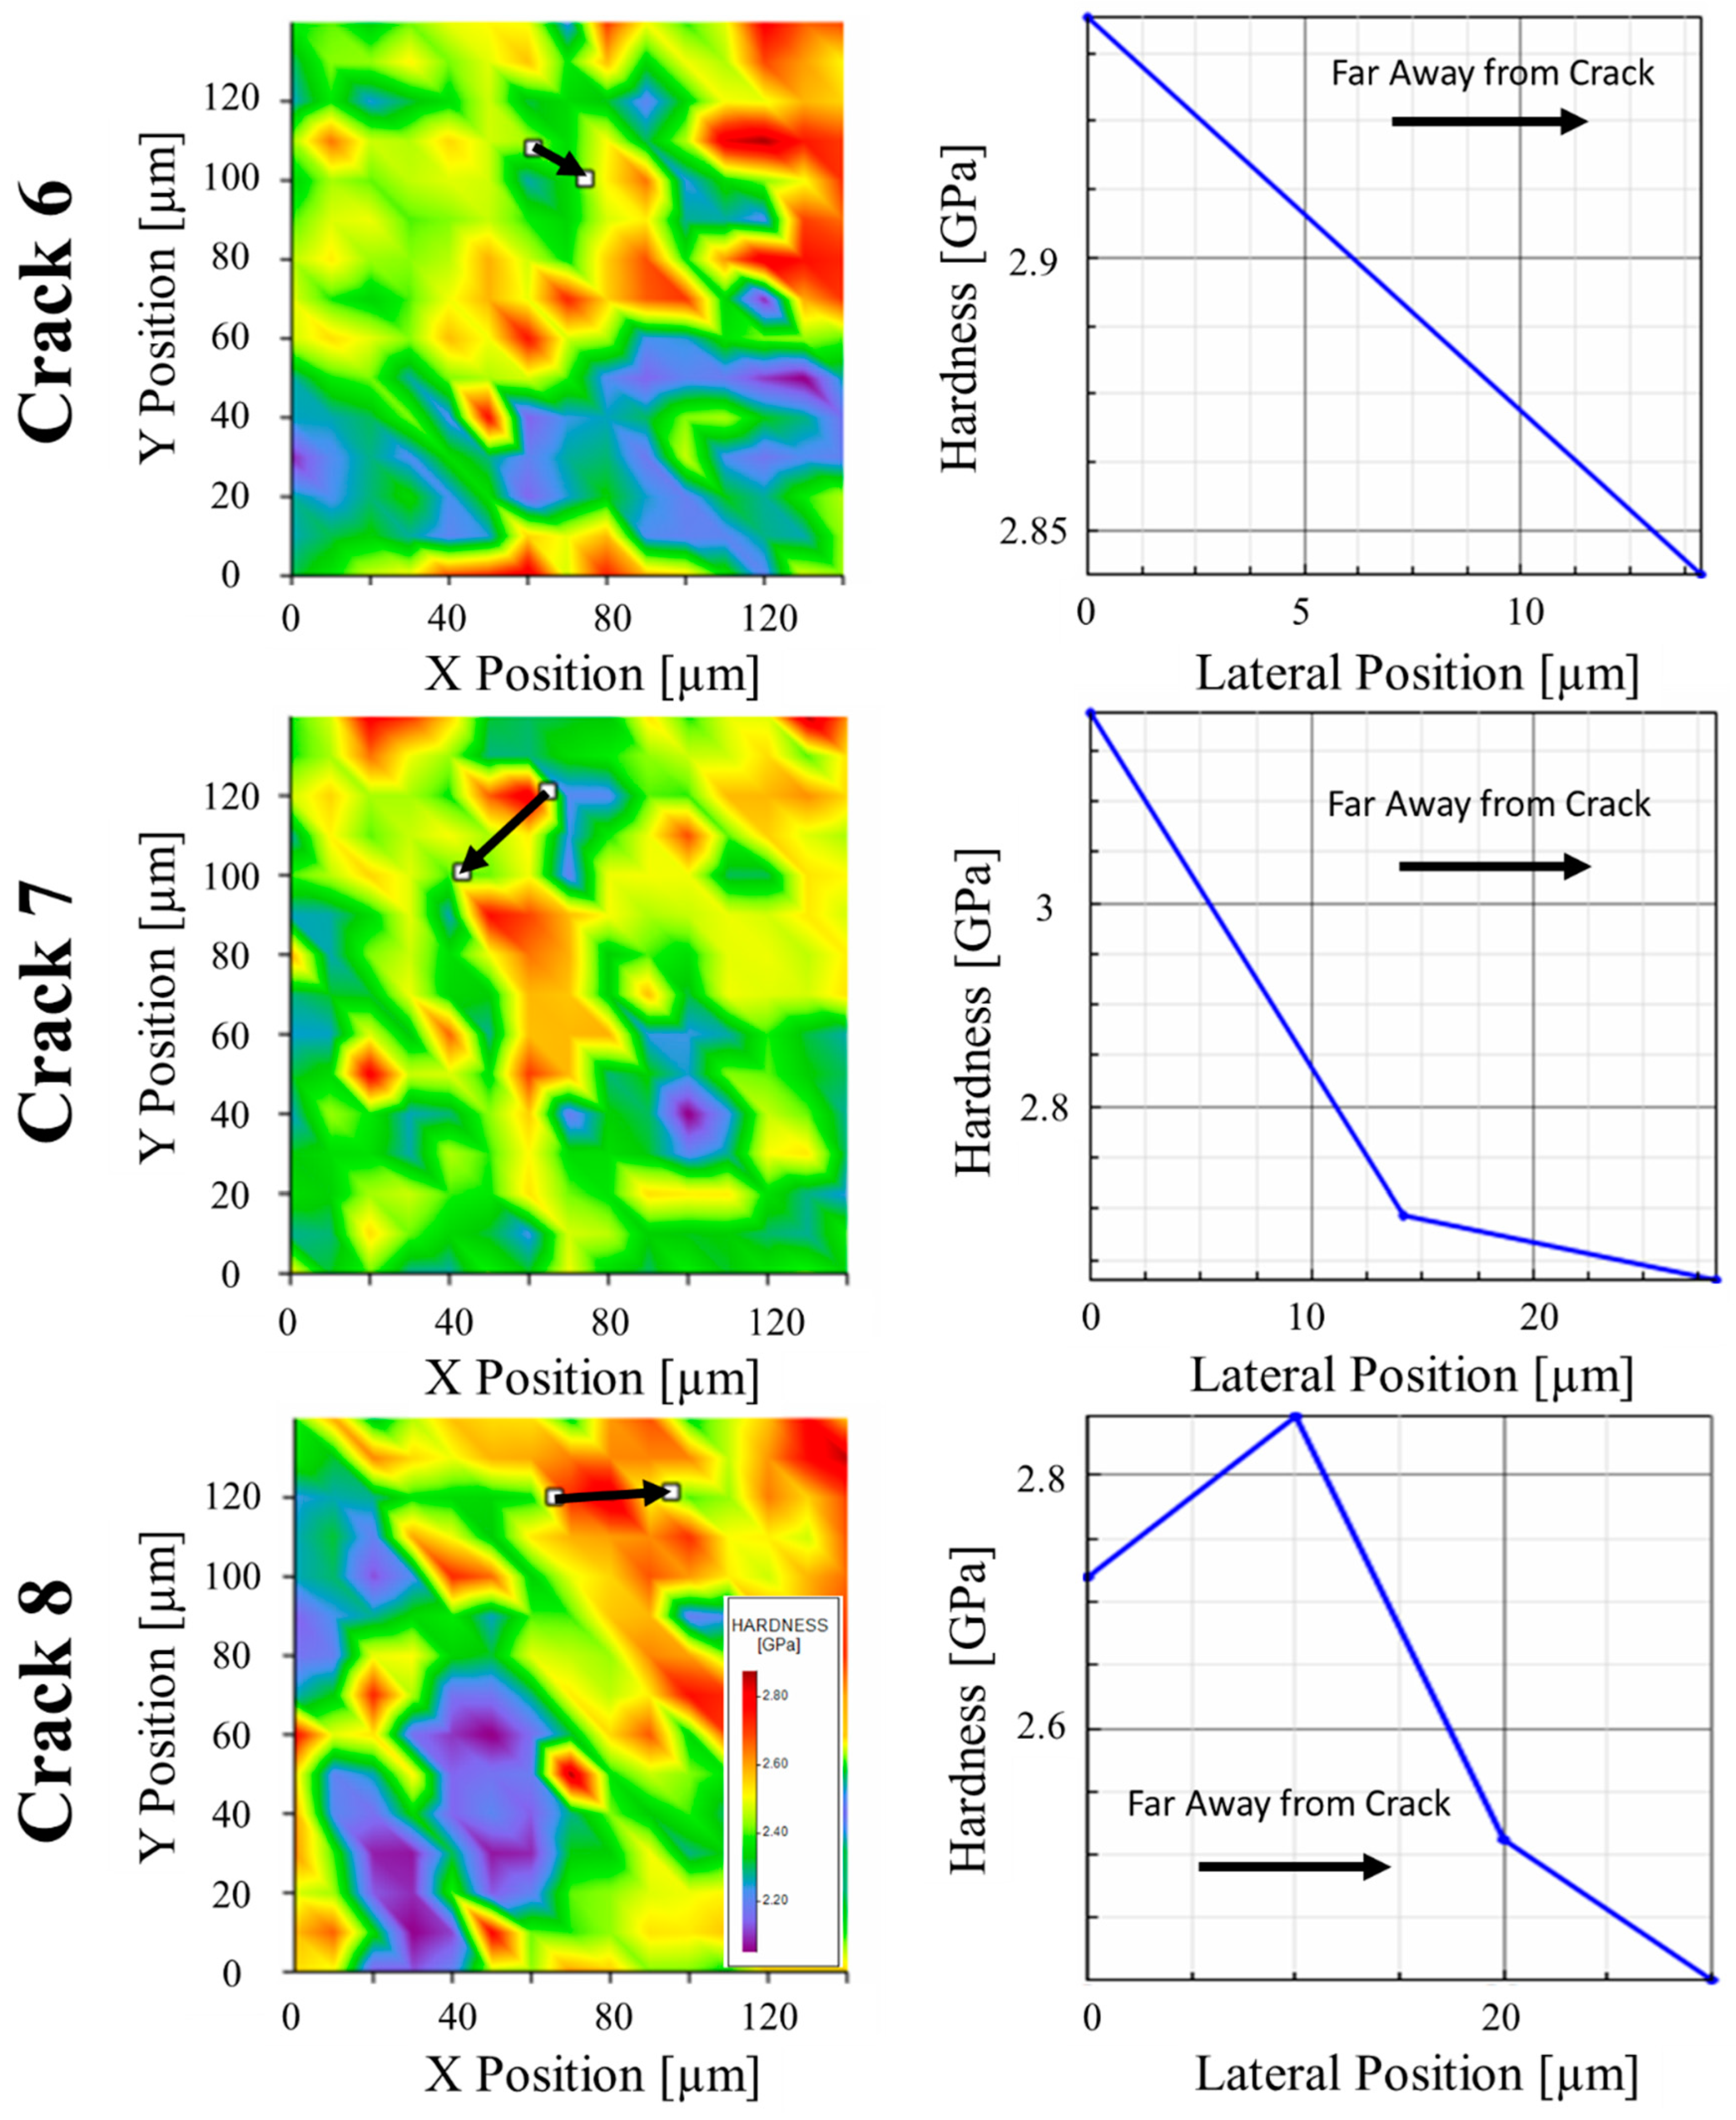
Figure 8 shows the intergranular hardness distribution along the crack path for cracks #6–#8, whereas Figure 9 shows the intragranular hardness distribution within a single cracked grain for cracks #6–#8. When examining the line scan of hardness along the crack paths (Figure 8), it can be observed that the cracks propagate through both hard and soft grains, which further confirms the conclusion drawn from Section 3.2. Moreover, the cracks appear to propagate along grains having alternating high and low mechanical hardness. This behavior is consistent with previously reported observations that crystallographic hardness—namely, Schmid (m) and Taylor (M) factor mismatch—control the crack propagation tendency in 304L stainless steel welds [27]. Specifically, our previous work showed that cracks tend to propagate either from crystallographically hard to crystallographically soft grains (i.e., high m, low M grains to low m, high M grains), or vice versa. The current results corroborate that mechanical (indentation) hardness has a similar influence on crack propagation as crystallographic hardness.
Additionally, when focusing on the intragranular hardness variation within an individual cracked grain (direction of hardness scan marked with orange arrows in Figure 7c, Figures S5c and S6c), it is found that the material closest to the crack tends to be harder than the surrounding material within the same grain. In other words, the hardness decreases when moving away from the crack within a grain, as shown in Figure 9. This observation suggests that the crack propagation induces strain hardening within a plastic zone immediately surrounding the crack, which is supported by crack tip plasticity mechanisms within the archival literature. The highly localized stress and strain around the crack tip leads to a higher density of dislocations, and thus, localized strain hardening during crack propagation [58,59]. As the crack propagates in randomly oriented polycrystalline materials, some grains experience higher shear stress, and thus, undergo more plastic deformation than the immediate neighboring grains ahead of the crack tip due to the orientation of their slip systems with respect to the applied load. This leads to the heterogeneous distributions in plastic deformation and local strain between different neighboring grains during crack propagation, and could explain the resultant strain concentrations in certain cracked grains [60]. Additionally, GBs are common obstacles for dislocation glide [61,62,63] and can lead to a pile-up of dislocations, and consequently, local strain hardening within the region surrounding the crack tip [64,65].

4. Conclusions

Nanoindentation mapping was conducted over CISCC paths in the HAZ of a 304L stainless steel weld. Nanoindentation maps were conducted at two different spatial resolutions, 50 µm and 10 µm, to evaluate the effects of intergranular mechanical hardness and intragranular hardness, respectively. The major conclusions are:
  • Grain boundaries and twins do not show a significant impact on hardness compared to randomly oriented grains in the SS 304L HAZ.
  • Grain-level mechanical hardness and orientation are not the primary controlling factors that determine the propagation of TGCISCC in the SS 304L HAZ.
  • Within an individual cracked grain, hardness is generally highest immediately around the crack due to the elevated dislocation density and strain hardening ahead of crack tips during TGCISCC propagation.
  • Nanoindentation techniques corroborate advanced multiscale electron microscopy techniques in identifying CISCC susceptibility and qualitatively assessing CISCC-induced strain hardening.

Supplementary Materials

The following supporting information can be downloaded at: https://www.mdpi.com/article/10.3390/met12081243/s1.

Author Contributions

Conceptualization, H.J.Q. and J.P.W.; methodology, H.J.Q. and J.P.W.; validation, H.J.Q.; formal analysis, H.J.Q.; investigation, H.J.Q.; resources, J.P.W.; data curation, H.J.Q.; writing—original draft preparation, H.J.Q. and J.P.W.; writing—review and editing, H.J.Q. and J.P.W.; visualization, H.J.Q.; supervision, J.P.W.; project administration, J.P.W.; funding acquisition, J.P.W. All authors have read and agreed to the published version of the manuscript.

Funding

This research was funded by the U.S. Department of Energy Office of Nuclear Energy through contract DE-NE0008759.

Institutional Review Board Statement

Not applicable.

Informed Consent Statement

Not applicable.

Data Availability Statement

The original EBSD OIM files and corresponding images are available at: EBSD Data of Nanoindentation Maps around Chloride-induced Stress Corrosion Cracks in Austenitic Stainless Steel 304L Welds. Available online: doi:10.17632/wpdygfg4zv.3 (accessed on 24 June 2022).

Acknowledgments

The authors are grateful to Eric Schindelholz of the School of Materials Science and Engineering at Ohio State University and Rebecca F. Schaller, Jason M. Taylor, and Timothy Montoya of the Center for Materials Science and Engineering at Sandia National Laboratories for the support in performing boiling magnesium chloride tests and stimulating discussions.

Conflicts of Interest

The authors declare no conflict of interest.

Abbreviations

Full TermAbbreviation
Stress corrosion crackingSCC
Intergranular stress corrosion crackingIGSCC
Transgranular stress corrosion crackingTGSCC
Grain boundaryGB
Chloride-induced stress corrosion crackingCISCC
Transgranular chloride-induced stress corrosion crackingTGCISCC
Stainless steelSS
Austenitic stainless steelAuSS
Scanning electron microscopySEM
Electron backscatter diffractionEBSD
Gas tungsten arc weldGTAW
Spent nuclear fuelSNF
Magnesium chlorideMgCl2
Heat-affected zoneHAZ
Image qualityIQ
Inverse pole figureIPF

References

  1. Fontana, M.G.; Greene, N.D. Corrosion Engineering, McGraw-Hill. 2018. Available online: https://modps71.lib.kmutt.ac.th/xmlui//handle/123456789/310 (accessed on 30 October 2020).
  2. Jones, D.A. Principles and Prevention of Corrosion; Prentice Hall: Hoboken, NJ, USA, 1996. [Google Scholar]
  3. Spencer, D.; Edwards, M.; Wenman, M.; Tsitsios, C.; Scatigno, G.; Chard-Tuckey, P. The initiation and propagation of chloride-induced transgranular stress-corrosion cracking (TGSCC) of 304L austenitic stainless steel under atmospheric conditions. Corros. Sci. 2014, 88, 76–88. [Google Scholar] [CrossRef]
  4. Paccou, E.; Tanguy, B.; Legros, M. Irradiation-assisted stress corrosion cracking susceptibility and mechanical properties related to irradiation-induced microstructures of 304L austenitic stainless steel. J. Nucl. Mater. 2019, 528, 151880. [Google Scholar] [CrossRef]
  5. Bai, J.; Ritter, S.; Seifert, H.-P.; Virtanen, S. Stress corrosion cracking initiation and short crack growth behaviour in Alloy 182 weld metal under simulated boiling water reactor hydrogen water chemistry conditions. Corros. Sci. 2017, 131, 208–222. [Google Scholar] [CrossRef]
  6. Panda, B.; Sujata, M.; Madan, M.; Bhaumik, S. Stress corrosion cracking in 316L stainless steel bellows of a pressure safety valve. Eng. Fail. Anal. 2014, 36, 379–389. [Google Scholar] [CrossRef] [Green Version]
  7. Kumar, M.S.; Sujata, M.; Venkataswamy, M.; Bhaumik, S. Failure analysis of a stainless steel pipeline. Eng. Fail. Anal. 2008, 15, 497–504. [Google Scholar] [CrossRef]
  8. Winzer, N.; Atrens, A.; Song, G.-L.; Ghali, E.; Dietzel, W.; Kainer, K.U.; Hort, N.; Blawert, C. A Critical Review of the Stress Corrosion Cracking (SCC) of Magnesium Alloys. Adv. Eng. Mater. 2005, 7, 659–693. [Google Scholar] [CrossRef]
  9. Rao, A.U.; Vasu, V.; Govindaraju, M.; Srinadh, K.S. Stress corrosion cracking behaviour of 7xxx aluminum alloys: A literature review. Trans. Nonferrous Met. Soc. China 2016, 26, 1447–1471. [Google Scholar] [CrossRef]
  10. Lu, B.; Chen, Z.; Luo, J.; Patchett, B.; Xu, Z. Pitting and stress corrosion cracking behavior in welded austenitic stainless steel. Electrochim. Acta 2005, 50, 1391–1403. [Google Scholar] [CrossRef]
  11. Stratulat, A.; Duff, J.A.; Marrow, T.J. Grain boundary structure and intergranular stress corrosion crack initiation in high temperature water of a thermally sensitised austenitic stainless steel, observed in situ. Corros. Sci. 2014, 85, 428–435. [Google Scholar] [CrossRef]
  12. Gertsman, V.; Bruemmer, S. Study of grain boundary character along intergranular stress corrosion crack paths in austenitic alloys. Acta Mater. 2001, 49, 1589–1598. [Google Scholar] [CrossRef]
  13. Shen, Z.; Arioka, K.; Lozano-Perez, S. A study on the diffusion-induced grain boundary migration ahead of stress corrosion cracking crack tips through advanced characterization. Corros. Sci. 2021, 183, 109328. [Google Scholar] [CrossRef]
  14. Volpe, L.; Burke, M.; Scenini, F. Correlation between Grain Boundary Migration and Stress Corrosion Cracking of Alloy 600 in Hydrogenated Steam. Acta Mater. 2020, 186, 454–466. [Google Scholar] [CrossRef]
  15. Sundar, A.; Chen, G.; Qi, L. Substitutional adsorptions of chloride at grain boundary sites on hydroxylated alumina surfaces initialize localized corrosion. NPJ Mater. Degrad. 2021, 5, 18. [Google Scholar] [CrossRef]
  16. Bruemmer, S.M.; Arey, B.W.; Charlot, L.A. Influence of Chromium Depletion on Intergranular Stress Corrosion Cracking of 304 Stainless Steel. Corrosion 1992, 48, 42–49. [Google Scholar] [CrossRef]
  17. Smith, T.J.; Staehle, R.W. Role of Slip Step Emergence in the Early Stages of Stress Corrosion Cracking in Face Centered Iron-Nickel-Chromium Alloys. Corrosion 1967, 23, 117–129. [Google Scholar] [CrossRef]
  18. Andresen, P.L.; Ford, F. Fundamental modeling of environmental cracking for improved design and lifetime evaluation in BWRs. Int. J. Press. Vessel. Pip. 1994, 59, 61–70. [Google Scholar] [CrossRef]
  19. Magnin, T.; Chambreuil, A.; Bayle, B. The corrosion-enhanced plasticity model for stress corrosion cracking in ductile fcc alloys. Acta Mater. 1996, 44, 1457–1470. [Google Scholar] [CrossRef]
  20. Zhang, Y.; Cook, A.; Padovani, C.; Zhou, S.; Turnbull, A. Atmospheric stress corrosion crack growth rates of 316 L stainless steel for nuclear waste containment. Corros. Sci. 2020, 177, 109008. [Google Scholar] [CrossRef]
  21. Tani, J.-I.; Mayuzumi, M.; Hara, N. Stress corrosion cracking of stainless-steel canister for concrete cask storage of spent fuel. J. Nucl. Mater. 2008, 379, 42–47. [Google Scholar] [CrossRef]
  22. Cook, A.B.; Lyon, S.B.; Stevens, N.P.C.; Gunther, M.; McFiggans, G.; Newman, R.C.; Engelberg, D.L. Assessing the risk of under-deposit chloride-induced stress corrosion cracking in austenitic stainless steel nuclear waste containers. Corros. Eng. Sci. Technol. 2014, 49, 529–534. [Google Scholar] [CrossRef]
  23. Scatigno, G.; Dong, P.; Ryan, M.; Wenman, M. The effect of salt loading on chloride-induced stress corrosion cracking of 304L austenitic stainless steel under atmospheric conditions. Materialia 2019, 8, 100509. [Google Scholar] [CrossRef]
  24. Turnbull, A. Corrosion pitting and environmentally assisted small crack growth. Proc. R. Soc. A Math. Phys. Eng. Sci. 2014, 470, 20140254. [Google Scholar] [CrossRef] [PubMed] [Green Version]
  25. Dong, P.; Scatigno, G.; Wenman, M. Effect of Salt Composition and Microstructure on Stress Corrosion Cracking of 316L Austenitic Stainless Steel for Dry Storage Canisters. J. Nucl. Mater. 2020, 545, 152572. [Google Scholar] [CrossRef]
  26. Wang, J.-A.J.; Payzant, A.; Bunn, J.R.; An, K. Neutron Residual Stress Mapping for Spent Nuclear Fuel Storage Canister Weldment; Oak Ridge National Lab. (ORNL): Oak Ridge, TN, USA, 2018. [Google Scholar] [CrossRef]
  27. Qu, H.J.; Tao, F.; Gu, N.; Montoya, T.; Taylor, J.M.; Schaller, R.F.; Schindelholz, E.; Wharry, J.P. Crystallographic effects on transgranular chloride-induced stress corrosion crack propagation of arc welded austenitic stainless steel. NPJ Mater. Degrad. 2022, 6, 43. [Google Scholar] [CrossRef]
  28. Qu, H. Effect of Crystallography On Stress Corrosion Cracking Growth in Austenitic Stainless Steels; Purdue University: West Lafayette, IN, USA, 2020. [Google Scholar] [CrossRef]
  29. Zhu, L.; Li, Y. Cleavage-dissolution assisted stress corrosion cracking under elastic loads. NPJ Mater. Degrad. 2021, 5, 25. [Google Scholar] [CrossRef]
  30. Moss, T.; Was, G. Accelerated Stress Corrosion Crack Initiation of Alloys 600 and 690 in Hydrogenated Supercritical Water. Met. Mater. Trans. A 2017, 48, 1613–1628. [Google Scholar] [CrossRef]
  31. Shen, Z.; Karamched, P.S.; Arioka, K.; Lozano-Perez, S. Observation and quantification of the diffusion-induced grain boundary migration ahead of SCC crack tips. Corros. Sci. 2018, 147, 163–168. [Google Scholar] [CrossRef]
  32. Meisnar, M.; Moody, M.; Lozano-Perez, S. Atom probe tomography of stress corrosion crack tips in SUS316 stainless steels. Corros. Sci. 2015, 98, 661–671. [Google Scholar] [CrossRef]
  33. Schoell, R.; Xi, L.; Zhao, Y.; Wu, X.; Hong, Y.; Yu, Z.; Kenesei, P.; Almer, J.; Shayer, Z.; Kaoumi, D. Mechanism of chlorine-induced stress corrosion cracking of two 304 SS heats in simulated marine environment through in situ X-ray tomography and diffraction: Role of deformation induced martensite and crack branching. Mater. Charact. 2022, 190, 112020. [Google Scholar] [CrossRef]
  34. Schoell, R.; Xi, L.; Zhao, Y.; Wu, X.; Yu, Z.; Kenesei, P.; Almer, J.; Shayer, Z.; Kaoumi, D. In situ synchrotron X-ray tomography of 304 stainless steels undergoing chlorine-induced stress corrosion cracking. Corros. Sci. 2020, 170, 108687. [Google Scholar] [CrossRef]
  35. Moore, S.; Burrows, R.; Kumar, D.; Kloucek, M.B.; Warren, A.D.; Flewitt, P.E.J.; Picco, L.; Payton, O.D.; Martin, T.L. Observation of stress corrosion cracking using real-time in situ high-speed atomic force microscopy and correlative techniques. NPJ Mater. Degrad. 2021, 5, 3. [Google Scholar] [CrossRef]
  36. Mao, K.S.; Sun, C.; Huang, Y.; Shiau, C.-H.; Garner, F.A.; Freyer, P.D.; Wharry, J.P. Grain orientation dependence of nanoindentation and deformation-induced martensitic phase transformation in neutron irradiated AISI 304L stainless steel. Materialia 2019, 5, 100208. [Google Scholar] [CrossRef]
  37. Dolph, C.K.; da Silva, D.J.; Swenson, M.J.; Wharry, J.P. Plastic zone size for nanoindentation of irradiated Fe–9%Cr ODS. J. Nucl. Mater. 2016, 481, 33–45. [Google Scholar] [CrossRef] [Green Version]
  38. Mao, K.; Wang, H.; Wu, Y.; Tomar, V.; Wharry, J.P. Microstructure-property relationship for AISI 304/308L stainless steel laser weldment. Mater. Sci. Eng. A 2018, 721, 234–243. [Google Scholar] [CrossRef]
  39. Mao, K.S.; Sun, C.; Shiau, C.-H.; Yano, K.H.; Freyer, P.D.; El-Azab, A.A.; Garner, F.A.; French, A.; Shao, L.; Wharry, J.P. Role of cavities on deformation-induced martensitic transformation pathways in a laser-welded, neutron irradiated austenitic stainless steel. Scr. Mater. 2019, 178, 1–6. [Google Scholar] [CrossRef]
  40. Patki, P.V.; Wu, Y.; Wharry, J.P. Effects of proton irradiation on microstructure and mechanical properties of nanocrystalline Cu–10at%Ta alloy. Materialia 2020, 9, 100597. [Google Scholar] [CrossRef]
  41. Clement, C.; Zhao, Y.; Warren, P.; Liu, X.; Xue, S.; Gandy, D.W.; Wharry, J.P. Comparison of ion irradiation effects in PM-HIP and forged alloy 625. J. Nucl. Mater. 2021, 558, 153390. [Google Scholar] [CrossRef]
  42. Saleh, M.; Zaidi, Z.; Hurt, C.; Ionescu, M.; Munroe, P.; Bhattacharyya, D. Comparative Study of Two Nanoindentation Approaches for Assessing Mechanical Properties of Ion-Irradiated Stainless Steel 316. Metals 2018, 8, 719. [Google Scholar] [CrossRef] [Green Version]
  43. Bhattacharyya, D.; Hurt, C.; Xu, A.; Ionescu, M. An Analytical Model for Oblique Cross Section Nanoindentation of Ion-Irradiated Metallic Alloys Based on Studies of Oxide Dispersion Strengthened Steel MA957. Adv. Eng. Mater. 2021, 23, 2001431. [Google Scholar] [CrossRef]
  44. Gasparrini, C.; Xu, A.; Short, K.; Wei, T.; Davis, J.; Palmer, T.; Bhattacharyya, D.; Edwards, L.; Wenman, M. Micromechanical testing of unirradiated and helium ion irradiated SA508 reactor pressure vessel steels: Nanoindentation vs in-situ microtensile testing. Mater. Sci. Eng. A 2020, 796, 139942. [Google Scholar] [CrossRef]
  45. Hosemann, P.; Vieh, C.; Greco, R.; Kabra, S.; Valdez, J.; Cappiello, M.; Maloy, S. Nanoindentation on ion irradiated steels. J. Nucl. Mater. 2009, 389, 239–247. [Google Scholar] [CrossRef]
  46. Krumwiede, D.; Yamamoto, T.; Saleh, T.; Maloy, S.; Odette, G.; Hosemann, P. Direct comparison of nanoindentation and tensile test results on reactor-irradiated materials. J. Nucl. Mater. 2018, 504, 135–143. [Google Scholar] [CrossRef]
  47. Kareer, A.; Prasitthipayong, A.; Krumwiede, D.; Collins, D.; Hosemann, P.; Roberts, S. An analytical method to extract irradiation hardening from nanoindentation hardness-depth curves. J. Nucl. Mater. 2018, 498, 274–281. [Google Scholar] [CrossRef]
  48. Enos, D.; Bryan, C.R. Final Report: Characterization of Canister Mockup Weld Residual Stresses; OSTI: Oak Ridge, TN, USA, 2016. [Google Scholar] [CrossRef] [Green Version]
  49. Qu, H.J.; Srinivasan, J.; Zhao, Y.; Mao, K.S.; Taylor, J.M.; Marino, G.; Montoya, T.; Johnson, K.; Locke, J.S.; Schaller, R.; et al. Stress corrosion cracking mechanism of cold spray coating on a galvanically similar substrate. Mater. Sci. Eng. A 2022, 849, 143404. [Google Scholar] [CrossRef]
  50. Qu, H.J.; Wharry, J.P. Crystallographic orientation data from chloride-induced stress corrosion crack (CISCC) paths in gas tungsten arc welded (GTAW) austenitic stainless steel 304L. Data Brief 2022, 42, 108059. [Google Scholar] [CrossRef]
  51. ASTM-G36-94; Standard Practice for Evaluating Stress-Corrosion-Cracking Resistance of Metals and Alloys in a Boiling Magnesium Chloride Solution. ASTM International: West Conshohocken, PA, USA, 2013.
  52. Oliver, W.C.; Pharr, G.M. An improved technique for determining hardness and elastic modulus using load and displacement sensing indentation experiments. J. Mater. Res. 1992, 7, 1564–1583. [Google Scholar] [CrossRef]
  53. Phani, P.S.; Oliver, W. A critical assessment of the effect of indentation spacing on the measurement of hardness and modulus using instrumented indentation testing. Mater. Des. 2018, 164, 107563. [Google Scholar] [CrossRef]
  54. Ke, R.; Hu, C.; Zhong, M.; Wan, X.; Wu, K. Grain refinement strengthening mechanism of an austenitic stainless steel: Critically analyze the impacts of grain interior and grain boundary. J. Mater. Res. Technol. 2022, 17, 2999–3012. [Google Scholar] [CrossRef]
  55. Voyiadjis, G.Z.; Zhang, C. The mechanical behavior during nanoindentation near the grain boundary in a bicrystal FCC metal. Mater. Sci. Eng. A 2015, 621, 218–228. [Google Scholar] [CrossRef]
  56. Tsuru, T.; Kaji, Y.; Matsunaka, D.; Shibutani, Y. Incipient plasticity of twin and stable/unstable grain boundaries during nanoindentation in copper. Phys. Rev. B 2010, 82, 024101. [Google Scholar] [CrossRef]
  57. Tsuru, T.; Shibutani, Y.; Kaji, Y. Fundamental interaction process between pure edge dislocation and energetically stable grain boundary. Phys. Rev. B 2009, 79, 012104. [Google Scholar] [CrossRef]
  58. Lu, Z.; Shoji, T.; Meng, F.; Xue, H.; Qiu, Y.; Takeda, Y.; Negishi, K. Characterization of microstructure and local deformation in 316NG weld heat-affected zone and stress corrosion cracking in high temperature water. Corros. Sci. 2011, 53, 1916–1932. [Google Scholar] [CrossRef]
  59. Shen, Z.; Chen, K.; Tweddle, D.; He, G.; Arioka, K.; Lozano-Perez, S. Characterization of the crack initiation and propagation in Alloy 600 with a cold-worked surface. Corros. Sci. 2019, 152, 82–92. [Google Scholar] [CrossRef]
  60. Karlsen, W.; Diego, G.; Devrient, B. Localized deformation as a key precursor to initiation of intergranular stress corrosion cracking of austenitic stainless steels employed in nuclear power plants. J. Nucl. Mater. 2010, 406, 138–151. [Google Scholar] [CrossRef]
  61. Byun, T.; Hashimoto, N.; Farrell, K. Temperature dependence of strain hardening and plastic instability behaviors in austenitic stainless steels. Acta Mater. 2004, 52, 3889–3899. [Google Scholar] [CrossRef]
  62. Haouala, S.; Alizadeh, R.; Bieler, T.; Segurado, J.; Llorca, J. Effect of slip transmission at grain boundaries in Al bicrystals. Int. J. Plast. 2019, 126, 102600. [Google Scholar] [CrossRef] [Green Version]
  63. Sangid, M.D.; Ezaz, T.; Sehitoglu, H.; Robertson, I.M. Energy of slip transmission and nucleation at grain boundaries. Acta Mater. 2011, 59, 283–296. [Google Scholar] [CrossRef]
  64. Meisnar, M.; Vilalta-Clemente, A.; Moody, M.; Arioka, K.; Lozano-Perez, S. A mechanistic study of the temperature dependence of the stress corrosion crack growth rate in SUS316 stainless steels exposed to PWR primary water. Acta Mater. 2016, 114, 15–24. [Google Scholar] [CrossRef]
  65. Sennour, M.; Laghoutaris, P.; Guerre, C.; Molins, R. Advanced TEM characterization of stress corrosion cracking of Alloy 600 in pressurized water reactor primary water environment. J. Nucl. Mater. 2009, 393, 254–266. [Google Scholar] [CrossRef]
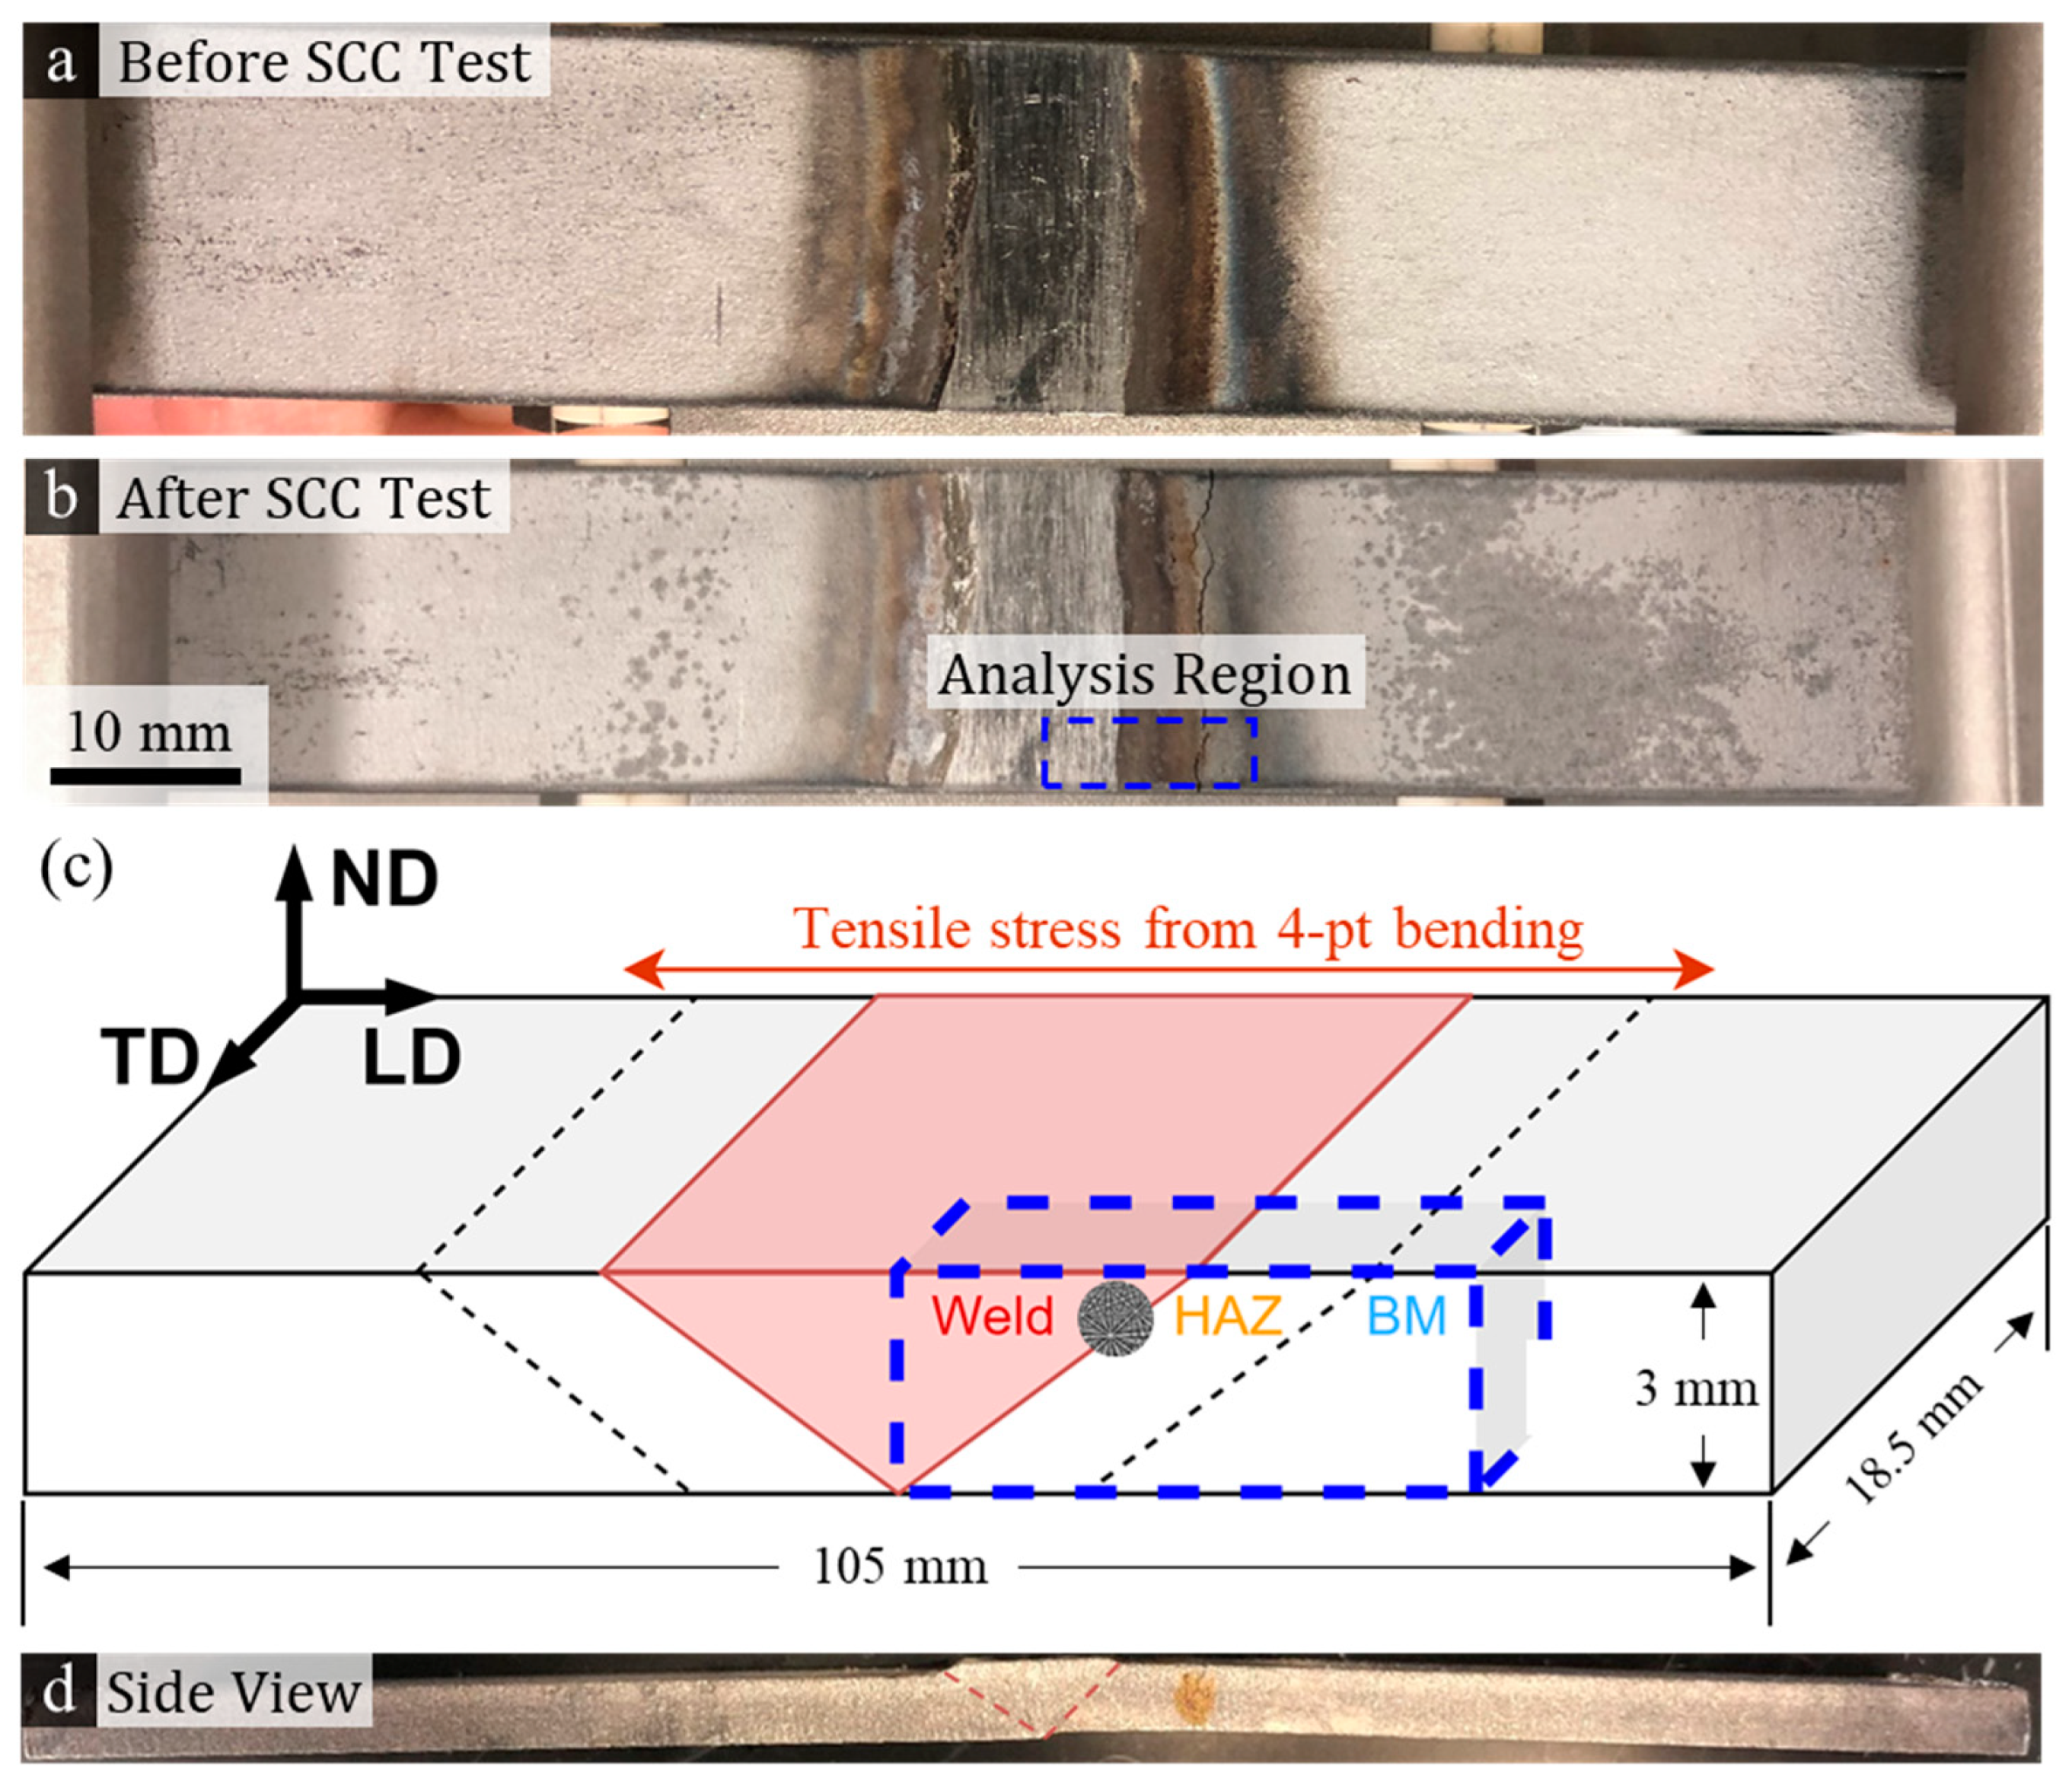
Figure 1. (a,b) Surface morphology of test coupon before and after immersion in boiling magnesium chloride; (c) schematic illustration of the coupon dimension and welding zones; (d) side view of the test coupon after boiling magnesium chloride immersion, with a major crack appearing to the right of the weld seam (adapted from Reference [27]).
Metals 12 01243 g001
Figure 2. Four-point bend apparatus [50]. Reprinted/adapted with permission from Reference [50].
Metals 12 01243 g002
Figure 3. Boiling magnesium chloride test setup [50]. Reprinted/adapted with permission from Reference [50].
Metals 12 01243 g003
Figure 4. Nanoindentation and EBSD maps of crack #1 region. (a) SEM image with crack marked in red; (b,c) EBSD-IQ and IPF maps showing the grain structure; (d) SEM image annotated with hardness and triangle indentation position, with circle and square marks indicating that the corresponding indent is located on GBs or within a twin, respectively.
Metals 12 01243 g004
Figure 5. Hardness distribution of (a) cracked grains on crack path compared to bulk uncracked material, and (b) indents located within grains, within twins, and on GBs.
Metals 12 01243 g005
Figure 6. Hardness distribution of uncracked and cracked grains as a function of their (a) Schmid factor and (b) Taylor factor; IPF of the grain orientations for (c) bulk material and (d) cracked grains.
Metals 12 01243 g006
Figure 7. Crack #6 region: (a) NanoBlitz maps overlayed with EBSD-IQ map for identification of grain structure, with the crack path marked by the arrow; (b) SEM image of the mapped region with crack area marked in red rectangle; (c,d) EBSD-IQ and IPF maps, with GBs marked in blue, crack path traced with red dashed arrow corresponding to intergranular hardness profiles shown in Figure 8, and orange arrow indicating direction of intragranular hardness profiles shown in Figure 9.
Metals 12 01243 g007
Figure 8. NanoBlitz maps with corresponding intergranular line scan hardness profiles along the arrowed paths of cracks #6–#8.
Metals 12 01243 g008
Figure 9. NanoBlitz maps with corresponding intragranular line scan hardness profile along the arrowed path from the crack to the GB within a cracked grain for cracks #6–#8.
Metals 12 01243 g009
Table 1. Base metal and weld filler metal composition [27].
MaterialsAlloying wt.% (Balance Fe)
CSiCrPSNMnNiCuMo
SS 304030.0270.3518.110.0230.040.0561.318.02--
SS 308800.0140.4719.880.0210.002-1.839.660.10.01
Publisher’s Note: MDPI stays neutral with regard to jurisdictional claims in published maps and institutional affiliations.