Article

Parameters Optimization and Repeatability Study on Low-Weldable Nickel-Based Superalloy René 80 Processed via Laser Powder–Bed Fusion (L-PBF)

by
Pietro Antonio Martelli
1,2,*,
Antonio Sivo
1,2,
Flaviana Calignano
2,3,4,
Emilio Bassini
1,2,4,
Sara Biamino
1,2,4 and
Daniele Ugues
1,2,4
1
Department of Applied Science and Technology (DISAT), Polytechnic of Turin, Corso duca degli Abruzzi 24, 10129 Turin, Italy
2
Centro Interdipartimentale Integrated Additive Manufacturing IAM@PoliTO, Polytechnic of Turin, Corso Castelfidardo 51, 10138 Turin, Italy
3
Department of Management and Production Engineering (DIGEP), Polytechnic of Turin, Corso duca degli Abruzzi 24, 10129 Turin, Italy
4
Consorzio Nazionale della Scienza e Tecnologia dei Materiali (INSTM), Via G. Giusti 9, 50121 Florence, Italy
*
Author to whom correspondence should be addressed.
Metals 2023, 13(2), 210; https://doi.org/10.3390/met13020210
Submission received: 7 December 2022 / Revised: 16 January 2023 / Accepted: 17 January 2023 / Published: 20 January 2023
(This article belongs to the Section Additive Manufacturing)

Abstract

:
This work aims to investigate the processability of René 80 via laser powder–bed fusion (L-PBF). René 80 is a poorly weldable Ni-superalloy, currently processed via investment casting to fabricate turbine blades working at an operating temperature of about 850 °C. The L-PBF parameters optimization aims to increase part integrity and enhance processing repeatability. This part was tackled by creating a complete design of experiments (DOE) in which laser power, scan speed and hatching distance were varied accordingly. Optimizing the abovementioned parameters minimized the crack density and pore area fraction. Hence, five parameter sets leading to a crack density lower than 100 µm/mm2 and a pore fraction between 0.045% and 0.085% were selected. Furthermore, the intra-print repeatability was studied by producing three specimens’ repetitions for each optimal set of parameters in the same build. The porosity value obtained was constant among repetitions, and the crack density (around 75 µm/mm2) had a slight standard deviation. The third step of the research assessed the inter-prints repeatability by producing a replica of the five selected parameter sets in a different build and by comparing the results with those studied previously. According to this latter study, the porosity fraction (ca. 0.06%) was constant in intra- and inter-print conditions. Conversely, crack density was lower than 100 µm/mm2 only in three sets of parameters, regardless of the intra- or inter-build cross-check. Finally, the best parameter set was chosen, emphasizing the average flaw fraction (least possible value) and repeatability. Once the optimal densification of the samples was achieved, the alloy’s microstructural features were also investigated.

1. Introduction

René 80 is a nickel superalloy mainly used in the aerospace field to produce blades for low-pressure aeronautical turbines [1]. This alloy was developed in the 1980s by General Electric to have a castable alloy with high rupture strength, thermal fatigue, and hot corrosion resistance. As for most Ni superalloys, the high-temperature properties are guaranteed by: (a) the precipitation of reinforcing γ′, which can reach 40% in volume [2]; (b) the presence of solid solution strengtheners such as Cr, Co, Mo, W; and (c) the formation of MC and M23C6 carbides, reinforcing the grain boundaries [3].
Nevertheless, the presence of many alloying elements can also negatively affect processability with traditional techniques [4]. This alloy is hardly deformable and workable due to its high thermal stability. In addition, aerospace parts can have a highly complex shape; therefore, this alloy is typically processed via investment casting [5]. Although this process allows for excellent dimensional accuracy, the manufacturing costs are high [4]. Furthermore, post-processing requires long homogenization treatment to remove segregation before the final heat treatment [5]. In addition, repair by welding is used. The latter restores the initial geometry by adding material in the damaged zone. As for all the welding processes, defects such as cracks and pores can alter the melted regions and the heat-affected zone (HAZ) [6], based also on the welding parameters [7]. In superalloys, weldability is related to the amount of γ′ or, in other words, the content of γ′ forming elements (Al, Ti, Ta). DuPont et al. showed that γ′ precipitation in the HAZ leads to crack formation [8]. Therefore, it is possible to classify superalloys into two groups: weldable alloys, e.g., IN718, IN625, Hastelloy X, and low weldable alloys, e.g., IN738LC, CM247LC, RR1000 and René 80. In particular, in the latter work, it is explained that low weldability is reached when the empirical threshold value of Al + 0.5Ti = 3 is overcome. Further to this mechanism, there are other factors to be considered: (1) solidification cracking, i.e., interdendritic channels closed by rapid solidification not allowing the liquid to fill the voids left by solidification; (2) liquation cracking, given by low melting eutectic phases melted during rapid heating; and (3) ductility dip cracking, consisting in loss of ductility at the midrange of heat treatment temperature [8].
To overcome the manufacturing issues of casting, additive manufacturing is considered a promising technological alternative. Among the additive manufacturing (AM) techniques defined in the ISO/ASTM 52911, the laser powder–bed fusion (L-PBF) gained massive interest to process superalloys in the last decades [9], especially for aerospace applications. L-PBF is based on melting powder layers, slice by slice, to create a near-net-shape part [10]. Essentially, it is an iterated welding process through the entire component. Therefore, this process has many similarities to welding, and the issues related to the material are almost the same. On the other hand, the melting and solidification of melt pools are much faster than in conventional welding; hence, the final achievable microstructures are different [11]. As it comes to micro-cracking in L-PBF parts, three main approaches can be used to mitigate the problem: (1) alloy design, (2) process parameter optimization and (3) post-processing [12]. In this paper, the second route was followed and investigated. As far as additive manufacturing is concerned, process parameters are finely adjusted to obtain parts with specific physical properties such as densification, surface roughness, residual stresses, etc. [13]. The most studied parameters are laser power, scanning speed, scanning strategy, hatching distance and layer thickness. For example, Tomus et al. [14] focused on scan speed, while Carter et al. [15] considered the energy density given to the powder bed. There are many studies about parameter optimization for Ni superalloys processed via L-PBF in the literature. Most of the studied materials are easy-to-weld grades, such as In718 [16,17], In625 [18] and Hastelloy X [19], for which the effect of alloying elements on cracking behavior was also studied [20]. Furthermore, hard-to-weld compositions have been investigated, such as CM247 LC [21,22], CMSX486 [23], In738 [24] and In939 [25]. René 80 is also a hard-to-weld alloy, but to the best of the authors’ knowledge, there are no articles reporting its AM processing except for the one by Acharya et al. [26], where selective laser epitaxy (SLE) was used to produce a single layer repair on a René 80 substrate with no cracks and good bonding.
Different approaches were proposed for process optimization in AM. Carter et al. [27] and Rickenbacher et al. [28] optimized the process parameters focusing on reducing the number of cracks and pores in CM247 LC and In738 LC, respectively. They also studied processability with the modulation of volume energy density (VED), a compact parameter that summarizes the laser setup. They found that those superalloys cannot be processed beneath a certain value of VED. Gange et al. [29] tried to reduce the crack density in In738 LC parts, correlating the process parameters with melt pool shape and size. They found that the melt pool shape must be regular, and the size affects the grains’ growth along the building direction. Therefore, finding a set of parameters leading to small and regular melt pools also reduces the crack density. Another approach is given by Hilal et al. [30], who studied the effect of post-processing on CM247 LC. Since the post-processing heat treatment can develop macro-cracks in the samples, the authors correlated the process parameters of L-PBF with the post-treated part’s integrity. They found that increasing the beam power and reducing the scan speed can mitigate the macro-crack development in the post-processing steps. A different framing is given by Dowling et al. [31]. The authors analyzed the issues of reproducibility and repeatability in L-PBF part properties, highlighting three primary sources of uncertainty: (a) the powder feedstock, (b) the laser–powder interaction and (c) post processes. In the latter review, it is highlighted how parameter optimization mainly focuses on the maximization or minimization of a certain property, without considering the effects on repeatability of the process. In the present work, the authors aim to perform a full optimization, considering the effect of different parameter sets on repeatability of the L-PBF process.
In the present work, processability of René 80 is discussed and assessed. As a first step, 18 different parameter sets were screened evaluating crack density and pore area fraction as criteria. Then, a repeatability study was carried out by printing intra-print and inter-prints repetitions of the five most promising parameter sets from the first screening. For the final decision, the maximum crack length was added as a criterion to refine the best set identification. The latter improvement was particularly important for the industrial partner of the project, which operates in the aeronautical sector. In conclusion, this work demonstrates that René 80 can be processed via L-PBF, obtaining good densification despite its high fraction of reinforcing γ′ forming elements. Focusing on a repeatability study, was considered vital for obtaining good sample densification, significantly reducing the variation among repetitions.

2. Materials and Methods

2.1. Powder Characterization

The raw material used in this work is a Ni-based superalloy supplied as metallic powder by Praxair Inc. This alloy is commercialized as Ni 183-4 and has the same composition as René 80 [1]. It was produced by argon gas atomization and sieved in the range of 16 to 45 μm. Two different batches of powders were used for the research. A full characterization was performed in terms of composition, particle morphology and distribution and flowability to assess their compatibility.
The composition of the powders was determined via ICP-EOS for major elements, while Leco C-S and O-N-H were used for residual elemental analysis. The recorded contents of elements were then compared with the nominal ones for this alloy. The powders were then characterized via scanning electron microscopy (SEM), G5 Phenom ProX SEM, to evaluate their shape and size. About 5 g of powder was taken from the center of a container flask and placed on a stub of 12.5 mm. The excess was removed by tilting the stub. After sampling with the SEM, the numerical size distribution was assessed via image analysis acquiring a number of pictures capable of collecting 60,000 powder particles, using a resolution of 0.45 µm/pixel. The images were processed with an ImageJ script. A typical picture, optimized for automated image analysis, is shown in Figure 1. In addition, the volumetric size distribution was assessed using a laser diffraction size analyzer, mastersizer 3000, Malvern Panalytical.
Powders were also tested for determining the apparent density and flowability, according to ASTM B212 and B213, respectively. A complete analysis of the powders’ properties is critical for the L-PBF process, as deeply explained in the review written by Capozzi et al. [32].

2.2. Samples Production

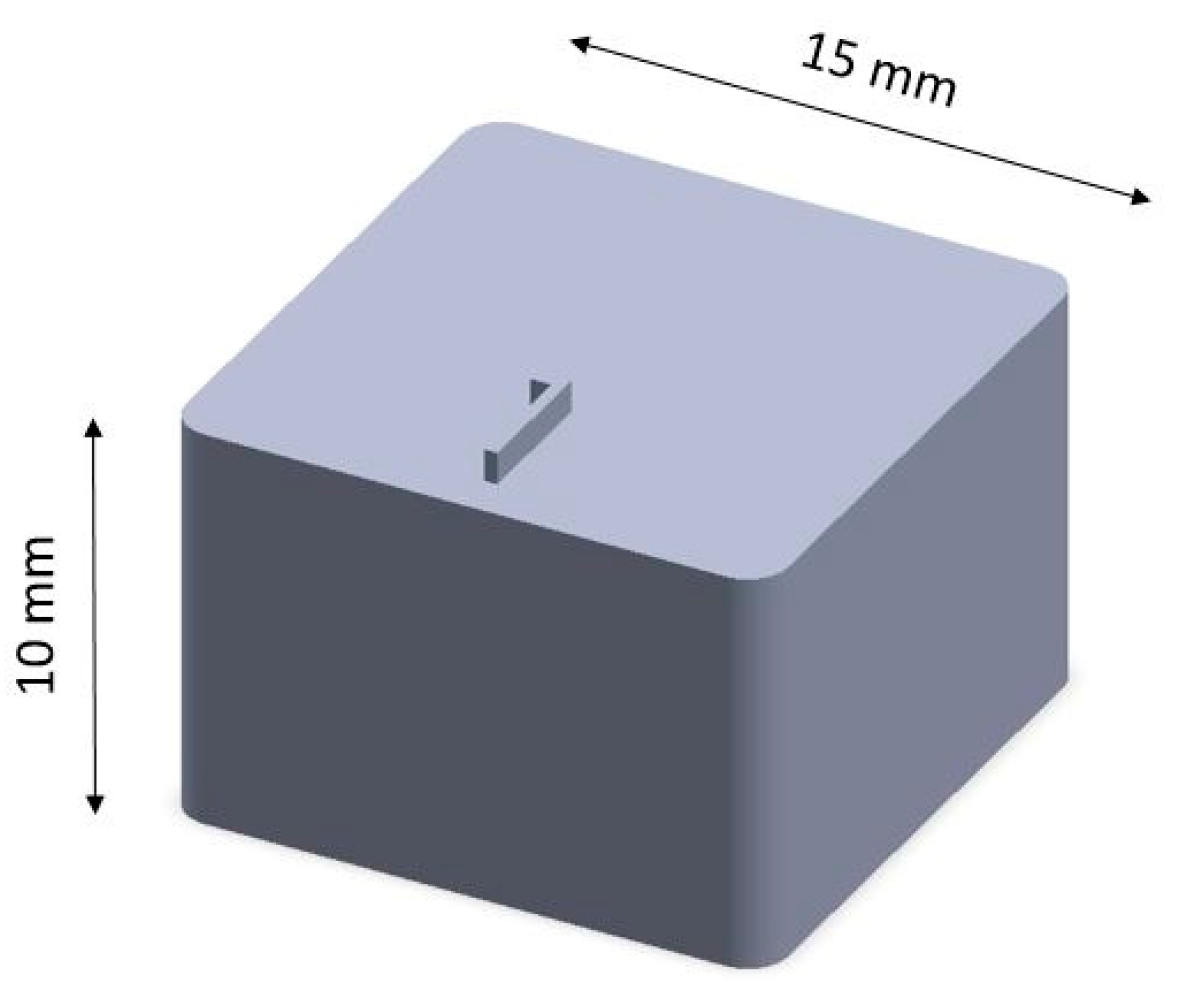
The samples were produced with an EOSINT M270 Dual Mode machine (EOS, Krailling, Germany) using a low-alloyed carbon steel platform heated to 80 °C and a steel recoater. The adopted scanning strategy was stripes-based with a pattern rotation of 67° among each layer of powder. This strategy guarantees a homogenous heat distribution within the layers of the samples, which were produced at 15 × 15 × 10 mm in size, as reported in Figure 2.
A full DOE was defined for the production of the samples by combining three main processing parameters: laser power, scan speed and hatching distance. As a result, 18 combinations were tested, varying the values in the ranges reported in Table 1. The layer thickness was kept constant at 20 µm. The oxygen level was always kept below 0.1%.
The effects of process parameters on processability were then evaluated by measuring the fractions of pores and cracks in the samples. According to a first preliminary screening, a sub-set of the five most promising combinations was chosen to evaluate the reproducibility of the results with two other printing sessions. The first one consisted of three repetitions of all the five best combinations to evaluate intra-job repeatability, whereas one repetition per combination of parameters was produced in the second build. All the builds were used to assess the inter-job repeatability of the defined five parameter combinations.

2.3. Samples Analysis

After printing, all the samples were removed from the platform using wire electrical discharge machining (W-EDM; Baoma, Suzhou, China) and were characterized with standard metallographic techniques. Each sample was cut on the X–Z plane (parallel to the building direction), mounted in resin and polished. In detail, the as-cut surface was subjected to grinding with silicon carbide papers from 180 to 1200 grit, and then, lapping was performed with diamond suspensions from 6 to 1 µm in size. At the end of this step, a slight etching was performed with Kalling N2 (waterless) by immersion and soaking for 5 s, followed by a new lapping step with 1 µm suspension to detect defects. The surface was then sampled with a Leica DZ500 light optical microscope (Leica, Wetzlar, Germany). Detected defects were classified as pores and cracks based on morphologic features. To compare the measurements statistically, fifteen images per sample were taken, covering 35 mm2 in total with a resolution of 0.914 µm/pixel. The same scheme was applied to all the samples. A detailed description of the image processing is reported in Section 2.4. In the first step of the optimization procedure, resulting metrics of flaw size and fraction permitted the evaluation of the effect of the parameter combinations on the material densification. In the second step, standard deviation of these metrics was calculated among the sources of variation (intra- and inter-print variability) to assess the repeatability of the L-PBF process as per ASTM E117-20. Samples processed with the optimal identified parameters were then subjected to microstructure assessment. The as-polished surface was etched with Glycia Regia by immersion for 15 s. After that, random sampling of the surface was performed with an optical microscope and with SEM at various magnifications.

2.4. Image Analysis

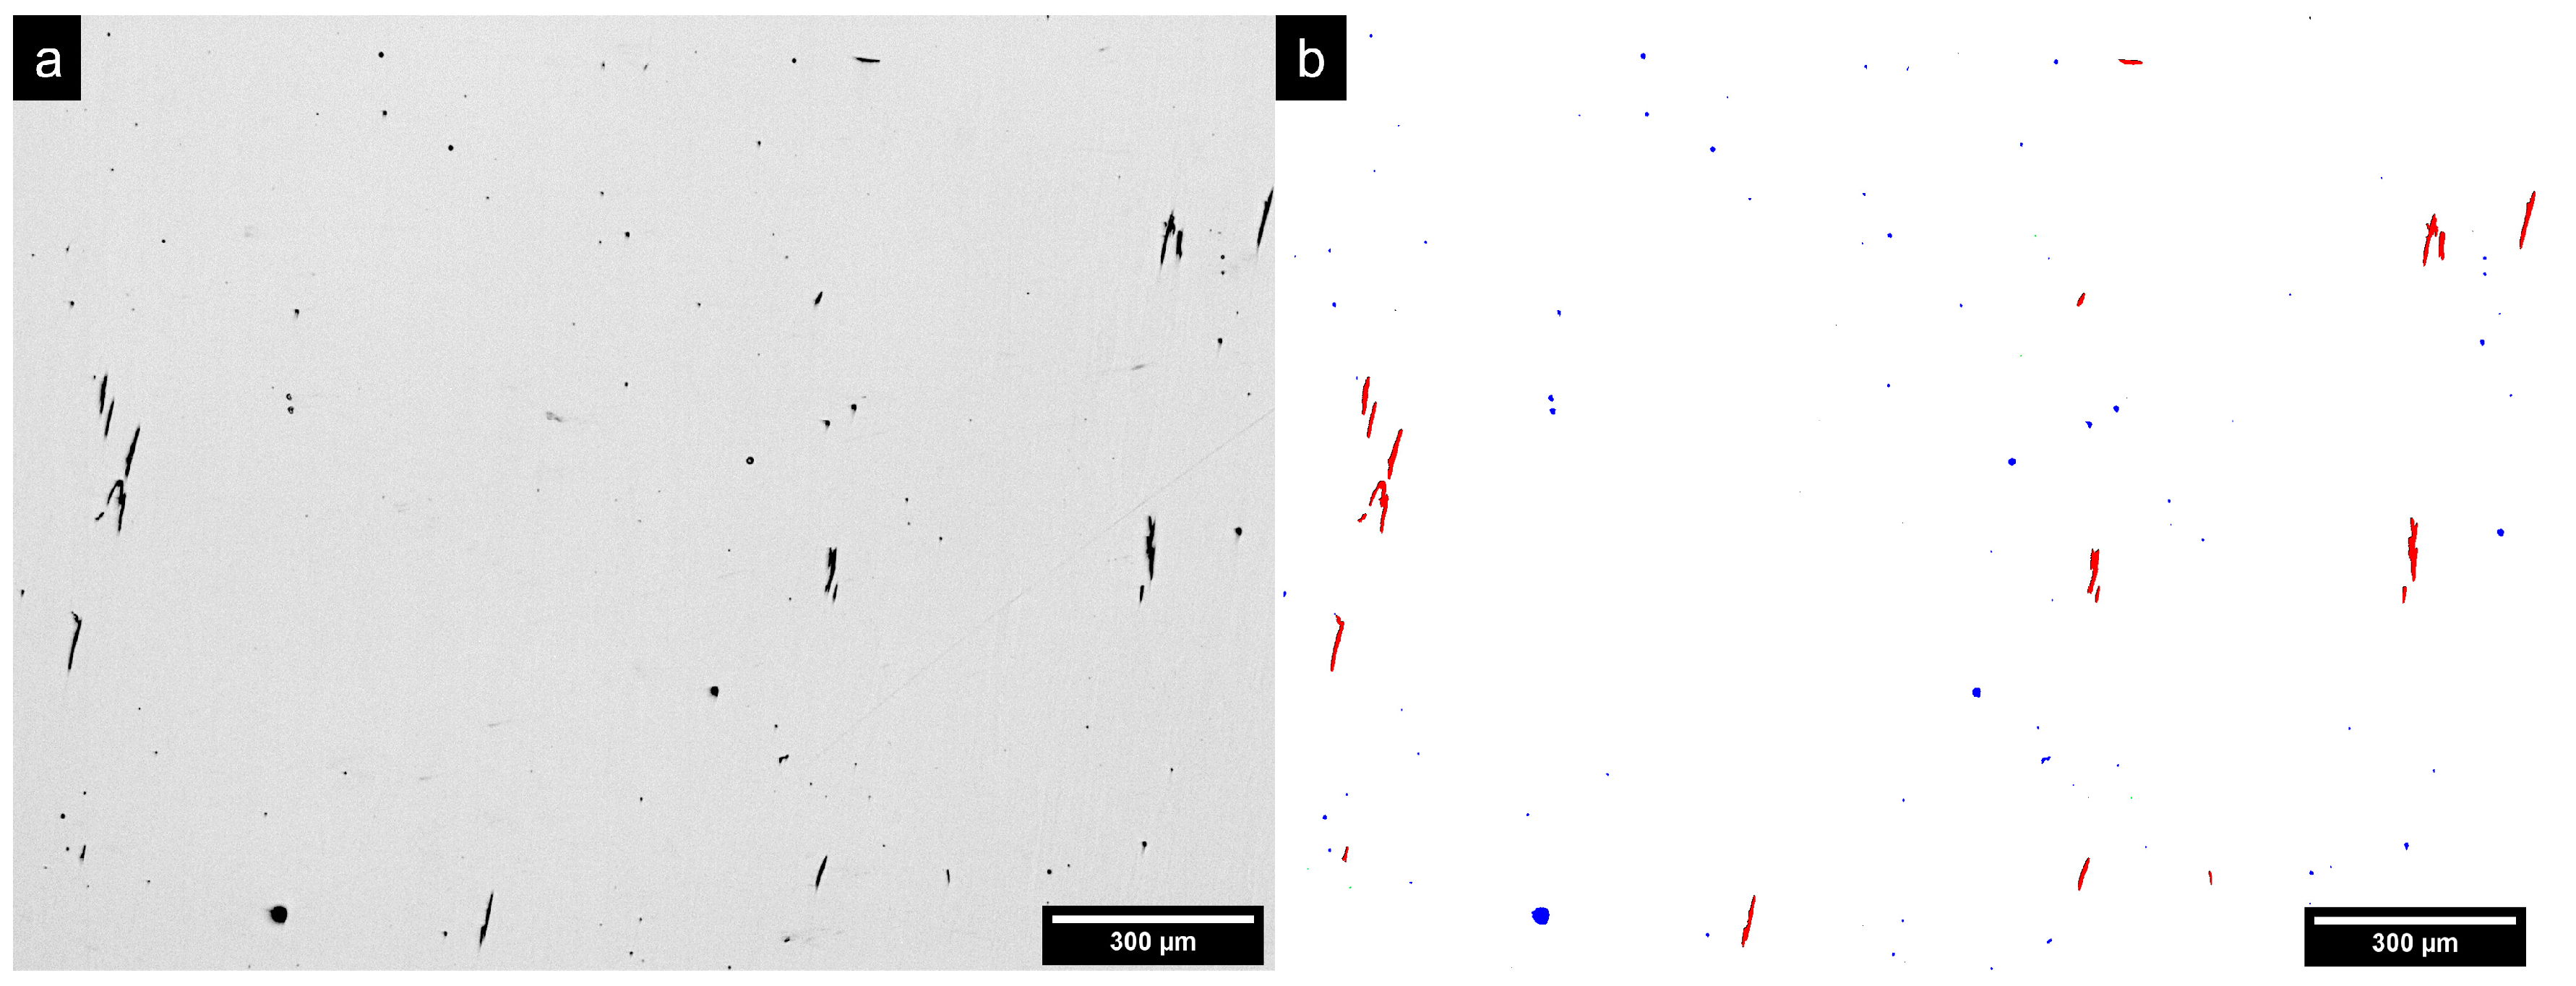
The images obtained with OM for defect assessment were analyzed with an ImageJ Script developed by the authors to classify the defects in pores and cracks and to measure the relative mean dimensions. This processing workflow is divided into three steps: defect segmentation, classification and manual check. The segmentation consists of separating the features from the image background using grey-scale thresholding. Then, the defects’ main geometrical features (area, equivalent diameter, Feret length, etc.) are measured and classified according to the type of defect. Lastly, a control image is produced, where cracks and pores are filled with different colors, to check the correctness of the process. The classification rule is reported in the flowchart in Figure 3. The first step of the classification separates “noise” and “defects”, since features less than 5 µm2 in area are not appropriately resolved with this equipment. Then, defects are classified as cracks if their area is less than 2000 µm2 and the aspect ratio is greater than 3 simultaneously. The threshold values were defined via a trial-and-error process by manually checking the control images.
For each feature, descriptive statistical properties are calculated as follows:
  • Pores:
    Area and equivalent diameter to properly represent the dimensions.
    Area fraction [pct]: ratio of total measured pore area to total sampled area.
  • Cracks:
    Feret approximation of a single crack to provide crack extension assessment.
    Crack density (µm/mm2) = sum of all crack lengths/total sampled area.
    Max crack length (µm) = maximum value of crack population.

3. Results

3.1. Powders Characterization

The feedstock quality was assessed prior to sample production. This step was divided into three examinations: composition, particle size distributions and flowability, as described in Section 2.1. Table 2 and Table 3 verify the accordance of the major elements with the nominal composition and the presence of trace elements. The measured composition can be considered in line with the nominal one. Nevertheless, the C content approaches the lower boundary of the nominal composition, while the oxygen content is relatively high. The latter can be justified by the presence of fine and very fine powder fractions, which are more prone to develop an oxidized crust on their surface.
The measured particle size distributions (PSD) are reported in Figure 4 for the two batches. Both distributions show the typical log-normal shape of gas atomized powders. The numeric PSD, reported in Figure 4a, goes from a few microns up to 50 micrometers. Even though the powders were sieved to range between 16 and 45 µm, there was a small peak around 10 µm. This fraction can be generated by the detachment of satellites linked to the particles. In Table 4, the main distribution measures are reported. The only differences are represented by the mode of the distributions, for which there is a gap of about 4 µm, and D10 and D50, which are smaller in batch B (2 µm ca.). These discrepancies suggest a greater amount of small particles in batch B compared to A. The volumetric PSD is spread between 8 and 70 µm, as shown in Figure 4b. As for numeric PSD, the volumetric shows slight differences between the two batches.
Table 4 reports the mode and the mean of batch A to be about 4 µm greater compared to B. The volumetric PSD does not show the peak at 10 µm, and it is typically shifted to larger values of diameter. This is due to the laser measurement method, which tends to depress the small fraction count and expand the bigger ones due to the particle volume effect. The use of numeric PSD is then crucial because it is capable of detecting fine particles, which are responsible for changing the rheology of the powders and may also have the greatest amount of oxygen [33]. Furthermore, Figure 4 shows how the procedure for numeric PSD described in Section 2.1 is able to give more precise information on the particle population.
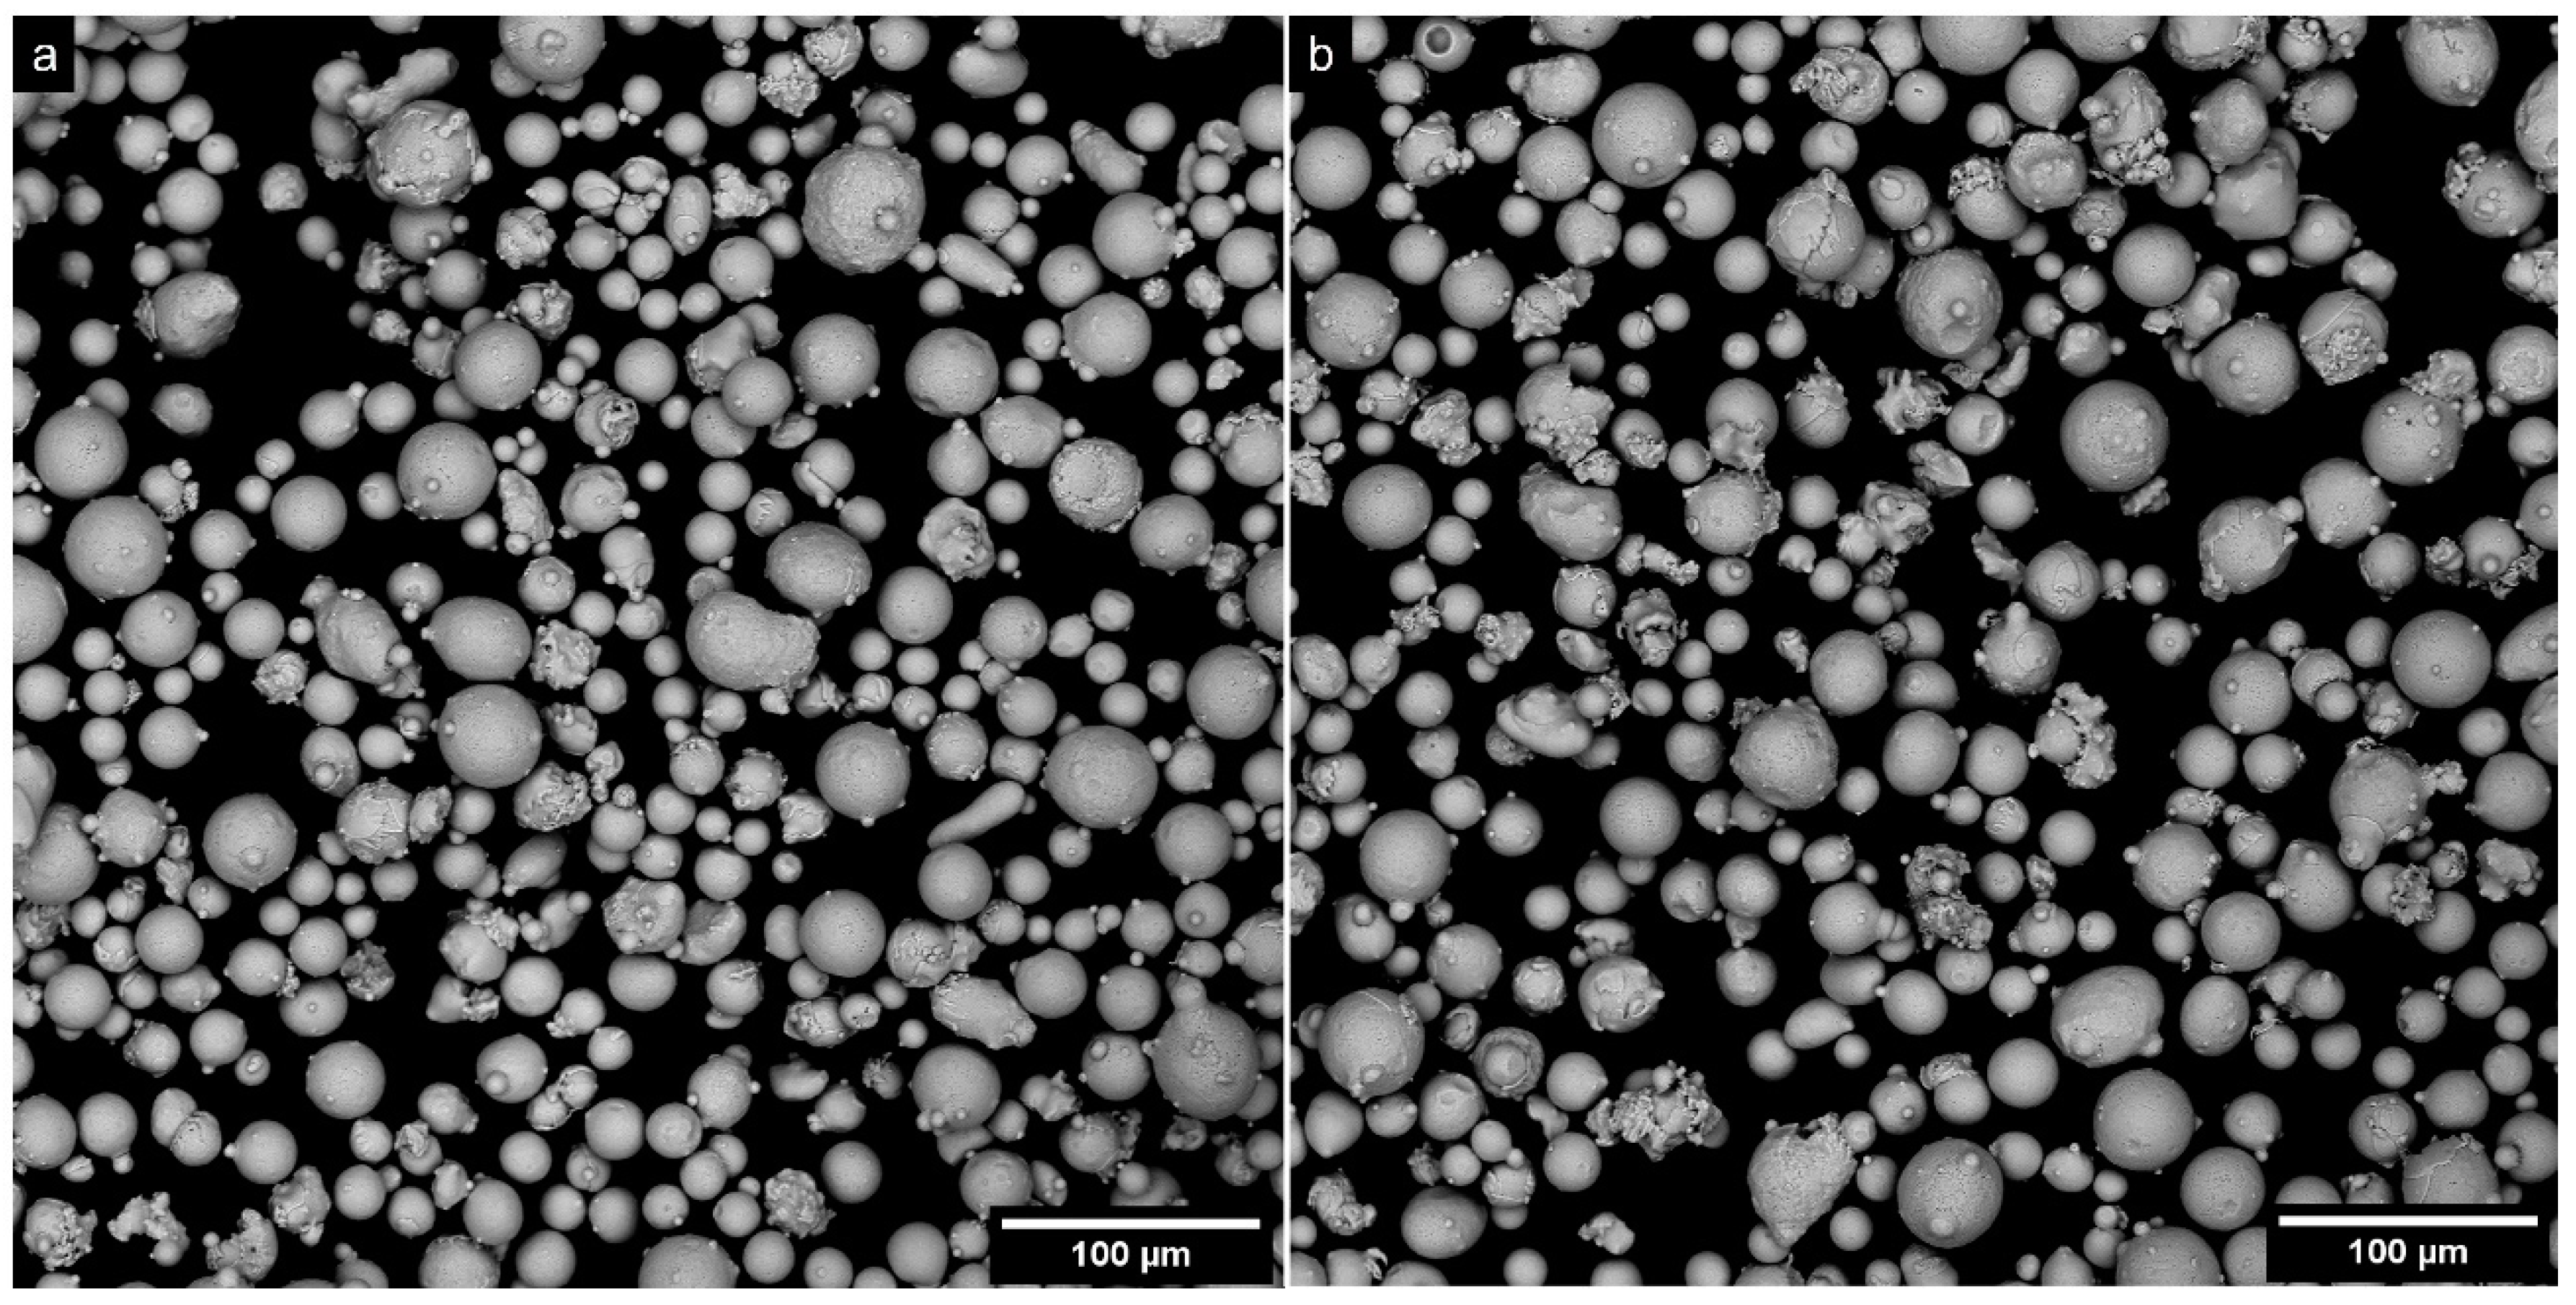
The particle shape in both cases is mainly spherical, with some satellites and occasional cold splashes, as shown in Figure 5. There are only a few latter typical defects, and they do not negatively affect the flowability properties of the powder.
Lastly, Table 5 summarizes the flowability measurements showing no relevant differences between the batches.
In conclusion, since the final flowability and apparent density properties were almost identical, the two batches were considered equivalent for producing the samples used in this work, and the slight differences observed in the PSDs were considered to be negligible.

3.2. Process Parameter Optimization

The process parameter optimization was performed by evaluating the fractions of cracks and pores, which are the common defects detectable in the L-PBF process. According to the literature [34], cracks can be generated by various mechanisms such as ductility dip cracking, secondary aging cracking, liquation, etc. On the other hand, porosities are subdivided into two types according to their shape. The first family of include the “lacks of fusion”, which are usually large in size and irregular in shape. They resemble the inter-particle region, as they are consequences of the incomplete melting of entire or portions of particles. They can be generated when insufficient local energy is provided for the melting. The second family includes the “gas porosities”. Such defects are small with a spherical shape. This kind of porosity can be generated during the melting of the material or can be inherited from the powder particles [27].
The image-processor algorithm described in Section 2.4 was used to analyze the sample defects: original and segmented images are reported in Figure 6. Apart from speeding up the analysis, the automatic process eliminates errors related to the operator. The correctness of the segmentation and classification output are finally checked with the control image, as reported in Figure 6b. The robustness of this procedure is essential to guarantee the correct classification of defects and the consistency of the derived conclusions.
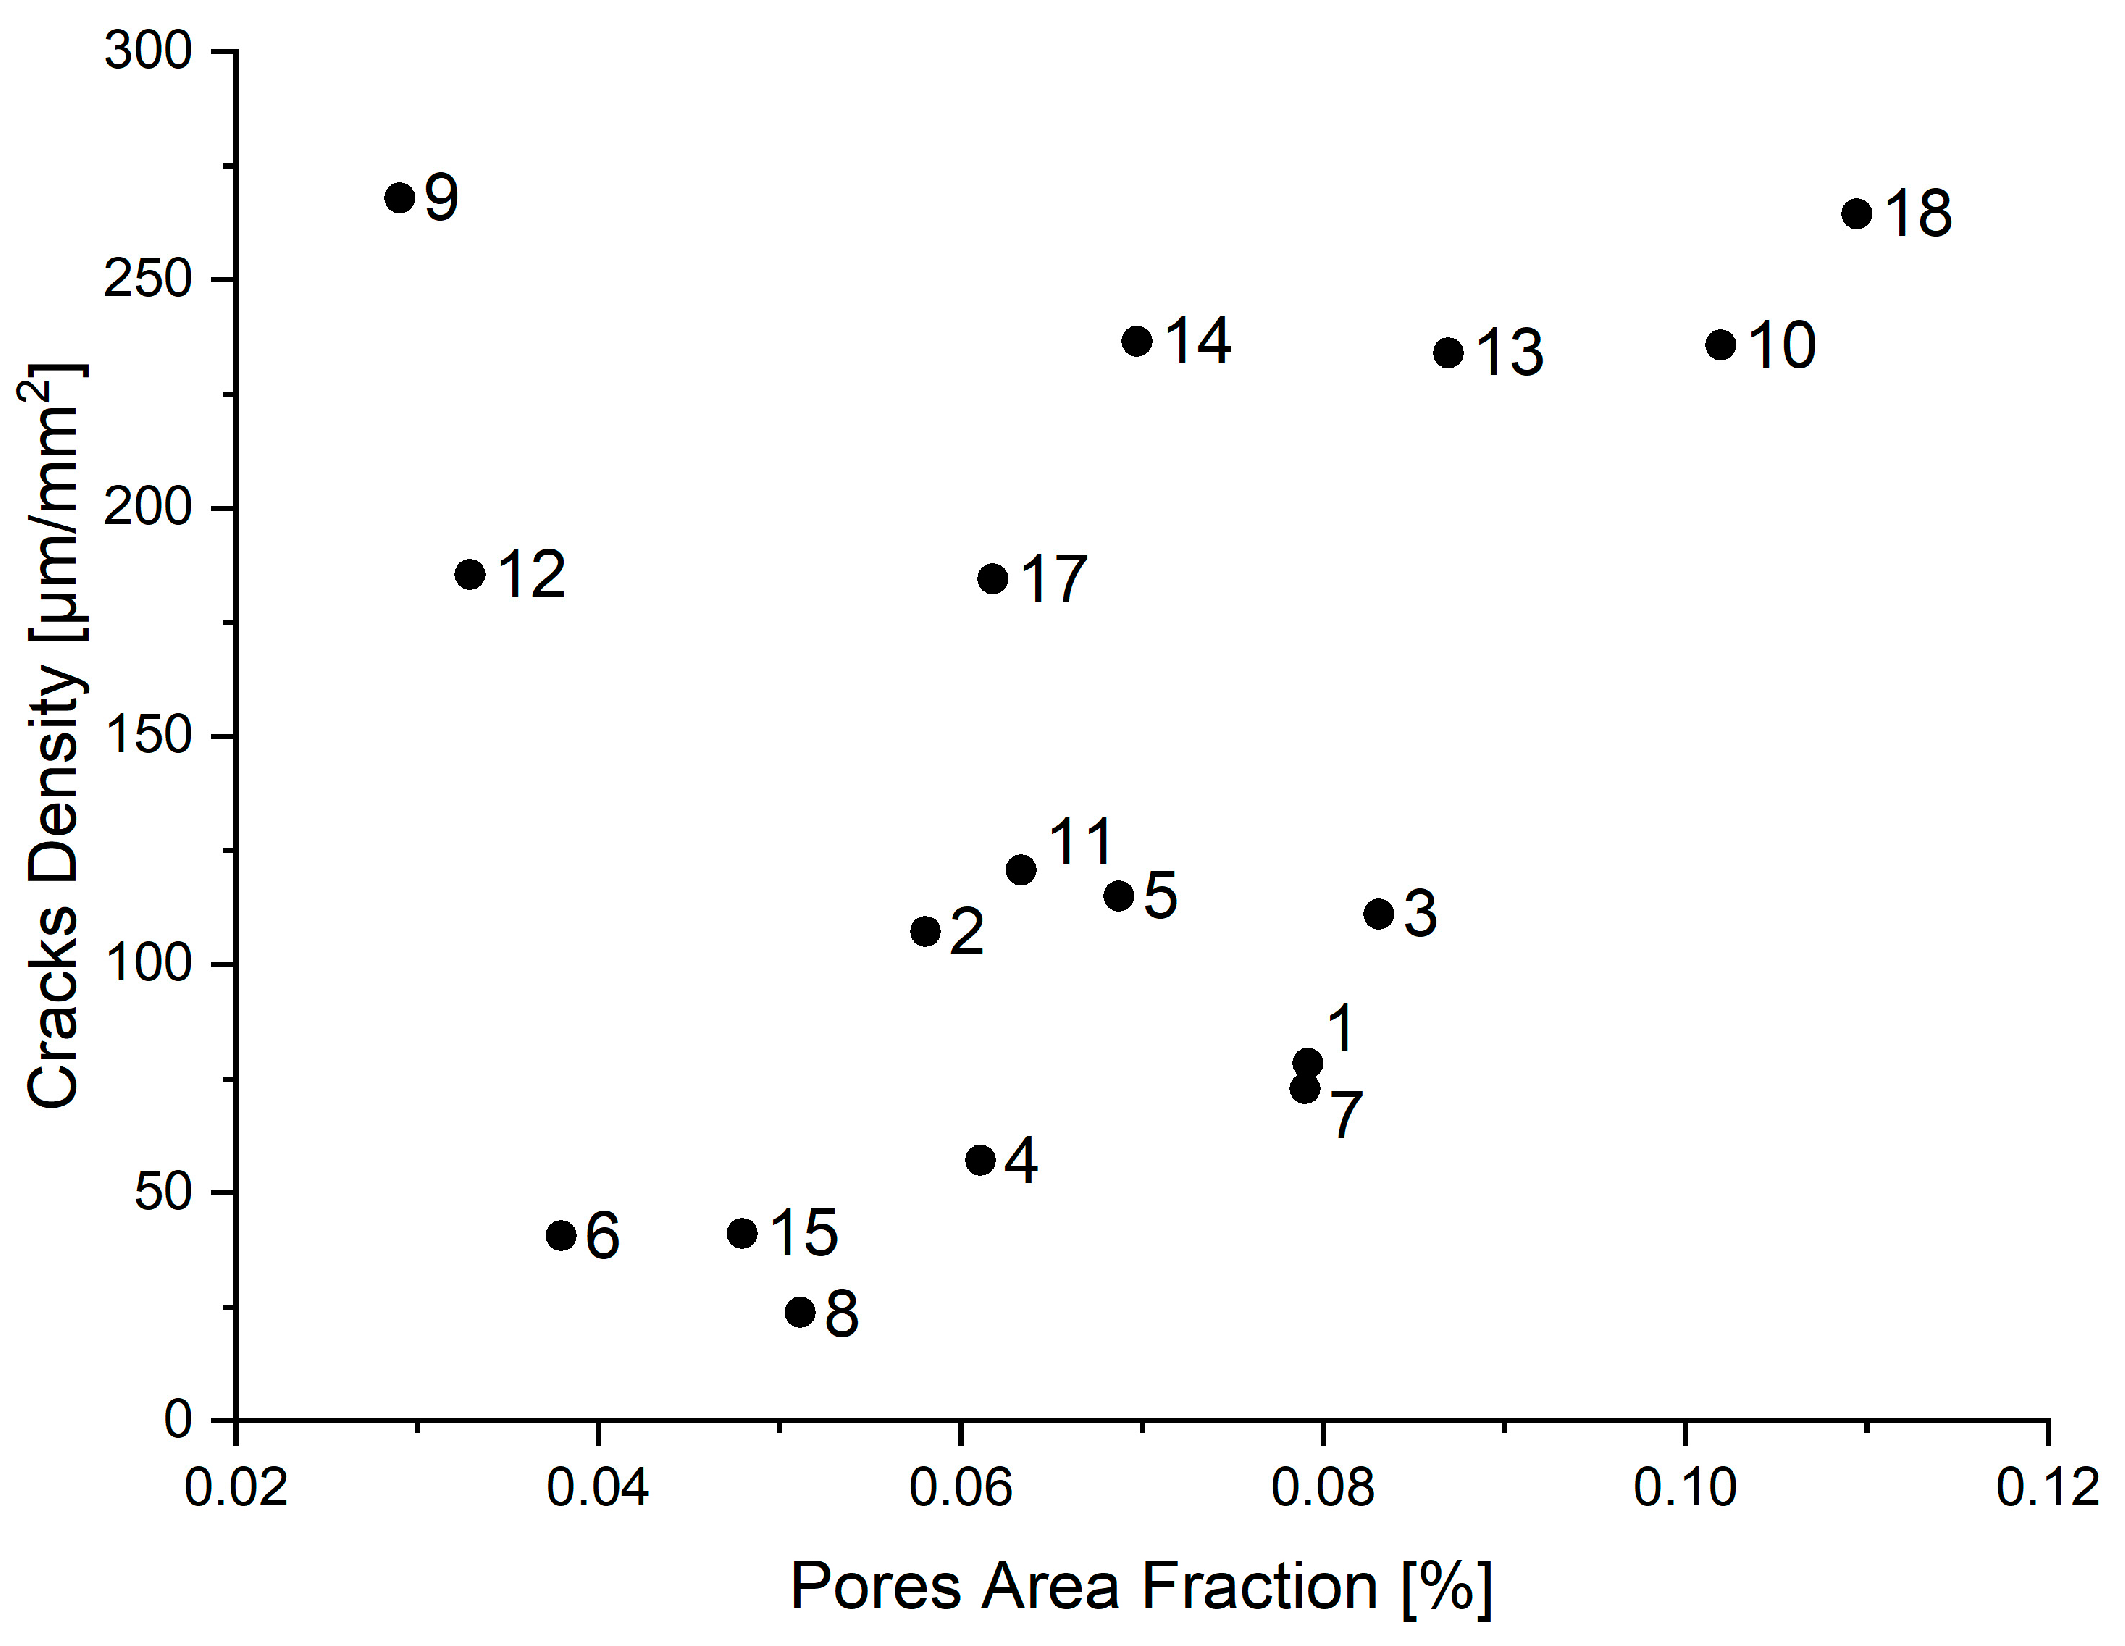
After the image analysis process, mean values of pore area fraction and crack density were used to compare the samples of the first build, as reported in Figure 7, where the different process parameter combinations are labeled with numbers from 1 to 18. The recorded values varied in the 30–300 µm/mm2 range and from 0.02% to 0.12% in terms of crack density and pore area fraction, respectively.
Figure 7 shows six samples, 1, 4, 6, 7, 8, and 15, having crack densities lower than 100 µm/mm2, which was suggested from the industrial partner of the project as a safety value according to aeronautical standards. However, set 1 was discharged due to the presence of large lacks of fusion, as represented in Figure 8, and only sets 4, 6, 7, 8 and 15 were kept for further optimization. These samples are characterized by different VED levels, as reported in Table 6. From the previous results, it is clear that the simple maximization of the energy density is not a suitable approach to reduce the propensity to crack and pore formation; the five sets have similar values of crack density (around 50 µm/mm2), while VED ranges from 110 to 212 J/mm3.
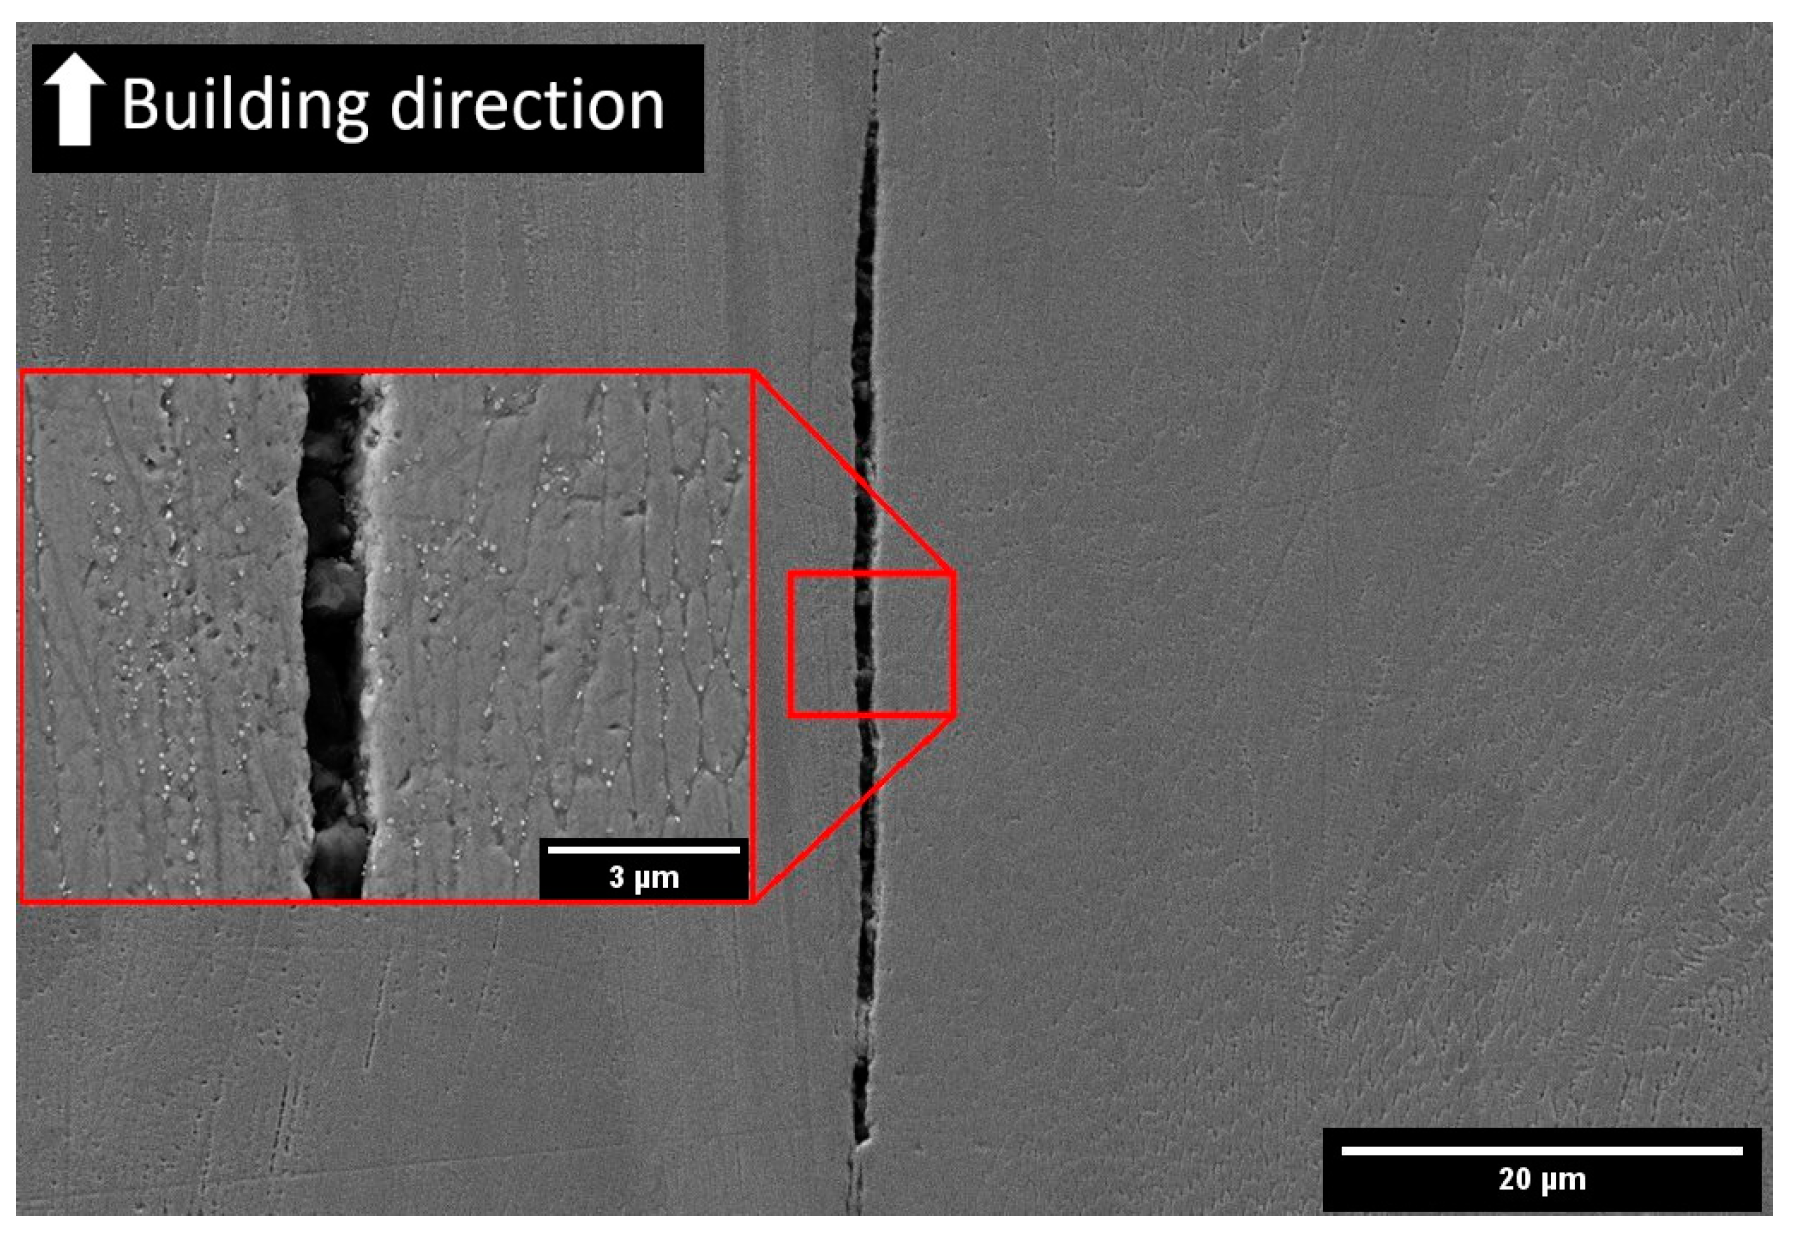
In the as-built state, the alloy exhibits mainly cracks grown along grain or cell boundaries. These cracks are characterized by sharp edges, typical of brittle thermal rupture, and they develop across neighboring grains. The cracks found in the studied samples differ from those reported by Carter et al. [27] due to the absence of a dendritic pattern on the edges. An example is given in Figure 9, where a crack grown on the grain boundaries is parallel to the building direction and has straight edges, not showing dendritic patterns. Small particles entrapped inside the crack are residuals from the polishing steps.

3.3. Intra-Print Repeatability

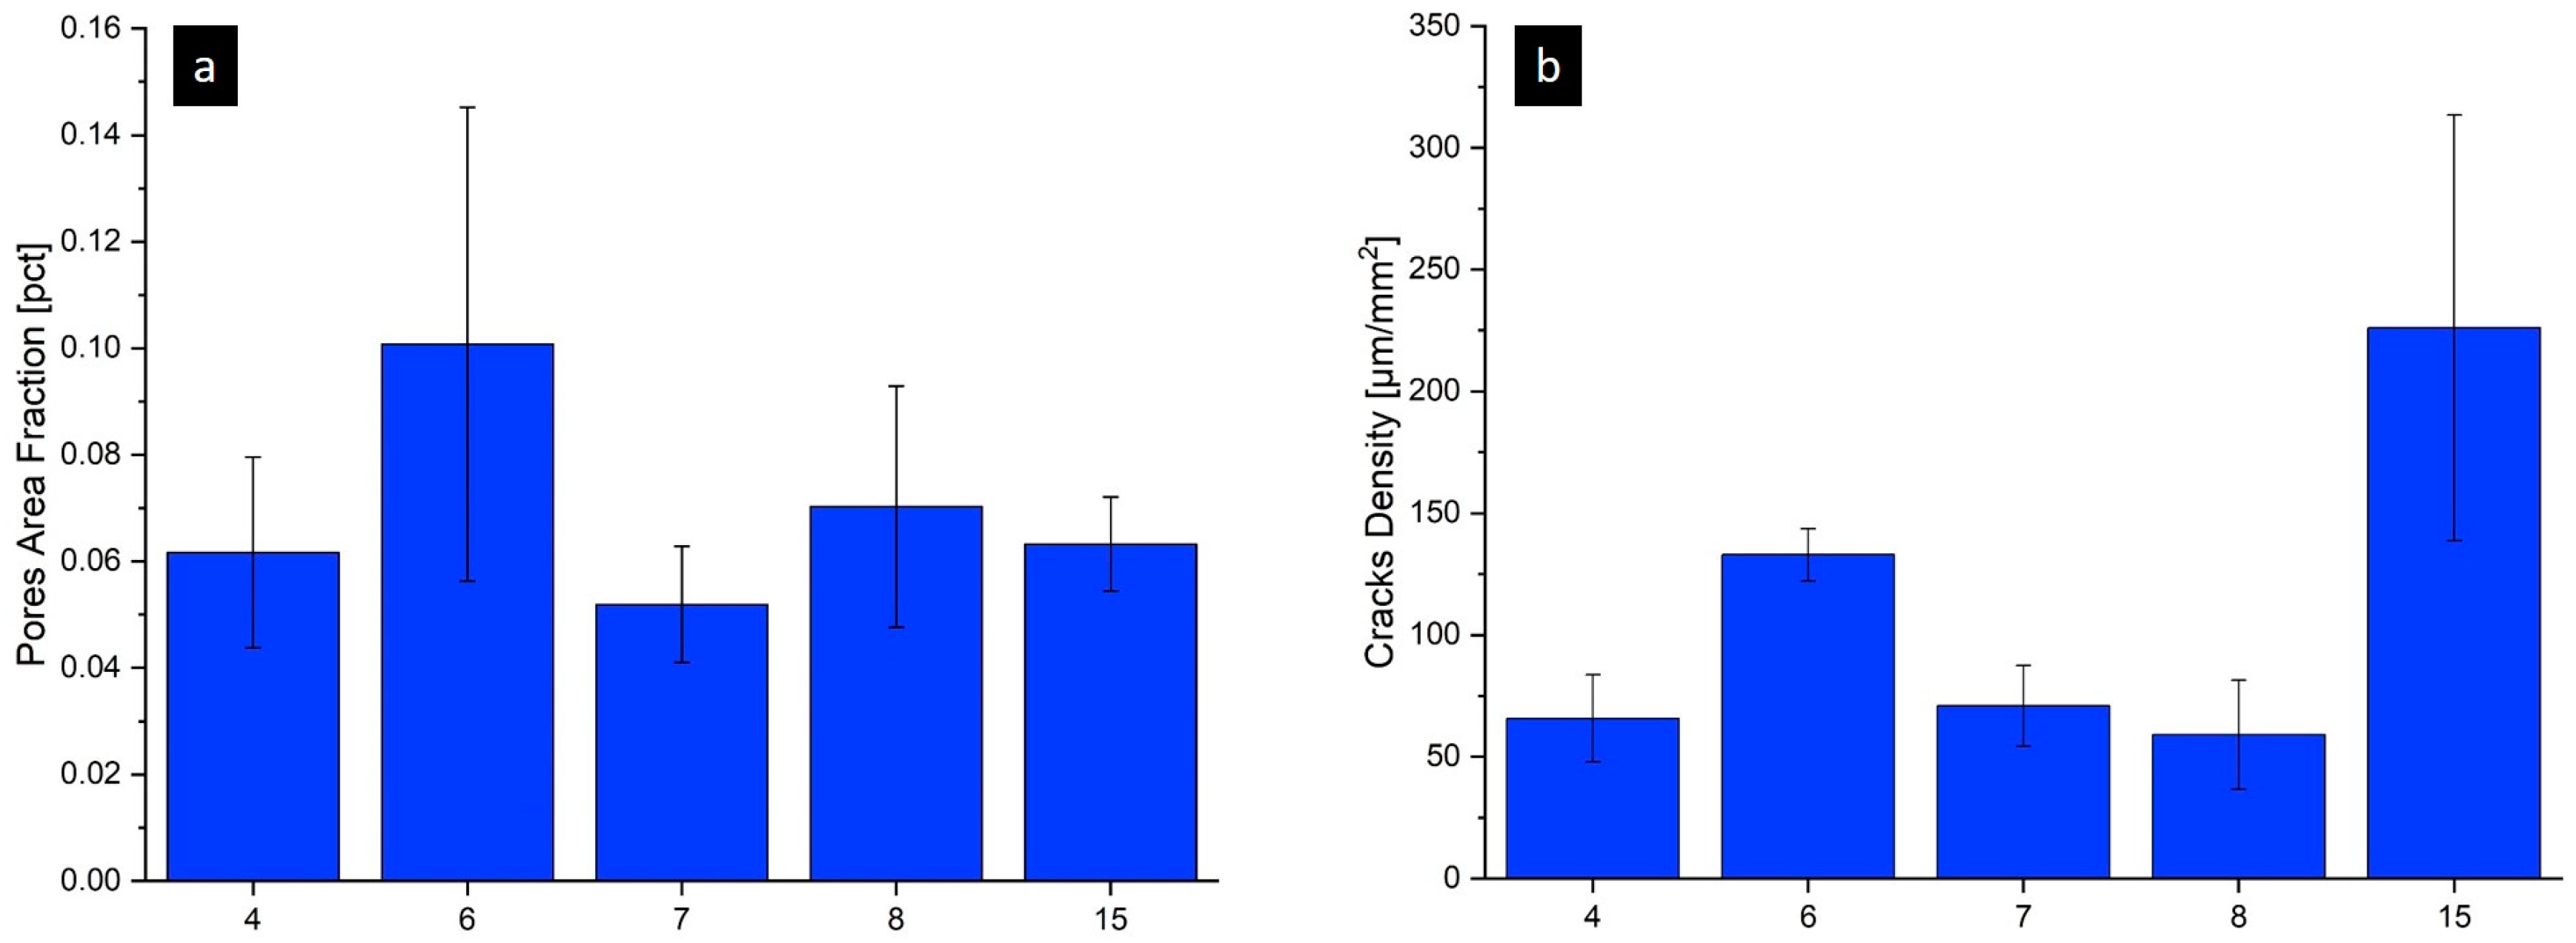
In Figure 7, parameter sets can be clustered into two groups, divided by a crack density value of 100 µm/mm2. Among the less cracked samples, a sub-set of the five most promising samples (4, 6, 7, 8 and 15) was selected to assess the production repeatability. The first repeatability test was performed within a second build (intra-print), replicating the same process parameter sets three times. Results of the metallographic characterization are shown in Figure 10. The bar chart in Figure 10a reports the pore area fraction mean values among the intra-print repetitions and their standard deviations. Except for set 6, the others have a small variability and are close to 0.06%. The bar chart in Figure 10b is relative to crack density and reveals a different trend if compared to the one in Figure 10a. Sets 4, 7 and 8 have similar crack densities, slightly scattered around 75 µm/mm2, while 6 and 15 have higher mean values. Sets from 4 to 8 have a slight standard deviation in terms of crack density, which indicates good repeatability, while set 15 has a high standard deviation, thus indicating a critical instability for such a parameter combination.

3.4. Inter-Print Repeatability

The comparison between the following prints is briefly reported in Figure 11 and Figure 12. Here, the error bars represent the standard deviation of the mean values recorded in different prints, which can be used as an indicator of their variability. In particular, three prints were considered for this analysis: Print-1, also used for the first rough optimization (see Figure 7 as reference); Print-2, used for the intra-print repeatability test (Figure 10); and Print-3, produced explicitly for the inter-print repeatability study. Figure 11 reports the mean values of pore area fraction and their standard deviation among the three prints. The print-to-print repeatability is good regarding mean values, located in the 0.05–0.08% range. On the other hand, the standard deviation is similar for all the sets except for 6. Hence, for this group of sets, the porosity levels can be considered constant.
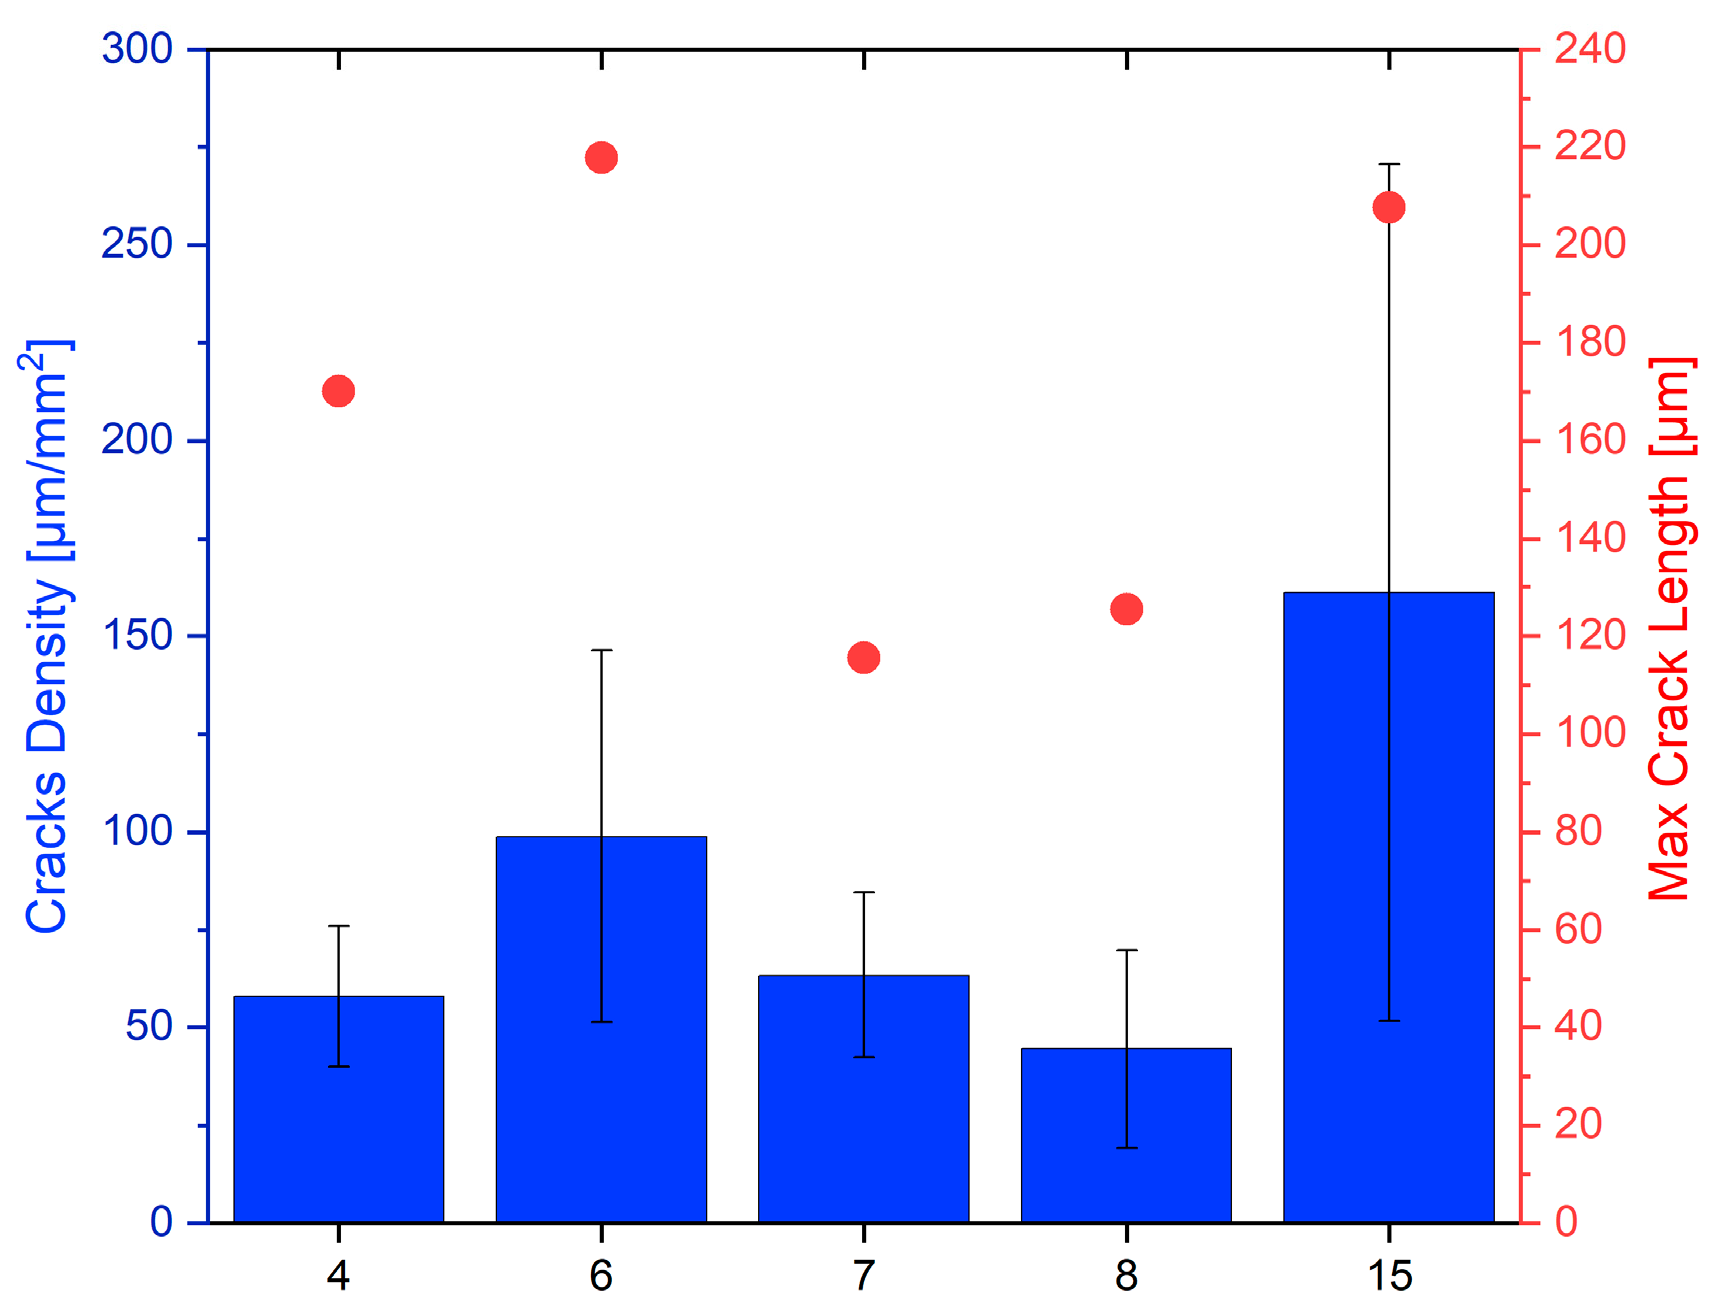
Measurements of the crack population variability are presented in Figure 12, correlating to the mean crack density (bars) and the maximum crack length (circles) calculated among all the samples produced. As expected from previous data (Figure 10), set 15 shows the highest mean value and a significant standard deviation. During the first optimization (Print-1), this parameter set was selected, as it exhibited similar performances of 7 and 8. However, further repetitions revealed its poor stability. This suggests that using high VED levels to produce parts enhances crack formation and affects both the intra- and the inter-repeatability, leading to different mean values between ideally analogous samples. Set 6 is placed in a middle position between sets 15 and 4 and between 7 and 8. Even if the applied VED level is smaller than set 15, significant standard deviations on crack density and pore area fraction were measured (about double that of groups 4, 7 and 8). The behaviors of sets 6 and 15 suggest that the correlation between VED and crack formation is not direct; hence, other parameter effects should be investigated. Sets 4, 7 and 8 show very close mean values for crack density in the range of 45–65 µm/mm2. Sample 4 presents the slightest standard deviation but also had the highest maximum crack length among the prints; therefore, it was discarded. Sets 7 and 8 had similar maximum crack length and standard deviation. Hence, set 8 was identified as the optimal one, with the lowest mean crack density. The motive behind the use of the maximum crack length as the third criteria for the final decision is explained in Section 4.

3.5. Microstructural Assessment

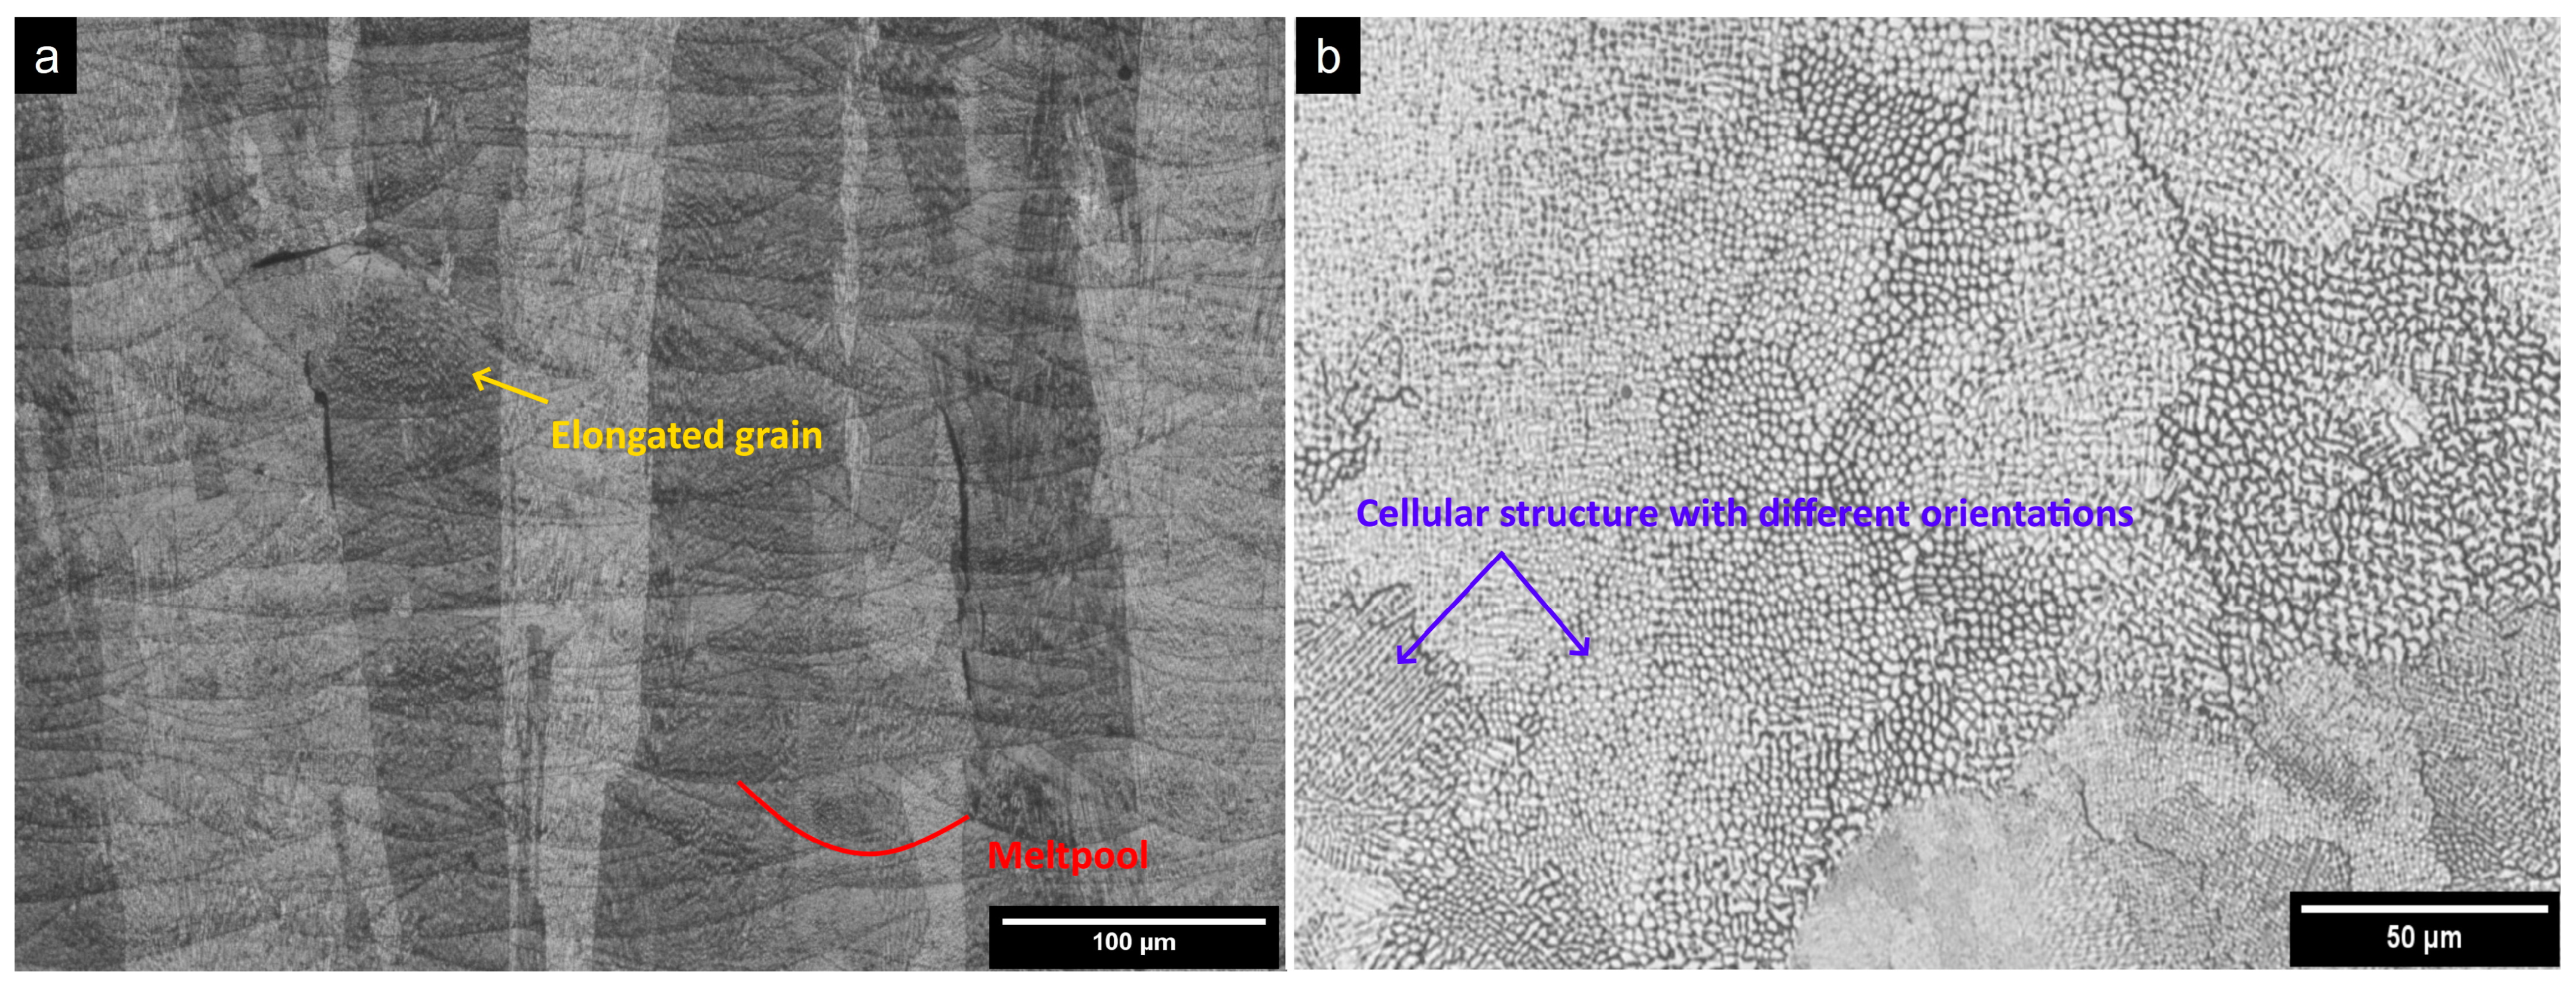
Figure 13 shows the typical microstructure of René 80 obtained in the as-built state: the usual features of L-PBF are present, such as melt pools, elongated grains, densification defects and the cellular structure. The pattern of the melt pool reported in Figure 13a is typically obtained with the stripes scan strategy with a rotation of 67°. Rotating the scans of 67° for each layer leads to melt pools that are differently oriented as well. Once the metallographic section is cut, they are sectioned, showing different morphologies, according to the orientation.
In Figure 13a, the grains are visible and are highlighted with different shades of grey. They show an elongated shape and are oriented along the building direction, passing through about ten layers and eventually presenting cracks along the boundaries. The typical cellular structure within the grains has a different orientation between the grains, as can be observed in Figure 13b. Figure 14 shows the microstructure observed with the secondary electrons in the SEM. The image presents the material’s cellular structure, with small particles in the intercellular region. Even if energy dispersive X-Ray spectroscopy (EDS) analysis could not solve such small precipitates, they are supposed to be MC carbides. The latter features have been widely reported in the literature to form after casting of René 80 [2,35], and they reasonably precipitate during the L-PBF process. It can be assumed that due the very high cooling rate, these carbides have no time to further grow. Here, it is clear that the etchant dissolves the intercellular region, leaving the cell core and the carbides in relief.
In conclusion, L-PBF leads to a microstructure that is completely different from that obtained by casting. In the literature, there are different studies that investigate the latter one [2,35]. Due to its low cooling rates, casting leads to the formation of a dendritic structure, with very large carbides and a γ-γ′ eutectic phase. Moreover, γ′ is able to precipitate. On the other hand, when material is processed with the L-PBF technique, the cooling rates are extremely high. For this reason, the dendritic structure is substituted by a γ matrix cellular structure (Figure 14), with very thin precipitates, which can be assumed to be carbides. At last, grains after L-PBF are oriented along the building direction with a very high aspect ratio, in contrast with the as-casted microstructure, where they are coarser (up to a few millimeters).

4. Discussion: VED, Decision Criteria and the Importance of Repeatability

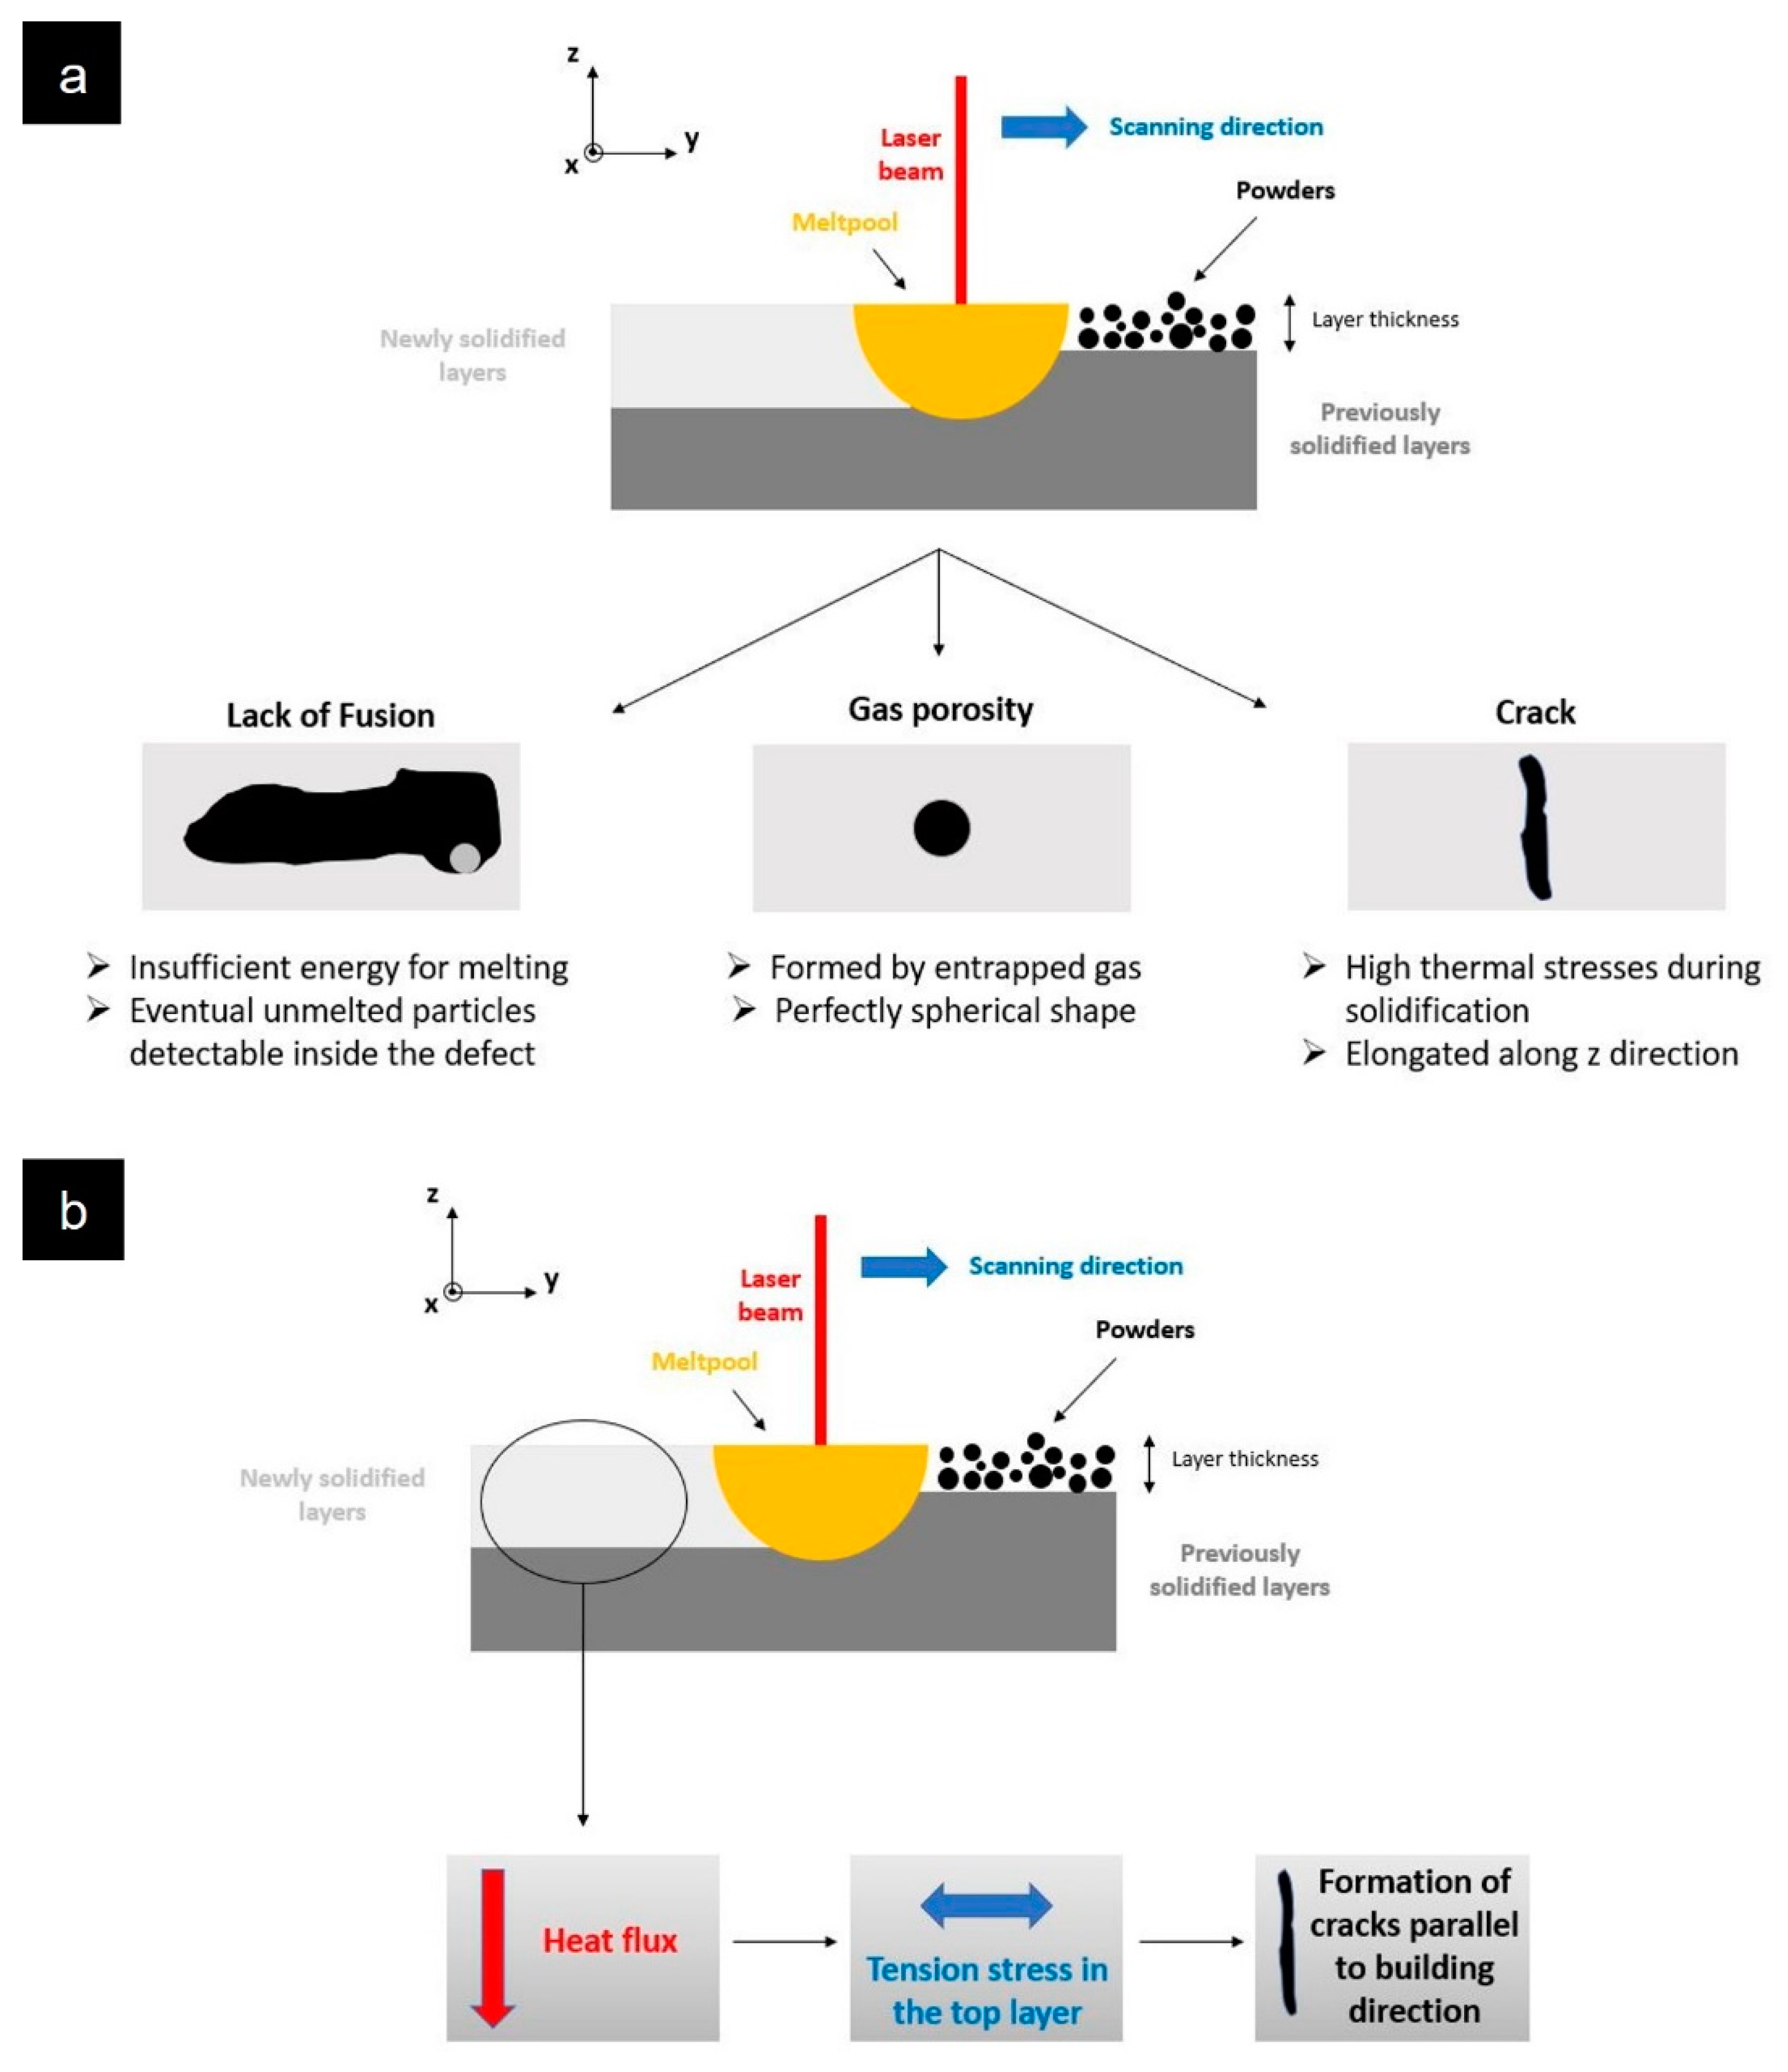
Finally, some considerations can be made about the energy density’s effect on the material’s densification properties. If it is evident that low VED values lead to the formation of lacks of fusion, as described in Section 1, too high of values can negatively affect the material integrity as well. A representation of the typical defects of the L-PBF process is reported in Figure 15a. This is mainly related to the thermal gradient formed during the process. One must remember that laser scanning leads to extremely rapid thermal variations within the material. In particular, when the laser passes along a scan line, the top layer undergoes high-speed heating, which leads to a strong thermal gradient along the underlying layers, emphasized by the alloy’s low thermal conductivity. After the laser passes, i.e., during cooling, the top layer tends to shrink due to thermal contraction, while the underlying layers slightly expand due to the heat flux that derives from the melt pool. As a result, tensile stresses arise on the top layer while compressive stresses arise on the underlying ones, which is a favorable condition for hot cracking (Figure 15b). An interesting study on the effect of the different parameters on the thermal history of the powder bed and affordable crack mitigation is given by Iveković et al. [36]. The process explained above is the reason that cracks in L-PBF samples are typically oriented along the building direction (Figure 9). This said, the authors can conclude that concentrating only on the VED values does not represent a suitable approach to optimize process parameters and their repeatability properly, while a complete screening such as the one performed in this study has to be performed to investigate the effect of the different parameter combinations on the densification and their repeatability through different productions. The five most promising parameter sets chosen to perform the repeatability tests were characterized by very different VED values (Table 6).
Another vital aspect to discuss is how process optimization is conceptualized. Different criteria, such as defect fractions and/or size, can be used. However, densification properties cannot be the only driving force for process optimization, and one can also focus on microstructural features or residual stresses to avoid further cracking, for example. It is then imperative to set the goal of the optimization process itself. To the best of the authors’ knowledge, the L-PBF process applied to René 80 is still absent in the literature. For this reason, the authors set the optimization goal to be the densification properties, also moved by the low weldability of René 80. Furthermore, very different physical features could be used as metrics, such as defect fraction (or density, based on the unit), size, morphology and/or orientation. In the present work, the authors used the pore area fraction and the crack density as the main criteria, while maximum crack length was used to refine the final decision after the inter-print repeatability test. This is justified by the impact that long cracks could have on the mechanical performance of the processed material and the increasing difficulty in healing large flaws with further treatments such as HIP. Furthermore, the authors identified the pore area fraction and the crack density as the main factors influencing the material’s densification properties, and for this reason, these were used as the main decision criteria for the study.
Moreover, from the previous results, it is clear that focusing on a simple production batch can incompletely optimize the parameter choice. In particular, looking at only the first screening results in Figure 7, one would have probably chosen set 6 as the best, while set 8 turned out to be the optimal one after the complete repeatability study. A summary of the logical path followed for this study is shown in Figure 16.
As a result of this discussion, “process optimization” has a broad meaning, and researchers should find the best criteria and refinement steps according to the goal of the optimization itself.

5. Conclusions

The current work focuses on the processability of René 80 alloy via L-PBF in terms of reduction of densification defects and repeatability of the results within the same (intra-) and among different (inter-) prints. The main steps and results can be summarized as follows:
  • Even if it is classified as a low-weldable alloy, René 80 showed good densification properties already after the first screening with six parameters having a crack density significantly below 100 µm/mm2. One of them was discarded due to the presence of big lacks of fusion, probably caused by a low VED.
  • The repetition of the best five sets showed similar values of pore area fraction both for the intra- and inter-print studies. The crack density showed a different trend instead; two groups were identified. The first included the more cracked and less repeatable sets 6 and 15, while the second was represented by the less cracked (mean density between 45 and 65 µm/mm2) and more repeatable (standard deviation around 20 µm/mm2) sets 4, 7 and 8. Within the latter group, the optimal condition for processing René 80 was considered to be combination 8 (VED = 113 J/mm3), since it was characterized by a lower average crack density (45 ± 20 µm/mm2), accepting slightly less repeatability than 4 and 7.
  • René 80 showed typical microstructural features of the L-PBF process: (1) thermal cracks and porosity, (2) elongated grains parallel to the building direction, made of (3) cellular structures, oriented in the same way into the single grain. Since the etchant Glycia Regia dissolves the γ′, it is possible to assume that the cellular structures are made of γ matrix, while the intercellular regions are made by a eutectic-like phase similar to γ′ (Figure 14). In addition, very fine primary carbides are present in the as-built condition.
Future studies will be performed to refine the processing of this alloy further. The primary target is the reduction of the internal stresses responsible for the thermal crack formation by applying stress relief treatment. Then, the defect population reduction should be studied by applying hot isostatic pressing (HIP). This technique has been successfully applied to other superalloys such as In718 [37], René 88DT [38] and CM247 LC [21], reducing crack density. In addition, the heat treatment must be investigated to optimize the microstructure by tailoring grains and γ′ size and shape to obtain good mechanical properties at high temperatures.

Author Contributions

Conceptualization, A.S., D.U. and E.B.; methodology, A.S., E.B., F.C. and D.U.; software, A.S. and P.A.M.; validation, P.A.M., A.S., F.C., E.B. and D.U.; formal analysis, P.A.M. and A.S.; investigation, P.A.M. and A.S.; data curation, P.A.M. and A.S.; writing—original draft preparation, P.A.M. and A.S.; writing—review and editing, P.A.M., E.B., F.C. and D.U.; visualization, P.A.M.; supervision, S.B. and D.U.; project administration, S.B. and D.U. All authors have read and agreed to the published version of the manuscript.

Funding

This project has received funding from the Clean Sky 2 Joint Undertaking under the European Union’s Horizon 2020 research and innovation program under grant agreement No. 821274.

Data Availability Statement

The data presented in this study are available on request from the corresponding author. The data are not publicly available because they were developed in the frame of a project with industrial partner.

Conflicts of Interest

The authors declare no conflict of interest.

References

  1. Ross, E.W. Cast Nickel Base Alloy (René80). U.S. Patent 3615376A, 1 November 1968. [Google Scholar]
  2. Safari, J.; Nategh, S. On the Heat Treatment of Rene-80 Nickel-Base Superalloy. J. Mater. Process. Technol. 2006, 176, 240–250. [Google Scholar] [CrossRef]
  3. Kim, I.S.; Choi, B.G.; Hong, H.U.; Yoo, Y.S.; Jo, C.Y. Anomalous Deformation Behavior and Twin Formation of Ni-Base Superalloys at the Intermediate Temperatures. Mater. Sci. Eng. A 2011, 528, 7149–7155. [Google Scholar] [CrossRef]
  4. Henderson, M.B.; Arrell, D.; Heobel, M.; Larsson, R.; Marchant, G. Nickel-Based Superalloy Welding Practices for Industrial Gas Turbine Applications. Sci. Technol. Weld. Join. 2004, 9, 13–21. [Google Scholar] [CrossRef] [Green Version]
  5. Donachie, M.J.; Donachie, S.J. Superalloys: A Technical Guide; ASM International: Novelty, OH, USA, 2002; Volume 36, ISBN 0871707497. [Google Scholar]
  6. Osoba, L.O.; Sidhu, R.K.; Ojo, O.A. On Preventing HAZ Cracking in Laser Welded DS Rene 80 Superalloy. Mater. Sci. Technol. 2011, 27, 897–902. [Google Scholar] [CrossRef]
  7. Rush, M.T.; Colegrove, P.A.; Zhang, Z.; Broad, D. Liquation and Post-Weld Heat Treatment Cracking in Rene 80 Laser Repair Welds. J. Mater. Process. Technol. 2012, 212, 188–197. [Google Scholar] [CrossRef] [Green Version]
  8. DuPont, J.N.; Lippold, J.C.; Kiser, S.D. Welding Metallurgy and Weldability of Nickel-Base Alloy; John Wiley & Sons: Hoboken, NJ, USA, 2009. [Google Scholar]
  9. Adegoke, O.; Andersson, J.; Brodin, H.; Pederson, R. Review of Laser Powder Bed Fusion of Gamma-Prime-Strengthened Nickel-Based Superalloys. Metals 2020, 10, 996. [Google Scholar] [CrossRef]
  10. Wu, X.; Mei, J. Near Net Shape Manufacturing of Components Using Direct Laser Fabrication Technology. J. Mater. Process. Technol. 2003, 135, 266–270. [Google Scholar] [CrossRef]
  11. Wu, X. A Review of Laser Fabrication of Metallic Engineering Components and of Materials. Mater. Sci. Technol. 2007, 23, 631–640. [Google Scholar] [CrossRef]
  12. Griffiths, S.; Ghasemi Tabasi, H.; Ivas, T.; Maeder, X.; De Luca, A.; Zweiacker, K.; Wróbel, R.; Jhabvala, J.; Logé, R.E.; Leinenbach, C. Combining Alloy and Process Modification for Micro-Crack Mitigation in an Additively Manufactured Ni-Base Superalloy. Addit. Manuf. 2020, 36, 101443. [Google Scholar] [CrossRef]
  13. Cloots, M.; Uggowitzer, P.J.; Wegener, K. Investigations on the Microstructure and Crack Formation of IN738LC Samples Processed by Selective Laser Melting Using Gaussian and Doughnut Profiles. Mater. Des. 2016, 89, 770–784. [Google Scholar] [CrossRef]
  14. Tomus, D.; Jarvis, T.; Wu, X.; Mei, J.; Rometsch, P.; Herny, E.; Rideau, J.F.; Vaillant, S. Controlling the Microstructure of Hastelloy-X Components Manufactured by Selective Laser Melting. Phys. Procedia 2013, 41, 823–827. [Google Scholar] [CrossRef] [Green Version]
  15. Carter, L.N.; Wang, X.; Read, N.; Khan, R.; Aristizabal, M.; Essa, K.; Attallah, M.M. Process Optimisation of Selective Laser Melting Using Energy Density Model for Nickel Based Superalloys. Mater. Sci. Technol. 2016, 32, 657–661. [Google Scholar] [CrossRef]
  16. Wang, W.; Wang, S.; Zhang, X.; Chen, F.; Xu, Y.; Tian, Y. Process Parameter Optimization for Selective Laser Melting of Inconel 718 Superalloy and the Effects of Subsequent Heat Treatment on the Microstructural Evolution and Mechanical Properties. J. Manuf. Process. 2021, 64, 530–543. [Google Scholar] [CrossRef]
  17. Alizadeh-Sh, M.; Marashi, S.P.H.; Ranjbarnodeh, E.; Shoja-Razavi, R.; Oliveira, J.P. Prediction of Solidification Cracking by an Empirical-Statistical Analysis for Laser Cladding of Inconel 718 Powder on a Non-Weldable Substrate. Opt. Laser Technol. 2020, 128, 106244. [Google Scholar] [CrossRef]
  18. Arisoy, Y.M.; Criales, L.E.; Özel, T.; Lane, B.; Moylan, S.; Donmez, A. Influence of Scan Strategy and Process Parameters on Microstructure and Its Optimization in Additively Manufactured Nickel Alloy 625 via Laser Powder Bed Fusion. Int. J. Adv. Manuf. Technol. 2017, 90, 1393–1417. [Google Scholar] [CrossRef]
  19. Harrison, N.J.; Todd, I.; Mumtaz, K. Reduction of Micro-Cracking in Nickel Superalloys Processed by Selective Laser Melting: A Fundamental Alloy Design Approach. Acta Mater. 2015, 94, 59–68. [Google Scholar] [CrossRef] [Green Version]
  20. Tomus, D.; Rometsch, P.A.; Heilmaier, M.; Wu, X. Effect of Minor Alloying Elements on Crack-Formation Characteristics of Hastelloy-X Manufactured by Selective Laser Melting. Addit. Manuf. 2017, 16, 65–72. [Google Scholar] [CrossRef]
  21. Bassini, E.; Sivo, A.; Martelli, P.A.; Rajczak, E.; Marchese, G.; Calignano, F.; Biamino, S.; Ugues, D. Effects of the Solution and First Aging Treatment Applied to As-Built and Post-HIP CM247 Produced via Laser Powder Bed Fusion (LPBF). J. Alloys Compd. 2022, 905, 164213. [Google Scholar] [CrossRef]
  22. Catchpole-Smith, S.; Aboulkhair, N.; Parry, L.; Tuck, C.; Ashcroft, I.A.; Clare, A. Fractal Scan Strategies for Selective Laser Melting of ‘Unweldable’ Nickel Superalloys. Addit. Manuf. 2017, 15, 113–122. [Google Scholar] [CrossRef]
  23. Carter, L.N. Selective Laser Melting of Nickel Superalloys for High Temperature Applications. Ph.D. Thesis, University of Birmingham, Birmingham, UK, 2013. [Google Scholar]
  24. Engeli, R. Selective Laser Melting & Heat Treatment of Γ’ Strengthened Ni-Base Superalloys for High Temperature Applications. Ph.D. Thesis, ETH Zurich, Zurich, Switzerland, 2017. [Google Scholar]
  25. Marchese, G.; Parizia, S.; Saboori, A.; Manfredi, D.; Lombardi, M.; Fino, P.; Ugues, D.; Biamino, S. The Influence of the Process Parameters on the Densification and Microstructure Development of Laser Powder Bed Fused Inconel 939. Metals 2020, 10, 882. [Google Scholar] [CrossRef]
  26. Acharya, R.; Bansal, R.; Gambone, J.J.; Kaplan, M.A.; Fuchs, G.E.; Rudawski, N.G.; Das, S. Additive Manufacturing and Characterization of René 80 Superalloy Processed Through Scanning Laser Epitaxy for Turbine Engine Hot-Section Component Repair. Adv. Eng. Mater. 2015, 17, 942–950. [Google Scholar] [CrossRef]
  27. Carter, L.N.; Attallah, M.M.; Reed, R.C. Laser Powder Bed Fabrication of Nickel-Base Superalloys: Influence of Parameters; Characterisation, Quantification and Mitigation of Cracking. Superalloys 2012, 2012, 2826–2834. [Google Scholar] [CrossRef]
  28. Rickenbacher, L.; Etter, T.; Hövel, S.; Wegener, K. High Temperature Material Properties of IN738LC Processed by Selective Laser Melting (SLM) Technology. Rapid Prototyp. J. 2013, 19, 282–290. [Google Scholar] [CrossRef]
  29. Grange, D.; Bartout, J.D.; Macquaire, B.; Colin, C. Processing a Non-Weldable Nickel-Base Superalloy by Selective Laser Melting: Role of the Shape and Size of the Melt Pools on Solidification Cracking. Materialia 2020, 12, 100686. [Google Scholar] [CrossRef]
  30. Hilal, H.; Lancaster, R.; Stapleton, D.; Baxter, G. Investigating the Influence of Process Parameters on the Structural Integrity of an Additively Manufactured Nickel-Based Superalloy. Metals 2019, 9, 1191. [Google Scholar] [CrossRef] [Green Version]
  31. Dowling, L.; Kennedy, J.; O’Shaughnessy, S.; Trimble, D. A Review of Critical Repeatability and Reproducibility Issues in Powder Bed Fusion. Mater. Des. 2020, 186, 108346. [Google Scholar] [CrossRef]
  32. Capozzi, L.C.; Sivo, A.; Bassini, E. Powder Spreading and Spreadability in the Additive Manufacturing of Metallic Materials: A Critical Review. J. Mater. Process. Technol. 2022, 308, 117706. [Google Scholar] [CrossRef]
  33. Bassini, E.; Galech, U.; Soria, T.; Aristizabal, M.; Iturriza, I.; Biamino, S.; Ugues, D. Effect of the Particle Size Distribution on Physical Properties, Composition, and Quality of Gas Atomized Astroloy Powders for HIP Application. J. Alloys Compd. 2022, 890, 161631. [Google Scholar] [CrossRef]
  34. Boswell, J.H.; Clark, D.; Li, W.; Attallah, M.M. Cracking during Thermal Post-Processing of Laser Powder Bed Fabricated CM247LC Ni-Superalloy. Mater. Des. 2019, 174, 107793. [Google Scholar] [CrossRef]
  35. Yang, C.; Xu, Y.; Nie, H.; Xiao, X.; Jia, G.; Shen, Z. Effects of Heat Treatments on the Microstructure and Mechanical Properties of Rene 80. Mater. Des. 2013, 43, 66–73. [Google Scholar] [CrossRef]
  36. Iveković, A.; Montero-Sistiaga, M.L.; Vleugels, J.; Kruth, J.; Vanmeensel, K. A Combined Numerical-Experimental Approach. J. Alloys Compd. 2021, 864, 158803. [Google Scholar] [CrossRef]
  37. Attallah, M.M.; Jennings, R.; Wang, X.; Carter, L.N. Additive Manufacturing of Ni-Based Superalloys: The Outstanding Issues. MRS Bull. 2016, 41, 758–764. [Google Scholar] [CrossRef]
  38. Zhao, X.; Lin, X.; Chen, J.; Xue, L.; Huang, W. The Effect of Hot Isostatic Pressing on Crack Healing, Microstructure, Mechanical Properties of Rene88DT Superalloy Prepared by Laser Solid Forming. Mater. Sci. Eng. A 2009, 504, 129–134. [Google Scholar] [CrossRef]
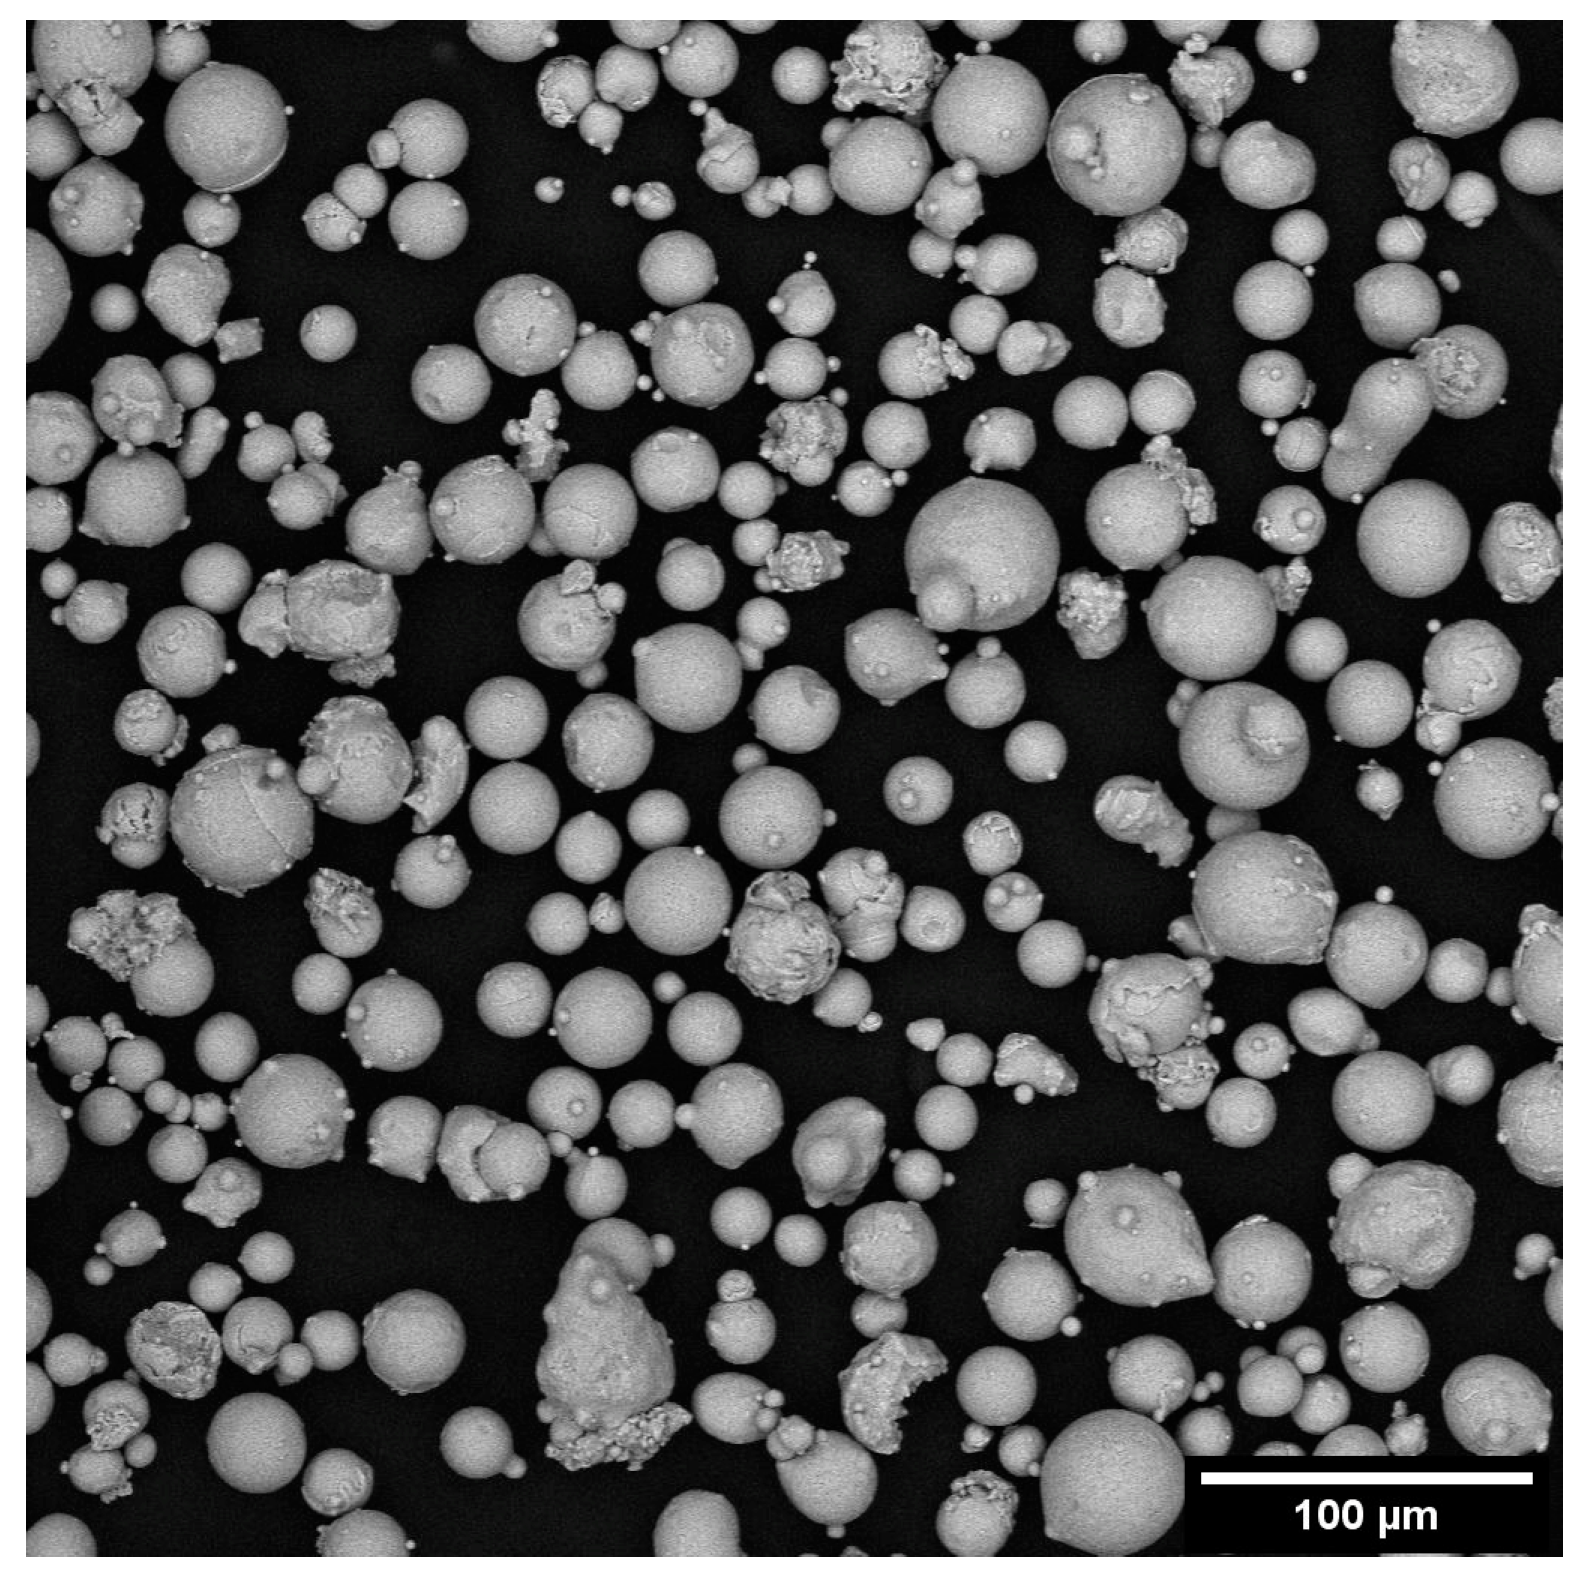
Figure 1. Typical SEM-BSE image of powder particles optimized for the analysis.
Metals 13 00210 g001
Figure 2. Example of cubic samples produced for the parameter optimization.
Metals 13 00210 g002
Figure 3. Particle classification flowchart.
Metals 13 00210 g003
Figure 4. (a) Numeric and (b) volumetric particle size distributions (PSD).
Metals 13 00210 g004
Figure 5. Powder morphology of batches (a) A and (b) B.
Metals 13 00210 g005
Figure 6. Example of (a) an original metallographic image taken with the optical microscope and (b) the resulting output from the algorithm. Cracks are filled with red and pores with blue.
Metals 13 00210 g006
Figure 7. First trial results in terms of crack density vs. pore area fraction.
Metals 13 00210 g007
Figure 8. Maximum pore area for the six most promising sets.
Metals 13 00210 g008
Figure 9. Grain boundary crack.
Metals 13 00210 g009
Figure 10. Results of the intra-print repetition assessment: (a) pore fraction and (b) crack density. The error bars represent the standard deviation of the three mean values calculated for each set in the same print.
Metals 13 00210 g010
Figure 11. Mean values and standard deviations of the pore area fraction measured among different prints.
Metals 13 00210 g011
Figure 12. Mean values and standard deviations of crack density and maximum crack length measured among different prints.
Metals 13 00210 g012
Figure 13. René 80 microstructure at the optical microscope: (a) detail of melt pools, grains elongated along the building direction and a crack developing on the grain boundary and (b) detail of the cellular structure.
Metals 13 00210 g013
Figure 14. Microstructural detail of L-PBF René 80 in the as-built state observed with secondary electrons in the SEM.
Metals 13 00210 g014
Figure 15. Representation of (a) the different typical defects formed by the L-PBF process and (b) the causes of the formation of cracks parallel to the building direction.
Metals 13 00210 g015
Figure 16. Logical path followed for the L-PBF process optimization on René 80.
Metals 13 00210 g016
Table 1. Process parameter ranges used in the DOE, full window variation.
ParameterRange
Laser Power (W)170–195
Scan Speed (mm/s)1000–1900
Hatching Distance (mm)0.03–0.08
Table 2. Nominal [1] and measured compositions of the powders (all measurements are in %wt).
CompositionCrCoMoWAlTiZrCNi
Nominal13.5–14.57.5–12.53.5–4.53.5–4.52.5–3.54.5–5.50.02–0.10.15–0.2Bal
Batch A14.49.54.044.073.034.850.060.15Bal
Batch B13.89.54.003.882.864.680.060.15Bal
Table 3. Measured composition of the powders—trace elements (all measurements are in ppm).
CompositionSONH
Batch A8136285.28
Batch B7167815.42
Table 4. Numeric and volumetric PSD measurements of the powder batches.
PSDBatchD10D50D90ModeMean
NumericA1120.130.718.820.8 ± 7.8
B8.218.330.914.419.6 ± 8.3
VolumetricA1931.446.737.634.5 ± 11.2
B16.527.441.133.130 ± 10
Table 5. Flowability measurements.
TestAB
Apparent density (g/cm3)—ASTM B2124.20 ± 0.034.15 ± 0.05
Flow rate (s/50 g)—ASTM B21315.2 ± 0.414.8 ± 0.5
Table 6. Parameter sets and relative VED values.
Parameter SetsVED (J/mm3)
4110
6130
7151
8113
15212
Disclaimer/Publisher’s Note: The statements, opinions and data contained in all publications are solely those of the individual author(s) and contributor(s) and not of MDPI and/or the editor(s). MDPI and/or the editor(s) disclaim responsibility for any injury to people or property resulting from any ideas, methods, instructions or products referred to in the content.