Abstract
Nickel-based superalloys, namely INCONEL® variants, have had an increase in applications throughout various industries like aeronautics, automotive and energy power plants. These superalloys can withstand high-temperature applications without suffering from creep, making them extremely appealing and suitable for manufactured goods such as jet engines or steam turbines. Nevertheless, INCONEL® alloys are considered difficult-to-cut materials, not only due to their superior material properties but also because of their poor thermal conductivity (k) and severe work hardening, which may lead to premature tool wear (TW) and poor final product finishing. In this regard, it is of paramount importance to optimise the machining parameters, to strengthen the process performance outcomes concerning the quality and cost of the product. The present review aims to systematically summarize and analyse the progress taken within the field of INCONEL® machining sensitively over the past five years, with some exceptions, and present the most recent solutions found in the industry, as well as the prospects from researchers. To accomplish this article, ScienceDirect, Springer, Taylor & Francis, Wiley and ASME have been used as sources of information as a result of great fidelity knowledge. Books from Woodhead Publishing Series, CRC Press and Academic Press have been also used. The main keywords used in searching information were: “Nickel-based superalloys”, “INCONEL® 718”, “INCONEL® 625” “INCONEL® Machining processes” and “Tool-wear mechanisms”. The combined use of these keywords was crucial to filter the huge information currently available about the evolution of INCONEL® machining technologies. As a main contribution to this work, three SWOT analyses are provided on information that is dispersed in several articles. It was found that significant progress in the traditional cutting tool technologies has been made, nonetheless, the machining of INCONEL® 718 and 625 is still considered a great challenge due to the intrinsic characteristics of those Ni-based-superalloys, whose machining promotes high-wear to the tools and coatings used.
1. Introduction
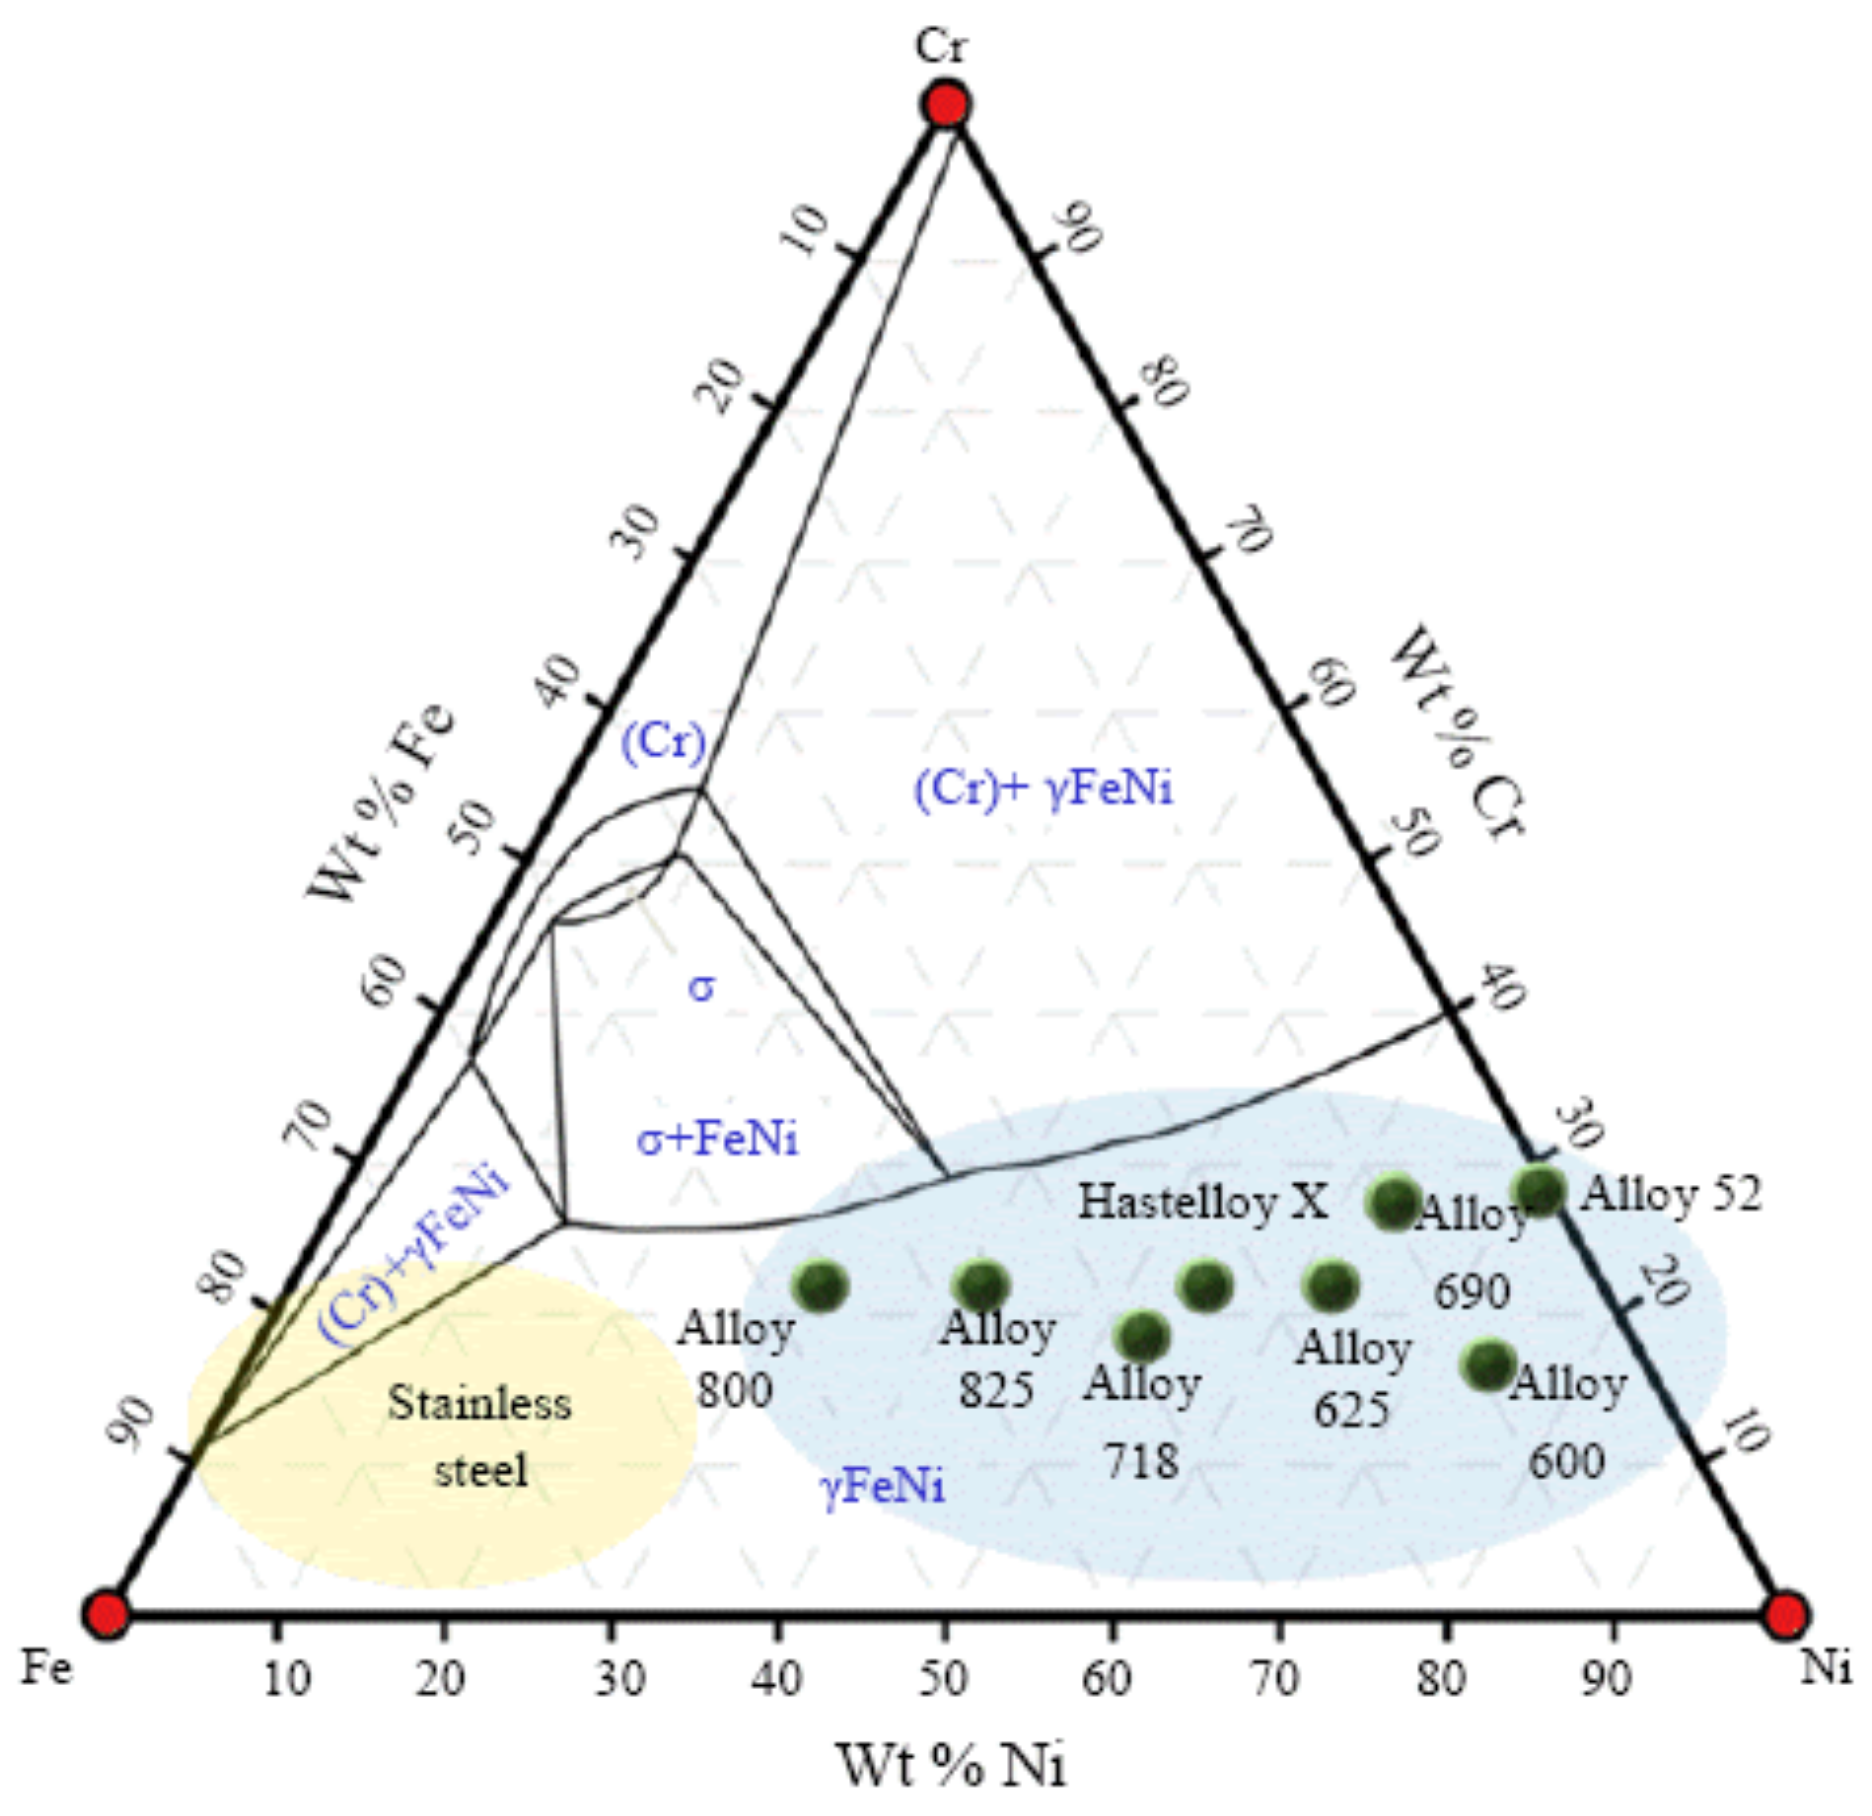
With the increasing requirement to achieve the best thermal efficiency in the field of aeronautics [1,2] and energy power plants steam turbines [3], applications in which aluminium and steel would succumb to creep [4] as a result of thermally induced crystal vacancies [5], nickel-based (Table 1) alloys became a very attractive solution for high-temperature operation [6,7,8,9]. Ni-Cr-Fe superalloys (Figure 1, blue zone), better known as INCONEL® (trademark registered by the International Nickel Company of Delaware and New York [10]), are materials resistant to oxidation, caustic and high-purity water corrosion, and stress-corrosion cracking (SCC) [11], optimal for service in extreme environments subjected to high mechanical loads [12], within numerous applications and characteristics (Table 2).

Table 1.
Some physical properties of nickel (adapted from [7]).
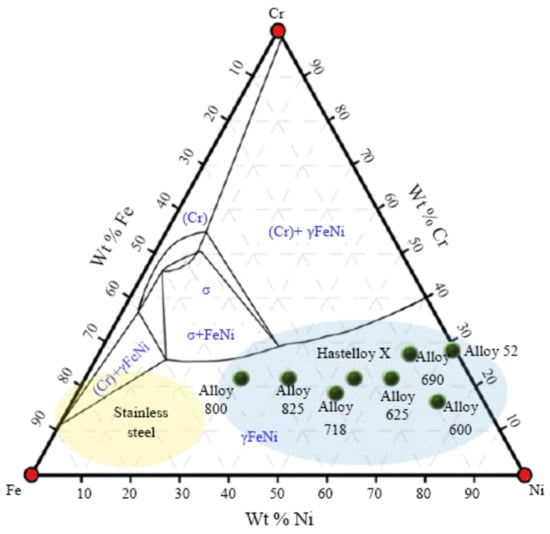
Figure 1.
Fe-Ni-Cr ternary phase diagram [13] (Caption: wt%—element weight percentage).
A brief insight is provided with the most known alloys, including the INCONEL® 600, a Ni-Cr alloy that offers high levels of resistance to several corrosive elements. In high-temperature situations, INCONEL® 600 will not succumb to Cl-ion SCC or general oxidation, but it can still undergo corrosion by sulphuration deterioration in the high-temperature flue gas. This was a research topic by Wei, et al. [14]. INCONEL® 600 also suffers from severe hydrogen embrittlement at 250 °C [15]. Nonetheless, this alloy is recommended for use in furnace components and chemical processing equipment [16]. Moreover, INCONEL® 600 is also effectively used in the food industry and nuclear engineering due to its constant crystalline structure in applications that would cause permanent distortion to other alloys [17].


Table 2.
Summary of applications and characteristics of some nickel-based superalloys (adapted from [18,19]).
Table 2.
Summary of applications and characteristics of some nickel-based superalloys (adapted from [18,19]).
| Superalloy | Sub-Grouped Material | Industry Applications | Characteristics |
|---|---|---|---|
| Ni-based alloys | INCONEL® (587, 597, 600, 601, 617, 625, 706, 690, 718, X750, 901) | Aircraft motors, nuclear reactors, gas turbines, spacecraft, pumps, furnaces, heat-treating equipment, petrochemical processing equipment, chemical processing, submarine, and manufacturing industry. | 600: Solid solution strengthened; 625: Acid resistant, good weldability; 690: Low cobalt content for nuclear applications, and low resistivity; 718: Gamma phase (γ′) double prime solution strengthened with good weldability. |
| INCONEL® 722 | Acids in the chemical industry | - | |
| INCONEL® 751 | - | Increased Al content for improved failure strength in the 870 °C range. | |
| INCONEL® 792 | - | Increased Al content for improved high-temperature corrosion properties, especially used in gas turbines. | |
| INCONEL® 903 | Petrochemical tubing. | - | |
| INCONEL® 939 | - | γ′ prime strengthened with good weldability. |
The INCONEL® 601 alloy, similarly to INCONEL® 600, resists various forms of high-temperature corrosion and oxidization [20]. Nevertheless, this Ni-Cr alloy has an addition of aluminium which results in higher mechanical properties, even in extremely hot environments. INCONEL® 601 can prevent the significant strains (ε) that would appear under operating loads when exposed to high-temperature environments. The applications go from the use in furnaces to heat-treating equipment like retorts, baskets and gas-turbine components [21] to petrochemical processing equipment. The INCONEL® 625, which will have a special focus during this study, is a rare alloy that gains strength without having to undergo an extensive strengthening heat treatment [22]. It is a Ni-Cr-Mo alloy with an addition of Nb. The Nb reacts with Mo, causing the alloy’s matrix to stiffen and increase its strength [23]. Like most INCONEL® alloys, the INCONEL® 625 has high resistance to several corrosive elements [24], withstanding harsh environments that would severely affect the performance of other alloys. This alloy is particularly effective when it comes to staving-off crevice corrosion and pitting. The INCONEL® 625 is a versatile alloy that is effectively used in the marine engineering, aerospace, chemical, and energy industries, among other applications [25,26]. The INCONEL® 690 alloy, unlike others in the group, is a high Ni and Cr alloy (Cr gives it particularly strong resistance to corrosion [15,27] that occurs in aqueous atmospheres). Along with its ability to resist the corrosion caused by oxidizing acids and salts, INCONEL® 690 can also withstand the sulfidation that takes place at extremely high temperatures (T). One of the most known INCONEL® alloys is the 718 alloy. This alloy, along with the formerly mentioned 625 alloy, will also have a special focus. INCONEL® 718 differs from other INCONEL® variants in structure and response, since it is designed for operation at T ≤ 650 °C [28]. The 718 alloy is obtained by precipitation hardening [29,30]. It contains substantial levels of Fe, Mo, and Nb, as well as trace amounts of Ti and Al [31]. It has good weldability, which is not matched by most INCONEL® alloys [32], and combines anti-corrosive elements with a high level of strength and flexibility. It is particularly resistant to post-weld cracking, maintaining its structure in both high-temperature and aqueous environments as well, being most widely used in different industries, such as petrochemical, aeronautics, energy, and aerospace [33]. INCONEL® alloys tend to form a thick and stable passivating oxide layer to protect the surface from further attack, retaining strength over a wide T range, making INCONEL® an attractive material for high-temperature applications [34]. The strength at high-temperatures of INCONEL® alloys may be developed by solid solution strengthening or precipitation strengthening, depending on the alloy [35]. In those processes, small amounts of niobium combine with nickel to form the intermetallic compound Ni3Nb or γ-prime, which consists of small cubic crystals that inhibit slip and creep effectively at elevated T [36].
Concerning the roles of major phases or composition elements that contribute to the INCONEL® alloys, an overview is presented in Table 3 on the effects of Ni-alloying to better comprehend the compositions presented in Table 4.

Table 3.
Major roles of solutes in different types of INCONEL® alloys [26].

Table 4.
Chemical composition of relevant INCONEL® alloys.
As it was possible to find out, some of the consequences of alloying Ni with certain chemical elements make INCONEL® alloys [46] a difficult-to-machine material [47] (Figure 2) and difficult to metal shape [48], identically to stainless steel [49,50]. As opposed to other alloys, like Al-alloys [36,51], Magnesium (Mg) alloys [51], steel alloys [52] or Ti-alloys [51], INCONEL® alloys do not benefit from better-established wear mechanisms between the pair tool-workpiece.
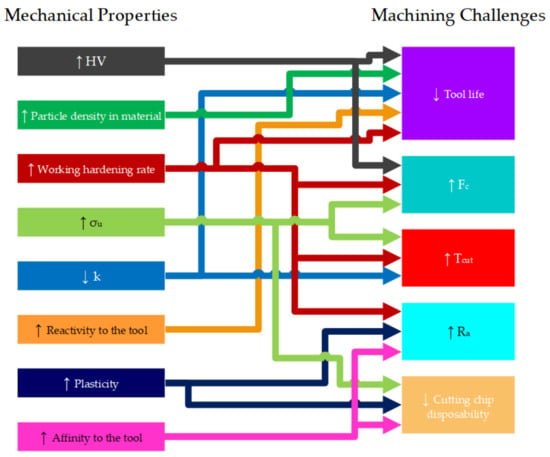
Figure 2.
Relationship between mechanical properties and machining challenges with INCONEL® (adapted from [19]).
Table 5 presents the most relevant and used models of the better-established wear mechanisms referred to, based on physics and experiments for heat partition coefficient Rchip, for common materials like aluminium and low carbon mild steels.

Table 5.
Predictive models based on physics and experiment for heat partition coefficient Rchip [53].
It is suggested to consult the work of Zhao, et al. [53] to better understand the additional variables described in Table 5.
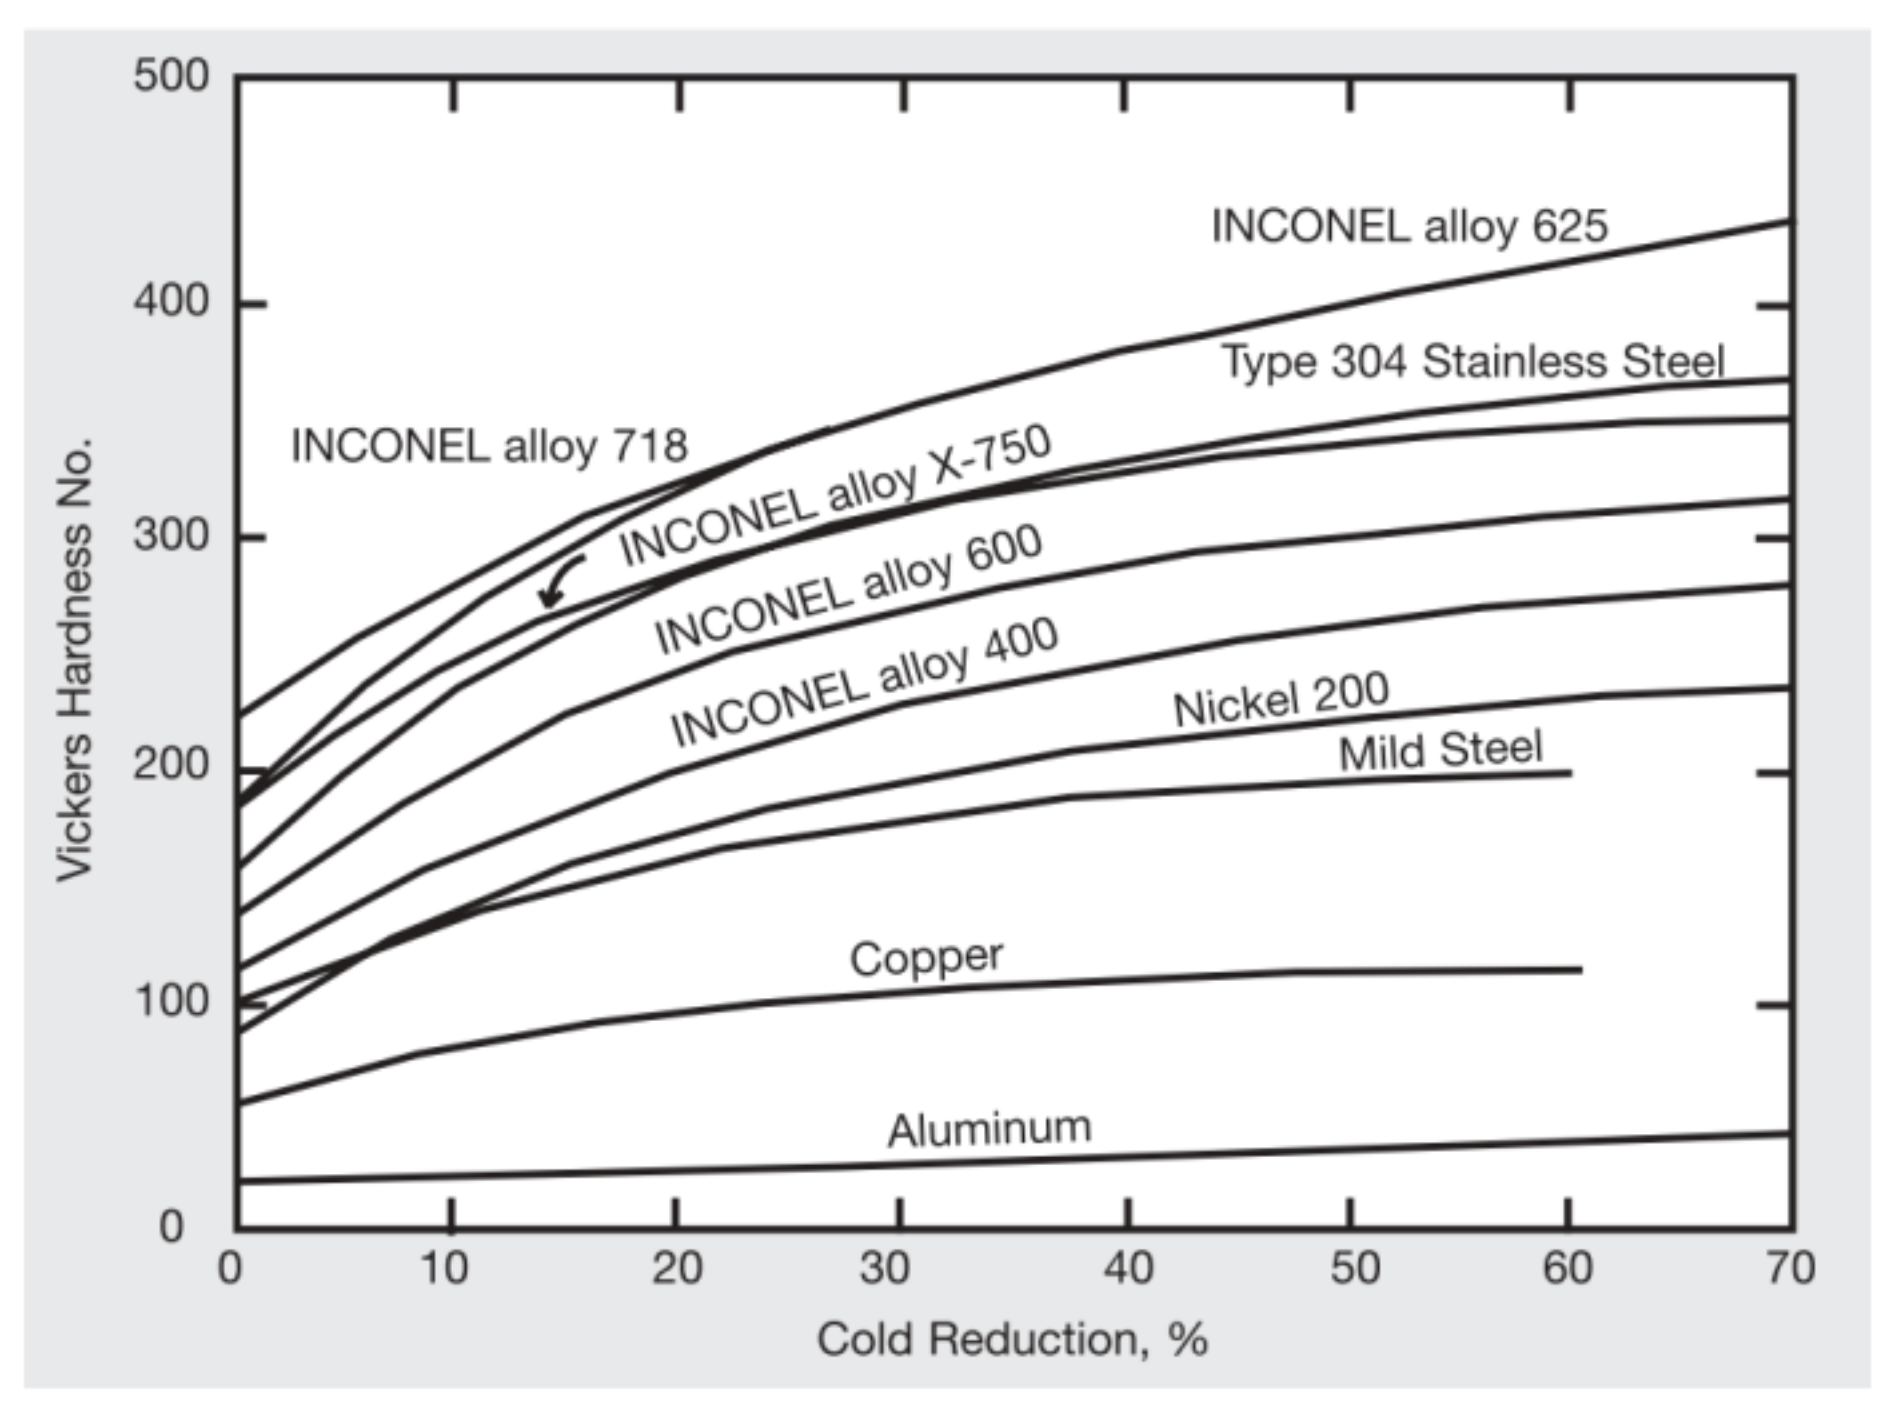
Figure 3 explains how superficial hardness is affected in INCONEL® alloys when machined after cold work processes, compared to some more stable materials like Cu, Al and mild steel. Machining (or surface) cold working may result from mechanical machining (milling, lathing, grinding) [61] or surface treatment (sandblasting, shot-peening), and may introduce residual tensile or compressive stresses into the surface of materials. Compressive stresses generated by shot-peening processes prevent the occurrence of stress corrosion cracks. In the case of plastic strain, tensile stresses appear instead, and the resulting stress levels may be extremely high [62]. A curious detail patent in Figure 3 is the similarity behaviour between INCONEL® 718 and 625 alloys after the 20% cold reduction.
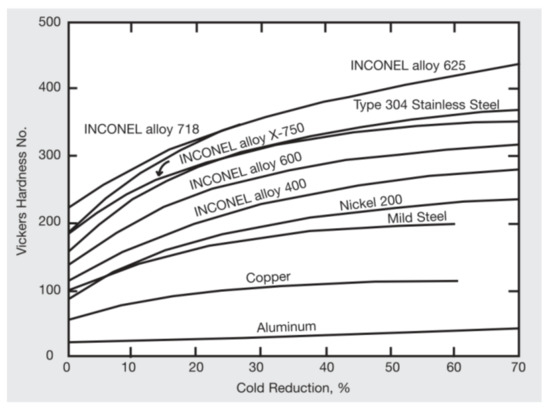
Figure 3.
Effect of cold work on hardness for different INCONEL® alloys and comparison with other materials [1].
As a consequence of low k [36] of nickel-based alloys, which significantly influences heat distribution during the machining process, the surface integrity is affected when applying traditional cold forming techniques, due to the rapid work hardening (Figure 3) in the chip formation region [63]. This phenomenon leads to plastic deformation of either the INCONEL® workpiece or the tool, on subsequent machining passes [64], eventually resulting in built-up-edge (BUE) formation [31] (Figure 4) and consequentially in premature tool failure [65]. For this reason, age-hardened INCONEL® alloys, such as the 718 alloy, are typically machined using an aggressive but slow cut with a hard tool, minimizing the number of passes required [66].
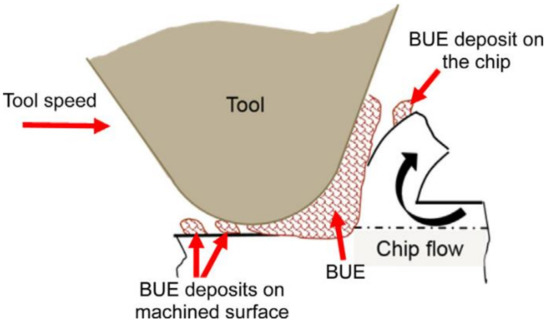
Figure 4.
Schematic diagram of BUE formation in micromachining processes [67].
The BUE phenomenon occurs because of an accumulation of hot debris generated by the chip-start cutting process and deposited on the tool surface during machining, leading afterwards to adhesion and abrasion TW. From an experimental point of view, some authors noted that the BUE is significantly affected by the state of stress around the tool cutting edge and happens under extreme contact conditions at the tool–chip interface as high friction, high pressure, and high sliding velocity [68]. INCONEL® alloys are well known to abrade tools and develop BUE [69], especially the 718 alloy. Also during the machining of INCONEL® 625, heat concentration is likely to occur at the cutting edges, resulting in early tool failure and consequent BUE [70].
2. Method of Research
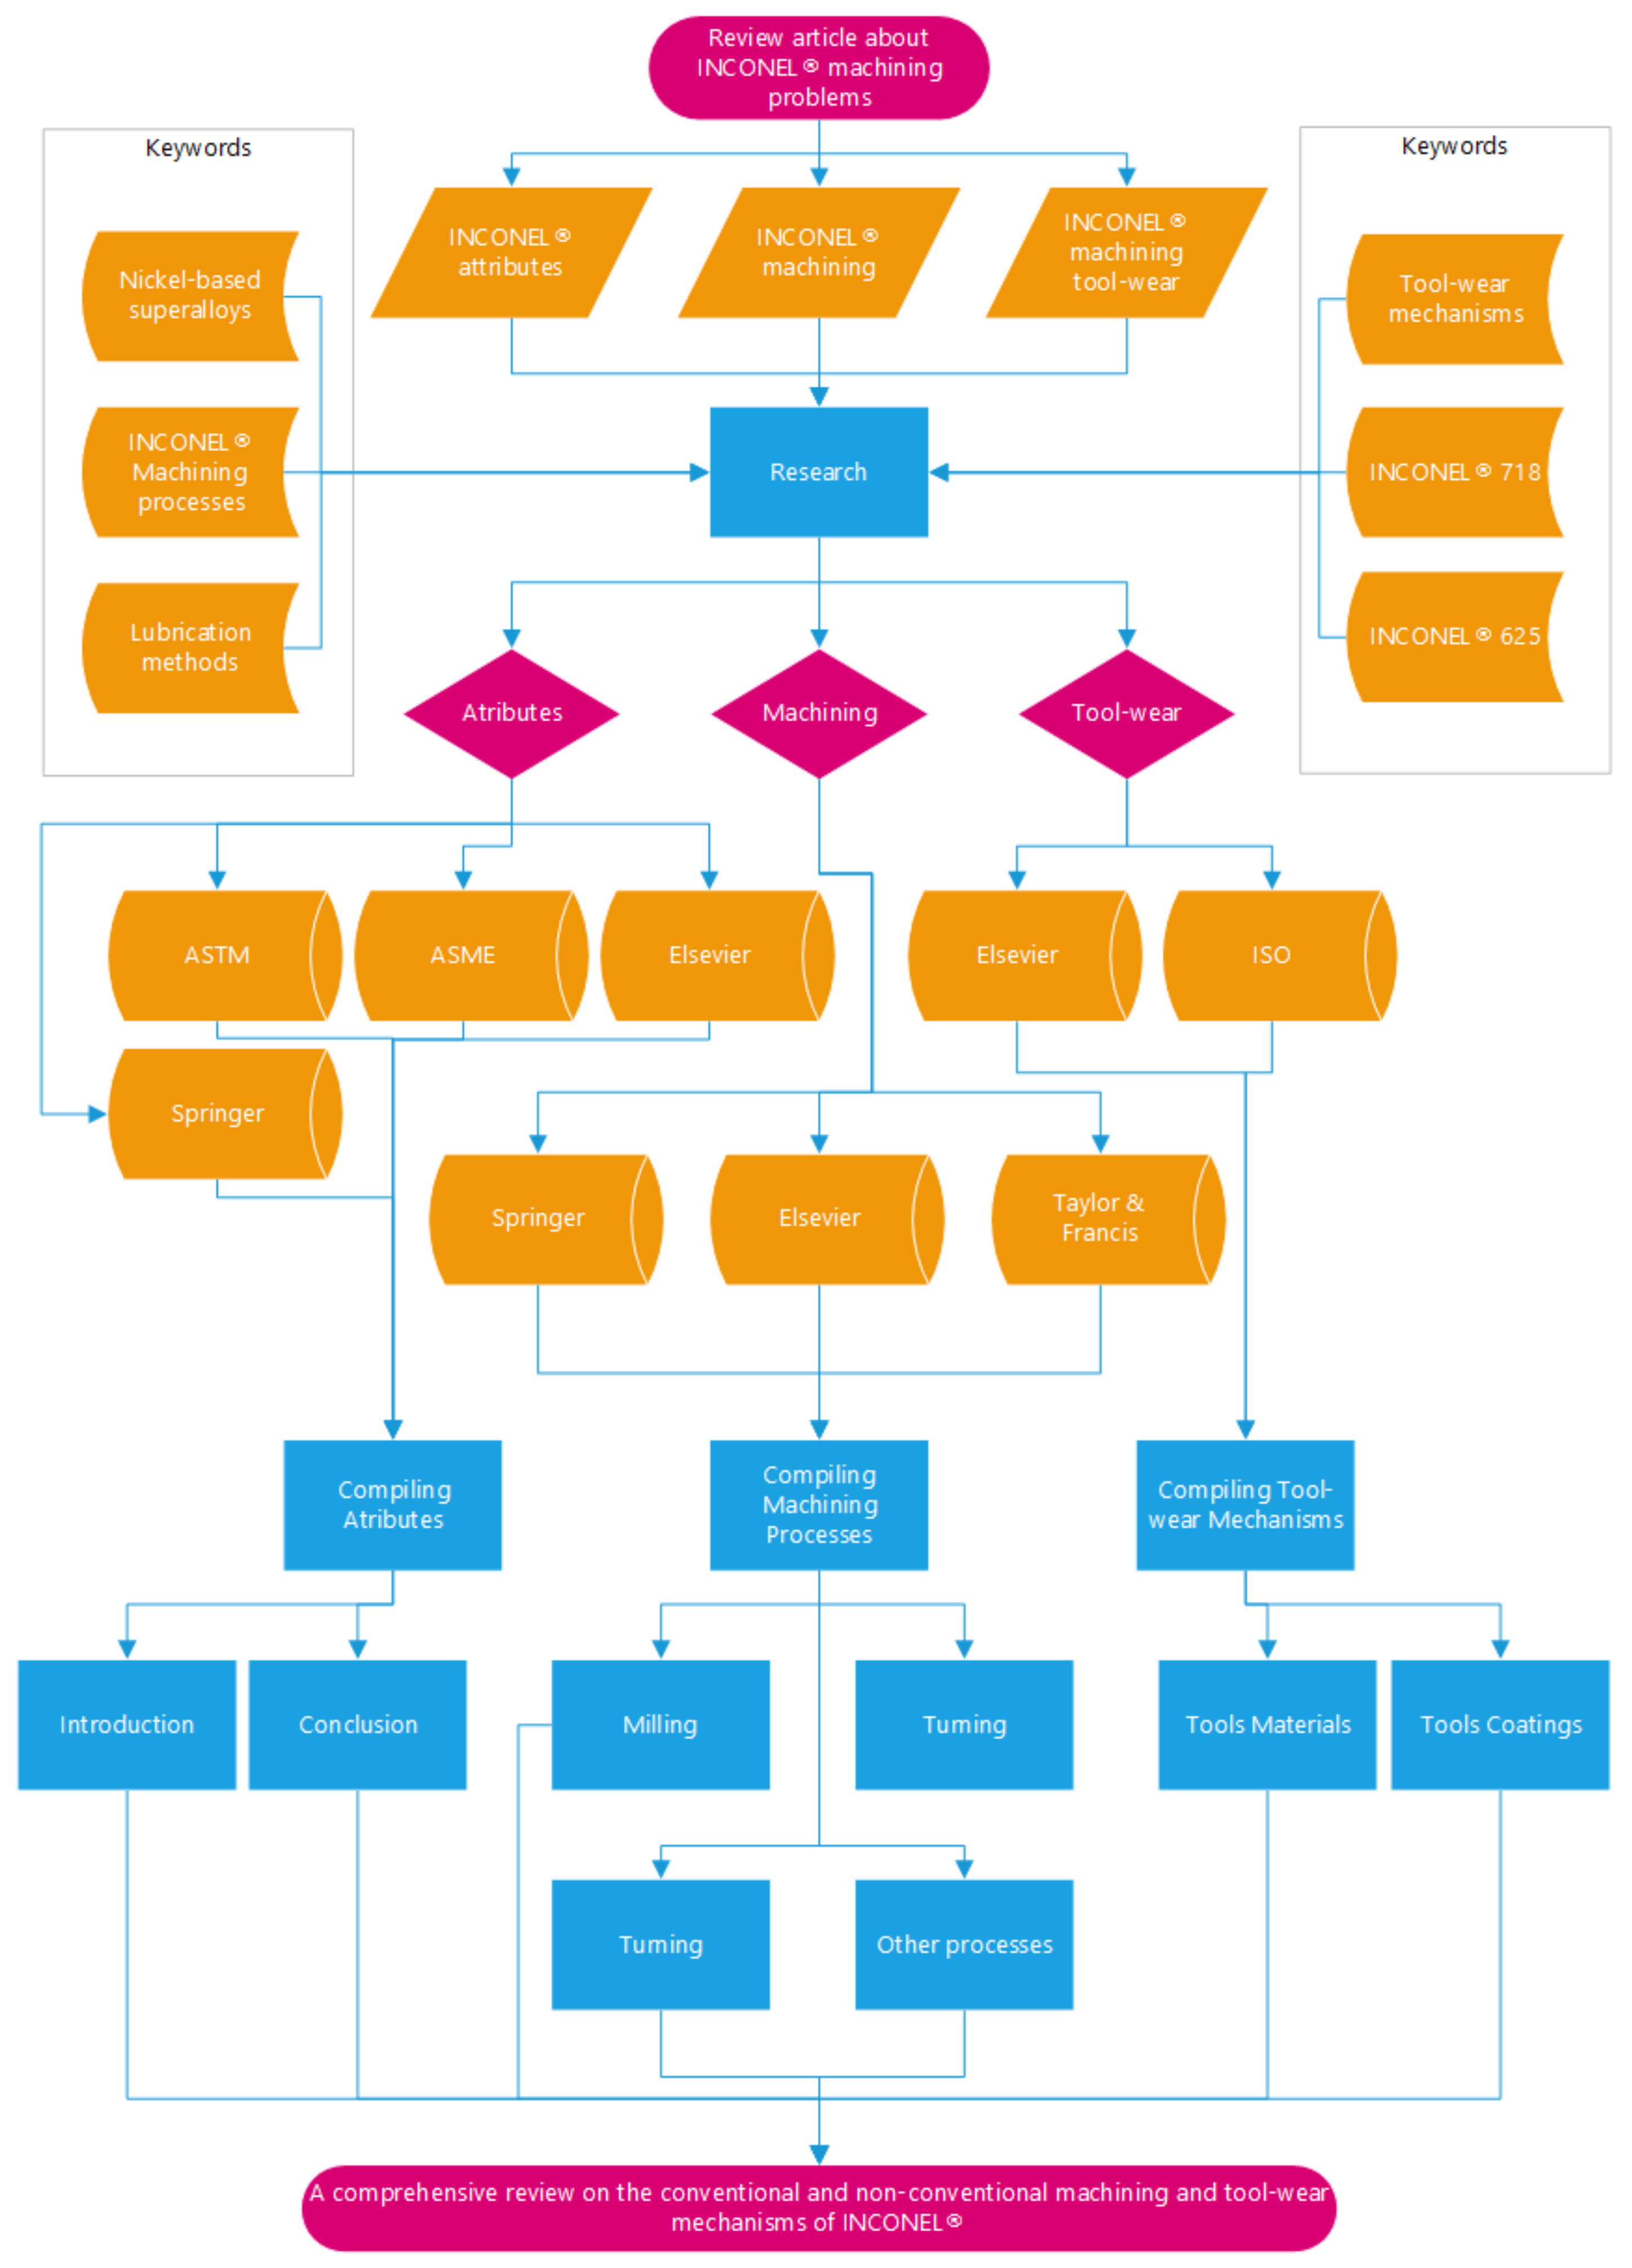
The research and information compiling method are illustrated in the flowchart of Figure 5, which is simple to visually interpret and track down all the inherent steps in the making of this specific paper. In the flowchart, all the consulted databases and most used keywords are found (in the topic of this document), to find information about conventional and non-conventional machining and tool-wear mechanisms of INCONEL® alloys.
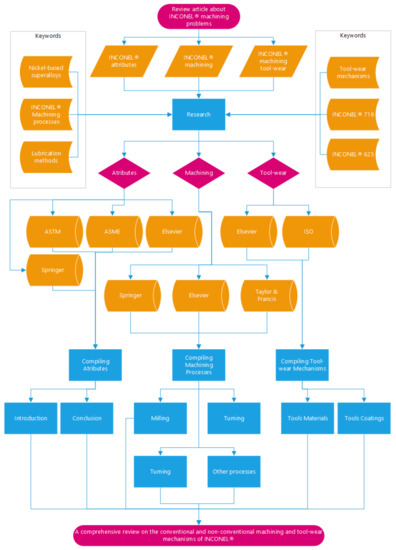
Figure 5.
Research method accomplished to achieve a better redacting result to the review paper.
Additionally, will be provided three attachments containing abbreviations, symbols and units used within the article.
3. Literature Review
3.1. Conventional Manufacturing Processes
The machining process of chip-start cutting is a technological process able to transform a wrought stock into a component, using a cutting tool. The surplus material from the wrought stock, or just stock, is removed in the form of chips; a consequence of the mechanical action of a cutting wedge with higher hardness than the material of the component that is meant to manufacture. In the following literature review, Milling, Turning, Drilling and Boring will be the discussed processes, in which chip-start cutting is a key and common factor to all these traditional processes.

Figure 6.
Evolution of the sliding velocity along the tool-material interface [71].
Figure 6.
Evolution of the sliding velocity along the tool-material interface [71].
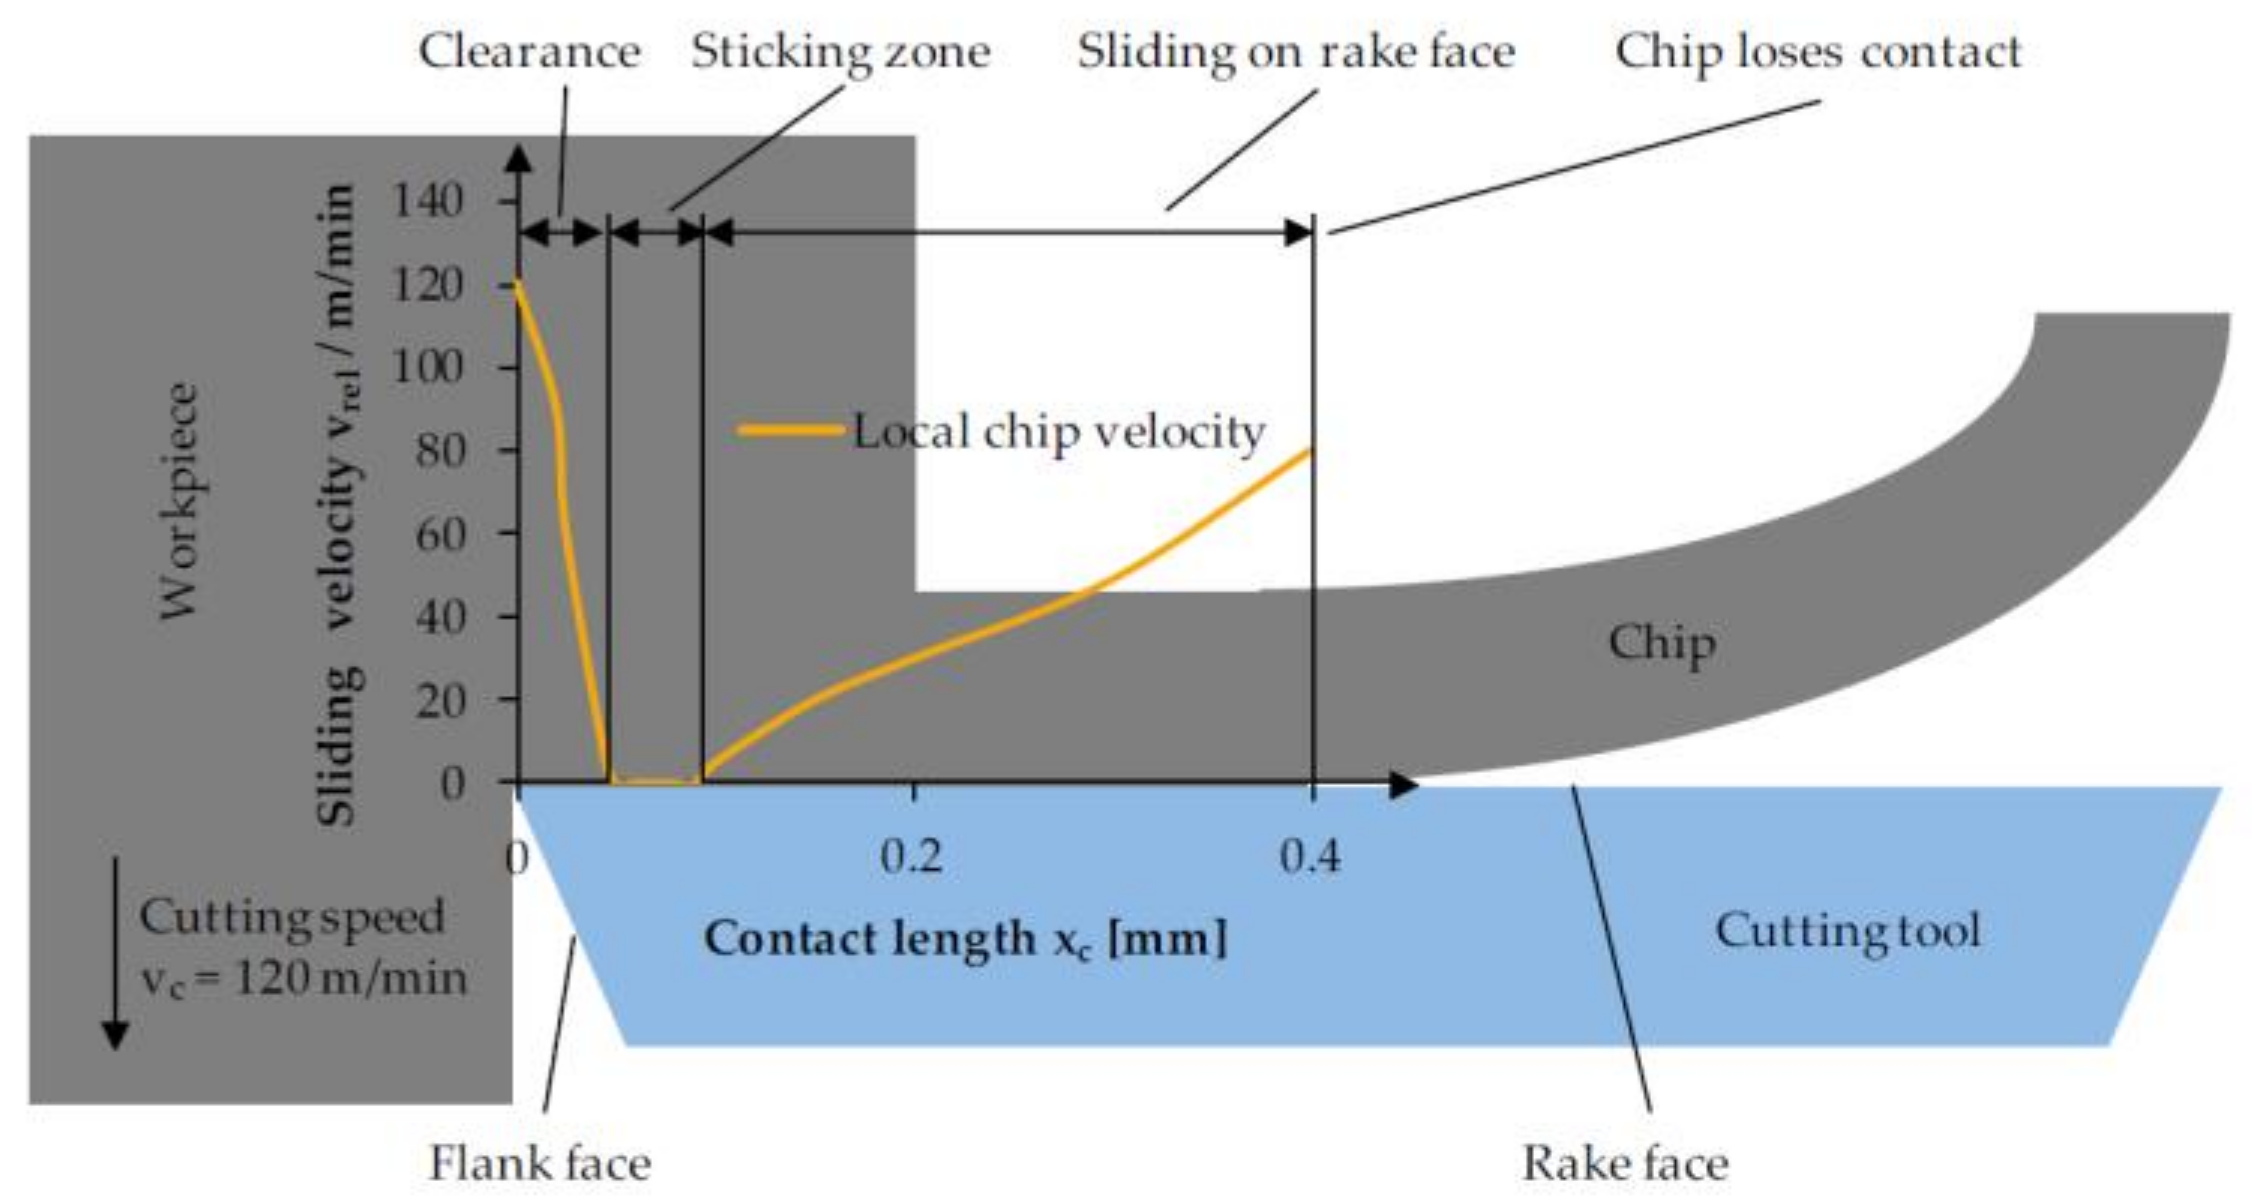
Making use of Figure 6, and taking into account that the chip-start cutting process is very much equal to the machining of INCONEL® 718 and 625, Bonnet et al. [72] described the different friction parts on the rake face in the machining of steel. Directly behind the cutting edge, the chip velocity rapidly shrinks to zero. For a certain contact length, the chip material has a sliding velocity of zero, which starts to increase for the rest of the tool–chip interface, before the chip loses contact with the tool [72].
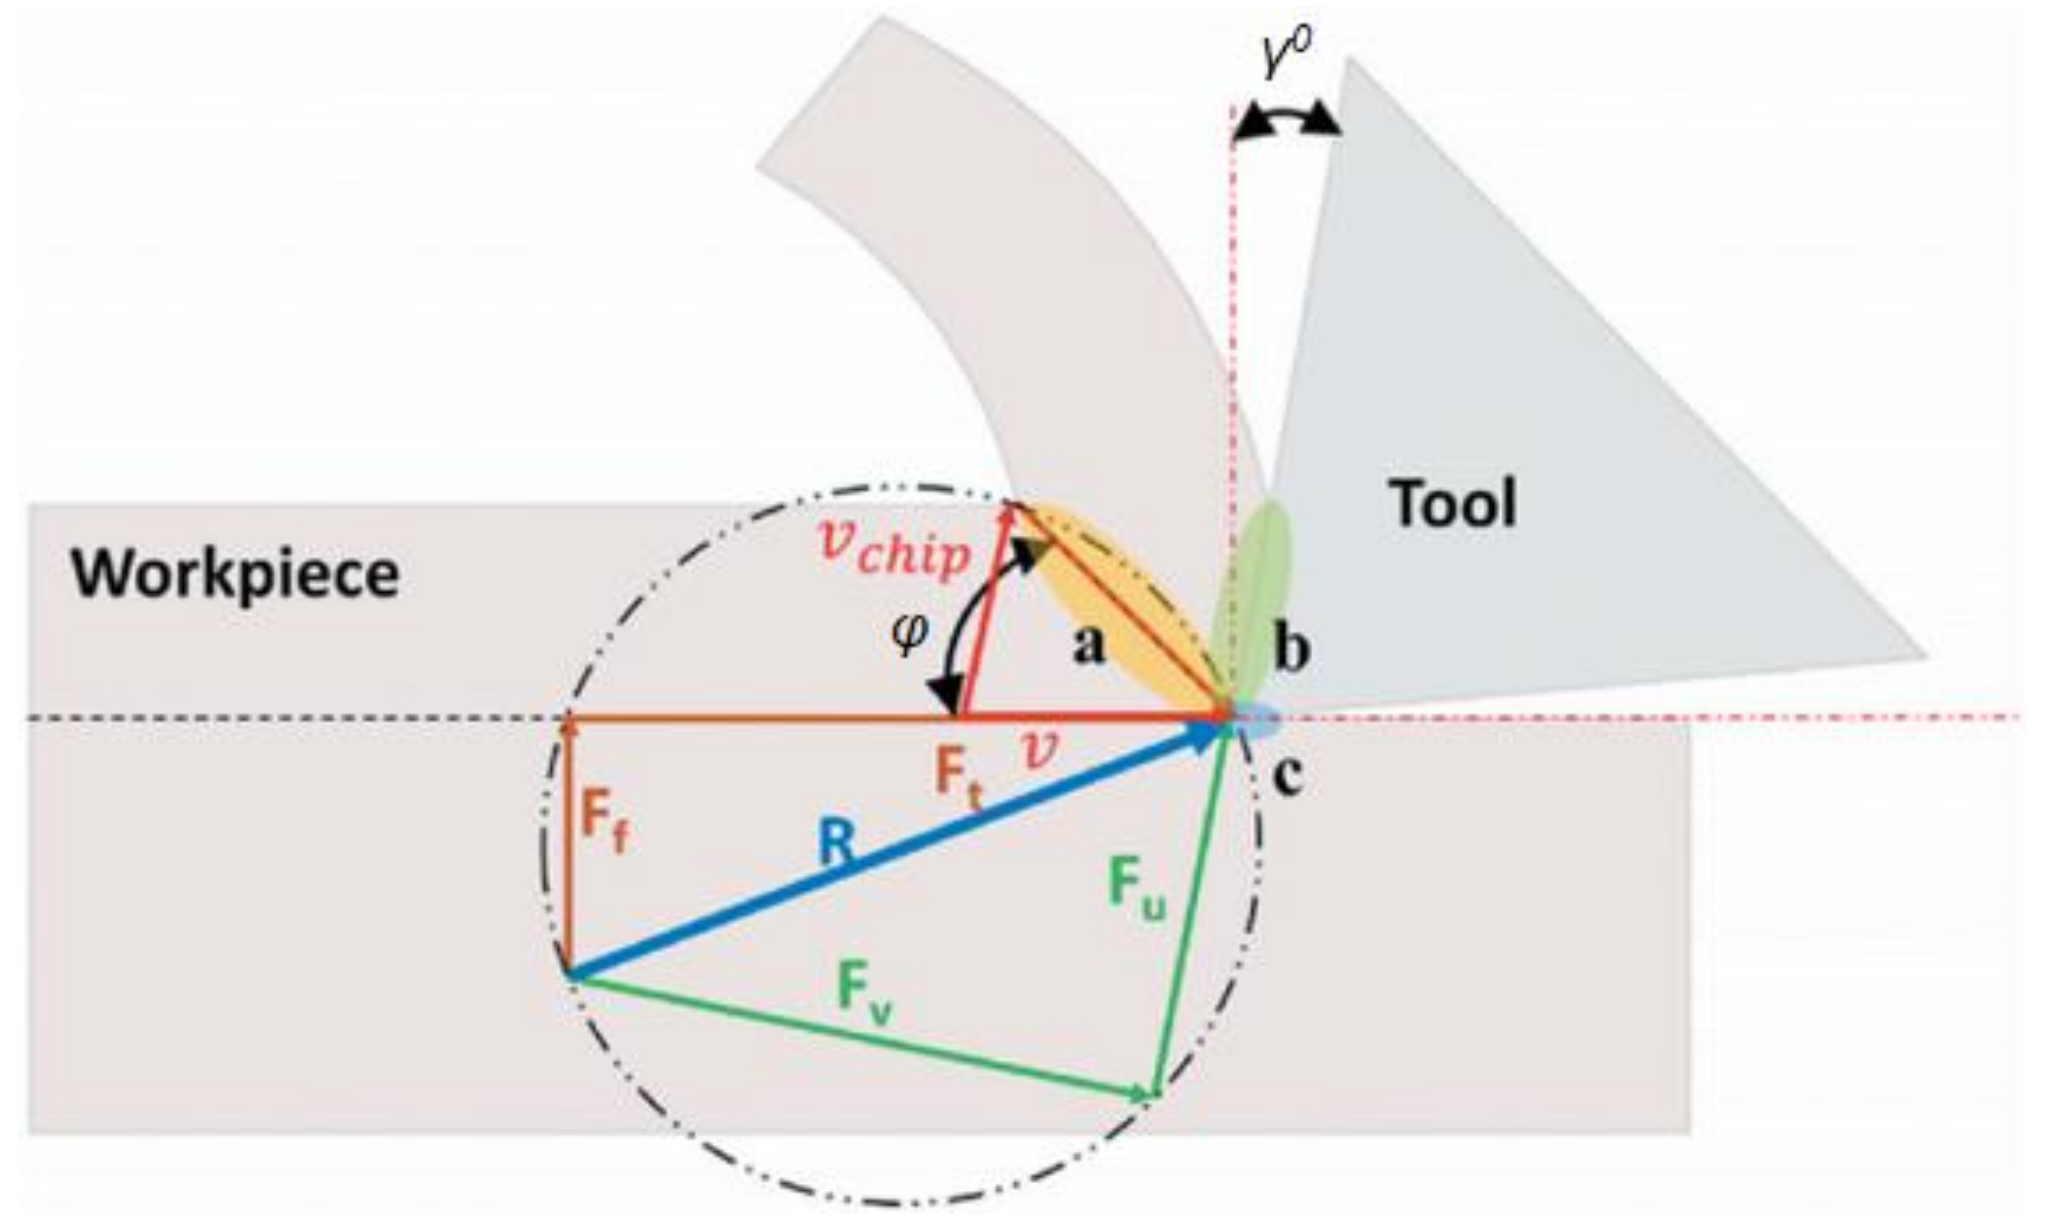
Due to the friction created around the chip creation process, three distinct heat zones are created within the vicinities of the cutting wedge. In Figure 7, the three different thermal affected regions between the tool-workpiece are visible. In Figure 7a there is a thermo-mechanical deformation of the primary shear region (or primary deformation zone, PDZ) where the majority of the energy is converted into heat due to the internal friction of the material to be cut. In Figure 7b there is a tool-material interface region, or SDZ, of the tool rake surface and the chip rear face where heat is generated by the rubbing between the chip and the tool and finally. In Figure 7c the contact between the flank of the tool and the already machined surface takes place, called tertiary deformation zone (TDZ).
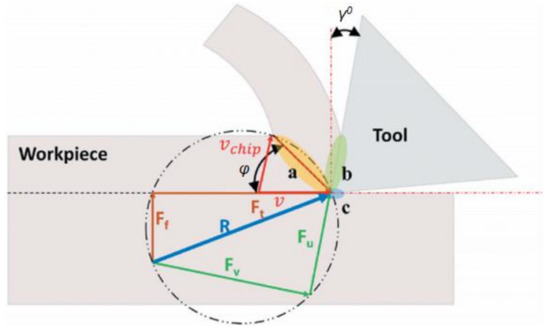
Figure 7.
Regions of heat generation during metal orthogonal machining (adapted from [73]): (Caption: φ—shear plane angle; γ0—Rake angle, Ff—Feed force, Ft—tangential force).
A novel approach to improve the efficiency of the traditional chip-start cutting process is laser-assisted machining (LAM), illustrated in Figure 8, which consists of preheating the material to cut and lowering the superficial hardness to facilitate tool cutting. This solution is common to turning, milling and grinding. Kim and Lee [74] also worked on a machining preheat approach for the INCONEL® 718 alloy, which includes a magnetic induction coil instead of a laser.
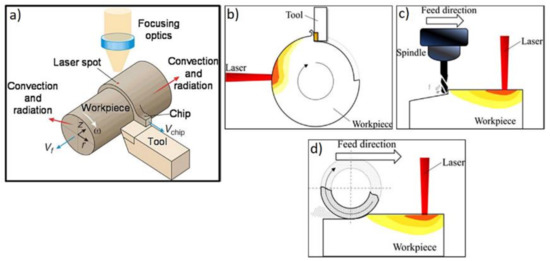
Figure 8.
(a) Schematic of LAM indicating heat-losses by convection and radiation, (b) Schematic of LAM turning, (c) LAM milling, and (d) LAM grinding (adapted from [75]) (Caption: Vf—feed velocity).
3.1.1. Milling
Milling is the nomenclature given to the machining process that uses rotary cutting tools to remove excess material from the wrought stock. Nowadays, with the use of CNCs, milling can be done at a maximum of six degrees of freedom (DOF).
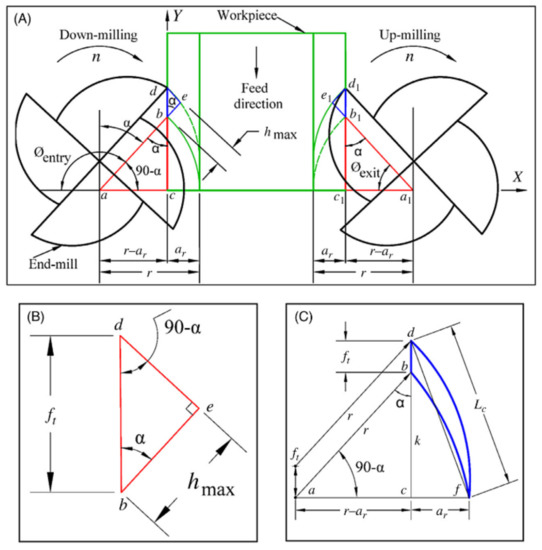
Figure 9.
Chip formation showing (A) chip formation showing cutter tooth entry angle in down-milling and cutter tooth exit angle in up-milling, (B) maximum chip thickness, hmax, and (C) chip length, Lc [76].
Figure 9.
Chip formation showing (A) chip formation showing cutter tooth entry angle in down-milling and cutter tooth exit angle in up-milling, (B) maximum chip thickness, hmax, and (C) chip length, Lc [76].

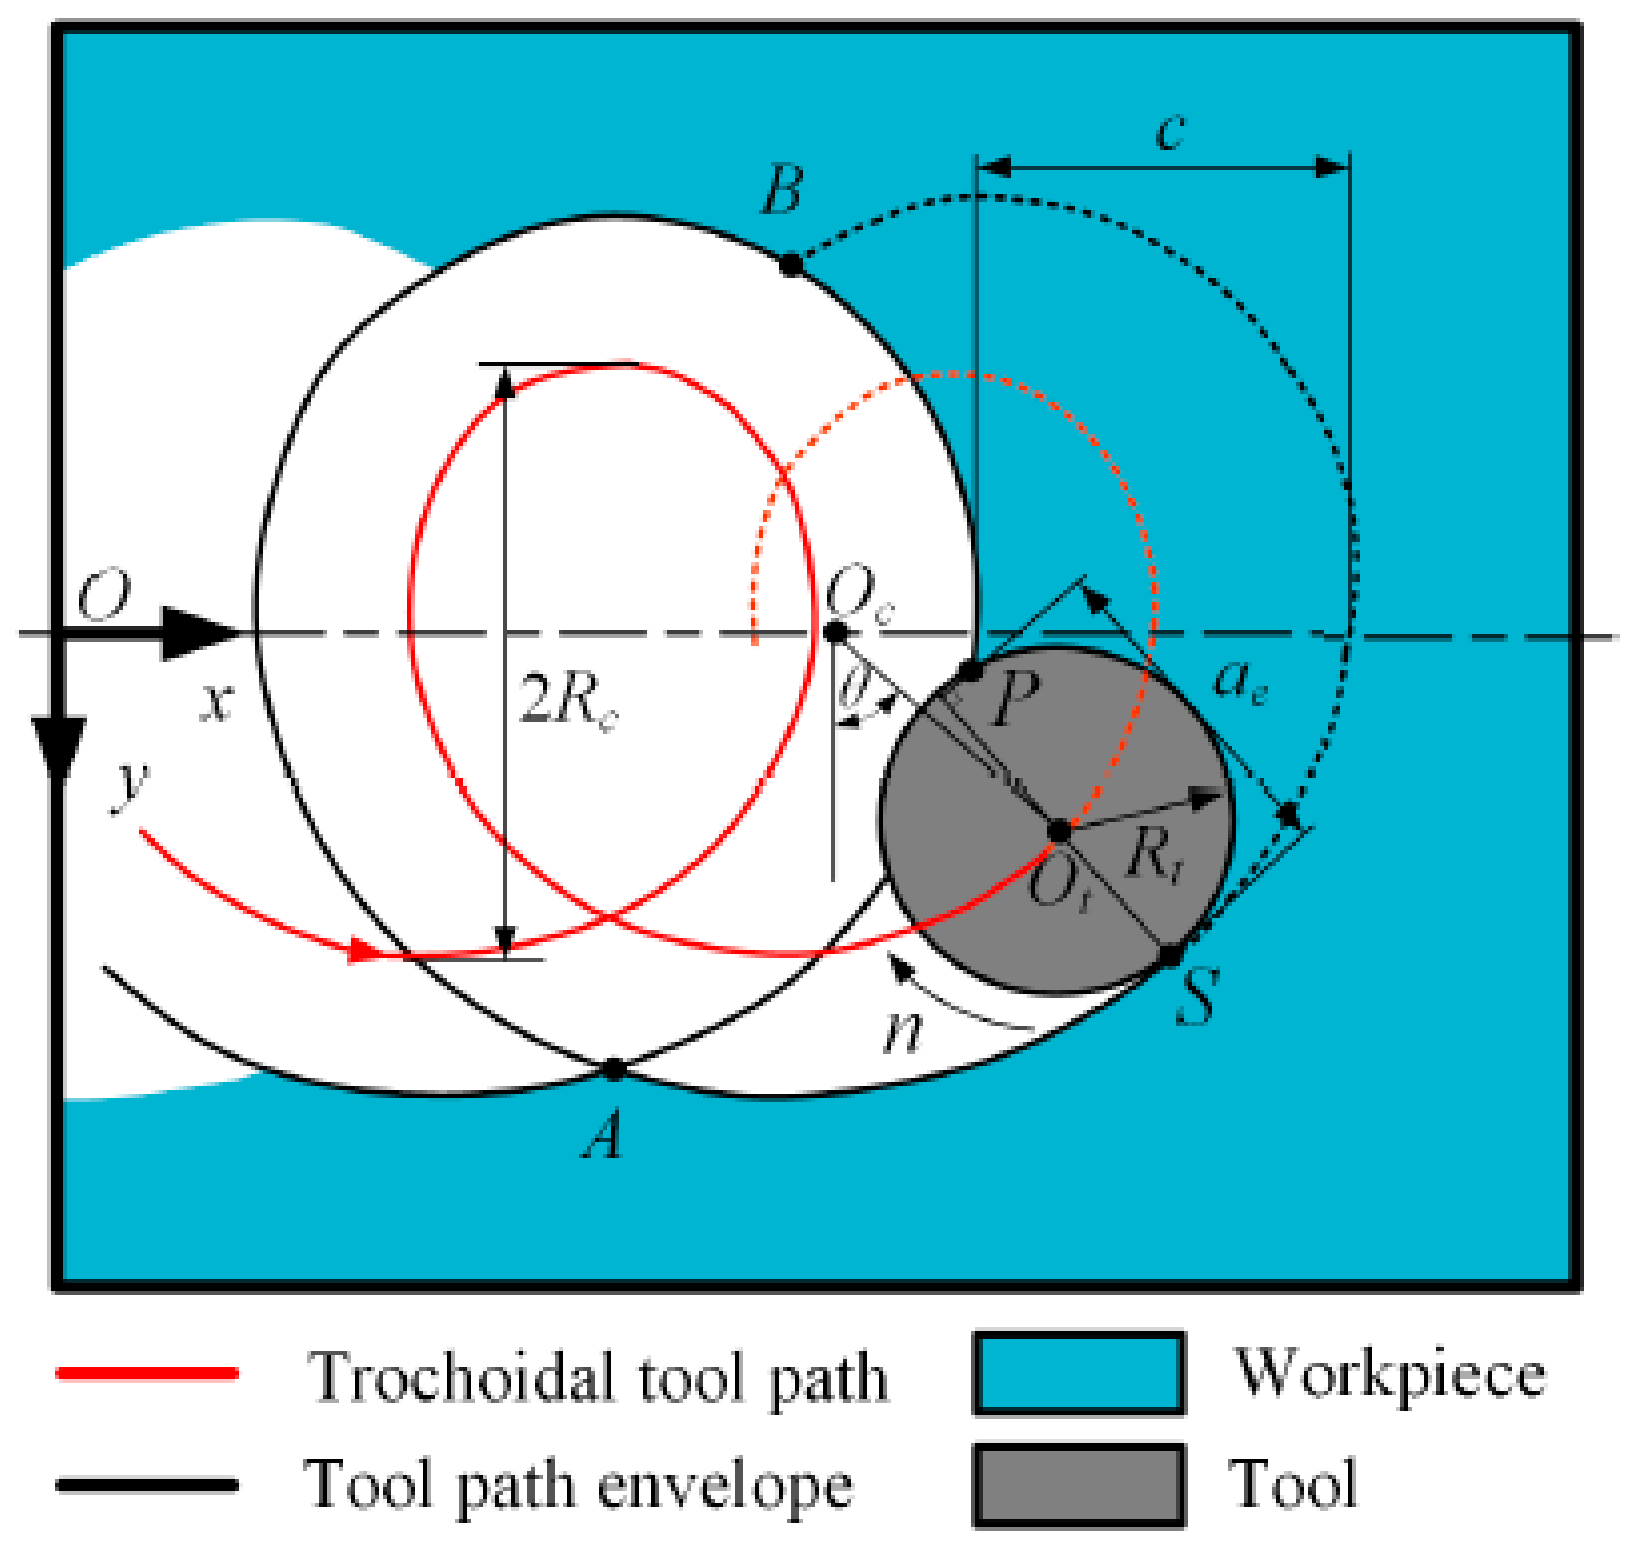
Traditional milling tends to have lower ap values and higher ae values compared to more advanced milling techniques. However, this would cause a concentration of all heat generated in a small portion of the cutting edge, which in this case is the tip of the tool. It would require more axial passes too. This problem can be well managed in aluminium and steel alloys, but not with refractory materials like INCONEL® alloys. Many milling approaches can be tackled to enhance INCONEL® machining, such as up and down-milling, studied by Hadi et al. [77] in INCONEL® 718 machining, illustrated by Figure 9. Another interesting and efficient technique [78] that enriches milling INCONEL® 718 and 625 is trochoidal milling, illustrated by Figure 10, which consists of making the centre of the cutting tool walk a “helical horizontal” path. This procedure not only prevents tool jamming due to workpiece heat-dilation, but it also enables cutting bigger ae dimensions, with lower ap, improving heat-spread over the entire tool with more radial passes.

Figure 10.
Example of a geometric model of trochoidal milling [79].
Table 6 presents the latest experimental challenges and developments in the machining of INCONEL® with the milling process.

Table 6.
Critical challenges and developments in the milling process of INCONEL®.
3.1.2. Turning
Opposed to milling, the turning process takes place in a lathe for components with a revolution axis, i.e., turbine shafts. The workpiece spins in a lathe while the fixed tools, with or without inserts, remove the surplus material. It is patent in Figure 11 the normal movement of the tool while turning a sort of shaft and some intrinsic characteristics of the inserts used. Some of the main problems in turning INCONEL® 718 and 625 are the specific cutting energy (SCE) and rapid augment of surface hardening upon cutting material. Moreover, since shafts must comply with certain geometric specs for the better functionality of the component, Ra is a key factor to be studied, varying vc, f and ap.
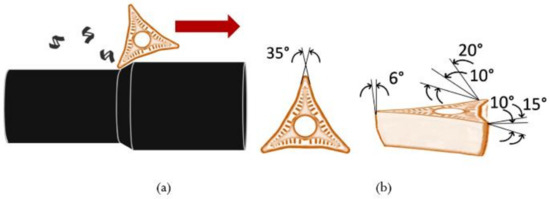
Figure 11.
(a) Turning example; (b). Insert A-type (view of basic side cutting edge angle, rake angle, and secondary angles for chip breakage) [84].
Table 7 presents the latest experimental challenges and developments in the machining of INCONEL® with the turning process.

Table 7.
Critical challenges and developments in the turning process of INCONEL®.
3.1.3. Drilling
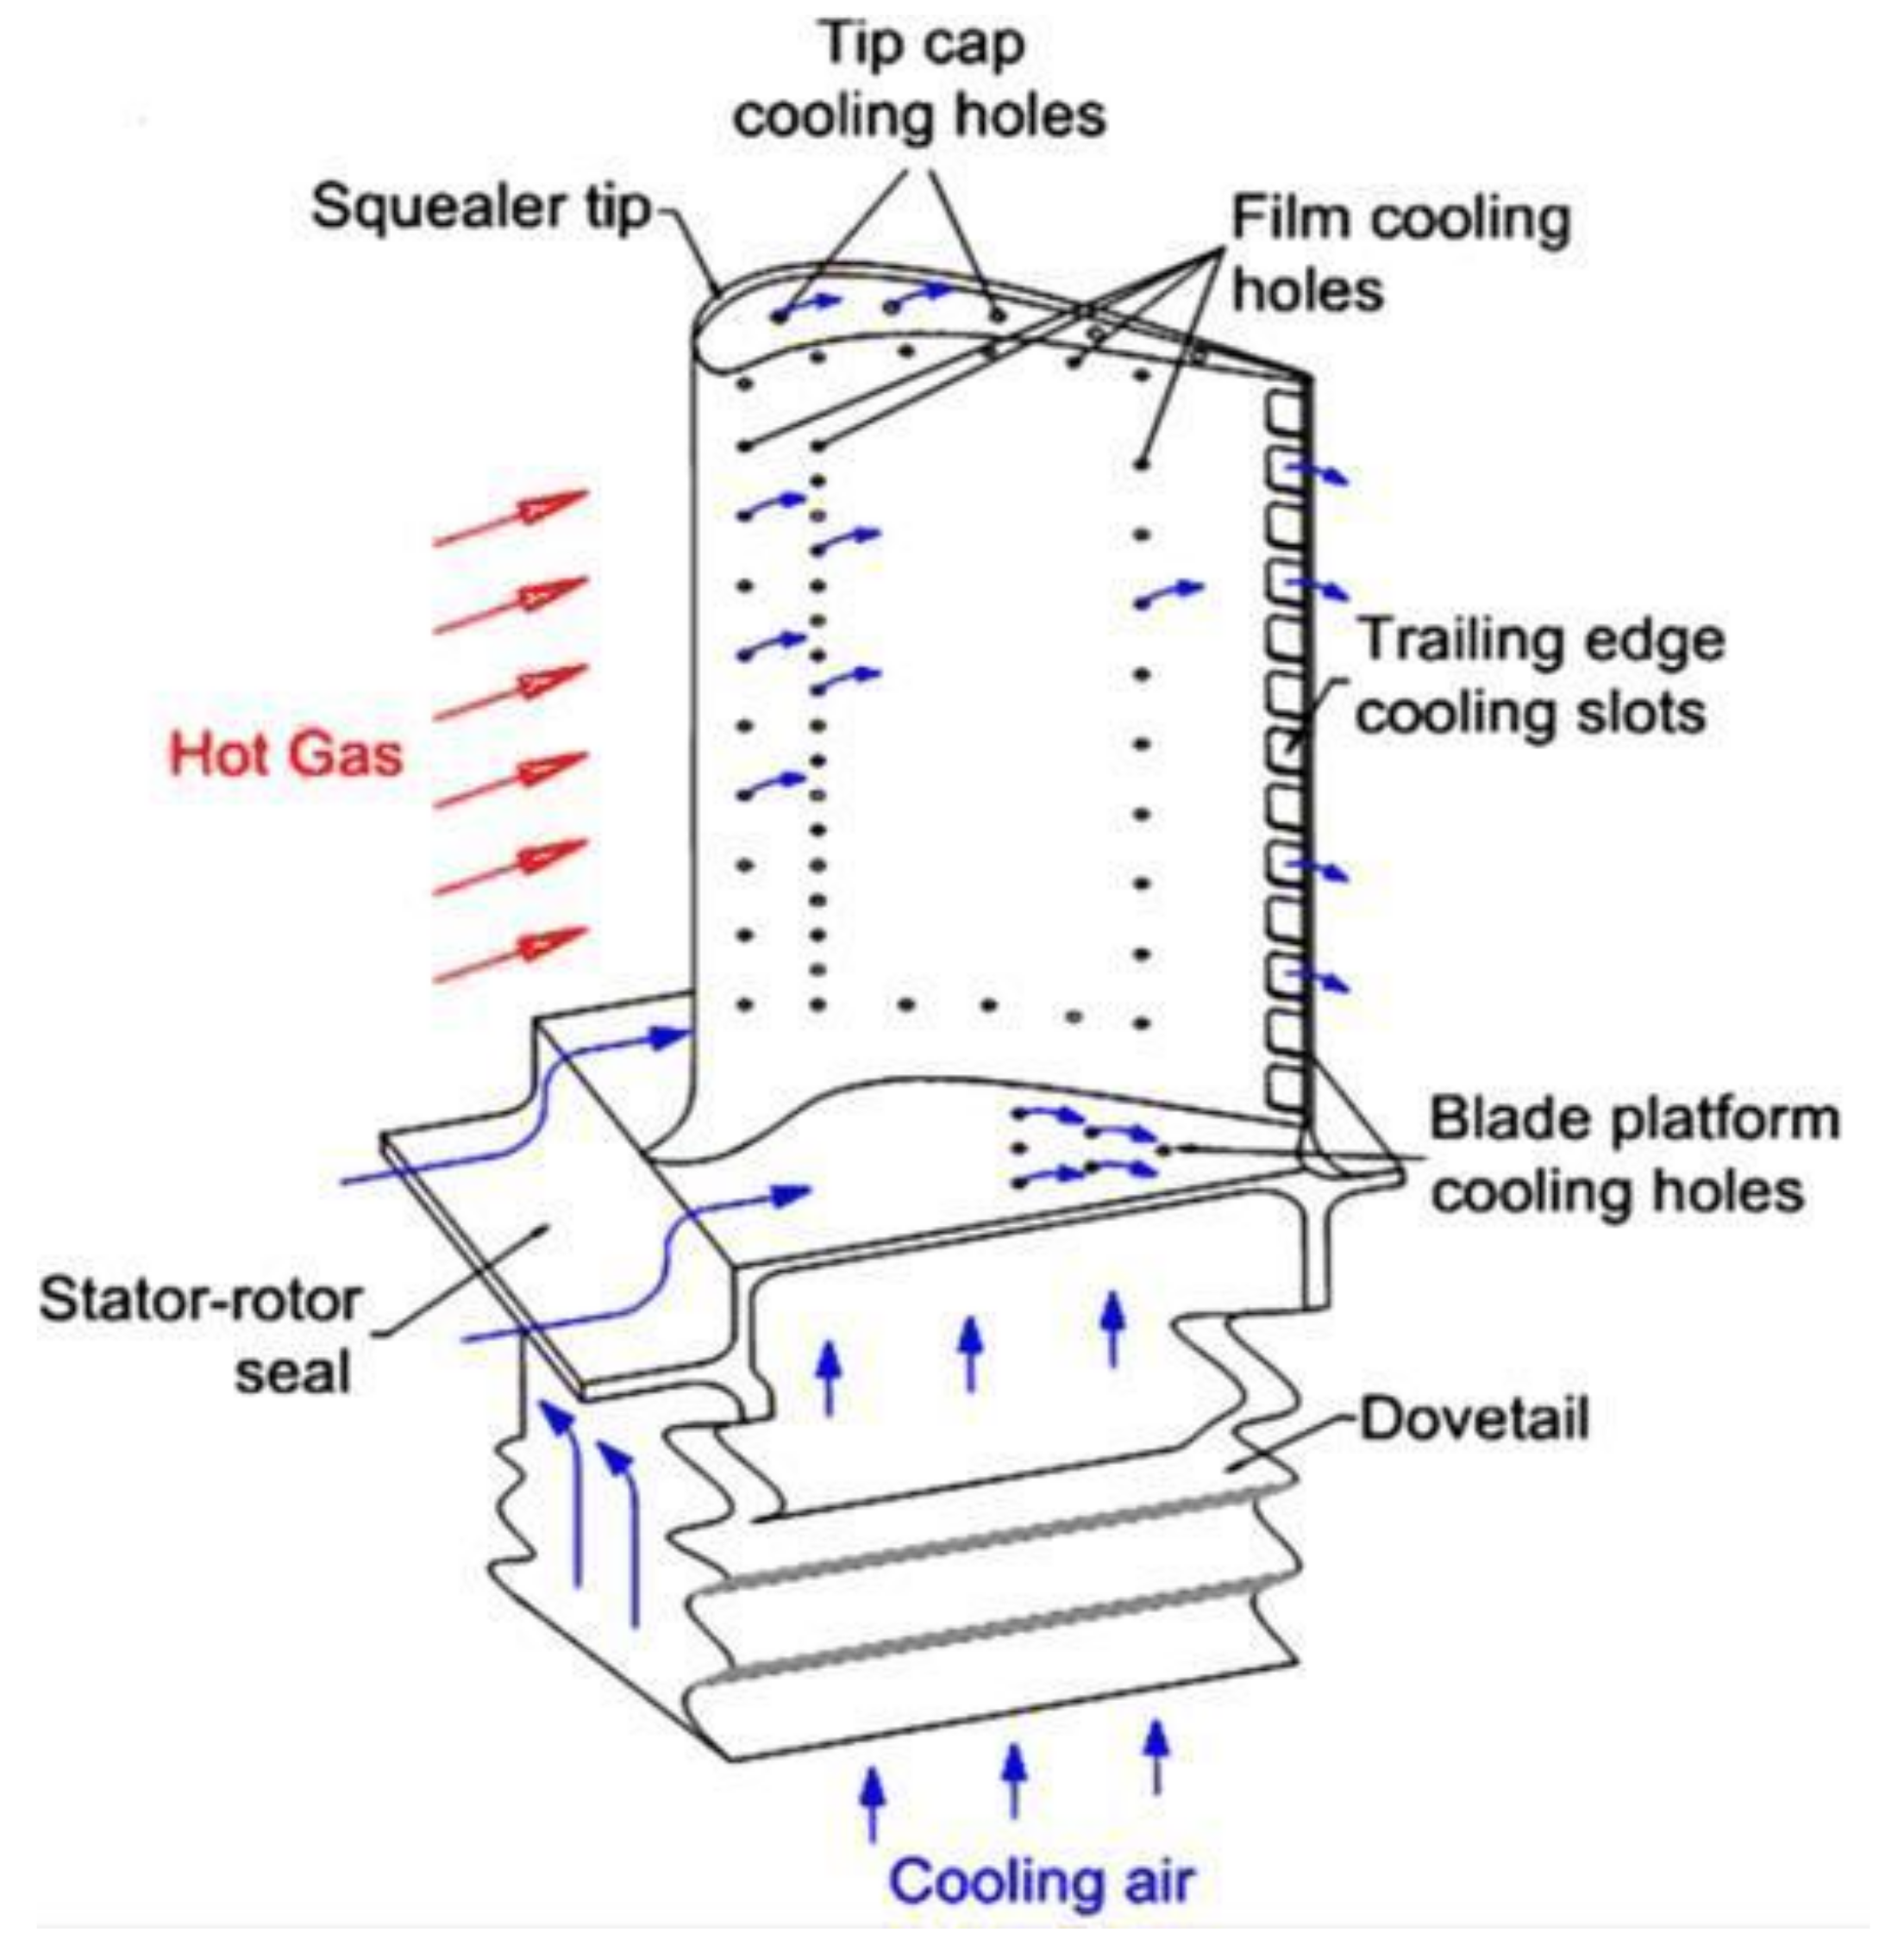
Drilling is a cutting process where a drill bit is spun to cut a circular hole in a component. In INCONEL® applications, drilling is important to create micro holes that will permit the cooling of gas turbines, as illustrated by Figure 12 and studied by Venkatesan et al. [90] on the hole quality assessment in INCONEL® 625 alloy parts.
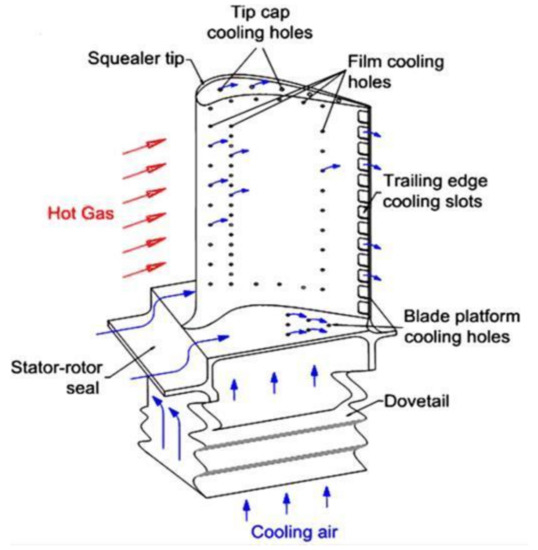
Figure 12.
Gas turbine blade cooling schematic [91].
The INCONEL® 718 alloy has many challenges in deep-hole-drilling as well since the process is prone to drill jamming due to material expansion inside the holes. Table 8 presents the latest experimental challenges and developments in the machining of INCONEL® alloys with the drilling process.

Table 8.
Critical challenges and developments in the drilling process of INCONEL®.
3.1.4. Boring
Boring is the manufacturing process in which previously drilled holes are enlarged by a single-point cutting tool. Not much information is available about the boring process on INCONEL® alloys whereby it is only presented in the study carried out by Ratnam et al. [94], whose challenges involved the investigation of the machining parameters’ effect on Ra, TW, Fc on the cutting tool and workpiece vibration during dry boring of INCONEL® 718 with TiCN-Al2O3-TiN coated inserts using response surface methodology (RSM). It was found that the use of accelerometers, radioactive sensors and piezoelectric actuators does not make it possible to measure rotating objects’ vibrations. On the other hand, the LDVs are capable to measure rotating objects’ vibrations with a simple experimental arrangement. Parameters s and f were found to have a significant influence on Ra. The parameter ap was found to be significant on VB, Fc, and workpiece vibration amplitude (VA). The optimal machining parametric combination was obtained using the desirability function. Cutting condition parameters such as s = 360 rpm, f = 0.14 mm/rev and ap = 0.4949 mm was obtained for VA = 38.7 μm, minimum F = 117.8 N, VB = 0.3 mm and minimum Ra = 2.55 μm. The proposed RSM approach was an easy method to obtain maximum information with a smaller number of experiments. and successfully used by different authors in the improvement of process parameters.
3.2. Non-Conventional Manufacturing Processes—Electrical Discharge Machining (EDM)
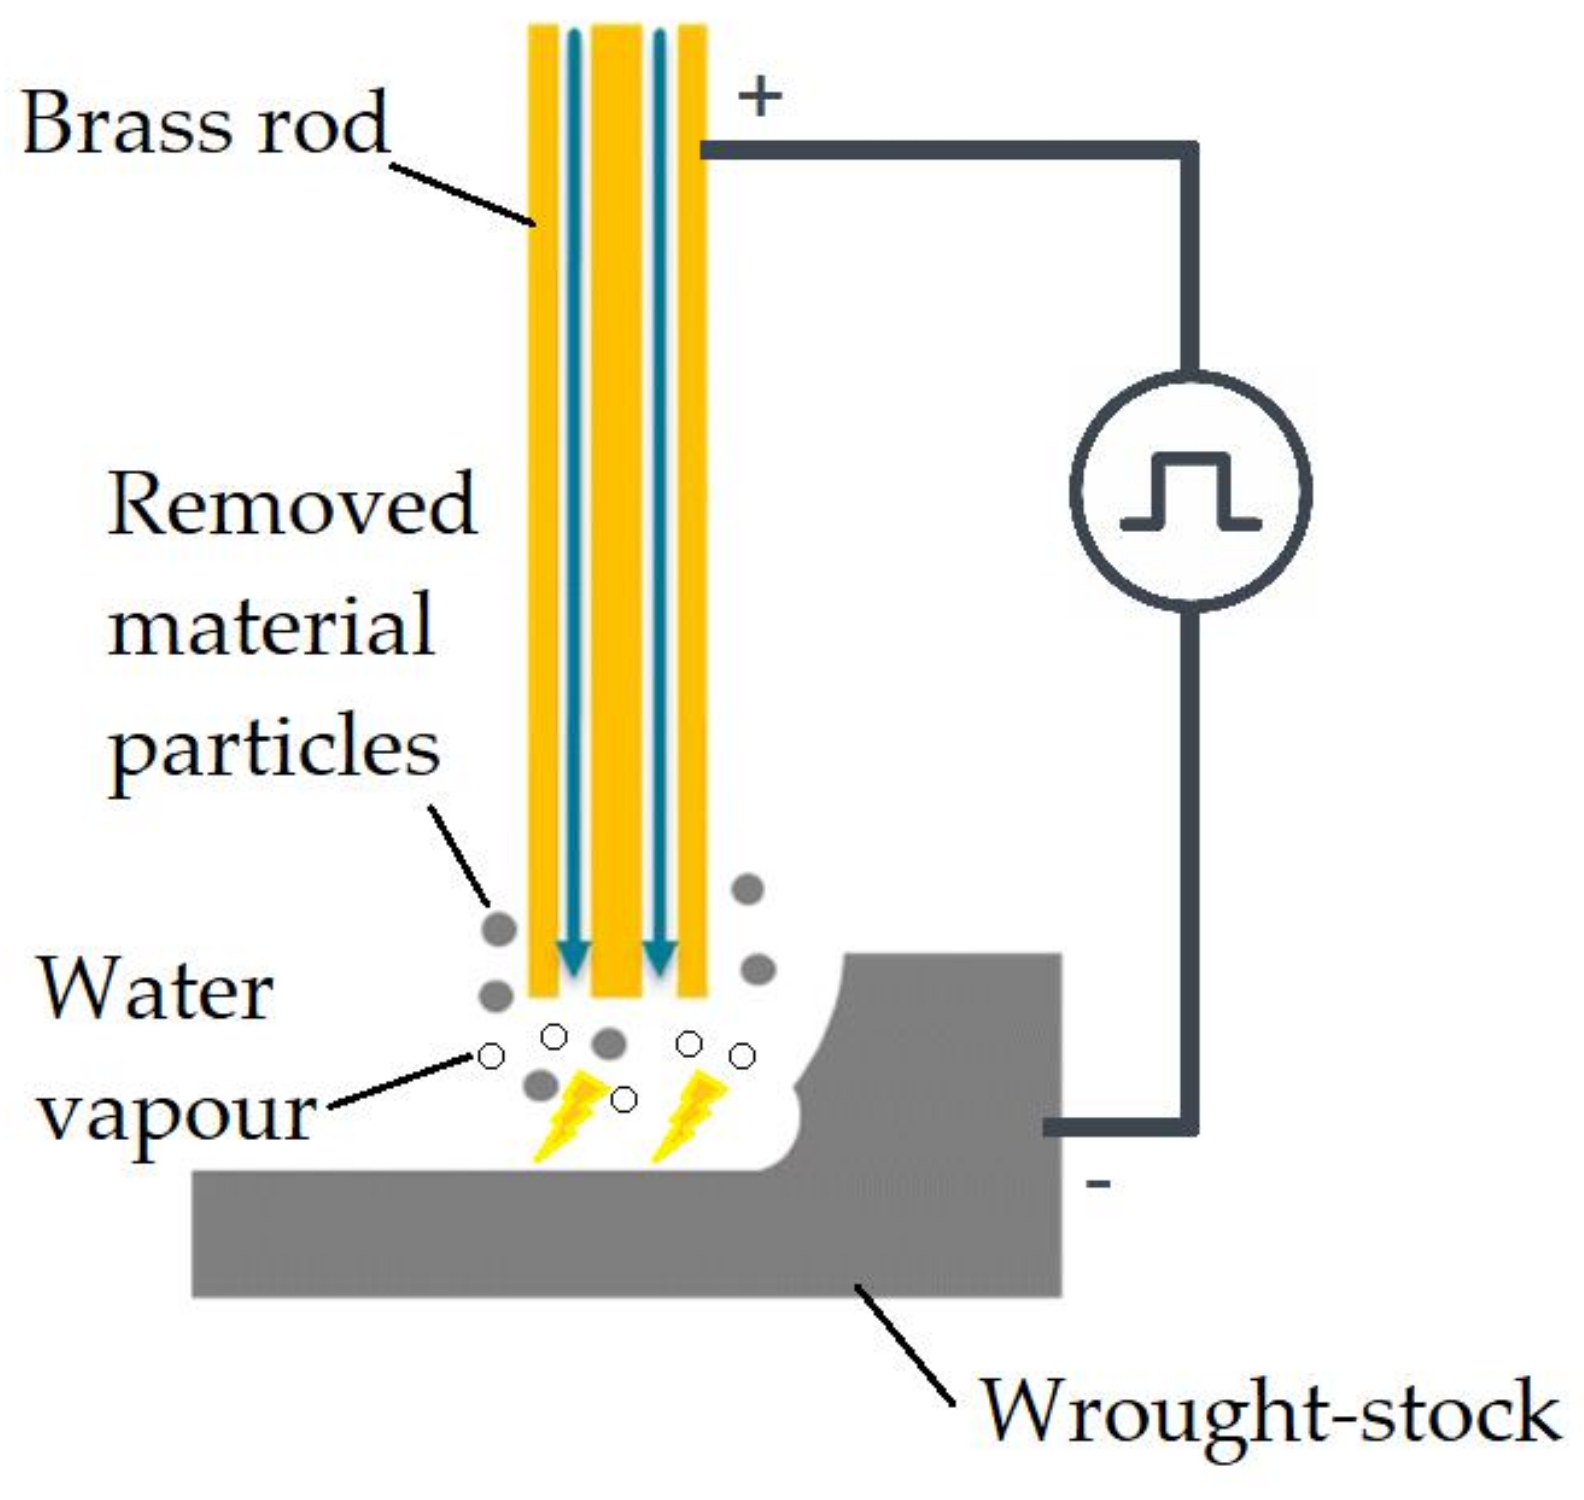
This review also presents some new insights into a non-conventional process, which is Electrical Discharge Machining (EDM). The process is a non-conventional machining method that allows the production of pieces with complex shapes, and it can be used in materials such as INCONEL® 718 and 625. This particular manufacturing technique removes material from the wrought-stock thanks to melting and vaporising cavities using electrical discharges that come from a scrolling wire [95], as illustrated in Figure 13.
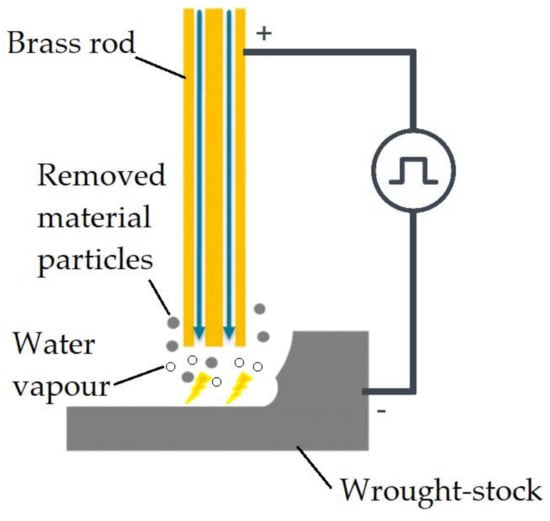
Figure 13.
Schematic representation of the EDM experiment setup (adapted from [96]).
Table 9 presents the latest experimental challenges and developments in the machining of INCONEL® alloys with EDM.

Table 9.
Critical challenges and developments in the EDM process of INCONEL®.
3.3. Tool Wear
With the tool operation in machining, wear starts to be a key factor in quality and productivity, namely with INCONEL® alloys, such as 718 and 625. To identify a worn milling tool, the ISO 8688-2 [101] standard predicts that a tool presenting either VB = 300 μm or VBmax = 500 μm on the flank is considered a worn tool [69]. For turning tools or inserts, the ISO 3685 standard is the one to consult [102]. Taking into account a novel lubrication method, Bartolomeis et al. [69] observed that the tool wear behaviour mechanisms during EL conditions were abrasion and microchipping on the cutting edge, due to the tendency of INCONEL® 718 to develop BUE.
Figure 14 packs the initial causes of wear, the various wear mechanisms that lead to different types of wear and the final consequences from the tool-wear due to INCONEL® machining. As a complement to Figure 14, Table 10 presents the typical TW mathematical models, used to characterize the numerous TW mechanisms. It is suggested to consult the work of Wang et al. [37] to better understand the additional variables described in Table 10.

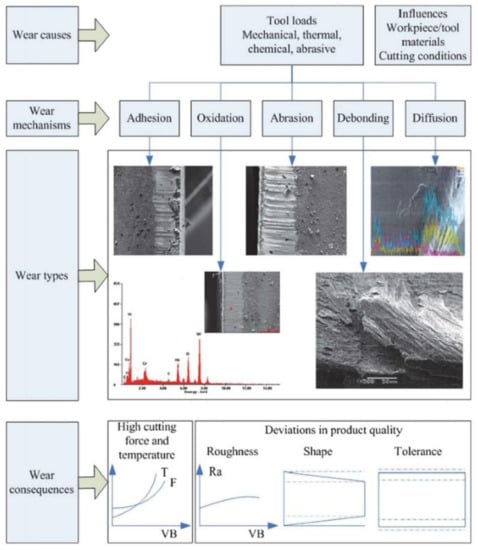
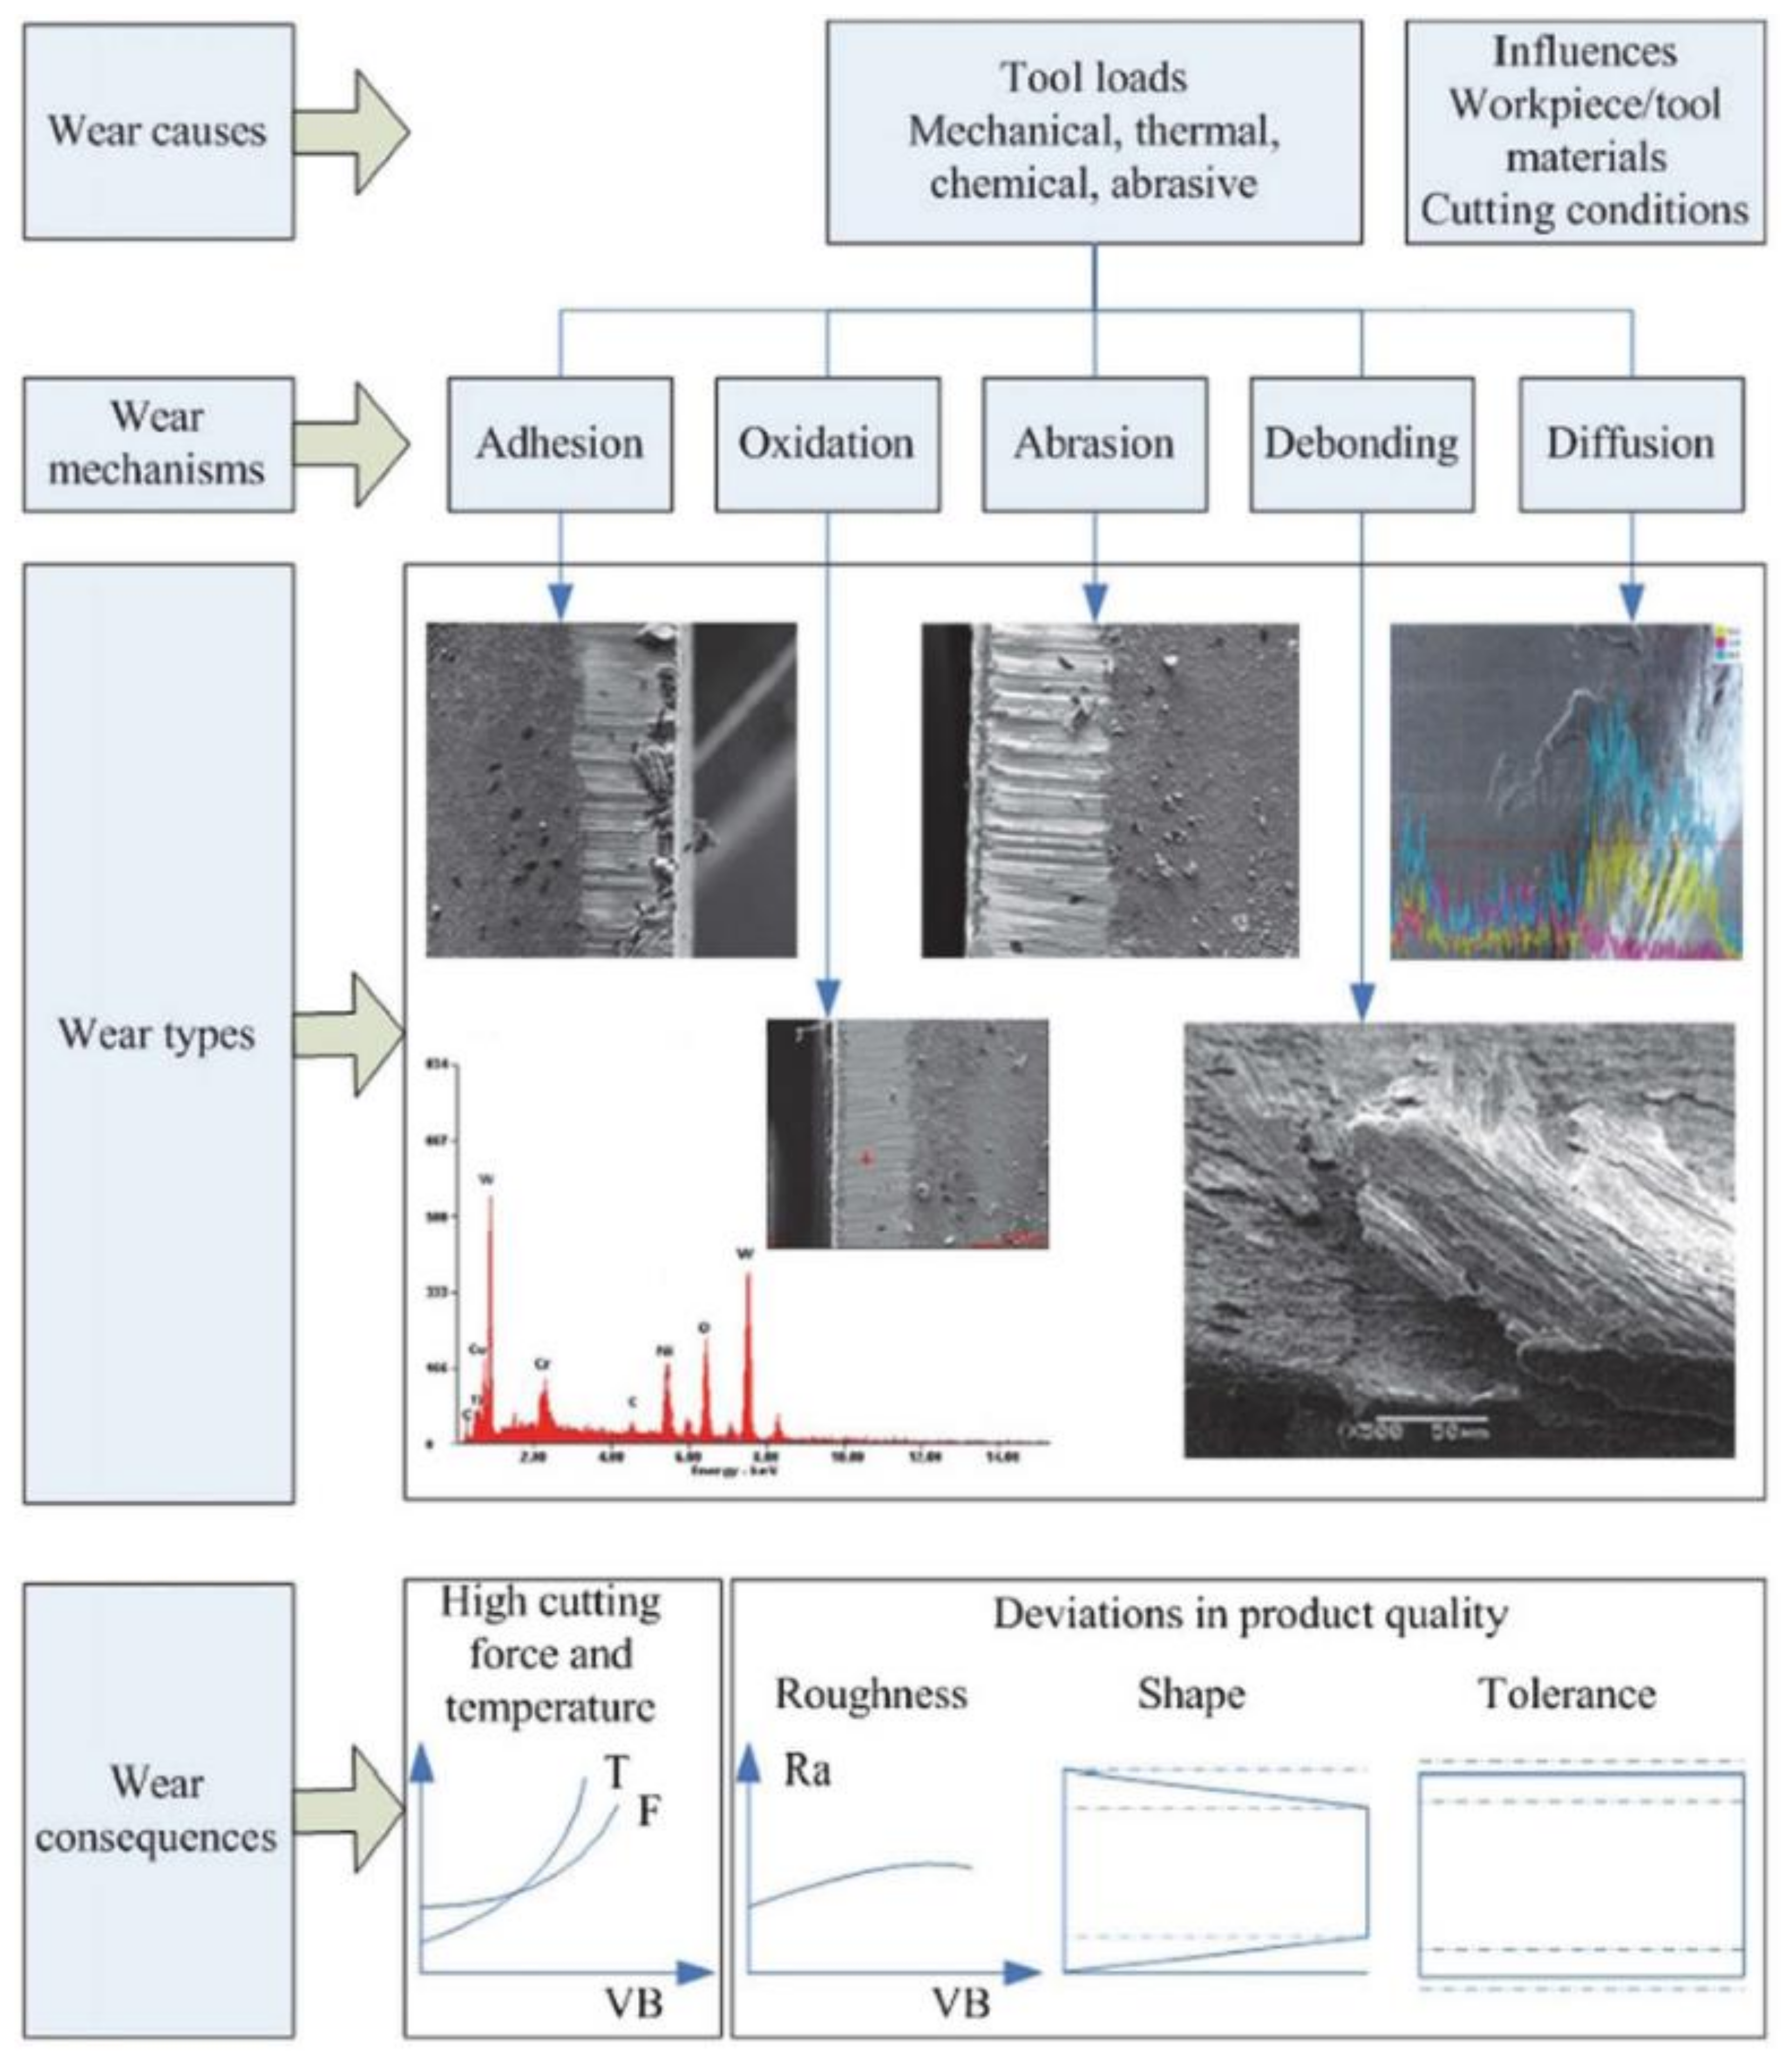

Table 10.
Typical TW mathematical models (adapted from [37]).
Table 10.
Typical TW mathematical models (adapted from [37]).
| Authors | TW Model | Comments |
|---|---|---|
| Taylor [103] | Taylor’s empirical tool life model. | |
| Archard [104] | Abrasive wear model. | |
| Usui [105,106] | Diffusive wear model. | |
| Takeyama [107] | Abrasive and adhesive wear model. | |
| Childs [108] | Abrasive and adhesive wear model. | |
| Schmidt [109] | Diffusive wear model. | |
| Luo [110] | Abrasive, adhesive, and diffusive wear model. | |
| Astakov [111,112] | Surface wear model. | |
| Attanasio [113,114] | Diffusive wear model, presenting the T-dependent diffusive coefficient. | |
| Pálmai [115] | TW model, considering the effects of wear-induced cutting, force, and T rise on TW. | |
| Halila [116,117] | TW model is dependent on the material removal rate. |

Figure 14.
The wear causes, wear mechanisms, wear types, and wear consequences in the cutting of Ni-based superalloys [118].
Figure 14.
The wear causes, wear mechanisms, wear types, and wear consequences in the cutting of Ni-based superalloys [118].

3.4. Tool Materials
As previously mentioned, due to poor k from INCONEL® alloys, which lead to a substantial increase of T in the three heat-zones when machining, the used tools are more prone to premature wear since the heat generated will end up creating BUE, which will rapidly degrade coatings and the tool material itself. The TW mechanisms, which include abrasive wear, adhesive wear, and plastic deformation, are following described. Severe TW is one of the key reasons for machining inefficiency [118].
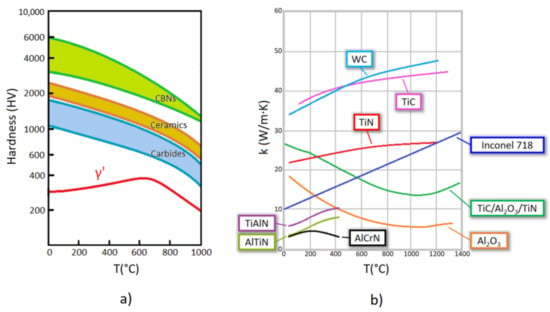
Figure 15.
(a) Hot hardness characteristic curve of CBN, Ceramic and Carbide tool materials compared with the γ′ structure of INCONEL® 718, (b) Thermal conductivity of tungsten carbide (WC), INCONEL® 718 and different coatings for carbide tools against T (adapted from [119]).
Figure 15.
(a) Hot hardness characteristic curve of CBN, Ceramic and Carbide tool materials compared with the γ′ structure of INCONEL® 718, (b) Thermal conductivity of tungsten carbide (WC), INCONEL® 718 and different coatings for carbide tools against T (adapted from [119]).

Tool materials, depending on their application, may vary as hard metal, high-speed steel (HSS, and its variant HSS-Co), cermets, ceramics (where carbides are inserted), PcBN and many more. Table 11 presents the latest experimental observations and performance of non-coated tools in the machining of INCONEL® alloys.

Table 11.
Machinability performance during non-coated tools assisted machining of INCONEL®.
3.5. Tool Coatings
Some tool materials have enough hardness to cut through INCONEL®, as it is shown in Figure 15, although others require a coating to protect the core material from abrasion when machining. The binomial substrate/coating is selected, as a function of specific requisites, from each application which often demands from the cutting tool antagonistic characteristics like tenacity and hardness. The usage of coated tools is highly advantageous from a production point of view, not because it is only possible to escalate vc or s values, but also to promote better quality to the fabricated components, and some of them can be multilayer, in which each layer has its unique function. The preferred manufacturing processes to make coated tools are metallurgical powder processes, chemical vapour deposition (CVD) or even physical vapour deposition (PVD).

Figure 16.
Scheme of how different types of coatings look when applied on the substrate [123].
Figure 16.
Scheme of how different types of coatings look when applied on the substrate [123].


Figure 17.
Crack propagation behaviour for each of the common coating structures [124].
Figure 17.
Crack propagation behaviour for each of the common coating structures [124].

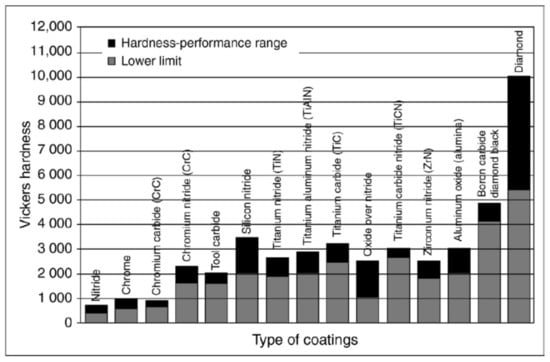
Figure 18.
The hardness of different coating materials with a lower limit and suitable performance range [125].
Figure 18.
The hardness of different coating materials with a lower limit and suitable performance range [125].
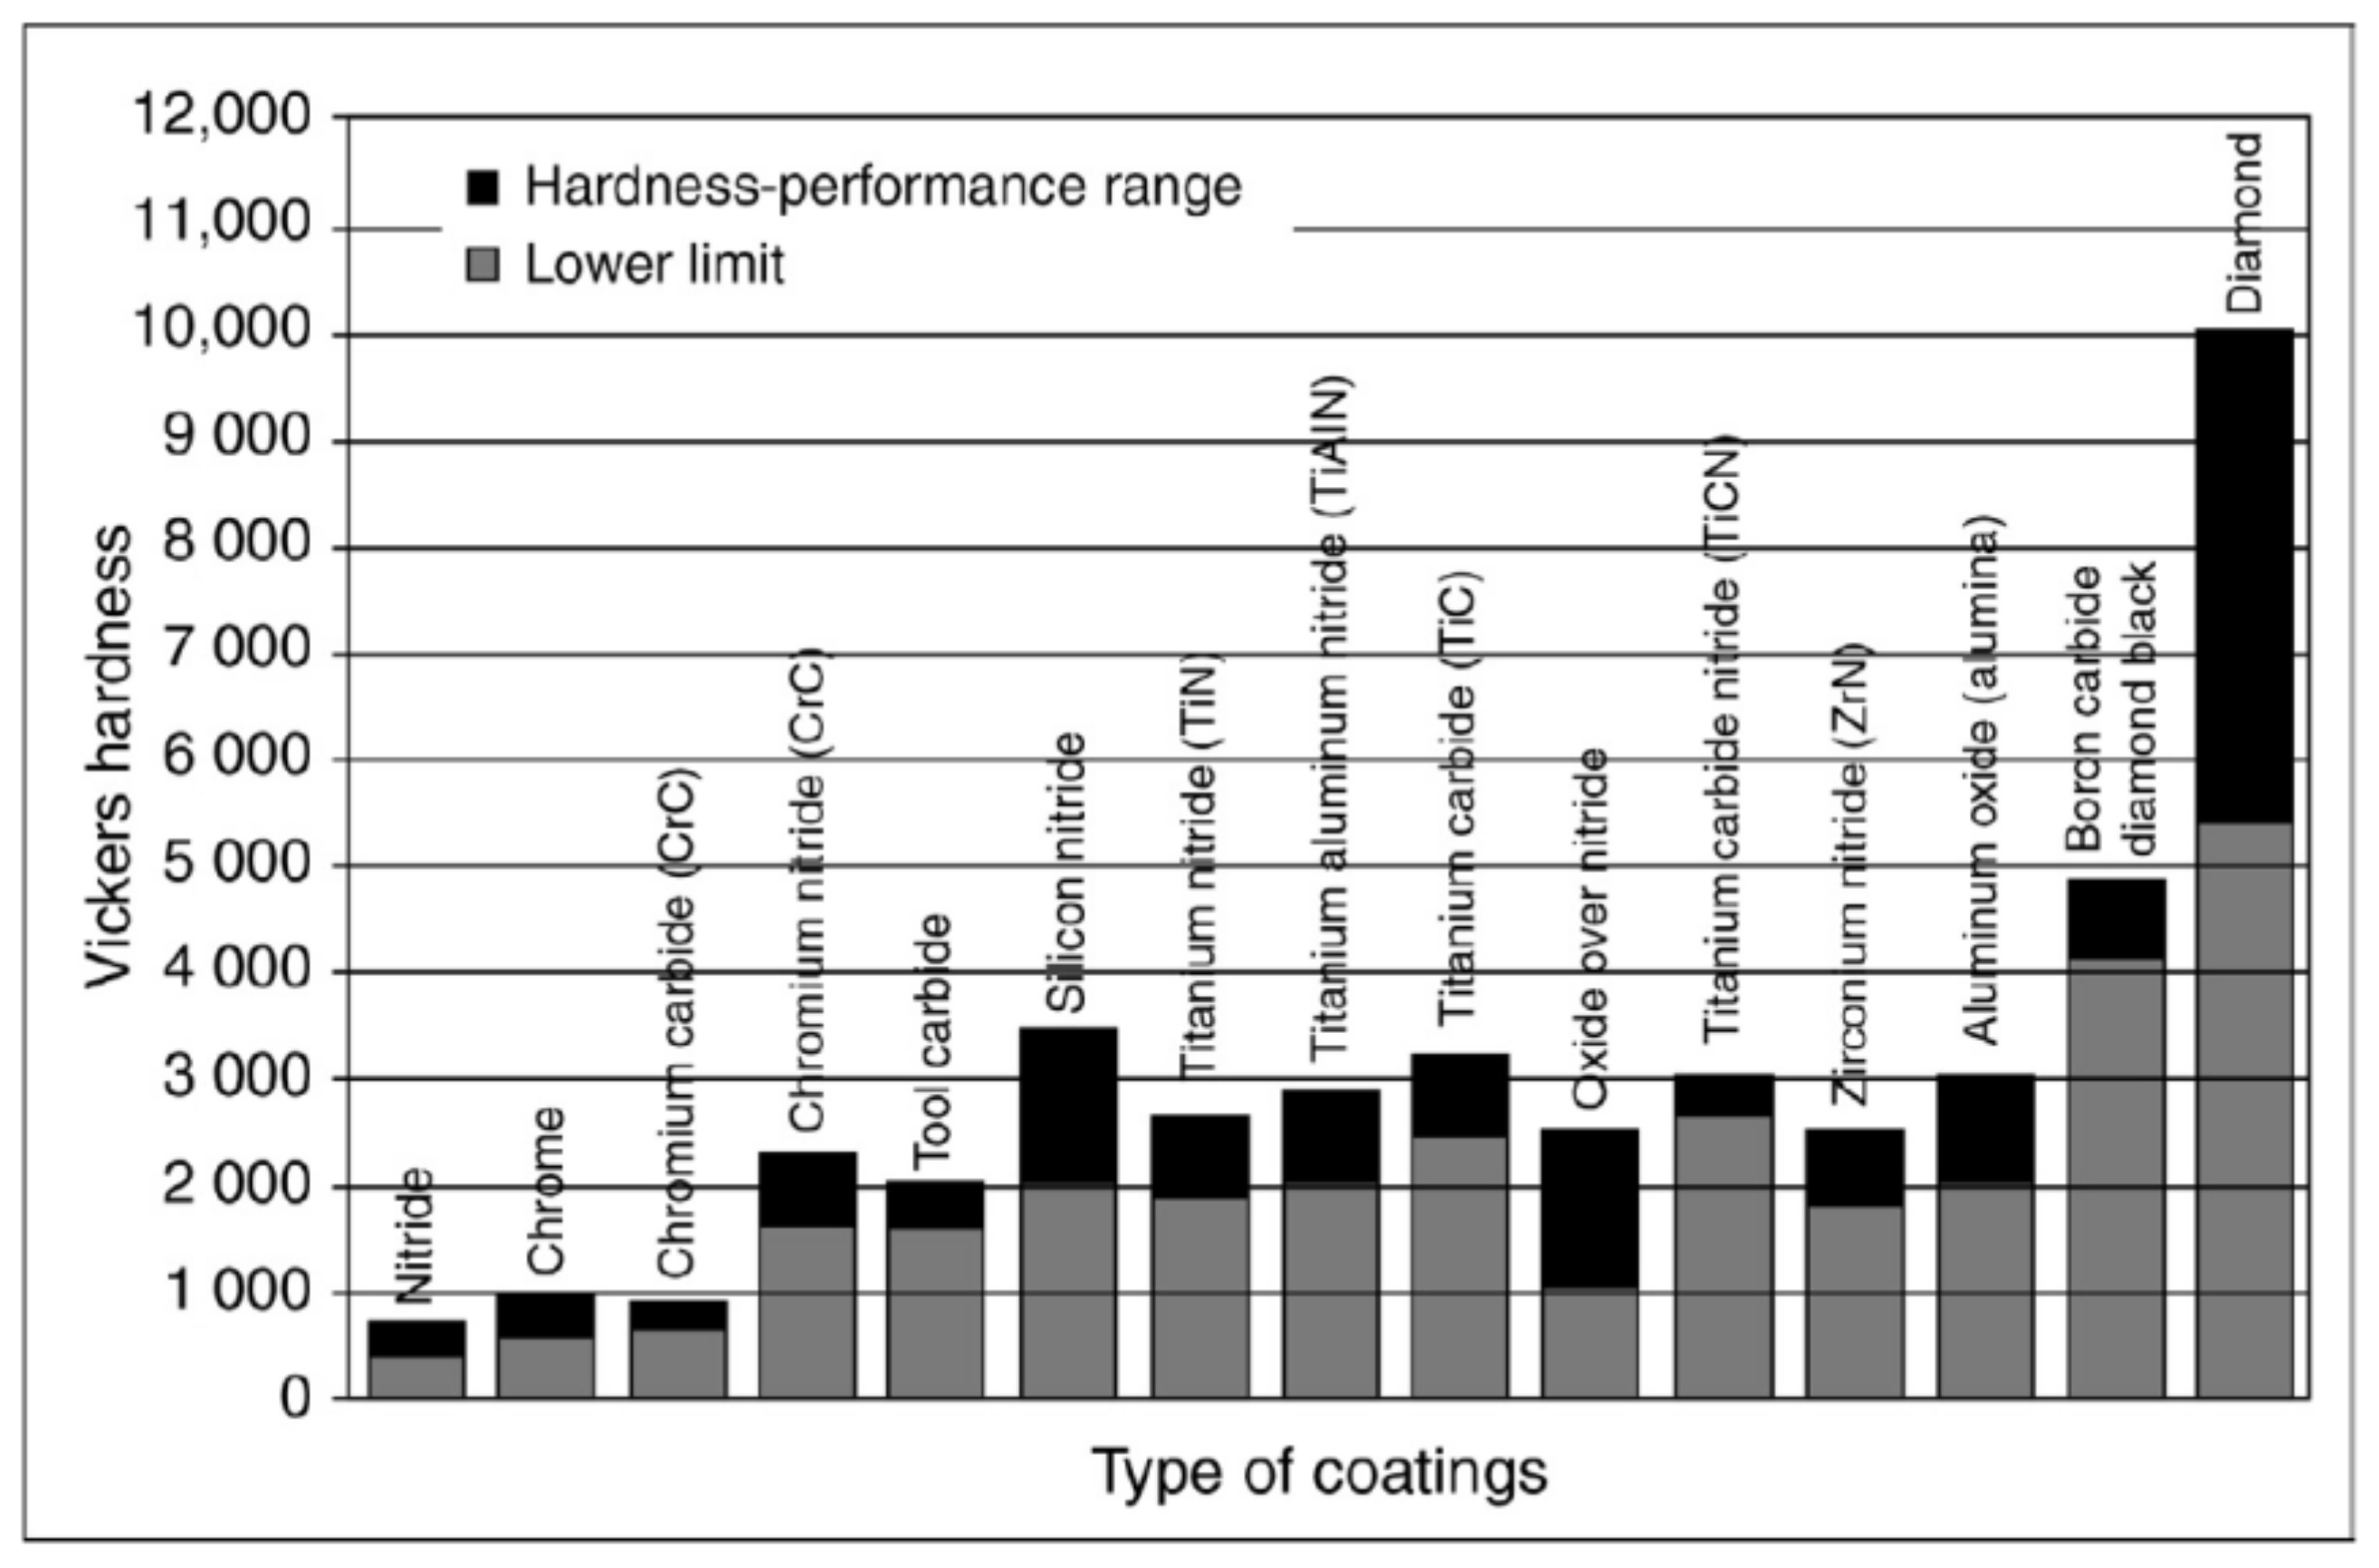
A schematic of how different coatings can appear in a tool is presented in Figure 16, whereas Figure 17 demonstrates how crack propagation occurs inside the coatings due to TW. Figure 18 shows the lower limits and the hardness performance range of some of the most used tool coatings. Examples of preferred coatings to machine INCONEL® 718 include TiAlN, TiAlCrN, TiCN, TiN/AlTiN, and TiAlCrSiYN/TiAlCrN [126].
Table 12 presents the latest experimental observations and performance of coated tools in the machining of INCONEL®.

Table 12.
Machinability performance during coated tools assisted machining of INCONEL®.
4. Discussion
After all that has been presented throughout this paper, a SWOT analysis was performed to discuss present perceptions of the INCONEL® machinability (Table 13), tool-wear (Table 14) and coatings utility to the tools (Table 15).

Table 13.
SWOT analysis about INCONEL® machinability.

Table 14.
SWOT analysis of TW resultant from INCONEL® machining.

Table 15.
SWOT analysis about cutting tools coatings.
5. Conclusions
Despite significant progress in the traditional cutting tool technologies, the machining of INCONEL® 718 and 625 is still considered a great challenge because of the intrinsic characteristics of those Ni-superalloys. It is notable, nevertheless, that there has been a pursuit to bring ease to conventional processes, resulting from the evolution of techniques and tool materials, to get better machinability with the Ni-based superalloys. From another point of view, by introducing non-conventional processes and assists like EDM, and hybrid techniques such as LAM and UAT, the evolution differential has a great potential to bring down manufacturing costs. Likewise, the conventional processes have had several improvements in the last five years, as reviewed along all states of the art, calling upon Taguchi DOE methods for improving tool-wear and for improving Ra, either with a lubrication environment or not. This is important for the own component’s wear resistance. A constructive criticism is made of the usage of TGRA and DOE methods, which were several times noticed to be used by different research in the states of the art of this paper. It is efficient to take advantage of such powerful methods to evaluate a series of parameters in an Lx array, and through the combination between them, to achieve the best result of Ra. Nonetheless, it is known that one of the main challenges in tackling INCONEL® machining is the high costs of the manufacturing processes, due to the elapsed time milling, and turning, and this key factor has been neglected. With this review paper, it is suggested to the forthcoming authors to take advantage of TGRA and ANOVA analyses, concerning the achievement of low-cost solutions when machining INCONEL®, at the same time quality is preserved by taking Ra parameter into account as it has been done so far. The present work highlighted a large amount of information regarding INCONEL® 718 traditional machining and applications, within the academic and scientific community, compared to its counterpart INCONEL® 625. On the other hand, the INCONEL® 625 showed advancements in non-conventional processes due to difficulties at the onset of chip cutting. Henceforward, research work is planned with the prospect of delivering a review paper regarding the evolution of lubrication environments, allied to the traditional machining of INCONEL®.
Author Contributions
Conceptualization: A.F.V.P., F.J.G.S. and R.D.S.G.C.; methodology: A.F.V.P., F.J.G.S. and R.D.S.G.C.; validation: V.F.C.S., N.P.V.S. and A.M.P.J.; formal analysis: F.J.G.S., V.F.C.S. and R.C.M.S.-C.; investigation: A.F.V.P.; data curation: F.J.G.S., R.C.M.S.-C. and A.M.P.J.; writing—original draft preparation: A.F.V.P.; writing—review and editing: V.F.C.S., F.J.G.S., R.D.S.G.C. and R.C.M.S.-C.; visualization: R.C.M.S.-C. and A.M.P.J.; supervision: F.J.G.S. and R.D.S.G.C.; project administration: F.J.G.S.; funding acquisition: F.J.G.S. All authors have read and agreed to the published version of the manuscript.
Funding
The work is developed under the “DRIVOLUTION—Transition to the factory of the future”, with the reference DRIVOLUTION/BL/01/2023 research project, supported by European Structural and Investments Funds with the “Portugal2020” program scope.
Data Availability Statement
No new data was created.
Acknowledgments
The authors thank ISEP and INEGI for their support.
Conflicts of Interest
The authors declare no conflict of interest.
References
- Ghiban, B.; Elefterie, C.F.; Guragata, C.; Bran, D. Requirements of Inconel 718 alloy for aeronautical applications. AIP Conf. Proc. 2018, 1932, 030016. [Google Scholar] [CrossRef]
- Qadri, S.; Harmain, G.; Wani, M. Influence of Tool Tip Temperature on Crater Wear of Ceramic Inserts During Turning Process of Inconel-718 at Varying Hardness. Tribol. Ind. 2020, 42, 310–326. [Google Scholar] [CrossRef]
- Nomoto, H. Development in materials for ultra-supercritical and advanced ultra-supercritical steam turbines. In Advances in Steam Turbines for Modern Power Plants, 2nd ed.; Chapter 13; Tanuma, T., Ed.; Woodhead Publishing: Sawston, UK, 2022; pp. 309–327. [Google Scholar]
- Ghosh, R.N. Creep Life Predictions of Engineering Components: Problems & Prospects. Procedia Eng. 2013, 55, 599–606. [Google Scholar] [CrossRef]
- Kassner, M.E. Chapter 10—Creep Fracture. In Fundamentals of Creep in Metals and Alloys, 3rd ed.; Kassner, M.E., Ed.; Butterworth-Heinemann: Boston, MA, USA, 2015; pp. 233–260. [Google Scholar]
- Kassner, M.E. Chapter 11—γ/γ′ Nickel-Based Superalloys. In Fundamentals of Creep in Metals and Alloys, 3rd ed.; Kassner, M.E., Ed.; Butterworth-Heinemann: Boston, MA, USA, 2015; pp. 261–273. [Google Scholar]
- Weber, J.H.; Banerjee, M.K. Nickel and Nickel Alloys: An Overview. In Reference Module in Materials Science and Materials Engineering; Elsevier: Amsterdam, The Netherlands, 2019. [Google Scholar]
- Liu, L.; Zhang, J.; Ai, C. Nickel-Based Superalloys. In Encyclopedia of Materials: Metals and Alloys; Caballero, F.G., Ed.; Elsevier: Oxford, UK, 2022; pp. 294–304. [Google Scholar]
- Ashby, M.F. Materials Selection in Mechanical Design; Elsevier Science: Amsterdão, Paises Baixos, 2016. [Google Scholar]
- International Nickel Company. Monel, Inconel, Nickel, and Nickel Alloys; International Nickel Company: Toronto, ON, Canada, 1947. [Google Scholar]
- Dai, H.; Shi, S.; Yang, L.; Hu, J.; Liu, C.; Guo, C.; Chen, X. Effects of elemental composition and microstructure inhomogeneity on the corrosion behavior of nickel-based alloys in hydrofluoric acid solution. Corros. Sci. 2020, 176, 108917. [Google Scholar] [CrossRef]
- Deng, D. Additively Manufactured Inconel 718: Microstructures and Mechanical Properties. Licentiate Thesis, Comprehensive Summary. Linköping University Electronic Press, Linköping, Sweden, 2018. [Google Scholar]
- Joshi, G.R.; Badheka, V.J.; Darji, R.S.; Oza, A.D.; Pathak, V.J.; Burduhos-Nergis, D.D.; Burduhos-Nergis, D.P.; Narwade, G.; Thirunavukarasu, G. The Joining of Copper to Stainless Steel by Solid-State Welding Processes: A Review. Materials 2022, 15, 7234. [Google Scholar] [CrossRef]
- Wei, C.; Wang, Z.; Chen, J. Sulfuration corrosion failure analysis of Inconel 600 alloy heater sleeve in high-temperature flue gas. Eng. Fail. Anal. 2022, 135, 106111. [Google Scholar] [CrossRef]
- Xu, D.; Guo, S. Chapter 2—Corrosion Types and Elemental Effects of Ni-Based and FeCrAl Alloys. In Corrosion Characteristics, Mechanisms and Control Methods of Candidate Alloys in Sub- and Supercritical Water; Xu, D., Guo, S., Eds.; Springer: Singapore, 2022; pp. 23–49. [Google Scholar]
- Vinod, K.; Udaya Ravi, M.; Yuvaraja, N. A Study of Surface Morphology and Wear Rate Prediction of Coated Inconel 600, 625 and 718 Specimens. Int. J. Sci. Acad. Res. (IJSAR) 2023, 3, 1–9. [Google Scholar] [CrossRef]
- Dhananchezian, M. Influence of variation in cutting velocity on temperature, surface finish, chip form and insert after dry turning Inconel 600 with TiAlN carbide insert. Mater. Today Proc. 2021, 46, 8271–8274. [Google Scholar] [CrossRef]
- Mahesh, K.; Philip, J.T.; Joshi, S.N.; Kuriachen, B. Machinability of Inconel 718: A critical review on the impact of cutting temperatures. Mater. Manuf. Process. 2021, 36, 753–791. [Google Scholar] [CrossRef]
- Yin, Q.; Liu, Z.; Wang, B.; Song, Q.; Cai, Y. Recent progress of machinability and surface integrity for mechanical machining Inconel 718: A review. Int. J. Adv. Manuf. Technol. 2020, 109, 215–245. [Google Scholar] [CrossRef]
- Singh, N.; Routara, B.C.; Nayak, R.K. Study of machining characteristics of Inconel 601 with cryogenic cooled electrode in EDM using RSM. Mater. Today Proc. 2018, 5, 24277–24286. [Google Scholar] [CrossRef]
- Harish, U.; Mruthunjaya, M.; Yogesha, K.; Siddappa, P.; Anil, K.K. Enhancing the performance of inconel 601 alloy by erosion resistant WC-CR-CO coated material. J. Eng. Sci. Technol. 2022, 17, 0379–0390. [Google Scholar]
- Singh, J.B. Physical Metallurgy of Alloy 625. In Alloy 625: Microstructure, Properties and Performance; Chapter 3; Singh, J.B., Ed.; Springer Nature: Singapore, 2022; pp. 67–110. [Google Scholar]
- Waghmode, S.P.; Dabade, U.A. Optimization of process parameters during turning of Inconel 625. Mater. Today Proc. 2019, 19, 823–826. [Google Scholar] [CrossRef]
- Singh, J.B. Chapter 7—Corrosion Behavior of Alloy 625. In Alloy 625: Microstructure, Properties and Performance; Singh, J.B., Ed.; Springer Nature: Singapore, 2022; pp. 241–291. [Google Scholar]
- Kosaraju, S.; Vijay Kumar, M.; Sateesh, N. Optimization of Machining Parameter in Turning Inconel 625. Mater. Today Proc. 2018, 5, 5343–5348. [Google Scholar] [CrossRef]
- Singh, J.B. Chapter 1—Introduction. In Alloy 625: Microstructure, Properties and Performance; Singh, J.B., Ed.; Springer Nature Singapore: Singapore, 2022; pp. 1–27. [Google Scholar]
- Yin, M.; Shao, Y.; Kang, X.; Long, J.; Zhang, X. Fretting corrosion behavior of WC-10Co-4Cr coating on Inconel 690 alloy by HVOF thermal spraying. Tribol. Int. 2023, 177, 107975. [Google Scholar] [CrossRef]
- Zhang, Q.; Zhang, J.; Zhuang, Y.; Lu, J.; Yao, J. Hot Corrosion and Mechanical Performance of Repaired Inconel 718 Components via Laser Additive Manufacturing. Materials 2020, 13, 2128. [Google Scholar] [CrossRef]
- Ding, J.; Xue, S.; Shang, Z.; Li, J.; Zhang, Y.; Su, R.; Niu, T.; Wang, H.; Zhang, X. Characterization of precipitation in gradient Inconel 718 superalloy. Mater. Sci. Eng. A 2021, 804, 140718. [Google Scholar] [CrossRef]
- Teixeira, Ó.; Silva, F.J.G.; Atzeni, E. Residual stresses and heat treatments of Inconel 718 parts manufactured via metal laser beam powder bed fusion: An overview. Int. J. Adv. Manuf. Technol. 2021, 113, 3139–3162. [Google Scholar] [CrossRef]
- Montazeri, S.; Aramesh, M.; Veldhuis, S.C. Novel application of ultra-soft and lubricious materials for cutting tool protection and enhancement of machining induced surface integrity of Inconel 718. J. Manuf. Process. 2020, 57, 431–443. [Google Scholar] [CrossRef]
- Manikandan, S.G.K.; Sivakumar, D.; Kamaraj, M. 1—Physical metallurgy of alloy 718. In Welding the Inconel 718 Superalloy; Manikandan, S.G.K., Sivakumar, D., Kamaraj, M., Eds.; Elsevier: Amsterdam, The Netherlands, 2019; pp. 1–19. [Google Scholar]
- Fayed, E.M.; Saadati, M.; Shahriari, D.; Brailovski, V.; Jahazi, M.; Medraj, M. Optimization of the Post-Process Heat Treatment of Inconel 718 Superalloy Fabricated by Laser Powder Bed Fusion Process. Metals 2021, 11, 144. [Google Scholar] [CrossRef]
- Jeyapandiarajan, P.; Anthony, X.M. Evaluating the Machinability of Inconel 718 under Different Machining Conditions. Procedia Manuf. 2019, 30, 253–260. [Google Scholar] [CrossRef]
- Pröbstle, M.; Neumeier, S.; Hopfenmüller, J.; Freund, L.P.; Niendorf, T.; Schwarze, D.; Göken, M. Superior creep strength of a nickel-based superalloy produced by selective laser melting. Mater. Sci. Eng. A 2016, 674, 299–307. [Google Scholar] [CrossRef]
- Evans, R. 2—Selection and testing of metalworking fluids. In Metalworking Fluids (MWFs) for Cutting and Grinding; Astakhov, V.P., Joksch, S., Eds.; Woodhead Publishing: Sawston, UK, 2012; pp. 23–78. [Google Scholar]
- Wang, C.; Ming, W.; Chen, M. Milling tool’s flank wear prediction by temperature dependent wear mechanism determination when machining Inconel 182 overlays. Tribol. Int. 2016, 104, 140–156. [Google Scholar] [CrossRef]
- Zhang, P.; Li, J.; Yu, H.L.; Tu, X.H.; Li, W. An experimental study on the fretting wear behavior of Inconel 600 and 690 in pure water. Wear 2021, 486–487, 203995. [Google Scholar] [CrossRef]
- Mohapatra, S.; Rahul; Kumar Sahoo, A. Comparative study of Inconel 601, 625, 718, 825 super-alloys during Electro-Discharge Machining. Mater. Today Proc. 2022, 56, 226–230. [Google Scholar] [CrossRef]
- Liu, X.; Fan, J.; Cao, K.; Chen, F.; Yuan, R.; Liu, D.; Tang, B.; Kou, H.; Li, J. Creep anisotropy behavior, deformation mechanism, and its efficient suppression method in Inconel 625 superalloy. J. Mater. Sci. Technol. 2023, 133, 58–76. [Google Scholar] [CrossRef]
- Kurniawan, R.; Park, G.C.; Park, K.M.; Zhen, Y.; Kwak, Y.I.; Kim, M.C.; Lee, J.M.; Ko, T.J.; Park, C.-S. Machinability of modified Inconel 713C using a WC TiAlN-coated tool. J. Manuf. Process. 2020, 57, 409–430. [Google Scholar] [CrossRef]
- Tanaka, H.; Sugihara, T.; Enomoto, T. High Speed Machining of Inconel 718 Focusing on Wear Behaviors of PCBN Cutting Tool. Procedia CIRP 2016, 46, 545–548. [Google Scholar] [CrossRef]
- Şirin, Ş.; Kıvak, T. Effects of hybrid nanofluids on machining performance in MQL-milling of Inconel X-750 superalloy. J. Manuf. Process. 2021, 70, 163–176. [Google Scholar] [CrossRef]
- Gupta, M.K.; Song, Q.; Liu, Z.; Sarikaya, M.; Jamil, M.; Mia, M.; Singla, A.K.; Khan, A.M.; Khanna, N.; Pimenov, D.Y. Environment and economic burden of sustainable cooling/lubrication methods in machining of Inconel-800. J. Clean. Prod. 2021, 287, 125074. [Google Scholar] [CrossRef]
- Yadav, R.K.; Abhishek, K.; Mahapatra, S.S.; Nandi, G. A study on machinability aspects and parametric optimization of Inconel 825 using Rao1, Rao2, Rao3 approach. Mater. Today Proc. 2021, 47, 2784–2789. [Google Scholar] [CrossRef]
- ASTM Standard B637-16; Standard Specification for Precipitation-Hardening and Cold Worked Nickel Alloy Bars, Forgings, and Forging Stock for Moderate or High Temperature Service. ASTM International: West Conshohocken, PA, USA, 2016; Volume 7. [CrossRef]
- Astakhov, V.P.; Godlevskiy, V. 3—Delivery of metalworking fluids in the machining zone. In Metalworking Fluids (MWFs) for Cutting and Grinding; Astakhov, V.P., Joksch, S., Eds.; Woodhead Publishing: Sawston, UK, 2012; pp. 79–134. [Google Scholar]
- Soffel, F.; Eisenbarth, D.; Hosseini, E.; Wegener, K. Interface strength and mechanical properties of Inconel 718 processed sequentially by casting, milling, and direct metal deposition. J. Mater. Process. Technol. 2021, 291, 117021. [Google Scholar] [CrossRef]
- Sierra-Soraluce, A.; Li, G.; Santofimia, M.J.; Molina-Aldareguia, J.M.; Smith, A.; Muratori, M.; Sabirov, I. Effect of microstructure on tensile properties of quenched and partitioned martensitic stainless steels. Mater. Sci. Eng. A 2023, 864, 144540. [Google Scholar] [CrossRef]
- Ding, H.; Zou, B.; Wang, X.; Liu, J.; Li, L. Microstructure, mechanical properties and machinability of 316L stainless steel fabricated by direct energy deposition. Int. J. Mech. Sci. 2023, 243, 108046. [Google Scholar] [CrossRef]
- Danish, M.; Ginta, T.L.; Yasir, M.; Rani AM, A. Chapter 1—Light alloys and their machinability. In Machining of Light Alloys: Aluminum, Titanium, and Magnesium; Carou, D., Davim, J., Eds.; Academic Press: Cambridge, MA, USA, 2018. [Google Scholar]
- Kumar Wagri, N.; Petare, A.; Agrawal, A.; Rai, R.; Malviya, R.; Dohare, S.; Kishore, K. An overview of the machinability of alloy steel. Mater. Today Proc. 2022, 62, 3771–3781. [Google Scholar] [CrossRef]
- Zhao, J.; Liu, Z.; Wang, B.; Hu, J. PVD AlTiN coating effects on tool-chip heat partition coefficient and cutting temperature rise in orthogonal cutting Inconel 718. Int. J. Heat Mass Transf. 2020, 163, 120449. [Google Scholar] [CrossRef]
- Loewen, E.G.; Shaw, M.C. On the Analysis of Cutting-Tool Temperatures. Trans. Am. Soc. Mech. Eng. 2022, 76, 217–225. [Google Scholar] [CrossRef]
- Shaw, M.C.; Cookson, J. Metal Cutting Principles; Oxford University Press: New York, NY, USA, 2005; Volume 2. [Google Scholar]
- Kato, T.; Fujii, H. Energy Partition in Conventional Surface Grinding. J. Manuf. Sci. Eng. 1999, 121, 393–398. [Google Scholar] [CrossRef]
- List, G.; Sutter, G.; Bouthiche, A. Cutting temperature prediction in high speed machining by numerical modelling of chip formation and its dependence with crater wear. Int. J. Mach. Tools Manuf. 2012, 54–55, 1–9. [Google Scholar] [CrossRef]
- Gecim, B.; Winer, W.O. Transient Temperatures in the Vicinity of an Asperity Contact. J. Tribol. 1985, 107, 333–341. [Google Scholar] [CrossRef]
- Reznikov, A.; Reznikov, A. Thermophysical aspects of metal cutting processes. Mashinostroenie Mosc. 1981, 212. [Google Scholar]
- Grzesik, W. Advanced Machining Processes of Metallic Materials: Theory, Modelling and Applications; Elsevier: Amsterdam, The Netherlands, 2008. [Google Scholar]
- Andresen, P.L. 5—Understanding and predicting stress corrosion cracking (SCC) in hot water. In Stress Corrosion Cracking of Nickel Based Alloys in Water-Cooled Nuclear Reactors; Féron, D., Staehle, R.W., Eds.; Woodhead Publishing: Sawston, UK, 2016; pp. 169–238. [Google Scholar]
- Féron, D.; Guerre, C.; Herms, E.; Laghoutaris, P. 9—Stress corrosion cracking of Alloy 600: Overviews and experimental techniques. In Stress Corrosion Cracking of Nickel Based Alloys in Water-Cooled Nuclear Reactors; Féron, D., Staehle, R.W., Eds.; Woodhead Publishing: Sawston, UK, 2016; pp. 325–353. [Google Scholar]
- Dai, X.; Zhuang, K.; Pu, D.; Zhang, W.; Ding, H. An Investigation of the Work Hardening Behavior in Interrupted Cutting Inconel 718 under Cryogenic Conditions. Materials 2020, 13, 2202. [Google Scholar] [CrossRef] [PubMed]
- Guimaraes, M.C.R.; Fogagnolo, J.B.; Paiva, J.M.; Veldhuis, S.C.; Diniz, A.E. Evaluation of milling parameters on the surface integrity of welded inconel 625. J. Mater. Res. Technol. 2022, 20, 2611–2628. [Google Scholar] [CrossRef]
- Li, X.; Liu, X.; Yue, C.; Liang, S.Y.; Wang, L. Systematic review on tool breakage monitoring techniques in machining operations. Int. J. Mach. Tools Manuf. 2022, 176, 103882. [Google Scholar] [CrossRef]
- Zheng, H.; Liu, K. Machinability of Engineering Materials. In Handbook of Manufacturing Engineering and Technology; Nee, A., Ed.; Springer London: London, UK, 2013; pp. 1–34. [Google Scholar]
- Wang, Z.; Kovvuri, V.; Araujo, A.; Bacci, M.; Hung, W.N.P.; Bukkapatnam, S.T.S. Built-up-edge effects on surface deterioration in micromilling processes. J. Manuf. Process. 2016, 24, 321–327. [Google Scholar] [CrossRef]
- Nouari, M.; Haddag, B.; Moufki, A.; Atlati, S. Chapter 2—Investigation on the built-up edge process when dry machining aeronautical aluminum alloys. In Machining of Light Alloys: Aluminum, Titanium, and Magnesium; Carou, D., Davim, J., Eds.; Academic Press: Cambridge, MA, USA, 2018. [Google Scholar]
- Bartolomeis, A.D.; Newman, S.T.; Shokrani, A. Initial investigation on Surface Integrity when Machining Inconel 718 with Conventional and Electrostatic Lubrication. Procedia CIRP 2020, 87, 65–70. [Google Scholar] [CrossRef]
- Anburaj, R.; Pradeep Kumar, M. Experimental studies on cryogenic CO2 face milling of Inconel 625 superalloy. Mater. Manuf. Process. 2021, 36, 814–826. [Google Scholar] [CrossRef]
- Lakner, T.; Hardt, M. A Novel Experimental Test Bench to Investigate the Effects of Cutting Fluids on the Frictional Conditions in Metal Cutting. J. Manuf. Mater. Process. 2020, 4, 45. [Google Scholar] [CrossRef]
- Bonnet, C.; Valiorgue, F.; Rech, J.; Claudin, C.; Hamdi, H.; Bergheau, J.M.; Gilles, P. Identification of a friction model—Application to the context of dry cutting of an AISI 316L austenitic stainless steel with a TiN coated carbide tool. Int. J. Mach. Tools Manuf. 2008, 48, 1211–1223. [Google Scholar] [CrossRef]
- Kuzu, A.T.; Berenji, K.R.; Ekim, B.C.; Bakkal, M. The thermal modeling of deep-hole drilling process under MQL condition. J. Manuf. Process. 2017, 29, 194–203. [Google Scholar] [CrossRef]
- Kim, E.J.; Lee, C.M. A Study on the Optimal Machining Parameters of the Induction Assisted Milling with Inconel 718. Materials 2019, 12, 233. [Google Scholar] [CrossRef] [PubMed]
- Vignesh, M.; Ramanujam, R. Chapter 9—Laser-assisted high speed machining of Inconel 718 alloy. In High Speed Machining; Gupta, K., Paulo Davim, J., Eds.; Academic Press: Cambridge, MA, USA, 2020; pp. 243–262. [Google Scholar]
- Okafor, A.C. Chapter 5—Cooling and machining strategies for high speed milling of titanium and nickel super alloys. In High Speed Machining; Gupta, K., Paulo Davim, J., Eds.; Academic Press: Cambridge, MA, USA, 2020; pp. 127–161. [Google Scholar]
- Hadi, M.A.; Ghani, J.A.; Haron, C.H.C.; Kasim, M.S. Comparison between Up-milling and Down-milling Operations on Tool Wear in Milling Inconel 718. Procedia Eng. 2013, 68, 647–653. [Google Scholar] [CrossRef]
- Bo, P.; Fan, H.; Bartoň, M. Efficient 5-axis CNC trochoidal flank milling of 3D cavities using custom-shaped cutting tools. Comput.-Aided Des. 2022, 151, 103334. [Google Scholar] [CrossRef]
- Liu, D.; Zhang, Y.; Luo, M.; Zhang, D. Investigation of Tool Wear and Chip Morphology in Dry Trochoidal Milling of Titanium Alloy Ti–6Al–4V. Materials 2019, 12, 1937. [Google Scholar] [CrossRef]
- Pleta, A.; Nithyanand, G.; Niaki, F.A.; Mears, L. Identification of optimal machining parameters in trochoidal milling of Inconel 718 for minimal force and tool wear and investigation of corresponding effects on machining affected zone depth. J. Manuf. Process. 2019, 43, 54–62. [Google Scholar] [CrossRef]
- Shankar, S.; Mohanraj, T.; Pramanik, A. Tool Condition Monitoring While Using Vegetable Based Cutting Fluids during Milling of Inconel 625. J. Adv. Manuf. Syst. 2019, 18, 563–581. [Google Scholar] [CrossRef]
- Alonso, U.; Veiga, F.; Suárez, A.; Gil Del Val, A. Characterization of Inconel 718® superalloy fabricated by wire Arc Additive Manufacturing: Effect on mechanical properties and machinability. J. Mater. Res. Technol. 2021, 14, 2665–2676. [Google Scholar] [CrossRef]
- Boozarpoor, M.; Teimouri, R.; Yazdani, K. Comprehensive study on effect of orthogonal turn-milling parameters on surface integrity of Inconel 718 considering production rate as constrain. Int. J. Lightweight Mater. Manuf. 2021, 4, 145–155. [Google Scholar] [CrossRef]
- Amigo, F.J.; Urbikain, G.; Pereira, O.; Fernández-Lucio, P.; Fernández-Valdivielso, A.; de Lacalle, L.N.L. Combination of high feed turning with cryogenic cooling on Haynes 263 and Inconel 718 superalloys. J. Manuf. Process. 2020, 58, 208–222. [Google Scholar] [CrossRef]
- Raykar, S.J.; Chaugule, Y.G.; Pasare, V.I.; Sawant, D.A.; Patil, U.N. Analysis of microhardness and degree of work hardening (DWH) while turning Inconel 718 with high pressure coolant environment. Mater. Today Proc. 2022, 59, 1088–1093. [Google Scholar] [CrossRef]
- Infante-García, D.; Diaz-Álvarez, J.; Cantero, J.-L.; Muñoz-Sánchez, A.; Miguélez, M.-H. Influence of the undeformed chip cross section in finishing turning of Inconel 718 with PCBN tools. Procedia CIRP 2018, 77, 122–125. [Google Scholar] [CrossRef]
- Meyer, R.; Köhler, J.; Denkena, B. Influence of the tool corner radius on the tool wear and process forces during hard turning. Int. J. Adv. Manuf. Technol. 2012, 58, 933–940. [Google Scholar] [CrossRef]
- Makhesana, M.A.; Patel, K.M.; Krolczyk, G.M.; Danish, M.; Singla, A.K.; Khanna, N. Influence of MoS2 and graphite-reinforced nanofluid-MQL on surface roughness, tool wear, cutting temperature and microhardness in machining of Inconel 625. CIRP J. Manuf. Sci. Technol. 2023, 41, 225–238. [Google Scholar] [CrossRef]
- Airao, J.; Nirala, C.K.; Khanna, N. Novel use of ultrasonic-assisted turning in conjunction with cryogenic and lubrication techniques to analyze the machinability of Inconel 718. J. Manuf. Process. 2022, 81, 962–975. [Google Scholar] [CrossRef]
- Venkatesan, K.; Nagendra, K.U.; Anudeep, C.M.; Cotton, A.E. Experimental Investigation and Parametric Optimization on Hole Quality Assessment During Micro-drilling of Inconel 625 Superalloy. Arab. J. Sci. Eng. 2021, 46, 2283–2309. [Google Scholar] [CrossRef]
- Cherrared, D. Numerical simulation of film cooling a turbine blade through a row of holes. J. Therm. Eng. 2017, 3, 1110. [Google Scholar] [CrossRef]
- Neo, D.W.K.; Liu, K.; Kumar, A.S. High throughput deep-hole drilling of Inconel 718 using PCBN gun drill. J. Manuf. Process. 2020, 57, 302–311. [Google Scholar] [CrossRef]
- Sahoo, A.K.; Jeet, S.; Bagal, D.K.; Barua, A.; Pattanaik, A.K.; Behera, N. Parametric optimization of CNC-drilling of Inconel 718 with cryogenically treated drill-bit using Taguchi-Whale optimization algorithm. Mater. Today Proc. 2022, 50, 1591–1598. [Google Scholar] [CrossRef]
- Ratnam, C.; Adarsha Kumar, K.; Murthy, B.S.N.; Venkata Rao, K. An experimental study on boring of Inconel 718 and multi response optimization of machining parameters using Response Surface Methodology. Mater. Today Proc. 2018, 5, 27123–27129. [Google Scholar] [CrossRef]
- Liu, L.; Thangaraj, M.; Karmiris-Obratański, P.; Zhou, Y.; Annamalai, R.; Machnik, R.; Elsheikh, A.; Markopoulos, A.P. Optimization of Wire EDM Process Parameters on Cutting Inconel 718 Alloy with Zinc-Diffused Coating Brass Wire Electrode Using Taguchi-DEAR Technique. Coatings 2022, 12, 1612. [Google Scholar] [CrossRef]
- Kliuev, M.; Kutin, A.; Wegener, K. Electrode wear pattern during EDM milling of Inconel 718. Int. J. Adv. Manuf. Technol. 2021, 117, 2369–2375. [Google Scholar] [CrossRef]
- Manikandan, N.; Binoj, J.S.; Thejasree, P.; Sasikala, P.; Anusha, P. Application of Taguchi method on Wire Electrical Discharge Machining of Inconel 625. Mater. Today Proc. 2021, 39, 121–125. [Google Scholar] [CrossRef]
- Hussain, A.; Kumar Sharma, A.; Preet Singh, J. Maximizing MRR of Inconel 625 machining through process parameter optimization of EDM. Mater. Today Proc. 2022; In Press. [Google Scholar] [CrossRef]
- Rahul; Datta, S.; Biswal, B.B.; Mahapatra, S.S. Machinability analysis of Inconel 601, 625, 718 and 825 during electro-discharge machining: On evaluation of optimal parameters setting. Measurement 2019, 137, 382–400. [Google Scholar] [CrossRef]
- Farooq, M.U.; Anwar, S.; Kumar, M.S.; AlFaify, A.; Ali, M.A.; Kumar, R.; Haber, R. A Novel Flushing Mechanism to Minimize Roughness and Dimensional Errors during Wire Electric Discharge Machining of Complex Profiles on Inconel 718. Materials 2022, 15, 7330. [Google Scholar] [CrossRef]
- ISO 8688-2:1989(E); Tool Life Testing in Milling—Part 2: End milling. ISO: London, UK, 1989; 26p.
- ISO 3685:1993(E); Tool-Life Testing with Single-Point Turning Tools. ISO: London, UK, 1993; 53p.
- Zhang, X.; Peng, Z.; Liu, L.; Zhang, X. A Tool Life Prediction Model Based on Taylor’s Equation for High-Speed Ultrasonic Vibration Cutting Ti and Ni Alloys. Coatings 2022, 12, 1553. [Google Scholar] [CrossRef]
- Archard, J.F. Contact and Rubbing of Flat Surfaces. J. Appl. Phys. 1953, 24, 981–988. [Google Scholar] [CrossRef]
- Usui, E.; Shirakashi, T.; Kitagawa, T. Analytical Prediction of Three Dimensional Cutting Process—Part 3: Cutting Temperature and Crater Wear of Carbide Tool. J. Eng. Ind. 1978, 100, 236–243. [Google Scholar] [CrossRef]
- Usui, E.; Shirakashi, T.; Kitagawa, T. Analytical prediction of cutting tool wear. Wear 1984, 100, 129–151. [Google Scholar] [CrossRef]
- Takeyama, H.; Murata, R. Basic Investigation of Tool Wear. J. Eng. Ind. 1963, 85, 33–37. [Google Scholar] [CrossRef]
- Childs, T.H.C.; Maekawa, K.; Obikawa, T.; Yamane, Y. Metal Machining: Theory and Applications; Arnold: London, UK, 2000. [Google Scholar]
- Schmidt, C.; Frank, P.; Weule, H.; Schmidt, J.; Yen, Y.; Altan, T. Tool wear prediction and verification in orthogonal cutting. In Proceedings of the 6th CIRP Workshop on Modeling of Machining, Hamilton, ON, Canada, 19–20 May 2003; pp. 93–100. [Google Scholar]
- Luo, X.; Cheng, K.; Holt, R.; Liu, X. Modeling flank wear of carbide tool insert in metal cutting. Wear 2005, 259, 1235–1240. [Google Scholar] [CrossRef]
- Astakhov, V.P. Effects of the cutting feed, depth of cut, and workpiece (bore) diameter on the tool wear rate. Int. J. Adv. Manuf. Technol. 2007, 34, 631–640. [Google Scholar] [CrossRef]
- Astakhov, V.P. Chapter 4 Cutting tool wear, tool life and cutting tool physical resource. In Tribology and Interface Engineering Series; Briscoe, B.J., Ed.; Elsevier: Amsterdam, The Netherlands, 2006; Volume 52, pp. 220–275. [Google Scholar]
- Attanasio, A.; Ceretti, E.; Fiorentino, A.; Cappellini, C.; Giardini, C. Investigation and FEM-based simulation of tool wear in turning operations with uncoated carbide tools. Wear 2010, 269, 344–350. [Google Scholar] [CrossRef]
- Attanasio, A.; Ceretti, E.; Rizzuti, S.; Umbrello, D.; Micari, F. 3D finite element analysis of tool wear in machining. CIRP Ann. 2008, 57, 61–64. [Google Scholar] [CrossRef]
- Pálmai, Z. Proposal for a new theoretical model of the cutting tool’s flank wear. Wear 2013, 303, 437–445. [Google Scholar] [CrossRef]
- Halila, F.; Czarnota, C.; Nouari, M. A new abrasive wear law for the sticking and sliding contacts when machining metallic alloys. Wear 2014, 315, 125–135. [Google Scholar] [CrossRef]
- Halila, F.; Czarnota, C.; Nouari, M. New stochastic wear law to predict the abrasive flank wear and tool life in machining process. Proc. Inst. Mech. Eng. Part J. J. Eng. Tribol. 2014, 228, 1243–1251. [Google Scholar] [CrossRef]
- Wang, R.; Yang, D.; Wang, W.; Wei, F.; Lu, Y.; Li, Y. Tool Wear in Nickel-Based Superalloy Machining: An Overview. Processes 2022, 10, 2380. [Google Scholar] [CrossRef]
- De Bartolomeis, A.; Newman, S.T.; Jawahir, I.S.; Biermann, D.; Shokrani, A. Future research directions in the machining of Inconel 718. J. Mater. Process. Technol. 2021, 297, 117260. [Google Scholar] [CrossRef]
- Breidenstein, B.; Grove, T.; Krödel, A.; Sitab, R. Influence of hexagonal phase transformation in laser prepared PcBN cutting tools on tool wear in machining of Inconel 718. Met. Powder Rep. 2019, 74, 237–243. [Google Scholar] [CrossRef]
- Rakesh, P.R.; Chakradhar, D. Machining performance comparison of Inconel 625 superalloy under sustainable machining environments. J. Manuf. Process. 2023, 85, 742–755. [Google Scholar] [CrossRef]
- Hoier, P.; Malakizadi, A.; Krajnik, P.; Klement, U. Study of flank wear topography and surface-deformation of cemented carbide tools after turning Alloy 718. Procedia CIRP 2018, 77, 537–540. [Google Scholar] [CrossRef]
- Sousa, V.F.C.; Silva, F.J.G. Recent Advances on Coated Milling Tool Technology—A Comprehensive Review. Coatings 2020, 10, 235. [Google Scholar] [CrossRef]
- Sousa, V.F.C.; Da Silva, F.J.G.; Pinto, G.F.; Baptista, A.; Alexandre, R. Characteristics and Wear Mechanisms of TiAlN-Based Coatings for Machining Applications: A Comprehensive Review. Metals 2021, 11, 260. [Google Scholar] [CrossRef]
- Jain, A.; Bajpai, V. Chapter 1—Introduction to high-speed machining (HSM). In High Speed Machining; Gupta, K., Paulo Davim, J., Eds.; Academic Press: Cambridge, MA, USA, 2020; pp. 1–25. [Google Scholar]
- Montazeri, S.; Aramesh, M.; Rawal, S.; Veldhuis, S.C. Characterization and machining performance of a chipping resistant ultra-soft coating used for the machining of Inconel 718. Wear 2021, 474–475, 203759. [Google Scholar] [CrossRef]
- Agarwal, A.; Potthoff, N.; Shah, A.M.; Mears, L.; Wiederkehr, P. Analyzing the evolution of tool wear area in trochoidal milling of Inconel 718 using image processing methodology. Manuf. Lett. 2022, 33, 373–379. [Google Scholar] [CrossRef]
- Liu, E.; An, W.; Xu, Z.; Zhang, H. Experimental study of cutting-parameter and tool life reliability optimization in inconel 625 machining based on wear map approach. J. Manuf. Process. 2020, 53, 34–42. [Google Scholar] [CrossRef]
- Criado, V.; Díaz-Álvarez, J.; Cantero, J.L.; Miguélez, M.H. Study of the performance of PCBN and carbide tools in finishing machining of Inconel 718 with cutting fluid at conventional pressures. Procedia CIRP 2018, 77, 634–637. [Google Scholar] [CrossRef]
- Saleem, M.Q.; Mumtaz, S. Face milling of Inconel 625 via wiper inserts: Evaluation of tool life and workpiece surface integrity. J. Manuf. Process. 2020, 56, 322–336. [Google Scholar] [CrossRef]
Disclaimer/Publisher’s Note: The statements, opinions and data contained in all publications are solely those of the individual author(s) and contributor(s) and not of MDPI and/or the editor(s). MDPI and/or the editor(s) disclaim responsibility for any injury to people or property resulting from any ideas, methods, instructions or products referred to in the content. |
© 2023 by the authors. Licensee MDPI, Basel, Switzerland. This article is an open access article distributed under the terms and conditions of the Creative Commons Attribution (CC BY) license (https://creativecommons.org/licenses/by/4.0/).

