Article

The Influence of Rapid Tempering on the Mechanical and Microstructural Characteristics of 51CrV4 Steel

Materials and Mechanical Engineering, Centre for Advanced Steels Research, University of Oulu, Pentti Kaiteran katu 1, 90570 Oulu, Finland
*
Author to whom correspondence should be addressed.
Metals 2024, 14(1), 60; https://doi.org/10.3390/met14010060
Submission received: 8 December 2023 / Revised: 30 December 2023 / Accepted: 31 December 2023 / Published: 3 January 2024
(This article belongs to the Special Issue Feature Papers in Structural Integrity of Metals)

Abstract

:
The microstructure and mechanical properties of a low-alloy medium carbon steel (Fe-0.5C-0.9Mn-1Cr-0.16V, in wt.%) were investigated after rapid tempering and compared with a conventionally tempered counterpart. The conventional thermal cycle was performed in a laboratory-scale box furnace while rapid heat treatments were carried out using the Gleeble 3800 thermomechanical simulator machine. In the rapid heat treatments, the heating rate was 50 °C/s for austenitizing and 60 °C/s for the tempering process, with a cooling rate of 60 °C/s for both treatments. Austenitization was performed at 900 °C for 3 s and tempering was conducted at 300 °C and 500 °C for 2 s. For conventional routes, the heating rate for both austenitization and tempering was 5 °C/s. Likewise, the austenitization was carried out at 900 °C for 45 min and tempering was carried out at 300 °C and 500 °C for 30 min. The results revealed that rapid tempering resulted in a significantly increased impact toughness compared to conventional tempering, while maintaining a consistent high strength level. The quenched samples showed the highest hardness and tensile strength but obtained the lowest toughness values. The optimum combination of strength and toughness was achieved with the sample rapidly tempered at 300 °C, resulting in a tensile strength of 2050 MPa and impact energy of 14 J for sub-sized CVN samples. These desirable mechanical properties were achieved throughout the tempered martensitic microstructure with a minor fraction of pearlitic strings.

1. Introduction

The green transition is currently taking place in the steel industry as many steel producers are adopting more environmentally friendly alternatives to replace traditional blast furnace iron production and steelmaking. Direct reduced iron and electric arc furnaces are becoming more common solutions for fossil-free or reduced CO2 steel production; however, efforts need to be made to reduce carbon emissions in heat treatment and hot-rolling stages. The possibility of using green heating procedures, such as induction and laser heating, with relatively fast heating rates was recently discussed and suggested [1,2].
The microstructure and mechanical properties of the steel can be modified by different heat treatments to meet the requirements for a given application, and the highest strength and hardness is generally achieved with a martensitic structure [3]. Quenching and tempering are both essential in the processing of ultra-high strength steels in order to achieve the desired structure and subsequent required mechanical properties [4,5]. Hence, the rapid tempering of martensitic steels could be an initial step towards a transition to green steel processing.
The conventional tempering of large steel sheets or plates often involves massive furnaces, which are heated, for example, with gas or oil. Tempering times and temperatures vary from 200 to 700 °C, and from minutes to hours, depending on the required final properties. However, rapid induction heating can be utilized for much faster austenitization and tempering processes. Energy and time savings are essential in terms of future heat treatments; however it is important that the properties of the rapidly tempered steels match those of conventionally tempered steels. Rapid tempering might provide some benefits in terms of fracture and impact toughness [6,7] improvement, which may be attributed to the different carbide formation kinetics favoring the formation of finer particles with higher heating rates [6]. The smaller precipitate size could be an explanation for the improved elongation of the rapidly tempered samples. It has been suggested that the annihilation of dislocations by recovery does not have time to occur when using rapid heating rates and fast tempering times [6]. Consequently, the rapid tempering leads to a finer particle distribution inside the martensite substructure due to the higher dislocation density, which then results in improved toughness and ductility. In addition, the carbides precipitated at the grain boundaries might become coarser, with slower heating rates degrading the fracture and impact toughness properties [7]. Additionally, it has been suggested that the preservation of retained austenite in rapidly tempered steels improves the toughness properties [8]. Retained austenite might be preserved in medium carbon steels during rapid tempering, while longer tempering times result in the decomposition of any austenite, especially in the tempered martensite embrittlement temperature range (200–400 °C). Therefore, there is great potential for the use of rapid induction heating in the tempering of steels. However, many scientific studies rely on physical simulations.
It is well known that grain refinement is an efficient way to increase the mechanical properties of steels [9,10], especially the toughness properties. For bainitic and martensitic steels, the prior austenite grain (PAG) size [11,12], packet size [11,13] and block size [14] have been claimed to be important in terms of mechanical properties. Furthermore, the effective grain size (deff), i.e., the size of grains bound by high-angle grain boundaries, has been shown to be an essential factor [15,16,17,18,19]. Austenitization temperature and duration, as well as heating and cooling rates, affect the PAG size. Rapid heating has recently become an interesting possibility to achieve a small grain size during both austenitization [20] and tempering [21,22]. Notably, induction tempering can be seen as an option for the tempering of thin sheets. Faster and more energy-efficient processing routes are becoming more feasible due to the increasing demand for more environmentally friendly steelmaking processes.
The aim of this study was to understand and compare the microstructure and mechanical properties of 51CrV4 steel processed via two different routes. 51CrV4 is an advanced high strength martensitic steel grade widely used as a heat-treatable steel in various applications, such as springs, shafts, and agricultural wear parts, where high strength, hardness, and toughness are needed [23]. For this purpose, two different heating routes were utilized: conventional and rapid heating cycles. This article focuses mainly on the feasibility of employing green heating processes and the potential benefits of rapid tempering instead of conventional heat treatments.

2. Materials and Methods

The microstructure and mechanical properties of a low-alloy medium carbon steel (Fe-0.5C-0.9Mn-1Cr-0.16V, in mass contents in %) were investigated in both conventional and rapid austenitization, quenching and tempering routes. The impurity levels of P and S were 0.006 and 0.001%, respectively, provided by the steel producer. The 51CrV4 standard commercial steel grade was received in as-rolled condition as heavy plates (8 mm thickness) containing a pearlitic microstructure and having a hardness of approximately 200 Vickers. For the conventional route, 8 × 300 × 100 mm3 plates were heat-treated in the laboratory-scale furnace (austenitizing at 900 °C for 45 min, water quenching to room temperature and then tempering at 300 °C and 500 °C for 30 min, Figure 1a). The rapid routes (austenitizing at 900 °C for 3 s and tempering at 300 °C and 500 °C for 2 s, Figure 1b), were realized with a Gleeble 3800 thermomechanical simulator machine (Dynamic Systems Inc., Poestenkill, NY, USA). The sample sizes varied in the Gleeble trials. The sample sizes for the microstructure investigation, tensile testing, and Charpy-V (CV) tests were 9 mm in length and 6 mm in diameter, 120 mm in length and 6 mm in diameter and 5 × 10 × 55 mm3, respectively. Conventional heat treatments were performed for the plate, which was later machined to tensile and CV sample dimensions. The major difference between the conventional and fast treatments was the heating and cooling rates. In the rapid trials, the heating rate was 50 °C/s for austenitizing and 60 °C/s for tempering, while for the conventional route the rates were approximately 5 °C/s. The conventional water quenching treatment (WQ) had a faster cooling rate (~100 °C/s) to room temperature and the plates were allowed to cool in still air after tempering (~0.5 °C/s), while in the Gleeble, the mean cooling rate at quenching and tempering was ~60 °C/s.
Additionally, JMatPro software version 14.0 (Sente Software Ltd., Guildford, UK) with a General Steel database was used to simulate the continuous cooling transformation (CCT) diagrams and determine the lower (A1) and upper critical (A3) temperatures of different prior austenite grain sizes with a 900 °C austenitization temperature. Dilation data for the construction of CCT diagrams were generated with a Linseis DIL L78 dilatometer (Selb, Germany) using cylindrical samples with a diameter of 6 mm and a length of 9 mm. Linear cooling rates in the range of 0.5–96 °C/s were applied. The heating rate was 10 °C/s up to the holding temperature of 900 °C with a soaking time of 10 min. Different phase transformation temperatures were identified from the temperature dilation data based on the deviation from the linear thermal contraction. Furthermore, the effect of the heating rate on the phase transformation temperature was determined with 10, 50 and 100 °C/s heating rates utilizing the dilatometer.

2.1. Microstructural Characterization

A general characterization of the microstructures was performed with a laser scanning confocal microscope (LSCM, Keyence VK-X200, Osaka, Japan) and a field emission scanning electron microscope (FESEM, Zeiss Ultra Plus, Jena, Germany) on specimens etched with 2% Nital. The prior austenite grain structure was studied using LSCM after approximately 5 min of etching in picric acid (1.5 g of picric acid + 100 mL of ethyl alcohol + 1 mL sodium alkylsulfonate (“Agepol”) + 4 − 6 drops of HCl) at room temperature [24]. The typical prior austenite grain size was quantified by measuring the mean linear intercept (MLI) method from five images per sample (~200 intercepts in both vertical and horizontal directions).
For electron backscatter diffraction (EBSD) imaging, an Oxford AZTEC (Oxford Instruments, Abingdon, UK) was utilized on the JEOL JSM-7900F FESEM (Japan Electron Optics Laboratory Co., Ltd., Tokyo, Japan) with an acceleration voltage of 20 kV and a working distance of 18 mm. The area of examination was 48 × 33 μm with a step size of 50 nm or 20 × 14 μm with a step size of 20 nm to obtain the most reasonable measurements. Grain boundaries with misorientations greater than 15° were considered as effective grain boundaries (deff), and the size of the coarsest grains, d90%, corresponded, respectively, to the effective grain size at 90% in the cumulative size distribution. The equivalent circular diameter (ECD) was used to define the effective grain size and ten pixels (less than 0.18 μm) were filtered from the original acquisitions in order to mitigate the frequency of the minuscule grains typically encountered with EBSD.

2.2. Mechanical Testing

Hardness was measured using a Wolpert DiaTestor R2 hardness tester (Amsler, KARL-KOLB, Dreieich, Germany) in Vickers method of HV30 force. For the tensile testing, the conventionally heat-treated samples were machined from 6 mm diameter samples to 3 mm to avoid fractures outside of the extensometer. Therefore, the Zwick Z100 kN tensile tests were conducted using round samples with a gauge length of 24 mm (Figure 2). During the tensile test, the strain rate was 0.0025 s−1 to the yield point and was 0.008 s−1 after the yield point was reached, according to the EN ISO 6892-1 standard [25]. Charpy-V notch impact testing was performed according to the standard EN ISO 148-1 [26] at room temperature (RT) using sub-size specimens with dimensions of 5 × 10 × 55 mm3. For the tensile and Charpy-V tests, three samples per material variant were tested.

3. Results and Discussion

3.1. JMatPro Simulation and CCT Diagrams

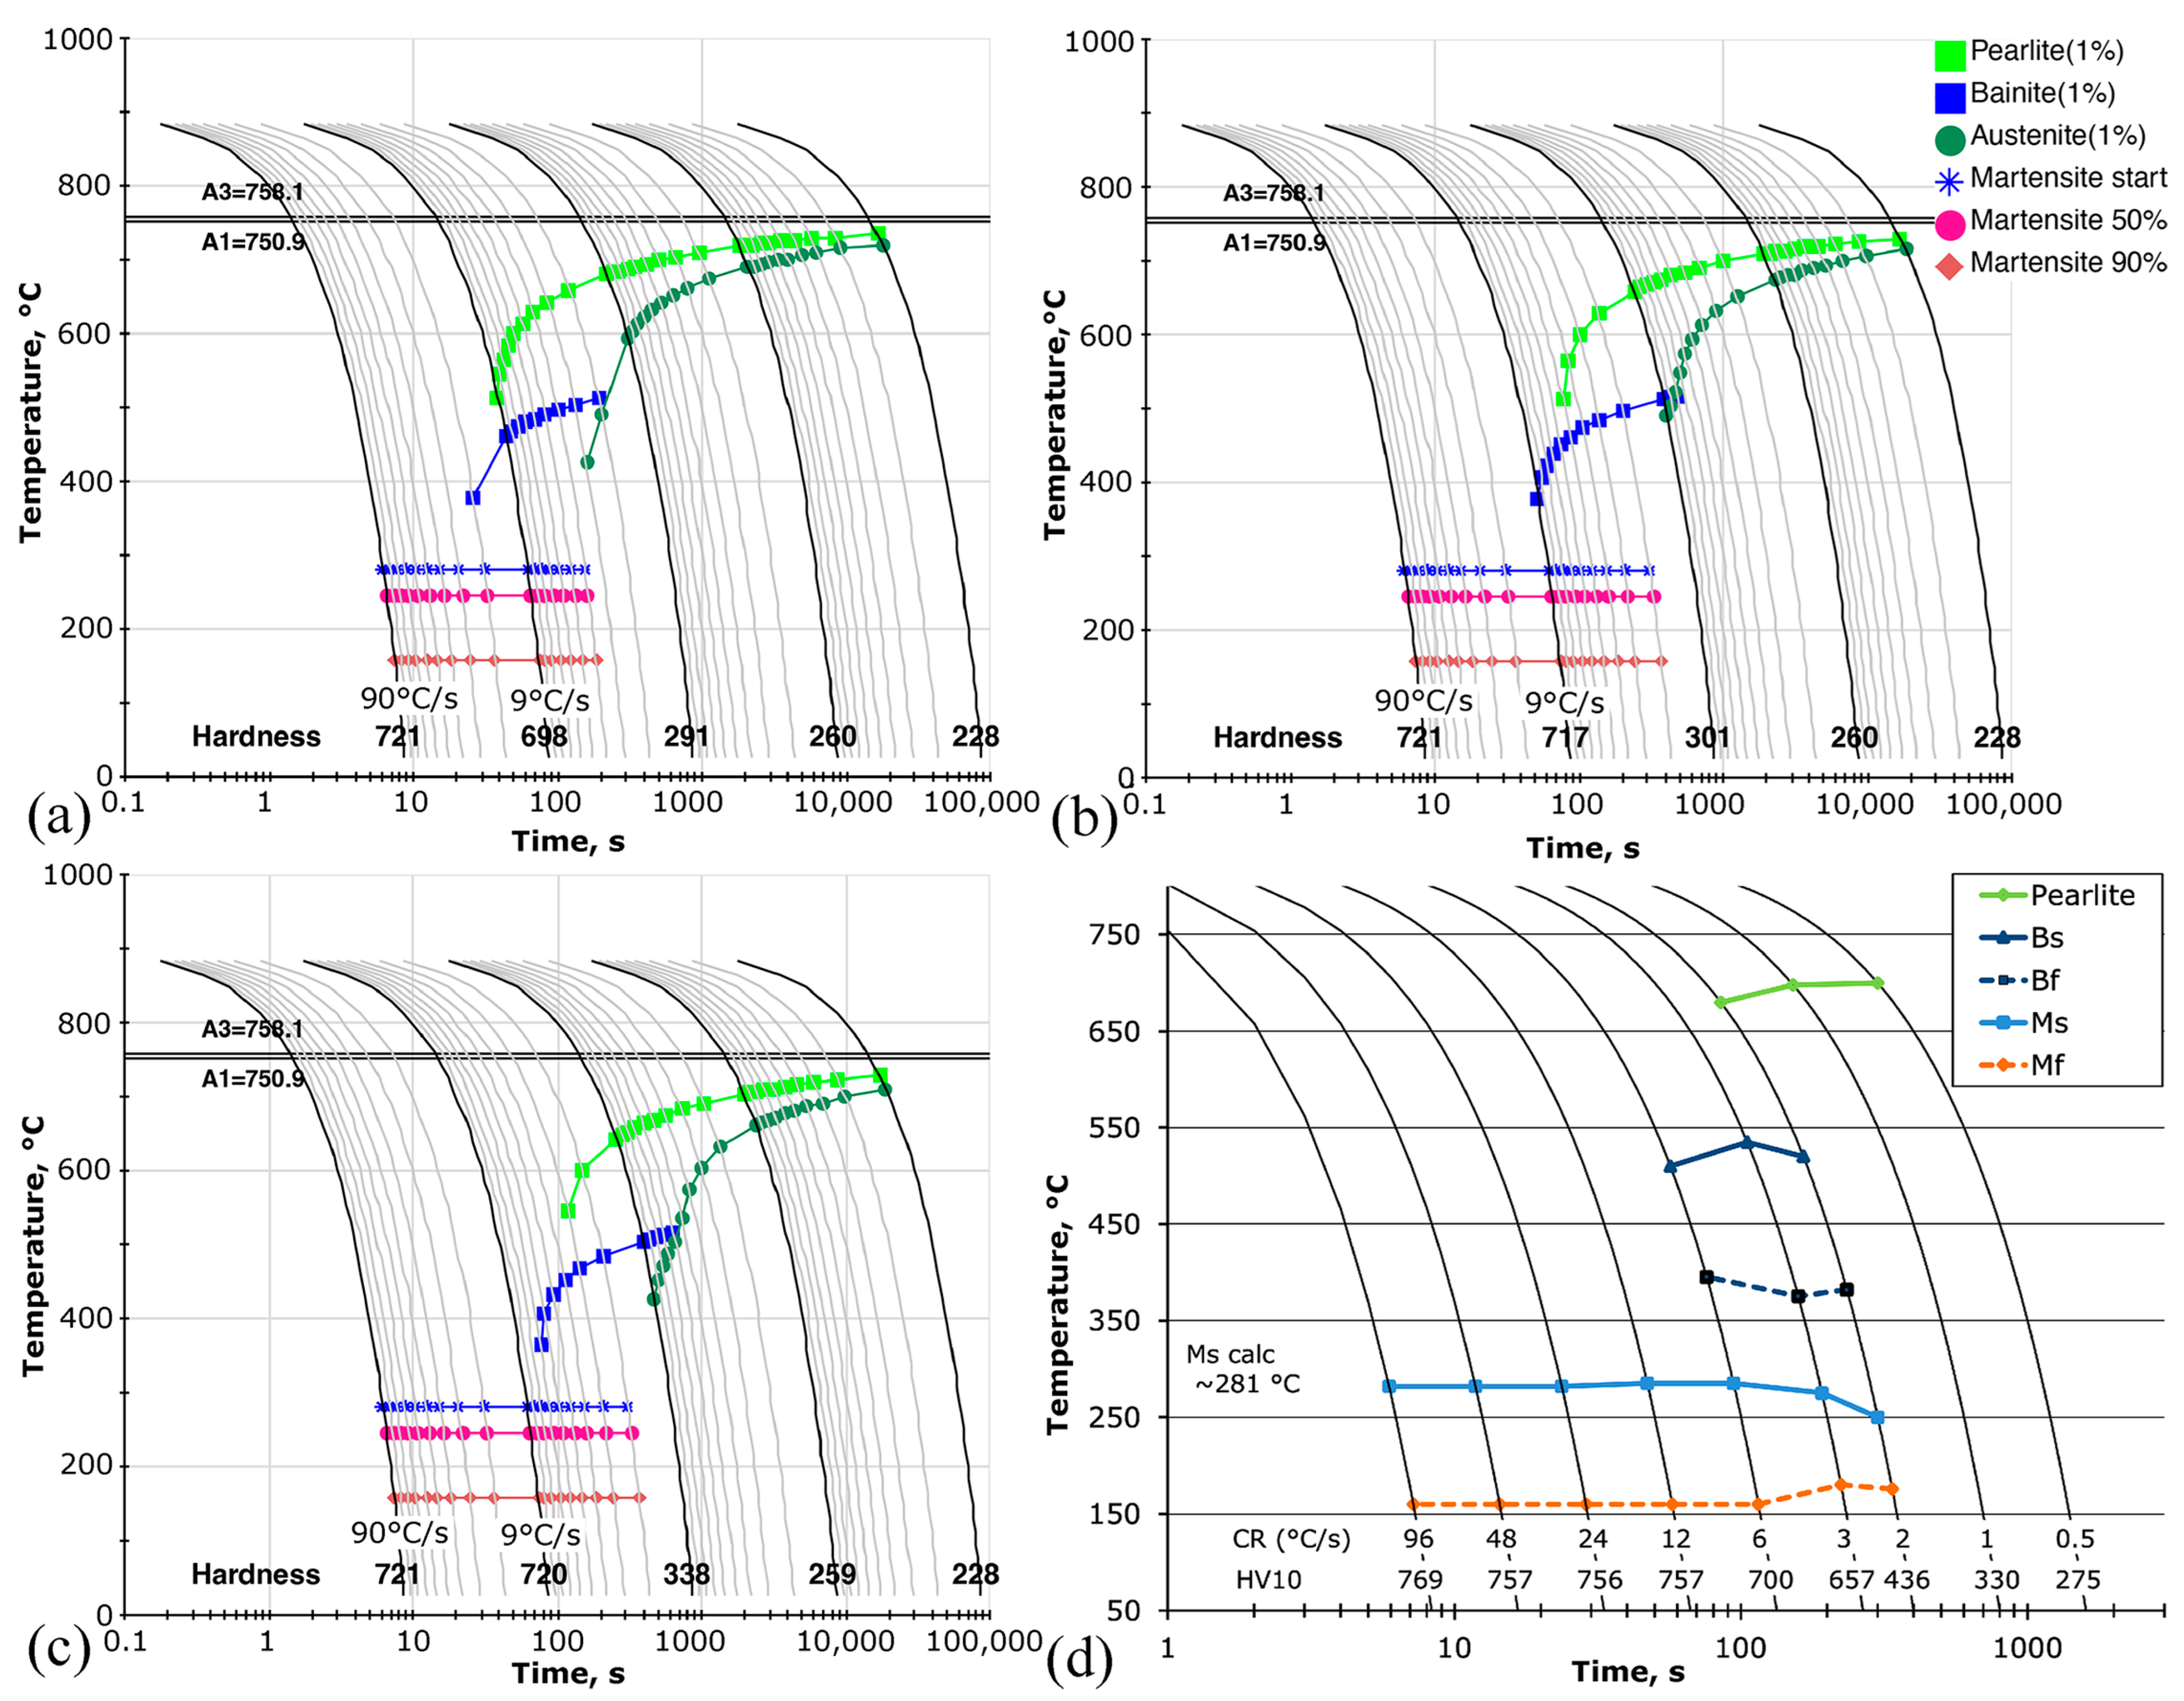
Figure 3a–c illustrates the JMatPro CCT calculations with three prior austenite grain sizes with austenitization at 900 °C. The simulations showed that, with the investigated steel composition, A1 and A3 temperatures were quite close, at 750.9 °C (pearlite) and 756.1 °C, respectively. The calculated martensite start temperature was approximately 290 °C. The increase in the prior austenite grain size from 5 μm to 15 μm shifted the bainite (blue) and pearlite (bright green) curves on the right, which indicated that the bainite phase transformation was only possible with a very slow cooling rate (Figure 3a–c). The experimental CCT based on the dilatometer simulated CCT diagram (Figure 3d) confirmed the JMatPro calculations, as the MS temperature was ~280 °C and the phase transformation curve was quite close to the calculated value. However, the prior austenite grain size could not be determined from the CCT diagram alone (Figure 3d).
Figure 4 shows the effect of the heating rate on phase transformation. From the plotted dilation curves (Figure 4b) it can be seen that, with the slowest heating rate (10 °C/s) the austenite phase transformation starts at ~745 °C, while at the rate of 50 °C/s and 100 °C/s phase transformations started at ~750 °C and ~755 °C, respectively. Therefore, it can be stated that the higher heating rate increases the austenite phase transformation start temperature, which is consistent with the literature [28]. As only one cooling rate (30 °C/s) was used, no difference in the martensite phase start temperatures could be detected, and temperatures were close to 280 °C. as is indicated in the dilatometer CCT diagram dilations.

3.2. Microstructural Characterization

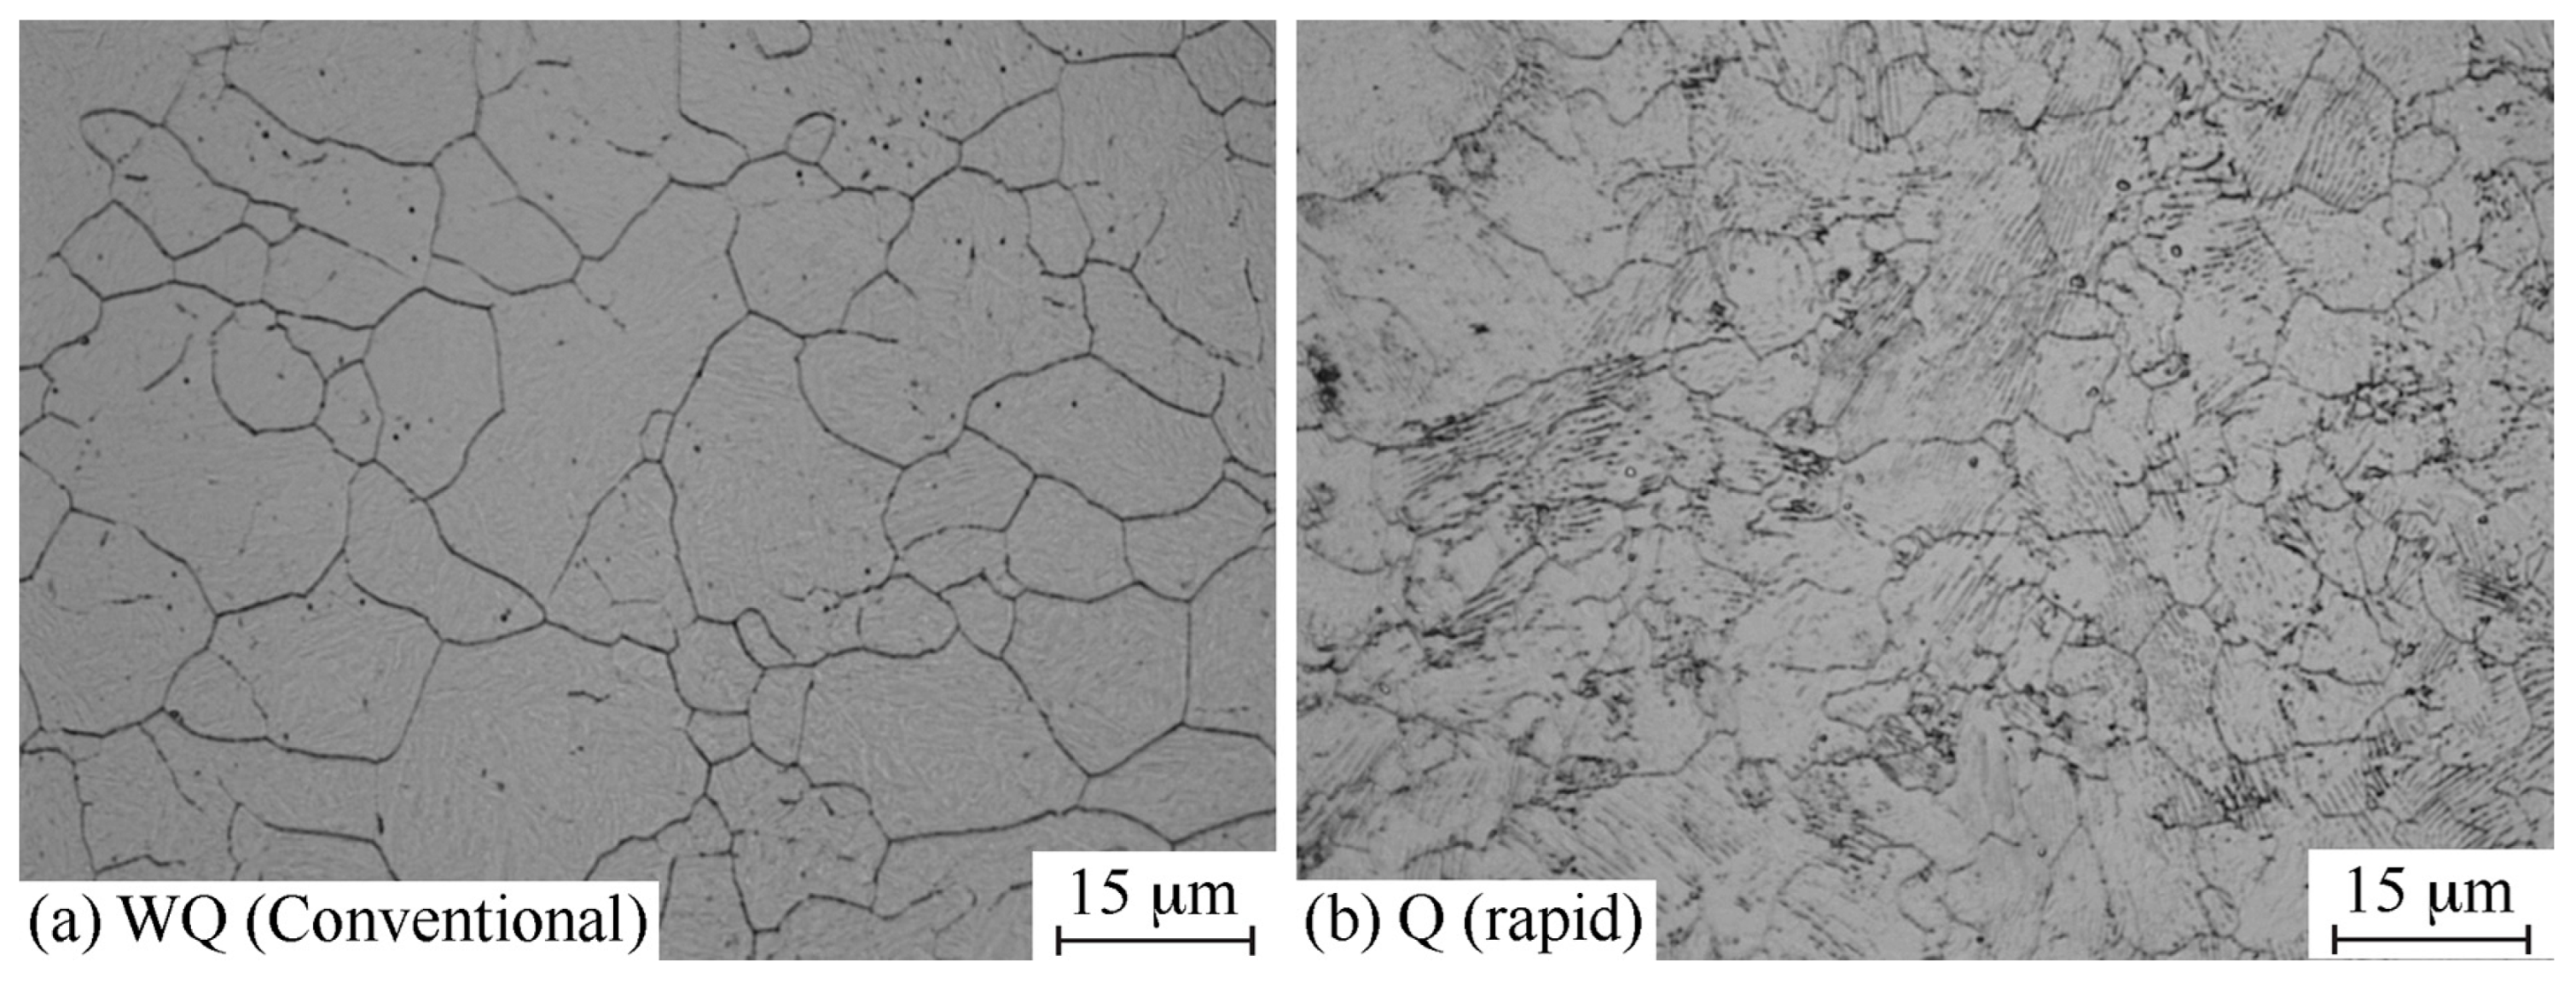
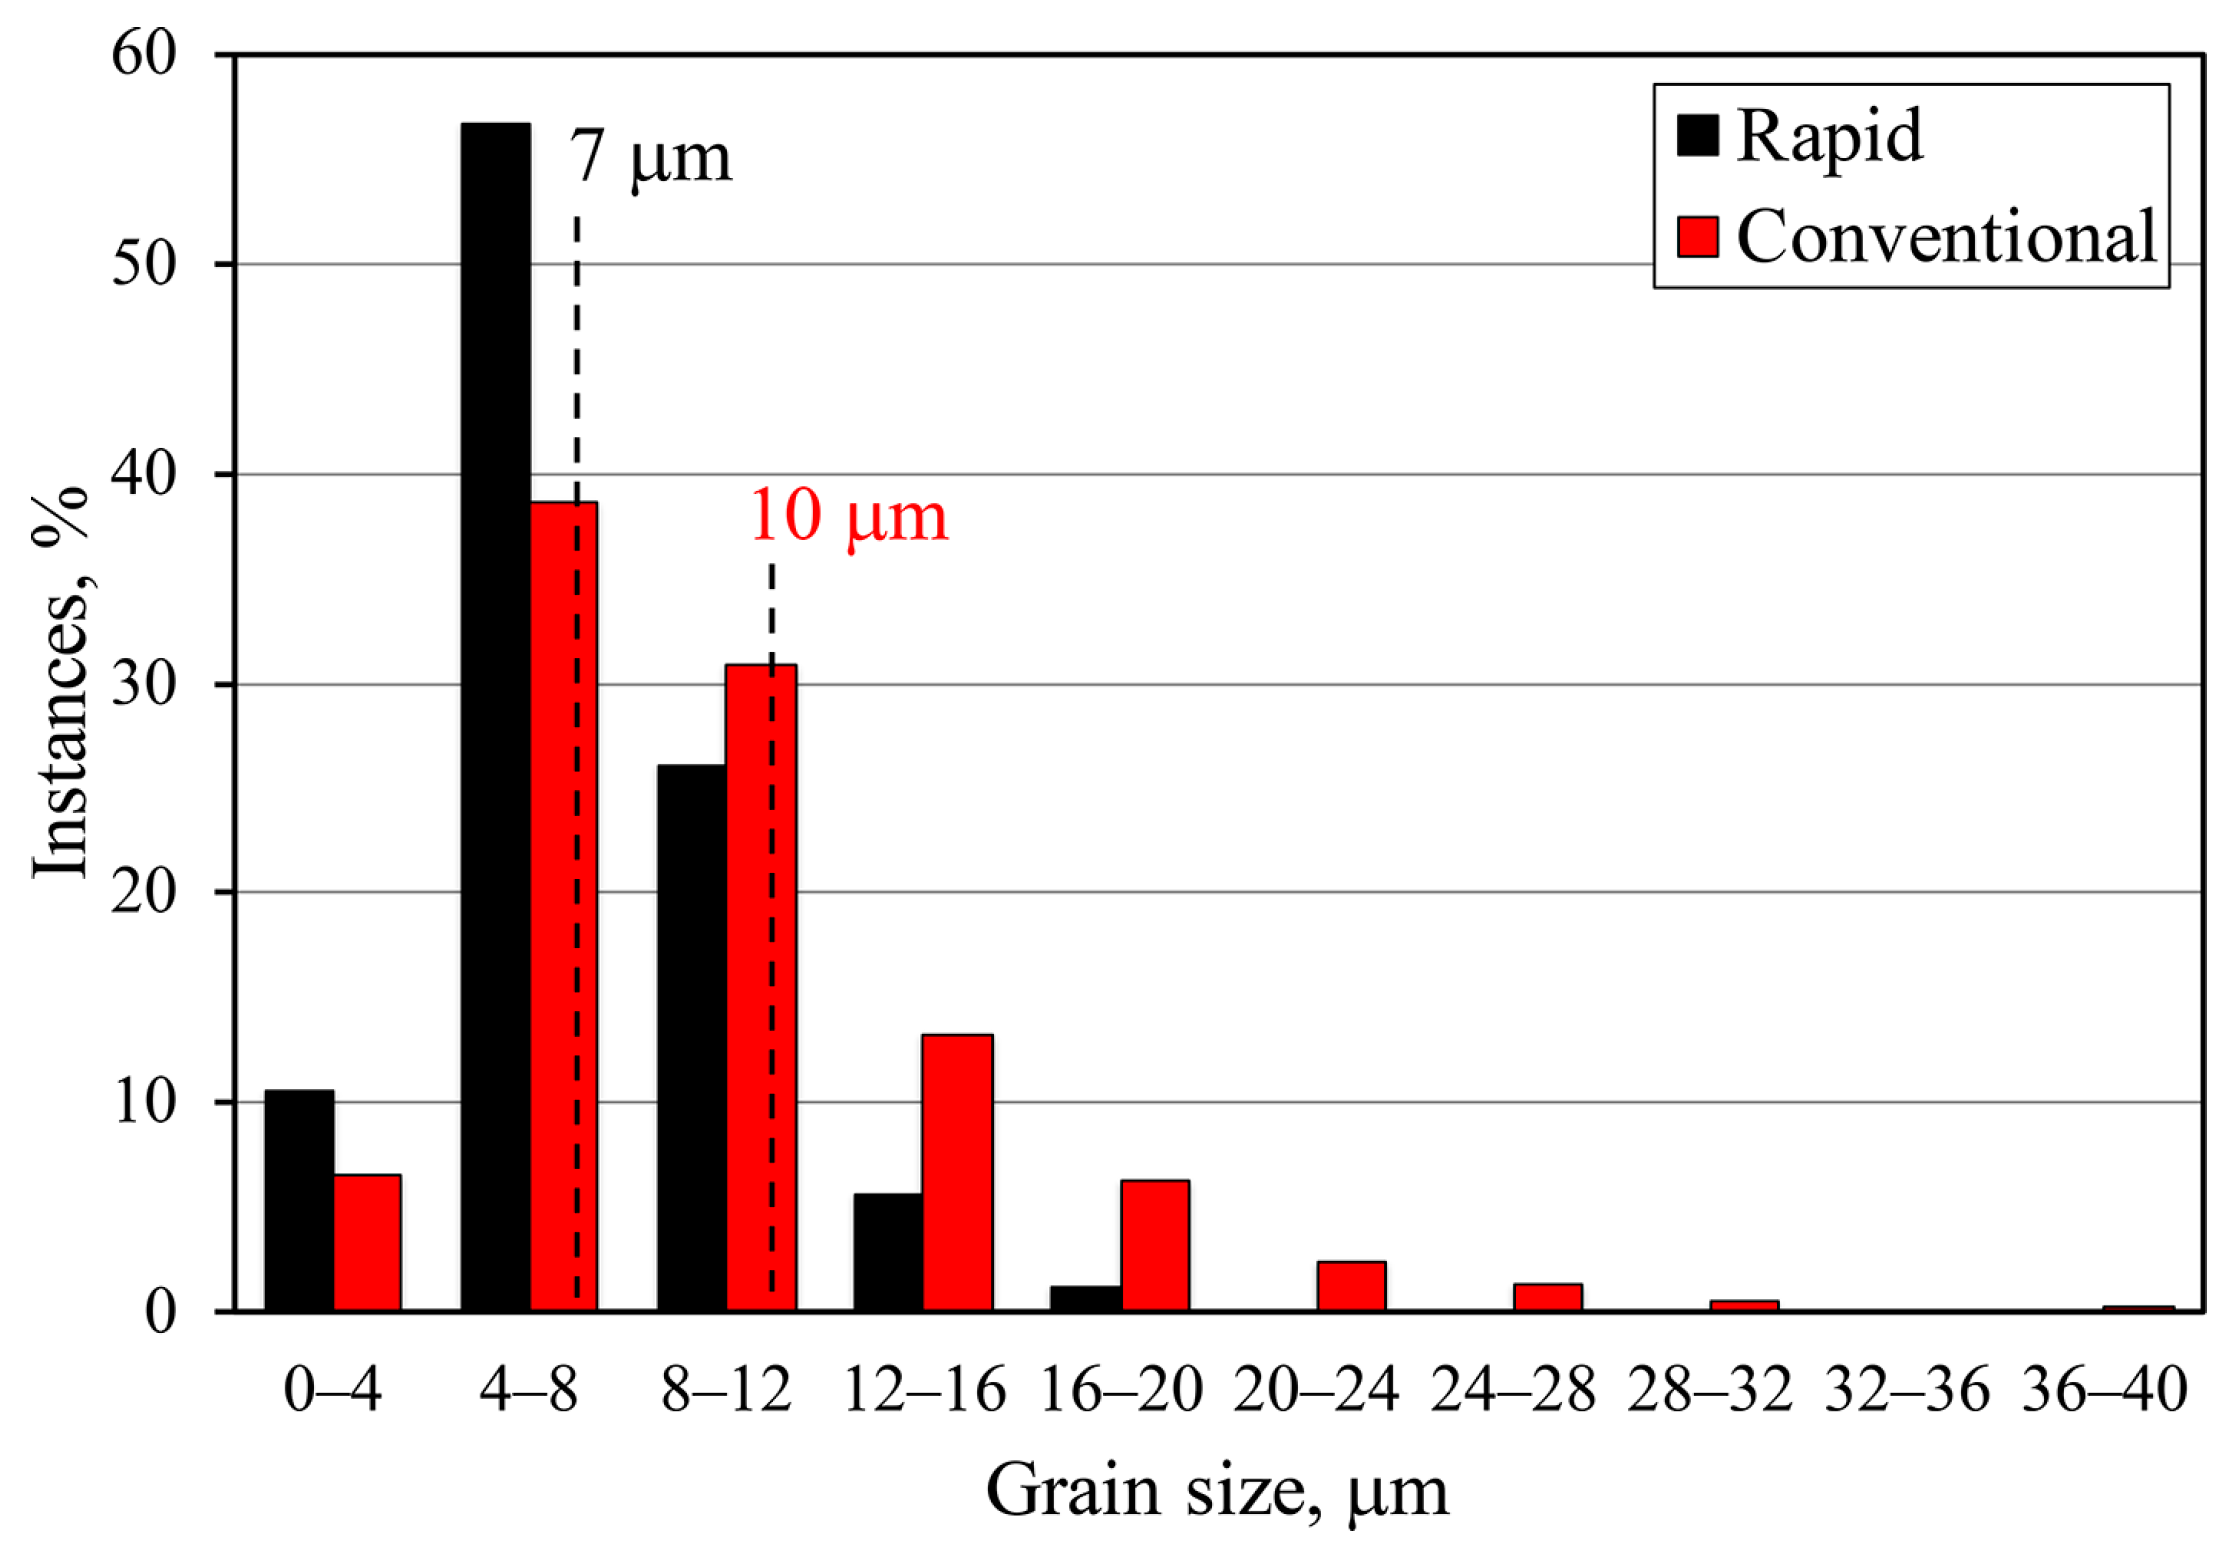
The typical prior austenite grain (PAG) structure of the quenched samples is shown in Figure 5, where a major difference between the conventional and rapid heat-treated samples can clearly be observed. The rapidly austenitized and quenched samples exhibit smaller PAG sizes than the conventional sample, along with a narrower distribution of PAG sizes (Figure 6). Figure 5b shows that the rapidly treated sample has a heterogeneous prior austenite grain structure. On the other hand, the grains in the conventionally treated sample appear quite uniformly distributed in Figure 5a; however, the grain distribution in Figure 6 shows a different aspect as it shows a more significant fraction of larger grains (>16 μm). Hence, the mean grain size for the rapidly austenitized materials was about 7 μm, while that of the conventional samples was around 10 μm. the minor differences in the PAG sizes did not affect the hardenability of the materials, as the JMatPro calculations demonstrate in Figure 3.
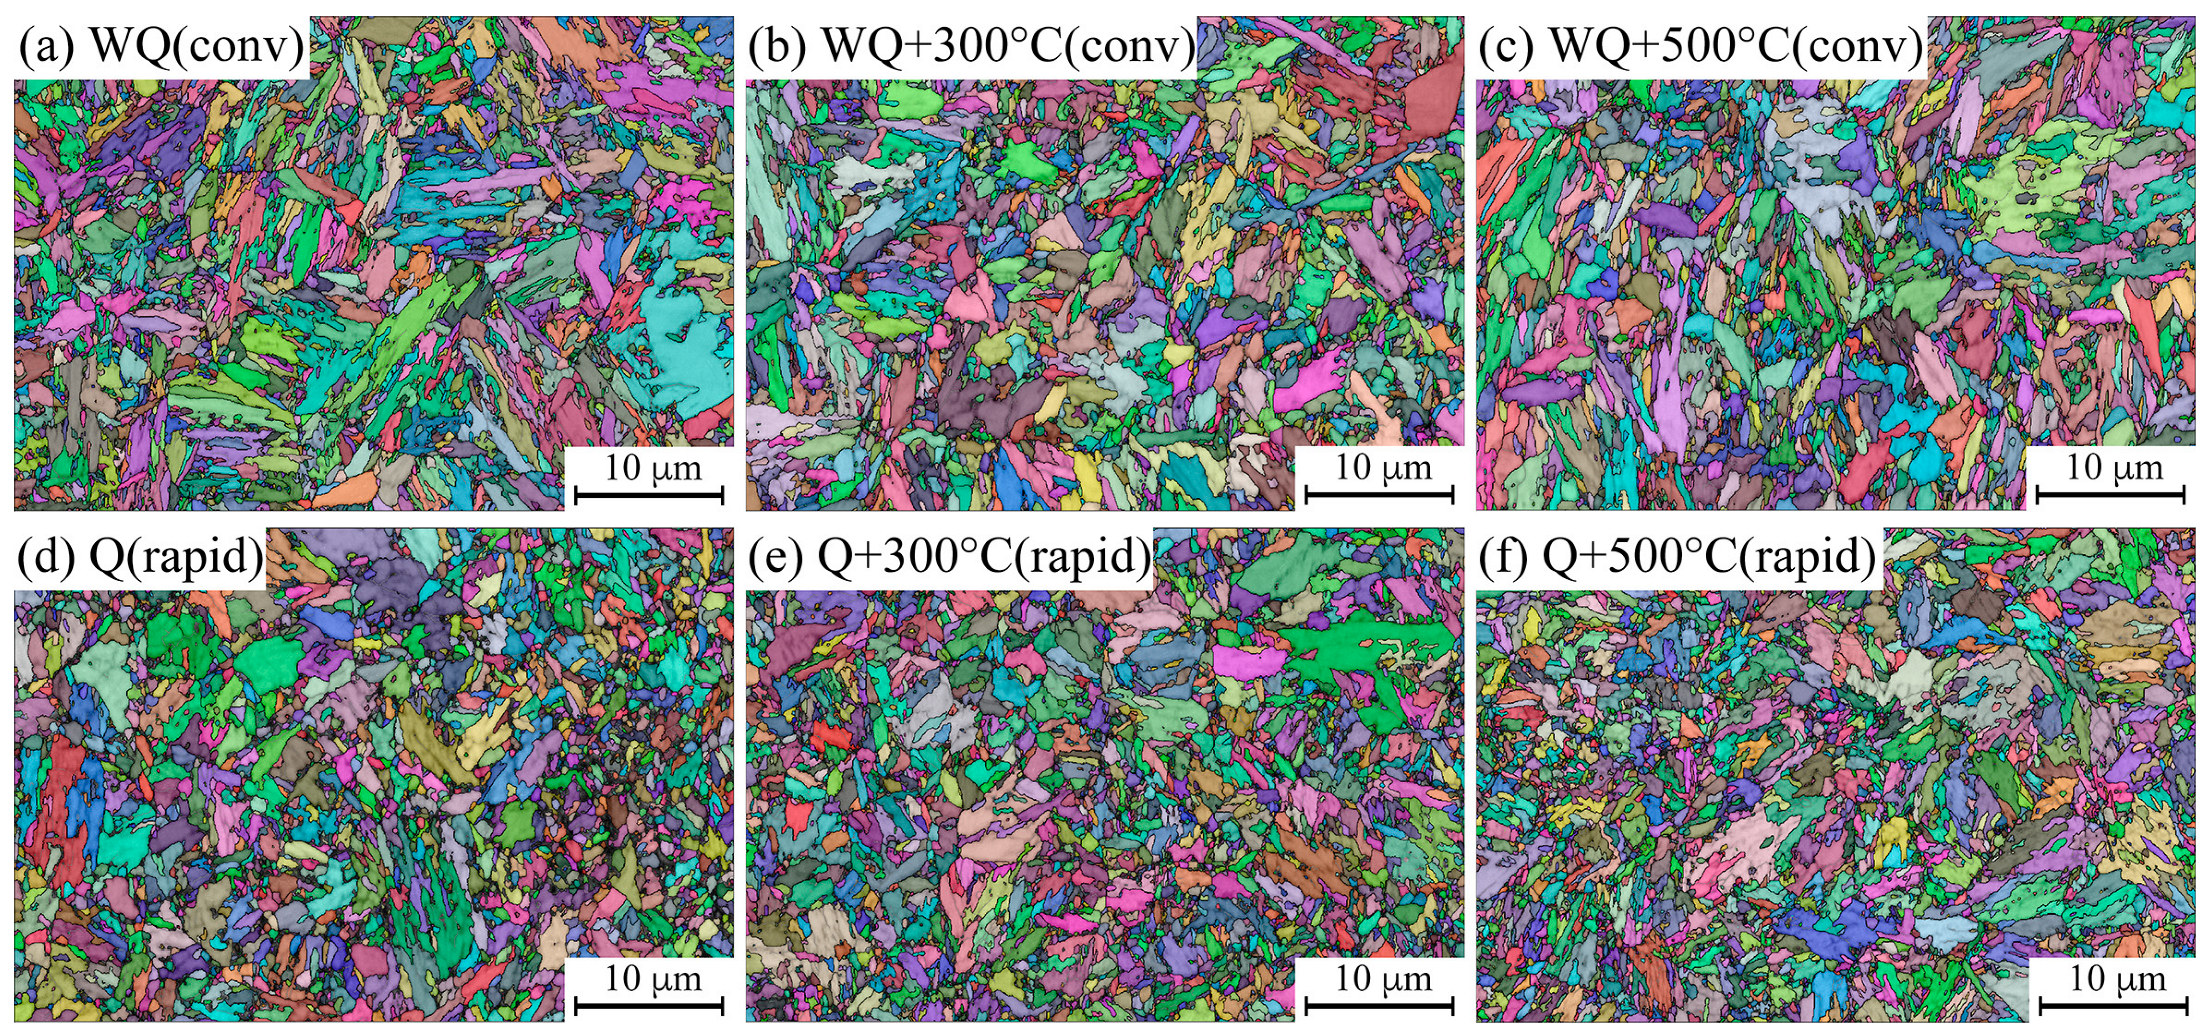
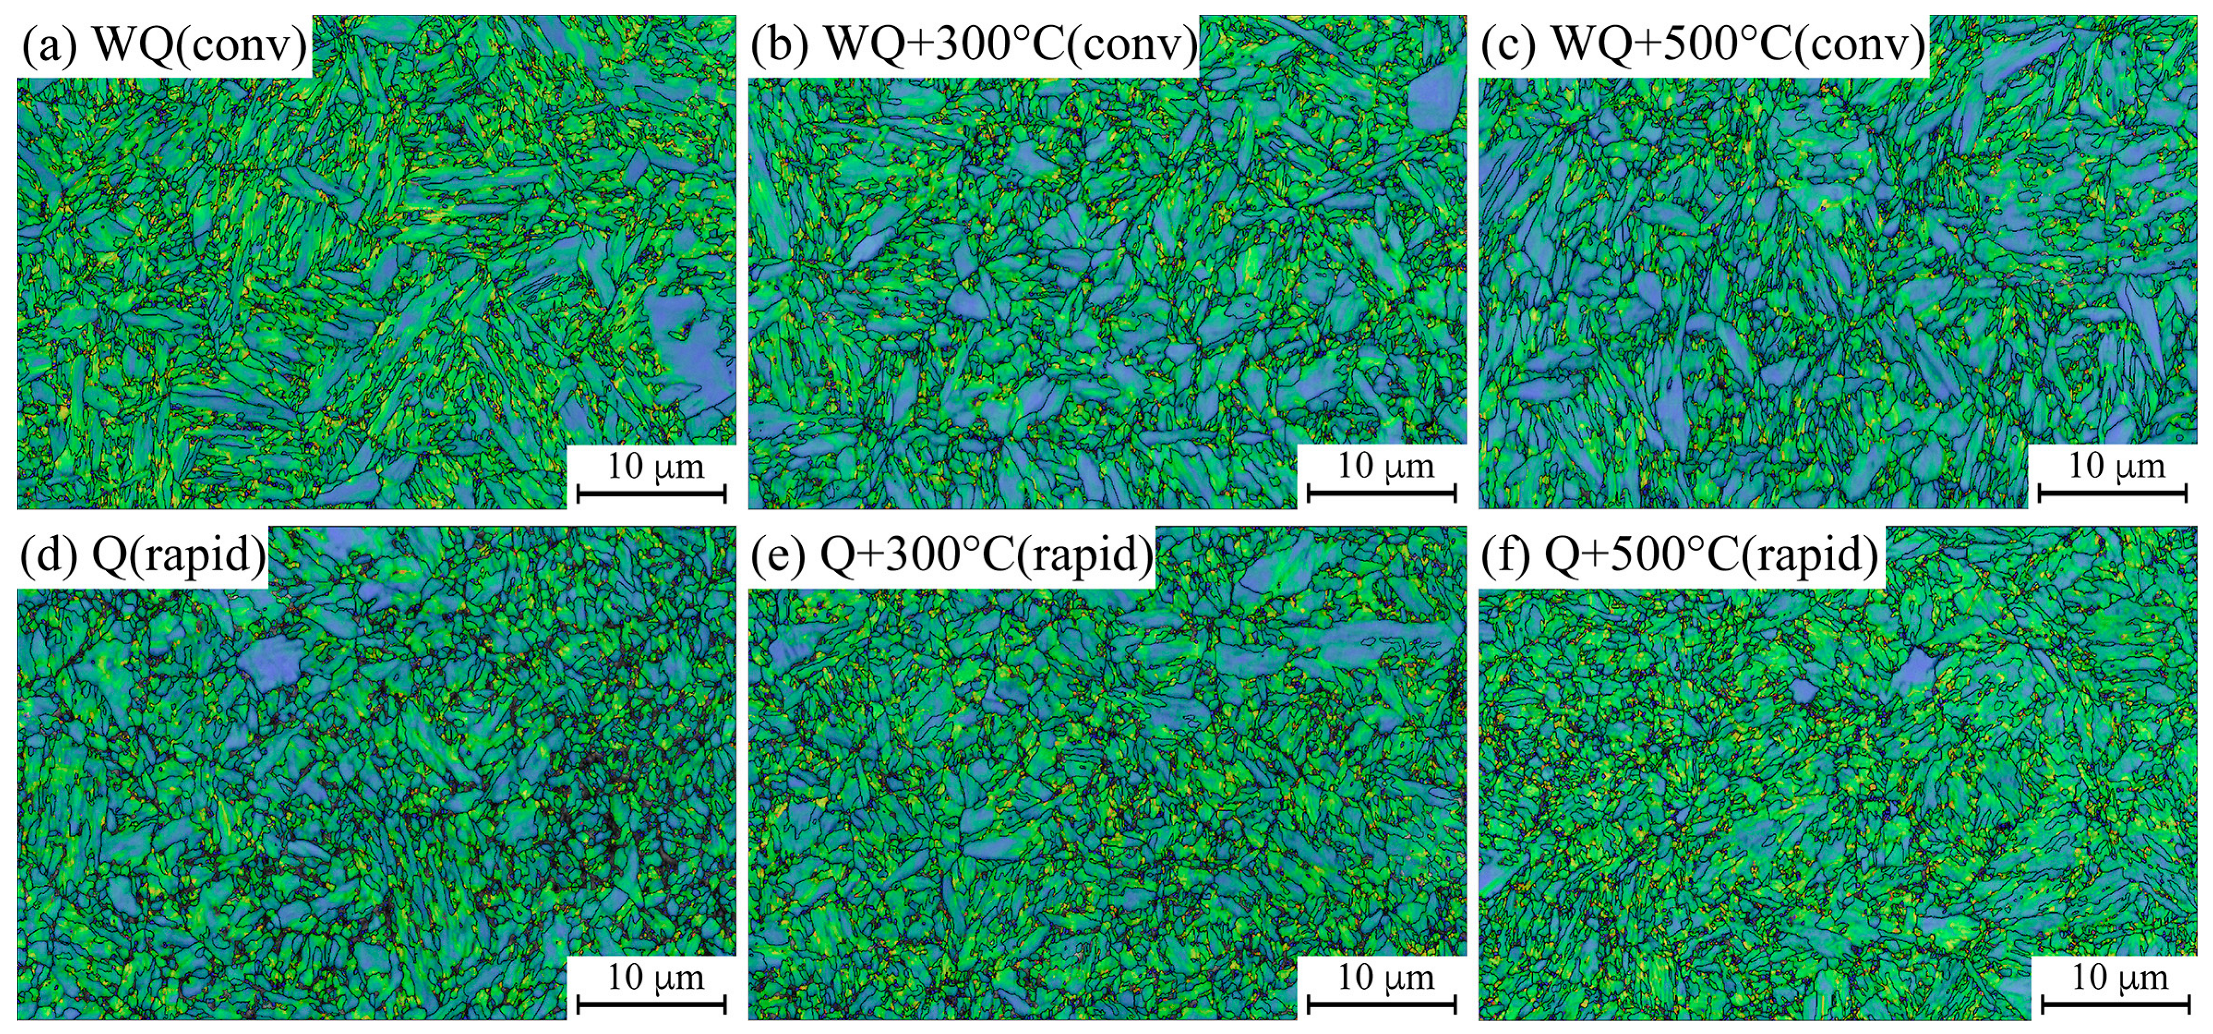
Figure 7 illustrates the EBSD characterization of the investigated samples, including randomly colored grain maps with an overlayered band contrast map and high-angle grain boundaries (HAGB, >15°) plotted in black. Table 1 summarizes the statistics of the acquired maps. Figure 7a–c shows that the microstructure of the conventionally treated samples consists of lath-type martensite, and it is more uniform than the rapidly treated microstructure. The rapidly treated materials (Figure 7d–f) are heterogeneous, as these samples consist of a higher fraction of fine grains along the typical lath martensite. It can be seen in Table 1 that the coarsest grain sizes are observed in the conventional samples, which are larger than those of the rapidly treated materials. Table 1 shows that the tempering had no effect on the effective grain sizes, which is in agreement with the results of a previous study [29].
An efficient method for assessing local strain concentrations and revealing the local dislocation density distribution is the local kernel average misorientation (KAM) map [30,31]. Figure 8 illustrates the KAM map, depicting misorientation angles ranging from 0° to 5° for all samples, along with the corresponding relative frequency of each misorientation angle. In Figure 8, the color scheme represents misorientation levels: blue for very low misorientation (below 1°), green for angles between 1° and 2°, yellow for angles between 2° and 3°, and red for misorientation angles exceeding 3°. Misorientations exceeding 5° were excluded from the KAM evaluation to avoid interference with low-angle grain boundaries.
According to Figure 8, although heating took place for a very short time through the rapid tempering regime, all the samples exhibit an almost similar trend with the distribution of misorientations of <1° (blue) and 1–2° (green), indicating that both rapid and conventional tempering were capable of relaxing the distorted fresh martensitic microstructure and improving the ductility of the tempered samples.
A more detailed microstructural characterization shows that the microstructures of the heat-treated materials were mainly martensitic with some fractions of pearlitic/cementite strings and some coarse carbides i.e., Fe3C (Figure 9 and Figure 10). In addition, the EBSD phase characterization shows that all samples contained a small fraction of retained austenite (blue in Figure 10c). In both cases, tempering caused the carbides to become more spherical/globular (Figure 10a). In many cases, the microstructure of Gleeble simulated samples have significant local variations. In this study, the microstructure was likewise not as homogeneous as that of the conventionally treated samples, as can be seen in the EBSD maps. However, for the rapidly quenched and 300 °C tempered samples, the microstructures were very fine, as is shown in Figure 9a,b. Likewise, the soaking time for the rapid treatments was short; therefore, the original structure after rolling (as-rolled microstructure; mostly pearlitic) may have influenced the final microstructure and caused the obscure, string-like structures (Figure 10b).

3.3. Mechanical Properties

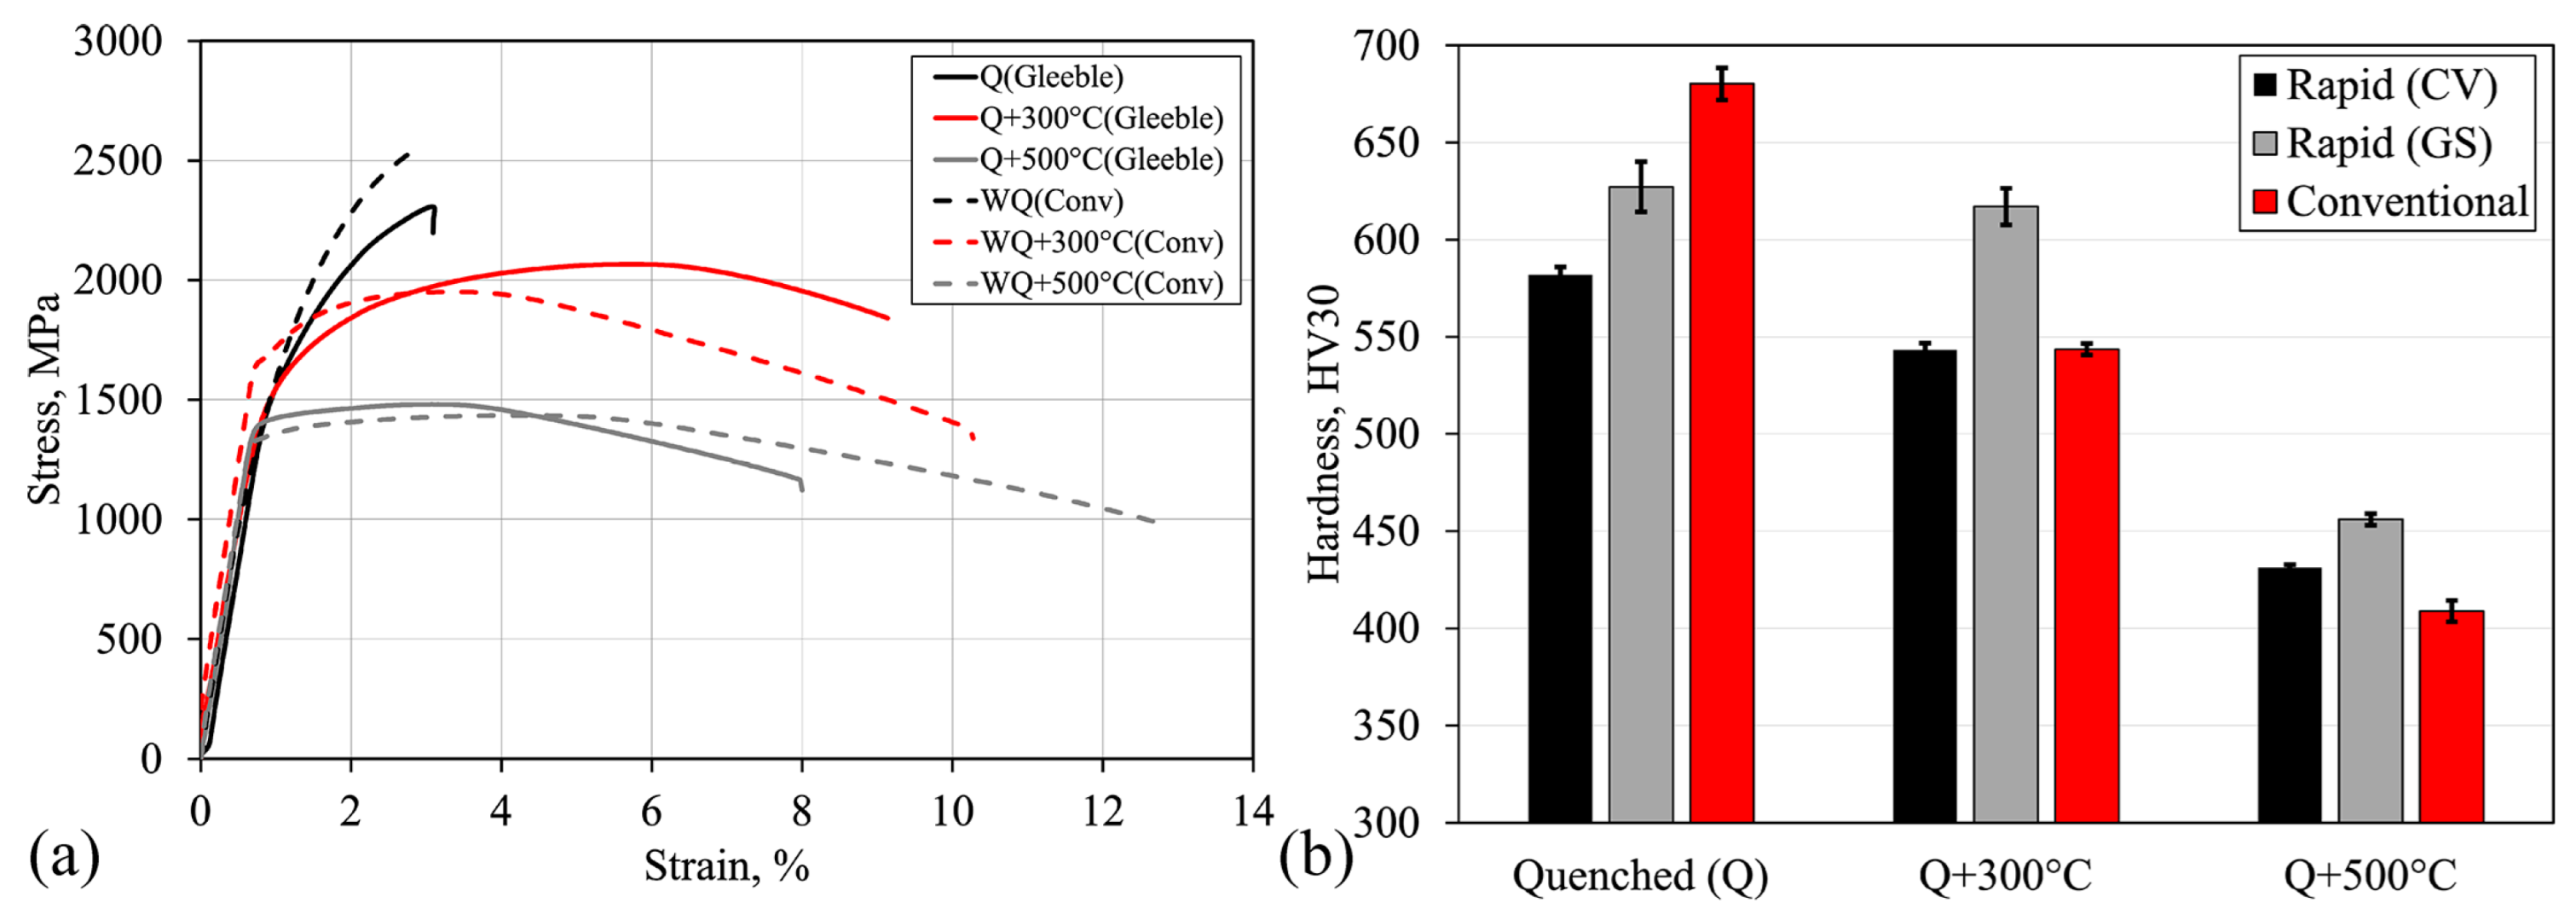
Table 2 presents the tensile, Charpy-V impact test, and hardness results. Likewise, the stress–strain curves of the investigated materials are shown in Figure 11. From the results it can generally be seen that the strength values for the quenched samples are higher, and the elongation values are lower, than those for the tempered samples. The increase in the tempering temperature led to a decrease in the strength levels but an increase in the elongation values. According to the tensile testing results, for both tempering temperatures of 300 °C and 500 °C, the rapid tempering resulted in a higher strength and lower elongation compared to conventional tempering. The biggest improvements were observed in the samples tempered at 300 °C, which provided excellent Rm × A values (18,093 MPa% and 19,580 MPa% for the Q + 300 °C and WQ + 300 °C samples, respectively). A higher Rm × A value means that the strength and ductile combination is enhanced. The elongation values for the rapidly treated samples were difficult to interpret, as the localization of the deformation occurred outside of the extensometer. Therefore, the tensile strength and hardness values were more reliable when comparing the mechanical properties. As the sample dimensions between the tensile and Charpy-V test samples were different, the heating/cooling rates during the Gleeble experiments may have somewhat varied, and this may have influenced the hardness values seen in Table 2. Therefore, the hardness was also tested on the Charpy-V samples to obtain a more reliable comparison between the properties of the materials. Considering only the hardness values, the major difference was found between the conventional and rapidly quenched materials, where the conventionally water-quenched material had a hardness of 680 HV and the rapidly treated sample had a hardness of 582 HV. This may have been due to the different cooling rates between the samples, as the conventionally treated samples had a very high cooling rate due to their immersion in a water tank. It is notable that the tempering treatment did not affect the hardness of tempered samples, as the tempering was done at the same temperature for both the conventionally and rapidly treated samples.
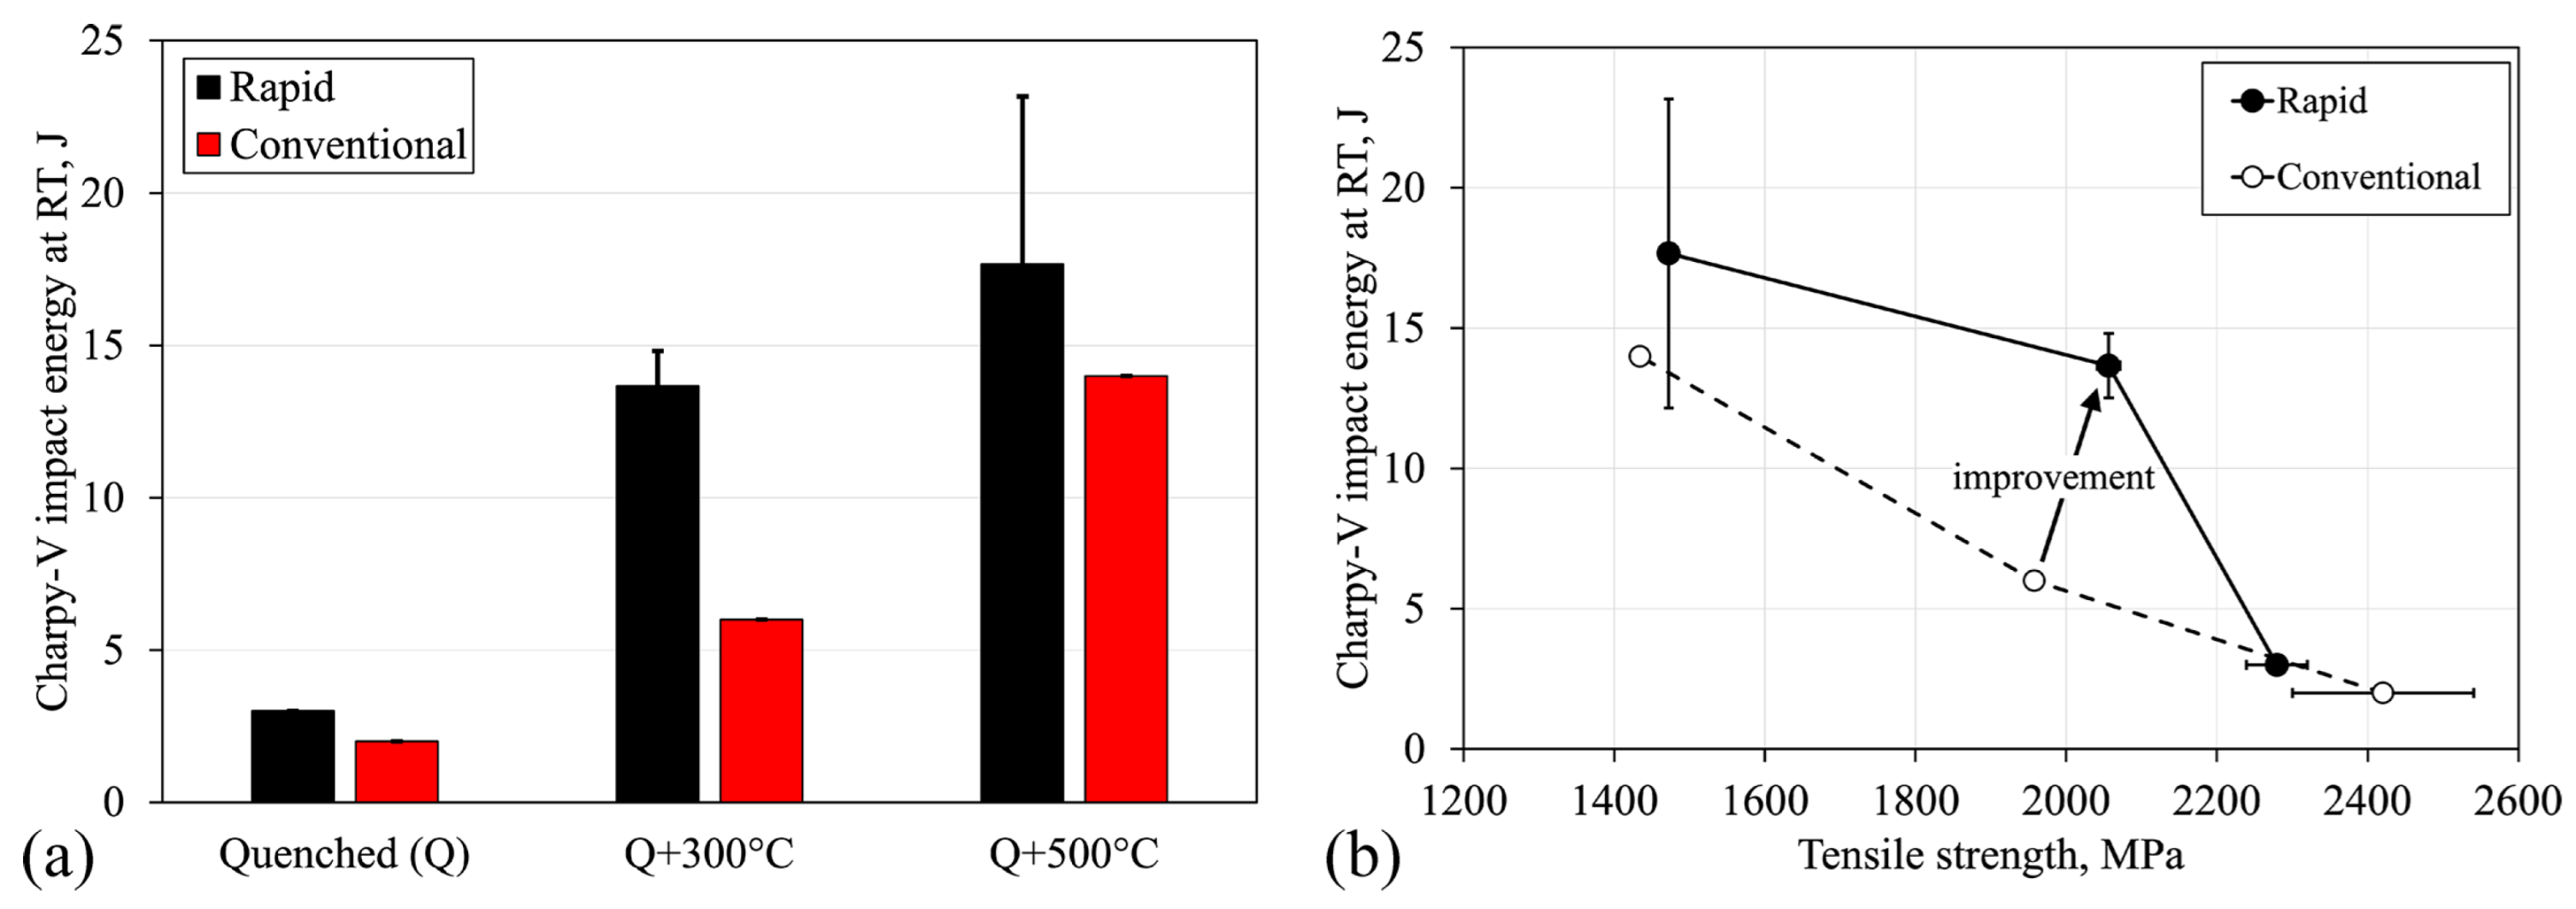
The impact energies of the investigated materials at room temperature are given in Figure 12a. Impact energies improved as the tempering temperature increased. Both quenched variants were very brittle, as the CV energies were between 2–3 J. The most notable improvement was seen after rapid tempering, where the CV energies increased from 3 J to 18 J. Generally, the rapidly treated materials showed improved impact toughness compared to the conventionally treated samples. Comparing the relationship between the tensile strength and impact energies in Figure 12b, the rapidly tempered materials at 300 °C and 500 °C have a significantly better combination of tensile strength and CV impact energy than the conventionally tempered materials. This is the most important result of the current study. The material behavior was totally different between the rapidly and conventionally heated samples. For example, the conventional WQ + 300 °C sample had a 1958 MPa tensile strength with 6 J impact energy, while the rapid Q + 300 °C sample had a tensile strength of 2056 MPa and 14 J impact energy. Although the absolute values are somewhat low for the impact toughness, the general relative improvement in the mechanical properties is noteworthy. Furthermore, the finer mean grain size of the rapidly treated samples cannot be clearly stated to have influenced the impact toughness, as both quenched, non-tempered variants had poor impact toughness values with no significant differences. On the other hand, the inclusion characterization was not performed. Although it is well-known that the quantity of inclusions and inclusion size or other impurity levels can decrease the ductility and impact energies of ultra-high-strength steels [32,33,34], it was assumed that the purity level was similar for both the rapidly and conventionally heat-treated samples since the investigated samples were cut from the same initial material.

3.4. Microstructure-Property Relationship

Although the results showed that the sample rapidly tempered at 300 °C has considerably better properties, further impact toughness improvement may be needed for industrial applications where a combination of high strength and toughness is required. Presumably, the prior austenite grain refinement of the rapid process improved the Charpy-V impact energies. However, some presumably brittle microstructural components, such as pearlitic strings and coarse carbides, were found in the rapidly treated samples. It is uncertain how much better the results could be if the material consisted of only a refined martensitic microstructure without coarse carbides and a heterogenous microstructure. However, the precise carbide size distribution for the current study was not obtained using transmission electron microscopy. Thus, the next step for future research is to discover how the rapid heat-treatment parameters (austenitization together with tempering) can be engineered to improve toughness and ductility with the rapid induction trials for on-going studies in the pilot induction platform [35]. The current results are linked to the initiation of the local cleavage cracks spanning across the coarsest grains [20] and in the second term, the fraction of {100} planes close to the crack plane is linked to the propagation and arrest of local cleavage fractures [36]. However, a texture analysis of the current EBSD acquirements was not possible as the samples are Gleeble simulations, and the exact orientation is undefined.

4. Conclusions

The microstructure and mechanical properties of conventionally and rapidly quenched and tempered 51CrV4 steel grade samples were studied. The microstructural characterization showed that the material consisted of martensite, while a small fraction of pearlite was also found. Rapid heat treatment refined the prior austenite grain size and coarsest grain sizes (d90%), and it was found to be an efficient way to improve the toughness properties. While the hardness and tensile strength values were quite similar for both the conventional and rapid materials, the rapidly quenched and 300 °C tempered material had the most promising strength and toughness combination. It should be noted that the combination of conventional austenitization and subsequent rapid tempering, not studied here, is an interesting processing route and should be included in further studies. The parameters of rapid treatment should be such that the grain size of austenite and martensite is fine and uniform, and not as heterogenous as those observed in the current study. However, more detailed studies need to be performed to understand the effect of rapid austenitization and tempering on the microstructure and mechanical properties of ultra-high-strength steels.

Author Contributions

Conceptualization, A.K. and V.J.; Methodology, A.K.; Validation, A.K., O.H. and S.S.; Investigation, A.K. and O.H.; Writing—original draft, A.K. and O.H.; Writing—review and editing, S.S. and V.J.; Supervision, J.K.; Project administration, A.K.; Funding acquisition, A.K. and J.K. All authors have read and agreed to the published version of the manuscript.

Funding

Financial assistance from the Business Finland, project FOSSA–Fossil-Free Steel Applications “Dno 5397/31/2021”, is acknowledged.

Data Availability Statement

The data presented in this study are available on request from the corresponding author. The data are not publicly available due to ongoing study.

Conflicts of Interest

The authors declare that they have no known competing financial interests or personal relationships that could have appeared to influence the work reported in this study.

References

  1. Matlock, D.K.; Kang, S.; De Moor, E.; Speer, J.G. Applications of Rapid Thermal Processing to Advanced High Strength Sheet Steel Developments. Mater. Charact. 2020, 166, 110397. [Google Scholar] [CrossRef]
  2. Gaggiotti, M.; Albini, L.; Di Nunzio, P.; Di Schino, A.; Stornelli, G.; Tiracorrendo, G. Ultrafast Heating Heat Treatment Effect on the Microstructure and Properties of Steels. Metals 2022, 12, 1313. [Google Scholar] [CrossRef]
  3. Göken, J.; Maikranz-Valentin, M.; Steinhoff, K.; Golovin, I.S.; Ivleva, T.V.; Flejszar, A.; Riehemann, W. Mechanical Spectroscopy Study of Thermo-Mechanically Treated 51CrV4 Steel. Mater. Sci. Eng. A 2009, 521–522, 335–339. [Google Scholar] [CrossRef]
  4. Zhang, L.; Gong, D.; Li, Y.; Wang, X.; Ren, X.; Wang, E. Effect of Quenching Conditions on the Microstructure and Mechanical Properties of 51CrV4 Spring Steel. Metals 2018, 8, 1056. [Google Scholar] [CrossRef]
  5. Lee, W.-S.; Su, T.-T. Mechanical Properties and Microstructural Features of AISI 4340 High-Strength Alloy Steel under Quenched and Tempered Conditions. J. Mater. Process. Technol. 1999, 87, 198–206. [Google Scholar] [CrossRef]
  6. Revilla, C.; López, B.; Rodriguez-Ibabe, J.M. Carbide Size Refinement by Controlling the Heating Rate during Induction Tempering in a Low Alloy Steel. Mater. Des. 2014, 62, 296–304. [Google Scholar] [CrossRef]
  7. Furuhara, T.; Kobayashi, K.; Maki, T. Control of Cementite Precipitation in Lath Martensite by Rapid Heating and Tempering. ISIJ Int. 2004, 44, 1937–1944. [Google Scholar] [CrossRef]
  8. Euser, V.K.; Williamson, D.L.; Clarke, A.J.; Speer, J.G. Cementite Precipitation in Conventionally and Rapidly Tempered 4340 Steel. JOM 2022, 74, 2386–2394. [Google Scholar] [CrossRef]
  9. Luo, Z.F.; Liang, Y.L.; Long, S.L.; Jiang, Y.; Wu, Z.L. Effects of Ultra-Refine Grain and Micro-Nano Twins on Mechanical Properties of 51CrV4 Spring Steel. Mater. Sci. Eng. A 2017, 690, 225–232. [Google Scholar] [CrossRef]
  10. Zhang, C.; Wang, Q.; Ren, J.; Li, R.; Wang, M.; Zhang, F.; Sun, K. Effect of Martensitic Morphology on Mechanical Properties of an As-Quenched and Tempered 25CrMo48V Steel. Mater. Sci. Eng. A 2012, 534, 339–346. [Google Scholar] [CrossRef]
  11. Hanamura, T.; Yin, F.; Nagai, K. Ductile-Brittle Transition Temperature of Ultrafine Ferrite/Cementite Microstructure in a Low Carbon Steel Controlled by Effective Grain Size. ISIJ Int. 2004, 44, 610–617. [Google Scholar] [CrossRef]
  12. Han, J.; da Silva, A.K.; Ponge, D.; Raabe, D.; Lee, S.-M.; Lee, Y.-K.; Lee, S.-I.; Hwang, B. The Effects of Prior Austenite Grain Boundaries and Microstructural Morphology on the Impact Toughness of Intercritically Annealed Medium Mn Steel. Acta Mater. 2017, 122, 199–206. [Google Scholar] [CrossRef]
  13. Wang, C.; Wang, M.; Shi, J.; Hui, W.; Dong, H. Effect of Microstructural Refinement on the Toughness of Low Carbon Martensitic Steel. Scr. Mater. 2008, 58, 492–495. [Google Scholar] [CrossRef]
  14. Morris, J.W., Jr. On the Ductile-Brittle Transition in Lath Martensitic Steel. ISIJ Int. 2011, 51, 1569–1575. [Google Scholar] [CrossRef]
  15. Bhattacharjee, D.; Knott, J.F.; Davis, C.L. Charpy-Impact-Toughness Prediction Using an “Effective” Grain Size for Thermomechanically Controlled Rolled Microalloyed Steels. Metall. Mater. Trans. A 2004, 35, 121–130. [Google Scholar] [CrossRef]
  16. Hwang, B.; Lee, C.G.; Lee, T.-H. Correlation of Microstructure and Mechanical Properties of Thermomechanically Processed Low-Carbon Steels Containing Boron and Copper. Metall. Mater. Trans. A 2010, 41, 85–96. [Google Scholar] [CrossRef]
  17. Hwang, B.; Lee, C.G.; Kim, S.-J. Low-Temperature Toughening Mechanism in Thermomechanically Processed High-Strength Low-Alloy Steels. Metall. Mater. Trans. A 2011, 42, 717–728. [Google Scholar] [CrossRef]
  18. Gutiérrez, I. Effect of Microstructure on the Impact Toughness of Nb-Microalloyed Steel: Generalisation of Existing Relations from Ferrite–Pearlite to High Strength Microstructures. Mater. Sci. Eng. A 2013, 571, 57–67. [Google Scholar] [CrossRef]
  19. Morris, J.W.; Kinney, C.; Pytlewski, K.; Adachi, Y. Microstructure and Cleavage in Lath Martensitic Steels. Sci. Technol. Adv. Mater. 2013, 14, 014208. [Google Scholar] [CrossRef]
  20. Javaheri, V.; Kolli, S.; Grande, B.; Porter, D. Insight into the Induction Hardening Behavior of a New 0.40% C Microalloyed Steel: Effects of Initial Microstructure and Thermal Cycles. Mater. Charact. 2019, 149, 165–183. [Google Scholar] [CrossRef]
  21. Judge, V.K.; Speer, J.G.; Clarke, K.D.; Findley, K.O.; Clarke, A.J. Rapid Thermal Processing to Enhance Steel Toughness. Sci. Rep. 2018, 8, 445. [Google Scholar] [CrossRef]
  22. Kaiser, D.; Damon, J.; Mühl, F.; de Graaff, B.; Kiefer, D.; Dietrich, S.; Schulze, V. Experimental Investigation and Finite-Element Modeling of the Short-Time Induction Quench-and-Temper Process of AISI 4140. J. Mater. Process. Technol. 2020, 279, 116485. [Google Scholar] [CrossRef]
  23. Podgornik, B.; Leskovšek, V.; Godec, M.; Senčič, B. Microstructure Refinement and Its Effect on Properties of Spring Steel. Mater. Sci. Eng. A 2014, 599, 81–86. [Google Scholar] [CrossRef]
  24. Brownrigg, A.; Curcio, P.; Boelen, R. Etching of Prior Austenite Grain Boundaries in Martensite. Metallography 1975, 8, 529–533. [Google Scholar] [CrossRef]
  25. EN ISO 6892-1; Metallic Materials. Tensile Testing. Part 1: Method of Test at Room Temperature. ISO: Geneva, Switzerland, 2019.
  26. EN ISO 148-1; Metallic Materials, Charpy Pendulum Impact Test, Part 1: Test Method. ISO: Geneva, Switzerland, 2010.
  27. Stuhlmann, W. What the TTT-Diagrams Tell Us. Härterei Technische Mitteilungen 1954, 6, 31–48. (In German) [Google Scholar]
  28. Yuan, Q.; Ren, J.; Mo, J.; Zhang, Z.; Tang, E.; Xu, G.; Xue, Z. Effects of Rapid Heating on the Phase Transformation and Grain Refinement of a Low-Carbon Mciroalloyed Steel. J. Mater. Res. Technol. 2023, 23, 3756–3771. [Google Scholar] [CrossRef]
  29. Saastamoinen, A.; Kaijalainen, A.; Heikkala, J.; Porter, D.; Suikkanen, P. The Effect of Tempering Temperature on Microstructure, Mechanical Properties and Bendability of Direct-Quenched Low-Alloy Strip Steel. Mater. Sci. Eng. A 2018, 730, 284–294. [Google Scholar] [CrossRef]
  30. De Knijf, D.; Petrov, R.; Föjer, C.; Kestens, L.A.I. Effect of Fresh Martensite on the Stability of Retained Austenite in Quenching and Partitioning Steel. Mater. Sci. Eng. A 2014, 615, 107–115. [Google Scholar] [CrossRef]
  31. Kwon, E.P.; Fujieda, S.; Shinoda, K.; Suzuki, S. Characterization of Transformed and Deformed Microstructures in Transformation Induced Plasticity Steels Using Electron Backscattering Diffraction. Mater. Sci. Eng. A 2011, 528, 5007–5017. [Google Scholar] [CrossRef]
  32. Tervo, H. Non-Metallic Inclusions in Steels and Their Effect on the Toughness and Ductility: Ultra-High-Strength Steels and High Strength Offshore Steels. Ph.D. Thesis, University of Oulu, Oulu, Finland, 2023. [Google Scholar]
  33. Pickering, F.B. Towards Improved Ductility and Toughness; Climax Molybdenum Development Company: Tokyo, Japan, 1971; p. 9. [Google Scholar]
  34. Pickering, F.B. Some Effects of Non-Metallic Inclusions on the Properties of Steels. In Proceedings of the Mechanical Working and Steel Processing Proceedings, Chicago, IL, USA, 22–25 October 1989; pp. 381–401. [Google Scholar]
  35. Haiko, O.; Kaijalainen, A.; Iso-Junno, T.; Jaskari, M.; Kömi, J.I. Effect of Rapid Induction Tempering on the Mechanical Properties and Microstructure of Ultra-High Strength Steel. Mater. Sci. Forum 2023, 1105, 29–34. [Google Scholar] [CrossRef]
  36. Pallaspuro, S.; Kaijalainen, A.J.; Mehtonen, S.; Kömi, J.I.; Zhang, Z.L.; Porter, D.A. Estimation of Impact Toughness Transition Temperatures of As-Quenched Steels. Mater. Sci. Forum 2018, 941, 498–503. [Google Scholar] [CrossRef]
Figure 1. Temperature–time diagrams showing differences between: (a) conventional; and (b) rapid heating, quenching, and tempering.
Metals 14 00060 g001
Figure 2. Schematic illustration of the tensile test sample.
Metals 14 00060 g002
Figure 3. JMatPro CCT diagram simulations with 900 °C austenitization temperature and (a) 5 μm; (b) 10 μm; and (c) 15 μm austenite grain sizes. (d) Dilatometer CCT diagram of investigated material with austenitization temperature of 900 °C. MS temperature computed using equation given in ref. [27] (Abbreviations: BS = Bainite start, Bf = Bainite finish, MS = Martensite start, and Mf = Martensite finish temperature).
Metals 14 00060 g003
Figure 4. (a) Dilatometer dilatation curves with 10, 50 and 100 °C/s heating rate and 30 °C/s cooling rate; and (b) plot of heating cycle during phase transformation of ferrite to austenite without the cooling stage.
Metals 14 00060 g004
Figure 5. Prior austenite morphologies of: (a) conventional sample; and (b) rapidly austenitized and quenched sample.
Metals 14 00060 g005
Figure 6. Prior austenite grain size (in diameter) distributions of the rapid and conventional materials.
Metals 14 00060 g006
Figure 7. EBSD randomly colored grain maps with band contrast layer and high-angle grain boundaries (>15°, black). Conventionally heat-treated samples (ac); and rapidly (df) heat-treated samples.
Metals 14 00060 g007
Figure 8. Kernel average maps (KAM) with band contrast (BC) layer and high-angle grain boundaries (>15°, black). Conventionally heat-treated samples (ac); and rapidly (df) heat-treated samples.
Metals 14 00060 g008
Figure 9. Typical microstructure of the rapidly heat-treated sample: (a) quenched (Q); (b) Q + tempered at 300 °C; and (c) Q + tempered at 500 °C.
Metals 14 00060 g009
Figure 10. (a) Globular cementite (blue arrows); (b) string-like structures (red arrows); and (c) EBSD phase map with BC layer and high-angle grain boundaries (>15°, black) of rapidly quenched (Q) + tempered at 500 °C material. Phases are colored as follows: red BCC, blue FCC, and yellow Fe3C.
Metals 14 00060 g010
Figure 11. (a) Stress–strain curves; and (b) hardness values of the investigated materials. The 95% confidence limits of the means are also given.
Metals 14 00060 g011
Figure 12. (a) Charpy-V impact energies at room temperature (RT) of investigated materials; and (b) relationship between tensile strength and impact energy. The standard deviations of the values are also given.
Metals 14 00060 g012
Table 1. Grain count, effective grain size (deff), largest grain (dmax), coarse grain size from 90% cut-off (d90%), and fraction of low- (LAGB, 5°–15°) and high-angle boundaries (HAGB, >15°) of the investigated materials.
MaterialGrains
pcs.
deff,
μm
dmax,
μm
d90%,
μm
LAGB,
%
HAGB,
%
Q(Rapid)21100.69 ± 0.035.612.6311.488.6
Q + 300 °C (Rapid)26080.62 ± 0.027.572.3911.988.1
Q + 500 °C (Rapid)25660.62 ± 0.025.642.7912.687.4
WQ (Conv)21780.64 ± 0.038.963.2812.987.1
WQ + 300 °C (Conv)19840.68 ± 0.039.653.3313.087.0
WQ + 500 °C (Conv)19460.69 ± 0.037.343.3612.987.1
Table 2. Mechanical properties of the investigated materials. In the tensile and Charpy-V impact testing, 2 or 3 samples were performed, respectively. Hardness measured from Charpy-V impact (CV) and Gleeble (GS) sample with 95% confidence limits of the means.
MaterialRp0.2,
MPa
Rm, MPaA,
%
Rp0.2/Rm-RatioRm × A,
MPa%
CV at RT, JHardness, HV30 (CV)Hardness,
HV30 (GS)
Q (Rapid)164322802.50.7257003582 ± 4627 ± 13
Q + 300 °C (Rapid)156320568.80.7618,09314543 ± 4617 ± 9
Q + 500 °C (Rapid)139414727.90.9511,62918431 ± 1456 ± 3
WQ (Conv)159724212.40.6658102680 ± 8-
WQ + 300 °C (Conv)1714195810.00.8819,5806544 ± 3-
WQ + 500 °C (Conv)1346143412.20.9417,49514409 ± 6-
Disclaimer/Publisher’s Note: The statements, opinions and data contained in all publications are solely those of the individual author(s) and contributor(s) and not of MDPI and/or the editor(s). MDPI and/or the editor(s) disclaim responsibility for any injury to people or property resulting from any ideas, methods, instructions or products referred to in the content.