Article

Lithography-Based Metal Manufacturing of Copper: Influence of Exposure Parameters on Green Part Strength

by
Jakob Scheibler
1,*,
Alina Sabine Kosmehl
1,
Thomas Studnitzky
1,
Chongliang Zhong
1 and
Thomas Weißgärber
1,2
1
Fraunhofer Institute for Manufacturing Technology and Advanced Materials IFAM, Dresden Branch, 01277 Dresden, Germany
2
Faculty Mechanical Engineering, Institute of Materials Science, TUD Dresden University of Technology, 01062 Dresden, Germany
*
Author to whom correspondence should be addressed.
Metals 2024, 14(11), 1268; https://doi.org/10.3390/met14111268
Submission received: 30 September 2024 / Revised: 22 October 2024 / Accepted: 29 October 2024 / Published: 8 November 2024
(This article belongs to the Special Issue The Next Generation of Metal Additive Manufacturing)

Abstract

:
Copper’s high thermal and electrical conductivity enables its application in heat exchangers and high-frequency components. For those applications, additive manufacturing has advantages with respect to functional integration, miniaturization, and reduced waste. However, the processing of copper is a challenge for established laser-based processes since copper’s high reflectivity impedes energy input. Sinter-based additive manufacturing processes do not exhibit this limitation since the energy for the fusion of material is applied by thermal energy during sintering. This makes them an ideal candidate for copper manufacturing. In the following work, Lithography-based Metal Manufacturing (LMM) of copper is demonstrated. Curing behavior is investigated by single-layer exposure (SLE) tests measuring curing thickness for different loading factors, particle sizes, and exposure times. Bending strength is investigated as a function of exposure time, loading factor, and orientation in the building space. A higher exposure time and lower loading factors increase bending strength. Furthermore, samples with different loading factors are produced to measure the impact of the loading factor on sintered density. For these parameters, no clear trend is demonstrated.

1. Introduction

Due to its high electrical and thermal conductivity—it being the second highest among metals after silver—copper has a widespread use in the electrical and electronic industry [1]. However, according to the classification of the European Union, copper is a “Strategic Raw Material” [2] and, therefore, an efficient use of this resource is advised. One possible way to implement this goal is additive manufacturing (AM), the layer-wise addition of material to build a three-dimensional object from a three-dimensional model [3]. Use cases like heat exchangers and high-frequency components will benefit from the design freedom offered by AM as with, e.g., manufacturing complex shaped inner cavities and channels [4]. These features are complicated to manufacture by conventional manufacturing techniques like milling, forging, casting, and combinations thereof.
Producing AM parts from copper by laser-based AM processes like Laser Powder Bed Fusion (PBF-LB) is challenging since copper’s high reflectivity hinders the heating of the powder. Therefore, it is necessary to lower the laser wavelength from 1000 nm to 515 nm to allow better energy absorption [5]. The same applies for the Laser Directed Energy Deposition (DED-LB) of copper [6]. An increase in the energy input is possible by using an electron beam to melt the material. This is used for Electron Beam Powder Bed Fusion (PBF-LB) and Electron Beam Directed Energy Deposition (DED-LB), as demonstrated in the literature by Dadbakhsh et al. [7] for PBF-EB, and Zamonaro Reichold and Baufeld [8] for DED-EB, respectively. Although DED-EB exhibits a high productivity of 7.5 kg/h, the obtained surface roughness is high. Certain applications like high-frequency components require lower surface roughness [9].
Alternatively, indirect AM processes can also produce copper parts. These processes consist of a method to manufacture a green part from metal powder with the addition of a binder and a subsequent heat treatment. The green part needs to be handled with care since its strength (green strength) is lower than that of solid metal. The heat treatment has two objectives: (a) debinding: decomposing and evaporating most of the binder and (b) sintering: compacting powdered material to form a solid mass without melting it.
These processes come with a wide variety of possible ways to produce a green part: In addition to Metal Binder Jetting, Material Extrusion, Mold Slurry Deposition (MoldJet®), Material Jetting, the selective laser sintering of metal–polymer mixtures, GelCasting, and additive screen printing, there is vat photopolymerization (Lithography-based Metal Manufacturing, LMM).
The LMM process scheme is shown as a schematic in Figure 1. The process incorporates a feedstock consisting of metal powder combined with a photosensitive organic binder system. This mixture is in a solid state at room temperature and liquefies when heated above 50 °C. To initiate the printing process, a heated blade (1) is employed to liquefy the feedstock stored in a reservoir. The liquefied feedstock is then evenly distributed onto the building platform. Light with a wavelength of 405 nm is used to cure certain portions of the feedstock while leaving other areas uncured. One whole layer is cured simultaneously by a DLP projector. The cured portions will not liquefy when heated. By lowering the build platform and repeating the process, a three-dimensional part can be built. Once the printing is complete, a solid block is formed containing both the cured and non-cured portions of the feedstock. This solid block is then removed from the printing chamber. Since the uncured feedstock acts as a support structure, no additional support structures are necessary. With LMM, the low surface roughness of sintered parts is demonstrated to go down to RA = 1.6 μm [10]. For copper, the surface roughness of an actual functional part inside a complex shaped channel is demonstrated to be SA ≈ 10 μm [4].
The curing of the binder is the critical step to ensure sufficient green strength, as the cohesion of the green part is created while curing. Curing parameters such as exposure energy, exposure intensity, and their ratio curing time define the cured layer thickness. Also, the ratio of the cured layer thickness (Cd) to the raked layer thickness (Cr), called overlap (O), affects the properties of a printed part [11,12]. Vogel et al. [12] suggest an overlap of two for sufficient strength. For the prediction of cure depth, a model first published by Jacobs [13] is employed. The model originates from the Beer–Lambert law (Equation (1)). With the incident exposure energy (E0), the exposure energy at a certain depth (E(z)), a constant (const) and the depth (z), Equation (2) describes the system at the lower boundary of the cured layer. This point is called the gel point since it marks the transition from cured, solid material to the liquid uncured resin. The incident exposure energy is the maximum exposure energy (Emax) that is set at the lithography printer. At the gel point, the exposure energy has decayed to the so-called critical exposure energy (Ecrit). The cure depth (Cd) is the z-coordinate of the gel point. The constant factor is called penetration depth (tpen). This factor is the depth at which the incident exposure energy has decayed to 1/e of the incident exposure energy. Typically, the Jacobs working curve is represented as in Equation (3). This is an equivalent transformation of Equation (2).
ln (E0/E(z)) = const∙z
ln (Emax/Ecrit) = 1/tpenCd
Cd = tpen∙ln (Emax/Ecrit)
The Jacobs working curve can be plotted as the cure depth Cd against the natural logarithm of the incident exposure energy (Emax). From this plot, a straight line, the penetration depth (tpen) can be determined as the slope of the working curve and the intercept with the x-axis representing the natural logarithm of the critical exposure energy (Ecrit). These relationships are not applicable to filled suspensions as used in LMM. There are studies employing empirical models to estimate the cure depth [14]. Another approach is modeling on the basis of Mie scattering, as demonstrated by Resch et al. [15]. However, Mie scattering only examines loading factors of up to 20%, which is lower than the threshold for technologically relevant loading factors. Loading factors (in first approximation equal to green density) of more than 50% are necessary for the densification of copper particles in the relevant size range [16]. In this work, the cured thickness is measured, with samples produced by single-layer exposure (SLE) tests. Based on these results, the green part’s three-point bending strength is measured at different ratios of cured layer thickness and raked layer thickness. Additionally, green part strength is measured as a function of sample orientation and loading factor.
Beyond the green part’s properties, densification during sintering is determining the quality of additively manufactured parts. Concerning densification of pure copper powder by pressureless sintering, some of the literature demonstrates a densification of over 99% relative density (850 °C for 6 h and 1075 °C for 6 h in H2) [16]. In the case of copper produced by LMM, only 90% of the density is achieved after sintering at 1050 °C for 4 h in H2 partial pressure [17]. Furthermore, Ott [16] proves that in the range of loading factors from 56% to 72%, there is a linear relationship between green density and sintered density. If the green density is increased by 1%, the sintered density increases by 0.21%. In the following work, densification during pressureless sintering is examined for different loading factors with LMM-printed samples.
The aim of this study is to examine the effect of exposure parameters and suspension loading factor on green strength and sintered density. Therefore, working curves for pure copper are recorded for a large range of particle sizes. Moreover, a new model for linking exposure parameters, particle size, suspension composition, and cured layer thickness is proposed. Furthermore, for the first time in the literature, the density of LMM-printed copper with solvent debinding is presented.

2. Materials and Methods

2.1. Source Materials Used in This Work

Three copper powders, supplied by ECKA Granules Germany GmbH, Velden, Germany, of different sizes are used. The particle size distributions (PSDs) are summarized in Table 1. Cross-sections are shown in Figure 2. The binder used is a formulation called BM-P18 supplied by Incus GmbH, Vienna, Austria. PSD measurement is carried out by laser diffraction (LA-950, K.K. Horiba Seisakusho, Kyōto, Japan) with water as the dispersing medium.

2.2. Single-Layer Exposure for Working Curve Determination

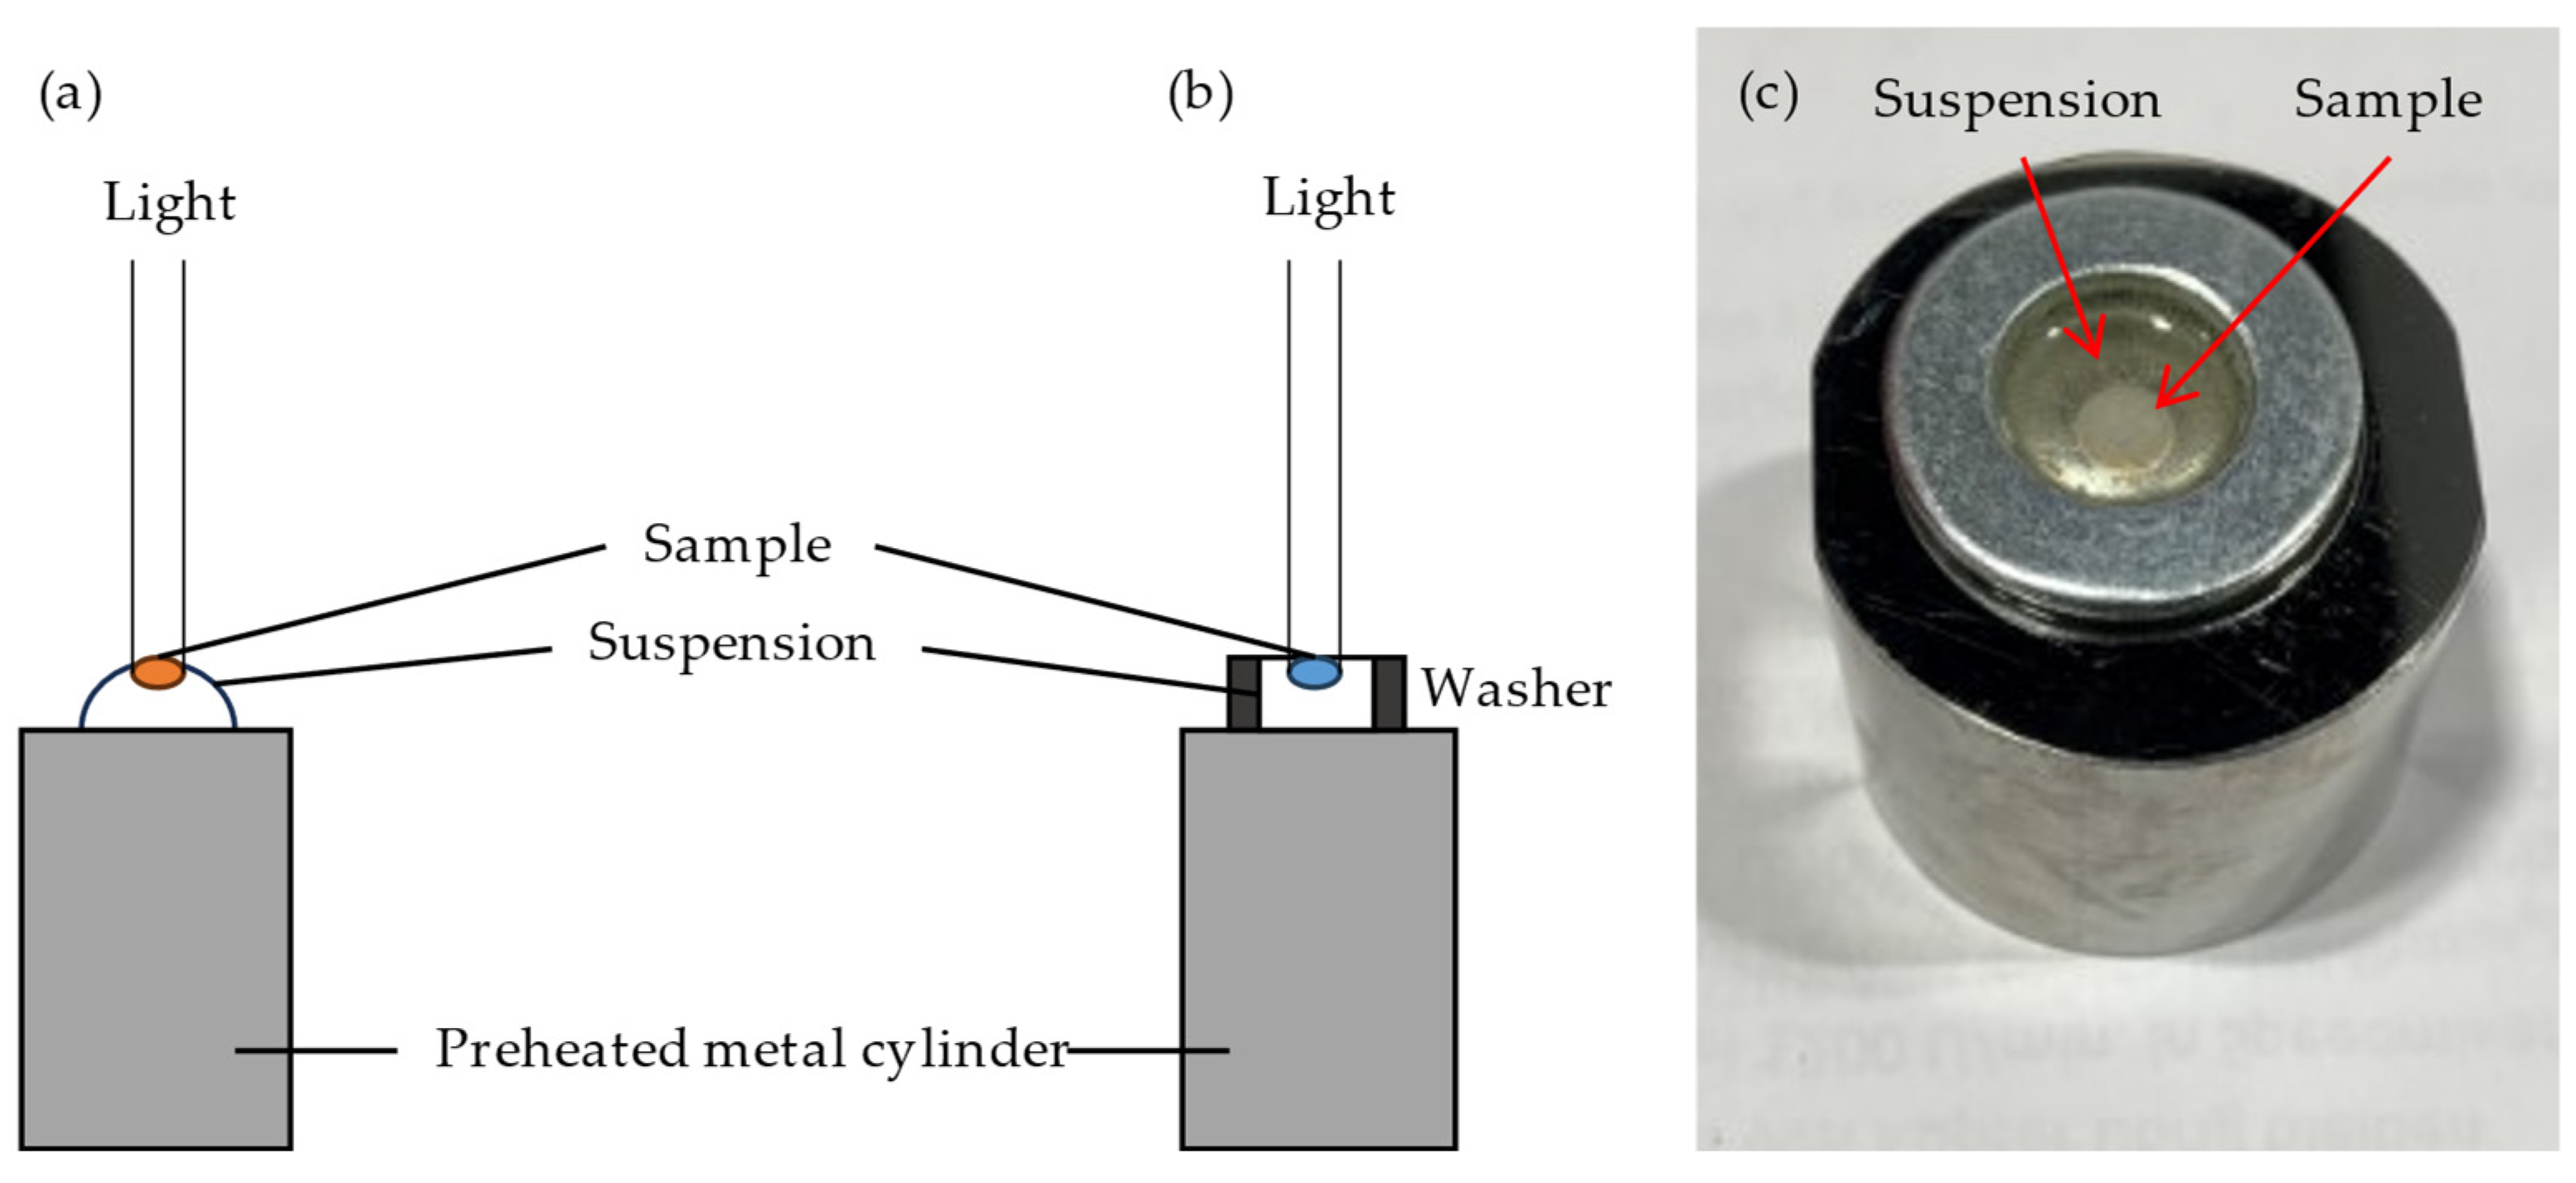
Single-layer exposure (SLE) tests for filled suspensions are carried out using the “Hammer Lab35” system from Incus GmbH (Vienna, Austria). The setup for both filled and unfilled suspensions is shown in Figure 3. The geometry to be exposed is a circle with a diameter of 5 mm. A spatula tip (10 mm × 4 mm × 0.5 mm) of suspension is applied on a metal cylinder. The cylinder is preheated to 60 °C in a water bath and dried before each exposure. The upper surface of the suspension drop must lie in the focal plane of the projector. Immediately after the suspension has melted, the exposure is started. After exposure, the resulting sample is placed in preheated (60 °C) solvent called Incusol (Incus GmbH, Vienna, Austria) using a spatula tip. This serves to remove unexposed suspension residues. The sample is then dried in air for at least 1 h on a paper towel and then measured using a dial gauge (measurement resolution: 0.001 mm). Drying and measurement are carried out in the same orientation as the exposure. Three thickness measurements are taken for each sample (edge—center—edge).
In the case of the SLE tests for the unfilled suspension, prior to the test, the unfilled suspension (consisting only of photosensitive binder) is heated to 60 °C until it is completely liquified. This is followed by homogenization by mixing for 60 s at 1200 rpm using a SpeedMixer (Hauschild SpeedMixer, Hamm, Germany). Furthermore, a metal washer is placed onto the cylinder before exposure. The inner hole of the washer (13 mm diameter, 2.5 mm height) is filled with suspension. The subsequent procedure is carried out analogously to that of filled suspensions. The exposure intensity is fixed at the DLP projector’s maximum value of 100 mW/cm2. Selected samples are sputtered with carbon and galvanically plated with nickel. This allows for the preparation and subsequent microscopical examination of cross-sections. Section 2.5 contains details of metallographic preparation.

2.3. Green Parts and Green Strength Measurement

The strength of green parts was measured in a three-point bending test (DIN EN ISO 3325, four cuboids of 60 mm × 30 mm × 12 mm [18]). Different orientations of the samples, as shown in Figure 4, are examined. The influence of a higher loading factor of 58% instead of 52% is also investigated. These loading factors represent the process window of spreadable suspensions. Moreover, different exposure parameters and different raked layer heights were examined, as shown in Table 2. Starting with an overlap of one, it is increased and decreased by a quarter and is then further increased while doubling the distance to 1. The DoE Method is not used in this study since the subsequent steps require significant resources in terms of time and materials. Moreover, only the influence of increasing overlap is investigated in this research. Increasing raked layer thickness to 50 µm while maintaining the overlap of one allows one to check if the overlap or cured layer thickness have more influence on green part strength. The exposure parameters for S-52 and S-58 are selected based on previous experience with printing parameters.
Four cuboids of 25 mm × 3 mm × 3 mm dimensions are printed for density measurement and metallographic preparation with an exposure energy of 200 mJ/cm2 with 52%, 55%, and 58% loading factors. The investigation of various loading factors allows one to gauge the impact on both densification and curing behavior as well as the resulting green strength. The three-point bending test, density measurement, and metallographic preparation are only examined for powder A, since its smaller particle size is the most technically relevant size for sinter-based additive manufacturing [12,15,17].

2.4. Heat Treatment and Sintering

Air debinding (ADB) is carried out in a convection drying cabinet. The temperature program consists of 24 h at 120 °C followed by 63 h at 250 °C. Two samples per suspension are immersed in Acetone for 24 h before that. These samples are marked as “Solvent debinding (SDB)”. Sintering is carried out under hydrogen (purity: 99.999%) in a tube furnace. The samples are placed on porous alumina sheets and the sintering dwell time is 2 h at 1050 °C.

2.5. Characterization of Sintered Samples

Density measurement is carried out by the Archimedes method, with water used as the liquid for immersion. The measurement is carried out three times. The testing is carried out in accordance with DIN EN 18754 [19]. For the bulk density of pure copper, a value of 8.96 g/cm3 is assumed [20]. It should be noted that only a small sample mass of 1 g was used. According to the aforementioned DIN standard, the mass is too small. For metallographic characterization, samples are embedded in epoxy resin followed by a 30 min vacuum treatment for infiltration of resin into the pores. Grinding with silica paper (320 to 1200) is followed by polishing with 3 µm and 1 µm diamond suspension. Optical microscopy is carried out with Axio Observer (Carl Zeiss AG, Oberkochen, Germany).

3. Results

3.1. Single-Layer Exposure for Working Curve Determination

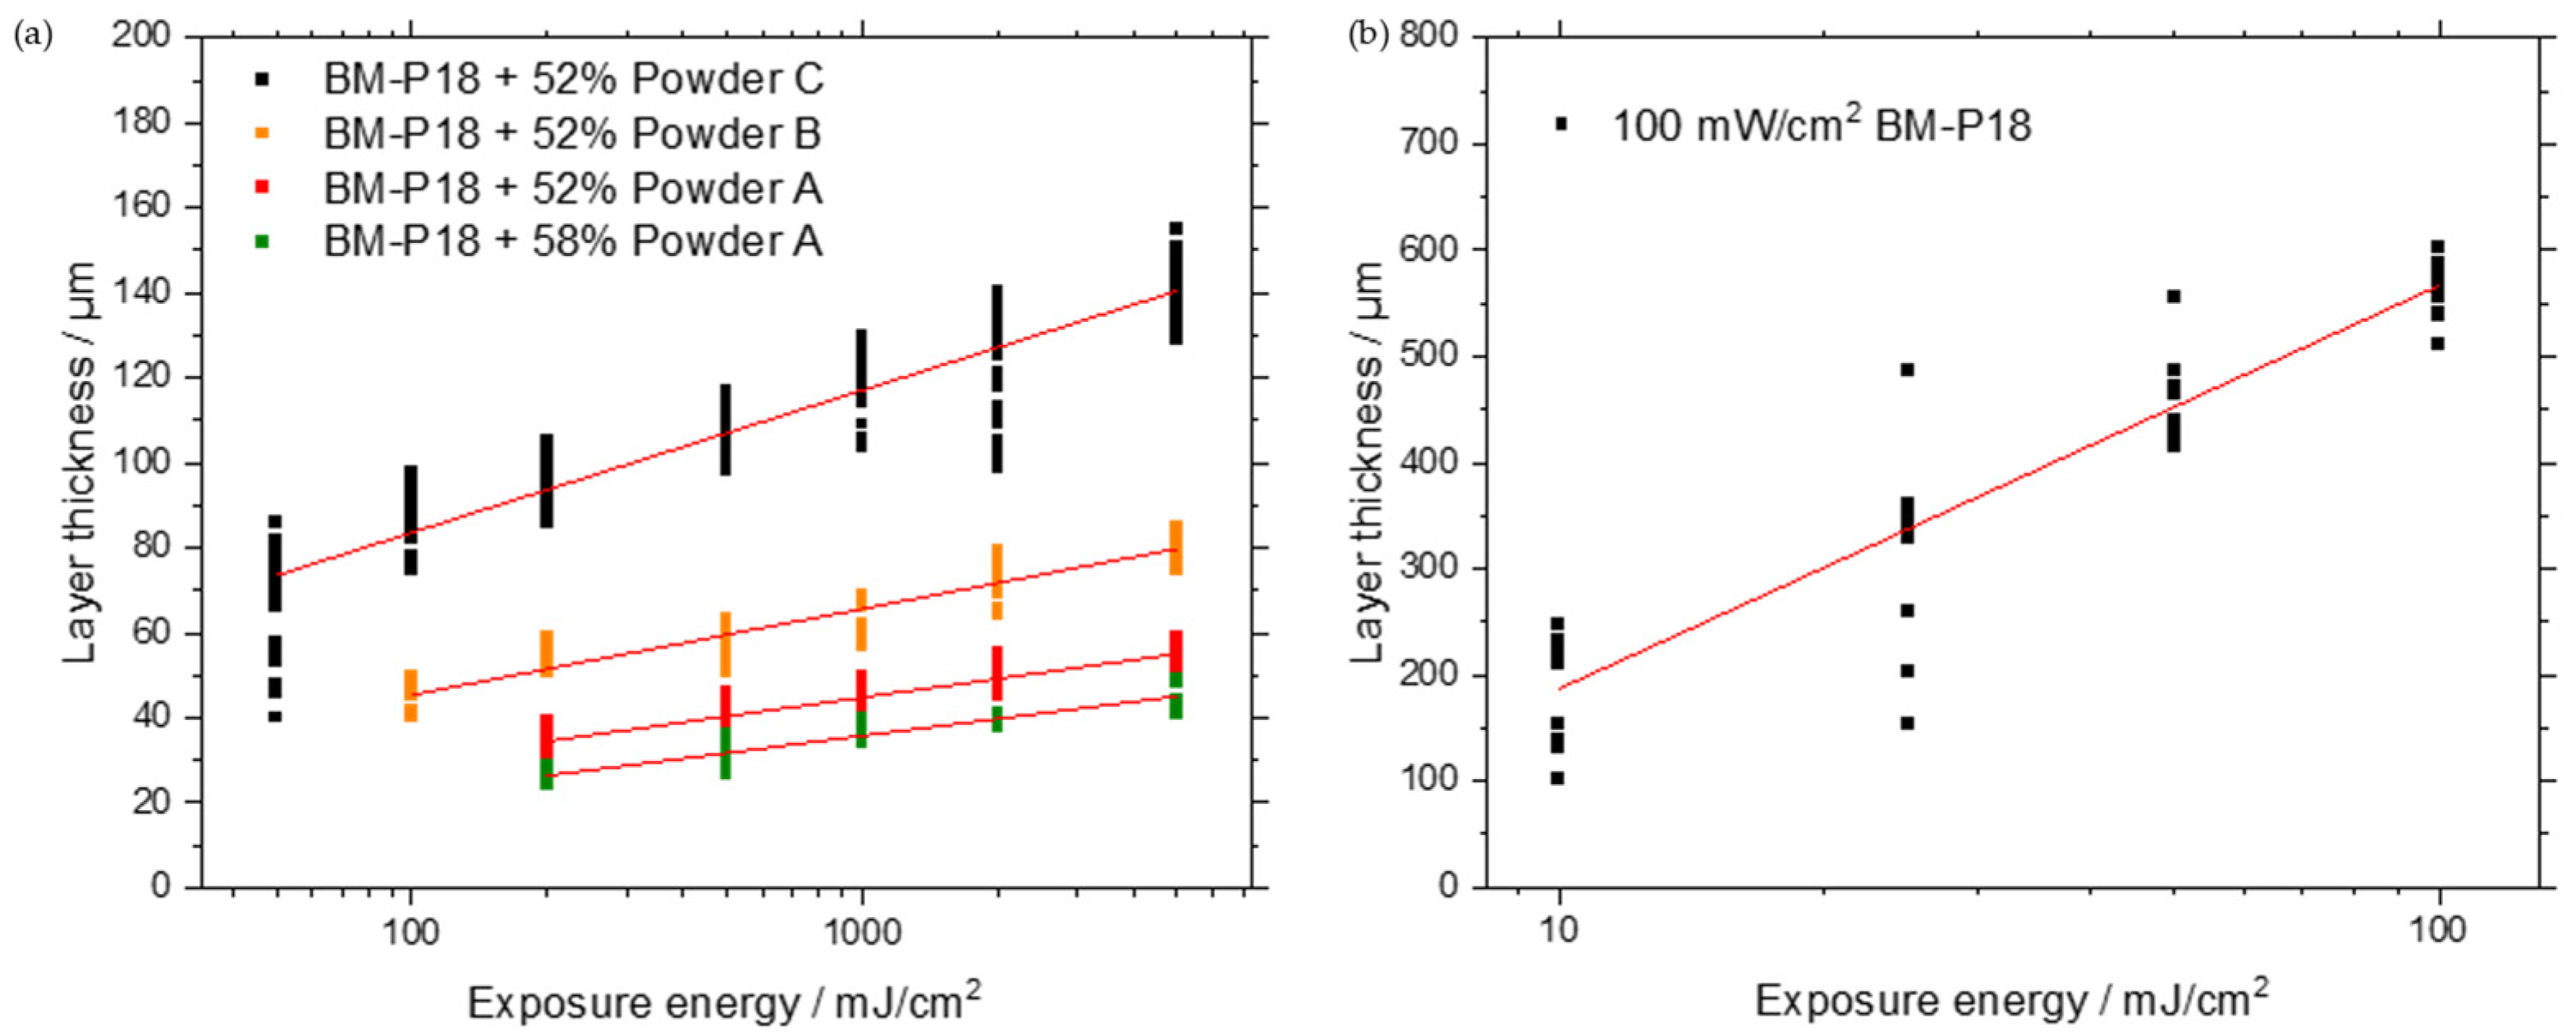
Figure 5 shows the working curves for filled and unfilled suspensions. For all examined suspensions, an increase in layer thickness is measured when increasing the exposure energy. The highest layer thicknesses are reached for a 52% loading factor of powder C. At the maximum exposure energy of 5000 mJ/cm2, a layer thickness of 140 µm is measured. For smaller particles of powder B, 80 µm is reached. Using powder A, 54 µm and 44 µm values are reached for loading factors of 52% and 58% respectively. The slope of the regression curve (penetration depth) is increasing with a higher powder particle size. Also, the scatter of the measured thicknesses is increasing. The minimum value of the exposure energy for every suspension is determined by the curing behavior; the said minimum indicates the smallest exposure energy that produced samples with enough rigidity to be measured. This minimum is also dependent on particle size, as can be seen in Table 3. For the unfilled suspension, a critical exposure energy of 3.2 mJ/cm2 is obtained. It should be noted that for filled suspensions, the minimum examined exposure energy is about 100× higher than the critical exposure energy obtained by a linear fit of the working curve. This is a hint for the limited applicability of the Jacobs working curve: the lowest energy that produces samples is two orders of magnitude higher than that predicted by the model.
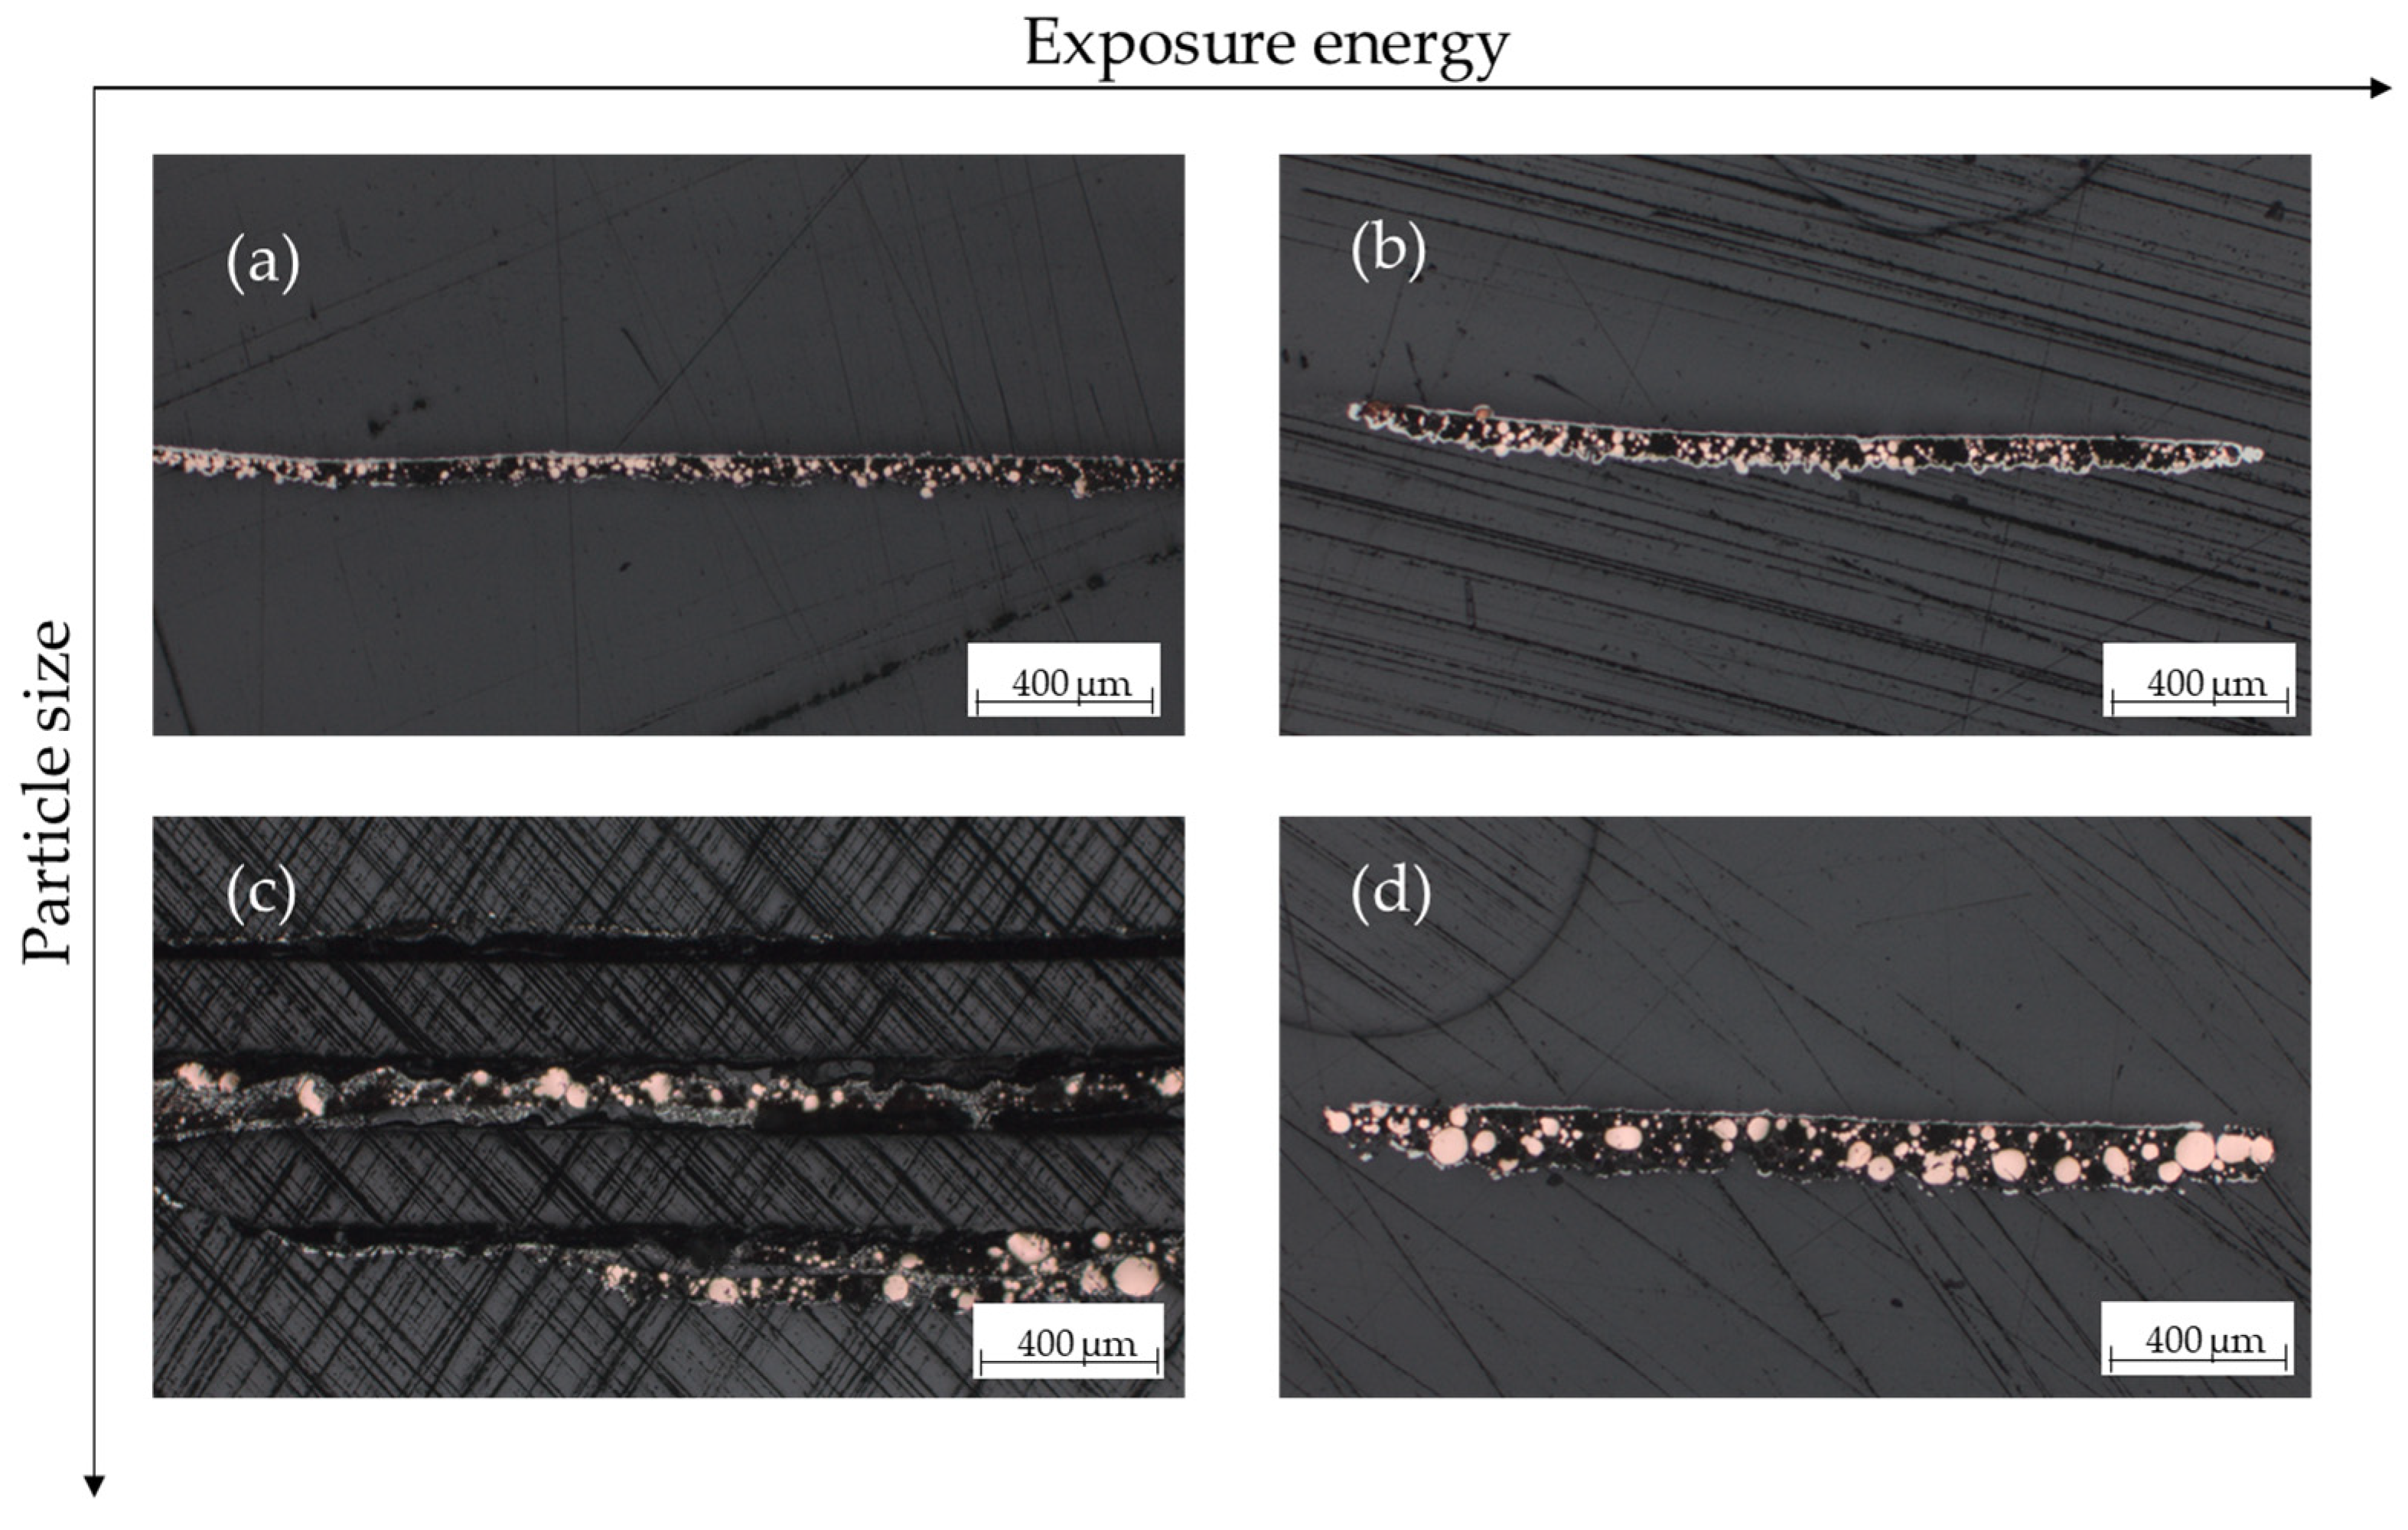
Figure 6 shows cross-sections of selected SLE samples. Microscopically, the top side of the samples is smooth while the bottom side is rough. The light layer around the samples is the nickel plating. There are particles protruding from the sample at the bottom. With increasing exposure energy, an increase in layer thickness is seen. This correlates well with the measurements by digital gauge shown in Figure 5. Increasing particle size leads to the presence of larger particles in the cross-section. Furthermore, the protrusions of particles are bigger with the presence of larger particles. The fraction of the area of powder in the samples is low. The assumed reason for this deviation from the original loading factor is the separation of powder particles during preparation.

3.2. Green Strength Measurement

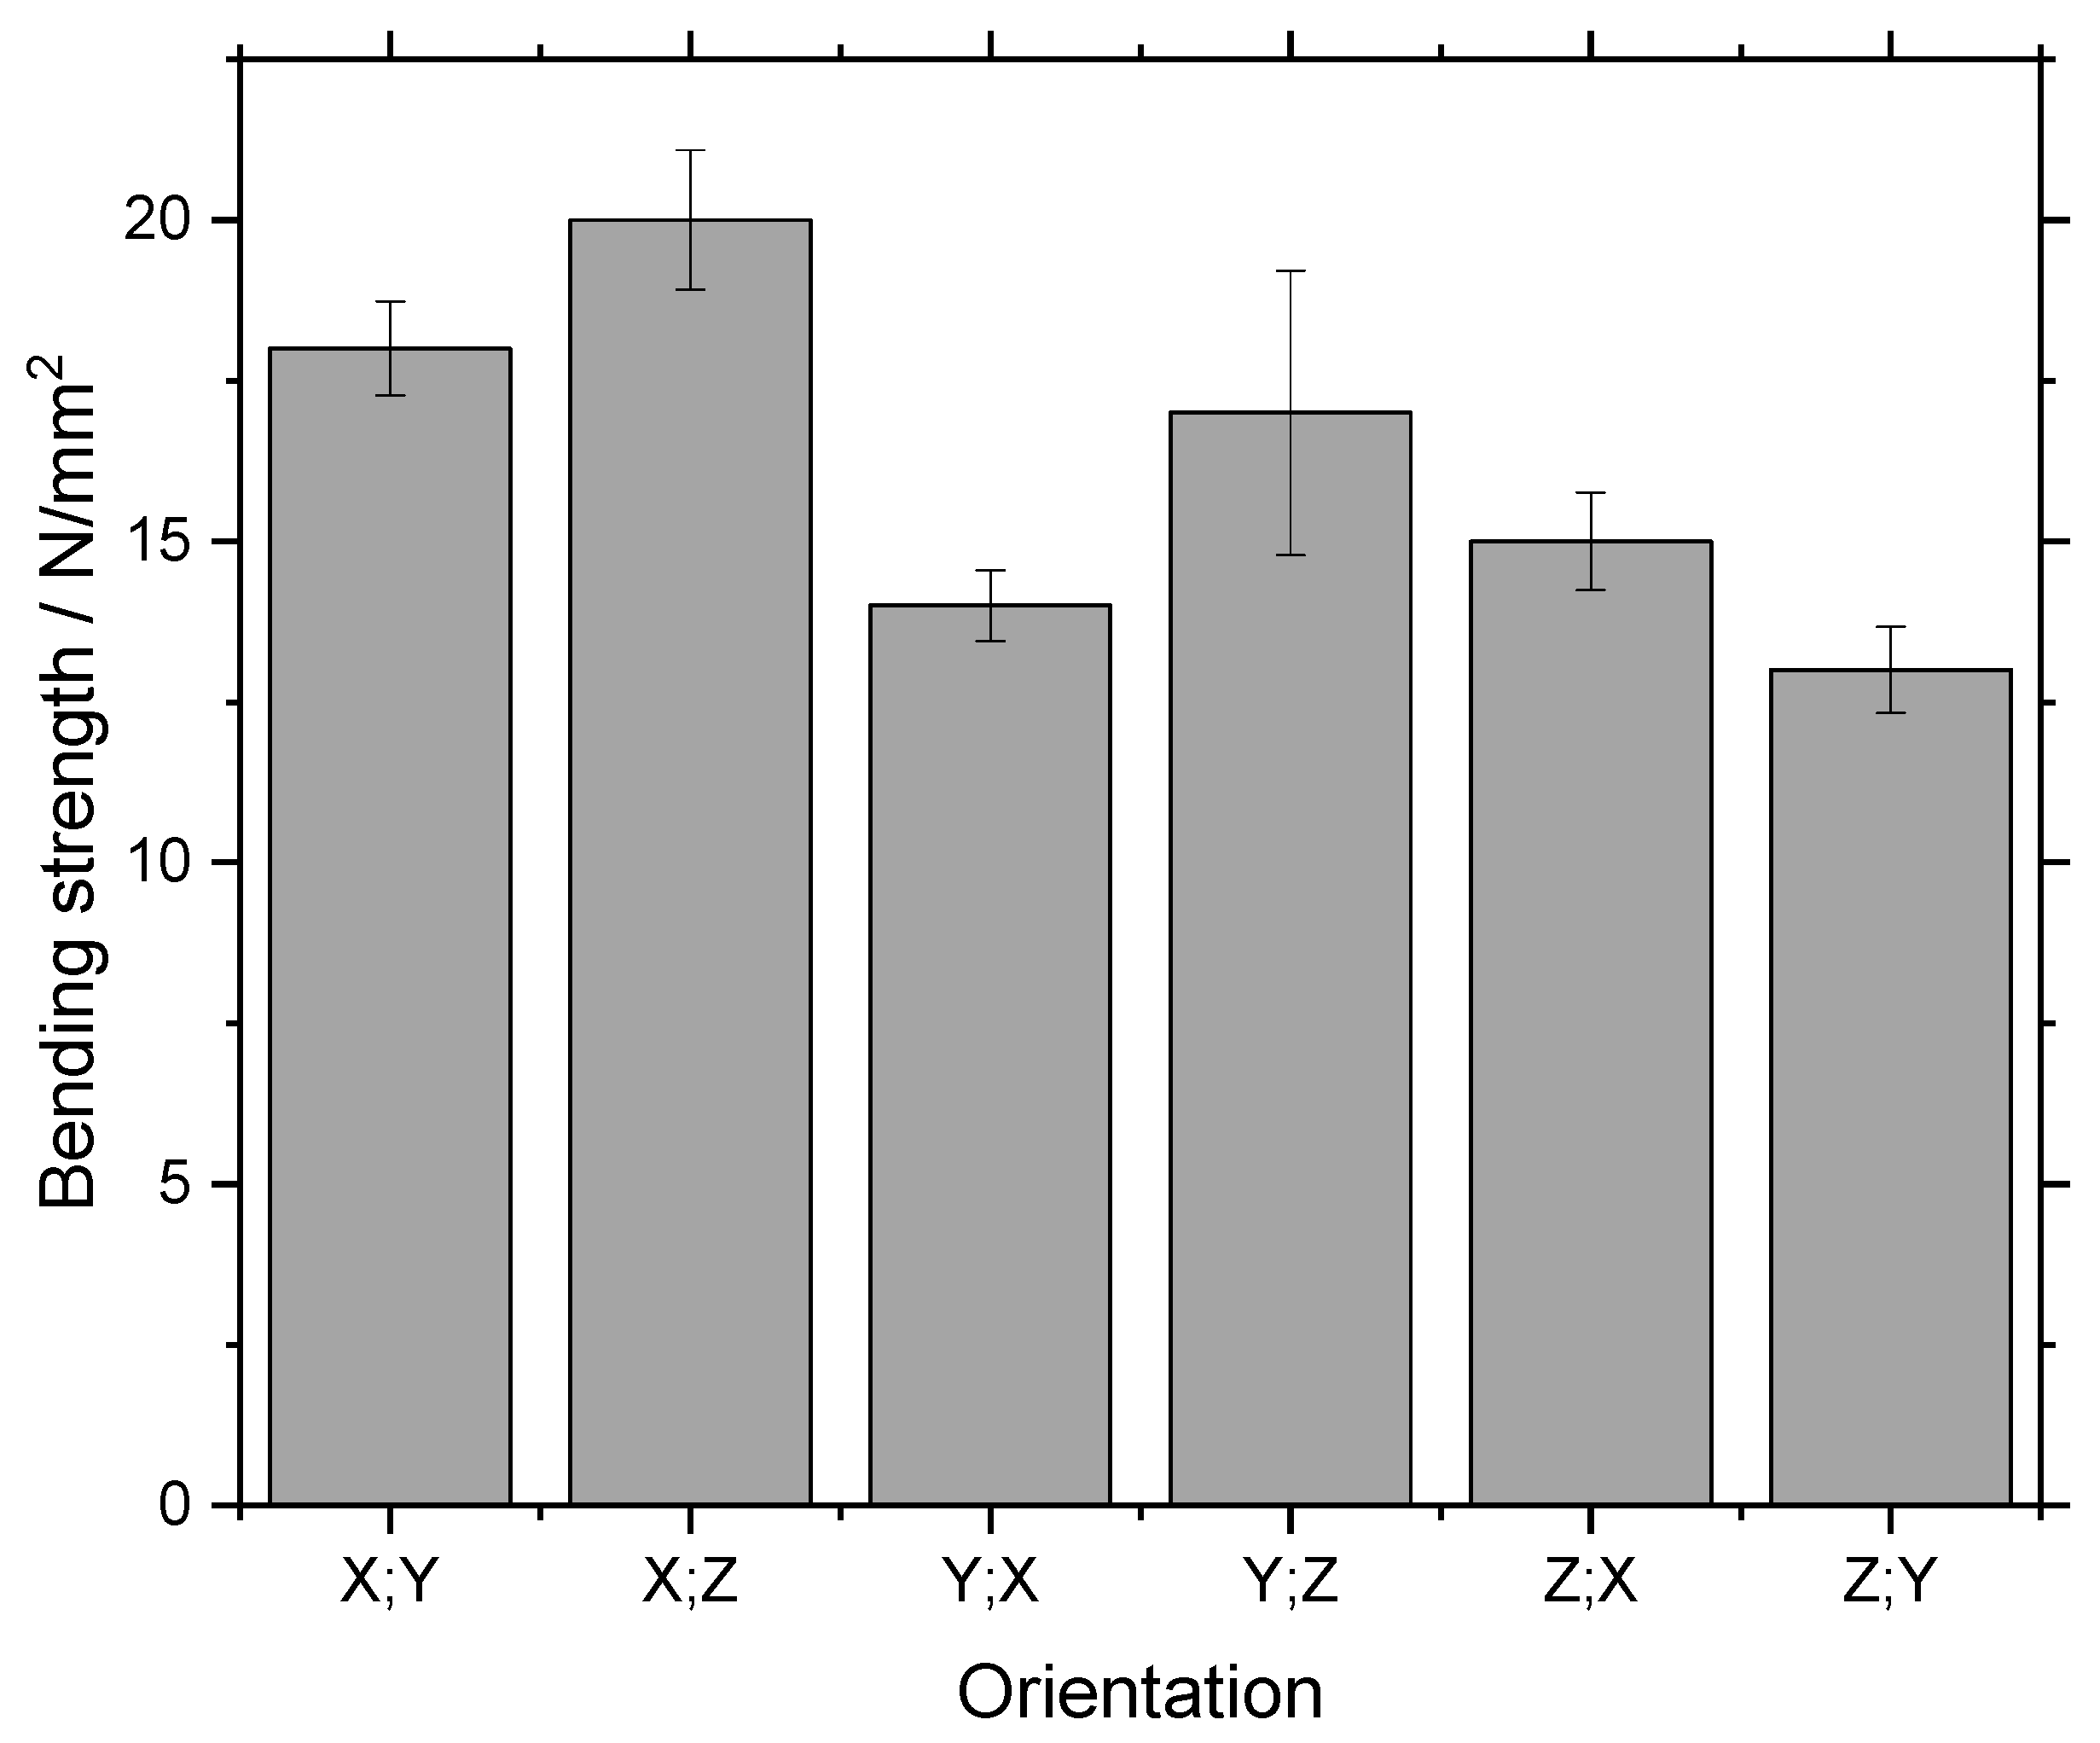
Figure 7 shows the bending strength for different orientations of the samples. Cuboid samples of 60 mm × 30 mm × 12 mm dimensions are used for green strength measurement via a three-point bending test. The highest bending strength of 20 N/mm2 is measured for the X; Z-orientation. For the Z; Y-orientation, only 13 N/mm2 is measured. The results suggest that green strength decreases when the longest dimension of the sample is aligned with the z-axis. This is the case for the Z; X- and Z; Y-orientations. For the Y; Z-orientation used in the following tests, the measured bending strength is 17 N/mm2.
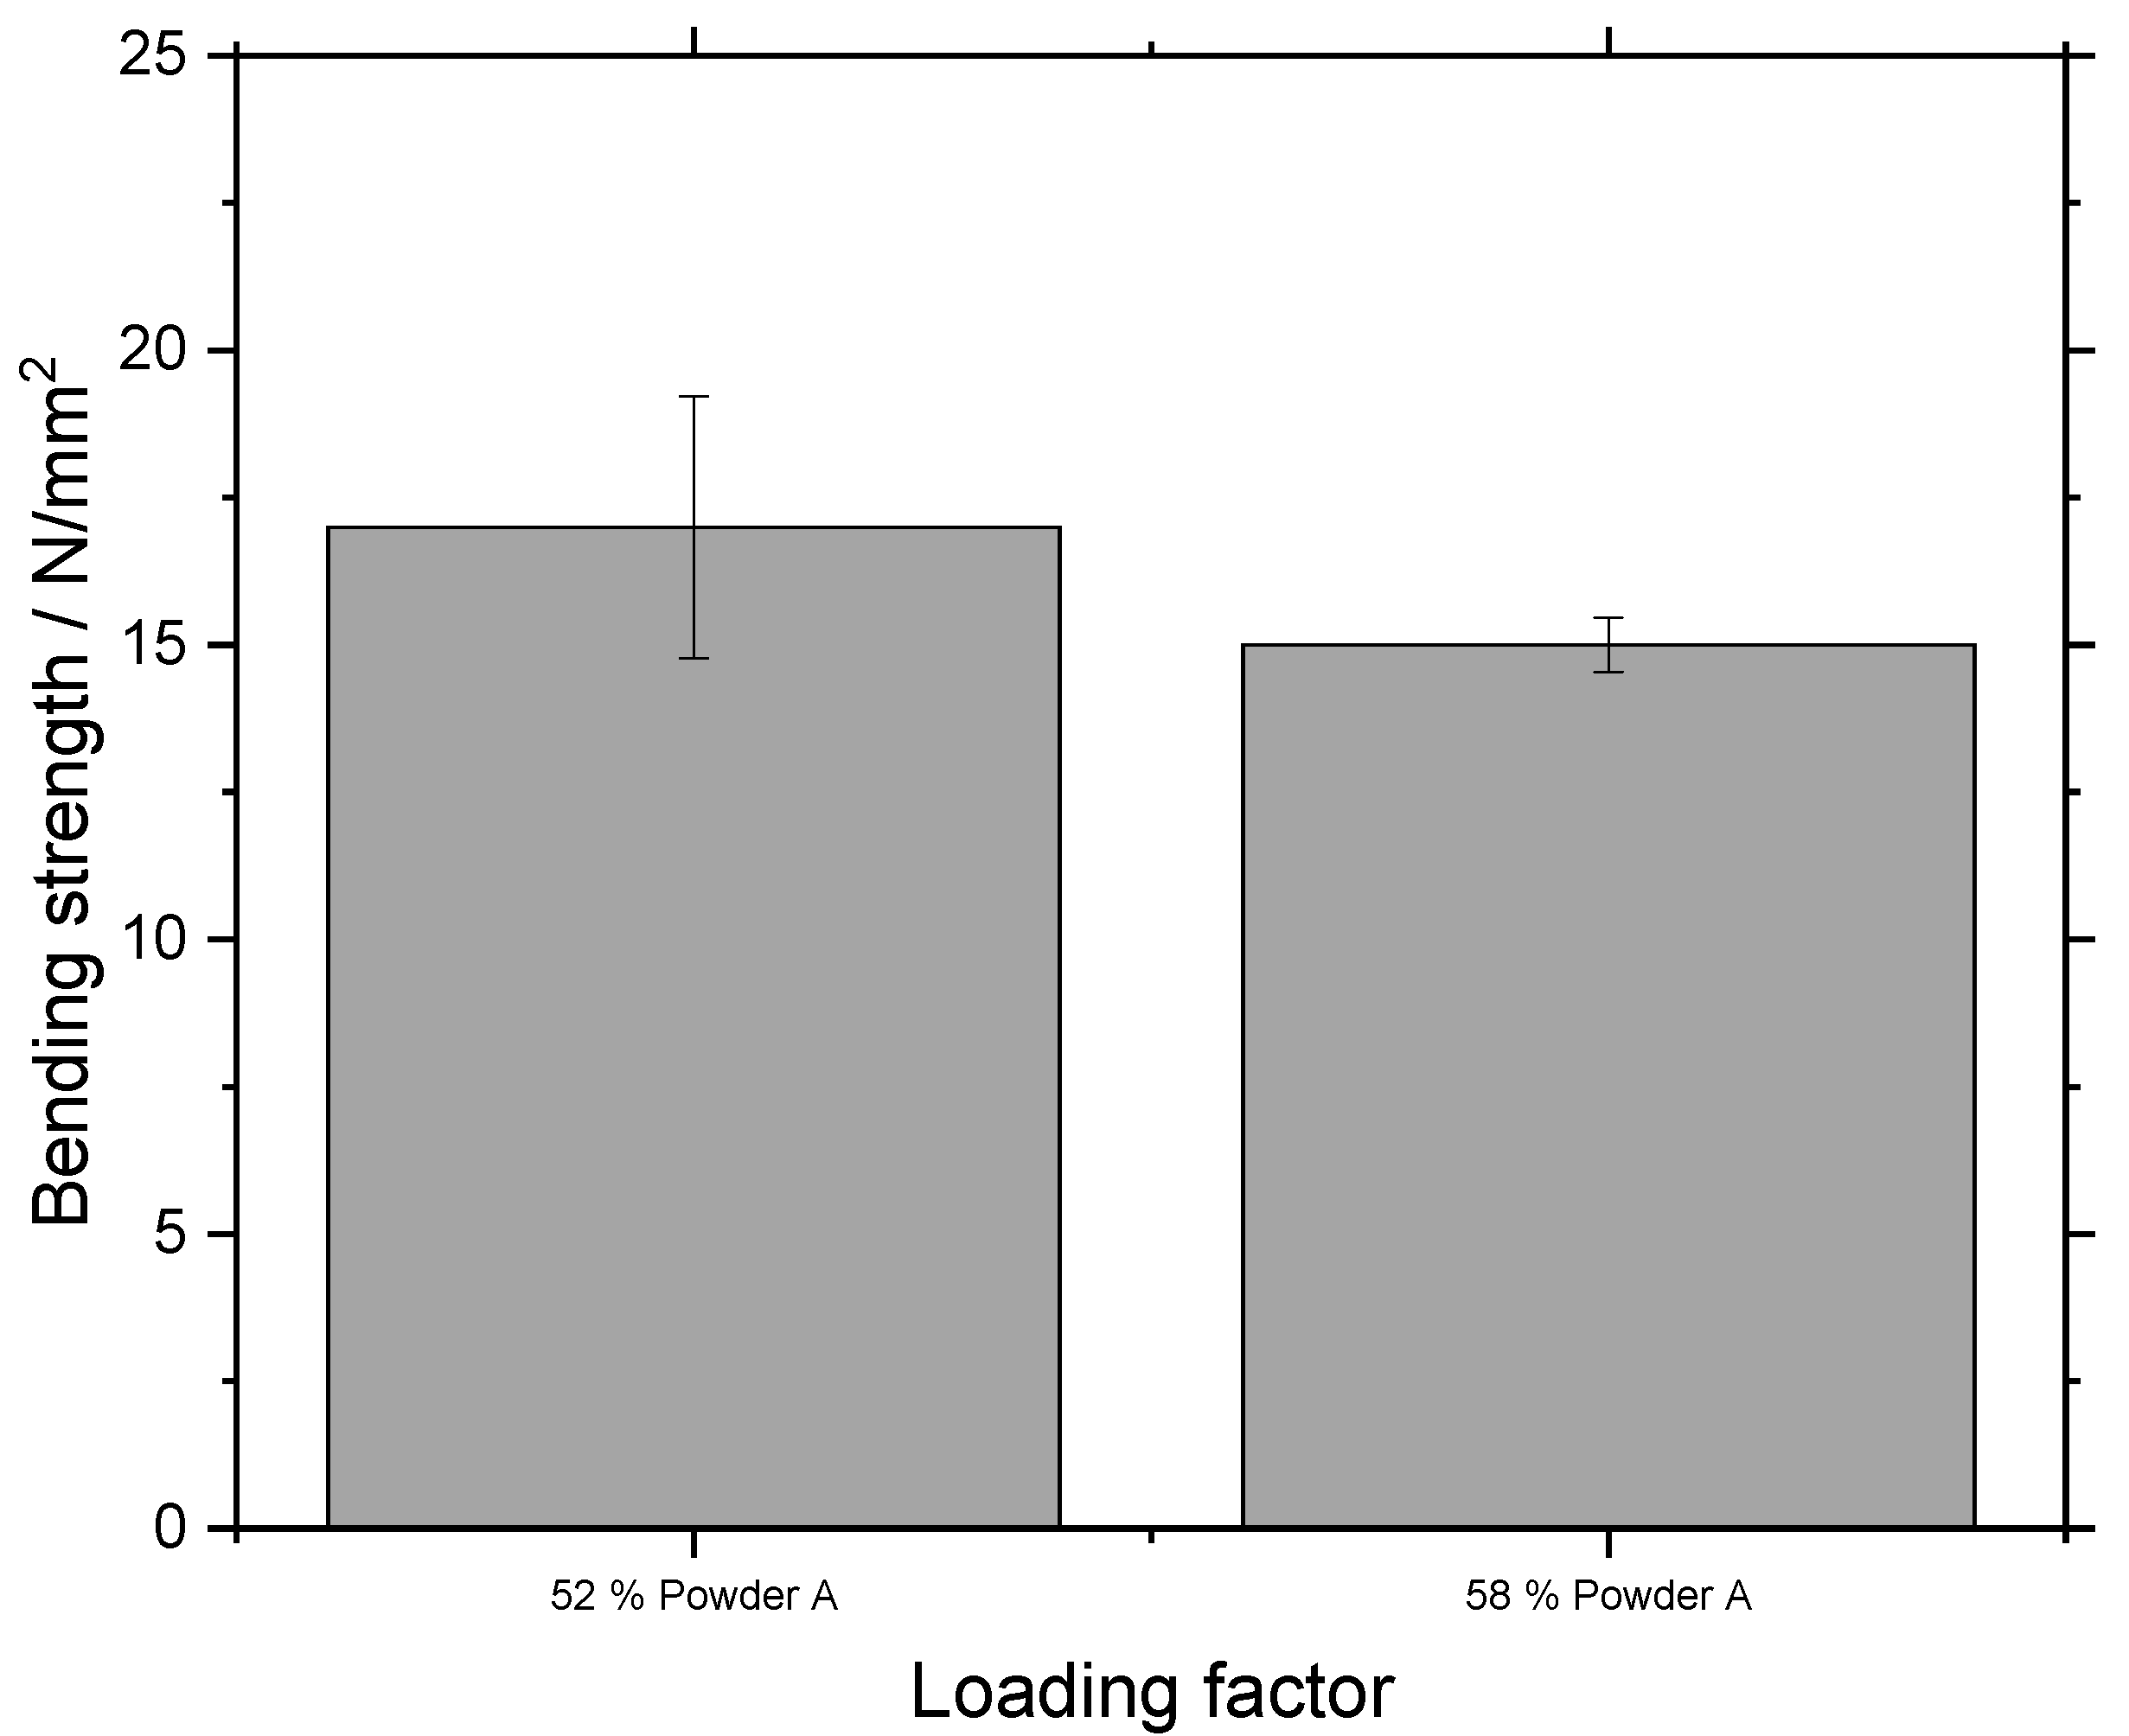
The influence of the loading factor on bending strength is shown in Figure 8. During sample manufacturing by LMM, no problems related to uneven spreading were reported, regardless of the loading factor. As shown with Figure 7, the bending strength for the Y; Z-orientation is 17 N/mm2 with a 52% loading factor. When increasing the loading factor to 58%, the bending strength is decreased to 15 N/mm2. Remarkably, the standard deviation also decreases from 2 N/mm2 to 0.5 N/mm2.
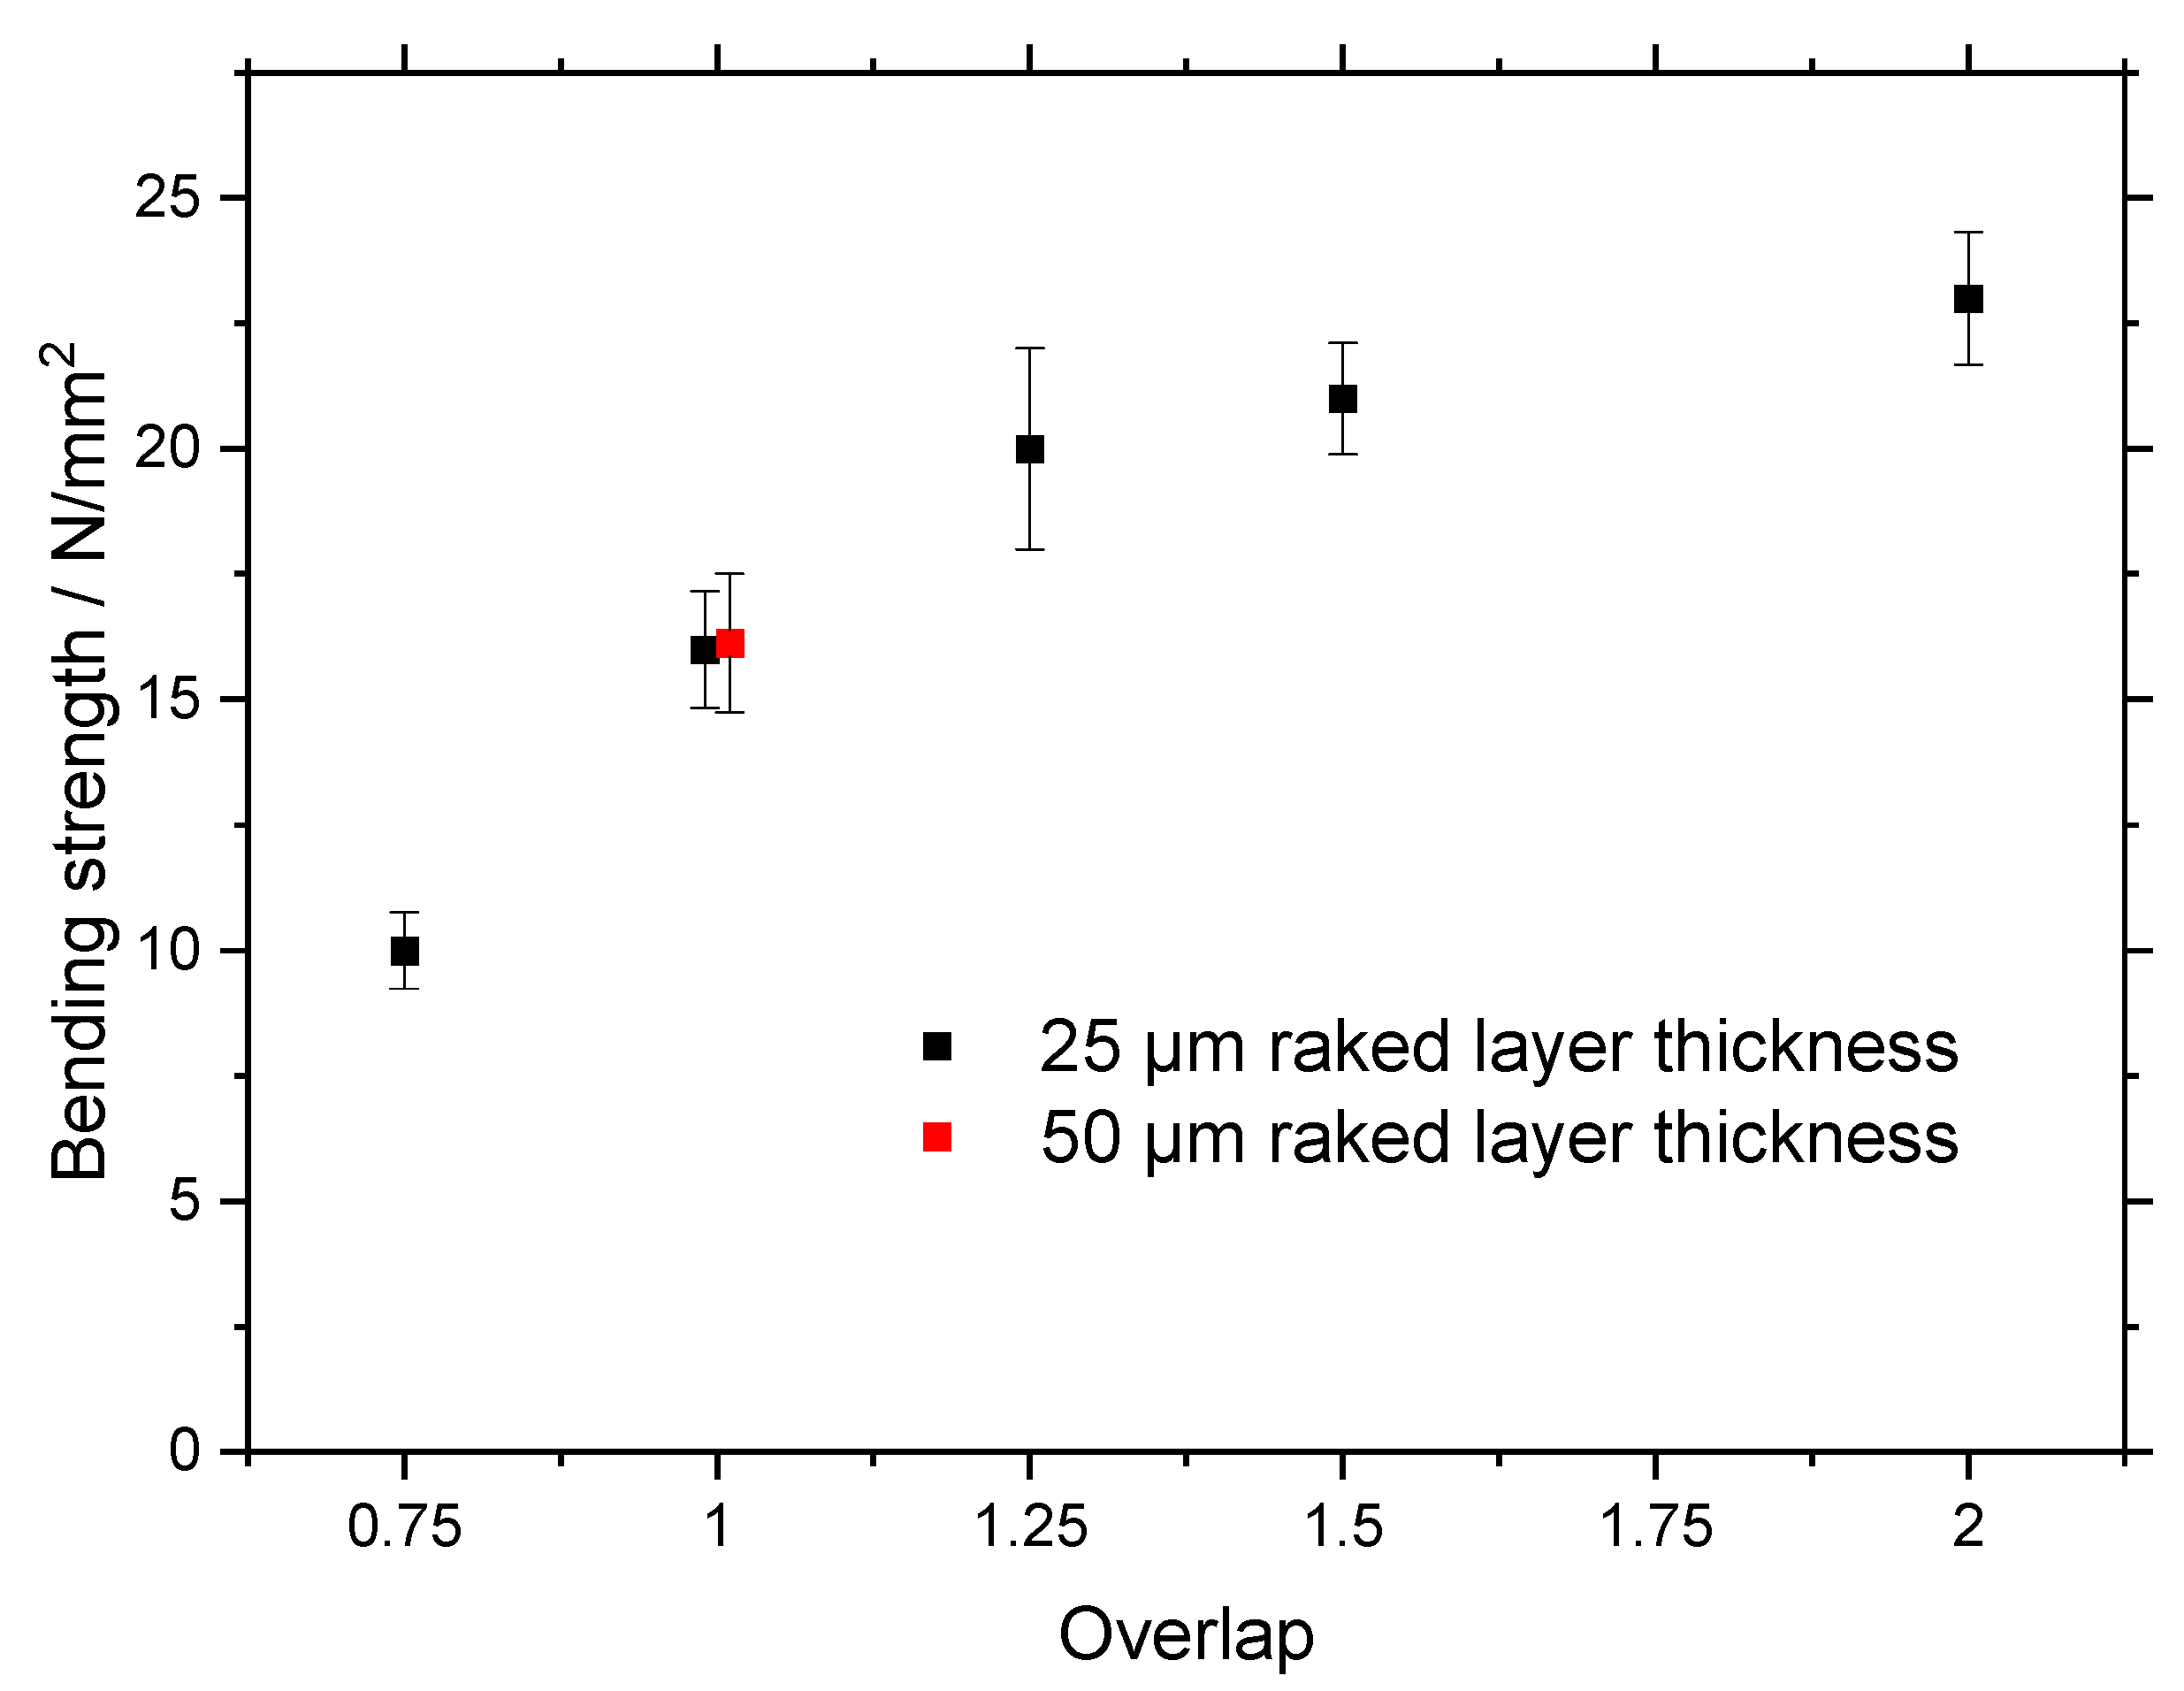
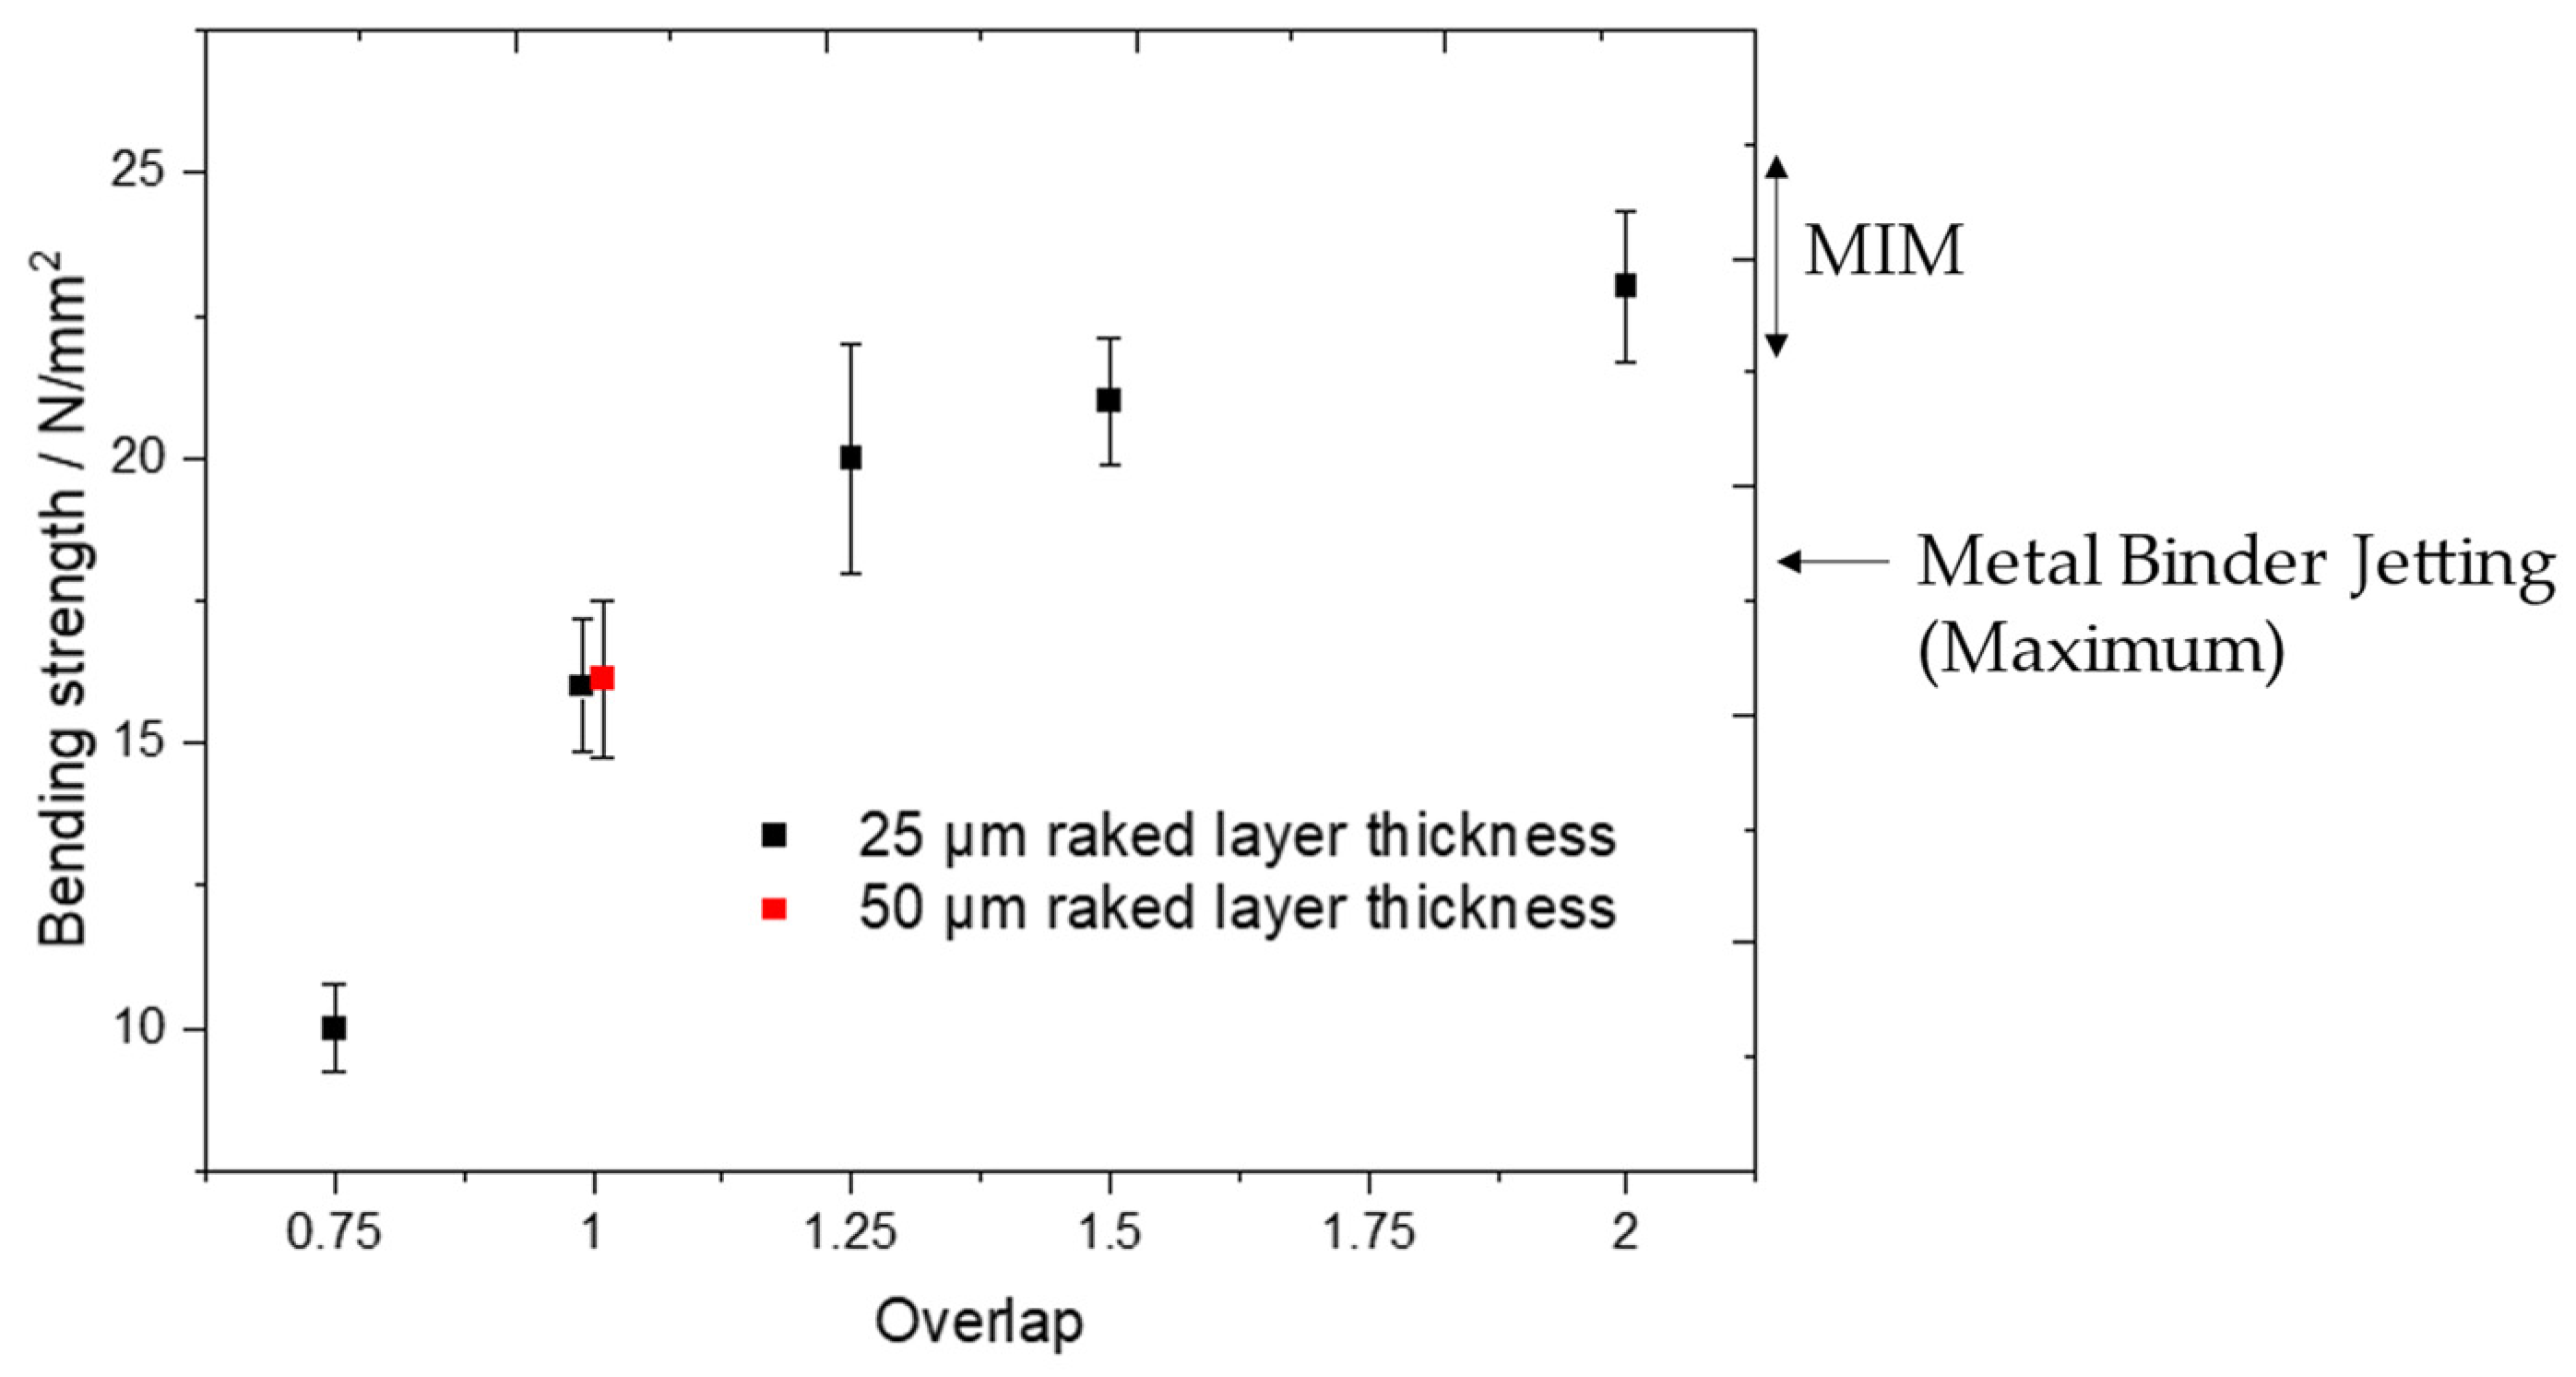
In Figure 9, the effect of increasing the overlap on bending strength is shown. The overlap strongly influences green strength. An increase from 10 N/mm2 to 23 N/mm2 is measured when increasing the overlap from 0.75 to 2. The relation between overlap and bending strength does not seem to be linear; at low overlaps, bending strength increases heavily whereas at higher overlaps, the increase levels off. For example, at an overlap of 1.25, the bending strength already reaches a value of 20 N/mm2. That means that there is a 7 N/mm2 increase by just increasing the overlap by 0.5 from 0.75 to 1.25. When increasing the overlap from 1.25 to 2 (by 0.75), the bending strength only increases by 3 N/mm2.

3.3. Properties of Sintered Samples

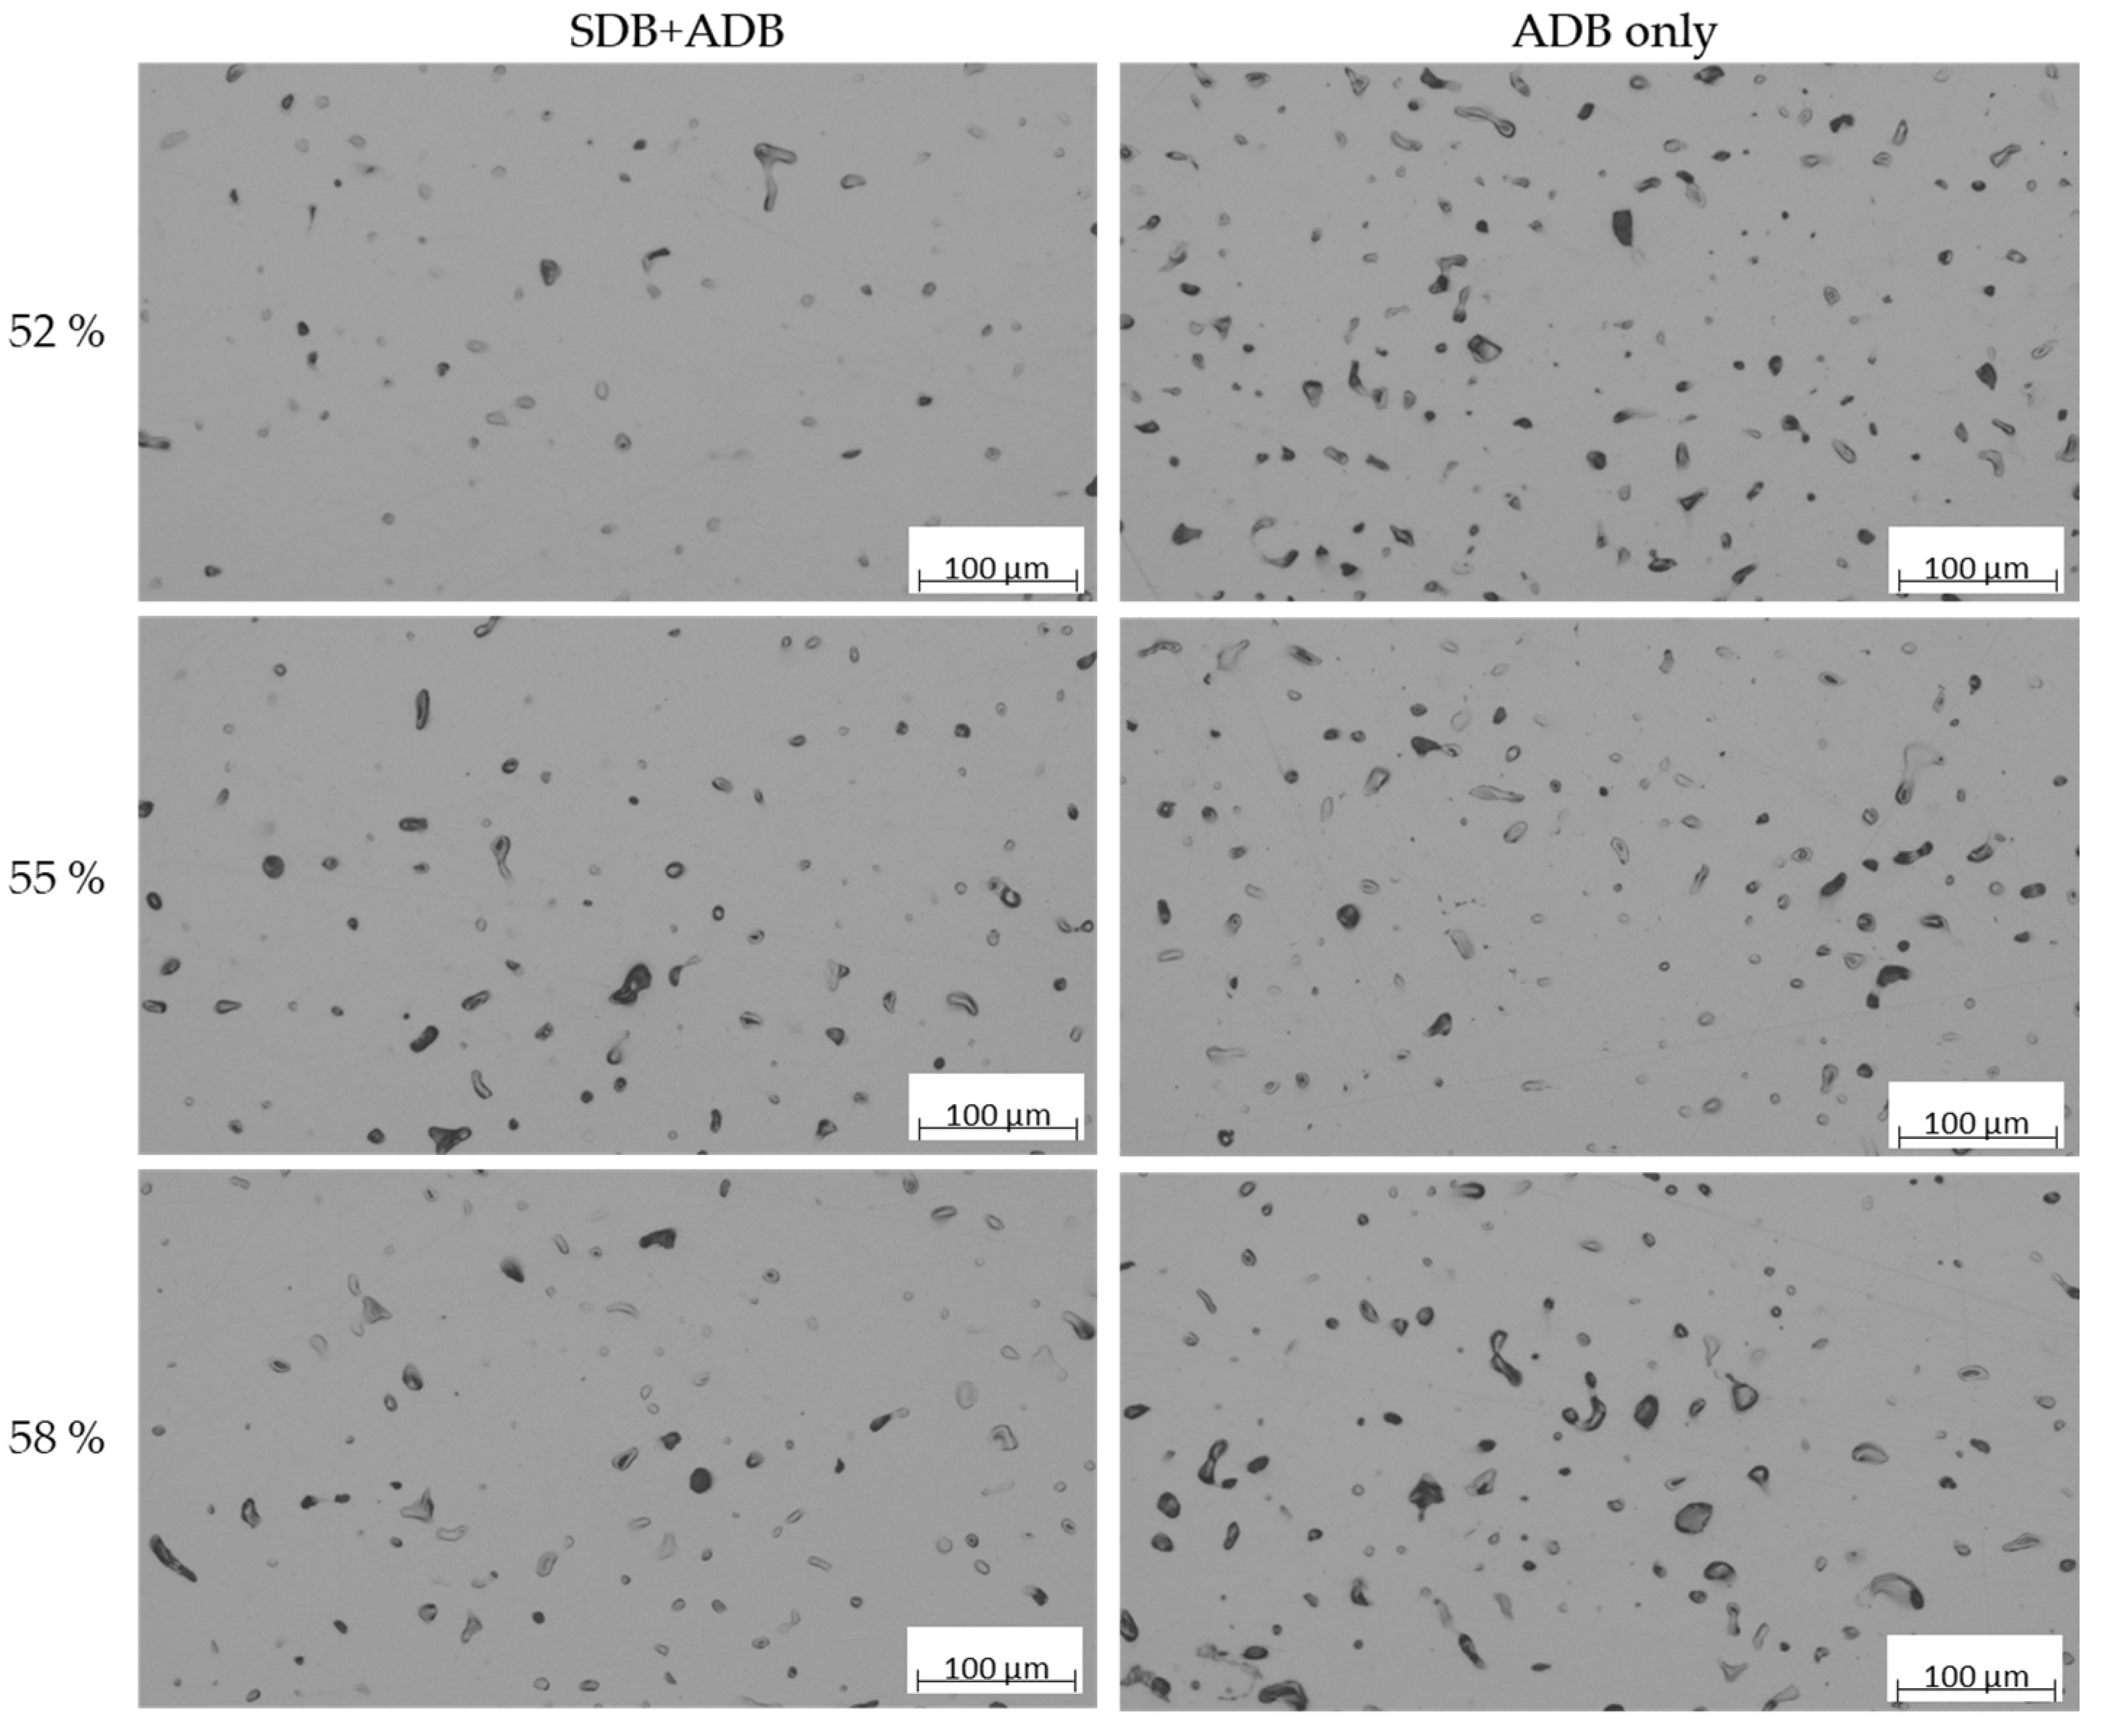
Figure 10 shows cross-sections of sintered copper samples. All samples have a nearly spherical porosity that is closed. With variation in the loading factor and debinding treatment, different amounts of porosity are observed. In the case of only ADB (air debinding), all samples have the same level of porosity, regardless of the loading factor. For SDB + ADB (solvent debinding + air debinding) samples, the porosity increases with a higher loading factor.
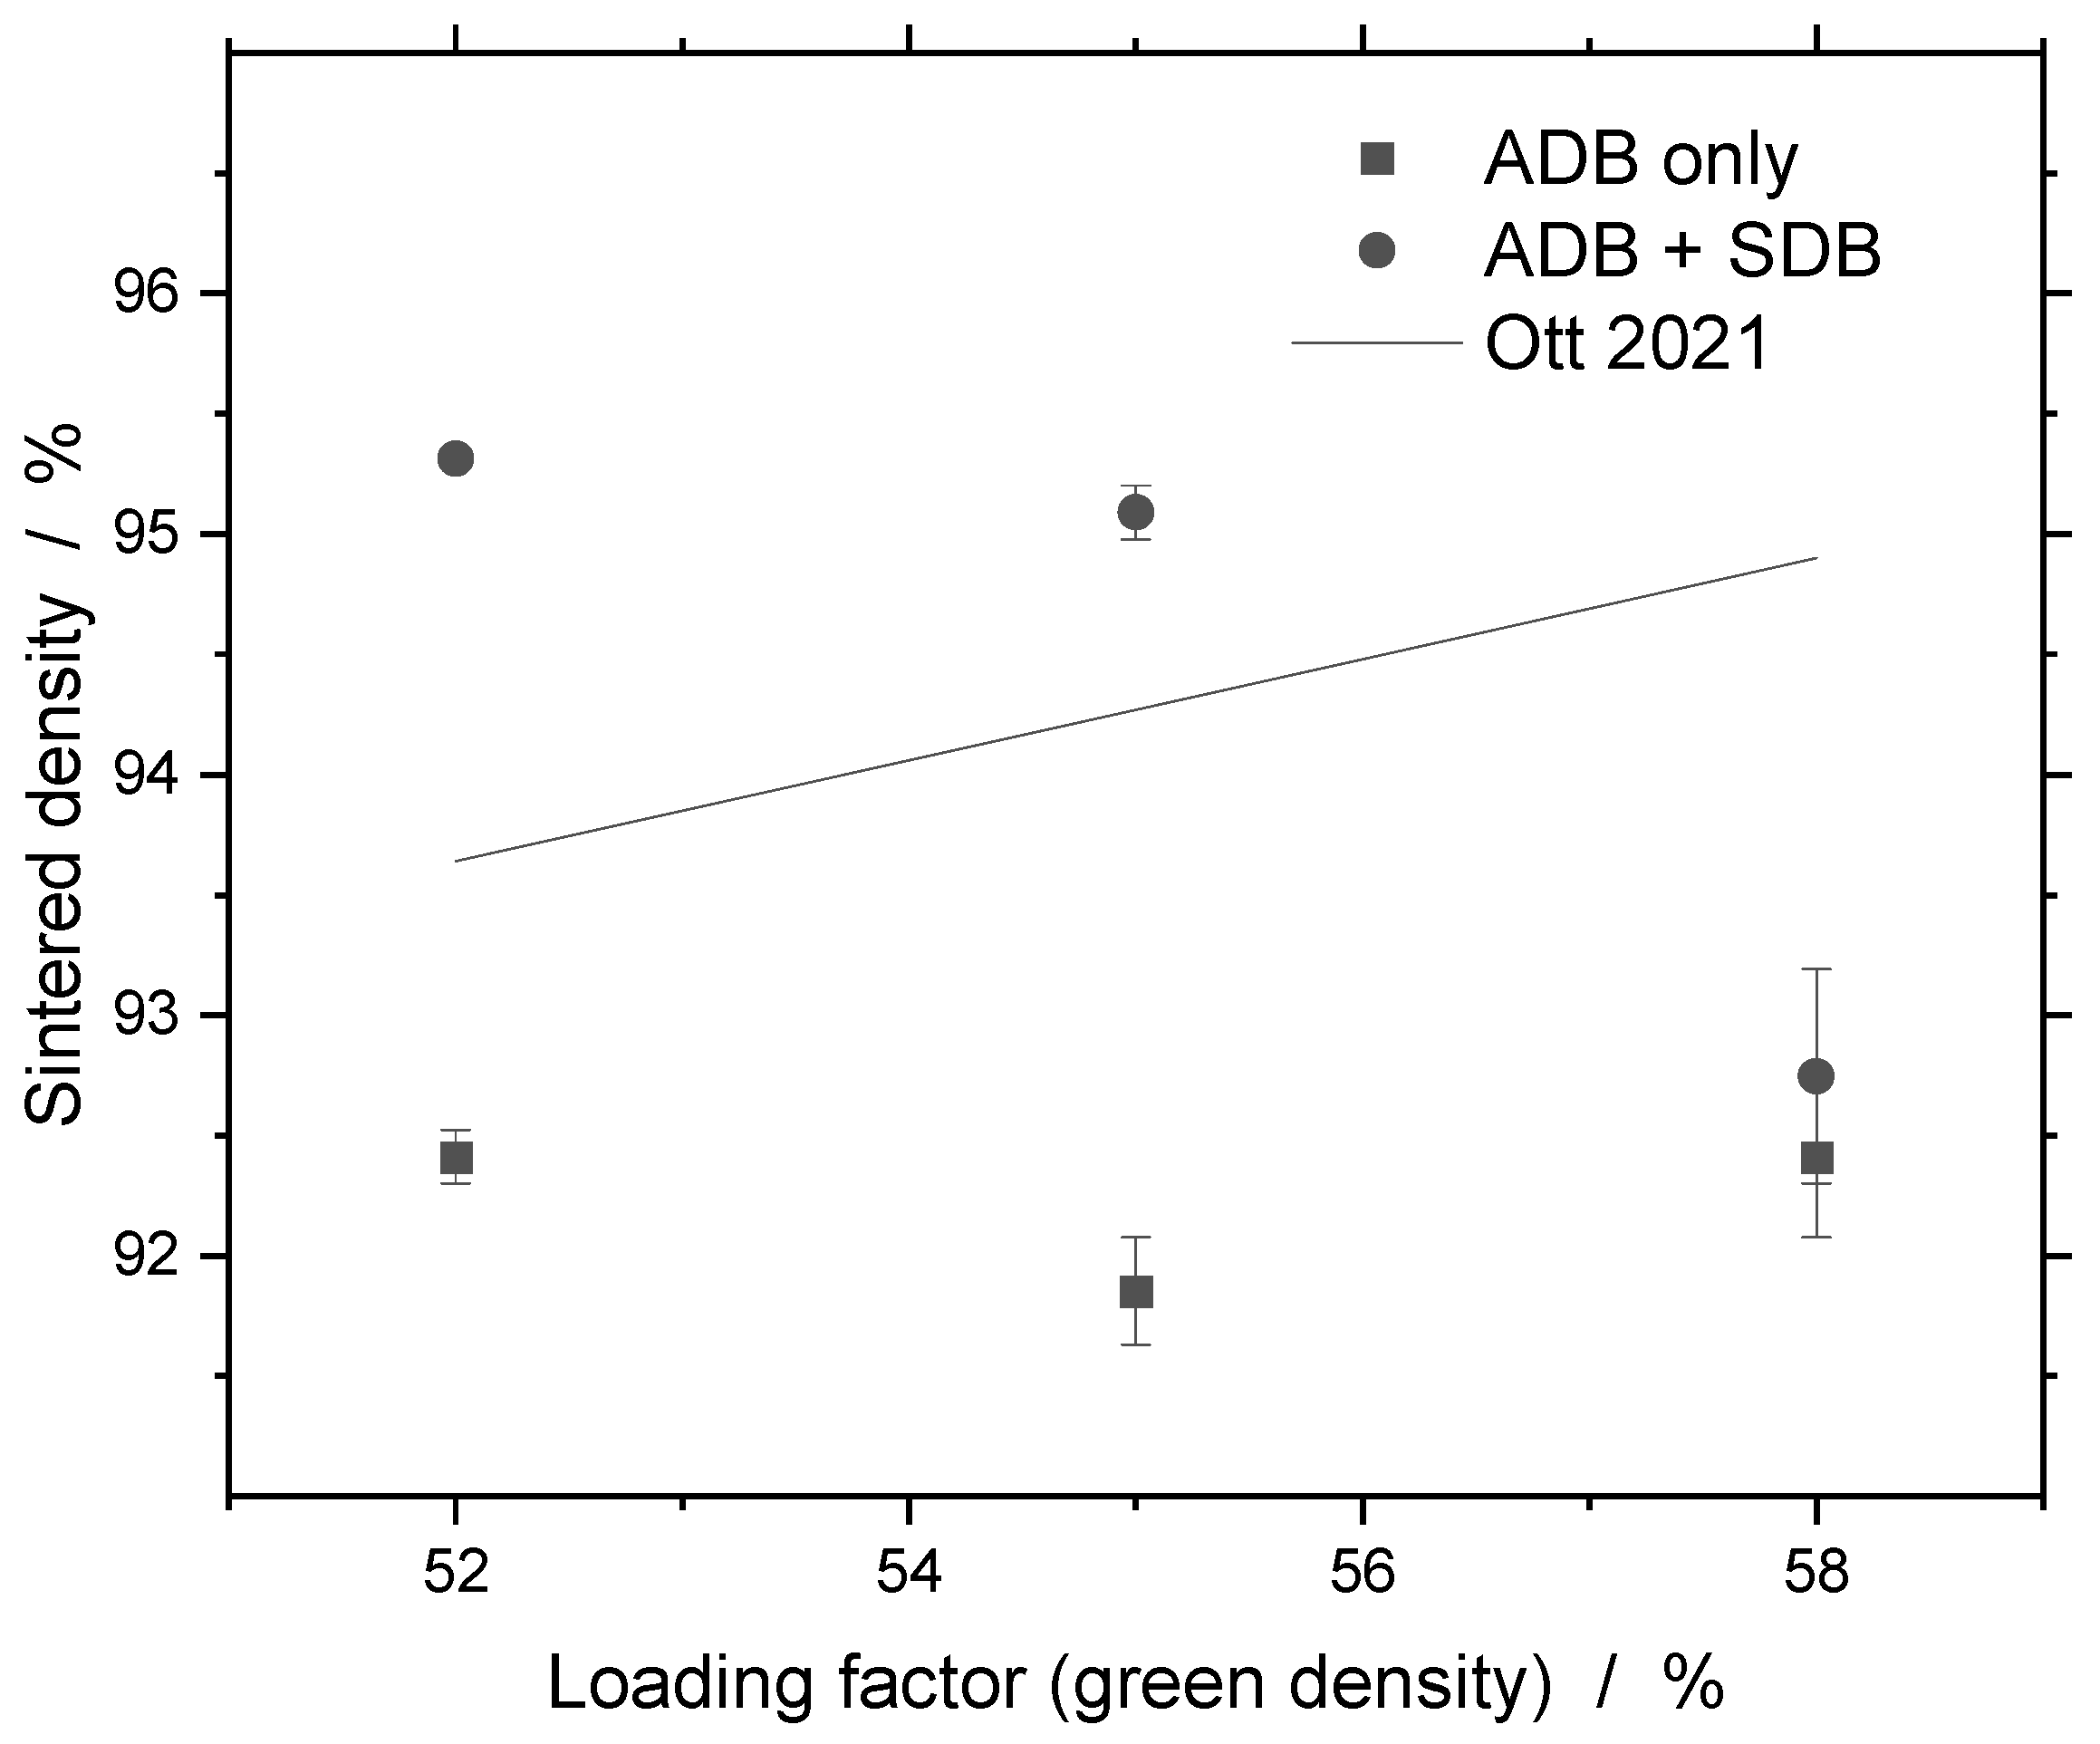
These trends are also observed when comparing the density measured by the Archimedes method. This is shown in Figure 11. For ADB, values of 91.9% to 92.4% are reached. This is below the empirical regression function reported by Ott [16]. For SDB + ADB samples, a higher density is reached. At a 52% loading factor, a density of 95.3% is measured. Both values for a 52% and 55% loading factor surpass the empirical regression function. At a 58% loading factor, density drops under the said function to 92.7%. It should be noted that only one sample per data point was examined.

4. Discussion

4.1. Influencing Factors on Working Curves

Working curves show increasing curing thicknesses with increasing energy. With the use of larger powder particles, an increase in curing thickness is reported. Increasing the loading factor in the suspension decreases the curing thickness. It should be noted that the measured value scatter is increased with larger particles. Contrary to the work of Melentiev et al. [10,21] that claims there is no effect of higher exposure energies, this work shows that higher exposure energies will lead to deeper curing.
Literature data published by Resch et al. [15] examines smaller particle sizes (d50 ranging from 4.5 µm to 5.1 µm). Their data are based on a different resin composition than that employed in this work and a slightly different loading factor of 50% compared to that of 52% used in the present study. Curing takes place with 365 nm light and an intensity of 85 mW/cm2. At the maximum exposure energy of 850 mJ/cm2, a maximum curing depth of more than 60 µm is reported for powder reduced in hydrogen (less oxygen content). For a linear interpolation of the results from this work, see Figure 5a, which suggests a cured layer thickness of 36 µm for the same exposure energy.
The high scatter of the measured values is explained as follows: for both filled and unfilled suspensions, after cleaning, some samples might still contain residue of uncured suspension. When cooled down, this contamination adheres to the cured layer and increases the measured sample thickness. For filled suspensions, the lower margin of an exposed layer is not flat since particles protrude from that layer. A schematic view is given in Figure 12. The assumed mechanism for the bonding of particles to the layer is form closure: a particle is sticking to the layer if more than half of its diameter is embedded into the cured layer. If that is not the case, it will detach from the layer. Therefore, bigger-diameter powder particles lead to larger protrusions from the layer. When measuring the layer’s thickness, the measurement location is selected randomly. This causes the measurement of different thicknesses depending on the location (see arrows in Figure 12).

4.2. Modeling of Working Curves

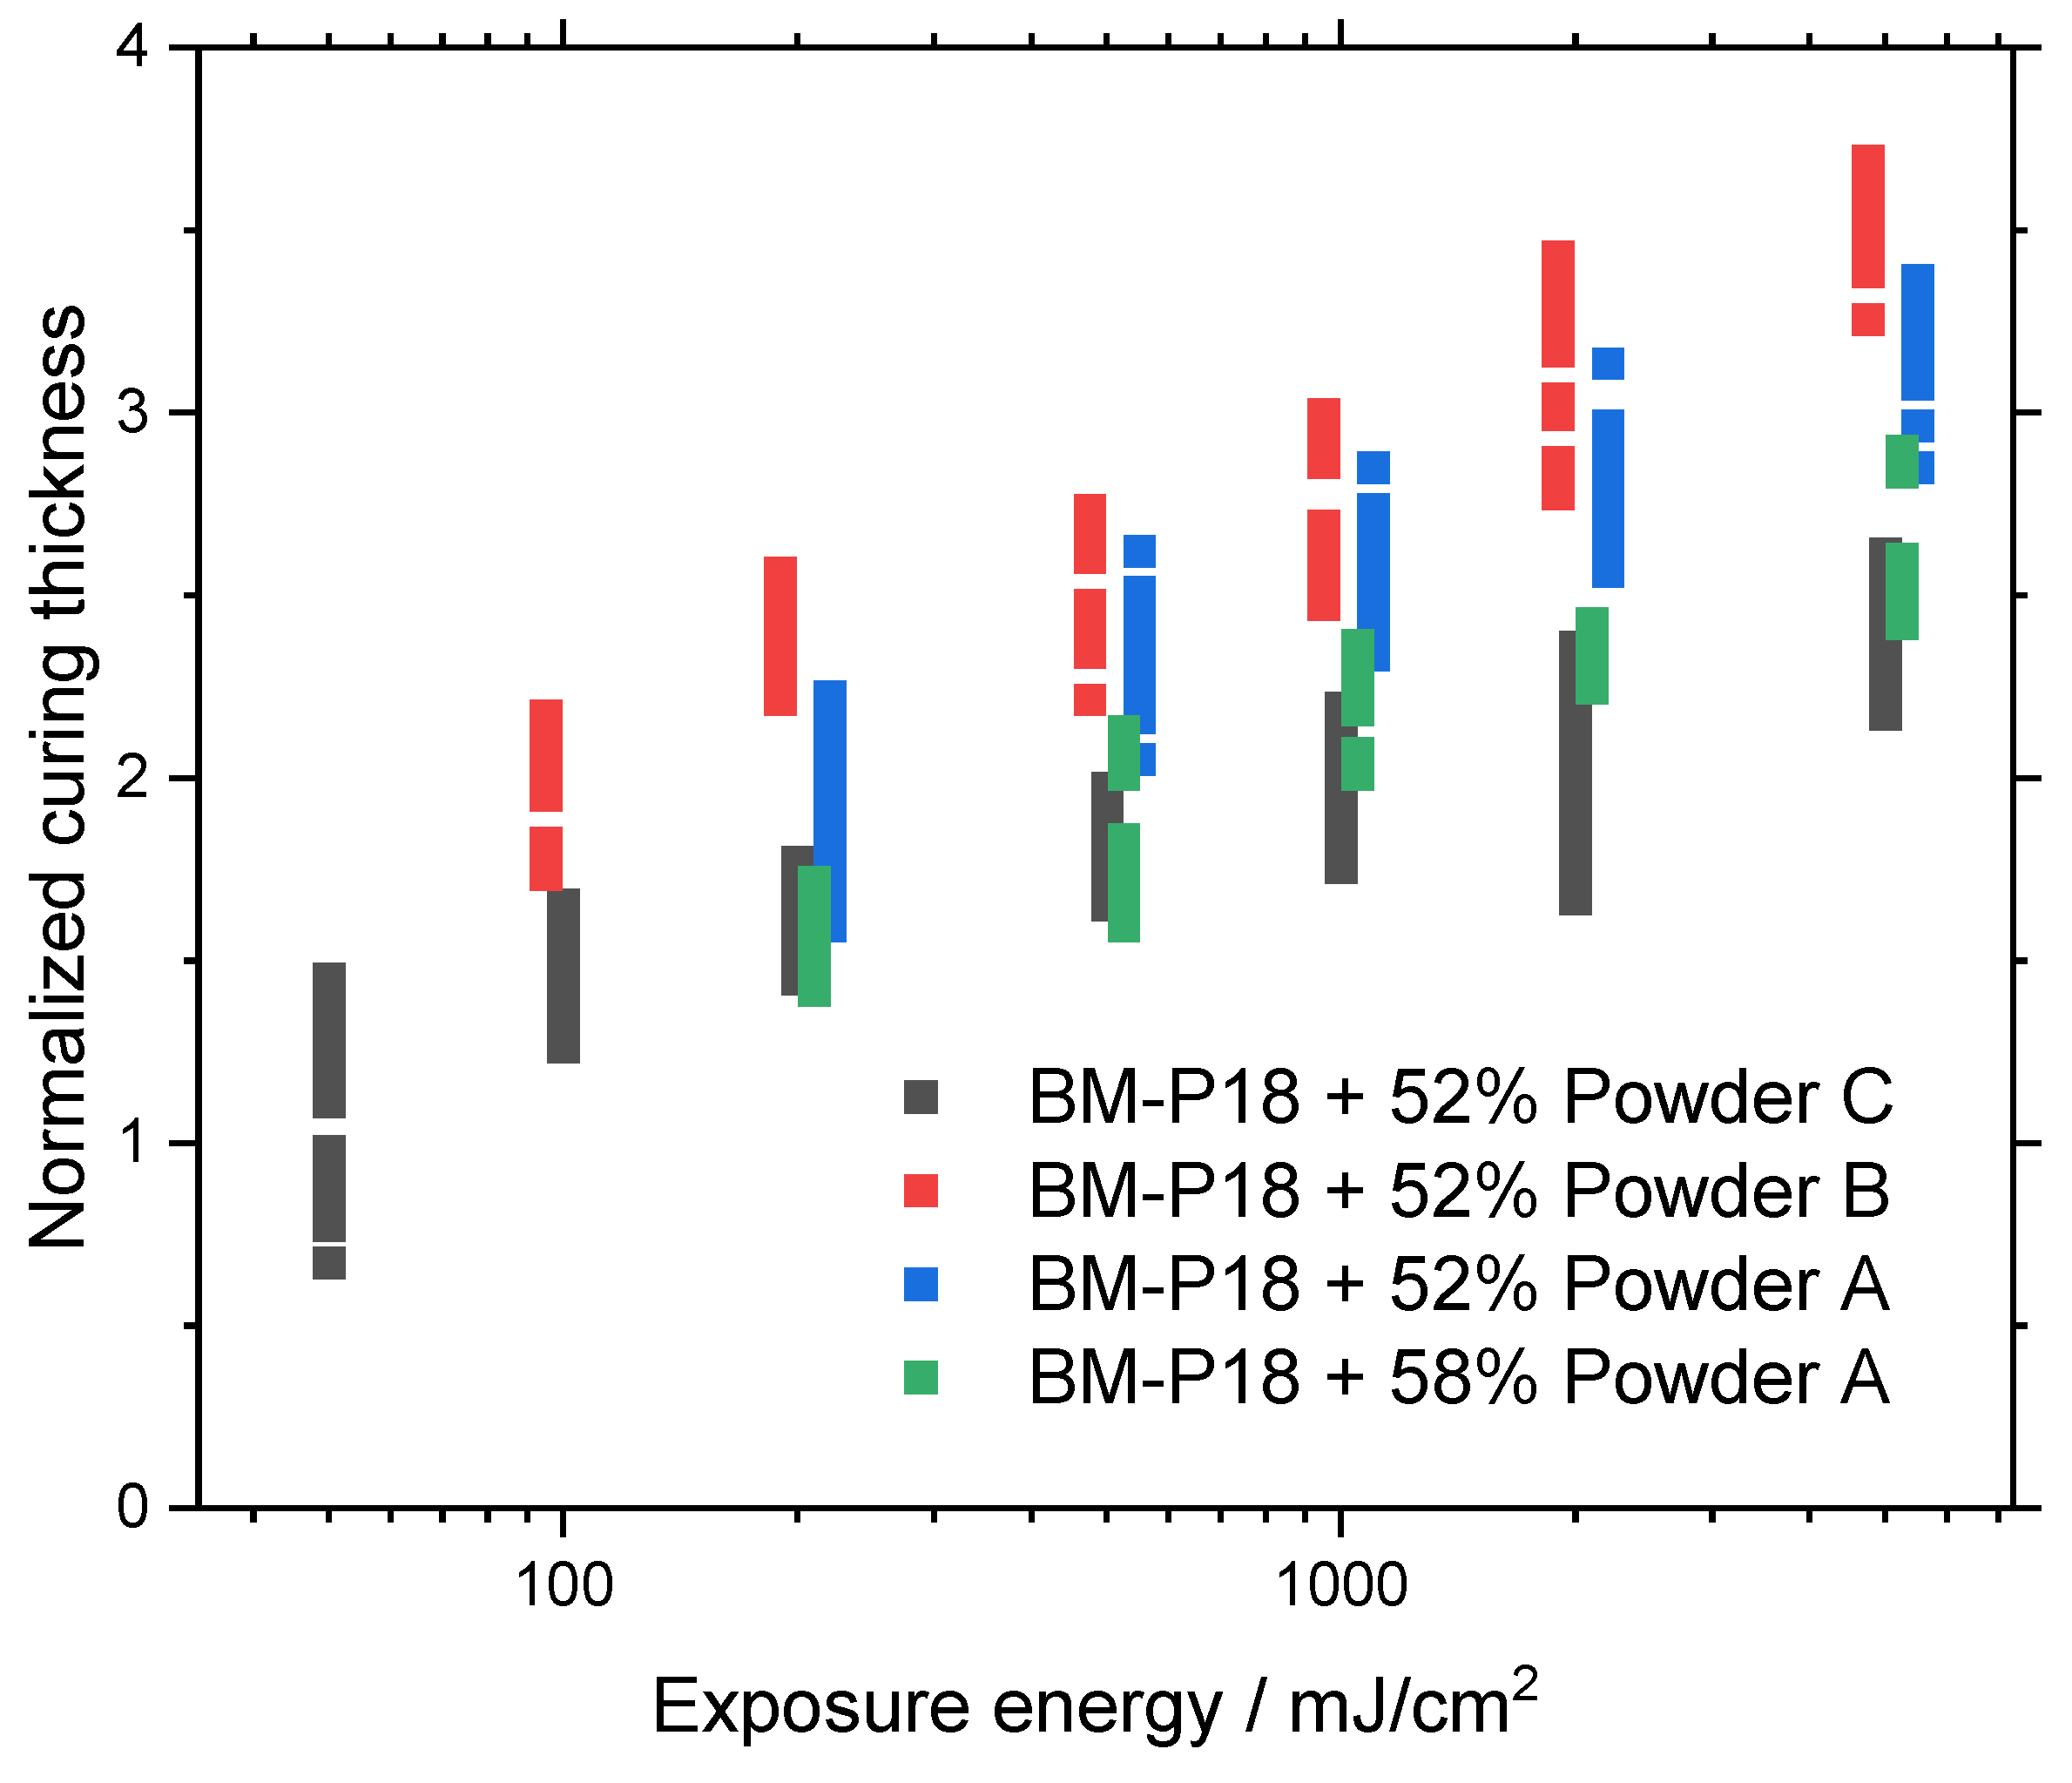
Figure 13 shows the curing behavior with normalized curing thickness (Cd,norm). Curing thickness (Cd) is divided by the diameter (S) of a powder particle coated by a binder (see Equation (8)). This is an indicator for the number of cured layers of particles. It should be noted that this number does not consider the actual arrangement of particles in the medium. This could be accommodated by applying a geometric model for the arrangement of packed layers consisting of binder-coated spheres, as illustrated in Figure 14. This factor would not be dependent on parameters relevant for feedstock formulation (powder particle size, optical properties of the powder, loading factor, binder properties). Therefore, the arrangement of particles in the suspension is not considered by the model.
The data points obtained by larger particles now coincide with the data points of smaller particles. This also applies to data points recorded with a higher powder loading. By employing an exposure energy of 500 mJ/cm2, 1.5 to 2.5 layers of binder-coated particles are cured. At the highest exposure energy of 5000 mJ/cm2, 2.5 to 3.5 layers of binder-coated particles are cured.
The calculation of the diameter of a powder particle coated by a binder is performed by the assumption of the hexagonal closest packing of unimodal particles with a size of d50 from the respective PSDs. A 2D representation is given in Figure 14a. The volume of powder particles (Vpowder) is calculated as shown in Equation (4). The total volume of powder and binder (Vtotal) is determined by calculating the volume of binder-coated spheres with the diameter S and then multiplying it by the reciprocal of the packing density of the hexagonal closest packing; see Equation (5). The packing density of the hexagonal closest packing is 0.74. In Equation (6), both terms are inserted into the definition of the loading factor (φpowder). By equivalent transformation, the diameter S of the binder-coated spheres is calculated with Equation (7).
Vpowder = π ∙ d503/6
Vtotal = 6/(21/2 ∙ π) ∙ (π ∙ S3)/6 = 2−1/2S3
φpowder = Vpowder/Vtotal = 21/2 ∙ π ∙ d503/(6 ∙ S3)
S = (21/2 ∙ π ∙ d503/(6 ∙ φpowder))1/3
Figure 15 shows the curing behavior with the normalized curing thickness and normalized exposure energy. Exposure energy is normalized by dividing it by the critical exposure energy for the unfilled binder and taking the logarithm to the basis of the powder’s reflectivity (see Equation (9)). In this work, the reflectivity R of pure copper (0.261 at 398 nm) is taken from Bowman et al. [22]. Emax,norm is an indicator for the number of possible reflection events until the reflected exposure energy has decayed below the critical exposure energy and, therefore, cannot cure the resin anymore. The absorption of light by transmission through the binder is neglected because the penetration depth in the unfilled binder is higher than all measured particle sizes. Since all values are based on the same binder and the same powder base material (e.g., copper), there is no change in the arrangement of the data points in relation to each other. However, there is linear correlation between the normalized layer thickness and the normalized exposure energy. The reciprocal of the slope of the regression function represents the number (ñ) of reflection events needed to cure a deeper layer of binder-coated spheres. By linear fit, this number is 2.24. Hence, after 2.24 reflections, a new (deeper) particle layer is cured. With this number determined, the curing behavior can be modeled by the proposed coated-sphere-layer model, given in Equation (10).
Cd,norm = Cd/S
Emax,norm = log R (Ecrit/Emax)
Cd/S = 1/ñ∙log R (Ecrit/Emax)
Future research should deal with simulation for the exact determination of E(t) profiles to ensure the verification of the claimed relations between powder particle size, loading factor, and layer thickness. Furthermore, the experimental determination of the reflectivity of the actual used powders is advised, since Giardino et al. [23] have shown that surface oxidation can influence the powder’s optical properties. Furthermore, the measurement of lateral dimensions, as demonstrated in Melentiev et al. [10], but with variation in exposure energy and particle size, should be examined. This would give insight into the effect of higher exposure energies on lateral dimensions. In essence, these future steps will give more insight in finding optimal printing parameters and suspension formulations that allow for high productivity while maintaining the precision of the printed green parts.
Both models for curing behavior (Jacobs working curve and coated-sphere-layer model) suggest an exponential relation between cure depth and exposure time. A higher cure depth will increase build height per layer linearly; however, exposure time must increase exponentially. At a certain point, increasing exposure time will lower the productivity since the exponential effect of a longer exposure time will diminish the effect of a higher build height per layer. By increasing powder particle size, a higher cure depth will lead to higher productivity. However, this calculation only considers productivity for green parts. High particle sizes are generally attributed with less sinter activity [24]. Possibly, this provokes incomplete densification. This problem could be avoided by using particle aggregates to combine the beneficial exposure performance of large particles with the high sinter activity of the small primary particles in the aggregate.

4.3. Green Strength

An overlap of two, as claimed by Vogel et al. [12], is not necessary to produce strong green parts. With an overlap of 1.25, a substantial increase in green strength is observed. At this overlap, a bending strength of 20 N/mm2 is reached. This is 20% higher than the strength (maximum 16 N/mm2) of Metal Binder Jetting green parts measured by Reineke et al. [25]. By using a higher overlap of 2, the bending strength of green parts manufactured by Metal Injection Molding (MIM) [26] is reached, as can be seen in Figure 16.
The effect of orientation on green strength is due to the layer-wise production process of LMM green parts. When the longest sample dimension is oriented in the z-direction, the printed layers are being pulled apart from each other during the bend test. For the other orientations, the tensile stress acts within one layer. With other sinter-based AM processes, like Metal Binder Jetting, an anisotropy of green strength has also been documented in the literature: Oh et al. [27] report a decrease in green strength from 10 N/mm2 to under 5 N/mm2 when the longest sample dimension is aligned parallelly with the printing head movement direction vs. when it is aligned perpendicularly. As an explanation, Oh et al. argue that the wetting of the powder bed with the jetted binder is different in parallel versus perpendicular alignment. In the case of LMM, since it is a suspension-based process, the wetting of powder particles and the binder takes place during suspension preparation. During that process, the mixing and wetting of the powder and binder take place uniformly with high energy input by shear stress [28]. Therefore, during printing, powder particles are already coated by the binder and no additional wetting processes are necessary. This could be an explanation for LMM’s lower dependence of green strength on orientation as compared to data on Metal Binder Jetting published by Oh et al. [27]. Both for LMM and Metal Binder Jetting, the optimization of the green part’s orientation might increase green strength, since the anisotropy of green strength has been proven. However, some geometries need to align with the largest dimension of the building space; therefore, the orientation cannot be chosen freely. Increasing the loading factor decreases green strength as it decreases the cured layer thickness and the overlap. Future research should check the influence of overlap on bending strength for other materials. The final goal of making green parts stronger is making the handling of these parts easier. Therefore, the necessary strength for practical use like handling resistance to automated gripping and cleaning with fluids at high pressure should be investigated. This could be carried out on samples produced with different overlaps.

4.4. Sintering Behavior

The sinter density of samples that are debinded in air is about 92%, regardless of the loading factor. For samples that undergo additional solvent debinding, a value of 95% is reached for loading factors of 52% and 55%. With an increased loading factor of 58%, only a 93% sinter density is measured. Compared to data by Roumanie et al. [17] which indicated a 90% density for an LMM-printed part, the densities are higher, even though the dwell time in this work was half of that used by Roumanie et al. Data from the literature from Ott [16] suggest a linear correlation between green density and sintered density. It is assumed that no relevant amount of binder components evaporates during the printing process. Therefore, green density and loading factor are assumed to be equal for the printed LMM parts in this work. This trend is not observed in the present work. The reasons for this could be incomplete debinding and, therefore, binder residues hindering densification. The debinding of LMM-produced parts is challenging, probably due to binder residues that do not evaporate before open porosity closes. Two research directions originate from this: the optimization of time–temperature profiles for heat treatment and the optimization of the chemical composition of the binder for the complete removal of binder residues. Singh et al. [29] show that residual binder content, even with solvent debinding, impedes densification. A study by by Ajjarupu et al. [30] suggests that employing hot isostatic pressing (HIP) enables densification with a 99% relative density for additively manufactured (Material Extrusion) copper. The applicability of HIP to LMM-printed copper shall be examined in future research.

5. Conclusions

In summary, this study highlights findings on the influence of exposure parameters on the green part strength of LMM-printed green parts made from pure copper. Single-layer exposure (SLE) tests measuring curing thickness were carried out with different loading factors, particle sizes, and exposure times. Based on these results, bending strength was investigated as a function of exposure time (or the overlap of raked layer thickness and cured layer thickness), loading factor, and orientation in the building space. Finally, samples with different loading factors were produced to measure the impact of loading factor, corresponding to the first approximation of green density, on sintered density.
  • The reflectivity of copper is low in the 400 nm wavelength range and high in the 1 µm wavelength range [20]. Both worsen the productivity for additive manufacturing by LMM (405 nm wavelength) or laser-based AM processes (1 µm wavelength), respectively.
  • The applicability of Jacobs working curve theory for filled suspensions is limited. Therefore, the coated-sphere-layer model is proposed. Future research will prove if this model is applicable to other powder materials and loading factors.
  • The study reaffirmed that curing thickness increases with higher exposure energy, a finding that contradicts previous research. The use of larger powder particles also results in thicker cured layers, although this comes with an increased scatter of measured values.
  • Green strength can be increased to 23 N/mm2 by increasing layer overlap or reducing loading factor. It is possible to achieve the green strength of MIM and surpass the green strength of Metal Binder Jetting. Green strength is lower when the longest sample dimension is aligned with the z-axis. A reduced loading factor increases green strength.
  • A sintered density of about 92% is reached. With additional solvent debinding, increasing density to 95% is possible for certain loading factors. The results suggest that incomplete debinding may hinder densification, highlighting the need for optimizing the time–temperature profile and binder composition to ensure the complete removal of binder residues.

Author Contributions

Conceptualization, J.S.; methodology, J.S. and A.S.K.; investigation, J.S. and A.S.K.; resources, T.S., C.Z., and T.W.; data curation, J.S.; writing—original draft preparation, J.S.; writing—review and editing, T.S., C.Z., and T.W.; visualization, J.S. and A.S.K.; supervision, T.W.; project administration, J.S. and T.S.; funding acquisition, T.S., C.Z., and T.W. All authors have read and agreed to the published version of the manuscript.

Funding

This research was funded by the European Fonds for Regional Development EFRE, with co-financing by tax revenues from the budget approved by the members of the Saxon state parliament; AddiMet project; Funding reference: 100405446.

Data Availability Statement

The raw data supporting the conclusions of this article will be made available by the authors on request.

Acknowledgments

The authors would like to thank Matteo Giardino, from Politicnico di Torino, for the fruitful discussion on the curing behavior of metal-filled suspensions.

Conflicts of Interest

The authors declare no conflicts of interest.

References

  1. Joseph, G. (Ed.) Copper: Its Trade, Manufacture, Use, and Environmental Status; 1. Printing; ASM International: Materials Park, OH, USA, 1999; ISBN 0871706563. [Google Scholar]
  2. Grohol, M.; Veeh, C. Study on the Critical Raw Materials for the EU 2023: Final Report; Publications Office of the European Union: Luxembourg, Germany, 2023; ISBN 978-92-68-00414-2. [Google Scholar]
  3. DIN Deutsches Institut für Normung e. V. Additive Fertigung:—Grundlagen—Terminologie (ISO/ASTM 52900:2021); Deutsche Fassung EN ISO/ASTM 52900:2021; (52900:2022-03); Beuth Verlag GmbH: Berlin, Germany, 2021. [Google Scholar]
  4. Braasch, K.; Teplyuk, A.; Miek, D.; Scheibler, J.; Weißgärber, T.; Zhong, C.; Höft, M. Additive Manufacturing of a Copper Elliptical Corrugated Horn Antenna in the Sub-Terahertz Regime. In Proceedings of the 2024 IEEE/MTT-S International Microwave Symposium—IMS 2024, Washington, DC, USA, 16–21 June 2024; IEEE: New York, NY, USA, 2024; pp. 509–512, ISBN 979-8-3503-7504-6. [Google Scholar]
  5. Tran, T.Q.; Chinnappan, A.; Lee, J.K.Y.; Loc, N.H.; Tran, L.T.; Wang, G.; Kumar, V.V.; Jayathilaka, W.A.D.M.; Ji, D.; Doddamani, M.; et al. 3D Printing of Highly Pure Copper. Metals 2019, 9, 756. [Google Scholar] [CrossRef]
  6. Siva Prasad, H.; Brueckner, F.; Volpp, J.; Kaplan, A.F.H. Laser metal deposition of copper on diverse metals using green laser sources. Int. J. Adv. Manuf. Technol. 2020, 107, 1559–1568. [Google Scholar] [CrossRef]
  7. Dadbakhsh, S.; Zhao, X.; Chinnappan, P.K.; Shanmugam, V.; Lin, Z.; Hulme, C. Process and geometrical integrity optimization of electron beam melting for copper. CIRP Ann. 2022, 71, 201–204. [Google Scholar] [CrossRef]
  8. Zamorano Reichold, A.; Baufeld, B. The potential of wire electron beam additive manufacturing of copper. Prog. Addit. Manuf. 2024, 9, 1417–1423. [Google Scholar] [CrossRef]
  9. Dicandia, F.A.; Fonseca, N.J.G.; Bacco, M.; Mugnaini, S.; Genovesi, S. Space-Air-Ground Integrated 6G Wireless Communication Networks: A Review of Antenna Technologies and Application Scenarios. Sensors 2022, 22, 3136. [Google Scholar] [CrossRef] [PubMed]
  10. Melentiev, R.; Harakály, G.; Stögerer, J.; Mitteramskogler, G.; Wagih, A.; Lubineau, G.; Grande, C.A. High-resolution metal 3D printing via digital light processing. Addit. Manuf. 2024, 85, 104156. [Google Scholar] [CrossRef]
  11. Allonas, X.; Hammouda, B.; Métral, B.; Goldbach, E.; Schuller, A.-S.; Ley, C.; Croutxé-Barghorn, C. Controlling photopolymerization reaction in layer-by-layer photopolymerization in 3D printing. Appl. Res. 2024, 3, e202400004. [Google Scholar] [CrossRef]
  12. Vogel, L.; Ali Khan, Q.; Zimmermann, M.; Burkhardt, C. Impact of Printing Parameters on Green Density Homogeneity in Lithography-based Metal Manufacturing. In Proceedings of the World PM2022, Lyon, France, 9–13 October 2022. [Google Scholar] [CrossRef]
  13. Jacobs, P.F. Fundamentals of Stereolithography, Valencia, California. 1992. Available online: https://repositories.lib.utexas.edu/handle/2152/64400 (accessed on 31 May 2023).
  14. Nguyen, H.X.; Suen, H.; Poudel, B.; Kwon, P.; Chung, H. Development of an innovative, high speed, large-scaled, and affordable metal additive manufacturing process. CIRP Ann. 2020, 69, 177–180. [Google Scholar] [CrossRef]
  15. Resch, A.; Benayad, A.; Roumanie, M.; Croutxé-Barghorn, C. Lithography based Metal Manufacturing (LMM): Influence of particle size and composition of copper powder on UV light penetration. Mater. Today Commun. 2023, 35, 105595. [Google Scholar] [CrossRef]
  16. Ott, J. Druckloses Sintern von Cu für Hochleistungsanwendungen. Ph.D. Dissertation, Universität des Saarlandes, Saarbrücken, Germany, 2021. [Google Scholar]
  17. Roumanie, M.; Flassayer, C.; Resch, A.; Cortella, L.; Laucournet, R. Influence of debinding and sintering conditions on the composition and thermal conductivity of copper parts printed from highly loaded photocurable formulations. SN Appl. Sci. 2021, 3, 55. [Google Scholar] [CrossRef]
  18. DIN Deutsches Institut für Normung e. V. Sintermetalle, Ausgenommen Hartmetalle: Ermittlung der Biegebruchfestigkeit; Beuth Verlag GmbH: Berlin, Germany, 2002. [Google Scholar]
  19. DIN Deutsches Institut für Normung e. V. Hochleistungskeramik: Bestimmung der Dichte und der scheinbaren Porosität; Beuth Verlag GmbH: Berlin, Germany, 2022. [Google Scholar]
  20. Enghag, P. Encyclopedia of the Elements: Technical Data, History, Processing, Applications; Wiley-VCH: Weinheim, Germany, 2004; ISBN 3527306668. [Google Scholar]
  21. Melentiev, R.; Wagih, A.; Lagerweij, A.; Mitteramskogler, G.; Lubineau, G.; Grande, C.A. Unlocking multiscale metallic metamaterials via lithography additive manufacturing. Virtual Phys. Prototyp. 2024, 19, e2339368. [Google Scholar] [CrossRef]
  22. Bowman, R.L.; Jack, J.R.; Spisz, E.W.; Weigand, A.J. Solar Absorptances and Spectral Reflectances of 12 Metals for Temperatures Ranging from 300 to 500 K; National Aeronautics and Space Administration (NASA): Moffett Field, CA, USA, 1969; Available online: https://api.semanticscholar.org/CorpusID:136918277 (accessed on 22 September 2024).
  23. Giardino, M.; Gobber, F.S.; Pennacchio, A.; Lupi, G.; Casati, R.; Actis Grande, M. Study of surface oxidation in metal powders by means of optical spectroscopy. Powder Technol. 2024, 443, 119883. [Google Scholar] [CrossRef]
  24. Schatt, W. Pulvermetallurgie: Technologien und Werkstoffe; VDI-Verlag: Dusseldorf, Germany, 1994; ISBN 3540633561. [Google Scholar]
  25. Reineke, L.; Barthel, B.; Hein, S.B. Analysis of powder characteristics and powder-binder interaction for process parameter prediction in Metal Binder Jetting. In Developing the Powder Metallurgy Future: Powder Production, Consolidation Technologies, Materials, Applications, Tools for Improving PM, Proceedings of the World PM2022 Congress & Exhibition, Lyon Convention Centre, Lyon, France, 9–13 October 2022; European Powder Metallurgy Association (EPMA): Shrewsbury, UK, 2022; ISBN 9781899072552. [Google Scholar]
  26. Contreras, J.M.; Jiménez-Morales, A.; Torralba, J.M. Fabrication of bronze components by metal injection moulding using powders with different particle characteristics. J. Mater. Process. Technol. 2009, 209, 5618–5625. [Google Scholar] [CrossRef]
  27. Oh, J.-W.; Nahm, S.; Kim, B.; Choi, H. Anisotropy in Green Body Bending Strength due to Additive Direction in the Binder-Jetting Additive Manufacturing Process. Korean J. Met. Mater. 2019, 57, 227–235. [Google Scholar] [CrossRef]
  28. Mezger, T. Das Rheologie Handbuch: Für Anwender von Rotations- und Oszillations-Rheometern, 5., Vollständig überarbeitete Auflage; Vincentz Network: Hannover, Germany, 2016; ISBN 978-3-74860-012-1. [Google Scholar]
  29. Singh, G.; Missiaen, J.-M.; Bouvard, D.; Chaix, J.-M. Copper additive manufacturing using MIM feedstock: Adjustment of printing, debinding, and sintering parameters for processing dense and defectless parts. Int. J. Adv. Manuf. Technol. 2021, 115, 449–462. [Google Scholar] [CrossRef]
  30. Ajjarapu, K.P.K.; Barber, C.; Taylor, J.; Pelletiers, T.; Jackson, D.; Beamer, C.; Atre, S.V.; Kate, K.H. Advancements in 3D printing and hot isostatic pressing of copper: Bridging the gap between green and sintered states for enhanced mechanical and electrical properties. Prog. Addit. Manuf. 2024, 9, 2343–2350. [Google Scholar] [CrossRef]
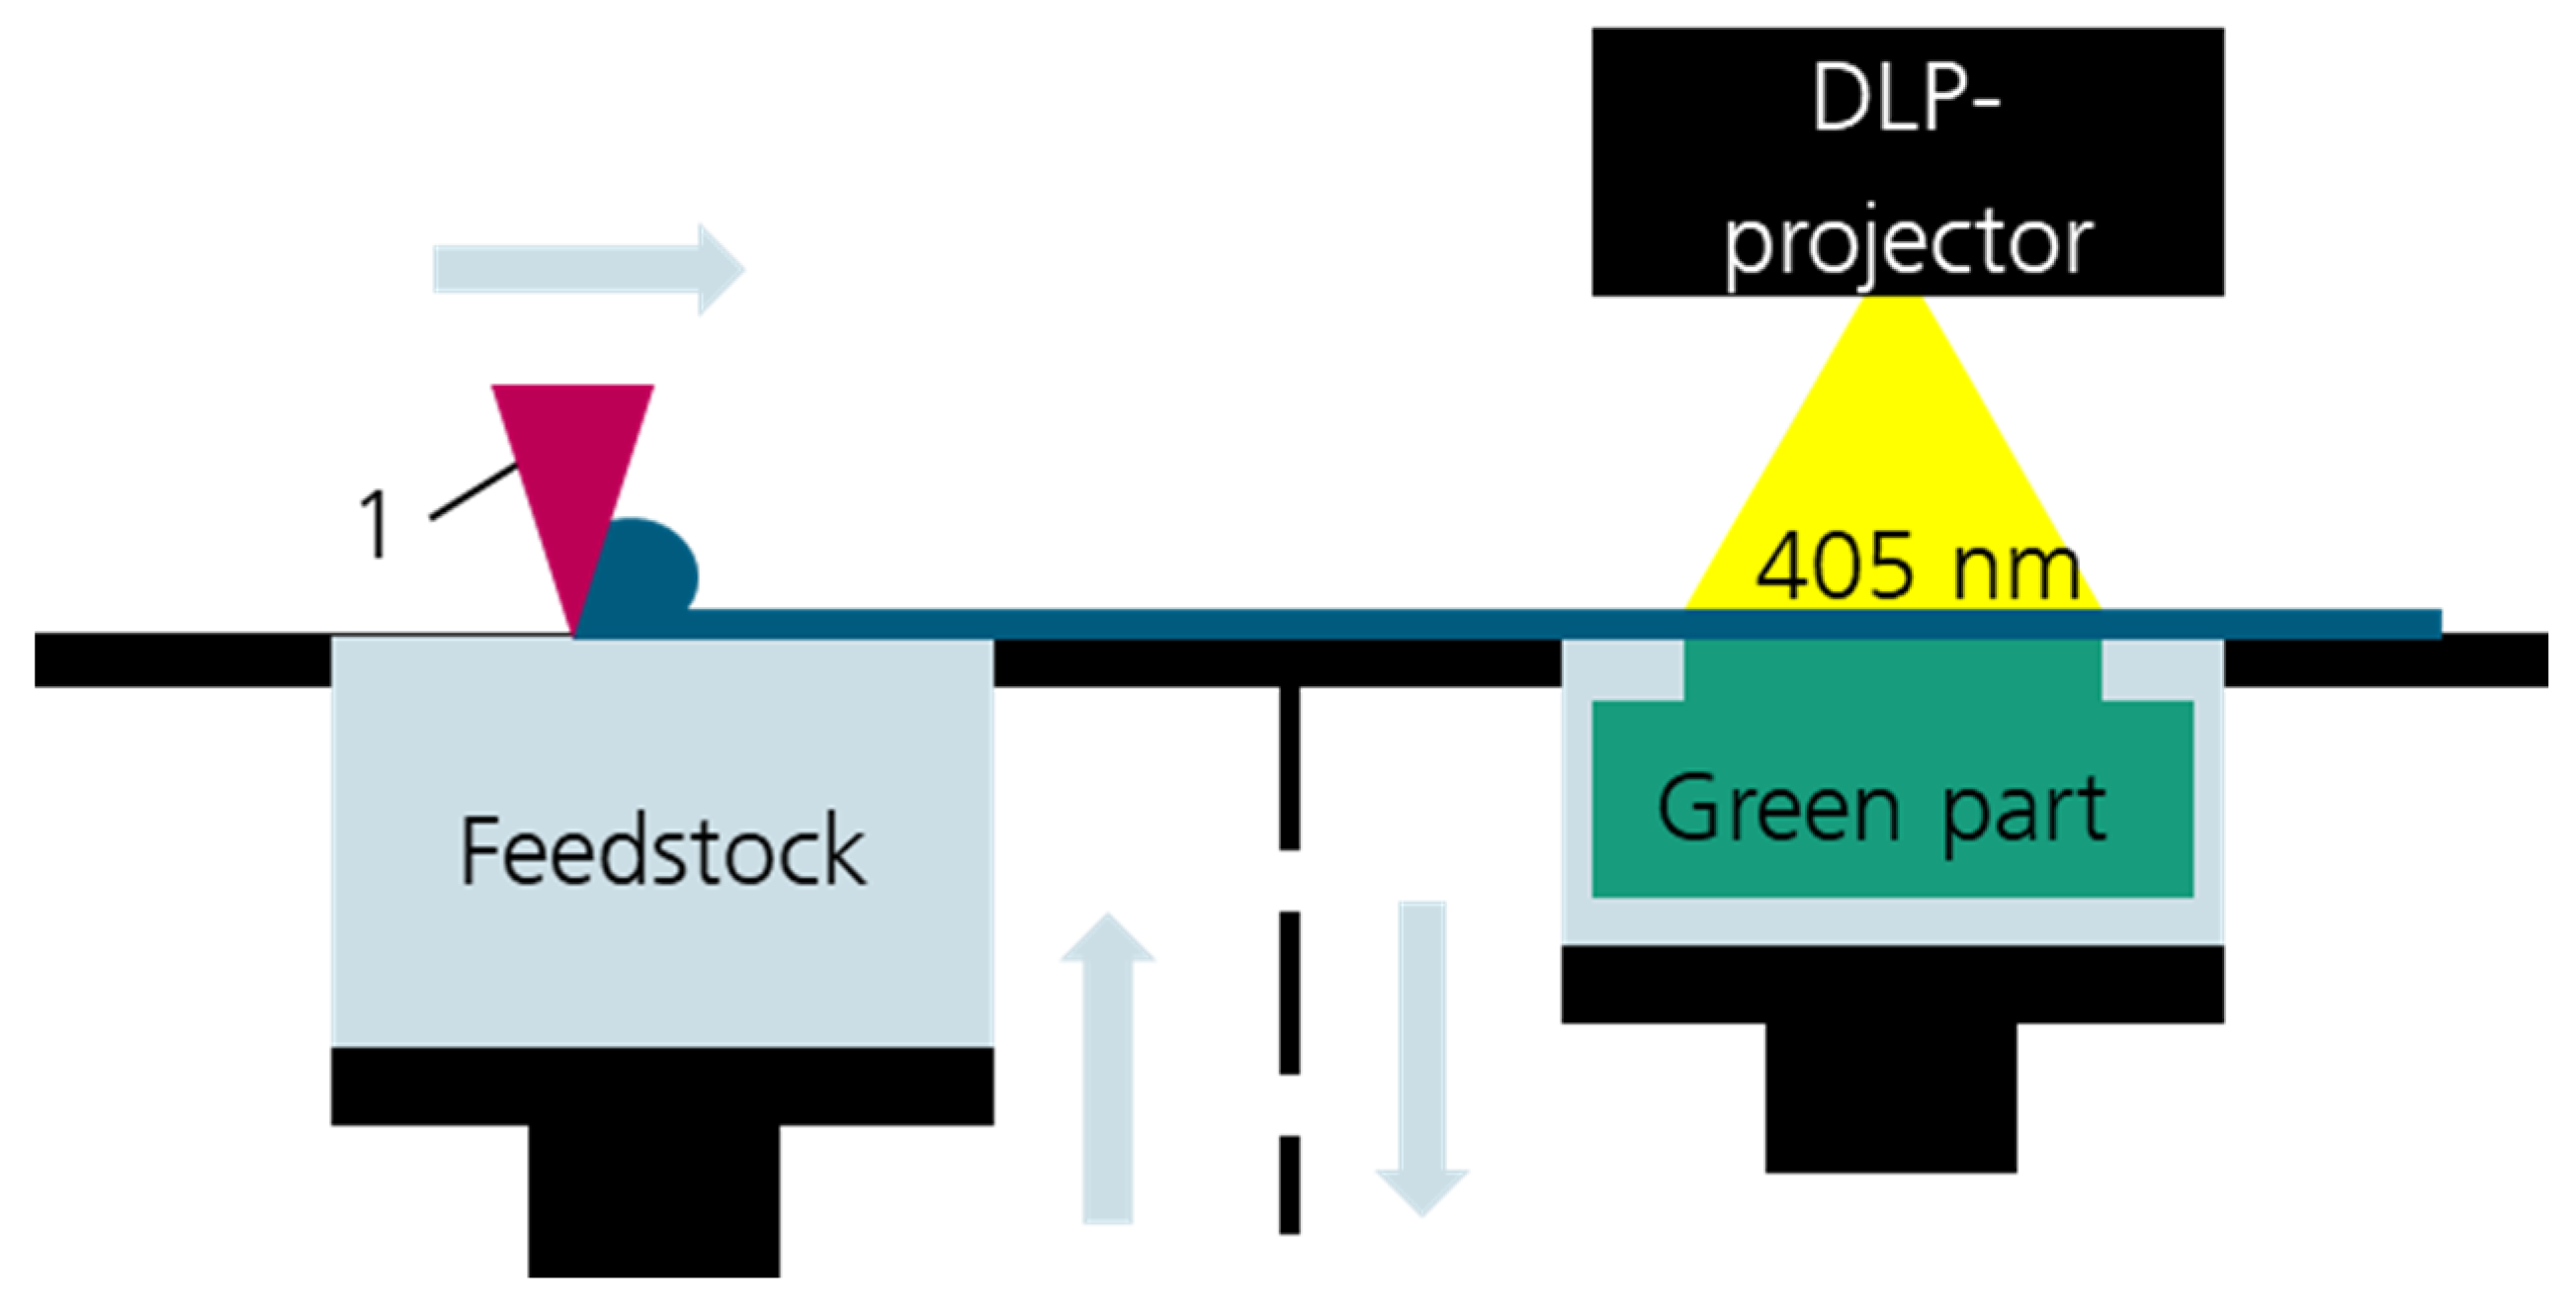
Figure 1. A schematic of the LMM printing process. (1) Heated blade. Left side: feedstock platform. Right side: building platform. The printed green parts are surrounded by cooled-down feedstock.
Metals 14 01268 g001
Figure 2. Cross-sections of powders used in the present study. The shape is mostly spherical except for a few irregularly shaped particles.
Metals 14 01268 g002
Figure 3. A schematic representation of the setup for the single-layer exposure of (a) filled suspensions and (b) unfilled suspensions. Light from the projector cures a circle of suspension whose thickness is measured after exposure and cleaning. The actual setup after the curing of an unfilled suspension is shown in (c). The setup is photographed outside the printer for better illumination.
Metals 14 01268 g003
Figure 4. The orientations used for the three-point bending test. The direction of blade movement is indicated by the black arrow. The first letter indicates the orientation of the longest sample dimension, and the second letter indicates the direction of impact for the bending fin. The Y; Z orientation is used while varying the other parameters.
Metals 14 01268 g004
Figure 5. Working curves; thickness of SLE samples for (a) filled suspensions and (b) unfilled suspensions. Red lines indicate regression curves for linear fit. Sample geometry is cylindrical with 5 mm diameter and varying thickness.
Metals 14 01268 g005
Figure 6. Cross-sections of samples produced by SLE with following parameters: (a) exposure energy 200 mJ/cm2, powder A; (b) exposure energy 5000 mJ/cm2, powder A; (c) exposure energy 50 mJ/cm2, powder C; (d) exposure energy 5000 mJ/cm2, powder C.
Metals 14 01268 g006
Figure 7. Bending strength as a function of sample orientation for samples based on powder A.
Metals 14 01268 g007
Figure 8. Bending strength as a function of loading factor for suspensions with powder A in Y; Z-orientation.
Metals 14 01268 g008
Figure 9. Bending strength in Y; Z-orientation as function of overlap for raked layer thickness of 25 µm (black) and 50 µm (red). Data points at overlap of 1 are intentionally shifted in x-direction to improve distinguishability. All shown data points are based on powder A.
Metals 14 01268 g009
Figure 10. The cross-sections of copper samples, sintered for 2 h in H2. The labeling on the left indicates the loading factor; the labeling on top indicates the debinding treatment.
Metals 14 01268 g010
Figure 11. Evolution of sintered density as function of loading factor. Samples produced by LMM, 16 µm powder, sintered for 2 h in H2. Line represents empirical regression function from Ott [16] for sintering of 12 µm powders for 3 h in H2. In this case, loading factor is assumed to be equal to green density.
Metals 14 01268 g011
Figure 12. Model of SLE sample with different particle sizes: (a) small particles, (b) large particles. Arrows indicate different measured thicknesses depending on location of measurement.
Metals 14 01268 g012
Figure 13. Working curves with normalized curing thickness. Data points are intentionally shifted in x-direction to improve distinguishability.
Metals 14 01268 g013
Figure 14. Schematic 2D representation of particles in different geometric arrangements. Orange: powder particles; blue: binder around those particles. Spaces between blue circles are also filled with binder. Case (a)—closest packing; case (b)—centering spheres in rectangular grid. Note, difference in arrow length indicates thickness of three layers.
Metals 14 01268 g014
Figure 15. Working curve with normalized curing thickness and normalized exposure energy. All data points from Figure 14 are combined into one dataset. Parameters of linear fit are as follows: slope: 0.44; reciprocal of slope: 2.24; y-intercept: 0.41, R2: 0.64.
Metals 14 01268 g015
Figure 16. Bending strength in Y; Z-orientation as function of overlap for raked layer thickness of 25 µm (black) and 50 µm (red). Additionally, values from literature are given for strength of green parts produced by Metal Injection Molding (MIM) and Metal Binder Jetting.
Metals 14 01268 g016
Table 1. The parameters describing the volumetric particle size distributions of the powders used in this work. The PSDs for powder A and B are monomodal; powder C has a bimodal PSD.
Powder Named10/µmd50/µmd90/µm
A91625
B112040
C 11553111
1 Bimodal PSD; modal values are 20 µm and 80 µm.
Table 2. Printing and suspension parameters used for production of samples for three-point bending test. Overlap is based on measurement of working curves presented in this work.
Sample NameLoading Factor/%Exposure Energy/mJ/cm2Raked Layer Thickness/µmOverlap
O-0.7552 28250.75
O-15260251
O-1.2552128251.25
O-1.552275251.5
O-2521262252
R-1521262501
S-52 152200251.40
S-5858200250.97
1 Samples with different orientations are also printed with these parameters.
Table 3. Fitting parameters of working curves.
SuspensionPenetration Depth/µmCritical Exposure Energy/mJ/cm2Minimum Examined Exposure Energy/mJ/cm2 R2
BM-P18 + 52% Powder C14.50.3500.86
BM-P18 + 52% Powder B8.30.41000.84
BM-P18 + 52% Powder A8.23.22000.89
BM-P18 + 58% Powder A5.82.12000.88
Unfilled BM-P18165.03.2100.87
Disclaimer/Publisher’s Note: The statements, opinions and data contained in all publications are solely those of the individual author(s) and contributor(s) and not of MDPI and/or the editor(s). MDPI and/or the editor(s) disclaim responsibility for any injury to people or property resulting from any ideas, methods, instructions or products referred to in the content.