Article

Numerical Simulation and Experimental Verification of Hot Roll Bonding of 7000 Series Aluminum Alloy Laminated Materials

1
College of Mechanical Engineering, Zhejiang University of Technology, Hangzhou 310014, China
2
College of Mechanical Engineering, Quzhou University, Quzhou 324000, China
3
Zhejiang Bulaoshen Civil Air Protection Equipment Co., Ltd., Quzhou 324022, China
*
Authors to whom correspondence should be addressed.
Metals 2024, 14(5), 551; https://doi.org/10.3390/met14050551
Submission received: 3 April 2024 / Revised: 30 April 2024 / Accepted: 3 May 2024 / Published: 7 May 2024
(This article belongs to the Special Issue Numerical Simulation and Experimental Research of Metal Rolling)

Abstract

:
In the present study, the hot roll bonding process of 7000 series aluminum alloy laminated materials was numerically simulated and investigated using the finite element method, and the process parameters were experimentally verified by properties testing and microstructure analysis after hot roll bonding. In the roll bonding process of aluminum alloy laminated materials, the effects of the intermediate layer, pass reduction ratio, rolling speed and thickness ratio of component layers were studied. The results of finite element simulations showed that the addition of a 701 intermediate layer in the hot roll bonding process could effectively coordinate the deformation of the 705 layer and 706 layer and prevented the warping of the laminated material during hot rolling. It is recommended to use a multi-pass rolling process with small deformation and high speed, and the recommended rolling reduction ratio is 20%~30%, the hot rolling speed is 1.5~2.5 m/s and the thickness ratio of the 705 layer and 706 layer is about 1:5. Based on the above numerical results, five-layer and seven-layer 7000 series aluminum alloy laminated materials were prepared by the hot roll bonding process. The results showed that metallurgical bonding was realized between each component layer, and no delamination was observed from the tensile fracture between the interfaces of component layers. The tensile strength of the prepared laminated materials decreased with the increase in the thickness ratio of the 705 layer, and the bonding strengths of the laminated materials were in the range of 88–99 MPa. The experimental results verified the rationality of the process parameters recommended by the numerical simulations in terms of warping and delamination prevention.

1. Introduction

Metal laminated composite material is a new type of composite material which combines two or more metals with different physical, chemical and mechanical properties and is formed using bonding technology. This kind of material integrates the respective performances of each component metal, and makes up for the shortcomings in the performance of each component metal and gives full play to the characteristics of each component metal, so it is widely used in the fields of transportation, aerospace, electric power electronics, chemical equipment, etc. [1,2,3]. Moreover, the existence of interlayer interfaces in multi-layer materials can further improve the damping characteristics of the materials, reduce vibration and thus further improve the material performance [4,5]. Aluminum alloy laminated composite materials of the 7000 series have advantages, such as light weight, high strength and good high-speed impact resistance, so they exhibit a broad application prospect in the field of safety protection [6,7].
Currently, the methods of preparing laminated metallic materials mainly include rolling bonding, extrusion bonding, explosion bonding and diffusion welding [8]. Rolling bonding is one of the most widely used preparation methods compared with other methods and has the advantages of low pollution, stable operation and good continuity of mass production [9,10,11]. Among them, hot roll bonding can easily realize the continuous production of large-size products, so it is mostly used to produce medium-thickness composite plates; however, the interface needs to be prevented from generating intermetallic compounds which would reduce the interlayer bonding strength. At present, pure Cu, Ni, Nb, Fe and other intermediate layers are usually added between the component metals to prevent the formation of intermetallic compounds [11,12]. The cold roll bonding process generally requires a first-pass reduction rate of 60% to achieve effective bonding, and often needs annealing treatment to eliminate residual stresses. The process has been widely used in laminated metal composites such as Al/Cu and Al/Fe [13,14,15]. Heterothermal roll bonding can effectively coordinate the deformation resistance of each metal layer caused by the different temperatures of each component layer in the embryo material, so as to complete the laminated materials with large performance differences, and can be used to prepare Ti/Al, Ti/Mg, Fe/Al and other laminates [16,17,18].
Researchers have carried out extensive studies on the roll bonding mechanism of laminated aluminum alloy composites. Saito [19,20] processed AA1100 composite plates by accumulative roll bonding and analyzed the bonding mechanism at the laminated interface, concluding that there existed a minimum thickness reduction to make the rolled processed interface sufficiently bonded, and there existed a minimum stress at the bonding interface of the composite. Ultra-fine-grain 1060 aluminum alloy composite plate prepared by accumulative roll bonding also had good mechanical properties [21]. The above studies were based on cold rolling preparation, without considering the bonding mechanism during hot rolling experiments. While Wang [22] achieved the hot rolling of laminated AA1060 aluminum alloy by accumulative roll bonding to quantify the texture evolution of the surface layer using a simple relationship between the texture volume fraction and the cumulative true strain, Su [23] also successfully prepared accumulative-roll-bonded AA6061 composite plates using hot rolling and explained the mechanism of the change in the volume fraction of the oriented r-cube during the laminated rolling process. However, the above studies also did not take into account the effect of some process factors, such as the interlayer, pass rolling reduction ratio, rolling speed and the thickness ratio of the component layer, on the stress variation and bonding quality of laminated aluminum alloy plates. The bonding quality of the interface could be reflected by the stress and strain distribution during the roll bonding process [24,25,26,27]. Therefore, the study of the roll bonding process is of great significance not only for the formulation of reasonable processing technology, but also for the study of the bonding mechanism.
In the present study, the effects of different factors including the interlayer, pass rolling reduction ratio, rolling speed and the thickness ratio of the component layer on the stress–strain distribution of 7000 series aluminum alloy laminated materials in the hot roll bonding process were studied using ABAQUS finite element analysis. According to the simulation results, the hot roll bonding process parameters of the laminated material were determined, and the feasibility of the process parameters was verified by hot roll bonding experiments, properties testing and microstructure analysis of the laminated composite materials. These results will provide theoretical guidance for the preparation of 7000 series aluminum alloy laminated composite materials.

2. Materials and Methods

2.1. Materials

Three 7000 series aluminum alloys were used in this study, which were named 701, 705 and 706, respectively, and their chemical compositions are shown in Table 1.

2.2. Finite Element Modeling

The rolling process could be simulated by making the length of the rolled plate greater than the circumference of the roll, and the rest process was the repetition of the process. In order to reduce the computational effort, 1/2 part modeling was performed based on symmetry using ABAQUS/CAE 2020 software. The modeling rolled parts were 1000 mm in length, 645 mm in width and 435 mm in thickness, while the thickness of the 701 alloy layer in the workpiece was 15 mm. The roll was 1000 mm in diameter and 850 mm in width.
In the geometric model, the workpiece was modeled as a solid, and eight-node hexahedral cells were used to delimit the mesh of the workpiece. The roll picks were modeled as discrete rigid shells, and discrete rigid cells were used to delimit the mesh. The meshing of the model is shown in Figure 1, where the negative direction of the X-axis is the rolling direction of the workpiece, the negative direction of the Y-axis is the downward pressure direction of the rolls and the direction of the Z-axis is the width direction. The finite element size of the rolled parts in the width direction is 10 mm, the finite element size of the 705 and 706 alloys in the press-down direction is 10 mm and the finite element size of the 701 alloy in the press-down direction is 7.5 mm. The number of roll finite elements is 54,008, and the number of workpiece finite elements is 313,302.

2.3. Determination of Material Parameters

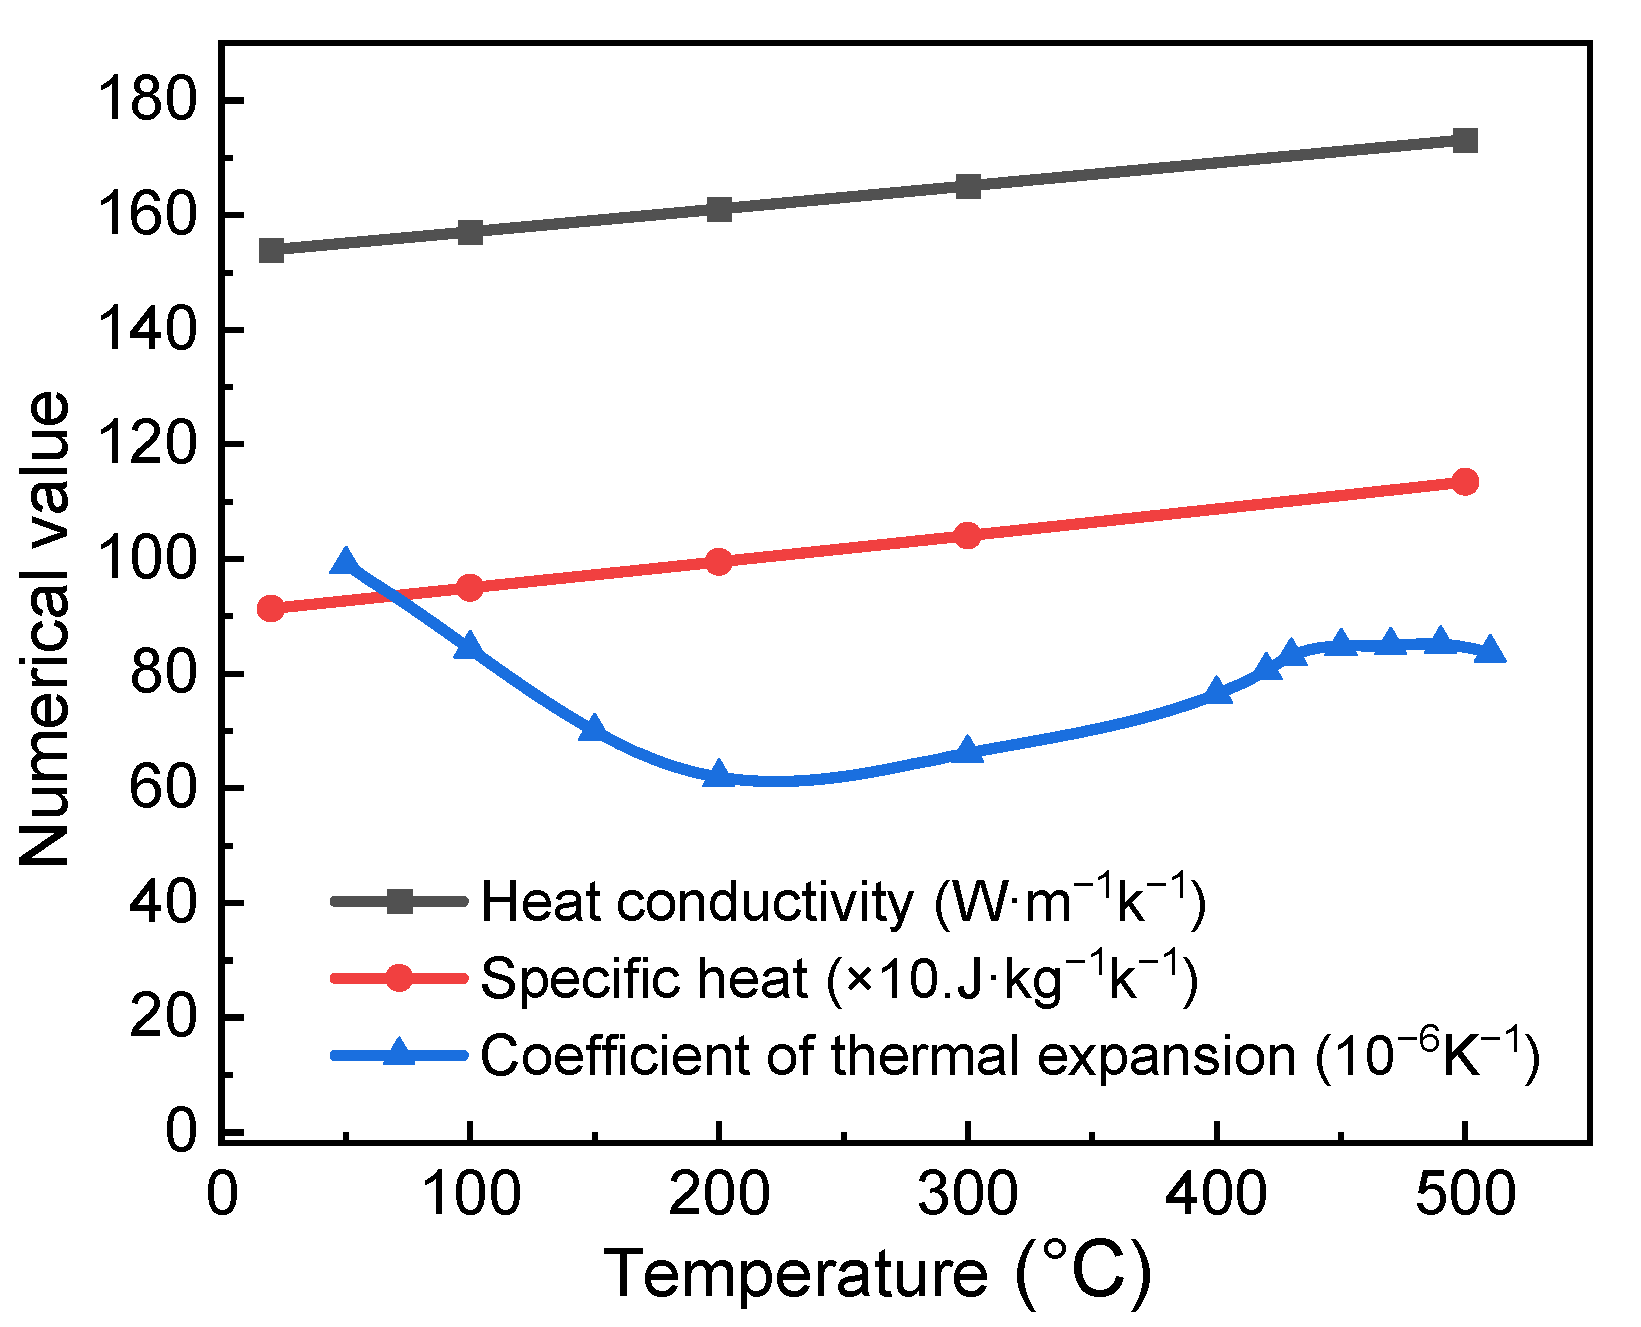
The accuracy of finite element simulation results mainly depends on the setting of material physical parameters, which should be consistent with the actual hot rolling process. In the simulation, the density of aluminum alloy was taken as 2.7 × 10³ kg/m3, and Poisson’s ratio was adopted as 0.33. At the initial stage of the actual hot rolling, the temperature of the rolled parts was generally in the range of 400–500 °C. Therefore, the temperature range of the material physical property parameters related to this simulation was also determined at 400~500 °C. According to reference [28,29,30], the specific heat, thermal conductivity and coefficient of thermal expansion of the material related to this simulation with the temperature change is as shown in Figure 2. ABAQUS automatically interpolated the input physical parameters with the temperatures changed.
The initial temperature of the workpiece was set to 470 °C and applied to all the cell nodes of the rolled part. The initial temperature of the roll was set to 100 °C and applied to the rigid reference point of the roll. The ambient temperature was 25 °C. In the deformation zone, the contact between the roll and the workpiece was modeled by a penalty function contact model with a friction coefficient of 0.3. The thermal parameter of the plastic deformation of the workpiece was set to 0.9, which was applied to all the nodes of the whole model of the workpiece. The friction heat generation parameter of the roll and the workpiece in the hot rolling process was set to 0.9. For the convenience of calculation, the radiant heat transfer and convective heat transfer were converted into the composite heat transfer coefficient, which was set to 30 W/(m2 K). The above physical parameters were added into the ABAQUS software to generate the relevant material model and then solved.
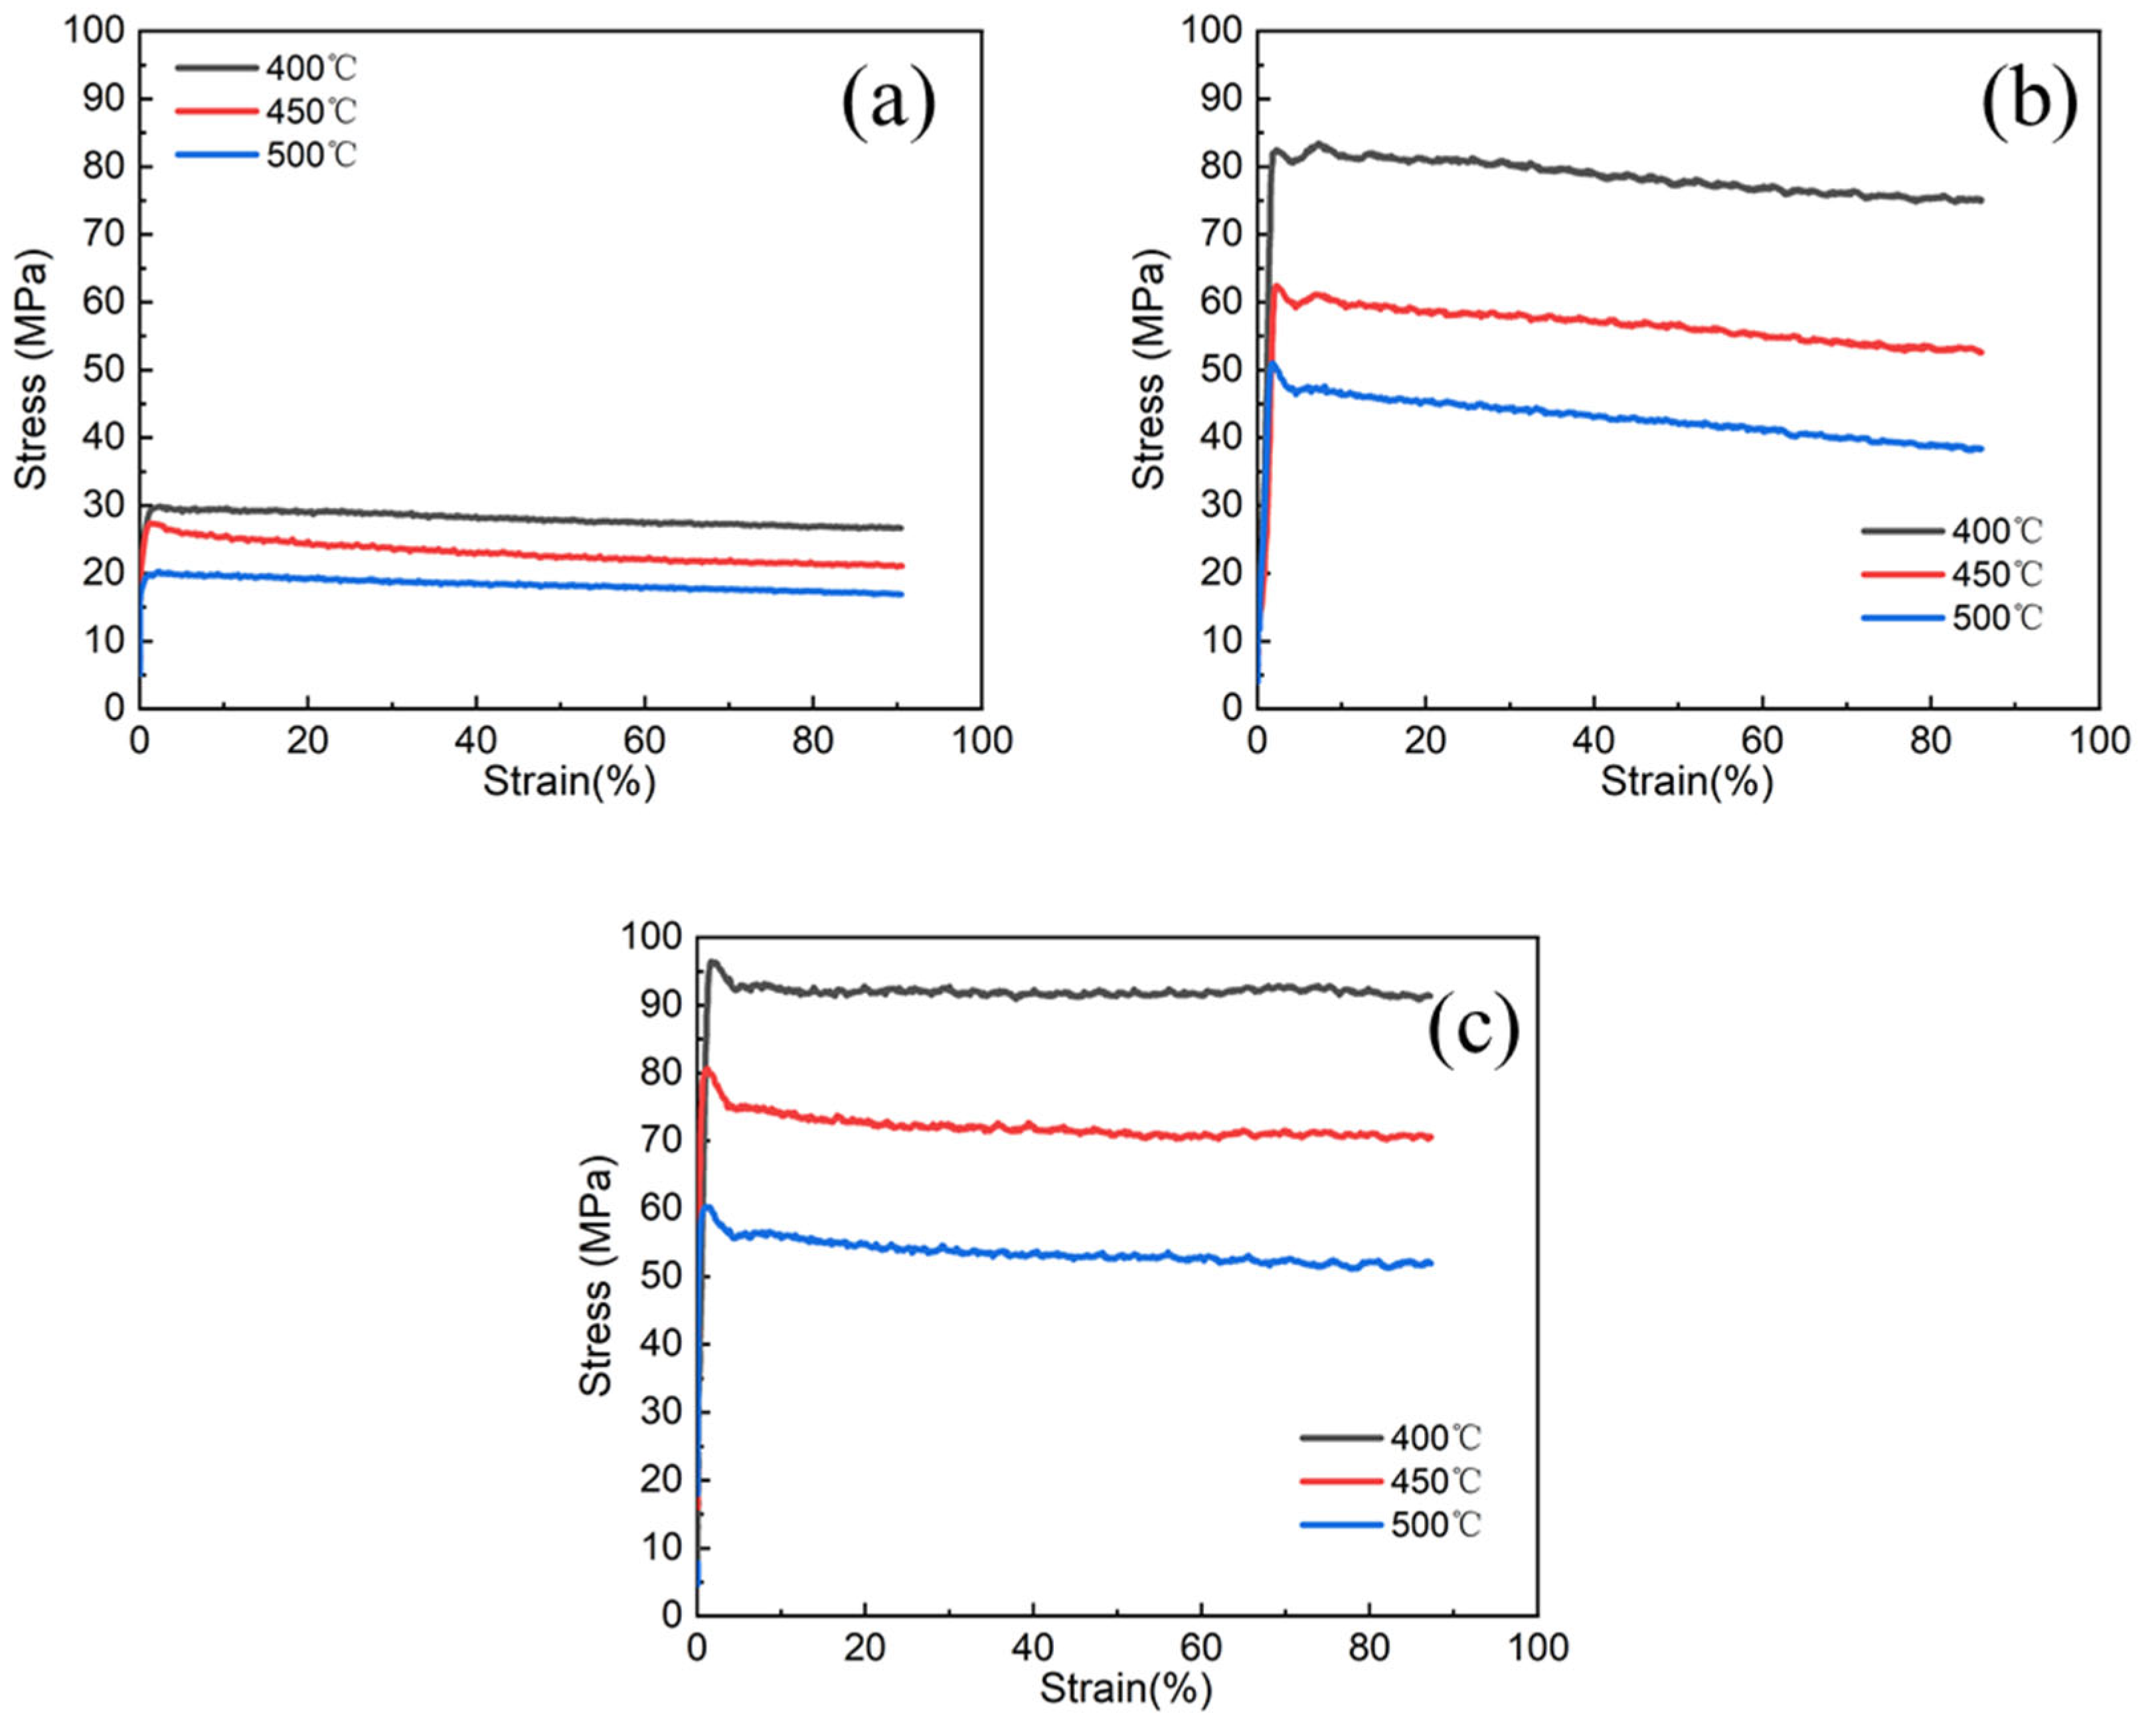
The material intrinsic data used for the rolling simulation in this paper were obtained by Gleeble 3500 thermal compression test. The specimen size was ϕ8 × 12 mm, and the strain rate of the compression was 0.1 s−1. When the temperature of the specimen rose to 400, 450 and 500 °C with a rate of 5 °C/s, respectively, it was compressed by 60% in air and then quenched after holding for 3 min. The true stress–strain curves of the three materials at different temperatures are shown in Figure 3. Based on the data of the elastic phase of the curves, the modulus of elasticity of 701, 705 and 706 was calculated to be 7.804, 2.717 and 0.893 GPa, respectively, from 400 °C to 500 °C. Since there is no obvious yield point, the value of the stress corresponding to the generation of 0.2% residual deformation was adopted as the yield stress of the materials.

2.4. Experimental Methods

The room-temperature tensile tests of samples were carried out on a Zwick Z050 universal tensile testing machine equipped with an extensometer. The total length of the tensile sample was 150 mm, the gauge length was 50 mm and the width of the gauge length area was 12.5 mm. The maximum load of the tension sensor was 50 kN, with an accuracy of 1% of the actual load, and the tensile rate was 9 mm/min. Three samples were tested in each state. Tensile–shear tests were carried out on the same tensile testing machine with a specimen width of 10 mm, a slot width of 8 mm and a lap width of 4 mm for the different component layers. After mechanical grinding and polishing, the metallographic samples of the laminated plates were prepared via electrochemical polishing with coating solutions of 5 mL HF, 10 mL HNO3 and 85 mL H2O and then were observed and analyzed using a Zeiss Axio Imager A2 optical microscope. The fracture morphology and chemical composition of the selected area were analyzed on a Zeiss Sigma thermal field emission scanning electron microscope with an energy-dispersive spectrometer under an accelerating voltage of 10–20 kV.

3. Results and Discussion

3.1. Simulation Design and Results

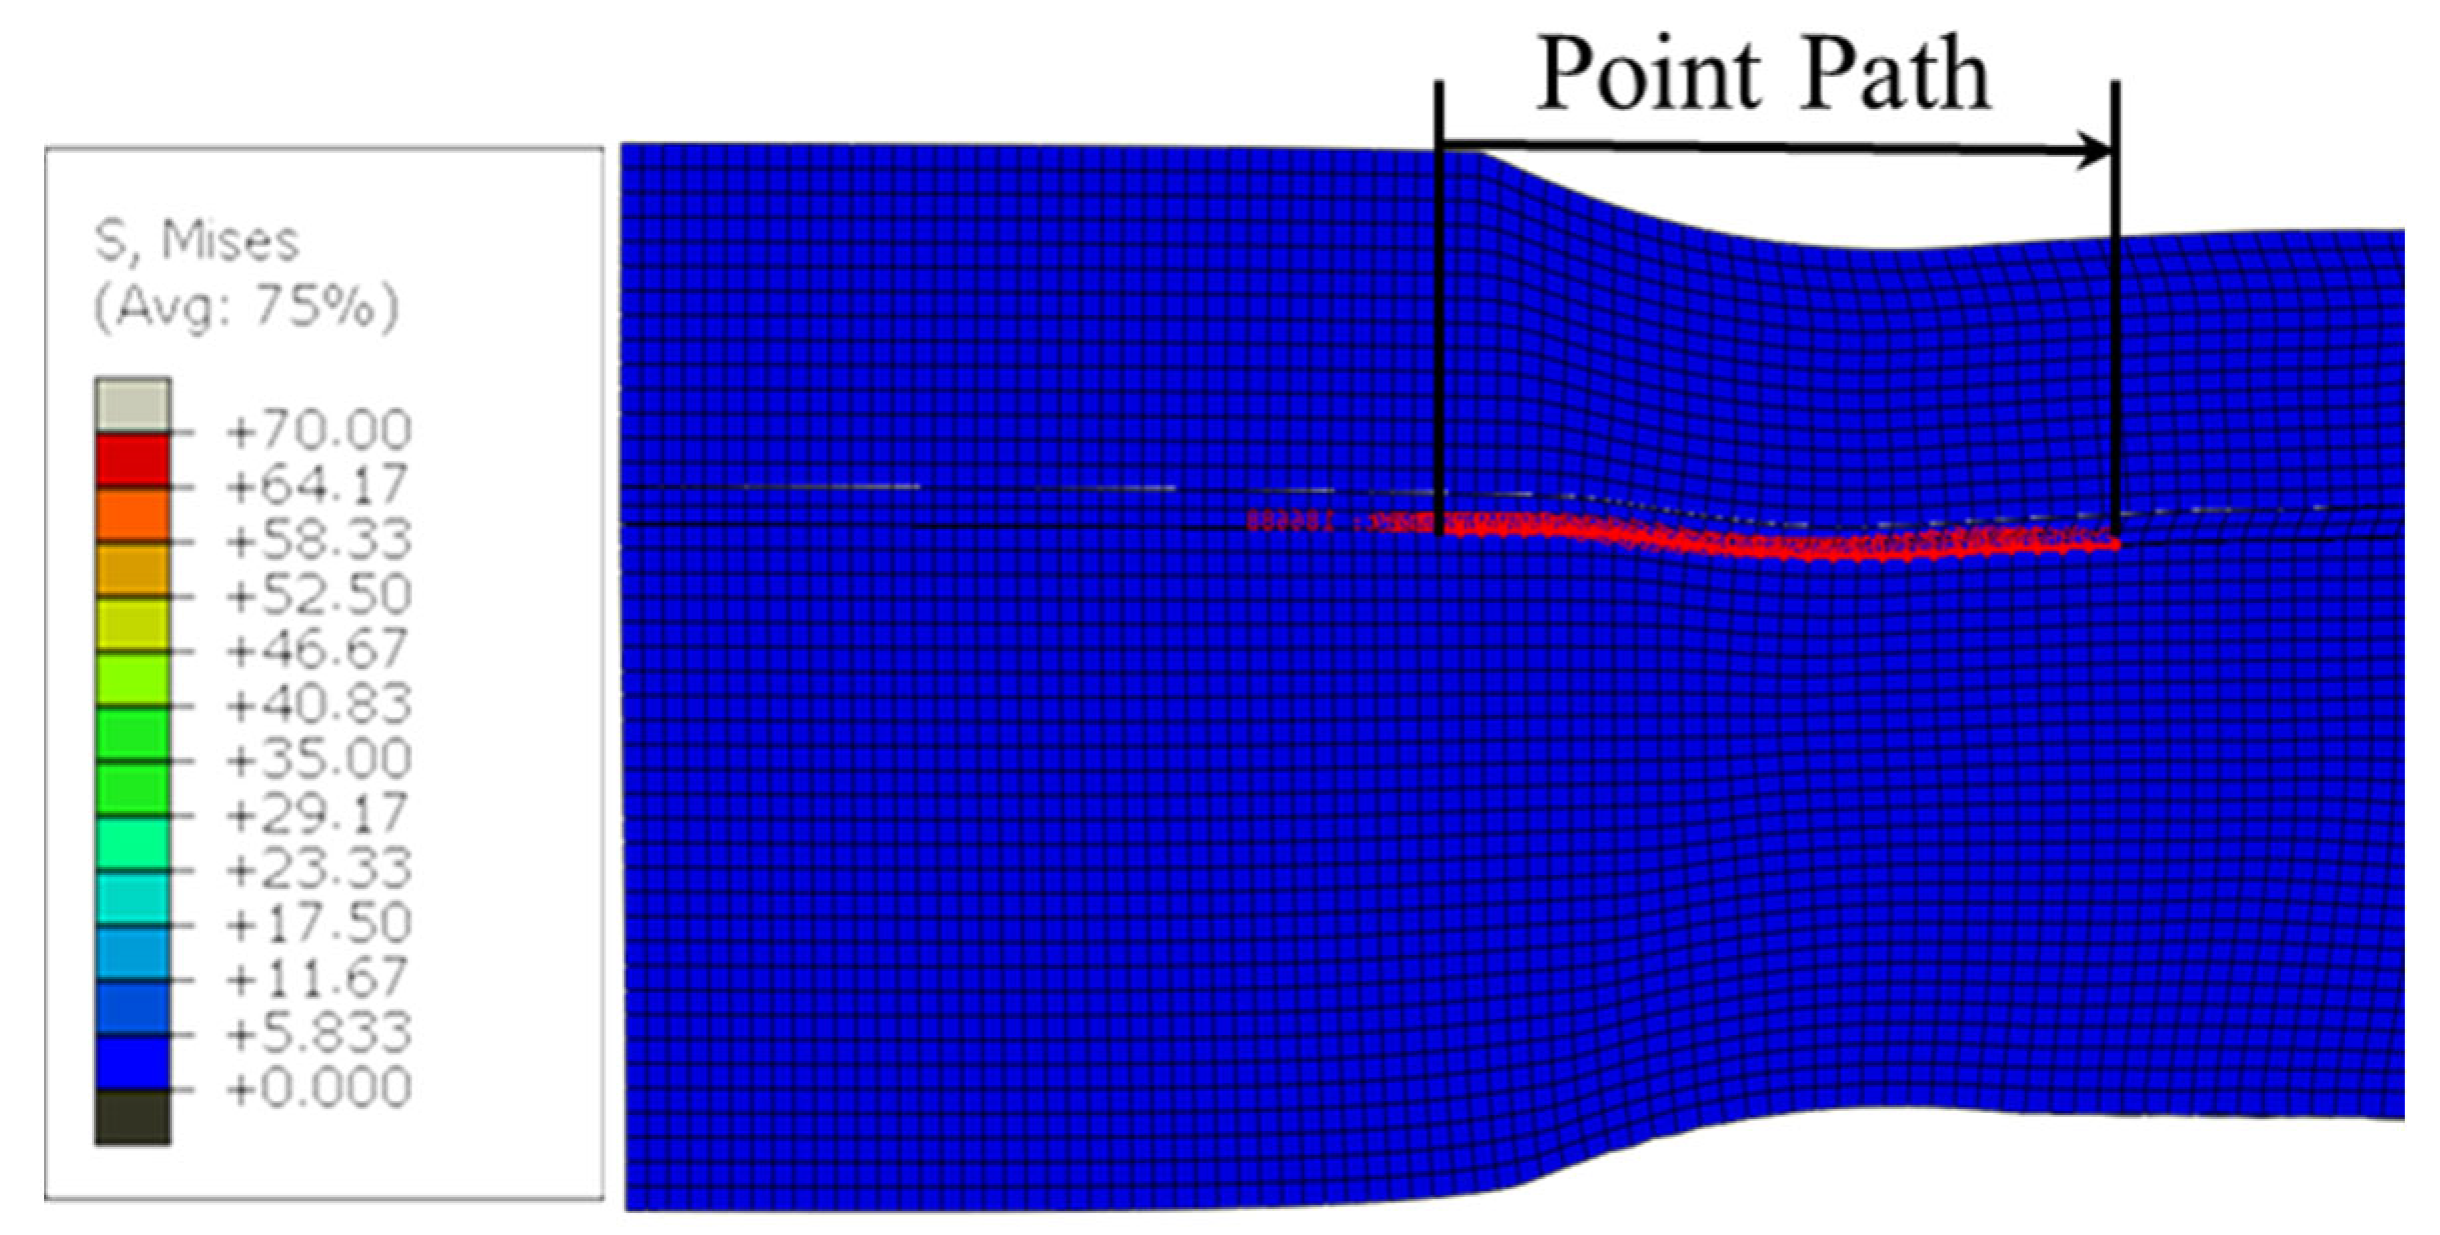
The simulation in this study took the rolling entrance as the coordinate origin and the rolling exit as the end point, and the point-taking analysis was carried out along the path in the direction of the rolling exit, as shown in Figure 4. The point-taking path included the entire rolling deformation zone (the horizontal projection of the contact arc length from the entrance of the rolled piece to the exit of the rolled piece). This method was adopted for the subsequent data point-taking analysis of the simulation in the present work, and the stress scales of the simulation results were also set as shown in Figure 4. The rolling reduction ratio was designed to be 20%, 30% and 40%, the hot rolling speed was designed as 0.5 m/s, 1.5 m/s and 2.5 m/s and the thickness ratio of the component layer was designed as 1:2, 1:5 and 1:11, respectively.

3.1.1. Simulation Results of 701 Interlayer Addition

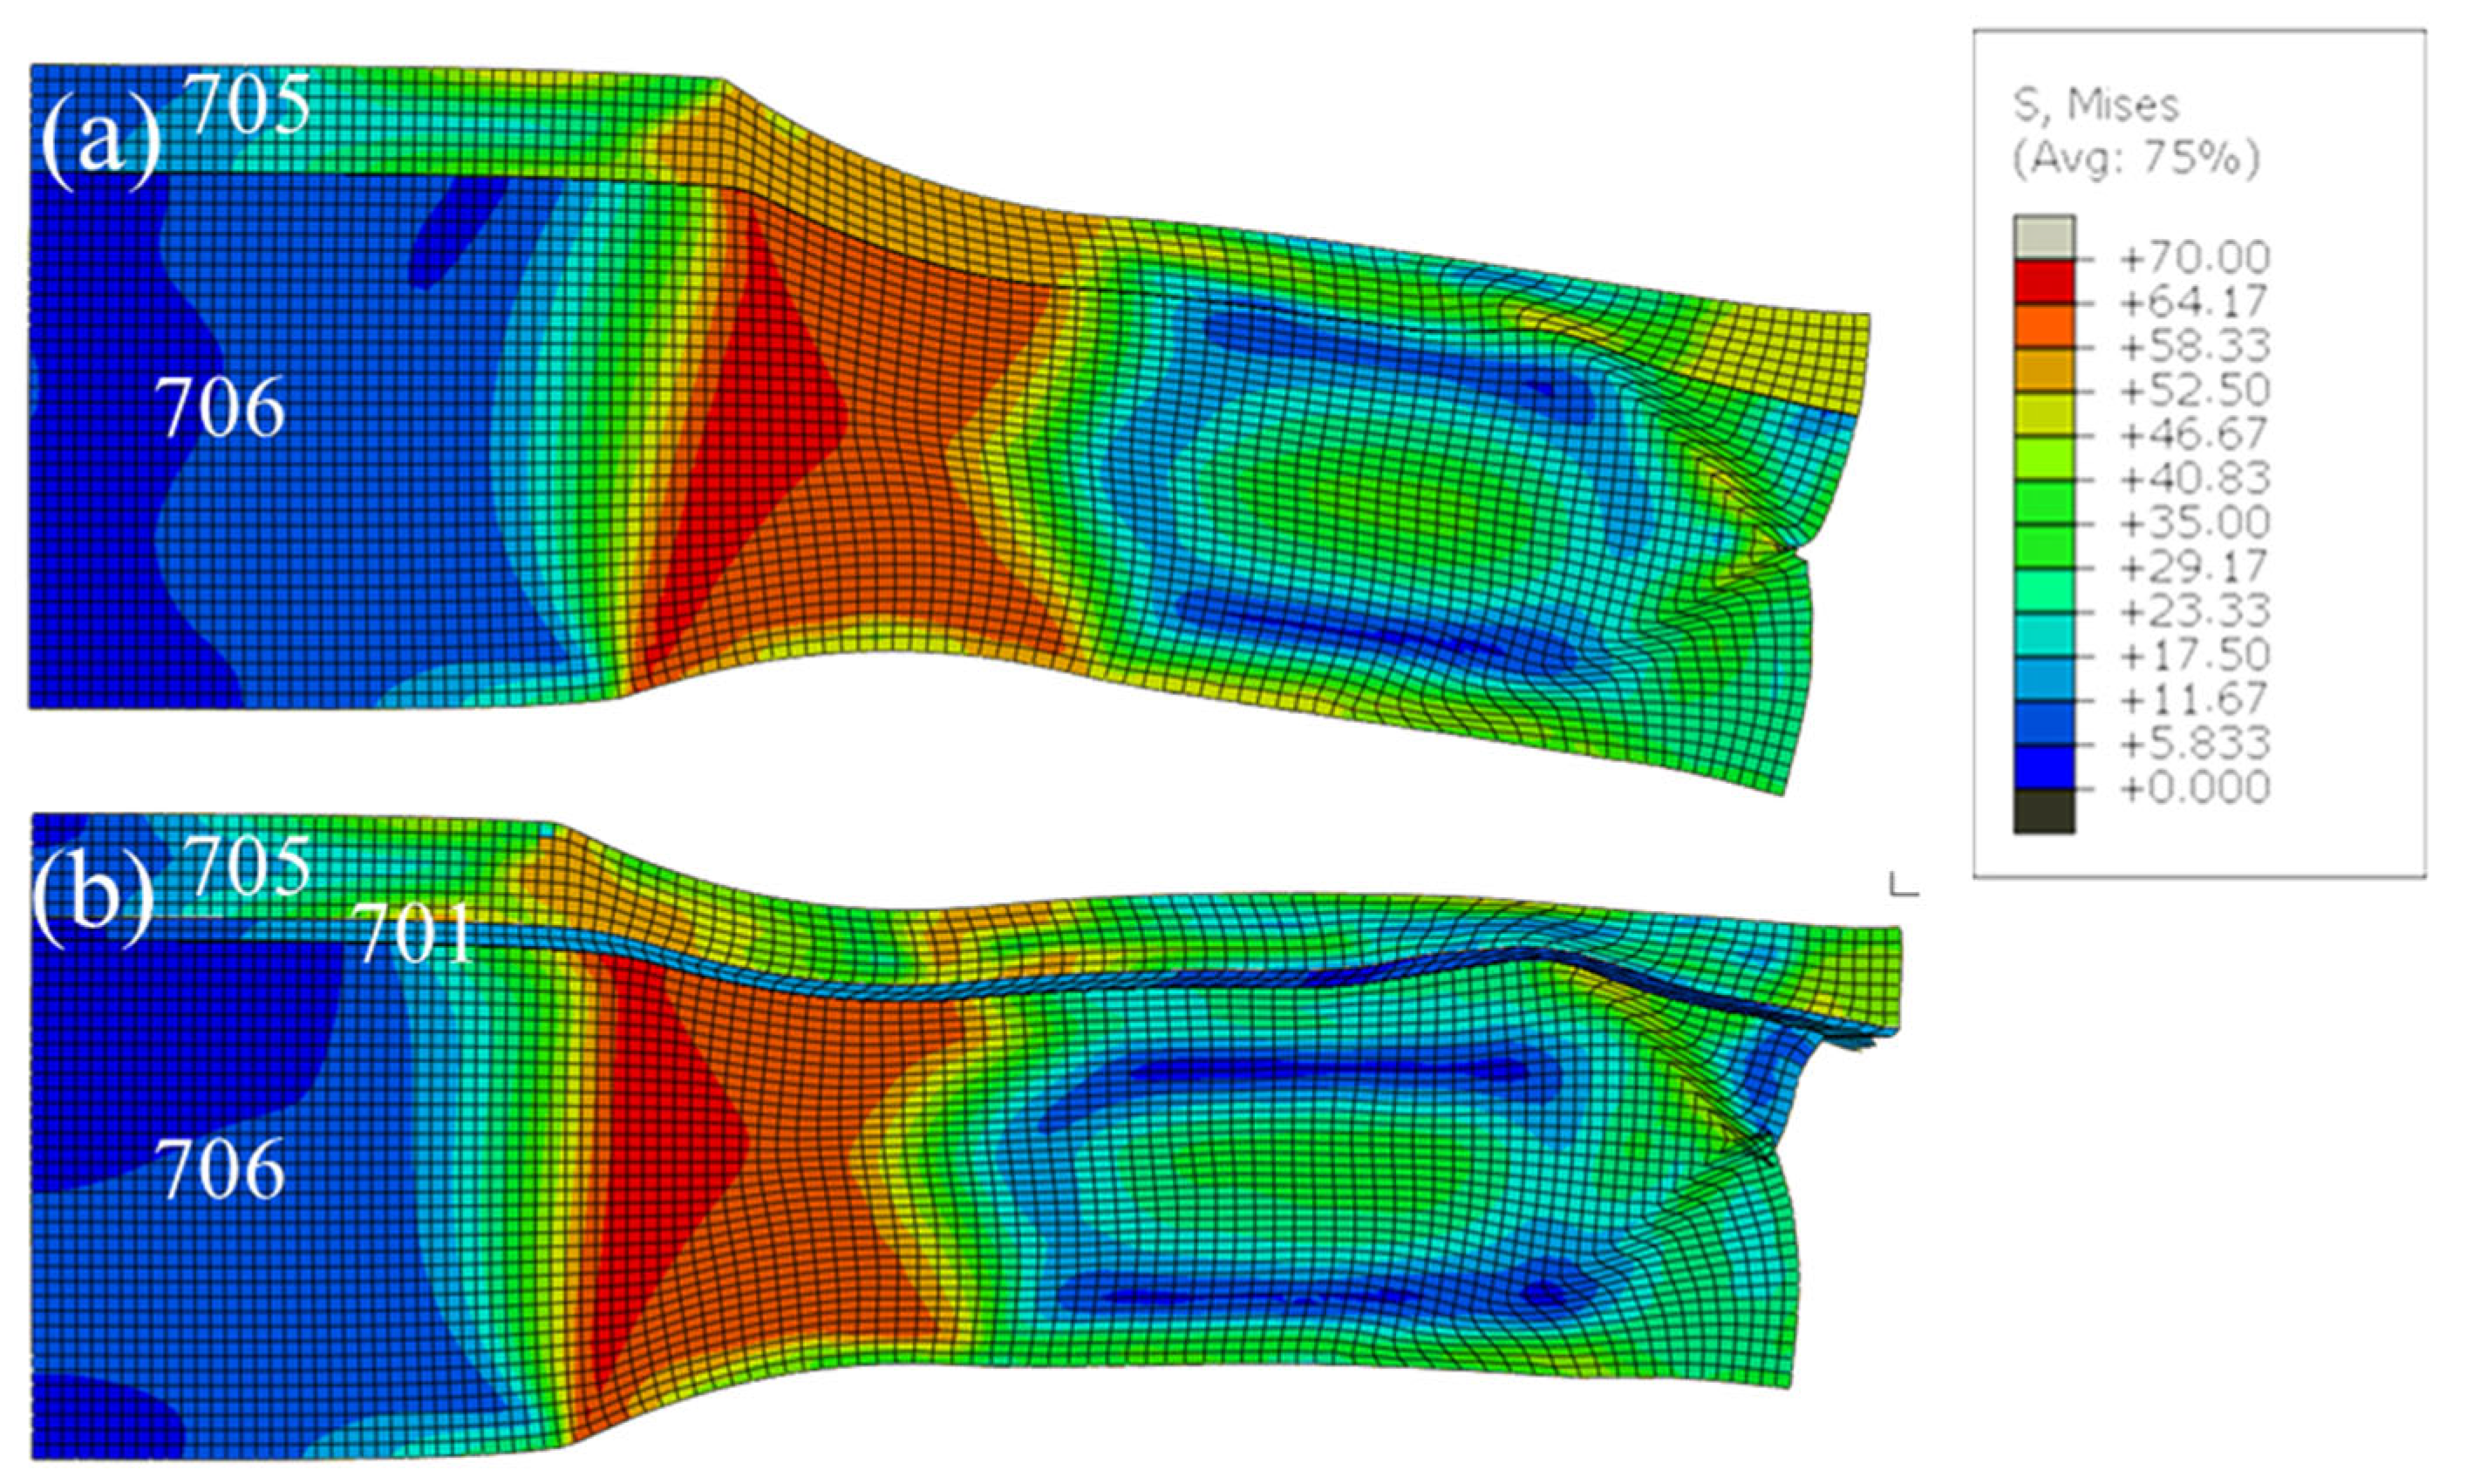
Figure 5 shows the von Mises stress distribution in symmetric sections of hot-rolled aluminum alloy laminated plates with and without a 701 interlayer. It can be seen from Figure 5a that the stress distribution of different materials is not uniform in the rolling deformation zone. In the rolling process of 705/706 laminated material, the stress concentration of the 705 layer is high, and the phenomenon of bending to the 706 layer occurs. After the addition of the 701 interlayer, the stress distribution of the 705 layer is more uniform, and the hot-rolled billet of 705/701/706 laminated material was straight. The results show that the addition of a 701 layer can effectively coordinate the deformation of the 705 layer and 706 layer. Therefore, in the subsequent rolling simulation process, a 701 layer was added to the 705 layer and 706 layer to obtain a straight aluminum alloy laminated plate shape.

3.1.2. Simulation Results of Different Rolling Reduction Ratios

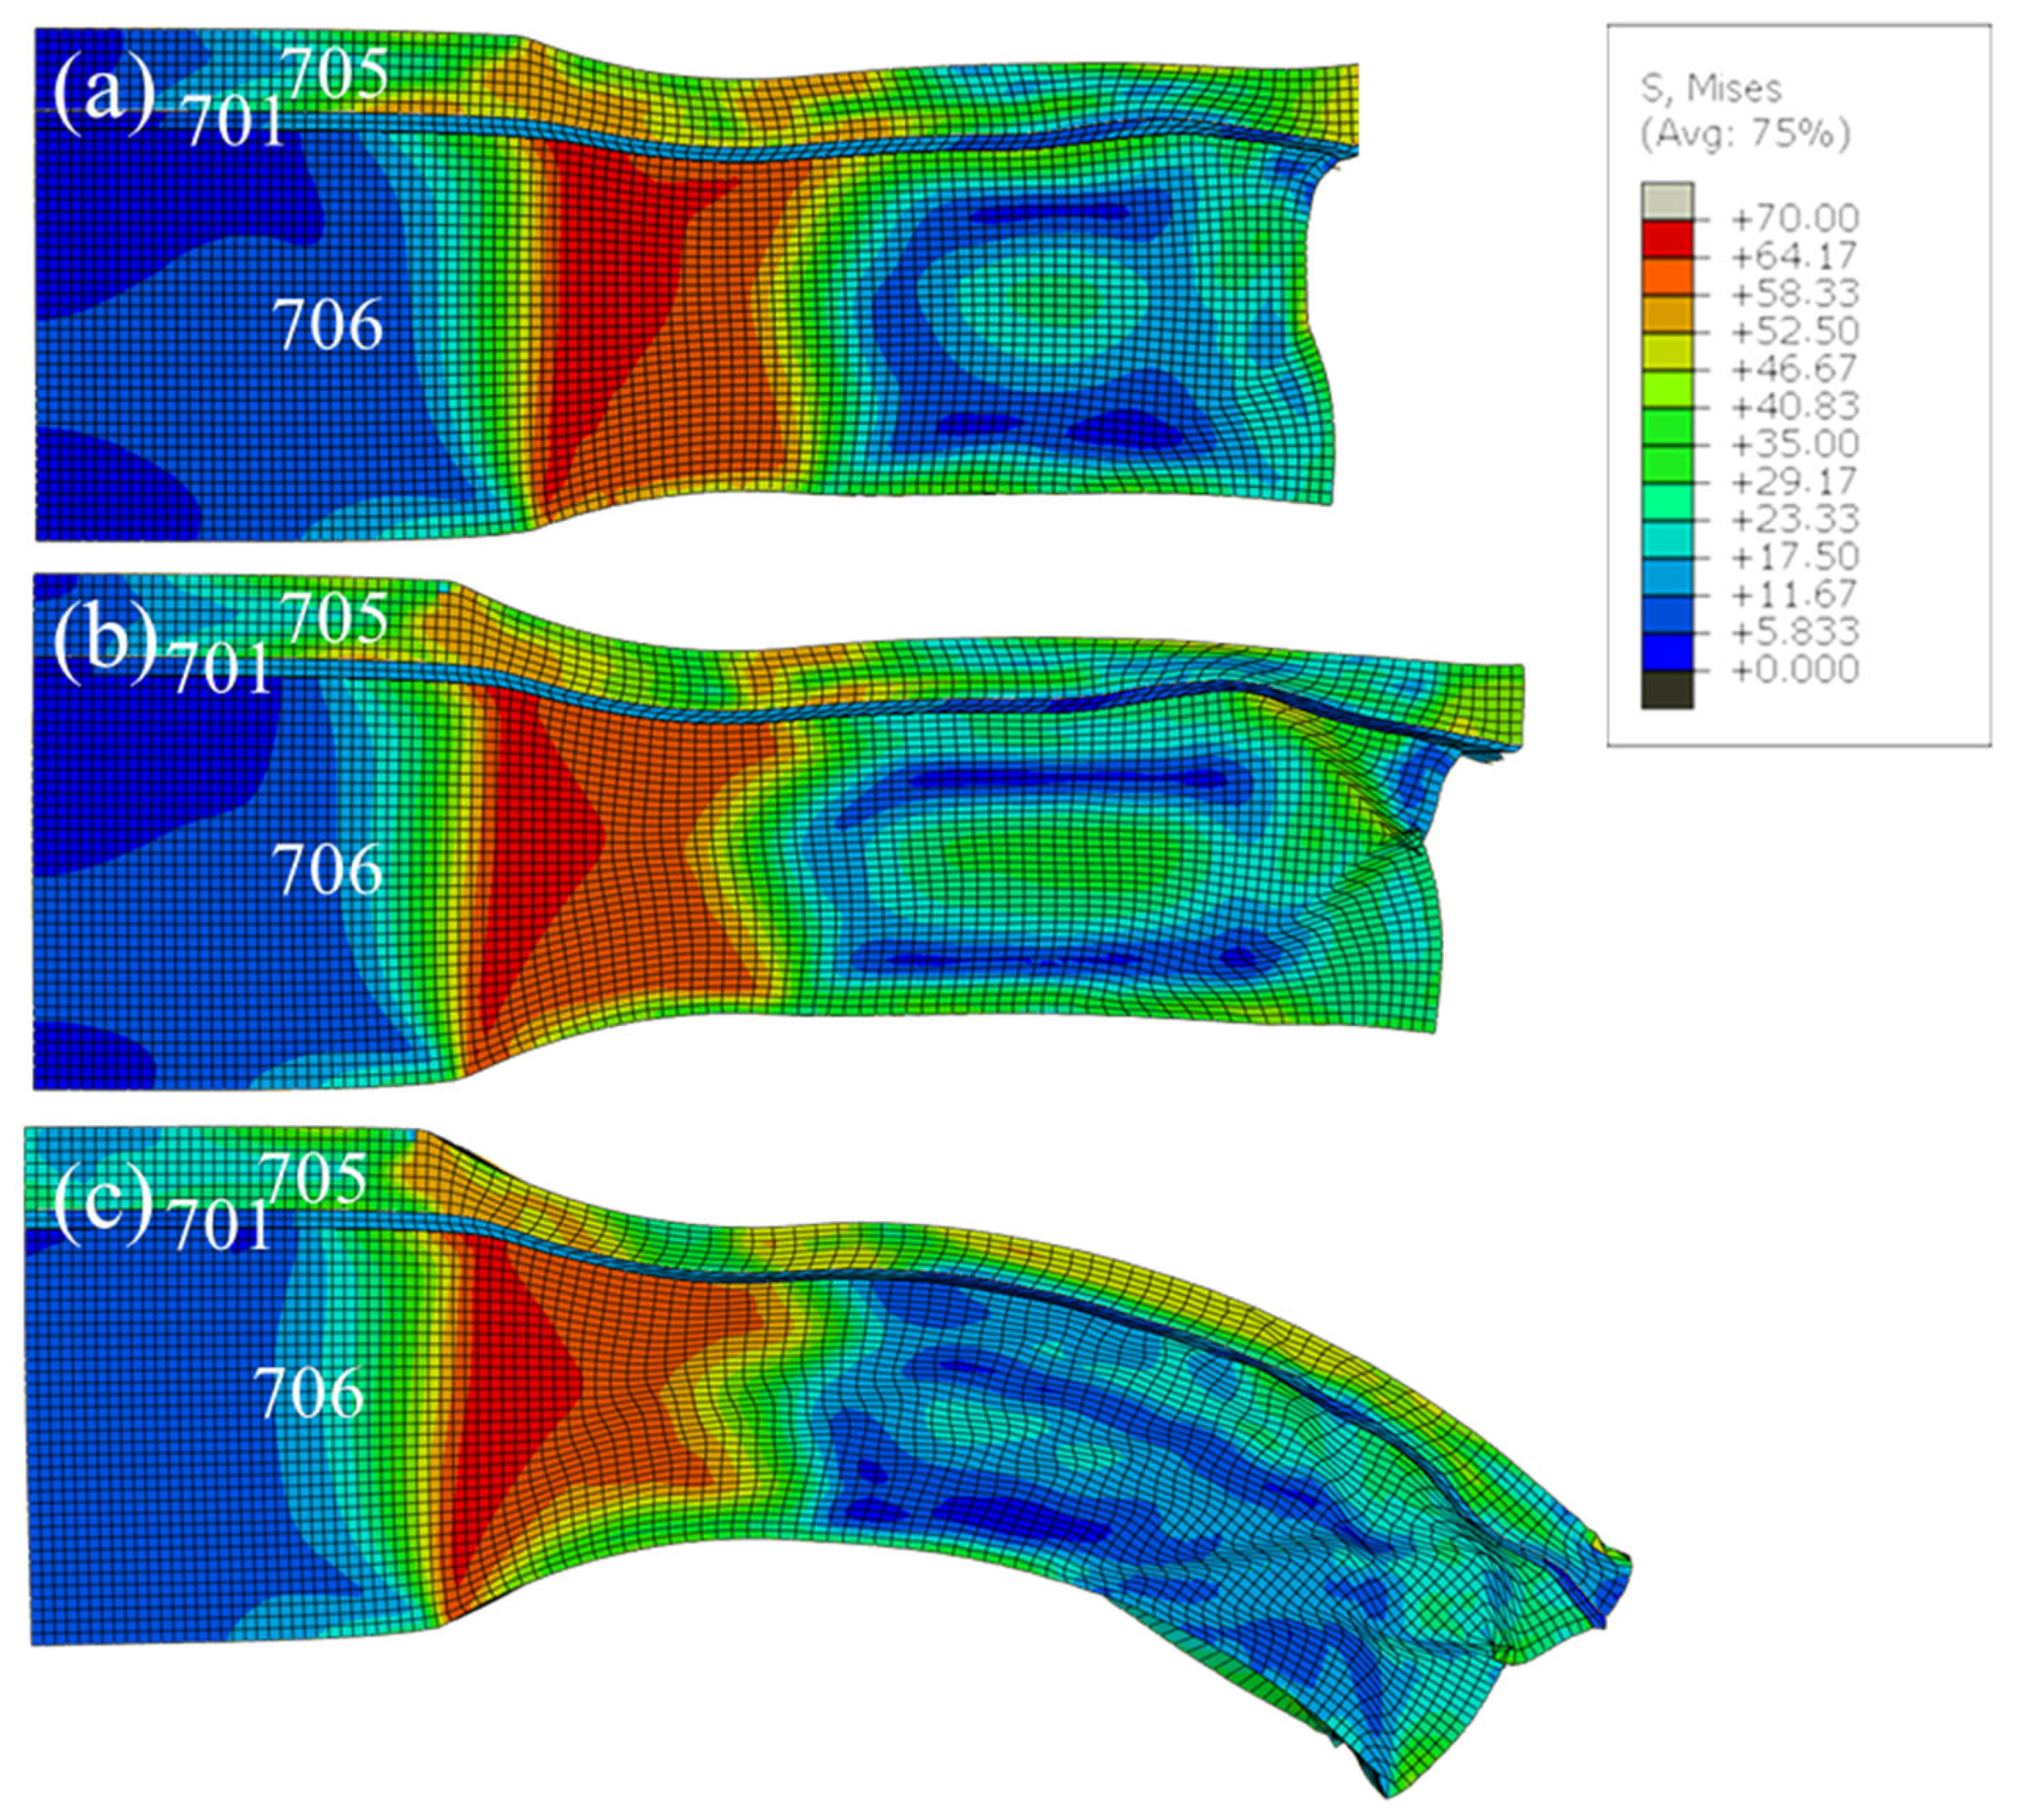
Figure 6 displays the von Mises stress distribution in symmetric sections of the hot rolling simulation of 705/701/706 laminated plates with different rolling reduction ratios. The von Mises force distribution of laminated plates under different rolling reduction ratios is not uniform in the rolling deformation zone, as the figure shows. With the increase in the rolling reduction ratio, the deformation coordination of the laminated plate also deteriorates. When the rolling reduction ratio reaches 40%, the length of the rolling deformation zone increases significantly, and a larger bending occurs towards the 706 layer. Due to the risk of damage to equipment, such as the hot rolling track caused by large bending during the hot rolling of laminated plates, such a phenomenon should be avoided as much as possible during the actual rolling process.
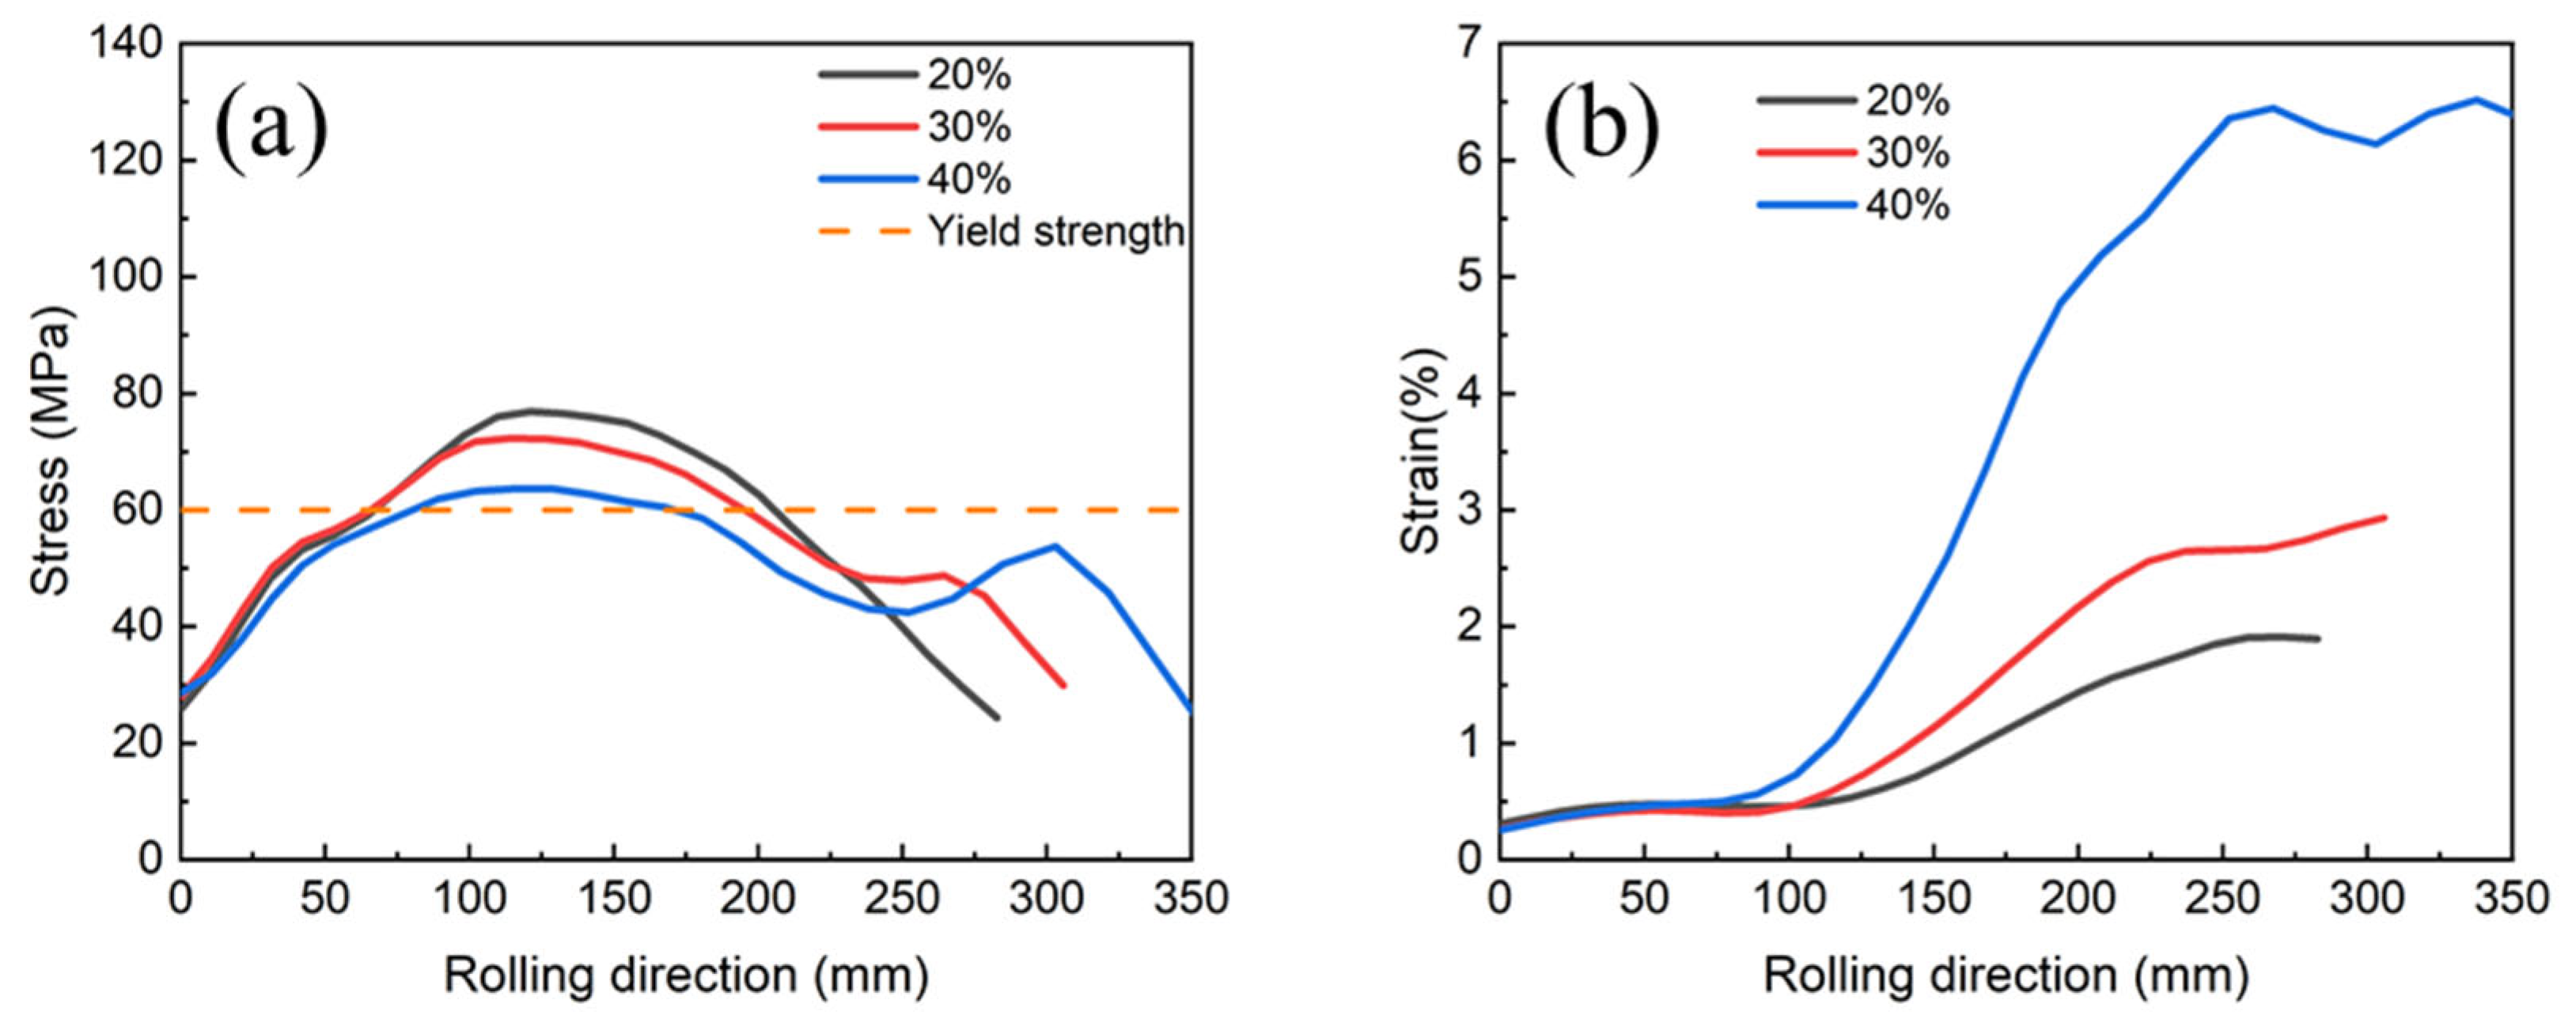
In the bonding process of multi-layer metals, metallurgical bonding begins to occur only when the value of normal compressive stress at the interface is greater than the yield strength of the hard-layer metal, and the oxide film on the surface of the hard-layer metal breaks, exposing the fresh metal [31,32]. At the same time, the equivalent plastic strain and plastic strain difference of the bonded interface should be considered. If the equivalent plastic strain difference between the two sides of the interface is too large, it is possible to cause the fresh metal interface that has been initially bonded to break under the action of shear [24]. Based on the yield strengths of the 706 aluminum alloy with the highest strengths at 400 °C, 450 °C and 500 °C, the yield strength of the 706 layer at 470 °C was derived from data interpolation to be 60 MPa, whereas that of the 701 layer and the 705 layer at 470 °C was lower than this value. Therefore, the compressive stresses in the subsequent hot roll bonding process were compared with this yield strength of the 706 layer.
Figure 7 shows the normal compressive stress and equivalent plastic strain difference at the bonding interface of 705/701/706 laminated plates under different rolling reduction ratios. There is little difference in the position of the entrance to the yield point. The normal compressive stress at 75 mm of the deformation zone gradually differentiates, and the maximum normal stress decreases with the increase in the reduction ratio. This indicates that a significant increase in the length of the rolling deformation zone can be achieved with a smaller normal pressure under a larger reduction, which is conducive to the interface bonding of the composite plate, as shown in Figure 6c and Figure 7a. However, as can be seen in Figure 7b, the equivalent plastic strain difference on both sides of the composite interface begins to increase sharply with the increase in the reduction ratio at the deformation zone of 100 mm. This is not conducive to the bonding of the interface.

3.1.3. Simulation Results of Different Rolling Speeds

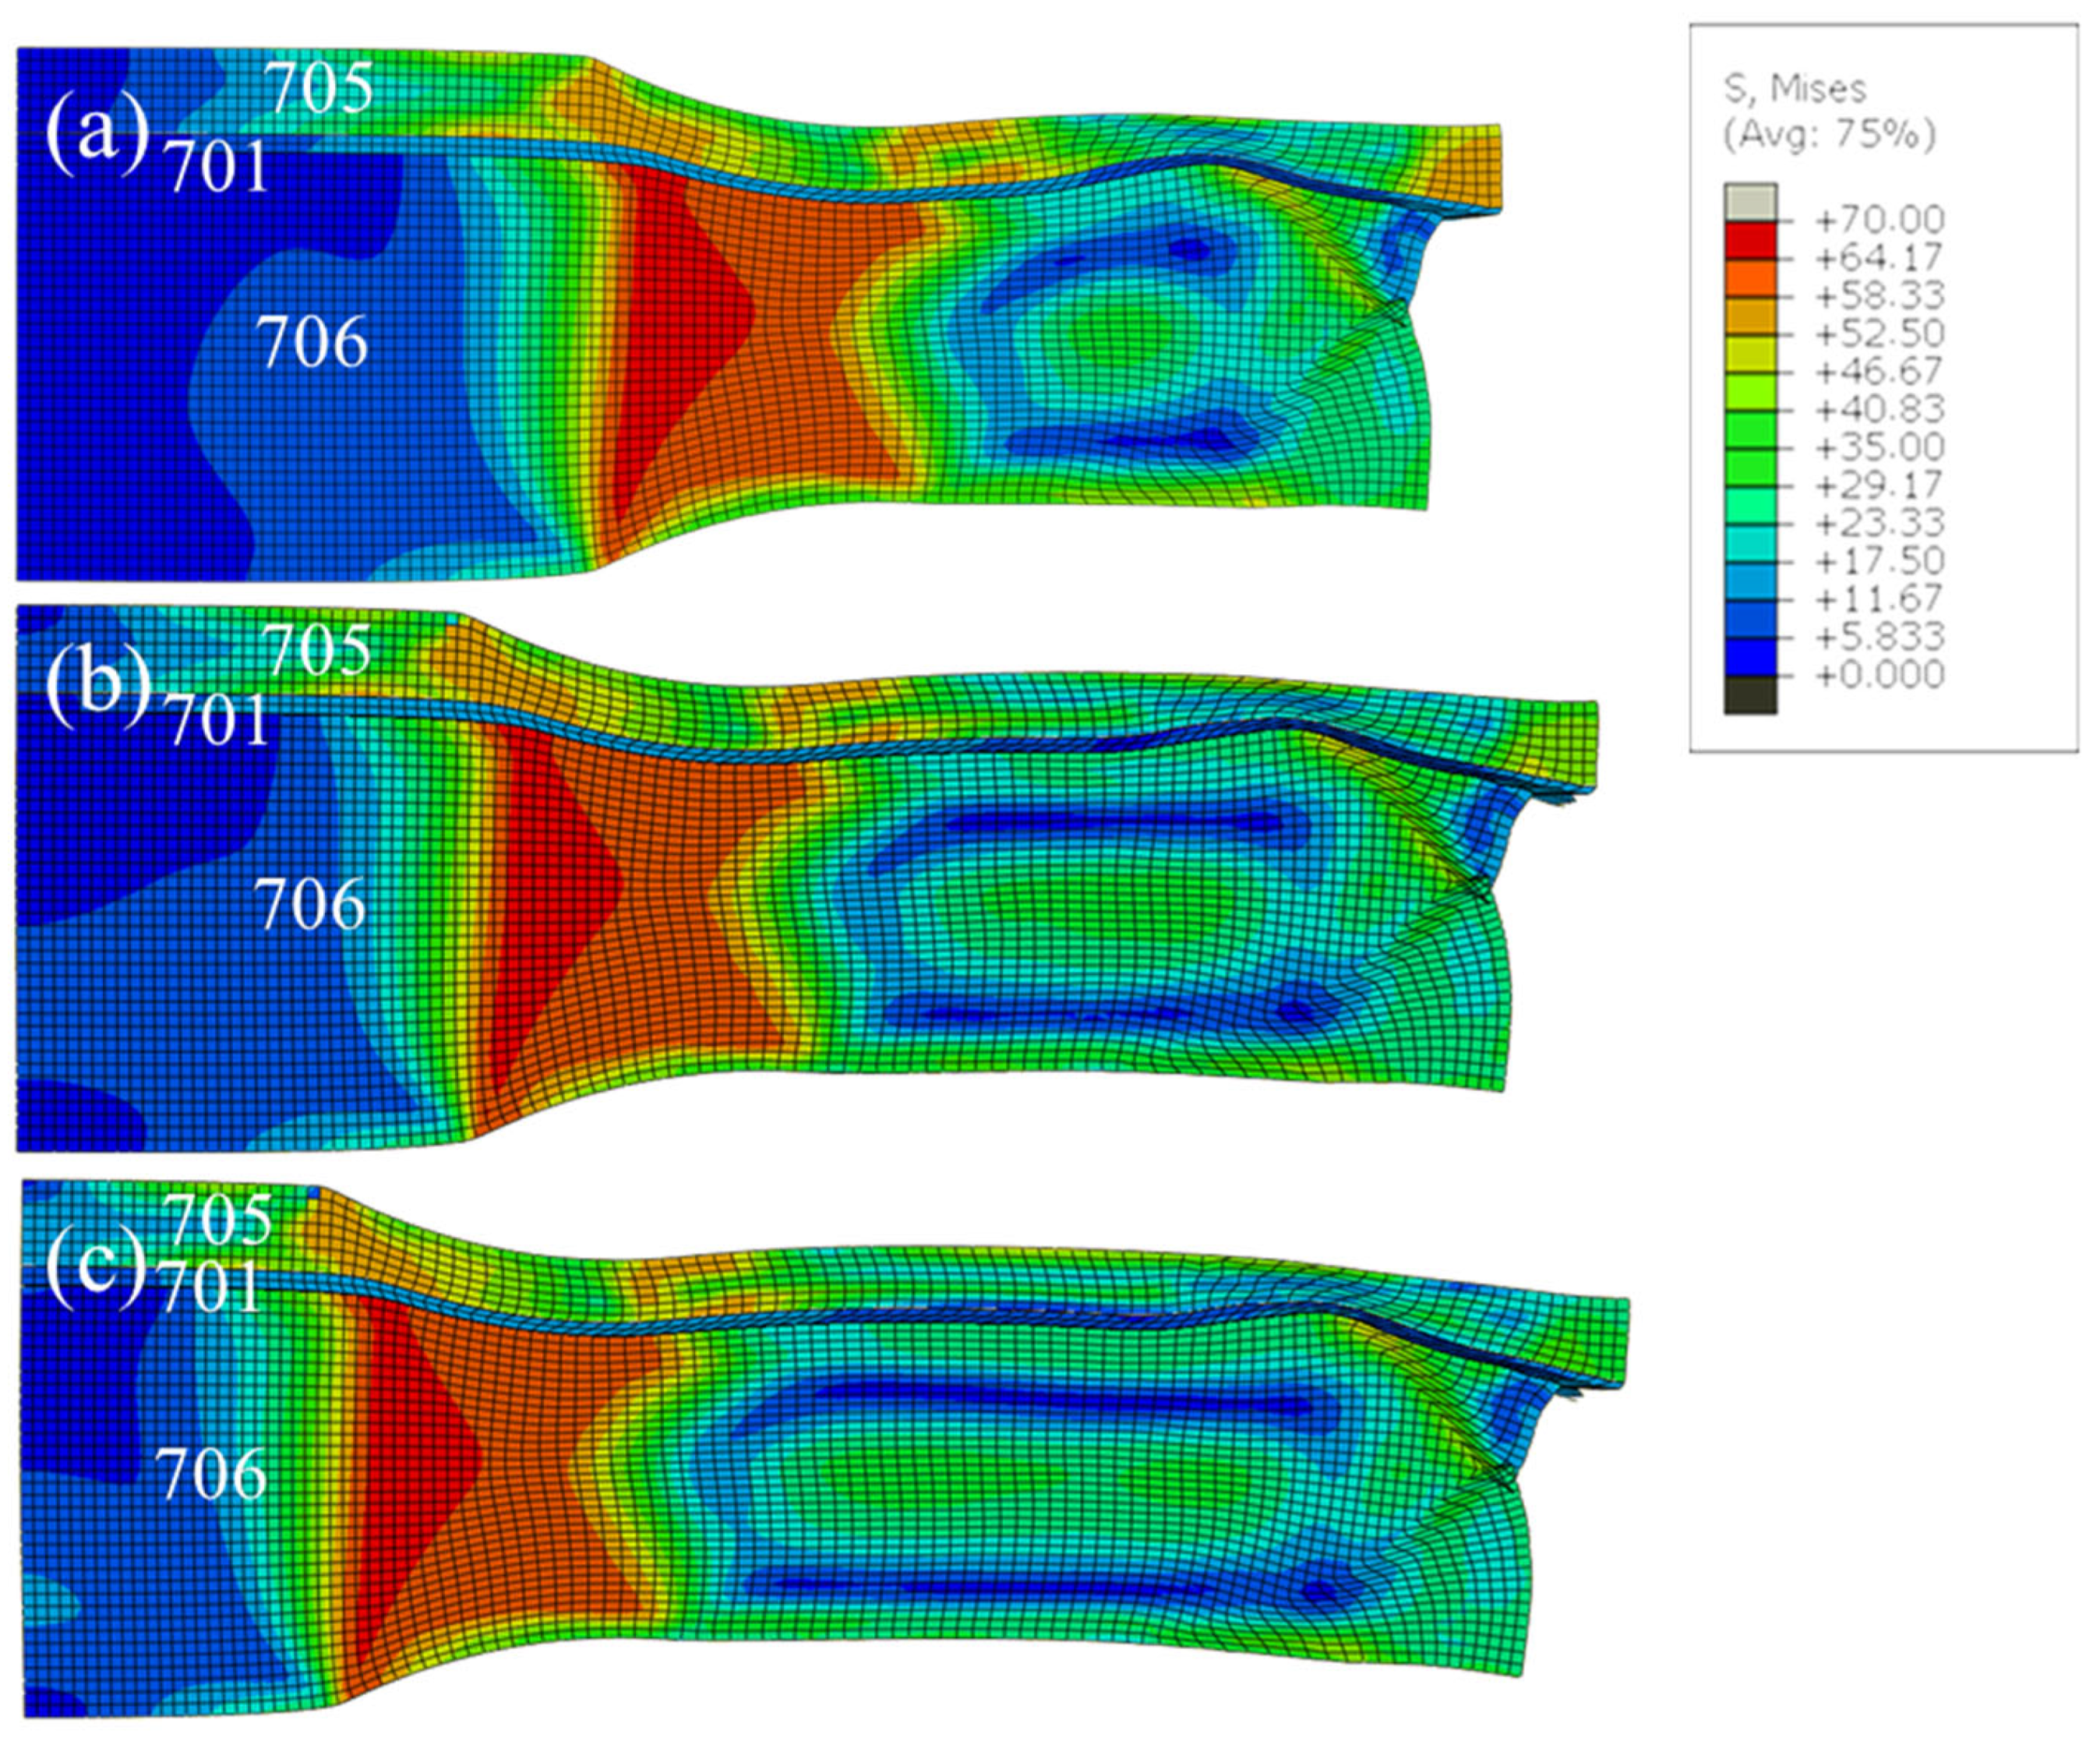
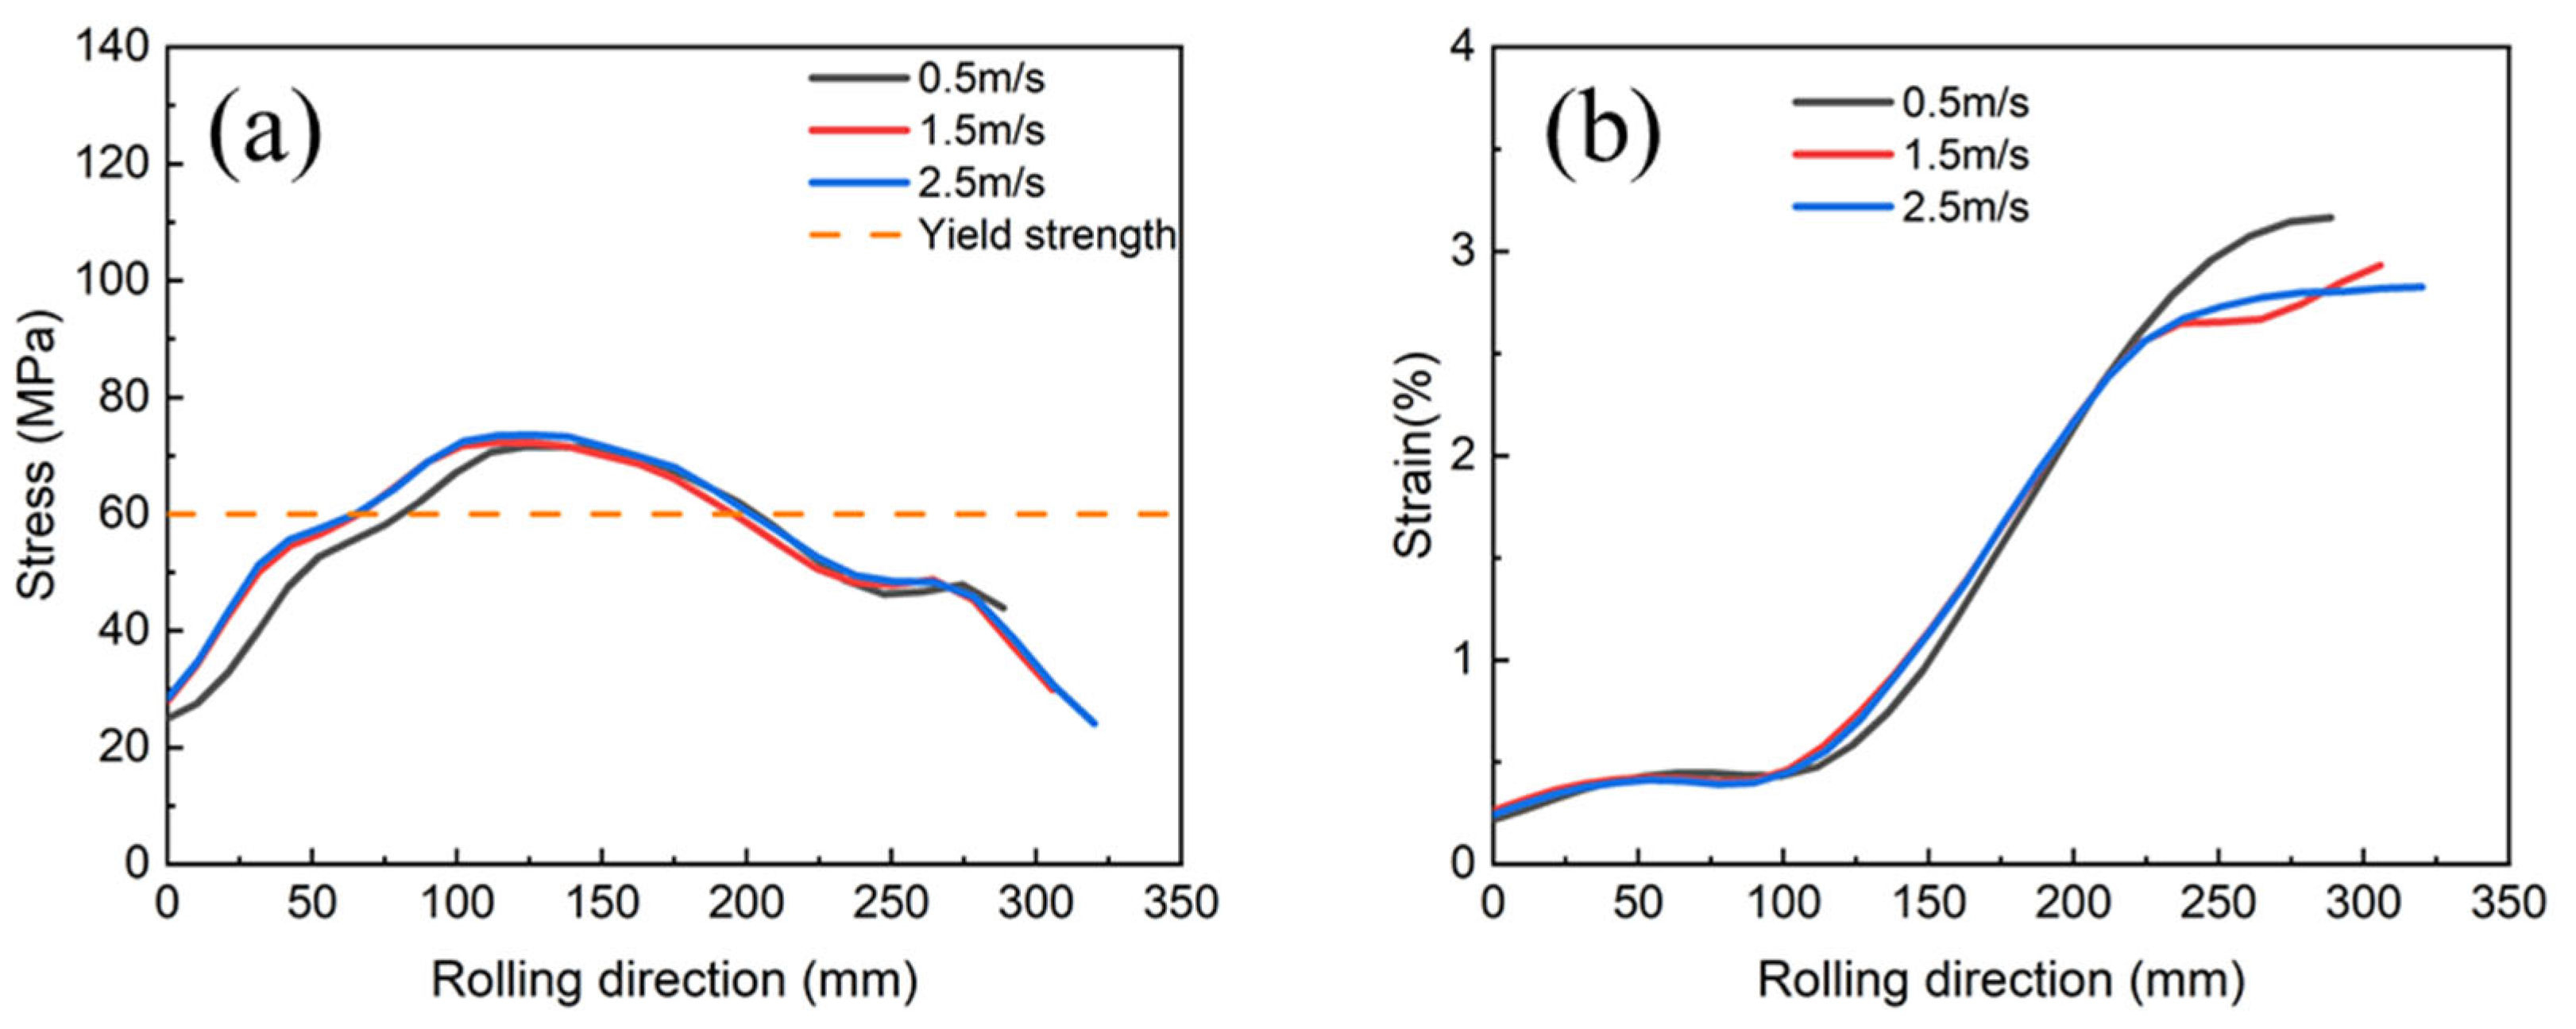
Figure 8 shows the von Mises stress distribution in symmetric sections of the hot roll bonding simulation of 705/701/706 laminated plates with different hot rolling speeds under 30% reduction ratio and 1:5 thickness ratio conditions for 705/706. There is no obvious difference in the stress state of each layer of the laminated material under different rolling speeds. Figure 9 displays the normal compressive stress and the equivalent plastic strain difference on both sides at the bonding interface of 705/701/706 laminated plates under different rolling speeds. Rolling speed has little effect on the normal compressive stress in the roll bonding process, and the higher the speed, the greater the length of the deformation zone in the rolling direction. When subjected to the same normal compressive stress, the deformation zone becomes longer in favor of the bonding of the interlayer interface. While the rolling speed is 0.5 m/s, the equivalent plastic strain difference of metals on both sides of the interface becomes larger, which is not conducive to the bonding of metals on both sides.

3.1.4. Simulation Results of Different Component Layer Thickness Ratios

Figure 10 exhibits the von Mises stress distribution in symmetric sections of hot rolling for 705/701/706 laminated plates with different thickness ratios of component layers under 30% rolling reduction and 1.5 m/s rolling speed conditions. As can be seen from the figure, the larger the thickness ratio of the 705 layer, the more uneven the stress distribution of the 705 layer in the deformation zone, and the stress inhomogeneity region of the 706 layer is also larger.
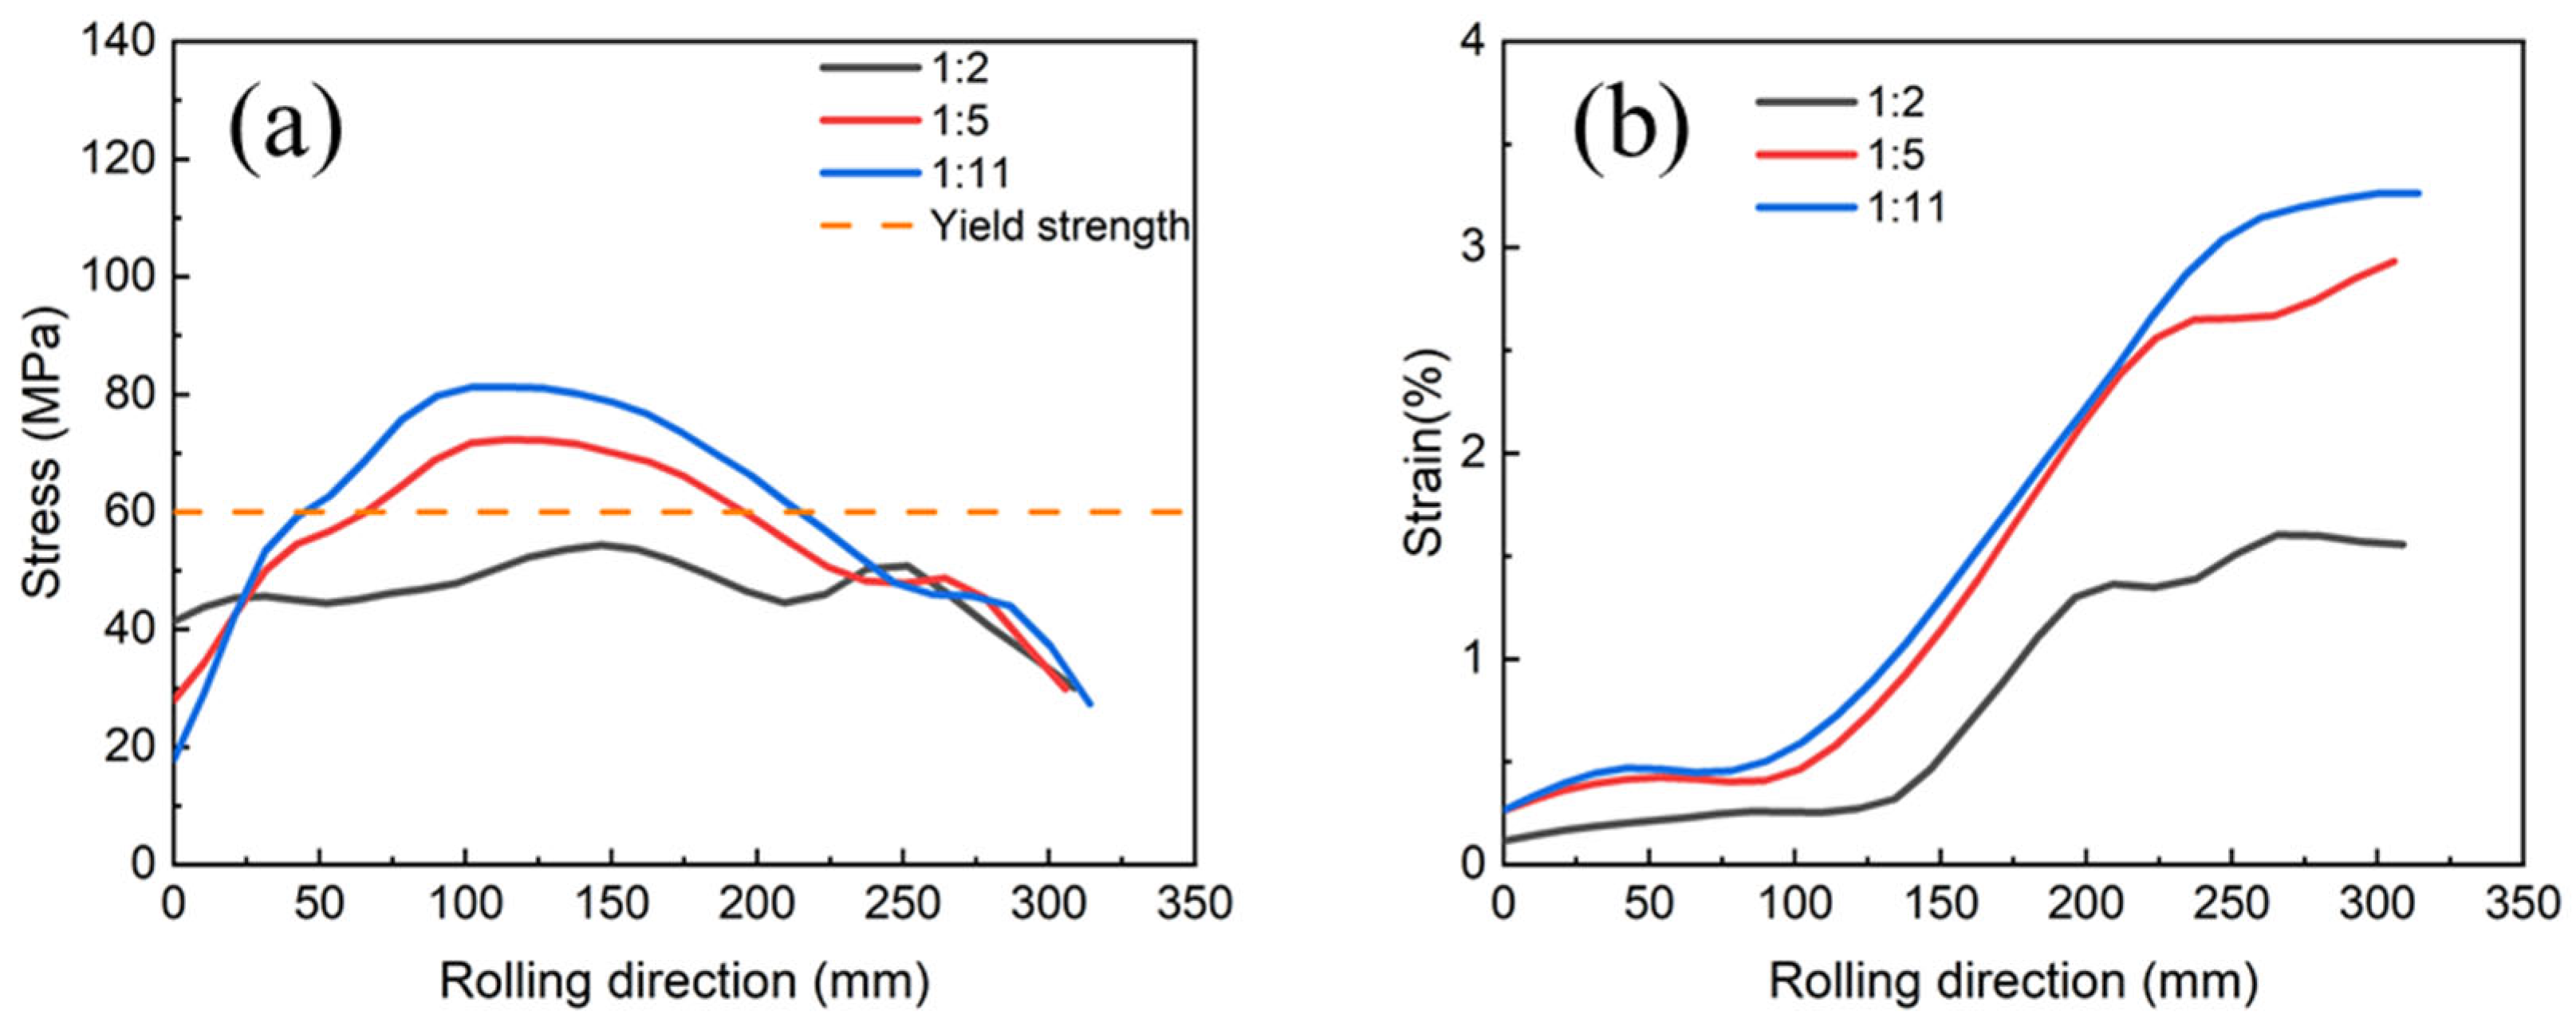
Figure 11 shows the normal compressive stress and the equivalent plastic strain difference on both sides at the bonding interface of laminated plates with different thickness ratios of the 705 and 706 layers. It can be seen that, under the conditions of 30% reduction ratio, 1.5 m/s rolling speed, the smaller the thickness ratio of the 705 and 706 layer, the greater the maximum normal compressive stress at the interlayer interface in the deformation zone, and the greater the equivalent plastic strain difference on both sides of the interface. When the thickness ratio is 1:2, the normal compressive stress at the interface fails to reach the yield strength of the 706 layer, 60 MPa. While the thickness ratio is less than 1:5, higher normal compressive stress can be obtained, which is favorable for the bonding between the interfaces; however, at the same time, the equivalent plastic strain difference between the two sides of the interface also increases.

3.2. Discussion of Simulation Results

3.2.1. The Effect of Intermediate Layer

Due to the difference in deformation resistance and plastic deformation capacity between the 705 layer and 706 layer in the high-temperature rolling process, the metal flow along the rolling direction is different. Under the same rolling force, the yield strength of the 705 layer is lower than that of the 706 layer, and the yield strength of the 705 layer will be reached first when the roll is biting into the multi-layer aluminum alloy; therefore, the plastic deformation of the 705 layer will be preferred, and the elongation is greater than that of the 706 layer, resulting in the hot-rolled billet bending to the side of the 706 layer. After the 701 intermediate layer with low strength and high plasticity is added, on the one hand, the plastic deformation of the 701 layer itself is used to coordinate the improvement of stress distribution, achieve the strain transfer between the different component layers, relieve the stress concentration conducted from the 705 layer and improve the deformation compatibility of the different component layers [33,34,35]. On the other hand, the addition of the 701 layer increases the two composite interfaces of 705/701 and 706/701, which play a very critical coordinating role in the process of plastic deformation, and improves the strong plastic matching ability of the material to a certain extent [36]. Therefore, the addition of an intermediate layer between the 705 layer and 706 layer in the hot roll bonding process continuously coordinates the deformation difference of the 705 layer and 706 layer along the rolling direction through plastic deformation and the interface so that the hot-rolled billet does not bend.

3.2.2. The Effect of Rolling Reduction Ratios

The rolling reduction ratio is considered to be the most critical parameter for roll bonding. Through a certain degree of the rolling reduction ratio, the brittle cover layer on the metal surface is cracked and fresh metal is exposed to form a metallic bond, or bonding occurs when a threshold surface expansion causing fracture of the contaminant film has been exceeded when no brittle cover layer is present. Manesh [37] attributed the increase in bonding strength due to the increase in roll reduction ratio to the increase in rolling pressure, surface expansion, crack area fraction and weld area percentage. In addition, the deformation inhomogeneity in the thickness direction of the component layers due to the rolling reduction ratio is closely related to the microstructure. Results showed that, in 6061Al/TC4/6061Al rolled laminated composite plates, the microstructure in the thickness direction of the aluminum layer was very inhomogeneous and moved along the thickness direction from the near-interface side to the near-roll side of the aluminum layer, with a gradual decrease in grain size [38].
In the present study, the differences in the mechanical properties of the 705 and 706 layers inevitably led to differences in the degree of deformation during hot roll bonding. When the rolling reduction ratio is small, the 705 layer is more prone to deform under a lower rolling force. With the increase in the rolling reduction ratio, the contact arc between the rolling piece and the roll increases, the shear force can be transferred between the two metals through the bonding interface and the bending degree of the rolled piece increases significantly when the reduction ratio is 40%, which further increases the length of the deformation zone. The work hardening of aluminum alloy material is not obvious due to dynamic recrystallization at 400 to 500 °C, and the deformation degree of laminates increases with the reduction ratio, which is conducive to the bonding of metal. However, with the increase in the rolling reduction ratio, the bending degree of rolled parts and the strain difference on the bonding interface will increase, resulting in more stress dispersed in the tangential direction, which means the normal compressive stress in the rolling is reduced, which is not conducive to the combination of metals on both sides of the composite plate interface. According to the simulation results in Figure 6 and Figure 7, the 705/701/706 laminated plates should be multi-pass hot roll bonded with a small reduction ratio, and the deformation of rolled pieces in the non-compression direction should be limited as much as possible. The optimal reduction ratio is 20%~30%.

3.2.3. The Effect of Hot Rolling Speeds

Rolling speed is one of the most critical process parameters, and it can, alone and/or in combination, affect the joint interface, microstructure and mechanical properties. Abbasi [39] investigated the effect of different rolling speeds on the bonding strength of Cu/Cu double-layer composite strips, and the results showed that an increase in rolling speed led to a decrease in bonding strength. This is due to the fact that, when the rolling speed is high, on the one hand, the contact time between the composite metals is short, and the surface oxide film breaks, or the work-hardened layer is not sufficiently extruded from the fresh metal in a short time [40], and, on the other hand, a high rolling speed can lead to a high temperature, which is favorable for the improvement of the interfacial bonding strength [41].
The numerical simulation of this study indicates that the maximum normal compressive stress under different rolling speeds is not very different, but, in the deformation zone where the normal stress exceeds the yield strength, the lower the rolling speed, the greater the equivalent plastic strain difference between the metals on both sides of the interface, and the greater strain difference is not conducive to the metals bonding on both sides of the interface. Therefore, in order to obtain a uniform microstructure and uniform performance, a low rolling speed should not be selected. In addition, a low rolling speed also affects the processing efficiency of the rolled parts, resulting in high manufacturing costs. The recommended rolling speed is 1.5–2.5 m/s.

3.2.4. The Effect of Thickness Ratio of the Layers

The thickness ratio of the soft/hard component layer has an important effect on the required rolling force, mean contact pressure, reduction of each layer, bonding length and peeling strength during the roll bonding process of multi-layer metals with different properties [42,43]. In this study, under the same initial thickness, reduction ratio and rolling speed, the thickness of the 705 layer decreased, resulting in a more uniform stress distribution between the 705 and 706 layers and an increase in the normal compressive stress at the bonding interface, as shown in Figure 10 and Figure 11. When the thickness ratio of the 705 layers is low, the overall deformation of the composite plate is small in the rolling process; therefore, the interface bears more compressive stress, and the longer plastic deformation area and the larger interface compressive stress are conducive to the combination of metals on both sides of the interface. Therefore, the layer thickness ratio of the 705 and 706 layers can achieve good interlayer bonding at less than 1:5. This result is consistent with the results of Hwang [42] and Rezaii [43] on the influence of component layer thickness ratio on the bonding strength of layered metals.
Although, from the point of view of roll bonding, a small thickness ratio of the soft/hard layer is conducive to interlayer bonding, a lower component layer thickness ratio is not better. The function of the component layer may be greatly reduced if the component layer ratio is too low or the component layer thickness is reduced. Therefore, the recommended thickness ratio of the component layer is about 1:5.

3.3. Experimental Verification

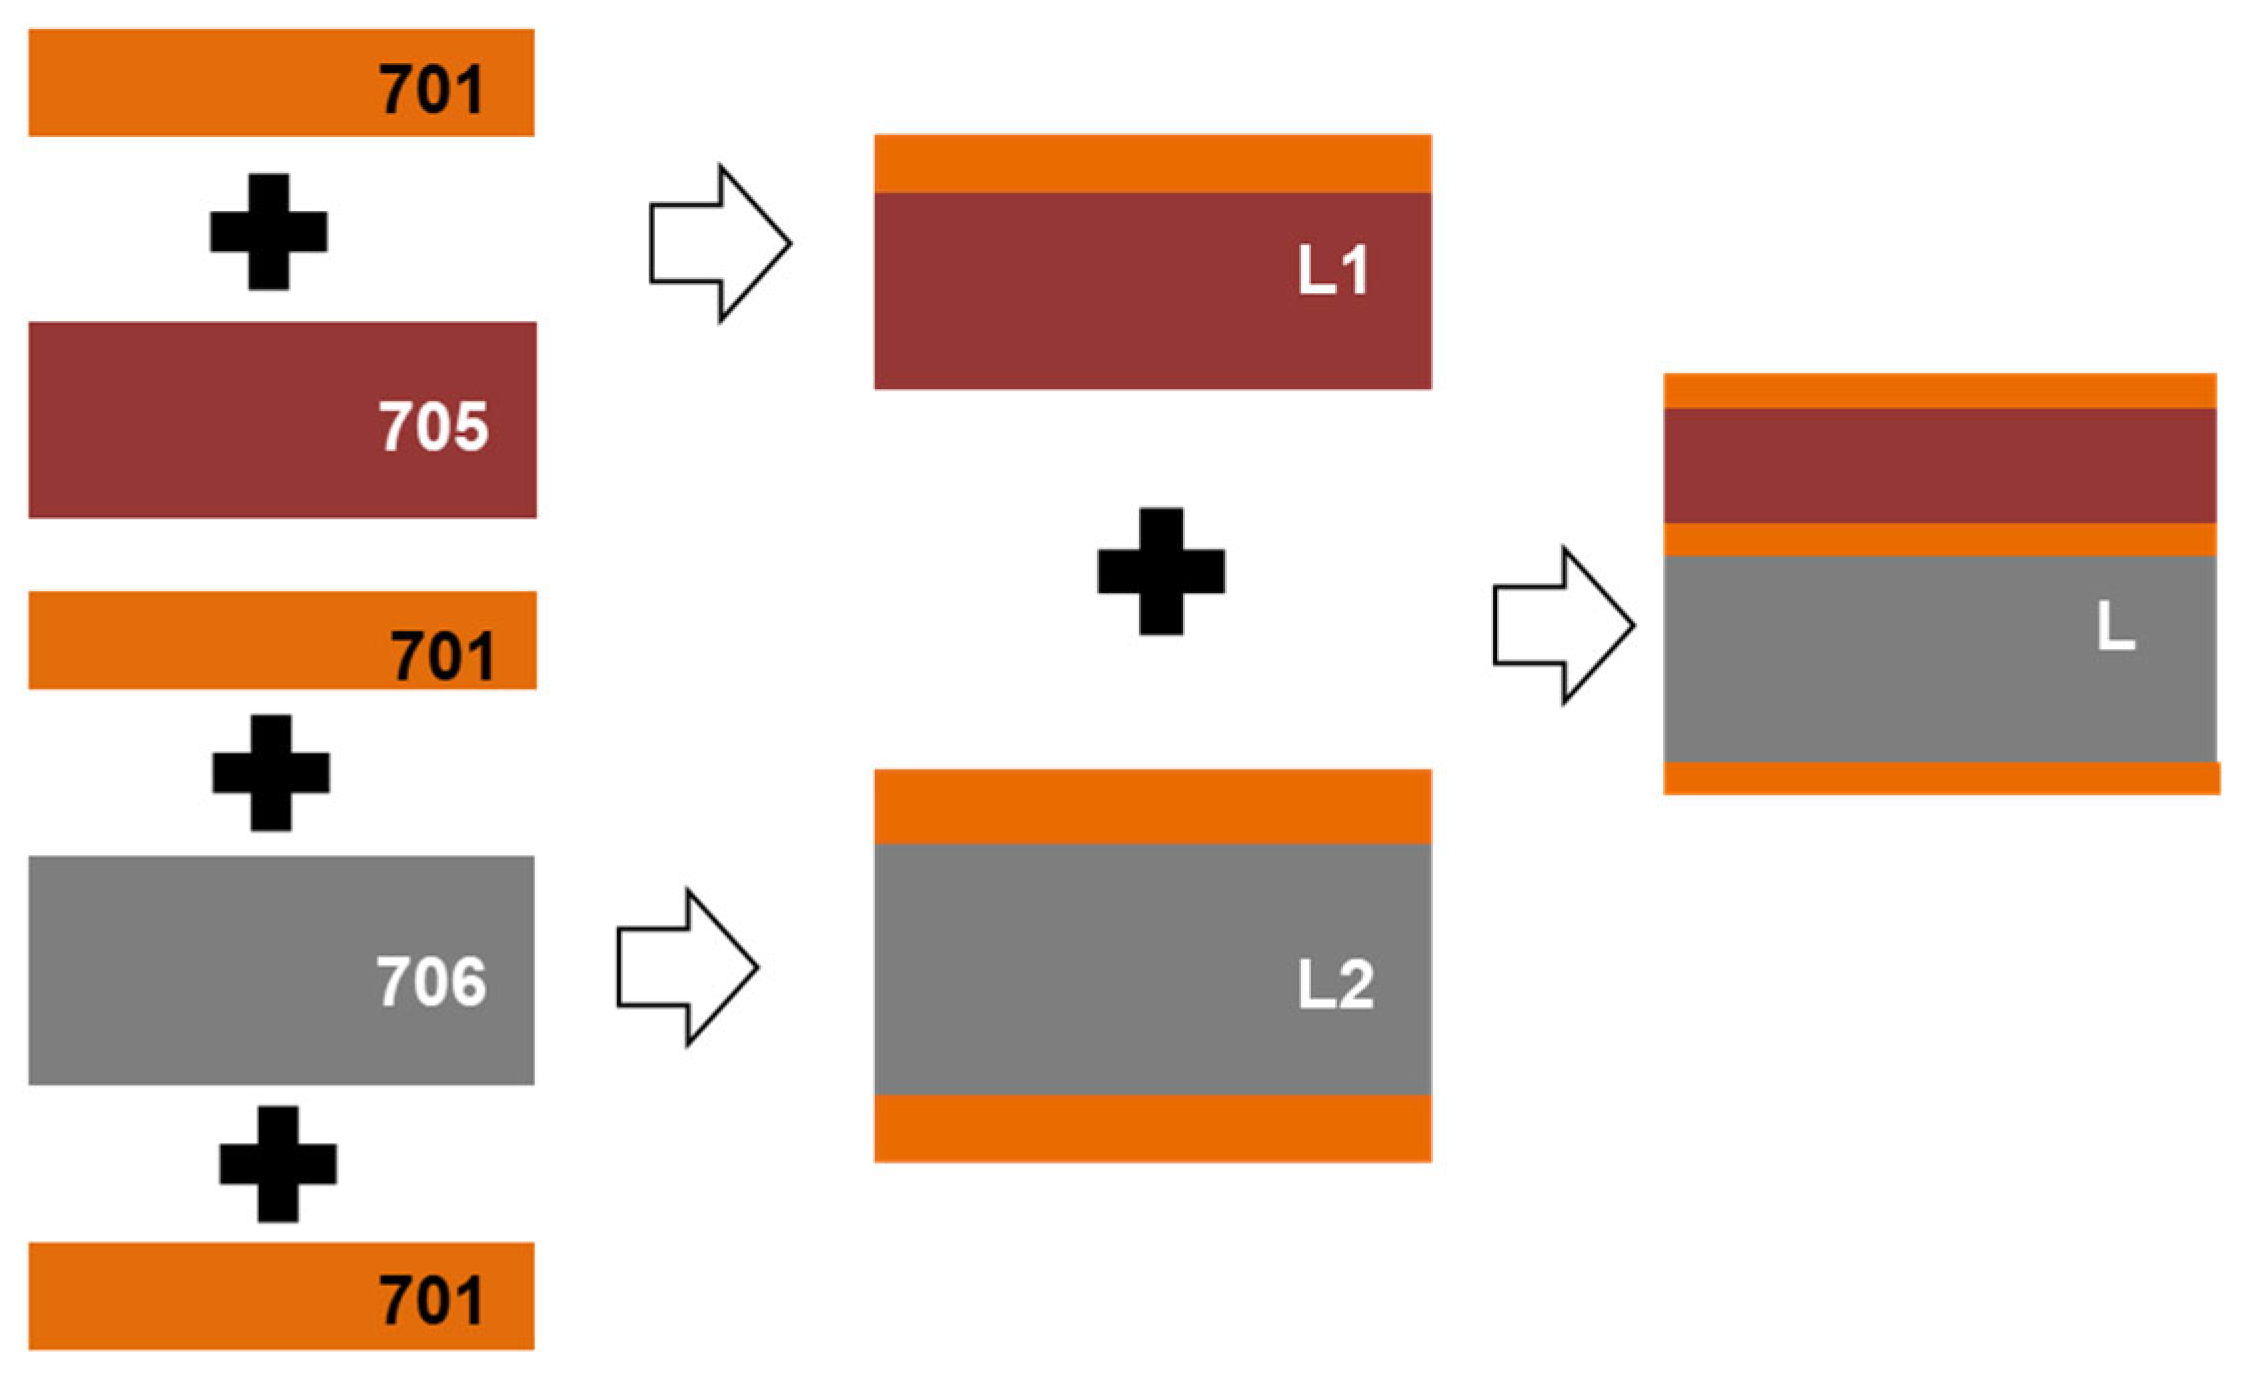
Based on the results of the above finite element simulation, this study adopted multiple hot rolling and a small rolling reduction ratio to develop the hot rolling bonding process of five- and seven-layer laminated plate, ensuring that the thickness ratio of the 705 component layers was less than 15% in each roll bonding, the reduction ratio was about 20% in each pass and the rolling speed was about 1.5 m/s. The laminated plates were finally hot rolled to a thickness of 5 mm. The hot roll bonding process of five-layer laminated plate is shown in Figure 12. After being solution treated at 475 °C for 1 h and aging treated at 120 for 24 h, 701/705/701/706/701 and 701/705/701/705/701/706/701 aluminum alloy laminated materials were obtained.
The metallographic photos of 7000 series aluminum alloy laminated composite plates with a thickness of 5 mm are shown in Figure 13. The layered structure, thickness ratio of component layers and microstructure of each component layer can be obtained from the figure. It can be seen that the structure of the five-layer composite plate is 701/705/701/706/701, in which the thickness proportion of the 705 layer is about 12%, and the thickness of each 701 layer is about 1%. The structure of the seven-layer composite plate is 701/705/701/705/701/706/701, which includes two layers of 705 alloy with a total thickness ratio of about 20% and four layers of 701 alloy. In terms of microstructure, the 701 layer alloy has an obvious equiaxed grain structure, and both the 705 layer and 706 layer have elongated grains, though the grains in the 705 layer are significantly coarser. The bonding interface of 701/705 and 701/706 is straight, and no obvious cracks or other defects can be seen.
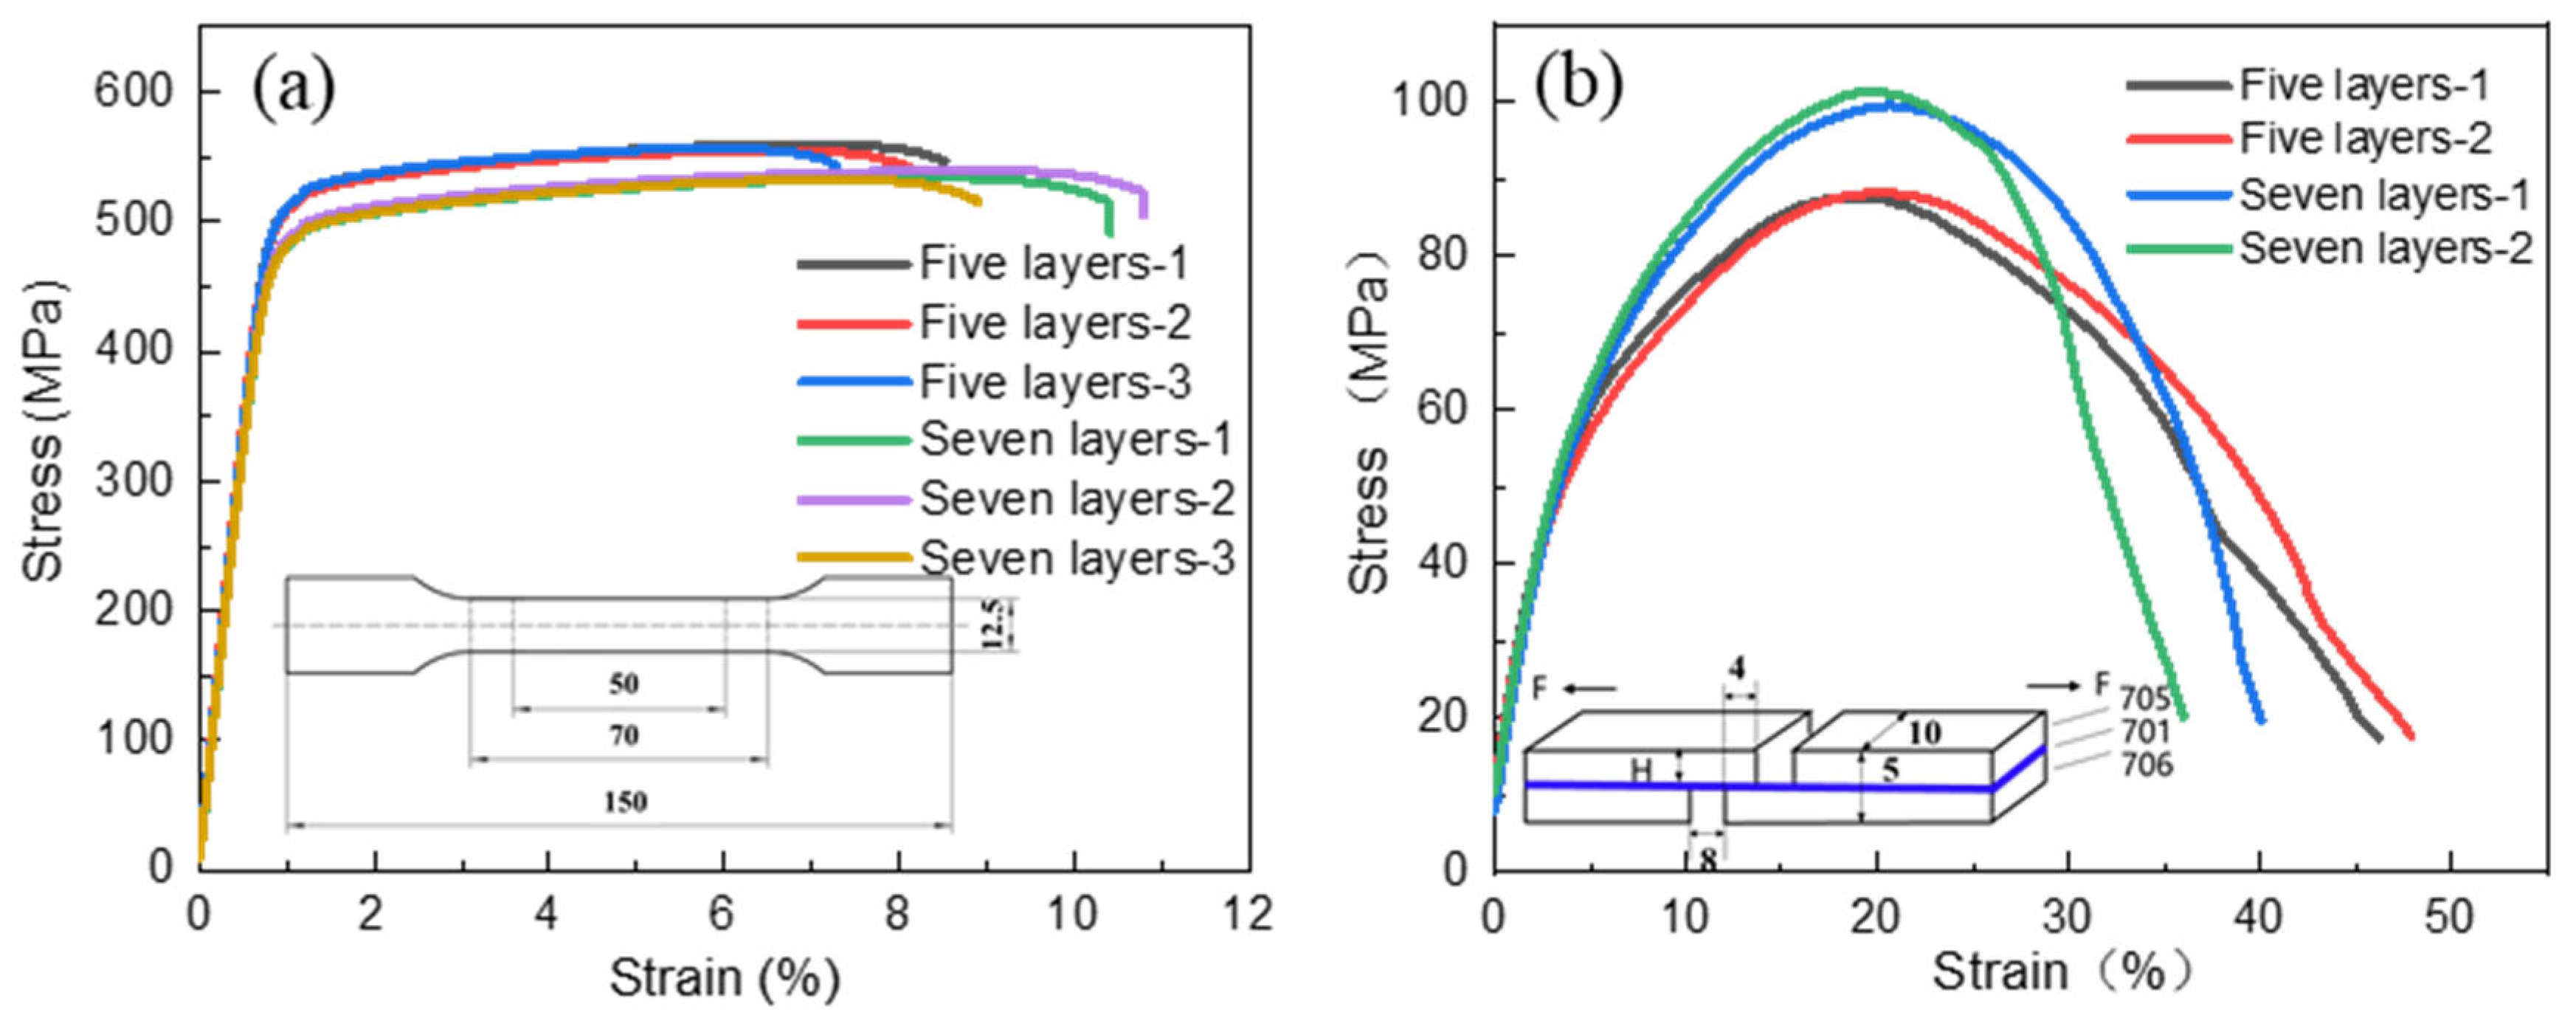
Figure 14 displays the mechanical properties of 7000 series aluminum alloy laminated composite plates. It can be seen from Figure 14a that the tensile strength of five-layer composite plates is higher than that of seven-layer composite plate, while the elongation is relatively lower. The average tensile strength of the five-layer composite sheet is 557 MPa, the yield strength is 505 MPa and the elongation is about 10.5%. The average tensile strength of the seven-layer composite plate was reduced to 535 MPa, the yield strength was reduced to 477 MPa and the elongation was about 13.1%. Combined with the thickness ratio of the composite plate in Figure 13, it can be concluded that the greater the thickness ratio of the 705 layer, the lower its tensile strength. The bonding interfacial tensile–shear property of the five-layer and seven-layer composite plates is shown in Figure 14b. It can be concluded that the interfacial bond strength of the five-layer composite sheet is about 88 MPa, and that it is about 99 MPa for the seven-layer composite plate.
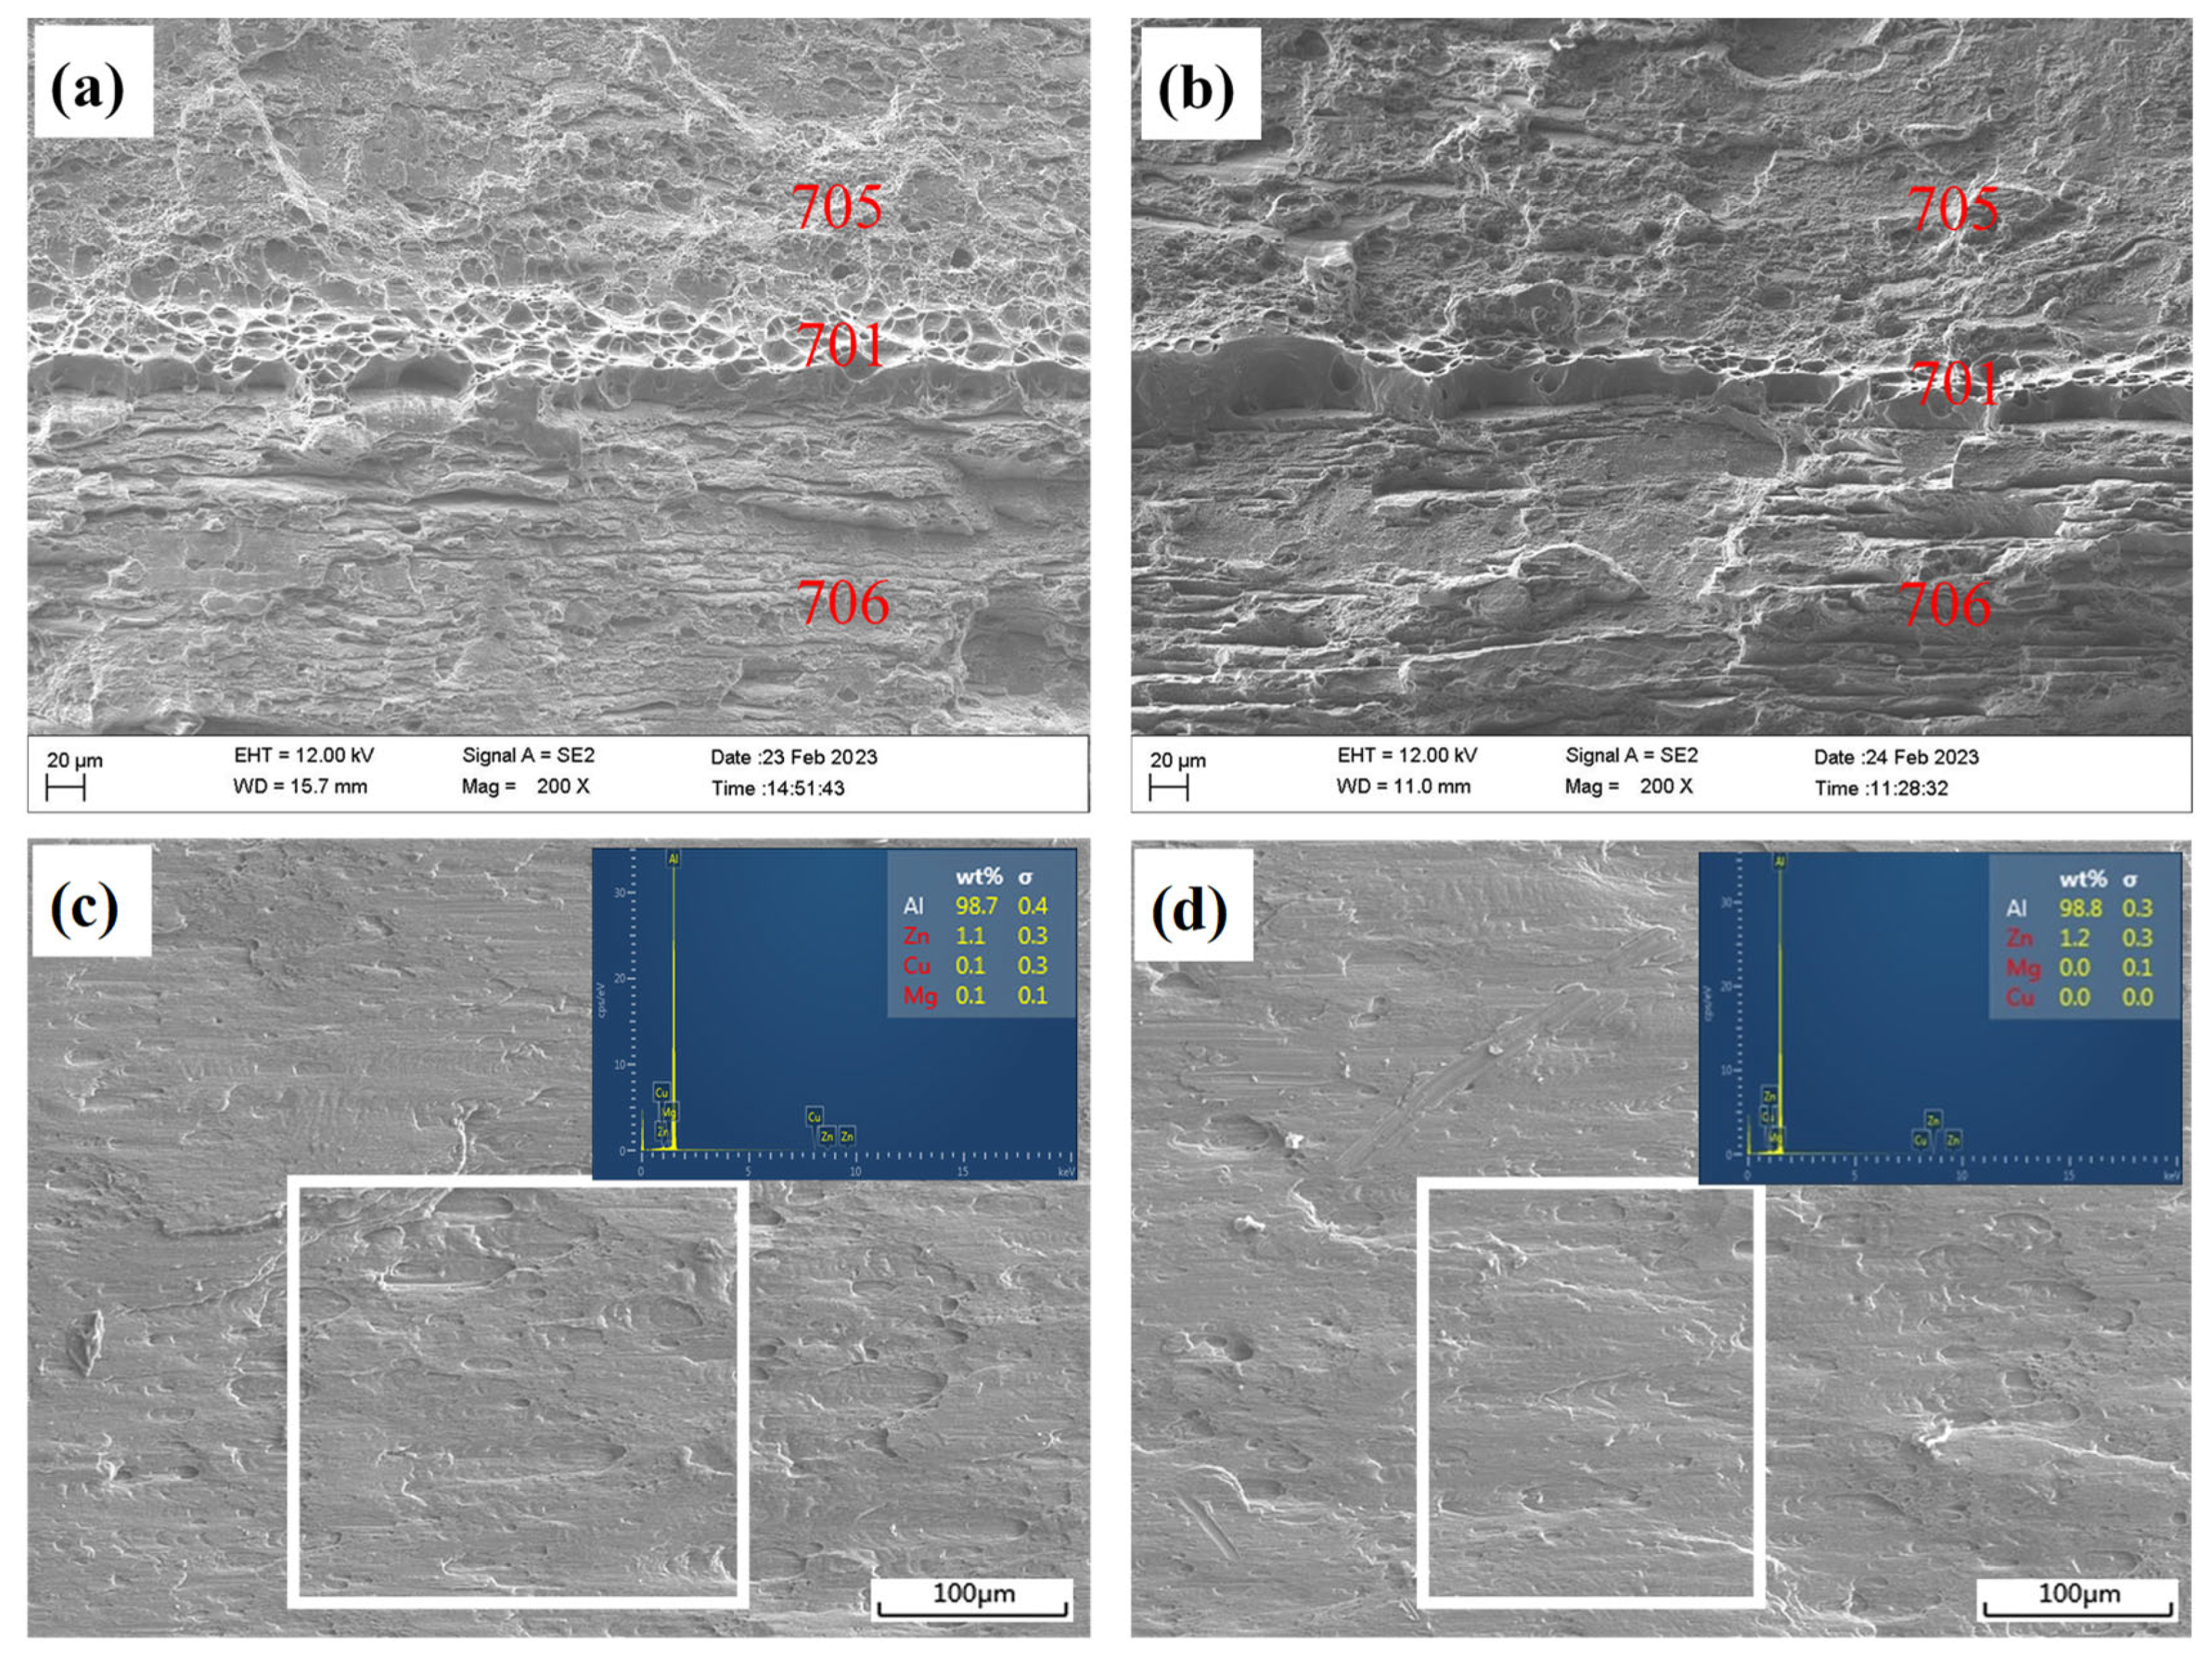
Figure 15 exhibits the fracture morphology and EDS results of the laminated composite plate. It can be seen that the tensile fractures shown in Figure 15a,b contain 705, 701 and 706 component layers, and their surface is generally flat, indicating that the deformation of the component layers of the five- and seven-layer aluminum alloy composite plates is relatively uniform during the tensile process. The fracture of the 705 alloy layer is composed of dimples formed by the accumulation of micropores, showing typical ductile fracture characteristics. The fracture of the 706 layer has a final tear along the grain boundary of the elongated grain, and the dimple on the tear edge is small and very shallow. The bonding interface between the 705 layer and 706 layer is the 701 layer, whose dimples are thick, uniform and deep, and no delamination is observed at the interface. The results indicate that metallurgical bonding is realized between the interface of 701/705 and 701/706. Figure 15c,d display the tensile–shear fractures of the five-layer and seven-layer composite plates. The tensile–shear fracture morphology of the five-layer and seven-layer composite plates is similar. The surface of the tensile–shear fracture is smoother and flatter, without dimples and tearing edges, which exhibits a significant difference from the tensile fracture. According to the EDS analysis results for the selected area, the tensile–shear fracture mainly contains about 1.1 wt.% Zn in addition to the matrix aluminum, which is close to the composition of the 701 aluminum alloy. Therefore, it can be concluded that the tensile–shear failure of the five-layer and seven-layer composite plates occurs in the 701 layer.
Based on the above experimental results relating to mechanical properties, metallography, tensile and tensile–shear fracture morphology and EDS analysis, it can be concluded that the interface of the five-layer and seven-layer composites prepared by the hot roll bonding process was well bonded. The experimental results verified the rationality of the hot roll bonding process parameters obtained by the finite element simulation.

4. Conclusions

The finite element method was used to simulate the hot roll bonding process of 7000 series aluminum alloy laminates, and the mesh size of the 705 and 706 layers of the workpiece was 10 × 10 × 10 mm, and that of the 701 layer was 10 × 10 × 7.5 mm, of which the downward direction was 7.5 mm. The process parameters were verified by hot roll bonding experiments, properties testing and microstructure analysis of the laminated composite materials, and the following conclusions can be drawn:
(1)
The addition of the 701 intermediate layer could effectively coordinate the deformation of the 705 layer and 706 layer and prevent the warping of the laminated material in the hot roll bonding process;
(2)
The recommended hot roll bonding process parameters were a pass reduction ratio of 20%~30%, hot rolling speed of 1.5~2.5 m/s and thickness ratio of 1:5 for the 705 layer and 706 layer;
(3)
The interface of the five-layer and seven-layer composites prepared by the hot roll bonding process was well bonded. The experimental results verified the rationality of the hot roll bonding process parameters obtained by the finite element simulation.

Author Contributions

Conceptualization, C.X. and C.N.; methodology, W.X., C.X. and C.N.; investigation, W.X.; resources, C.X. and C.N.; data curation, W.X.; writing—original draft preparation, W.X.; writing—review and editing, C.X. and C.N.; supervision, C.X. and C.N.; funding acquisition, C.X. and C.N. All authors have read and agreed to the published version of the manuscript.

Funding

This research was funded by Key Scientific and Technological Research Projects of Quzhou (nos. 2023K210 and 2022K15) and the Joint Funds of the Zhejiang Provincial Natural Science Foundation of China (nos. LZY23E010001 and LZY22E010002).

Data Availability Statement

Data are contained within the article.

Acknowledgments

The authors thank Yan An from Yinbang Clad Material Co., Ltd. for his support during the preparation of the laminated materials by the hot roll bonding process, and also thank Haonan Yu, Huafei Song from Quzhou University and Jianping Yu from Zhejiang Bulaoshen Civil Air Protection Equipment Co., Ltd., who participated in part of the experiments, data analysis and validation.

Conflicts of Interest

Author Chengdong Xia was employed by the company Zhejiang Bulaoshen Civil Air Protection Equipment Co., Ltd. The remaining authors declare that the research was conducted in the absence of any commercial or financial relationships that could be construed as a potential conflict of interest.

References

  1. Le, V.T.; San Ha, N.; Goo, N.S. Advanced sandwich structures for thermal protection systems in hypersonic vehicles: A review. Compos. Part B 2021, 226, 109301. [Google Scholar] [CrossRef]
  2. Xia, C.D.; Deng, S.H.; Ni, C.Y.; Ji, Y.Y.; Zheng, W.H.; Luo, J.Q.; Xu, W.; Li, W.D.; Pang, Y. Study on laminar structure and process on high strength brazed aluminum alloy for heat exchangers. Vacuum 2023, 215, 112303. [Google Scholar] [CrossRef]
  3. Costa, R.D.F.S.; Sales-Contini, R.C.M.; Silva, F.J.G.; Sebbe, N.; Jesus, A.M.P. A critical review on fiber metal laminates (fml): From manufacturing to sustainable processing. Metals 2023, 13, 638. [Google Scholar] [CrossRef]
  4. Catania, G.; Strozzi, M. Damping Oriented Design of Thin-Walled Mechanical Components by Means of Multi-Layer Coating Technology. Coatings 2018, 8, 73. [Google Scholar] [CrossRef]
  5. Yu, L.; Ma, Y.; Zhou, C.; Xu, H. Damping efficiency of the coating structure. Int. J. Solids Struct. 2005, 42, 3045–3058. [Google Scholar] [CrossRef]
  6. Chang, L.; Yuan, S.; Huang, X.; Cai, Z. Determination of Johnson-Cook damage model for 7xxx laminated aluminum alloy and simulation application. Mater. Today Commun. 2023, 34, 105224. [Google Scholar] [CrossRef]
  7. Liu, W.H.; Cao, P.; Zhao, C.B.; Song, Y.F.; Tang, C.P. Effect of temperature and strain rate on deformation mode and crack behavior of 7B52 laminated aluminum alloy under impact loading. Met. Mater. Int. 2021, 27, 4397–4407. [Google Scholar] [CrossRef]
  8. Gao, H.T.; Kong, C.R.; Yu, H.L. Lightweight metal laminated plates produced via (hot, cold and cryogenic) roll bonding: A review. Trans. Nonferrous Met. Soc. China 2023, 33, 337–356. [Google Scholar] [CrossRef]
  9. Gao, K.; Zhang, X.; Liu, B.; He, J.; Feng, J.; Ji, P.; Fang, W.; Yin, F. The deformation characteristics, fracture behavior and strengthening-toughening mechanisms of laminated metal composites: A review. Metals 2020, 10, 4. [Google Scholar] [CrossRef]
  10. Ebrahimi, M.; Wang, Q.D. Accumulative roll-bonding of aluminum alloys and composites: An overview of properties and performance. J. Mater. Res. Technol. 2022, 19, 4381–4403. [Google Scholar] [CrossRef]
  11. Frolov, Y.; Haranich, Y.; Bobukh, O.; Remez, O.; Voswinkel, D.; Grydin, O. Deformation of expanded steel mesh inlay inside aluminum matrix during the roll bonding. J. Manuf. Process. 2020, 58, 857–867. [Google Scholar] [CrossRef]
  12. Habila, W.; Azzeddine, H.; Mehdi, B.; Tirsatine, K.; Baudin, T.; Helbert, A.L.; Brisset, F.; Gautrot, S.; Mathon, M.H.; Bradai, D. Investigation of microstructure and texture evolution of a Mg/Al laminated composite elaborated by accumulative roll bonding. Mater. Charact. 2019, 147, 242–252. [Google Scholar] [CrossRef]
  13. Naseri, M.; Reihanian, M.; Borhani, E. Bonding behavior during cold roll-cladding of tri-layered Al/brass/Al composite. J. Manuf. Process. 2016, 24, 125–137. [Google Scholar] [CrossRef]
  14. Fu, L.; Xiao, H.; Yu, C.; Chen, N.; Guo, Y.; Yang, B.; Ren, Z. Analysis on mechanism of steel plate pre-oxidation in improving bonding properties of cold-rolled 6061 Al/Q235 steel composite plate. J. Mater. Process. Technol. 2023, 316, 117960. [Google Scholar] [CrossRef]
  15. Wang, T.; Zhao, W.Q.; Yun, Y.L.; Li, Z.X.; Wang, Z.H.; Huang, Q.X. A dynamic composite rolling model based on Lemaitre damage theory. Int. J. Mech. Sci. 2024, 269, 109067. [Google Scholar] [CrossRef]
  16. Qi, Z.C.; Yu, C.; Xiao, H. Microstructure and bonding properties of magnesium alloy AZ31/CP-Ti clad plates fabricated by rolling bonding. J. Manuf. Process. 2018, 32, 175–186. [Google Scholar] [CrossRef]
  17. Yu, C.; Zhang, W.; Jiang, R.; Wu, Y.; Xiao, H. Preparation method and properties of Q235/5083 composite plate with 1060 interlayer by differential temperature rolling with induction heating. Metals 2023, 13, 1501. [Google Scholar] [CrossRef]
  18. Zhi, C.C.; Wu, Z.Y.; Ma, L.F.; Huang, Z.Q.; Zheng, Z.B.; Xv, H.; Jia, W.T.; Lei, J.Y. Effect of thickness ratio on interfacial structure and mechanical properties of Mg/Al composite plates in differential temperature asymmetrical rolling. J. Mater. Res. Technol. 2023, 24, 8332–8347. [Google Scholar] [CrossRef]
  19. Saito, Y.; Utsunomiya, H.; Tsuji, N.; Sakai, T. Novel ultra-high straining process for bulk materials—Development of the accumulative roll-bonding (ARB) process. Acta Mater. 1999, 47, 579–583. [Google Scholar] [CrossRef]
  20. Saito, Y.; Utsunomiya, H.; Tsuji, N.; Shokai, T.; Hong, J.G. Accumulative roll-bonding of 1100 aluminum. J. Jpn. Inst. Met. Mater. 1999, 63, 790–795. [Google Scholar] [CrossRef]
  21. Du, Q.L.; Li, C.; Cui, X.H.; Kong, C.; Yu, H.L. Fabrication of ultrafine-grained AA1060 sheets via accumulative roll bonding with subsequent cryorolling. Trans. Nonferrous Met. Soc. China 2021, 31, 3370–3379. [Google Scholar] [CrossRef]
  22. Wang, Z.J.; Ma, M.; Qiu, Z.X.; Zhang, J.X.; Liu, W.C. Microstructure, texture and mechanical properties of AA 1060 aluminum alloy processed by cryogenic accumulative roll bonding. Mater. Charact. 2018, 139, 269–278. [Google Scholar] [CrossRef]
  23. Su, L.H.; Lu, C.; Gazder, A.A.; Saleh, A.A.; Deng, G.Y.; Tieu, K.; Li, H.J. Shear texture gradient in AA6061 aluminum alloy processed by accumulative roll bonding with high roll roughness. J. Alloys Compd. 2014, 594, 12–22. [Google Scholar] [CrossRef]
  24. Wu, B.; Li, L.; Xia, C.D.; Guo, X.F.; Zhou, D.J. Effect of surface nitiding treatment in a steel plate on the interfacial bonding strength of the aluminum/steel clad sheets by the cold roll bonding process. Mater. Sci. Eng. A 2017, 682, 270–278. [Google Scholar] [CrossRef]
  25. Lukaschkin, N.D.; Borissow, A.P. Interface surface behaviour in the upsetting of sandwich metal sheets. J. Mater. Process. Technol. 1996, 61, 292–297. [Google Scholar] [CrossRef]
  26. Zhou, M.; Hu, R.; Li, J.G.; Zou, H.; Gao, Z.T.; Luo, X. Interfacial optimization by CPED coating for improving mechanical properties of Nbf/TiAl composite. Mater. Sci. Eng. A Struct. Mater. 2024, 892, 145967. [Google Scholar] [CrossRef]
  27. Huang, C.X.; Wang, Y.F.; Ma, X.L.; Yin, S.; Höppel, H.W.; Göken, M.; Wu, X.L.; Gao, H.J.; Zhu, Y.T. Interface affected zone for optimal strength and ductility in heterogeneous laminate. Mater. Today 2018, 21, 713–719. [Google Scholar] [CrossRef]
  28. Sun, Z.B.; Liu, L.L.; Tong, J.H.; Han, Y.Q.; Chen, F.R. Numerical analysis of MIG welding of aluminum alloy based on improved heat source model. Trans. China Weld. Inst. 2023, 44, 111–116. [Google Scholar] [CrossRef]
  29. Huang, J.W.; Yin, Z.M.; Nie, B.; Chen, J.Q.; He, Z.B. Investigation of phases and thermal expansivity of 7A52 alloy in in-situ heating. Ordnance Mater. Sci. Eng. 2007, 30, 9–12. [Google Scholar] [CrossRef]
  30. Liu, L.X.; Chen, J.G. LC52 aluminum alloy forging process and performance. Forg. Stamp. Technol. 1999, 24, 13–14. [Google Scholar] [CrossRef]
  31. Liu, B.X.; An, Q.; Yin, F.X.; Wang, S.; Chen, C.X. Interface formation and bonding mechanisms of hot-rolled stainless steel clad plate. J. Mater. Sci. 2019, 54, 11357–11377. [Google Scholar] [CrossRef]
  32. Shan, S.J.; Liu, Y.X.; Zhang, J.L.; Fan, X.Y.; Jiao, K.X. Explosion welding research on large-size ultra-thick copper-steel composites: A review. J. Mater. Res. Technol. 2023, 24, 4130–4142. [Google Scholar] [CrossRef]
  33. Huang, M.; Xu, C.; Fan, G.H.; Maawad, E.; Gan, W.M.; Geng, L.; Lin, F.X.; Tang, G.Z.; Wu, H.; Du, Y.; et al. Role of layered structure in ductility improvement of layered Ti-Al metal composite. Acta Mater. 2018, 153, 235–249. [Google Scholar] [CrossRef]
  34. Wang, T.; Zha, M.; Gao, Y.P.; Wang, S.Q.; Jia, H.L.; Wang, C.; Wang, H.Y. Deformation mechanisms in a novel multiscale hetero-structured Mg alloy with high strength-ductility synergy. Int. J. Plast. 2023, 170, 103766. [Google Scholar] [CrossRef]
  35. Yin, Y.F.; Kou, W.J.; Zhao, Y.Q.; Zeng, W.D. Formation and deformation mechanism of the hierarchical diffusion layer in the laminated Ti/Ti-50Nb alloy. Mater. Sci. Eng. A 2023, 873, 144996. [Google Scholar] [CrossRef]
  36. Zhou, X.L.; Chen, C.Q. Molecular dynamic simulations of the mechanical properties of crystalline/crystalline and crystalline/amorphous nanolayered pillars. Comput. Mater. Sci. 2015, 101, 194–200. [Google Scholar] [CrossRef]
  37. Manesh, H.D.; Taheri, A.K. Study of mechanisms of cold roll welding of aluminium alloy to steel strip. Mater. Sci. Technol. 2004, 20, 1064–1068. [Google Scholar] [CrossRef]
  38. Ma, M.; Huo, P.; Liu, W.C.; Wang, G.J.; Wang, D.M. Microstructure and mechanical properties of Al/Ti/Al laminated composites prepared by roll bonding. Mater. Sci. Eng. A 2015, 636, 301–310. [Google Scholar] [CrossRef]
  39. Abbasi, M.; Toroghinejad, M.R. Effects of processing parameters on the bond strength of Cu/Cu roll-bonded strips. J. Mater. Process. Technol. 2010, 210, 560–563. [Google Scholar] [CrossRef]
  40. Khan, H.A.; Asim, K.; Akram, F.; Hameed, A.; Khan, A.; Mansoor, B. Roll Bonding Processes: State-of-the-Art and Future Perspectives. Metals 2021, 11, 1344. [Google Scholar] [CrossRef]
  41. Tsuji, N.; Toyoda, T.; Minamino, Y.; Koizumi, Y.; Yamane, T.; Komatsu, M.; Kiritani, M. Microstructural change of ultrafine-grained aluminum during high-speed plastic deformation. Mater. Sci. Eng. A 2003, 350, 108–116. [Google Scholar] [CrossRef]
  42. Hwang, Y.-M.; Chen, T.-H.; Hsu, H.-H. Analysis of asymmetrical clad sheet rolling by stream function method. Int. J. Mech. Sci. 1996, 38, 443–460. [Google Scholar] [CrossRef]
  43. Rezaii, A.; Shafiei, E.; Ostovan, F.; Daneshmanesh, H. Experimental & theoretical investigation of roll bonding process of multilayer strips by finite element method. J. Manuf. Process. 2020, 54, 54–69. [Google Scholar] [CrossRef]
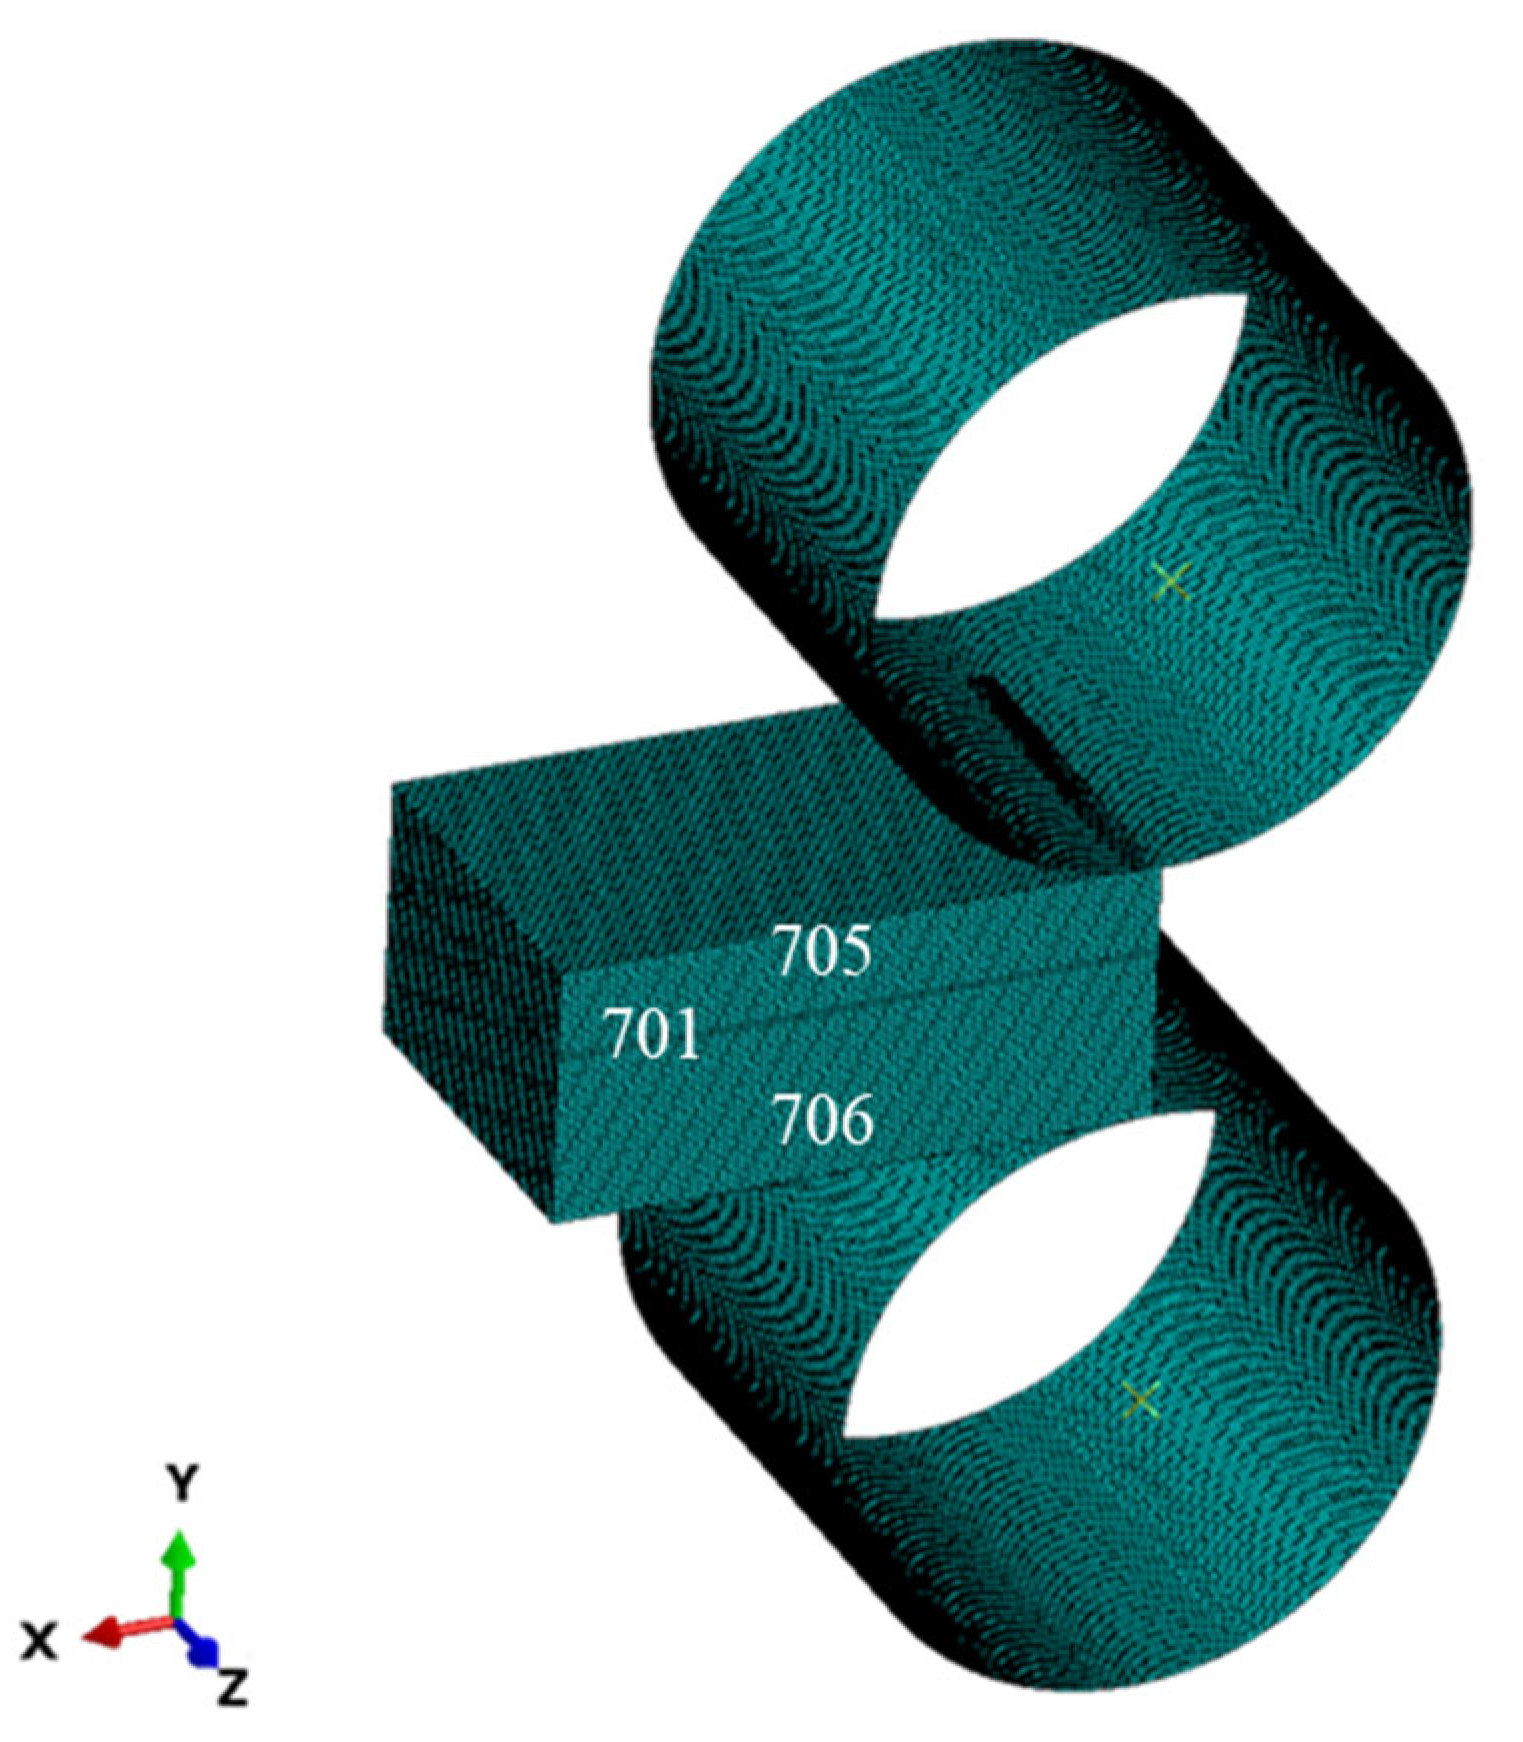
Figure 1. Schematic diagram of geometric modeling meshing.
Metals 14 00551 g001
Figure 2. Curves of thermal conductivity, specific heat and coefficient of thermal expansion with temperature.
Metals 14 00551 g002
Figure 3. True stress–strain curves at different temperatures for (a) 701, (b) 705, (c) 706.
Metals 14 00551 g003
Figure 4. Schematic of fetch-point analysis with stress cloud scale.
Metals 14 00551 g004
Figure 5. Von Mises stress distribution in symmetric sections of rolled aluminum alloy laminated plates (simulation conditions: 705:706 thickness ratio of 1:5, rolling speed of 1.5 m/s, rolling reduction ratio of 30%): (a) without 701 layers, (b) with 701 layers.
Metals 14 00551 g005
Figure 6. Von Mises stress distribution in symmetric sections of rolling deformation of laminated materials with different rolling reduction ratios, 705/701/706 (simulation conditions: 705:706 thickness ratio of 1:5, rolling speed of 1.5 m/s): (a) rolling reduction ratio of 20%, (b) rolling reduction ratio of 30%, (c) rolling reduction ratio of 40%.
Metals 14 00551 g006
Figure 7. Normal compressive stress and equivalent plastic strain difference on both sides at the composite interface of 705/701/706 laminated plates with different rolling reduction ratios (simulation conditions: 705:706 thickness ratio of 1:5, rolling speed of 1.5 m/s): (a) normal compressive stress, (b) equivalent plastic strain difference on both sides.
Metals 14 00551 g007
Figure 8. Von Mises stress distribution in symmetric sections of rolling deformation at different rolling speeds (simulation conditions: 705:706 thickness ratio of 1:5, 20% rolling reduction ratio): (a) 0.5 m/s, (b) 1.5 m/s, (c) 2.5 m/s.
Metals 14 00551 g008
Figure 9. Normal compressive stress and equivalent plastic strain difference on both sides at the composite interface of 705/701/706 laminated plates under different hot rolling speeds (simulation conditions: rolling reduction ratio of 30%; thickness ratio of 705:706 is 1:5): (a) normal compressive stress, (b) equivalent plastic strain difference on both sides.
Metals 14 00551 g009
Figure 10. Von Mises stress distribution in symmetric sections of rolling deformation of 705/701/706 laminated materials with different thickness ratios of 705 and 706 (simulation conditions: rolling reduction ratio of 30%, rolling speed of 1.5 m/s, white arrow points to 701 layer): (a) 1:2, (b) 1:5, (c) 1:11.
Metals 14 00551 g010
Figure 11. Normal compressive stress and equivalent plastic strain difference on both sides at the interface of 705/701/706 laminated plates with different thickness ratios of 705 and 706 (simulation conditions: rolling reduction ratio of 30%; rolling speed of 1.5 m/s): (a) normal compressive stress; (b) equivalent plastic strain difference on both sides.
Metals 14 00551 g011
Figure 12. Hot roll bonding process for preparing five-layer laminated material.
Metals 14 00551 g012
Figure 13. Metallographic photos of 7000 series aluminum alloy laminated composite plates with a thickness of 5 mm: (a,b) five-layer composite plate; (c,d) seven-layer composite plate.
Metals 14 00551 g013
Figure 14. Mechanical properties of 7000 series aluminum alloy laminated composite plates: (a) tensile property; (b) tensile–shear property of the bonding interface.
Metals 14 00551 g014
Figure 15. Fracture morphology and selected EDS results of aluminum alloy laminated composite plates: (a) tensile fracture of five-layer composite plate; (b) fracture of seven-layer composite plate; (c) tensile–shear fracture of five-layer composite plate and EDS result of selected area; (d) tensile–shear fracture of seven-layer composite plate and EDS result of selected area.
Metals 14 00551 g015
Table 1. Chemical composition of 7000 series aluminum alloys.
Element (wt.%)SiFeCuMnMgZnTiZrCrAl
7010.2620.320.00850.0550.0021.05///Bal.
7050.0480.1290.100.3562.444.520.0970.1050.201Bal.
7060.0420.1190.1050.3042.9707.2300.0940.0710.196Bal.
Disclaimer/Publisher’s Note: The statements, opinions and data contained in all publications are solely those of the individual author(s) and contributor(s) and not of MDPI and/or the editor(s). MDPI and/or the editor(s) disclaim responsibility for any injury to people or property resulting from any ideas, methods, instructions or products referred to in the content.