Article

High-Performance 2319 Aluminum Alloy via CMT-WAAM: Microstructure, Porosity, and Mechanical Properties

1
School of Mechanical Engineering and Automation, Beihang University, Beijing 100083, China
2
China Academy of Space Technology, Beijing 100094, China
3
School of Materials Science and Engineering, Harbin Institute of Technology, Harbin 150001, China
*
Author to whom correspondence should be addressed.
Metals 2024, 14(7), 797; https://doi.org/10.3390/met14070797
Submission received: 4 June 2024 / Revised: 25 June 2024 / Accepted: 2 July 2024 / Published: 8 July 2024

Abstract

:
The process of cold metal transfer (CMT) wire arc additive manufacturing (WAAM) for 2319 aluminum alloy was studied. The research investigated the coarse and fine equiaxed grain bands and porosity of the 2319 alloy after solution aging treatment, with a focus on the mechanical properties and deformation behavior of the aluminum alloy at different positions and orientations. Pores and coarse second phases mainly appeared at grain boundaries but were also observed within coarse equiaxed grains. The yield strength of the top horizontal samples reached 325.5 MPa, one of the highest yield strengths reported for 2319 aluminum alloy in the literature. The coarse brittle second phases at grain boundaries were the main crack sources during the failure process of the samples. In the fine equiaxed grain layer, cracks propagated along the grain boundaries connected to the second phases, and the presence of pores accelerated crack propagation; in the coarse equiaxed grain layer, cracks directly penetrated through the grains.

1. Introduction

Compared to traditional aluminum alloy manufacturing methods such as casting and plastic deformation, additive manufacturing (AM) has garnered increasing attention for its ability to reduce processing time, save materials, and decrease structural weight, showcasing immense potential in lightweight aluminum alloy applications [1,2,3]. In current industrial manufacturing, large aluminum alloy structures produced using AM technology are widely applied in the aerospace sector [4,5]. The most frequently used metal AM processes are Powder Bed Fusion (PBF) and (Directed Energy Deposition) DED. PBF typically offers higher dimensional accuracy and parts with lower surface roughness [6,7]. However, DED has several unique advantages over PBF. DED allows higher deposition rates (up to 2.5 kg/h); supports multi-material deposition and in situ alloying for functionally graded structures; is versatile for coatings, cladding, and repairs; can handle large part volumes (>1000 mm3); and can deposit layers in any direction with five or more axes [8]. DED-Arc, also known as WAAM, is particularly effective in producing medium to large components due to its high deposition rate (typically 2 to 4 kg/h), excellent material utilization (>90%), impressive energy efficiency (85% to 90%), and highly adaptable working conditions. Studies have shown that the WAAM process can reduce manufacturing costs by 7% to 69% compared to traditional subtractive methods such as machining [9,10,11]. In the WAAM process, metal wire is melted using an electric arc to build metal components layer by layer based on a 3D model. To date, WAAM has been successfully applied in the manufacturing of various aluminum alloy components, such as Al-6.3Cu, 7075, and Al-Mg [12,13,14]. Compared to WAAM based on Metal Inert Gas (MIG) welding, Tungsten Inert Gas (TIG) welding, and Plasma Arc Welding (PAW), numerous previous studies have concluded that CMT, an improved short-circuit MIG process that reduces heat input, is a suitable manufacturing process for aluminum components in WAAM [15]. CMT-WAAM, characterized by high deposition efficiency, good material utilization, and low cost, is a key manufacturing method for aluminum alloys.
Due to the layer-by-layer deposition, the deposited metal undergoes a complex thermal process, resulting in a final sample with a microstructure different from conventional casting. This includes heterogeneous microstructures, disordered grain orientations, porosity, and cracks [13,16]. Oxidation is a critical factor that is an often overlooked defect in WAAM. Oxidation contributes to defects like pores and cracks by introducing impurities into the melt pool during the remelting stages of WAAM. Currently, researchers primarily focus on optimizing the WAAM process or employing auxiliary techniques to achieve aluminum alloys with fewer defects and higher performance. In process exploration, Cong et al. discovered that the CMT mode significantly impacts porosity in the CMT-WAAM process. The CMT Pulse Advanced (CMT-PADV) mode, characterized by both alternating current and pulse features, combines the cathodic cleaning effect of alternating current, which removes the oxide film, with controlled heat input, reducing spatter and achieving a good forming trajectory. This effectively eliminates porosity [17]. Cui et al. achieved precision control by adjusting the deposition current to regulate heat input [18]. In terms of auxiliary techniques, Fang et al. [19] found that interlayer hammering can refine grains, increase dislocation density, and enhance the strength of 2319 aluminum alloy samples to a level close to that of forged components. Gu et al. [20] used interlayer rolling to produce porosity-free samples. Most of the separated hydrogen atoms were trapped in the dislocations and vacancies induced by the rolling process. However, 2–3 μm pores appeared after heat treatment. Li et al. [21] used Laser-CMT hybrid AM for 2319 Al alloy, achieving yield strength improvements of 7.03% in the x-direction and 13.78% in the z-direction compared to the as-deposited state. Wu et al. [22] also employed LaserTungsten Inert Gas hybrid AM technology to produce 2219 Al alloy samples with more uniform copper distribution and superior performance.
AlCu series aluminum alloys are high-performance materials that can be strengthened through heat treatment. They are renowned for their high specific strength, excellent corrosion resistance, and superior weldability, making them widely used in the automotive and aerospace industries [23,24]. For additively manufactured aluminum alloys, heat treatment can homogenize the microstructure and reduce residual stresses in the components, thereby enhancing overall performance. After T6 heat treatment (solution treatment and artificial aging), the UTS and YS of CMT-PAV deposited WAAM 2319 aluminum alloy significantly improved, reaching 453 MPa and 315 MPa, respectively [25]. Additionally, the author also explored the heat treatment process for CMT-WAAM fabricated AlCu4.3Mg1.5 alloy [26]. After T6 heat treatment, the average yield strength and ultimate tensile strength increased by 116% and 66%, respectively. This indicates that heat treatment is a crucial process in the WAAM of 2319 aluminum alloys.
WAAM is a rapid cooling and solidification process. During cooling, the solubility of hydrogen atoms sharply decreases. At the solid/liquid interface, hydrogen atoms precipitate from the solid phase of the aluminum alloy into the liquid phase. When the hydrogen content reaches its solubility limit, it precipitates in the form of bubbles. If the bubbles cannot escape in time, hydrogen gas pores are formed during solidification. Additionally, due to the higher density of solid aluminum alloy compared to liquid aluminum alloy, shrinkage occurs during solidification. The density difference prevents the liquid metal from promptly filling the shrinking areas, resulting in shrinkage gas pores, known as solidification gas pores. In deposited WAAM aluminum alloys, a significant amount of hydrogen may primarily exist in molecular form within micropores or at solidification defects such as cracks or voids. Moreover, supersaturated atomic hydrogen may also be trapped in crystal defects, such as interstitial lattice sites, vacancies, solute atoms, dislocations, and high-angle grain boundaries. N. Mclean et al. [27], through CT scanning of arc-prepared 2319 aluminum alloy specimens, found that the predominant porosity in WAAM 2319 aluminum alloy is hydrogen gas porosity, with some voids attributed to lack of fusion and/or shrinkage defects. Chain-like voids are typically caused by insufficient liquid supply at solidification shrinkage defects or interfaces between dendrite arms or phases, exhibiting lower sphericity compared to hydrogen gas pores. Additionally, heat-treated aluminum alloys showed coarsening of gas pores and the emergence of numerous secondary micropores [20,27].
Despite extensive research on process parameters, microstructure, porosity formation, and heat treatment evolution in the WAAM of Al alloys, the impact of micropore distribution and heterogeneous microstructure on deformation mechanisms in CMT-WAAM 2319 aluminum alloy remains unclear and requires further investigation. This study employed a low heat input CMT-WAAM method to produce high-strength 2319 specimens, followed by solution treatment and aging. And the reinforcement mechanisms and failure modes of specimens with different heights and orientations were analyzed. The relationship between the heterogeneous microstructure, microporosity distribution, A l 2 Cu second-phase distribution, and mechanical properties of WAAM 2319 Al alloy was analyzed. This is significant for enhancing alloy mechanical properties through improving grain morphology and second-phase distribution.

2. Materials and Methods

2.1. Materials

The raw material for WAAM is 2319 aluminum alloy welding wire, with a wire diameter of 1.2 mm, complying with the requirements of standard GB/T 10858-2023 [28] “Aluminum and Aluminum Alloy Welding Wires”. The wire’s circularity is within ±0.04 mm, and it is vacuum-sealed before use. The substrate is a 6061 forged aluminum plate, with dimensions tailored to the size of the arc additive formed specimens and a thickness of 30 mm. The composition of the 2319 wire is shown in Table 1.

2.2. Methods

The 2319 Al component is manufactured using the WAAM system shown in Figure 1a, consisting of a TPS 4000 CMT power source, CMT torch, KUKA KR22 robotic arm, wire feeder, platform, rotary arm, exhaust pipe, and AM path planning software 3dAM-PP-Planner (Version 1.1). During the WAAM process, the welding torch first begins to move along the planned path, accompanied by arc initiation and extinction. After welding one layer, the torch height is raised to the next layer, repeating the previous work. In WAAM, the deposition path for each layer transitions along the short edges, presenting a serpentine pattern, as shown in Figure 1b. As shown in Figure 1c, a bidirectional deposition strategy between layers is adopted to ensure stability of formation and reduce defect content. The process parameters are comprehensively considered and listed in Table 2.
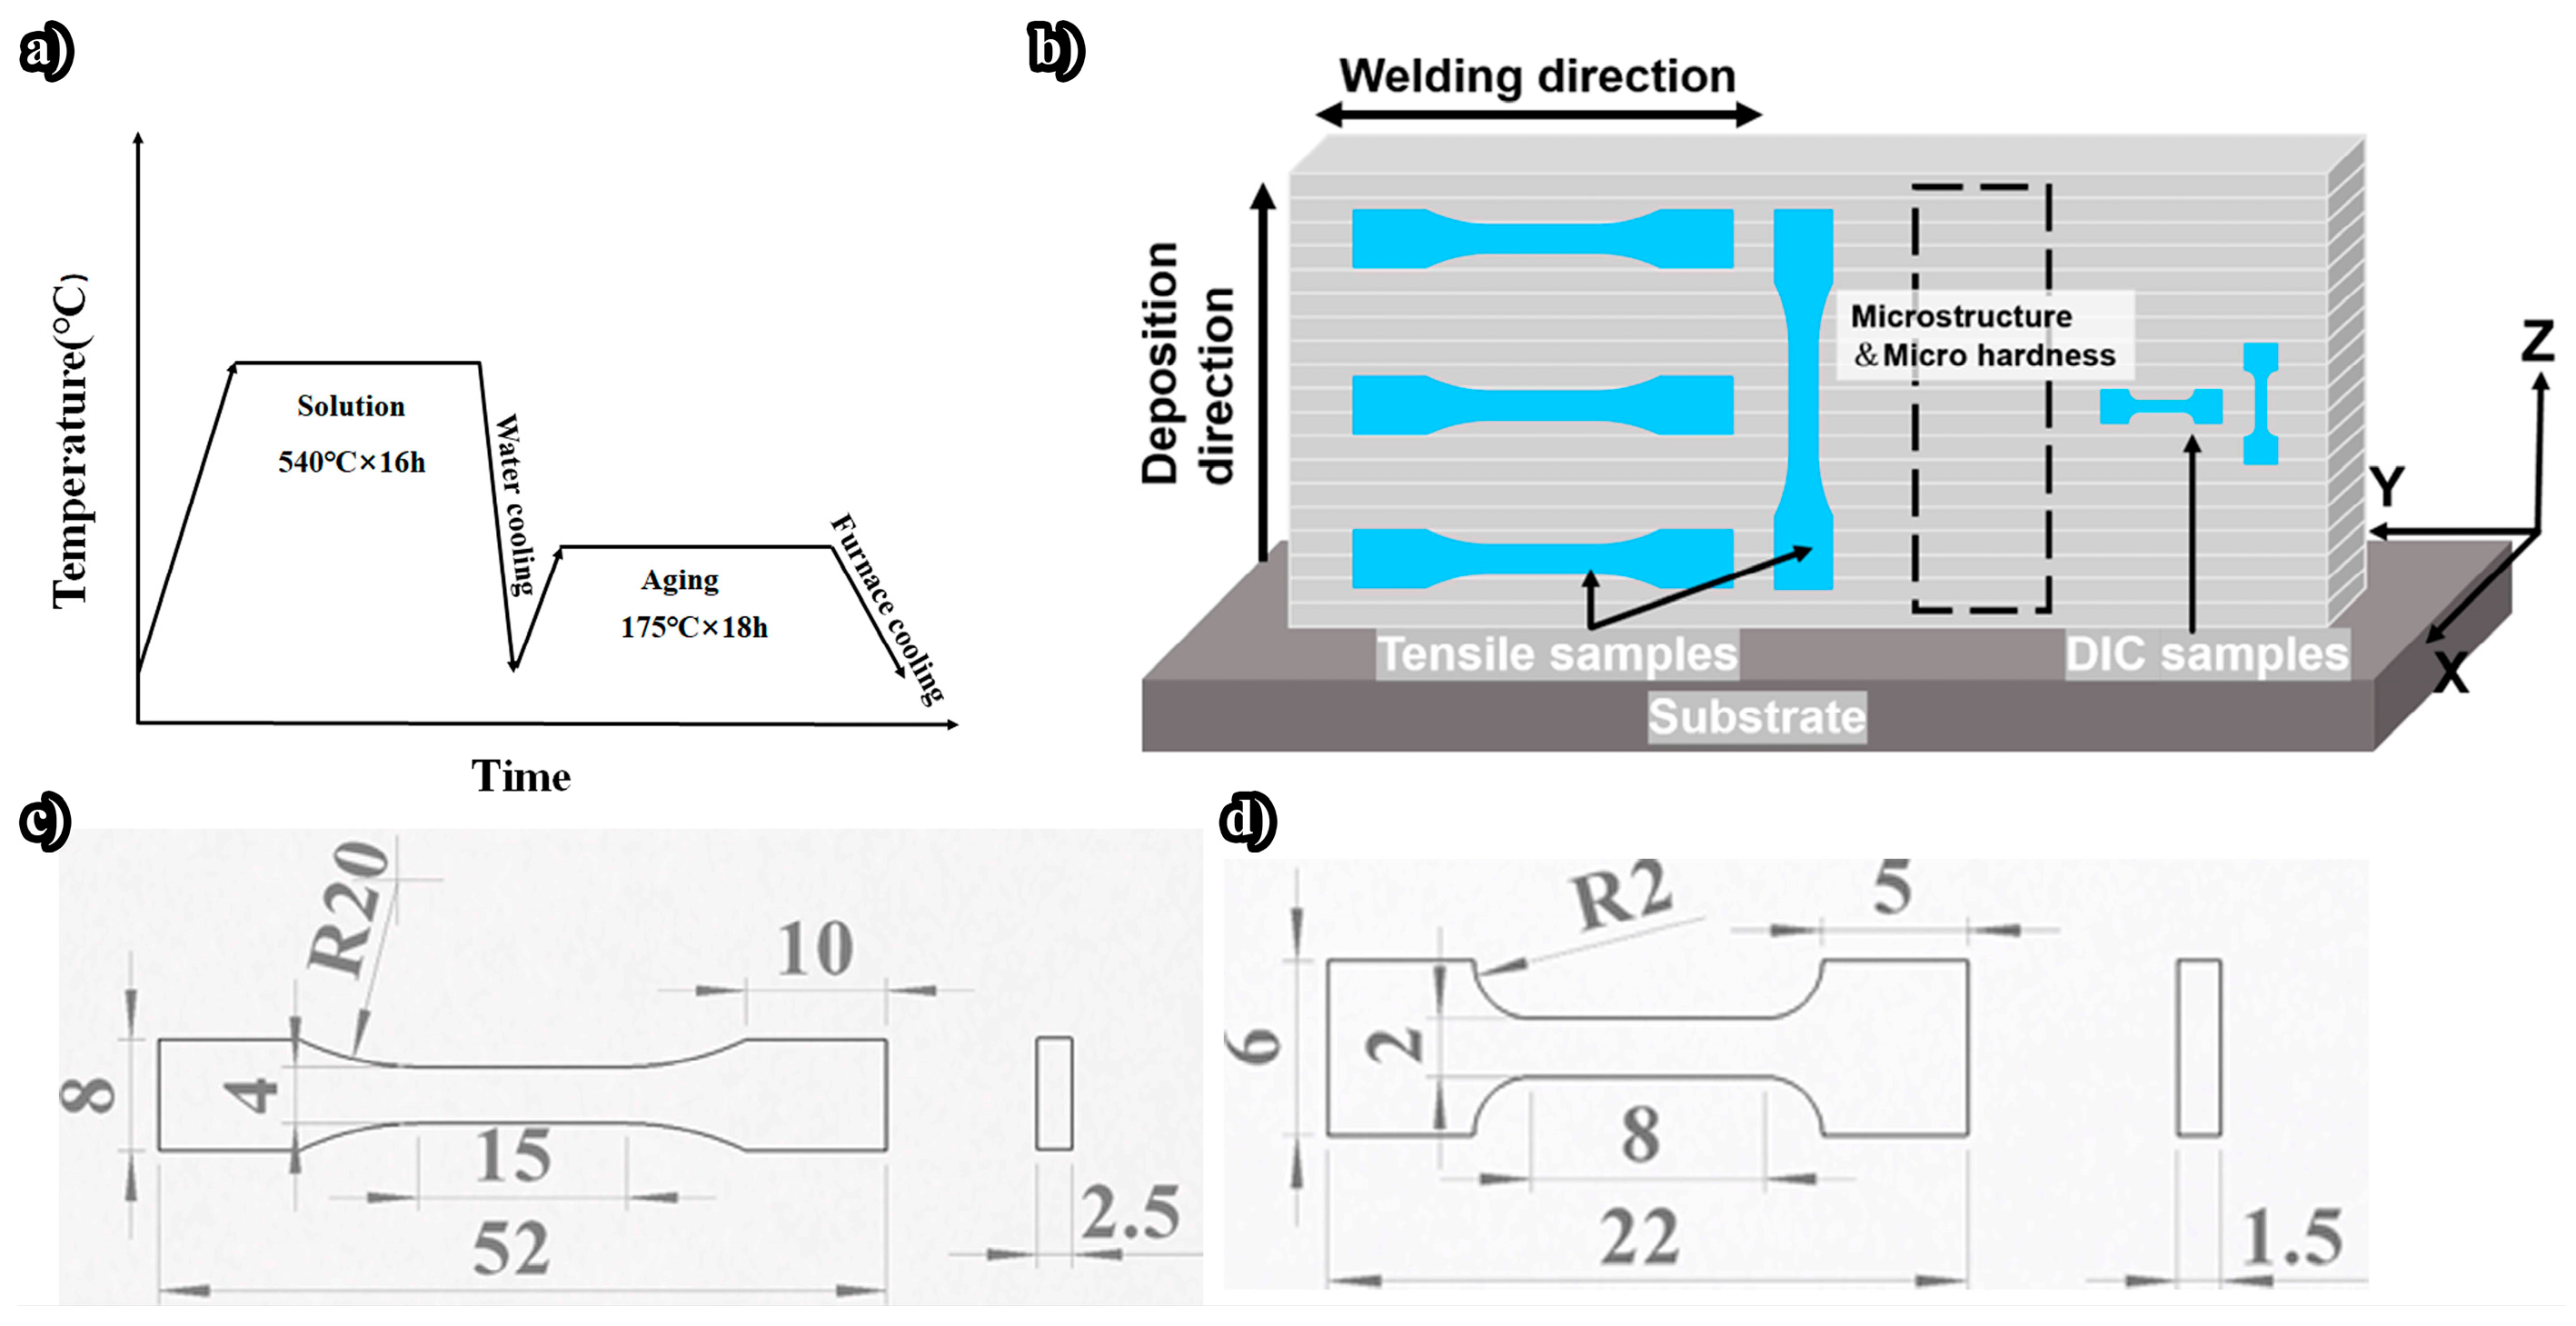
The deposition samples underwent solution treatment followed by artificial aging (T6) to enhance their performance. The heat treatment process is illustrated in Figure 2a. Firstly, the samples were heated to 540 °C and held at this temperature for 16 h, followed by quenching in water for solution treatment. Subsequently, the samples underwent artificial aging at 175 °C for 18 h, then were furnace-cooled to 80 °C before being removed and cooled in air.
The microstructural evolution and tensile properties of CMT-WAAM 2319 aluminum alloy are investigated by analyzing microstructure and tensile samples taken from various heights, as depicted in Figure 2b. The samples are ground with sandpaper and polished to a mirror finish using a polishing machine. They are then etched with Keller’s reagent (2 mL HF, 3 mL HCl, 5 mL HN O 3 , 190 mL H 2 O) for 30 s. Optical microscopy (OLYMPUS, Tokyo, Japan) and scanning electron microscopy (Carl Zeiss AG, Jena, Germany) are used to observe the grain morphology. Continuous imaging is performed using an optical microscope (OLYMPUS, Tokyo, Japan). Image-pro Plus 6.0 software is used to analyze metallographic images to calculate the porosity. The porosity of six samples at different heights is averaged, with six images analyzed for each sample. The type of intermetallic compound is determined using an X-ray diffractometer (Malvern Panalytical, Almelo, Netherlands). The tensile test at room temperature is conducted following ISO 6892-1:2009 [29] and carried out at a speed of 1 mm/min. Each tensile sample is tested three times. In the tensile test, an extensometer with a range of 10 mm is used, and the stretching rate is 1 mm/min. In situ mechanical tensile experiments are performed using OM (OLYMPUS, Tokyo, Japan) equipped with a 5 kN tensile testing machine attachment box, with a tensile test rate of 2 μm/s. The DIC samples are taken from the middle part of the deposition specimen, and the in situ observation sizes of samples with the two different orientations are the same. The commercial software VIC−2D (Version 2009.1.0) is used to calculate the strain in the observation area. Hardness testing is performed using a Vickers hardness tester (Leeb Testing Instrument, Chongqing, China) with a load of 200 g and a dwell time of 15 s. During testing, areas with pores are carefully avoided.

3. Results and Discussion

Based on welding parameters, structural geometric models, and torch movements, block specimens with heights ranging from 7.5 to 8 cm and thicknesses from 5.5 to 6 cm were obtained. After heat treatment, as shown in Figure 3a, the samples exhibit a smooth laminar structure, highlighting the sequential deposition process.

3.1. Microstructure and Porosity

From XRD analysis (Figure 3b), it is evident that all six samples from different heights are composed of Al and A l 2 Cu (θ phase). According to the AlCu binary phase diagram, during the WAAM preparation of 2319 aluminum alloy, α-Al initially precipitates from the liquid phase. Upon reaching the eutectic composition, AlCu eutectic (α-Al phase and θ phase) precipitates at the boundaries of already solidified α-Al.
Figure 4 shows the cross-section and microstructure of the deposited samples in different regions. The microstructure of heat-treated WAAM 2319 alloy exhibits a banded distribution of coarse grains and fine grains from bottom to top. After prolonged solution and aging treatment, the grain size and porosity distribution of the six samples from different heights become uniform. The characteristic of each sample is a mixture of coarse equiaxed grains and fine equiaxed grains. The smallest equiaxed fine grain size is several micrometers, and the largest coarse equiaxed grain size is about 250 μm.
In the process of WAAM of Al alloys, a complete deposition layer consists of equiaxed grain zones at the boundaries of the melt pool and columnar grain zones at the center of the melt pool. The lower part of the new deposition layer consists of equiaxed grains, while the middle and upper parts consist of columnar grains. Equiaxed grains and columnar grains form a complete deposition layer, as shown in Figure 5. Due to the prolonged solution and aging treatment in this study, columnar grains transform into equiaxed grains, and each complete deposition layer consists of fine equiaxed grains at the boundaries of the melt pool and coarse equiaxed grains at the upper part of the melt pool.
We also observed the presence of black pores of varying sizes in the microstructure of the six different height samples. Micropores in WAAM aluminum alloys typically exhibit a random and uniform distribution. The maximum pore diameter does not exceed 100 μm. It is worth emphasizing that, although some pores are present in each sample, their average sphericity is close to 1. The porosity of the sample is calculated by measuring the pore area percentage on the metallographic micrographs of six different positions of each sample. As shown in Figure 6, the porosity rate for the entire sample is 3.1%, and the top region A1 is at a minimum of 2.77%. This is determined by the characteristics of the WAAM process. Due to the thermal accumulation effect, as the height increases, the rate of heat dissipation continuously decreases. Therefore, the pores in the top region have more time to coalesce and float into the air [27,30]. Researchers [27] have highlighted in their studies that the porosity of Al alloy deposited by WAAM shows an interlayer distribution effect. Therefore, the metallographic photos used for statistics may be located in areas with high or low porosity, resulting in generally high error bars for the porosity in Figure 6.
In the as-deposited state, AlCu eutectic often exhibits a white reticular distribution at grain boundaries. For deposited metals, due to the thermal cycles during AM, the Cu-rich eutectic phase particles tend to coarsen easily. The θ phase is a stable phase, and as the θ phase gradually coarsens, the mechanical properties of the aluminum alloy decrease. Therefore, in this study, in order to dissolve large second phases on grain boundaries and improve material properties, the as-deposited alloy underwent solution treatment followed by aging. After prolonged solution treatment at near-eutectic temperature (540 °C), most of the AlCu eutectic (α-Al phase and θ phase) at grain boundaries melts. As shown in Figure 7, after solution treatment and aging, larger secondary phases are present at the grain boundaries of the fine equiaxed grains (indicated by the white arrow). In addition to being distributed along the grain boundaries, larger secondary phases are also found within the coarse equiaxed grains (indicated by the black arrow). The small black pits in Figure 7 are caused by the detachment of the secondary phases due to corrosion. The coarse eutectic phases are distributed at the grain boundaries, characterized by brittleness and hardness, and are prone to forming stress concentrations under tensile stress.

3.2. Mechanical Poperties

3.2.1. In Situ Micromechanical Test

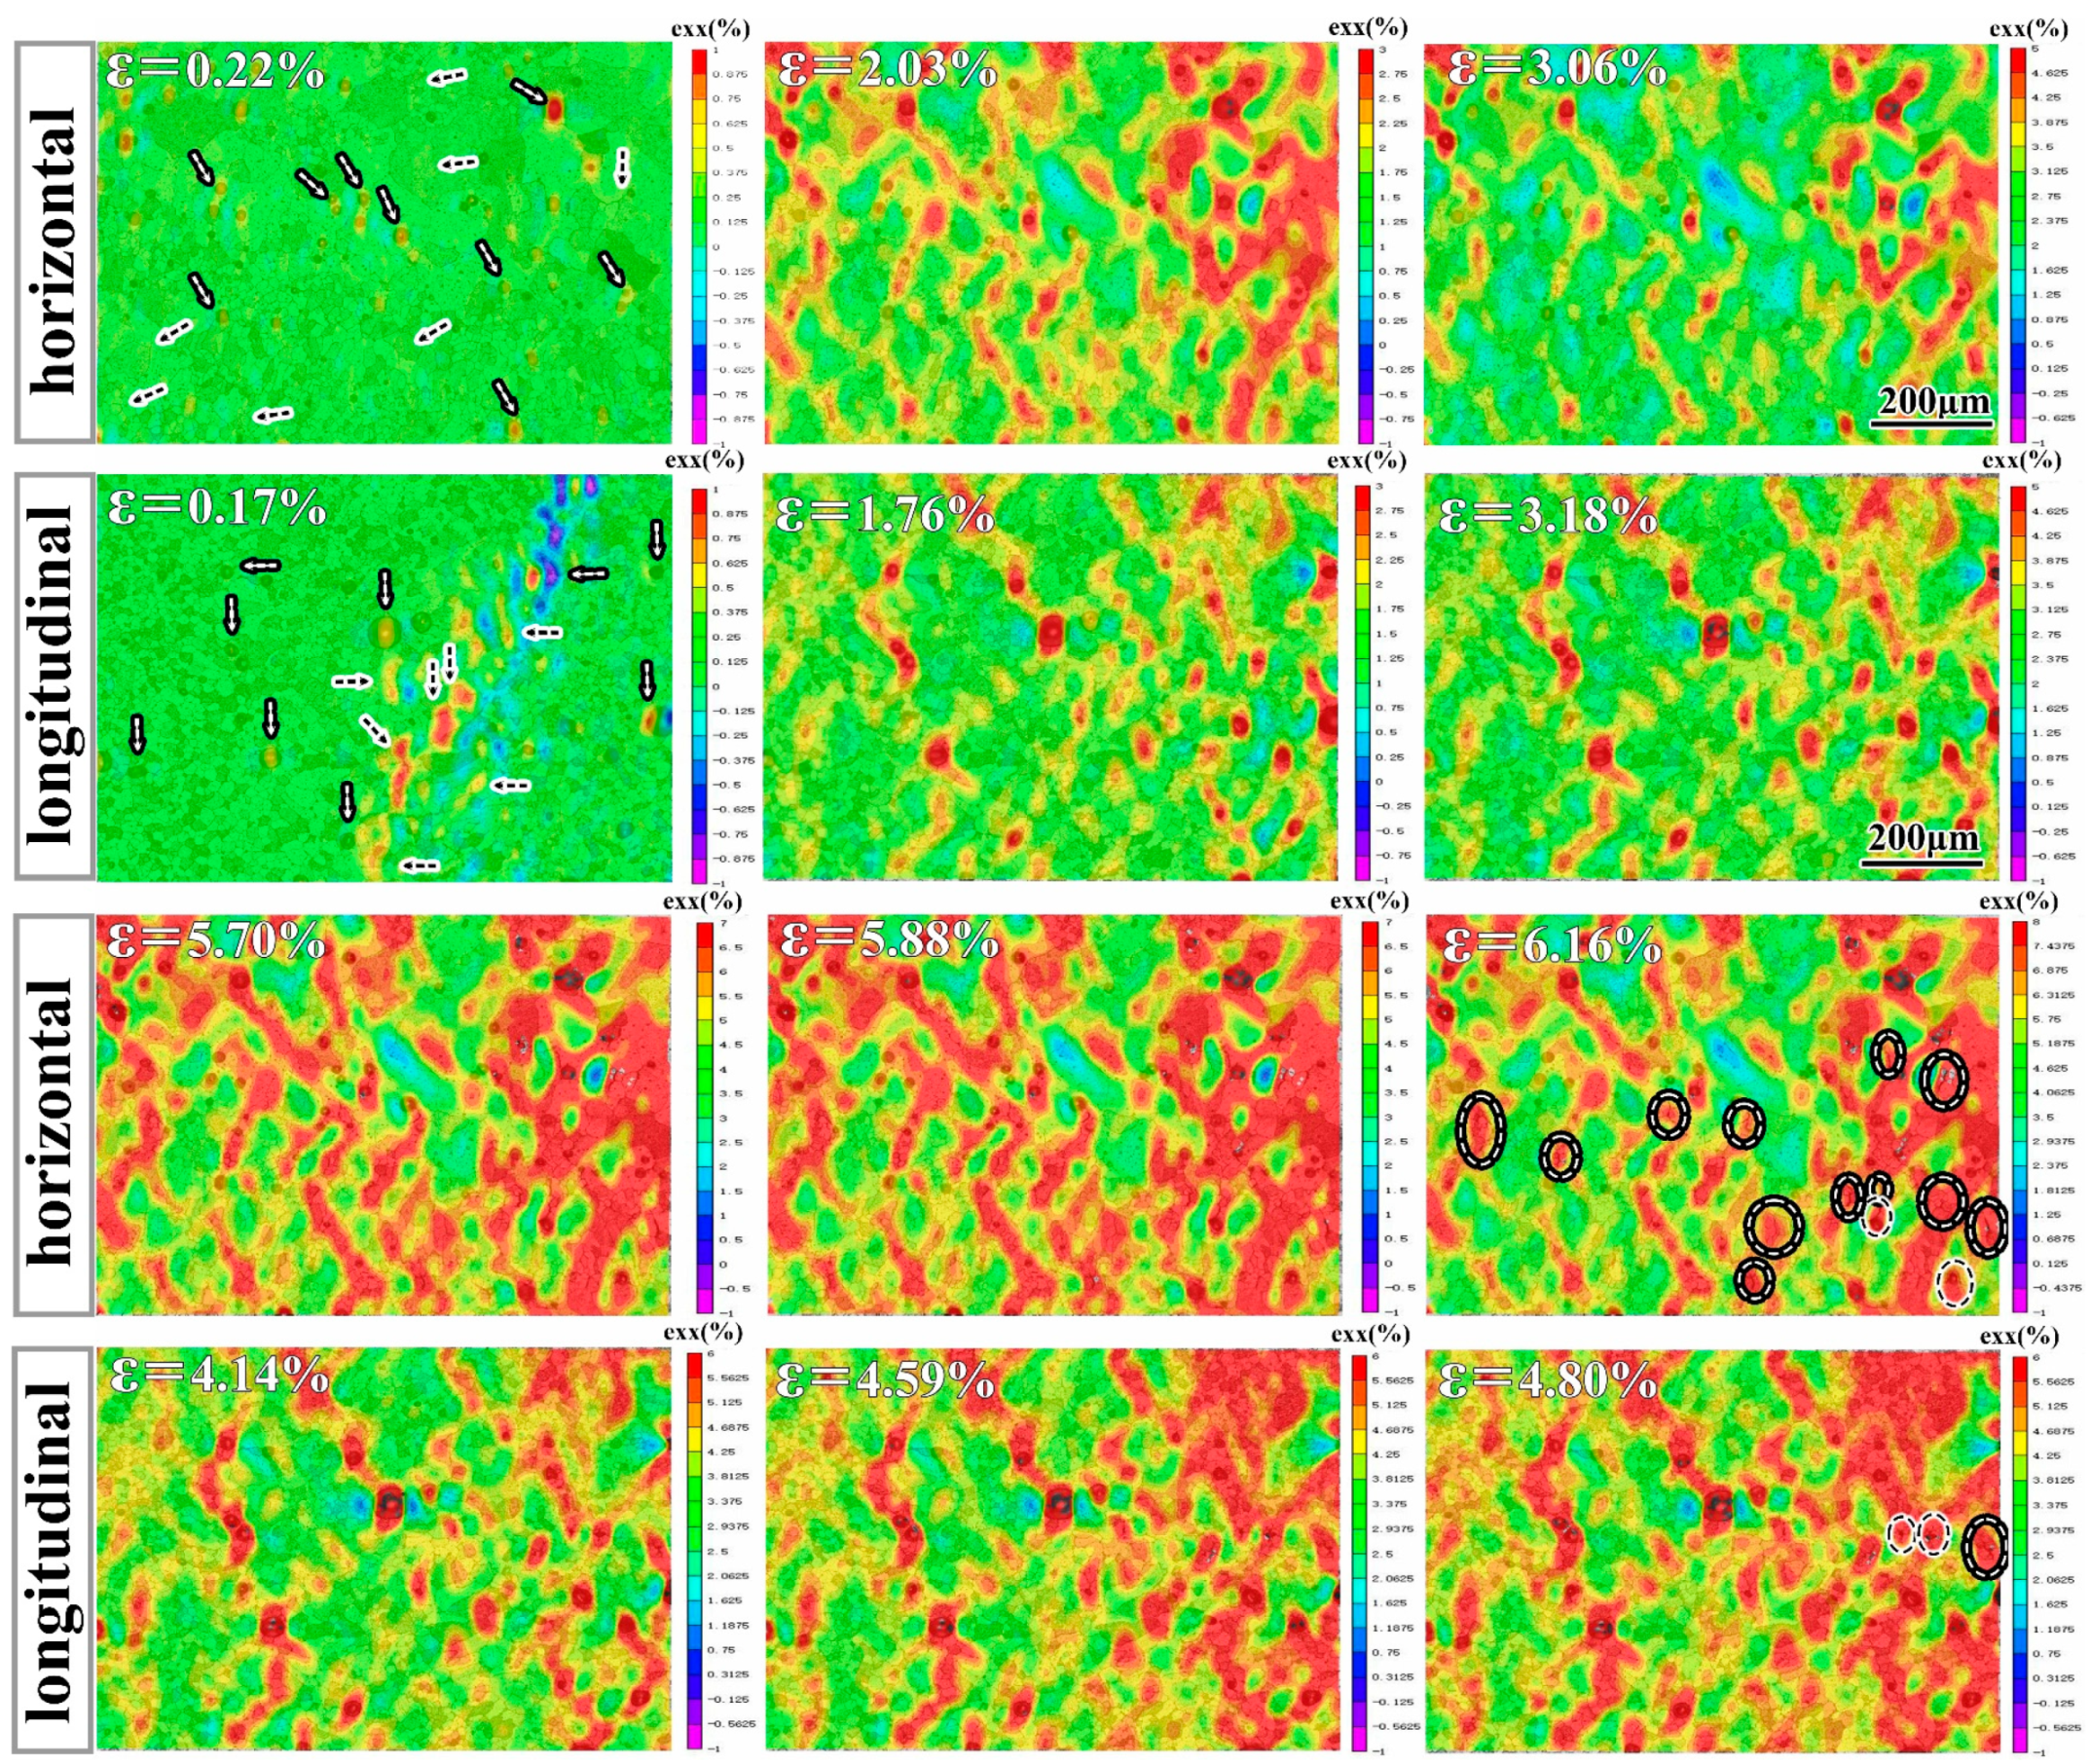
To investigate the relationship between microstructure, porosity, and tensile properties, Digital Image Correlation (DIC) experiments were conducted. The local x-direction strain distribution for horizontally and longitudinally stretched specimens is shown in Figure 8.
The principle of DIC technology is based on images with speckle markers. By tracking the changes of these markers during deformation and combining with the global structure of the sample, the local displacement variation of the specimen is calculated. Figure 8 shows the distribution of local x-direction strain under stress load for horizontally and longitudinally stretched specimens at the middle position in the height direction. The average x-strain value of the stress distribution is displayed in the upper left corner of each image. For the horizontal tensile specimen, when the average x-strain is 0.22%, it can be seen that the strain mainly concentrates at the pores, indicated by white arrows (highlighted with a black outline) and also concentrates at the grain boundaries, indicated by black arrows (highlighted with a white outline). As the load continues to increase and the average strain reaches 2.03%, the strain concentration at the grain boundaries increases significantly. During the subsequent tensile process, cracks primarily initiate along the grain boundaries (for better clarity, readers can refer to the unprocessed metallographic images of the in situ tensile process in the Supplementary Materials). Most of these intergranular cracks are observed at the boundaries of fine equiaxed grains, which are related to the morphology, size, and distribution of the second phase and the distribution of defects, marked by white ellipses (highlighted with black outlines). Additionally, some cracks originate from pores with low circularity, initiating at these pores and propagating along the grain boundaries surrounding them, marked by black ellipses (highlighted with white outlines). This is because the low circularity pores have tips that act as crack sources. The longitudinal tensile specimens exhibit the same pattern and are annotated similarly. Compared to the horizontal specimens, the longitudinal specimens show significant strain concentration at the grain boundaries when the average local strain is 0.17%, and they fail at an average strain of 4.8%, whereas the horizontal specimens fail at 6.16%. This is related to the heterogeneity of the microstructure and defect distribution in the WAAM samples. It can also be observed that the longitudinal specimens have fewer cracks in the DIC observation area than the horizontal specimens due to the different distances from the actual fracture location in the observation area.

3.2.2. Tensile Properties

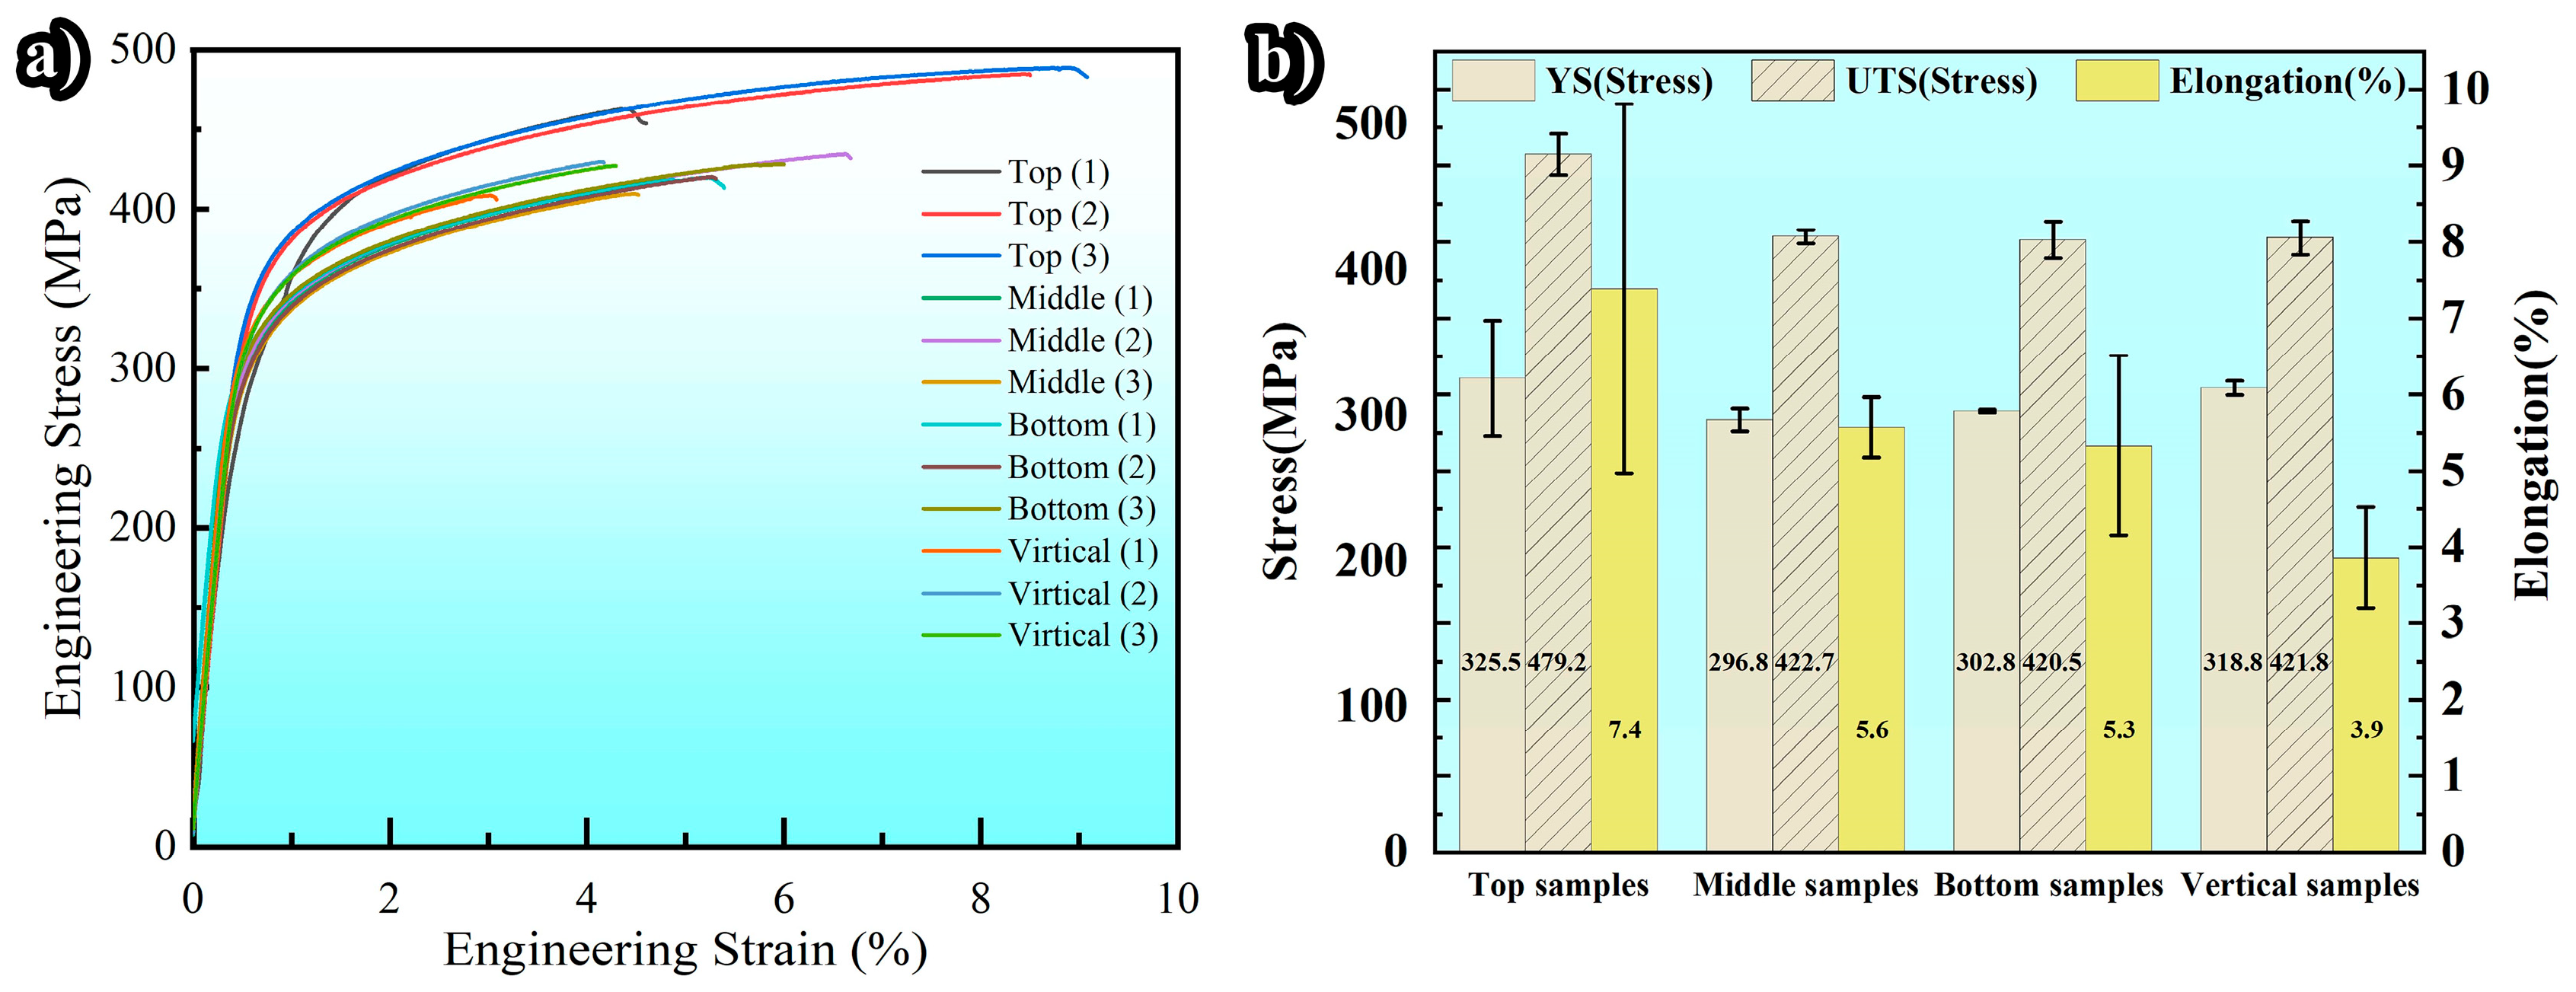
The test results for ultimate tensile strength (UTS), yield strength (YS), and elongation (EL) for 2319 aluminum alloy in horizontal and vertical orientations are shown in Figure 9a,b. Horizontal samples are divided into upper, middle, and lower positions based on their height. The mechanical properties statistics for the top, middle, and bottom horizontal samples, and the vertical samples taken from the middle position, are shown in Table 3. Notably, only the top samples demonstrate significantly better mechanical properties. In terms of tensile strength, there is no significant difference between the middle, bottom, and vertical samples. The vertical samples exhibit superior yield strength compared to the horizontal middle and bottom samples. However, the elongation rate is lower in the vertical samples. Compared to other regions, the number of micropores at the top is the least. This is an important factor leading to the optimal performance of the samples in the top region.
Figure 10 is a comparison chart of the mechanical properties of the 2319 aluminum alloy prepared in this study with those prepared by other methods. Due to the absence of heterogeneous grain bands, the microstructure of traditionally forged 2319 aluminum alloy is often more uniform than that obtained through wire arc additive manufacturing (WAAM). However, both forging and WAAM processes result in anisotropic samples. After solution aging treatment, both are strengthened by the uniform precipitation of fine   A l 2 Cu phases, exhibiting high strength. CMT-WAAM can achieve yield strength and elongation close to that of forged samples after solution aging. The red annotations in Figure 10 indicate the properties of the CMT-WAAM 2319 aluminum alloy after solution aging treatment, which achieved a high strength; the yield strength of the obtained 2319 aluminum alloy (325.5 MPa) is close to that of forged 2319 aluminum alloy (330 MPa, 342 MPa) and also exceeds that achieved by most other additive manufacturing processes. This is typically attributed to the lower heat input of the CMT-WAAM process [31]. WAAM equipment is relatively easy to set up, typically requiring a welding power supply, welding torch, wire feeder, motion control system, and worktable, making it suitable for industrial-scale production [32]. Compared to traditional casting and forging, WAAM offers higher efficiency and shorter production cycles, with the capability to fabricate complex parts that are challenging for conventional methods [33]. This highlights the potential of the CMT low heat input welding source and solution aging treatment in producing high-strength 2319 aluminum alloy. The slightly lower elongation observed in this study may primarily be influenced by porosity. Therefore, the CMT-WAAM technique combined with post-solution aging treatment has a significant advantage in producing high-strength 2319 Al alloy, showing great application potential.
In the WAAM of 2319 aluminum alloy samples, porosity is common. These pores reduce the load-bearing area of the material and facilitate crack propagation during tensile testing, leading to localized brittle fracture and lower elongation. Controlling porosity is one of the main challenges in manufacturing WAAM aluminum alloy components. An oxide film forms at the boundary of the molten pool in contact with air, absorbing hydrogen from the surrounding atmosphere and promoting pore formation. The primary sources of hydrogen pores in 2319 aluminum alloy include the welding wire, base material, and previously solidified layers. The oxide films formed on these surfaces typically contain significant amounts of moisture, which decomposes at high temperatures, providing supersaturated hydrogen molecules that promote pore nucleation. The appearance of secondary micropores due to heat treatment is another reason for the occurrence of micropores in this study. It was found that solution treatment increases the frequency and overall distribution of detectable pores [27,30]. Many scholars have also integrated auxiliary processes into the WAAM process, such as interlayer rolling [43], laser peening [40], and interlayer hammering [19]. These processes can reduce porosity and increase dislocation density and sub-grain boundaries through deformation, thereby enhancing strength. To reduce the formation of pores during the CMT-WAAM process, those auxiliary techniques can be employed.

3.2.3. Hardness Test

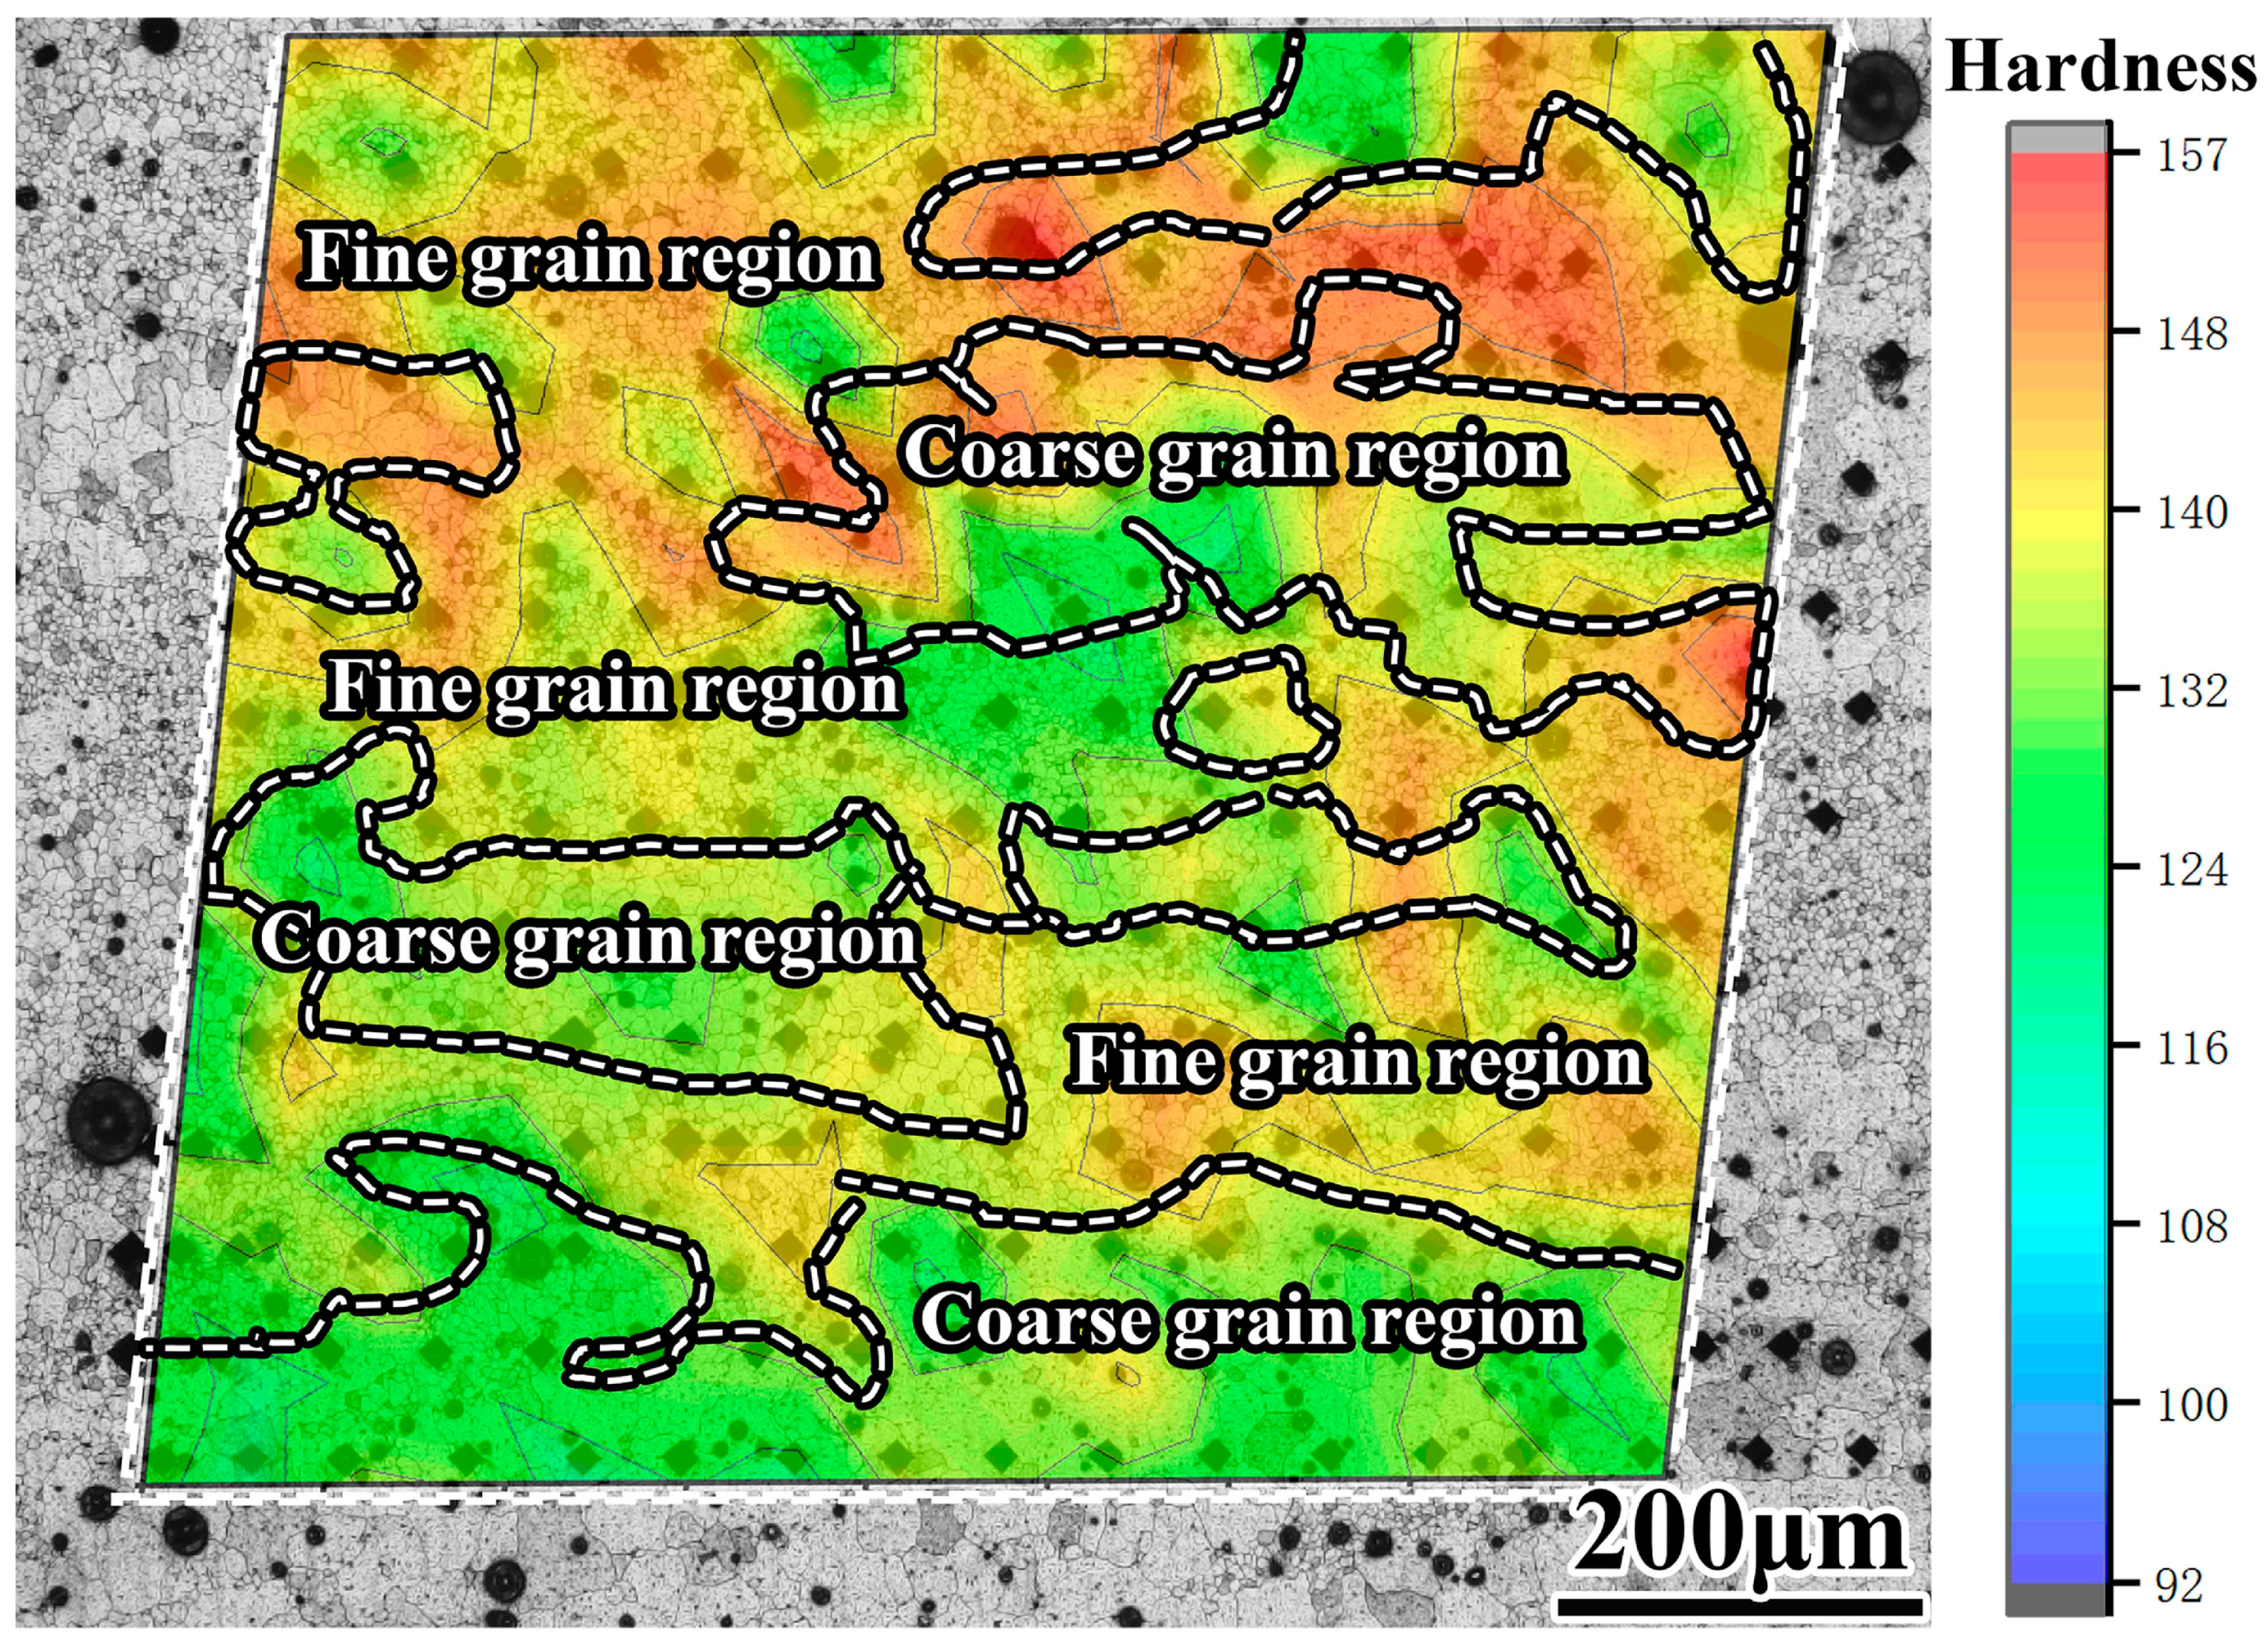
Hardness testing was conducted on the 2319 Al alloy, and the results are shown in Figure 11. It can be observed that grain size has a significant influence on the hardness of the samples. The hardness in the coarse equiaxed grain region is generally lower than that in the fine equiaxed grain region. On the other hand, according to the hardness distribution shown in Figure 11, the heterogenous structure can be divided into softer coarse equiaxed grain regions and harder fine equiaxed grain regions. When this heterogeneous strip-like structure deforms, the softer coarse equiaxed grain regions initially accommodate plastic deformation, while the harder fine equiaxed grain regions rely more on grain boundaries and the pinning effect of second phases at the boundaries to bear more strength during deformation. For horizontal tensile specimens, the structure perpendicular to the tensile load direction consists of heterogeneous coarse and fine equiaxed grains. For longitudinal tensile specimens, the structure perpendicular to the load direction consists of either a layer of coarse equiaxed grains or a layer of fine equiaxed grains. The region where soft coarse equiaxed grains coordinate with hard fine equiaxed grains for deformation possesses better coordination deformation capability compared to regions with solely hard or soft equiaxed grains, enabling good strengthductility synergy [36,38]. Therefore, the horizontal tensile specimens exhibit better strengthductility coordination, manifesting higher elongation at the macroscopic level.

3.2.4. Fracture Analysis

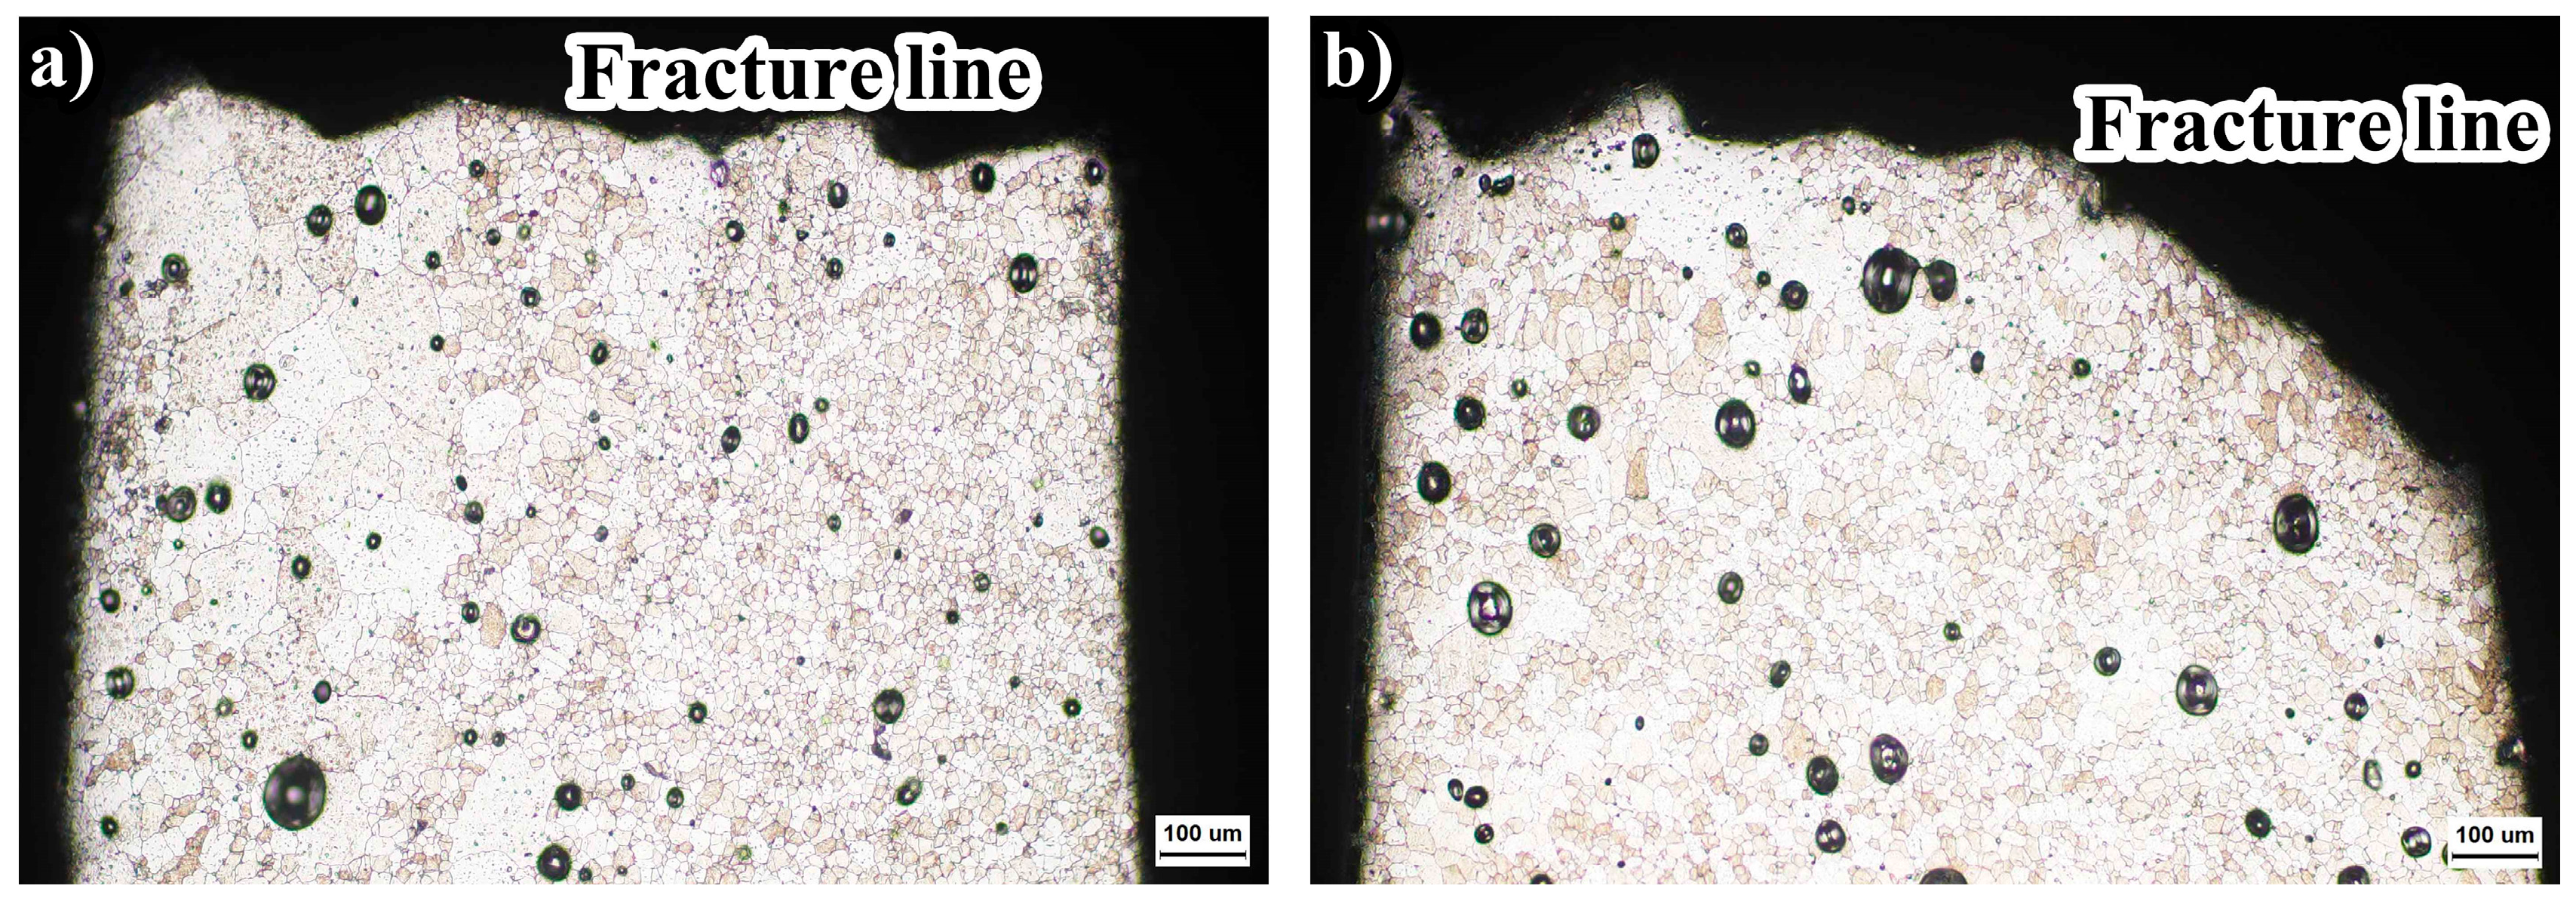
Figure 12 displays the fracture morphology of the specimens in both the horizontal and longitudinal directions. Granular or elongated second-phase particles can be observed at the fracture surfaces of both specimens. The pores on the longitudinal specimen appear smaller and denser, accompanied by more minor cracks. The fracture morphology of the longitudinal specimen exhibits large shallow dimples, while the horizontal specimen displays a mixed fracture pattern due to the presence of cleavage planes and cleavage steps. Smooth pore walls are also observable. For the horizontal specimens, cracks propagate along refined grain boundaries, but for larger grains, cracks penetrate through the grain interiors. Interlayer regions are typically areas of pore concentration, with pores/cracks on the fracture surfaces of horizontal and longitudinal specimens exhibiting linear concentration and uniform distribution, respectively, contrasting between the two. Hence, when subjected to tensile loading in the longitudinal direction, cracks easily propagate along this region due to its smaller stressed area and lower load-bearing capacity. As reflected in the micrograph near the fracture line on the fracture surface (Figure 13), the failure of longitudinal samples mainly occurred in the fine grain region, and the fracture line showed an oblique line. The fracture line of the transverse sample shows a straight line through the fine crystal region and the coarse crystal region. It is evident that the remelted interlayer interface serves as a weak point for arc-additive aluminum alloys, resulting in inferior performance in the longitudinal direction. The uniform distribution of pores and microcracks in the fracture scan confirms the brittle fracture characteristics of the longitudinal specimen’s alloy interlayer boundaries.
It is well known that precipitation hardening is the primary strengthening mechanism for 2319 aluminum alloy [45]. A large number of AlCu second-phase particles dispersed within the grains contribute to strengthening. The size and distribution of the fine A l 2 Cu phase significantly impact the mechanical properties of the material [34,46]. These precipitates act as barriers that hinder dislocation slip within the grains [35,37,47]. In this study, these strengthening phases hinder the movement of dislocations within the grains, leading to dislocation pile-ups at grain boundaries, which is also one of the reasons for crack propagation along the boundaries of fine grains under loading.
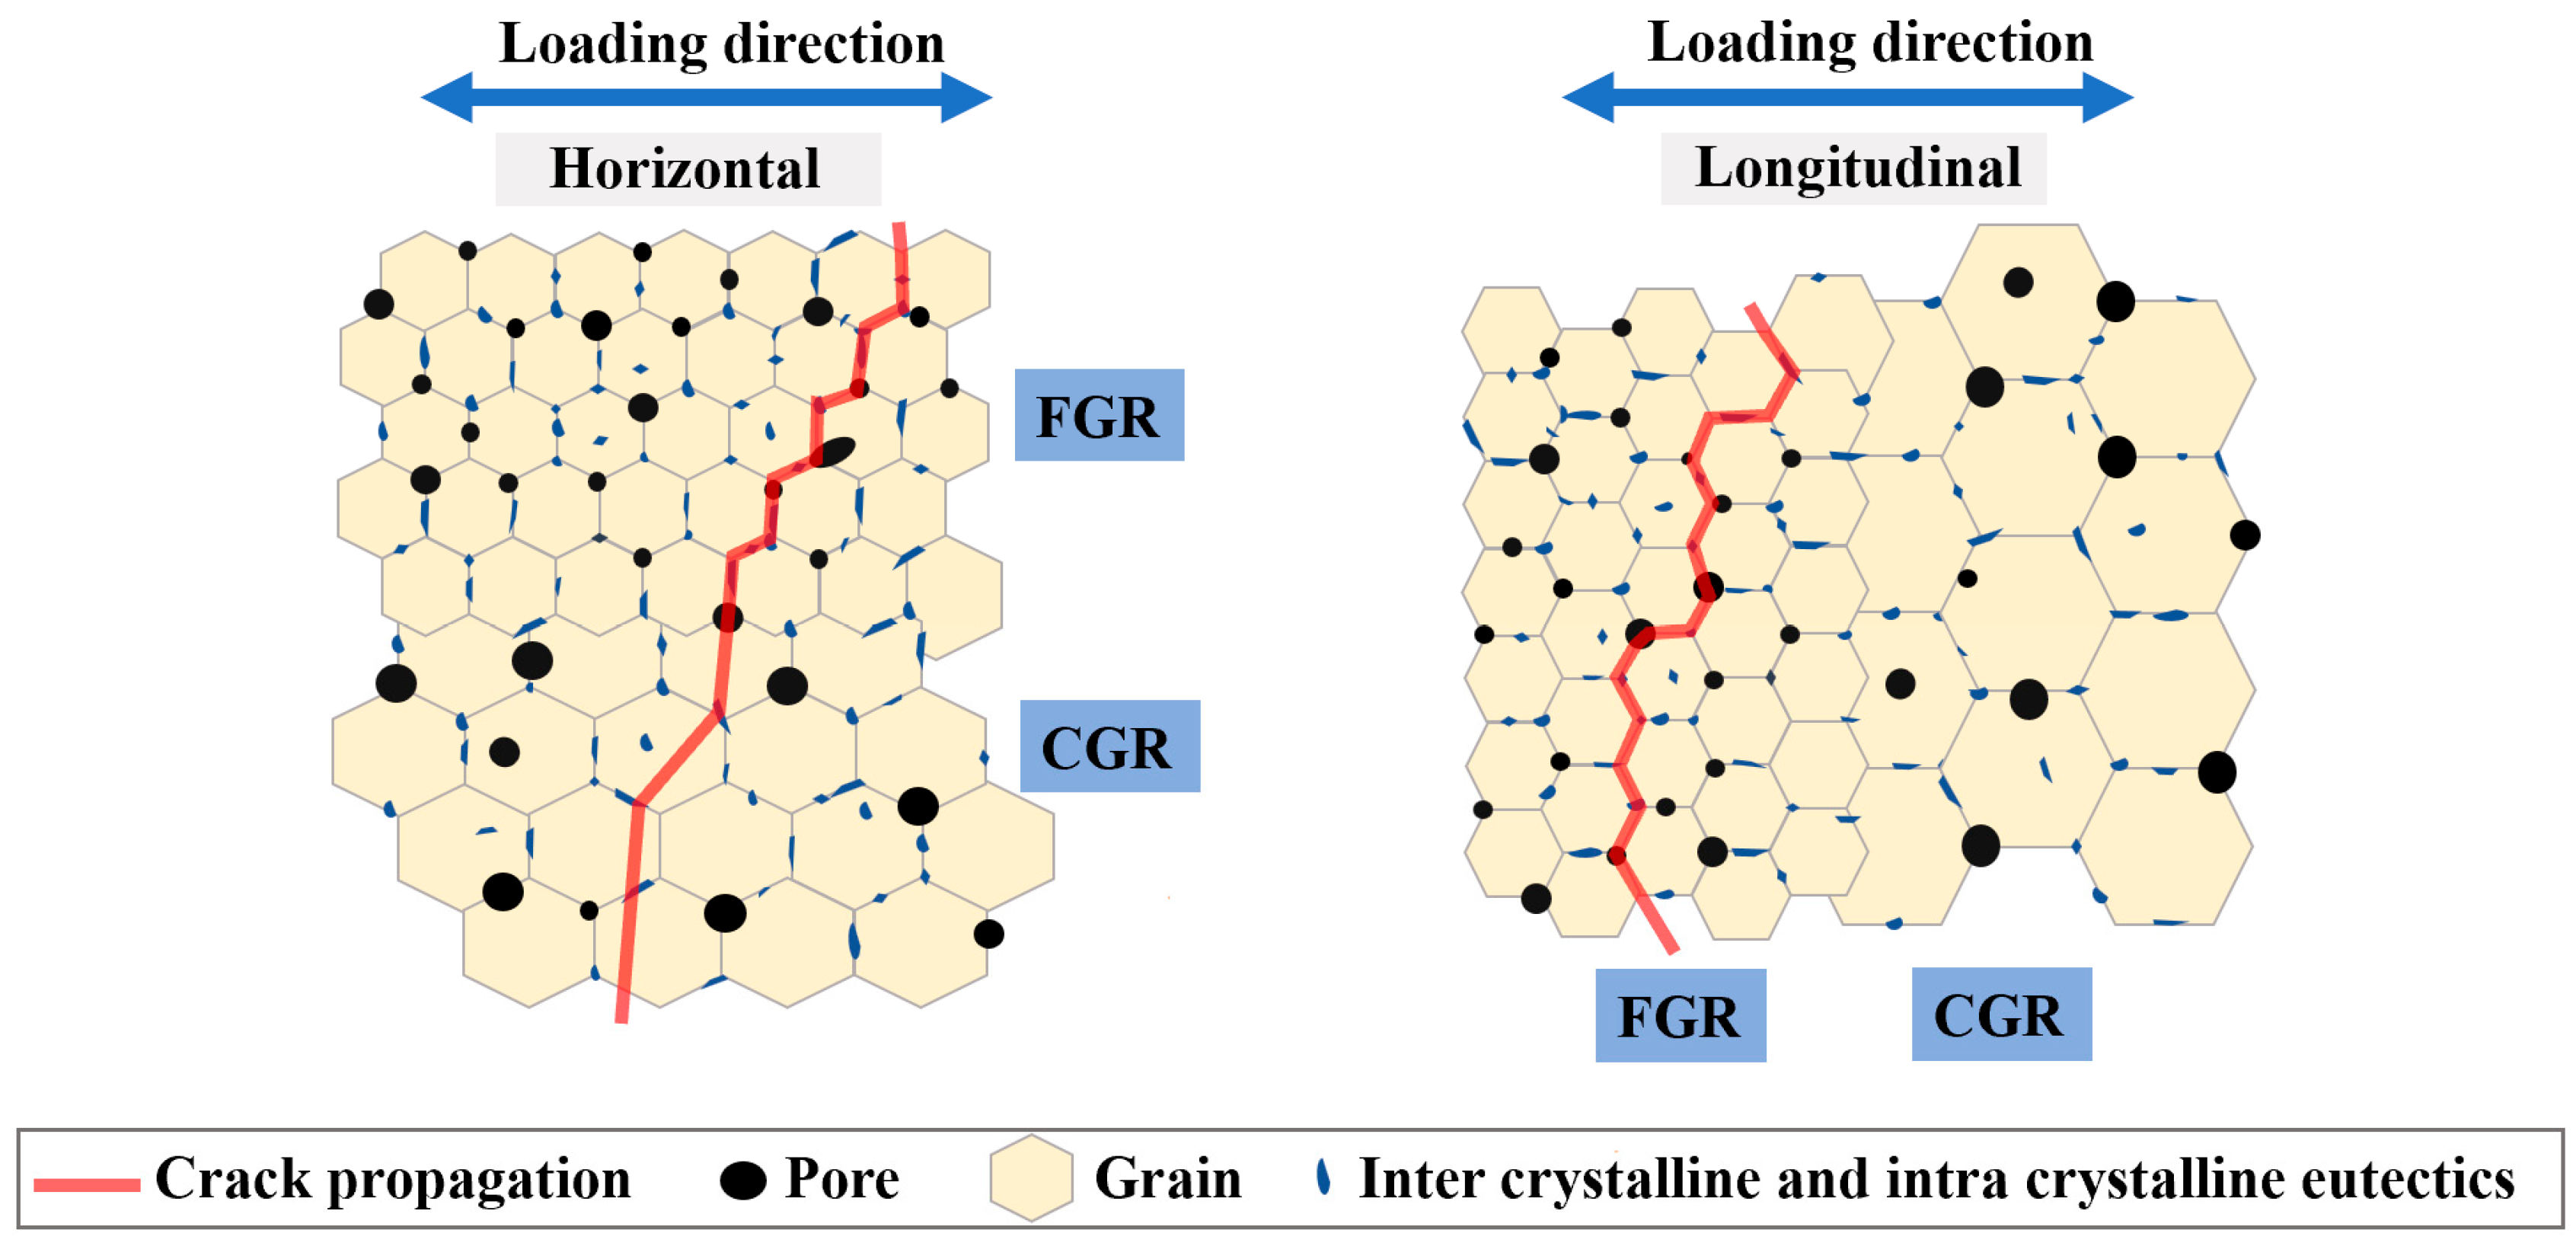
Based on the scanning electron microscope images of the fracture surfaces shown in Figure 14, it is evident that significant cracks occur near the fracture surface, with coarse second-phase particles predominantly appearing at grain boundaries. Combined with DIC testing, it can be observed that during tensile loading, voids and coarse second-phase particles are prone to strain localization. For voids with high circularity, strain localization may not necessarily initiate crack formation. Instead, crack initiation predominantly occurs at grain boundaries with coarse brittle second-phase particles, with only a small portion originating from voids with lower circularity. Although strain localization around voids due to pore formation may initiate cracks around the second-phase particles near the voids, the primary role of voids in the failure process is to promote crack propagation, leading to premature overall fracture failure. For longitudinal tensile specimens, voids are concentrated and distributed perpendicular to the tensile direction. As cracks propagate perpendicular to the loading direction, they are more likely to encounter voids compared to horizontal tensile specimens, resulting in lower elongation. This is also the reason why the elongation of longitudinal specimens is lower while the strength is essentially consistent with horizontal tensile specimens. The crack propagation path is illustrated in Figure 15 (where FGR and CGR stand for fine grain region and coarse grain region, respectively). Cracks initiate in brittle, hard second-phase particles, propagate along the grain boundaries connected to the second phase, accelerate when encountering voids, and directly penetrate through the grains when encountering coarse equiaxed grains.
In summary, the anisotropy of the mechanical properties in both the horizontal and longitudinal directions of WAAM-formed 2319 aluminum alloy is primarily attributed to the formation of bands of coarse and fine equiaxed grains, the dense distribution of micropores and AlCu eutectic phases along the boundaries of fine equiaxed grains (forming weak zones), and the coordinated deformation behavior of coarse and fine grains perpendicular to the loading direction in horizontal specimens.

4. Conclusions

This study achieved high-performance 2319 aluminum alloy under specific conditions. It investigated and compared the microstructure and mechanical properties of specimens with different heights and orientations. From the obtained results, the following conclusions can be drawn.
  • By employing the CMT + PADV mode with a solution treatment of 16 h followed by aging treatment of 18 h, a high-performance 2319 aluminum alloy with a tensile strength of 479.2 MPa, yield strength of 325.5 MPa, and elongation of 7.4% was achieved. These properties are among the highest yield strengths reported in the literature for 2319 aluminum alloy.
  • Pores affect the mechanical properties of the prepared 2319 Al alloy, with fewer pores in the top layer exhibiting the best mechanical performance. Additionally, the accumulation of fine pores in equiaxed grain regions leads to different deformation mechanisms and failure modes in longitudinal and horizontal directions. Further reduction in porosity is advantageous for improving the mechanical properties of longitudinal specimens.
  • In fine grain layers, cracks initiate at brittle second-phase particles and propagate along the grain boundaries intersecting with the second phase. Encounters with pores along the grain boundaries accelerate the overall failure of the material. In coarse grain layers, cracks directly penetrate through the grains.

Supplementary Materials

The following supporting information can be downloaded at: https://www.mdpi.com/article/10.3390/met14070797/s1. Figure S1. Horizontal DIC metallographic image (The average local strain value in the X direction is 6.16%). Figure S2. Longitudinal DIC metallographic image (The average local strain value in the X direction is 4.80%).

Author Contributions

Conceptualization, C.X. and Y.P.; methodology, C.X., Y.P. and M.Y.; software, J.Z. and M.Y.; validation, L.G, M.Y. and Y.P.; formal analysis, M.Y.; investigation, J.Z.; resources, C.X.; data curation, Y.P.; writing—original draft preparation, M.Y.; writing—review and editing, C.X.; visualization, Y.P.; supervision, L.G.; project administration, Y.P. and J.Z.; funding acquisition, C.X. All authors have read and agreed to the published version of the manuscript.

Funding

This work was financially supported by the National Key Research & Development Program of China (Grant Nos. 2021YFE010016 and 2021YFB3703300), the National Natural Science Foundation (Grant Nos. 52220105003 and 51971075), the Fundamental Research Funds for the Central Universities (Grant No. FRFCU5710000918), the Natural Science Foundation of Heilongjiang Province—Outstanding Youth Fund (Grant No. YQ2020E006), and JSPS KAKENHI (Grant No. JP21H01669).

Data Availability Statement

The original contributions presented in the study are included in the article/Supplementary Material, further inquiries can be directed to the corresponding author.

Acknowledgments

We acknowledge Xiaoqiang Li from Beihang University’s School of Mechanical Engineering and Automation for his assistance.

Conflicts of Interest

The authors declare no conflicts of interest.

References

  1. Fan, H.; Hu, J.; Wang, Y. A review of laser additive manufacturing (LAM) aluminum alloys: Methods, microstructures and mechanical properties. Opt. Laser Technol. 2024, 175, 110722. [Google Scholar] [CrossRef]
  2. Dixit, S.; Liu, S. Laser Additive Manufacturing of High Strength Aluminum Alloys Challenges and Strategies. J. Manuf. Mater. Process. 2022, 6, 156. [Google Scholar] [CrossRef]
  3. Montanari, R.; Palombi, A.; Richetta, M. Additive Manufacturing of Aluminum Alloys for Aeronautic Applications: Advantages and Problems. Metals 2023, 13, 716. [Google Scholar] [CrossRef]
  4. Blakey-Milner, B.; Gradl, P.; Snedden, G. Metal additive manufacturing in aerospace: A review. Mater. Des. 2021, 209, 110008. [Google Scholar] [CrossRef]
  5. Harshita, P.; Anisha, A.; Sutha, G.G. Applications of wire arc additive manufacturing (WAAM) for aerospace component manufacturing. Int. J. Adv. Manuf. Technol. 2023, 127, 4995–5011. [Google Scholar]
  6. Debroy, T.; Wei, H.L.; Zuback, J.S. Additive manufacturing of metallic components—Process, structure and properties. Prog. Mater. Sci. 2018, 92, 112–224. [Google Scholar] [CrossRef]
  7. Svetlizky, D.; Das, M.; Zheng, B. Directed energy deposition (DED) additive manufacturing: Physical characteristics, defects, challenges and applications. Mater. Today 2021, 49, 271–295. [Google Scholar] [CrossRef]
  8. Svetlizky, D.; Zheng, B.; Vyatskikh, A. Laser-based directed energy deposition (DED-LB) of advanced materials. Mater. Sci. Eng. A 2022, 840, 142967. [Google Scholar] [CrossRef]
  9. Martina, F.; Williams, S.W. Wire+arc additive manufacturing vs. traditional machining from solid: A cost comparison. Mater. Sci. Technol. 2015, 32, 27. [Google Scholar]
  10. Köhler, M.; Fiebig, S.; Hensel, J. Wire and Arc Additive Manufacturing of Aluminum Components. Metals 2019, 9, 608. [Google Scholar] [CrossRef]
  11. Tabernero, I.; Paskual, A.; Álvarez, P. Ivántabernero; Paskual, A.; Álvarez, P. Study on Arc Welding Processes for High Deposition Rate Additive Manufacturing. Procedia CIRP 2018, 68, 358–362. [Google Scholar]
  12. Liu, D.; Wu, D.; Wang, R. Formation mechanism of Al-Zn-Mg-Cu alloy fabricated by laser-arc hybrid additive manufacturing: Microstructure evaluation and mechanical properties. Addit. Manuf. 2022, 50, 102554. [Google Scholar] [CrossRef]
  13. Zhang, L.; Wang, S.; Wang, H. Mechanical properties and microstructure revolution of vibration assisted wire arc additive manufacturing 2319 aluminum alloy. Mater. Sci. Eng. A 2023, 885, 145634. [Google Scholar] [CrossRef]
  14. Wang, Z.; Lin, X.; Wang, L. Microstructure evolution and mechanical properties of the wire + arc additive manufacturing Al-Cu alloy. Addit. Manuf. 2021, 47, 102298. [Google Scholar] [CrossRef]
  15. Lopez, M.A.; Ukar, E.; Rodriguez, I. Influence of Deposition Strategy and Heat Treatment on Mechanical Properties and Microstructure of 2319 Aluminium Waam Components. Mater. Des. 2022, 221, 110974. [Google Scholar]
  16. Guo, Y.; Han, Q.; Hu, J. Comparative Study on Wire-Arc Additive Manufacturing and Conventional Casting of Al–Si Alloys: Porosity, Microstructure and Mechanical Property. Acta Metall. Sin. (Engl. Lett.) 2022, 35, 475–485. [Google Scholar] [CrossRef]
  17. Cong, B.; Ding, J.; Williams, S. Effect of arc mode in cold metal transfer process on porosity of additively manufactured Al-6.3%Cu alloy. Int. J. Adv. Manuf. Technol. 2015, 76, 1593–1606. [Google Scholar] [CrossRef]
  18. Cui, J.; Commins, P.; He, F. WAAM process for metal block structure parts based on Mixed Heat Input. Int. J. Adv. Manuf. Technol. 2021, 113, 503–521. [Google Scholar] [CrossRef]
  19. Fang, X.; Zhang, L.; Chen, G. Microstructure evolution of wire-arc additively manufactured 2319 aluminum alloy with interlayer hammering. Mater. Sci. Eng. A 2021, 800, 140168. [Google Scholar] [CrossRef]
  20. Gu, J.; Ding, J.; Williams, S.W. The effect of inter-layer cold working and post-deposition heat treatment on porosity in additively manufactured aluminum alloys. J. Mater. Process. Technol. 2016, 230, 26–34. [Google Scholar] [CrossRef]
  21. Li, R.; Wang, R.; Zhou, X. Microstructure and mechanical properties of 2319 aluminum alloy deposited by laser and cold metal transfer hybrid additive manufacturing. J. Mater. Res. Technol. 2023, 26, 6342–6355. [Google Scholar] [CrossRef]
  22. Wu, D.; Liu, D.; Niu, F.; Miao, Q.; Zhao, K.; Tang, B.; Bi, G.; Ma, G. Al–Cu alloy fabricated by novel laser-tungsten inert gas hybrid additive manufacturing. Addit. Manuf. 2020, 32, 100954. [Google Scholar] [CrossRef]
  23. He, H.; Yi, Y.; Huang, S. Effects of thermomechanical treatment on grain refinement, second-phase particle dissolution, and mechanical properties of 2219 Al alloy. J. Mater. Process. Technol. 2020, 278, 116506. [Google Scholar] [CrossRef]
  24. Derekar, K.S. A review of wire arc additive manufacturing and advances in wire arc additive manufacturing of aluminium. Mater. Sci. Technol. 2018, 34, 895–916. [Google Scholar] [CrossRef]
  25. Gu, J.; Ding, J.; Williams, S.W. The strengthening effect of inter-layer cold working and post-deposition heat treatment on the additively manufactured Al–6.3Cu alloy. Mater. Sci. Eng. A 2016, 651, 18–26. [Google Scholar] [CrossRef]
  26. Gu, J.; Gao, M.; Yang, S. Microstructure, defects, and mechanical properties of wire + arc additively manufactured Al Cu4.3-Mg1.5 alloy. Mater. Des. 2019, 186, 108357. [Google Scholar] [CrossRef]
  27. Mclean, N.; Bermingham, M.J.; Colegrove, P. Effect of Hot Isostatic Pressing and heat treatments on porosity of Wire Arc Additive Manufactured Al 2319. J. Mater. Process. Technol. 2022, 310, 117769. [Google Scholar] [CrossRef]
  28. GB/T 10858-2023; Wire Electrodes, Wires and Rods for Welding of Aluminium and Aluminium Alloys. China Quality Inspection Press: Beijing, China, 2023.
  29. ISO 6892-1:2009; Metallic Materials—Tensile testing—Part 1: Method of Test at Room Temperature. International Organization for Standardization (ISO): Geneva, Switzerland, 2009.
  30. Gu, J.; Gao, M.; Yang, S. Pore formation and evolution in wire + arc additively manufactured 2319 Al alloy. Addit. Manuf. 2019, 30, 100900. [Google Scholar] [CrossRef]
  31. Hu, S.; Zhang, H.; Wang, Z. The arc characteristics of cold metal transfer welding with AZ31 magnesium alloy wire. J. Manuf. Process. 2016, 24, 298–306. [Google Scholar] [CrossRef]
  32. Evans, S.I.; Wang, J.; Qin, J. A review of WAAM for steel construction—Manufacturing, material and geometric properties, design, and future directions. Structures 2022, 44, 1506–1522. [Google Scholar] [CrossRef]
  33. Tian, Y.; Shen, J.; Hu, S. Microstructure and mechanical properties of wire and arc additive manufactured Ti-6Al-4V and AlSi5 dissimilar alloys using cold metal transfer welding. J. Manuf. Process. 2019, 46, 337–344. [Google Scholar] [CrossRef]
  34. Zhou, Y.; Lin, X.; Kang, N.; Huang, W.; Wang, J.; Wang, Z. Influence of travel speed on microstructure and mechanical properties of wire + arc additively manufactured 2219 aluminum alloy. J. Mater. Sci. Technol. 2020, 37, 143–153. [Google Scholar] [CrossRef]
  35. Zhou, Y.; Lin, X.; Kang, N. Mechanical properties and precipitation behavior of the heat-treated wire + arc additively manufactured 2219 aluminum alloy. Mater. Charact. 2021, 171, 110735. [Google Scholar] [CrossRef]
  36. Zhou, Y.; Lin, X.; Kang, N. The heterogeneous band microstructure and mechanical performance in a wire + arc additively manufactured 2219 Al alloy. Addit. Manuf. 2022, 49, 102486. [Google Scholar] [CrossRef]
  37. Zhou, Y.; Lin, X.; Kang, N. Hot deformation induced microstructural evolution in local-heterogeneous wire + arc additive manufactured 2219 Al alloy. J. Alloys Compd. 2021, 865, 158949. [Google Scholar] [CrossRef]
  38. Dai, G.; Xue, M.; Guo, Y. Gradient microstructure and strength-ductility synergy improvement of 2319 aluminum alloys by hybrid additive manufacturing. J. Alloys Compd. 2023, 968, 171781. [Google Scholar] [CrossRef]
  39. Chang, T.; Fang, X.; Liu, G. Wire and arc additive manufacturing of dissimilar 2319 and 5B06 aluminum alloys. J. Mater. Sci. Technol. 2022, 124, 65–75. [Google Scholar] [CrossRef]
  40. Sun, R.; Li, L.; Zhu, Y. Microstructure, residual stress and tensile properties control of wire-arc additive manufactured 2319 aluminum alloy with laser shock peening. J. Alloys 2018, 747, 255–265. [Google Scholar] [CrossRef]
  41. Eimer, E.; Williams, S.; Ding, J. Mechanical performances of the interface between the substrate and deposited material in aluminium wire Direct Energy Deposition. Mater. Des. 2023, 225, 111594. [Google Scholar] [CrossRef]
  42. Anderson-Wedge, K.; Avery, D.Z.; Daniewicz, S.R. Characterization of the fatigue behavior of additive friction stir-deposition AA2219. Int. J. Fatigue 2021, 142, 105951. [Google Scholar] [CrossRef]
  43. Gu, J.; Wang, X.; Bai, J. Deformation microstructures and strengthening mechanisms for the wire+arc additively manufactured Al-Mg4.5Mn alloy with inter-layer rolling. Mater. Sci. Eng. A 2018, 712, 292–301. [Google Scholar]
  44. Guo, W.; Yi, Y.; Huang, S. Effect of warm-rolling temperature on the microstructural evolution and mechanical properties of large 2219 Al-Cu alloy rings. Mater. Today Commun. 2023, 36, 106702. [Google Scholar] [CrossRef]
  45. Xiao, H.; Zhang, C.; Zhu, H. Effect of direct aging and annealing on the microstructure and mechanical properties of AlSi10Mg fabricated by selective laser melting. Rapid Prototyp. J. 2023, 29, 118–127. [Google Scholar] [CrossRef]
  46. Huang, C.; Kou, S. Partially melted zone in aluminum welds: Solute segregation and mechanical behavior. Weld. J. 2001, 80, 9–17. [Google Scholar]
  47. Yang, J.; Ni, Y.; Li, H. Heat Treatment Optimization of 2219 Aluminum Alloy Fabricated by Wire-Arc Additive Manufacturing. Coatings 2023, 13, 610. [Google Scholar] [CrossRef]
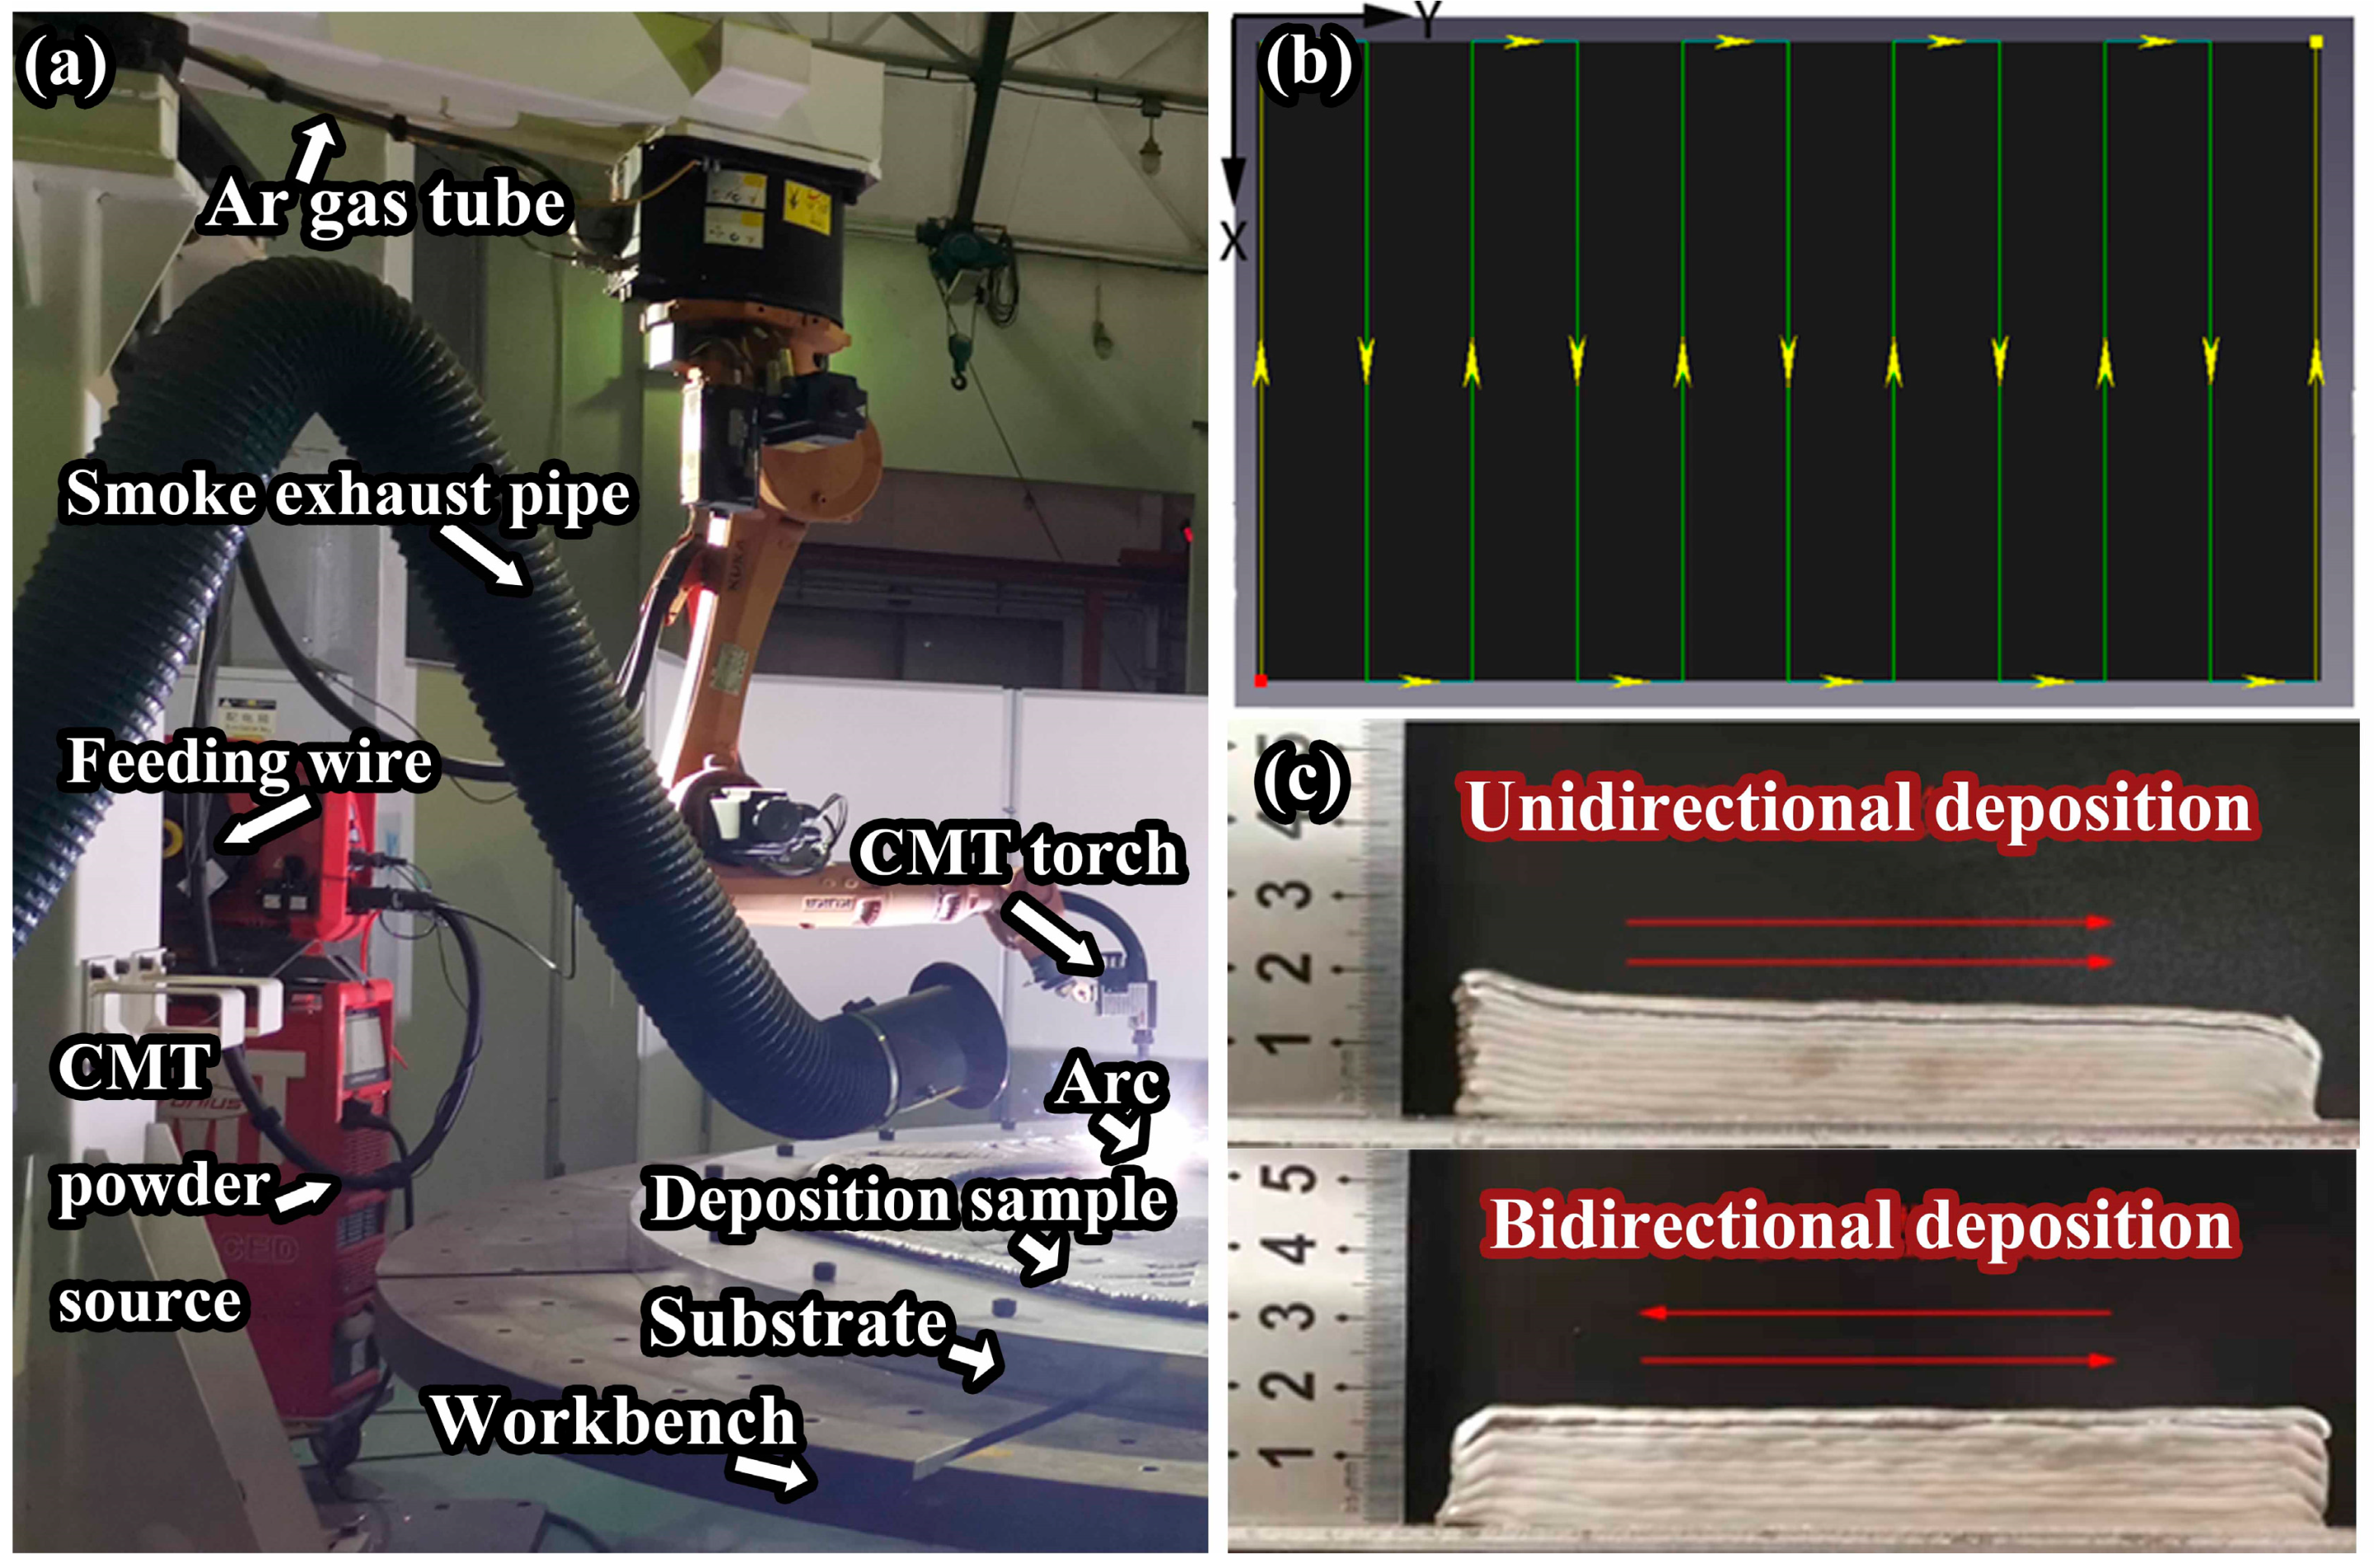
Figure 1. CMT-WAAM equipment and strategies: (a) CMT-WAAM experimental equipment; (b) deposition path planning for each layer; (c) weld bead formation under different interlayer deposition strategies.
Metals 14 00797 g001
Figure 2. (a) Heat treatment process diagram for 2319 aluminum alloy samples; (b) sampling location; (c) room temperature tensile sample dimensions; (d) DIC sample dimensions (unit: mm).
Metals 14 00797 g002
Figure 3. (a) The macroscopic image of the 2319 aluminum alloy sample and the sampling positions (samples A1 to A6 taken from top to bottom at six different heights). (b) XRD analysis of 2319 samples from A1 to A6.
Metals 14 00797 g003
Figure 4. Metallographic images of the front of 2319 aluminum alloy samples (samples A1A6 taken from top to bottom at six different heights).
Metals 14 00797 g004
Figure 5. Schematic diagram of grain morphology evolution during CMT-WAAM deposition.
Metals 14 00797 g005
Figure 6. Porosity statistics of samples at different heights (samples A1A5 taken from top to bottom at five different heights).
Metals 14 00797 g006
Figure 7. Local tissue sample scanning image (the secondary phase indicated by the arrow).
Metals 14 00797 g007
Figure 8. Strain distribution in the local x—direction of horizontal and vertical tensile samples. (The arrow indicates the region of strain concentration).
Metals 14 00797 g008
Figure 9. Mechanical property diagram for top, middle, and bottom horizontal samples and vertical samples: (a) tensile performance curve chart; (b) tensile performance bar chart.
Metals 14 00797 g009
Figure 10. Comparison chart of 2319Al alloy properties obtained in this work with those obtained by other fabrication and heat treatment methods (data from refs [15,19,21,34,35,36,37,38,39,40,41,42,43,44]).
Metals 14 00797 g010
Figure 11. Two-dimensional distribution map of local microhardness testing.
Metals 14 00797 g011
Figure 12. Tensile fracture morphology of 2319 samples with horizontal and longitudinal loading directions.
Metals 14 00797 g012
Figure 13. Metallographic photos of the fracture surface side for horizontal (a) and longitudinal (b) tensile samples, respectively.
Metals 14 00797 g013
Figure 14. Scanning image and elemental distribution map of the side of the tensile fracture. (The arrows indicate the location of the crack).
Metals 14 00797 g014
Figure 15. Schematic diagram of the fracture path during the tensile process of horizontal and longitudinal samples.
Metals 14 00797 g015
Table 1. Chemical compositions of 2319 wire (wt.%).
CuMnZrTiFeZnSiVAl
6.540.310.160.140.090.070.040.03Bal.
Table 2. Process parameters of CMT-WAAM.
Process ParametersValue
TypeCMT-PADV
Wire feeding speed6.5 m/min
Travel speed9 mm/s
EP/EN balance3.0
Argon99.99% purity
Protective gas flow25 L/min
Arc length correction3%
Wire extension15 mm
Table 3. Mechanical properties of samples from different positions and orientations.
Sample
Position
YS (MPa)UTS (MPa)EL (%)
Top325.5 ± 39.5479.2 ± 14.27.4 ± 2.4
Middle296.8 ± 7.8422.7 ± 4.75.6 ± 0.4
Bottom302.8 ± 1.0420.5 ± 12.75.3 ± 1.2
Vertical318.8 ± 4.8421.8 ± 11.53.9 ± 0.7
Disclaimer/Publisher’s Note: The statements, opinions and data contained in all publications are solely those of the individual author(s) and contributor(s) and not of MDPI and/or the editor(s). MDPI and/or the editor(s) disclaim responsibility for any injury to people or property resulting from any ideas, methods, instructions or products referred to in the content.