Article

Establishment of Heat Treatment Process for Modified 440A Martensitic Stainless Steel Using Differential Scanning Calorimetry and Thermo-Calc Calculation

Deptartment of Materials Science and Engineering, I-Shou University, Kaohsiung 84001, Taiwan
*
Author to whom correspondence should be addressed.
Metals 2016, 6(1), 4; https://doi.org/10.3390/met6010004
Submission received: 28 October 2015 / Accepted: 18 December 2015 / Published: 23 December 2015

Abstract

:
To provide a suitable microstructure and mechanical properties for modified Grade 440A martensitic stainless steel (MSS), which could facilitate the further cold deformation process (e.g., cold rolling), this work used differential scanning calorimetry (DSC) and Thermo-Calc software to determine three soaking temperatures for annealing heat treatment processes (HT1, HT2 and HT3). To verify the feasibility of the proposed annealing heat treatment processes, the as-received samples were initially heated to 1050 °C (similar to the on-line working temperature) for 30 min and air quenched to form a martensitic structure. The air-quenched samples were then subjected to three developed annealing heat treatment conditions. The microstructure and mechanical properties of the heat-treated samples were then investigated. Test results showed that considering the effects of the microstructure and the hardness, the HT1, the HT2 or the soaking temperatures between the HT1 and HT2 were the most recommended processes to modified Grade 440A MSS. When using the recommended processes, their carbides were fine and more evenly distributed, and the microhardness was as low as 210 Hv, which can be applied to the actual production process.

Graphical Abstract

1. Introduction

Grade 440A martensitic stainless steel (MSS) [1,2,3] is a high carbon (around 0.6 wt. %) and high chromium (around 16–18 wt. %) MSS. Given the advantages of high strength, moderate corrosion resistance, and good hardness and wear resistance, it is designed to be used for wear components, such as stainless steel knives, bearings, valves, nozzles, precision slides, etc. With a high content of C and Cr, a large sized carbide particle may precipitate during cooling due to solidification or high temperature operation. Large sized carbide particles not only can induce stress concentration when this material is utilized but also have a negative impact on the surface roughness of the material [4]. To eliminate the above problem by reducing the content of Cr, recently, a modified Grade 440A MSS (containing 0.6 wt. % of C and 12.7 wt. % of Cr) was developed. The amount and type of carbide particles in the new type of Grade 440A MSS have important effects on hardness, resistance to corrosion, wear, deformation process (e.g., rolling), etc., and are significantly influenced by associated heat treatments. Although the heat treatment process for the new type of MSS could be conducted by using the empirical approach or referred to the typical Grade 440A heat treatment process, optimal properties of the new type of MSS may not be obtained. Many recent studies [5,6,7] used the combination of differential scanning calorimetry (DSC) and Thermo-Calc calculation to obtain the phase transformation temperatures of materials, which were used to design suitable parameters for heat treatment in the deformation process of materials.
In this study, the combination of DSC and Thermo-Calc calculation was used to determine various annealing heat treatment parameters for air-cooled samples. After heat treatment, the microstructure and mechanical properties of the heat-treated samples were investigated to develop the most suitable fully annealing heat treatment conditions for modified Grade 440A MSS.

2. Materials and Experimental Procedure

The chemical composition of the modified Grade 440A MSS (Yieh Haing Enterprise Co., LTD, Kaohsiun, Taiwan) samples identified by inductively coupled plasma optical emission spectrometry (ICP-OES) used in this study is shown in Table 1. For comparison purposes, the chemical composition of a typical Grade 440A MSS is also shown in this table. The alloy was cast, hot rolled and cut in the form of 30 mm diameter by 40 mm length bars. To simulate the on-line process, the test was performed at a heating temperature of 1050 °C (a heating rate of 5 °C/min) for 30 min, which is similar to the on-line working temperature. Then, the alloy was air quenched, and the working temperatures for annealing were characterized using differential scanning calorimetry (DSC) and Thermo-Calc to determine the first temperature interval where the α phase transfers to the γ phase. For DCS analysis, 100 mg samples were placed in a NETZSCH 404C simultaneous thermal analyzer (NETZSCH Gerätebau GmbH, Selb, Germany) which was heated to 1500 °C at a heating rate of 5 °C/min. During the tests, all of the samples were conducted in a purged high-purity argon atmosphere using high-purity alumina crucibles. Simulations were made using Thermo-Calc software (Thermo-Calc software, Stockholm, Sweden), excluding inclusions or residual elements. The same compositions of the modified Grad 440A MMS were used, and an equilibrium phase diagram was plotted. Based on the results of the DSC tests and Thermo-Calc calculations, various working temperatures of annealing heat treatment conditions were determined. Annealing heat treatment processes were then carried out on the air-quenched samples. After the heat treatments, the samples were sectioned longitudinally, etched (HNO3 1 mL + HCL 10 mL + H2O 10 mL) and prepared for inspection. The microstructures of the samples were characterized using an optical microscope (OM, Olympus BX51M, Olympus, Tokyo, Japan.) and a scanning electron microscope (SEM; Hitachi S-4700, Hitachi High-Technologies Corporation, Tokyo, Japan) equipped with an energy dispersive spectrometer (EDS; HORIBA 7200-H, HORIBA, Ltd., Kyoto, Japan). The volume factions of the large sized carbides were measured using the intercept method, following the ASTM E562-08 standard [8] (standard test method for determining volume fraction by systematic manual point count). The Vickers microhardness was measured using a microhardness tester (Shimadzu HMV-2, Shimadzu Corporation, Kyoto, Japan) under a load of 300 g.
Table 1. Chemical compositions of typical and modified Grade 440A MSS.
Element (wt. %)CMnPSCrMo
Typical 440A0.60–0.751.000.35 max0.030 max16.0–18.00.075
Modified 440A0.650.680.020.00312.550.05

3. Results and Discussion

3.1. Thermo-Calc Prediction and DSC Analysis
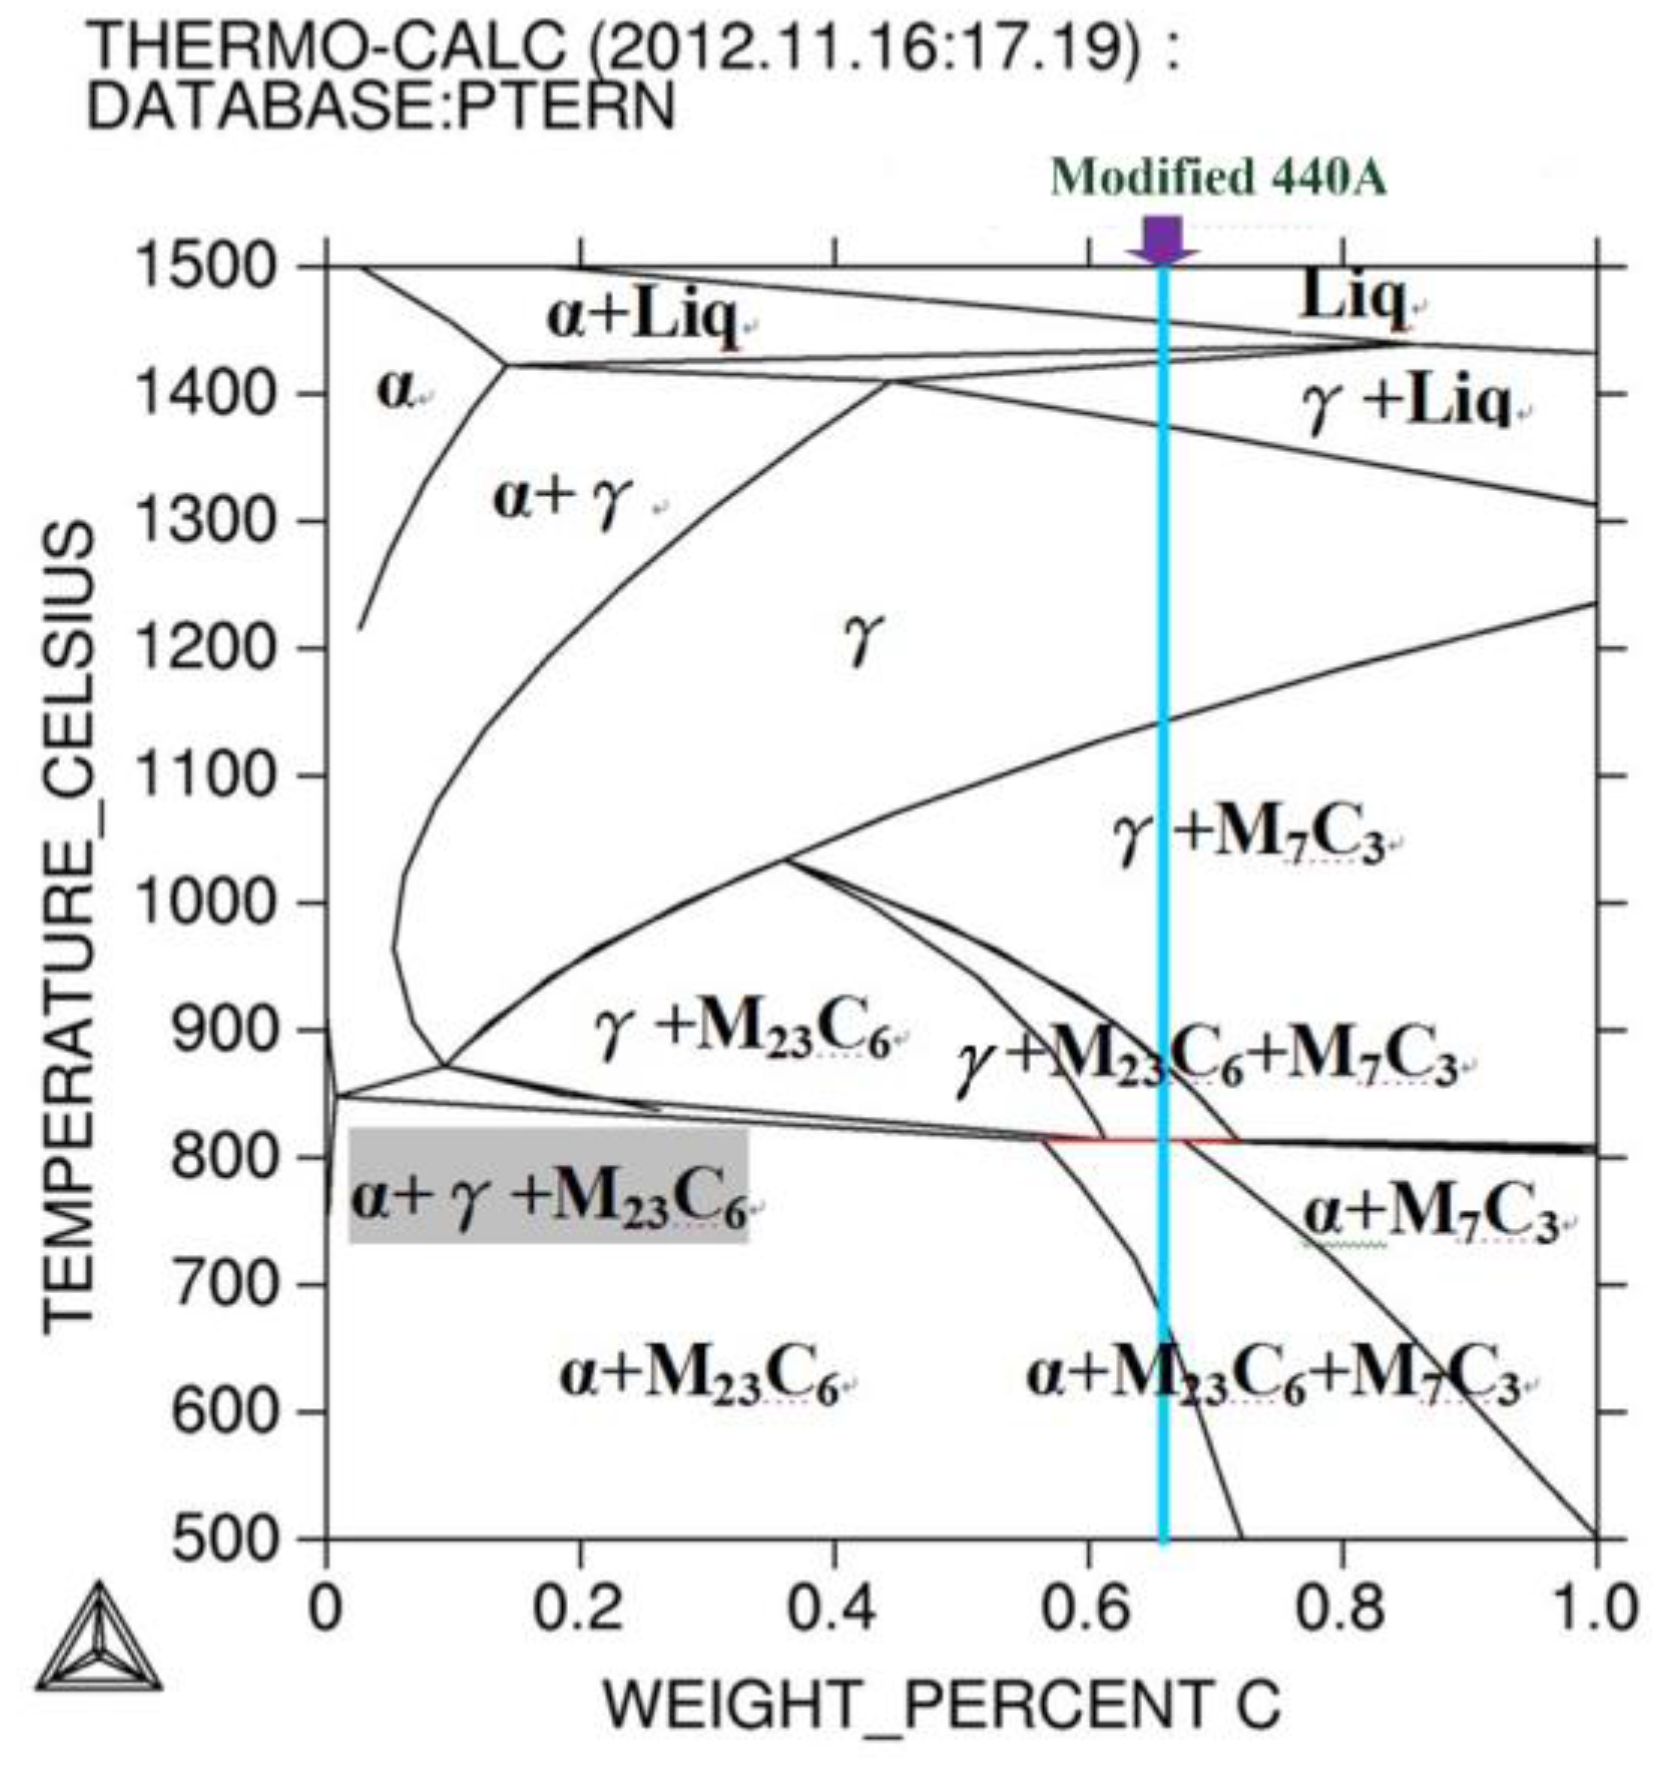
The Fe–Cr–C ternary phase diagram calculated using Thermo-Calc is shown in Figure 1. The carbon content is plotted along the horizontal axis. In this figure, the vertical line indicates phase transformation of the test sample vs. heating temperature. Figure 2 shows the DSC heating curve of as-received materials. As seen, four major endothermic peaks in the heating curves of the materials were observed. Referring to Figure 1, the first peak corresponds to the phase transformation of α → γ, the second peak corresponds to the phase transformation of C1(M23C6) → C2(M7C3), the third peak corresponds to the dissolution of C2 and the fourth peak corresponds to the melting of the matrix.
Figure 1. Phase diagram of the test sample calculated using Thermo-Calc.
Metals 06 00004 g001
Figure 2. DSC traces measured from the as-received modified Grade 440 MSS at a heating rate of 5 K/min.
Metals 06 00004 g002

3.2. Design of Annealing Heat Treatment Processes
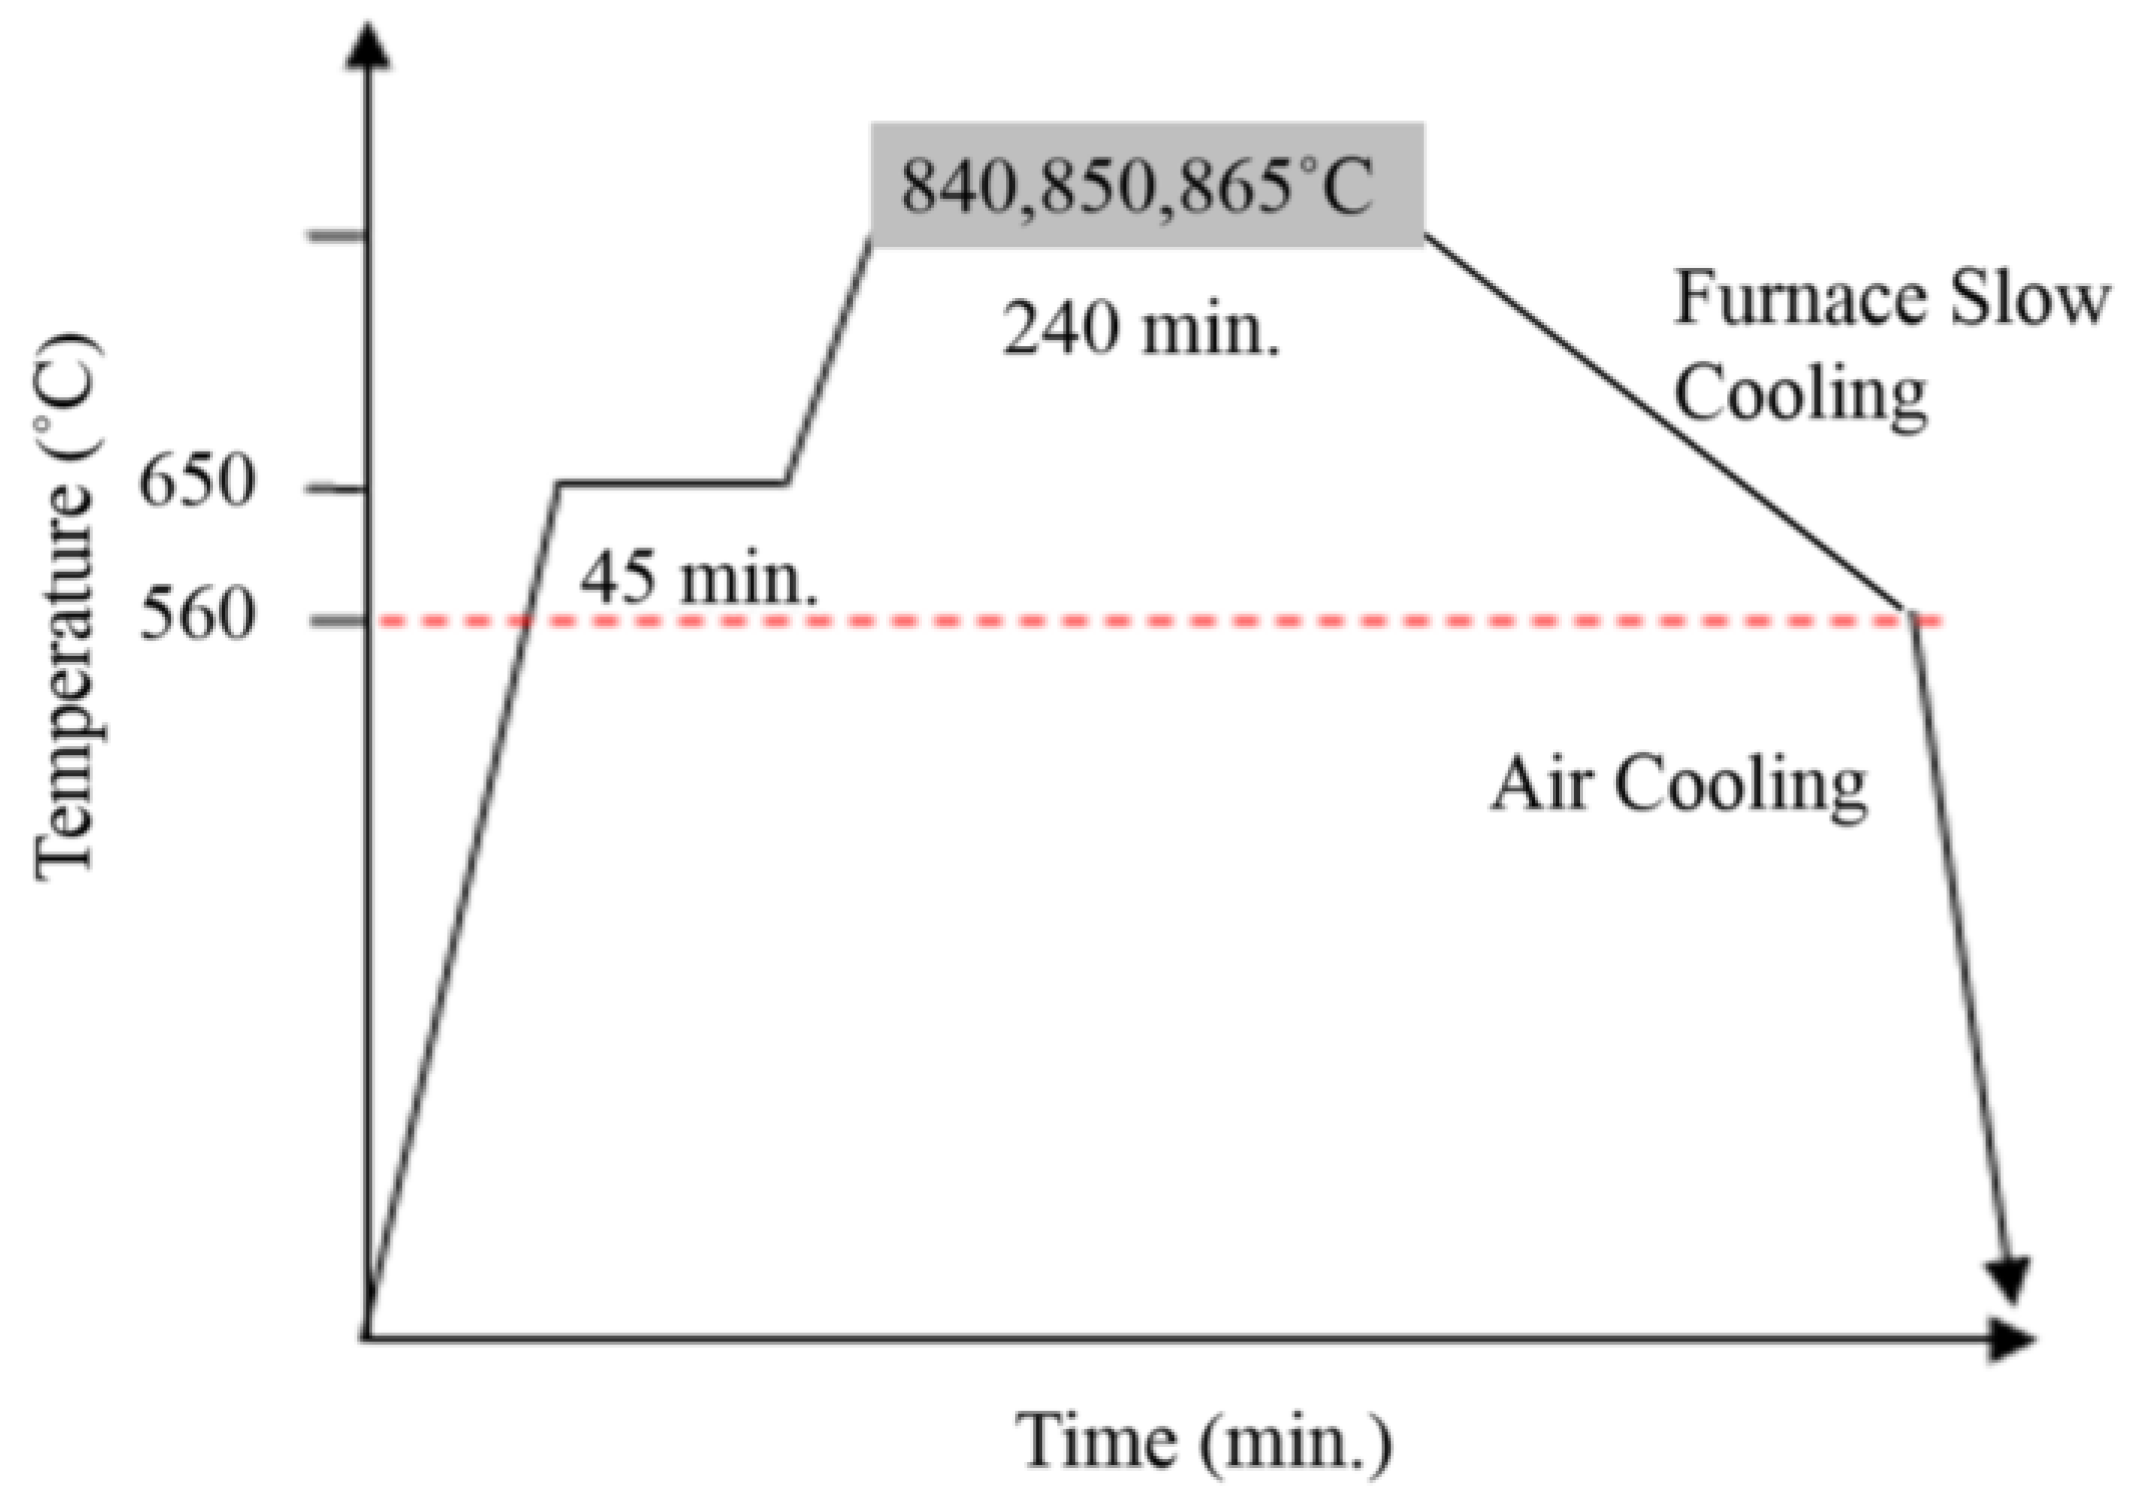
To prove the feasibility of the developed annealing heat treatment processes, the samples were heated to 1050 °C (similar to the on-line working temperature) for 30 min. Referring to Figure 1, at a slow heating rate (5 °C/min = 0.08 °C/s), an approximation γ phase and un-dissolved C2(M7C3) carbides were obtained. After a short time of soaking at 1050 °C, the samples were air quenched. It was expected that the lath martensite, the most common phase in the microstructure; fine carbides (could be C1 or C2); retained austenite; and ferrite may be found in the microstructure. To provide a suitable microstructure and mechanical properties for a further cold deformation process, the annealing processes were required. Considering the size of the matrix grain, three soaking temperatures (840, 850 and 865 °C, defined as HT1, HT2 and HT3 processes, respectively), as shown in Figure 3, for annealing were determined in the temperature interval corresponding to the phase transformation of α → γ (i.e., 810 °C to 870 °C, referring to Figure 1). A slow heating rate (5 °C/min = 0.08 °C/s) was applied for the annealing process. After soaking followed by furnace cooling to 500 °C, the M7C3 phase fully transformed to M23C6 (see Figure 1). The test samples were then cooled by air.
Figure 3. Schematic of various working temperatures of annealing heat treatment processes.
Metals 06 00004 g003

3.3. Microstructure Analysis of As-Received, As-Quenched and Heat-Treated Materials

Figure 4a–c show three micrographs of the as-received modified 440A martensitic stainless steel which were taken from the edge, quarter and center areas, respectively. The as-received sample was cut from the hot-rolled bar. As seen, due to the rapid cooling in this area, the microstructure consists of martensite and different types of carbides (grain size of carbides ≤ 1.5 µm, and averaged volume fraction is 15%) distributed in a matrix of the edge area. In the quarter and center areas, due to the slower cooling rate in these areas, the microstructure mainly consists of perlite and different types of carbides (grain size of carbides ≤ 3 µm, and averaged volume fraction is around 1%). Furthermore, it clearly exhibits larger sized globular carbide particles mainly formed in the quarter and center areas.
Figure 5 shows the microstructure of air-quenched modified 440A MSS from a temperature of 1050 °C to room temperature. As can be seen, a transformation from the austenite to martensitic phase was observed. Furthermore, the size and amount of carbide particles were decreased (grain size ≤ 1.5 µm, and averaged volume fraction ≤ 1%) According to the phase diagram of the test sample calculated using Thermo-Calc (Figure 1), in addition to the martensitic phase, it is expected that the mixed structure of retained austenite, M23C6 (C1) and M7C3 (C2) carbide particles should also exist in the as-quenched samples. However, C2 carbide is generally unwanted due to its hard and brittle nature, which may have deleterious effects on the following cold working processes. To eliminate this phase, three annealing processes (HT1, HT2 and HT3) were conducted in this study. Figure 6 shows the microstructure of modified 440A MSS after HT1, HT2 and HT3 processes. It was found that the matrix structure of the martensitic phase transforms into a ferrite structure after three annealing processes. When compared to the as-quenched sample, more carbide particles were found on those samples. Referring to Figure 1, as the annealing samples were furnace cooled to 500 °C, the M7C3 phase in the as-quenched samples tended to fully transform to M23C6. Therefore, the carbide particles in those figures were mainly M23C6. However, as the soaking temperature was increased (e.g., HT3), more volume factions of the large sized carbide particles were observed.
In general, large sized carbide tends to result in a larger crack along the carbide grain during the cold working. This finding was also observed (see Figure 7) in our on-line production work. In this case, larger cracks were observed along the large sized (>5 µm) carbides. However, after HT1, HT2 and HT3 processes, it was observed the volume factions of the large sized (>5 µm) carbides are 0.6%, 0.8% and 2.0%, respectively. Hence, the use of HT1 or HT2 may be the better choice for actual production needs.
Figure 4. Microstructure of the as-received modified 440A MSS which were taken from (a) edge; (b) quarter; and (c) center areas, respectively.
Metals 06 00004 g004
Figure 5. Microstructure of as-quenched modified 440A MSS at a temperature of 1050 °C, taken from the (a) quarter and (b) center areas, respectively.
Metals 06 00004 g005
Figure 6. Microstructure of modified 440A MSS after (a) HT1; (b) HT2 and (c) HT3 processes.
Metals 06 00004 g006
Figure 7. Initial position of crack during cold working.
Metals 06 00004 g007

3.4. Microhardness under Various Heat Treatment Processes

Figure 8 shows the microhardness of modified 440A MSS under various heat treatment processes. As seen, an average hardness value of 723.3 Hv was obtained from the as-quenched samples. After HT1, HT2 and HT3 processes, their hardness dropped significantly, approximately 210–230 Hv. As mentioned in the previous section, the decrease in hardness is attributed to the fact that most martensite transforms to ferrite after annealing heat treatment processes. However, considering the effects of the microstructure and hardness, the HT1, HT2 or the soaking temperature between the HT1 and HT2 are the most recommended approaches in actual production.
Figure 8. Microhardness of modified 440A MSS under various heat treatment processes.
Metals 06 00004 g008

4. Conclusions

Based on the results, the conclusions are drawn as follows:
  • The combination of DSC and the Thermo-Calc calculation approach was used to determine various annealing heat treatment parameters (HT1, HT2 and HT3) for the air-quenched samples.
  • After the HT1, HT2 and HT3 processes, the volume factions of the larger sized carbide (>5 µm) were 0.6%, 0.8% and 2.0%, respectively.
  • After the HT1, HT2 and HT3 processes, hardness values were approximately 210–230 Hv.
  • Considering the effects of the microstructure and hardness, the HT1, HT2 or soaking temperatures between HT1 and HT2, were the most recommended processes for the modified Grade 440A MSS.

Acknowledgments

This research is financially supported by Yieh Hsing Enterprise Co., LTD, Taiwan, under Project No. ISU101-IND-123.

Author Contributions

H.S.W. designed the experimental procedure; H.S.W. and P.J.H. conducted the experiments and analyzed the data; H.S.W. performed the analysis tools; H.S.W. wrote the paper.

Conflicts of Interest

The authors declare no conflict of interest.

References

  1. Fan, R.; Gao, M.; Ma, Y.; Zha, X.; Hao, X.; Liu, K. Effect of heat treatment and nitrogen on microstructure and mechanical properties of 1Cr12NiMo martensitic stainless steel. J. Mater. Sci. Technol. 2012, 28, 1059–1066. [Google Scholar] [CrossRef]
  2. Aksoy, M.; Yilmaz, O.; Korkut, M.H. The effect of strong carbide-forming elements on the adhesive wear resistance of ferritic stainless steel. Wear 2001, 249, 639–646. [Google Scholar] [CrossRef]
  3. Andres, C.G.; Caruana, G.; Alvarez, L.F. Control of M23C6 Carbides in 0.45C–13Cr martensitic stainless steel by means of three representative heat treatment parameters. Mater. Sci. Eng. A 1998, 241, 211–215. [Google Scholar] [CrossRef]
  4. Lin, C.C.; Lin, Y. Microstructure and mechanical properties of 0.63C–12.7Cr martensitic stainless steel. Taiwan Chung Hua J. Sci. Eng. 2009, 7, 41–46. [Google Scholar]
  5. Andersson, J.O.; Helander, T.; Hdghmd, L.; Shi, P.; Sundman, B. Thermo-Calc & DICTRA computational tools. Mater. Sci. 2002, 26, 273–312. [Google Scholar]
  6. Zhang, J.; Singer, R.F. Hot tearing of nickel-based superalloys during directional solidification. Acta Mater. 2002, 50, 1869–1879. [Google Scholar] [CrossRef]
  7. Shi, Z.; Dong, J.; Zhang, M.; Zheng, L. Solidification characteristics and segregation behavior of Ni-based superalloy K418 for auto turbocharger turbine. J. Alloy. Compd. 2013, 571, 168–177. [Google Scholar] [CrossRef]
  8. ASTM Standard E562–11. Standard Test Method for Determining Volume Fraction by Systematic Manual Point Count; ASTM International: West Conshohocken, PA, USA, 2011. [Google Scholar]