Article

Strain-Induced Ferrite Formation During Steckel Mill Simulations with Varying Roughing Pass Schedules

by
Henry B. Palhano
1,
Clodualdo Aranas, Jr.
2,*,
Samuel F. Rodrigues
1,
Eden S. Silva
1,
Gedeon S. Reis
1,
Edson Jansen P. Miranda, Jr.
1,
Fulvio Siciliano
3 and
John J. Jonas
4
1
Department of Materials Engineering, Federal Institute of Maranhao, Sao Luis, 65075-441 Maranhao, Brazil
2
Mechanical Engineering, University of New Brunswick, Fredericton, NB E3B 5A3, Canada
3
Dynamic Systems Inc. 323 NY 355, Poestenkill, NY 12140, USA
4
Materials Engineering, McGill University, Montreal, QC H3A 0C5, Canada
*
Author to whom correspondence should be addressed.
Metals 2019, 9(8), 814; https://doi.org/10.3390/met9080814
Submission received: 9 July 2019 / Revised: 19 July 2019 / Accepted: 22 July 2019 / Published: 24 July 2019

Abstract

:
It has been previously demonstrated that austenite may undergo partial dynamic transformation (DT) during the plate rolling process. Austenite dynamically transforms into unstable ferrite during hot deformation even at very high temperatures. In this work, the plate rolling simulations, with emphasis on Steckel mill operations, through torsion testing under isothermal conditions were performed on an X70 steel. Four different roughing schedules were tested followed by five finishing passes with pass strains of 0.3 applied at 900 °C. The roughing schedules had zero, one, two and three roughing passes at a temperature of 1100 °C, strain of 0.4 and strain rate of 1 s−1. The stress–strain curves as well as the mean flow stress (MFS) behaviors indicated that both dynamic transformation (DT) and dynamic recrystallization (DRX) occurred during straining. The critical strains for the onset of DT and DRX were determined by means of the double differentiation method and the critical strain values decreased with the number of roughing and finishing strains from the first going to the last pass. It was observed that the volume fraction of the dynamically formed ferrite increased sharply during the finishing stage as the number of previous roughing passes increased, which can be attributed to higher strain accumulation. The results presented here indicate that improved models are needed to control the microstructure of the material during subsequent cooling.

1. Introduction

Fine-grained steels exhibit excellent mechanical properties suited to numerous industry applications. Thermomechanical controlled processing (TMCP) and strain-induced ferrite transformation by austenite deformation are considered two primary strategies to produce ultrafine ferrite grains [1]. The present work will primarily focus on the analysis of the latter, also known as dynamic transformation of austenite to ferrite. The concept of dynamic transformation (DT) was first introduced by Yada and co-workers in the 1980s [2,3]. In their work, they were able to produce fine grains of ferrite in three plain carbon steels, ranging from 1 to 2 µm, during compression testing above the Ae3 temperature. This temperature is the boundary between the single-phase austenite field and two-phase region (ferrite and austenite) in the Fe–C phase diagram. It ranges from 738 °C to 912 °C for the Fe–C system, however, this range changes significantly with the addition of alloying elements. From the obtained results, Yada and co-workers pointed out that the application of strain increased the volume fraction of ferrite and that the critical strain for the onset of dynamic transformation was approximately 0.5 [2]. In the other investigation, they carried out isothermal experiments using a dilatometer and applied various holding times after deformation. Here, they observed that the volume fraction of ferrite formed above the Ae3 decreased with increasing holding time [3].
Although the above experiments showed solid evidence of DT, some metallurgists were still skeptical regarding the occurrence of this unusual phenomenon at that time. Thus, in 2000, Yada and co-workers provided real-time evidence of the transformation of austenite to ferrite during deformation. They captured the diffraction patterns associated with α-ferrite using an in situ X-ray diffraction technique during torsion experiments in three Fe–C alloys above the Ae3 temperature [4]. After this outstanding in situ experimental work, significant progress on this topic has been achieved. As an example, Chen and Chen used a laser dilatometry technique and detected the occurrence of reverse transformation phenomenon (i.e. ferrite retransforming back into the more thermodynamically stable austenite) [5]. Later in 2007, Liu et al. [6] obtained numerous metallographic images from quenched samples right after performing Gleeble experiments on a low carbon steel. One year after, Sun et al. used a laser dilatometer in a Gleeble thermomechanical simulator and studied the reverse DT, both below and above the Ae3 on a 0.17% C plain carbon steel [7]. They concluded that the forward and backward transformations could occur at temperatures close to 115 °C above the Ae3. These experiments clearly showed that austenite can be transformed into ferrite by deformation.
Since there are numerous evidences of DT in the literature, a thermodynamic study was carried out to explain this phenomenon. Ghosh et al. [8] suggested that this temperature could be 15 °C higher (130 °C above the Ae3) in which the dislocations was non-homogeneously distributed in the steel. Aranas et al. [9,10] presented a thermodynamic feature approach explaining that the driving force for DT comes solely from the softening mechanisms that takes place during transformation due to the applied stress. The DT occurs when the driving force is higher than the energy obstacles, consisting of the Gibbs free energy difference between austenite and ferrite, the lattice dilatation work and shear accommodation work. With this explanation, Grewal et al. [11] showed that austenite can be dynamically transformed into ferrite at any temperature between the Ae3 and the δ-ferrite phase field for plain C steel.
Alloying elements plays a major role in the occurrence of DT. Thus, the effect of niobium on DT was initially studied by Basabe and Jonas [12]. In their investigation they performed torsion tests on 0.036% Nb microalloyed and plain C steels in order to compare the forward (during straining) and backward (during holding time after straining) transformations. They concluded that backward transformation was retarded by the addition of Nb. This was attributed to the pinning and solute drag effects on DT provoked by the presence of niobium carbonitride precipitates and Nb atoms in the solid solution, respectively.
In order to show the industrial application of DT, Rodrigues et al. [13,14,15,16,17,18] conducted simulations of plate rolling to investigate the occurrence of DT, and they found that the application of roughing pass strains lead to the presence of around 9% and 6.5% of dynamically transformed ferrite after deformation under isothermal and cooling conditions, respectively [16,18]. It is known that the formation of less dense ferrite (as the bar passes through a rolling mill) above the Ae3 temperature generates lower rolling loads and mean flow stresses (MFS) [19]. Nevertheless, the phenomenon of DT has not been studied under isothermal finishing passes with the influence of different number of roughing passes, which realistically represent a Steckel mill process. Thus, the current study presents new insights on the application of DT, more specifically on the manufacturing of X70 Nb steel and its high temperature dynamic behavior.

2. Materials and Methods

The material investigated in this research was an API-X70 microalloyed steel; its complete chemical composition (in wt%) is presented in Table 1. Note that the methods and materials in this work have similarities to the published papers of the present authors [13,14,16,17]. The corresponding paraequilibrium and orthoequilibrium Ae3 temperatures are also presented in this table. These transition temperatures were calculated using the FactSage thermodynamic software 7.1 employing FSstel database [20]. The 12.5 mm hot-rolled plate material was machined into cylindrical specimens with the axes aligned with the rolling direction. The sample dimensions can be seen in references [13,14,16,17]. The torsion experiments were carried out on a modified MTS machine with a radiation furnace connected to a temperature controller. A K-type thermocouple was spot welded to the mid-section of the specimens to acquire the actual temperature during deformation. An argon environment was employed to reduce the amount of oxidation and decarburization during the torsion simulation of rolling. The Fields and Backofen formulas were used to determine the equivalent stress/strain [21]. Moreover, the incremental increase in diameter that developed during the free-end torsion tests were properly accounted for [22].

2.1. Torsion Simulations

The thermomechanical schedule employed in the present work is illustrated in Figure 1. In the first stage of the simulation, the temperature of the samples was increased to 1200 °C at a rate of 1 °C/s. This temperature was held for 20 minutes to allow for austenitization and carbonitride dissolution. The samples were then cooled at 1 °C/s to 1100 °C, the roughing pass temperature. Four simulations with a varying number of roughing passes (zero, one two and three) with 0.4 strains per pass were employed, the details of which is described in reference [16]. For the finishing pass simulations, isothermal conditions were employed. These aimed to represent the operation of a Steckel mill process. After four different roughing deformation schedules, the samples were cooled to 900 °C, about 90 °C above the Ae3, at 1 °C/s. The temperature of the samples was held isothermally for 60 s followed by the finishing passes. The samples were subjected to five deformation finishing passes by applying a strain of 0.3 per pass and strain rate of 1.0 s−1. A fixed inter-pass time of 10 s was employed in the simulations. After the 1st, 3rd and 5th passes, samples were water quenched to freeze the microstructure. This will permit quantification of the amount of DT ferrite produced per pass.
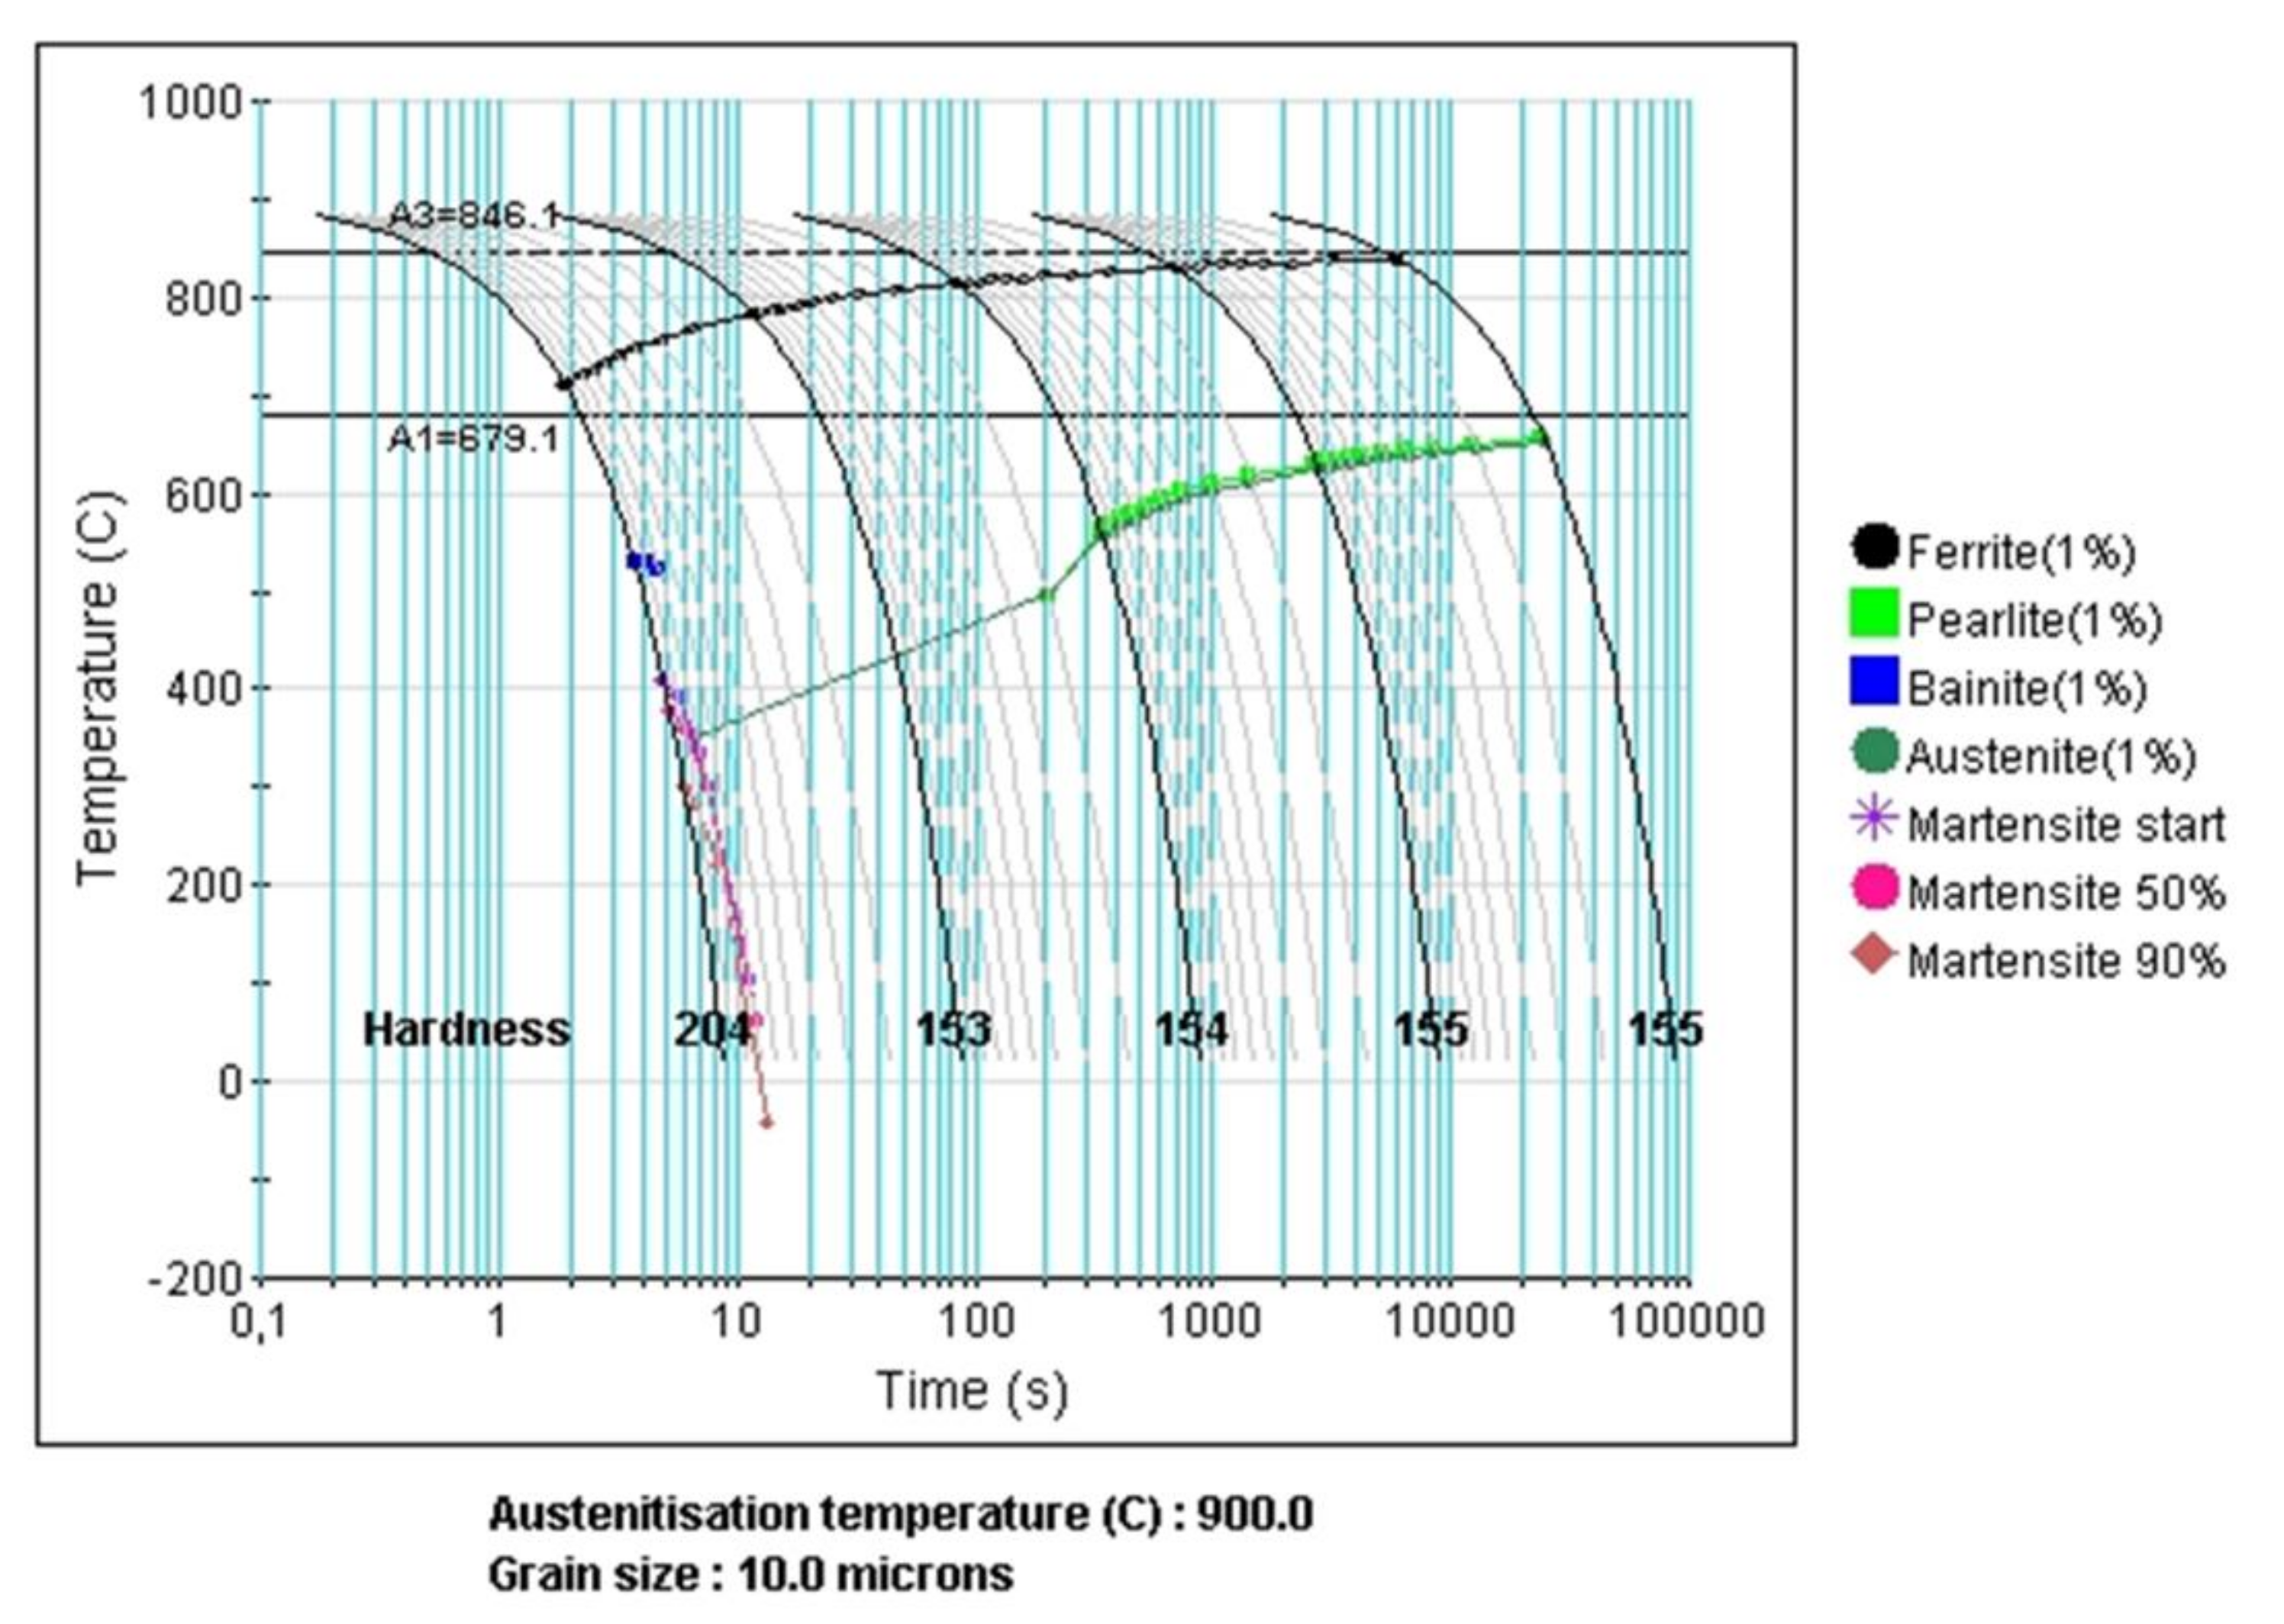
To avoid the formation of ferrite during cooling from temperatures above the Ae3, a continuous cooling transformation (CCT) diagram with austenite grain sizes of 10 µm was calculated, see Figure 2. This plot was generated using the Fe Alloys module of JMatPro software 11.2 (Guildford, UK) at the University of New Brunswick. Based on the CCT curve of the present alloy, it can be seen that it requires approximately 2 s to obtain 1% ferrite. In the present study, the cooling from 900 °C to 200 °C took less than 1 s [18]. This means that the ferrite phase observed and measured in this work was exclusively due to the applied deformation above the Ae3. Additionally, for the formation of ferrite during cooling below the Ae3, a diffusional mechanism is required in order to enable partitioning of the Mn and Si between the γ and α phases and requires times of 8–10 s [8,10,23]. Here, the quench times were sufficiently fast to prevent the formation of polygonal ferrite by diffusional mechanisms [18,23].

2.2. Microstructural Analysis

The torsion samples were sectioned longitudinally to provide cross-sections for microstructural examination, which allows for the observation of the changes in grain shape that accompany straining. Although the cooling rate of the cylindrical sample may vary from the surface to its center, the microstructures were obtained from 150 µm below the surface of the specimens. This aimed to accurately take microstructures with cooling rates of more than 1200 °C/s and to avoid the oxidation of the outer surface.
The quenched samples were mounted and polished using silicon carbide paper grits from 400 to 1200 with water that acted as lubrication. For final polishing, diamond paste suspensions (6 µm, 3 µm and 1 µm) were used followed by a 0.02 µm colloidal silica suspension. The polished samples were then etched with a 3% nital solution for approximately 15–20 seconds and treated with a 10% aqueous sodium metabisulfite (Na2S2O5) solution in order to improve the contrast between ferrite and martensite. The initial microstructural analysis was carried out using optical microscopy. In addition, Scanning Electron Microscopy (SEM) and Electron-Backscatter Diffraction (EBSD) techniques were employed to provide more detailed microstructural information. The SEM were carried out using a Hitachi SU8230 at an accelerating voltage of 15 kV (secondary electrons mode) while the EBSD analysis was performed on a Hitachi SU3500 employing a step size of 0.4 μm.
To quantify the volume fractions of produced and retained DT ferrite, an optical microscope equipped with an image analyzer was used. For this purpose, the ImageJ software was employed [24]. Ten to fifteen images were used for each measurement at magnifications of 200X, 500X and 1000X.

3. Results

3.1. Stress–Strain Curves from the Plate Rolling Simulations

The flow curves obtained from the five-pass simulations (finishing pass strains of 0.3) with different numbers of roughing passes (roughing pass strains of 0.4) are illustrated in Figure 3a–d, for the samples with zero, one, two and three roughing passes, respectively. These finishing five-pass simulations were performed at approximately 90 °C above the paraequilibrium Ae3 temperature. Note that in the present work, no flow stress corrections were made as the tests were performed under isothermal conditions (no cooling applied between passes). This approach will also simulate a Steckel rolling mill operation. As the temperature was kept constant, it is expected that the flow stress levels should not change significantly from pass to pass assuming that phase transformation and dynamic recrystallization will not take place. However, the peak stresses decreased perceptibly from the second pass going to the final pass in all the tests. The flow stress decrease was more evident in the simulation with a higher number of roughing passes.
The shapes of the curves suggest that static recrystallization is presented between passes. It can be seen from the figure that the peak stress increases from the first to the second pass in all tests and displays a decreasing behavior from the second going to the last pass. The increase in stress level for the second pass is associated with strain accumulation and the later decrease (after the second pass) can be accounted to the initiation and occurrence of dynamic transformation (DT). Dynamic recrystallization (DRX) during straining also contribute to the decreasing level of flow stress [14,15]. As the number of roughing passes is increased, more softening due to DT takes place as a result of more retained work hardening. Previous research has proved that the occurrence of DT also contributes to the decreasing the flow stress levels from pass to pass [8,9,10,11,12,13,14,15,16,17,18,19]. This will be presented in more detail in the following sections below.

3.2. Optical Microscopy Results

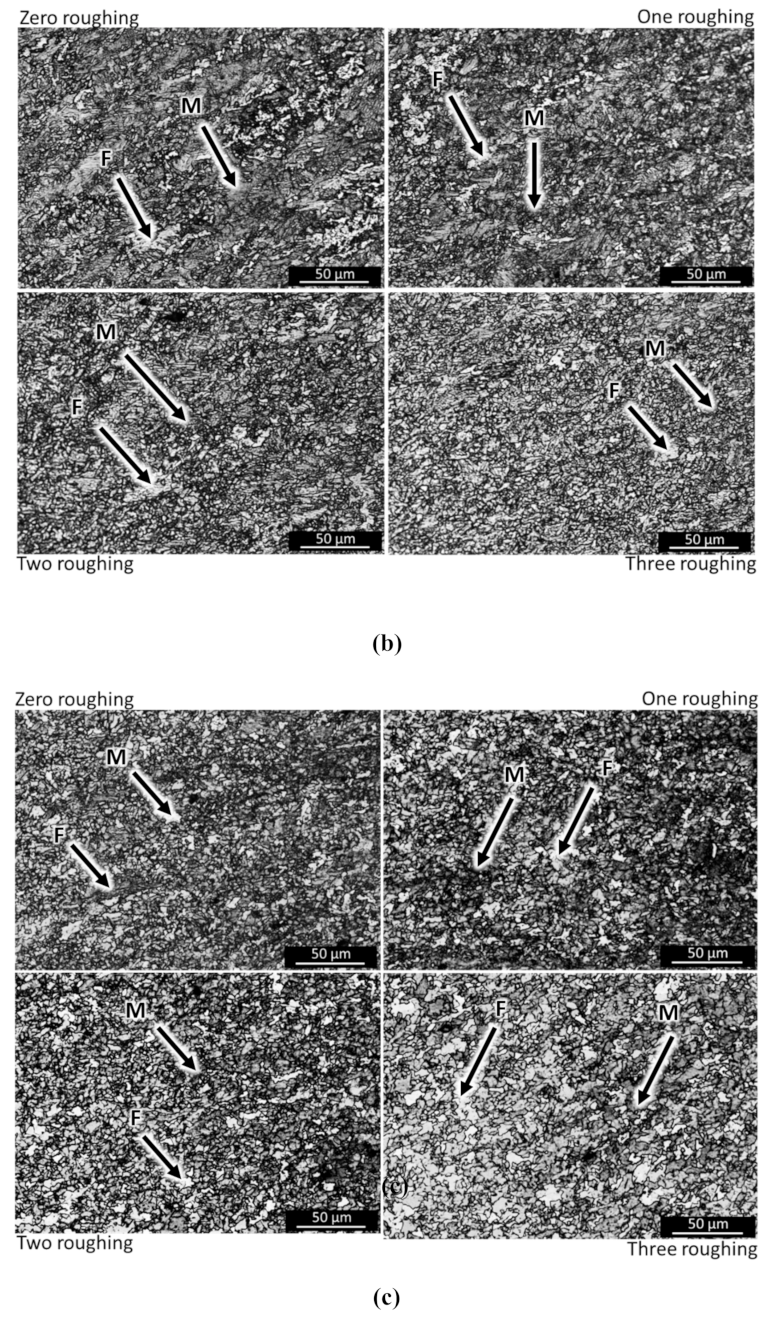
The optical microscopy results are displayed in Figure 4. Images that correspond to samples quenched after the 1st, 3rd and 5th passes of the finishing stage simulations, i.e. with a) no roughing; b) one; c) two; and d) three roughing passes, are displayed in Figure 4a–c, respectively. The darker areas are associated with martensite (austenite at elevated temperature) while the lighter regions are ferrite. The arrows in Figure 4 indicate martensite and ferrite labelled as M and F, respectively. Note that optical micrographs were chosen for quantitative measurements of phases to allow the use of 10–15 images per sample. Moreover, separating BCC (ferrite) from BCT (martensite) crystal structures is quite difficult in EBSD, which may lead to inaccuracy in the phase fraction measurement.
It can be seen that ferrite is present after the first finishing pass (see Figure 4a) regardless of the number of roughing passes applied. However, it can be seen that a higher volume fraction of ferrite is formed for the simulation with three roughing passes. The first finishing passes formed about 3.5%, 5.0%, 7.0% and 11% of ferrite for the simulation with zero, one, two and three roughing passes, respectively. It is perceived that the quantity of DT ferrite increased after the 3rd pass (see Figure 4b), and as well as after the 5th and final pass (see Figure 4c). The third finishing passes produced about 5.4%, 6.0%, 10% and 12% of ferrite while in the 5th finishing passes, 6.7%, 9.5%, 12% and 16% of ferrite were formed for simulation with zero, one, two and three roughing passes, respectively. Again, similar trends can be seen in Figure 4b,c. Simulations with higher number of roughing passes display higher volume fraction of ferrite. The volume fraction of DT ferrite can be seen to increase progressively during simulated rolling and with increasing number of roughing pass, a topic that will be examined in more detail below.

3.3. Calculation of the Critical Strains for the Onset of DT and DRX

At a fixed temperature, it is expected that the flow curve levels remain constant during multi-pass hot deformation. However, in the present work, the stress levels showed a steady decrease during the simulations, as shown above. The steady decrease was analyzed by applying the double differentiation method [25] on the flow curves using the Matlab software. The curves were fitted from the 0.2% offset yield stress up to the peak stress using a 9th order polynomial (higher order is necessary in some cases). In this calculation, the critical stresses and strains for the onset of DT and DRX were firstly determined by plotting the θ versus σ curves. Here, θ is the strain hardening rate calculated by δσ/δε at a fixed strain rate (first derivative). Then, softening mechanisms can be identified by the inflection points of the θ-σ curve. This can be described by the equation:
δ δ σ δ θ δ σ = 0
The onset of DT can be associated with the first minimum, while the second minimum determines the initiation of dynamic recrystallization (DRX) as shown by previous researchers [8,12,23,26]. The −(dθ/dσ) versus σ curves for the present material taken from the finishing passes after different number of roughing strains are illustrated in Figure 5a–d for zero, one, two and three roughing passes, respectively.
The critical strains required for the onset of DT and DRX determined according to the above procedure are illustrated in Figure 6a–d for the finishing passes with zero, one, two and three roughing passes, respectively. In all simulations, the first pass DT and DRX critical strains are higher than in the succeeding finishing passes. It is notable that for higher numbers of roughing passes, the value of the overall critical strain is lower. In the first case, seen in Figure 6a (with no roughing pass), the first finishing pass presented critical strains of 0.16 and 0.12 for DRX and DT, respectively. In the fifth finishing pass, these critical strains decreased to 0.11 and 0.04. In the last case, seen in Figure 6d (with three roughing passes), the first finishing pass presented critical strain for DRX of 0.11 and critical strain for DT of 0.058. In the fifth pass of finishing stage, the critical strains were 0.07 and 0.02 for the onset of DRX and DT, respectively. It can be seen that this trend is consistent even for the simulations with one and two roughing passes.
The reason for the observation above is the strain accumulation and retained work hardening, which favor the reduction of the critical strain for the initiation of DT. Moreover, the DT ferrite formed from roughing passes at 1100 °C contributed to the lower critical strains observed for simulations with multiple roughing passes [16].

4. Discussion

4.1. Mean Flow Stresses

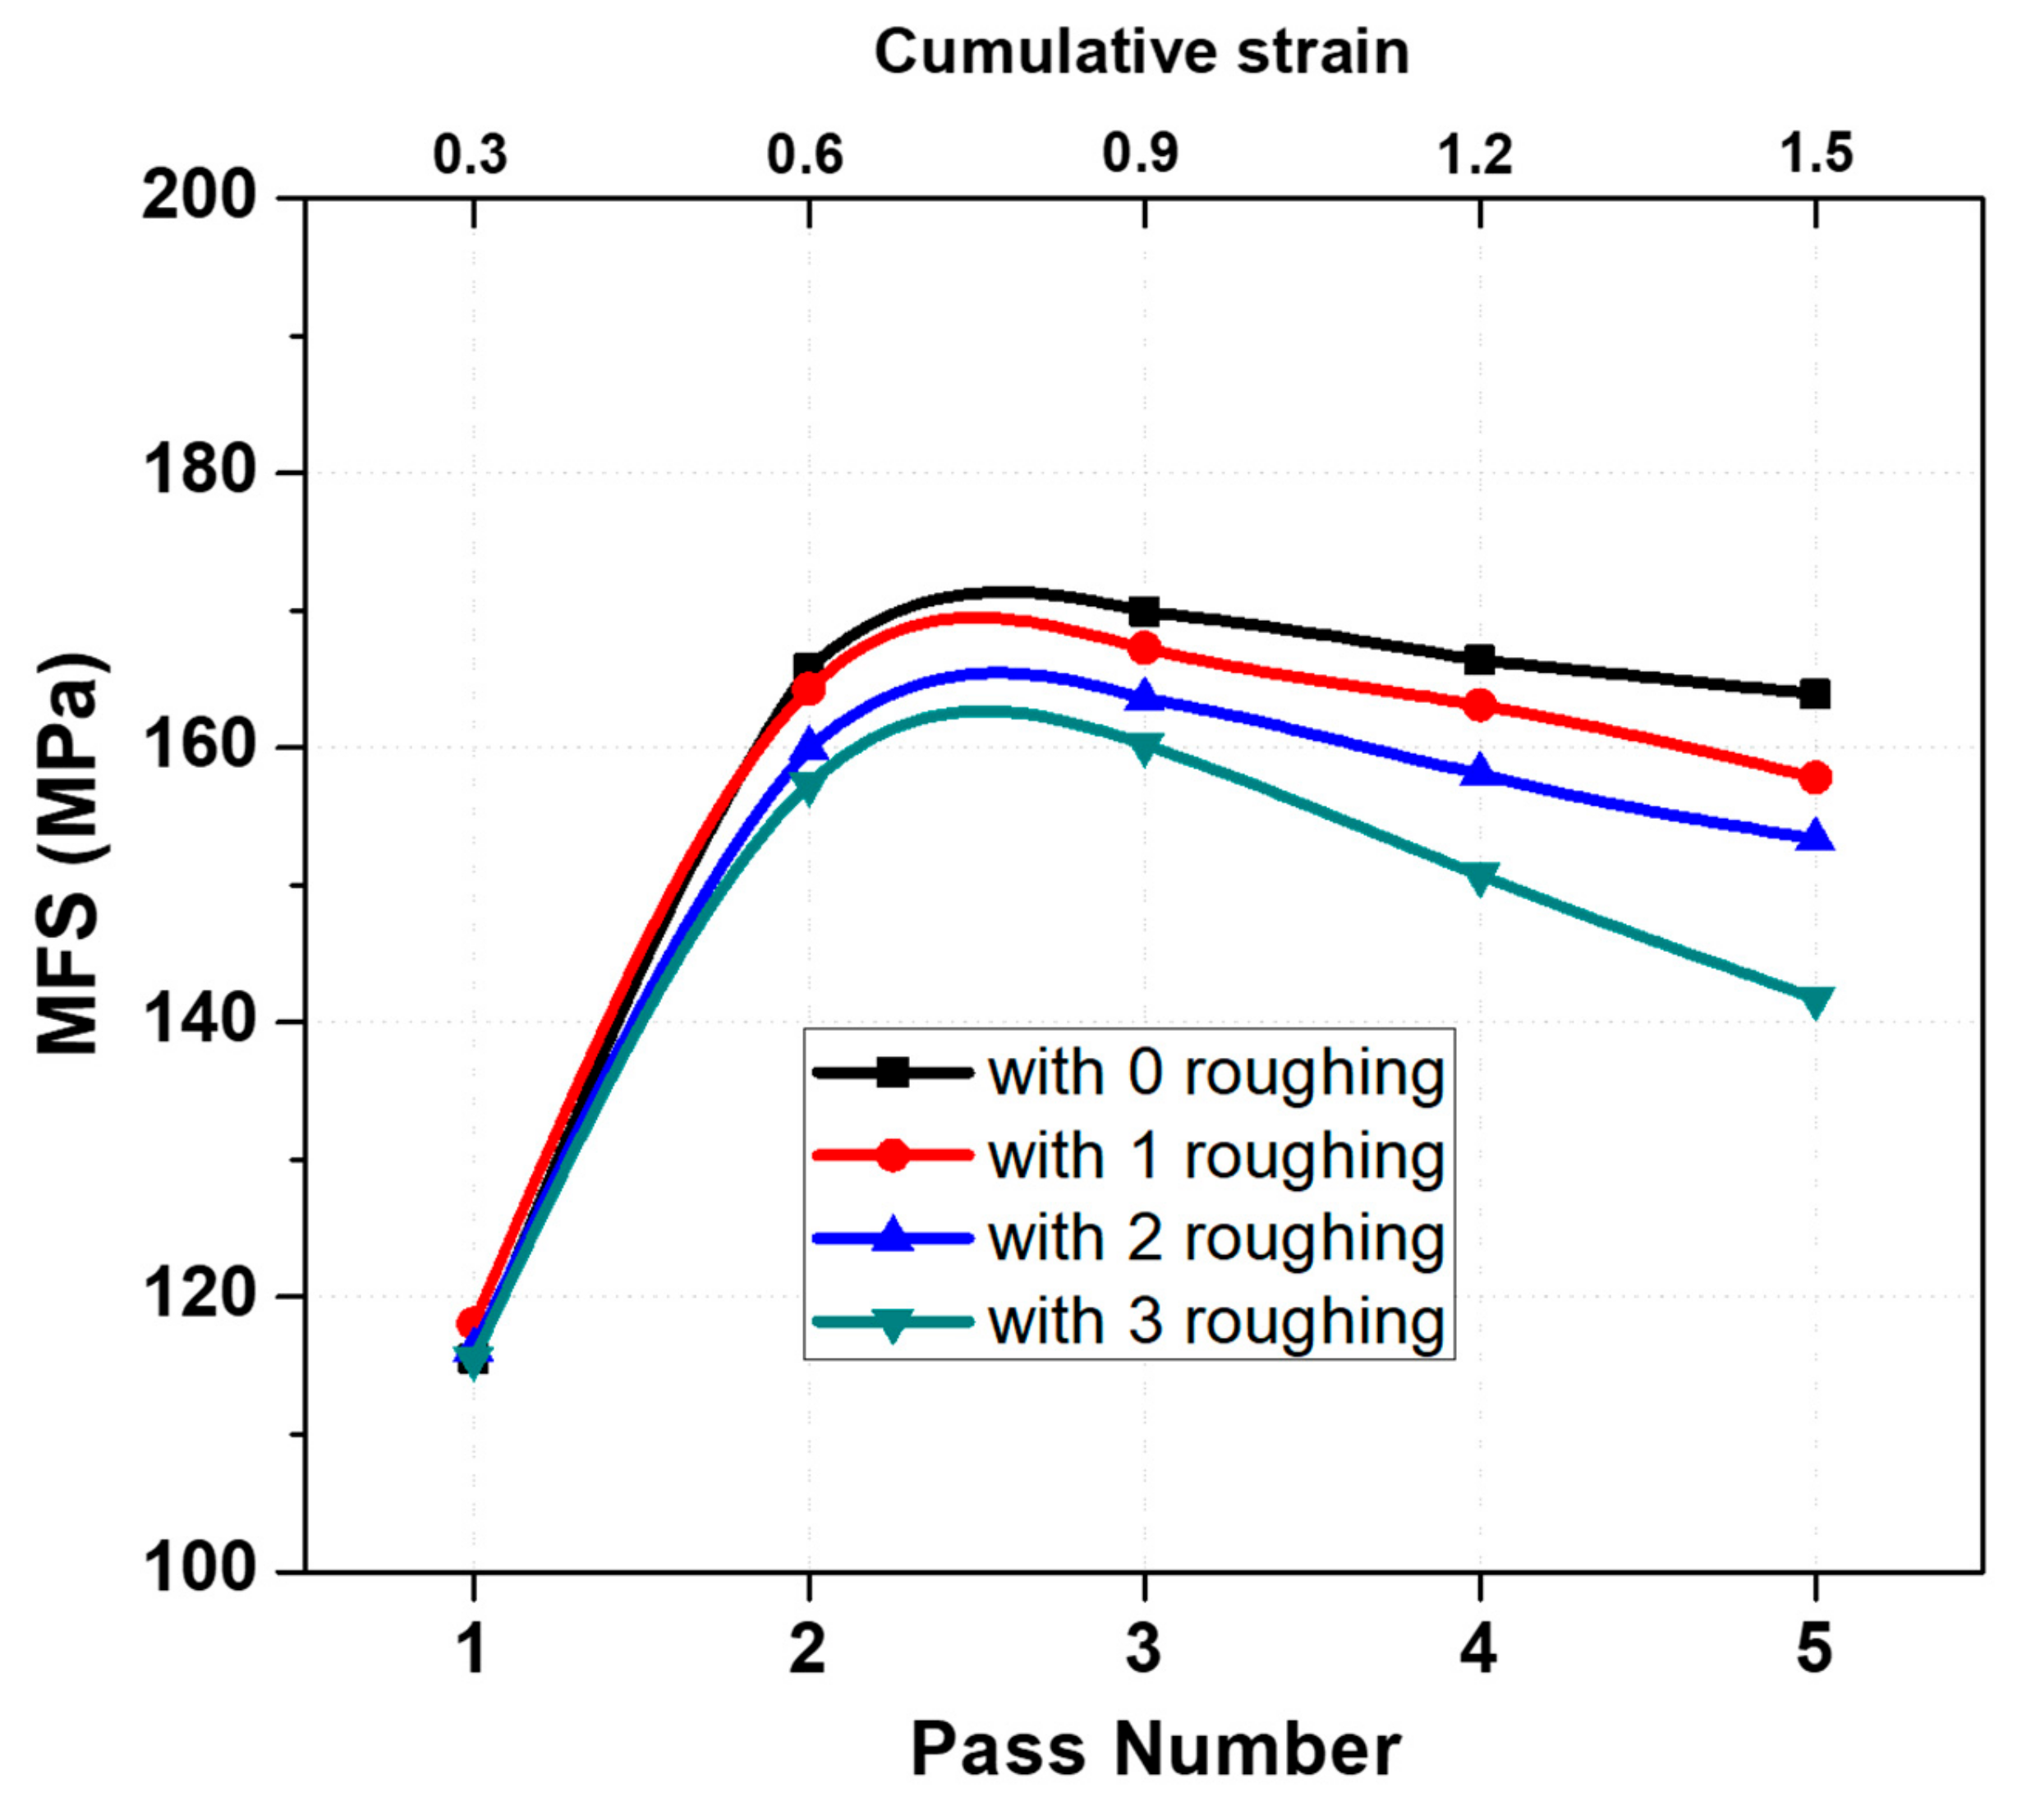
The mean flow stress (MFS) shown in Figure 7 were calculated in order to have an overview of the physical metallurgical mechanisms that act during hot rolling process. In this case, Equation 2 was used on the stress-strain curves of Figure 3 to obtain the MFSs.
M F S =   1 ε b ε a ε a ε b σ e q d ε
where, σeq is the equivalent stress and (εb − εa) is the equivalent strain applied in each pass. The calculated MFS for the finishing passes with roughing pass number of zero, one, two and three are presented in Figure 7.
The MFS increases from the first going to the second finishing passes for all the simulations as a result of strain accumulation, which is consistent with the behavior of the flow curves, shown in Figure 3 above. An average increase of about 42 MPa can be observed. The MFSs remain approximately constant from the second to the third pass. This trend was followed by a decrease until the last pass. This decreasing behavior indicates that ferrite is being formed in each pass since ferrite is softer than austenite (at the same temperature). Additionally, for the simulation with higher number of roughing strains, the levels of the MFS were lower than that of the simulation with lower number of roughing passes. As previously mentioned, the total amount of strain accumulation led to more ferrite formation, thus, reducing both the levels of the flow curves as well as the MFS. This interpretation is supported by the optical microstructures presented in Figure 4. These optical images were employed to quantify the ferrite volume fractions that will be shown below.

4.2. Volume Fraction of DT Ferrite per Pass

The cumulative volume fractions of DT ferrite present after (black line) each pass are shown in Figure 8a–d for the finishing passes after zero, one, two and three roughing passes, respectively. The quantities of ferrite before (red line) each pass are also displayed here. The cumulative strain is also shown on the axis above each figure. It should be noted that the amount of ferrite produced and retained increases with the pass number in all simulations. Additionally, the volume fraction of transformed ferrite increases more rapidly as the number of roughing passes are increased.
It is evident that a certain percentage of volume fraction of ferrite found after the finishing passes was inherited from the dynamic transformation that took place during the roughing passes. According to Figure 8, the DT ferrite volume fraction that remained before the first finishing pass from roughing strains was approximately 1.0%, 2.6% and 4.1% for one, two and three roughing passes, respectively. Note that these quantities are lower compared to the DT ferrite formed right after the roughing passes due to the time between the roughing and finishing passes, thus allowing diffusional retransformation of ferrite back into austenite to take place. For reference, the DT ferrite were originally 1.5%, 7.6% and 9.1% for one, two and three roughing passes (without any holding time), respectively [16]. These observations are consistent with previous research which demonstrated that ferrite could be formed at roughing mill temperatures during the plate rolling process [11]. This concept is also supported by an STT (strain-temperature transformation) diagram that was developed to specifically track the formation of DT ferrite [27].
For the simulations with no roughing pass (see Figure 8a), the amount of ferrite increased to 3.5% after the first finishing pass, then to 9.7% and 20.4% after the third and fifth finishing passes, respectively. For simulations with one roughing pass (see Figure 8b), the DT ferrite increased to 6.1% after the first finishing pass, then increased to 16.1% and 28% after the third and fifth finishing passes, respectively. In the case of the simulation with two roughing passes (see Figure 8c), the measured volume fraction of ferrite after the first, third and fifth finishing passes were 9.5%, 23.4% and 37.7%, respectively. Finally, for the simulation with three roughing passes (see Figure 8d), the DT ferrite increased to 15% after the first followed by 31.5% after the third, and finally around 50% after the fifth pass. These numbers clearly suggest that ferrite volume fractions are favored by increasing the number of roughing passes before the finishing stage of the plate rolling process.

4.3. Production/Retention Tendencies for the Formation of DT Ferrite

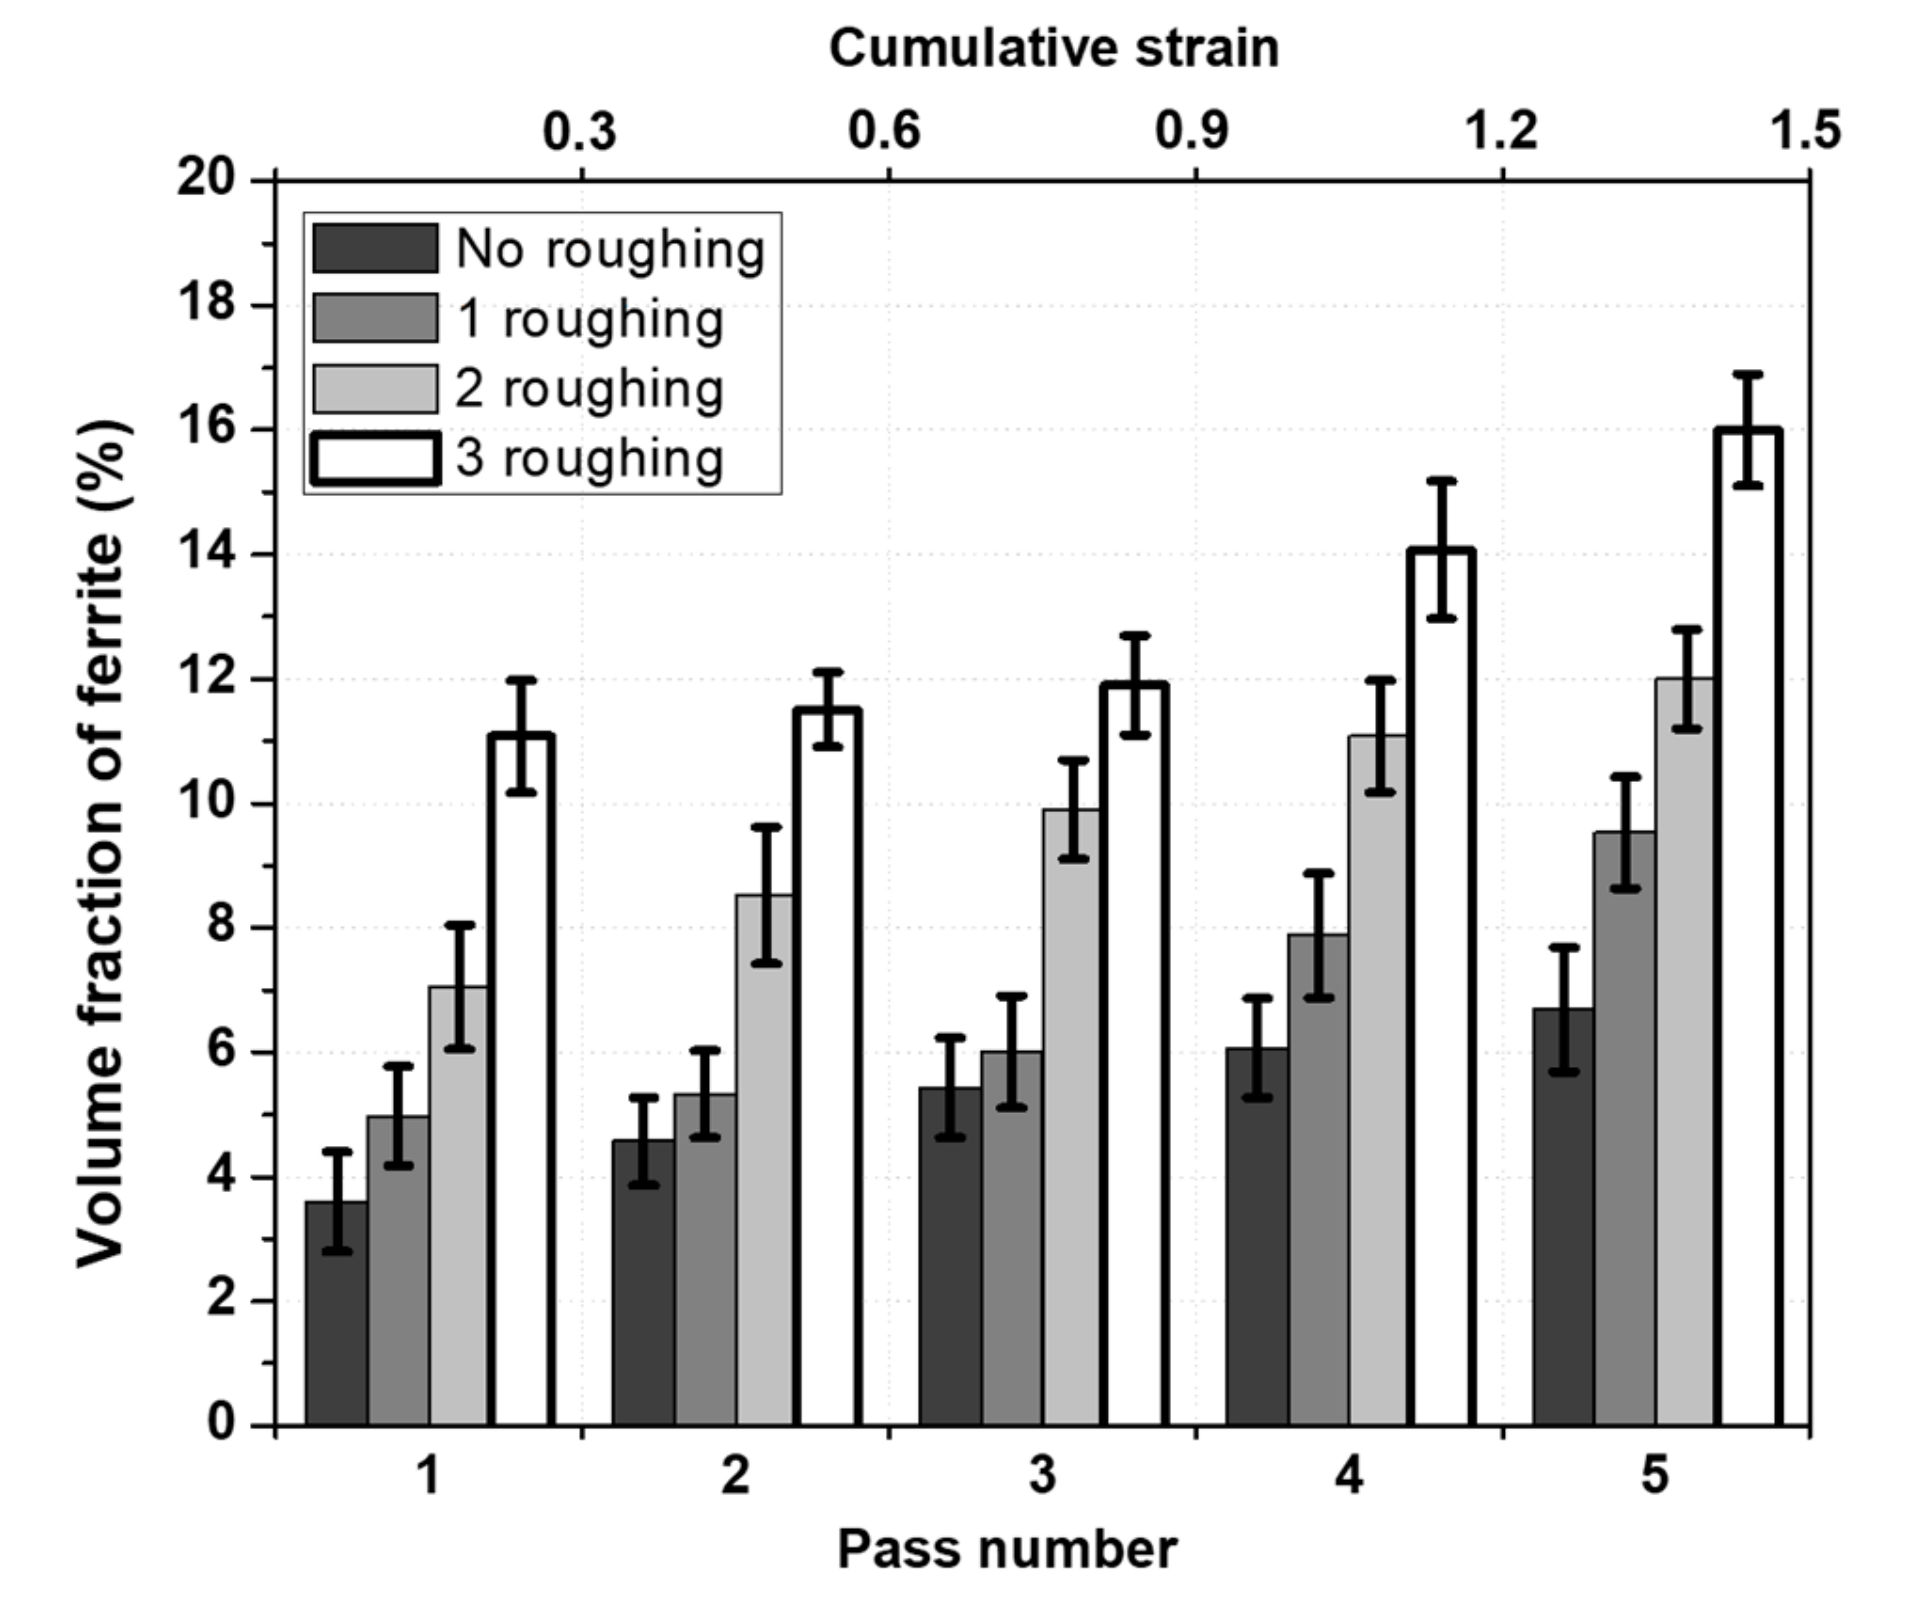
The quantity of DT ferrite formed in a given pass is displayed in Figure 9. This was calculated by the difference between the cumulative amount of ferrite present before (red line) and after (black line) each pass as shown in Figure 8. The amounts of ferrite associated with the second and fourth passes were obtained by interpolation. The first finishing passes were responsible for the formation of about 3.5%, 5.0%, 7.0% and 11% of ferrite for the simulation with zero, one, two and three roughing passes, respectively. The second finishing passes produced 4.6%, 5.3%, 8.5% and 11.5% of ferrite. The third finishing passes were responsible for 5.4%, 6.0%, 10% and 12% of ferrite. In the fourth passes, ferrite amounts of 6.1%, 7.9%, 11.1% and 14.1% were formed. Finally, in the final finishing passes, 6.7%, 9.5%, 12% and 16% of ferrite were produced. Note that DT ferrite forms in a displacive manner once the driving force for DT is higher than the total energy obstacle. It is well known that this obstacle consists of the free energy difference between the phases, as well as the lattice dilatation work and shear accommodation work [9,10,19].
The ratio of transformed ferrite in a given pass over the volume fraction of available austenite is depicted in Figure 10. The proportion increases with pass number, which denotes a higher driving force for DT as a result of higher levels of work hardening. Concurrently, as the number of previous roughing passes is increased, this ratio increased more sharply, and its values is higher. The driving force for DT is also increased due to strain accumulation.

4.4. Microstructure Analysis

The SEM microstructure of torsion specimens sectioned transversely after the fifth finishing pass from the schedule with zero, one, two and three roughing passes are presented in Figure 11a–d, respectively. It is well known that ferrite is first formed as Widmanstätten ferrite plates at the DT critical strain followed by coalescence of plates into polygonal ferrite grains upon further straining [8,12,23]. It can be seen in Figure 11 that ferrite is mostly present in the polygonal form. These are highlighted by arrows in the expanded images of samples with different thermomechanical schedules. Qualitatively, it is clear that the amount of ferrite presented after the fifth finishing passes increased with the number of roughing passes.
The presence of DT ferrite in the simulations was confirmed using the EBSD technique, as illustrated in Figure 12. The images were taken from a quenched sample after the fifth finishing pass with three roughing passes. Band contrast (pattern quality) map is shown in Figure 12a. Coalesced small quasi-polygonal ferrite grains produced by the DT process were evident. On the hand, the martensitic areas can be seen in the form of small parallel aligned laths within the structure with irregular blocks at its boundaries. The corresponding inverse colored orientation pole figure (IPF) map of the same region is displayed in Figure 12b. Martensitic area with some polygonal grains of ferrite are labelled with letter “M”. This was identified by band contrast map imaging showing that the darker region is martensite while the lighter area is ferrite. This method has been shown to reasonably separate martensite from ferrite (compared to phase map imaging) as shown by Oxford Instruments [28].

5. Conclusions

In the present work, the occurrence of dynamic transformation during five-pass finishing simulations above the Ae3 temperature in a Nb-microalloyed X70 steel was investigated. Each finishing rolling simulation had a varying number of roughing passes. These led to the following conclusions:
  • The number of roughing passes employed before the finishing simulations influenced the levels of flow curves during the five-pass simulated Steckel mill operation. The DT ferrite inherited from the higher number of roughing passes (higher retained strain) contributed to the increase in softening observed during the finishing passes.
  • Thermomechanical schedules with a higher number of roughing passes produced higher amounts of ferrite volume fractions which sharply reduced the levels of the MFS. This is supported by images from optical microscopy. The perceptive MFS increase from the first to the second pass is attributable to strain accumulation.
  • The critical strains to dynamic transformation in the finishing passes were shown to be dependent on the number of roughing passes. Higher numbers of roughing strains led to lower values of critical strain to DT in the first finishing pass of the five-pass simulations. This value decreases from pass to pass due to retained work hardening from the previous pass.
  • Microstructure analysis showed that ferrite is mostly present in a polygonal form after each strain. This is a result of the displacive mechanism that occurs on the critical strain, which then coalesces diffusionaly into polygonal grains on continued straining.

Author Contributions

All the authors contributed to this research work: Conceptualization, H.B.P., C.A., S.F.R., F.S., E.J.P.M., and J.J.J.; Formal analysis, H.B.P., C.A., S.F.R., G.S.R., and J.J.J; Data curation, S.F.R., C.A., G.S.R. and E.S.S.; Methodology, H.B.P., C.A., S.F.R., F.S., E.S.S., E.J.P.M., and J.J.J.; Software, S.F.R., and E.S.S.; Validation, S.F.R., C.A., and J.J.J.; Investigation, H.B.P., C.A., S.F.R., G.S.R. and J.J.J.; Resources, S.F.R., G.S.R., E.J.P.M., and E.S.S.; Writing—original draft preparation, C.A., S.F.R., F.S., and J.J.J.; Writing—review and editing, C.A., S.F.R., F.S. and J.J.J.; Visualization, C.A., H.B.P., and E.S.S.; Supervision, C.A., S.F.R., G.S.R., J.J.J. and E.S.S.; Project administration, C.A., H.B.P., S.F.R., and J.J.J.; Funding acquisition, H.B.P., S.F.R., and C.A.

Funding

Brazilian National Council for Scientific and Technological Development (CNPq), Research and Support Foundation of Maranhão (FAPEMA), Natural Sciences and Engineering Research Council of Canada (NSERC), New Brunswick Innovation Foundation (NBIF) and Harrison McCain Foundation.

Acknowledgments

The authors acknowledge with gratitude funding received from the Brazilian National Council for Scientific and Technological Development (CNPq), Research and Support Foundation of Maranhão (FAPEMA), Natural Sciences and Engineering Research Council of Canada (NSERC), New Brunswick Innovation Foundation (NBIF) and Harrison McCain Foundation. They also thank Mr. Jon Jackson and Dr. Laurie Collins from the EVRAZ North America Research and Development Centre (Regina) for providing the steel investigated in this research.

Conflicts of Interest

The authors declare no conflict of interest.

References

  1. Zhao, L.; Park, N.; Tian, Y.; Shibata, A.; Tsuji, N. Dynamic transformation mechanism for producing ultrafine grained steels. Adv. Eng. Mater. 2018, 20, 1701016. [Google Scholar]
  2. Matsumura, Y.; Yada, H. Evolution deformation of ultrafine-grained ferrite in hot successive deformation. Trans. ISIJ 1987, 27, 492–498. [Google Scholar]
  3. Yada, H.; Matsumura, Y.; Senuma, T. International conference on physical metallurgy of thermomechanical processing of steels and other metals Thermec ’88. In Proceedings of the 1st Conference Physical Metallurgy of Thermomechanical Processing of Steels and Other Metals, Tokyo, Japan, 6–10 June 1988; Tamura, I., Ed.; 1988; Volume 2, pp. 200–207. [Google Scholar]
  4. Yada, H.; Li, C.M.; Yamagata, H. Dynamic γ—A transformation during hot deformation in Iron-Nickel-Carbon alloys. ISIJ Int. 2000, 40, 200–206. [Google Scholar]
  5. Chen, Y.; Chen, Q. Dilatometric investigation on isothermal transformation after hot deformation. J. Iron Steel Res. Int. 2003, 10, 46–48. [Google Scholar]
  6. Liu, Z.; Li, D.; Lu, S.; Qiao, G. Thermal stability of high temperature deformation induced ferrite in a low carbon steel. ISIJ Int. 2007, 47, 289–293. [Google Scholar]
  7. Sun, X.; Luo, H.; Dong, H.; Liu, Q.; Weng, Y. Microstructural evolution and kinetics for post-dynamic transformation in a plain low carbon steel. ISIJ Int. 2008, 48, 994–1000. [Google Scholar]
  8. Ghosh, C.; Basabe, V.V.; Jonas, J.J.; Kim, Y.; Jung, I.; Yue, S. The dynamic transformation of deformed austenite at temperatures above the Ae3. Acta Mater. 2013, 61, 2348–2362. [Google Scholar] [Green Version]
  9. Aranas, C.; Nguyen-Minh, T.; Grewal, R.; Jonas, J.J. Flow softening-based formation of Widmanstatten ferrite in a 0.06%C steel deformed above the Ae3. ISIJ Int. 2015, 55, 300–307. [Google Scholar]
  10. Aranas, C.; Jonas, J.J. Effect of Mn and Si on dynamic transformation of austenite above the Ae3 temperature. Acta Mater. 2015, 82, 1–10. [Google Scholar]
  11. Grewal, R.; Aranas, C.; Chadha, K.; Shahriari, D.; Jahazi, M.; Jonas, J.J. Formation of Widmastatten ferrite at very high temperatures in the austenite phase field. Acta Mater. 2016, 109, 23–31. [Google Scholar]
  12. Basabe, V.V.; Jonas, J.J. The ferrite transformation in hot deformed 0.036% Nb austenite at temperature above the Ae3. ISIJ Int. 2010, 50, 1185–1192. [Google Scholar]
  13. Rodrigues, S.F.; Aranas, C.; Wang, T.; Jonas, J.J. Dynamic transformation of an X70 steel under plate rolling conditions. ISIJ Int. 2017, 57, 162–169. [Google Scholar]
  14. Rodrigues, S.F.; Aranas, C.; Jonas, J.J. Dynamic transformation during the simulated plate rolling of a 0.09% Nb steel. ISIJ Int. 2017, 57, 1102–1111. [Google Scholar]
  15. Rodrigues, S.F.; Aranas, C.; Jonas, J.J. Retransformation behavior of dynamically transformed ferrite during the simulated plate rolling of a low C and an X70 Nb steel. ISIJ Int. 2017, 57, 929–936. [Google Scholar]
  16. Rodrigues, S.F.; Aranas, C.; Siciliano, F.; Jonas, J.J. Dynamic transformation during the simulation of plate rolling in an X70 steel. Steel Res. Int. 2016, 88, 1600388. [Google Scholar]
  17. Rodrigues, S.F.; Aranas, C.; Sun, B.; Siciliano, F.; Yue, S.; Jonas, J.J. Effect of grain size and residual strain on the dynamic transformation of austenite under plate rolling conditions. Steel Res. Int. 2018, 89, 1700547. [Google Scholar]
  18. Rodrigues, S.F.; Siciliano, F.; Aranas, C.; Silva, E.S.; Reis, G.S.; Jahazi, M.; Jonas, J.J. Dynamic phase transformation behavior of a Nb-microalloyed steel during roughing passes at temperatures above the Ae3. Metals 2019, 9, 334. [Google Scholar]
  19. Aranas, C.; Wang, T.; Jonas, J.J. Effect of interpass time on the dynamic transformation of a plain C-Mn and Nb-microalloyed steel. ISIJ Int. 2015, 55, 647–654. [Google Scholar]
  20. Bale, C.W.; Belisle, E.; Chartrand, P.; Decterov, S.A.; Eriksson, G.; Hack, K.; Jung, I.H.; Kang, Y.Y.; Melancon, J.; Pelton, A.D.; et al. FactSage thermomechanical software and database-recent developments. Calphad 2009, 33, 295–311. [Google Scholar]
  21. Fields, D.S.; Backofen, W.A. Determination of strain hardening characteristics by torsion testing. Proc. Am. Soc. Test. Mater. 1957, 57, 1259–1272. [Google Scholar]
  22. Jonas, J.J. Modelling the length changes that take place during torsion testing. Int. J. Mech. Sci. 1993, 35, 1065–1077. [Google Scholar]
  23. Ghosh, C.; Aranas, C.; Jonas, J.J. Dynamic transformation of deformed austenite at temperatures above the Ae. Prog. Mater. Sci. 2016, 82, 151–233. [Google Scholar]
  24. Schneider, C.A.; Rasband, W.S.; Eliceiri, K.W. NIH Image to ImageJ: 25 years of image analysis. Nat. Methods 2012, 9, 671–675. [Google Scholar] [PubMed]
  25. Poliak, E.I.; Jonas, J.J. A one-parameter approach to determining the critical conditions for the initiation of dynamic recrystallization. Acta Mater. 1996, 44, 127–136. [Google Scholar]
  26. Aranas, C.; Rodrigues, S.F.; Fall, A.; Jahazi, M.; Jonas, J.J. Determination of the critical stress associated with dynamic phase transformation in steels by means of free energy method. Metals 2018, 8, 360. [Google Scholar]
  27. Aranas, C.; Shen, Y.; Rodrigues, S.F.; Jonas, J.J. Microstructural evolution of a C-Mn steel during hot compression Above the Ae3. Metall. Mater. Tran. A 2016, 47, 4357–4361. [Google Scholar]
  28. Aztec Reclassify Phase: Discriminating Phases in Steels; Oxford Instruments: High Wycome, UK, 2016; Available online: www.nano.oxinst.com (accessed on 19 July 2019).
Figure 1. Thermomechanical schedule for the plate rolling simulations by means of torsion testing. The deformation temperature for the roughing and finishing passes were 1100 °C and 900 °C, respectively.
Metals 09 00814 g001
Figure 2. Calculated continuous cooling transformation (CCT) diagram of the material quenched from 900 °C with a grain size of 10 µm.
Metals 09 00814 g002
Figure 3. Stress–strain curves determined on the X70 steel according to the schedule in Figure 1 using pass strains of 0.4 applied at 1 s−1. Previous roughing pass numbers of (a) zero, (b) one, (c) two and (d) three.
Metals 09 00814 g003
Figure 4. Optical microstructures of the present material subjected to the five-pass finishing simulations with different thermomechanical roughing passes schedules. The samples were quenched immediately after the: (a) 1st pass, (b) 3rd pass, and (c) 5th pass. Light regions are ferrite while the dark regions are martensite (prior austenite).
Metals 09 00814 g004aMetals 09 00814 g004b
Figure 5. Plots of −(dθ/dσ) versus σ used to identify the minima related to the initiation of dynamic transformation (DT) and dynamic recrystallization (DRX). The samples associated with (a) zero, (b) one, (c) two and (d) four roughing passes are presented above.
Metals 09 00814 g005
Figure 6. The dependence of critical strains for dynamic transformation (DT) and dynamic recrystallization (DRX) on the finishing pass number. Simulations with roughing number of (a) zero, (b) one, (c) two and (d) four are shown. Here the first finishing pass always displays the highest critical strain, and this critical value is reduced with increasing roughing pass number.
Metals 09 00814 g006
Figure 7. Mean flow stress (MFS) curves derived from the stress–strain curves of Figure 3. The MFSs increase from the 1st to the 2nd pass followed by softening in the succeeding passes, which can be accounted to the formation of DT ferrite during each pass.
Metals 09 00814 g007
Figure 8. The dependence of the cumulative volume fraction of ferrite formed and retained on finishing pass number after roughing pass number of: (a) zero, (b) one, (c) two and (d) three. More ferrite was formed in the simulations with higher numbers of roughing passes.
Metals 09 00814 g008
Figure 9. Volume fraction of ferrite formed per pass. The amounts of ferrite increase with pass number and were even favored by the number of roughing passes.
Metals 09 00814 g009
Figure 10. The dependence of the proportion of austenite available for transformation that is transformed into ferrite on pass number. The ratio increases sharply when the number of roughing is increased.
Metals 09 00814 g010
Figure 11. Microstructure of samples subjected to five finishing passes with roughing pass number of: (a) zero, (b) one, (c) two and (d) three. The images show the presence of ferrite (mostly of polygonal form) and martensite (prior austenite).
Metals 09 00814 g011aMetals 09 00814 g011b
Figure 12. Selected EBSD maps of the sample quenched after the fifth finishing pass with three roughing passes: (a) band contrast (pattern quality) map, and (b) inverse colored orientation pole figure (IPF) map.
Metals 09 00814 g012
Table 1. Chemical composition (mass%) and equilibrium transformation temperatures (°C).
CMnSiCrNbNOrthoequilibrium Ae3Paraequilibrium Ae3
0.0471.560.250.210.0920.008846.1 °C811.2 °C