A general overview of the network configuration and daemons used has been provided. This appendix aims to provide a more detailed explanation of the network and how it was setup. A network created in Netkit-NG is made up of several different files and folders. lab.conf and lab.dep files are used by Netkit-NG for lab configuration detail. Netkit-NG requires each node to have a folder and a .startup file with the node’s name, both of which can be empty, however, in most cases in this network are not. The node folders contain files and folders the user would like in the specific node, for example if the file test.txt was required for pc1 this would be placed in its folder. The .startup file contains a bash script the user would like to run when a particular node is started, for example if the user required the ls command run when pc1 was started this command would appear in pc1.startup.
Appendix A.3. Collision Domain: TAP
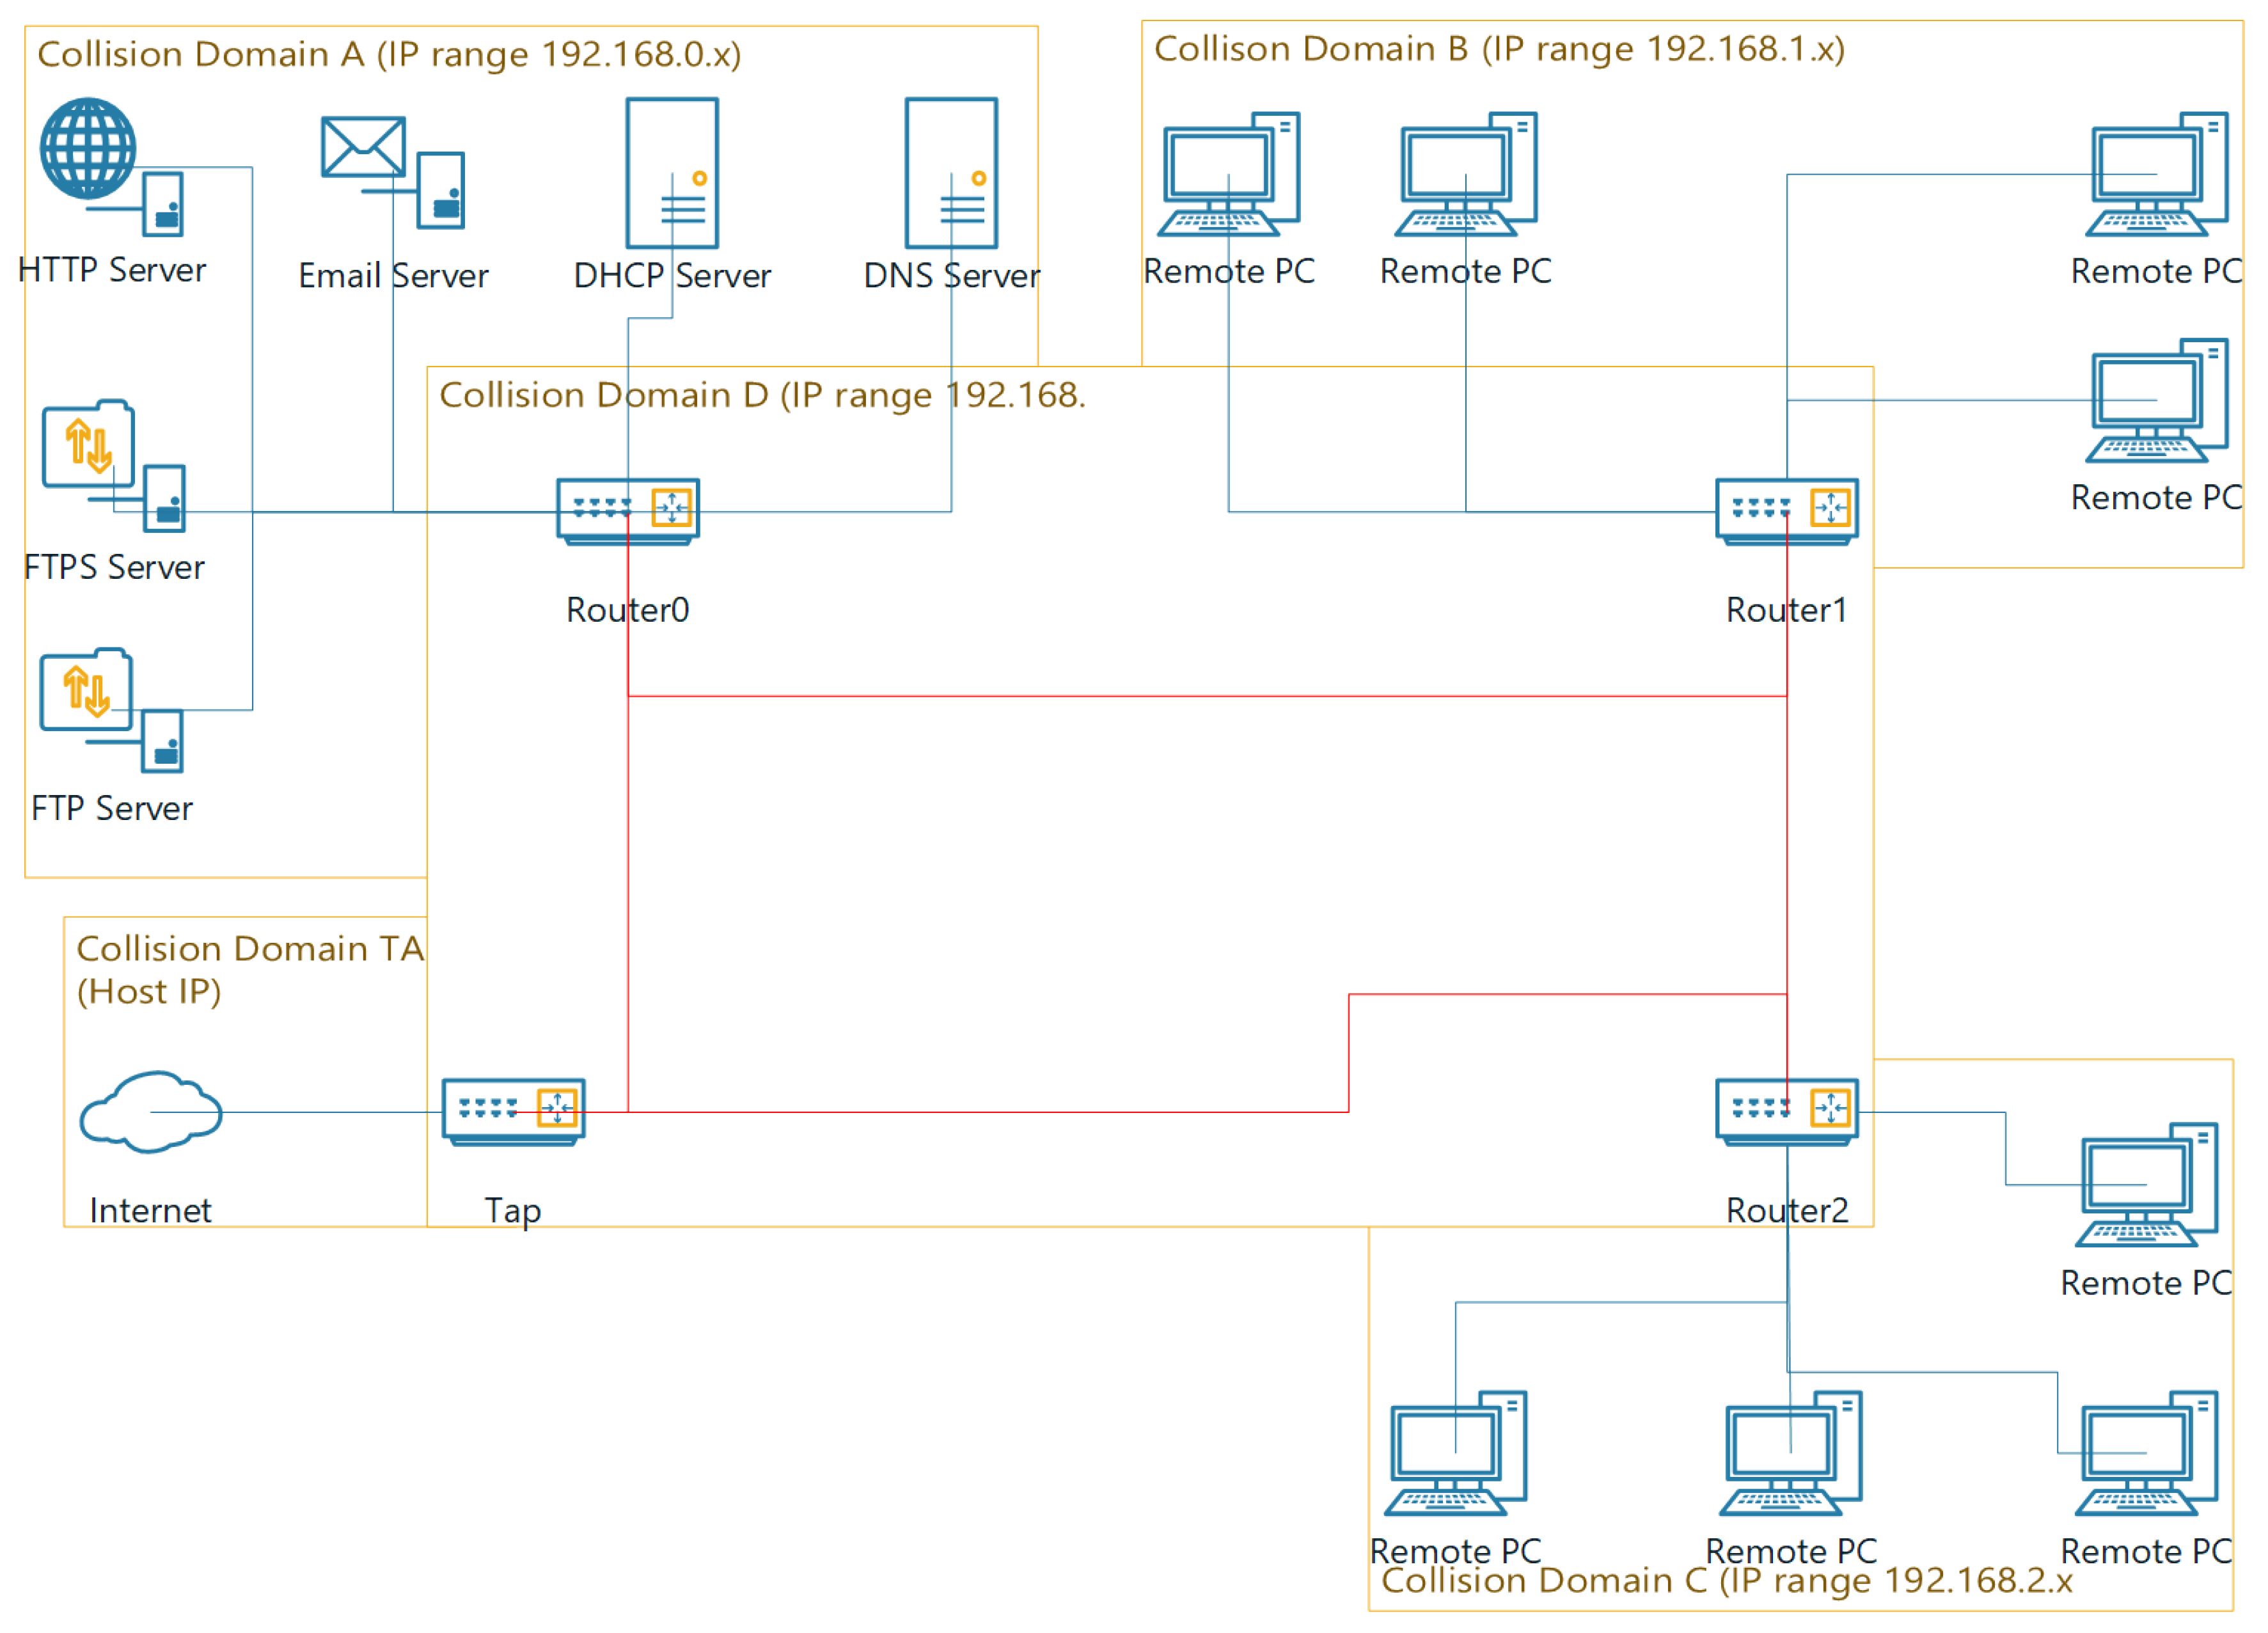
The TAP collision domain contains the TAP node on the network. This node acts as a gateway to the internet however does not differ greatly from the router nodes on the network (see
Appendix A.4), it uses commands placed in the
tap.startup file to add routes to the other collision domains:
route add -net 192.168.0.0 netmask 255.255.255.0 gw 192.168.4.10 eth1
route add -net 192.168.1.0 netmask 255.255.255.0 gw 192.168.4.20 eth1
route add -net 192.168.2.0 netmask 255.255.255.0 gw 192.168.4.30 eth1
The first route command tells the node that any traffic with an IP address in the range 192.168.0.0–192.168.0.255 should be sent to the address 192.168.4.10. The other commands work in a similar manner. The lab.conf file for the TAP node is not like other nodes. The rule for the TAP machine is:
Like a router this node has a network interface that sits on collision domain D. However, it has a second interface that sits on the TAP collision domain, the name tap is special in Netkit and allows the machine to communicate to the internet. Of the two IP addresses, the first is that of the host machine, and the second IP is the IP you would like to give to the tap nodes interface zero.
The tap node uses a slightly different resolv.conf file to the other machines. The resolv.conf file contains a list of DNS servers a node is able to contact, the tap node’s resolv.conf looks like:
nameserver 192.168.0.5
nameserver 8.8.8.8
The first address is that of
dnsServer (see
Appendix A.6.6), which all other nodes use for DNS queries. The second is the address of Google’s domain server, setting this allows the tap machine to make DNS queries outside of the network.
When the tap node starts it also installs the text-based web browser, Links. This is achieved using the command:
The tap machine connects to the internet and therefore does not require anything more to install this program.
Appendix A.4. Collision Domain: D
As stated in
Appendix A.3 this collision domain contains the routers for the network. The routers of this network are setup in the same way, the only differences being that the IP addresses differ between routers, as such only
router0 will be explained in detail. The
lab.conf file assigns two interfaces to the router, 1 and 2. ), and the
lab.dep file ensures the router cannot start until
dhcpServer has started.
router0.startup contains a number of commands for different purposes. The first command segment sets the IP addresses for both interfaces:
The IP address for the router was assigned statically to ensure it cannot be changed by the DHCP server, and the router always has the same IP. The next command segment assigns the router its routes:
route add -net 192.168.2.0 netmask 255.255.255.0 gw 192.168.4.30 eth1
route add -net 192.168.1.0 netmask 255.255.255.0 gw 192.168.4.20 eth1
route add default gw 192.168.4.40
These routes are assigned in the same way as the
tap node, however a default route has been added. This was added so that any traffic intended for an IP not listed would go through the
tap node and thus the internet. The final command segment consists of the setup and installation of ISC-DHCP-Relay (see
Section 3.2). The command segment is as follows:
echo “isc-dhcp-relay isc-dhcp-relay/servers string dhcpServer.test.sc.com”
| debconf-set-selections
echo “isc-dhcp-relay isc-dhcp-relay/interfaces string” | debconf-set-selections
echo “isc-dhcp-relay isc-dhcp-relay/options string” | debconf-set-selections
apt-get update
apt-get –force-yes install isc-dhcp-relay -y
The first three
echo statements contain setup information for the DHCP relay. This information is stored by the node and used to set options when ISC-DHCP-Relay is installed. The first command sets the DHCP server location to
dhcpServer.test.sc.com, this is where DHCP requests will be forwarded when received by the router. The second leaves the interface field blank, leaving it blank allows the relay to detect which interface should forward DHCP requests. The final command is blank, to stop ISC-DHCP-Relay asking for additional options. These options are set to ensure the scripted installation requires no additional user setup. The
apt-get update command is used to update where apt-get will look when installing new packages, this is used because the relevant files are installed from files local to the node. The installation uses local files so an internet connection isn’t required for the lab to function (see
Appendix A.4.1).
A resolv.conf is also used by the routers and uses the following line:
domain test.sc.com
nameserver 192.168.0.5
The first line tells the node what the local domain is, this means that when the node attempts to communicate with another node on the network it does not have to use the fully qualified domain name (i.e., remote1.test.sc.com), it can instead use just the hostname of that node (i.e., remote1). The next line points the node to the local DNS server.
Appendix A.4.1. Installing from Local Files
Installing a program using local files requires several steps. The required files were downloaded, in the .deb format on a host machine, this included any dependencies. These files were then placed in the etc/debPackages folder on the node that required them. Once the files were downloaded the following command was run on the host machine.
This command creates a zip file with information regarding the .deb files.
The host’s etc/apt/sources.list file was then changed so that it contained the single line:
This line tells the node to look in the /etc/debPackages folder for packages. When the apt-get install command is run on the node it will now install without using an internet connection. This process has been repeated throughout the network as it is a fast and simple method of installing required applications, without an active connection to the internet.
Appendix A.5. Collision Domains: B & C
These subdomains do not contain any server daemons (see
Section 3.3) and therefore require minimal setup, these are referred to as remote nodes. Each node has only one interface that sits on either collision domain B or C, the
lab.dep file contains a variation of the line:
The name of each node will change as will the name of the last router, depending on the machine and collision domain it will be placed on.
The node’s .startup files are very similar, each contain the command:
This command makes the node query for a DHCP server when it starts up. If a DHCP server is found it will send and request several pieces of information for its eth0 interface, if one is not found the device will not obtain any information and the interface will not be able to communicate with the network which is why it is important that these devices start after both the dhcpServer and the routers.
The information sent and requested by the dhclient command is defined in etc/dhcp/dhclient.conf. The information sent is done so via the below segment:
This will send the host name of the node to the DHCP server, which is used for DDNS (see
Appendix A.6.6). The next segment in
dhclient.conf is:
request subnet-mask, broadcast-address, time-offset, routers,
domain-name, domain-name-servers, domain-search, host-name,
dhcp6.name-servers, dhcp6.domain-search,
netbios-name-servers, netbios-scope, interface-mtu,
ntp-servers;
This will request various information from the DHCP server that will allow/aid the node in communicating with the network.
A default route is added on start-up, however these nodes will use the IP address of 192.168.1.11 or 192.168.2.22, this is collision domain dependant. The final section in the
.startup files is the installation of the Links web browser, this is installed offline (see
Appendix A.4.1).
The Pine program is installed on these nodes as an email client (see
Section 3.3). This requires several files to work, one of which is the
root/mail/sent-mail file, this contains information used by Pine for its mail folder and is used for no other purpose. The Pine program is held in
usr/local/bin/pine, and the Pine manual page is held in
usr/share/man/man1/pine.1. It also requires the hidden file
root/mail/.pinerc, this file contains a large amount of configuration information for the Pine application. Pine requires a line to be added in this file. This line is shown below and is added at line 29.
This line makes Pine look for the inbox of remote1 on the IMAP server in the /usr directory.
The final section in the remote nodes .startup file is the following lines:
The first line will start the bash script located at the specified file path, which will then run in the background. This script is used to replay network traffic (see
Section 4). The second line is used because the nodes would hang during the start-up procedure, and this was found to stop this.
Like the routers (see
Appendix A.4) the nodes in this collision domain use the
resolv.conf file. The configuration adds a third line. This line is a second
nameserver and is used to allow the node to query a non-local DNS server, which is capable of resolving internet requests.
Appendix A.6. Collision Domain: A
This subnet contains all of the servers required by the network. Each server is assigned one network interface by the
lab.conf file, these interfaces all sit on collision domain A. The
lab.dep file ensures that
dhcpSever starts before the other servers, after this
dnsServer will start, only then will the others start. When the other nodes on the network start, they will query the DHCP server using the
dhclient command (see
Appendix A.5). Each server node on this subnet will also have a default route of 192.168.0.55 which corresponds to router0. Another commonality between all servers is the use of an SSH daemon which allows remote command execution via a secure connection, this is started using:
Once started a user is added, to allow access to the node via SSH. A user is added using the command:
This adds a user called root and the appropriate directories. The user is then given the password toor. While not being a very secure password this is done for the purpose of this network scenario as password cracking will not be a focus of this environment.
Like the routers (see
Appendix A.4), the server nodes in this collision domain use the
resolv.conf file. The configuration used is the same as used by the router nodes.
Appendix A.6.1. FTP Server
All configuration for
ftpServer is contained in its
.startup file. Firstly, it will query the DHCP server for an IP address (see
Appendix A.6.5).
ftpServer will then add users (remote0–remote8), this is a simple operation but it is required to establish a connection with the proftpd daemon. Once the users have been added the FTP daemon is started:
Appendix A.6.2. SFTP Server
The sftpServer.startup file is exactly the same as ftpServer.startup, however sftpServer contains the file /etc/proftpd/conf.d/sftp.conf. This file instructs the proftpd daemon to use the SFTP protocol rather than standard FTP. It also states which port to use and that it should use a public key. This is the only difference between the two server nodes.
Appendix A.6.3. HTTP Server
In addition to the commands discussed in
Appendix A.6 httpServer.startup contains the following lines:
The first two lines enable the apache2 SSL modules. These modules allow apache2 to use HTTPS as well as standard HTTP. The last line starts the apache server daemon.
HTTP works on this server without any additional configuration. HTTP webpages are stored in the
httpServer/var/www directory, two very basic webpages were placed in this directory,
corp_home.html and
an_page_of_VSTART.html, these pages simply provide proof that
httpServer works and can be accessed via the Links program using the address
http://httpServer.test.sc.com/ and then the name of the file.
Implementing HTTPS requires more configuration. In order for SSL to work a certificate must be generated, this certificate is used to confirm the identity of the server to the client node, for the purposes of this network it was decided to sign this certificate myself to ensure the network does not directly require an internet connection to function. To self-sign a certificate a tutorial was followed provided by Zahn and Zahn (n.d.), this goes through the entire process. Once the correct files were generated a small number of changes were made. These changes took place in the httpServer/etc/apache2/sites-available file. The document root, on line five, was changed from /var/www to /var/ssl as was the directory, on line ten. These two changes ensure that httpServer is capable of using both the HTTP and HTTPS protocols.
Another change made to the same file was the addition of the following lines:
These lines enforce the directory where apache will look for the .crt and .key files, the names of these files were also changed, these changes helped to make the files easier to locate if further changes were required.
As with the standard HTTP webpages a very basic page was created in the
httpSever/var/ssl directory. When
httpServer is started the page that implements HTTPS can be reached using the address
https://httpServer.test.sc.com/ssl.html.
Appendix A.6.4. Email Server
The
emailServer.startup file is similar to the other nodes on this collision domain, however like the FTP server it adds several users. The email server also includes some installs that have been scripted (see
Appendix A.4.1). The commands used to script the installation are:
apt-get update
apt-get –force-yes install exim4 -y
chmod 644 /etc/exim4/exim4.conf
chown root:root /etc/exim4/exim4.conf
/etc/init.d/exim4 start
/etc/init.d/openbsd-inetd start
In addition to the installation commands are the
chmod and
chown commands. These are used to change the permissions of the
exim4.conf file, the permissions had to be changed as there were errors encountered when starting exim4 initially which were diagnosed as permission related. Similar to the nodes in collision domains B and C this node contains the Pine application as well as the imapd and pop3d daemons(see
Section 3.4.4).
The exim4 daemon is configured using the emailServer/etc/exim4/exim4.conf and emailServer/etc/exim4/update-exim4.conf.conf files. The exim4.conf file should not be changed directly by the user, which is why the update-exim4.conf.conf file is required. update-exim4.conf.conf contains information about the network so exim4 can function properly and only receive traffic from a certain range of IP addresses.
Like the standard nodes (see
Appendix A.5) the email server uses Pine. It is used here to allow emails to be stored in a remote inbox. The only change required in the hidden file
.pinerc is following line eighty where the following is added:
This allows the Reply-To field to be automatically filled in, while not strictly necessary this makes it easier for the nodes to communicate via email.
Appendix A.6.5. DHCP Server
dhcpServer uses most of the commands used by the other server nodes (see
Appendix A.4), however it does not use
dhclient, instead it uses the following:
These commands set a hardware address for eth0, and subsequently assign an IP address for eth0. A hardware address is assigned to ensure the DHCP server will not attempt to give its assigned address to another node. This is done by defining a static lease in the dhcpd.conf file.
After eth0 has been configured the following commands are run:
apt-get update
apt-get –force-yes install isc-dhcp-server -y
cp /etc/dhcp/myConf/dhcpd.conf /etc/dhcp
service isc-dhcp-server restart
This installs the server daemon (see
Section 3.4.5), a configuration file is then copied and the server daemon is restarted. The configuration file is copied as there is a
dhcpd.conf file already in the
dhcpServer/etc/dhcp directory. Under normal circumstances this would be replaced on start-up if the file was present in the lab directory structure, however when ISC-DHCP-Server is installed this file is replaced, because of this the file has to be copied into the directory following installation of the server daemon. After copying the new configuration file the server daemon has to be restarted to ensure the daemon uses the new file. Following this is the installation and configuration of the ISC-DHCP-Relay daemon, this is the same as the routers.
ISC-DHCP-Server uses two files for its configuration, dhcpServer/etc/default/isc-dhcp-server and dhcpServer/etc/dhcp/myconf/dhcpd.conf. The first file is used, in this lab, to configure what interface the DHCP server should serve requests from, the following line was used:
This line specifies eth0, this is the only interface dhcpServer has.
The dhcpd.conf file is used to specify how the DHCP server allocates addresses and communicates with the network, and in this case how it updates the DNS server with the addresses it distributes. It should be noted that this file is divided into sections, which are denoted by curly braces and a semi colon . In order to update the DNS server the following lines are used:
ddns-update-style interim;
update-static-leases on;
key ddns.key
algorithm hmac-md5;
secret NvoL1uVTOeWOmWQPbip1Rg==;
;
zone test.sc.com
primary 192.168.0.5;
key ddns.key;
zone reverse.in-addr.arpa
primary 192.168.0.5;
key ddns.key;
option domain-name “test.sc.com”;
option domain-name-servers dnsServer.test.sc.com;
The first line enables the DHCP server to send updates to the DNS server, and the second ensures that it will send updates about any static IP addresses that are assigned later in the file. The next section, starting
key ddns.key, defines a key that should be sent by the DHCP server daemon when it updates the DNS server, this is used as a method of authentication so the DNS server does not accept updates unless the key is provided. The two sections that begin
zone denote the two DNS zones that
dhcpServer can update (see
Appendix A.6.6), you will also notice that the aforementioned key is referred to in these sections, this is provided when the DHCP server updates the zone. The final lines inform the DHCP server of the domain name and the location of the DNS server it will be updating.
The next four lines in dhcpd.conf are as follows:
default-lease-time 600;
max-lease-time 7200;
authoritative;
log-facility local7;
The first two dictate the lease time allowed on IP address allocations, this is measured in seconds. When a device queries the DHCP server for an address it will be given this information and should send another request when this time is over, if it does not the DHCP server is able to give the allocated address to another device. The next line states that this particular DHCP server is authoritative for the network. The final line makes the DHCP server create logs using the local7 utility, this is used for logging various information, which can be used for debugging errors.
Following the aforementioned sections are three sections that define subnets and the addresses the DHCP server can assign within those subnets. The sections are of a similar structure and look like:
subnet 192.168.1.0 netmask 255.255.255.0
range 192.168.1.50 192.168.1.250;
default-lease-time 600;
max-lease-time 7200;
option routers 192.168.1.11;
option ip-forwarding off;
option domain-name-servers 192.168.0.5;
option broadcast-address 192.168.1.255;
option subnet-mask 255.255.255.0;
The first line defines the subnet as 192.168.1.0 with a netmask of 255.255.255.0. The netmask is the range of IP addresses available to the subnet in this case the available addresses are in the range 192.168.1.0–192.168.1.255. The next line sets the range of IP addresses the DHCP server is actually able to assign. The two lines following this reiterate the lease times assigned earlier. The fifth line simply states the IP address of the router for a particular subnet. Following that line is one that turns off ip-forwarding, this is normally turned on if there is a router being assigned an address. The final three lines are information regarding the network, and is sent to the client node.
The final section in dhcpd.conf defines any client nodes which should have fixed IP addresses:
The first line simply denotes the node the rule applies to, this name does not have to be the name of the node, however, doing so makes the rule easier to read/understand. The second line is the hardware address of the node the rule applies to, this information is supplied by each node when they query the DHCP server. The final line is the IP address that will be given to the specified device. Fixed addresses are used for the DHCP and DNS server nodes, because if they were to change address the network would not function properly.
Appendix A.6.6. DNS Server
Like the other server nodes on this collision domain this node use the same .startup file, with the addition of the following line:
This line starts the Bind9 server daemon which is used for DNS. A key difference between
dnsServer and other nodes on this collision domain is the omission of the line referencing the
nameserver in the
resolv.conf file, this is because it is the DNS server and does not need to reference itself. This server node uses the Bind9 server daemon to implement the DNS protocol (see
Section 3.4.6), the configuration files for this are in contained within the directory
dnsServer/etc/bind/.
The named.conf.local file is read by Bind9 for information regarding domains it controls. This file contains the ddns.key, this is the same as found in the DHCP server and is what the DHCP servers key is compared against. The rest of the file contains information about the various zones under the control of this DNS server, there are two zones in this particular configuration file. The first zone is defined as:
The first section defines a new zone, test.sc.com, and states that this DNS server is the master of that zone, this means that it is the authoritative name server for the particular zone. Following this is a line with the location of a file, this file will be explained in more detail in the following paragraph. The final line states that the server should allow updates to this zone if the key in ddns.key is provided. The second zone is very similar to this one however it is called reverse.in-addr.arpa and the related file is located at /etc/bind/zones/reverse.db.com.sc.test, the contents of which will be explained in a subsequent paragraph. This zone is used for reverse lookups, these are like normal DNS lookups (i.e., using domain names to find IP addresses) except the opposite way around.
The file dnsServer/etc/bind/db.com.sc.test contains information about the test.sc.com zone. The first section of this files relates to refresh rates of the DNS records, and when they expire. The next section is where records are denoted, records are used by the DNS server to locate a node based on its domain name. Typically, a record looks like:
This denotes that the domain name dhcpServer.test.sc.com. refers to the node with the IP address at the end of the line. There are few records in this file given that most of the network’s nodes are given records using Dynamic DNS. Some exceptions exist and this is mostly for email protocol as emails are not addressed to a specific node’s host name, the lines used for email are shown below.
mail.test.sc.com. IN A 192.168.0.8
imap.test.sc.com. IN A 192.168.0.8
pop.test.sc.com. IN A 192.168.0.8
These all relate to the location of the email server.
The second file used by Bind9 was /etc/bind/zones/reverse.db.com.sc.test. The contents of which look very similar to that described above, however the lines denoting domain names are in reverse:
This allows the DNS server to resolve queries that look for the domain name of a given IP address.


