Article

Optical and Mechanical Performance and Feasibility Analysis of Meter-Level Corrector Lenses for Survey Telescope

1
Suzhou Institute of Biomedical Engineering and Technology, Chinese Academy of Sciences, Suzhou 215163, China
2
Jinan Guoke Medical Technology Development Co., Ltd., Jinan 250000, China
3
Changchun Institute of Optics, Fine Mechanics and Physics, Chinese Academy of Sciences, Changchun 130033, China
*
Author to whom correspondence should be addressed.
Photonics 2023, 10(4), 422; https://doi.org/10.3390/photonics10040422
Submission received: 2 March 2023 / Revised: 23 March 2023 / Accepted: 6 April 2023 / Published: 8 April 2023

Abstract

:
A prime-focus optical system is a common type of large aperture survey telescope with a small obscuration ratio, high transmittance, and simple structure. As the detection capabilities and search efficiency of the telescope are improved, the aperture of the primary mirror becomes larger. The primary mirror aperture of a high-performance survey telescope has a four-meter scale, and the aperture of the corrector lenses of a corresponding prime-focus optical system can reach a one-meter scale. In this study, optical surface shape changes due to gravity were studied via an integrated optomechanical analysis. The Zernike polynomial was used to characterize the changed optical surface. The influence of optical surface variations on the wavefront and imaging quality of the optical system was analyzed by calculating the optical path differences. From the perspective of optical aberration, the optical properties of meter-level corrector lenses were quantitatively analyzed. The effect of the meter-level corrector lenses on imaging was explained in principle, and the feasibility of this optical scheme was verified.

1. Introduction

A ground-based wide-field survey telescope is considered an important tool for the birth of new theories and the exploration of new discoveries in the field of astronomy in the 21st century. As a large scale surveying method of Space Situational Awareness [1], the main functions of a ground-based wide-field survey telescope are to image large-scale space targets, draw an atlas of astronomical galaxies, compare the images taken by celestial targets at different times, and obtain effective information. The emergence of the survey telescope has enabled us to understand the universe on an unprecedented macroscopic scale [2]. This special observation form puts forward new requirements for optical systems to obtain highly sensitive and high-decomposition images while imaging at wide field angles [3].
Common telescope optical systems [4] include prime-focus systems, Mersenne–Schmidt systems, and Ritchey–Chretien (R–C) systems [5]. Such optical systems are designed for the fast imaging of flat structures and are examples of agile telescopes. Wavefront correction techniques (adaptive optics, etc.) are not usually used. Therefore, the development of this kind of telescope requires perfectly detailed simulation analyses and calculations. It is a complicated and difficult scientific problem to establish the correct mathematical model of telescopes and to estimate the observation performance and imaging effect reasonably.
A prime-focus optical system is a common optical system in large aperture survey telescopes. It has a small obscuration ratio, high transmittance, and a simple structure. As the detection capabilities and search efficiency of the telescope improve, the aperture of the primary mirror becomes larger. The primary mirror aperture of a high-performance survey telescope is at the four-meter scale, and the aperture of the corrector lenses of a corresponding prime-focus optical system reaches a one-meter scale.
In this study, optical surface shape changes due to gravity were studied via integrated optomechanical analysis. The Zernike polynomial was used to characterize the changed optical surface. The influence of optical surface variations on the wavefront and imaging quality of the optical system was analyzed by calculating the optical path differences. From the perspective of optical aberration, the optical properties of meter-level corrector lenses were quantitatively analyzed. The effect of the meter-level corrector lens on imaging was explained in principle, and the feasibility of this optical scheme was verified.

1.1. Optical System

With the development of technology, optical systems have become an important technical approach to solving scientific problems. In order to realize the detection of farther and weaker targets, the aperture of an optical system becomes larger. Simultaneously, in order to realize the observation of a larger space, the field of view of the optical system becomes wider [6], as is shown in Figure 1.
Photoelectric imaging telescopes are used for space target detection and monitoring and can be divided into the tracking type and searching type. The tracking type has a small field of view, small target surface size, and high tracking accuracy. The search type has a wide field of view, short focal length, and large target surface size [7]. For searching photoelectric imaging telescopes, large-aperture and large-field-of-view optical systems can greatly improve the detection ability and search efficiency of space targets.

1.2. Common Optical Systems

Common optical systems of telescopes include Schmidt optical systems, Maksutov optical systems, Cassegrain optical systems, off-axis three-mirror optical systems, Mersenne–Schmidt optical systems, and prime-focus systems [4].
Through screening, it has been found that both the Schmidt optical system and the Maksutov optical system require transmission materials of the same caliber as the size of the primary mirror used as the corrector plate, and as such they can be directly excluded. At the same time, the optical systems with a large aperture and wide field of view in the world have been studied and analyzed. Most telescopes are found to have optical systems in the form of prime-focusing systems and Mersenne–Schmidt systems. There are seven prime-focus-type telescopes and two Mersenne–Schmidt-type telescopes. They are listed in Table 1.
The Mersenne–Schmidt optical system is composed of three large-aperture aspherical mirrors and several small-aperture transmission correction mirrors. The surface shapes of the aspherical mirrors are all in the form of high-order aspherical surfaces. Small aperture transmission correction mirrors are designed to eliminate additional aberrations and obtain better imaging quality.
The prime-focus optical system uses the focus of the primary mirror for imaging. It is composed of an aspherical primary mirror and several small-aperture transmission corrector lenses, including spherical-surface and aspherical-surface lenses. The central shielding of the system is relatively small, which improves the energy utilization. Considering the use of the equipment, the receiver detector can be easily adjusted and replaced, the system imaging quality is better, the field of view can be expanded as required, and the image plane quality is guaranteed.
To sum up, the main focus form has obvious advantages in terms of detection ability, optical efficiency, optical processing, detection, assembly, and other processes. It is not only implementable but can also fully guarantee system accuracy. At present, some aspects of the Mersenne–Schmidt system are more difficult to deal with and uncertain. Therefore, the prime-focus form is selected as the optical system for a 4 m large aperture, wide-field-of-view telescope.

1.3. Typical Telescopes in the Form of Prime Focus

The prime focus optical system is a common optical form for wide-field telescopes. As the aperture of the primary mirror increases, the size of the corrector lenses and the mosaic of the focal plane array in the prime-focus system increases, which presents technical difficulties in the development process. This section is devoted to the corrector lenses and the mosaic of the focal plane array of large-aperture, wide-field-of-view telescopes.
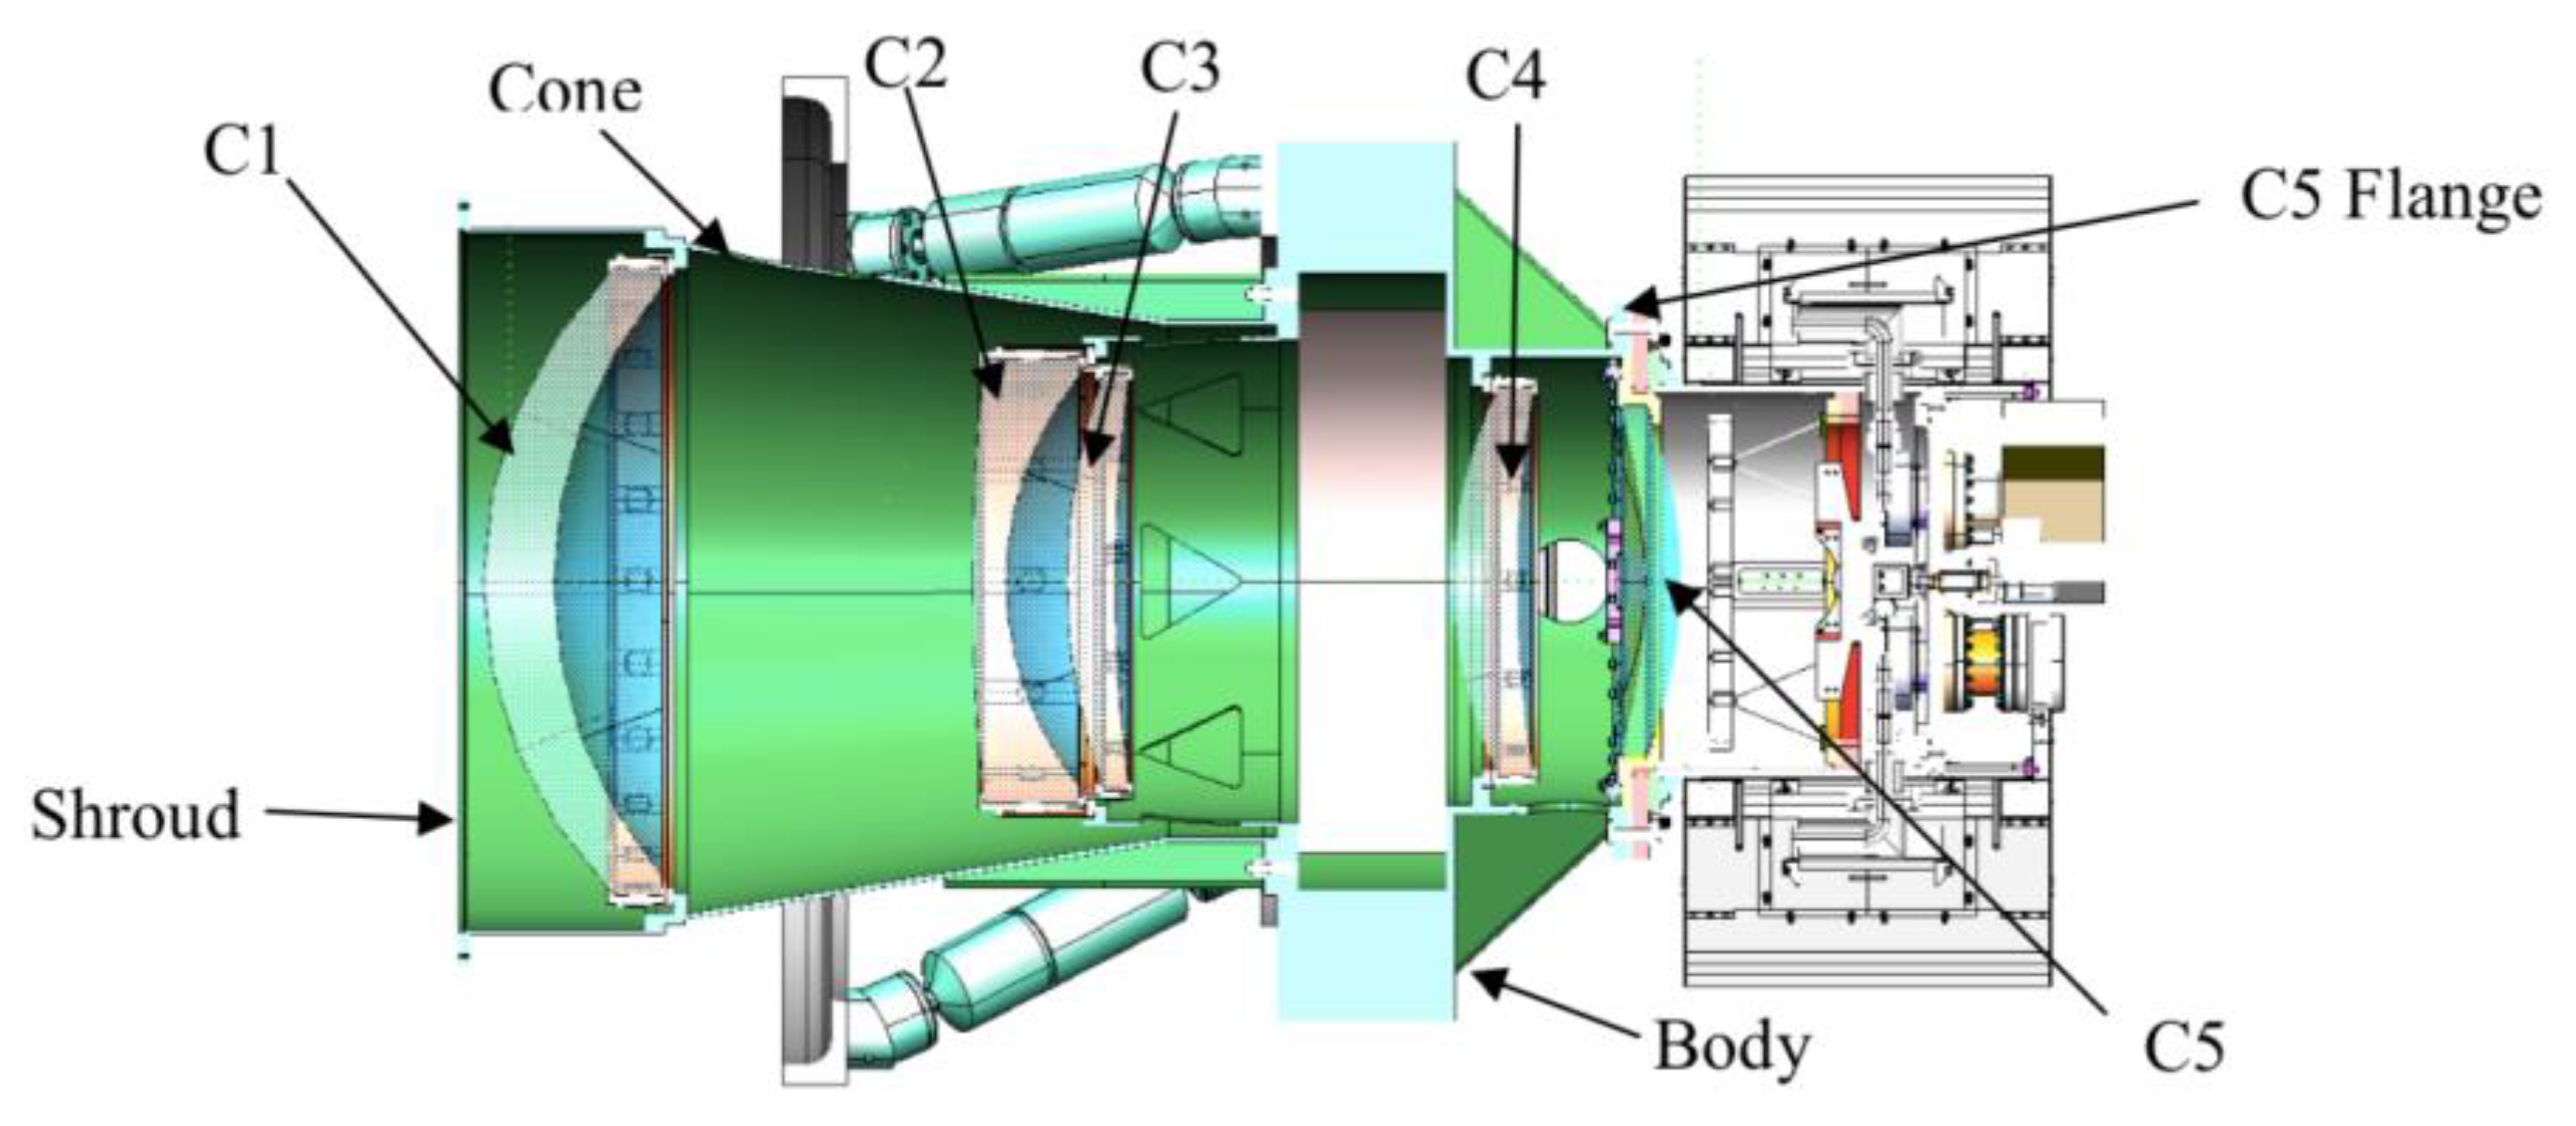
Dark Energy Camera (DECam) was used for “The Dark Energy Survey” (DES). It was installed at a prime-focus position of 4 m on the Blanco telescope in the Cerro Tololo Inter-American Observatory, Chile. The first observation was made in 2011, and its composition is shown in Figure 2. The prime-focus system consists of five corrector lenses and the mosaic of the focal plane array of a CCD. The size parameters of the corrector lenses are given in Table 2. With a field of view of 2.2 degrees and a five-year operating life, a sky area measurement of 5000 square degrees was achieved. Due to its superior performance in astronomical observation, its scientific research results are abundant.
2.
8.2 m Subaru Telescope
The Subaru Telescope is an optical telescope that was built by the National Astronomical Observatory of Japan at the Mauna Kea Observatory in Hawaii, USA [16]. The aperture of the primary mirror of the telescope is 8.2 m. It has four focuses, the prime-focus (F/2), the Cassegrain focus (F/12.2), and two Coudé focuses (F/12.6), to meet different observation and imaging needs.
To stay ahead of the curve in large-aperture observations, the National Astronomical Observatory of Japan decided to develop a new-generation Hyper Suprime-Cam (HSC) camera in November 2008 [17,18,19,20]. The prime-focus system consists of seven corrector lenses and the mosaic of the focal plane array of a CCD [21,22,23,24], as is shown in Figure 3.
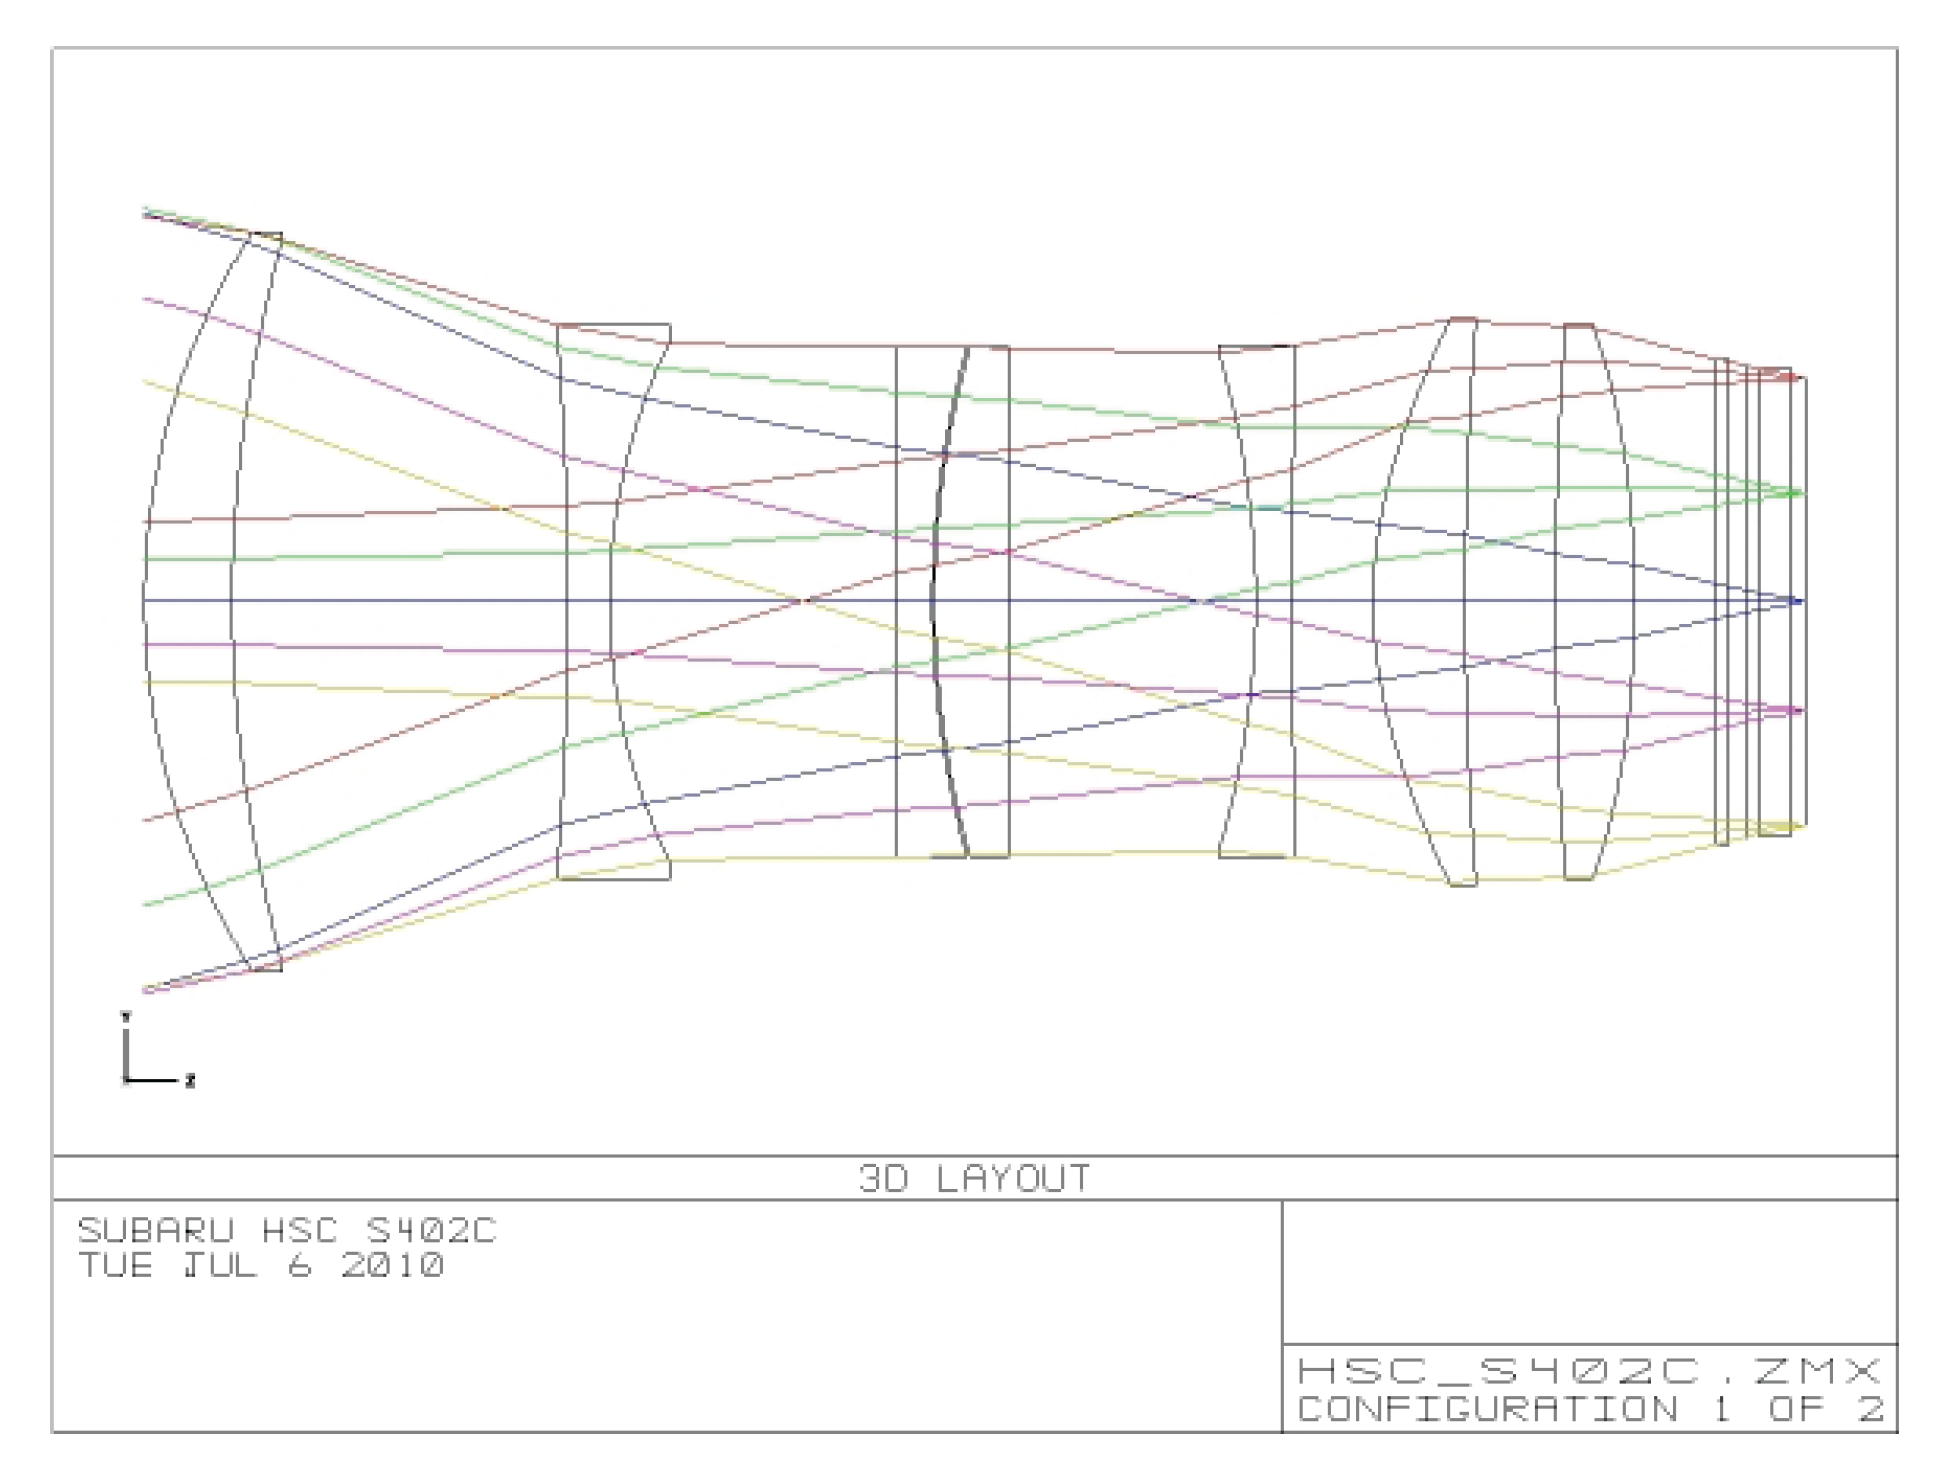
The primary focus optical system of the telescope is shown in Figure 4, where the first lens has a maximum diameter of 850 mm, the third and fourth lenses are atmospheric dispersion correctors, and the remaining corrector lenses have aspherical surfaces. Considering the assembly and detection errors comprehensively, the 80% energy concentration of the prime-focus optical system is better than that of 0.3 arcsec, and the imaging performance is excellent.

2. Materials and Methods

2.1. Our Optical System Design

After comprehensive consideration, the design inputs used to meet our working requirements of a large-aperture and wide-field-of-view telescope are as follows—aperture: 4 m; field-of-view angle: 3.5°; wavelength range: 486–960 nm; detector resolution: 16 k × 16 k; pixel size: 10 μm × 10 μm.
A prime-focus optical system scheme was chosen as the design. The differences between our design and the existing ones are listed in Table 3.
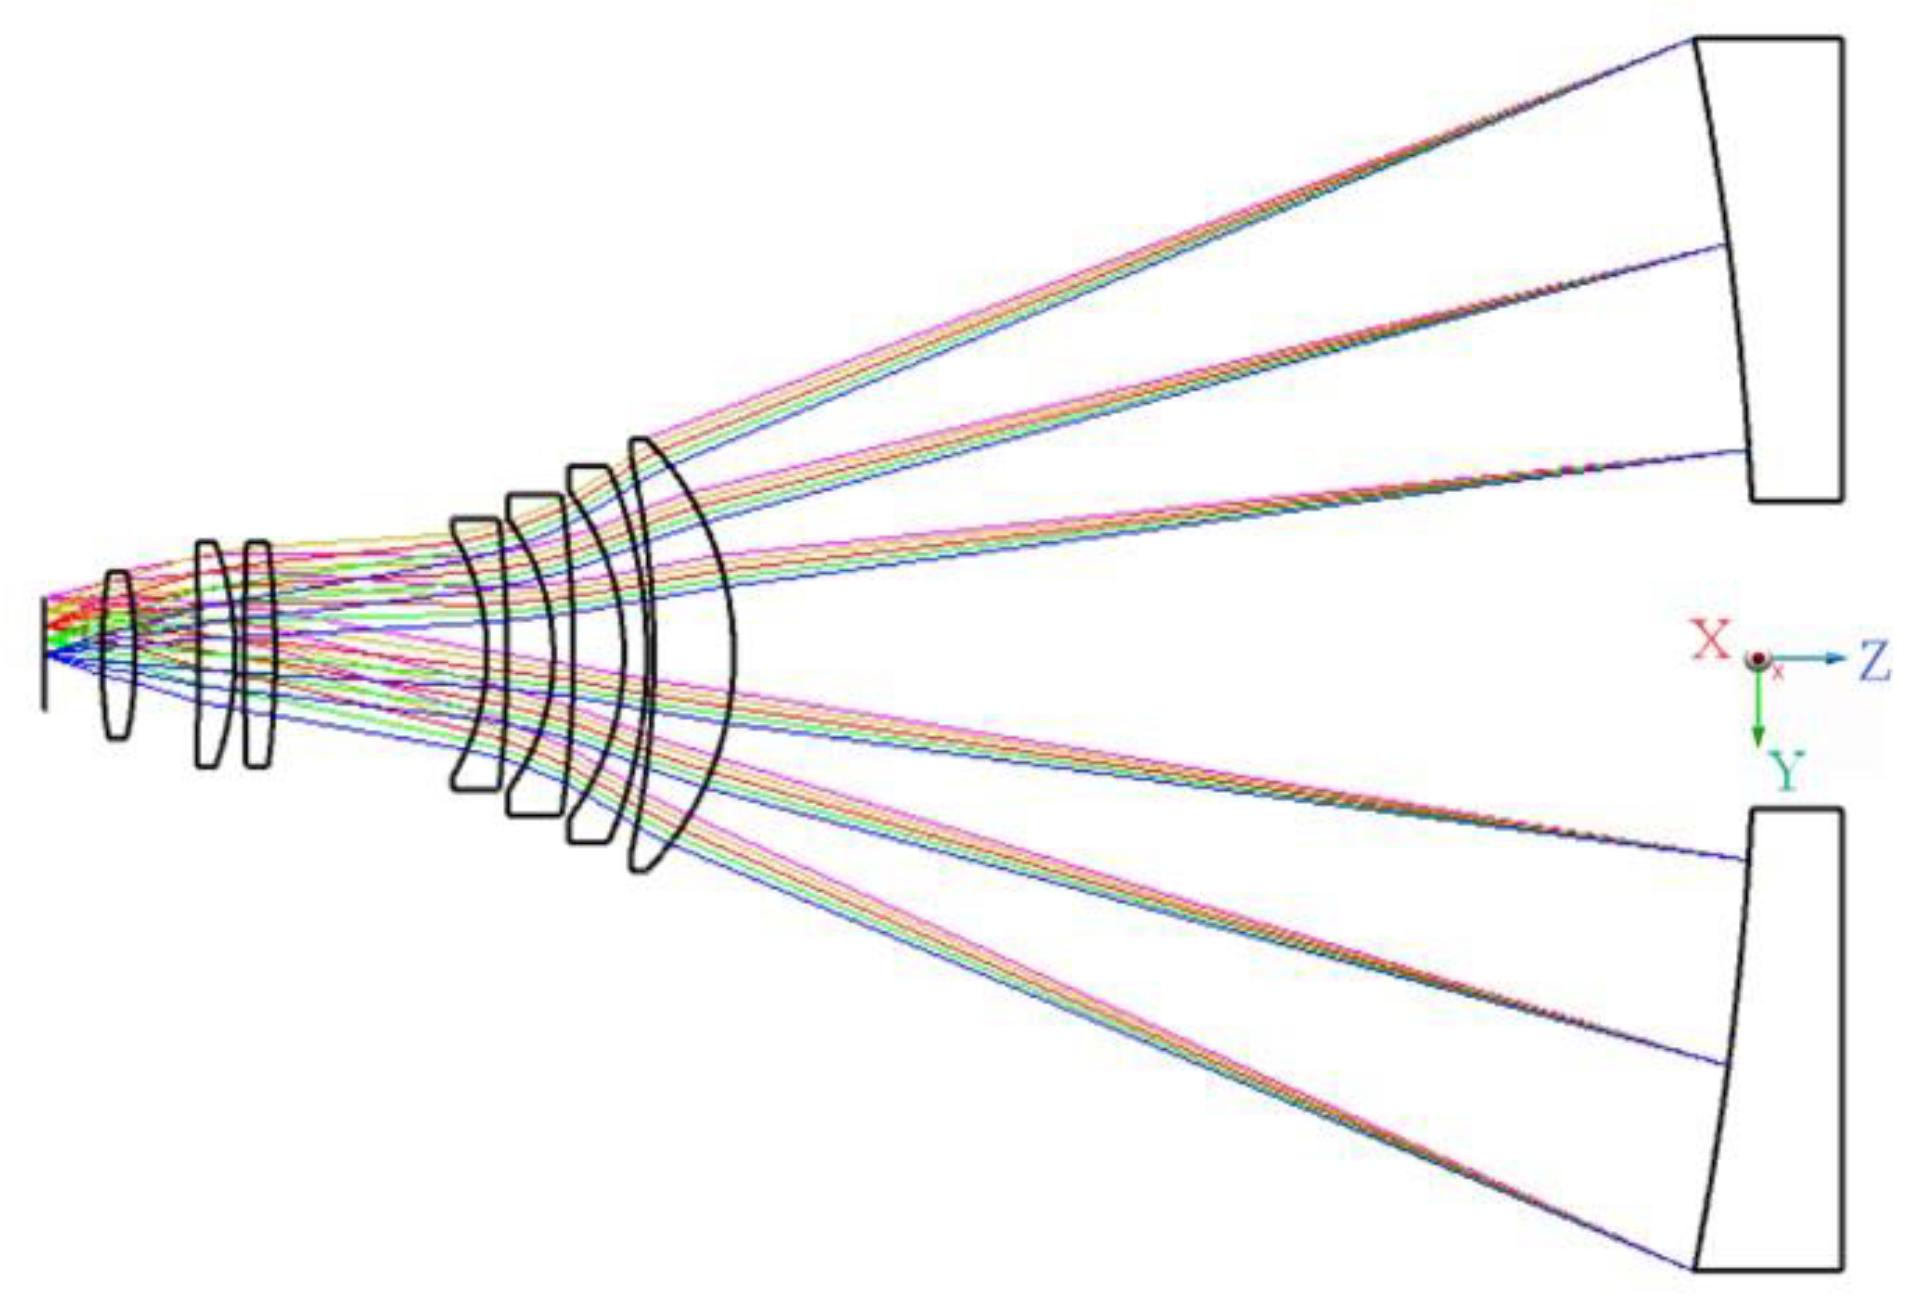
The layout of our optical system is shown in Figure 5, and the design parameters are given in Table 4. The prime-focus corrector lens consists of seven corrector lenses, L1, L2, L3, L4, L5, L6, and L7, which are oriented from right to left as shown in Figure 5. The right surface of each lens is defined as S1 and the left surface is defined as S2. The size of the prime-focus corrector lens is enormous. The largest corrector lens is L1, which is of a diameter of 1400 mm and a weight of 574 kg. The smallest corrector lens is L7, of diameter of 540 mm and a weight of 42 kg. There has been little domestic or international research on the use of corrector lenses of this size. In this paper, the feasibility of the optical scheme of meter-level corrector lenses with a prime focus system is demonstrated by means of an integrated optomechanical analysis.

2.2. Integrated Optomechanical Analysis

2.2.1. Analytical Method

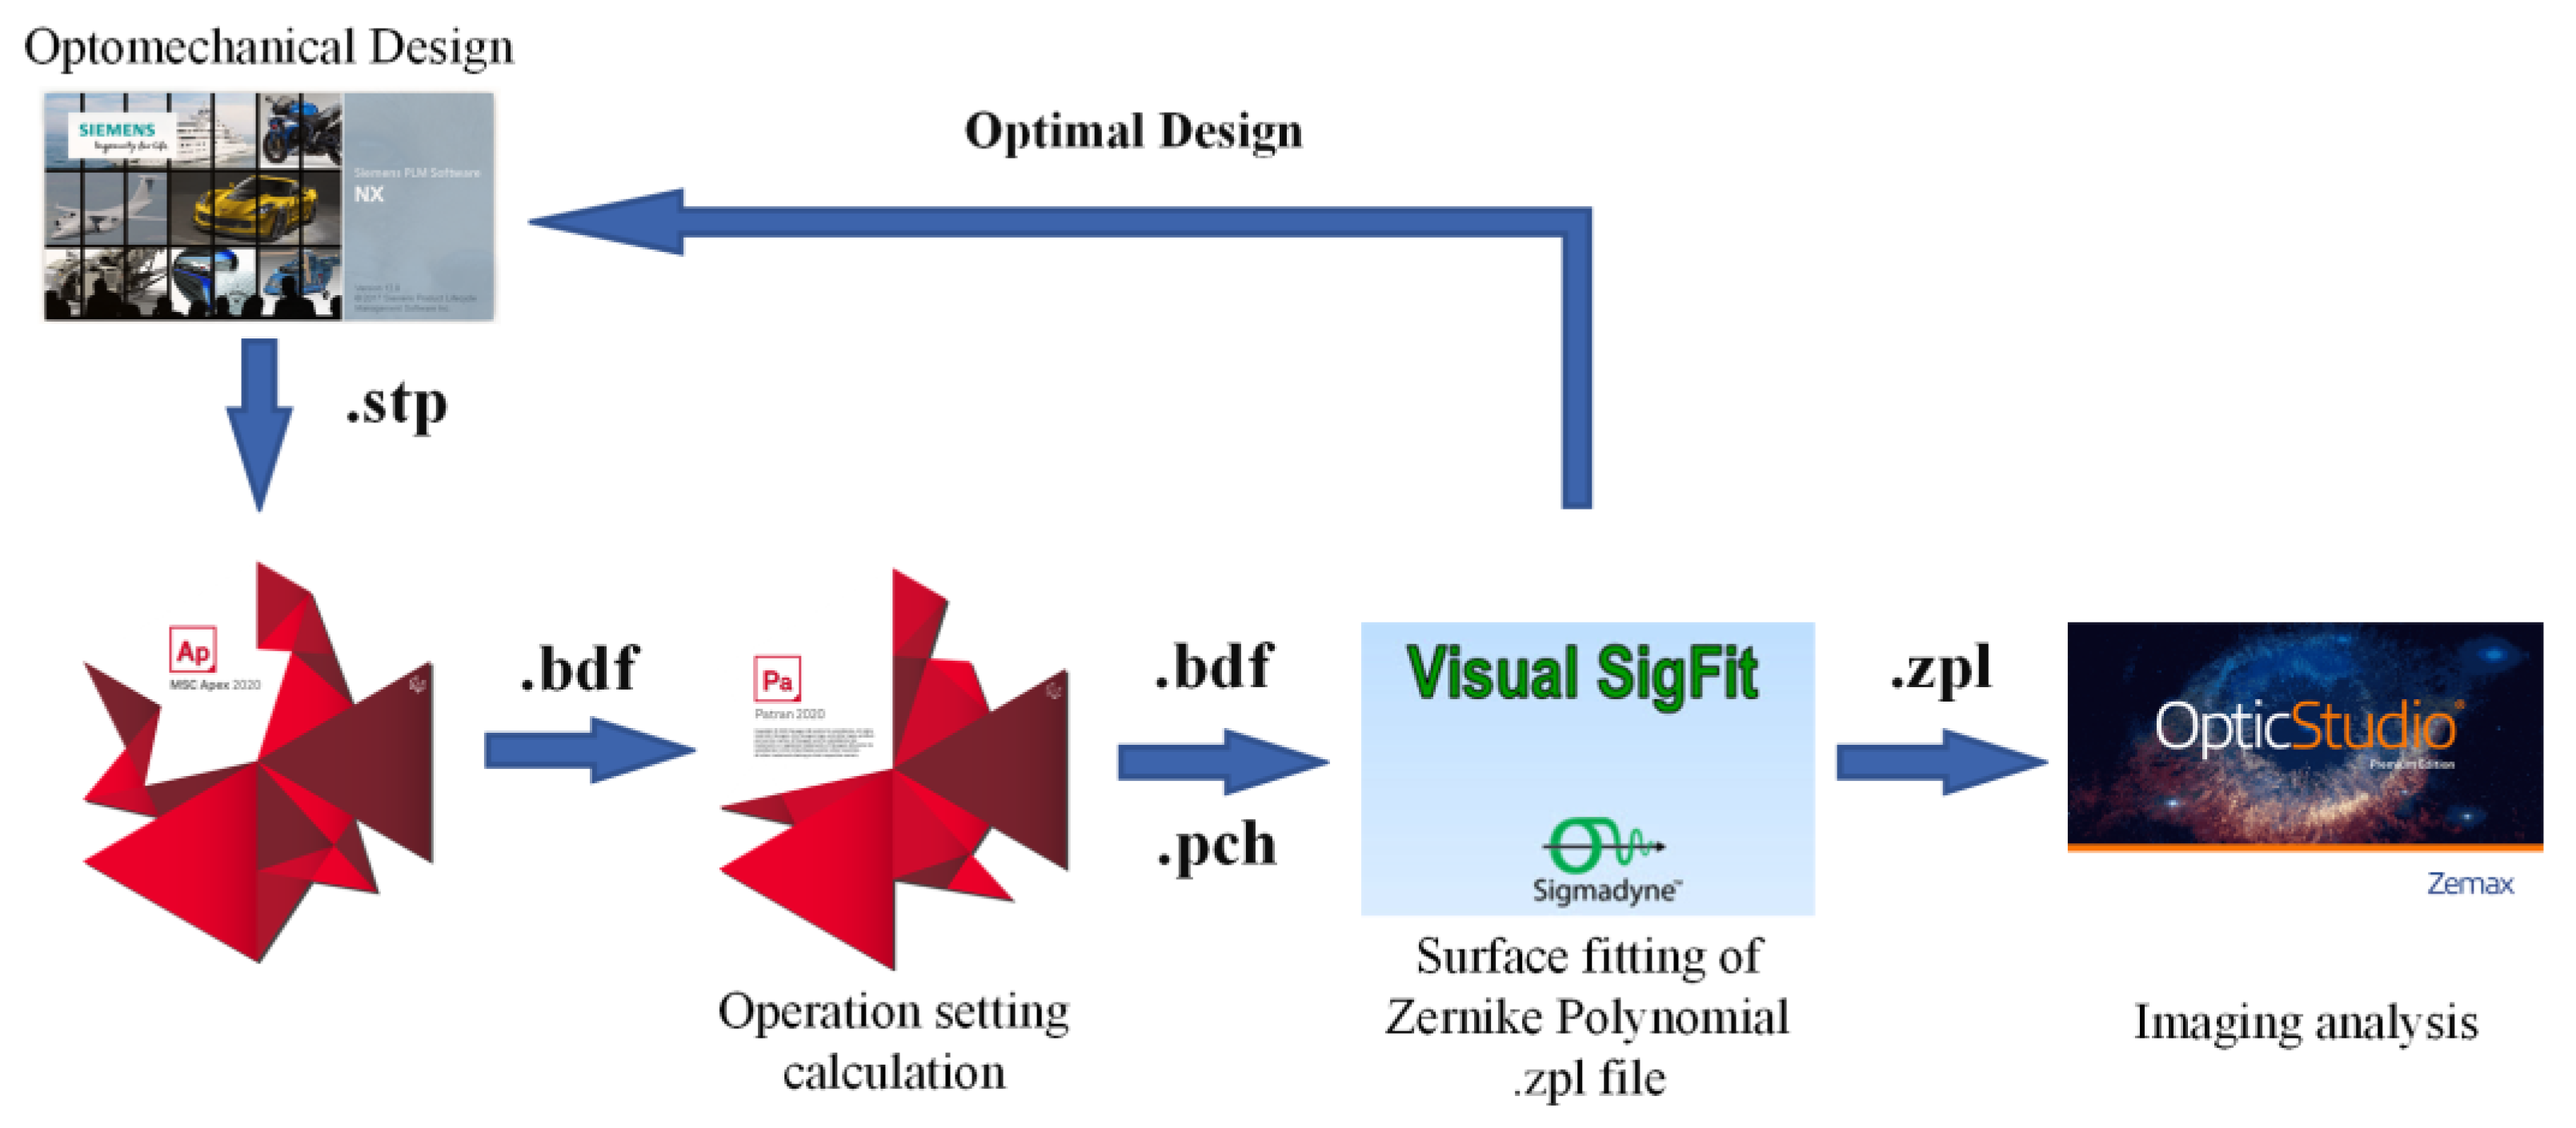
The integrated optomechanical analysis method involves a variety of disciplines such as optics, mechanics, and thermodynamics [25]. The transfer of data between different disciplines is complex. Wavefront aberration, optical path difference, Zernike polynomial, energy concentration, and other metrics are used in optical design; stress and strain are used in mechanical design; temperature, heat conduction coefficient, and thermal expansion coefficient are used in thermodynamic analysis. In finite element analysis, mesh, node displacement, fitting, and other concepts are used. Different discipline areas have specialized software to solve specific problems in their fields. To predict these interdisciplinary problems, an integrated optomechanical analysis must transfer data between different analyses. The analysis software and data transfer format used are shown in Figure 6.
As a data transfer method between mechanical simulation analysis and optical design, Visual SigFit combines the effects of a mechanical support structure and thermodynamics on optical imaging and performs the optimized design of optical, mechanical, and thermal integration.
The software used in the mechanical structure part are UG NX, MSC Apex, MSC Patran, and MSC Nastran, among which UG NX is used for 3D model creation, MSC Apex is used for mesh division and boundary condition creation, and MSC Patran is used for working condition setting and output setting. MSC Nastran is used as a finite element calculation. The optical design part adopts Zemax Optic Studio, which is used as optical design and analysis software.
Visual SigFit calculates and fits the finite element node information obtained from the mechanical and thermal data and outputs Zernike polynomials, surface fitting results, and optical path difference files that are readable by optical software.
The optical design software evaluates the results and assigns errors. The systematic error part is used as the design input for iterative optimization design, and the remaining error part is compensated for by the mechanical structure optimization design. With the above steps, the optical and mechanical integration analysis and optimization design of the prime-focus optical system are completed.
The influence of the supporting structure of the large aperture corrector lens of the prime-focus optical system on imaging was analyzed using the optomechanical integrated analysis method. Taking the imaging quality as the metric of optical mechanical structure design, the rationality and feasibility of the existing optical design scheme were quantitatively analyzed and demonstrated. Guidance was given on optical design error distribution, support structure optimization design, component assembly, and adjustment accuracy design.

2.2.2. Finite Element Model

The corrector lens for this optical scheme is large, and the shape of the optical surface changes due to gravity during changes in telescope elevation. An integrated optomechanical analysis method was used to analyze the optical surface changes caused by gravity, and the effect on imaging quality was analyzed quantitatively, which provides a theoretical basis for the feasibility of the optical scheme.
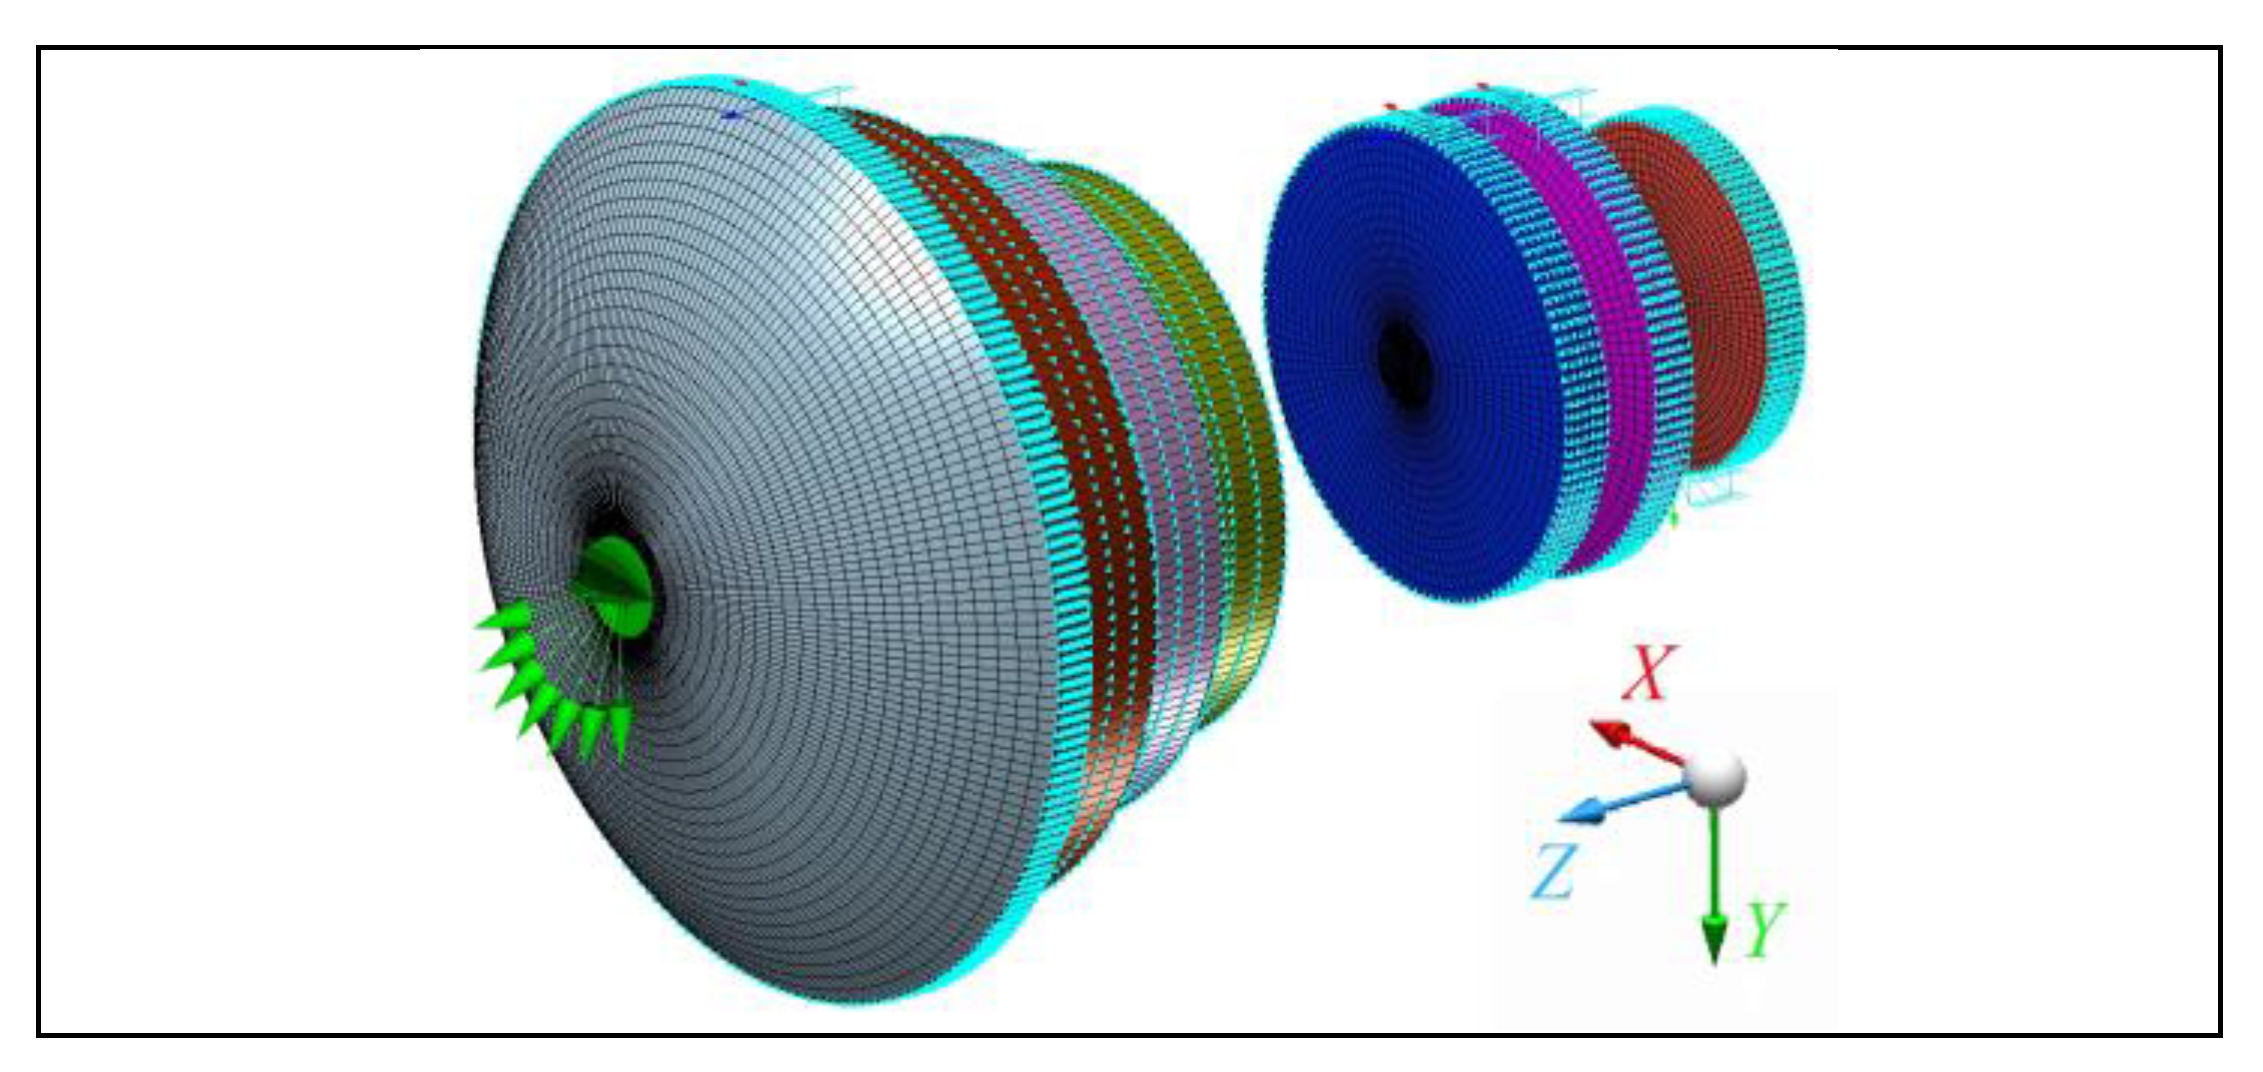
The finite element analysis model of the corrector lens is shown in Figure 7. All lenses were divided into hexahedral grids with fully fixed constraints on the sides. There were 7 working conditions under gravity without other external forces. The altitude angle of the telescope ranges from 0° to 90° in intervals of 15°; 0° meant that the optical axis of the correction mirror was horizontal; 90° meant that the optical axis of the correction mirror was vertical. The analysis mainly involved 7 lenses, 14 optical surfaces, and 7 working conditions.
The material of the corrector was fused silica, mainly due to the following factors:
It is the most commonly used optical material with high transmittance and less absorption in the visible band. The material has good uniformity. The preparation technology is mature, and the bubble rate is low. Fused silica is a type of crystal; only this material can be used to realize the preparation of a meter-level corrector.
The properties of the fused silica were as follows—elasticity modulus: 73 GPa; density: 2250 kg/m3; Poisson’s ratio: 0.17; coefficient of thermal expansion: 0.58 ppm/°C.

3. Results

3.1. Global Deformation of Corrector Lenses

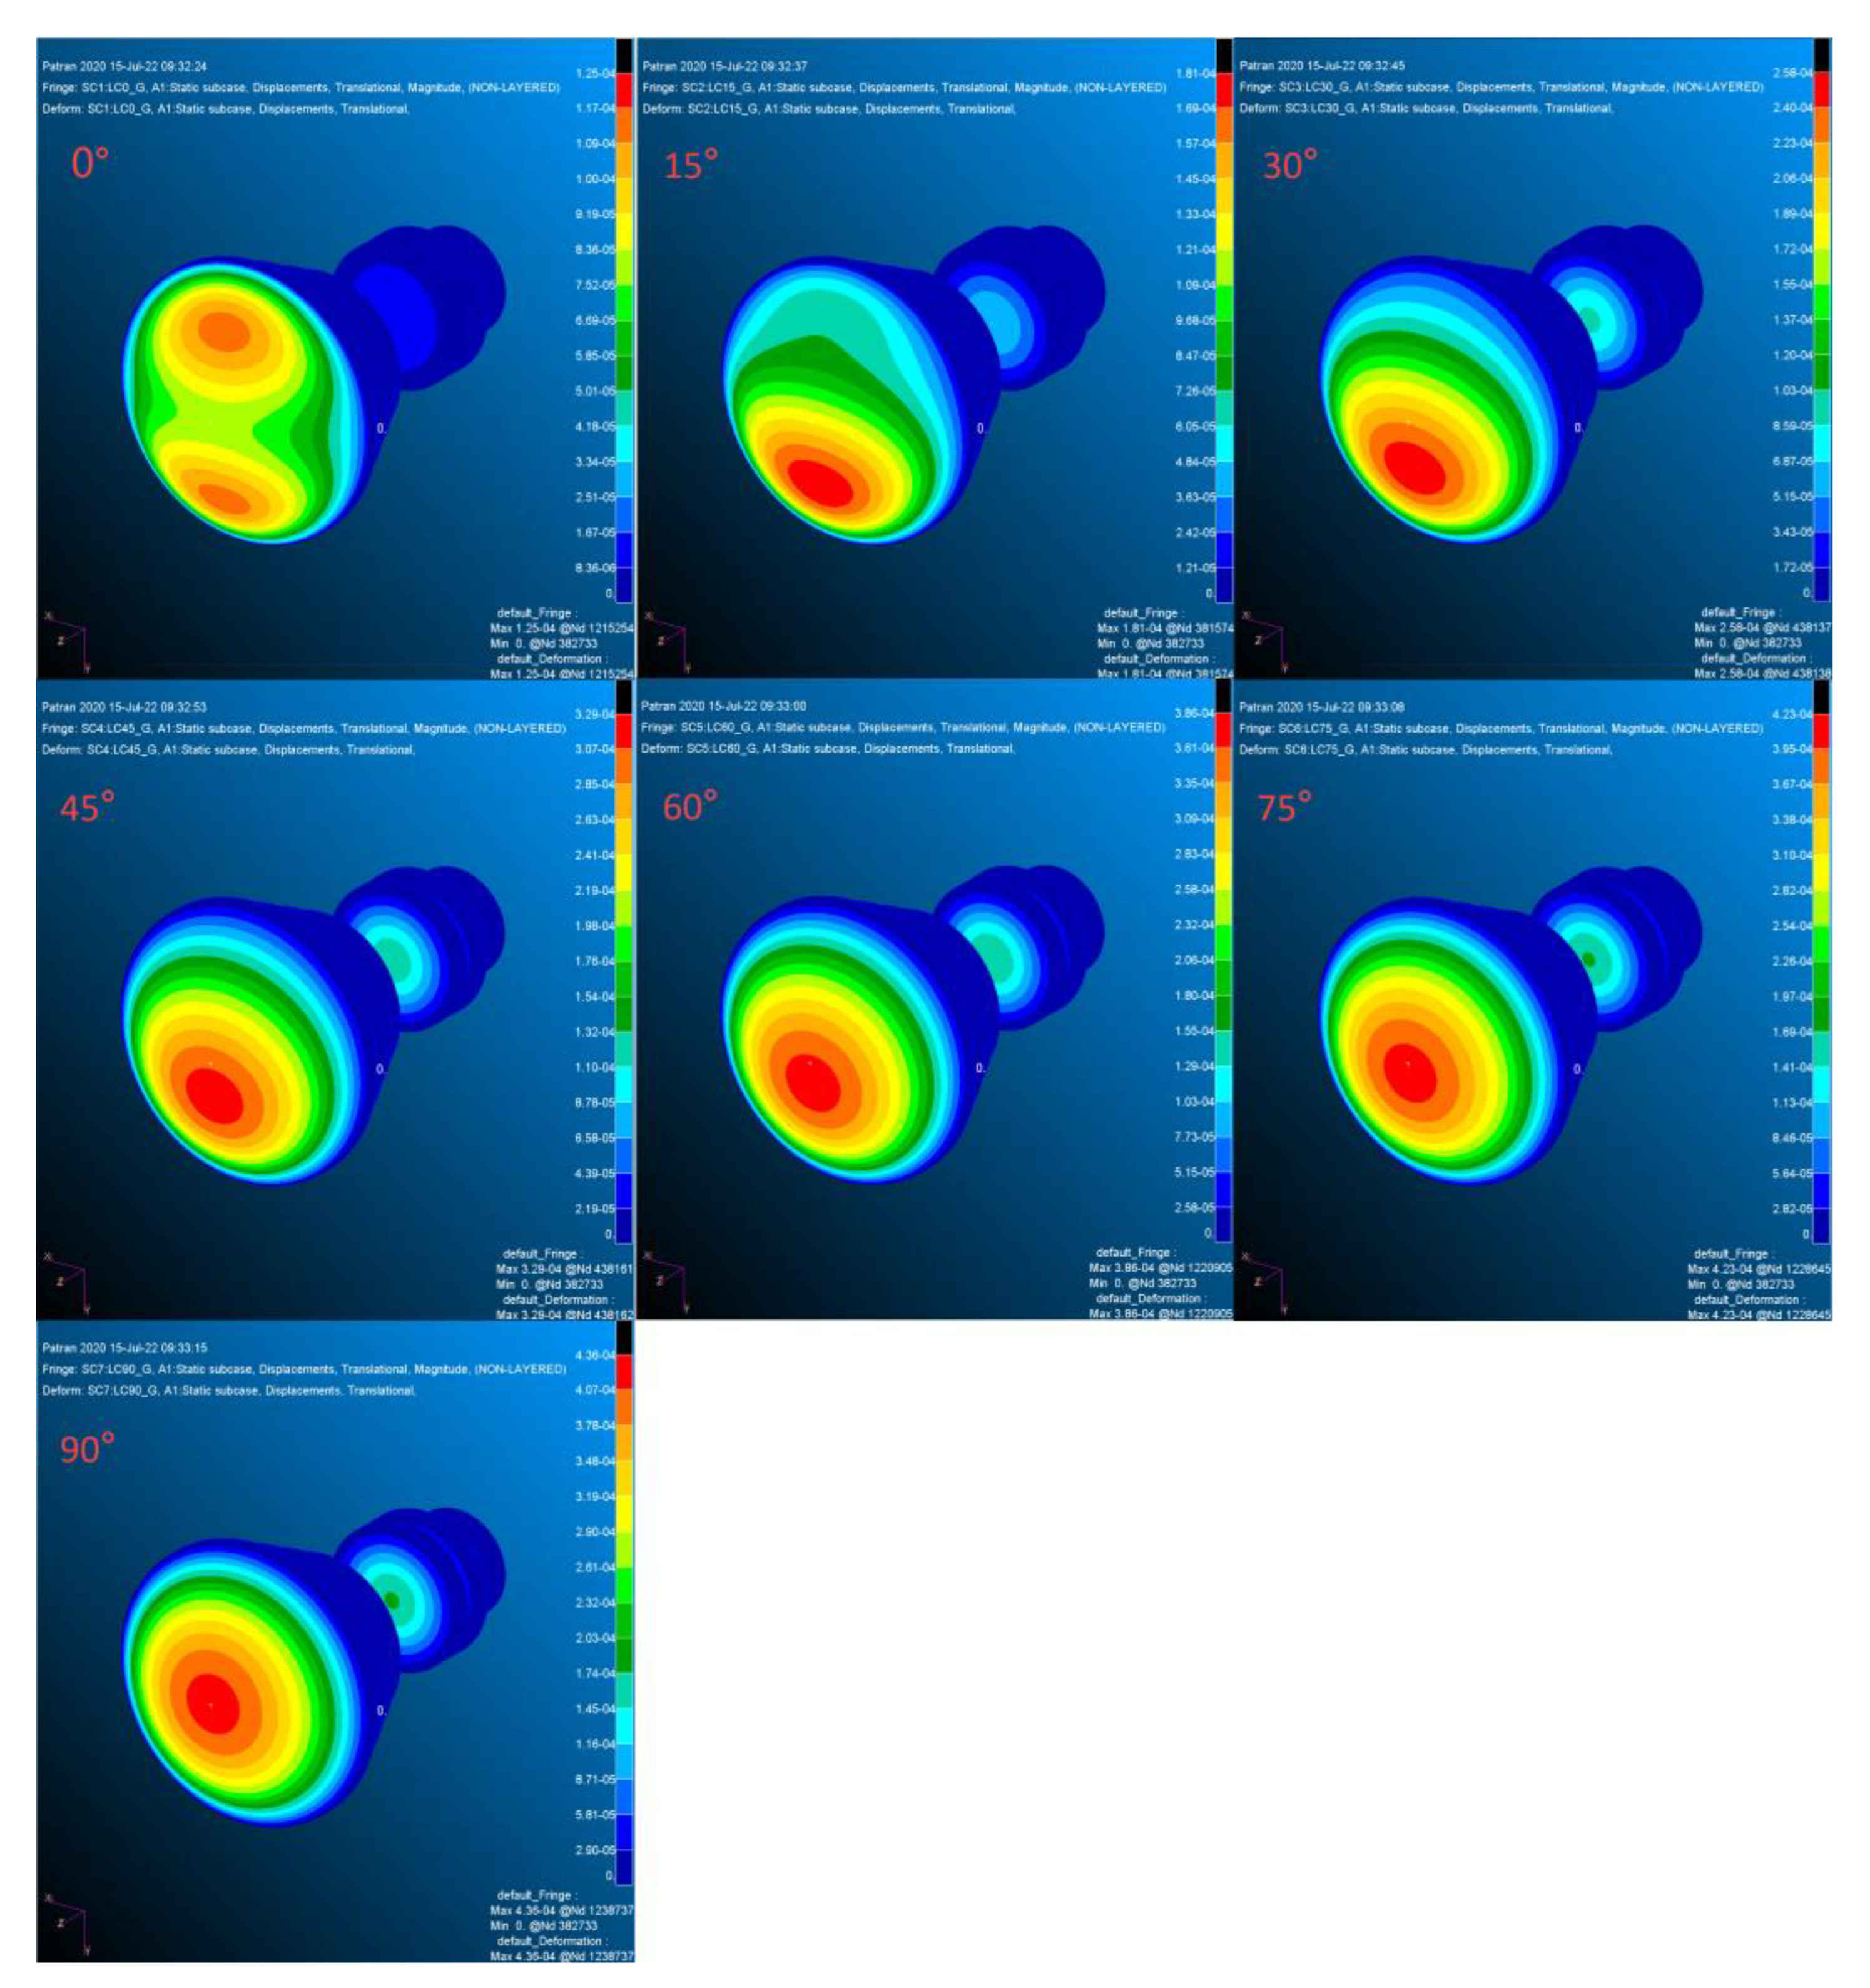
The global deformation of the corrector lenses under the action of gravity in different directions is shown in Figure 8.

3.2. Surface Shape Fitting Results of Optical Surfaces L1S1

Optical surface errors are divided into optical surface rigid body displacement errors and shape errors. For a single optical surface, the shape error of the optical surface is the main source of error. In the decomposition of the Zernike polynomial, the best reconstructed optical surface should be determined first, and the rigid body displacement should be calculated by comparing it with the original optical surface. The remaining error term is used as the surface shape error of the reconstructed optical surface for Zernike polynomial decomposition. When analyzing a series of optical surfaces, all error terms participate in the imaging and affect the final imaging quality. In the analysis, it was necessary to take into account the rigid body displacement error of the optical surface, the error of the reconstructed optical surface, and the shape error. Since all lenses share the same variation trends, corrector lens L1, with large deformation, was used as the example to expand the process of surface shape fitting and for the analysis of the optical surface shape changes due to gravity. The results of the analysis are given below.

3.2.1. Curvature Radius Error

The curvature radius error of each optical surface of the corrector lens L1 in different optical axis directions is shown in Table 5 for ideal boundary conditions.
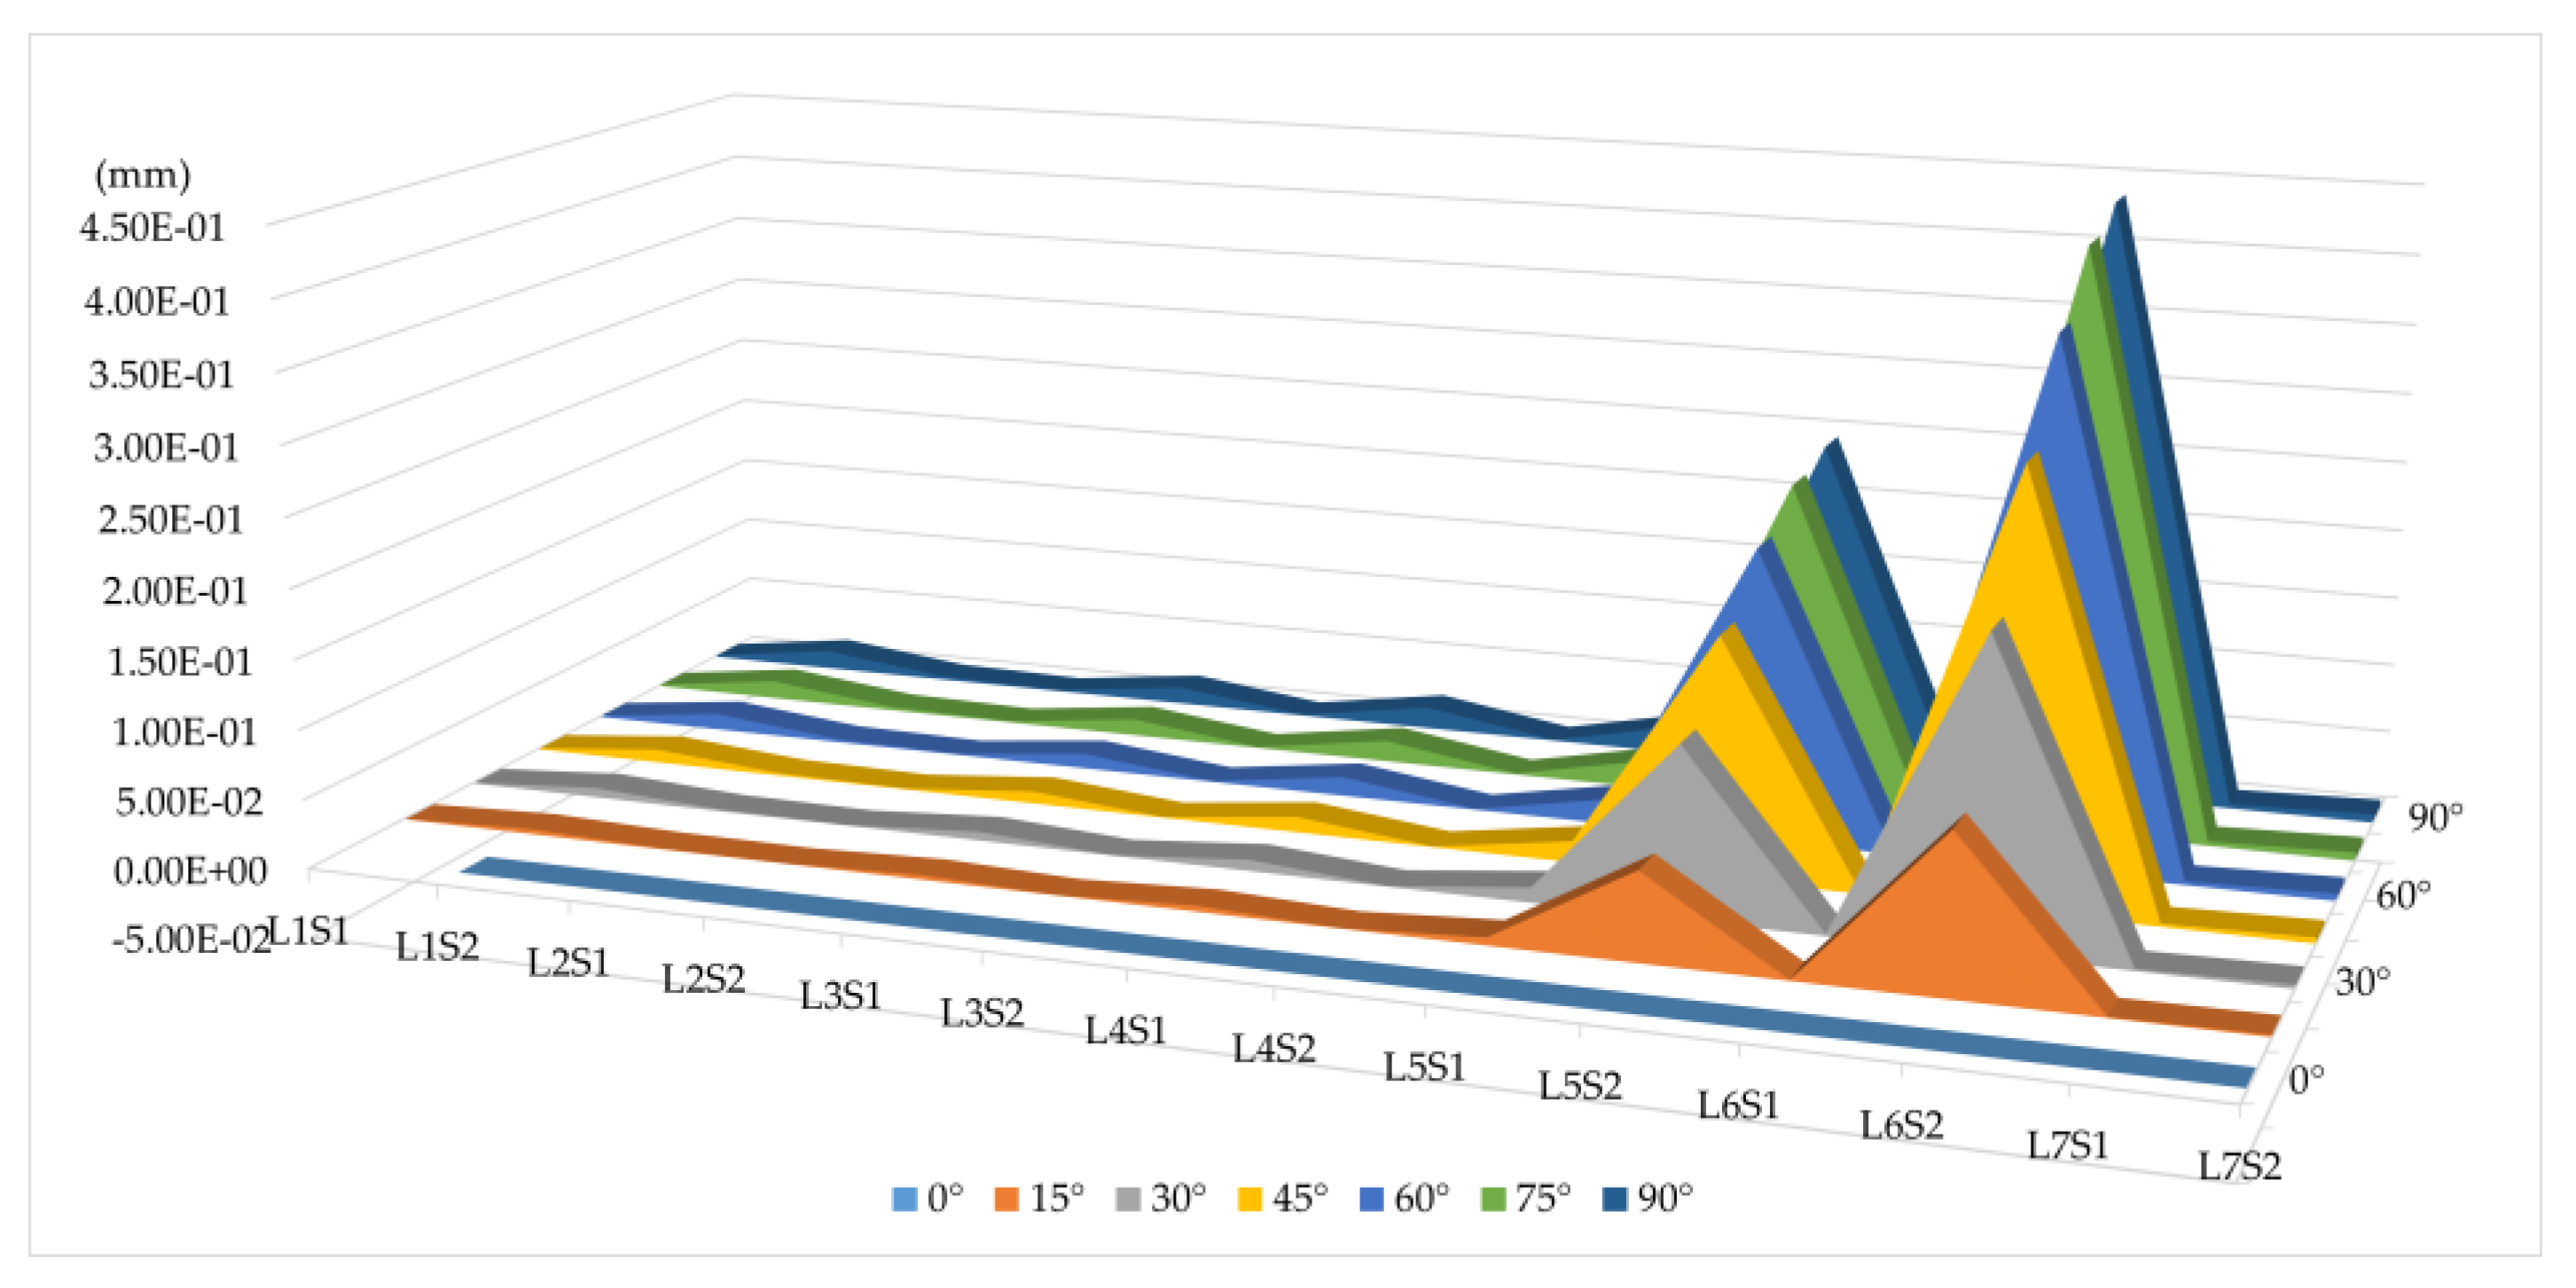
As the altitude angle of the telescope ranges from 0° to 90°, the curvature change gradually increases; that is, the curvature of the optical surface changes the most when the telescope is directed towards the zenith.

3.2.2. Rigid Body Displacement Error

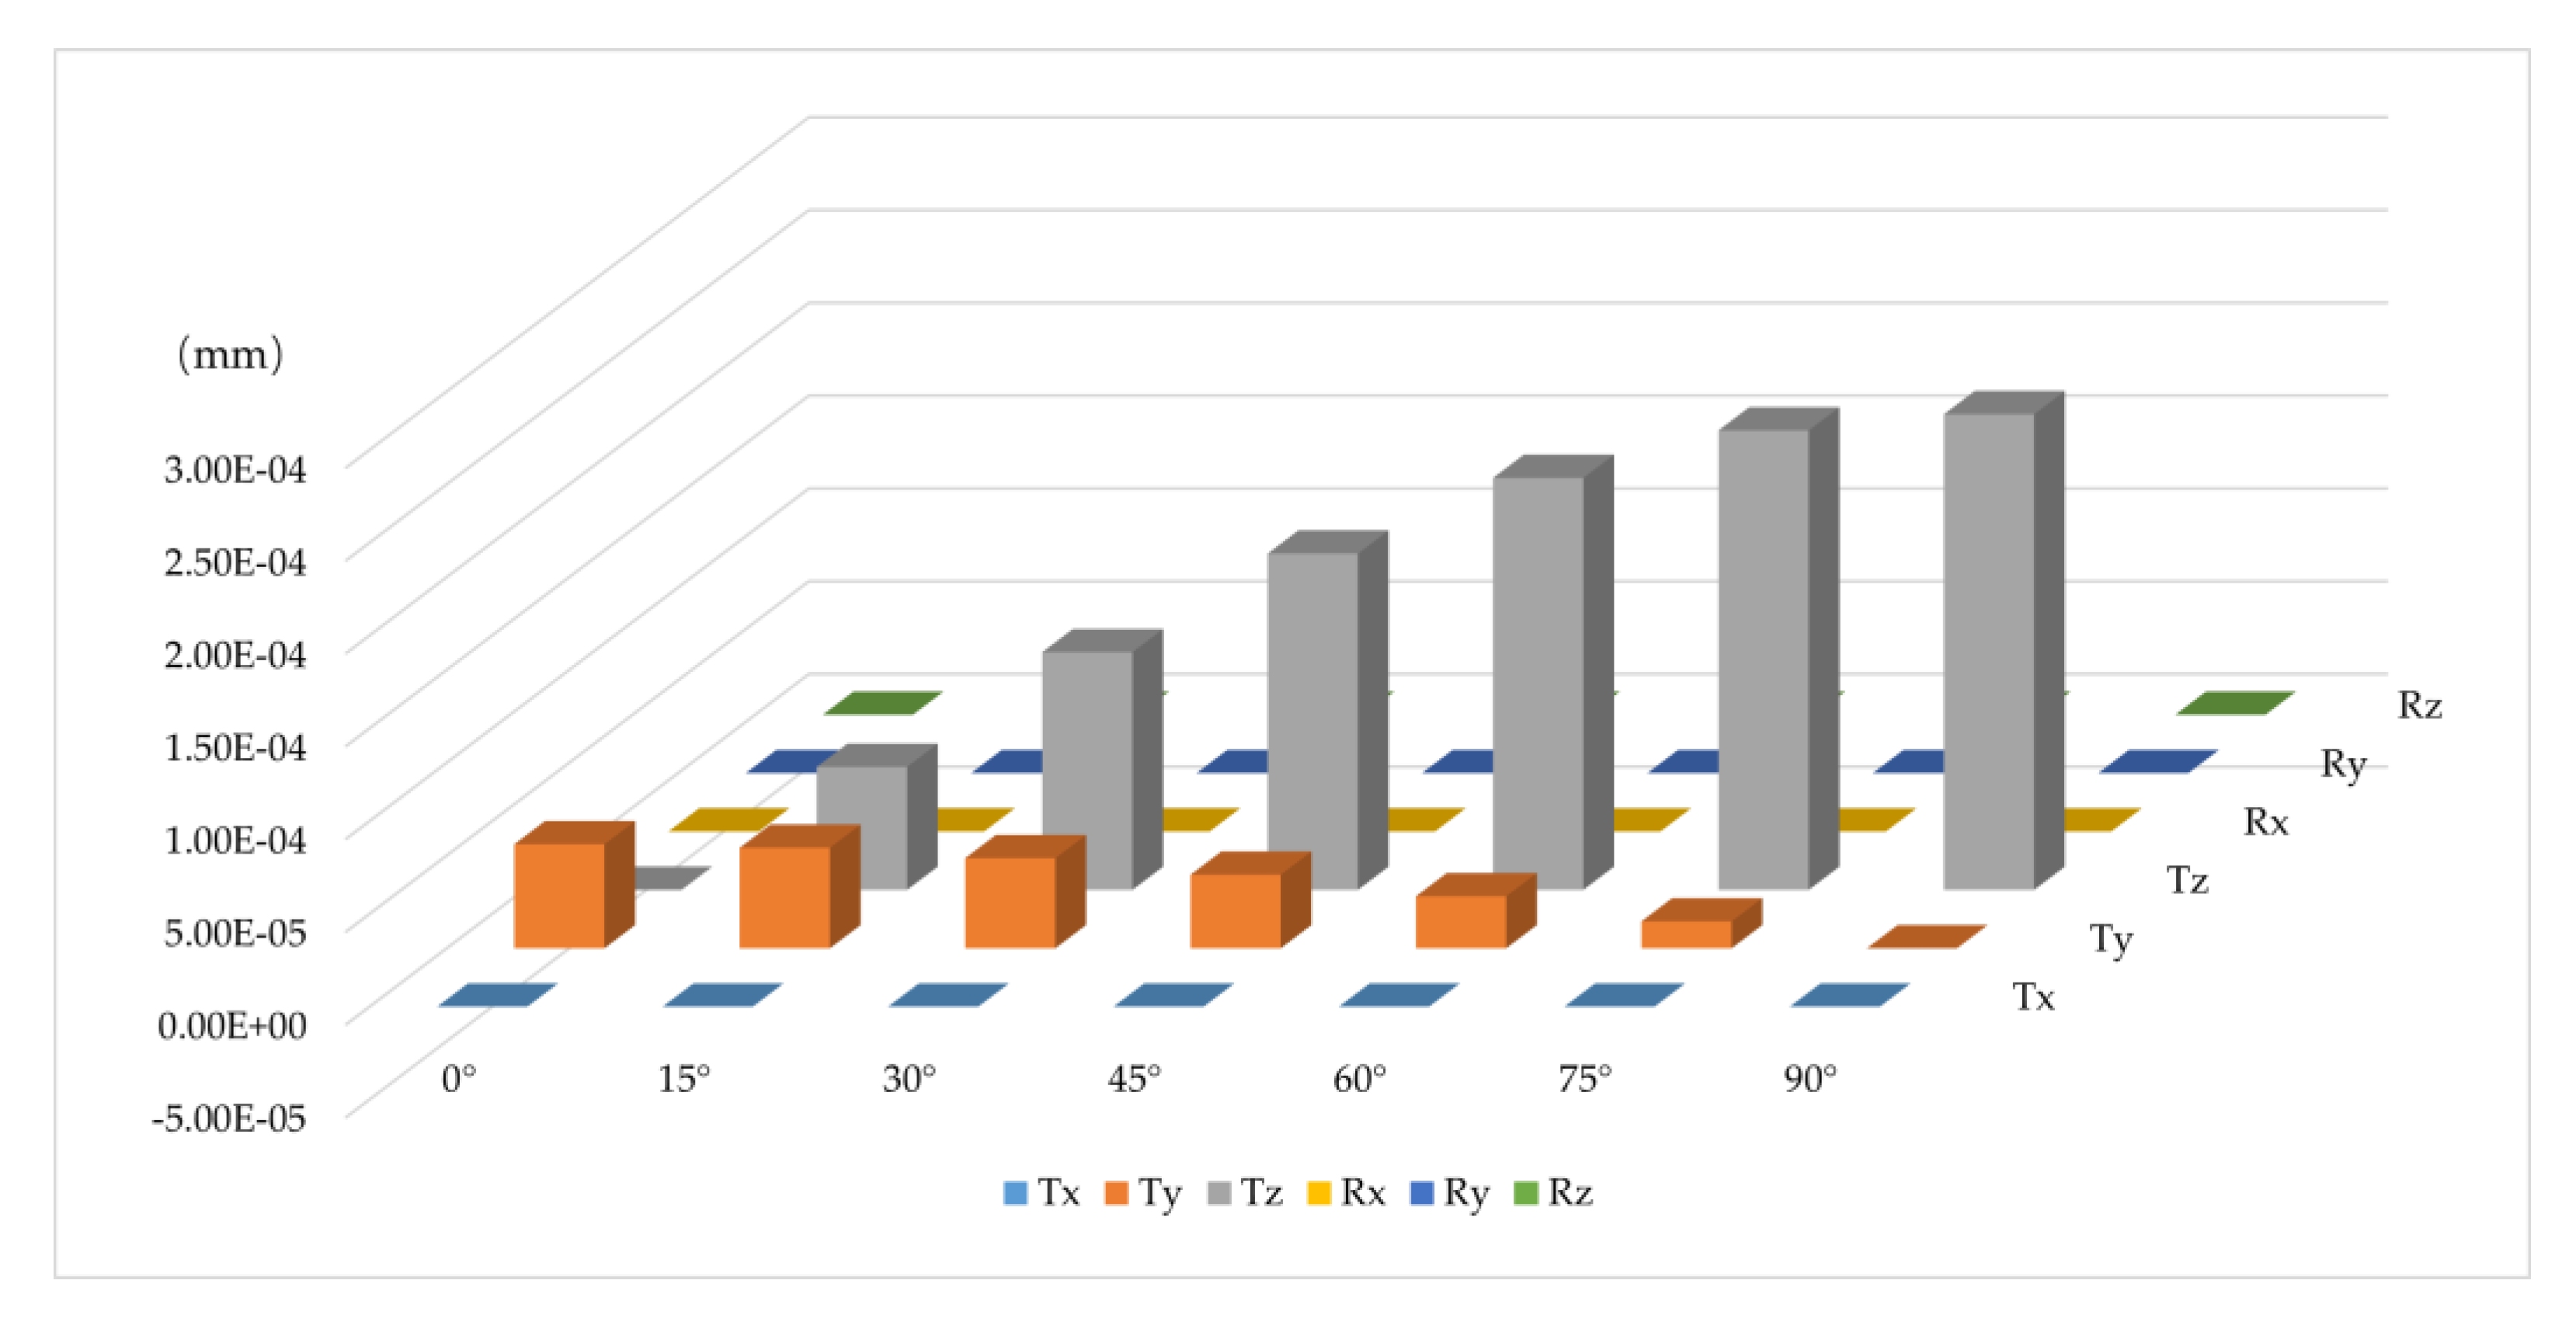
The rigid body displacement errors of the optical surface L1S1 are shown in Table 6, where Tx represents a translation along the positive X-axis, Ty represents a translation along the positive Y-axis, Tz represents a translation along the positive Z-axis, Rx represents a positive rotation along the positive X-axis (that is, a clockwise rotation from the positive Y-axis to the positive Z-axis), Ry represents the positive rotation along the positive Y-axis (that is, a clockwise rotation from the positive Z-axis to the positive X-axis), and Rz represents the positive rotation along the positive Y-axis (that is, a clockwise rotation from the positive X-axis to the positive Y-axis). A plot of the rigid body displacement error of L1S1 on a log scale is shown in Figure 9. As the altitude angle of the telescope ranges from 0° to 90°, the main rigid body displacement direction gradually changes from Ty to Tz and the main rigid body rotation Rx gradually shrinks. When pointing to the zenith, all the rigid body displacements are dominated by Tz.

3.2.3. Surface Shape Error

Surface fitting and Zernike polynomial decomposition were performed on each optical surface of all the corrector lenses. There were seven operating conditions for each optical surface and four fitting results for each condition, namely the removal of the rigid body’s displacement surface, the removal of the shape behind the best-fit surface, the removal of the shape behind the defocusing surface, and the removal of the residual unfitted surface. Figure 10 and Figure 11 show the normalized surface shape fitting results obtained by taking the L1S1 optical surface as an example under gravity.

3.2.4. Zernike Polynomial Fitting

Zernike polynomial decomposition is a commonly used expression method in the process of optical system analysis and detection that has a long history of application and has developed into a variety of expression forms. In this paper, the standard Zernike polynomial form agreed to by Born and Wolf was used [26]. The Zernike shape decomposition of the optical surface of the corrector lens under different working conditions gives a quantitative analysis of the surface’s deformation, which can directly reflect the influence of surface deformation on imaging and quantitatively describe the magnitude of deformation. The change in image quality in the working process of the correcting lens is thus clarified.
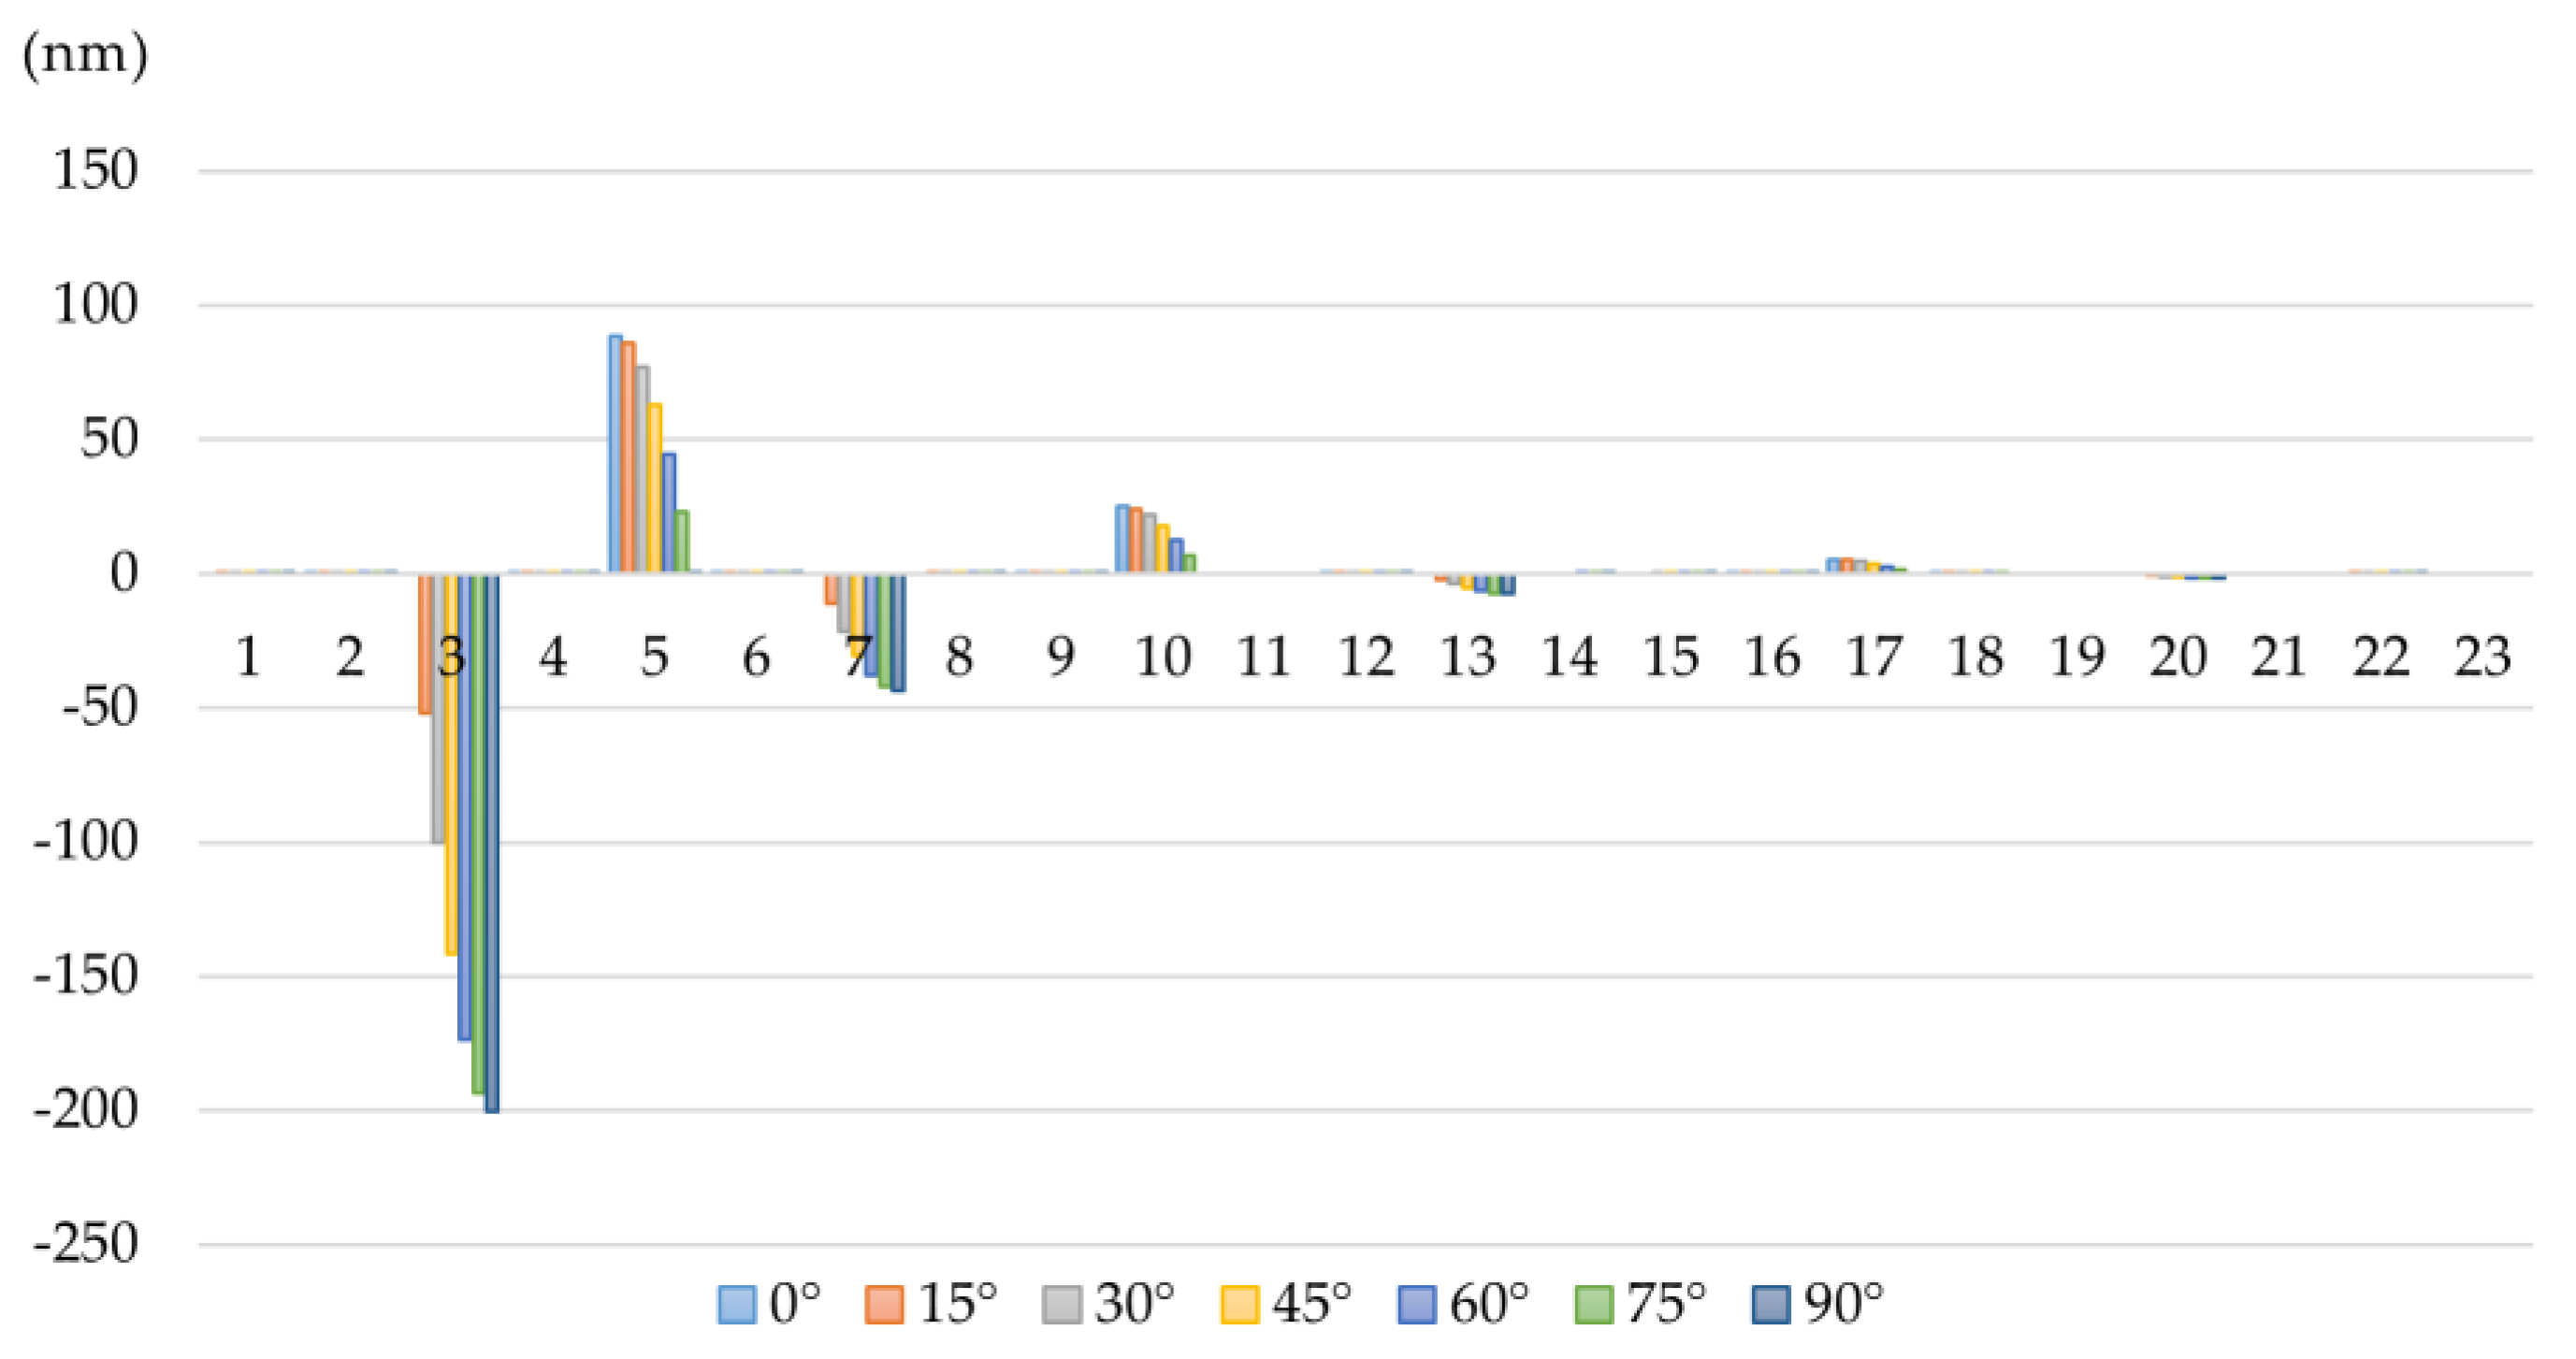
The corrector lenses consist of seven lenses with a total of 14 optical surfaces. There are seven working conditions under gravity without other external forces. I altitude angle of the telescope ranges from 0° to 90° in intervals of 15°. Therefore, 98 sets of analysis results were obtained, and each set contains the amplitude, phase, RMS value, and P–V value of the Zernike decomposition. Since each optical surface had the same variation trends at different altitude angles, L1S1 was taken as an example for detailed analysis and explanation, as is shown in Table 7.
The aberration in the optical surface of L1S1 is mainly caused by defocus, coma, and spherical aberration during the telescope altitude angle variations. When the optical axis of the telescope is horizontal, the most dominant aberrations are comas, of which the first-order coma is 88.71321 nm, the second-order coma is 25.09534 nm, and the third-order coma is 5.08125 nm. The remaining aberrations can be ignored. When the telescope is pointed towards the zenith, i.e., the optical axis is vertical, the main aberrations are defocus and spherical aberrations, of which the defocus is −200.47905 nm, the first-order spherical aberration is −43.4504 nm, the second-order spherical aberration is −7.62939 nm, and the third-order spherical aberration is −1.82303 nm. As the altitude angle of the telescope changes from 0° to 90°, the coma of the optical surface L1S1 decreases gradually, and the defocus and spherical aberration increase continuously. The same trends holds for the aberration variations of the other 13 optical surfaces, which are omitted here.

3.3. Analysis Results of the Corrector Lenses

3.3.1. Curvature Radius Variation

The curvature radius error of each optical surface of the corrector lens pointed in different optical axis directions is shown in Figure 12 for ideal boundary conditions.

3.3.2. Rigid Body Displacement Variation

The rigid body displacement of the optical surface of the corrector lens varies with the altitude angle of the telescope. The most important changes are the translation of the Y-axis and the Z-axis and the rotation around the X-axis, which are also similar conditions to the working state of the actual telescope. For the same optical surface, as the altitude angle of the telescope ranges from 0° to 90°, the main rigid body displacement direction gradually changes from Ty to Tz, and the main rigid body rotation, Rx, also gradually shrinks. When pointing to the zenith, all the rigid body displacements are dominated by Tz.

3.3.3. Surface Shape Variation

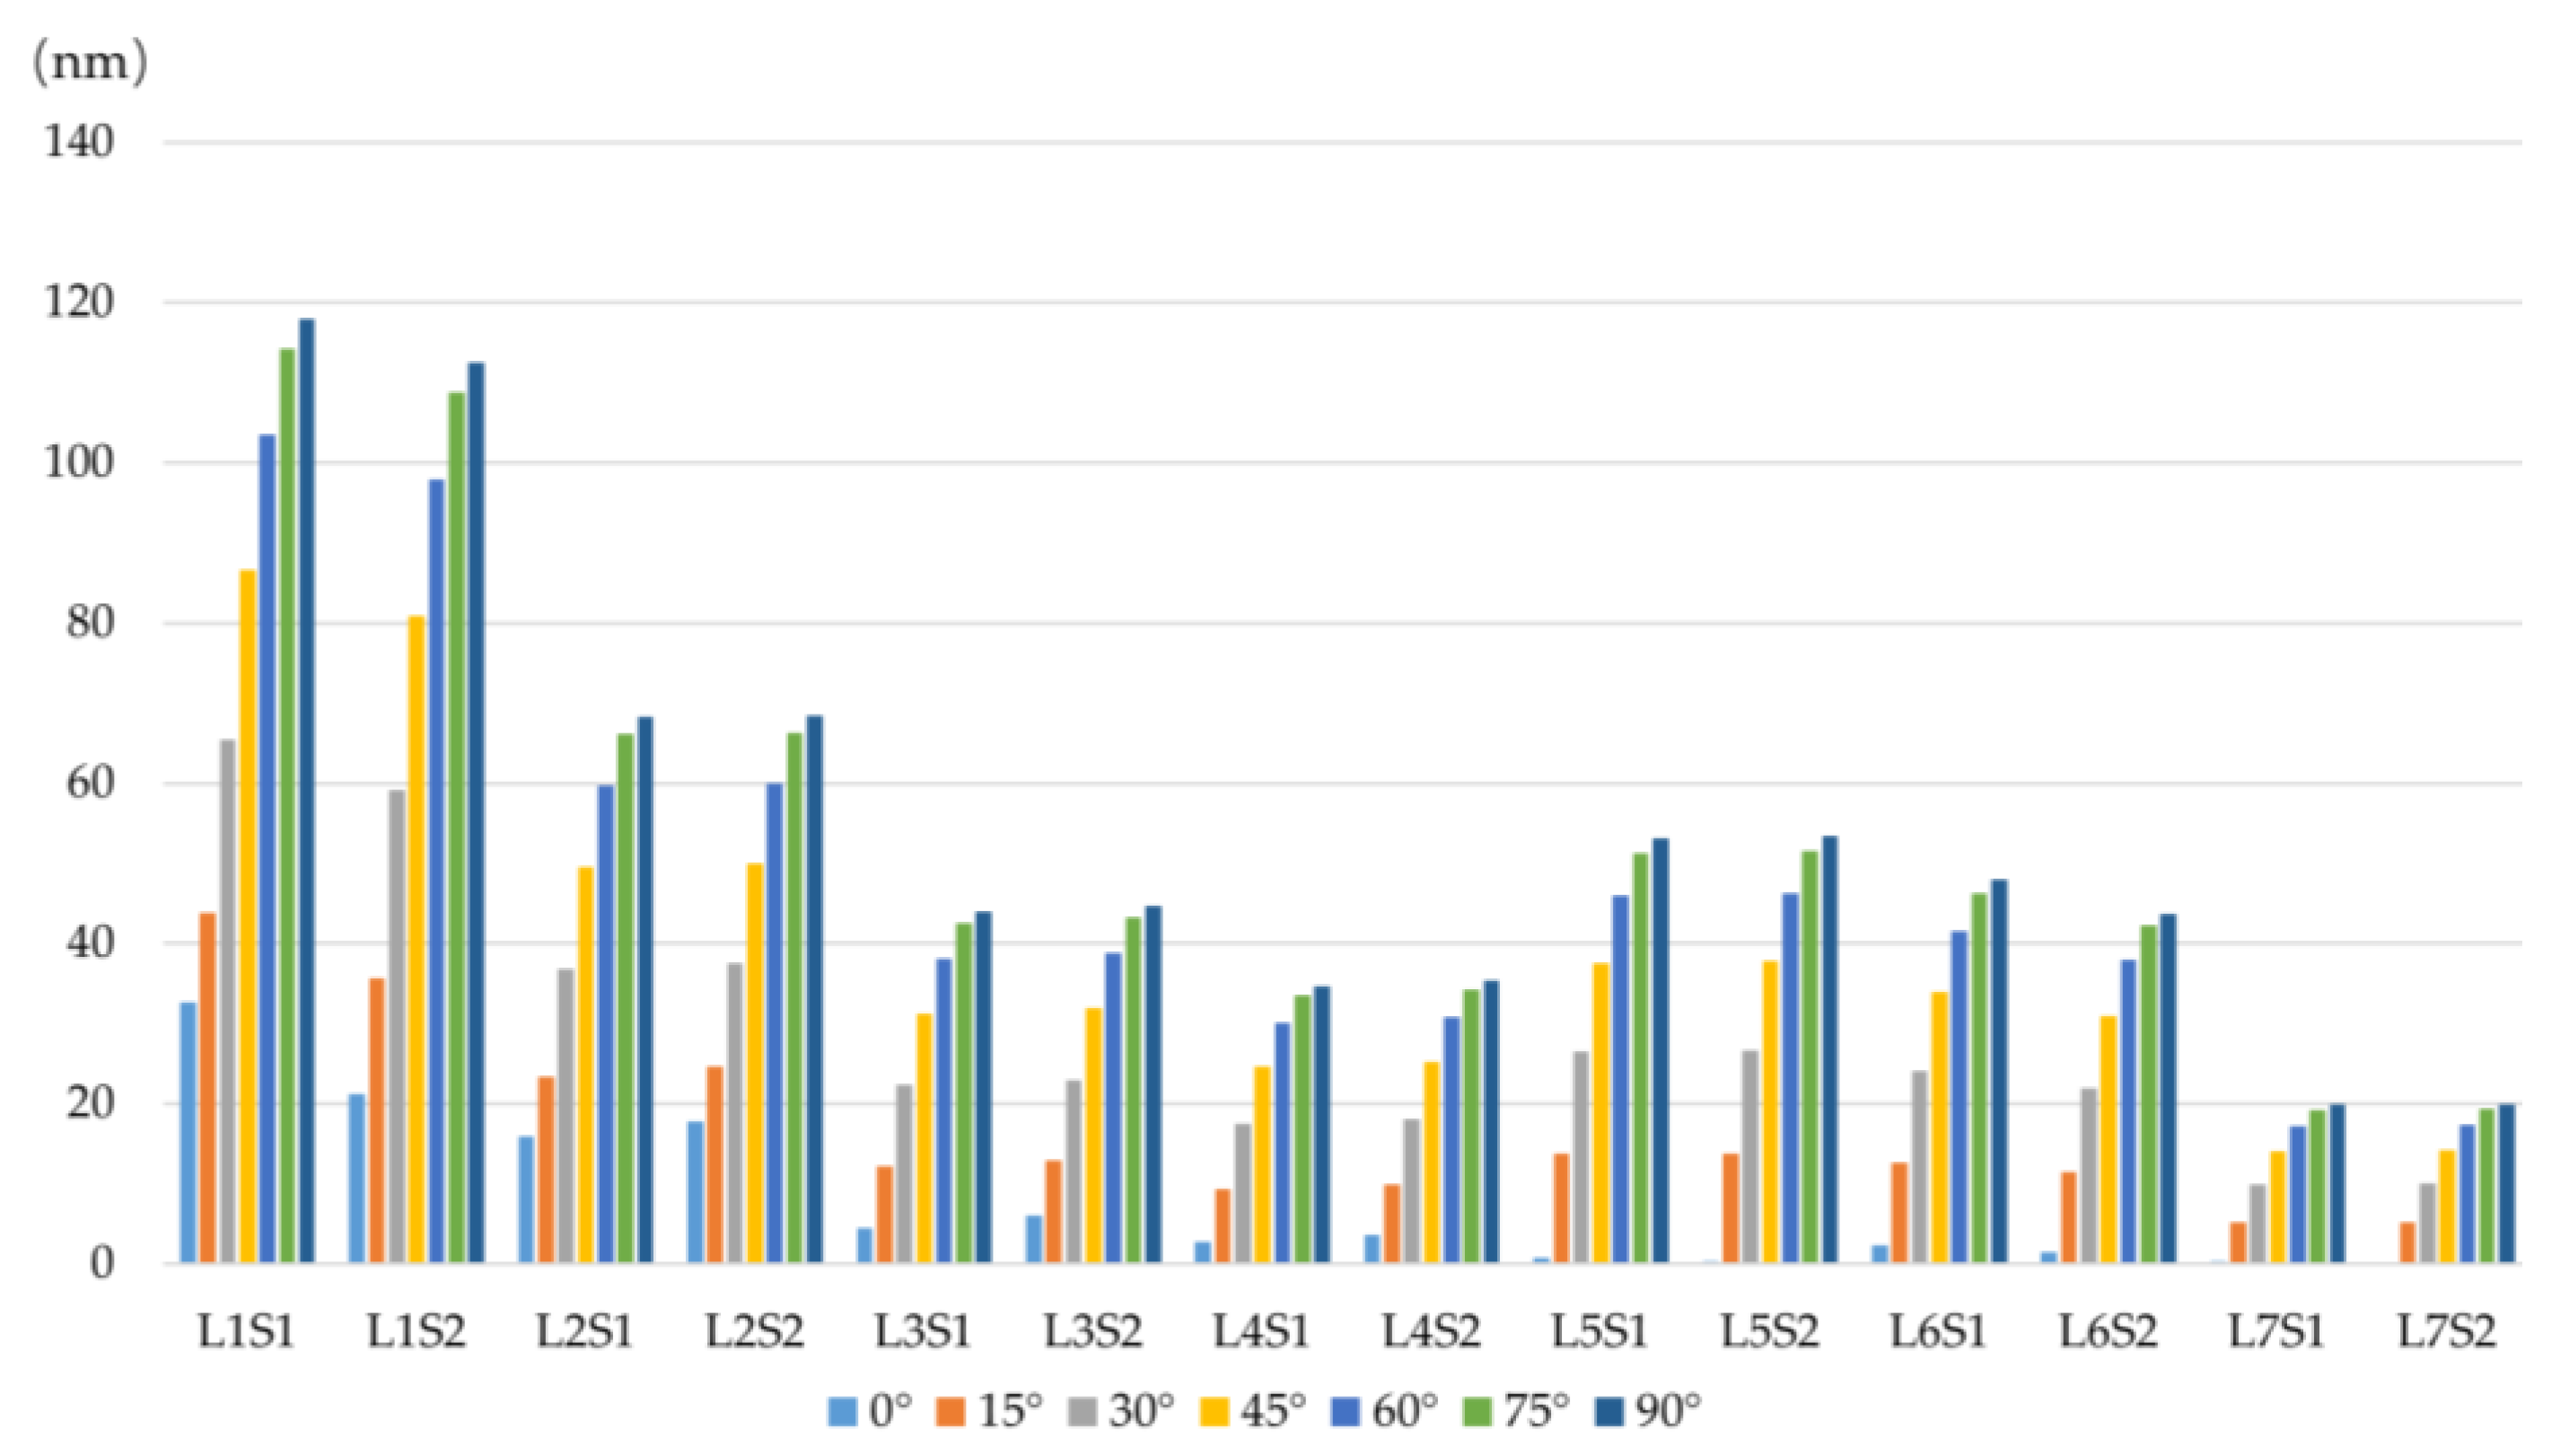
The surface shape variations of the corrected optical surface of the lens are the values obtained by removing rigid body displacements, curvature radius variations, and defocusing after an optimal surface is fitted to the node displacements of the finite element model. The main evaluation metric for the surface shape variation of the optical surface is the RMS value, and the main expression is Zernike polynomial fitting. The RMS values of each optical surface under different working conditions are shown in Figure 13.

3.3.4. Zernike Polynomial Fitting

The Zernike shape decomposition of the optical surface of the corrector lenses under different working conditions gives a quantitative analysis of surface deformation, which can directly reflect the influence of surface deformation on imaging and quantitatively describe the magnitude of deformation. The change in image quality in the working process of the corrector lens is thus clarified.
The corrector lens consists of seven lenses with a total of 14 optical surfaces. There are seven working conditions under gravity without other external forces. The altitude angle of the telescope ranges from 0° to 90° in intervals of 15°. Therefore, 98 sets of analysis results were obtained, and each set contains the amplitude, phase, RMS value, and P–V value of the Zernike decomposition. Since each optical surface has the same variation trends at different altitude angles, L1S1 is taken as an example for detailed analysis and explanation, as is shown in Figure 14.
The aberration in the optical surface of L1S1 is mainly caused by defocus, coma, and spherical aberration during telescope altitude angle variations, as is shown in Figure 14. When the optical axis of the telescope is horizontal, the most dominant aberrations are comas. When the telescope is pointed at the zenith, the main aberrations are defocus and spherical aberrations. As the altitude angle of the telescope changes from 0° to 90°, the coma of the optical surface L1S1 decreases gradually, and the defocus and spherical aberration increase continuously. The same trends hold for the aberration variations of the other 13 optical surfaces, which are omitted here.
We can see that the position of the individual corrector lenses and the shape of the optical surface of the corrector lenses change when the altitude angle of the telescope changes. The position of the corrector lens can be compensated for by optimizing the design of the supporting structure so that the variation of the position of each corrector lens is within the allowed margin of error. The surface shape of the corrector lens needs to be compensated for by adjusting the relative positions (eccentricity and tilt) between the corrector lenses and the primary mirror because when the relative position between the corrector lenses and the primary mirror position changes, the error terms are exactly coma and spherical aberration, and the surface shape error of the corrector lens’ optical surface can be completely eliminated using a high-precision, heavy-duty, six-degree-of-freedom platform. The defocusing aberration of the corrector lenses should be compensated for by adjusting the splicing detector.

3.4. Feasibility Analysis Results of the Optical Design Scheme

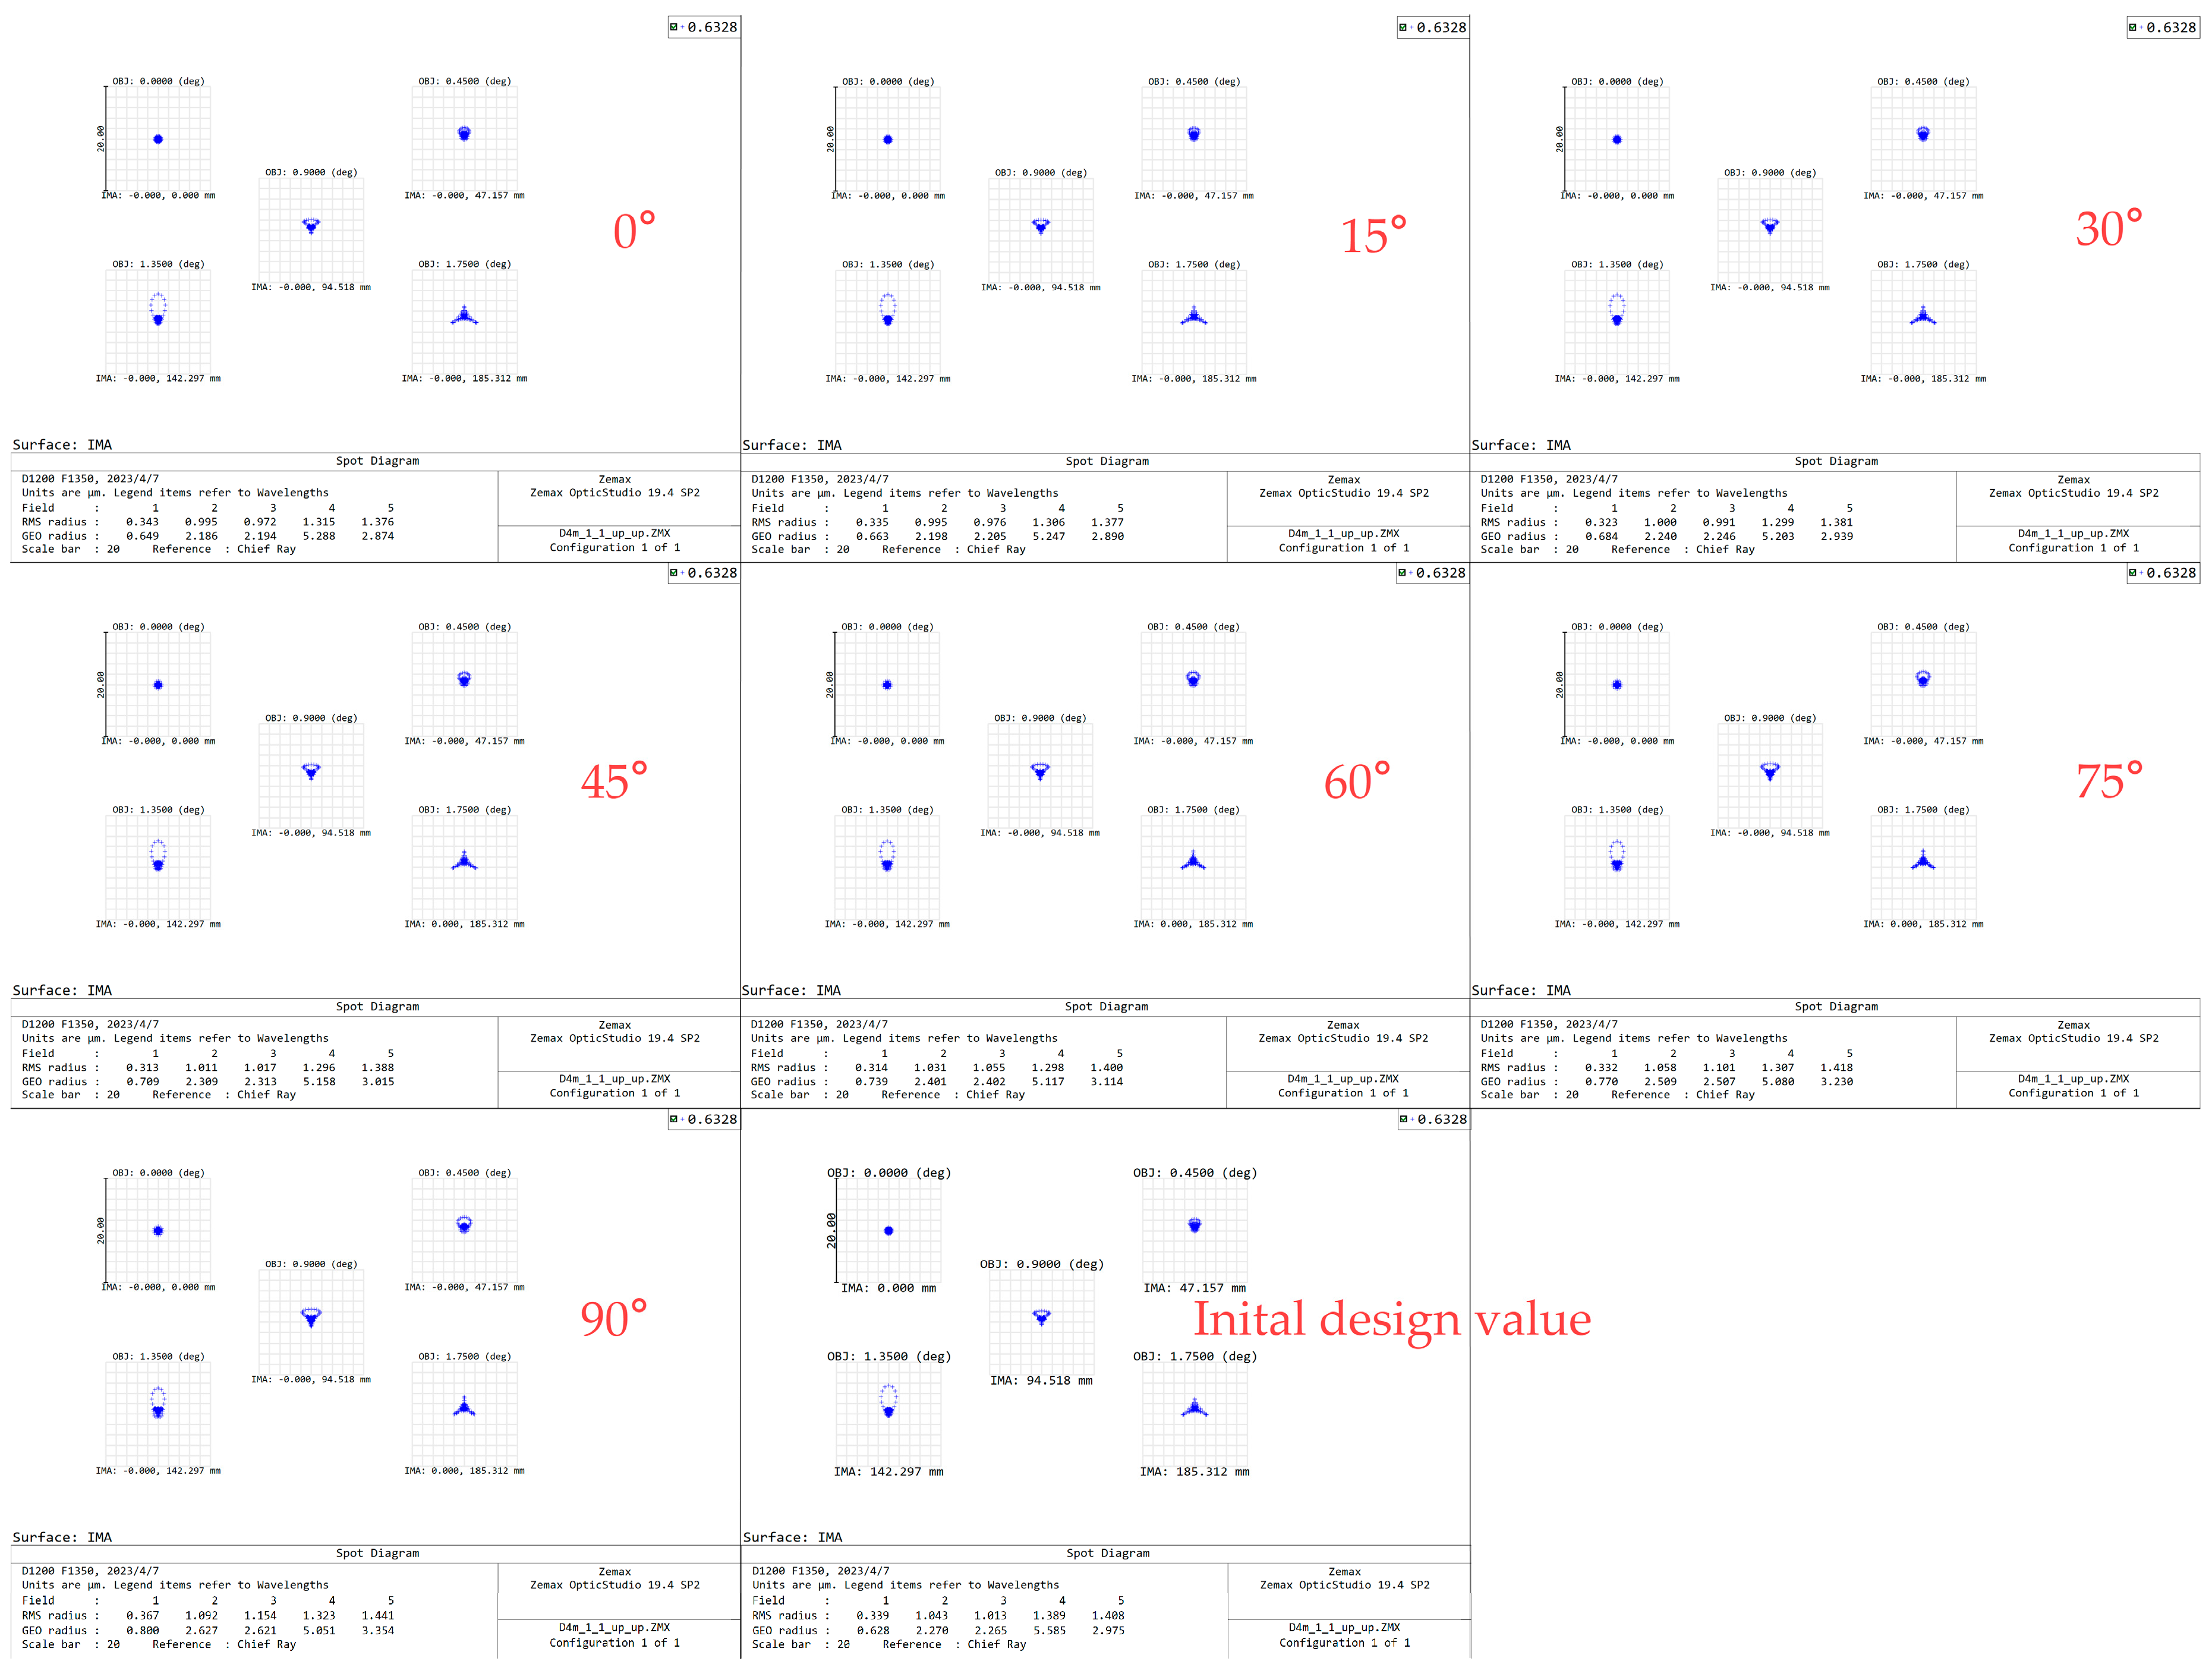
The image quality of large-aperture and wide-field-of-view telescopes is directly related to the wavefront aberration of the optical system. After the light is reflected by the primary mirror, it will converge on the focal plane of the splicing detector after passing through the 14 optical surfaces of the corrector lens. The wavefront of the optical system is affected by the curvature radius of the corrector lens, rigid body displacement, and surface shape errors, among other factors. The optical path difference (OPD) was calculated comprehensively for the above errors, and final imaging was obtained. A spot diagram is shown in Figure 15, and a FFT diffraction encircled energy radius is shown in Figure 16.
As can be seen from Figure 15 and Figure 16, the important evaluation index of the prime-focus telescope is the energy concentration; the 80% energy concentration of our original optical design was 22 microns, and the 80% energy concentration caused by optical surface changes due to gravity was 24 microns, which meets the requirements of the optical system for energy concentration. This means that the imaging effect changes little when the corrector lens changes with the altitude angle of the telescope and that the optical design scheme of this system can meet imaging requirements and is thus feasible.

4. Discussion

In this paper, an optomechanical integrated analysis method was used to analyze the optomechanical behavior and structural feasibility of an optical design scheme for a prime-focus, meter-level corrector lens for a ground-based, large-aperture, wide-field-of-view telescope. The results are summarized below, along with future research prospects:
  • The optical design scheme for a meter-level correction lens is feasible. When the correction lens varies with the pitch angle of the telescope, the shape of the optical surface changes, and the wavefront aberration caused by the corrector lens mainly shows defocus, coma, and spherical aberrations. The two main types of aberration alternate as the altitude angle of the telescope changes, with little effect on the imaging quality and energy concentration. The feasibility of the prime-focus optical design scheme for a ground-based, large-aperture, wide-field-of-view telescope is thus demonstrated.
  • An auxiliary wavefront correction method is needed. Ideally, the wavefront aberration caused by the corrector lenses is small, but in practical engineering applications where discrete multi-point support structures are required, the shape deformation of the optical surface is inevitable, especially when multiple optical surfaces have the same variation trends. In subsequent engineering applications, a high-precision, heavy-load, six-degree-of-freedom platform should be used to correct the aberration in real time.
  • Optical, mechanical, and thermal integration analyses should be carried out. In this paper, an integrated optomechanical analysis of the corrector lens was realized and a feasibility analysis of the meter-level corrector lens structure was verified. For a more detailed analysis, mechanically and thermally induced wavefront aberration variations will be fully taken into account in a subsequent study, thus allowing a near-realistic integrated optomechanical analysis.

5. Conclusions

Optical surface shape changes due to gravity were studied using integrated optomechanical analysis. The Zernike polynomial was used to characterize the changed optical surface. The influence of optical surface variations on the wavefront and imaging quality of the optical system was analyzed by calculating the optical path differences. From the perspective of optical aberrations, the optical properties of the meter-level corrector lens were quantitatively analyzed. The effect of the meter-level corrector lens on the imaging was explained in principle, and the feasibility of this optical scheme was verified.

Author Contributions

Conceptualization and methodology, C.L.; software analysis and validation, X.C. and C.L.; writing—manuscript and editing, X.C.; writing—review, C.L.; funding acquisition, X.C. All authors have read and agreed to the published version of the manuscript.

Funding

This research was funded by Natural Science Foundation of Shandong Province, China, grant number: ZR2020QF100.

Institutional Review Board Statement

Not applicable.

Informed Consent Statement

Not applicable.

Data Availability Statement

Data are contained within the article.

Conflicts of Interest

The authors declare no conflict of interest.

References

  1. Yan, P.; Yang, Y.; She, W.; Liu, K.; Jiang, K.; Duan, J.; Shan, Q. Wide-field and large aperture optical system design for ground-based photoelectric detection. In Proceedings of the 9th International Symposium on Advanced Optical Manufacturing and Testing Technologies: Large Mirrors and Telescopes, Chengdu, China, 26–29 June 2019; Volume 10837, p. 108370U. [Google Scholar] [CrossRef]
  2. Morgan, J.S.; Kaiser, N. Alignment of the Pan-STARRS PS1 prototype telescope optics. In Proceedings of the Ground-based and Airborne Telescopes II, Marseille, France, 23–28 June 2008; Volume 7012, p. 70121K. [Google Scholar] [CrossRef]
  3. Ming, M.; Yang, F.; Zhao, J.Y.; Zhang, L.M.; Wu, X.X. Catadioptric optical system with large aperture, wide field of view and broad waveband. Infrared Laser Eng. 2012, 41, 149–154. [Google Scholar] [CrossRef]
  4. Cheng, J.Q. Principle and Design of Astronomical Telescopes; Nanjing University Press: Nanjing, China, 2020. [Google Scholar]
  5. Terebizh, V.Y. A wide-field corrector at the prime focus of a Ritchey-Chrétien telescope. Astron. Lett. 2004, 30, 200–208. [Google Scholar] [CrossRef] [Green Version]
  6. Wang, F.G.; Wang, Z.; Ming, M.; Li, H.; Lu, T. Opto-mechanical Structure Design, Alignment and Test of Prime Focus Optical System. Acta Photon. Sin. 2012, 41, 21–25. [Google Scholar] [CrossRef]
  7. Wang, F.G.; Yang, F.; Chen, B.G.; Li, W.Y. Lightweight Structure Design, Analysis and Test of Lager Aperture and Prime Focus Optical System. Infrared Technol. 2011, 33, 4–8. [Google Scholar] [CrossRef]
  8. Doel, P.; Sholl, M.J.; Liang, M.; Brooks, D.; Flaugher, B.; Gutierrez, G.; Kent, S.; Lampton, M.; Miller, T.; Sprayberry, D. The DESI wide field corrector optics. In Proceedings of the Ground-based and Airborne Instrumentation for Astronomy V, Montréal, QC, Canada, 22–27 June 2014; Volume 9147, p. 91476R. [Google Scholar] [CrossRef]
  9. Kent, S.; Bernstein, R.; Abbott, T.; Bigelow, B.C.; Brooks, D.C.; Doel, P.; Flaugher, B.; Gladders, M.D.; Walker, A.R.H.; Worswick, S. Preliminary optical design for a 2.2 degree diameter prime focus corrector for the Blanco 4 meter telescope. In Proceedings of the Ground-based and Airborne Instrumentation for Astronomy, Orlando, FL, USA, 24–31 May 2006; Volume 6269, p. 626937. [Google Scholar] [CrossRef] [Green Version]
  10. Doel, P.; Abbott, T.; Antonik, M.; Bernstein, R.; Bigelow, B.; Brooks, D.; Cease, H.; DePoy, D.L.; Flaugher, B.; Gladders, M.; et al. Design and status of the optical corrector for the DES survey instrument. In Proceedings of the Ground-based and Airborne Instrumentation for Astronomy II, Marseille, France, 23–28 June 2008; Volume 7014, p. 70141V. [Google Scholar] [CrossRef]
  11. Antonik, M.; Doel, P.; Brooks, D.; Bridle, S.; Abbot, T.; Bernstein, R.; Bigelow, B.; Cease, H.; Depoy, D.L.; Flaugher, B.; et al. The design and alignment of the DECam lenses and modelling of the static shear pattern and its impact on weak lensing measurements. In Proceedings of the Optical System Alignment, Tolerancing, and Verification III, San Diego, CA, USA, 2–6 August 2009; Volume 7433, p. 74330M. [Google Scholar] [CrossRef]
  12. Flaugher, B.L.; Abbott, T.M.C.; Angstadt, R.; Annis, J.; Antonik, M.L.; Bailey, J.; Ballester, O.; Bernstein, J.P.; Bernstein, R.A.; Bonati, M.; et al. Status of the Dark Energy Survey Camera (DECam) project. In Proceedings of the Ground-based and Airborne Instrumentation for Astronomy IV, Amsterdam, The Netherlands, 1–6 July 2012; Volume 8446, p. 844611. [Google Scholar] [CrossRef] [Green Version]
  13. Diehl, T. The Dark Energy Survey Camera (DECam). Phys. Procedia 2012, 37, 1332–1340. [Google Scholar] [CrossRef] [Green Version]
  14. DePoy, D.L.; Abbott, T.; Annis, J.; Antonik, M.; Barceló, M.; Bernstein, R.; Bigelow, B.; Brooks, D.; Buckley-Geer, E.; Campa, J.; et al. The Dark Energy Camera (DECam). In Proceedings of the Ground-based and Airborne Instrumentation for Astronomy II, Marseille, France, 23–28 June 2008; Volume 7014, p. 70140E. [Google Scholar] [CrossRef] [Green Version]
  15. Doel, P.; Brooks, D.; Antonik, M.L.; Flaugher, B.L.; Stefanik, A.; Kent, S.M.; Gutierrez, G.; Cease, H.P.; Abbott, T.M.; Walker, A.R.; et al. Assembly, alignment, and testing of the DECam wide field corrector optics. In Proceedings of the Ground-based and Airborne Instrumentation for Astronomy IV, Amsterdam, The Netherlands, 1–6 July 2012; Volume 8446, p. 84466F. [Google Scholar] [CrossRef]
  16. Overview of Subaru Telescope. Available online: https://subarutelescope.org/en/about/ (accessed on 25 February 2023).
  17. Komiyama, Y.; Miyazaki, S.; Nakaya, H.; Furusawa, H.; Takeshi, K. Subaru next-generation wide-field camera: HyperSuprime. In Proceedings of the Ground-based Instrumentation for Astronomy, Glasgow, UK, 21–25 June 2004; Volume 5492, pp. 525–533. [Google Scholar] [CrossRef]
  18. Komiyama, Y.; Aihara, H.; Fujimori, H.; Furusawa, H.; Kamata, Y.; Karoji, H.; Kawanomoto, S.; Mineo, S.; Miyatake, H.; Miyazaki, S.; et al. Hyper Suprime-Cam: Camera design. In Proceedings of the Ground-based and Airborne Instrumentation for Astronomy III, San Diego, CA, USA, 27 June–2 July 2010; Volume 7735, p. 77353F. [Google Scholar] [CrossRef]
  19. Nakaya, H.; Miyatake, H.; Uchida, T.; Fujimori, H.; Mineo, S.; Aihara, H.; Furusawa, H.; Kamata, Y.; Karoji, H.; Kawanomoto, S.; et al. Hyper Suprime-Cam: Performance of the CCD readout electronics. In Proceedings of the High Energy, Optical, and Infrared Detectors for Astronomy V, Amsterdam, The Netherlands, 1–6 July 2012; Volume 8453, p. 84532R. [Google Scholar] [CrossRef]
  20. Nakaya, H.; Uchida, T.; Miyatake, H.; Fujimori, H.; Mineo, S.; Aihara, H.; Furusawa, H.; Kamata, Y.; Karoji, H.; Kawanomoto, S.; et al. Hyper Suprime-Cam: Development of the CCD readout electronics. In Proceedings of the Ground-based and Airborne Instrumentation for Astronomy III, San Diego, CA, USA, 27 June–2 July 2010; Volume 7735, p. 77352P. [Google Scholar] [CrossRef]
  21. Miyazaki, S.; Komiyama, Y.; Nakaya, H.; Doi, Y.; Furusawa, H.; Gillingham, P.; Kamata, Y.; Takeshi, K.; Nariai, K. Hyper Suprime: Project overview. In Proceedings of the Ground-based and Airborne Instrumentation for Astronomy, Orlando, FL, USA, 24–31 May 2006; Volume 6269, p. 62690B. [Google Scholar] [CrossRef]
  22. Komiyama, Y.; Miyazaki, S.; Doi, Y.; Nakaya, H.; Furusawa, H.; Takeshi, K.; Nariai, K. Hyper Suprime: Imaging optics. In Proceedings of the Ground-based and Airborne Instrumentation for Astronomy, Orlando, FL, USA, 24–31 May 2006; Volume 6269, p. 62693E. [Google Scholar] [CrossRef]
  23. Kamata, Y.; Miyazaki, S.; Nakaya, H.; Komiyama, Y.; Obuchi, Y.; Kawanomoto, S.; Uraguchi, F.; Utsumi, Y.; Suzuki, H.; Miyazaki, Y.; et al. Hyper Suprime-Cam: Characteristics of 116 fully depleted back-illuminated CCDs. In Proceedings of the High Energy, Optical, and Infrared Detectors for Astronomy V, Amsterdam, The Netherlands, 1–6 July 2012; Volume 8453, p. 84531X. [Google Scholar] [CrossRef]
  24. Hyper Suprime-Cam Ushers in a New Era of Observational Astronomy. Available online: https://subarutelescope.org/en/news/topics/2012/09/12/2531.html (accessed on 25 February 2023).
  25. Hu, M.; Pan, Y.; Zhang, N.; Xu, X. A Review on Zernike Coefficient-Solving Algorithms (CSAs) Used for Integrated Optomechanical Analysis (IOA). Photonics 2023, 10, 177. [Google Scholar] [CrossRef]
  26. Born, M.; Wolf, E. Principles of Optics; Pergamon Press: New York, NY, USA, 1964. [Google Scholar]
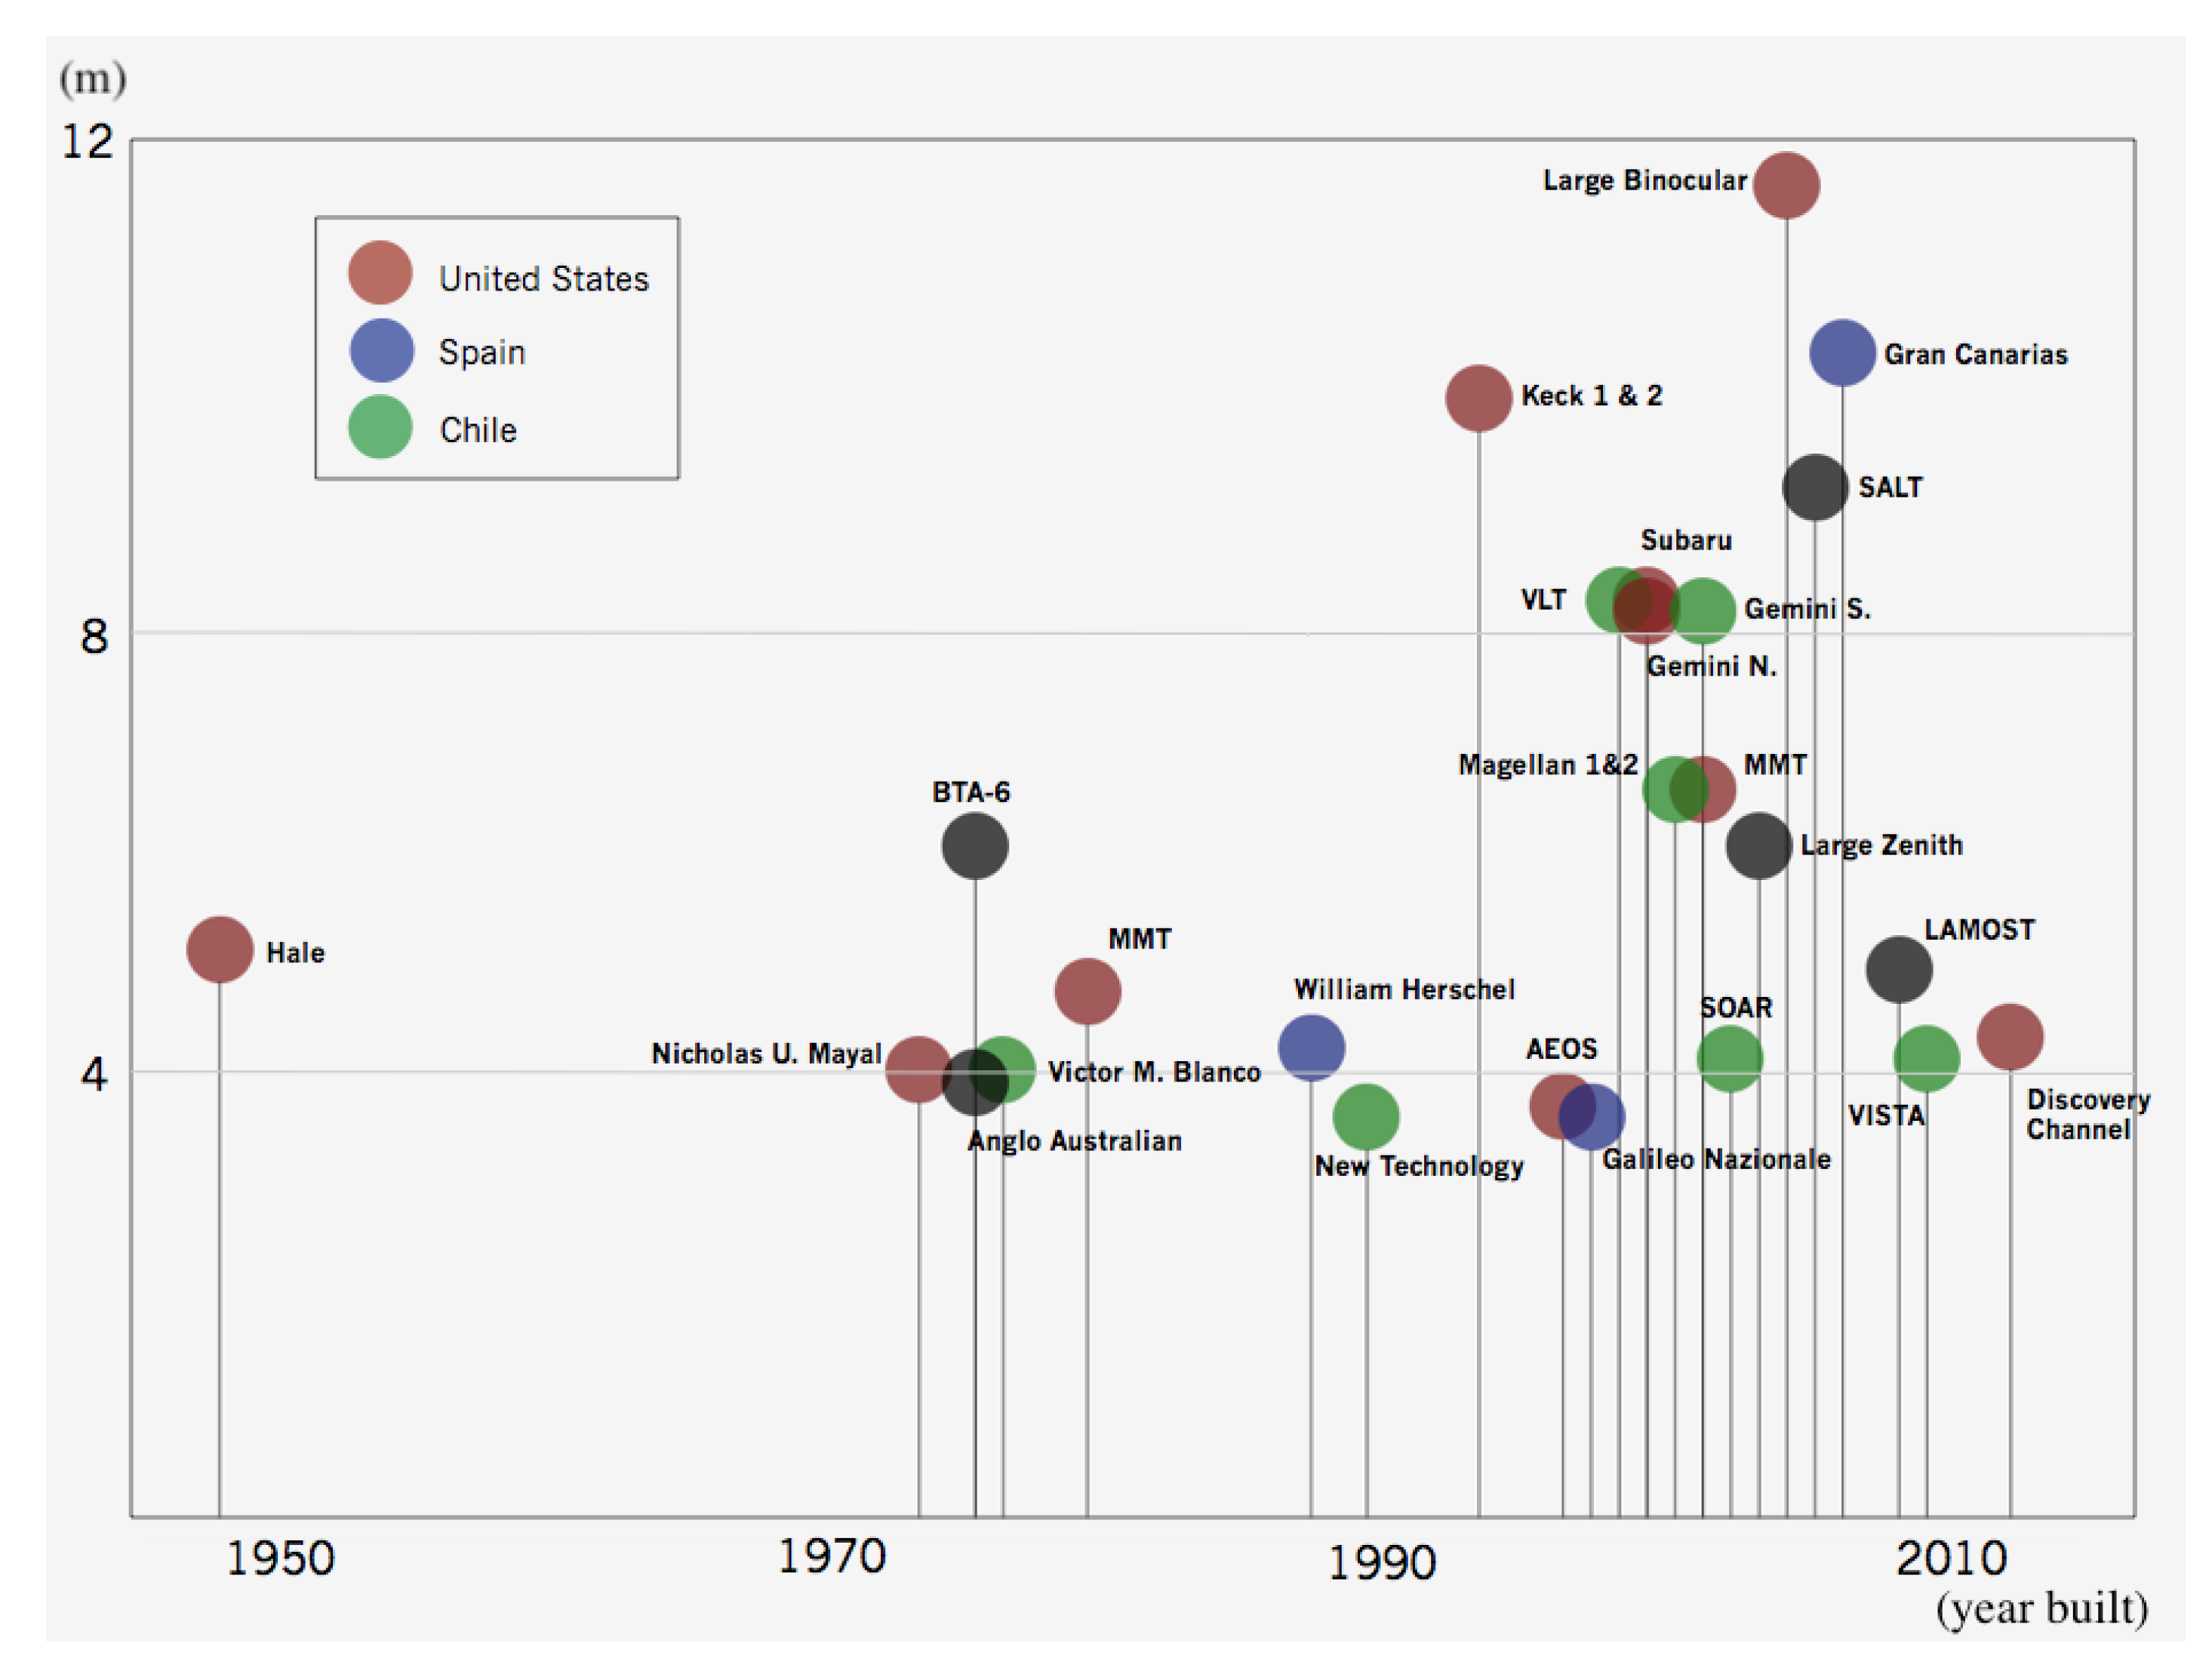
Figure 1. Development trend of large aperture telescopes.
Photonics 10 00422 g001
Figure 2. Schematic cross-section of DECam’s camera [15].
Photonics 10 00422 g002
Figure 3. Hyper Suprime-Cam of Subaru Telescope [24].
Photonics 10 00422 g003
Figure 4. Optical design scheme of HSC [18].
Photonics 10 00422 g004
Figure 5. Optical design model.
Photonics 10 00422 g005
Figure 6. Integrated optomechanical analysis method and process.
Photonics 10 00422 g006
Figure 7. Finite element meshing, boundary condition setting and coordinate system directions, with calculation domain of a hexahedral mesh type and fully fixed constraints on the sides of each lens under gravity without other external forces.
Photonics 10 00422 g007
Figure 8. Deformation diagram under the action of gravity.
Photonics 10 00422 g008
Figure 9. Plots of rigid body displacement error of L1S1 on a log scale.
Photonics 10 00422 g009
Figure 10. Normalized surface after removing rigid body displacement of L1S1.
Photonics 10 00422 g010
Figure 11. Normalized surface after removing defocusing of L1S1.
Photonics 10 00422 g011
Figure 12. Curve of curvature radius variation. As the altitude angle of the telescope changes, the corrector lens curvature radius of the prime focus changes. As the altitude angle of the telescope ranges from 0° to 90°, the curvature change of the optical surface gradually increases; that is, the curvature of the optical surface changes the most when the telescope is directed towards the zenith; when different optical surfaces have the same altitude angle, the larger the curvature radius of the lens is, the larger the variation is.
Photonics 10 00422 g012
Figure 13. RMS of optical surfaces.
Photonics 10 00422 g013
Figure 14. Aberration variation of optical surface.
Photonics 10 00422 g014
Figure 15. Imaging quality analysis (spot diagram).
Photonics 10 00422 g015
Figure 16. Imaging quality analysis (FFT diffraction encircled energy radius).
Photonics 10 00422 g016
Table 1. Large-aperture and wide-field-of-view telescopes.
Optical System FormTypical TelescopeEffective Aperture or
Primary Mirror Aperture
Prime focusDesi Telescope [8]4.2 m
Blanco Telescope [9]4 m
LBT Telescope11.8 m
Subaru Telescope8.2 m
DCT Telescope4.3 m
VISTA Telescope4.1 m
AEOS Telescope (recoat)3.6 m
Mersenne–SchmidtSpace Surveillance Telescope3.5 m
Large Synoptic Survey Telescope8.4 m
Table 2. The dimensions of DECam’s corrector lenses.
Name of
Corrector Lens
Lens Diameter
(mm)
Central Thickness
(mm)
Edge Diameter
(mm)
Weight
(kg)
C198011072.6172.68
C269052148.187.16
C365275.137.73942.11
C4604101.752.749.58
C55125536.324.33
Table 3. Comparison of the technical characteristics of different telescopes.
No.NamePrimary Mirror
Aperture
Field of ViewMaximum Corrector
Aperture
1The Blanco Telescope4 m2.2°980 mm
2The Subaru Telescope8.2 m1.5°850 mm
3The KMTNet Telescope1.6 m552 mm
4The MMT Telescope6.5 m750 mm
5Our System4 m3.5°1400 mm
Table 4. Optical design parameters.
Name of Optical SurfaceCurvature Radius
(mm)
Distance
(mm)
Lens Diameter
(mm)
Weight
(kg)
L1S1−1007.630−260.0001400574
L1S2−2811.320−22.587
L2S1−1546.940−75.0001220312
L2S2−878.310−164.118
L3S1−3465.840−65.0001040259
L3S2−727.470−151.030
L4S1−3712.420−65.000880156.9
L4S2−756.220−688.534
L5S1−2857.135−100.00073078
L5S29475.188−29.938
L6S1−1062.845−120.00073083.4
L6S2−12,580.000−204.865
L7S1−1322.140−108.00054042
L7S21795.050−187.774
Focal plane diameterΦ 370
Table 5. Curvature radius error.
Name of Optical Surface L1S1(mm)L1S2(mm)
Original curvature radius −1007.63−2811.32
Curvature radius error4.28435 × 10−102.74851 × 10⁻⁹
15°2.74884 × 10−43.60830 × 10−3
30°5.31034 × 10−46.97068 × 10−3
45°7.50996 × 10−49.85804 × 10−3
60°9.19778 × 10−41.20736 × 10−2
75°1.02588 × 10−31.34663 × 10−2
90°1.06207 × 10−31.39414 × 10−2
Table 6. Rigid body displacement error of L1S1.
Displacement
Decomposition Terms
Tx
(mm)
Ty
(mm)
Tz
(mm)
Rx
(rad)
Ry
(rad)
Rz
(rad)
Rigid body displacement error−1.358 × 10−115.608 × 10⁻⁵−4.035 × 10−116.869 × 10−82.513 × 10−132.485 × 10⁻¹⁴
15°−3.101 × 10−115.417 × 10−56.633 × 10−56.635 × 10−86.433 × 10−145.155 × 10⁻¹⁶
30°−4.621 × 10−114.857 × 10−51.281 × 10−45.949 × 10⁻⁸−1.264 × 10⁻¹³−2.376 × 10⁻¹⁴
45°−5.873 × 10−113.965 × 10−51.812 × 10−44.857 × 10⁻⁸−3.115 × 10⁻¹³−4.615 × 10⁻¹⁴
60°−6.673 × 10−112.804 × 10−52.220 × 10−43.435 × 10⁻⁸−4.713 × 10⁻¹³−6.562 × 10⁻¹⁴
75°−7.029 × 10−111.451 × 10−52.476 × 10−41.778 × 10⁻⁸−6.008 × 10⁻¹³−8.066 × 10⁻¹⁴
90°−6.923 × 10−113.785 × 10−112.563 × 10⁻⁴−3.180 × 10⁻¹³−6.890 × 10⁻¹³−8.995 × 10⁻¹⁴
Table 7. Zernike polynomial fitting of L1S1 *.
L1S115°30°45°60°75°90°
KNMAberrationAmplitudeAmplitudeAmplitudeAmplitudeAmplitudeAmplitudeAmplitude
100Piston0.000010.059920.115760.16370.200490.223610.2315
211Tilt0.375290.362510.325020.265390.187660.097150.00016
320Defocus−0.00001−51.88784−100.2394−141.7601−173.6199−193.6479−200.4790
422Pri Astigmatism0.000230.000330.000790.00120.001540.001780.00189
531PriComa88.7132185.6903976.8278662.7296644.3564822.96060.00016
633Pri Trefoil0.000270.000310.000340.000350.000350.000320.00027
740PriSpherical0.00005−11.24575−21.72513−30.72404−37.62913−41.96986−43.4504
842Sec Astigmatism0.000060.000320.000640.000910.001120.001260.00131
944Pri Tetrafoil0.000150.000360.000550.000690.00080.000840.00083
1051SecComa25.0953424.2402421.7331917.7450612.547636.495120.00011
1153Sec Trefoil0.000020.000030.000030.000030.000030.000030.00003
1255Pri Pentafoil0.000390.000410.000410.000380.000320.000240.00015
1360SecSpherical0.00003−1.9746−3.81466−5.39477−6.60722−7.36941−7.62939
1462Ter Astigmatism0.000040.000060.000090.000110.000120.000130.00013
1564Sec Tetrafoil0.000030.000070.000120.000170.000210.000230.00024
1666Pri Hexafoil0.000130.000140.000140.000140.000140.000130.00012
1771TerComa5.081254.908114.40053.592992.540631.315130.00002
1873Ter Trefoil0.000310.000310.000290.000250.000190.000120.00004
1975Sec Pentafoil0.000010.000020.000020.000010.000010.000010.00001
2080TerSpherical0−0.47184−0.91152−1.28908−1.5788−1.76092−1.82303
2182Qua Astigmatism0.000010.000020.000050.000070.000090.00010.00011
2284Ter Tetrafoil0.000020.000380.000720.0010.001230.001360.00141
2386Sec Hexafoil0.000020.000020.000010.000010.000020.000020.00003
Unfitted term1.6877%1.3746%1.1129%1.6877%1.3746%1.1129%1.0050%
* Unit: nm.
Disclaimer/Publisher’s Note: The statements, opinions and data contained in all publications are solely those of the individual author(s) and contributor(s) and not of MDPI and/or the editor(s). MDPI and/or the editor(s) disclaim responsibility for any injury to people or property resulting from any ideas, methods, instructions or products referred to in the content.