Article

Deformation Measurement of a SS304 Stainless Steel Sheet Using Digital Image Correlation Method

1
Department of Mechanical Engineering, National Institute of Technology Delhi, New Delhi 110036, India
2
Department of Applied Mechanics, Indian Institute of Technology Delhi, New Delhi 110016, India
3
Department of Mechanical Engineering, Indian Institute of Technology Bombay, Mumbai 400076, India
4
Department of Mechanical Engineering, MMEC, Maharishi Markandeshwar (Deemed to be University), Mullana 133207, India
5
Department of Mechanical Engineering, National University of Singapore, Singapore 117549, Singapore
6
Department of Mechanical Engineering, Chandigarh University, Sahibzada Ajit Singh Nagar 140413, India
*
Author to whom correspondence should be addressed.
Photonics 2022, 9(12), 912; https://doi.org/10.3390/photonics9120912
Submission received: 8 October 2022 / Revised: 21 November 2022 / Accepted: 21 November 2022 / Published: 28 November 2022

Abstract

:
The digital image correlation (DIC) method is widely used in deformation measurements as it has the advantages of being a non-contact, high precision method that provides full field measurements, and requires simple experimental equipment. Traditionally, the grayscale speckle patterns captured by a monochromatic camera are used in the DIC method. With the growing development of consumer color cameras, there is great potential for developing color information in the DIC method. This paper proposes a displacement- and stress–strain-invariant DIC deformation measurement method based on the integer-pixel matching approach for speckle patterns during a tension test. For the integer-pixel matching stage, the load and displacement and stress–strain-invariant histories feature is used to estimate the initial value of the deformation parameters. In addition, this paper proposes a reverse retrieve strategy, instead of a forward search, to reduce the search time. Experiments show that the proposed DIC deformation measurement approach is not only capable of displacement invariance measurement, with robustness and high efficiency, but also that the average accuracy of the stress–strain result can reach 0.1%.

1. Introduction

Demand for lightweight parts, better product performance, efficiency, and higher safety is rising in the automotive sector [1,2,3]. Detailed measurements of crucial material parameters, such as strain limit, strength coefficients, and anisotropy coefficients, are necessary to optimize the design and production of these components [4,5,6]. Tension testing with an extensiometer is the technique most frequently used to determine a material’s properties [7]. However, this system is not appropriate for post-diffuse necking and only provides an average strain over the specimen gauge length. A cutting-edge method for precise strain assessment is Digital Image Correlation (DIC) [8]. This method is ideal for characterizing material properties in the elastic and plastic ranges, since it allows for quick data collection. Additionally, it provides a noncontact method for carrying out complete-field, extremely high-precision measurement of displacement and strain. In the consideration of affordable and lightweight goods, the modern industrial sector needs materials with better strengths, such as SS304. To determine the material qualities needed for industrial applications, SS304 must be tested. For material processing, including stretching, stamping, bending, and other processes, tensile test data, such as the stress–strain relation, are essential [9,10,11]. The classic extensiometer method is typically used to calculate the average strain over a region by measuring the tensile strain between two sites. Using a tensile test machine with an extensiometer to determine the strain information at the necking point is nearly impossible. The entire measurement area between the extensiometerprobes is where the measured strain is spread out. During the tensile test, the DIC system measures the full-range strain distribution [8,12,13,14]. This study will examine field deformation using DIC strain measurement in tension testing, and contrast the results with the load vs. displacement and stress–strain relationship obtained using the conventional approach. Testing was conducted on SS304, which is an example of an advanced high-strength steel (AHSS) material. The measurement of SS304 is used in this paper as an example of how the test procedure works. Strain fields can be quantified using a variety of techniques, including photo elasticity, electronic speckle-pattern interferometry, and digital image correlation (DIC) [4,14,15,16].
The last 10 years have seen rapid progress in data processing and digital imaging technologies, which has increased interest in optical digital image techniques for strain assessment [8,13,14,17,18,19,20]. Strain fields of different sizes can be measured using the optical digital-image approach. Failure and damage can result from the localization of deformation within the tiny zones of the specimen. As a result, localization effects are crucial for comprehending material failure. To fully appreciate the localization impact, strain measurement and residual stress measurement appear to be crucial. There are several approaches for measuring residual stress, including X-ray diffraction, and the ultrasonic, eddy current, active magnetic, and passive magnetic methods [4,21]. The digital image correlation approach for measuring strain is the main topic of this study. In this study, a local deformation pattern is visualized using the digital image strain measuring approach, which is integrated with DIC. In recent years, DIC has been applied to numerous materials and mechanics research laboratories for full-field strain mapping applications. Theoretically, DIC can attain high accuracy and dependability. In reality, a number of other variables, including the deformation of a speckle on the specimen’s surface, and the fixture method of the image capture instruments, might affect measurement precision during a mechanical test.
The range and frequency response of conventional contact measurement methods, such as mechanical extensometers and strain gauges, are limited, and thus do not give enough data to address the complexity of dynamic mechanical behavior. To quantify stress and deformation fields in tests, non-contact full-field approaches, such as photoelasticity, Moiré, caustics, coherent gradient sensors, and digital image correlation (DIC), have significant advantages [22]. The DIC technique, first proposed by [23], is a promising tool for ductile heterogeneous materials across a wide range of length and time scales [24,25,26,27,28,29,30,31,32]. This is due to the recent advancement of image processing methods and the introduction of CCD (charge-coupled device) cameras. On the one hand, the method is applicable to studies encompassing a wide range of fields of view, from the nano-/micro-scale to the field-scale, as well as from two-dimensional (2D) to three-dimensional, because it has no inherent length scale (3D). On the other hand, the DIC methodology has also been tested over a wide variety of loading rates, leading to improvements in the advent of CCD-cameras with high spatial and temporal resolutions, modern image processing algorithms, and numerical computations. Assessing the performance of the DIC approach for materials testing is one of the goals of the current paper.
The structure of this paper is as follows. In order to confirm the accuracy of the strain estimation utilizing the load vs. displacement obtained through the DIC technique, a direct comparison experiment of the elastic strain measurement is first offered. Then, in order to observe the strain distribution during the test, the application of the DIC approach to assess the nonhomogeneous deformation of an SS304 rectangular sample during a tensile test is shown.

2. DIC Methodology

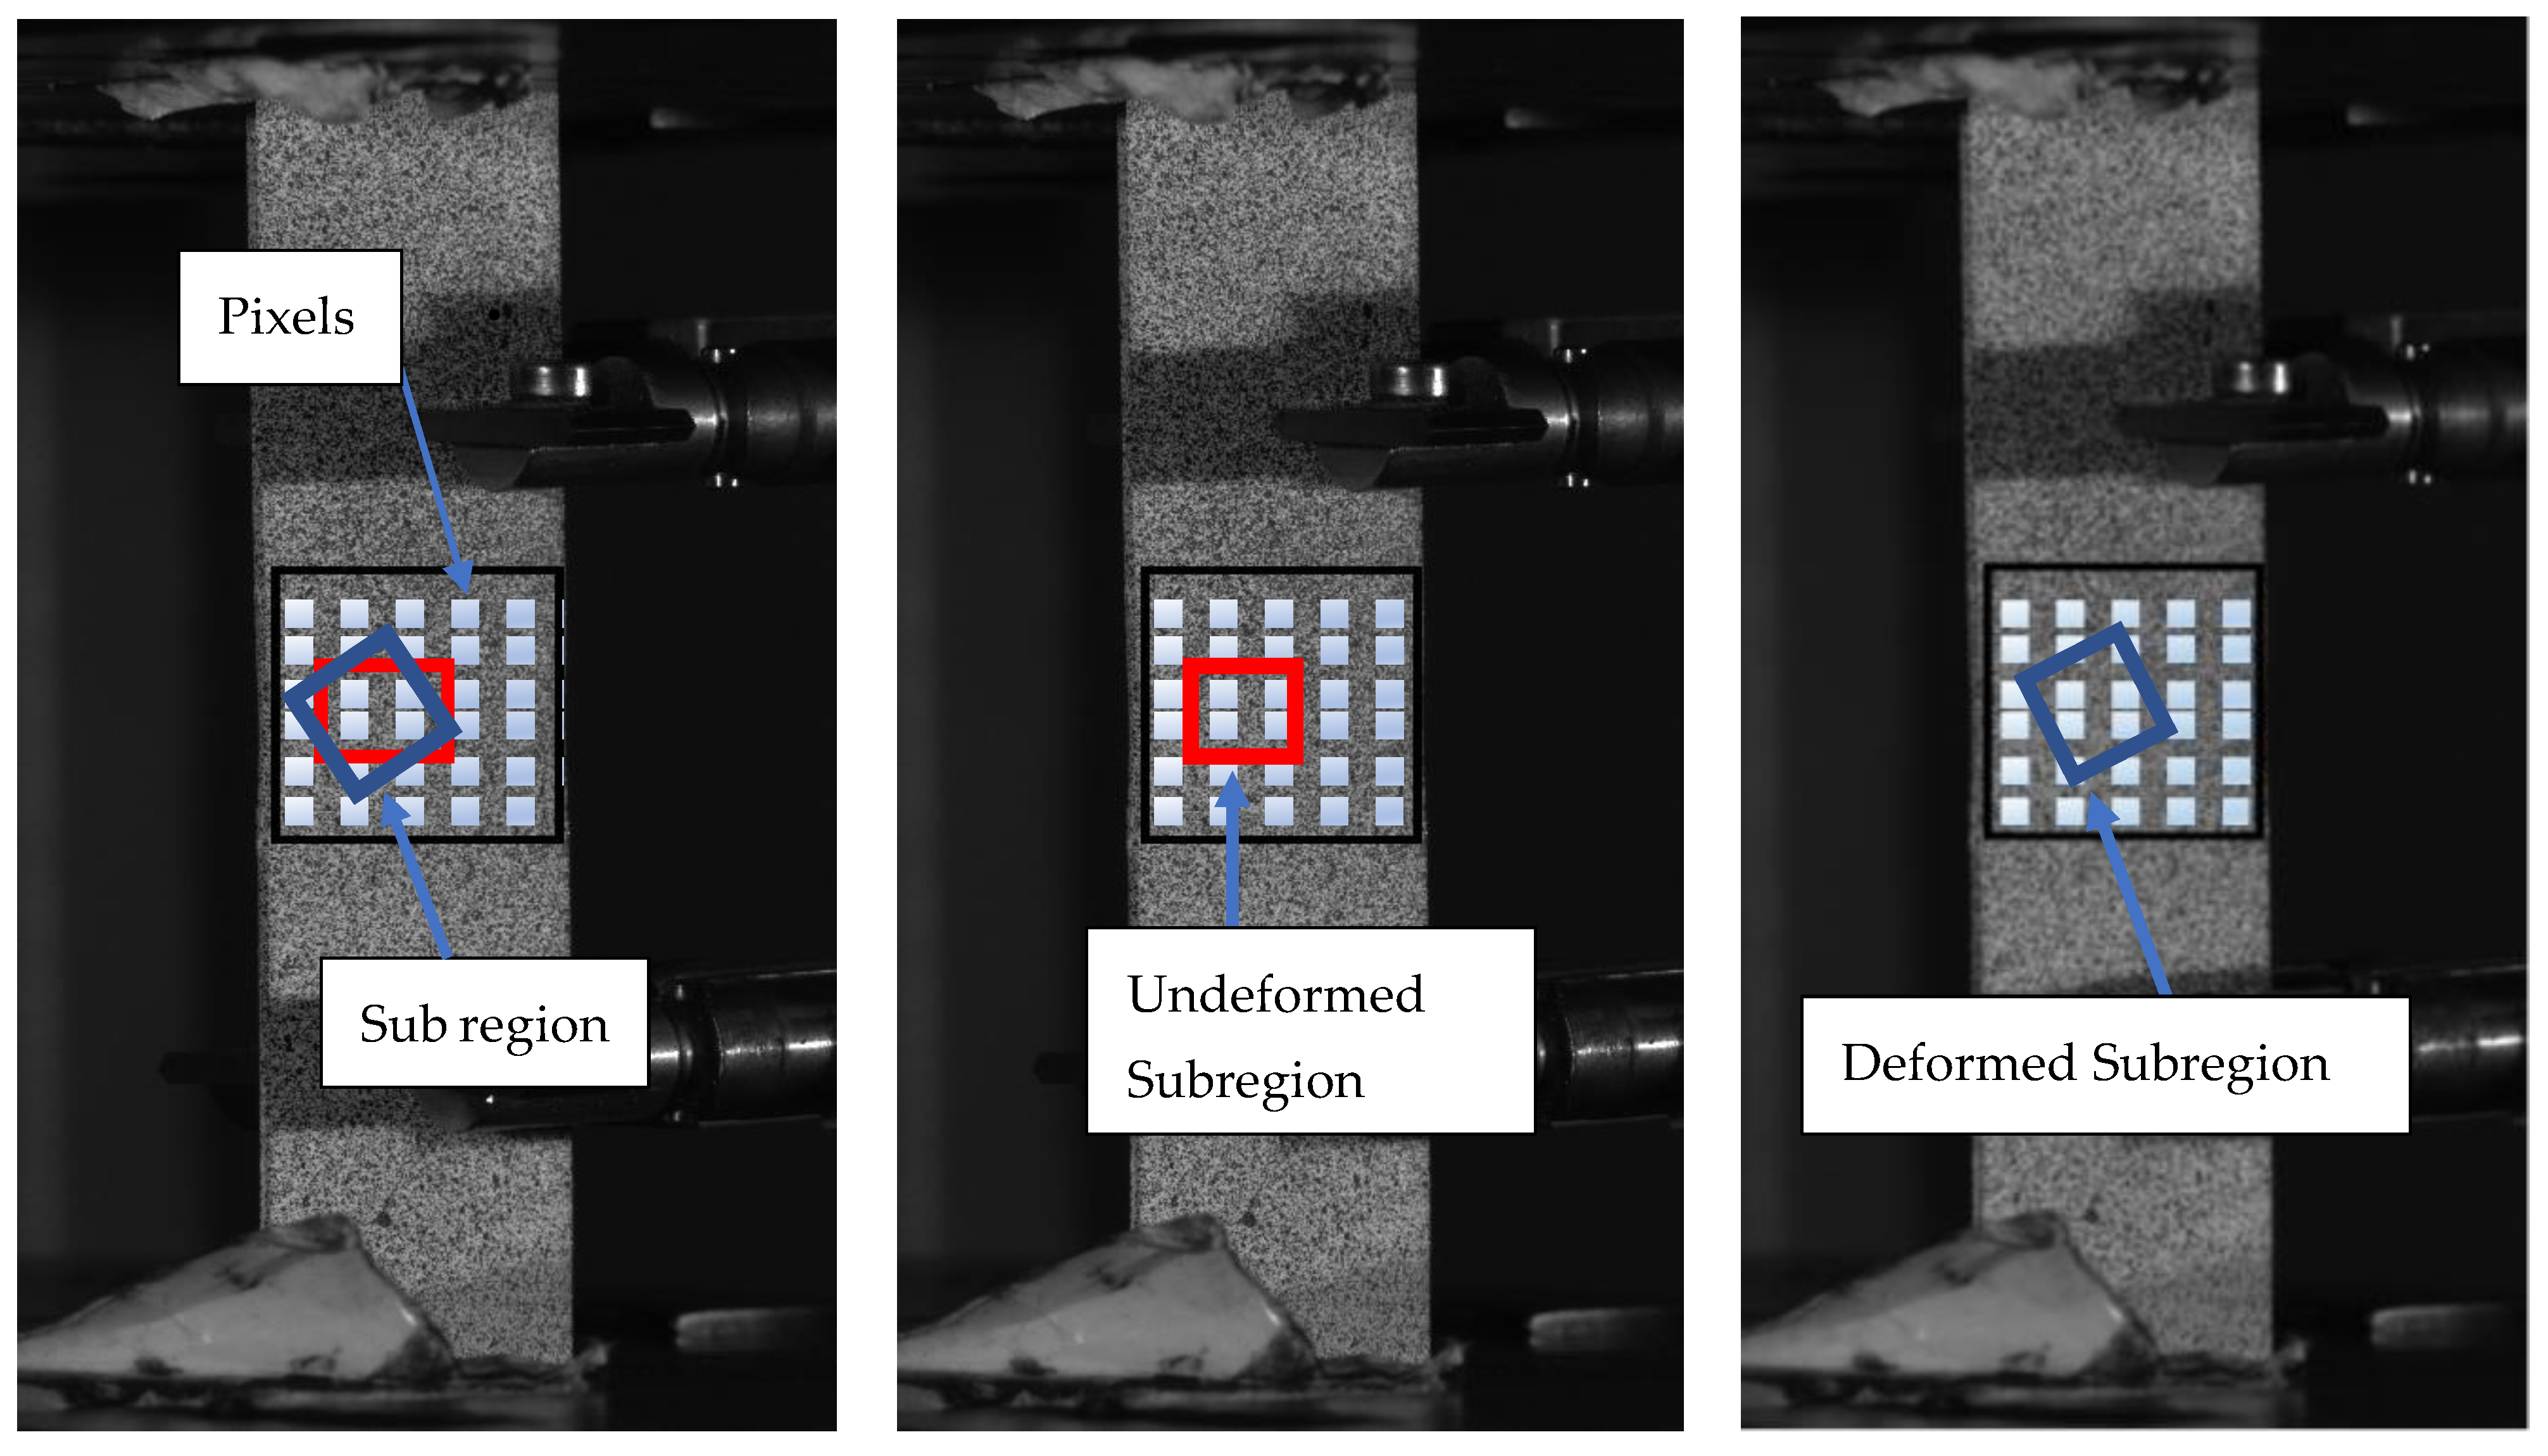
DIC is a non-contact 3D full-field optical method for detecting contours, deformation, vibration, and strain on practically any material. The method is applicable to a wide range of static and dynamic tests, including tensile, torsion, bending, and combination loads. DIC is less costly and simpler than other techniques, such as speckle interferometry, and it is more accurate and subjective than manual measuring methods, offering up a wide range of possible applications. To monitor a group of pixels (called subsets) in the distorted and reference pictures, as shown in Figure 1, DIC measurement uses temporal matching and correlation functions.
A charge-coupled device (CCD) camera collects picture data, which is then converted into digital form and stored in a computer for analysis. The DIC technique includes tracking the position of many surface points in two consecutive images using a correlation algorithm to determine displacement information. Displacements must be interpolated as weight functions in finite element form in order to calculate stress and strains using the correlation function. The correlation algorithm is based on tracking the intensity (Gray value) pattern in discrete subsets of neighborhoods during movement (shown in the area with a dashed line; one pane represents an image pixel), as shown in Figure 1. By contrasting the two picture subsets, the correlation algorithm calculates the local displacement values, U and V. A (n × m) pixel area that is rectangular in shape defines the area of interest in the reference image. The appropriate subset, which is likewise a (n × m) pixel region, is estimated at a specific point with a certain range in the distorted image. The range in the deformed image is searched for carefully, pixel by pixel.
By entwining the subset from the deformed image with the broader subset from the reference image, the algorithm produces the cross-correlation factor, C (Equation (1)) for a domain of theoretical displacements, (U, V), in 1-pixel increments as described in:
Figure 1. Temporal matching for the correlation function generation of unreformed and deformed images.
Photonics 09 00912 g001

Stress and Strain Calculation from the Correlation Function

DIC measurement uses temporal matching and correlation functions, shown in Equation (1).
The working procedure is explained as follows:
  • The digital image is first separated into smaller parts known as subsets.
  • Subset shape functions are imposed on the reference subset to account for the deformed shape of the subset in the deformed picture.
  • The distorted position of the subset may not be at the integer location.
  • The correlation function (C) is constructed to match the similarity of the subset in the un-deformed and deformed images.
C = A m 0 ( F x , y G X 0 + U , Y 0 + V d A A M 0 [ F x , y 2 A m 0 G X 0 + U , Y 0 + V 2 d A 1 2
where G is the severity of the pixels in the reference subset, d A is the severity of the pixels in the deformed subset, and ( X 0 , Y 0 ) are positional subset coordinate axes. Its origin is at the center of the subset at the control point.
In this paper, the Newton–Raphson method is used to estimate strain and stress. If we want to calculate the strains at the current position, we first choose a square window that contains discrete points that are (2m + 1) by (2m + 1) all around it. This window is known as the strain calculation window. The displacement distributions within it can be roughly represented as a linear plane if the strain calculation window is small enough.
Thus, we have the following equation:
U i , j = a 0 + a 1 x + a 2 y V i , j = b 0 + b 1 x + b 2 y
where a,b is the unknown polynomial coefficient that determines the displacement relationship with the m coordinate frame. U, V are the reference displacement at location (i,j) obtained by DIC, as indicated in Figure 1. Equation (2) can be rewritten in matrix form:
1 m m 1 m 1 m 1 0 0 1 m + 1 m 1 m m a 0 a 1 a 2 = U m . m U m 1 , m U 0 , 0 U m , m U m + 1 , m
Therefore, it is possible to solve the unknown polynomial coefficients using the Newton–Raphson method. It is vital to remember that the strain calculation window may contain fewer points than (2m + 1) (2m + 1) for points at the image boundary or in the region of the discontinuity area. However, by ignoring these faulty points within the local strain calculation window from the above equation, we can still compute the strain components using the Newton–Raphson iteration method.
u i = u 0 + u x Δ x i + u y Δ y i v i = v 0 + v x Δ x i + v y Δ y i
After obtaining the displacements and displacement gradients at the point (x,y), the full field strain can be calculated under the small deformation assumption:
ε x = u x
ε y = v y
γ x y = u y + v x
The unknown parameters u , v , u x , u y , v x , v y are determined by using the Newton–Raphson method to minimize the correlation function.

3. Experiments

The experiments were performed on a universal testing machine (Zwick Roell 250 with a maximum capacity of 250 kN, as shown in Figure 2b) with homogenous working conditions at room temperature. The strain rate was kept ε ˙ = 1 × 10⁻³ per second. The material used for the tensile test was SS304 with 1 mm thickness. A series of samples were cut in a 0° rolling direction. Rectangular cross sections with dimension 200 mm × 20 mm × 1 mm were cut out from the steel sheet. While performing the experiments, 50 mm from both ends was constrained, and the remaining mid-section (100 mm in length) was kept under loading conditions. The samples’ length, width, and thickness were measured along the y-axis, the x-axis, and the z-axis, respectively. The load was applied in the y-direction along the length. The tests were conducted for the samples in the rolling direction until three reproducible curves were produced.
The test specimen with dimensions and a coordinate frame is shown in Figure 2a. The strain was measured using the DIC device and a POINTGREY® camera. The DIC system is helpful for measuring strain distribution in the plastic zone of the sample. The Cauchy stress vs. logarithmic strain curves were computed using results from the DIC system that were acquired after post-processing. The strain was measured using a digital image correlation device (DIC). This guarantees that the results are accurate and removes the impact of any impurities or porosity in the material from the results.
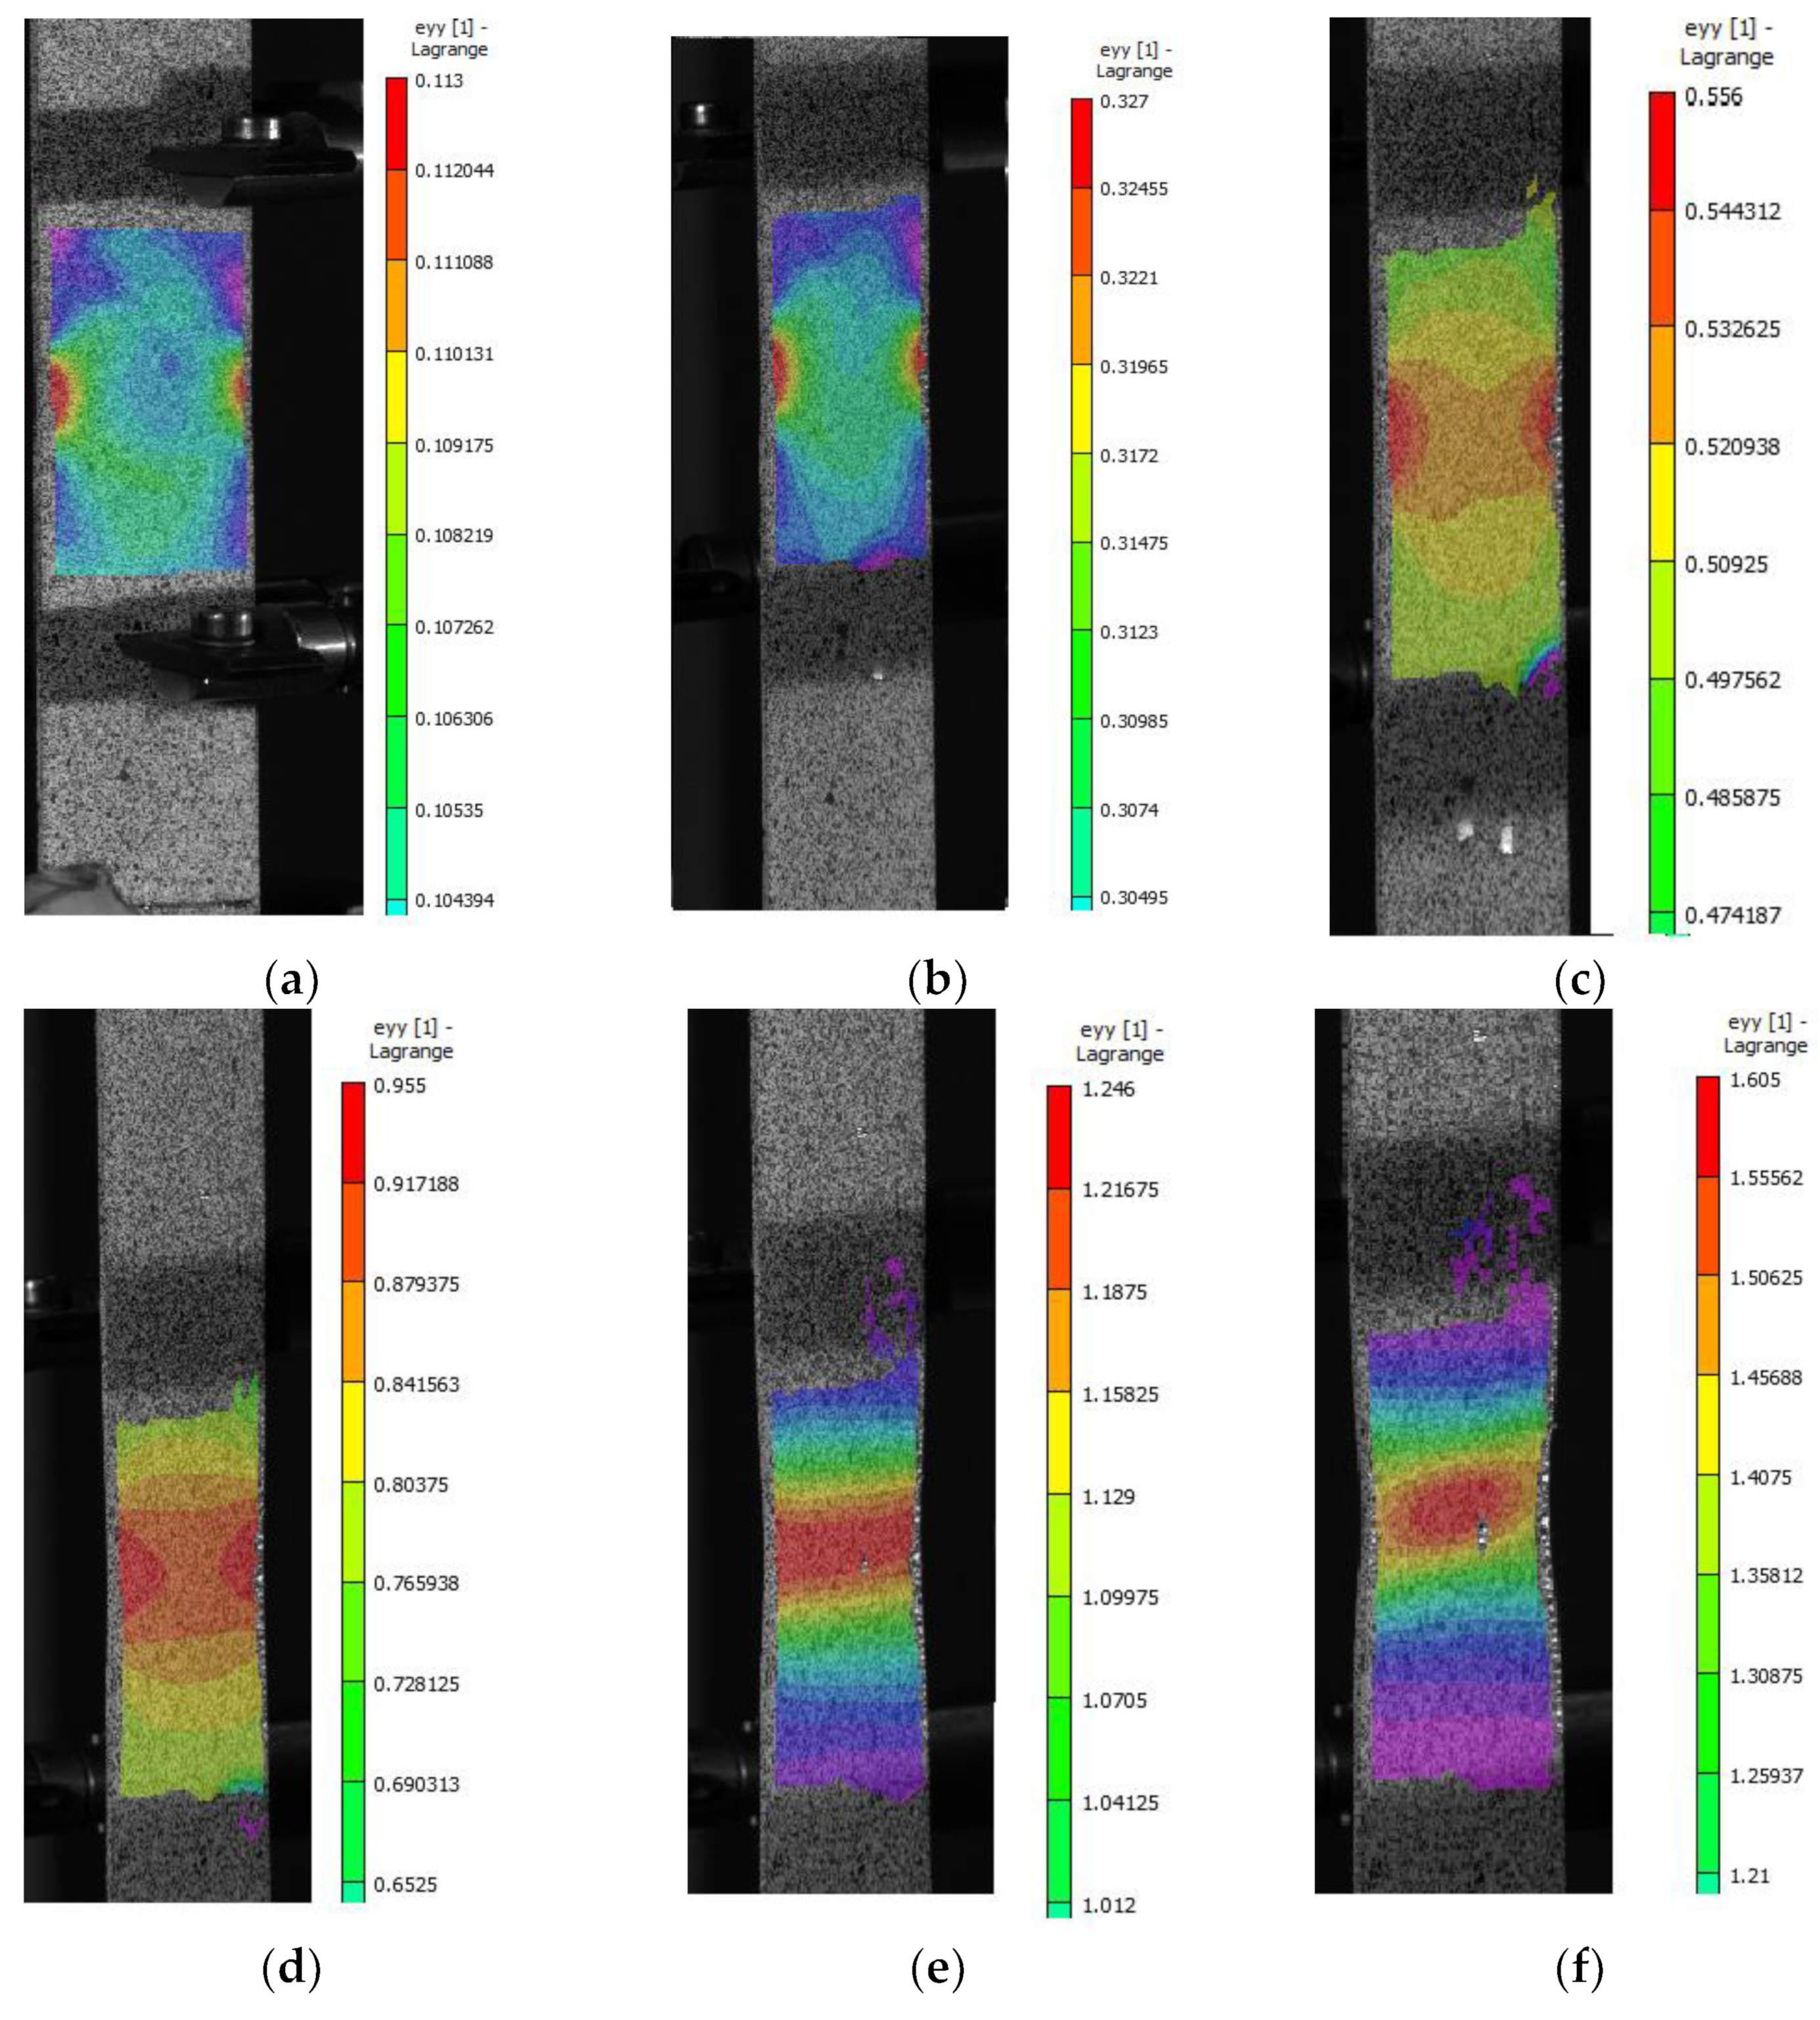
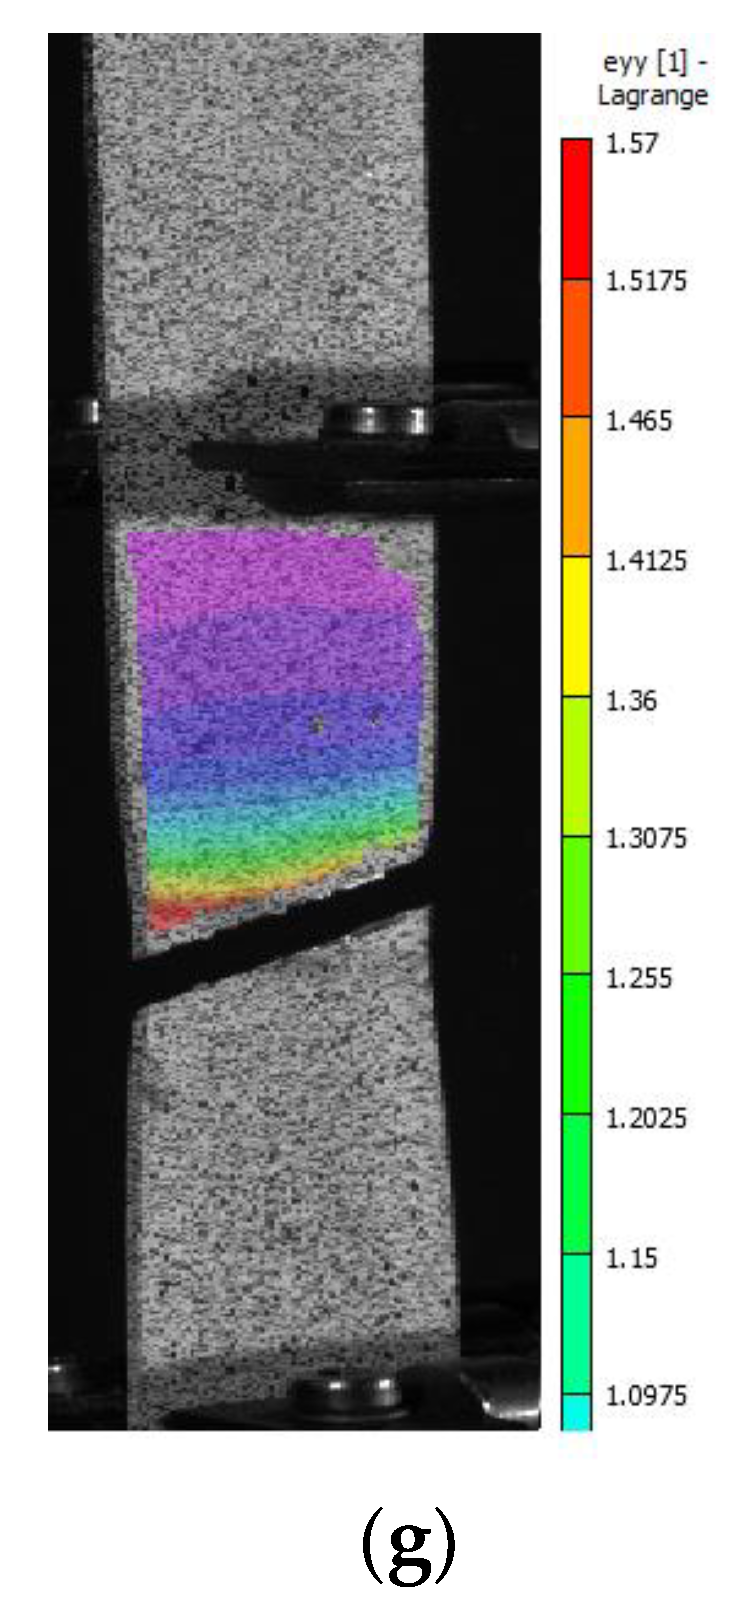
The contour plot image was obtained from the DIC Vic-3D software, which was applied under tensile load conditions. Figure 3 shows the contour plot of the measured strain under tensile loading, which provides some parameters such as analysis types, the DIC radius, step analysis, image correspondence, units for pixel, and the correlation coefficient. Figure 3a shows the contour plot of the strain value on the stainless steel material, which recorded the development trend of the strain value. The necking area was detected and observed using the experimental DIC method, as shown in Figure 3b. Moreover, the maximum strain value red colour was 35 mm and minimum strain value blue colour was around 0 mm.

4. Results

4.1. Experimental Results and Discussion

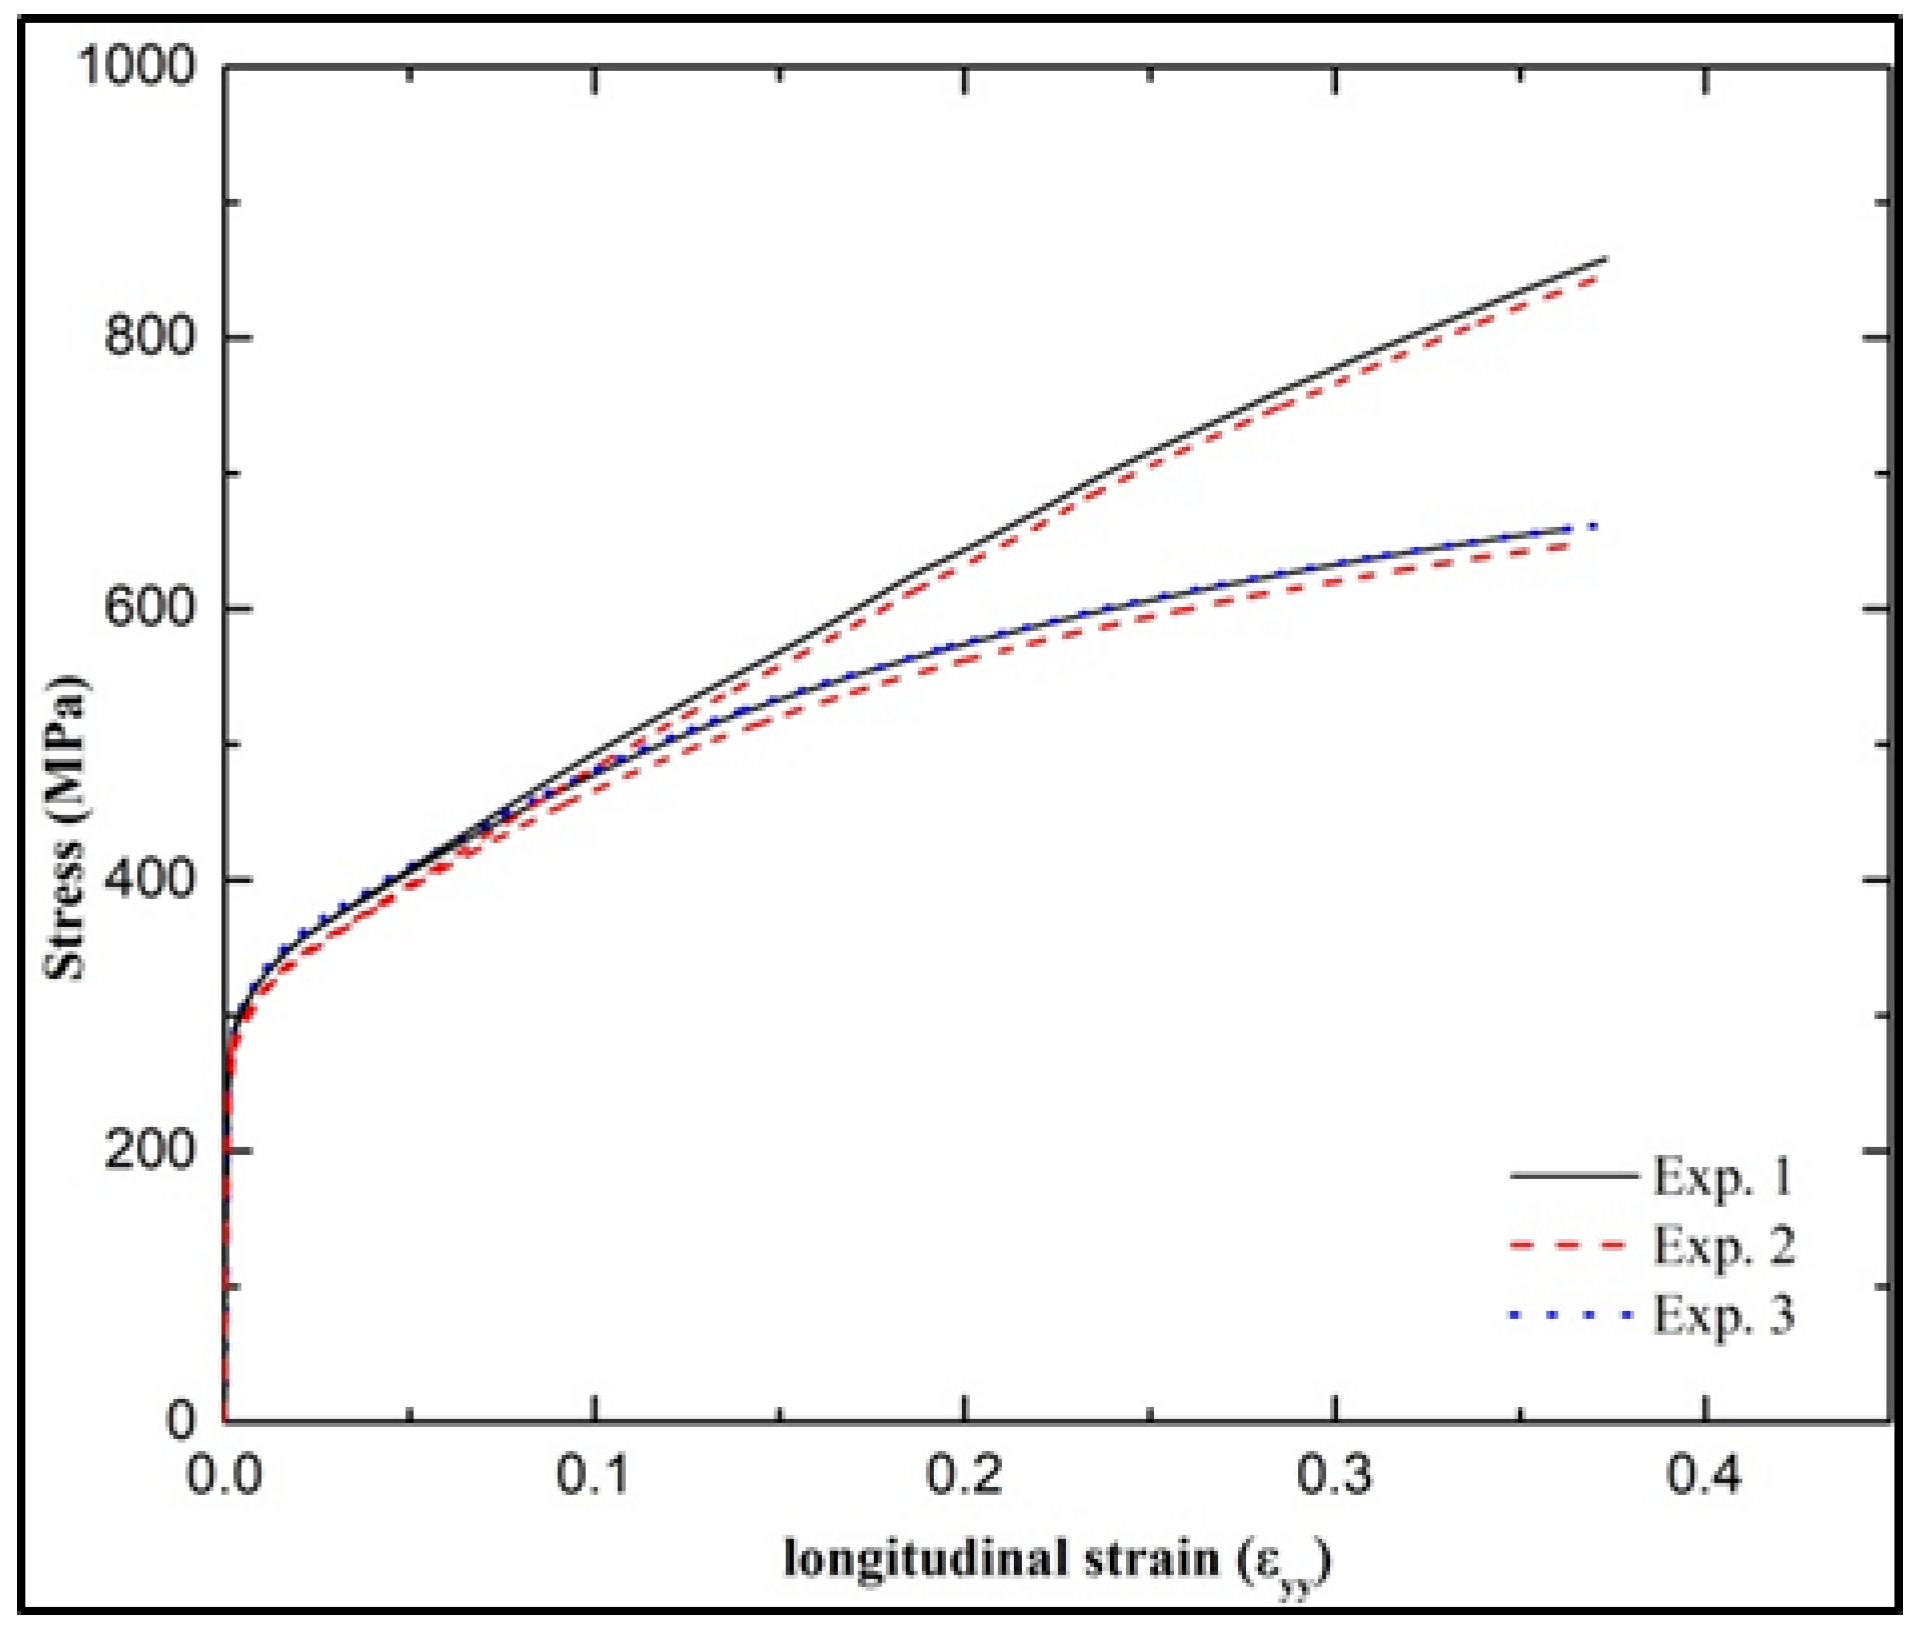
The stress–strain curve is plotted using data obtained from the DIC for the tension test samples. The plot for the 0° rolling direction is shown in Figure 4. While Cauchy stress vs. logarithmic strain curves are plotted up to the necking, nominal stress vs. logarithmic strain curves are plotted up to the rupture. The data are unreliable because, after necking, the nominal stress in the stress–strain curves starts to decrease. The outcomes show that the curves can be replicated. Reproducible results were obtained from similar tests carried out on the tensile test materials in each orientation. Figure 3b shows one from each orientation of the nominal stress–logarithmic-strain curve and the Cauchy stress–logarithmic-strain curve. This demonstrates that there is no discernible difference in the highest value of nominal stress and between curves from all orientations.

4.2. Numerical Results and Discussion

Using an elasto-plastic model with homogeneous material properties, the tensile test sample was numerically simulated. The material’s mechanical properties were utilized in accordance with the experimental sections stated above. As shown in Figure 5, the simulation with symmetry boundary conditions was run as per the eighth sample along the x, y, and z directions. The sample’s 3D model was created using the following dimensions: 50 mm × 10 mm × 0.5 mm. As shown in Figure 5, a 5 mm displacement was applied to the model’s top surface, along the y-axis. The commercial finite element code ABAQUS/Standard was used for the simulation. Only the area subjected to the load was taken into consideration for the numerical simulation of the sample, disregarding the area beneath the grips during the experiments (50 mm at both ends of the sample). Calculations of various stresses and strains were made using the simulation. The stress–strain data were post-processed using several macroscopic criteria to compute the damage factor, as mentioned in the preceding sections. The C3DR element was used to generate the mesh. The linear mesh was defined as 0.2 mm to 20 mm in length, away from the sample’s center (half-length under the extensometer, as the symmetric sample is considered). After that, a biased mesh was taken along the length, ranging in size from 0.2 to 0.5 mm. A linear mesh with a 0.2 mm size was taken across the width. Young’s modulus and the hardening curve were taken into consideration as typical properties when simulating the sample at 0°/RD.
The simulation result was considered up to the point when the extensiometer displacement in the simulation reached the same value as in the experiment (i.e., the rupture point). The various stress–strain data obtained from the numerical simulation of the tensile test sample are presented in Figure 6. They indicate the distribution of (a) von-Mises stress, (b) maximum principal stress, (c) equivalent plastic strain, and (d) hydrostatic stress at the point of rupture. The load–extensiometer-displacement curve is presented in Figure 7. It indicates that there is good agreement between the experimental curve and the simulated curve. The maximum load value reached in experiment was 13,702 N and in the simulation it was 13,331 N, whereas the extensiometer displacement at the rupture point was 27 mm in both the experiment and the simulation.

5. Validation

A reverse retrieve strategy was used to validate the proposed deformation measurement approach. In this strategy, a pixel of speckle samples was used to evaluate deformation by node-point matching during the simulation. To verify the feasibility of this matching technique, it was further compared with experiment results. Moreover, traditional equations were used to obtain stress and strain data for the experiment and for the numerical simulation.

5.1. Simulation

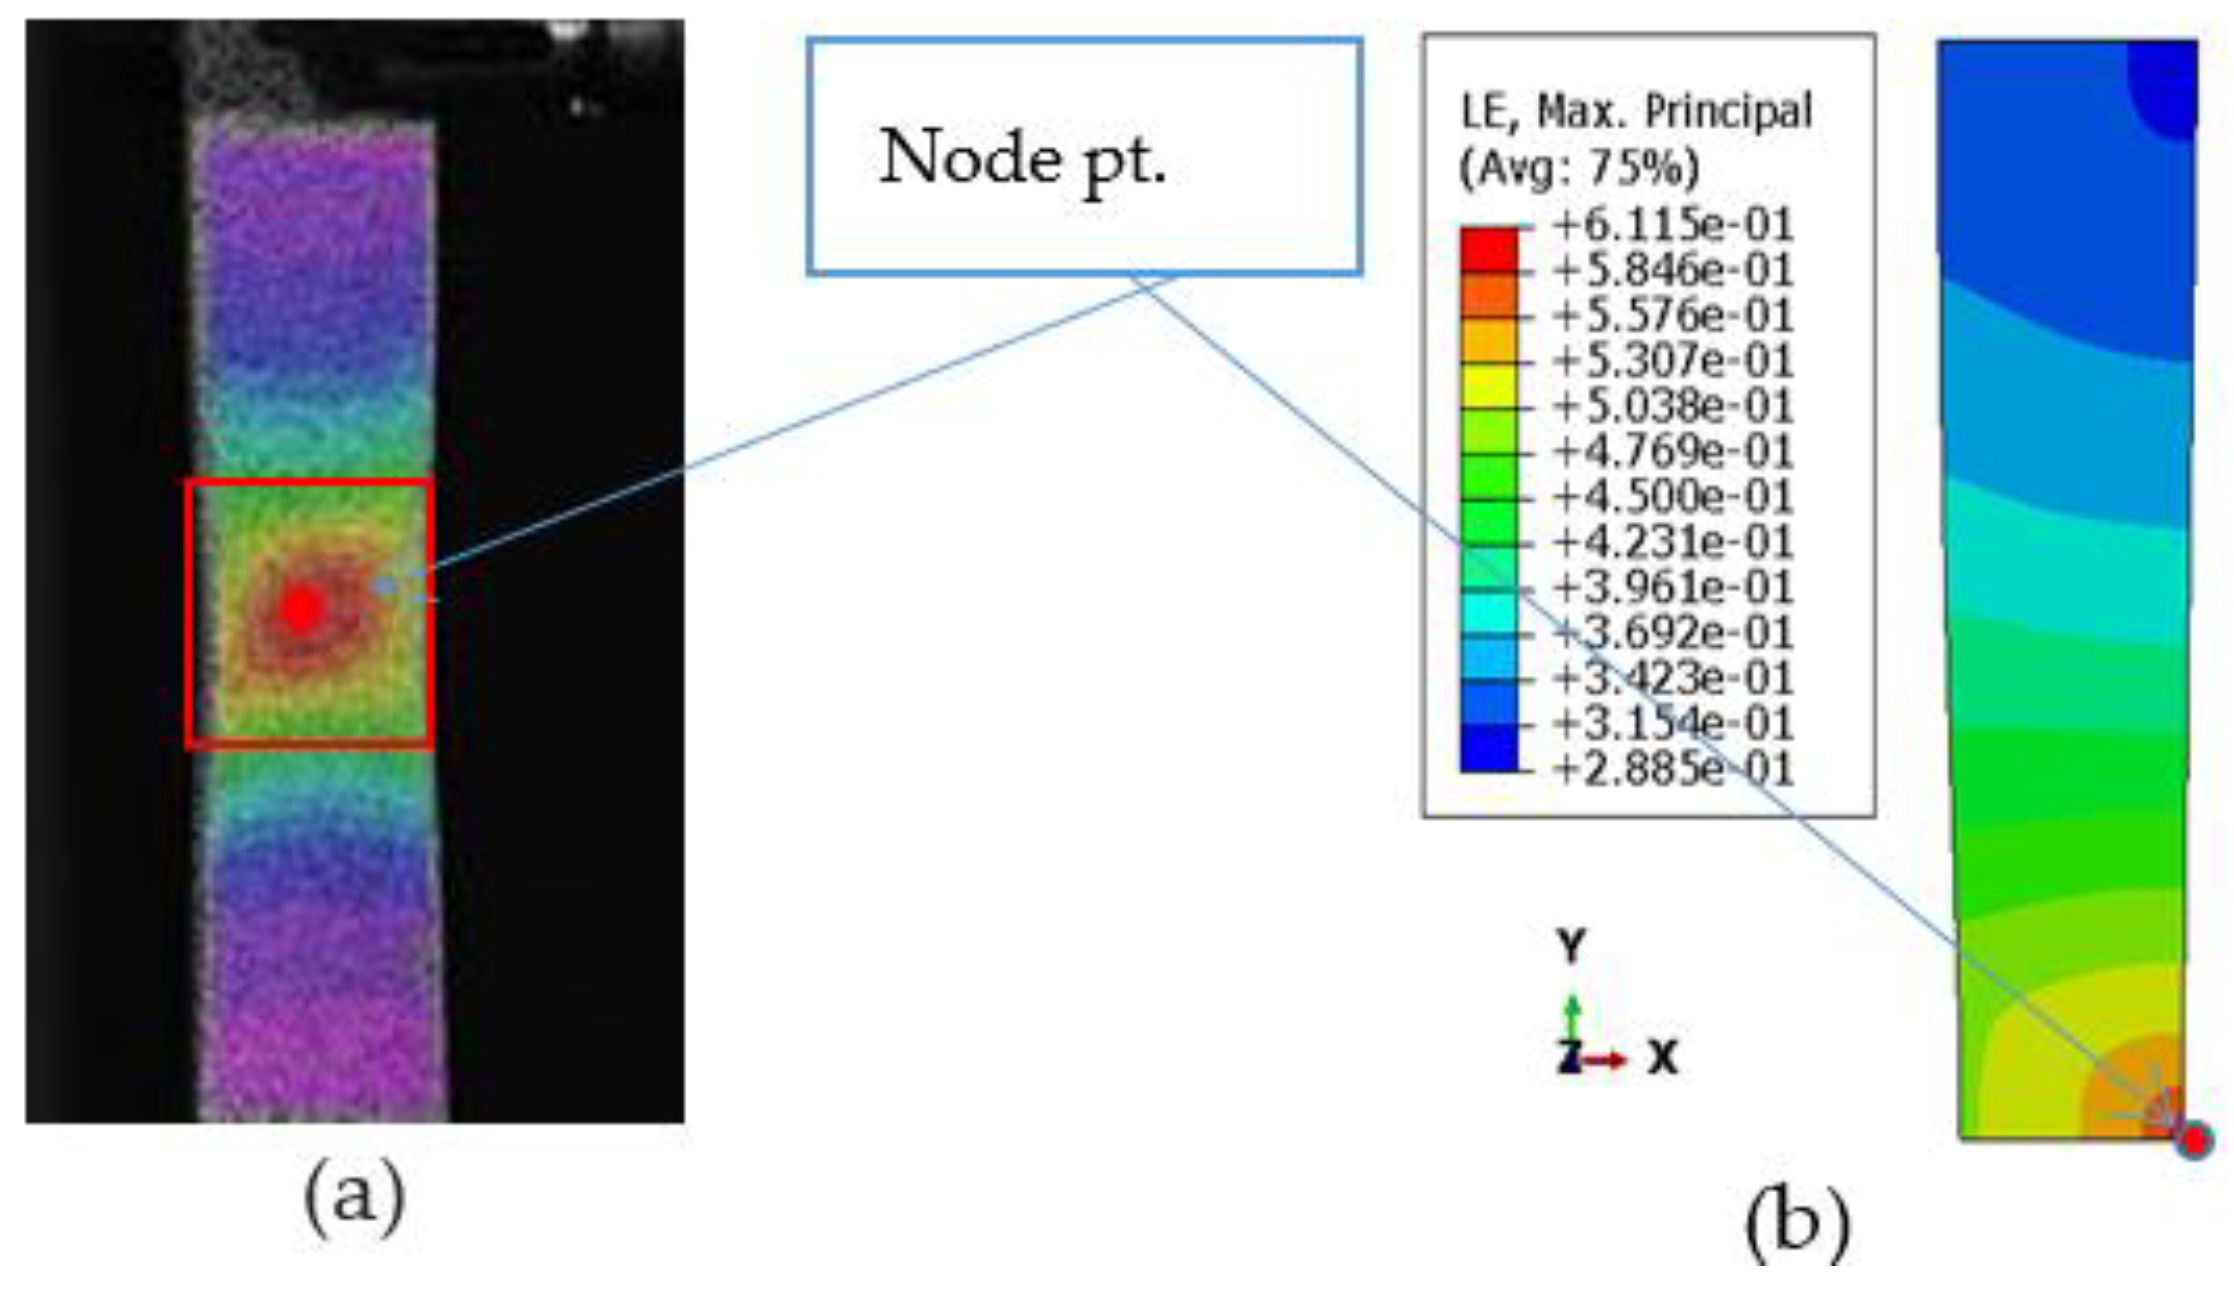
The first validation concerns the displacement invariance of the samples, whereby a speckle pattern was used for verification, as shown in Figure 5. Figure 5a was displaced by 0 and Figure 5b was obtained after rupture. To better conform the actual measurement situation, the load in the experiments was homogenously added to these samples. Subsequently, in the numerical simulation, a node point at the highest strain deformation was uniformly selected in Figure 6a,b, and this node point was matched in the tension test experiment using the DIC device. Since the deformation is known from the true displacement of the generated samples, the true displacement of these node points is known. The performance of the DIC deformation measurement technique was evaluated by the error between the simulated results and the true displacements, as shown in Figure 6. On samples with node points, it can be demonstrated that the DIC deformation measurement technique can match displacement with a maximum inaccuracy of roughly 3%. The precision of the DIC deformation measurement technique fully satisfies the experimental value’s accuracy criterion, as the convergence range of the simulation approach is roughly 7% [16].
The validation of the stress–strain curve obtained from the tension test experiment is concerned with the numerical simulation in same rolling direction. The simulation was run in the same working conditions as were employed in the experiments. In the simulation, the calculation was performed by taking the centroidal node element and extracting the parameters of Cauchy stress and logarithmic strain value; these values were further compared with the DIC-obtained data. The experimentally obtained load value needed to be converted into Cauchy stress, as DIC gives logarithmic strain values.

5.2. Experimental

Traditional calculations were performed for the deformation measurement. Stress and strain are vital parameters which indicate the deformation of any material. The calculation was conducted by continuously measuring gauge length l 0   (i.e., the calibrated distance between two marked surfaces of a specimen) until rupture. The strain yield leads to the measurement of sample deformation. This is then calculated using the ratio of the increase in the specimen gauge’s length to its initial gauge length, represented in Equation (7):
δ = L L 0 L 0
Tensile stress   σ is calculated as the ratio of the tensile load F that was applied to it and the specimen’s initial cross-section area ( A 0 ), represented in Equation (8):
σ = F A 0
As DIC measures strain at every instant, Cauchy stress and logarithmic strain were obtained for the test sample in the 0° rolling direction. Relative elongation and relative reduction of area are obtained as parameters of the deformation measurement of the material.
Relative elongation is represented by Equation (9):
δ = L m l 0 L 0
where L m is the maximum length of the specimen.
Relative reduction in area is the ratio between the decrease in the area of the specimen’s cross section before its rupture and its original cross-sectional area, represented by Equation (10):
ψ = A 0 A m i n A 0
where A m i n is the minimum specimen cross-sectional area.
The comparison of the numerical simulation and the experimental values was plotted into a stress–strain curve, which shows an error of roughly 0.1% (see Figure 7).

5.3. Reverse Retrieve Strategy

The numerical simulation and experimental displacement of the DIC measurement uses color histogram features, which have the advantages of scaling and rotation invariance. The reverse retrieve strategy can also be used to improve the efficiency of the DIC deformation technique. In addition, the stress–strain comparison makes the efficacy of DIC measurement technique more accurate. Therefore, in the experimental section, simulation experiments were conducted for the evaluation of the displacement invariance, deformation invariance, and computational efficiency of the DIC measurement technique. It can be seen from the experimental results that the reverse retrieve strategy can also be used for validation, and meets the accuracy requirements of deformation measurement methods. Furthermore, the search strategy based on reverse retrieval can greatly improve the matching speed, which is faster than the state-of-the-art DIC displacement measurement method. In actual experiments, the test specimen was stretched and measured using an extensiometer and tension test equipment. The deformation of the test specimen was measured using the DIC deformation measurement technique, and the error was estimated to be around 0.1%, which satisfies the majority of measurement criteria. The suggested approach focuses on addressing the measurement of sample deformation during mechanical testing. At this time, color paint must be properly sprayed in a speckle pattern, rather than as a naturally occurring surface. To solve this issue, it is anticipated that feature acquisition and matching methods will be improved.
When using the above strategy, the computational burden is greatly increased due to the use of pixel-to-node point matching in the simulation. The different scales need to be extracted and matched. For instance, the area of the subset of interest is 30 pixels for obtaining the highest strain value at the rupture point, and then the simulation contains a total of 390 nodes, which means that the computational burden of obtaining the highest strain value is increased by 13 times. Moreover, when the range of the scaling factors is unclear, the computational burden will be much greater. To improve efficiency, this paper proposes a search strategy based on the reverse retrieve method.
The traditional method adopts a forward strategy; that is, the reference sub-region is searched pixel by pixel in all deformed images to find the best matching position, as shown in Figure 8. With the rupture of the material, the deformation feature of forward matching will also change. Once the feature is changed, it is necessary to perform feature extraction on all nodes in the new simulation, which is very time consuming. To avoid redundant calculations, a reverse retrieve strategy is proposed, in which some deformed subregions are selected and matched with the reference image, as shown in Figure 8. By using this method, the search space is the reference image, i.e., before loading, which is constant and can be precalculated. The reverse search strategy only needs to perform feature extraction on the search space once; therefore, it is more efficient than the forward search strategy.
Before the matching, the displacement feature of the multiscale templates in the reference image are extracted pixel by pixel and stored in a feature set Q, which is constant and does not need to be updated. When the deformed images are updated, only the displacement features of the new deformed subregion need to be extracted, and then they are retrieved in feature set Q. The value of the displacement is quantized and the retrieval-method-based search space is used to speed up image retrieval. Finally, the reverse retrieval strategy avoids the repeated feature extraction of the search space and greatly improves research efficiency.
The figures show that the reverse search method searches the deformed sub-regions (the yellow and green boxes) in the reference image, which is constant and precalculated. For clarity, only two deformed images are displayed.

6. Conclusions

The speckle-pattern matching information has brought great advantages to the fields of computer vision and image retrieval. However, it has not been fully utilized in relation to the DIC method. To exploit the additional pattern information provided by color speckle patterns, this paper improves the DIC deformation measurement in two respects: displacement measurement and stress–strain curve matching. Specifically, this paper proposes that the performance of the DIC deformation measurement method can be enhanced by: (i) load vs displacement measurements based on integer-pixel matching; and (ii) a comparison based on the stress–strain histories strategy. For validation, experiments with simulated color images were performed, and show that our method have the advantages of measurement in displacement invariance, high efficiency, and deformation invariance. For the property measurement of the real material, uniaxial tension tests were conducted, where the average error of the strain results reached 0.1%.
The traditional extensiometer method for tensile tests can only provide a stress–strain curve before the tensile load reaches its peak value or before substantial strain localization occurs. An important and unique feature of the DIC-assisted tensile test is that it can provide a more complete true stress–strain curve after the tensile load passes its peak and drops into a “necking” stage, until the specimen’s complete separation. This material mechanical response information is critical for numerical simulations that correctly visualize the formation history.
A comparison of the DIC technique with the traditional extensiometer-based technique is presented in Table 1 and Table 2.

Author Contributions

Conceptualization, A.J., V.T. and G.S.; methodology, R.P.S., A.J. and S.S. validation, A.J., A.M., V.T. and G.S. data curation, A.J., A.M., S.S. and R.P.S., writing—original draft preparation, A.J., A.M. and V.T., writing—review and editing, A.J., G.S. and S.S. All authors have read and agreed to the published version of the manuscript.

Funding

This research received no external funding.

Data Availability Statement

Not applicable.

Conflicts of Interest

The authors declare no conflict of interest.

References

  1. Pandre, S.; Morchhale, A.; Kotkunde, N.; Singh, S.K. Influence of Processing Temperature on Formability of Thin-Rolled DP590 Steel Sheet. Mater. Manuf. Process. 2020, 35, 901–909. [Google Scholar] [CrossRef]
  2. Harikrishna, C.; Nagaraju, C. Modeling of Cylindrical Upsetting Process for Enhanced Ductile Fracture. Mater. Today Proc. 2020, 39, 1629–1634. [Google Scholar] [CrossRef]
  3. Habibi, N.; Zarei-Hanzaki, A.; Abedi, H.R. An Investigation into the Fracture Mechanisms of Twinning-Induced-Plasticity Steel Sheets under Various Strain Paths. J. Mater. Process. Technol. 2015, 224, 102–116. [Google Scholar] [CrossRef]
  4. Mishra, A.; Leguen, C.; Thuillier, S.; Maire, E. Investigation of Ductile Damage in DP980 Steel Sheets Using Mechanical Tests and X-ray Micro-Tomography. AIP Conf. Proc. 2011, 1353, 1464–1469. [Google Scholar] [CrossRef]
  5. Kim, J.H.; Serpantié, A.; Barlat, F.; Pierron, F.; Lee, M.G. Characterization of the Post-Necking Strain Hardening Behavior Using the Virtual Fields Method. Int. J. Solids Struct. 2013, 50, 3829–3842. [Google Scholar] [CrossRef] [Green Version]
  6. Jain, A.; Mishra, A. Comparative Study of Macroscopic Rupture Criteria. Mater. Today Proc. 2019, 18, 3394–3400. [Google Scholar] [CrossRef]
  7. Chen, Y.; Clausen, A.H.; Hopperstad, O.S.; Langseth, M. Stress-Strain Behaviour of Aluminium Alloys at a Wide Range of Strain Rates. Int. J. Solids Struct. 2009, 46, 3825–3835. [Google Scholar] [CrossRef] [Green Version]
  8. Gharehbaghi, S.; Gandomi, M.; Plevris, V.; Gandomi, A.H.; Abdulameer Kadhim, A.; Mohammed Kadhim, H.; Ham, S.W.; Cho, J.U.; Cheon, S.S.; Paresi, P.R.; et al. Fracture Prediction in Plastic Deformation Processes. Ductile Fract. Met. Form. 2020, 7, 1–17. [Google Scholar]
  9. Jain, M.; Lloyd, D.J.; Macewen, S.R. Hardening Laws, Surface Roughness and Biaxial Tensile Limit Strains of Sheet Aluminium Alloys. Int. J. Mech. Sci. 1996, 38, 219–232. [Google Scholar] [CrossRef]
  10. Gia Hai, V.; Thi Hong Minh, N.; Nguyen, D.T. A Study on Experiment and Simulation to Predict the Spring-Back of SS400 Steel Sheet in Large Radius of V-Bending Process. Mater. Res. Express 2020, 7, 016562. [Google Scholar] [CrossRef]
  11. Lou, Y.; Yoon, J.W. A User-Friendly Anisotropic Ductile Fracture Criterion for Sheet Metal under Proportional Loading. Int. J. Solids Struct. 2021, 217, 48–59. [Google Scholar] [CrossRef]
  12. Boyce, B.L.; Reu, P.L.; Robino, C.V. The Constitutive Behavior of Laser Welds in 304L Stainless Steel Determined by Digital Image Correlation. Metall. Mater. Trans. A Phys. Metall. Mater. Sci. 2006, 37, 2481–2492. [Google Scholar] [CrossRef]
  13. Khare, S.; Kumar, K.; Choudhary, S.; Singh, P.K.; Verma, R.K.; Mahajan, P. Determination of Johnson–Cook Material Parameters for Armour Plate Using DIC and FEM. Met. Mater. Int. 2021, 27, 4984–4995. [Google Scholar] [CrossRef]
  14. Jang, I.; Bae, G.; Song, J.; Kim, H.; Park, N. Fracture Envelopes on the 3D-DIC and Hybrid Inverse Methods Considering Loading History. Mater. Des. 2020, 194, 108934. [Google Scholar] [CrossRef]
  15. Iosipescu, N. New Accurate Procedure for Single Shear Testing of Metals. J. Mater. 1967, 2, 537–566. [Google Scholar]
  16. Jain, A.; Mishra, A.; Tiwari, V. Investigation of Rupture in SS304 Steel Sheet Using Macroscopic Criteria. IOP Conf. Ser. Mater. Sci. Eng. 2020, 998, 012015. [Google Scholar] [CrossRef]
  17. Wang, L.; Park, J.H.; Choi, N.S. Observation of Notch Effect in Al6061-T6 Specimens under Tensile Loading Using Digital Image Correlation and Finite Element Method. J. Mech. Sci. Technol. 2020, 34, 1049–1058. [Google Scholar] [CrossRef]
  18. Gardner, K.A. Experimental Techniques for Shear Testing of Thin Sheet Metals and Compression Testing at Intermediate Strain Rates. Master’s Thesis, The Ohio State University, Columbus, OH, USA, 2013; p. 133. [Google Scholar]
  19. Paul, S.K.; Roy, S.; Sivaprasad, S.; Bar, H.N.; Tarafder, S. Identification of Post-Necking Tensile Stress–Strain Behavior of Steel Sheet: An Experimental Investigation Using Digital Image Correlation Technique. J. Mater. Eng. Perform. 2018, 27, 5736–5743. [Google Scholar] [CrossRef]
  20. Versaillot, P.D.; Wu, Y.F.; Zhao, Z.L. An Investigation into the Phenomenon of Macroscopic Plastic Deformation Localization in Metals. J. Phys. Conf. Ser. 2021, 1777, 012067. [Google Scholar] [CrossRef]
  21. Pham, C.H.; Thuillier, S.; Manach, P.Y. Mechanical Properties Involved in the Micro-Forming of Ultra-Thin Stainless Steel Sheets. Metall. Mater. Trans. A Phys. Metall. Mater. Sci. 2015, 46, 3502–3515. [Google Scholar] [CrossRef]
  22. Field, J.E.; Walley, S.M.; Proud, W.G.; Goldrein, H.T.; Siviour, C.R. Review of Experimental Techniques for High Rate Deformation and Shock Studies. Int. J. Impact Eng. 2004, 30, 725. [Google Scholar] [CrossRef]
  23. Peters, W.H.; Ranson, W.F. Digital Imaging Techniques In Experimental Stress Analysis. Opt. Eng. 1982, 21, 213427. [Google Scholar] [CrossRef]
  24. Hild, F.; Roux, S. Digital Image Correlation: From Displacement Measurement to Identification of Elastic Properties—A Review. Strain 2006, 42, 69–80. [Google Scholar] [CrossRef] [Green Version]
  25. Tiwari, V.; Sutton, M.A.; McNeill, S.R. Assessment of High Speed Imaging Systems for 2D and 3D Deformation Measurements: Methodology Development and Validation. Exp. Mech. 2007, 47, 561–579. [Google Scholar] [CrossRef]
  26. Bornert, M.; Brémand, F.; Doumalin, P.; Dupré, J.C.; Fazzini, M.; Grédiac, M.; Hild, F.; Mistou, S.; Molimard, J.; Orteu, J.J.; et al. Assessment of Digital Image Correlation Measurement Errors: Methodology and Results. Exp. Mech. 2009, 49, 353–370. [Google Scholar] [CrossRef] [Green Version]
  27. Schreier, H.; Orteu, J.J.; Sutton, M.A. Image Correlation for Shape, Motion and Deformation Measurements: Basic Concepts, Theory and Applications. In Image Correlation for Shape, Motion and Deformation Measurements; Springer: Berlin/Heidelberg, Germany, 2009; 321p. [Google Scholar] [CrossRef]
  28. Motra, H.B.; Hildebrand, J.; Dimmig-Osburg, A. Assessment of Strain Measurement Techniques to Characterise Mechanical Properties of Structural Steel. Eng. Sci. Technol. Int. J. 2014, 17, 260–269. [Google Scholar] [CrossRef] [Green Version]
  29. Jia, B.; Rusinek, A.; Pesci, R.; Bernier, R.; Bahi, S.; Wood, P. A Novel Technique for Dynamic Shear Testing of Bulk Metals with Application to 304 Austenitic Stainless Steel. Int. J. Solids Struct. 2020, 204, 153–171. [Google Scholar] [CrossRef]
  30. Kajberg, J.; Sundin, K.G.; Melin, L.G.; Ståhle, P. High Strain-Rate Tensile Testing and Viscoplastic Parameter Identification Using Microscopic High-Speed Photography. Int. J. Plast. 2004, 20, 561–575. [Google Scholar] [CrossRef] [Green Version]
  31. Hung, P.C.; Voloshin, A.S. In-Plane Strain Measurement by Digital Image Correlation. J. Braz. Soc. Mech. Sci. Eng. 2003, 25, 215–221. [Google Scholar] [CrossRef] [Green Version]
  32. Schwab, R.; Harter, A. Extracting True Stresses and Strains from Nominal Stresses and Strains in Tensile Testing. Strain 2021, 57, e12396. [Google Scholar] [CrossRef]
Figure 2. (a) Test specimen with dimensions and a coordinate frame. (b) Experimental setup for the tension test with the DIC devices.
Photonics 09 00912 g002
Figure 3. Strain contour plot of an SS304 steel sheet at the ultimate load with different strain legends. Figure 3 represent contour of test sample obtained from DIC. (a) ε y y distribution at time 0 s. (b) ε y y distribution at time 30 s. (c) ε y y distribution at time 60 s. (d) ε y y distribution at time 90 s. (e) ε y y distribution at time 120 s. (f) ε y y distribution at time 150 s. (g) ε y y distribution at time 180 s.
Photonics 09 00912 g003aPhotonics 09 00912 g003b
Figure 4. Nominal and Cauchy stress vs. logarithmic strain for reproducible experiments.
Photonics 09 00912 g004
Figure 5. Tension test samples; (a) original sample and (b) sample after rupture.
Photonics 09 00912 g005
Figure 6. Tensile test: images of the specimen; (a) distribution of strain along length (via digital image correlation (DIC)) and (b) logarithmic strain distribution just before rupture.
Photonics 09 00912 g006
Figure 7. Load–Extensiometer-displacement curves for the simulation and for the experiment.
Photonics 09 00912 g007
Figure 8. The figures show that the reverse search method searches the deformed sub-regions (the red and blue boxes) in the deformed image, which is constant and precalculated.
Photonics 09 00912 g008aPhotonics 09 00912 g008b
Table 1. Comparison of the strain measurements produced by different mechanisms and their possible applications.
TypeApproachMechanism of Mechanical Strain EvaluationTestImage AnalysisAdvantageDisadvantage
Electro-based
(1)
Strain gauge [28]
(2)
Strain transducers [29]
The deformation of the material
induces the electrical signal
changes, which can be converted into the strain values of the materials.
Discrete
In vivo
Ex vivo
N/ACheap; offline workInvasive; low anti-interference
Light -based
(1)
Microscopy camera [30]
The relative strain is assessed by comparing the images before and after the material deformation.Serial
Ex vivo
Marker-tracking algorithmCheap; easy operationTransparent or translucent samples
(2)
Photo-elastic [15]
Strain measurement based on load-induced (stress-induced) birefringence. Cheap; easy applicationtime-consumingRegional phase unwrapping algorithm
Texture-correlation-based
(1)
Speckle interferometry [31]
Strain is quantified from changed search space patterns in the images during the deformation of the materials.Serial
In vivo
Ex vivo
Simple structureComplex analysisBaseband speckle tracking algorithm; Registration algorithm
Imaging-based
(1)
Moiré [22]
The Moiré effect is the mechanical interference of light by a superimposed network of lines.In-plane fringes; out-plane fringesFast; non-invasive; portable; cost-efficient and has no harmful radiationResolution; costly Moiré fringe phase shifting measurement algorithm
(2)
DIC [16]
Strain is evaluated by tracking the subsets including markers or speckles on the surface of tissues.Serial
Ex vivo
Relatively fast imaging; relatively low costExpensive; high contrast Computed tomography
(3)
DVC [32]
Strain is evaluated by tracking image subsets by tracking the natural pattern in the tissues.Serial
In vivo Ex vivo
Correlation-based algorithm
Table 2. Comparison between DIC system and Extensiometer.
DIC SystemExternsiometer
Non-contact measurementContact measurement
Unlimited number of deformation measurementsAn extensometer can be used only once (a glued extensometer cannot be peeled off without damaging it)
The possibility of testing samples of any shape and material; the tested surface of the sample does not have to be flatA surface on which the extensometer is glued has to be flat
The ability to measure deformation in all directions (along the X-axis, Y-axis, and Z-axis), on a plane or in three-dimensional spaceThe ability to measure deformation only in the chosen direction
Full-field deformation analysisResults of the deformation at selected points of the sample, i.e., at the points where the sensors are attached
A measurement of the real maximum displacements and deformationsA measurement limited by the maximum value of the deformation of an extensometer
A quick preparation of a random pattern of black dots on a white background on the sample surface by spraying paintA time-consuming process of placing the extensometer on the surface of a sample (gluing, etc.)
The need to clean the surface of a sample before testing
Publisher’s Note: MDPI stays neutral with regard to jurisdictional claims in published maps and institutional affiliations.