Article

Establishing Flow Stress and Elongation Relationships as a Function of Microstructural Features of Ti6Al4V Alloy Processed using SLM

ANSYS Inc., 1794 Olympic Parkway # 110, Park City, UT 84098, USA
*
Author to whom correspondence should be addressed.
Designs 2019, 3(2), 21; https://doi.org/10.3390/designs3020021
Submission received: 14 February 2019 / Revised: 10 April 2019 / Accepted: 11 April 2019 / Published: 13 April 2019
(This article belongs to the Special Issue Design and Applications of Additive Manufacturing and 3D Printing)

Abstract

:
Selective laser melting (SLM) is an attractive technology for fabricating complex metal parts with reduced number of processing steps compared to traditional manufacturing technologies. The main challenge in its adoption is the variability in mechanical property produced through this process. Control and understanding of microstructural features affected by the SLM process is the key for achieving desirable mechanical properties. Numerous studies have been published related to microstructure and mechanical properties of SLM printed parts; however, few of those reported end-to-end process–structure–property relationship. Therefore, the current study aims to comprehensively present the widespread microstructure information available on SLM processed Ti6Al4V alloy. Furthermore, its effects on the magnitude and anisotropy of the resultant mechanical properties, such as the yield strength and elongation, has been established. A Hall–Petch relationship is established between α lath size and yield strength magnitude for the as-built, heat-treated, transverse, and longitudinal built samples. The anisotropy in flow stress is established using the α lath size and prior β grain orientation. Percentage elongation was identified to be affected by both α lath size and powder layer thickness, due to its correlation with the prior β columnar grain size. A linear relationship was established between percentage elongation and combined size of α lath and powder layer thickness using the rule of mixtures.

1. Introduction

Additive manufacturing (AM) is a method of fabricating 3D components where materials are added in a layer-by-layer fashion [1]. It is an advanced manufacturing technology capable of fabricating complex part geometries with low lead time and material consumption. Metal-melting AM technologies, their feed systems, and energy sources are described elsewhere [2]. Among these, selective laser melting (SLM) and electron beam melting (EBM) are widely used methods in order to avail printing of complex geometries. A big challenge in the adoption of these methods is the variability in mechanical properties, which can vary from machine to machine as well as with changing process parameters. There are many process parameters which are responsible for this variability such as the power, velocity and type of heat source (e.g., electron beam or laser, laser scan strategy, powder layer thickness, hatch spacing, beam diameter, pre-heating) [3]. These parameters vary considerably with machine type and most of them are either confidential or locked for a machine type and a material system. As a result, it can be very challenging to reproduce a part with the same mechanical properties using different machines. This leads to the motivation behind exploration for a unified approach to correlate process parameter variations with resultant mechanical properties of additively manufactured materials, using a thorough understanding of microstructural features and morphologies. The current study aims to look into the published microstructure information and combine results in a meaningful form to demonstrate how microstructure relates to the mechanical properties of a part processed through SLM. The material system investigated in this article is Ti6Al4V due to its applications in a variety of industries, such as automotive, aerospace, and medical sectors.

2. Background

Ti6Al4V is an attractive alloy for lightweight structural components due to its excellent strength-to-weight ratio, corrosion resistance, and bio combability [4]. This alloy contains 6 wt.% of aluminum and 4 wt.% of vanadium, which are α and β stabilizers, respectively. The α stabilizers (Al, O2, N2, C, etc.,) extend the α phase field to higher temperatures, whereas β stabilizers (V, Mo, Ta, etc.,) shift the β phase field to lower temperatures. Depending on the starting temperature, cooling rate, thermomechanical process, and post processing heat treatment, the final microstructures could be lamellar, martensitic, or equiaxed [4,5]. For example, when heated fully above the β-transus temperature of 995 ℃ followed by a furnace quasi-static cooling, the final microstructure consists of a lamellar structure of α and β, as shown in Figure 1a. Depending on the cooling rate, the resulting width of the lamellae could be coarsened or made finer. Rapid cooling leads to a martensitic transformation as shown in Figure 1b, which offers high strength-to-weight ratio, caused by high dislocation densities as a function of the severity of cooling. Equiaxed grains, as shown in Figure 1c, formed during recrystallization heat treatment on pre-deformed microstructures, also increase strength. Depending upon the heat treatment temperature, the size of equiaxed grains could be large or small. Further, at different combinations of solution heat treatments, the final distribution of microstructure could be bimodal in some cases, such as a mix of equiaxed and lamellar structures [4,6,7], as shown in Figure 1d. These microstructures have their specific roles on the mechanical behavior. Based on the literature [4,6], it could be established that the fine microstructural features, such as the grain size, offers high strength and ductility; coarse microstructure offers better resistance to creep and fatigue crack growth; equiaxed microstructure offers good ductility and fatigue strength; and lamellar microstructure offers better fracture toughness as well as superior resistance to creep and fatigue crack growth.

3. Results and Discussion

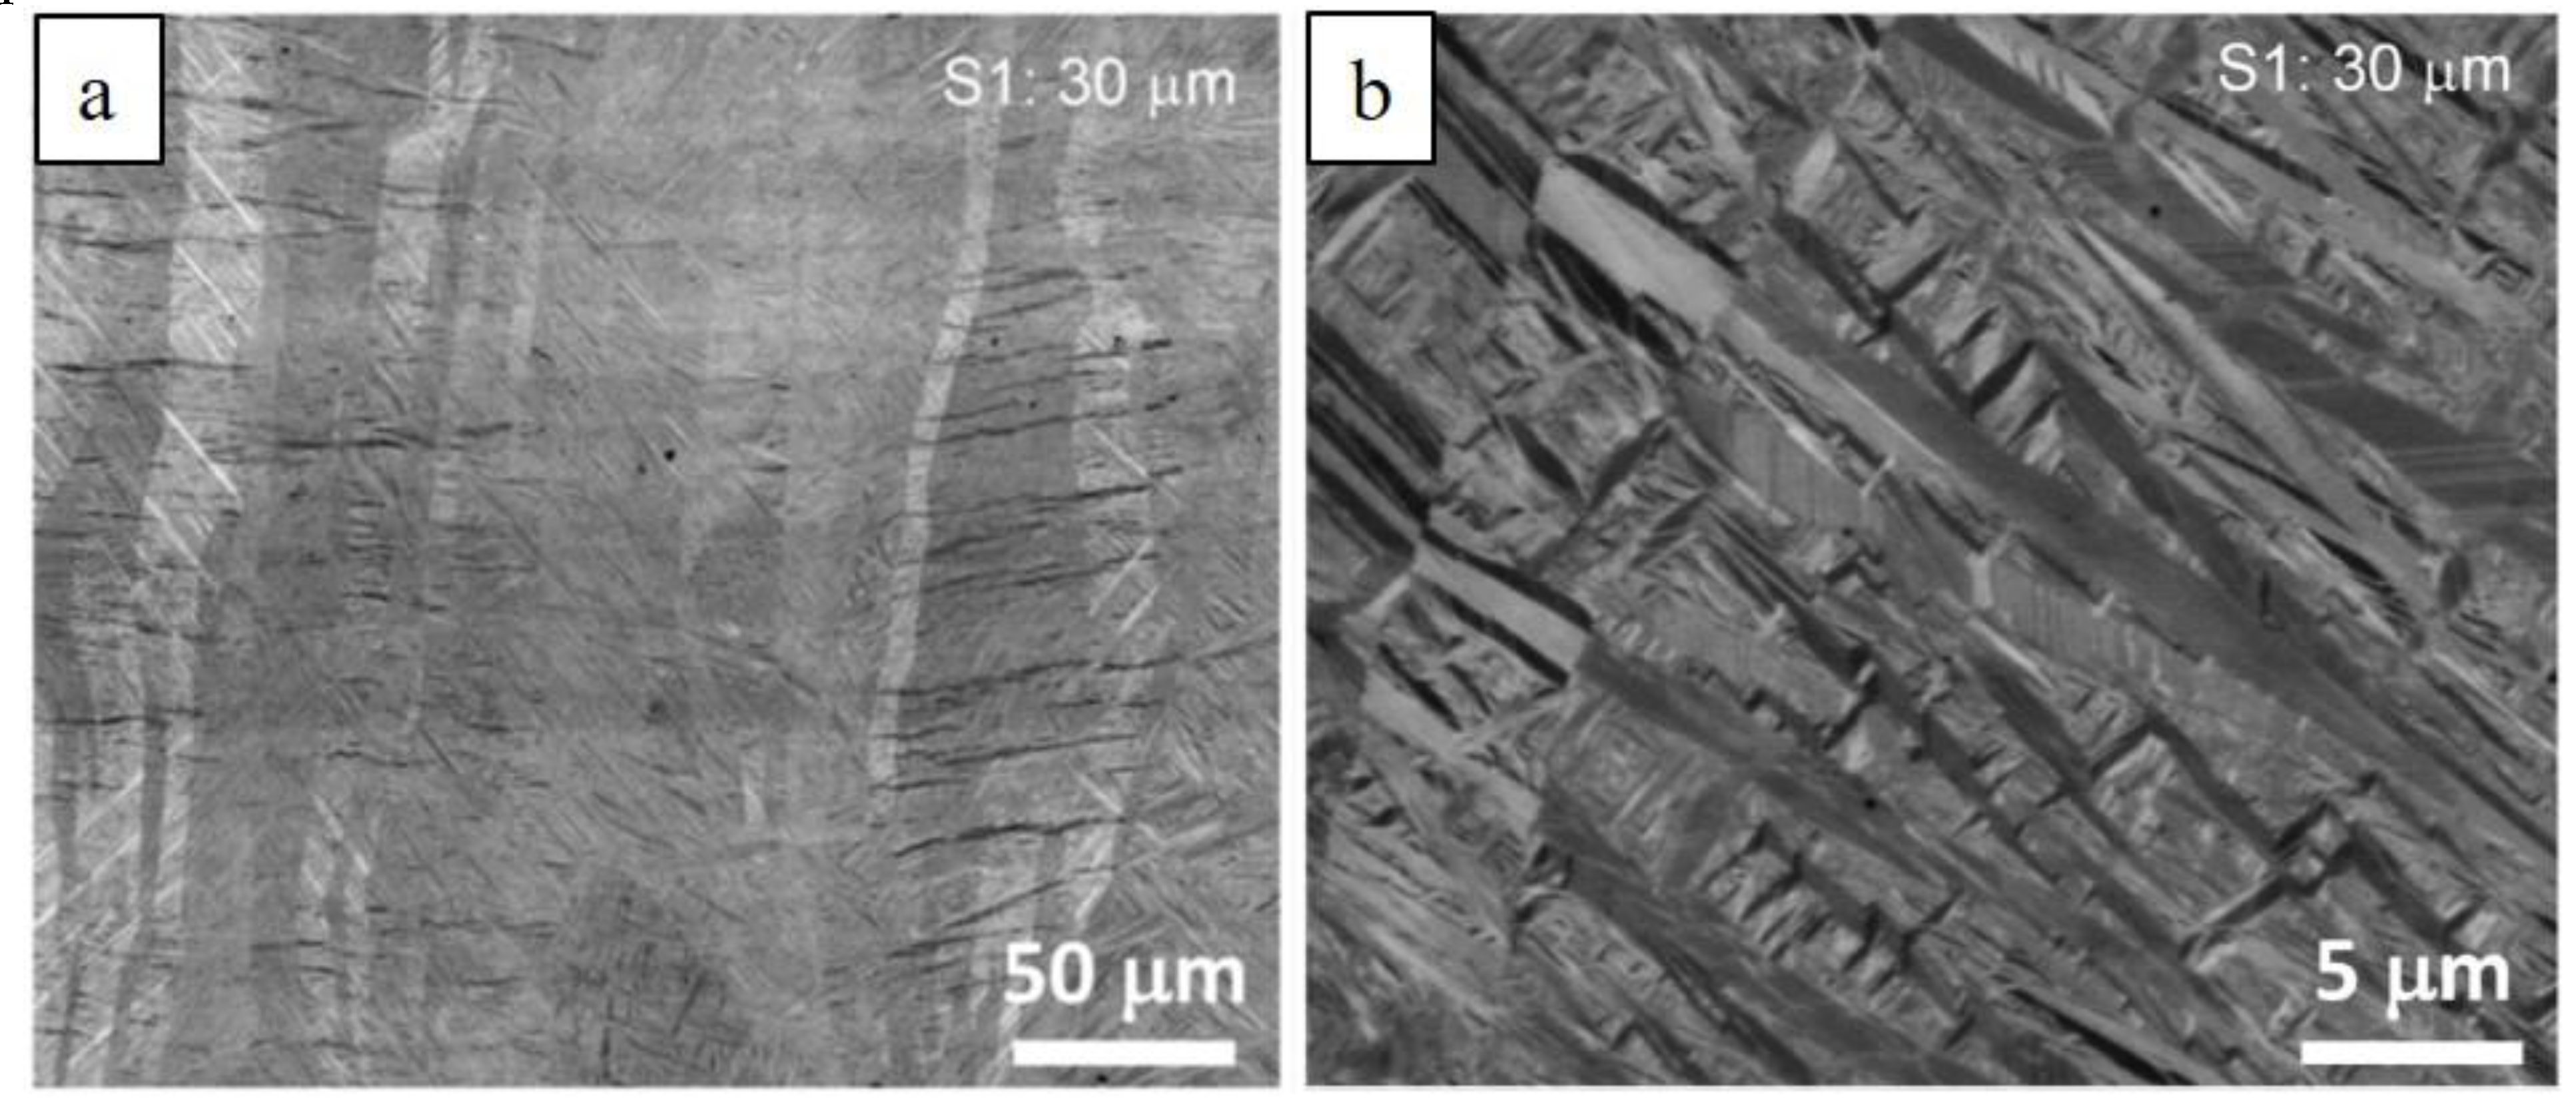
In SLM processed materials, the as-built microstructure is mainly composed of a very fine α’ lath martensite structure due to excessively high rates of cooling. The typical α’ lath martensite micro structure as processed using the SLM method is shown in Figure 2. Table 1 summarizes the literature review of all the as-built and heat-treated microstructures (i.e., α colony width and prior β columnar grain width), processed using different process parameters and corresponding mechanical property variations. The resolution of fine α’ lath martensite ranged from 0.2 to 0.6 μm. In few cases, these features could grow up to 2–3 μm during the heat treatment. Presence of acicular α’ in as-built structures imparts a very high amount of dislocation density [8], which is responsible for high strength compared to conventional processed materials. However, this high strength is compromised by reduced elongation. Therefore, a post process heat treatment becomes essential. It can be seen from the literature data presented in Table 1 that after post additive heat treatment (PAHT), a considerable amount of gain in elongation value is achieved compared to the as-built parts at the cost of yield strength, which is comparable to that of the wrought products.

3.1. Correlation between As-Built and Heat-Treated Yield Strength and α/β Feature Sizes

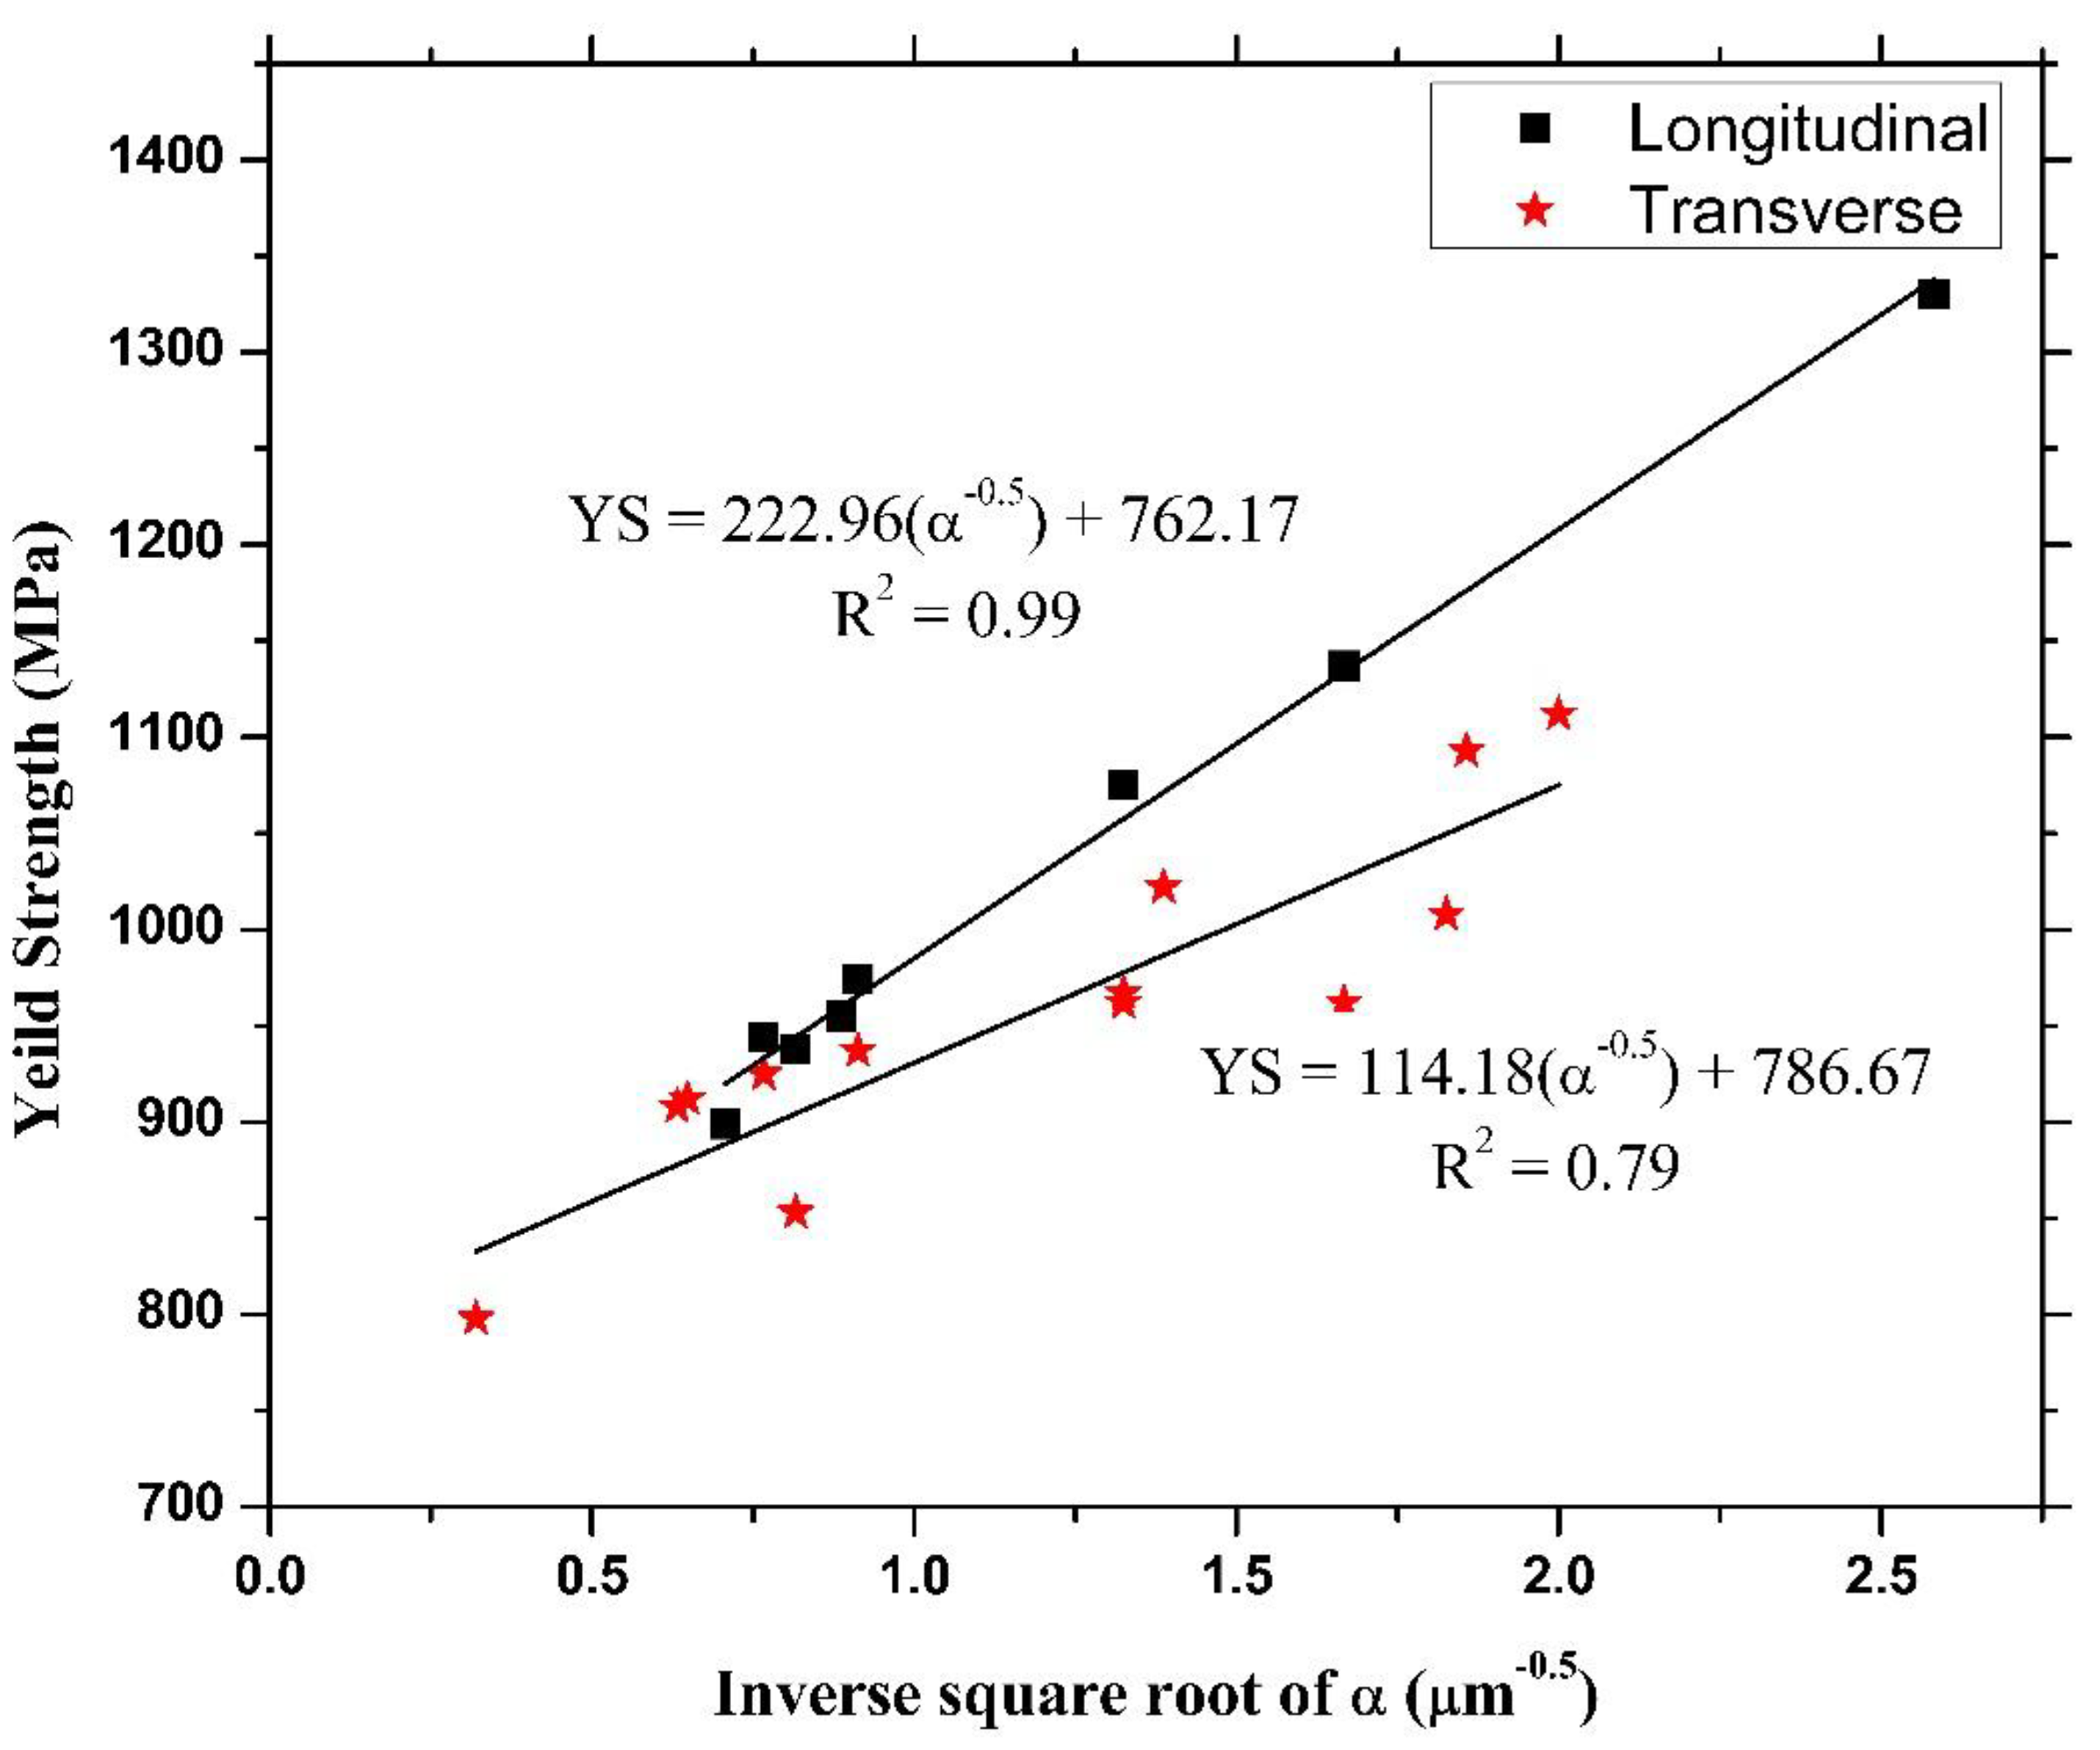
The presented information in Table 1 clearly indicates that the width of α lath size is mainly responsible for high yield strengths. Figure 3 illustrates the Hall–Petch relationship between α lath size and yield strength of as-built and heat-treated samples. Although the inversely proportional relationship between grain size and flow stress is known from Hall–Petch expression, the constant of proportionality needs to be determined as a function of processing condition and given material. Using information from literature as presented in Table 1, such constants have been evaluated for Ti6Al4V alloy processed through SLM, as shown in Figure 3. The α lath size values presented in Table 1 were either taken as reported in a paper or calculated using image J software. It clearly reflects the fact that the finer the lath size is, the higher the resulting yield strength is, and is in good agreement with the conventional Hall–Petch relationship. It could be also observed that the samples built in the longitudinal direction show higher strength when compared with their transverse counterparts, which is common in all AM parts [22,23]. Although, the strength increases faster with respect to inverse square root α lath size in the longitudinal direction than its transverse counterpart. This anisotropy in mechanical behavior is not only observed in SLM but also in EBM- and DED-produced parts, and could be attributed to strong texturing during SLM processing [24]. Texture in the AM parts occurs from growth of columnar grains, which seem to preferentially occur in an epitaxial manner from one layer to multiple layers in the building direction [24], driven due to strong −z thermal gradients towards the heat sink. In Ti6Al4V, the columnar grains are a result of prior β grains, which are stable above the β-transus temperature. Upon cooling, α grains nucleate at the columnar β grain boundaries and grow according to the Burger orientation correlation during cooling [25]. Due to the rapid cooling in SLM, these α grains grow in a very fine needle-like shape (acicular α’) with certain variant selection [25] by diffusionless transformation mode. Therefore, the β phase is almost absent in the final microstructure. These prior β grains in the as-built microstructure cannot be seen but are important in evaluating final yield strength and elongation of a material, because final orientation of α laths are dependent on the orientation of the prior β columnar grains. When these columnar grains are oriented transverse to the loading axis, they impart high yield strength by dislocation pile-up at prior β columnar grain boundaries. In longitudinally/horizontally built samples, these columnar grains are oriented transverse to the loading direction and; therefore, high yield strength values are seen compared to transverse, as shown in Figure 4. The grain boundaries of these columnar grains are not easy to identify and are sometimes misinterpreted by laser vector hatch spacing. Careful identification or reconstruction of β grains using electron backscattered diffraction data is a promising technique to resolve the width of these grains [26].

3.2. Correlation between As-Built Elongation and α/β Feature Sizes

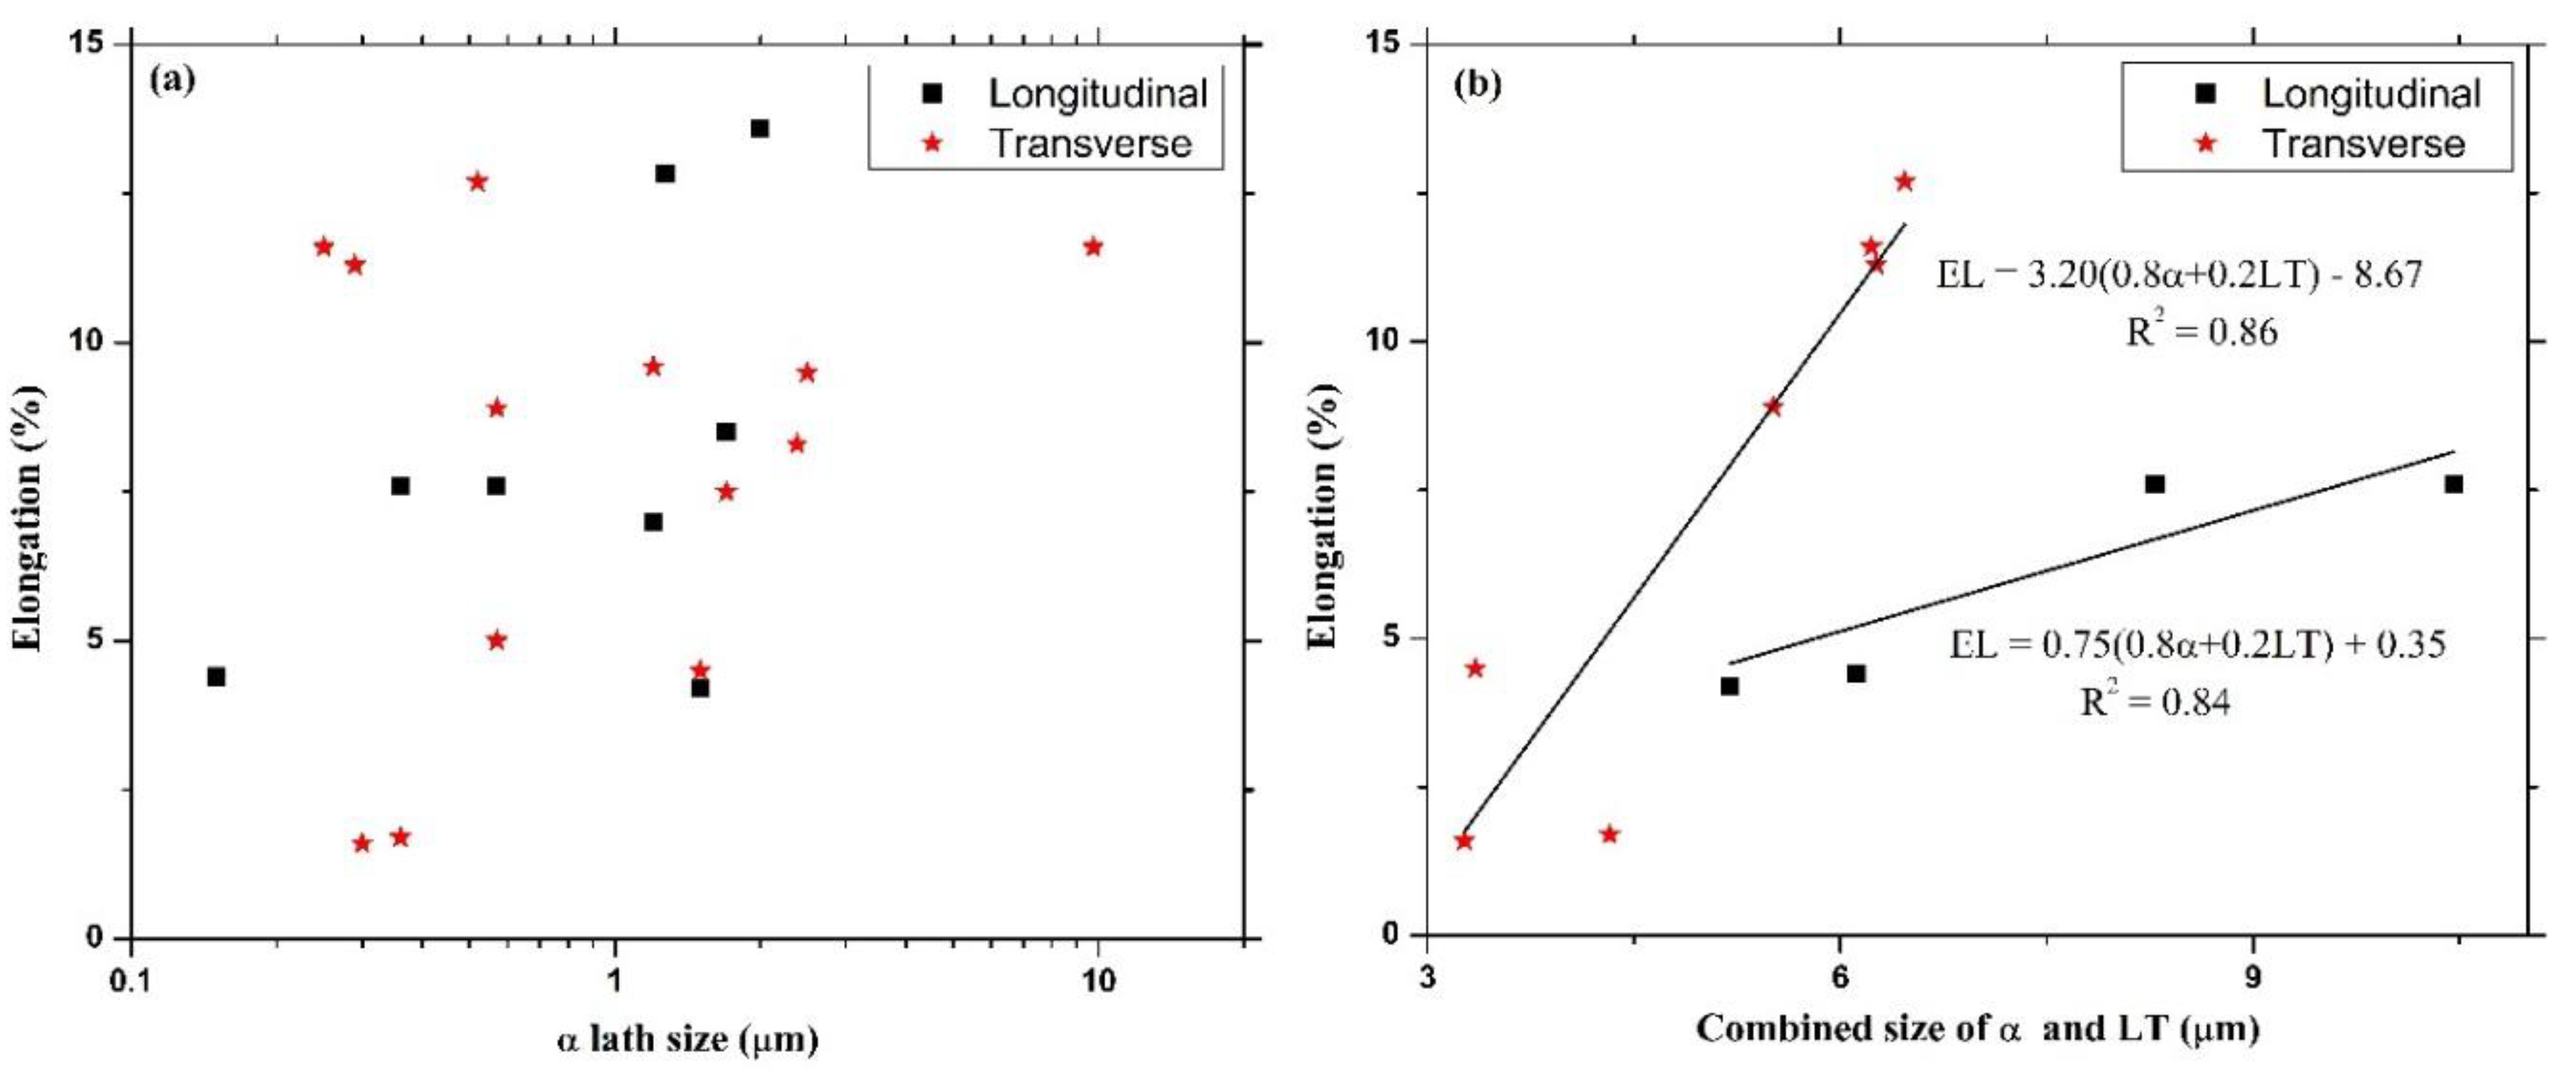
Apart from the yield strength, another important property specification of any engineering material required for the structural integrity is ductility. Figure 5a is the plot between α lath size and percent elongation of as-built and heat-treated SLM samples. It can be seen from the plot that there is no clear relationship between elongation and α lath size, as seen for yield strength, as well as no distinction in elongation values between longitudinally and transversely built samples. The wide scatter indicates α lath size is not the only factor responsible for percent elongation. It could be possible that prior β grain size and orientation does affect elongation values in a similar manner as yield strength values. Although, the width of β columnar grains are not widely reported in the literature since β phase becomes unstable at lower temperatures. By incorporating larger amounts of β stabilizers, the β microstructure could be frozen at a relatively lower temperature to study these effects, if any. However, powder layer thickness does appear to relate to elongation. Higher powder layer thickness combined with large α lath size imparts high percentage elongation. Rule of mixtures is adopted to combine these two parameters, where 0.8 and 0.2 fraction of contribution is given to α lath size and powder layer thickness, respectively (0.8*(α lath size) + (0.2*layer thickness)). The combined size is plotted with percentage elongation for as-built samples, as shown in Figure 5b. It can be observed from the plot that a linear relationship is established, which shows layer thickness does affect the elongation values.
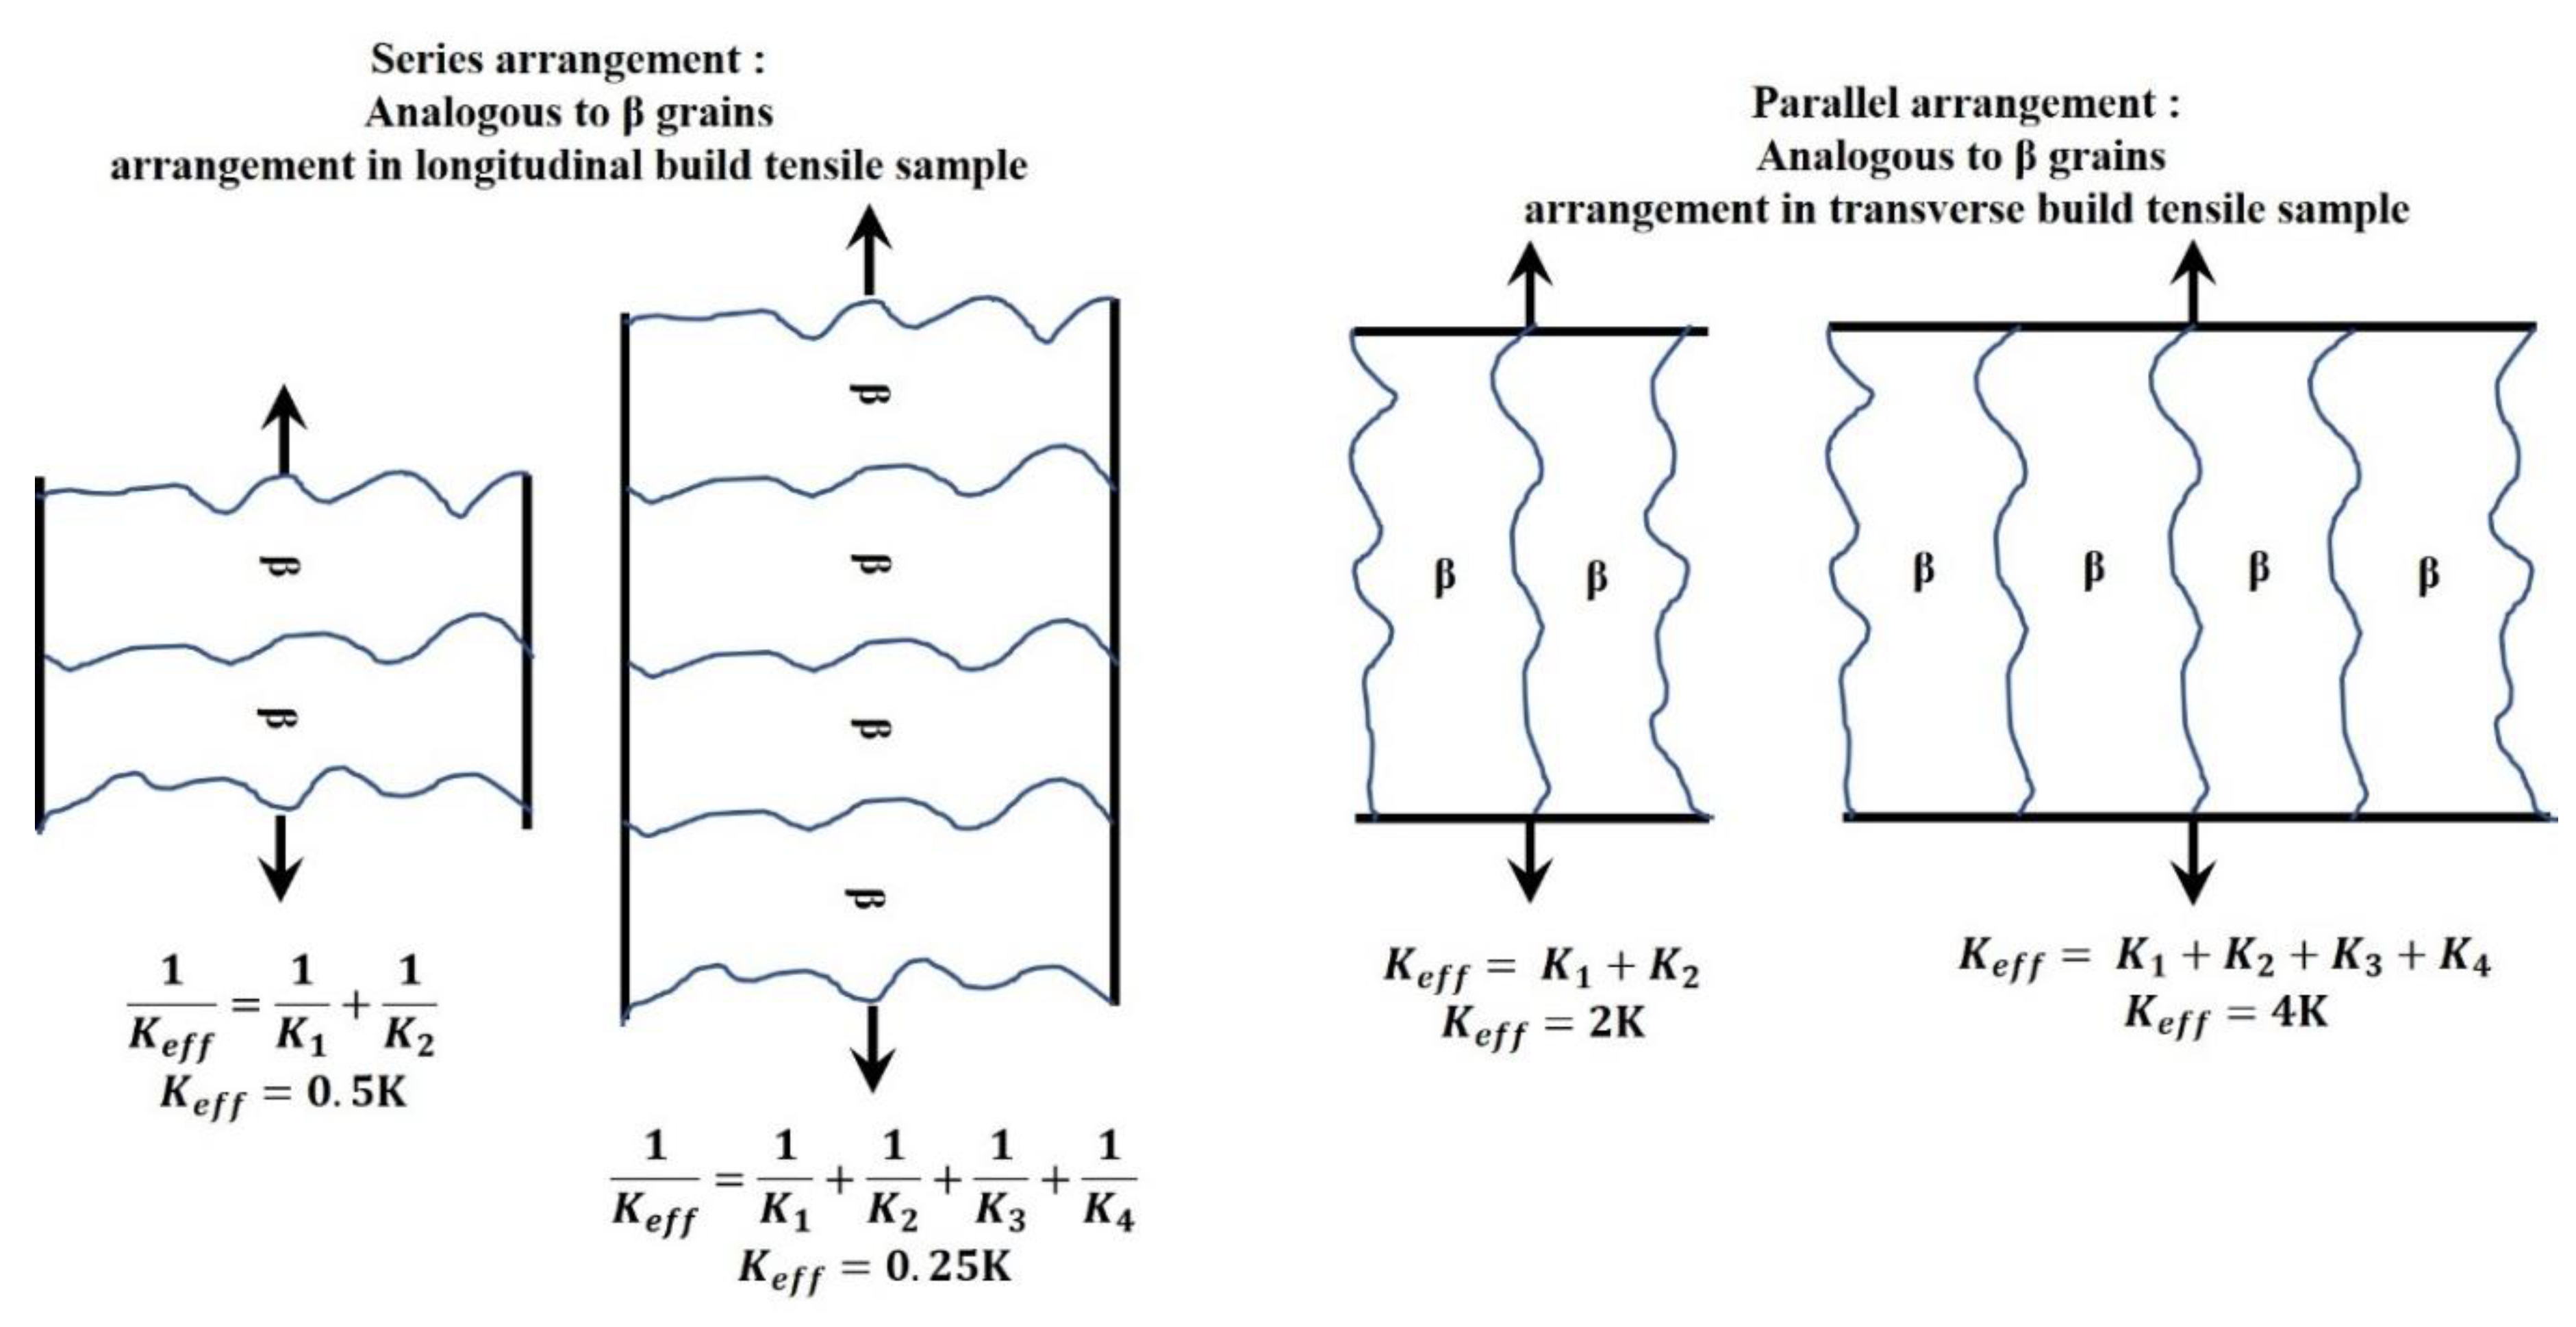
The powder layer thickness could be corelated with prior β columnar grain size by considering the nucleation population in a specified build height. For example, the higher the layer thickness, the lesser would be the number of melted layers for a specified build height. This considerably reduces the total number of nucleation events, hence a larger prior β columnar grain width becomes probable. This is also indicated in Table 1 with a few exceptions. By relating β grain size with powder layer thickness, it can be inferred that a larger prior β columnar grain width combined with a large α lath width imparts higher elongation as shown in Figure 5b. Like the yield strength relationship, the orientation of prior β columnar grain also affects elongation. Higher elongation values are achieved for transverse as-built samples when β columnar grains are aligned along the tensile loading axis, as shown in Figure 5b. This higher elongation is the result of a higher Schmid factor value, which is achieved due to nearly transverse orientation of α’ (~60° with prior β columnar grains) laths with the tensile loading axis for transversely built samples [14]. Apart from higher elongation, the rate at which elongation increases as a function of combined α lath widths and powder layer thickness, is also faster in transverse samples compared to their longitudinal counterparts. One possible explanation is as follows: The effective spring coefficient decreases from 0.5 to 0.25 K resulting in a change of 0.25 K for loss of two springs (from four to two springs) in the series spring configuration on the left (Figure 4). This effectively implies that the stiffness change per unit spring is 0.125 K. Similarly, the stiffness change per unit spring is K for the parallel spring configuration. The reduction in the number of springs in the parallel and series scenario is theoretically equivalent to the increase in powder layer thickness. Increase in powder layer thickness corresponds to reduction in the number of nucleation spots, which leads to increase in grain size. The stiffness change per unit spring stiffness is higher in the transversely built samples when loaded in transverse direction compared to longitudinally built samples when loaded in longitudinal direction. Henceforth, the increase in elongation with respect to the decreasing number of grains or increasing powder layer thickness is also going to be higher in transverse samples compared to their longitudinal counterparts.

3.3. Correlation between Heat-Treated Elongation and α/β Feature Sizes

The percentage elongations of heat-treated samples for longitudinal and transverse oriented samples are plotted with combined α lath and layer thickness (relating with β columnar) width using rule of mixtures, as shown in Figure 6. The transverse-built heat-treated samples again showed good linear relationship with combined α lath and layer thickness; however, longitudinal samples showed an inverse relationship with increasing combined width. This discrepancy can be anticipated by considering the effect of PAHT conditions. In heat-treated samples; holding time, temperature, and cooling media are factors which affect the size of α lath and β columnar width. It can be seen from Table 1 that the lower elongation values correspond to the samples that were either heat treated at very low temperature or water quenched after heat treatment. Therefore, correct measurement of prior β columnar grains and its orientation in addition to α lath size is needed to correctly evaluate or to establish a relationship for yield strength and elongation.

4. Conclusions

It could be concluded that widely reported tensile data for Ti6Al4V fabricated through SLM, when combined with microstructural information (i.e., structure, α lath, and prior β columnar grain width size), enables a Hall–Petch relationship to be established, showing that finer α lath size is responsible for imparting high yield strength. Orientation of prior β columnar grains introduce anisotropy in mechanical behavior, which is commonly observed in AM-fabricated samples. Transverse orientation of prior β columnar grains with respect to tensile loading axis gives higher yield strength. Powder layer thickness showed considerable effect on elongation due to its correlation with β columnar grains. Rule of mixtures is adopted to establish a relationship between grain size and elongation. Results show good correlation between combined α lath, powder layer thickness (related to β columnar), and elongation.
Design Criteria: For a design perspective, the built material should have optimal elongation in the as-build condition along with strength. Based on the observed results and inferred trends, the combination of high strength and high elongation value can be achieved in the as-build condition by properly choosing the powder layer thickness. A high powder layer thickness, which is related to β columnar grains by the virtue of number density of nucleation sites, provides high elongation and conserves the high strength in a part. This work can be very useful to improve the mechanical properties of AM-printed parts by using larger layer thickness. As we mentioned, the powder layer thickness values are related with β columnar grains, in future it would be very interesting to see if this relationship still holds true using the β columnar grain size directly instead of layer thickness. If the value of α lath size and powder layer thickness are known, the yield strength and elongation values could be predicted or by using Integrated Computational Materials Engineering (ICME) tools which can predict these microstructure features.

Author Contributions

For research articles with several authors, a short paragraph specifying their individual contributions must be provided. conceptualization, J.A. and D.P.; writing—original draft preparation, J.A.; writing—review and editing, J.A., D.P., and B.S.

Funding

This research was funded by Naval Air Command, grant number N68335-17-C-0157.

Acknowledgments

The authors gratefully acknowledge the financial help rendered by the Naval Air Command (grant no. N68335-17-C-0157) and Mechanical Business Unit at ANSYS in supporting this work and its public dissemination.

Conflicts of Interest

The authors declare no conflict of interest.

References

  1. Gibson, I.; Rosen, D.W.; Stucker, B. Additive Manufacturing Technologies; Springer: Berlin, Germany, 2010; Volume 238. [Google Scholar]
  2. Frazier, W.E. Metal additive manufacturing: A review. J. Mater. Eng. Perform. 2014, 23, 1917–1928. [Google Scholar] [CrossRef]
  3. Kumar, P.; Farah, J.; Akram, J.; Teng, C.; Ginn, J.; Misra, M. Influence of laser processing parameters on porosity in Inconel 718 during additive manufacturing. Int. J. Adv. Manuf. Technol. 2019. [Google Scholar] [CrossRef]
  4. Peters, M.; Hemptenmacher, J.; Kumpfert, J.; Leyens, C. Structure and Properties of Titanium and Titanium Alloys. In Titanium and Titanium Alloys: Fundamentals and Applications; Wiley: Hoboken, NJ, USA, 2003; pp. 1–36. [Google Scholar]
  5. Ramosoeu, M.; Chikwanda, H.; Bolokang, A.; Booysen, G.; Ngonda, T. Additive manufacturing: Characterization of TI-6AI-4V alloy intended for biomedical application. In Proceedings of the The Southern African Institute of Mining and Metallurgy Advanced Metals Initiative, Light Metals Conference; Southern African Institute of Mining and Metallurgy: Muldersdrift, South Africa, 2010; pp. 337–344. [Google Scholar]
  6. Lütjering, G.; Williams, J.C.; Gysler, A. Microstructure and mechanical properties of Titanium alloys. In Microstructure and Properties of Materials; World Scientific: Singapore, 2000; Volume 2, pp. 1–74. [Google Scholar]
  7. Vrancken, B.; Thijs, L.; Kruth, J.-P.; van Humbeeck, J. Heat treatment of Ti6Al4V produced by Selective Laser Melting: Microstructure and mechanical properties. J. Alloys Compd. 2012, 541, 177–185. [Google Scholar] [CrossRef] [Green Version]
  8. Cottam, R.; Palanisamy, S.; Avdeev, M.; Jarvis, T.; Henry, C.; Cuiuri, D.; Balogh, L.; Rashid, R.A.R. Diffraction Line Profile Analysis of 3D Wedge Samples of Ti-6Al-4V Fabricated Using Four Different Additive Manufacturing Processes. Metals 2019, 9, 60. [Google Scholar] [CrossRef]
  9. Xu, W.; Brandt, M.; Sun, S.; Elambasseril, J.; Liu, Q.; Latham, K.; Xia, K.; Qian, M. Additive manufacturing of strong and ductile Ti-6Al-4V by selective laser melting via in situ martensite decomposition. Acta Mater. 2015, 85, 74–84. [Google Scholar] [CrossRef]
  10. Edwards, P.; Ramulu, M. Fatigue performance evaluation of selective laser melted Ti-6Al-4V. Mater. Sci. Eng. A 2014, 598, 327–337. [Google Scholar] [CrossRef]
  11. Vilaro, T.; Colin, C.; Bartout, J.D. As-fabricated and heat-treated microstructures of the Ti-6Al-4V alloy processed by selective laser melting. Metall. Mater. Trans. A Phys. Metall. Mater. Sci. 2011, 42, 3190–3199. [Google Scholar] [CrossRef]
  12. Mertens, A.; Reginster, S.; Paydas, H.; Contrepois, Q.; Dormal, T.; Lemaire, O.; Lecomte-Beckers, J. Mechanical properties of alloy Ti-6Al-4V and of stainless steel 316L processed by selective laser melting: influence of out-of-equilibrium microstructures. Powder Metall. 2014, 57, 184–189. [Google Scholar] [CrossRef]
  13. Simonelli, M.; Tse, Y.Y.; Tuck, C. Effect of the build orientation on the mechanical properties and fracture modes of SLM Ti-6Al-4V. Mater. Sci. Eng. A 2014, 616, 1–11. [Google Scholar] [CrossRef]
  14. Yang, J.; Yu, H.; Wang, Z.; Zeng, X. Effect of crystallographic orientation on mechanical anisotropy of selective laser melted Ti-6Al-4V alloy. Mater. Charact. 2017, 127, 137–145. [Google Scholar] [CrossRef]
  15. Yang, J.; Yu, H.; Yin, J.; Gao, M.; Wang, Z.; Zeng, X. Formation and control of martensite in Ti-6Al-4V alloy produced by selective laser melting. Mater. Des. 2016, 108, 308–318. [Google Scholar] [CrossRef]
  16. Facchini, L.; Magalini, E.; Robotti, P.; Molinari, A.; Höges, S.; Wissenbach, K. Ductility of a Ti-6Al-4V alloy produced by selective laser melting of prealloyed powders. Rapid Prototyp. J. 2010, 16, 450–459. [Google Scholar] [CrossRef]
  17. Kasperovich, G.; Hausmann, J. Improvement of fatigue resistance and ductility of TiAl6V4 processed by selective laser melting. J. Mater. Process. Technol. 2015, 220, 202–214. [Google Scholar] [CrossRef]
  18. Leuders, S.; Thöne, M.; Riemer, A.; Niendorf, T.; Tröster, T.; Richard, H.A.; Maier, H.J. On the mechanical behaviour of titanium alloy TiAl6V4 manufactured by selective laser melting: Fatigue resistance and crack growth performance. Int. J. Fatigue 2013, 48, 300–307. [Google Scholar] [CrossRef]
  19. Murr, L.E.; Quinones, S.A.; Gaytan, S.M.; Lopez, M.I.; Rodela, A.; Martinez, E.Y.; Hernandez, D.H.; Martinez, E.; Medina, F.; Wicker, R.B. Microstructure and mechanical behavior of Ti-6Al-4V produced by rapid-layer manufacturing, for biomedical applications. J. Mech. Behav. Biomed. Mater. 2009, 2, 20–32. [Google Scholar] [CrossRef]
  20. Koike, M.; Greer, P.; Owen, K.; Lilly, G.; Murr, L.E.; Gaytan, S.M.; Martinez, E.; Okabe, T. Evaluation of titanium alloys fabricated using rapid prototyping technologies-electron beam melting and laser beam melting. Materials 2011, 4, 1776–1792. [Google Scholar] [CrossRef] [PubMed]
  21. Xu, W.; Lui, E.W.; Pateras, A.; Qian, M.; Brandt, M. In situ tailoring microstructure in additively manufactured Ti-6Al-4V for superior mechanical performance. Acta Mater. 2017, 125, 390–400. [Google Scholar] [CrossRef]
  22. Carroll, B.E.; Palmer, A.; Beese, A.M. Anisotropic tensile behavior of Ti-6Al-4V components fabricated with directed energy deposition additive manufacturing. Acta Mater. 2015, 87, 309–320. [Google Scholar] [CrossRef]
  23. Beese, A.M.; Carroll, B.E. Review of mechanical properties of Ti-6Al-4V made by laser-based additive manufacturing using powder feedstock. Jom 2016, 68, 724–734. [Google Scholar] [CrossRef]
  24. Akram, J.; Chalavadi, P.; Pal, D.; Stucker, B. Understanding grain evolution in additive manufacturing through modeling. Addit. Manuf. 2018, 21, 255–268. [Google Scholar] [CrossRef]
  25. Simonelli, M.; Tse, Y.Y.; Tuck, C. On the texture formation of selective laser melted Ti-6Al-4V. Metall. Mater. Trans. A Phys. Metall. Mater. Sci. 2014, 45, 2863–2872. [Google Scholar] [CrossRef]
  26. Antonysamy, A.A.; Meyer, J.; Prangnell, P.B. Effect of build geometry on the β-grain structure and texture in additive manufacture of Ti-6Al-4V by selective electron beam melting. Mater. Charact. 2013, 84, 153–168. [Google Scholar] [CrossRef]
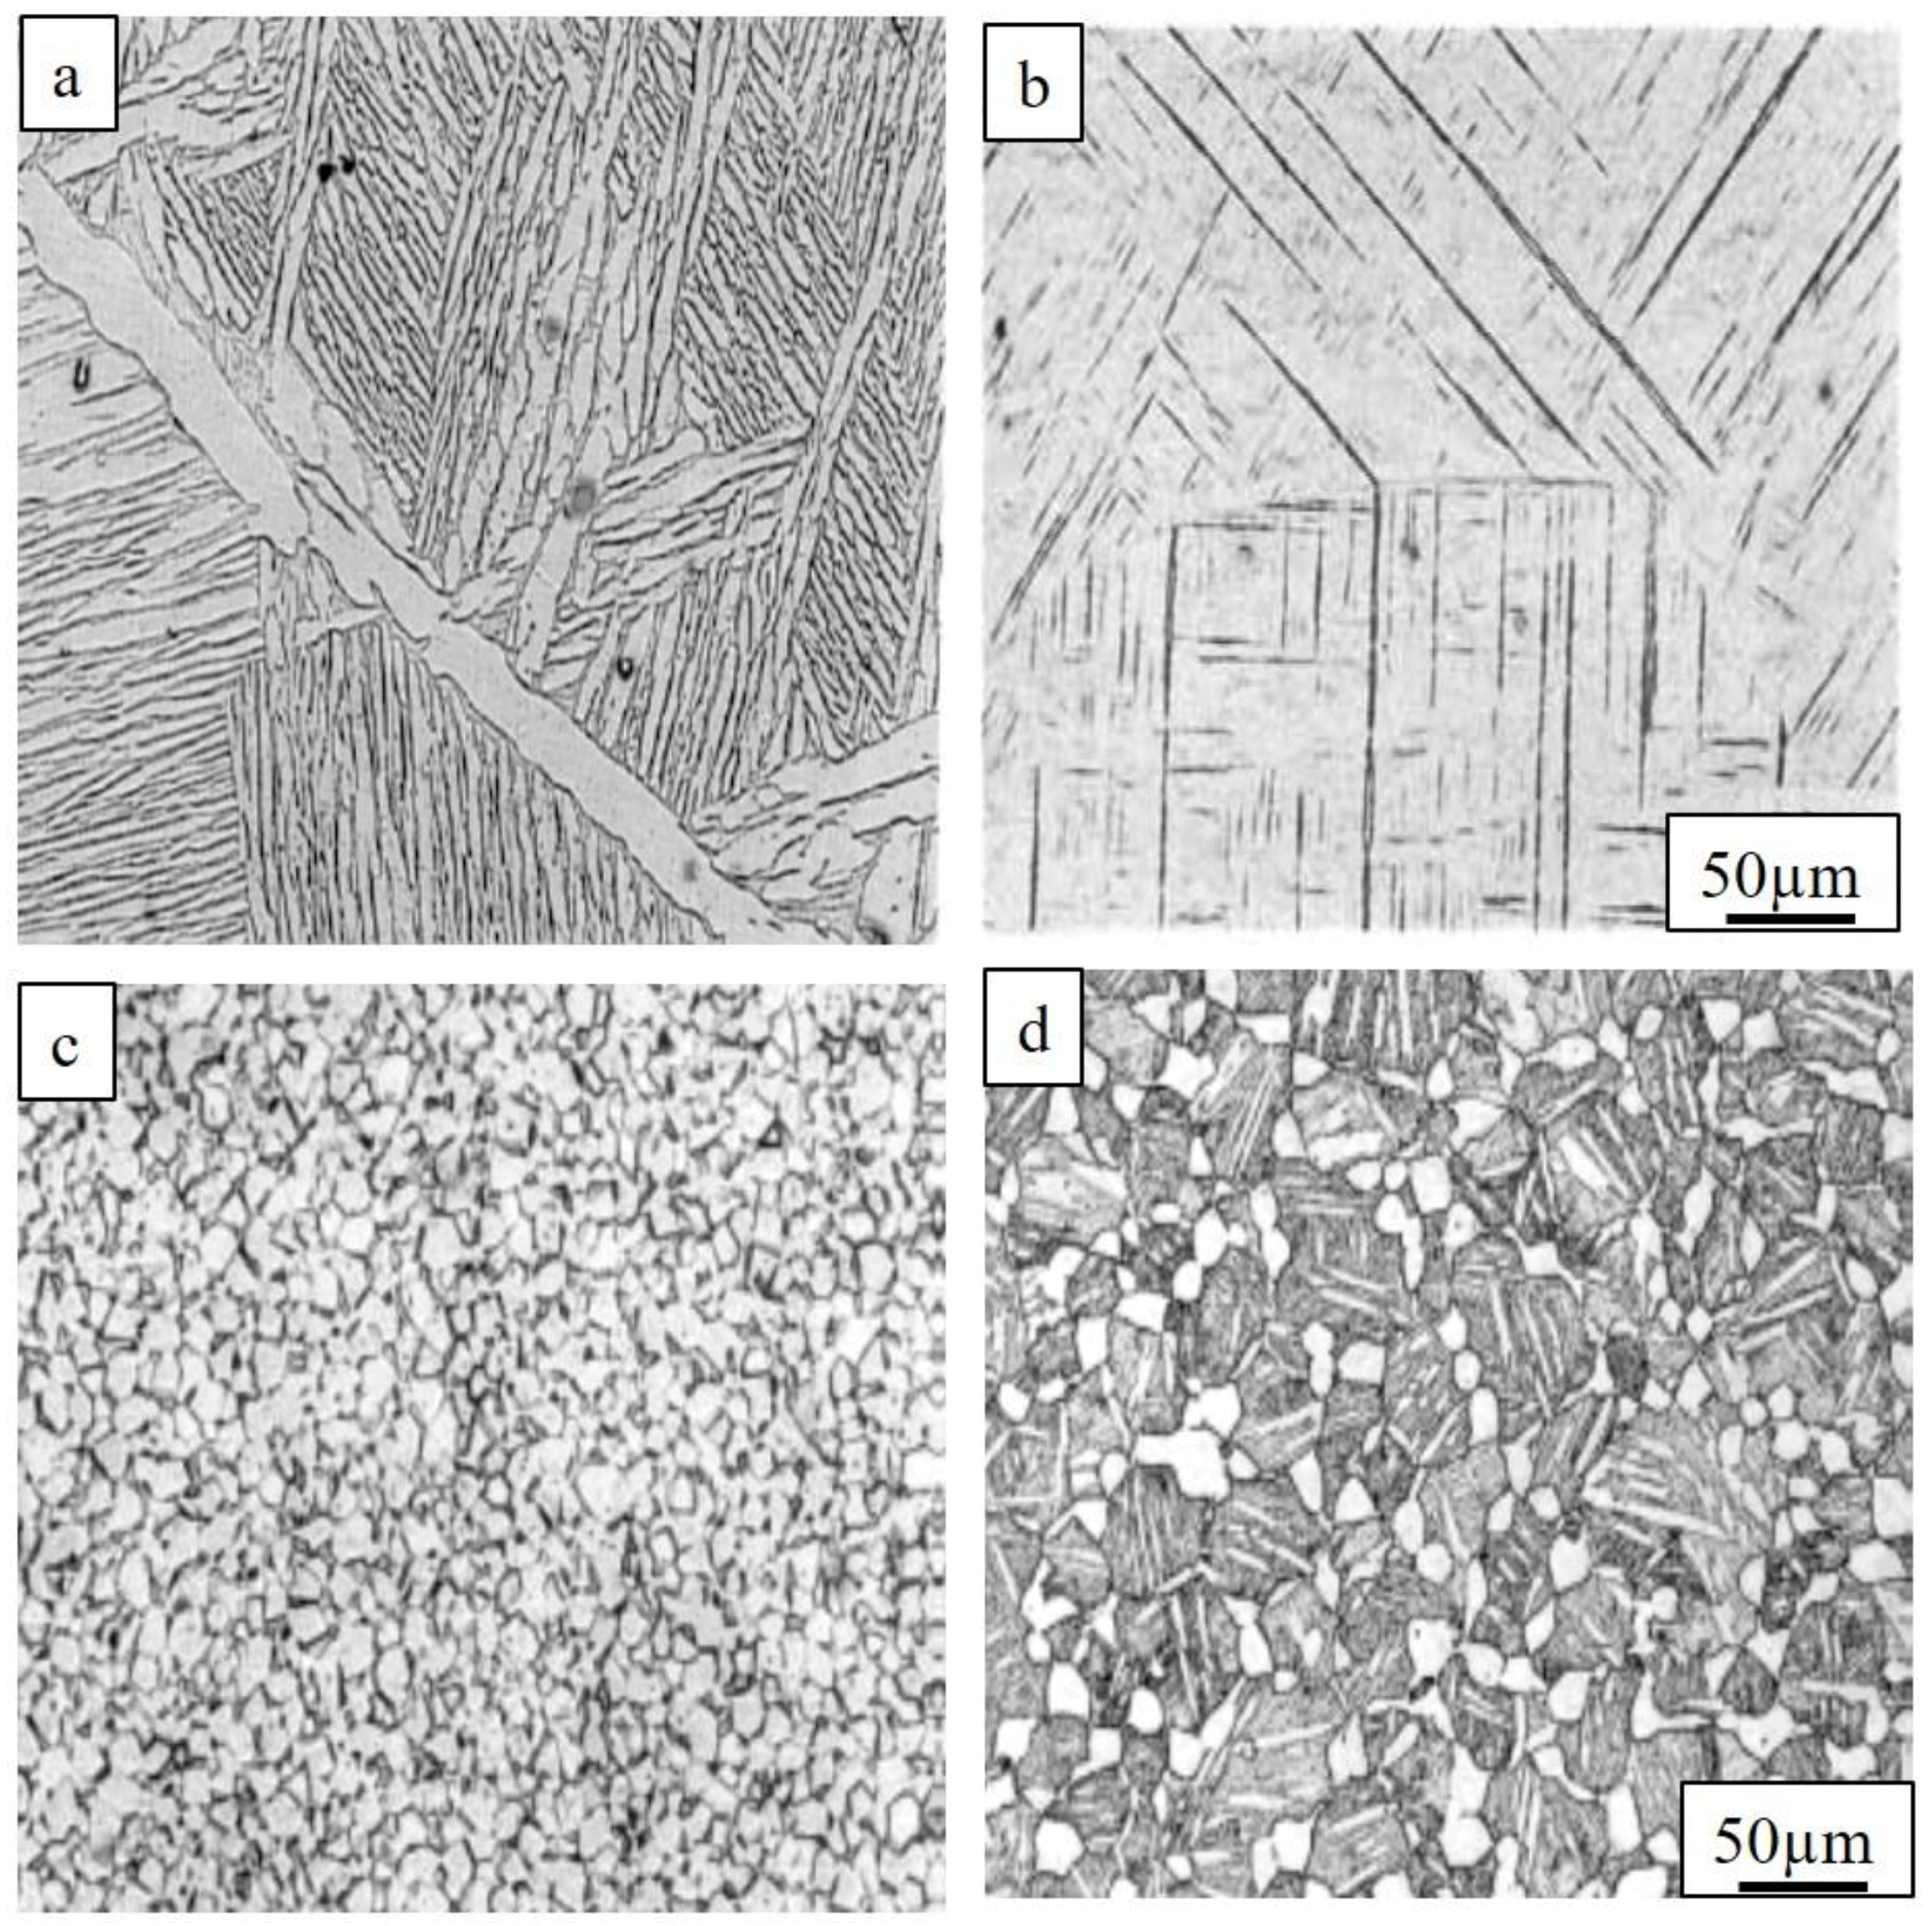
Figure 1. Example of (a) lamellar, (b) acicular, (c) equiaxed, and (d) bi-modal microstructure in Ti6Al4V alloy [4,6].
Designs 03 00021 g001
Figure 2. Typical α’ lath martensite micro structure as processed using SLM method: (a) Lower and (b) higher magnification [9].
Designs 03 00021 g002
Figure 3. Hall–Petch relationship between α lath size and yield strength for as-built and heat-treated samples.
Designs 03 00021 g003
Figure 4. Schematic of spring arrangement in series and parallel case analogous to β grains in longitudinal and transverse built samples.
Designs 03 00021 g004
Figure 5. Plot between percentage elongation and (a) α lath size for as-built and heat-treated samples and (b) combined α lath and powder layer thickness (LT) using rule of mixture for as-built samples.
Designs 03 00021 g005
Figure 6. Plot between percentage elongation and combined α lath and powder layer thickness (LT) using rule of mixture for heat-treated samples.
Designs 03 00021 g006
Table 1. List of microstructures (α lath and prior β columnar width) and corresponding mechanical property from literature. The mechanical data are included from the work which reported mechanical property along with their microstructure information.
ReferenceProcess Parameter
*P(W), V(mm/s), HS (µm), LT (µm), LHI (J/mm3), SS, SP, PH (℃)
Sample OrientationMicrostructure
W is Width in (μm)
YS (MPa)UTS
(MPa)
EL
(%)
E (GPa)
[10]P: 200, V: 200, HS: 180, LT: 50 µm, LHI: 111, SP: bidirectional scan vector with 67° rotated, MTT SLM 250LAcicular α’, β columnar grains (W: 109.48) 910 ± 9.91035 ± 293.3 ± 0.76-
[11]P: 160, V: 600, HS: 200, LT: 40, LHI: 33, BD: 220, SP: bidirectional scan vector with 90° rotated, PH: 500, Trumpf LF 250LAcicular α’ (W: 0.36) 1137 ± 201206 ± 87.6 ± 2105 ± 5
T962 ± 471166 ± 251.7±0.3102 ± 7
Heat treated at 950 ℃ for 1h followed by water quenching LAcicular α’ + α + β (W: 1.7)944 ± 81036 ± 308.5 ± 1103 ± 11
T925 ± 141040 ± 47.5 ± 298 ± 3
[12] P: 175, V: 710, HS: 120, LT: 30 µm,
LHI: 68.5, SP: bidirectional scan vector with 79° rotation, MTT SLM250
LAcicular α’, β columnar grains (W: 117.2) 1166 ± 61321 ± 62.0 ± 0.7-
[7]P: 250, V: 1600, HS: 60, LT: 30, LHI:
86.8, SS: 50, SP: bidirectional scan vector with 90° rotation
LAcicular α’, β columnar grains (W: 55.5) 1110 ± 91267 ± 57.28 ± 1.12109.2 ± 3.1
Heat treated at 850 °C for 2 h, followed by furnace cooling LMixture of α + β (W:1.27 ± 0.13, V: 73%), β columnar grains (W: 82.17) 955 ± 61004 ± 612.84 ± 1.36114.7 ± 3.6
Heat treated at 940 °C for 1 h, followed by 650 °C for 2 h, then air cooled LLamellar mixture of α + β (W: ~2), β columnar grains (W: 82.17) 899 ± 27948 ± 2713.59 ± 0.32115.5 ± 2.4
[13]P: 157, V: 225, HS: 100, LT: 50, LHI: 139.5, SS: 70, SP: bidirectional scan vector with 67° rotated, flat sample, Renishaw AM250L, XY plane Acicular α’ (W: 0.57 ± 0.13, L: 8 ± 3), β columnar grains (W: XY: 91.29, XZ: 89.61, and YZ: 76.68)1075 ± 251199 ± 497.6 ± 0.5113 ± 5
Flat sample L, XZ plane 978 ± 51143 ± 611.8 ± 0.5115 ± 6
T, ZX plane 967 ± 101117 ± 38.9 ± 0.4119 ± 7
Stress relieved at 730 °C for 2 h, FC at 283.15 K/minL, XY planeMixture of α + β (W: 1.2 ± 0.3, L: 8.7 ± 2.4), β columnar grains (W: XY: 91.29, XZ: 89.61, and YZ: 76.68)974 ± 71065 ± 217.0 ± 0.5112 ± 6
L, XZ plane 958 ± 61057 ± 812.4 ± 0.7113 ± 9
T, ZX plane 937 ± 91052 ± 119.6 ± 0.9117 ± 6
[14,15]P: 194, V: 1000, HS: 80, LT: 20, LHI: 121.25, SP: bidirectional scan vector with
90° rotation
LAcicular α’ (W: ~1.5), β columnar grains (W: 53.7)937.951140.84.2-
T853.51077.54.5-
[16] P: 120–200, BD: 200–600LAcicular α’ 990 ± 51065 ± 108.1 ± 0.3-
Heat treatment variant 1: NILLamellar α + β 835 ± 5915 ± 1010.6 ± 0.6
Heat treatment variant 2: NILLamellar α + β and Globular α870 ± 15990 ± 1511.0 ± 0.5
[17]P: 200, V: 1250, HS: ~100, LT: 40, LHI: 40, SS: 250, SP: bidirectional scan vector with 90° rotation, Concept Laser M2 TAcicular α’ (W: <0.5)986115510.9112.4
Heat treated at 700 °C for 1 h, 10 K/min cool TAcicular α’ (W: <1) 1051111511.3117.4
Heat treated at 900 °C for 2 hours + 700 °C for 1 h, 10 K/minTLamellar α + β (W: 2–3, L: 50–60)9089889.5118.8
HIP at 900 °C and 100 MPa for 2 h in Ar2 gas atmosphere + 700 °C for 1 h, 10 K/min cool. TLamellar α + β (W: 2–3, L: 50–60)88597319.0115.4
[18]P: 175, V: 710, HS: 120, LT: 30, PH: 100,
LHI: 68.46, SLM 250HL
TAcicular α’ (W: 0.37 ± 0.07) 1008 ± 301080 ± 301.6 ± 2-
Heat treated at 800 °C for 2 h in Ar2 gas, FCTMixture of α + β (W: 0.57 ± 0.06) 962 ± 301040 ± 305 ± 2-
HIPed at 920 °C and 1000 bar for 2 h in Ar2 gas, FCTLamellar α + β (W: 2.38 ± 0.3) and
Globular α (S: 5.0 ± 1.6)
912 ± 301005 ± 308.3 ± 2-
Heat treated at 1050 °C for 2 h in vacuum, FCTLamellar α+β (W: 9.75 ± 3.7) and If globular (S: 13.73 ± 5.3)798 ± 30945 ± 3011.6 ± 2-
[19] No information L Acicular α’ (W: 0.1 to 0.3)133014004.4-
[20]P: 5500, V: 104, LT: 40, LHI: 0.55,
PH: 700, EOSINT M270
TAcicular α’ (W: 0.23 to 0.3) ~850~9406.5-
[21]P: 375, V: 1029, HS: 120, LT: 60, FOD: 2, Ti: 1, LHI: 50.62, SP: bidirectional scan vector with 90° rotation, SLM 250HLTLamellar α + β (W: 0.52 ± 0.22)1022 ± 101090 ± 1012.7 ± 2.1
Ti: 5 and all the parameters remain sameTLamellar α + β (W: 0.29 ± 0.13)1093 ± 151149 ± 1111.3 ± 0.5
Ti: 8 and all the parameters remain sameTLamellar α + β (W: 0.25 ± 0.10)1112 ± 31165 ± 211.6 ± 1.2
*L: Longitudinal (long length along x or y direction); T: Transverse (long length along build direction); P: Power; V: Velocity; HS: Hatch Spacing; LT: Layer Thickness; LHI: Laser Heat Intensity; SS: Spot Size; SP: Scan Pattern; PH: Platform Heating; YS: Yield Strength; UTS: Ultimate Tensile Strength; EL: Elongation; E: Modulus of Elasticity; FOD: Focal Offset Distance; Ti: Inter Layer Time; HIP: Hot Isostatic Pressure; in longitudinal samples, columnar grains are transverse to loading direction; in transverse samples, columnar grains are along the loading direction.