Article

Empirical Investigation of Properties for Additive Manufactured Aluminum Metal Matrix Composites

PolarOnyx, Inc., 144 Old Lystra Road, Unit 2, Chapel Hill, NC 27517, USA
*
Author to whom correspondence should be addressed.
Appl. Mech. 2024, 5(3), 450-474; https://doi.org/10.3390/applmech5030026
Submission received: 13 May 2024 / Revised: 16 June 2024 / Accepted: 3 July 2024 / Published: 11 July 2024

Abstract

:
Laser additive manufacturing with mixed powders of aluminum alloy and silicon carbide (SiC) or boron carbide (B4C) is investigated in this experiment. With various mixing ratios of SiC/Al to form metal matrix composites (MMC), their mechanical and physical properties are empirically investigated. Parameters such as laser power, scan speed, scan pattern, and hatching space are optimized to obtain the highest density for each mixing ratio of SiC/Al. The mechanical and thermal properties are systematically investigated and compared with and without heat treatment. It shows that 2 wt% of SiC obtained the highest strength and Young’s modulus. Graded composite additive manufacturing (AM) of MMC is also fabricated and characterized. Various types of MMC devices, such as heat sink using graded SiC MMC and grid type three-dimensional (3D) neutron collimators using boron carbide (B4C), were also fabricated to demonstrate their feasibility for applications.

1. Introduction

Metal matrix composite (MMC) shows a great potential in tailoring mechanical, physical, and metallurgical properties of metals and/or ceramics [1,2,3]. A metal matrix composite consists of insoluble metal alloy matrix materials such as aluminum, manganese, iron, and cobalt with one or more other reinforcement materials, usually ceramic particles like oxides, carbides (silican carbide SiC or boron carbide B4C) or other different metal phases such as lead, molybdenum, or tungsten, to achieve a combination of properties that cannot be achieved by the main matrix materials such as hardness and wear resistance [4,5], strength [6], toughness [7], impact resistance, etc. Among various matrix materials, aluminum alloys are a common selection because of their light weight and appropriate mechanical properties. The melting point of the aluminum is high enough to fit many applications.
Silicon carbide is the most widely used reinforcement because of its good corrosion resistance, high melting point, high wear resistance, and good compatibility with aluminum alloys. For example, the SiC particle behaves like a crack blocker, and oxidation of SiC induces the self-healing. The mechanical strength and healing mechanism can be controlled by the particle size of the contained SiC particles [8,9,10]. However, conventional tools and technologies, such as casting [1], cold spray [11], powder blending and consolidation, and semi-solid powder processing [12,13,14], do not provide capability and cost effectiveness for the fabrication of parts having a complex shape and sophisticated composition for the custom tailoring of the properties.
Additive manufacturing or 3D printing technology is an enabling technology which does provide for the fabrication of complex shapes, but unfortunately, current additive manufacturing technologies require that the powders with a given composition must be alloyed and made with either plasma or gas atomization techniques prior to their use in the additive manufacturing process. Additive manufacturing (AM) of alloyed MMC powders [15] or metal-coated powders [16] are too complicated and time consuming to be practically used for industrial levels of development. Moreover, additive manufacturing of ceramics such as SiC or B4C usually involves binders for sintering at temperatures much lower than the melting point and the post heating and annealing.
Recently, additive manufacturing (AM) has shown significant advantages in fabrication with mixed powders, metals and/or ceramics to achieve the desired performance [15,16,17,18,19]. Recent publications by the authors and researchers from Oak Ridge National Laboratory (ORNL) show that by directly mixing powders of aluminum and boron carbide (B4C), excellent neutron attenuation and components such as collimators can be achieved without sag or distortion at elevated temperatures [19,20]. The hardness (110 MPa) and Young’s modulus (11.7 GPa) of mixed B4C/Al are close to those of Al [19]. The use of Al/B4C is a viable alternative for use in neutron-shielding applications when toxicity or prompt gamma exposure may be issues [20]. In a publication authored by Zeng, X.; Jing, Q.; Sun, J.; Zhang, J. it was indicated that the addition of a ceramic fractal structure can improve the compressive and torsional properties of composite materials [21]. Risse, J.H., et al. described that the mechanical properties (hardness, compression strength, and Young’s Modulus) of the Al-high Si alloys were correlated to the microstructure [22]. A significant improvement could be achieved by increasing the Si content from 50 to 70 wt%, inducing the formation of a dense network of primary Si phases. However, none of these publications have reported the composition ratio impact on tensile strength and elongation, as well as heat treatment, that are essential to industrial applications.
The main purpose of this paper is to give a systematic analysis of MMC by directly mixing SiC powders with aluminum alloy AlSi10Mg powders at various weight percentages of SiC. The base line for investigation is AlSi10Mg only. After optimizing the printing conditions in which the part has the highest density value, the mechanical and thermal properties were compared for three compositions [AlSi10Mg, 2 wt% SiC/98 wt% AlSi10Mg (SiC/Al: 2/98), and 5 wt% SiC/95 wt% AlSi10Mg (SiC/Al: 5/95)], and the microstructure properties of the corresponding parts were analyzed through scanning electron microscope (SEM), X-ray diffraction (XRD), energy-dispersed X-ray spectroscopy (EDS), and electron backscatter diffraction (EBSD). In addition, hot isostatic pressing (HIP) heat treatment was proceeded to modify the mechanical properties and microstructures, and compared with those without HIP treatment. Graded composition was investigated for SiC/AlSi10Mg MMC. MMC components using SiC/AlSi10Mg and B4C/AlSi10Mg were also present for various applications.
New compounds may also be synthesized during the AM process. For SiC/Al AM, SiC + Al yields to Al4C3 and Si [17,18]. For B4C/Al, it also clearly demonstrates newly formed crystal phases of aluminum carbide (Al4C3) and aluminum diboride (AlB2) during the melting and solidification process for the mixed compound powders [19]. This will tailor the mechanical properties, such as tensile strength, stiffness, hardness, Young’s modulus, wear resistance, thermal conductivity, and/or thermal expansion coefficient (TEC), to fit to certain applications, such as the engine, brakes, sports tools, machine tools, aerospace parts, etc.
In Section 2, the characterization of SiC and AlSi10Mg powders and AM parameters is given. In Section 3, several subdivisions are present. Section 3.1 presents AM process optimization for the three compositions, including AlSi10Mg, SiC/Al: 2/98, and SiC/Al: 5/95. Section 3.2 gives microstructure comparisons under various orientations through etching. Section 3.3 shows the test results on mechanical properties such as ultimate tensile strength (UTS), yield strength, Young’s Module, and elongation. Section 3.4 summarizes thermal properties such as coefficient of thermal expansion (CTE) and thermal conductivity. Section 3.5 discusses the XRD/EDS/EBSD results for the three compositions. Section 3.6 presents AM examples of MMC components such as graded composition heat sink and two-dimensional (2D) and three-dimensional (3D) radial neutron collimators. Section 4 provides conclusions.

2. Materials and Methods

Silicon carbide (density 3.21 g/cm3) from American Element, Los Angeles, CA, USA and aluminum alloy (AlSi10Mg, density 2.65 g/cm3) powders from CNPC, Beijing, China were used. Al alloy powder size is smaller than the SiC. About 80% of the AlSi10Mg powders were measured to have diameters within 10–30 µm. Figure 1 shows the powder characterization results, including microscopic image, scanning electron microscopy (SEM), and powder size distribution.
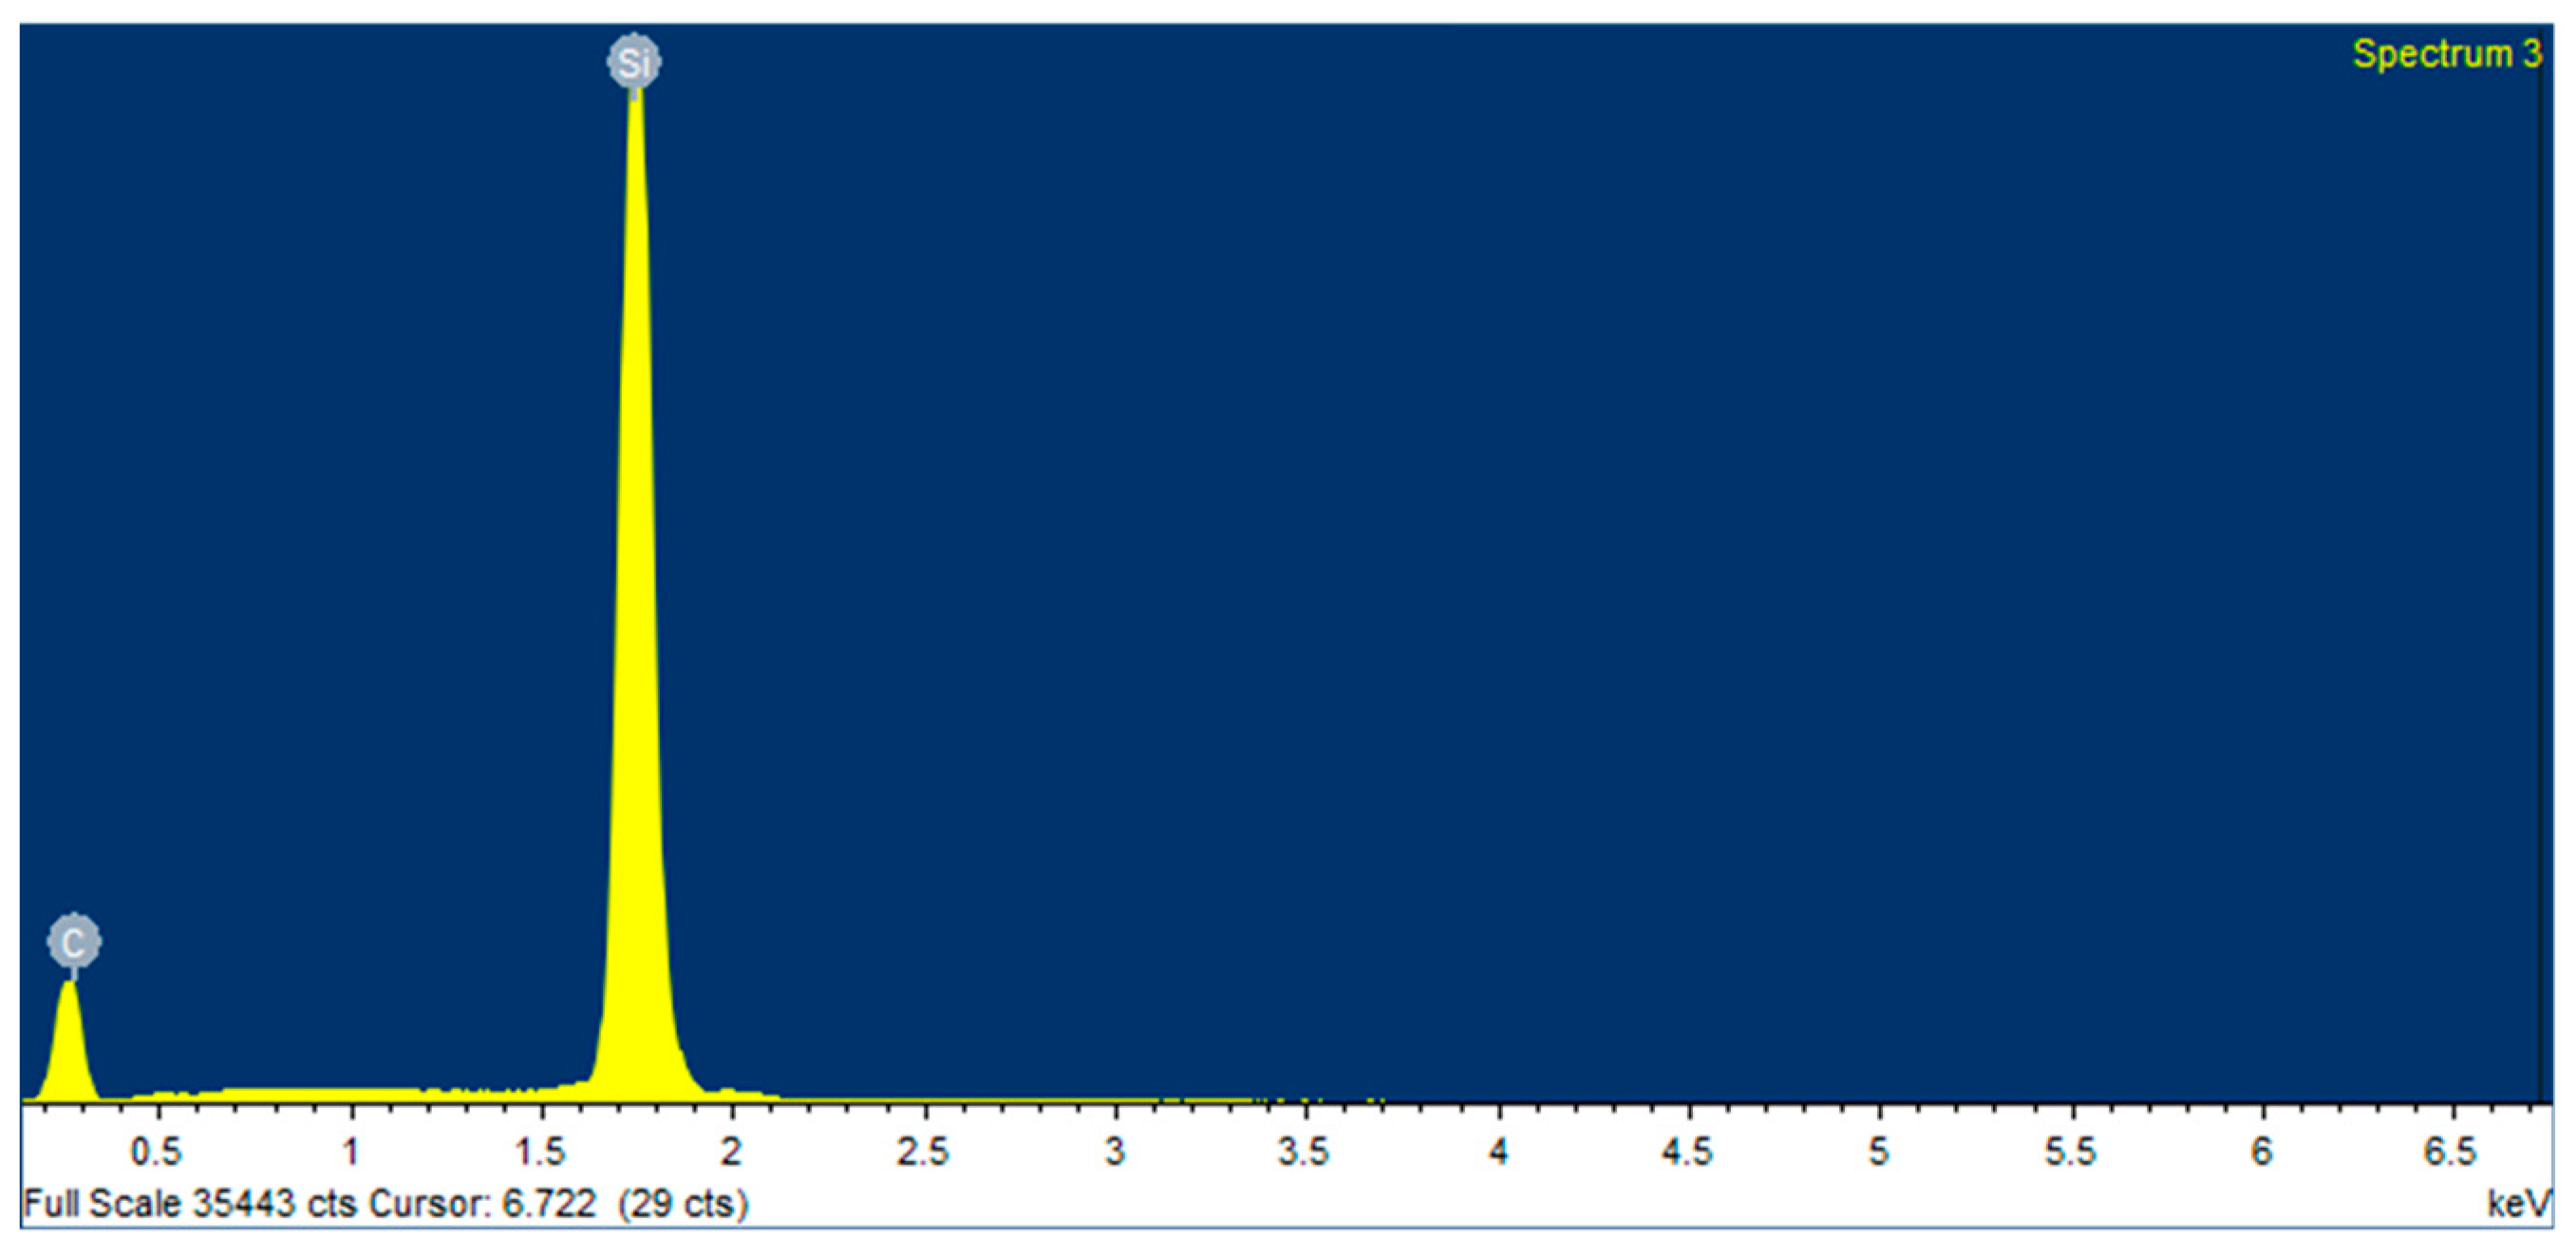
Microscopic image, SEM image and powder size distribution for SiC powders are given in Figure 2. The sample’s particle size generally locates at 10–50 µm for SiC, from the microscopic measurement. As a note, the SiC powders show irregular shapes, which is not ideal for AM process. Practically, we had no other choice since this was the best we could find for all suppliers. After making parts and testing, we have learned that the particle size distribution plays a more important role than the shape. As long as a well-distributed particle size (Gaussian distribution) is given, high density can be achieved. Figure 3 presents the result of energy-dispersed X-ray spectroscopy (EDX). It indicates a pretty pure SiC.
SiC and AlSi10Mg powders were weighted separately and then put in a glass bottle for mixing. A roller mixer was used to mix the SiC and AlSi10Mg powders for at least 4 h. Theoretical density for SiC/Al: 2/98 is 2.659 g/cm3, and for SiC/Al: 5/95 it is 2.673 g/cm3. A homemade laser powder bed fusion (LPBF) AM system was used in our experiment [23]. The coordinate system follows the international standard of American Society for Testing and Materials (ASTM) 52921, for which the blade moving direction is the X-axis and the laser beam incident direction is the Z-axis.
In order to select the optimal AM parameters, the laser power (130–175 W), scan speed (100–300 mm/s), and hatch spacing (0.1–0.2 mm) were varied to find the best density of cubical samples. The slicing layer thickness was fixed at 50 µm, and the hatch pattern with 57-degree rotation for each layer was used.

3. Results and Discussion

3.1. AM Process Optimization

  • A: AlSi10Mg
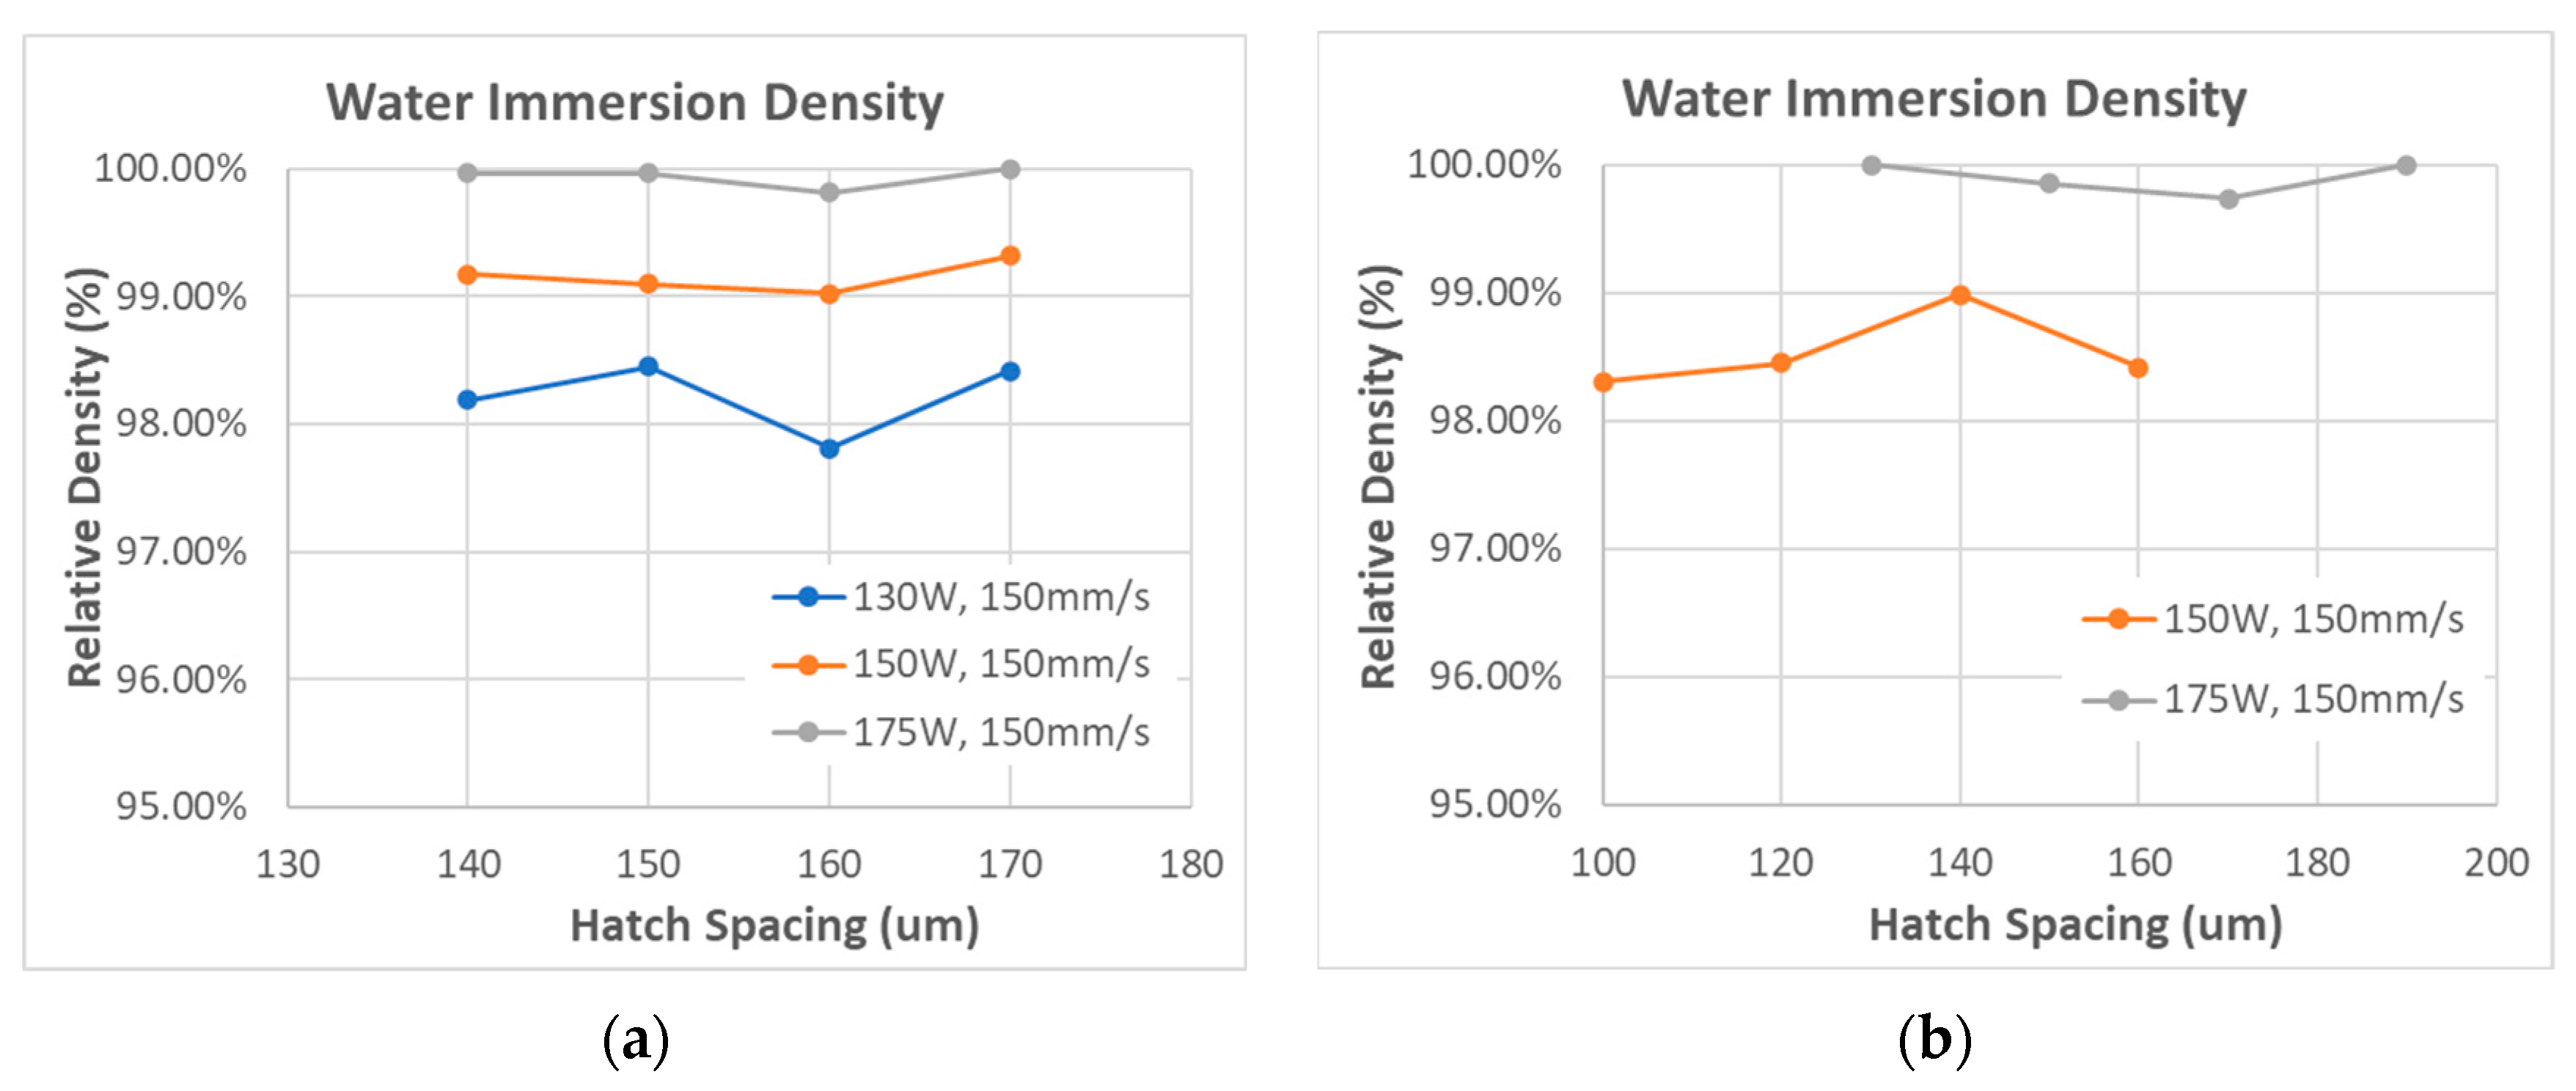
The laser power and hatch spacing were changed during the matrix test for comparison of density and surface roughness while maintaining the scan speed of 150 mm/s. After printing, each cubic sample was separated by an electrical discharge machining (EDM) system, and the density was measured using the water immersion method (Archimedes method). In Figure 4a, the relative density (compared with theoretical density 2.65 g/cm3) shows a clear tendency to increase as the laser power increased. The hatch spacing was changed over a wider range in the verification test to confirm this trend, as shown in Figure 4b. High density was obtained with a hatch spacing of 130 µm at 175 W or 140 µm at 150 W. In particular, 100% of relative density (2.65 g/cm3) was obtained under the condition of laser power at 175 W, hatch spacing at 130 µm, and scan speed at 150 mm/s, and this was selected as the optimal condition.
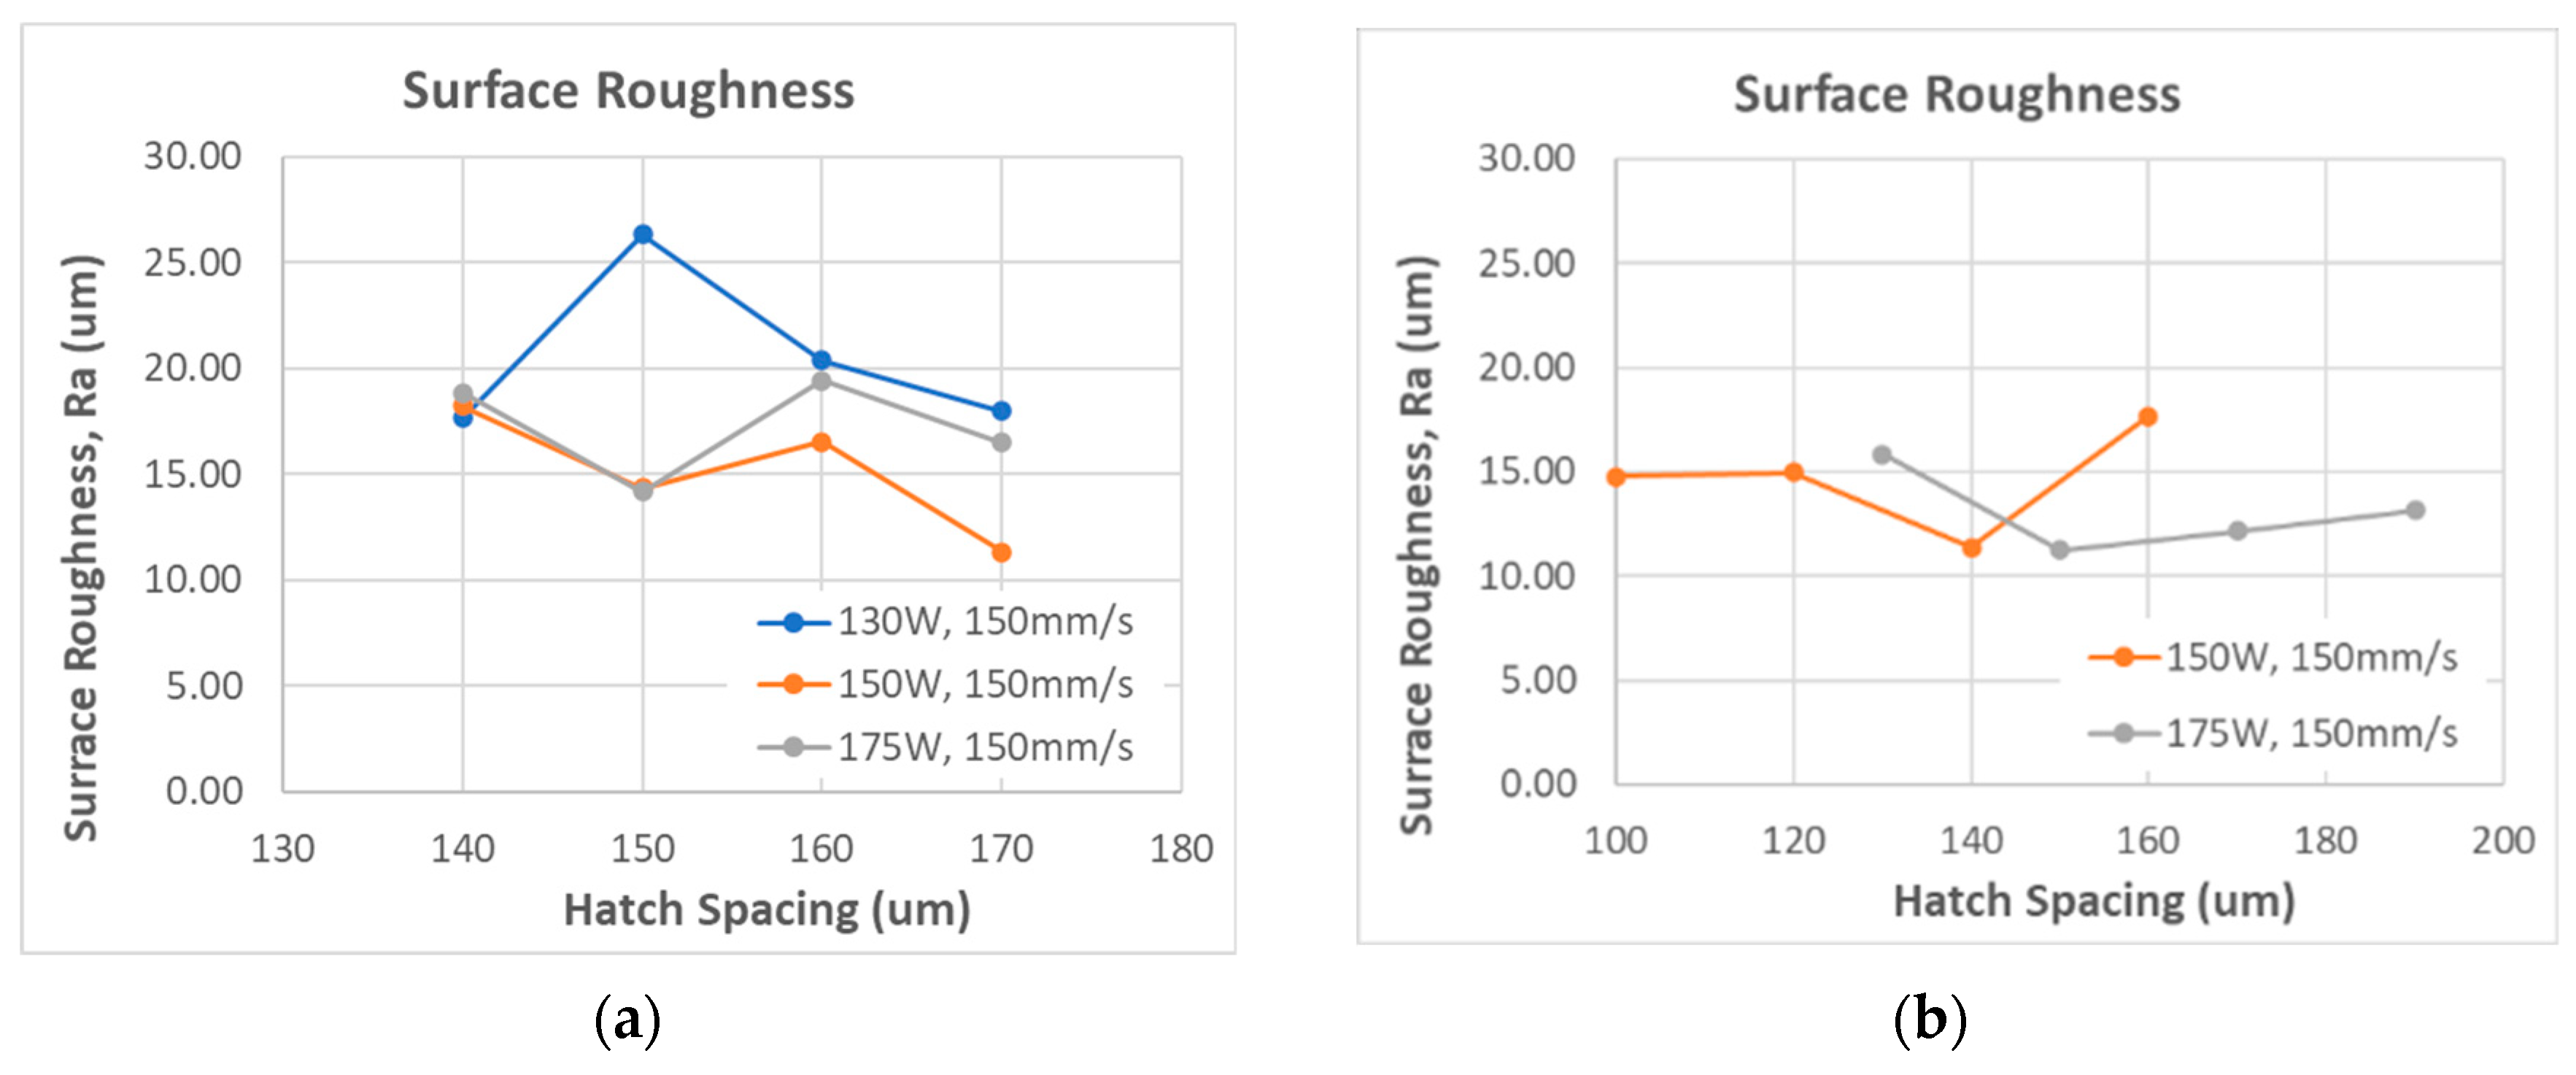
Figure 5 shows the surface roughness (Ra) test results, with a surface stylus profiler. Generally, the overall Ra value tends to decrease at the higher laser power. This can be interpreted to mean that the powder is not completely melted at the lower laser power, so it is difficult to spread the melt pool widely.
  • B: SiC/Al: 2/98
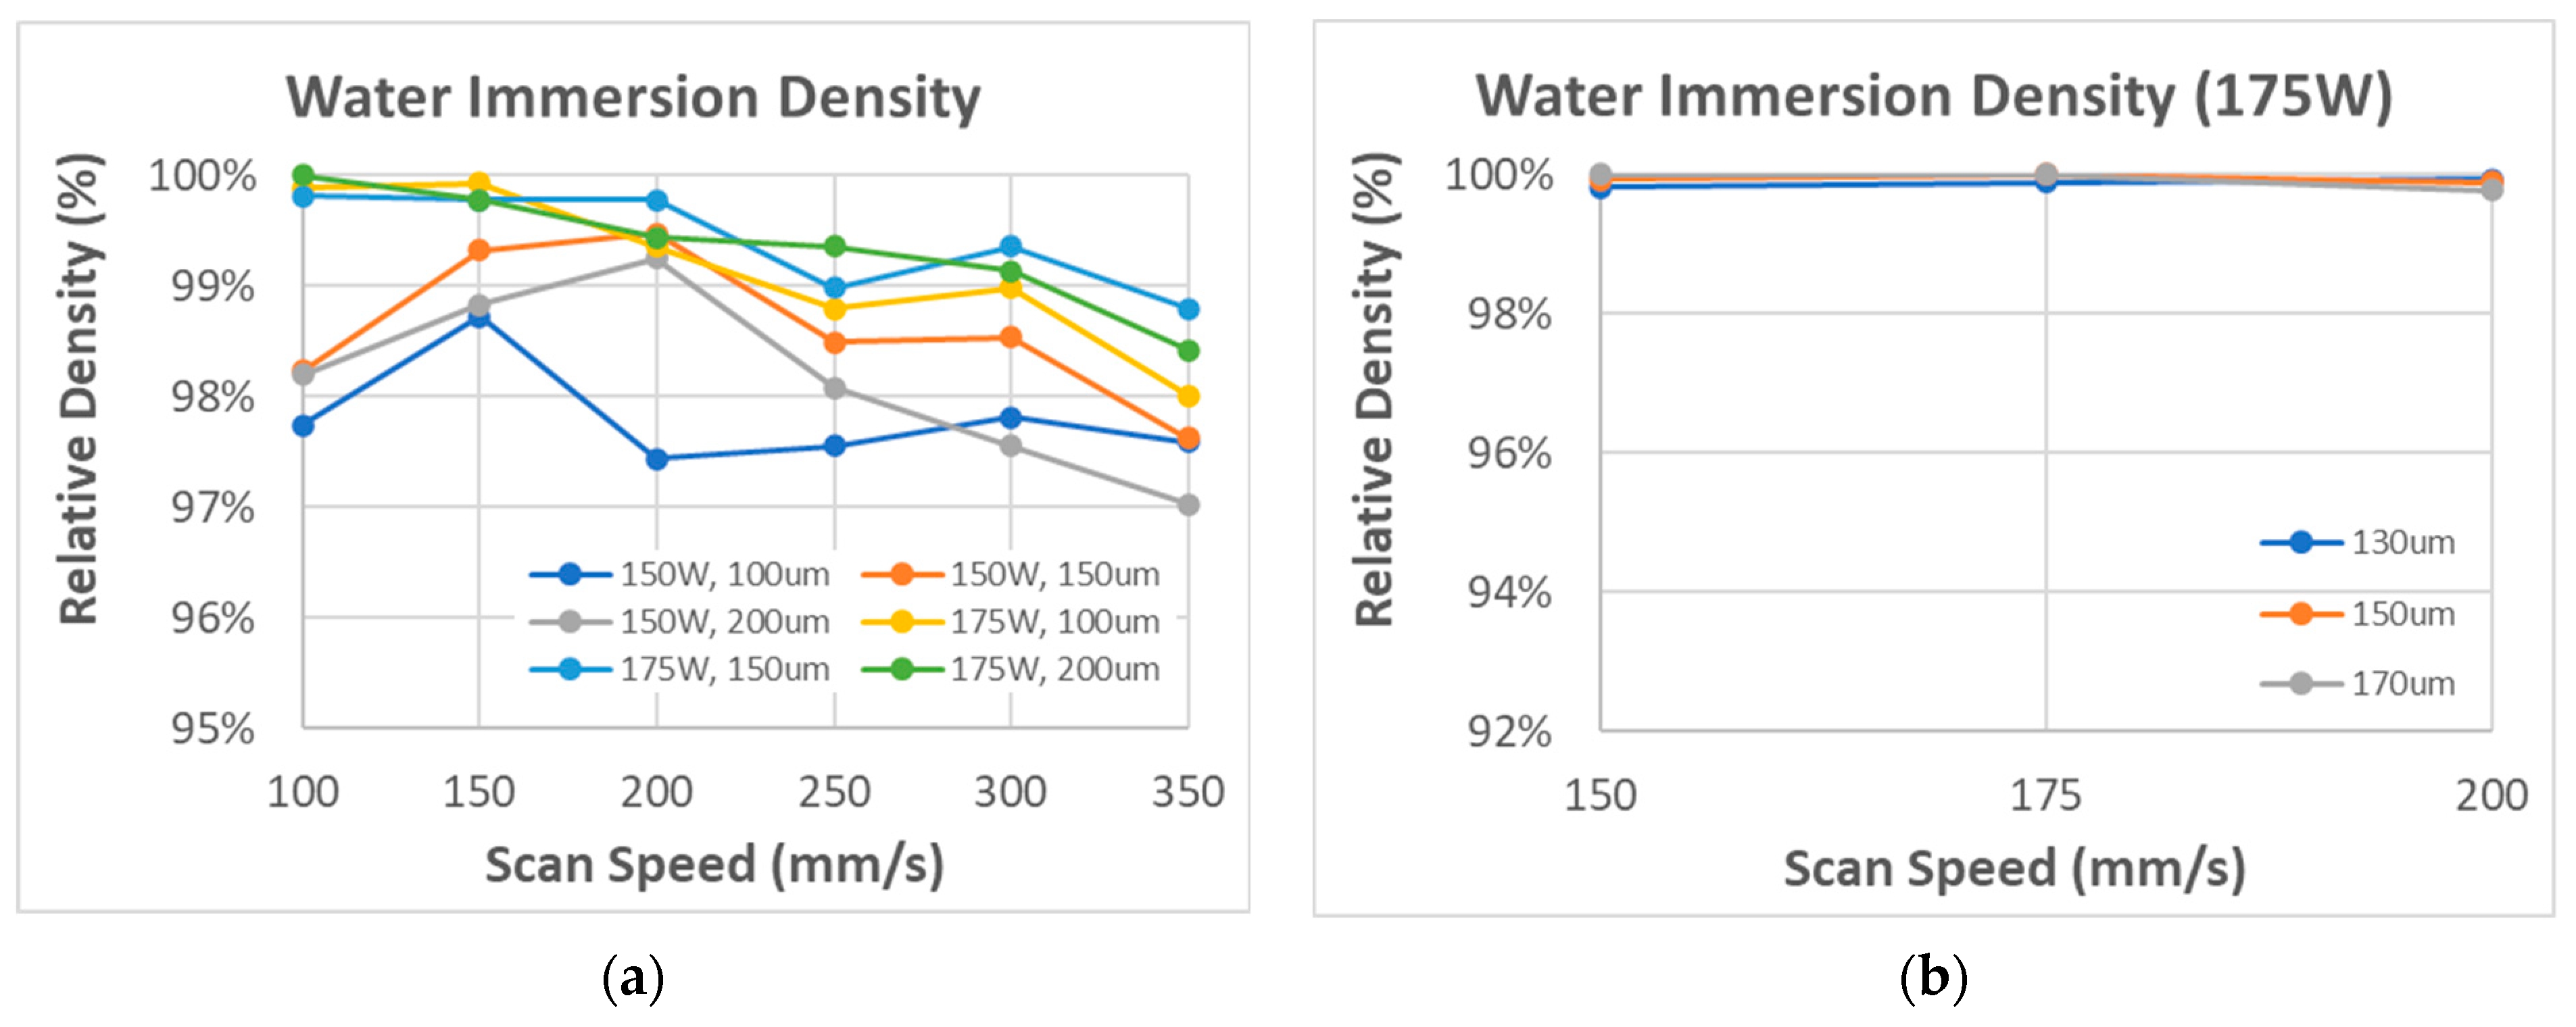
In the matrix test of SiC/Al: 2/98 (theoretical density 2.659 g/cm3), the scan speed and hatch spacing were varied for comparison while setting the laser power at 150 W or 175 W. As shown in Figure 6a, high density was obtained at higher laser power and lower scan speed and at a hatch spacing of 150 µm, similar to the AlSi10Mg test results.
The verification test was then proceeded by narrowing the range of hatch spacing and scan speed at a laser power of 175 W. A total of 100% relative density was obtained under all conditions of this test, as shown in Figure 6b. Among them, the median hatch spacing of 150 µm and the fastest scan speed of 200 mm/s were selected as the optimal conditions.
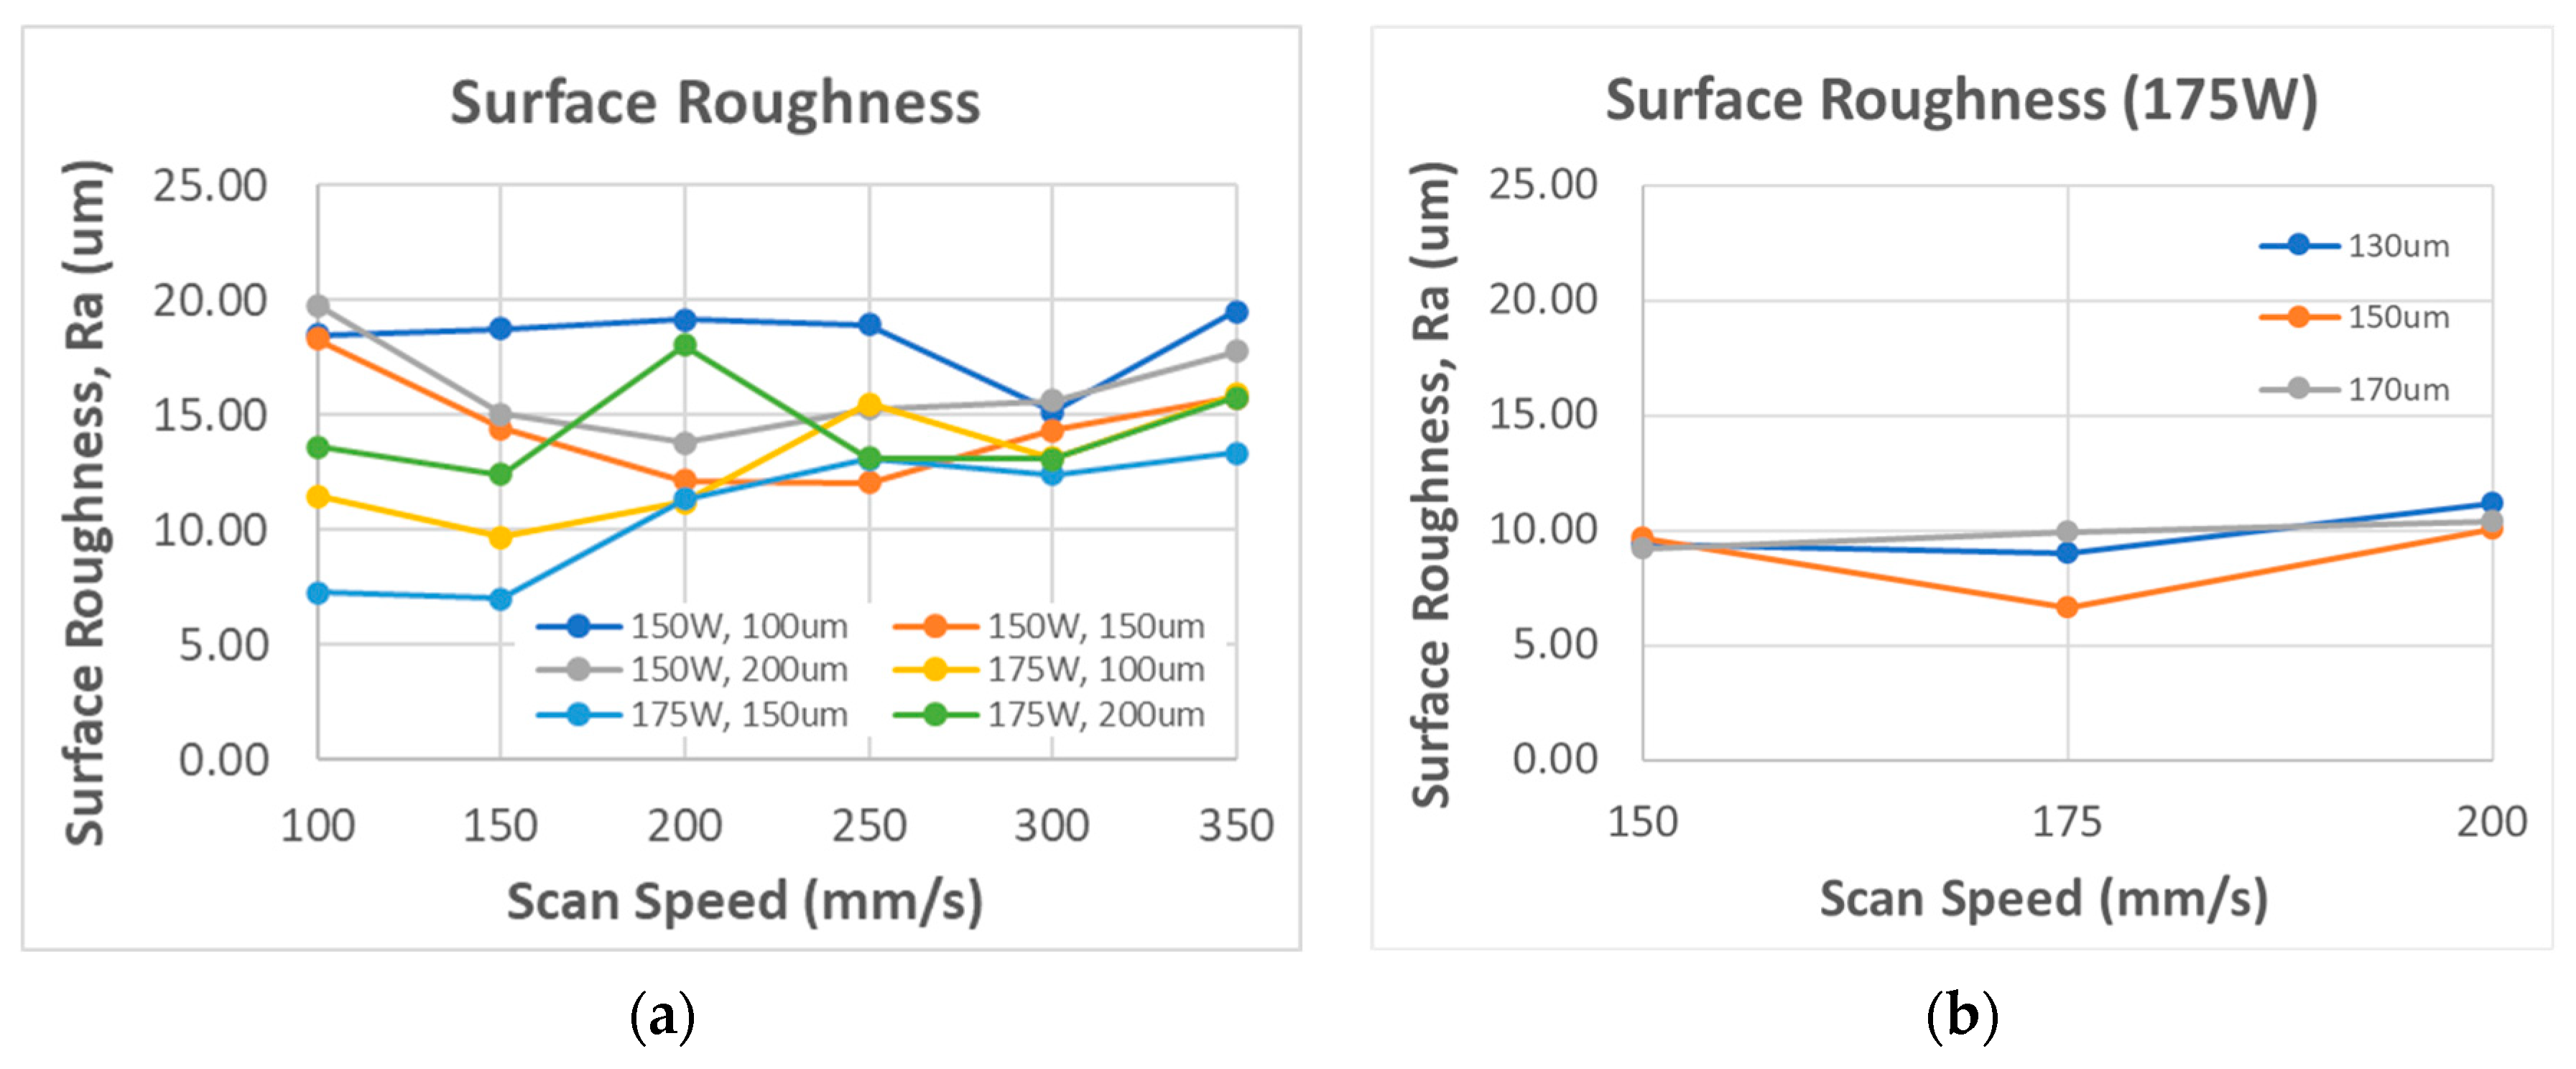
In Figure 7, surface roughness Ra values also show a similar trend with those AlSi10Mg tests. Ra tends to decrease at a higher laser power, and their overall values were lower than 20 μm. In the verification test, all Ra values were distributed around 10 µm, which is very good for AM.
  • C: SiC/Al: 5/95
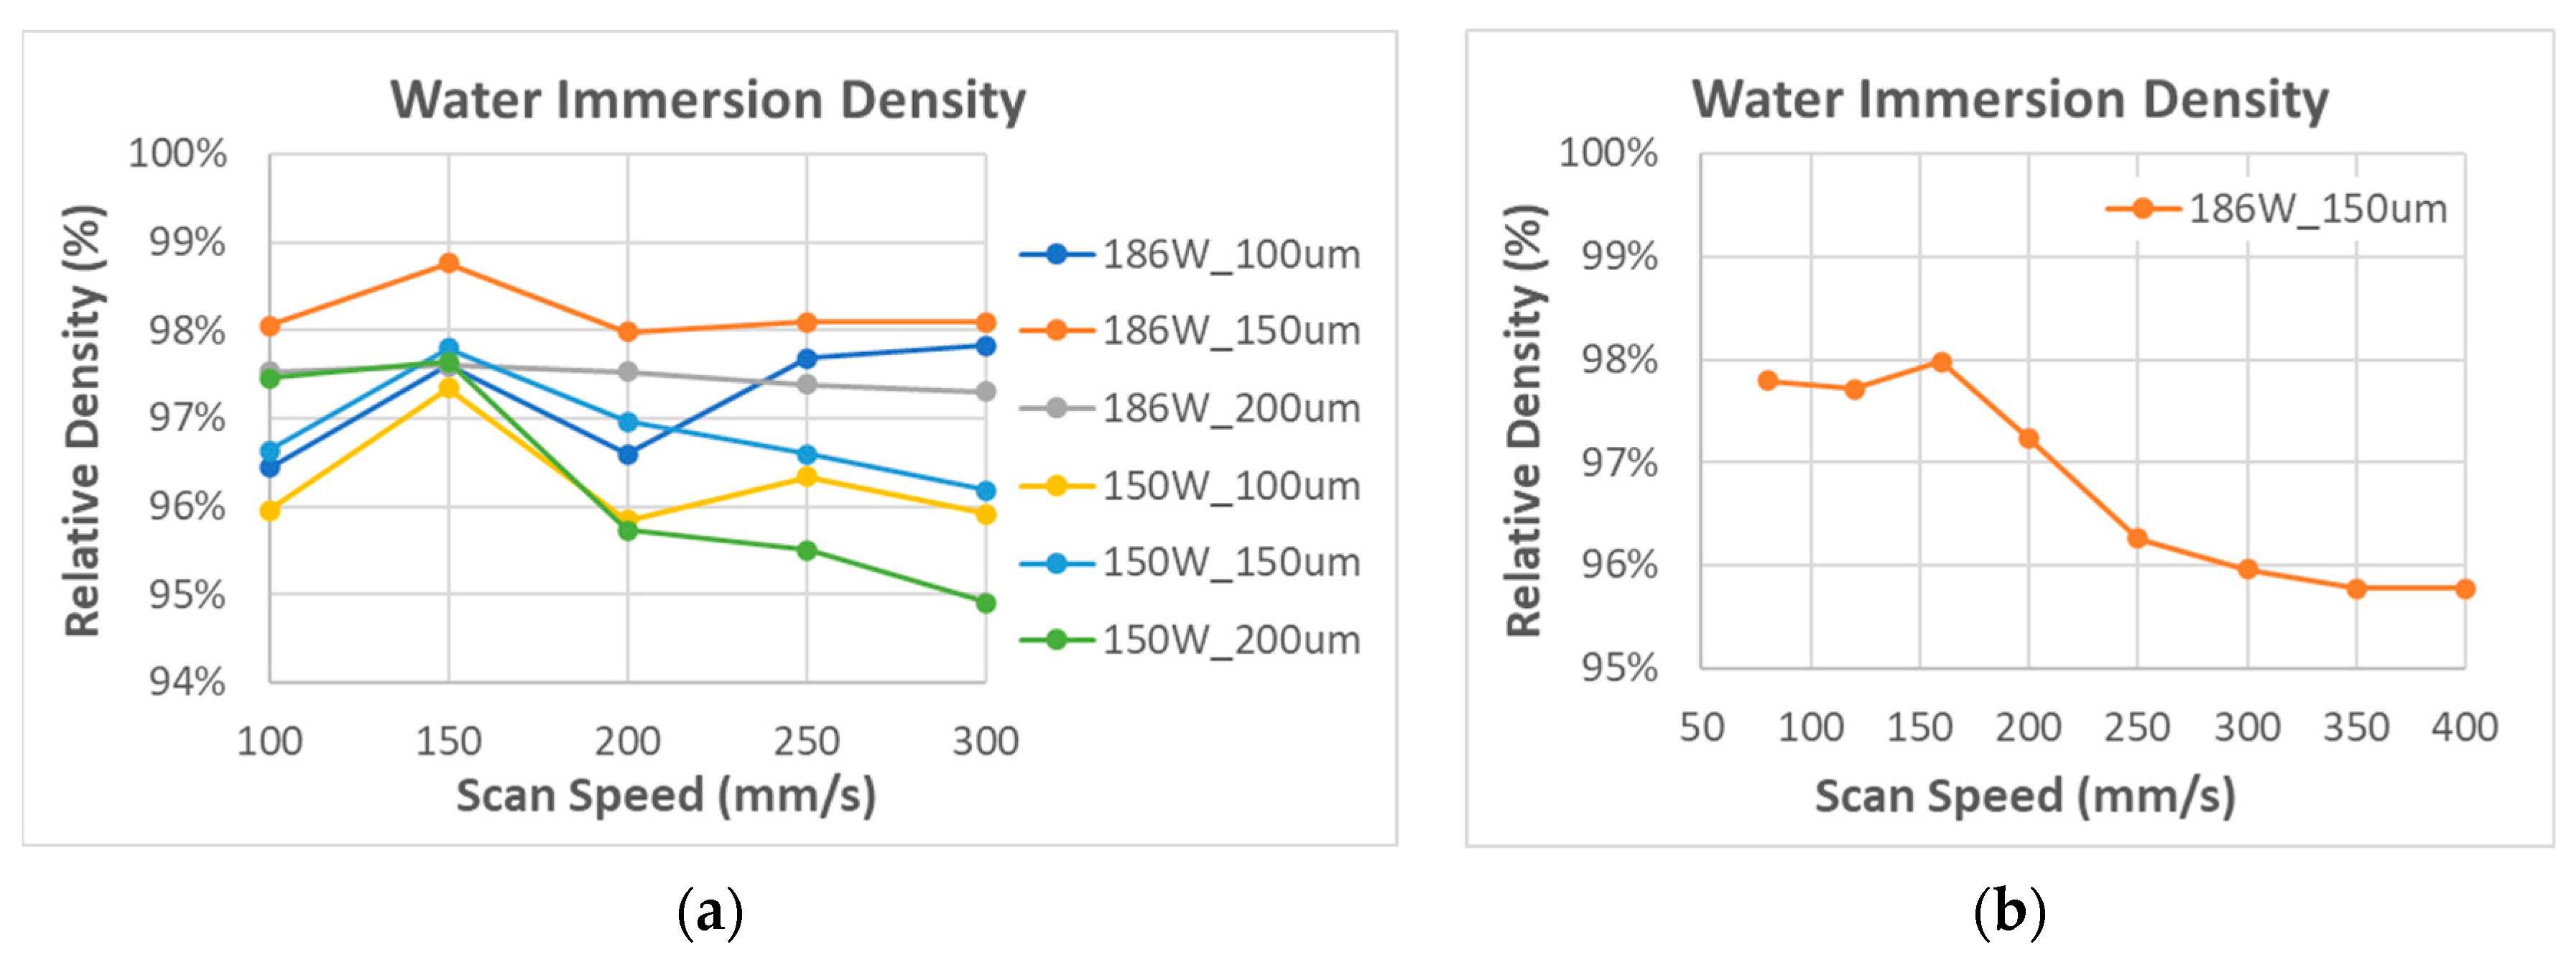
The SiC/Al: 5/95 (density 2.673 g/cm3) matrix test of cubic samples was also attempted at the same parameters as those of the SiC/Al: 2/98 test. As shown in Figure 8a, the highest density was obtained at a higher laser power with a hatch spacing of 150 µm. However, when scan speed was decreased from 150 mm/s to 100 mm/s, the density values were decreased at all test conditions of laser power and hatch spacing. At the condition of laser power 186 W, scan speed 150 mm/s, and hatch spacing 0.15 mm, the maximum relative density value of 98.77% was achieved, which was lower than the previous tests for AlSi10Mg and SiC/Al: 2/98.
In the verification test, a wider speed range was intentionally used to check the performance. As shown in Figure 8b, the highest density was obtained at a speed of 150 mm/s, and the density decreased at high scan speeds.
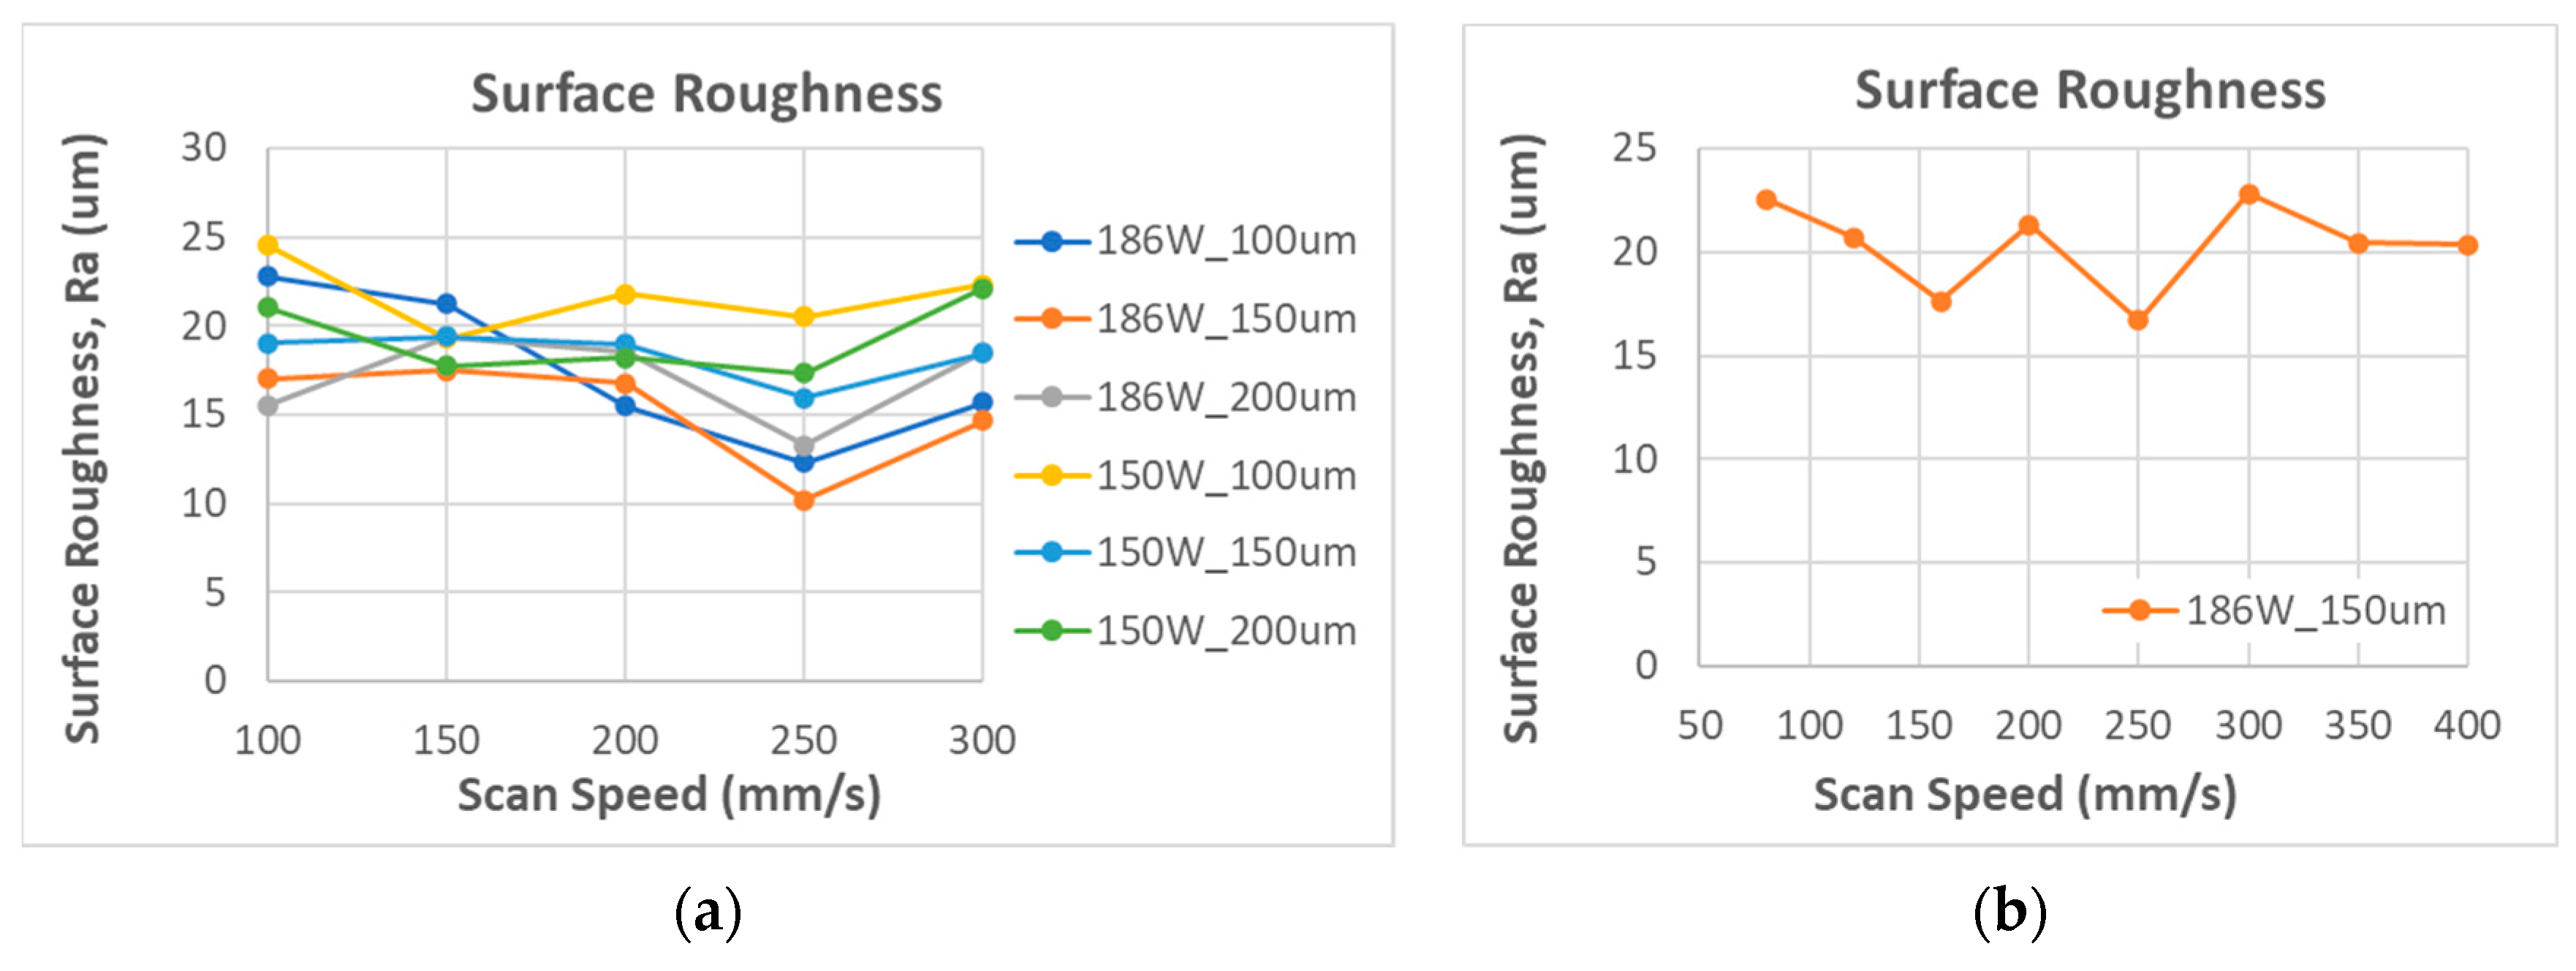
For the surface roughness shown in Figure 9, a relatively low Ra value was obtained at a higher laser power. Compared with the previous tests, it is slightly higher.

3.2. Microstructure Comparison at Different Orientations

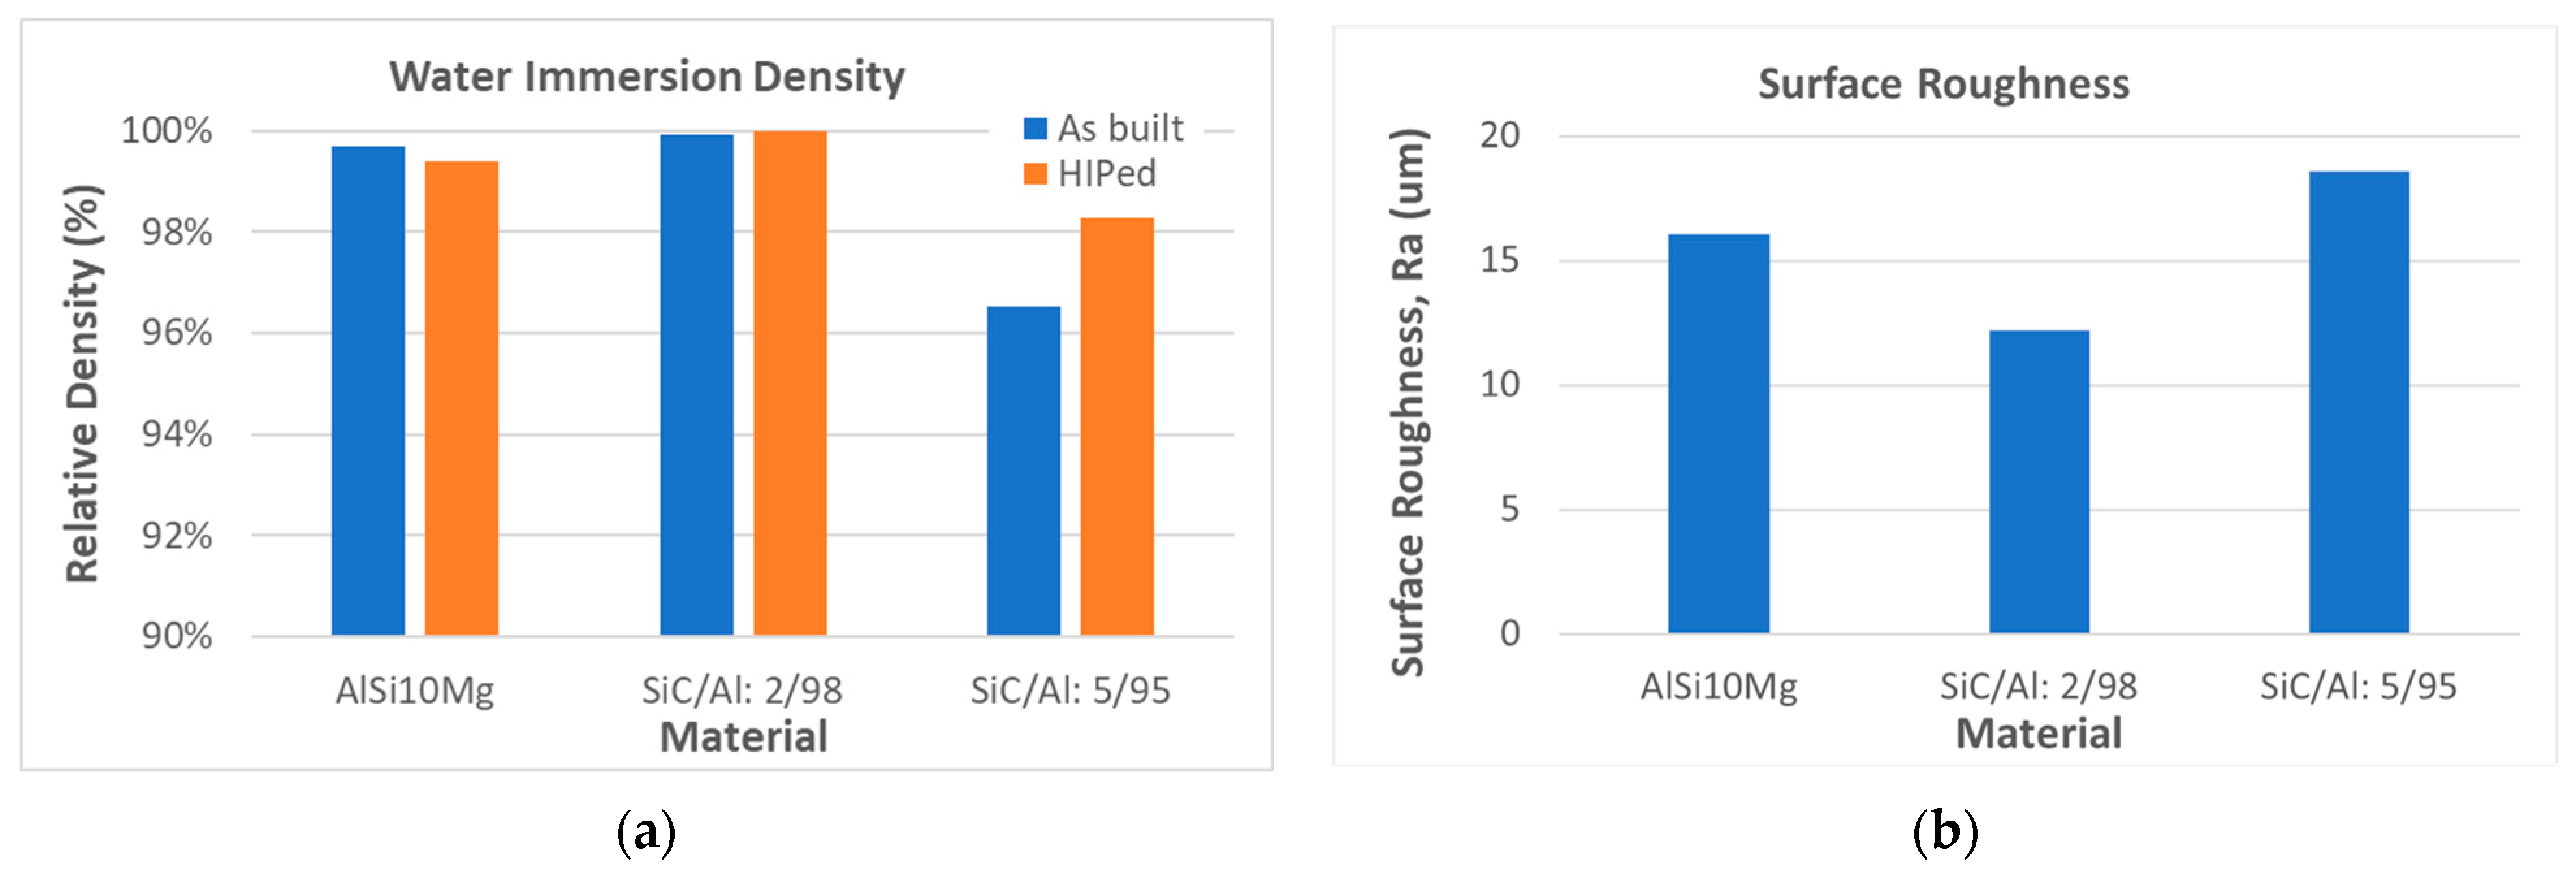
The optimal printing conditions for the described three types of compositions, AlSi10Mg, SiC/Al: 2/98, and SiC/Al: 5/95, are shown in Table 1. Compared to the reference material AlSi10Mg, the silicon carbide additive has a relatively lower thermal conductivity (typically 3.8–20 W/mK), so SiC/Al: 2/98 can obtain high-density printed parts with less laser energy (higher scan speed and higher hatch spacing). However, when the SiC addition rate was increased to 5%, even when higher energy was applied, the SiC powders interfered with the thermal conduction, restricting sufficient Al melting, and as a result, they resulted in pores inside the printed part and subsequently lower the density, as shown in Figure 10. In terms of surface roughness, SiC/Al: 2/98 obtained the lowest Ra value of around 12 µm.
In order to modify the mechanical properties of the printed part, the hot isostatic pressing (HIP) process was performed to improve the microstructures and reduce the anisotropic properties. For the HIP processing conditions, the residual stress of printed parts was relieved for 2 h at 300 °C and 60 MPa, and then the parts were pressed at 475 °C and 100 MPa for 2 h.
For each composition, four cube parts with a dimension of 20 mm (L) × 20 mm (W) × 15 mm (H) were printed with the optimized printing conditions listed in Table 1. Among them, two parts were HIP-treated. The density before and after HIP was compared.
Since the density of the AlSi10Mg and SiC/Al: 2/98 parts were almost 100% just after printing, there were no big differences in the density values after HIP. On the other hand, the density of SiC/Al: 5/95 was improved from 96.54% to 98.28% due to the decreased pores under high-temperature and pressure conditions during the HIP process.
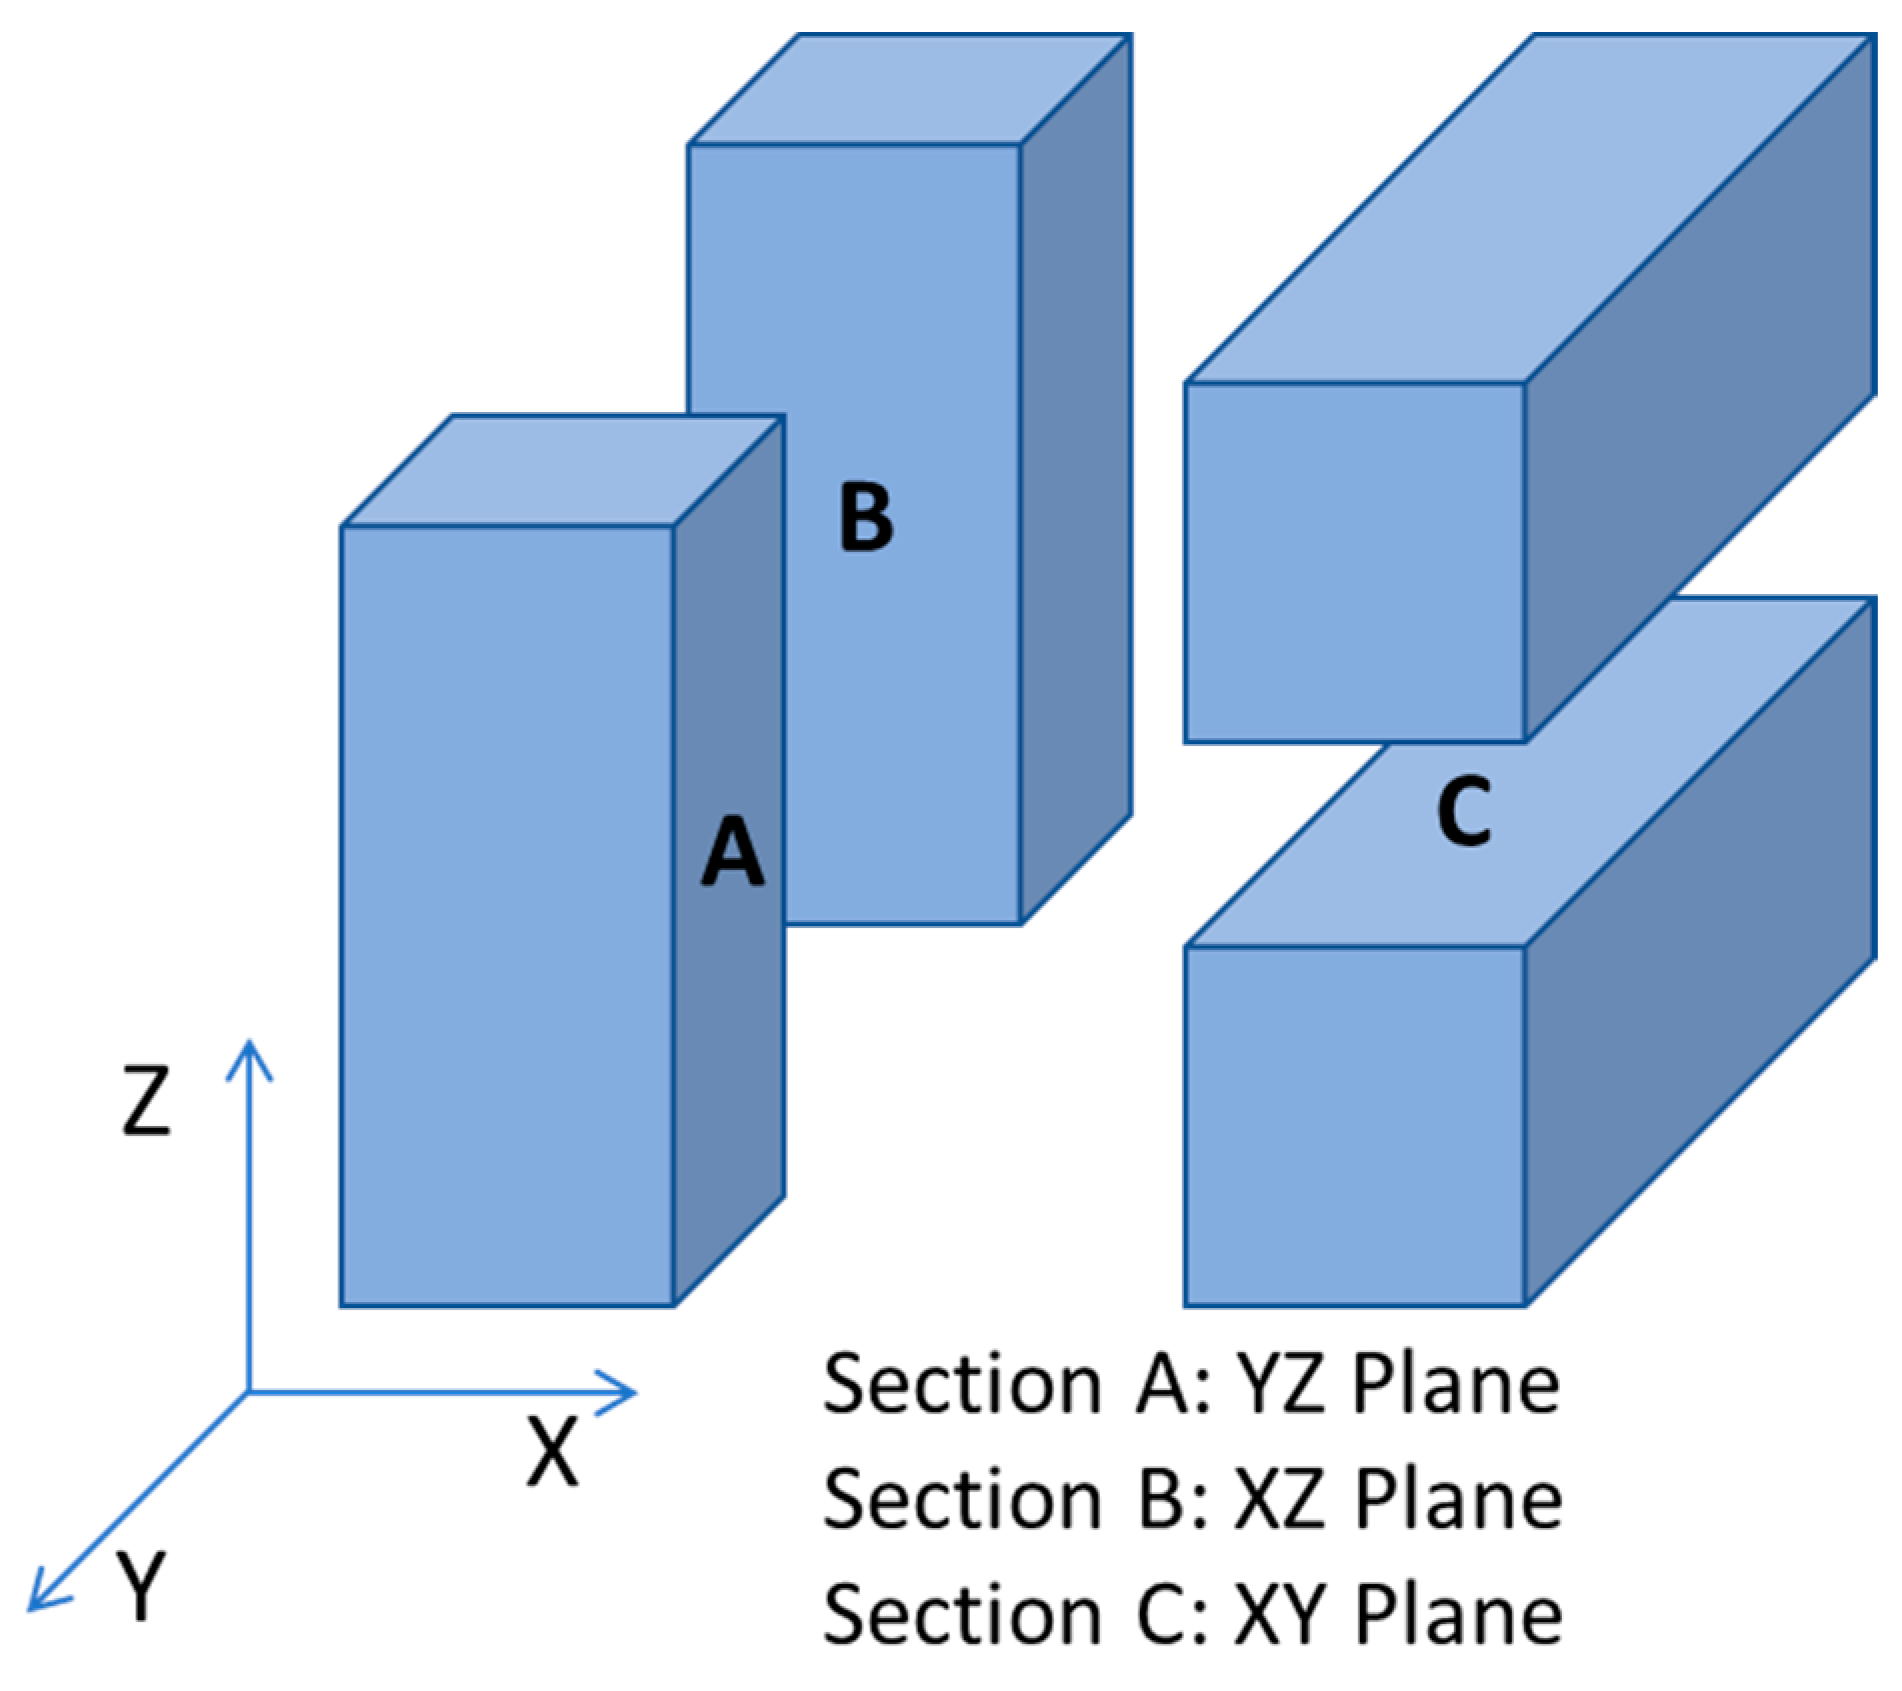
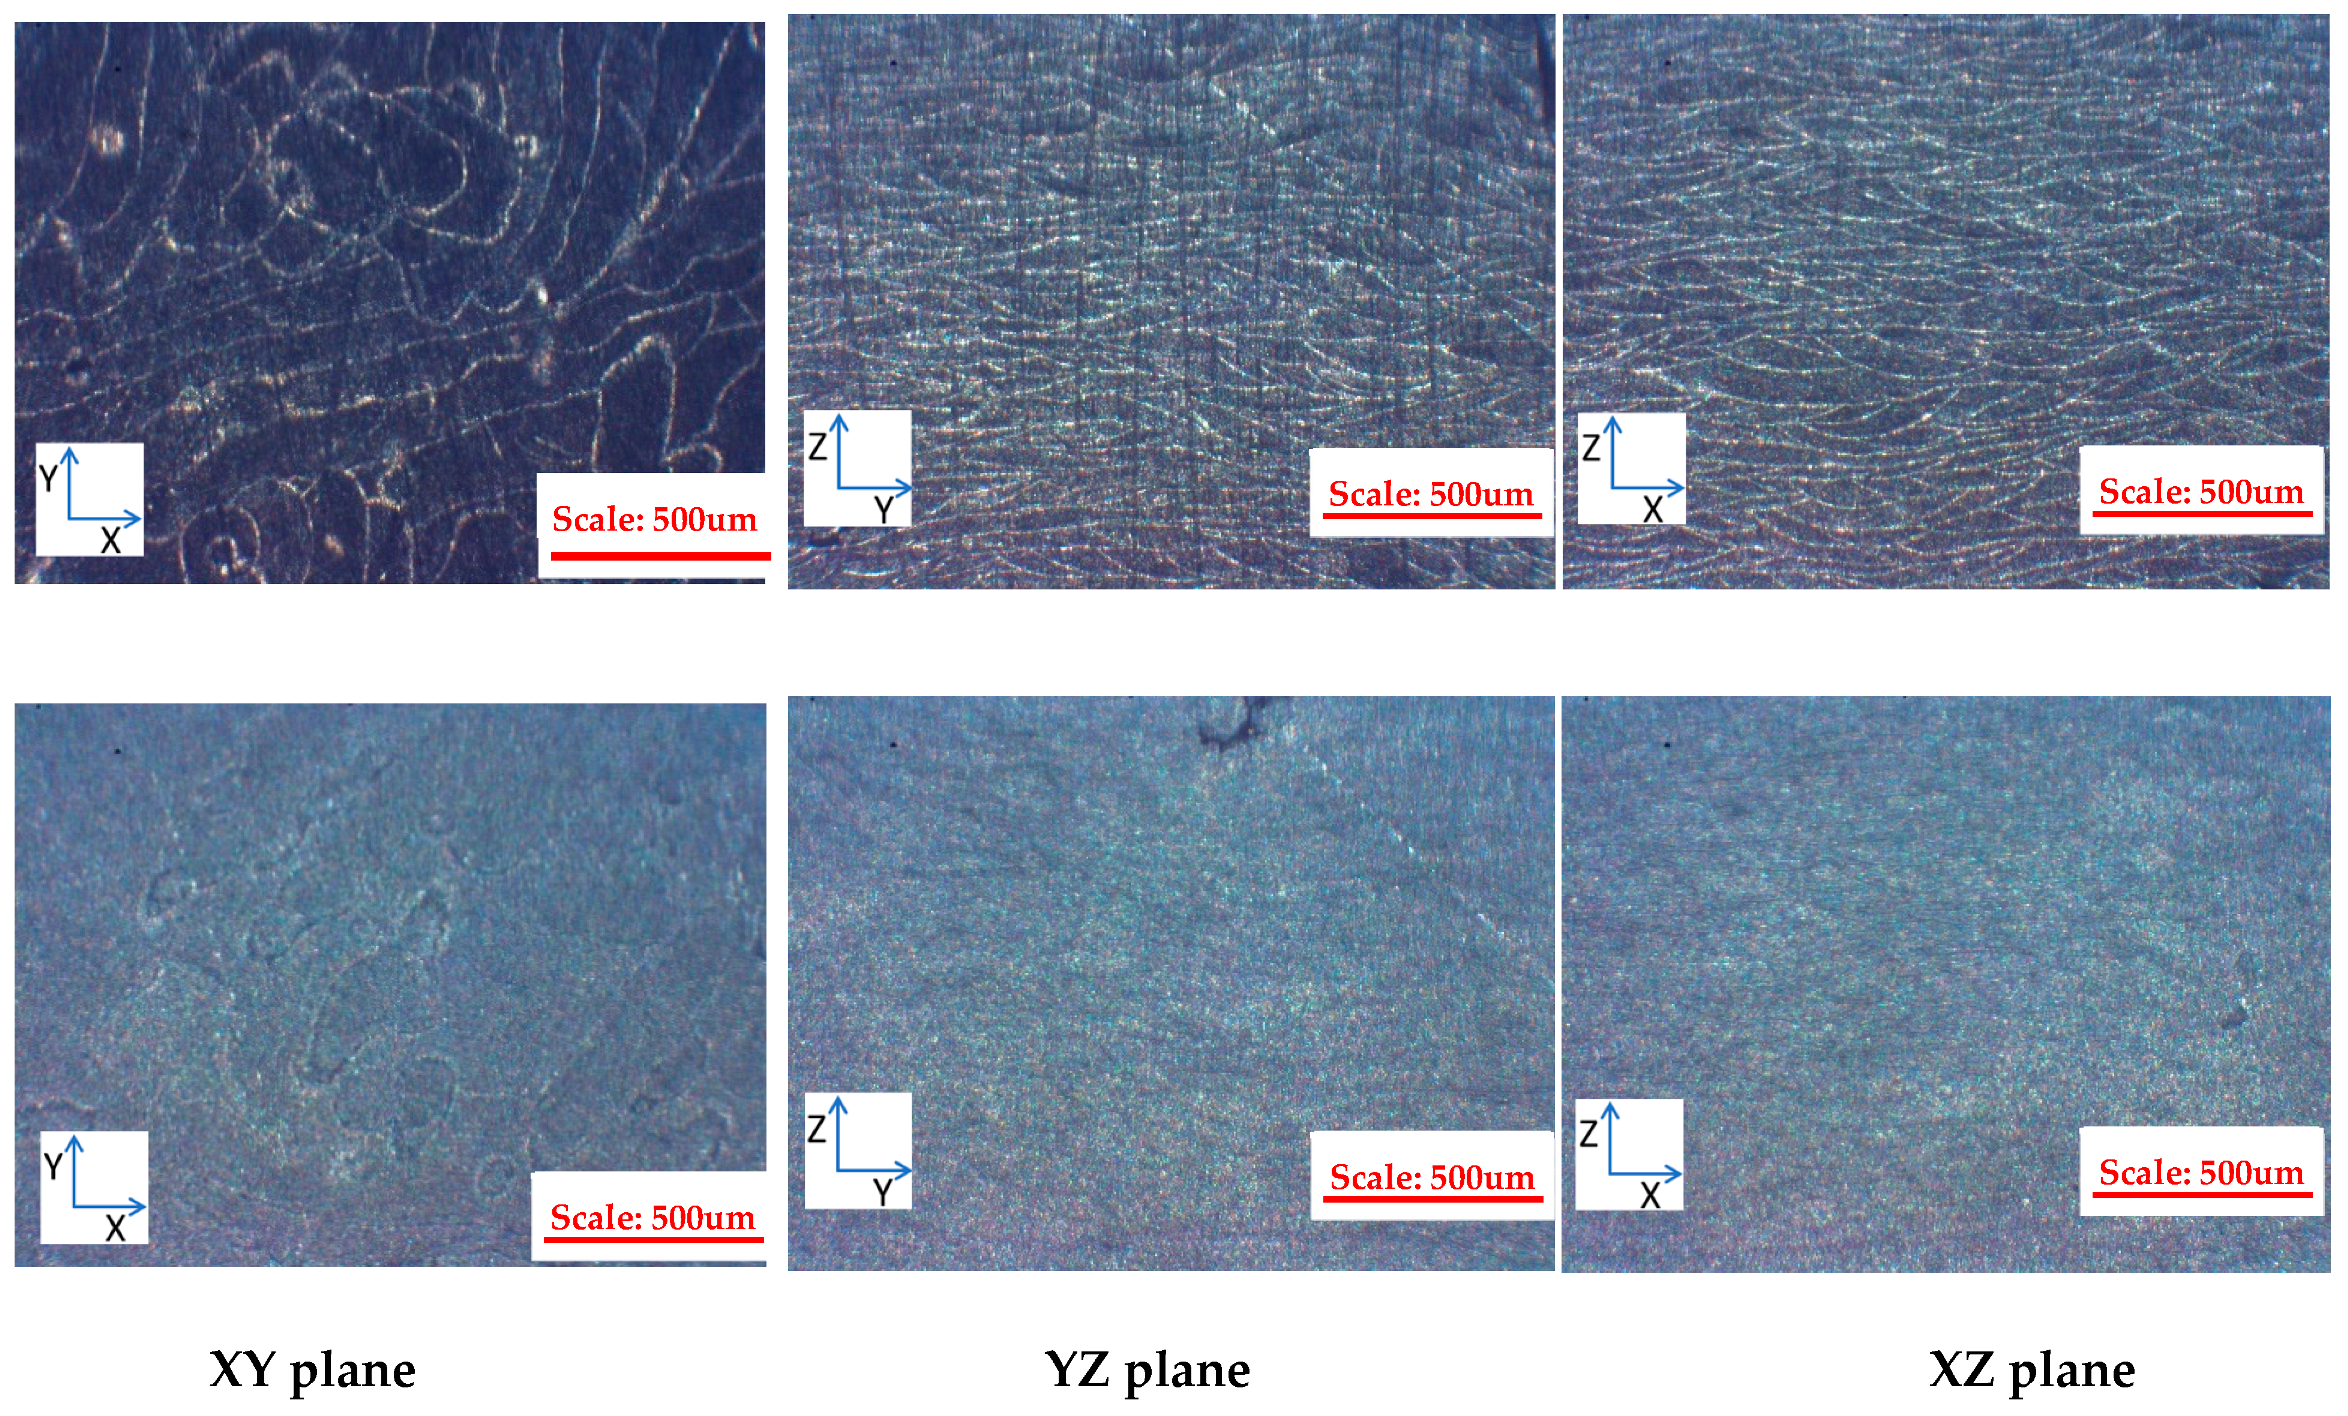
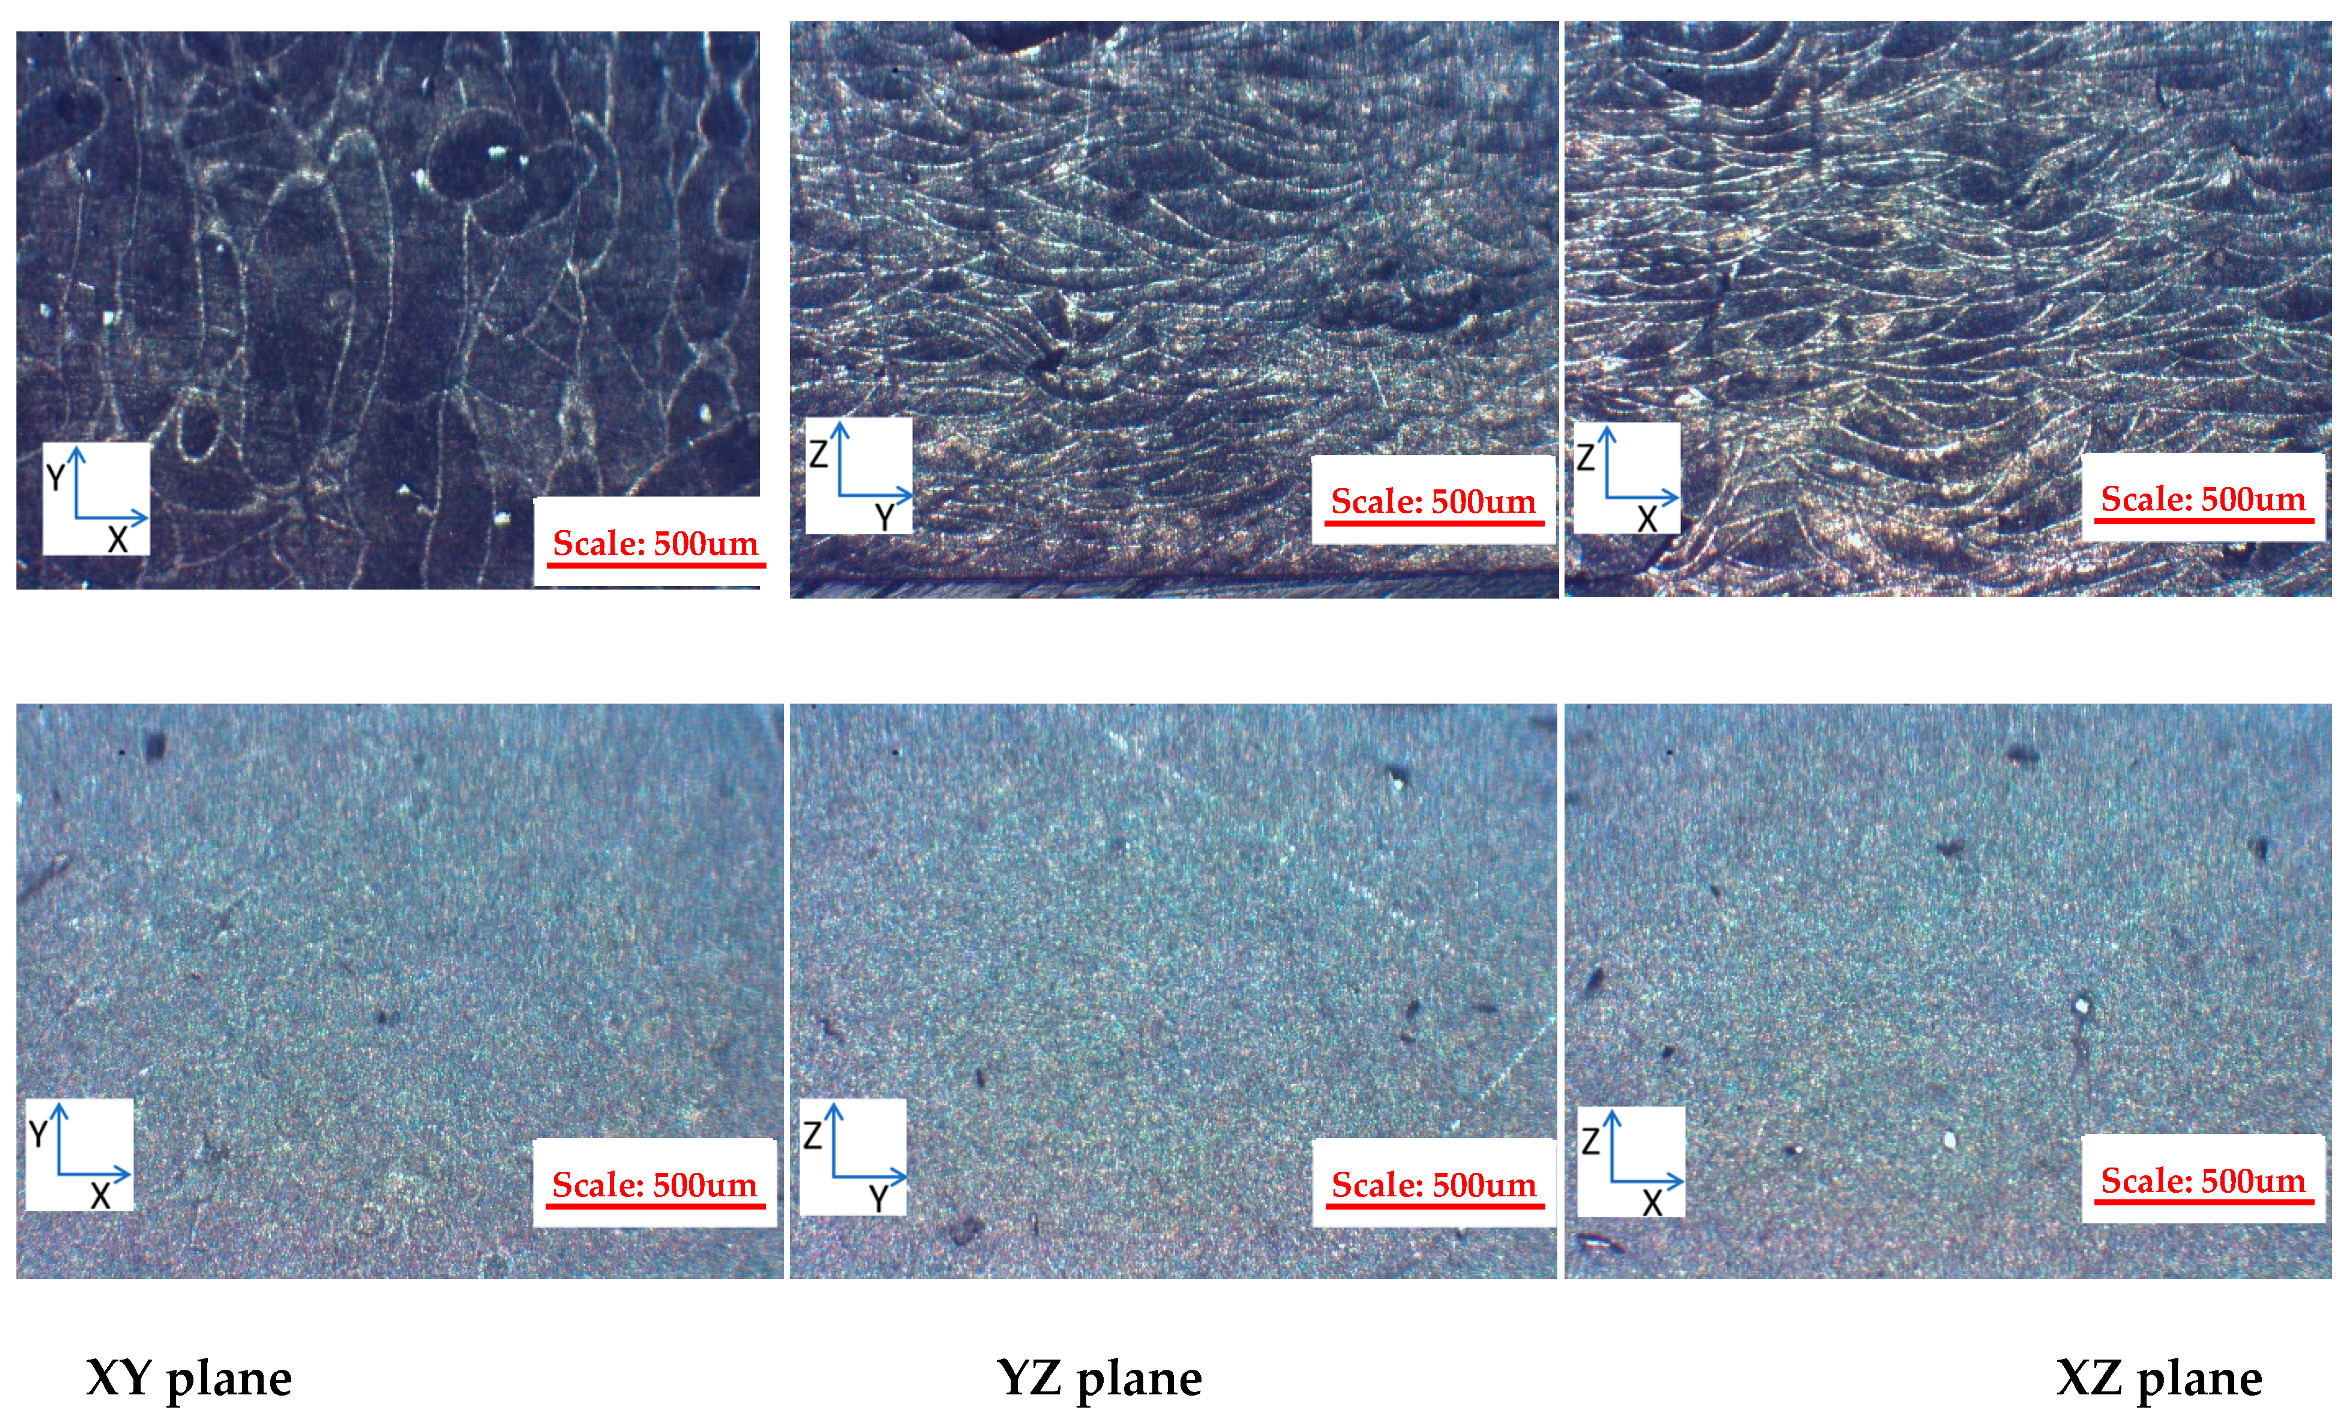
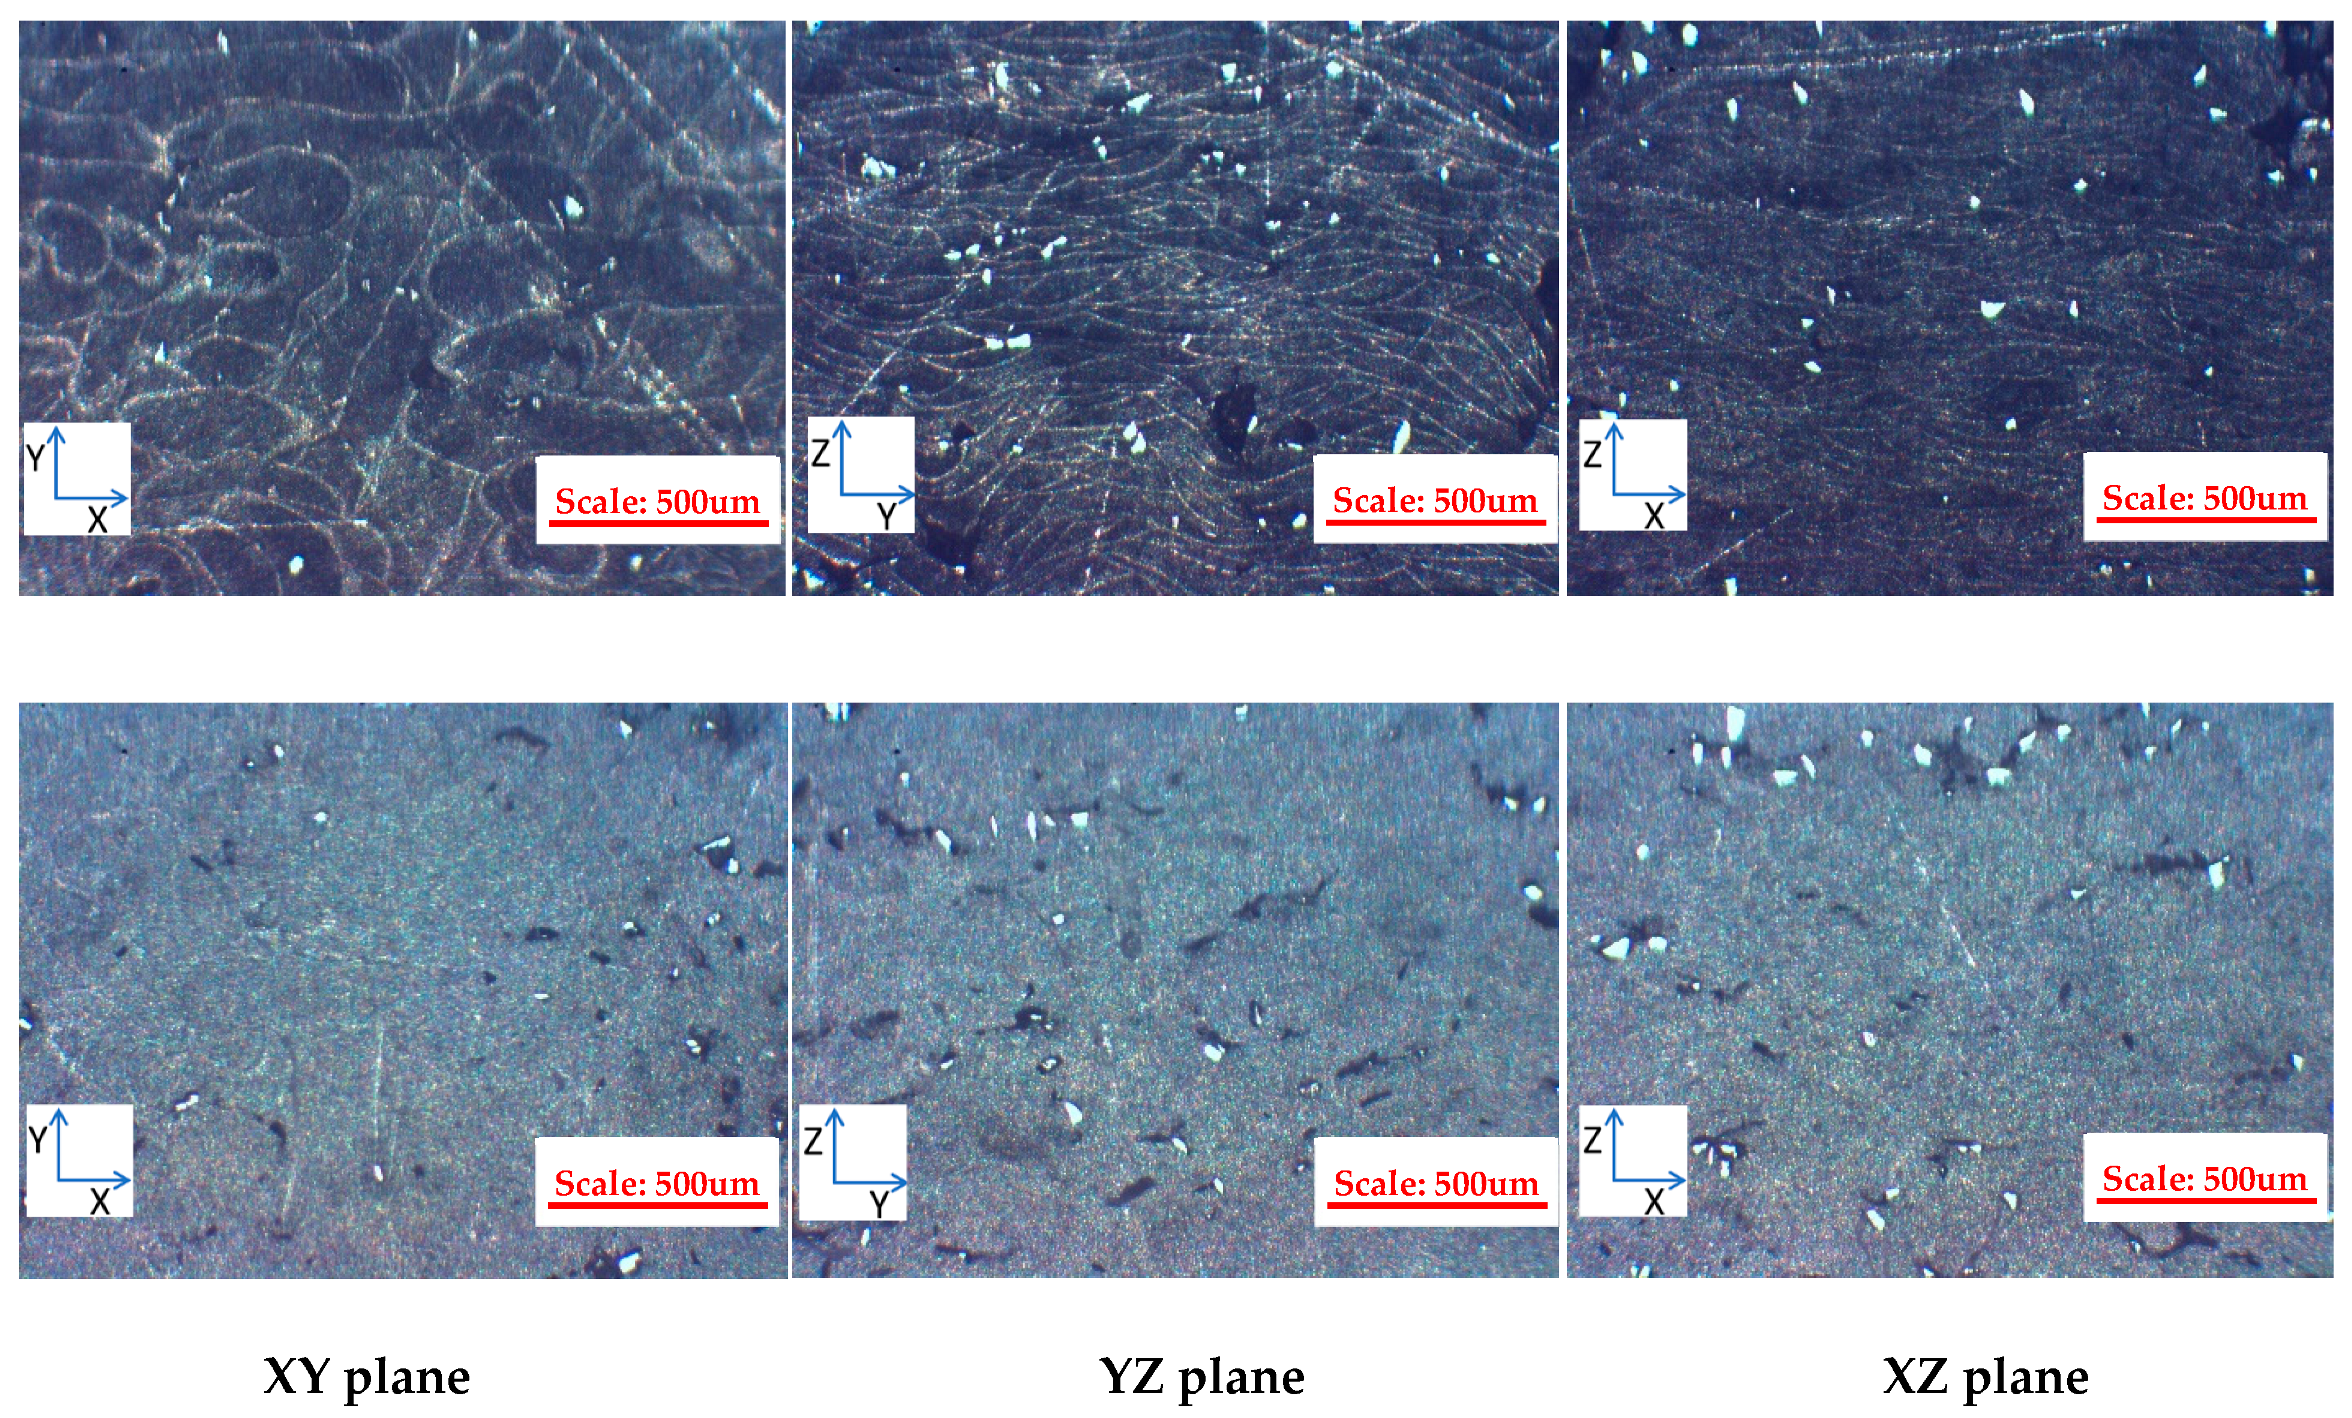
After cutting the printed cubic parts in three direction planes (XY/XZ/YZ, ASTM 52921) as shown in Figure 11, the microstructure and grain boundary were visualized through etching. Etching times were 10 min for the as-built parts and 2 h for the HIP-treated parts in Keller’s Reagent (HNO3, HF, HCL, water). Figure 12, Figure 13 and Figure 14 give the test results for three compositions. As a note, some straight lines were caused by polishing. The bright spots in Figure 13 and Figure 14 are unmelted SiC particles.
Basically, most of the grain boundaries have similar shapes. They were elongated with a length up to around 1 mm on the XY plane and stacked as thin layers with around 60 µm thickness in the Z-axis direction. The angle of the laser hatch pattern was changed by 57 degrees for each layer, but in most cases, the long grains were oriented in the direction of 45 degrees and 135 degrees in most of the areas on the XY plane. When the content of silicon carbide was increased, more small grains were observed to be formed around silicon carbide. As a result, the grain size showed a tendency to slightly decrease, but the value was insignificant.
In the etched section of the HIP-treated parts, it was difficult to identify the grain boundary, although the etching time was extended from 10 min to 2 h. In the case of SiC/Al MMC parts, the boundary was not found. Only the AlSi10Mg part section was able to observe faint boundaries. The grain size of the HIP-treated parts decreased slightly in the X and Y directions but slightly increased in the Z-axis direction. It seems that most of the long grains obtained a strong bonding force with each other or integrated into a large grain boundary under high temperature and high pressure during the HIP process, and then, only some of the small grains that have relatively low bonding force were distinguished. The EBSD results in Section 3.5 also confirm the mechanism.

3.3. Test on Mechanical Properties

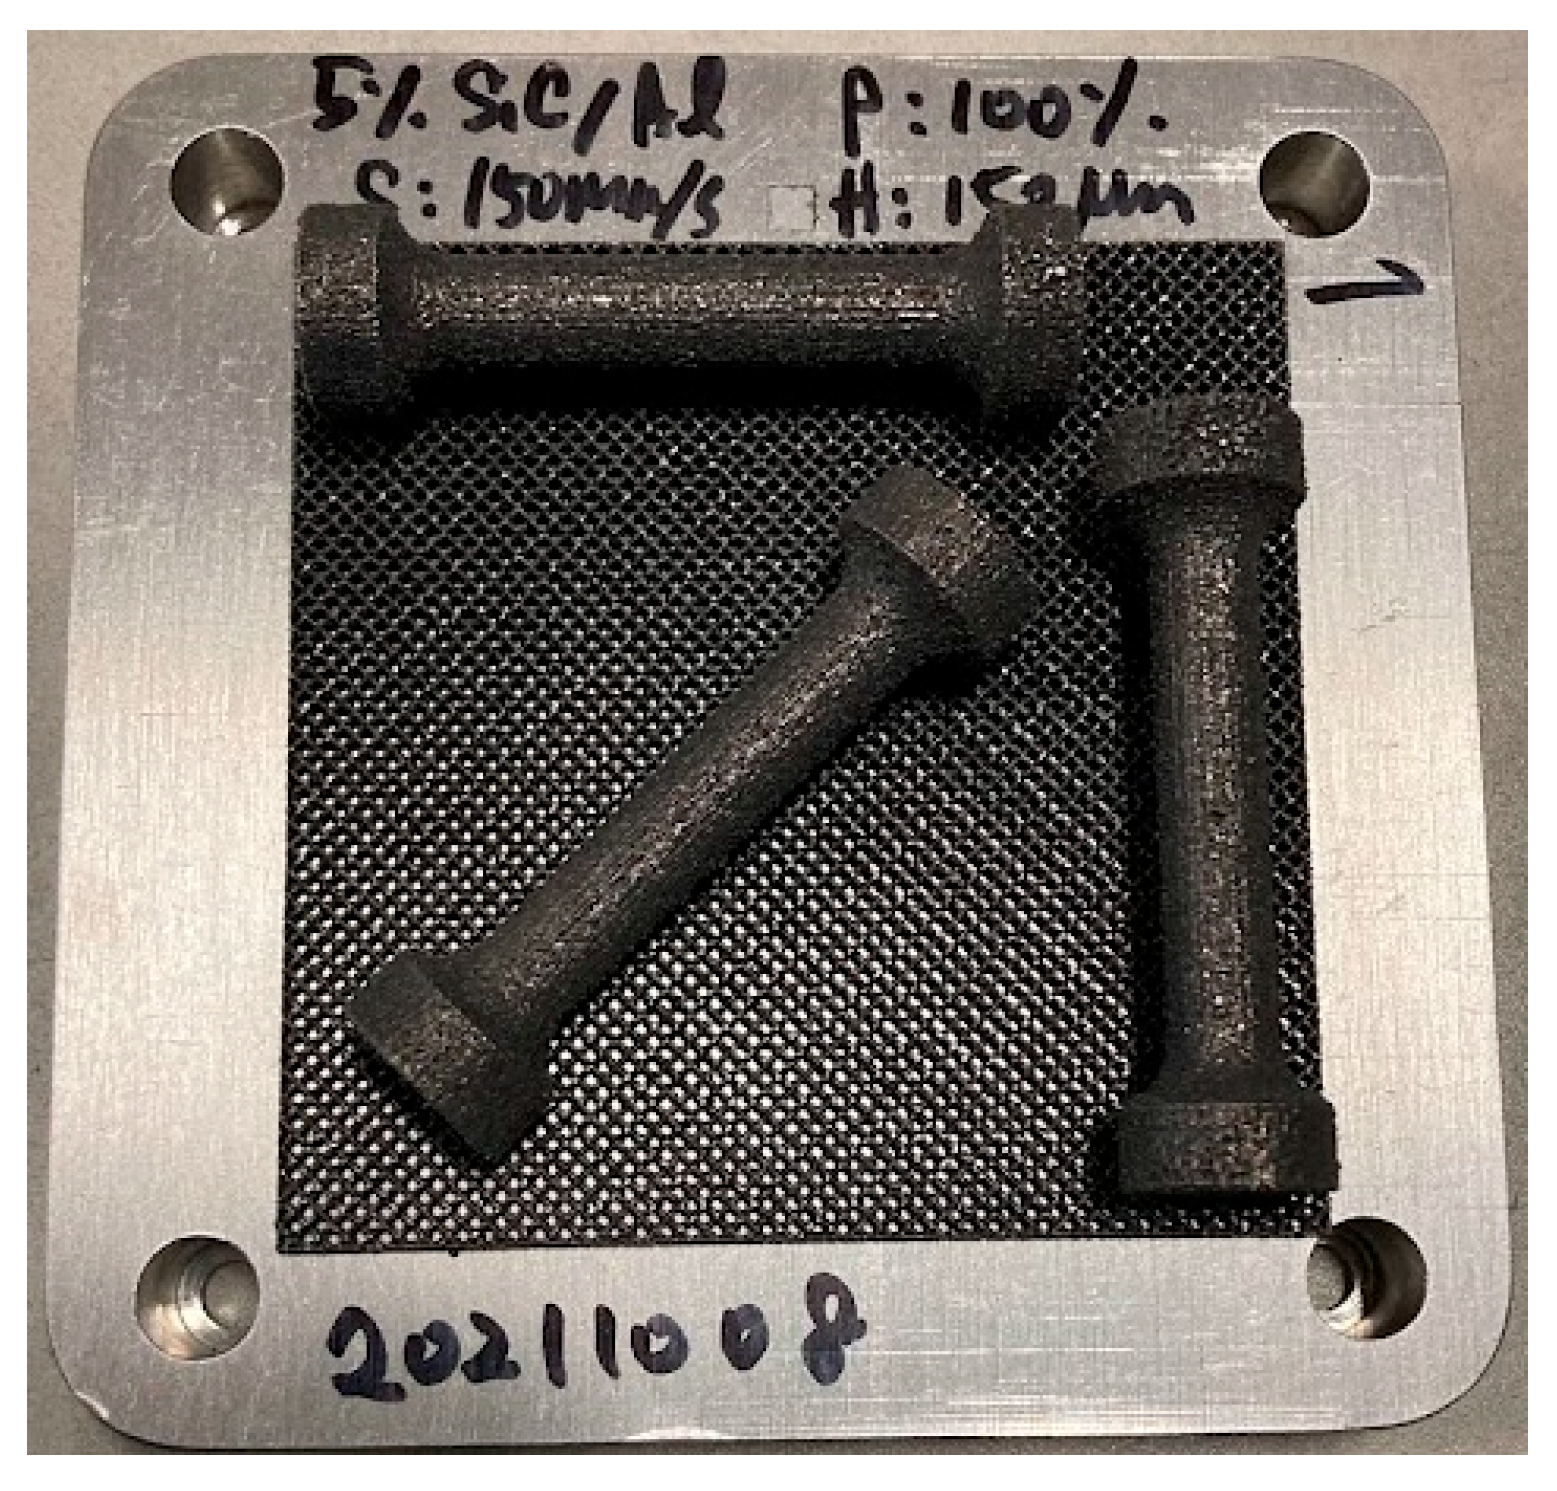
In order to compare the mechanical properties of MMC with different compositions, dog-bone samples were designed and printed, and tensile tests were performed in compliance with ASTM E8. Rod-shaped dog-bone samples were printed in the directions of 0, 45, and 90 degrees on the same substrate to do the mechanical characteristics, as shown in Figure 15. Half of the dog bones were HIP treated with the same conditions in Section 3.2.
Figure 16 and Table 2 summarize the test results of yield strength, ultimate tensile strength, Young’s modulus, and elongation. SiC/Al: 2/98 obtained the highest strength and Young’s modulus, and AlSi10Mg got the highest elongated value. For dog bones under the HIP process, the elongation increased as the residual stress was released and the grain became finer in a high-temperature and high-pressure environment, but the strength and Young’s modulus decreased as the material became more ductile. As a note, the relative densities of HIP-treated SiC/Al samples are lower than those samples without HIP treatment. This is mainly due to the fact that some pores may be incurred in the boundaries of SiC/Al during the HIP treatment.
In the case of yield strength and Young’s modulus, the elastic behaviors of the dog-bone parts printed in the 45-degree direction tended to be different from those in the 0-degree and 90-degree directions. This seems to be related to the orientation of the long grains in the 45° and 135° directions when observing the grain boundary. Therefore, in order to obtain a uniform elastic behavior in all directions, it is necessary to select the printing conditions to shorten the grain length on the XY plane.

3.4. Test on Thermal Properties

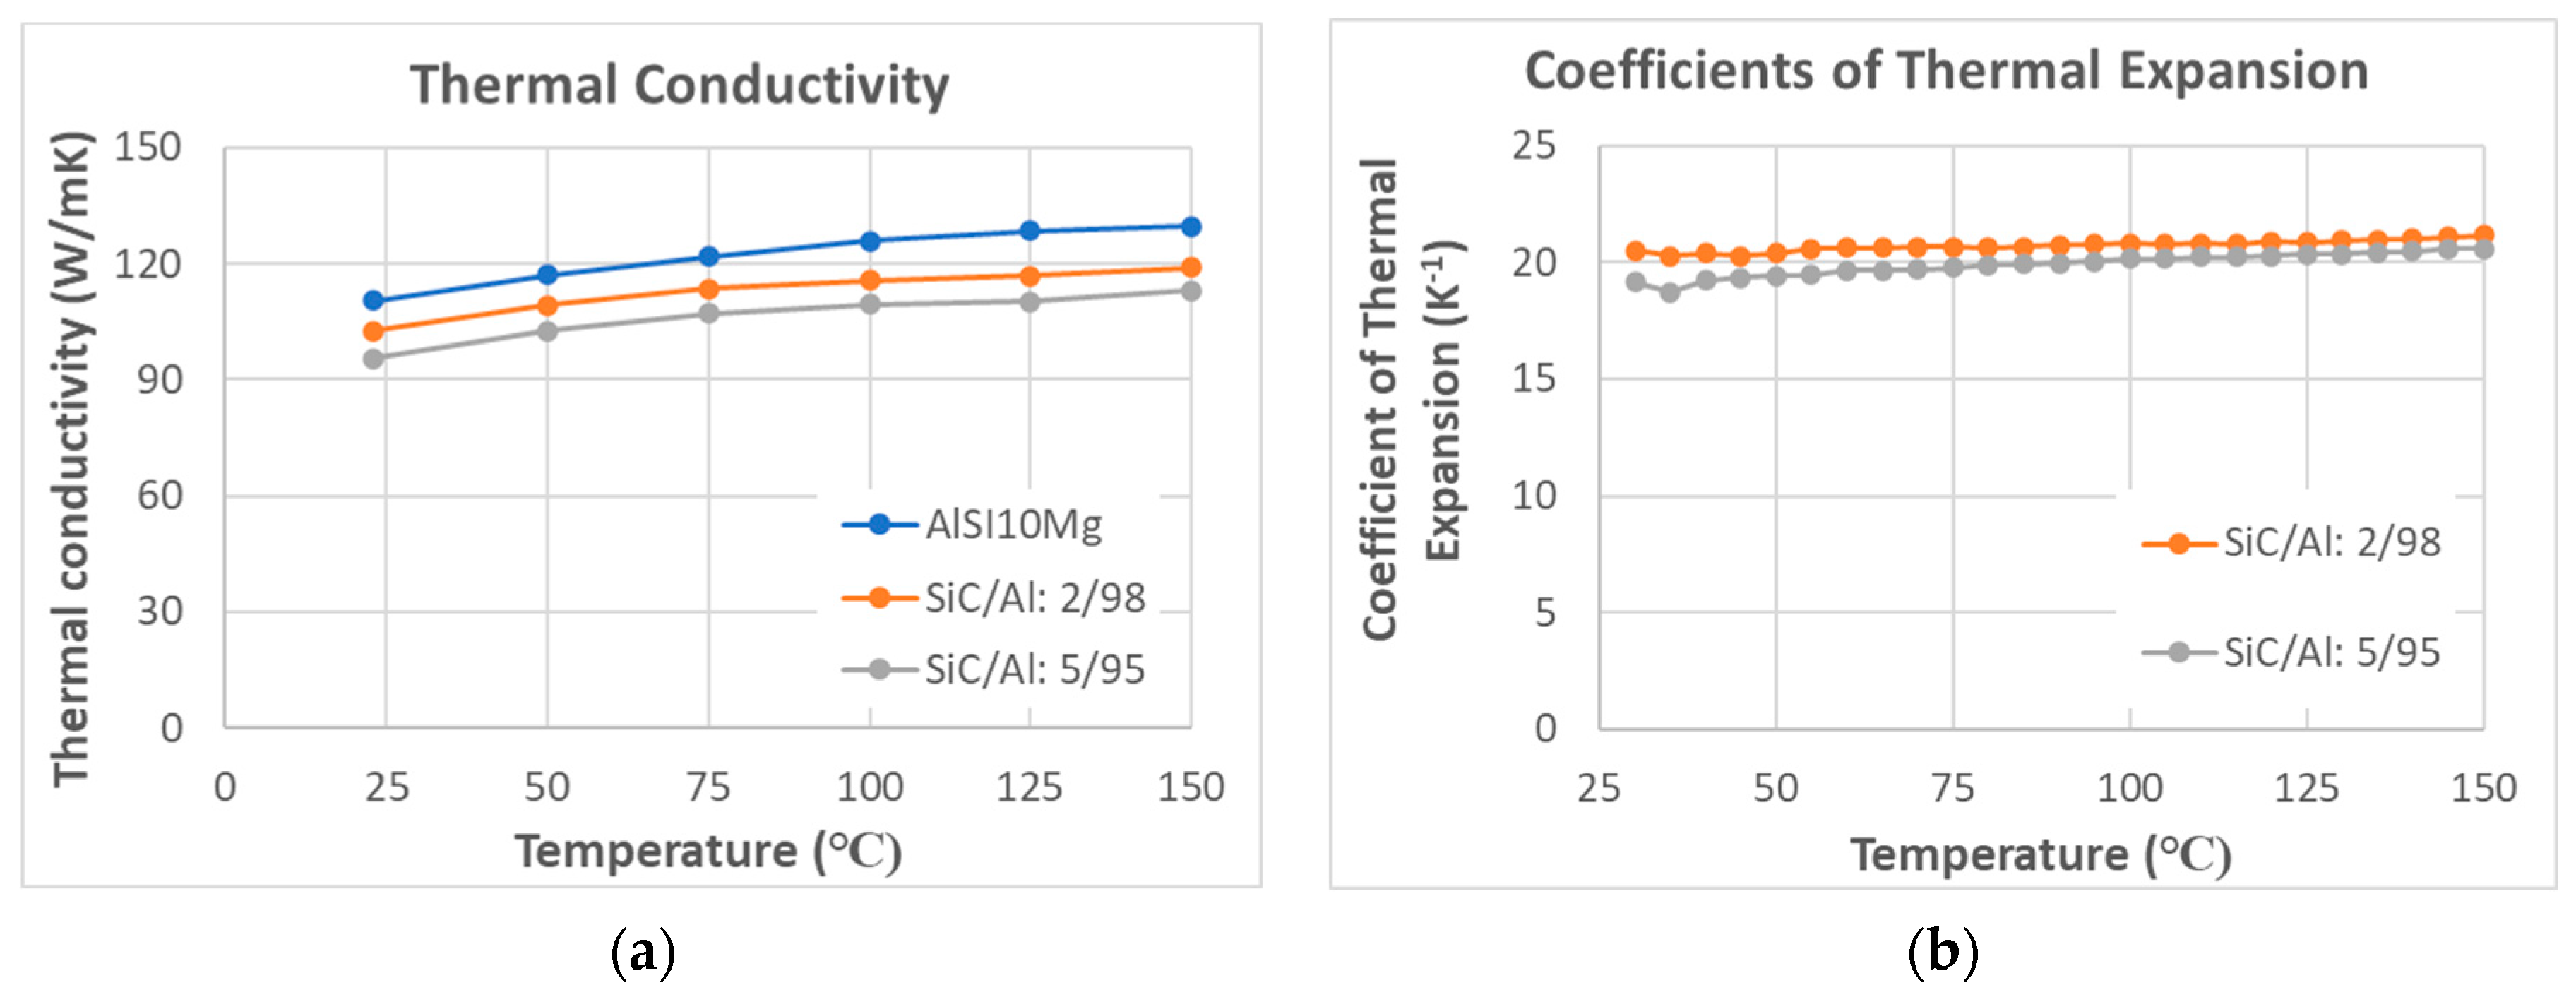
Thermal conductivity of the printed parts was measured using the laser flash diffusivity method (ASTM E1461). The range of measurement temperature is from room temperature to 150 °C, and thermal conductivity values for six points were obtained at intervals of about 25 °C. A comparison of thermal conductivity related to AlSi10Mg, SiC/Al: 2/98, and SiC/Al: 5/95 is given in Figure 17a. Linear thermal expansion was measured by a dual push-rod dilatometer following ASTM standard testing procedure E228. Measurements were made at intervals of 5 °C in the temperature range of 30 °C to 150 °C. The coefficient of thermal expansion (CTE) measurement results of SiC/Al: 2/98 and SiC/Al: 5/95 are given in Figure 17b. Due to the fact that SiC has lower thermal conductivity compared with Al, the addition of SiC causes the equivalent thermal conductivity to become lower.

3.5. XRD/EDS/EBSD Analysis

3.5.1. XRD Analysis

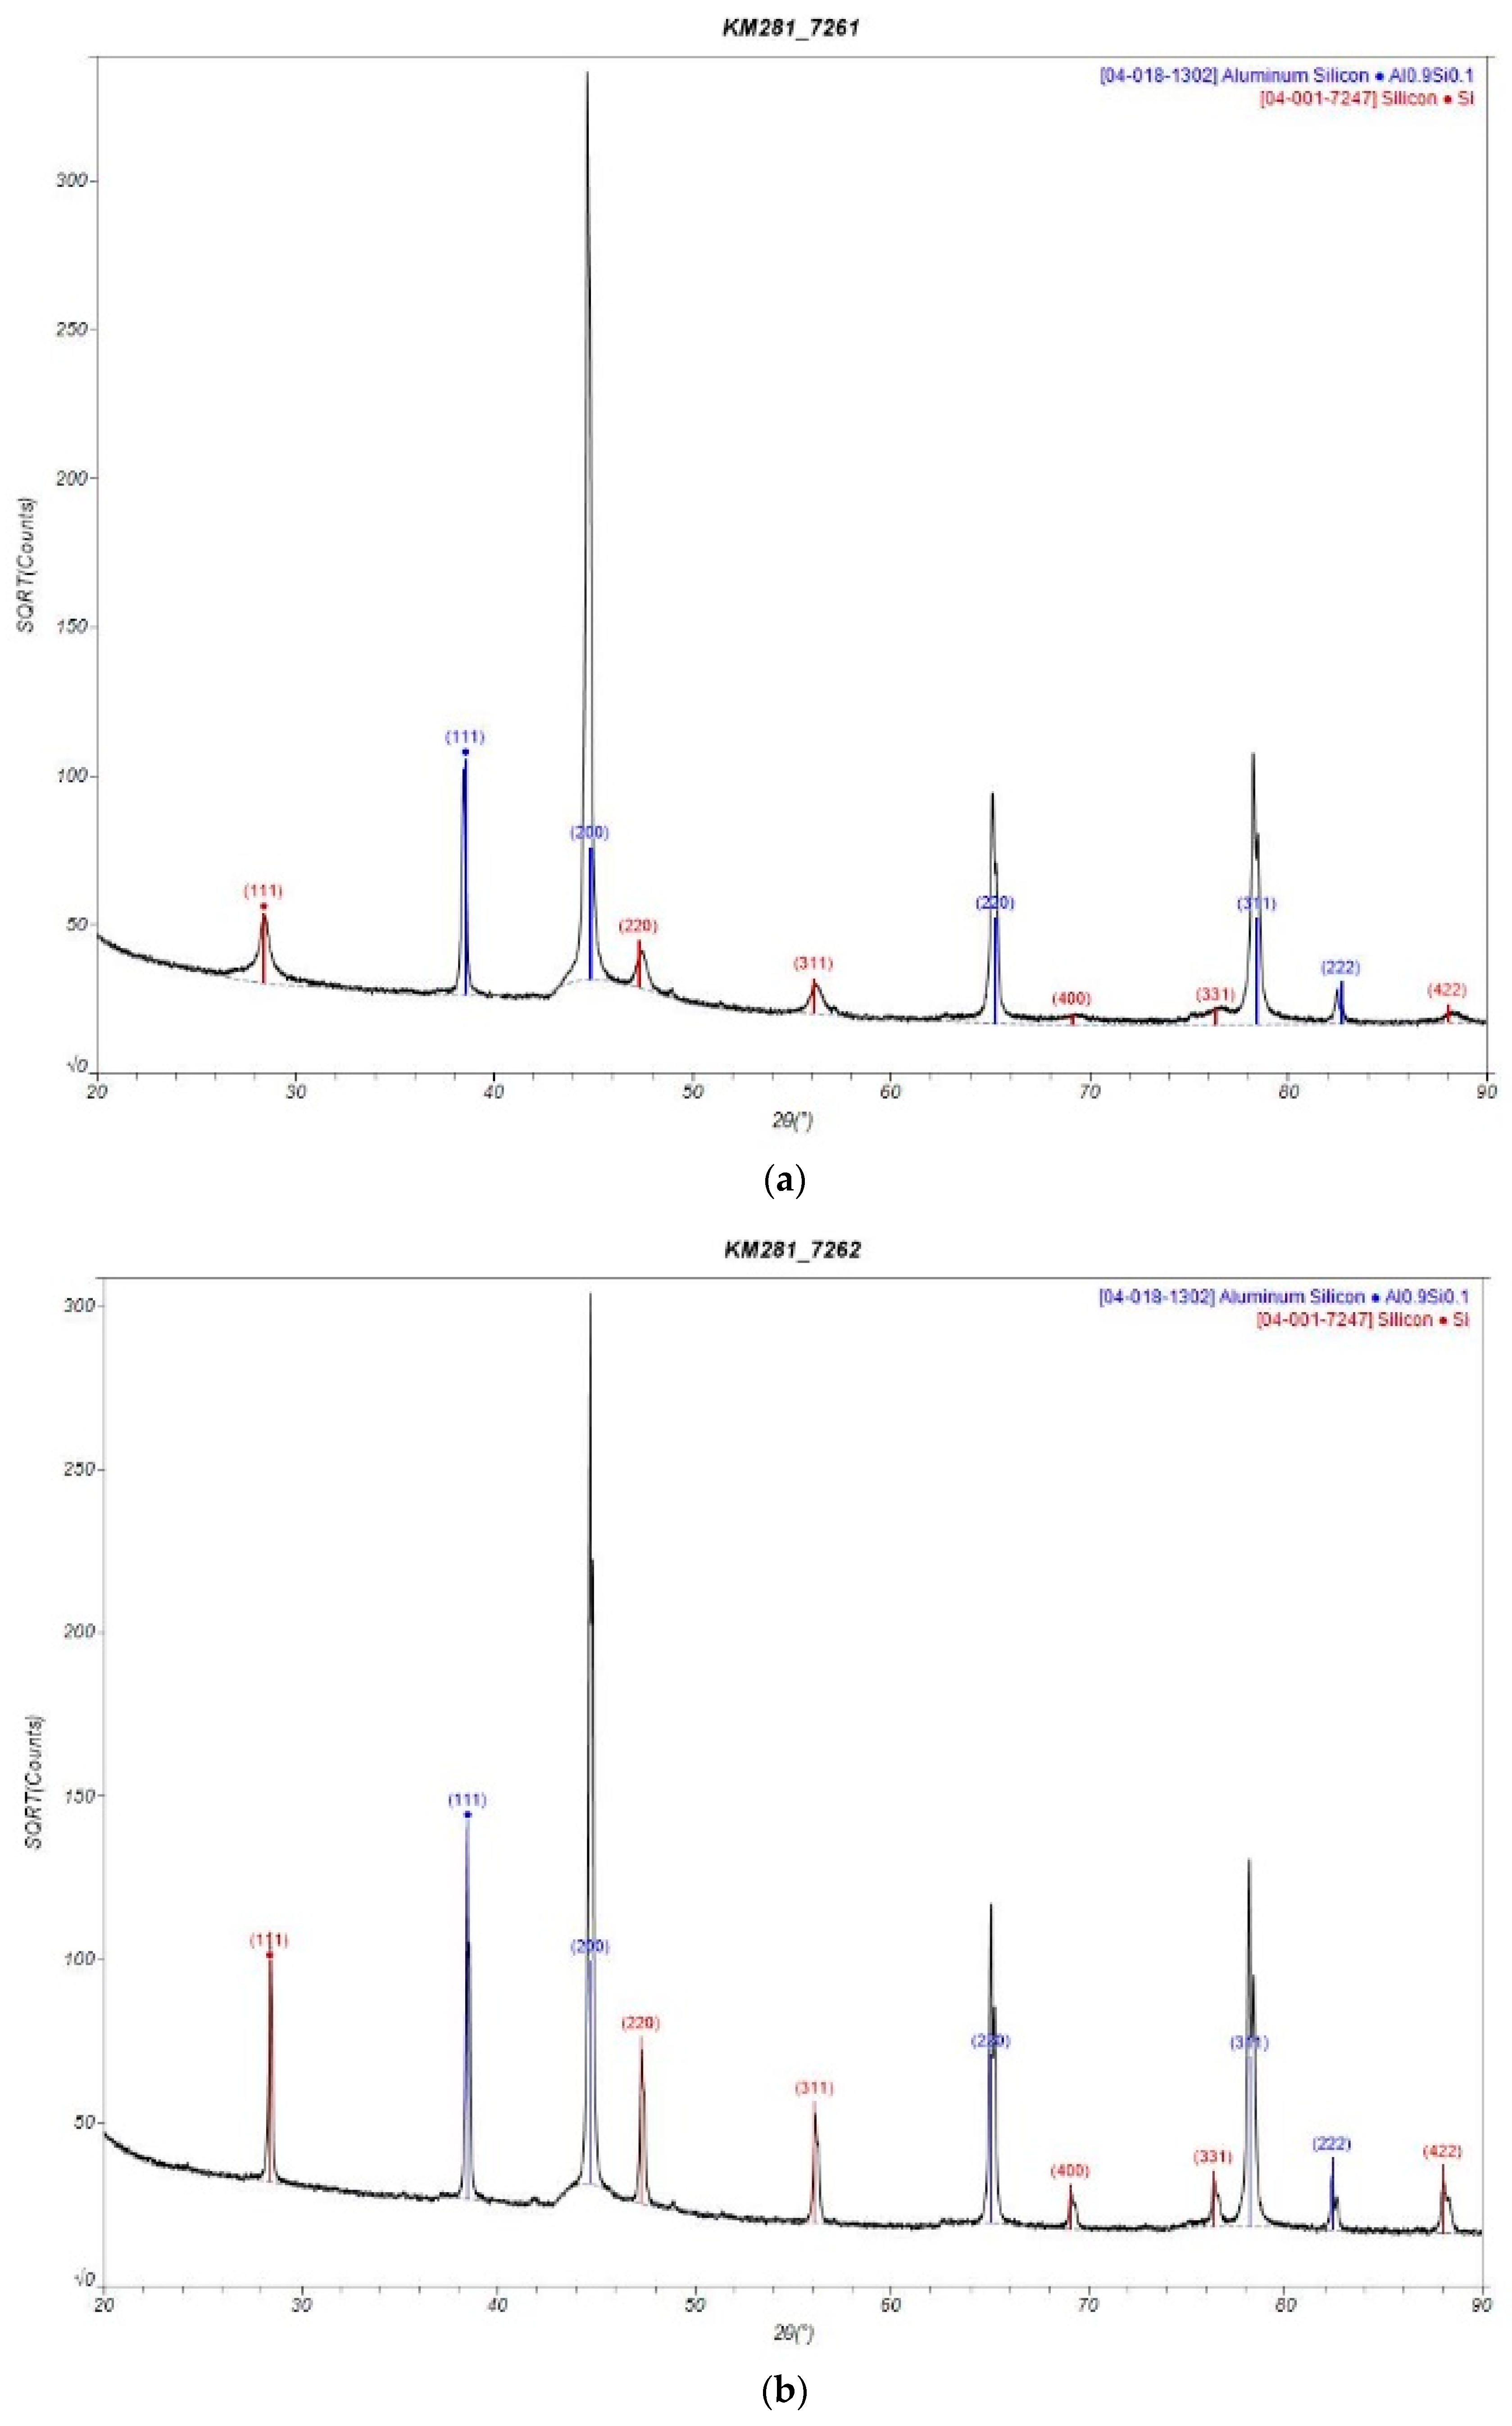
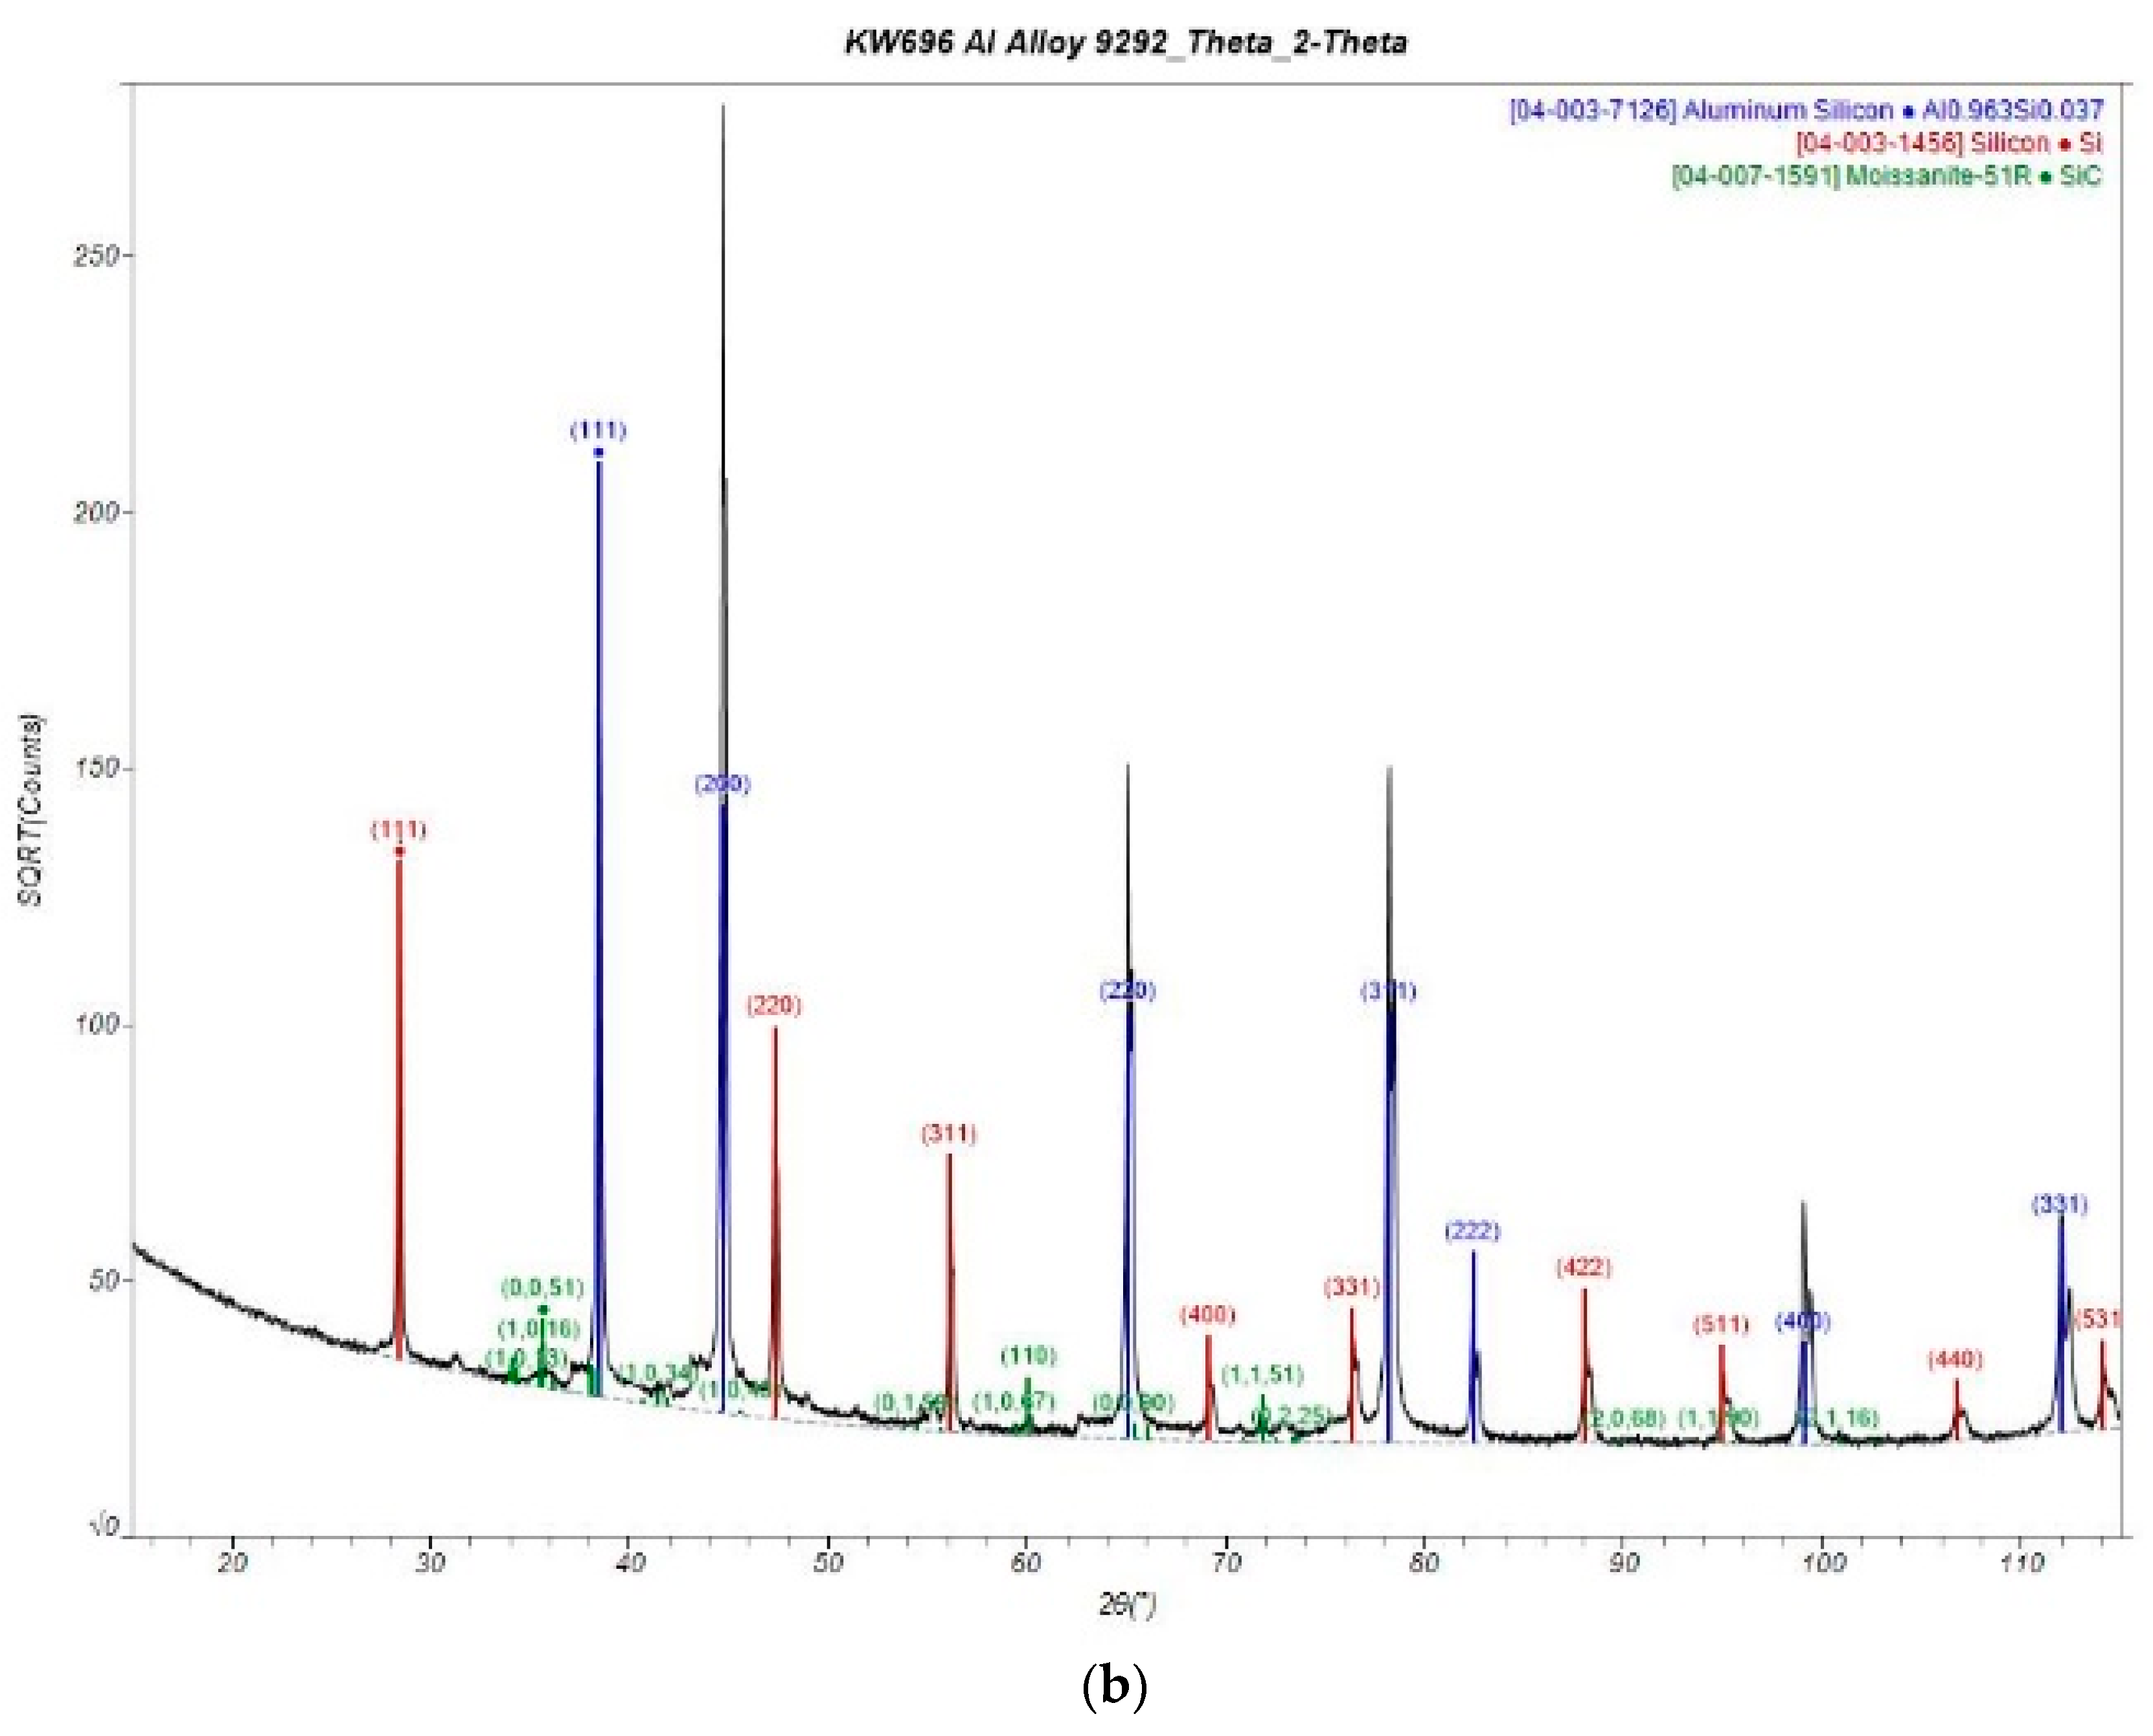
XRD is a semi-quantitative analysis by crystalline phase technique and might not obtain accurate quantitative analytical results. Due to the nature of the analysis method, it is difficult to distinguish between the Al-Si alloy and pure Al because the peak regions are nearly identical. Also, the AlSi10Mg alloy contained small amounts of various substances, but they were not detected as it was below the XRD minimum detection limit of about 3 wt%. The results of XRD analysis before and after HIP for each material are given as follows.
  • A: AlSi10Mg
The AlSi10Mg alloy mainly contains about 90% aluminum and about 10% silicon. Therefore, in the XRD analysis for this alloy shown in Figure 18, only aluminum (or aluminum–silicon) and silicon were detected as expected, although the quantitative values were not accurate.
  • B: SiC/Al: 2/98
In the XRD analysis of SiC/Al:2/98 as shown in Figure 19, components such as aluminum (or aluminum–silicon) and silicon from AlSi10Mg, and silicon carbide, were detected. It confirms that silicon carbide powder (melting temperature 2830 °C) is distributed without being completely melted through the detection of SiC crystals when compared with the results of AlSi10Mg (melting temperature 570 °C).
  • C: SiC/Al 5/95
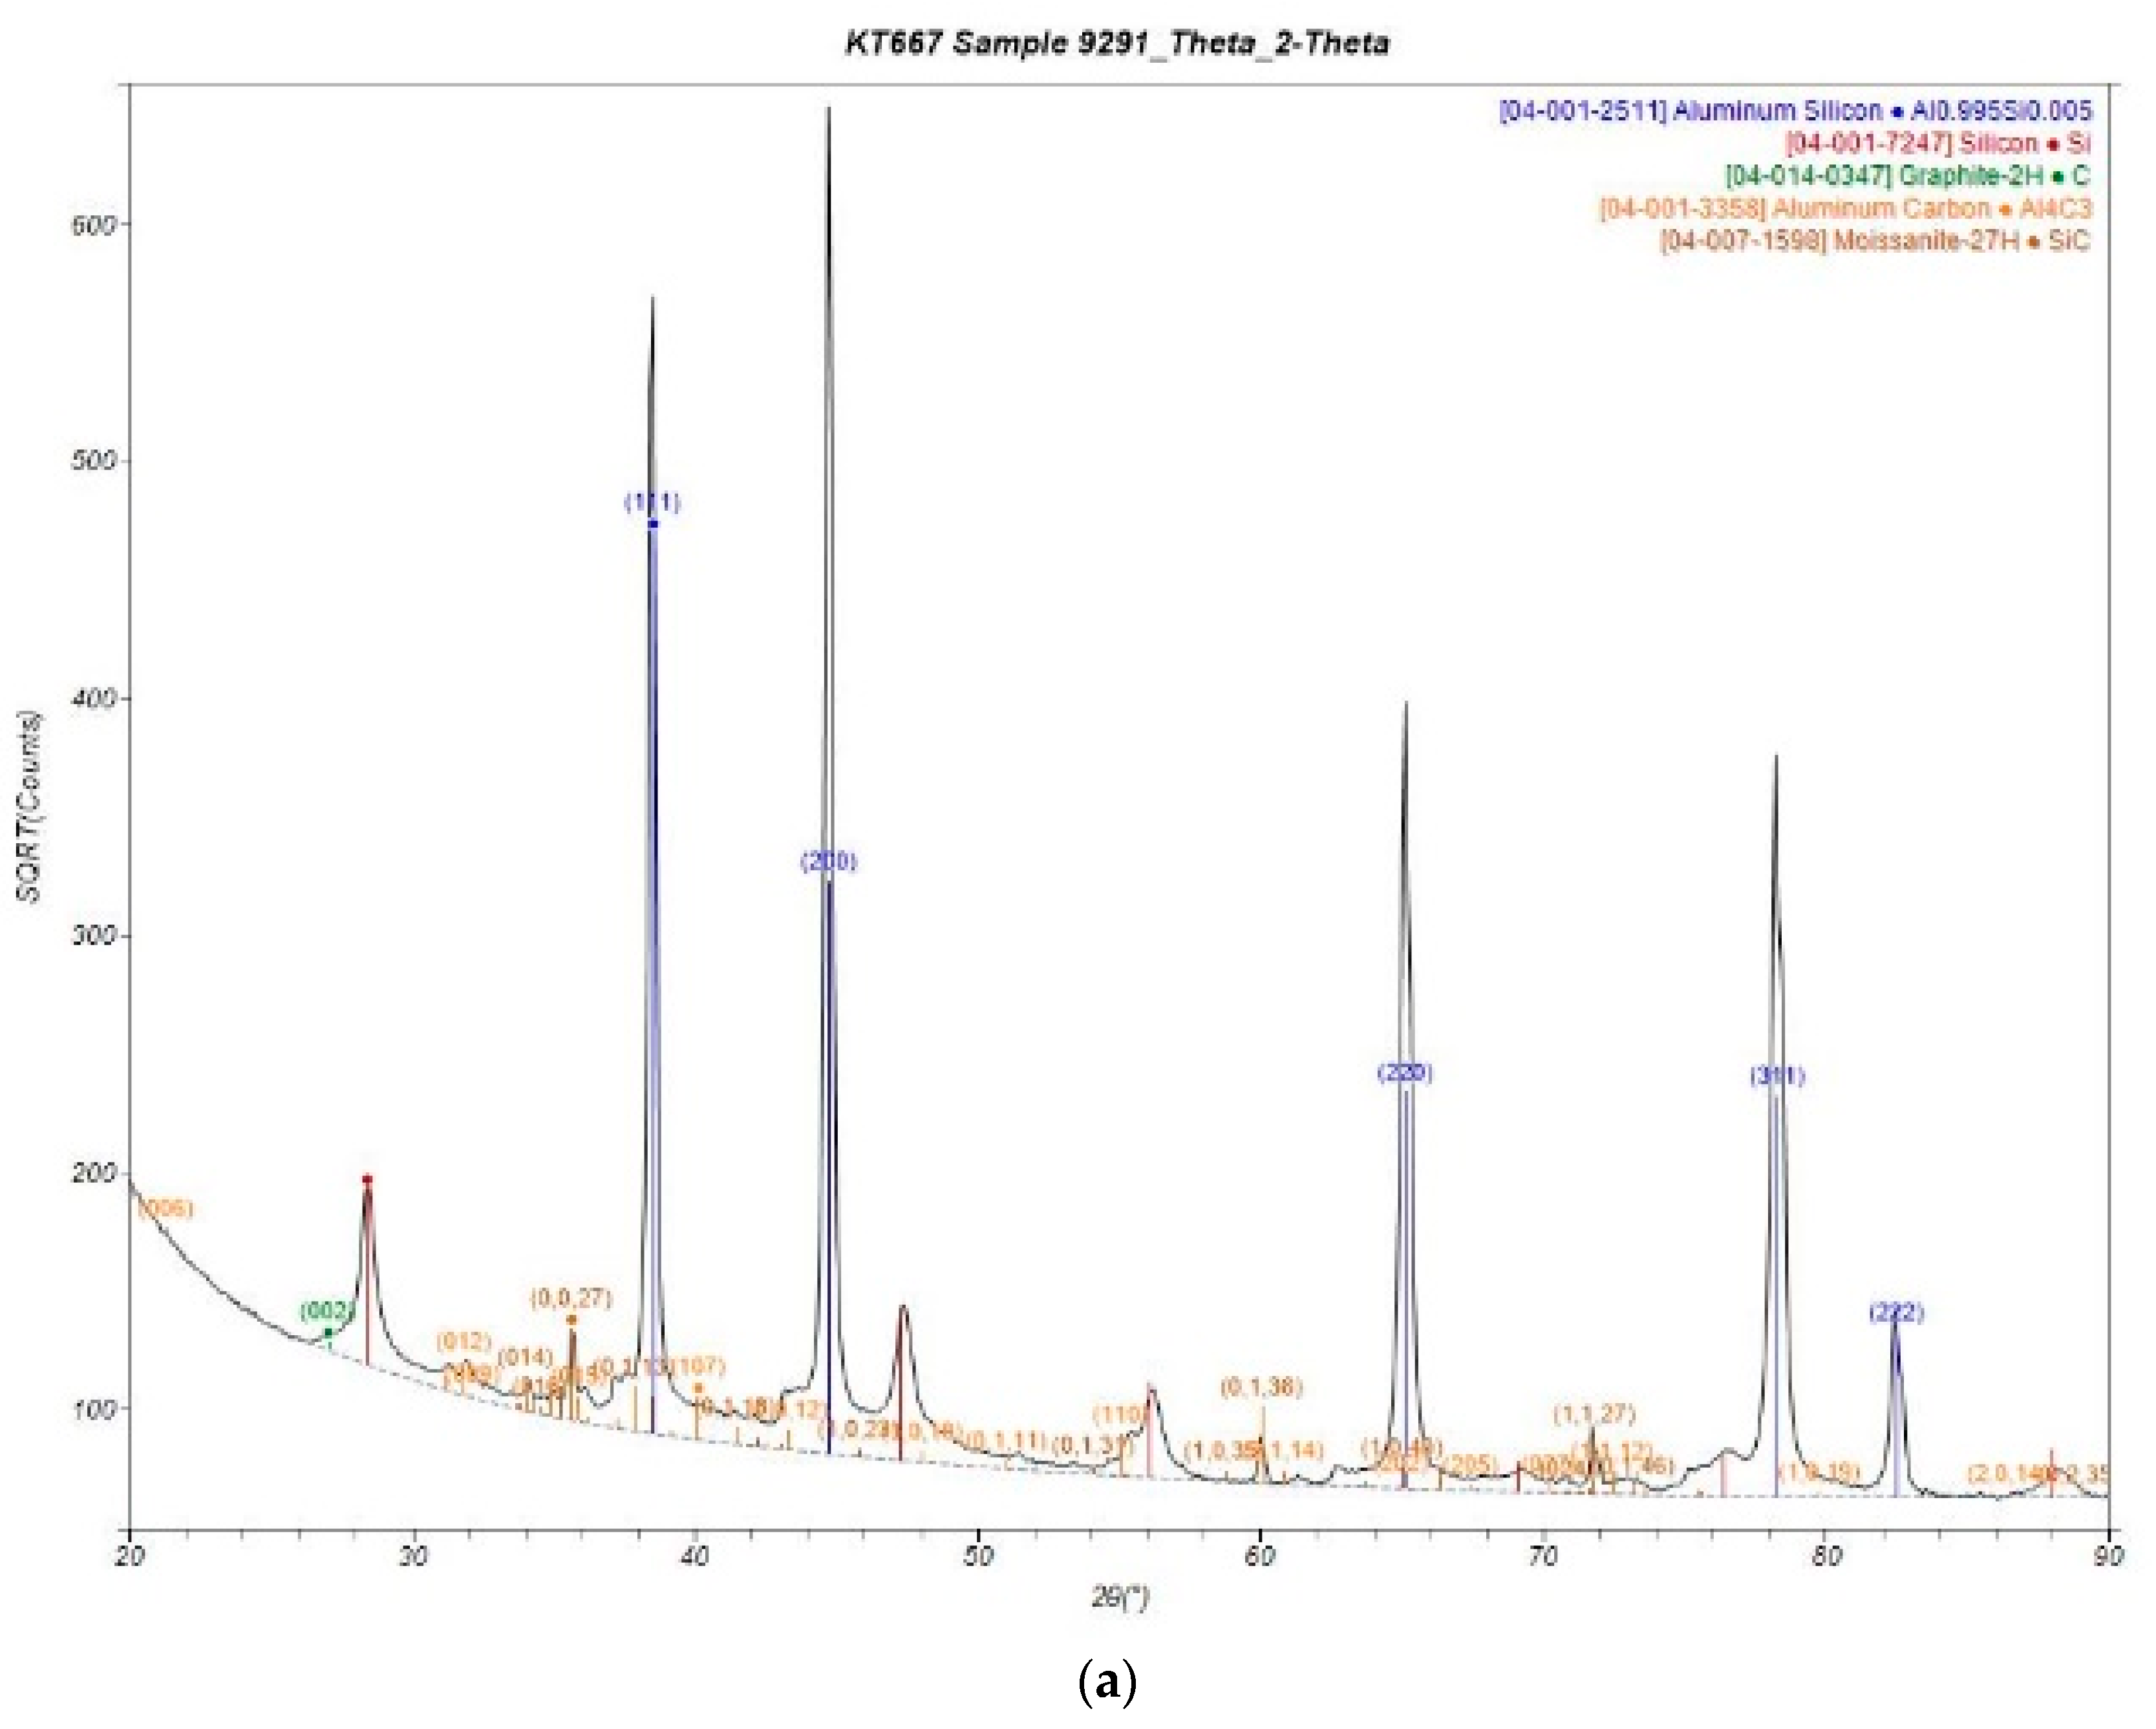
Figure 20 shows the XRD analysis of SiC/Al:5/95. Carbon (graphite) and aluminum carbon (Al4C3) were additionally detected, as well as aluminum, silicon, and silicon carbide, as compared to the results of SiC/Al:2/98. This means that silicon carbide was not only distributed without being completely melted, but also that it was partially melted, and then the carbon from silicon carbide changed into graphite or alloy with aluminum. Most likely, Al4C3 compound is created at the boundary areas of SiC particles, where high carbon concentration is located. However, only Al, Si, and SiC were detected in the HIP-treated MMC part. As mentioned before, for detection results as small as around 3%, more cumulative data is needed to make an accurate judgment. Table 3 lists a summary of the XRD results for three compositions.

3.5.2. EBSD/EDS Analysis

  • A: AlSi10Mg
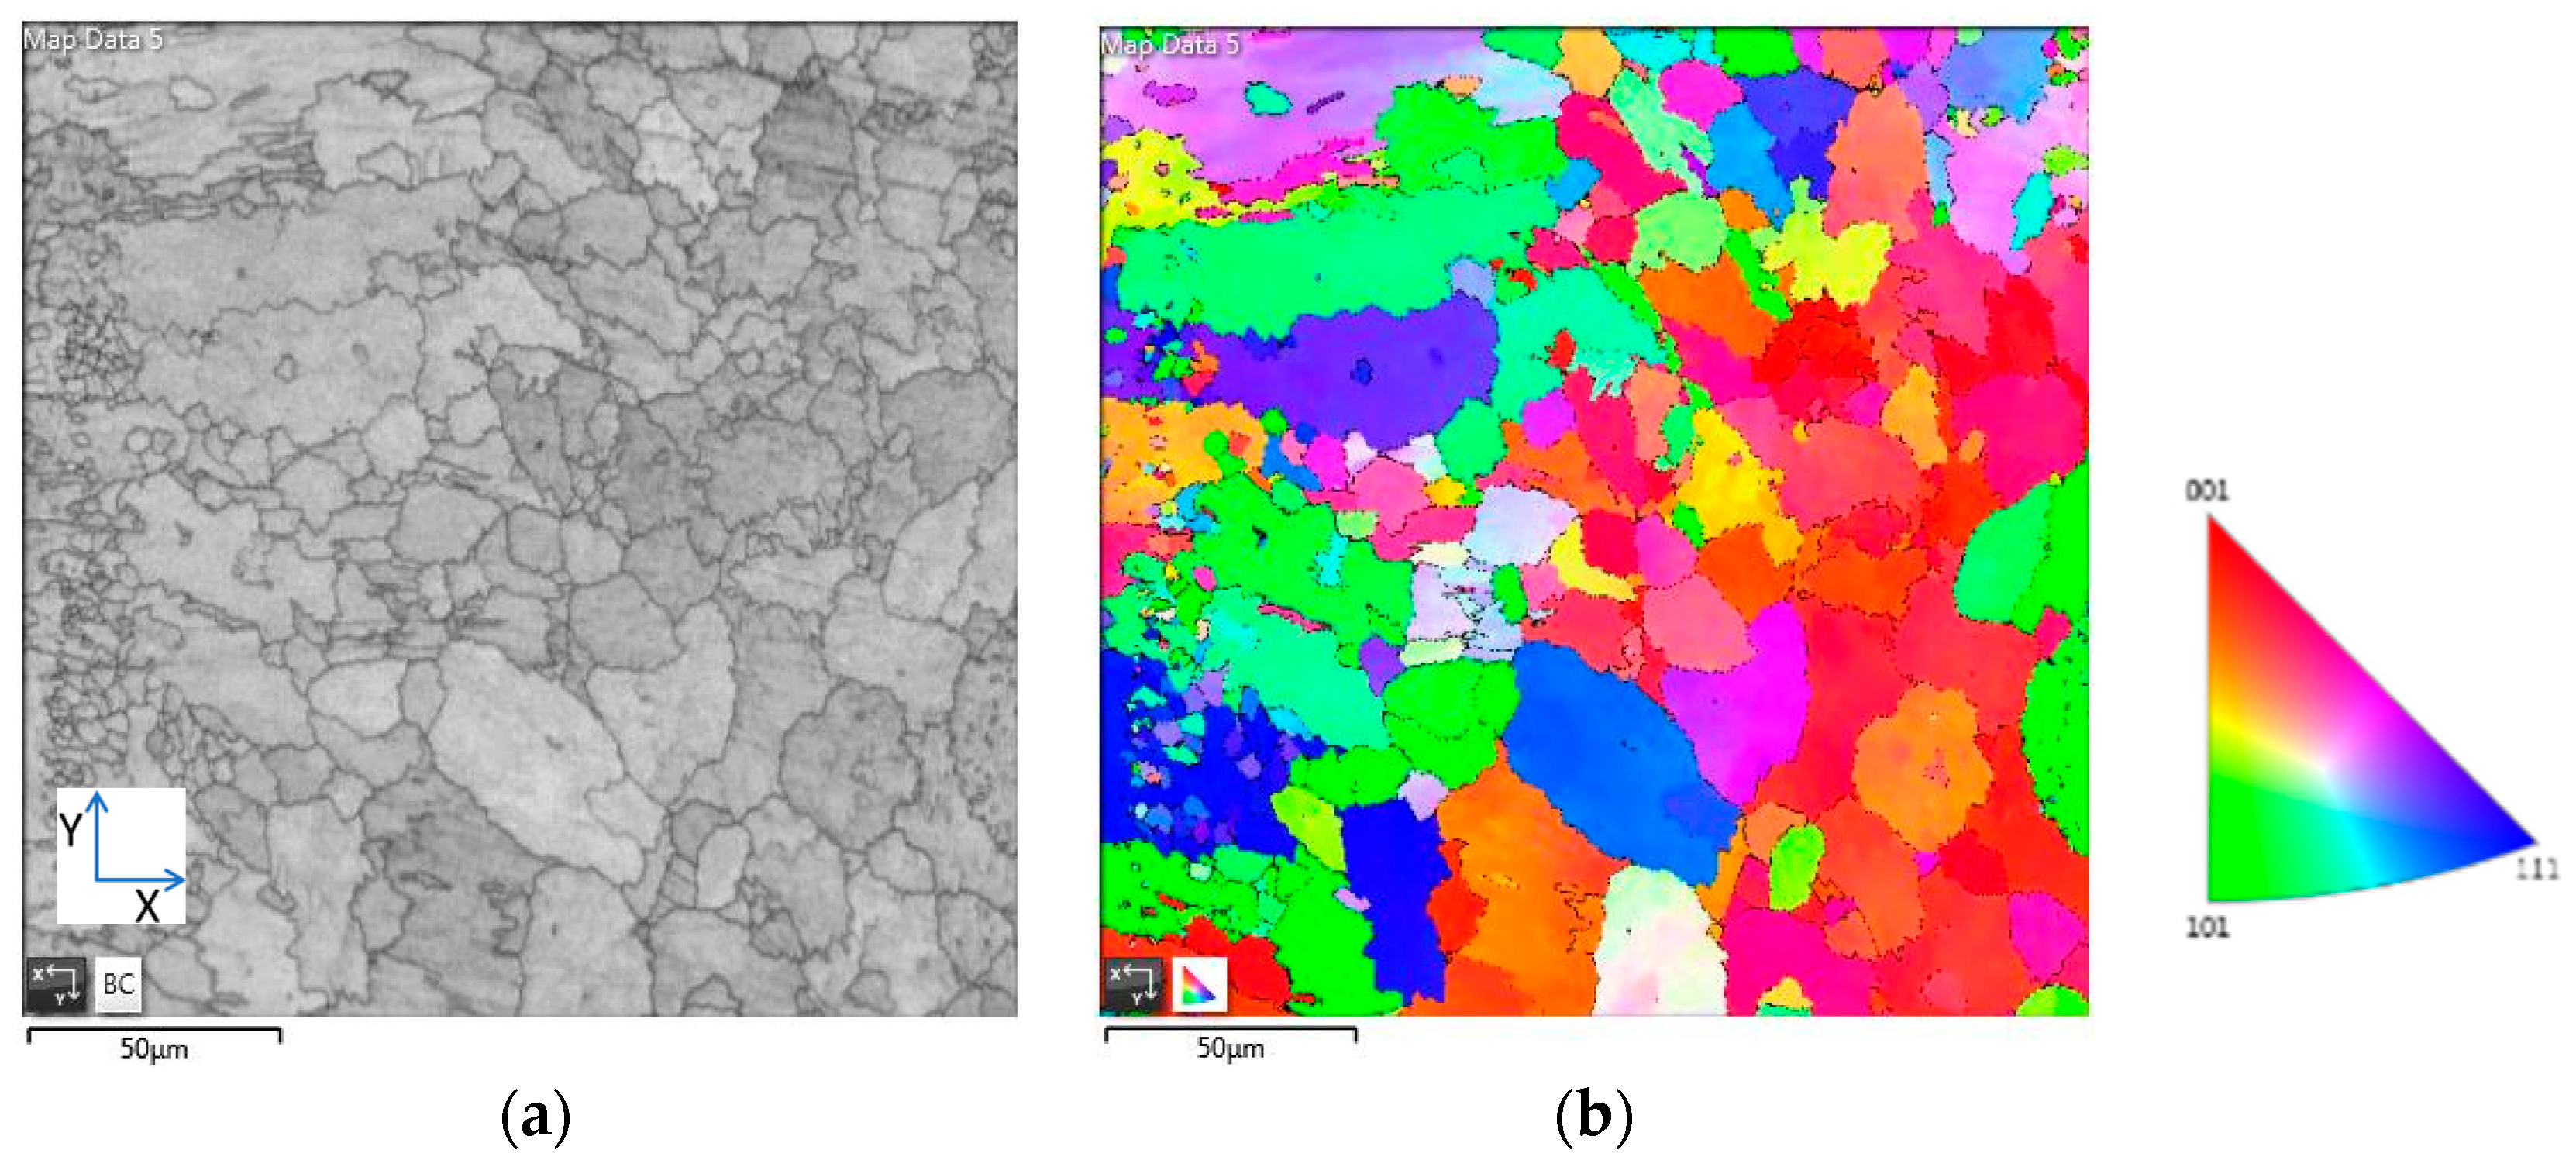
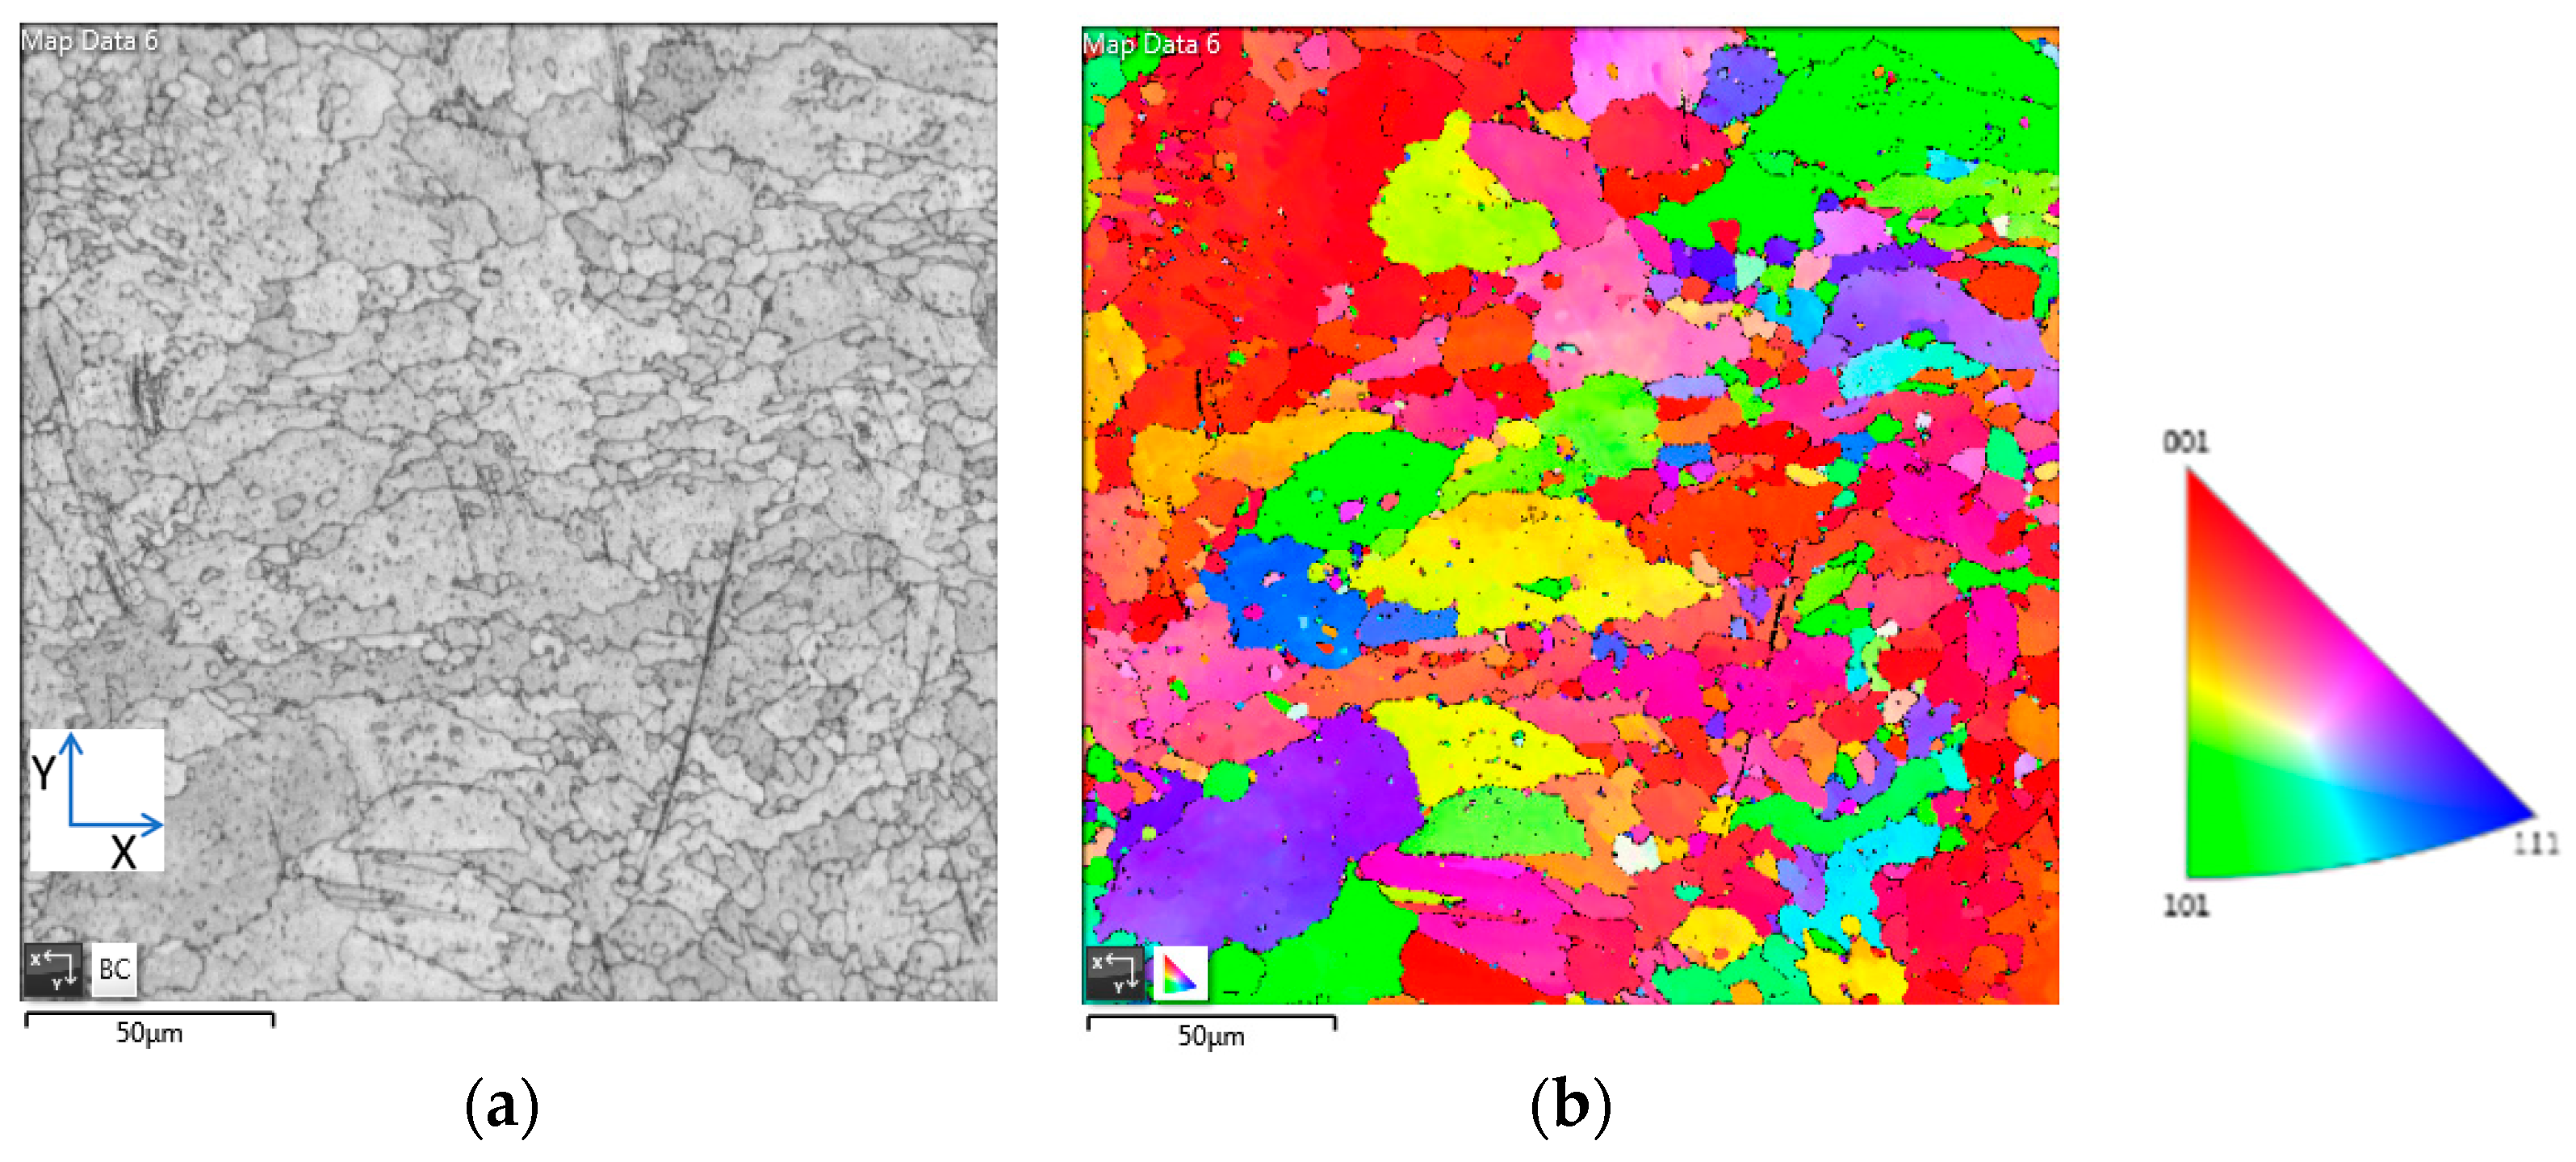
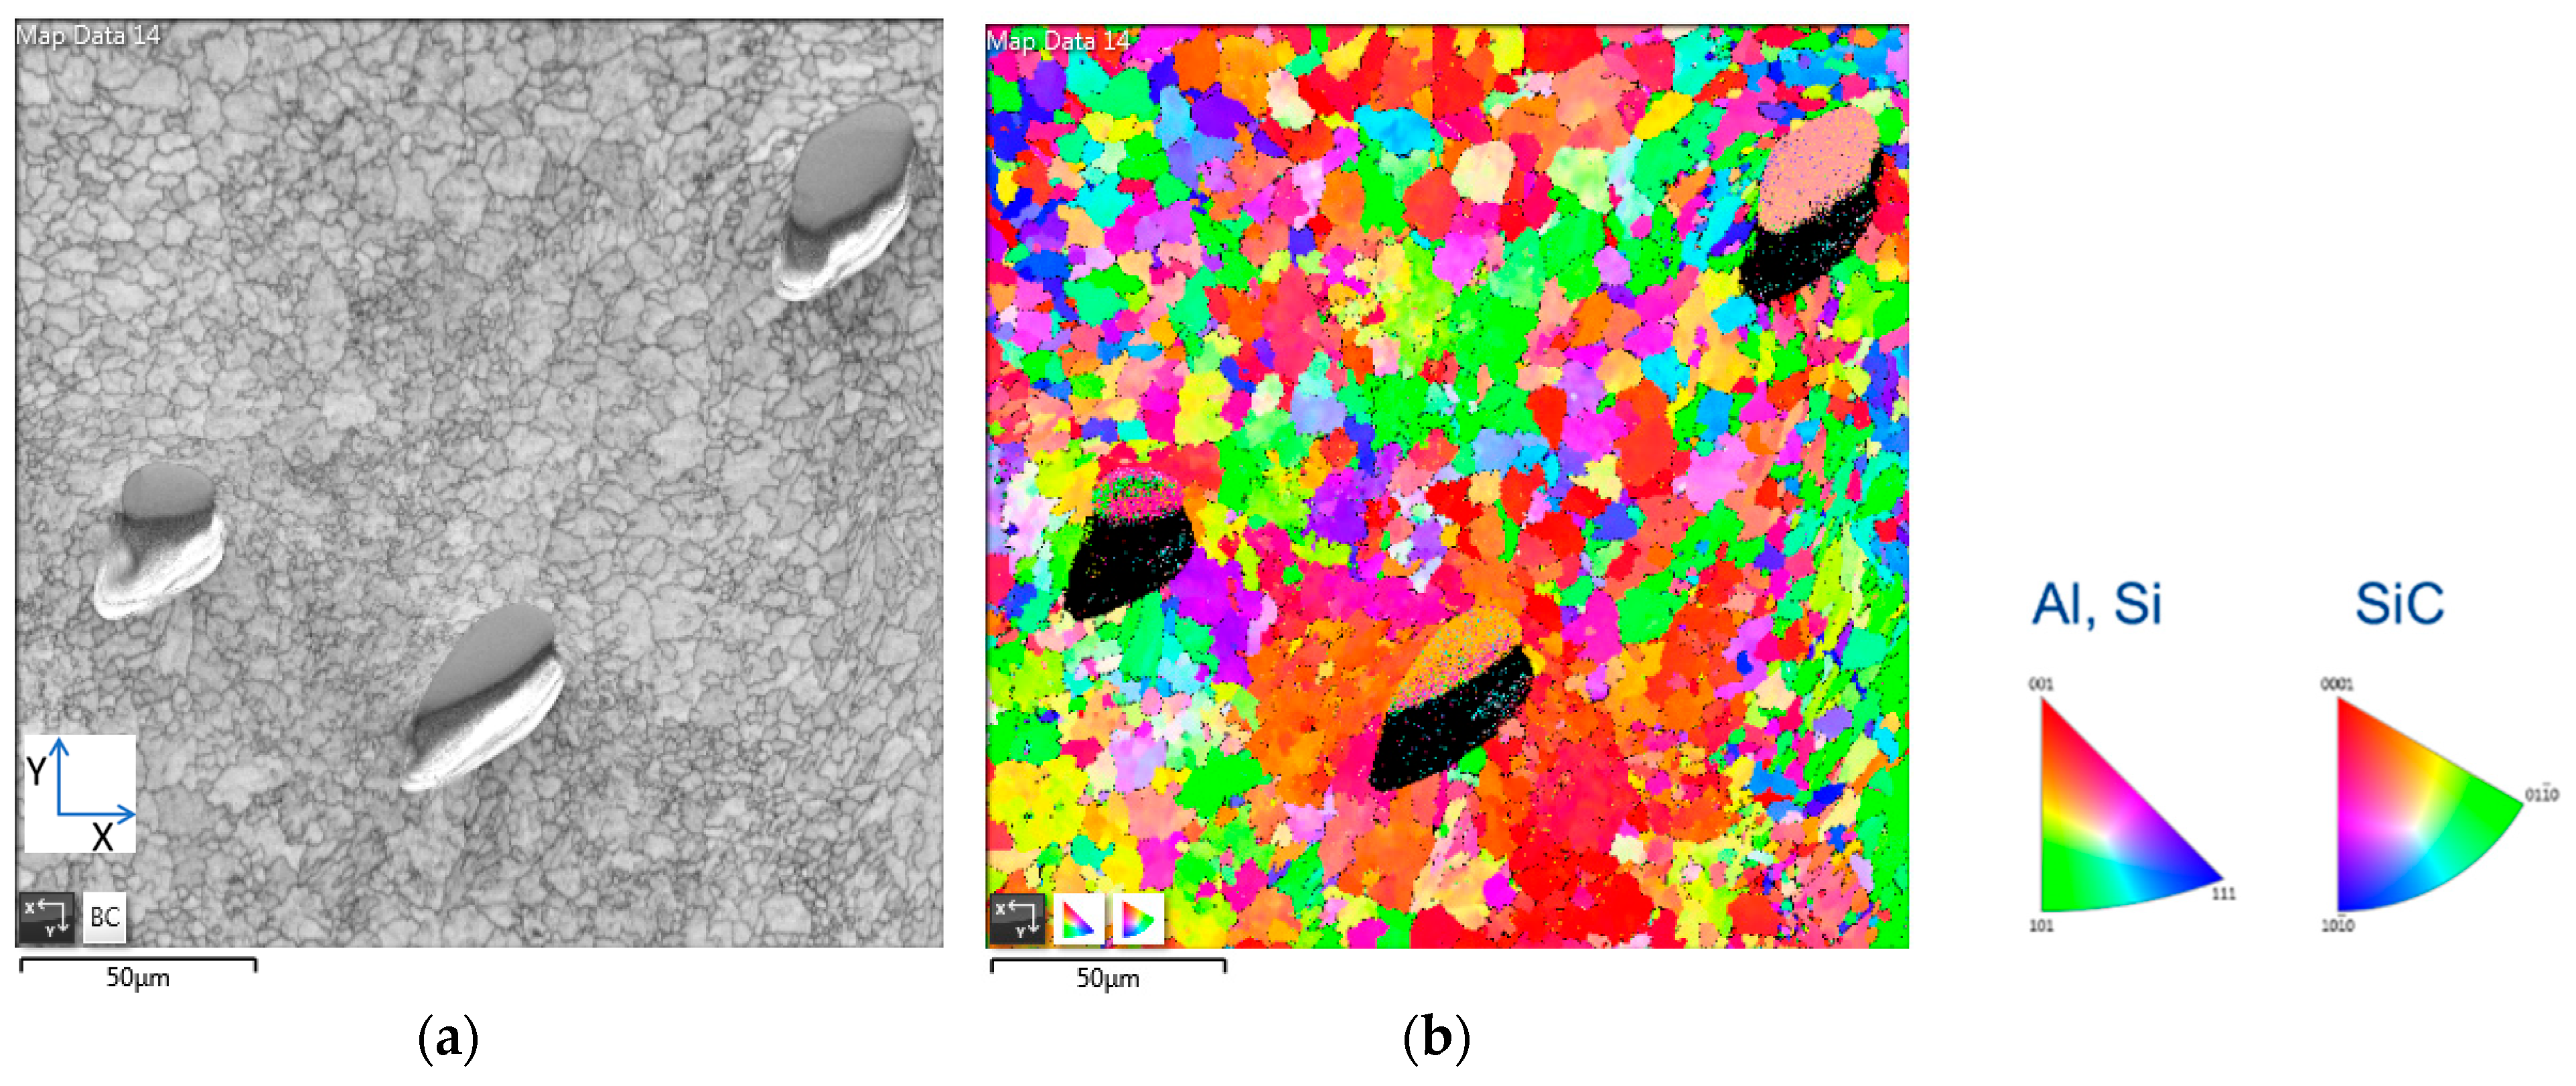
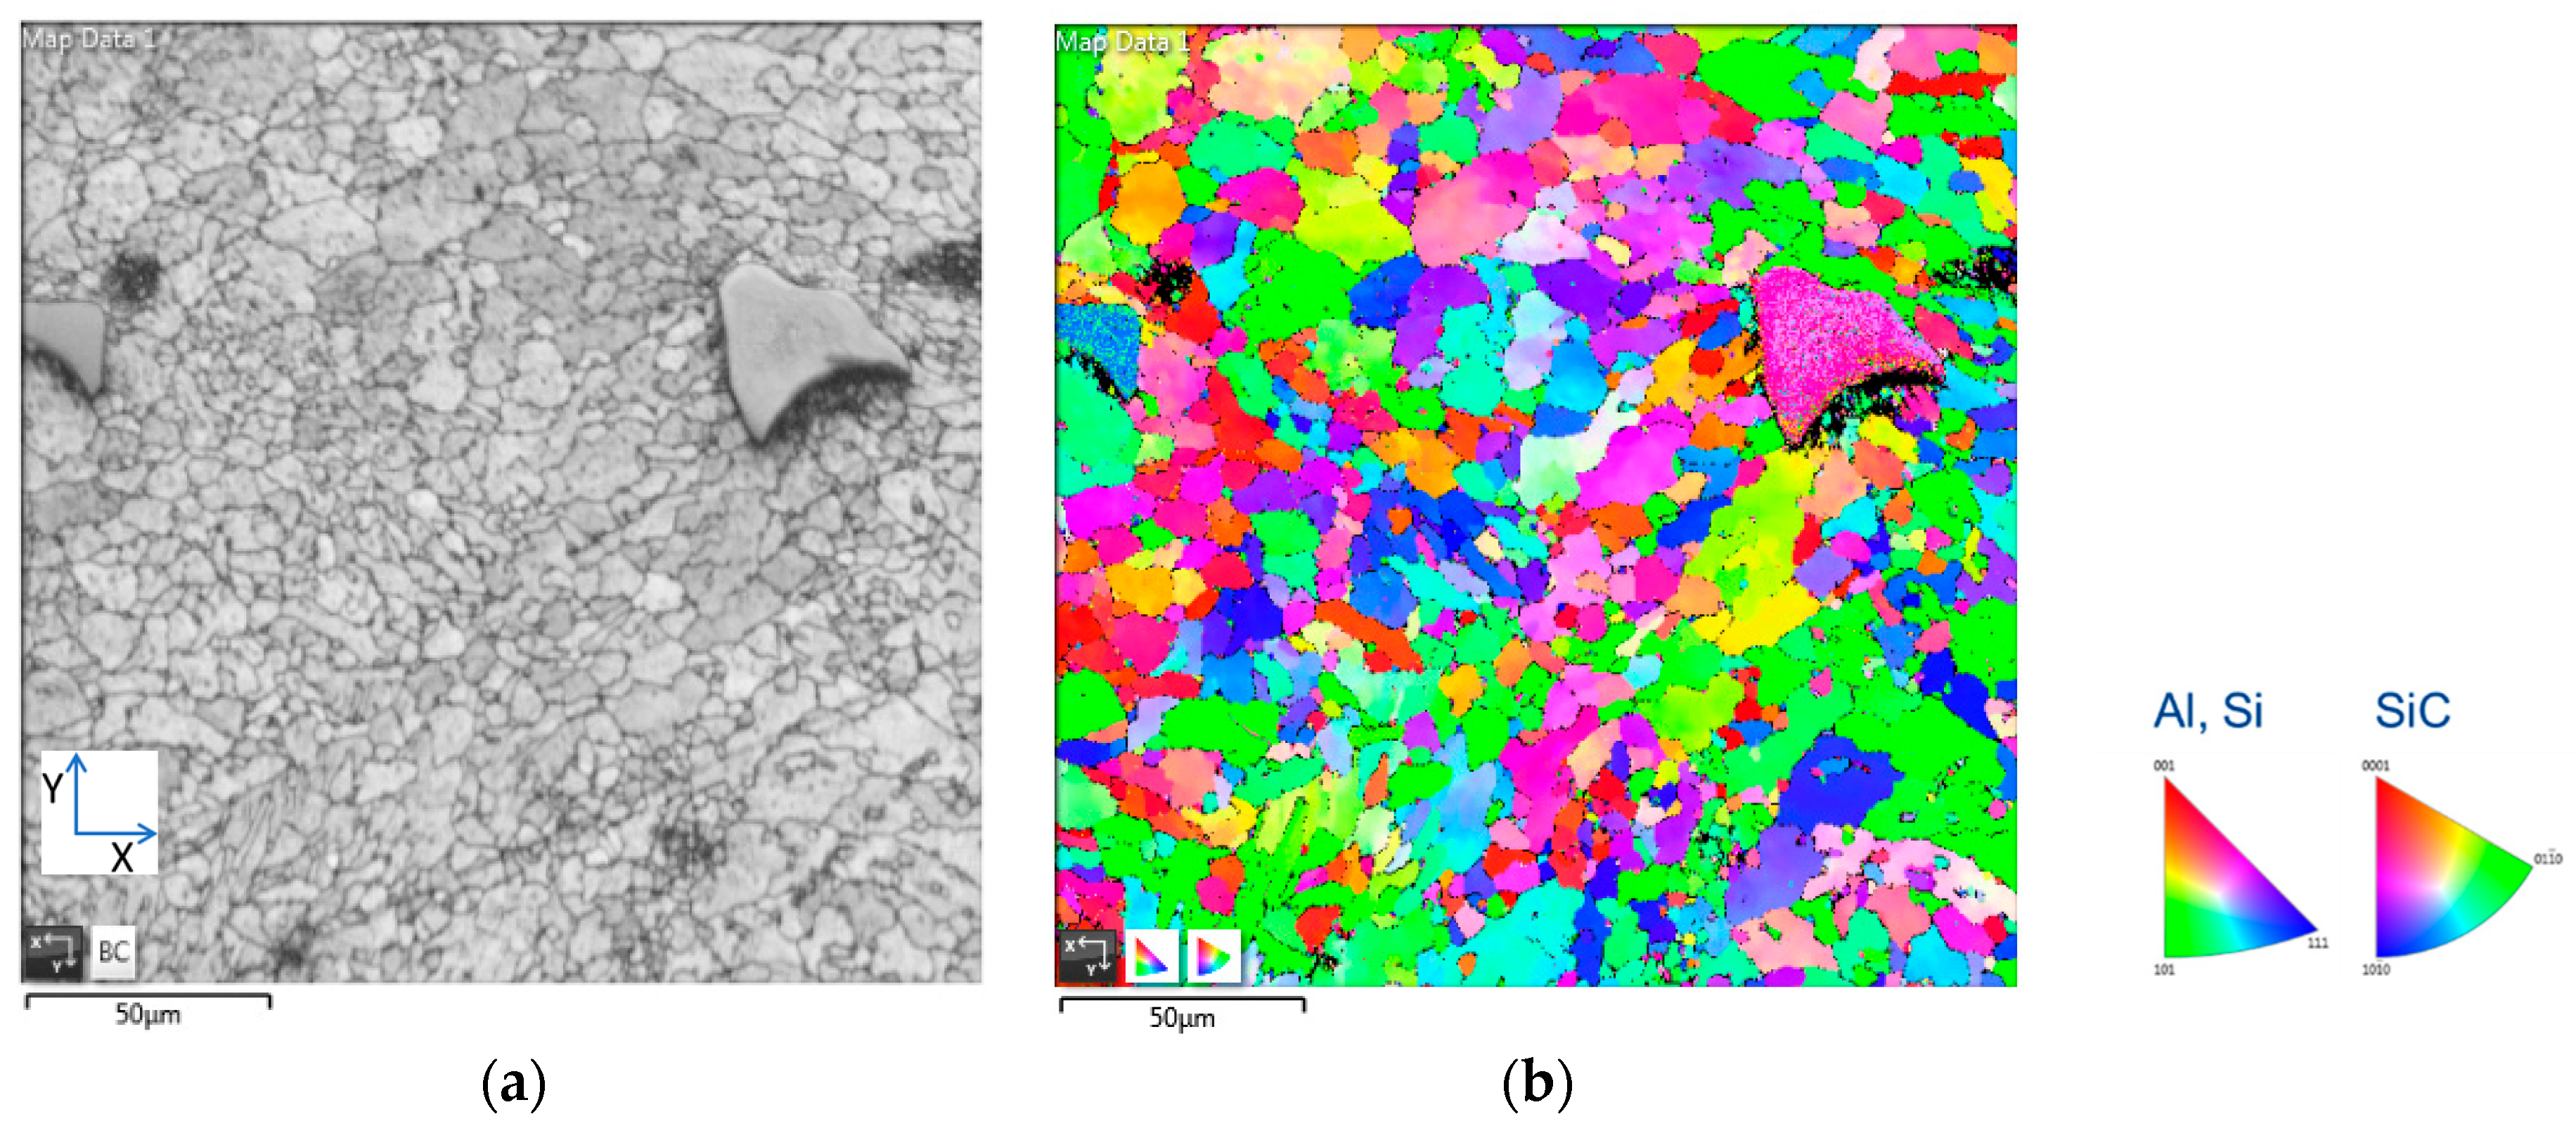
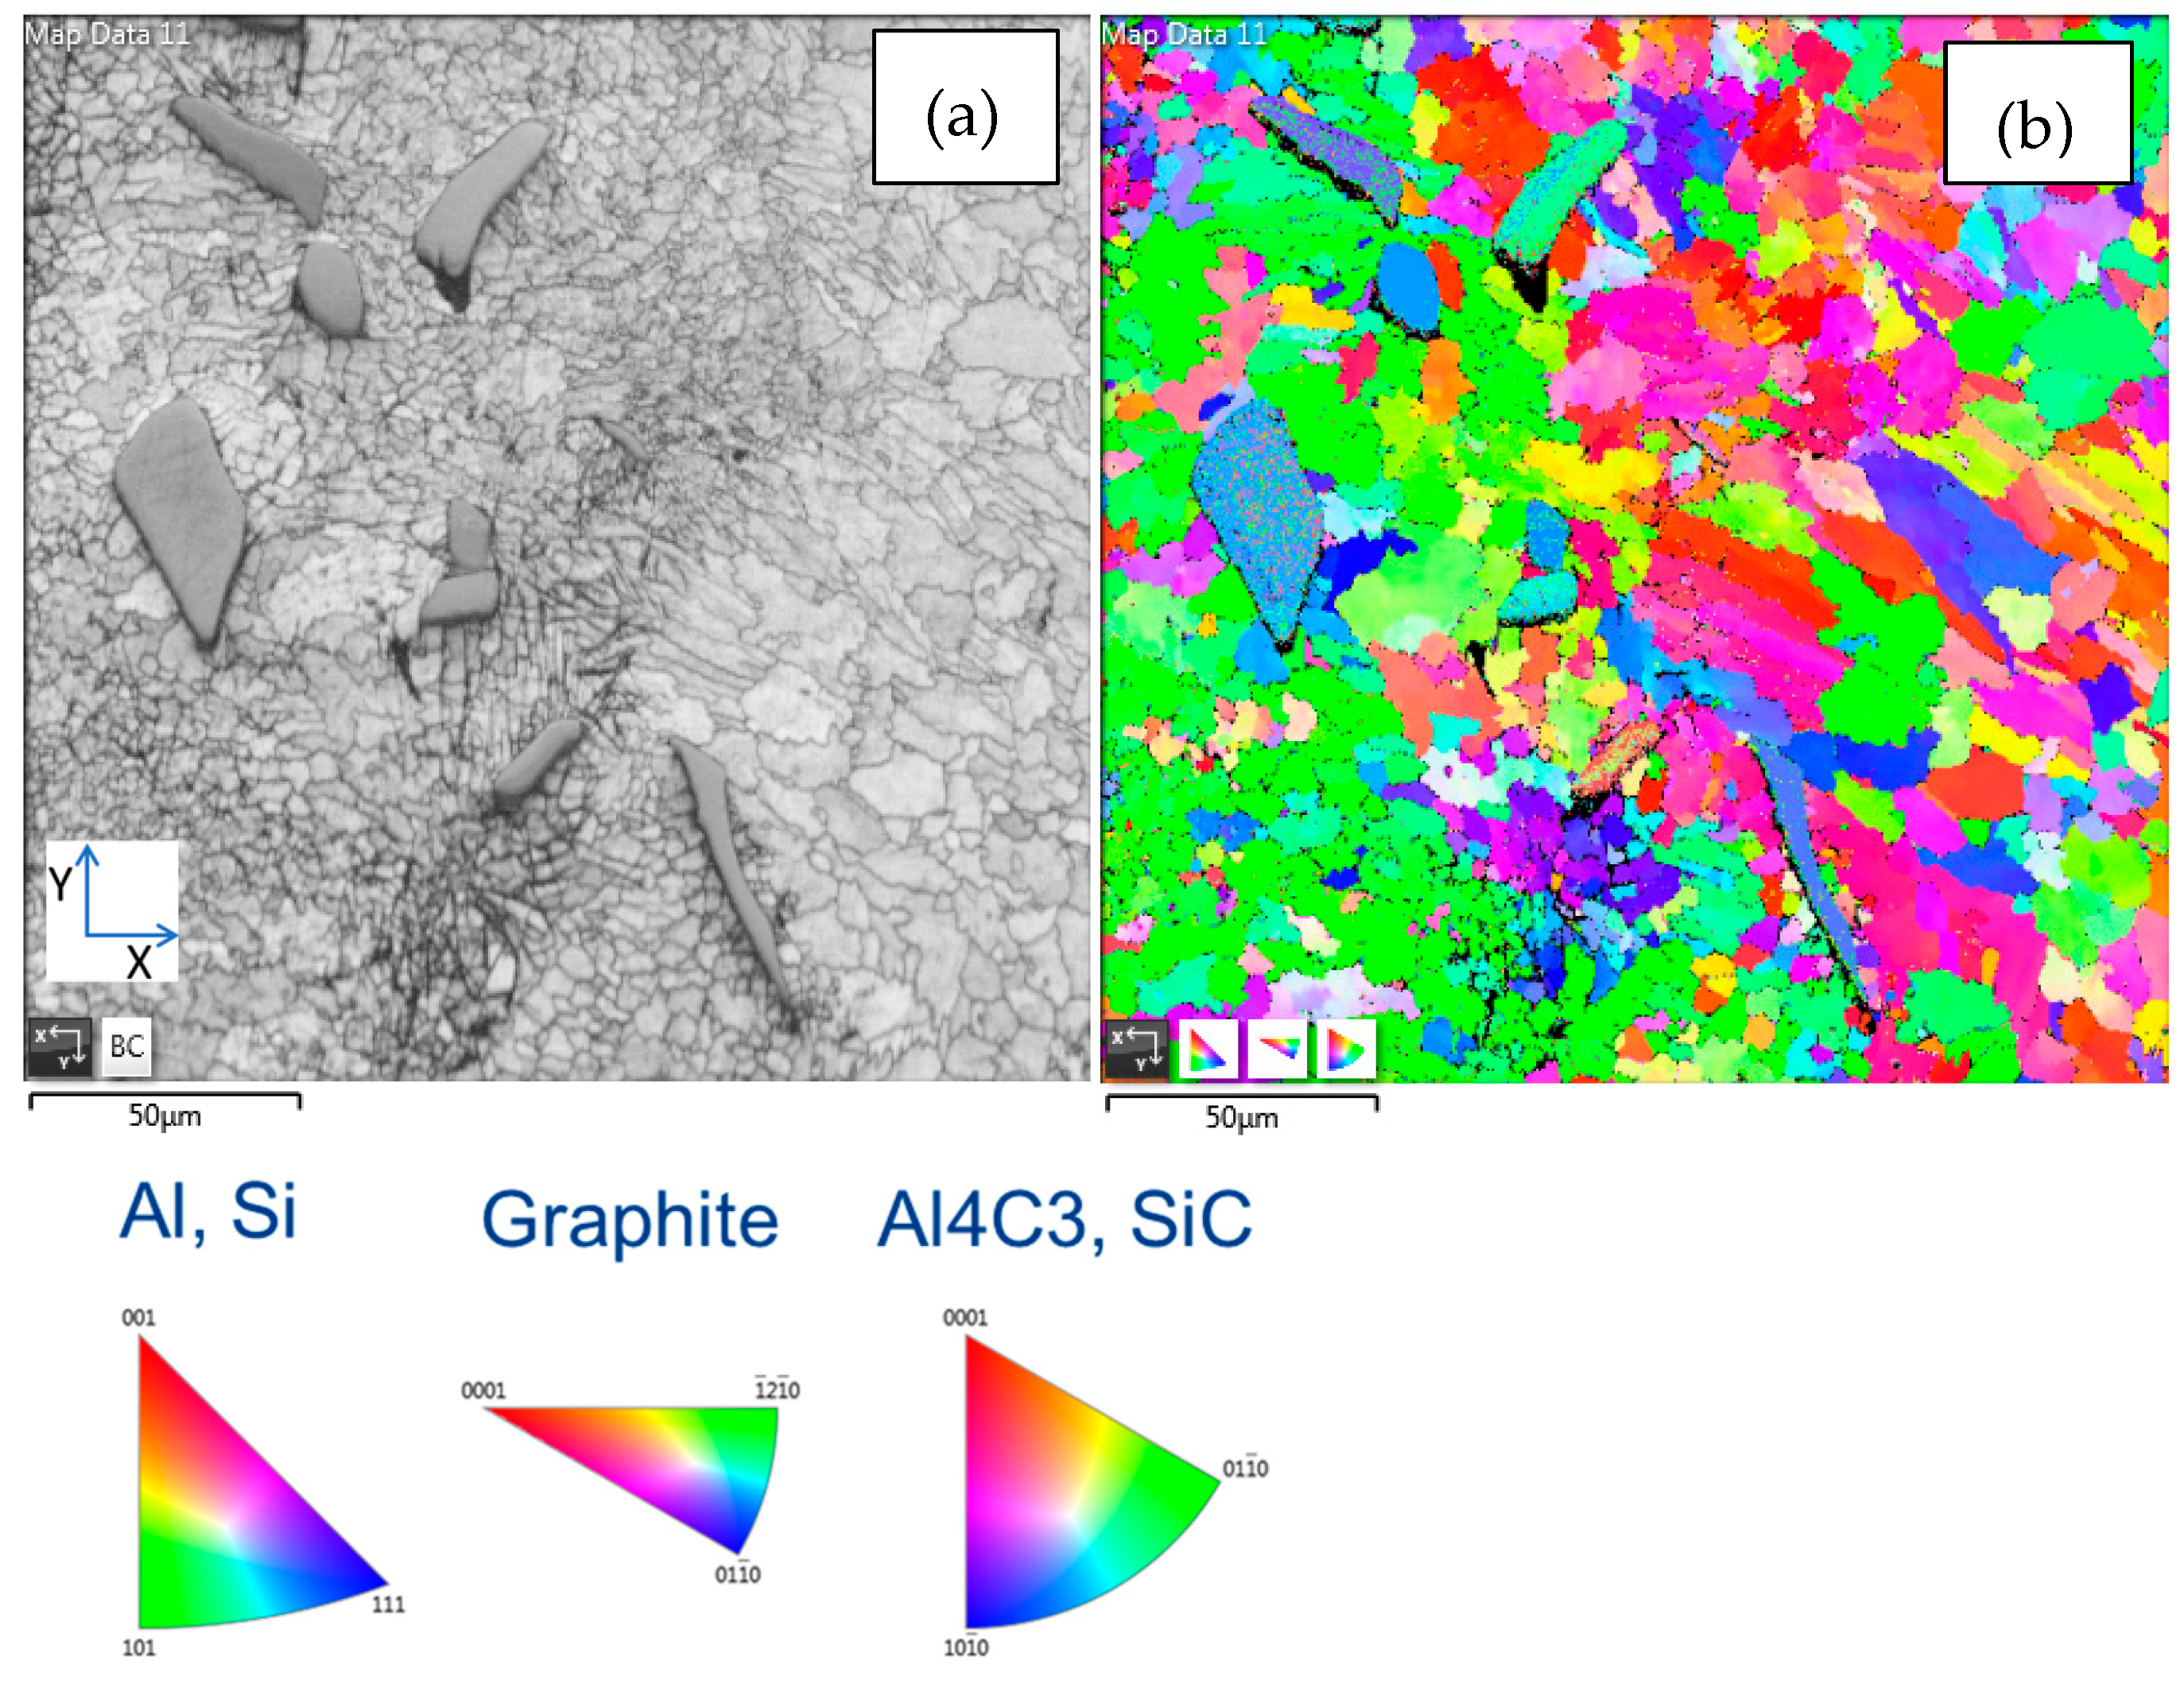
In EBSD analysis, three types of images can be acquired. The Kikuchi band contrast map is a direct view of grain size and shape, while the phase and the orientation map show the crystal phase and the normal direction of the crystal by color. The EBSD technique cannot differentiate between the same crystal systems, and both aluminum and Si belong to the cubic crystal system. Therefore, although the scan region is indexed as a single Si or Al phase, in actuality it could be a mix of both.
Figure 21 and Figure 22 are EBSD results of a cross-section of an AlSi10Mg cubic part before and after HIP. Numerous fine grains were distributed after HIP treatment, which could be easily identified with the eye. The fine grains distributed on the cross-section after the HIP process were more easily observed by EBSD analysis. During the HIP process, it is predicted that the fine grains were finely decomposed along with their respective directions at 300 °C and 60 MPa, thereby releasing the residual stress caused by fast laser heating during printing. And then, as the temperature and pressure increased further to 475 °C and 100 MPa, their bonding strength became stronger, which made macro-level grain boundaries difficult to identify during the etching test.
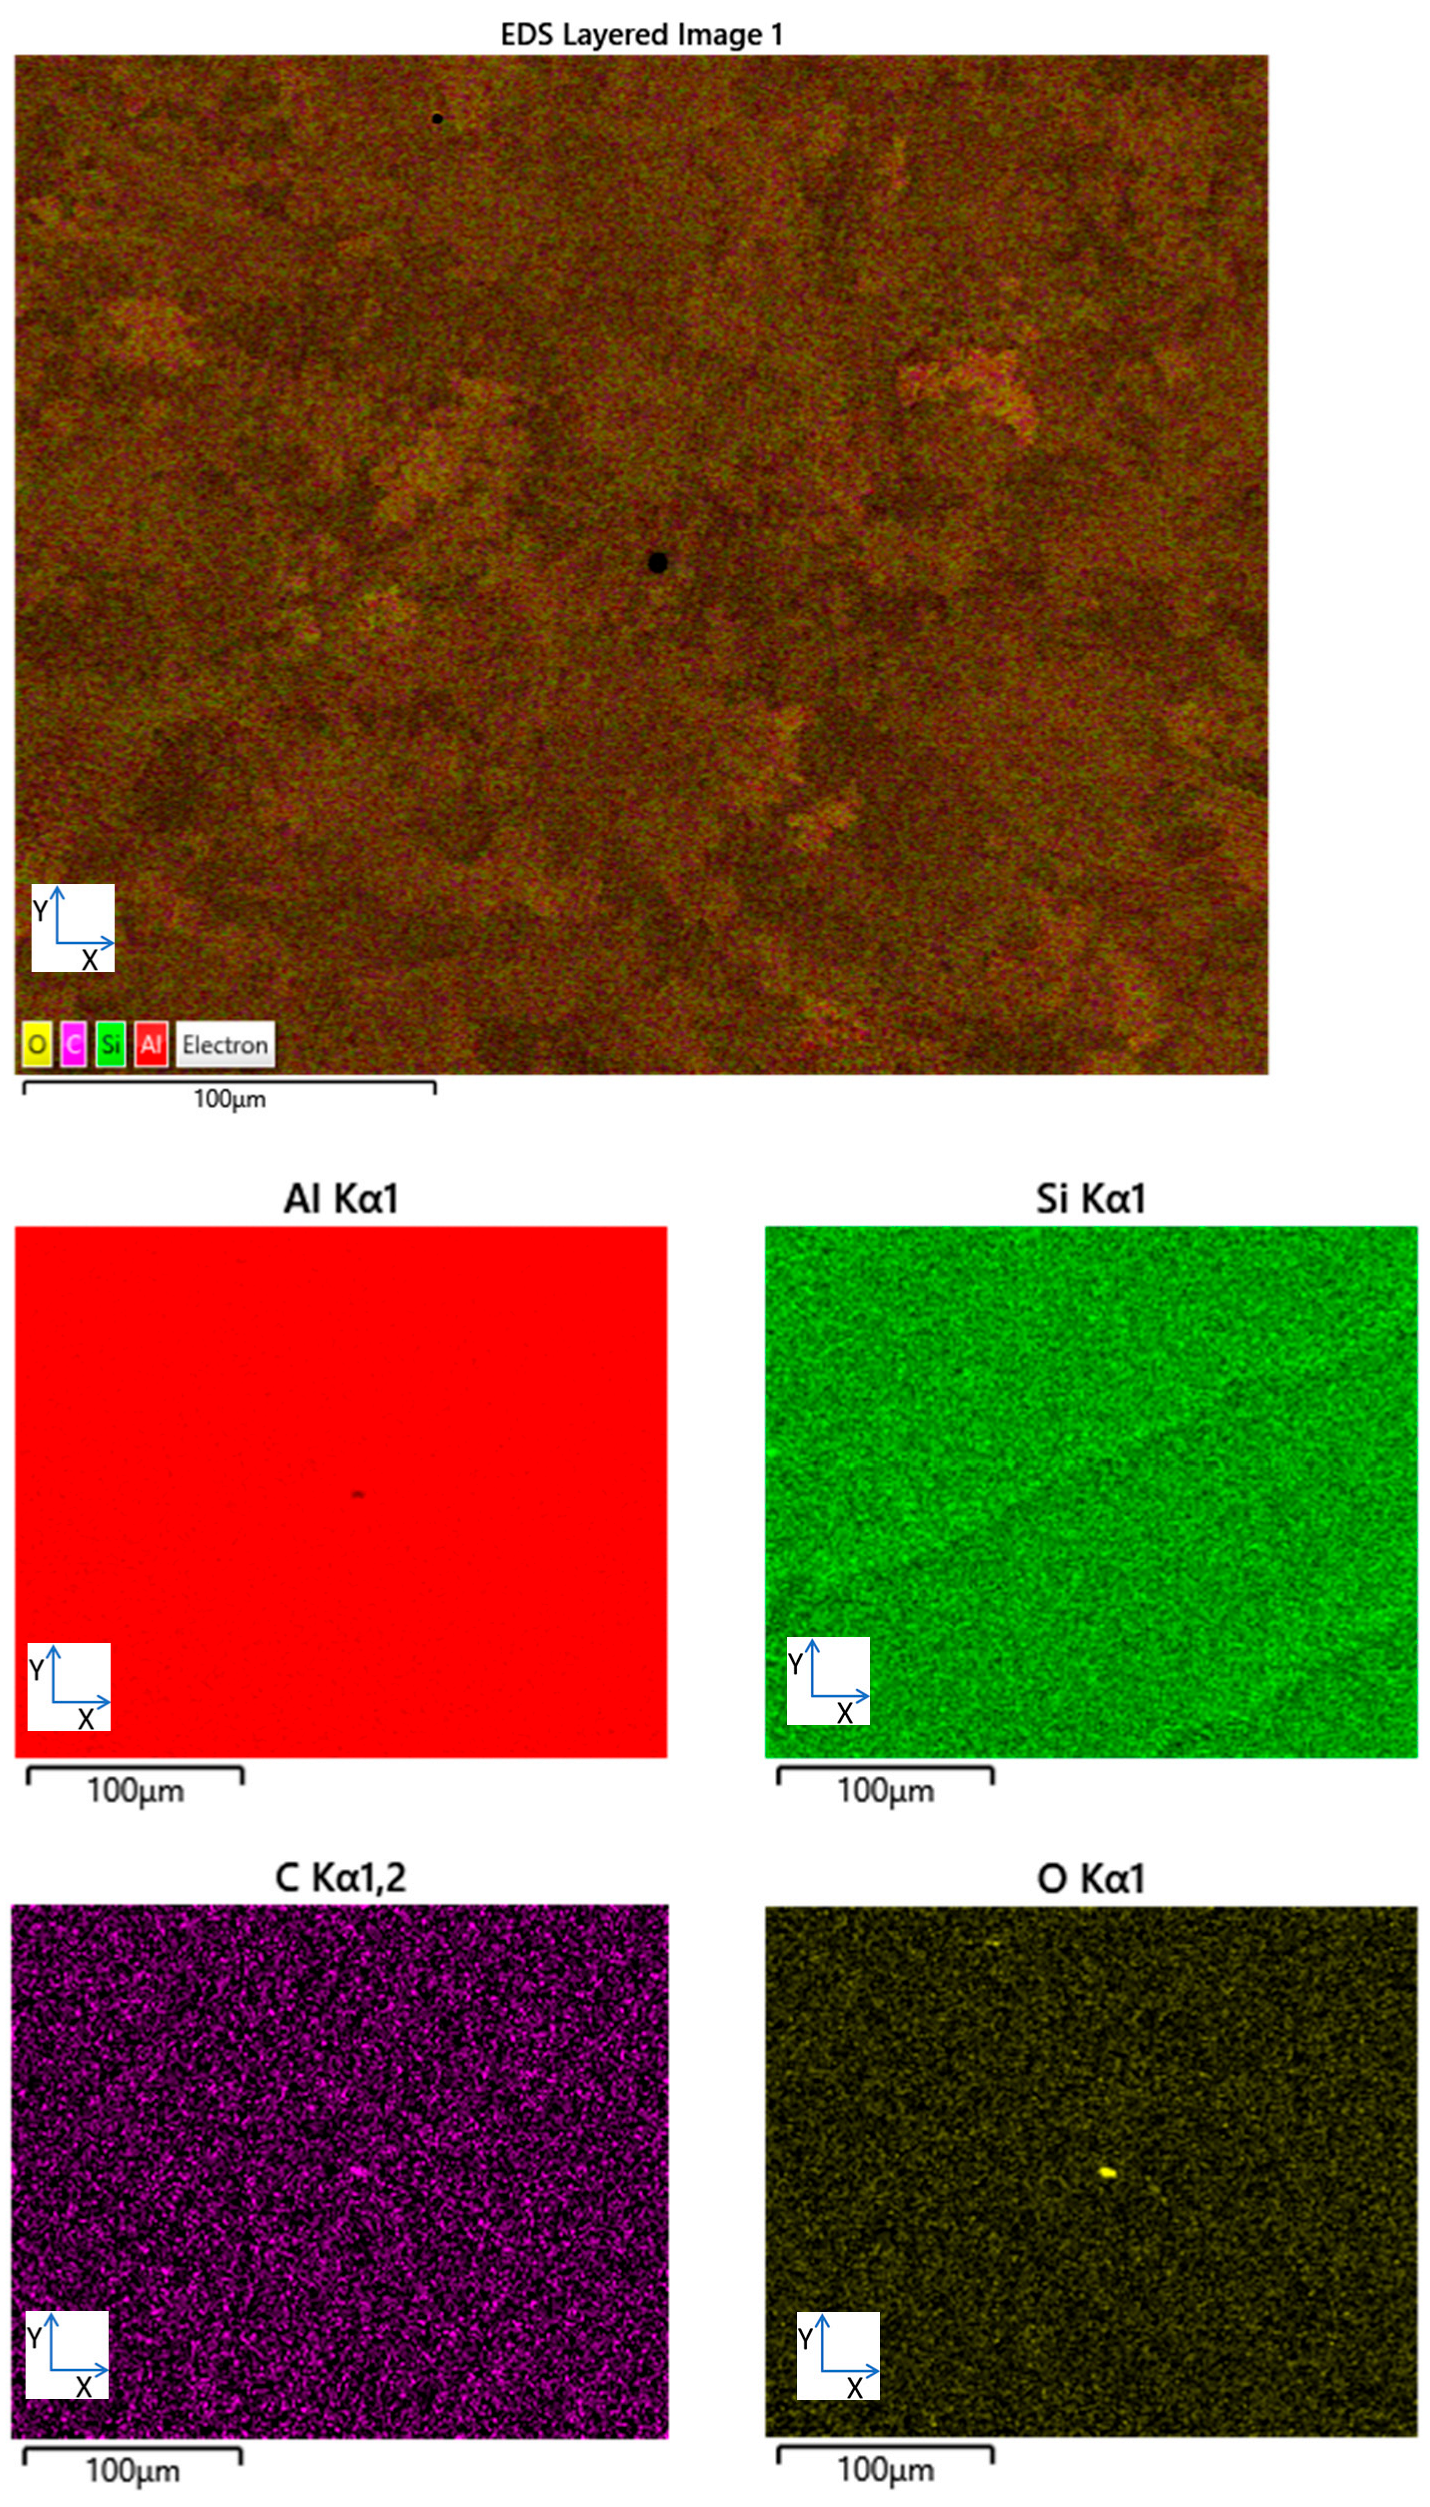
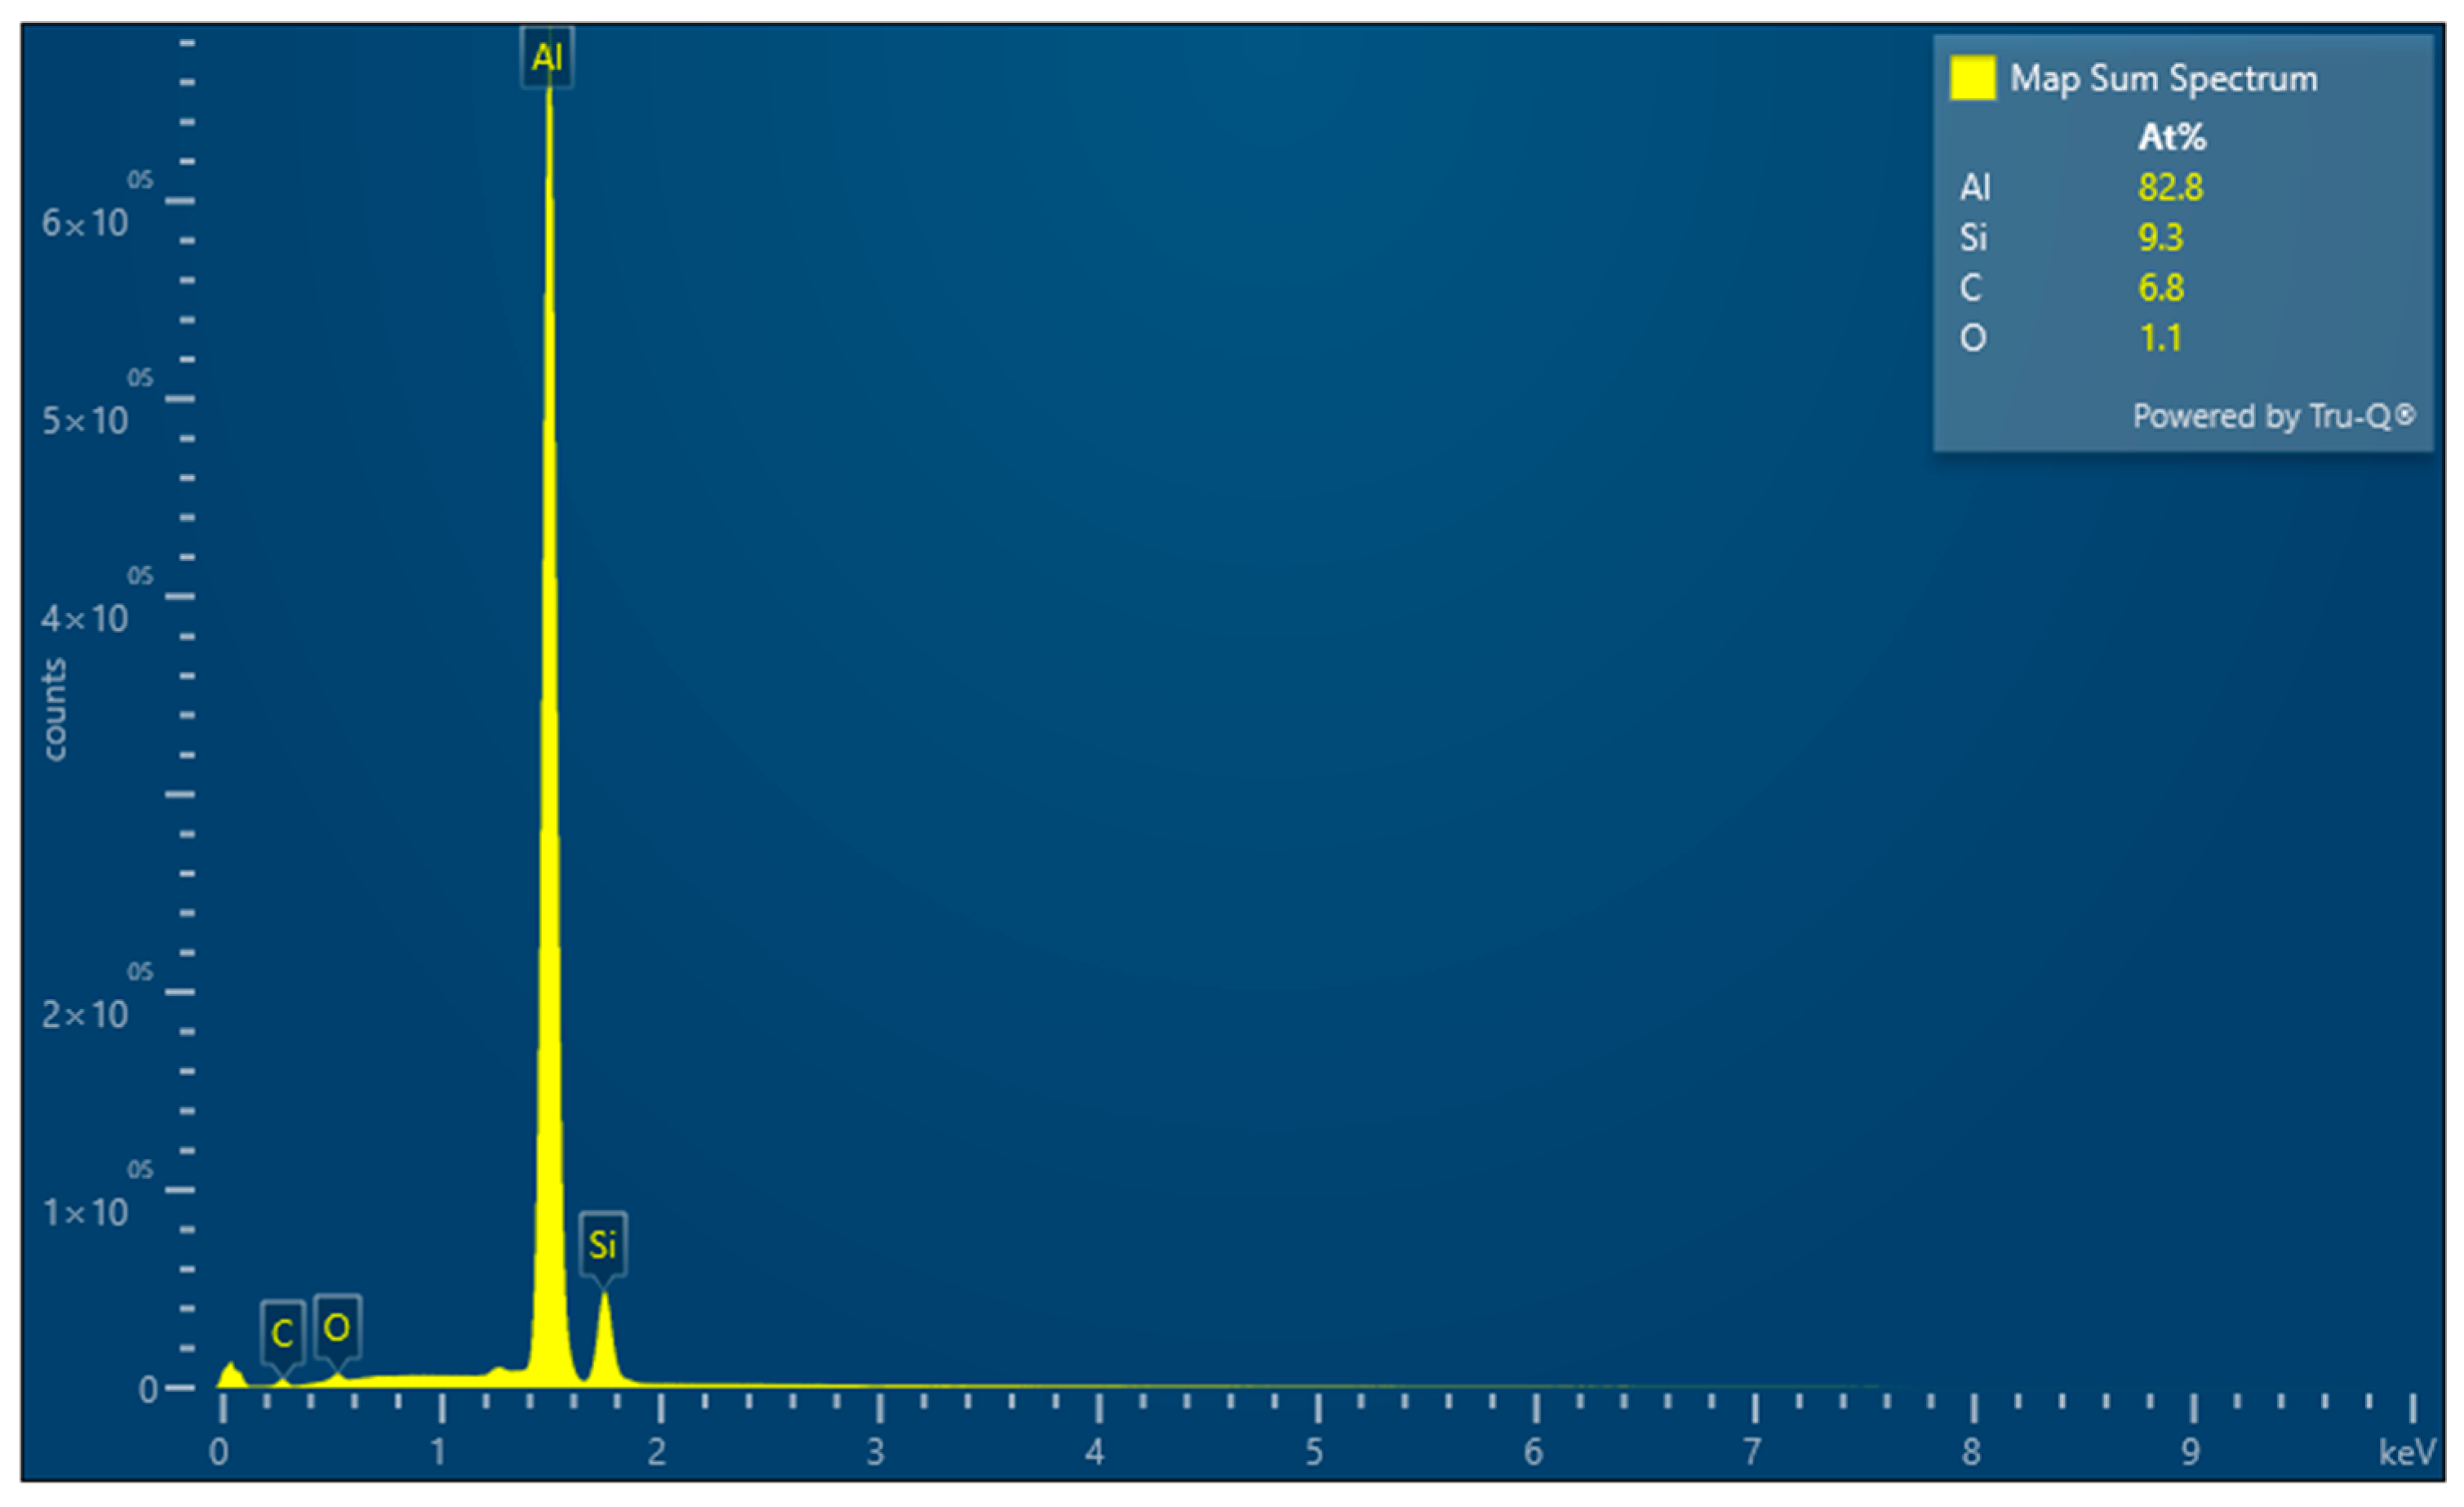
Figure 23 and Figure 24 show the results of EDS mapping and element characterization for the cross-section of AlSi10Mg printed parts. EDS is widely known to be inaccurate for low atomic number elements such as C, B, N, and O. The carbon and oxygen could be from the polishing process. Also, no crystalline phases related to carbon and oxygen were detected in the XRD analysis. Therefore, it is reasonable to conclude that about 90% aluminum and about 10% silicon form the main components of the alloy. Moreover, there is no change in the composition observed in EDS tests before and after HIP.
  • B: SiC/Al: 2/98
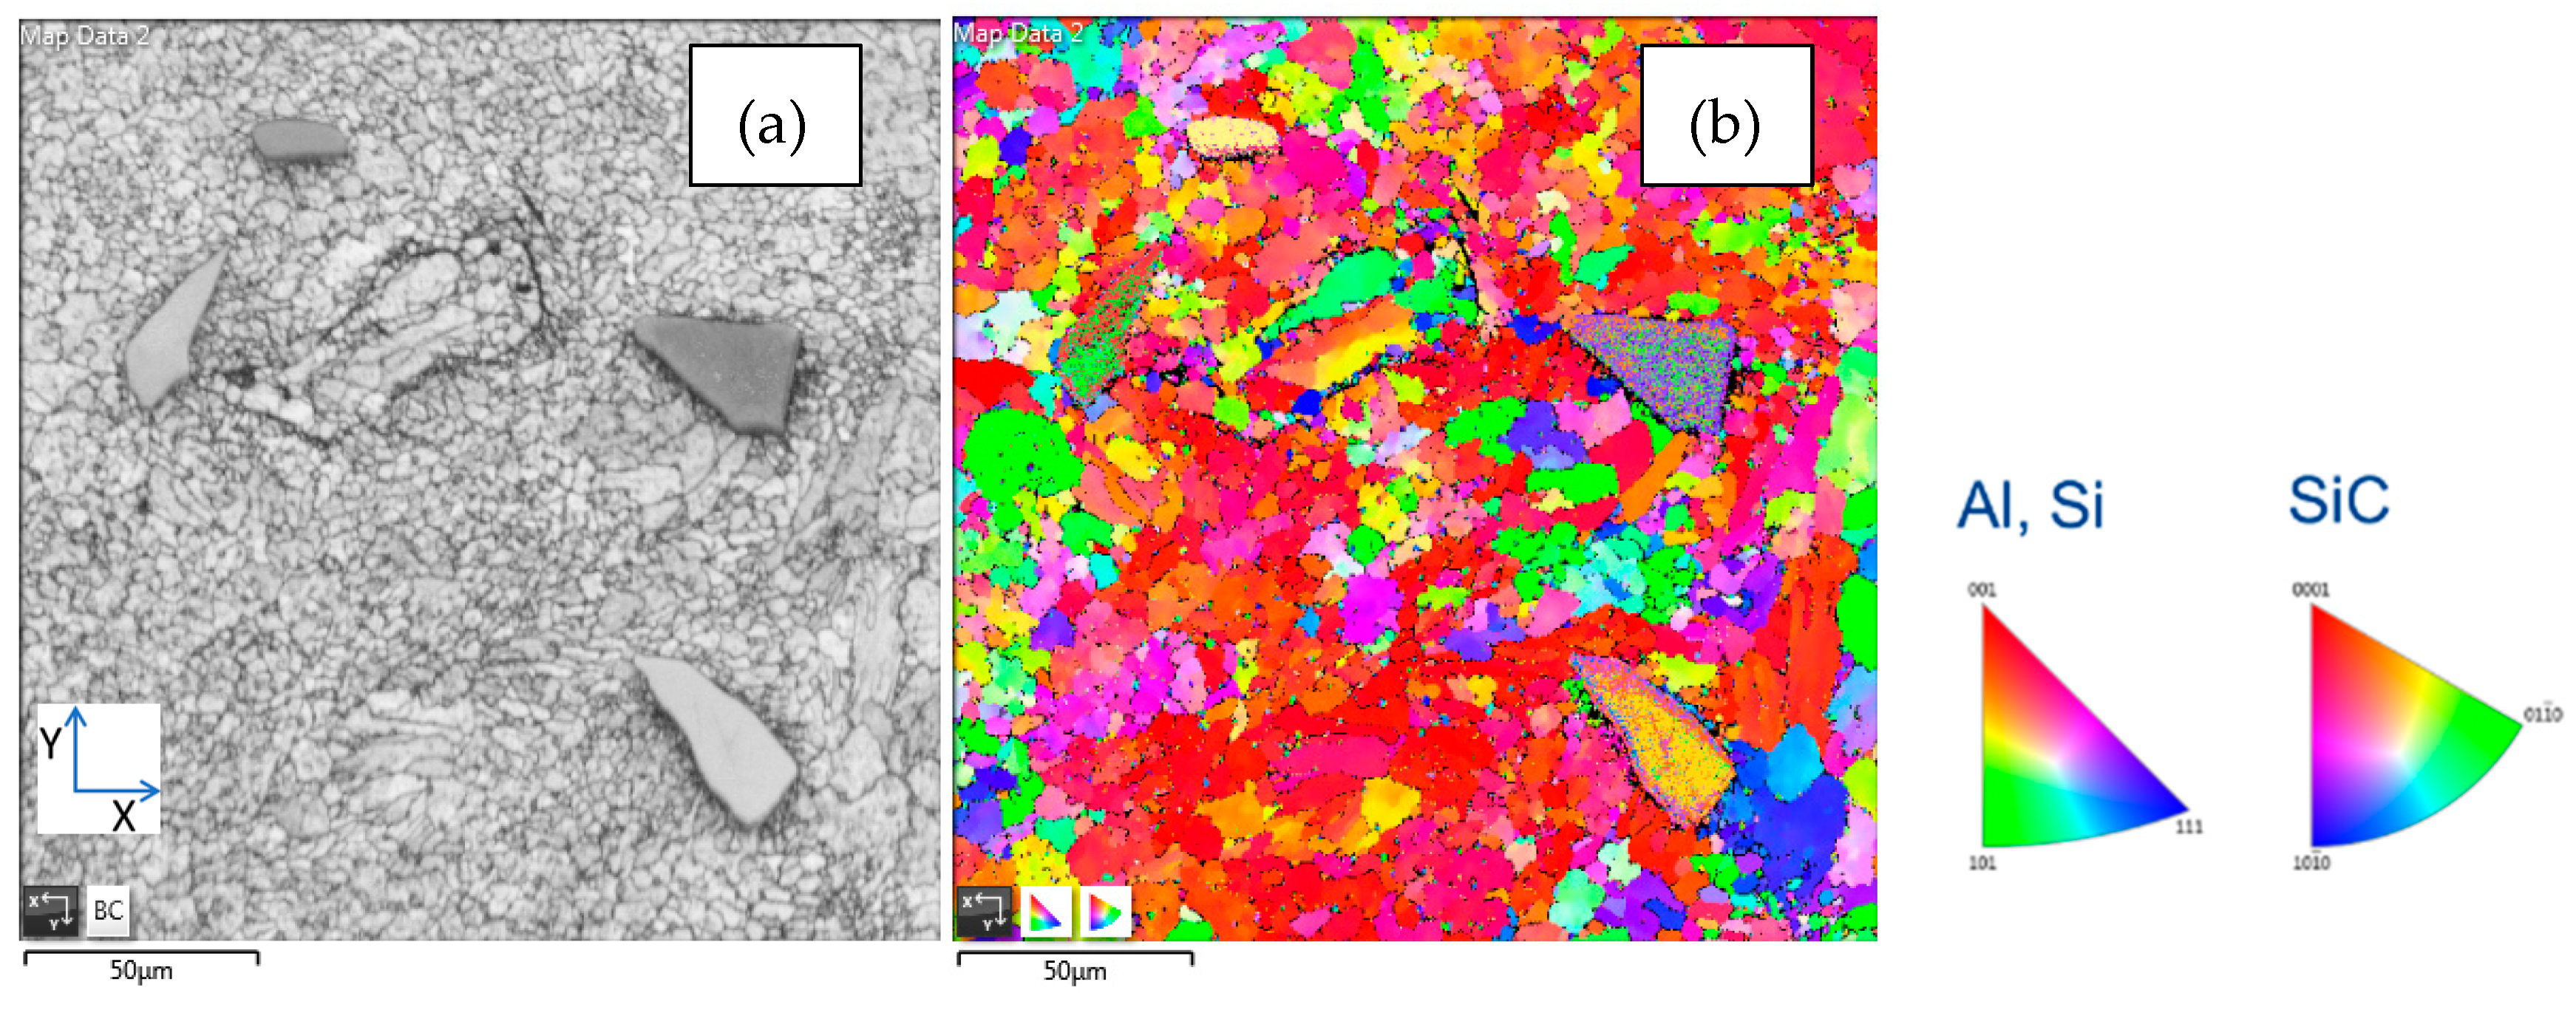
Figure 25 and Figure 26 are the EBSD results for a cross-section of a SiC/Al: 2/98 cubic part before and after HIP. It shows that the unmelted silicon carbide powder is distributed in AlSi10Mg. In SiC/Al: 2/98, the AlSi10Mg portion behaves similarly to that of AiSi10Mg without mixed SiC.
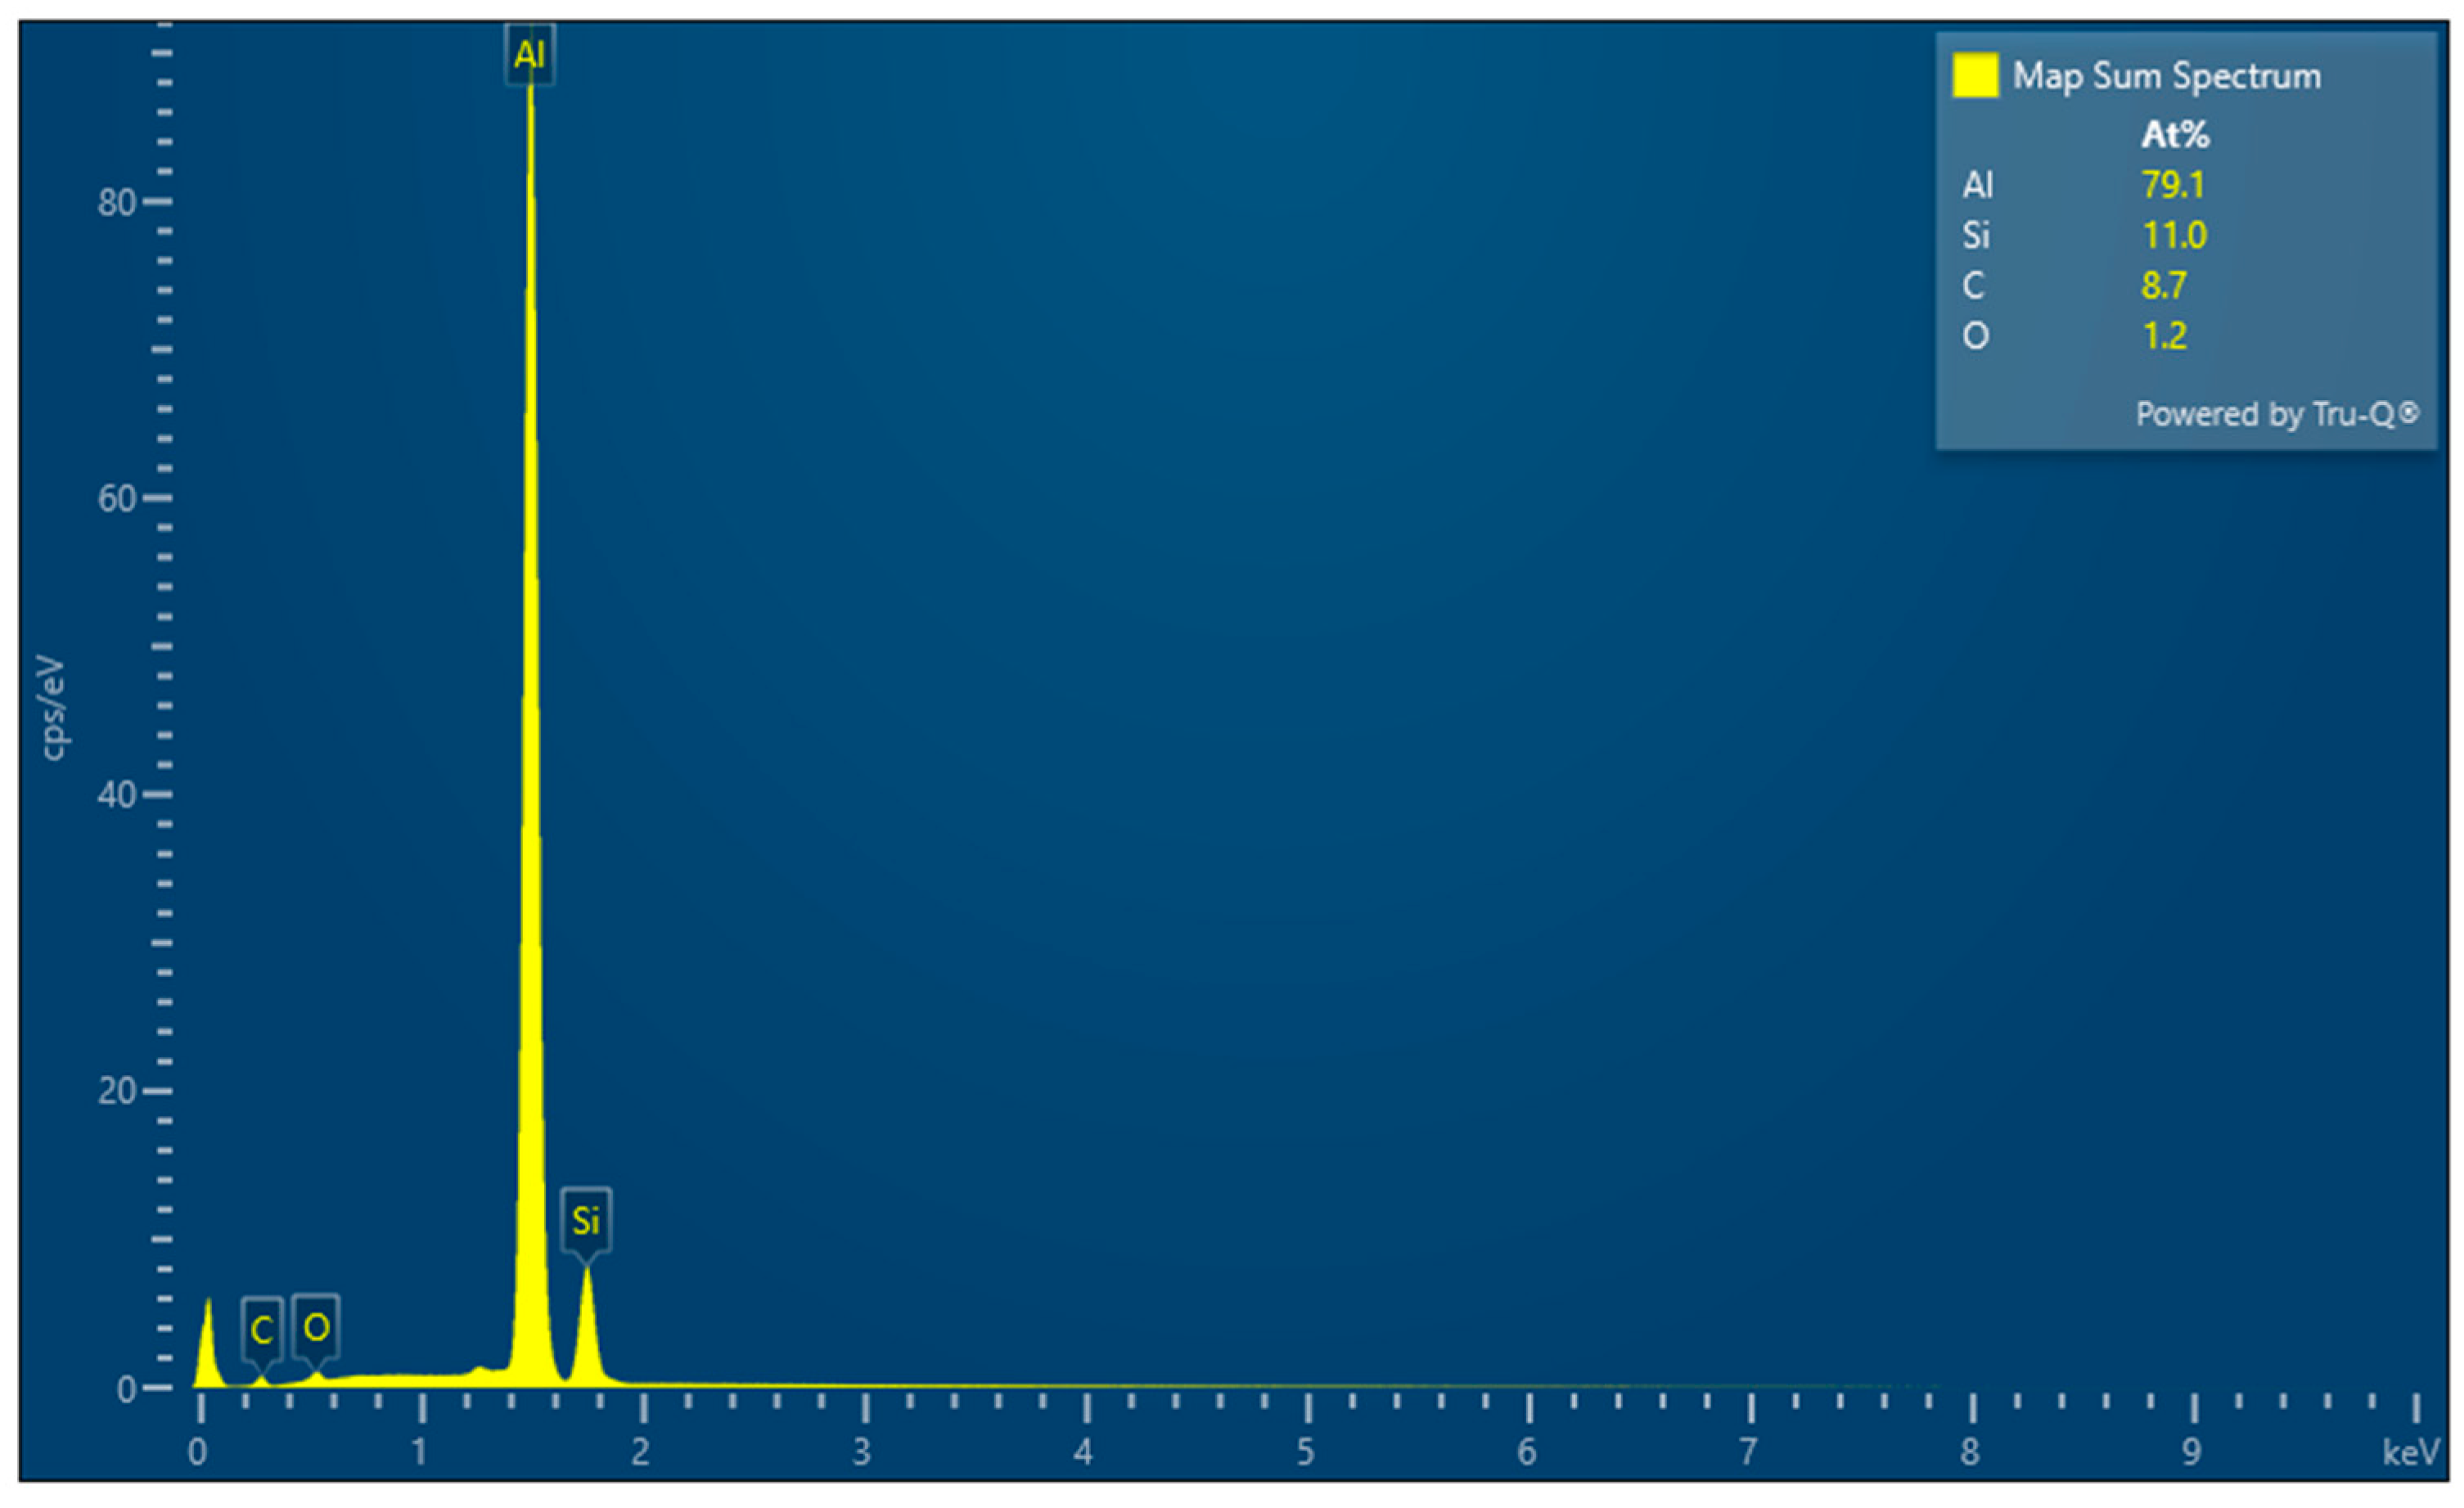
Figure 27 and Figure 28 show the results of EDS mapping and element characterization for the cross-section of SiC/Al: 2/98 parts. It does show that the content of Si is increased compared with that of AiSi10Mg in Figure 24. Since only a local area of several hundred microns was used to analyze, the result of the detected content of silicon carbide affects the measurement results and may not be accurate.
  • C: SiC/Al: 5/95
Figure 29 and Figure 30 show the EBSD results of a cross-section of a SiC/Al: 5/95 part before and after HIP. It shows that the unmelted silicon carbide powder is more distributed compared to that of SiC/Al: 2/98. Similar to XRD tests, Al4C3 was observed for the as-built sample and disappeared after HIP treatment.
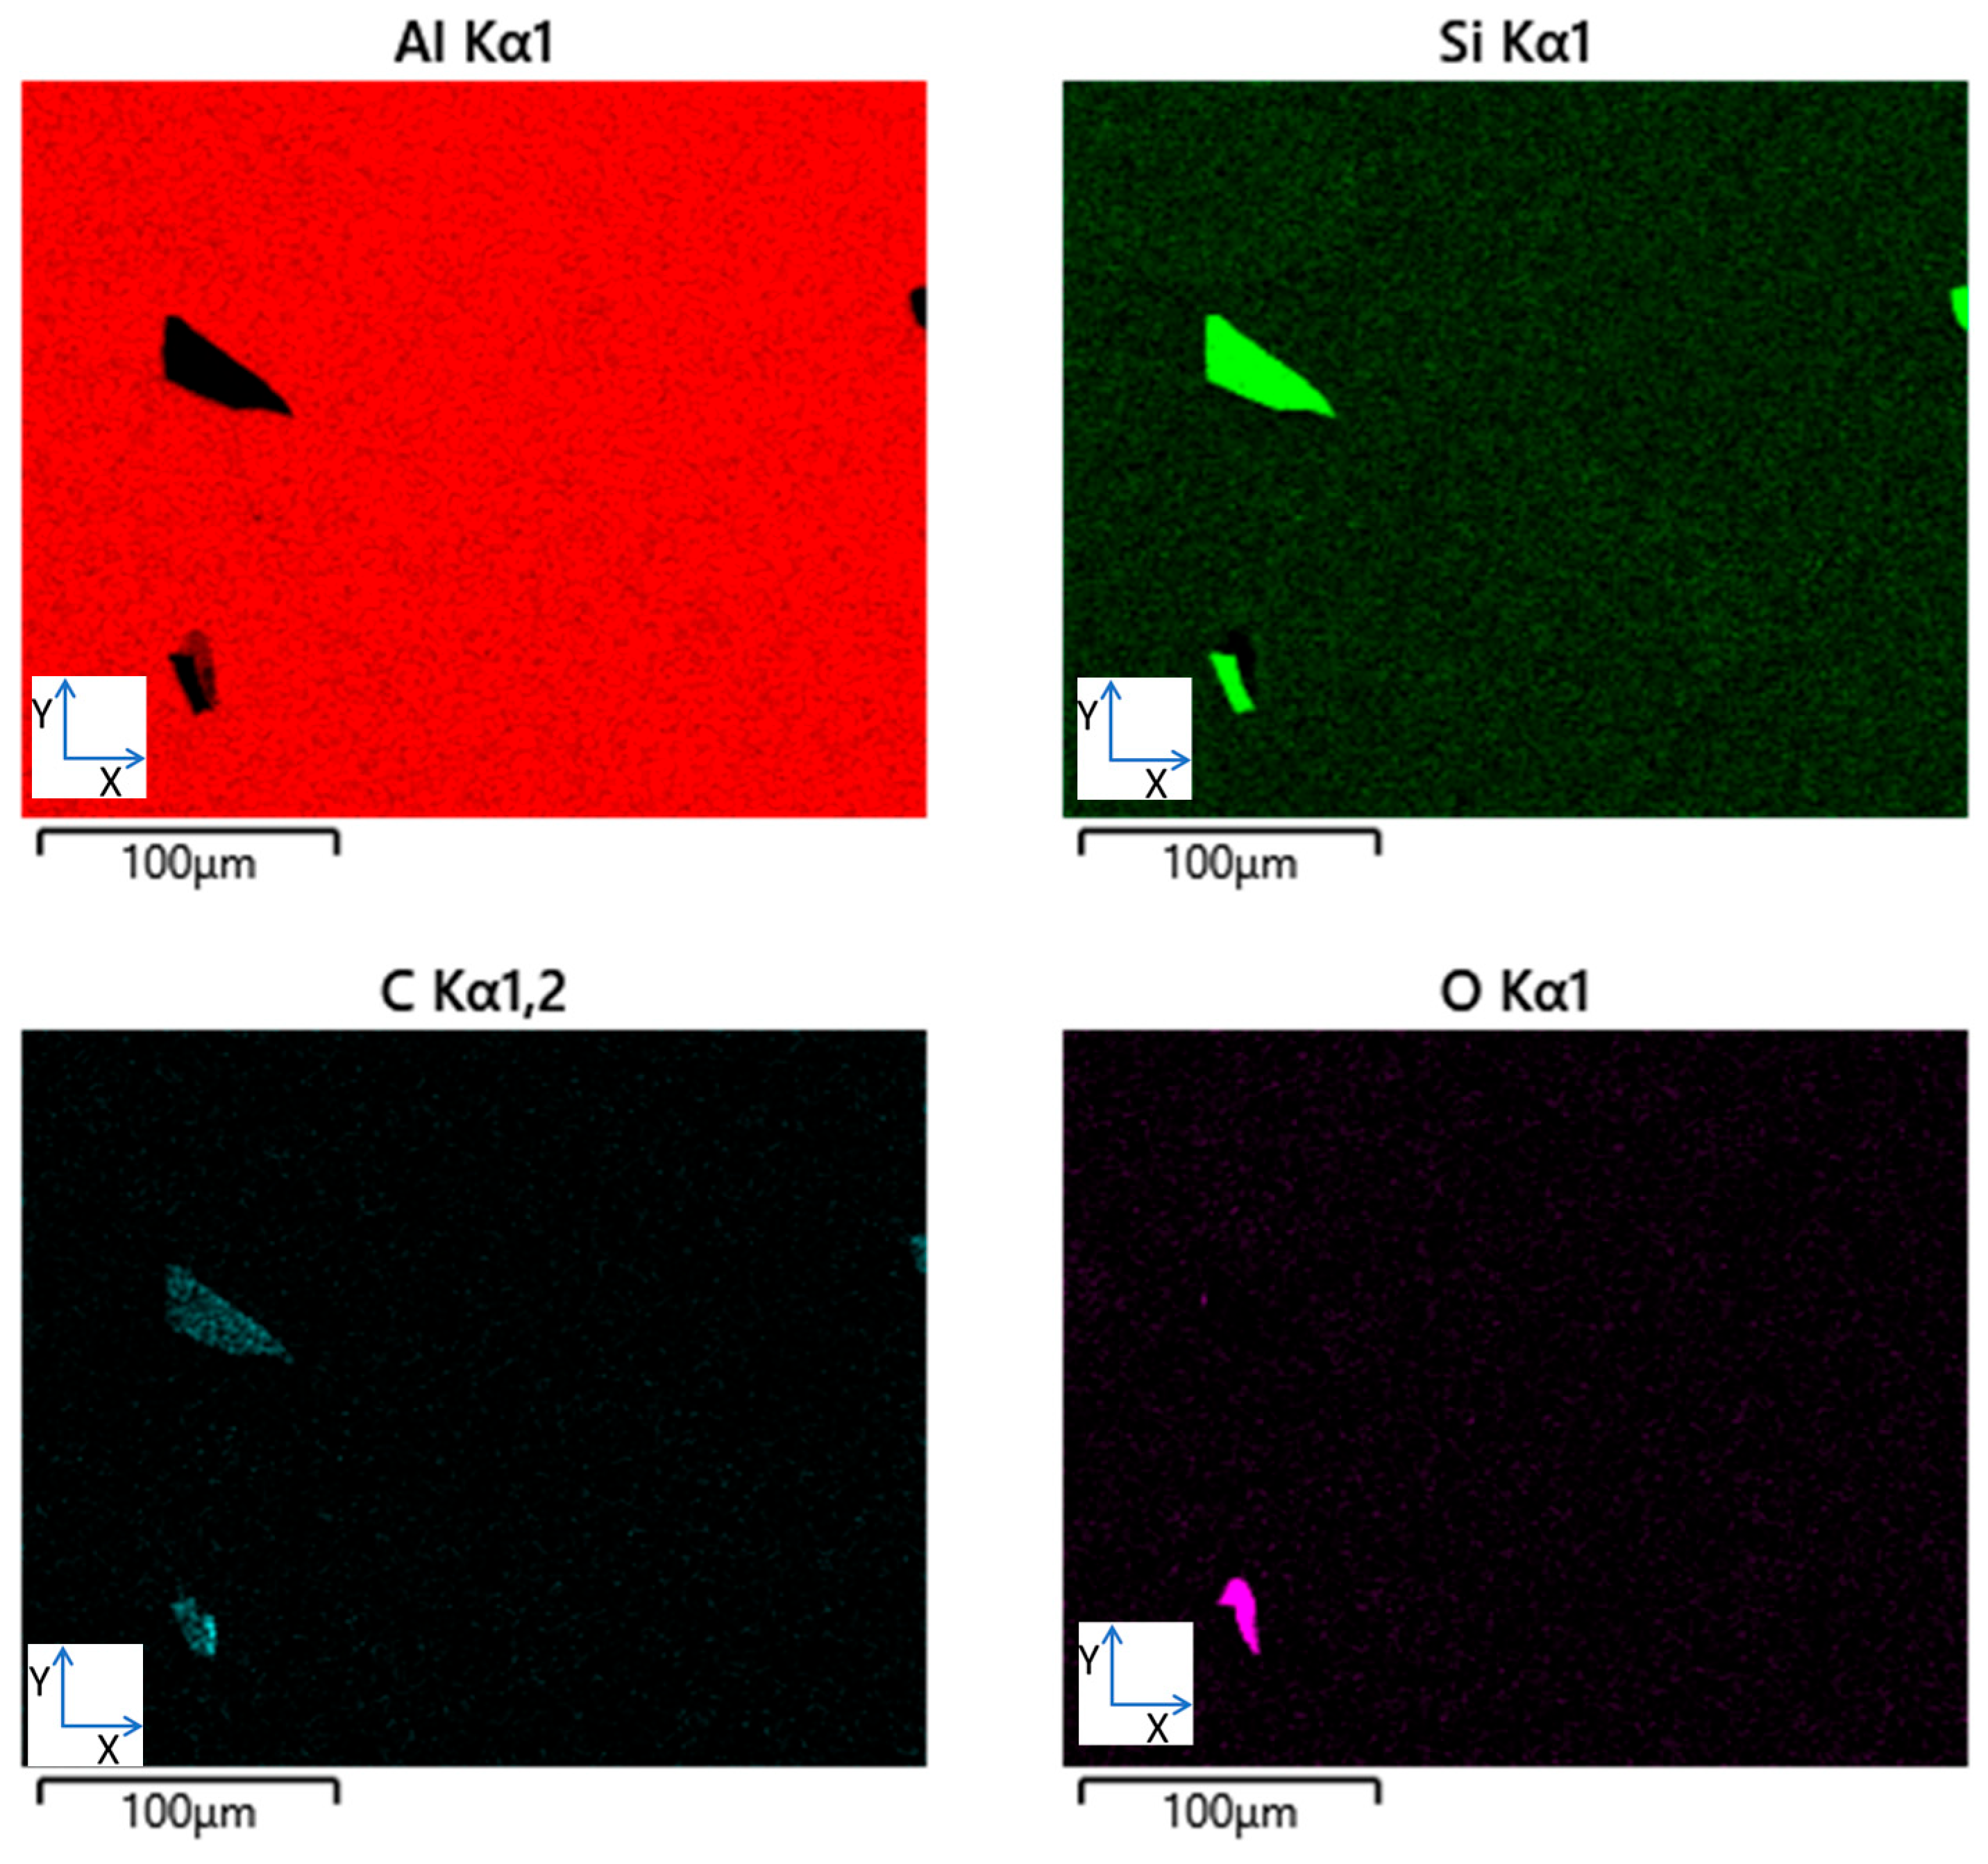
The EDS results of SiC/Al: 5/95 are shown in Figure 31 and Figure 32. It is obvious that the SiC component is slightly increased compared to that of SiC/Al: 2/98.

3.6. Examples of MMC Components

3.6.1. Graded Composition AM of Heat Sink

Four material compositions are used for graded composition parts printing. These include AlSi10Mg, SiC/Al: 2/98, SiC/Al:5/95, and SiC/Al: 10/90. Figure 33 shows a schematic layout. In order to print without a time delay between all layers, each powder layer was configured according to the calculated values in Table 4, and printing was performed continuously under the optimal conditions described before.
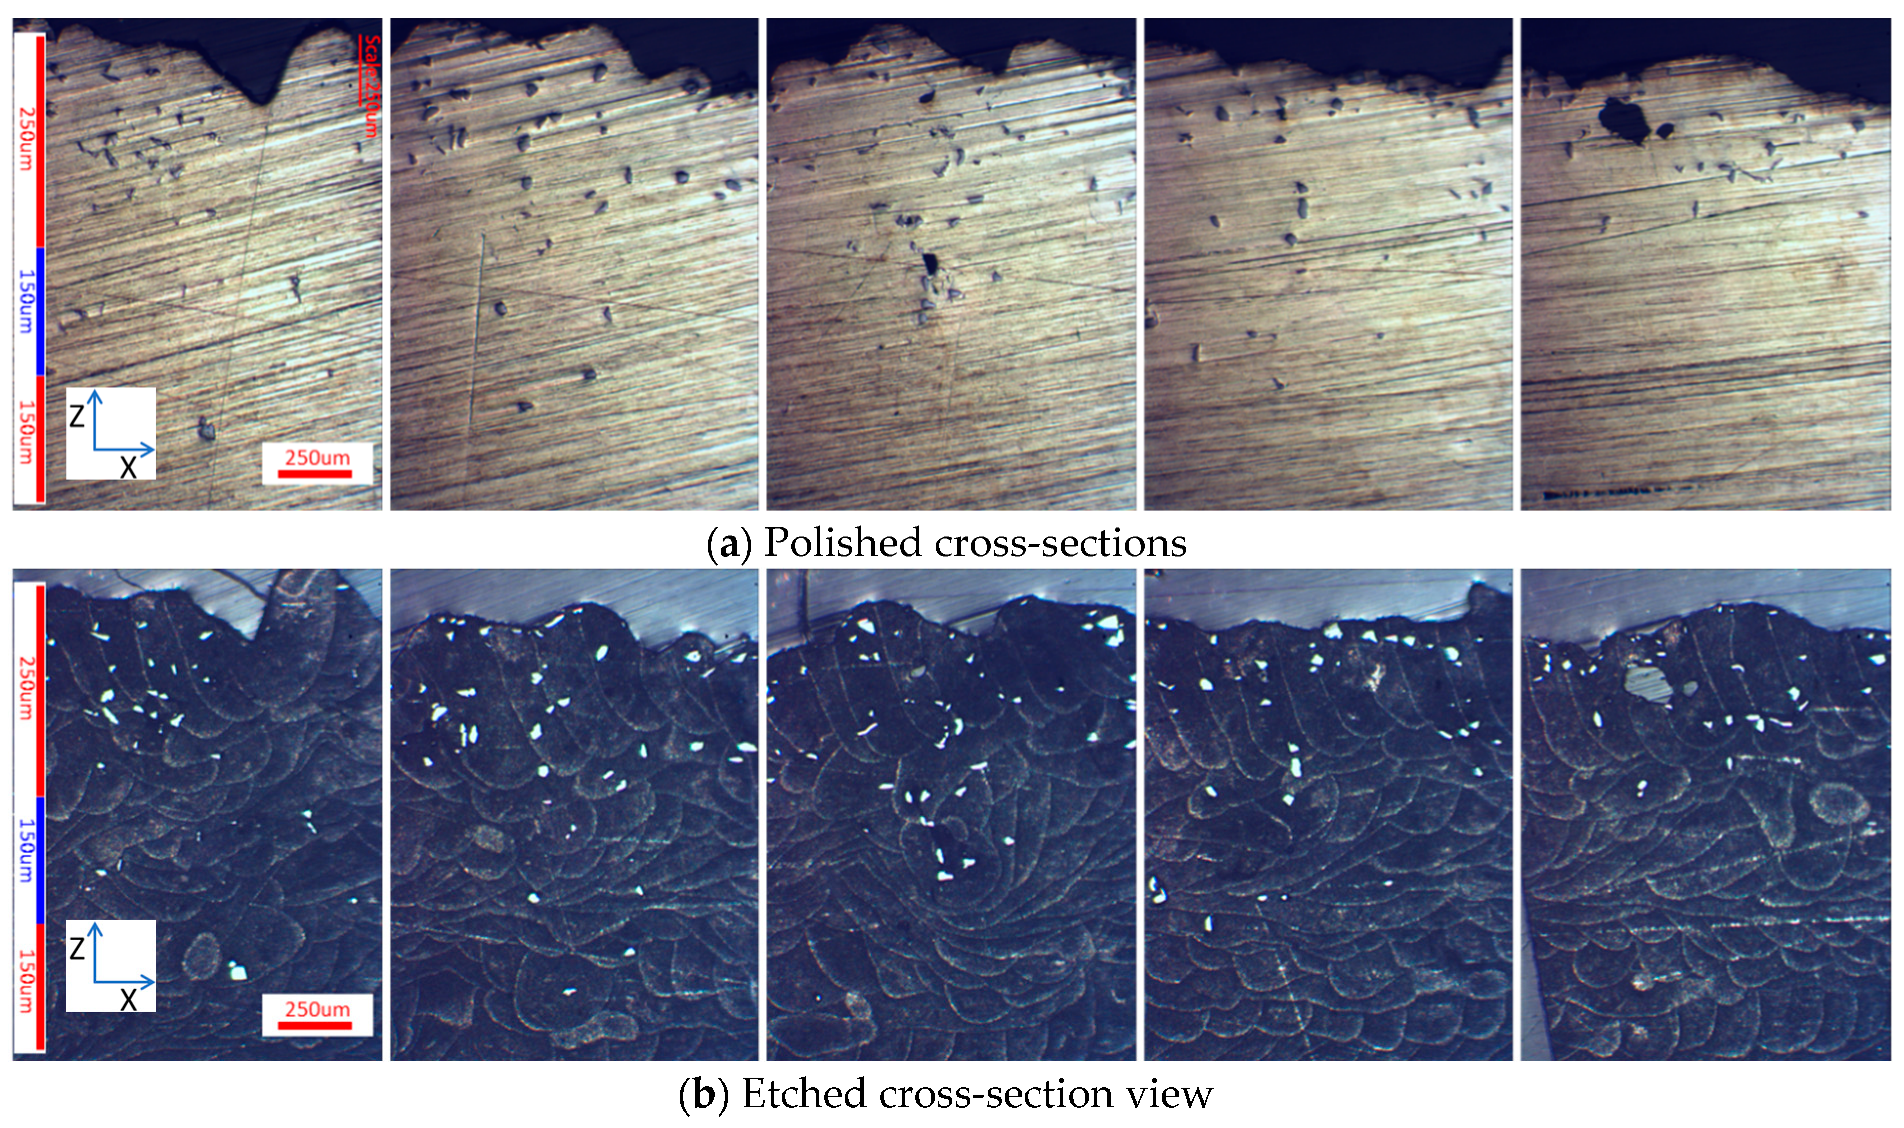
After printing, the cross-section was cut and polished, and then checked with a microscope. Thirty minutes of etching was performed to evaluate the microstructures. Figure 34 shows the microscopic images for both polished cross-sections and etched cross-sections for five locations of the sample. It is easier to identify the distribution of SiC powder. It is noticed that the microstructures were a little changed for each layer but with very smooth transitions between two adjacent compositions.
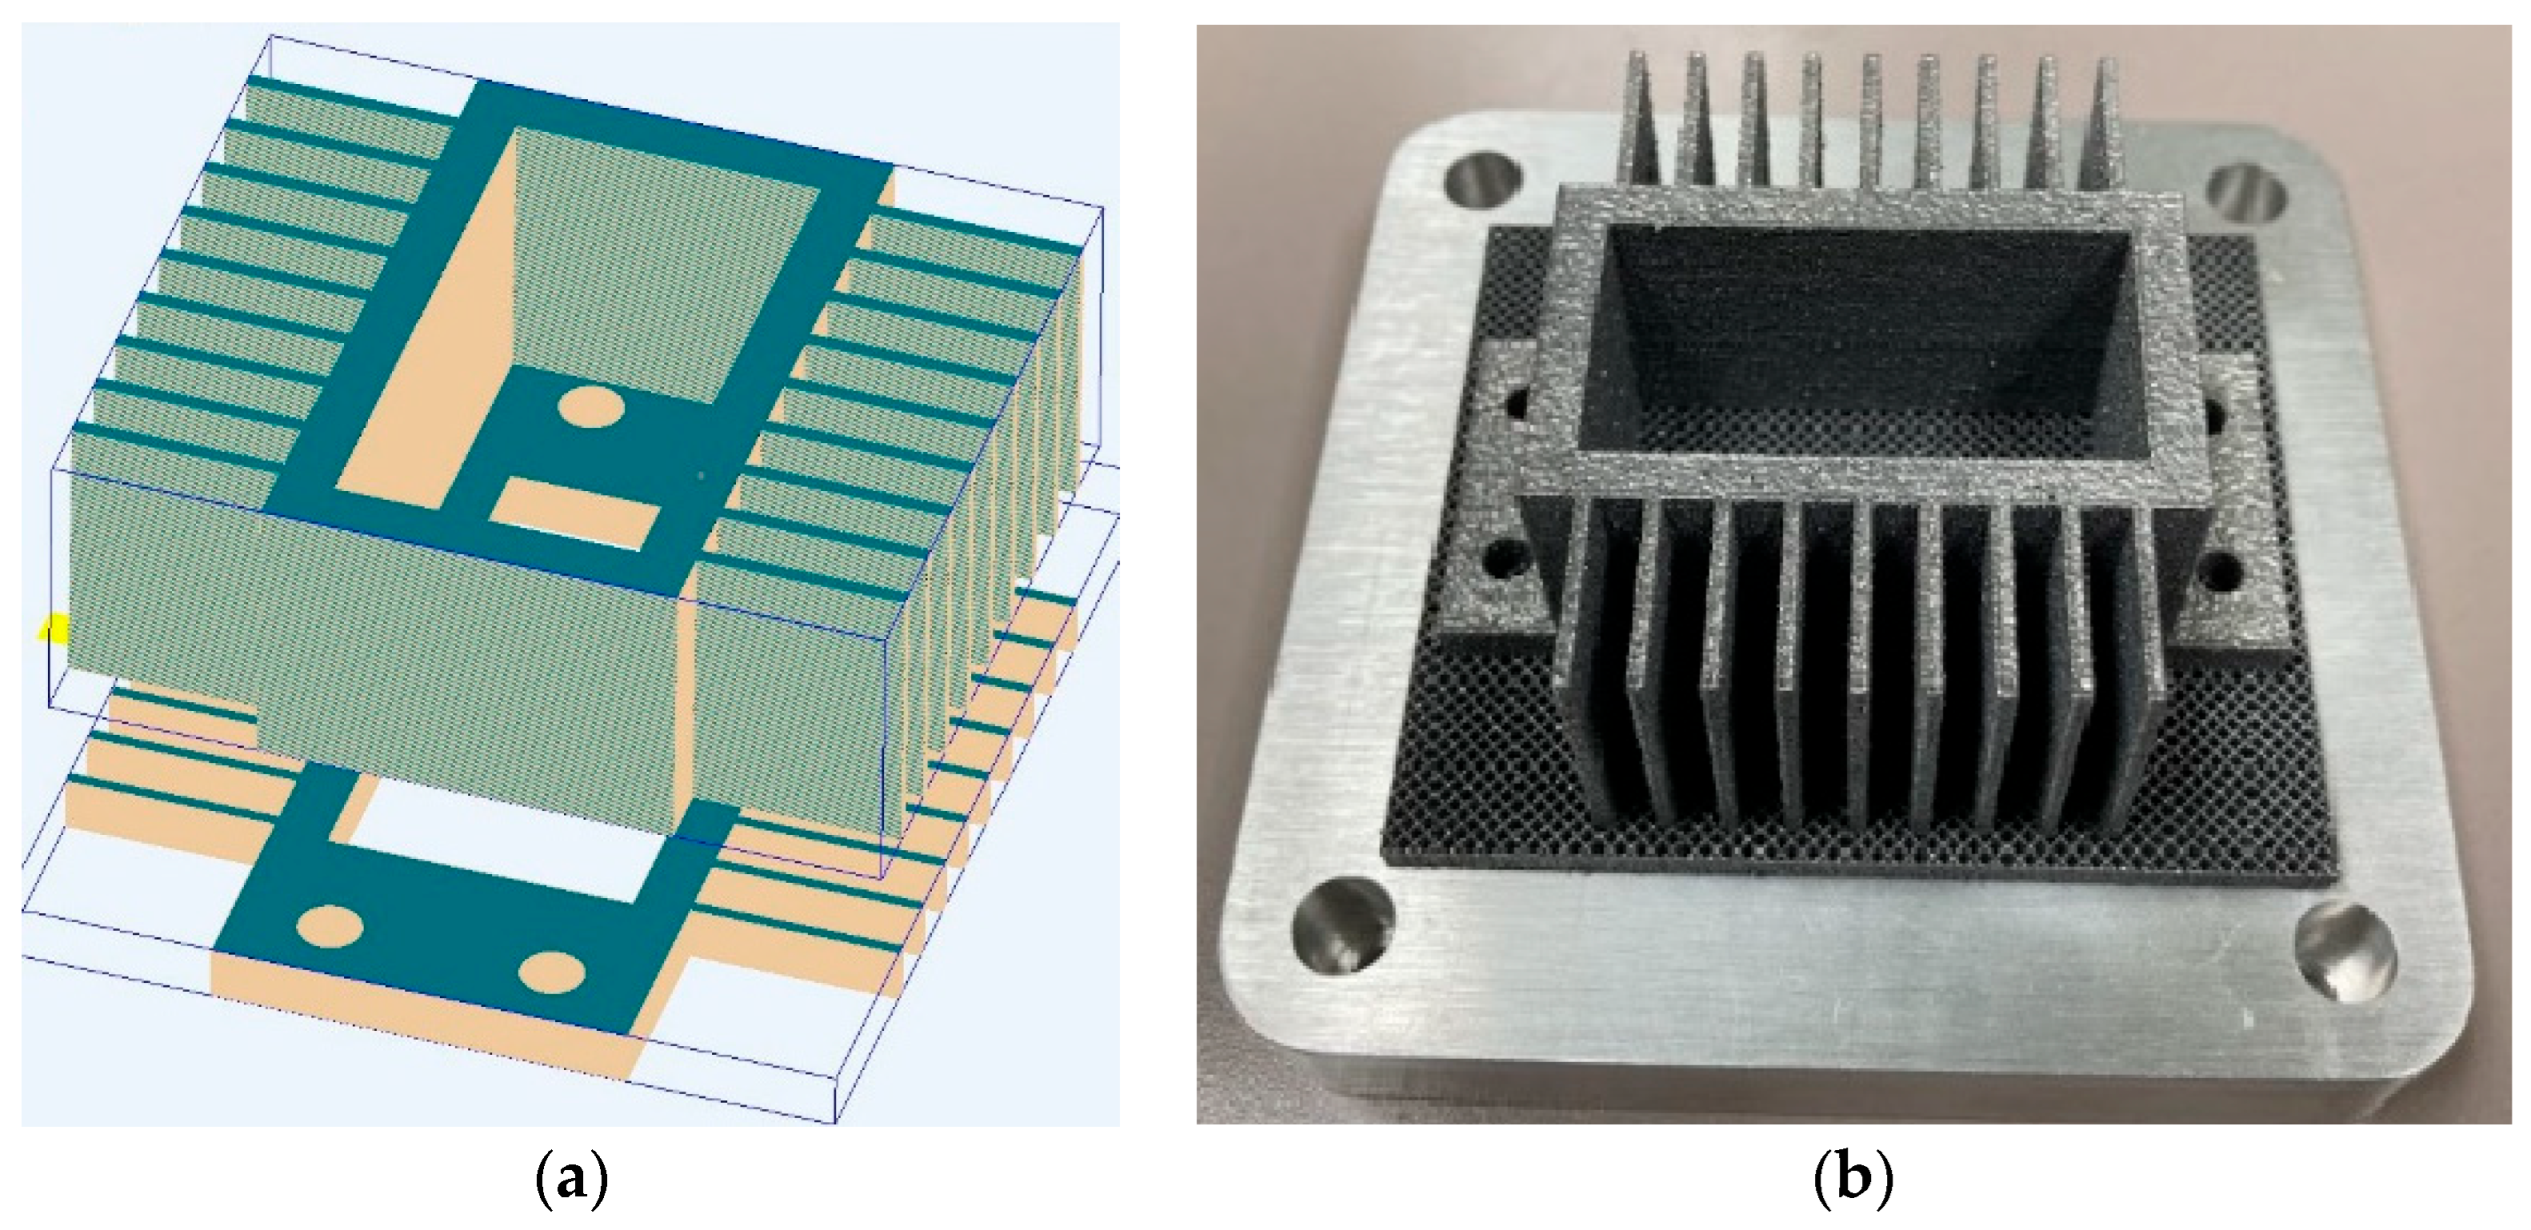
As shown in Figure 35, a multi-functional heat sink was printed using a graded composition printing technique. There are two types of powder combinations. For the base part, AlSi10Mg powder was used for ease of mounting and machining, and for the body, SiC/Al:10/90 was used for tailoring of mechanical properties and heat dissipation. Between AlSi10Mg and SiC/Al:10/90 layers of the second type, there are SiC/Al:2/98 and SiC/Al:5/95 layers with a thickness of 200 µm, respectively, to gradually transit the compositions.

3.6.2. AM of MMC Neutron Radial Collimators and Components

Boron is one of the best neutron absorbers for the range of wavelengths of neutrons. However, because of the material’s extreme hardness, it is difficult to make custom-shaped boron carbide parts for neutron scattering instruments. By combining aluminum with boron carbide to form a matrix, the challenging issue is resolved, and the complex collimator and other neutron instrument parts can be printed (Figure 36 and Figure 37). These additively manufactured neutron collimators and parts have a very high neutron absorbing cross-section with a small neutron scattering cross-section, and a larger thermal conductivity compared to other additive manufactured materials [19,20]. They can be used in cryogenic environments while conducting thermal energy and they will not sag, distort, or decompose at elevated temperatures.
As shown in Figure 36, neutron collimators define the divergence of the neutron beam in neutron scattering instrumentation. Controlling beam divergence allows for more accurate measurements of the neutron scattering cross-section of the material being examined. By using additive manufacturing techniques, complex 2D and 3D radial collimators with a height of 120 mm were printed with mixed boron carbide and aluminum powders. Septic fin thickness as thin as 300 µm was achieved. AM of aluminum/boron carbide MMC parts can also be extended easily to other areas of operation, including custom nuclear shielding and nuclear tomography.

4. Conclusions

This paper presents a comprehensive investigation on aluminum-based MMC including SiC. By varying the compositions of SiC and AlSi10Mg powders, mechanical properties and microstructures were experimentally studied. Samples with and without HIP treatment were also given for comparison as well as orientations. A few conclusions are made as follows:
(a)
High relative density (>99%) is achievable by optimizing AM process parameters.
(b)
Mechanical properties show anisotropic properties; however, HIP treatment helps improve the samples to be more isotropic.
(c)
SiC/Al: 2/98 obtained the highest strength and Young’s modulus.
(d)
Compound Al4C3 was observed for as-built SiC/Al:5/95 MMC samples.
(e)
Thermal conductivities close to AlSi10Mg were achieved for both SiC/Al: 2/98 and SiC/Al: 5/95 MMCs.
(f)
During the HIP process, it is predicted that the fine grains were finely decomposed along with their respective directions at 300 °C and 60 MPa, thereby releasing the residual stress caused by fast laser heating during printing. And then, as the temperature and pressure increased further to 475 °C and 100 MPa, their bonding strength became stronger, which made macro-level grain boundaries difficult to identify during the etching test.
With continuing advancements of MMC AM, it is expected in the near future that more and more functional components will be developed by integrating functions such as mechanical strength, wear resistance, radiation shielding or tolerance, electrical enhancement, and/or chemical resistance.

Author Contributions

Conceptualization, S.B. and J.L.; Methodology, S.B.; Validation, S.B.; Investigation, S.B.; Writing—original draft, S.B. and J.L.; Writing—review & editing, S.B. and J.L.; Supervision, J.L.; Project administration, J.L. and S.B. All authors have read and agreed to the published version of the manuscript.

Funding

This paper is partially supported by Department of Energy (DOE) Small Business Innovation Program (SBIR) DE-SC0024742.

Institutional Review Board Statement

Not applicable.

Informed Consent Statement

Not applicable.

Data Availability Statement

The raw data supporting the conclusions of this article will be made available by the authors on request. The data are not public due to privacy.

Acknowledgments

Special thanks to Amy Swain for her valuable guidance and support. We also acknowledge our appreciation to Mathew Stone and Hassina Bilheux (Oak Ridge National Labs) for their helpful discussion.

Conflicts of Interest

Authors Shuang Bai and Jian Liu were employed by the company PolarOnyx, Inc. The authors declare that the research was conducted in the absence of any commercial or financial relationships that could be construed as a potential conflict of interest.

References

  1. Sharma, D.K.; Mahant, D.; Upadhyay, G. Manufacturing of metal matrix composites: A state of review. Mater. Today Proc. 2020, 26 Pt 2, 506–519. [Google Scholar] [CrossRef]
  2. Krishna, M.G.; Kumar, K.P.; Swapna, M.N.; Rao, J.B.; Bhargava, N.R.M.R. Metal-metal Composites—An Innovative Way for Multiple Strengthening. Mater. Today Proc. 2018, 4, 8085–8095. [Google Scholar] [CrossRef]
  3. Volpp, J. Impact of process parameters on particle distribution and wear resistance during laser deep alloying processes. In Proceedings of the Laser Advanced Materials Processing (LAMP), Fukuoka, Japan, 26–29 May 2015. [Google Scholar]
  4. Megahed, M.; Saber, D.; Agwa, M.A. Modeling of Wear Behavior of Al-Si/Al2O3 Metal Matrix Composites. Phys. Met. Metallogr. 2019, 120, 981–988. [Google Scholar] [CrossRef]
  5. Bhatt, J.; Balachander, N.; Shekher, S.; Karthikeyan, R.; Peshwe, D.R.; Murty, B.S. Synthesis of nanostructured Al-Mg-SiO2 metal matrix composites using high-energy ball milling and spark plasma sintering. J. Alloys Compd. 2012, 536, S35–S40. [Google Scholar] [CrossRef]
  6. Park, B.G.; Crosky, A.G.; Hellier, A.K. Material characterization and mechanical properties of Al2O3-Al metal matrix composites. J. Mater. Sci. 2001, 36, 2417–2426. [Google Scholar] [CrossRef]
  7. Agrawal, P.; Sun, C.T. Fracture in metal–ceramic composites. Compos. Sci. Technol. 2004, 64, 1167–1178. [Google Scholar] [CrossRef]
  8. Nakao, W.; Abe, S. Enhancement of the self-healing ability in oxidation induced self-healing ceramic by modifying the healing agent. Smart Mater. Struct. 2012, 21, 025002. [Google Scholar] [CrossRef]
  9. Nakao, W.; Takahashi, K.; Ando, K. Threshold stress during crack healing treatment of structural ceramics having crack healing ability. Mater. Lett. 2007, 61, 2711–2713. [Google Scholar] [CrossRef]
  10. Osada, T.; Hara, T.; Mitome, M.; Ozaki, S.; Abe, T.; Kamoda, K.; Ohmura, T. Self-healing by design: Universal kinetic model of strength recovery in self-healing ceramics. Sci. Technol. Adv. Mater. 2020, 21, 593–608. [Google Scholar] [CrossRef]
  11. Woo, D.J.; Heer, F.C.; Brewer, L.N.; Hooper, J.P.; Osswald, S. Synthesis of nanodiamond-reinforced aluminum metal matrix composites using cold-spray deposition. Carbon 2015, 86, 15–25. [Google Scholar] [CrossRef]
  12. Wu, Y.; Kim, G.Y. Carbon nanotube reinforced aluminum composite fabricated by semi-solid powder processing. J. Mater. Process. Technol. 2011, 211, 1341–1347. [Google Scholar] [CrossRef]
  13. Wu, Y.; Kim, G.Y.; Anderson, I.E.; Lograsso, T.A. Fabrication of Al6061 composite with high SiC particle loading by semi-solid powder processing. Acta Mater. 2010, 58, 4398–4405. [Google Scholar] [CrossRef]
  14. Wu, Y.; Kim, G.Y. Compaction behavior of Al6061 and SiC binary powder mixture in the mushy state. J. Mater. Process. Technol. 2015, 216, 484–491. [Google Scholar] [CrossRef]
  15. Parsons, E.M.; Shaik, S.Z. Additive manufacturing of aluminum metal matrix composites: Mechanical alloying of composite powders and single track consolidation with laser powder bed fusion. Addit. Manuf. 2022, 50, 102450. [Google Scholar] [CrossRef]
  16. Behera, M.P.; Dougherty, T.; Singamneni, S. Conventional and Additive Manufacturing with Metal Matrix Composites: A Perspective. Procedia Manuf. 2019, 30, 159–166. [Google Scholar] [CrossRef]
  17. Xi, X.; Chen, B.; Tan, C.; Song, X.; Feng, J. Microstructure and mechanical properties of SiC reinforced AlSi10Mg composites fabricated by laser metal deposition. J. Manuf. Process. 2020, 58, 763–774. [Google Scholar] [CrossRef]
  18. Wang, M.; Song, B.; Wei, Q.; Shi, Y. Improved mechanical properties of AlSi7Mg/nano-SiCp composites fabricated by selective laser melting. J. Alloys Compd. 2019, 810, 151926. [Google Scholar] [CrossRef]
  19. Bai, S.; Lee, H.J.; Liu, J. 3D Printing with Mixed Powders of Boron Carbide and Al Alloy. Appl. Sci. 2020, 10, 3055. [Google Scholar] [CrossRef]
  20. Stone, M.B.; Kolesnikov, A.I.; Fanelli, V.R.; May, A.; Bai, S.; Liu, J. Characterization of aluminum and boron carbide based additive manufactured material for thermal neutron shielding. Mater. Des. 2023, 237, 112463. [Google Scholar] [CrossRef]
  21. Zeng, X.; Jing, Q.; Sun, J.; Zhang, J. Effect of Fractal Ceramic Structure on Mechanical Properties of Alumina Ceramic–Aluminum Composites. Materials 2023, 16, 2296. [Google Scholar] [CrossRef]
  22. Risse, J.H.; Trempa, M.; Huber, F.; Höppel, H.W.; Bartels, D.; Schmidt, M.; Reimann, C.; Friedrich, J. Microstructure and Mechanical Properties of Hypereutectic Al-High Si Alloys up to 70 wt.% Si-Content Produced from Pre-Alloyed and Blended Powder via Laser Powder Bed Fusion. Materials 2023, 16, 657. [Google Scholar] [CrossRef] [PubMed]
  23. Liu, J.; Cheng, D.; Oo, K.; McCrimmon, T.-L.; Bai, S. Design and Additive Manufacturing of TPMS Heat Exchanger. Appl. Sci. 2024, 14, 3970. [Google Scholar] [CrossRef]
Figure 1. AlSi10Mg powder size measurement.
Applmech 05 00026 g001
Figure 2. Silicon carbide powder size measurement.
Applmech 05 00026 g002
Figure 3. Characterization of SiC (silicon carbide) powder with EDX (energy-dispersed X-ray spectroscopy).
Applmech 05 00026 g003
Figure 4. Water immersion density measurement of AlSi10Mg printed cubic parts (a) matrix test, (b) verification test.
Applmech 05 00026 g004
Figure 5. Surface roughness, Ra, measurement of AlSi10Mg cubic parts (a) matrix test, (b) verification test.
Applmech 05 00026 g005
Figure 6. Water immersion density measurement of SiC/Al: 2/98 printed cubic parts (a) matrix test, (b) verification test.
Applmech 05 00026 g006
Figure 7. Surface roughness, Ra, measurement of SiC/Al: 2/98 printed cubic parts (a) matrix test, (b) verification test.
Applmech 05 00026 g007
Figure 8. Water immersion density measurement of SiC/Al: 5/95 printed cubic parts (a) matrix test, (b) verification test.
Applmech 05 00026 g008
Figure 9. Surface roughness, Ra, measurement of SiC/Al: 5/95 printed cubic parts (a) matrix test, (b) verification test.
Applmech 05 00026 g009
Figure 10. (a) Density comparison of printed cubic parts before and after HIP. (b) Surface roughness comparison.
Applmech 05 00026 g010
Figure 11. Directions of the cross-section for measurement (American Society for Testing and Materials ASTM 52921).
Applmech 05 00026 g011
Figure 12. Comparison of microstructure and grain boundary of AlSi10Mg cubic samples along different orientations: (Top) etched for 10 min (as built) (Bottom) etched for 2 h (HIP-treated).
Applmech 05 00026 g012
Figure 13. Comparison of microstructure and grain boundary of SiC/Al: 2/98 cubic samples along different orientations: (Top) etched for 10 min (as built), (Bottom) etched for 2 h (HIP-treated).
Applmech 05 00026 g013
Figure 14. Comparison of microstructure and grain boundary of SiC/Al: 5/95 cubic samples along different orientations: (Top) etched for 10 min (as built), (Bottom) etched for 2 h (HIP-treated).
Applmech 05 00026 g014
Figure 15. Example of standard dog-bone parts printing.
Applmech 05 00026 g015
Figure 16. Tensile test results of three compositions. (a) Yield strength. (b) Ultimate strength. (c) Young’s modulus. (d) Elongation.
Applmech 05 00026 g016
Figure 17. (a) Thermal conductivity measurement results and (b) coefficient of thermal expansion measurement results.
Applmech 05 00026 g017
Figure 18. Phase identification results for AlSi10Mg (a) as-built, (b) HIP-treated.
Applmech 05 00026 g018
Figure 19. Phase identification for SiC/Al: 2/98 (a) as-built, (b) HIP-treated.
Applmech 05 00026 g019
Figure 20. Phase identification for SiC/Al: 5/95 (a) as-built, (b) HIP-treated.
Applmech 05 00026 g020aApplmech 05 00026 g020b
Figure 21. Electron backscatter diffraction (EBSD) analysis results of AlSi10Mg (as-built) (a) Kikuchi band contrast map, (b) phase map.
Applmech 05 00026 g021
Figure 22. EBSD analysis results of AlSi10Mg (HIP-treated) (a) Kikuchi band contrast map, (b) phase map.
Applmech 05 00026 g022
Figure 23. EDS mapping images of the cross-section of AlSi10Mg part (as-built).
Applmech 05 00026 g023
Figure 24. EDS quantitative analysis of AlSi10Mg part (as-built).
Applmech 05 00026 g024
Figure 25. EBSD analysis results of SiC/Al: 2/98 (as-built) (a) Kikuchi band contrast map, (b) phase map. Irregular shapes are unmelted SiC powders.
Applmech 05 00026 g025
Figure 26. EBSD analysis result of SiC/Al: 2/98 (HIP-treated) (a) Kikuchi band contrast map, (b) phase map. Irregular shapes are unmelted SiC powders.
Applmech 05 00026 g026
Figure 27. EDS mapping images of the cross-section of SiC/Al: 2/98 part (as-built). Irregular shapes are unmelted SiC powders.
Applmech 05 00026 g027aApplmech 05 00026 g027b
Figure 28. EDS quantitative analysis of SiC/Al: 2/98 part (as-built).
Applmech 05 00026 g028
Figure 29. EBSD analysis result of SiC/Al: 5/95 (as-built) (a) Kikuchi band contrast map, (b) phase map. Irregular shapes are unmelted SiC powders.
Applmech 05 00026 g029
Figure 30. EBSD analysis results of SiC/Al: 5/95 (HIP-treated) (a) Kikuchi band contrast map, (b) phase map. Irregular shapes are unmelted SiC powders.
Applmech 05 00026 g030
Figure 31. EDS mapping images of the cross-section of SiC/Al: 5/95 part (as-built). Irregular shapes are unmelted SiC powders.
Applmech 05 00026 g031
Figure 32. EDS quantitative analysis of SiC/Al: 5/95 part (as-built).
Applmech 05 00026 g032
Figure 33. Composition layers of graded printing test sample.
Applmech 05 00026 g033
Figure 34. Microscopic images of cross-section for five different locations of the graded composition cubic sample.
Applmech 05 00026 g034
Figure 35. Graded composition AM of multi-functional heat sink (a) 3D modeling, (b) printed heat sink.
Applmech 05 00026 g035
Figure 36. Neutron scattering instrumentation at the Spallation Neutron Source of ORNL (middle), boron carbide MMC 3D collimator (left), and 2D collimator (right).
Applmech 05 00026 g036
Figure 37. B4C/Al MMC parts made for ORNL neutron scattering instrumentation. These holder and bracket are used to shield neutron scattering from mounting detection components.
Applmech 05 00026 g037
Table 1. Optimal laser printing parameters.
PowderAlSi10MgSiC/Al: 2/98SiC/Al: 5/95
Laser power (W)175175186
Scan speed (mm/s)150200150
Hatch spacing (mm)0.130.150.15
Table 2. Tensile test results of standard dog-bone parts.
MaterialPrinting
Direction
(°)
Sample IDYield Strength
(MPa)
Ultimate Strength
(MPa)
Young’s Modulus
(GPa)
Elongation
(%)
Relative Density
(%)
AlSi10Mg (As-built)010141183388309100.00
4510142193392779100.00
9010143174382218100.00
AlSi10Mg (HIP-treated)010151801704823100.00
45101521051649824100.00
9010153931676625100.00
SiC/Al: 2/98
(As-built)
010121221403575100.00
45101222433971194100.00
9010123216382773100.00
SiC/Al: 2/98 (HIP-treated)0101311421831142299.55
4510132701841021999.92
901013314118110819100.00
SiC/Al: 5/95
(As-built)
01007119938232399.21
451007222836789399.63
901007318927550199.44
SiC/Al: 5/95 (HIP-treated)010081176196971199.89
45100821611967010100.00
90100831141921231099.03
Table 3. Summary of XRD quantitative analysis results.
MaterialWeight Percent (wt%)
AlSi10Mg
(As-Built)
AlSi10Mg
(HIP-Treated)
SiC/Al: 2/98
(As-Built)
SiC/Al: 2/98
(HIP-Treated)
SiC/Al: 5/95
(As-Built)
SiC/Al: 5/95
(HIP-Treated)
Al62.163.991.585.281.981.3
Si37.936.18.113.49.114.1
SiC--0.41.43.74.6
C----3.6-
Al4C3----1.7-
Table 4. Calculations for the powder preparation.
PowderThickness of Layer
(mm)
The Number of
Slicing Layers
Powder Thickness in Powder Bed (mm)
SiC/Al: 10/900.2551.1
SiC/Al: 5/950.1530.66
SiC/Al: 2/980.1530.66
AlSi10Mg36013.2
Disclaimer/Publisher’s Note: The statements, opinions and data contained in all publications are solely those of the individual author(s) and contributor(s) and not of MDPI and/or the editor(s). MDPI and/or the editor(s) disclaim responsibility for any injury to people or property resulting from any ideas, methods, instructions or products referred to in the content.