Article

A New Electron Backscatter Diffraction-Based Method to Study the Role of Crystallographic Orientation in Ductile Damage Initiation †

by
Behnam Shakerifard
1,*,
Jesus Galan Lopez
1,2 and
Leo A. I. Kestens
1,3
1
Materials Science and Engineering Department, Faculty 3mE, Delft University of Technology, Mekelweg 2, 2628 CD Delft, The Netherlands
2
Materials Innovation Institute M2i, Elektronicaweg 25, 2628 XG Delft, The Netherlands
3
EEMMECS Department, Metals Science and Technology Group, Faculty of Engineering and Architecture, Ghent University, Technologiepark Zwijnaarde 903, 9052 Ghent, Belgium
*
Author to whom correspondence should be addressed.
This paper is an extended version of our paper published in the 18th International Conference on Textures of Materials (ICOTOM 18), St George, UT, USA, 5–10 November, 2017.
Metals 2020, 10(1), 113; https://doi.org/10.3390/met10010113
Submission received: 19 October 2019 / Revised: 15 December 2019 / Accepted: 6 January 2020 / Published: 12 January 2020
(This article belongs to the Special Issue High-Strength Low-Alloy Steels)

Abstract

:
The third generation of advanced high strength steels shows promising properties for automotive applications. The macroscopic mechanical response of this generation can be further improved by a better understanding of failure mechanisms on the microstructural level and micro-mechanical behavior under various loading conditions. In the current study, the microstructure of a multiphase low silicon bainitic steel is characterized with a scanning electron microscope (SEM) equipped with an electron backscatter diffraction detector. A uniaxial tensile test is carried out on the bainitic steel with martensite and carbides as second phase constituents. An extensive image processing on SEM micrographs is conducted in order to quantify the void evolution during plastic deformation. Later, a new post-mortem electron backscatter diffraction-based method is introduced to address the correlation between crystallographic orientation and damage initiation. In this multiphase steel, particular crystallographic orientation components were observed to be highly susceptible to micro-void formation. It is shown that stress concentration around voids is rather relaxed by void growth than local plasticity. Therefore, this post-mortem method can be used as a validation tool together with a crystal plasticity-based hardening model in order to predict the susceptible crystallographic orientations to damage nucleation.

1. Introduction

Advanced high strength steels (AHSSs) and, in particular, the third generation of AHSSs with bainitic matrix have shown remarkable potential for automotive applications [1,2]. Complex multiphase bainitic steels with second phase constituents martensite and retained austenite are promising candidates to reach an optimum balance between strength, ductility, and formability [3,4,5,6,7,8,9]. Developing bainitic steels with enhanced properties would enable weight reduction of the car body, thus reducing fuel consumption and pollution and saving energy. Studying the micro-mechanical behavior and damage micro-mechanisms of such multiphase steels is essential for developing a bainitic microstructure with improved properties. In multiphase steels, it has been well reported that microstructural heterogeneities, such as different phases with various mechanical contrast, play a significant role in the partitioning of stress (and/or strain) during plastic deformation [10,11,12,13]. Hence, at the microstructure level, these local deformation incompatibilities may induce void formation at the critical moment in order to dissipate the local plastic work.
The role of the second phase (i.e., martensite) and its morphology (size, shape, and distribution) in ductile damage initiation in dual phase steels has been extensively studied by advanced experimental and crystal plasticity-based modelling techniques [14,15,16,17,18]. Moreover, in polycrystalline materials, the anisotropic response of each individual crystallographic orientation to stress (and/or strain) is another important factor that needs to be considered in damage initiation mechanisms. Jia et al. [19] have shown for a duplex stainless steel that, at high macroscopic stresses, when all grains in both constituent phases deform plastically, the role of the crystallographic orientation anisotropy on stress–strain partitioning is more pronounced than the phase contrast. The role of crystallographic orientation on damage initiation at relatively high levels of plastic deformations was also observed on metal–matrix [20], rigid fiber composites [21], as well as in an austenitic stainless steel under the cyclic loading condition [22]. Eventually, in multiphase polycrystalline materials, the simultaneous effect of phase contrast, with various morphologies, and crystallographic orientation on damage initiation is a frequent topic of investigation [15,22,23,24].
In the current study, firstly, a comprehensive and quantitative microstructural characterization is performed using a scanning electron microscope (SEM) equipped with an electron backscatter diffraction (EBSD) detector. Second, a quantitative analysis on void distribution and its correlation to the macroscopic strain is conducted. This enables to understand at which macroscopic strain level damage initiates in the microstructure. In this research work, particular attention is given to the crystallographic orientation aspect of damage initiation, while the mechanical phase contrast and its morphological aspect is reported elsewhere by Shakerifard et al. [18]. An EBSD analysis is employed to observe the orientations around the initiated voids. Afterwards, textures are calculated and compared in order to study the correlation between damage and crystallographic orientation.

2. Materials and Methods

The bainitic steel used in the current study has a low silicon content. The chemical composition is shown in Table 1. The 1 mm thick sheet of cold rolled ferritic–pearlitic steel is annealed above the Ac3 temperature in the Vatron Annealing Simulator® (Vatron, Linz, Austria), and quenched to the bainite holding temperature of 450 °C for the holding time of 120 s. Following bainite transformation, the material is quenched to room temperature. The annealing cycle of the developed bainitic steel is depicted in Figure 1.
In order to analyze the microstructure of this bainitic steel, as reported by Shakerifard et al. [9], samples are prepared by the standard metallographic steps of grinding, diamond polishing, and polishing with colloidal SiO2. A scanning electron microscope FEI® (SEM-Quanta FEG 450, FEI, Hillsboro, OR, USA) equipped with EBSD detector is employed to characterize the microstructure of the samples prior to and after tensile testing. EBSD maps are recorded with a step size of 0.05 µm and post processed with the EDAX-TSLOIM AnalysisTM software.
The investigated steel consists of a bainitic matrix with two main second phase constituents of martensite and carbide. However, two types of martensites are observed: (i) auto-tempered martensite (ATM) and (ii) MA islands, which are composed of isolated martensite blocks (M) with a negligible fraction of retained austenite (A) between the martensite laths [18]. The EBSD technique is employed to quantify the grain size and fraction of bainite and martensite (ATM and MA) separately. For this purpose, the grain average image quality (GAIQ) parameter, directly correlated to the sharpness of the Kikuchi pattern, is used in order to distinguish these two constituents [14,15,25]. This is possible because the martensite phase demonstrates a lower IQ parameter compared with bainite, as a result of intrinsic distortion in the martensitic crystal structure, and higher dislocation density compared with bainite. Grains are defined with a minimum number of five pixels and a misorientation threshold of five degrees. The grain size is measured based on the linear intercept method and by averaging lines along both the rolling and normal directions (RD and ND) for each phase.
The fraction of MA islands is measured separately from the total martensite (ATM and MA) fraction by a specific etching method. Initially, the surface of the samples is activated by ethanol, which is quickly followed by Klemm etchant (50 mL saturated aqueous sodium thiosulfate, 1 g potassium metabisulfite) color etching. Later, ten backscatter electron (BSE) images, which provide an enhanced contrast between matrix and MA islands compared with secondary electron images, are captured from the sample and binarized into black and white images. In addition, the fraction of MA islands is measured by image processing.
Uniaxial tensile tests are performed at room temperature with strain rates of 2 × 10⁻⁵ and 8 × 10⁻³ s−1 in the elastic and plastic regions of the tensile curve, respectively, in order to examine the tensile properties of the bainitic steel. Tensile tests are carried out based on the DIN EN 6892-1 standard using a Zwick Z100® tensile machine (ZwickRoell AG, Fürstenfeld, Austria). Dog-bone specimens with a width and gauge length of 6.25 and 25 mm, respectively, are loaded along the rolling direction (RD). Two tests are performed, and elongations are measured by the extensometer. Additionally, two tensile tests are interrupted in the uniform and non-uniform regions, respectively, in order to investigate the evolution of damage within the microstructure at various strain levels.
Tasan et al. [16] have conducted an extensive study on various techniques for the quantification of voids evolution during plastic deformation. They have reported that microscopic techniques such as 2D SEM and 3D X-ray micro-tomography (XµT) provide significant information regarding the strain levels and the involved micro-mechanisms in damage initiation and evolution compared with mechanical-based techniques. The possible drawback of the 2D SEM technique is an underestimation in damage quantities, where voids may smear-out by mechanical polishing. Lai et al. [26] have demonstrated that the advantage of the SEM-based technique is its high resolution and its ability to detect smaller voids compared with XµT. However, as reported by Landron et al. [27,28], the XµT can provide 3D visual information with regard to growth characteristics of individual void.
In the current study, the quantification of voids is performed by a high resolution FEG-SEM Nova 600 (FEI, Hillsboro, OR, USA). The evolution of voids as a function of the plastic strain is studied on the RD–ND section in the middle width of the fractured tensile samples. Two variables are considered to quantify the evolution of voids: (i) the void number density (VD) and (ii) the void area fraction (VAF) in the 2D section of microscopic observation. The VD indicates the nucleation activity of voids during plastic deformation, while VAF includes void growth in addition to nucleation. This SEM-based technique provides the possibility to visualize the dispersion of the voids within the microstructure. True plastic strain ( ε longitudinal ) values are calculated in equally distanced intervals from the fracture surface based on the normal ( ε thickness ) and transversal strains ( ε transveral ) using optical microscopy images and the following equations:
ε fracture = ln A 0 A f ,
ε longitudinal = ( ε thickness + ε transveral ) = ln t f t 0 + ln w f w 0   ,
where A 0   is the initial cross-section area of the tensile sample and A f is the fracture surface area (measured by optical microscope image) in Equation (1). The t 0 , t f , w 0 , and w f are the thickness and width values of the tensile sample prior and after tensile test, respectively. A field of approximately 1 mm2 is examined by running an automated image acquisition software to capture over 1000 SEM micrographs. The SEM micrographs are captured with a magnification of 4000×, having a width and height of 1024 × 884 pixels, respectively. These settings provide a pixel resolution of 31 nm and enable to detect the micro-voids within the microstructure. Matlab@ (R2017(a), MathWorks, Natick, MA, USA) and ImageJ@ software (1.5 1P, NIH, WA, USA) with specific image processing algorithm is used to stich and study all micrographs. A void size criterion is defined in which all the voids larger than 0.1 µm2 (≈33 pixels) are counted.

3. Results and Discussion

3.1. Microstructure Characterization

The microstructures of the low Si bainitic steel are shown in Figure 2. The bainitic steel reveals a bainitic matrix in which small carbides are observed, whereby isolated MA islands are also observed within the bainitic matrix. Table 2 quantitatively illustrates the microstructural variations of the bainitic steel.

3.2. Tensile Test

The tensile curve and mechanical properties of the material are depicted in Figure 3. The engineering tensile curve of the material demonstrates the small non-uniform region, which implies that the steel could not accommodate considerable elongation beyond the uniform plastic domain. The localized necking behavior (cf. Figure 4) of the material also confirms the small post-necking region of the tensile curve.

3.3. Damage Analysis

3.3.1. Quantitative Analysis of Voids’ Evolution

Figure 4 demonstrates the RD–ND cross section at half width of the fracture tensile sample before and after image processing. The size of the voids and their shape fully correspond to their real geometry. It is observed that voids are only present at the neck region of the fractured tensile sample. Voids are distributed heterogeneously and more densely present in the vicinity of the fracture surface. The microstructural observation of the interrupted tensile sample at the elongation of 5%, reported elsewhere by Shakerifard et al. [18], confirmed the absence of void formation during the uniform plastic deformation. In contrast to this bainitic martensitic steel, for ferritic and martensitic dual phase (DP) steels, it has been reported that voids can nucleate in the early stage of plastic deformation prior to necking [29].
It is observed in Figure 5 that VD and VAF parameters increase with the plastic deformation. The exponential trend of these two damage-related parameters demonstrates a sudden increase at the strain level of 74%. The localized necking behavior of the fracture tensile sample close to fracture surface (cf. Figure 4) resulted in higher stress triaxiality, and thus increases VAF significantly.

3.3.2. Crystallographic Orientation Aspect of Void Initiation

The individual role of martensite as a hard phase and its topological impact on micro-mechanisms of void initiation in ductile failure in this bainitic multiphase steel has been reported in detail by Shakerifard et al. [18]. They have shown that in this steel grade voids nucleate at the interface of bainite and martensite (B/M). This shows the effect of mechanical phase contrast between B and M (soft and hard phase, respectively), which leads to stress and strain partitioning. At any moment when incompatibilities reach a critical level, voids nucleate in order to locally relax the sharp stress gradients among soft and hard phases. Although the effect of second phase constituents and their topology is significant, the role of crystallographic orientation in the evolution of stress (and/or) strain is inevitable. In this regard, in order to investigate the role of crystallographic orientation in void initiation, 33 voids were analyzed locally by the EBSD technique. The method of capturing orientations of grains is depicted schematically in Figure 6. Figure 6b particularly reveals the procedure of capturing the local surrounding orientations of grains around a void. This rectangular area has faces with approximately three times the short and long diameters of a typical void (approximating the void by an elliptical area with a major and minor axis). This method is used consistently for all 33 of the studied voids.
Owing to severe plastic deformation and distortion of the crystal lattices in the vicinity of the voids, a poor pattern quality was normally observed. Only orientations with a confidence index above 0.1 are used for further analysis. Later, the orientation distribution function (ODF) is calculated from approximately 131,000 void neighboring pixels (with an equivalent area of ~642 μm2 surrounding 33 voids). The calculated 3D-ODF of 33 voids using MTEX software (5.1.1, Chemnitz, Germany) [30] is shown in Figure 7 and denominated as the void-ODF (VODF) using the Euler space.
Figure 7 shows three sections of φ 2     = 15°, 45°, and 75°, which exhibit the dominant components of VODF. In the neck region of the fracture tensile sample where voids are present, the orthorhombic sample symmetry no longer exists, and thus the Euler space is confined into 0 < φ 1 < 360° and 0 < φ 2 , Φ < 90° (triclinic symmetry condition). Figure 8c shows the texture of the regions with no voids, which will be denominated here as the no-void-ODF (NVODF). The NVODF reveals a smoother distribution, which is because of the fact that regions with no voids have more dispersed orientations compared with regions selected around voids (cf. Figure 6c).
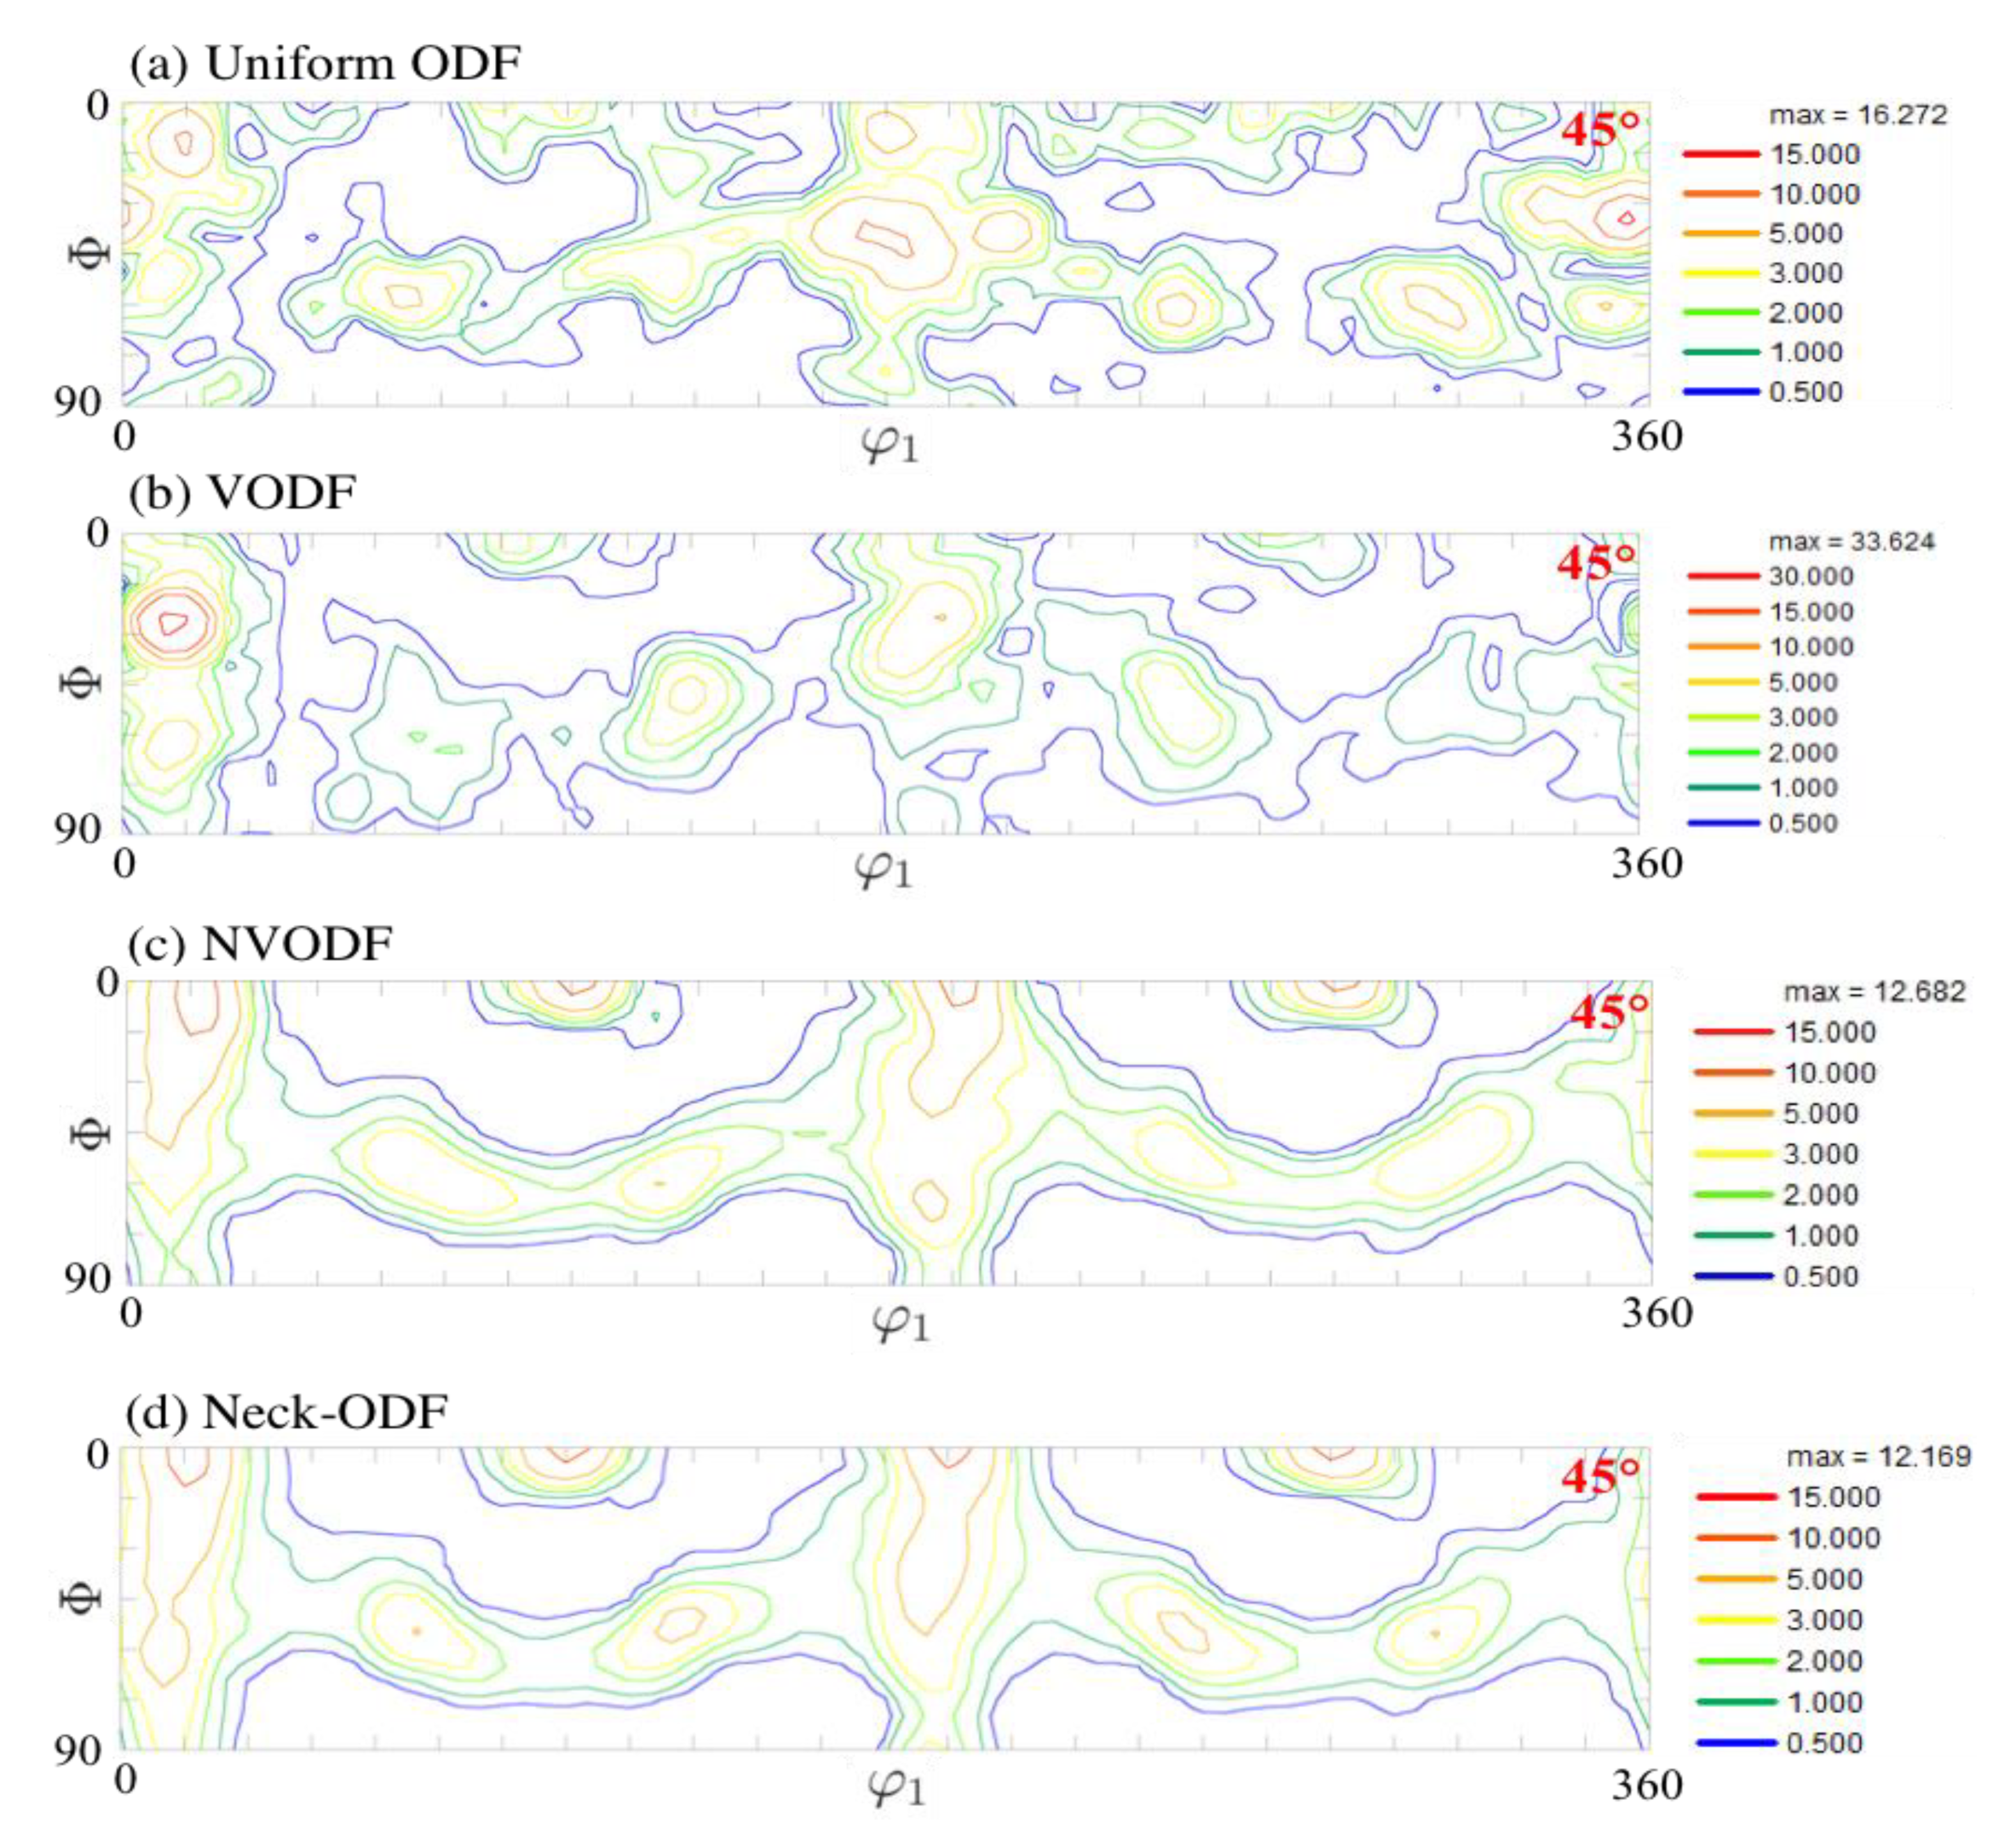
In Section 3.3.1, it was illustrated that, prior to the necking point at elongation of 5% ( e u   = 5%), no microstructural voids were initiated in the tensile sample. Therefore, the deformation texture of the material at the ultimate tensile strength (UTS) point, which is denominated here as the uniform ODF (UODF), cf. Figure 8a, can be considered as a reference texture from which voids will nucleate. Furthermore, the neck-ODF will be considered, cf. Figure 8d, which is calculated by merging the textures of VODF and NVODF, which means it includes all the orientations of void neighboring grains and void distant grains. It needs to be emphasized that this method is a post-mortem analysis, which implies that all orientations related to the VODF and NVODF are derived from the tensile sample after its fracture. Therefore, it is not obvious which interface was initially at the origin of the void nucleation. The rectangular region of interest around voids includes all the potentially susceptible orientations from which voids might have been initiated. Therefore, this rectangular geometry also includes the grains that were indirectly involved in the void initiation process by providing the local constraint to the void nucleation process.
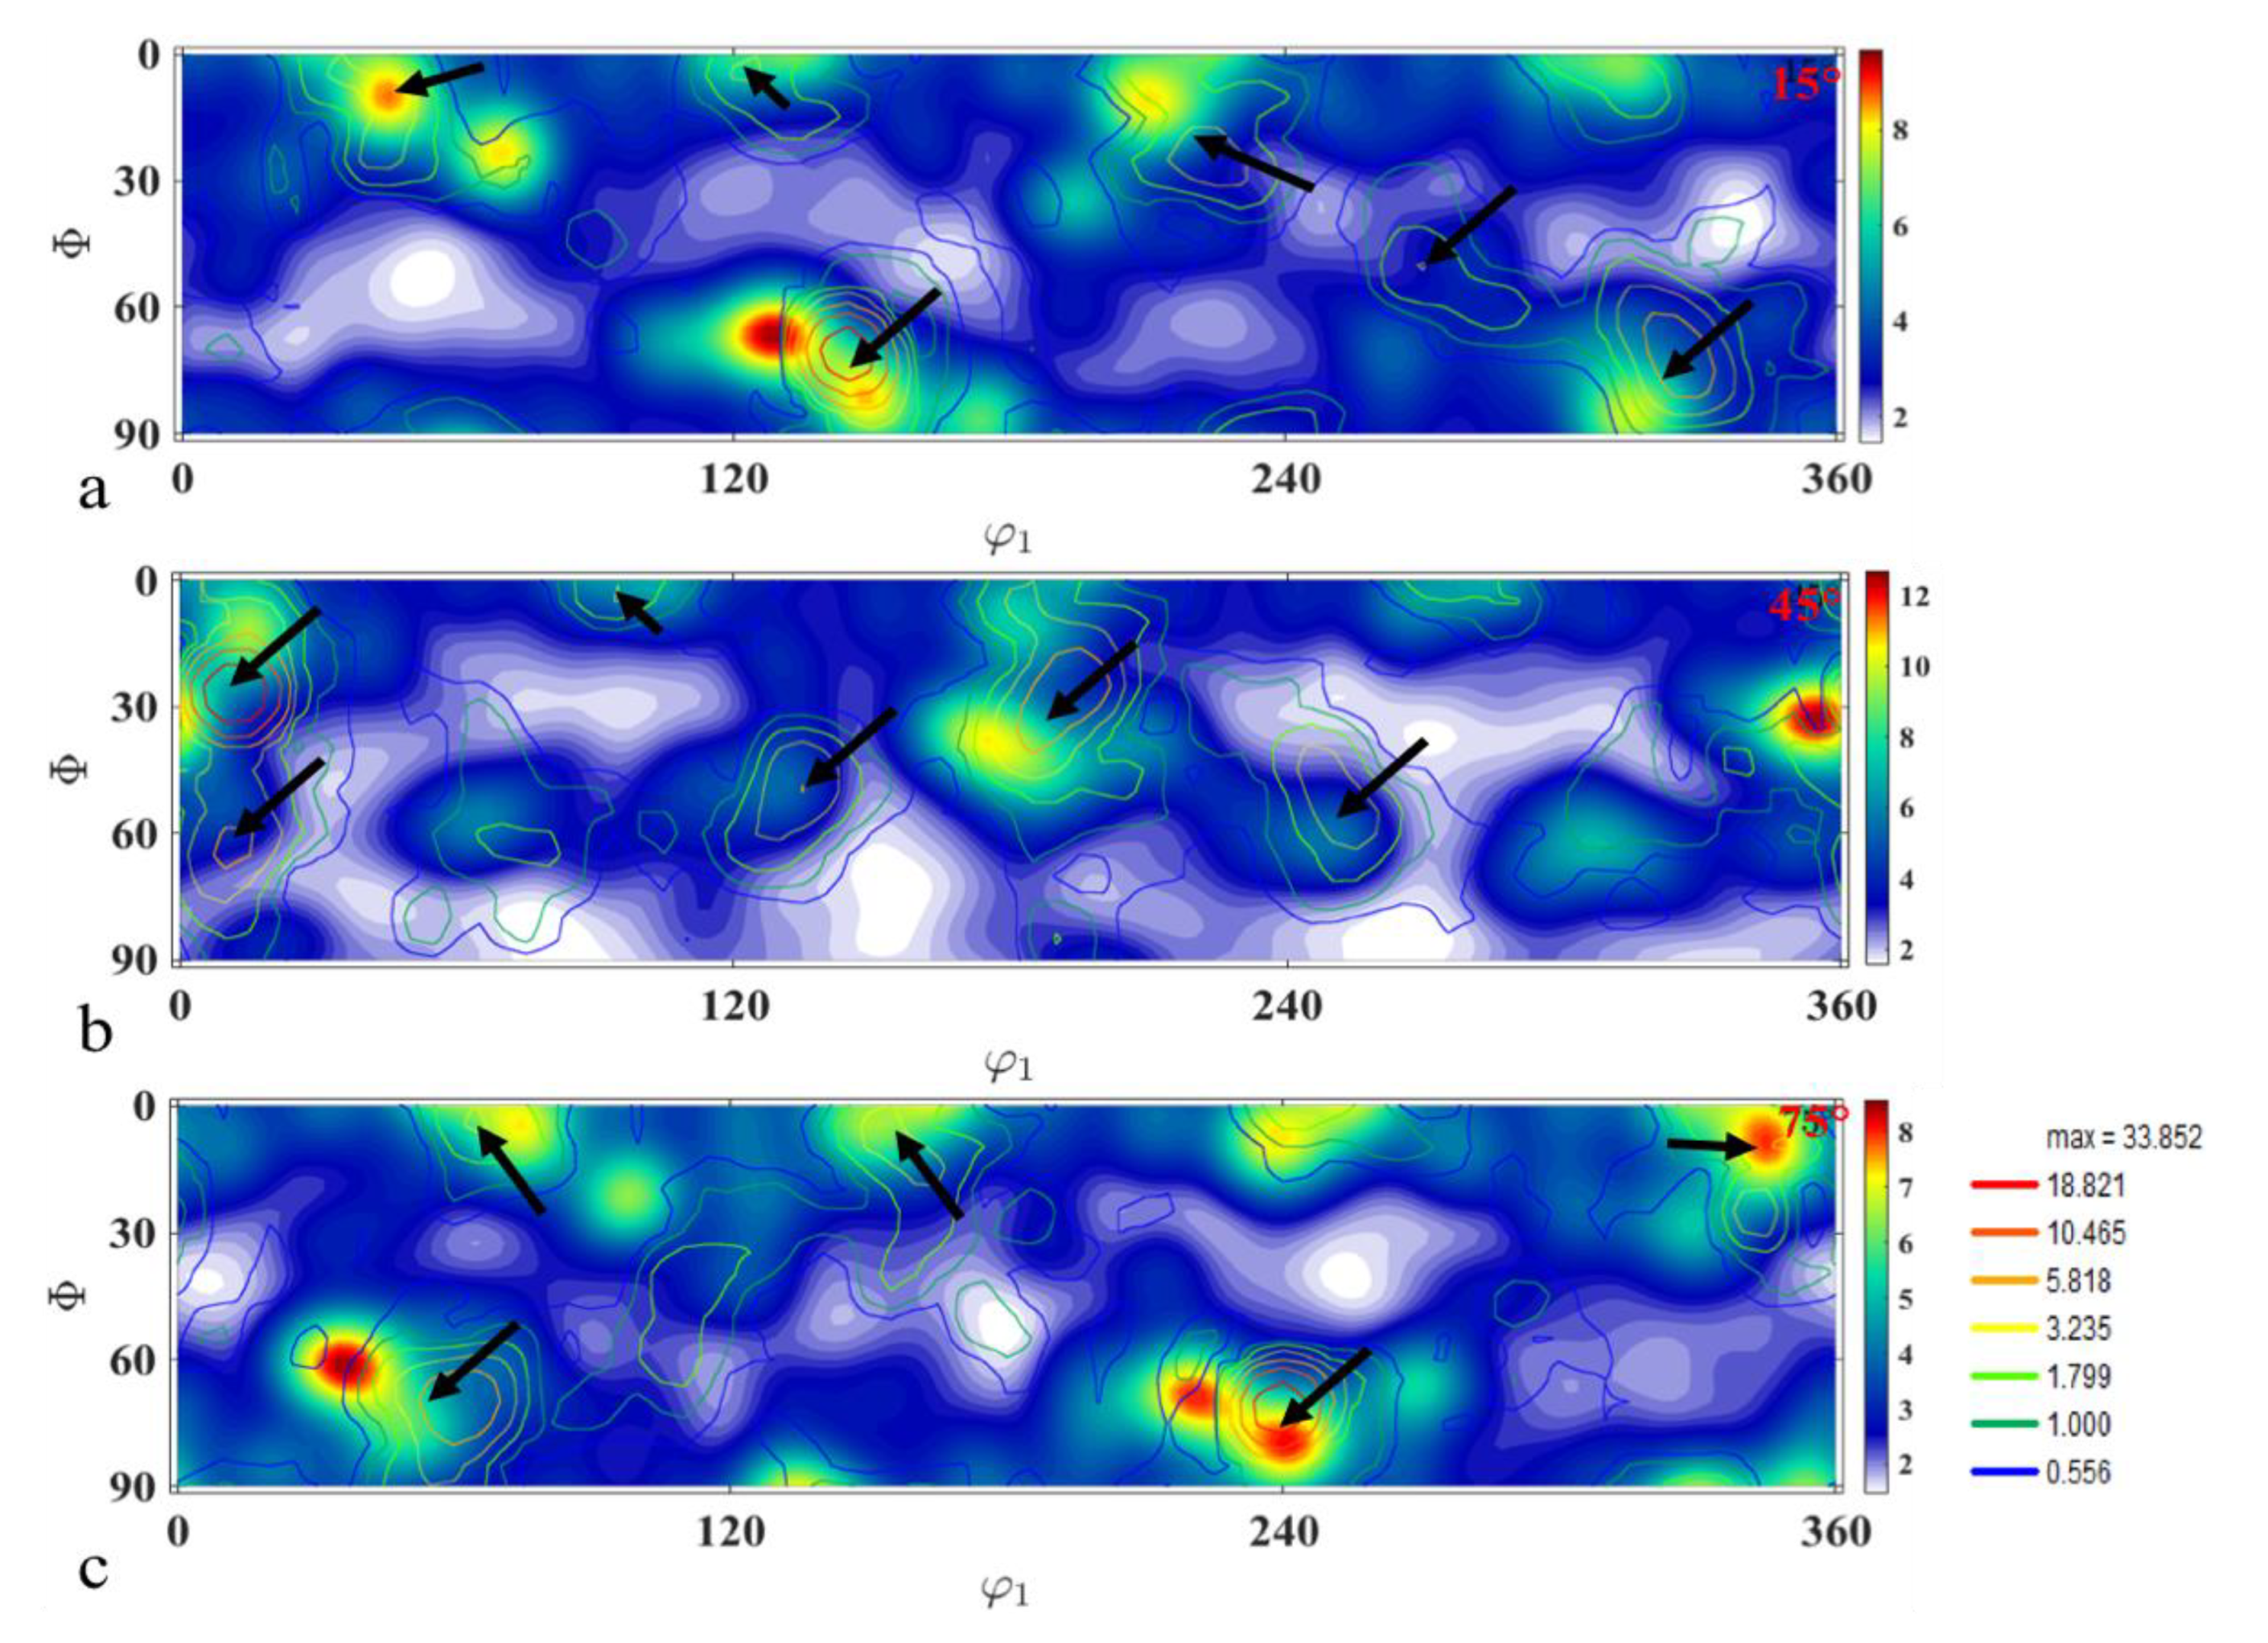
The visual comparison of the VODF and NVODF with respect to the neck-ODF reveals that that the NVODF more closely resembles the texture observed in the necked region (neck-ODF). However, by the comparison between the VODF and NVODF with the UODF, it appears that the VODF better resembles the UODF. In order to further investigate the resemblance of the VODF and UODF textures, the contour maps of VODF are overlaid with the UODF at the three sections of φ 2     = 15°, 45°, and 75°, cf. Figure 9. The contour maps represent the VODF, while the gradient maps in the backgrounds represent the UODF, and the black arrows indicate the main components of the VODF. Figure 9 also reveals that, for the φ 2     = 15° and 75° sections, the VODF closely resembles the UODF, as shown earlier for the φ2 = 45° section, cf. Figure 8a,b.
The texture similarity between the UODF and VODF can be understood by considering the stress relaxation processes in the microstructural level. According to Figure 5, voids are nucleated at a high rate at the strain level of approximately 74% and, knowing that voids act as stress concentrators, one may expect that the local stress peaks can be relaxed further either by plastic deformation of the grains surrounding a void and/or by further void growth. However, it is observed in Figure 9 that, upon void initiation, the local stress relaxation is rather controlled by the void growth mechanism than local plasticity inside the grains. This mechanism acts as a preferred local stress relaxation process as the VODF clearly resembles the UODF texture. However, it is also apparent that the components of the VODF and UODF do not correlate one to one, which can be explained either by further plasticity after void initiation at the neighboring grains around voids or including orientations that are not directly involved in void initiation. In addition, a void represents a free surface trapped in the bulk of the material that has appeared in order to relax the stresses at the microstructural level. However, once it has nucleated, the competitive role between the local hardening and free surface growth determines the major contribution of these two mechanisms on local stress relaxation, which is an energetically driven process. As void growth seems to be the main mechanism of local stress relaxation around voids, the dominant components of the VODF can be considered as susceptible orientations to void nucleation.

4. Summary and Conclusions

In this research, a new EBSD-based method was used to study the role of crystallographic orientation in void nucleation. In this regard, the microstructure of the fractured tensile sample in the vicinity of the fracture surface, where voids were concentrated, was measured by EBSD. Later, ODFs were calculated based on their relative locations with respect to voids: (i) the crystallographic orientations of the grains surrounding 33 voids were selected and represented by the void-ODF, (ii) whereas the regions away from the voids represented the no-void-ODF (NVODF). It was observed that the VODF more closely resembles the UODF. The post-mortem crystallographic orientation analysis around voids revealed that, after void initiation, the local stress relaxation process is rather dissipated by void growth than by further local plastic deformation. In other words, it can be concluded, that upon void initiation, orientations around voids may not go through significant rotations. This can be explained by the hardening saturation process of grains at certain macroscopic strain level due to plasticity prior to damage initiation. Consequently, the increased macroscopic deformation until failure does not lead to considerable orientation change in the VODF components. Therefore, the major components of the uniform ODF at the onset of necking correspond to ODF observed in the vicinity of voids (the VODF).

Author Contributions

Methodology, B.S. and L.A.I.K.; Resources, B.S.; Supervision, J.G.L.; Visualization, B.S.; Writing—original draft, B.S.; Writing—review & editing, L.A.I.K. All authors have read and agreed to the published version of the manuscript.

Funding

This work has been conducted in the framework of the BaseForm project, which has received funding from the European Union’s Research Fund for Coal and Steel (RFCS) research programme under grant agreement #RFCS-CT-2014-00017.

Acknowledgments

The authors would like to acknowledge Tata Steel, IJmuiden (The Netherlands), for providing the material in the current study. Special thanks to Frank Hisker for providing the tensile test results.

Conflicts of Interest

The authors declare no conflict of interests.

References

  1. Matlock, D.; Speer, J.G.; de Moor, E.; Gibbs, P.J. Recent developments in Advanced High Strength Sheet Steels for automotive applications—An Overview. JESTECH 2012, 15, 1–12. [Google Scholar]
  2. Bouaziz, O.; Zurob, H.; Huang, M. Driving force and logic of development of advanced high strength steels for automotive applications. Steel Res. Int. 2013, 84, 937–947. [Google Scholar] [CrossRef]
  3. Caballero, F.G.; Allain, S.; Cornide, J.; Velásquez, J.D.P.; Garcia-Mateo, C.; Miller, M.K. Design of cold rolled and continuous annealed carbide-free bainitic steels for automotive application. Mater. Des. 2013, 49, 667–680. [Google Scholar] [CrossRef] [Green Version]
  4. Caballero, F.G.; Bhadeshia, H.K.D.H. Design of novel high-strength bainitic steels. Thermec. Mater. Sci. Forum 2003, 426–432, 1337–1342. [Google Scholar] [CrossRef]
  5. Caballero, F.G.; Bhadeshia, H.K.D.H.; Mawella, K.J.A.; Jones, D.G.; Brown, P. Design of novel high strength bainitic steels: Part 1. Mater. Sci. Technol.-Lond. 2001, 17, 512–516. [Google Scholar] [CrossRef]
  6. Caballero, F.G.; Bhadeshia, H.K.D.H.; Mawella, K.J.A.; Jones, D.G.; Brown, P. Design of novel high strength bainitic steels: Part 2. Mater. Sci. Technol.-Lond. 2001, 17, 517–522. [Google Scholar] [CrossRef] [Green Version]
  7. Caballero, F.G.; Garcia-Mateo, C.; Chao, J.; Santofimia, M.J.; Capdevila, C.; de Andres, C.G. Effects of morphology and stability of retained austenite on the ductility of TRIP-aided bainitic steels. ISIJ Int. 2008, 48, 1256–1262. [Google Scholar] [CrossRef] [Green Version]
  8. Wang, Y.; Zhang, K.; Guo, Z.; Chen, N.; Rong, Y. A new effect of retained austenite on ductility enhancement in high strength bainitic steel. Mater. Sci. Eng. A-Struct. 2012, 552, 288–294. [Google Scholar] [CrossRef]
  9. Shakerifard, B.; Lopez, J.G.; Legaza, M.C.T.; Verleysen, P.; Kestens, L.A.I. Strain rate dependent dynamic mechanical response of bainitic multiphase steels. Mater. Sci. Eng. A-Struct. 2019, 745, 279–290. [Google Scholar] [CrossRef]
  10. Ahmad, E.; Manzoor, T.; Ali, K.L.; Akhter, J.I. Effect of microvoid formation on the tensile properties of dual-phase steel. J. Mater. Eng. Perform. 2000, 9, 306–310. [Google Scholar] [CrossRef]
  11. Avramovic-Cingara, G.; Ososkov, Y.; Jain, M.K.; Wilkinson, D.S. Effect of martensite distribution on damage behaviour in DP600 dual phase steels. Mater. Sci. Eng. A-Struct. 2009, 516, 7–16. [Google Scholar] [CrossRef]
  12. He, X.J.; Terao, N.; Berghezan, A. Influence of Martensite Morphology and Its Dispersion on Mechanical-Properties and Fracture Mechanisms of Fe-Mn-C Dual Phase Steels. Meter. Sci. 1984, 18, 367–373. [Google Scholar] [CrossRef]
  13. Steinbrunner, D.L.; Matlock, D.K.; Krauss, G. Void Formation during Tensile Testing of Dual Phase Steels. Metall. Trans. A 1988, 19, 579–589. [Google Scholar] [CrossRef]
  14. Tasan, C.C.; Diehl, M.; Yan, D.; Zambaldi, C.; Shanthraj, P.; Roters, F.; Raabe, D. Integrated experimental-simulation analysis of stress and strain partitioning in multiphase alloys. Acta Mater. 2014, 81, 386–400. [Google Scholar] [CrossRef]
  15. Tasan, C.C.; Hoefnagels, J.P.M.; Diehl, M.; Yan, D.; Roters, F.; Raabe, D. Strain localization and damage in dual phase steels investigated by coupled in-situ deformation experiments and crystal plasticity simulations. Int. J. Plast. 2014, 63, 198–210. [Google Scholar] [CrossRef] [Green Version]
  16. Tasan, C.C.; Hoefnagels, J.P.M.; Geers, M.G.D. Identification of the continuum damage parameter: An experimental challenge in modeling damage evolution. Acta Mater. 2012, 60, 3581–3589. [Google Scholar] [CrossRef] [Green Version]
  17. Yan, D.S.; Tasan, C.C.; Raabe, D. High resolution in situ mapping of microstrain and microstructure evolution reveals damage resistance criteria in dual phase steels. Acta Mater. 2015, 96, 399–409. [Google Scholar] [CrossRef]
  18. Shakerifard, B.; Lopez, J.G.; Hisker, F.; Kestens, L.A.I. Effect of banding on micro-mechanisms of damage initiation in bainitic/martensitic steels. Mater. Sci. Eng. A-Struct. 2018, 735, 324–335. [Google Scholar] [CrossRef]
  19. Jia, N.; Peng, R.L.; Wang, Y.D.; Chai, G.C.; Johansson, S.; Wang, G.; Liaw, P.K. Interactions between the phase stress and the grain-orientation-dependent stress in duplex stainless steel during deformation. Acta Mater. 2006, 54, 3907–3916. [Google Scholar] [CrossRef]
  20. Needleman, A.; Tvergaard, V. Comparison of Crystal Plasticity and Isotropic Hardening Predictions for Metal-Matrix Composites. J. Appl. Mech. Trans. ASME 1993, 60, 70–76. [Google Scholar] [CrossRef]
  21. Nugent, E.E.; Calhoun, R.B.; Mortensen, A. Experimental investigation of stress and strain fields in a ductile matrix surrounding an elastic inclusion. Acta Mater. 2000, 48, 1451–1467. [Google Scholar] [CrossRef] [Green Version]
  22. Li, R.G.; Xie, Q.G.; Wang, Y.D.; Liu, W.J.; Wang, M.G.; Wu, G.L.; Li, X.W.; Zhang, M.H.; Lu, Z.P.; Geng, C.; et al. Unraveling submicron-scale mechanical heterogeneity by three-dimensional X-ray microdiffraction. Proc. Natl. Acad. Sci. USA 2018, 115, 483–488. [Google Scholar] [CrossRef] [PubMed] [Green Version]
  23. de Geus, T.W.J.; Maresca, F.; Peerlings, R.H.J.; Geers, M.G.D. Microscopic plasticity and damage in two-phase steels: On the competing role of crystallography and phase contrast. Mech. Mater. 2016, 101, 147–159. [Google Scholar] [CrossRef] [Green Version]
  24. Shakerifard, B.; Lopez, J.G.; Hisker, F.; Kestens, L.A.I. Crystallographically resolved damage initiation in advanced high strength steel. In Proceedings of the 18th International Conference on Textures of Materials (Icotom-18), St. George, UT, USA, 6–10 November 2017; Volume 375. [Google Scholar]
  25. Choi, S.H.; Kim, E.Y.; Woo, W.; Han, S.H.; Kwak, J.H. The effect of crystallographic orientation on the micromechanical deformation and failure behaviors of DP980 steel during uniaxial tension. Int. J. Plast. 2013, 45, 85–102. [Google Scholar] [CrossRef]
  26. Lai, Q.; Bouaziz, O.; Goune, M.; Brassart, L.; Verdier, M.; Parry, G.; Perlade, A.; Brechet, Y.; Pardoen, T. Damage and fracture of dual-phase steels: Influence of martensite volume fraction. Mater. Sci. Eng. A-Struct. 2015, 646, 322–331. [Google Scholar] [CrossRef]
  27. Landron, C.; Maire, E.; Adrien, J.; Bouaziz, O.; di Michiel, M.; Cloetens, P.; Suhonen, H. Resolution effect on the study of ductile damage using synchrotron X-ray tomography. Nucl. Instrum. Meth. B 2012, 284, 15–18. [Google Scholar] [CrossRef]
  28. Landron, C.; Maire, E.; Bouaziz, O.; Adrien, J.; Lecarme, L.; Bareggi, A. Validation of void growth models using X-ray microtomography characterization of damage in dual phase steels. Acta Mater. 2011, 59, 7564–7573. [Google Scholar] [CrossRef]
  29. Han, S.K.; Margolin, H.; Formation, V. Void Growth and Tensile Fracture of Plain Carbon-Steel and a Dual-Phase Steel. Mater. Sci. Eng. A-Struct. 1989, 112, 133–141. [Google Scholar] [CrossRef]
  30. Bachmann, F.; Hielscher, R.; Schaeben, H. Texture Analysis with MTEX—Free and Open Source Software Toolbox. Solid State Phenom. 2010, 160, 63–68. [Google Scholar] [CrossRef] [Green Version]
Figure 1. Schematic illustration of the annealing cycle used to develop the bainitic steel.
Metals 10 00113 g001
Figure 2. Scanning electron micrographs of the bainitic steel under consideration: (a) SEM micrograph of the microstructure etched by Klemm; (b) SEM micrograph of the microstructure etched by Nital; (c) image quality map and the fraction of retained austenite is negligible (<1%). The rolling direction is along the horizontal axis and the normal direction is along the vertical axis. ATM, auto-tempered martensite; SEM, scanning electron microscope.
Metals 10 00113 g002
Figure 3. Engineering stress and elongation curve with corresponding tensile properties.
Metals 10 00113 g003
Figure 4. Roughly 1000 contiguous high-resolution SEM micrographs (each ≈ 27 × 32 µm2); (a) after stitching all SEM micrographs and (b) image processed, whereby voids are magnified 50× with respect to matrix pixels for enhanced visualization.
Metals 10 00113 g004
Figure 5. Quantitative analysis of voids’ evolution as a function of true plastic strain.
Metals 10 00113 g005
Figure 6. Schematic representation of orientation selection on an overlapped image quality and inverse pole figure map; (a) complete region of analysis, (b) region selected around the void with faces approximately equal to three times the void diameter; and (c) remaining region of analysis. The rolling direction is along the horizontal axis and the normal direction is along the vertical direction.
Metals 10 00113 g006
Figure 7. Three-dimensional (3D) void orientation distribution function (ODF) (3D-VODF). Three φ 2 sections ( φ 2     = 15°, 45°, and 75°) consist of the dominant components with regard to voids orientations.
Metals 10 00113 g007
Figure 8. φ 2 = 45° section of ODFs of the steel at two various deformation levels; (a) uniform deformation union ODF (UODF) (calculated from 796,000 data points), (b) post uniform VODF (131,000 data points), (c) post uniform no-void-ODF (NVODF) (460,000 data points), and (d) necking or post uniform ODF consist of the merged ODFs in b and c.
Metals 10 00113 g008
Figure 9. The overlapped VODF (contour map with arrows indicating dominant components) and UODF (color gradient map) of the material at two different deformation levels (UODF at 5% and VODF at ≥74%); (a) φ 2 = 15°, (b) φ 2 = 45°, (c) φ 2 = 75°.
Metals 10 00113 g009
Table 1. Chemical composition of the studied bainitic steel (wt.%).
ElementsC%Mn%Si%Cr%Al%P%S%N%
Steel0.2151.960.100.610.0200.0070.00270.005
Table 2. Microstructural variables of the bainitic steel.
SamplePhasesGrain Size (μm)Fraction (%)Block Size (μm)Cementite Size (μm)
Bainitic steelBainite1.44 ± 0.01Bal--
MA-3.4 ± 1.70.7 ± 0.35-
Cementite-3.6 ± 1.0-0.07 ± 0.04
ATM10.5 ± 0.14.8 ± 1.8--
1 Auto-tempered martensite (ATM) phase was exposed by Nital etchant and quantified by the subtraction of whole martensitic region measured by electron backscatter diffraction (EBSD) from MA regions.