Developing Inlaid Colouring Technique for Hot-Glass Making Process


Coburg House Art Studio, 15 Coburg St, Edinburgh EH6 6ET, UK
Arts 2018, 7(4), 89; https://doi.org/10.3390/arts7040089
Submission received: 10 October 2018
/
Revised: 15 November 2018
/
Accepted: 21 November 2018
/
Published: 26 November 2018
(This article belongs to the Collection Contemporary Glass Art: Materiality and Digital Technologies)
Abstract
:This article discusses both the complexity and technical benefits of developing an inlaid colouring technique for the hot glass-making process. This technique was inspired by the ancient Korean ceramic decorative technique known as Sanggam, and has allowed me to delineate geometric patterns and counterfeit letters onto glass artworks, before encapsulating them between layers of transparent glass. By developing a typography design that deliberately chooses the wrong consonant and vowel letters, and combines Korean characters, the resulting designs do not fit into either South Korean or British visual culture. A number of optical properties (in particular refraction, reflection, and distortion) provoke a sense of ambiguity in the viewer’s visual experience of, as well as their response to, a series of glass artworks created for experimental purposes. The technique offers an innovative creative tool for artists working in the field of glass art, enabling them to depict expressive drawings and images through a line drawing style, using diverse colours, and in a more controlled manner than the hot glass-making process of the ‘Graal’ technique. The technical possibilities and limitations of the inlaid glass colouring technique are addressed at each step of the development process, while examples of the technical palette serve as a useful reference for artists working in the field of glass art.
1. Introduction
I first identified the potential for developing a colour decorative technique for glassblowing in response to research concerning the encapsulation of voids within the body of glass artefacts undertaken by Flavell (2001), a British glass artist, researcher, and former lecturer at the Edinburgh College of Art. His innovative technical contribution to the field of glassblowing makes it possible for controlled drawings to be transferred directly onto a parison (i.e., a blown glass bubble) through the application of stencil cutting and sandblasting (cf. Figure 1).
I further recognised the potential to apply the Sanggam1 ceramic decorative technique onto glass artefacts during an in-depth study of Flavell’s (2001) techniques. This included using incised motifs to create a void, which can then be filled with coloured glass powder, allowing the creation of a delicate line-drawing design with dynamic colour variations. The Korean dynasty of Goryeo potters (918–1392) first used inlaid decorations, known in Korean as Sanggam, during the second half of the 12th century. The technique was unique to the contemporary ceramic decorative techniques in neighbouring countries. Goryeo potters developed the Sanggam technique to decorate the Goryeo celadon that was first introduced by Chinese traders in the Song dynasty (960–1279) period in China. Sanggam decorative designs included natural motifs (such as cranes, flowers, and grapevines), which were first incised into the leather-hard (or semi-dried) body of bowls, vessels, cups, and bottles. Next, the incised design was filled with white or red slip (i.e., clay mixed with water), and the excess was wiped off prior to the application of clear glaze and the firing process.
To achieve controlled colour decoration on blown glass artefacts, the inlaid colouring technique is similar to (1) the ‘Graal’2 glass technique (named ‘Intarsia’3 by British-born American glass artist Frederick Carder (1863–1963)), and (2) the ‘Mykene’ technique (cf. Figure 2), developed in 1936 by Swedish glass designer Vicke Lindstrand (1904–1983), while working in the Orrefors Glasbruk, in Sweden. It suggests that an earlier attempt had been made to achieve more controlled drawings within a layer of glass (cf. Figure 2c). Flavell (2001) speculated that powdered carborundum mixed with epoxy resin had been applied directly to the drawing on the surface of the glass body, followed by a second layer of glass wall to encapsulate it. However, the clear spots revealed in the transparent glass body in the form of irregular bubbles, and the fine definition of the drawing, suggested a thin layer of powdered carborundum was applied onto the shallow etched void on the parison4. Therefore, the outline of the drawing remains intact, despite the chemical reaction of the bonding agent (i.e., the epoxy resin).
I first undertook a study of Flavell’s (2001) research into the development of the encapsulation of voids, and then examined the Graal and Mykene glass technique, along with the Sanggam ceramic technique. This resulted in a desire to combine these well-established techniques to develop an innovative colour decorative technique for glassblowing. I had previously recognised the early technical achievements and limits of applying the Sanggam technique directly during the glassmaking process. This led to the development of the innovative solution discussed in this article.
By fabricating artworks using both glass and porcelain, my contribution offers an artistic perspective for a cross-cultural discourse analysis. My artistic approach is underpinned by an exploration of the state of cultural uncanniness5 in visual experience. The inlaid colouring technique allows me to encapsulate pseudo Korean letters and patterns onto my glass artworks. They then function as ‘foreign’ text for British audiences, who are unable to read the script on the surface of my artwork. At the same time, South Koreans find the images on the glass parts unfamiliar too. However, to help both audiences overcome the feelings of discomfort that are provoked in them by being unable to ground the artwork in a context that they recognise, I provide some familiar visual references in the vase shape. Nonetheless, both UK and Korean groups still perceived the artwork as being outside their cultural boundary. My aim is to use this as a tool to provoke aesthetic emotions, thereby developing a formal visual vocabulary by creating a body of artwork in glass and porcelain. The development of the inlaid colouring technique offers an innovative creative tool for inserting expressive drawings and images onto glass during the hot glass-making process. My aim is for this theoretical and practical knowledge to benefit cross-cultural studies in the field of contemporary glass art. It is hoped that this paper will inspire others to look further into my doctoral findings and apply my techniques to their own practice.
2. Developing Inlaid Colouring Technique
The success of the inlaid colouring technique requires an interruption in the standard hot glass making process. It is necessary to make a suitably-shaped parison and anneal it before progressing to the next steps (i.e., sand-blasting and colour introduction), before reheating it for pick up before later manipulation at the furnace over an extended time scale.
2.1. Step One
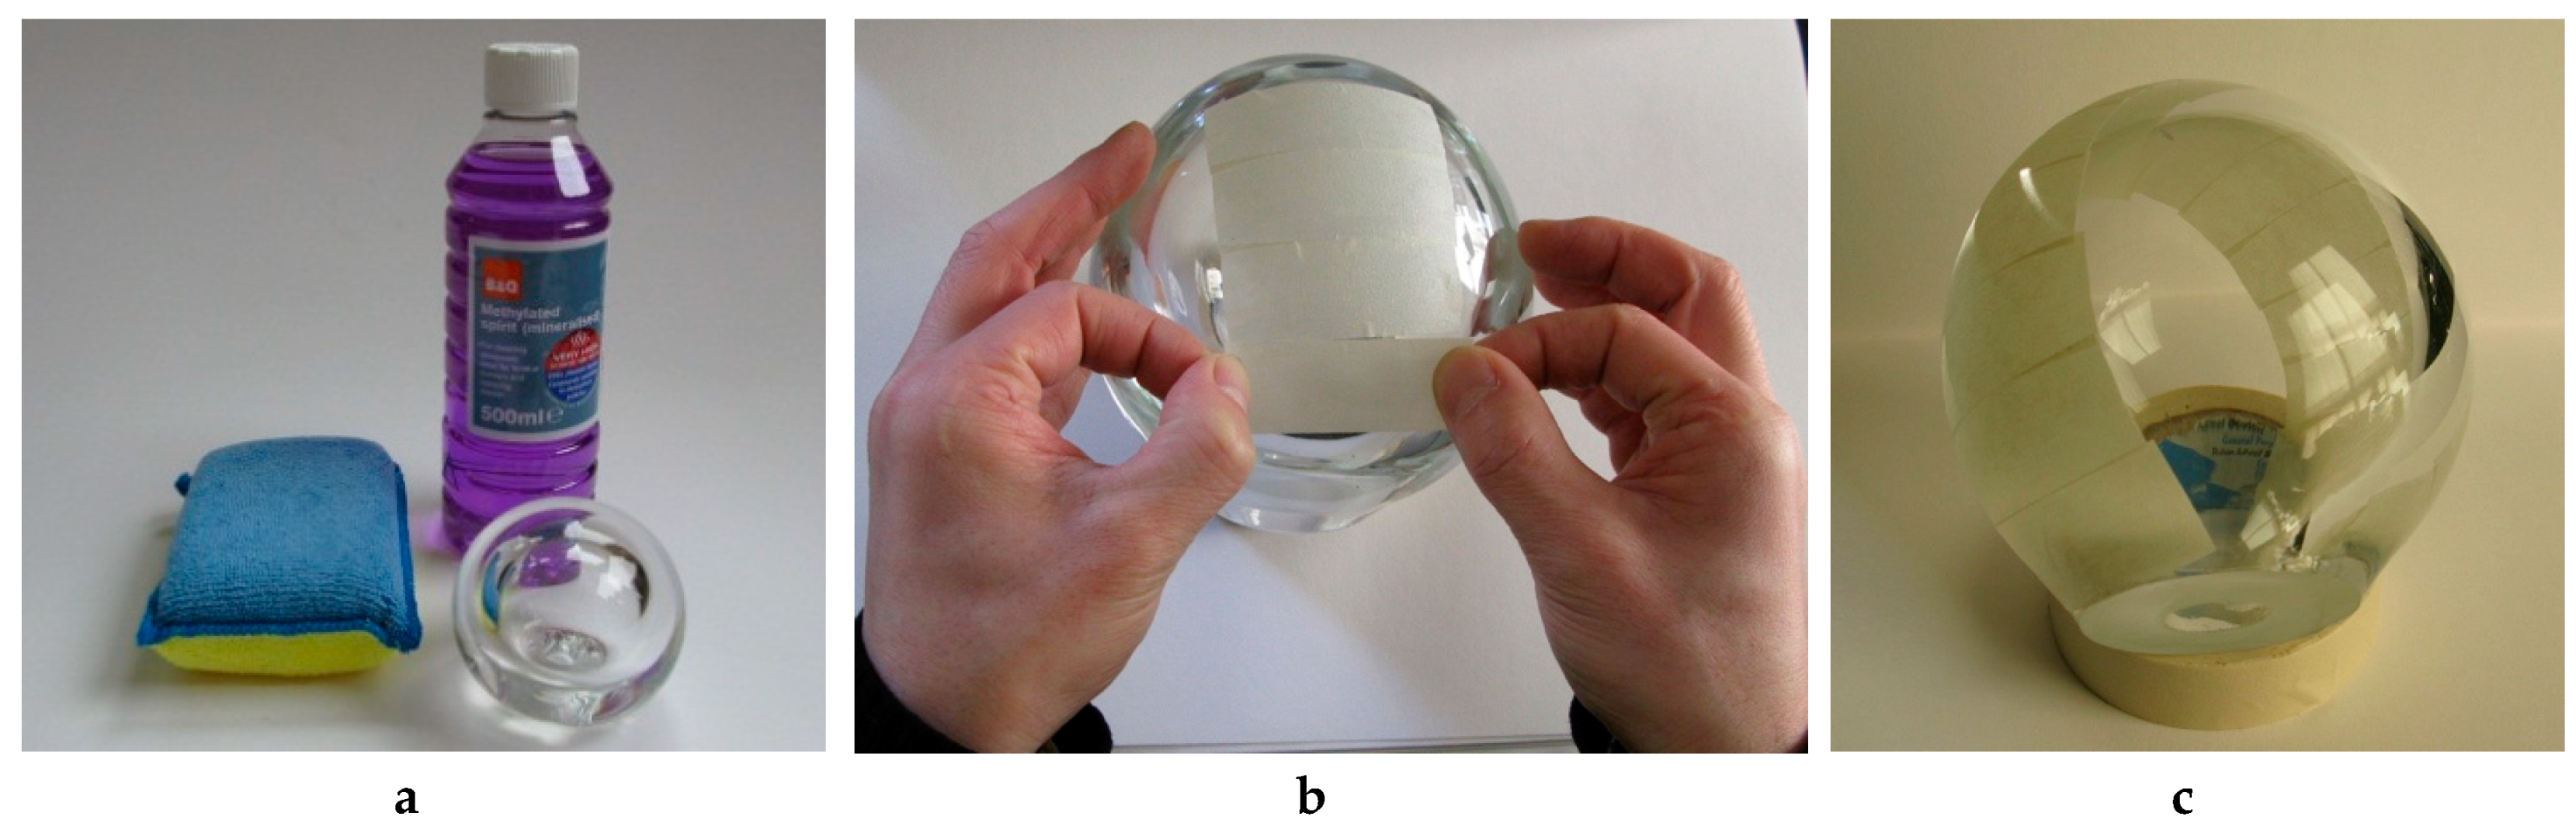
In this step, the parison is prepared for stencil cutting and sandblasting. Depending on the desired depth of the sandblasted void, two or three layers of masking tape are applied evenly to the surface as the resist. Flavell (2001) noted that it is vital to apply masking tape flatly and evenly, avoiding folds and air traps, and to achieve clean cuts with a scalpel blade (Flavell 2001, p. 51). Various types of resist can be used to sandblast a glass surface, i.e., self-adhesive film, rubber, or vinyl resist, as well as PVA glue (polyvinyl acetate). However, masking tape provides the best durability for deep sandblasting and flexibility for use on the round surface of the parison. Rubber or vinyl type resist is unsuitable for deep sandblasting, due to frictional heat generated by the silicon carbide grit and the high pressure of sandblast, which softens the resist. Multiple layers of masking tape are applied to prevent abrasions with potential to damage the design (cf. Figure 3).
It is important to clean the surface of the parison with methyl alcohol or glass cleaner prior to the application of the masking tape (cf. Figure 3a). Masking tape (approximately 25 mm in width) is cut to between 50 mm and 80 mm, depending on the curved surface.
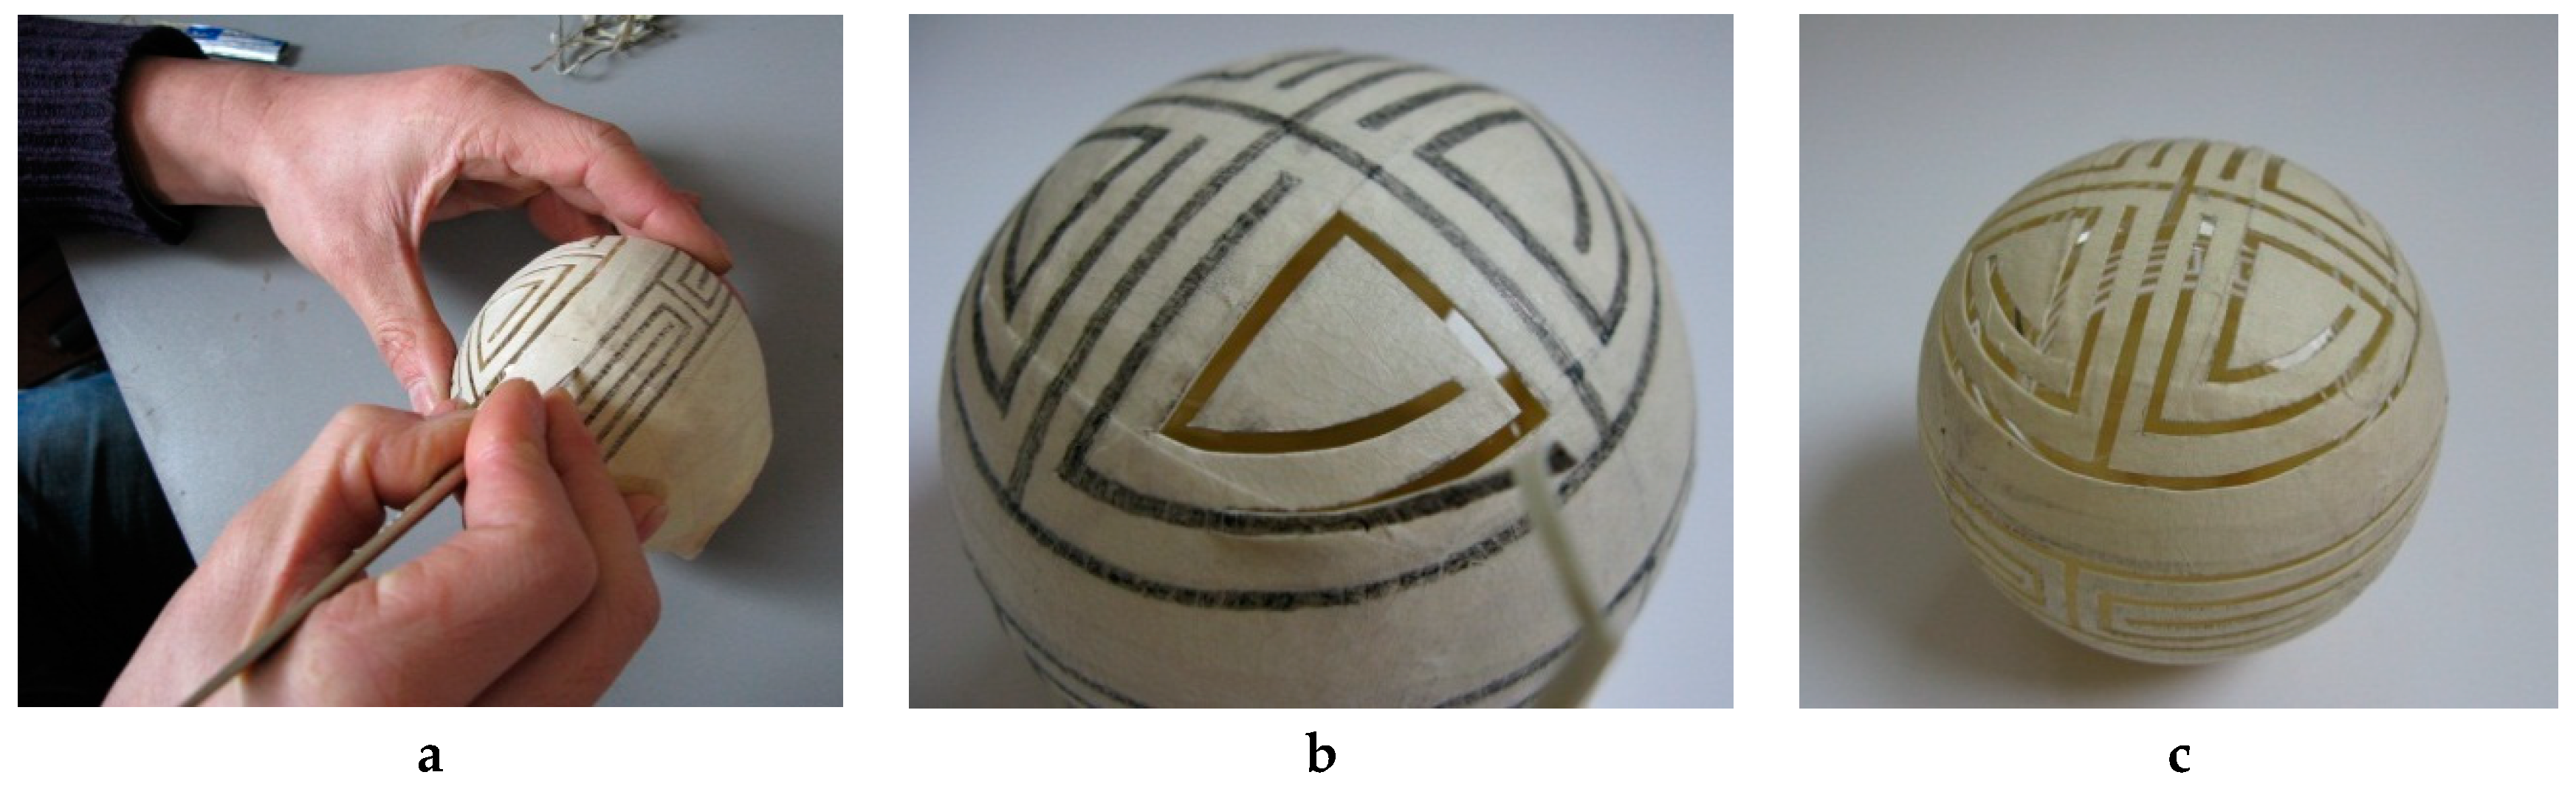
2.2. Step Two
The design (including patterns and images) is drawn directly onto the surface covered by masking tape (cf. Figure 4a). The first guideline is made with a pencil and the second with a fibre-tipped pen, following a clear-cut line (cf. Figure 4a,b). Crucially, the design must not be applied close to the neck of the parison (cf. Figure 4c, Diagram 1), as it is picked up from the kiln (or pick-up kiln) by the neck on a blowing pipe, with a prepared collar (or a prepared gather) (cf. Figure 4d, Diagram 2). Once picked up, the parison needs to be immediately reheated in the glory hole6, to avoid risking thermal shock7. This is due to the temperature of the kiln being 550 °C, i.e., just above the annealing temperature. During the reheating process, coloured glass powder placed within the void (or sandblasted part) melts in the glory hole. However, as a result of the protruding body of the parison, insufficient heat reaches the neck of the parison to melt the glass powder, and the joined part is inclined to create an air pocket as a result of the docking process. The neck will later need to be cut off with a diamond saw to remove the resulting air pocket.
2.3. Step Three
The drawings on the masking tape are cut out with a sharp scalpel blade to ensure control (Flavell 2001) and minimise scratches on the glass (cf. Figure 5).
2.4. Step Four
Once the cutting is complete, the design is sandblasted (cf. Figure 6a,b). The working air pressure for the sandblaster is set at between 50 PSI and 90 PSI (or 3.5 to 6 Bar) (cf. Figure 6c,d). Ninety PSI is ideal for a rough cut, as the high air pressure cuts the glass faster. When the sandblasting is close to the desired depth, a 50 PSI pressure is used to achieve a right-angled cut and an even surface. The silicon carbide grit for a sandblaster comes in various sizes, from F80 (coarse) to F400 (fine). The process under discussion uses a medium coarse grit size of F220 grade silicon carbide grit. To avoid damaging the design, the sandblaster nozzle must be maintained at a distance of between 15 cm and 20 cm from the parison, (cf. Figure 6e–h). The depth for sandblasting is approximately 2.5 mm, since this creates a sufficient void for the insertion of coloured glass powder (cf. Figure 6f). The line drawing tends to be disconnected if the depth is less than 2.5 mm, because the glass powder shrinks when it melts at high temperatures. However, if the depth is too great, the glass powder generates bubbles when another layer of molten glass is added to cover the design. The thick layer of powdered glass requires an extended reheating time in the glory hole, carrying the risk of the design becoming distorted. This occurs because the thick glass body of the parison heats up slowly, with the heat retained for a longer period of time, while the glass powder heats and cools down in a more rapid manner. Therefore, in order to avoid burning off the surface of the powdered glass, and ensuring it melts evenly, the reheating must be divided into several steps.
2.5. Step Five
In this step, the masking tape is removed from the parison and the incised design is cleaned with water (cf. Figure 7a–c). Different shaped dental filling tools are used for packing the coloured glass powder into the incised design (cf. Figure 7d–g). Previously, the colours were applied directly into the incised design before removing the masking tape, with the silicon carbide grit removed with a paintbrush or compressed air. However, it then proved impossible to prevent contamination of the glass powder with the residue of the masking tape (cf. Figure 7h,i). This process uses Kugler coloured glass powder, which is compatible with the Cristalica glass, which the parison is made of.
It is important to use an organic bonding agent for powdered glass to minimise the risk of chemical reactions during the reheating process. Acasia gum/Gum Arabic is therefore used as a bonding agent, with 5 gs of Acasia gum/Gum Arabic being mixed with 30 gs of water at the rate of 1:6, to achieve a colloidal consistency (cf. Figure 8).
2.6. Step Six
The prepared parison is pre-fired in the pick-up kiln at 550 °C, prior to being picked up on a blowing pipe for the second gather, which encapsulates the design within a layer of glass. The parison is positioned vertically on a layer of ceramic fibre, with a terracotta flowerpot positioned underneath. It is vital to ensure that the temperature of the kiln temperature is raised slowly and to undertake soaking at a high temperature for several hours to reduce the risk of thermal shock (cf. Figure 9). I therefore use a firing cycle of 25 °C/h to 550 °C/5 h soaking time.
2.7. Step Seven
Once the temperature reaches 550 °C, the parison is soaked for a minimum of three hours, while the collar is prepared to pick up the parison from the kiln. A stainless steel paddle is used to shape the collar, and if necessary, a hole is made in the blowing pipe with a pair of tweezers to enable further blowing. The diameter of the collar is determined by the size of the neck of the parison. The neat and flat collar shape ensures correct contact with the parison, to improve control for further manipulation (cf. Figure 10).
2.8. Step Eight
The parison is picked up on a blowing pipe and immediately reheated in the glory hole (cf. Figure 11a,b). To prevent distortion of the design, I bring the parison to the working bench (or glassblowing bench) before it becomes soft. The blowtorch can help melt the powdered glass without softening the parison’s body. Prior to applying another layer of glass, the melted glass powder needs to be compressed using a stainless steel paddle, to obtain an even surface and reduce the risk of creating air traps (cf. Figure 11c). It is crucial to ensure the powdered glass is completely melted, so it can be fused onto the parison body, avoiding the generation of bubbles when it is later covered with molten glass (cf. Figure 11d,e).
2.9. Step Nine
Once the glass powder is fused onto the parison, the complete glass body is cooled down to a temperature below the point at which it might become deformed,8 i.e., approximately 563 °C (log 10 viscosity, poise 11.5). This reduces the risk of distortion during the second gathering of the glass. To obtain an even layer of glass (and avoid trapping bubbles in response to the higher temperature increasing the viscosity of the molten glass), the temperature of the furnace for the second gather is set at between 1140 °C and 1150 °C (i.e., between 5 °C and 10 °C higher than the regular furnace temperature for Cristalica glass in the glassblowing studio at the university of Edinburgh). The second gathered glass is shaped into the desired form using glassblowing tools, including wooden blocks, a wet newspaper pad, and a jack (cf. Figure 12g,h). I initially applied a layer of clear glass overlay over the parison, in the same way that Flavell (2001) encapsulates the sandblasted void (cf. Figure 12a–d). Although the test was successful on a small scale, it identified a critical issue, i.e., that, when the surface is uneven, flat bands of air are more likely to become trapped between the parison and the clear glass layer (cf. Figure 12f). However, the development of an uneven surface is an inevitable consequence of glass powder shrinking as it melts during reheating. A solution to the problem of air bubbles is to gather molten glass from the furnace directly onto the parison, as the hot glass then fills the uneven surface (cf. Figure 12f).
The finished piece is knocked off the blowing pipe and annealed in the kiln using a slow cooling cycle. The annealing cycle involves cooling down from 520 °C to 310 °C by 15 °C/h soaking for five hours, from 310 °C to 210 °C by 20 °C/h soaking for three hours, and from 210 °C to the room temperature by 30 °C/h.
3. Technical Palette
My intention in developing the technical palette is to create an improved understanding of the technical possibilities and limitations of the inlaid colouring technique. The beneficial aspect of this technique is the achievement of a drawn motif with colour variations over a desired area, determined at an early stage of the design by the glass practitioner. Thus, line drawings, patterns, and textures can be introduced onto the surface of blown glass forms, allowing flexibility and personal style.
3.1. Life Drawing Images
Life drawing images are drawn in brush and pencil onto the masking taped parison, to create the dynamics of a human figure with an expressive line drawing. The sketch is made directly from observations of life drawing models; the image is then sandblasted. The line drawing can only produce flat images (i.e., a two-dimensional image), and the technique cannot illustrate the shadows and shadings of the body. The thickness of the transparent glass wall partially becomes a convex and concave lens, creating the optical illusion that a reflection of the suspended image is captured on the wall of the inner bubble. Hence, two or three layers of reflections appear as the image is viewed at different angles. In addition, the strong angled cut and polished rim magnifies the images (cf. Figure 13).
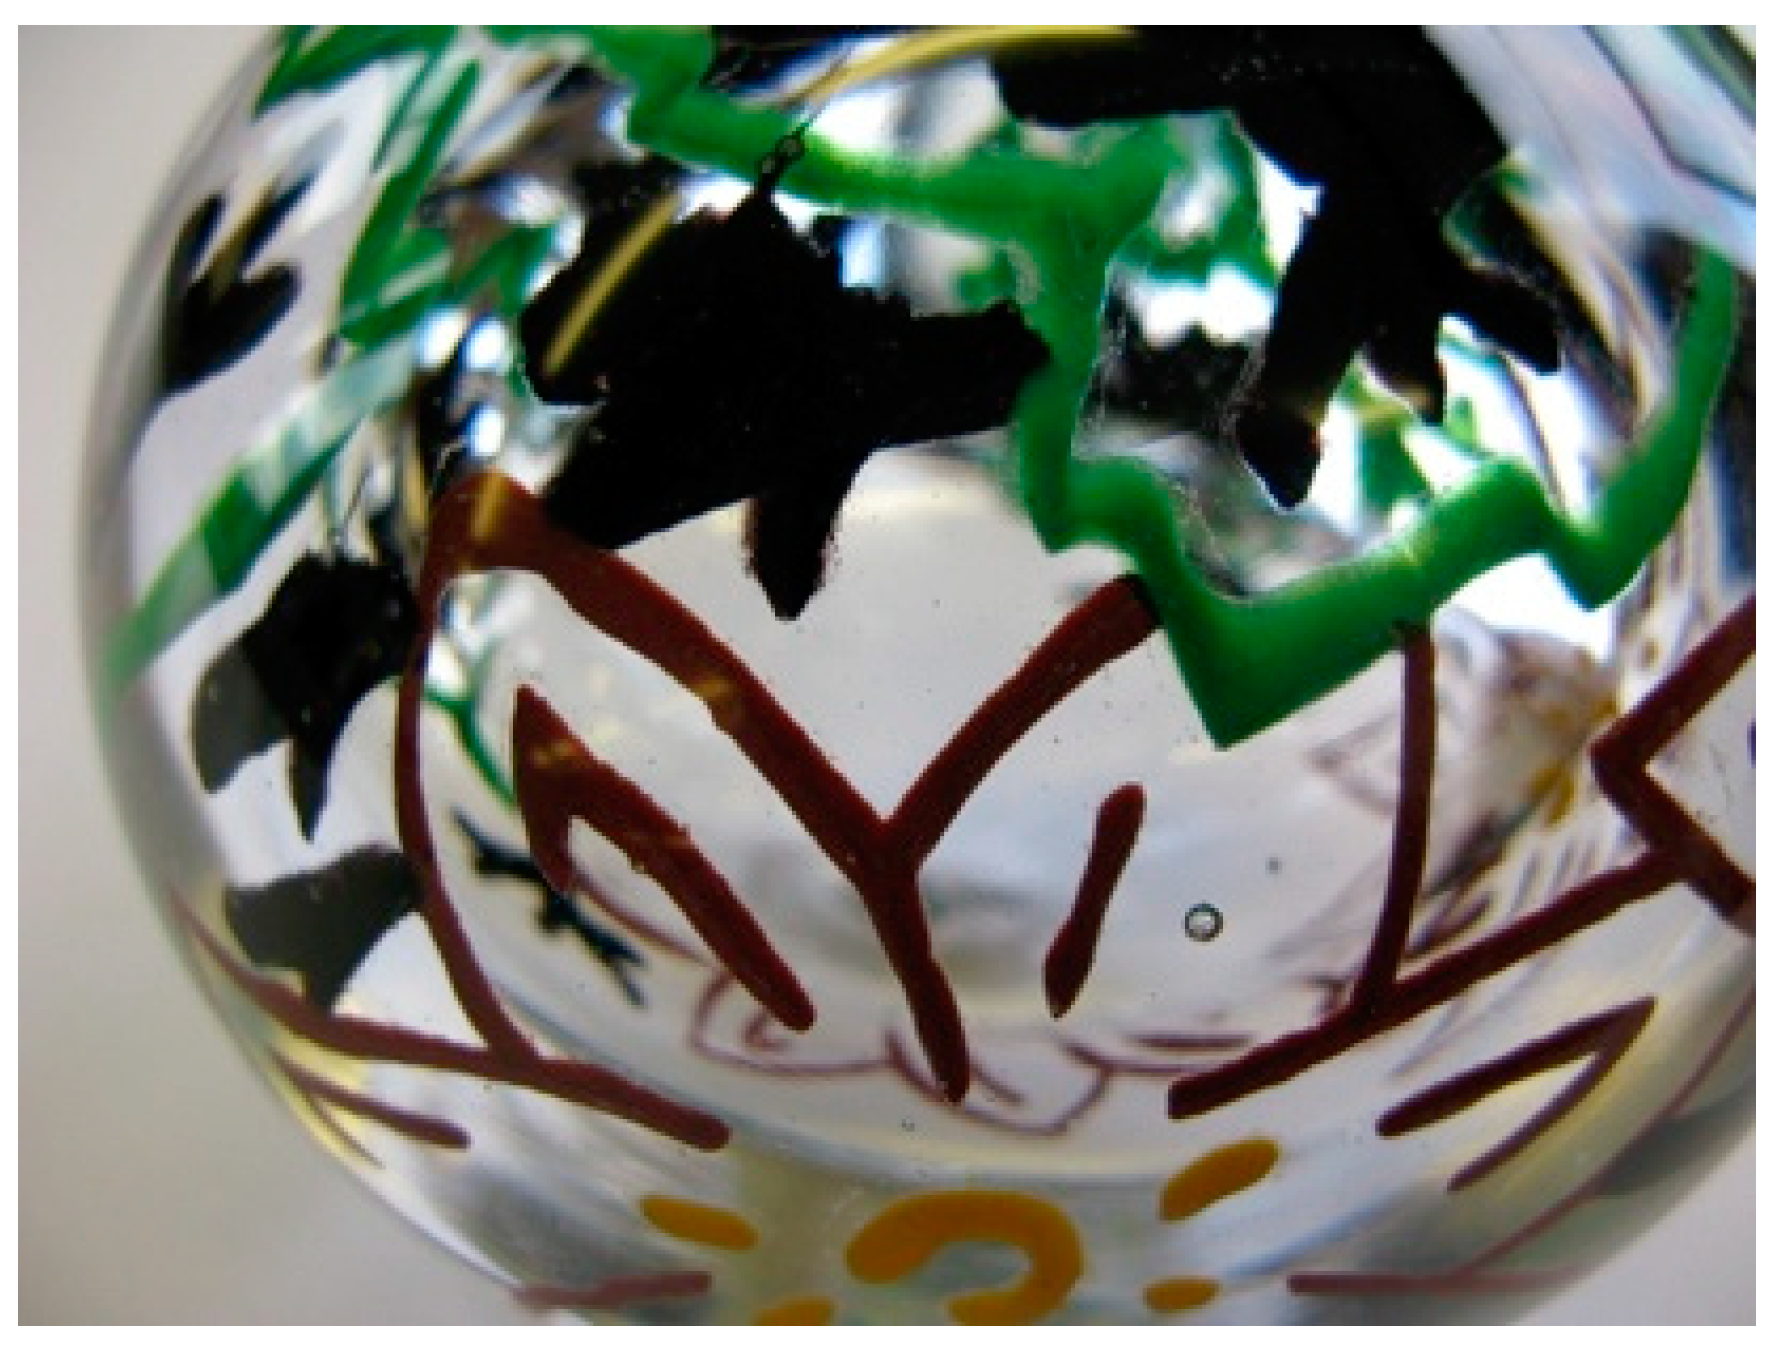
I have been inspired by the success of the dynamic lines of ‘Life drawing glass’ (2011), which encouraged me to create an Asian-style ink painting using the technique, by increasing the thickness of the line and density of the colour. A tree motif was sandblasted to a depth of between 3mm and 3.5 mm to create additional space for coloured powder glass. The parison was exposed to heat for a longer period of time during the reheating process to avoid the creation of bubbles on the line, and to allow the colour to move naturally. Once the parison had cooled for the second gather, it was reheated with a blowtorch to ensure the exterior of the parison remained hot while the interior cooled. The test revealed that ‘soft’ colours (i.e., opaque black and green) absorbed more heat and spread. These ‘soft’ colours drew spontaneous lines following the centrifugal force as the parison was continuously turned in the shaping process following the second gather (cf. Figure 14). The distinctive quality of the lines established a potential for developing Asian-style ink painting on blown glass artefacts as an expressive tool.
3.2. Multiple Layers of Images/Patterns
The unique property of transparent glass supported the application of multiple layers of images/patterns onto the surface of blown glass. Of course, much depends on skill and experience when manipulating hot glass on a large scale, as well as the conditions within the studio. However, the example of the smaller pieces proved the technique’s potential, particularly in terms of applying multiple layers of images/patterns at various scales.
Following the first layer of the inlaid pattern, the parison is encased and annealed. Then a further masking tape layer is applied for the stencil-cutting and sandblasting of the second inlay (cf. Figure 15).
The examples of the two-layered test pieces highlight the potential for applying multiple layers of images/patterns to enhance the sense of depth in the two-dimensional image/pattern (cf. Figure 16). Each layer of glass physically creates an approximate thickness of between 15 and 30 mm, although the perceived depth is increased by the reflections and refractions of the image/pattern. This enhances the three-dimensional effect on the blown glass form by developing the ‘pictorial depth cue’ (or depth perception), such as interposition9, linear perspective10, and relative size11. In ‘Tulip pattern’ tests 1 and 2 (2012), the tulip pattern on the second layer covers some parts of the pattern on the first layer, while the reflection on the inner surface of the bubble (which appears smaller) enhances the appearance of perspective (cf. Figure 16b,d).
3.3. Cutting and Polishing
Cutting and polishing endows the finished glass piece with the dynamics of form and characteristic textures, while also enhancing the optical property of transparent glass.
Depending on the angle at which it is viewed, the encased image/pattern appears magnified, distorted, and multiplied. For example, the ribbed cut glass surface changes the refraction angle of the pattern, with (when viewed from the top) the reflection of the distorted curve appearing on the inner bubble surface (cf. Figure 17). The highly polished rim (or mouth) of the flat cut (cf. Figure 17d) and punty (or concave) cut (cf. Figure 17e) also delivers different optical experiences.
4. Developing the Artwork
As an artist, my intention was to use glass and porcelain to provoke curiosity in the viewer. I chose glass and porcelain as primary materials, and glassblowing as the main means of developing a body of artwork, in order to highlight the tensions, conflicts, uncertainty, and negotiations that I believe arise as a by-product of the cultural exchanges between East and West. Furthermore, by combining the two materials, and creating familiar (or unfamiliar) images, I have ensured the artwork does not completely fit into either Korean or British visual culture. This produces a pseudo Korean-British or British-Korean image, capable of being viewed as a Western or Eastern image, or as a blend of both. Although glass in the West, and porcelain in the East, developed in different cultural and historical circumstances, the unique distinctions in both cultures tend to become more abstract and blurred when the interplay between them becomes more complex, dynamic, and interactive. The anthropologist Ronald Niezen (2004) argued that the revolutionary development of technologies in communication and transportation accelerated the speed, and decreased the physical distance, of interaction worldwide, eventually resulting in an ‘unnatural’ relationship between cultures and localities.
Korean Glass
My understanding of the unique properties inherent in glass, in conjunction with my investigation into the possibilities and limitations of the inlaid colouring technique, led to the development of a series of ‘Korean glass’ (cf. Figure 18). This artwork takes the recognisable pattern of the English manufactured porcelain teapot and its forms, juxtaposing them with counterfeit Korean letters and patterns placed over the glass body, to question the authenticity of the object in terms of its cultural origin. Although viewers in the UK readily recognise the porcelain elements and engage with the familiarity of the mediums (i.e., porcelain and glass), they tend to view ‘Korean glass’ as an Oriental object, as a result of the pseudo-Korean design interrupting the first visual message, in which they identified something familiar. As such, it becomes a powerful dominant reference throughout the course of the British viewer’s visual experience of the work. However, conversely, the counterfeit Korean letters, the patterns on the porcelain, and a lack of familiarity with glass as an artistic medium, lead Korean audiences to view the object as ‘foreign’, or as something made by a foreign artist to imitate a Korean object. Korean restaurants in the UK, seemingly, can provide a better understanding of the invented exotic image that satisfies locals’ expectations, but they do provoke some uneasy feelings in Koreans. I have seen many Korean restaurants in the UK with interiors that are decorated with objects from China, Japan, or Southeast Asian countries, which are often perceived as offering an authentic Korean image by local customers. However, Korean customers can identify this as a ‘constructed’ or ‘false’ image, which then provokes some uneasy feelings of ‘embarrassment’ or ‘frustration’ in them.
The counterfeit Korean letters were developed based on Internet words, known as ‘alien words’, invented by young people in South Korea and used widely on Internet chat sites and social media platforms, i.e., Facebook and Twitter. Korean characters combine twenty-four consonant and vowel letters that follow certain rules to represent the correct sound and convey meaning. However, the Internet words deliberately selected inappropriate consonant and vowel letters, combining them to make meaningless characters. They also integrated additional symbols and signs, along with Japanese and Chinese letters, and the English alphabet. An example of a sentence written using ‘alien words’ provides a clearer understanding of how to make a sentence using a random choice of components. The sentence is as follows:
♀ ̆乙 l ̆『구!Ω ぎ じ ; 늼 을 why 룍(하)눙(ᄀ)ざ데 ! !
The ‘alien words’ sometimes appear accidentally as a computer processing error when the Central Processing Unit (CPU) fails to recognise input, or as the result of the speed of typing or a technical misrecognition.
The counterfeit Korean letters for the ‘Korean glass’ series are written in the style of Chinese calligraphy, in order to confuse and trick the untrained eye of the UK viewer into ‘seeing’ them as Chinese or Japanese. The surface of the glass body is divided into sections with geometric patterns.
5. Conclusions
I developed the inlaid colouring technique (inspired by Flavell’s 2001 doctoral research on the encapsulation of voids within the body of glass artefacts and the Sanggam ancient Korean ceramic decorative technique) to imbue my artwork with established Korean cultural values, thereby questioning the discourse on bicultural identity. The technique reinforces the viewer’s experience of cultural ambiguity by encapsulating counterfeit Korean letters and patterns on transparent glass, creating optical illusions, and conveying mystery.
The development of the counterfeit Korean letters was inspired by my personal experience of being in a state of cultural in-between-ness personally, i.e., I have lived and studied in Edinburgh for approximately thirteen years, but was born in South Korea and resided there for thirty years. My intention in using ‘alien words’ was to highlight the tension, anxiety, and in-between-ness that exists in the cross-cultural experience.
The technique offers an innovative and creative tool for artists in the field of glass art, enabling them to depict expressive drawings and images which are in line-drawing styles with diverse colours and in a more controlled manner. This is particularly relevant in comparison to the ‘Graal’ glass technique, which involves a hot glass-making process. The technical palette and the series of glass artworks suggest the potential for artists to use the technique in the field of glass art to further their own expression. The development of this technique highlights the unique property of glass as an artistic medium capable of offering a three-dimensional space in which to create images and designs.
However, I investigated only a limited number of colours for the development of the inlaid colouring technique in this research: (1) opaque black; (2) opaque red; (3) opaque blue; (4) opaque green; and (5) opaque yellow. The glass from the furnace used to make the artwork was Cristalica soda-lime glass and the coloured glass powder was from the Kugler Glass Company. Therefore, further research is needed to discover a wider range of colours, both in opaque and transparent glass, available from different companies, and to assess their compatibility with the technique when making a parison. In this research, the sandblasted void for creating artworks, to a maximum depth of 25 mm and width of 35 mm, was investigated using opaque colours from the Kugler Glass Company. In order to achieve the dynamics in the line drawing-style images, in which lines without gradations in shade or hue emphasise form and outline, sandblast tests need to correspond with colour shrinkage and expansion tests. The technique is of great benefit in the process of building layers of images on to which the artist can then apply further images and create a ‘pictorial depth cue’ (or depth perception) related to the first layer of images. Future layered glass artwork, therefore, could be developed in order to enhance the three-dimensional effect of the flat image/pattern on the blown glass, and then it could be utilised as a vehicle with which to provide a more dynamic optical experience for viewers.
A series of collaborative studies with other glass artists is also planned to demonstrate the feasibility and potential this technique offers as a model for others in the field. It is hoped that this paper will bring this technique to a new audience and open up new technical and creative pathways for future research in this area.
Funding
This research was funded by Scottish Overseas Research Student Awards Scheme (SORSAS) grant 2010–2012.
Conflicts of Interest
The author declares no conflict of interest.
References
- Bhabha, Homi K. 1994. The Location of Culture. New York: Routledge, p. 195. [Google Scholar]
- Flavell, Maurice Raymond. 2001. The Development and Application of the Use of Encased Voids within the Body of Glass Artefacts as a Means of Drawing and Expression. Ph.D. Thesis, Edinburgh College of Art, Heriot-Watt University, Edinburgh, UK. [Google Scholar]
- Niezen, Ronald. 2004. A World beyond Difference: Cultural Identity in the Age of Globalization. Oxford: Blackwell, p. 38. [Google Scholar]
| 1 | The ‘Graal’ glass technique was developed by the designer Simon Gate, in collaboration with a team including Gustaf Abels (engraver) and Knut Bergqvist, at Orrefors Glasbruk (also known as Orrefors glasshouse), Sweden, in 1916 (Flavell 2001). |
| 2 | Carder developed the technique with the assistance of Swedish glass blower Johnny Jenson at the Corning Glassworks in 1916. The intarsia glass was produced until 1923 (Flavell 2001). |
| 3 | Parison is a gather on the end of a blowpipe, which is partly inflated. However, in this current research, I use this term to indicate a blank (or pre-blown glass bubble). The word parison is derived from French ‘Paraison’. |
| 4 | This term in the research refers to Homi K. Bhabha’s (Bhabha 1994) description of the nature of culture in a post-colonial society. He argues: “Culture is heimlich, with its disciplinary generalisations, its mimetic narratives, its homologous empty time, its seriality, its progress, its customs and coherence. But cultural authority is also unheimlich, for to be distinctive, significatory, influential and identifiable, it has to be translated, disseminated, differentiated, interdisciplinary, inter-textual, international, inter-racial. Inbetween these two plays the time of a colonial paradox in those contradictory statements of subordinate power” (Bhabha 1994). |
| 5 | This term refers to a second furnace used to reheat a glass piece between the steps of glassblowing. |
| 6 | Thermal shock refers to the risk of glass breaking as the result of a rapid or uneven change in temperature. This ensures that an annealing process is essential for glass making. |
| 7 | At this temperature, glass deforms under its own weight. The softening point for Cristalica glass is 563 °C (log 10 viscosity, poise 11.5). |
| 8 | At this temperature, glass deforms under its own weight. The softening point for Cristalica glass is 563 °C (log 10 viscosity, poise 11.5). |
| 9 | The nearer image/pattern covers some part of the image/pattern that is further away. |
| 10 | Parallel lines converge and become closer in the distance. |
| 11 | The nearer image/pattern appears larger than that further away. |
Figure 1.
The stencil cutting and sandblasting process. Photographic source from Flavell’s (2001) PhD thesis. Used by permission.

Figure 2.
(a) ‘Intarsia’ vase (1920–1929), made by Steuben Division and Johnny Jansson in the Corning Glassworks, USA. Height 174 mm. The Corning Museum of Glass collection. (b) ‘Graal’ fish vase (unknown), made by Hald, Edvard Niels Tove (1883–1980) in Orrefors Glasbruk, Sweden. Height 132 mm. The Corning Museum of Glass collection. (c) ‘Horse’-Mykene glass vase (1936), made by Vicke Lindstrand in Orrefors Glasbruk, Sweden. Photographic source: from Ray Flavell’s PhD thesis (2001) (Flavell 2001). Used by permission.

Figure 3.
Applying masking tape to the surface of the parison.

Figure 4.
(a,b) Applying the design with a pencil and fibre-tipped pen. (c) Diagram 1: technical terms for the parison parts; (d) Diagram 2, technical terms for the parison parts and a prepared gather on a blowing pipe.
Figure 4.
(a,b) Applying the design with a pencil and fibre-tipped pen. (c) Diagram 1: technical terms for the parison parts; (d) Diagram 2, technical terms for the parison parts and a prepared gather on a blowing pipe.

Figure 5.
Cutting out a design with a scalpel blade.

Figure 6.
The sandblasting processes.

Figure 7.
Applying the coloured glass powder.

Figure 8.
Measuring the Acasia gum/Gum Arabic and water.

Figure 9.
(a,b) Preparing the pick-up kiln for pre-firing. (c) The temperature of the pick-up kiln.

Figure 10.
Preparing the collar.

Figure 11.
(a–c) Picking up the parison from the pick-up kiln. (d,e) Bubbles on the colour.

Figure 12.
(a) Encapsulating a void with a transparent parison pushed over. Photographic source from Ray Flavell’s PhD thesis (2001) (Flavell 2001, p. 60). Used by permission. (b–e) Applying a layer of glass with a transparent glass overlay. (f–h) Gathering the second layer of glass from the furnace and shape the glass with glassblowing tools.

Figure 13.
(a) ‘Life drawing glass’ 1 and 2 (2011). Cristalica glass body with Kugler powder glass (opaque yellow (K2078-Canary yellow), opaque red (K2124-Poppy red) and opaque black (K2095-Opal black), 120 mm (H) × 140 mm (W) and 120 mm (H) × 155 mm (W)). (b) ‘Life drawing glass’ 3 (2011) Cristalica glass body with Kugler powder glass (opaque yellow (K2078-Canary yellow), opaque red (K2124-Poppy red) and opaque black (K2095-Opal black), 160 mm (H) × 120 mm (W)).

Figure 14.
Drawing test (2011). Cristalica glass body with Kugler glass powder (opaque green (K2070-Opal green), opaque yellow (K2078-Canary yellow), opaque red (K2124-Poppy red) and opaque black (K2095-Opal black), 118 mm (H) × 85 mm (W).
Figure 14.
Drawing test (2011). Cristalica glass body with Kugler glass powder (opaque green (K2070-Opal green), opaque yellow (K2078-Canary yellow), opaque red (K2124-Poppy red) and opaque black (K2095-Opal black), 118 mm (H) × 85 mm (W).

Figure 15.
‘Square pattern’ test 1 (2012). Cristalica glass body with Kugler glass powder: opaque yellow (K2078-Canary yellow) and opaque black (K2095-Opal black), 290 mm (H) × 175 mm (W), two layers of pattern.
Figure 15.
‘Square pattern’ test 1 (2012). Cristalica glass body with Kugler glass powder: opaque yellow (K2078-Canary yellow) and opaque black (K2095-Opal black), 290 mm (H) × 175 mm (W), two layers of pattern.

Figure 16.
(a) ‘Japanese tattoo pattern’ test (2012). Cristalica glass body with Kugler glass powder: opaque green (K2070-Opal green), opaque yellow (K2078-Canary yellow), opaque red (K2124-Poppy red), opaque blue (K2091-Lapis blue) and opaque black (K2095-Opal black), 160 mm (H) × 135 mm (W). Two layers of pattern. (b) ‘Tulip pattern’ tests 1 and 2 (2012). Cristalica glass body with Kugler glass powder: opaque green (K2070-Opal green), opaque yellow (K2078-Canary yellow) and opaque red (K2124-Poppy red). From the left: 1—85 mm (H) × 115 mm (W); 2—130 mm (H) × 140 mm (W). Two layers of pattern. (c) Applying the second layer of the design. (d) Detail of ‘Tulip pattern’ test 2 (2012).

Figure 17.
(a–c) ‘Ribbed cut glass’ tests 1 and 2 (2012). Cristalica glass body with Kugler glass powder: opaque green (K2070-Opal green), (K2076-Opal light green) and opaque blue (K2091-Lapis blue) (K2028-Opal sky blue). (d) Flat cut. (e) Punty cut (or concave cut).
Figure 17.
(a–c) ‘Ribbed cut glass’ tests 1 and 2 (2012). Cristalica glass body with Kugler glass powder: opaque green (K2070-Opal green), (K2076-Opal light green) and opaque blue (K2091-Lapis blue) (K2028-Opal sky blue). (d) Flat cut. (e) Punty cut (or concave cut).

Figure 18.
(a) ‘Korean glass’ 15 (2013). Cristalica glass body with Kugler glass powder: opaque red (K2124-Poppy red), opaque black (K2095-Opal black), opaque green (K2070-Opal green) and opaque yellow (K2078-Canary yellow), 260 mm (H) × 190 mm (W). (b) ‘Korean glass’ 16 (2013). Cristalica glass body with Kugler glass powder: opaque red (K2124-Poppy red), opaque green (K2070-Opal green), and opaque yellow (K2078-Canary yellow), 260 mm (H) × 190 mm (W).

© 2018 by the author. Licensee MDPI, Basel, Switzerland. This article is an open access article distributed under the terms and conditions of the Creative Commons Attribution (CC BY) license (http://creativecommons.org/licenses/by/4.0/).
Share and Cite
MDPI and ACS Style
Choi, K.R. Developing Inlaid Colouring Technique for Hot-Glass Making Process. Arts 2018, 7, 89. https://doi.org/10.3390/arts7040089
AMA Style
Choi KR. Developing Inlaid Colouring Technique for Hot-Glass Making Process. Arts. 2018; 7(4):89. https://doi.org/10.3390/arts7040089
Chicago/Turabian StyleChoi, Kee Ryong. 2018. "Developing Inlaid Colouring Technique for Hot-Glass Making Process" Arts 7, no. 4: 89. https://doi.org/10.3390/arts7040089
Note that from the first issue of 2016, this journal uses article numbers instead of page numbers. See further details here.