Article

Effect of One- and Two-Stage Shear Cutting on the Fatigue Strength of Truck Frame Parts

1
Chair of Metal Forming and Casting, Technical University of Munich, Walther-Meißner-Straße 4, 85748 Garching, Germany
2
Volkswagen Group Innovation, Center of Innovation Battery, Letterbox 1777/4, 38436 Wolfsburg, Germany
3
Materials Technology Department, SCANIA AB, SE-151 87 Södertälje, Sweden
*
Author to whom correspondence should be addressed.
J. Manuf. Mater. Process. 2020, 4(2), 52; https://doi.org/10.3390/jmmp4020052
Submission received: 27 March 2020 / Revised: 26 April 2020 / Accepted: 18 May 2020 / Published: 27 May 2020

Abstract

:
The longitudinal and transverse beams of trucks are manufactured with a large number of holes to fasten brackets for springs, fuel tanks, batteries etc. The quality of the holes, which is particularly influenced by the manufacturing process, has a major influence on the fatigue strength of the beams and thus the service lifetime of the vehicle. In most cases, the holes are produced using the highly economical shear cutting process. Previous investigations have shown that the fatigue strength of thin sheets can be increased by adjusting the shearing parameters and using a two-stage shear cutting process. This paper discusses the difference between one- and two-stage shear cutting on the hole quality of components made of S500MC (1.0984, thickness 8 mm) and its resulting fatigue strength. The hole quality is characterized by the geometry of the shear cut surface, its roughness, microstructure, and microhardness. It was shown that the two-stage shear cutting process allows producing holes of better quality than the ones manufactured by a one-stage shear cutting process. Furthermore, this resulted in an improved fatigue behavior.

1. Introduction

Heavy commercial vehicles play an important role in freight and passenger transport, which is also reflected in the growing world market [1]. Besides the quality of the product, trends such as fuel efficiency requirements and therefore lightweight construction are the main drivers for the truck market [2]. When manufacturing longitudinal beams also, it is these requirements that come into play. In the material release process, the lifetime predictions of components made of steel sheet materials are based on material data determined by samples with polished edges. In comparison, in series production, the highly economical shear cutting process is used [3], which means that the data obtained in the material qualification process cannot be transferred one-to-one to the components. As a result, high safety factors are used, and the component design is very conservative and contrary to the lightweight design concept.
Cutting thick sheets requires a high press force. Thus, special punch geometries are commonly used to reduce the punch through a pulling cut. For example, angled punches were used in [4]. Here, a force reduction of 80% was achieved. Nevertheless, also the part quality was heavily affected. The angle between the punch and sheet metal can cause a displacement of the punch in the lateral direction, as shown by [5], which is critical when the displacement exceeds the die clearance [6]. A significant force reduction was also achieved by punches with a wave form as proposed in [7]. These punches also show an improved dimensional accuracy of the manufactured hole. By carrying out finite element simulations, different punch geometries were compared in [8]. It was found that a rooftop-shaped punch should be preferred to angled punches, concave punches, or punches with an inverted cup geometry due to the absence of eccentric loads and their high rigidity. Furthermore, punches with a rooftop shape can improve the part quality, as shown in [9] for the hole expansion ratio and in [10] for the fatigue behavior.
Shear cutting of thick sheets, as used in truck frames, is challenging due to delaminations, which makes shear cutting parameters adapted to the sheet thickness essential [11]. This effect mainly occurs at larger die clearances and forms a starting location for further crack development.
Fatigue crack growth usually starts from a highly stressed edge. In [12] it was shown that the quality of the edge, which essentially depends on the manufacturing process, has a significant influence on the fatigue performance of the component. For example, shear cut edges usually show a lower fatigue strength than laser cut edges, as shown in [13]. The work in [3] found that cutting with a too big die clearance significantly decreases the fatigue strength. Nevertheless, a smaller die clearance does not always improve the fatigue strength, as shown by [14]. The results published in [15,16] were able to show that the variation of shear cutting parameters leads to very different cut surface qualities and has a high influence on the fatigue strength of shear cut edges. In particular, a two-stage shear cutting process was able to increase the fatigue strength as it greatly reduced the damage of the shear affected zone. Iwaya et al. varied the cutting offset between 20% and 80% to the sheet thickness and showed that the forming capacity of the edge is greatly improved by the two-stage shear cutting process. Furthermore, it could be shown that work hardening of the shear cut edge is reduced [17]. Another positive effect of the two-stage trimming is, as described by [18], the bending of the slug, which leads to an improved stress state in the shear affected zone. Gläsner et al. showed that the scrap stiffness and the resulting material flow in the two-stage shear cutting process have a significant influence on the reduction of damage in the shear affected zone [19].
This paper focuses on improving the shear cut surface quality in a one- and two-stage shear cutting process on thick steel sheet material to increase the fatigue strength of shear cut holes used for example in truck beams. The state-of-the-art is advanced as the two-stage shear cutting process is adapted for cutting thick sheets, i.e., by using a punch with a rooftop shape. Additionally, the influence of the process parameters, die clearance, and cutting offset on the cut surface is investigated and compared to those of one-stage shear cutting with a rooftop-shaped punch. Finally, the fatigue behavior of specimens cut by one- and two-stage shear cutting is investigated. Thus, further insight is given into the effect of the shear cutting process on the fatigue behavior.

2. Materials and Methods

2.1. Material

The material used for the investigations was a hot rolled 8 mm thick high-strength low-alloy steel Grade S500MC, which consisted of a fine ferritic/pearlitic microstructure. Applications for this steel grade are, for example, longitudinal beams or frames of trucks. It has a high yield strength of a minimum of 500 MPa, a minimum tensile strength of 550–700 MPa, and a minimum total elongation of 18% [20]. The mechanical properties of the material, listed in Table 1, were measured on the specimen according to [21] taken longitudinal and perpendicular to the sheet’s rolling direction.
The mean hardness of the base material was determined to be 200 HV 0.1 by microhardness measurement according to the standard [22]. The chemical composition of this steel grade, measured by an optical emission spectrometer, is listed in Table 2.

2.2. Shear Cutting Tool and Stamping Press

A very rigid modular shear cutting tool as displayed in Figure 1 was designed and manufactured to investigate the influence of the shear cut surface quality on the fatigue strength of shear cut holes. This tool can be used both for one- and two-stage shear cutting. In both cases, the specimens are positioned by guiding pins to ensure a precise location of the hole.
To decrease the maximum cutting force, punches with a rooftop shape are commonly used for cutting thick sheets. The geometry of the punches was chosen according to [9], which was milled to punches standardized in [23]. This is illustrated in Figure 2. The punch and die edge radii were polished to 50 μ m in order to avoid breakouts. Additionally, all punches were coated with Balinit Alcrona Pro, an AlCrN-based coating with a thickness of 2 to 4 μ m , to minimize wear and thus get a smooth hole surface.
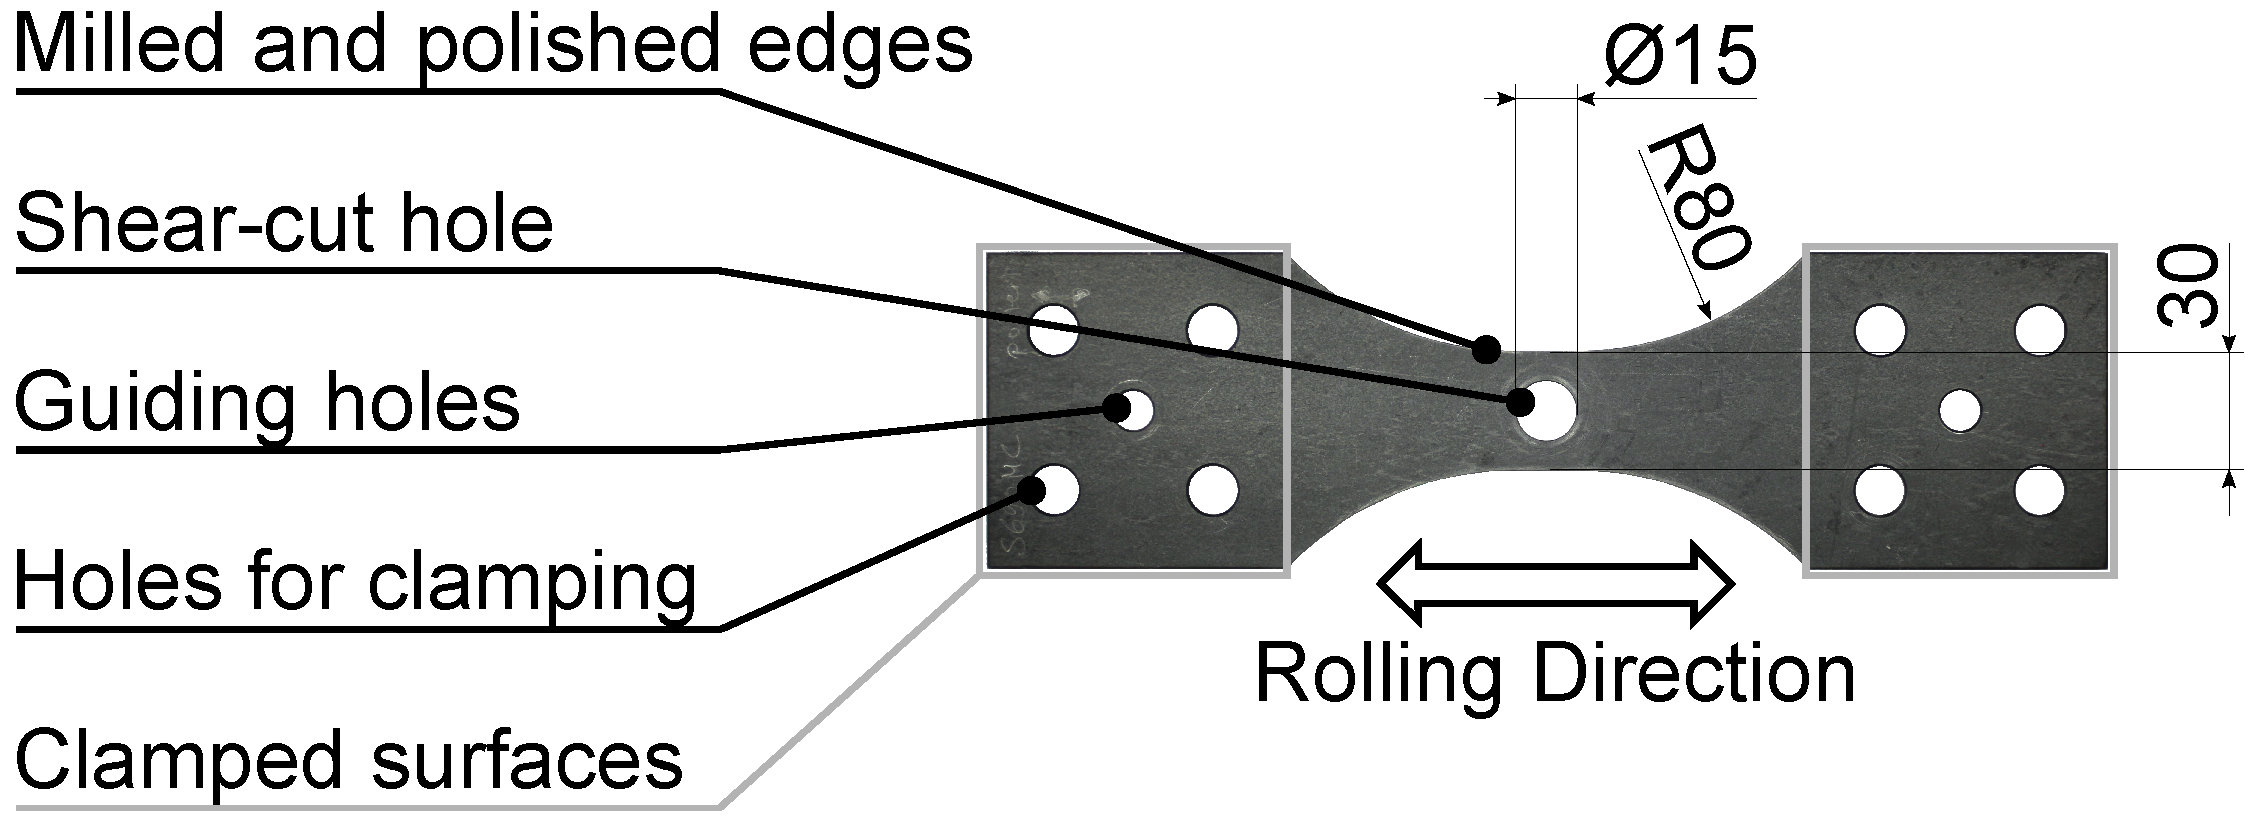
A fatigue test specimen is displayed in Figure 3. The diameter of the final hole was 15 m m for all configurations. The width of the specimen was w = 30 m m , i.e., the width of the remaining sheet metal was 7.5 m m on each side of the hole. Furthermore, the specimens showed a milled and polished edge on both sides, thus making sure the crack initiated in the notch root. Additionally, the outer edges in the region of the hole were parallel for a distance of 15 mm. On both sides, there were four holes for clamping the specimen in the fatigue testing rig and two additional ones for the positioning in the shear cutting tool. The specimen was taken out in the rolling direction of the sheet metal, as this is a typical orientation towards the load direction for many truck side beam applications. The punches were oriented with their rooftop perpendicular to the specimen axis to get a high amount of clean cut in the highly stressed notch root. All experiments were carried out on a Bruderer high-speed stamping press BSTA-1600 with a nominal press force of 1600 kN. As this force was significantly higher than the force needed to cut the hole, the influences of the press elasticity on the results could be neglected.
The die clearance of the first cutting operation of the specimens manufactured by two-stage shear cutting was chosen to be 10%. The hole diameter of this first cut was varied to achieve the different cutting offsets z, i.e., the diameter of the punch of the first cutting operation was d p r e = 15 m m 2 z . The second cutting operation was carried out with a punch with a diameter of d = 15 m m while varying the die clearance u r by changing the die’s inner diameter.

2.3. Fatigue Testing

The stress-controlled fatigue tests were performed with a resonance testing system from Schenck with a maximum force of 250 k N . The fatigue tests were carried out by testing under constant amplitude and using a load ratio R = σ m i n / σ m a x equal to 1 at a frequency of about 33 Hz. In the following, the results are presented for a failure probability of 50%. For each stress level, at least three samples were tested.

2.4. Measurement Equipment

To evaluate the quality of the shear cut edges, different measuring methods were used. The first step in characterizing was a photographic documentation with a digital microscope from Keyence Co., Ltd., Osaka, Japan. A preselection for further investigations was then made based on three criteria: a maximum percentage of clean cut with a minimum burr height and a smooth fracture surface at the same time. Using the contour measurement system MarSurf XCR 20 from Mahr GmbH, Göttingen, Germany, the shear cut surface characteristics were determined according to [24] on at least six specimens of each configuration. The measuring system could record the profile of the shear cut edge with an accuracy of 0.5 μ m using a probe arm with two needles. The analysis of the edge surface was extended by a roughness measurement on the clean cut and fracture surface. According to [25], the roughness characteristics R a and R z were determined on each surface with a VK-X 150 laser scanning microscope from Keyence Co., Ltd., Osaka, Japan. The deformation caused by the shear cutting process in the shear-affected zone was documented by micrographs of polished specimen etched with 3% Nital. In addition, the hardening of the material was analyzed with microhardness testing, using type AMH-43 of LECO Instrumente GmbH, Mönchengladbach, Germany. The microhardness testing was performed by applying a load of 100 g for 10 s on a predefined measuring grid according to standard [22]. Overall, two-hundred seventy-five hardness indentations were measured, distributed over the shear affected zone, up to a depth of 3 mm starting from the clean cut surface. In order to visualize the areas of maximum hardening, the measured values were visualized in a false-color contour plot.

2.5. Experimental Procedure

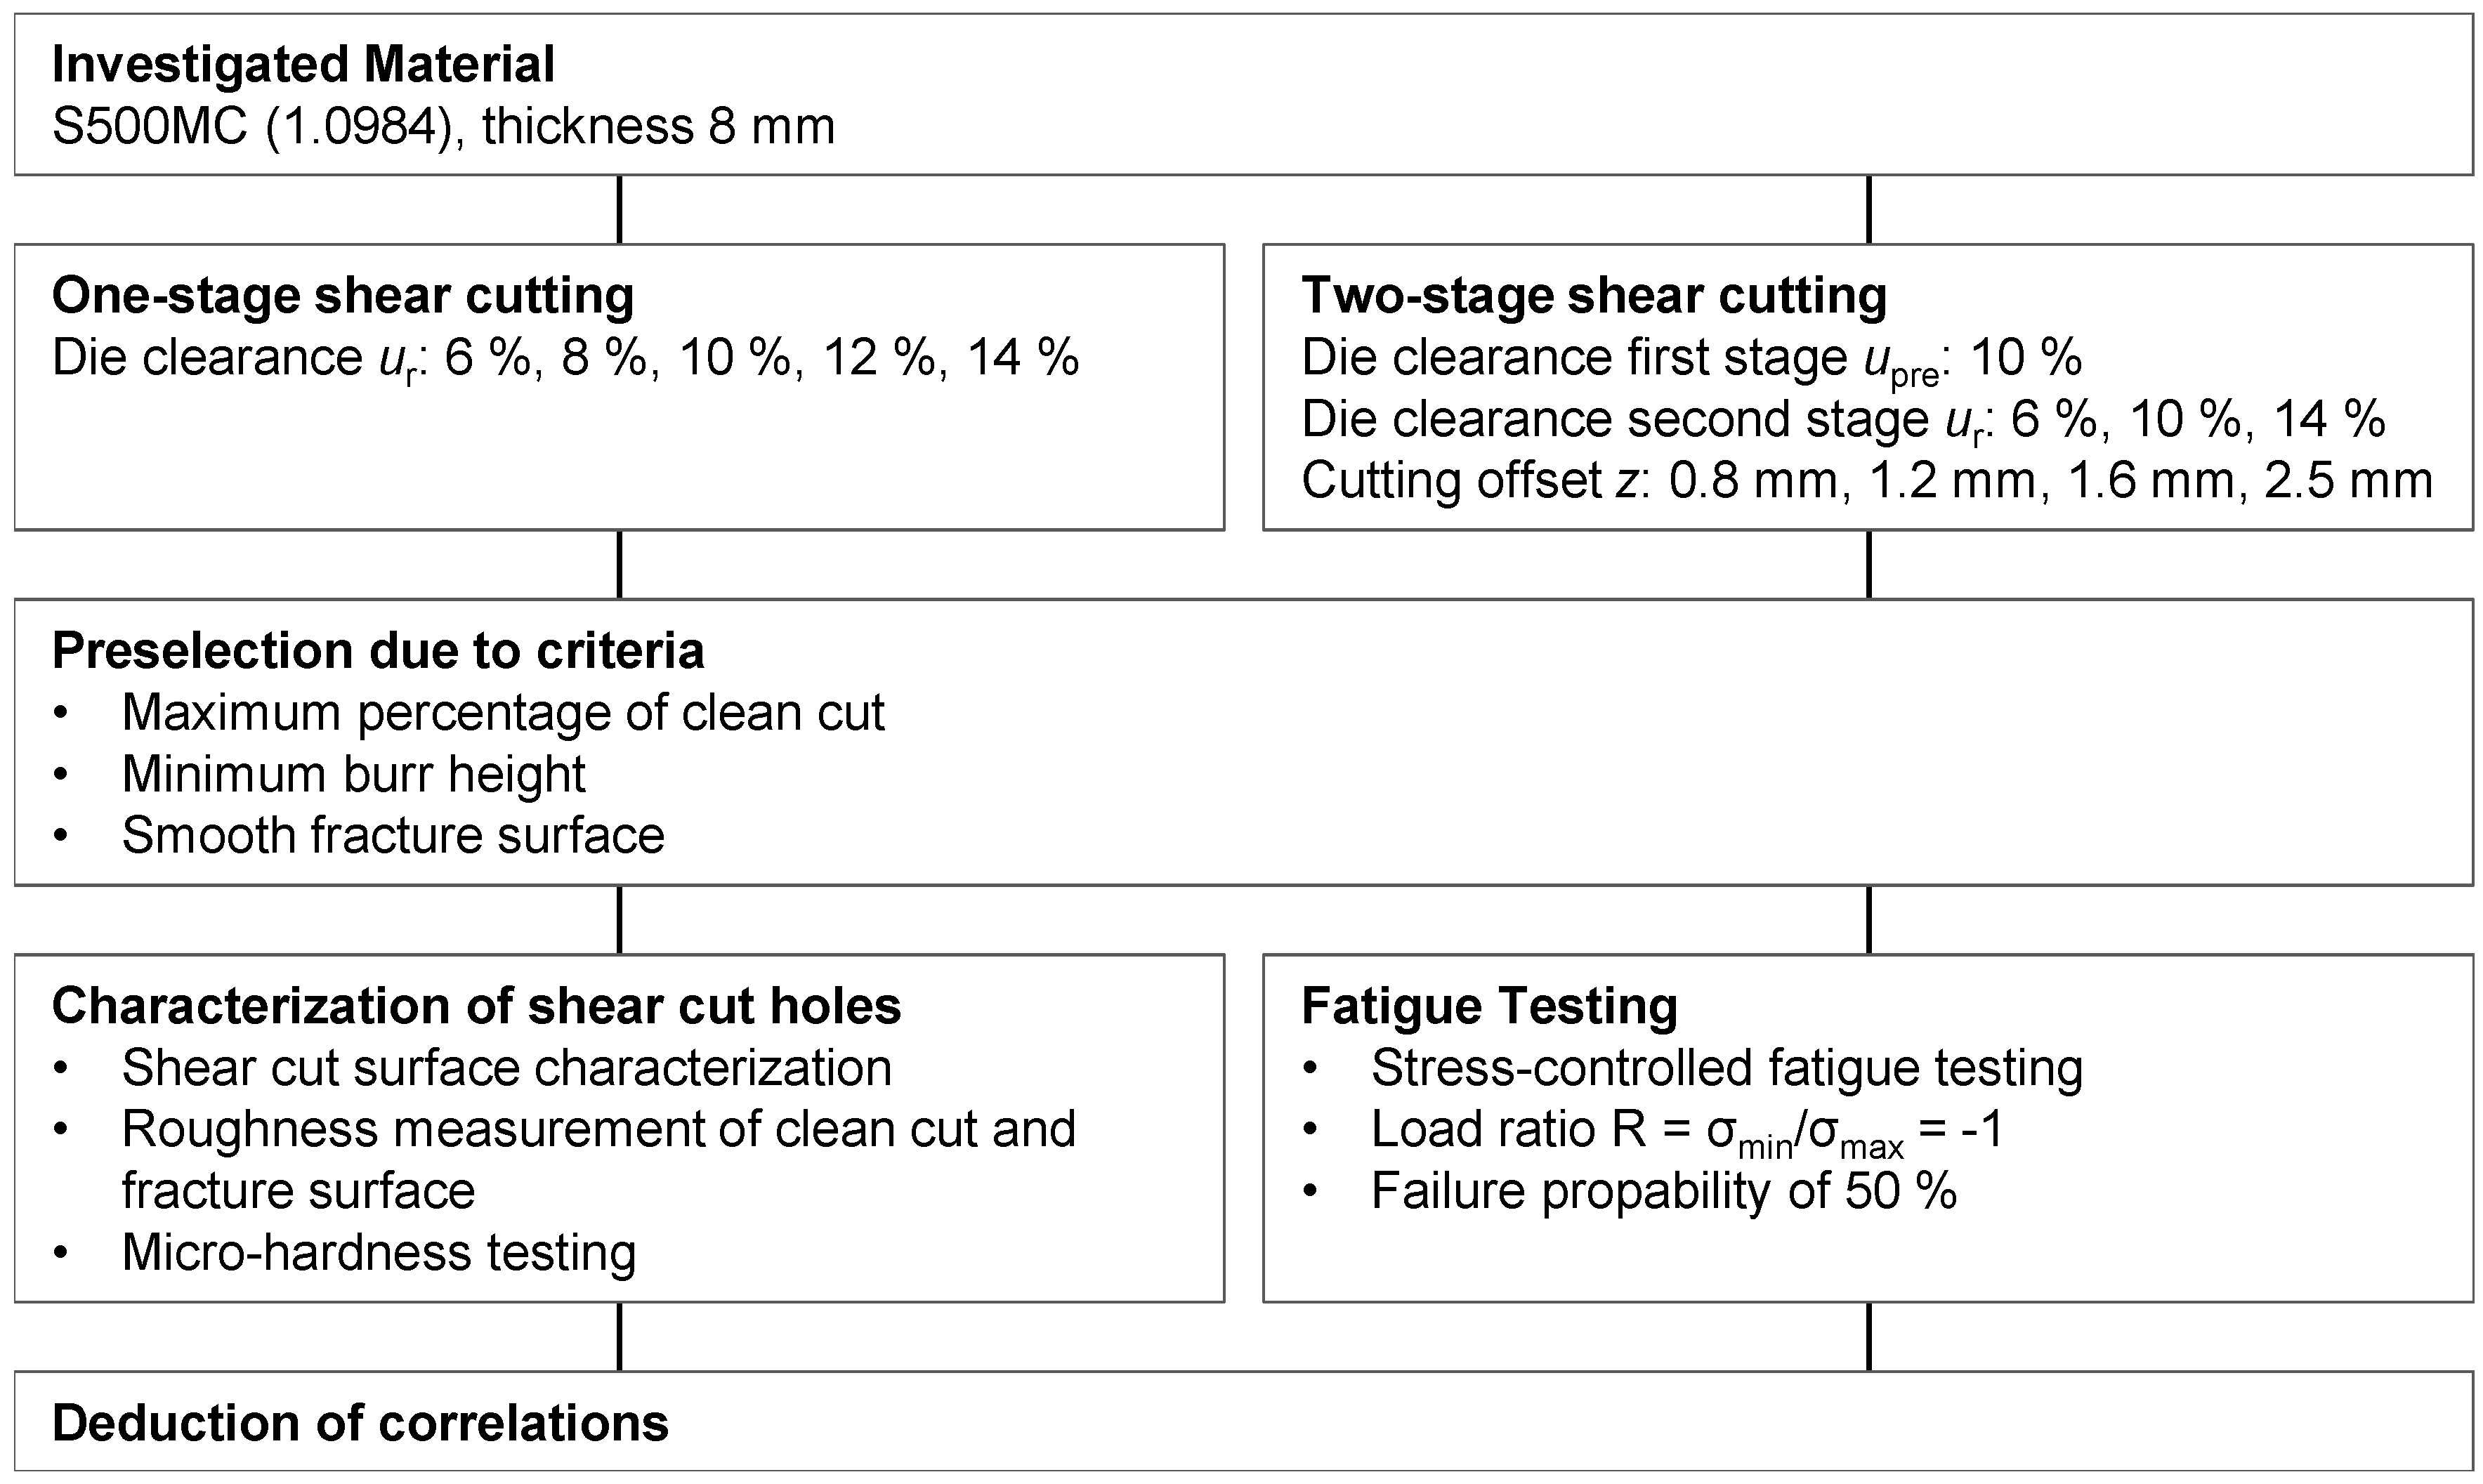
The aim of these investigations was to examine the quality of shear cut edges with regard to their fatigue strength behavior. The investigated shear cutting parameters were the die clearance, as well as the cutting offset. The characteristic cut surface parameters, the surface roughness of the shear cut edge, and the deformation of the material in the shear-affected zone were used to evaluate the quality of the shear cut edges. The fatigue strength results were then compared to the Woehler curves of polished specimen. Figure 4 illustrates the experimental procedure.

3. Results and Discussion

3.1. Cut Surface Characteristics

Microscope pictures of the cut surfaces in the critical cross-section of the specimens produced by one-stage shear cutting are displayed in Figure 5.
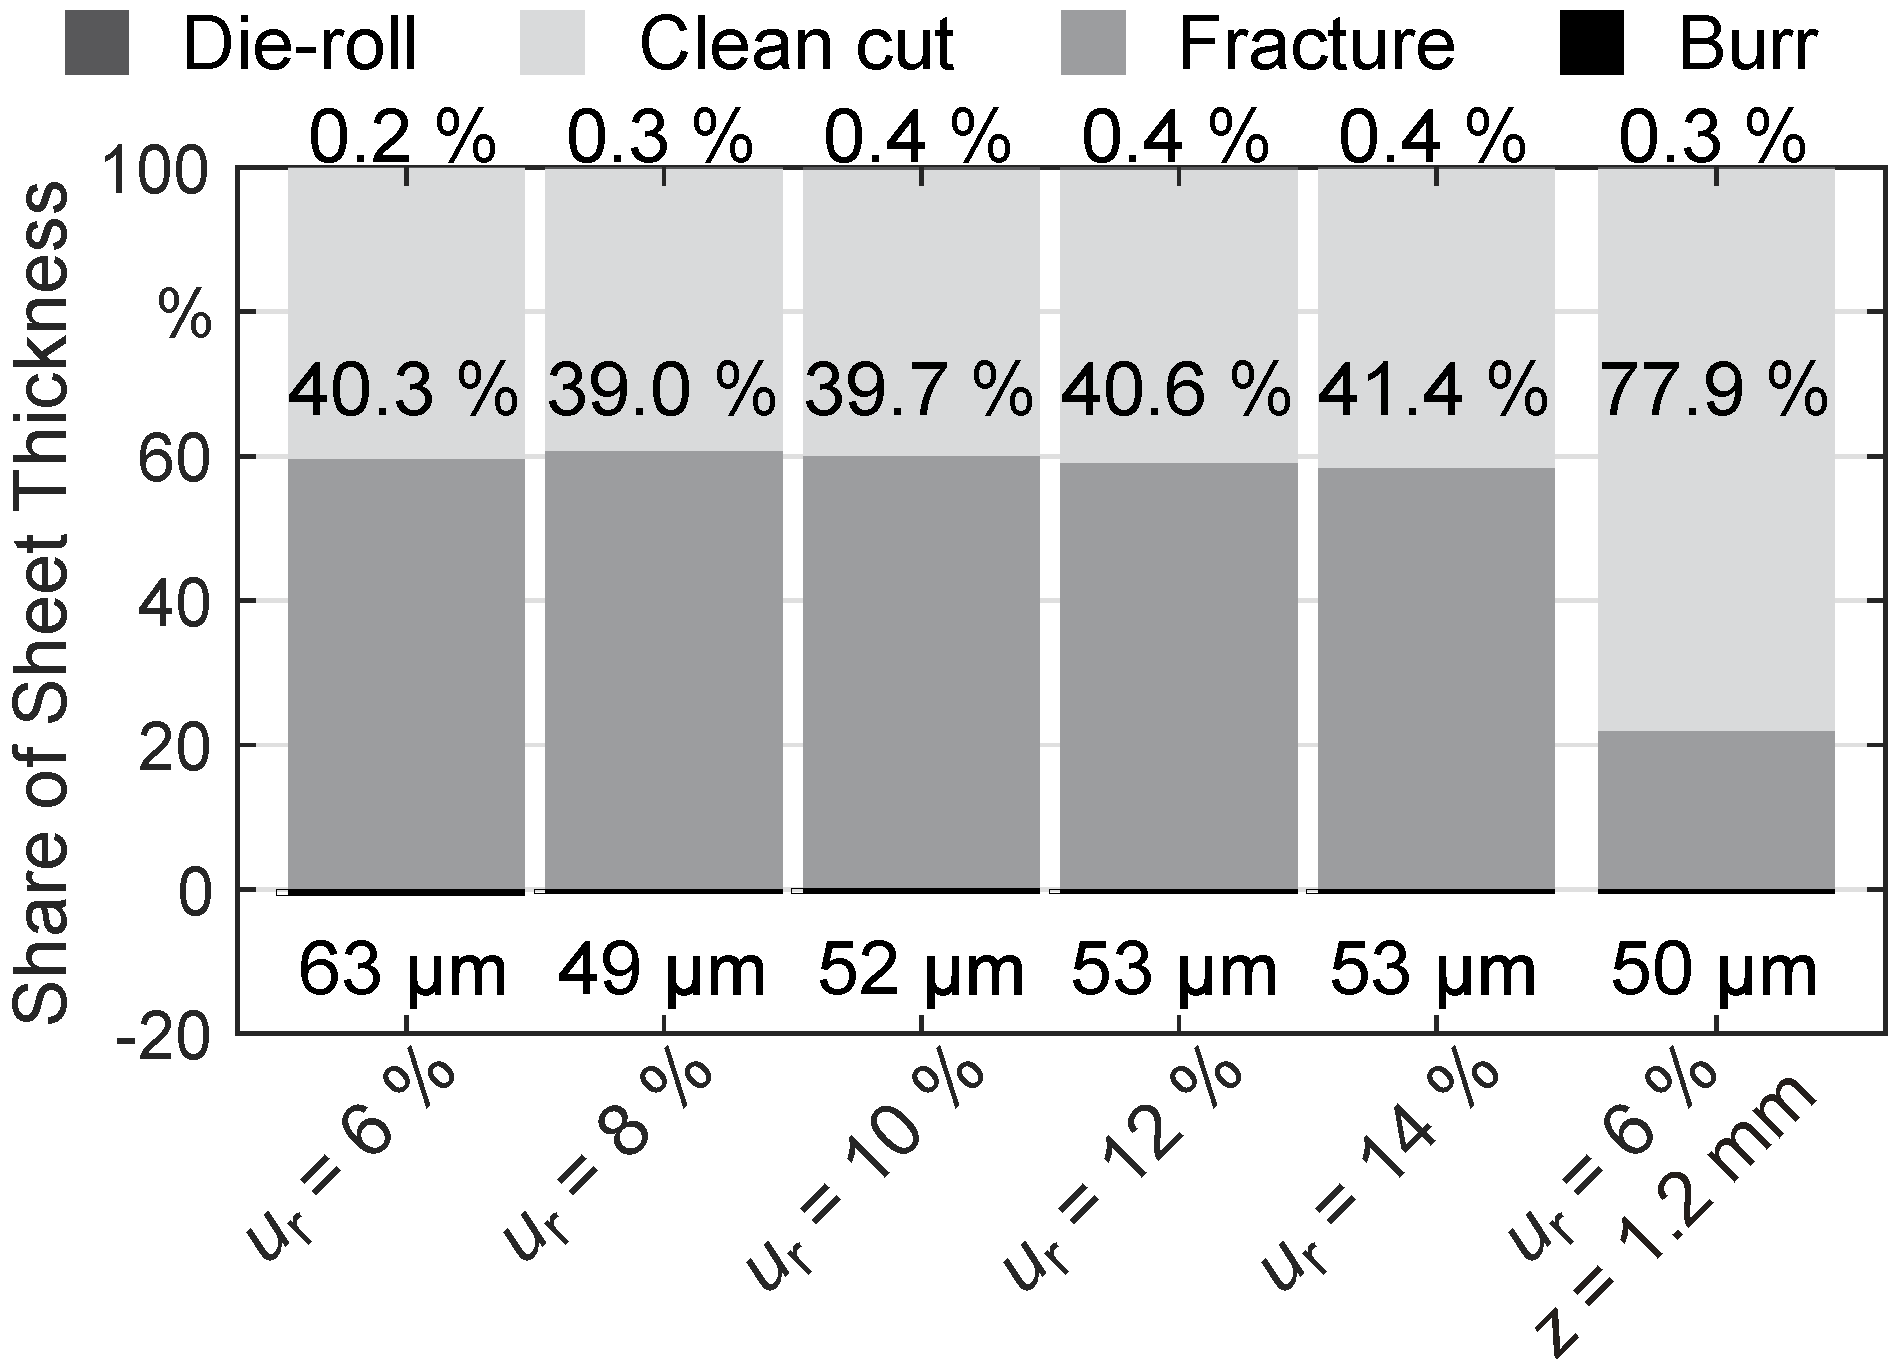
It can be observed that even though the die clearance was varied in a comparably big range of u r = 6 % to u r = 14 % , only small changes were visible. This could be also observed in the profile measurements displayed in Figure 6. The die roll was not measurable, and the clean cut height only changed between 39.6% and 41.9% of the sheet metal thickness with a local minimum for u r = 10 % . Only small changes of the burr height of less than 14 μ m were measured. While the classical cut surface characteristics showed a very small change caused by a different die clearance, the appearance of the fracture zone showed signs of delaminations for a die clearance of u r = 12 % and u r = 14 % . This made them unsuitable for further fatigue test investigations. Specimens manufactured with these process parameters are not considered in the following.
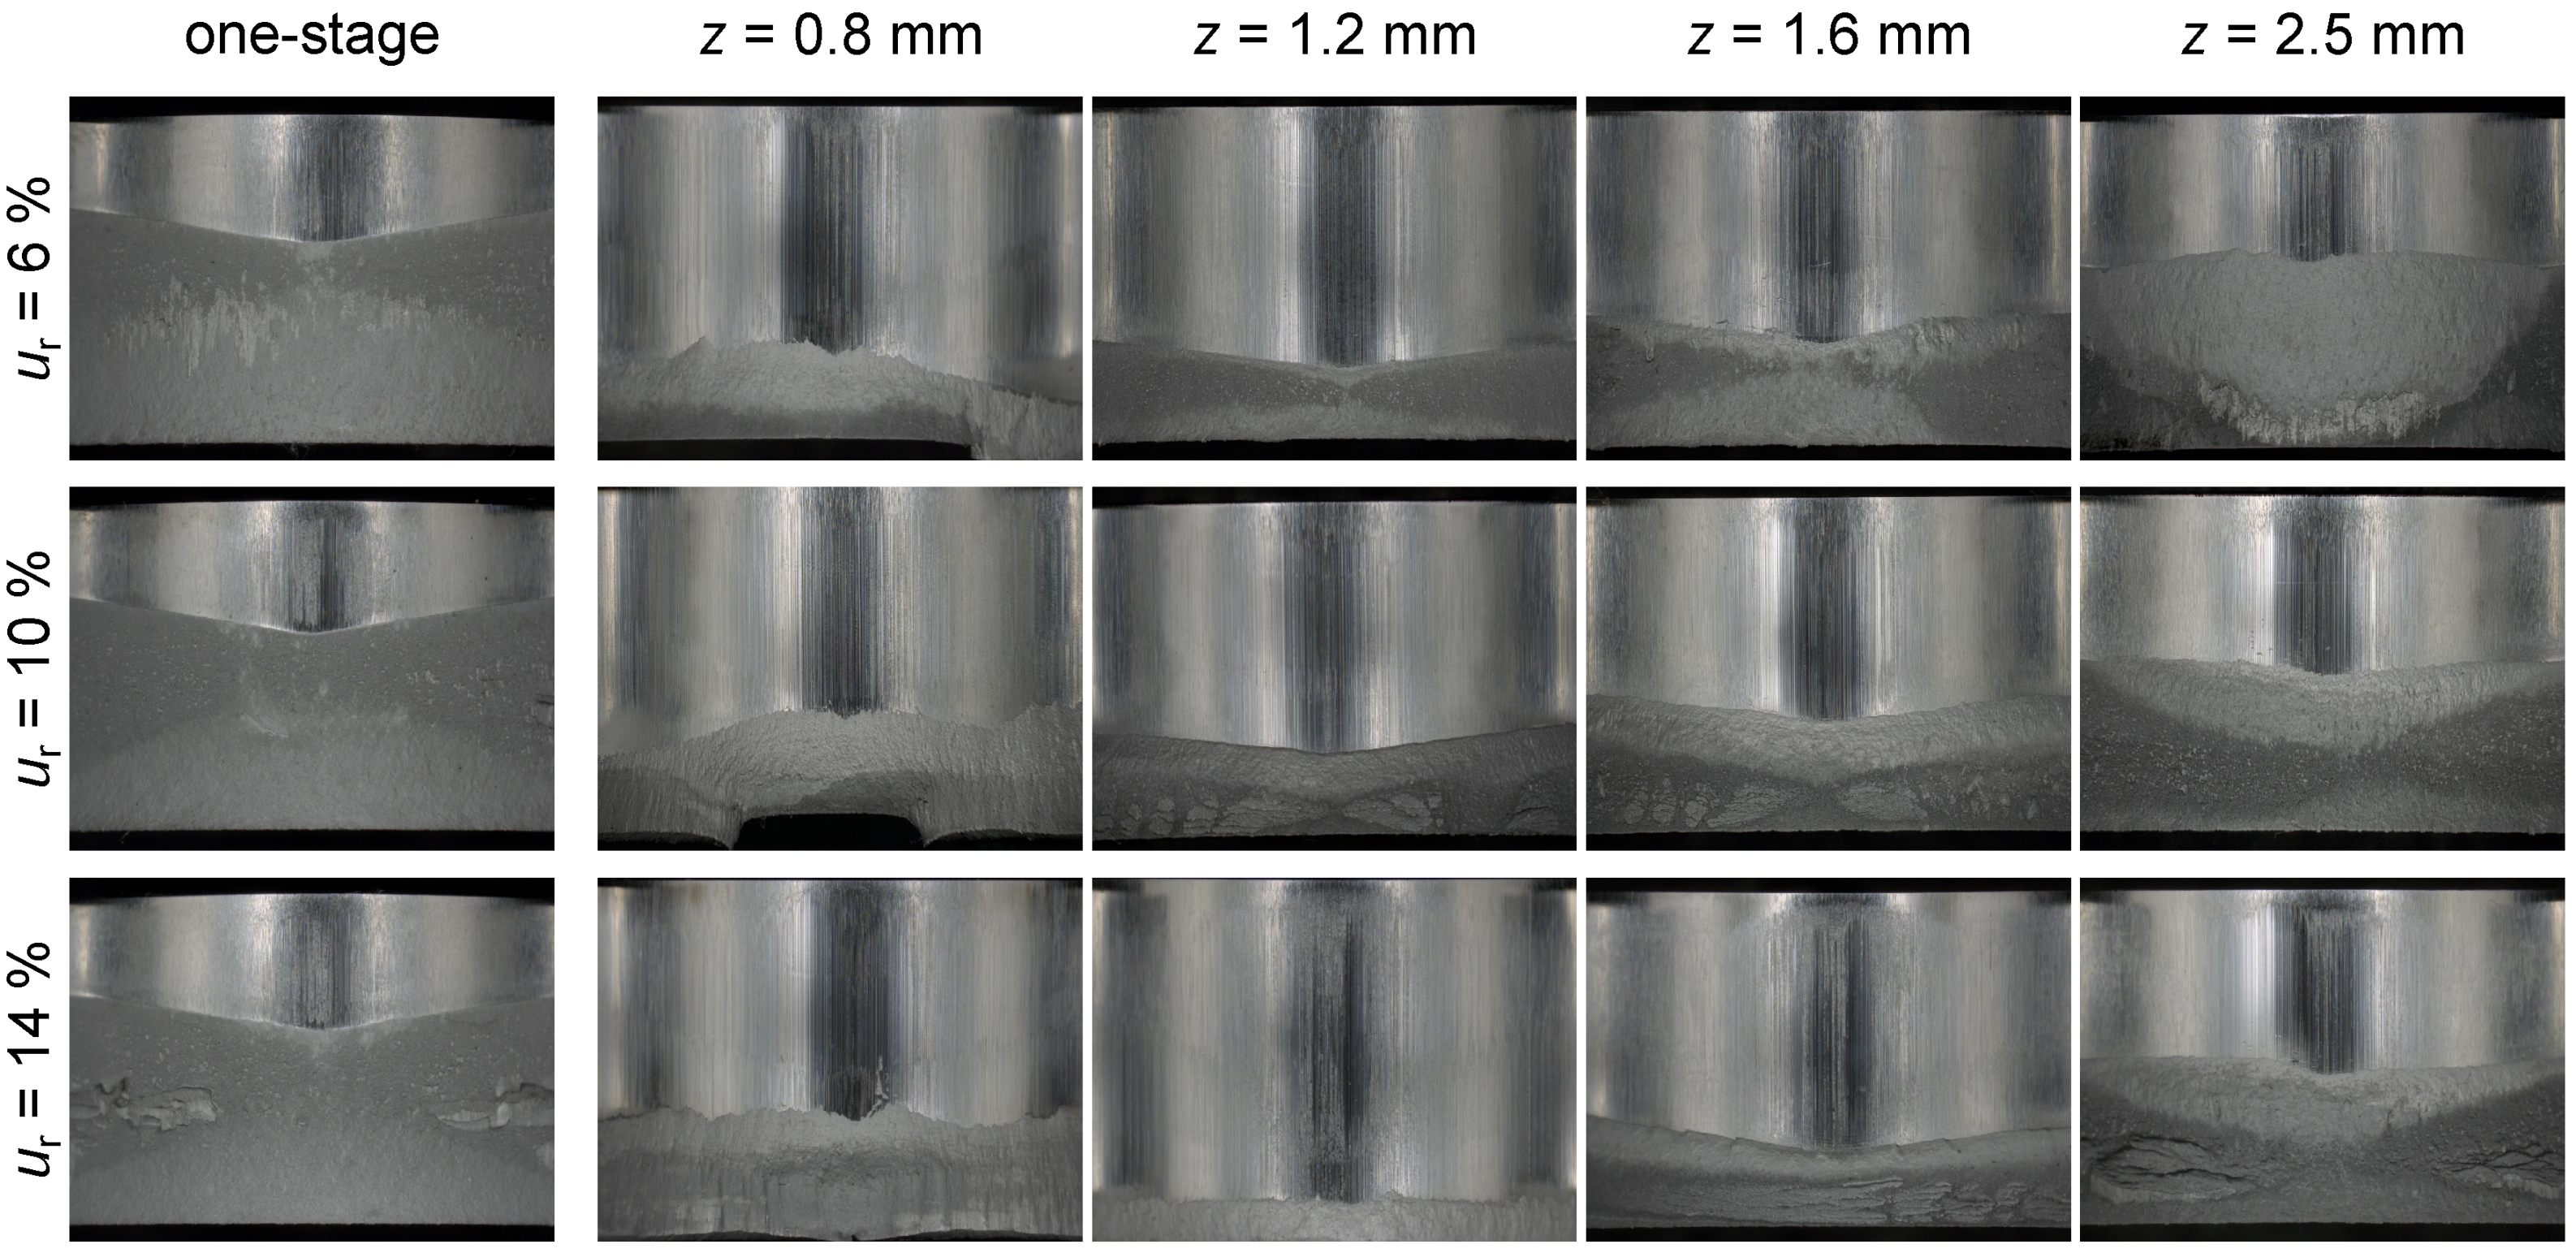
The pictures of the cut surfaces resulting from two-stage shear cutting compared to those manufactured by one-stage shear cutting are displayed in Figure 7.
It can be observed that the two-stage shear cutting process significantly changed the cut surfaces. In most cases, the clean cut height was much higher than in the one-stage process. Especially for a small cutting offset of z = 0.8 m m , an undefined transition from clean cut to fracture zone could be observed. This was accompanied by a big burr height. For the bigger cutting offsets of z = 1.6 m m and z = 2.5 m m , delaminations in the fracture zone could be observed.
As a big burr height was unfavorable for most applications and delaminations already showed a crack that was highly likely to result in a lower fatigue strength, the specimens showing these characteristics were not further investigated. The ones with a big burr were all specimens manufactured with a cutting offset of z = 0.8 m m and the ones manufactured with a cutting offset of z = 1.2 m m and a die clearance of u r = 14 % . Delaminations could be observed on the parts manufactured with a cutting offset of z = 2.5 m m and a die clearance of u r = 14 % , with a cutting offset of z = 1.6 m m and a die clearance of u r = 10 % and bigger and those manufactured with a cutting offset of z = 1.2 m m and a die clearance of u r = 10 % . This only left four options for further investigations: The parts manufactured with a cutting offset of z = 1.2 m m , z = 1.6 m m and z = 2.5 m m and a die clearance of u r = 6 % , as well as those manufactured with a cutting offset of z = 2.5 m m and a die clearance of u r = 10 % .
Based on the results published in [15], the parts manufactured with z = 1 . 2 m m and u r = 6 % were most likely to achieve an improvement of the fatigue behavior due to the big amount of clean cut and were therefore investigated in the following.
A comparison of the cut surface characteristics of these specimens with the one-stage variants is displayed in Figure 6. Additionally, the absolute values are given in Table 3.
All manufactured specimens showed almost no die roll. For u r = 10 %, only 32 ± 6 μ m were measured. Due to this small value, the die roll is almost not visible in Figure 6. It could be observed that the clean cut height could be almost doubled by the two-stage process. Furthermore, the die roll height and the burr height were not increased.

3.2. Fatigue Strength

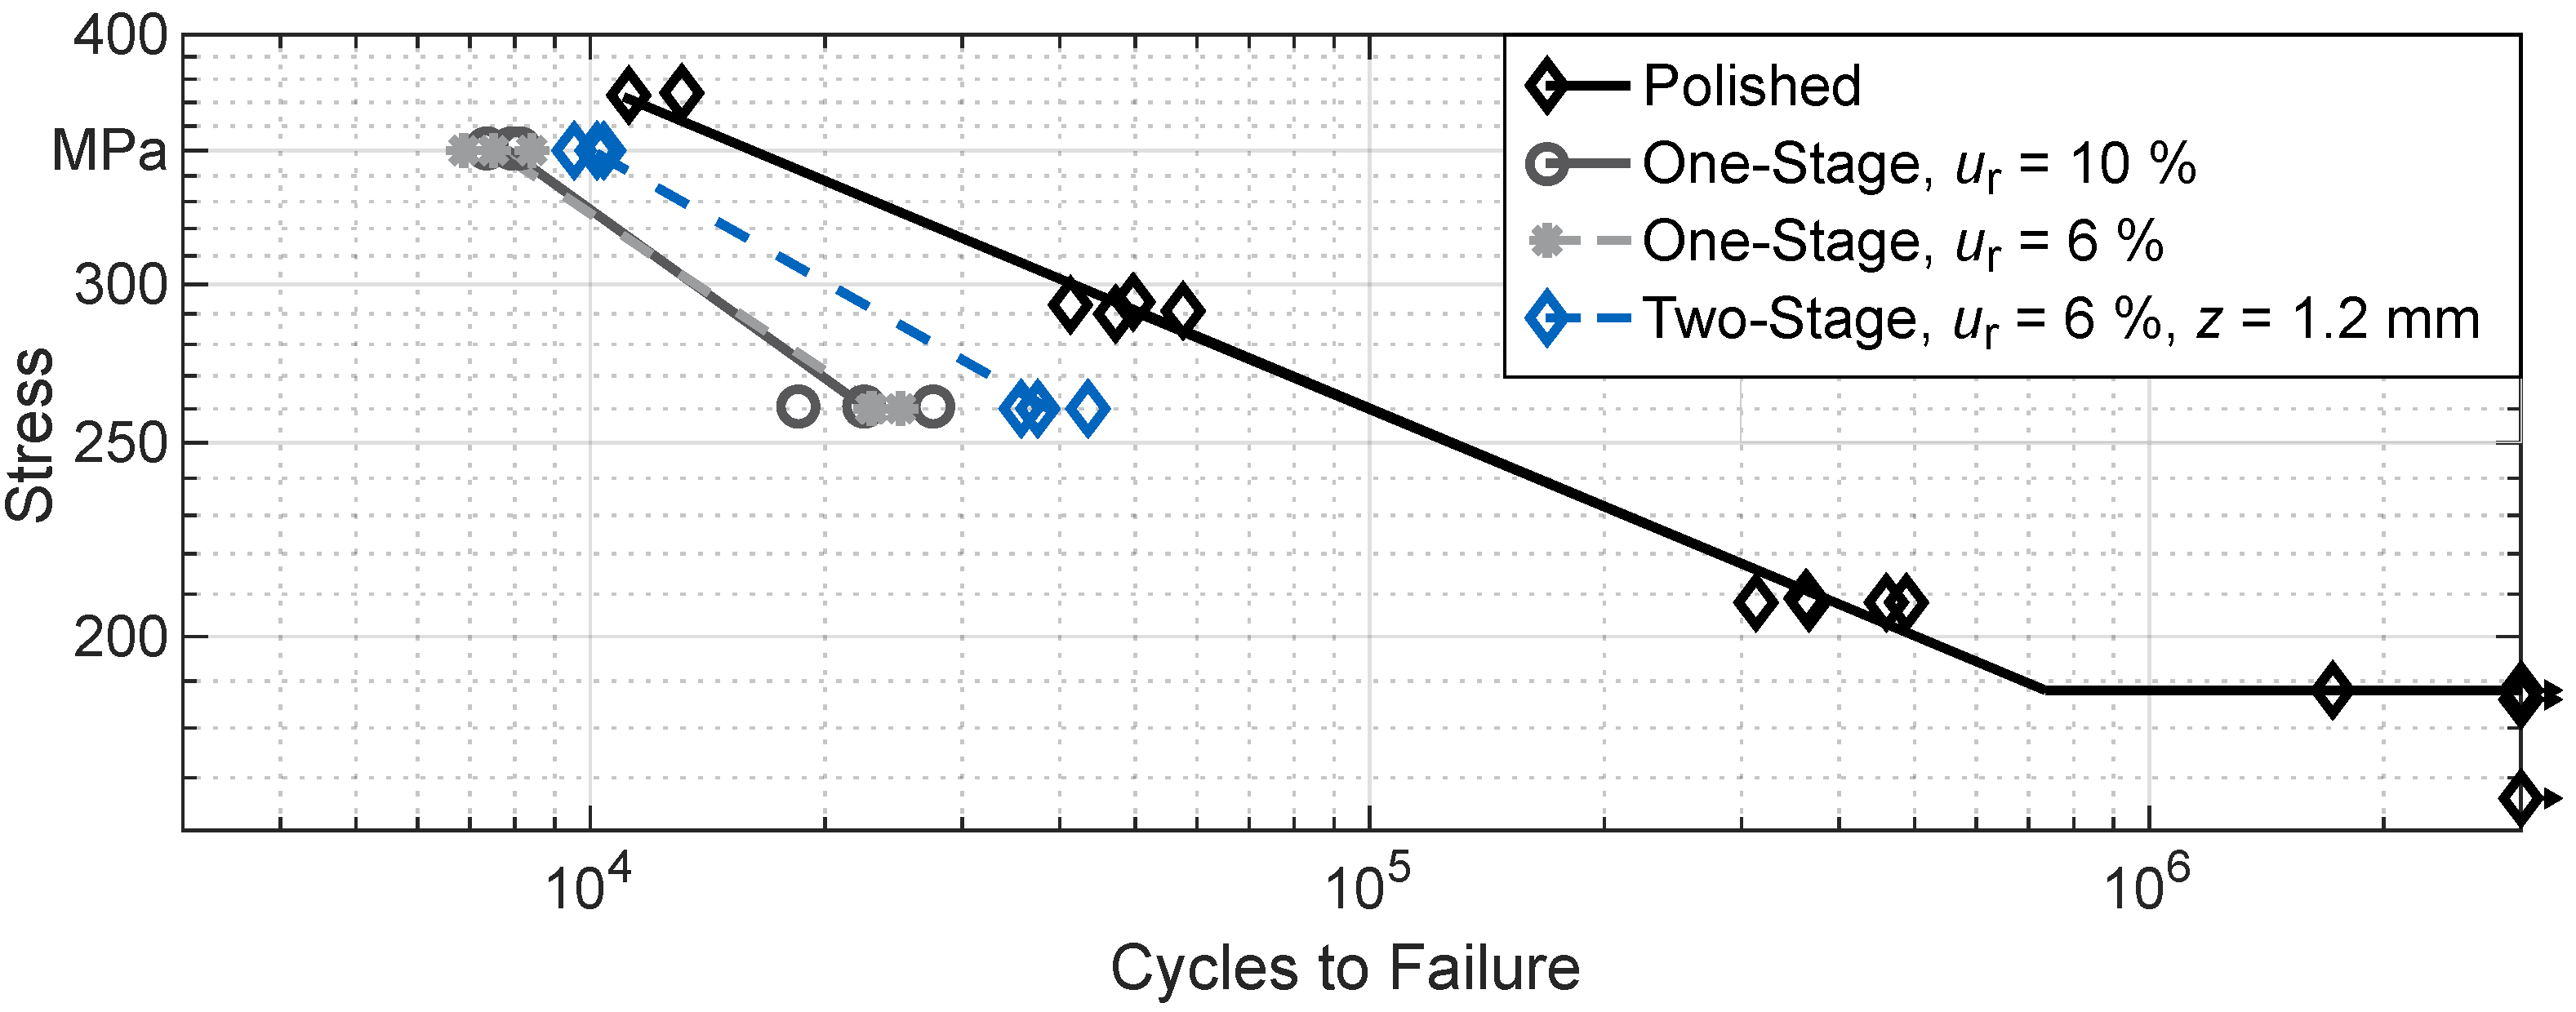
The resulting fatigue strength of the selected specimens is displayed in Figure 8. All measured data points were displayed to show the robustness of the results. It should be noted that the nominal stress in the hole was given, i.e., the real stress considering the notch factor was 2 + ( 1 d w 3 ) = 2 . 13 times higher than the results given in Figure 8 [26]. As expected, the polished specimens showed the highest limited lifetime strength. The k-factor in the limited lifetime range, calculated by k = log ( N 1 / N 2 ) / l o g ( σ 1 / σ 2 ) according to [27], was 6.18. This was followed by the two-stage shear cut specimens. Here, the curve was not only moved to the left, but was also tilted. It showed a k-factor of 4.54. The specimens produced by one-stage shear cutting showed an even lower limited lifetime strength. Here, the results for the specimens manufactured with u r = 10 % and u r = 6 % were almost identical. Again, a slightly changed slope could be observed with k = 3 . 82 for u r = 10 % and k = 3 . 57 for u r = 6 % .
The results showed that two-stage shear cutting was able to improve the fatigue strength of shear cut holes significantly. Still, the results could not be explained by simply looking at the cut surfaces, as both the one-stage and two-stage shear cut specimens showed a significant amount of fracture.

3.3. Roughness

As the surface roughness influenced the fatigue strength [28], it was measured for the relevant specimens. The roughness of the clean cut is listed in Table 4 and in Table 5 for the fracture zone.
The roughness R a varied in a comparably small range of 0.26 and 0.66 μ m and R z in a range of 2.45 and 3.71 μ m in the clean cut with the two-stage variant showing the highest roughness.
On the fracture zone, a significantly higher roughness between R a 2.48 and 3.22 μ m and R z between 14.6 and 18.6 μ m were observed. Again, the two-stage variants showed the highest roughness. Due to the higher roughness of the two-stage shear cut specimens on both the clean cut and fracture zone, the roughness was also not the measure that caused the much higher fatigue strength.

3.4. Micrographs and Microhardness

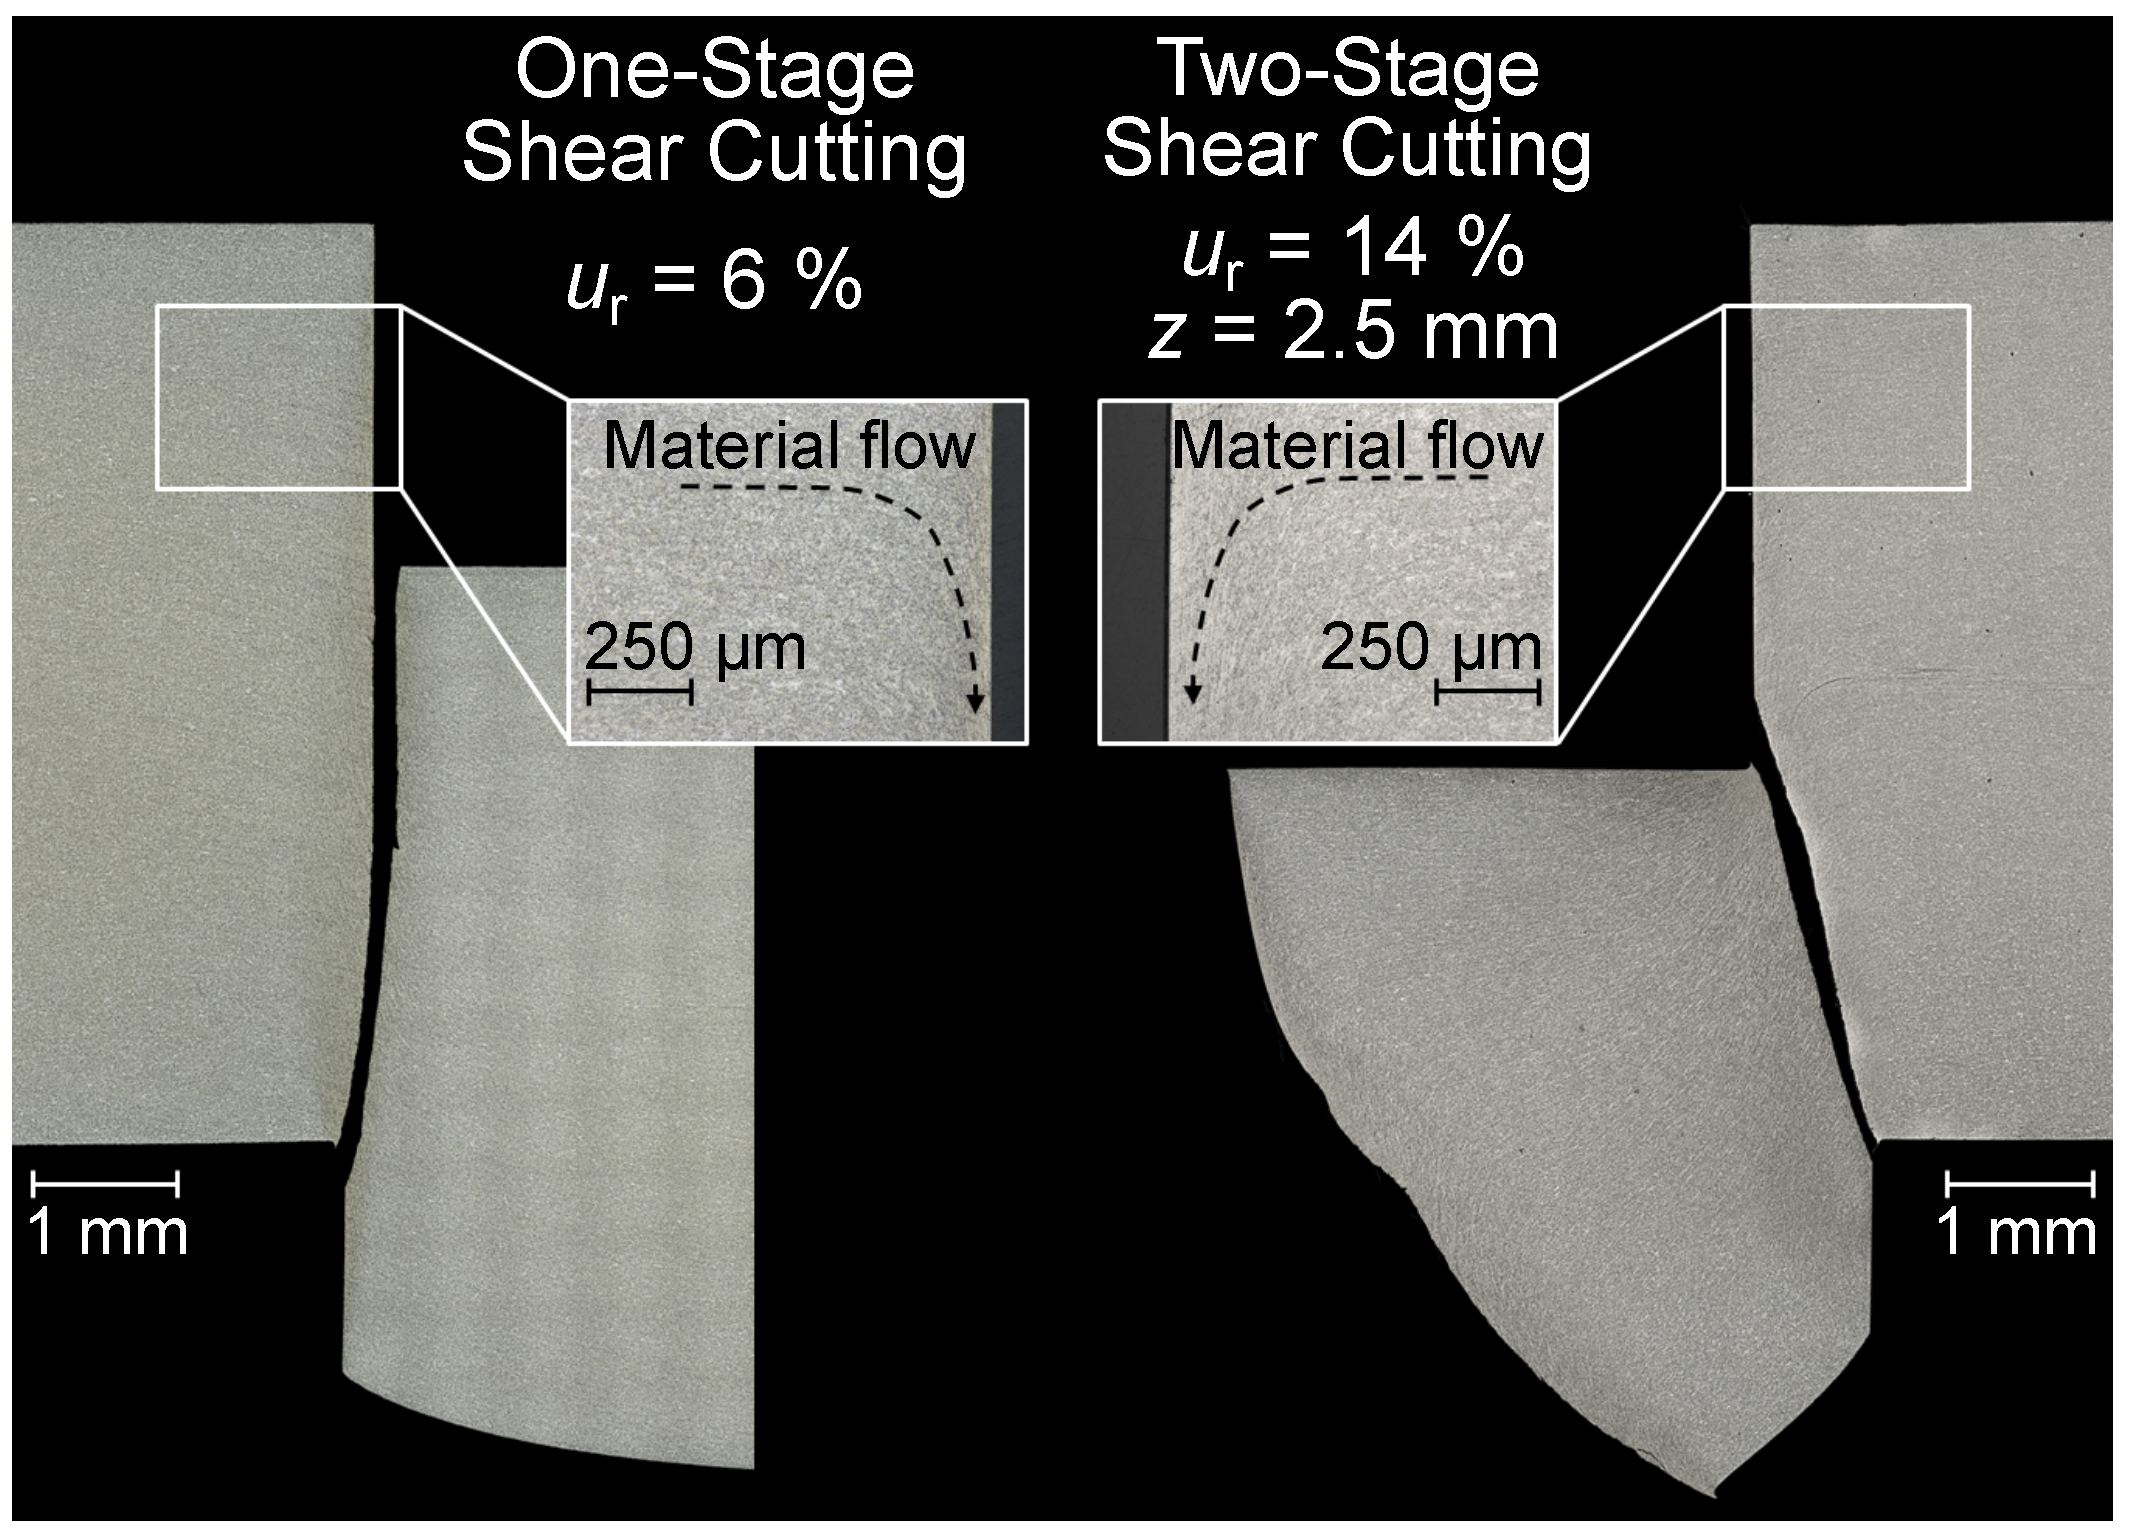
For the investigated shear cutting strategies, four parameter combinations were compared with each other using micrographs to illustrate the influence of cutting offset and die clearance on the plastic deformation in the shear-affected zone. Figure 9 and Figure 10 illustrate the microsections of shear cut edges and corresponding scraps.
In a one-stage shear cutting process ( u r = 6%), the stiff scrap caused a strong deformation in the front area of the cut surface, and the scrap absorbed a similar amount of deformation to the shear cut part. In a two-stage shear cutting process, by contrast, the material of the scrap could flow in a radial direction, was significantly less rigid, and could therefore absorb more plastic deformation from the shear cutting process.
This was already apparent for the first parameter combination with a relatively large addition of z = 2.5 m m , combined with a die clearance of u r = 14%. Due to the lower stiffness of the scrap, the proportion of clean cut could be increased, but the scrap was still too broad to absorb enough deformation. The result in the shear cut edge was therefore an elongation of the grain structure similar to that in the one-stage shear cutting process. The microsection also showed microcracks caused by a too large die clearance and should be avoided for dynamic loading.
For a small cutting offset of z = 0.8 m m combined with a die clearance of u r = 14%, the material flowed into the die clearance and left a very large burr. Nevertheless, the stiffness of the scrap decreased considerably due to its small width and led the scrap to take over a large amount of the deformation. In the clean cut portion of the cut part, almost no stretching of the grains resulted.
For an adjusted die clearance and cutting offset ( u r = 6%, z = 1.2 m m ), a maximization of the clean cut paired with a minimum burr and a smooth fracture surface could be achieved at the same time. Again, there was almost no damage due to severe deformation to the shear-affected zone.
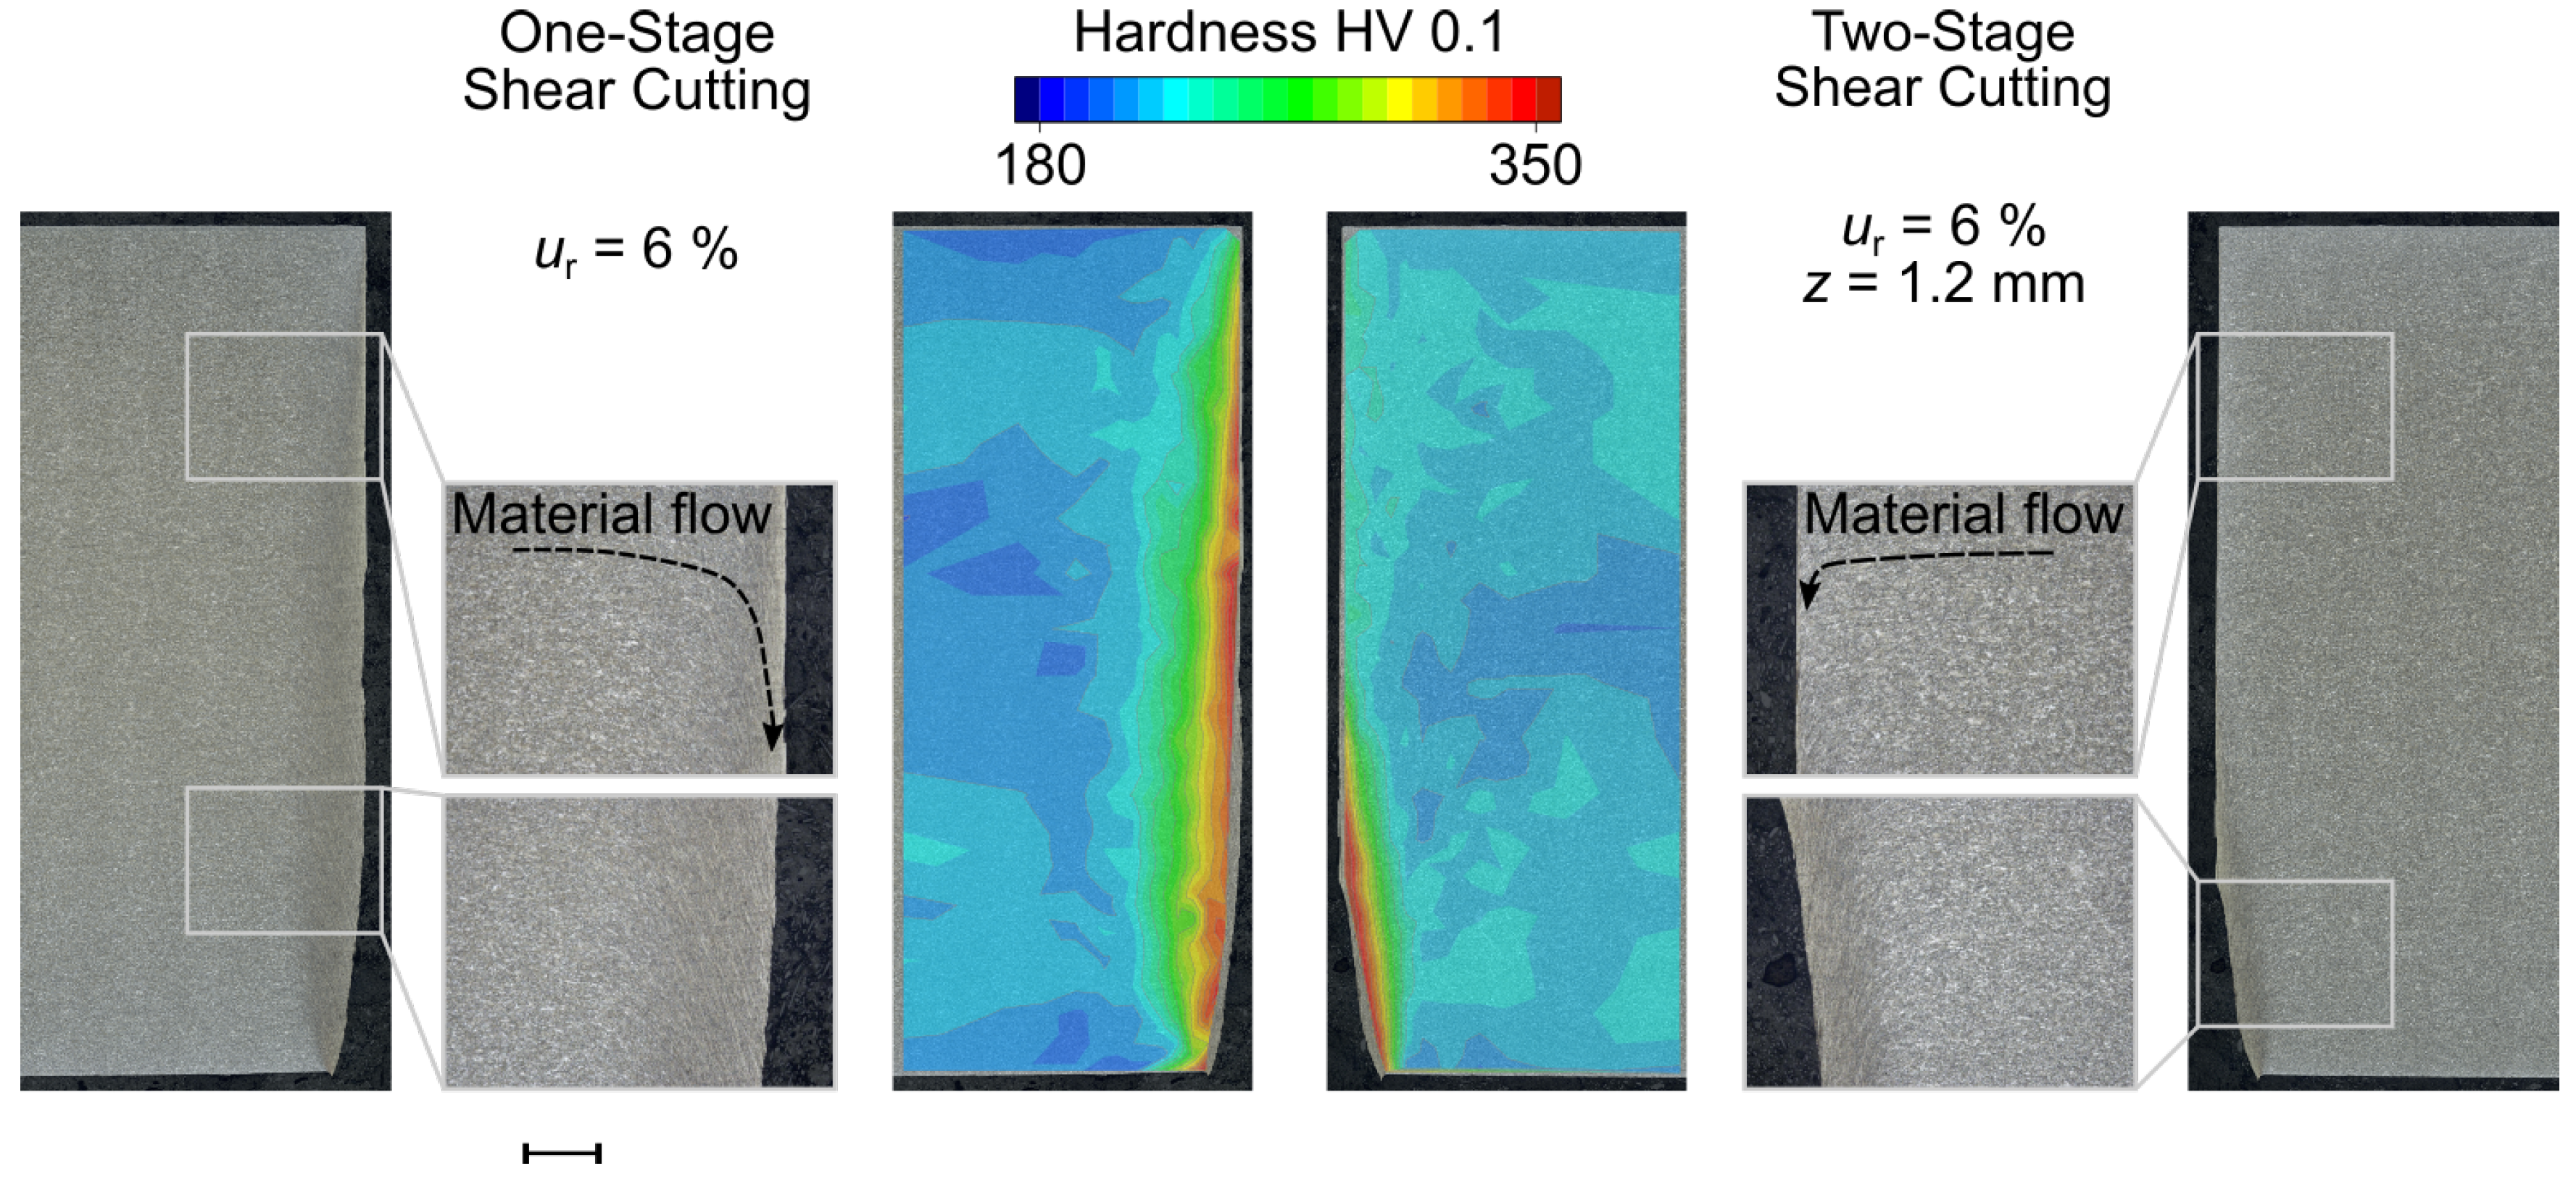
A comparison of the material flow and the hardness resulting from the plastic deformation between the one- and two-stage shear cut hole is displayed in Figure 11.
A heavily deformed microstructure of the specimen produced by one-stage shear cutting was visible in the microsections. The plastic deformation reached 1 m m from the cut surface into the adjacent material. This could also be seen in the microhardness, which increased towards the cut surface and ascended from the die roll side (upper side in Figure 7) to the burr side of the sheet metal. Here, the hardness reached values of up to 355 HV 0.1.
The two-stage shear cut specimen on the other hand showed almost no plastic deformation on most of the clean cut. Only close to the fracture zone, plastic deformation was visible. This could also be observed in the microhardness distribution. A slight hardness increase up to 240 HV 0.1 dominated most of the clean cut, which rose up to 345 HV 0.1 around the fracture zone.
This effect of the low plastic deformation (i.e., low hardness) was caused by the two-stage shear cutting process due to a changed material flow. The initial hole of the first cutting operation was already strain hardened. By choosing the correct process parameters, the plastic deformation mainly occurred in the scrap, and thus, less deformation remained in the edge of the part. This also resulted in a higher proportion of clean cut and in a lower damage of the clean cut zone. In the best case, microcracks from the first cutting operation were cut off by the second cutting operation.
To show this changed material flow, three different scraps are displayed in Figure 9 and Figure 10.
It should be noted that a higher hardness is usually favorable in parts subjected to cyclic loads. This indicated that the higher fatigue strength of the two-stage shear cut parts was caused by a less damaged cut surface. This was also supported by the fact that the height of the shear cut surface where microcracks were likely to occur was significantly lower in the case of two-stage shear cut holes than in the case of one-stage shear cuts.

4. Conclusions

When shear cutting holes in thick sheet metals (in this case, S500MC with an 8 m m thickness), several observations can be made regarding the resulting cut surfaces and the resulting fatigue strength. Regarding the cut surfaces the following conclusions can be drawn:
  • The die clearance should be chosen as u r = 10 % or smaller for one-stage shear cutting to avoid delaminations. Otherwise, the influence of the die clearance on the cut surface characteristics was small in contrast to many other investigations where punches without a roof-top shape were used.
  • The cutting offset should be big enough so that cracks from the first cutting operation were cut off completely.
  • When the cutting offset was chosen too small, the burr height was heavily increased.
  • When cutting offset and die clearance were chosen too big, delaminations could be observed.
  • When cutting offset and die clearance were chosen too small, this may have resulted in an undefined transition from clean cut to fracture zone.
  • Two-stage shear cutting resulted in a much higher amount of clean cut for all investigated configurations with a cutting offset z 1 . 6 m m .
Regarding the fatigue behavior in the limited lifetime range, the following was observed:
  • Shear cutting changed the slope of the limited lifetime fatigue strength line due to an additional notch, the very rough fracture zone.
  • Both one- and two-stage shear cutting significantly reduced the number of cycles to failure compared to polished edges.
  • A much higher fatigue strength could be achieved by two-stage shear cutting compared to one-stage shear cutting.
Although a two-stage shear cutting process means double the manufacturing effort, its application on highly stressed holes could improve the fatigue strength of shear cut holes to a large extent using a very economic manufacturing technique compared to other cutting processes.

Author Contributions

Conceptualization, J.S., I.P., R.G., C.S., H.S., and W.V.; methodology, I.P. and J.S.; investigation, J.S. and I.P.; resources, R.G., C.S., H.S., and W.V.; data curation, J.S. and I.P.; writing, original draft preparation, J.S. and I.P.; writing, review and editing, J.S., I.P., R.G., C.S., H.S., and W.V.; visualization, J.S. and I.P.; supervision, R.G., C.S., and W.V.; project administration, R.G.; funding acquisition, C.S. All authors read and agreed to the published version of the manuscript.

Funding

This research was funded by Volkswagen Group Innovation, Center of Innovation Battery.

Conflicts of Interest

The funders had a role in the design of the study, in the writing of the manuscript, and in the decision to publish the results, but not in the collection, analyses, or interpretation of the data.

References

  1. VDA. The Automotive Industry in Facts and Figures, Annual Report 2018; Association of the German Automotive Industry (VDA): Berlin, Germany, 2018. [Google Scholar]
  2. Heid, B.; Diedrich, D.; Kässer, M.; Küchler, S.; Kley, F. Route 2030—The Fast Track to the Future of the Commercial Vehicle Industry; McKinsey Center for Future Mobility: New York, NY, USA, 2018. [Google Scholar]
  3. Maronne, E.; Galtier, A.; Robert, J.; Ishikawa, T. Cutting process influence on fatigue sheet properties. WIT Trans. Eng. Sci. 2003, 40, 13–22. [Google Scholar]
  4. Gürün, H.; Göktaş, M.; Guldas, A. Experimental Examination of Effects of Punch Angle and Clearance on Shearing Force and Estimation of Shearing Force Using Fuzzy Logic. Trans. Famena 2016, 40, 19–28. [Google Scholar] [CrossRef] [Green Version]
  5. Senn, S.; Liewald, M. Experimental investigation of piercing of high-strength steels within a critical range of slant angle. J. Phys. Conf. Ser. 2017, 896, 012099. [Google Scholar] [CrossRef] [Green Version]
  6. Schenek, A.; Liewald, M.; Senn, S. Identification of process limits for punching with a slant angle. IOP Conf. Ser. Mater. Sci. Eng. 2019, 651, 012066. [Google Scholar] [CrossRef]
  7. Karjalainen, J.A.; Mäntyjärvi, K.; Juuso, M. Punching Force Reduction with Wave-Formed Tools. In Key Engineering Materials; Sheet Metal 2007; Trans Tech Publications Ltd.: Baech, Switzerland, 2007; Volume 344, pp. 209–216. [Google Scholar] [CrossRef]
  8. Singh, U.; Streppel, A.; Kals, H. Design study of the geometry of a punching/blanking tool. J. Mater. Process. Technol. 1992, 33, 331–345. [Google Scholar] [CrossRef] [Green Version]
  9. Matsuno, T.; Sato, K.; Okamoto, R.; Mizumura, M.; Suehiro, M. Synergy effect of shear angle and anisotropic material ductility on hole-expansion ratio of high-strength steels. J. Mater. Process. Technol. 2016, 230, 167–176. [Google Scholar] [CrossRef]
  10. Matsuno, T.; Kuriyama, Y.; Murakami, H.; Yonezawa, S.; Kanamaru, H. Effects of Punch Shape and Clearance on Hole Expansion Ratio and Fatigue Properties in Punching of High Strength Steel Sheets. Steel Res. Int. 2010, 81, 853–856. [Google Scholar]
  11. Engin, K.; Eyercioglu, O. The Effect of Thickness to Die Diameter Ratio on Sheet Metal Blanking Process. Stroj. Vestn. J. Mech. Eng. 2017, 63, 501–509. [Google Scholar] [CrossRef] [Green Version]
  12. Lara, A.; Picas, I.; Casellas, D. Chapter Effect of the cutting process on the fatigue behavior of press hardened and high strength dual phase steels. J. Mater. Process. Technol. 2013, 213, 1908–1919. [Google Scholar] [CrossRef]
  13. Meurling, F.; Melander, A.; Linder, J.; Larsson, M. The influence of mechanical and laser cutting on the fatigue strengths of carbon and stainless sheet steels. Scand. J. Metall. 2001, 30, 309–319. [Google Scholar] [CrossRef]
  14. Thomas, D.J.; Whittaker, M.T.; Bright, G.W.; Gao, Y. The influence of mechanical and CO2 laser cut-edge characteristics on the fatigue life performance of high strength automotive steels. J. Mater. Process. Technol. 2011, 211, 263–274. [Google Scholar] [CrossRef]
  15. Paetzold, I.; Dittmann, F.; Feistle, M.; Golle, R.; Haefele, P.; Hoffmann, H.; Volk, W. Chapter Influence of shear cutting parameters on the fatigue behavior of a dual-phase steel. J. Phys. Conf. Ser. 2017, 896, 012107. [Google Scholar] [CrossRef] [Green Version]
  16. Stahl, J.; Müller, D.; Paetzold, I.; Golle, R.; Tobie, T.; Volk, W.; Stahl, K. The Influence of Residual Stresses Induced by Near-Net-Shape Blanking Processes on the Fatigue Behavior under Bending Loads. IOP Conf. Ser. Mater. Sci. Eng. 2019, 651, 012086. [Google Scholar] [CrossRef]
  17. Iwaya, J.; Okano, Y.; Ueno, K. Stretch Flangeability Improvement in Sheared Edge Steel Sheets with Double Punching. Nikai uchinuki ni yoru usukoban no nobi flange sei kojo 1997, 47, 33–37. [Google Scholar]
  18. Gläsner, T.; Sunderkötter, C.; Plath, A.; Volk, W.; Hoffmann, H.; Golle, R. Methods to Decrease Cut Edge Sensitivity of High Strength Steels. Key Eng. Mater. 2014, 611–612, 1294–1307. [Google Scholar] [CrossRef]
  19. Gläsner, T.; Sunderkötter, C.; Hoffmann, H.; Volk, W.; Golle, R. Development of a 2-stage shear cutting-process to reduce cut-edge-sensitivity of steels. J. Phys. Conf. Ser. 2017, 896, 012104. [Google Scholar] [CrossRef] [Green Version]
  20. DIN EN 10149-2. Hot Rolled Flat Products Made of High Yield Strength Steels for Cold Forming; Beuth Verlag GmbH: Berlin, Germany, 1995. [Google Scholar]
  21. DIN 50125. Testing of Metallic Materials—Tensile Test Pieces; Beuth Verlag GmbH: Berlin, Germany, 2016. [Google Scholar]
  22. DIN 6507. Metallic Materials-Vickers Hardness Test—Part 1: Test Method; Beuth Verlag GmbH: Berlin, Germany, 2018. [Google Scholar]
  23. DIN 5118. Tools for Pressing-Punches with Trombone Neck; Beuth Verlag GmbH: Berlin, Germany, 2017. [Google Scholar]
  24. VDI 2906-2. Quality of Cut Faces of (Sheet) Metal Parts after Cutting, Blanking, Trimming or Piercing-Shearing, Form of Sheared Edge and Characteristic Values; Beuth Verlag GmbH: Berlin, Germany, 1994. [Google Scholar]
  25. DIN EN ISO 4287. Geometrical Product Specifications (GPS)-Surface Texture: Profile Method-Terms, Definitions and Surface Texture Parameters; Beuth Verlag GmbH: Berlin, Germany, 2010. [Google Scholar]
  26. Pilkey, W.D.; Pilkey, D.F.; Bi, Z. Holes. In Peterson’s Stress Concentration Factors; John Wiley & Sons, Ltd.: Hoboken, NJ, USA, 2008; Chapter 4; pp. 176–400. [Google Scholar] [CrossRef]
  27. Einbock, S. Statistics of Metal Fatigue in Engineering: Planning and Analysis of Metal Fatigue Tests; Books on Demand: Norderstedt, Germany, 2018. [Google Scholar]
  28. Li, C.; Dai, W.; Duan, F.; Zhang, Y.; He, D. Fatigue Life Estimation of Medium-Carbon Steel with Different Surface Roughness. Appl. Sci. 2017, 7, 338. [Google Scholar] [CrossRef] [Green Version]
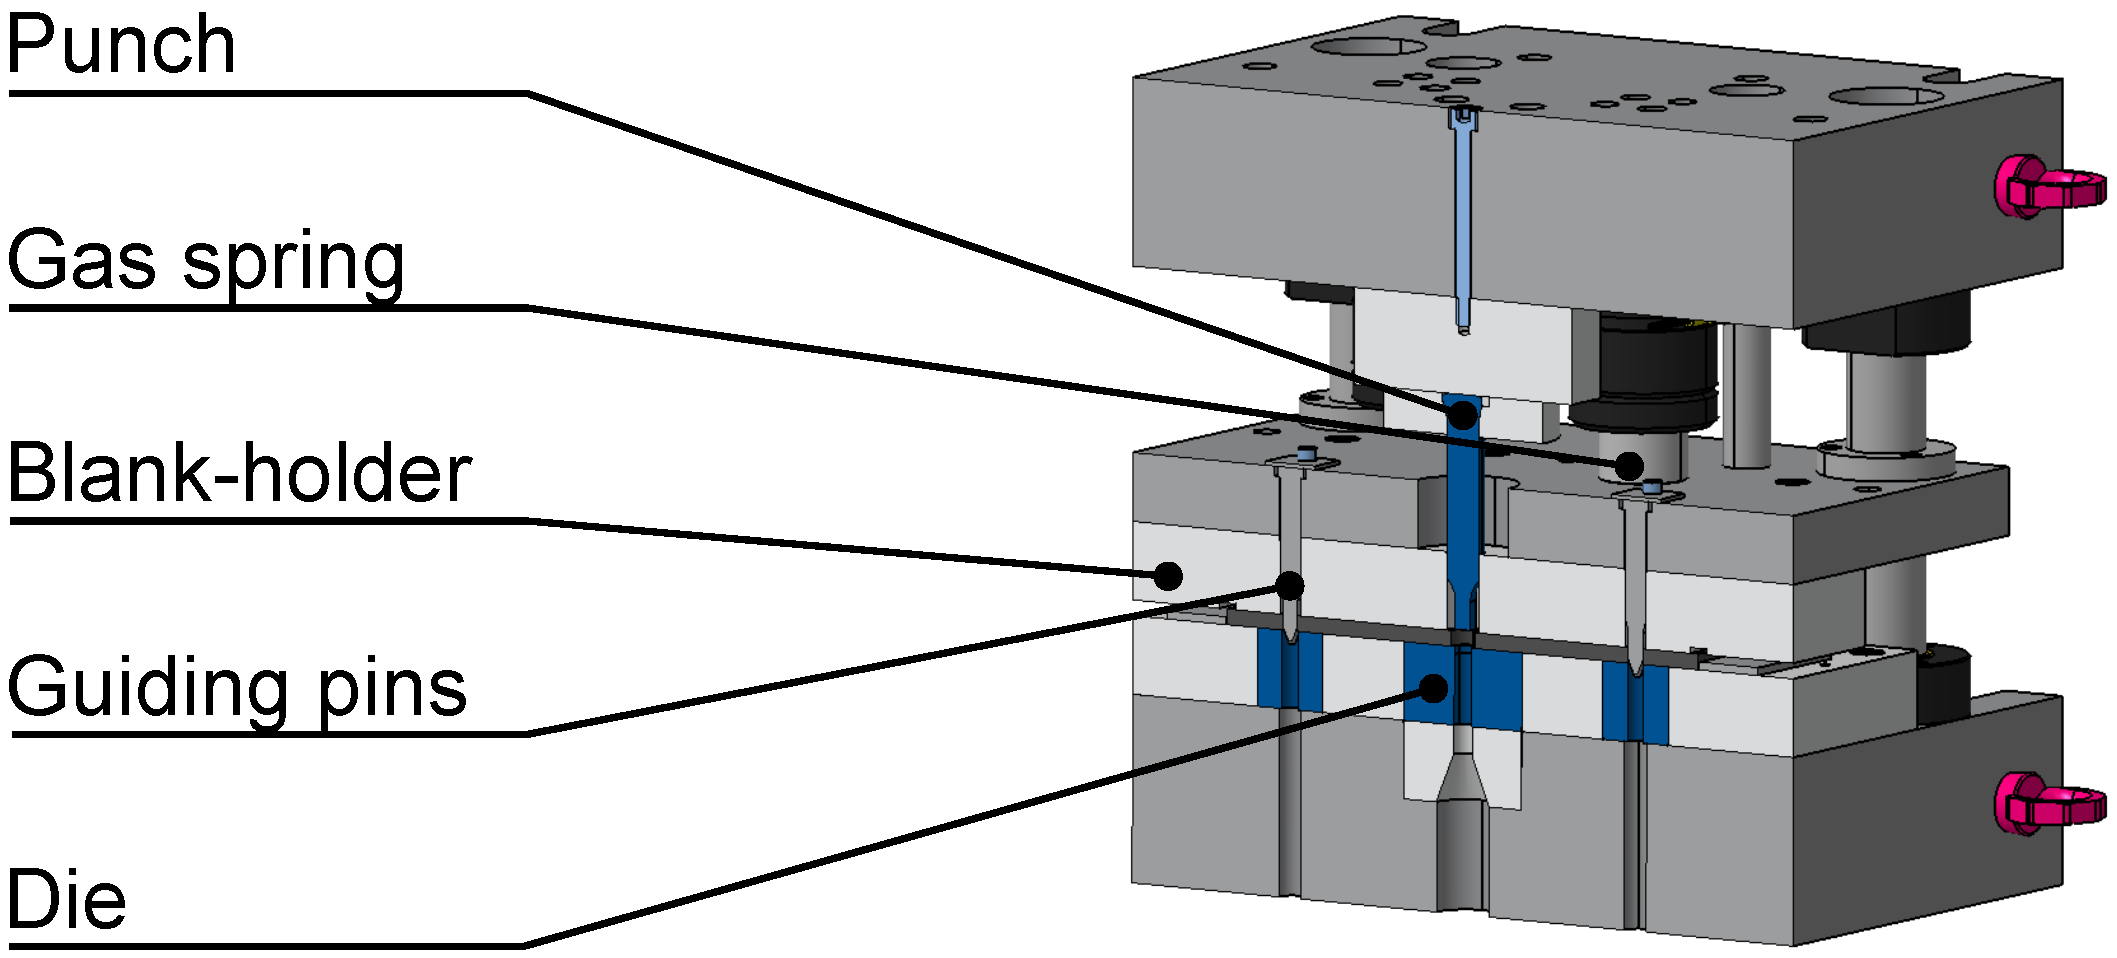
Figure 1. Shear cutting tool used for the experiments.
Jmmp 04 00052 g001
Figure 2. Punch with rooftop shape as used in the experiments according to [9].
Jmmp 04 00052 g002
Figure 3. Specimen geometry for the fatigue tests.
Jmmp 04 00052 g003
Figure 4. Design of experiments.
Jmmp 04 00052 g004
Figure 5. Microscope pictures of the cut surfaces produced by one-stage shear cutting.
Jmmp 04 00052 g005
Figure 6. Comparison of the cut surface characteristics of the specimens produced by one-stage and two-stage shear cutting.
Jmmp 04 00052 g006
Figure 7. Microscope pictures of the cut surfaces produced by two-stage shear cutting compared to the ones manufactured by one-stage shear cutting.
Jmmp 04 00052 g007
Figure 8. Fatigue strength of the specimen manufactured by one-stage shear cutting with a die clearance of 6% and 10%, manufactured by two-stage shear cutting with a cutting offset of 1.2 m m and a die clearance of 6% compared to specimens with a polished surface.
Jmmp 04 00052 g008
Figure 9. Comparison of the micrographs of the specimens and slugs produced by one-stage shear cutting (left, u r = 6%) and by two-stage shear cutting with a too big cutting offset (right, u r = 14%; z = 2.5 mm).
Jmmp 04 00052 g009
Figure 10. Comparison of micrographs of the specimens and slugs produced by two-stage shear cutting with a too small cutting offset (left, u r = 14%; z = 0.8 mm) and by two-stage shear cutting with an improved cut surface (right, u r = 6%; z = 1.2 mm).
Jmmp 04 00052 g010
Figure 11. Micrographs and microhardness of the parts produced by two-stage shear cutting (right) compared to the ones manufactured by one-stage shear cutting (left).
Jmmp 04 00052 g011
Table 1. Mechanical properties of the investigated steel Grade S500MC.
R p 0.2 R m
0 to the Rolling Direction562 ± 8.5 MPa642 ± 8.7 MPa
90 to the Rolling Direction617 ± 0.9 MPa660 ± 0.9 MPa
Table 2. Measured chemical composition of the sheet metal material S500MC (1.0984, 8 m m ) in percentage by mass.
CSiMnPSAlNbVTi
0.0520.0191.3270.009<0.0020.0360.0230.0090.046
Table 3. Absolute cut surface characteristics of selected variants manufactured by one- and two-stage shear cutting.
VariantDie RollClean CutFractureBurr
One-Stage u r = 6%16 ± 4  μ m 3.19 ± 0.14  m m 4.72 ± 0.14  m m 63 ± 8  μ m
One-Stage u r = 8%21 ± 4  μ m 3.11 ± 0.05  m m 4.83 ± 0.04  m m 49 ± 12  μ m
One-Stage u r = 10%32 ± 6  μ m 3.15 ± 0.07  m m 4.76 ± 0.08  m m 52 ± 9  μ m
One-Stage u r = 12%31 ± 9  μ m 3.23 ± 0.09  m m 4.69 ± 0.11  m m 53 ± 6  μ m
One-Stage u r = 14%28 ± 8  μ m 3.31 ± 0.05  m m 4.65 ± 0.05  m m 53 ± 7  μ m
Two-Stage u r = 6%, z = 1.2  m m 20 ± 4  μ m 6.22 ± 0.03  m m 1.74 ± 0.04  m m 50 ± 10  μ m
Table 4. Roughness of the clean cut of the specimens manufactured by one- and two-stage shear cutting.
Variant R a R z
One-Stage u r = 6%0.26 ± 0.09  μ m 2.45 ± 0.55  μ m
One-Stage u r = 10%0.48 ± 0.05  μ m 3.57 ± 0.32  μ m
Two-Stage u r = 6%, z = 1.2  m m 0.66 ± 0.09  μ m 3.71 ± 1.09  μ m
Table 5. Roughness of the fracture zone of the specimens manufactured by one- and two-stage shear cutting.
Variant R a R z
One-Stage u r = 6%2.63 ± 0.27  μ m 15.6 ± 1.69  μ m
One-Stage u r = 10%2.48 ± 0.24  μ m 14.6 ± 0.98  μ m
Two-Stage u r = 6%, z = 1.2  m m 3.22 ± 0.80  μ m 18.6 ± 3.74  μ m