Article

Structural Behavior of L-Type Flange Joint with Various Flange Flatness Conditions

1
Institute of Offshore Wind Energy, Kunsan National University, 558 Daehak-ro, Gunsan-City 54150, Jeollabuk-do, Republic of Korea
2
Advanced Structural Engineering Laboratory, Department of Structural Engineering, Faculty of Civil Engineering, Ho Chi Minh City Open University, Ho Chi Minh City 700000, Vietnam
3
Department of Wind Energy, The Graduate School of Kunsan National University, 558 Daehak-ro, Gunsan-City 54150, Jeollabuk-do, Republic of Korea
*
Author to whom correspondence should be addressed.
Energies 2023, 16(15), 5703; https://doi.org/10.3390/en16155703
Submission received: 3 July 2023 / Revised: 24 July 2023 / Accepted: 26 July 2023 / Published: 30 July 2023
(This article belongs to the Section A3: Wind, Wave and Tidal Energy)

Abstract

:
The L-type flange joint is widely used to attach steel tower segments to each other. However, tolerances on the flange surface flatness may occur during its fabrication, leading to a negative impact on the bolt stress distribution. This study evaluates the influences of the flange surface flatness on the behavior of L-type flange joints through numerical simulations. First, the finite element model of a 5 MW L-type flange joint is established, and its accuracy is verified based on comparison with an experimental test. Using the same loading conditions and material properties, the influences of geometrical imperfections (i.e., flange-sided gap, tower-sided gap) on the structural response are investigated. Furthermore, the impact of the flange gap opening length is reported. The results show that the flange-sided gap outperforms the tower-sided gap, resulting in reduced stress concentration in the bolt. In addition, the stresses in flange-sided gapping joints increase with an increase in the opening length.

1. Introduction

The L-type flange is widely used to connect the tower segments in wind turbine towers [1,2,3]. However, during flange manufacturing, it is common to make a slope on the flange surface, which might have negative effects on the stress distribution of the bolts [2,4,5]. Therefore, it is necessary to investigate the influences of flange surface flatness on the structural behavior of L-type flange joints (LTFJs).
Currently, research on the bolted flange joint focuses on predicting the load-carrying capacity under the tensile force [1,2,6,7,8,9,10]. The initial analytical models for calculating ultimate resistance were developed by Petersen and Seidel [7,11]. Taking into account the impact of the contact area and bolt bending on the flange performance, Couchaux et al. [12] developed a simplified model to predict the plastic resistance of LTFJ. Next, Tran and Lee [13] also proposed new yielding failure modes of LTFJs under tensile force. Aiming at the effect of prying action on the behavior of LTFJ, Slęczka and Len’ [14] developed a novel analytical formula using the component method. Tobinaga and Ishihara [15] conducted a modification of failure mode B (bolt failure and plastic hinge in flange-to-shell junction) through numerical simulations.
Regarding the geometrical imperfection of the flange connections, several studies have been conducted using various analytical, numerical, and experimental methods [3,16,17,18]. In both experimental and numerical analyses, Jakubowski [17] thoroughly examined the impact of flange imperfections on the load-bearing capacity of the bolted flange connections. In this work, he clarified the flange imperfections into three types, including flange-sided, tower-sided, and parallel gapping, based on the opening locations. During the operation conditions, these gaps cause high stress on the bolt member, which is a significant impact on the ultimate resistance and fatigue damage [16]. Therefore, it is necessary to provide the flatness tolerance requirements for the flange connections in wind turbines. According to the design practice [19,20] (i.e., DNVGL-ST-0126 and IEC 61400-6), the threshold values of flange flatness deviation k are also provided. The allowable gap of one flange is within 2 mm over the entire circumference of the flange and within 1 mm for a sector of 30° after manufacturing the tubular sections. A detailed discussion of these threshold values can be found in Seidel [21].
Although the present study addressed fundamental issues relating to geometrical parameters and load-carrying capacity, it is important to note that the geometrical imperfection and opening length are important parameters that can affect the LTFJ’s performance. A variation in these factors can result in different stress distributions and bolt behavior, ultimately impacting the joint’s load-bearing capacity.
This paper aims to evaluate the impact of geometrical imperfection and opening length on the behavior of LTFJs through numerical simulations. To this end, the finite element model of a 5 MW L-type flange joint is established, and its accuracy is verified against an experimental test. Then, the influences of flange surface flatness (i.e., flange-sided, tower-sided gap) and their opening lengths on the structural response of the flange joints are investigated. The results of this research will provide valuable insights into the tensile behavior of L-type flanges in wind towers and will help to ensure the reliability and safety of these critical components.

2. Experimental Study

2.1. L-Type Flange Joint Test

2.1.1. Test Specimen

The main objective of the experimental test is to evaluate the load-carrying capacity of the flange joint and check the accuracy of the related finite element analysis (FEA). Thus, only one specimen of an L-type flange joint was fabricated and tested in this work. This configuration is taken from an existing 5 MW wind turbine in South Korea. The geometric dimensions of the testing specimen are displayed in Figure 1. The tower shell and flange members were made of SS400 material, and a high-strength 10.9 M56 bolt was used (Table 1). The bolt hole was 3 mm larger than the bolt diameter. To aid in the tightening process, two wing plates were welded to the tower shells.
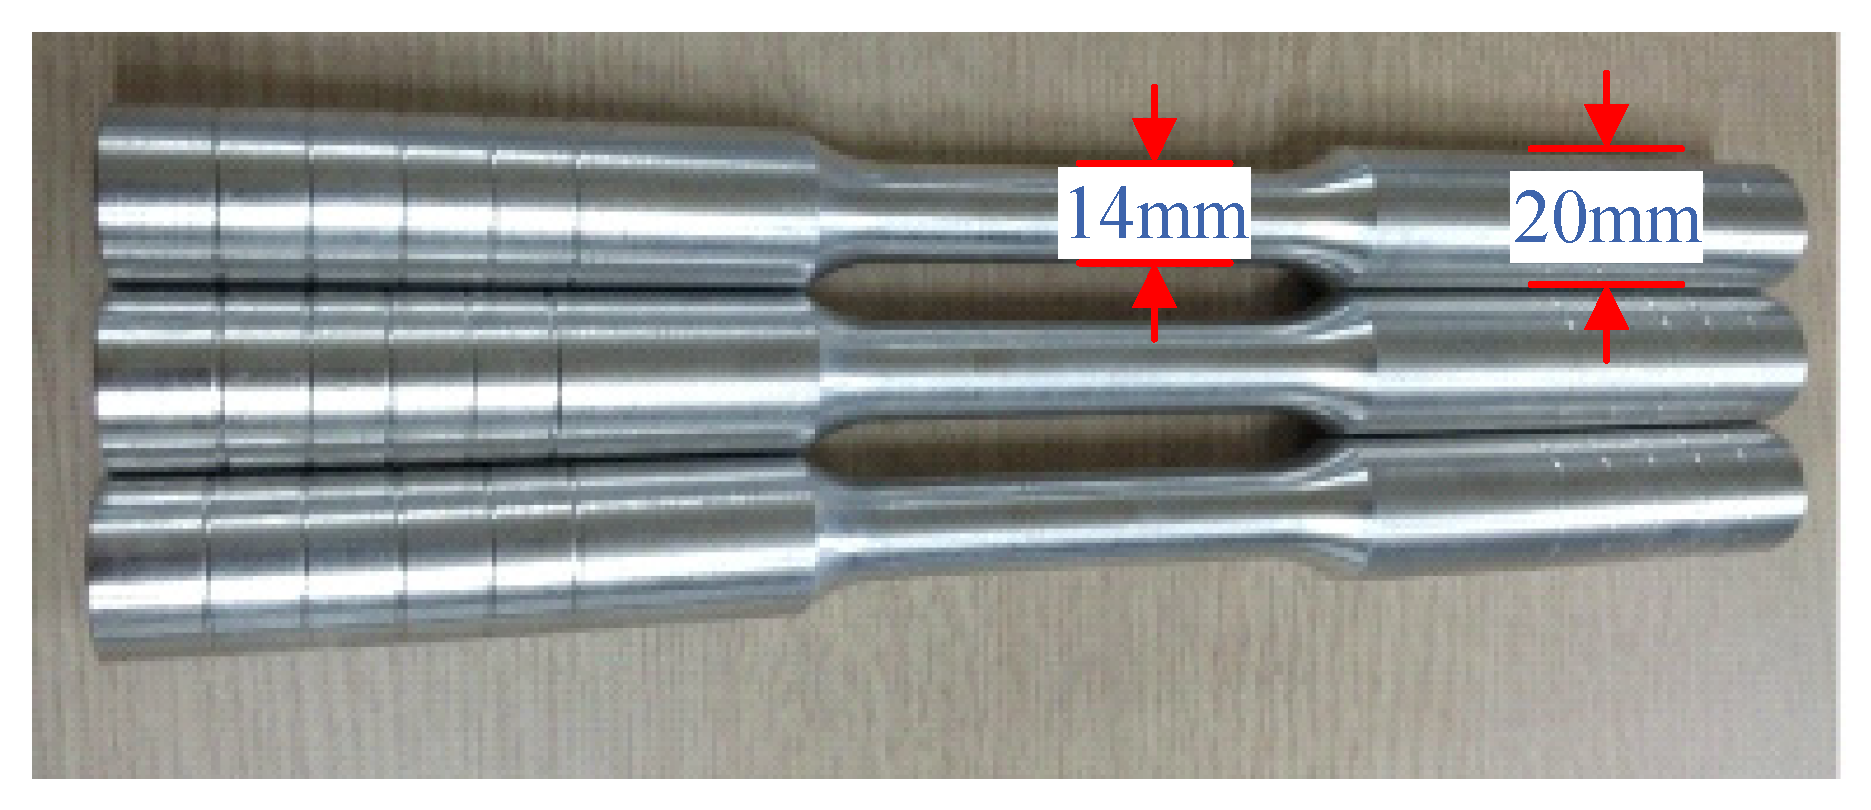
Tensile coupon tests were conducted to determine the material properties of the LTFJ. Coupons were taken from the main components, and they were tested according to KSB 0802:2021 for the tower shell and flange [22] and KSB 0801:2022 for bolt [23]. An example of the bolt specimen is given in Figure 2. The material properties (such as yield strength σ y , ultimate strength σ u , ultimate elongation ε u , and fracture elongation ε f ) are listed in Table 2.
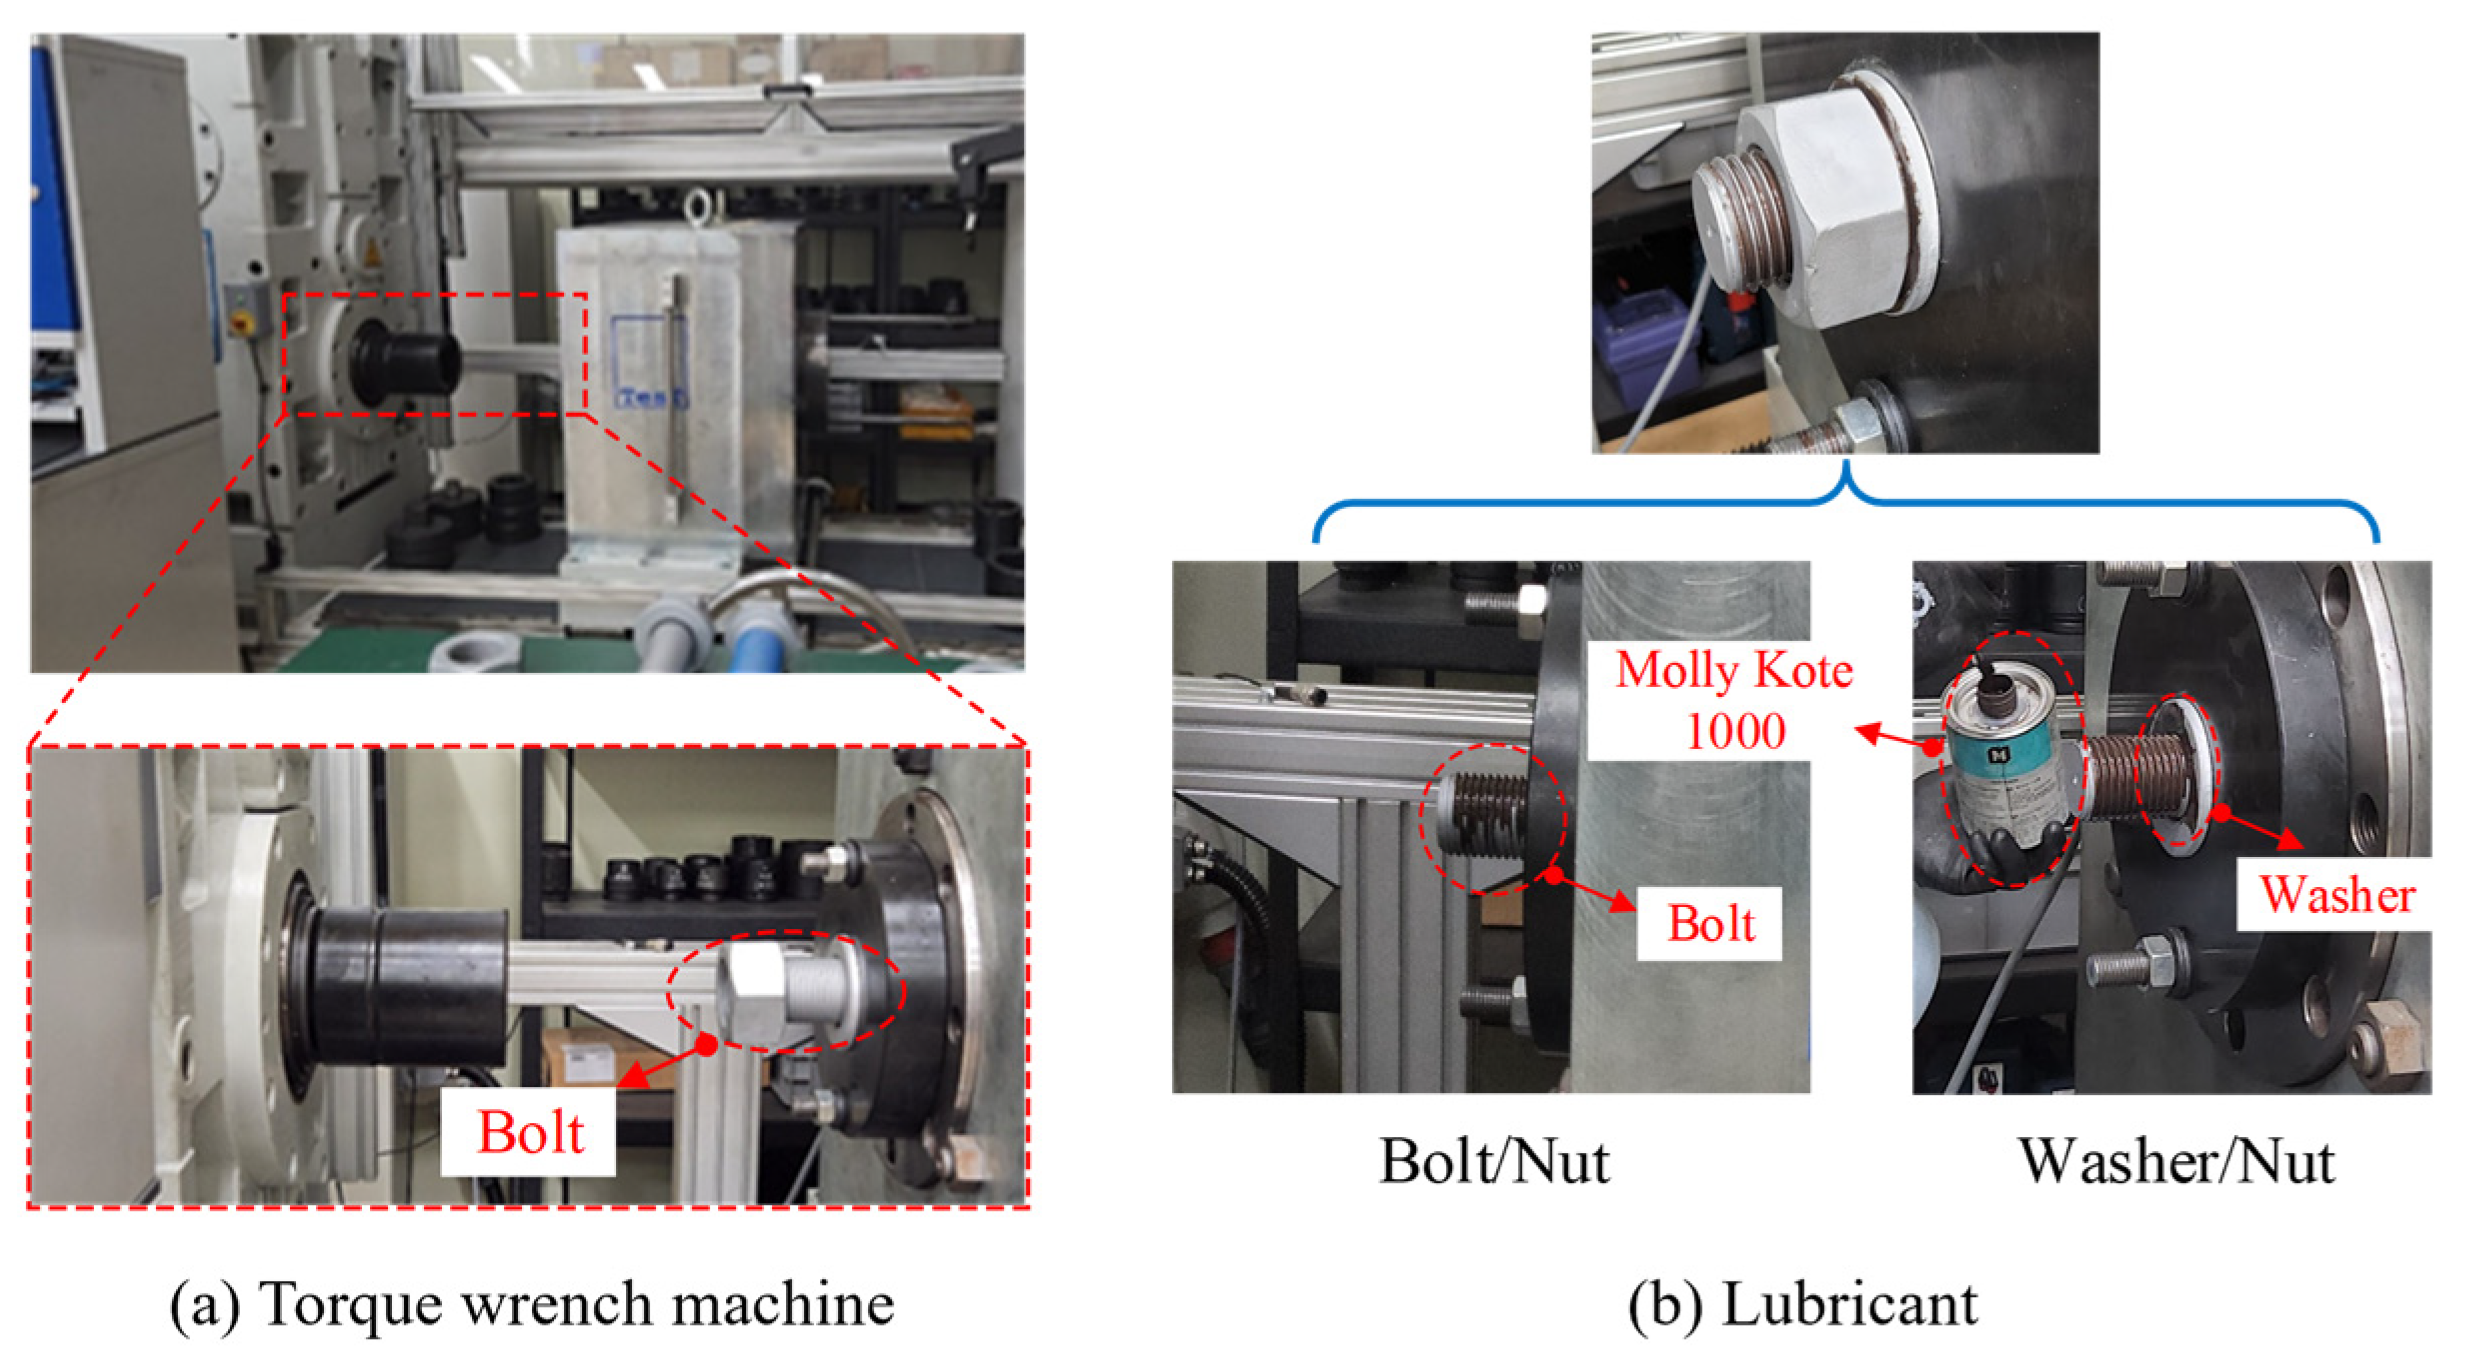
During the pretension process, a proper torque moment was applied to the bolt. If the torque applied is insufficient, the fastener may be loosened due to vibrations. On the other hand, applying excessive torque can result in the stretching or even breaking of the bolts. To determine the appropriate torque for pretension, a torque test was also conducted, as shown in Figure 3. The results of the test, including the maximum force, torque moment, and K-factor, are summarized in Table 3.

2.1.2. Data Measurement Plan

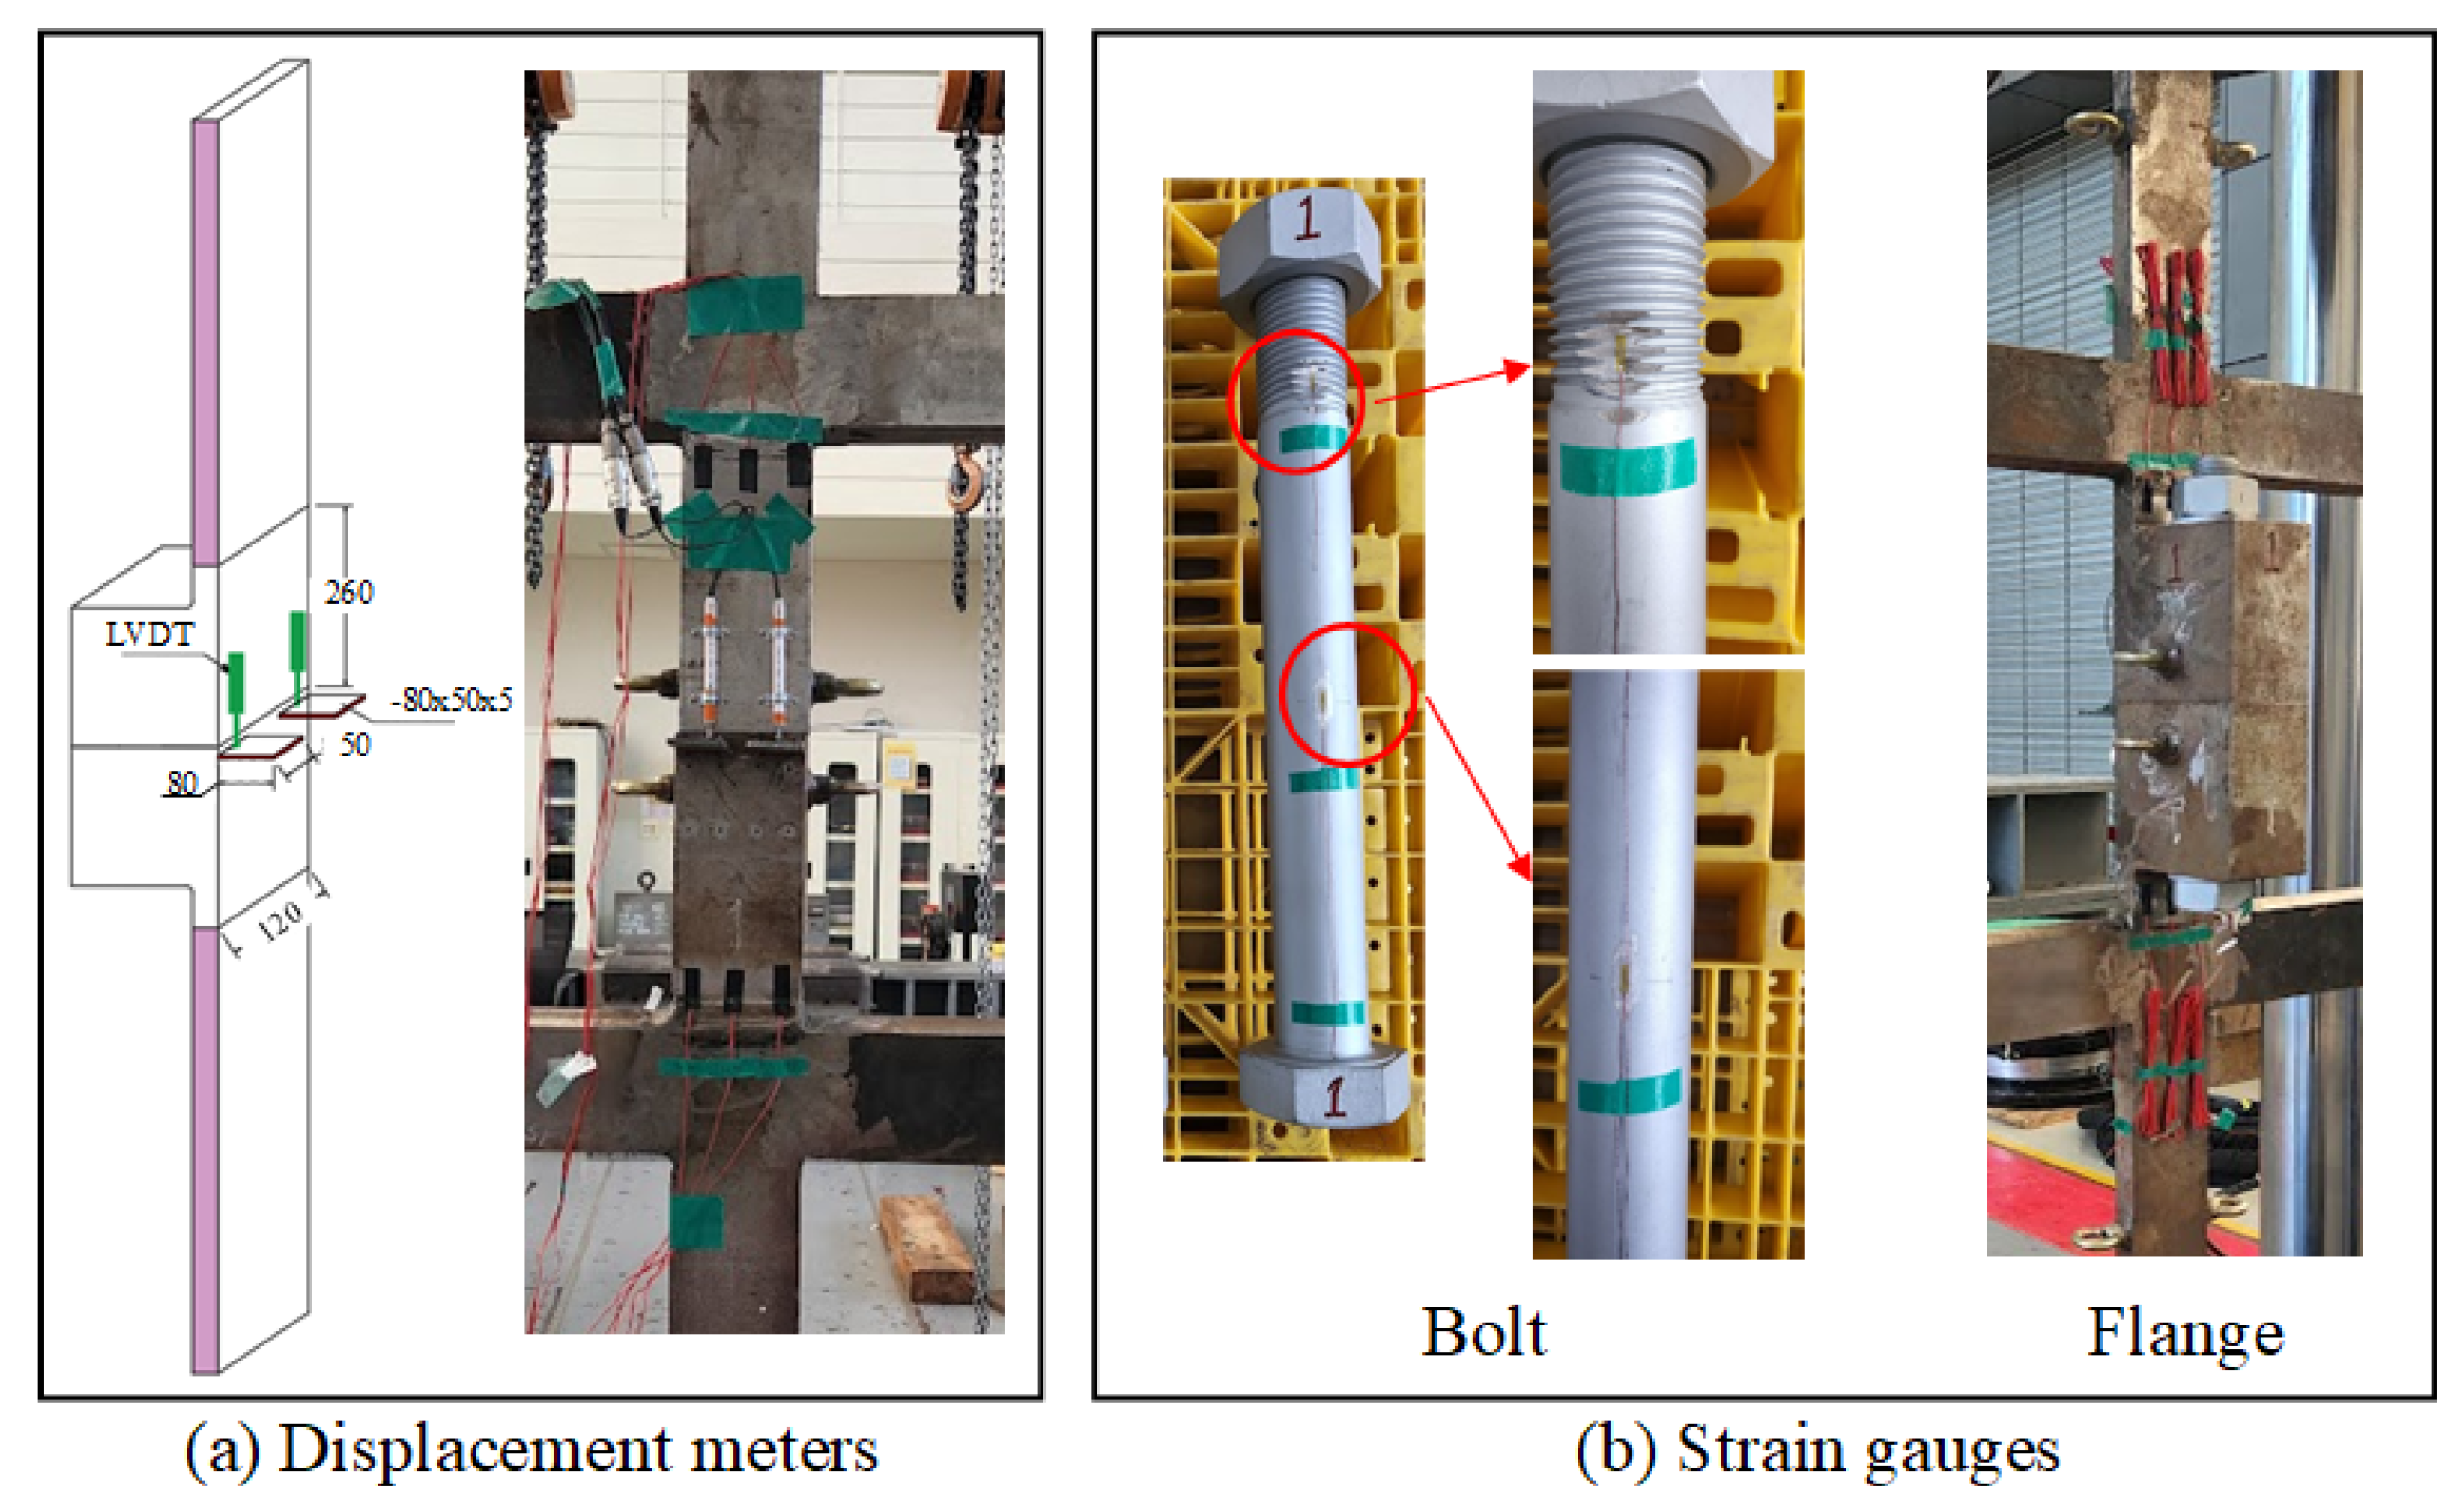
The linear variable differential transformers (LVDTs) and strain gauges were placed in the specimen to examine the behavior of the flange joint. As depicted in Figure 4a, two displacement meters were positioned at the rear of the flange members to measure the opening deformation between the two flange members. Regarding the location of the strain gauges, they were attached in the critical regions with high-yield sensitivities, as shown in Figure 4b. For the bolt member, four strain gauges were attached at the surface of the middle and thread area. For the flange member, a total of twelve strain gauges were attached on both the front and back sides of the upper and lower flange members.

2.1.3. Two Loading Steps

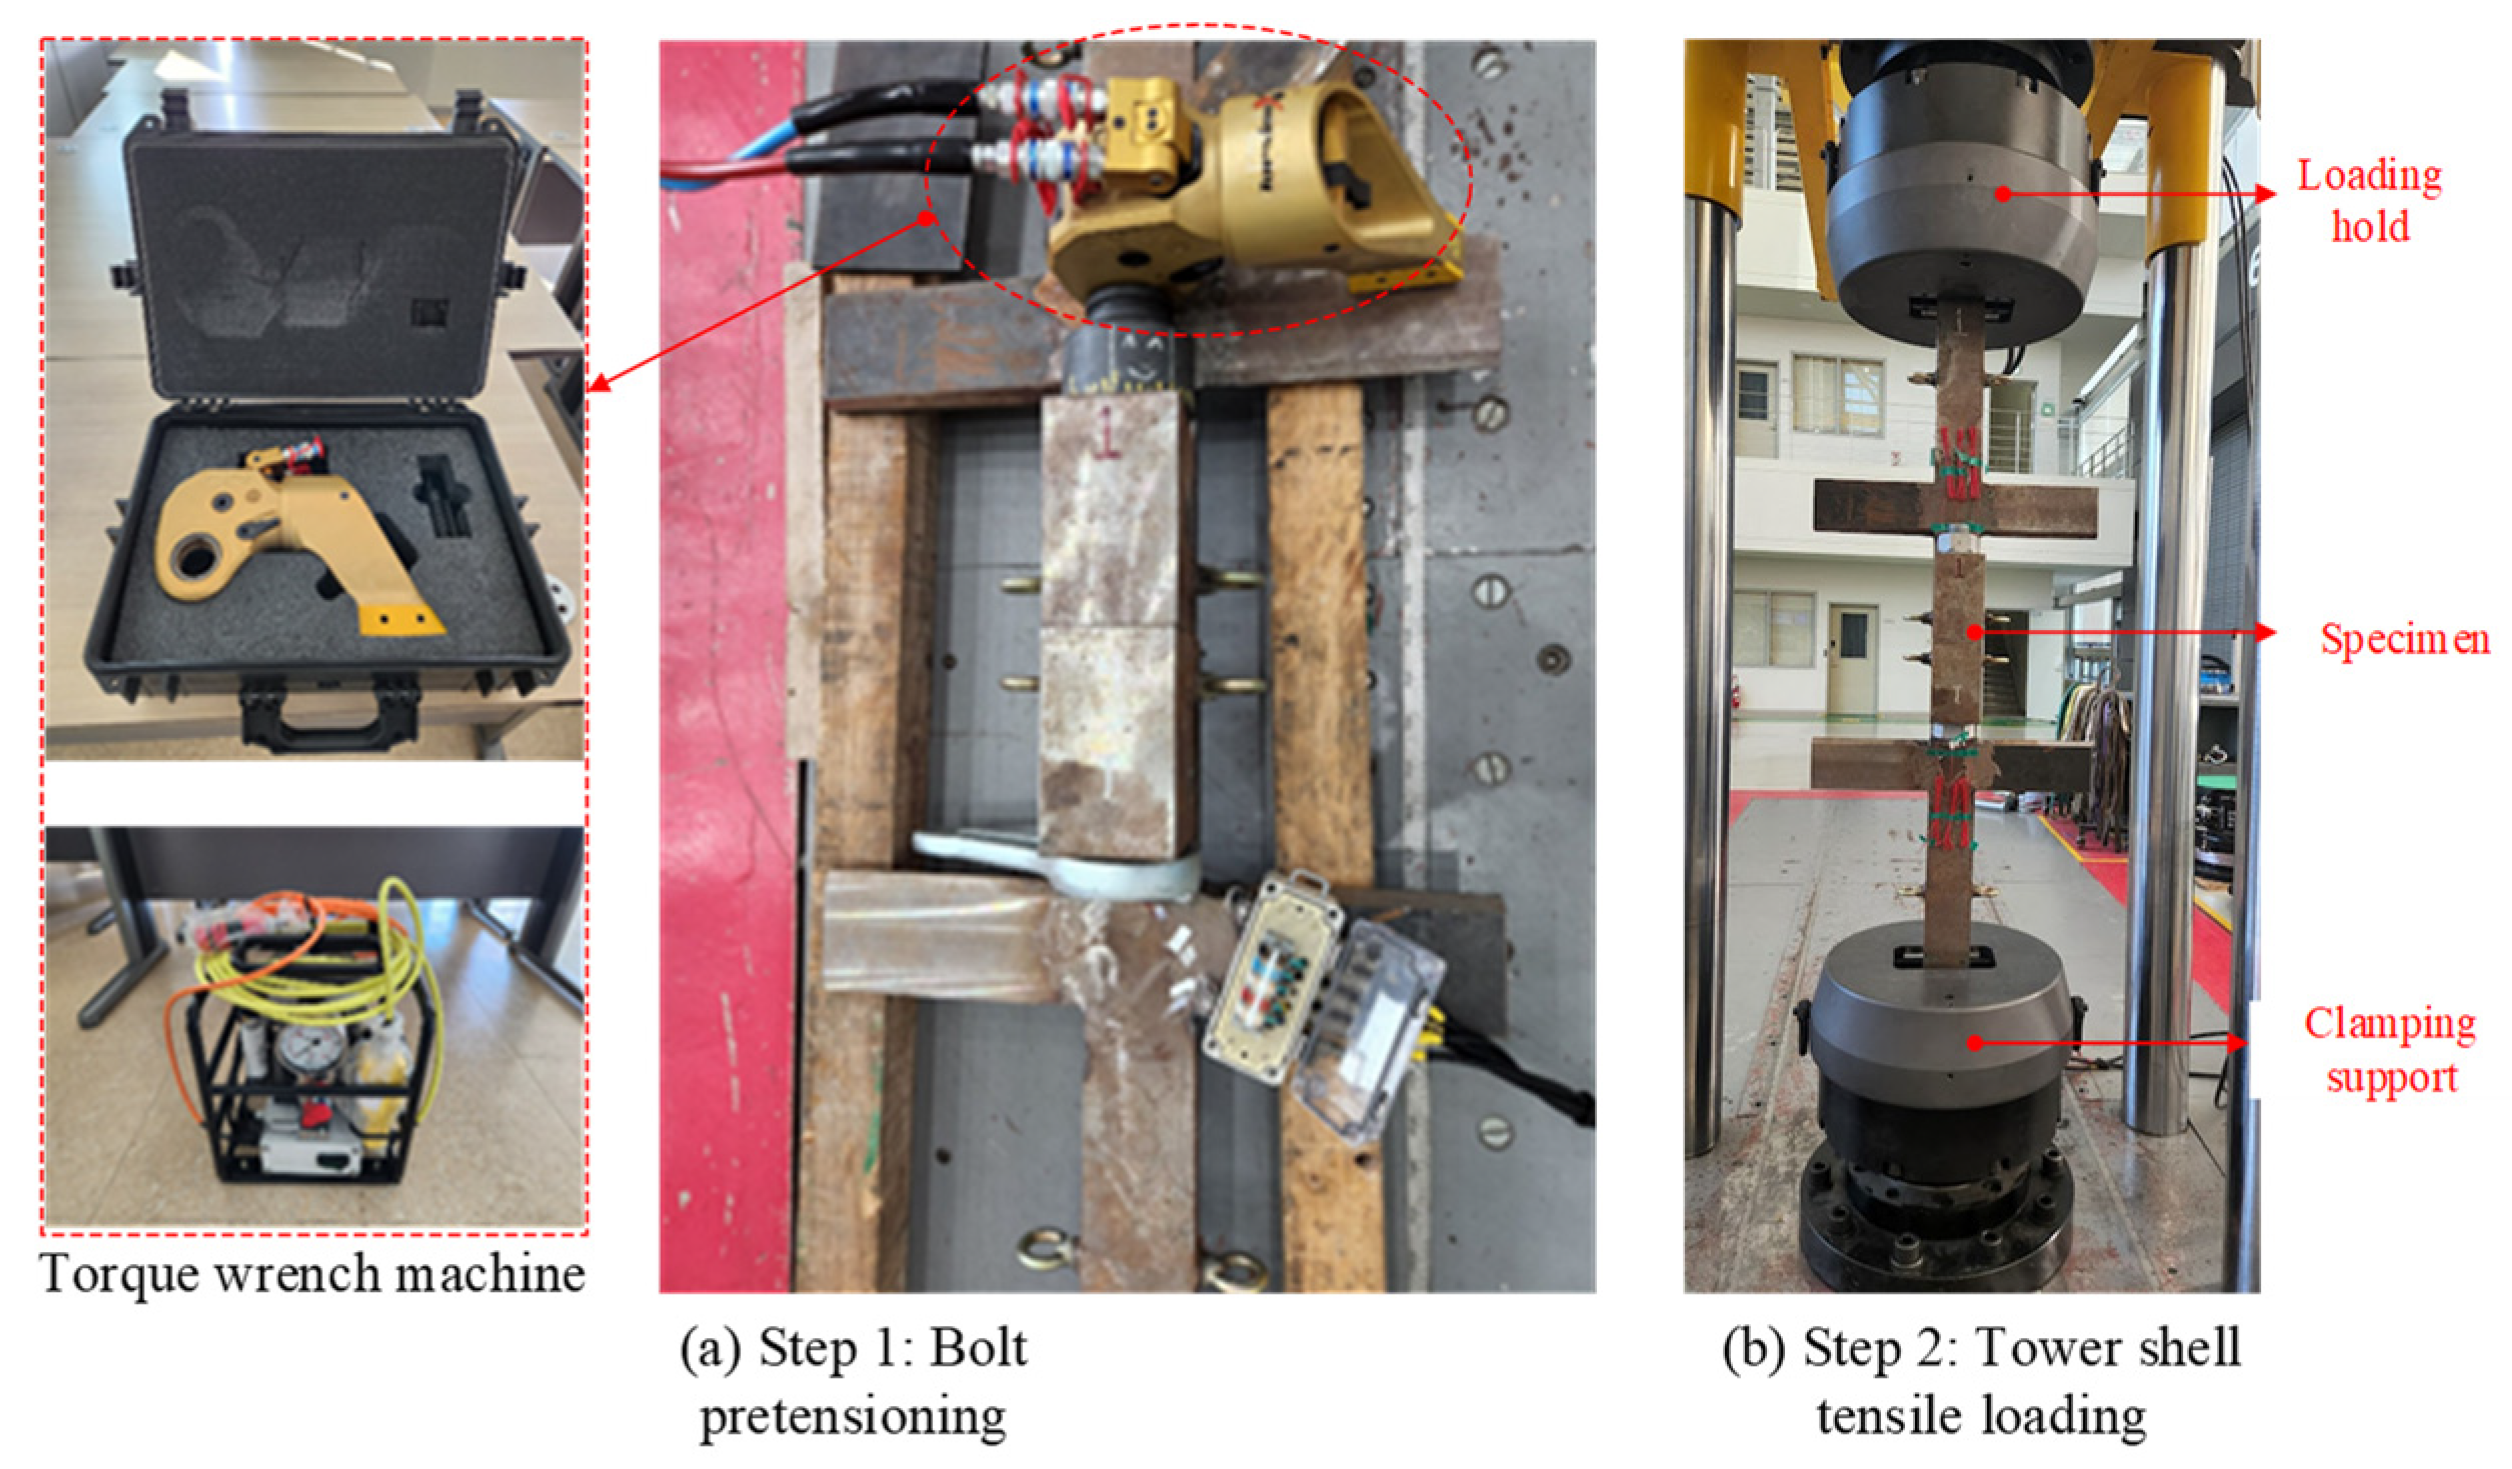
As shown in Figure 5, the experimental program was conducted with two main steps, including bolt pretension and tower shell tensile load. First, two flange members were assembled through the pretension process of the bolt member (Figure 5a). The bolt was fastened with a pretension force equal to 70% of its ultimate resistance, following EN 1993-1-8-2005 [24]. This pretension force was converted into torque moment, which was applied to the bolt using the torque wrench (Table 3). The specimen was then subjected to a tensile load using a hydraulic universal testing machine (UTM) with a maximum capacity of 3000 kN (Figure 5b). The specimen was clamped onto the clamping support and restrained with a loading hold, where the tensile force was applied.

2.2. Test Results and Observations

2.2.1. Force–Displacement Relationship

The force–displacement relationship of the specimen (blue line) is given in Figure 6. The curve shows that the tensile force is a function of the total displacement. At the beginning of the loading (elastic stage), the deformations increase very slowly due to the effect of pretension force. When the load increases up to 1065 kN, the deformation increases and reaches a maximum value of 28 mm.
The opening deformation between the two flange members is also observed (red line in Figure 6). As seen, there is no separation at the beginning of loading due to the pretension force, and the deformation becomes gradually larger with the increase of the tensile load. At around 440 kN, the two flange members separate from each other by a value of 0.1 mm. At the final stage (1065 kN), the maximum gap between the two members is about 10 mm.
The deformation of the tower shell (black line in Figure 6) is calculated by subtracting the opening deformation (measured by LVDT) from the total deformation (measured by UTM). During the test, the tower shell yielded and stretched due to the external load, resulting in a maximum displacement of about 17 mm. This large displacement can be explained due to the relatively higher stiffness of the flange and bolt members compared to the shell member. Therefore, when yielding occurs in the tower shell, the external load is concentrated in the shell, leading to significant deformation.

2.2.2. Failure Modes

During the tensile test, two failure modes were observed, as shown in Figure 7. The first failure mode occurred when the tower shell yielded under tension (Figure 7a), causing it to bend and deform further when the external load was increased. The second failure mode was a bolt failure (Figure 7b), in which the upper four threads of the bolt were either stripped or sheared off. The nut showed a similar pattern of failure, with the upper four threads mostly bent and the three bottom engaged threads sheared off.

3. Numerical Simulation

3.1. Modelling of 5 MW L-Type Flange Joint

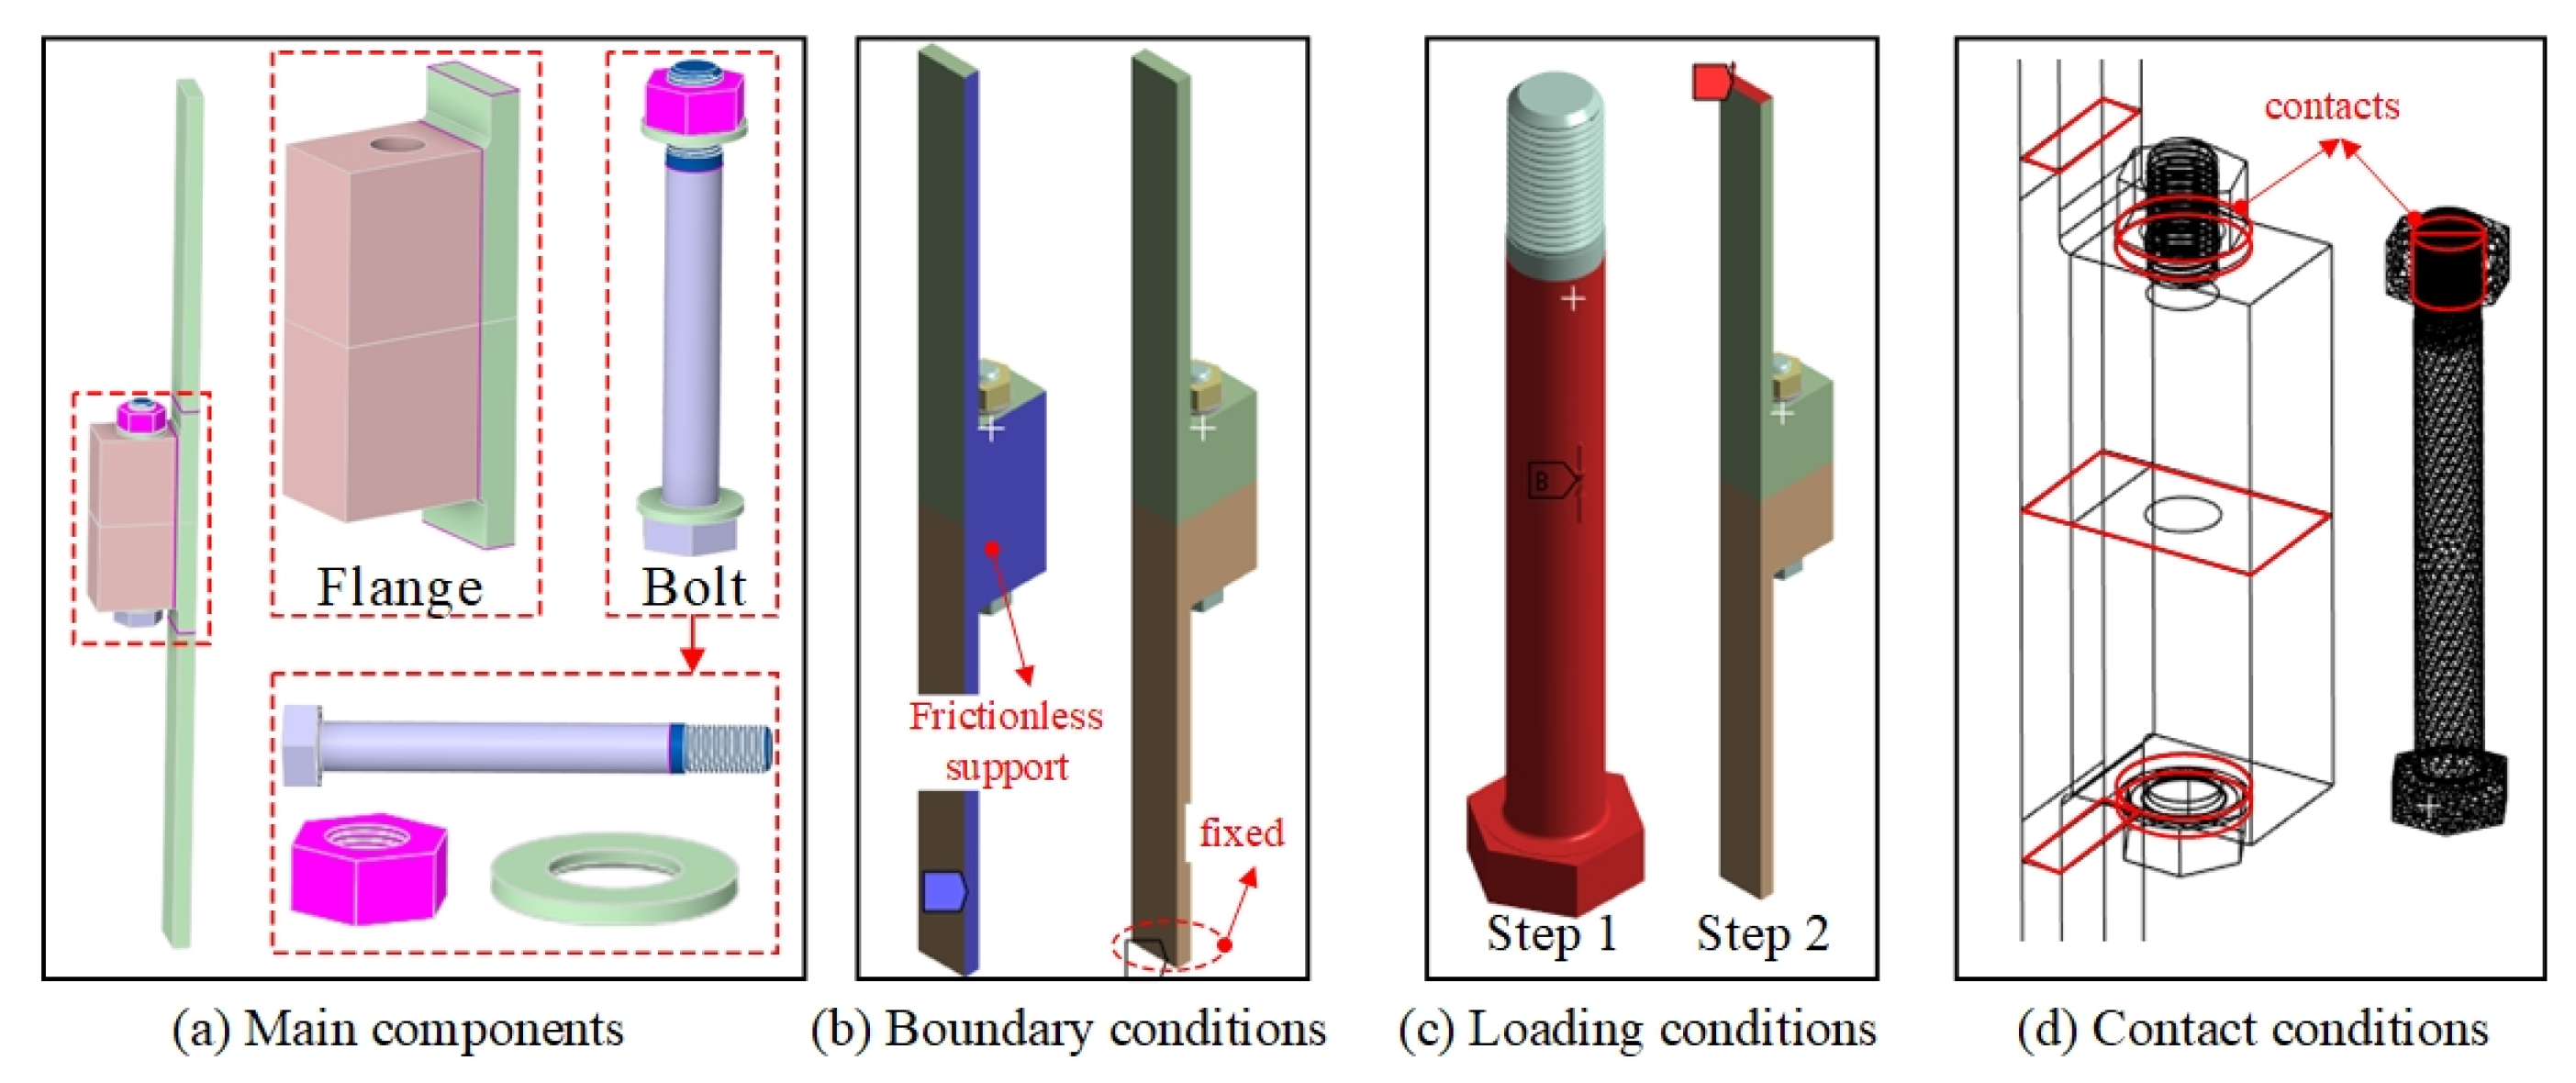
The FEA model of a 5 MW flange joint is developed using ANSYS 2022 R2 (see Figure 8). The SOLID186 element, which has 20 nodes and three degrees of freedom, is adopted to simulate irregular geometries and structural phenomena efficiently. The geometrical parameters are consistent with those of the experimental test. To capture the flange joint stiffness accurately, the bolt with full threads is modeled. Different types of contact conditions are applied, including (i) frictional contact between the flange members, flange-to-washer, and bolt-to-nut, and (ii) bonded contact for the remaining components. For the boundary conditions, the bottom tower is fixed in all degrees of freedom, and frictionless supports are applied for both sides of the flange joint.
The finite element model is analyzed with the nonlinear material model, which is specified by the DNVGL-RP-C208 guideline [25]. The material properties are from the coupon tests (Table 2). The analysis requires two loading steps, including (i) the load generated by the bolt pre-tensioning and (ii) the tensile force applied at the top level of the tower member. These loading values are the same as those from the experimental test.

3.2. Validation of the Finite Element Model

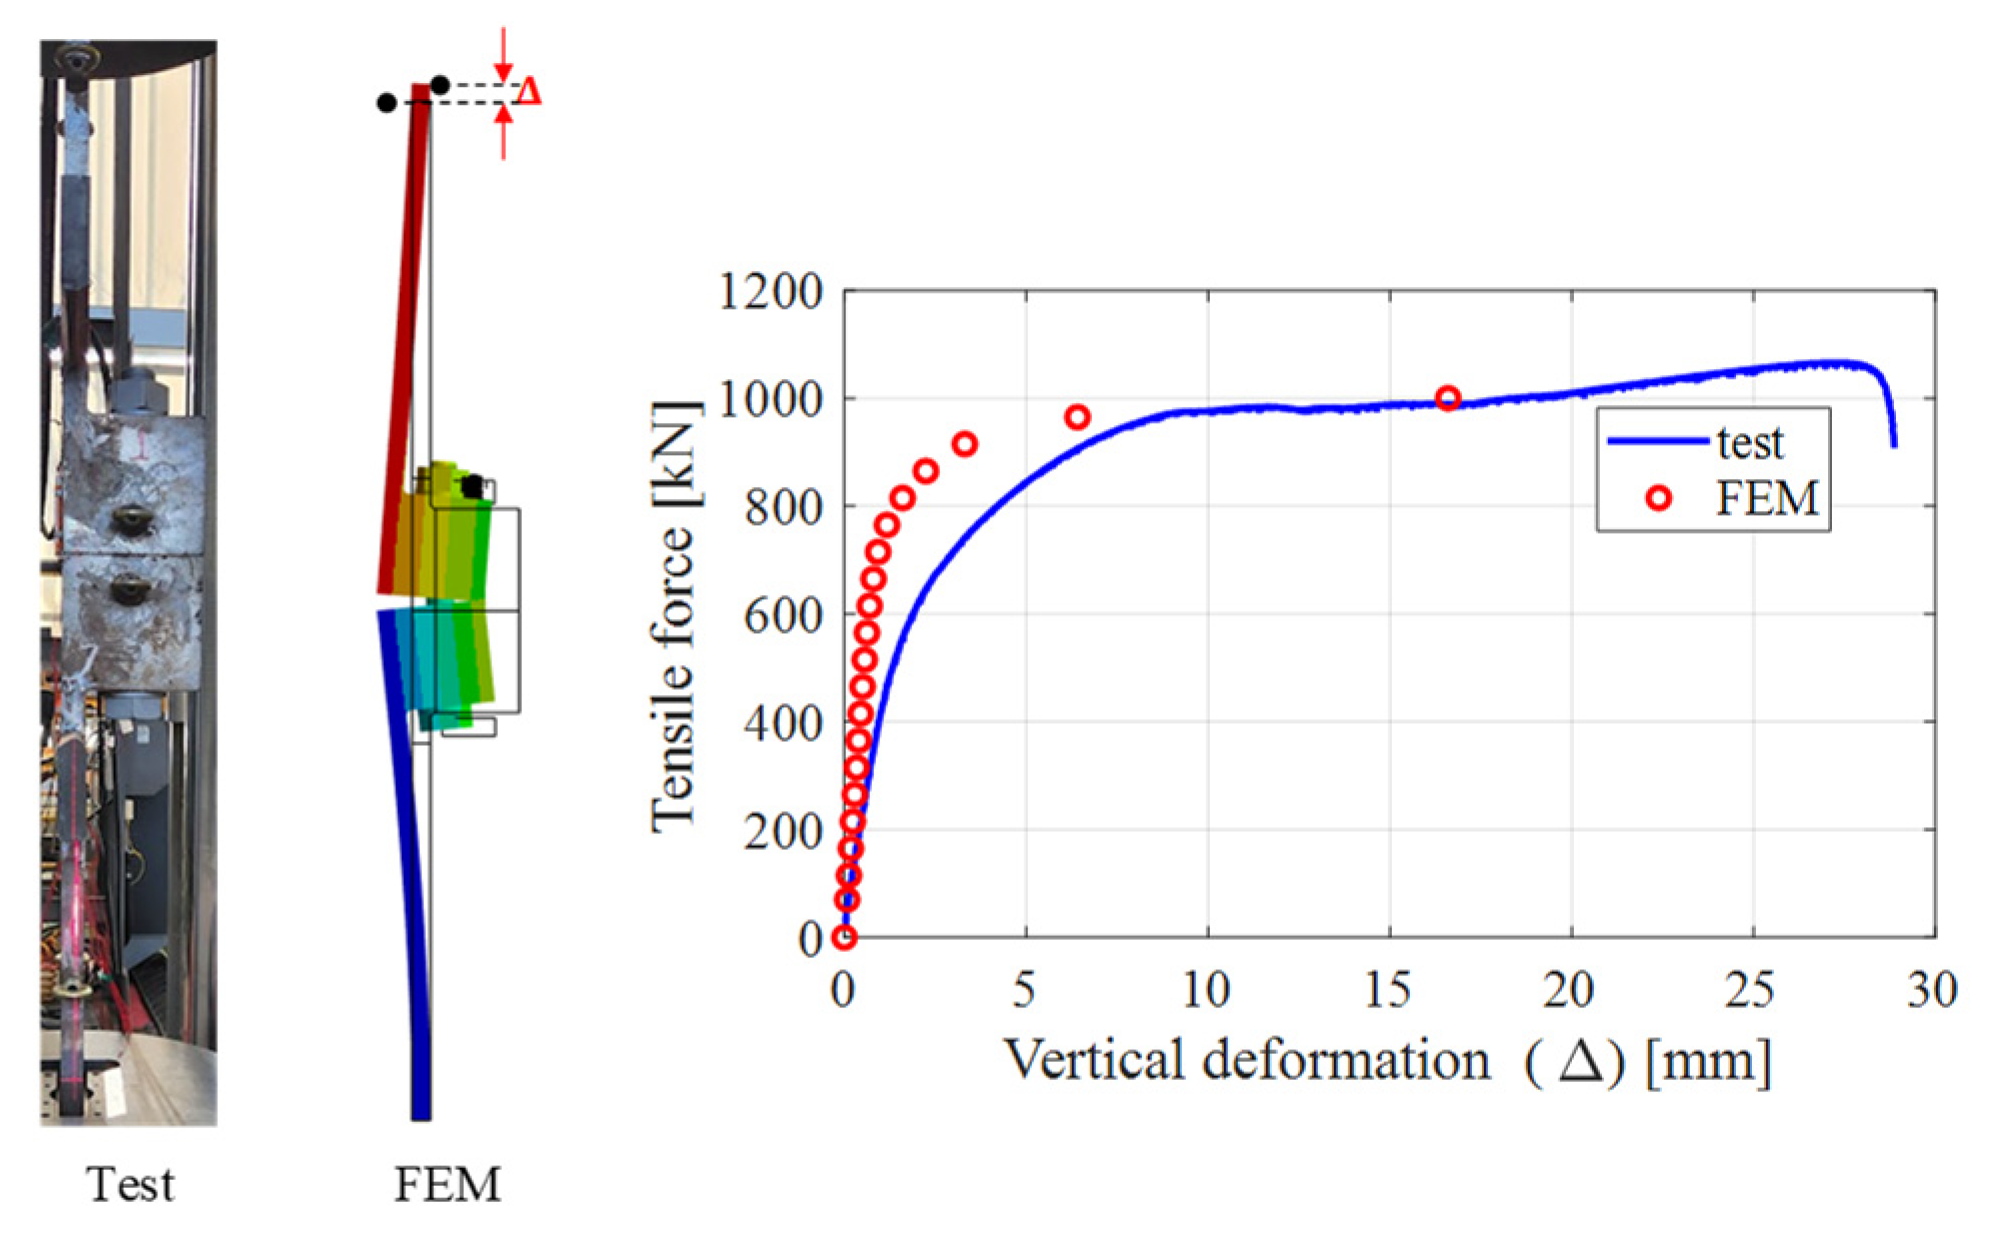
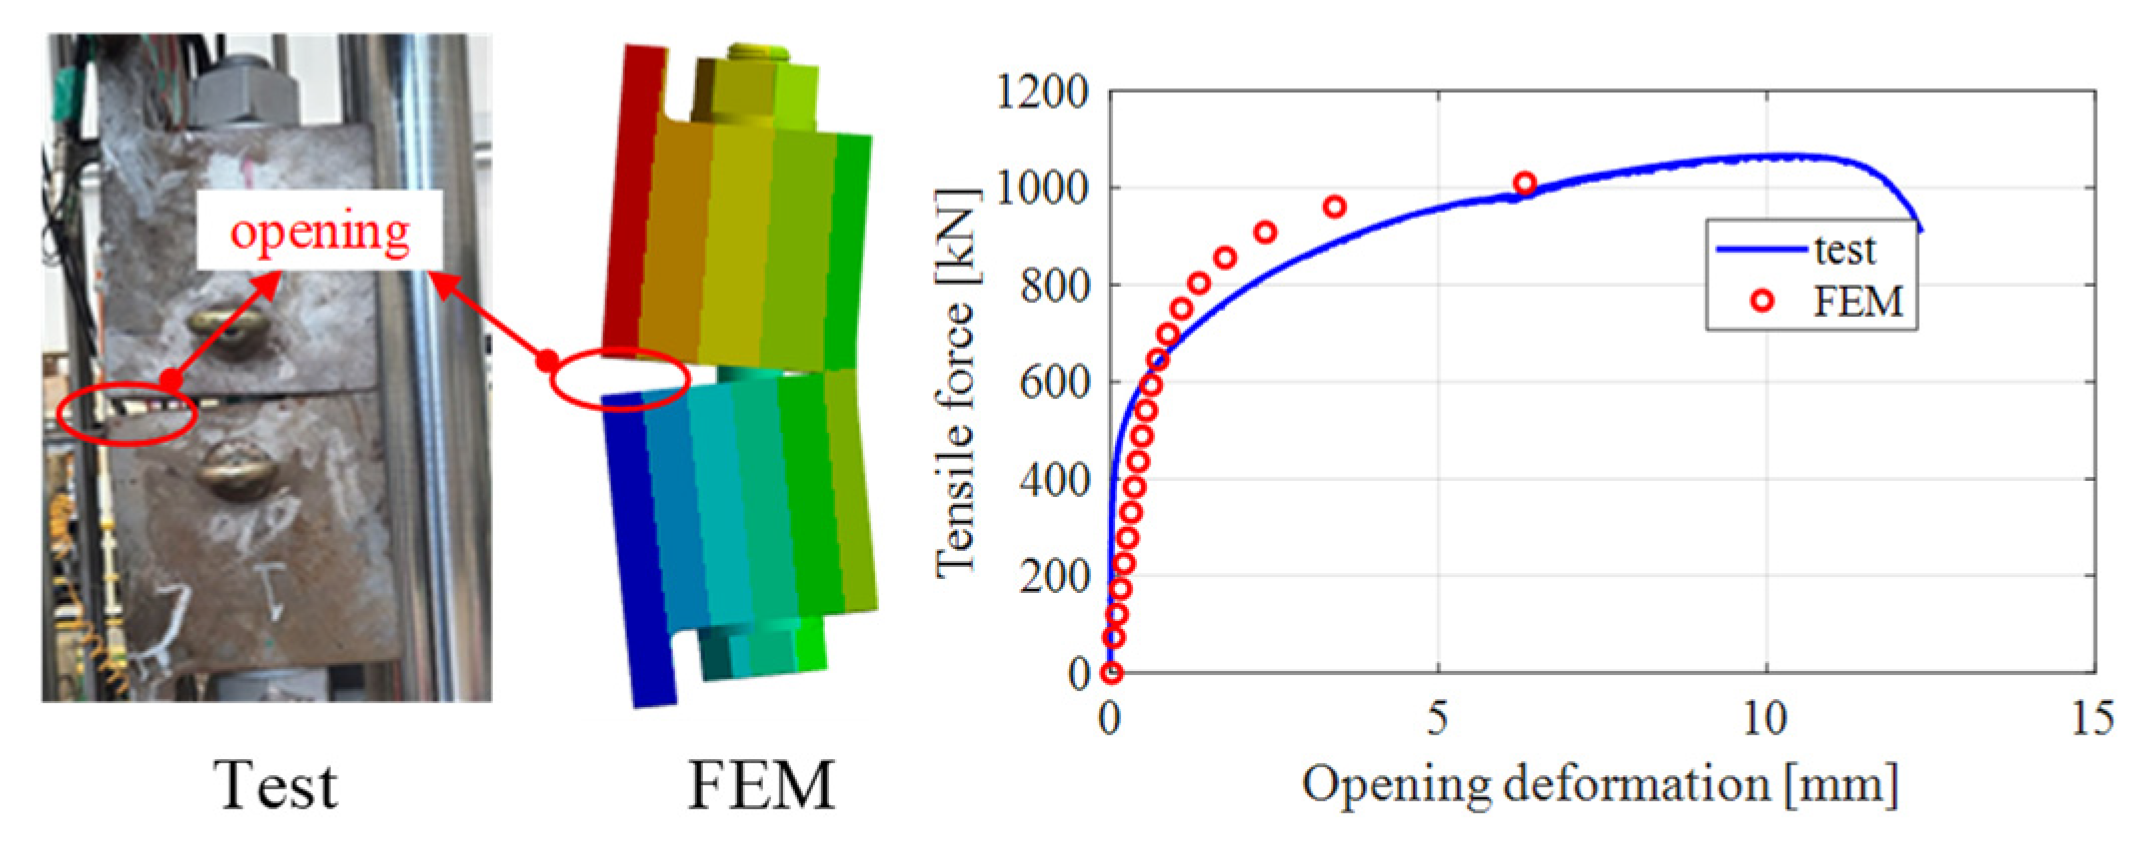
Figure 9 and Figure 10 show the comparison of force–displacement curves and opening deformations of the flange joint.
As shown in Figure 9, during the elastic stage of loading, the deformations increase slowly, mainly due to the pretension force. However, as the tensile load exceeds 1000 kN, the deformations start to increase rapidly. When the loads reach 1050 kN, the numerical simulation shows a peak deformation of 16.2 mm. Meanwhile, in the experimental test, the maximum deformation recorded was 24.59 mm under 1050 kN.
The opening deformation follows a similar trend, as shown in Figure 10. Due to the pretension force, there is no significant separation at the beginning of loading, but as the tensile load increases, the opening gap increases. In the case of numerical simulation, the opening value is 6.31 mm at 1000 kN, whereas in the test, it reaches approximately 6.59 mm at 1000 kN.
Overall, the simulated results are basically consistent with the tested results. Both test and numerical curves linearly increase prior to reaching the yield load. The comparison indicated that the numerical simulation is in good agreement with the experimental test results. However, there is still a difference between the experiment and simulation curves, which could be due to the following reasons:
  • The finite element model assumes ideal contact between the components of the joint, such as the bolt/nut, flange/washers, etc. In contrast, the manual assembly of the test may result in imperfect contact between these components, leading to an inaccuracy in the test results comparison.
  • The fastening process may have caused the flange members to rotate, thereby leading to a decrement in the clamping solid stiffness. This rotation may have further contributed to the difference between the experimental and simulation curves.

4. Parametric Study

This section aims to examine the impact of the flange surface flatness on the structural behavior of the flange joint. This will be achieved by assessing the effects of geometrical imperfections and opening length (Figure 11). It is noted that the perfect model refers to the scenario where there is no flange gap.
This section is divided into two main parts. In Section 4.1, the performance of various flange models with geometrical imperfections is analyzed, and the results are discussed. Subsequently, Section 4.2 addresses the influence of opening length on the structural behavior of the flange joint.

4.1. Influence of Geometrical Imperfect Flange Models

To explore how the flatness of the flange surfaces affects the performance of the LTFJs, various geometrically imperfect flange models (e.g., flange-sided, tower-sided) are examined, and the results are compared with a perfect model. For the imperfect models, a flange gap of 2 mm is utilized, which is known as the maximum allowable value according to the guidelines [19,20].

4.1.1. Structural Response of the Flange Member

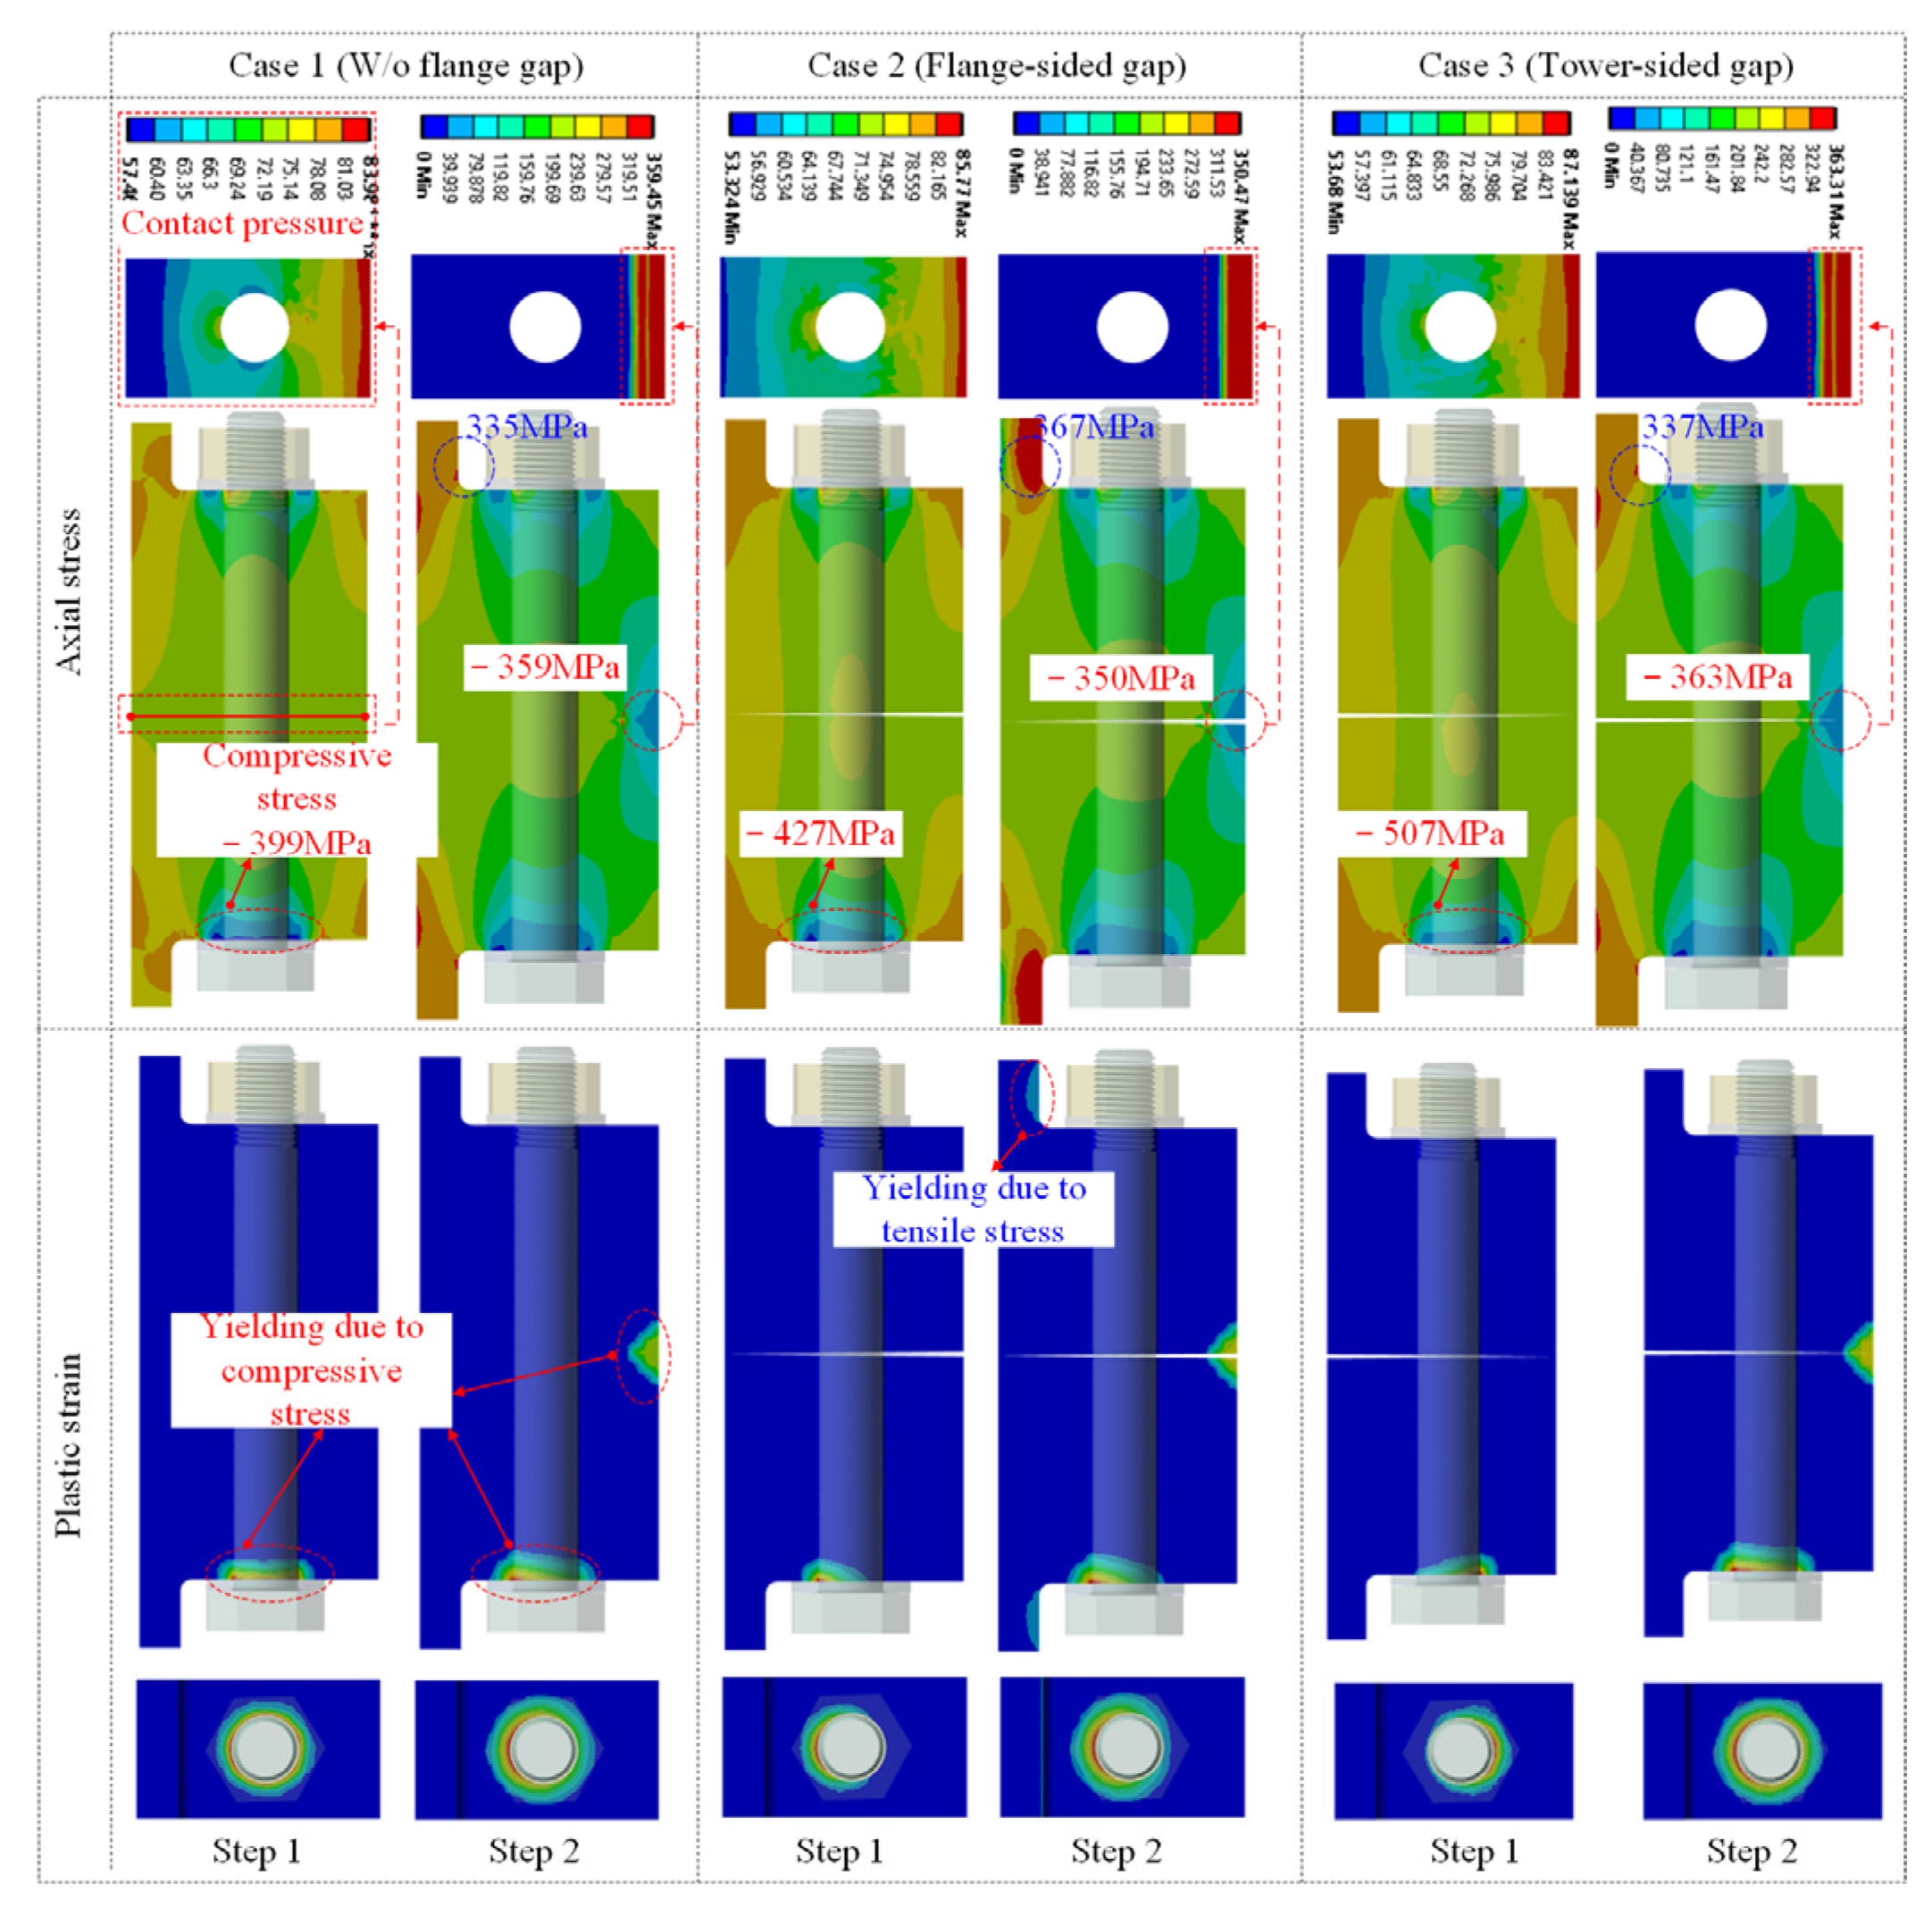
The purpose of the investigation is to examine how the initial flange surface affects the performance of the LTFJ. This will be achieved by analyzing the stress and strain distributions of the flange member at three sensitive locations: the flange-to-shell junction (FSJ), the flange inner, and the flange’s region surrounding the bolt hole. The comparisons, given in Figure 12, are summarized as follows:
  • The contact pressure between the flange parts is first discussed. Under bolt pretension, a clamping pressure is established between the two flange members. The pressure increases from the left side to the right side of the flange surface. In the perfect model, the pressure is highest at the flange inner (83 MPa). For imperfection cases, higher pressures of 85 MPa and 87 MPa are found for the flange-sided and tower-sided gapping cases, respectively. Under the tensile load, the upper and lower flanges are separated, resulting in zero pressure at the flange outer and high pressure at the flange inner.
  • Regarding axial stress, stress concentration occurs at the surface contact between the flanges and washers under a bolt pretension load. With the perfect model, the highest compressive stress of 399 MPa is found in the bolt hole. An increase of 7.0% and 27.0% in stress is observed in the cases of flange-sided and tower-sided gaps, respectively, compared to the perfect condition. These values exceed the yield strength of the material specified in Section 2.1.1, which increases the risk of failure close to the center of the bolt hole. Under tensile load, there is considerable compressive stress at the flange tip, which is consistent with the pressure distribution between the two flange members. A value of 359 MPa is found for the perfect condition, and little change is observed when considering the skew effects (1.1%).
  • When the tower is subjected to tensile load, a high stress of 335 MPa occurs at this location. This stress increases considerably in the case of flange-sided gaps, with an increase of about 9.5%.
  • The compressive stress observed at the flange inner area and bolt hole, as well as the tensile stress observed at the FSJ, exceeds the material yielding strength specified in Section 2.1.1, which can lead to yielding in the flange joint. However, it is worth noting that the compressive stress yielding is less significant compared to the tensile zone, as the flange has a high thickness in that area.

4.1.2. Structural Response of the Bolt Member

The bolt performance is also investigated since it is a major structural component in the joint. Figure 13 shows a comparison of the global stress for three analysis cases, where the linearization technique is employed to extract the bolt global stress. This technique provides an estimation of the equivalent stress distribution along the bolt axis [26]. The figure indicates that the global stress is almost the same under pretension, with a maximum stress of 800 MPa found at the bolt thread. However, under tensile load, a slight change in global stress along the bolt is observed, with an increment of 6.4% in the case of a flange-sided gap.
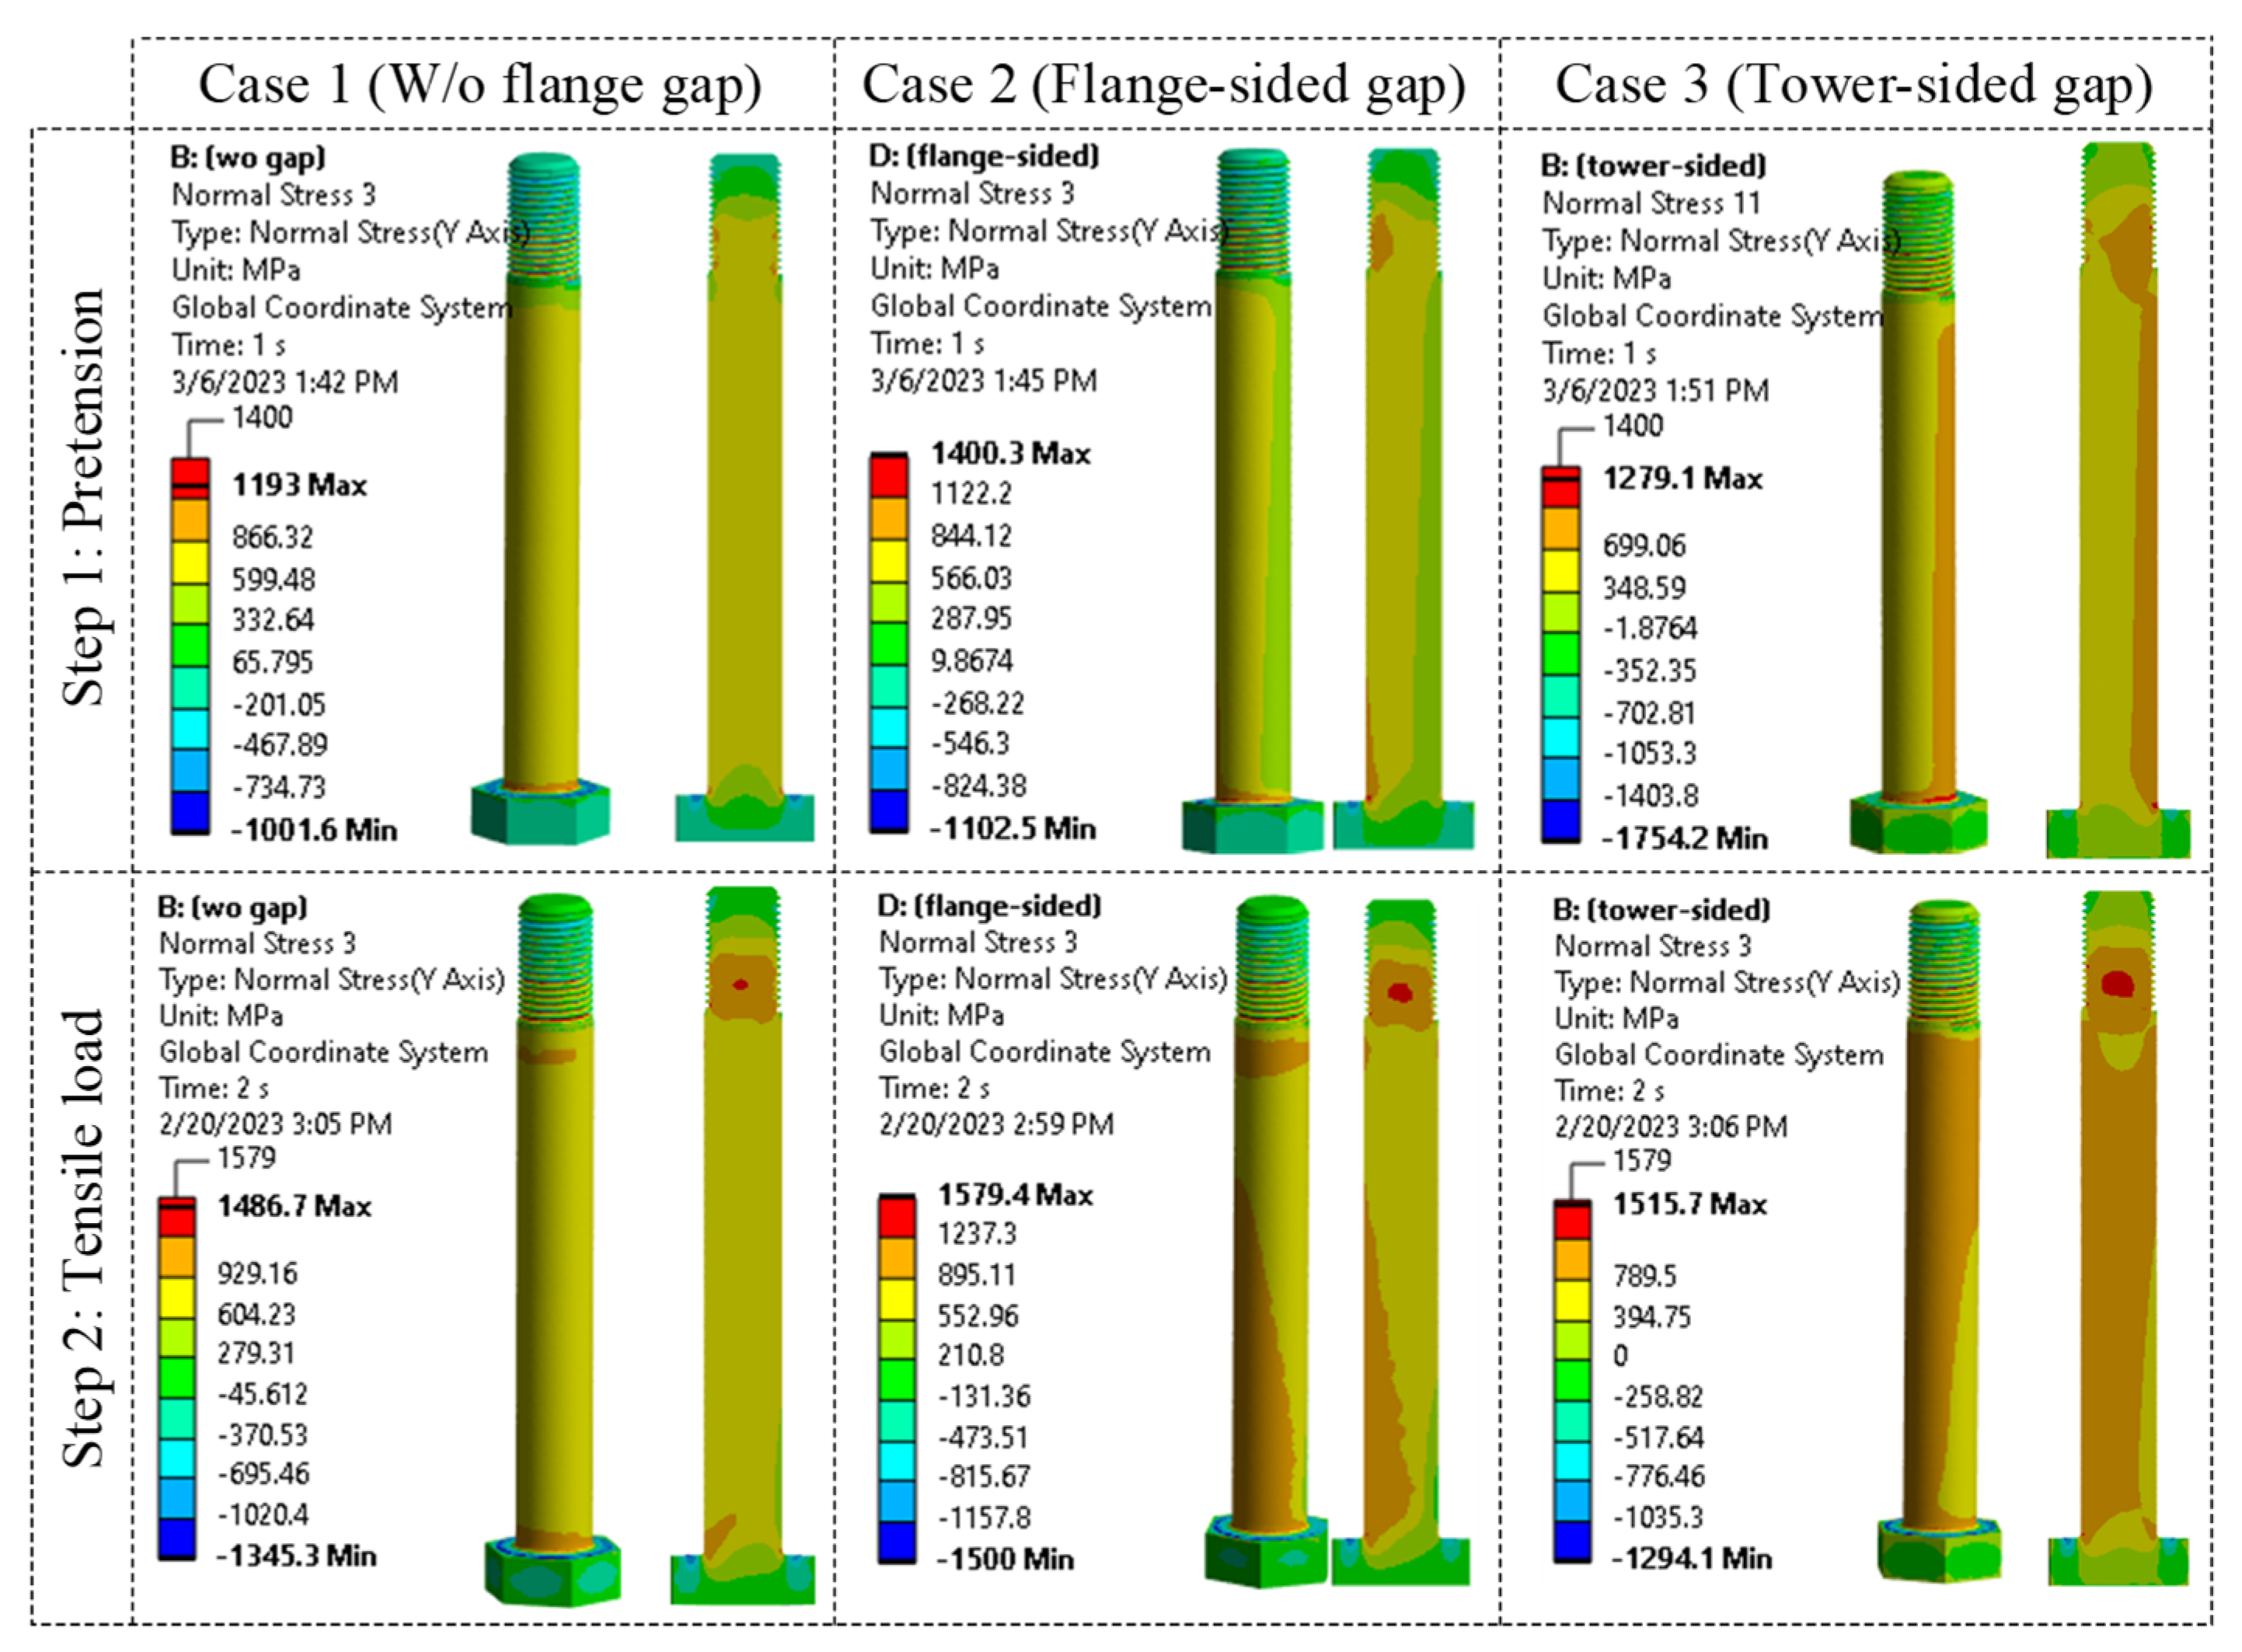
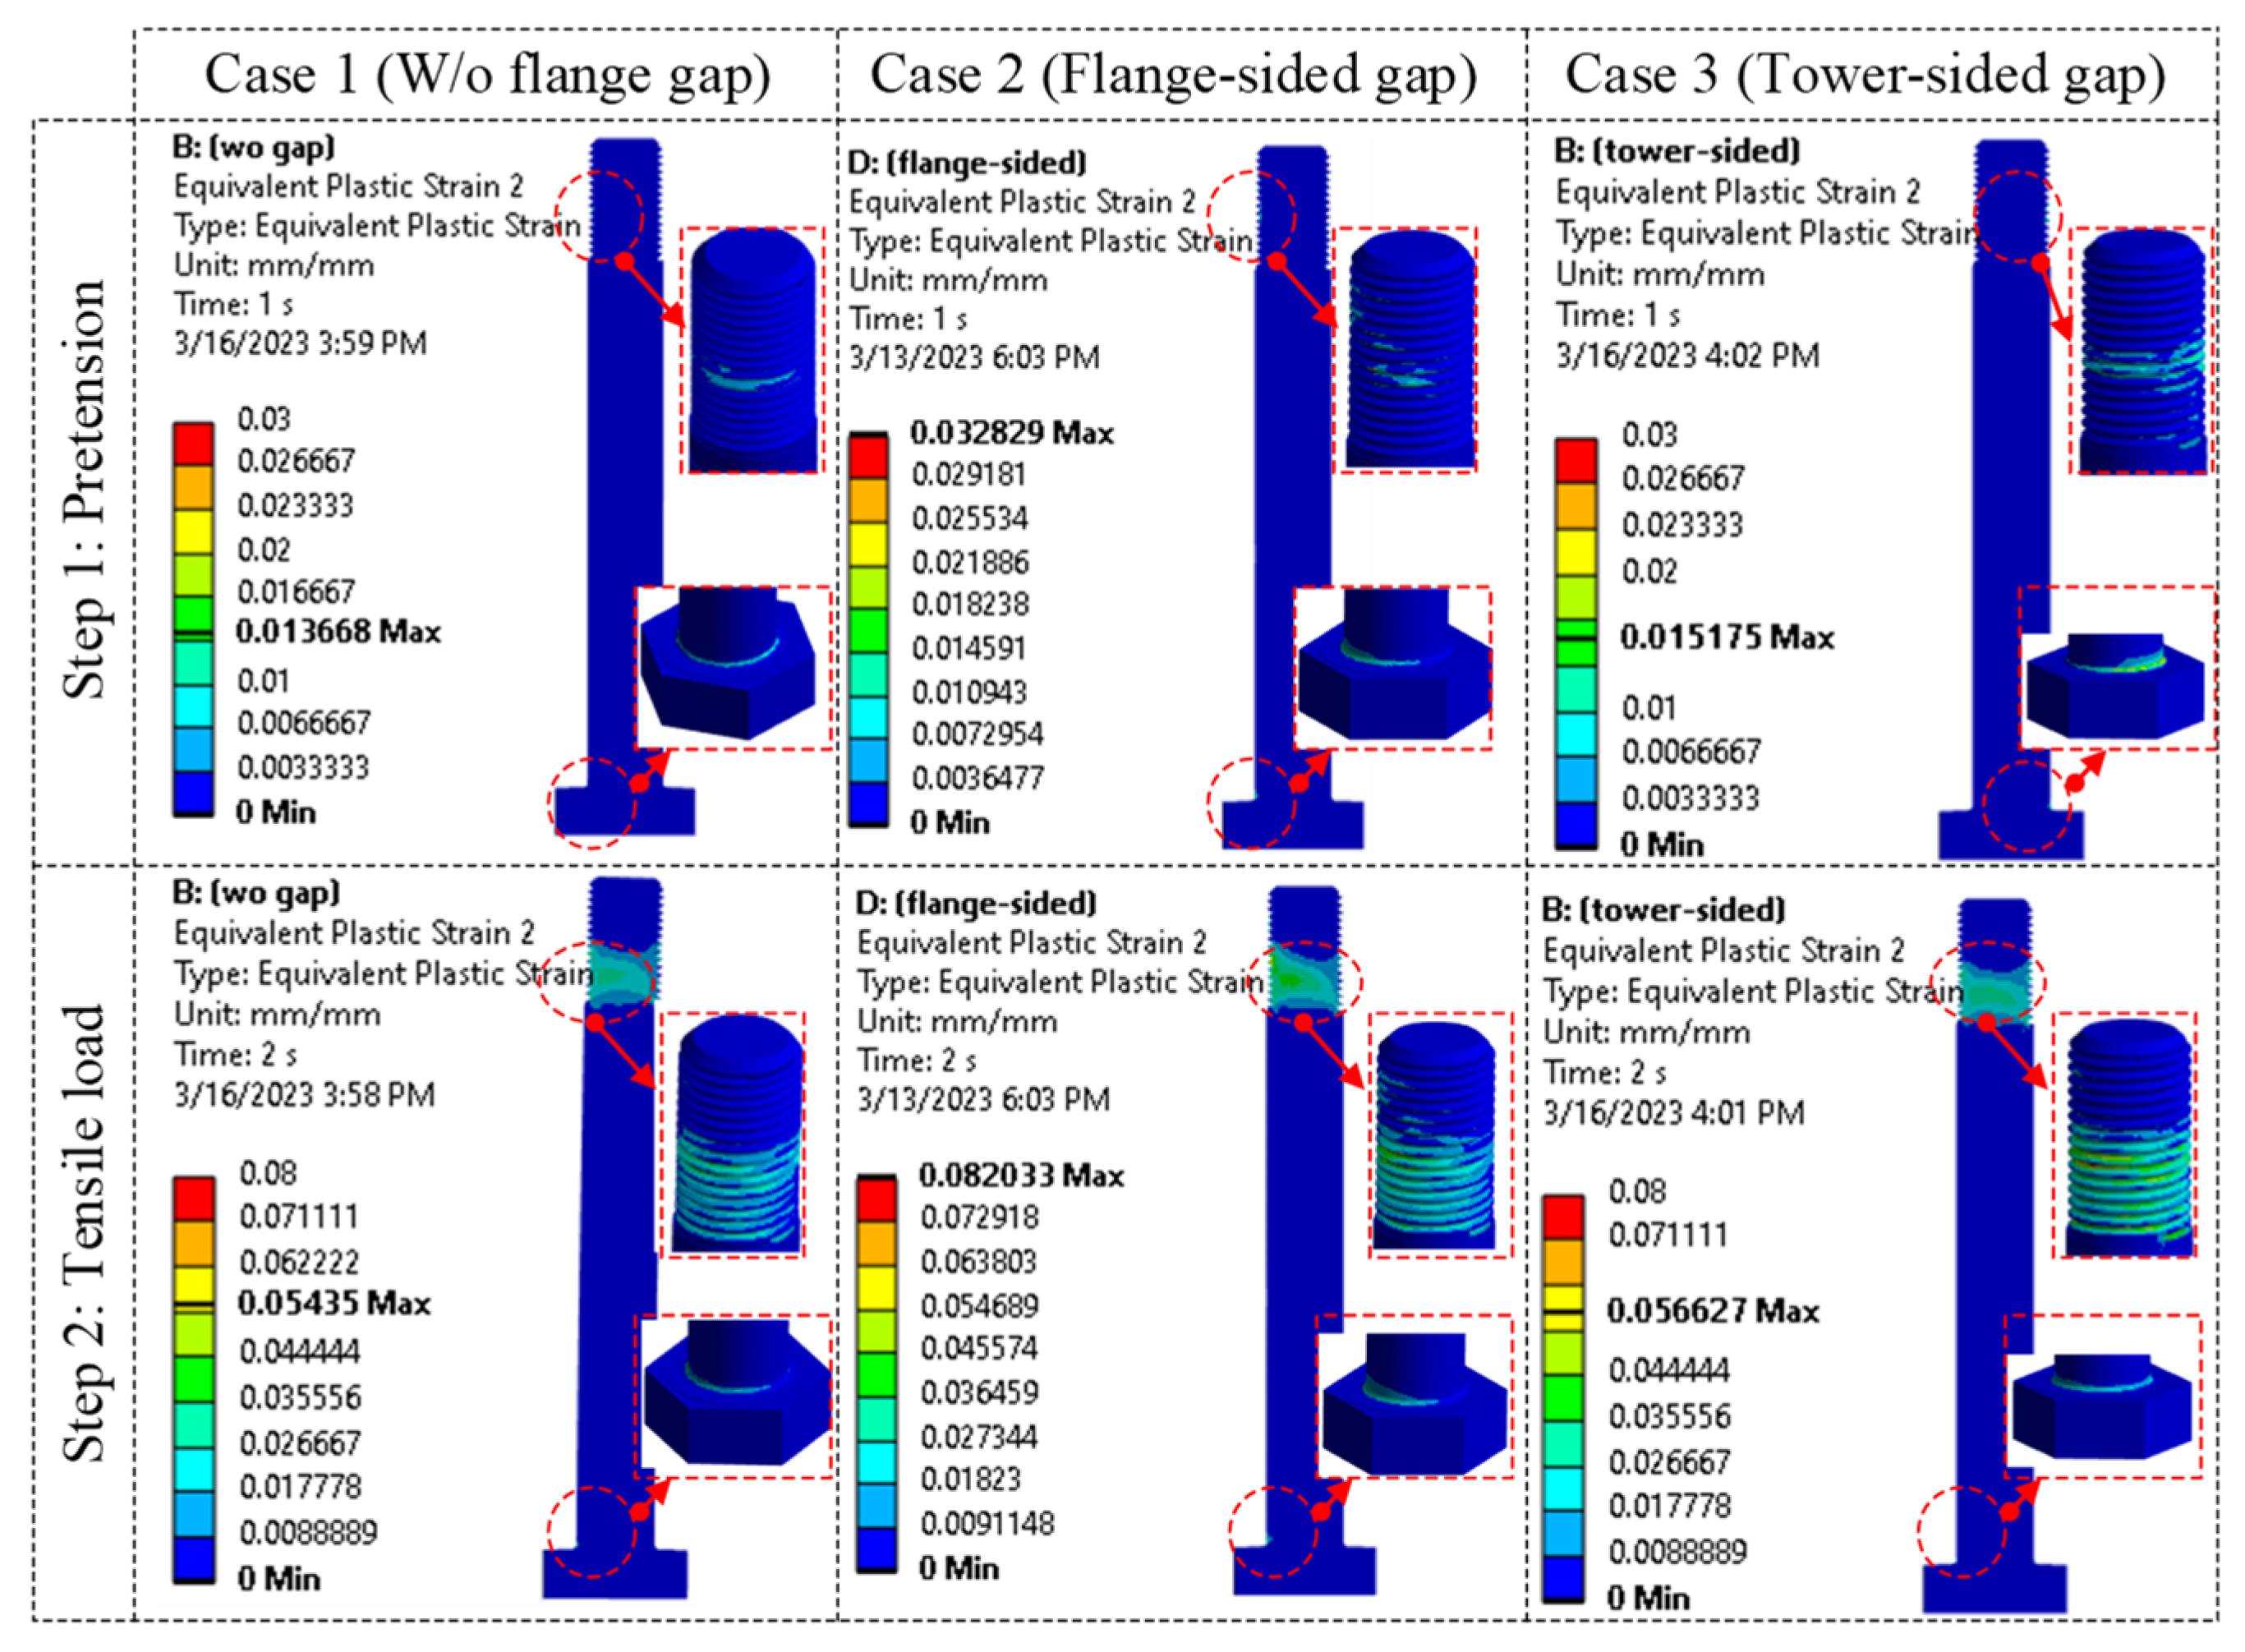
To better evaluate the bolt performance, a comparison between axial stress and plastic strain is depicted in Figure 14 and Figure 15. The structural response is significantly affected by the imperfect model compared to the perfect model. The following observations are drawn:
  • In a perfect model, the stress is distributed symmetrically in the bolt during the pretension process, with very little stress concentration at the bolt thread (1193 MPa). However, for flange-sided gaps, bending-induced stress increases, resulting in a larger stress amplitude on the bolt’s left side. In contrast, a larger stress amplitude is observed on the right side of the shank and bolt thread in the case of the tower-sided gap.
  • Under the tensile load, similar stress distributions are found in the bolt members. In the perfect model, the stress distributes symmetrically in the bolt. The stress concentration occurs at the bolt head and thread area, with a maximum value of 1486 MPa. However, there is a clear difference when considering the flange surface flatness. Looking at the flange-sided gap, the area going through stress concentration is much larger when compared to the perfect model, with an increase of 6.3%. For the tower-sided gap, more stress concentration seems to occur in the bolt. These stress areas may play a significant role in the fatigue assessment [27,28,29].
  • There is a slight plastic deformation observed in the bolt during the preloading. However, the area going through the plastic strain zone increases considerably under the tensile load. Notably, there is an increased number of threads subject to plastic deformation in the case of the tower-sided gap (see Figure 15).

4.2. Influence of the Flange Opening Length

The effect of flange surface flatness is investigated in Section 4.1, and it indicates that the flange-sided gap case shows better performance compared to the tower-sided gap case. In this section, parametric studies are carried out to investigate the effect of opening length on the performance of the flange joint. Various opening lengths L i , including 100 mm, 150 mm, and 210 mm (corresponding to locations (1), (2), and (3) in Figure 11) are analyzed, and the results are compared.

4.2.1. Structural Response of the Flange Member

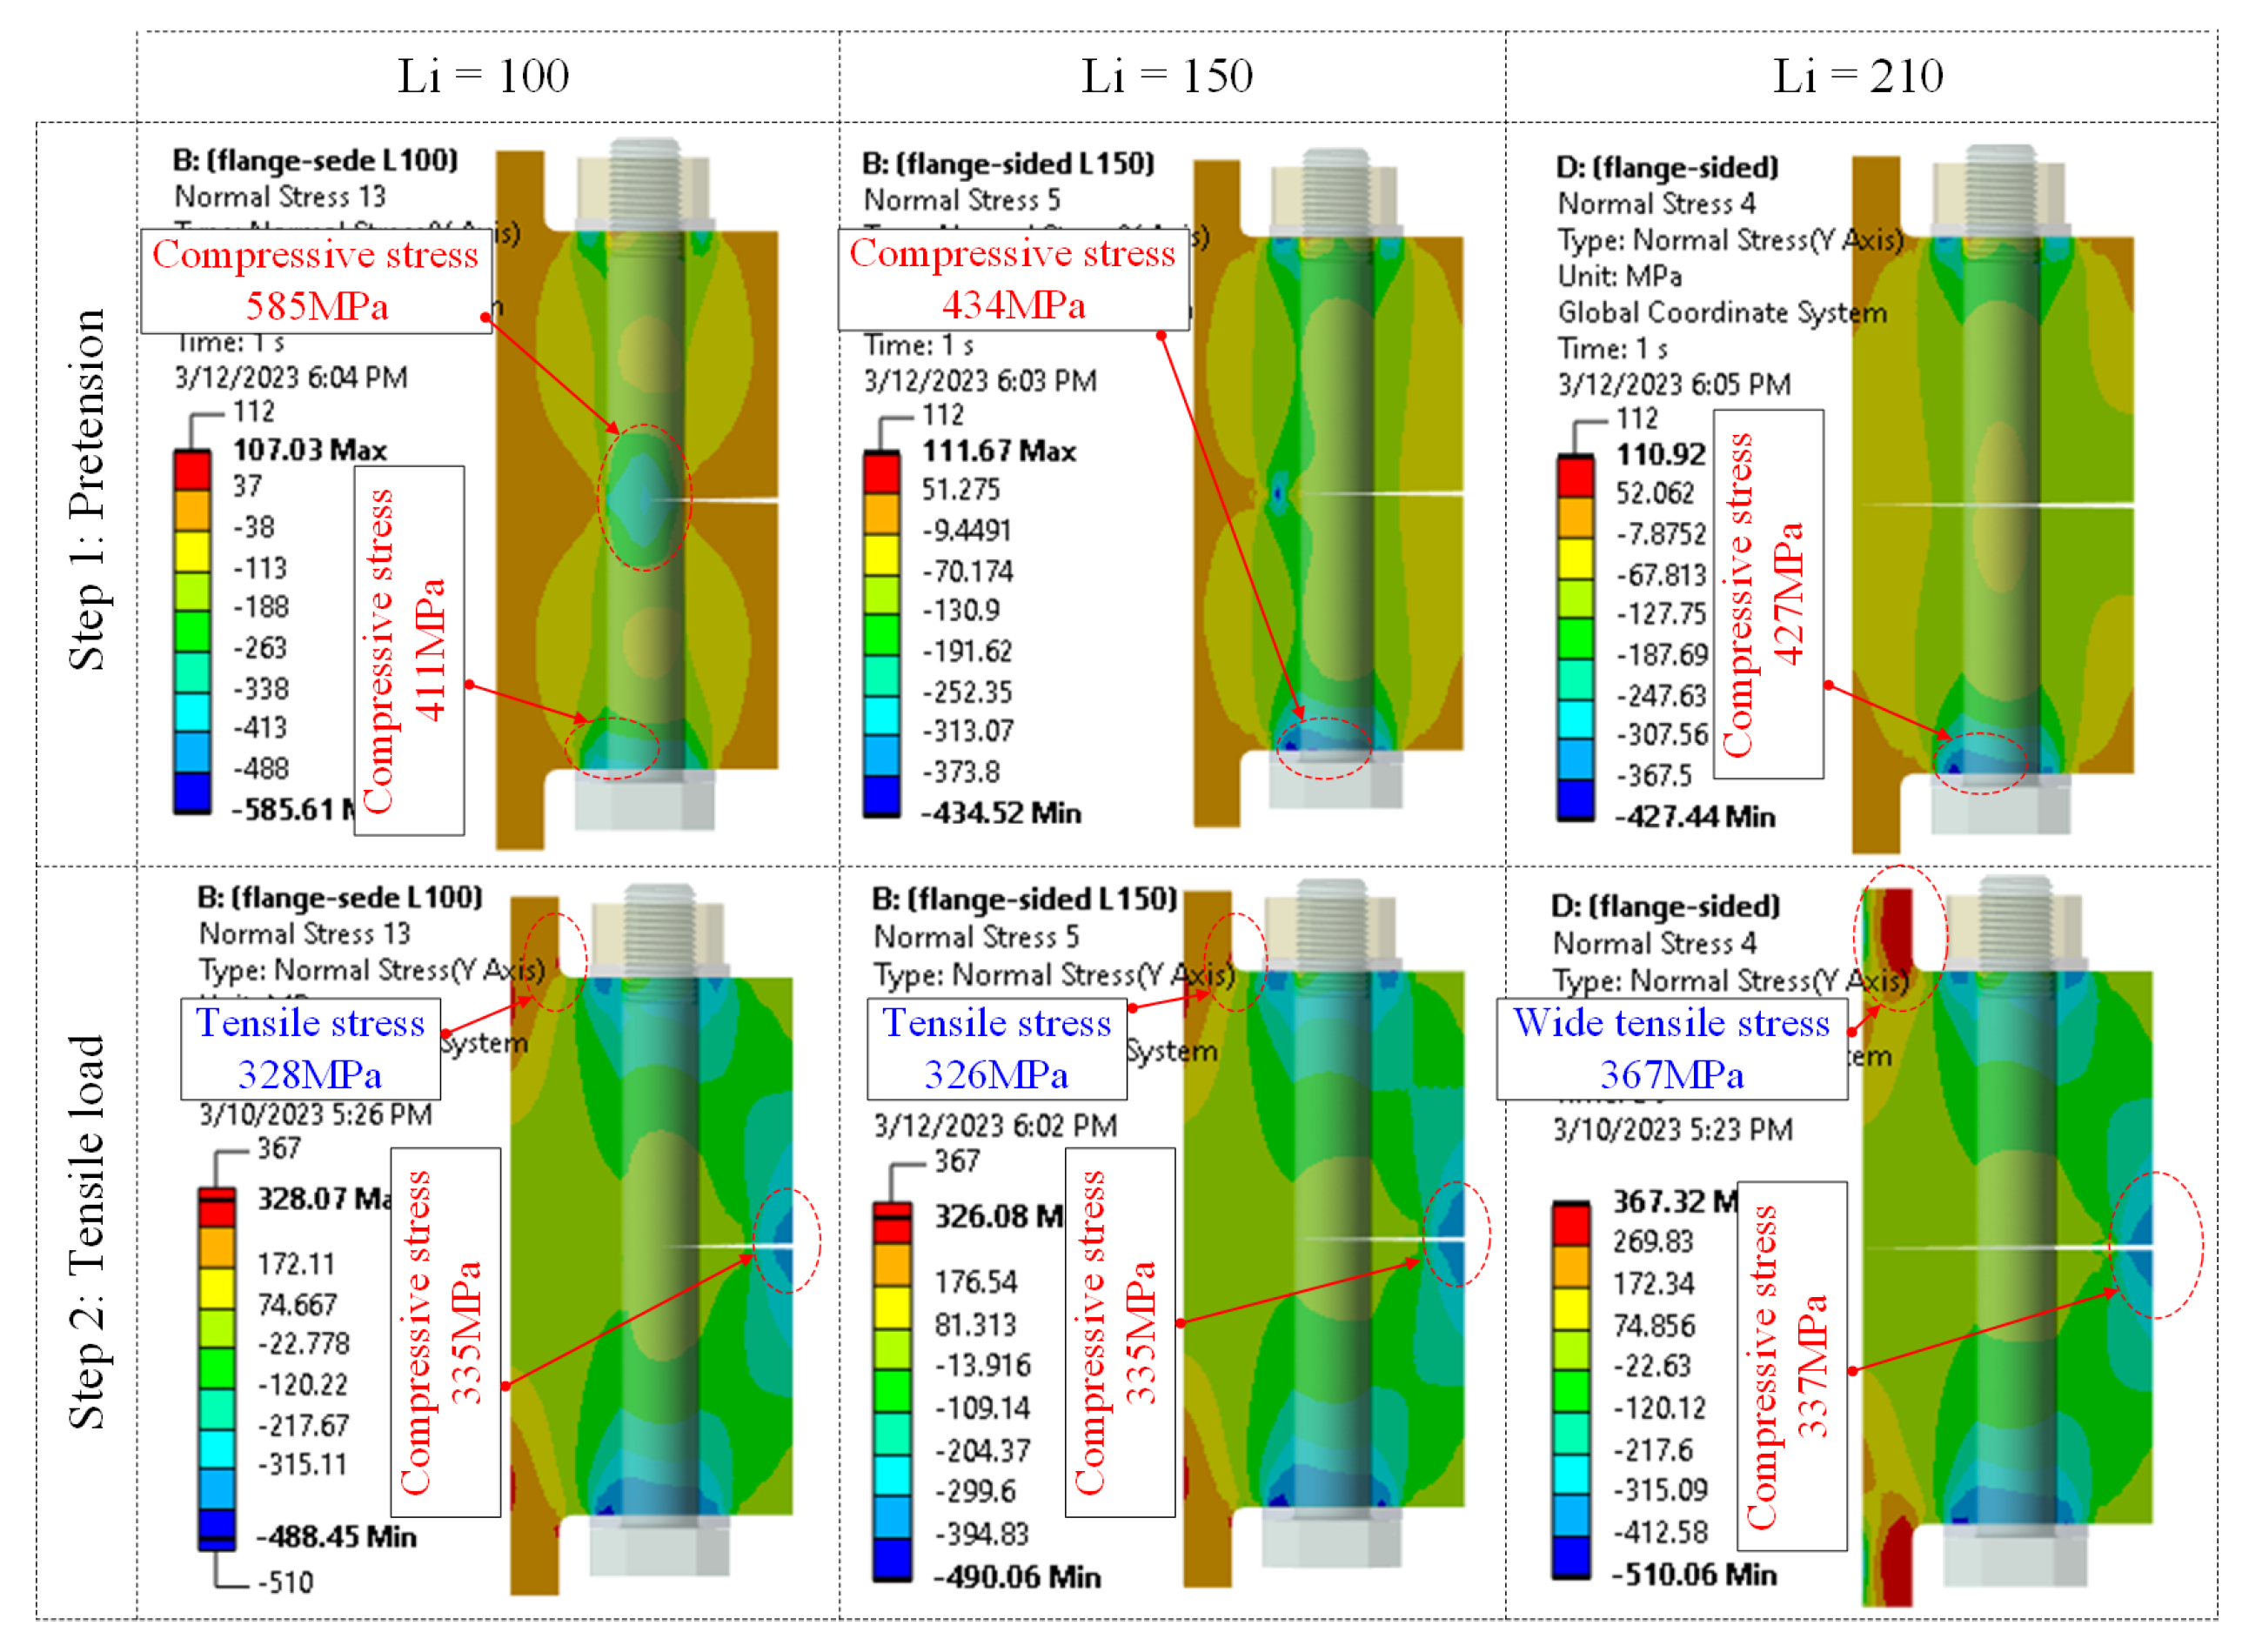
Figure 16 and Figure 17 show the stress and strain distributions in the flange members with varying opening lengths. In general, the flange stress increases as the opening length increases. The following observations were made:
  • The surface contact between the flanges and washers causes stress concentration with a stress of 411 MPa for Li = 100 mm. This stress slightly increases with increasing the opening length by up to 5.6%.
  • When the tower shell is subjected to tensile load, a significant area of compressive stress appears at the internal flange tip, reaching a value of around 335 MPa for all cases (as shown in Figure 16) due to the separation of the flange members. Another finding is the tensile stress distribution at the FSJ, about 328 MPa for Li = 100 mm. The stress concentration becomes wider as the opening becomes larger. For instance, when Li = 210 mm, the stress is 11.9% higher than in the other cases.
  • When the opening is located in the center of the bolt hole (Li = 100 mm), it is evident that the bolt hole experiences very high compressive stress (reaching a value of 585 MPa), leading to the flange yielding (as shown in Figure 17).

4.2.2. Structural Response of the Bolt Member

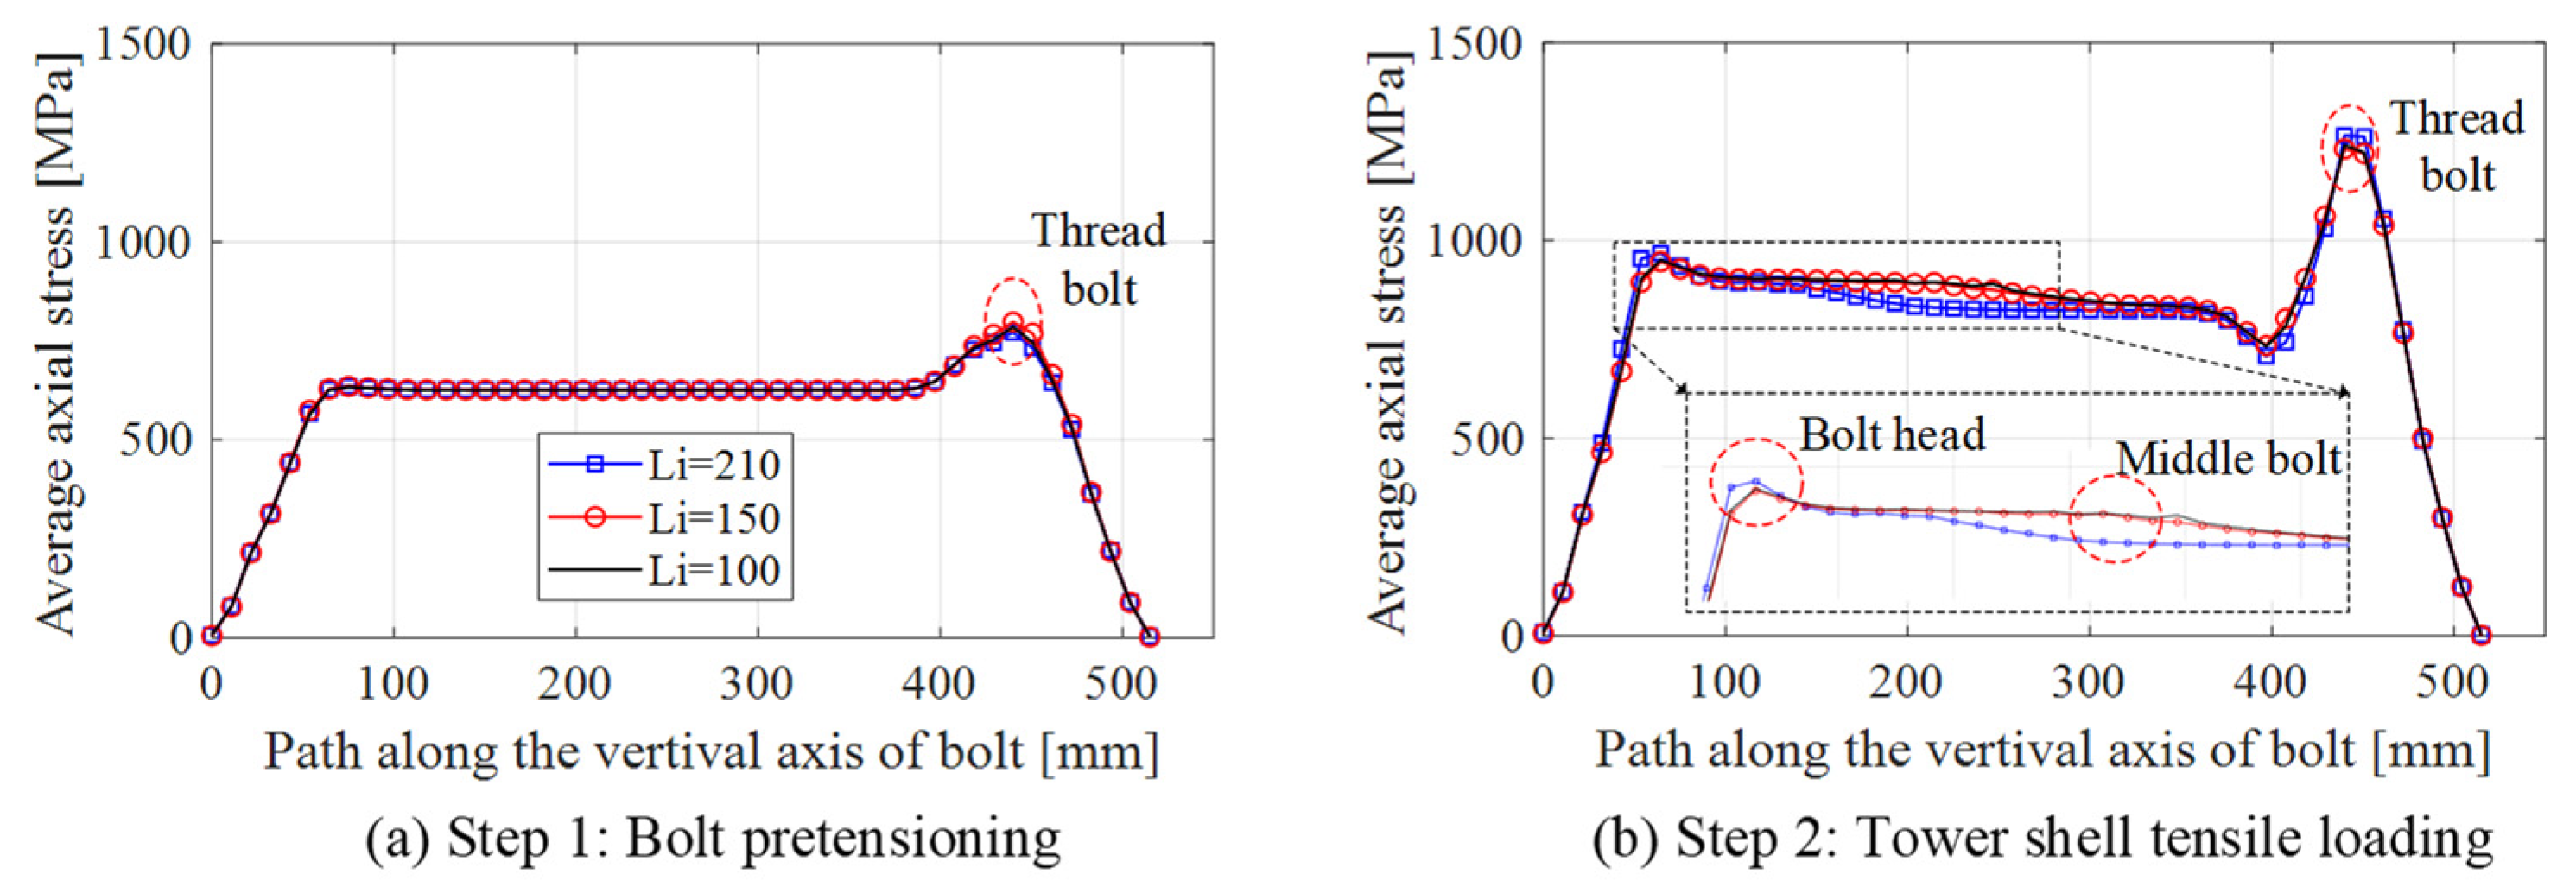
The opening length has little impact on the global bolt stress under the bolt pretension (Figure 18a). However, under a tower shell tensile load, an increase in the flange opening length results in a shift of stress from the middle bolt toward the bolt head, as shown in Figure 18b. Specifically, an increase in the flange opening length leads to an increase in stress at the bolt head and a decrease in stress at the middle bolt. The stress at the bolt head increases by 7.8%, while the stress at the middle bolt decreases by 7.9%.
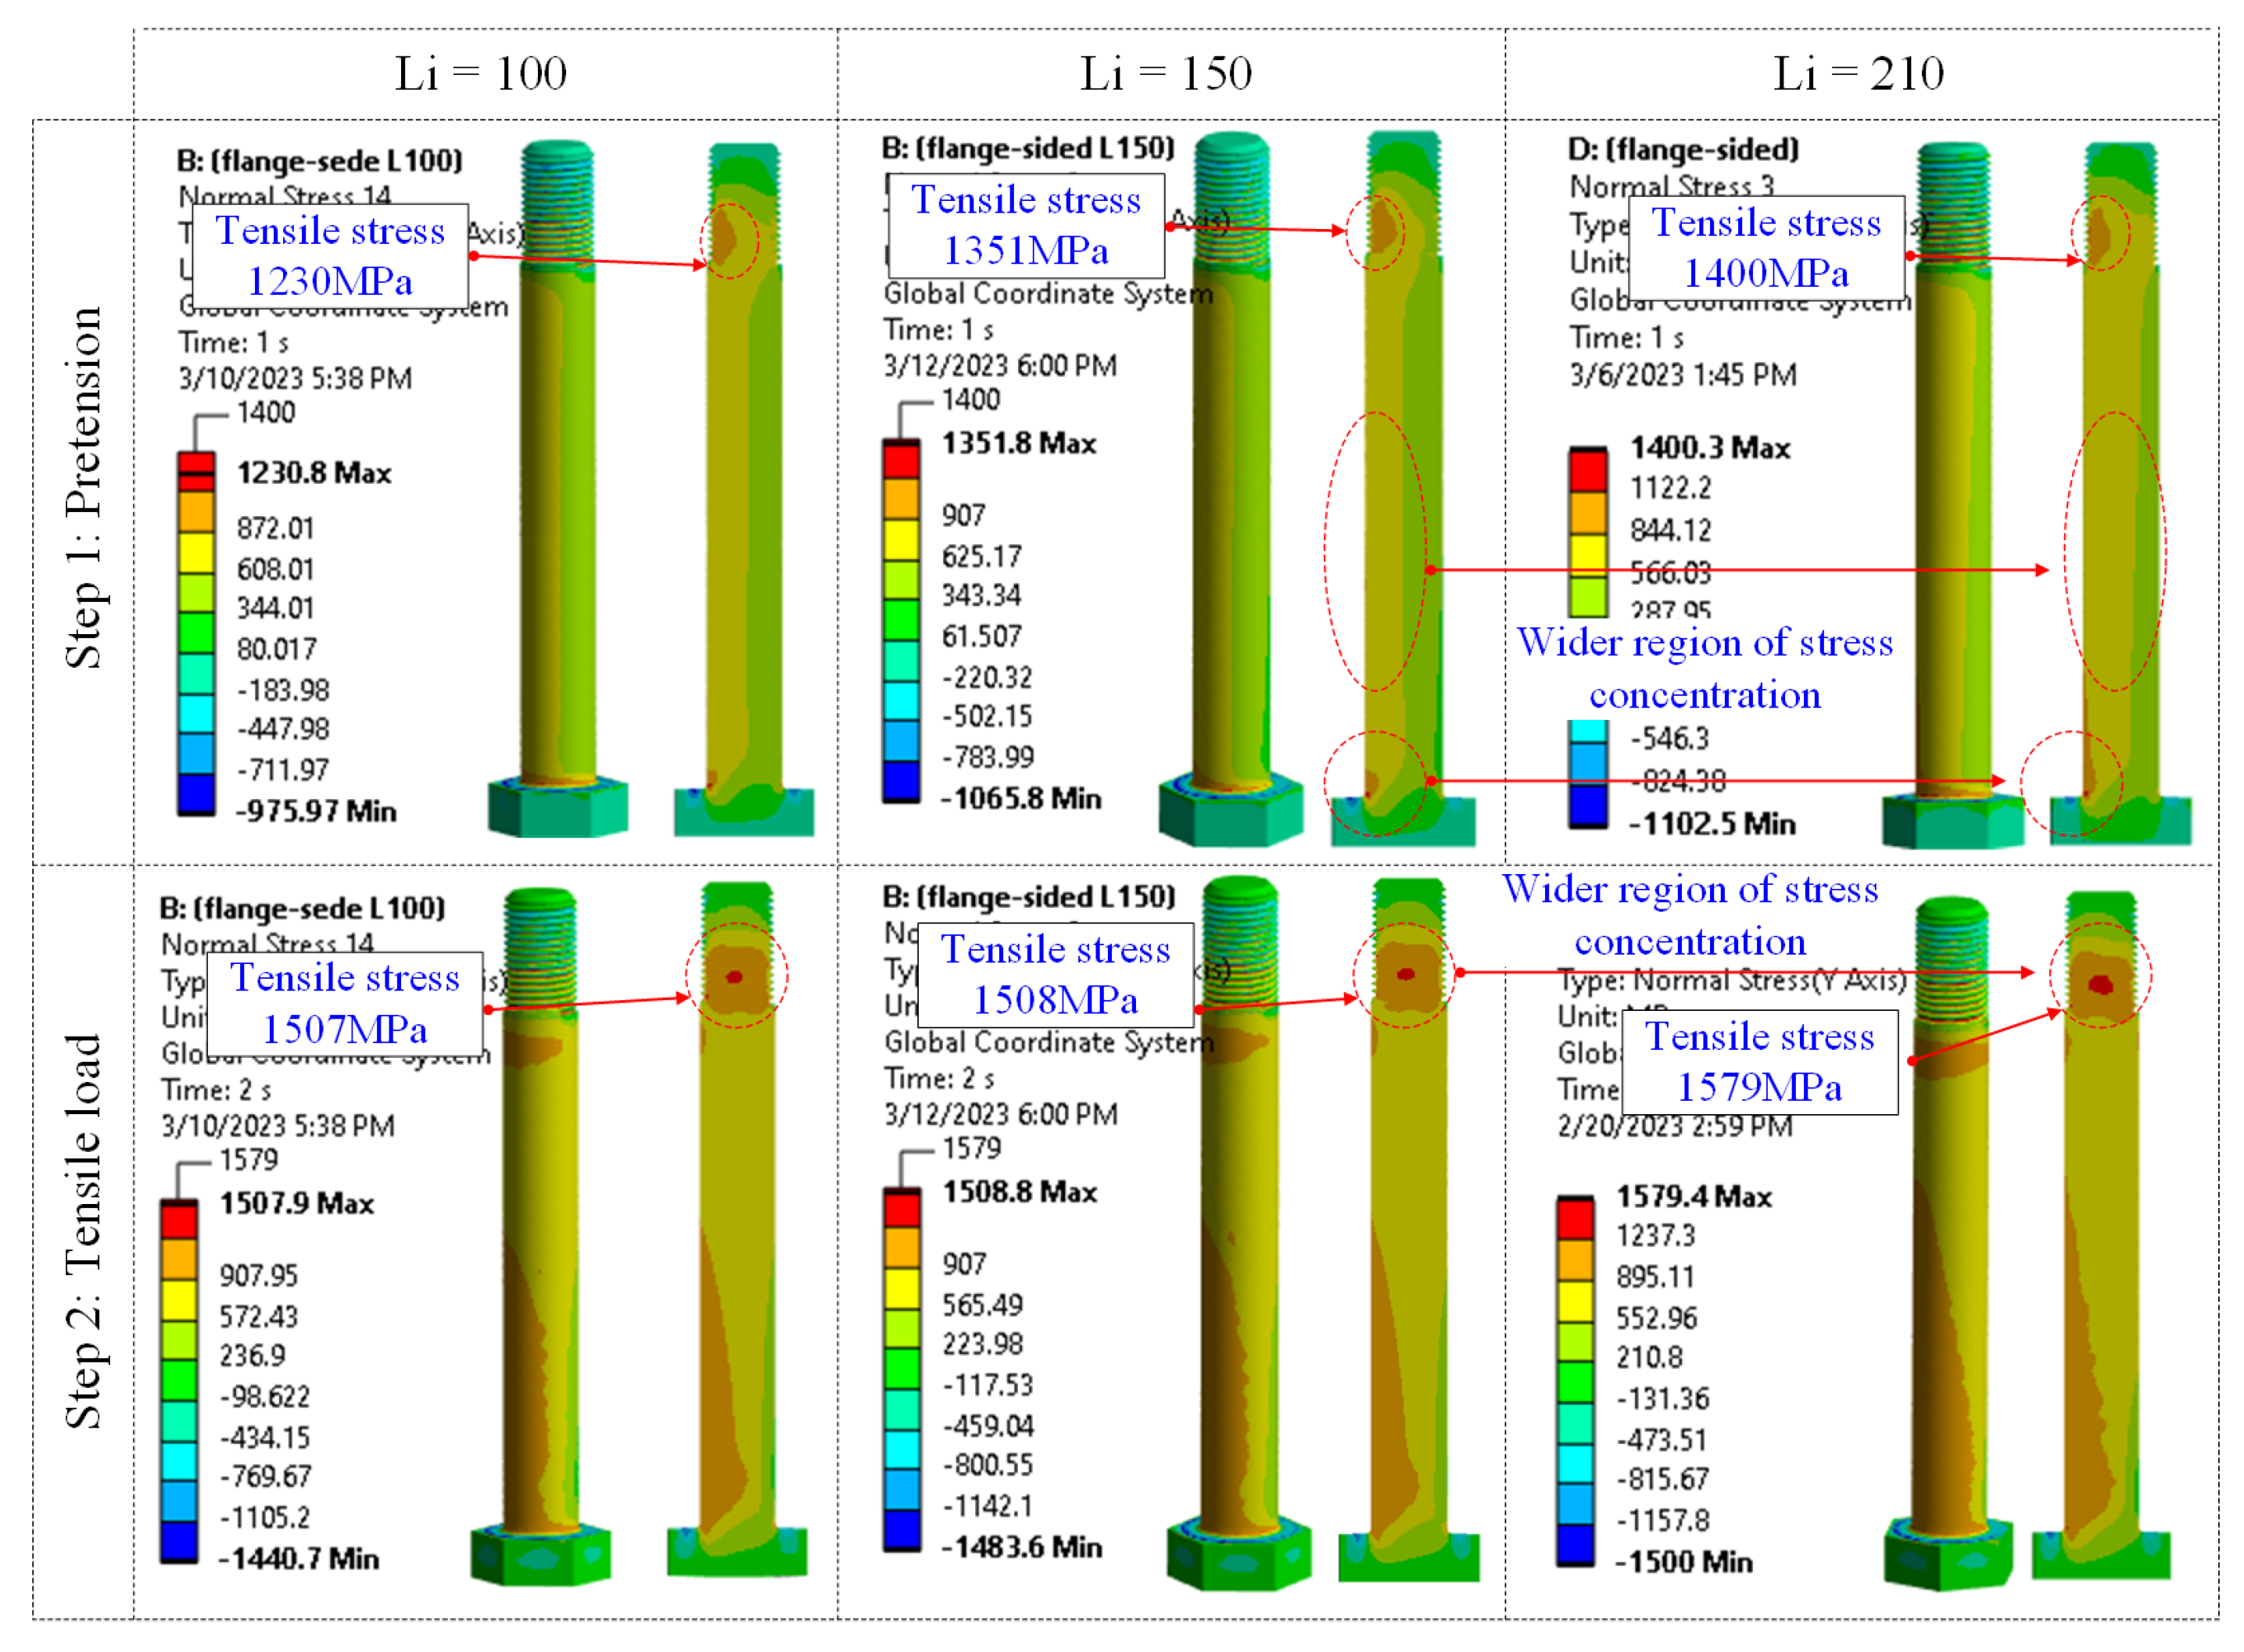
Figure 19 and Figure 20 show the stress distribution and plastic deformation in the bolt under different analysis cases. In general, an increase in the flange opening length results in higher stress in the bolt. The following observations were made:
  • Under the bolt pretension load, the maximum stress of 1230 MPa occurs at the opening length of Li = 100 mm. The stress increases by 9.9% and 13.8% at Li = 150 mm and Li = 210 mm, respectively. Additionally, wider regions of stress concentration are observed in the bolt with larger opening lengths.
  • For the tensile load, the maximum stress at Li = 100 mm is approximately 1507 MPa. There is a small change in maximum stress with increasing opening length, up to 4.8%. Furthermore, higher stresses are concentrated on the bolt’s left side due to its bending, and a wider region of stress concentration occurs as the opening length increases.
  • The plastic strain increases as the opening length becomes larger, and there is a larger area that goes across the bolt threads.

4.3. Discussions

The above observation highlights the significant impact of the flange surface flatness on the structural response of the flange joint. The performance of the flange and bolt members under joint tensile loads can be summarized as follows:
  • For the flange member, compressive stress concentration appears in the flange inner and surface between the flange and washer, and the tensile stress concentration occurs at the FSJ. When the opening is located at the center of the bolt hole, the compressive stress concentration increases rapidly in the bolt hole. However, these regions of compressive stress are not as significant as other parts due to the flange thickness.
  • For the bolt member, the stress concentration often occurs at the threads and bolt shank. The tower-sided gap has a significant impact on bolt stress. As the opening length increases, wider stress concentrations are found in the bolt due to the increase in bending moment.

5. Conclusions

The aim of this study is to analyze how the flange surface flatness affects the structural response of the L-type flange joint. Using the same loading conditions and material properties, the effects of the geometrical imperfections (i.e., flange-sided and tower-sided gaps), as well as the flange opening lengths, are investigated. The following conclusions are drawn:
  • Geometrical imperfections cause a local bending in the bolt, leading to a significant difference in bolt performance between the perfect and imperfect models. Imperfect models have a larger stress concentration area under bolt preloading and tower shell tensile loading, with a 6.3% increase in the maximum stress.
  • Flange-sided gap case performs better than the tower-sided gap case, as the former results in less plastic deformation in the bolt threads due to the flange surface flatness.
  • Increasing the flange gap opening length significantly increases the stress in the flange joint, with an 11.9% and 13.8% increase in stress for the flange and bolt members, respectively. This also causes a shift in global stress from the middle bolt toward the bolt head.
There is an important factor that needs to be investigated in future work to evaluate how the skew gap influences the fatigue strength under both bolt pretension and wind turbine operating conditions.

Author Contributions

Conceptualization, T.-T.T., H.P. and D.L.; methodology, T.-T.T. and H.P.; software, T.-T.T.; validation, D.L.; formal analysis, T.-T.T.; investigation, D.L.; data curation, T.-T.T. and D.L.; writing—original draft preparation, T.-T.T.; writing—review and editing, T.-T.T. and D.L. All authors have read and agreed to the published version of the manuscript.

Funding

This work was supported by the Human Resources Development of the Korea Institute of Energy Technology Evaluation and Planning (KETEP) grant funded by the Korean government (Ministry of Trade, Industry & Energy) (No. 20214000000180) and by Basic Science Research Program through the National Research Foundation of Korea (NRF) funded by the Ministry of Education (NRF2021R1A6A1A0304518511).

Data Availability Statement

The data presented in this study are available on request from the corresponding author.

Conflicts of Interest

The authors declare no conflict of interest.

References

  1. Schaumann, P.; Seidel, M. Failure Analysis of Bolted Steel Flanges. In Proceedings of the Seventh International Symposium on Structural Failure and Plasticity (IMPLAST2000), Melbourne, Australia, 4–6 October 2000; pp. 507–512. [Google Scholar]
  2. Alonso-Martinez, M.; Adam, J.M.; Alvarez-Rabanal, F.P.; del Coz Díaz, J.J. Wind Turbine Tower Collapse Due to Flange Failure: FEM and DOE Analyses. Eng. Fail. Anal. 2019, 104, 932–949. [Google Scholar] [CrossRef]
  3. Seidel, M.; Stang, A.; Wegener, F.; Schierl, C.; Schaumann, P. Full-Scale Validation of FE Models for Geometrically Imperfect Flange Connections. J. Constr. Steel Res. 2021, 187, 106955. [Google Scholar] [CrossRef]
  4. Okorn, I.; Nagode, M.; Klemenc, J.; Oman, S. Analysis of Additional Load and Fatigue Life of Preloaded Bolts in a Flange Joint Considering a Bolt Bending Load. Metal 2021, 11, 449. [Google Scholar] [CrossRef]
  5. Weijtjens, W.; Stang, A.; Devriendt, C.; Schaumann, P. Bolted Ring Flanges in Offshore-Wind Support Structures-in-Situ Validation of Load-Transfer Behaviour. J. Constr. Steel Res. 2021, 176, 106361. [Google Scholar] [CrossRef]
  6. Tran, T.-T.; Lee, D. Ultimate Load Capacity Assessment of the L-Type Flange Connection of An Existing 5 MW Wind Tower. In Proceedings of the Asia-Pacific Forum on Renewable Energy, Jeju, Republic of Korea, 7–11 November 2021; p. 146. [Google Scholar]
  7. Seidel, M. Zur Bemessung Geschraubter Ringflanschverbindungen Von Windenergieanlagen; Leibniz Universität Hannover: Hanover, Germany, 2001. [Google Scholar]
  8. Thage, K.J. Investigation of Flange Connection Capacity for Offshore Wind Turbine Foundations; Technical University of Denmark: Kongens Lyngby, Denmark, 2017. [Google Scholar]
  9. Petersen, C. Tragfähigkeit Imperfektionsbehafteter Geschraubter Ringflansch-Verbindungen. Der Stahlbau 1990, 59, 97–104. [Google Scholar]
  10. Veljkovic, M.; Heistermann, C.; Husson, W.; Limam, M.; Feldmann, M. High-Strength Tower in Steel for Wind Turbines (HISTWIN); European Commission Joint Research Centre: Brussels, Belgium, 2009. [Google Scholar]
  11. Petersen, C. Stahlleichtbau. In Stahlbau; Springer: Wiesbaden, Germany, 2013. [Google Scholar] [CrossRef]
  12. Couchaux, M.; Hjiaj, M.; Ryan, I.; Bureau, A. Tensile Resistances of L-Stubs. J. Constr. Steel Res. 2017, 138, 131–149. [Google Scholar] [CrossRef]
  13. Tran, T.-T.T.; Lee, D. Understanding the Behavior of L-Type Flange Joint in Wind Turbine Towers: Proposed Mechanisms. Eng. Fail. Anal. 2022, 142, 106750. [Google Scholar] [CrossRef]
  14. Ślęczka, L.; Leń, D. Prying Action in Bolted Circular Flange Joints: Approach Based on Component Method. Eng. Struct. 2021, 228, 111528. [Google Scholar] [CrossRef]
  15. Tobinaga, I.; Ishihara, T. A Study of Action Point Correction Factor for L-Type Flanges of Wind Turbine Towers. Wind Energy 2018, 21, 801–806. [Google Scholar] [CrossRef]
  16. Ji, X.; Zou, T.; Bai, X.; Niu, X.; Tao, L. Fatigue Assessment of Flange Connections in Offshore Wind Turbines under the Initial Flatness Divergence. Front. Energy Res. 2023, 11, 137. [Google Scholar] [CrossRef]
  17. Jakubowski, A. Ermüdungssichere Bemessungen Geschraubter Ringflanschstöße in Turmartigen Stahlbauten Unter Besonderer Berücksichtigung von Flanschimperfektionen; Cuvillier Verlag: Göttingen, Germany, 2003; Available online: https://cuvillier.de/de/shop/publications/3323 (accessed on 25 July 2023).
  18. Zou, T.; Niu, X.; Ji, X.; Li, M.; Tao, L. The Impact of Initial Imperfections on the Fatigue Assessment of Tower Flange Connections in Floating Wind Turbines: A Review. Front. Mar. Sci. 2022, 9, 1–16. [Google Scholar] [CrossRef]
  19. DNVGL-ST-0126; Support Structures for Wind Turbines. DNV GL: Bærum, Norway, 2018. Available online: https://www.dnv.com/energy/standards-guidelines/dnv-st-0126-support-structures-for-wind-turbines.html (accessed on 25 July 2023).
  20. IEC 61400-6; Wind Energy Generation System-Part 6: Tower and Foundation Design Requirements. 2020. Available online: https://webstore.iec.ch/publication/26383 (accessed on 25 July 2023).
  21. Seidel, M. Tolerance Requirements for Flange Connections in Wind Turbine Support Structures. Stahlbau 2018, 87, 880–887. [Google Scholar] [CrossRef]
  22. KATS KSB 0802; Steel Welding Pipe Flanges. Korean Agency for Technology and Standards: Eumseong-gun, Republic of Korea, 2021.
  23. KATS KSB 0801; Test Pieces for Tensile Test for Metallic Materials. Korean Agency for Technology and Standards: Eumseong-gun, Republic of Korea, 2022.
  24. EN-1993-1-8; Eurocode 3: Design of Steel Structures-Part 1–8: Design of Joints. European Standard: Bruxelles, Belgium, 2011.
  25. DNVGL-RP-C208; Determination of Structural Capacity by Non-Linear Finite Element Analysis Methods. DNV GL: Bærum, Norway, 2013. Available online: https://www.dnv.com/oilgas/download/dnv-rp-c208-determination-of-structural-capacity-by-non-linear-finite-element-analysis-methods.html (accessed on 25 July 2023).
  26. Tran, T.T.; Kang, S.; Lee, D. Improving Structural Safety of L-Type Flange Joint for Wind Towers. Energies 2022, 15, 8967. [Google Scholar] [CrossRef]
  27. Masoudi Nejad, R.; Berto, F.; Tohidi, M.; Jalayerian Darbandi, A.; Sina, N. An Investigation on Fatigue Behavior of AA2024 Aluminum Alloy Sheets in Fuselage Lap Joints. Eng. Fail. Anal. 2021, 126, 105457. [Google Scholar] [CrossRef]
  28. Shariati, M.; Nejad, R.M. Fatigue Strength and Fatigue Fracture Mechanism for Spot Welds in U-Shape Specimens. Lat. Am. J. Solids Struct. 2016, 13, 2487–2501. [Google Scholar] [CrossRef] [Green Version]
  29. Badrkhani Ajaei, B.; Soyoz, S. Effects of Preload Deficiency on Fatigue Demands of Wind Turbine Tower Bolts. J. Constr. Steel Res. 2020, 166, 105933. [Google Scholar] [CrossRef]
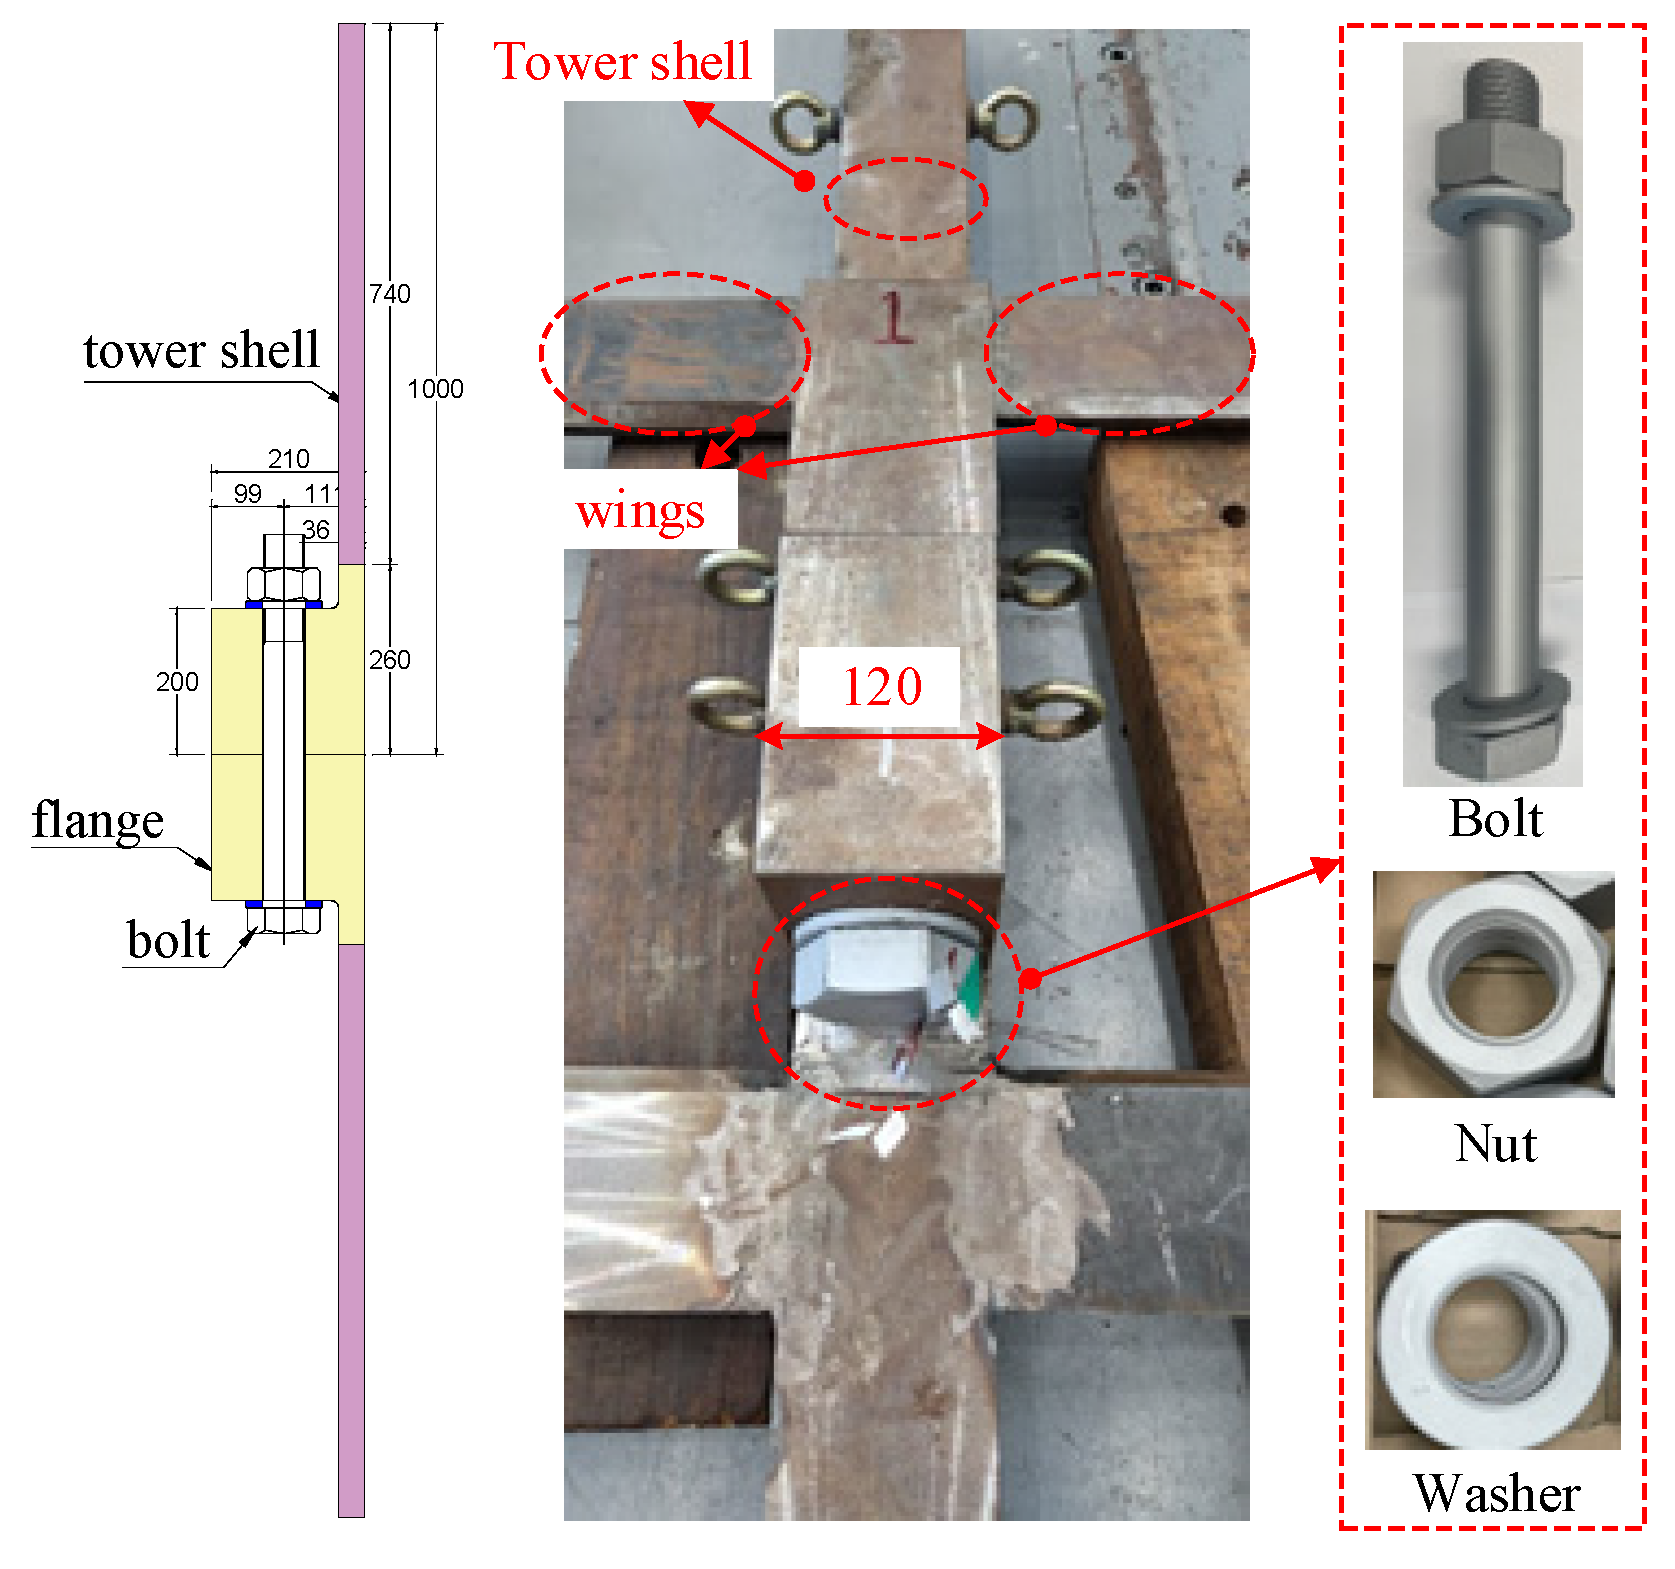
Figure 1. Test specimen.
Energies 16 05703 g001
Figure 2. Specimen cutting scheme.
Energies 16 05703 g002
Figure 3. Torque test setup.
Energies 16 05703 g003
Figure 4. Location of data measurements.
Energies 16 05703 g004
Figure 5. Test Setup.
Energies 16 05703 g005
Figure 6. Force–Deformation Curves.
Energies 16 05703 g006
Figure 7. Failure modes.
Energies 16 05703 g007
Figure 8. Finite element model of the flange joint.
Energies 16 05703 g008
Figure 9. Load–displacement curves.
Energies 16 05703 g009
Figure 10. Flange gap opening deformation curves.
Energies 16 05703 g010
Figure 11. Analysis cases.
Energies 16 05703 g011
Figure 12. Axial stress and plastic strain.
Energies 16 05703 g012
Figure 13. Global stress.
Energies 16 05703 g013
Figure 14. Axial stress.
Energies 16 05703 g014
Figure 15. Plastic strain.
Energies 16 05703 g015
Figure 16. Axial Stress.
Energies 16 05703 g016
Figure 17. Plastic strain.
Energies 16 05703 g017
Figure 18. Global stress.
Energies 16 05703 g018
Figure 19. Axial stress.
Energies 16 05703 g019
Figure 20. Plastic strain.
Energies 16 05703 g020
Table 1. Configuration of the test specimen.
Bolt Tower (mm)Flange (mm)
SizeHoleLengthLengthThicknessThickness a   * b   ** c f   ***
M5659480740362009993120
*   a : Distance from the bolt center to flange inner; **   b : distance from the bolt center to shell center; ***   c f : width of the flange segment.
Table 2. Material properties.
PartMaterialStandard σ y σ u ε u ε f
[MPa][MPa][%][%]
TowerSS400KS B 0802:2021 [22]2724323862
FlangeSS400KS B 0802:2021 [22]3104673867
Bolt10.9KS B 0801:2022 [23]108811941453
Table 3. Torque test results.
ParametersValue
F b , m a x   k N 1945.2
T p N m 8309
K-factor0.104
Disclaimer/Publisher’s Note: The statements, opinions and data contained in all publications are solely those of the individual author(s) and contributor(s) and not of MDPI and/or the editor(s). MDPI and/or the editor(s) disclaim responsibility for any injury to people or property resulting from any ideas, methods, instructions or products referred to in the content.