1. Introduction
Due to the high sputtering resistance and low deuterium/tritium retention of tungsten as well as a high thermal conductivity, excellent welding properties and a relatively high strength of copper, the W–Cu bimetal constitutes a promising candidate for the plasma facing material (PFM) in fusion test reactors. These include the international thermonuclear experimental reactor (ITER) [
1], where the W is utilized to resist the high heat load, the high flux low-energy ion and neutral particle irradiation along with Cu to transfer the heat loads to the water coolant. Consequently, the large difference in the coefficient of thermal expansion (CTE) and the elastic modulus between W and Cu creates significantly high stresses at the interface, decreasing the structure reliability under high heat loading. Various methods have been developed to join W and Cu, such as casting, e-beam welding, brazing, diffusion bonding (HIP), chemical vapor deposition (CVD) and selective laser melting (SLM) [
2,
3,
4]. These methods have corresponding limitations such as lowering the allowable temperature of the interface, reducing the strength of copper substrate [
5], low neutron resistance of the large-grained Cu and low cycle fatigue cracking [
6].
Explosive welding is a solid-phase joining technique, in which several dissimilar metallic components can be welded with a strong metallurgical bond, whereas one of the components is driven by explosion to impact the others. The phenomenon of jet formation at the collision point is an essential condition for welding, which is generally accepted based on experimental evidence. The jet removes the oxide films and other contaminants from the mating surface, thereby making it possible for the atoms of the two materials to approach within inter-atomic distances under the high pressure (exceeding tens of GPa) induced by impact. The inter-atomic bonds are achieved with the effect of pressure and the deposited kinetic energy [
7]. The high pressure generated instantaneously, as two plates colliding leads to severe plastic deformations of both materials. The kinetic energy of the impact plate is deposited at the interface in the form of plastic work; also, the partial plastic work is transformed into heat due to the adiabatic compression, leading to the melting of both materials at the impact surface. The heating rate during explosive welding is estimated to be of the order of 10
9 K/s [
8]. The high pressure far exceeds the yield strengths of both materials and makes the metals at the interface behave as a fluid. These metallic flows are instable and the wavy interface is formed during the interaction of flows, through which the two metals are “hooked up” with each other. Consequently, the bond of explosive welding is a combination of metallurgical bond and mechanical joint and is usually as strong or stronger than the weaker one of the components. This makes the explosive welding extremely suitable for the joining of metals with zero mutual solubility, such as W and Cu.
Due to its brittleness, W cannot withstand the large deformation during the acceleration process and the subsequent collision. Severe cracks occurred while the 1 mm thick W was explosively welded on the CuCrZr [
9]. However, brittle behavior is not intrinsic to W, the soluble interstitial impurities segregating along the grain boundaries (GBs) render the GBs the weak link, leading to the grain boundary embrittlement [
10]. The ductility may be improved if the average impurity concentration at the GBs can be reduced. This implies that a thin W plate may be more ductile since the impurity concentration is reduced along the rolling direction, due to the grain elongation. The thin W plate utilization may be an appropriate method to avoid cracking. Otherwise, coating a thin plate on the surface of the parent plate will produce certain special properties required in the industry, such as corrosion resistance, hardness, high temperature resistance, suitable frictional properties or special electrical properties. In contrast, the explosive welding of quite thin metallic foils is hard to achieve, due to the destruction under a high strain rate, requiring a proper selection of parameters.
The underwater explosive welding process was explored and has been successfully applied to clad metallic foils, including W foils. Mori et al. [
11] cladded the 0.2 mm thick, 50 mm square W foils onto ferritic steel F82H plate through underwater explosive welding. Thus, a partial W foil with an area of 30 mm
2 square was welded and micro-cracks were observed at the interlayer, due to the residual stress caused by the CTE mismatch. Manikandan et al. [
12] cladded pure W foils on copper through underwater explosive welding, whereas occasionally cracks were observed in the experiments ranging from 0.1 mm to 0.5 mm of the tungsten foil. The authors claimed that the reflected tensile wave caused the plane crack in 0.1 mm W foil and the bending forces during acceleration caused the grain boundary cracking in 0.5 mm thick W. For underwater explosive welding, however, it was difficult to isolate the explosive from the water and the use of inclined set-up had corresponding limitations in the welding of large-sized plates [
13].
The purpose of this paper was to fabricate a crack free W–Cu bimetal with W foils through explosive welding in the open air. Furthermore, the morphology of the interfacial microstructures of the W/Cu joint was investigated. A numerical simulation was also conducted to offer insights into the wavy interface and vortex formations.
2. Experimental Procedure
A pure W plate was utilized as the flyer plate and pure Cu plates were used as the base plate. The size of the clad plate was 100 mm × 50 mm. The thickness of the Cu plates was 10 mm and the thickness of the W plate varied from 0.1 mm to 0.5 mm. Also, 2024 Al/pure Cu sheets of 2 mm in thickness were utilized as buffer layers between the explosive and the W plate, as presented in
Figure 1. The compacted sand was utilized as an anvil to avoid the elastic recoil. A powder explosive named expanded ammonium nitrate (EAN) of 10 mm in constant thickness and of 1.0 g/cm
3 in packing density was employed in all experiments. The EAN explosive was a mixture of puffed ammonium nitrate, diesel and saw powders; perlite powders are also added to the EAN as inert materials to lower the detonation velocity. As a non-ideal explosive, the EAN detonation velocity was dramatically affected by the packing density and thickness. In this study, the average detonation velocity with a fixed thickness of 10 mm was measured to be 2600 m/s by the resistance change measurement of a cable probe with the Handi Trap
II VOD recorder (MREL Group of Companies Limited, Kingston, ON, Canada). The cable probe was embedded in the explosive and was shortened by the plasma during detonation.
Generally, the preset stand-off distance should be twice the flyer thickness, which would be sufficiently high for the flyer to be accelerated to the maximum velocity [
14]. In this case, the stand-off distance should be at least 4 mm, taking account of the buffer plate thickness. However, the actual stand-off distance was below 1.5 mm, in order to lower the impact velocity and bending angle, avoiding the fracture of W from large deformation during the acceleration. The dominating parameters of explosive welding were the impact velocity
VP and the collision angle
β; a relationship existed between these parameters, which is given by [
15]:
where
D is the detonation velocity. It meant that the only parameter left unknown on the equation is the collision angle once the detonation velocity
D is measured and the impact velocity
VP is determined using numerical simulation. In this work, the impact velocity was altered by the stand-off distance and the E/M value adjustments, whereas the E/M value is the mass ratio of explosive to flyer and buffer plate, presenting the explosion energy per unit mass. The impact velocity was determined by the simulation presented in the following section. The dynamic parameters of the welding are listed in
Table 1. The interfacial microstructures were characterized through scanning electron microscopy (SEM, JEOL Ltd., Tokyo, Japan) and light microscopy (ZEISS, Oberkochen, Germany).
3. Weldability Window Calculations
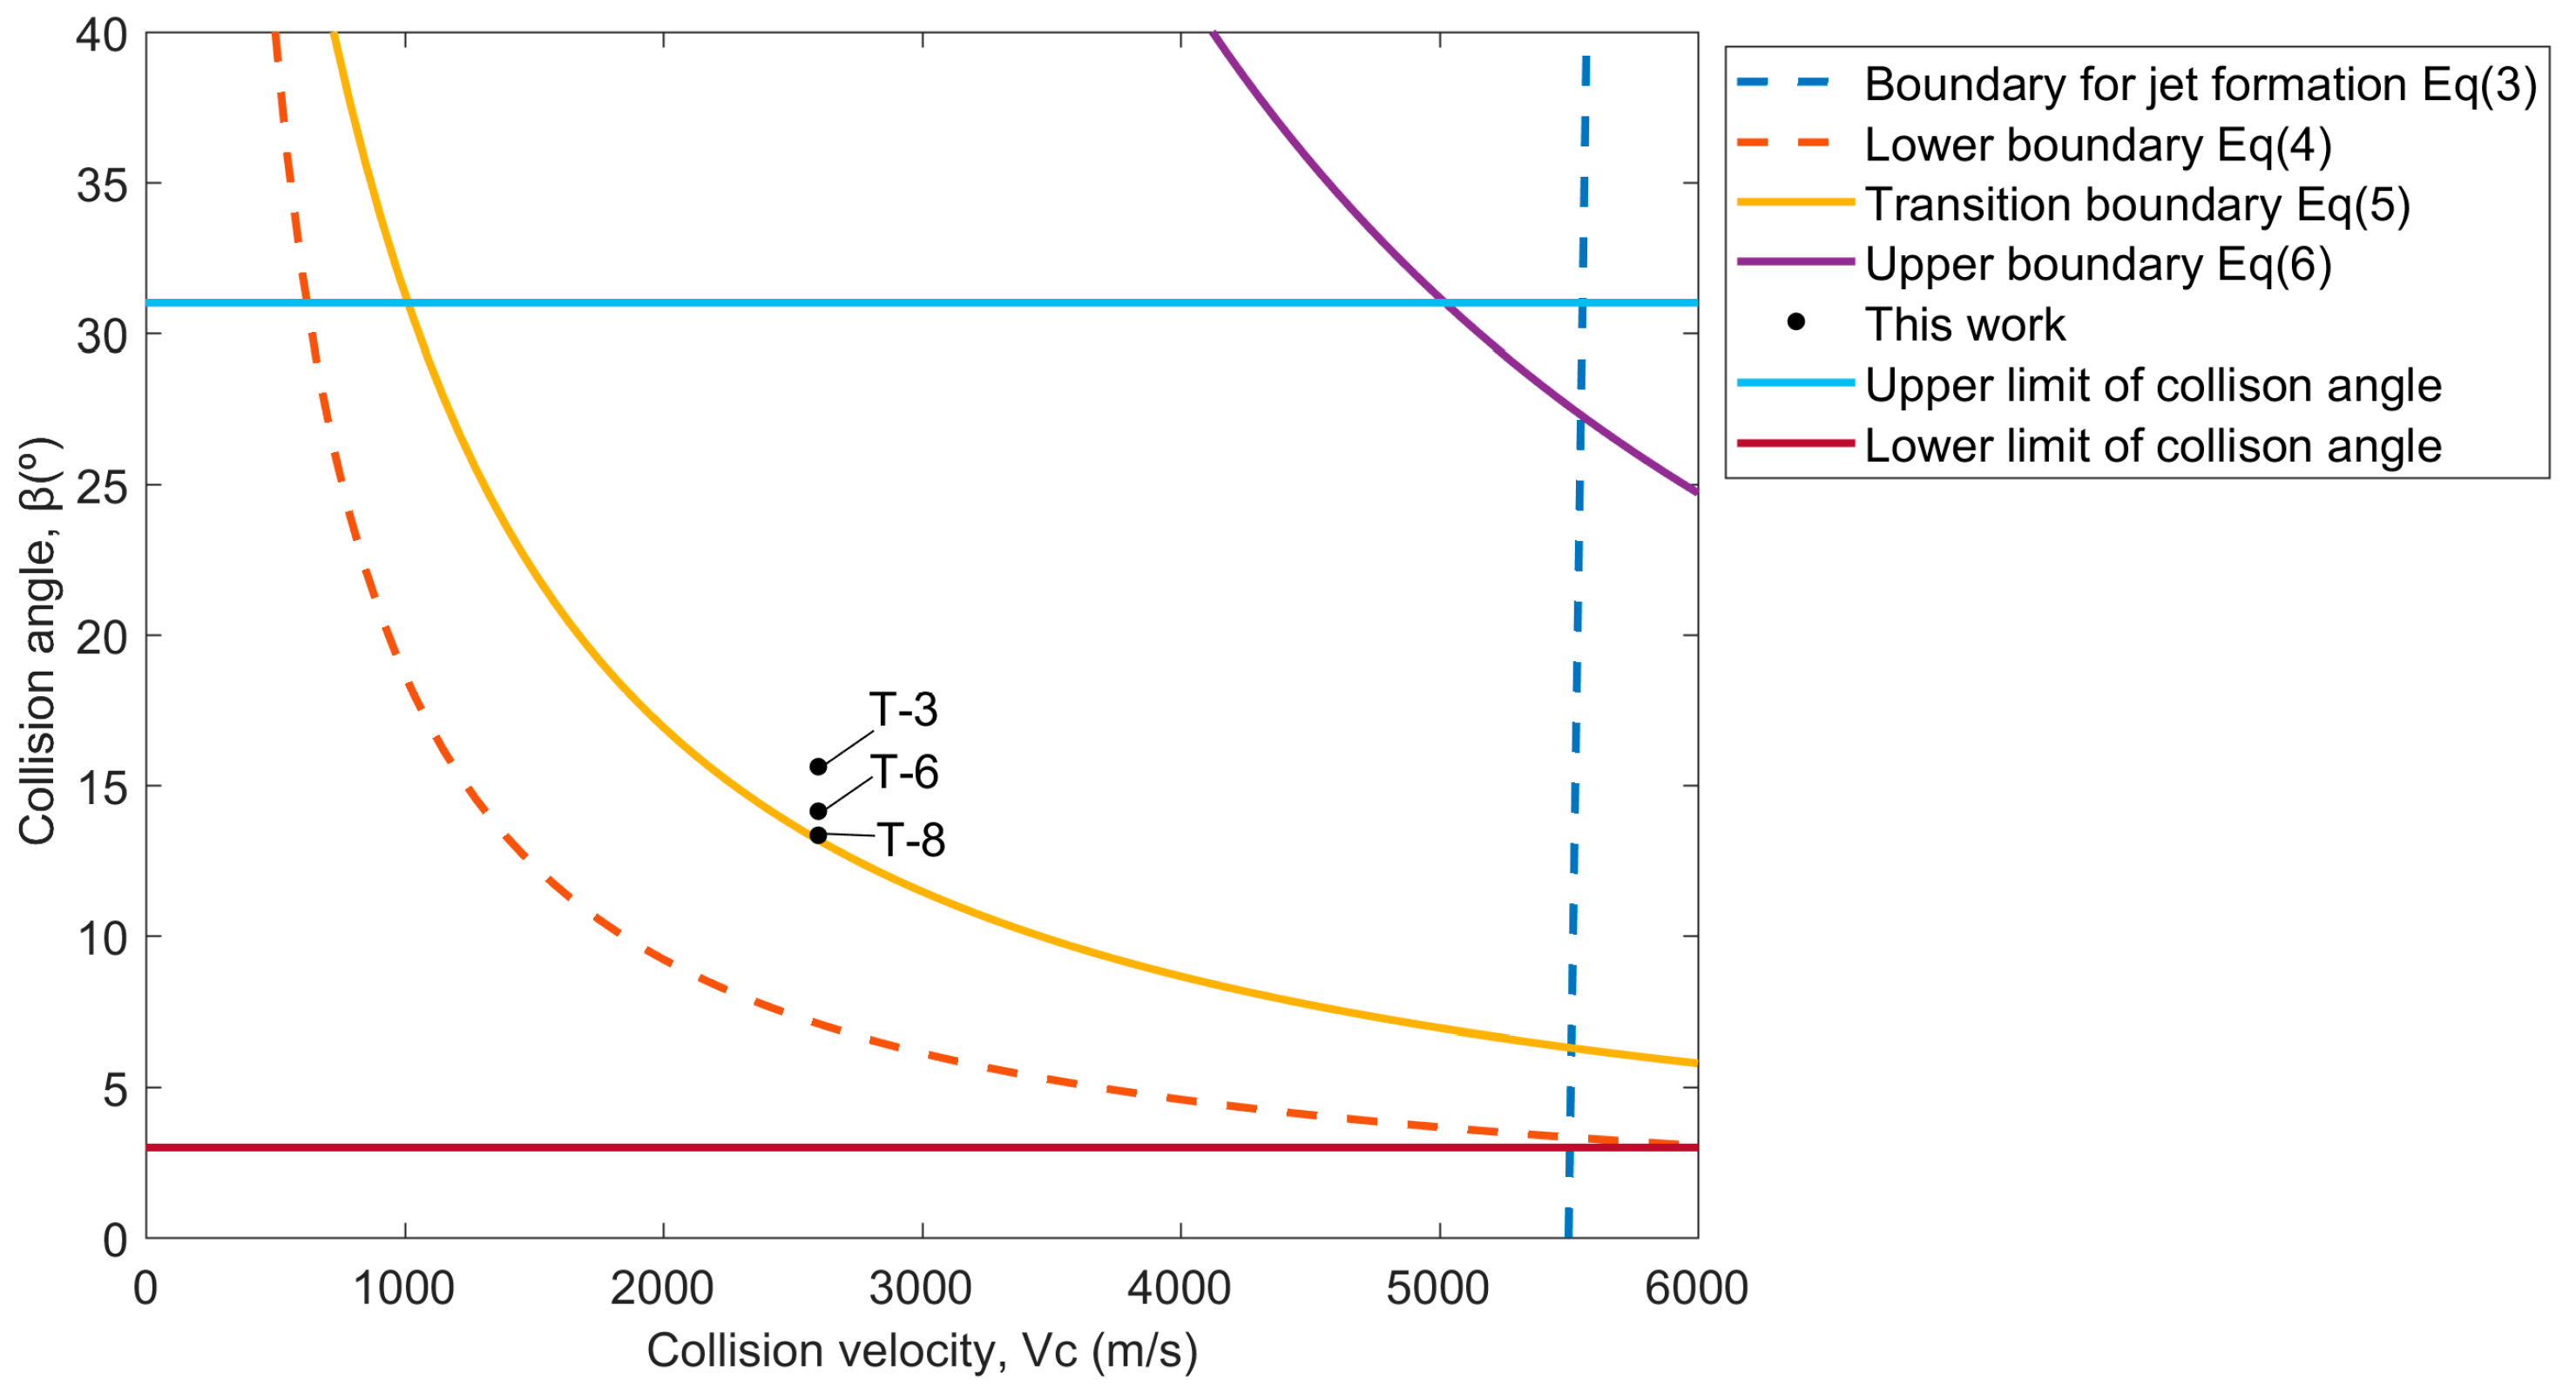
The weldability window concept has been introduced to predict whether or not bonding will occur under different welding conditions. Wittman and Carpenter [
16] and Deribas [
17] developed an applicable weldability window in which the collision angle
β was plotted against the collision velocity
VC, as shown in
Figure 2. There also exists the relationship between
VC and the impact velocity
VP in the parallel geometry, which is given by [
15]:
where
β is the collision angle.
The right boundary defines the conditions to the formation of a jet at the collision point. Walsh stated that the
VC should be smaller than the sound speed of the materials to be welded. However, Abrahamsen [
18] suggested that
VC is a weak function of the collision angle
β, as follows:
The lower boundary relates to the achieved impact pressure at the collision point exceeding the yield stress of the materials, so that plastic deformation occurs. Deribas [
17] developed an equation for this limit:
where
HV is Vickers hardness of flyer,
ρ is material density and are as mentioned above. Constant
k takes values between 0.6 for clean surfaces, and 1.2 for imperfectly cleaned surfaces.
The left boundary is also called transition boundary, related to the formation of a wavy interface. Kuzmin and Lysak [
19] experimentally proved that this boundary depends not only on
VC, but also on the collision angle
β. Therefore, Crossland and Williams [
20] and Wittman [
21] proposed a dynamic plasticity criterion for transition from straight to wavy interface, as follows:
where the parameters are the same as before.
The upper boundary is considered as maximum impact velocity which avoids the formation of an interfacial melted layer. Deribas [
17] calculated the upper boundary as:
where
E and
ν are the elastic modulus and Poisson’s ratio, and
h is the thickness of the flyer. Other parameters are the same. In addition to the mentioned boundaries, Bahrani and Crossland [
22] experimentally obtained a lower limit of 2–3° and an upper limit of 31° for collision angle
β in parallel geometry; below and above these angles, welding is impossible. Material properties used for weldability window calculation are presented in
Table 2.
5. Results and Discussion
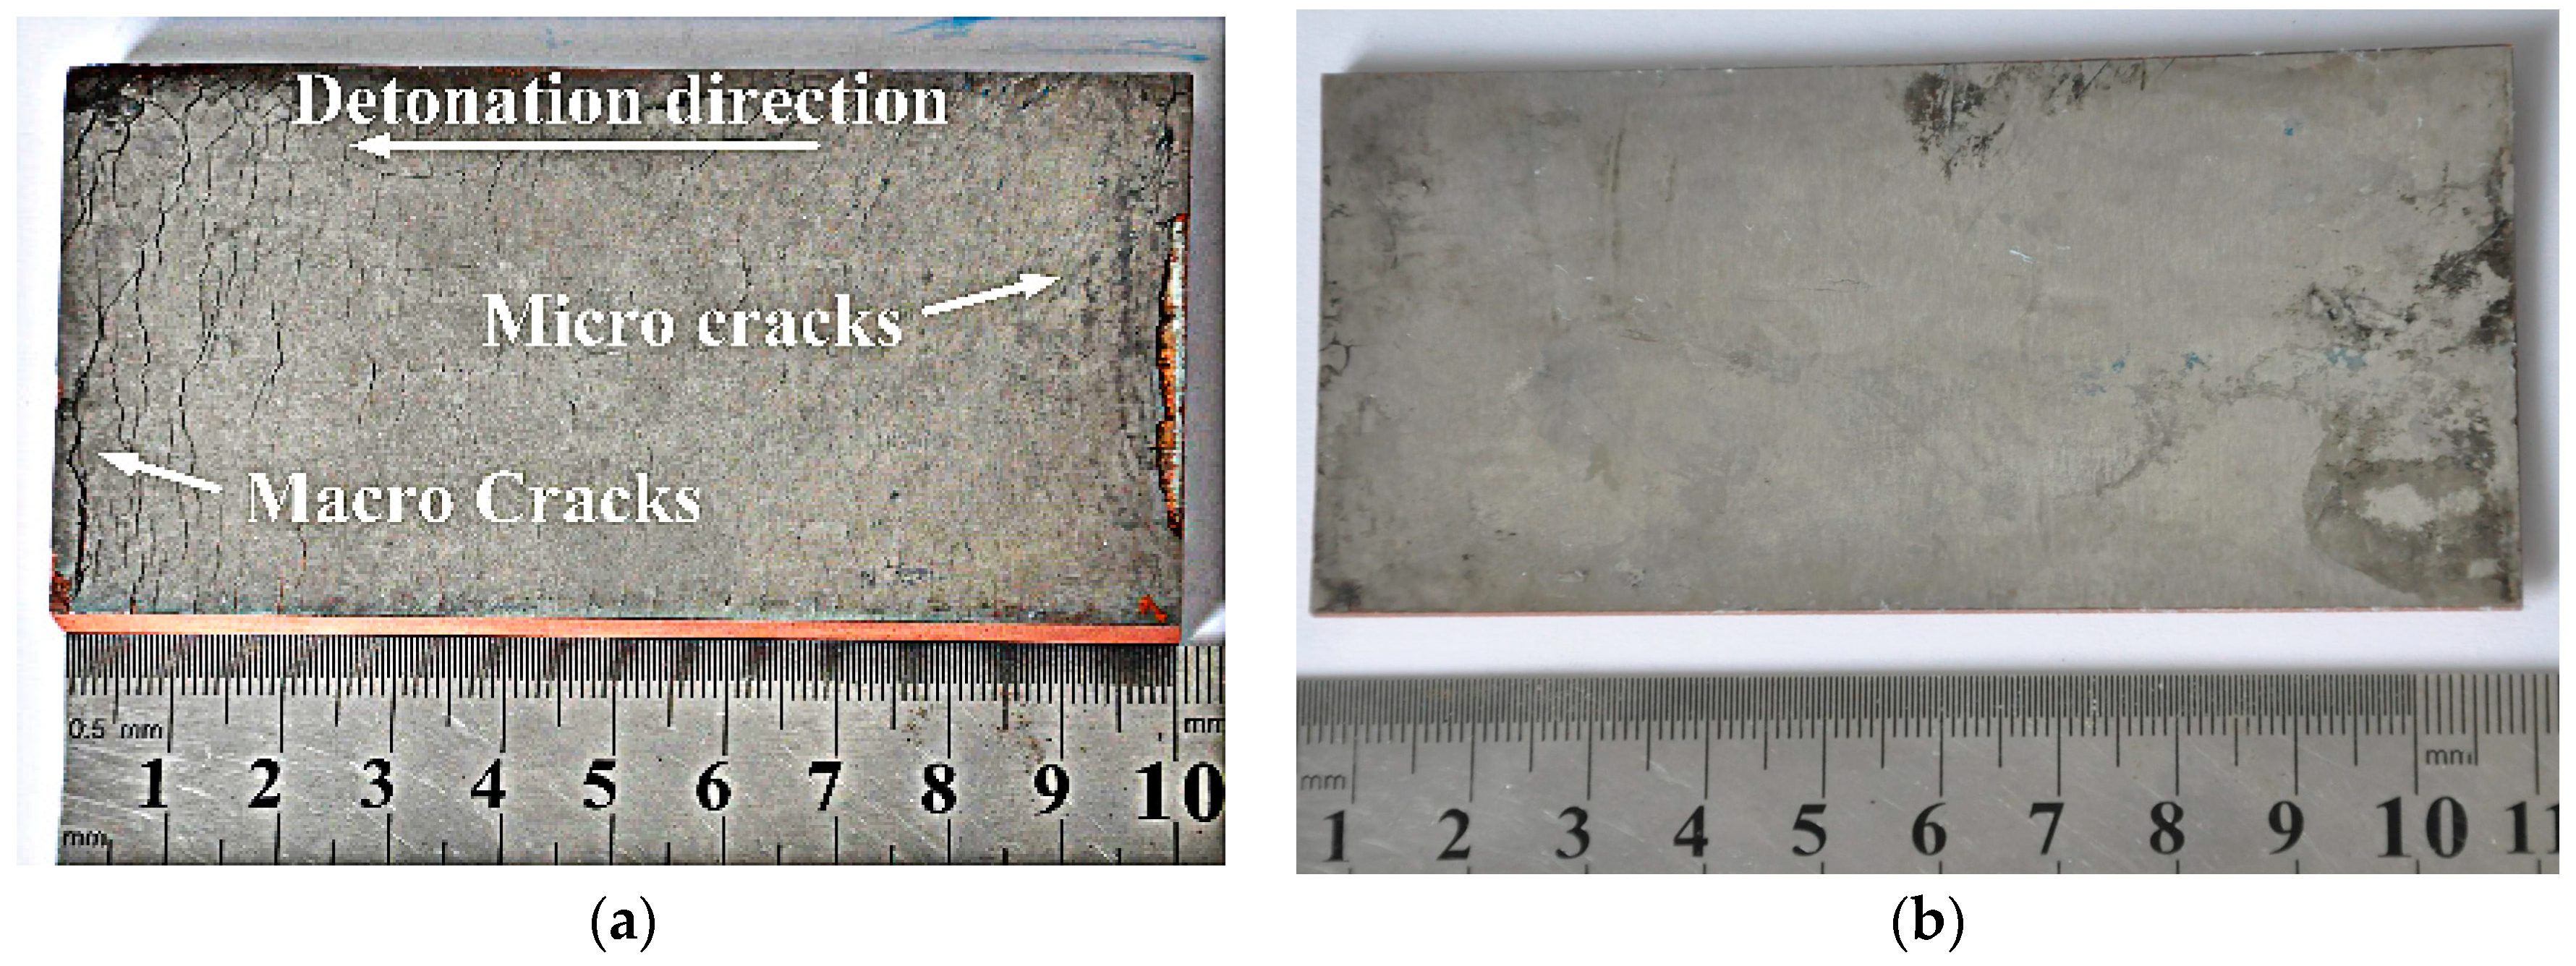
The photographs of the welded plates recovered subsequent to explosive welding are shown in
Figure 4.
Figure 4a presents the apparent cracks and peeling at the edge of the 0.5 mm thick W. It was discovered that the annular micro-cracks near the ignition point evolved into macro-cracks at the other edge along the detonation direction. These cracks distributed near both ends, were transverse cracks induced by tensile wave, the formation of which will be discussed below. The micro-cracks near the ignition point displayed a concentric distribution, whereas the macro-cracks at the opposite edge distributed in parallel. This crack trend was consistent with the shape of the detonation wave, shown as concentric arcs near the ignition point and as parallel lines far away from the ignition point. For the 0.1 mm W foil, few cracks could be observed, indicating that the W foil could withstand large deformation and high strain rate due to its huge improvement in ductility.
Figure 5 shows the interface optical micrograph of the 0.1 mm W/Cu with various collision angles and impact velocities. The wavy structure shown in
Figure 5b,d is a typical wavy interface of the explosively welded composites, which has been proved to be an indication of high bonding strength by numerous references, such as in copper/stainless steel [
31], CuCrZr/316LN-IG [
32], and stainless steel/carbon steel [
33]. During explosive welding, the mechanical energy released during strong impact resulted in intense plastic deformation at the interface. The amplitude and wavelength of the wavy morphology could be used to estimate the degree of deformation as the plates collide. The transition from a wavy interface of T-3 to a straight one of T-8 was related to a decrease in the plastic strain and shear stress, as the impact velocity decreased from 706.6 m/s to 604.1 m/s. The calculated weldability window for 0.1 mm W/Cu and the experimental results are shown in
Figure 6. The conditions of all the experiments are above the lower boundary, and T-8 with a straight interface is located on the transition boundary, above which we end up with wavy interfaces for T-3 and T-6. The prediction agrees well with the experimental results, and Equation (5) can reliably predict the transition from the straight to wavy interface.
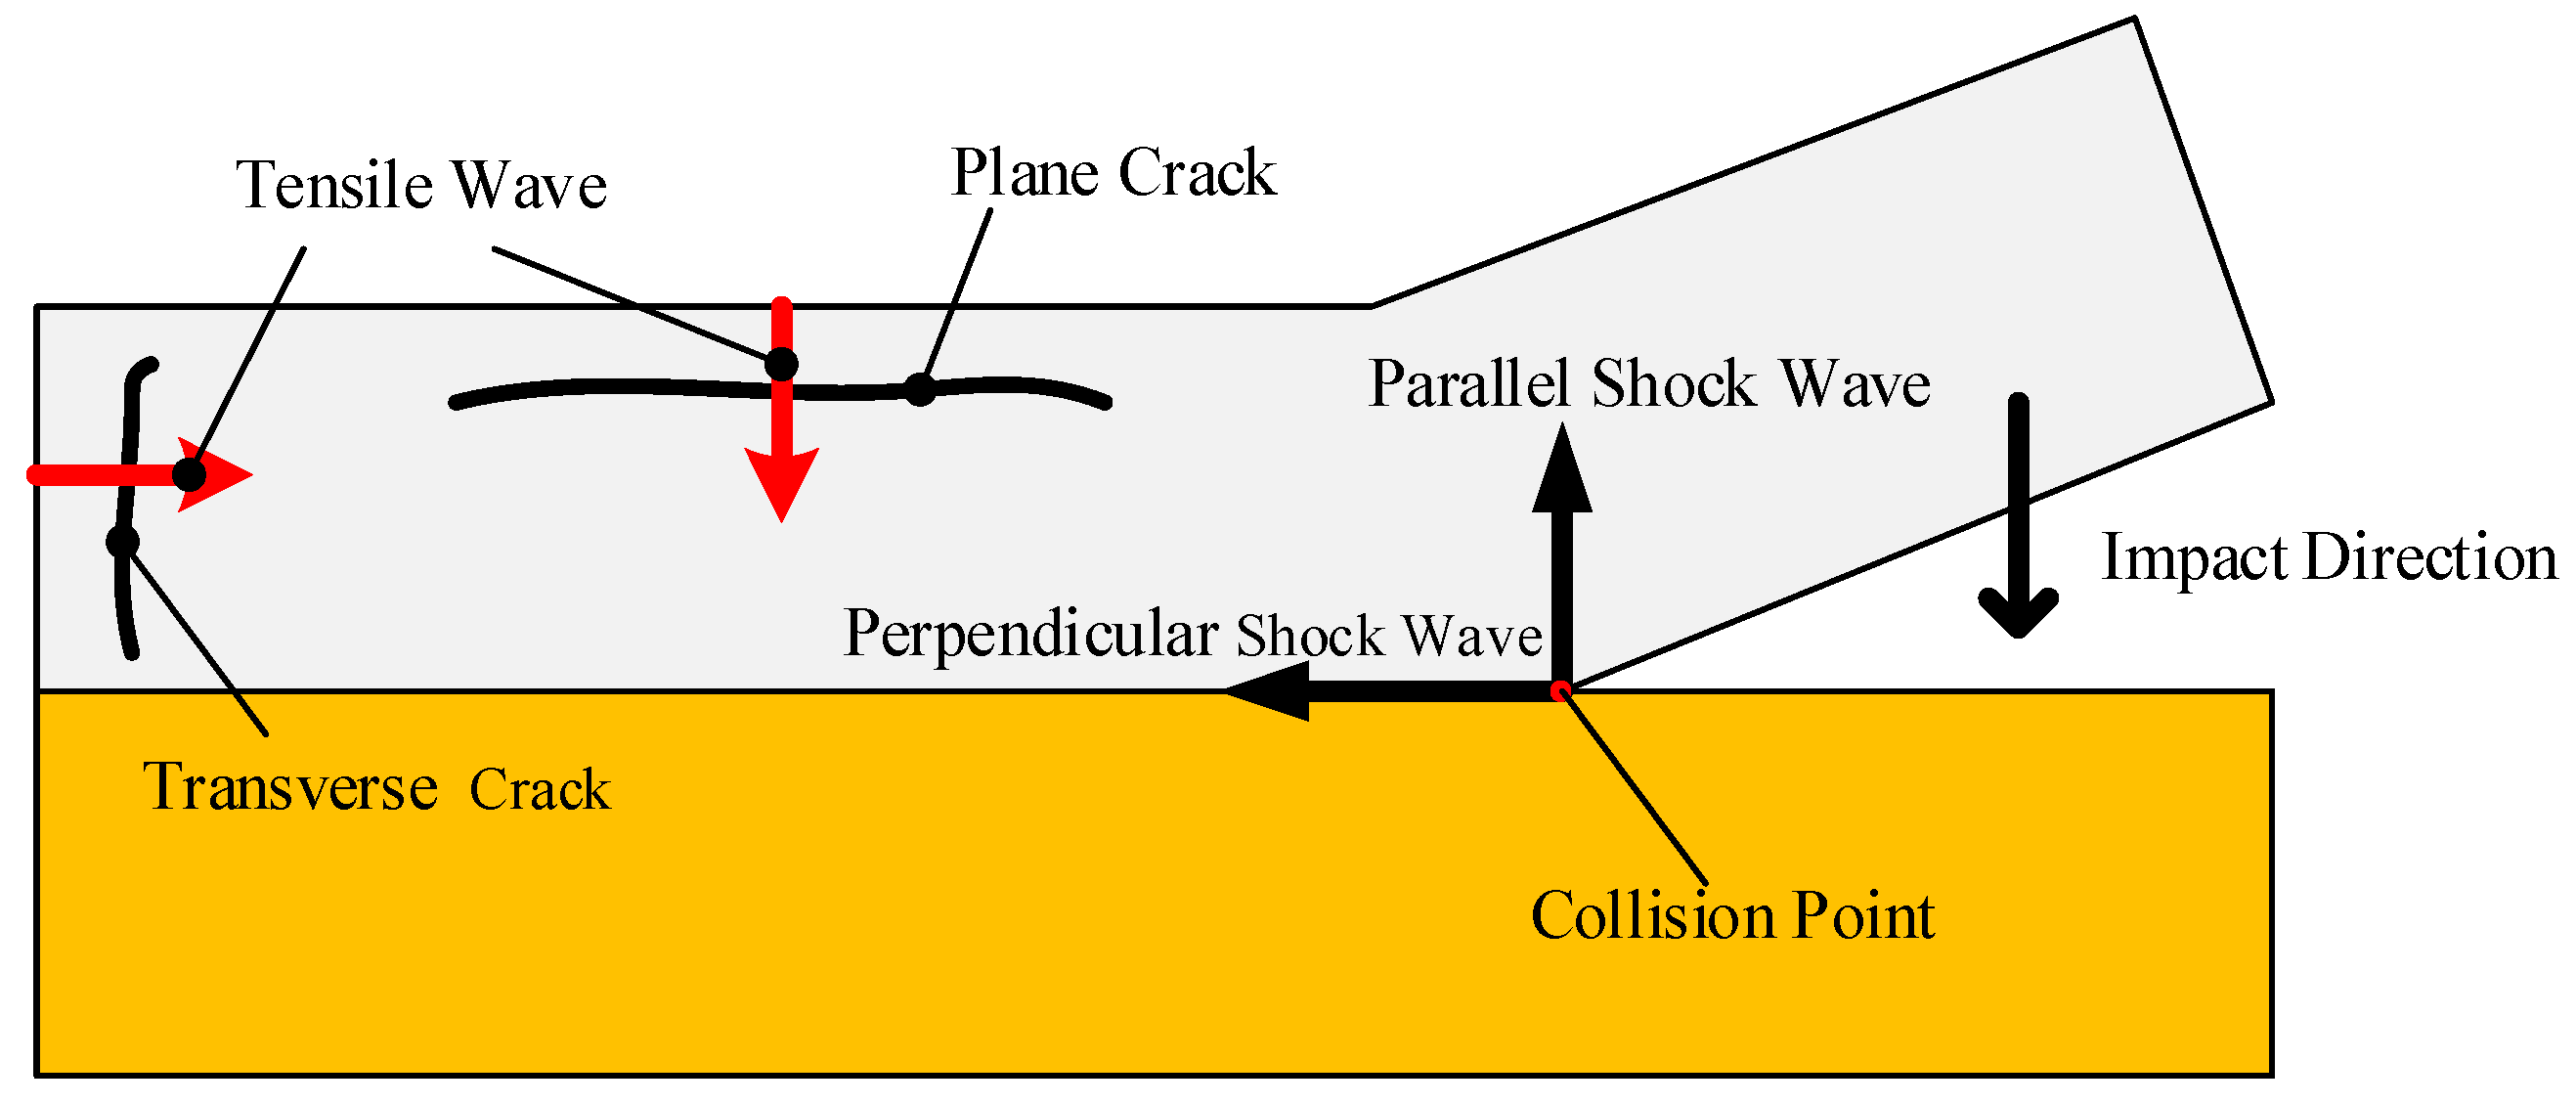
Cracks were still observed for the samples cladded with higher impact velocity, as shown by
Figure 5a,c. It was notable that the cracks displayed two morphologies: the plane crack and the transverse crack, which were caused by the tensile wave. As the buffer plate with the attached W foil impacted the Cu plate, the shock waves were formed at the interface instantaneously and propagated in the W plate along two directions: parallel to and perpendicular to the impact direction. When the perpendicular shock wave reached the free surface, a tensile wave was reflected, leading to transverse cracking. Similarly, the parallel shock wave reached the interface between the W and the buffer plate, where a tensile wave was reflected due to the impedance mismatch, leading to plane cracking. The schematic illustration of the formation of cracks is presented in
Figure 7. The tensile wave intensity depended on the kinetic energy loss at the interface upon collision, which was deposited in the form of plastic work and shock wave. Through lowering the impact velocity from 706.6 m/s to 639 m/s, the tensile wave intensity was decreased and the transverse cracks were eliminated, as shown in
Figure 5c. However, the W foils are quite susceptible for in-plane crack formation due to the layered stacking of elongated W-grains during rolling [
34], and the plane cracks still existed in T-6. Consequently, the Cu plate was used as the buffer plate instead of Al for sample T-8, to lower the tensile wave intensity by reducing the impact velocity and the mismatch in impedance between the W foil and the buffer plate. As presented by
Figure 5f, the plane cracks were finally eliminated. Moreover, the reduction in impact velocity also led to a straight interface. It was indicated that the crack-free W foil and the Cu could be successfully joined through the explosive welding technique. The harmful effect of the tensile wave could be eliminated by the buffer plate material adjustment. In addition, as shown in
Figure 6, the sample T-6 with plane cracks is located slightly above the transition boundary. It means that the parameters for explosive welding of W–Cu should be adjusted precisely to achieve a wavy interface without cracks.
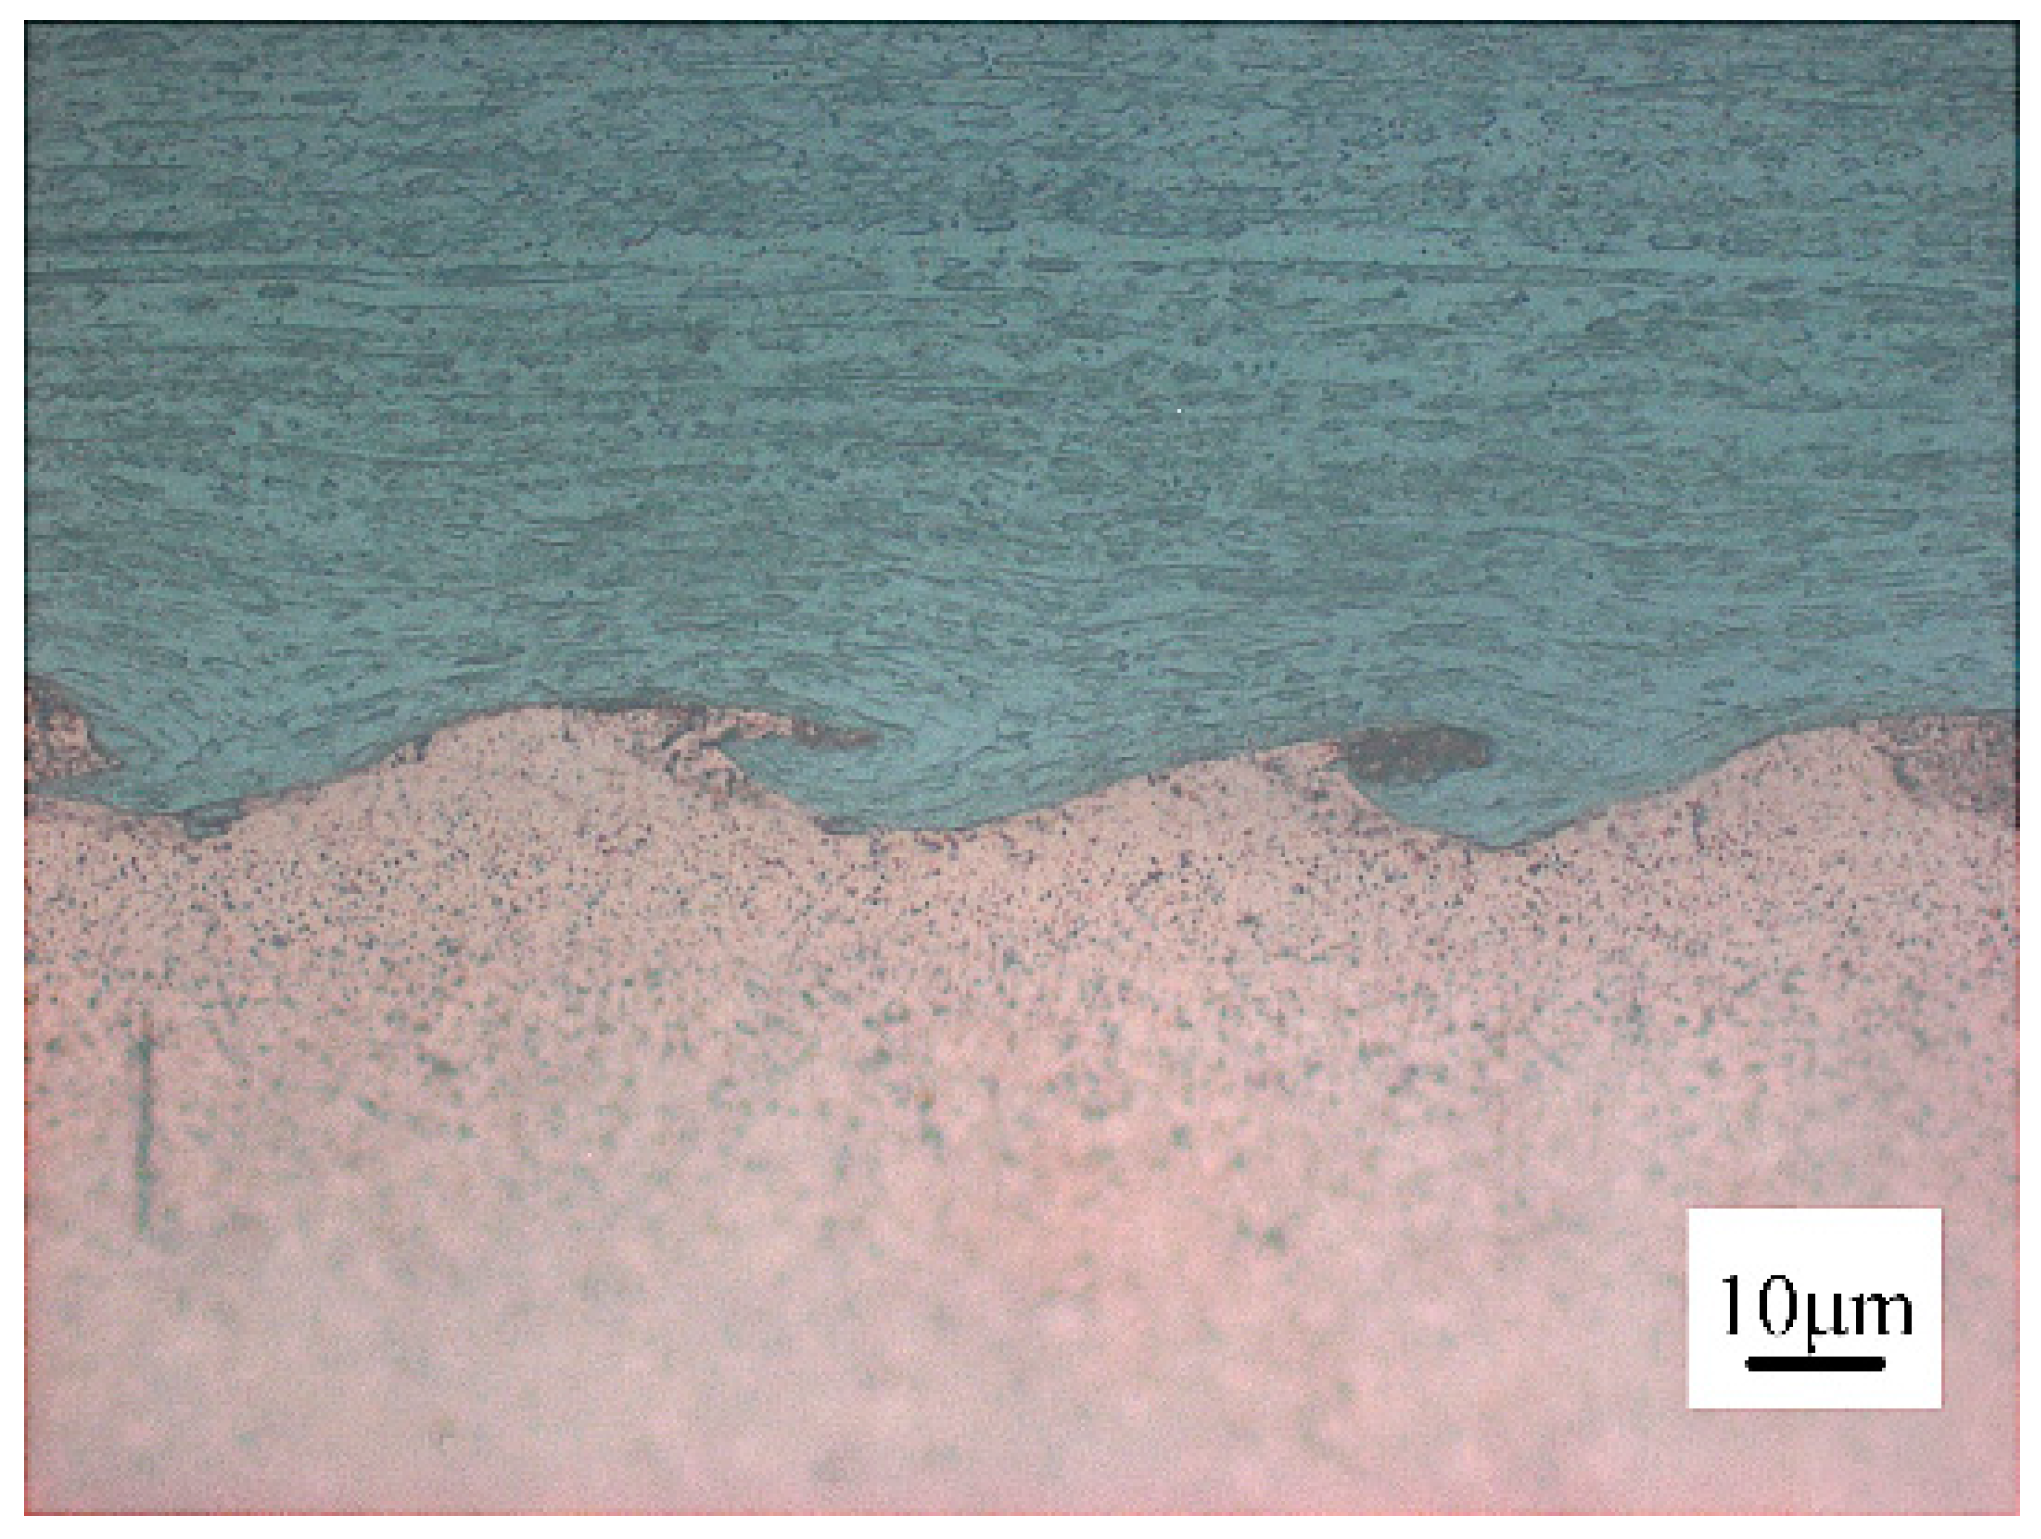
Figure 8 provides a close-up of the etched interface of W–Cu, demonstrating that the W grain afar from the interface retained the elongation parallel to the rolling direction, whereas the W grain adjacent to the interface was drawn into the vortex by the intruding Cu flow. The energy-dispersive X-ray spectrometry (EDS, Oxford Instruments, OAbingdon, UK) line scanning (plotted in
Figure 9) exhibited a distinct interface of the W and Cu, where no intermediate layer was formed due to the zero-mutual solubility of W and Cu. The enlarged views of the interfaces of the W–Cu bimetal welded with different impact velocities are presented in
Figure 10.
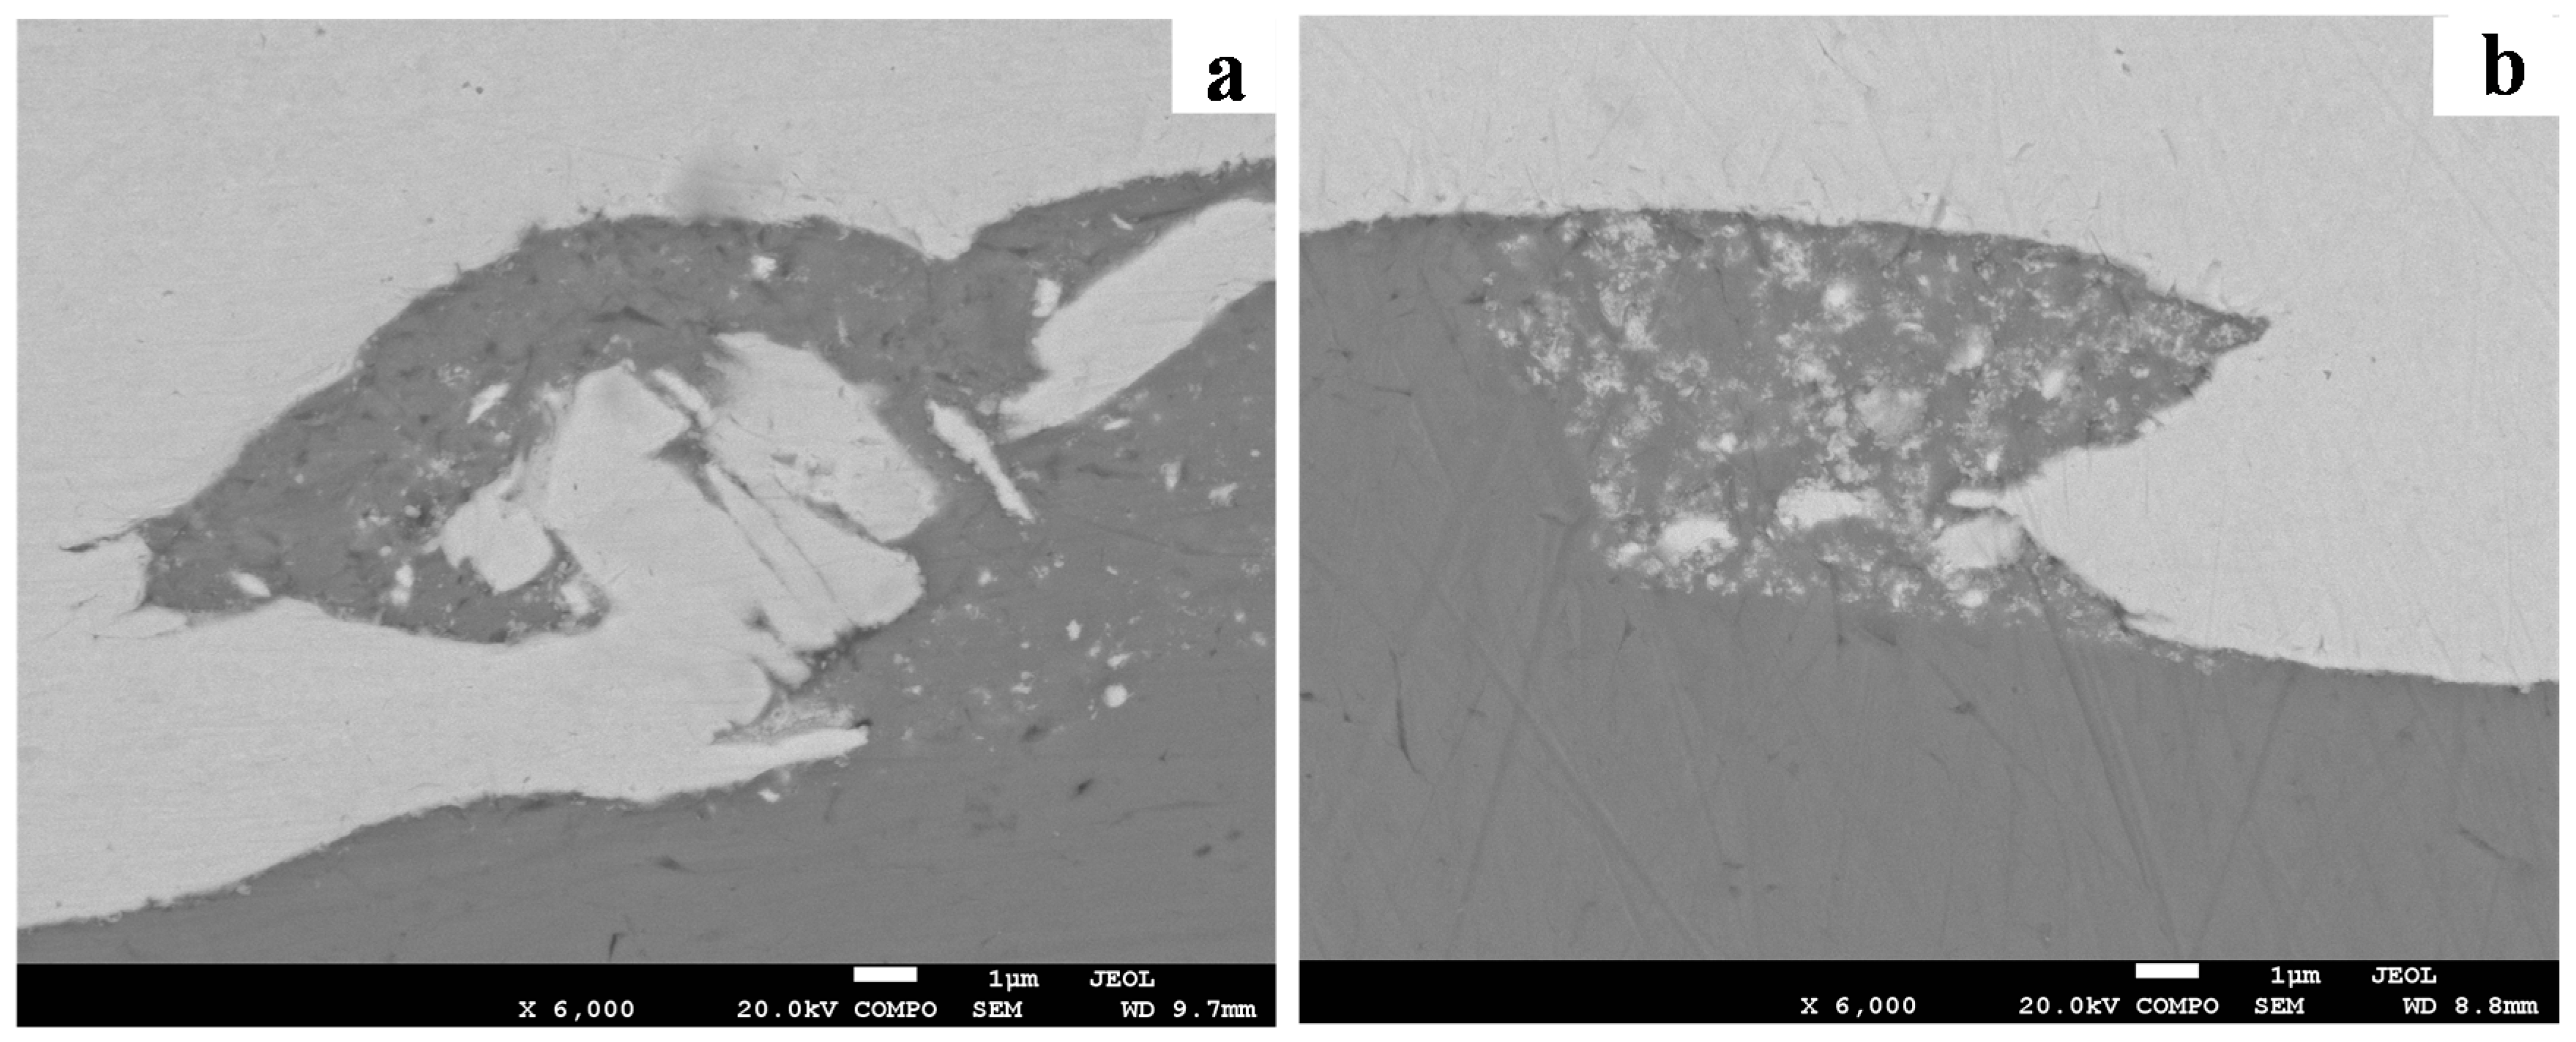
Figure 10a shows the severe deformation and fracture of W under the Cu jet penetrating. The deformed W appeared to be stirred by the Cu jet and moved counter-clockwise to form a vortex. The process was verified by the following simulation. Actually, the W was crushed into tiny pieces by the Cu jet as the penetration started. Consequently, the W was deformed under the penetration and the collision, and stirred by the Cu jet with residual kinetic energy, forming the vortex shown in
Figure 10a. With a lower impact velocity, the kinetic energy of the Cu jet was not sufficient to support a severe deformation of W, due to the dissipation during crushing. It explains the morphology shown in
Figure 10b, where the vortex size was lower than the vortex size shown in
Figure 10a and numerous fine W particles were embedded into the Cu matrix. The elemental mapping presented in
Figure 11 verified that the fine particles were of pure W, not intermetallic. Such flocculent W pieces were also observed in the compaction of W–Cu powders under intense shock loading [
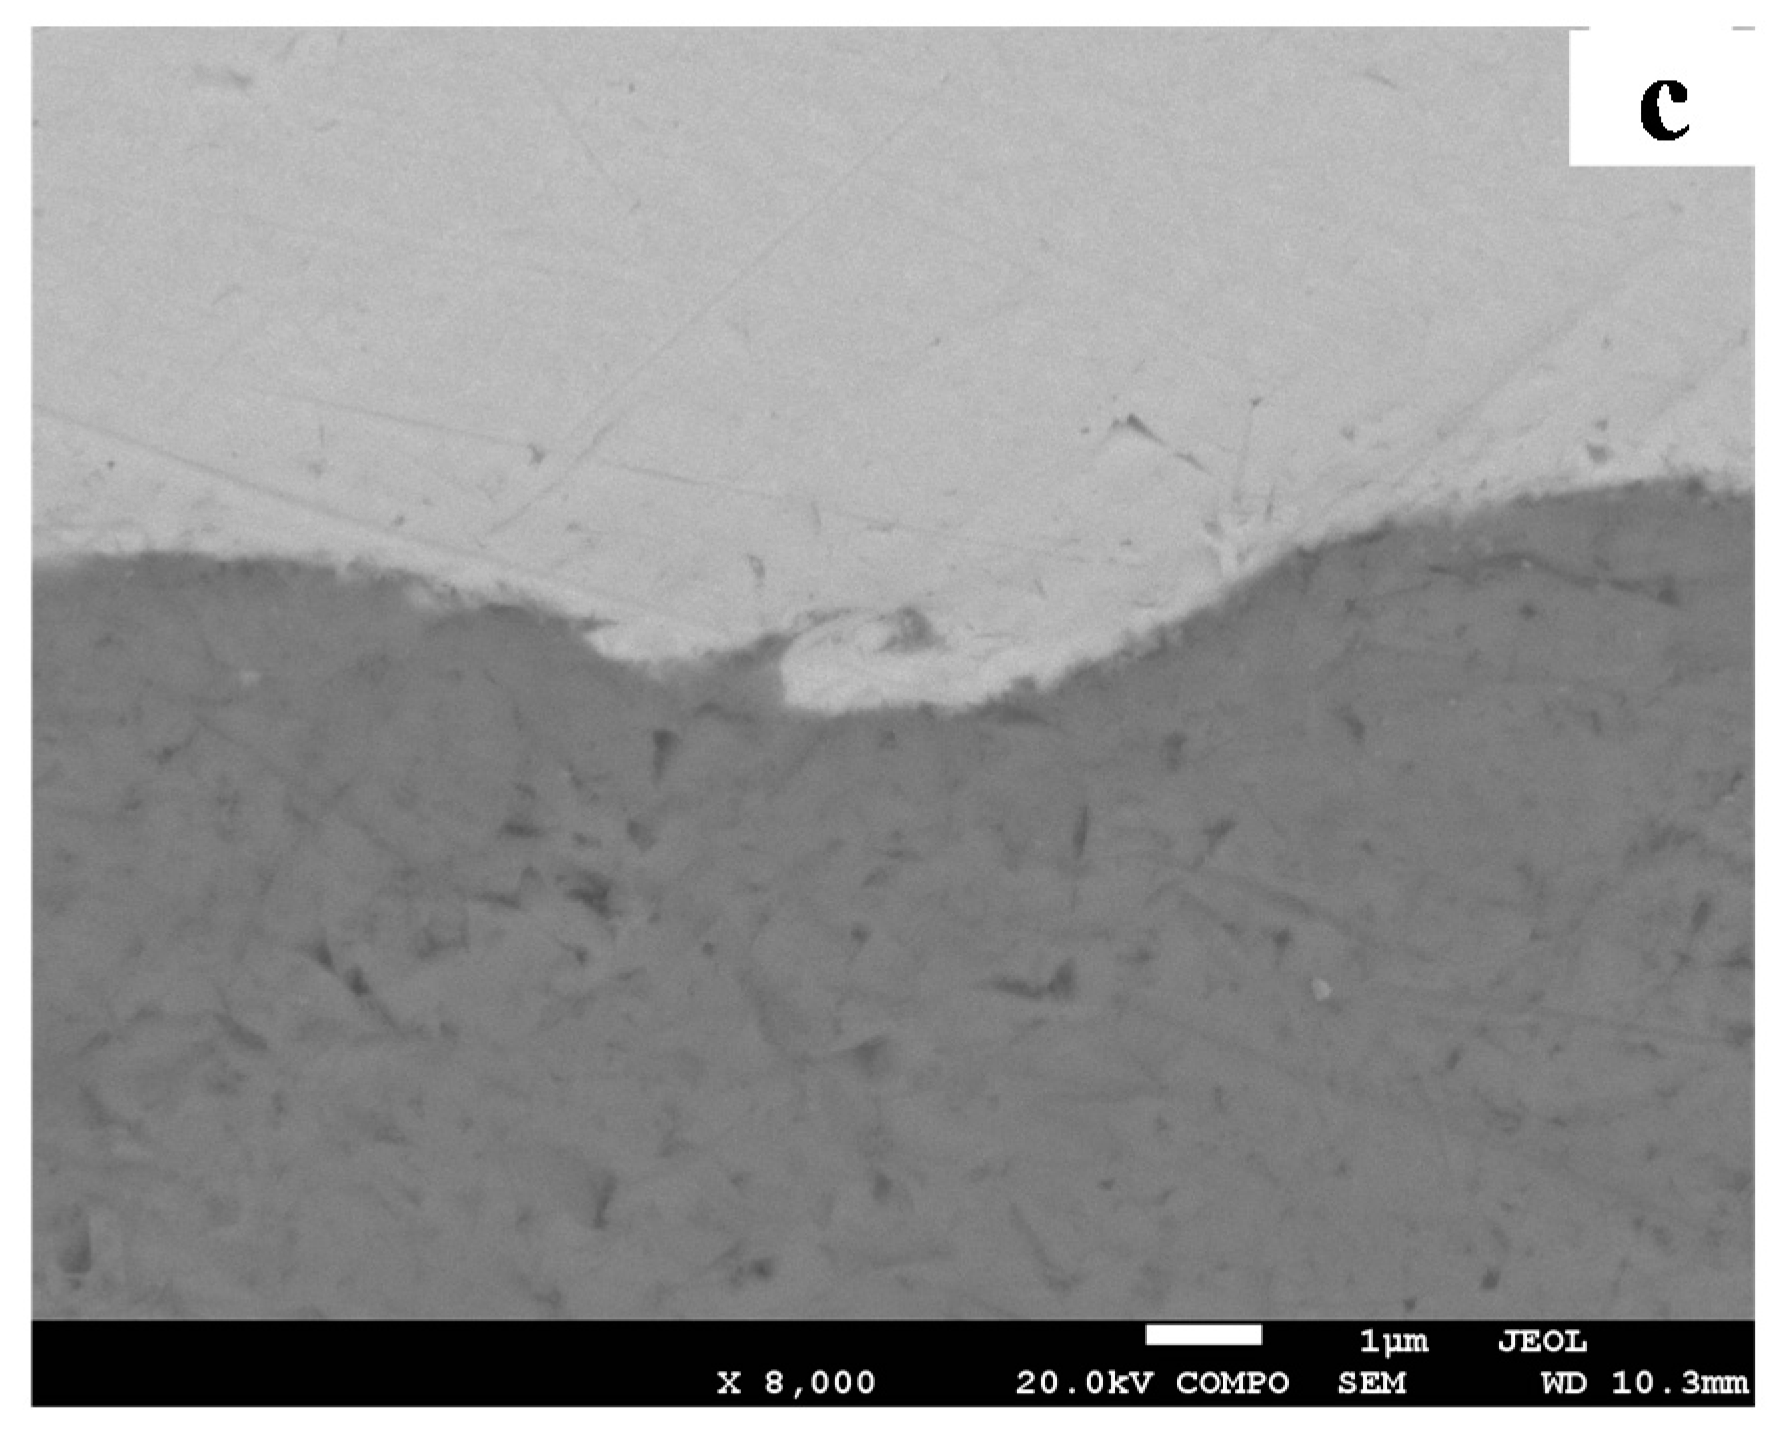
35]. As the impact velocity decreased further, the deformation of W and the kinetic energy of the Cu jet were significantly weakened, resulting in the small hump shown in
Figure 10c.
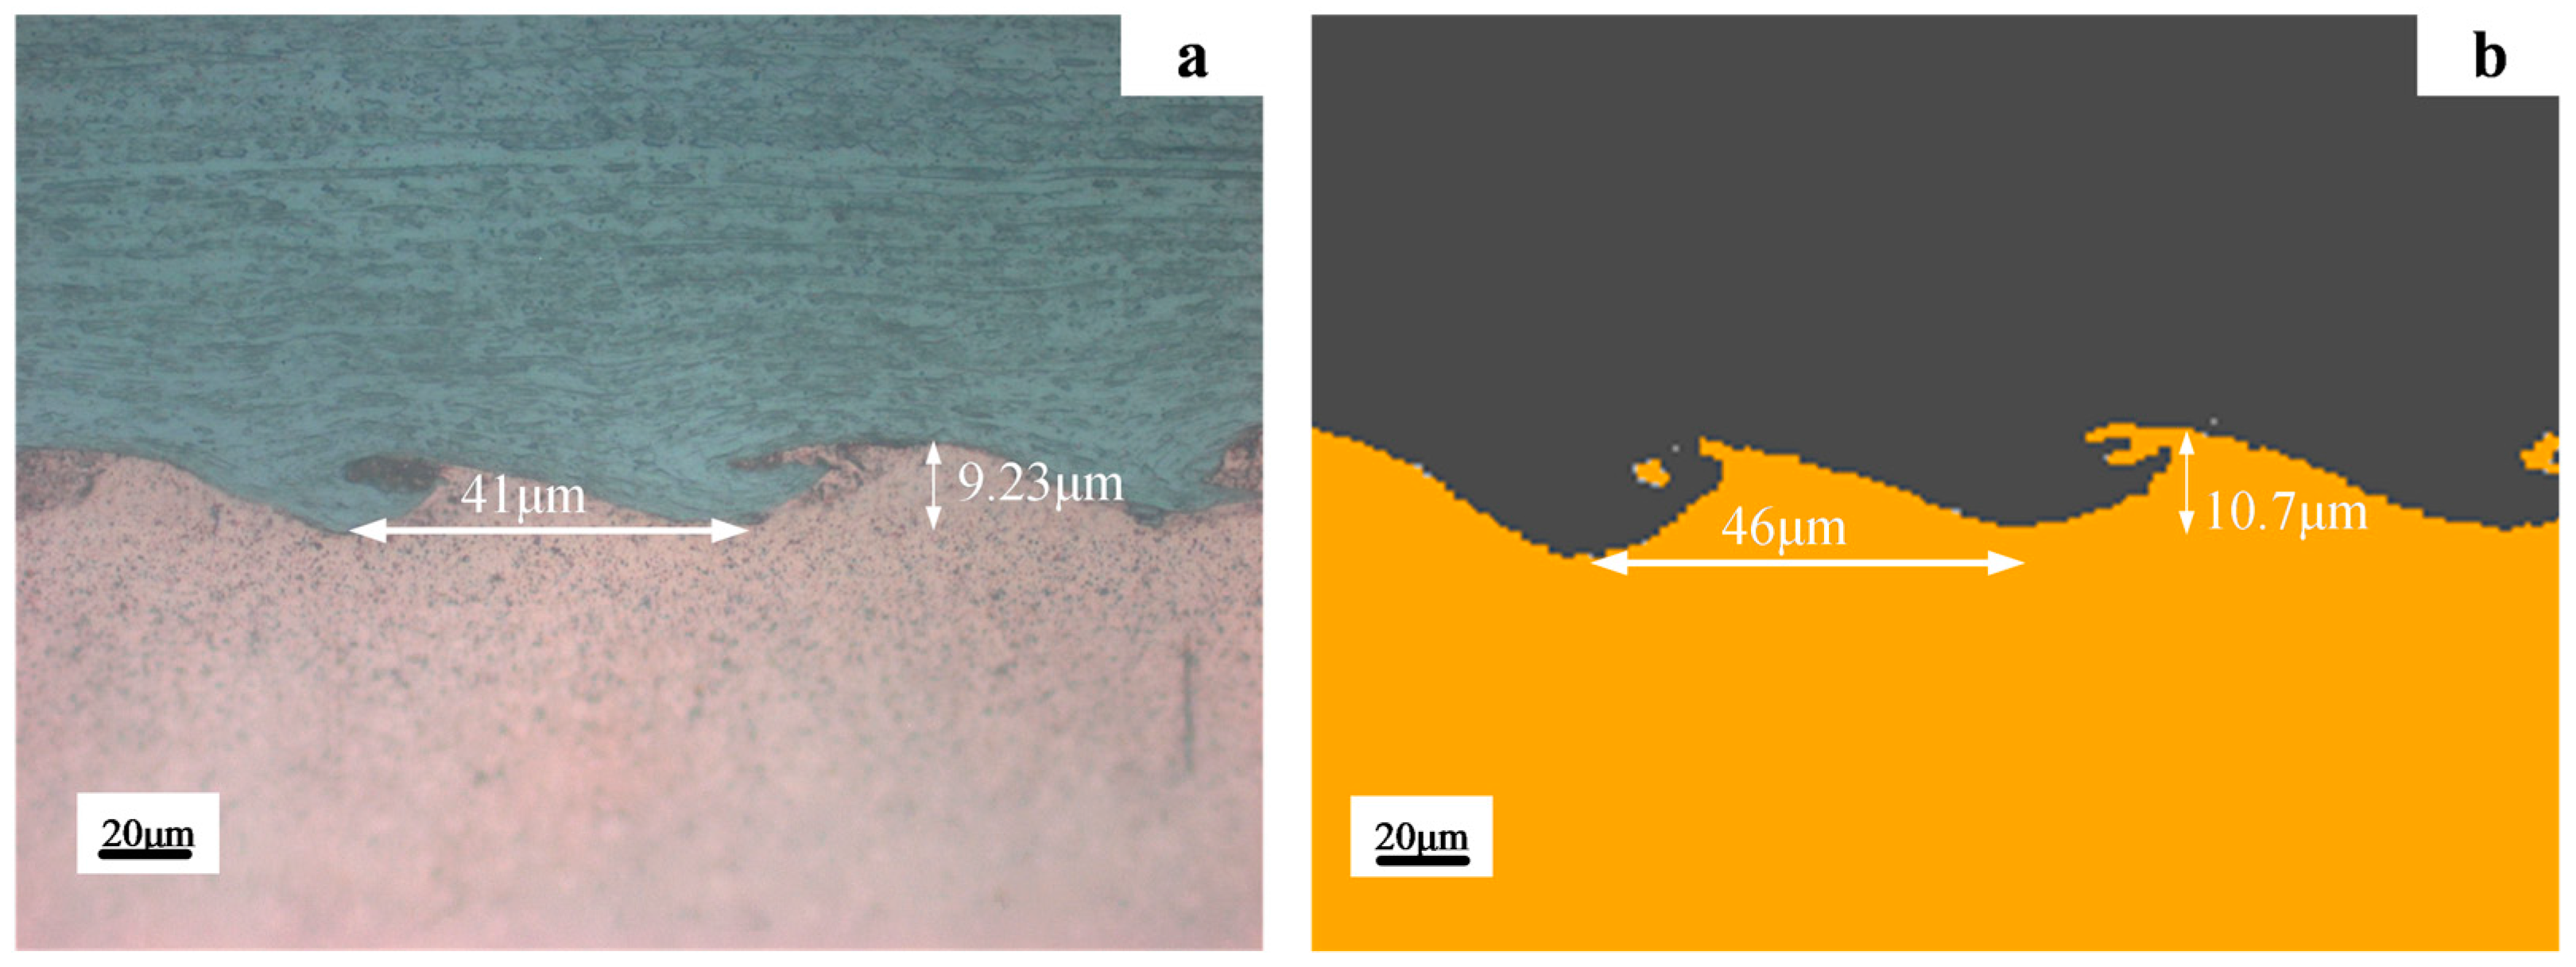
Figure 12 presents the morphology comparisons between the experimental observation and the numerical simulations for the T-6 with the identical impact velocity and impact angle, of 639.8 m/s and 14.14°, respectively. The predicted wave morphology agreed with the experimental results, and the predicted amplitude whereas wave length was 10.7 μm and 46 μm while the experimental results were 9.23 μm and 41 μm, respectively. It was validated that the present modelling was feasible and could provide a useful insight into the plastic deformation and temperature distribution, which could not be observed or measured experimentally.
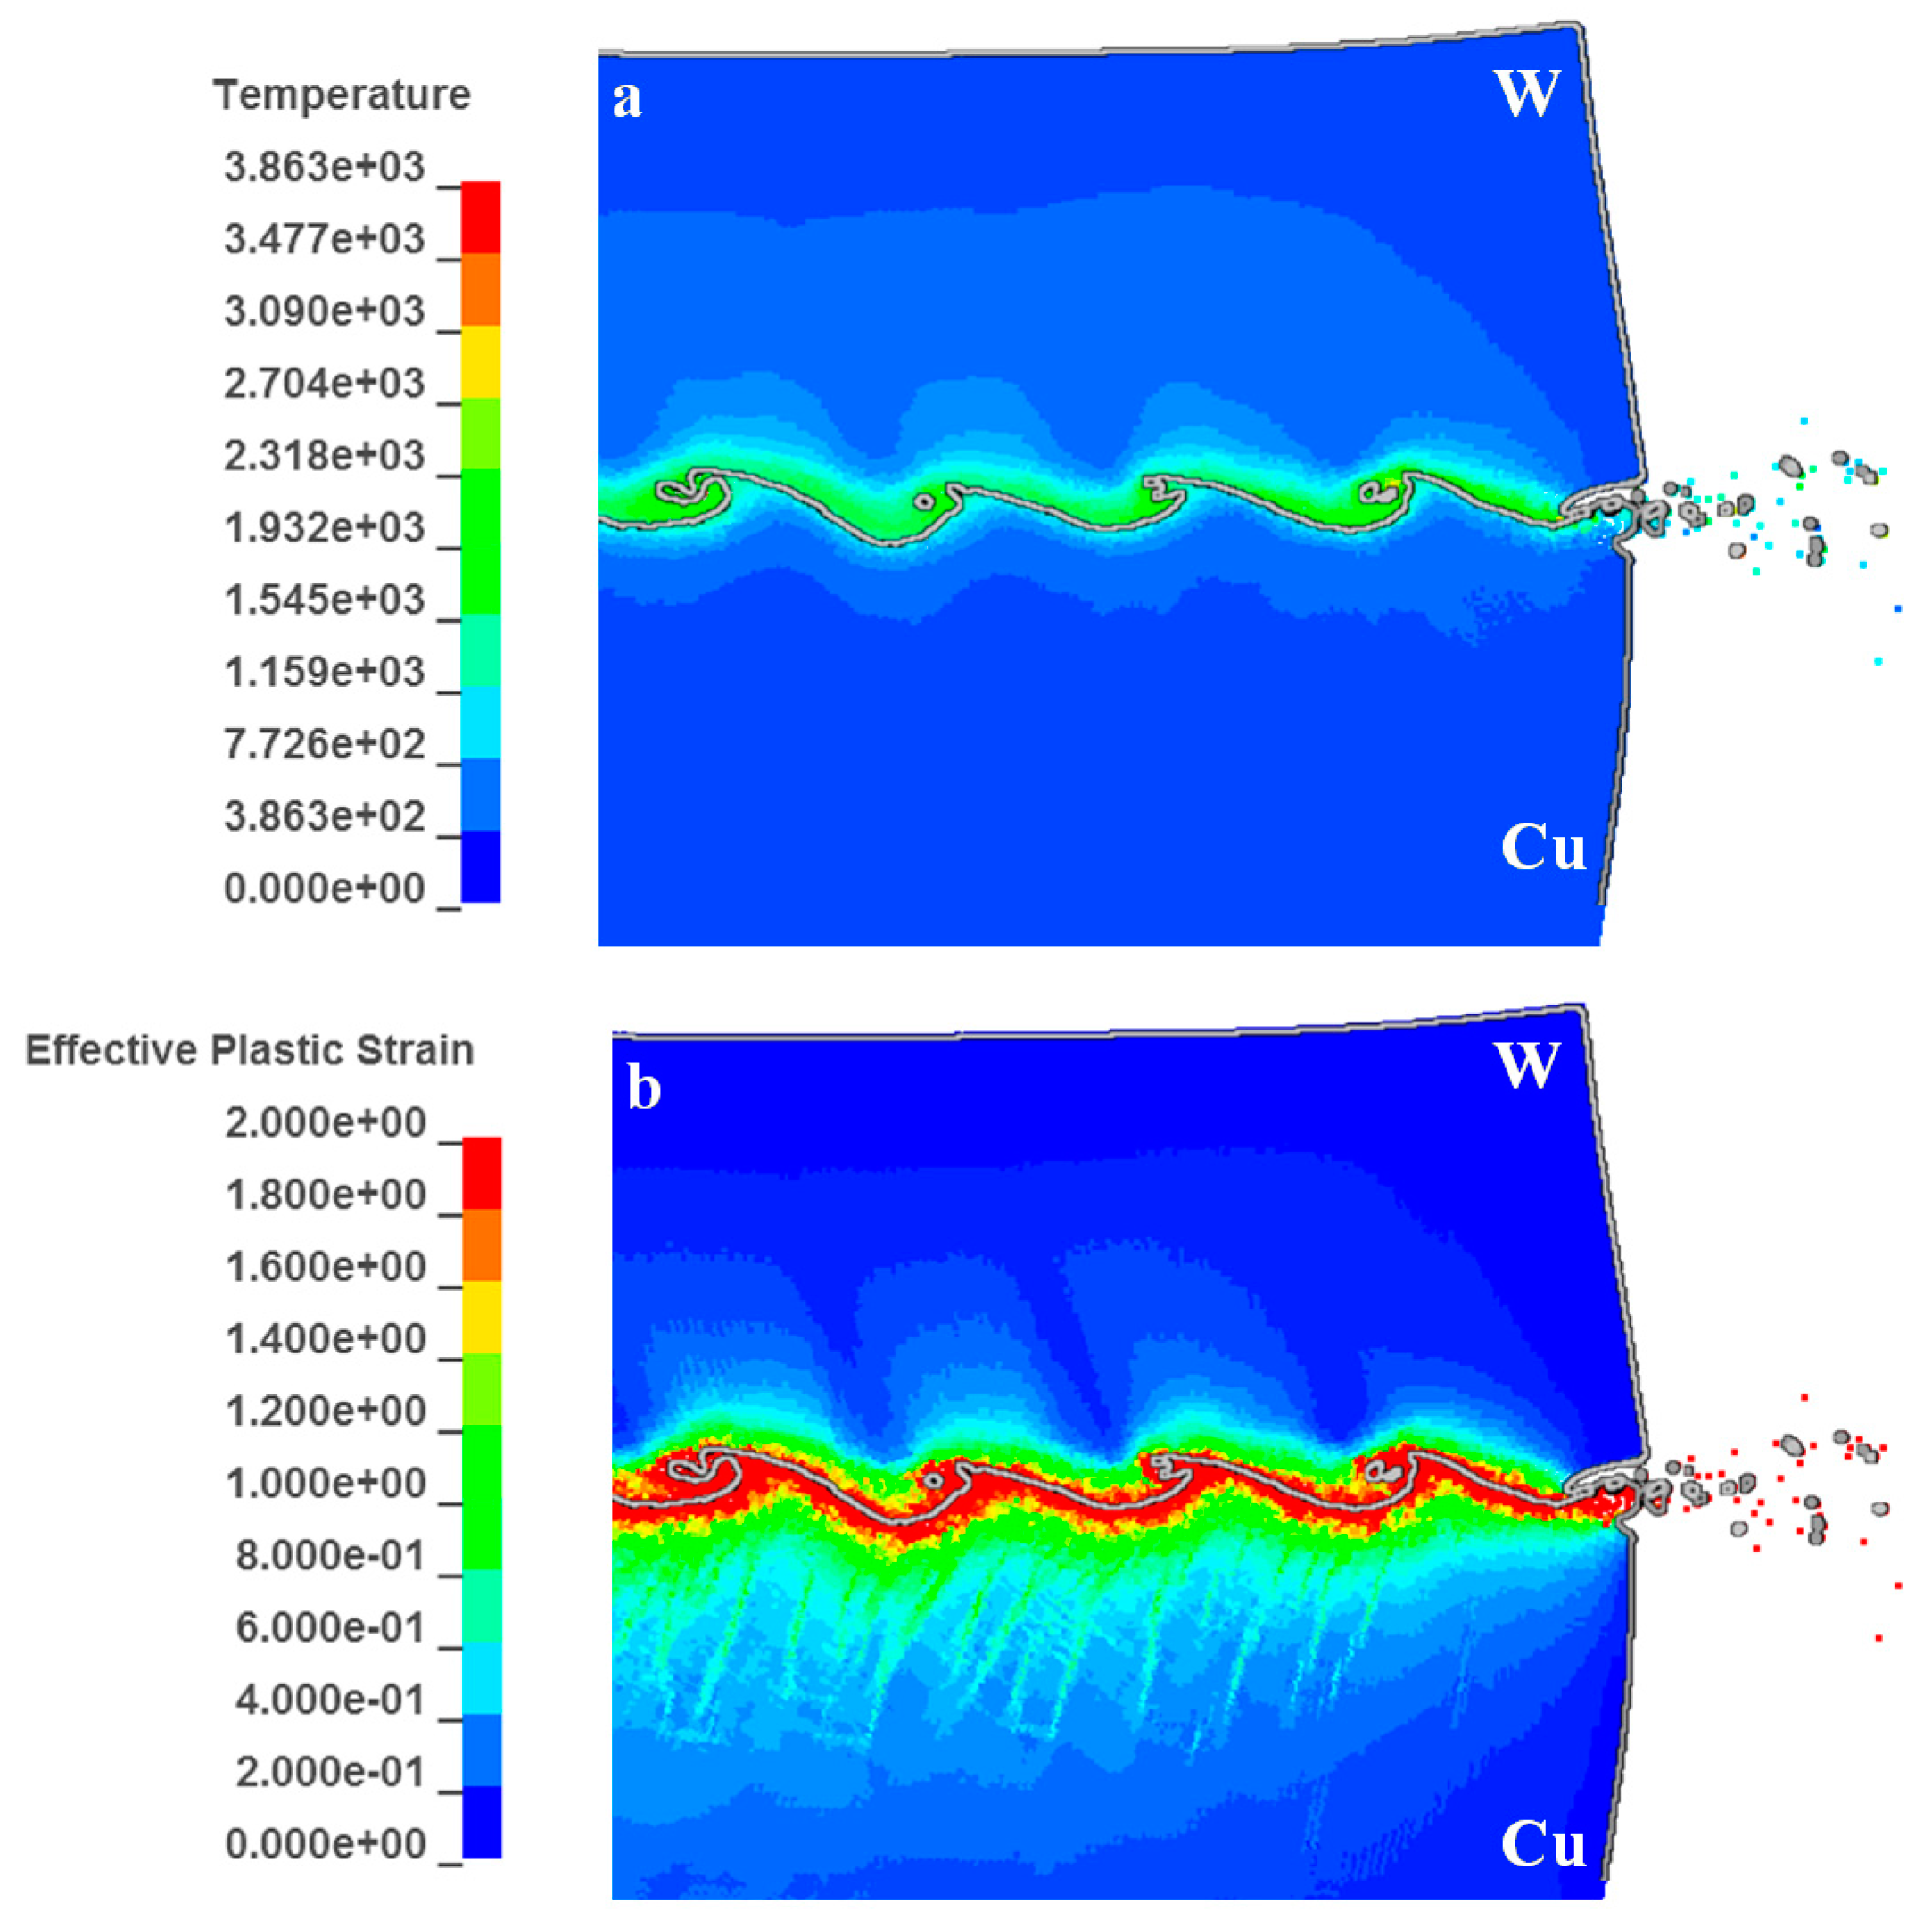
Figure 13 presents the predicted high temperature and plastic strain distributed along the wave interface. The mechanical energy released during strong impact resulted in intense plastic deformation, friction and shear of the two materials, which was eventually converted into heat accumulation [
36]. Since the process occurred over microseconds, there is no time for heat transfer away from the interface. The temperature was highly localized in the vortex and near the interface.
Figure 13a exhibits that the high temperature region at the W side was in the range of 600–1700 K, with a thickness of ~7 μm, whereas the region at the Cu side was in the range of 600–1200 K, with a thickness of ~2 μm. A higher amount of energy was accumulated at the W side due to its lower conductivity compared to Cu, leading to lower energy loss by thermal conduction. The highest temperatures located in the vortex were 2400–3000 K for W and 1700–2100 K for Cu, indicating that the W did not melt during the formations of the jet and the vortex. In other words, all jets originated from the Cu side. This was verified by the experimental results, as shown in
Figure 10a,b.
Figure 13b presents the plastic strain distribution at the interface. It shows that the distribution of high temperature is generally consistent with the high strain region, in accordance with the fact that heat is transformed from plastic work during the adiabatic compression. However, in this case, the region with higher temperature at the W side does not present higher strain. A similar trend was also observed by Zhang et al. [
37].
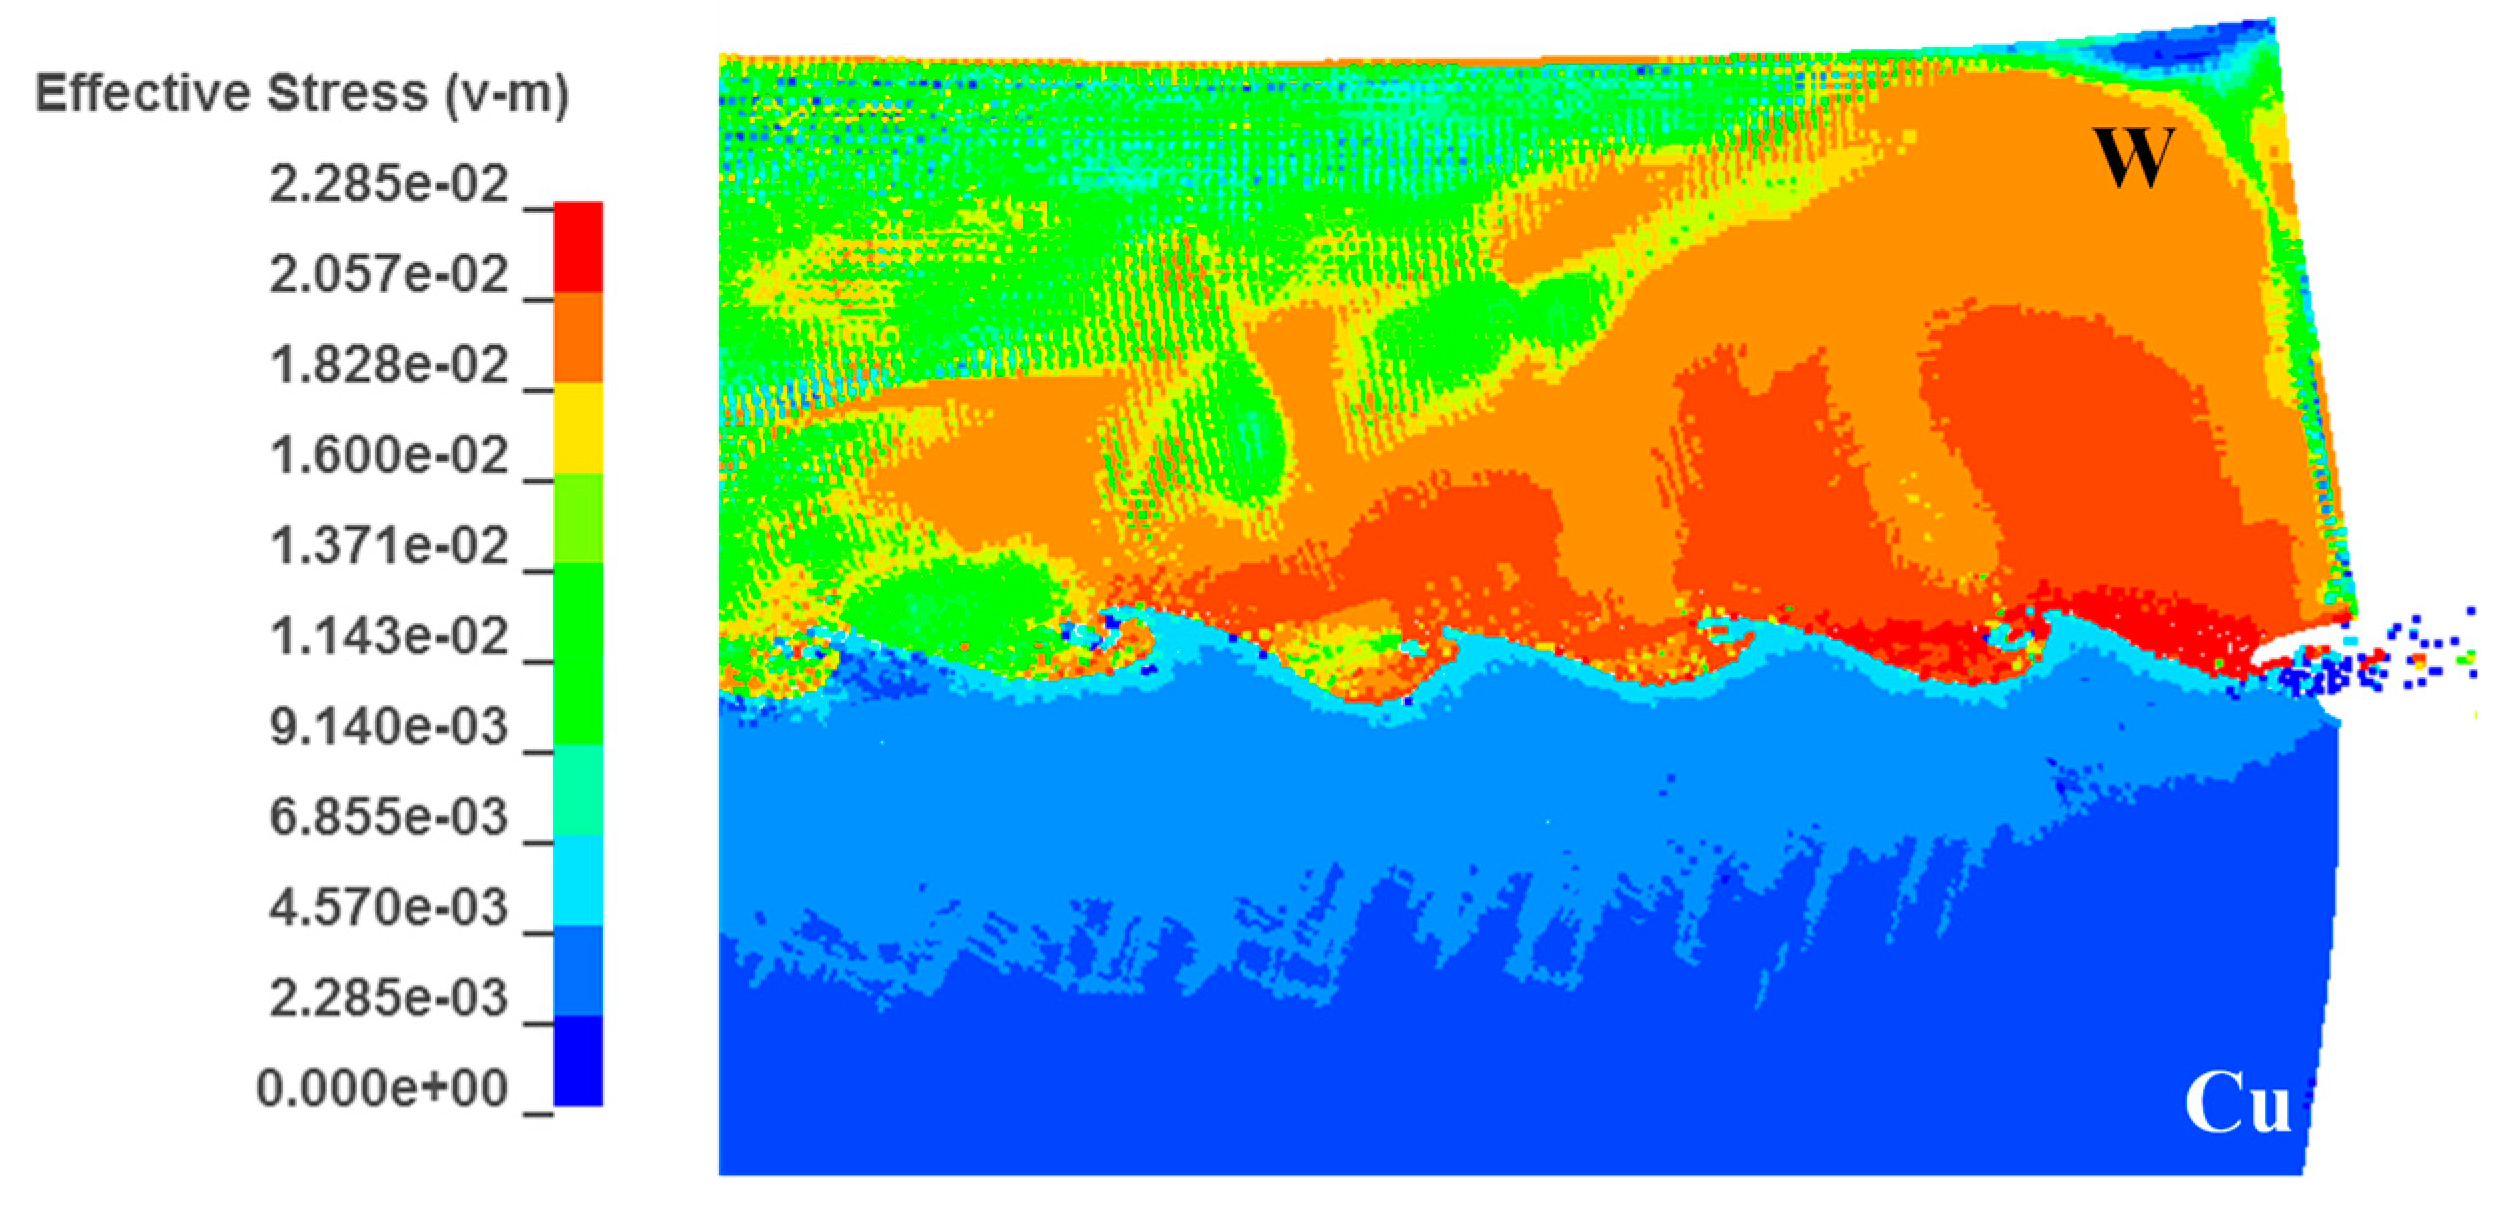
Figure 14 presents the equivalent stress for the W adjacent to the interface at 2~2.2 GPa, 3~4 times the stress for the Cu side, 450~685 MPa. As shown in
Figure 13b, the strain at the W side, which exceeded 0.8, was 0.4~0.5 times the strain for the Cu side, from which it could be deduced that the plastic work deposited at the W side was still higher than the Cu side. This explained why the region with higher temperature presented lower strain.
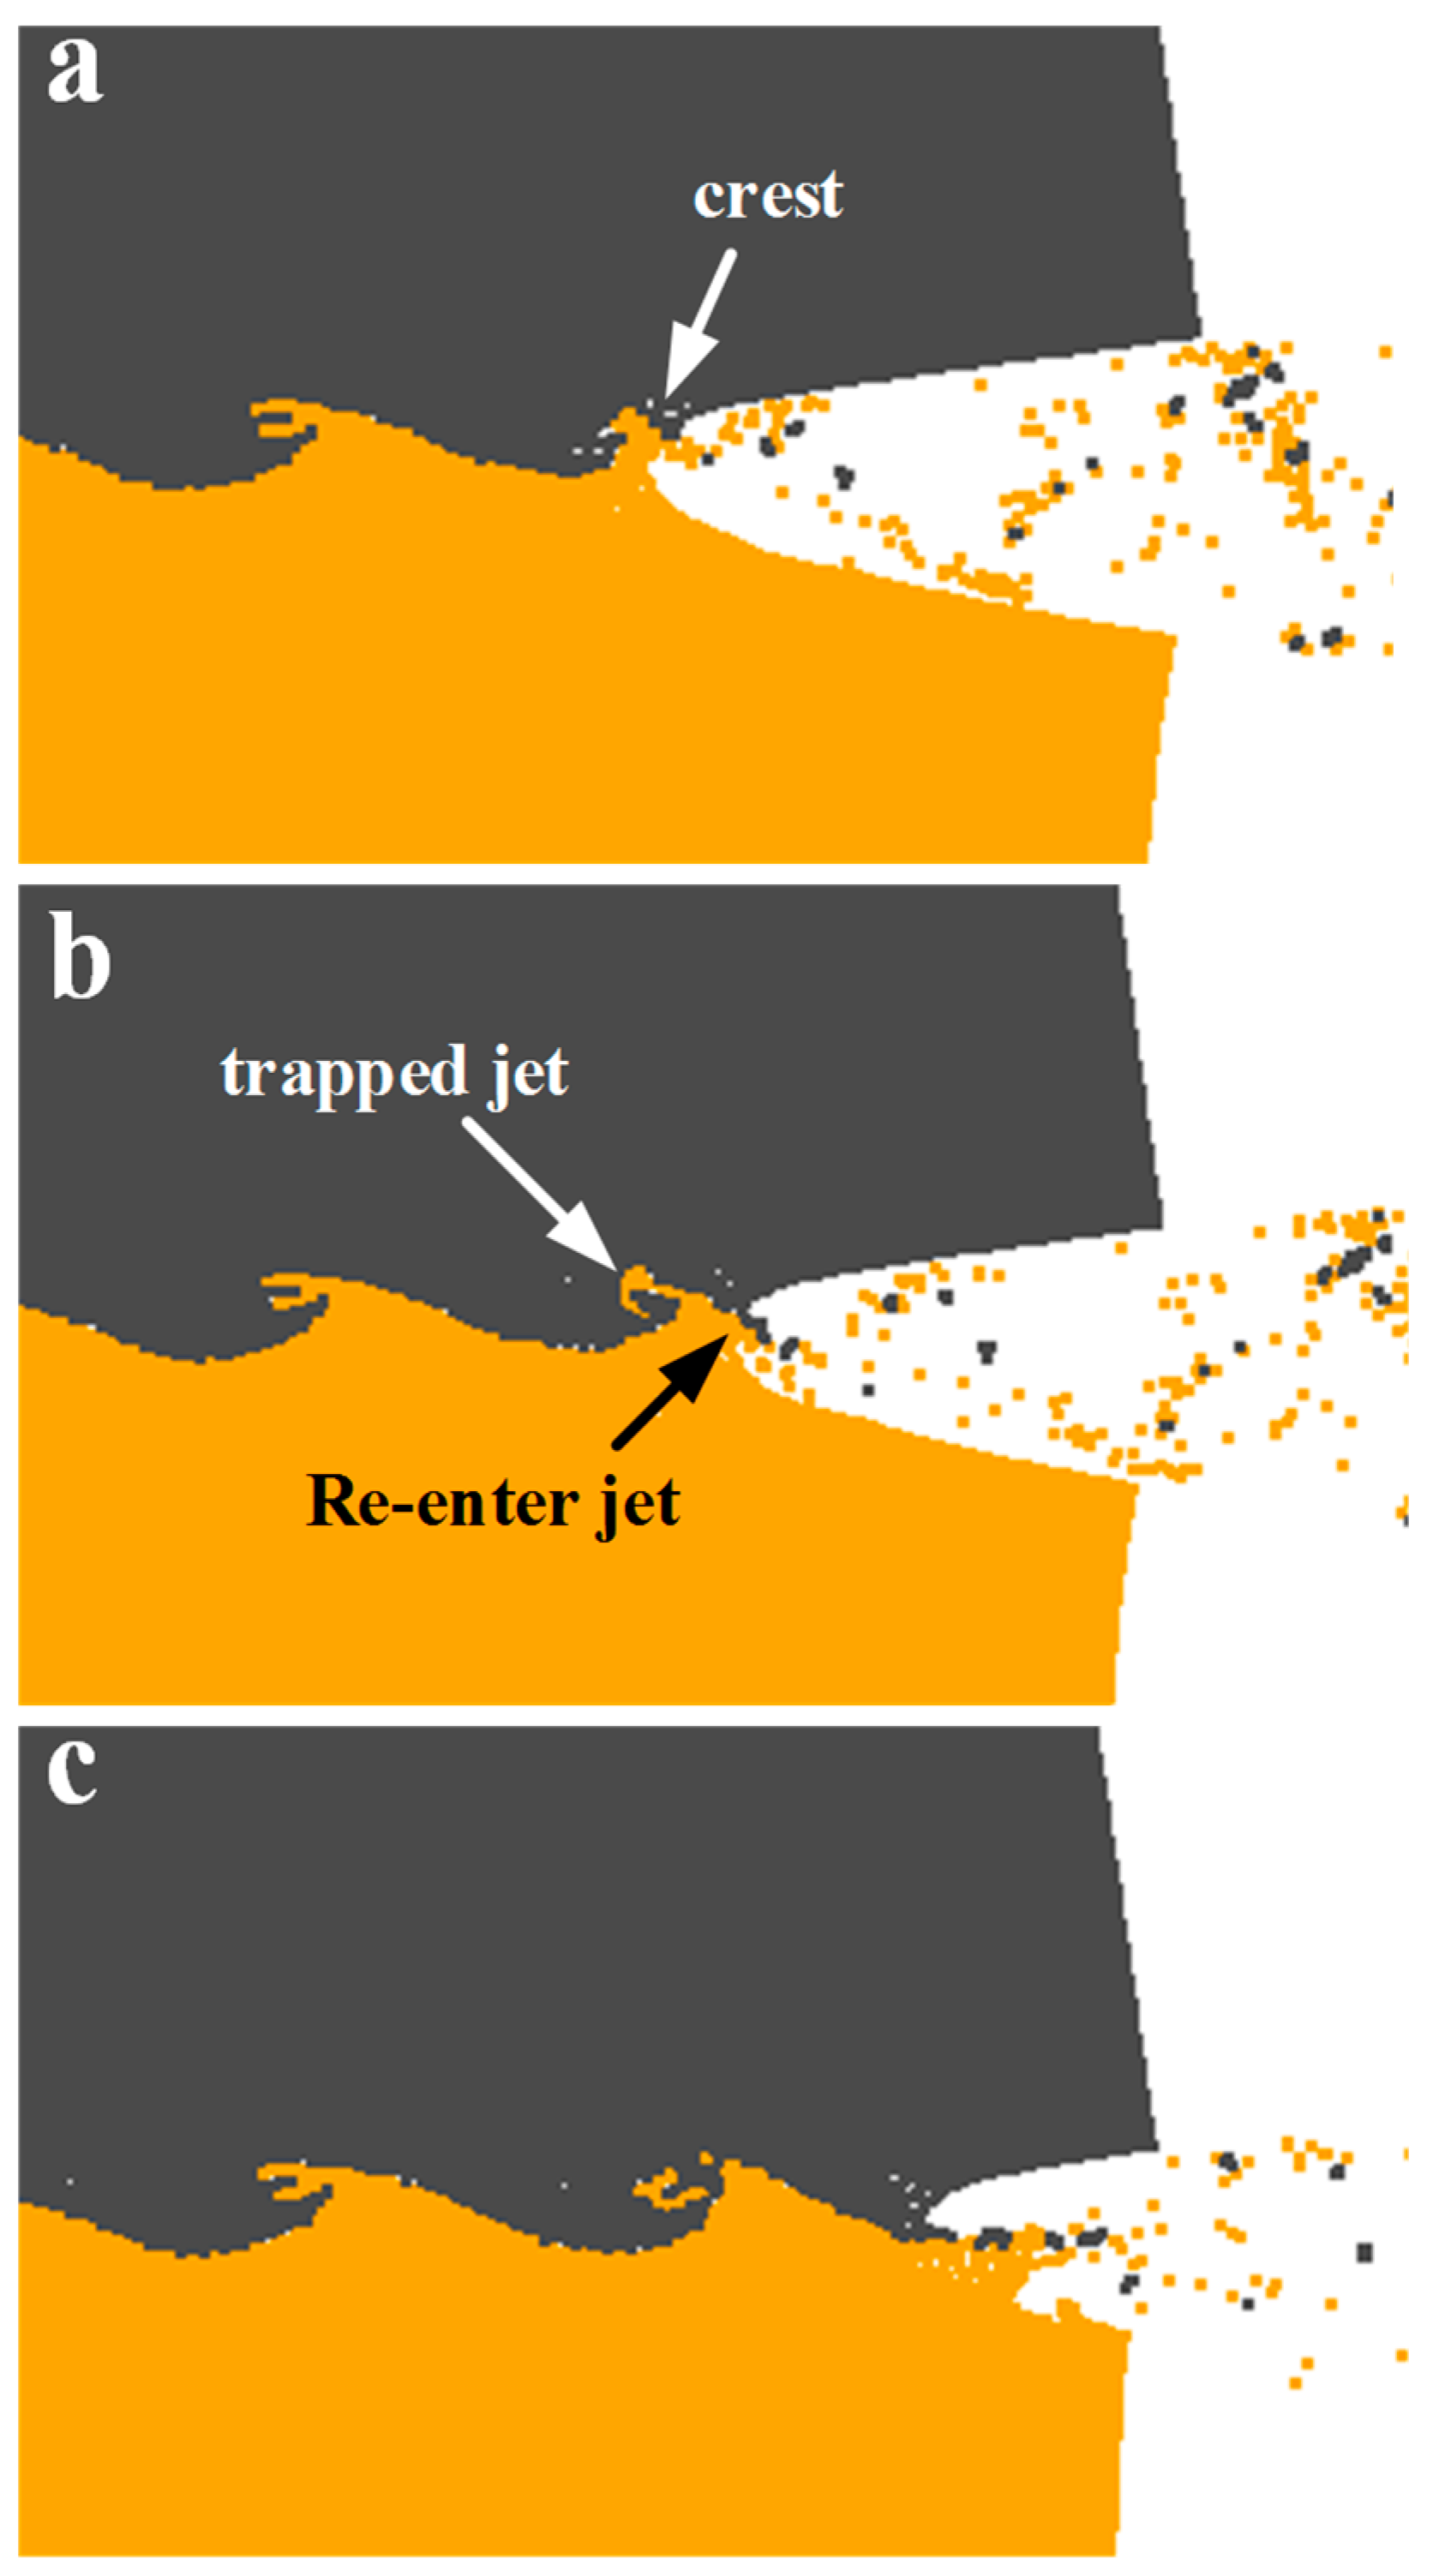
Figure 15 presents the vortex formations in the simulation, which was in accordance with the indentation mechanism proposed by Bahrani [
38]. The Bahrani mechanism has been questioned due to the assumption that the jets were all from the flyer plate, which was not in agreement with the facts. For the common metallic plates, the jet originates from both plates as the differences in density and melting point are not considerable. For the case of W and Cu, their physical properties differ dramatically, especially in the melting points. This implied that the jets might all originate from the Cu side during the collision by the W flyer, which makes the Bahrani mechanism reasonable. It is known [
39] that if the colliding metals differ greatly in density, the discrete jet does not move along the bisector of the collision angle but is deflected towards the denser (in our case, W). The W plate deformed under the penetration by the Cu jet and consequently a crest was formed (
Figure 15a). Subsequently, the Cu jet was divided into two parts by the crest: one part was the trapped jet behind the crest and the other part was the re-enter jet, as shown in
Figure 15b. The trapped jet was completely choked, leading to a counter-clockwise movement and intense stirring with the severely deformed W. A backward vortex was then produced. Also, the re-enter jet was forced to move towards the Cu side by the crest, which was elongated as the trapped jet kept penetrating the W plates. Finally, the re-enter jet fell into the newly formed jet and produced another crest repeatedly, as shown in
Figure 15c.


