Automatic Defects Recognition of Lap Joint of Unequal Thickness Based on X-Ray Image Processing
Abstract
1. Introduction
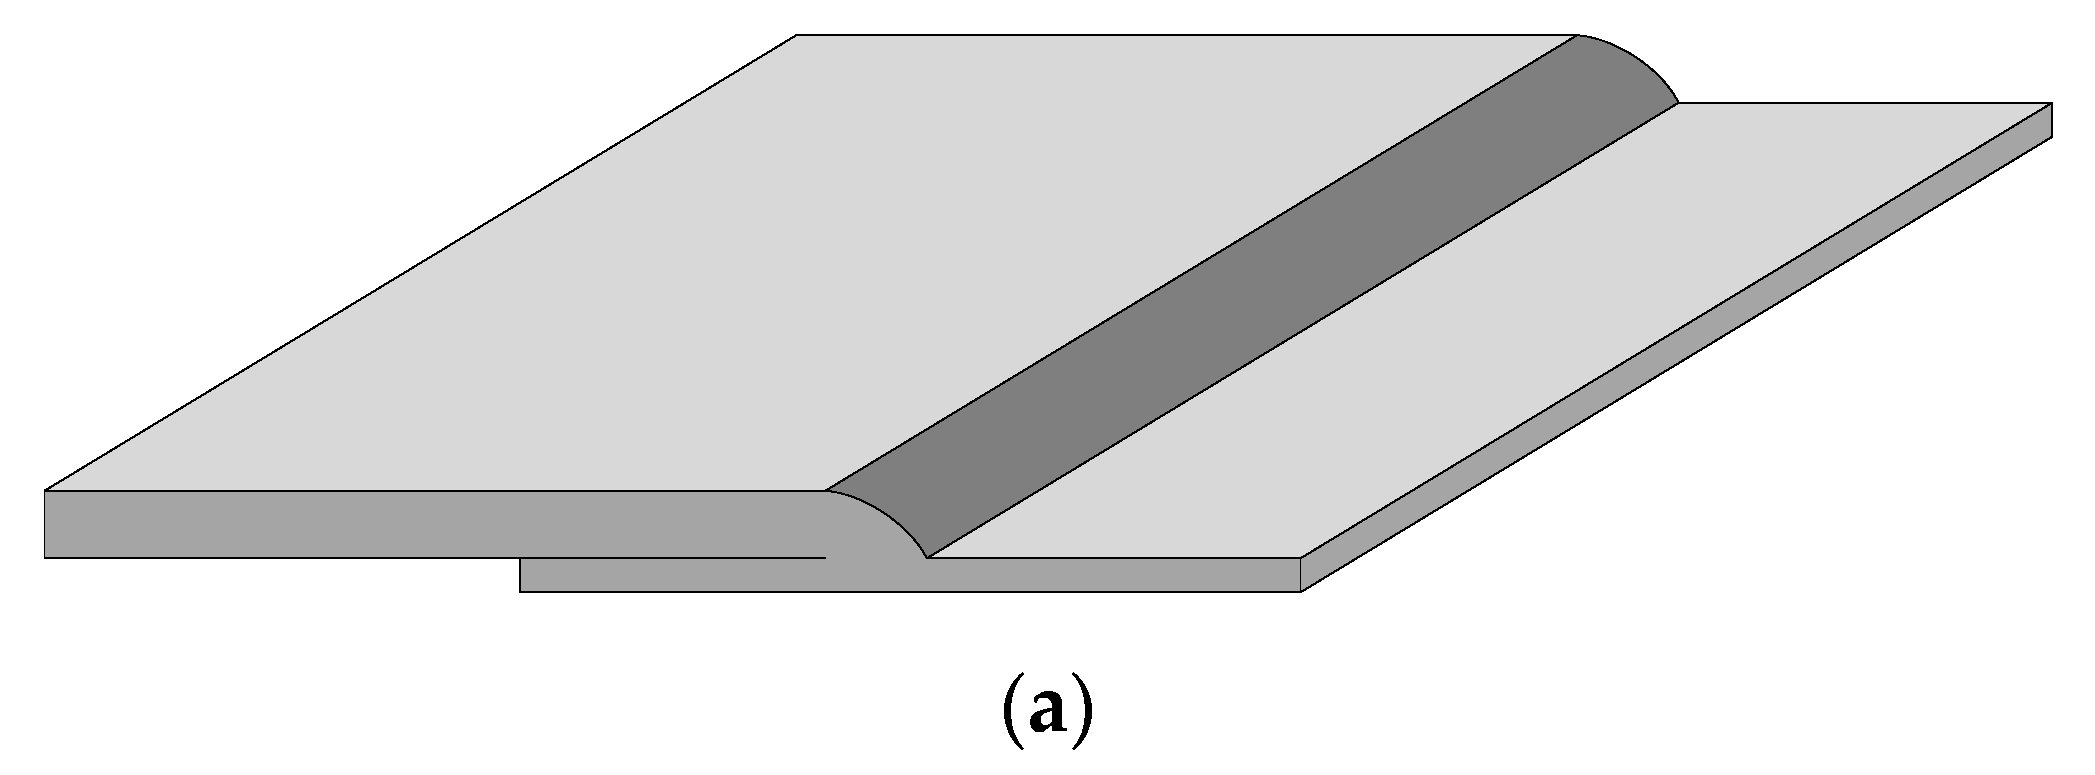
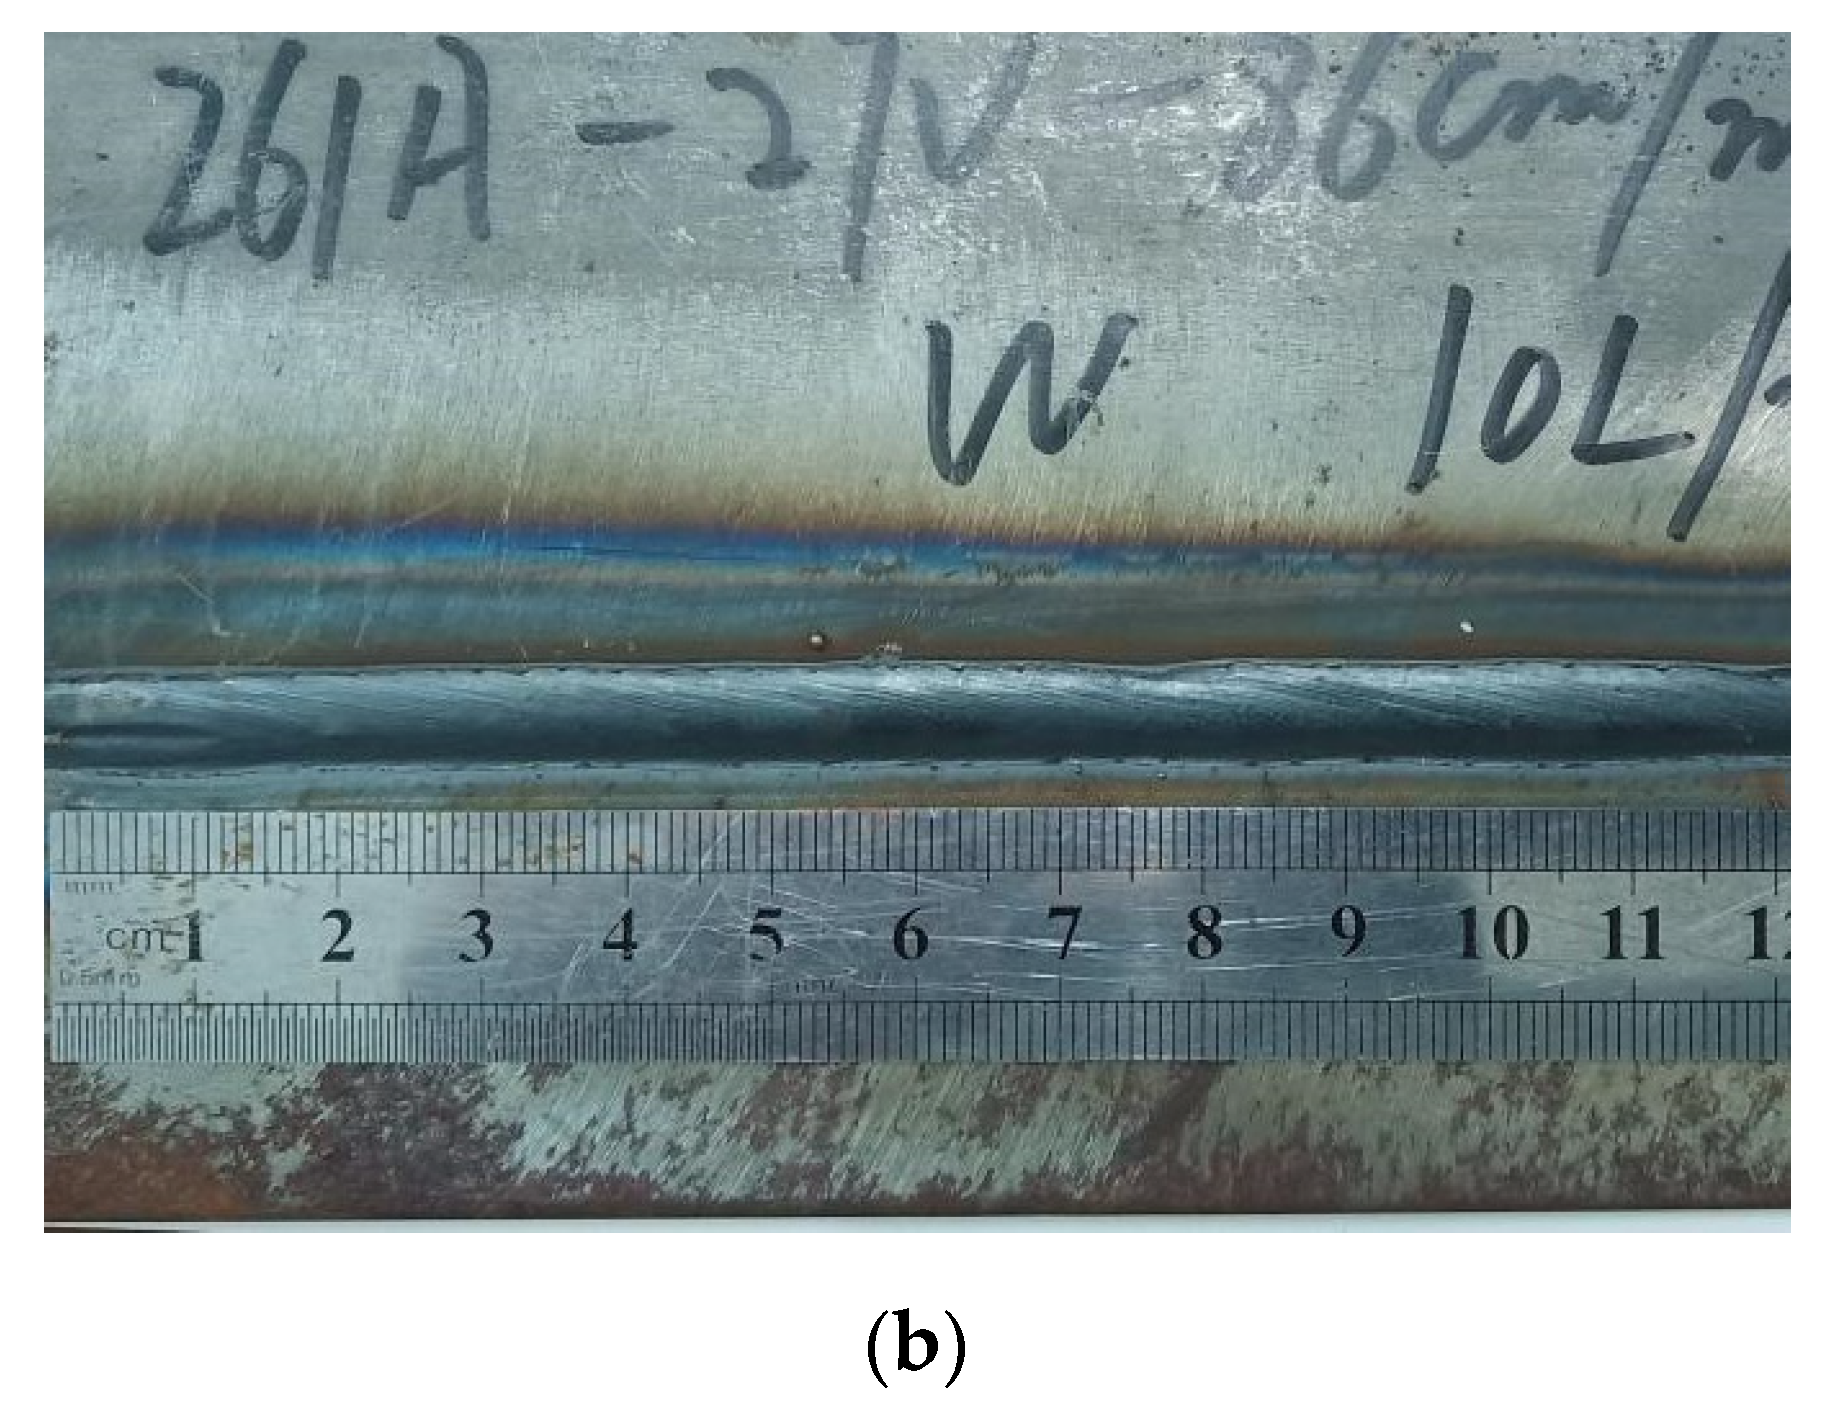
2. Experimental Subjects and Equipment
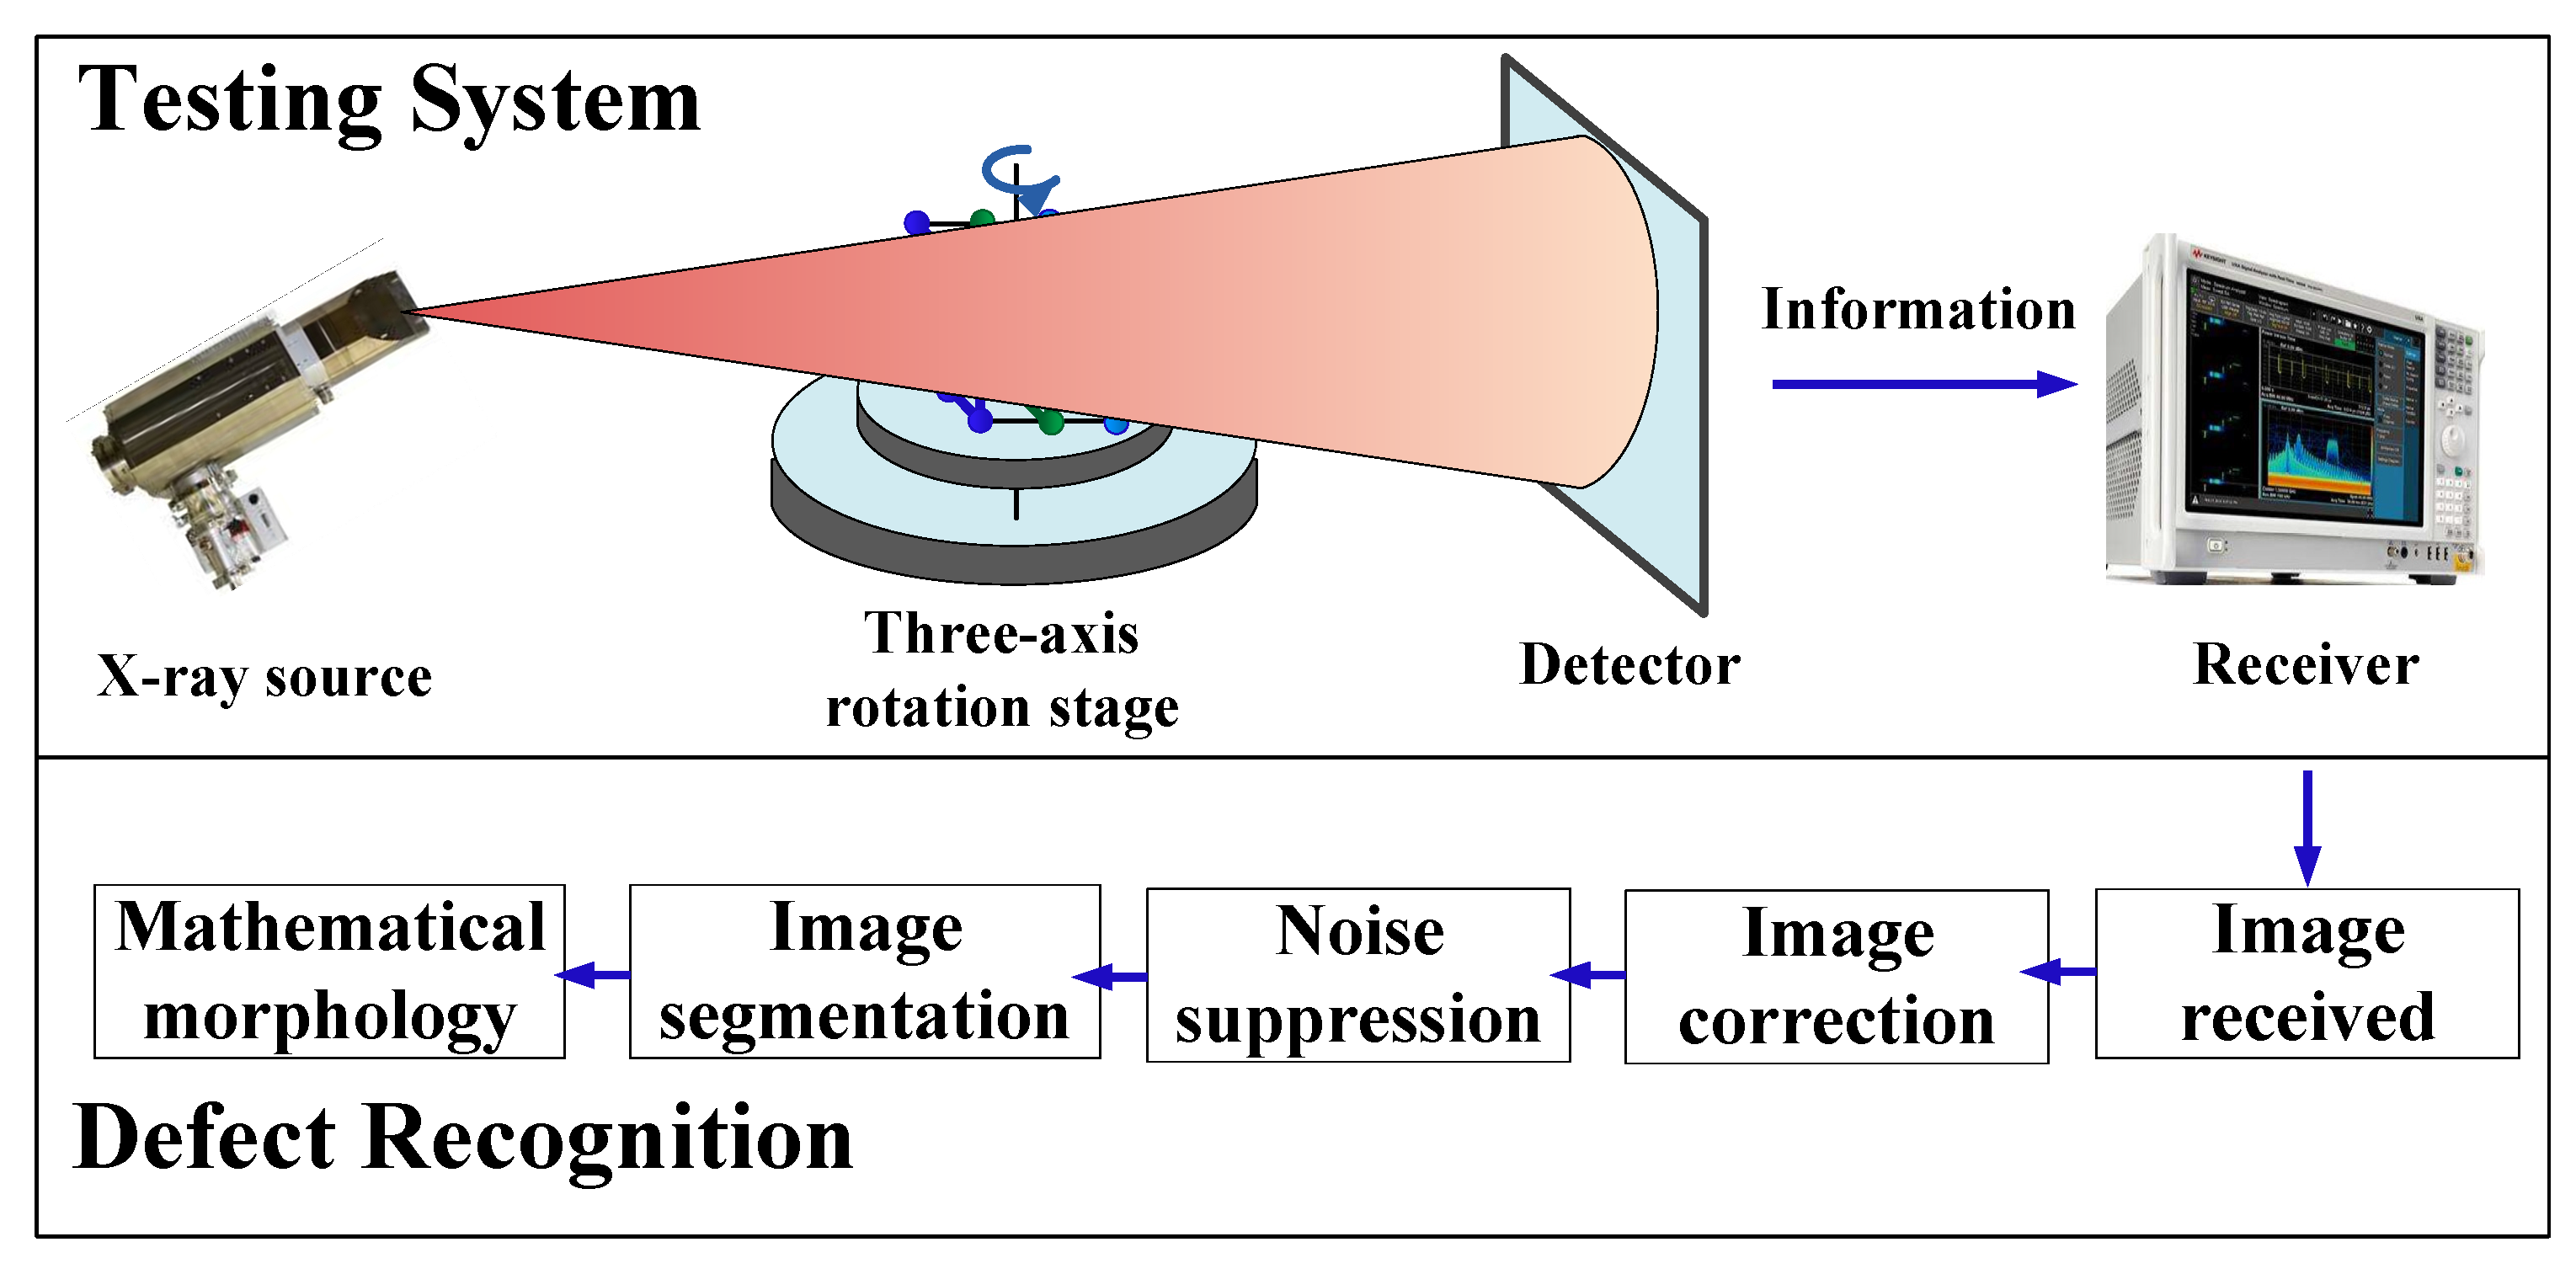
3. Methodology
3.1. Principle of X-Ray Radiographic Testing
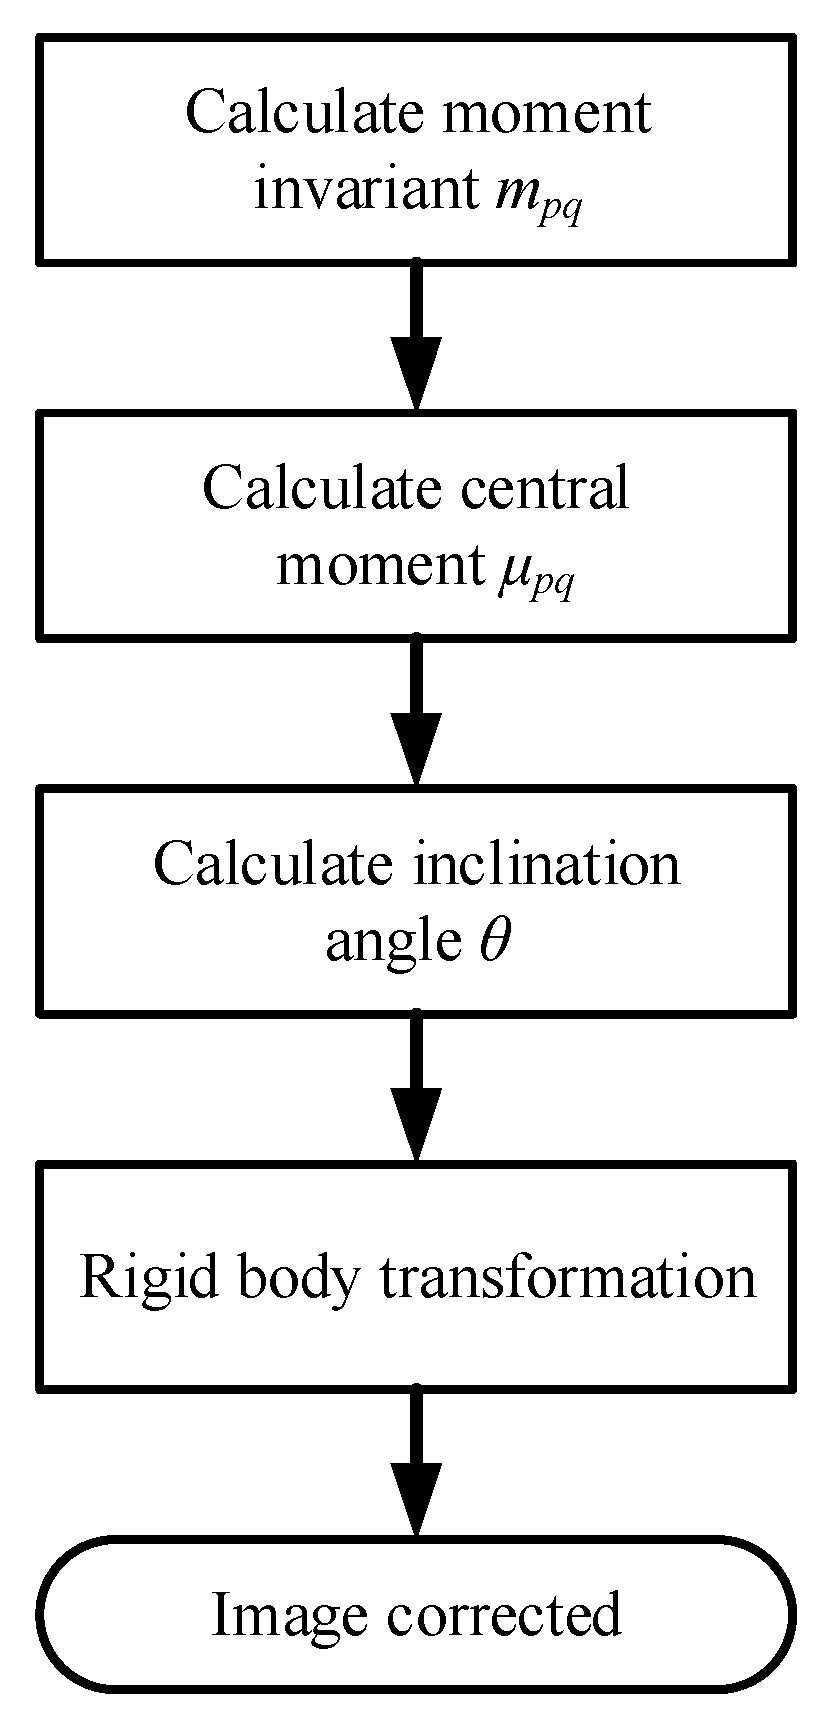
3.2. X-Ray Radiographic Image Correction
3.2.1. Moment Invariants
3.2.2. Rigid Body Translation
3.3. Defect Detection in X-Ray Radiographics
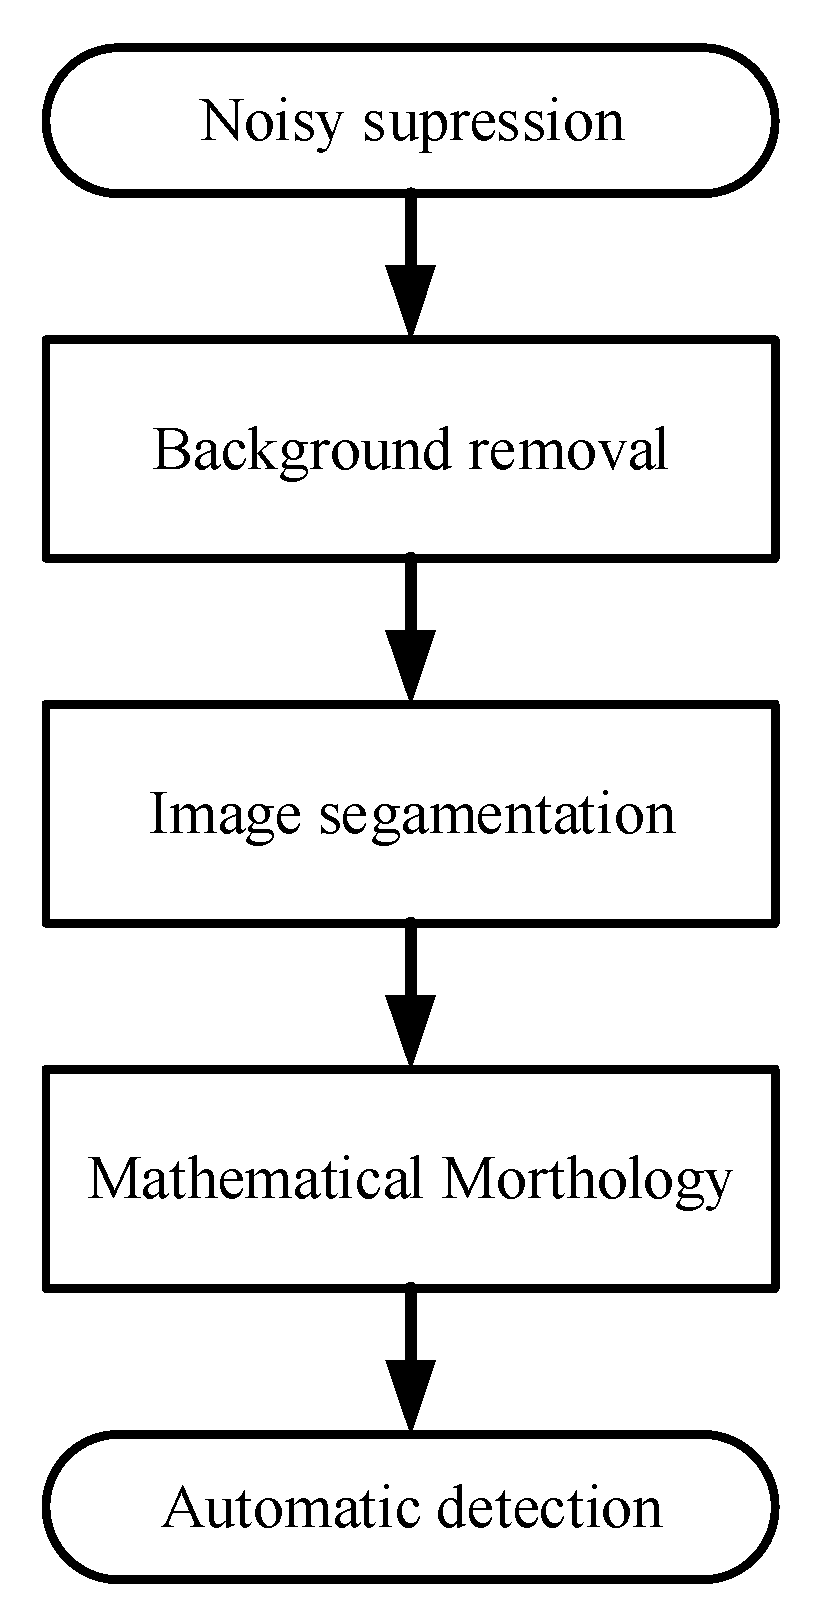
3.3.1. Noise Suppression
- Select the appropriate wavelet and wavelet decomposition level N, each will obtain the wavelet coefficients of low-frequency components and high-frequency components, that is, approximation signals and detail signals. Continue to perform wavelet decomposition on approximation signals and obtain a set of wavelet coefficients;
- Perform quantization processing on the wavelet coefficients obtained through decomposition, based on the threshold method, to estimate wavelet coefficients;
- Use the estimated wavelet coefficients to perform inverse wavelet transformation, which also known as wavelet reconstruction, to obtain a noise-suppressed image.
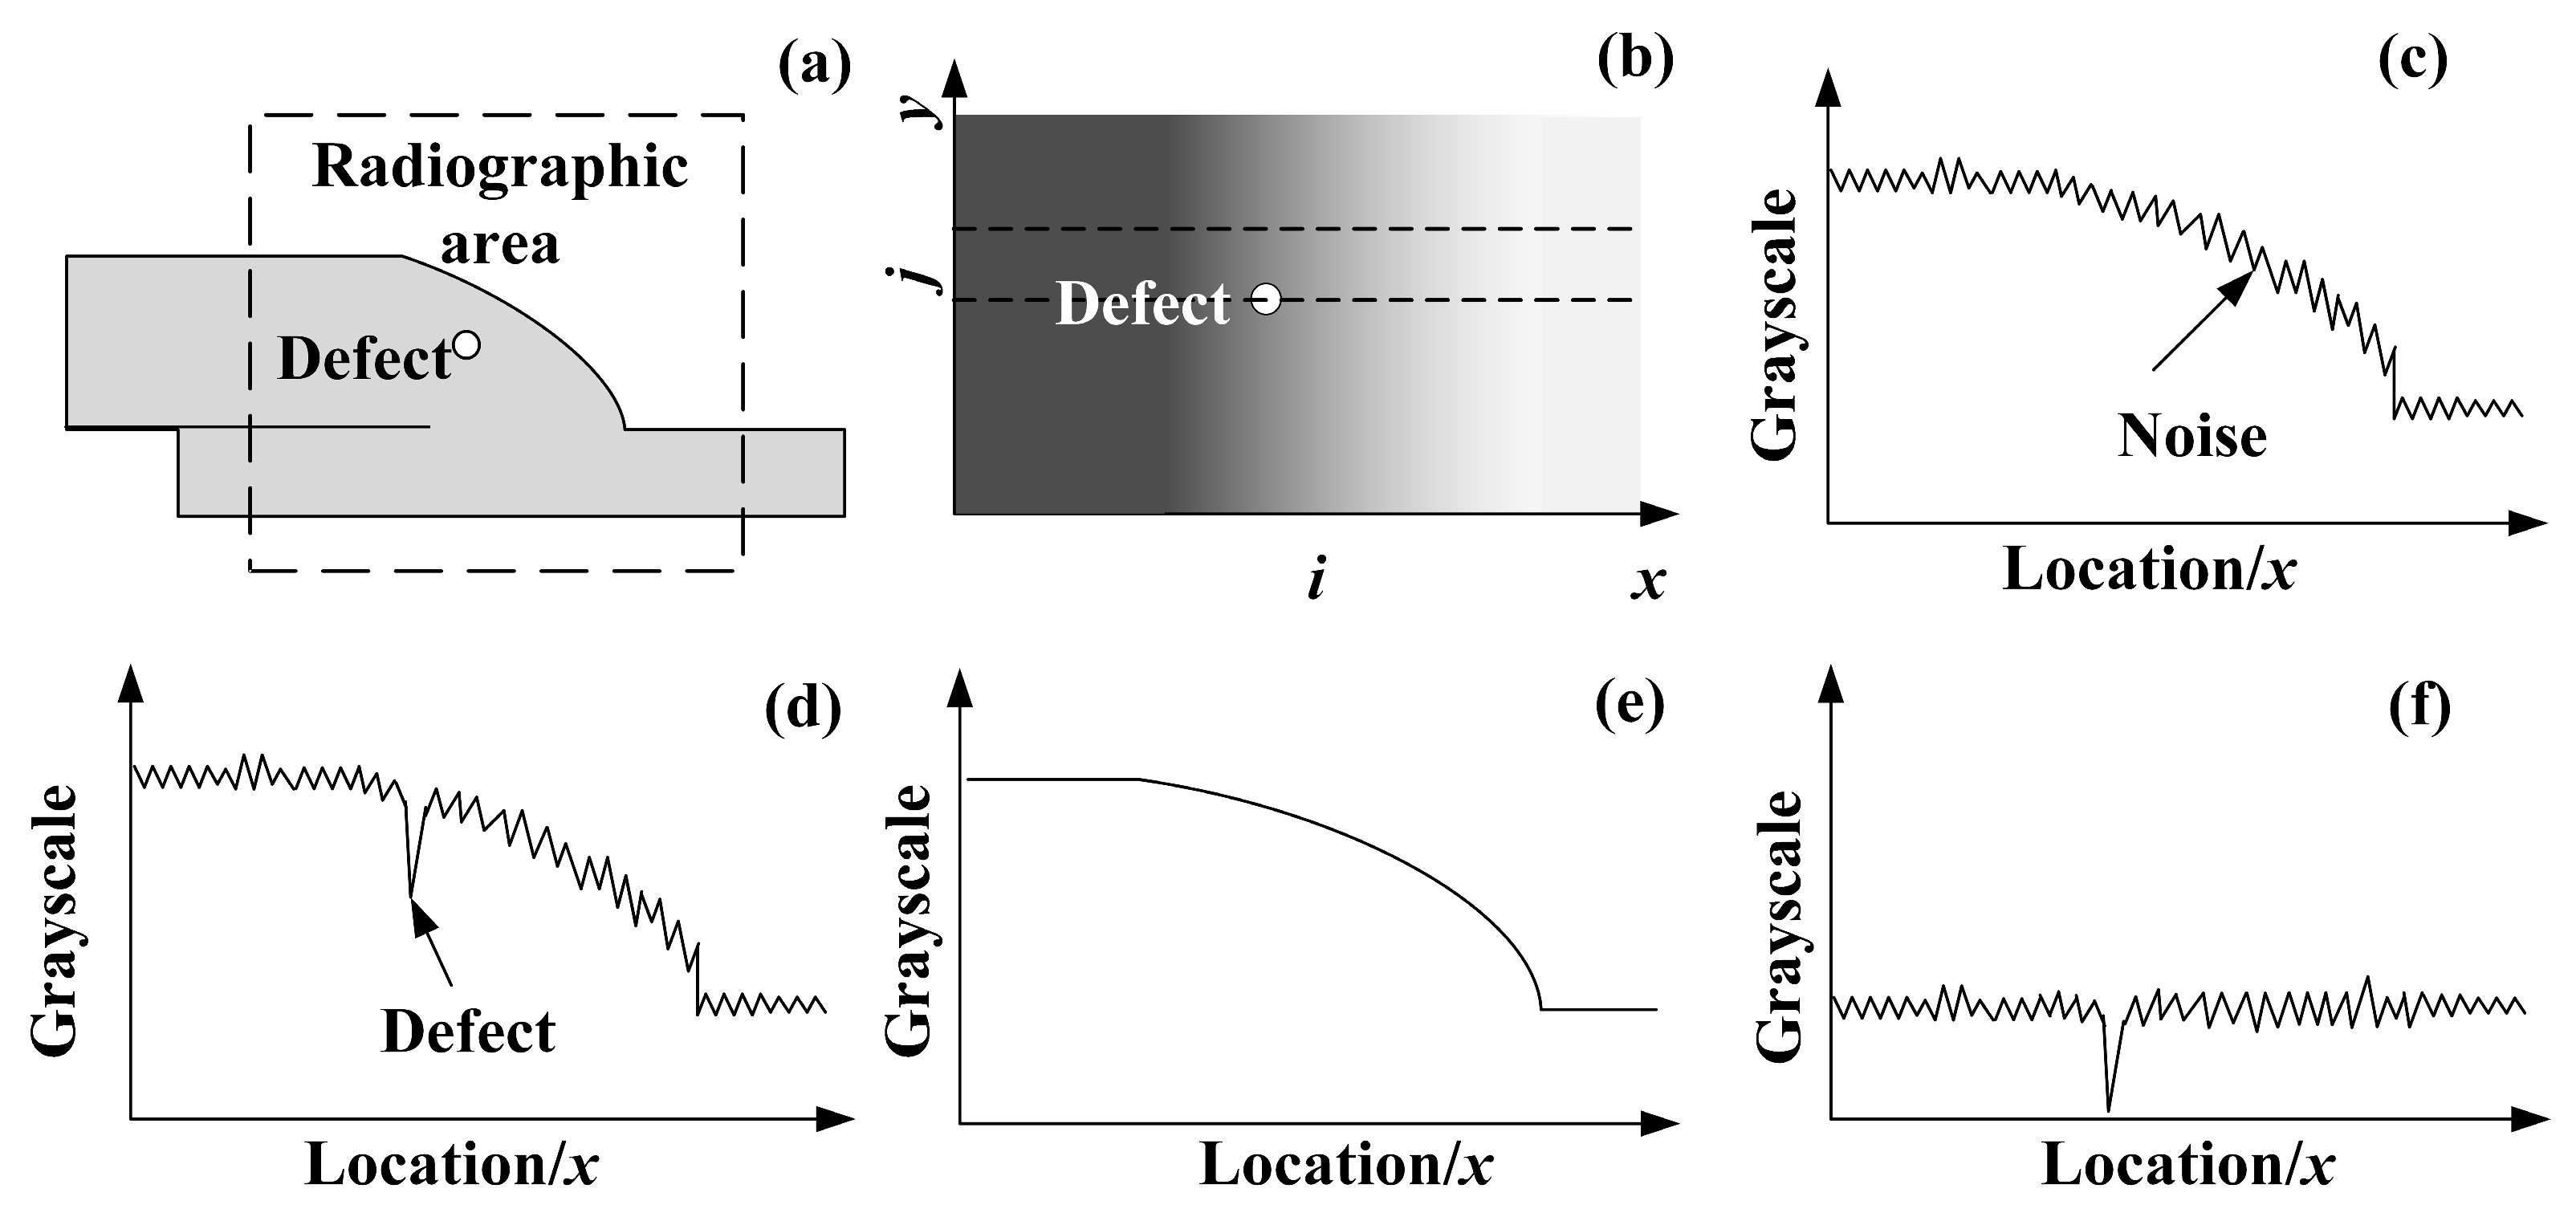
3.3.2. Background Removal
3.3.3. Image Segmentation
- Set the program terminal parameter . At the same time, select a suitable threshold value based on grayscale distribution;
- Segment the image with and all pixels can be divided into two sets: set A includes pixels with greater grayscale value than and set B includes pixels with smaller grayscale values than ;
- Calculate the average grayscale value of each set and get and , the new threshold can be obtained using formula (11):
- Terminate the program when the optimal threshold is found, which satisfies the constrain in formula (12):
3.3.4. Mathematical Morphology
4. Experimental Results and Analysis
4.1. Image Pre-Processing
4.2. Automatic Defects Detection
5. Discussion
6. Conclusions
- The characteristics of digital X-ray images of lap weld structures with unequal thickness plates are analyzed and researched. Firstly, the variation in the thickness of the workpiece leads to differences in the grayscale of the image background and continuous changes in the grayscale of the weld zone. Secondly, the position of the weld seam in the radiograph is not vertical and the place of it is uncertain.
- To facilitate automatic defect detection, the distribution of weld seam in the radiograph is first preprocessed to be vertical. First, the moment invariants method is introduced to calculate the inclination angle. Then, rigid body transformation is applied to fulfill image correction. The preprocessing of the original radiograph provided a solid foundation for subsequent work.
- Based on preprocessing, a background removal method through background simulation was applied to the image. This resulted in obtaining the radiographic foreground image through background removal.
- Through threshold segmentation and mathematical morphology, a binary image of defects is obtained. The automatic recognition of defects in the X-ray radiograph of the lap joint with an unequal thickness plate was achieved.
- The proposed method enables automatic recognition, sizing, measuring, and locating of defects. It is an image processing-based method that does not require a large number of samples and training, as machine learning methods do.
Author Contributions
Funding
Institutional Review Board Statement
Informed Consent Statement
Data Availability Statement
Acknowledgments
Conflicts of Interest
References
- José, A.; Santiago, P.; Juan, V.; Manuel, D. Advanced Comparison of Phased Array and X-rays in the Inspection of Metallic Welding. Materials 2022, 15, 7108. [Google Scholar] [CrossRef] [PubMed]
- Xu, G.; Li, P.; Li, L.; Hu, Q.; Zhu, J.; Gu, X.; Du, B. Influence of Arc Power on Keyhole-Induced Porosity in Laser + GMAW Hybrid Welding of Aluminum Alloy: Numerical and Experimental Studies. Materials 2019, 12, 1328. [Google Scholar] [CrossRef] [PubMed]
- Masoud, S.; Martin, S.; Thomas, K.; Norbert, H.; Bernhard, R. A Review of Non-Destructive Testing (NDT) Techniques for Defect Detection: Application to Fusion Welding and Future Wire Arc Additive Manufacturing Process. Metals 2022, 15, 3697. [Google Scholar]
- DebRoy, T.; Wei, H.L.; Zuback, J.S.; Mukherjee, T.; Elmer, J.W.; Milewski, J.O.; Beese, A.M.; Wilson-Heid, A.; De, A.; Zhang, W. Additive manufacturing of metallic components—Process, structure and properties. Prog. Mater. Sci. 2018, 92, 112–224. [Google Scholar] [CrossRef]
- Andrew, E.; Athanasios, T.; Yevgen, G. Very High Cycle Fatigue of Welds: A Review. Metals 2023, 13, 1860. [Google Scholar] [CrossRef]
- Rozemarijn, V.; Andreas, F.; Colin, J.; Nickolas, P. Innovations in thoracic imaging: CT, radiomics, AI and x-ray velocimetry. Respirology 2022, 27, 818–833. [Google Scholar]
- Max, F.; Ronay, A.; Yung-Tsun, T.L.; Kincho, H.L. Detection and Segmentation of Manufacturing Defects with Convolutional Neural Network and Transfer Learning. Smart Sustain. Manuf. Syst. 2018, 2, 1. [Google Scholar]
- Zimu, X.; Ki-Young, S.; Madan, M.G. Development of a CNN edge detection model of noised X-ray images for enhanced performance of non-destructive testing. Measurement 2021, 174, 109012. [Google Scholar]
- Zeng, J.L.; Zou, Y.R.; Du, D.; Chang, B.H.; Pan, J.L. Research on a visual weld detection method based on invariant moment. Ind. Robot. -Int. J. Robot. Res. Appl. 2015, 42, 117–128. [Google Scholar]
- Diana, C.; Sabin, M.; Muhammad, A.M.; Mihail, L.; Ioana, P.; Adrian, S.; Cosmin, D.; Ion, T.; Andrei, C.P. Use of X-ray Computed Tomography for Assessing Defects in Ti Grade 5 Parts Produced by Laser Melting Deposition. Metals 2020, 10, 1408. [Google Scholar] [CrossRef]
- Isabel, D.; Thomas, F.; Lovre, K.O.; Matej, V. Brief Review on Experimental and Computational Techniques for Characterization of Cellular Metals. Metals 2020, 10, 726. [Google Scholar] [CrossRef]
- Katsunori, M.; Wataru, Y.; Margie, O.; Atsushi, M. Evaluation of gratings for X-ray and neutron phase imaging techniques by using x-ray projection microscope. Int. Workshop X-Ray Neutron Phase Imaging Gratings 2012, 1466, 193–198. [Google Scholar]
- Gilbert, A.C.; Nils, B.; Stephan, A.; Frédéric, D.G.; René, G.; Nathalie, B. Advanced Non-Destructive in Situ Characterization of Metals with the French Collaborating Research Group D2AM/BM02 Beamline at the European Synchrotron Radiation Facility. Metals 2019, 9, 352. [Google Scholar] [CrossRef]
- Gábor, V.; Antal, G.; Inge, U.; Ildikó, S.; Ferenc, G.; Rachid, C. Nondestructive Investigation of Neutron Irradiation Generated Structural Changes of Reactor Steel Material by Magentic Hyteresis Method. Metals 2020, 10, 642. [Google Scholar]
- Wei, T.; Stylianos, C.; Caleb, M.S.; Roger, G.M.; Robert, H. Study of Mechanical Properties, Microstructure, and Residual Stresses of AISI 304/304L Stainless Steel Submerged Arc Weld for Spent Fuel Dry Storage Systems. Metals 2024, 14, 262. [Google Scholar] [CrossRef]
- Yoshihiko, H.; Daisuke, K.; Masataka, O.; Mizuki, A.; Takuya, O.; Yoshiaki, M.; Hidetoshi, F.; Yuichiroh, K.; Hironao, M.; Kenji, A. X-ray Radiography Inspection of Pores of Thin Aluminum Foam during Press Forming Immediately after Foaming. Metals 2021, 11, 1226. [Google Scholar] [CrossRef]
- Qian, W.; Dong, S.; Chen, L.; Ren, Q. Image enhancement method for low-light pipeline weld X-ray radiographs based on weakly supervised deep learning. NDTE Int. 2024, 143, 103049. [Google Scholar] [CrossRef]
- Hardik, D.V.; Kush, P.M.; Vishvesh, B.; Bharat, D. Processing and evaluation of dissimilar Al-SS friction welding of pipe configuration: Nondestructive inspection, properties, and microstructure. Measurement 2021, 167, 108305. [Google Scholar]
- Wang, Y.; Guo, H. Weld Defect Detection of X-ray Images Based on Support Vector Machine. IETE Tech. Rev. 2014, 31, 137–142. [Google Scholar] [CrossRef]
- Abdelhak, M.; Fakhita, R. Fast segmentation method for defects detection in radiographic images of welds. In Proceedings of the 2009 IEEE/ACS International Conference on Computer Systems and Applications, Rabat, Morocco, 10–13 May 2009; Volume 1, pp. 857–860. [Google Scholar]
- Wang, Y.; Sun, Y.; Lv, P.; Wang, H. Detection of line weld defects based on multiple thresholds and support vector machine. NDTE Int. 2008, 41, 517–524. [Google Scholar] [CrossRef]
- Jensen, O.; Kaiser, J.; Lachaux, J.-P. Human gamma-frequency oscillations associated with attention and memory. Trends Neurosci. 2007, 30, 317–324. [Google Scholar] [CrossRef] [PubMed]
- Avital, N.; Nahum, E.; Levi, G.C.; Malka, D. Cognitive State Classification Using Convolutional Neural Networks on Gamma-Band EEG Signals. Appl. Sci. 2024, 14, 8380. [Google Scholar] [CrossRef]
- Tang, Z.; Tian, E.; Wang, Y.; Wang, L.; Yang, T. Nondestructive Defect Detection in Castings by Using Spatial Attention Bilinear Convolutional Neural Network. Ind. Inf. 2021, 17, 82–89. [Google Scholar] [CrossRef]
- Marek, S.; Krzysztof, S.; Ewa, K. Detection of Flaws in concrete Using Ultrasonic Tomography and convolutional Neural Networks. Materials 2020, 13, 1557. [Google Scholar] [CrossRef] [PubMed]
- Liu, X.; Liu, J.; Zhang, H.; Zhang, H.Y.; Shen, X. DGICR-Net: Dual-Graph Interactive Consistency Reasoning Network for Weld Defect Recognition with Limited Labeled Samples. Instrum. Meas. 2024, 73. [Google Scholar] [CrossRef]
- Bassam GN, M.; Mouna, A.; Mohammed, H.M.; Boualem, M.; Željko, B.; Rami, S.; Sorour, A.A. Inspection of internal erosion-corrosion of elbow pipe in the desalination station. Eng. Fail. Anal. 2019, 102, 293–302. [Google Scholar]
- Yasir, Z.; Vineet, T.; Nasir, R.; Amjad, A.; Rajwali, K.; Ali, A.; Kashif, I.; Saiful, I.; Tao, W. Electrical and Optical Properties of Indium and Lead Co-Doped Cd0.9Zn0.1Te. Metals 2021, 14, 5825. [Google Scholar]
- Das, H.; Kunar, A.; Rajkumar, K.V.; Saravanan, T.; Jayakumar, T.; Tapan, K.P. Nondestructive Evaluation of Friction Stir-Welded Aluminum Alloy to Coated Steel Sheet Lap Joint. J. Mater. Eng. Perform. 2015, 24, 11. [Google Scholar] [CrossRef]
- Saravanan, T.; Lahiri, B.B.; Arunmuthu, K.; Bagavathiappan, S.; Sekhar, A.S.; Pillai VP, M.; Philip, J.; Rao BP, C.; Jayakumar, T. Non-Destructive Evaluation of Friction Stir Welded Joints by X-ray Radiography and Infrared Thermography. Procedia Eng. 2014, 86, 469–475. [Google Scholar] [CrossRef]
- Saravanan, T.; Mahadevan, S.; Mukhopadhyay, C.K. An improved quality assessment of fuel pin end plug welds using digital X-ray radiography. Digit. Radiogr. 2020, 62, 579–583. [Google Scholar] [CrossRef]



Disclaimer/Publisher’s Note: The statements, opinions and data contained in all publications are solely those of the individual author(s) and contributor(s) and not of MDPI and/or the editor(s). MDPI and/or the editor(s) disclaim responsibility for any injury to people or property resulting from any ideas, methods, instructions or products referred to in the content. |
© 2024 by the authors. Licensee MDPI, Basel, Switzerland. This article is an open access article distributed under the terms and conditions of the Creative Commons Attribution (CC BY) license (https://creativecommons.org/licenses/by/4.0/).
Share and Cite
Chi, D.; Wang, Z.; Liu, H. Automatic Defects Recognition of Lap Joint of Unequal Thickness Based on X-Ray Image Processing. Materials 2024, 17, 5463. https://doi.org/10.3390/ma17225463
Chi D, Wang Z, Liu H. Automatic Defects Recognition of Lap Joint of Unequal Thickness Based on X-Ray Image Processing. Materials. 2024; 17(22):5463. https://doi.org/10.3390/ma17225463
Chicago/Turabian StyleChi, Dazhao, Ziming Wang, and Haichun Liu. 2024. "Automatic Defects Recognition of Lap Joint of Unequal Thickness Based on X-Ray Image Processing" Materials 17, no. 22: 5463. https://doi.org/10.3390/ma17225463
APA StyleChi, D., Wang, Z., & Liu, H. (2024). Automatic Defects Recognition of Lap Joint of Unequal Thickness Based on X-Ray Image Processing. Materials, 17(22), 5463. https://doi.org/10.3390/ma17225463


