Article

A Simplified Model for Assembly Precision Information of Complex Products Based on Tolerance Semantic Relations

1
School of Mechanical Engineering, Northwestern Polytechnical University, Xi’an 710072, China
2
National Engineering Laboratory for Highway Maintenance Equipment, School of Construction Machinery, Chang’an University, Xi’an 710064, China
3
School of Aircraft Engineering, Xi’an Aeronautical University, Xi’an 710077, China
*
Authors to whom correspondence should be addressed.
Sustainability 2018, 10(12), 4482; https://doi.org/10.3390/su10124482
Submission received: 22 October 2018 / Revised: 17 November 2018 / Accepted: 19 November 2018 / Published: 28 November 2018
(This article belongs to the Special Issue Sustainable Product Lifecycle: The Role of ICT)

Abstract

:
Assembly precision analysis (APA) plays an important role in the whole life cycle of complex products design, manufacturing, assembly and even remanufacturing. Assembly precision information model (APIM) is usually complex since it is affected by many factors, such as design tolerance of parts, assembly process scheme, assembly sequence planning and tolerance of positioning tooling, etc. Therefore, it is of practical significance for APA to reasonably reduce the workload of assembly precision information (API) modeling. A semantic simplification approach for APIM is proposed in this paper, which mainly takes semantic relations between APIM and design tolerance of parts into consideration. Initially, ontology of structure knowledge of APIM is constructed according to a tolerance standard. Furthermore, simplification rules are respectively established by considering two semantic relations: one semantic relation between deviation change direction and deviation accumulation direction and the other semantic relation among multiple geometric characteristics on the same geometric feature. Additionally, by utilizing ontology reasoning function, the simplified semantic APIM is generated. Finally, the effectiveness of the proposed method is demonstrated by a practical example of engine front auxiliary drive equipment. It is expected that our work would lay the foundation for APA of complex products based on actual measured data.

1. Introduction

In the increasing intensive competition of manufacturing market, performance and quality of product has been widely considered as key prerequisite for the success of a company. Performance and quality of product is directly influenced by product assembly quality. Assembly work is one of the most important stage in product lifecycle management accounting for 40–50% of total manufacturing time and more than 20% of total manufacturing cost [1]. Assembly precision analysis (APA) can predict assembly quality in the stage of design or process planning [2], which can optimize assembly precision and provide useful and reasonable advices to enhance and improve product assembly quality. Consequently, APA technologies are expected due to the production requirements of complex products [3].
As of now, complex products have tendencies to be collaboratively designed and manufactured, which is frequently specified different tolerance types and values for the same kind of geometry feature by different product designers. Taking geometric feature cylinder being controlled as an example to illustrate, cylindricity tolerance is able to control longitudinal and cross section of a cylinder, such as axis straightness, roundness tolerance, etc. While cylinder also can be controlled by a tolerance set of straightness and roundness. In the process of product design, assembly quality of product will be influenced by design tolerance of parts. These situations will eventually make product assembly quality unstable and arise uncertain of product quality. Therefore, it is necessary to carry out APA before manufacturing to guarantee product assembly quality.
As a semantics-based information integration in various organizations has been hindered by differences in the software applications and by the structural and semantic heterogeneity of the different information sources. Due to the nature of being independently designed and built existing information systems, even for the same domain, are often heterogeneous in terms of their: (1) supporting infrastructures such as hardware platforms and operating systems; (2) syntactic representations of information; (3) schematic designs of information models; and (4) semantics of information. This problem has made information retrieval and collaboration among information systems extremely difficult. There exists a requirement of integrate these information sources and applications to provide consistent services to global users [4]. Most computer-aided design (CAD) systems can fully define product geometric model and GD&T (geometric dimensioning and tolerancing) information. When transferring product model to downstream system for precision analysis, GD&T information cannot be transformed and transmitted through STEP neutral files. Consequently, designers entail manually modeling GD&T information in precision analysis software. The data amount of assembly precision information model (APIM) is large which is affected by many factors such as design tolerance of parts, assembly process scheme, assembly sequence planning and tolerance of positioning tooling, etc. Consequently, the workload of modeling assembly precision information (API) is redundant which affects efficiency of APA and has possibilities of omission and error of important API information.
Based on aforementioned situations, simplifying APIM can be a method to solve these problems. Semantic definition and expression of product tolerance information is the basis of the approach. Ontology modelling, one of the commonly used modelling methods in data management, can express unified, structural and semantic information and has reasoning capabilities due to the formal and logic-based specifications underlying in information model. Therefore, the method of semantic simplification of APIM is proposed in this paper, which mainly takes semantic relations between APIM and design tolerance of parts into consideration. The semantic APIM is simplified according to SWRL (Semantic Web Rule Language) rules which omit some tolerance information having less impact on APA.
The remainder of this paper is organized as follows. In Section 2, an overview of related work about tolerance representation is provided. In Section 3, the simplified semantic ontology model of API is expressed in detail. In Section 4, the assembly of engine front auxiliary drive equipment is taken as an example to verify the availability of simplified semantic APIM. Finally, Section 5 concludes the research work and discusses future tasks.

2. Related Work

With the ever-increasing demand of performance and quality for complex products, traditional linear dimension tolerance is not able to meet functional requirements of complex products as well as production assembly requirements of complex products. As new generations of tolerancing standards, i.e., ASME Y14.5-2009 and ISO 1101 were released and popularized, GD&T are generally accepted as industry practices. The advent of GD&T brings the idea that geometric features of a part should be controlled in the geometric characteristics of size, form tolerance, orientation tolerance, location tolerance, runout tolerance, profile tolerance and surface texture [5]. Variations of geometric features caused by geometric characteristics are in three-dimension space, which are inadequate to be considered by traditional one/two dimensional methods. It is reasonable that APA has been developed from traditional one/two dimensional analysis to three dimensional analysis [6]. APA guarantees product to work correctly, since it evaluates the influence of tolerances assigned to assembly components on product. There are three main approaches for evaluation of tolerance effect, i.e., Worst Case (WC) method, Root Mean Square (RMS) method and Monte Carlo (MC) method. The WC method has been utilized in the process of design during past decades because of its convenience to estimate tolerance accumulation of linear tolerance specifications. However, it is conservative to overestimate tolerance effect on assembly precision by taking the sum of individual worst values. The WC method increase manufacturing cost of product. The RMS method makes an assumption that dimensions of parts are normal distributions, which is not in line with actual production situations that fabricating parts by different process schemes and adjusting processes of fabricating parts according to manufacturing situations. The MC method can deal with different types of statistical distributions of deviation and can give an accurate approximation of APA. Consequently, the MC method is an effective method for APA of product.
APA mainly includes two research aspects, namely one aspect of tolerance representation and modeling and the other aspect of deviation propagation and accumulation. The purpose of tolerance representation and modeling is to organize and express tolerance information in a computer-readable and computer-understandable format so that tolerance information can be used effectively and efficiently, which lays the foundation for APA of product. During past decades, a substantial number of studies have been devoted to the research of tolerance representation and modeling. Scholars pay much attention on mathematical expressions of tolerance information. Mathematical definition-based models are utilized to represent boundaries of geometric feature, meanwhile tolerance information assigned on a geometric feature can be expressed by this method [7]. A variety of mathematical models, such as offset model [8,9,10], parametric model [11,12], vector equation model [13], kinematic model [14,15,16], degree of freedom (DOF) model [17,18,19], variational geometry model such as vectors [12], small displacement torsor (SDT) [20], matrix [21,22] and metric tensors [23] have been proposed. However, the most widely used mathematical model is statistical distribution model [24]. All these mathematical models aim at specifying tolerance information in an unambiguous and rigorous way. However, using mathematical expressions to describe tolerance information is not computer-readable and not computer-understandable.
Tolerance representation model aims to reasonably and effectively represent semantics of tolerance information in computer. Consequently, from semantic perspective of tolerance information, tolerance representation models, including technologically and topologically related surface (TTRS) model [25], GeoSpelling model [26],surface graph model such as constructive solid geometry (CSG) model [27], boundary representation (B_rep) model [28], tolerance network model [29,30,31], tolerance-map (T-Map) model [30,32] and graph-based model [32], have been presented. Comparing with above tolerance representation models, Web Ontology Language (OWL) ontology is capable of describing complex semantic structures of tolerance information more accurately which has advantages in the aspects of conformance checking, computer-interpretable format, semantic representation, and logic-based reasoning. Lu et al. [33] put forward OWL ontology representation of variational geometric constraint information, and Qin et al. [34,35] presented OWL ontology representation of tolerance zone information and composite tolerance information. In addition to using OWL ontology to achieve tolerance information representation, Zhong et al. [36,37] used OWL ontology to study automatic generation of assembly tolerance types in CAD systems; Ahmed and Han [38] leveraged OWL to implement the exchange of tolerance information indicated in CAD systems among heterogeneous CAD systems; and Qin et al. [39] designed an OWL ontology supported case-based reasoning approach to assist tolerance specification.
As can be seen from the above literature review, studies about computerized representation of tolerance information have been paid much attention during past decades. A variety of kinds of tolerance information representation models have been presented in this field, where OWL ontology model is one of the most explicit semantic representative kinds. However, very little work has addressed simplifying APIM. It is gratifying that the existing research results about semantic representation of tolerance information have shown the feasibility of simplifying APIM by semantic method. Consequently, we extend semantic representation of tolerance information into domain of simplification of APIM.

3. Approach of Simplification of APIM

APA plays an important role in the whole lifecycle of complex products design, manufacturing, assembly and even remanufacturing. Based on parts with tolerance information, assembly process of product model is simulated to predict assembly precision of product model to achieve assembly-oriented design and optimization of part sizes and deviations and to meet assembly precision requirement of product. The focus of this paper is the segment of assembly precision of product model, as shown in Figure 1.
Initially, description logic terminological axioms are leveraged to represent structure knowledge of APIM according to tolerance standards. Furthermore, a set of rules are established to utilize to simplify APIM which cannot be simplified only by the description logic semantic of APIM. Additionally, information related to assembly precision of product is extracted from CAD/CAPP system, which includes design tolerance of parts, assembly process scheme and assembly sequence planning. The APIM regarding to design tolerance of product is instantiated. The last step is that simplified semantic APIM of product is generated by leveraging reasoning function. According to simplified semantic model of API established, APIM of product is constructed in the precision analysis software and APA of product is implemented. Meanwhile, outcomes of APA of two kinds of APIMs, i.e., simplified APIM and not-simplified APIM are compared to verify the effectiveness of simplified semantic APIM. If results of APA of product model meet design precision requirement, the preparation for part production is started. Otherwise, it is necessary to adjust assembly process scheme and demands of design. The details of the procedure of simplification of APIM are respectively explained in the following sub-sections: (1) representation of structure knowledge of APIM; (2) representation of rule knowledge of simplification of APIM.

3.1. Representation of Structure Knowledge of APIM

The related terminologies and definitions should be firstly identified to represent structure knowledge of APIM, such as geometric characteristic, geometric tolerance zone (GTZ) and datum, etc. The class diagram of APIM is hierarchical expression starting from two perspectives of assembly structure and tolerance information, which are the coarsest classes of APIM and can be further decomposed into finer subclasses.
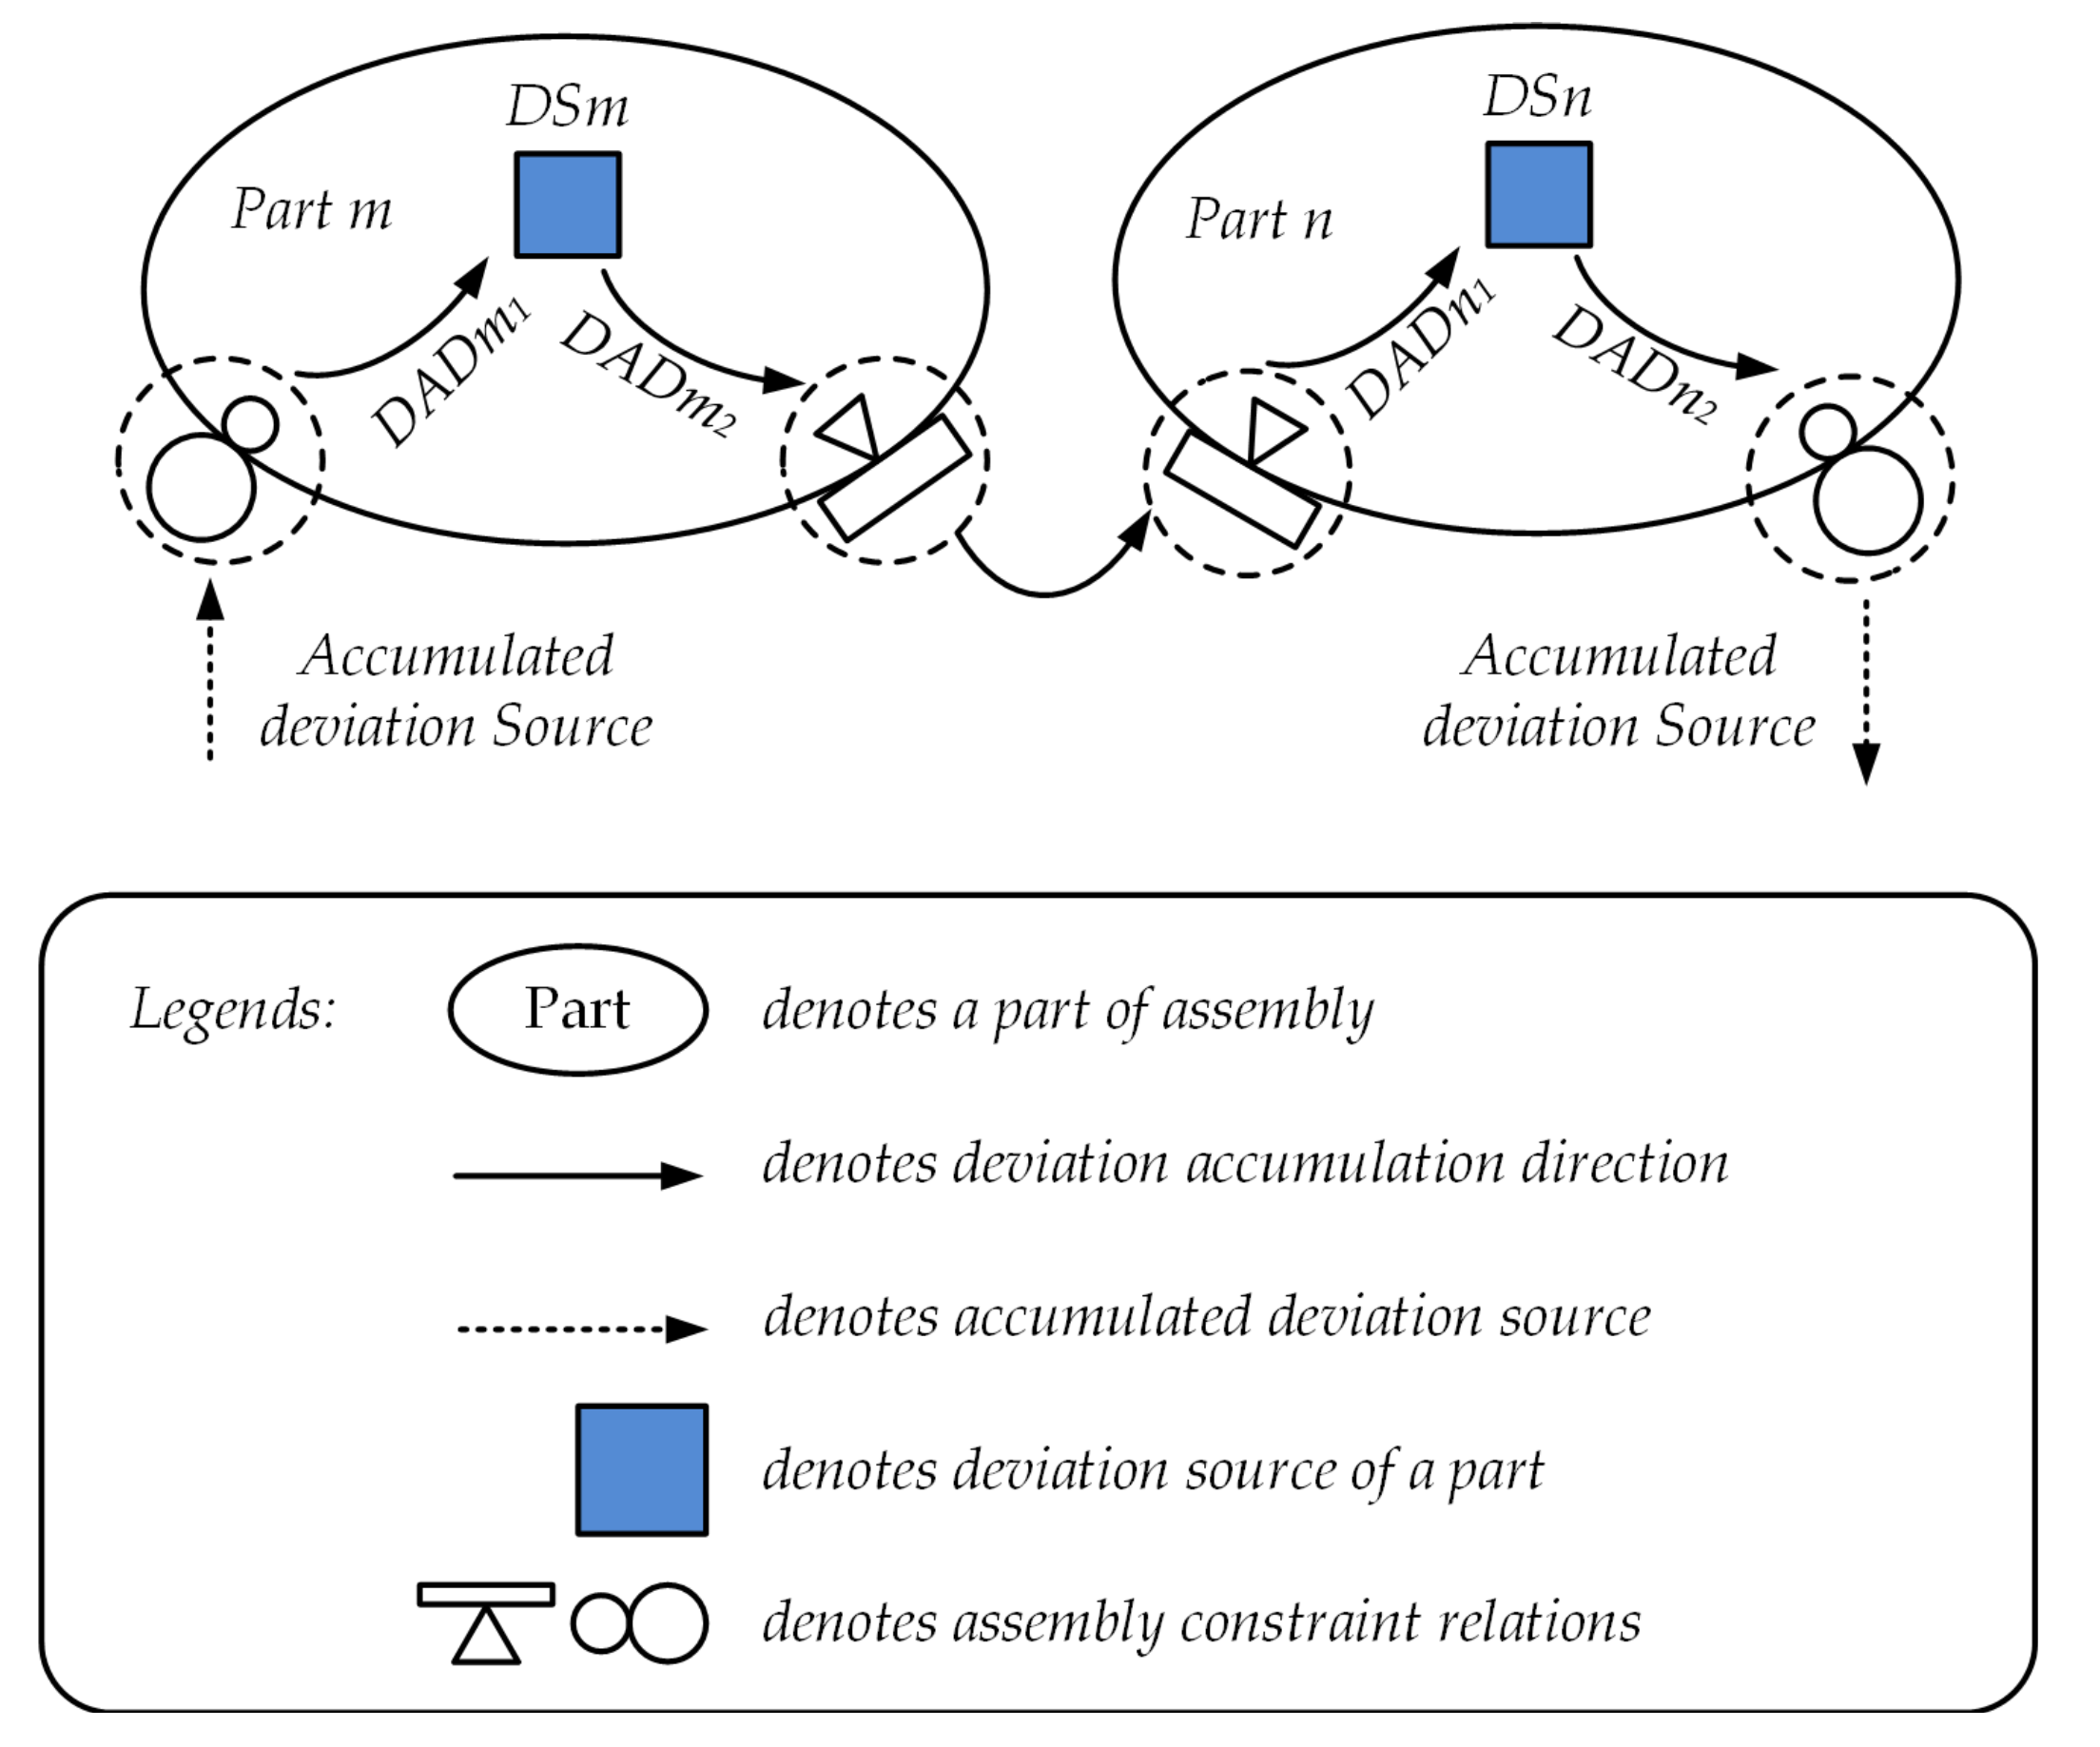
Assembly structure includes component level and part level, which records assembly constraint relations between parts. According to assembly constraint relation between parts, accumulated deviation sources are transmitted between parts along a specific deviation accumulation direction in the process of assembly, as illustrated in Figure 2. Accumulated deviation source enters into part m via the mating surfaces, passing along deviation accumulation direction DADm1 and coupling with deviation source of part m DSm. In the next moment, accumulated deviation source passes along deviation accumulation direction DADm2 and enters into part n from the mating surfaces, and so on.
A part is constituted of a set of geometric features, and a geometric feature is the carrier of tolerance information. According to tolerancing standard specifications, there exist three aspects of geometric tolerance information, namely geometric characteristic, GTZ and datum. Geometric characteristic stipulates form tolerance, orientation tolerance, location tolerance, runout tolerance and profile tolerance. Form tolerance is independent geometric characteristic associated with an ideal geometric feature of a part, while orientation tolerance, location tolerance and runout tolerance are dependent geometric characteristics which entail geometric features as reference datum. Profile tolerance consists of two cases: profile tolerance with reference datum and profile tolerance without reference datum. Datum is used to construct reference geometric feature to position tolerance, orientation tolerance, runout tolerance and profile tolerance on a tolerance zone. GTZ is a region that real geometric feature is permitted with the limitation of ideal geometric feature.
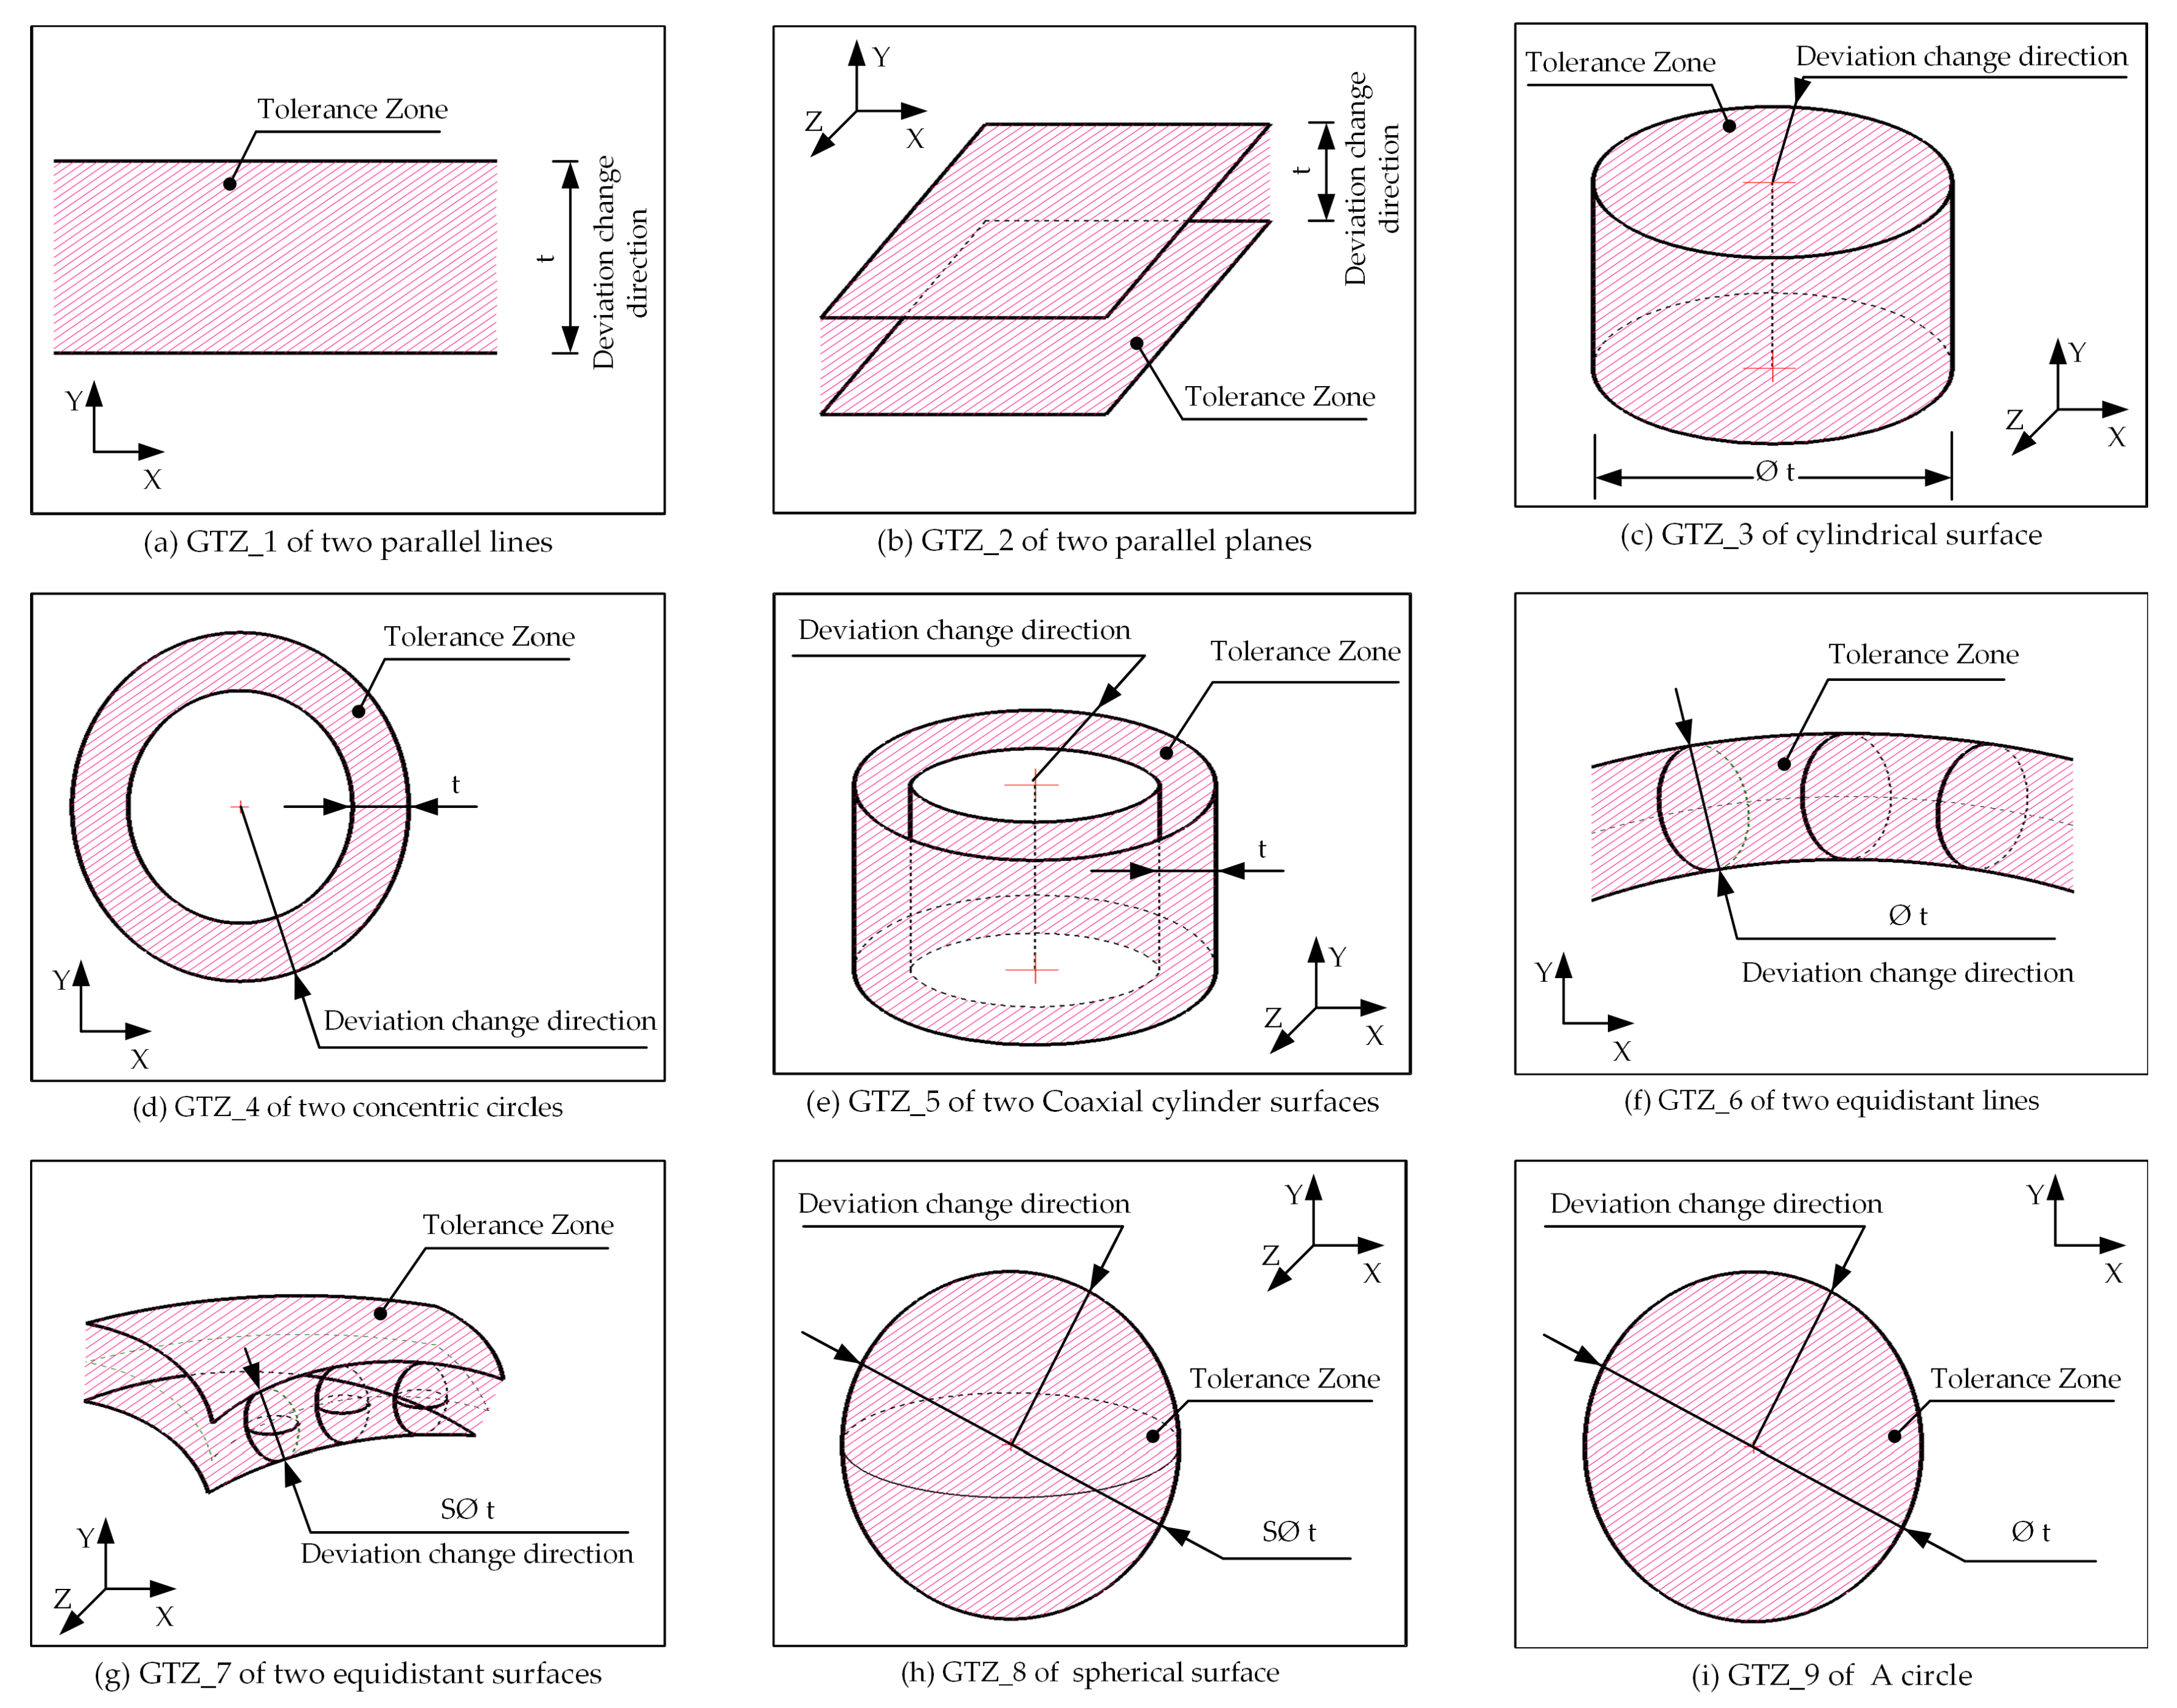
There are altogether nine basic types of GTZs in geometrical tolerancing standard. As depicted in Figure 3, shapes and deviation change directions of nine basic GTZs are as follows:
(1) GTZ_1 denotes that a GTZ is limited by two parallel lines and deviation change direction is along value of GTZ_1 whose distance between parallel lines is tolerance value t, as shown in Figure 3a;
(2) GTZ_2 denotes that a GTZ is limited by two parallel planes and deviation change direction is along value of GTZ_2 whose distance between parallel planes is tolerance value t, as shown in Figure 3b;
(3) GTZ_3 denotes that a GTZ is limited by cylinder surface and deviation change direction is along radius inside GTZ_3 whose diameter is tolerance value diameter t, as shown in Figure 3c;
(4) GTZ_4 denotes a GTZ is limited by two concentric circles and deviation change direction is along radius inside GTZ_4 whose radius difference is tolerance value t, as shown in Figure 3d;
(5) GTZ_5 denotes a GTZ is limited by two coaxial cylinder surfaces and deviation change direction is along radius inside GTZ_5 whose radius difference is tolerance value t, as shown in Figure 3e;
(6) GTZ_6 denotes a GTZ is limited by two equidistant lines and deviation change direction is along radius inside GTZ_6 whose distance between two equidistant lines is tolerance value diameter t, as shown in Figure 3f;
(7) GTZ_7 denotes a GTZ is limited by two equidistant surfaces and deviation change direction is along radius inside GTZ_7 whose distance between two equidistant surfaces is tolerance value spheres of diameter t, as shown in Figure 3g;
(8) GTZ_8 denotes a GTZ is limited by a sphere surface and deviation change direction is along radius inside GTZ_8 whose diameter is tolerance value spheres of diameter t, as shown in Figure 3h;
(9) GTZ_9 denotes a GTZ is limited by a circle and deviation change direction is along radius inside GTZ_9 whose diameter is tolerance value diameter t, as shown in Figure 3i.
Let Part and Geometric_Feature be OWL classes assertion which indicate a part of assembly and a geometric feature of a part, respectively. Let has_Assembly_Relation and has_Deviation_Accumulation_Direction be OWL object properties assertion which denote has an assembly constraint relation between parts and a part has deviation accumulation direction, respectively. Let has_Geometric_Feature be OWL object property assertion which denotes a part has a geometric feature. Let has_Geometric_Characteristic be an OWL property assertion which denotes a geometric feature has a geometric characteristic. Let has_GTZ be an OWL property assertion which denotes a geometric feature has a certain kind of GTZ. Let has_Datum be an OWL object property assertion which denotes geometric feature has a reference geometric feature. Let has_deviation_change_direction be an OWL property assertion which denotes a geometric feature has deviation change direction. Let has_Value_of_Tolerance be an OWL data property assertion which denotes tolerance value of geometric characteristic.
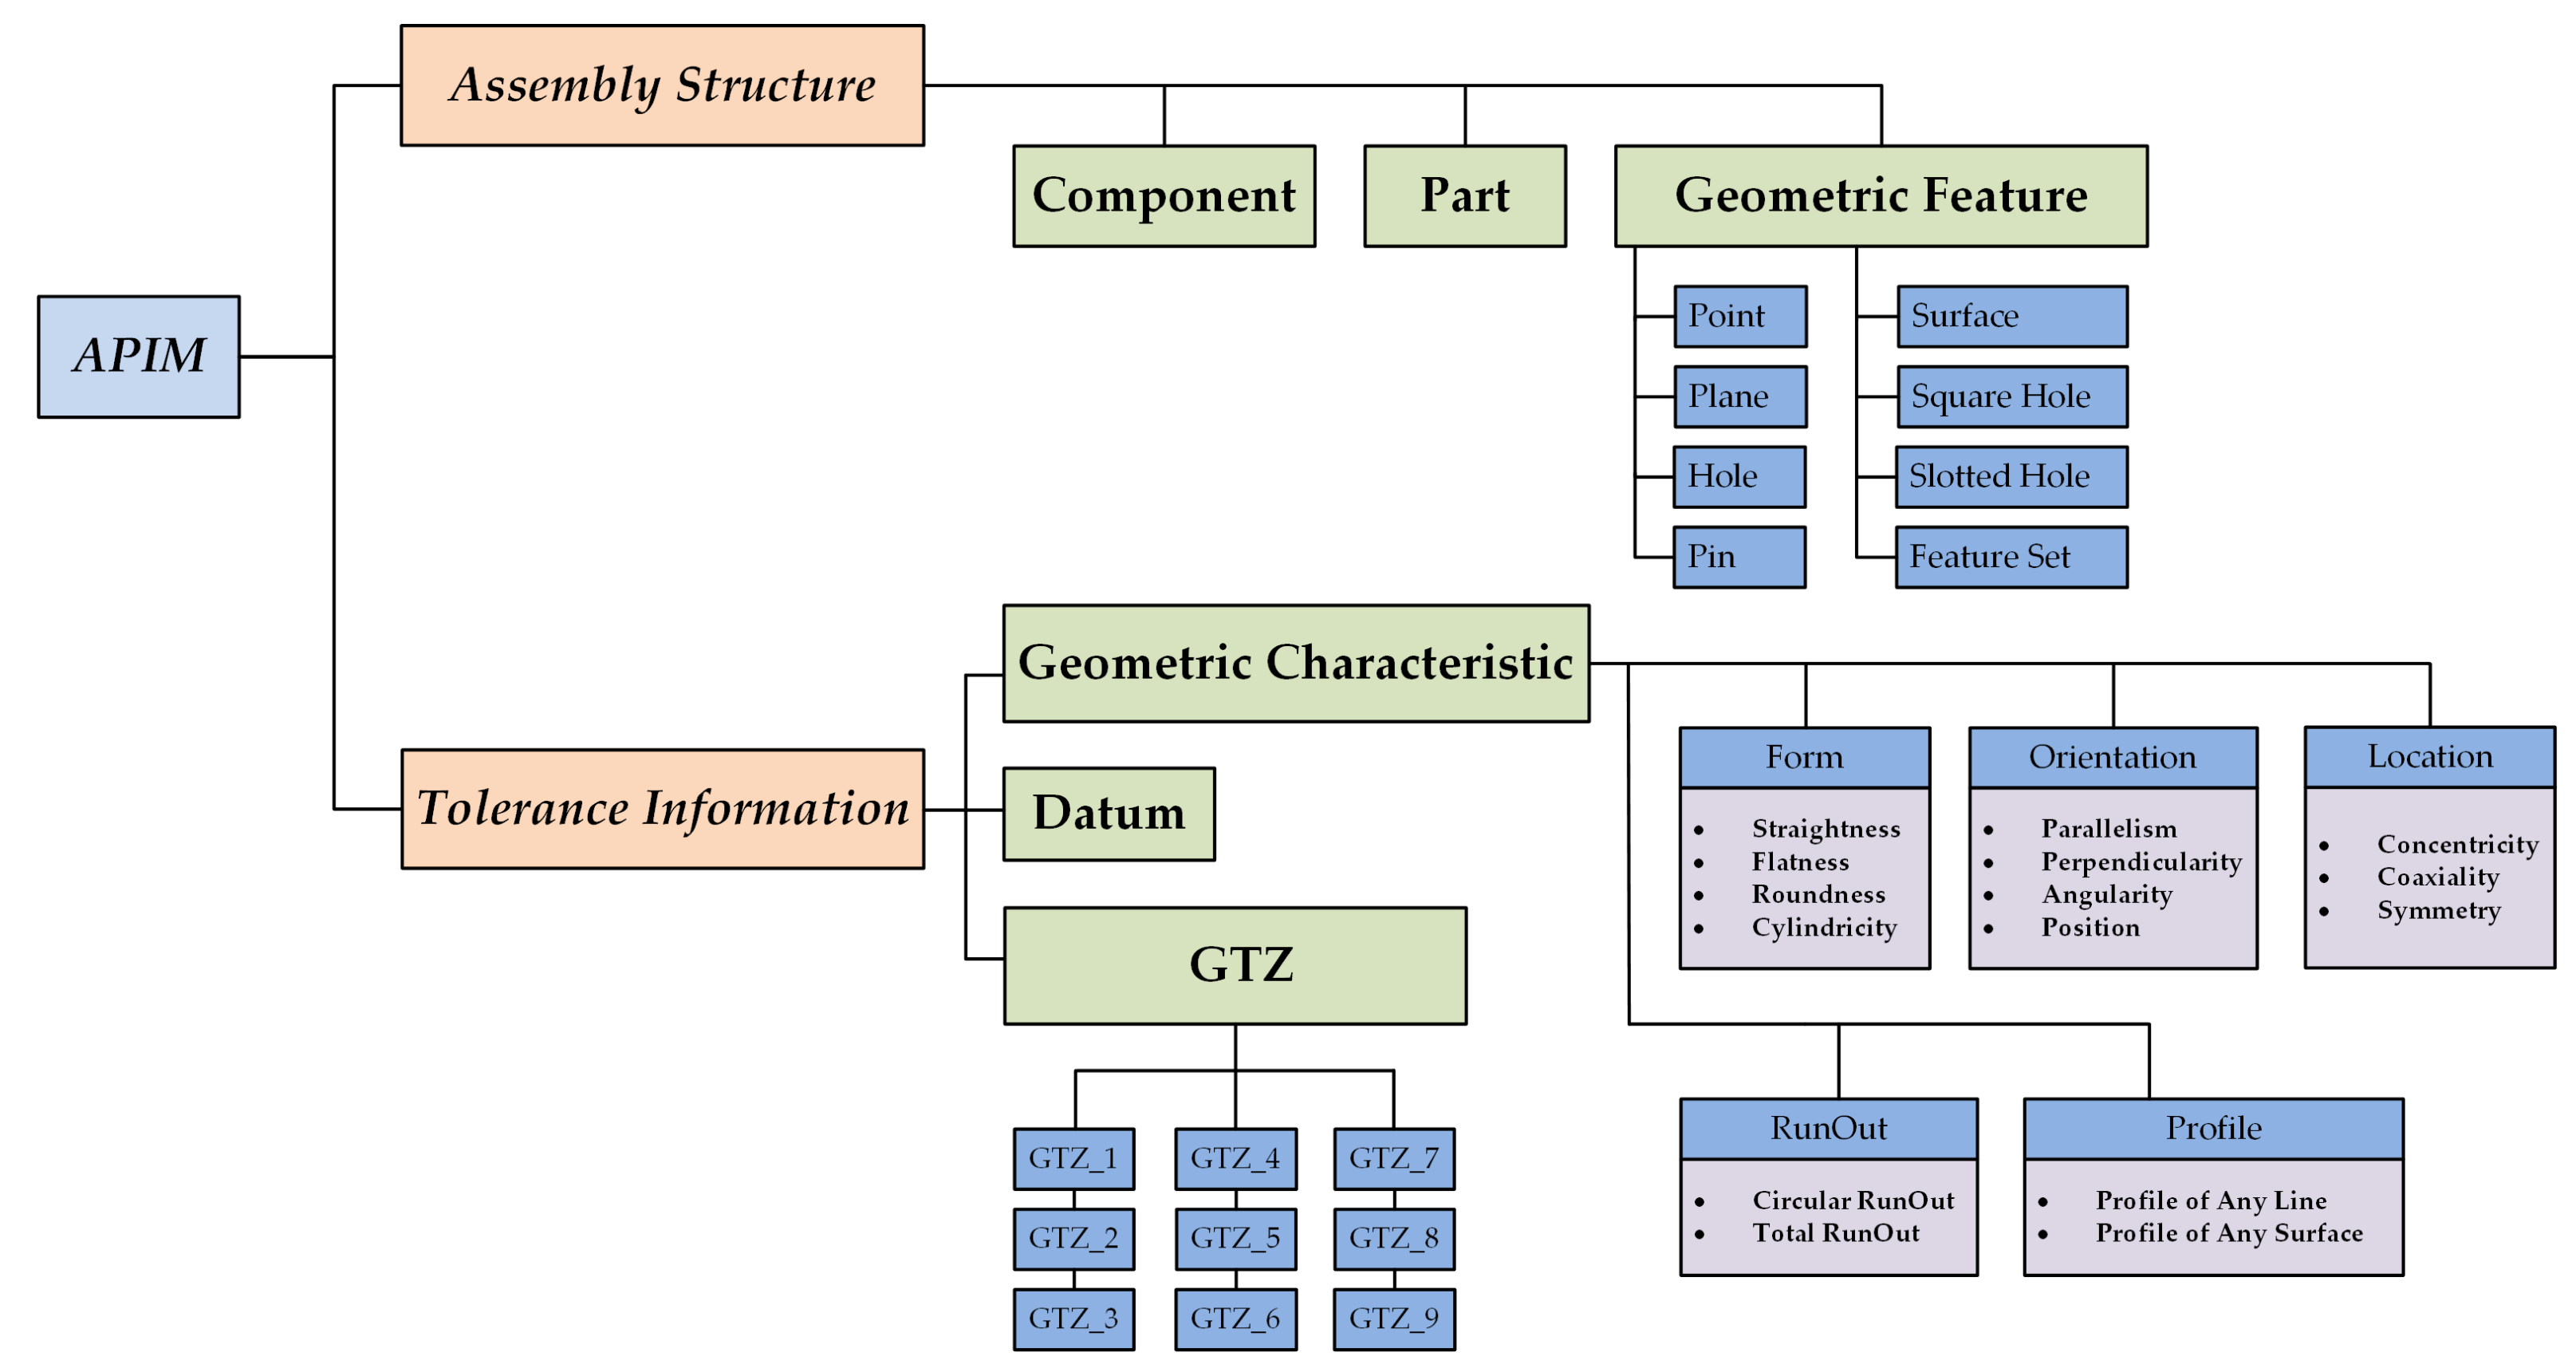
As shown in Figure 4, the classes assertion of APIM are enumerated, including APIM, assembly structure, tolerance information, component, part, geometric feature, geometric characteristic, GTZ, datum, point, surface, plane, pin, hole, square hole, slotted hole, feature set, form, orientation, location, runout, profile, straightness, flatness, roundness, cylindricity, parallelism, perpendicularity, angularity, position, concentricity, coaxiality, symmetry, circular runout, total runout, profile of any line, profile of any surface, gtz_1, gtz_2, gtz_3, gtz_4, gtz_5, gtz_6, gtz_7, gtz_8 and gtz_9.
The OWL object/data properties assertion of ontology of APIM are binary relations that link an individual to an individual or data value, as illustrated in Table 1.
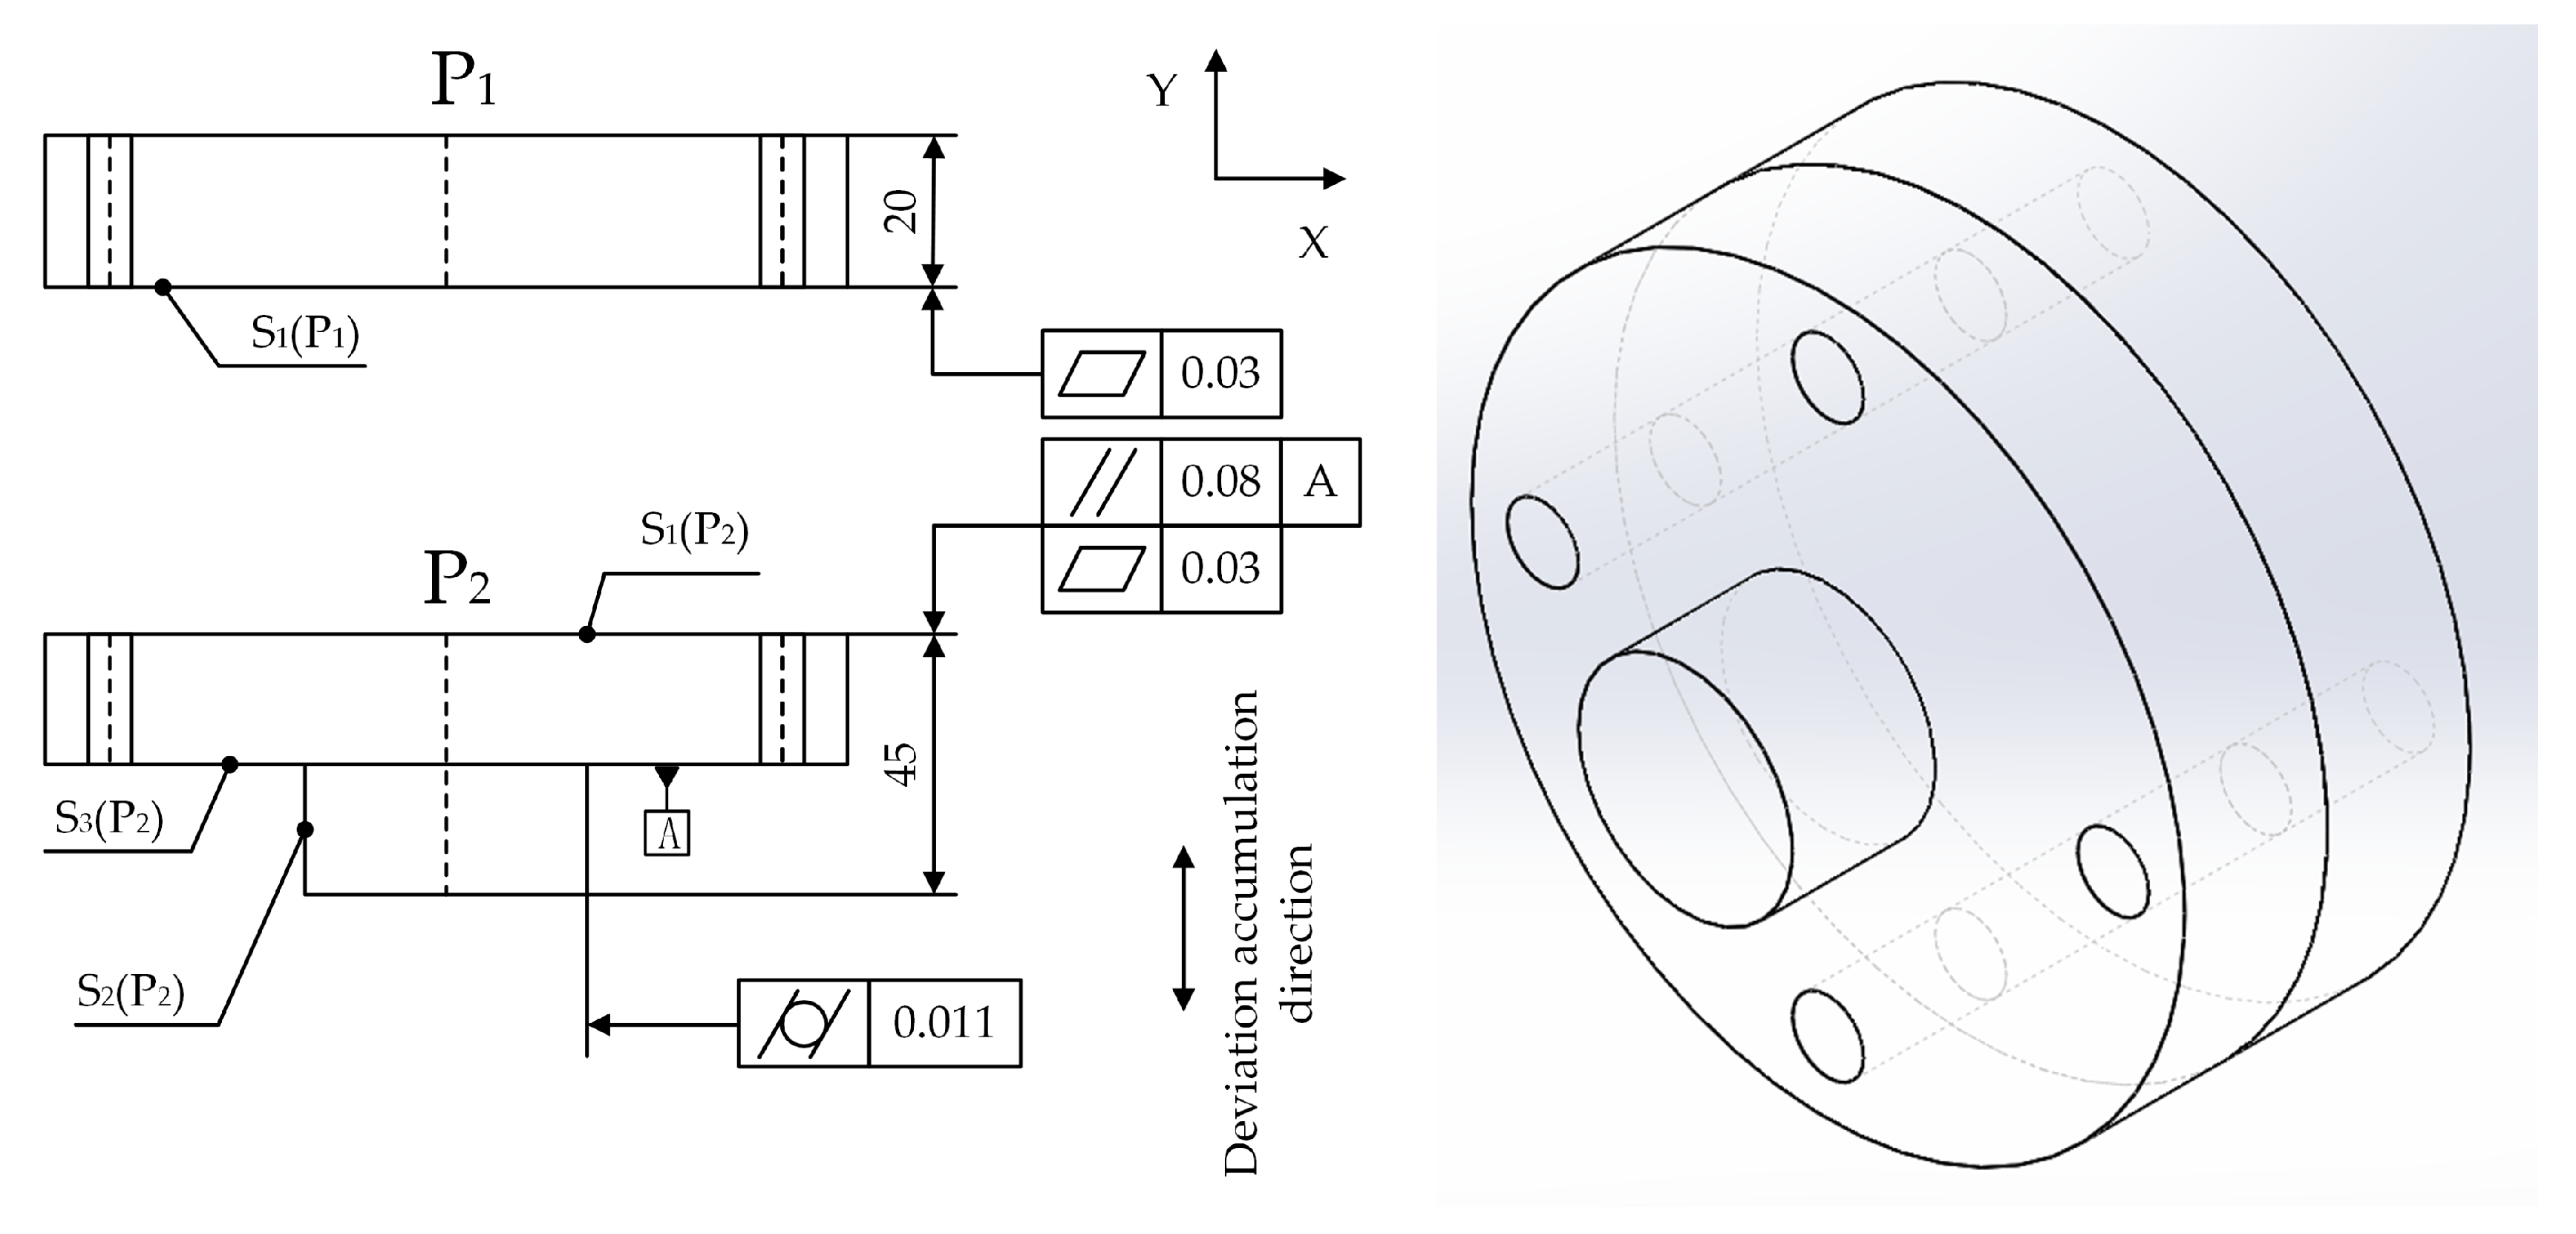
Let A = { p 1 , p 2 , , p m , p n } be an assembly, where p 1 , p 2 , , p m , p n are the N parts constituting the assembly. Let p i = { S 1 ( p i ) , S 2 ( p i ) , , s m ( p i ) } be part p i of an assembly, where S 1 ( p i ) , S 2 ( p i ) , , s m ( p i ) are the m geometric features of part p i needed to be controlled in size, form tolerance, orientation tolerance, location tolerance, runout tolerance and profile tolerance. Taking S 1 ( p 2 ) as an example to describe tolerance information of part p 2 , S 1 ( p 2 ) imposed a parallelism tolerance and a flatness tolerance is shown in Figure 5. The semantic of tolerance information of S 1 ( p 2 ) can be illustrated as follows. There is a geometric feature control frame including two segments, i.e., the upper segment-parallelism tolerance and the lower segment-flatness tolerance. The upper segment has a parallelism tolerance symbol indicating tolerance characteristic of the specific geometric feature. To satisfy the requirement of parallelism tolerance, its variational geometry must lie in its the scope of GTZ, and the shape and deviation change direction of GTZ is GTZ_1 according to Figure 3. S 3 ( p 2 ) is regarded as datum A. The lower segment also can be depicted in a similar way.
According to the aforementioned description, the major classes assertion and properties assertion used to define geometric tolerance information of assembly are A = { p 1 , p 2 } , p 1 = { S 1 ( p 1 ) } , p 2 = { S 1 ( p 2 ) , S 2 ( p 2 ) , S 3 ( p 2 ) } , parallelism, flatness, GTZ_2, GTZ_5, has_Assembly_Relation, has_Deviation_Accumulation_Direction, has_deviation_change_direction, has_Parallelism, has_Flatness, has_Roundness, has_Cylindricity, has_Datum, has_GTZ, has_Value_of_Parallelism, has_Value_of_Flatness, has_Value_of_Roundness and has_Value_of_Cylindricity. The semantic of tolerance information of assembly can be defined as follows:
  • has_Assembly_Relation( p 1 , p 2 ),
  • has_Deviation_Accumulation_Direction( p 1 , Y-axis),
  • has_Geometric_Feature( p 1 , S 1 ( p 1 ) ),
  • has_Flatness( S 1 ( p 1 ) , flatness),
  • has_GTZ( S 1 ( p 1 ) , GTZ_2),
  • has_Deviation_Change_Direction( S 1 ( p 1 ) , Y-axis),
  • has_Value_Of_Flatness( S 1 ( p 1 ) , 0.03f),
  • has_Deviation_Accumulation_Direction( p 2 , Y-axis),
  • has_Geometric_Feature( p 2 , S 1 ( p 2 ) ),
  • has_Geometric_Feature( p 2 , S 3 ( p 2 ) ),
  • has_Parallelism( S 1 ( p 2 ) , parallelism),
  • has_GTZ( S 1 ( p 2 ) , GTZ_1),
  • has_Datum( S 1 ( p 2 ) , S 3 ( p 2 ) ),
  • has_Deviation_Change_Direction( S 1 ( p 2 ) , Y-axis),
  • has_Value_Of_Parallelism( S 1 ( p 2 ) , 0.08f),
  • has_Flatness( S 1 ( p 2 ) , flatness),
  • has_GTZ( S 1 ( p 2 ) , GTZ_1),
  • has_Deviation_Change_Direction( S 1 ( p 2 ) , Y-axis),
  • has_Value_Of_Flatness( S 1 ( p 2 ) , 0.03f),
  • has_Geometric_Feature( p 2 , S 2 ( p 2 ) ),
  • has_Cylindricity( S 2 ( p 2 ) , cylindricity),
  • has_GTZ( S 2 ( p 2 ) , GTZ_5),
  • has_Deviation_Change_Direction( S 2 ( p 2 ) , X-axis),
  • has_Value_Of_Cylindricity( S 2 ( p 2 ) , 0.011f)

3.2. Representation of Rule Knowledge of Simplification of APIM

Simplified semantic model of API cannot be represented only with OWL classes assertion and OWL object/data properties assertion. SWRL rules, a descriptive language capable of logical reasoning, are facilitated to extend and enrich semantic expressive ability of ontology, which is tightly integrated with OWL. Hence, in addition to presented classes and properties, there are two basic SWRL rules to simplify APIM as follows.

3.2.1. Correlations between Deviation Change Direction and Deviation Accumulation Direction

Deviation change direction has close relation with deviation accumulation direction, which affects assembly precision of product. While deviation change direction is perpendicular to deviation accumulation direction, deviation source does not affect deviation accumulation, consequently assembly precision will not be affected by deviation source. While deviation change direction is not perpendicular to deviation accumulation direction, deviation source has an impact on deviation accumulation, consequently assembly precision will be affected by deviation source. The smaller the angle between deviation change direction and deviation accumulation direction, the more significant assembly accuracy is affected by deviation source.
Compared with other types of deviation sources, the value of form tolerance is smaller in tolerance standard and form tolerance usually has little impact on deviation accumulation. Traditional APIM omits the influence of form tolerance on deviation accumulation, and form tolerance information is not considered during modeling API. However, form tolerance in specific direction has a great influence on deviation accumulation. During generating APIM, it is more suitable to take form tolerance into comprehensive consideration when angle between deviation change direction and deviation accumulation direction is small. Therefore, APIM is preliminarily simplified through correlation between deviation change direction and deviation accumulation direction, as follows:
(1) Not considering the influence of geometric tolerance on deviation accumulation, deviation change direction is perpendicular to deviation accumulation direction.
(2) Considering the influence of geometric tolerance on deviation accumulation, deviation change direction is not perpendicular to deviation accumulation direction.
As shown in Table 2, APIM can be simplified following SWRL rule 1 of simplification of APIM.
As depicted in Figure 5, deviation change direction of cylindricity tolerance of S 2 ( p 2 ) is along X-axis and deviation accumulation direction is along Y-axis. Consequently, deviation change direction is perpendicular to deviation accumulation direction. Therefore, the influence of cylindricity tolerance on deviation accumulation is not considered when carrying out APA. This situation can be represented by a set of rules of SWRL rule 1 as follows:
  • has_Cylindricity( S 2 ( p 2 ) , cylindricity),
  • has_GTZ( S 2 ( p 2 ) , GTZ_5),
  • has_Deviation_Change_Direction( S 2 ( p 2 ) , X-axis),
  • has_Deviation_Accumulation_Direction( S 2 ( p 2 ) , Y-axis),
  • has_Deviation_Change_Direction( S 2 ( p 2 ) , perpendicular_to_the_deviation_accumulation_
  • direction),
  • ->has_no_Influence_on( S 2 ( p 2 ) , assembly_precision)

3.2.2. Simplification of Multiple Geometric Characteristics Existing on a Geometric Feature

Each geometric characteristic has corresponding one or more types of the basic nine GTZs, as illustrated in Table 3. In most cases, multiple geometric characteristics exist on a geometric feature of a part simultaneously and have a kind of the nine basic GTZs in common, taking the GTZ_1 as example to illustrate in detail. In a considered plane, GTZ shapes of straightness, parallelism, perpendicularity and position are two parallel lines, two parallel lines parallel to the datum reference, two parallel lines perpendicular to the datum reference, two parallel lines, respectively, namely GTZ_1.
According to geometric tolerance standard specifications, variation range of location tolerance or runout tolerance is larger than variation range of orientation tolerance and variation range of orientation tolerance is larger than variation range of form tolerance. When a geometric feature of a part has two or more geometric characteristics such as location tolerance, orientation tolerance, runout tolerance and form tolerance simultaneously, one sort of tolerance is considered in the process of deviation accumulation. The specific principle is that location tolerance or runout tolerance has the highest priority, followed by orientation tolerance and the lowest form tolerance.
A complete SWRL rule 2 of simplification of APIM is as shown in Table 4. S 1 ( p 2 ) of Figure 5 has two geometric characteristics at the same time, namely, the first geometric characteristic is parallelism tolerance whose value of GTZ_2 is 0.08 and the second is planeness tolerance whose value of GTZ_2 is 0.03. According to the above specifications, only parallelism tolerance is considered not having a bad effect on the result of APA. Thus simplified semantic API of S 1 ( p 2 ) can be described by a set of rules as follows:
  • has_GTZ( S 1 ( p 2 ) , GTZ_2),
  • has_Parallelism( S 1 ( p 2 ) , parallelism),
  • has_Flatness( S 1 ( p 2 ) , flatness),
  • ->has_no_Flatness( S 1 ( p 2 ) , flatness)
In addition to these two basic SWRL rules of simplification of APIM, other rules will be added dynamically to rule base, enriching SWRL rules of simplification of APIM.

4. Case Study

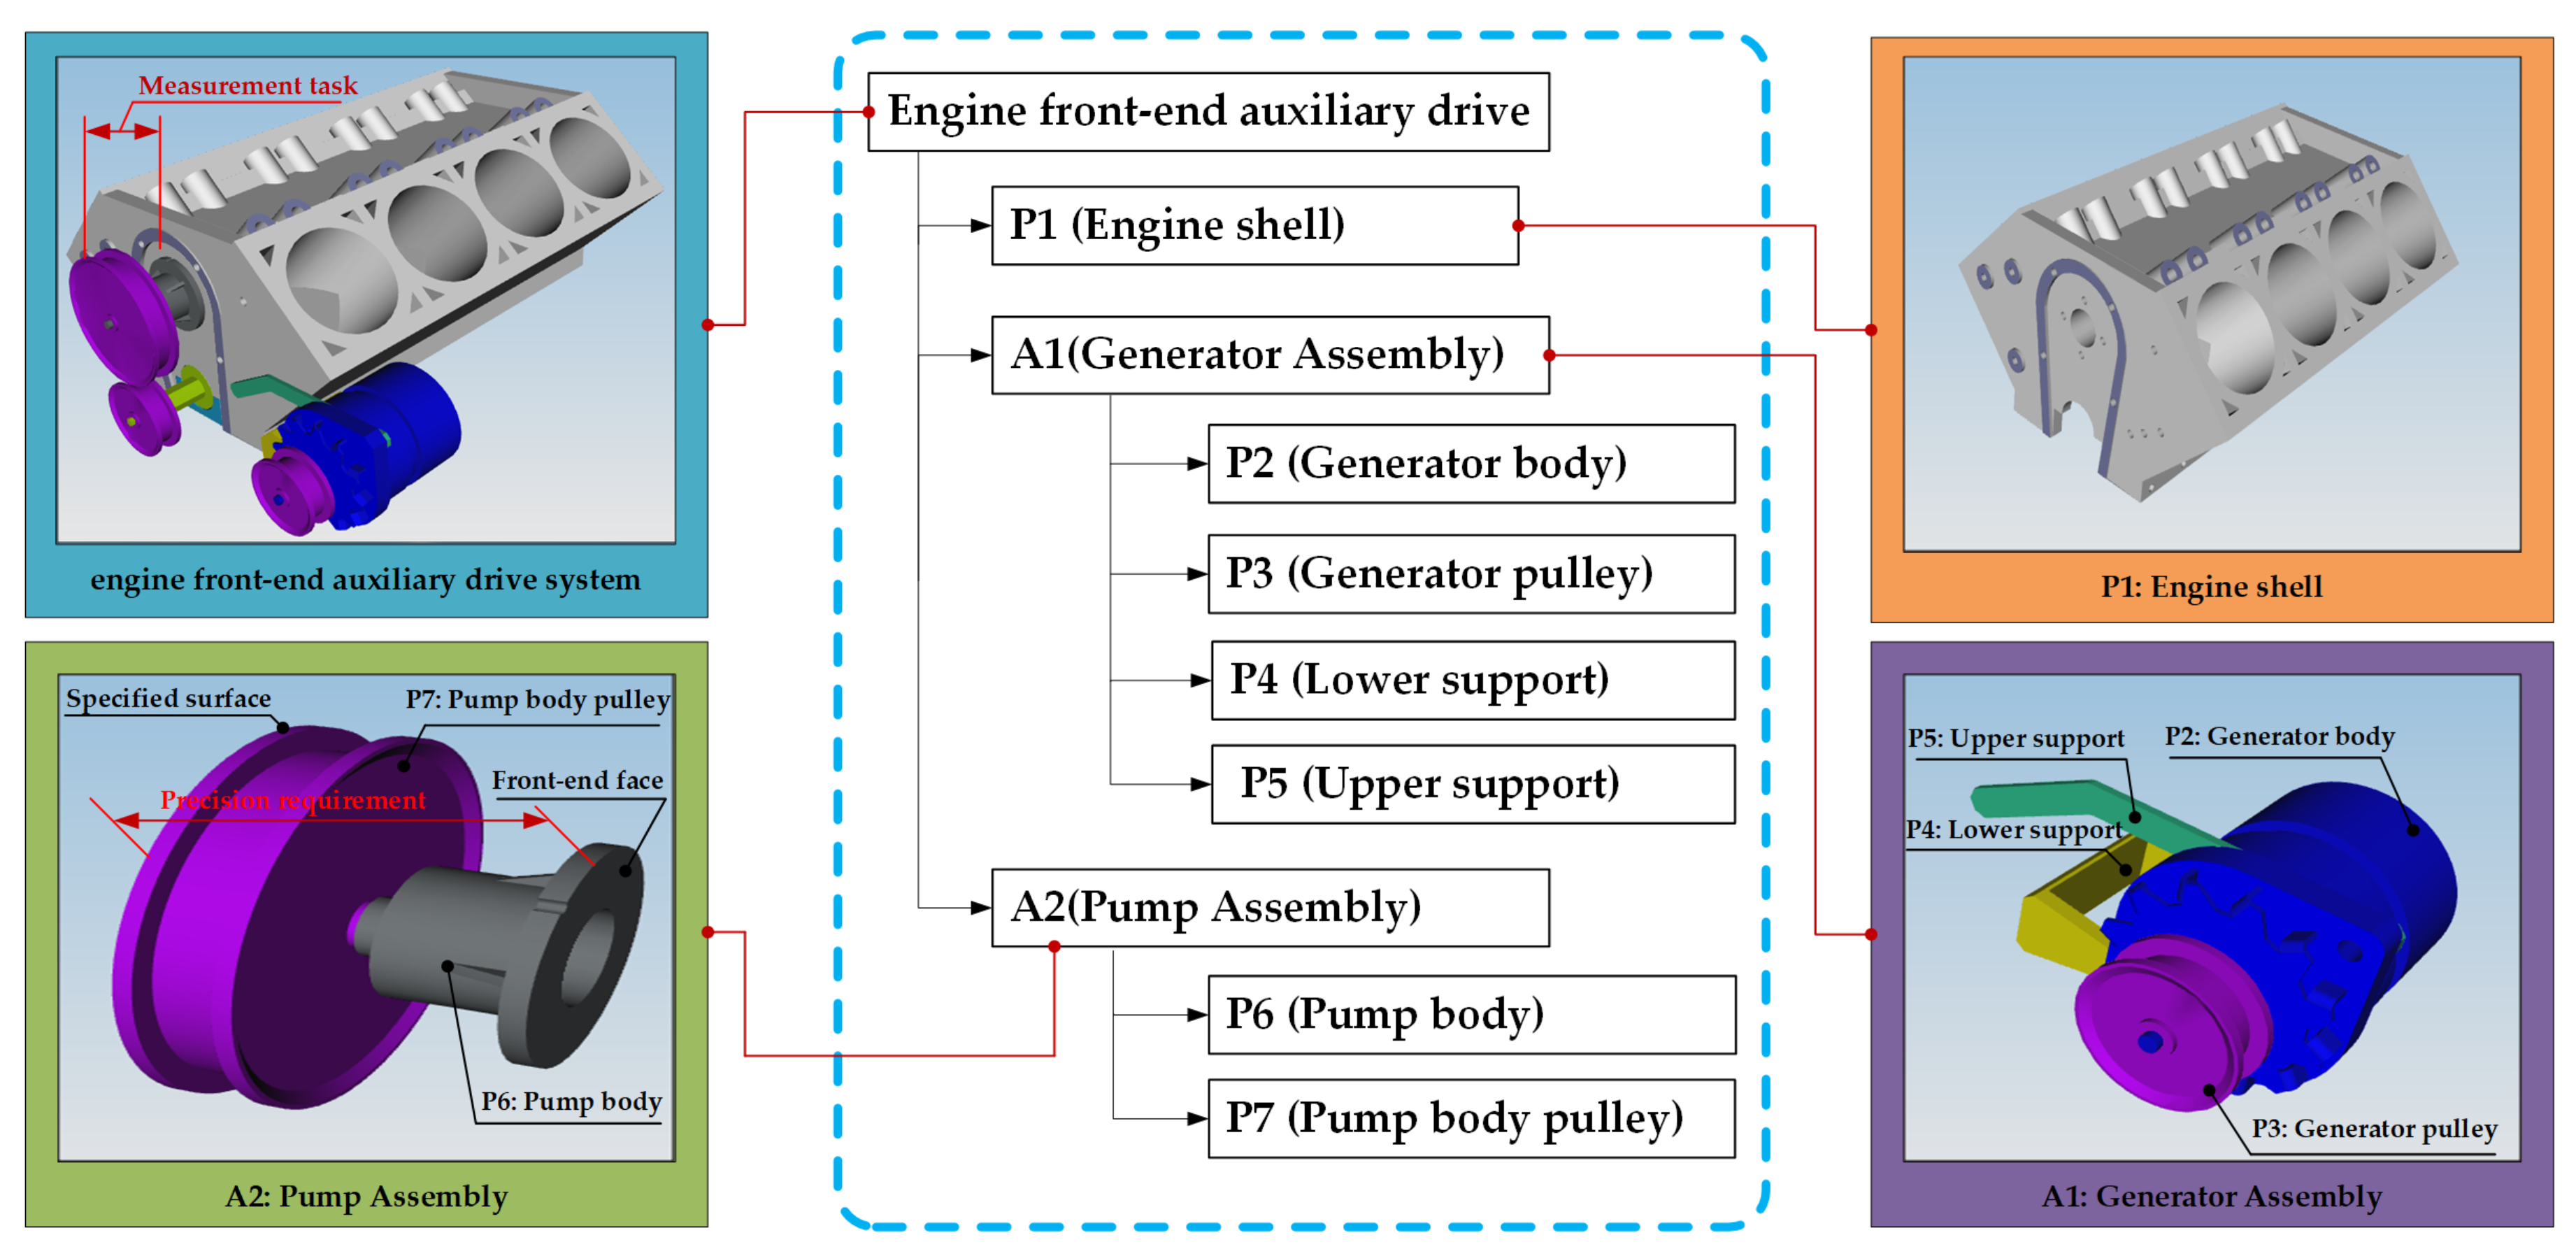
In this section, we implement simplified semantic model of API proposed in the previous sections and take the assembly of engine front auxiliary drive equipment as an example to verify availability of the proposed approach, decomposition structure of which is shown in Figure 6. Assembly precision requirement of product model is that the distance between front-end face of pump body and specified surface of pump body pulley is 88 mm, and allowable deviation range is between plus or minus 0.1 mm. Therefore, measurement task is determined as follow: to measure the distance between front-end face of pump body and specified surface of pump body pulley. In the process of actual assembly, generator body and generator pulley need to be assembled into sub-assembly, and pump body and pump body pulley entail being assembled into sub-assembly. Assembly sequence is engine shell, generator body, generator pulley, lower support, upper support, generator assembly, pump body, pump body pulley, pump assembly, as shown in Figure 6.
The working procedure of APA based on semantic simplification of APIM consists of three main steps as follows.
Step 1: According to requirements of product, demands of design and geometric parameters of each part, geometric model of engine front auxiliary drive equipment is constructed utilizing UG software, as shown in Figure 6. Then the format (.PRT) of geometric model of engine front auxiliary drive equipment in UG software is transformed into the format (.JT) of geometric model in VSA software utilized in the process of assembly precision simulation. Information related to assembly precision include precision requirements of product, assembly process scheme, assembly sequence planning and design tolerance of parts, etc.
Step 2: Simplified semantic model of API of engine front auxiliary drive equipment is generated. The detailed simplification process of APIM is divided into five portions, as shown in Figure 7.
(1) Classes assertion of structure knowledge of APIM is established, meanwhile, concepts of APIM are hierarchical visualization as shown in panel 1-1 and panel 1-2, respectively.
(2) Panel 2-1 and panel 2-2 show object properties and data properties of structure knowledge of APIM, respectively.
(3) SWRL rules of simplification of APIM are dynamically added into rule base regarding as a vital portion of knowledge of API, which are generated based on the given feature and corresponding standards. SWRL rules of simplification of APIM are shown in panel 3.
(4) The above (1)–(3) are the basis of simplification of APIM of engine front auxiliary drive equipment, which can be reused in simplification of APIM of different product. Next, geometric tolerance information and assembly structure of engine front auxiliary drive equipment are instantiated, as depicted in panel 4.
(5) Meanwhile, logic relations and semantic expression of classes of APIM of engine front auxiliary drive equipment are shown in panel 5.
According to OWL ontology of APIM and SWRL rules of simplification of APIM, the simplified semantic APIM of engine front auxiliary drive equipment is generated to facilitate leveraging reasoner of HermiT 1.3.8.
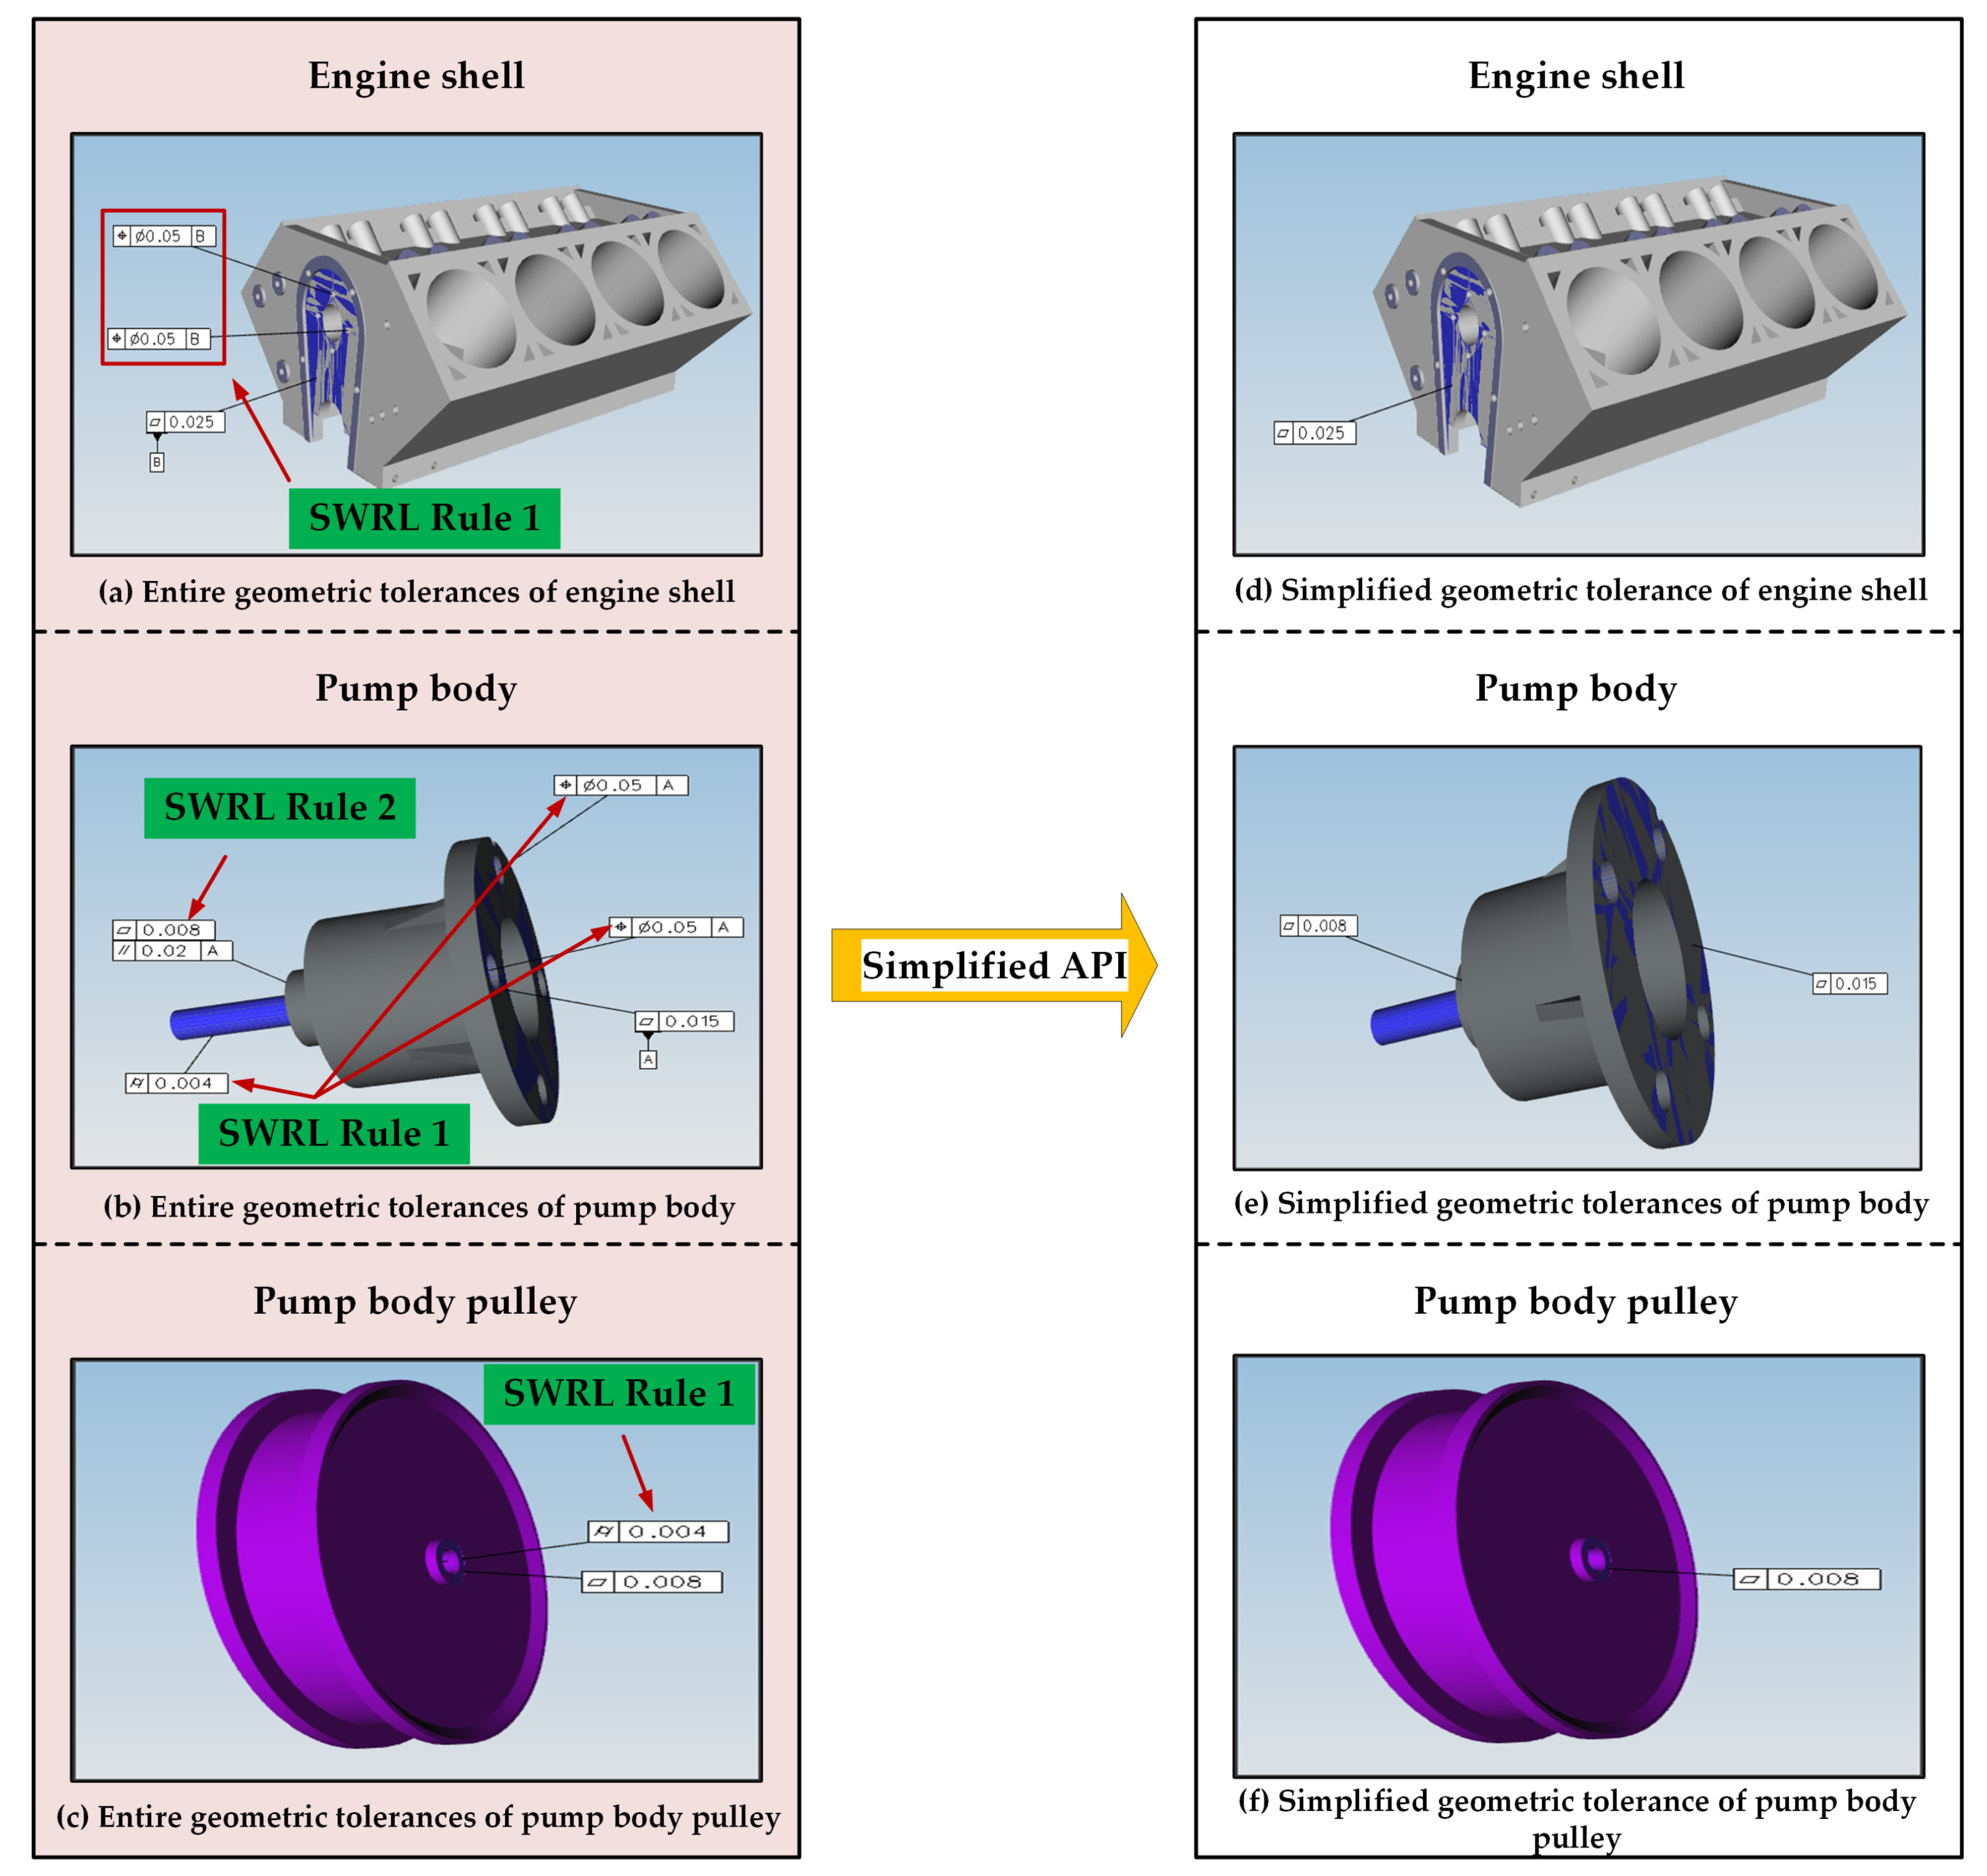
Step 3: According to simplified semantic APIM of engine front auxiliary drive equipment, APIM is established in precision analysis VSA software. Assembly precision simulation of engine front auxiliary drive equipment is implemented. In order to compare not-simplified APIM with simplified APIM, two kinds of APIMs of engine shell, pump body and pump body pulley are established respectively in VSA software, which are APIMs containing entire tolerance information as shown in Figure 8a–c and APIMs containing simplified tolerance information as shown in Figure 8d–f.
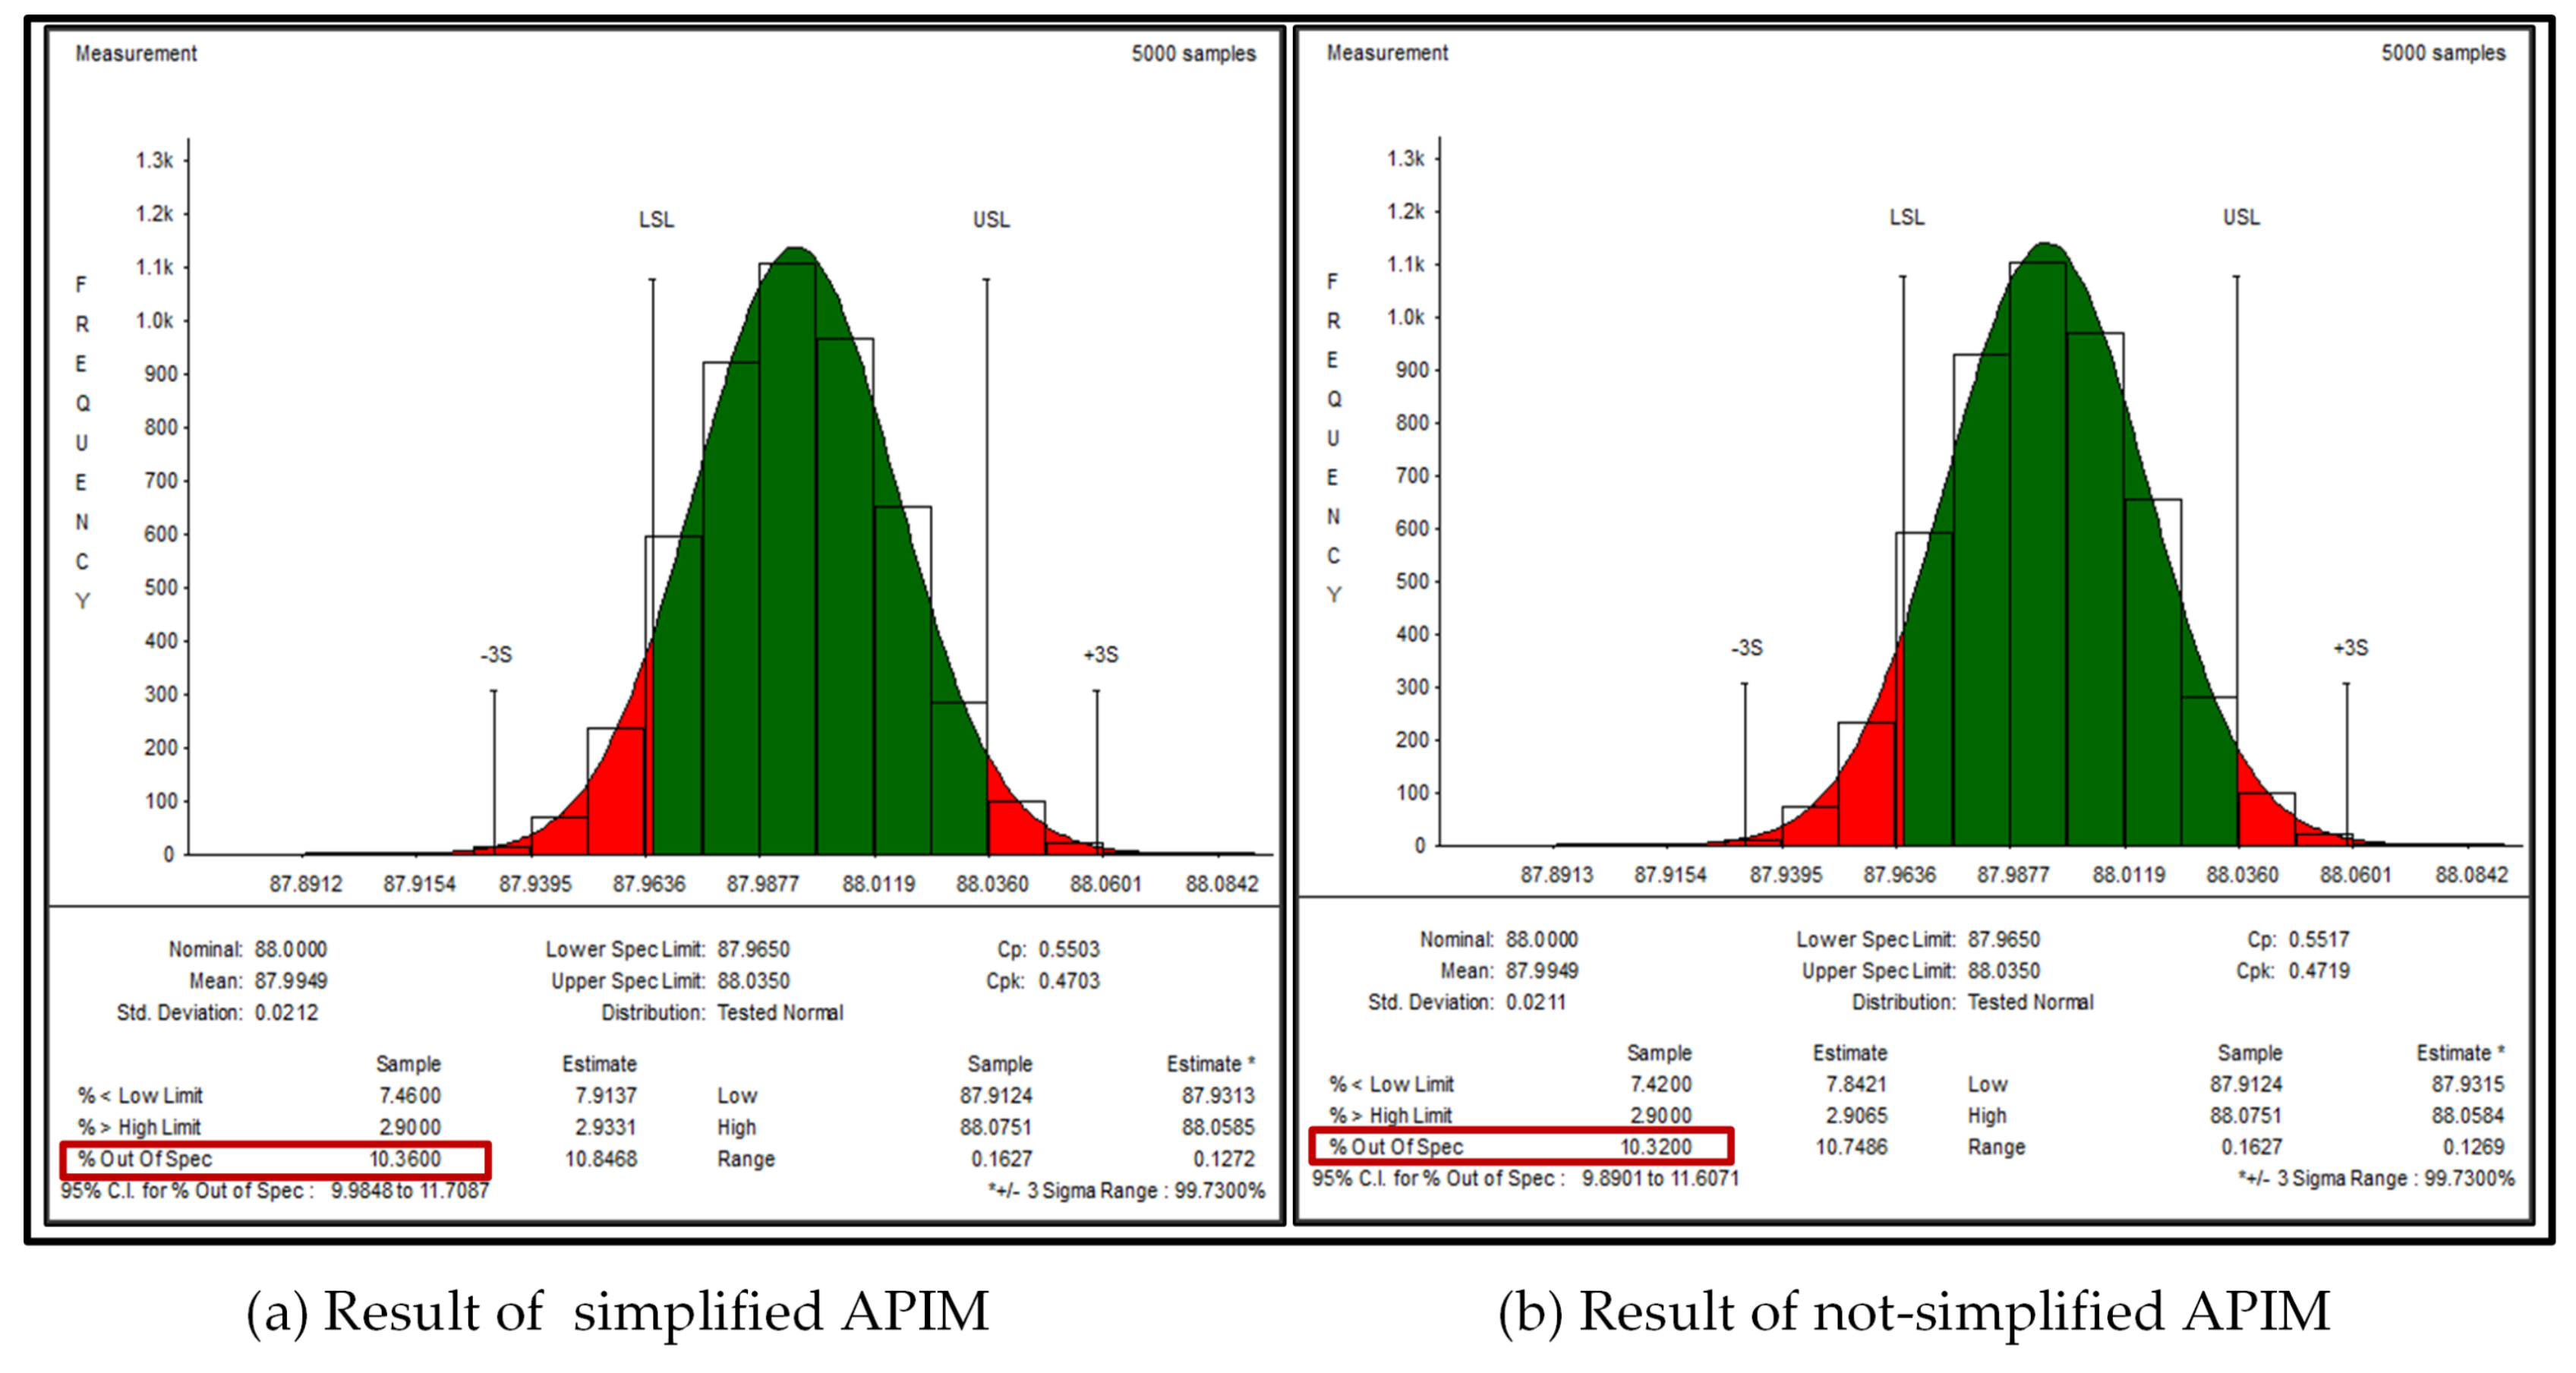
The outcomes of assembly precision simulation of engine front auxiliary drive equipment utilizing VSA software are Figure 9a,b, respectively. Figure 9a is the result of APIM with simplification, and red frame is 10.36% out of design requirement. Figure 9b is the result of APIM without simplification, and red frame is 10.32% out of design requirement. The outcomes of two kinds of APIMs are very close, which indicate availability of simplification of APIM.

5. Conclusions

APIM of complex products is complicated since it is affected by many factors such as design tolerance of parts, assembly process scheme and assembly sequence planning. Nevertheless, it is of practical significance for APA to reasonably reduce workload of API modeling and to avoid possibility of omission and error of important API information. Consequently, semantic simplification of APIM is proposed in this paper. The main contributions of this approach are listed below:
  • By considering complexity of APIM, this method of simplified semantic APIM is proposed mainly from the perspective of simplification of design tolerance of parts. In the process of simplification, tolerance semantic is the basis of simplification.
  • By considering the angle between deviation change direction and deviation accumulation direction, the influence of deviation source on deviation accumulation is preliminarily confirmed. A further discussion regarding to the situation that multiple geometric characteristics exist simultaneously on a geometric feature of a part, another basic principle of simplification of APIM is established.
Potential future studies related to this work are as follows. Firstly, in addition to current two SWRL rules of simplification of APIM, we are interested in studying further SWRL rules of simplification of APIM. Secondly, we will comprehensively expand our APIM considering tolerance information of positioning tooling, which can make outcome of APA more reliable. Moreover, from perspective of measurement data of parts, it is worth exploring APA before assembly. This model would push the development of simplification of APIM and lay foundation of APA based on measurement data of parts.

Author Contributions

Conceptualization, X.S., X.T. and G.W.; Methodology, X.S., X.T., G.W. and M.Z.; Software, X.S. and D.Z.; Supervision, X.T. and G.W.; Validation, X.S., M.Z. and D.Z.; Writing—original draft, X.S.; Writing—review & editing, M.Z. and D.Z.

Funding

This work was partial supported by the China Postdoctoral Science Foundation (Grant No. 2018M633439) and the Fundamental Research Funds for the Central Universities of China (Grant Nos. 310825171004 and 300102258506).

Conflicts of Interest

The authors declare no conflict of interest.

Abbreviations

The following abbreviations are used in this manuscript:
CADComputer-Aided Design
CAPPComputer-Aided Process Planning
GD&TGeometric Dimensioning and Tolerancing
OWLWeb Ontology Language
SWRLSemantic Web Rule Language
GTZGeometric Tolerance Zone
APAAssembly Precision Analysis
APIAssembly Precision Information
APIMAssembly Precision Information Model
WCWorst Case
RMSRoot Mean Square
MCMonte Carlo
DOFDegree Of Freedom
SDTSmall Displacement Torsor
TTRSTechnologically and Topologically Related Surface
CSGConstructive Solid Geometry
B_repBoundary Representation
T-MapTolerance-Map

References

  1. Samy, S.N.; ElMaraghy, H. A model for measuring complexity of automated and hybrid assembly systems. Int. J. Adv. Manuf. Technol. 2012, 62, 813–833. [Google Scholar] [CrossRef]
  2. Tsai, J.C.; Kuo, C.H. A novel statistical tolerance analysis method for assembled parts. Int. J. Prod. Res. 2012, 50, 3498–3513. [Google Scholar] [CrossRef]
  3. Geetha, K.; Ravindran, D.; Kumar, M.S.; Islam, M.N. Concurrent tolerance allocation and scheduling for complex assemblies. Robot. Comput-Integr. Manuf. 2015, 35, 84–95. [Google Scholar] [CrossRef]
  4. Xue, Y.J.; Ghenniwa, H.H.; Shen, W.M. Frame-based ontological view for semantic integration. J. Netw. Comput. Appl. 2012, 35, 121–131. [Google Scholar] [CrossRef] [Green Version]
  5. Armillotta, A. A method for computer-aided specification of geometric tolerances. Comput-Aided Des. 2013, 45, 1604–1616. [Google Scholar] [CrossRef]
  6. Dantan, J.Y.; Qureshi, A.J. Worst-case and statistical tolerance analysis based on quantified constraint satisfaction problems and Monte Carlo simulation. Comput-Aided Des. 2009, 41, 1–12. [Google Scholar] [CrossRef]
  7. Franciosa, P.; Gerbino, S.; Patalano, S. Variational modeling and assembly constraints in tolerance analysis of rigid part assemblies: Planar and cylindrical features. Int. J. Adv. Manuf. Technol. 2010, 49, 239–251. [Google Scholar] [CrossRef]
  8. Requicha, A.A.G. Toward a theory of geometric tolerancing. Int. J. Robot. Res. 1983, 2, 45–60. [Google Scholar] [CrossRef]
  9. Requicha, A.A.G.; Chan, S.C. Representation of geometric features, tolerances, and attributes in solid modelers based on constructive geometry. IEEE J. Robot. Autom. 1986, 2, 156–166. [Google Scholar] [CrossRef]
  10. Etesami, F. A mathematical-model for geometric tolerances. J. Mech. Des. 1993, 115, 81–86. [Google Scholar] [CrossRef]
  11. Hillyard, R.C.; Braid, I.C. Analysis of dimensions and tolerances in computer-aided mechanical design. Comput-Aided Des. 1978, 10, 161–166. [Google Scholar] [CrossRef]
  12. Gossard, D.C.; Zuffante, R.P.; Sakurai, H. Representing dimensions, tolerances, and features in mcae systems. IEEE Comput. Graph. Appl. 1988, 8, 51–59. [Google Scholar] [CrossRef]
  13. Hoffmann, P. Analysis of tolerances and process inaccuracies in discrete part manufacturing. Comput-Aided Des. 1982, 14, 83–88. [Google Scholar] [CrossRef]
  14. Chase, K.W.; Gao, J.S.; Magleby, S.P.; Sorensen, C.D. Including geometric feature variations in tolerance analysis of mechanical assemblies. IIE Trans. 1996, 28, 795–807. [Google Scholar] [CrossRef]
  15. Desrochers, A.; Riviere, A. A matrix approach to the representation of tolerance zones and clearances. Int. J. Adv. Manuf. Technol. 1997, 13, 630–636. [Google Scholar] [CrossRef]
  16. Sacks, E.; Joskowicz, L. Parametric kinematic tolerance analysis of general planar systems. Comput-Aided Des. 1998, 30, 707–714. [Google Scholar] [CrossRef]
  17. Shah, J.J.; Yan, Y.; Zhang, B.C. Dimension and tolerance modeling and transformations in feature based design and manufacturing. J. Intell. Manuf. 1998, 9, 475–488. [Google Scholar] [CrossRef]
  18. Roy, U.; Li, B. Representation and interpretation of geometric tolerances for polyhedral objects—I. Form tolerances. Comput-Aided Des. 1998, 30, 151–161. [Google Scholar] [CrossRef]
  19. Roy, U.; Li, B. Representation and interpretation of geometric tolerances for polyhedral objects. II. Size, orientation and position tolerances. Comput-Aided Des. 1999, 31, 273–285. [Google Scholar] [CrossRef]
  20. Anselmetti, B. Generation of functional tolerancing based on positioning features. Comput-Aided Des. 2006, 38, 902–919. [Google Scholar] [CrossRef]
  21. Turner, J.U. Relative positioning of parts in assemblies using mathematical-programming. Comput-Aided Des. 1990, 22, 394–400. [Google Scholar] [CrossRef]
  22. Sodhi, R.; Turner, J.U. Relative positioning of variational part models for design analysis. Comput-Aided Des. 1994, 26, 366–378. [Google Scholar] [CrossRef]
  23. Serre, P.; Riviere, A. Analysis of Functional Geometrical Specification; Springer: Dordrecht, The Netherlands, 2003; pp. 115–125. [Google Scholar]
  24. Nigam, S.D.; Turner, J.U. Review of Statistical Approaches to Tolerance Analysis. Comput-Aided Des. 1995, 27, 6–15. [Google Scholar] [CrossRef]
  25. Desrochers, A.; Clement, A. A dimensioning and tolerancing assistance model for cad-cam systems. Int. J. Adv. Manuf. Technol. 1994, 9, 352–361. [Google Scholar] [CrossRef]
  26. Dantan, J.Y.; Ballu, A.; Mathieu, L. Geometrical product specifications—Model for product life cycle. Comput-Aided Des. 2008, 40, 493–501. [Google Scholar] [CrossRef]
  27. Requicha, A.A.G.; Voelcker, H.B. Solid modeling—A historical summary and contemporary assessment. IEEE Comput. Graph. Appl. 1982, 2, 9–24. [Google Scholar] [CrossRef]
  28. Juster, N.P. Modeling and representation of dimensions and tolerances—A survey. Comput-Aided Des. 1992, 24, 3–17. [Google Scholar] [CrossRef]
  29. Tsai, J.C.; Cutkosky, M.R. Representation and reasoning of geometric tolerances in design. AI EDAM-Artif. Intell. Eng. Des. Anal. Manuf. 1997, 11, 325–341. [Google Scholar] [CrossRef]
  30. Ameta, G.; Davidson, J.K.; Shah, J.J. Tolerance-maps applied to a point-line cluster of features. J. Mech. Des. 2007, 129, 782–792. [Google Scholar] [CrossRef]
  31. Roy, U.; Liu, C.R. Feature-based representational scheme of a solid modeler for providing dimensioning and tolerancing information. Robot. Comput-Integr. Manuf. 1988, 4, 335–345. [Google Scholar] [CrossRef]
  32. Zhang, K.F.; Li, Y.; Tang, S.L. An integrated modeling method of unified tolerance representation for mechanical product. Int. J. Adv. Manuf. Technol. 2010, 46, 217–226. [Google Scholar] [CrossRef]
  33. Lu, W.L.; Qin, Y.C.; Liu, X.J.; Huang, M.F.; Zhou, L.P.; Jiang, X.Q. Enriching the semantics of variational geometric constraint data with ontology. Comput-Aided Des. 2015, 63, 72–85. [Google Scholar] [CrossRef]
  34. Qin, Y.C.; Lu, W.L.; Liu, X.J.; Huang, M.F.; Zhou, L.P.; Jiang, X.Q. Description logic-based automatic generation of geometric tolerance zones. Int. J. Adv. Manuf. Technol. 2015, 79, 1221–1237. [Google Scholar] [CrossRef]
  35. Qin, Y.C.; Lu, W.L.; Qi, Q.F.; Li, T.K.; Huang, M.F.; Scott, P.J.; Jiang, X.Q. Explicitly representing the semantics of composite positional tolerance for patterns of holes. Int. J. Adv. Manuf. Technol. 2017, 90, 2121–2137. [Google Scholar] [CrossRef]
  36. Zhong, Y.R.; Qin, Y.C.; Huang, M.F.; Lu, W.L.; Chang, L. Constructing a meta-model for assembly tolerance types with a description logic based approach. Comput-Aided Des. 2014, 48, 1–16. [Google Scholar] [CrossRef]
  37. Zhong, Y.R.; Qin, Y.C.; Huang, M.F.; Lu, W.L.; Gao, W.X.; Du, Y.L. Automatically generating assembly tolerance types with an ontology-based approach. Comput-Aided Des. 2013, 45, 1253–1275. [Google Scholar] [CrossRef]
  38. Ahmed, F.; Han, S. Interoperability of product and manufacturing information using ontology. Concurr. Eng-Res. Appl. 2015, 23, 265–278. [Google Scholar] [CrossRef]
  39. Qin, Y.C.; Lu, W.L.; Qi, Q.F.; Liu, X.J.; Huang, M.F.; Scott, P.J.; Jiang, X.Q. Towards an ontology-supported case-based reasoning approach for computer-aided tolerance specification. Knowl-Based Syst. 2018, 141, 129–147. [Google Scholar] [CrossRef]
Figure 1. General outline of simplified semantic model of API.
Sustainability 10 04482 g001
Figure 2. Deviation accumulation direction of assembly.
Sustainability 10 04482 g002
Figure 3. Shape and deviation change direction of nine basic GTZs.
Sustainability 10 04482 g003
Figure 4. Classes of APIM representations.
Sustainability 10 04482 g004
Figure 5. An example of semantic representation of APIM.
Sustainability 10 04482 g005
Figure 6. Decomposition structure and assembly sequence of engine front auxiliary drive equipment.
Sustainability 10 04482 g006
Figure 7. The procedure of simplification of APIM of engine front auxiliary drive equipment utilizing Protégé software (partial).
Sustainability 10 04482 g007
Figure 8. Entire tolerance information and simplified tolerance information of parts.
Sustainability 10 04482 g008
Figure 9. Outcomes of assembly precision simulation of two kinds of APIM.
Sustainability 10 04482 g009
Table 1. Object property assertion and data property assertion of APIM.
Object PropertyData Property
(1) has_Geometric_Characteristic(2) has_no_Geometric_Characteristic(10) has_Value_of_Tolerance_Zone
has_
Form_
Tolerance
has_Straightnesshas_no_
Form_
Tolerance
has_no_Straightnesshas_Value_of_
Form_
Tolerance_Zone
has_Value_of_Straightness
has_Roundnesshas_no_Roundnesshas_Value_of_Roundness
has_Cylindricityhas_no_Cylindricityhas_Value_of_Cylindricity
has_Flatnesshas_no_Flatnesshas_Value_of_Flatness
has_
Location_
Tolerance
has_Coaxialityhas_no_
Location_
Tolerance
has_no_Coaxialityhas_Value_of_
Location_
Tolerance_Zone
has_Value_of_Coaxiality
has_Concentricityhas_no_Concentricityhas_Value_of_Concentricity
has_Positionhas_no_Positionhas_Value_of_Position
has_Symmetryhas_no_Symmetryhas_Value_of_Symmetry
has_
Orientation_
Tolerance
has_Angularityhas_no_
Orientation_
Tolerance
has_no_Angularityhas_Value_of_
Orientation_
Tolerance_Zone
has_Value_of_Angularity
has_Parallelismhas_no_Parallelismhas_Value_of_Parallelism
has_Perpendiculaityhas_no_Perpendiculaityhas_Value_of_Perpendiculaity
has_
RunOut_
Tolerance
has_Circular_RunOuthas_no_
RunOut_
Tolerance
has_no_Circular_RunOuthas_Value_of_
RunOut_
Tolerance_Zone
has_Value_of_Circular_RunOut
has_Total_RunOuthas_no_Total_RunOuthas_Value_of_Total_RunOut
has_
Profile_
Tolerance
has_Profile_of_Any_Linehas_no_
Profile_
Tolerance
Has_no_
Profile_of_Any_Line
has_Value_of_
Profile_
Tolerance_Zone
has_Value_of_
Profile_of_Any_Line
has_Profile_of_Any_SurfaceHas_no_
Profile_of_Any_Surface
has_Value_of_
Profile_of_Any_Surface
(3) has_GTZ(4) has_Assembly_Relation(5) has_Datum(6) has_Geometric_Feature
(7) has_DirectionHas_deviation_change_direction(8) has_Influence_on
Has_deviation_accumulation_direction(9) has_no_Influence_on
Table 2. SWRL rule 1 of simplification of APIM.
NumberRelations of Deviation Change Direction and Deviation Accumulation Direction
SR.1-1has_Deviation_Changing_Direction(?x,
perpendicular_to_the_deviation_accumulation_direction)
->has_no_Influence_on(?x,assembly_precision)
SR.1-2has_Deviation_Changing_Direction(?x,
not_perpendicular_to_the_deviation_accumulation_direction)
->has_Influence_on(?x,assembly_precision)
Table 3. GTZs of geometric characteristic.
Geometric CharacteristicGTZ_1GTZ_2GTZ_3GTZ_4GTZ_5GTZ_6GTZ_7GTZ_8GTZ_9
Form ToleranceStraightness
Flatness
Roundness
Cylindricity
Orientation Toleranceparallelism
perpendicularity
Angularity
Location TolerancePosition
Coaxiality
Symmetry
RunOut ToleranceCircular RunOut
Total RunOut
Profile ToleranceProfile of Any Line
Profile of Any Surface
The symbol • represents geometric characteristic corresponding to geometric tolerance zone (zones).
Table 4. SWRL rule 2 of simplification of APIM.
GTZNumberMultiple Geometric Characteristics Existing on a Geometric Feature
GTZ_1SR.2-1has_GTZ(?x, GTZ_1),has_Straightness(?x, straightness), has_Parallelism(?x, parallelism) ->has_no_Straightness(?x, straightness)
SR.2-2has_GTZ(?x, GTZ_1),has_Straightness(?x, straightness), has_Perpendiculaity(?x, perpendiculaity) ->has_no_Straightness(?x, straightness)
SR.2-3has_GTZ(?x, GTZ_1),has_Straightness(?x, straightness), has_Position(?x, position) ->has_no_Straightness(?x, straightness)
GTZ_2SR.2-4has_GTZ(?x, GTZ_2),has_Straightness(?x, straightness), has_Parallelism(?x, parallelism) ->has_no_Straightness(?x, straightness)
SR.2-5has_GTZ(?x, GTZ_2),has_Straightness(?x, straightness), has_Perpendiculaity(?x, perpendiculaity) ->has_no_Straightness(?x, straightness)
SR.2-6has_GTZ(?x, GTZ_2),has_Straightness(?x, straightness), has_Angularity(?x, angularity) ->has_no_Straightness(?x, straightness)
SR.2-7has_GTZ(?x, GTZ_2),has_Straightness(?x, straightness), has_Position(?x, position) ->has_no_Straightness(?x, straightness)
SR.2-8has_GTZ(?x, GTZ_2),has_Straightness(?x, straightness), has_Symmetry(?x, symmetry) ->has_no_Straightness(?x, straightness)
SR.2-9has_GTZ(?x, GTZ_2),has_Flatness(?x, flatness), has_Parallelism(?x, parallelism) ->has_no_Flatness(?x, flatness)
SR.2-10has_GTZ(?x, GTZ_2),has_Flatness(?x, flatness), has_Perpendiculaity(?x, perpendiculaity) ->has_no_Flatness(?x, flatness)
SR.2-11has_GTZ(?x, GTZ_2),has_Flatness(?x, flatness), has_Angularity(?x, angularity) ->has_no_Flatness(?x, flatness)
SR.2-12has_GTZ(?x, GTZ_2),has_Flatness(?x, flatness), has_Position(?x, position) ->has_no_Flatness(?x, flatness)
SR.2-13has_GTZ(?x, GTZ_2),has_Flatness(?x, flatness), has_Symmetry(?x, symmetry) ->has_no_Flatness(?x, flatness)
GTZ_3SR.2-14has_GTZ(?x, GTZ_3),has_Straightness(?x, straightness), has_Parallelism(?x, parallelism) ->has_no_Straightness(?x, straightness)
SR.2-15has_GTZ(?x, GTZ_3),has_Straightness(?x, straightness), has_Perpendiculaity(?x, perpendiculaity) ->has_no_Straightness(?x, straightness)
SR.2-16has_GTZ(?x, GTZ_3),has_Straightness(?x, straightness), has_Angularity(?x, angularity) ->has_no_Straightness(?x, straightness)
SR.2-17has_GTZ(?x, GTZ_3),has_Straightness(?x, straightness), has_Position(?x, position) ->has_no_Straightness(?x, straightness)
SR.2-18has_GTZ(?x, GTZ_3),has_Straightness(?x, straightness), has_Coaxiality(?x, coaxiality) ->has_no_Straightness(?x, straightness)