Article

Sustainable Infrastructure Maintenance: Crack Depth Detection in Tunnel Linings via Natural Temperature Variations and Infrared Imaging

College of Civil Engineering, Tongji University, Shanghai 200092, China
*
Author to whom correspondence should be addressed.
Sustainability 2024, 16(9), 3731; https://doi.org/10.3390/su16093731
Submission received: 14 November 2023 / Revised: 29 November 2023 / Accepted: 5 December 2023 / Published: 29 April 2024
(This article belongs to the Special Issue Analysis and Modeling for Sustainable Geotechnical Engineering)

Abstract

:
In this research, we propose the use of infrared detection methods for identifying cracks in the tunnel lining of concrete structures. Through thermal simulation experiments on pre-existing cracks, we investigate the heat conduction patterns in cracked linings under natural temperature variations. The influence of temperature differences inside and outside the lining, crack depth, and crack width on the temperature distribution on the inner surface of the lining is analyzed by using a controlled variable approach. This exploration aims to assess the feasibility and applicable conditions of using infrared thermal imaging technology for detecting lining crack defects, contributing to sustainable maintenance of infrastructure. We further validate the experimental approach through numerical simulations. Considering the temperature distribution on the inner surface of the lining, it becomes feasible to comprehensively determine the location and depth of cracks. This offers a novel and rapid inspection method for tunnel lining cracks, thereby enhancing the sustainability of tunnel infrastructure.

1. Introduction

During the service life of a tunnel, the concrete lining is susceptible to cracking due to various factors, including geological conditions, material deterioration, and engineering activities within the protective zone [1]. When cracks in the lining reach a certain extent, they can lead to issues such as leakage, deformation, spalling, or delamination [2,3], which, in turn, can impact the performance and operational safety of the tunnel [4,5]. Therefore, accurate detection of the geometric parameters of concrete structural cracks is crucial, as it provides guidance for subsequent repairs, reduction of repair costs, minimization of resource wastage, and enhancement of the sustainability of infrastructure.
Currently, non-destructive crack detection methods often focus on identifying the shape, length, and width of visible cracks in concrete [6,7]. However, in reality, the detection of crack depth is even more critical because the depth to which cracks extend into the structure directly determines the load-bearing performance of essential components. Existing crack depth detection methods for concrete structures are primarily based on the stress wave theory [8,9,10]. Nevertheless, the current stress-wave-based crack depth detection methods suffer from cumbersome operational procedures and inaccurate results, making it challenging to effectively and directly measure the depth to which concrete cracks propagate [11,12].
However, infrared thermography (IRT) has garnered considerable attention, notably for its merits in providing real-time [13], non-contact [14], and wide-area measurements [15]. Additionally, the affordability of infrared (IR) cameras has recently increased noticeably [13]. Therefore, IRT emerges as a suitable non-destructive testing (NDT) method for civil infrastructures and buildings.
IRT encompasses the practice of capturing surface temperature distribution using IR cameras and subsequently processing and interpreting the data obtained from IR images [16]. Its applications across infrastructures and buildings are extensive, including areas such as thermal insulation [17], internal structure analysis [18], detection of delamination [19], cracks [20,21], identification of air leakage [22], and preservation of cultural heritage [23,24,25]. Currently, most of the methods employed for infrared thermal imaging rely on active thermal stimulation [26,27,28,29]. However, these methods often face challenges in applying uniform thermal excitation and require a significant amount of stimulation time, which limits their practical application in engineering contexts. To overcome the limitations of traditional infrared detection methods for remote crack detection in concrete, this paper proposes the use of natural temperature differences to detect cracks in the tunnel lining of concrete structures.
To investigate the impact of crack depth on heat conduction and the distribution of surface temperature both inside and outside the lining, concrete specimens with pre-existing cracks were exposed to thermal stimulation. This process aimed to generate temperature differences within and outside the lining, based on the tunnel’s heat conduction model under winter conditions. Through indoor model experiments and numerical analysis, the research delved into the impact of crack depth on the temperature distribution of the lining structure under different crack width conditions. This exploration aims to assess the feasibility of infrared detection of crack depth in tunnel linings under natural temperature variations, contributing to the sustainability of infrastructure by improving maintenance practices and resource efficiency.

2. Experimental Model Design

2.1. Specimen and Defect Preparation

The cement strength was C30, with a material mix ratio of cement:sand:gravel:water = 1:1.98:2.97:0.44. The dimensions of the specimen were 300 mm in length, 300 mm in width, and 350 mm in height. The specimen was placed horizontally, with the upper and lower surfaces designated as the thermal image data collection surface and the thermal excitation surface, respectively. An important distinction to note is that the thermal image data collection surfaces and the thermal excitation surface were positioned on opposing sides, marking a difference from the ‘active detection’. In accordance with the experimental conditions, the dimensions of cracks under various working conditions are presented in Table 1.
Steel pieces of appropriate specification were cut according to the prefabricated crack parameters. The surface of the steel pieces was evenly coated with lubricating oil and inserted into the design position of the cracks in the mold. Then, the concrete was poured and the surface was smoothed out after being pounded with a vibrating bar. All steel pieces were pulled out after the initial setting of concrete.

2.2. Sensor Arrangement and Data Acquisition Method

The thermal imager used in this type of experiment is the FLIR A655sc with a detector resolution of 640 × 480, an accuracy of ±2 °C, and a thermal sensitivity of <30 mK. The experimental setup includes a temperature-controlled heating platform and an air conditioner to create a temperature difference between the upper and lower surfaces of the specimen, simulating the real environmental temperature gradient inside the tunnel. Additionally, for precise monitoring of heat transfer within the specimen, PT-100 temperature sensors are installed on the data collection surface, the thermal excitation surface, and inside the specimen. A schematic representation of the specimen and the equipment installation is presented in Figure 1.

2.3. Experimental Operation Procedure

This type of experiment is conducted with the objective of replicating natural temperature fluctuations via thermal excitation and subsequently discerning the distribution of surface temperatures across the specimen. Previous investigations have corroborated that the optimal outcomes in terms of infrared detection are achieved under winter thermal conditions. Consequently, the test procedure for emulating winter thermal conditions and conducting temperature field detection is outlined as follows:
  • Ensure the proper alignment of the infrared thermal imager to encompass the entire detection area within its operational range.
  • Utilize an STC803-S/II constant-temperature heating device to facilitate the heating of the thermal excitation surface, thereby facilitating the transfer of heat to the data acquisition surface. Concurrently, ensure the regulation of indoor temperature to uphold the specified temperature difference (ΔTN) between the thermal excitation surface and the data acquisition surface within the predetermined range.
  • Surface temperature data of the specimen are monitored until the temperature variation remains within 0.5 °C, indicating that the specimen has reached a steady-state heat conduction condition. At this point, heating is discontinued, and the infrared thermal image of the specimen’s surface is recorded.

3. Thermal Conduction Effects of Cracks under Natural Temperature Difference Conditions

To accurately describe the experimental phenomenon, the concrete surface was divided into two regions: the deep blue area represents the crack-damaged region, and the light blue area represents the healthy region. The distances from the edges of the healthy region to the crack center were 3 cm and 10 cm, respectively, as shown in Figure 2. For ease of analysis, the maximum surface temperature difference (ΔTf) between the maximum temperature (Td) in the cracked region and the average temperature (Ts) in the healthy region was defined on the specimen’s surface.

3.1. Test Results

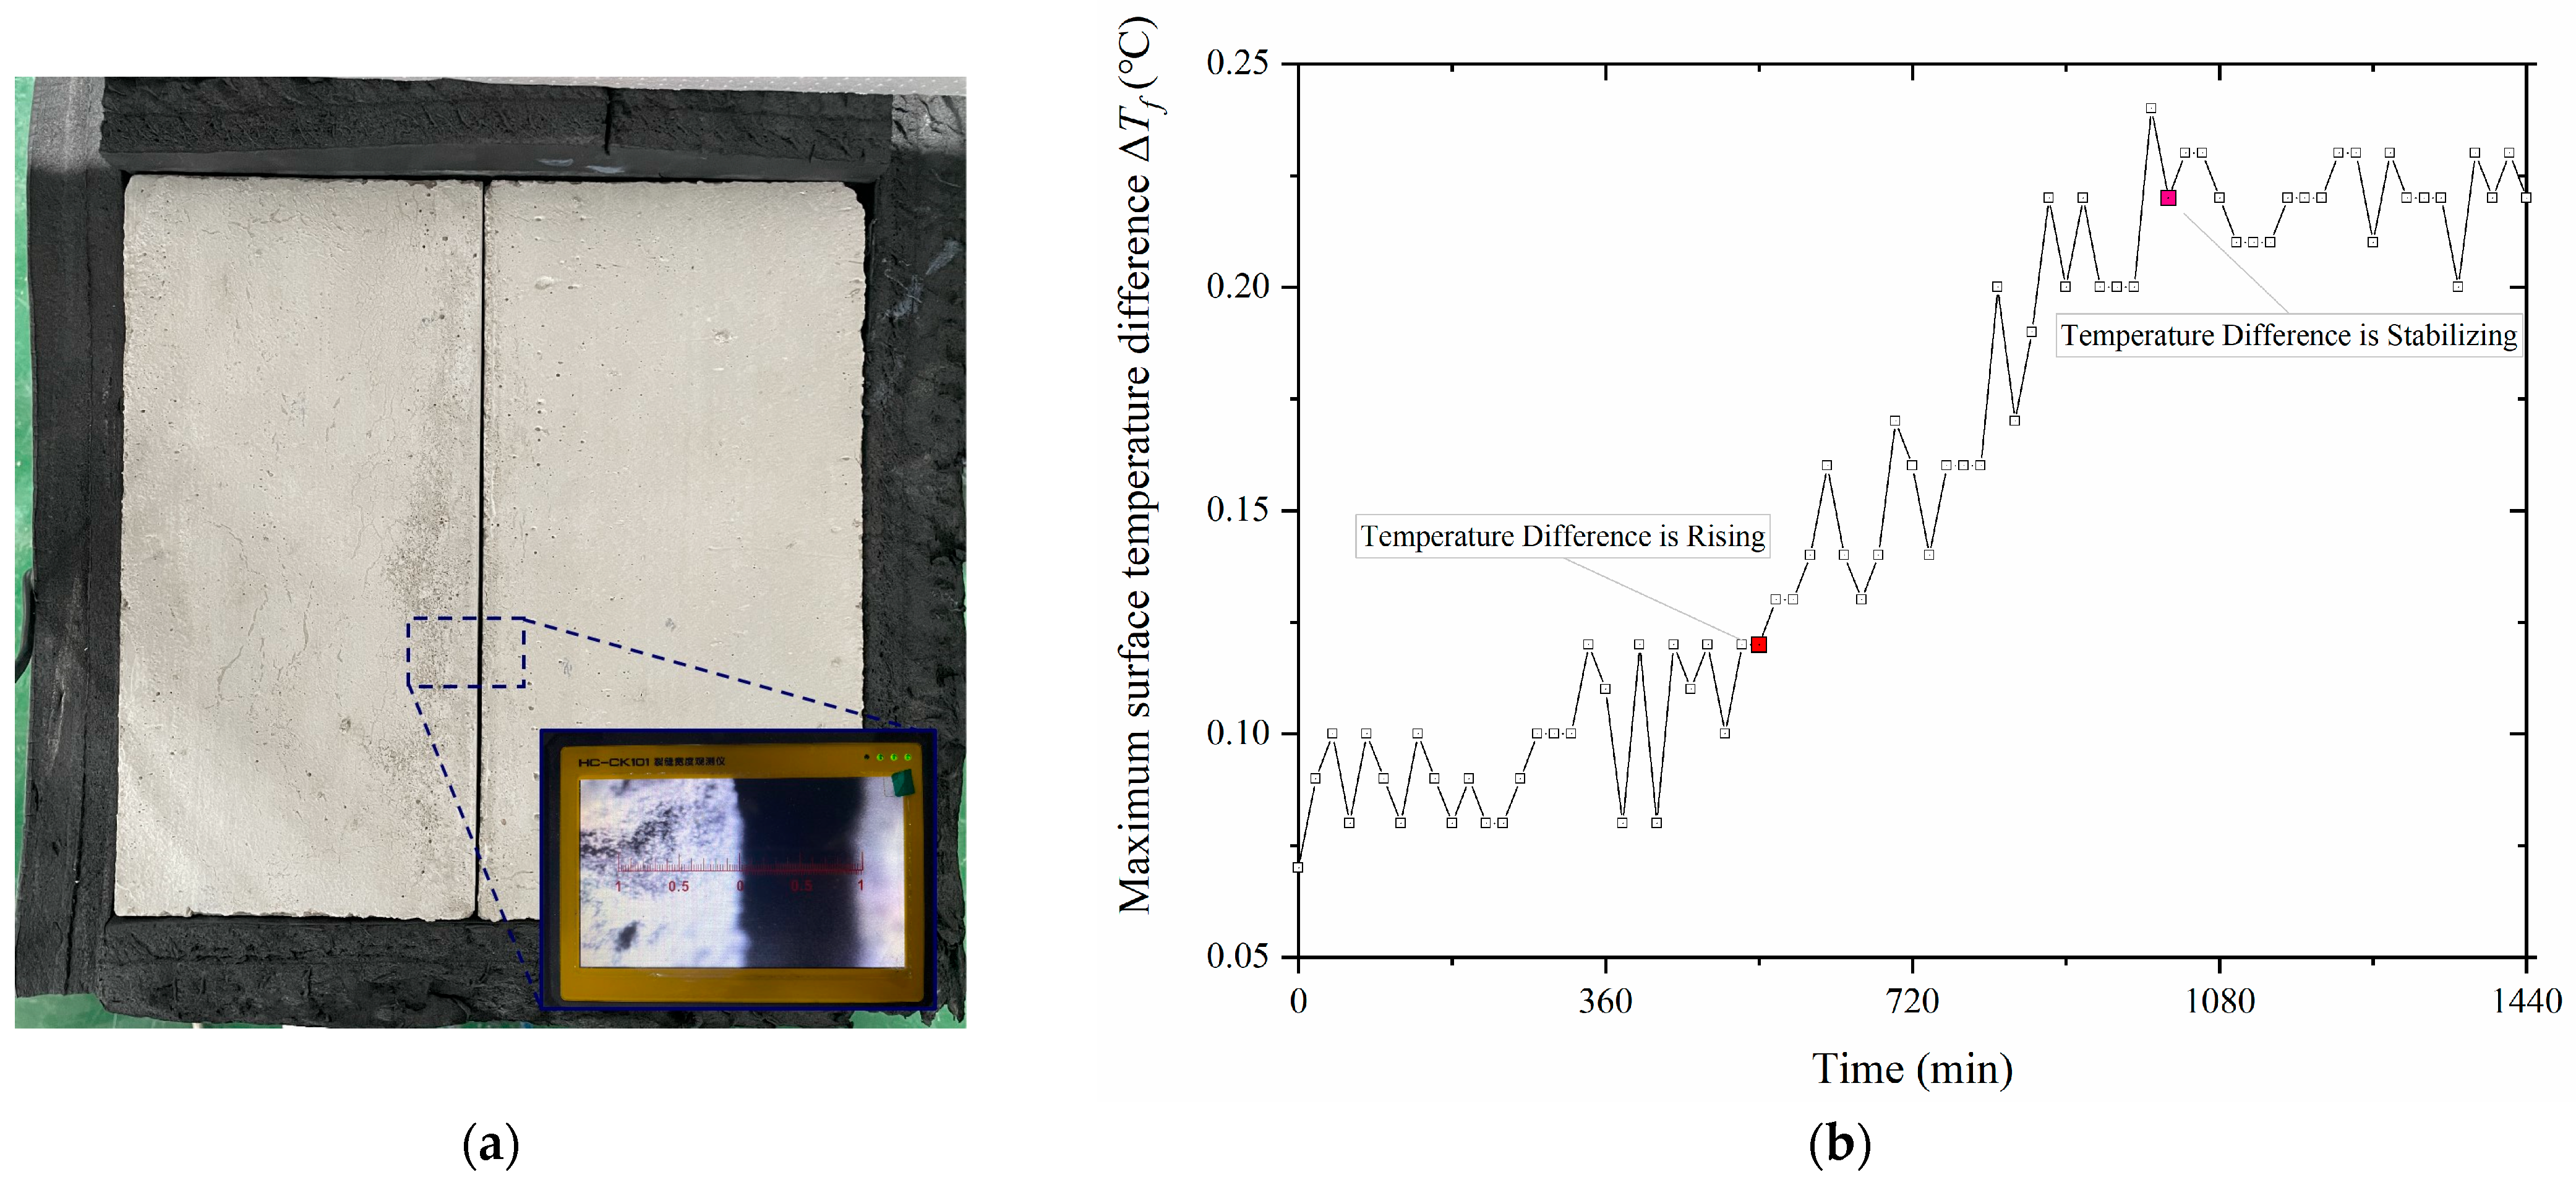
During the heating process, infrared thermal images of the specimen’s surface were captured at 20 min intervals. To illustrate this, the infrared detection results for condition 1-α are introduced as an example. In this case, an analysis of the thermal characteristics of the cracked lining surface was performed. After the concrete specimen was cured, the crack width was measured using a crack gauge whose accuracy is 0.01 mm, as shown in Figure 3a. Figure 3b illustrates the variation in the maximum surface temperature difference (ΔTf) on the specimen’s surface throughout the entire heating process.
Referring to Figure 3b, it is evident that during the initial 0 to 540 min following the commencement of heating, the specimen’s surface displays a relatively uniform heat distribution, primarily due to incomplete heat conduction. After 540 min, the cracked area manifests as a distinct golden yellow region, with the maximum temperature (Td) registering at 34.56 °C, while the undamaged section is characterized by an orange-brown hue with an average temperature (Ts) of 34.46 °C. The maximum surface temperature difference (ΔTf) on the specimen’s surface is calculated to be 0.10 °C. Figure 4a presents the thermal image of the specimen’s surface during the testing process. At 1020 min, the temperature differential on the concrete surface reaches its peak and starts to stabilize. The cracked area is now characterized by a pale yellow color, with the maximum temperature (Td) reaching 36.01 °C, while the region surrounding the crack exhibits a light orange-red shade, with an average temperature (Ts) of 35.79 °C. The maximum surface temperature difference (ΔTf) on the specimen’s surface is measured at 0.22 °C, as depicted in Figure 4c.
Upon analysis, it becomes evident that as the specimen eventually reaches a condition of steady-state heat conduction, the maximum surface temperature difference (ΔTf) on the specimen’s surface stabilizes at 0.23 °C. This stabilization can be attributed to the presence of air within a certain depth below the crack, which shortens the heat conduction path to the specimen’s surface, thereby resulting in a localized high-temperature region at the crack, often referred to as the “hot spot”. Furthermore, considering the infrared thermal imager’s minimum resolvable temperature difference of 0.1 °C, it is indicated that crack detection within the lining can be effectively conducted under natural temperature- gradient conditions.

3.2. The Impact of Crack Width

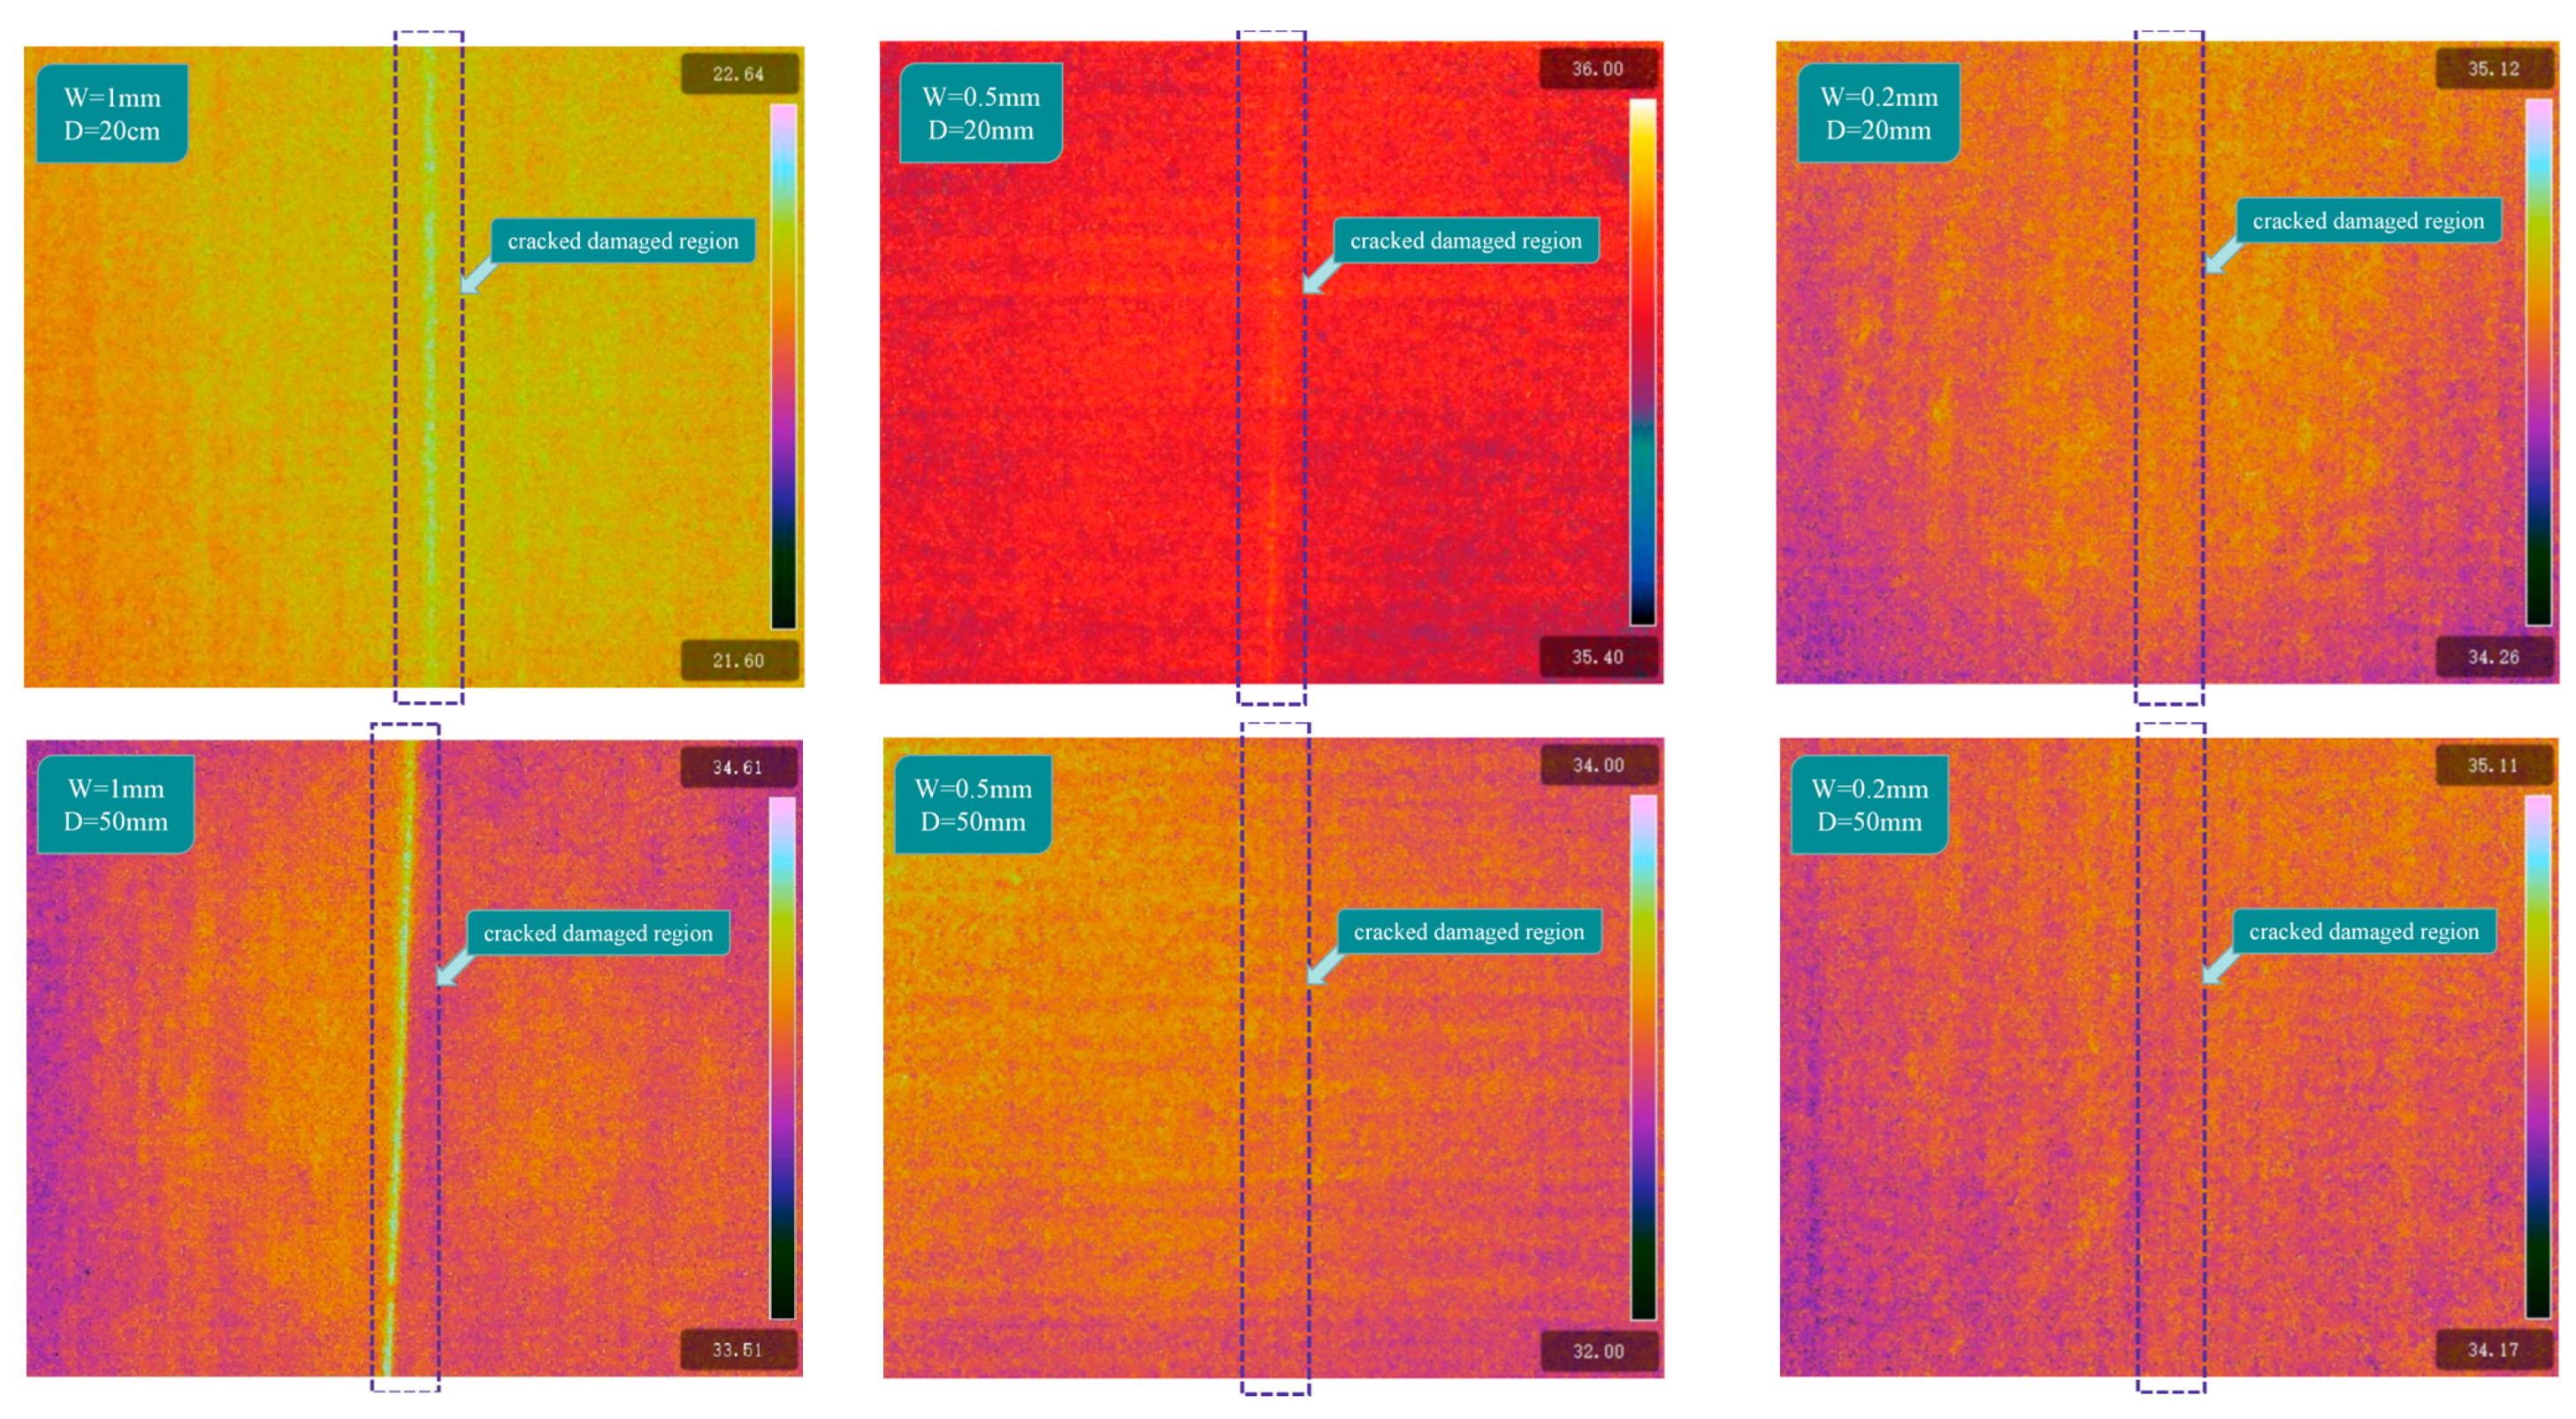
To elucidate the influence of crack width on the temperature field of the specimen’s surface, infrared detection was performed under three different conditions: 1-β, 2-β, and 3-β, each featuring a crack depth of 50 mm and varying crack widths of 1 mm, 0.5 mm, and 0.2 mm, respectively. Figure 5 presents the thermal images of the specimen’s surface corresponding to these distinct conditions.
In practical applications, setting the thermal image’s temperature range either too high or too low may result in challenges in defect detection. As a countermeasure, it becomes imperative to capture a region-of-interest (ROI) line at a consistent location on the concrete specimen’s surface, traversing the center of the defect. Subsequently, a temperature distribution curve is plotted along the horizontal direction of the specimen, as illustrated in Figure 6.
The overall curve exhibits a single-peak pattern, with the peak’s position corresponding to the defect’s location. This phenomenon arises because the temperature at the crack surpasses that of the concrete specimen’s surface, thereby resulting in an elevated temperature at the cross-section’s midpoint. As the crack width grows, the temperature differential between the edge of the healthy region and the high-temperature area around the crack progressively amplifies. Specifically, for crack widths of 1 mm and 0.5 mm, the temperature disparity between the crack’s highest temperature and the average temperature of the healthy region measures 0.23 °C and 0.16 °C, respectively. Notably, both of these values exceed the infrared thermal imager’s minimum resolvable temperature difference of 0.1 °C.
The peak temperature in the curve corresponds to the horizontal coordinate aligned with the crack’s center, and the surface temperature difference augments with an increase in crack width. Nonetheless, when the crack width narrows to 0.2 mm, the temperature difference becomes very slight (falling below the minimum resolvable temperature difference of 0.1 °C). This diminutive temperature contrast complicates the distinction between the crack area and the healthy region. As a result, when the crack width is less than 0.2 mm and the crack depth is under 50 mm, the utilization of an infrared thermal imager for crack depth detection is deemed unfeasible.

3.3. The Impact of Crack Depth

To elucidate the influence of crack width on the temperature field of the specimen’s surface, infrared detection was performed for various crack widths at different crack depths. Figure 7 illustrates the thermal images of surface temperature of the concrete test block.
After examining the surface thermal images from the 12 test cases, a noticeable pattern emerges. Once the heat transfer within the specimen stabilizes, the surface consistently portrays a configuration wherein a cooler, undamaged region encompasses a warmer, cracked area. It is worth noting that for cracks with a width of 0.2 mm, discernible cracks in the thermal images are only observable when the crack depth exceeds 100 mm.
Likewise, temperature distribution curves along the specimen’s horizontal coordinates were generated for each test case, as depicted in Figure 8. It is evident that for cracks of the same width, an increase in crack depth leads to a gradual elevation in the temperature within the crack area. Consequently, this results in a corresponding rise in the maximum temperature difference observed on the specimen’s surface. Additionally, it was noted that when the crack width is 0.2 mm, the temperature distribution on the specimen’s surface lacks a discernible pattern, making it a challenging task to distinguish variations in crack depths.

4. Simulation Method

In laboratory conditions, maintaining a continuous and steady thermal flow to concrete specimens can present challenges, and replicating the authentic thermal conditions of a tunnel environment is subject to certain constraints. Consequently, numerical analysis methods are employed to simulate the thermal conduction effects at crack sites under thermal excitation conditions. This analytical approach aids in comprehending the thermal conduction behaviors of concrete components featuring cracks under natural temperature differentials, as well as evaluating the influence of crack geometry on the temperature distribution across the concrete surface.

4.1. FEM Simulation Model

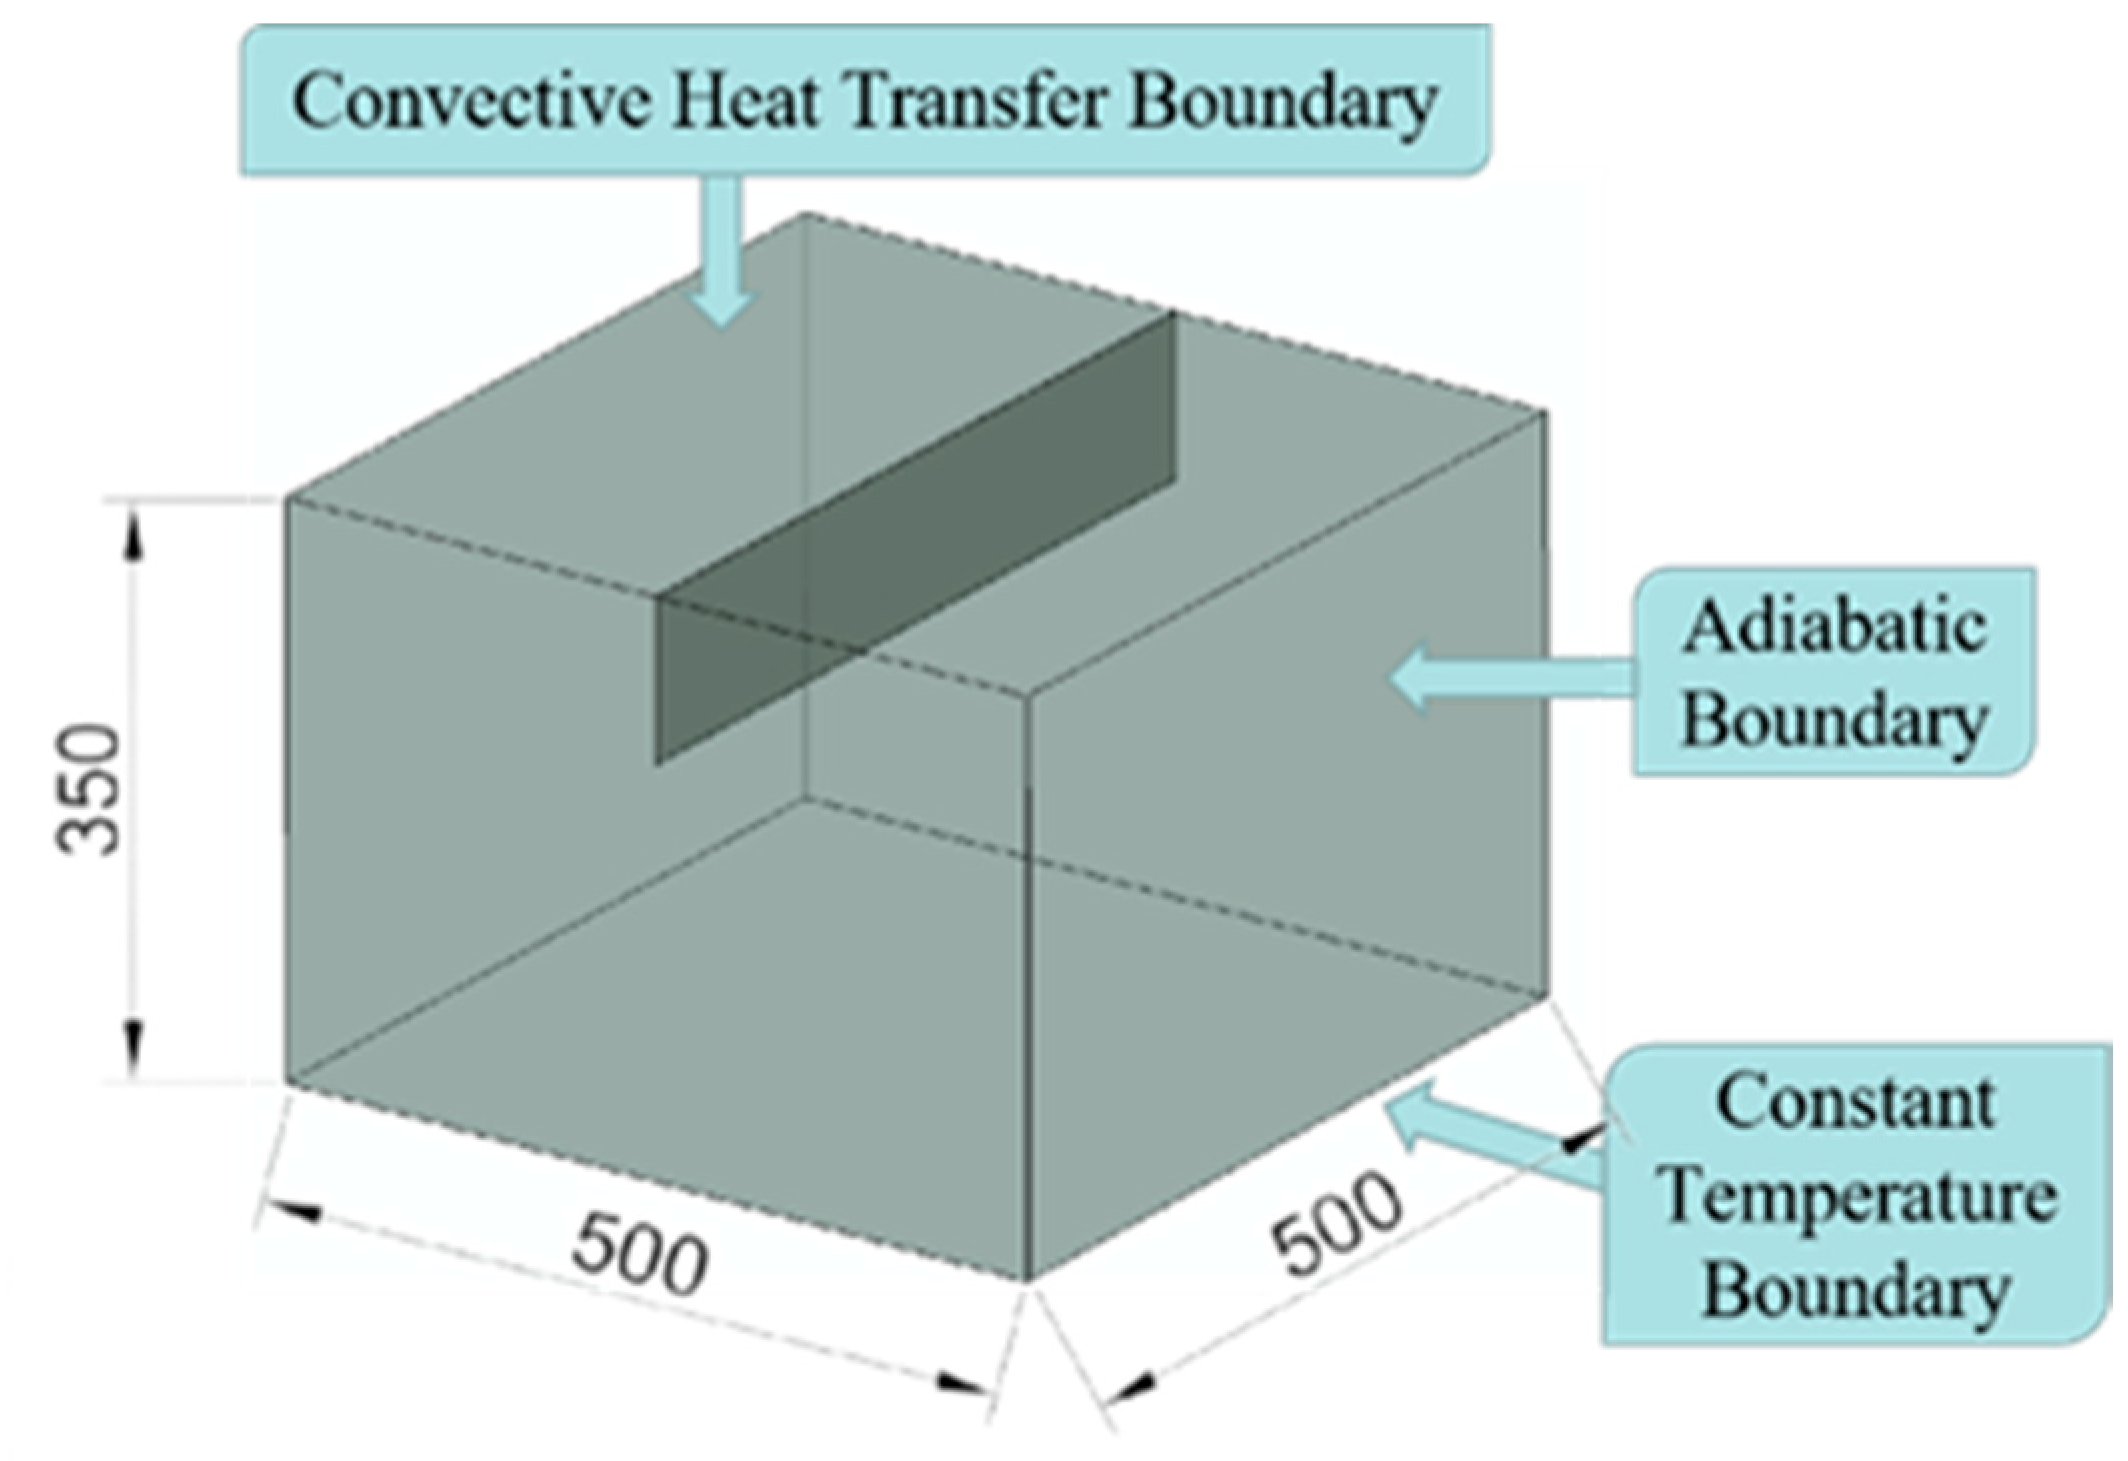
The model dimensions align with those of the concrete specimens used in the experiments. In the model, the backside of the specimen is designated as a high-temperature boundary (25 °C), characterized by zero heat transfer. On the inner side of the lining and at its interaction with air, a convective heat transfer boundary (20 °C) is established, with a convective heat transfer coefficient of 7.97 W/(m2·°C), assumed to mimic environmental conditions with a wind speed of 0.5 m/s. The remaining four sides are configured as adiabatic boundaries, facilitating heat transfer solely in the thickness direction. Figure 9 depicts the boundary conditions within the analysis model for the cracked component.

4.2. Material Properties

The numerical simulation employs materials that match those used in the experimental setup. The concrete’s strength corresponds to C30, with the cracked section essentially representing air. The crucial thermal properties of the materials utilized in the simulation are outlined in Table 2.

4.3. Simulation Results and Experimental Validation

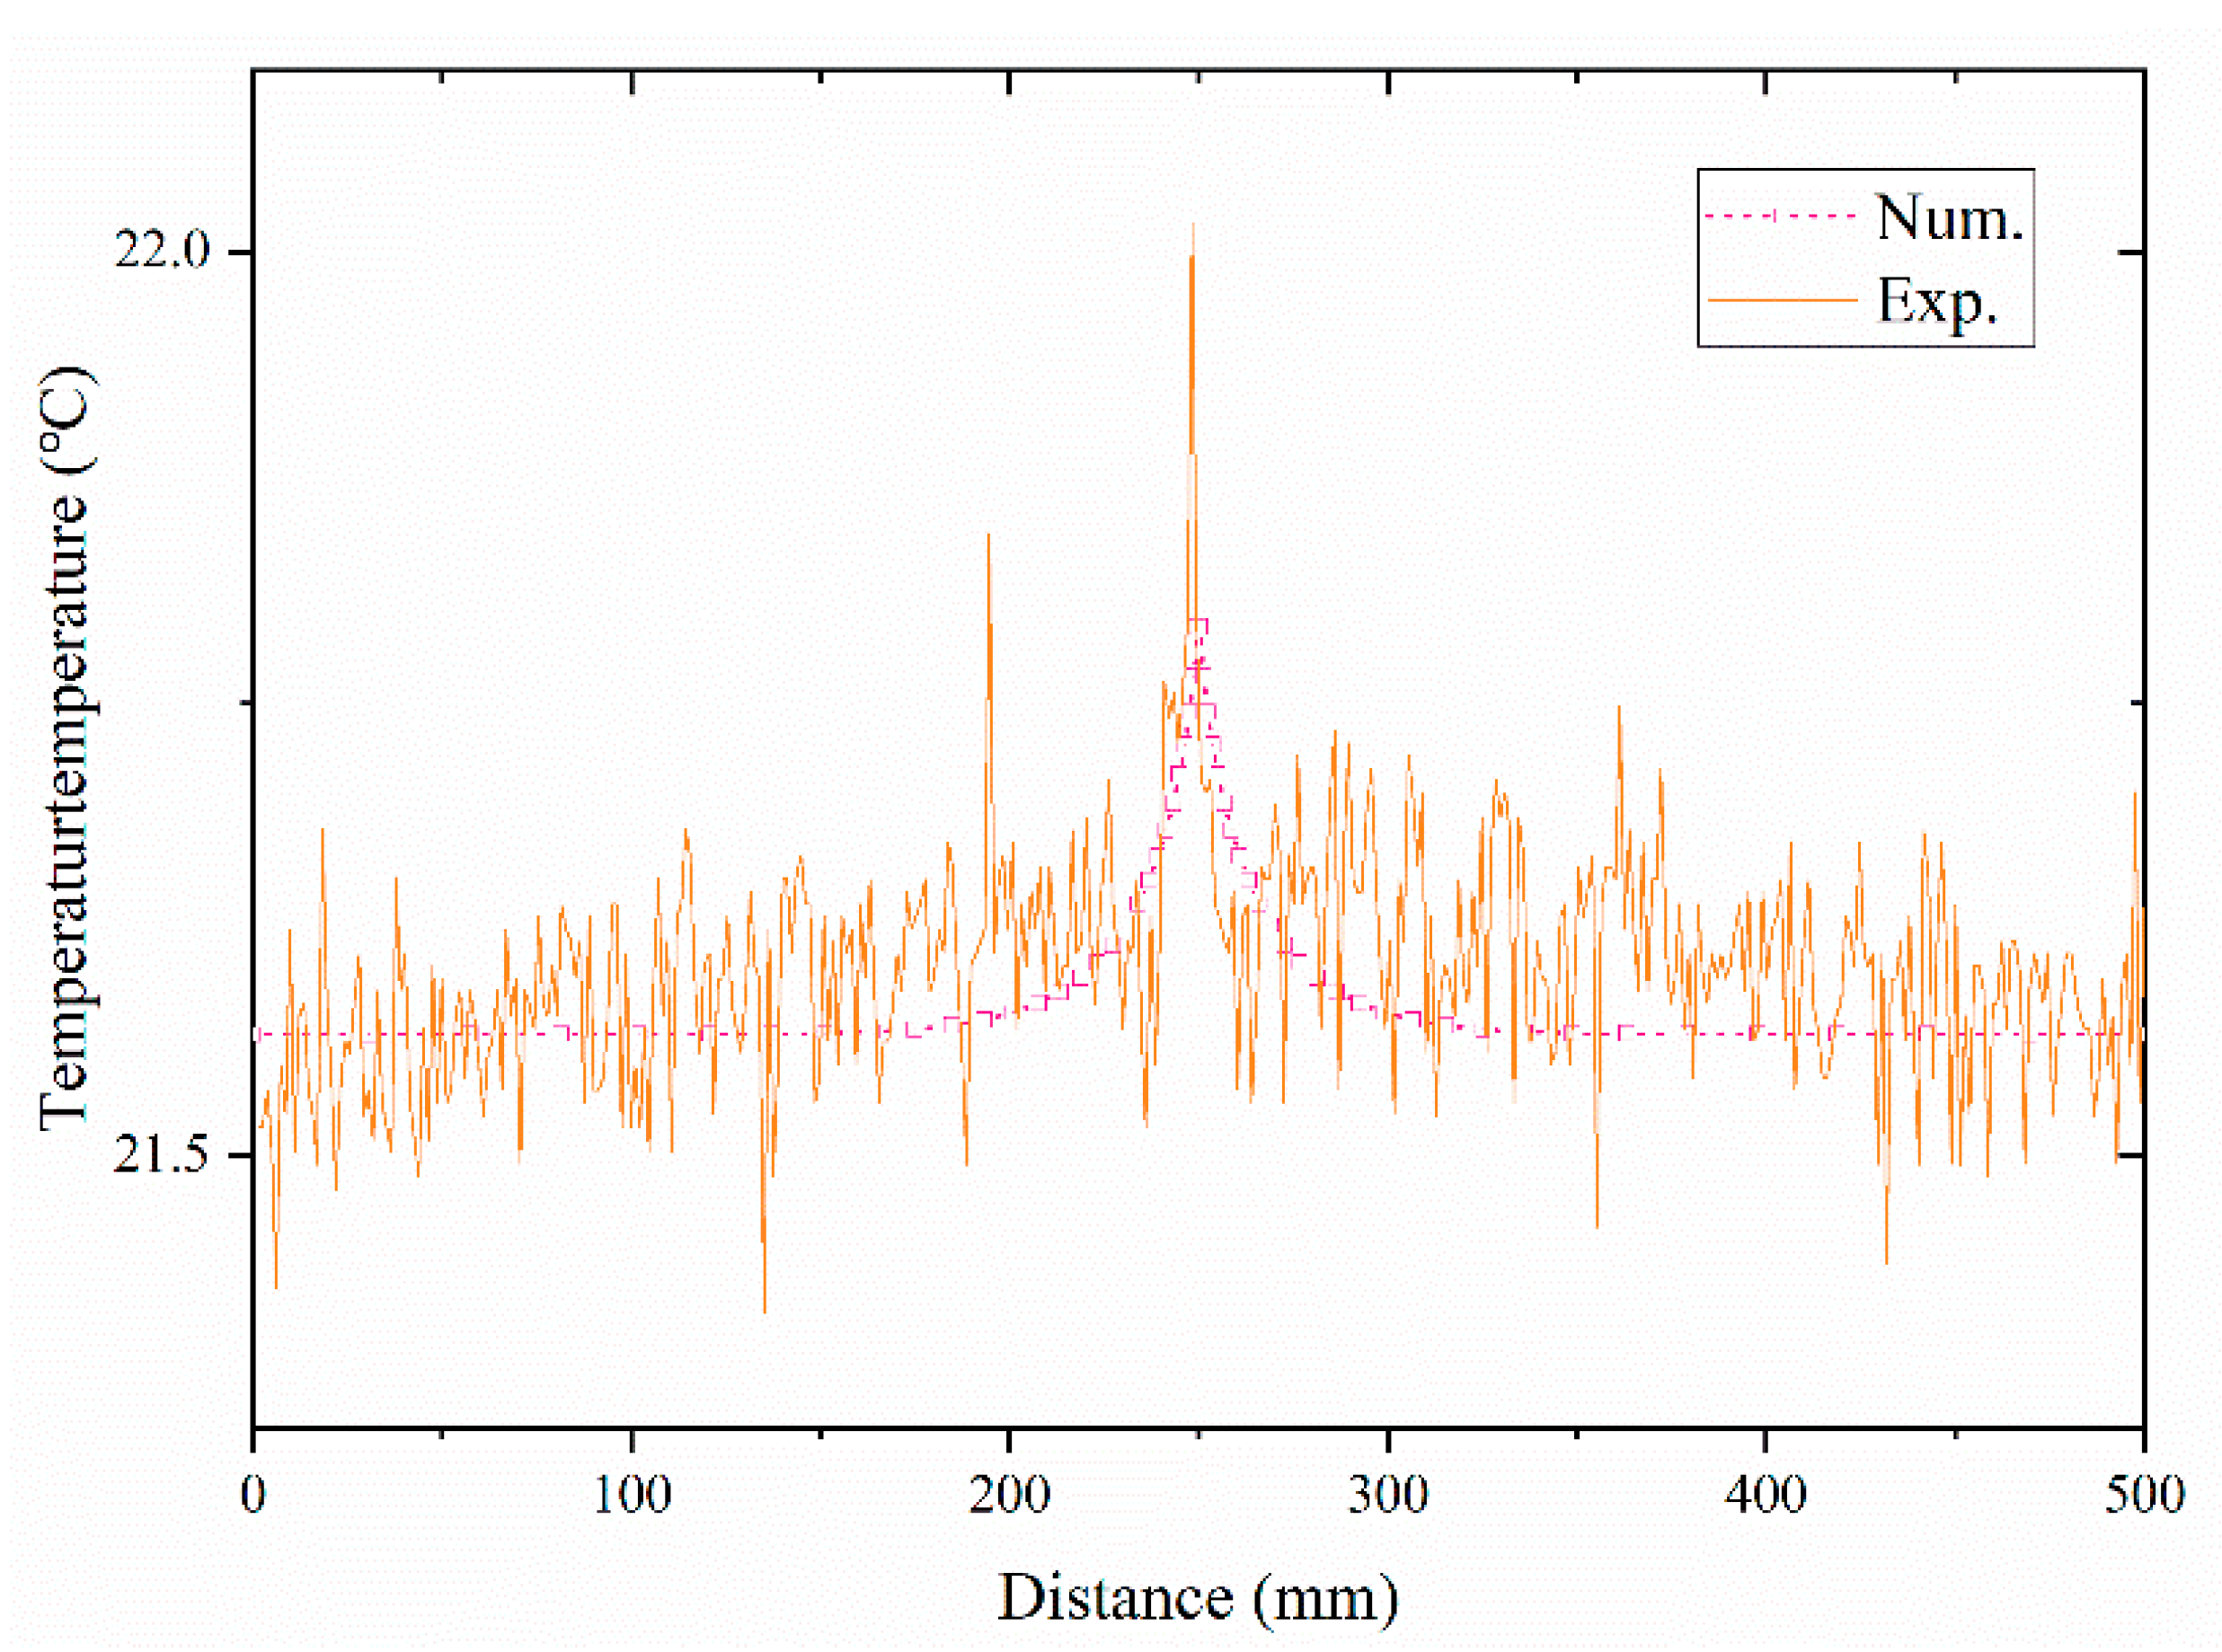
Using condition 1-β (crack width 1 mm, crack depth 5 cm) as an example, Figure 10 presents a comparative chart depicting the temperature distribution along the ROI line. The figure reveals that under continuous thermal excitation, the measured curve and the simulated curve do not align perfectly. This discrepancy can be attributed to the sensitivity of the infrared thermal imager and the non-uniformity of the specimen’s surface. However, it is noteworthy that in both numerical simulations and indoor experiments, the surface temperature distribution exhibits analogous characteristics, notably a single-peak curve with the peak’s position corresponding to the defect’s location. Comparative results for the other test conditions are summarized in Table 3.

4.4. The Impact of Environmental Temperature Difference

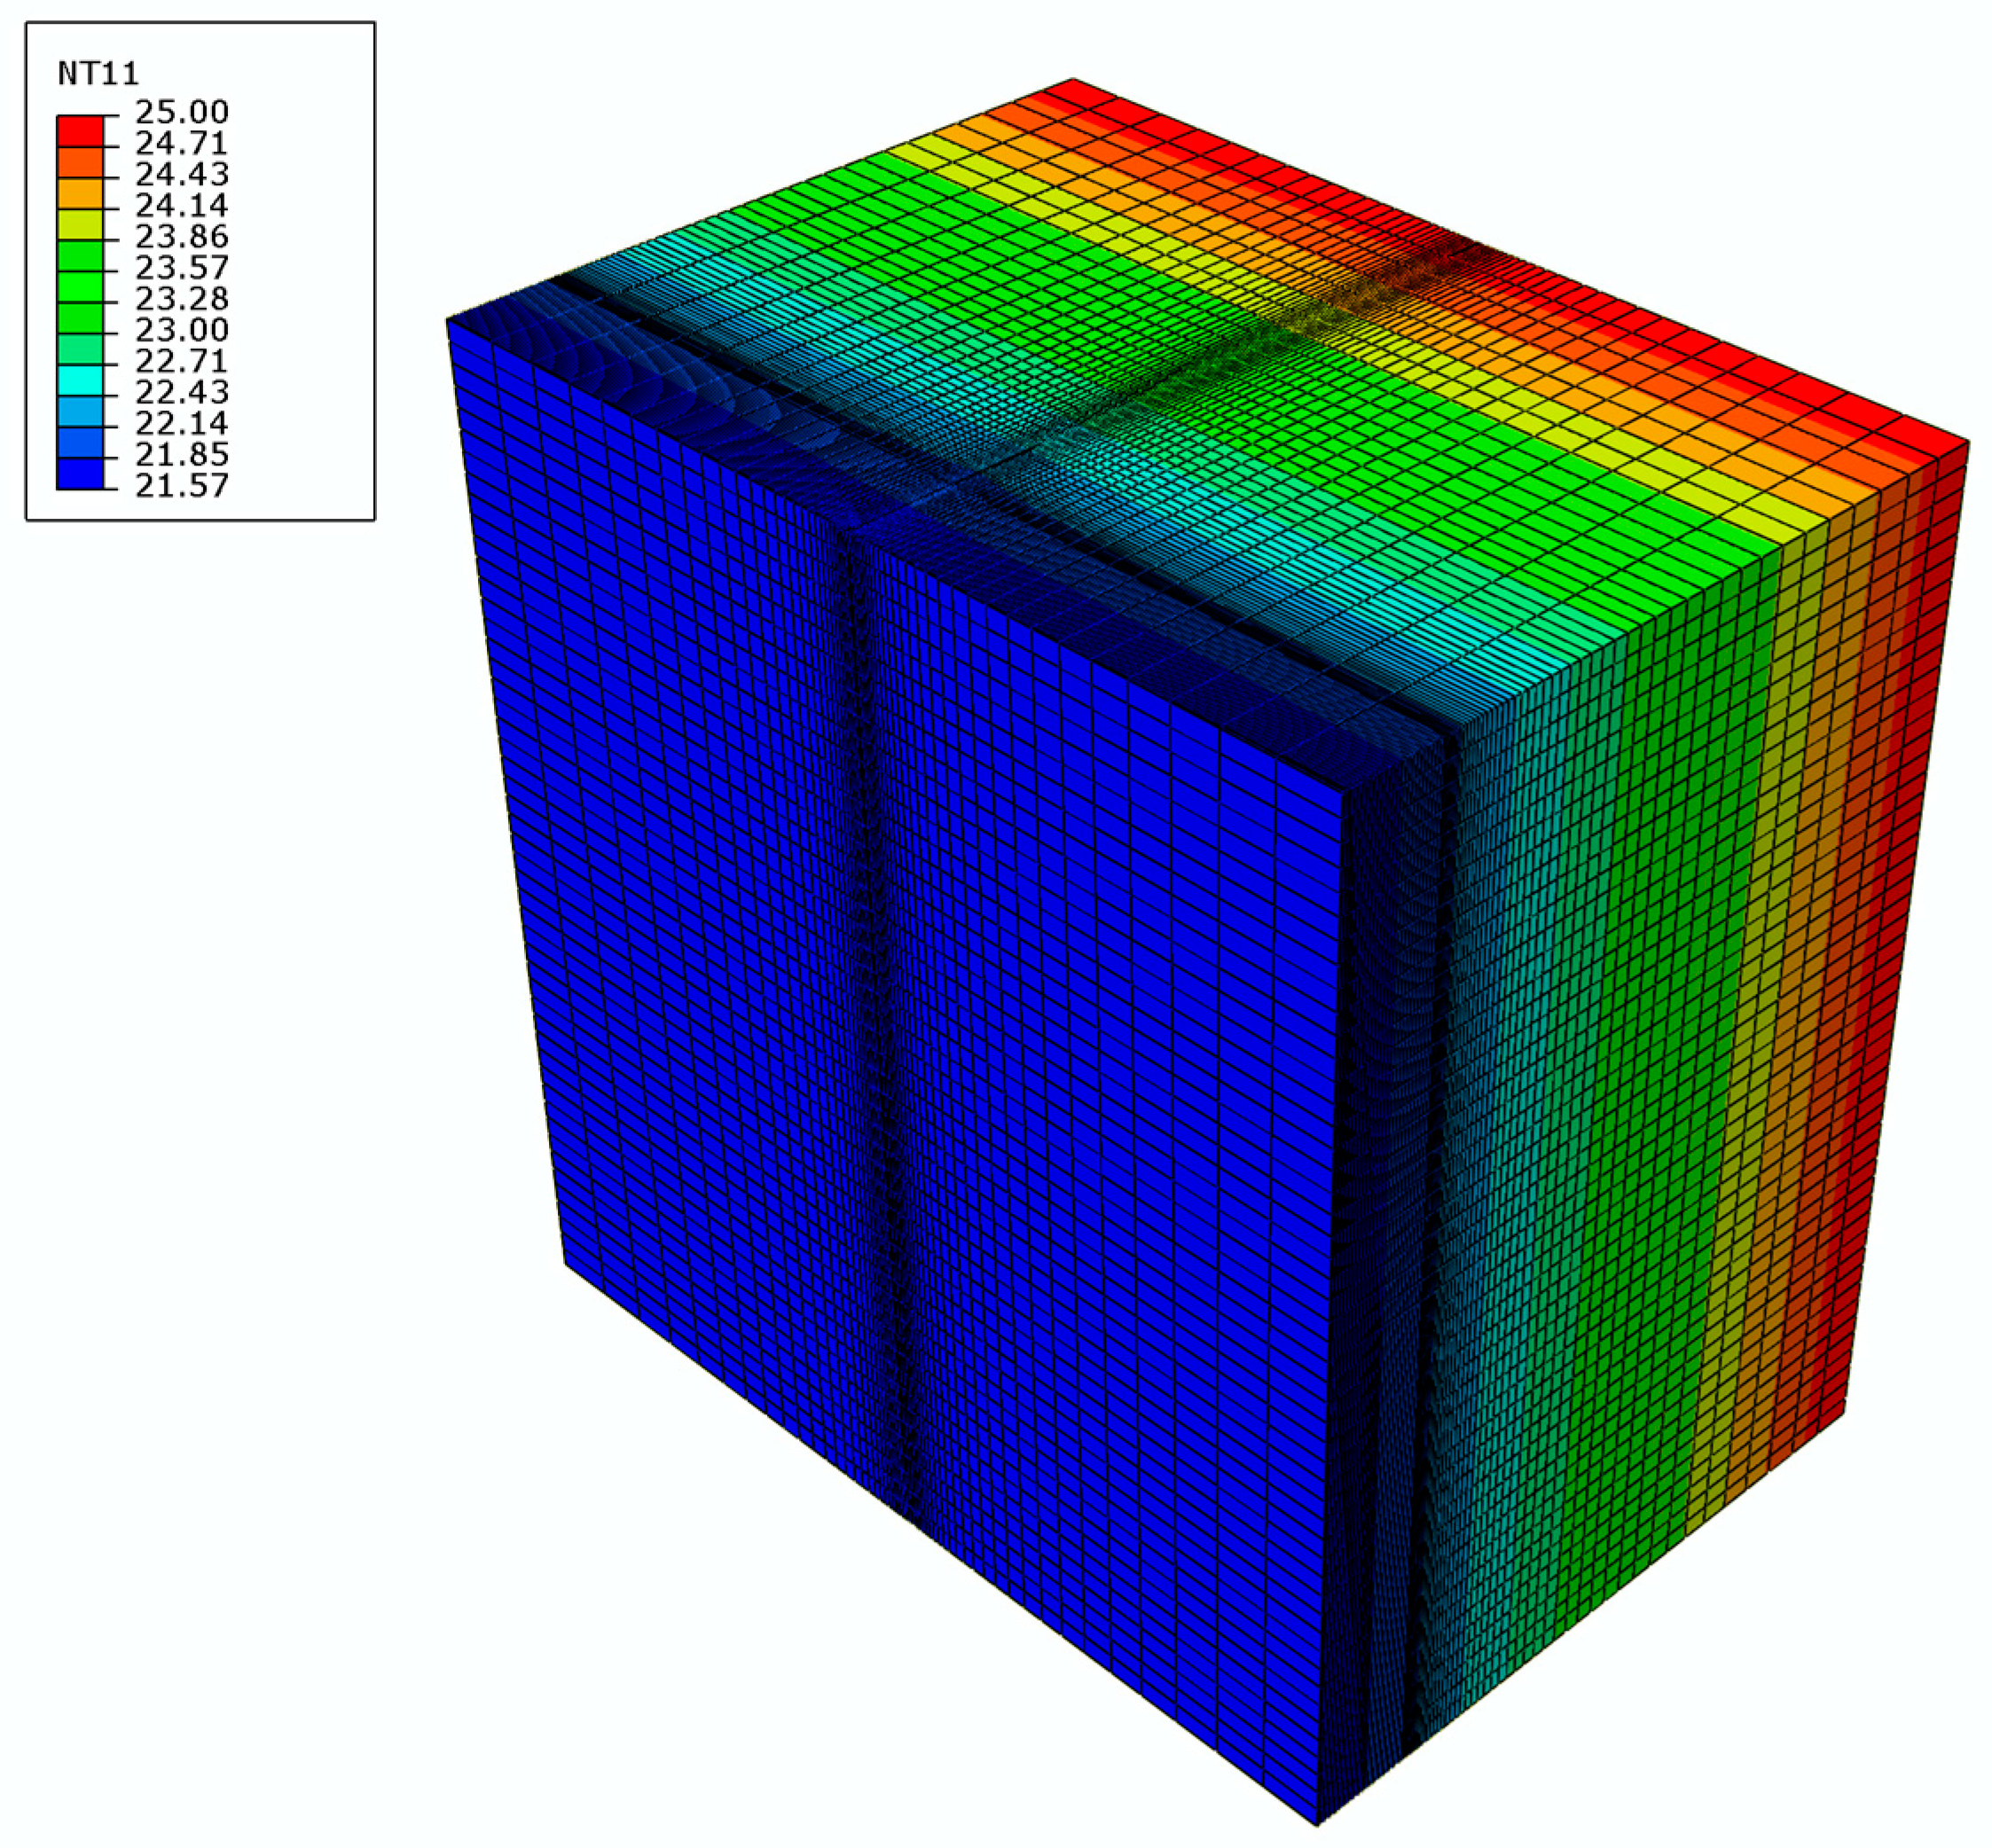
Examining the temperature distribution on the inner surface of the lining for condition 1-β (crack width 1 mm, crack depth 5 cm), with the tunnel lining’s backside at 25 °C and the inner surface at 20 °C, and taking into account convective heat transfer between the lining and the surrounding air, Figure 11 presents the comprehensive temperature contour map of the lining.
It is apparent that due to the temperature difference between the inner and outer sides of the lining, heat is conducted towards the inner surface of the lining, leading to a significant temperature gradient in the thickness direction of the lining. When heat transfer reaches a steady state, the temperature on the inner surface of the lining stabilizes at 21.6 °C. This observation demonstrates that with a natural temperature difference of 5 °C, once heat transfer reaches stability, the temperature increase on the inner surface of the lining amounts to 1.6 °C.
The temperature contrast on the inner surface of the lining in various regions serves as a critical parameter for evaluating the viability of infrared detection. The temperature distribution on the inner surface of the lining exhibits variations with different temperature differentials. In Figure 12, temperature contour maps of the inner lining surface are presented for natural temperature differences of 3 °C, 8 °C, and 10 °C, respectively.
An analysis reveals the following:
  • In the temperature contour maps of the inner lining surface, a noticeable temperature distinction exists between the healthy area and the cracked area, and this contrast becomes more pronounced with increasing natural temperature differences. Consequently, as the natural temperature difference augments, the viability of infrared detection also improves. It is noteworthy that the high-temperature region associated with cracks remains relatively constant, suggesting that fluctuations in environmental temperature differences do not substantially affect the extent of the low-temperature region on the specimen’s surface.
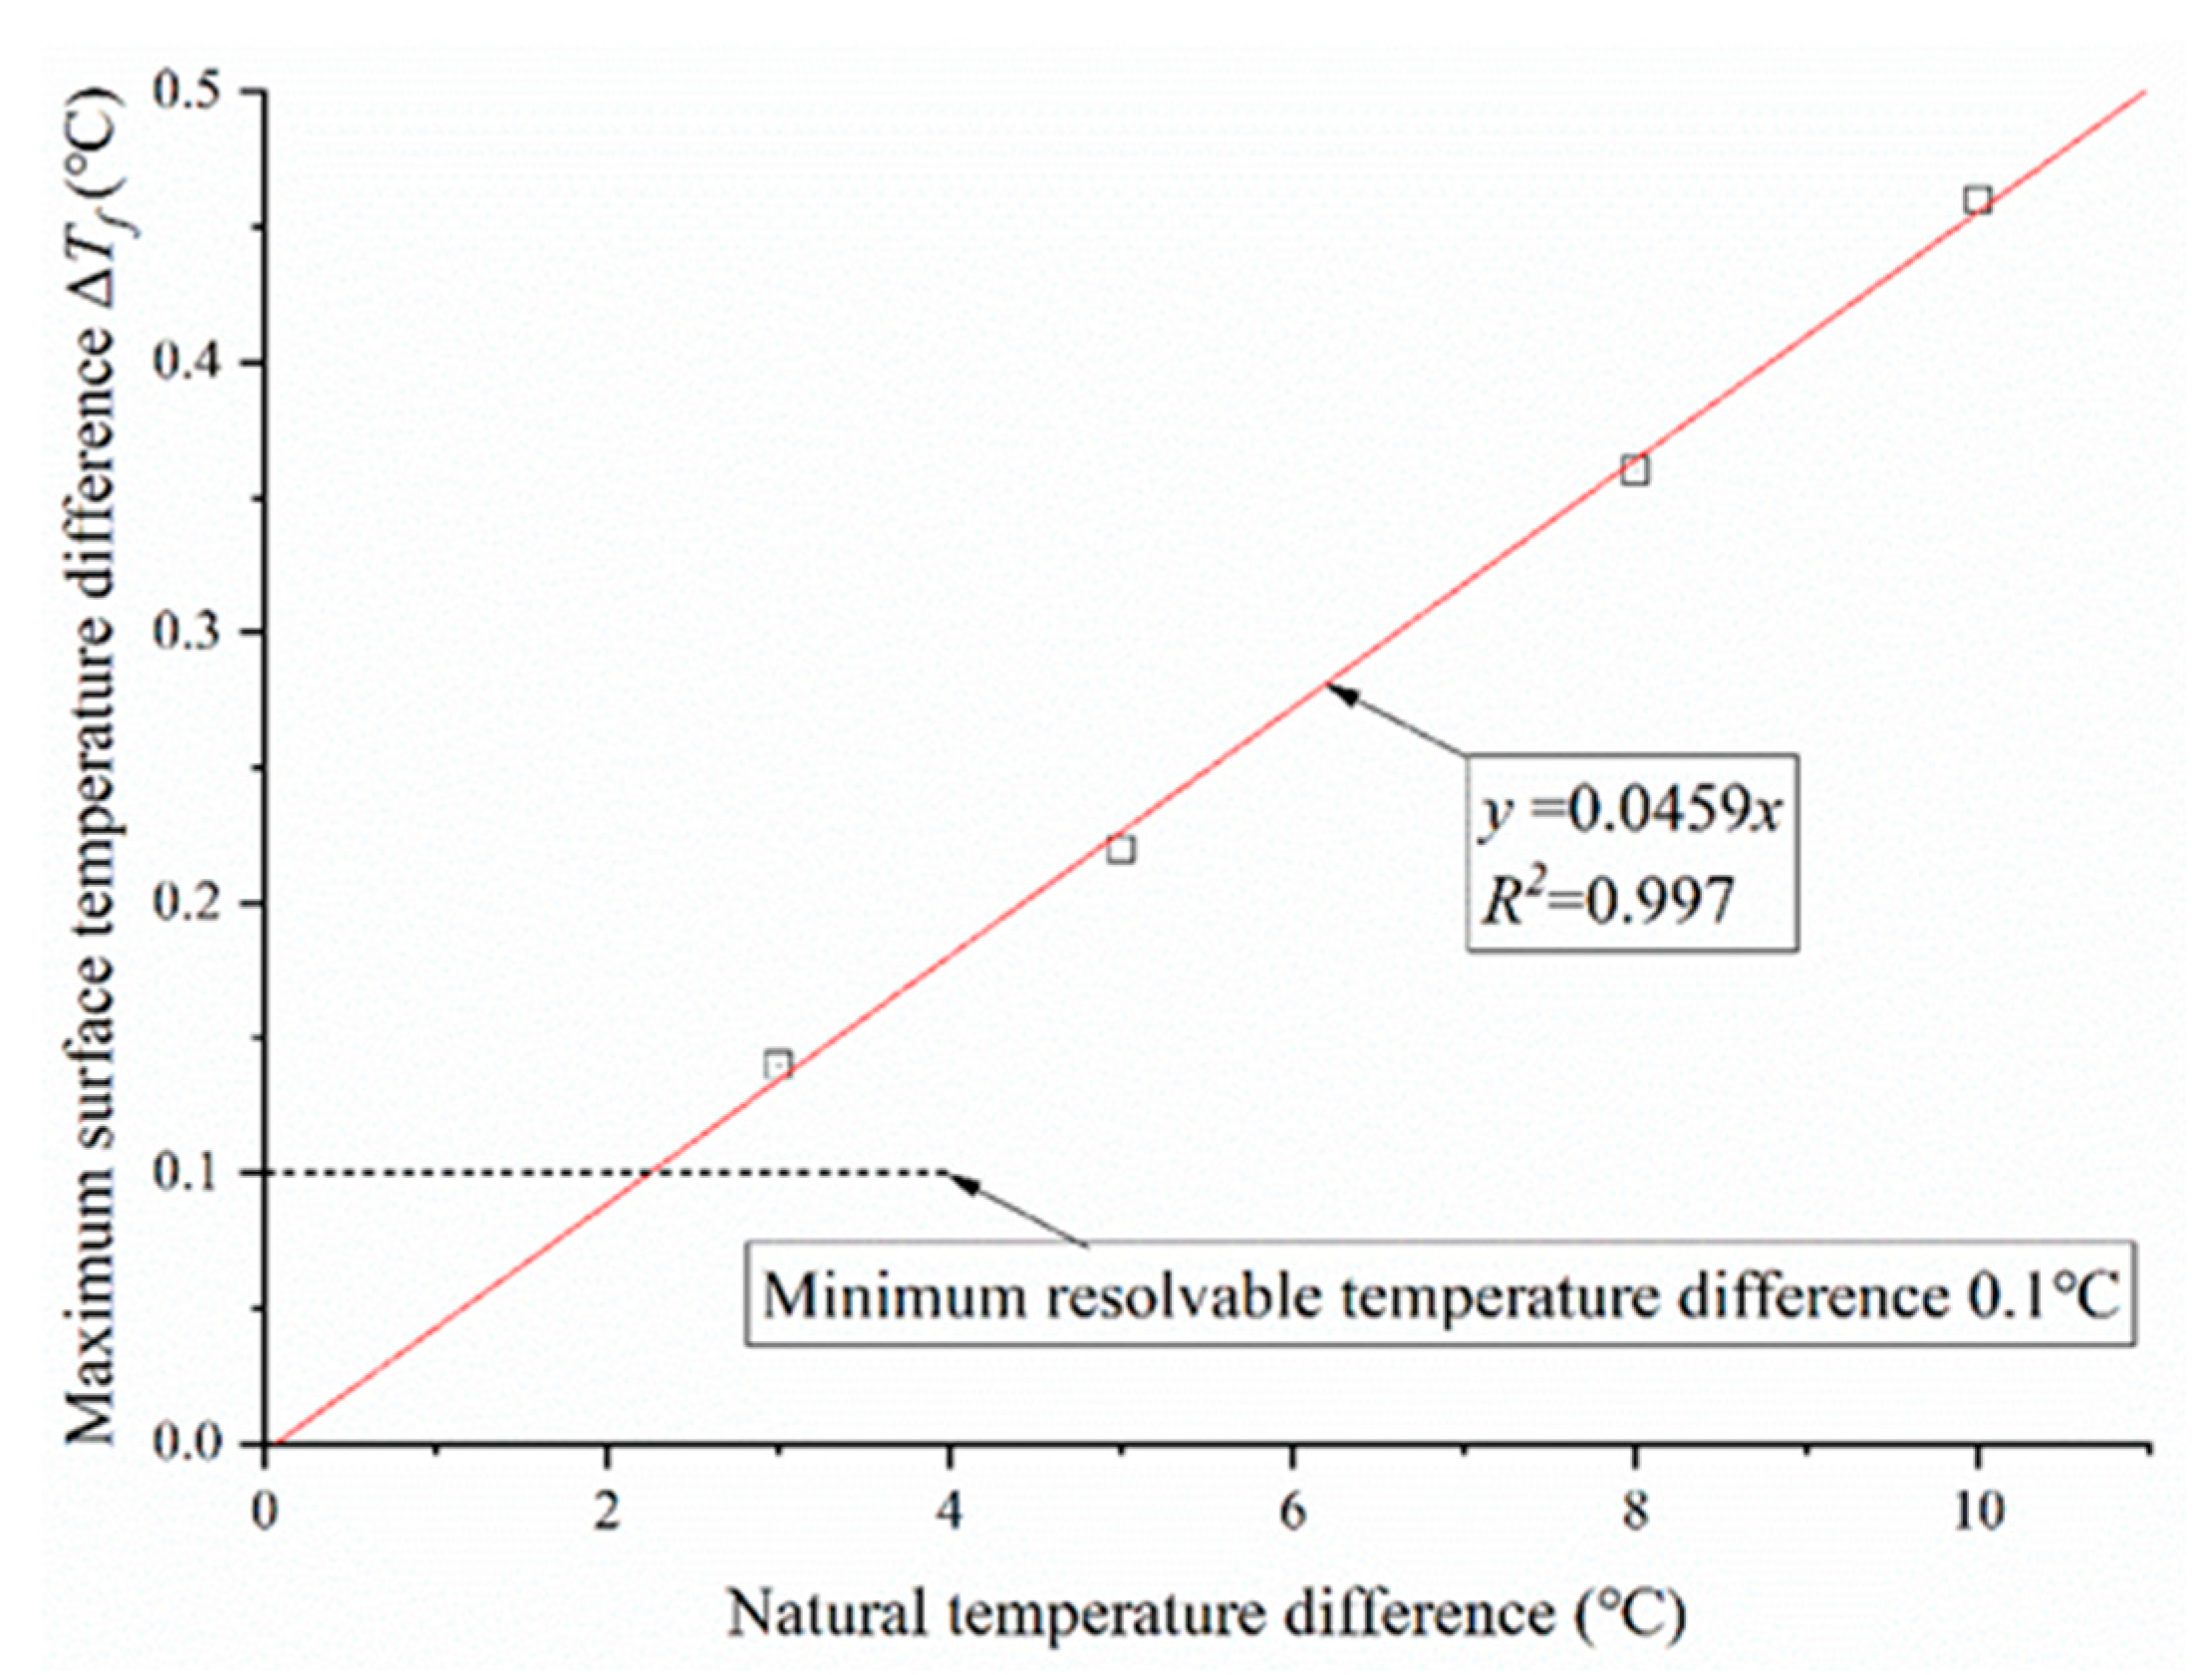
  • For natural temperature differences of 3 °C, 5 °C, 8 °C, and 10 °C, the maximum surface temperature differences (ΔTf) on the lining surface are 0.14 °C, 0.22 °C, 0.36 °C, and 0.46 °C, respectively. Considering the minimum resolvable temperature difference of the infrared thermal imager, which is 0.1 °C, it can be concluded that when the natural temperature difference between the inner and outer sides of the lining is 3 °C or greater, infrared thermal imaging technology can effectively be employed to detect cracks in concrete lining with a crack width exceeding 1 mm and a crack depth of 5 cm or more.
The fitting curve depicting the relationship between the natural temperature difference (ΔTN) and the maximum surface temperature difference (ΔTf) is illustrated in Figure 13. An analysis reveals that there is a linear correlation between the maximum surface temperature difference (ΔTf) on the inner lining surface and the natural temperature difference (ΔTN). To ensure effective crack detection in a concrete lining with a crack width of 1 mm and a crack depth of 5 cm, considering the minimum resolvable temperature difference of the infrared detection to be 0.1 °C, a minimum required natural temperature difference of approximately 2.2 °C is identified.

4.5. Results and Discussion

Drawing on the earlier experimental findings, we can make an initial inference that the temperature field distribution on the tunnel lining surface is predominantly influenced by crack dimensions (width and depth) and the natural temperature difference. In addition to those presented in Table 1, supplementary simulated conditions were introduced to investigate the impact of varying crack depths on the surface temperature field, as detailed in Table 4.
Given the linear correlation between the maximum surface temperature difference (ΔTf) and the natural temperature difference (ΔTN), temperature scaling factors (k) for various conditions could be computed using the formula k = ΔTf /ΔTN. The precise values are detailed in Table 5.
In practice, the temperature scaling factor k is interconnected with the crack width (W), crack depth (D), and their interplay. A relationship curve was fitted to depict the connection between crack depth (D) and the temperature scaling factor (k) for varying crack widths (W), as depicted in Figure 14.
Hence, during the detection process, when armed with the known natural temperature difference (ΔTN) between the inner and outer sides of the tunnel lining, the maximum surface temperature difference (ΔTf), and the crack width (W), the following equations can be used to estimate the crack depth (D):
D = 30.28 W 1.324 ( e k / t 1 ) k = Δ T f / Δ T N t = 0.0505 W
Utilizing the infrared detection method as delineated previously, crack depths were computed for various typical indoor test conditions, as detailed in Table 6. Upon comparing the actual depth with the estimated depth, it is evident that this method is well-suited for accurate crack depth estimation, when ΔTN = 5 and ΔTf is based on indoor test data.

5. Conclusions

Based on the temperature difference inside and outside the tunnel lining, this study conducted indoor experiments to analyze the heat transfer patterns and infrared image characteristics of concrete with cracks. The main conclusions are as follows:
  • During the winter season, the surrounding rock temperature in the tunnel is higher than the environmental temperature inside the tunnel. A heat transfer phenomenon is observed from the rock–soil body to the surface of the lining. The healthy region on the inner surface of the lining appears as a low-temperature area, while the cracked region presents as a high-temperature area.
  • The temperature contrast among distinct regions on the inner surface of the lining escalates proportionally with the inherent temperature difference between the interior and exterior, along with the depth of cracks. However, it diminishes as the crack width expands. Specifically, for crack widths of 1 mm and 0.5 mm (both with a crack depth of 50 mm and a natural temperature difference of 5 °C), the maximum surface temperature differences are 0.23 °C and 0.16 °C, respectively.
  • The relationship between the crack depth (D) and the natural temperature difference (ΔTN), the maximum surface temperature difference (ΔTf), and the crack width (W) can be expressed as D = 30.28 W 1.324 ( e Δ T f / Δ T N 0.0505 W 1 ) . This formula enables the rapid detection and diagnosis of lining crack depth defects.

6. Discussion

In this study, we conducted experimental and numerical investigations on the feasibility of using infrared thermography to detect the depth of cracks in concrete lining under natural temperature differentials. While the research has yielded certain findings, there are notable limitations that require further refinement in the following areas: In practical engineering scenarios, cracks may not be confined solely to the surface of the lining but could also exist within the material. Hence, future research should integrate various detection methods to ensure a broader scope of detection. Due to constraints related to the experiment site and equipment, this study was only able to simulate natural temperature differentials within tunnel linings during winter. Consequently, it did not analyze the process of heat transfer from the tunnel surface to the back of the lining under summer conditions. Subsequent research should focus on employing different simulation methods to address and simulate conditions specific to summer.

Author Contributions

W.G.: conceptualization, methodology, writing—original draft. X.L.: supervising, methodology, writing—review and editing. Z.L.: writing—review and editing. All authors have read and agreed to the published version of the manuscript.

Funding

The research described in this paper was supported by the National Natural Science Foundation of China (52278409).

Institutional Review Board Statement

Not applicable.

Informed Consent Statement

Not applicable.

Data Availability Statement

All relevant data are within the paper.

Conflicts of Interest

The authors declare that they have no known competing financial interests or personal relationships that could have impacted the work reported in this paper.

References

  1. Song, W.; Lai, H.; Liu, Y.; Yang, W.; Zhu, Z. Field and laboratory study of cracking and safety of secondary lining for an existing highway tunnel in loess ground. Tunn. Undergr. Space Technol. 2019, 88, 35–46. [Google Scholar] [CrossRef]
  2. Xiong, L.; Zhang, D.; Zhang, Y. Water leakage image recognition of shield tunnel via learning deep feature representation. J. Vis. Commun. Image Represent. 2020, 71, 102708. [Google Scholar] [CrossRef]
  3. Zhou, P.; Lin, M.; Zhou, F.; Gong, L.; Ao, W. Bearing characteristics and failure mechanism of a novel plate-short anchor structure for tunnel crack reinforcement. Eng. Fail. Anal. 2022, 135, 106160. [Google Scholar] [CrossRef]
  4. Zhao, Y.; Yang, J.; Zhang, Y. Failure Behavior of Tunnel Lining Caused by Concrete Cracking: A Case Study. J. Fail. Anal. Prev. 2019, 19, 1158–1173. [Google Scholar] [CrossRef]
  5. Tan, X.; Bao, Y. Measuring crack width using a distributed fiber optic sensor based on optical frequency domain reflectometry. Measurement 2021, 172, 108945. [Google Scholar] [CrossRef]
  6. Jia, Y.; Tang, L.; Ming, P.; Xie, Y. Ultrasound-excited thermography for detecting microcracks in concrete materials. NDT & E Int. Indep. Nondestruct. Test. Eval. 2019, 101, 62–71. [Google Scholar]
  7. Kumar, V.; Morris, I.M.; Lopez, S.A.; Glisic, B. Identifying Spatial and Temporal Variations in Concrete Bridges with Ground Penetrating Radar Attributes. Remote Sens. 2021, 13, 1846. [Google Scholar] [CrossRef]
  8. Li, X.; Lu, X.; Li, M.; Hao, J.; Xu, Y. Numerical Study on Evaluating the Concrete-Bedrock Interface Condition for Hydraulic Tunnel Linings Using the SASW Method. Appl. Sci. 2018, 8, 2428. [Google Scholar] [CrossRef]
  9. Merioua, A.; Bezzar, A.; Ghomari, F. Non-destructive Electrical Methods for Measuring the Physical Characteristics of Porous Materials. J. Nondestruct. Eval. 2015, 34, 1–12. [Google Scholar] [CrossRef]
  10. Ikebata, K.; Kobayashi, Y.; Oda, K.; Nakamura, K. Evaluation of Unfilled Sheath in Concrete Structures Using Response Waveform in Time Domain. Appl. Sci. 2021, 11, 11402. [Google Scholar] [CrossRef]
  11. Wang, Y.; Tang, L.; Zhang, S.; Jia, Y.; Tian, H.; Liang, J. Research on visualisation of plain concrete crack depth detection based on tracer and hand-held radar. Nondestruct. Test. Eval. 2023. ahead of print. [Google Scholar] [CrossRef]
  12. Zhan, H.; Jiang, H.; Jiang, R. Three-dimensional images generated from diffuse ultrasound wave: Detections of multiple cracks in concrete structures. Struct. Health Monit. 2020, 19, 12–25. [Google Scholar] [CrossRef]
  13. Kylili, A.; Fokaides, P.A.; Christou, P.; Kalogirou, S.A. Infrared thermography (IRT) applications for building diagnostics: A review. Appl. Energy 2014, 134, 531–549. [Google Scholar] [CrossRef]
  14. Garrido, I.; Lagüela, S.; Arias, P. Infrared Thermography’s Application to Infrastructure Inspections. Infrastructures 2018, 3, 35. [Google Scholar] [CrossRef]
  15. Usamentiaga, R.; Venegas, P.; Guerediaga, J.; Vega, L.; Molleda, J.; Bulnes, F.G. Infrared Thermography for Temperature Measurement and Non-Destructive Testing. Sensors 2014, 14, 12305–12348. [Google Scholar] [CrossRef] [PubMed]
  16. Pozzer, S.; Pravia, Z.M.; Rezazadeh Azar, E.; Dalla Rosa, F. Statistical analysis of favorable conditions for thermographic inspection of concrete slabs. J. Civ. Struct. Health Monit. 2020, 10, 609–626. [Google Scholar] [CrossRef]
  17. Tejedor, B.; Barreira, E.; Almeida, R.M.; Casals, M. Thermographic 2D U-value map for quantifying thermal bridges in building façades. Energy Build. 2020, 224, 110176. [Google Scholar] [CrossRef]
  18. Ibarra-Castanedo, C.; Sfarra, S.; Klein, M.; Maldague, X. Solar loading thermography: Time-lapsed thermographic survey and advanced thermographic signal processing for the inspection of civil engineering and cultural heritage structures. Infrared Phys. Technol. 2017, 82, 56–74. [Google Scholar] [CrossRef]
  19. Tomita, K.; Chew, M.Y.L. A Review of Infrared Thermography for Delamination Detection on Infrastructures and Buildings. Sensors 2022, 22, 423. [Google Scholar] [CrossRef]
  20. Bauer, E.; Milhomem, P.M.; Aidar, L.A.G. Evaluating the damage degree of cracking in facades using infrared thermography. J. Civil Struct. Health Monitor. 2018, 8, 517–528. [Google Scholar] [CrossRef]
  21. Jo, J.; Jadidi, Z. A high precision crack classification system using multi-layered image processing and deep belief learning. Struct. Infrastruct. Eng. 2020, 16, 297–305. [Google Scholar] [CrossRef]
  22. Barreira, E.; Almeida, R.M.; Moreira, M. An infrared thermography passive approach to assess the effect of leakage points in buildings. Energy Build. 2017, 140, 224–235. [Google Scholar] [CrossRef]
  23. Moropoulou, A.; Avdelidis, N.P.; Karoglou, M.; Delegou, E.T.; Alexakis, E.; Keramidas, V. Multispectral Applications of Infrared Thermography in the Diagnosis and Protection of Built Cultural Heritage. Appl. Sci. 2018, 8, 284. [Google Scholar] [CrossRef]
  24. Yousefi, B.; Sfarra, S.; Ibarra-Castanedo, C.; Avdelidis, N.P.; Maldague, X.P.V. Thermography data fusion and nonnegative matrix factorization for the evaluation of cultural heritage objects and buildings. J. Thermal Anal. Calorimetry 2019, 136, 943–955. [Google Scholar] [CrossRef]
  25. Sfarra, S.; Yao, Y.; Zhang, H.; Perilli, S.; Scozzafava, M.; Avdelidis, N.P.; Maldague, X.P.V. Precious walls built in indoor environments inspected numerically and experimentally within long-wave infrared (LWIR) and radio regions. J. Therm. Anal. Calorim. 2019, 137, 1083–1111. [Google Scholar] [CrossRef]
  26. Wang, Y.; Tang, L.; Jia, Y.; Zhang, S. Scheme Design and Experimental Study of Selective Thermal Stimulation for Concrete Microcracks Based on IR Thermography. J. Nondestruct. Eval. 2021, 40, 32. [Google Scholar] [CrossRef]
  27. Park, M.J.; Kim, J.; Jeong, S.; Jang, A.; Bae, J.; Ju, Y.K. Machine Learning-Based Concrete Crack Depth Prediction Using Thermal Images Taken under Daylight Conditions. Remote Sens. 2022, 14, 2151. [Google Scholar] [CrossRef]
  28. Qiu, J.; Pei, C.; Liu, H.; Chen, Z. Quantitative evaluation of surface crack depth with laser spot thermography. Int. J. Fatigue 2017, 101, 80–85. [Google Scholar] [CrossRef]
  29. Pan, M.; He, Y.; Tian, G.; Chen, D.; Luo, F. Defect characterisation using pulsed eddy current thermography under transmission mode and NDT applications. Ndt & E Int. 2012, 52, 28–36. [Google Scholar]
Figure 1. Schematic diagram of specimen and defect preparation.
Sustainability 16 03731 g001
Figure 2. Schematic diagram of concrete surface regionalization.
Sustainability 16 03731 g002
Figure 3. (a) Pre-cracked concrete specimen and standardized crack; (b) diagram of concrete surface temperature change with time.
Sustainability 16 03731 g003
Figure 4. Thermal images of surface temperature of concrete test block in condition 1-α: (a) 540 min; (b) 780 min; (c) 1020 min.
Sustainability 16 03731 g004
Figure 5. Thermal images of surface temperature of concrete test block in conditions 1-β to 3-β: (a) W = 1 mm; (b) W = 0.5 mm; (c) W = 0.2 mm.
Sustainability 16 03731 g005
Figure 6. Diagram of concrete surface temperature change with pixel in conditions from 1-β to 3-β.
Sustainability 16 03731 g006
Figure 7. Thermal images of surface temperature of concrete test block.
Sustainability 16 03731 g007aSustainability 16 03731 g007b
Figure 8. Diagram of concrete surface temperature change with pixel: (a) W = 1 mm; (b) W = 0.5 mm; (c) W = 0.2 mm.
Sustainability 16 03731 g008
Figure 9. Analysis diagram.
Sustainability 16 03731 g009
Figure 10. Comparisons of temperature profiles in simulation and experiment in ROI.
Sustainability 16 03731 g010
Figure 11. Diagram of overall lining temperature contours.
Sustainability 16 03731 g011
Figure 12. Simulated thermal images of healthy region and cracked region: (a) ΔTN = 3 °C; (b) ΔTN = 8 °C; (c) ΔTN = 10 °C.
Sustainability 16 03731 g012
Figure 13. Relationship curve between ΔTN and ΔTf.
Sustainability 16 03731 g013
Figure 14. Relationship curve between W, D, and k.
Sustainability 16 03731 g014
Table 1. Test conditions.
Sample NumberCrack Width W/mmCrack Depth D/cm
1-α120
1-β50
1-γ100
1-δ250
2-α0.520
2-β50
2-γ100
2-δ250
3-α0.220
3-β50
3-γ100
3-δ250
Table 2. Thermal properties of materials.
MaterialConcreteAir
Thermal Conductivity/(W·m−1·K−1)1.280.026
Specific Heat Capacity/(J·kg−1·K−1)9701013
Density/(kg·m−3)2242.51.164
Table 3. Comparative analysis of experimental results.
Sample NumberΔTf (Num.)/°CΔTf (Exp.)/°CError/°C
1-α0.110.15+0.04
1-β0.220.23+0.01
1-γ0.360.38+0.02
1-δ0.540.60+0.06
2-α0.100.12+0.02
2-β0.190.16−0.03
2-γ0.270.26−0.01
2-δ0.370.36−0.01
Table 4. Additional test conditions.
Sample NumberW/mmD/cm
1-ε1175
2-ε0.5175
4-α1.520
4-β50
4-δ100
4-ε175
4-γ250
5-α220
5-β50
5-δ100
5-ε175
5-γ250
Table 5. Temperature scaling factors.
D/mmW/mm
0.511.52.0
20.0200.0220.0230.023
50.0370.0440.0480.050
100.0540.0720.0800.086
17.50.0680.0960.1130.124
250.0730.1080.1330.150
Table 6. Comparative analysis of formula results.
Sample NumberΔTN/°CΔTf/°CW/mmD/mmError/%
CalculationActual
1-β80.361.043.5450−12.92
1-γ50.381.0106.10100+6.10
1-γ100.711.093.24100−6.76
2-β50.190.542.3850−15.44
2-γ50.270.590.56100−9.44
Disclaimer/Publisher’s Note: The statements, opinions and data contained in all publications are solely those of the individual author(s) and contributor(s) and not of MDPI and/or the editor(s). MDPI and/or the editor(s) disclaim responsibility for any injury to people or property resulting from any ideas, methods, instructions or products referred to in the content.