Review

Advances in Ultrasonic-Assisted Directed Energy Deposition (DED) for Metal Additive Manufacturing

by
Wenjun Zhang
1,
Chunguang Xu
1,*,
Cencheng Li
1 and
Sha Wu
2
1
School of Mechanical Engineering, Beijing Institute of Technology, Beijing 100081, China
2
Faculty of Materials and Manufacturing, Beijing University of Technology, Beijing 100124, China
*
Author to whom correspondence should be addressed.
Crystals 2024, 14(2), 114; https://doi.org/10.3390/cryst14020114
Submission received: 2 January 2024 / Revised: 17 January 2024 / Accepted: 22 January 2024 / Published: 24 January 2024

Abstract

:
Directed Energy Deposition (DED), a branch of AM processes, has emerged as a significant technique for fabricating large metal components in sectors such as aerospace, automotive, and healthcare. DED is characterized by its high deposition rate and scalability, which stand out among other AM processes. However, it encounters critical issues such as residual stresses, distortion, porosity, and rough surfaces resulting from rapid melting and solidification. As a novel advancement, Ultrasonic-Assisted Directed Energy Deposition (UA-DED) integrates ultrasonic oscillations into DED aimed at addressing these challenges. Herein, the latest research related to the UA-DED process and the current major challenges of the DED process, residual stresses, porosity, and crack defects are critically reviewed. Subsequently, the paper also details the working principle and system components of UA-DED technology and reviews the material improvement by introducing UA into the DED process, grain, porosity, tensile properties, and deposition defects. The most critical optimization methods of process parameter variables for UA and the different material interaction mechanisms between UA and DED processes are identified and discussed in detail. Finally, the perspectives on the research gap and potential future developments in UA-DED are also discussed.

1. Introduction

AM has revolutionized the production of complex metal components, offering unparalleled geometric freedom and material versatility [1,2]. AM stands out for its ability to manufacture parts with complex structures and exceptional material properties, beyond the reach of traditional manufacturing. Its precise layering and material deposition facilitate the production of complex geometries, making AM ideal for economically efficient, small-scale production runs of both structural and functional components [3]. Within the spectrum of AM technologies, DED stands out for industrial-scale applications, attributed to its rapid deposition rate and ability to construct large metal components [4,5]. Demonstrated across the aerospace, defense, automotive, and biomedical sectors, DED’s capability to craft critical industrial components underscores its potential as a cornerstone in advanced manufacturing [5,6].
While DED holds significant promise in additive manufacturing, inherent characteristics and process-induced limitations present notable challenges for its broader implementation. Critical among these are the nonequilibrium thermal conditions leading to uneven heating, cooling, temperature gradients, and solidification cracking [7,8]. High-temperature processing inherent to DED induces residual stresses and distortion, impacting the component’s dimensional accuracy and mechanical integrity [9]. King et al. [10] provide an in-depth analysis of how DED’s localized heat input creates steep thermal gradients, markedly affecting microstructural properties and inducing residual stresses. Xie et al. [11] detail the resultant thermal stresses, which can cause distortions and warping, thereby compromising the final product’s dimensional accuracy and mechanical integrity [12]. DebRoy et al. [1] discuss solidification cracking, elucidating differential contraction and solidification mechanisms in alloys and highlighting the susceptibility of certain materials to cracking under rapid cooling.
Furthermore, the rapid melting and subsequent solidification throughout the process can lead to the formation of porous defects and anisotropic microstructures [12,13], adversely affecting the mechanical properties of constructed parts. Shamsaei et al. [14] note that these processes result in fine, dendritic, and inherently anisotropic structures, with mechanical properties varying based on the build direction. Ng et al. [15] show that gas entrapment and incomplete fusion lead to voids and gaps, diminishing fatigue life and structural integrity. These porous defects serve as stress concentrators and crack initiation sites, significantly undermining the material’s performance under cyclic loads and real-world conditions. Additionally, the layered manufacturing nature and scanning strategy in DED lead to dimensional inaccuracies and poor surface finish [16], restricting the performance and applicability of DED-fabricated components. Complex molten pool dynamics, such as Marangoni flow and Rayleigh instabilities, cause composition segregation and balling effects [17]. Shim et al. [18] emphasize that the staircase effect inherent to layered manufacturing contributes to surface roughness and dimensional inaccuracies, thereby compromising mechanical functionality and performance. Moreover, the scanning strategy, dictating the energy input path, is pivotal in determining the residual stress and resulting deformation in the AM component [19]. Liu [20] notes that suboptimal scanning patterns exacerbate uneven melting and cooling, leading to significant surface irregularities and dimensional discrepancies. Additionally, the intricacies of metallurgy and the interrelated nature of defects make DED a challenging process to monitor and control [21,22,23].
To enhance the overall quality and mechanical properties of parts fabricated using DED, a spectrum of strategies has been explored, encompassing feedstock optimization [24,25], in-process monitoring and control [23,26,27,28], as well as various post-processing techniques [29,30,31,32,33,34,35,36]. Within the realm of post-processing, heat treatment methodologies [29,37] play a pivotal role in alleviating residual stresses and refining microstructures through mechanisms of recovery, recrystallization, and grain growth. Additionally, solution treatment and aging [38] have been recognized for their effectiveness in bolstering strength and ductility, a fact substantiated by the comprehensive analysis conducted by Hu et al. [38].
Hot Isostatic Pressing (HIP) [31] employs elevated temperatures and inert gas pressure to eliminate internal voids and enhance component consolidation, thereby augmenting density, surface finish, and fatigue performance. Concurrently, surface machining techniques such as milling and turning [32,39] are instrumental in eradicating surface irregularities, achieving dimensional and geometric accuracies beyond the direct capabilities of DED. Laser Shock Peening (LSP) [34], utilizing shock waves from high-energy laser pulses, instills deep compressive residual stresses, substantially elevating surface quality and mechanical attributes. Similarly, Ultrasonic Impact Treatment (UIT) [35] leverages the synergistic effects of ultrasonic energy and high-frequency mechanical impacts to induce severe plastic deformation on metal surfaces, diminishing roughness and porosity while enhancing hardness.
In the realm of AM, the integration of auxiliary fields has emerged as a pivotal innovation, enhancing the process capabilities beyond traditional methods. This approach, known as Field-Assisted Additive Manufacturing (FAAM), amalgamates a variety of auxiliary fields—magnetic, acoustic, mechanical, and thermal—to transcend the inherent limitations of standard AM processes. Notably, these auxiliary fields have proven to be instrumental in refining a wide spectrum of metallic materials, including aluminum alloys, titanium alloys, nickel-based superalloys, magnesium alloys, and various steels. The profound impact of these fields is observed in multiple aspects of the AM process. They contribute to improved formation quality and surface smoothness, enhance the printability and densification of materials, and offer the ability to modulate residual stresses. Furthermore, these fields play a critical role in influencing the solidification behavior, thereby tuning the microstructure, alleviating anisotropy in mechanical properties, and significantly boosting mechanical performance and fatigue resistance. The application of ultrasonic vibrations, particularly in DED processes such as Wire Arc Additive Manufacturing (WAAM) and Laser Directed Energy Deposition (LDED), exemplifies this approach.
Distinguished among these is ultrasonic-assisted DED, a potent in situ method to amplify molten pool dynamics, microstructural evolution, and defect mitigation during the printing process [36,40,41]. The integration of ultrasonic vibrations into the melt pool promotes homogeneous nucleation, fostering refined and equiaxed grain structures [40], while acoustic streaming ameliorates molten fluid flow, curtailing defects and compositional segregation [42]. This technique has shown to bolster microstructural and mechanical properties in an array of metallic materials, including titanium [43], aluminum [44], Inconel alloy [45], carbon steel [46], and stainless steel alloys [40]. However, despite extensive research endeavors, recognizing and understanding the inherent limitations of the UA-DED process is a prerequisite to further advance and mature the UA-DED technique and enhance UA-DED processing capabilities. For instance, there are notable restrictions on the maximum size that can be produced both efficiently and effectively, which are determined by factors such as the extent of the deposition head’s reach and the efficiency of ultrasonic wave transmission. Incorporating ultrasonic technology into DED systems adds complexity and extra equipment, leading to a potentially higher initial setup and operational costs [47]. More importantly, the complex influence of ultrasonic parameters on the DED process and the characteristics of the resulting components remains to be thoroughly clarified.
This paper aims to provide a comprehensive explanation of the fundamental principles, methodologies, impacts, and recent advancements in UA-DED technology. Emphasis is placed on exploring the intricate mechanisms by which ultrasonic vibrations influence molten pool dynamics, microstructure formation, defect genesis, and crystallographic texture within the DED process. Moreover, it establishes a detailed correlation between ultrasonic parameters and the attributes of the resulting metallic parts. Strategies for integrating ultrasonic generators within multi-axis DED systems are also scrutinized. It is expected that this review will promote the fundamental understandings and technological readiness of UA-DED, making it more applicable for fabricating high-quality complex-shaped components across various industrial sectors where high precision and mechanical performance are required.

2. Fundamental Mechanisms and Principles of DED

2.1. Overview of DED Technology

DED represents a sophisticated additive manufacturing technique, utilizing focused heat sources such as lasers, electron beams, or electric arcs to meld materials—predominantly metals—to construct three-dimensional objects [48,49,50]. Within DED processes, feedstock materials, either in powder or wire form, are directed into a molten pool generated by the concentrated energy source upon the substrate’s surface [2,51]. These materials undergo a controlled melting and solidification process, adhering to pre-defined tool paths on a track-by-track and layer-by-layer basis, to directly fabricate functional components directly from 3D CAD data [18,34]. Notably, DED distinguishes itself from selective laser melting by its capacity to produce large-scale, near-net shape metallic constructs, extending over meters, facilitated by a superior deposition rate thanks to higher laser power capabilities (up to 10 kW) [52]. Furthermore, DED affords the creation of functionally graded materials and advanced property parts through the strategic amalgamation of disparate powders/wires [53]. One notable application of DED is in the repair of complex metal parts such as austenitic stainless steel vessels, diesel engine crankshafts, and drive shafts, where laser energy is used to melt and deposit metal powders onto substrates, thereby demonstrating DED’s capability to achieve high-quality interfacial bonding and dilution, as well as its economic benefits, with the cost of repairing drive shafts being 50% of what it costs to produce a new one [52,53]. DED can also be combined with pre-machining as a hybrid approach to repair parts such as turbine airfoils and tool dies. This method has been used effectively to repair defects in materials such as Ti-6Al-4V, stainless steel, and Inconel 718. These practical implementations of DED in various industries highlight the potential of these technologies in driving sustainable and efficient manufacturing practices.
Feedstock materials for DED are introduced into the melt pool either through one or multiple nozzles utilizing carrier gas, as seen in powder-based DED [54], or directly fed in wire form for wire-based DED [55]. Generally, an increase in the powder or wire feed rate necessitates a larger nozzle to accommodate the increased volume of material. This is crucial when using larger-diameter wires to enhance deposition rates, necessitating nozzles with wider inner diameters to reduce wear and ensure smooth material flow. The nozzle orientation varies depending on whether the material, be it powder or wire, is introduced into the bath either off-axis or coaxially [5].
Depending on the employed heat sources, DED is primarily classified into several types: laser direct deposition [56,57], Electron Beam AM (EBAM) [49], WAAM [50,57], laser-arc hybrid deposition [58], and micro-plasma deposition [59]. Laser DED, which utilizes a laser as the precise heat source, is renowned for its high resolution, albeit at a relatively lower deposition rate [53]. Powder-based laser DED utilizes lateral powder injection nozzles, whereas wire-based variants rely on a laser-melted wire tip. EBAM, harnessing a focused electron beam within a high vacuum, boasts rapid scanning speeds and reduced oxidation at the expense of higher equipment costs [59]. Conversely, WAAM employs less costly heat sources and achieves greater deposition rates for large-scale parts such as flanges and stiffened panels [60]. These components often require materials such as titanium and nickel alloys, which are expensive and have a low fly-to-buy ratio. WAAM’s high deposition rate is advantageous in efficiently creating these parts while minimizing material waste. Hybrid DED systems combine laser and arc/plasma heating to optimize both heating efficiency and precision [54].
In light of the various DED technologies discussed, such as laser direct deposition and EBAM, it becomes crucial to address the material selection criteria tailored for each method. The choice of feedstock materials in DED is pivotal in determining the effectiveness and quality of the manufacturing outcome. This selection is largely dependent on factors such as the melting point, thermal properties, and compatibility with the specific energy source used in different DED types. For instance, metals such as titanium and stainless steel are often chosen for their optimal melting properties and mechanical strength post deposition in laser-based DED, where materials with high laser wavelength absorptivity are preferred for their energy efficiency and reduced thermal distortion. Similarly, EBAM’s high vacuum environment necessitates materials such as Inconel and titanium with low vapor pressure to minimize evaporation. WAAM exhibits flexibility in material choice, accommodating a range of metals such as aluminum and steel, catering to its varied melting points and thermal conductivities requirements. Furthermore, the DED technique also plays a crucial role in depositing metal–ceramic composites. This application during the restoration phase is key in prolonging the implant’s service life and enhancing its biocompatibility [61]. Svetlizky et al. [4] and Gibson et al. [62] provide insights into these material selections, aligning them with specific DED technologies. Moreover, as Feenstra et al. [63] elaborate, multi-material DED introduces additional complexities, necessitating an in-depth understanding of how different materials interact under various heating conditions. Therefore, the choice of material not only influences the final product’s structural and mechanical integrity but also dictates crucial process parameters such as the energy input, deposition rate, and layer thickness, thereby underlining the need for a strategic balance to achieve optimal deposition quality.

2.2. Working Principle of DED

Figure 1 presents an illustrative layout of the typical DED process. Powder-based laser DED is an innovative AM technique that integrates material deposition and high-energy laser technology to construct components layer by layer. As depicted in Figure 1a, the system encompasses a laser source, powder delivery mechanism, motion system, and substrate holder. During the operation, the laser beam generates a melt pool on the substrate, into which powder feedstock is injected when the laser travels along a pre-programmed path. This process, meticulously orchestrated, ensures a stable melt pool while maintaining uniform layer thickness and composition. Concurrently, the motion system precisely guides either the laser and powder nozzle assembly or the substrate, or both, along the designated path, harmonizing with the powder and laser delivery to fabricate the targeted geometry layer by layer. High-speed cameras, equipped with advanced image processing algorithms, vigilantly monitor the melt pool’s size and morphology in real time, offering the capability to adjust processing parameters as required [64]. After finishing one layer, the substrate moves down vertically by the thickness of one layer, preparing for printing the next layer [56]. This cumulative, layer-by-layer method progressively constructs the final part, complete with intricate geometries.
In contrast, EBAM utilizes a focused electron beam as its principal heat source, as illustrated in Figure 1b. Its fundamental components comprise an electron beam gun, a wire or powder feedstock delivery system, a vacuum chamber, and a computer-controlled motion platform. The electron beam gun is central to this technique, emitting a high-velocity electron stream that, when targeted at the material, transfers energy to generate a melt pool for feedstock deposition. Operating within a vacuum is imperative, mitigating beam scattering and preserving the material’s purity and structural integrity.
WAAM has emerged as an arc-based DED process that garnered significant interest in recent years [57,62]. Illustrated in Figure 1c, a standard WAAM setup comprises a wire feeder, Computer Numerical Control (CNC) system, arc torch, shielding gas supply, and a monitoring camera. Within this system, the arc melts the wire material into droplets. This droplet then detaches and is deposited onto the substrate, where it solidifies into a bead. Additionally, the arc current aids in preheating the substrate, thereby mitigating thermal stresses [63]. The bead size depends on the wire feeding speed and the torch moving speed. Through the precise control of robotic motion, 3D parts are constructed layer by layer, with each layer consisting of a sequence of welded bead deposits.
The fundamental principle of DED is predicated on the precise synchronization of the heat source and material feed rate. This synchronization is crucial for tailoring the material properties and ensuring geometric fidelity. Typically, DED operates within a shielded gas environment to avert oxidation and maintain the purity of the deposited materials. The quality and structural integrity of the final part depend on an array of factors, such as the scanning methodology, substrate conditions and hatch spacing. These parameters collectively influence the microscopic morphology and mechanical property of the fabricated material, as illustrated in Figure 2. Meticulous optimization of these parameters is imperative to fabricate DED parts with the desired density and structural integrity, thereby achieving superior outcomes in DED processes [6].

2.3. Current Challenges of DED Processes

DED has ascended as a powerful technique for crafting large-scale and intricate components, and is renowned for its material versatility, expansive design freedom, and capacity for in situ repairs. Nonetheless, alongside its multitude of advantages, DED confronts considerable challenges and inherent limitations. This method frequently exhibits issues, including porosity, heterogeneity, and cracks, arising from a plethora of factors including suboptimal parameter settings, rapid thermal gradients, and specific material reactions, as outlined in Table 1. The genesis of these imperfections is inherently complex, entailing intricate interactions among multiple process parameters, including laser power, scanning speed, powder flow rate, and environmental conditions. These factors determine the thermal behavior and microstructural development of the material, thereby substantially affecting the ultimate mechanical characteristics and quality of the fabricated components [4].
Through a meticulous scrutiny of the extant literature, this review specifically dissects residual stresses, porosity defects, and crack formation inherent to DED processes. It aims to delineate the adverse impacts of these imperfections on material properties and to articulate strategies for their mitigation.

2.3.1. Residual Stresses

The manifestation of residual stresses is acknowledged as a paramount challenge within DED methodologies. The incessant rapid heating and cooling cycles inherent to DED precipitate non-uniform expansion and contraction across adjacent material volumes, culminating in the emergence of substantial residual stresses [66,67]. Such accrued stresses not only constrict the maximum achievable dimensions of printed constructs due to distortion but also compromise the structural integrity, performance, and fatigue resistance of the final product [68]. Moreover, they exacerbate the propensity for cracking and potential fracture during the operational life of the component.
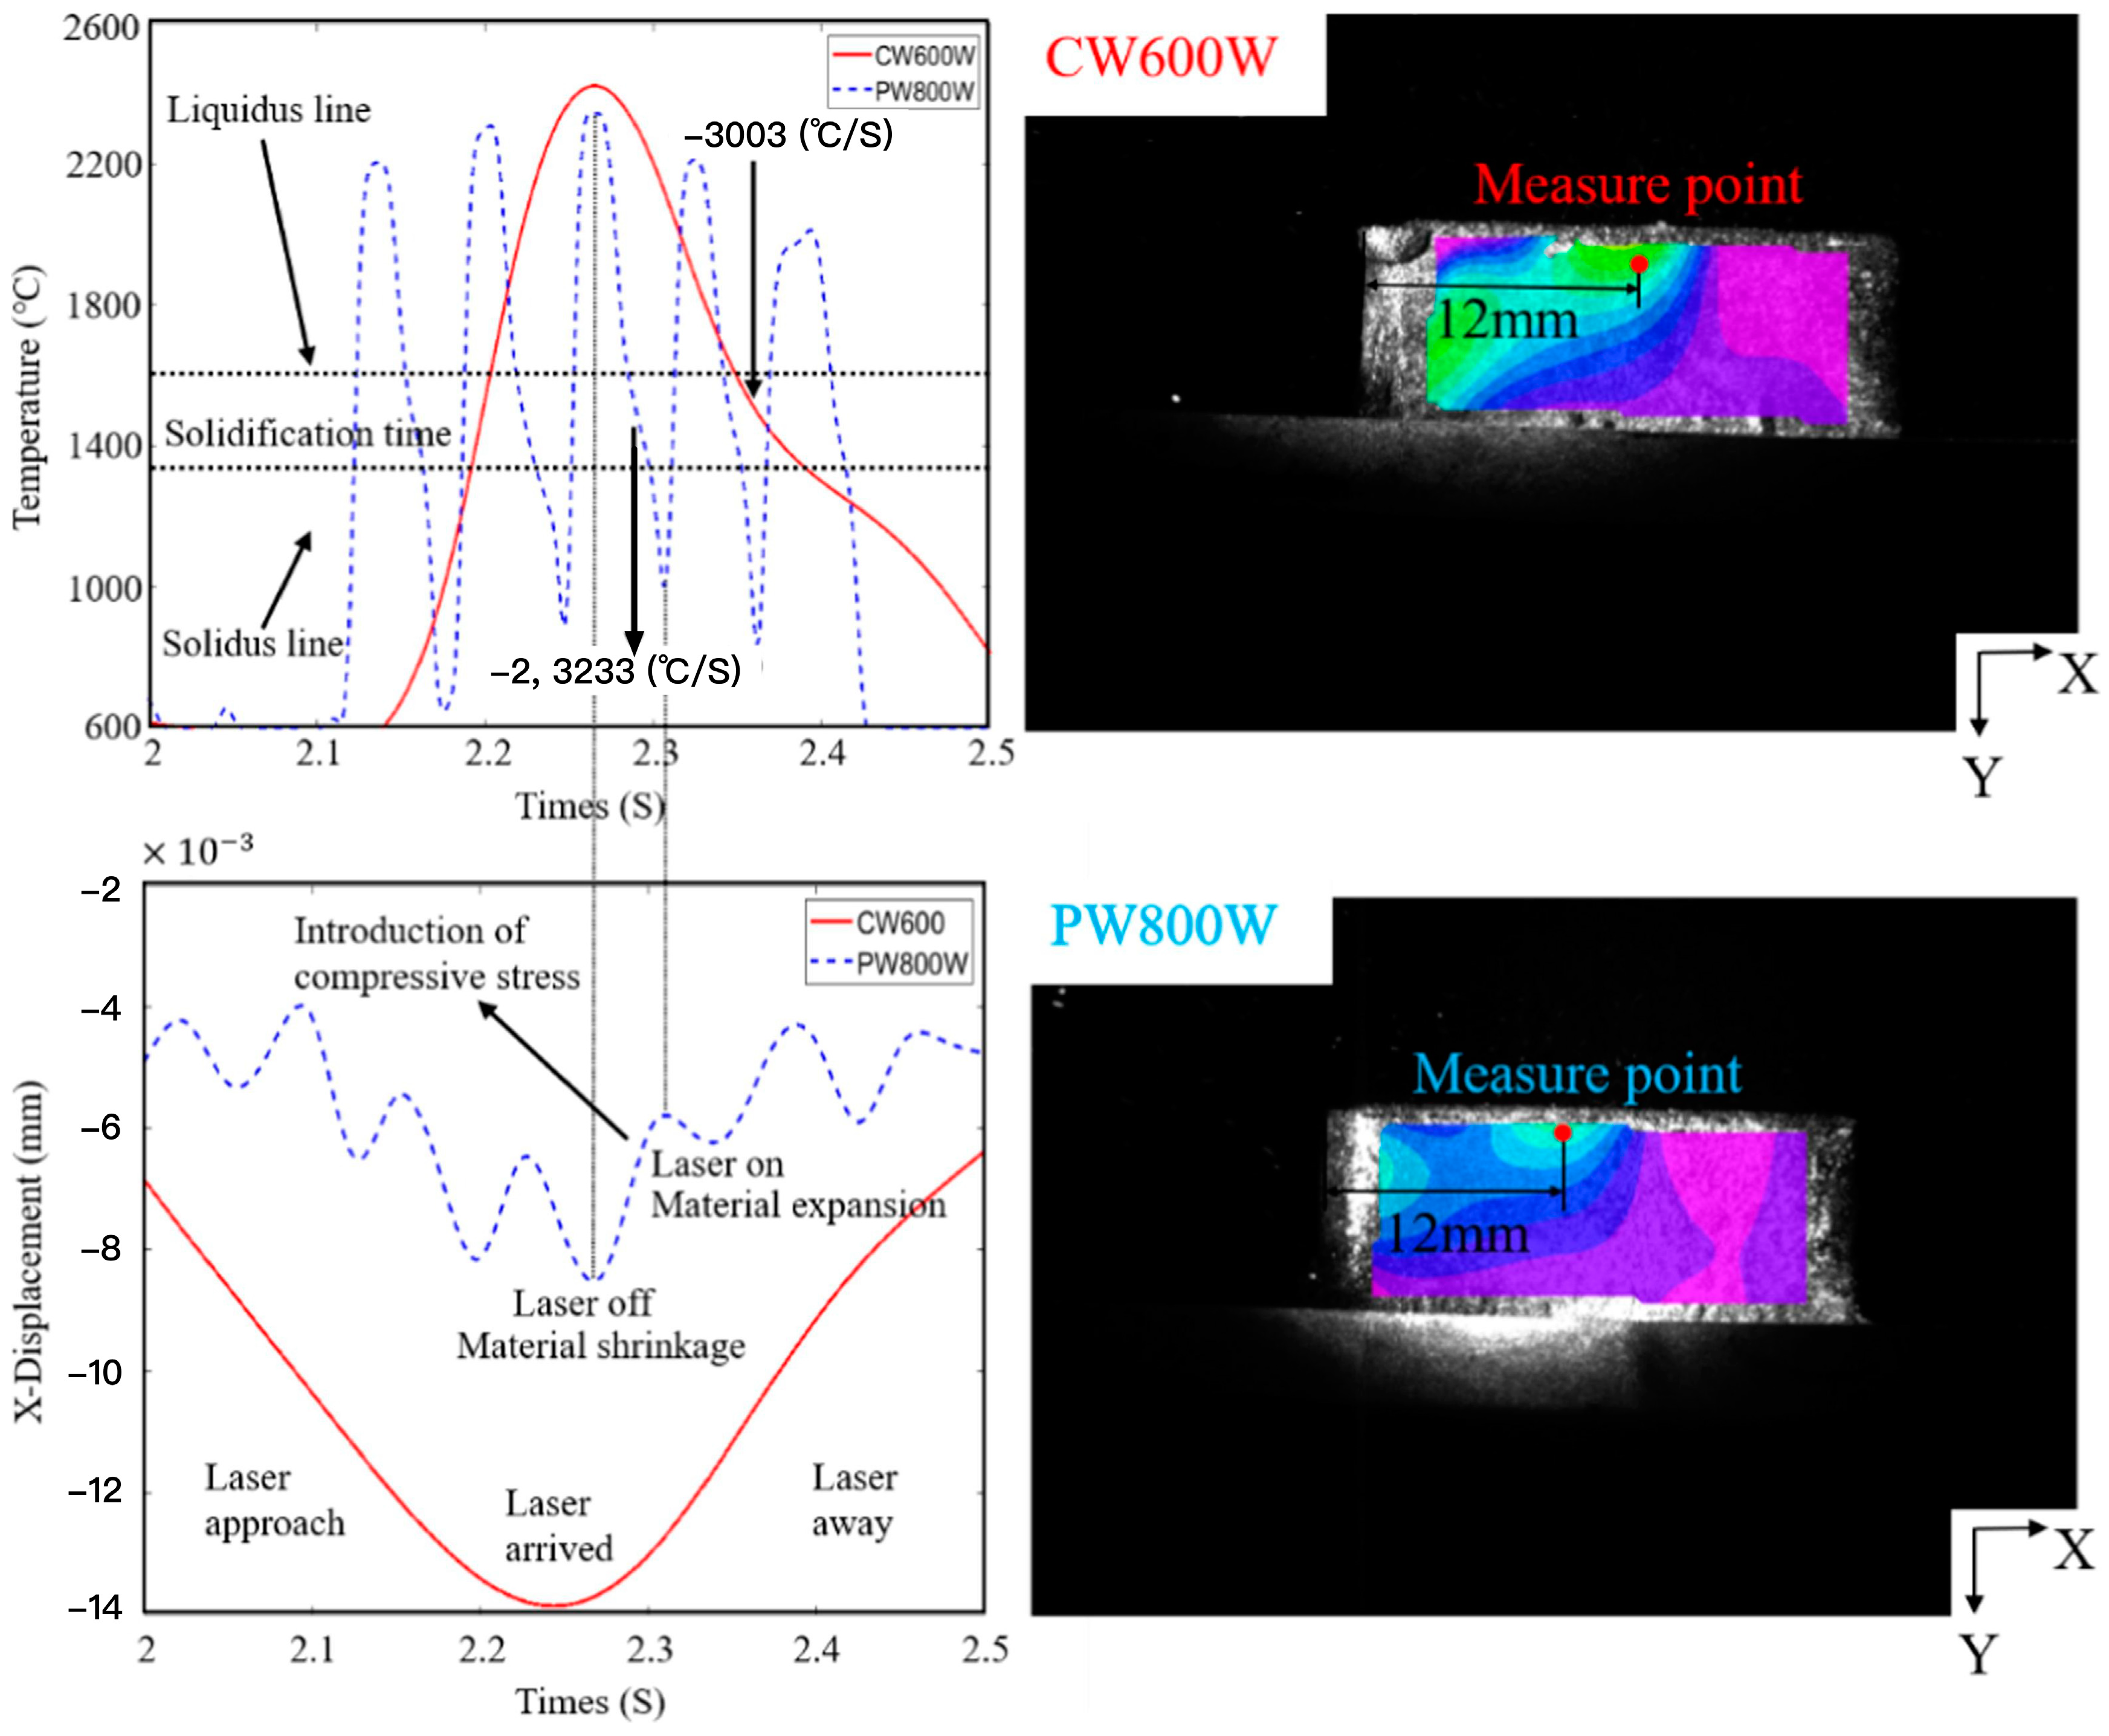
The genesis of residual stresses in DED is principally attributed to two mechanisms. The initial mechanism, known as the Temperature Gradient Mechanism (TGM), originates from the localized and moving heat source. Zou et al. [69] elucidate that the rapid heating of the sample surface, coupled with the comparatively slow release of heat, results in a sharp temperature gradient around the area of laser exposure. The subsequent mechanism takes effect during the cooling stage, where the contraction of the molten metal is hindered by the solidified material, resulting in thermal contraction stresses. This effect imparts additional tensile stresses along the build direction as the material solidifies. Together, these mechanisms intricately shape the residual stress profile in DED-fabricated components. Illustrative of this, Figure 3 presents the temperature and displacement curves at a specific measurement point for both continuous-wave and pulse-wave laser modes, substantiating these phenomena. Notably, the continuous-wave laser induces a characteristic thermal expansion and subsequent contraction in the material, while the pulse-wave laser induces a distinct serrated pattern of expansion and contraction.
Regarding the distribution of residual stresses, Ding et al.’s seminal study [70] provides a comprehensive examination of longitudinal residual stress patterns in WAAM components. According to their findings, these parts typically exhibit a distribution characterized by tensile stresses along the deposited wall, which are counterbalanced by compressive stresses within the base plate. Their rigorous thermomechanical modelling, corroborated by experimental validation, depicts a multi-layer wall structure wherein the deposited layers accrue pronounced tensile stresses upon cooling, attributed to material contraction. This tensile state is offset by the generation of compressive stresses within the base plate lying beneath the deposit. Notably, the tensile stress magnitude peaks at the uppermost section of the deposit and progressively diminishes through the thickness, approaching the base plate.

2.3.2. Porosity Defects

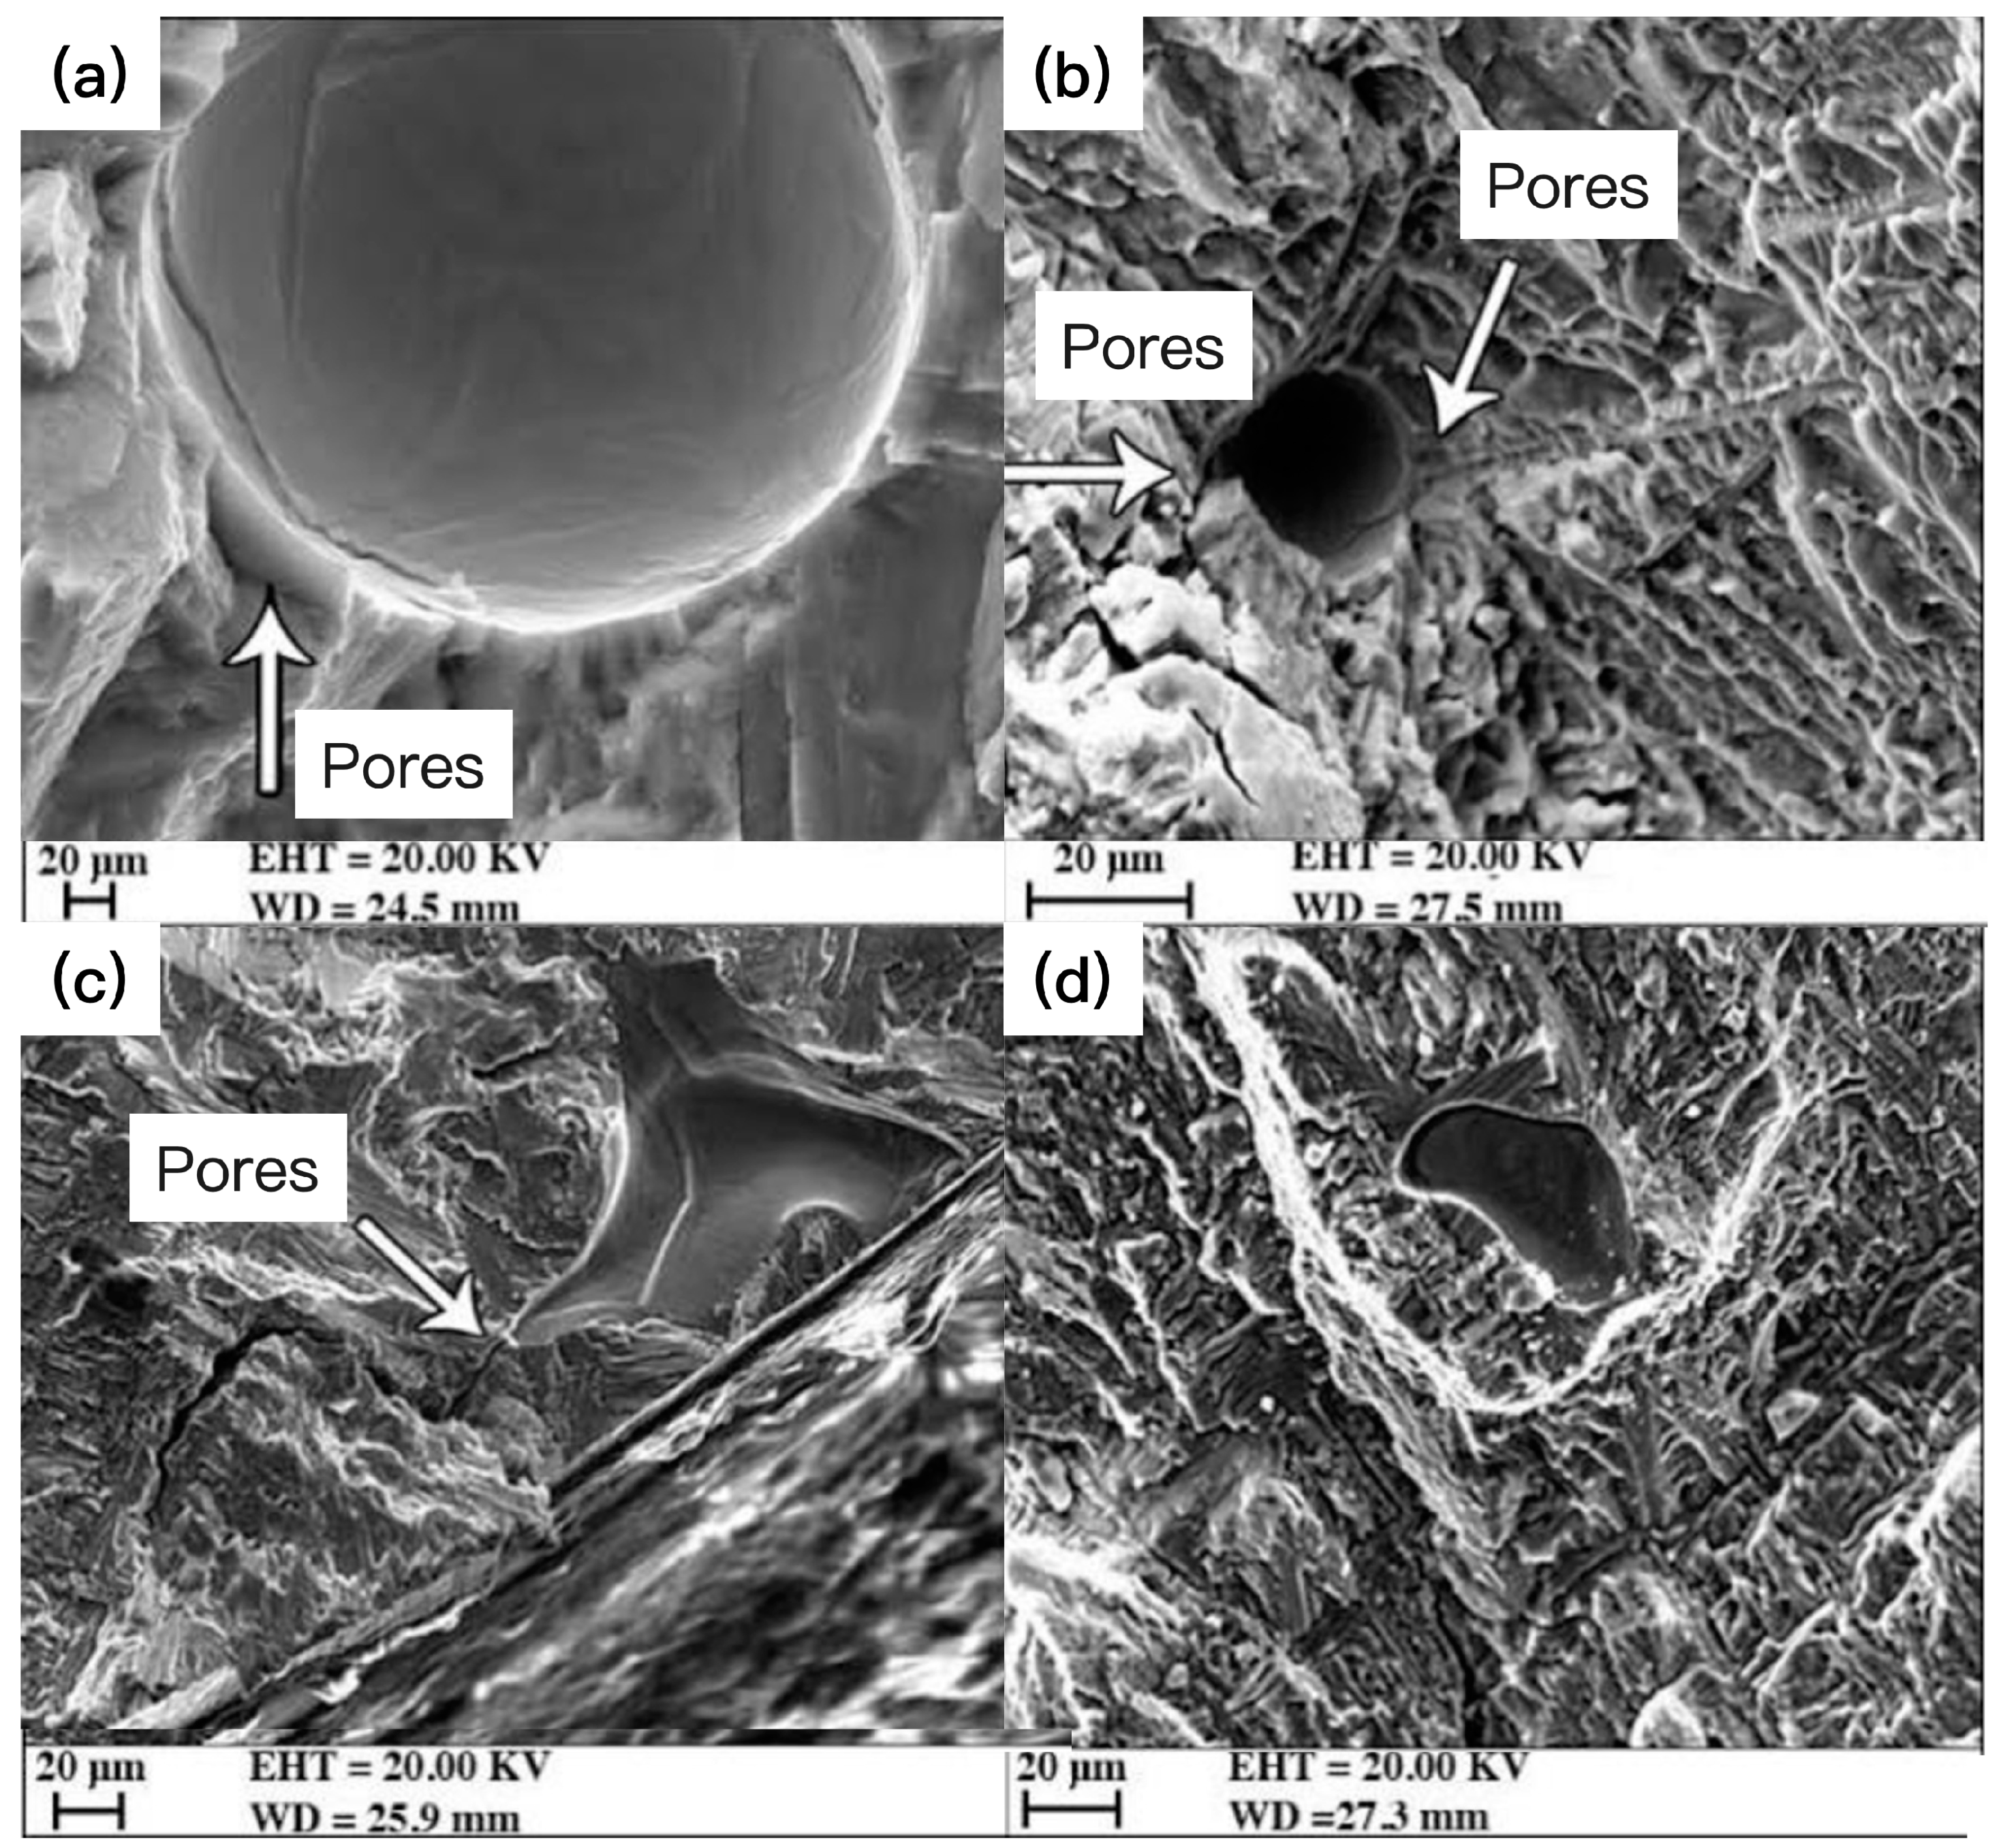
Porosity stands as a prevalent defect in components fabricated via DED [71]. The presence of pores precipitates significant stress concentrations and effectively functions as pre-existing, crack-like flaws, thus becoming the primary nucleation sites for fatigue cracks. Sterling et al.’s study [70] elucidates the adverse ramifications of porosity on the fracture behaviors of a DED Ti-6Al-4V alloy. Their fractographic analysis indicated that pores predominantly initiated cracks, leading to earlier fatigue failure compared to wrought Ti-6Al-4V samples. Notably, larger pores with irregular shapes, particularly those nearer to the surface, significantly undermine fatigue resistance, as evidenced in Figure 4. Moreover, the agglomeration of pores exerts a more profound negative impact on fatigue life than their sparse distribution. Consequently, the occurrence of pores engenders a more erratic fatigue behavior and data scatter. Pores that are irregular in shape, larger, and closer to the surface have been identified as especially detrimental to fatigue resistance [72].
The pore formation during DED is mainly attributed to three mechanisms. Firstly, pores originate from the entrapped gas bubbles in the molten pool, which are induced by factors such as low-melting constituents, metallurgical reactions, and keyhole instability [15]. Secondly, the complex fluid flow caused by the thermal capillary force and recoil pressure can carry bubbles into the melt and leave pores after solidification [73]. Thirdly, the rapid solidification and inadequate feeding lead to shrinkage porosity due to the lack of supplementary liquid metal [74]. As Tan et al. [75] found in their study of DED stainless steel AISI 316L, the presence of smooth, round pores, inferred to be related to gas entrapment during the DED process, likely form from the high scan velocity trapping gaseous bubbles in the melt pool. Irregular pores originate from poor interlayer bonding that produces incomplete melting defects.
An array of strategies has been investigated to mitigate porosity, a critical flaw that impairs the mechanical integrity of components. Among these is Hot Isostatic Pressing (HIP), whereby by applying high pressure and temperature in a synergistic manner, it is possible to homogenize the microstructure of AM components while concurrently densifying and relieving stress within the matrix. This is widely considered the most effective post-treatment technique for rectifying process-related defects in DED parts and enhancing their fatigue performance [31,76]. However, specialized high-temperature and high-pressure equipment is required to create the extreme conditions needed for hot isostatic pressing. Pre-processing methods [77] such as controlling parameters and in situ techniques provide extra time for pore escape through melt pool remelting [78] but introduce dimensional errors and hardware challenges.

2.3.3. Cracking Defects

The cracking tendency of DED-printed components is increased by the repeated thermal cycle history [79]. The susceptibility to cracking is mainly attributed to the high cooling rates and large thermal stresses inherently present in metal AM processes. In their investigative study, Dang et al. [80] noted that hot cracking along grain boundaries was a prevalent issue in DED samples, induced by the constitutional liquation of segregated elements and the ensuing the formation of low-melting eutectics within interdendritic zones. Concurrently, solid-state cracking has also been identified as a significant concern in final AM parts. As they cool to the ductility dip temperature range, strain localization and an inherent reduction in ductility can precipitate cracking, as delineated in Zhang et al.’s study [81] examining cracking mechanisms in laser-melted Inconel 738 alloys (refer to Figure 5).
Regarding the impetus for crack formation, based on the research by Guo et al. [82] and Zhou et al. [83], the genesis of cracking is closely correlated with residual stresses in additively manufactured components. Guo et al. showed that tensile residual stresses can accelerate crack growth along the lamellar structure in 316L stainless steel produced by DED. Zhou et al. further revealed that incomplete fusion voids can act as sources of cracks. Additionally, an excessively high scanning velocity can induce large residual internal stresses, whereas insufficiently low scanning velocity promotes undesirable stray grain formation; both factors amplify the propensity for hot cracking. Overall, controlling residual stress development is crucial to mitigate cracking issues in additively manufactured metals.
To mitigate cracking defects in DED, strategies have been proposed. Woo et al. [84] found that strategies such as orthogonal and island scanning help prevent large fluctuations and relax stresses by altering heat buildup and dissipation during processing. In turn, this approach helps minimize part distortion, lack of fusion defects, and the propensity for cracking in the fabricated component. Zhang et al. [85] proposed an innovative in situ doping approach, whereby thin interlayers of Inconel 718 were deposited between layers of Inconel 738 during the DED process. Su et al. showed that cracks formed in an Al 7075 alloy produced by laser DED. In addition, post-processing heat treatment has been demonstrated to be an efficacious approach for mitigating cracking in an additively manufactured Al 7075 alloy, as demonstrated by the research of Su et al. [86]. Cu segregation at grain boundaries of the as-fabricated alloy may contribute to cracking inhibition. Additionally, the refined microstructural grains resulting from post-treatment annealing impart enhancements in mechanical performance.

2.3.4. Design Flexibility

Design flexibility, a key feature of Directed Energy Deposition (DED) processes, enables the creation of highly intricate and complex components, often unattainable with traditional manufacturing techniques. DED’s layer-by-layer material deposition capability facilitates the realization of designs with advanced geometric complexity, internal structures, and customized features. However, despite these advantages, a significant challenge in DED’s design flexibility arises from the process’s inherent limitations. As noted by Renjith [87] and Bikas [88], the manufacturability of a part in DED is not merely a matter of whether it can be manufactured or not. The unique build mechanisms of this technology mean that while certain design aspects and features are theoretically possible, they may be impractical or excessively expensive to produce. For example, overhanging structures are a notable challenge in DED; without adequate support, they can suffer from structural failures or poor surface quality. Furthermore, while DED enables the creation of complex internal channels and geometries, this process may be constrained by the nozzle’s physical accessibility, leading to difficulties in fabricating some internal structures and potentially raising production time and costs. Additionally, geometrical deviations due to thermal effects can occur during the process, possibly resulting in the final geometry not being achieved, or necessitating oversizing the part to compensate for distortion in subsequent machining.
Current strategies addressing these challenges emphasize optimizing design algorithms and process parameters. Advanced computational techniques are under development to predict and mitigate the effects of Direct Energy Deposition’s (DED) layer-by-layer construction, particularly in terms of mechanical properties. A typical example is provided by Teresa Primo et al. [89], who focused on the topology optimization of a simple test case geometry, such as a C-Clip, using an innovative approach that combines structural optimization with lattice structure design. The authors developed a hybrid method that leverages the benefits of both topological and lattice approaches. By implementing various lattice structures in specific regions, they achieved further weight reduction of the component and more controlled printing times. This method offers greater flexibility in design, but the optimal solution varies depending on the final application. These techniques aim to improve the predictability and reliability of the DED process, enabling designers to explore greater complexity while ensuring the manufacturability and functional integrity of the parts.

2.3.5. Post-Processing Requirement

Post-processing in Direct Energy Deposition (DED) is crucial for achieving the required mechanical properties and surface finishes in fabricated parts. Typically, the DED process results in parts with elevated levels of surface roughness, residual stresses, and potential defects such as porosity, necessitating comprehensive post-processing. A vital aspect of this post-processing is thermal treatment [90], which serves to normalize the material’s microstructure and reduce internal stresses that may have built up during the layer-by-layer deposition. Additionally, mechanical finishing steps [91], such as machining or polishing, are essential to enhance surface roughness. However, these post-processing stages come with their own challenges. For example, thermal treatments need precise control to prevent warping or dimensional changes in the part. Likewise, mechanical finishing requires a careful approach to achieve the desired surface quality without impairing the part’s integrity or altering its dimensions.
To address these challenges, ongoing research and development are focusing on the integration of process control and optimization techniques. Careri et al. [39] investigated the impact of different post-processing sequences (machining followed by heat treatment, or heat treatment followed by machining) on the surface integrity of components made with Inconel 718 superalloy using DED. They found that the AD+M (DED followed by post-machining) strategy offered the best machining conditions, due to increased ductility of the material without reinforcement. The AD+M+DA strategy (DED followed by post-machining and double aging heat treatment) proved to be a superior fabrication approach, as evidenced by hardness and residual stress test results on the specimens. Additionally, Jiang et al. [92] proposed a support interface method for DED, which allows for direct part removal without extra machining. This method involves printing a sacrificial layer of struts, upon which the actual part is built. This innovation aims to improve process efficiency and automation in DED, enabling more precise tailoring of post-processing steps to minimize risks and maximize the quality and performance of the final components.

3. UA-DED Technology

UA-DED involves the external coupling or internal integration of an ultrasonic transducer with a conventional DED system to introduce vibrational energy into the melt pool [93]. As early as the 1800s, researchers began experimenting with adding vibrations to enhance metallurgical bonding, refining grains in castings, and altering solidification structures [94]. In recent years, UA-DED has emerged as a promising technique to actively control the printing process for better microstructural and mechanical properties [95,96,97].
The mechanisms of grain refinement, porosity reduction, and residual stress relief via in-process ultrasonic vibrations hold the potential to overcome key limitations of traditional DED and significantly enhance part performance [43,98].

3.1. Working Principles of UA-DED

The core principles of ultrasonic-assisted directed energy deposition lie in the interactions between high-frequency mechanical vibrations and the melt pool evolution during printing. As analyzed by El-Azab et al. [36] through in situ observations, the oscillatory molten metal flows generated within the melt pool have the potential to substantially alter the heat and mass transport, fluid flow, damping phenomena, and solidification kinetics. When ultrasonic vibrations are applied during the DED process, the high frequency acoustic waves propagating into the melt pool cause fluctuations in pressure and velocity fields within the molten metal. This leads to complex hydrodynamic effects that alter heat transfer, mixing patterns, and solidification kinetics.
There are primarily three effects that impart strong influences—acoustic cavitation, ultrasound absorption, and acoustic streaming (cf. Figure 6) [36].
Acoustic cavitation denotes the genesis, oscillation, expansion, and violently implosive collapse of microscopic gaseous cavities, induced by the extreme pressures generated during ultrasonic irradiation [99]. As these bubbles collapse, they create local hotspots where the interior temperature can rise dramatically, reaching up to 6000 K. The implosive collapse of the cavitation bubbles can markedly dissipate energy, thereby promoting thermal transport through intensified turbulence and surface replenishment dynamics. This enhancement of heat transfer is not merely due to the agitation of the liquid but the dynamic and intense effects of the cavitation bubbles themselves, as studied experimentally by Zhou and Liu [99].
Ultrasound absorption originates from the vibrational excitation of atoms whereby acoustic wave energy is transformed into thermal energies [100]. Ultrasonic energy can be converted to heat in molten metals via absorption, causing thermal variation gradients. Absorption also accelerates physical diffusion processes, which together with cavitation-induced effects promote greater elemental homogenization [101].
Acoustic streaming refers to steady-state fluid motion driven by acoustic wave propagation in the presence of solid boundaries or vibrationally excited interfaces [101]. Within the melt pool, rapid oscillating velocities of up to 100 cm/s are generated from sonication to circulate the liquid metal in controlled vortex flows or directed jets/streams [102]. This intensifies mixing and breaks temperature boundary layers to assist feeding during solidification.
Derived from the preceding synthesis, it is evident that thermal fluctuations, oscillatory flows, cavitation phenomena, and kinetic energy impacts induced by ultrasonic vibrations constitute the pivotal mechanisms that steer melt pool dynamics during DED processing. These mechanisms collectively play a critical role in procuring desirable microstructural and mechanical improvements. To harness these benefits effectively, it is imperative that vibration parameters are meticulously calibrated to ensure optimal energy coupling and circumvent potential process instabilities. Future research endeavors ought to establish a comprehensive correlation between the effects instigated by ultrasonic vibrations and the resultant grain morphology, defect formation, and material properties.

3.2. System Configurations of UA-DED

Figure 7 illustrates the configuration of a typical UA-DED system. This system encompasses a conventional DED subsystem, an ultrasonic-assisted module, and a deposition platform. The ultrasonic-assisted module is integral to the system, comprising several essential components: the ultrasonic generator, transducer, amplitude transformer, and sonotrode probe [97,98]. Within this module, the generation and propagation of high-frequency sound waves are pivotal. High-frequency electrical signals, emanating from the generator, are transmuted into mechanical vibrations by the transducer, which is typically fabricated from piezoelectric materials. These mechanical oscillations are then amplified through booster horns, designed to minimize energy dissipation, before they are ultimately coupled with the deposition nozzle.
For ultrasonic-assisted arc DED specifically [103], the transducer, amplitude transformer, and sonotrode probe are integrally coupled in a rigid construct. During operation, the DED-arc process initiates material deposition in a layer-by-layer manner, where an electric arc melts the feedstock material that is then deposited onto the substrate. Concurrently, the ultrasound-assisted system activates, applying ultrasonic vibrations to the molten pool. These ultrasonic vibrations can engender microstructural modifications within the melt pool via acoustic cavitation and molten metal flow dynamics, promoting the transition from coarse columnar to fine equiaxed grains, thus improving the microstructure and mechanical performance of the material. Analogous to the ultrasonic-assisted Arc DED system, the ultrasonic-assisted laser DED [41] employs a laser as the heat source to melt the material powder, while the ultrasonic vibrator, affixed to the substrate, transmits vibrations vertically, influencing the molten pool in a similar manner.
Figure 7. General arrangement of ultrasound-assisted DED system: (a) laser DED [104], (b) arc DED [105].
Crystals 14 00114 g007

3.3. Performance Enhancement Mechanisms in UA-DED

UA-DED integrates high-frequency mechanical oscillations into the deposition process, engendering a spectrum of enhancements across the microstructure, densification, and mechanical integrity of AM parts. The oscillations and induced acoustic streaming perturb the thermal profiles and flow dynamics during solidification to directly influence grain evolution, porosity formation and defect generation [44,95,106,107]. By regulating the melt pool hydrodynamics and energetics, these distinct improvements across the grain morphology, density, defects, and various mechanical properties highlight the capabilities of ultrasonic assistance in augmenting directed energy deposition processing, properties, and performance capabilities beyond conventional limitations.

3.3.1. Grain Refinement

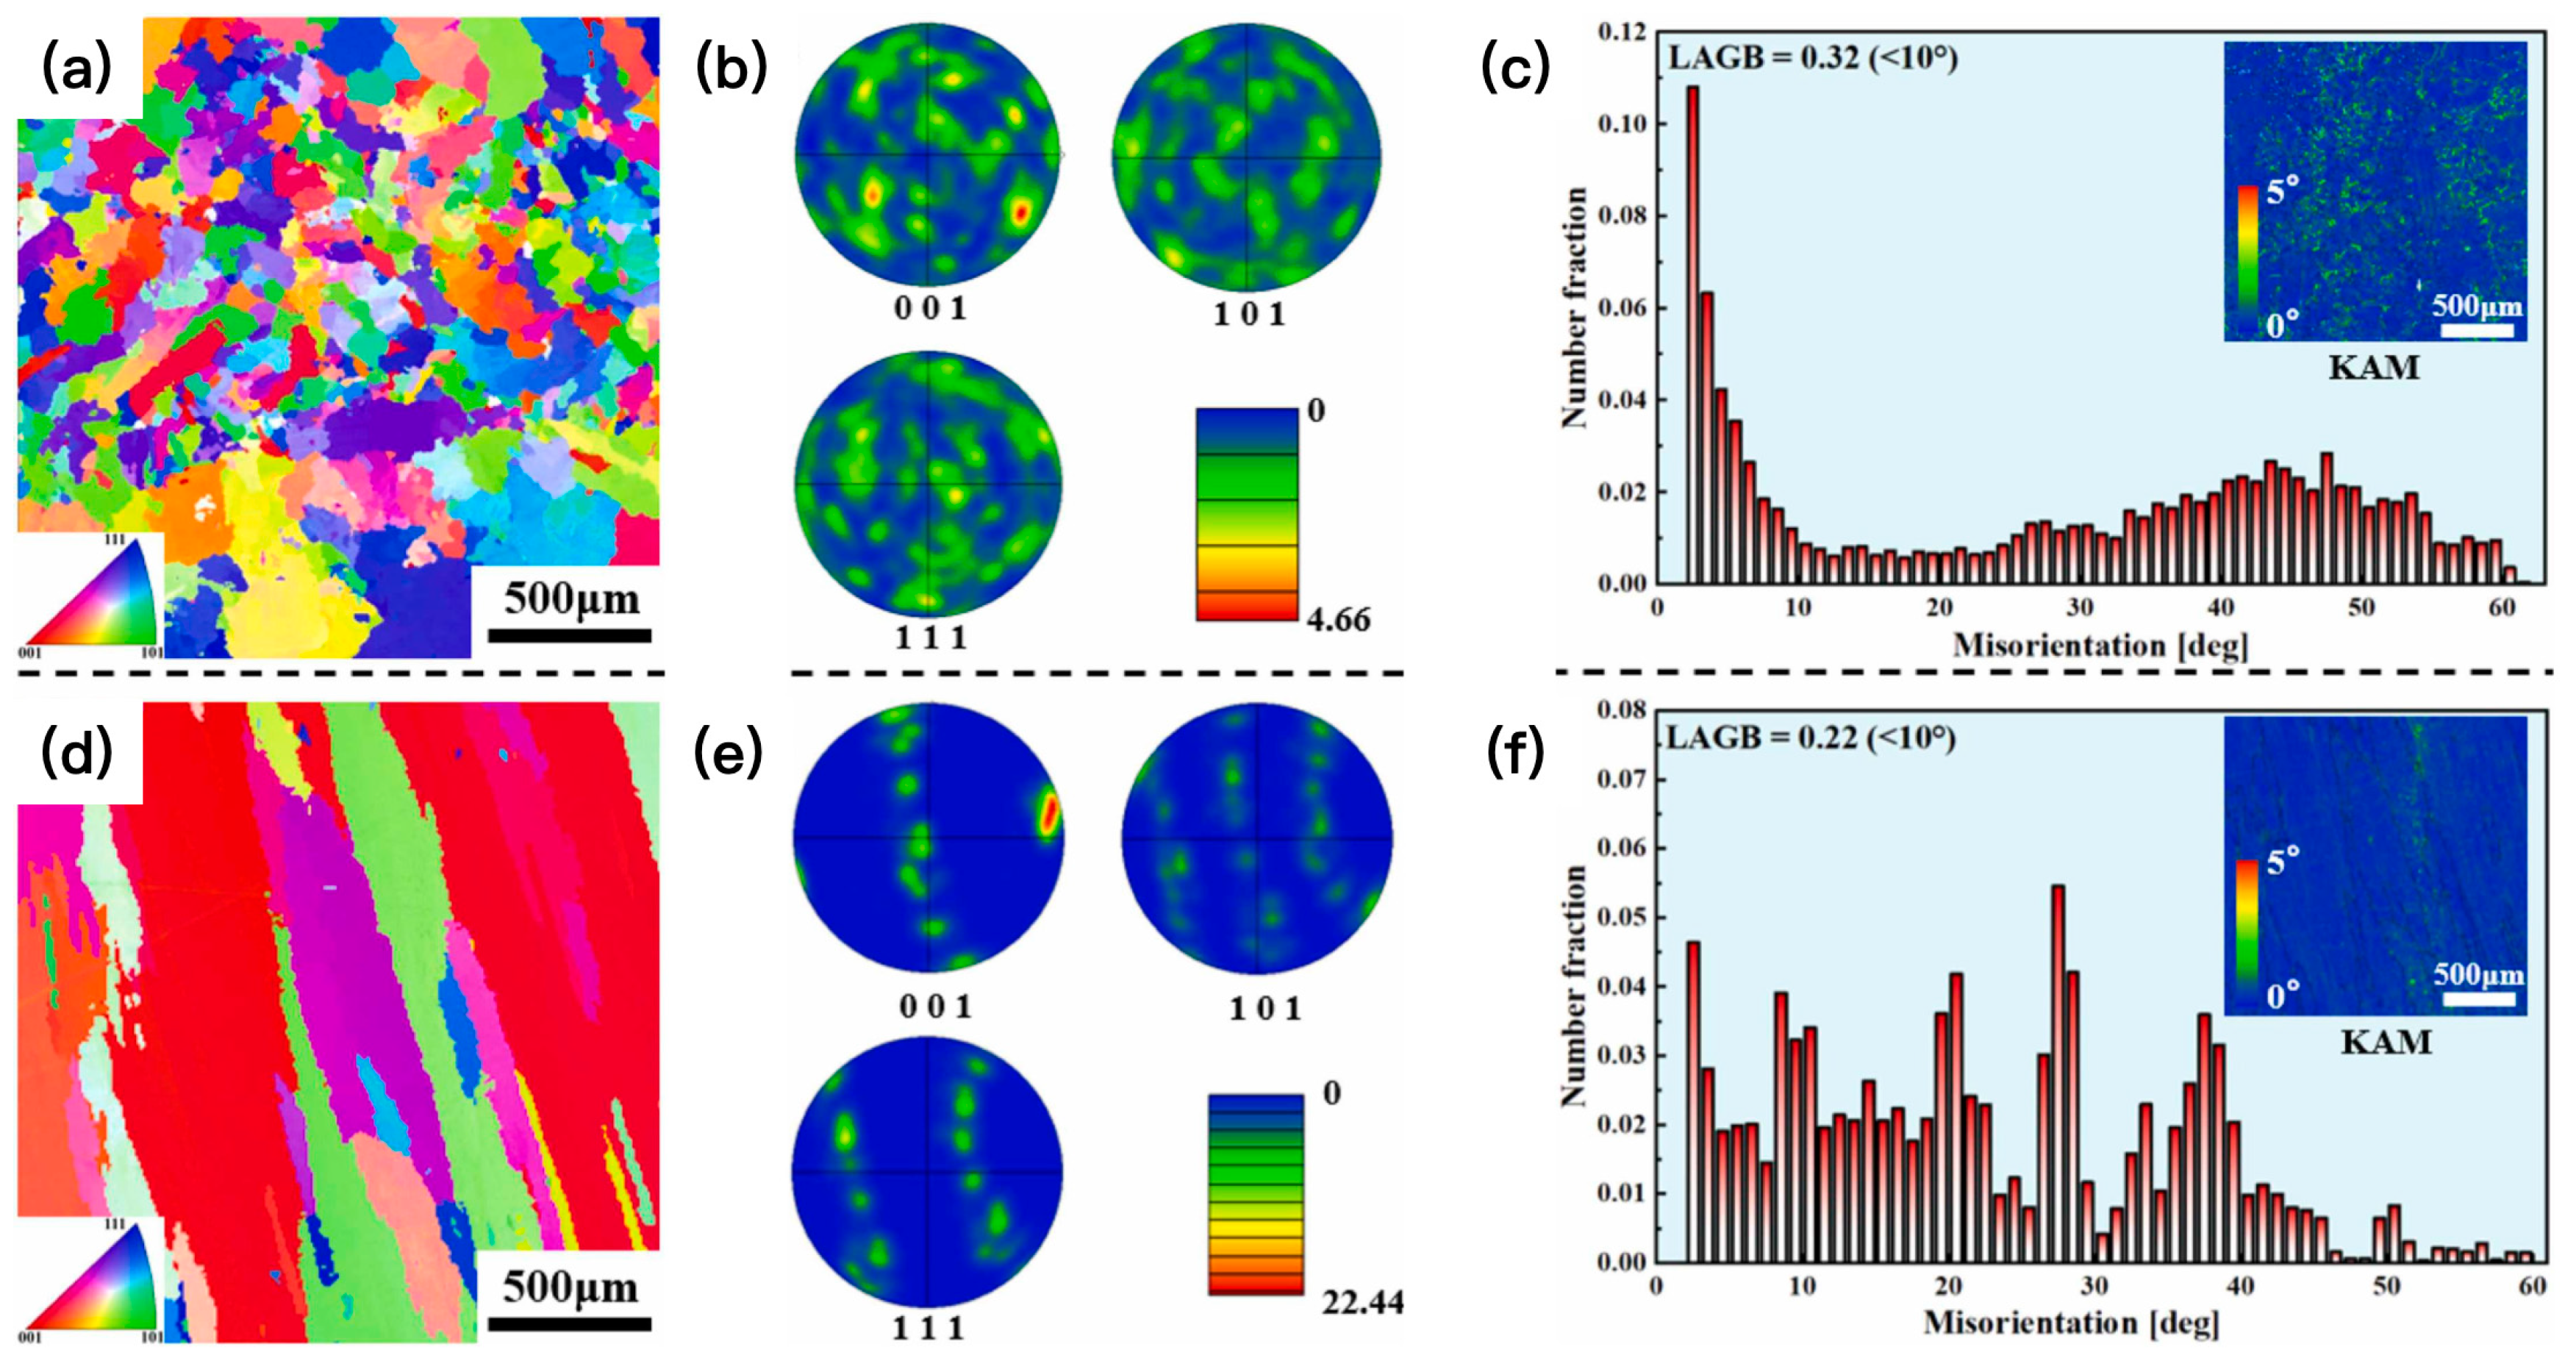
The incorporation of ultrasonic vibration during DED has been empirically validated to yield significant grain refinement effects. Research conducted by Chen et al. on the Inconel 625 alloy produced using ultrasonic-assisted WAAM demonstrated that the application of UA effectively interrupted the growth of coarse columnar grains and encouraged a shift from columnar to more uniform equiaxed grain structures [45]. Figure 8 clearly illustrates that the samples created using UA-DED successfully demonstrate a nearly random crystallographic orientation. The maximum value of the uniform distribution is notably decreased to 4.66 due to the application of ultrasonic-assisted DED. This additionally indicates that incorporating ultrasonic vibrations can significantly reduce and potentially eliminate the texture density in the Inconel 625 alloy produced via WAAM. Further, as demonstrated in Figure 8c,f, the use of UA promotes an increase in low-angle grain boundaries, resulting in superior mechanical properties compared to samples produced without ultrasonic-assisted DED. Mechanical property test outcomes indicated that the yield strength of the Inconel 625 alloy saw an increase of 13.2% and 23.8% across the two build orientations, and the mechanical anisotropy was remarkably reduced compared to samples without ultrasonic assistance. Yuan et al. [102] observed a comparable evolution in grain morphology during the ultrasonic-assisted directed laser and wire solidification of stainless steel. Specifically, they noted an increase of 21.7% in the proportion of grains with a grain size (d ≤ 60 μ m ), alongside a transition from coarse columnar to refined rosette-like equiaxed microstructures. Additionally, Yang et al. [106] demonstrated that ultrasonic-assisted DED promoted grain refinement and transition in the Inconel 718 microstructure compared to DED alone. Yang et al. discovered that in as-built DED samples, the coarse columnar grains along the build direction underwent a transformation into finer equiaxed grains exhibiting a more random crystallographic texture when produced using ultrasonic-assisted DED. They noted a significant reduction in the average grain size, decreasing from 743.38 μ m in standard DED to 68.96 μ m   in UA-DED.

3.3.2. Reduced Porosity

Ultrasonic assistance has proven effective in diminishing porosity levels in materials deposited through DED. Zhu et al. [42] conducted a detailed study on the effects of ultrasonic amplitude on porosity in Inconel 718 components fabricated using laser cladding. Their findings indicated that ultrasonic assistance markedly reduced both the quantity and size of pores compared to traditional laser cladding methods devoid of ultrasound. The porosity first increased and then decreased with higher ultrasonic amplitudes from 10 to 25 μ m . At a 25 μ m amplitude, the porosity reached a minimum. This phenomenon is attributed to the acoustic streaming and cavitation effects induced by UA within the molten pool during solidification. The intense stirring motions enhance fluidity, which allows gas bubbles to easily escape before solidification.
Ning et al. [108] applied UA during a laser-engineered net shaping process of Fe–Cr stainless steel (cf. Figure 9). Employing ultrasonic assistance led to a decrease in the porosity value from 0.68% to 0.35%. In a separate study focusing on the laser deposition of 316L austenitic stainless steel [40], with the application of UA, the area fraction of porosity across the entire section of each sample was found to approach 0.01 area %, as determined through a thresholding analysis of the optical microscopy images.

3.3.3. Improved Tensile Properties

The incorporation of UA-DED has been substantiated as a potent means to significantly enhance the tensile properties of the fabricated materials. Cong et al. [109] applied UA in the deposition of an AISI 630 stainless steel. With optimized parameters, enhancements were achieved with a 144.2% increase in ultimate tensile strength, a 117.7% increase in yield strength, and a 108.5% increase in ductility. Chen et al. [45] demonstrated a ~13.2% (0° direction) and ~23.8% (90° direction) improvement in tensile strength of Inconel 625 alloys deposited with UA compared to samples without. Similar tensile property improvements have been reported for titanium alloys and Al-12Si alloys fabricated by ultrasonic-assisted DED [43,44].
The enhancement in tensile performance is principally attributed to the ultrasonic-induced grain refinement and diminished defect prevalence [40]. The fine and uniformly distributed equiaxed grains formed during UA contribute to increased strength, in accordance with the Hall–Petch relationship. Moreover, the inhibition of pores, microcracks, and phase segregation by ultrasonics decreases stress concentrations in the microstructure. The high-density deposits with minimal defects can sustain higher loads prior to failure. Additionally, the residual compressive stresses induced by ultrasonic impact during solidification are beneficial in resisting tensile forces.

3.3.4. Reduction in Deposition Defects

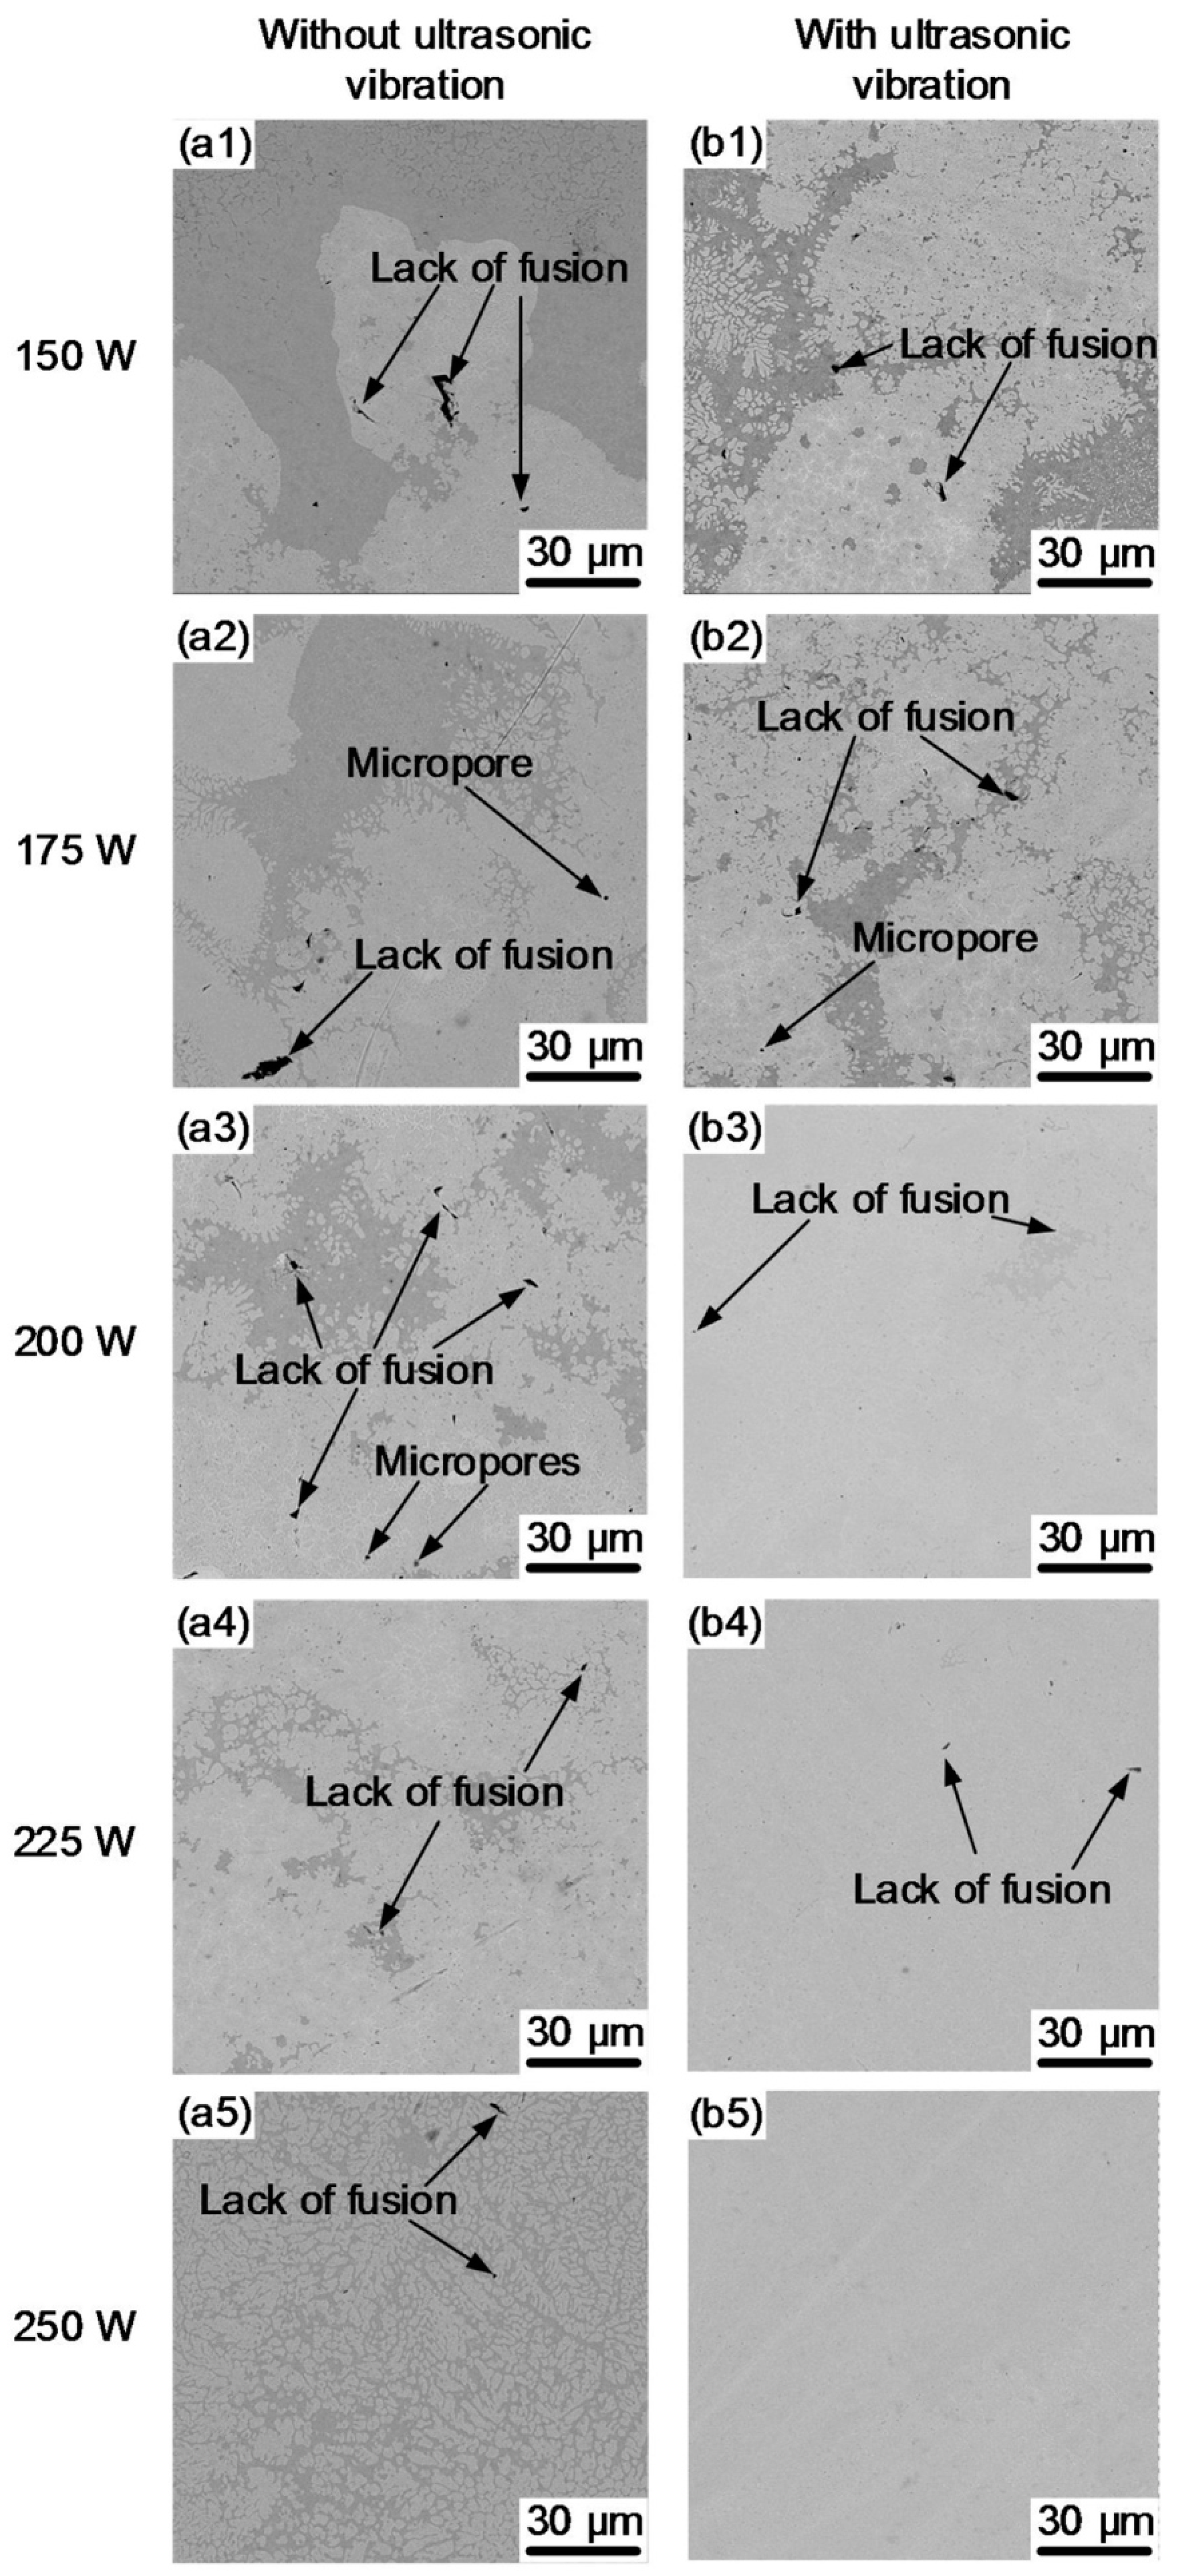
UA has been demonstrated to effectively minimize deposition defects such as cracking, warpage, and delamination in DED processes. Gorunov [110] achieved over a 1.12 times increase in microhardness by applying ultrasonic vibration, attributed to a significant refinement of grains and a reduction in defects. Additionally, the wear resistance of ultrasonic-assisted DED samples doubled that of DED samples, which Gorunov attributed to better resistance against crack propagation in the fine-grained microstructure. Researchers have also discovered that the application of UA-DED can significantly minimize defects in the fabricated nickel–titanium components. Specifically, Zhang et al. [111] noted that NiTi components produced via traditional DED exhibited heterogeneous microstructures characterized by Ni-rich and Ti-rich regions, alongside defects such as lack of fusion and microporosity. They attributed these issues to the non-uniform distribution and biased flow rates of the nickel and titanium powders that had differences in size and density. In contrast, under the same laser power, the NiTi parts fabricated through ultrasonic-assisted DED demonstrated markedly more homogeneous microstructures with fewer darker Ni-rich regions distributed in the matrix (cf. Figure 10). The UA-DED process also effectively reduced the lack of fusion defects and micropores in the NiTi parts. Zhang elucidated that ultrasonic assistance (UA) facilitated acoustic streaming and cavitation effects within the molten pool during deposition. This process circulated the molten materials, improved heat transfer, and the shockwaves along with microjets produced by cavitation disrupted powder agglomerates and aided in degassing.

3.3.5. Enhanced Microhardness

The microhardness of materials fabricated using DED has been found to improve considerably with the integration of UA. In laser fabrication of Ti-6Al-4 V alloys, Gorunov [110] achieved over a 1.12 times increase in microhardness by applying ultrasonic vibration, attributed to a significant refinement of grains and a reduction in defects. Additionally, the wear resistance of ultrasonic-assisted DED samples doubled that of DED samples, which Gorunov attributed to better resistance against crack propagation in the fine-grained microstructure. Yang et al. [106] demonstrated that ultrasonic vibration during laser DED of Inconel 718 increased the microhardness by 14.9%, resulting from subsurface grain refinement and rapid cooling under ultrasonics. The application of UA assistance during laser DED has been observed to enhance the microhardness of in situ synthesized NiTi alloys. Zhang et al. [106] reported an increase in the microhardness values of the fabricated NiTi components across all tested laser power levels ranging from 150 to 250 W. The microhardness values of NiTi parts fabricated with UA ranged from approximately 420–520 HV, while those without UA ranged from 380–460 HV. This corresponds to an increase of around 10–15% in the microhardness values when utilizing UA.

4. Optimization of Ultrasonic-Assisted Parameters in DED

In UA-DED, the impact of ultrasonic vibrations on the materials and build quality is significantly influenced by the parameters of the UA [1]. Selecting inappropriate UA parameters can lead to unstable melt pool dynamics, undesired microstructures, and poor mechanical properties in the fabricated components [112]. By coordinating the UA parameters such as amplitude, frequency, and power with the DED process parameters, the melt pool stability, material microstructure, deposited geometry, defect reduction, and mechanical performance can be synergistically optimized [6]. This section focuses on the subjects outlined in Table 2. It presents a study on optimizing key parameters (amplitude, frequency, power) and multi-parameter co-optimization of UA through different DED process conditions for different materials. The table summarizes how these parameters impact the properties of the deposited materials and highlights the main findings. Subsequent subsections provide more detailed discussions.

4.1. Ultrasonic Intensity Optimization

In DED processes, Ji et al. conducted a study on how varying ultrasonic amplitudes influence the grain morphology and tensile strength of steel alloy samples fabricated by arc DED [105].
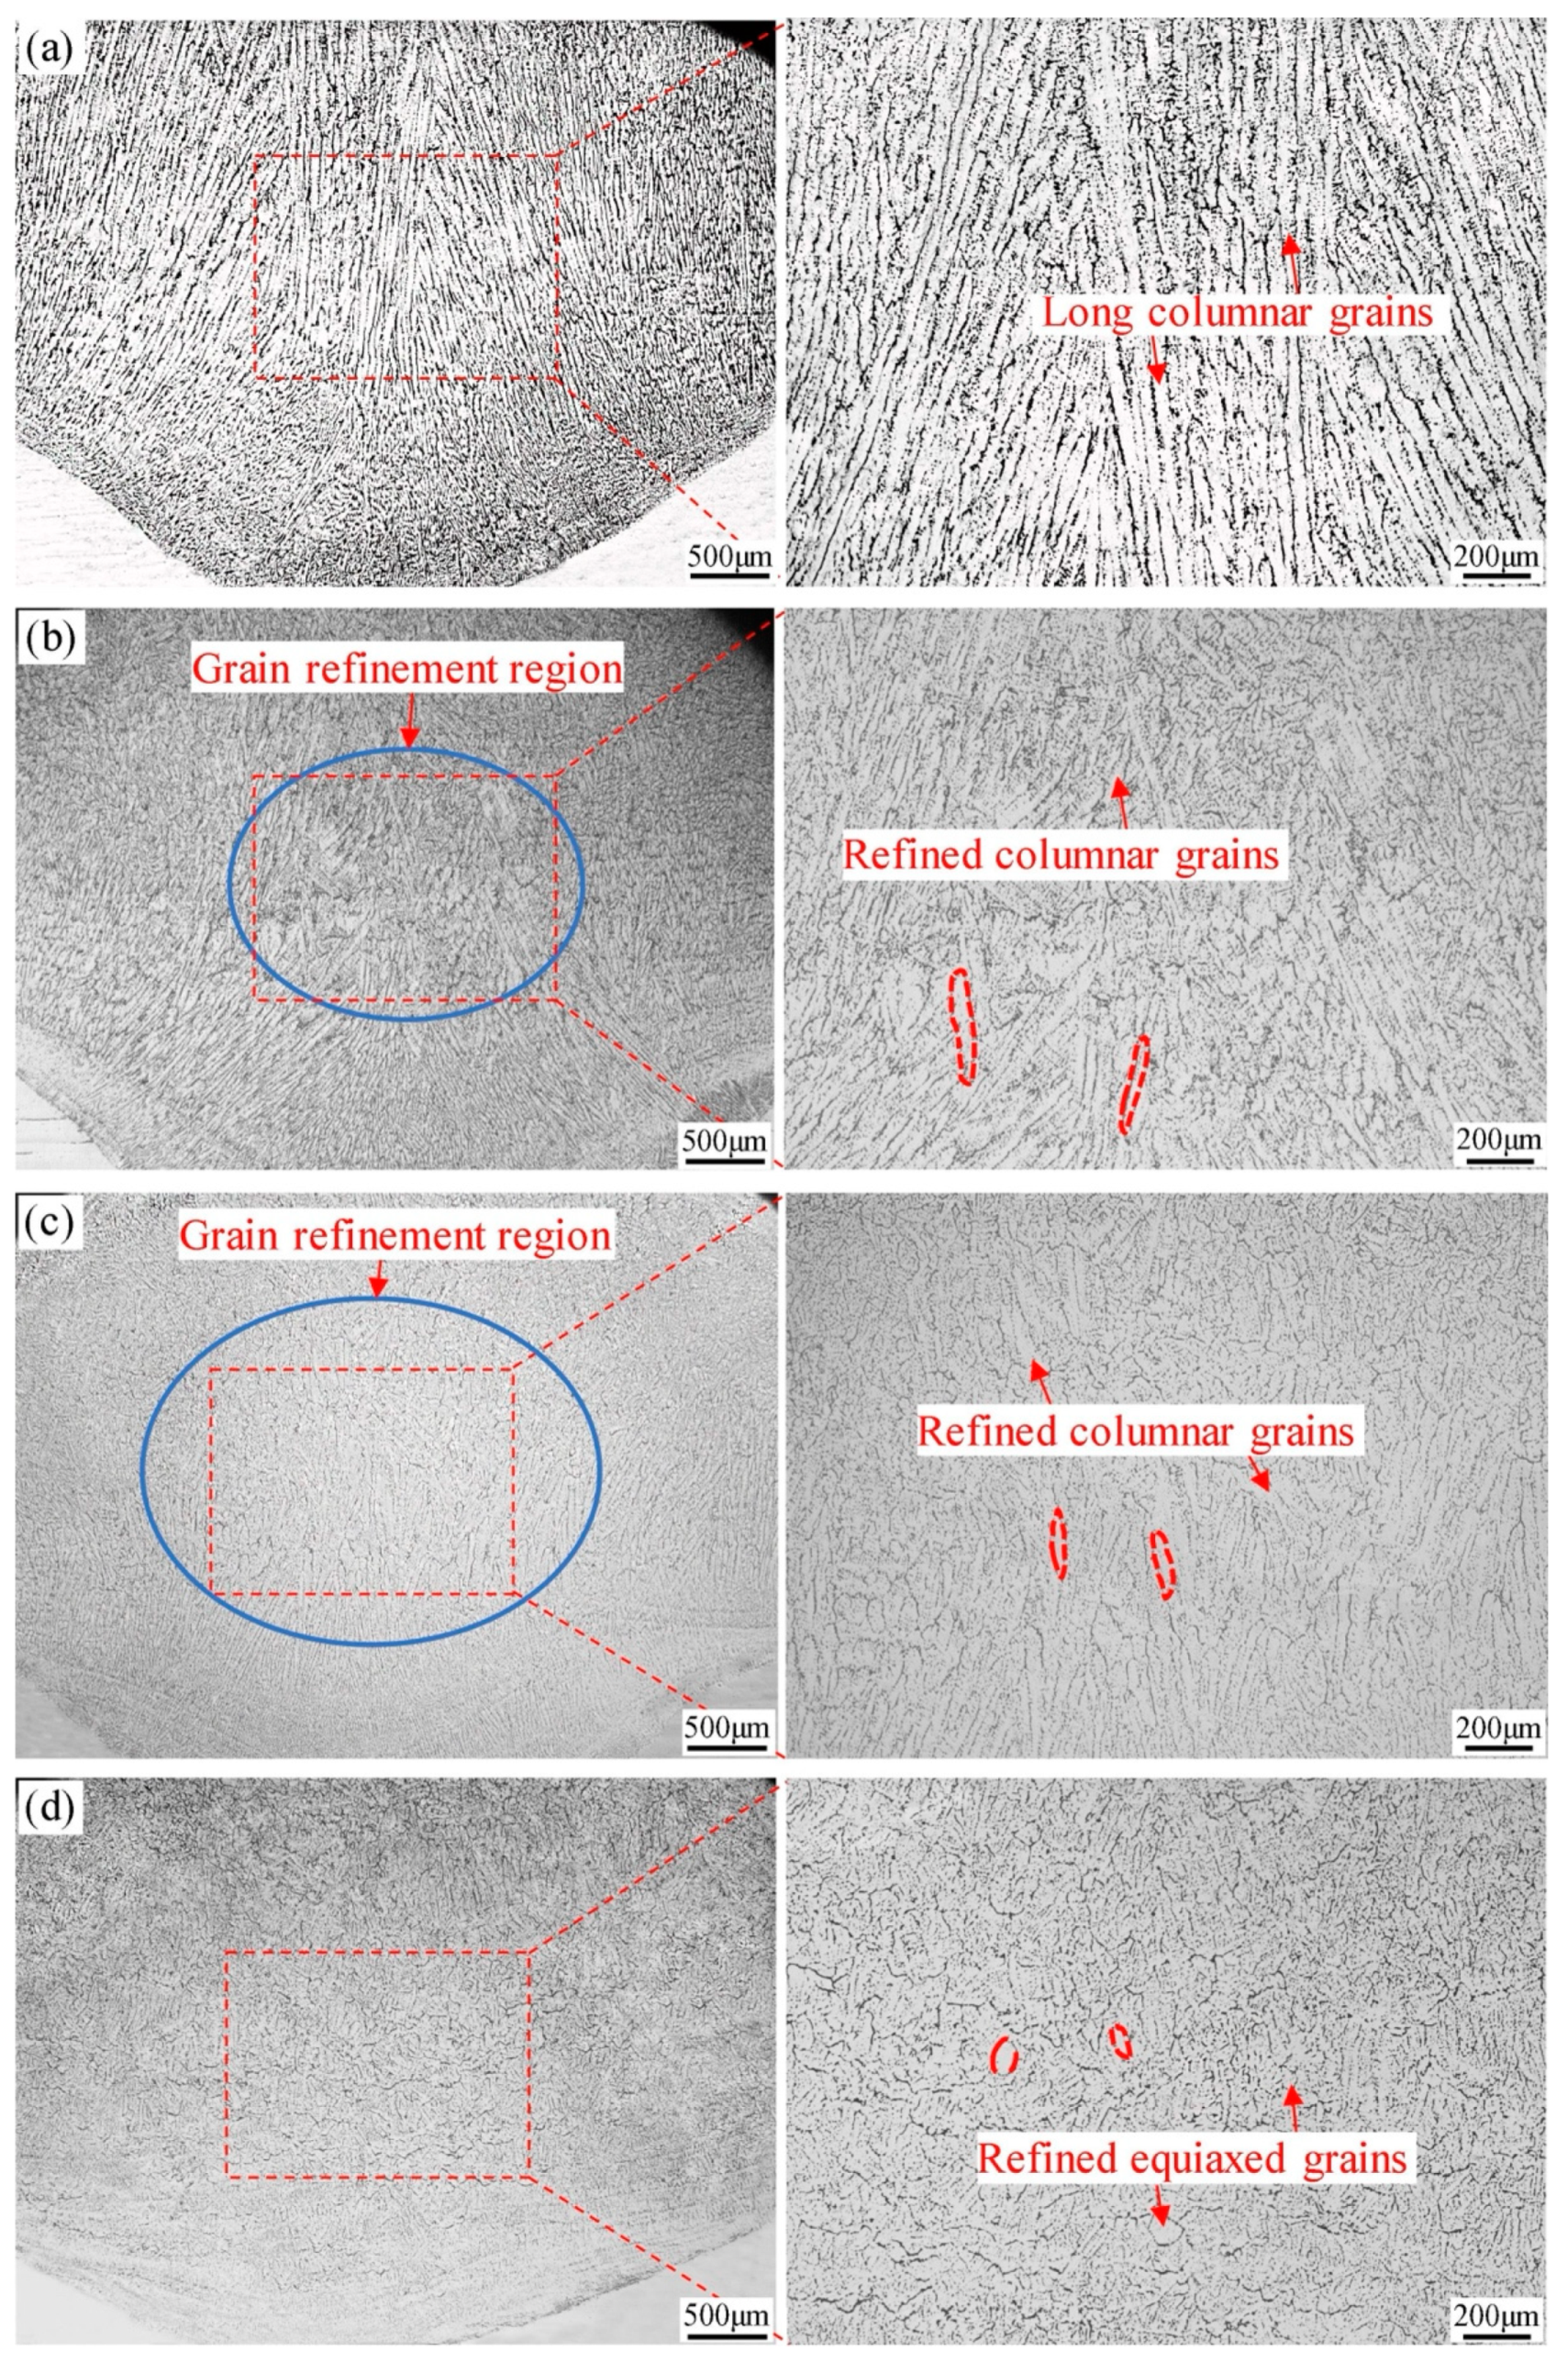
Ji et al.’s investigation [105] into the influence of UA amplitudes on the microstructure and mechanical attributes of steel alloy fabricated via arc DED revealed that an increase in ultrasonic amplitude significantly alters the microstructure and simultaneously improves the mechanical properties of the fabricated ER70S-6 steel alloy. Commencing from an amplitude of 0 μ m , where coarse columnar grains predominate, an increment to 5 μ m instigated a localized refinement in the deposition layer’s central region. Progressing the amplitude to 10 μm amplified the refinement area to 36.3% of the cross-sectional area, with a notable decrease in grain size. However, the most marked metamorphosis was observed at a 15 μm amplitude, where 94.6% of the cross-section exhibited fine equiaxed grains averaging a size of about grade 6 (cf. Figure 11). Correspondingly, the mechanical properties exhibited a significant enhancement as the amplitude increased. Applying a 15 μ m amplitude led to a 10.6% rise in microhardness compared to the specimen that was not subjected to UA. The yield strength and ultimate tensile strength were augmented by 10.9% and 10.7% respectively, under similar comparative conditions. Nevertheless, it was observed that an excessive amplitude could potentially destabilize the melt pool dynamics and degrade the formation quality, implying the necessity for a balanced approach in amplitude application.

4.2. Frequency Optimization

The frequency of UA is vital in dictating the microstructure and characteristics of metal components fabricated using UA-DED. A study by Wang et al. [41] examined the influence of varying ultrasonic frequencies (0 kHz, 25 kHz, 33 kHz, and 41 kHz) on these characteristics.
In their investigation, the augmentation of ultrasonic frequency within ultrasonic-assisted laser DED was found to correlate with a decrease in grain size and a transformation of the Laves phase from elongated columnar to particulate forms. Additionally, the process led to increased porosity and microhardness, while the elastic modulus decreased. For instance, an increase in ultrasonic frequency to 41 kHz resulted in a 19% increment in microhardness from 236.1 HV1.0 at 0 kHz to 280.6 HV1.0. This grain refinement was principally attributed to intensified cavitation effects and acoustic streaming within the molten pool, which engendered an increase in heterogeneous nucleation sites during solidification. Such modifications result in a more homogeneous density and thermal distribution, conducive to the formation of uniform equiaxed grains. Nonetheless, an excess in ultrasonic frequency also resulted in increased porosity, thus indicating the necessity for optimization to establish a critical threshold. Additionally, the impact of ultrasonic frequency on the mechanical properties was significant. The introduction of ultrasonic vibration refined the grain size, leading to a greater microhardness. The wear rate also showed significant improvement, decreasing with increased frequency up to 33 kHz due to the refined grains and more uniform microstructure. However, a further increase to 41 kHz led to an increased wear rate, likely due to the increased porosity at higher frequencies.

4.3. Ultrasonic Power Optimization

The power of ultrasonic vibration has significant effects on the microstructure evolution and properties of alloy steel fabricated by non-contact UA-DED, according to the study by Wang et al. on the effect of varying ultrasonic power on a 1Cr12Ni3MoVN alloy deposited by DED [112].
Specifically, with an increase in ultrasonic power, there is a notable transition in the microstructure from coarse columnar to fine equiaxed crystals. At 0 W (without UV), the sample exhibited coarse columnar crystals, a structure typical for high-temperature gradients and slow cooling rates during DED. However, with the escalation of ultrasonic power to 1000 W, the microstructure transformed into fine equiaxed crystals, indicating a substantial disruption in the columnar growing tendency. This transformation is quantitatively supported by the reduction in the average area size of grains from 158 μm2 at 0 W to 80 μm2 at 1000 W. This microstructural transformation can be ascribed to the effects of UA, fostering higher nucleation rates and hindering the expansion of pre-existing columnar grains, culminating in grain refinement. In addition, the mechanical properties, particularly microhardness and tensile strength, also demonstrate significant variations with changes in ultrasonic power. Initially, at 200 W, there was an evident increase in microhardness compared to the non-UA-treated sample. With a further increase in power to 1000 W, there was a decline in the average microhardness, indicating an optimal range for UV application to enhance hardness. Tensile testing revealed that while the ultimate tensile strength remained relatively consistent across different ultrasonic powers, the elongation at 1000 W increased by 53.8% in comparison to the sample not treated with UA. This suggests that UV treatment, particularly at higher power levels, effectively enhances the material’s ductility while maintaining its strength.

4.4. Multi-Parameter Coordinated Optimization

To fully utilize the advantages of ultrasonic assistance in DED, coordinated optimization of multiple ultrasonic parameters is often required. As studied by Gorunov et al., synergistic effects were achieved by jointly controlling the ultrasonic power and frequency during laser DED of a Ti6Al4V alloy [110].
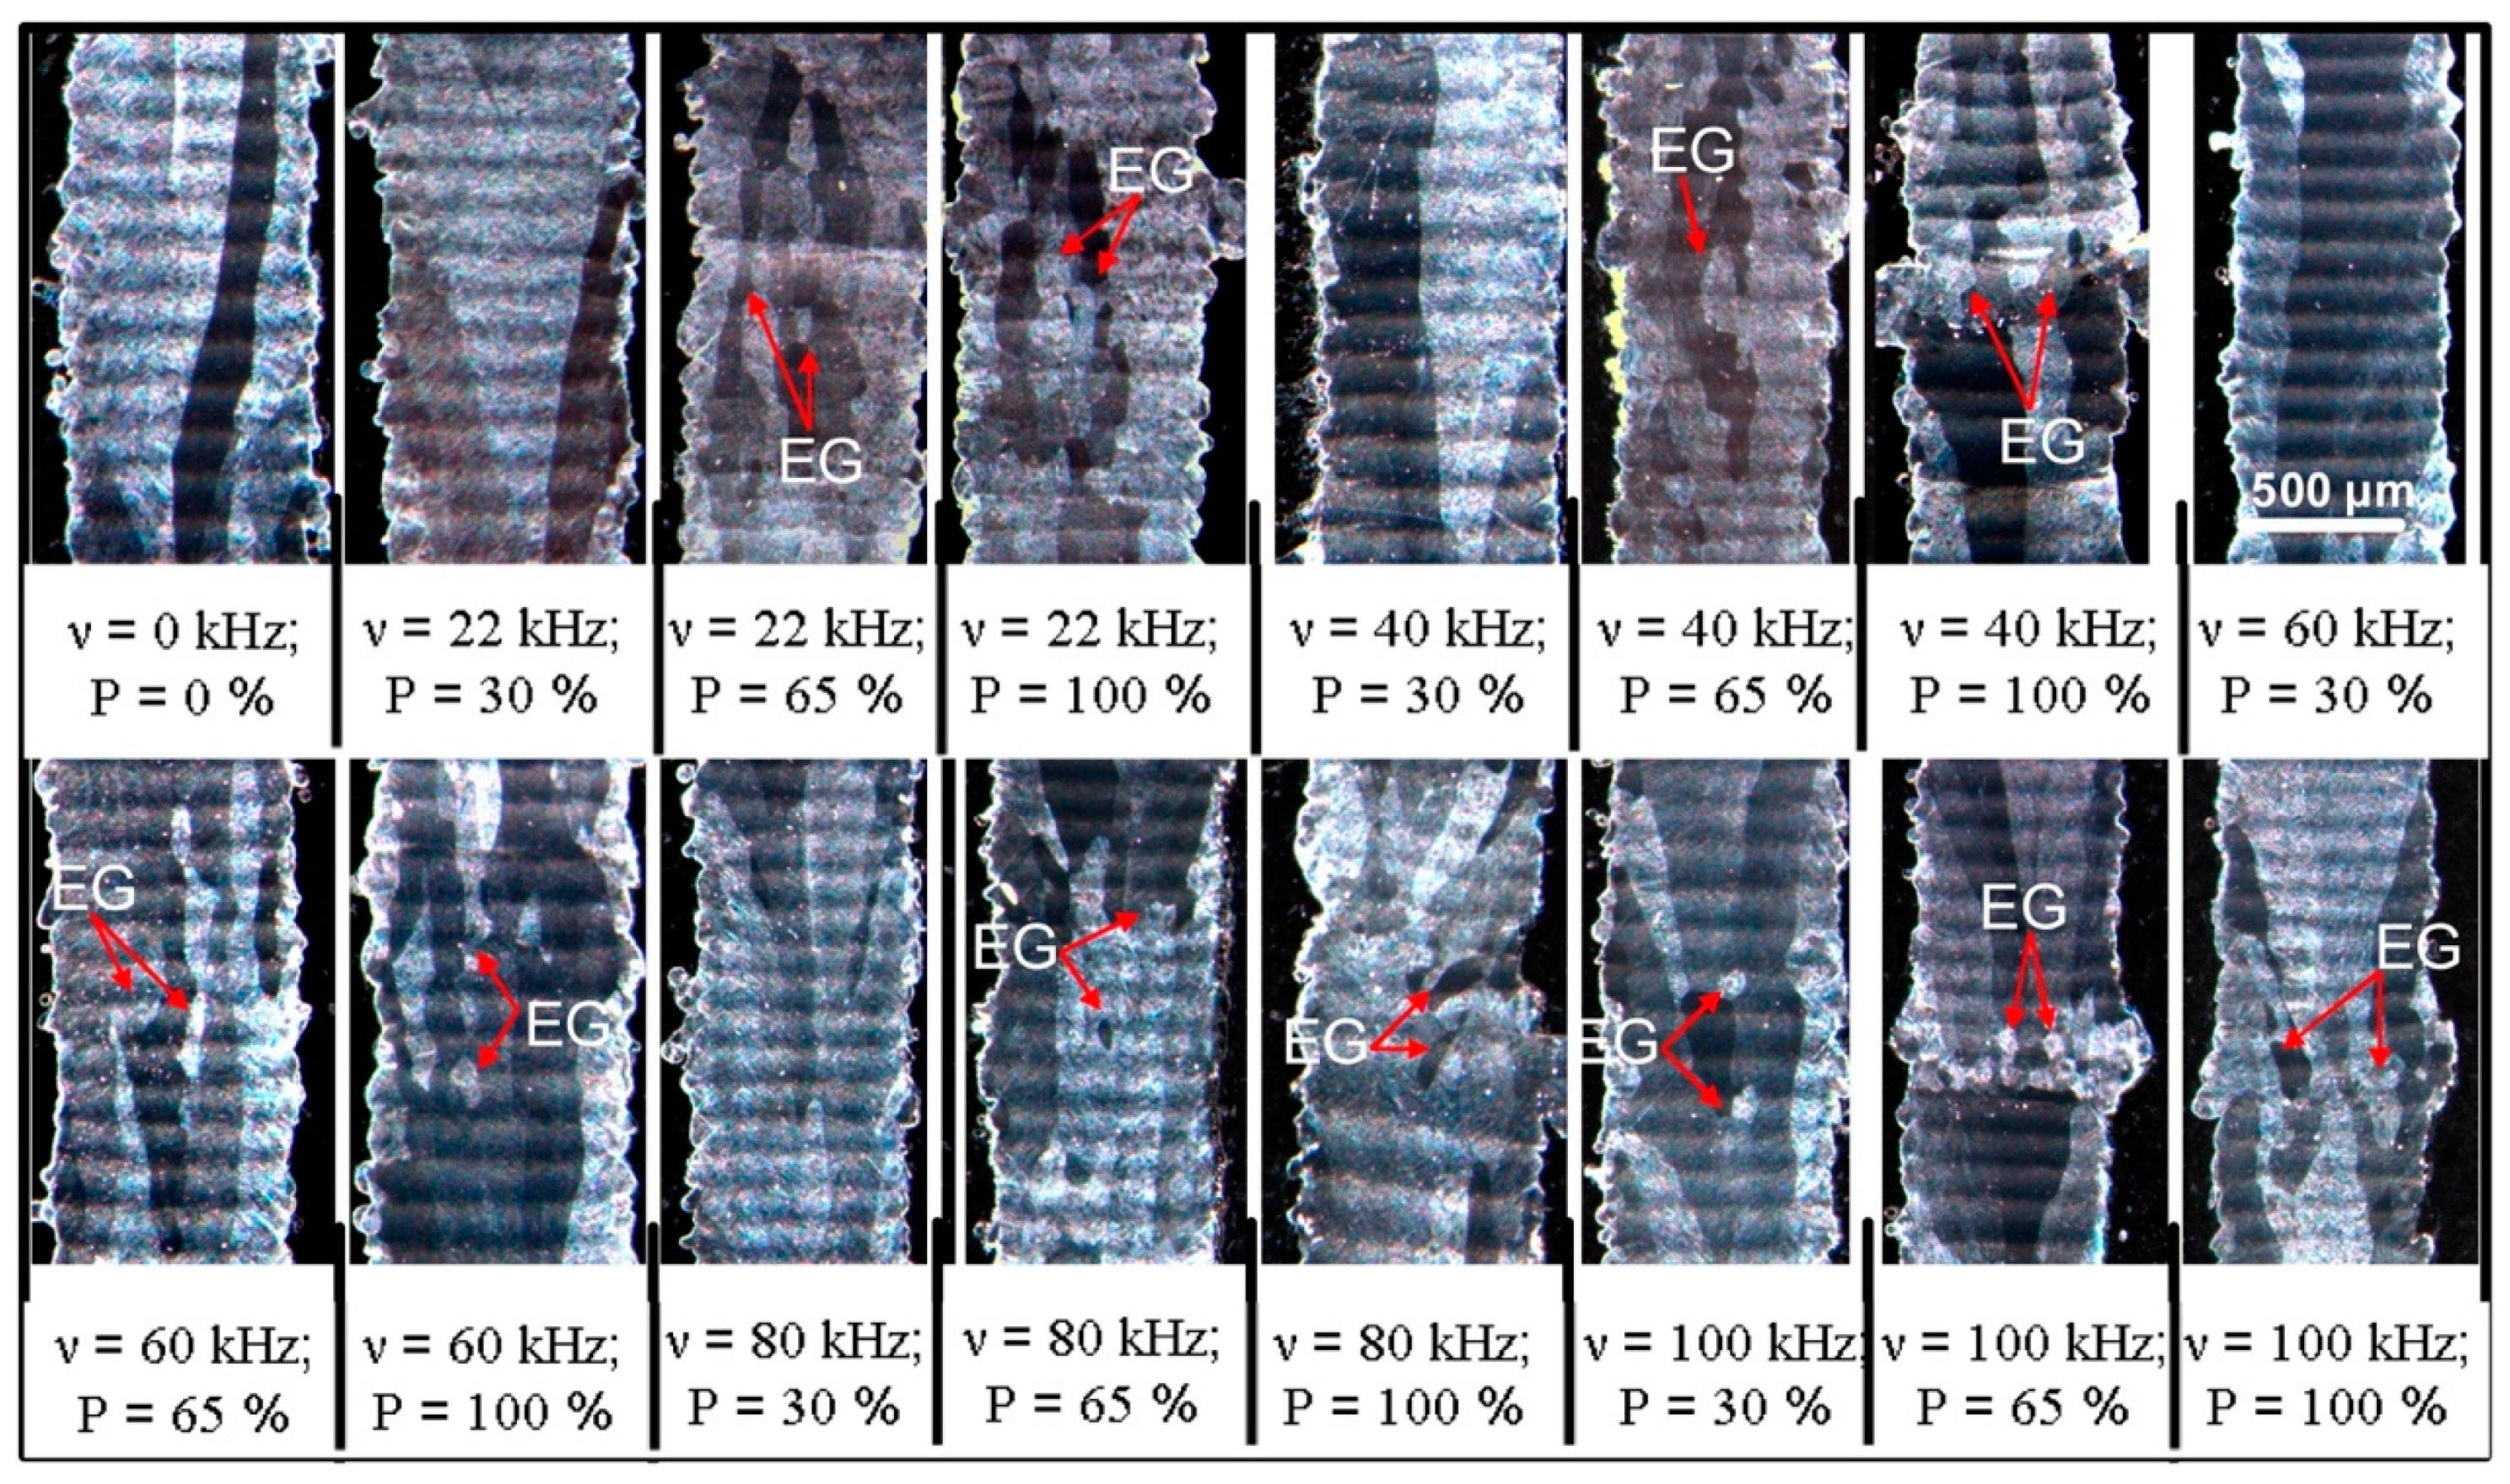
In their study, the Ti6Al4V samples were fabricated with varied ultrasonic power from 30% to 100% and frequency from 22 kHz to 100 kHz. It was found that varying the frequency and power culminated in the formation of equiaxed grain regions at different locations in the parts. For instance, with a frequency of 22 kHz and power at 100%, equiaxed grains developed 5 mm above the substrate in the constructed part (see Figure 12). Conversely, with a frequency of 100 kHz and power at 65%, finer equiaxed grains appeared at a lower height of 2.5 mm. The microhardness of the parts also exhibited a strong dependence on the ultrasonic vibration parameters. Specimens made with an 80 kHz frequency and 100% power showed a 1.12 times increase in microhardness over those made by DED without ultrasonic vibration. At a 100 kHz frequency, microhardness peaked at 30% power but decreased at 100% power compared to the DED sample, and the wear properties were improved in parts made by UA-DED, with the coefficient of friction being reduced by half initially during wear tests. The cycling fatigue life also improved by over 60% for UA-DED parts from. The author attributed these enhancements to the fine equiaxed grain and enhanced hardness induced by controlling the UA frequency and power.
Additionally, the ultrasonic parameters need coordinated optimization with the DED process parameters. For example, the laser power and scanning speed must be matched with the ultrasonic input to ensure sufficient energy density for material melting while enabling controlled solidification under ultrasonic refinement effects [112,116].

5. Summary and Prospectives

5.1. Summary

The fundamentals, mechanisms, configurations, and performance enhancement effects of UA-DED have been systematically elucidated. The influence of ultrasonic vibration on melt pool dynamics, microstructural evolution, defect formation, and mechanical properties during DED has been assessed. The intrinsic correlations between ultrasonic parameters and the microstructure–property relationships of fabricated materials have been established. The unique capabilities of the UA-DED technique in augmenting additive manufacturing quality and applicability have been highlighted. UA-DED provides a potent means for quality and performance improvements of AM components. The specific findings of this investigation are as follows:
  • The introduction of ultrasonic vibration can effectively manipulate melt pool dynamics, microstructure evolution, and defect formation through mechanisms of acoustic cavitation, streaming, and damping. Tailored UA-DED with optimized vibration parameters matched to DED signatures has demonstrated great capabilities for eliminating cracks, refining grains, and enhancing mechanical properties.
  • Strong evidence has been provided on the intrinsic correlations between input ultrasonic parameters and output materials properties. By tuning the ultrasonic frequency, amplitude, and power, the precise regulation of grain morphology, defects, and hardness/strength can be achieved synchronously with DED process parameters. These intrinsic relationships form the basis for quality and performance improvements in UA-DED technology.
  • Despite the potent effects exhibited, the applications and further development of UA-DED still face limitations such as process stability, parameter matching, and materials generalization. To address these gaps and facilitate the industrialization of UA-DED integrated monitoring systems, multi-physics modelling tools and extensive research uncovering multi-material microstructure–property relationships have been highlighted as critical future efforts.

5.2. Prospectives

5.2.1. System Integration and Standardization of UA-DED

While UA-DED has demonstrated significant capabilities in improving additive manufacturing quality and applicability, this technology is still not mature and faces limitations in parameter optimization, ultrasonic wave attenuation with increasing wave propagation distance, and materials generalization. Further system integration and standardization efforts are critical to address these gaps and facilitate the industrial-scale implementation of UA-DED.
On the system level, the integration of multi-physics modelling tools and in situ monitoring systems with closed-loop control of ultrasonic vibration inputs can promote process stability and repeatability. Physics-based models can provide predictive capabilities for parameter matching between ultrasonic vibration and DED signatures across various materials. In situ monitoring tools such as high-speed imaging, infrared thermography, and spectral sensing allow real-time tracking and closed-loop control of melt pool dynamics, thermal history, and microstructure evolution [36]. The integration of these capabilities will enhance process robustness and part quality consistency. The standardization of procedures and benchmarks is also needed to quantify UA-DED performance and enable quality certification. Standard UA-DED process flows, test artifacts, and quality standards for deposited parts need to be established. These will provide metrics for comparing process capabilities across different DED processes and materials.
While the system integration and standardization incur additional time and costs, the long-term payoffs in process reliability, product quality, and industry adoption justify these investments. The synergistic effects of modelling, monitoring, and benchmarking will tackle the existing limitations of UA-DED and accelerate its maturation as a transformative manufacturing platform. In summary, a systematic outlook with concerted efforts in developing integrated tools, quantitative metrics, and community datasets will be key to unlocking the full potential of UA-DED.

5.2.2. Mechanistic Study of UA-Material Interaction

Advanced multi-physics modelling encompassing ultrasonic effects has shown promise in guiding UA-DED system optimization. Sophisticated simulations coupling vibrational acoustics with melt pool fluid flow, thermal transport, microstructure evolution, and mechanical responses will enable predictive capabilities for tailored parameter matching. Further in-depth study on the customization of ultrasonic inputs and the elucidation of their roles and impacts across various materials is needed. Both computational and experimental efforts are required to uncover the intrinsic connections between ultrasonic parameters, solidification patterns, microstructural developments, and resultant part properties in different alloy systems. The findings will provide fundamental insight on how ultrasonic vibrations interact with distinct alloy chemistries during solidification to manipulate defects, phases, and mechanical performance.
Robust correlations established between ultrasonic inputs, thermal signatures, microstructures, and mechanical properties across various materials such as steels, titanium alloys, and nickel superalloys will guide the development of process–structure–property maps for UA-DED modelling. The physics-based models and maps will provide critical capabilities for optimizing ultrasonic parameters and predicting AM part quality for different materials. In summary, a mechanistic perspective encompassing multi-field simulations, customized experiments, and data-driven analytics will accelerate the understanding and control of UA interactions with diverse alloys to expand the design space and applicability of UA-DED technology.

5.2.3. Further Development and Practical Application of Processes for Material Adaptation

The unique capabilities of UA-DED in manipulating microstructures and properties of materials open exciting avenues for expanding alloy design spaces. Further research and development efforts are imperative to adapt this process for enabling new materials and enhancing the performances of existing alloys.
On the material development side, the microstructure and defect control of UA-DED can potentially enable compositions that were previously unprocessable for AM. Coarse grains and unfavorable textures often hinder the AM processing of novel compositions with superior potential properties. The implementation of ultrasonic inputs to alter solidification and restrain cracking and coarsening could sufficiently expand composition ranges for successful AM deposition.

Author Contributions

Conceptualization, calculation, experiments, analysis and discussion, writing—original draft, review and editing, W.Z.; resources, analysis and discussion, supervision, review and editing, project administration, C.X.; analysis and discussion, project administration, C.L.; analysis and discussion, validation, check and proofreading, S.W. All authors have read and agreed to the published version of the manuscript.

Funding

This research was supported by National Key R&D Program of China, grant number 2021YFF0600500.

Data Availability Statement

No new data were created or analyzed in this study. Data sharing is not applicable to this article.

Conflicts of Interest

The authors declare no conflicts of interest.

References

  1. DebRoy, T.; Wei, H.L.; Zuback, J.S.; Mukherjee, T.; Elmer, J.W.; Milewski, J.O.; Beese, A.M.; Wilson-Heid, A.; De, A.; Zhang, W. Additive Manufacturing of Metallic Components–Process, Structure and Properties. Prog. Mater. Sci. 2018, 92, 112–224. [Google Scholar] [CrossRef]
  2. Moeinfar, K.; Khodabakhshi, F.; Kashani-bozorg, S.F.; Mohammadi, M.; Gerlich, A.P. A Review on Metallurgical Aspects of Laser Additive Manufacturing (LAM): Stainless Steels, Nickel Superalloys, and Titanium Alloys. J. Mater. Res. Technol. 2022, 16, 1029–1068. [Google Scholar] [CrossRef]
  3. Mellor, S.; Hao, L.; Zhang, D. Additive Manufacturing: A Framework for Implementation. Int. J. Prod. Econ. 2014, 149, 194–201. [Google Scholar] [CrossRef]
  4. Svetlizky, D.; Das, M.; Zheng, B.; Vyatskikh, A.L.; Bose, S.; Bandyopadhyay, A.; Schoenung, J.M.; Lavernia, E.J.; Eliaz, N. Directed Energy Deposition (DED) Additive Manufacturing: Physical Characteristics, Defects, Challenges and Applications. Mater. Today 2021, 49, 271–295. [Google Scholar] [CrossRef]
  5. Ahn, D.-G. Directed Energy Deposition (DED) Process: State of the Art. Int. J. Precis. Eng. Manuf. Green Technol. 2021, 8, 703–742. [Google Scholar] [CrossRef]
  6. Dass, A.; Moridi, A. State of the Art in Directed Energy Deposition: From Additive Manufacturing to Materials Design. Coatings 2019, 9, 418. [Google Scholar] [CrossRef]
  7. Haley, J.; Karandikar, J.; Herberger, C.; MacDonald, E.; Feldhausen, T.; Lee, Y. Review of in Situ Process Monitoring for Metal Hybrid Directed Energy Deposition. J. Manuf. Process. 2024, 109, 128–139. [Google Scholar] [CrossRef]
  8. Zheng, B.; Haley, J.C.; Yang, N.; Yee, J.; Terrassa, K.W.; Zhou, Y.; Lavernia, E.J.; Schoenung, J.M. On the Evolution of Microstructure and Defect Control in 316L SS Components Fabricated via Directed Energy Deposition. Mater. Sci. Eng. A 2019, 764, 138243. [Google Scholar] [CrossRef]
  9. Yadroitsev, I.; Krakhmalev, P.; Yadroitsava, I.; Johansson, S.; Smurov, I. Energy Input Effect on Morphology and Microstructure of Selective Laser Melting Single Track from Metallic Powder. J. Mater. Process. Technol. 2013, 213, 606–613. [Google Scholar] [CrossRef]
  10. King, W.; Anderson, A.T.; Ferencz, R.M.; Hodge, N.E.; Kamath, C.; Khairallah, S.A. Overview of Modelling and Simulation of Metal Powder Bed Fusion Process at Lawrence Livermore National Laboratory. Mater. Sci. Technol. 2015, 31, 957–968. [Google Scholar] [CrossRef]
  11. Xie, D.; Lv, F.; Yang, Y.; Shen, L.; Tian, Z.; Shuai, C.; Chen, B.; Zhao, J. A Review on Distortion and Residual Stress in Additive Manufacturing. Chin. J. Mech. Eng. Addit. Manuf. Front. 2022, 1, 100039. [Google Scholar] [CrossRef]
  12. Shifeng, W.; Shuai, L.; Qingsong, W.; Yan, C.; Sheng, Z.; Yusheng, S. Effect of Molten Pool Boundaries on the Mechanical Properties of Selective Laser Melting Parts. J. Mater. Process. Technol. 2014, 214, 2660–2667. [Google Scholar] [CrossRef]
  13. Gu, D.D.; Meiners, W.; Wissenbach, K.; Poprawe, R. Laser Additive Manufacturing of Metallic Components: Materials, Processes and Mechanisms. Int. Mater. Rev. 2012, 57, 133–164. [Google Scholar] [CrossRef]
  14. Shamsaei, N.; Yadollahi, A.; Bian, L.; Thompson, S.M. An Overview of Direct Laser Deposition for Additive Manufacturing; Part II: Mechanical Behavior, Process Parameter Optimization and Control. Addit. Manuf. 2015, 8, 12–35. [Google Scholar] [CrossRef]
  15. Ng, G.K.L.; Jarfors, A.E.W.; Bi, G.; Zheng, H.Y. Porosity Formation and Gas Bubble Retention in Laser Metal Deposition. Appl. Phys. A 2009, 97, 641–649. [Google Scholar] [CrossRef]
  16. Giganto, S.; Martínez-Pellitero, S.; Barreiro, J.; Leo, P.; Castro-Sastre, M.Á. Impact of the Laser Scanning Strategy on the Quality of 17-4PH Stainless Steel Parts Manufactured by Selective Laser Melting. J. Mater. Res. Technol. 2022, 20, 2734–2747. [Google Scholar] [CrossRef]
  17. Yadollahi, A.; Shamsaei, N. Additive Manufacturing of Fatigue Resistant Materials: Challenges and Opportunities. Int. J. Fatigue 2017, 98, 14–31. [Google Scholar] [CrossRef]
  18. Shim, D.-S.; Baek, G.-Y.; Seo, J.-S.; Shin, G.-Y.; Kim, K.-P.; Lee, K.-Y. Effect of Layer Thickness Setting on Deposition Characteristics in Direct Energy Deposition (DED) Process. Opt. Laser Technol. 2016, 86, 69–78. [Google Scholar] [CrossRef]
  19. Wang, J.; Zhang, J.; Liu, G.; Liang, L.; Yang, G.; Huang, A.; Pang, S. Effects of Scanning Strategies on Residual Stress and Deformation by High-Power Direct Energy Deposition: Island Size and Laser Jump Strategy between Islands. J. Manuf. Process. 2022, 75, 23–40. [Google Scholar] [CrossRef]
  20. Liu, W.-W.; Saleheen, K.M.; Tang, Z.; Wang, H.; Al-Hammadi, G.; Abdelrahman, A.; Yongxin, Z.; Hua, S.-G.; Wang, F.-T. Review on Scanning Pattern Evaluation in Laser-Based Additive Manufacturing. Opt. Eng. 2021, 60, 070901. [Google Scholar] [CrossRef]
  21. Cai, Y.; Xiong, J.; Chen, H.; Zhang, G. A Review of In-Situ Monitoring and Process Control System in Metal-Based Laser Additive Manufacturing. J. Manuf. Syst. 2023, 70, 309–326. [Google Scholar] [CrossRef]
  22. Tang, Z.; Liu, W.; Wang, Y.; Saleheen, K.M.; Liu, Z.; Peng, S.; Zhang, Z.; Zhang, H. A Review on in Situ Monitoring Technology for Directed Energy Deposition of Metals. Int. J. Adv. Manuf. Technol. 2020, 108, 3437–3463. [Google Scholar] [CrossRef]
  23. Tapia, G.; Elwany, A. A Review on Process Monitoring and Control in Metal-Based Additive Manufacturing. J. Manuf. Sci. Eng. 2014, 136, 060801. [Google Scholar] [CrossRef]
  24. Martin, J.H.; Yahata, B.D.; Hundley, J.M.; Mayer, J.A.; Schaedler, T.A.; Pollock, T.M. 3D Printing of High-Strength Aluminium Alloys. Nature 2017, 549, 365–369. [Google Scholar] [CrossRef] [PubMed]
  25. Bartels, D.; Fallqvist, M.; Heise, M.; Vetter, J.; Schmidt, M.; Krakhmalev, P. Development of a Novel Wear-Resistant WC-Reinforced Coating Based on the Case-Hardening Steel Bainidur AM for the Substitution of Carburizing Heat Treatments. J. Mater. Res. Technol. 2023, 26, 186–198. [Google Scholar] [CrossRef]
  26. Heralić, A.; Christiansson, A.-K.; Lennartson, B. Height Control of Laser Metal-Wire Deposition Based on Iterative Learning Control and 3D Scanning. Opt. Lasers Eng. 2012, 50, 1230–1241. [Google Scholar] [CrossRef]
  27. Smith, T.R.; Sugar, J.D.; San Marchi, C.; Schoenung, J.M. Strengthening Mechanisms in Directed Energy Deposited Austenitic Stainless Steel. Acta Mater. 2019, 164, 728–740. [Google Scholar] [CrossRef]
  28. Wang, T.; Zhu, Y.Y.; Zhang, S.Q.; Tang, H.B.; Wang, H.M. Grain Morphology Evolution Behavior of Titanium Alloy Components during Laser Melting Deposition Additive Manufacturing. J. Alloys Compd. 2015, 632, 505–513. [Google Scholar] [CrossRef]
  29. Gu, J.; Ding, J.; Williams, S.W.; Gu, H.; Bai, J.; Zhai, Y.; Ma, P. The Strengthening Effect of Inter-Layer Cold Working and Post-Deposition Heat Treatment on the Additively Manufactured Al–6.3Cu Alloy. Mater. Sci. Eng. A 2016, 651, 18–26. [Google Scholar] [CrossRef]
  30. Xu, X.; Ganguly, S.; Ding, J.; Seow, C.E.; Williams, S. Enhancing Mechanical Properties of Wire + Arc Additively Manufactured INCONEL 718 Superalloy through In-Process Thermomechanical Processing. Mater. Des. 2018, 160, 1042–1051. [Google Scholar] [CrossRef]
  31. Keist, J.S.; Nayir, S.; Palmer, T.A. Impact of Hot Isostatic Pressing on the Mechanical and Microstructural Properties of Additively Manufactured Ti–6Al–4V Fabricated Using Directed Energy Deposition. Mater. Sci. Eng. A 2020, 787, 139454. [Google Scholar] [CrossRef]
  32. Maleki, E.; Bagherifard, S.; Bandini, M.; Guagliano, M. Surface Post-Treatments for Metal Additive Manufacturing: Progress, Challenges, and Opportunities. Addit. Manuf. 2021, 37, 101619. [Google Scholar] [CrossRef]
  33. Kim, M.; Oh, W.; Baek, G.; Jo, Y.; Lee, K.; Park, S.; Shim, D. Ultrasonic Nanocrystal Surface Modification of High-Speed Tool Steel (AISI M4) Layered via Direct Energy Deposition. J. Mater. Process. Technol. 2020, 277, 116420. [Google Scholar] [CrossRef]
  34. Zhou, J.; Zhou, X.; Li, H.; Hu, J.; Han, X.; Liu, S. In-Situ Laser Shock Peening for Improved Surface Quality and Mechanical Properties of Laser-Directed Energy-Deposited AlSi10Mg Alloy. Addit. Manuf. 2022, 60, 103177. [Google Scholar] [CrossRef]
  35. Wang, J.; Xue, Y.; Xu, D.; Zeng, Y.; Li, L.; Wang, Z.; Jiang, F. Effects of Layer-by-Layer Ultrasonic Impact Treatment on Microstructure and Mechanical Properties of 304 Stainless Steel Manufactured by Directed Energy Deposition. Addit. Manuf. 2023, 68, 103523. [Google Scholar] [CrossRef]
  36. El-Azab, S.A.; Zhang, C.; Jiang, S.; Vyatskikh, A.L.; Valdevit, L.; Lavernia, E.J.; Schoenung, J.M. In Situ Observation of Melt Pool Evolution in Ultrasonic Vibration-Assisted Directed Energy Deposition. Sci. Rep. 2023, 13, 17705. [Google Scholar] [CrossRef] [PubMed]
  37. Aversa, A.; Piscopo, G.; Salmi, A.; Lombardi, M. Effect of Heat Treatments on Residual Stress and Properties of AISI 316L Steel Processed by Directed Energy Deposition. J. Mater. Eng. Perform. 2020, 29, 6002–6013. [Google Scholar] [CrossRef]
  38. Hu, Y.L.; Lin, X.; Li, Y.L.; Wang, J.; Zhang, S.Y.; Lu, X.F.; Huang, W.D. Effect of Heat Treatment on the Microstructural Evolution and Mechanical Properties of GH4099 Additive-Manufactured by Directed Energy Deposition. J. Alloys Compd. 2019, 800, 163–173. [Google Scholar] [CrossRef]
  39. Careri, F.; Imbrogno, S.; Umbrello, D.; Attallah, M.M.; Outeiro, J.; Batista, A.C. Machining and Heat Treatment as Post-Processing Strategies for Ni-Superalloys Structures Fabricated Using Direct Energy Deposition. J. Manuf. Process. 2021, 61, 236–244. [Google Scholar] [CrossRef]
  40. Todaro, C.J.; Easton, M.A.; Qiu, D.; Brandt, M.; StJohn, D.H.; Qian, M. Grain Refinement of Stainless Steel in Ultrasound-Assisted Additive Manufacturing. Addit. Manuf. 2021, 37, 101632. [Google Scholar] [CrossRef]
  41. Wang, H.; Hu, Y.; Ning, F.; Cong, W. Ultrasonic Vibration-Assisted Laser Engineered Net Shaping of Inconel 718 Parts: Effects of Ultrasonic Frequency on Microstructural and Mechanical Properties. J. Mater. Process. Technol. 2020, 276, 116395. [Google Scholar] [CrossRef]
  42. Zhu, L.; Yang, Z.; Xin, B.; Wang, S.; Meng, G.; Ning, J.; Xue, P. Microstructure and Mechanical Properties of Parts Formed by Ultrasonic Vibration-Assisted Laser Cladding of Inconel 718. Surf. Coat. Technol. 2021, 410, 126964. [Google Scholar] [CrossRef]
  43. Todaro, C.J. Grain Structure Control during Metal 3D Printing by High-Intensity Ultrasound. Nat. Commun. 2020, 11, 142. [Google Scholar] [CrossRef] [PubMed]
  44. Zhang, Y.; Guo, Y.; Chen, Y.; Cao, Y.; Qi, H.; Yang, S. Microstructure and Mechanical Properties of Al-12Si Alloys Fabricated by Ultrasonic-Assisted Laser Metal Deposition. Materials 2019, 13, 126. [Google Scholar] [CrossRef] [PubMed]
  45. Chen, Y.; Xu, M.; Zhang, T.; Xie, J.; Wei, K.; Wang, S.; Yin, L.; He, P. Grain Refinement and Mechanical Properties Improvement of Inconel 625 Alloy Fabricated by Ultrasonic-Assisted Wire and Arc Additive Manufacturing. J. Alloys Compd. 2022, 910, 164957. [Google Scholar] [CrossRef]
  46. Jorge Junior, A.M.; Guedes, L.H.; Balancin, O. Ultra Grain Refinement During the Simulated Thermomechanical-Processing of Low Carbon Steel. J. Mater. Res. Technol. 2012, 1, 141–147. [Google Scholar] [CrossRef]
  47. Tan, C.; Li, R.; Su, J.; Du, D.; Du, Y.; Attard, B.; Chew, Y.; Zhang, H.; Lavernia, E.J.; Fautrelle, Y.; et al. Review on Field Assisted Metal Additive Manufacturing. Int. J. Mach. Tools Manuf. 2023, 189, 104032. [Google Scholar] [CrossRef]
  48. Fayazfar, H.; Salarian, M.; Rogalsky, A.; Sarker, D.; Russo, P.; Paserin, V.; Toyserkani, E. A Critical Review of Powder-Based Additive Manufacturing of Ferrous Alloys: Process Parameters, Microstructure and Mechanical Properties. Mater. Des. 2018, 144, 98–128. [Google Scholar] [CrossRef]
  49. Liang, Z.; Chang, B.; Zhang, H.; Li, Z.; Peng, G.; Du, D.; Chang, S.; Wang, L. Electric Current Evaluation for Process Monitoring in Electron Beam Directed Energy Deposition. Int. J. Mach. Tools Manuf. 2022, 176, 103883. [Google Scholar] [CrossRef]
  50. Rodrigues, T.A.; Duarte, V.; Miranda, R.M.; Santos, T.G.; Oliveira, J.P. Current Status and Perspectives on Wire and Arc Additive Manufacturing (WAAM). Materials 2019, 12, 1121. [Google Scholar] [CrossRef]
  51. Cunningham, C.R.; Flynn, J.M.; Shokrani, A.; Dhokia, V.; Newman, S.T. Invited Review Article: Strategies and Processes for High Quality Wire Arc Additive Manufacturing. Addit. Manuf. 2018, 22, 672–686. [Google Scholar] [CrossRef]
  52. Saboori, A.; Aversa, A.; Marchese, G.; Biamino, S.; Lombardi, M.; Fino, P. Application of Directed Energy Deposition-Based Additive Manufacturing in Repair. Appl. Sci. 2019, 9, 3316. [Google Scholar] [CrossRef]
  53. Li, S.-H.; Kumar, P.; Chandra, S.; Ramamurty, U. Directed Energy Deposition of Metals: Processing, Microstructures, and Mechanical Properties. Int. Mater. Rev. 2023, 68, 605–647. [Google Scholar] [CrossRef]
  54. Li, Z.; Sui, S.; Ma, X.; Tan, H.; Zhong, C.; Bi, G.; Clare, A.T.; Gasser, A.; Chen, J. High Deposition Rate Powder- and Wire-Based Laser Directed Energy Deposition of Metallic Materials: A Review. Int. J. Mach. Tools Manuf. 2022, 181, 103942. [Google Scholar] [CrossRef]
  55. Xu, X.; Ganguly, S.; Ding, J.; Dirisu, P.; Martina, F.; Liu, X.; Williams, S.W. Improving Mechanical Properties of Wire plus Arc Additively Manufactured Maraging Steel through Plastic Deformation Enhanced Aging Response. Mater. Sci. Eng. A 2019, 747, 111–118. [Google Scholar] [CrossRef]
  56. Thompson, S.M.; Bian, L.; Shamsaei, N.; Yadollahi, A. An Overview of Direct Laser Deposition for Additive Manufacturing; Part I: Transport Phenomena, Modeling and Diagnostics. Addit. Manuf. 2015, 8, 36–62. [Google Scholar] [CrossRef]
  57. Wang, F.; Mei, J.; Wu, X. Compositionally Graded Ti6Al4V+TiC Made by Direct Laser Fabrication Using Powder and Wire. Mater. Des. 2007, 28, 2040–2046. [Google Scholar] [CrossRef]
  58. Gong, M.; Meng, Y.; Zhang, S.; Zhang, Y.; Zeng, X.; Gao, M. Laser-Arc Hybrid Additive Manufacturing of Stainless Steel with Beam Oscillation. Addit. Manuf. 2020, 33, 101180. [Google Scholar] [CrossRef]
  59. Negi, S.; Nambolan, A.A.; Kapil, S.; Joshi, P.S.; Karunakaran, K.P.; Bhargava, P. Review on Electron Beam Based Additive Manufacturing. Rapid Prototyp. J. 2019, 26, 485–498. [Google Scholar] [CrossRef]
  60. Abe, T.; Sasahara, H. Dissimilar Metal Deposition with a Stainless Steel and Nickel-Based Alloy Using Wire and Arc-Based Additive Manufacturing. Precis. Eng. 2016, 45, 387–395. [Google Scholar] [CrossRef]
  61. Bose, S.; Robertson, S.F.; Bandyopadhyay, A. Surface Modification of Biomaterials and Biomedical Devices Using Additive Manufacturing. Acta Biomater. 2018, 66, 6–22. [Google Scholar] [CrossRef]
  62. Gibson, I.; Rosen, D.; Stucker, B. Directed Energy Deposition Processes. In Additive Manufacturing Technologies: 3D Printing, Rapid Prototyping, and Direct Digital Manufacturing; Gibson, I., Rosen, D., Stucker, B., Eds.; Springer: New York, NY, USA, 2015; pp. 245–268. ISBN 978-1-4939-2113-3. [Google Scholar]
  63. Feenstra, D.R.; Banerjee, R.; Fraser, H.L.; Huang, A.; Molotnikov, A.; Birbilis, N. Critical Review of the State of the Art in Multi-Material Fabrication via Directed Energy Deposition. Curr. Opin. Solid State Mater. Sci. 2021, 25, 100924. [Google Scholar] [CrossRef]
  64. Clijsters, S.; Craeghs, T.; Buls, S.; Kempen, K.; Kruth, J.-P. In Situ Quality Control of the Selective Laser Melting Process Using a High-Speed, Real-Time Melt Pool Monitoring System. Int. J. Adv. Manuf. Technol. 2014, 75, 1089–1101. [Google Scholar] [CrossRef]
  65. McAndrew, A.R.; Alvarez Rosales, M.; Colegrove, P.A.; Hönnige, J.R.; Ho, A.; Fayolle, R.; Eyitayo, K.; Stan, I.; Sukrongpang, P.; Crochemore, A.; et al. Interpass Rolling of Ti-6Al-4V Wire + Arc Additively Manufactured Features for Microstructural Refinement. Addit. Manuf. 2018, 21, 340–349. [Google Scholar] [CrossRef]
  66. Saboori, A.; Piscopo, G.; Lai, M.; Salmi, A.; Biamino, S. An Investigation on the Effect of Deposition Pattern on the Microstructure, Mechanical Properties and Residual Stress of 316L Produced by Directed Energy Deposition. Mater. Sci. Eng. A 2020, 780, 139179. [Google Scholar] [CrossRef]
  67. Piscopo, G.; Salmi, A.; Atzeni, E. Influence of High-Productivity Process Parameters on the Surface Quality and Residual Stress State of AISI 316L Components Produced by Directed Energy Deposition. J. Mater. Eng. Perform. 2021, 30, 6691–6702. [Google Scholar] [CrossRef]
  68. Moat, R.J.; Pinkerton, A.J.; Li, L.; Withers, P.J.; Preuss, M. Residual Stresses in Laser Direct Metal Deposited Waspaloy. Mater. Sci. Eng. A 2011, 528, 2288–2298. [Google Scholar] [CrossRef]
  69. Zou, X.; Yan, Z.; Zou, K.; Gang Zhang, S.; Liu, W.; Song, L. Residual Stress Control of 316 L Stainless Steel Using Pulsed-Wave Laser Additive Manufacturing. Opt. Laser Technol. 2022, 150, 107910. [Google Scholar] [CrossRef]
  70. Ding, J.; Colegrove, P.; Mehnen, J.; Williams, S.; Wang, F.; Almeida, P.S. A Computationally Efficient Finite Element Model of Wire and Arc Additive Manufacture. Int. J. Adv. Manuf. Technol. 2014, 70, 227–236. [Google Scholar] [CrossRef]
  71. Sterling, A.J.; Torries, B.; Shamsaei, N.; Thompson, S.M.; Seely, D.W. Fatigue Behavior and Failure Mechanisms of Direct Laser Deposited Ti–6Al–4V. Mater. Sci. Eng. A 2016, 655, 100–112. [Google Scholar] [CrossRef]
  72. Yadollahi, A.; Shamsaei, N.; Thompson, S.M.; Elwany, A.; Bian, L. Effects of Building Orientation and Heat Treatment on Fatigue Behavior of Selective Laser Melted 17-4 PH Stainless Steel. Int. J. Fatigue 2017, 94, 218–235. [Google Scholar] [CrossRef]
  73. Ding, J.; Colegrove, P.; Mehnen, J.; Ganguly, S.; Sequeira Almeida, P.M.; Wang, F.; Williams, S. Thermo-Mechanical Analysis of Wire and Arc Additive Layer Manufacturing Process on Large Multi-Layer Parts. Comput. Mater. Sci. 2011, 50, 3315–3322. [Google Scholar] [CrossRef]
  74. Aboulkhair, N.T.; Everitt, N.M.; Ashcroft, I.; Tuck, C. Reducing Porosity in AlSi10Mg Parts Processed by Selective Laser Melting. Addit. Manuf. 2014, 1–4, 77–86. [Google Scholar] [CrossRef]
  75. Tan, Z.E.; Pang, J.H.L.; Kaminski, J.; Pepin, H. Characterisation of Porosity, Density, and Microstructure of Directed Energy Deposited Stainless Steel AISI 316L. Addit. Manuf. 2019, 25, 286–296. [Google Scholar] [CrossRef]
  76. Molaei, R.; Fatemi, A.; Phan, N. Significance of Hot Isostatic Pressing (HIP) on Multiaxial Deformation and Fatigue Behaviors of Additive Manufactured Ti-6Al-4V Including Build Orientation and Surface Roughness Effects. Int. J. Fatigue 2018, 117, 352–370. [Google Scholar] [CrossRef]
  77. Kistler, N.A.; Corbin, D.J.; Nassar, A.R.; Reutzel, E.W.; Beese, A.M. Effect of Processing Conditions on the Microstructure, Porosity, and Mechanical Properties of Ti-6Al-4V Repair Fabricated by Directed Energy Deposition. J. Mater. Process. Technol. 2019, 264, 172–181. [Google Scholar] [CrossRef]
  78. Koike, R.; Misawa, T.; Kakinuma, Y.; Oda, Y. Basic Study on Remelting Process to Enhance Density of Inconel 625 in Direct Energy Deposition. Int. J. Autom. Technol. 2018, 12, 424–433. [Google Scholar] [CrossRef]
  79. Oh, W.J.; Lee, W.J.; Kim, M.S.; Jeon, J.B.; Shim, D.S. Repairing Additive-Manufactured 316L Stainless Steel Using Direct Energy Deposition. Opt. Laser Technol. 2019, 117, 6–17. [Google Scholar] [CrossRef]
  80. Dang, X.; Li, Y.; Chen, K.; Ramamurty, U.; Luo, S.; Liang, X.; He, W. Avoiding Cracks in Additively Manufactured Non-Weldable Directionally Solidified Ni-Based Superalloys. Addit. Manuf. 2022, 59, 103095. [Google Scholar] [CrossRef]
  81. Zhang, X.; Chen, H.; Xu, L.; Xu, J.; Ren, X.; Chen, X. Cracking Mechanism and Susceptibility of Laser Melting Deposited Inconel 738 Superalloy. Mater. Des. 2019, 183, 108105. [Google Scholar] [CrossRef]
  82. Guo, D.; Yan, K.; Callaghan, M.D.; Daisenberger, D.; Chatterton, M.; Chen, J.; Wisbey, A.; Mirihanage, W. Solidification Microstructure and Residual Stress Correlations in Direct Energy Deposited Type 316L Stainless Steel. Mater. Des. 2021, 207, 109782. [Google Scholar] [CrossRef]
  83. Zhou, Z.; Lei, Q.; Yan, Z.; Wang, Z.; Shang, Y.; Li, Y.; Qi, H.; Jiang, L.; Liu, Y.; Huang, L. Effects of Process Parameters on Microstructure and Cracking Susceptibility of a Single Crystal Superalloy Fabricated by Directed Energy Deposition. Mater. Des. 2021, 198, 109296. [Google Scholar] [CrossRef]
  84. Woo, W.; Kim, D.-K.; Kingston, E.J.; Luzin, V.; Salvemini, F.; Hill, M.R. Effect of Interlayers and Scanning Strategies on Through-Thickness Residual Stress Distributions in Additive Manufactured Ferritic-Austenitic Steel Structure. Mater. Sci. Eng. A 2019, 744, 618–629. [Google Scholar] [CrossRef]
  85. Zhang, X.; Chai, Z.; Chen, H.; Xu, J.; Xu, L.; Lu, H.; Chen, X. A Novel Method to Prevent Cracking in Directed Energy Deposition of Inconel 738 by In-Situ Doping Inconel 718. Mater. Des. 2021, 197, 109214. [Google Scholar] [CrossRef]
  86. Su, Y.; Wang, Y.; Shi, J. Microstructure and Mechanical Properties of Laser DED Produced Crack-Free Al 7075 Alloy: Effect of Process Parameters and Heat Treatment. Mater. Sci. Eng. A 2022, 857, 144075. [Google Scholar] [CrossRef]
  87. Renjith, S.C.; Park, K.; Okudan Kremer, G.E. A Design Framework for Additive Manufacturing: Integration of Additive Manufacturing Capabilities in the Early Design Process. Int. J. Precis. Eng. Manuf. 2020, 21, 329–345. [Google Scholar] [CrossRef]
  88. Bikas, H.; Lianos, A.K.; Stavropoulos, P. A Design Framework for Additive Manufacturing. Int. J. Adv. Manuf. Technol. 2019, 103, 3769–3783. [Google Scholar] [CrossRef]
  89. Primo, T.; Calabrese, M.; Del Prete, A.; Anglani, A. Additive Manufacturing Integration with Topology Optimization Methodology for Innovative Product Design. Int. J. Adv. Manuf. Technol. 2017, 93, 467–479. [Google Scholar] [CrossRef]
  90. Momenzadeh, N.; Nath, S.D.; Berfield, T.A.; Atre, S.V. In Situ Measurement of Thermal Strain Development in 420 Stainless Steel Additive Manufactured Metals. Exp. Mech. 2019, 59, 819–827. [Google Scholar] [CrossRef]
  91. Souza, A.M.; Ferreira, R.; Barragán, G.; Nuñez, J.G.; Mariani, F.E.; da Silva, E.J.; Coelho, R.T. Effects of Laser Polishing on Surface Characteristics and Wettability of Directed Energy-Deposited 316L Stainless Steel. J. Mater. Eng. Perform. 2021, 30, 6752–6765. [Google Scholar] [CrossRef]
  92. Jiang, J.; Weng, F.; Gao, S.; Stringer, J.; Xu, X.; Guo, P. A Support Interface Method for Easy Part Removal in Directed Energy Deposition. Manuf. Lett. 2019, 20, 30–33. [Google Scholar] [CrossRef]
  93. Ning, F.; Cong, W. Ultrasonic Vibration-Assisted (UV-A) Manufacturing Processes: State of the Art and Future Perspectives. J. Manuf. Process. 2020, 51, 174–190. [Google Scholar] [CrossRef]
  94. Eskin, D.G. Ultrasonic Processing of Molten and Solidifying Aluminium Alloys: Overview and Outlook. Mater. Sci. Technol. 2017, 33, 636–645. [Google Scholar] [CrossRef]
  95. Zhou, L.; Chen, S.; Ma, M.; Liang, J.; Chen, J.; Wang, M. The Dynamic Recrystallization Mechanism of Ultrasonic Power on Non-Contact Ultrasonic-Assisted Direct Laser Deposited Alloy Steel. Mater. Sci. Eng. A 2022, 840, 142971. [Google Scholar] [CrossRef]
  96. Vorontsov, A.; Astafurov, S.; Melnikov, E.; Moskvina, V.; Kolubaev, E.; Astafurova, E. The Microstructure, Phase Composition and Tensile Properties of Austenitic Stainless Steel in a Wire-Feed Electron Beam Melting Combined with Ultrasonic Vibration. Mater. Sci. Eng. A 2021, 820, 141519. [Google Scholar] [CrossRef]
  97. Wu, D.; Song, C.; Di, T.; Niu, F.; Ma, G. Intermetallic Regulation Mechanism of Inconel 718/Ti6Al4V Composite by Novel Follow-up Ultrasonic Assisted Laser Additive Manufacturing. Compos. Part B Eng. 2022, 235, 109736. [Google Scholar] [CrossRef]
  98. Yang, Z.; Zhu, L.; Wang, S.; Ning, J.; Dun, Y.; Meng, G.; Xue, P.; Xu, P.; Xin, B. Effects of Ultrasound on Multilayer Forming Mechanism of Inconel 718 in Directed Energy Deposition. Addit. Manuf. 2021, 48, 102462. [Google Scholar] [CrossRef]
  99. Zhou, D.W.; Liu, D.-Y. Heat Transfer Characteristics of Nanofluids in an Acoustic Cavitation Field. Heat Transf. Eng. 2004, 25, 54–61. [Google Scholar] [CrossRef]
  100. Eskin, G.I. Cavitation Mechanism of Ultrasonic Melt Degassing. Ultrason. Sonochem. 1995, 2, S137–S141. [Google Scholar] [CrossRef]
  101. Puga, H.; Barbosa, J.; Teixeira, J.C.; Prokic, M. A New Approach to Ultrasonic Degassing to Improve the Mechanical Properties of Aluminum Alloys. J. Mater. Eng. Perform. 2014, 23, 3736–3744. [Google Scholar] [CrossRef]
  102. Legay, M.; Gondrexon, N.; Le Person, S.; Boldo, P.; Bontemps, A. Enhancement of Heat Transfer by Ultrasound: Review and Recent Advances. Int. J. Chem. Eng. 2011, 2011, 670108. [Google Scholar] [CrossRef]
  103. Ji, F.; Qin, X.; Hu, Z.; Xiong, X.; Ni, M.; Wu, M. Influence of Ultrasonic Vibration on Molten Pool Behavior and Deposition Layer Forming Morphology for Wire and Arc Additive Manufacturing. Int. Commun. Heat Mass Transf. 2022, 130, 105789. [Google Scholar] [CrossRef]
  104. Yuan, D.; Shao, S.; Guo, C.; Jiang, F.; Wang, J. Grain Refining of Ti-6Al-4V Alloy Fabricated by Laser and Wire Additive Manufacturing Assisted with Ultrasonic Vibration. Ultrason. Sonochem. 2021, 73, 105472. [Google Scholar] [CrossRef] [PubMed]
  105. Ji, F.; Qin, X.; Ni, M.; Hu, Z.; Wu, M. Effect of Ultrasonic Intensity on Microstructure and Mechanical Properties of Steel Alloy in Direct Energy Deposition-Arc. Ultrasonics 2023, 134, 107090. [Google Scholar] [CrossRef] [PubMed]
  106. Yang, Z.; Zhu, L.; Ning, J.; Wang, S.; Xue, P.; Xu, P.; Dun, Y.; Xin, B.; Zhang, G. Revealing the Influence of Ultrasound/Heat Treatment on Microstructure Evolution and Tensile Failure Behavior in 3D-Printing of Inconel 718. J. Mater. Process. Technol. 2022, 305, 117574. [Google Scholar] [CrossRef]
  107. Masaylo, D.; Igoshin, S.; Popovich, A.; Orlov, A.; Kim, A.; Popovich, V. Microstructural and Hardness Behavior of H13 Tool Steel Manufactured by Ultrasound-Assisted Laser-Directed Energy Deposition. Metals 2022, 12, 450. [Google Scholar] [CrossRef]
  108. Ning, F.; Cong, W. Microstructures and Mechanical Properties of Fe-Cr Stainless Steel Parts Fabricated by Ultrasonic Vibration-Assisted Laser Engineered Net Shaping Process. Mater. Lett. 2016, 179, 61–64. [Google Scholar] [CrossRef]
  109. Cong, W.; Ning, F. A Fundamental Investigation on Ultrasonic Vibration-Assisted Laser Engineered Net Shaping of Stainless Steel. Int. J. Mach. Tools Manuf. 2017, 121, 61–69. [Google Scholar] [CrossRef]
  110. Gorunov, A.I. Additive Manufacturing of Ti6Al4V Parts Using Ultrasonic Assisted Direct Energy Deposition. J. Manuf. Process. 2020, 59, 545–556. [Google Scholar] [CrossRef]
  111. Zhang, D.; Li, Y.; Wang, H.; Cong, W. Ultrasonic Vibration-Assisted Laser Directed Energy Deposition in-Situ Synthesis of NiTi Alloys: Effects on Microstructure and Mechanical Properties. J. Manuf. Process. 2020, 60, 328–339. [Google Scholar] [CrossRef]
  112. Wang, Z.; Jiang, F.; Guo, C.; Xing, X.; Yang, Z.; Li, H.; Liu, C.; Xu, D.; Jiang, G.; Konovalov, S. Effects of Ultrasonic Vibration on Microstructure and Mechanical Properties of 1Cr12Ni3MoVN Alloy Fabricated by Directed Energy Deposition. Ultrasonics 2023, 132, 106989. [Google Scholar] [CrossRef] [PubMed]
  113. Ji, F.; Hu, Z.; Qin, X.; Ni, M.; Xiong, X.; Liu, G. Improving Microstructure and Mechanical Properties of Thin-Wall Part Fabricated by Wire Arc Additive Manufacturing Assisted with High-Intensity Ultrasound. J. Mater. Sci. 2023, 58, 2381–2395. [Google Scholar] [CrossRef]
  114. Ning, F.; Jiang, D.; Liu, Z.; Wang, H.; Cong, W. Ultrasonic Frequency Effects on the Melt Pool Formation, Porosity, and Thermal-Dependent Property of Inconel 718 Fabricated by Ultrasonic Vibration-Assisted Directed Energy Deposition. J. Manuf. Sci. Eng. 2020, 143, 051009. [Google Scholar] [CrossRef]
  115. Lowe, P.S.; Honey, X.; Crossley, J.; Karunaratne, K.; Kannangara, C.; Jones, S. Scaling-up Ultrasonic Vibration Assisted Additive Manufacturing to Build 316 L 3 M3 Waste Container Flange. J. Manuf. Process. 2022, 83, 97–104. [Google Scholar] [CrossRef]
  116. Lin, J.J.; Lv, Y.H.; Liu, Y.X.; Xu, B.S.; Sun, Z.; Li, Z.G.; Wu, Y.X. Microstructural Evolution and Mechanical Properties of Ti-6Al-4V Wall Deposited by Pulsed Plasma Arc Additive Manufacturing. Mater. Des. 2016, 102, 30–40. [Google Scholar] [CrossRef]
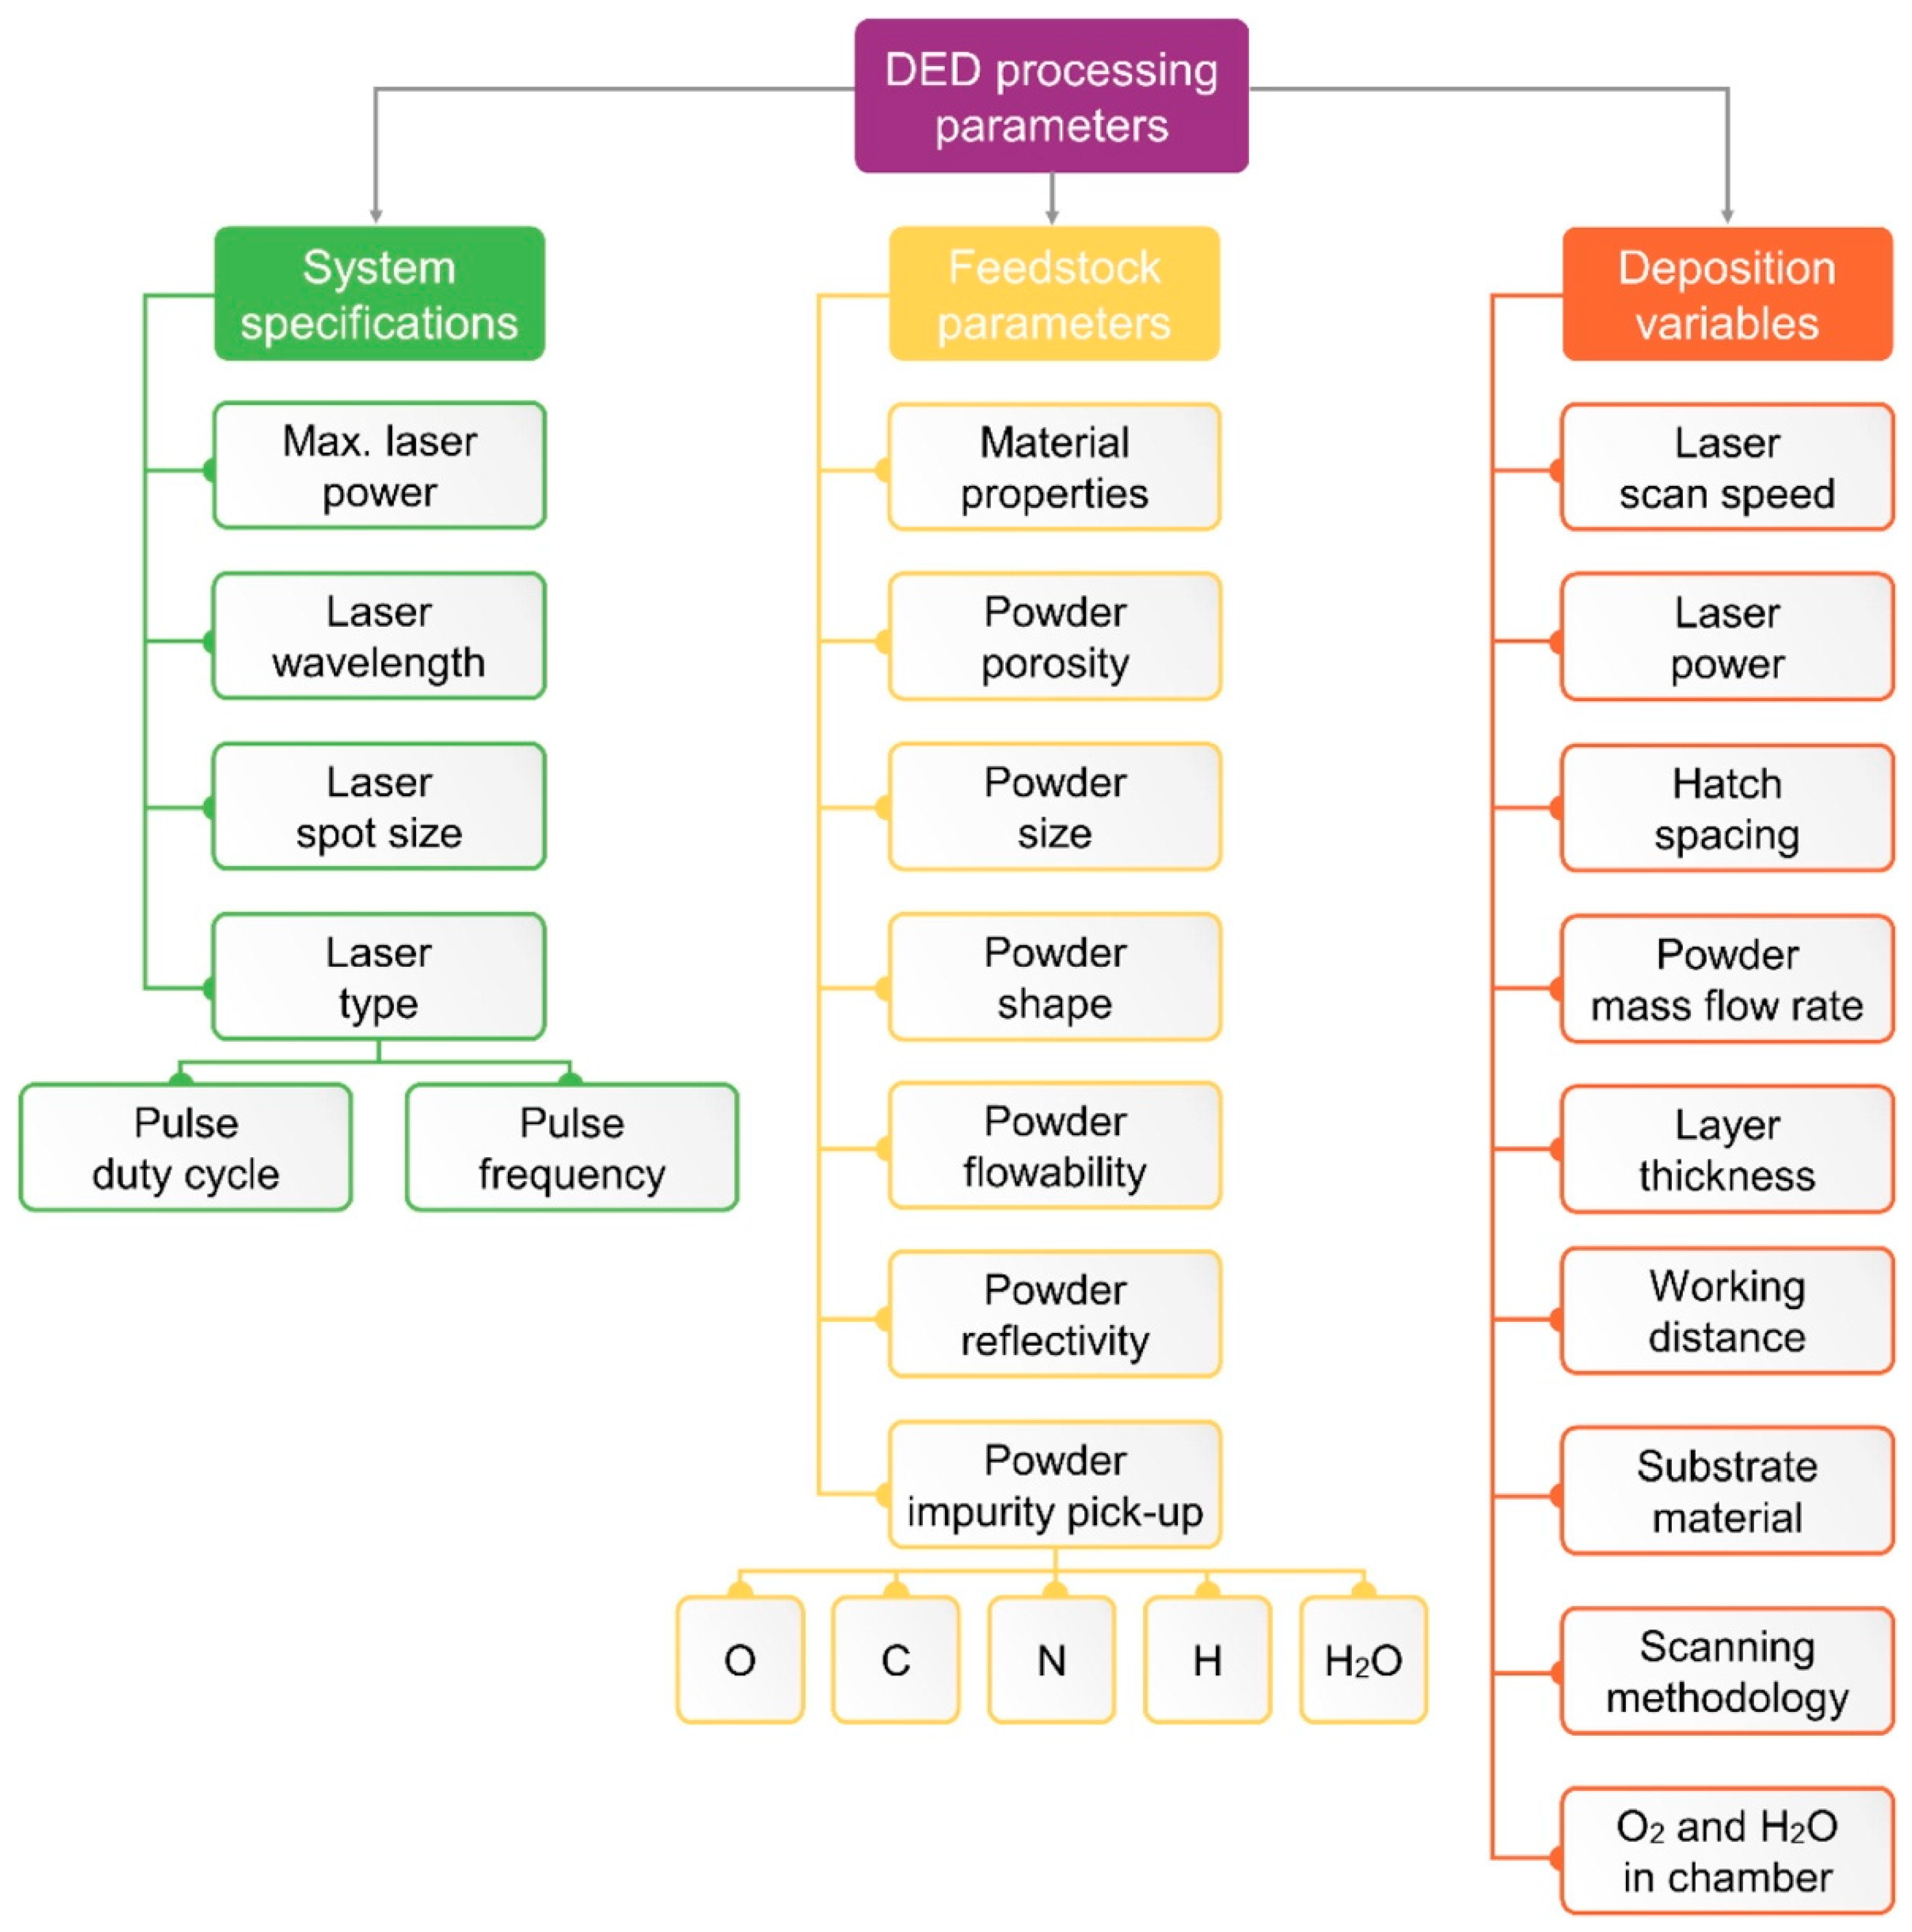
Figure 1. Illustrative layout of (a) laser DED, (b) EB-DED [1], (c) WAAM [65].
Crystals 14 00114 g001
Figure 2. DED process parameters diagram [4].
Crystals 14 00114 g002
Figure 3. The progression of temperature and X-displacement at measure point [69].
Crystals 14 00114 g003
Figure 4. (a) Porosity resulting from gas entrapment, (b) pore serving as a crack initiation site, (c) crack initiation and propagation off the tip of an irregularly shaped pore, and (d) the merging of two pores to create a larger one [71].
Crystals 14 00114 g004
Figure 5. Solid-state cracking. (a) SE-SEM image and (b) the corresponding EDS maps; (c) SE-SEM image shows the enlarged region marked in (a) [80].
Crystals 14 00114 g005
Figure 6. Diagrammatic illustrations of the three phenomena: (a) acoustic cavitation, (b) ultrasound absorption, and (c) acoustic streaming [36].
Crystals 14 00114 g006
Figure 8. WAAM of Inconel 625 with ultrasound and without ultrasound (X-Z plane). (a,d) Inverse pole figure; (b,e) inverse pole figure (IPF) maps; (c,f) misorientation distribution (GB); and the inserts are Kernel Average Misorientation (KAM) [45].
Crystals 14 00114 g008
Figure 9. Microstructures of parts fabricated by LENS without and with UA. (a)Without ultrasonic vibration; (b) With ultrasonic vibration; (c,d) porosity; (e,f) grain structures; (g,h) micro-cracks [108].
Crystals 14 00114 g009
Figure 10. Effects of UA on microstructure. (a1,b1) 150 W; (a2,b2) 175 W; (a3,b3) 200 W, (a4,b4) 225 W; (a5,b5) 250 W [111].
Crystals 14 00114 g010
Figure 11. OM of arc DED single deposition layer. (a) SS-0, (b) SS-5, (c) SS-10, (d) SS-15 [105].
Crystals 14 00114 g011
Figure 12. Cross-sectional optical micrographs of parts obtained by DED and UA-DED [110].
Crystals 14 00114 g012
Table 1. Characterizing primary defects in DED processing [4].
DefectDefect’s OriginDefect’s Selected Effects on the Deposited Material PropertiesMitigation
Residual stresses and distortionHigh cooling rates and thermal gradientsInduced phase transformations, loss of geometric tolerance, cracking, delamination, degradation in fatigue behavior, premature failureSubstrate preheating, preheating the chamber and printed part during deposition, optimization of the scan strategy, post-print heat and surface treatments
PorosityHigh laser energy density, feedstock porosity, selective evaporation, entrapment of shielding gas, insufficient energy input (LoF)Degradation of mechanical properties (mainly fatigue life), facilitated crack propagation, anisotropy, reduced corrosion resistanceProcess optimization, control of the powder feedstock’s composition and quality, HIP post-print treatment
Cracking and delaminationHigh cooling rates and thermal gradients, either too high or too low energy input, physical and metallurgical properties of the deposited materialDegradation of both static and dynamic mechanical properties, reduced corrosion resistance, premature failureProcess and geometric optimization, e.g., substrate and chamber preheating, materials compatibility when printing jointly multi-materials
High surface roughnessLow heat input, large powder particles, high laser scanning speeds; a variety of material feedstock, part design, processing, post-processing conditions and variablesAdverse effects on dimensions and geometric tolerances, degradation of mechanical properties (particularly fatigue)Increase in heat input, small layer thickness, finer powder particles, post-processing (e.g., HIP and chemical/electrochemical polishing)
Table 2. Optimization and impact analysis of UA parameters in DED processes.
ParameterAmplitudeFrequencyPowerMulti-Parameter Coordinated
Power, Frequency
MaterialSteel alloy
Ti-6Al-4V
Inconel 7181Cr12Ni3MoVN alloyTi6Al4V
stainless steel
DED ProcessArc DED
Laser DED
Laser-engineered net shaping (LENS)Laser DEDLaser DED
Effects on the deposited material propertiesFormation of grains
Grain size
Microhardness
Yield strength, tensile strength
formation of grains
grain size
Laves phase amount, particle size, Nb content
Pore number, average pore size
Microhardness
Wear rate
Elastic modulus
Formation of grains
Grain size
Mechanical properties
Microstructure
Microhardness
Mechanical properties
Pore size
Defects
Key results
  • The larger the ultrasonic amplitude, the greater the degree of grain refinement and refinement area, and variation in ultrasonic intensity along the build height
  • The microhardness improves with the increase in ultrasonic amplitude
  • Higher ultrasonic frequency led to decrease in grain size
  • the particle size and Nb content of Laves phase were further decreased with the increase in ultrasonic frequency
  • Porosity value decreased with frequency of 25 kHz, increased ultrasonic frequency resulted in the increased porosity when ultrasonic frequency was larger than 25 kHz
  • Microhardness was increased by increasing ultrasonic frequency
  • Ultrasonic frequency of 25 kHz produced the smallest porosity, the porosity was increased when ultrasonic frequency was increased from 25 kHz to 41 kHz
  • Increasing ultrasonic power, the columnar crystal transforms into equiaxed crystal gradually
  • Grain size decreases with increasing ultrasonic power
  • Ultimate tensile strength of samples treated with different ultrasonic powers is almost identical, the elongation of samples increases with increasing ultrasonic power
  • The frequency and power of the acoustic oscillation occurrence area is determined in a sample of fine equiaxed grains
  • The hardness greatly varies depending on the frequency, power affects hardness at frequencies of 80 and 100 kHz
  • The hardness increases by more than 1.1 times with a frequency of 100 kHz and a power of more than 1 kW
Ref.[43,105,113][41,114][112][110,115]
Disclaimer/Publisher’s Note: The statements, opinions and data contained in all publications are solely those of the individual author(s) and contributor(s) and not of MDPI and/or the editor(s). MDPI and/or the editor(s) disclaim responsibility for any injury to people or property resulting from any ideas, methods, instructions or products referred to in the content.