Abstract
In this paper, the effects of laser heat input on the microstructures, tensile strength, and fatigue properties of Ti60 laser welded joints were investigated. The results show that with the increase in laser heat input, the macro morphology of the weld zone (WZ) changes from the Y-type to X-type. In the Y-type WZ, the porosity defects are almost eliminated. In contrast, there are a lot of porosity defects in the lower part of the X-type WZ. The microstructure of the base metal (BM) comprises equiaxed α phases, and β phases are mainly distributed at the boundaries of α phases. The heat-affected zone (HAZ) is comprised of α phases and acicular α′ phases, while the WZ mainly contains acicular α′ phases. With the increase in laser heat input, the quantity of the α phase gradually decreases and the acicular α′ phase gradually increases in the HAZ, and the size of the acicular α′ phase in the WZ gradually decreases. Due to the different microstructures, the hardness of BM is lower than the HAZ and WZ under different laser heat input conditions. In the tensile tests and low-cycle fatigue tests, the welded joints are fractured in BM. The porosity defects do not have decisive effects on the tensile and low-cycle fatigue properties of Ti60 laser welded joints.
1. Introduction
Titanium alloys are important structural materials in the aerospace field due to their low density, high specific strength, and superior corrosion resistance [1,2,3,4]. In order to achieve the light weight of titanium alloy components, welding has become a necessary processing method [5,6].
Compared with other titanium alloys, Ti60 alloy has excellent comprehensive mechanical properties and fatigue strength [7,8]. At present, the research on the welding of Ti60 mainly focuses on electron beam welding, friction welding and brazing. Li et al. [9] carried out electron beam welding on TA15/Ti60 alloy and found that there were no welding defects such as undercut and unwelded areas in the WZ. The microstructure of the WZ was mainly columnar grains. Song et al. [10,11] studied the tensile property of an electron beam welding joint of a Ti60/GH3128 alloy. It was revealed that the tensile fracture mode of the joint was brittle fracture. Guo et al. [12,13] analyzed the linear friction welding behavior of Ti60. They found that an element diffusion layer with a width of about 1 μm was formed at the interface of the welded joint, and the grains on both sides of the interface connected in a eutectic way. The tensile strength of the welded joint was higher than that of the BM. Liu et al. [14] studied the inertial radial friction welding behavior of Ti60/TC18. They found that the joint was tensile fractured at BM, and the fracture analysis consistently revealed a quasi-cleavage fracture mode. Zhao et al. [15] analyzed the microstructure and mechanical properties of a C/C-SiC/Ti60 brazed joint. It was revealed with an increase in the brazing temperature, the joint strength increased and then decreased. Both the block Ti2(Ni,Cu) at low brazing temperature and the overreaction of SiC at a high brazing temperature deteriorated the joints. Wang et al. [16] studied the microstructure and mechanical properties of a Ti2AlNb/Ti60 brazed joint and found that the fracture mode of the original brazed joints predominantly exhibited cleavage fracture. However, after homogenization treatment at 600 °C for 1 h, the fracture mode shifted primarily to intergranular brittle fracture.
Compared with electron beam welding, friction welding and brazing, laser welding has the advantages of a flexible processing capacity, fast welding speed, small HAZ, and easy automation, thereby, it is widely used in aerospace, petrochemical, nuclear energy, biomedicine, and other fields [17,18,19]. Li et al. [20] studied the influence of laser welding parameters on a TC4 alloy. The results indicated that the defocused position had the largest effect, followed by the laser power and welding speed. The optimal welding parameters were a laser power of 2.3 kW, welding speed of 0.04 m/s and defocused position of 0 mm. Zhu et al. [21] analyzed the influence of laser welding parameters on a Ti-4Al-2V alloy. They found that negative defocusing helped to increase the depth of penetration, but it was more prone to undercut defects. Porosity defects were prone to forming in the middle and bottom parts of the fusion zone due to rapid cooling. The mechanical properties of the joints were significantly affected by the laser power [22]. Wang et al. [23] studied the influences of laser power and welding speed on low-alloy high-strength steel. The results indicated that the laser power was a decisive factor in the weld formation: excessive laser power lead to an unstable behavior of the molten pool and key hole, while insufficient laser power resulted in a lack of penetration. Cai et al. [24] studied the influence of parameters on the porosity defects, weld formation, and properties of the joints. Results showed that increasing the laser power and decreasing the welding speed were conducive to improve the formation of welds and reduce porosity.
Clearly, the previous studies mainly focused on the effects of the laser power and scanning rate on the microstructure and properties of welding joints, but the essence is the interaction of these two parameters, that is, the influence of heat input. Particularly, the design of heat input is crucial once it lies in the range that the shape of weld zone changes significantly. However, the relevant work on Ti60 alloys is still insufficient, and further clarifications on the relationships between heat input, microstructure, and fatigue performance are indispensable. Therefore, in this paper, laser welding is performed on Ti60, and the effects of laser heat input on the microstructures and low-cycle fatigue properties of the welded joint are studied. The research results can provide a meaningful reference for the regulation and optimization of the microstructure and mechanical properties of Ti60 welded joints.
2. Materials and Methods
The experimental BM is forged Ti60 titanium alloy comprising α + β phases, and the chemical composition and mechanical properties are shown in Table 1 and Table 2, respectively. First, the forged Ti60 was cut into plates with a thickness of 5 mm. Then, the plates were etched for 2 min using 90 mL of pure water + 6 mL of HNO3 + 4 mL of HF to remove the surface stains. Afterward, the surfaces of the plates were wiped with dehydrated ethanol and dried naturally. These treated specimens were welded using a YLS-4000 fiber laser with a YASKAWA welding robot. The welding process and parameters are shown in Figure 1a and Table 3.

Table 1.
Chemical composition of the Ti60 base metal (wt%).

Table 2.
Mechanical properties of the Ti60 base metal at room temperature.
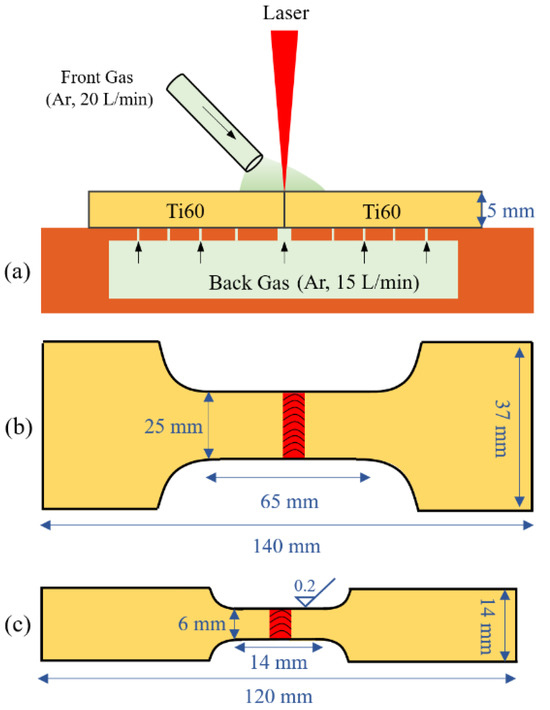
Figure 1.
Schematic diagrams: (a) welding process; (b) tensile test specimen; and (c) fatigue test specimen.

Table 3.
Laser welding parameters.
After welding, the welded plates were machined into metallographic, tensile, and fatigue specimens using electrical discharge wire cutting equipment and a grinding machine. The metallographic specimen of the welded joint was polished with sandpaper and a silica suspension, etched with 80 mL of pure water + 15 mL of HNO3 + 5 mL of HF etching solution for 3 min, and then the surface was wiped with anhydrous ethanol and finally dried with a hair dryer. The tensile specimens were prepared according to ISO 4136:2022, and the low-cycle fatigue specimens were prepared in accordance with ISO 12106:2017. After processing, the final thicknesses of the tensile and fatigue specimens were about 3 mm, and their dimensions are illustrated in Figure 1b,c. The low-cycle fatigue test equipment was a PLS-100 electro-hydraulic servo static and dynamic testing machine, the control mode was stress control, the waveform was a triangular wave, the stress ratio was R = −1, the frequency was 0.125 Hz, and the stress amplitude was 900 MPa. The tensile test equipment was a UTM5305 electronic universal testing machine, and the tensile rate was 5 mm/min. The microhardness test equipment was a TMVS-1 Vickers hardness tester, the load was 200 g, and the load holding time was 15 s. In order to eliminate test errors, all the mechanical property tests were repeated three times, and their average values were taken as the experimental results.
Finally, a HIROX-200 optical microscope (OM), a JSM-6510A scanning electron microscope (SEM), and a JEM-2100 transmission electron microscope (TEM) were used to characterize the macro morphology, microstructure, and fracture morphology of the welded joints.
3. Results and Discussion
The microstructure of Ti60 BM is shown in Figure 2. As can be seen in Figure 2a, its microstructure is an α + β dual-phase structure; β phases are mainly distributed at the boundaries of α phases, and the average size of α phases is about 13 μm. In the magnified image, the β phases present lamellar structure features, as shown in Figure 2b. According to the TEM images of BM in Figure 2c,d, it can be seen that the width of the β phase is about 200 nm, and α phases are distributed between β phases.
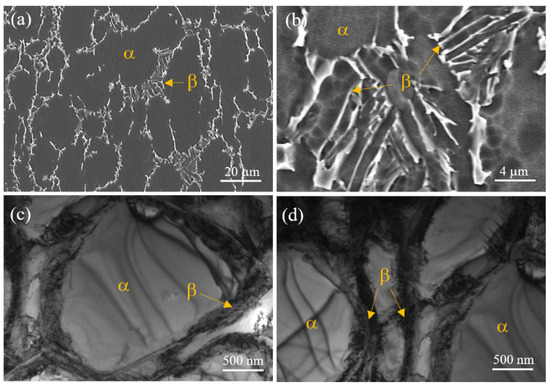
Figure 2.
Microstructure of the Ti60 base metal: (a,b) SEM images and (c,d) TEM images.
The macroscopic morphologies of Ti60 laser welded joints are shown in Figure 3. It can be seen that with the increase in the laser heat input, the macro morphology of the WZ changes from the Y-type to X-type. There are basically no porosity defects in the Y-type WZ, while lots of welding pores emerge in the middle and lower parts of the X-type WZ.
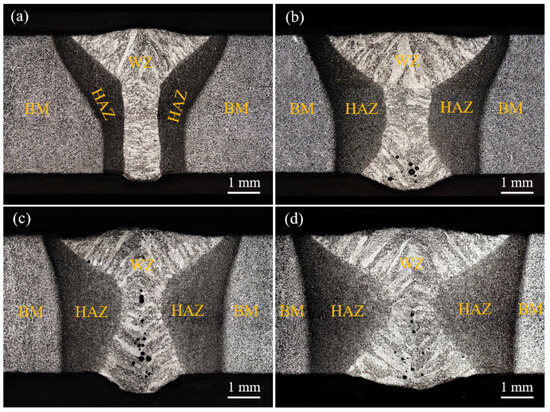
Figure 3.
Effect of the laser heat input on the macroscopic morphologies of the welded joints: (a) 2000 J/mm; (b) 2333 J/mm; (c) 2625 J/mm; and (d) 3000 J/mm.
The macro morphology types of the WZs are mainly caused by the keyhole effect of laser deep penetration welding. Due to the high laser energy density, the liquid metal in the molten pool is vaporized, and a keyhole is formed under the impact of metal vapor. When the depth of the keyhole is smaller than the thickness of the specimen, the metal vapor can only eject outwards from the upper surface of the specimen. Under this circumstance, the metal vapor drives the liquid metal to move upward along the inner wall of the keyhole, forming Marangoni vortices, as shown in Figure 4a. Under the action of Marangoni vortices, the width of the upper part of the weld is larger than those of the middle and lower parts, forming the Y-type WZ. In contrast, when the depth of the keyhole exceeds the thickness of the specimen, the bottom of the molten pool is penetrated by the laser, and the metal vapor in the keyhole simultaneously ejects outward from the upper and lower surfaces of the specimen, forming Marangoni vortices in the upper and lower parts of the molten pool, respectively, as shown in Figure 4b. As a consequence, the widths of the upper and lower parts of the weld are larger than that the middle part, forming the X-type WZ.
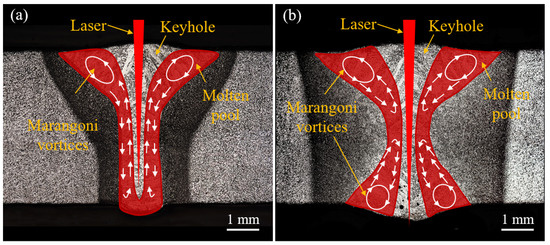
Figure 4.
Schematic diagram of the influence of the laser heat input on the macroscopic morphology of the joint: (a) Y-type and (b) X-type.
The difference in the number of welding pores is due to the different ejection directions of metal vapor between the Y-type and X-type WZs. During the cooling process of the molten pool, the liquid metal of the Y-type WZ flows along the keyhole wall to the bottom of the keyhole, and the metal vapor escapes along the center of the keyhole, rendering the formation of a pore-free weld after solidification.
For the X-type WZ, the escape mode of the metal vapor in the keyhole becomes complicated. As shown in Figure 5, the liquid metal at the upper part of the molten pool flows down along the keyhole wall under the action of gravity during the post-welding cooling process, blocking the narrow zone in the middle of the X-type WZ. In this context, the keyhole is divided into two independent zones, as shown in Figure 5b. In the upper part of the keyhole, the metal vapor ejects upward along the keyhole, so that after cooling, there is almost no porosity defect in the upper part of the WZ, as shown in Figure 3b–d. However, in the lower part of the keyhole, the upward escape channel of metal vapor is blocked, and so the metal vapor has to eject through the opening on the lower surface of the specimen. Meanwhile, the liquid metal in the lower part of the molten pool flows downward under the action of gravity, resulting in the narrowing of the porosity escape channel on the lower surface, as shown in Figure 5c. Due to the rapid cooling rate of the weld pool in laser welding, the metal vapor that has not escaped in time is trapped in the liquid molten pool and dispersed into several bubbles. After the solidification of the molten pool, pore defects form at the lower part of the X-type WZ, as shown in Figure 5d.
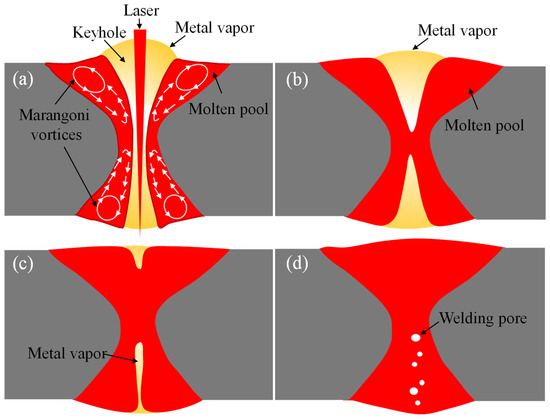
Figure 5.
Schematic diagram of the pore formation process of the X-type laser welded joint: (a) keyhole of X-type WZ; (b) the keyhole divided into two independent zones; (c) the lower part of the molten pool flows downward under the action of gravity; (d) pore defects form at the lower part of the X-type WZ.
The difference in the macroscopic color contrast between the BM, HAZ, and WZ is caused by their distinct microstructures. In Figure 6, we compare the microstructures of the welded joint (2000 J/mm) with that of the BM. It should be noted that, considering the similarity of the microstructures in the grain and phase features aspect, here, we only present the microstructures of the welded joint with a laser heat input of 2000 J/mm.
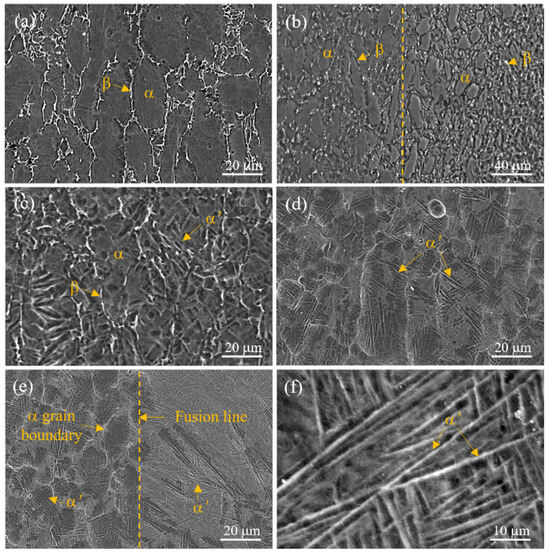
Figure 6.
SEM microstructure of the Ti60 laser welded joint: (a) BM; (b) boundary between BM and HAZ; (c) HAZ far from the WZ; (d) HAZ near to the WZ; (e) boundary between HAZ and WZ; and (f) WZ.
Figure 6a shows the microstructure of the BM. As described in Figure 2, it comprises equiaxed α-phase grains, β phases are mainly distributed in the grain boundaries, and the average grain size is about 13 μm. Figure 6b shows the boundary line between the BM and HAZ, where the left side is the BM and the right side is the HAZ. The closer to the WZ, the more heat input and higher temperature during the welding process. The temperature on the left side of the line is lower than the α→β phase transition temperature, and the microstructure is basically unchanged. The temperature on the right side of the line is higher than the phase transition temperature of α→β, but the laser welding speed is so fast that only a small amount of α phase transformed into β phase, and then the β phase transformed into a needle-like α′ phase due to the rapid cooling process.
Figure 6c,d shows the microstructures of the far-HAZ (far away from the WZ) and near-HAZ (near to the WZ) regions. With the decrease in the distance to WZ, the temperature gradually surpasses the α→β phase transition temperature, and more and more α phases are transformed into β phases. During the rapid cooling process after welding, more and more acicular α′ phases are formed. Additionally, the average grain size of the HAZ is the same as that of the BM, due to the pinning effect of β phases at the boundary of α grains. Figure 6e shows the boundary between the HAZ and WZ. The microstructures on both sides of the fusion line are comprised of acicular α′ phases. However, the microstructure of the HAZ (on the left side of the fusion line) still clearly retains the grain boundary outline of the original α phase. In contrast, the grain boundaries of WZ (on the right side of the fusion line) are virtually invisible. At the same time, the numbers and sizes of the acicular α′ phases of the HAZ and WZ are nearly identical. As shown in Figure 6f, the microstructure in the center of the WZ comprises acicular α′ phases, but the size and quantity of α′ phases are larger than those of the HAZ.
The microhardness curve of the Ti60 laser welded joint (2000 J/mm) is shown in Figure 7. It can be seen that the hardness of the BM is about 350 HV. The microhardness of the HAZ is higher than the BM, and the average value is 379 HV. The microhardness of the WZ is the highest, with an average value of 412 HV. The different hardnesses of the three zones are attributed to their distinct microstructures, as displayed in Figure 2, Figure 3 and Figure 6, where the BM is an equiaxed α grain + grain boundary β phase, the HAZ comprises an equiaxed α grain + grain boundary β phase + acicular α′ phase, and the closer to the WZ, the more acicular α′ phase in the HAZ. The microstructure of the WZ is acicular α′ phase. As is well known, the crystal structure of α phase is close-packed hexagonal (HCP) and the β phase is body-centered cubic (BCC). Since that BCC has 12 slip systems and HCP only has 3 slip systems, the β phase is more prone to deform, thereby the hardness of β phase is lower than the α phase. In addition, the acicular α′ phase contains more dislocations than does the equiaxed α phase, and thus the hardness of acicular α′ is higher than the equiaxed α phase owing to dislocation strengthening. In summary, from the BM to WZ, the content of the β phase gradually decreases and the content of acicular α′ phase gradually increases; so, the microhardness is gradually enhanced.
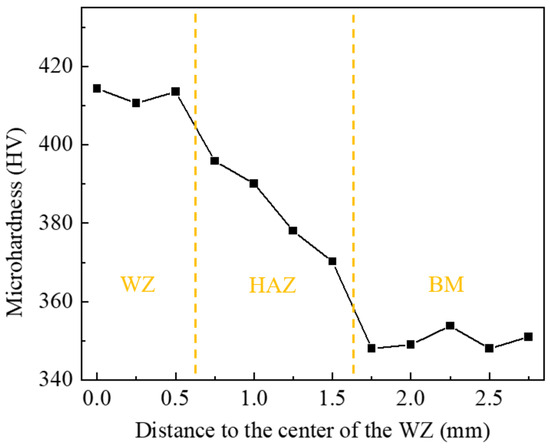
Figure 7.
Microhardness curve of the Ti60 laser welded joint.
In order to explore the influence of the laser heat input on the microstructure and mechanical properties of Ti60 welded joint, the microstructures of the HAZ and WZ and the tensile properties and fatigue properties of the welded joints under different laser heat inputs are compared, and the results are shown in Figure 8, Figure 9, Figure 10, Figure 11 and Figure 12.
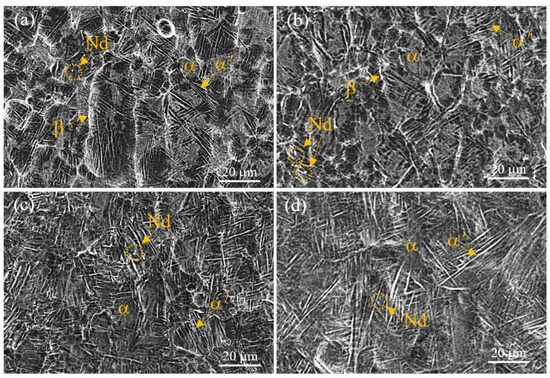
Figure 8.
Effect of the laser heat input on the microstructures of the HAZ: (a) 2000 J/mm; (b) 2333 J/mm; (c) 2625 J/mm; and (d) 3000 J/mm.
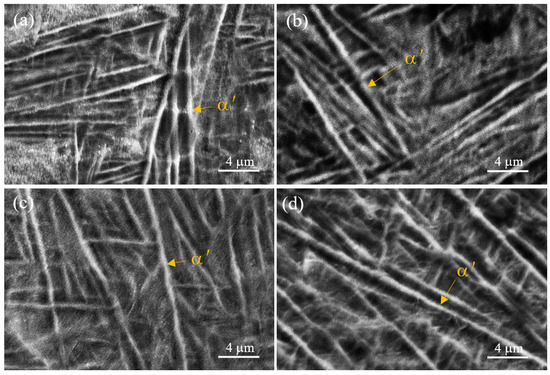
Figure 9.
Effect of the laser heat input on the microstructures of the WZ: (a) 2000 J/mm; (b) 2333 J/mm; (c) 2625 J/mm; and (d) 3000 J/mm.
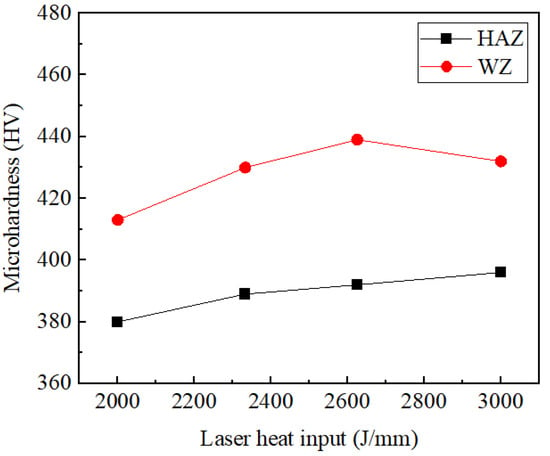
Figure 10.
Effect of the laser heat input on the microhardness of the HAZ and WZ.
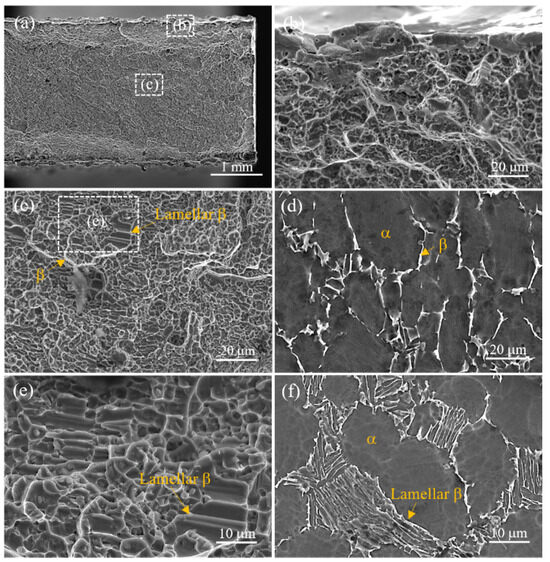
Figure 11.
Fracture morphology of the tensile specimen of the Ti60 laser welded joint: (a) macrofracture surface; (b) the edge of the fracture surface; (c) the inside of the fracture surface; (d) the equiaxed α grains in the BM; (e) the enlarged view of the inside of the fracture surface; and (f) the lamellar β phases in the BM.
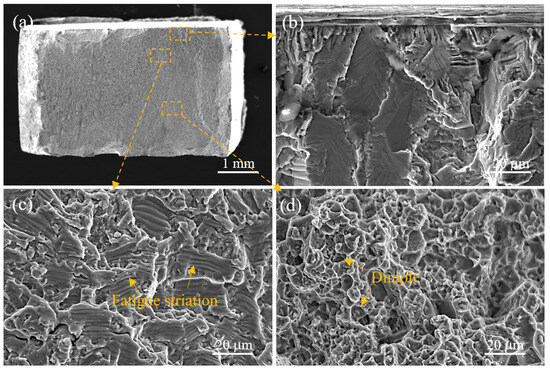
Figure 12.
Fracture morphology of the low-cycle fatigue specimen of the Ti60 laser welded joint: (a) whole fracture surface; (b) crack initiation zone; (c) crack expansion zone; and (d) final fracture zone.
Figure 8 shows the microstructure of the HAZ under different laser heat inputs. It can be seen that with the increase in the laser heat input, the β phases distributed at the boundaries of α grains gradually disappear, and the number and size of the acicular α′ phases in the α grains gradually increase. This is because with the increase in the laser heat input, the holding time of the α→β phase transition temperature of the HAZ is increased, and more α phases transform into β phases. In the following post-welding process, due to the fast cooling, the β phases transform into acicular α′ phases. It is understandable that the greater the laser heat input, the slower the cooling rate, and so the size of the needle-shaped α′ phase increases.
Figure 9 shows the microstructure of the WZ under different laser heat inputs. It can be seen that the WZs are all comprised of α phases + acicular α′ phases. With the increase in the laser heat input, the α phase content gradually decreases, and the content and the size of acicular α′ phases gradually increase. This is because with the increasing laser heat input, the cooling rate after welding decreases, and the acicular α′ phase has more sufficient time to grow; so, the size increases while the quantity decreases.
Figure 10 shows the effect of the laser heat input on the microhardness of WZ and HAZ. It can be seen that with the increase in the laser heat input, the hardness of the HAZ increases, but the hardness of the WZ increases first and then decreases. The main reason for this phenomenon is that, as is depicted in Figure 8, with the increase in the laser heat input, the fraction of α phases in the HAZ gradually decreases, and the content of acicular α′ phases gradually increases. The acicular α′ phases can increase the strength of the material, and so the microhardness of the HAZ increases continuously. In contrast, for the WZ shown in Figure 9, with the increase in the laser heat input, the content and size of the acicular α′ phases are gradually elevated. This will have two opposite effects: the higher content of the acicular α′ phases enhances the microhardness, but the coarser acicular α′ phases reduce the microhardness. Under the mutual interactions of these two effects, the increasing laser heat input causes the microhardness of the WZ to peak at 2600 J/mm.
As shown in Table 4, the tensile and low-cycle fatigue fracture locations of the Ti60 laser welded joint are located at the BM under different laser heat inputs. Additionally, with the increase in the laser heat input, the tensile strength and low-cycle fatigue life both increase first and then decrease. According to the microhardness test results in Figure 7, the hardness values of the WZ with different heat inputs are higher than those of the BM. Clearly, the harder WZ can withstand a higher strength, and the softer BM can withstand a lower strength during tensile and low-cycle fatigue tests, leading to the prior fracture of the BM.

Table 4.
Fracture location and strength of the welded joints after tensile and fatigue tests.
The tensile fracture morphology of the Ti60 laser welded joint (2000 J/mm) is shown in Figure 11. As previously known, the WZ has the highest hardness, followed by the HAZ, and the hardness of BM is the lowest. In the process of the tensile test, due to the low hardness, the BM is easier to deform and fracture. It can be seen from Figure 11b that the fracture surface is smooth, which is caused by tangential stress that is perpendicular to the tensile direction. Inside the tensile fracture, the surface exhibits mainly the dimple feature, but there are also some characteristic morphologies similar to the grain boundaries of equiaxed grains and some lamellar features similar to shutters, as shown in Figure 11c,e. Compared with the microstructure of the BM (Figure 2), it is confirmed that these features are consistent with the equiaxed α grains and the lamellar β phases in the BM, as shown in Figure 11d,e. As mentioned above, the β phase is BCC crystal with more slip systems than the HCP α phase. Therefore, in the process of the tensile test, the plastic deformation is mainly concentrated at the β phases. As a consequence, the β phases distributed around the equiaxial α grains form a topography similar to the grain boundaries on the fracture surface, and the lamellar β phases form a topography similar to shutters.
The low-cycle fatigue fracture morphology of the Ti60 laser welded joint (3000 J/mm) is shown in Figure 12. As can be seen in Figure 12a, the fracture surface is relatively flat, indicating that the low-cycle fatigue property of the material is relatively uniform. As can be seen in the morphology of the fatigue crack initiation zone in Figure 12b, the surface of the crack initiation zone is relatively flat, and no metallurgical defects such as welding pores, inclusions and processing defects can be found on the fracture surface. As is mentioned in Figure 3, many porosity defects exist in the WZ. The fact that the specimen is fractured at the BM suggests that the pore defects in the WZ do not induce low-cycle fatigue fracture in the present case. Under the actions of tensile and compressive stresses caused by the low-cycle fatigue test, slip bands are produced and extrude the surface of the fatigue specimen; then, micro-cracks form on the surface. Figure 12c shows the fracture morphology of the fatigue crack expansion zone. It can be seen that a large number of fatigue striations appear in the expansion zone, indicating that the plasticity of the material is good. In the process of fatigue crack propagation, tensile stress induces the expansion of the crack tip, while the compressive stress compresses the crack tip in the manner of work hardening, and then fatigue striations form on the fracture surface. Every fatigue striation represents one fatigue cycle. At the same time, there are also some tearing edges around the fatigue striations. Compared with the microstructure of the BM (Figure 6a), it can be found that the outlines of tearing edges are similar to the boundaries of equiaxial α phase grains, and the outlines of fatigue striations are similar to the equiaxial α phase grains. Figure 12d shows the morphology of the final fracture zone of the low-cycle fatigue specimen. With the continuous expansion of the fatigue crack, the bearing capacity of the fatigue specimen decreases continuously. When the crack length reaches a critical value, the tensile stress loaded on the fatigue specimen (900 MPa) exceeds its bearing limit, then the specimen undergoes tensile fracture, and dimples form on the final fracture zone of the low-cycle fatigue specimen.
4. Conclusions
In this study, the microstructures and tensile and low-cycle fatigue properties of Ti60 welded joints with different laser heat inputs are investigated. The main conclusions are as follows:
(1) With the increase in the laser heat input, the macro morphology of the WZ changes from Y-type to X-type. Welding pores are mainly formed at the lower part of the X-type WZ.
(2) From the BM to the WZ, the microhardness increases gradually. With the increase in the laser heat input, the microhardness of the WZ increases first and then decreases, which is mainly due to the changes in the size and number of the acicular α′ phase.
(3) Although there are lots of pore defects at the bottom of the X-type WZ, the tensile and low-cycle fatigue specimens all fracture at the BM.
(4) Although the porosity defect in the WZ does not cause the tensile and low-cycle fatigue fracture of the welded joint at the WZ, it may damage the joint’s high-cycle fatigue and persistent creep properties. Therefore, the welding parameters should be carefully controlled during the welding process to obtain a Y-type WZ to avoid porosity defects in the WZ, thereby improving the long-term service performance of the welded joints.
Author Contributions
Conceptualization, Q.Z., L.R. and X.L.; methodology, Q.Z.; validation, Q.Z. and K.Z.; formal analysis, Q.Z. and L.R.; investigation, Q.Z.; resources, J.Y. and J.Z.; data curation, Q.Z.; writing—original draft preparation, Q.Z. and L.R.; writing—review and editing, X.L. All authors have read and agreed to the published version of the manuscript.
Funding
This research was funded by Natural Science Foundation of Shaanxi Province, grant numbers 2019JQ-915 and 2019JQ-224, and Xi’an Scientific and Technological Project, grant number 2023JH-GXRC-0232.
Data Availability Statement
The original contributions presented in the study are included in the article; further inquiries can be directed to the corresponding author.
Acknowledgments
Thanks to Xi’an Aeronautical University, Xi’an Jiaotong University, and Northwestern Polytechnical University.
Conflicts of Interest
Author Lina Ren was employed by the company Western Titanium Technologies. Author Jiadian Yang was employed by the company Gui Zhou Aviation Technical Development. The remaining authors declare that the research was conducted in the absence of any commercial or financial relationships that could be construed as a potential conflict of interest.
References
- Chen, W.; Li, R.; Liu, L.; Liu, R.; Cui, Y.; Chen, Z.; Wang, Q.; Wang, F. Effect of NaCl-rich environment on internal corrosion for Ti60 alloy at 600 °C. Corros. Sci. 2023, 220, 111307. [Google Scholar] [CrossRef]
- Shao, L.; Li, W.; Li, D.; Xie, G.; Zhang, C.; Zhang, C.; Huang, J. A review on combustion behavior and mechanism of Ti alloys for advanced aero-engine. J. Alloys Compd. 2023, 960, 170584. [Google Scholar] [CrossRef]
- Wu, J.; Yuan, S.; Wang, X.; Chen, H.; Huang, F.; Yu, C.; He, Y.; Yin, A. The Microstructure Characterization of a Titanium Alloy Based on a Laser Ultrasonic Random Forest Regression. Crystals 2024, 14, 607. [Google Scholar] [CrossRef]
- Ai, Y.; Wang, Y.; Yan, Y.; Han, S.; Huang, Y. The evolution characteristics of solidification microstructure in laser welding of Ti-6Al-4V titanium alloy by considering transient flow field. Opt. Laser Technol. 2024, 170, 110195. [Google Scholar] [CrossRef]
- Kotlarski, G.; Kaisheva, D.; Ormanova, M.; Stoyanov, B.; Dunchev, V.; Anchev, A.; Valkov, S. Improved Joint Formation and Ductility during Electron-Beam Welding of Ti6Al4V and Al6082-T6 Dissimilar Alloys. Crystals 2024, 14, 373. [Google Scholar] [CrossRef]
- Fernandes, F.A.O.; Gonçalves, J.J.M.; Pereira, A.B. Evaluation of Laser Lap Weldability between the Titanium Alloy Ti-6Al-4V and Aluminum Alloy 6060-T6. Crystals 2023, 13, 1448. [Google Scholar] [CrossRef]
- Wang, B.; Zeng, W.; Zhao, Z.; Jia, R.; Xu, J.; Wang, Q. Effect of micro-texture and orientation incompatibility on the mechanical properties of Ti60 alloy. Mater. Sci. Eng. A 2023, 881, 145419. [Google Scholar] [CrossRef]
- Li, L.; Xie, F.; Wu, X.; He, J.; Li, G.; Zhang, T. Effect of the APS YAG coating on the fretting wear properties of Ti60 titanium alloy. Surf. Coat. Technol. 2024, 489, 131061. [Google Scholar] [CrossRef]
- Li, H.; Chen, M.; Wang, N.; Wu, T. Microstructure Evolution and Mechanical Properties of TA15/Ti60 Tailor Welded Blank by Electron Beam Welding. J. Mater. Eng. Perform. 2024. [Google Scholar] [CrossRef]
- Song, D.; Wang, T.; Jiang, S.; Xie, Z. Influence of welding parameters on microstructure and mechanical properties of electron beam welded Ti60 to GH3128 joint with a Cu interlayer. Chin. J. Aeronaut. 2021, 34, 39–46. [Google Scholar] [CrossRef]
- Song, D.; Wang, T.; Zhu, J.; Jiang, S.; Xie, Z. Influence of welding sequences on the microstructure and mechanical properties of dual-pass electron beam welded Ti60/V/Cu/GH3128 joints. J. Mater. Res. Technol. 2020, 9, 14168–14177. [Google Scholar] [CrossRef]
- Guo, Z.; Ma, T.; Yang, X.; Chen, X.; Tao, J.; Li, J.; Li, W.; Vairis, A. Linear friction welding of Ti60 near-α titanium alloy: Investigating phase transformations and dynamic recrystallization mechanisms. Mater. Charact. 2022, 194, 112424. [Google Scholar] [CrossRef]
- Guo, Z.; Ma, T.; Chen, X.; Yang, X.; Tao, J.; Li, J.; Li, W.; Vairis, A. Interfacial bonding mechanism of linear friction welded dissimilar Ti2AlNb–Ti60 joint: Grain intergrowth induced by combined effects of dynamic recrystallization, phase transformation and elemental diffusion. J. Mater. Res. Technol. 2023, 24, 5660–5668. [Google Scholar] [CrossRef]
- Liu, Y.-Y.; Tian, W.-T.; Yang, Q.-H.; Yang, J.; Wang, K.-S. Inertia radial friction welding of Ti60(near-α)/TC18(near-β) bimetallic components: Interfacial bonding mechanism, heterogenous microstructure and mechanical properties. Mater. Charact. 2024, 208, 113598. [Google Scholar] [CrossRef]
- Zhao, K.; Liu, D.; Song, Y.; Hou, Z.; Song, X. Joining C/C–SiC composite and Ti60 alloy using a semi-solid TiNiCuNb filler. J. Mater. Res. Technol. 2023, 27, 8073–8083. [Google Scholar] [CrossRef]
- Wang, P.; Zhao, S.; Nai, X.; Chen, H.; Wang, P.; Song, X.; Li, W. Homogenization treatment-induced reduction of brittle intermetallic compounds in Ti2AlNb/Ti60 brazed joints: Effect on microstructure and mechanical properties. Mater. Sci. Eng. A 2024, 909, 146856. [Google Scholar] [CrossRef]
- Park, C.; Hwang, T.; Kim, G.-D.; Nam, H.; Kang, N. Effect of the Initial Grain Size on Laser Beam Weldability for High-Entropy Alloys. Crystals 2022, 13, 65. [Google Scholar] [CrossRef]
- Lassila, A.A.; Lönn, D.; Andersson, T.; Wang, W.; Ghasemi, R. Effects of different laser welding parameters on the joint quality for dissimilar material joints for battery applications. Opt. Laser Technol. 2024, 177, 111155. [Google Scholar] [CrossRef]
- Sheng, J.; Kong, F.; Tong, W. Experimentally-guided finite element modeling on global tensile responses of AA6061-T6 aluminum alloy joints by laser welding. J. Adv. Join. Process. 2024, 9, 100229. [Google Scholar] [CrossRef]
- Li, G.; Wang, Y.; Liang, Y.; Gao, P.; Liu, X.; Xu, W.; Yang, D. Microstructure and mechanical properties of laser welded Ti-6Al-4V (TC4) titanium alloy joints. Opt. Laser Technol. 2024, 170, 110320. [Google Scholar] [CrossRef]
- Zhu, Y.; Lu, L.; Zhang, C.; Yuan, J.; Fu, C.; Wang, L. Microstructure, Variant Selection, and Mechanical Properties of Laser-Welded Ti-4Al-2V Joints. Metals 2024, 14, 405. [Google Scholar] [CrossRef]
- Zhu, Y.; Zhang, Y.; Li, C.; Zhu, J.; Wang, L.; Fu, C. Investigation of Microstructure, Oxides, Cracks, and Mechanical Properties of Ti-4Al-2V Joints Prepared Using Underwater Wet Laser Welding. Materials 2024, 17, 1778. [Google Scholar] [CrossRef]
- Wang, C.; Mi, G.; Zhang, X. Welding stability and fatigue performance of laser welded low alloy high strength steel with 20 mm thickness. Opt. Laser Technol. 2021, 139, 106941. [Google Scholar] [CrossRef]
- Cai, D.; Luo, Z.; Han, L.; Han, S.; Yi, Y. Porosity and joint property of laser-MIG hybrid welding joints for 304 stainless steel. J. Laser Appl. 2020, 32, 022056. [Google Scholar] [CrossRef]
Disclaimer/Publisher’s Note: The statements, opinions and data contained in all publications are solely those of the individual author(s) and contributor(s) and not of MDPI and/or the editor(s). MDPI and/or the editor(s) disclaim responsibility for any injury to people or property resulting from any ideas, methods, instructions or products referred to in the content. |
© 2024 by the authors. Licensee MDPI, Basel, Switzerland. This article is an open access article distributed under the terms and conditions of the Creative Commons Attribution (CC BY) license (https://creativecommons.org/licenses/by/4.0/).