Article

Study on the Preparation and Performance of Self-Regressive Fixed Abrasive Chemical Mechanical Polishing Pad

1
School of Mechanical and Electrical Engineering, Nanjing University of Aeronautics and Astronautics, Nanjing 210016, China
2
School of Mechanical and Electrical Engineering, Henan Institute of Science and Technology, Xinxiang 453003, China
*
Author to whom correspondence should be addressed.
Machines 2022, 10(11), 999; https://doi.org/10.3390/machines10110999
Submission received: 31 August 2022 / Revised: 10 October 2022 / Accepted: 15 October 2022 / Published: 30 October 2022
(This article belongs to the Section Advanced Manufacturing)

Abstract

:
Chemical mechanical polishing (CMP) technology is one of the key technologies to realize the global planarization of semiconductor wafer surfaces. With the increasing popularity and universality of its application, more and higher requirements are put forward for ultra-precision machining. As an important part of the CMP system, polishing pads occupy a dominant position. In this paper, a self-regressive fixed abrasive polishing pad (SR-FAPP) was prepared by photo-curing. The physical and mechanical properties of the SR-FAPP and the retreat threshold of the abrasive particles on the SR-FAPP were studied. After the CMP of the SiC wafer with a polyurethane polishing pad and the SR-FAPP, it was found that the material removal rate of the former was 75% higher than that of the latter, and the surface roughness of the latter was 75% higher than that of the former. In the micro-morphology, the scratches on the surface of the latter’s polished SiC wafer were obviously reduced, which effectively improved the unevenness of the scratches on the surface of the SiC wafer after polishing, thus providing a reference for the preparation and performance research of the polishing pad.

1. Introduction

With the continuous decrease in the minimum line width, the perfect planarization of semiconductor materials is realized and the requirements for its surface quality are raised accordingly [1,2,3]. CMP technology is undoubtedly one of the most effective methods to realize local and global planarization [4,5,6,7]. However, toxic and corrosive slurries are widely used for traditional CMP, resulting in the pollution of the environment [8]. To overcome this challenge, a novel green CMP is proposed for copper [9], alloys [10,11], and sapphire [12]. Using the developed CMP, high-performance surfaces are fabricated for use in the aerospace and semiconductor industries. These studies are a great contribution to the conventional CMP, dramatically removing its pollution of the environment [13]. A polishing pad is the carrier of the whole CMP system, and it plays a role in supporting, storing, transporting, and distributing the polishing solution evenly. Polishing pads significantly affect polishing results, including the material removal rate (MRR), surface roughness (Ra), and inhomogeneity within and between wafers [14,15,16,17]. The performance of polishing pad materials occupies a major position in the cost of the CMP process [18,19,20,21,22]. Due to the difference in material types and technical specifications in the polishing process, there are certain differences in requirements for polishing pads. Common polishing pads are classified according to their materials and structures, as shown in Figure 1.
A large number of researchers have studied polishing pads from many angles, including their preparation method [23,24], material [25], structure [26,27,28,29], and so on. C.L. Nelsen [30] et al. studied a CMP 4H-SiC with a polyurethane polishing pad and colloidal silica as the polishing solution, and they studied the material removal rate and surface roughness of the workpiece by controlling the process parameters. It was found that a higher pressure will increase the material removal rate, but at the same time, it will damage the polishing pad. The effect of speed on the material removal rate is nonlinear, and the final formula can obtain a non-damaged surface, but the material removal rate is very low. Zhong Min [31] et al. carried out research on the effects of polyurethane polishing pads with porous surfaces and no grooves (the IC1000 polishing pad, IC1000, and Suba IV composite polishing pad), and compared their performance on the removal rate of sapphire material and the surface roughness after polishing. The results show that the surface quality of the sapphire polished by silica was 0.1 nm, and the material removal rate of the polyurethane polishing pad was 3.2 μm/h, which was higher than those of the IC1000 and the composite polishing pad. Yan Zhou [32] et al. studied the change in the removal rate and polishing quality of molten quartz with the use time of a polishing pad, and they analyzed the performance change in the polishing pad during chemical mechanical polishing. The results showed that after the polishing pad was used for 2.5 h, the MRR of the quartz decreased and the surface quality became worse. As the polishing pad was used for 2.5 h, the thickness of the polishing pad decreased and the polishing surface became rough. In this paper, an SR-FAPP was prepared by a photo-curing method. By studying the performance of the polishing pad, a theoretical reference was provided for the preparation of polishing pads and the concession thresholds of polishing pads.
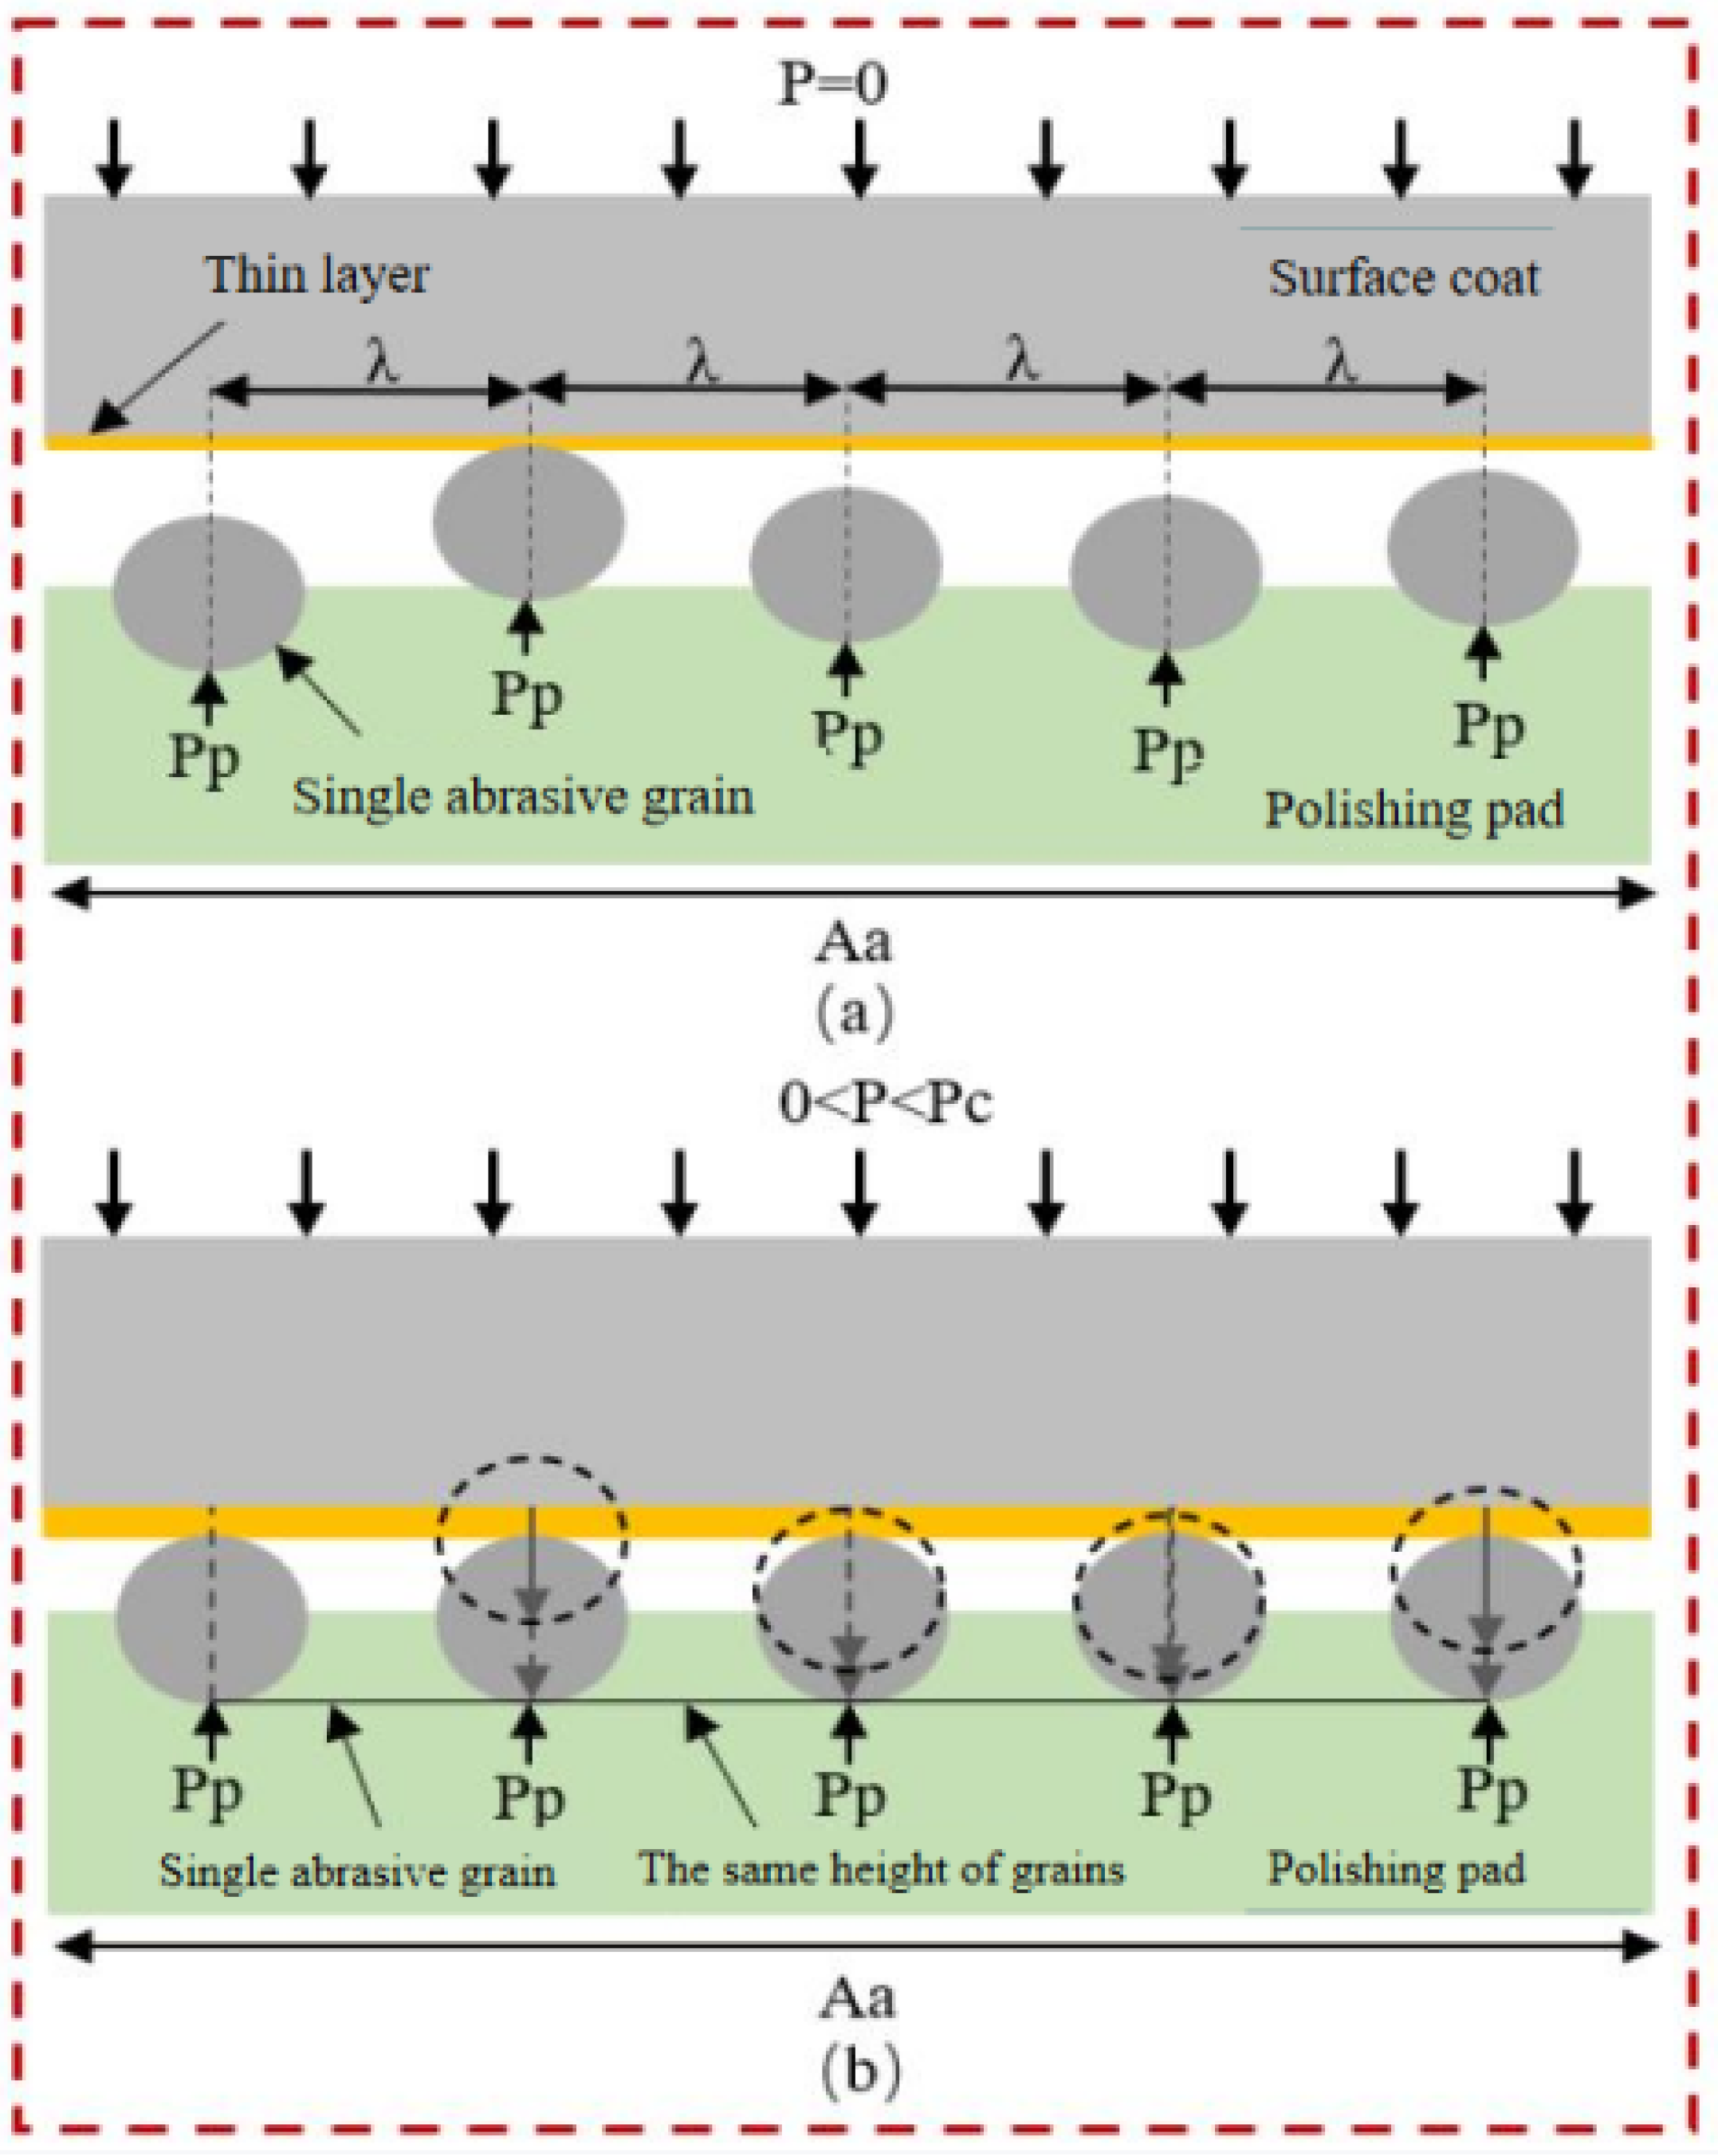
The commonality of these materials after polishing is that there is still a certain degree of surface/sub-surface damage. Current research shows that cracks, chipping, scratches, sub-surface damage, etc. always occur after polishing. In order to solve this bottleneck problem, Yuan [33] et al. proposed semi-fixed machining tools with a ‘trap in effect’, for which surface damage induced by the larger abrasive particles could be reduced or even eliminated. Luo [34] et al. used semi-solid and consolidated polishing films to conduct comparative tests on a silicon carbide base. The material removal rate (MRR) and surface topography of the substrate, and the protrusion height of the abrasive together with the wear debris, were investigated to reveal the processing characteristics of the substrates. SR-FAPP research was carried out in this paper. An SR-FAPP aims at material removal by keeping the exposed height of the abrasive grains in the polishing pad consistent, as shown in Figure 2. When the surface pressure of the polishing pad increases from P = 0 to P (P < Pc critical pressure) under the same area (Aa), the load is transmitted to the surface of the workpiece through the pressure, and the contact surface between the polishing pad and the workpiece is subjected to the normal force such that the abrasive particles with higher exposed heights retreat to the same height as the abrasive particles with lower exposed heights, thus realizing the ultra-smooth and damage-free polishing of materials.

2. Preparation of the SR-FAPP

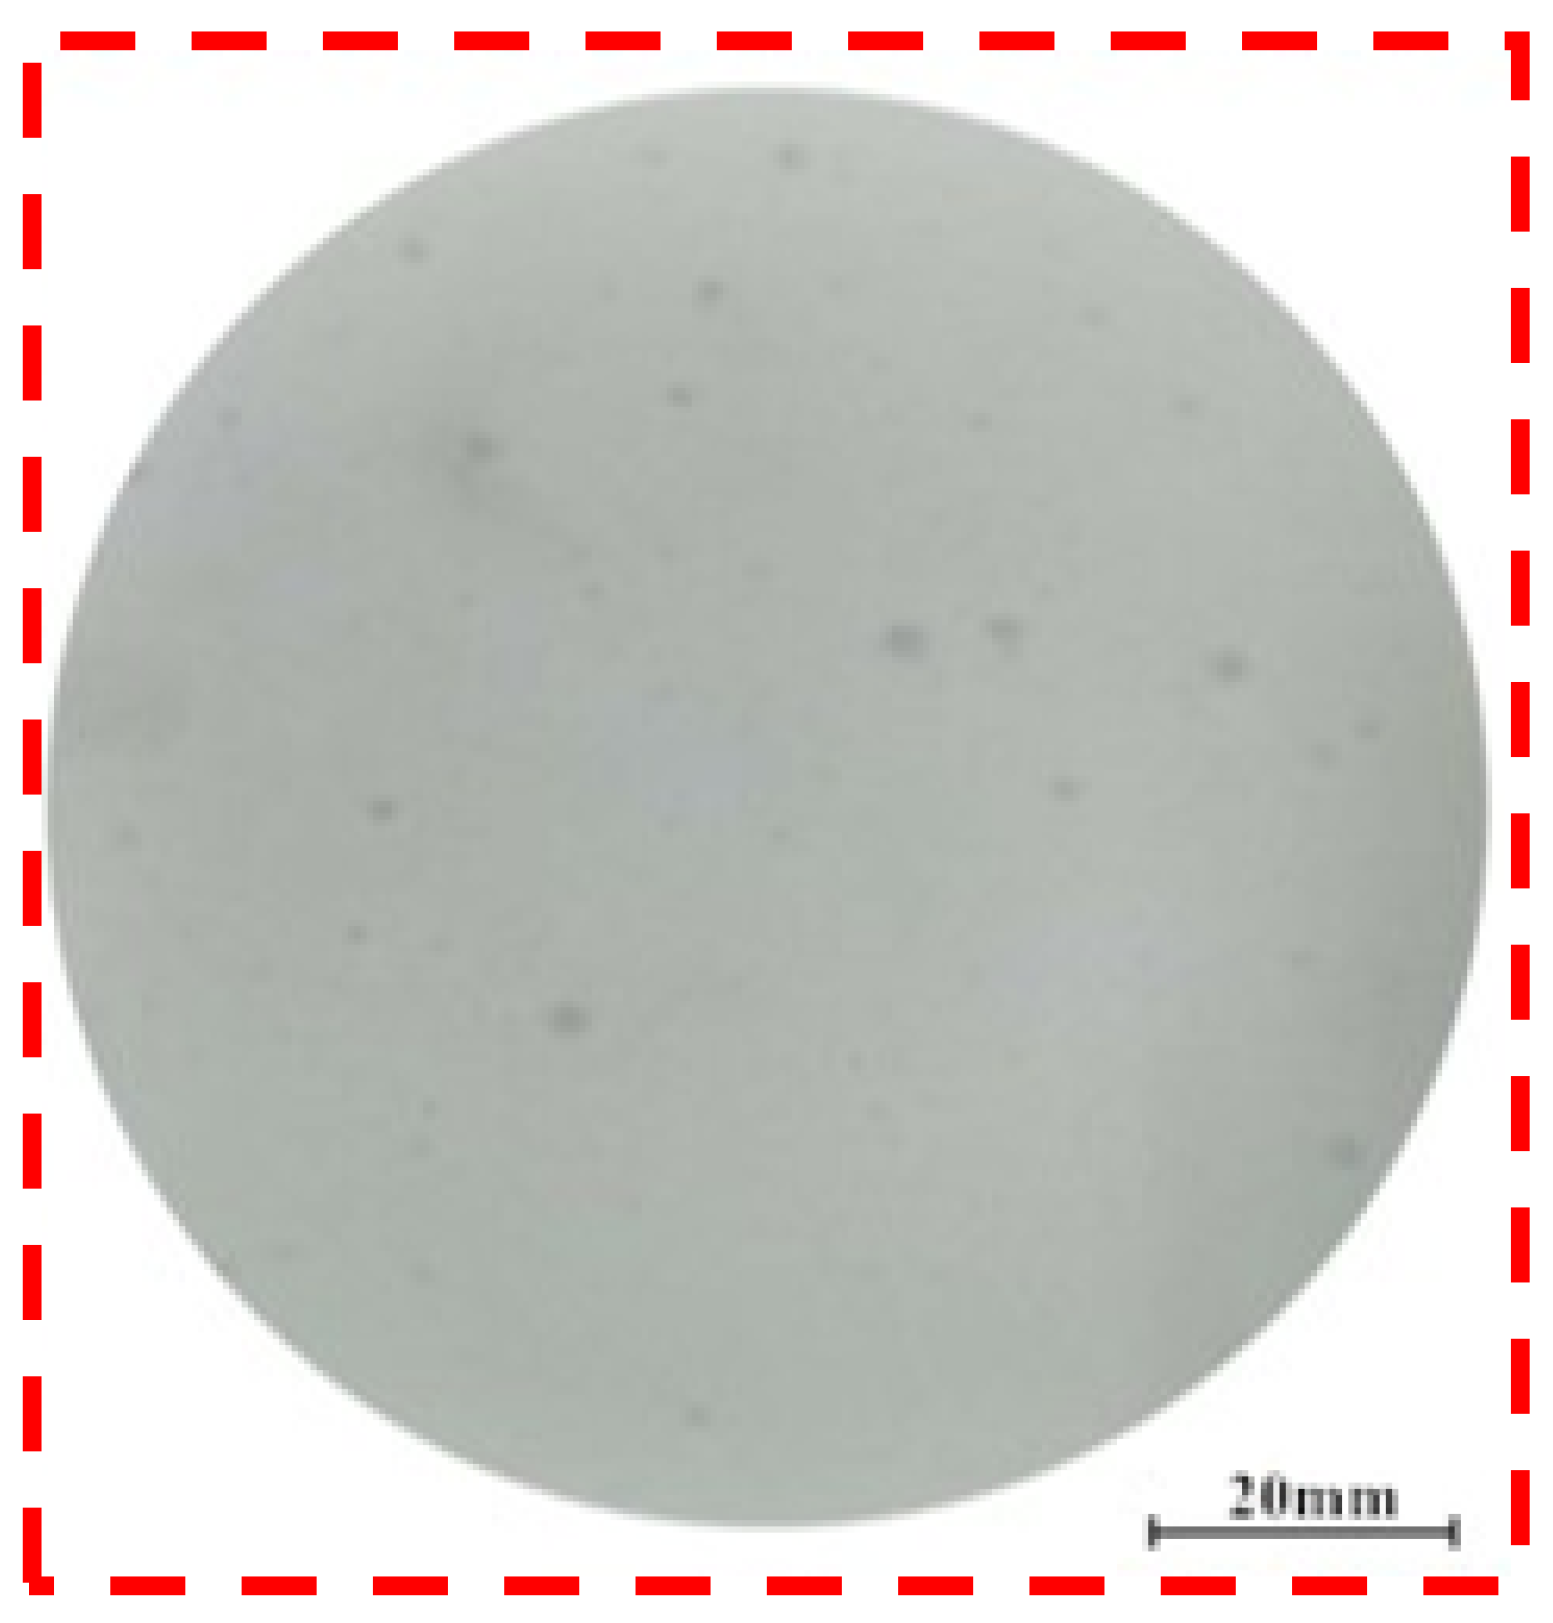
The SR-FAPP was prepared using polymer materials and activator materials, which included the prepolymer (photocurable resin and polyurethane resin), activator, photoinitiator, and abrasive dispersant. The qualitative influence of these elements on the performance of the polishing pad was the joint action of the prepolymer and reactive diluent, where the prepolymer and reactive diluent cross-linked under the catalysis of ultraviolet rays to form a spatial grid structure to form the polishing pad. The dissolution rate and Young’s modulus were used as the performance evaluation indexes of the self-receding solidified abrasive polishing pads, and the orthogonal design was used to investigate the significant effects of the resin type and active agent content on the performance of the pads. The significant effects of the resin type and active agent content on the swelling rate and Young’s modulus were investigated. The relationship between the material removal rate, surface roughness, and swelling rate and the Young’s modulus was used to determine the active agent content, and the resin content was determined by combining the equilibrium method and the test results. The resin content was determined by combining the equilibrium method and the test results, and the final components of the polishing pad were determined as follows: UV resin, aqueous polyurethane resin, trimethylolpropane triacrylate (TMPTA), polyurethane resin, polyethylene glycol diacrylate (PEGDA), and photoinitiator (UV1173D). The ratio of the polymer and activator had a great influence on the performance of the prepared polishing pad, which determined the threshold values of the Young’s modulus and the swelling rate of the polishing pad. The prepared polishing pad is shown in Figure 3. The thickness of the polishing pad had a certain influence on the preparation difficulty of the polishing pad because the ultraviolet ray had a limited penetration ability for colored materials (light curing machine-rated power is 1 kw), which made it more difficult to prepare the colored abrasive layer in the preparation process. Therefore, in the preparation process, the thickness of the abrasive grain layer was 0.5 mm, and in the continuous preparation process, the layered solidification preparation process was adopted to achieve the appropriate thickness. In this paper, the polishing pad was prepared using a layered curing technology. The thickness of the polishing pad was 2 mm and the diameter of the polishing pad was 230 mm. Two kinds of abrasive particles were used in the preparation of the polishing pad: one was alumina abrasive particles and the other was silicon carbide abrasive particles. After experimental comparison, the polishing effect of the alumina polishing pad was better than that of the silicon carbide polishing pad. Therefore, in the actual experiment, the alumina polishing pad was used for polishing.

3. Study on the Physical and Mechanical Properties of the SR-FAPP

3.1. Study on the Surface Structure of the SR-FAPP

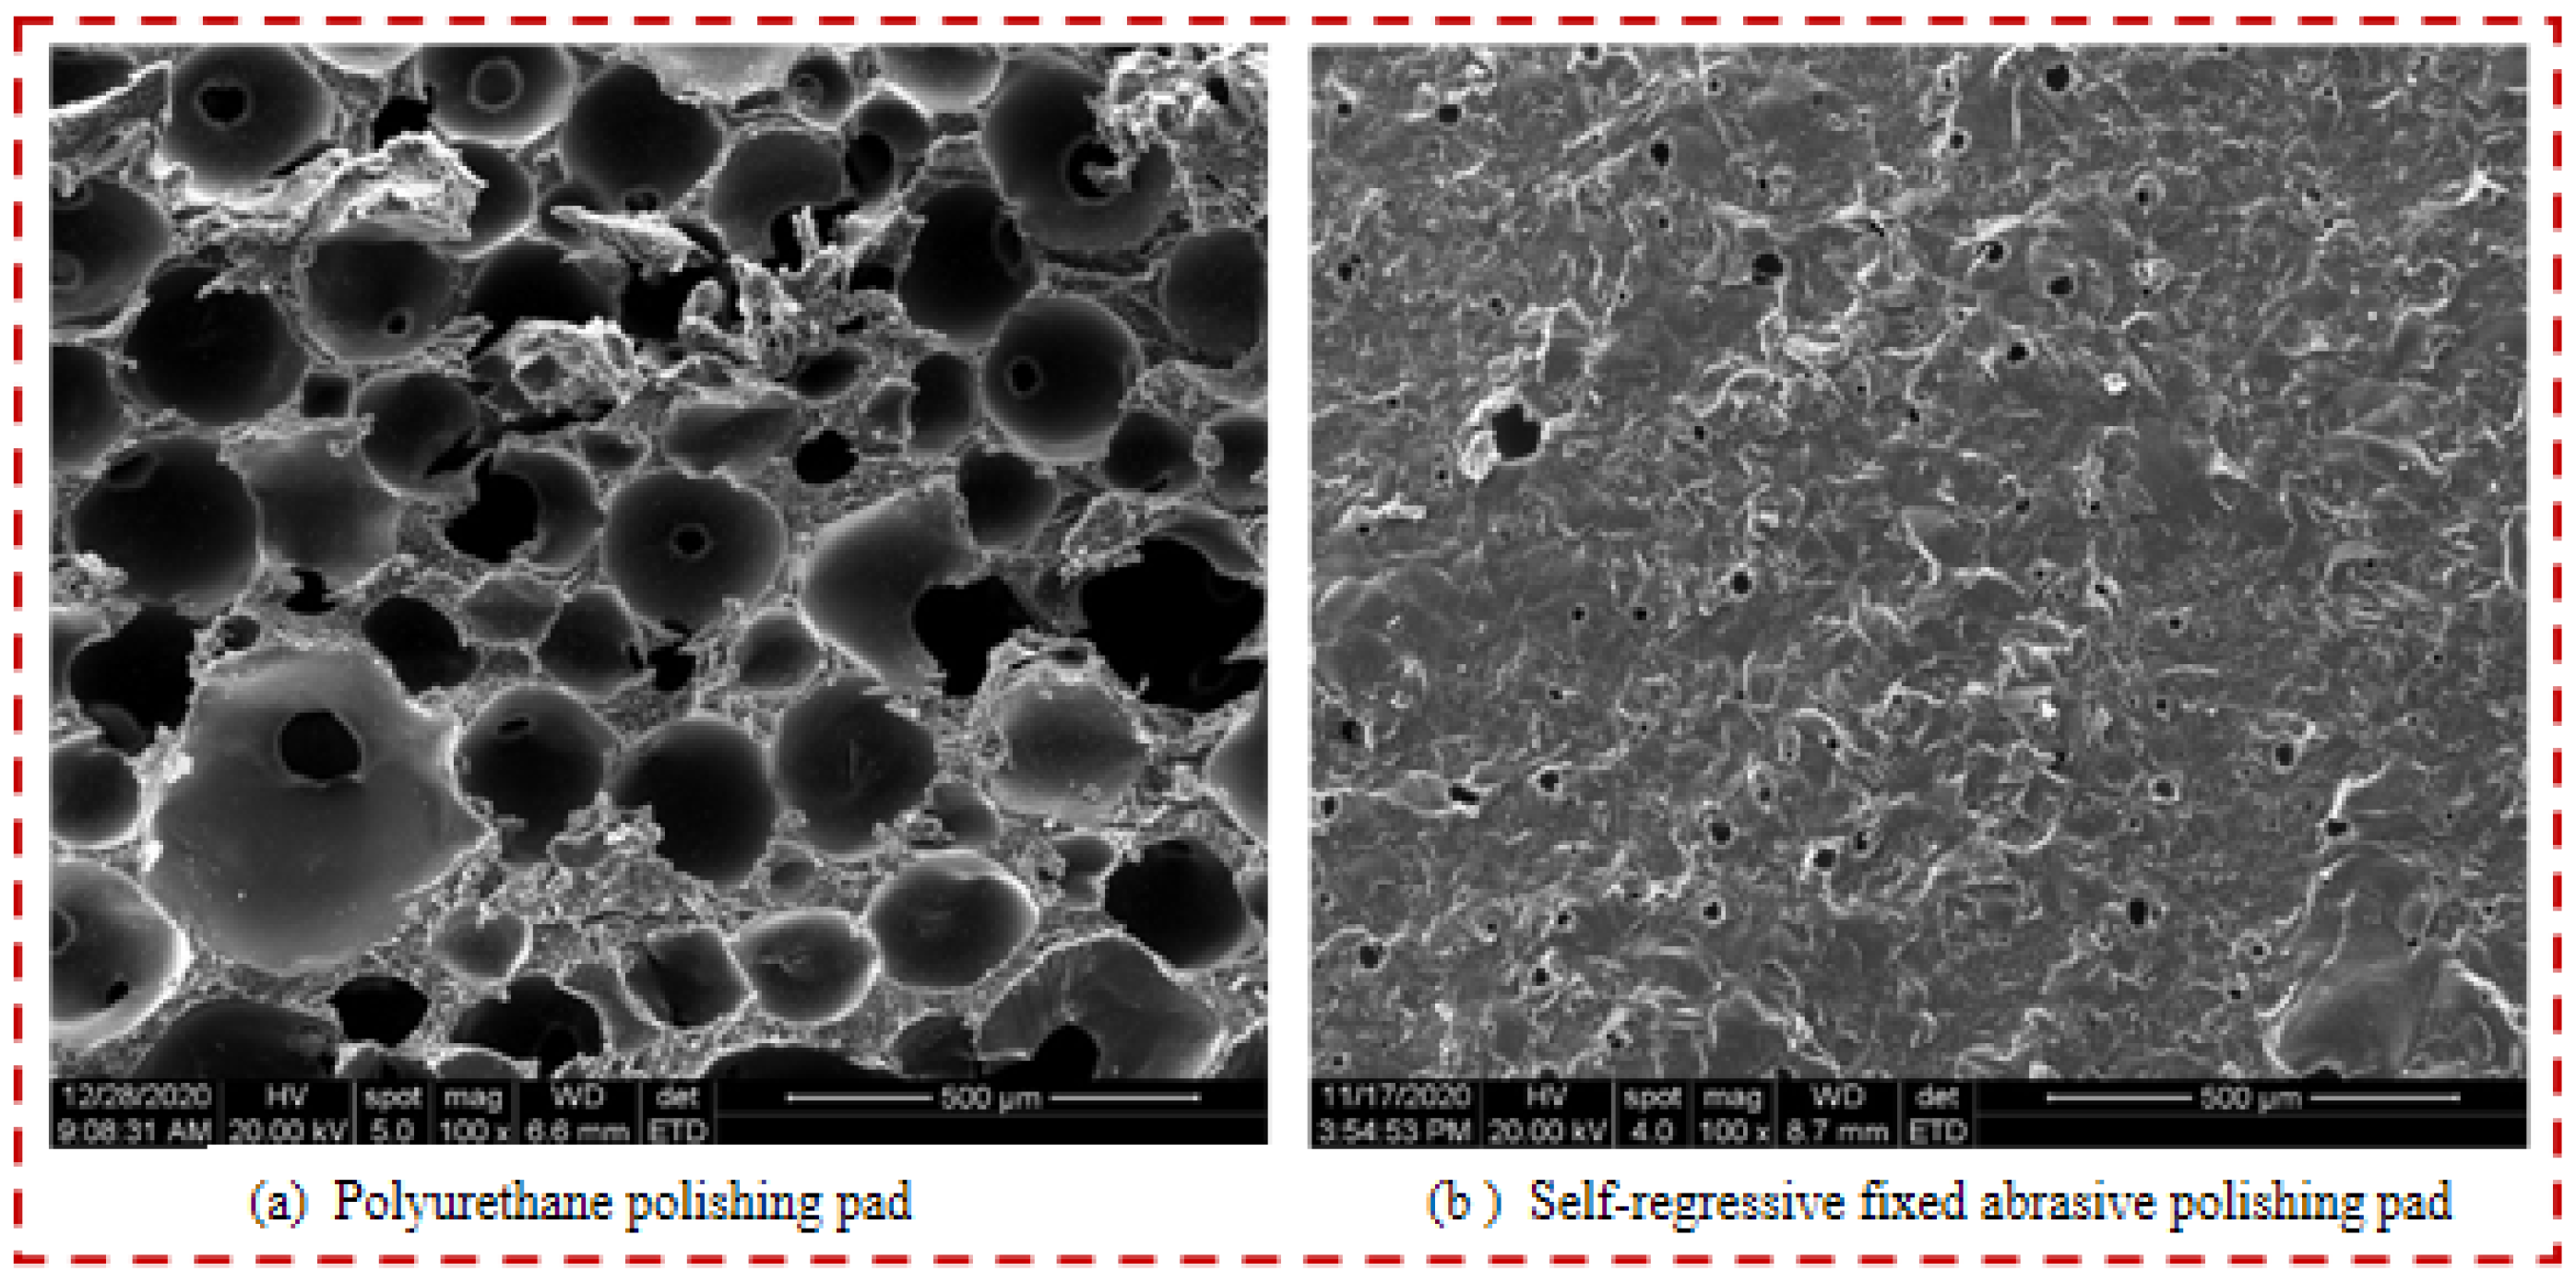
Compared with the polyurethane polishing pads commonly used in the market, the surface structure of the SR-FAPP was observed by scanning electron microscope (SEM) and the results are shown in Figure 4. Under the same multiple, the number and diameter of the micropores on the surface of the polyurethane polishing pad are larger than those of the SR-FAPP, and so the polyurethane polishing pad can more effectively ensure a higher material removal rate.
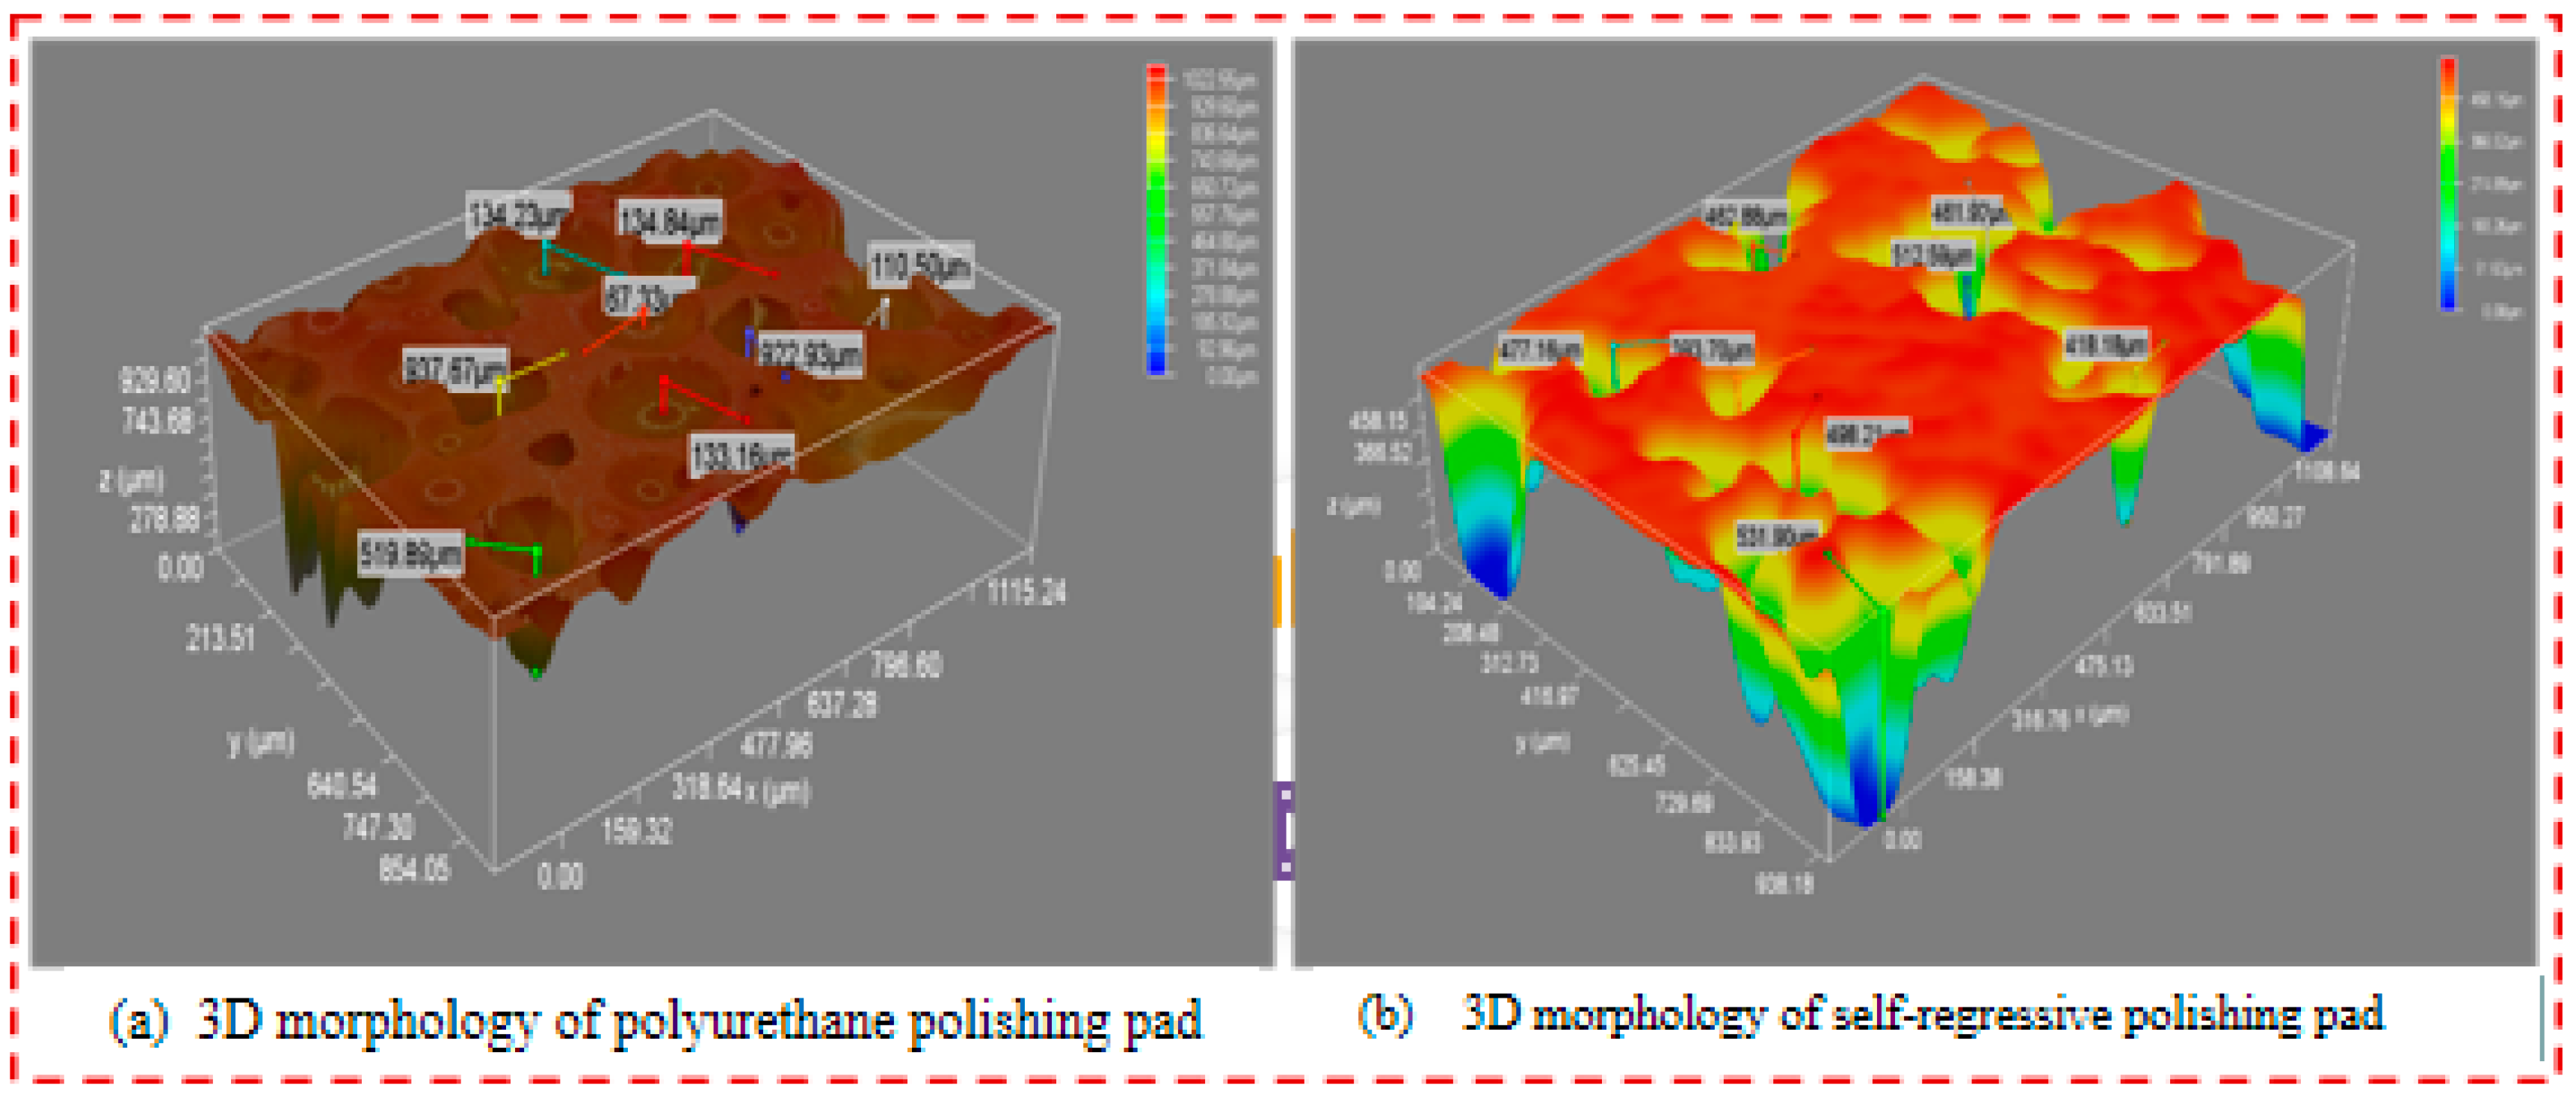
The 2D and 3D topography of the two polishing pad surfaces measured by a three-dimensional profilometer (ContourGT-K, vertical accuracy 0.1 nm) are shown in Figure 5 and Figure 6. The results show that the average surface roughness (Ra) of the polyurethane polishing pad was 14.726 μm and that of the SR-FAPP was 7.527 μm. On the numerical value, the roughness of the polyurethane polishing pad was twice that of the SR-FAPP, which further shows that under the same conditions, the polyurethane polishing pad had a stronger material removal ability, and the subsequent CMP results are consistent with the measured results.
The number and diameters of the pores on the surface of a polishing pad determine the storage, transportation, and chip-containing capacity of that polishing pad, as well as the mechanical force required in the process of transmission and bearing [13,14,15]. When the number of micropores is too large or the pore diameter is too large, the density and hardness of the polishing pad will be affected to different degrees. The surface porosity of the polyurethane polishing pad was 65%, as measured by SEM, and that of the self-made polishing pad was 44%. The 3D morphology of the internal aperture and hole depth of the polishing pad measured by DVM6 under 700 times magnification is shown in Figure 7. After collecting eight pore diameters for estimation, the average diameter of the micropores of the polyurethane polishing pad was determined to be 216 μm, while that of the SR-FAPP was 71 μm. After estimation, the hole depth of the polyurethane polishing pad was 325 μm and that of the SR-FAPP was 471 μm. Table 1 shows the measured values of these parameters.

3.2. Study on the Gripping Force of the Self-Repressive Fixed Abrasive Polishing Pad Substrate to Abrasive Particles

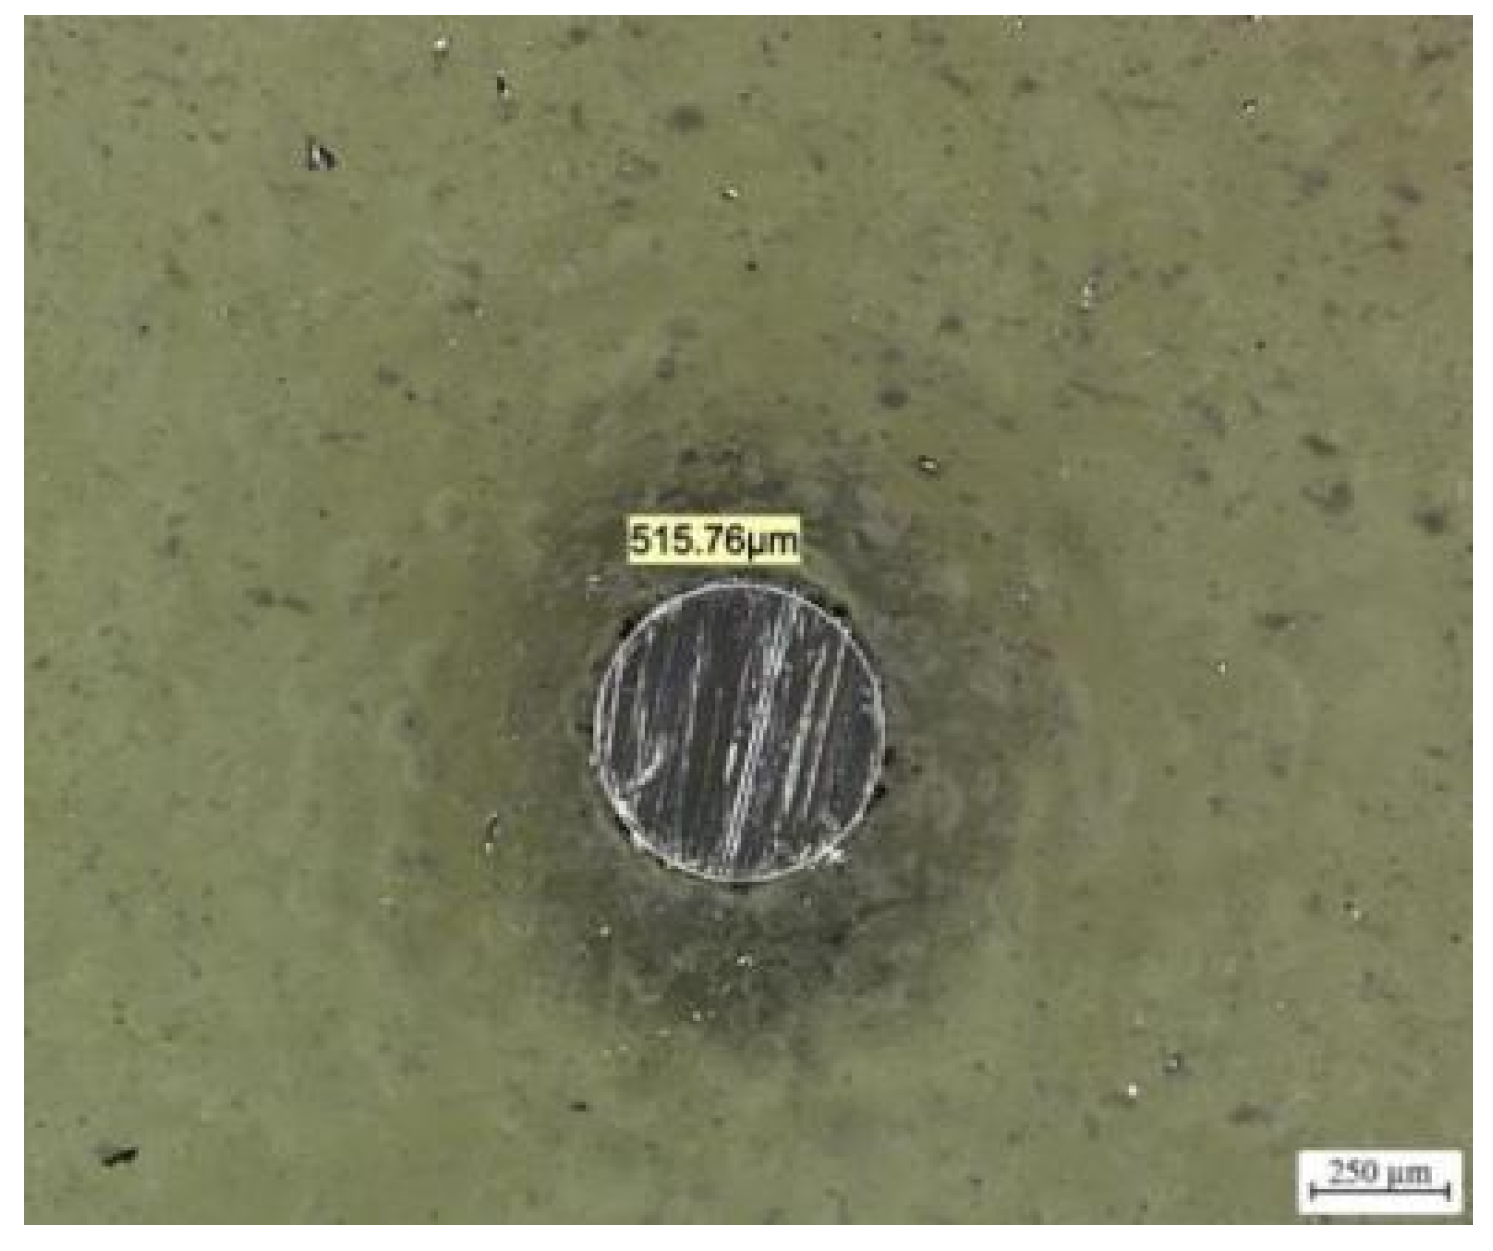
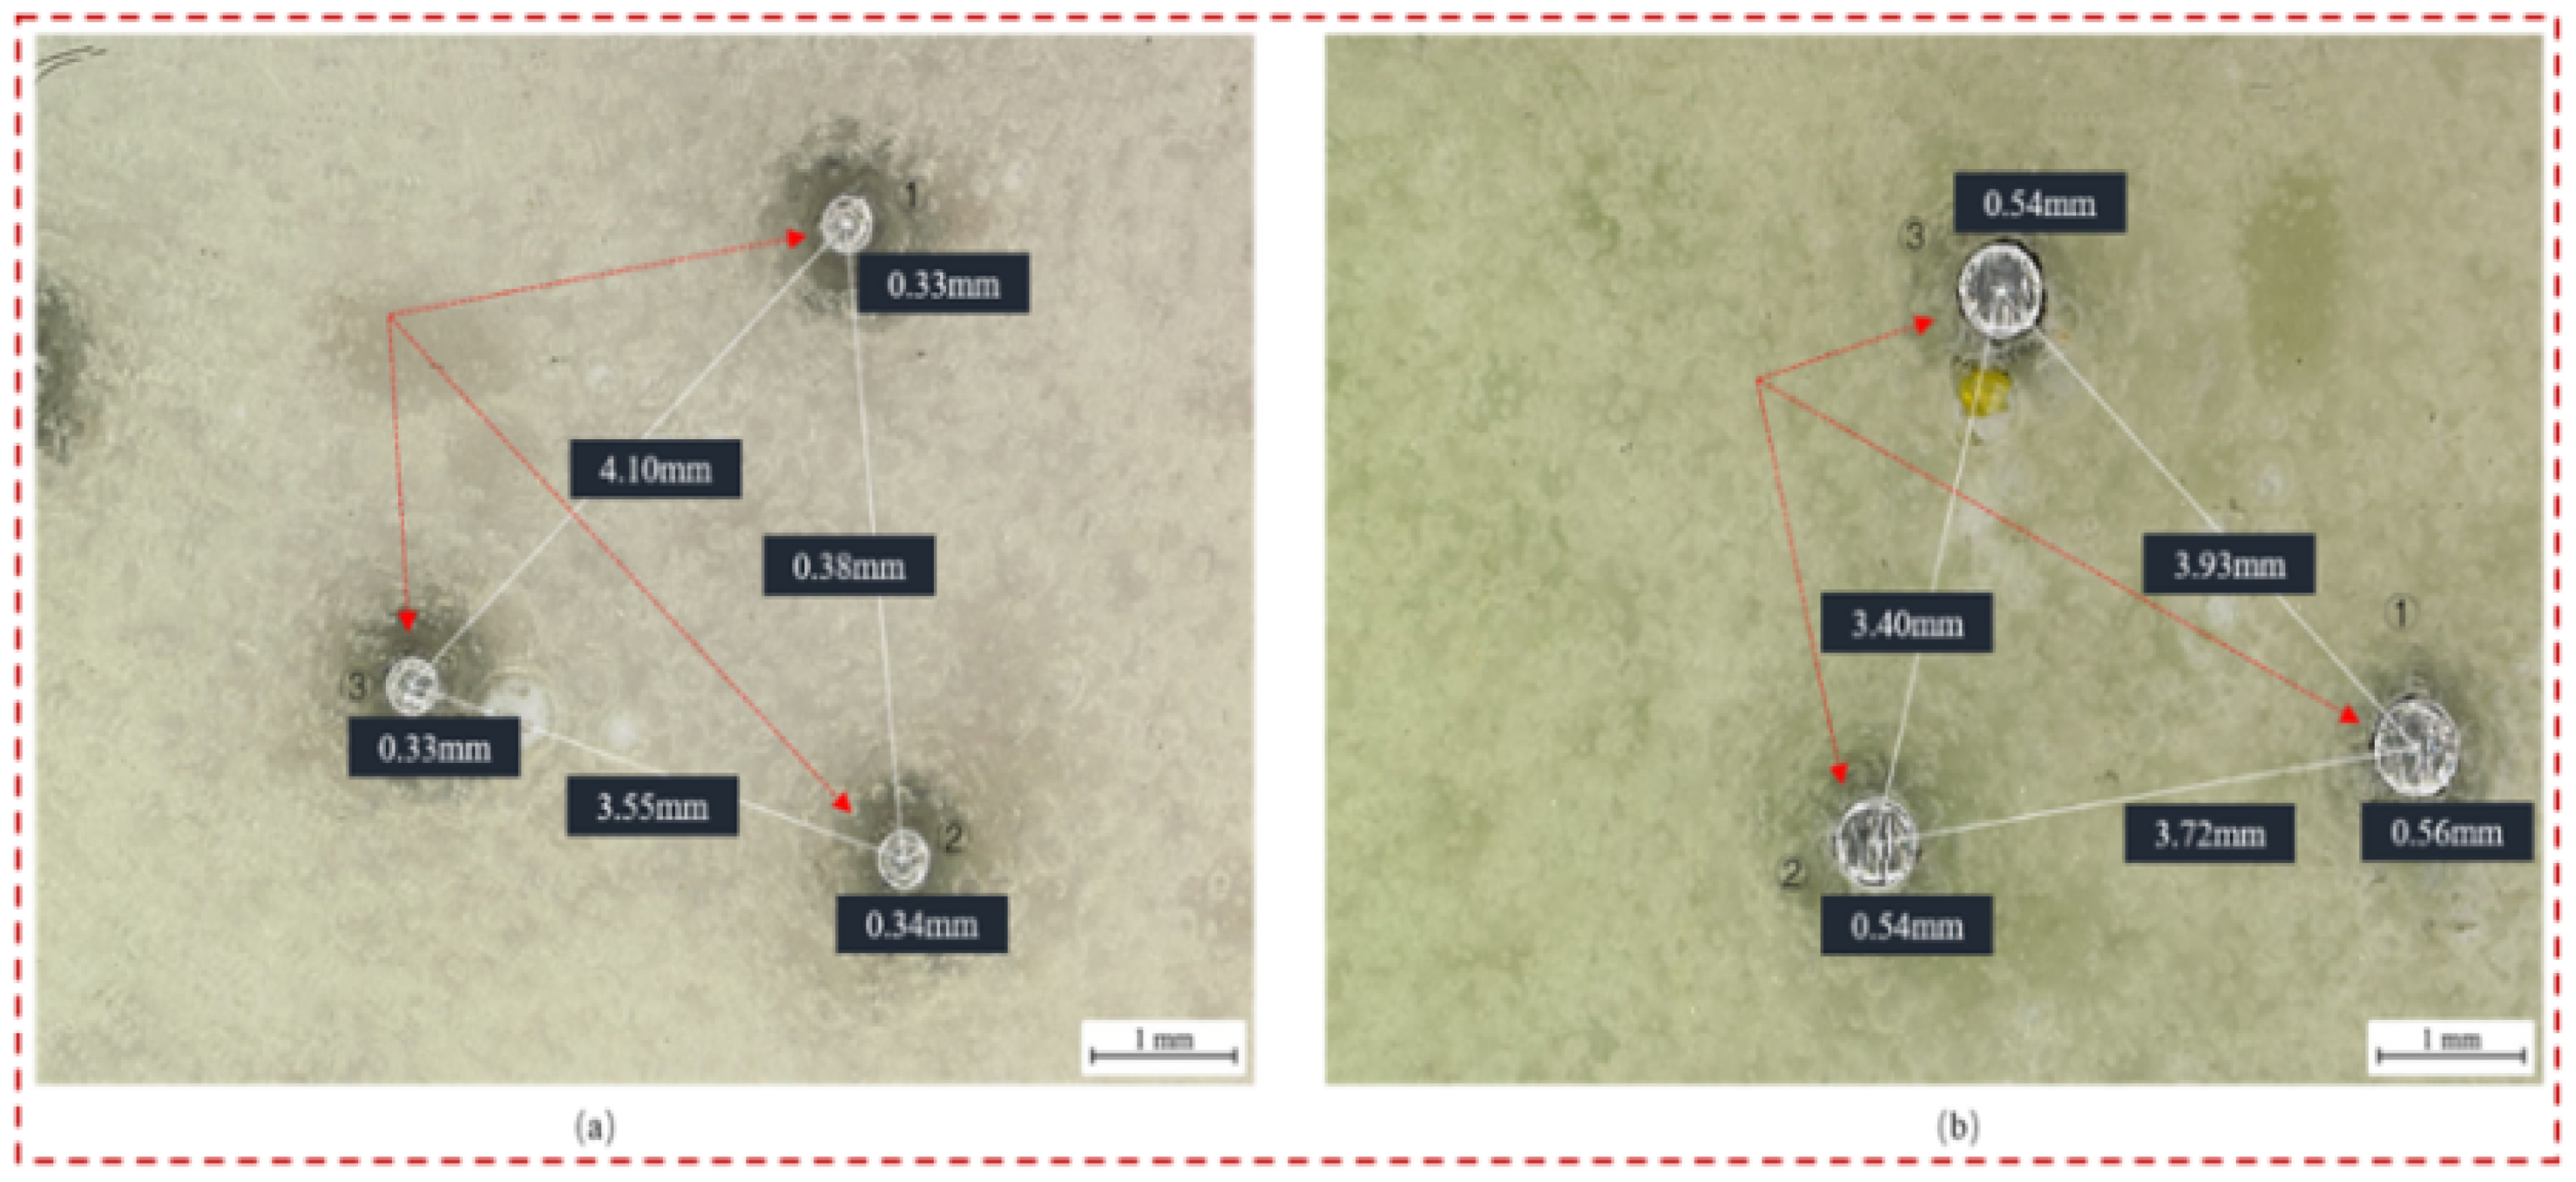
Figure 8 shows the modified morphology of a single abrasive grain, and Figure 9 shows the 2D morphology before and after dressing with a diamond dresser with a pressure of 1 psi. The exposed diameter of the steel ball before dressing was 0.333 mm, on average, and the exposed diameter of the abrasive particles after dressing for 1 min was 0.55 mm. In order to visually observe the change state of the abrasive particles on the SR-FAPP, 304 stainless steel balls were adopted, and their hardness was much lower than that of diamond, and so the diameter of the abrasive particles changed obviously after wear. The distance between the abrasive grains before and after dressing had also changed. The reason is that the SR-FAPP matrix was a resin matrix. In the wear test, the resin matrix subjected to grinding bore the tangential force from the dresser speed direction, and the abrasive grains yielded tangentially. At the same time, the change in the abrasive particle size, that is, the change in the abrasive particle area after correction, shows that the matrix had enough holding ability for the abrasive particles. After the modification, the surface roughness of the SR-FAPP became larger, which shows that the abrasive grains could be exposed well after the modification of the SR-FAPP, and it also shows that the SR-FAPP could achieve a certain amount of self-sharpening due to friction during polishing.

3.3. Study on the Yielding Threshold of the Self-Regressive Fixed Abrasive Polishing Pad

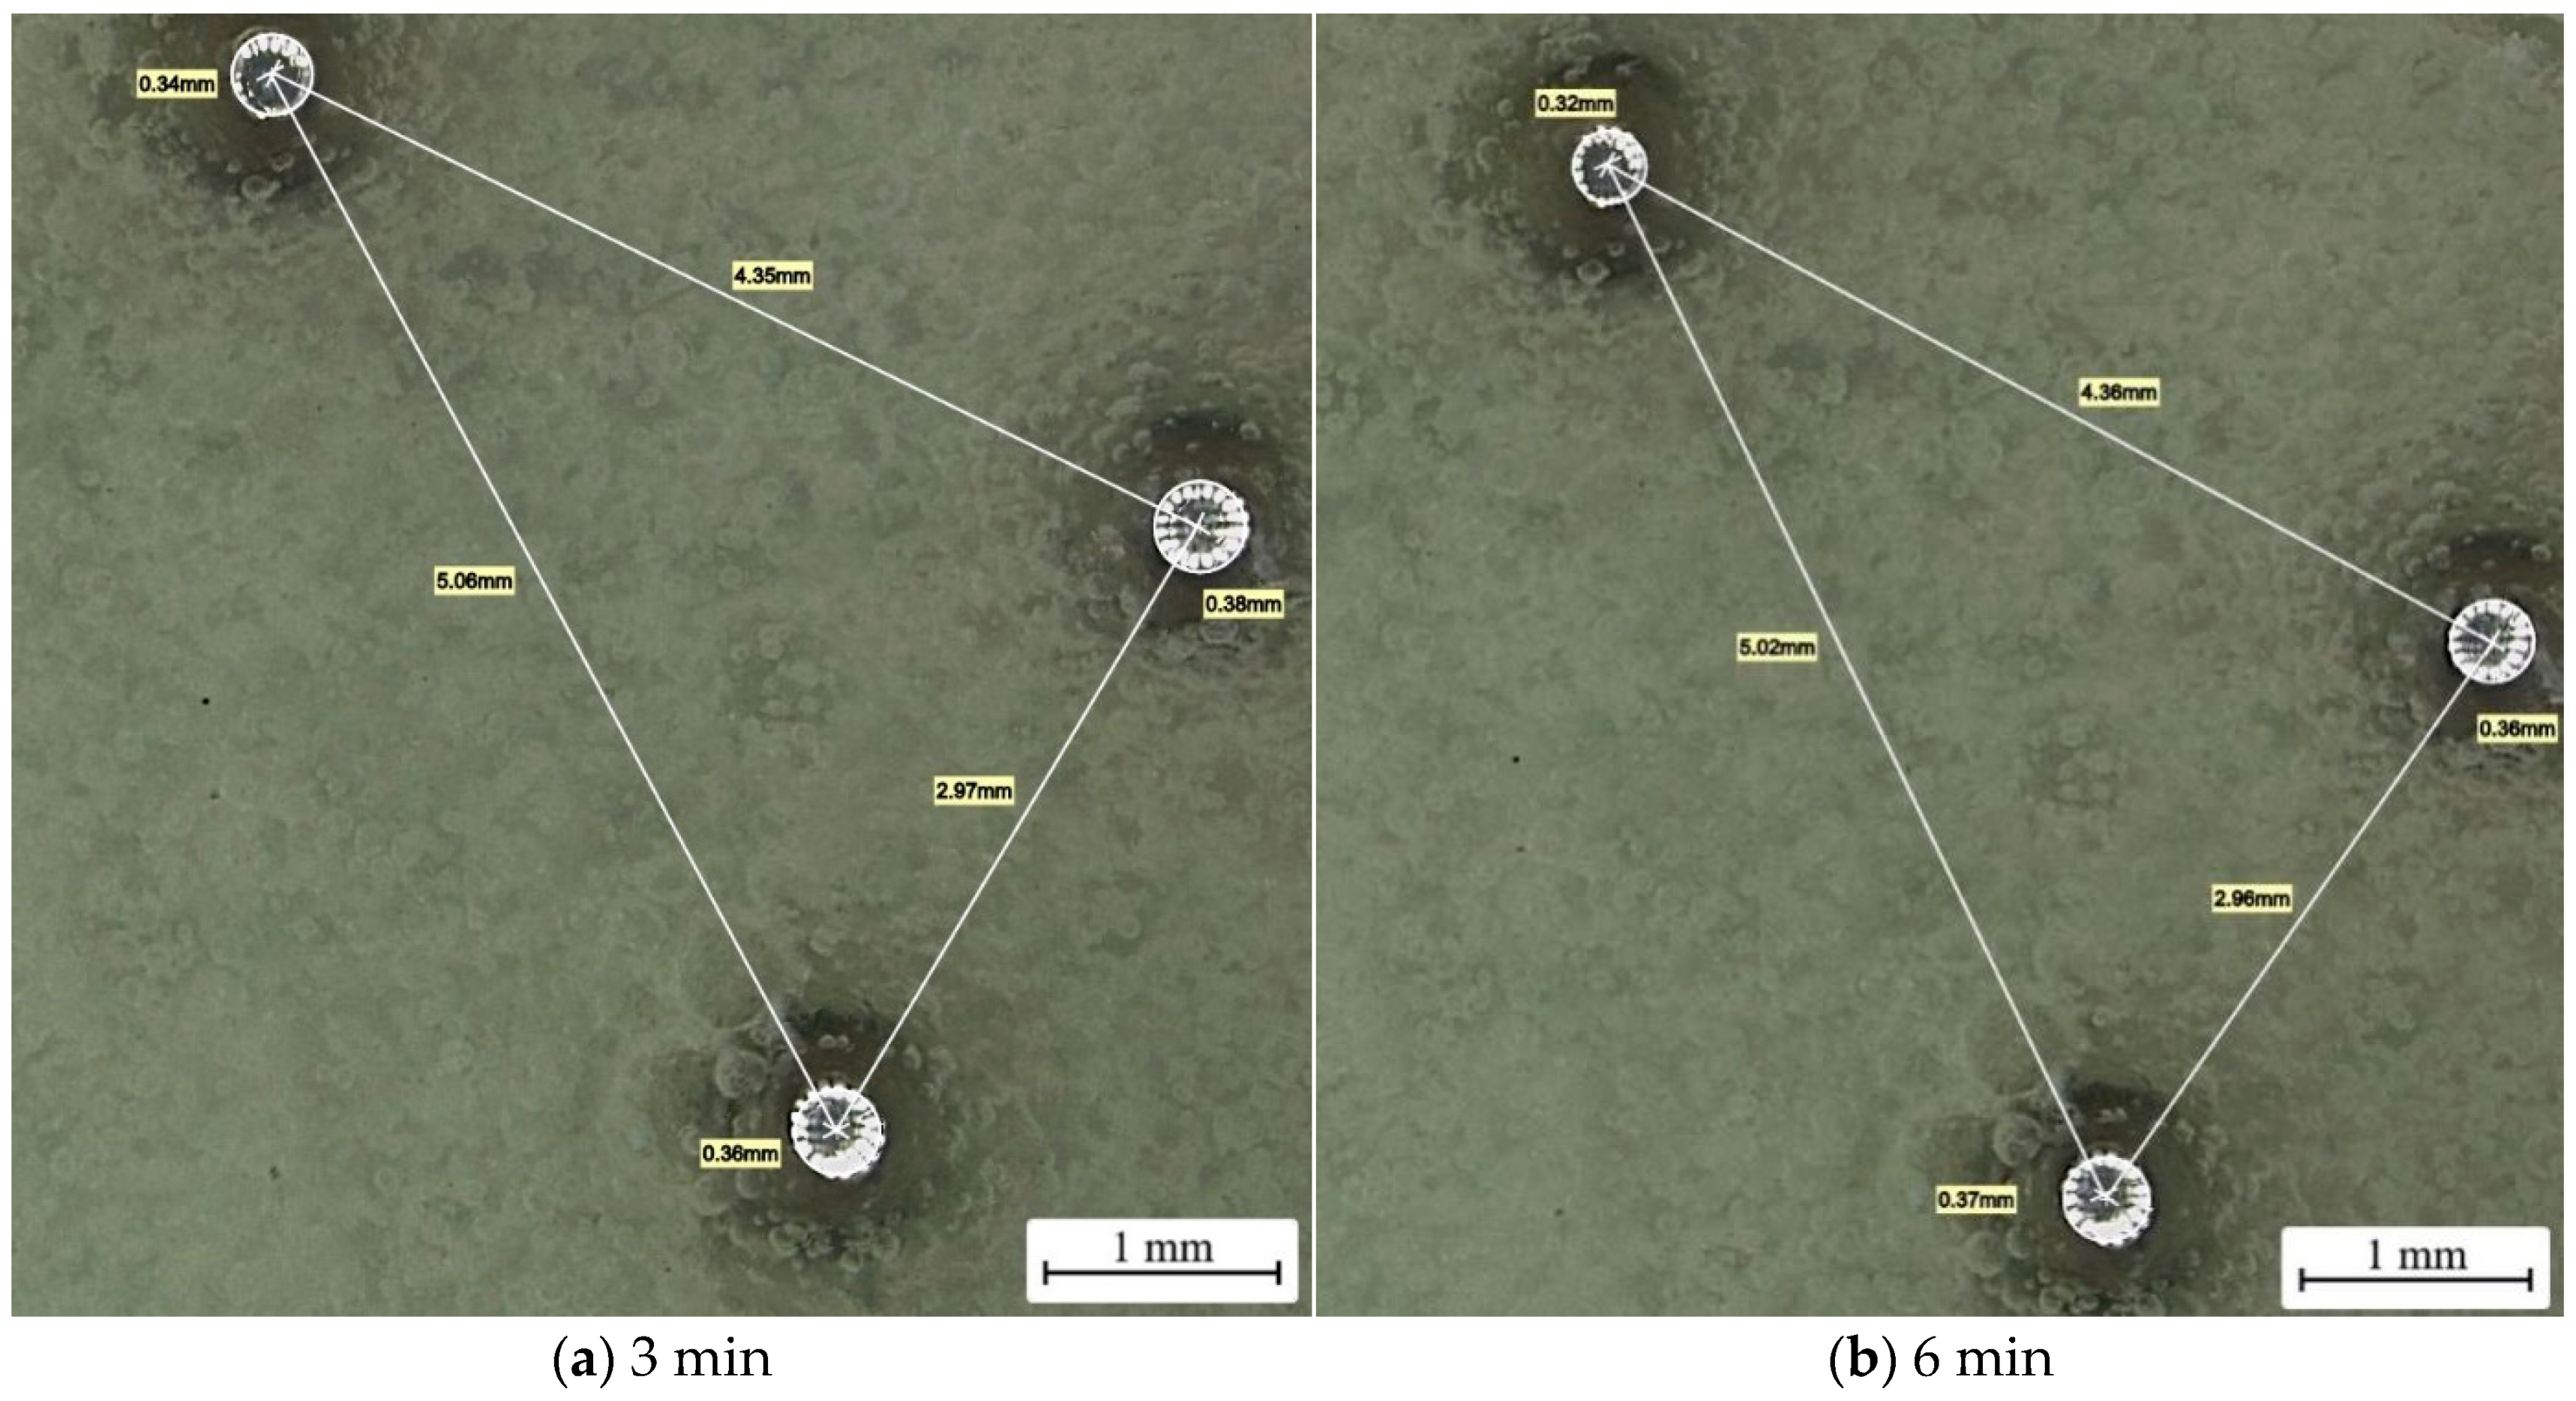
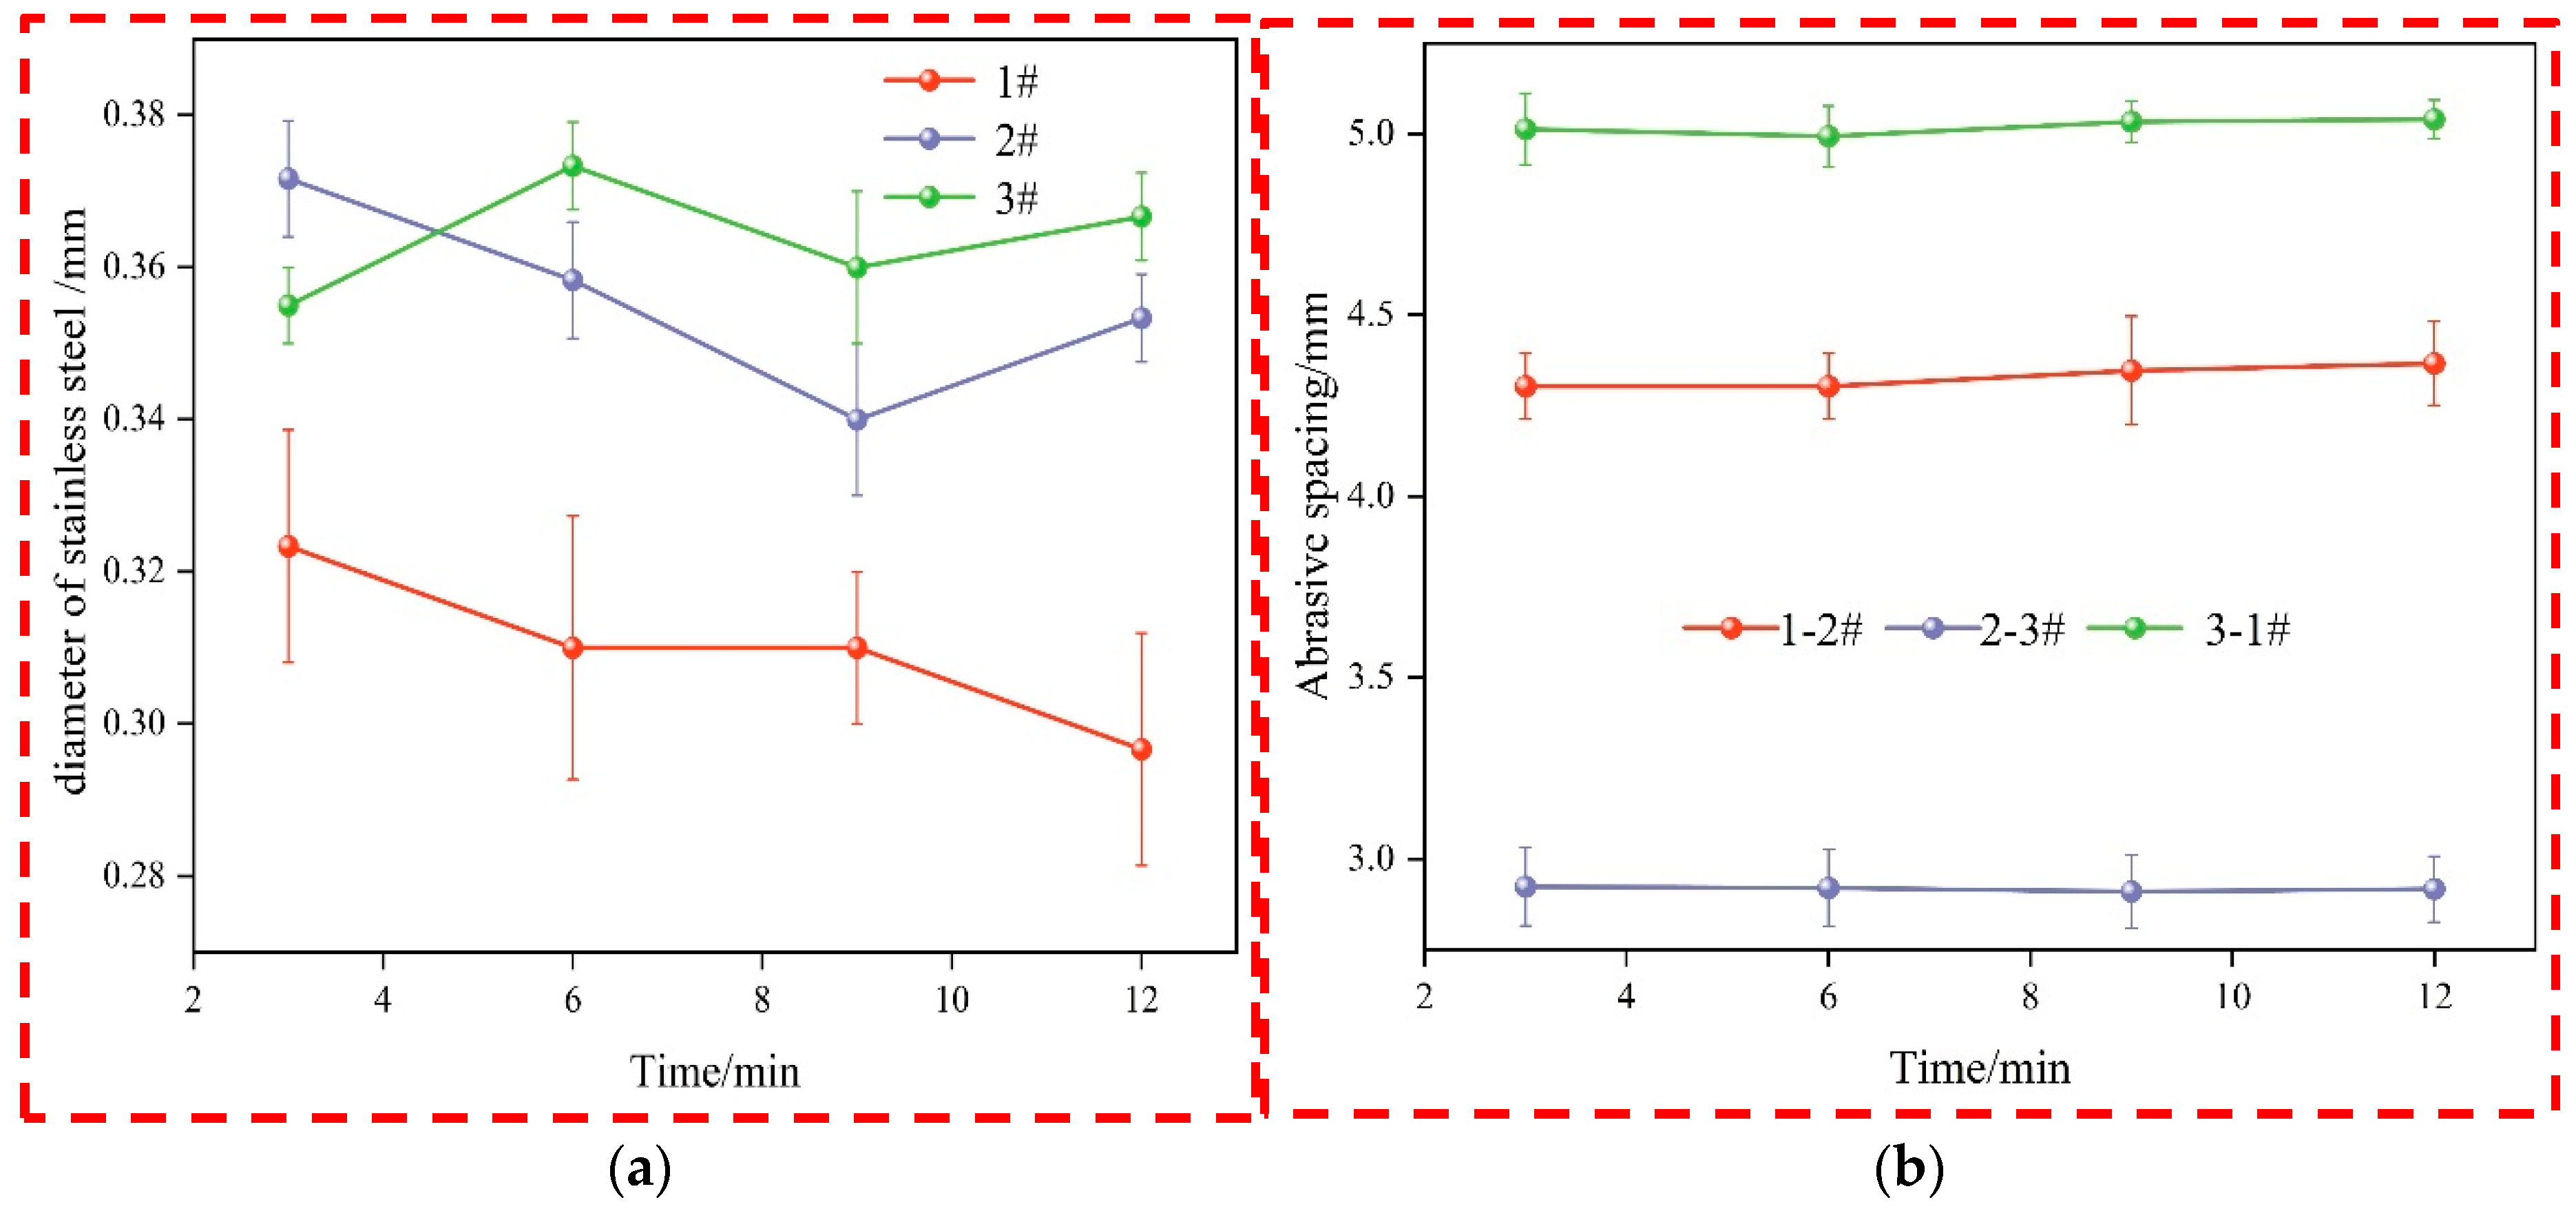
A single-factor wear test of the SR-FAPP was carried out with a 5 N weight. The morphology of the SR-FAPP after 2 days of wear is shown in Figure 10, and the change in grain size and grain spacing after wear is shown in Figure 11. The data of three abrasive grains were collected, respectively. With the increase in wear time, the particle size of abrasive grains changed, but the change range was small, that is, with the increase in wear time, the exposed area of the abrasive grains could be kept well. This indirectly shows that under the same force, the abrasive grains gave way on the surface of the SR-FAPP. It can be seen from the change in grain spacing that the SR-FAPP had a certain toughness. When the grain size and grain spacing changed together, it was found that the abrasive grains yielded in the normal direction.
Figure 12 shows the 3D surface morphology of the abrasive particles after wear with time, and Figure 13 shows the surface profile change in the SR-FAPP after wear. The surface roughness increased at first, then decreased, and then increased again, which indicates that with the increase in wear time, the surface of the abrasive particles gradually began to wear, but there was no phenomenon wherein the abrasive particles fell off the surface of the SR-FAPP with the increase in time, which indicates that the SR-FAPP had good durability and a smooth performance in the wear process.
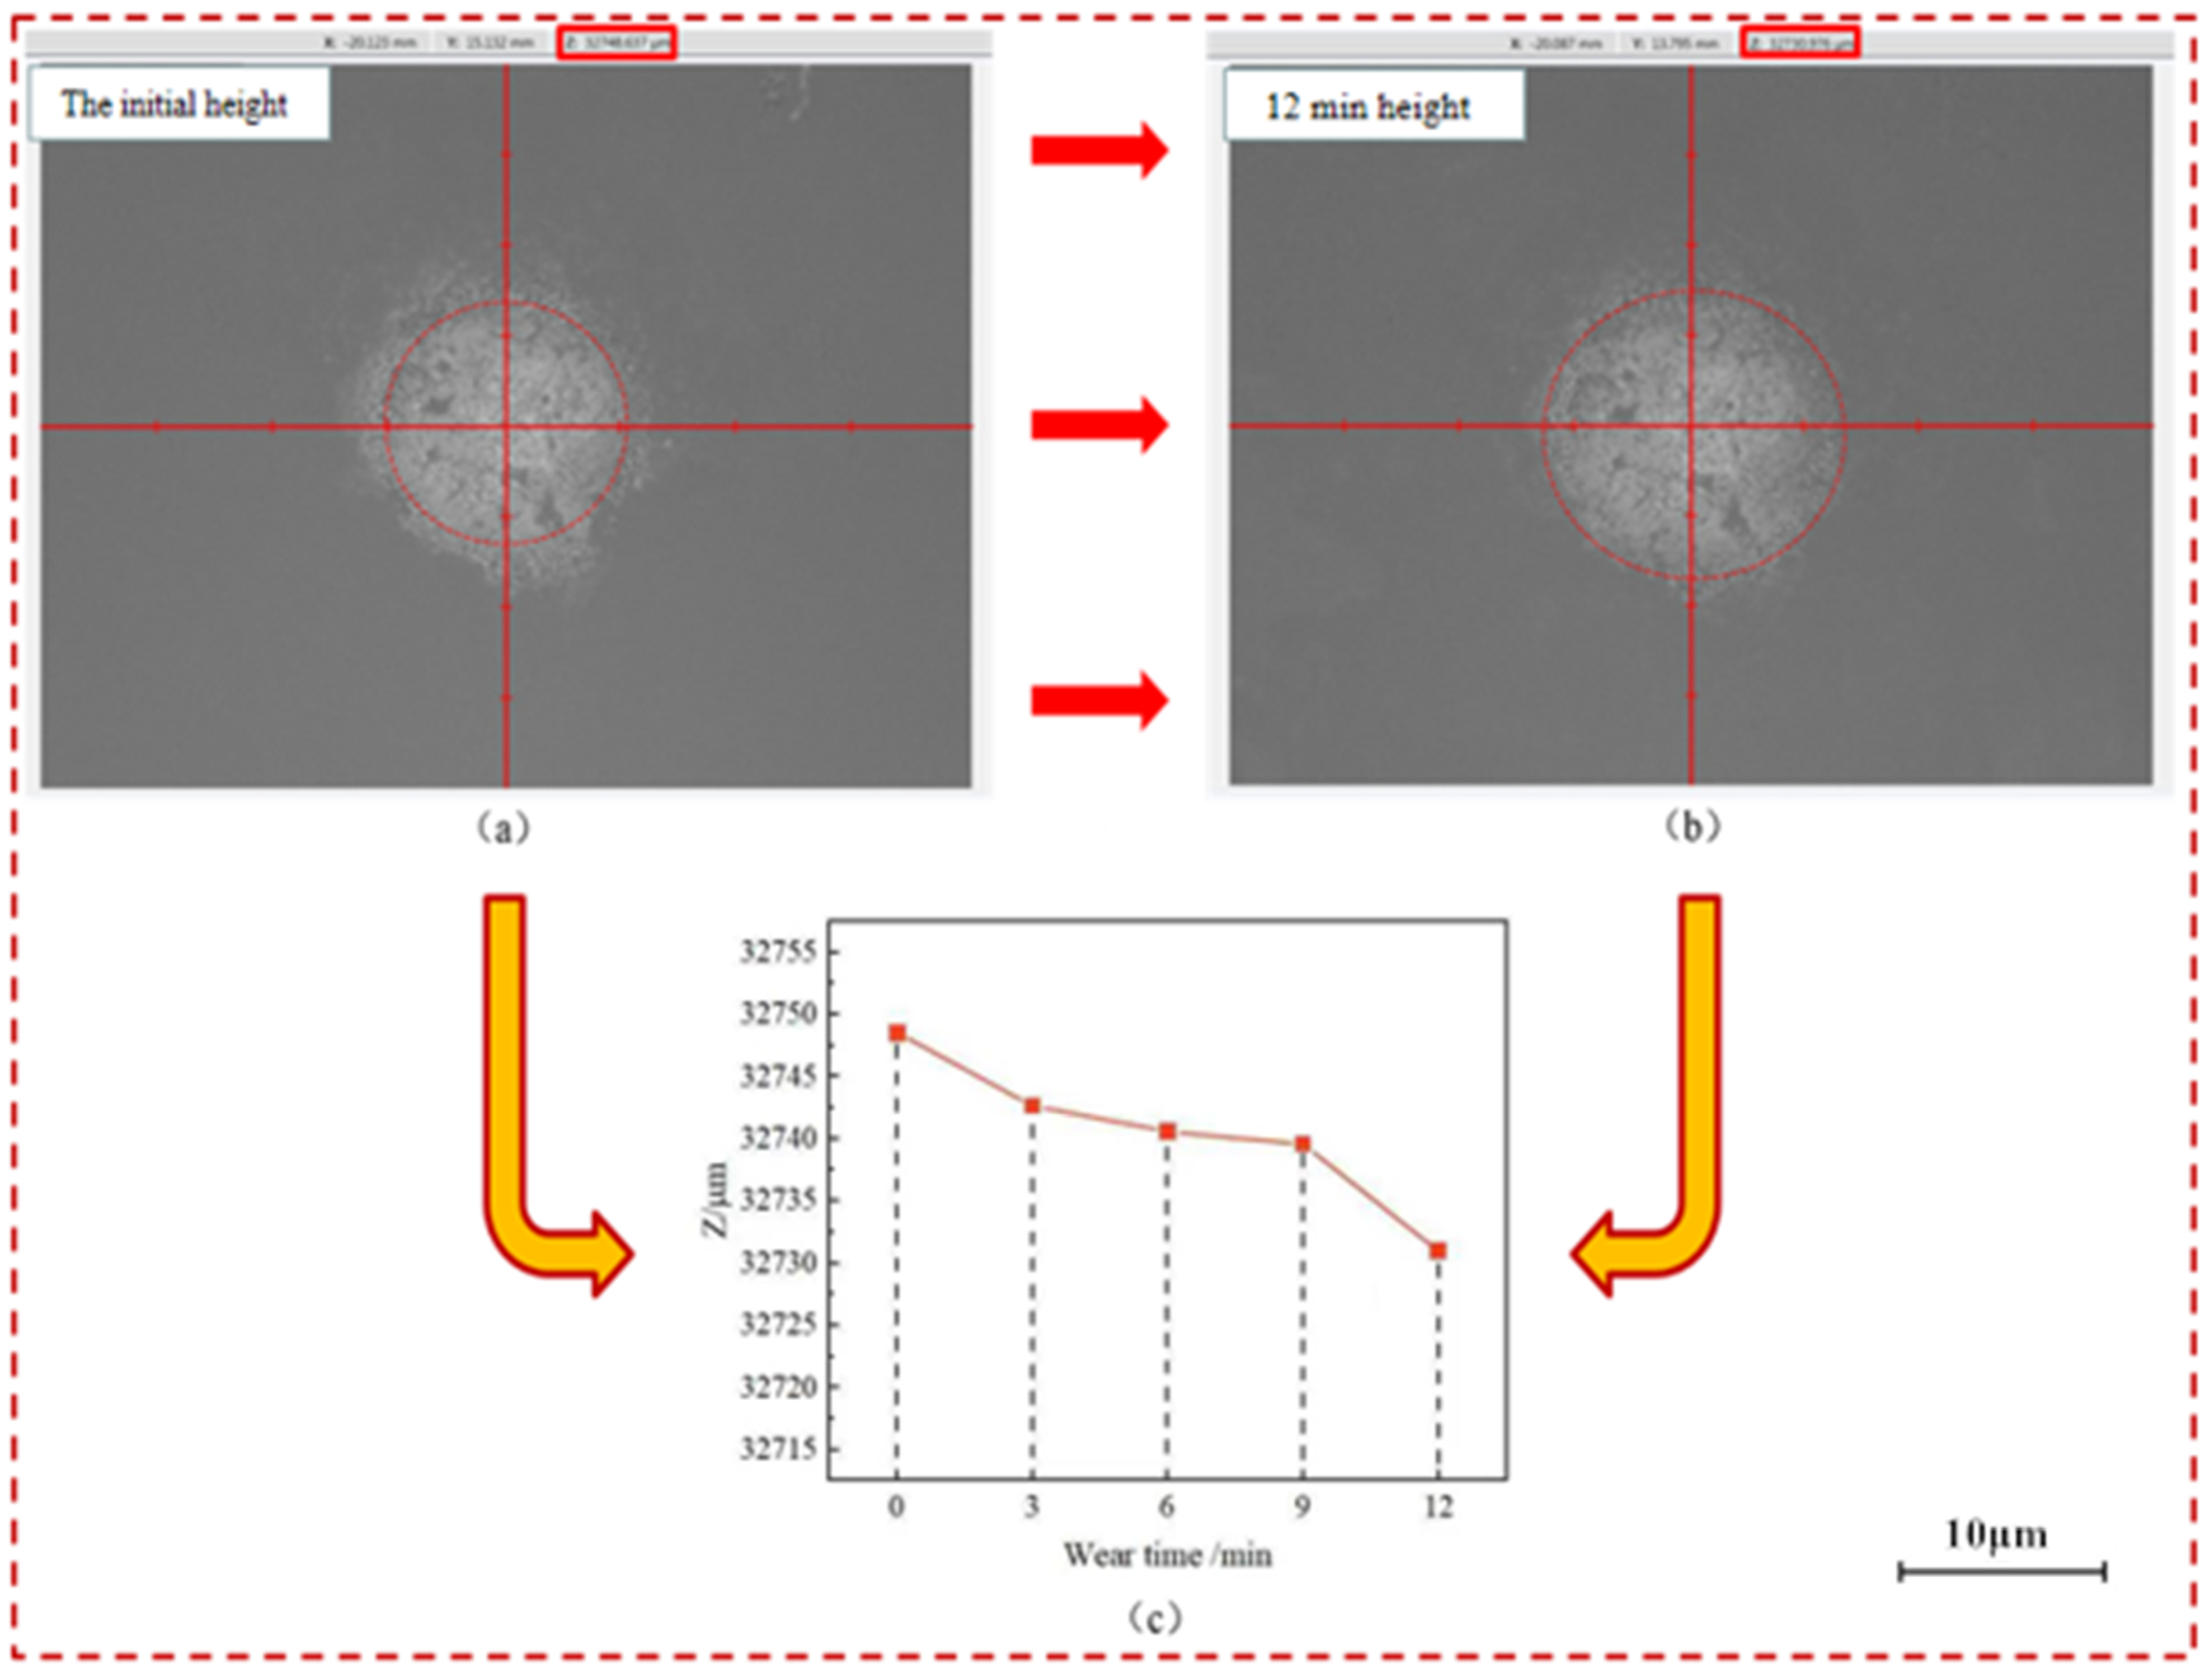
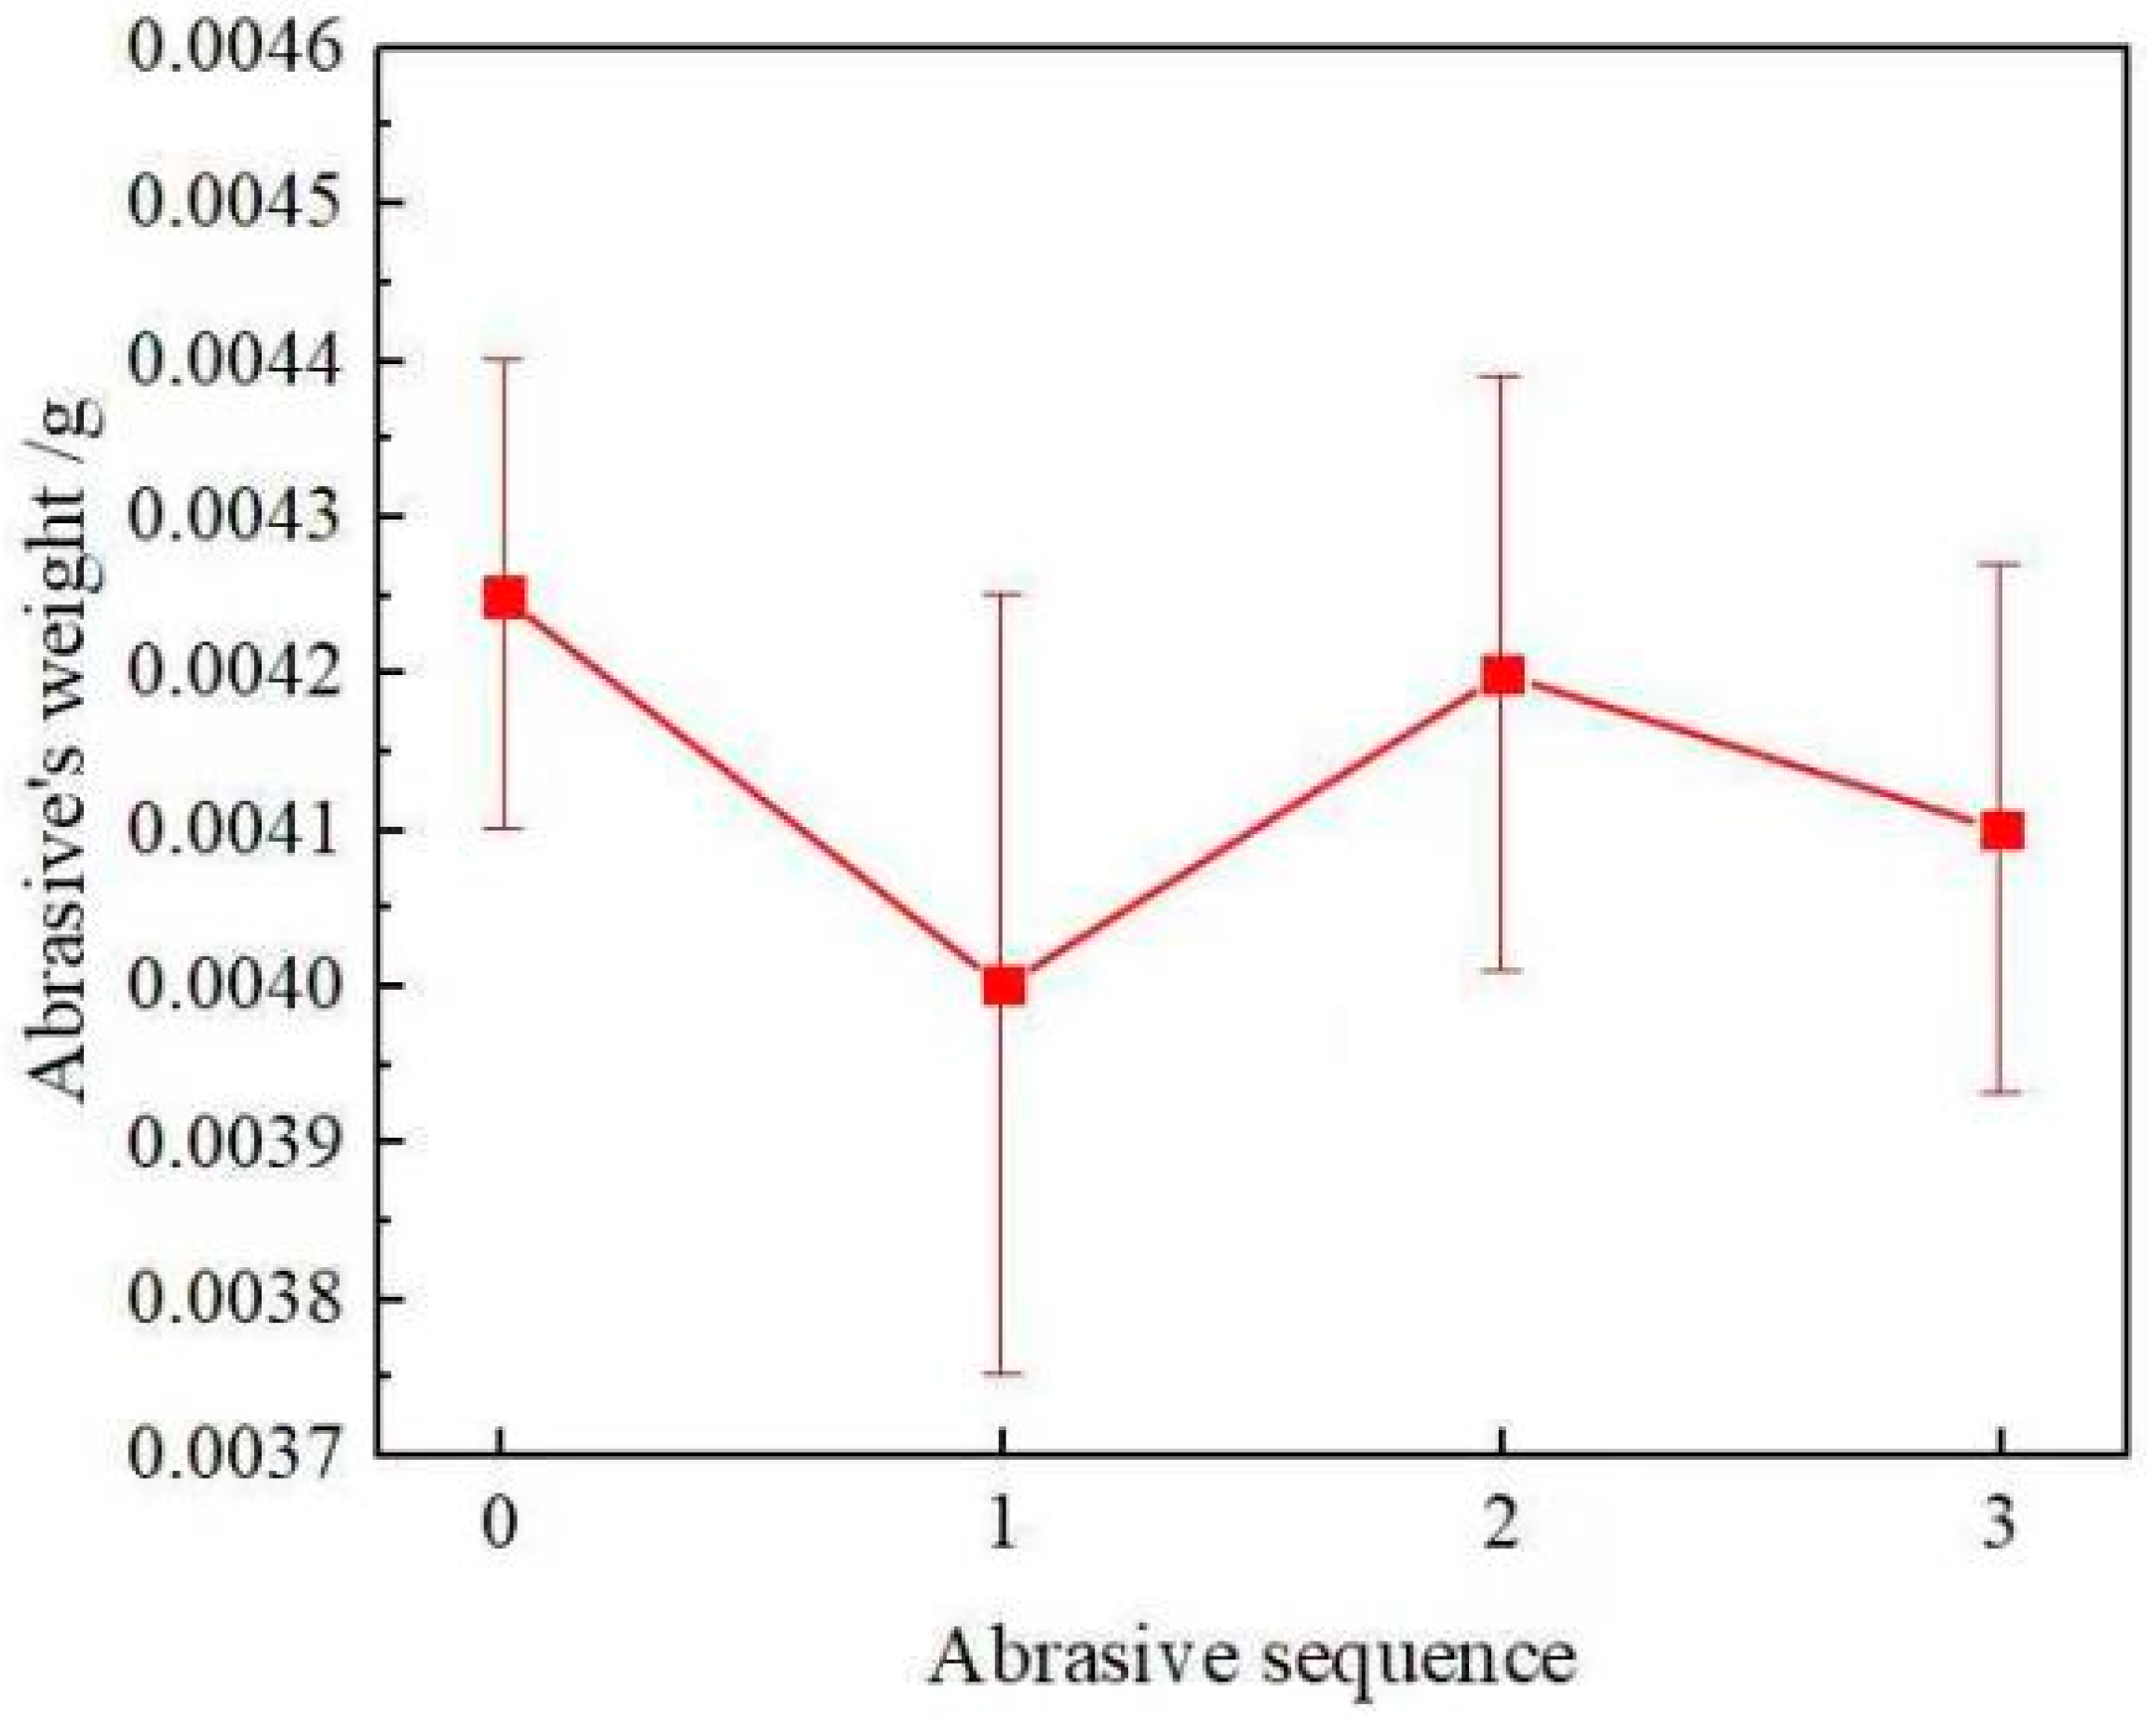
Figure 14 shows the normal displacement of the abrasive particles under the change in wear time. In the ContourGT-K, the change in the stripe position on the surface of the abrasive particles represented the change in the normal position of the abrasive particles on the surface of the polishing pad. When worn for 3–6 min, the exposed area of the abrasive grains was the largest. With the increase in time, the abrasive grains retreated on the surface of the SR-FAPP. The Z-axis value of the ContourGT-K shows the retreat height of the abrasive grains. After the test was finished, we took down the abrasive grains and weighed them. The change in the abrasive grain mass is shown in Figure 15. The mass of the abrasive grains before wear was 0.00425 g, and the mass of the three abrasive grains after wear had different degrees of change, though the change range was very small. The reason is that the exposed height of the abrasive grains on the SR-FAPP surface was smaller than the diameter of the abrasive grains, and the normal force on the abrasive grains was decomposed by several abrasive grains on the SR-FAPP surface and the force generated was not enough to make all the abrasive grains the same level, and only some of the abrasive grains with higher exposed heights were forced to reach the same level.

4. Single-Crystal SiC Wafer CMP

As shown in Table 2, the polishing conditions were as follows: Al2O3 abrasive grains were used, and the polishing pads were W28 (approximately 28 μm), W14 (approximately 14 μm), W7 (approximately 7 μm), and W3.5 (approximately 3.5 μm), respectively, and the abrasive grain content was 3 g/100 mL. Before each polishing, the polishing pads were trimmed for 3 min with a diamond dresser. After the experiment, the workpiece was dried, and its surface quality was measured by a Brooke three-dimensional profilometer.
In the comparative experiment of the free abrasive polishing and the fixed abrasive polishing, the abrasive particles were all Al2O3 abrasive particles, and a series of polishing tests was carried out by changing the particle size. In the process of the chemical mechanical polishing of the SiC wafer, the hydrogen peroxide in the polishing solution was easily decomposed at room temperature, and the friction between the wafer and the polishing pad was caused by the interaction. Under the combined action of friction and pressure, transient heat was generated between the contact surface of the SiC wafer and the polishing pad. As the polishing solution entered the contact surface between the wafer and the polishing pad, the decomposition of the hydrogen peroxide in the polishing solution accelerated. Under the combined action of hydroxyl radicals from the decomposed hydrogen peroxide and the external oxygen, a highly active SiO2 layer was formed on the surface of the SiC wafer, which could be dissolved by an alkaline solution, and the material was removed from the surface of the wafer by the mechanical action of the abrasive particles.
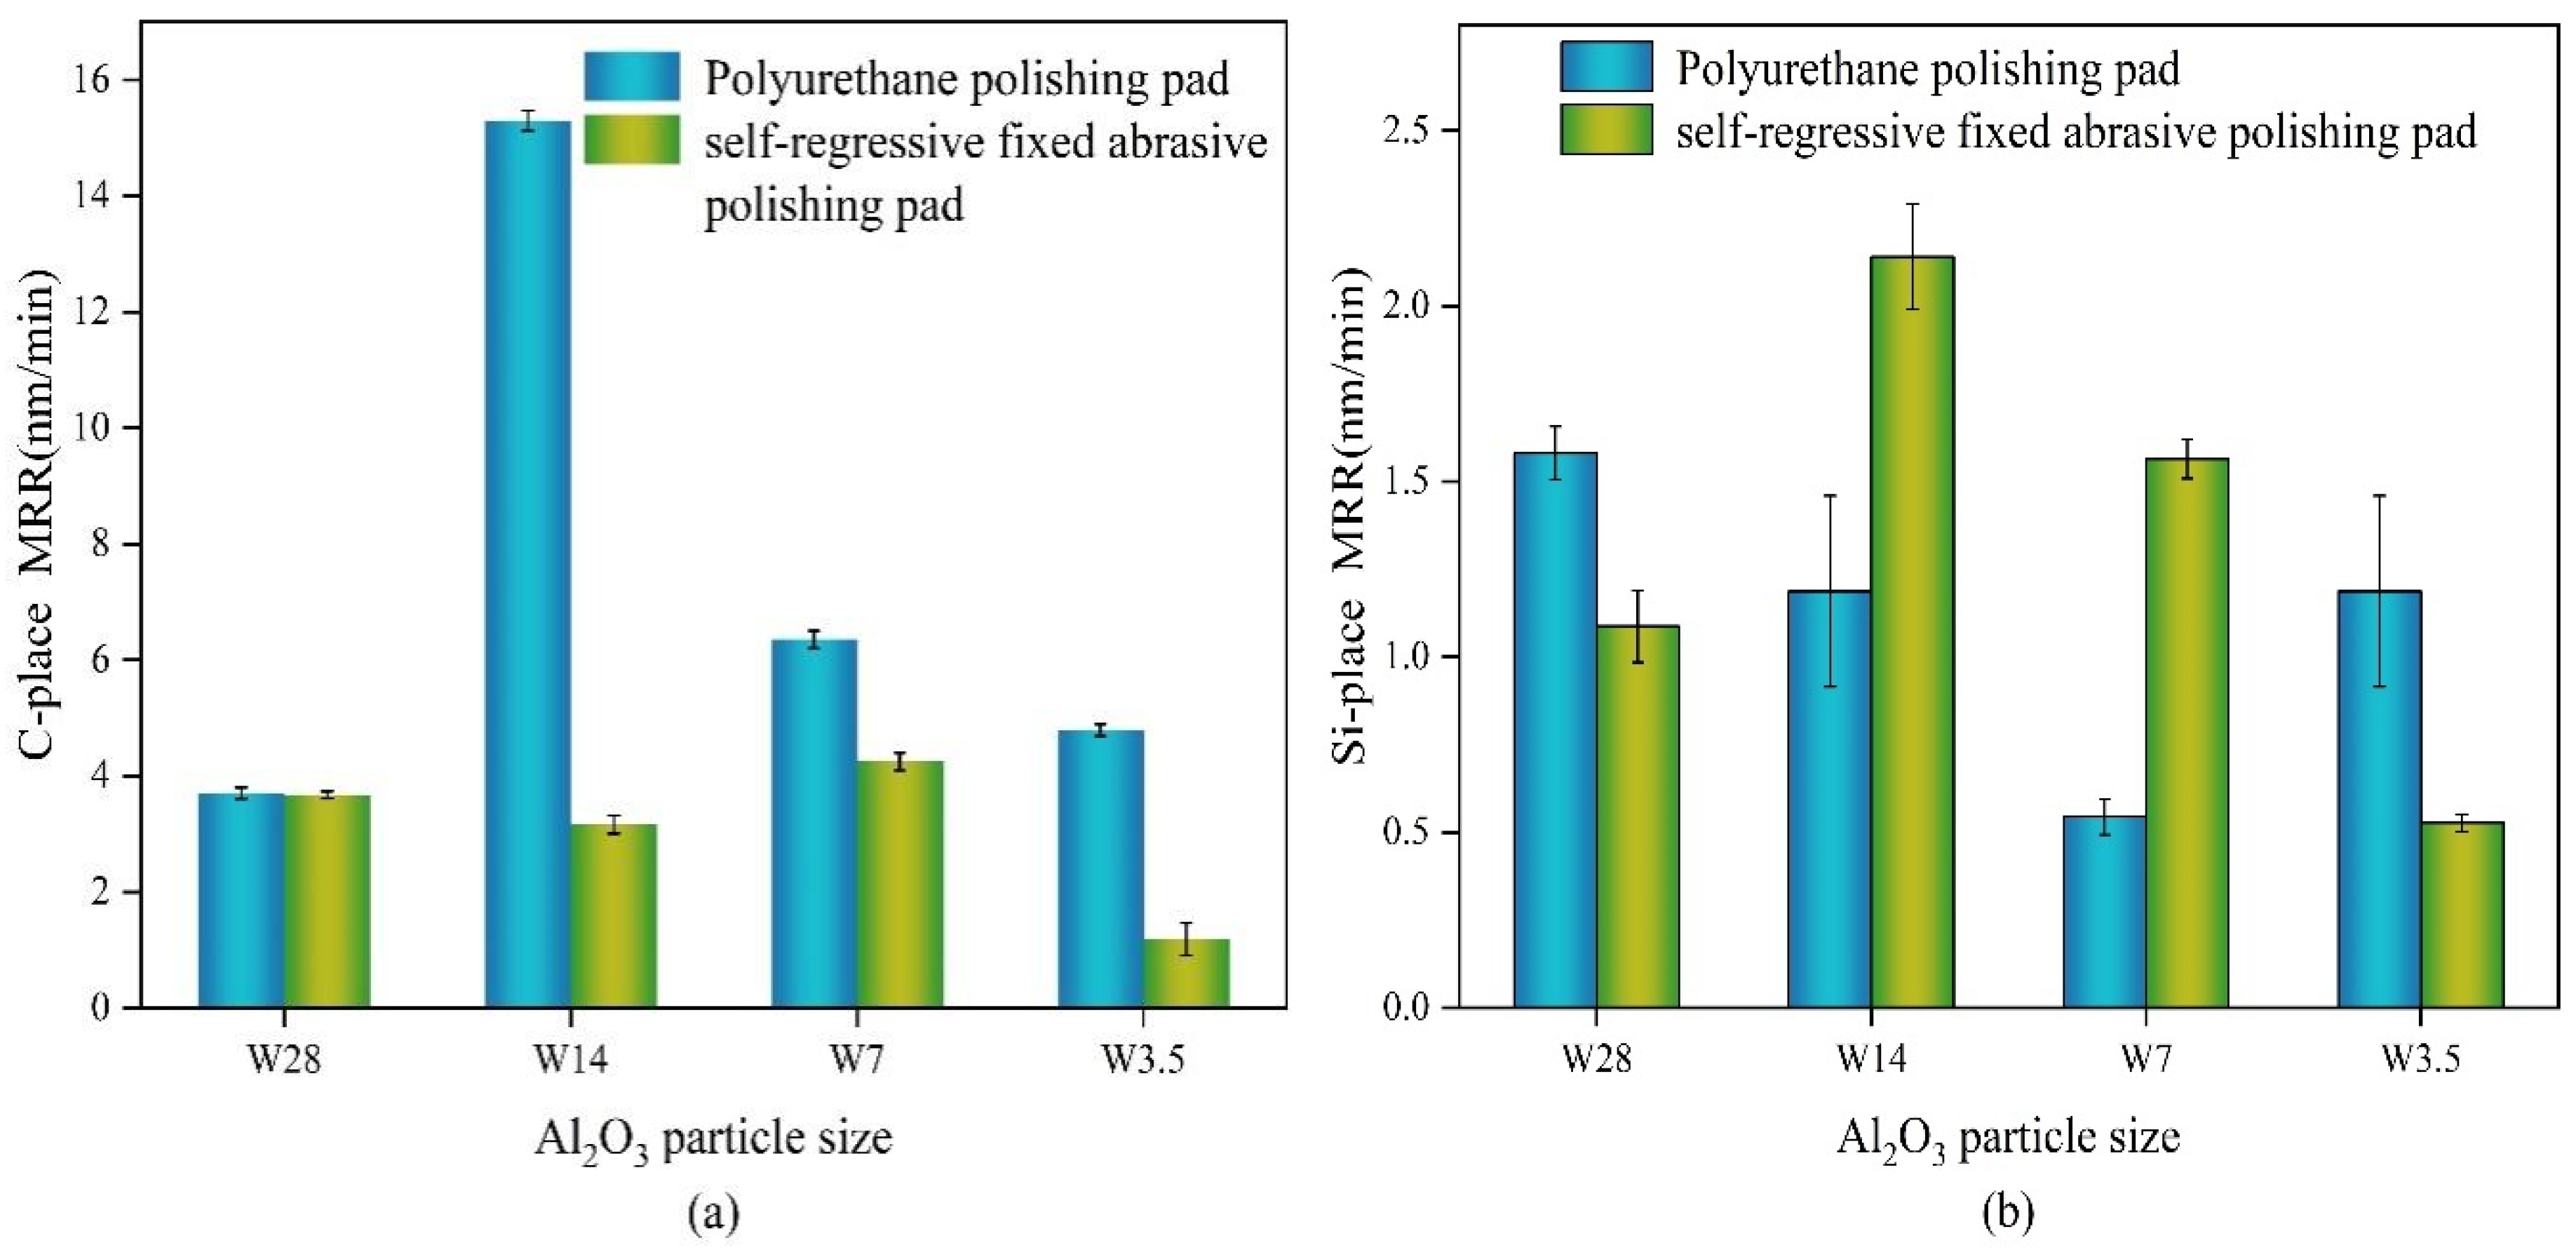
Figure 16 shows the material removal rates of the C and Si surfaces of the SiC wafer after polishing with the free abrasive particles and the self-regressive fixed abrasive. It can be seen from Figure 16a that under the same abrasive content, with the change in particle size, the material removal rate of the C-surface polished by the free abrasive particles increased at first, and then decreased with the decrease in the abrasive particle size, and the material removal rate reached the maximum of 15.385 nm/min when the abrasive particle size was W14. After consolidated abrasive polishing, the removal rate of the C-surface material showed a wave trend of decreasing, increasing, and then decreasing. When the abrasive particle size was W7, the material removal rate was 4.244 nm/min. Under the action of the same quality of abrasive particles, the smaller the particle size, the greater the number of corresponding abrasive particles. In the polishing process of the free abrasive particles, theoretically, the effect of the large particle size on the material removal should have been more obvious, and the wafer could be removed by rolling on the surface of the polishing pad. However, in the actual polishing process, the abrasive particles would be embedded on the surface of the polishing pad. The reason for the low removal rate of the abrasive particles under the action of the large particle size may be that the abrasive particles were less embedded on the surface of the polishing pad. Most of the abrasive grains were used for the interaction and rolling between the abrasive grains, and some of the energy was used to remove the polishing pad, resulting in energy waste. Under the action of the W7 and W3.5 particle sizes, the removal rate decreased because of the excessive number of abrasive particles, and most of the abrasive particles still moved on the surface of the polishing pad after being embedded in it. The interaction between the embedded abrasive particles and the rolling abrasive particles counteracted the cutting effect of the abrasive particles on the SiC wafers, and thus the material removal rate decreased. Under the action of the consolidated abrasive particles, the material removal rate of the wafer was not very different. From the numerical value, it can be seen that the material removal rate of the C-surface after polishing had a certain change, but the change range was small. This is because the polishing pad with the fixed abrasive particles was self-yielding, and the convex height of the abrasive particles on the surface of the polishing pad was inconsistent. Under the joint action of the wafer and the normal load, the abrasive particles could act on the polishing pad after being stressed, and the abrasive particles were at the same level within the concession threshold. Because of the identical quality of the abrasive particles, there were more abrasive particles with small sizes. On the fixed abrasive polishing pad, the material removal rate of the large particles was not high because the swelling rate of the polishing pad was higher and the resistance of the water molecules entering the surface of the polishing pad was correspondingly lower, and so the holding force of the substrate of the polishing pad to the abrasive particles would be reduced and the abrasive particles would fall off of the surface of the polishing pad under the action of the tangential force if they were not fully utilized [34,35,36].
It can be seen from Figure 16b that the material removal rate of the polished Si surface by the free abrasive particles first decreased and then increased with the decrease in particle size. When the particle size was W28, the material removal rate rose to 1.592 nm/min, and the material removal rate of the polished Si surface by the consolidated abrasive particles increased first and then decreased with the decrease in particle size. When the particle size was W14, the material removal rate was 2.122 nm/min. Compared with the Si surface of the SiC wafer, the material removal rate of the C surface was higher than that of the Si surface, regardless of whether the free abrasive particles or the consolidated abrasive particles were polished. In the related literature, it was found that the crystal dislocation of the C-plane was more likely to occur in the nano-scale processing of the Si-plane than that of the C-plane, which is contrary to the experimental results in this paper.
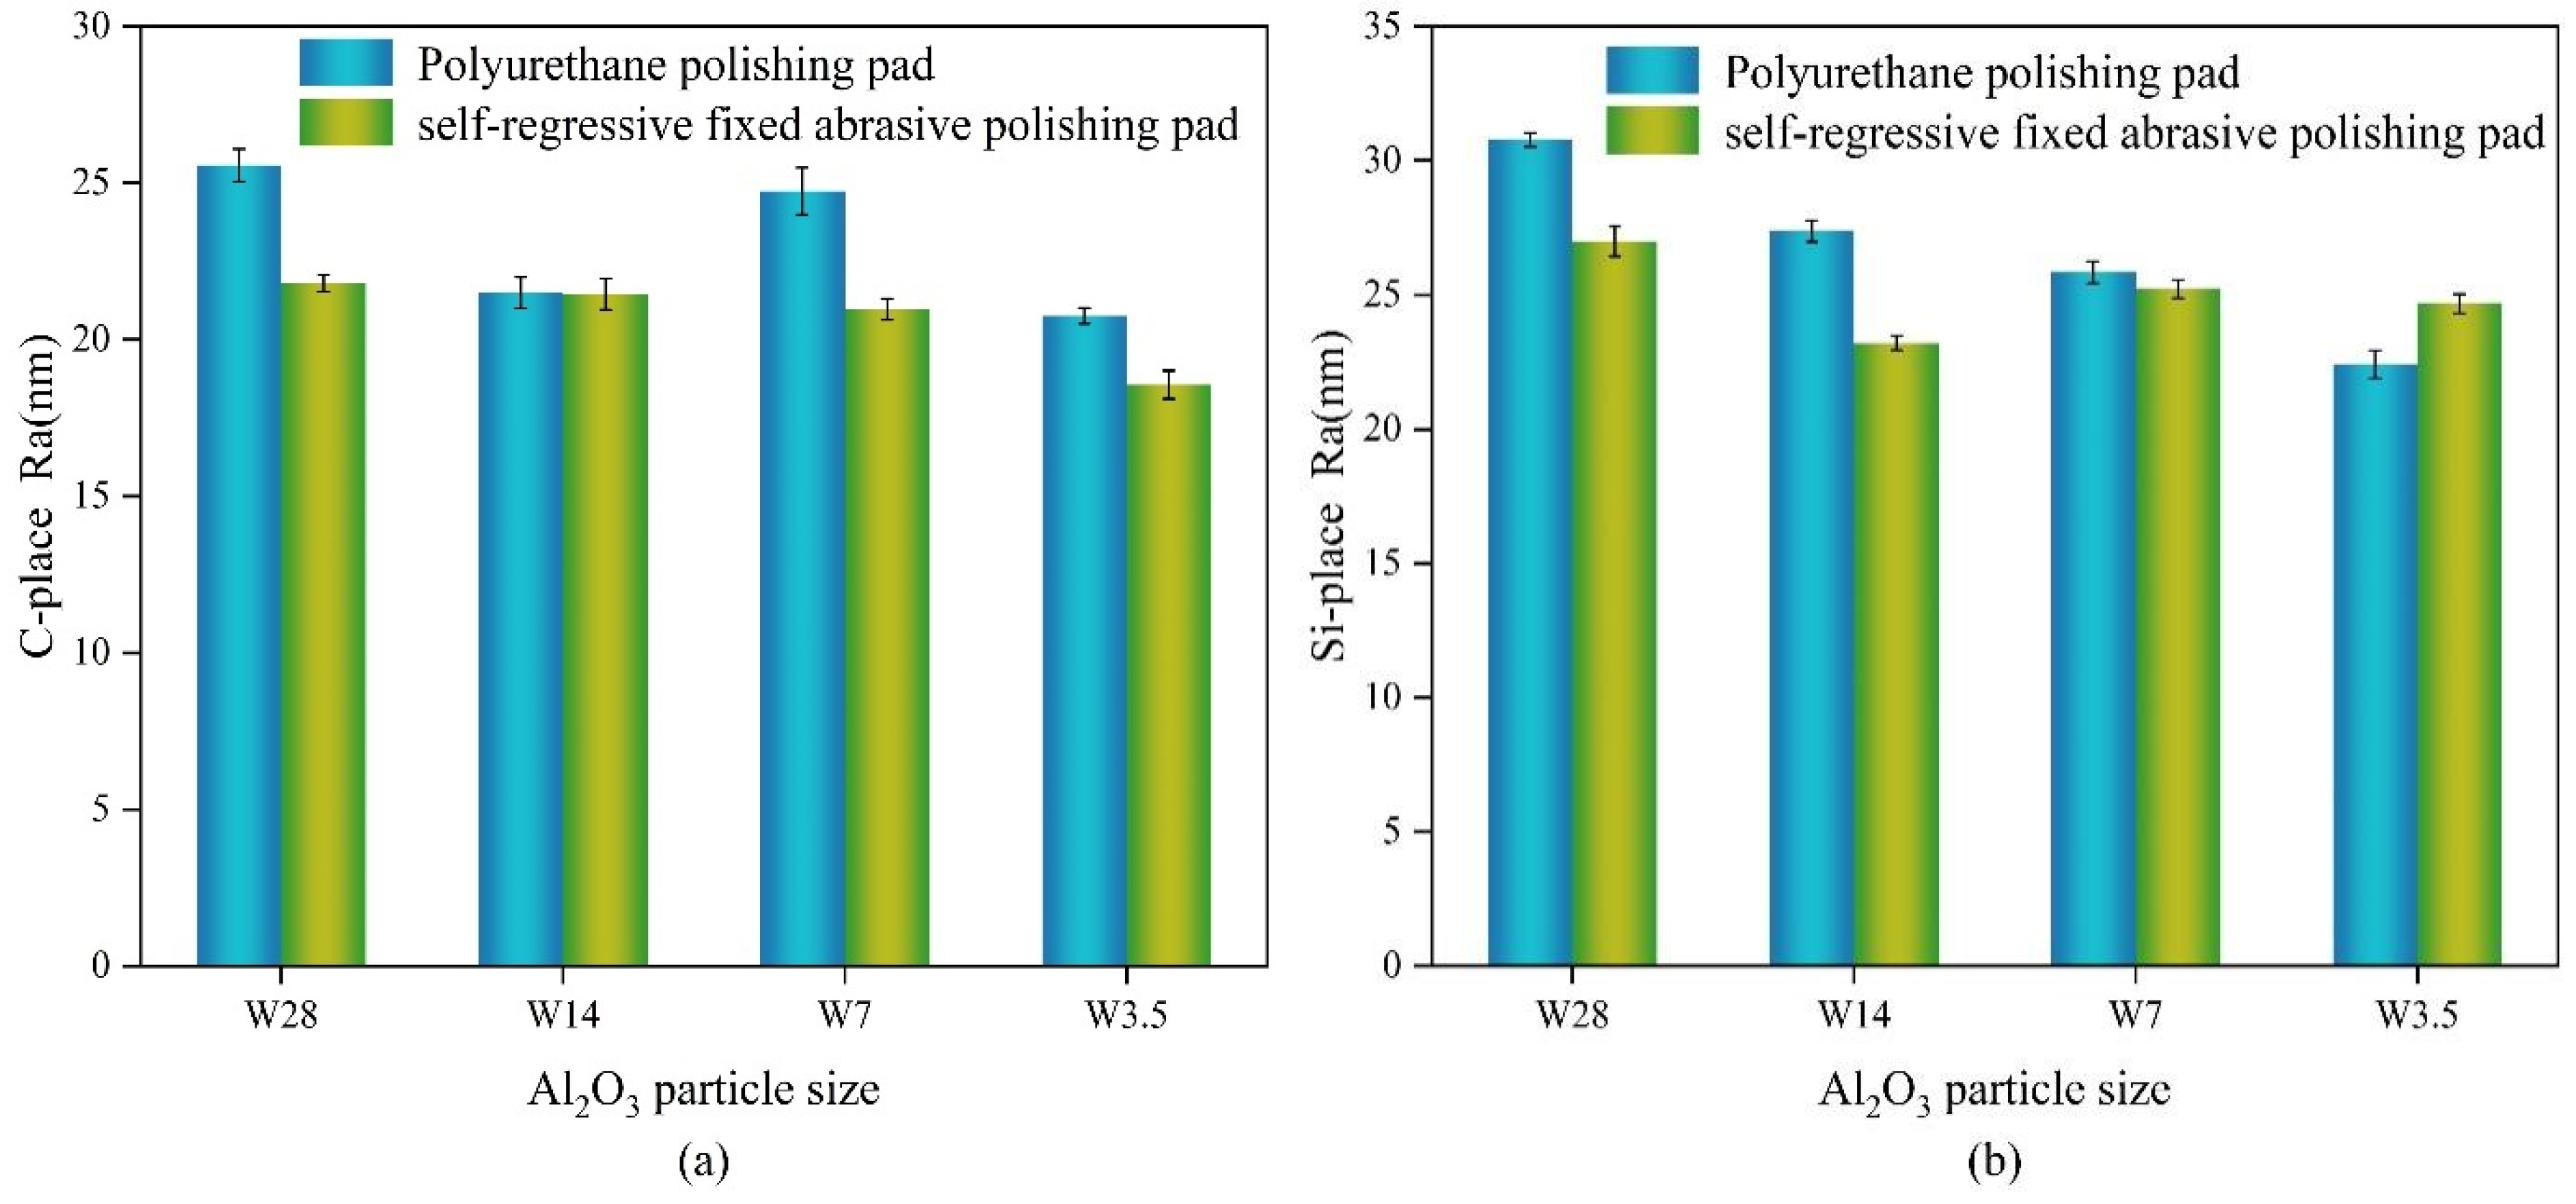
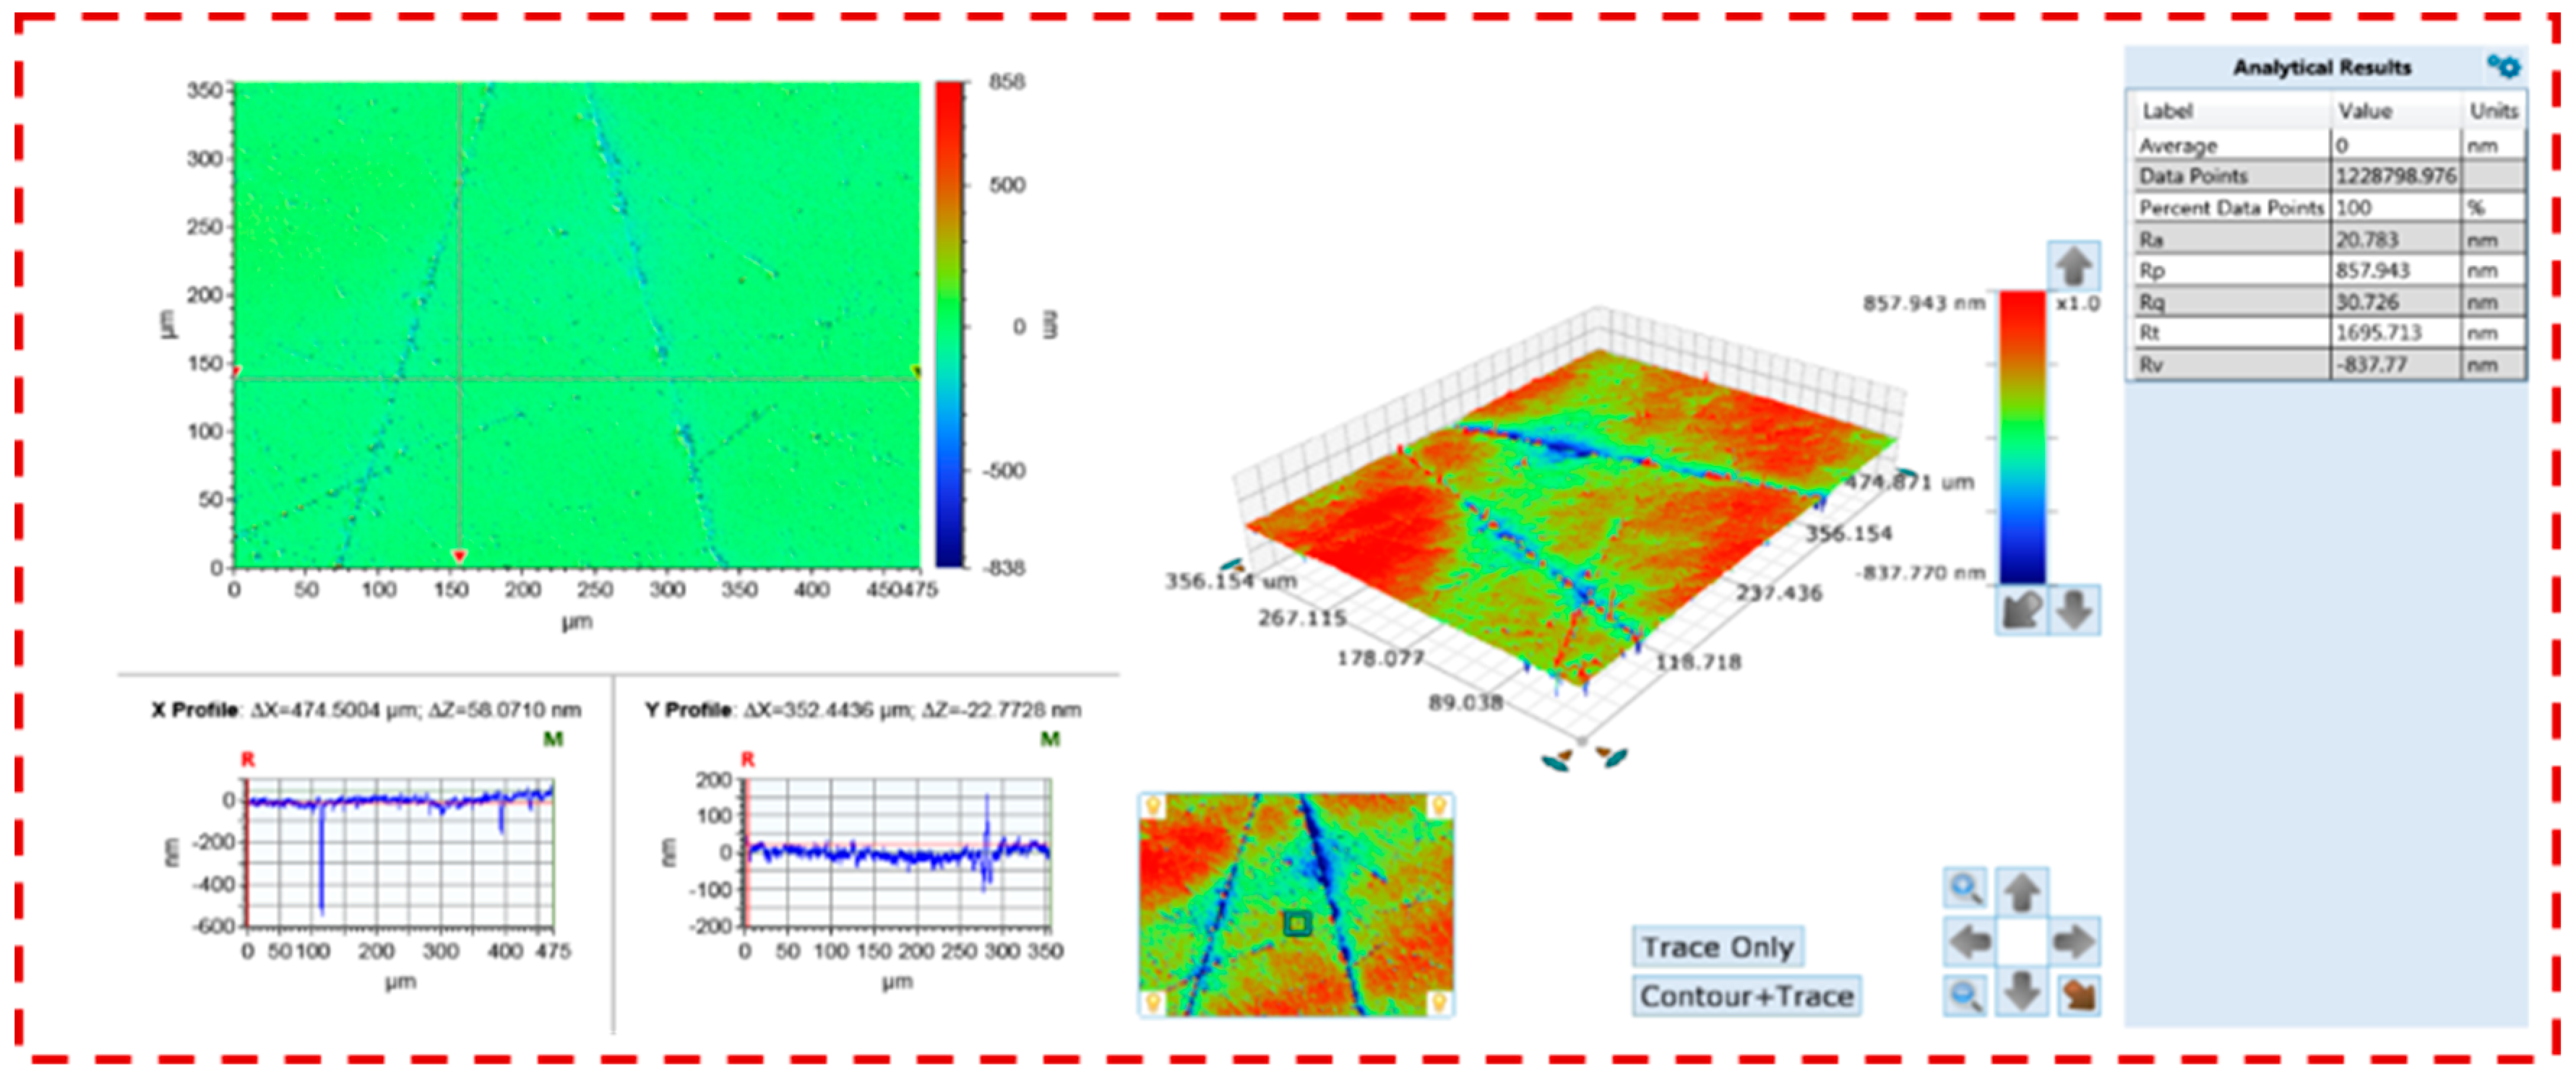
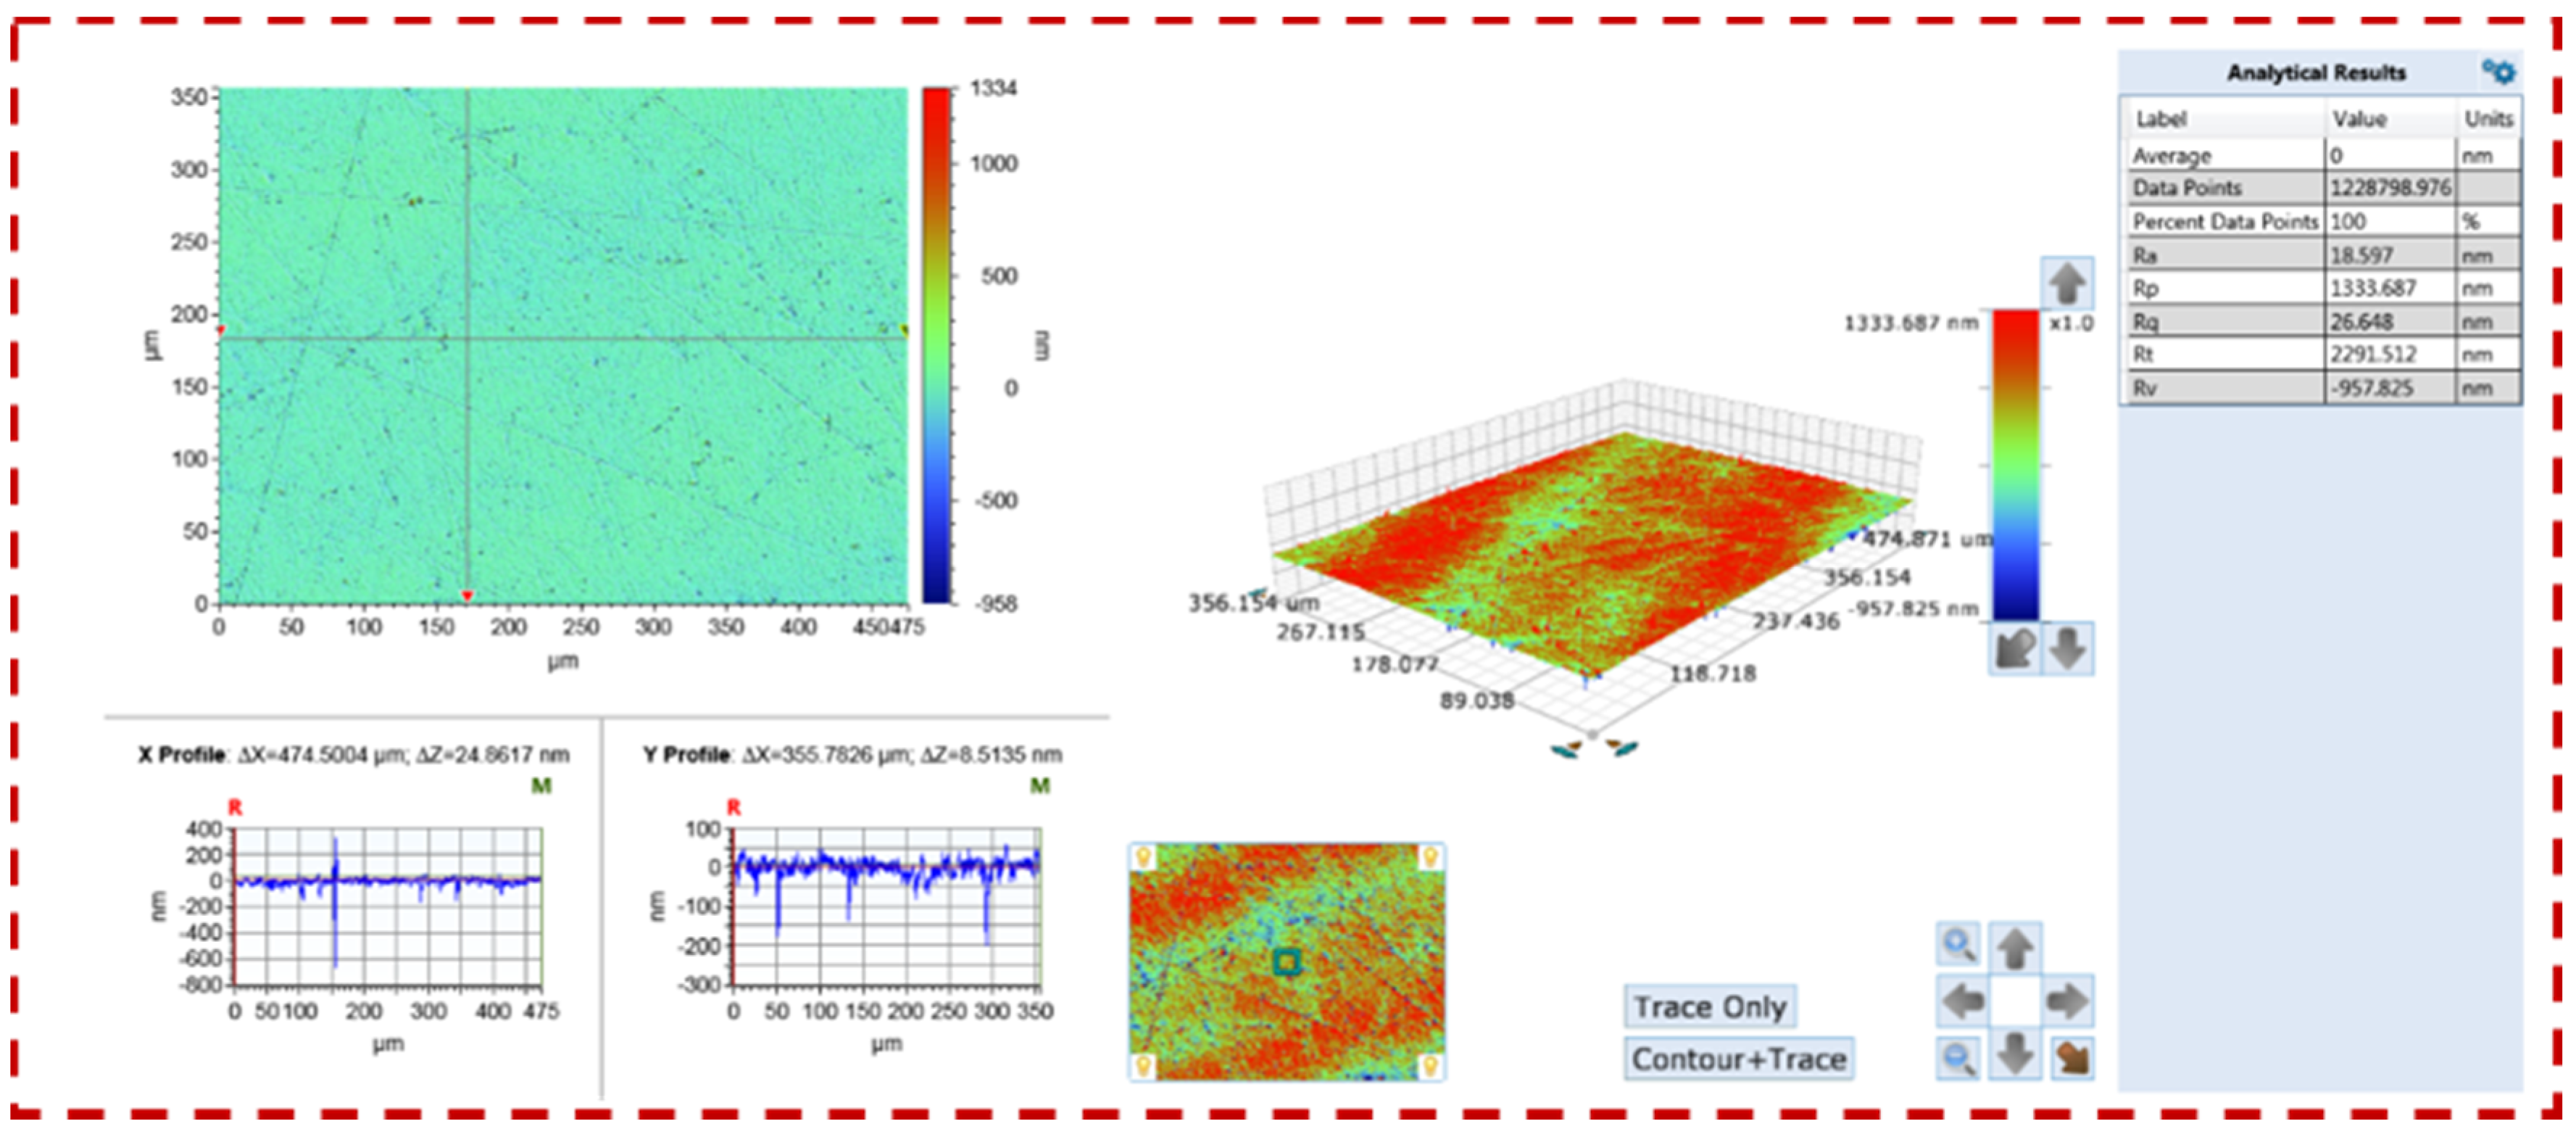
Figure 17 shows the surface roughness of the C and Si surfaces of the SiC wafer after polishing with the free abrasive particles and the self-regressive fixed abrasive. It can be seen from Figure 17a that with the change in particle size, the surface roughness of the C surface polished by the free abrasive particles first decreased and then increased with the decrease in particle size. When the abrasive grain size was W3.5, the minimum surface roughness was 20.783 nm, as shown in Figure 18. The surface roughness of the C-plane showed a continuous decreasing trend after the consolidated abrasive particles were polished. When the particle size was W3.5, the minimum surface roughness was 18.597 nm, as shown in Figure 19. It can be seen from the 2D topography of Figure 18 and Figure 19 that there were many large and deep scratches in the 3D topography of the workpiece after polishing with the free abrasive particles, while the surface scratches after polishing with the fixed abrasive particles were obviously reduced and the surface quality was obviously improved.
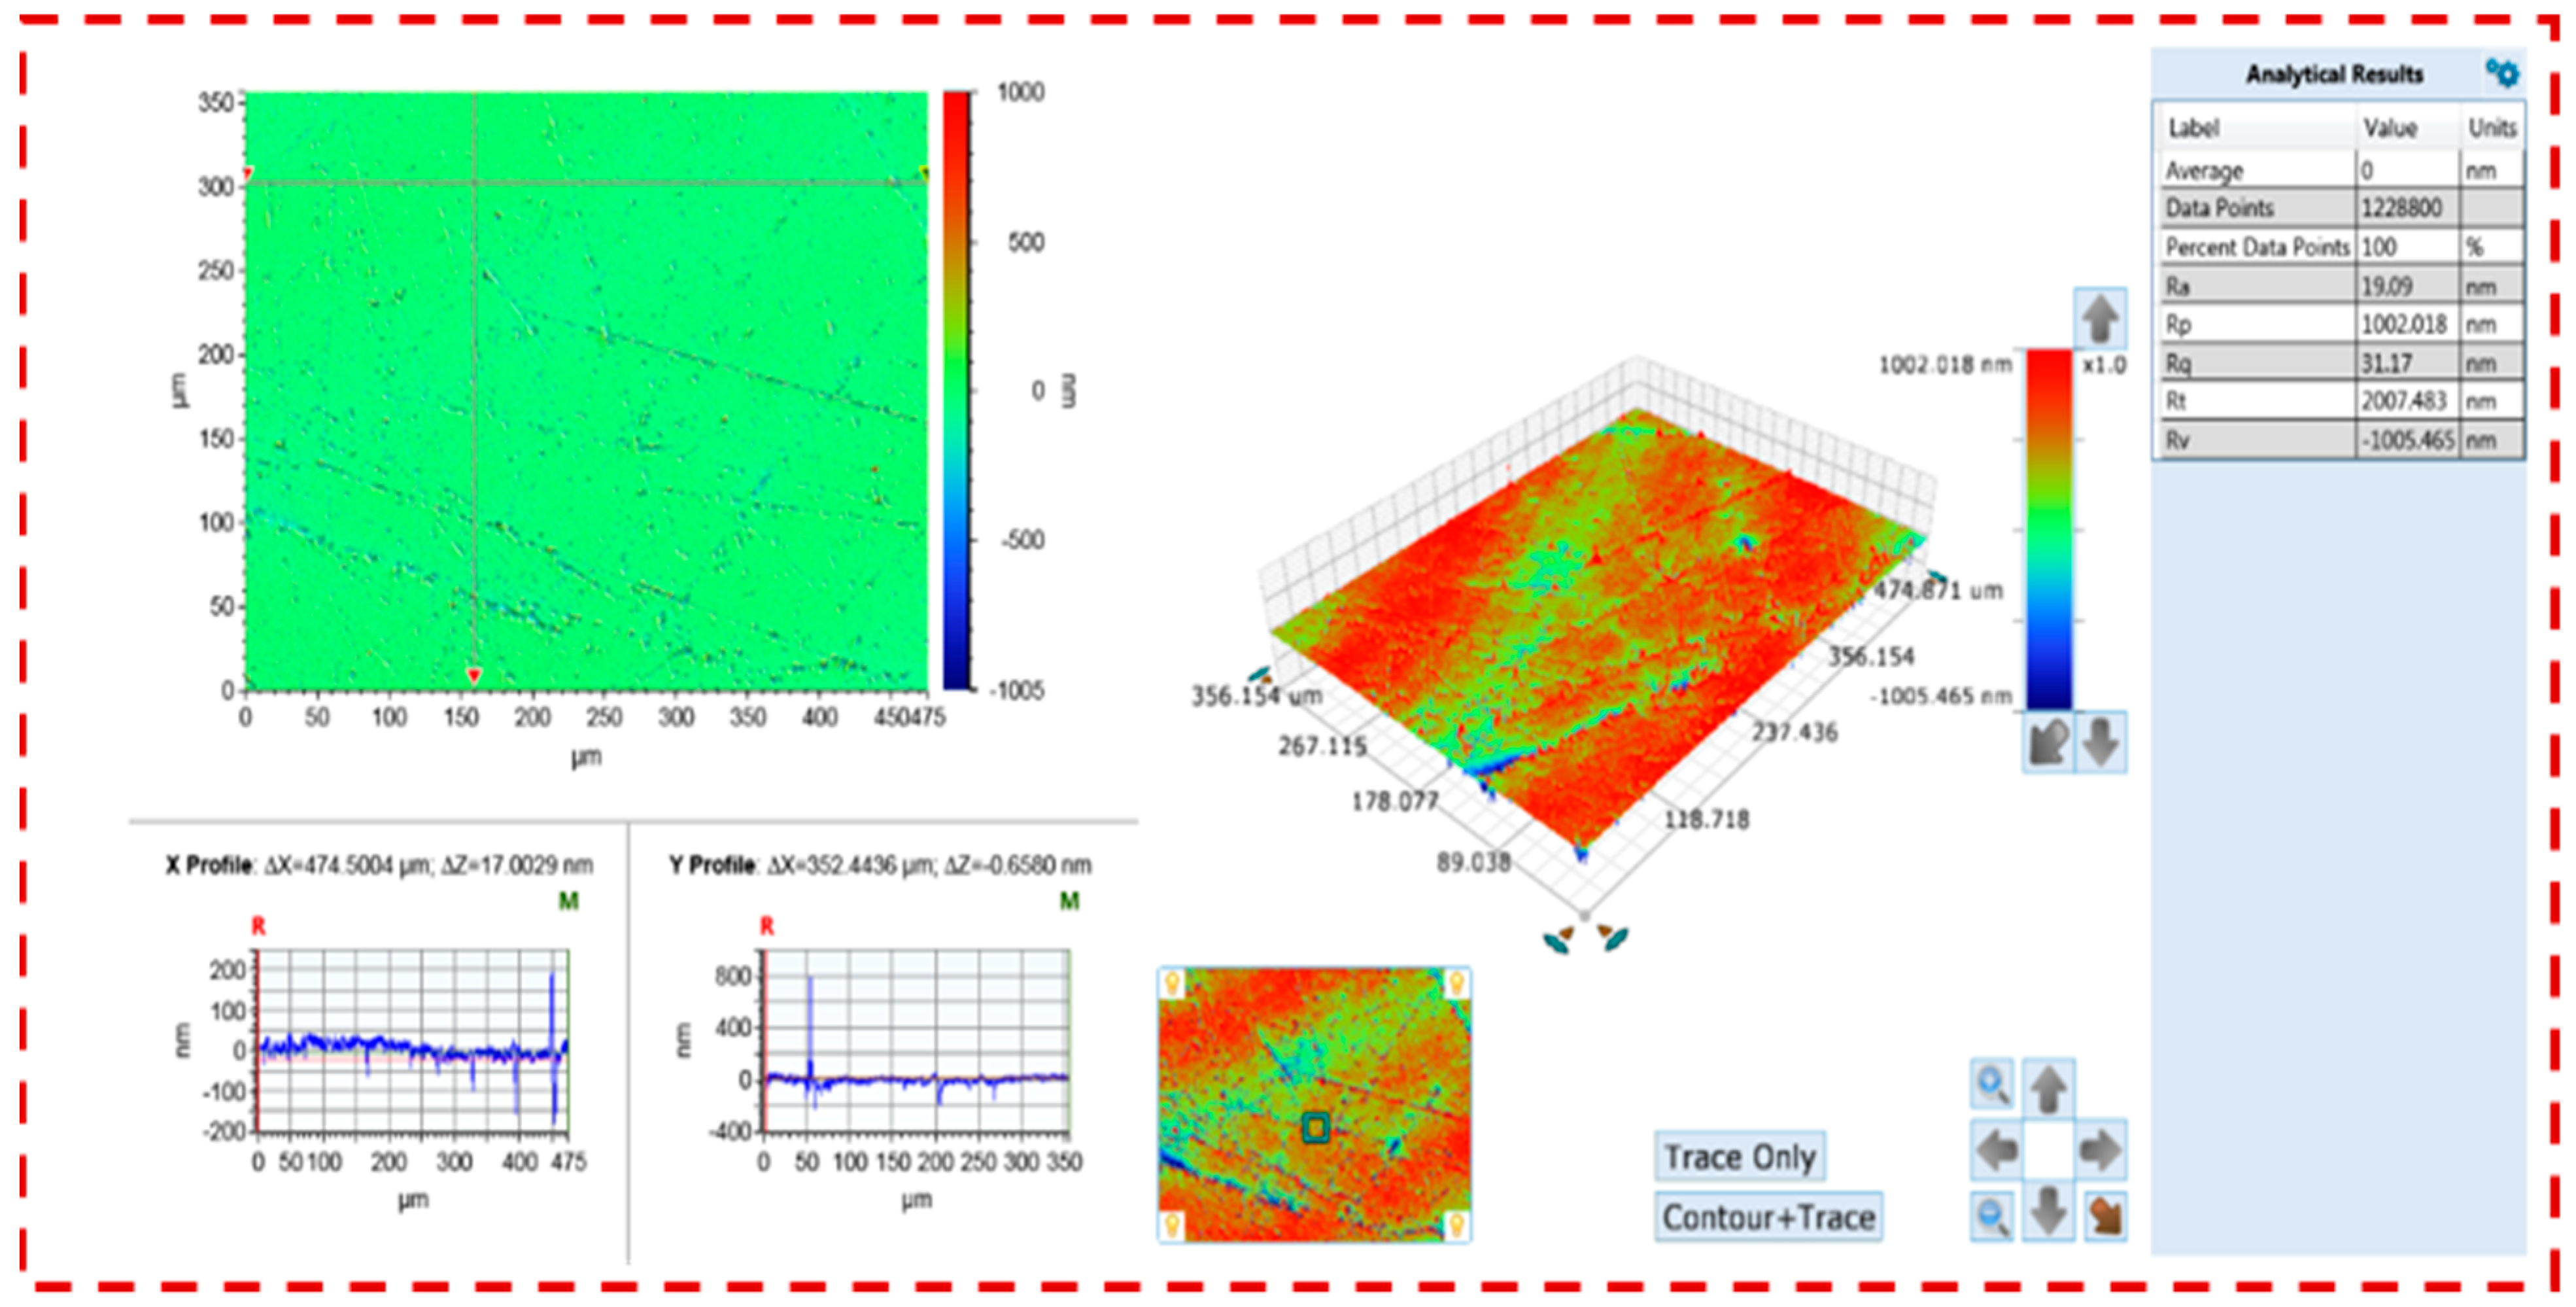
It can be seen from Figure 17b that the surface roughness of the Si surface polished by the free abrasive particles showed a continuous decreasing trend with the decrease in particle size. When the particle size was W3.5, the minimum surface roughness was 19.09 nm, as shown in Figure 20. After polishing with the consolidated abrasive particles, the surface roughness of the Si surface first decreased and then increased with the decrease in particle size, and it remained stable. When the particle size was W14, the surface roughness was the minimum (23.117 nm), as shown in Figure 21. By comparing the surface roughness of the C and Si surfaces, it was found that the surface roughness of the C and Si surfaces polished by the fixed abrasive particles was better than that of the free abrasive particles.

5. Conclusions

In this paper, the preparation and performance of a self-regressive fixed abrasive polishing pad (SR-FAPP) are described, and its performance is evaluated according to the performance of the existing polyurethane polishing pad on the market, and the CMP results of single-crystal SiC wafers are compared according to the same experimental conditions.
(1) The SR-FAPP is a new polishing pad based on hydrophilicity.
(2) By comparing the surface and the internal structure of the SR-FAPP, it was found that the material removal ability of the polyurethane polishing pad was stronger.
(3) By studying the holding force and retreat threshold of the abrasive particles on the SR-FAPP, it was found that the substrate had enough holding force for the abrasive particles, and the polishing pad had a certain self-sharpening capability. After wear, it was found that the threshold value of the abrasive grains on the polishing pad surface was approximately 20 μm.
(4) After the CMP of the SiC wafer with the polyurethane polishing pad and the SR-FAPP, it was found that the material removal rate of the former in polishing the SiC wafer was 75% higher than that of the latter, and the surface roughness of the latter in polishing the SiC wafer was 75% higher than that of the former. In the micro-morphology, it could be clearly observed that the scratches on the surface of the SiC wafer were obviously reduced after polishing with the latter, which effectively improved the unevenness of the scratches on the surface of the SiC wafer after polishing.

Author Contributions

Conceptualization, J.S. and J.Y.; methodology, J.S. and Y.Z.; software, H.L.; validation, J.Y., Z.W., and H.L.; formal analysis, J.Y.; investigation, Y.Z. and J.S.; resources, J.S.; data curation, J.Y.; writing—original draft preparation, J.Y.; writing—review and editing, J.Y.; visualization, Y.Z; supervision, J.S.; project administration, Z.W.; funding acquisition, Z.W. All authors have read and agreed to the published version of the manuscript.

Funding

This study was supported by the National Natural Science Foundation of China (U1804142), the project funded by the China Postdoctoral Science Foundation (2020M672220), the Science and Technology Plan Projects of Henan province (212102210062), and the Postdoctoral Research Project of Henan Province (201903045).

Data Availability Statement

Not applicable.

Conflicts of Interest

The authors declare no conflict of interest.

References

  1. Kim, H.; Kim, H.; Jeong, H.; Seo, H.; Lee, S. Self-conditioning of encapsulated abrasive pad in chemical mechanical polishing. J. Mater. Process. Technol. 2003, 142, 614–618. [Google Scholar] [CrossRef]
  2. Wilson, S.R.; Tracy, C.J. Handbook of Multilevel Metallization for Integrated Circuits; Noyes Publications: Park Ridge, NJ, USA, 1993; pp. 97–107. [Google Scholar]
  3. Cook, L.M. Chemical processes in glass polishing. J. Non-Cryst. Solids 1990, 120, 152. [Google Scholar] [CrossRef]
  4. Patrick, W.J.; Guthrie, W.L.; Standley, C.L.; Schiable, P.M. Application of chemical mechanical polishing to the fabrication of VLSI circuitinter connections. J. Electrochem. Soc. 1991, 138, 1778. [Google Scholar] [CrossRef]
  5. Steigerwald, J.M. Chemical Mechanical Planarization of Microelectronic Materials; Wiley: New York, NY, USA, 1997; p. 48. [Google Scholar]
  6. Chen, J.; Sun, T.; Su, J.; Li, J.; Zhou, P.; Peng, Y.; Zhu, Y. A novel agglomerated diamond abrasive with excellent micro-cutting and self-sharpening capabilities in fixed abrasive lapping processes. Wear 2021, 464–465, 203531. [Google Scholar] [CrossRef]
  7. Chen, J.; Zhu, N.; Niu, F.; Peng, Y.; Su, J.; Zhu, Y. Influence of agglomerated diamond abrasive wear on sapphire material removal behavior. Diam. Relat. Mater. 2020, 108, 107965. [Google Scholar] [CrossRef]
  8. Shi, X.; Xu, L.; Zhou, Y.; Zou, C.; Wang, R.; Pan, G. An in situ study of chemical-mechanical polishing behaviours on sapphire (0001) via simulating the chemical product-removal process by AFM-tapping mode in both liquid and air environments. Nanoscale 2018, 10, 19692–19700. [Google Scholar] [CrossRef]
  9. Zhang, Z.; Cui, J.; Zhang, J.; Liu, D.; Yu, Z.; Guo, D. Environment friendly chemical mechanical polishing of copper. Appl. Surf. Sci. 2019, 467–468, 5–11. [Google Scholar] [CrossRef]
  10. Zhang, Z.; Liao, L.; Wang, X.; Xie, W.; Guo, D. Development of a novel chemical mechanical polishing slurry and its polishing mechanisms on a nickel alloy. Appl. Surf. Sci. 2020, 506, 144670. [Google Scholar] [CrossRef]
  11. Zhang, Z.; Shi, Z.; Yue, F.; Guo, Z.; Guo, L.; Guo, D. A novel approach of chemical mechanical polishing for a titanium alloy using an environment-friendly slurry. Appl. Surf. Sci. 2018, 427, 409–415. [Google Scholar] [CrossRef]
  12. Xie, W. Green chemical mechanical polishing of sapphire wafers using a novel slurry. Nanoscale 2021, 12, 22518–22526. [Google Scholar] [CrossRef]
  13. Dong, Y.; Lei, H.; Liu, W.; Chen, Y. Preparation of ellipsoidal rod-shaped silica nanocomposite abrasives by Chromium ion/PEG200 induced method for sapphire substrates chemical mechanical polishing. J. Alloys Compd. 2019, 777, 1294–1303. [Google Scholar] [CrossRef]
  14. Wang, Z.; Niu, F.; Wang, Z.; Li, J.; Sun, T.; Zhu, Y. Friction and wear characteristics of agglomerated diamond abrasives and lapping performance of fixed agglomerated diamond pads. Wear 2021, 470–471, 203598. [Google Scholar] [CrossRef]
  15. Wang, Z.; Niu, F.; Zhu, Y.; Li, J.; Wang, J. Comparison of lapping performance between fixed agglomerated diamond pad and fixed single crystal diamond pad. Wear 2019, 432–433, 202963. [Google Scholar] [CrossRef]
  16. Runnel, S.R.; Eyman, L.M. Tribology analysis of chemical mechanical polishing. J. Electrochem. Soc. 1994, 141, 1698. [Google Scholar] [CrossRef]
  17. Wang, Z.; Wang, S.; Ding, Y.; Yang, Y.; Ma, L.; Pang, M.; Han, J.; Su, J. Process parameter modeling and optimization of abrasive water jet dressing fixed-abrasive pad based on box-behnken design. Materials 2022, 15, 5251. [Google Scholar] [CrossRef] [PubMed]
  18. Zefang, Z.; Shiyue, P. A Polyurethane Composite Polishing Pad and Its Preparation Method. CN 111205430A, 23 June 2020. [Google Scholar]
  19. Huajun, W. A Non-Woven Polyurethane Polishing Pad. CN 210909505U, 3 July 2020. [Google Scholar]
  20. Huajun, W. A Polyurethane Fiber Polishing Pad. CN 211220222U, 11 August 2020. [Google Scholar]
  21. Jianxiu, S.; Yu, F.; Jiaxi, D.; Xiqu, C.; Xueliang, Z.; Dongming, G. Analysis of polishing pad surface characteristics. Semicond. Technol. 2007, 32, 957–960. [Google Scholar]
  22. Chunyu, L. Research and analysis of the groove shape on the surface of the polishing pad for chemical mechanical polishing. China Sci. Technol. 2014, 19, 61. [Google Scholar]
  23. Kim, S.; Saka, N.; Chun, J. The Role of Pad Topography in Chemical-Mechanical Polishing. IEEE Trans. Semicond. Manuf. 2014, 27, 431–442. [Google Scholar] [CrossRef]
  24. Zhankui, W.; Minghua, P.; Mingchao, L.; Jianbin, W.; Lijie, M.; Haixu, L.; Jianhai, H.; Yongwei, Z.; Jianxiu, S. Effect of material structure on spinel machinability in its fixed abrasive lapping. J. Manuf. Process 2021, 68, 141–153. [Google Scholar] [CrossRef]
  25. Jianguo, Y.; Jiejing, L.; Haixu, L.; Zhankui, W.; Yongwei, Z.; Jianxiu, S. Tribochemical action on the tribochemical mechanical lapping (0001) C plane of the SiC single-crystal substrate. Int. J. Mod. Phys. B 2022, 36, 2240027. [Google Scholar] [CrossRef]
  26. Wang, Z.; Zhang, Z.; Wang, S.; Pang, M.; Ma, L.; Su, J. Study on wavelet packet energy characteristics on friction signal of lapping with fixed abrasive pad. Micromachines 2022, 13, 981. [Google Scholar] [CrossRef] [PubMed]
  27. Wang, Z.; Yang, Y.; Pang, M.; Li, Y.; Ma, L.; Yao, J.; Zhu, Y.; Su, J. Response surface model of processing parameters for lapping quartz glass with a fifixed abrasive pad. Surf. Technol. 2021, 50, 376–385. [Google Scholar]
  28. Niu, F.; Wang, K.; Sun, T.; Zhou, P.; Hu, W.; Zhu, Y. Lapping performance of mixed-size agglomerated diamond abrasives in fifixed abrasives pads. Diam. Relat. Mater. 2021, 118, 108499. [Google Scholar] [CrossRef]
  29. Wang, Z.K.; Wang, Z.K.; Zhu, Y.W.; Su, J.X. Effect of lapping slurry on critical cutting depth of spinel. Appl. Surf. Sci. 2015, 347, 849–855. [Google Scholar] [CrossRef]
  30. Neslen, C.L.; Mitchel, W.C.; Hengehold, R.L. Effects of process parameter variations on the removal rate in chemical mechanical polishing of 4H-SiC. J. Electron. Mater. 2001, 30, 1271–1275. [Google Scholar] [CrossRef]
  31. Min, Z.; Renjiang, Y.; Xiaobing, L.; Jianfeng, C.; Wenhu, X. Effects of abrasive particle and polishing pad characteristics on ultrasonic chemical mechanical polishing of sapphire. China Surf. Eng. 2018, 153, 131–138. [Google Scholar]
  32. Zhou, Y.; Luo, H.; Pan, G.; Zou, C.; Luo, G.; Chen, G.; Kang, C. Study on Pad Performance Deterioration in Chemical Mechanical Polishing (CMP) of Fused Silica. Ecs J. Solid State Sci. Technol. 2018, 7, 295–298. [Google Scholar] [CrossRef]
  33. Yuan, J.; Wang, Z.; Hong, T. A semi-fixed abrasive machining technique. J. Micromech. Microeng. 2009, 19, 054006. [Google Scholar] [CrossRef]
  34. Luo, Q.; Lu, J.; Xu, X. Study on the processing characteristics of SiC and sapphire substrates polished by semi-fixed and fixed abrasive tools. Tribol. Int. 2016, 104, 191–203. [Google Scholar] [CrossRef]
  35. Luo, Q.; Lu, J.; Xu, X. A comparative study on the material removal mechanisms of 6H-SiC polished by semi-fixed and fixed diamond abrasive tools. Wear 2016, 350–351, 99–106. [Google Scholar] [CrossRef]
  36. Lu, J.; Li, Y.; Xu, X. The effects of abrasive yielding on the polishing of SiC wafers using asemi-fixed flexible pad. Proc. Inst. Mech. Eng. Part B-J. Eng. Manuf. 2015, 229, 170–177. [Google Scholar] [CrossRef]
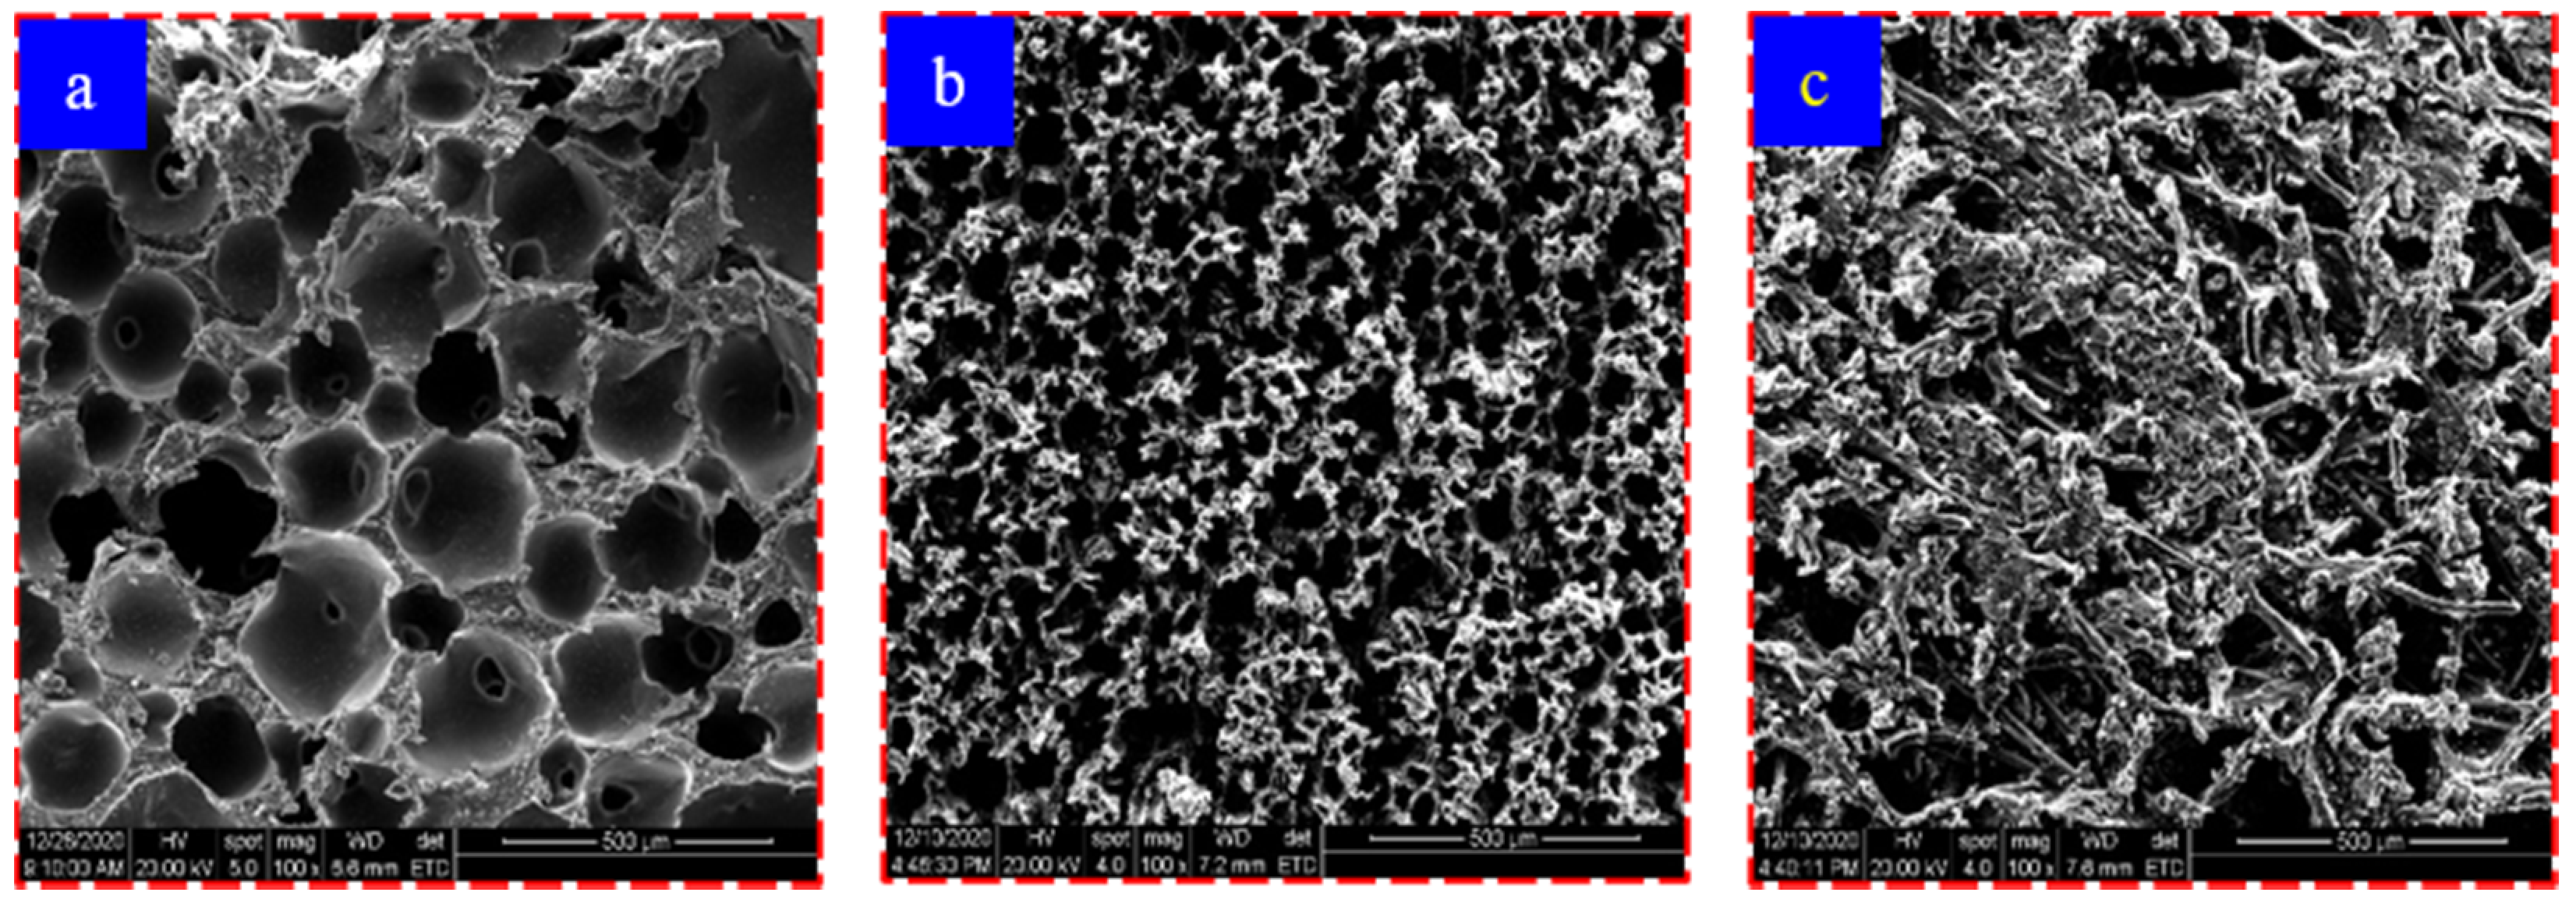
Figure 1. Polishing pad structures. (a) Polyurethane polishing pad. (b) Non-woven polishing pad. (c) Double-layer composite polishing pad.
Machines 10 00999 g001
Figure 2. Schematic diagram of the abrasive particle movement of the self-regressive fixed abrasive. (a) Schematic diagram of no pressure applied, and (b) schematic diagram of applied pressure and of pressure less than critical pressure.
Machines 10 00999 g002
Figure 3. Self-regressive consolidated abrasive polishing pad made of alumina abrasive particles.
Machines 10 00999 g003
Figure 4. SEM images of the different polishing pad surface microstructures.
Machines 10 00999 g004
Figure 5. 2D and 3D morphologies of the polyurethane polishing pad.
Machines 10 00999 g005
Figure 6. 2D and 3D morphologies of the self-made bonded abrasive polishing pad.
Machines 10 00999 g006
Figure 7. The deep morphology of the polishing pads’ holes.
Machines 10 00999 g007
Figure 8. Morphology of a single abrasive grain after dressing.
Machines 10 00999 g008
Figure 9. 2D morphology of diamond before and after dressing. (a) Appearance before trimming. (b) Appearance after trimming.
Machines 10 00999 g009
Figure 10. 2D morphology after wear. (a) Wear after 3 min (2D). (b) Wear after 6 min (2D). (c) Wear after 9 min (2D). (d) Wear after 12 min (2D).
Machines 10 00999 g010aMachines 10 00999 g010b
Figure 11. Abrasive particle size and particle spacing after wear. (a) Change in abrasive particle diameter. (b) Change in abrasive particle spacing.
Machines 10 00999 g011
Figure 12. 3D morphology after wear. (a) Wear for 3 min; (b) wear for 6 min; (c) wear for 9 min; and (d) wear for 12 min.
Machines 10 00999 g012
Figure 13. Surface profile of the abrasive grain position of the polishing pad after wear. (a) Wear for 3 min; (b) wear for 6 min; (c) wear for 9 min; and (d) wear for 12 min.
Machines 10 00999 g013
Figure 14. Normal displacement of the abrasive particles after wear. (a) Initial height morphology; (b) morphology after polishing for 12 min; and (c) change in abrasive grain concession height.
Machines 10 00999 g014
Figure 15. Changes in the quality of the abrasive particles before and after wear.
Machines 10 00999 g015
Figure 16. The polishing effect of the abrasive particles’ size on both sides of the C and Si planes. (a) Removal rate of the C-plane material. (b) Removal rate of the Si-plane material.
Machines 10 00999 g016
Figure 17. The polishing effect of the abrasive particles’ size on both sides of the C and Si planes. (a) Surface roughness of the C surface. (b) Surface roughness of the Si surface.
Machines 10 00999 g017
Figure 18. 2D and 3D morphologies and surface roughness of the C-plane surfaces after being polished by the free abrasive particles.
Machines 10 00999 g018
Figure 19. 2D and 3D morphologies and surface roughness of the C-plane surfaces after being polished by the consolidated abrasive particles.
Machines 10 00999 g019
Figure 20. 2D and 3D morphologies and surface roughness of the Si-plane surfaces after being polished by the free abrasive particles.
Machines 10 00999 g020
Figure 21. 2D and 3D morphologies and surface roughness of the Si-plane surface after being polished by the consolidated abrasive particles.
Machines 10 00999 g021
Table 1. Comparison of the physical and mechanical properties of the different polishing pads.
FactorSwelling Rate/%Young’s Modulus/MPaPorosity/%Aperture/μmHole Depth/μmRoughness/μm
Polishing Pad
Polyurethane pad1.9066528.31665216.432325.92514.726
Self-made polishing pad14.4342094.8974471.898471.8237.527
Table 2. CMP conditions of the 1SiC wafer.
CMP1CMP2
Pressure (psi)22
Rotational speed (r/min)6060
Time (t)3030
Polishing padPolyurethanePolyurethaneSR-FAPP
SR-FAPP
Polishing solutionAl2O3
Oxidant
Dispersing agent
Oxidant
Dispersing agent
PH9–10
Publisher’s Note: MDPI stays neutral with regard to jurisdictional claims in published maps and institutional affiliations.