Article

Prediction and Control Technology of Stainless Steel Quarter Buckle in Hot Rolling

1
Institute of Engineering Technology, University of Science and Technology Beijing, Beijing 100083, China
2
Guangxi Beibu Gulf New Materials Company Limited, Beihai 536000, China
3
Engineering Research Centre for Metallurgical Automation and Measurement Technology of Ministry of Education, Wuhan University of Science and Technology, Wuhan 430081, China
*
Author to whom correspondence should be addressed.
Metals 2020, 10(8), 1060; https://doi.org/10.3390/met10081060
Submission received: 12 July 2020 / Revised: 3 August 2020 / Accepted: 4 August 2020 / Published: 6 August 2020
(This article belongs to the Special Issue Numerical Modelling and Simulation of Metal Processing)

Abstract

:
To obtain the good flatness of hot-rolled stainless-steel strips, high-precision shape control has always been the focus of research. In hot rolling, the quadratic wave (centre buckle and edge wave) can usually be controlled effectively. However, the quarter buckle of the strip is still a challenge to solve. In this paper, a prediction model of roll deflection and material flow is established to study the change rule and control technology of the quarter buckle. The effects of the process parameters on the quarter buckle are analysed quantitatively. The process parameters affect the quarter buckle and the quadratic wave simultaneously. This coupling makes the control of the quarter buckle difficult. The distribution of lateral temperature and the quartic crown of the strip have less effect on the quadratic wave but have a great effect on the quarter buckle. Finally, a new technology for work roll contour is developed to improve the quarter buckle. Through industrial application, the model and the new contour are proved to be effective.

1. Introduction

Hot-rolled strips, especially of stainless steel, are commonly used directly in product processing. The strip should have a good flatness to meet the requirement of users. He et al. [1] divided strip flatness defects into three types: the linear wave, the quadratic wave, and the high-order wave, according to the patterns of these waves in the width direction of the strip. The linear wave is also called the single-edge wave, which is adjusted by roll tilting. The quadratic wave refers to the centre buckle and the edge wave, which can be controlled by the roll bending system. The high-order wave cannot be characterised by linear or quadratic equations. In the production of hot-rolled stainless steel, high-order wave primarily include the flatness defect of the bilateral symmetrical quarter buckle. Figure 1 shows the quarter buckle of the strip after rolling detected by the flatness meter in a 1450 mm hot-rolled stainless steel line. It not only causes the strip edge to easily crack during hot rolling, or even pile-up accidents, but also affects the surface quality of the products in subsequent processes such as pickling and annealing. It is a challenge for researchers to overcome this problem.
The essence of the flatness problem has been widely recognised. Zhang et al. [2] described the generation mechanism of flatness when studying the shape control of a temper mill. In the process of the plastic deformation of the strip, when the distribution of the longitudinal extension difference along the strip width is uneven, residual internal stress is generated, including positive tensile stress and negative compressive stress. When the difference of the internal stresses exceeds the ultimate load of the strip buckling, a visible wave will appear. This can also explain the generation of the quarter buckle of hot-rolled stainless steel.
Some researchers believe that the roll wear and the grinding error of the roll contour cause the quarter buckle. Du et al. [3] heated the local position of the roll to compensate for the uneven roll wear to eliminate the quarter buckle. Li et al. [4] believed the uneven wear of the back-up roll and the low wear of the work roll to have little effect on the strip flatness, but that the large grinding error of the roll contour caused the quarter buckle. In production, we find that within the working period of the work roll, the quarter buckle appears at all stages. Meanwhile, with the use of high-precision roll grinders and the improvement of roll grinding technology, the grinding accuracy of the roll contour can usually be well controlled. He et al. [5] proposed intelligent roll precision grinding and management technology. Hence, the effects of these on the quarter buckle are ignored in this paper. Under some process parameters, the longitudinal strain distribution of the quarter-buckle after strip rolling is related to the high-order deflection of the loaded roll gap profile. By calculating the deformations of the roll stack and the strip, the distribution of the strip longitudinal strain can be obtained to help study how the changes of process parameters affect the quarter buckle.
Nowadays, with the development of computer performance, the finite element method (FEM) has become popular. Jiang et al. [6] used rigid-plastic FEM to study the friction in thin strip rolling. The study was based on the strip deformation, and the effect of the roll stack was simplified. Chandra et al. [7] analysed the temper rolling process using rigid-plastic FEM. The calculation of roll stack deformation is optimised. Wang et al. [8] studied the effect of roll contour configuration on the flatness of hot-rolled thin strip using two-dimensional varying thickness FEM. The elastic deformation of the roll stack is calculated by this method, which is a simplification of the three-dimensional FEM. The optimisation of the roll contour reduced the concentration of contact stress between the back-up roll and the work roll and improved the flatness control of the bending force. Kong et al. [9] built an elastic-plastic FEM model for the calculation of roll thermal expansion, which improved the calculation accuracy. Kim et al. [10] established a three-dimensional FEM model of thermal–mechanical coupling for the research of lubrication rolling. Hao et al. [11] built an FEM model of aluminium alloy rolling by using the ANSYS software and calculated the deformations of the roll stack and the strip. The calculation accuracy of the FEM has been recognised by many researchers. However, it has the shortcomings of longer calculation and difficulty of attaining convergence. The modelling process with multiple constraints and iterative calculations is complex and difficult to achieve for the commercial finite element software.
The influence function method has high accuracy and short calculation time, which is convenient for on-line applications. Jiang et al. [12] analysed the contact of roll edge during cold rolling of the thin strip using the influence function method. Hao et al. [13] used the influence function method to calculate the deformation of the roll stack for aluminium alloys. Wang et al. [14] described the distributions of the contact pressure between the rolls and the rolling force using a high-order polynomial and achieved a fast calculation of the influence function method. In the influence function method, the stress and displacement fields are obtained from the influence function superposition, so it is not suitable for calculating the plastic deformation of the strip. Wang et al. [15] solved the lateral metal flow of the strip in the hot rolling process using the variational method. Lian et al. [16] believed that the accuracy of the variational method depended too much on assumptions. The three-dimensional difference method was adopted to calculate the strip deformation. Zhang et al. [17] built a rigid-plastic FEM model to calculate the strip deformation, which was combined with the influence function method to get the lateral distribution of the strip thickness. Shao et al. [18] analysed the limitations of the finite difference method, and used the finite volume method to solve the plastic deformation of the strip. Analysis of the quarter buckle with different process parameters requires a large number of simulations. Considering the time cost of the FEM model, in this paper, the rapid influence function method and the finite volume method are used to calculate the distribution of the strip’s longitudinal strain after rolling.
The key to solving the problem of the quarter buckle is to make up the high-order loaded roll gap profile and improve the distribution of the strip’s longitudinal strain after rolling. In cold rolling, Ma et al. [19] added the roll bending system of the intermediate and work rolls for the researched universal crown mill. In this way, the high-order deflection of the loaded roll gap profile can be adjusted. Guo et al. [20] studied the relationship between the spray cooling of the work roll and the strip cross section. Wang et al. [21] explored the local heat transfer characteristic of the spray cooling of the work roll. Although spray cooling is a solution for local higher-order waves, the effect of changing the local crown of the work roll by heat transfer is slow. Li et al. [22] designed the Baosteel universal roll contour for the intermediate rolls, which was used to adjust the quarter buckle in cooperation with roll shifting. Li et al. [23] upgraded the original roll contour of the continually variable crown to a new roll contour of the quintic curve, which can improve the quarter buckle. Seilinger et al. [24] reduced the quarter buckle by adjusting the sinusoidal component of the roll contour of Smart Crown. In addition, Hara et al. [25] showed the quarter buckle could be corrected by using a partial concave profile to the first intermediate rolls for the Sendzimir mill. Kubo et al. [26] improved the quarter buckle for the Sendzimir mill by using the flexible shaft backing assemblies and the concave roll contour. In the hot rolling, there have been limited reports about the applications of the continually variable crown plus and the Smart Crown. When the quarter buckle is adjusted, the quadratic crown of the loaded roll gap profile is also changed. Hence, it is difficult for them to control the quarter buckle individually, which makes their application more difficult. Therefore, it is of great significance to develop a new control technology for the quarter buckle in the hot rolling.
In this paper, to study the change rule and control technology of the quarter buckle of hot-rolled stainless steel, a prediction model of roll deflection and material flow (RDMF) is established. The rapid influence function method and the finite volume method are used to achieve the iterative computations between the elastic deformation of the roll stack and the three-dimensional plastic deformation of the strip. The model is used to quantitatively analyse the effect of the shape process parameters on the quarter buckle, such as the bending force, the rolling force, the lateral temperature distribution of the strip, the quartic crown of the strip before rolling and so forth. Finally, we develop a new work roll contour to improve the quarter buckle, which is called the middle variable crown (MVC).

2. Methods and Materials

The RDMF model that is built to research the change rule of the quarter buckle incorporates the roll stack deflection and the strip material flow. The former is used to solve the loaded roll gap profile, while the latter can obtain the metal flow and stress distribution. The iterative calculations are performed between them. The calculation process of the RDMF model is shown in Figure 2.

2.1. Roll Bending

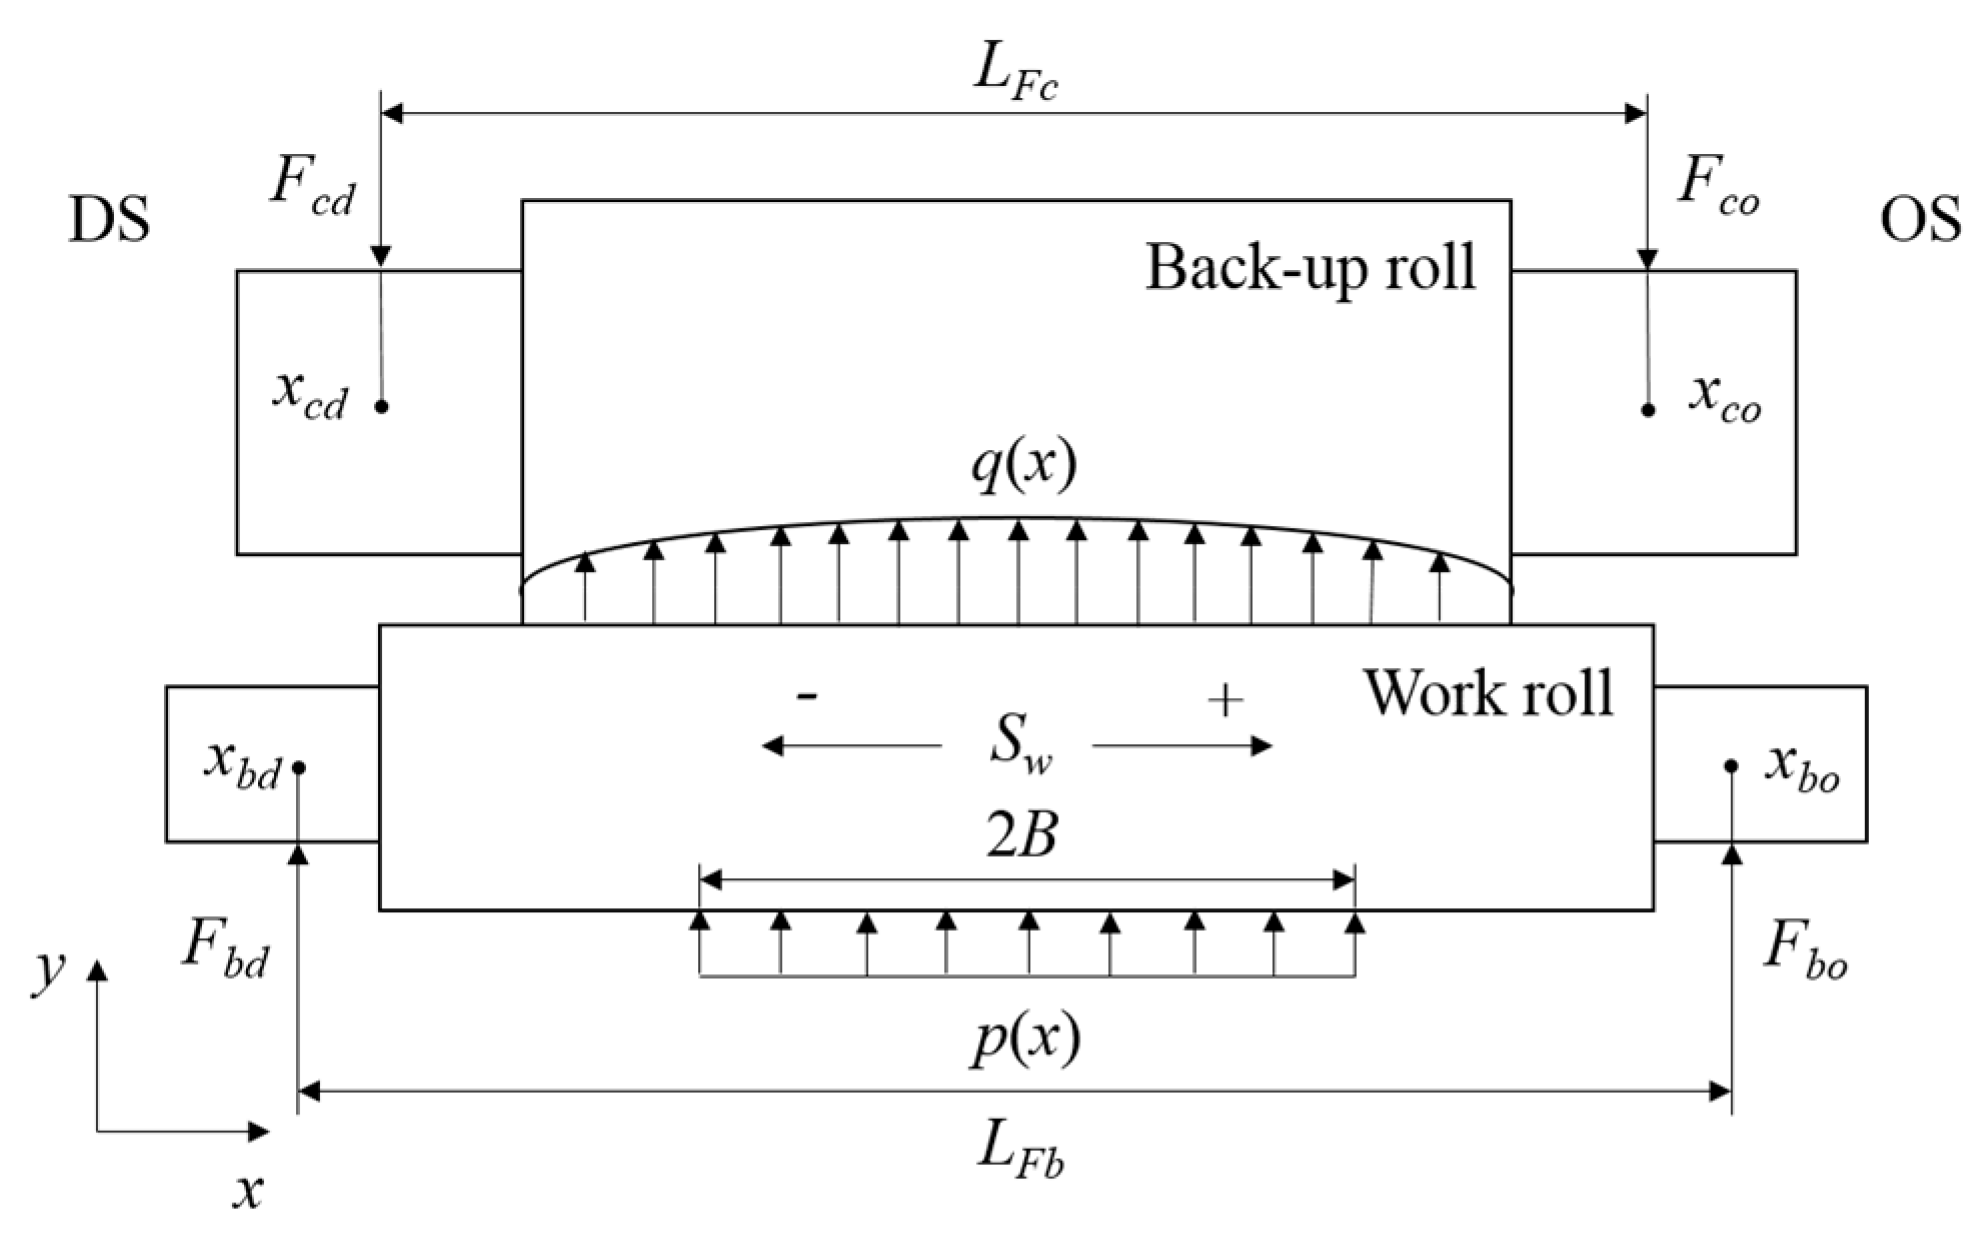
Because of the symmetry of the rolling system, the calculation process involves the upper rolls. According to the load characteristic of the rolls, both the work roll and the back-up roll can be abstracted into a simply supported beam, respectively. The simplified mechanical model of the upper rolls is shown in Figure 3.
In Figure 3, DS represents the driving side of the mill and OS represents the operating side. xcd, xbd are the positions of the rolling force and bending force of DS. xco, xbo are those of OS. The equilibrium relation in the y direction is as follows:
{ F c d + F c o + x c d x c o q ( x ) d x = 0 x c d x c o x c d x c o q ( x ) d x d x F c o L F c + M c d + M c o = 0
where q(x) is the distribution of the contact pressure between the rolls, Fcd is the rolling force of DS and Fco is that of OS, LFc is the distance between the rolling forces, Mcd is the bending moment of DS for back-up roll and Mco is that of OS.
For the work roll:
{ F b d + F b o + x b d x b o [ p ( x ) q ( x ) ] d x = 0 x b d x b o x b d x b o [ p ( x ) q ( x ) ] d x d x F b o ( L F b ± S w ) + M b d + M b o = 0
where p(x) is the distribution of rolling force, Fbd is the bending force of DS and Fbo is that of OS, LFb is the distance between the bending forces, Sw is the shifting value of the work roll in the axial direction. We define the shifting in the direction of OS to be positive. Mbd is the bending moment of DS for work roll and Mbo is that of OS.
The roll barrel is discretely divided into N slab elements with the same spacing Δx, as shown in Figure 4. The coordinate xi of the roll barrel is:
x i = i × Δ x i = 1 ,   2 ,   ,   N
According to the bending theory of the beam, the total bending deformation of the roll is expressed by the following equation:
y i = y M i + y Q i
where yi is the total bending deformation at element i, y M i is the deformation at element i caused by the bending moment, y Q i is the deformation at element i caused by the shearing force. y M i and y Q i can be expressed as:
{ d 4 y M i d x 4 = φ i E I d 2 y Q i d x 2 = 2 k s f ( 1 + μ ) φ i G S
where φ i is the concentrated force at element i, E is Young’s modulus, I is the polar moment of inertia, ksf is the shear factor of the cylindrical beam, μ is Poisson’s ratio, G is the shear elastic modulus, S is the cross-section area of the roll.
According to the boundary conditions of the simplified mechanical model of the rolls and the discretisation of the rolls, the total bending deformation at each element can be derived as:
y i + 1 = y i + M 1 + M 2 + + M i E I ( Δ x ) 2 + M i + 1 2 E I ( Δ x ) 2 + k s f φ i G S ( Δ x )

2.2. Roll Flattening

Based on the Hertz theory, the contact width of an element in the contact zone between the back-up roll and the work roll is assumed to be b:
b = 8 π q ( 1 μ 2 E ) R 1 R 2 R 1 + R 2
where q is the specific contact pressure between the rolls at the element, R1 is the radius of the work roll and R2 is that of the back-up roll.
As shown in Figure 5, the proximity of the axes of the back-up roll and the work roll caused by the contact flattening is expressed as w:
w = 2 q ( 1 μ 2 ) π E ( 2 3 + ln 2 R 1 b + ln 2 R 2 b )
Combined with Equations (7) and (8), this can be obtained as:
w = 2 q ( 1 μ 2 ) π E ( ln π 3 q 2 E 4 ( 1 μ 2 ) + ln ( 2 R 1 + 2 R 2 ) ln q )
Because of the coupling relationship between the flattening w and the specific contact pressure q, we fit the functions by the quartic polynomial, respectively. The two expressions are repeatedly iterated and corrected during the calculation of the elastic deformation of the rolls.
w = a 0 + a 1 q + a 2 q 2 + a 3 q 3 + a 4 q 4
q = b 0 + b 1 w + b 2 w 2 + b 3 w 3 + b 4 w 4
where ai, bi are the corresponding polynomial coefficients i = 0, 1, 2, 3, 4.
The contact flattening equation of the infinite cylinder is not suitable for the calculation of the flattening between the work roll and the strip. Therefore, the influence function method is used in this paper. The work roll is equidistantly discretised in the direction of the roll barrel according to the above discretisation method. The strip is divided into n slab elements, as shown in Figure 6. The discretised coordinates are expressed as:
{ n = B Δ x x i = i Δ x Δ x 2 x j = j Δ x Δ x 2
where B is half the strip width, xi is the coordinate of the roll barrel at element i, xj is the coordinate of the strip at element j.
At the coordinate xi of the roll barrel, the flattening ws(xi) between the work roll and the strip is:
w s ( x i ) = ( 1 μ 2 ) π E j n [ a F ] i j p ( x j )
where p(xj) is the specific rolling force at the coordinate xj of the strip, [aF]ij is the influence coefficient matrix of the elastic flattening of the work roll caused by the specific rolling force.

2.3. Strip Material Flow

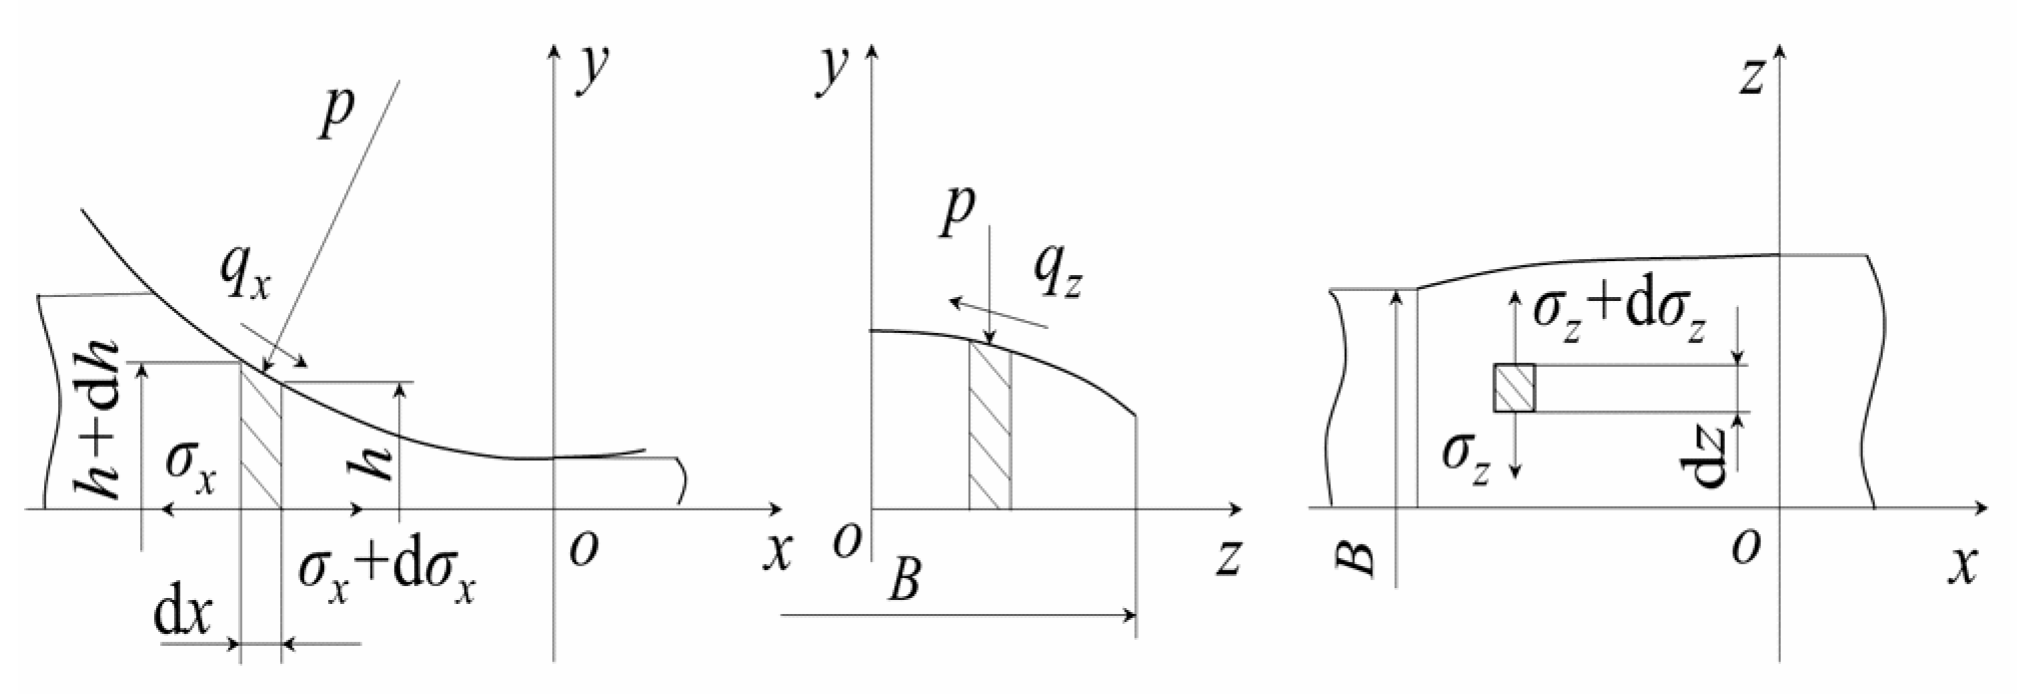
The strip material flow model is used to calculate the metal flow and stress distribution so as to provide the lateral distribution of the rolling force for the calculation of the roll stack deflection. Figure 7 shows the stress state of the segment of the strip in the deformation zone. The coordinate axes x, y and z correspond to the strip length, thickness and width direction, respectively. The origin o is located at the cross-section centre of the strip passing through the axis of the work roll.
Basic equations include equilibrium differential equation, constitutive equation, the condition of constant volume and the condition of plastic yield. Ignoring the effect of body force, the equilibrium differential equation is:
{ σ ^ x x ^ + τ ^ xy y ^ + τ ^ xz z ^ = 0 τ ^ xy x ^ + σ ^ y y ^ + τ ^ yz z ^ = 0 τ ^ xz x ^ + τ ^ yz y ^ + σ ^ z z ^ = 0
where σ ^ i is the normal stress, τ ^ i j is the shear stress, i, j = x, y, z.
For the segment of the contact surface between the strip and the work roll, the equation of its upper surface is:
  y ^ = 1 2 h ^ ( x ^ ,   z ^ )
where   h ^ is the strip thickness at the point (   x ^ ,   z ^ ) in the contact surface between the strip and the work roll.
The equilibrium differential equation of the segment of the contact surface is expressed as:
{ σ ^ x 2 h ^ x ^ τ ^ x y + τ ^ x z 2 h ^ z ^ + p ^ 2 h ^ x ^ + q ^ x | n | | i | = 0 σ ^ y τ ^ x y 2 h ^ x ^ τ ^ y z 2 h ^ z ^ + p ^ q ^ x 2 h ^ x ^ | n | | i | q ^ z 2 h ^ z ^ | n | | m | = 0 σ ^ z 2 h ^ z ^ τ ^ y z + τ ^ x z 2 h ^ x ^ + p ^ 2 h ^ z ^ + q ^ z | n | | i | = 0
where n is the outward normal vector of the surface, i is the tangent vector of the friction stress in the x direction and m is that in the z direction.
The plastic constitutive equation of the strip describes the relationship between plastic stress and strain. The Levy–Mises incremental constitutive theory is used in this paper:
{ λ ^ s ^ x x = u ^ x ^ λ ^ s ^ x y = 1 2 ( u ^ y ^ + v ^ x ^ ) λ ^ s ^ y y = v ^ y ^ λ ^ s ^ y z = 1 2 ( v ^ z ^ + w ^ y ^ ) λ ^ s ^ z z = w ^ z ^ λ ^ s ^ x z = 1 2 ( w ^ x ^ + u ^ z ^ )
where   s ^ i j is the deviator stress, i, j = x, y, z; λ is the plastic multiplier factor, which changes with the loading process;   u ^ ,   v ^ and   w ^ represent the strain rates in the x, y and z directions, respectively.
The equation of constant volume is expressed as:
  u ^ x ^ + v ^ y ^ + w ^ z ^ = 0
Mises yield criterion is applied in the plastic deformation of the strip:
  s ^ x x 2 +   s ^ y y 2 +   s ^ z z 2 + 2   s ^ x y 2 + 2   s ^ x z 2 + 2   s ^ y z 2 = 2 k ^ s 2 = 2 3 σ ^ F 2
where   k ^ s is the shear strength, σ ^ F is the yield strength.
The ratio of the centreline thickness of the strip   h ^ r to the length of contact arc   l ^ c is defined as the bite ratio δ, as follows:
δ =   h ^ r l ^ c
According to the asymptotic analysis method, the variables in the material flow model are normalised:
For the dimension variables:
{ x ^ = x l ^ c y ^ = y h ^ r z ^ = z l ^ c
For the stress variables:
{ p ^ = p k ^ s s ^ i j = s i j δ k ^ s σ ^ i = ( s i i δ p ) k ^ s τ ^ i j = τ i j δ k ^ s q ^ i = q i δ k ^ s
For the rate variables:
{ u ^ = u v ^ 0 v ^ = v v ^ 0 w ^ = w v ^ 0
For the plastic multiplier factor:
λ ^ = λ v ^ 0 δ   k ^ s l ^ c
The equilibrium differential equation after normalisation is:
{ p x + τ x y y + δ s x x x + δ τ x z z = 0 p y + δ s y y y + δ 2 τ x y x + + δ 2 τ y z z = 0 p z + τ y z y + δ s z z z + δ τ x z x = 0
The strip thickness is much smaller than the radius of the work roll, so the bite ratio δ is much smaller than one. The first-order asymptotic expansion of the equilibrium equation is deduced, neglecting the small items with δ:
{ τ x y ( 0 ) y = p ( 0 ) x p ( 0 ) y = 0 τ y z ( 0 ) y = p ( 0 ) z
Combined with all the basic equations and constraints, the governing equation can be obtained:
f x h 2 ( 2 p x 2 + 2 p z 2 ) + 2 h f x ( p h x 2 + p h z 2 ) = ( f x + f z ) v 0 h 2 ( h x + f z h z )
In this paper, the finite volume method is used to solve the partial differential Equation (27). Rectangular element meshing is applied to discretise the deformation zone, as shown in Figure 8.
In Figure 8, taking the node A of the shadow region as an example, the points c, d, e and f are the midpoints of the line AC, AD, AE and AF, respectively. The nodes C, D, E and F are the adjacent nodes of the node A in the x and z directions. Based on the finite volume method, Equation (27) is solved in the control volume. According to the Gauss formula, the following equation can be acquired:
f x h 3 [ S f ( p x ) f S d ( p x ) d + S e ( p z ) e S c ( p z ) c ] + 2 h 2 f x [ S f ( p h x ) f S d ( p h x ) d + S e ( p h z ) e S c ( p h z ) c ] = ( f x + f z ) v 0 ( S d + S f 2 + f z S c + S e 2 )
where Sf is the area of the control volume at the point f in the x direction and Sd is that at the point d in the x direction, Sc is the area of the control volume at the point c in the z direction and Se is that at the point e in the z direction.
Each partial derivative in Equation (28) is obtained by the linear interpolation of stress values at adjacent nodes:
{ ( p x ) f = P F P A d x ( p h x ) f = P F h F P A h A d x ( p z ) c = P A P C d C A ( p h z ) c = P A h A P C h C d C A ( p x ) d = P A P D d x ( p h x ) d = P A h A P D h D d x ( p z ) e = P E P A d E A ( p h z ) e = P E h E P A h A d E A
where PA, PC, PD, PE and PF are the rolling forces at nodes A, C, D, E and F, respectively; dCA is the length of the line CA and dEA is that of the line EA.
The large sparse linear equation is built as Equation (30). We used the preprocessing method of the incomplete LU decomposition and the bi-conjugate gradient stabilised method to achieve a fast calculation of Equation (30):
Qn×nPn×1 = Rn×n
where Qn×n is the coefficient matrix, Rn×n is the constant matrix.

2.4. Model Verification

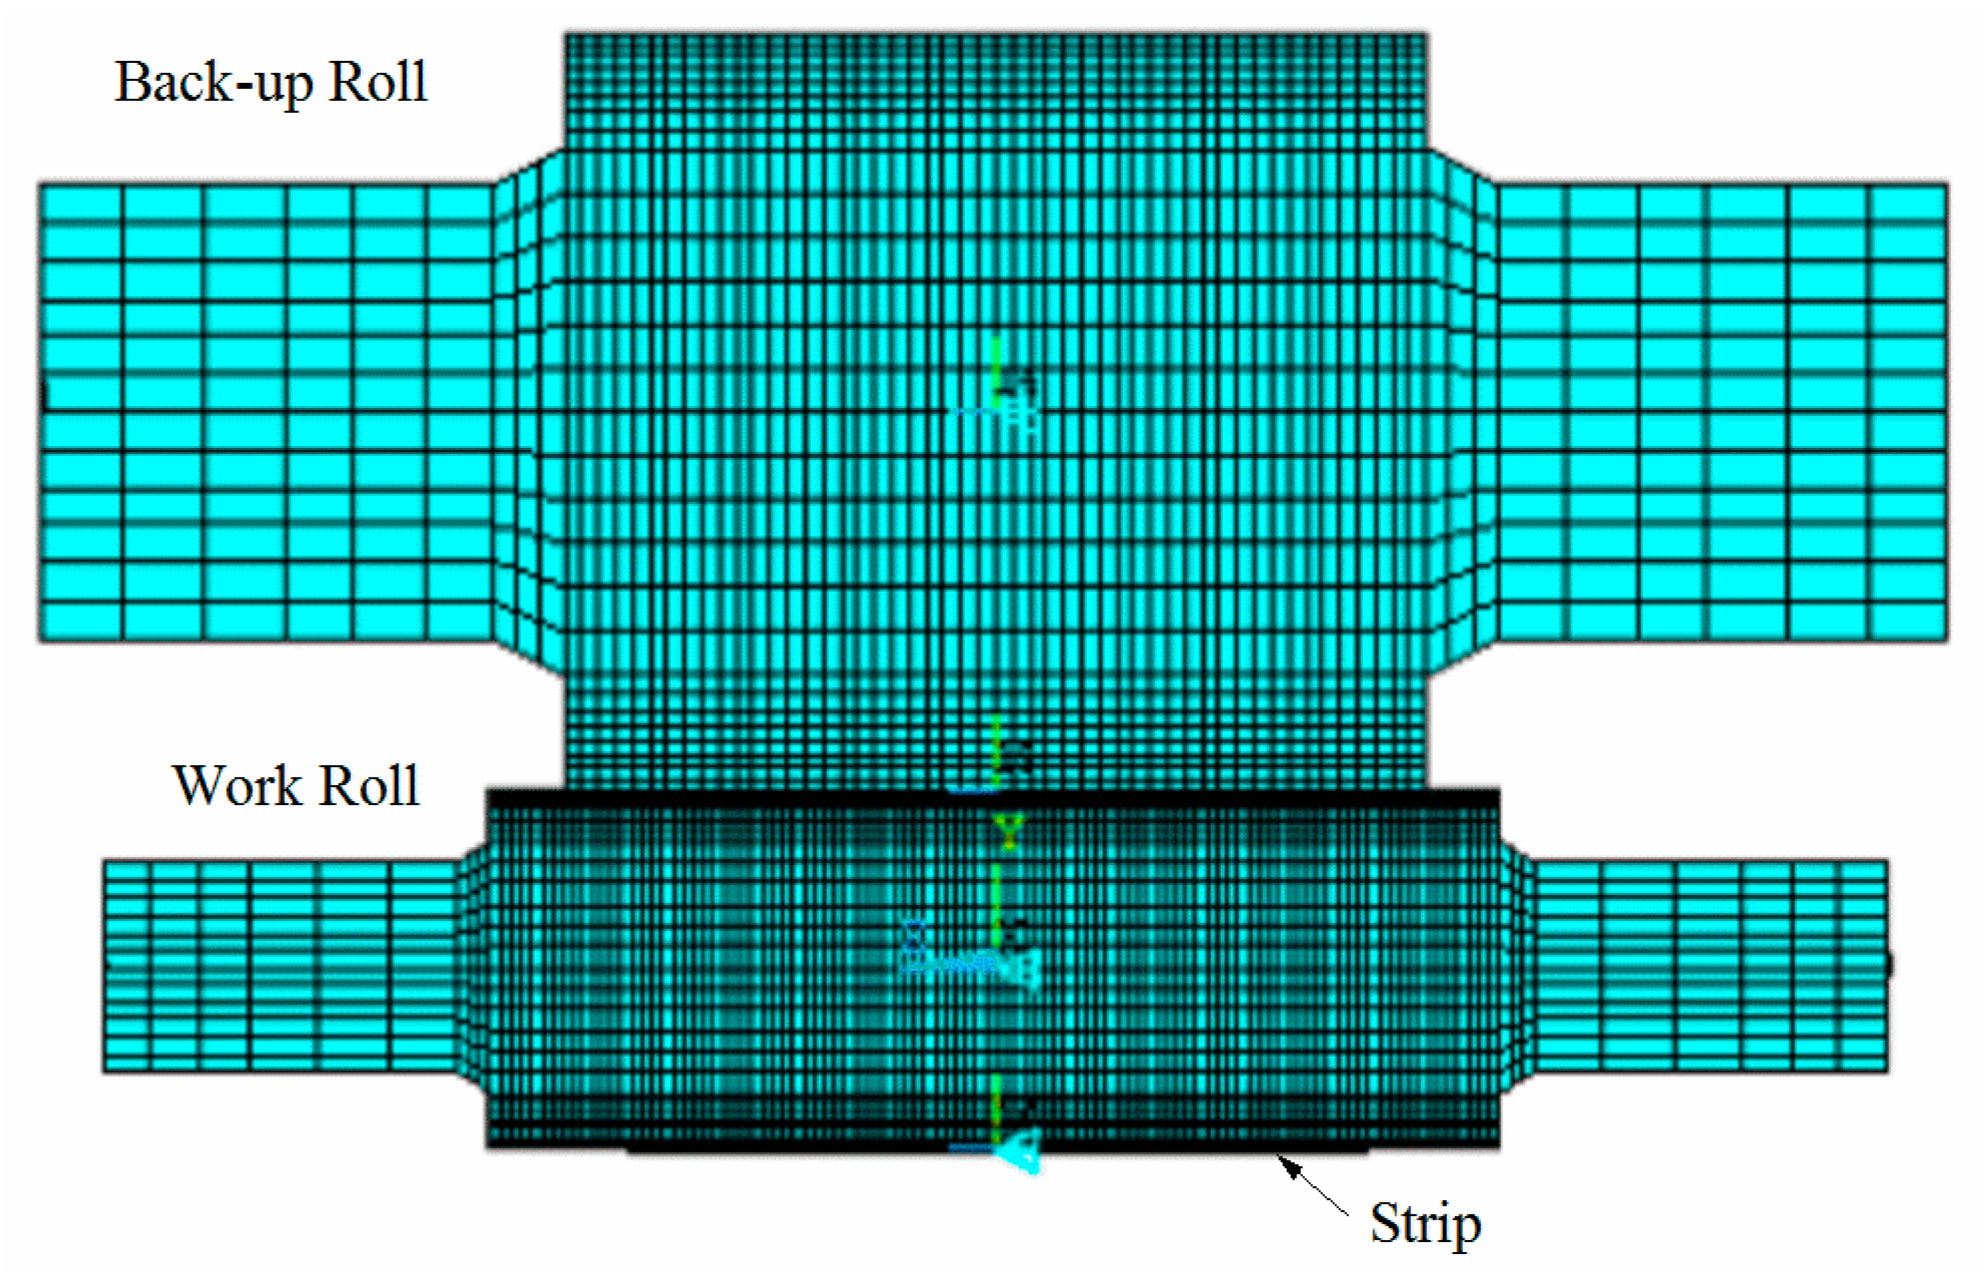
To verify the calculation accuracy of the RDMF model, the last stand of the 1450 mm tandem hot mills in Southwest Stainless Steel Co., Ltd. is taken as the simulation object. The actual parameters of the strip are taken to the RDMF model for numerical simulation and the calculated lateral thickness difference of the strip is compared with the measured one. In addition, considering that the accuracy of FEM is recognised by many researchers, an implicit model of roll-strip coupling is built by using the large-scale commercial finite element software ANSYS [27]. The calculation result of the FEM model is also used to verify the calculation accuracy of the RDMF model. The parameters of the geometrical dimension and the material are listed in Table 1. The FEM model is shown in Figure 9. The element type of the roll stack is SOLID45 and that of the strip is SOLID185. The total number of model elements is 74444, and the number of model nodes is 79185.
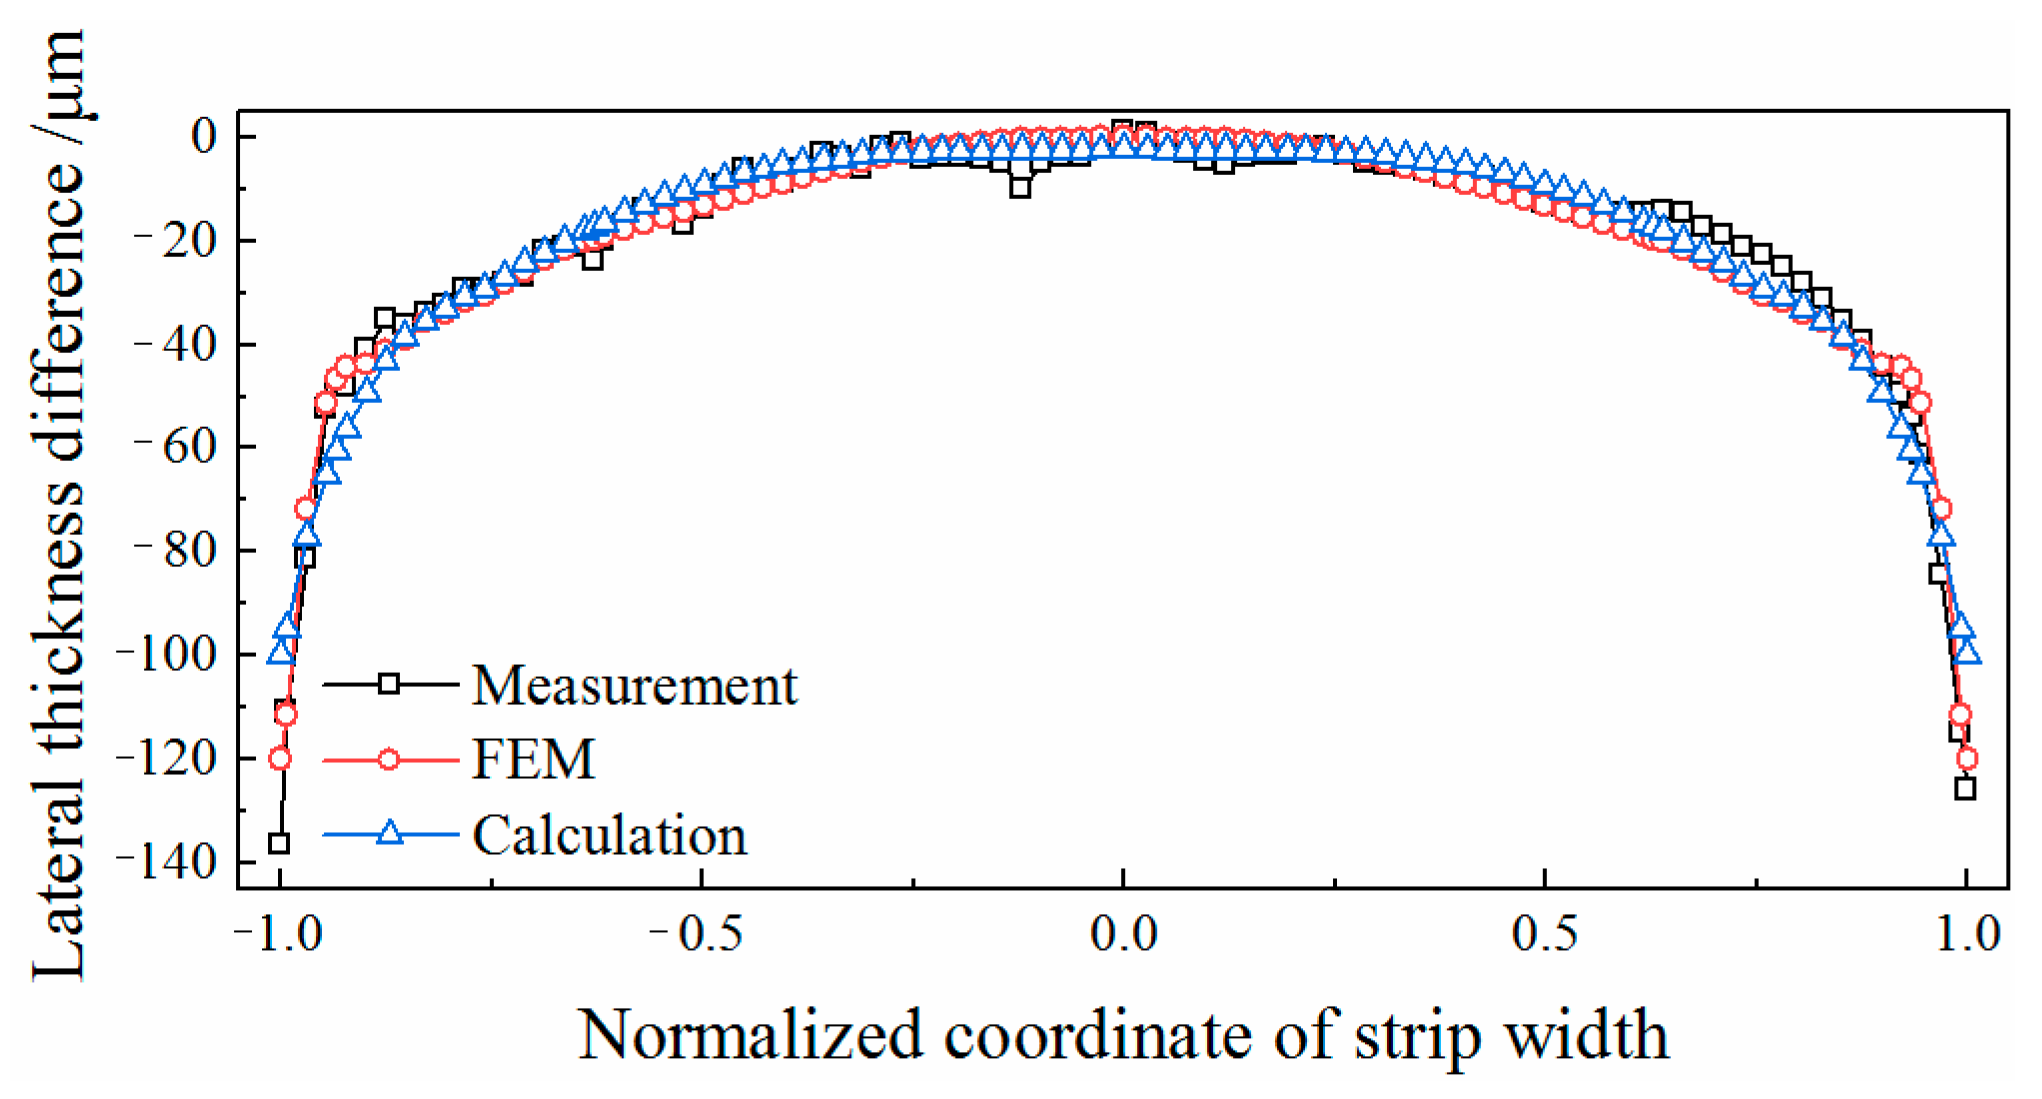
As shown in Figure 10, the distributions of the lateral thickness difference of the strip after rolling are compared. The lateral thickness difference is defined as the difference between the cross section of the strip and the thickness of the strip centre. Taking the midpoint of the strip width as an origin, the normalised coordinate values of the strip width are used as the abscissa axis. It can be found that the calculation results of the RDMF model and the FEM model are basically consistent with the measured distribution of the lateral thickness difference. Without the effect of the edge-drop region, the relative error of the RDMF model is 10.61%, and that of the FEM model is 6.69%. The calculation error of the strip edge may be caused by the friction condition and deformation state in the edge region, but it has a limited effect on the calculation of the strip cross section. Therefore, the calculation accuracy of the RDMF model and the FEM model are able to meet the requirements of actual production. However, the RDMF model has a better solving speed. In the same configuration of calculation (CPU: Intel Core2 Quad Q6600, RAM: 2GB), the RDMF model takes 0.005 s to calculate, while it takes 4.55 h for the FEM model. Because of the complex grade and various specification of the strip in the hot-rolled line, the simulation workload is huge. In the case of ensuring the calculation accuracy and reducing calculation time, the RDMF model proposed in this paper is more practical for the numerical calculation in the hot rolling process.

3. Results and Discussion

Using the proposed RDMF model, a lot of simulated calculations are carried out with different working conditions. Based on the calculation results of the RDMF model, the effects of process parameters on the quarter buckle are analysed. According to the actual production of the last stand of the tandem hot mill, the basic working condition is determined as the control group, as listed in Table 2.

3.1. Effect of Bending Force

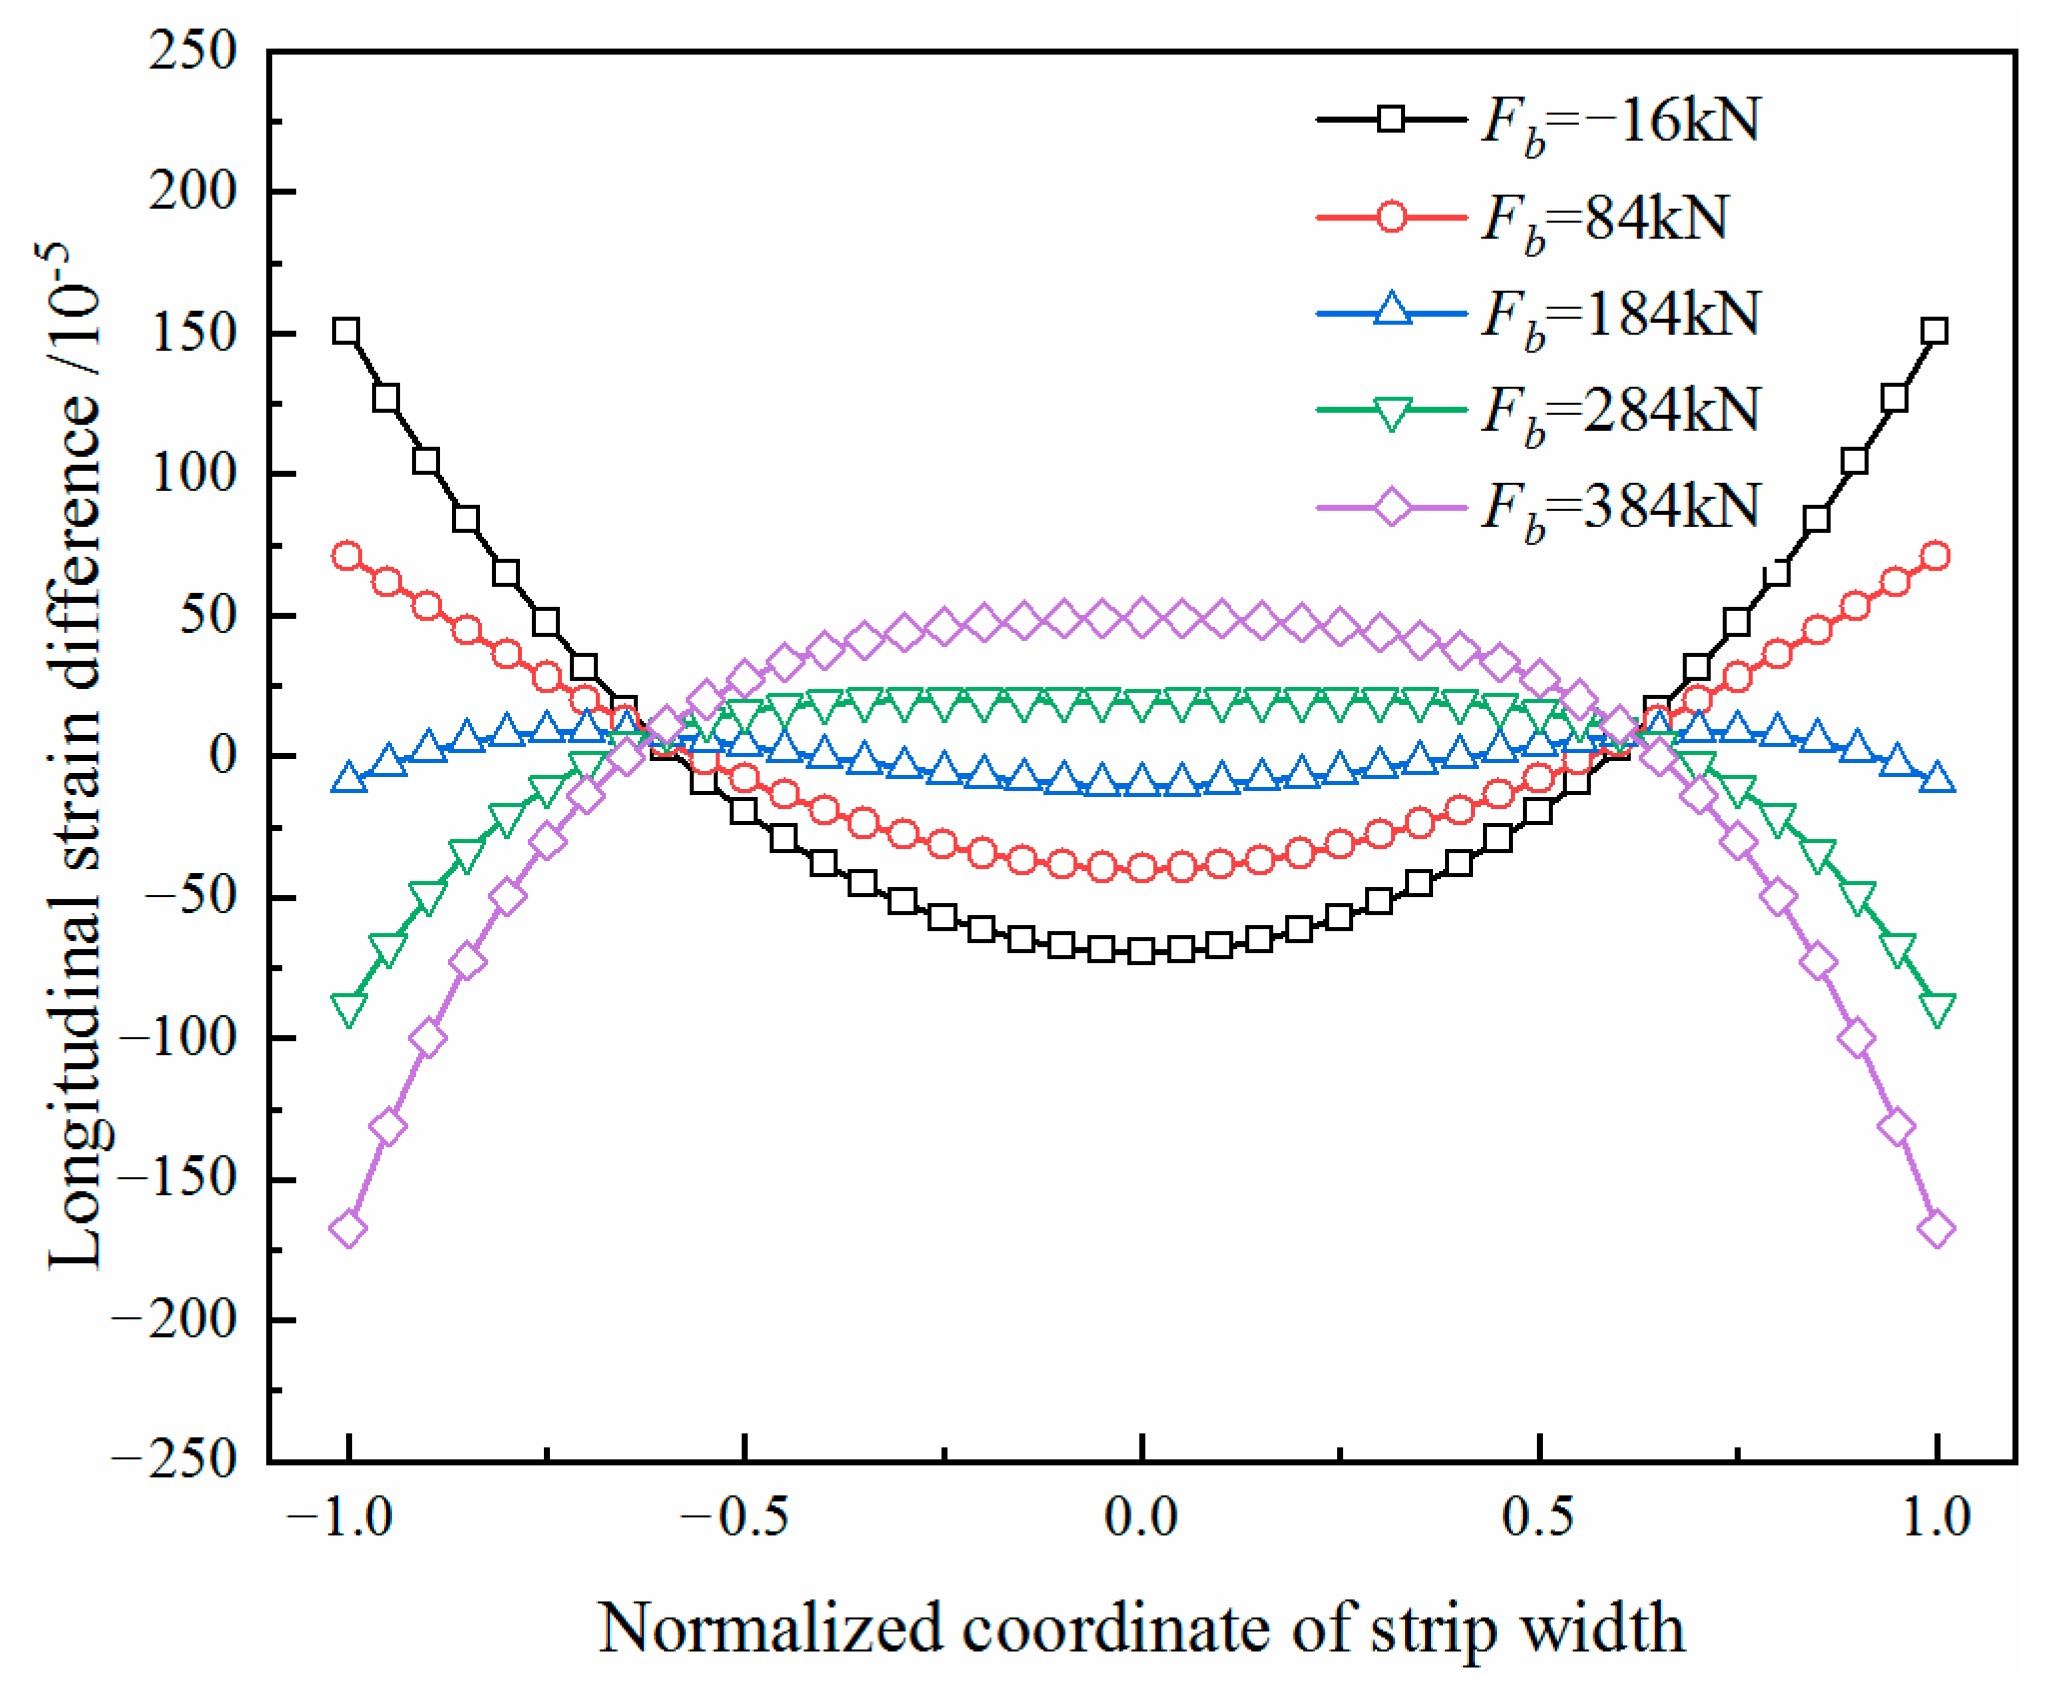
The bending system of the work roll is an on-line adjusting method for controlling the flatness. To study the effect of the change of bending force on the quarter buckle, the distributions of the longitudinal strain differences of the strip are calculated during the increase of the bending force from –16 kN to 384 kN based on the control group, as shown in Figure 11.
To parameterise the distribution characteristic of the longitudinal strain difference, the curve is fitted to a quartic polynomial, as shown below:
Δ ε ( x ) = c 0 + c 2 x 2 + c 4 x 4 x [ 1 ,   1 ]
where x is the normalised coordinate of the strip width; ci is the polynomial coefficient, i = 0, 2, 4.
According to the Chebyshev polynomial expansion, Equation (31) can also be expressed as:
Δ ε ( x ) = d 0 + d 2 T 2 ( x ) + d 4 T 4 ( x )
where di is the Chebyshev polynomial coefficient, i = 0, 2, 4; T2(x) is the Chebyshev quadratic component; T4(x) is the Chebyshev quartic component.
According to Equations (31) and (32), the Chebyshev polynomial coefficients can be expressed as:
{ d 0 = c 0 + 1 2 c 2 + 3 8 c 4 d 2 = 1 2 ( c 2 + c 4 ) d 4 = 1 8 c 4
In the distribution of the longitudinal strain difference, the convexity of the quadratic component is defined as Δε2 and the convexity of the quartic component is Δε4:
{ Δ ε 2 = d 2 T 2 ( 0 ) 1 2 [ d 2 T 2 ( 1 ) + d 2 T 2 ( 1 ) ] = ( c 2 + c 4 ) Δ ε 4 = 1 2 [ d 4 T 4 ( 2 2 ) + d 4 T 4 ( 2 2 ) ] d 4 T 4 ( 0 ) = c 4 4
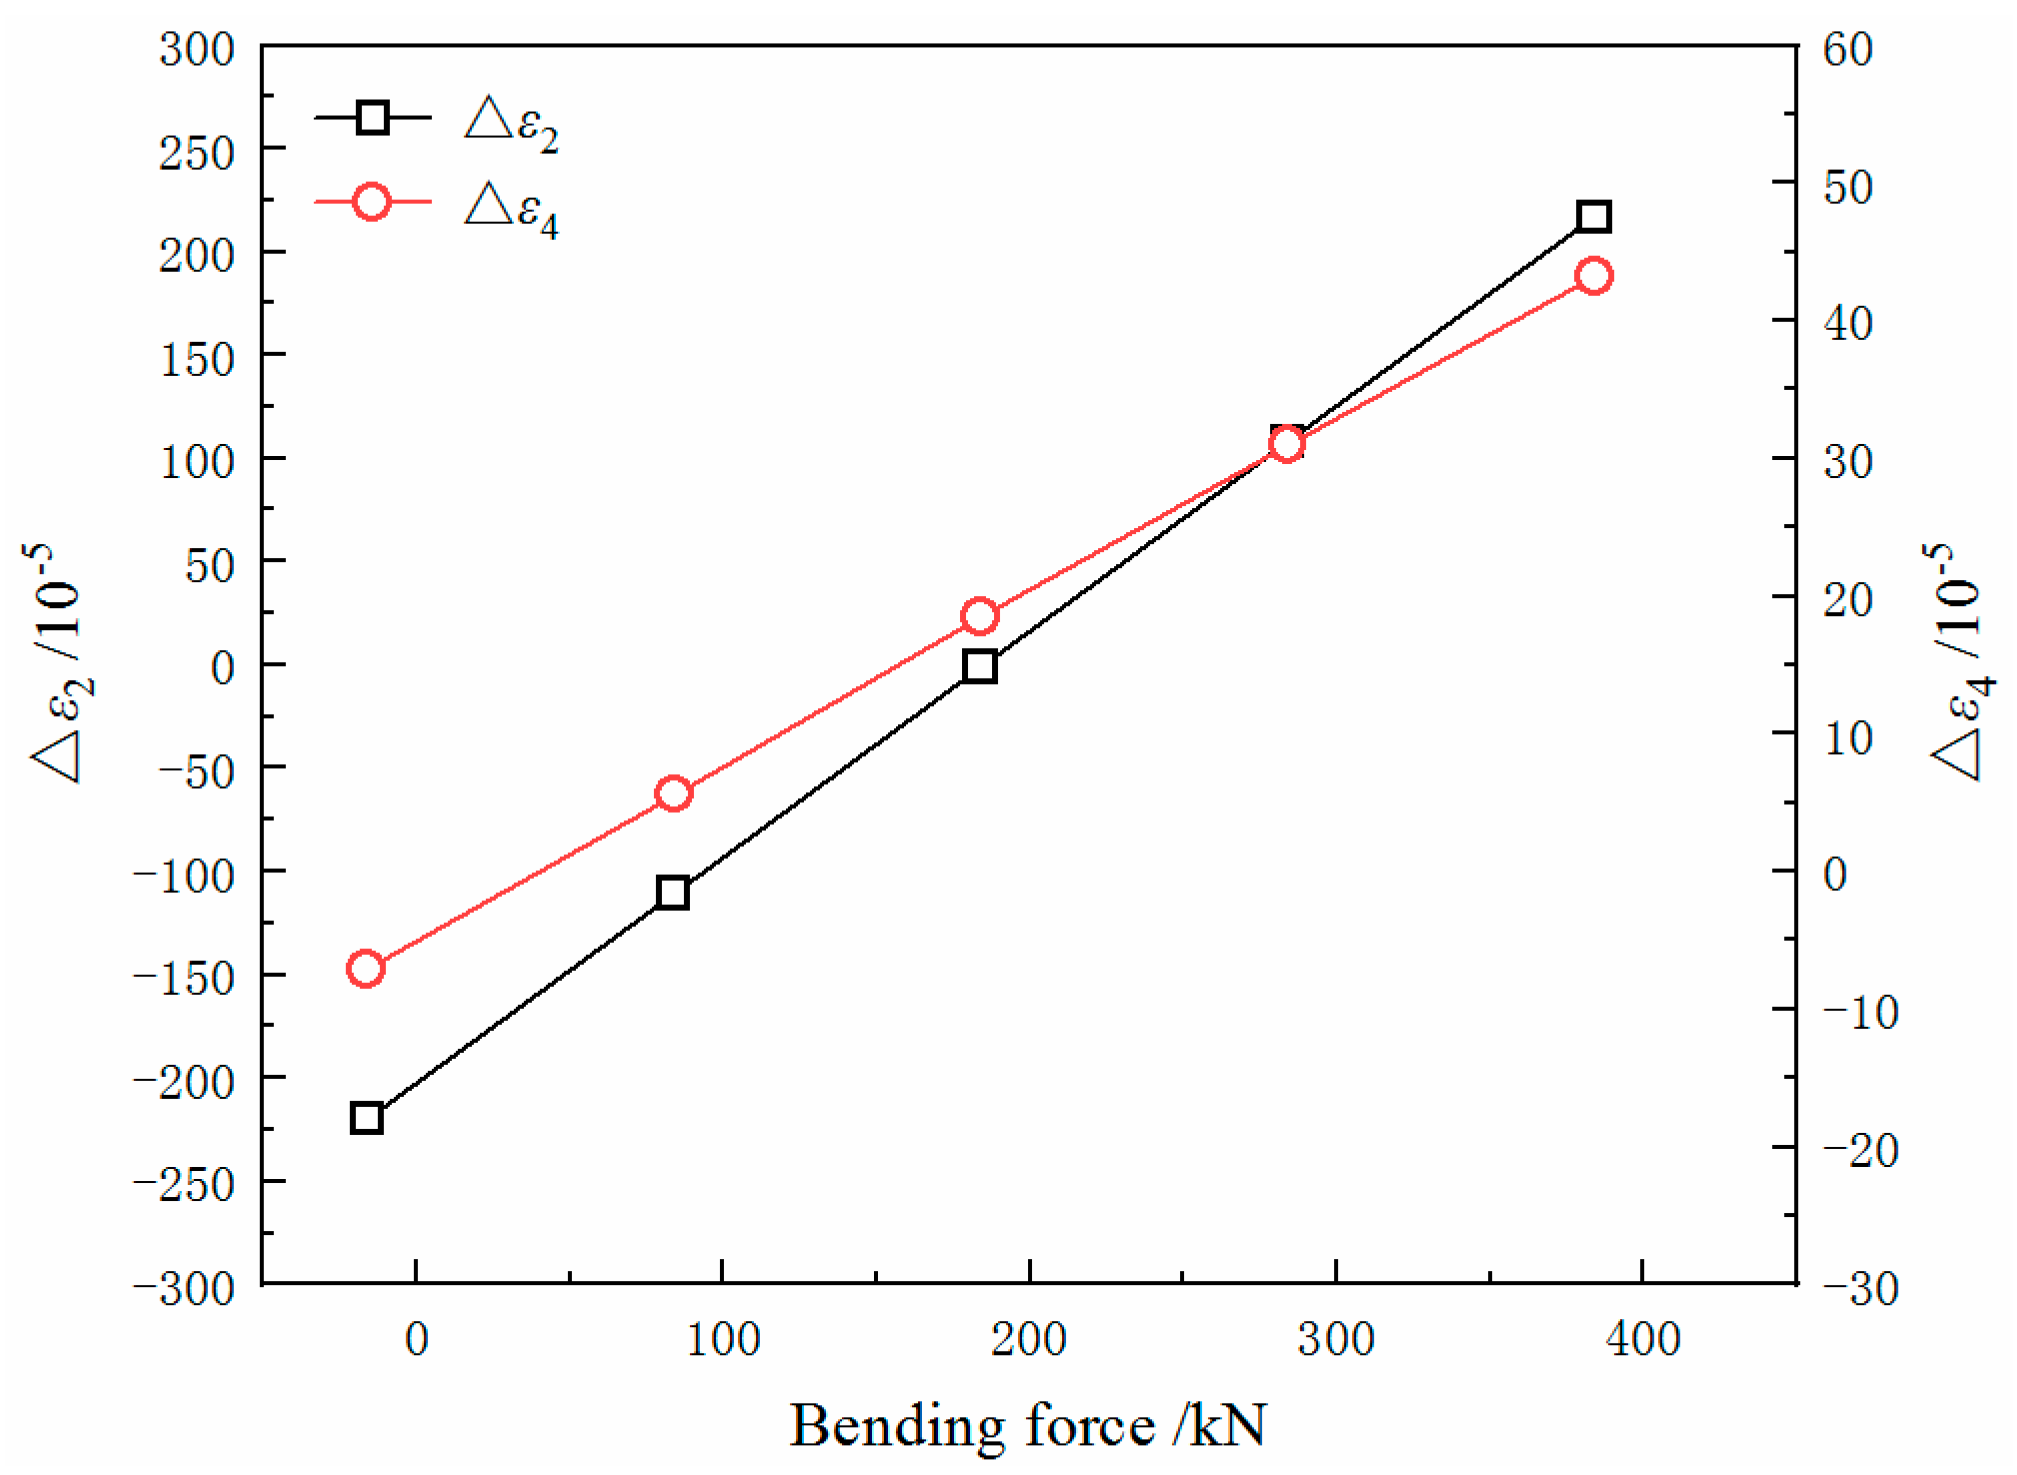
The values of Δε2 and Δε4 with different bending forces are shown in Figure 12. As the bending force increases, both of them increase simultaneously. When the value of Δε2 is close to zero and the value of Δε4 is large, there is the mode of a quarter buckle. When the bending forces are 284 and 384 kN, the distributions of longitudinal strain difference are in the mode of a centre buckle. The values of Δε2 are 108.2 × 10⁻⁵ and 216.7 × 10⁻⁵, the values of Δε4 are also large. When the bending forces are −16 and 84 kN, the distributions of longitudinal strain difference are in the mode of an edge wave. In addition, the values of Δε2 are −219.9 × 10⁻⁵ and −110.5 × 10⁻⁵, while the values of Δε4 are much smaller than that of the centre buckle mode. When the bending force is changed from −16 kN to 384 kN, the quarter buckle mode occurs in the change from the edge wave mode to the centre buckle mode. This is similar to the situation in production: when a quarter buckle appears, increasing the bending force will turn it into a centre buckle, while reducing the bending force will turn it into an edge wave.
It is difficult to improve the quarter buckle solely by the bending force. When studying the effect of other parameters on the quarter buckle, it is necessary to decouple the quadratic wave and the quarter buckle, namely, by adjusting the bending force to eliminate the quadratic wave, and then studying the change of the Δε4.

3.2. Effect of Strip Lateral Temperature Difference

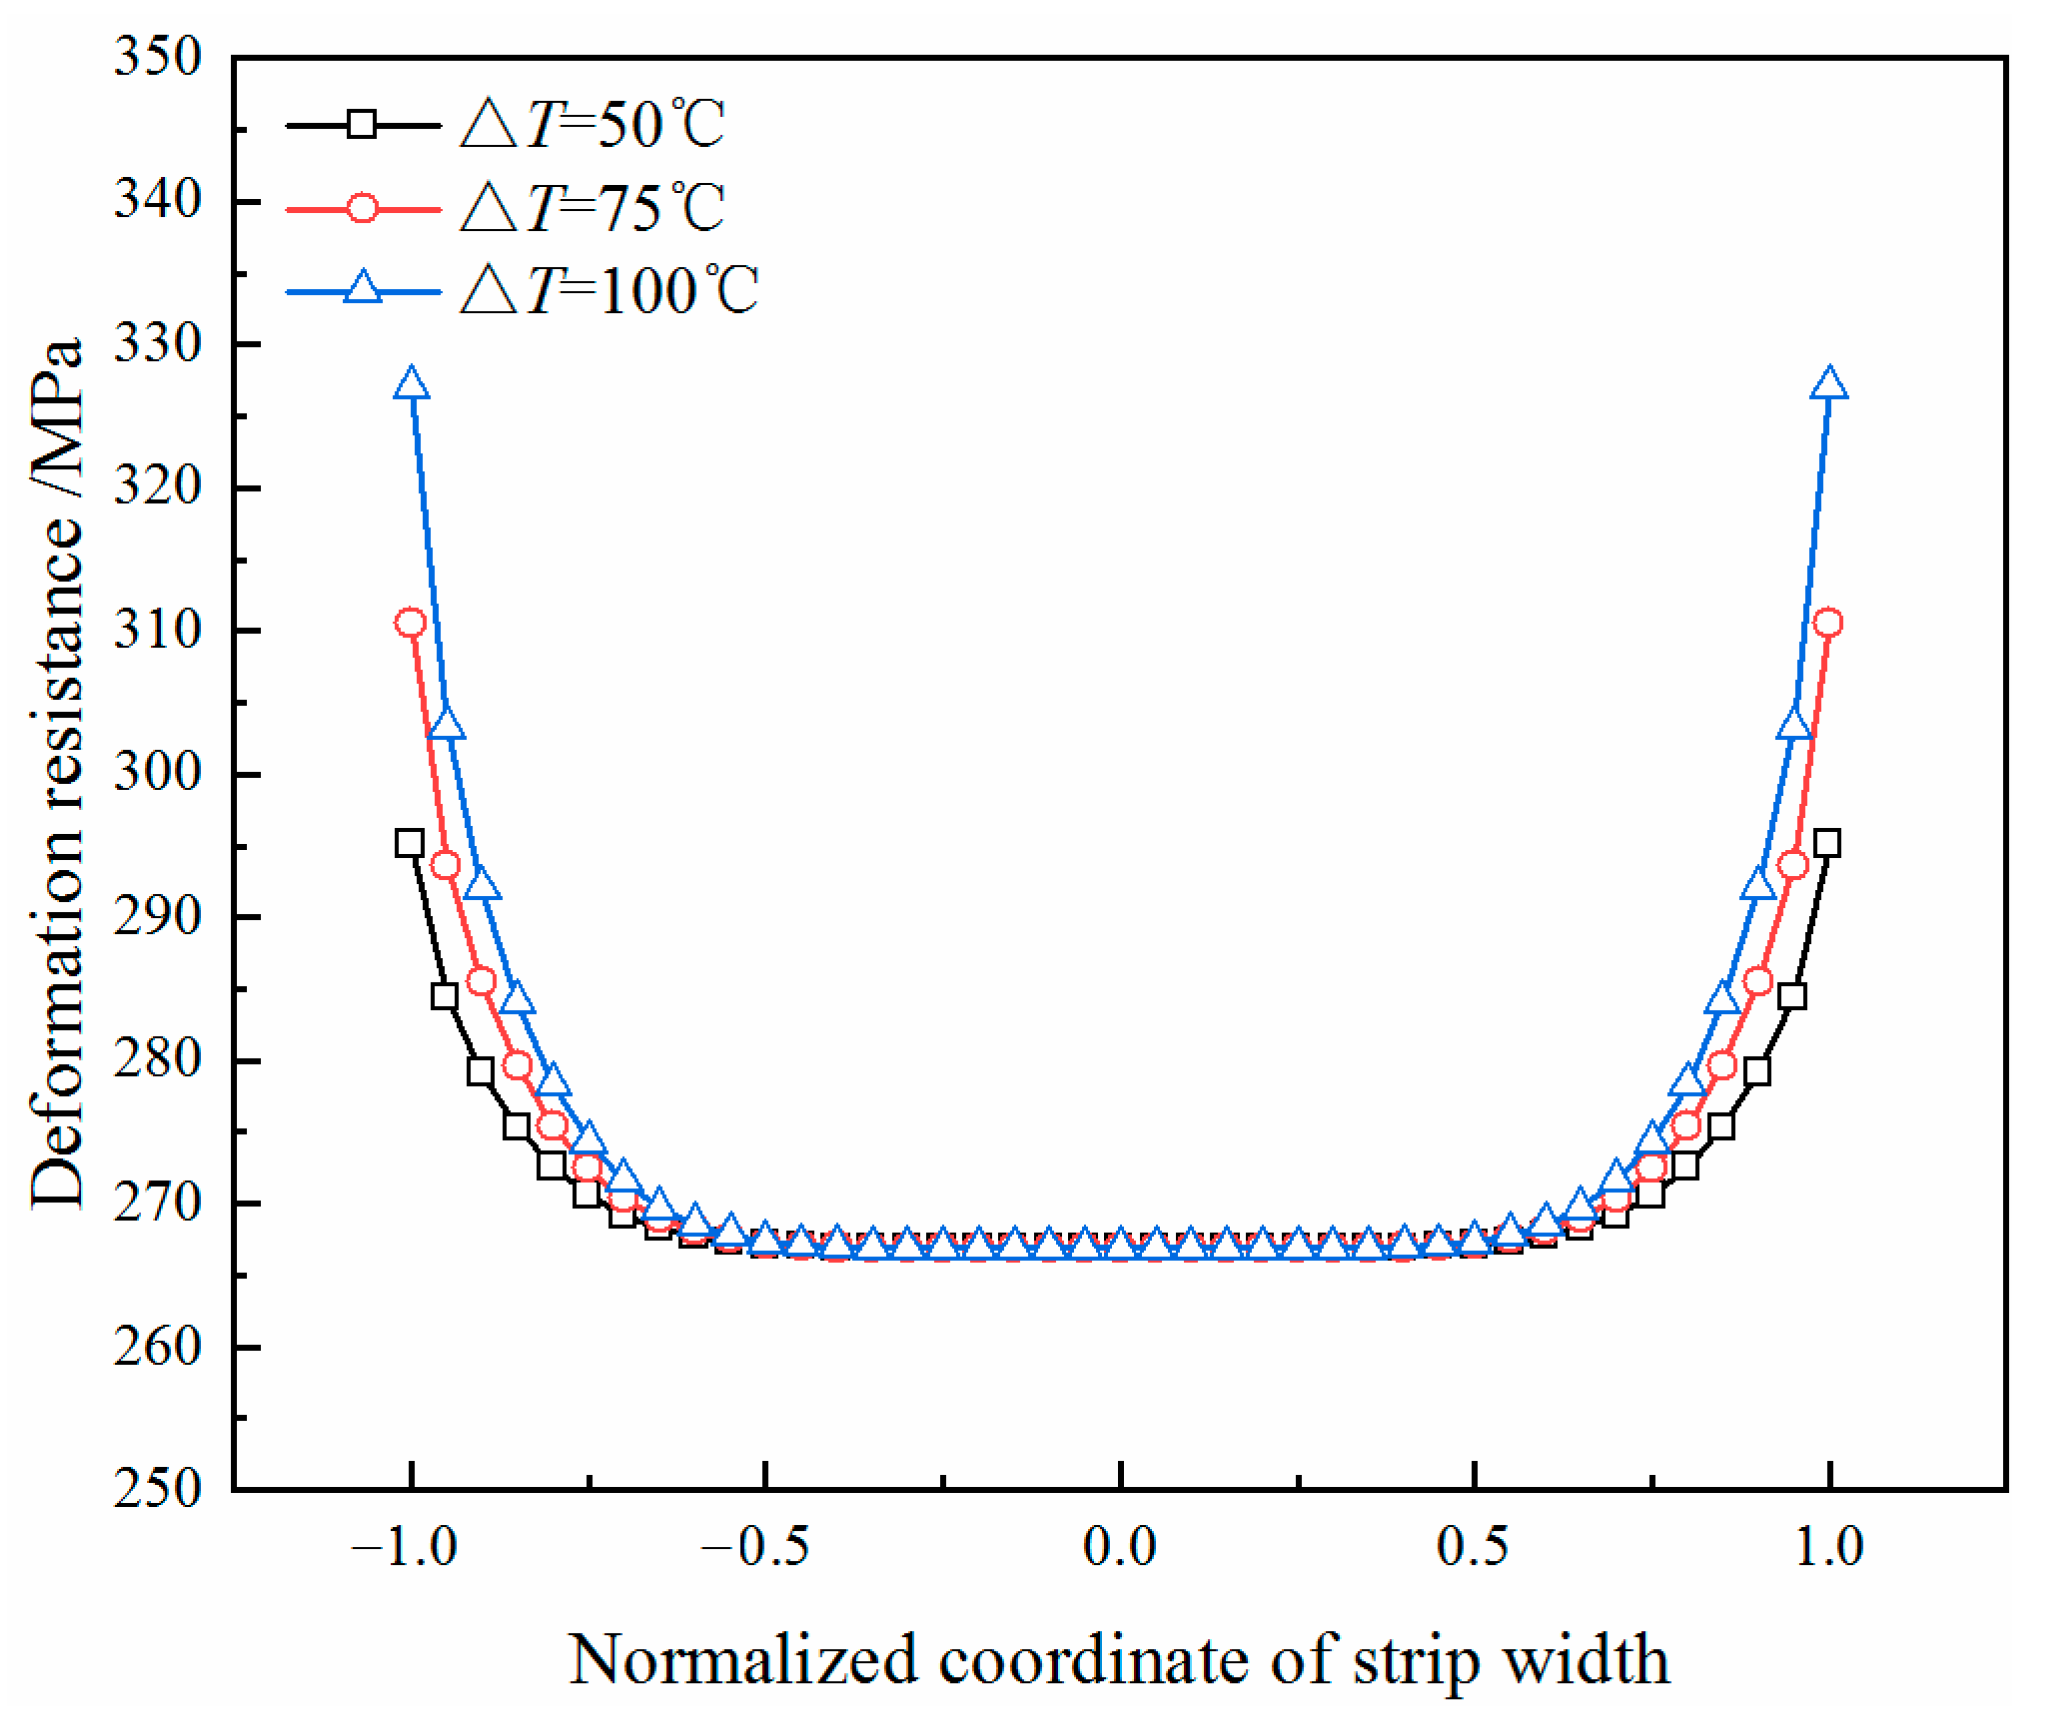
In hot rolling, the temperature of the strip edge is lower than the middle. Because the thermal conductivity of stainless steel is poor, the strip lateral temperature difference (ΔT) is usually greater than that of plain carbon steel. The uneven temperature distribution of the strip makes the distribution of the rolling force uneven, which is related to the generation of the quarter buckle. The lateral temperature distribution of the strip in the last stand, detected by a thermal imager, is shown in Figure 13. The temperature difference between the middle and the edge of the strip is 50 °C. By keeping the measured value of the temperature in the middle of the strip constant and decreasing the temperature value at the edge of the strip, the distribution curves with lateral temperature differences of 75 °C and 100 °C were obtained as control groups. In Figure 14, due to the different distribution of the lateral temperature, the deformation resistance of the strip in the width direction is also different.
In the simulation of the rolling process, the value of Δε2 is close to zero by changing the bending force. As the ΔT of the strip increases, the bending force required to improve the quadratic wave decreases. The bending force and the Δε4 are shown in Figure 15. With an increase in ΔT, the value of Δε4 increases linearly. When ΔT increased by 10 °C, and the value of Δε4 increased by 3.1 × 10⁻⁵. However, the change of bending force is very small with different temperature differences.

3.3. Effect of Rolling Force

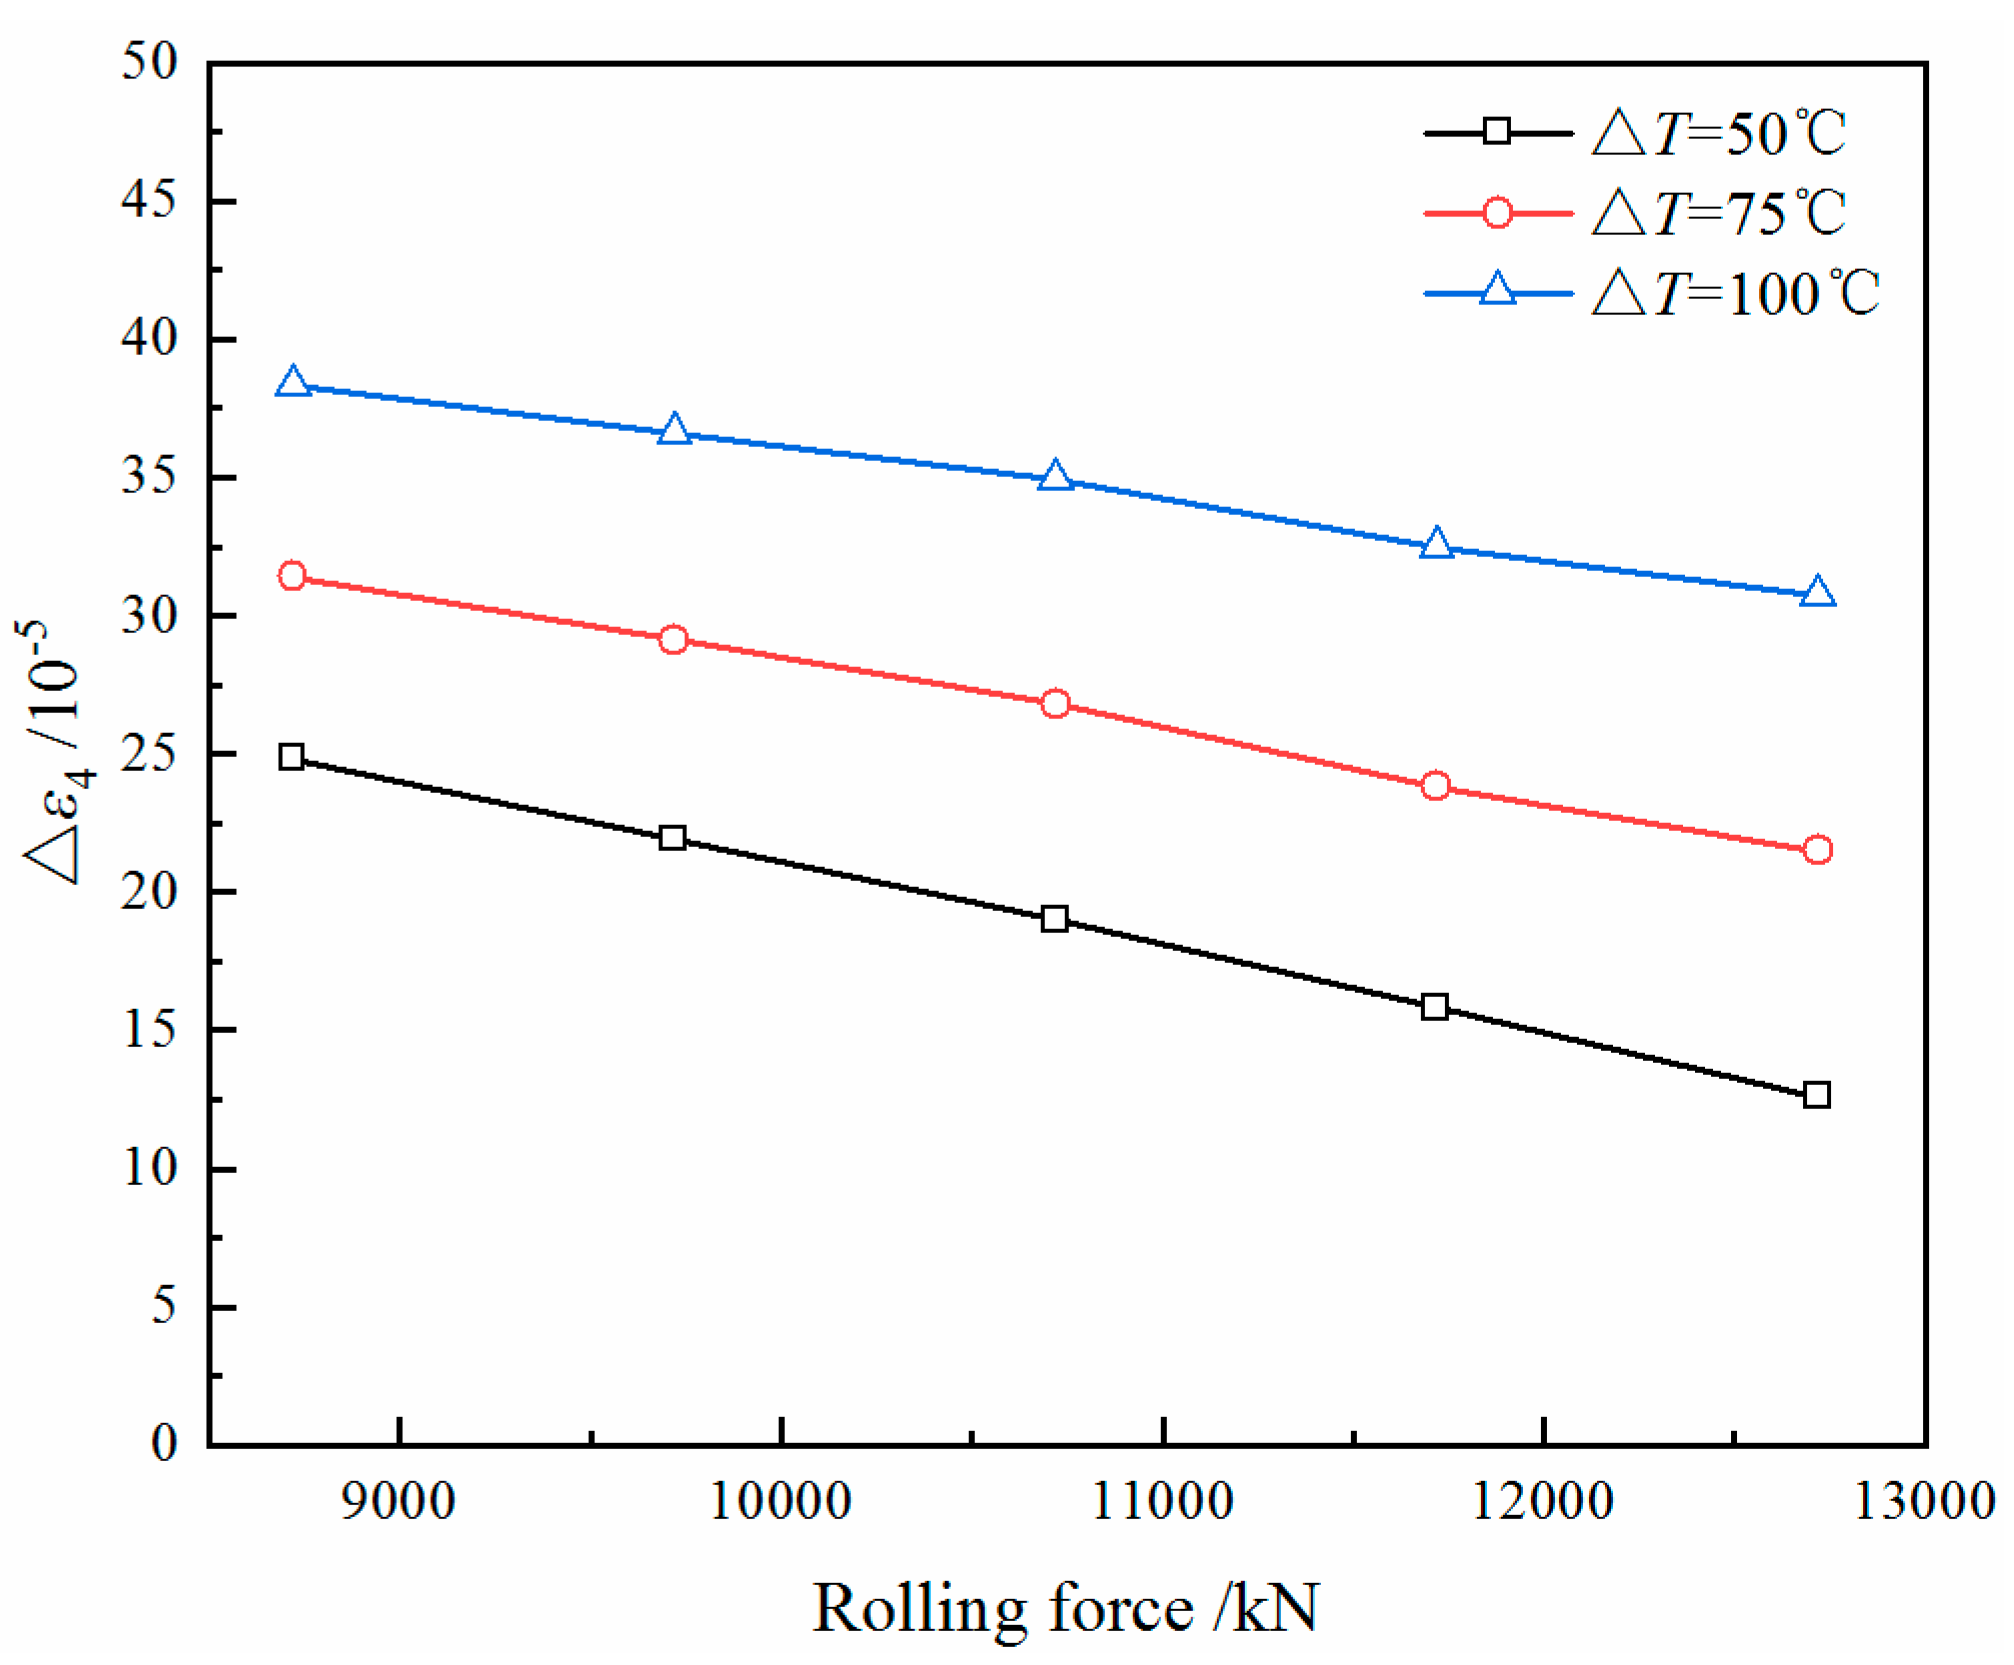
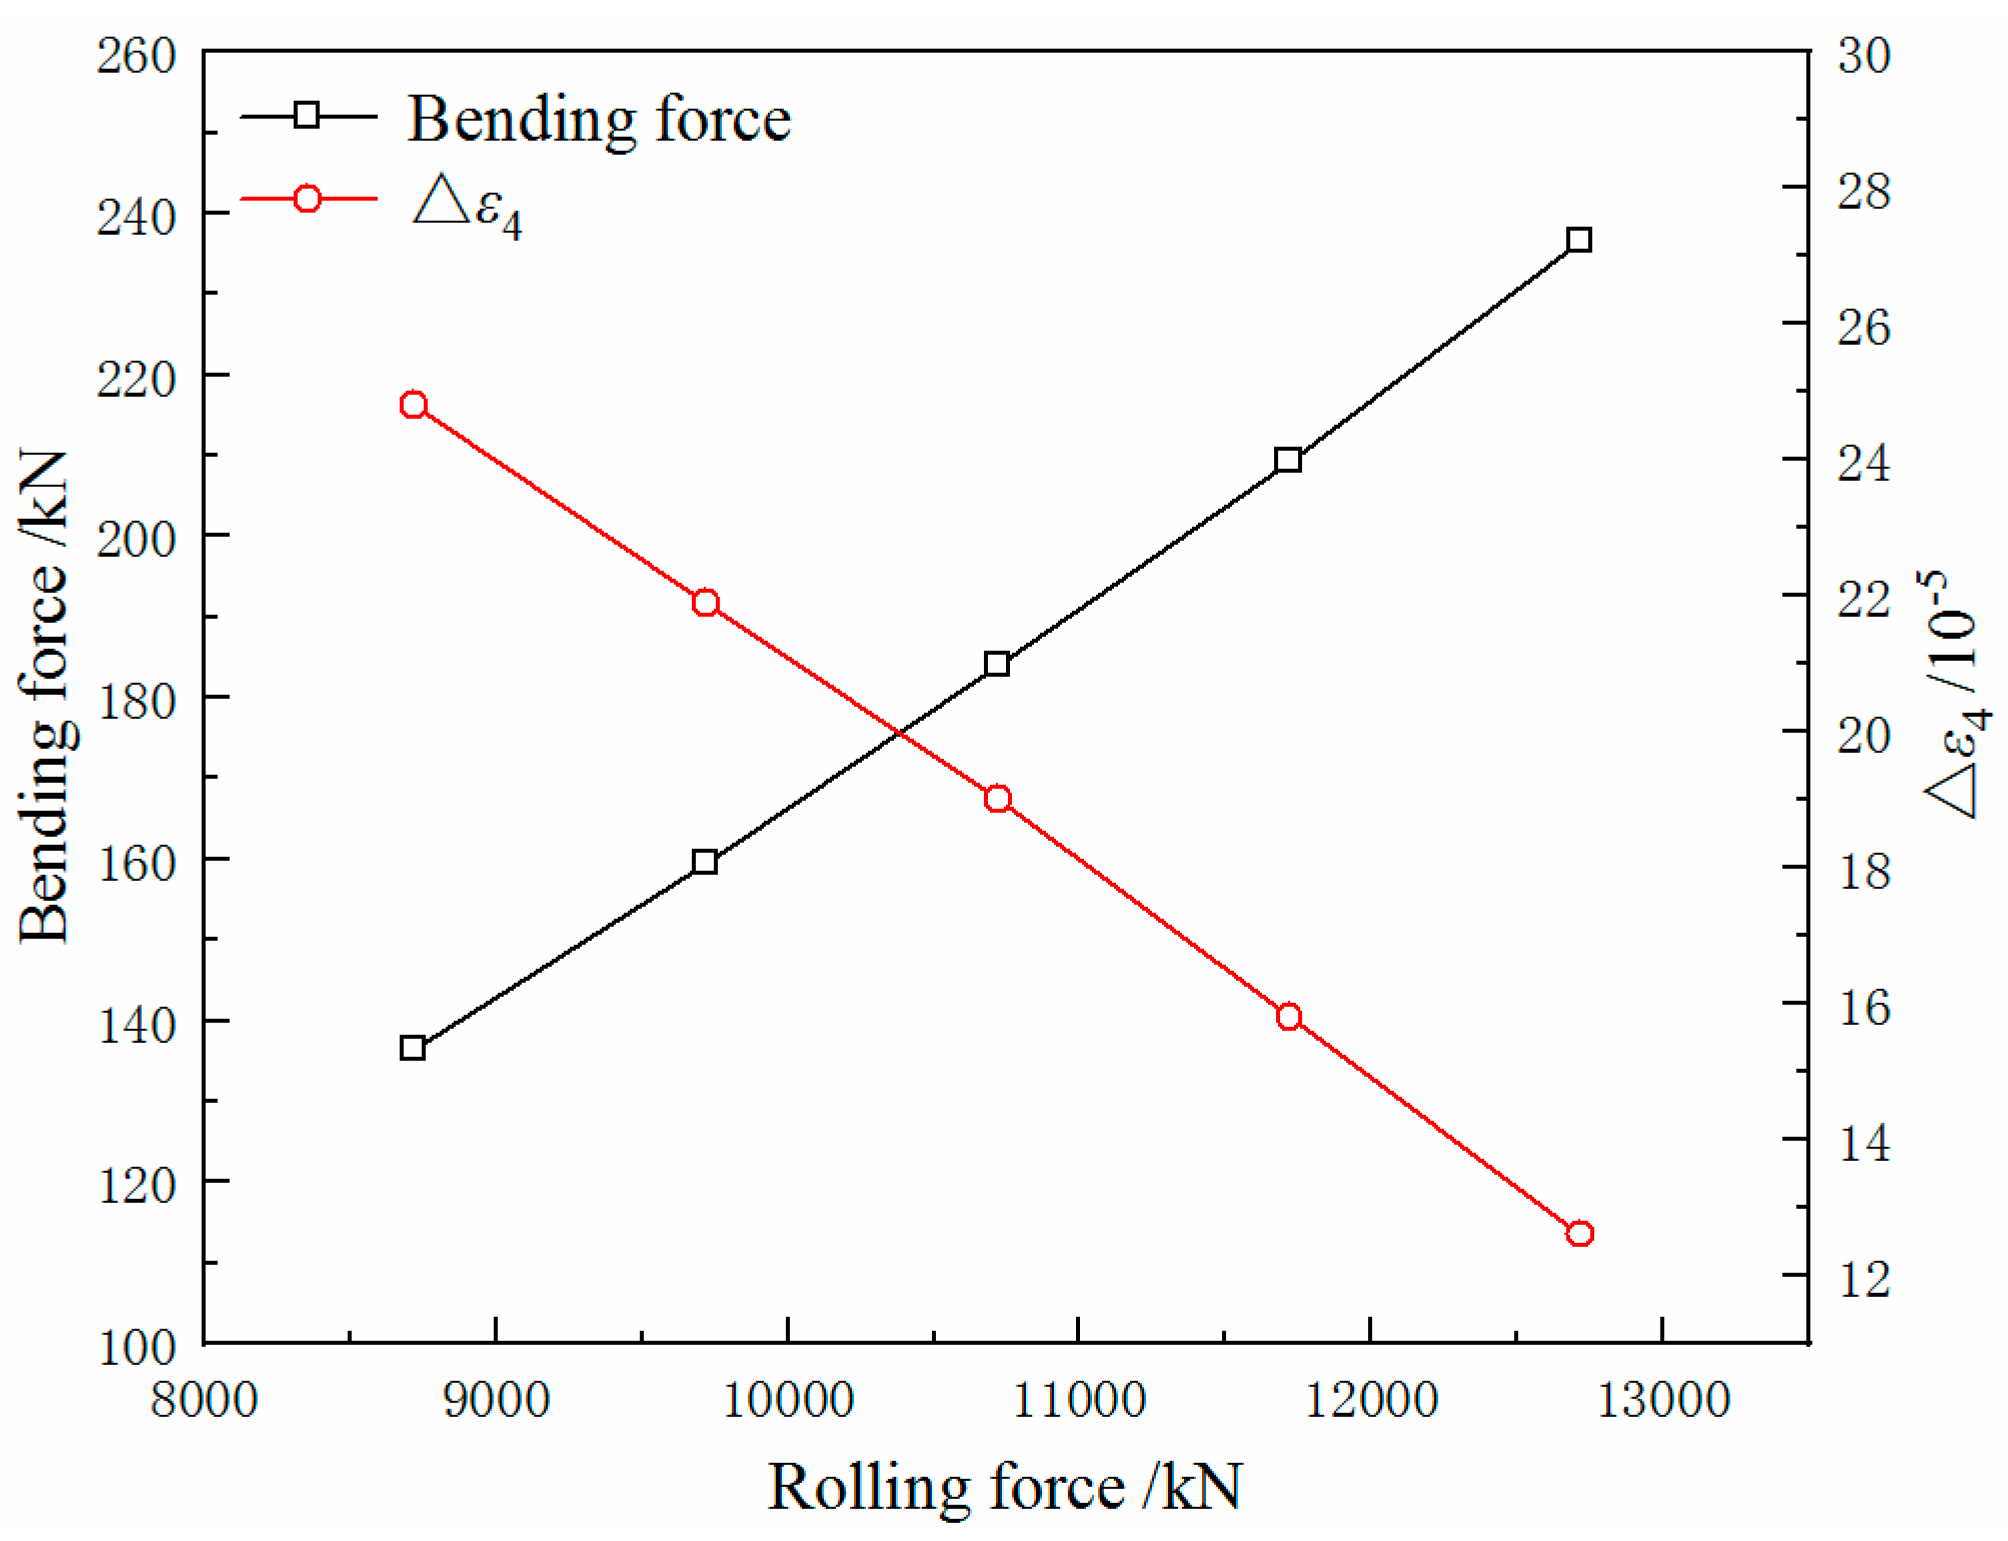
Research into the effect of rolling force on the quarter buckle can provide a basis for the optimisation of load distribution. With different distributions of lateral temperature, the effect of rolling force on the quarter buckle is considered. The ΔT of the strip is selected to be 50 °C, 75 °C and 100 °C, respectively. Taking 1000 kN as the interval, two rolling force control groups are selected above and below the rolling force of 10,720 kN in Table 2. The calculation results are shown in Figure 16 and Figure 17.
The results show that at the same ΔT the value of Δε4 decreases linearly with the rolling force increasing, but the bending force required to eliminate the quadratic wave increases gradually. The effect of rolling force on the reduction of the quarter buckle is different with different values of ΔT. When the ΔT is relatively small, as the rolling force increases, the bending force required to improve the quadratic wave is increased, but the effect of reducing the quarter buckle is more obvious as a whole.

3.4. Effect of Strip Quartic Crown before Rolling

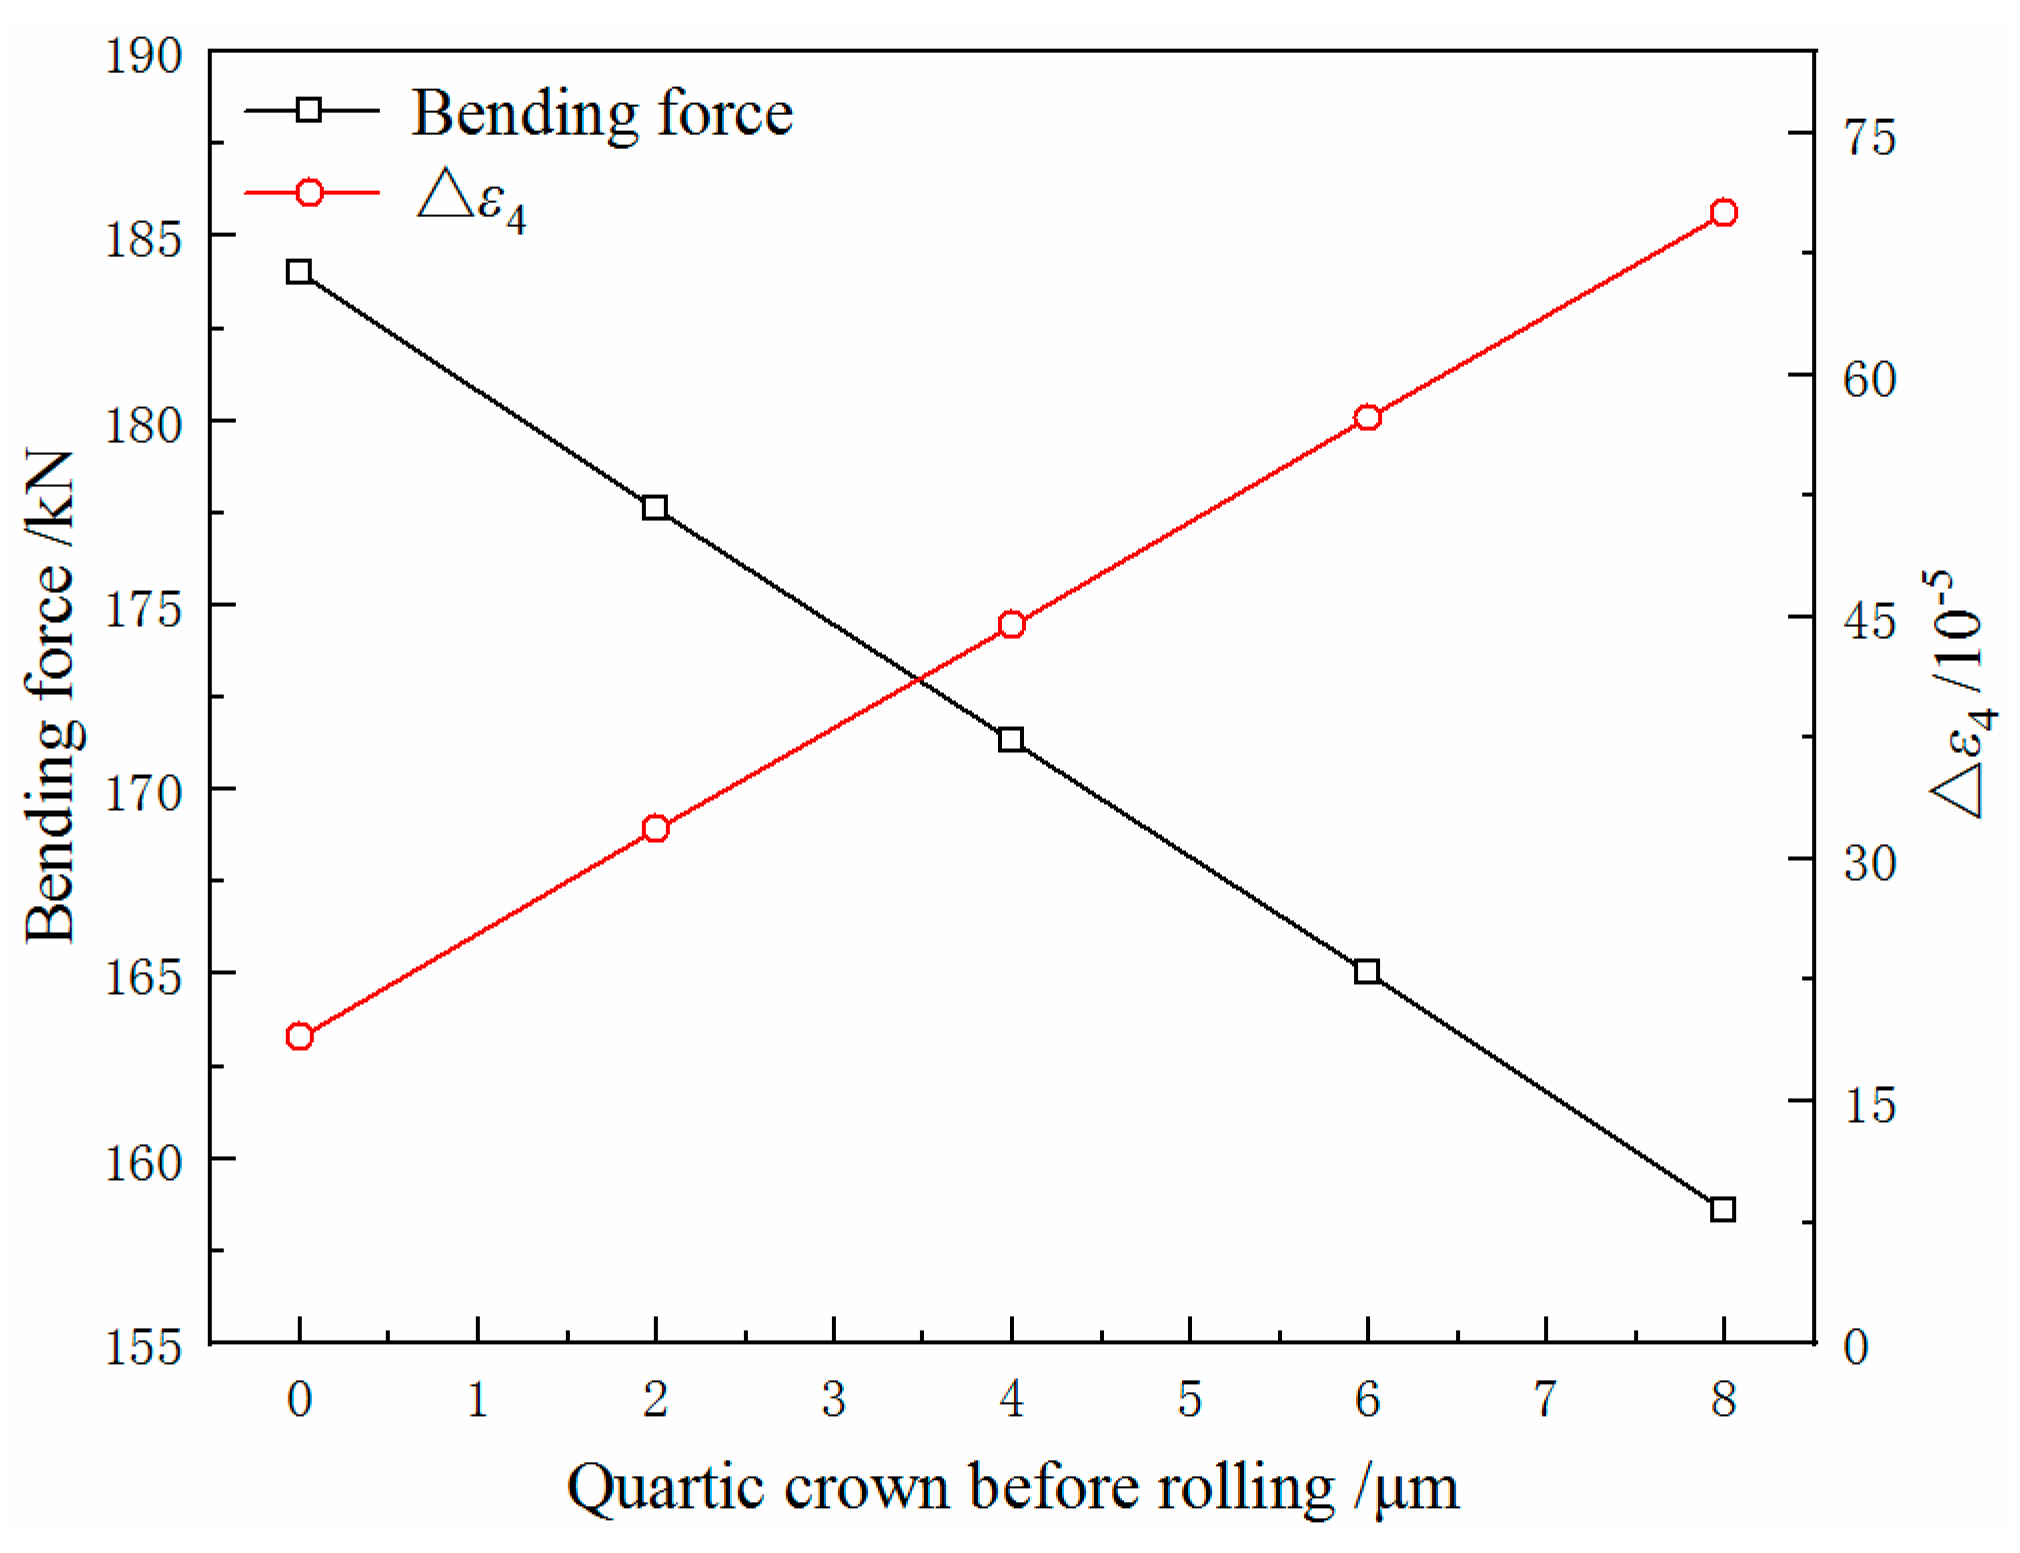
The key to the shape control of hot-rolled strips is the change of the strip crown distribution before and after rolling. To study the change rule of the quarter buckle of the strip, the effect of the strip crown before rolling cannot be ignored. The strip crown before rolling can be divided into the quadratic crown and the quartic crown. The former is related to the quadratic wave of the strip, and the latter is related to the high-order wave [23]. In this paper, the effect of the strip quartic crown before rolling on the quarter buckle is studied. The quartic crown is set to 0, 2, 4, 6 and 8 µm. Other parameters remain unchanged. The calculation results are shown in Figure 18 and Figure 19.
At the same ΔT, the value of Δε4 gradually increases with the increase of the quartic crown. With different values of ΔT, as the quartic crown increases, the values of Δε4 increase at almost the same rate. This indicates that with different values of ΔT, the effect of the quartic crown on the quarter buckle of the strip is only different in the basic value. The magnitude of the quartic crown can reflect the severity of the quarter buckle to a certain extent. According to the comparison of the calculation results, it is found that when the quartic crown changes, the bending force does not change significantly. It has a great impact on the quarter buckle.

3.5. Effect of Back-Up Roll Chamfer Length

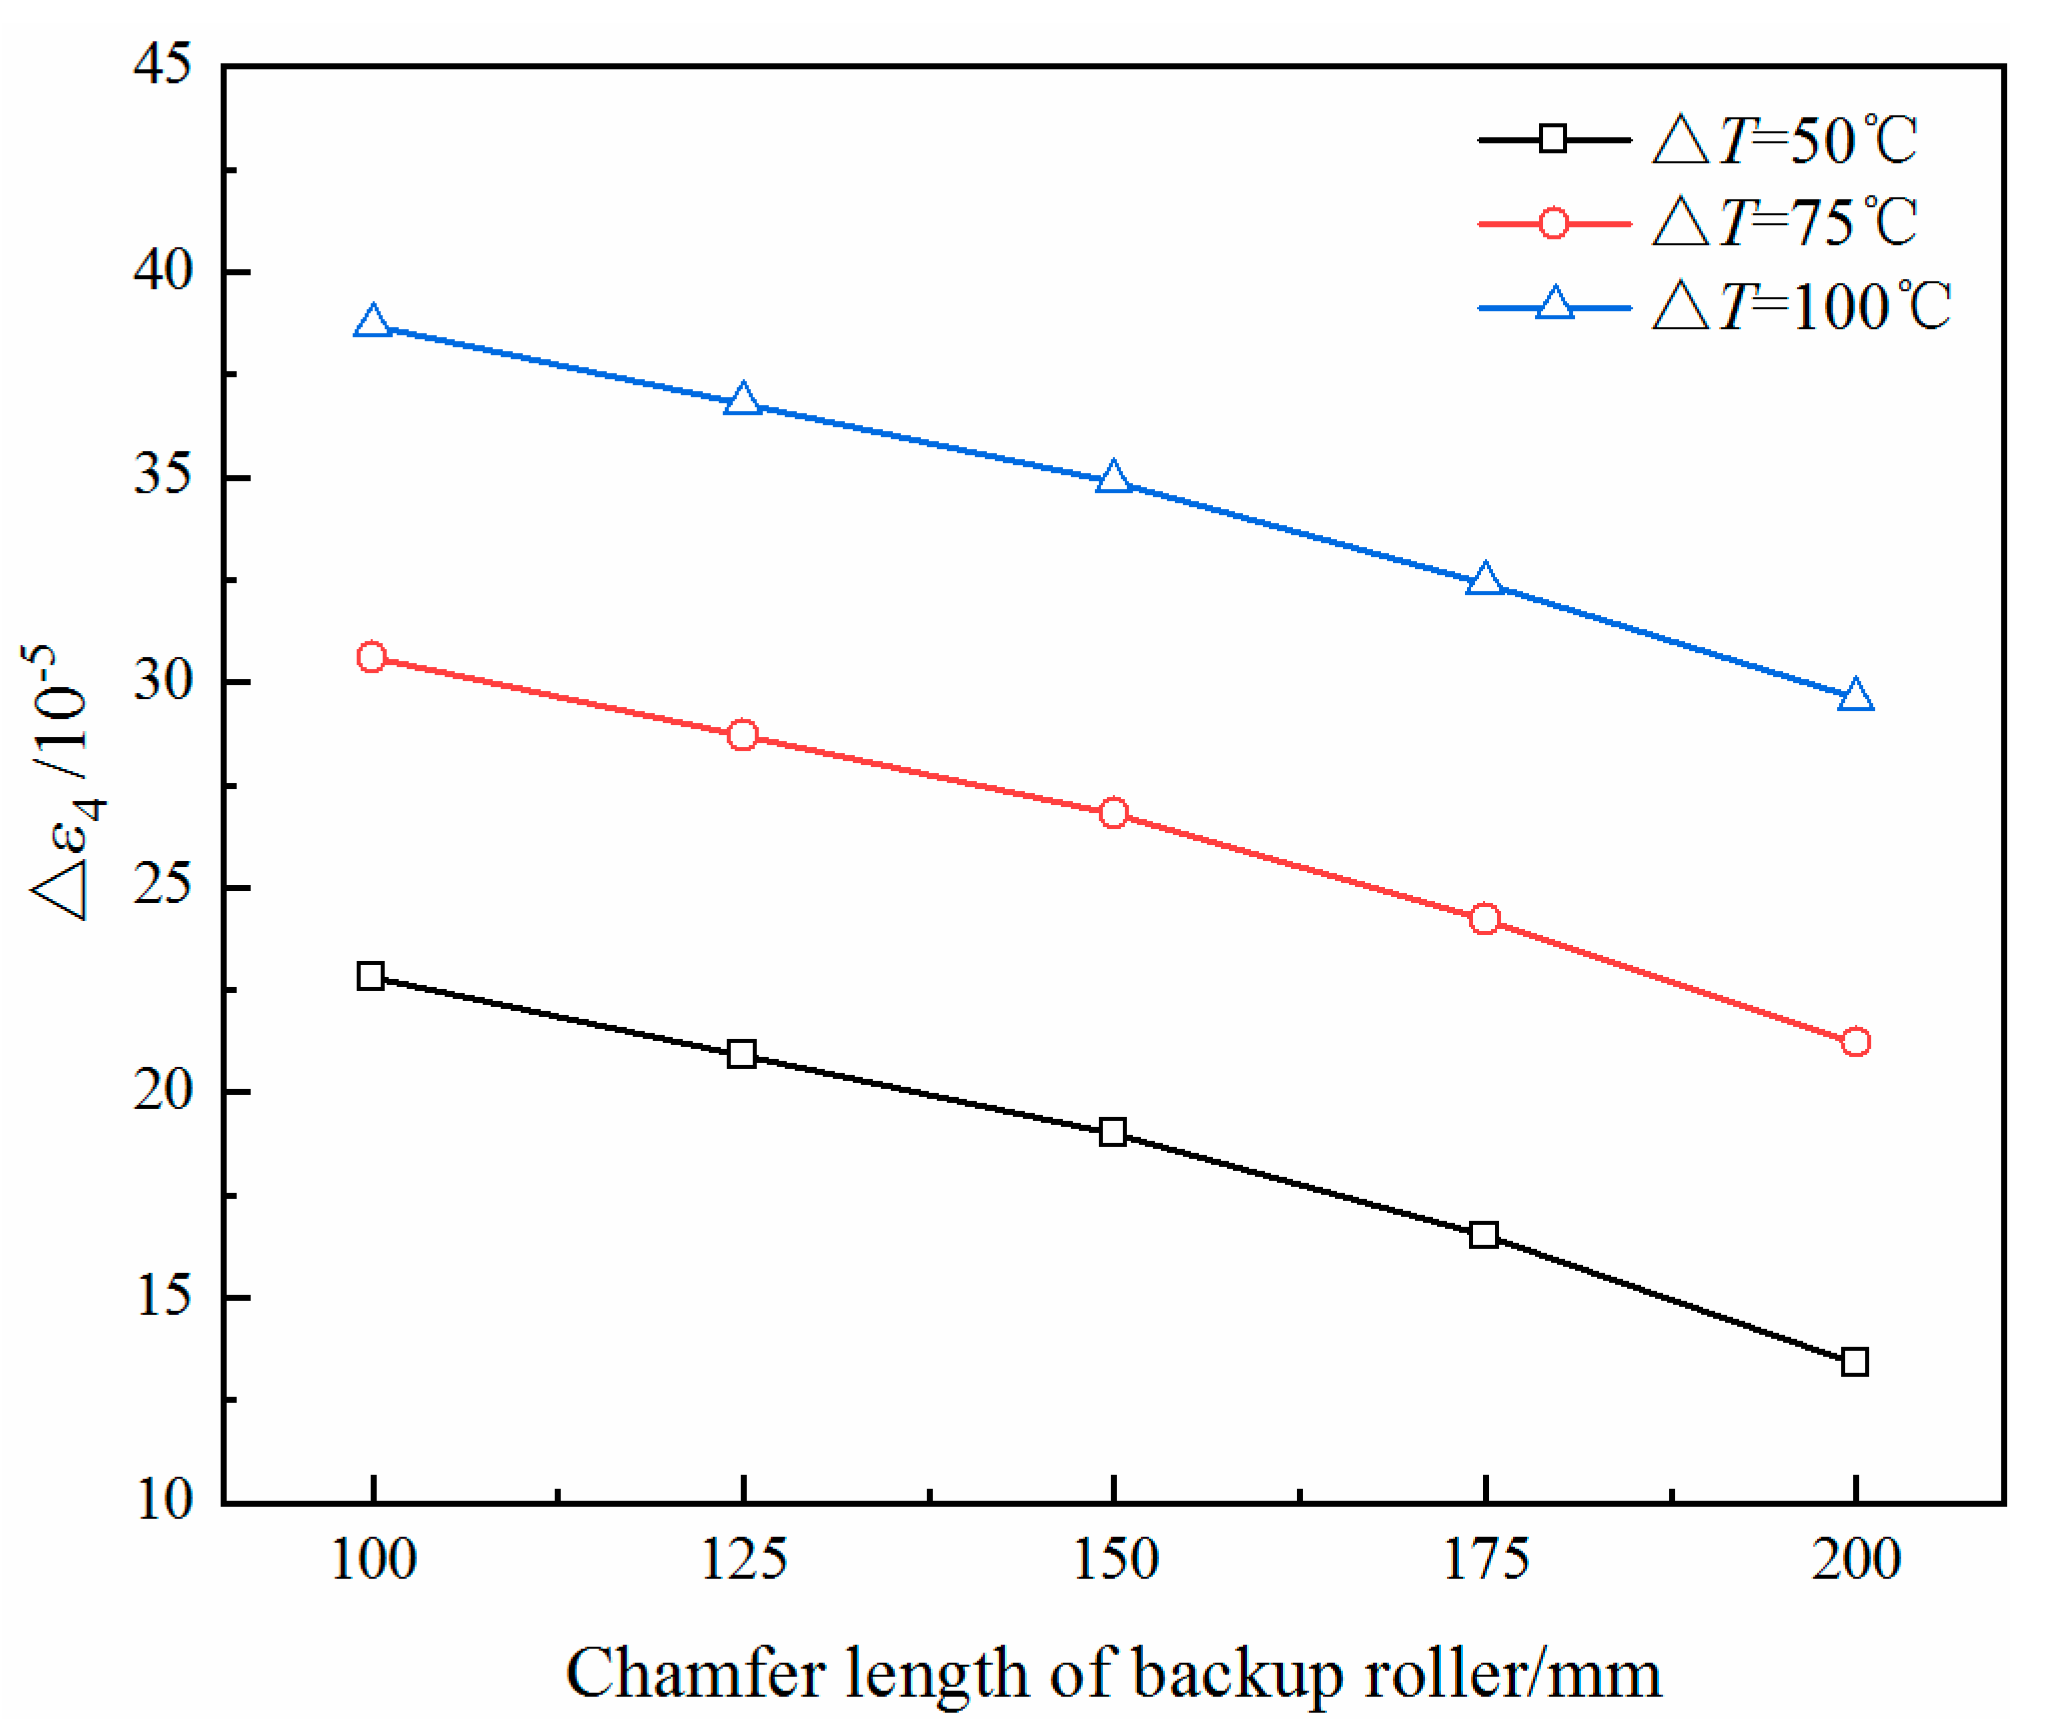
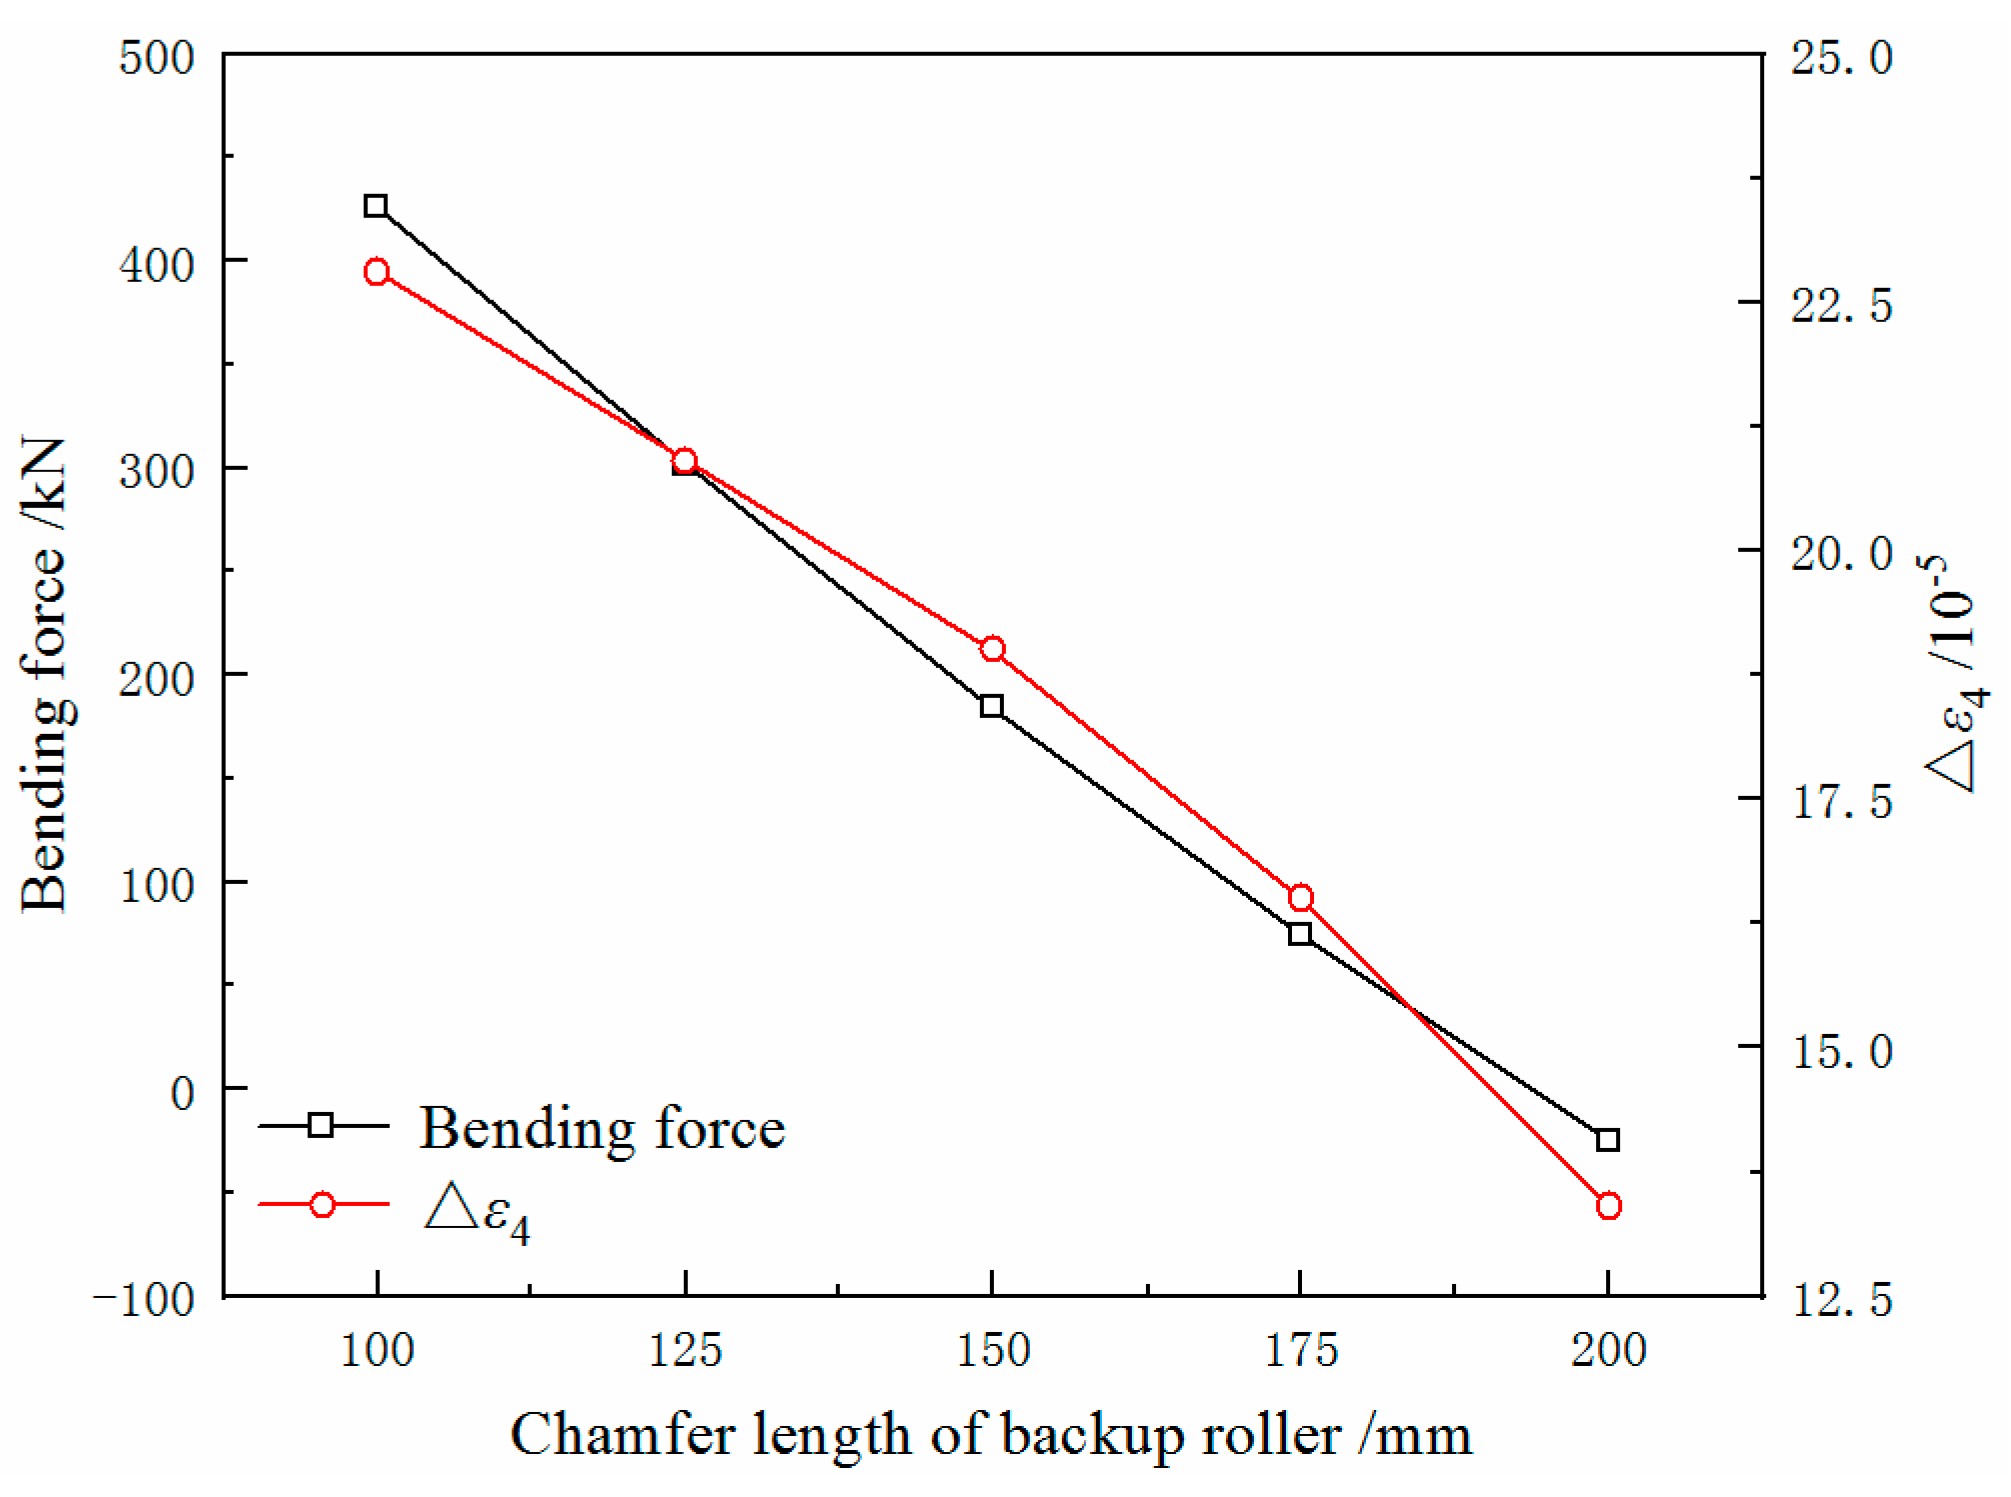
The chamfer of the back-up roll helps to reduce the harmful contact zone between the rolls, and affects the deflection of the roll stack. The chamfer length is an important parameter for the back-up roll contour, which affects the range of the contact zone between the rolls. The chamfer length of the back-up roll is selected to be 50, 100, 150, 200 and 250 mm. The effect on the quarter buckle are studied through simulation.
It can be seen in Figure 20 that at the same ΔT, the Δε4 decreases in a parabola with the increase of the chamfer length, which reduces the possibility of a quarter buckle. At the same time, increasing the chamfer length will reduce the deflection of the roll stack, thereby reducing the strip crown. To compensate for this effect and avoid the quadratic wave, the bending force is significantly reduced, as shown in Figure 21. Therefore, the reduction of Δε4 in the calculation results from the combined effects of increasing the chamfer length and reducing the bending force.

4. Design of MVC and Industrial Application

Aiming at the quarter buckle of hot-rolled stainless steel, a new technology of work roll contour is developed in this paper. The MVC designed by the superposition of the quadratic curve and the sextic curve not only causes the work roll to have the ability to control the quadratic wave, but also improves the quarter buckle. The coefficient of the quadratic curve is designated by the magnitude of the quadratic wave. The coefficients of the sextic curve are determined by the position and magnitude of the quarter buckle. Then, they will be superimposed in different regions. Assuming the strip width is 2B and the roll barrel is 2L, the curve equation of MVC is:
y ( x ) = { e 2 x 2 + ( f 2 x 2 + f 4 x 4 + f 6 x 6 ) x [ B ,   B ] e 2 x 2 x [ L , B ) ( B ,   L ]
where e2 is the coefficient of the quadratic curve; fi is the coefficient of the sextic curve, i = 2, 4, 6.
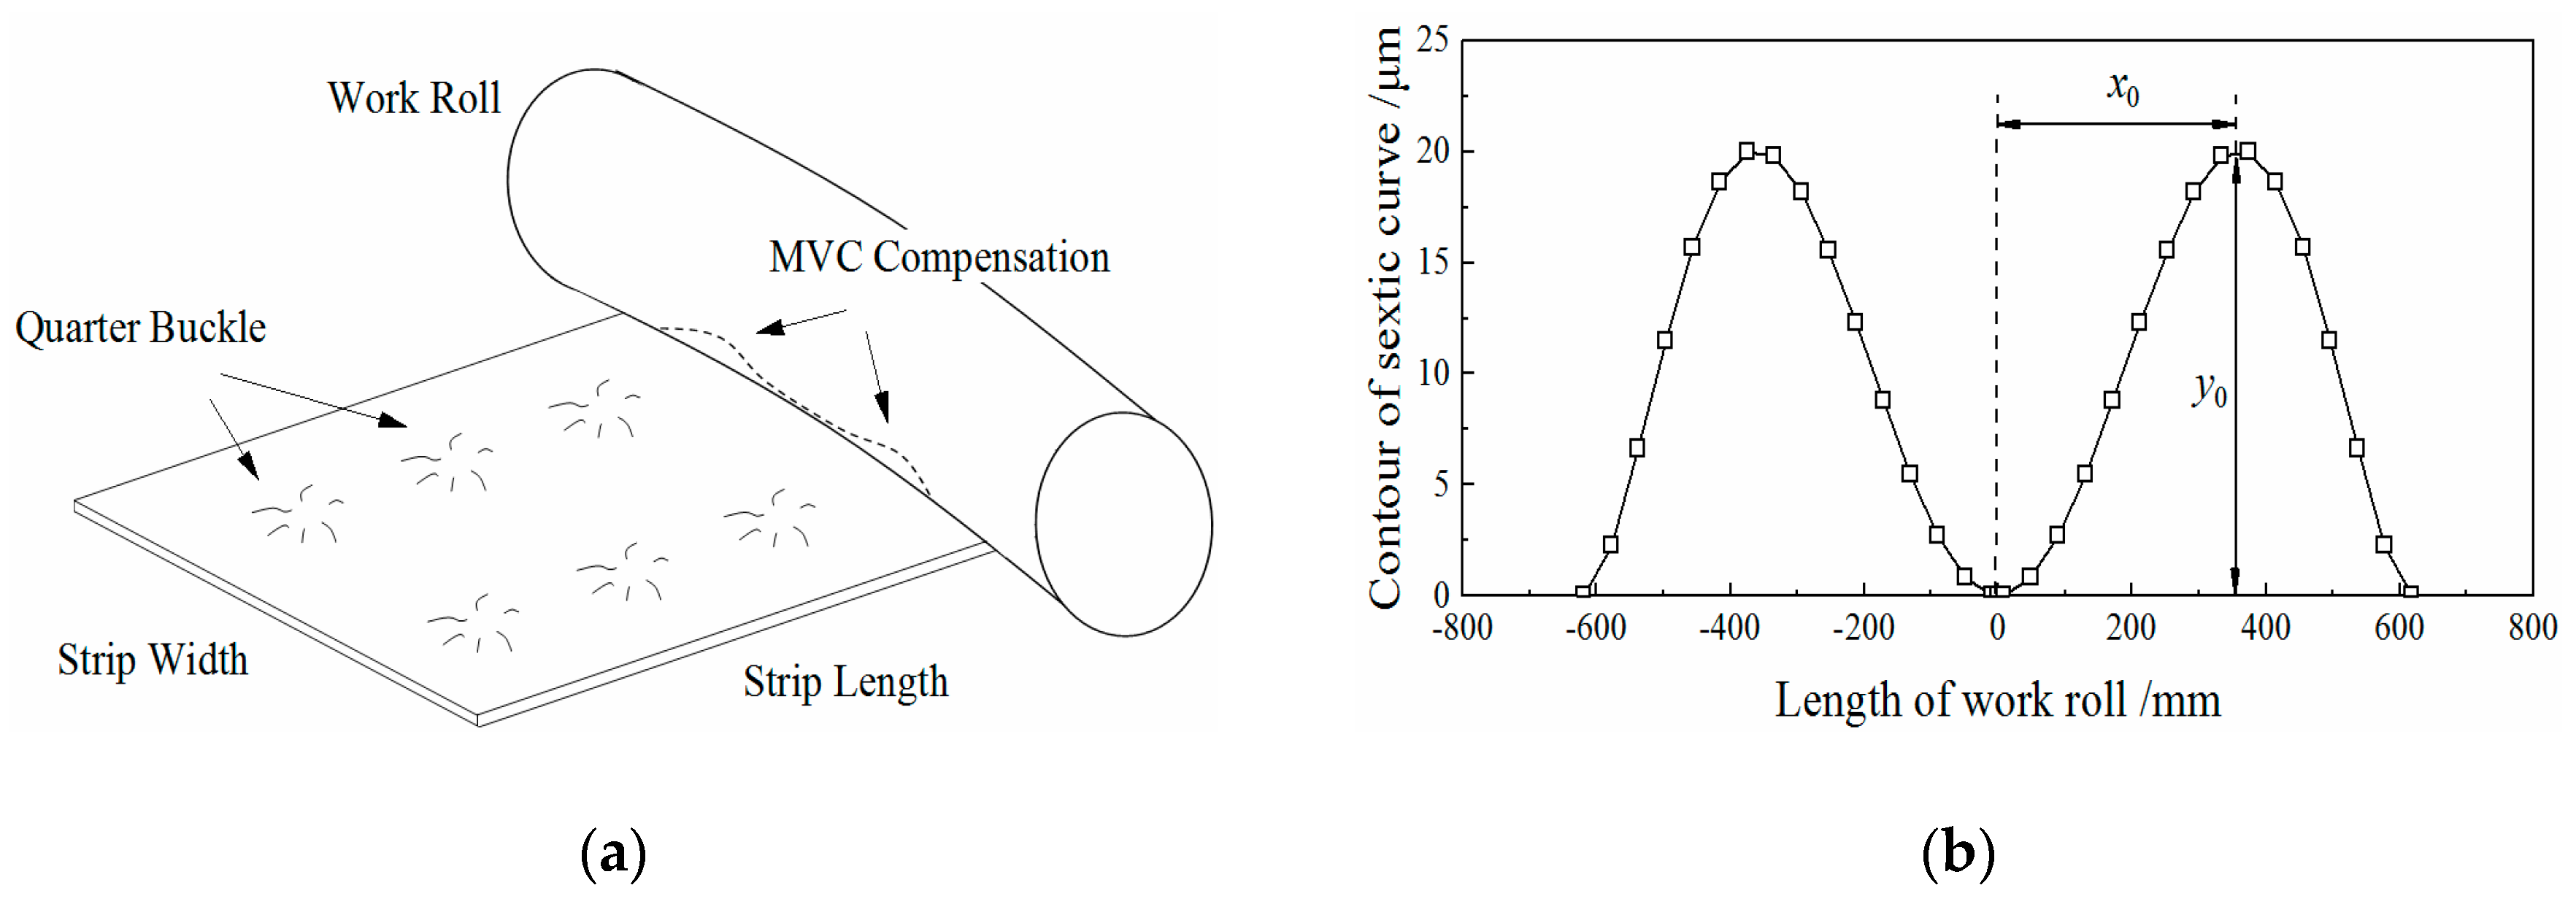
Figure 22a is a diagram of the compensation for the quarter buckle by the roll contour of MVC. To determine the coefficients of the sextic curve, Equation (36) needs to be satisfied. The contour of the sextic curve is shown in Figure 22b. The key is to determine the values of the extreme point x0 and the compensation y0. The position x0 is generally determined by the position of the quarter buckle, and the compensation y0 is optimised based on the RDMF model.
{ f 2 x 0 2 + f 4 x 0 6 + f 6 x 0 6 = y 0 2 f 2 + 4 f 4 x 0 2 + 6 f 6 x 0 4 = 0 f 2 B 2 + f 4 B 4 + f 6 B 6 = 0
Taking the quarter buckle problem (Figure 1) of the 1450 mm hot rolling line in Southwest Stainless Steel as an example, we use the MVC technology to optimise the original contour of the work roll (quadratic parabola, −200 µm). The roll contours before and after the optimisation are depicted in Figure 23.
According to the actual production, the changes of the Δε4 with different values of the quartic crown before and after the optimisation are listed in Table 3. When the original contour is used, the Δε4 increases from 34.9 to 86.2. However, when the optimised contour is used, as the quartic crown of the strip increases, the bending force for adjusting the quadratic wave is little changed, and the Δε4 can be kept relatively small. To improve the quarter buckle problem, the calculation results show that the optimised contour needs the compensation value of 2.71 to 6.74 µm.
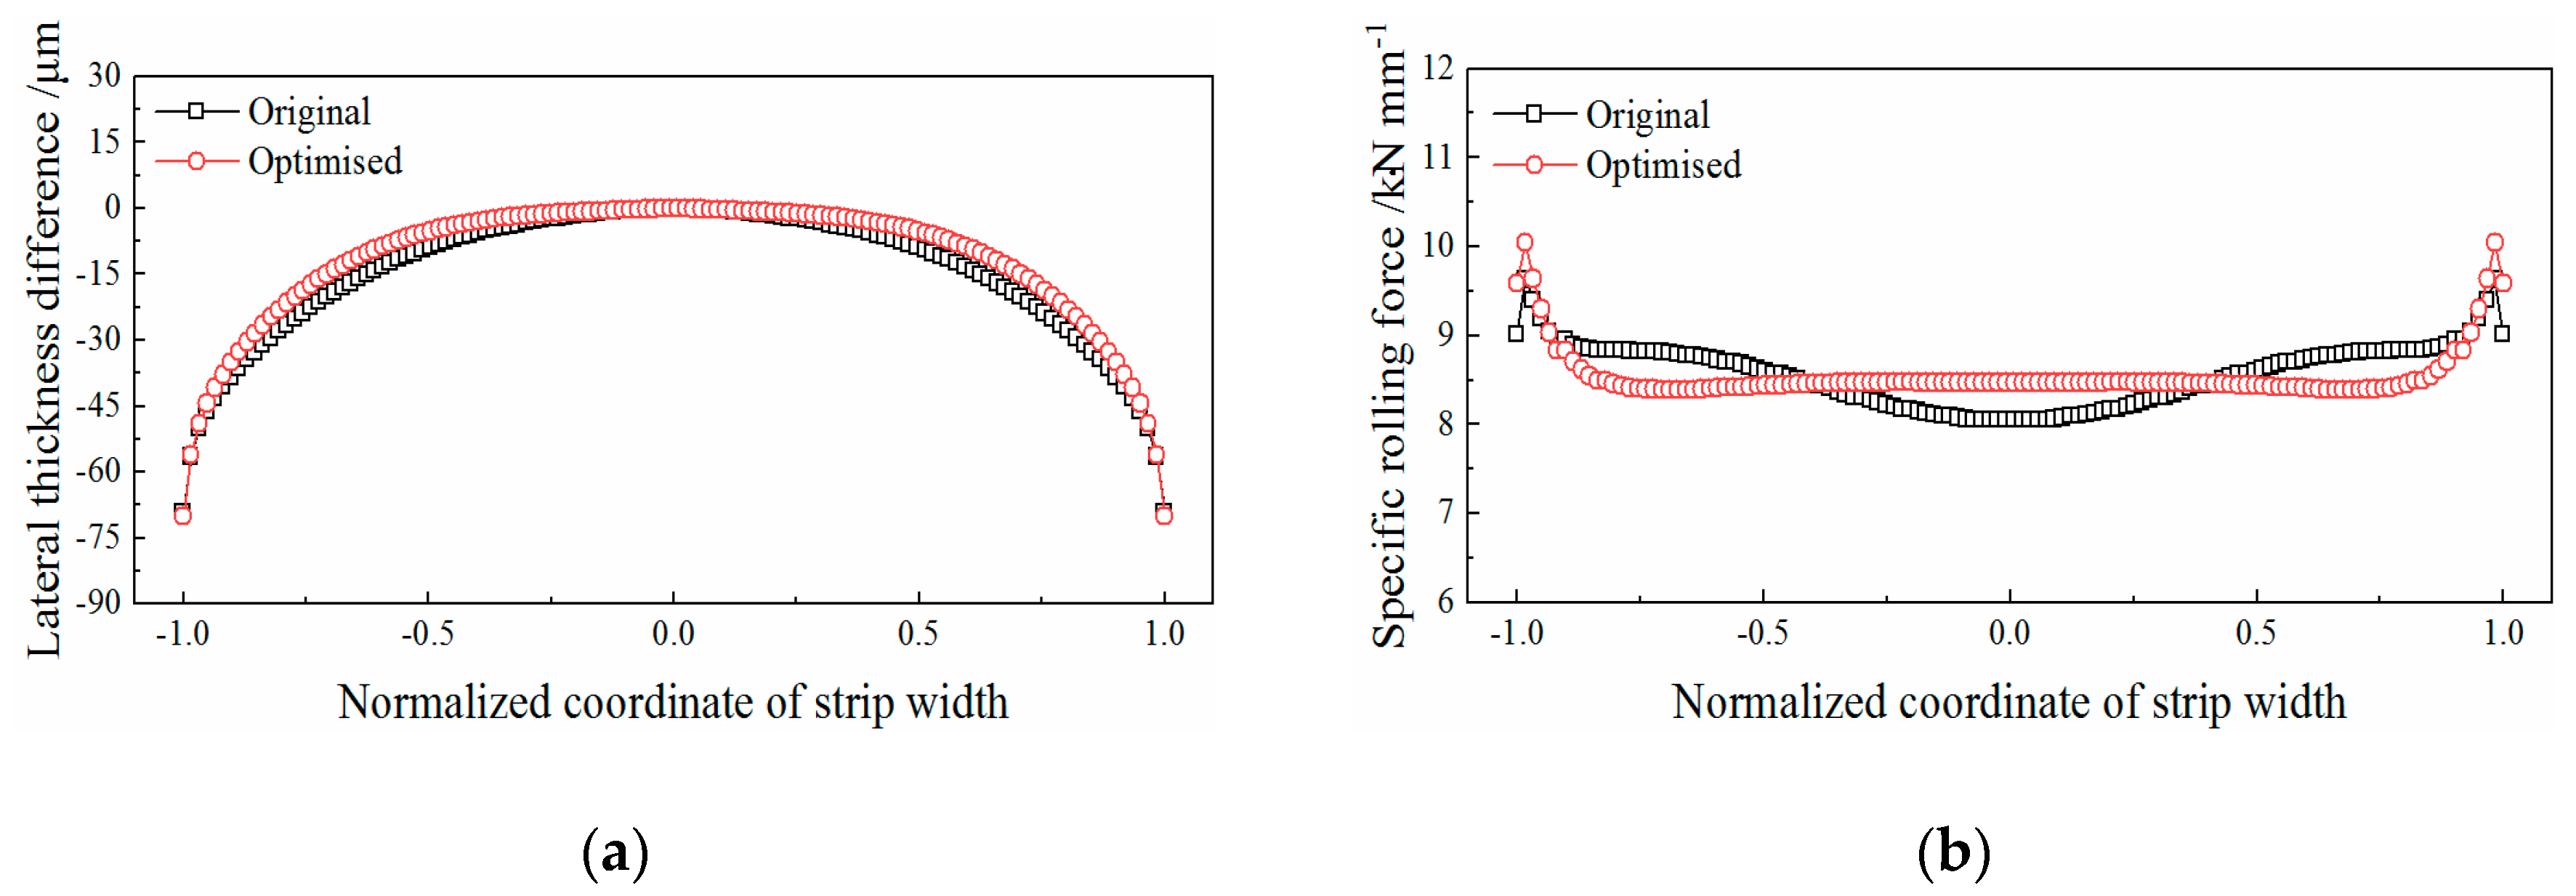
In Figure 24a, the cross section of the strip before and after the optimisation is compared. Using the optimised contour, the cross section of the strip is compensated in the region of the quarter buckle, thereby reducing the relative longitudinal strain of the strip in the region. Correspondingly, in Figure 24b, the relative rolling force of the strip in the region is reduced, and the overall distribution of the rolling force is more uniform, which is beneficial for achieving a more uniform reduction.
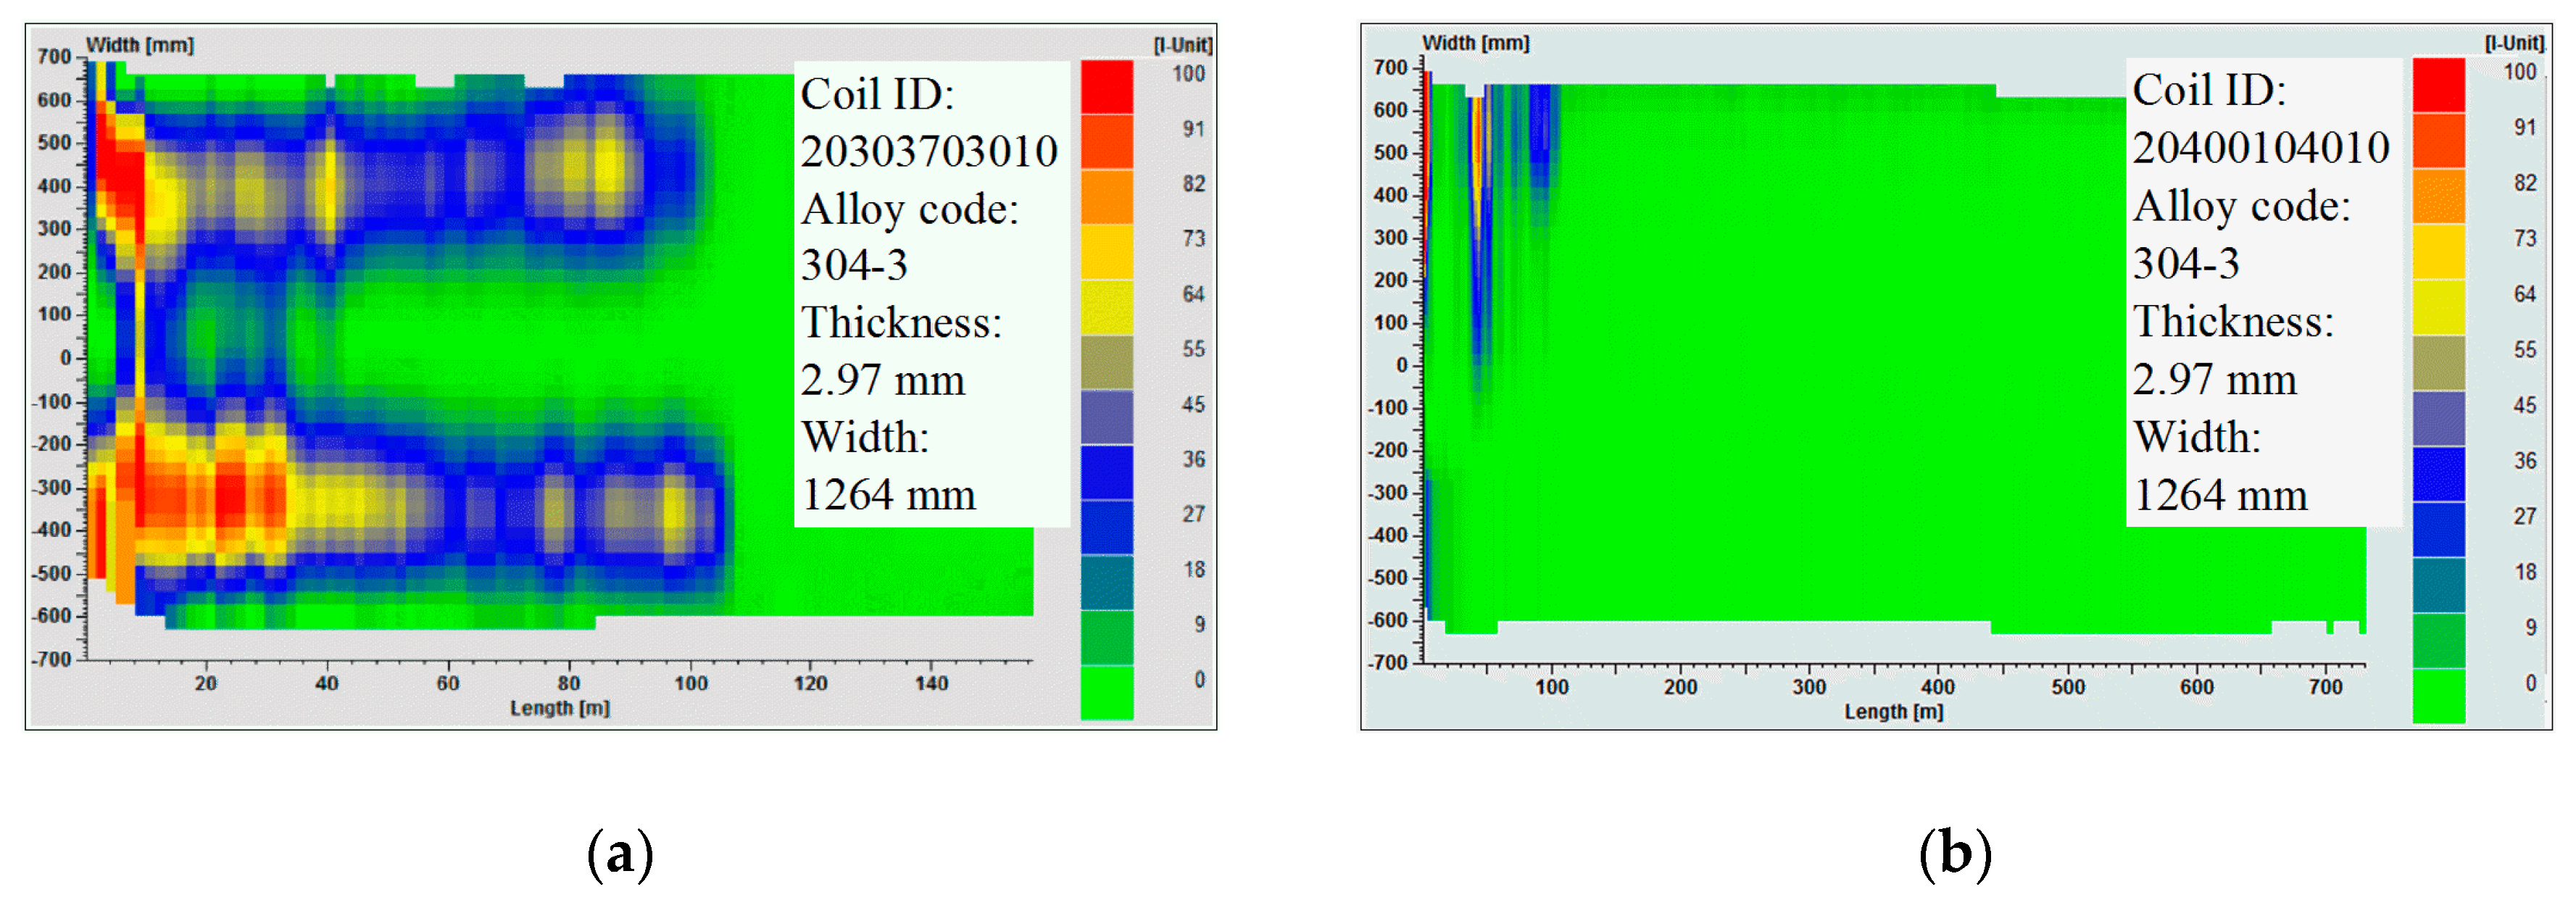
By comparing the strip flatness detected by the flatness meter before and after the optimisation, the effectiveness of the MVC technology is verified. Figure 25a shows the quarter buckle before solving the problem. With the optimised contour, the quarter buckle of the strip is effectively improved, as shown in Figure 25b. In addition, the research in this paper was successfully applied to other hot rolling lines, as listed in Table 4.

5. Conclusions

To solve the problem of the quarter buckle in the production of hot-rolled strips, the change rule and control technology of the quarter buckle are studied in this paper. The conclusions are as follows:
(1) A model of roll deflection and material flow for predicting the quarter buckle is established. Compared with the finite element method and the measured data, the accuracy of the RDMF model is verified, and is able to meet the requirements of actual production. However, the RDMF model is much faster in terms of calculation speed than the finite element model, which is suitable for online application and performing a large number of offline calculations.
(2) Quantitative analyses of the effects of the shape process parameters on the quarter buckle are carried out using the RDMF model. The coupling relationship between the quarter buckle and the quadratic wave increases the difficulty of the quarter buckle control. By decoupling analysis, it is found that the lateral temperature difference of the strip and the quartic crown of the strip before rolling have a great impact on the quarter buckle, but their effects on the quadratic wave are small. In addition, increasing the rolling force and the chamfer length of the back-up roll could reduce the quarter buckle, but this would also obviously change the bending force and affect the control of the quadratic wave.
(3) A new control technology for the work roll contour, MVC, is developed for the quarter buckle. The roll contour of MVC improves the strip shape by compensating the loaded roll gap profile at the position of the quarter buckle. It not only has the ability to control the quadratic wave, but also effectively improves the quarter buckle. The roll contour of MVC proved to be effective in industrial applications.

Author Contributions

H.L. and C.Y. carried out the simulation work; A.H. and Z.Z. conceived and designed the industrial verification of the model; J.S. and A.H. developed the work roll contour; H.L. and C.Y. analysed the data. J.S., W.L. and Z.Z. performed the industrial applications. H.L. wrote the paper. All authors have read and agreed to the published version of the manuscript.

Funding

This research was funded by National Natural Science Fund of China, grant number 51674028; Innovative Method Project of Ministry of Science and Technology of China, grant number 2016IM010300; and Guangxi Special Funding Program for Innovation-Driven Development, grant number GKAA17202008.

Acknowledgments

This work was supported by the National Natural Science Fund of China (No.51674028); the Innovative Method Project of Ministry of Science and Technology of China (2016IM010300); and the Guangxi Special Funding Program for Innovation-Driven Development (GKAA17202008).

Conflicts of Interest

The authors declare no conflict of interest. The funders had no role in the design of the study; in the collection, analyses, or interpretation of data; in the writing of the manuscript, or in the decision to publish the results.

References

  1. He, A.R.; Shao, J.; Sun, W.Q. Theory and Practice of Shape Control, 1st ed.; Metall Ind Press: Beijing, China, 2016; pp. 11–15. ISBN 9787502473679. [Google Scholar]
  2. Zhang, Q.D.; Li, B.; Zhang, X.F. Research on the behavior and effects of flatness control in strip temper rolling process. J. Mech. Eng. 2014, 50, 45–52. [Google Scholar] [CrossRef]
  3. Du, F.S.; Liu, W.W.; Feng, Y.F.; Sun, J.N. Roll profile electromagnetic control process parameters in precision rolling mill. J. Univ. Sci. Technol. Beijing 2017, 39, 1874–1880. [Google Scholar] [CrossRef]
  4. Li, X.Y.; Zhang, J.; Cheng, X.L.; Zhao, X.M.; Jia, S.H.; Huang, T. Wear of rolls in single-stand temper mill and its effect on the strip shape. J. Univ. Sci. Technol. Beijing 2002, 24, 326–328. [Google Scholar] [CrossRef]
  5. He, A.R.; Shao, J.; Sun, W.Q.; Song, Y. Key precise control technologies of rolling for smart manufacturing. Metall. Ind. Autom. 2016, 40, 1–8. [Google Scholar] [CrossRef]
  6. Jiang, Z.Y.; Tieu, A.K.; Zhang, X.M. Finite element simulation of cold rolling of thin strip. J. Master. Process. Technol. 2003, 140, 542–547. [Google Scholar] [CrossRef]
  7. Chandra, S.; Dixit, U.S. A rigid-plastic finite element analysis of temper rolling process. J. Mater. Process. Technol. 2004, 152, 9–16. [Google Scholar] [CrossRef]
  8. Wang, X.D.; Li, F.; Wang, L. Development and application of roll contour configuration in temper rolling mill for hot rolled thin gauge steel strip. Ironmak. Steelmak. 2012, 39, 163–170. [Google Scholar] [CrossRef]
  9. Kong, F.F.; He, A.R.; Shao, J. Finite element model for rapidly evaluating the thermal expansion of rolls in hot strip mills. J. Univ. Sci. Technol. Beijing 2014, 36, 674–679. [Google Scholar] [CrossRef]
  10. Kim, K.S.; Hong, W.K.; Frédéric, B. Effect of rolling parameters on surface strain variation in hot strip rolling. Steel Res. Int. 2017, 88, 1600492. [Google Scholar] [CrossRef]
  11. Hao, P.J.; He, A.R.; Sun, W.Q. Formation mechanism and control methods of inhomogeneous deformation during hot rough rolling of aluminum alloy plate. Arch. Civ. Mech. Eng. 2018, 18, 245–255. [Google Scholar] [CrossRef]
  12. Jiang, Z.Y.; Wei, D.T.; Tieu, A.K. Analysis of cold rolling of ultra-thin strip. J. Mater. Process. Technol. 2009, 209, 4584–4589. [Google Scholar] [CrossRef]
  13. Hao, P.J.; He, A.R.; Sun, W.Q. Predicting model of thickness distribution and rolling force in angular rolling process based on influence function method. Mech. Ind. 2018, 19, 302. [Google Scholar] [CrossRef]
  14. Wang, D.C.; Wu, Y.L.; Liu, H.M. High-efficiency calculation method for roll stack elastic deformation of four-high mill. Iron Steel. 2015, 50, 69–74. [Google Scholar] [CrossRef]
  15. Wang, T.; Xiao, H.; Zhao, T.Y. Improvement of 3-d fem coupled model on strip crown in hot rolling. J. Iron Steel Res. Int. 2012, 3, 17–22. [Google Scholar] [CrossRef]
  16. Lian, J.C.; Qi, X.D. Theory of Strip Rolling and Shape Control, 1st ed.; China Mach. Press: Beijing, China, 2013; pp. 88–95. ISBN 9787111409724. [Google Scholar]
  17. Zhang, G.; Xiao, H.; Wang, C. Three-dimensional model for strip hot rolling. J. Iron Steel Res. Int. 2006, 13, 23–26. [Google Scholar] [CrossRef]
  18. Shao, J.; Yao, C.; Chen, C.; Sun, W.Q.; He, A.R. A Rapid online calculation method of three-dimensional plastic deformation in strip rolling. Int. J. U E-Serv. Sci. Technol. 2016, 9, 151–162. [Google Scholar] [CrossRef]
  19. Ma, X.B.; Wang, D.C.; Liu, H.M. Coupling mechanism of control on strip profile and flatness in single stand universal crown reversible rolling mill. Steel Res. Int. 2017, 88, 1600495. [Google Scholar] [CrossRef]
  20. Guo, X.Y.; He, A.R.; Shao, J.; Zhou, B.; Li, Q.L. Modeling and simulation of subsectional cooling system during hot aluminum rolling. J. Mech. Eng. 2013, 4, 74–78. [Google Scholar] [CrossRef]
  21. Wang, Z.P. Research on the Local Heat Transfer Based on the Stepped Cooling of the Rolls. Master’s Dissertation, Yanshan University, Qinhuangdao, China, 2017. [Google Scholar]
  22. Li, Q.S.; Xu, J.Y.; Zhou, J.G. BURS roll designed for non-quadratic waves. In Proceedings of the 2005 China Iron and Steel Annual Conference, Beijing, China, 1 October 2005; pp. 330–336. [Google Scholar]
  23. Li, H.B.; Zhang, J.; Cao, J.G.; Cheng, F.W.; Hu, W.D.; Zhang, Y. Roll contour and strip profile control characteristics for quantic CVC work roll. J. Mech. Eng. 2012, 48, 24–30. [Google Scholar] [CrossRef]
  24. Seilinger, A.; Mayrhofer, A.; Kainz, A. SmartCrown—A new system for improved profile and flatness control in strip mills. Steel Times Int. 2003, 26, 11–12. [Google Scholar]
  25. Hara, K.; Yamada, T.; Takagi, K. Shape controllability for quarter buckles of strip in 20-high Sendzimir mills. ISIJ Int. 1991, 31, 607–613. [Google Scholar] [CrossRef]
  26. Kubo, T.; Aizawa, A.; Hara, K.; Uchihata, O. Development of high-precise shape control technology in 20-high Sendzimir mills. Metall. Res. Technol. 2006, 103, 507–513. [Google Scholar] [CrossRef]
  27. ANSYS Version 14.0, ANSYS Inc.: Pittsburgh, PA, USA.
Figure 1. Quarter buckle of the strip after rolling: (a) flatness measured by on-line meter; (b) diagram of the quarter buckle.
Metals 10 01060 g001
Figure 2. Flow chart of the RDMF model.
Metals 10 01060 g002
Figure 3. Simplified mechanical model of the upper rolls.
Metals 10 01060 g003
Figure 4. Discretisation of the back-up roll and loads.
Metals 10 01060 g004
Figure 5. Schematic diagram of contact flattening between the back-up roll and the work roll.
Metals 10 01060 g005
Figure 6. Schematic diagram of contact flattening between the work roll and the strip.
Metals 10 01060 g006
Figure 7. Stress state of the segment of the strip in the deformation zone.
Metals 10 01060 g007
Figure 8. Dispersion of the deformation zone of the strip.
Metals 10 01060 g008
Figure 9. Finite element model of roll-strip coupling.
Metals 10 01060 g009
Figure 10. Comparison of the lateral thickness difference.
Metals 10 01060 g010
Figure 11. Longitudinal strain difference with different bending forces.
Metals 10 01060 g011
Figure 12. The values of Δε2 and Δε4 with different bending forces.
Metals 10 01060 g012
Figure 13. Lateral temperature distribution of the strip in the last stand measured by a thermal imager.
Metals 10 01060 g013
Figure 14. Distribution of the deformation resistance with difference values of ΔT.
Metals 10 01060 g014
Figure 15. Bending force and Δε4 of the strip with different values of ΔT.
Metals 10 01060 g015
Figure 16. The Δε4 of the strip with different rolling forces.
Metals 10 01060 g016
Figure 17. Bending force and the Δε4 of the strip with different rolling forces (ΔT = 50 °C).
Metals 10 01060 g017
Figure 18. The value of Δε4 of the strip with different quartic crowns before rolling.
Metals 10 01060 g018
Figure 19. Bending force and Δε4 of the strip with different quartic crowns before rolling (ΔT = 50 °C).
Metals 10 01060 g019
Figure 20. The value of Δε4 of the strip with different chamfer lengths of back-up roll.
Metals 10 01060 g020
Figure 21. Bending force and Δε4 of the strip with different chamfer lengths of back-up roll (ΔT = 50 °C).
Metals 10 01060 g021
Figure 22. Compensation for the quarter buckle by the MVC: (a) schematic diagram; (b) contour of the sextic curve.
Metals 10 01060 g022
Figure 23. Roll contours before and after optimisation.
Metals 10 01060 g023
Figure 24. Comparison of calculation results before and after the optimisation (ΔT = 100 °C, quartic crown is 8 μm): (a) lateral thickness difference of the strip; (b) specific rolling force.
Metals 10 01060 g024
Figure 25. Comparison of the strip flatness detected by the on-line meter: (a) before optimisation; (b) after optimisation.
Metals 10 01060 g025
Table 1. Parameters of the geometrical dimension and the material.
ParametersValue
Work roll/mmΦ615 × 1650
Distance between the bending forces/mm2660
Work roll neck diameter/mm358
Back-up roll/mmΦ1385 × 1450
Distance between the rolling forces/mm2900
Back-up roll neck diameter/mm1100
Young modulus of the roll/MPa2.10 × 105
Poisson’s ratio of the roll0.300
Friction coefficient between the rolls0.30
Strip width/mm1240
Strip thickness before rolling/mm3.1
Alloy code304-3
Strip temperature/°C943
Strip yield stress/MPa269.8
Young modulus of the strip/MPa1.27 × 105
Poisson’s ratio of the strip0.345
Friction coefficient between roll and strip0.30
Table 2. Parameters of the basic working condition.
ParametersValue
Rolling force/kN10,720
Bending force/kN184
Back-up roll chamfer/mm150 × 1.0
Roll contour type of work rollQuadratic parabola
Roll contour amount of work roll/μm−50
Strip width/mm1240
Strip thickness before rolling/mm3.1
Strip thickness after rolling/mm2.8
Strip lateral temperature difference/°C50
Quadratic crown before rolling/μm44.3
Quartic crown before rolling/μm0
Table 3. Changes of the Δε4 under different values of the quartic crown before and after the optimisation (ΔT = 100 °C).
Quartic Crown/μm02468
y0/μm2.713.754.745.746.74
Bending force/kN175172168164161
Δε4 (Optimised)/10−5−0.1−0.7−0.7−0.7−0.6
Δε4 (Original)/10−534.947.860.673.486.2
Table 4. Other hot rolling lines with a successful application.
CaseHot Rolling Line
Beibu Gulf New Material Co., Ltd., Guangxi, China1700 mm
Delong Nickel Industry Co., Ltd., Jiangsu, China1450 mm
Dingxin Technology Co., Ltd., Fujian China1780 mm
Guangqing Metal Rolling Co., Ltd., Guangdong, China1780 mm
Qingshan Stainless Steel Co., Ltd., Indonesia1780 mm