Article

A Mixed Numerical-Experimental Method to Characterize Metal-Polymer Interfaces for Crash Applications

1
Institute of Lightweight Engineering and Polymer Technology (ILK), Technische Universität Dresden, 01307 Dresden, Germany
2
Institute of Metallurgy (IMET), Clausthal University of Technology, 38678 Clausthal-Zellerfeld, Germany
3
Department of Metallurgical and Materials Engineering, Faculty of Petroleum and Mining Engineering, Suez University, 43512 Suez, Egypt
*
Author to whom correspondence should be addressed.
Metals 2021, 11(5), 818; https://doi.org/10.3390/met11050818
Submission received: 29 March 2021 / Revised: 12 May 2021 / Accepted: 13 May 2021 / Published: 18 May 2021
(This article belongs to the Special Issue Characterization and Monitoring of Metal-CFRP-Hybrid Structures)

Abstract

:
Metallic (M) and polymer (P) materials as layered hybrid metal-polymer-metal (MPM) sandwiches offer a wide range of applications by combining the advantages of both material classes. The interfaces between the materials have a considerable impact on the resulting mechanical properties of the composite and its structural performance. Besides the fact that the experimental methods to determine the properties of the single constituents are well established, the characterization of interface failure behavior between dissimilar materials is very challenging. In this study, a mixed numerical–experimental approach for the determination of the mode I energy release rate is investigated. Using the example of an interface between a steel (St) and a thermoplastic polyolefin (PP/PE), the process of specimen development, experimental parameter determination, and numerical calibration is presented. A modified design of the Double Cantilever Beam (DCB) is utilized to characterize the interlaminar properties and a tailored experimental setup is presented. For this, an inverse calibration method is used by employing numerical studies using cohesive elements and the explicit solver of LS-DYNA based on the force-displacement and crack propagation results.

1. Introduction

In recent decades, the application of hybrid structures such as metal-polymer-metal sandwiches has strongly increased, as the combination of different materials can combine the advantages of each individual material and offers possibilities for new application fields with respect to the lightweight design. They show high strength, fatigue/damage resistance and impact strength/ energy absorption compared to a separate use of metals or polymers [1,2]. In addition, metal-polymer combinations without fiber-reinforcements are used in mainly sandwich layup configurations, such as BONDAL® (steel polymer laminate, [3]) and ALUCOBOND® (aluminum polymer laminate, [4]). They show an increased bending stiffness resulting in higher energy absorption capacity [5,6].
In [7], it was found by comparison between experimental and numerical studies, that the energy absorption of hybrid MPM structures under axial crushing conditions is governed by the plastic deformation of the sandwich rather than their delamination failure behavior.
Nevertheless, delamination failure can be observed in the experimental results (Figure 1) upon cross-section views, which could not be replicated in the simulation ones due to the utilized model simplification approaches. So, the interfacial properties of MPM composites need to be evaluated to account for this type of failure in the development, design process and enhanced validation of the simulation results.
The mechanical behavior of interfaces is typically characterized by through-thickness Young’s modulus and strengths as well as the energy release rates characterizing crack propagation for normal and shear loading conditions. There are different hybrid layups and test methods that have already been investigated and proven their suitability in characterizing the interfaces. Common tests are the double cantilever beam (DCB) [8,9] and through-thickness tension tests for normal direction properties (mode I), end-notched flexure (ENF) [10], end-loaded split (ELS), short beam shear [11] and single lap shear tests for shear direction properties (mode II) [12] or single cantilever beam tests for mixed mode [13,14].
However, the abovementioned standard tests and parameter identification methods are commonly used for metal alloys, composites or polymers [15,16,17], and are not directly applicable to hybrid materials, mainly due to the large stiffness gradients between adjacent plies [18,19] and the associated discontinuous stress distribution [20]. Additionally, plastic deformation within the plies needs to be prevented; otherwise, the calculation of energy release rates in the interface will be erroneous [9]. Unfortunately, for high strength interfaces and low strength plies, such as PP/PE, the occurrence of plastic deformation is very likely. In this case, it is useful to perform simulations and recalibrate force-displacement results, since direct parameter identification based on analytical formulas given in the standards is not appropriate [8]. For the joining of steel-epoxy laminates, the authors can successfully apply the compliance method, but hardly any plastic deformation occurred here, and this is not to be expected for viscoplastic thermoplastics [21]. In [22], it was reported that the greater plastic deformation capacity of a ductile material leads to redistribution of load, so the application of the equation based on the modified compliance methods is open. Therefore, advanced measurement technology is required to determine the crack propagation experimentally and compare it with the simulation results [23].
In this study the interlaminar properties of a St-PP/PE-St- hybrid sandwich material, which is strongly bonded with high-strength adhesion promoters, are investigated. Due to the foreseen application of this MPM in the automotive industry, thin laminates were favored. Therefore, modified DCB specimens and test methods have been developed with the focus on reproducibility to characterize the metal-polymer interfaces with respect to the determination of the interlaminar mode I critical energy release rate. The delamination progress is captured by an optical measurement system. Due to the high strength of the metal/polymer bond and to the fact that alternative standardized test methods are not available, an appropriate specimen design is developed based on preliminary tests. The stiffness of the specimen is increased by attaching adapted steel plates, called backing beams, through bonding. The existing test methods and standards for interface characterization are formulated in a material-specific manner, where the possibility to transfer this knowledge into testing of differing materials is limited. Therefore, this study proposes a robust numerical-experimental approach, which is used to exploit the established test methods for characterizing novel multilayered materials. Figure 2 illustrates the proposed research approach. The non-calibrated experimental determined interface properties are used as input for the numerical model based on Finite Element Analysis (FEA). Thereby a cohesive zone modeling (CZM) approach is pursued to model the delamination behavior of the MPM sandwich material, as this strategy is the most promising to represent the ply debonding on structural level. This approach is mainly used in FEA through cohesive elements [24] or by cohesive contact formulations such as tiebreak contacts [25]. In contrast to alternative modeling approaches, such as XFEM, element splitting or even phase-field approaches, CZM is available and well-established in most of the commercially available FE-software products. By using an inverse modeling approach, the measured force, displacement and delamination front are subsequently used to re-calibrate and validate the investigated parameters in the simulations with focus on the interfaces represented by the cohesive elements. A parameter study, also resulting from this, shows the influence of the essential parameters used in the cohesive material model.
In the present work, the systematic development of an adapted specimen geometry for the experimental characterization of the critical energy release rate in mode I by means of DCB testing for MPM sandwich composites is described for the first time and its recalibration by numerical methods is presented. Furthermore, this approach also takes into account the influence of plastic deformation of the individual components. This should make it possible in the future to include the delamination behavior of MPM composites in the calculation of structural applications such as crash boxes via verified characteristic values for established cohesive zone models.

2. Materials and Methods

2.1. Mixed Numerical-Experimental Characterization Method

The total thickness of the considered MPM is about 1.3 mm utilizing two 0.48 mm thick steel cover sheets. Therefore, the stiffness of the test specimens is very limited and the cover sheets were subjected to bending during the DCB test. On this basis, the stiffness of the cover sheets has to be increased for a valid and controlled delamination propagation. In order to achieve this, the test specimens were prepared by bonding the so-called backing beams on the two sides of the MPM [26]. For the precise and continuous detection of the crack propagation, the DCB tests were monitored by an optical measuring system (Gesellschaft für Optische Messtechnik mbH (GOM)Aramis 5 M, Braunschweig, Germany). Provided that the entire energy input is transferred into the specimen Δ W and converted totally into delamination work (no work is exerted in, e.g., bending deformation), the critical energy release rate can accordingly be calculated as the quotient of the fracture work W F and the delamination area created Δ A :
G I C = Δ W Δ A = W F Δ A
If the condition that all energy is transferred into delamination work, is not fulfilled, at least an upper limit of the critical energy release rate can be determined. The interlaminar properties determined in the DCB test are used directly as input parameters for CZM in the first iteration stage. With the help of a self-developed python script, LS-DYNA models with different parameter sets for CZM are automatically created, calculated and evaluated. Thus, on the one hand, the interface properties can be calibrated by comparing the force-displacement curves and crack-length-displacement curves from the experiments and the simulation. On the other hand, the ratio of the energies can be verified. By using elasto-plastic material models for core and cover layers of the MPM, it can be checked whether all the energy supplied to the specimen is converted into delamination work or whether the energy is dissipated by other inelastic effects such as plastic deformation of respective layers. Thus, the energy converted into delamination work can be used to directly determine the critical energy release rate and consequently, the remaining parameters of the CZM can be determined. As a result of this procedure, calibrated interface properties can be obtained.

2.2. Investigated Material Configurations

The material system is an MPM consisting of two high strength formable, electrolytic galvanized steel cover sheets DPK 30/50+ZE (HCT500X, thyssenkrupp Steel Europe AG, Duisburg, Germany, grade number: 1.0939, its chemical compositions is shown in Table 1 [27]) with a thickness of 0.48 mm and a PP/PE core of 0.3 mm thickness. It was manufactured by roll-bonding with an adhesive agent (one-component epoxy resin Köratac FL201, Kömmerling Chemische Fabrik GmbH, Pirmasens, Germany, thickness approx. 0.01 mm) (see also [5,7,27]). Köratac FL201 is a special liquid product used to bond several metallic skin sheets with the PP/PE polymer, which contains solid material and dissolvent; its properties are listed in Table 2.
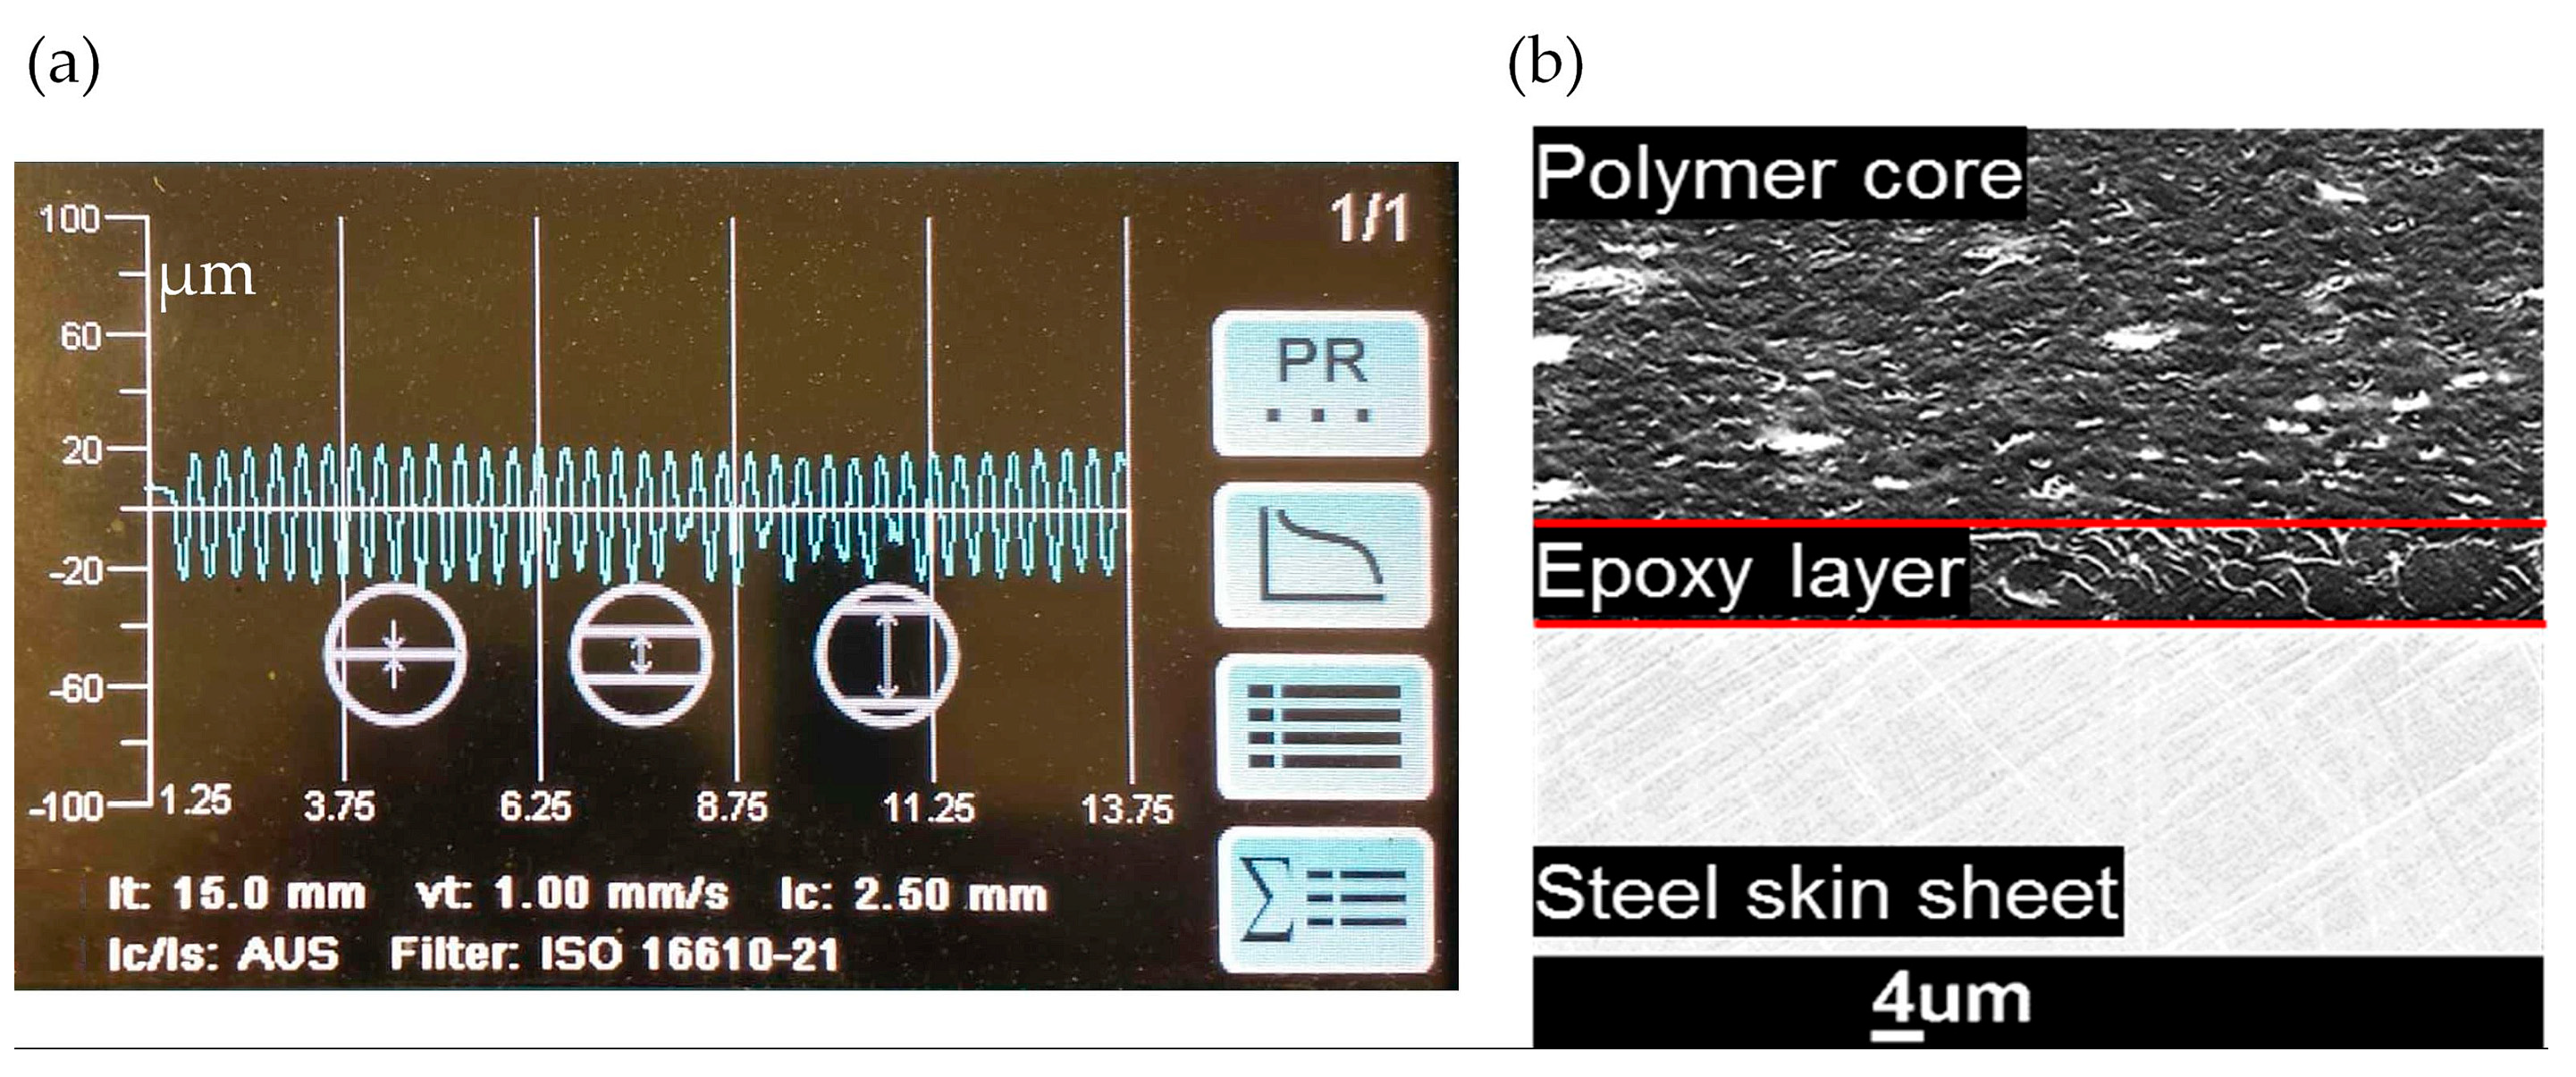
For the DCB specimens, a pre-defined crack at the metal/polymer interface must be created. This was achieved by letting a certain area of the plate without the adhesive agent (Figure 3). For this purpose, a thin tape film is positioned on only one steel cover sheet to define the borderline for the adhered region. The adhesive agent is spread with a steel scraper (roller). A sandwich size of about 220 × 200 mm2 is produced to deliver 10 DCB specimens. The depth profile of the scraper, measured with the roughness measurement device model “hommel etamic W10”, is shown in Figure 4a, which is ±20 µm delivering a total wet layer thickness of about 35 µm (wet thickness), as stated earlier in Table 2. After drying the steel sheet with the adhesive agent at 260 °C (in the range of the peak metal temperature given in Table 2), the dry thickness of the adhesive layer of about 10 µm is reached. This can be shown additionally from the micrograph in Figure 4b. Then the tape film is removed to produce two parts; one covered with the adhesive agent and the other without, which leads to the pre-crack length a 0 . In the third step the sandwich is produced after the standard two-step roll bonding process (see [5]).
It is noteworthy to mention that the layers’ thicknesses are not changed during the roll bonding. This can be attributed to the processing conditions in roll bonding [28], namely:
The PP/PE core is preheated at 120 °C (<Tmelting (156 °C)). The steel with the adhesive agent is dried at 260 °C which is very low temperature for steel to make any thickness reduction during rolling. Moreover, rolling is carried out without applying remarkable pressure (max. 2 kN). Additionally, the sandwich layup layers are embedded in a rubber casing during rolling to reduce and distribute the rolling pressure equally. Despite the symmetric MPM thickness layup (0.48/0.3/0.48), an asymmetric loading behavior resulted due to the existing adhesive delamination area at only one metal/polymer interface. An initial crack-length a 0 of about 74 mm is realized.

2.3. Experimental Data Analysis

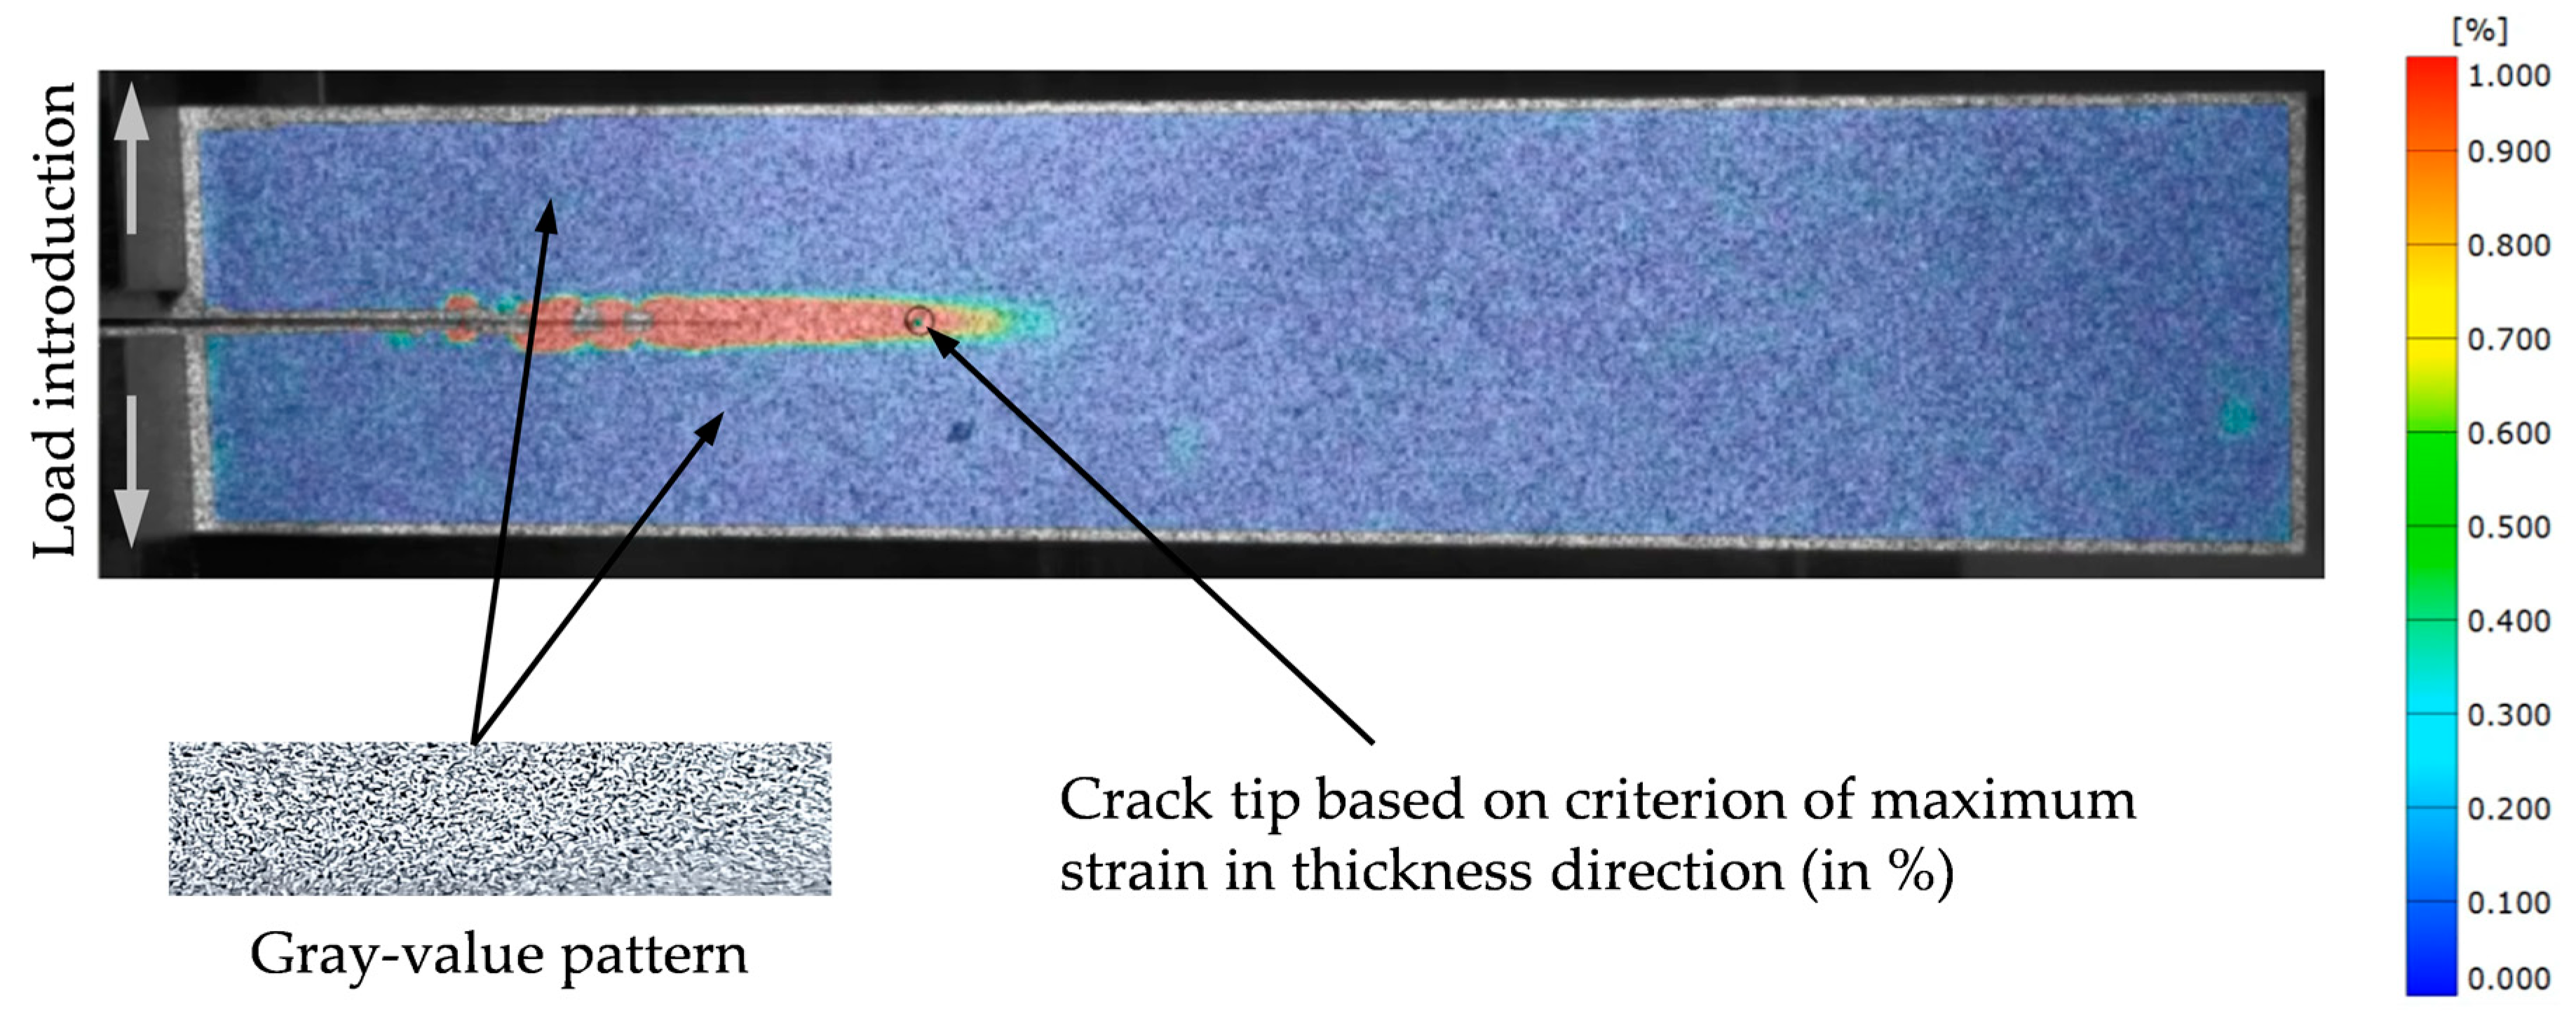
The width w, thickness t and initial crack lengths a 0 of all three DCB specimens were measured before conditioning for 24 h at 23 °C and 50% humidity prior to testing. A testing velocity of 1 mm/min for the MPM specimens was used. In addition to the force-displacement (F-u) measurement of the loading and unloading cycles by the “Zwick 1475” testing machine(ZwickRoell GmbH & Co. KG, Ulm, Germany), the crack propagation Δ a = a a 0 has been recorded, visually determined using the digital image correlation system ARAMIS 5 M. Thereby, the specimens were primed with white spray paint and the pattern was created with black spray paint. The deformation measurements are based on a frame size of 4096 pixel × 1000 pixel with facet sizes of 20 pixel × 20 pixel, facet distances of 12 pixel × 12 pixel at a frame rate of 5 frames per second. By measuring the specimen deformation during loading, the delamination propagation is calculated for each loading step, see Figure 5. The algorithm for delamination propagation measurement is based on analyzing the maximum strain in thickness direction [23]. Thus, on the one hand, it is possible to determine the fracture work W F as the difference of the integral under the F-u curve (Equation (2)) and the current elastic energy W e l with high temporal resolution (Equation (3)). On the other hand, it can also be used to calculate the incremental or cumulative critical energy release rate or G I c as a quotient of the fracture work and the delaminated area as a function of the delamination progress (Equations (4) and (5), respectively). This progression is referred to as cumulative crack growth resistance curves (R-curve) (Equation (6)).
W t o t a l = 0 u o F d u
W F = W T o t a l W e l
δ G I C = δ W F b · δ a
G I C = W F b · Δ a
R = G I C ( Δ a )

3. Results

3.1. Sepcimen Development

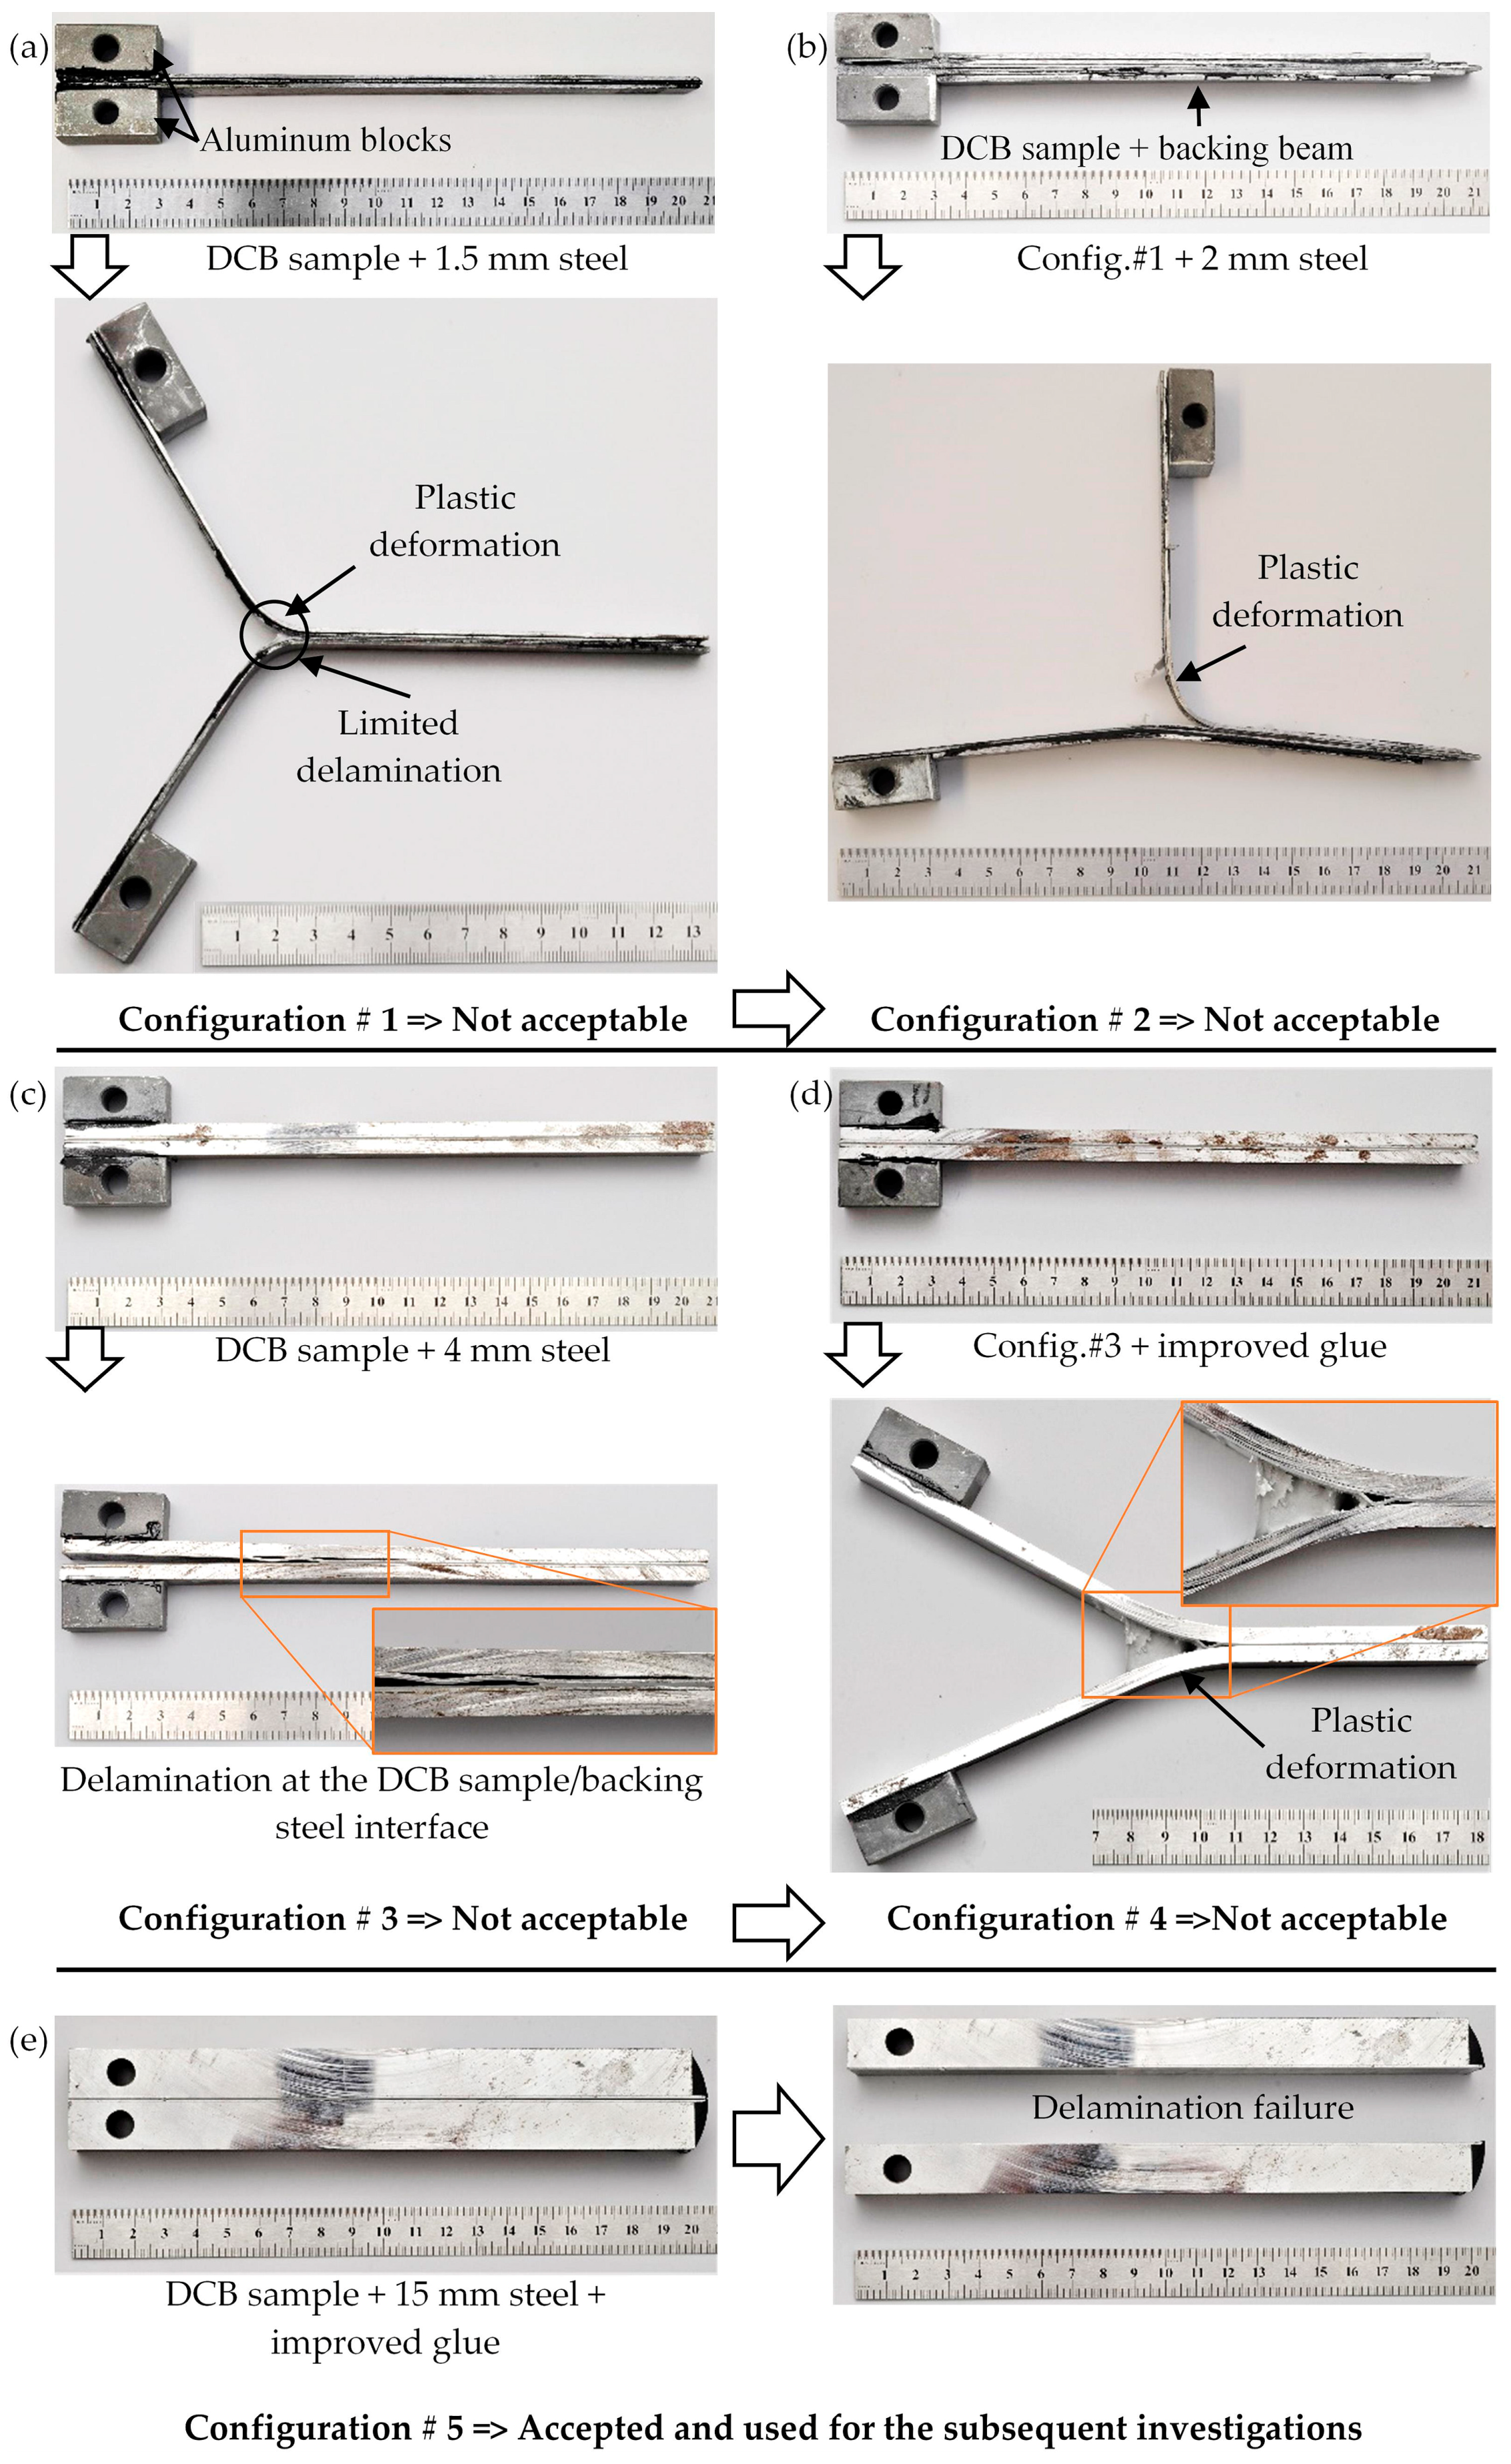
A total of five backing beams configurations were examined, see Figure 6. In the first configuration, the sandwich test specimens were reinforced with 1.5 mm backing beams of mild steel on the top and bottom sides. The load introduction blocks, which are the parts with the holes for fixation in the universal tensile testing machine, are made of a standard aluminum alloy. They and the backing beams are bonded to the sandwich with a two-component adhesive agent (3M, DP490). All test specimens with dimensions of 183 mm × 25 mm were cut out from the previously produced sandwich sheets using a water-cooled abrasive cutting machine (Axitom by Struers GmbH, Willich, Germany). It was observed from the result of the first test configurations utilizing 1.5 and 2.0 mm backing plates that significant plastic deformation occurs and hardly any crack propagation is achieved. Moreover, adhesive failure between the backing beams and the MPM was found in the 2nd configuration. So, from these configuration, no valid results could have been achieved.
For a further increase of the stiffness of the test specimens and to avoid adhesive layer failure between the backing beams and the MPM, 4 mm steel sheets are used in configuration 3 and 4. Since adhesive layer failure occurs again in configuration 3, the bonding process is improved in configuration 4: In addition to chemical cleaning, all bonding surfaces of the sandwich are ground by hand with a 320 grit sandpaper. The backing beams are sandblasted manually with 150 µm grit high-grade corundum at 5 bar blasting pressure. Copper wires with a 150 µm diameter are inserted at the edge areas to uniformly define the bond gap size. Finally, the sheets are cured in a press at 65 °C and 4 bar pressure for 2 h.
By using the improved bonding process, no adhesive failure occurs between the backing beams and the MPM. However, since plastic deformation continues to be the dominant failure phenomenon, the stiffness is increased enormously by applying a 15 mm thick backing beam with the improved bonding process with the final configuration 5. The height of the backing beams allows to avoid the usage of the aluminum load introduction blocks. Appropriate holes were drilled directly in these thick backing beams for clamping connection in the testing machine. The increase in stiffness shows the desired result. There are no visible plastic deformations in the steel layers and delamination failure can take place, accordingly. The appearance of local plastic deformations is analyzed in detail by the simulation results in Section 4.2. Test specimen design configuration 5 was found to provide a valid failure behavior and is used for the subsequent investigations.

3.2. DCB Experiments

The specimens were loaded and evaluated until the initial crack has propagated to a length of 50 mm. The force-displacement, crack length-displacement behavior and the R-curves were determined based on the analysis in Section 2.3 (see Figure 7).
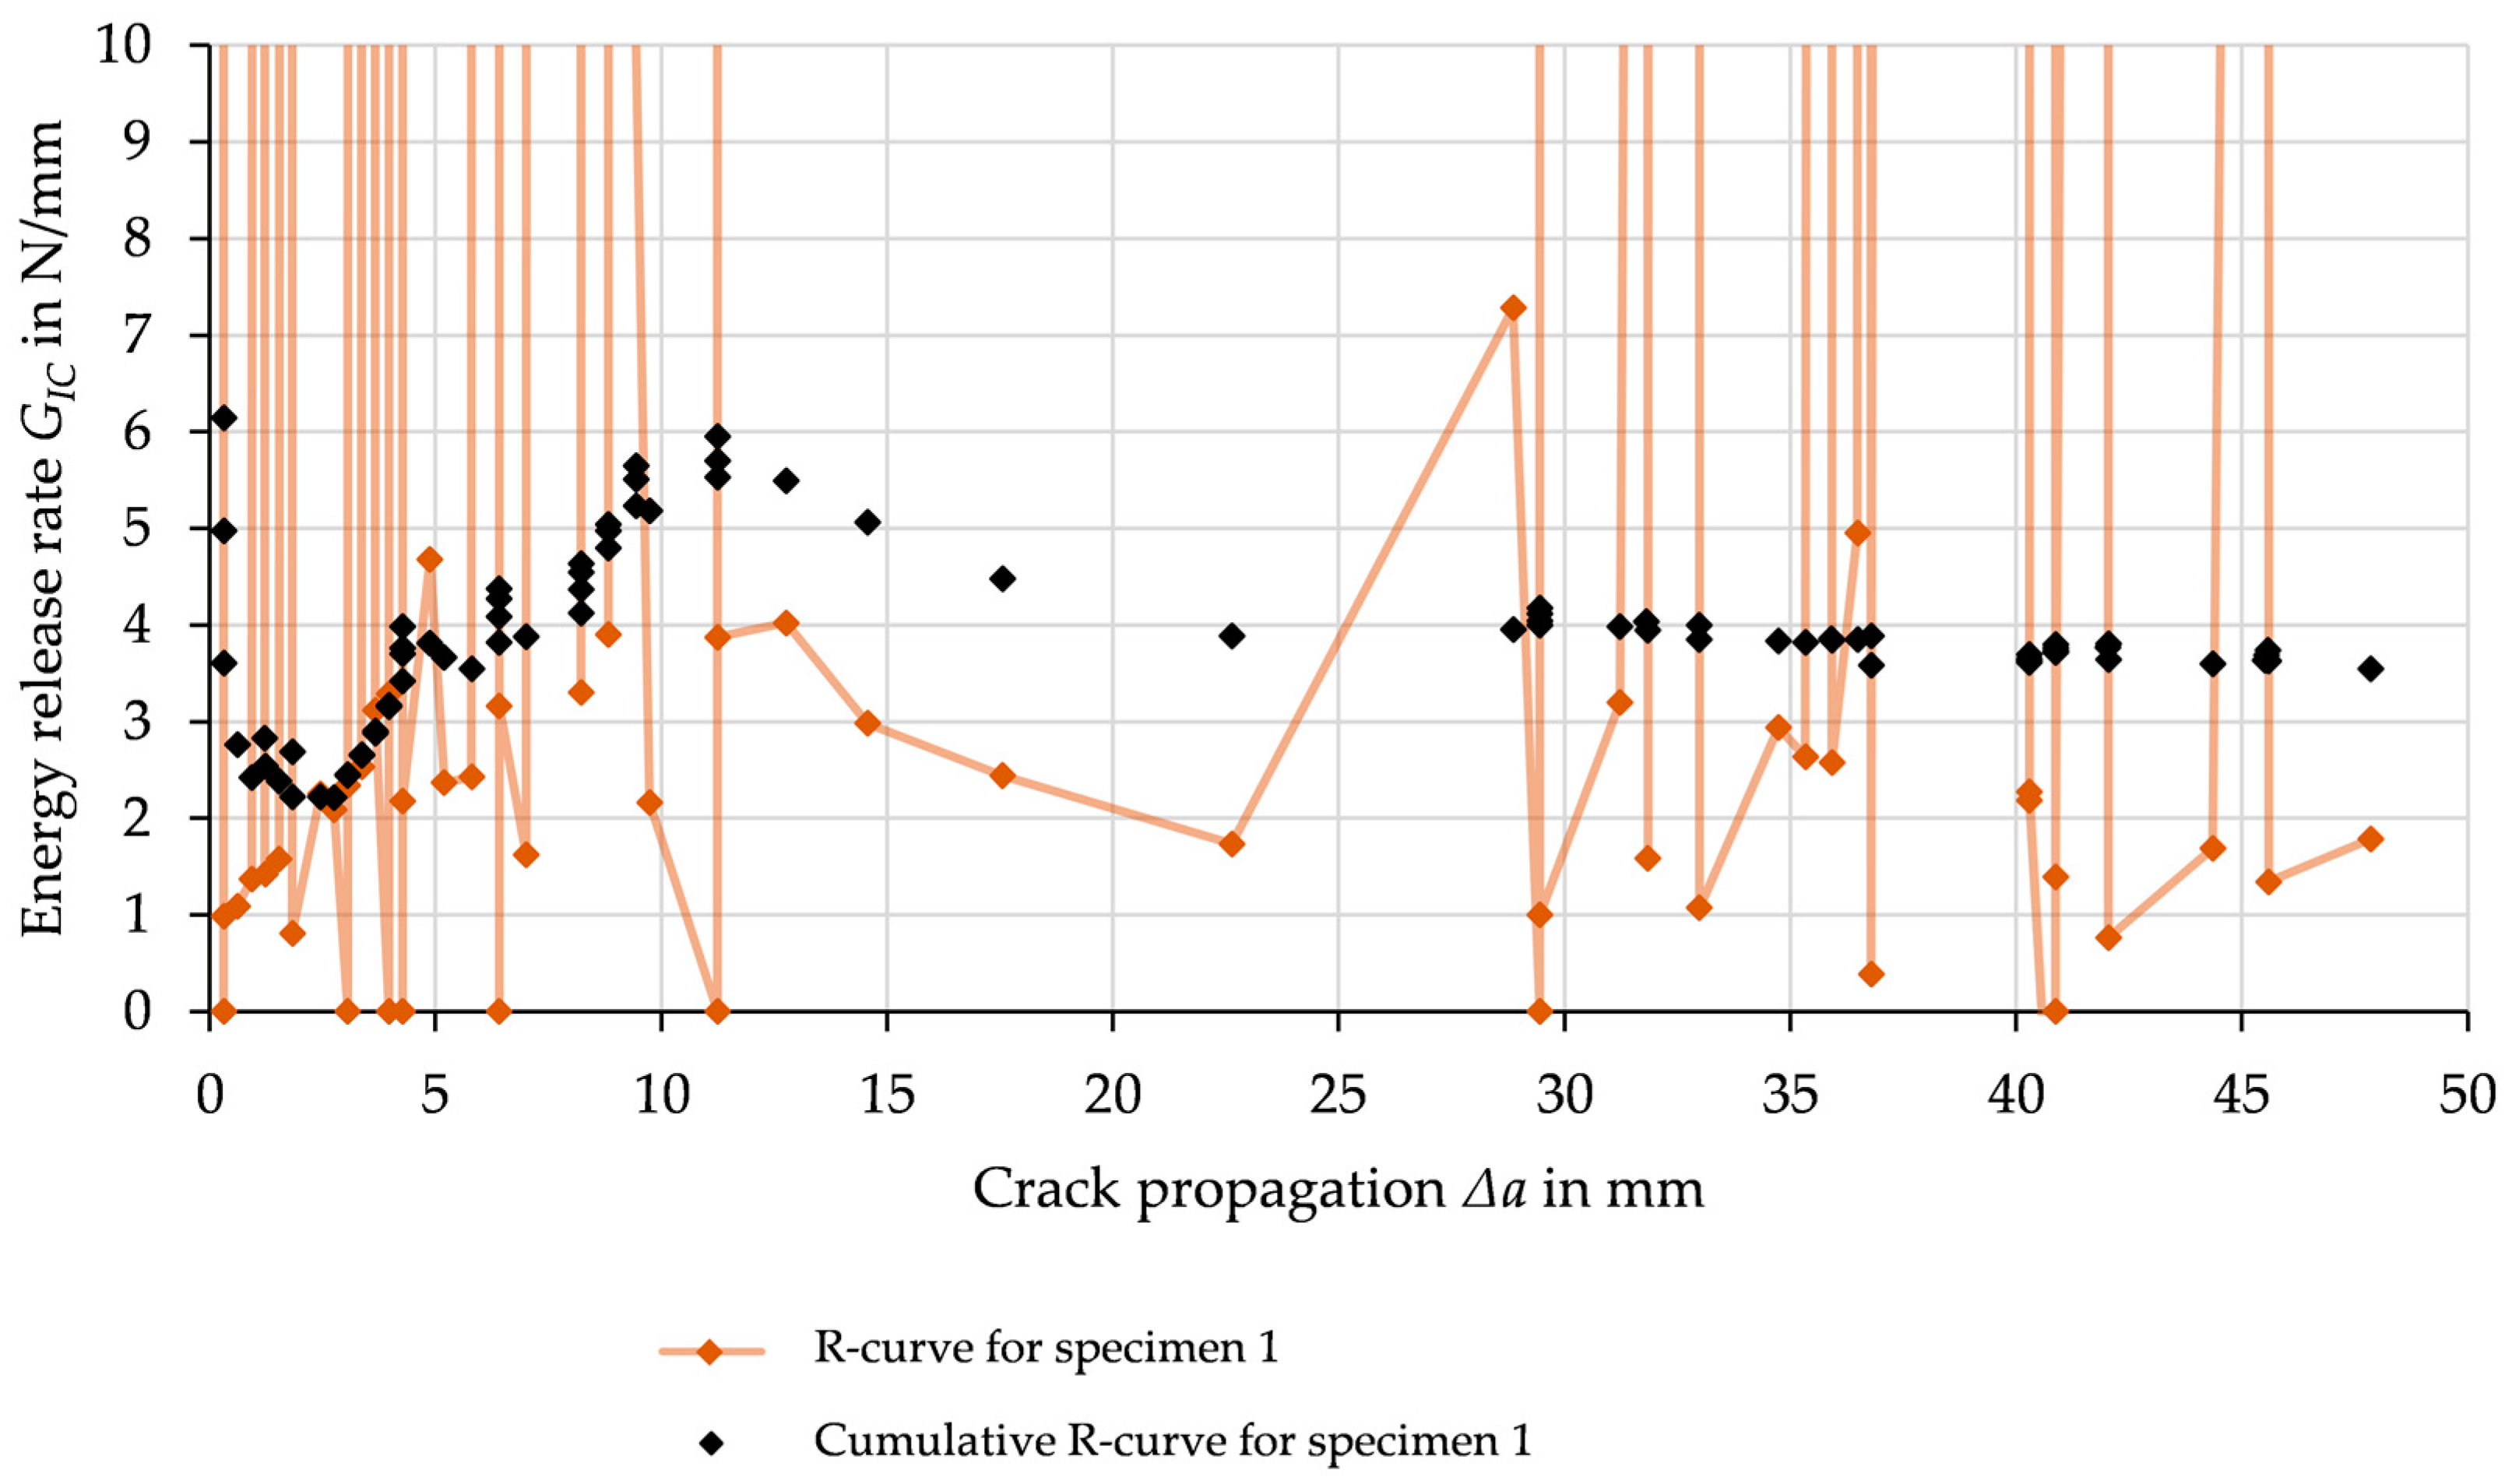
In Figure 8, the R-curve for one specimen is exemplarily shown. The high oscillations of the data points for incremental crack propagation are observed for all specimens, which makes it impracticable for further evaluations. For a more robust evaluation, the abovementioned cumulative R-curve is determined and plotted and will be used for further investigations (see Figure 8 and Figure 9). It represents the average energy release rate for the current total crack propagation at each captured time. During data acquisition for determining crack propagation, the measurements were temporarily interrupted numerous times. This causes unrealistic sudden result fluctuations where the detected crack tip is identified to jump forwards and backwards. As a consequence, the data points will not be connected by lines further on.
Due to the high stiffness of the specimens, the stiffness of the testing machine should not be neglected for the displacement measurement. Moreover, the comparison with idealized simulation models is more difficult. Therefore, the displacements from the testing machine traverse output were not considered, but have been determined at the load introduction points of every specimen using ARAMIS.
The colored rectangles in Figure 9 qualitatively illustrate the different phases of the crack propagation for specimen 1 as described below. The small displacement measurement deflection in Figure 9a is caused by inaccuracy due to setting or low turning of components during the load introduction phase. The crack starts propagating for approximate 10 mm until the maximum force peak is reached and the slope of the curve changes. A non-linear behavior is observed, which indicates that the initial energy release rate at the beginning is lower, due to manufacturing influences.
The cumulative R-curves (Figure 9b) indicate, that the energy release rate between 1 and 10 mm crack propagation is comparably low due to the reason described above. The first peak is negligible from inaccuracies in displacement and crack measurement during the adjustment of the specimens as they slightly rotate and align, respectively, at the moment of load introduction. Furthermore, before the crack starts propagating, plastic deformation is assumed. This leads to energy absorption without a significant increase in the crack length, resulting in a very high energy release rate. Finally, the curve converges to a roughly constant value for all specimens, which is 3.1 N/mm on average with a standard deviation of about 0.6 N/mm.
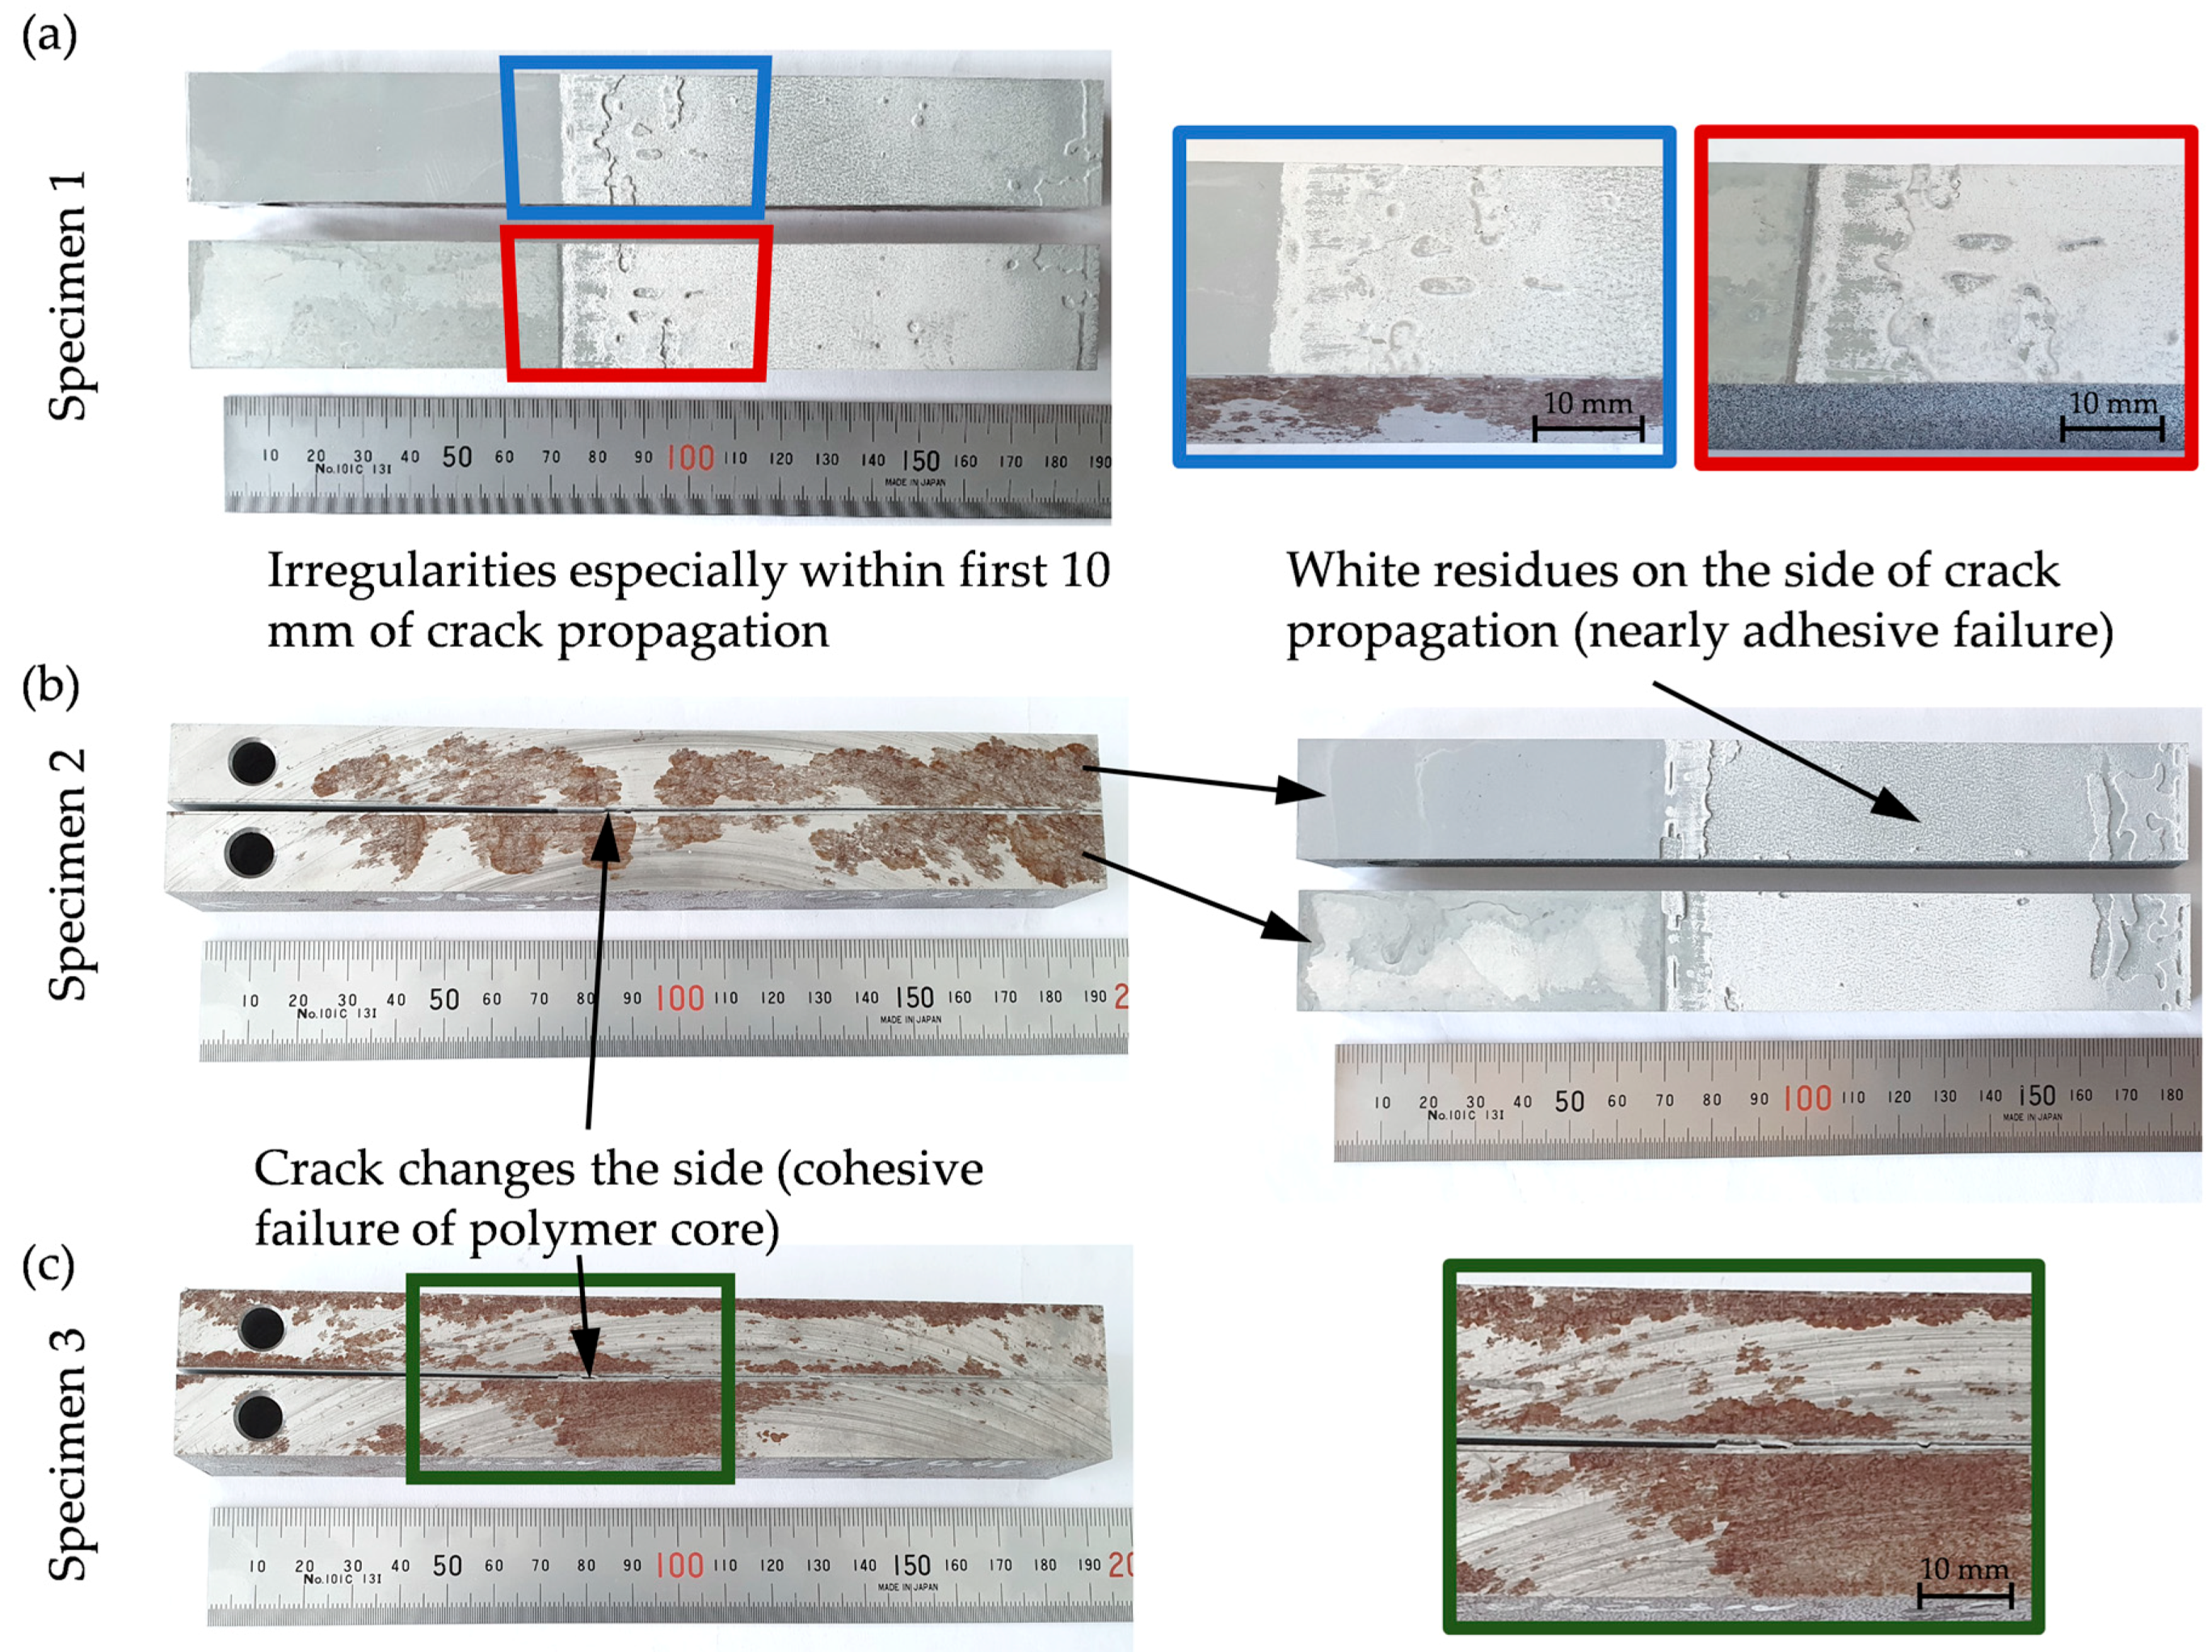
Although the first 10 mm and the end of the specimens show that the surface of the interface looks very inhomogeneous and irregular, the remaining part shows principally a uniform interface failure (Figure 10). For all the specimens, the crack propagates or rather transfers from one metal/polymer interface to the other one through the polymer core after this length, resulting in a sudden increase of the energy release rate. Subsequently, it propagates nearly on the lower metal sheet in the adhesive promoter with again a lower value of determined energy release rate, since at this point there is no larger amount of failure involved through the whole thickness of the polymer. Only at a few positions, the crack returns temporarily to the initial crack plane before it propagates to the other plane once again. There is no pure adhesion failure, as some white residue is also present on the side of the metal sheet closer to the crack. It can be concluded that the polymer undergoes plastic deformation and failure by tearing, leading to a mix of cohesive and adhesive failure. This makes it more difficult to determine the “real” energy release rate of the specimen. The results clearly show that the local energy release rate along the specimen length varies largely not only at the beginning but also at certain positions.

3.3. Simulation Methodology and Initial CZM

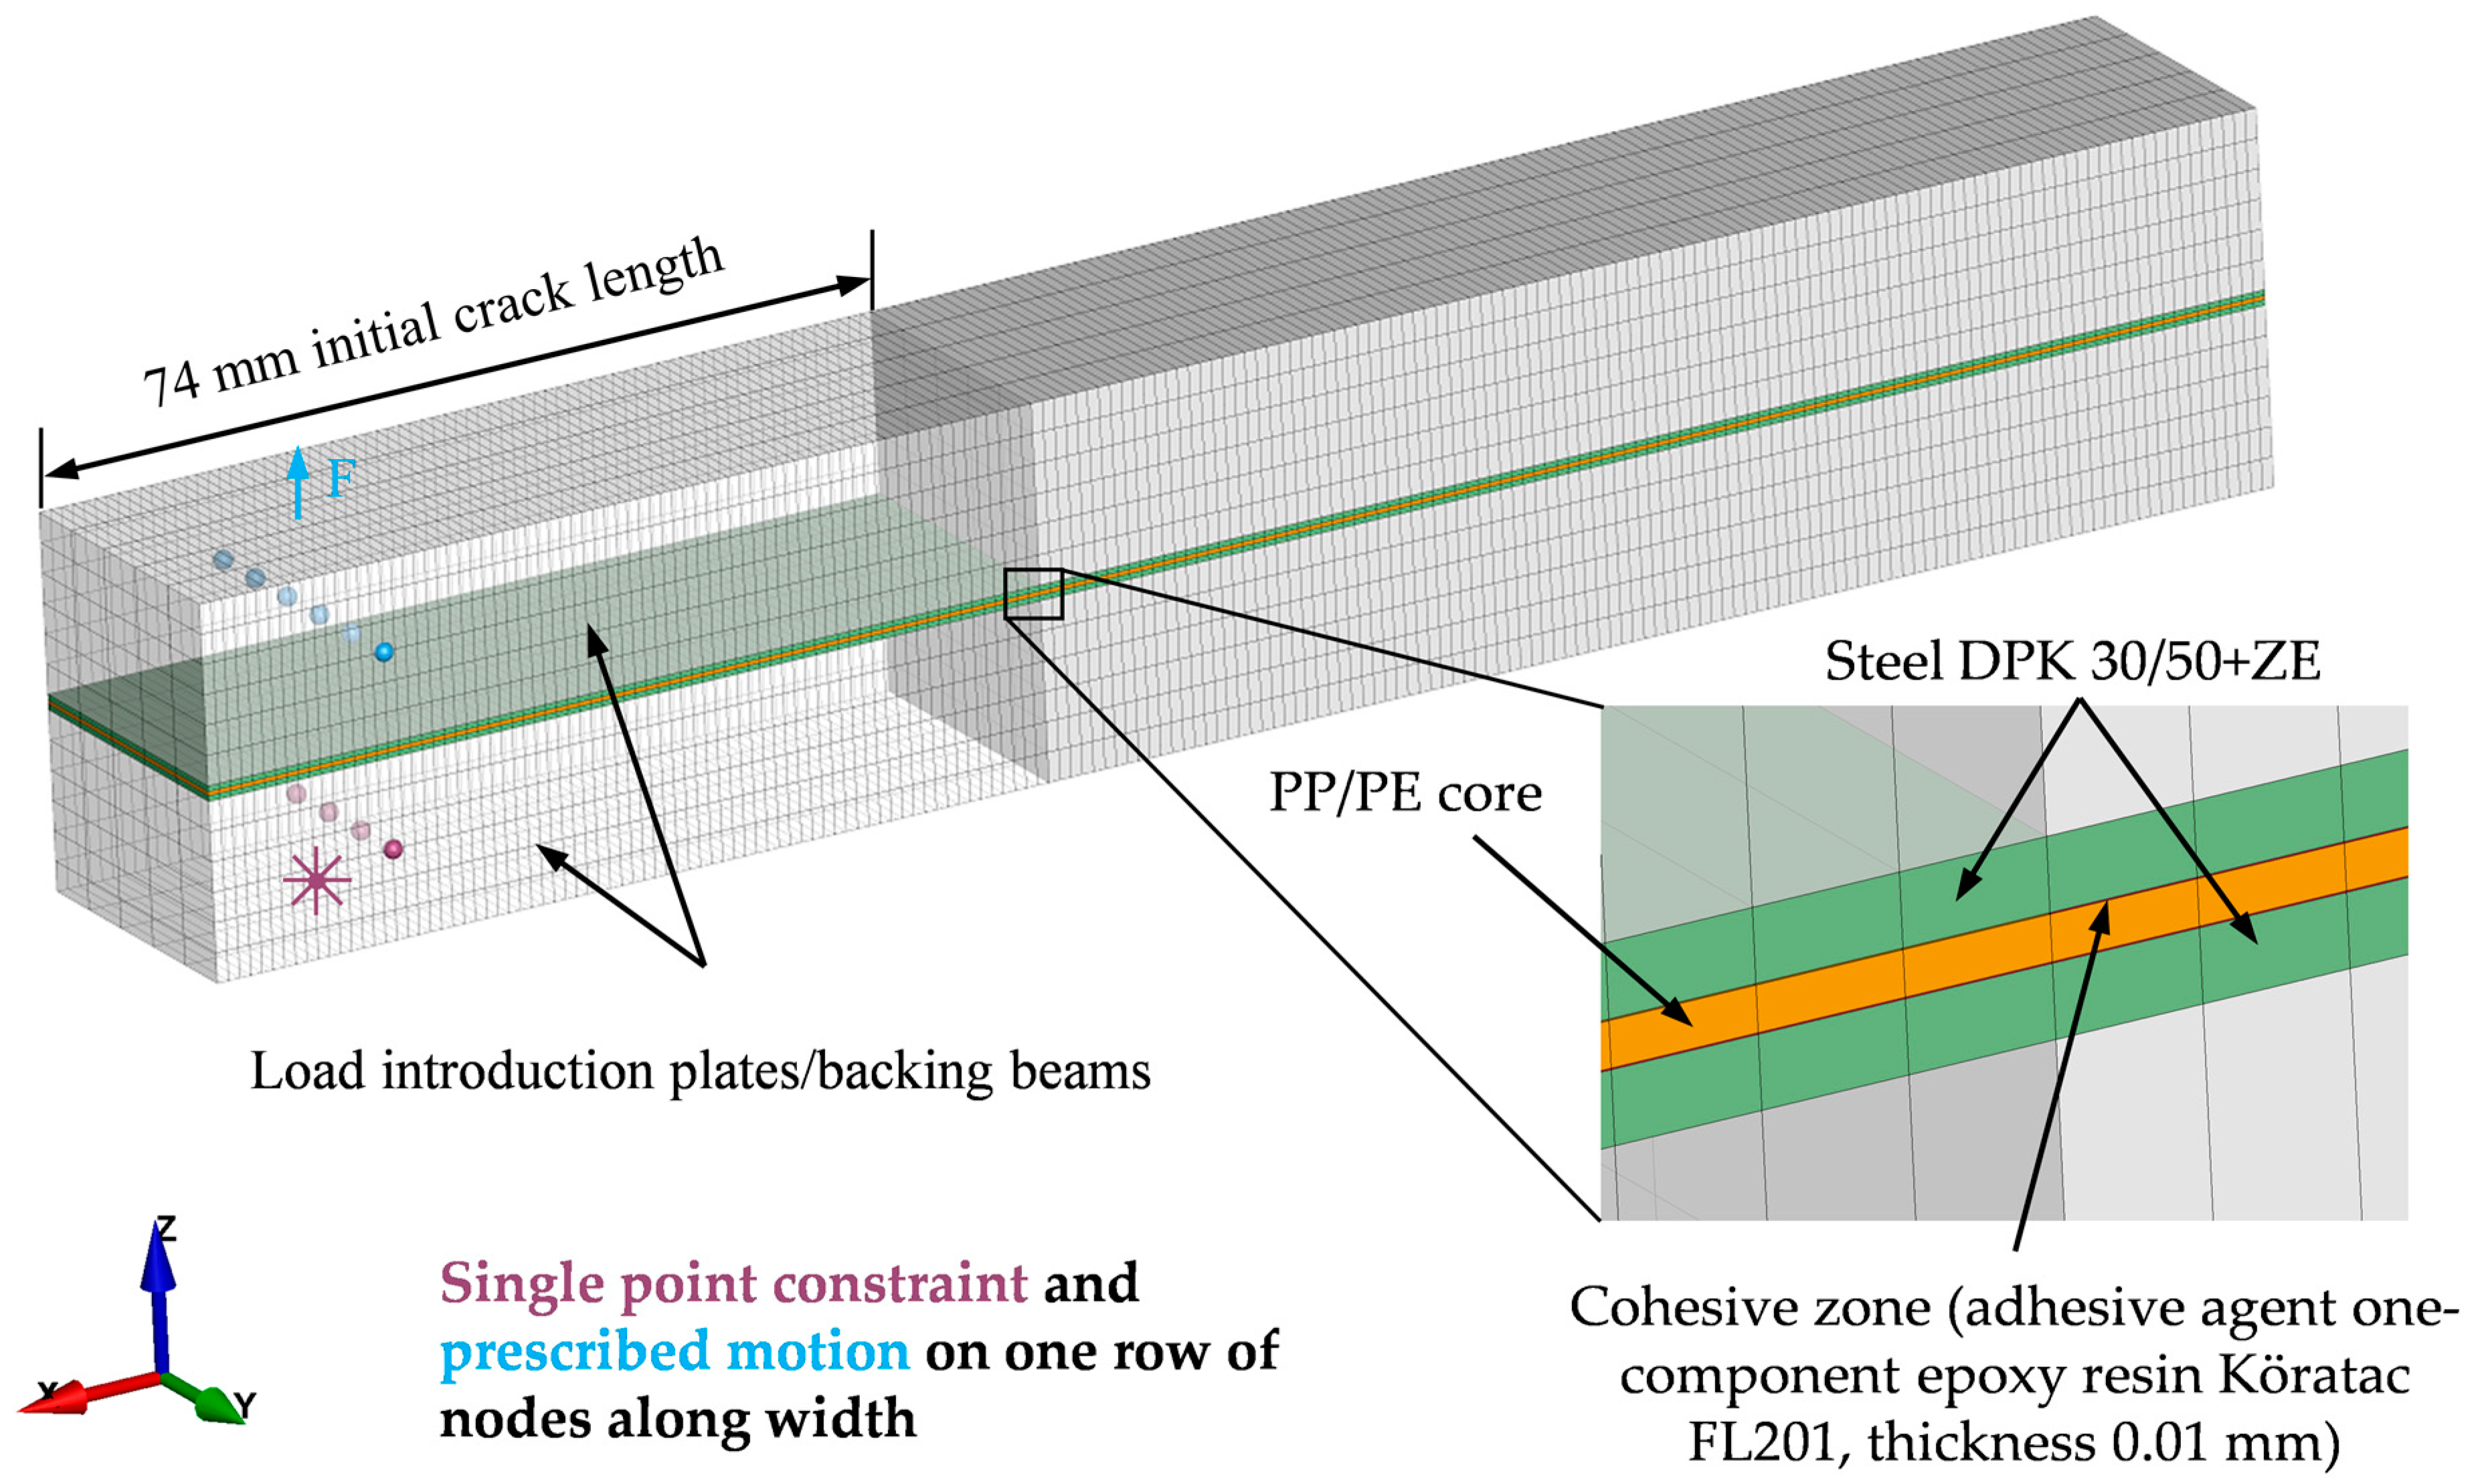
The simulations to validate the selected material models with the experimental results is conducted using the explicit solver of LS-DYNA R11.0. To reduce simulation time, the testing velocity has been adjusted to 250 mm/s (time scaling method). For this reason, the strain rate effect parameters in the material model are not considered. The DCB simulation model is build up with 8-node-hexahedron elements as shown in Figure 11. There is one element per layer in thickness direction for the metal sheet (green) and polymer core (orange), as well. While the backing beams (gray) are modelled with six elements through the thickness, the interfaces are modeled with one single layer of cohesive elements (black). On the one hand, these are positioned in the plane, in which the crack propagates with a thickness corresponding to the adhesion promoter from the tests; in this case 0.01 mm. On the other hand, a layer of cohesive elements is positioned on the opposite side between the metal and the polymer, where no initial crack has been created.
The transversal mesh density is coarser (5 mm) than the longitudinal one (1 mm), where the crack propagation takes place in the latter direction, which requires a higher element resolution. Thus, the simulation time is reduced. The load introduction steel backing beams are much coarser since there is no large deformation expected. However, the nodes at the connection area match with the specimen elements to achieve a tied connection.
The standard elements are assigned with the type ELFORM 2 to consider poor aspect ratios with respect to shear locking. Pre-investigations showed high instability when using the more time-efficient but reduced integrated ELFORM 1 in combination with the cohesive elements, for which ELFORM 19 is used. The total number of elements is 15,185.
The load is introduced on a single row of nodes along the width via prescribed motion in the z-direction and a curve defining constant acceleration as described above (in 16 mm distance to the end of the specimen). The node row at the opposite load introduction block is supported only via translational single point constraint in x-direction and y-direction, so that it has a rotational degree of freedom around the y-axis. The transparency on the left shows the area of the initial crack length where no cohesive elements are attached.
For the sheet steel and polymer, strain rate dependent elasto-plastic material models are used (*MAT_PIECEWISE_LINEAR_PLASTICITY), where the corresponding mechanical properties have been determined previously in [7]. The cohesive elements are assigned with a bilinear traction-separation law with quadratic mixed mode delamination criterion and damage propagation (*MAT_COHESIVE_MIXED_MODE). The initial material card used for the recalibration process is shown in Table 3. The backing beams are specified as elastic.

3.4. Recalibarion of the CZM

The recalibration is performed using a Python script, which is able to automatically change a predefined parameter in the cohesive material model, start simulations and present the comparison the force-displacement and the crack propagation-displacement curves with the experimental results to determine the parameter’s influence. The evaluation of the results after each run and the decision for parameter adjustment in the next run is done manually. All parameters shown in Table 2 were investigated in ranges as shown below. To reduce the oscillations in the force curve of the simulation, a moving average filter with a step width of 4 data points is applied. While the crack in the experiments is measured by the location of the maximum strain, the criterion in the simulation is the deletion of a cohesive element row along the width.
The cohesive stiffnesses E N and E T , defined as the stiffnesses divided by the element thickness, have a considerable influence on the stability of the model but not on the curves and crack propagation as long as the simulation remains stable. The chosen stiffnesses secure a stable calculation (Table 3) and are further kept constant throughout the calibration procedure.
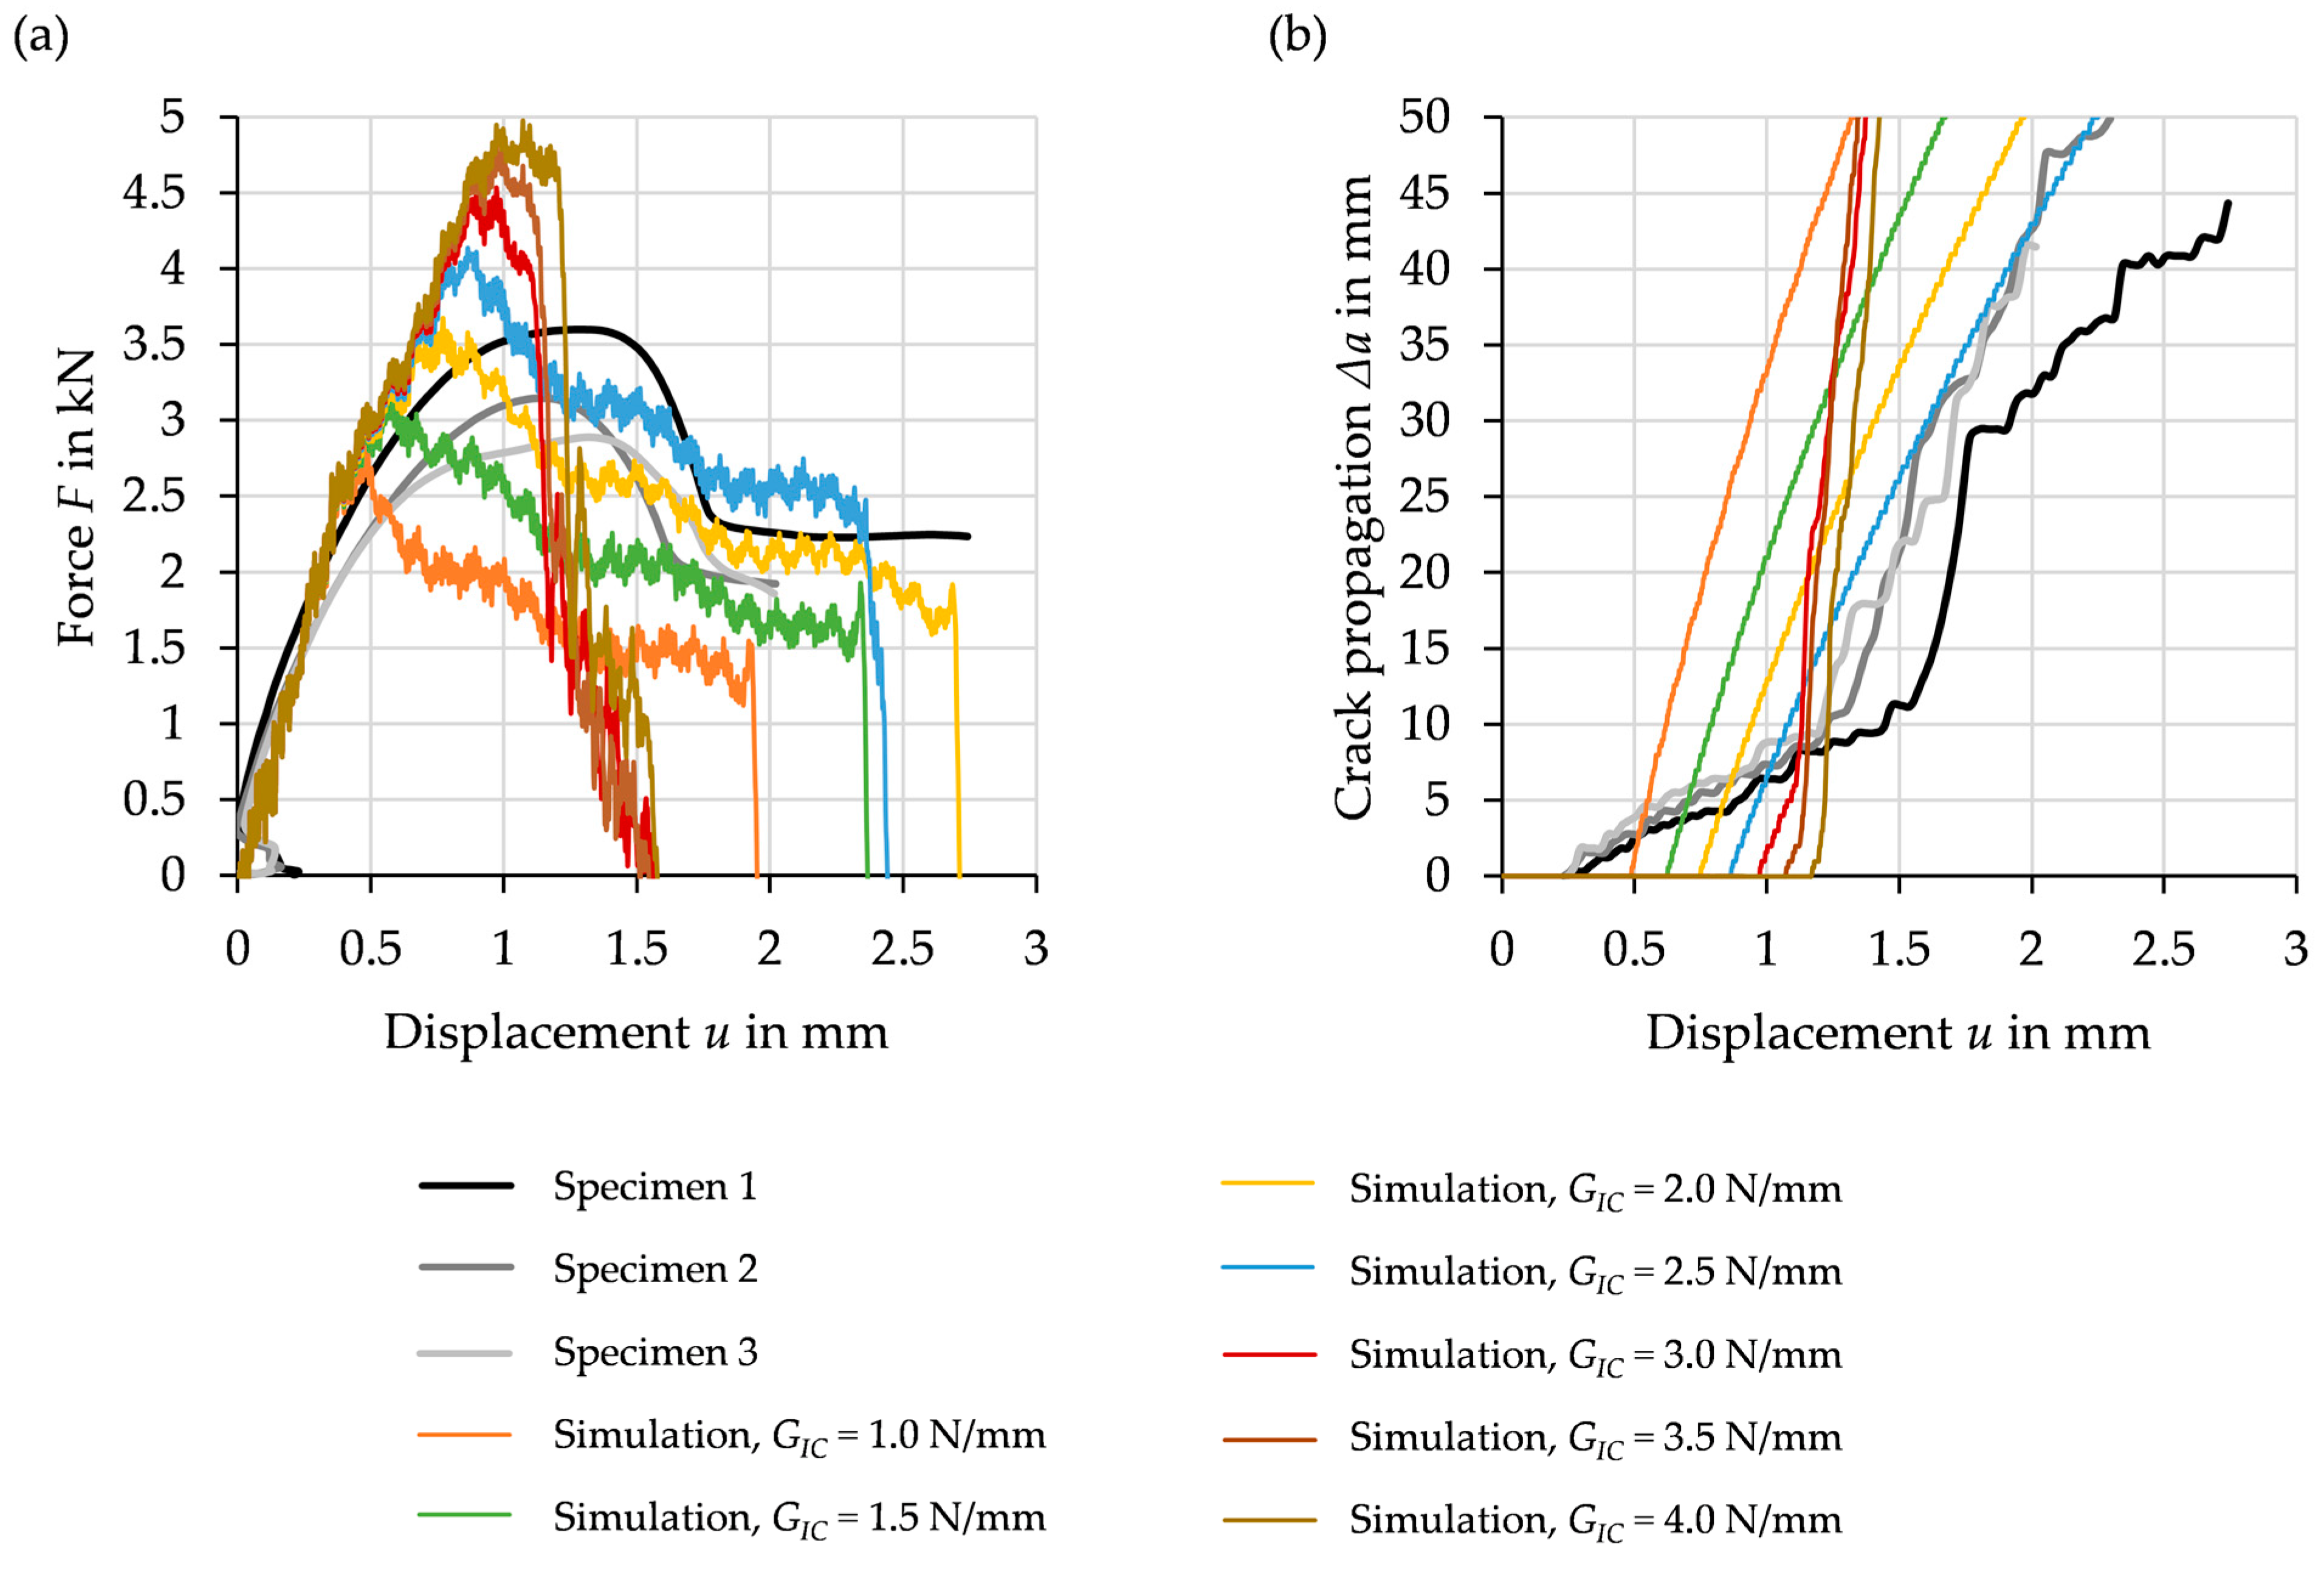
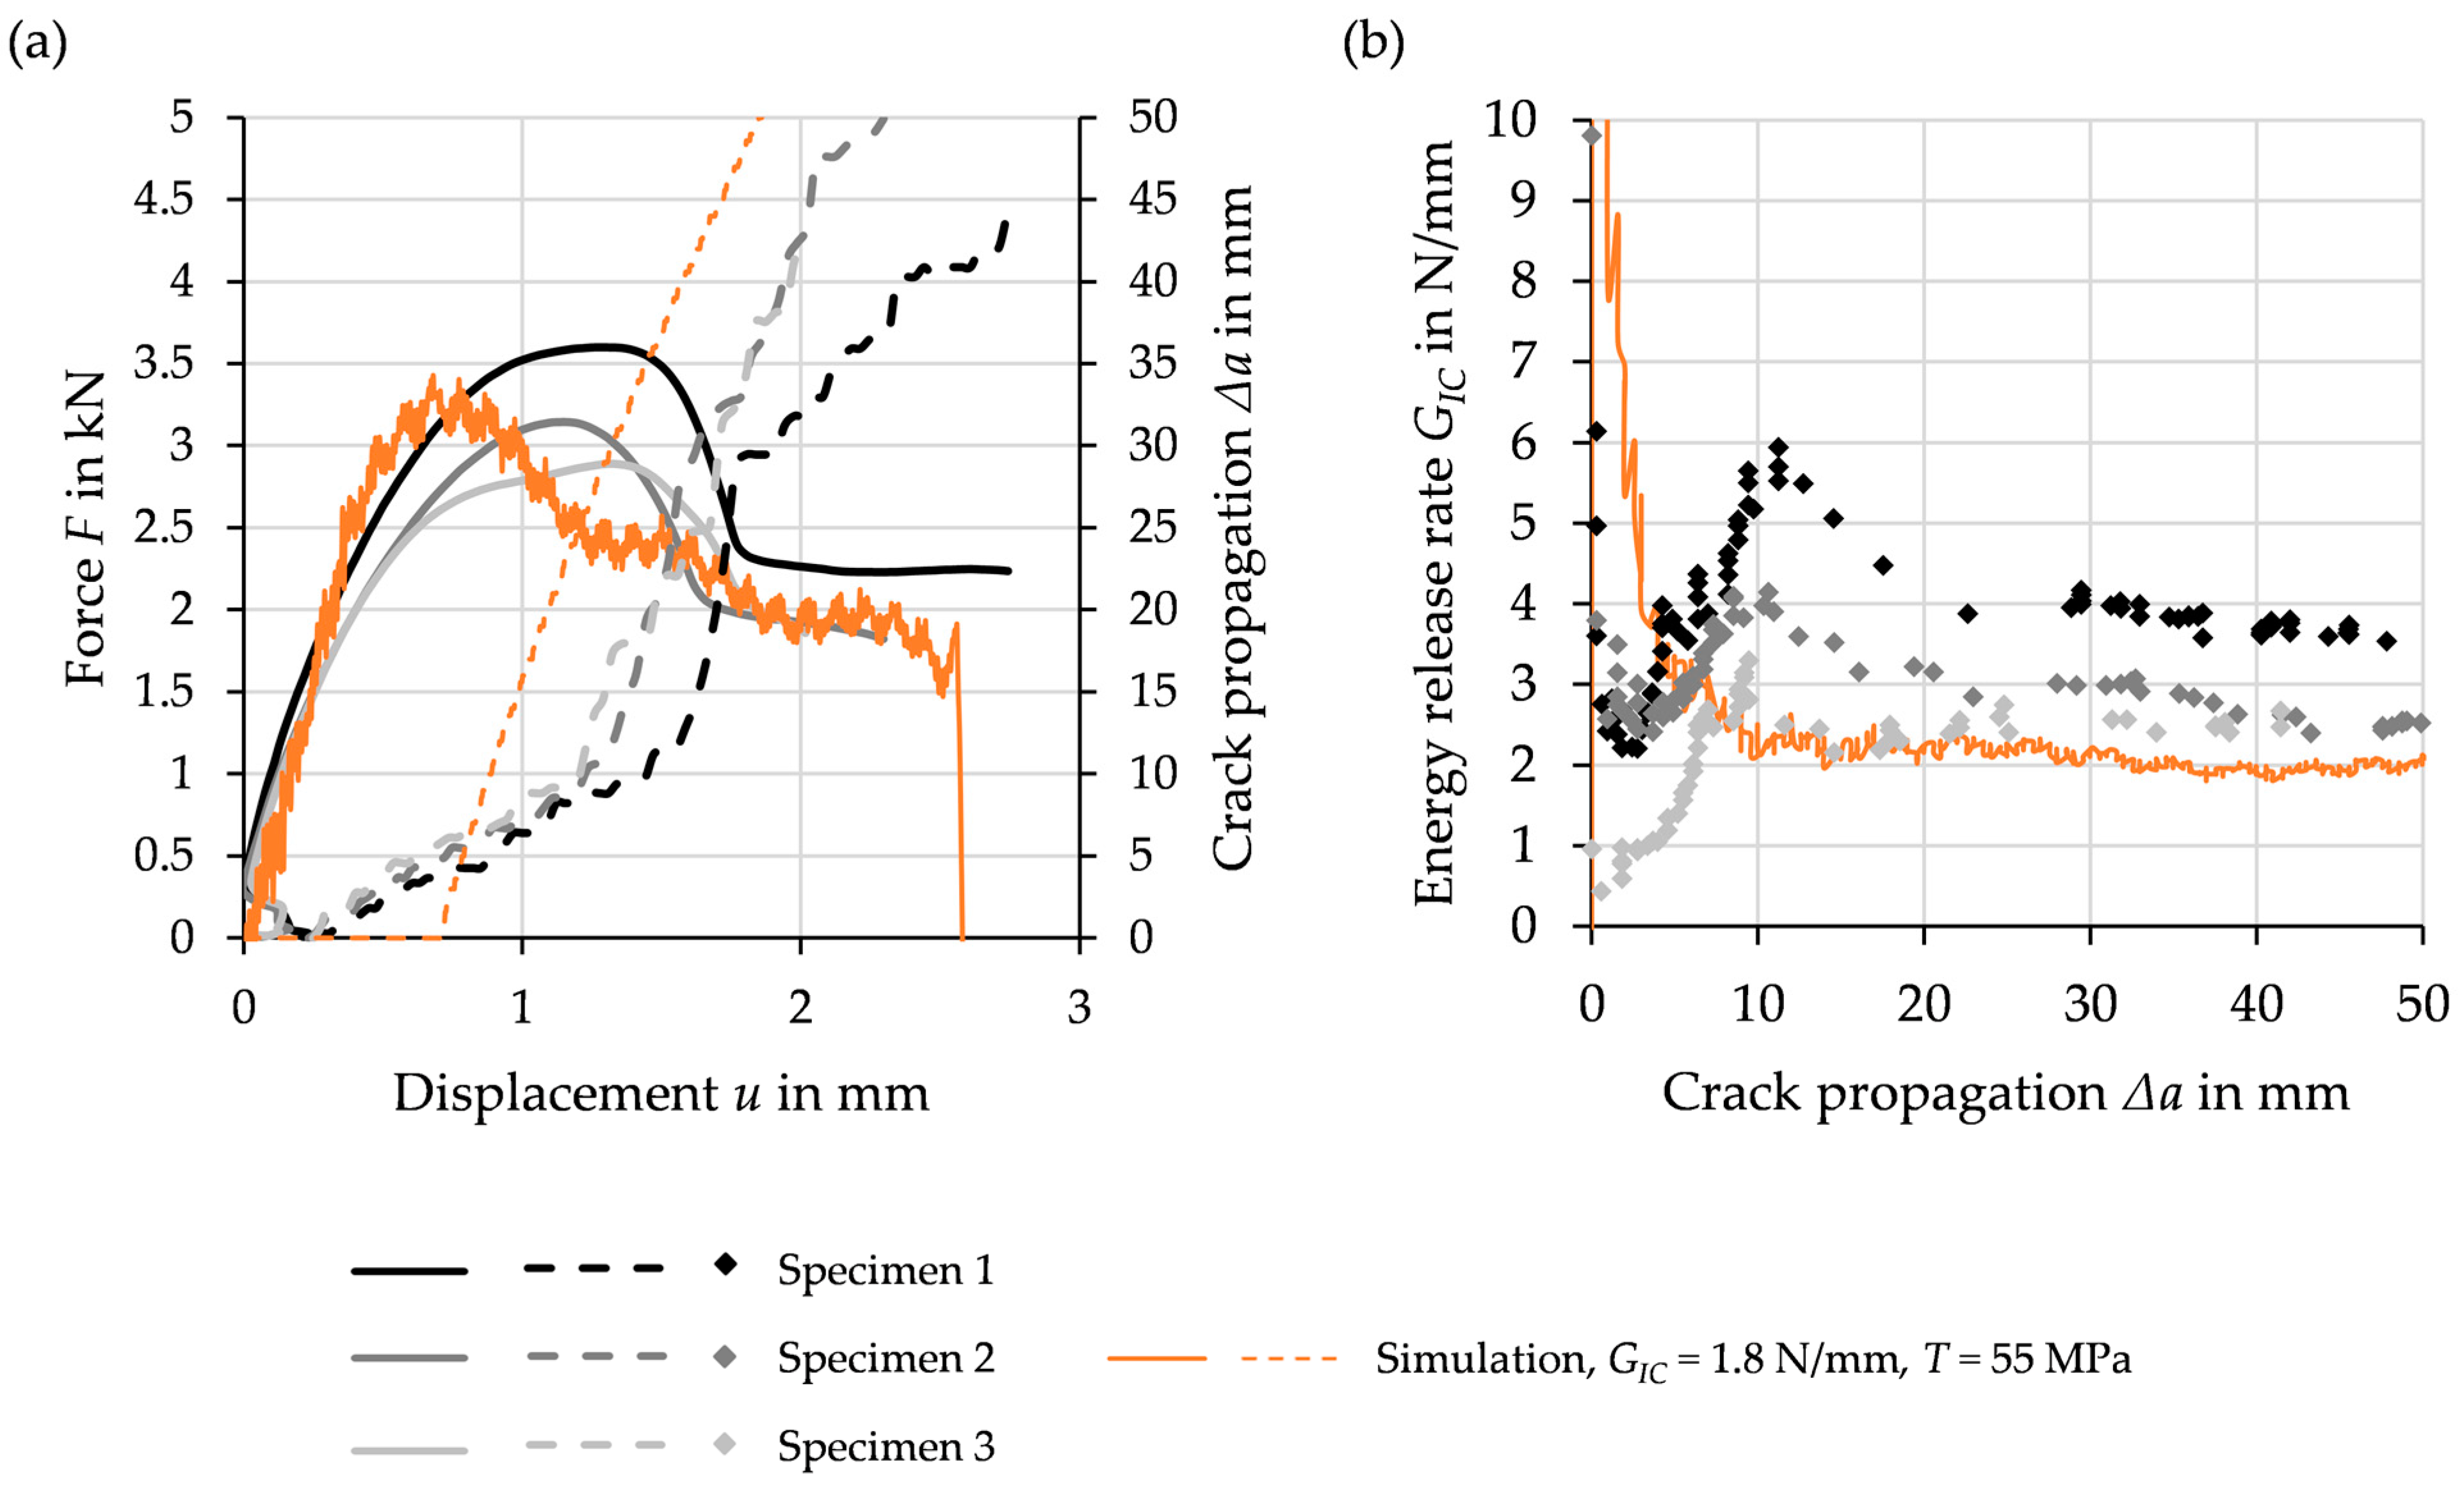
As a result of the calibration procedure, a decrease of the experimentally determined G I C , leads to a more accurate prediction of the force peak and the following slope. In contrast, the displacement at maximum force peak decreases with increasing values. When G I C exceeds about 2.5   N / mm , instability occurs, resulting in a sudden force drop after the peak and a very high crack propagation increase. Highest force-displacement-curve correlation was achieved with G I C = 2   N / mm and for the crack propagation-displacement curves with about G I C = 2.5   N / mm (Figure 12). However, for the latter curves the bilinear behavior in the simulation could not be reproduced, because of a constant value for the whole cohesive layer.
The normal strength T does not have a significant influence on the force-displacement curves, as shown in Figure 13. The force level after the force peak decreases slightly with increasing T . Furthermore, the crack propagation starts earlier since the maximum separation of a cohesive element is reduced, according to the applied material law in MAT_138. The model stability is affected when using T values lower than 40–70 MPa , depending on mode I energy release rate G I C in the varied range of 1–4 N / mm . As for the parameter G I C the result is a premature force drop and sudden deletion of all cohesive elements. Figure 13a,b shows selected results for different T values at a critical energy release rate in mode I of 1.8 N / mm .
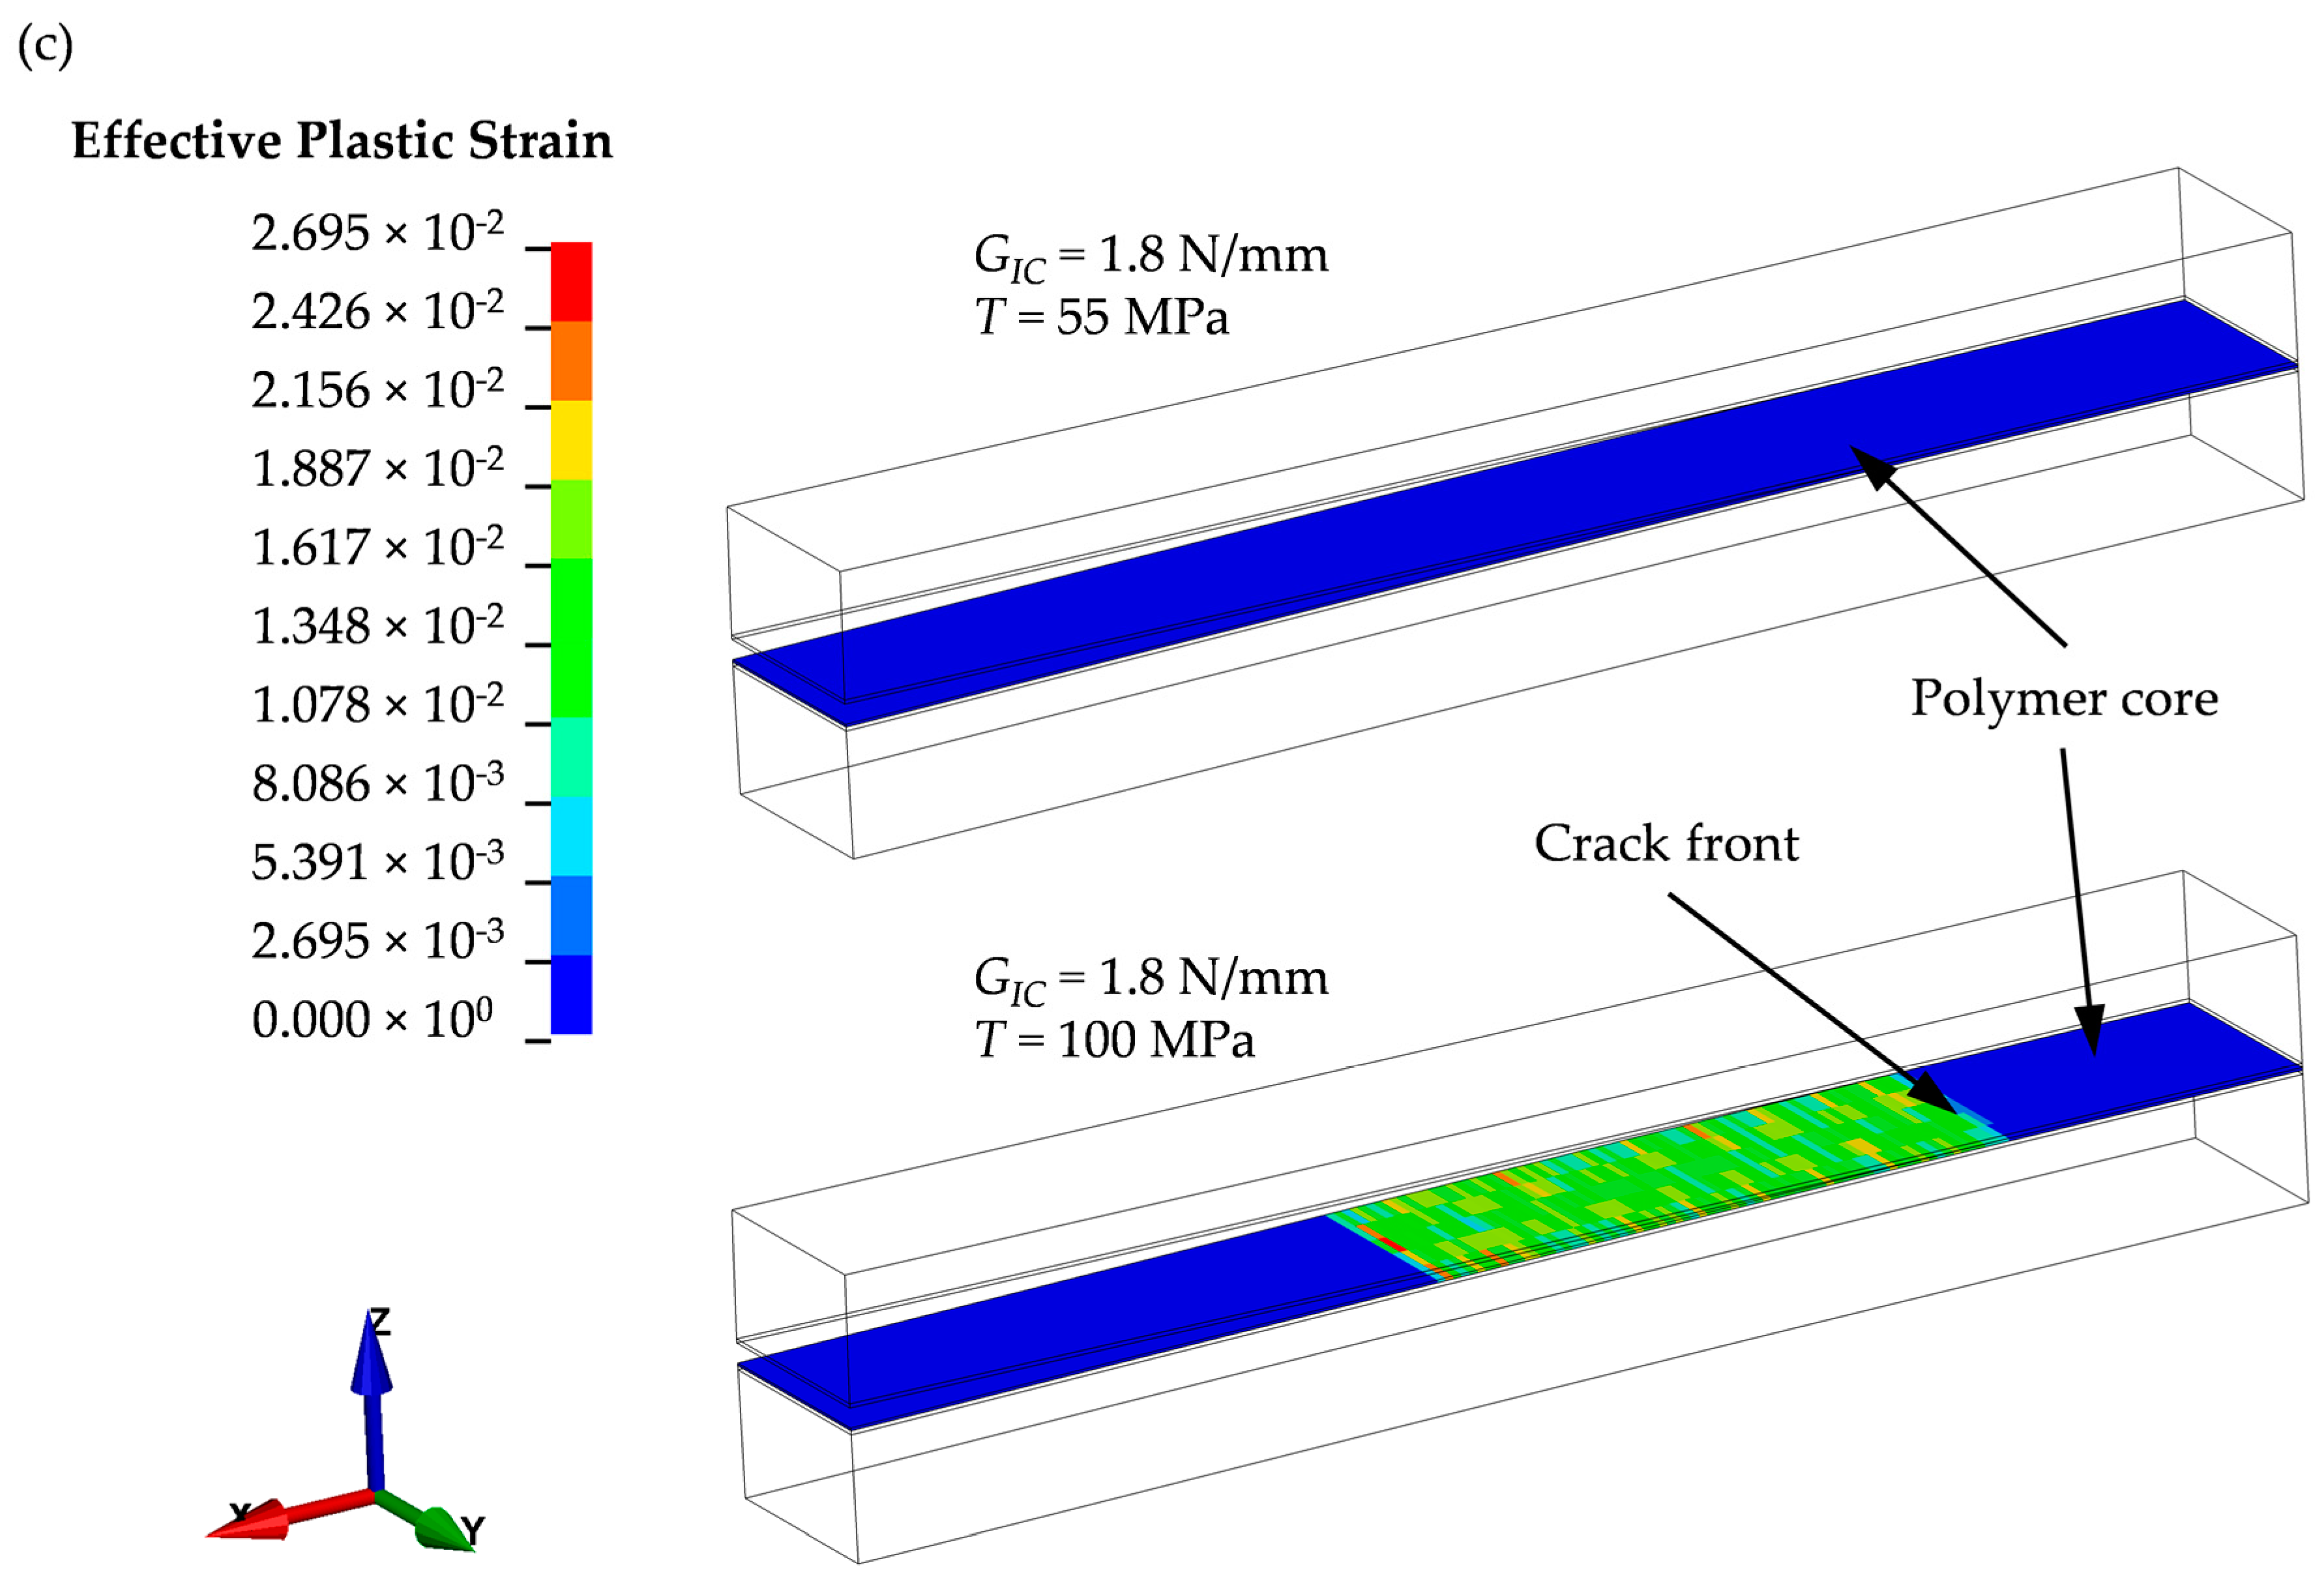
Moreover, plastic deformation of the polymer core is significantly influenced by the parameter T , shown in Figure 13c. The higher T is, the higher is the effective plastic strain. A remarkable effective plastic strain starts at about T = 80   MPa and propagates in the layer together with the crack front/deleted cohesive elements. This effective plastic strain in the PP/PE core correlates to the observed experimental results. Thus, the experimental determination of G I C (Equations (1)–(4)) leads to an overestimation since the total energy consists of elastic, fracture and plastic energy. The side change of the crack through the polymer could not be observed in the simulation. This leads to a deviation to the experimental curves also after recalibration of the cohesive parameters. Because of this fact, the normal strength T cannot be calibrated exactly, since the real plastic deformation proportion of the polymer core in the specimens is unknown.
The currently best parameters for the cohesive elements after recalibration are listed in Table 4. The comparison of the curves between experiments and simulation with this new material card is depicted in Figure 14. As mentioned before, in contrast to the experiments, the crack propagation in the simulation is linear and starts at the peak force. The local change of the crack propagation through the polymer core until it forms an adhesive failure at the other steel sheet cannot be modeled currently. A more complex material model for stress state dependent damage and failure behavior for the PP/PE has to be used. It should be noticed that for T values between 50 and 75 MPa, almost the same results for both curves are found.
To control the input energy release rate G I C , the cumulative R-curve has been also calculated from the simulation results. As it can be seen in Figure 14, the output energy release rate tends to a constant and comparable to the input (approximately 1.9–2.0 N / mm ). The deviation and the high value at the beginning can be attributed to the low crack resolution which is based on the size of the cohesive elements. It is worthy to mention that the crack propagation is detected after the elements are completely deleted only. Therefore, the first energy is released at nearly no crack progress (see Section 3.2). This effect diminishes with increasing crack length.
The initial slope of the force-displacement curves is higher than in the experiments, because the load introduction region in the model is simplified and the compliance due to the hole, where the alignment and adjustment of the specimen takes place, is not taken into account.
A variation of the parameters G I I C and S does not show any difference in the simulation results since the mode I loading condition is dominating. In addition, they do not have an influence on the stability of the model in an investigated range such as for the parameters G I C and T .
Further investigations showed that the number of elements through thickness in each layer does not significantly influence the force-displacement and the deformation behavior. Moreover, the decrease in the prescribed motion velocity by half led to negligible force reduction. Based on this, the simulation results are less noisy at the cost of higher simulation termination time.
It is noticeable that although in the second cohesive layer, no crack propagation occurs, the normal stresses are almost of the same level as in the cohesive layer with the crack propagation itself. The only difference is that these elements are not deleted. This correlates with the results of the experiments, where the crack changes the propagation side. However, removing this layer does not influence the force-displacement-curves significantly, but increases the stability of the model.

4. Discussion

4.1. Discussion on Experimental Results

Depending on the type and layup of hybrid structure specimens, the determination of mode I energy release rate utilizing the DCB-tests requires adding thick backing beams on that specimens to avoid plastic deformation of both of the sandwich and the backing beams during the test. Based on the large stiffness gradients between adjacent plies, as suggested by [18,19] and discontinuous stress distribution [20], the thickness of these beams depend on the adhesive strength and have to be determined with pre-tests. Within the first phase of crack propagation (in the range of few millimeters), the adhesive strength is quite low, and the failure surface shows irregularities possibly due to manufacturing reasons. Therefore, a pre-cracking before the determination of the energy release rate would be recommended. Besides this pre-crack area with lower adhesion properties, the adhesive strength along the length of the specimens can also be not constant because of local effects in the material, which corresponds to the reported redistribution effects in [3]. In contrast to the suggestion in [9], the plastic deformation of the polymer layer has not been prevented. The real energy release rate, especially if assumed constant, cannot be determined just by experimental results with the approach of linear elastic fracture mechanics, since it is overestimated as the energy required for the plastic deformation and failure of the polymer core is included in the test results. This is in agreement to the findings in [7], where a considerable impact of the plastic deformation in the polymeric layer has also been observed. Since the incremental energy release rates fluctuate considerably, it is reasonable to draw a cumulative R-curve for a better presentation and understanding of measured results and deviating conclusions for the local adhesive properties.

4.2. Discussion on Numerical-Experimental Recalibration

For the evaluation of the experimentally determined results and specific parameters, it was found, that additional simulation is required as the analytical formulas given in the standards are not appropriate [21]. Therefore, it can be concluded, that the critical energy release rate G I C in the cohesive material model was found to be the most influencing parameter on the force-displacement behavior in the simulation. The parameter for normal cohesive strength T changes the force in a minor extent but has a significant influence on the model stability and the amount of plastic deformation in the polymer core as already observed in [22]. The normal cohesive stiffness influences only the model stability. Parameters for mode II do not change the simulation behavior and have to be evaluated by further experimental work. After recalibration of the cohesive element as suggested in [23] using constant parameters G I C and T , the simulation can recreate the force peak and the rough shape of the curve in general. However, the crack propagation-displacement-curve is too even compared to the experiments and the amount of plasticity in the polymer core cannot be calibrated. A more detailed characterization of the polymer core and application of a more complex material model is required, since plastic deformation and failure occur, which correlates to the findings in [10]. This also leads to a side change of the crack propagation, depending on the properties of the adhesion promoter and the core thickness. Additionally, considering the representation of cohesive crack propagation, it is reasonable to discretize the model with more layers of polymer core resp. more elements with another cohesive zone between them. The thereby required parameters have to be determined separately.
The calibration of only constant cohesive element parameters G I C and T over the length of the model is difficult since no local increase or decrease of the adhesive properties can be modeled. As described above, it is reasonable to assume different energy release rates along the specimen length for at least three areas, starting with a lower value for the pre-crack area, higher values in the middle of the specimens and another set-up for the end of the length. For future studies, this has the potential of improving the match of the obtained force-displacement-curves and represent non-linear crack propagation with the help of optimization tools such as LS-OPT. Further approaches regarding mathematical programing algorithms or neural networks are promising to address and speed up the problem of inverse calibration or material card generation, while the required experimental effort can be reduced [28,29].
If the results are improved, even the defining of the properties differently for each row of cohesive elements in relation to the curve of energy release rate over crack propagation is worth taking into account.
Regarding the load introduction area adaptions in the sense of a higher level of details can improve the initial behavior, and in the model by considering effects of specimen alignment. Bringing in some damping in the model may improve the stability and reduce high oscillations in the output signal.
To roughly determine the extent of plasticity in the crack propagation region or the polymer core, loading and unloading in several steps in the experimental and later numerical work would be useful., loading and unloading in multiple steps in the experimental and later also numerical work would be useful. However, the thicker the backing beams are and the thinner the polymer core is, the more difficult is the measurement of a noticeable effect in the force-displacement curve, experimentally.

5. Conclusions

In this paper, the interface properties between a steel cover sheet and a thermoplastic polyolefin (PP/PE) core layer bonded by using an epoxy adhesive agent, as an example for a combined metallic and polymer materials in layered hybrid sandwich sheet, are investigated using the DCB test. With the applied specimen modification by bonding two 15 mm backing beams to the upper and lower specimen surface, an initiation of mode I crack propagation along the full length of the specimen without plastic deformation of the cover sheet metals is achieved. The observed crack propagation contains a mixture of adhesive and cohesive phenomena as well as plasticity effects induced by the polymeric layer. The crack path alternates between the upper and the lower metal-polymer interfaces leading to a mix of cohesive and adhesive failure. Therefore, a conclusive mode I energy release value cannot be determined, but the highest values can be considered as an upper threshold value which will not be exceeded during delamination propagation in the sandwich.
For the numerical investigations based on FEA with the explicit solver of LS-DYNA, an approach has been elaborated to model ply debonding purely based on an interface failure modeling strategy to enable structural simulations on meso- and macroscopic level using CZM. A numerical-experimental approach with inverse calibration is used to determine the parameters which are not directly derivable from the tests only or need high effort in micro analysis of the interface. Furthermore, the deformation and failure behaviors are compared in order to understand the different phenomena that affect the energy released through crack propagation at the metal–polymer interface. The experimentally determined results are applicable to calibrate CZM values in a smeared manner to represent the delamination behavior on structural level in the simulations. A purely adhesive failure at the interface was not observed and the crack propagated rather along the interface and through the polymer in a mixed manner. However, it has been shown, that the crack propagation phenomena can be aggregated and projected into to the cohesive zones by utilizing the CZM approach and a plasticity model for the polymer layer. The calibration revealed that the energy release rate G I C dominate the structural response. The experimental determined value of about 3.1 N/mm which is overestimated was thereby calibrated to a value of rather about 1.8 N/mm. The cohesive stiffness and normal strength T play a minor role in this respect, but have a considerable impact on the numerical stability of the simulations. Additionally, T influences the amount of plasticity in the polymer core. As expected, the parameters for mode II loading condition do not have any influence on the simulation results.
Further effort in, e.g., full characterization of failure parameters of the polymer is required to achieve a better match of the curves. An assumption of different parameters along the specimen length is reasonable and requires optimization tools. In the next steps, it is necessary to investigate the interface properties considering the failure mode II under different loading velocities, so that the material card for the cohesive elements can be used without larger restrictions in models for other applications, such as the mentioned crash structures that are often affected by interlaminar failure.

Author Contributions

Conceptualization, J.R., M.K., A.H., M.H., H.P. and M.G.; methodology, J.R., M.K. and A.H.; software, J.R., M.K. and A.H.; validation, J.R., M.K. and A.H.; formal analysis, J.R., M.K. and A.H.; investigation, J.R., M.K., A.H. and M.H.; resources, H.P. and M.G.; data curation, J.R. and M.K.; writing-original draft preparation, J.R., M.K. and M.H.; writing-review and editing, A.H., H.P. and M.G.; visualization, J.R., M.K., A.H. and M.H.; supervision, H.P. and M.G.; project administration, H.P. and M.G.; funding acquisition, H.P. and M.G. All authors have read and agreed to the published version of the manuscript.

Funding

This research was funded by the German Research Foundation, DFG project number 407352905.

Institutional Review Board Statement

Not applicable.

Informed Consent Statement

Not applicable.

Data Availability Statement

Data available on request due to restrictions eg privacy or ethical.

Acknowledgments

The authors would like to thank Thomas Beckert for his laboratory support. Open Access Funding by the Publication Fund of the Technische Universität Dresden.

Conflicts of Interest

The authors declare no conflict of interest.

References

  1. Hufenbach, W.; Jaschniski, J.; Weber, T.; Weck, D. Numerical and experimental investigations on HYLITE sandwich sheets as an alternative sheet metal. Arch. Civ. Mech. Eng. 2008, 8, 67–80. [Google Scholar] [CrossRef]
  2. Ding, Z.; Wang, H.; Luo, J.; Li, N. A review on forming technologies of fibre metal laminates. Int. J. Lightweight Mater. Manuf. 2021, 4, 110–126. [Google Scholar] [CrossRef]
  3. ThyssenKrupp Steel Europe AG. BONDAL® Composite Material with Structure-Borne Sound Damping Properties. Available online: https://www.thyssenkrupp-steel.com/en/products/composite-material/overview-composite-material.html (accessed on 3 March 2021).
  4. 3A Composites GmbH. ALUCOBOND® for Transport and Industry. Available online: https://alucobond.com/alucobond-technical-data.html (accessed on 3 March 2021).
  5. Harhash, M.; Sokolova, O.; Carradò, A.; Palkowski, H. Mechanical properties and forming behaviour of laminated steel/polymer sandwich systems with local inlays-Part 1. Compos. Struct. 2014, 118, 112–120. [Google Scholar] [CrossRef]
  6. Kuhtz, M.; Buschner, N.; Henseler, T.; Hornig, A.; Klaerner, M.; Ullmann, M.; Jäger, H.; Kroll, L.; Kawalla, R. An experimental study on the bending response of multi-layered fibre-metal-laminates. J. Compos. Mater. 2019, 53, 2579–2591. [Google Scholar] [CrossRef] [Green Version]
  7. Harhash, M.; Kuhtz, M.; Richter, J.; Hornig, A.; Gude, M.; Palkowski, H. Trigger geometry influencing the failure modes in steel/polymer/steel sandwich crashboxes: Experimental and numerical evaluation. Compos. Struct. 2021, 262, 113619. [Google Scholar] [CrossRef]
  8. Ning, H.; Li, Y.; Hu, N. Improvement of interlaminar mechanical properties of CARALL based on nanofiller interface reinforcement and other fabrication techniques. In Proceedings of the 13th International Conference on Fracture, Beijing, China, 16–21 June 2013; pp. 1–11. [Google Scholar]
  9. Manikandan, P.; Chai, G.B. Mode-I Metal-Composite Interface Fracture Testing for Fibre Metal Laminates. J. Adv. Mater. Sci. Eng. 2018, 2018, 4572989. [Google Scholar] [CrossRef] [Green Version]
  10. Linde, P.; Pleitner, J.; de Boer, H.; Sinke, J. Numerical and experimental simulation of damage behaviour of fibre metal laminates. In Proceedings of the ICAS 2004-24th International Congress of the Aeronautical Sciences, Yokohama, Japan, 29 August–3 September 2004; pp. 1–9. [Google Scholar]
  11. Hader-Kregl, L.; Wallner, G.M.; Kralovec, C.; Eyßell, C. Effect of inter-plies on the short beam shear delamination of steel/composite hybrid laminates. J. Adhes. 2019, 95, 1088–1100. [Google Scholar] [CrossRef]
  12. Uzay, C.; Bayramoglu, M.; Boztepe, M.H.; Necdet, G. Adhesion Surface Bonding Capability of Different Metal Sheets for Fiber Metal Laminate (FML) Applications. In Proceedings of the 1st International Mediterranean Science and Engineering Congress (IMSEC 2016), Adana, Turkey, 26–28 October 2016; pp. 1–9. [Google Scholar]
  13. Abdullah, M.R.; Prawoto, Y.; Cantwell, W.J. Interfacial fracture of the fibre-metal laminates based on fibre reinforced thermoplastics. Mater. Des. 2015, 66, 446–452. [Google Scholar] [CrossRef]
  14. Guillen, J.F.; Cantwell, W.J. The influence of cooling rate on the fracture properties of a glass reiforced/nylon fiber-metal laminate. Polym. Compos. 2002, 23, 839–851. [Google Scholar] [CrossRef]
  15. ASTM D 5379. Test Method for Shear Properties of Composite Materials by the V-Notched Beam Method; ASTM International: West Conshohocken, PA, USA, 2019. [Google Scholar]
  16. ASTM D 5528. Test Method for Mode I Interlaminar Fracture Toughness of Unidirectional Fiber-Reinforced Polymer Matrix Composites; ASTM International: West Conshohocken, PA, USA, 2013. [Google Scholar]
  17. ASTM D 7291. Test Method for Through-Thickness Flatwise Tensile Strength and Elastic Modulus of a Fiber-Reinforced Polymer Matrix Composite Material; ASTM International: West Conshohocken, PA, USA, 2015. [Google Scholar]
  18. Ostapiuk, M.; Bieniaś, J.; Surowska, B. Analysis of the bending and failure of fiber metal laminates based on glass and carbon fibers. Sci. Eng. Compos. Mater. 2018, 25, 1095–1106. [Google Scholar] [CrossRef]
  19. Wollmann, T.; Hahn, M.; Wiedemann, S.; Zeiser, A.; Jaschinski, J.; Modler, N.; Ben Khalifa, N.; Meißen, F.; Paul, C. Thermoplastic fibre metal laminates: Stiffness properties and forming behaviour by means of deep drawing. Arch. Civ. Mech. Eng. 2018, 18, 442–450. [Google Scholar] [CrossRef]
  20. Loutas, T.; Tsokanas, P.; Kostopoulos, V.; Nijhuis, P.; van den Brink, W.M. Mode I fracture toughness of asymmetric metal-composite adhesive joints. Mater. Today Proc. 2021, 34, 250–259. [Google Scholar] [CrossRef] [Green Version]
  21. Boeman, R.G.; Erdman, D.L.; Klett, L.B.; Lomax, R.D. A Practical Test Method for Mode I Fracture Toughness of Adhesive Joints with Dissimilar Substrates. In Proceedings of the SAMPE-ACCE-DOE Advanced Composites Conference, Detroit, MI, USA, 27–28 September 1999; pp. 1–9. [Google Scholar]
  22. Yousefi Kanani, A.; Green, S.; Hou, X.; Ye, J. Hybrid and adhesively bonded joints with dissimilar adherends: A critical review. J. Adhes. Sci. Technol. 2020. [Google Scholar] [CrossRef]
  23. Kuhtz, M.; Hornig, A.; Gude, M.; Jäger, H. A method to control delaminations in composites for adjusted energy dissipation characteristics. Mater. Des. 2017, 123, 103–111. [Google Scholar] [CrossRef]
  24. Tsartsaris, N.; Meo, M.; Dolce, F.; Polimeno, U.; Guida, M.; Marulo, F. Low-velocity impact behavior of fiber metal laminates. J. Compos. Mater. 2011, 45, 803–814. [Google Scholar] [CrossRef]
  25. Dogan, F.; Hadavinia, H.; Donchev, T.; Bhonge, P. Delamination of impacted composite structures by cohesive zone interface elements and tiebreak contact. Cent. Eur. J. Eng. 2012, 2, 612–626. [Google Scholar] [CrossRef] [Green Version]
  26. DIN EN 10346:2009-07. Continuously Hot-Dip Coated Steel Flat Products-Technical Delivery Conditions; German Version; Beuth Verlag GmbH: Berlin, Germany, 2009. [Google Scholar]
  27. Harhash, M. Forming Behaviour of Multilayer Metal/Polymer/Metal Systems. Ph.D. Thesis, TU Clausthal, Clausthal-Zellerfeld, Germany, 2017. [Google Scholar]
  28. Gajewski, T.; Garbowski, T. Mixed experimental/numerical methods applied for concrete parameters estimation. In Recent Advances in Computational Mechanics, Proceedings of the 20th International Conference on Computer Methods in Mechanics (CMM2013), Poznań, Poland, 27–31 August 2013; Łodygowski, T., Rakowski, J., Litewka, P., Eds.; CRC Press/Balkema: Leiden, The Netherlands, 2014; pp. 293–301. ISBN 978-1-138-02482-3. [Google Scholar]
  29. Garbowski, T.; Maier, G.; Novati, G. On calibration of orthotropic elastic-plastic constitutive models for paper foils by biaxial tests and inverse analyses. Struct. Multidisc. Optim. 2012, 46, 111–128. [Google Scholar] [CrossRef] [Green Version]
Figure 1. Adhesive failure in an MPM crashbox between polymer blend and steel sheet after a crash test.
Metals 11 00818 g001
Figure 2. Numerical-experimental approach to determine the interface properties of high-performance metal-polymer interface.
Metals 11 00818 g002
Figure 3. Layup and manufacturing of the MPM sandwich with adhesive pre-crack.
Metals 11 00818 g003
Figure 4. (a) Depth profile of the steel scraper (roller) used to distribute the adhesive agent, and (b) cross-sectional micrograph showing the thickness of the adhesive agent.
Metals 11 00818 g004
Figure 5. Schematic force-displacement and delamination propagation-displacement curve to determine the resistance curves R for mode I delamination.
Metals 11 00818 g005
Figure 6. Development approach of the DCB specimen design for MPM sandwich in configurations: (a) 1, (b) 2, (c) 3, (d) 4 and (e) 5.
Metals 11 00818 g006
Figure 7. Evaluation of the crack propagation with Software ARAMIS.
Metals 11 00818 g007
Figure 8. Comparison of experimental determined R-curve and cumulative R-curve for specimen 1.
Metals 11 00818 g008
Figure 9. (a) Force-displacement and crack propagation-displacement curves and (b) R-curves, for three exemplary specimens; colored rectangles for specimen 1.
Metals 11 00818 g009
Figure 10. Failure patterns of the metal–polymer-interfaces after DCB-test for: (a) specimen 1, (b) specimen 2 and (c) specimen 3.
Metals 11 00818 g010
Figure 11. Simulation models of MPM specimens with adhesive crack propagation.
Metals 11 00818 g011
Figure 12. Influence of the critical energy release rate in mode I on the (a) force-displacement and (b) crack propagation-displacement behavior, for T = 55 MPa.
Metals 11 00818 g012
Figure 13. Influence of the normal strength T on the (a) force-displacement, (b) crack propagation-displacement and (c) plasticity behavior of the polymer core, for GIC = 1.8 N/mm.
Metals 11 00818 g013aMetals 11 00818 g013b
Figure 14. Comparison of the (a) force-displacement-curves and (b) crack propagation-displacement-curves, between experiment and simulation.
Metals 11 00818 g014
Table 1. Chemical composition of the steel HCT500X (1.0939) according to DIN EN 10346:2009 [26].
ElementC, max.Si, max.Mn, max.P, max.S, max.Al, totalCr + Mo, max.Nb + Ti, max.V, max.B, max.
Wt. %0.140.82.00.0800.015≤2.001.000.150.200.005
Table 2. Properties of the adhesive agent, Köratac FL201.
PropertyValueUnit
Layer thickness, wet35µm
Layer thickness, dry7–15µm
Peak metal temperature216–241°C
Fraction of solid material30.9wt. %
Fraction of dissolvent69.1wt. %
Table 3. Material card parameters for the cohesive elements representing the MPM interface before recalibration.
*MAT_138/*MAT_COHESIVE_MIXED_MODE for MPM Interface before Recalibration
ROENETGICGIICTS
g/cm3GPa/mmGPa/mmN/mmN/mmMPaMPa
1.23001003580100
RO—Density, EN—Normal cohesive stiffness, ET—Shear cohesive stiffness, GIC—Critical energy release rate mode I, GIIC—Critical energy release rate mode II, T—Normal cohesive strength, S—Shear cohesive strength.
Table 4. Material card parameters for the cohesive elements with MAT_138 in the simulation model in LS-DYNA representing the MPM interface after recalibration.
*MAT_138/*MAT_COHESIVE_MIXED_MODE for MPM Interface after Recalibration
ROENETGICGIICTS
g/cm3GPa/mmGPa/mmN/mmN/mmMPaMPa
1.23001001.8555100
RO—Density, EN—Normal cohesive stiffness, ET—Shear cohesive stiffness, GIC—Critical energy release rate mode I, GIIC—Critical energy release rate mode II, T—Normal cohesive strength, S—Shear cohesive strength.
Publisher’s Note: MDPI stays neutral with regard to jurisdictional claims in published maps and institutional affiliations.