Article

Improving the Wear Resistance of Ledeburitic Tool Steels by a Combination of Semi-Solid and Cryogenic Processing

1
Faculty of Mechanical Engineering, University of West Bohemia, Univerzitní 8, CZ-301 00 Pilsen, Czech Republic
2
COMTES FHT a.s., Průmyslová 995, CZ-334 41 Dobřany, Czech Republic
*
Author to whom correspondence should be addressed.
Metals 2022, 12(11), 1869; https://doi.org/10.3390/met12111869
Submission received: 30 September 2022 / Revised: 27 October 2022 / Accepted: 30 October 2022 / Published: 2 November 2022
(This article belongs to the Special Issue Semi-solid Metal Processing in Combination with Other Technologies)

Abstract

:
Ledeburitic tool steel X210Cr12 was processed by passing through a semi-solid state with subsequent forming on a hydraulic press, thus achieving a fine-grained martensitic matrix, uniformly dispersed fine precipitates, and removal of sharp-edged primary chromium carbides. The hardness value was over 700 HV10. The decomposition of austenite and the promotion of further carbide precipitation were carried out by cryogenic treatment or a combination of cryogenic treatment and tempering. Transmission electron microscopy showed that tempering after cryogenic treatment also led to the precipitation of needle-like M3C carbide, unlike the previous regimes. Furthermore, after the combined treatment, the microstructures showed a significant wear resistance, which was detected both by a waterjet abrasive blast test and a laboratory pin on disk test. Both tests showed a significant increase in wear resistance compared to the initial condition and special high wear resistance steels, such as Hardox 450 and Hardox 600.

1. Introduction

Abrasive wear is one of the basic damage modes of machine parts and components. Therefore, new materials, processing methods, or surface treatments are constantly being sought to obtain materials with higher wear resistance. Mostly, materials with a higher fraction of uniformly dispersed fine carbides in a martensitic matrix with a small fraction of metastable retained austenite are being sought [1,2]. Such materials are used in a wide range of applications, such as mining, metallurgy, road building, drilling, and other industries. One particular application may be for the replaceable wear liners (side liners, apron liners, side/frame liners) in the chambers of various types of horizontal shaft impactors [3]. These liners need to be replaced frequently due to abrasive wear caused by the impact of stones, concrete, construction material, or other material in the crusher chamber and during the crushing of the material by blow bars. They are usually made of AR (abrasion resistant) steel plates, which are high-strength martensitic steels [3,4]. To ensure the highest possible wear resistance, new materials [5] and new heat or thermomechanical processing methods, such as direct quenching and redistribution [6] as well as new manufacturing technologies [7,8,9], are being investigated.
In metal matrix-carbide composites, the hardness of the matrix and carbides, their distribution and size, and the interface strength between the matrix and carbides are important. For wear-resistant alloys based on Fe–Cr–C hardfacings, the size of the precipitating carbides and their resulting brittleness is an issue. Martensitic steels exhibit good impact abrasion resistance but have lower abrasion resistance due to the absence of hard phase precipitates. Complex Fe–Cr-based hard metals alloyed with W, Nb, B, Si, and other alloying elements are suitable for use in two- and three-body abrasive environments [5].
Another option is using conventional, high-alloyed ledeburitic tool steels processed by semi-solid state transition technology, which leads to a very hard martensitic matrix with finely precipitated chromium carbides with sizes of about 100 nm [7,8,9,10,11]. Semi-solid processing is a forming technology in which the material is partially melted. Due to the high temperature, the sharp-edged chromium carbides, which significantly reduce the material’s toughness, are dissolved. These M7C3 carbides are formed in the eutectic reaction during cooling and are typical for ledeburitic types of steels [12]. Due to the presence of the melt and with the appropriate size and shape of the solid particles, the material exhibits thixotropic behavior, which allows the production of shape-complex parts in one forming step to form even hard-to-form materials and to use lower forming forces than in classic forming technologies [13,14,15,16]. After semi-solid processing, the microstructure consists of polyhedral austenite grains surrounded by a ledeburitic network [17,18]. The grain refinement, the network morphology, and the promotion of fine carbide precipitation can be influenced by the cooling parameters and the forming conditions [19].
Since the microstructure after semi-solid processing contains a high fraction of austenite, it is possible to further increase the wear resistance by cryogenic treatment. Its purpose is mainly to stabilize the martensite and eliminate retained austenite by cooling the steel below the Mf temperature. This temperature is usually below −100 °C for tool steels. Cryogenic treatment (DCT) can be defined as an add-on process for hardening and tempering steels. In this process, the material is frozen to a temperature close to that of liquid nitrogen (−196 °C). Another reason for DCT, but even more important, is the stabilization of the martensite, which is accompanied by the precipitation of finer dispersed carbides during the tempering process. Tempering generally follows immediately after DCT. This process increases wear resistance in most tool steels [20,21]. DCT leads to the decomposition of retained austenite to martensite during cooling to temperatures down to −130 °C. During freezing to lower temperatures, i.e., down to −196 °C, the primary martensite decomposes during a time-dependent transformation leading to the nucleation of numerous coherent nanocarbides. The newly formed carbides are considered to be the main contributor to the significant increase in wear resistance after cryogenic treatment [20,21,22,23]. A higher quantity of precipitated nanocarbides can be expected with a longer holding time at cryogenic temperature. Increased tool life due to DCT has recently been described for various machining and forming tools [22,23].
Most of the research works dealing with wear resistance discuss the problems of various types of materials produced by standard metallurgical methods as well as by powder metallurgy and subsequently processed by conventional methods, such as heat treatment. The works on semi-solid processing deal mainly with the influence of processing parameters on the thixotropic behavior of the material, production of shape-complex parts, and obtaining a structure without internal defects. A combination of thermomechanical processing with a transition through a semi-solid state followed by cryogenic treatment to obtain materials with higher wear resistance has not been described so far. Therefore, this paper discusses the effect of combined semi-solid and cryogenic processing on the development of structures and their influence on wear resistance.

2. Materials and Methods

The experimental program was conducted on X210Cr12 tool steel with 1.8%C, 12%Cr, 0.3%Mn, and 0.35%Si (Table 1). It is a ledeburitic steel with simple alloying without expensive alloying elements. The steel was supplied in the annealed condition, and the microstructure consisted of large sharp-edged chromium carbides and very fine cementite in a ferritic matrix (Figure 1a).
JMatPro (Sente Software Ltd., Guildford, UK), (Figure 1b) [24] was used to design suitable heating temperatures for the first experiments. The temperature of the start of liquid phase formation was determined to be 1247 °C. Complete melting of the material occurs at 1390 °C. The start of the formation of the austenitic phase was found at 722 °C. The dissolution temperature for all the carbides in the structure was also important and was found to be 1260 °C. For this steel, it was significant that the temperature interval between the solid and the liquid was 143 °C, giving a sufficiently wide temperature interval to obtain the necessary fraction of the liquid phase in the structure. Based on previous experience, the aim was to achieve approximately 30–40% liquid phase in the microstructure [11].

2.1. Semi-Solid Processing with Subsequent Thermomechanical Treatment

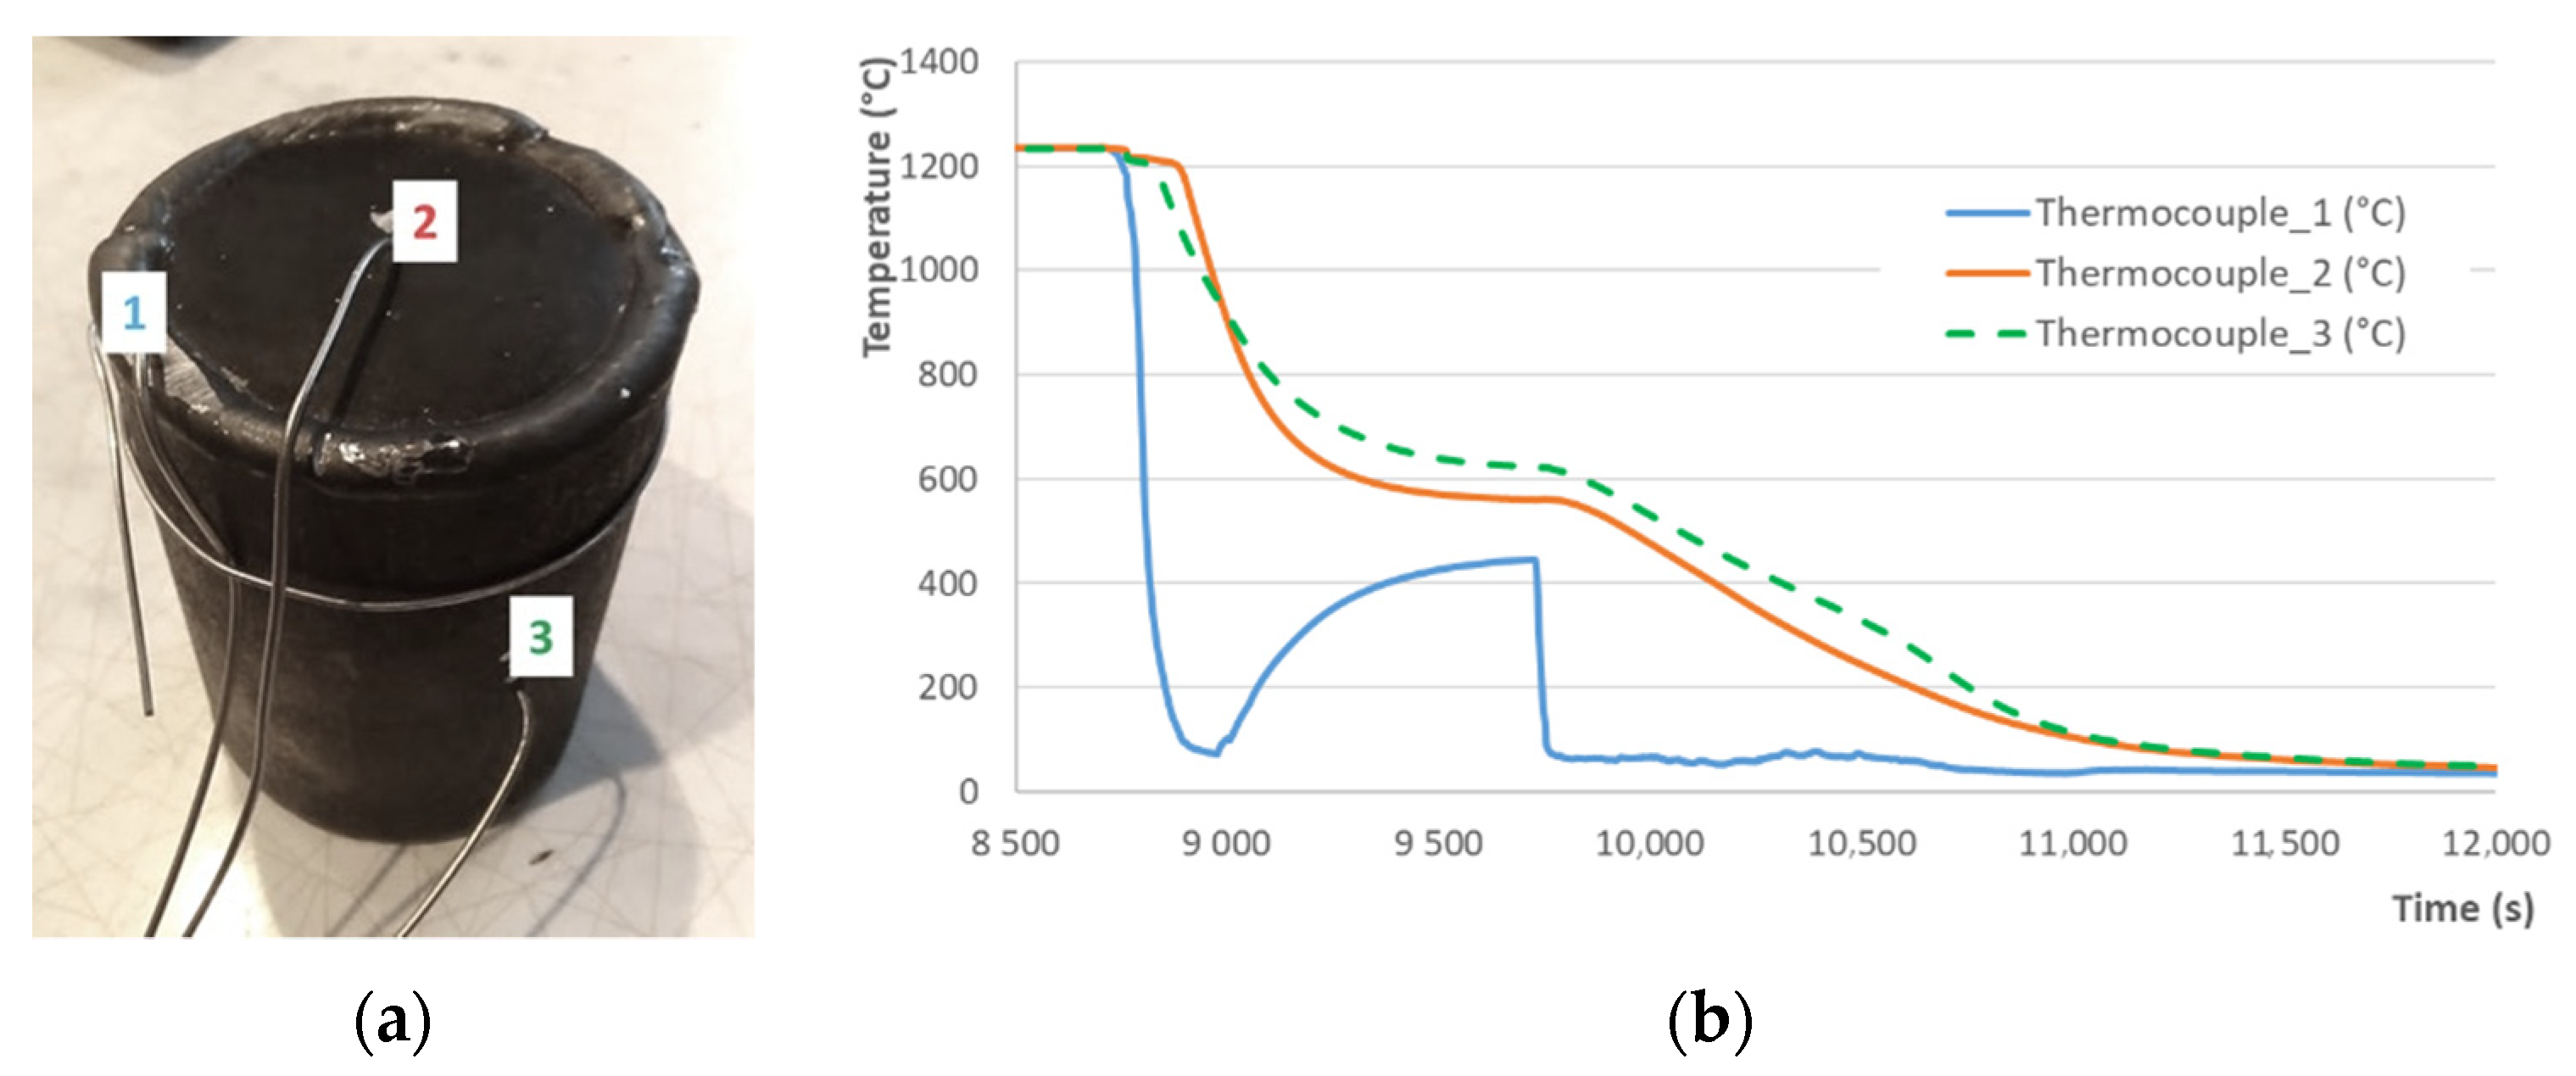
Semi-finished products with a diameter of 75 mm and a height of 105 mm were made from X210Cr12 and inserted into S235JR tubes with a melting temperature of 1400 °C and good formability. The ends of the tube were closed with caps of the same material and were welded around the circumference (Figure 2a). This container was created to safely handle the molten semi-finished product from the ledeburitic tool steel.
Since the tool steel semi-finished product is placed in a low-carbon steel container, other factors (heat transfer between the container and the semi-finished product, air gap, etc.) play an important role during heating and cooling that do not need to be taken into account in conventional heating and cooling without packaging. Therefore, to ensure that the desired temperature of the semi-finished product and a homogeneous temperature field distribution is achieved and the cooling rate during quenching in water is measured, the first semi-finished products were processed with K-type thermocouples attached. The thermocouples were fixed into the container wall (thermocouple 1) and the tool steel blank (thermocouples 2 and 3). The data obtained were then used to design appropriate processing parameters (Figure 2b).
Processing consisted of heating in a furnace at 1250 °C with a holding time of 60 min. The heating was carried out in an electric LAC resistance furnace without a protective atmosphere. Then, the sample was cooled in water for 35 s. This was followed by transfer to a second furnace at 1080 °C with a holding time of 30 min. to equilibrate the temperatures. This heating was included mainly due to the heating of the low-carbon steel container wall, which was very significantly cooled during the quenching in water. A total of 1080 °C is the forging temperature recommended by the material data sheet [25] for X210Cr12 steel. After the material is quenched from the semi-solid state, the microstructure is composed of polyhedral austenite grains and a ledeburitic network. The austenite content is over 90% [10,14,17,18].
Austenite is soft, and the ledeburitic network is very brittle. Therefore, it was necessary to fragment the mesh and distribute it evenly among the austenitic grains. To achieve higher wear resistance, it was further necessary to refine the austenitic grains, transform them into martensite, and promote secondary precipitation of fine carbides. This was performed by forging on a hydraulic press, where the insertion of the deformation in 3, 5, or 10 steps was tested (regimes: 3 × def., 5 × def., 10 × def.), (Table 2, Figure 3 and Figure 4a). The reduction size was 55 mm at each step, and the upsetting and elongation steps were alternated so that the semi-finished products were deformed on all sides.
After the deformation was completed, the semi-finished products were quenched in water.
After obtaining very fine microstructures, further possibilities were sought for increasing the fraction of very fine carbides, reducing the fraction of retained austenite, and increasing the toughness of the hard matrix. Two approaches were chosen. In the first one, only tempering at 300 °C for 2 h was used (Regime: Temp.). The temperature of 300 °C was chosen based on information from the material data sheets [26,27] and temperatures reported in the literature [28]. Since an attempt was made to reduce the very high hardness obtained after semi-solid processing, a temperature of 300 °C was used, which resulted in lower hardness values. In the other procedure, the effect of cryogenic treatment at −160 °C with a holding time of 24 h (Regime: Cryo) and the combination of cryogenic treatment and tempering at 300 °C with a holding time of 2 h (Regime: Cryo + Temp.) were tested (Table 2, Figure 4b).

2.2. Methods of Evaluation

The semi-finished products were heated in an electric chamber furnace without a protected atmosphere (LAC s.r.o., Židlochovice, Czech Republic). The semi-finished products were formed on a CKW 6000 hydraulic press with a force of 100 tons. Cryogenic treatment was carried out in a CES-CTC cryogenic box (C.E.S NV, Asse, Belgium), which allows controlled cooling and heating in the temperature range −170 °C to 60 °C. The cooling medium is liquid nitrogen, which is automatically dosed in the required amount by means of a PID controller. The internal dimensions of the cryogenic box are 500 mm × 720 mm × 450 mm, the maximum load capacity of the box is 150 kg.
The processed semi-finished products were cut by a water jet. The microstructures were evaluated by light microscope (SM) and scanning electron microscopy (SEM) on Tescan VEGA 3 microscopes (Tescan, Brno, Czech Republic), and a Zeiss Crossbeam 340-47-44 (Carl Zeiss, Oberkochen, Germany) microscope was also used for more detailed analyses. In addition, hardness measurements were performed according to Vickers HV10 (Wollpert Wilson Instruments, Aachen, Germany). XRD measurements were performed in a Panalytical X’Pert PRO diffractometer (Malvern Panalytical Ltd., Malvern, UK) with Co Kα radiation (lambda = 0.1789 nm) and an X’celerator detector. Measurements were carried out using a divergent beam in the Bragg-Brentano (theta/2theta) vertical geometry. A beta filter was set in the incident beam to improve the signal/background ratio. The measurements were taken with a line focus in the range 30–130 degrees, with a step of 0.05 deg. Phase identification was determined by X’Pert HighScore Plus (Malvern Panalytical Ltd., Malvern, UK) with PDF-4 database and Rietveld refinement by means of Topas V3 (Bruker, Billerica, MA, USA).
Transmission electron microscopy (TEM) on a JEOL 200 CX microscope (JOEL Ltd., Tokyo, Japan) with an accelerating voltage of 200 kV was used for a detailed analysis of the structures. Electron diffraction (ED) was used for phase identification. Single-stage carbon replicas were prepared by grinding on a set of sandpapers and mechanical polishing in diamond suspensions. The microstructure was developed by chemical etching in COR solution. A thin amorphous carbon layer was deposited on the metallographically prepared surface, which was released from the surface by anodic dissolution in 3% Nital at 20 V. The thin foils were thinned from a 1.5 mm thick slice by mechanical grinding on SiC papers to a thickness of about 100 μm. Samples with a diameter of 3 mm were stamped from the slice and prepared to their final thickness by electrodeposition on a TenuPol 5 device (Struers LLC, Cleveland, OH, USA) in 700 mL CH3OH + 300 mL HNO3, temperature −20 °C and voltage 15 V.
The WJ2030-2Z-Cobra-PJ60° (water jet cutting machine, from PTV, Hostivice, Czech Republic) was used for the blasting test. The weight loss was evaluated using a KERN EMB 600-2 (Kern and Sohn GmbH, Balingen, Germany) precision laboratory scale with an accuracy of 2 hundredths of a gram. In addition, pin-on-disc tests were performed on equipment from CSM Instruments (CSM Instruments, Peseux, Switzerland).

3. Results and Discussion

3.1. Effect of the Number of Deformation Steps on Grain Refinement

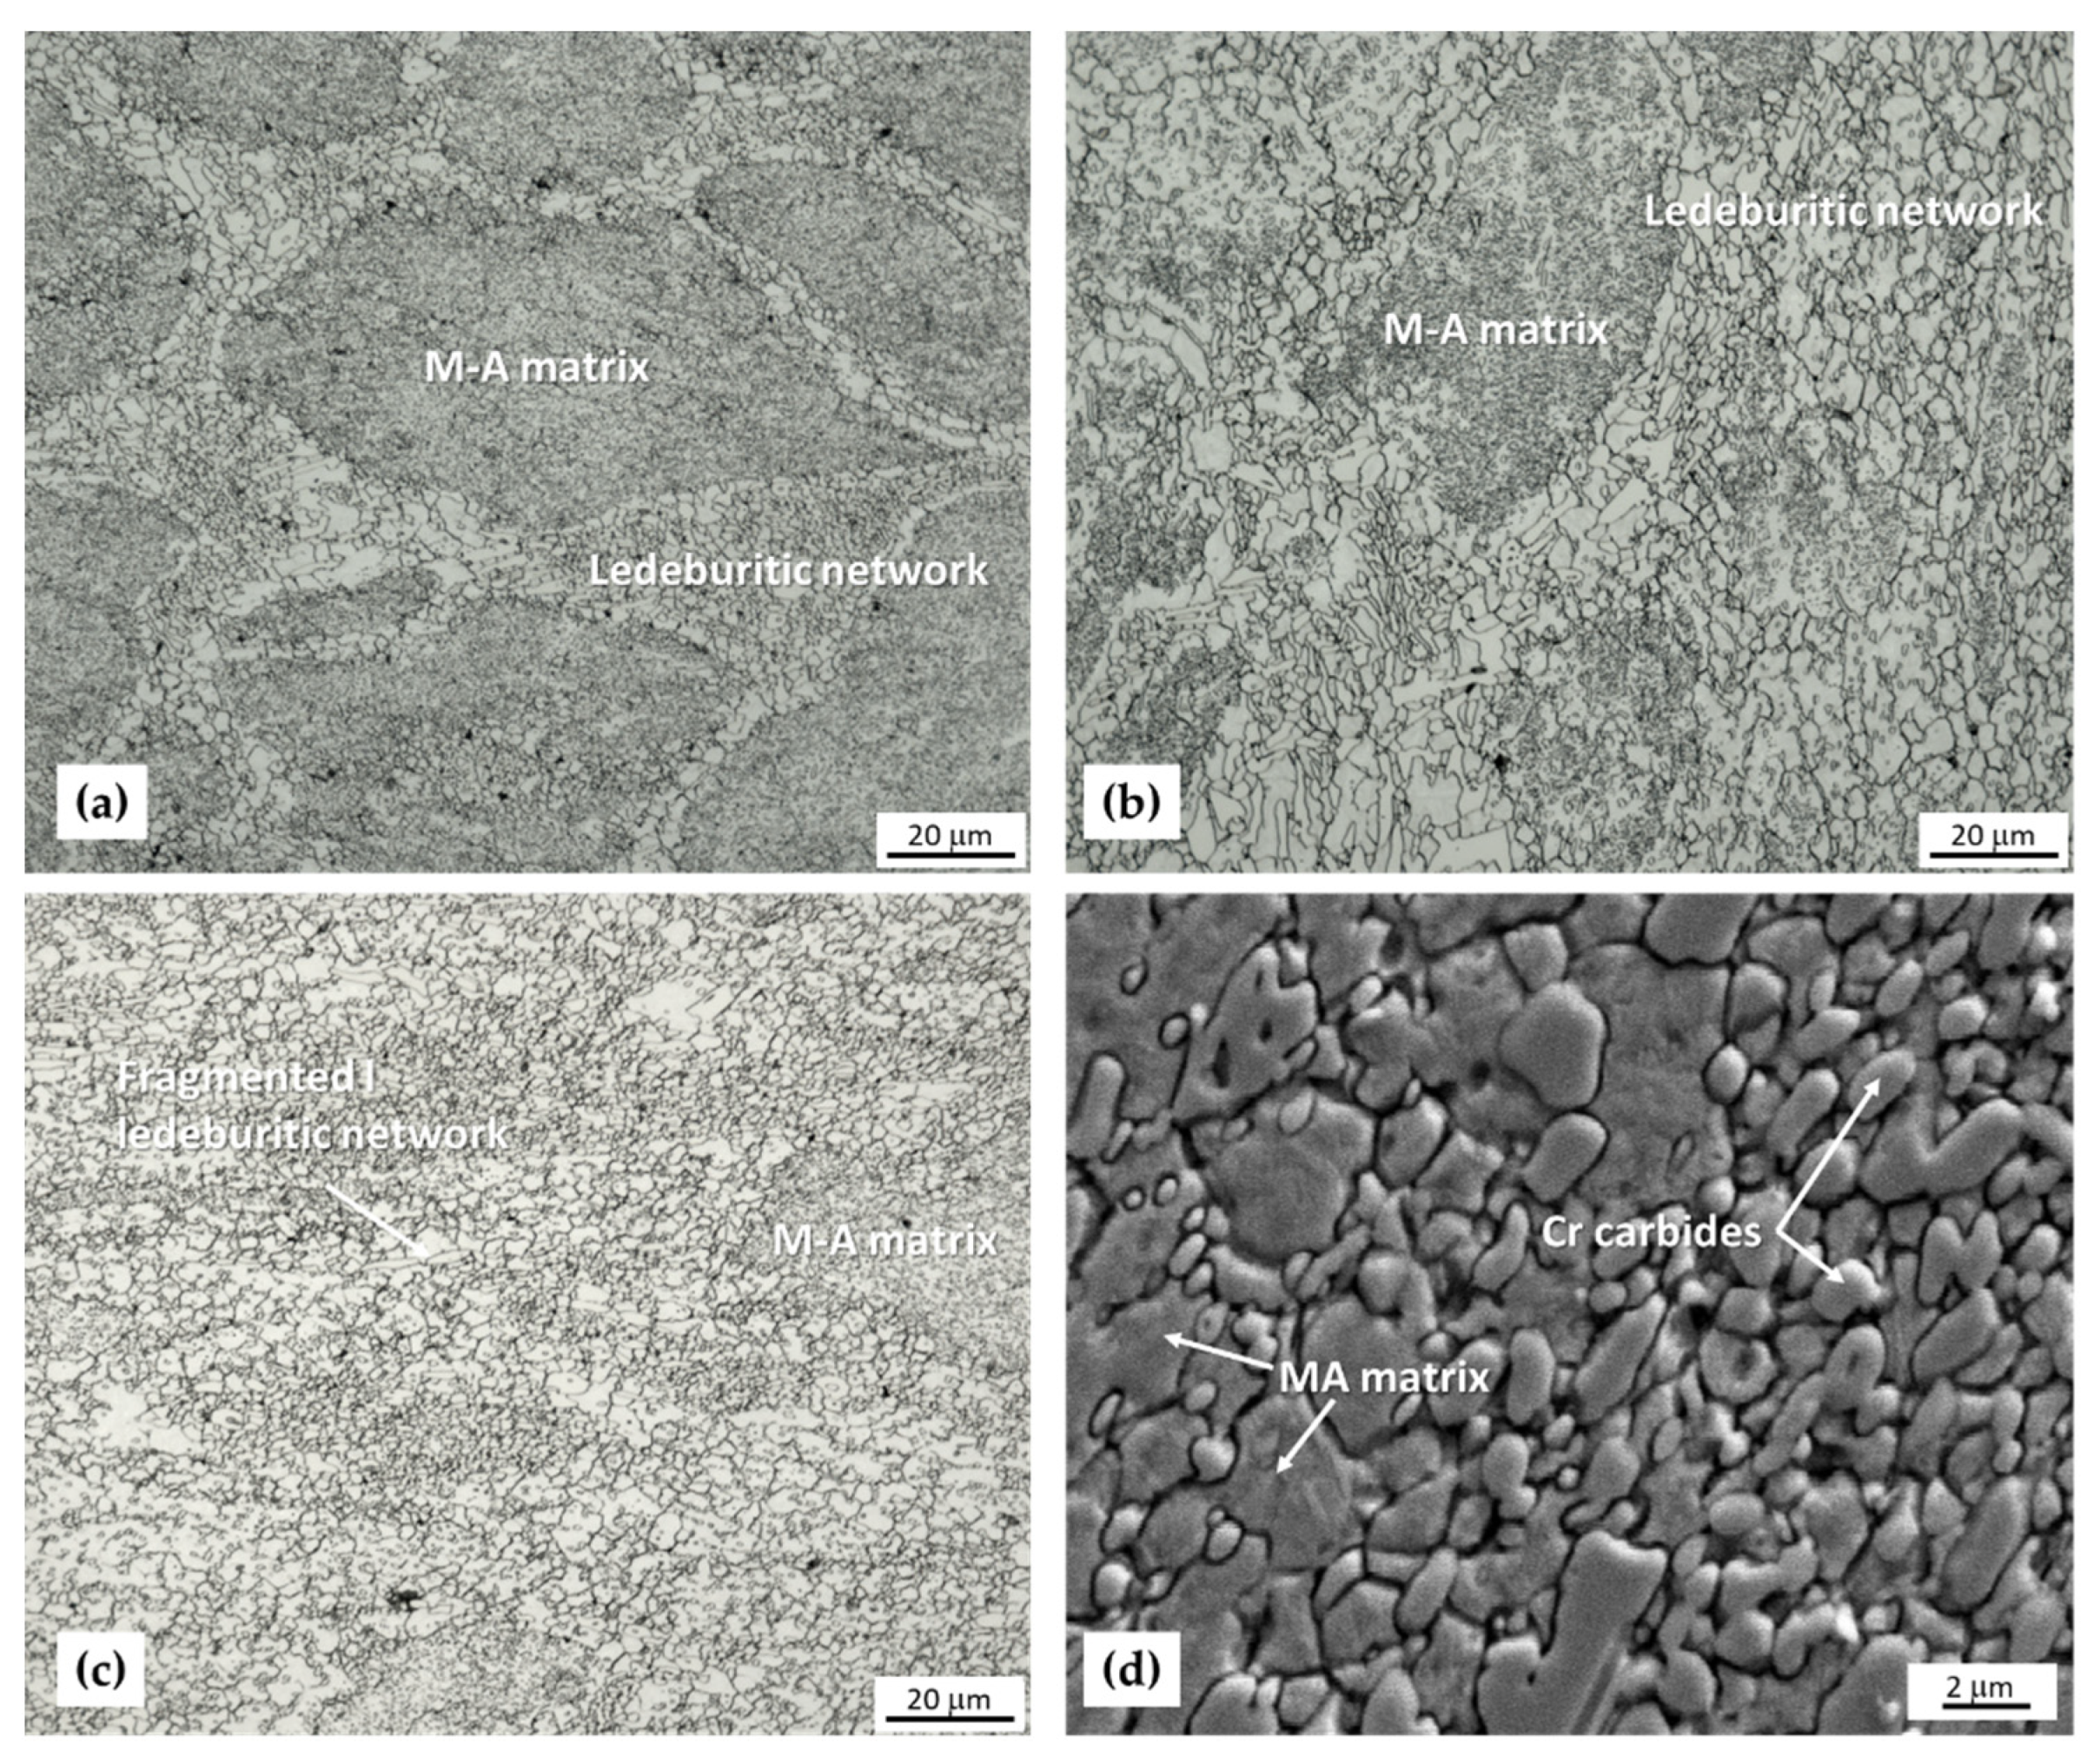
After processing with a transition through the semi-solid state with three deformation steps (Regime: 3 × def.), a microstructure with visible boundaries of the previous austenitic grains with a ledeburitic network was obtained. Although this mesh still bounded the original austenitic grains, it was evident that it had been severely fractured and, in some places, had begun to spheroidize. Very fine secondary carbides were precipitated within the austenitic grains formed by the transition through the semi-solid state. In some grains, the beginning of recrystallization and substructure formation was also detected (Figure 5a). The size of these subgrains was 6.2 ± 3.5 μm. A very high hardness of 748 HV10 was obtained.
With five deformation steps (Regime: 5 × def.), regions with a significantly fine grain size of 4.6 ± 2.1 μm and a very fine carbide precipitation were detected in the microstructure (Figure 5b). However, large areas of the original ledeburitic network were still seen. The hardness value was 633 HV10. X-ray diffraction analysis showed that 60% austenite was still present in the structure.
With ten deformation steps, a very fine microstructure was obtained, which consisted of a martensitic-austenitic matrix with a grain size of 1.4 ± 0.5 μm and fine secondary precipitates (Figure 5c,d). The proportion of austenite decreased to 41%. The hardness value reached up to 738 HV10.
Similar results were found in [19], where deformation was applied in the temperature interval from 1100 to 1000 °C. There was also significant fragmentation of the ledeburitic network, recrystallization, and substructure formation in the original austenitic grains. However, due to the insertion of only three deformation steps, such a significant refinement of the structures was not achieved.

3.2. Tempering

Since a high hardness value of 738 HV10 was obtained after the 10-deformation step regime, which was due to the formation of a large proportion of martensite, it was necessary to carry out tempering to increase the toughness of the material. At the same time, an effort was made to reduce the austenite content, which was still 40% in the structure, and to promote the further formation of very fine chromium carbides.
After tempering at 300 °C/2 h, the matrix showed the character of a tempered structure (Figure 6). The hardness value decreased from 738 HV10 to 663 HV10. The fraction of retained austenite only decreased to 36%.

3.3. Cryogenic Treatment

The primary objective of cryogenic processing was to reduce the austenite content by undercooling below its Ms temperature. Especially for tool steels, cryogenic treatment is accompanied by a positive effect in terms of precipitation of fine dispersed carbides, which cannot be achieved during the standard tempering process. Cryogenic treatment is often used because of the increase in wear resistance. This effect has been published and demonstrated in the literature [20,22,23,29]. Cryogenic treatment was carried out in special furnaces designed specifically for this treatment.
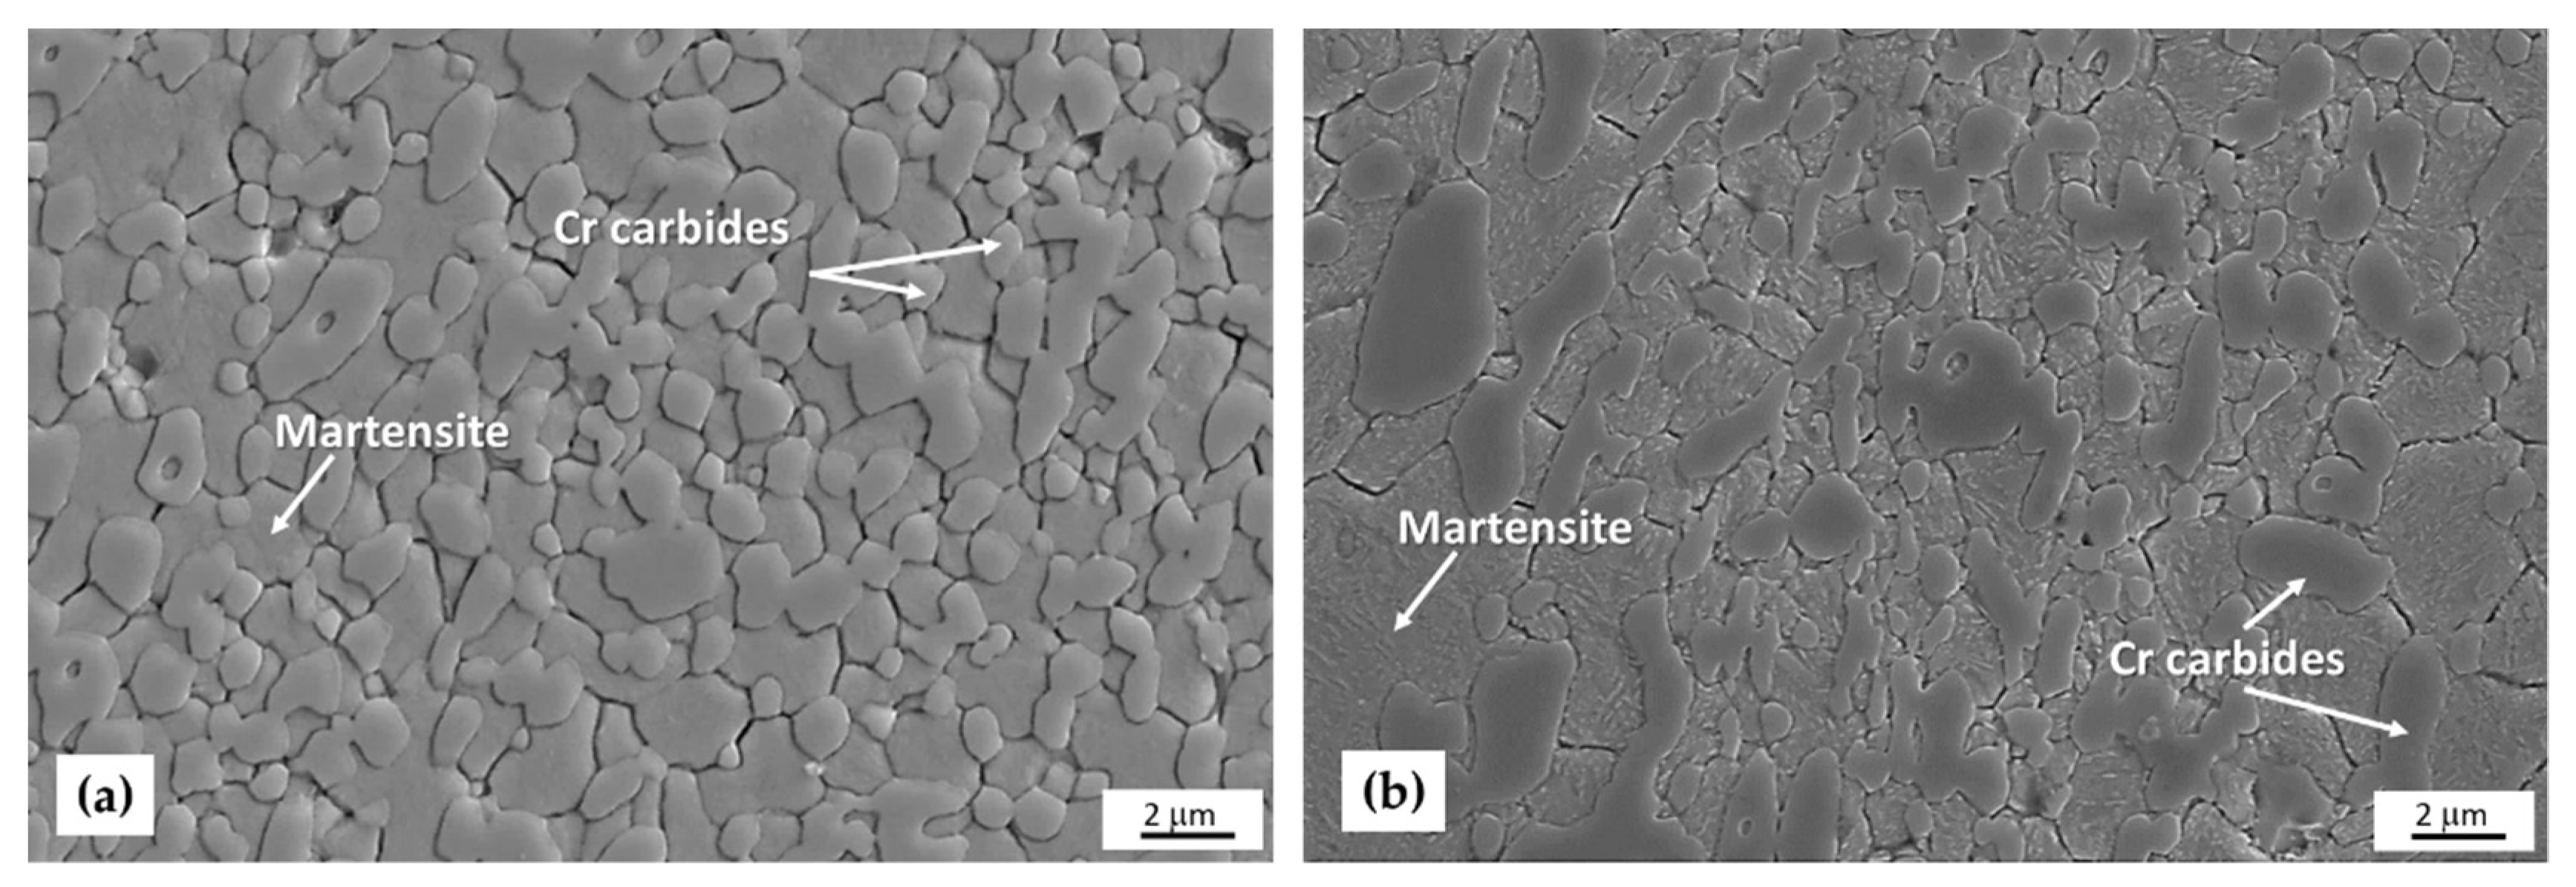
When only cryogenic treatment at −160°C/24 h was applied after the 10 × def. regime, a significant increase in hardness value up to 905 HV10 was observed (Figure 7a). X-ray diffraction analysis confirmed that the austenite content in the structure decreased from the original 41% to 22%. After cryogenic processing, the retained austenite is transformed into martensite, and secondary carbides are precipitated. During cryogenic treatment, the precipitation of secondary carbide (Fe, Cr)23C6 reduces the chromium and carbon content in the austenite, thereby decreasing its stability. This leads to an increase in the martensite start temperature (Ms) of the austenitic matrix, allowing transformation to martensite. Furthermore, at −196 °C, the retained austenite satisfies the thermodynamic conditions for transformation to martensite [28,30]. All this explains the significant reduction in the fraction of retained austenite after cryogenic treatment.
A further reduction in the austenite fraction was achieved by tempering at 300 °C/2 h. There was also a general tempering of the martensitic structure (Figure 7b), which was reflected by a decrease in the hardness value to 844 HV10. The grain size in both cases was 1.4 μm.

3.4. Transmission Electron Microscopy

Since cryogenic treatment and subsequent tempering results in the formation of additional fine precipitates that play a role in increasing wear resistance, it is necessary to determine their type, quantity, and size. Because these particles are very small, this analysis was carried out on a transmission electron microscope. In addition, a statistical evaluation of the secondary excluded particles was also performed (Equations (1)–(4)).
Individual statistical parameters were evaluated based on the following equations:
Medium   particle   size :         D = t o t a l   p a r t i c l e   l e n g t h n u m b e r   o f   p a r t i c l e s       ( m )
Number   of   particles   per   unit   area :         N A = n u m b e r   o f   p a r t i c l e s a n a l y z e d   a r e a       ( m 2 )
Number   of   particles   per   unit   volume :         N V = N A t       ( m 3 ) ( t replica thickness )
The   mean   particle   distance   of   the   particles :         L = 1 N V · D   ( m )

3.4.1. Structure after Cryogenic Treatment −160 °C/24 h

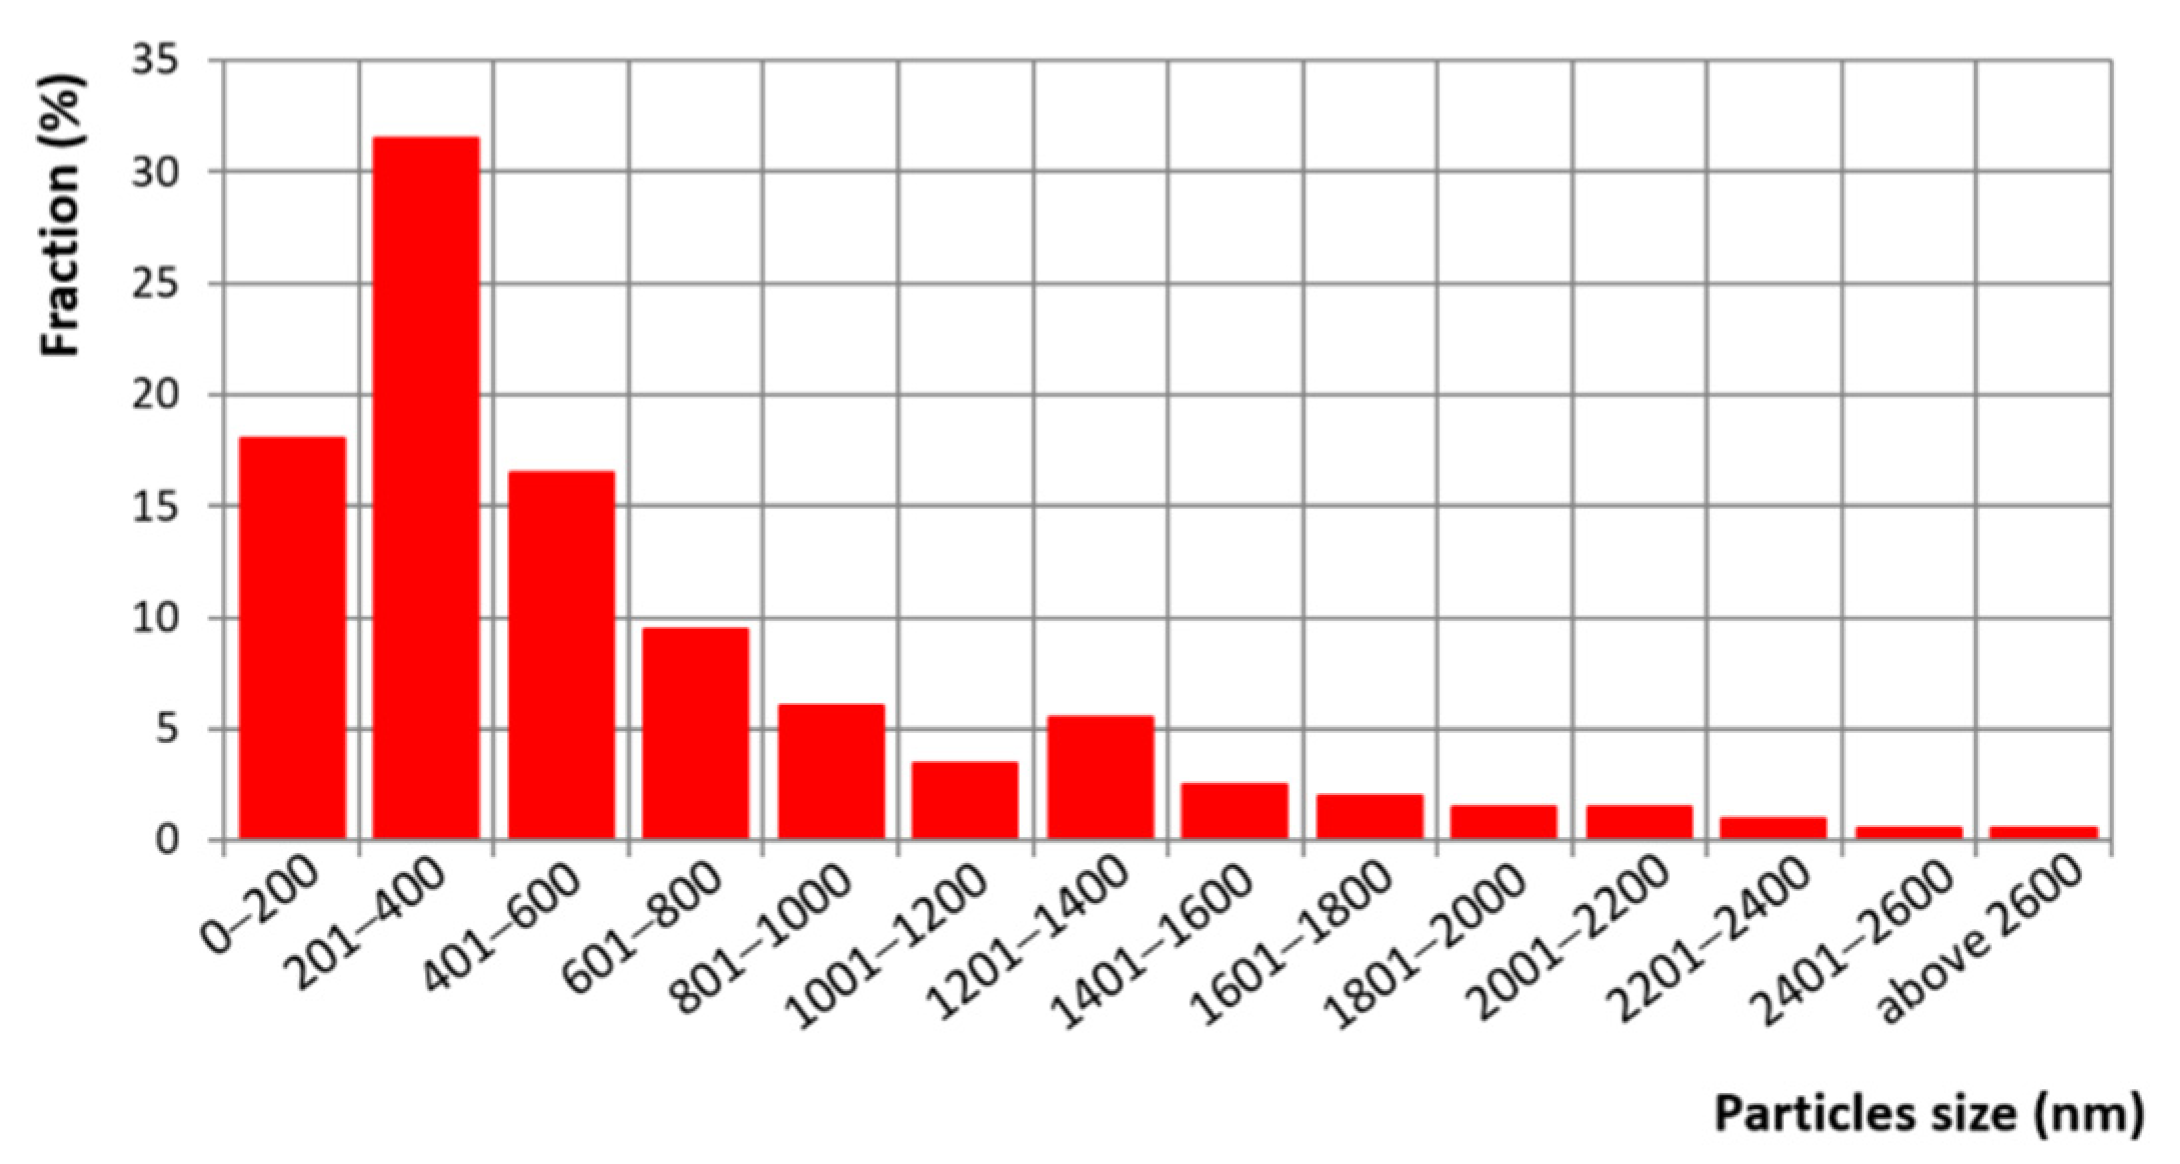
Analysis using carbon extraction replicas confirmed strong precipitation of particles with different morphologies and sizes (Figure 8). Two types of regions were observed, differing mainly in particle character. These were areas with particles of a regular geometric shape with a high density of precipitates and areas where large particles of irregular shape were precipitated. Due to the size of the particles, there was low extraction into the replicas. In most cases, the presence of particles can be predicted from the indentation left in the replica. Based on statistical analysis, it can be concluded that the particle size range was very wide, ranging from 15 to 4000 nm (Figure 9, Table 3). The histogram of the particle distribution shows a wide interval. One maximum is between 200 and 400 nm and the other between 1200 and 1400 nm.
Based on the solution of the diffraction spectra, the large irregular shaped particles were identified by electron diffraction as M7C3 carbide. On the contrary, regular geometric-shaped particles were identified as M23C6 carbide (Figure 7).
Structural analysis using the thin film method confirmed that the matrix is composed of martensite with very fine needles with an increased density of dislocations or twins (Figure 10a). TEM analysis also confirmed the presence of retained austenite, which was detected between the martensite needles (Figure 10b). Larger irregularly shaped particles were identified as M7C3 carbide. In these particles, an increased density of stacking faults was usually observed, which was also reflected in the character of the diffraction points, where deformation in the form of “streaks” was detected due to lattice stresses (Figure 10b and Figure 11). Smaller geometric-shaped particles were identified as M23C6 carbide (Figure 10b).

3.4.2. Structure after Cryogenic Treatment −160 °C/24 h and Tempering 300 °C/2 h

Next, the sample was analyzed after cryogenic treatment and tempering at 300 °C for 2 h. Structural analysis using carbon extraction replicates showed more significant precipitation than the sample without tempering after cryogen treatment. In addition to large irregular-shaped particles and smaller regular-shaped particles, fine needle-like particles were observed in the matrix, which were mainly precipitated at the boundaries of the martensite laths (Figure 12). The density of the precipitated needle-like particles showed moderate heterogeneity. Large clusters of these particles with different orientations were observed (Figure 12a) or individual needles with precise geometrical orientations (Figure 12b).
The size of large irregularly shaped particles and regular geometrically shaped particles ranged from 15 to 2500 nm (Figure 13a). This interval is related to the particles that were observed only in the TEM, because particles as small as about 7 μm could be detected in the light microscope. The size of the needle-like particles ranged from 9 to 500 nm (Figure 13b). Compared to the sample with cryogenic treatment only, the density of the precipitates is an order of magnitude higher, and the mean distance between particles is an order of magnitude lower (Table 3 and Table 4). Electron diffraction confirmed the presence of carbides M23C6 (Figure 14a), M7C3 (Figure 14b), and M3C (Figure 15b).
The thin-film method confirmed that the matrix is composed of tempered martensite with very fine lamellae and an increased density of dislocations or twins (Figure 14b). Larger irregularly shaped particles were identified as M7C3 carbide. Fine needle-like particles were observed in the matrix and were identified as M3C carbide.

3.5. Wear Tests

Materials used in abrasive wear conditions are usually selected according to their microstructure and hardness. However, increased wear resistance can also be achieved by less studied factors. These are grain size, morphology, carbide size, and distribution. Therefore, it is important to subject semi-finished products produced by semi-solid state transition forming technology not only to detailed microstructural evaluation after various processing regimes but also to evaluate them in terms of abrasive wear resistance.

3.5.1. Sandblast Test

The sandblast test was designed specifically for this material under shop conditions and on commonly used equipment. This type of wear could occur when the material is used as a protective plate, e.g., in crusher chambers, tumbling machines, etc.
The sandblast test was carried out on waterjet cutting equipment. A combination of waterjet and abrasive nozzle was used for testing (Figure 16a). The abrasive used was ClassicCut 80, garnet-GMA. The 35 mm × 40 mm specimens were ground to a roughness of 0.8 Ra before abrasion. The test was always performed on two samples (Figure 16b). The weight before and after the test was measured on a laboratory balance. For each sandblast test, 20 g of abrasive was used, and the blasting was carried out for 200 s from a height of 100 mm with a pressure of 4130 MPa.
In addition to the samples processed by the proposed procedures with the transition through the semi-solid state, the experiment was also supplemented with a baseline condition (Figure 16c) and with the condition after conventional heat treatment. The treatment consisted of oil quenching from 960 °C and tempering to 250 °C for 2 h. The processing parameters were selected based on data from the material data sheets [25,26,27]. The structure was composed of tempered martensite and chromium carbides. The hardness was 716 HV10 (Figure 17, Table 5). The sandblast test was also performed on Hardox 450 and Hardox 600 materials, which are currently used in the chambers of crushers and tumbling machines. These are high-quality martensitic steels with high wear resistance [31,32,33], (Table 5). They were tested as delivered with hardness values of 465 HV10 for Hardox 450 and 660 HV10 for Hardox 600 (Table 6).
The sandblast test showed a significant influence of the nature of the structure and the hardness value. The initial annealed condition with the lowest hardness value of 216 HV10 showed the highest weight loss of 1.73 g of the tested samples (Figure 16c). Even in the case of the conventionally processed sample, there was no reduction in weight loss, which was 1.75 g. Even the presence of large sharp-edged chromium carbides did not lead to better results.
Furthermore, the influence of the number of deformation steps and, therefore, the refinement of the structure was also significant. For the sample with 5 deformation steps, the weight loss was 1.54 g, and for the sample with 10 deformation steps, the measured weight loss decreased to 1.40 g. A further reduction in weight loss was found after applying the cryogenic treatment when the lowest weight loss was found to be 1.33 g. This was mainly due to a significant increase in the hardness value to 905 HV10, the breakdown of retained austenite in the structure, and the promotion of further precipitation of chromium carbides. For the specimens that were tempered after cryogenic treatment, there was an increase in weight loss to 1.61 g, which was due to the tempering of the martensitic structure, and neither further precipitation of chromium carbides nor the presence of another type of carbide led to an increase in sandblast resistance.
Compared to the Hardox 450 and Hardox 600 materials where the weight losses were 1.55 and 1.65 g, respectively, better results were obtained after processing with the transition through the semi-solid state, except for one case with tempering.

3.5.2. Pin-on-Disc Test

The standard pin-on-disc test was also used to determine wear resistance. The tests were carried out at room temperature. A ball with ø 6 mm (Al2O3) was used as a pin. Each processing mode was tested two times, and the resulting value is the average of these measurements. Wear area measurements were performed using a profilometer. The result is the average of eight measurements across the wear track. The testing was carried out on a high temperature tribometer from CSM Instruments.
The radius of the track was 1.5 mm, the applied load was 15 N, and the total distance of the track was 141.375 m, which corresponded to 15,000 cycles. The rotation speed was 240 rpm. The testing time was 1.02 h.
The wear rate was calculated after the test according to the following relation [36]:
W = V o l u m e   o f   w e a r   t r a c k   [ µ m 3 ] L o a d   [ N ] · T o t a l   d i s t a n c e   o f   t r a c k [ m ]
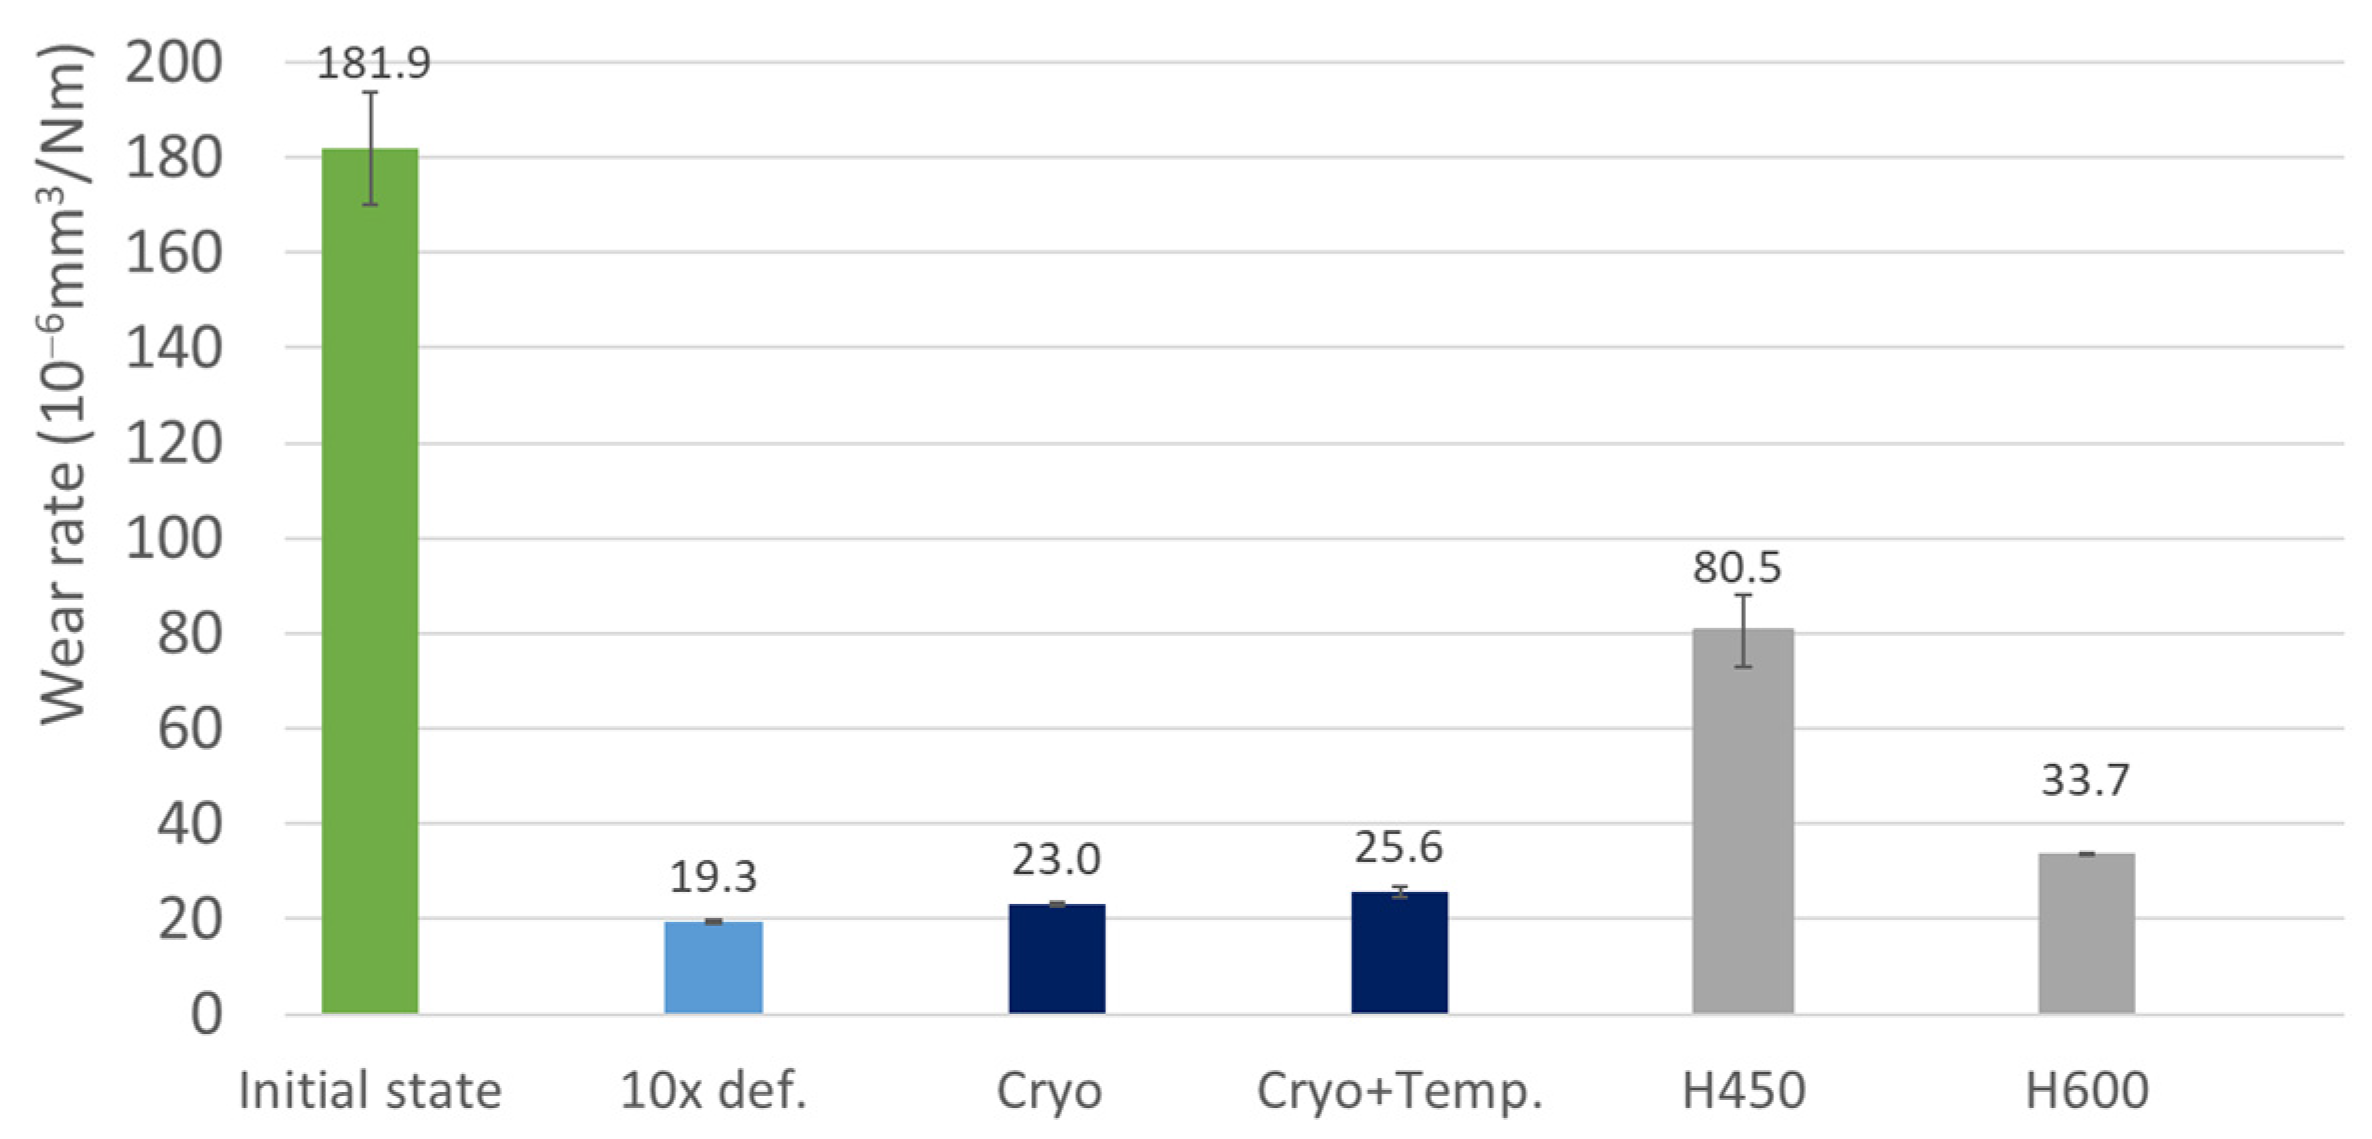
The same processing modes as the sandblast test were tested, including a comparison with Hardox 450 and Hardox 600 (Figure 18). The results show that the test again replicates the hardness values and is highly dependent on the type of structure tested. The highest through-wear rate of 181.9 × 10⁻⁶ mm3/Nm was found for the initial condition, whose structure consisted of a ferritic matrix, fine cementite, and primary chromium carbides. The lowest values were then achieved after semi-solid processing with 10 deformation steps and after combination with cryogenic processing, where the wear rate ranged from 19.3 to 23.0 × 10⁻⁶ mm3/Nm (Figure 17). The higher wear rate for the specimen after cryogenic processing with a higher hardness value compared to the regime with 10-deformation steps was probably due to the higher brittleness of the material that broke out of the formed traces during the test, which led to the detection of higher wear rate. This breakage is due to the lack of surface plasticity and the more brittle structure compared to the structure without cryogenic treatment. The breakage is generally smaller, but the frequency is higher. In the non-cryogenically processed state, bulkier fragments with a lower frequency can be expected [37]. The Cryo + Temp sample also had a higher tendency to break out due to the higher hardness compared to the sample without cryogenic treatment (10 def.).
Even after this wear test, the standard Hardox 450 and Hardox 600 materials achieved higher wear rates than the proposed semi-solid transition modes. This may be due to the absence of fine precipitates in the martensitic structures of Hardox steels compared to the ledeburitic steel, where there is a large number of fine precipitates of different morphologies in the structure.

4. Conclusions

The X210Cr12 ledeburitic tool steel was processed with a transition through a semi-solid state with forming, which was further combined with cryogenic treatment.
The results show that:
  • By inserting 10 deformation steps after the transition to the semi-solid state, a structure with very fine grains of the so-called M-A component with a size of 1 μm and very fine carbides of the M23C and M7C3 type can be obtained. The sharp-edged chromium carbides were also removed from the structure.
  • Cryogenic processing leads to the precipitation of additional fine carbides and a reduction in the austenite content of the structure from 41% to 22%, resulting in a significant increase in hardness up to 905 HV10.
  • The tempering after cryogenic treatment causes the precipitation of M3C carbide, which had a needle-like morphology compared to the previous carbides.
  • The waterjet abrasive sandblast test showed the lowest weight loss after a combination of semi-solid and cryogenic treatment. The samples after this treatment showed up to 40% less weight loss compared to the baseline samples and compared to the Hardox material that is standardly used; the weight loss was 24% less.
  • The results were confirmed by the pin-on-disk method. The lowest wear rate was achieved for the samples after combined semi-solid and cryogenic treatment.
The results obtained confirm that the proposed processing method can be used to obtain very fine martensitic structures with fine chromium carbide precipitates in conventionally produced ledeburitic tool steel, which exhibit high wear resistance.

Author Contributions

Conceptualization, H.J., K.R. and Š.J.; methodology, H.J., K.R. and Š.J.; validation, H.J. and K.R.; investigation, H.J., K.R., D.H., L.K. and Š.J.; resources, H.J. and Š.J.; writing—original draft preparation, H.J. and D.H.; writing—review and editing, H.J. and D.H.; visualization, H.J.; supervision, Š.J.; project administration, Š.J.; funding acquisition, L.K. All authors have read and agreed to the published version of the manuscript.

Funding

This research was funded by the Ministry of Education, Youth and Sports (MŠMT), student grant competition of the University of West Bohemia, under the project SGS 2022-012 “Research and development of modern metal materials” and by ERDF grant “Research of advanced steels with unique properties”, No. CZ.02.1.01/0.0/0.0/16_019/0000836.

Data Availability Statement

The raw data are not publicly available due to ongoing research.

Acknowledgments

The authors would like to thank Maria Dománková from the Faculty of Materials Science and Technology in Trnava, Slovak University of Technology for performing the analyses on a transmission electron microscope. We also thank native speaker, Jeremy M. King, for editing the English language and style.

Conflicts of Interest

The authors declare no conflict of interest.

References

  1. Filippov, M.A.; Gervas’Ev, M.A.; Plotnikov, G.N.; Zhilin, A.S.; Nikiforova, S.M. Formation of Structure of Wear-Resistant Steels 150KhNML and Kh12MFL upon Quenching. Met. Sci. Heat Treat. 2016, 57, 641–644. [Google Scholar] [CrossRef]
  2. Filippov, M.A.; Sharapova, V.A.; Shveykin, V.P.; Nikiforova, S.M. Heat Treatment Effect on Ledeburite Alloys Wear Resistance. Mater. Today Proc. 2021, 38, 1810–1812. [Google Scholar] [CrossRef]
  3. Shah, K.P. Construction, Working and Maintenance of Crushers for Crushing Bulk Materials; Hindawi: London, UK, 2018; pp. 1–53. [Google Scholar]
  4. Hietala, M.; Ali, M.; Khosravifard, A.; Keskitalo, M.; Jarvenpaa, A.; Hamada, A. Optimization of the Tensile-Shear Strength of Laserwelded Lap Joints of Ultra-High Strength Abrasion Resistance Steel. J. Mater. Res. Technol. 2021, 11, 1434–1442. [Google Scholar] [CrossRef]
  5. Rojacz, H.; Katsich, C.; Kirchgaßner, M.; Kirchmayer, R.; Badisch, E. Impact-Abrasive Wear of Martensitic Steels and Complex Iron-Based Hardfacing Alloys. Wear 2022, 492–493, 204183. [Google Scholar] [CrossRef]
  6. Haiko, O.; Javaheri, V.; Valtonen, K.; Kaijalainen, A.; Hannula, J.; Kömi, J. Effect of Prior Austenite Grain Size on the Abrasive Wear Resistance of Ultra-High Strength Martensitic Steels. Wear 2020, 454–455, 13–16. [Google Scholar] [CrossRef]
  7. Jirková, H.; Rubešová, K.; Konopík, P.; Opatová, K. Effect of the Parameters of Semi-Solid Processing on the Elimination of Sharp-Edged Primary Chromium Carbides from Tool Steel. Metals 2018, 8, 713. [Google Scholar] [CrossRef] [Green Version]
  8. Rubešová, K.; Peković, M.; Jirková, H.; Hradil, D. Resistance of Tool Steel Processed by Unconventional Forming Technology against Abrasive Wear. Manuf. Technol. 2021, 21, 240–245. [Google Scholar] [CrossRef]
  9. Rubešová, K.; Pekovic, M.; Jirková, H. Innovative Process to Eliminate Ledeburite Network in Tool Steel. Manuf. Technol. 2017, 17, 940–945. [Google Scholar] [CrossRef]
  10. Jirková, H.; Aišman, D.; Mašek, B. Unconventional Structure of X210Cr12 Steel Obtained by Thixoforming. J. Alloys Compd. 2010, 504, 500–503. [Google Scholar] [CrossRef]
  11. Jirková, H.; Rubešová, K.; Opatová, K.; Peković, M.; Mašek, B. Effect of Heating Temperature during Semi-Solid Processing on Structure of X210CR12 Steel. Acta Metall. Slovaca 2017, 23, 229–235. [Google Scholar] [CrossRef]
  12. Song, R.; Kang, Y.; Zhao, A. Semi-Solid Rolling Process of Steel Strips. J. Mater. Process. Technol. 2008, 198, 291–299. [Google Scholar] [CrossRef]
  13. Bombac, D.; Fazarinc, M.; Podder, A.S.; Kugler, G. Study of Carbide Evolution during Thermo-Mechanical Processing of AISI D2 Tool Steel. J. Mater. Eng. Perform. 2013, 22, 742–747. [Google Scholar] [CrossRef]
  14. Püttgen, W.; Hallstedt, B.; Bleck, W.; Uggowitzer, P.J. On the Microstructure Formation in Chromium Steels Rapidly Cooled from the Semi-Solid State. Acta Mater. 2007, 55, 1033–1042. [Google Scholar] [CrossRef]
  15. Balan, T.; Becker, E.; Langlois, L.; Bigot, R. A New Route for Semi-Solid Steel Forging. CIRP Ann.-Manuf. Technol. 2017, 66, 297–300. [Google Scholar] [CrossRef]
  16. Kopp, R.; Kallweit, J.; Möller, T.; Seidl, I. Forming and Joining of Commercial Steel Grades in the Semi-Solid State. J. Mater. Process. Technol. 2002, 130, 562–568. [Google Scholar] [CrossRef]
  17. Uhlenhaut, D.I.; Kradolfer, J.; Püttgen, W.; Löffler, J.F.; Uggowitzer, P.J. Structure and Properties of a Hypoeutectic Chromium Steel Processed in the Semi-Solid State. Acta Mater. 2006, 54, 2727–2734. [Google Scholar] [CrossRef]
  18. Aisman, D.; Jirkova, H.; Kucerova, L.; Masek, B. Metastable Structure of Austenite Base Obtained by Rapid Solidification in a Semi-Solid State. J. Alloys Compd. 2011, 509, S312–S315. [Google Scholar] [CrossRef]
  19. Aišman, D.; Jirková, H.; Mašek, B. The Influence of Deformation and Cooling Parameters after Transition through Semi-Solid State on Structure Development of Ledeburite Steel. J. Alloys Compd. 2012, 536, S204–S207. [Google Scholar] [CrossRef]
  20. Das, D.; Dutta, A.K.; Toppo, V.; Ray, K.K. Effect of Deep Cryogenic Treatment on the Carbide Precipitation and Tribological Behavior of D2 Steel. Mater. Manuf. Process. 2007, 22, 474–480. [Google Scholar] [CrossRef]
  21. Jandová, D.; Šuchmann, P.; Nižňanská, J. Microstructure of Tool Steel X37CrMoV5 after Cryogenic Treatment and Its Effect on Wear Resistance. Key Eng. Mater. 2015, 647, 23–37. [Google Scholar] [CrossRef]
  22. Collins, D.N.; Dormer, J. Deep Cryogenic Treatment of a D2 Cold-Work Tool Steel. Heat Treat. Met. 1997, 24, 71–74. [Google Scholar] [CrossRef]
  23. Stratton, P.F. Optimising Nano-Carbide Precipitation in Tool Steels. Mater. Sci. Eng. A 2007, 449–451, 809–812. [Google Scholar] [CrossRef]
  24. JMatPro, Release 12.0; Sente Software Ltd.: Guildford, UK, 2022.
  25. ČSN 41 9436; Ocel 19436 Chromová. Český Normalizační Institut: Praha, Czech Republic, 1994.
  26. SIJ Group: Data Sheet for X210Cr12. Available online: https://steelselector.sij.si/steels/OCR12.html (accessed on 21 October 2022).
  27. Dörrenberg Edelstahl: Data Sheet for X210Cr12. Available online: https://www.finemetal.ro/wp-content/uploads/2020/09/1.2080-CP10V-X210Cr12.pdf (accessed on 21 October 2022).
  28. Jovičević-Klug, P.; Jovičević-Klug, M.; Sever, T.; Feizpour, D.; Podgornik, B. Impact of steel type, composition and heat treatment parameters on effectiveness of deep cryogenic treatment. J. Mater. Res. Technol. 2021, 14, 1007–1020. [Google Scholar] [CrossRef]
  29. Podgornik, B.; Paulin, I.; Zajec, B.; Jacobson, S.; Leskovšek, V. Deep Cryogenic Treatment of Tool Steels. J. Mater. Process. Technol. 2016, 229, 398–406. [Google Scholar] [CrossRef]
  30. Liu, H.; Wang, J.; Shen, B.; Yang, H.; Gao, S.; Huang, S. Effects of deep cryogenic treatment on property of 3Cr13Mo1V1.5 high chromium cast iron. Mater. Des. 2007, 3, 1059–1064. [Google Scholar] [CrossRef]
  31. Beköz Üllen, N. Investigation of the Wear Resistance of Hardox Steel Plates. In Proceedings of the 2nd International Conference on Tribology-TURKEYTRIB’18, Istanbul, Turkey, 18–20 April 2018; pp. 69–73. [Google Scholar]
  32. Filip, A.C.; Vasiloni, M.A.; Mihail, L.A. Experimental Research on the Machinability of Hardox Steel by Abrasive Waterjet Cutting. MATEC Web. Conf. 2017, 94, 03003. [Google Scholar] [CrossRef] [Green Version]
  33. Mazur, M.; Mikova, K. Impact Resistance of High Strength Steels. Mater. Today Proc. 2016, 3, 1060–1063. [Google Scholar] [CrossRef]
  34. SSAB: Data Sheet for Hardox 450. Available online: https://www.ssab.com/en/products/brands/hardox/products/hardox-450 (accessed on 21 October 2022).
  35. SSAB: Data Sheet for Hardox 600. Available online: https://www.ssab.com/en/products/brands/hardox/products/hardox-600 (accessed on 21 October 2022).
  36. Hradil, D.; Duchek, M.; Jirková, H.; Rubešová, K. Impact of Semi-Solid Processing and Cryogenic Treatment on Wear Resistance of X210Cr12 Tool Steel. IOP Conf. Ser. Mater. Sci. Eng. 2021, 1178, 012021. [Google Scholar] [CrossRef]
  37. Amini, K.; Nategh, S.; Shafyei, A. Influence of Different Cryotreatments on Tribological Behavior of 80CrMo12 5 Cold Work Tool Steel. Mater. Des. 2010, 31, 4666–4675. [Google Scholar] [CrossRef]
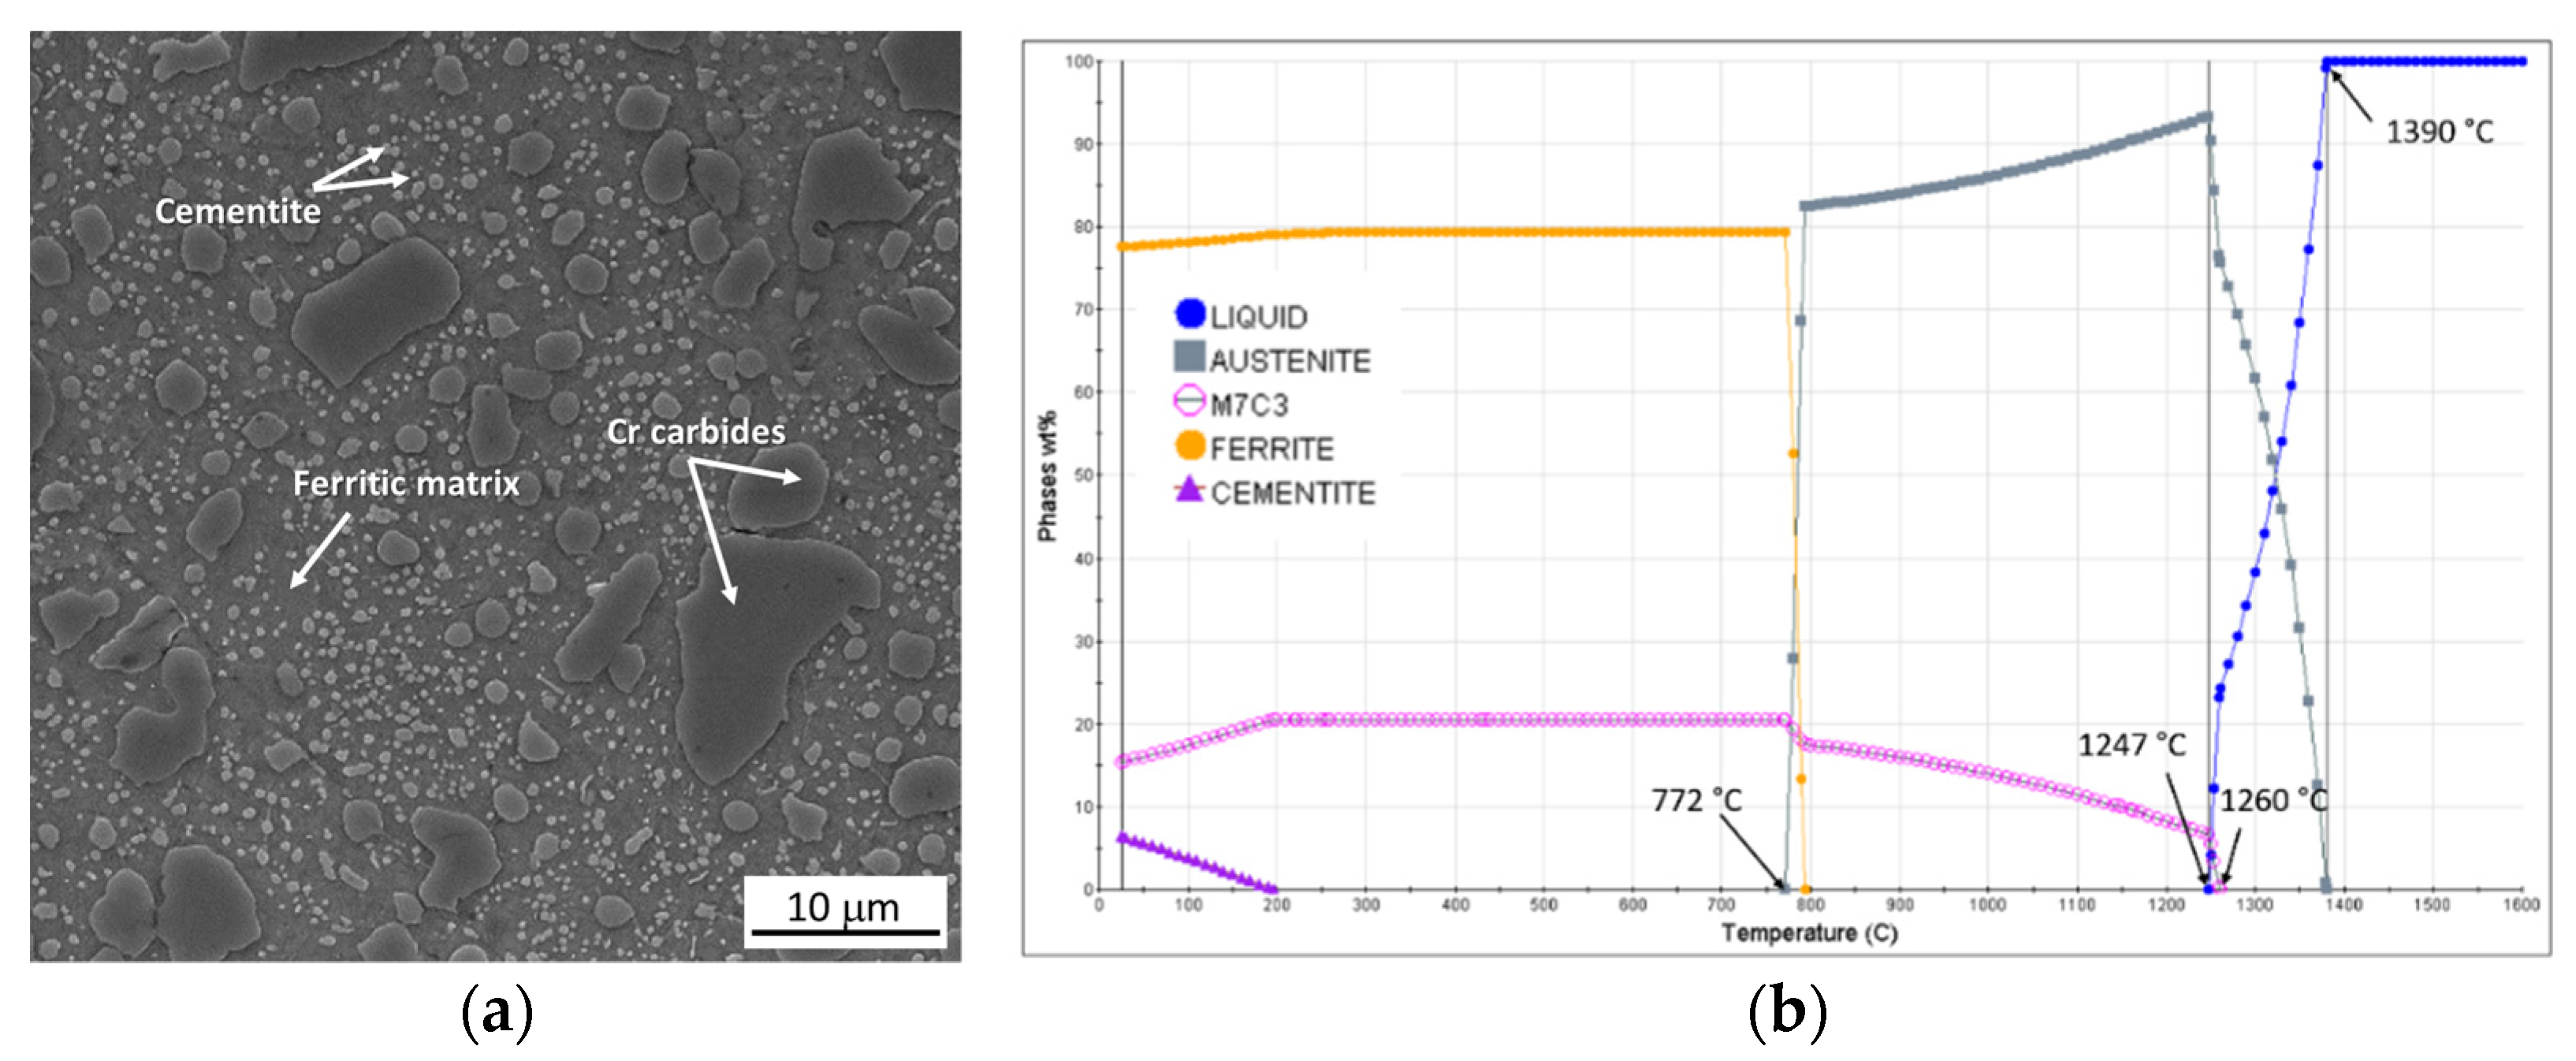
Figure 1. (a) Initial state of X210Cr12 steel, SEM; (b) calculation of the dependence of the proportion of each phase on the heating temperature in JMatPro.
Metals 12 01869 g001
Figure 2. (a) A welded container with fixed K-type thermocouples for temperature measurement; (b) a record of the temperature during the hardening of the container in water.
Metals 12 01869 g002
Figure 3. Demonstration of forming procedures in the case of five deformation steps.
Metals 12 01869 g003
Figure 4. Schematic representation of processing regimes: (a) with a different number of deformation steps and tempering (b) combination with cryogenic treatment.
Metals 12 01869 g004
Figure 5. Microstructure after processing with transition through semi-solid state: (a) Regime: 3 × def.; (b) Regime: 5 × def.; (c) Regime: 10 × def.; (d) Regime: 10 × def.—detail of matrix.
Metals 12 01869 g005
Figure 6. Microstructure after processing with transition through semi-solid state with 10 deformation steps and tempering at 300 °C/2 h (Regime: Temp.).
Metals 12 01869 g006
Figure 7. Microstructure after processing with transition through semi-solid state with 10 deformation steps: (a) with cryogenic treatment −160 °C/24 h (Regime: Cryo); (b) with cryogenic treatment −160 °C/24 h + tempering 300 °C/2 h (Regime: Cryo + Temp).
Metals 12 01869 g007
Figure 8. (a) Detail of a particle that had a predominantly regular geometric shape; the labelled particle was identified by ED as M23C6 carbide, upper right electron diffraction spectrum; (b) detail of a larger particle with an irregular shape; the labelled particle was identified by ED as M7C3 carbide, upper right electron diffraction spectrum.
Metals 12 01869 g008
Figure 9. Histogram of the particle distribution observed in the processed semi-finished product.
Metals 12 01869 g009
Figure 10. (a) Detail of the matrix—fine needles of martensite and twins, light-field view; (b) highlighting the areas that occurred between the martensite needles—the reflection (020)austenit was applied to the dark-field view.
Metals 12 01869 g010
Figure 11. Detail at the matrix-particle interface—an increased density of stacking faults can be observed in the particle, which is typical of M7C3 carbide, and an increased density of dislocations and electron diffraction spectrum of the larger particle can be observed in the martensite needles.
Metals 12 01869 g011
Figure 12. (a) Detail of precipitates with different morphology and size, fine needle-like particles excluded in the matrix showed slight heterogeneity in density; (b) detail of particles with different morphology and size.
Metals 12 01869 g012
Figure 13. (a) Histogram of the distribution of irregular-shaped and regular-shaped particles; (b) histogram of the distribution of needle-shaped particles.
Metals 12 01869 g013
Figure 14. (a) Detail of particles with different morphology and size; the marked particle was identified by ED as M23C6 carbide; (b) detail of irregularly shaped and fine needle-shaped particles; the marked particle was identified by ED as M7C3 carbide.
Metals 12 01869 g014
Figure 15. (a) Detail of a needle-like particle in the matrix; electron diffraction was performed on the marked area; the particles were identified as M3C carbide; (b) detail of the substructure—the yellow line delineates the phase interface between the matrix and the carbide phase; an increased density of dislocations, twins, and stacking faults can be observed in the matrix.
Metals 12 01869 g015
Figure 16. Sandblast test: (a) Sample placement in the machine; (b) samples after sandblast test; (c) sandblast test mass loss dependence graph.
Metals 12 01869 g016
Figure 17. Microstructure after conventional heat treatment.
Metals 12 01869 g017
Figure 18. Average wear rate for selected processing modes.
Metals 12 01869 g018
Table 1. Chemical composition of X210Cr12 steel (wt.%).
CSiMnCrPS
1.9–2.20.1–0.60.2–0.611–13max. 0.03max 0.01
Table 2. Processing parameters with transition through semi-solid state.
RegimeHeating Temperature [°C]/Time [min.]Reheating Temperature
[°C]/Time [min.]
Number of Forming StepsTempering Temperature [°C]/Time [h]Cryogenic Treatment Temperature [°C]/Time [h]Tempering Temperature [°C]/Time [h]
3 × def.1250/601080/303---
5 × def.5---
10 × def.10---
Temp.10300/2--
Cryo10-−160/24-
Cryo + Temp.10-−160/24300/2
Table 3. Summary of static evaluation of precipitated particles (sample Cryo).
D
(10−9 m)
NA
(1012 m−2)
NV
(1019 m−3)
L
(10−7 m)
623 *2.836 ± 0.6455.722 ± 0.4842.515 ± 0.558
* Value is only informative due to the wide range (15 to 4000 nm).
Table 4. Summary of static evaluation of precipitated particles (sample Cryo + Temp).
D
(10−9 m)
NA
(1013 m−2)
NV
(1020 m−3)
L
(10−7 m)
400 *2.651 ± 0.7255.302 ± 0.5320.687 ± 0.152
* Value is only informative due to the wide range (9 to 2500 nm).
Table 5. Chemical composition of Hardox 450 and Hardox 600 steels (wt.%) [34,35].
SteelCSiMnCrNiMoBPS
Hardox 4500.180.251.30.10.10.040.0030.0150.001
Hardox 6000.40.561.01.21.50.60-0.0150.010
Table 6. Results of the sandblast test, including the hardness value.
SampleGrain Size (μm)Hardness HV10 (-)Weight Loss (g)
Initial state-216 ± 31.73 ± 0.22
Conventional heat treated-716 ± 91.75 ± 0.05
5 × def.4.6 ± 2.1633 ± 31.54 ± 0.05
10 × def.1.4 ± 0.5738 ± 191.40 ± 0.04
Cryo1.4 ± 0.6905 ± 51.33 ± 0.03
Cryo + Temp.1.4 ± 0.4844 ± 141.61 ± 0.03
Hardox 450-465 ± 81.55 ± 0.02
Hardox 600-660 ± 91.65 ± 0.03
Publisher’s Note: MDPI stays neutral with regard to jurisdictional claims in published maps and institutional affiliations.