Article

Microstructural Organization and Mechanical Properties of 5356 Aluminum Alloy Wire Arc Additive Manufacturing Under Low Heat Input Conditions

1
Collaborative Innovation Centre for Steel Common Technology, University of Science and Technology Beijing, Beijing 100083, China
2
College of Intelligent Manufacturing and Modern Industry, Xinjiang University, Urumqi 830017, China
*
Author to whom correspondence should be addressed.
Metals 2025, 15(2), 116; https://doi.org/10.3390/met15020116
Submission received: 25 December 2024 / Revised: 21 January 2025 / Accepted: 23 January 2025 / Published: 25 January 2025

Abstract

:
This study examines the microstructure and mechanical properties of 5356 aluminum alloy under low heat input conditions during arc additive manufacturing, focusing on the challenges posed by excessive heat input, which hinders specimen formation and affects dimensional accuracy. The study analyzes the characteristics of single-pass multilayer straight-walled specimens fabricated under varying low heat input conditions, along with evaluations of their mechanical properties, including their microstructure, microhardness, and tensile strength. This study demonstrates that as the heat input increases from 87.5 J/mm to 190.0 J/mm, the width of the vertical wall specimens increases significantly, whereas the change in single-layer height remains minimal. The specimen width increases from 5.22 mm to 8.87 mm, representing a change of 3.65 mm, while the single-layer height increases by only 0.16 mm. The microstructure primarily consists of the α(Al) matrix and the skeletal β(Al3Mg2) phase. As heat input increases, some of the β(Al3Mg2) phase dissolves, resulting in a decrease in its distribution density, a reduction in its quantity, and an increase in its size. The average hardness increases from 69.40 HV at 87.5 J/mm to 77.89 HV at 154.2 J/mm, before decreasing to 73.56 HV at 190.0 J/mm. As the heat input increases, the tensile strength and elongation of both horizontal and vertical specimens initially increase and then decrease. The tensile strength and elongation of the horizontal specimens are slightly greater than those of the vertical specimens. The microstructure and mechanical properties vary across different regions. In the upper region, the β(Al3Mg2) phase is uniformly distributed, with high density and small size. The fracture surface exhibits fine, uniform dimples, displaying the best microhardness and mechanical properties, with a tensile strength of 245.88 MPa. In the middle region, the distribution density of the β phase decreases, the size increases, and the dimples become slightly coarser. Consequently, the microhardness and mechanical properties decline. At the bottom, due to the higher cooling rates, the β phase does not dissolve significantly. The distribution density is high, the dimples are large and uneven, and the microhardness and mechanical properties are the lowest, with a tensile strength of 236.00 MPa.

1. Introduction

Aluminum alloys are metallic materials in which a specific amount of other elements are added to aluminum. These alloys are characterized by low density, high strength, excellent casting properties, and good plasticity, making them widely used in industries such as aerospace, automotive manufacturing, and packaging [1,2]. However, with the advancement of industrialization, traditional aluminum alloy forming methods—such as casting, forging, and machining—are characterized by long production cycles and high costs, and they increasingly fail to meet industrial requirements [3,4,5]. Wire arc additive manufacturing (WAAM) continuously feeds metal wire into the molten pool for layer-by-layer deposition of complex metal parts. This technology is characterized by rapid manufacturing rates, simple equipment, and high material efficiency, making it particularly suitable for the fabrication of medium- to large-sized structural components. Consequently, arc additive manufacturing using aluminum alloys as filler material has attracted significant attention in recent years [6,7,8,9]. However, during the arc additive manufacturing process, the continuous high heat input, combined with the effects of heat accumulation, leads to poor dimensional accuracy and surface roughness of the fabricated specimen. Additionally, when the heat input is excessive, it extends the time available for the formation, aggregation, and growth of porosity defects, which increases the likelihood of cracking in the specimen [10].
To address these challenges, researchers globally have investigated two primary aspects: controlling the specimen’s molding morphology and optimizing performance characteristics. In controlling the specimen’s molding morphology, research primarily focuses on the effects of process parameters such as the current mode, welding speed, and torch angle on the specimen size and molding characteristics [11,12,13]. Regarding performance control, research has mainly explored optimizing the microstructure and mechanical properties through auxiliary measures or heat treatment [14,15]. Derekar et al. [16] investigated the influence of interlayer temperature on the porosity and mechanical properties of 5356 aluminum alloy. They found that in samples with higher interlayer temperatures, microporosity accounted for 81.47% of the total porosity, whereas in those with lower interlayer temperatures, it accounted for 67.92%. Additionally, the tensile properties of high-interlayer-temperature samples were relatively superior to those of low-interlayer-temperature samples. Ahsan et al. [17] observed that both low and high-heat input deposits exhibited similar yield and tensile strengths. However, the ductility of high heat input deposits was approximately 10% higher than that of low heat input deposits, while the hardness was slightly lower. Wang et al. [18] examined the effect of heat input on the microstructure and properties of WAAM Al-Cu-Sn alloy. Their findings revealed that as heat input increased, both the size and number of pores also increased. Furthermore, the grain size of the sediment and the precipitate phase increased, while the incomplete dissolution of the θ phase during solid solution treatment resulted in a marked decline in the mechanical properties of the specimens. Zhou et al. [19] investigated the effect of arc speed on the macromorphology, microstructure, and mechanical properties of 2219 aluminum alloy. Their study revealed that as traveling speed increased, the solidification rate accelerated, reducing the solidification time and consequently decreasing the equiaxed grain size and volume fraction. Wang et al. [20] utilized Gas Tungsten Arc Welding (GTAW) to fabricate 4043 aluminum alloy and observed that a lower arc current produced a lower heat input, resulting in faster cooling and nucleation rates, and finer grains with near-equiaxed morphology. As the arc current increased, the grains thickened, transitioning from short columnar to long columnar crystals, which led to a reduction in the tensile strength from 146.5 MPa to 110.5 MPa. Lupo et al. [21] proposed an experimental procedure in their study on the experimental indicators of powder layer quality during selective laser sintering, which quantifies the powder layer quality obtained during the spreading step of the SLS process. Prasad et al. [22] found in their experimental study using the response surface method for 4047 aluminum alloy arc additive manufacturing process parameters that the heat input (current) has the greatest impact on the weld bead geometry. Chen et al. [23] found in their study on the effect of equivalent heat input on AI-Si alloy WAAM that using a lower current and voltage easily results in a refined microstructure and improved ultimate tensile strength.
In conclusion, numerous scholars have concluded that reducing heat input through methods such as decreasing the current and voltage, increasing the welding speed and interlayer waiting time, and adding auxiliary equipment, can more precisely control the dimensional accuracy of the specimens, resulting in finer grains, more uniform microstructures, and improved mechanical properties [24,25,26,27,28].
While the aforementioned studies analyze the effects of heat input on the microstructure and mechanical properties of aluminum alloys, they predominantly employed arc currents exceeding 70 A, resulting in a relatively high heat input. Research on the microstructure and mechanical properties of aluminum alloys under low heat input conditions is scarce. Therefore, this study conducts a systematic investigation of the microstructure and mechanical properties of 5356 aluminum alloy in the WAAM process under low heat input conditions. By analyzing the microstructure, mechanical properties, and forming dimensions of the specimens under low heat input conditions, this study provides new theoretical insights and data support for optimizing the application of 5356 aluminum alloy in WAAM technology.

2. Test Materials and Methods

The experimental material chosen for cladding with the wire arc deposition is the OK AlumaRod 5356 aluminum alloy welding, produced by (ESAB Corporation, Bethesda, MA, USA), with a wire diameter of 1.2 mm. The substrate material is a 5087 aluminum alloy rolled plate with dimensions of 150 mm × 40 mm × 6 mm. The material standard for 5356 aluminum alloy filler wire is EN ISO 18273 [29], while the material standard for the 5087 aluminum alloy base plate is GB/T 3190 [30], and the chemical compositions of both the welding wire and substrate are listed in Table 1. The WAAM system used in this experiment consists of an OTC Daihen Corporation six-axis robot (OTC Daihen, Osaka, Japan), a Metal Inert Gas Welding welding machine (Oudixi Electromechanical Co LTD, Qingdao, China), a protective gas device (Suzhou Jinhong Gas Co. Ltd., Suzhou, China), an automatic wire feeder (OTC Daihen, Osaka, Japan), and a substrate preheating device (Taizhou Ouli Electrical Appliances Co. Ltd., Taizhou, China), as shown in Figure 1. The OTC robot model is FD-V8L, and the MIG welding machine is the DP400, which is specifically matched to the OTC robot and offers stable arc performance in both low current and high-speed welding. The protective gas used is 99.99% pure argon, while the wire feeder model is AF-4012-C, and the preheating device is an OuLi Cast Aluminum heating plate. The wire extension is 8 mm, with the welding wire tip positioned approximately 2 mm above the 5087 aluminum alloy plate. After each welding layer, the welding gun rises by 1.5 mm, resulting in a total of 44 deposited layers. The cladding path followed a reciprocating additive method, as shown in Figure 2a. Before the experiment, the substrate surface was polished with an angle grinder to remove the oxide layer, followed by acetone wiping to eliminate surface oil contamination.
The welding machine utilizes an integrated function where the wire feed speed and voltage are automatically adjusted based on the welding current. This study examines the microstructure and mechanical properties of 5356 aluminum alloy in arc additive manufacturing under low heat input conditions while maintaining additive efficiency with a welding speed of 6 mm/s. Due to the low heat input, intermittent bead formation occurs; therefore, the substrate was preheated to 90 °C. The comparison between the as-formed substrate without preheating and with 90 °C preheating under the same low heat input conditions is shown in Figure 2b. The specific welding parameters are provided in Table 2.
The welding heat input (Q) refers to the amount of heat delivered per unit length of the weld during the welding process. The formula for heat input is typically expressed as follows [31]:
Q = U I / v
In the formula, Q represents the heat input (J/mm), U is the welding voltage (V), I denotes the welding current (A), and v refers to the welding speed (m/s).
After the experiment, a wire Electrical Discharge Machining (Jiangsu Samsung Machinery Manufacturing Co. Ltd., Jiangsu, China) was used to cut tensile, metallographic, hardness, and XRD samples from the thin-walled specimen, as shown in Figure 3a. Three tensile samples were cut from the top, middle, and bottom in the horizontal direction, and one sample in the vertical direction, with dimensions shown in Figure 3b. The metallographic, hardness, and XRD samples were polished with sandpapers from 600# to 3000#, followed by mechanical polishing with W1.5 and W0.5 diamond pastes on cloth and silk pads. Metallographic samples were etched with Keller’s reagent for 30 s and then observed under an optical microscope (Yunke Biotech Co. Ltd., Taizhou, China). Microhardness was measured using a Vickers tester, with readings taken every 1 mm from the substrate bottom to the top. X-ray diffraction (XRD) analysis was performed with a Bruker D8 Advance instrument (Bruker AXS GmbH, Karlsruhe, Germany), using a scanning range from 5° to 90°.

3. Results and Discussion

3.1. WAAM Sample Forming Analysis

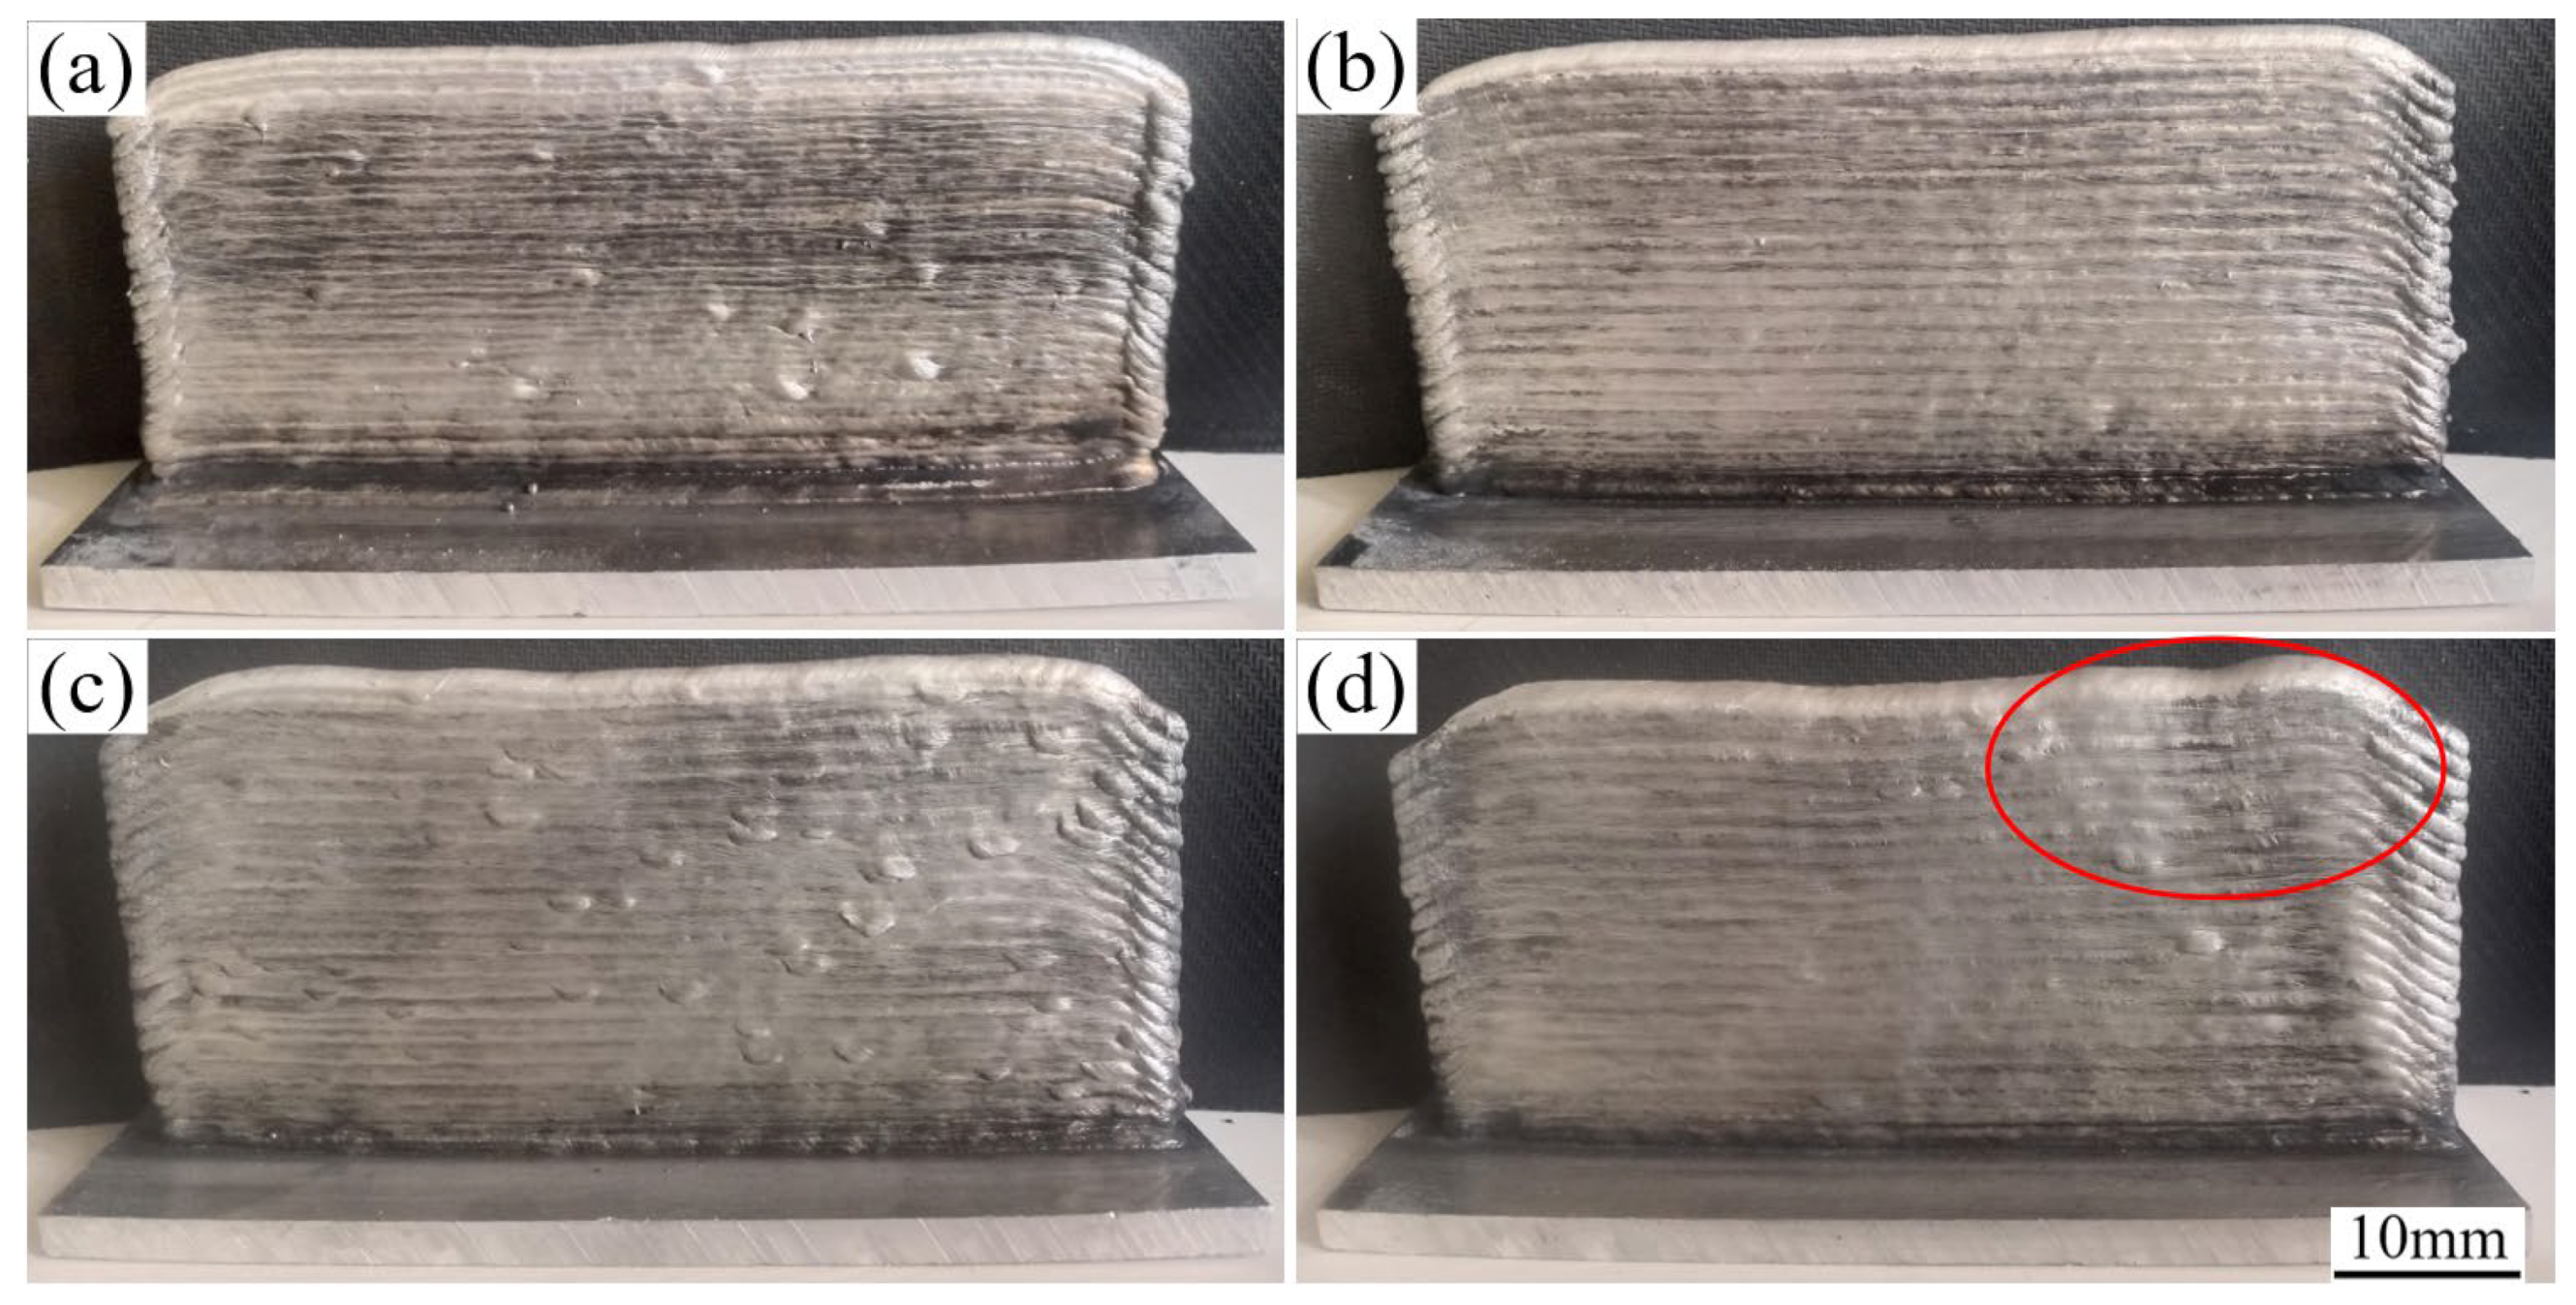
The forming results of single-pass multilayer straight-walled specimens under different low heat input levels are shown in Figure 4. From the figure, it can be observed that at a heat input of 87.5 J/mm, the front surface of the specimen exhibits a small amount of spatter, and the surface flatness is relatively poor. This is likely due to insufficient heat in the molten pool, leading to poor pool stability and resulting in spatter and unevenness on the surface. At a heat input of 120.0 J/mm, the front and upper surfaces of the specimen are smooth and flat, presenting a more aesthetically pleasing appearance. When the heat input increases to 154.2 J/mm, a significant amount of spatter appears on the front surface, and a height discrepancy is observed on the upper surface. This occurs because excessive heat input causes the molten pool to become too large, resulting in uneven metal deposition, non-uniform shrinkage and deformation during the cooling process, and instability in the molten pool flow. These issues lead to spatter on the front surface and height discrepancies on the upper surface of the specimen. When the heat input increases to 190.0 J/mm, the further increase in heat input exacerbates the defects on both the front and upper surfaces of the specimen, as shown in the red circle in Figure 4d.
To further investigate the forming dimensions of single-pass multilayer straight-walled specimens under different low heat input levels, measurements of the specimen width and single-layer height were taken. Five random locations on each specimen were measured to ensure data representativeness, and the average value was calculated. The single-layer height was determined by dividing the total specimen height by the number of layers. Figure 5 shows the variation in width and single-layer height of the specimens under different heat input levels, with other process parameters held constant. It is evident that as the heat input increases from 87.5 J/mm to 190.0 J/mm, both the width and the single-layer height increase. The specimen width rises from 5.22 mm at 87.5 J/mm to 8.87 mm at 190.0 J/mm, a change of 3.65 mm. The single-layer height increases from 1.38 mm at 87.5 J/mm to 1.56 mm at 190.0 J/mm, a smaller change of 0.16 mm. This indicates that the heat input has a greater impact on the specimen width than on the single-layer height.

3.2. XRD Analysis

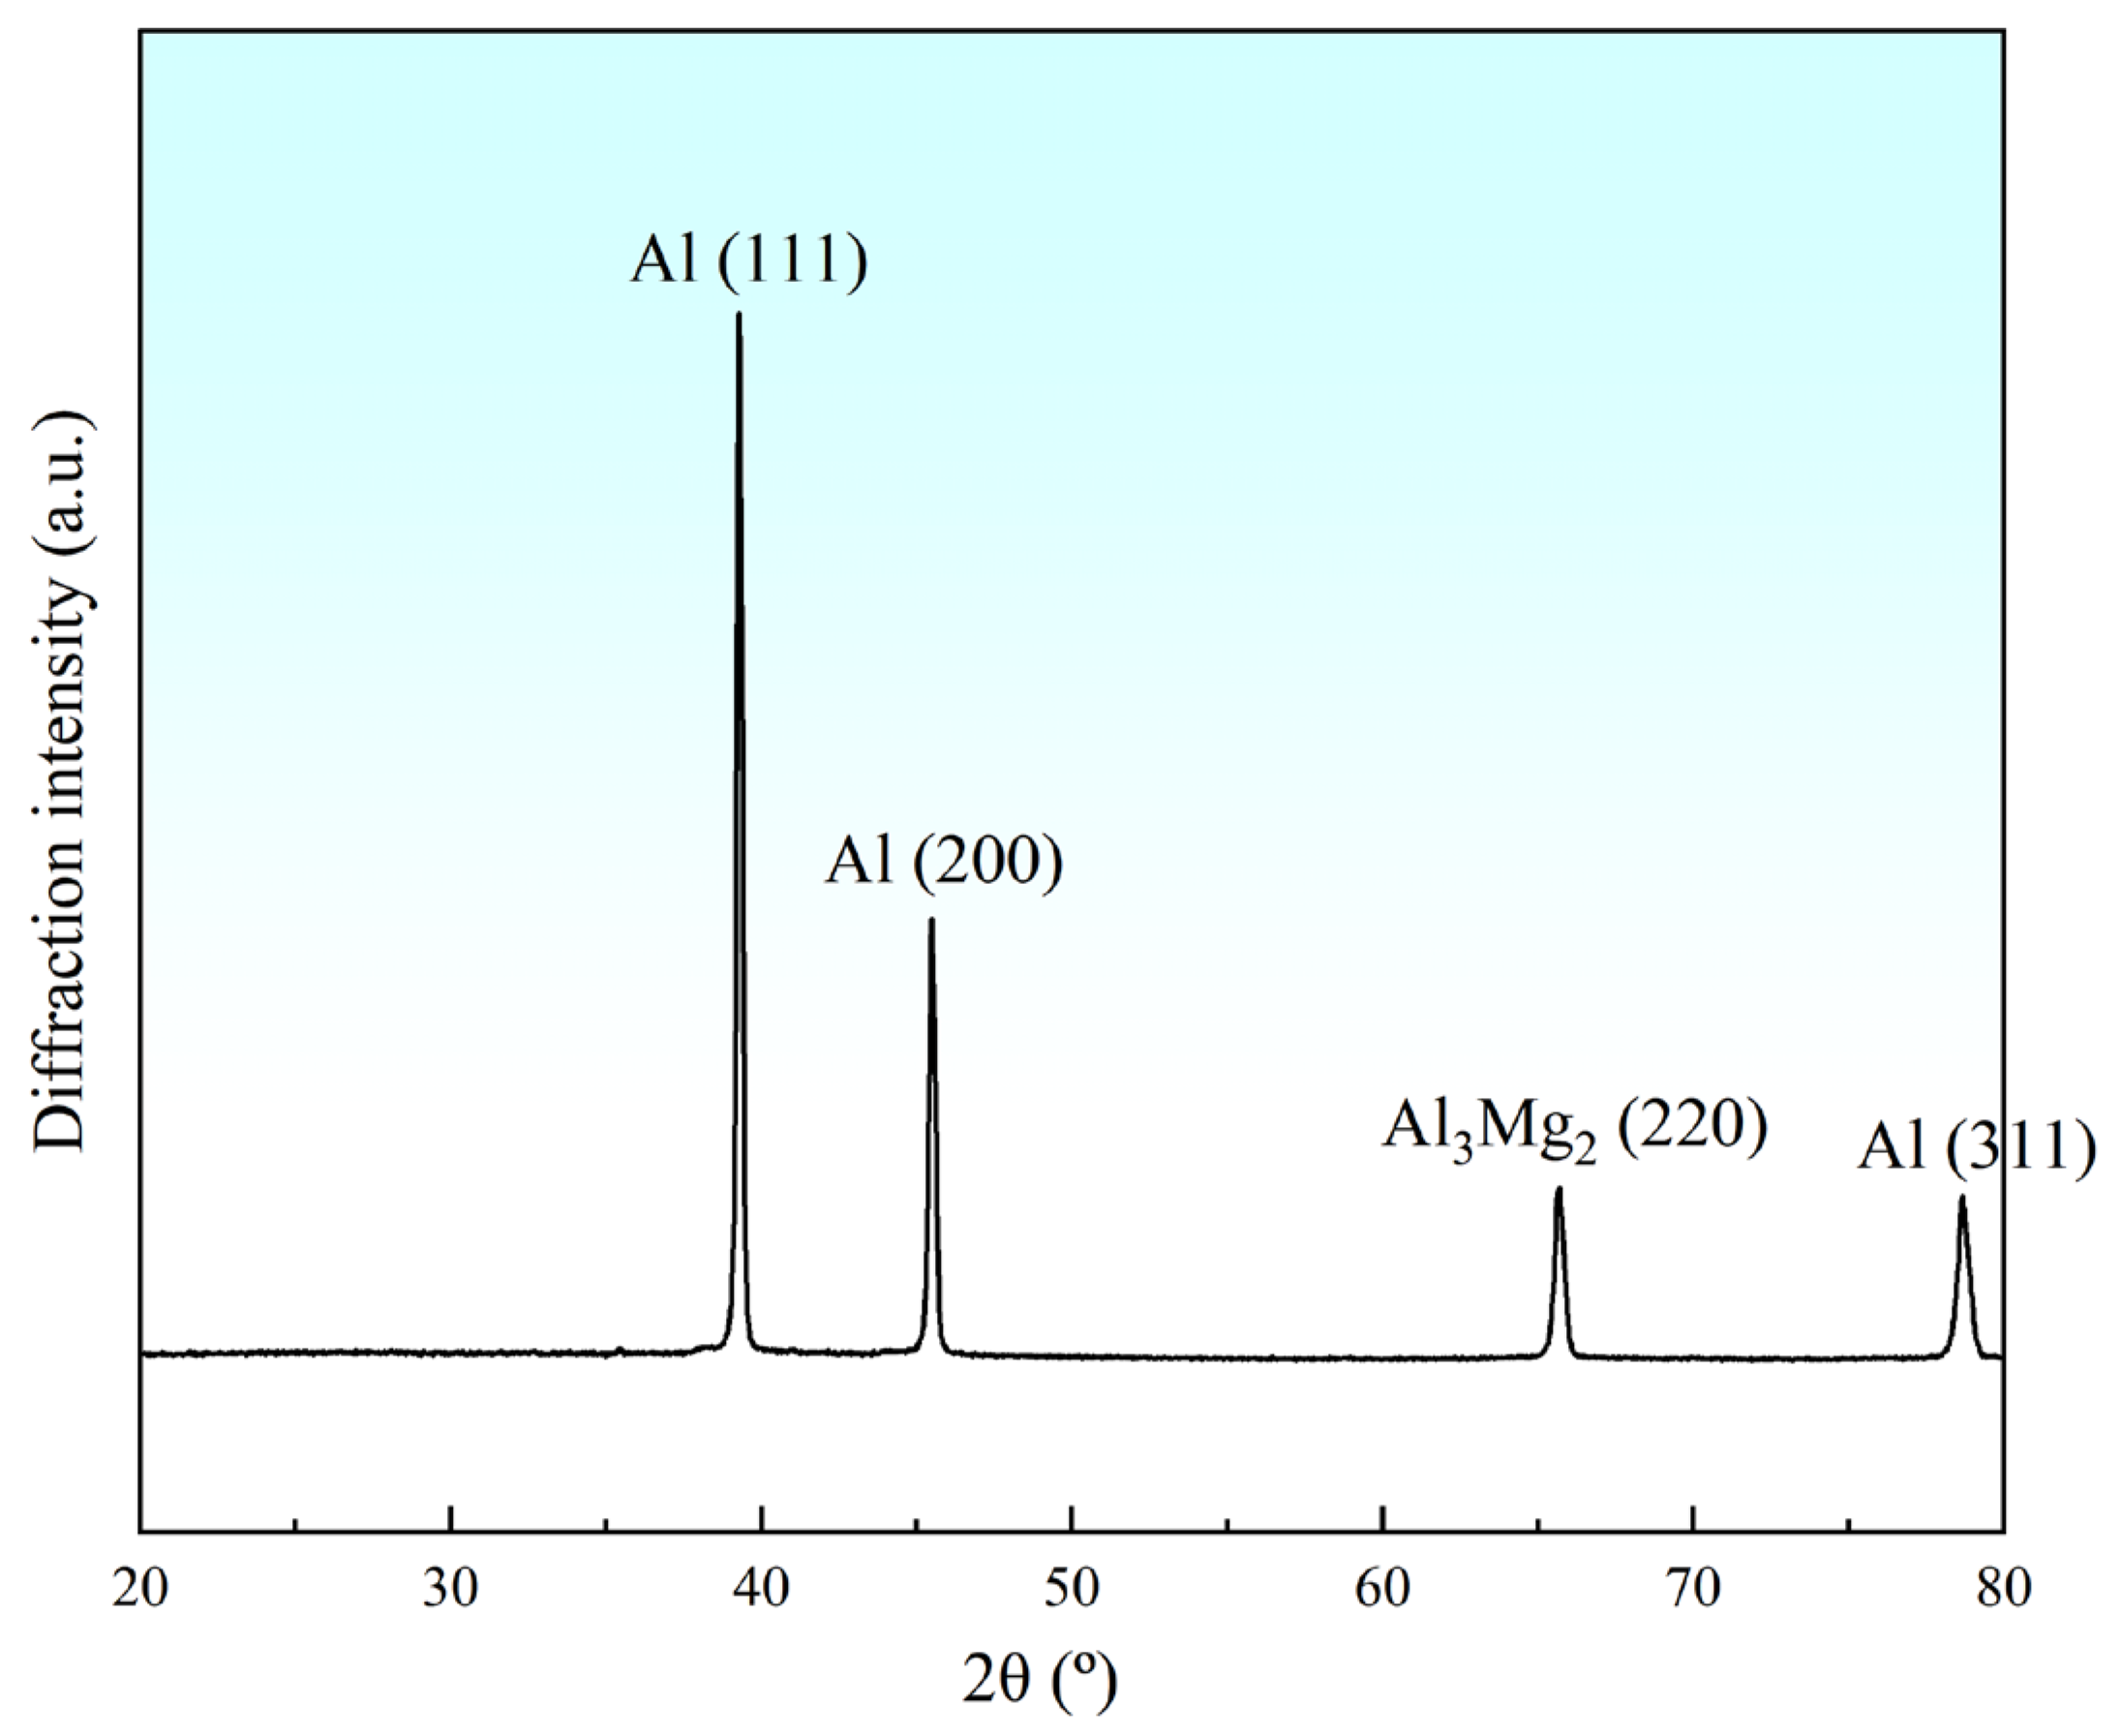
XRD analysis was conducted on the 5356 aluminum alloy WAAM sample, using the sample with a heat input of 120.0 J/mm as an example. Figure 6 shows the XRD spectrum of the 5356 aluminum alloy WAAM sample. Several prominent diffraction peaks are observed in the spectrum, located at 2θ angles of approximately 38°, 46°, 66°, and 78°, corresponding to the diffraction features of different phases. The strongest diffraction peak appears at approximately 38°, corresponding to the (111) crystal plane of aluminum (Al), indicating that aluminum is the primary component of the alloy. Additionally, the peak observed at 46° corresponds to the (200) crystal plane of aluminum, while the peaks at 66° and 78° correspond to the (311) plane of aluminum and the (220) plane of Al3Mg2 phase, respectively, indicating the presence of both the aluminum matrix and β-phase (Al3Mg2) in the alloy. The β-phase is typically a strengthening phase in aluminum alloys, characterized by high hardness and strength. In Al-Mg alloys with magnesium content below 4%, the β-phase tends to fully dissolve into the α(Al) solid solution, resulting in a microstructure predominantly consisting of a single-phase α(Al) solid solution. In aluminum alloys with magnesium content above 4%, since the solubility of Mg in Al is approximately 4% at room temperature, the excess Mg precipitates in the form of the β-phase. The β-phase is a dispersion-strengthening phase, contributing to the dispersion-strengthening of the alloy. Overall, the distribution of peaks in the XRD spectrum is clear and distinct, suggesting that the alloy’s crystal structure is relatively ordered, with no significant phase transitions or formation of impurity phases occurring during the welding process. Further analysis can involve calculating the intensity and width of the diffraction peaks to assess the grain size and stress state, providing a basis for subsequent studies on the physical properties of the alloy.

3.3. Microstructure Analysis

The microstructure of 5356 aluminum alloy WAAM samples at different positions was analyzed, using the sample with a heat input of 120.0 J/mm as an example. Figure 7 shows the microstructure of the alloy at different positions (top, middle, and bottom). Figure 7a shows the microstructure of the top region, which mainly consists of an α(Al) matrix, a uniformly distributed skeletal β-phase, and a fine Mg2Si phase. The Mg2Si phase is distributed as fine particles, with a relatively uniform distribution, indicating a good dispersion of reinforcing phases in this region. The β-phase particles are relatively small and uniformly distributed with a high density, and no significant macroscopic segregation is observed. Figure 7b shows the microstructure of the middle region, where the microstructure is more complex, with local aggregation of reinforcing phases. Compared to the top region, the β-phase particles in the middle region are larger, with reduced distribution density and fewer particles. This change is due to multiple thermal cycles in the middle region during welding, causing part of the β-phase to dissolve into the α(Al) matrix while the rest grows. Although the Mg2Si particles remain uniformly distributed, their density increases in certain regions, suggesting the possible presence of local overheating or uneven cooling rates, leading to the aggregation of reinforcing phases in some areas, which could affect the alloy’s microstructural uniformity. Figure 7c shows the microstructure of the bottom region, exhibiting noticeable aggregation of reinforcing phases, particularly the significant enlargement and local aggregation of β-phase particles. This phenomenon may be related to the slower cooling rate in this region, allowing more time for the reinforcing phases to aggregate during cooling. Although the Mg2Si particles are evenly distributed, their number decreases. Compared to the top and middle regions, the β-phase particles at the bottom are coarser and the aggregation is more pronounced, which may affect the mechanical properties of this region, particularly the yield strength and toughness, leading to potential local weaknesses. Overall, through comparative analysis of the microstructure in different regions, significant differences in the microstructure of 5356 aluminum alloy are observed as the position changes. The top region exhibits a more uniform microstructure with a good distribution of reinforcing phases, contributing to improved mechanical properties. In contrast, the middle and bottom regions show aggregation of reinforcing phases, particularly the enlargement and aggregation of β-phase particles, which may result in uneven mechanical properties of the alloy. To optimize the overall performance of the alloy, it is essential to control the heat input and cooling rate during welding, reduce the local aggregation of reinforcing phases, and ensure the uniformity and high performance of the material.
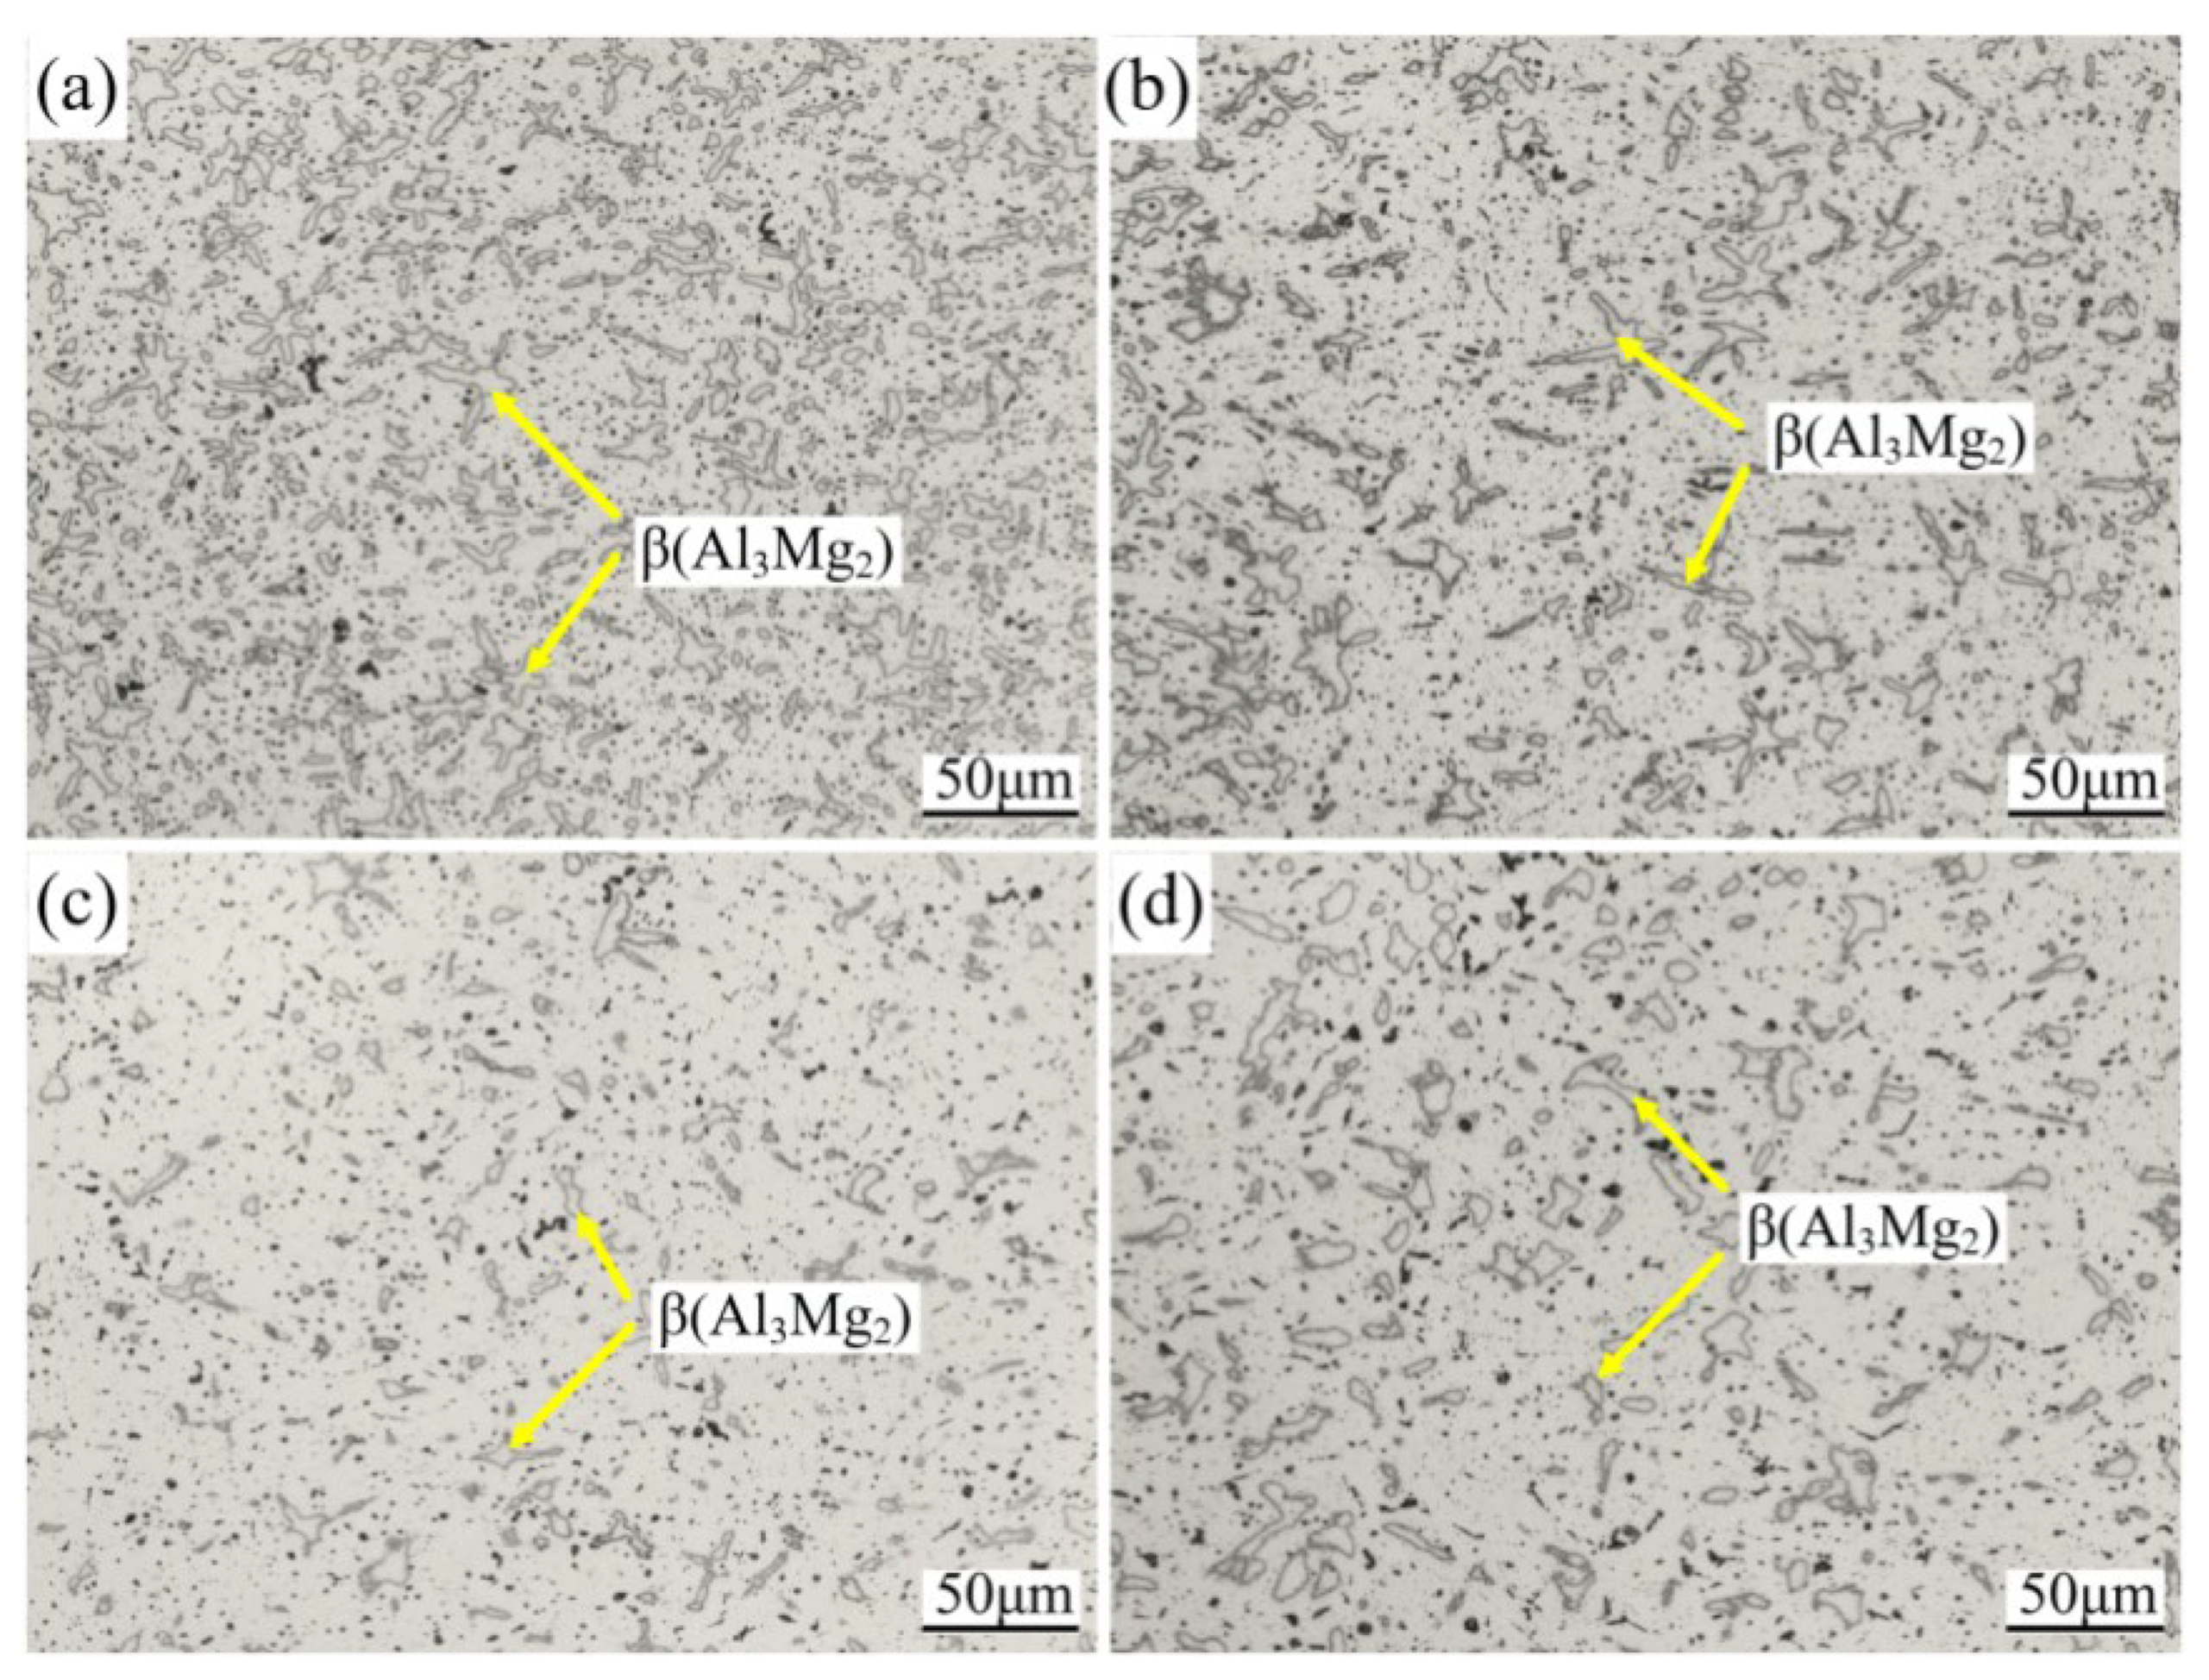
Figure 8 shows the microstructure of 5356 aluminum alloy WAAM samples at different heat input levels. It can be observed that as the heat input increases gradually from 87.5 J/mm to 190.0 J/mm, the microstructure of the alloy undergoes various changes. Figure 8a shows the microstructure at a heat input of 87.5 J/mm, where the microstructure is relatively uniform, and the β-phase is dispersed with smaller particles. This indicates that at a lower heat input, the solidification rate of the alloy is faster, leading to the precipitation of fine β-phase particles, which predominantly take a granular shape. The inter-particle spacing is larger, and there is a noticeable aggregation of particles in some areas. Figure 8b shows the microstructure at a heat input of 120.0 J/mm, where the size of the β-phase particles increases and the distribution changes. The higher heat input slows down the solidification process, leading to grain growth and promoting the expansion of the β-phase. At this stage, the tendency for β-phase aggregation becomes more pronounced, and the grain boundaries become more blurred, indicating that the heat input at this temperature facilitates further expansion of the β-phase. In Figure 8c, with a heat input of 154.2 J/mm, the β-phase particles further increase in size and begin to form a connected network structure. This change typically indicates that a higher heat input raises the alloy’s temperature, promoting more complete dissolution and recrystallization processes. The β-phase takes on a network or plate-like morphology, and the distribution of grain boundaries becomes more complex, which may affect the material’s mechanical properties, particularly its fracture toughness. Figure 8d shows that at a heat input of 190.0 J/mm, the size of the β-phase particles reaches its maximum, and a more pronounced network structure is observed. This indicates that at higher heat input, the alloy’s temperature becomes too high, potentially causing excessive grain growth and overgrowth of the β-phase, which can further affect the material’s uniformity and mechanical properties. Overall, as the heat input increases, the microstructure of 5356 aluminum alloy evolves from fine particles to larger particles and eventually to a connected network structure. This process is closely related to the effect of heat input on the alloy’s solidification behavior, grain growth, and phase transformation.

3.4. EDS Analysis

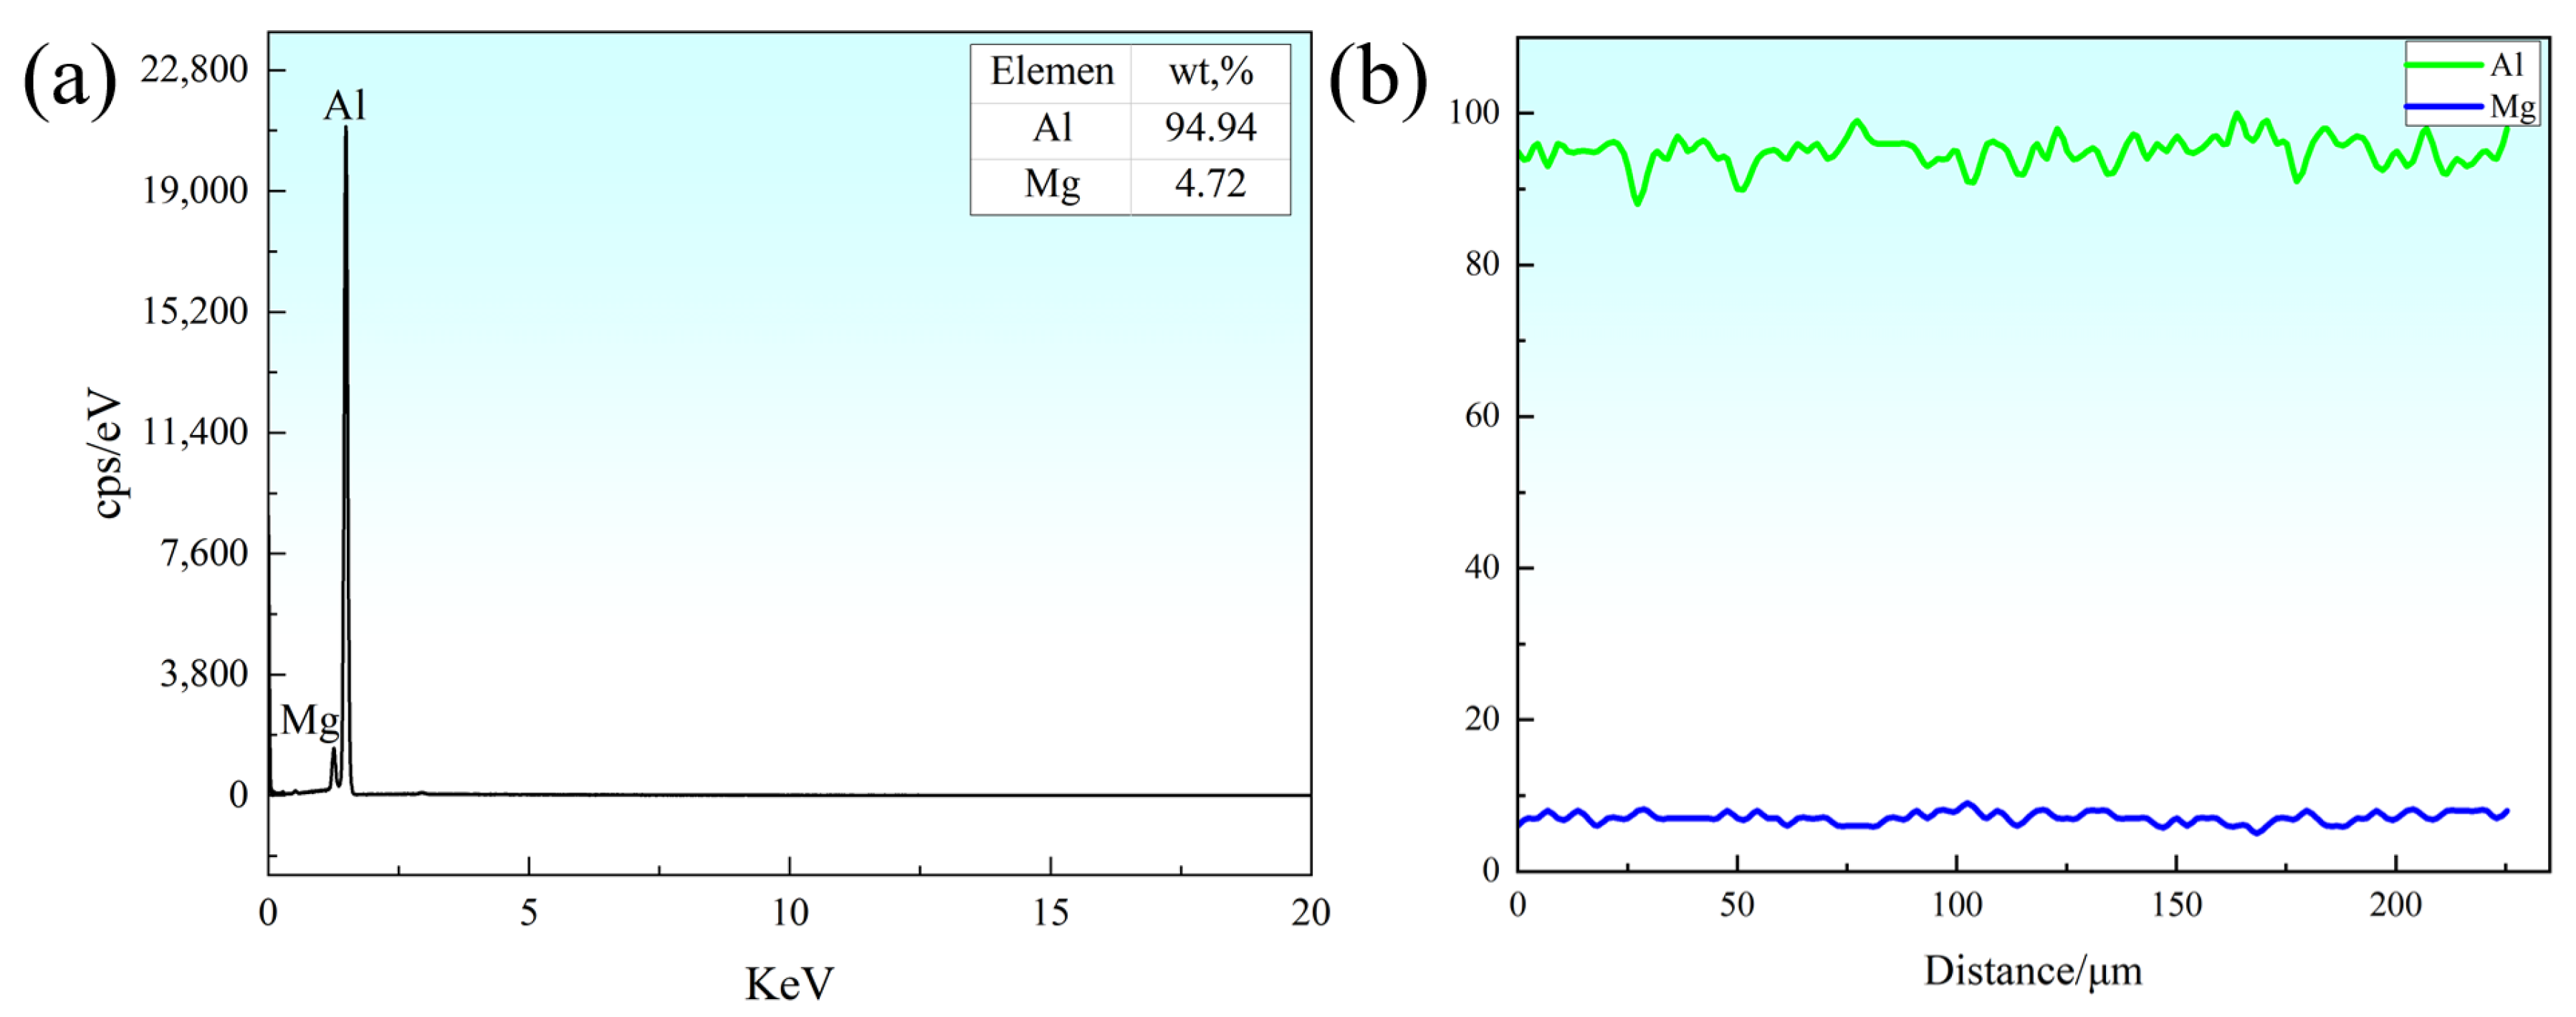
EDS analysis was performed on the 5356 aluminum alloy WAAM sample, using the sample with a heat input of 120.0 J/mm as an example. Figure 9 shows the EDS point scan and line scan of the 5356 aluminum alloy WAAM sample. Figure 9a shows the EDS point scan, which displays the elemental composition distribution at specific points. The EDS scan reveals that the main elements at this point are aluminum (Al) and magnesium (Mg). According to the spectrum data, the mass fraction of aluminum is 94.94%, while that of magnesium is 4.72%. Aluminum dominates the composition in this region, confirming that aluminum is the primary component of the 5356 aluminum alloy, while magnesium, as a strengthening element, is also present but at a lower concentration. This is consistent with the standard composition of 5356 aluminum alloy, which is primarily used to provide strength and corrosion resistance. In the spectrum, the characteristic peak of aluminum is located in a higher energy range, while the characteristic peak of magnesium is in a lower energy range, and the magnesium peak is weaker, reflecting the relatively low content of magnesium. Figure 9b shows the EDS line scan, with the scan direction along a line on the sample surface. The scanning results indicate that aluminum remains relatively stable and present at a high concentration across the entire scanned area, occupying the majority of the scan region. This suggests that aluminum is uniformly distributed within the sample, and the aluminum matrix dominates the composition of the alloy. Magnesium also shows a uniform distribution within the scanned area, but its content is lower than that of aluminum, and there is no significant variation throughout the scan. This indicates that magnesium is well dissolved in the alloy, with no evidence of phase separation. This result demonstrates that the distribution of magnesium in 5356 aluminum alloy is fairly uniform, with no magnesium-rich or magnesium-poor regions, indicating that magnesium has a high solubility in the alloy and that no significant precipitation or segregation of magnesium occurred during the welding process. Overall, the EDS analysis results validate the compositional distribution characteristics of 5356 aluminum alloy. The ratio of aluminum to magnesium in the alloy meets the design specifications, and the uniform distribution of magnesium, with no significant phase separation or precipitation, is beneficial for the alloy’s mechanical properties and corrosion resistance. Furthermore, the EDS analysis further indicates that the alloy maintains good elemental uniformity during the WAAM process, contributing to more stable material properties.

3.5. Microhardness Analysis

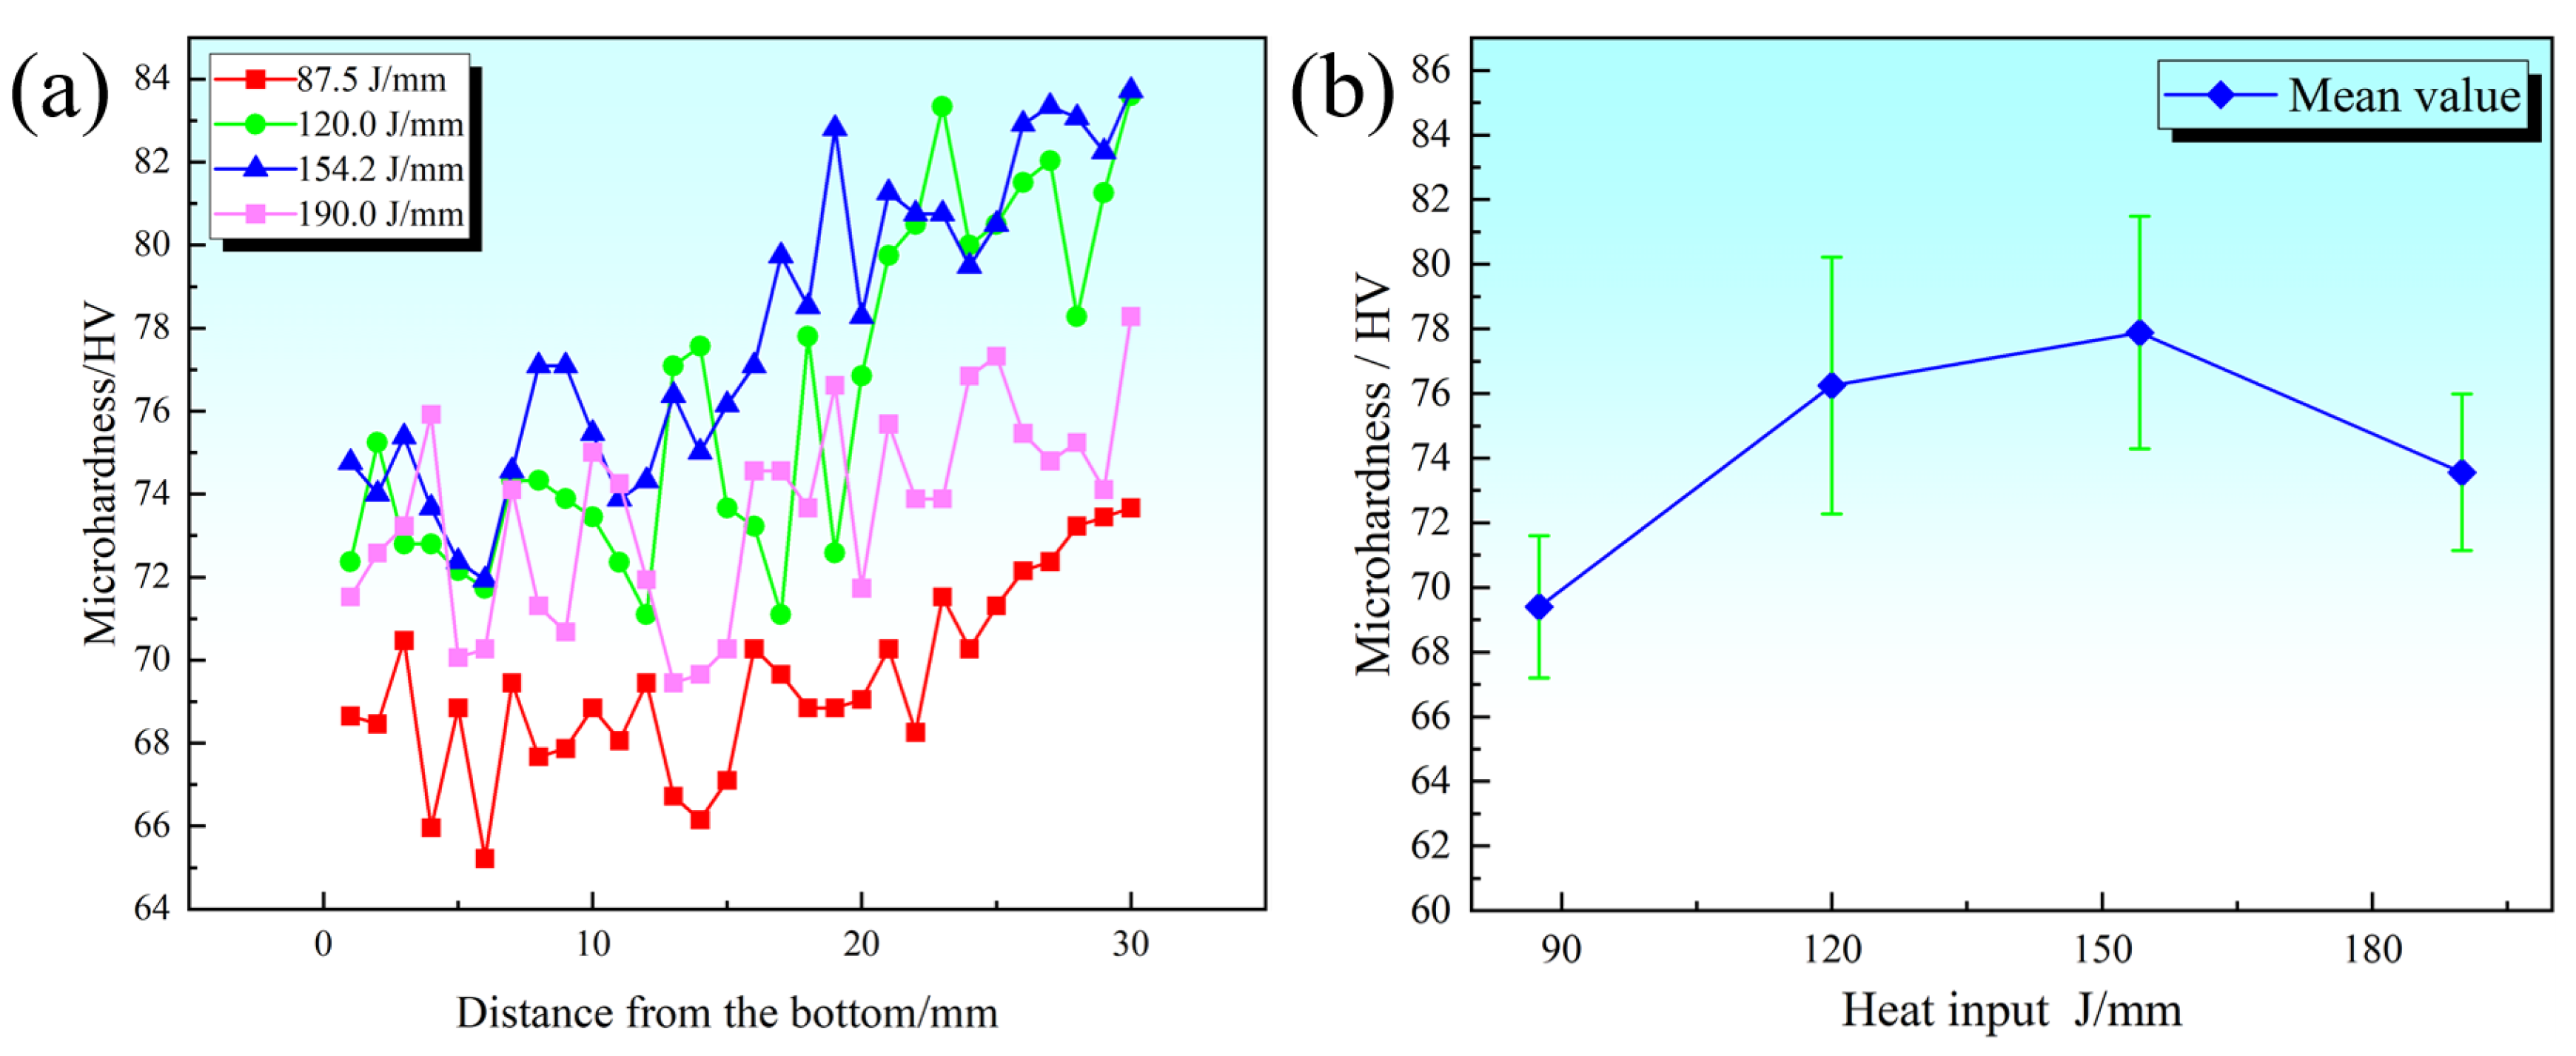
Figure 10 shows the microhardness of 5356 aluminum alloy WAAM specimens under different low heat input conditions. The microhardness is similar at the bottom and middle but increases at the top. This is primarily due to the absence of subsequent weld passes or the presence of very few, leading to fewer thermal cycles, reduced heat accumulation, and faster cooling, which promotes the formation of fine grain structures and consequently increases hardness. The data show significant fluctuations, which may be attributed to two factors: first, the cooling rate at the interlayer bonding areas is high, preventing timely gas expulsion and leading to porosity defects; second, repeated heating at the interlayer bonding areas causes the grain size of the α(Al) matrix to increase, thus decreasing the hardness at the bonding interfaces. It is also observed that as the heat input increases from 87.5 J/mm to 154.2 J/mm, the hardness gradually increases; however, when the heat input reaches 190.0 J/mm, the hardness decreases. The average hardness increases from 69.40 HV at 87.5 J/mm to 77.89 HV at 154.2 J/mm, then decreases to 73.56 HV at 190.0 J/mm. This is because at lower heat inputs, the faster cooling rate results in a higher degree of undercooling, which facilitates the formation of fine and uniform grain structures, thereby increasing hardness. However, when the heat input is too high, the slower cooling rate promotes grain growth, which may lead to a reduction in material hardness.

3.6. Tensile Properties and Fracture Morphology

Taking the 5356 aluminum alloy WAAM sample with a heat input of 120.0 J/mm as an example, the tensile performance at different positions is analyzed. Figure 11 shows significant anisotropy in the tensile performance across positions. Studies [32,33,34,35] indicate that interlayer porosity accumulation and uneven microstructure are the main causes of anisotropy. The tensile strength and elongation of the horizontal samples are slightly higher than the vertical samples, as the latter contain interlayer bonding defects like porosity, reducing the effective load-bearing area and mechanical properties. The upper and middle parts have similar properties, while the lower part shows a significant reduction in tensile strength. This could be due to slower cooling in the lower region or the impact of multiple thermal cycles, leading to grain coarsening and reduced tensile strength.
Figure 12 shows the mechanical properties of 5356 aluminum alloy WAAM samples at different low heat input levels. As can be seen from the figure, with the increase in heat input, the tensile strength and elongation of both the horizontal and vertical samples first increase and then decrease. This is because at a heat input of 87.5 J/mm, the welding heat input is relatively low, and the heat generated by the molten pool is limited, unable to fully melt the contact surfaces between the materials. This situation may lead to incomplete metallurgical bonding between metal layers, particularly in the vertical direction, where the molten pool does not fully expand, resulting in poor inter-layer bonding quality and weakening the overall strength and ductility of the structure. As the heat input increases to 120.0 J/mm, the heat input increases and the molten pool cooling rate becomes moderate, which is favorable for complete metallurgical bonding and grain growth. At the same time, the distribution of second-phase precipitates becomes more uniform, resulting in maximum tensile strength and elongation. When the heat input increases further to 154.2 J/mm or 190.0 J/mm, excessive heat input accelerates grain coarsening, significantly reducing the material’s strength. Additionally, more metallurgical defects such as porosity and inclusions may form within the molten pool, which become preferential sites for crack initiation and propagation, further reducing the material’s ductility. Particularly in the vertical direction, the metallurgical quality of the inter-layer bonding decreases due to excessive heat input, resulting in a more significant reduction in mechanical properties.
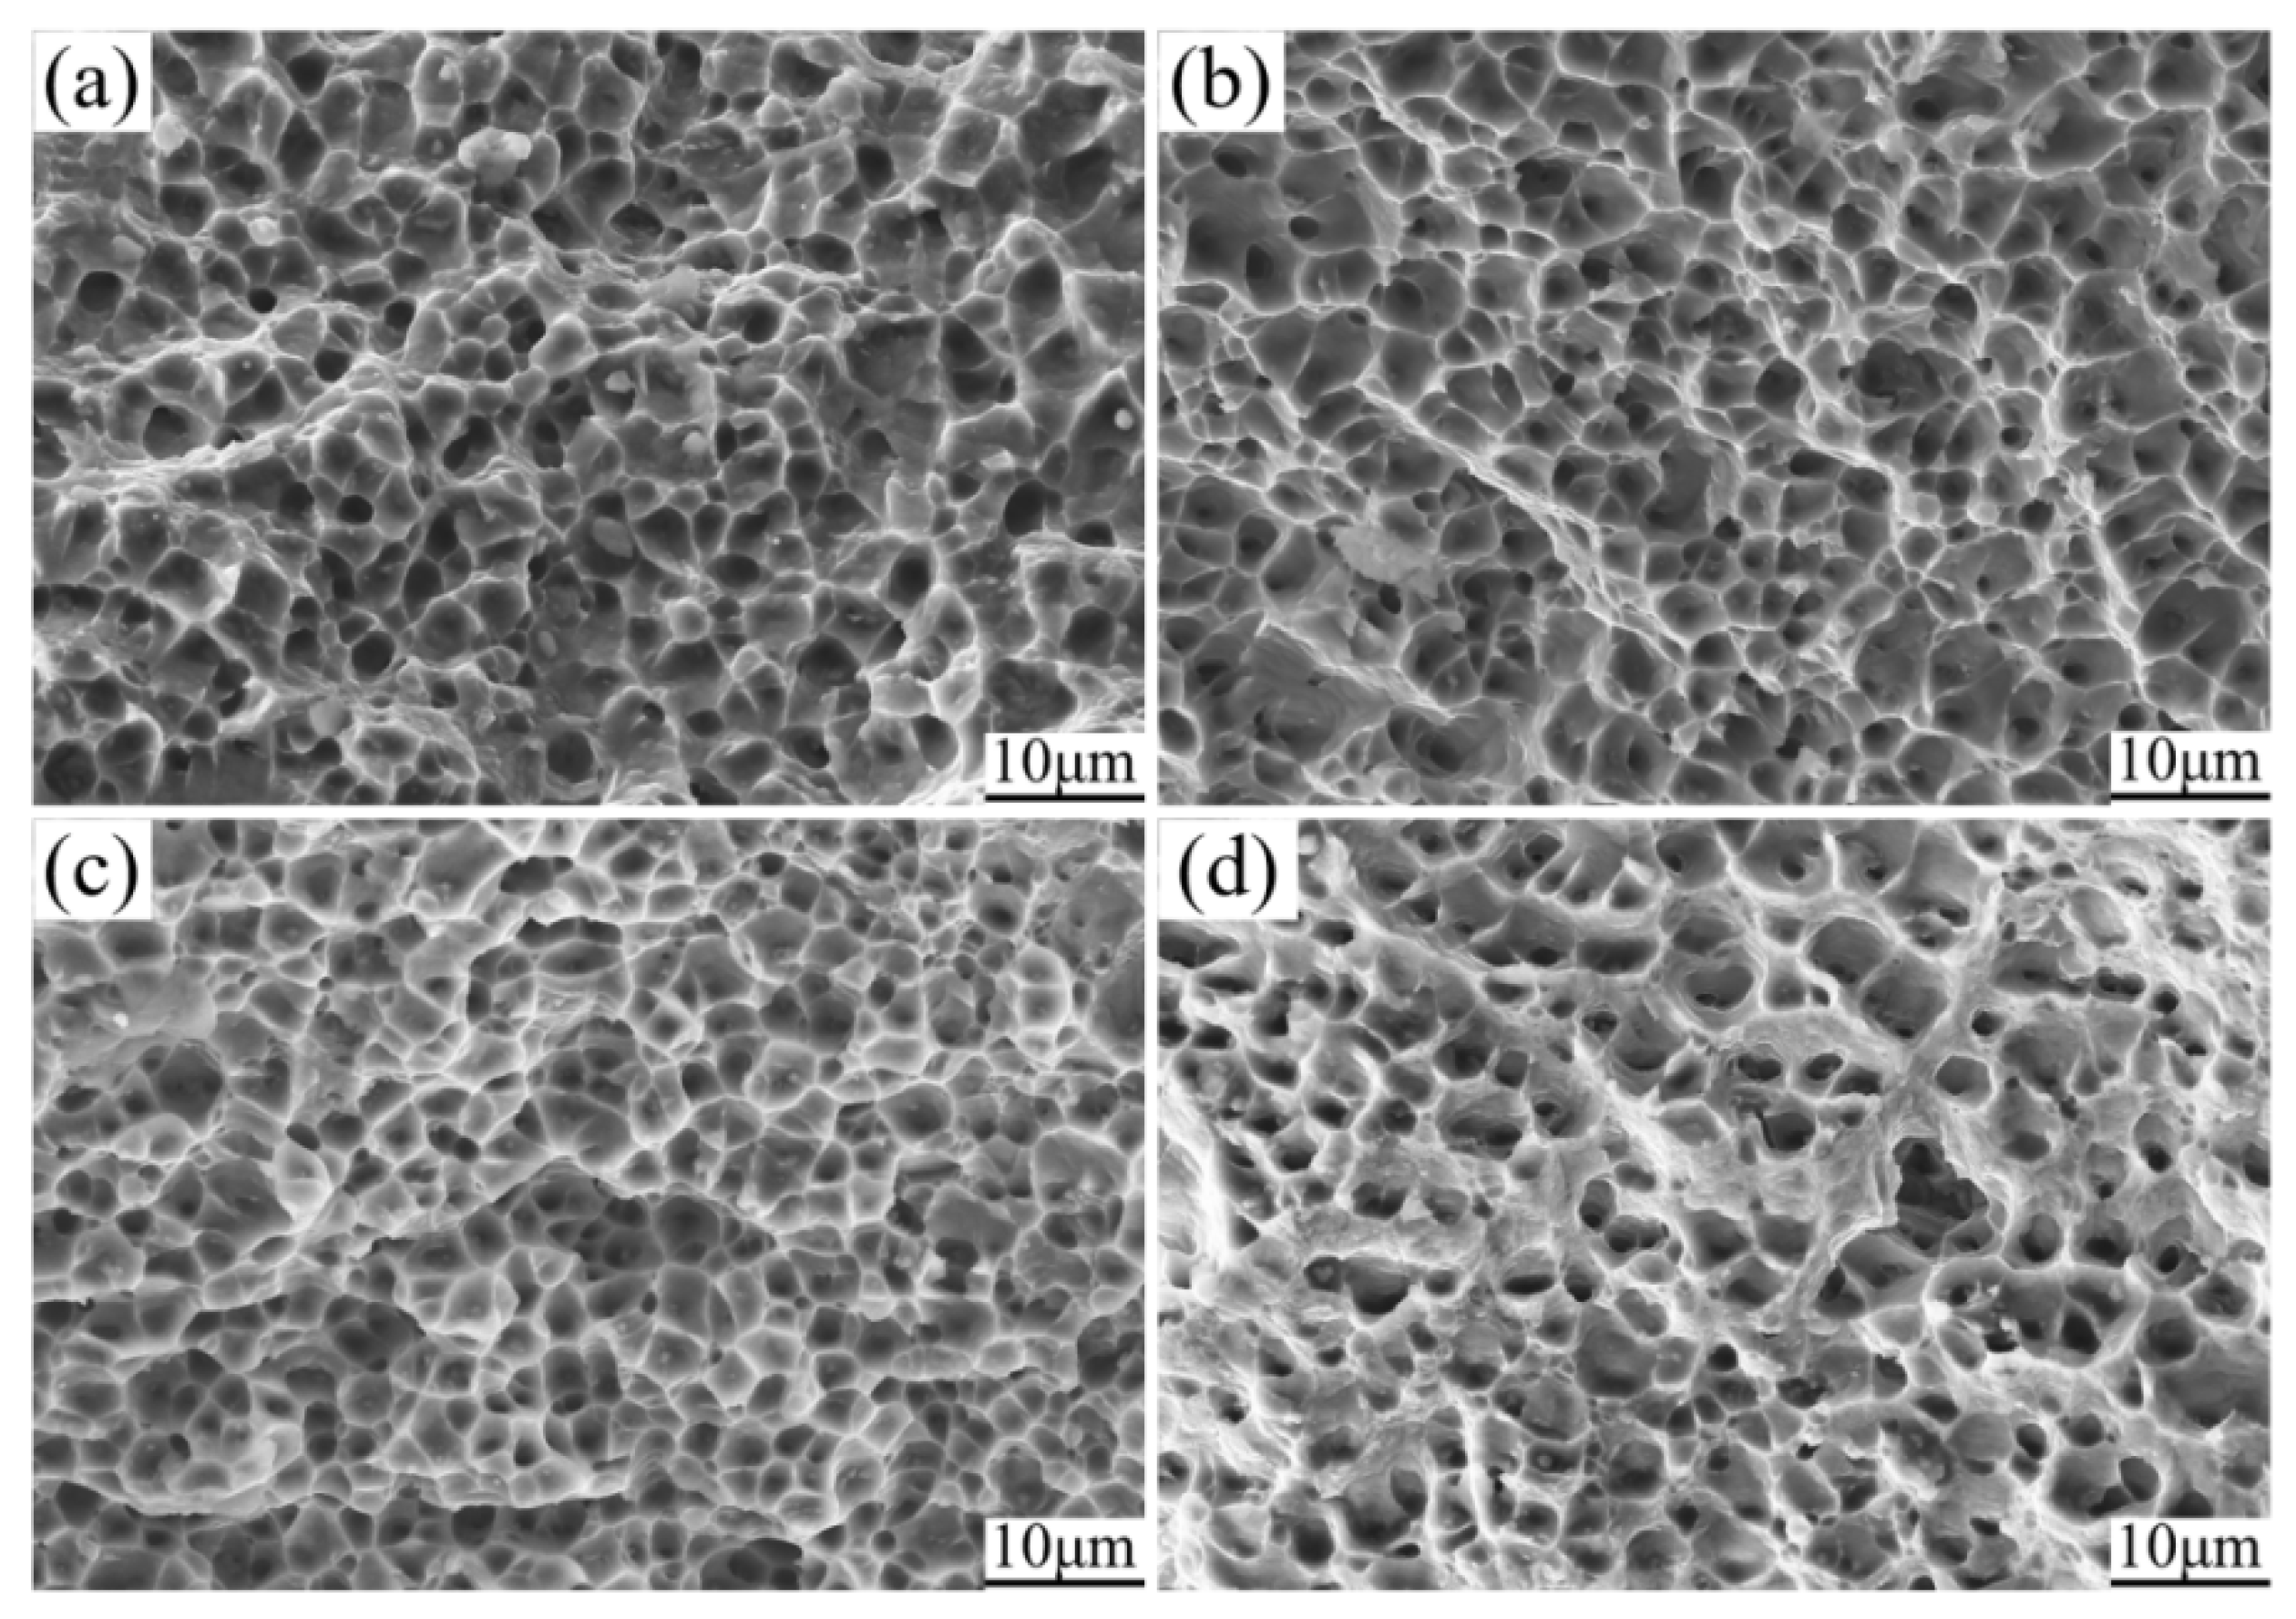
In the analysis of the tensile fracture morphology of 5356 aluminum alloy WAAM samples at different positions, using the sample with a heat input of 120.0 J/mm as an example, Figure 13 illustrates the fracture morphology characteristics. All samples show numerous and dense dimples, indicative of ductile fracture, with the fracture mode being ductile in both transverse and longitudinal tensile tests. Granular second-phase particles are observed at the bottom of the dimples, and their presence contributes to microvoid formation, ultimately leading to fracture in a transgranular fracture mode. The fracture at the top shows a relatively fine dimple structure, indicating that the fracture in this region is primarily ductile. This is due to the fact that the top region experiences fewer thermal cycles and rapid cooling, resulting in fine grains, dense metal structure, and better ductility. The dimple structure at the middle fracture is relatively uniform but slightly coarser, indicating that the fracture remains ductile, but the plasticity is slightly lower than that of the top region. The middle region undergoes more thermal cycles with moderate cooling rates, which may lead to some degree of grain coarsening. Additionally, due to higher heat input, internal porosity or inclusions may form, slightly reducing ductility. The dimple structure at the bottom is larger and more unevenly distributed, with microcracks or voids observed, indicating a further reduction in ductility in this region. This is due to the bottom region being closer to the substrate, where the thermal influence is greatest, and heat input causes significant grain coarsening. In the vertical sample fractures, larger dimples and voids are visible, along with tear marks and cracks, reflecting uneven heating in the vertical direction. Inter-layer bonding may have voids or weak bonding defects, further reducing ductility. In summary, the fracture morphology of samples at different positions shows a certain degree of consistency; however, due to differences in heat input and microstructure, the mechanical properties exhibited in localized regions vary.

4. Conclusions

(1)
As the heat input increases from 87.5 J/mm to 190.0 J/mm, both the width and single-layer height of the vertical wall specimen exhibit an increasing trend. The specimen width increases from 5.22 mm at 87.5 J/mm to 8.87 mm at 190.0 J/mm, a change of 3.65 mm, indicating a noticeable increase. The single-layer height increases from 1.38 mm to 1.56 mm, a change of 0.16 mm, which is relatively small. Overall, the effect of the heat input on the specimen width is greater than on the single-layer height. Furthermore, when the heat input is 120 J/mm, the specimen formation is optimal.
(2)
The microstructure of the vertical wall specimen mainly consists of an α(Al) matrix and a skeletal β(Al3Mg2) phase. As the heat input increases, part of the β(Al3Mg2) phase gradually dissolves into the α(Al) matrix, resulting in the decreased distribution density, reduced quantity, and increased size of the β(Al3Mg2) phase.
(3)
[Q13] During the increase in heat input from 87.5 J/mm to 154.2 J/mm, the average hardness gradually increases from 69.40 HV to 77.89 HV. However, when the heat input increases to 190.0 J/mm, the excessive heat input slows the cooling rate, resulting in grain growth and a decrease in microhardness to 73.56 HV. Additionally, the hardness increases gradually from the bottom to the top of the specimen.
(4)
As the heat input increases, the tensile strength and elongation of both horizontal and vertical samples first increase, then decrease. Horizontal samples show slightly higher tensile strength and elongation. Fracture surfaces in both transverse and longitudinal tests exhibit dense dimples, indicating ductile fracture.
(5)
[Q13] The microstructure and mechanical properties of the 5356 aluminum alloy WAAM sample exhibit regional differences. In the upper region, the β(Al3Mg2) phase is evenly distributed, with high density and small size, showing fine and uniform fracture dimples. The microhardness and mechanical properties are optimal, with a tensile strength of 245.88 MPa. In the middle region, the distribution density of the β phase significantly decreases, with reduced quantity and increased size. The fracture dimples are relatively uniform but slightly coarser, resulting in a decrease in microhardness and mechanical properties. In the lower region, due to a higher undercooling degree, no significant dissolution of the β phase occurs. The phase density in the α matrix is relatively high, and the fracture dimples are large and unevenly distributed, leading to the lowest microhardness and mechanical properties, with a tensile strength of 236.00 MPa.

Author Contributions

Conceptualization, X.C. and Z.L.; methodology, X.Z.; software, Y.W.; validation, Y.W., X.C. and W.Q.; formal analysis, Y.W.; investigation, X.Z.; resources, Z.L.; data curation, X.Z.; writing—original draft preparation, Y.W.; writing—review and editing, X.Z.; visualization, X.C.; supervision, W.Q.; project administration, W.Q.; funding acquisition, Z.L. All authors have read and agreed to the published version of the manuscript.

Funding

This research received no external funding.

Data Availability Statement

The original contributions presented in this study are included in the article material. Further inquiries can be directed to the corresponding author.

Acknowledgments

This work was supported by Xinjiang University, China.

Conflicts of Interest

The authors declare no conflicts of interest.

References

  1. Pan, J.; Yuan, B.; Ge, J.; Ren, Y.; Chen, H.; Zhang, L.; Lu, H. Influence of arc mode on the microstructure and mechanical properties of 5356 aluminum alloy fabricated by wire arc additive manufacturing. J. Mater. Res. Technol. 2022, 20, 1893–1907. [Google Scholar] [CrossRef]
  2. Gungor, B.; Kaluc, E.; Taban, E.; Aydin, S.I.K. Mechanical and microstructural properties of robotic Cold Metal Transfer (CMT) welded 5083-H111 and 6082-T651 aluminum alloys. Mater. Design 2014, 54, 207–211. [Google Scholar] [CrossRef]
  3. Tao, Y.; Ren, X.; Chen, S.; Jiang, X. Grain refinement and property improvements of Al–Zn–Mg–Cu alloy by heterogeneous particle addition during wire and arc additive manufacturing. J. Mater. Res. Technol. 2022, 16, 824–839. [Google Scholar] [CrossRef]
  4. Karayel, E.; Bozkurt, Y. Additive manufacturing method and different welding applications. J. Mater. Res. Technol. 2020, 9, 11424–11438. [Google Scholar] [CrossRef]
  5. Chen, S.; Xu, M.; Yuan, T.; Jiang, X.; Zhang, H.; Zheng, X. Thermal–microstructural analysis of the mechanism of liquation cracks in wire-arc additive manufacturing of Al–Zn–Mg–Cu alloy. J. Mater. Res. Technol. 2022, 16, 1260–1271. [Google Scholar] [CrossRef]
  6. Wu, B.; Pan, Z.; Ding, D.; Cuiuri, D.; Li, H. Effects of heat accumulation on microstructure and mechanical properties of Ti6Al4V alloy deposited by wire arc additive manufacturing. Addit. Manuf. 2018, 23, 151–160. [Google Scholar] [CrossRef]
  7. Ding, D.; Pan, Z.; Van Duin, S.; Li, H.; Shen, C. Fabricating superior NiAl bronze components through wire arc additive manufacturing. Materials 2016, 9, 652. [Google Scholar] [CrossRef]
  8. Shen, C.; Pan, Z.; Cuiuri, D.; Dong, B.; Li, H. In-depth study of the mechanical properties for Fe3Al based iron aluminide fabricated using the wire-arc additive manufacturing process. Mater. Sci. Eng. A 2016, 669, 118–126. [Google Scholar] [CrossRef]
  9. Xu, X.; Ding, J.; Ganguly, S.; Diao, C.; Williams, S. Oxide accumulation effects on wire+ arc layer-by-layer additive manufacture process. J. Mater. Process. Technol. 2018, 252, 739–750. [Google Scholar] [CrossRef]
  10. Gu, J.; Bai, J.; Ding, J.; Williams, S.; Wang, L.; Liu, K. Design and cracking susceptibility of additively manufactured Al-Cu-Mg alloys with tandem wires and pulsed arc. J. Mater. Process. Technol. 2018, 262, 210–220. [Google Scholar] [CrossRef]
  11. Aldalur, E.; Suárez, A.; Veiga, F. Metal transfer modes for Wire Arc Additive Manufacturing Al-Mg alloys: Influence of heat input in microstructure and porosity. J. Mater. Process. Technol. 2021, 297, 117271. [Google Scholar] [CrossRef]
  12. Sahul, M.; Pavlík, M.; Sahul, M.; Kovačócy, P.; Martinkovič, M. Effect of travel speed on the properties of 5087 aluminum alloy walls produced by wire and arc additive manufacturing. J. Mater. Eng. Perform. 2024, 33, 8582–8600. [Google Scholar] [CrossRef]
  13. Wang, B.; Li, R.; Zhou, X.; Liu, F.; Wei, L.; Tian, L.; Song, X.; Tan, C. Insight into role of arc torch angle on wire arc additive manufacturing characteristics of ZL205A aluminum alloy. Materials 2024, 17, 3771. [Google Scholar] [CrossRef] [PubMed]
  14. Zhang, C.; Gao, M.; Zeng, X. Workpiece vibration augmented wire arc additive manufacturing of high strength aluminum alloy. J. Mater. Process. Technol. 2019, 271, 85–92. [Google Scholar] [CrossRef]
  15. Zhou, Y.; Lin, X.; Kang, N.; Huang, W.; Wang, Z. Mechanical properties and precipitation behavior of the heat-treated wire+ arc additively manufactured 2219 aluminum alloy. Mater. Charact. 2021, 171, 110735. [Google Scholar] [CrossRef]
  16. Derekar, K.; Lawrence, J.; Melton, G.B.; Addison, A.; Zhang, X.; Xu, L. Influence of interpass temperature on wire arc additive manufacturing (WAAM) of aluminium alloy components. In Proceedings of the MATEC Web of Conferences, Sibiu, Romania, 7–9 June 2017; p. 5001. [Google Scholar] [CrossRef]
  17. Ahsan, M.R.; Seo, G.J.; Fan, X.S.; Liaw, P.K.; Motaman, S.; Haase, C.; Kim, D.B. Effects of process parameters on bead shape microstructure and mechanical properties in wire+ arc additive manufacturing of Al01CoCrFeNi high-entropy alloy. J. Manuf. Process. 2021, 68, 1314–1327. [Google Scholar] [CrossRef]
  18. Wang, S.; Gu, H.; Wang, W.; Li, C.; Ren, L.; Wang, Z.; Zhai, Y.; Ma, P. The influence of heat input on the microstructure and properties of wire-arc-additive-manufactured Al-Cu-Sn alloy deposits. Metals 2020, 10, 79. [Google Scholar] [CrossRef]
  19. Zhou, Y.; Lin, X.; Kang, N.; Huang, W.; Wang, J.; Wang, Z. Influence of travel speed on microstructure and mechanical properties of wire+ arc additively manufactured 2219 aluminum alloy. J. Mater. Sci. Technol. 2020, 37, 143–153. [Google Scholar] [CrossRef]
  20. Wang, D.; Lu, J.; Tang, S.; Yu, L.; Fan, H.; Ji, L.; Liu, C. Reducing porosity and refining grains for arc additive manufacturing aluminum alloy by adjusting arc pulse frequency and current. Materials 2018, 11, 1344. [Google Scholar] [CrossRef]
  21. Lupo, M.; Ajabshir, S.Z.; Sofia, D.; Barletta, D.; Poletto, M. Experimental metrics of the powder layer quality in the selective laser sintering process. Powder Technol. 2023, 419, 118346. [Google Scholar] [CrossRef]
  22. Prasad, R.; Yuvaraj, N.; Vipin; Gopal, A. Experimental investigation of process parameters of cold metal transfer welding-based wire arc additive manufacturing of aluminum 4047 alloy using response surface methodology. Weld. World 2024, 68, 2837–2852. [Google Scholar] [CrossRef]
  23. Chen, C.; Sun, G.; Du, W.; Liu, J.; Zhang, H. Effect of equivalent heat input on WAAM Al-Si alloy. Int. J. Mech. Sci. 2023, 238, 107831. [Google Scholar] [CrossRef]
  24. Zhao, Y.; Jia, Y.; Chen, S.; Shi, J.; Li, F. Process planning strategy for wire-arc additive manufacturing: Thermal behavior considerations. Addit. Manuf. 2020, 32, 100935. [Google Scholar] [CrossRef]
  25. Guo, Y.; Han, Q.; Hu, J.; Yang, X.; Mao, P.; Wang, J.; Sun, S.; He, Z.; Lu, J.; Liu, C. Comparative study on wire-arc additive manufacturing and conventional casting of Al–Si alloys: Porosity, microstructure and mechanical property. Acta Metall. Sin. Engl. Lett. 2022, 35, 475–485. [Google Scholar] [CrossRef]
  26. Ma, Y.; Yang, Y.; Jia, X.; Zhao, H.; Qu, Z.; Wang, D.; Wang, B. Effect of welding heat input on microstructure and properties of coarse-grained HAZ of 500 MPa high-strength low-alloy steel. Trans. Indian Inst. Met. 2022, 75, 1877–1884. [Google Scholar] [CrossRef]
  27. Yu, C.; Zhang, D.; Liu, Z.; Wu, D.; Zhong, Y.; Wu, J. Study on nitrogen pores, microstructure, and mechanical properties of nickel-free high-nitrogen stainless steel fabricated via LDED regulated by heat input. Virtual Phys. Prototyp. 2025, 20, 2445711. [Google Scholar] [CrossRef]
  28. Nagasai, B.P.; Malarvizhi, S.; Balasubramanian, V. Effect of interlayer delay on microstructure and bead geometry of wire arc additive manufactured low carbon steel components. Int. J. Interact. Des. Manuf. 2023, 17, 939–946. [Google Scholar] [CrossRef]
  29. Protsenko, N.A. Status of normative base, certification and attestation of welding consumables in ukraine. Paton Weld. J. 2014, 6–7, 159–162. [Google Scholar] [CrossRef]
  30. Li, Y. The Situation of New National Standard Designations in GB/T3190-2008 “Chemical Composition of Deformed Aluminum and Aluminum Alloys”. Nonferrous Met. Process. 2009, 38, 20–21. [Google Scholar]
  31. Kutelu, B.J.; Ogundeji, F.O.; Aluko, A.O. Microstructure and Mechanical Properties of Electric arc welded Low-alloy Steel at Varied Welding Heat Input. Int. J. Adv. Multidiscip. Res. Stud. 2024, 4, 717–723. Available online: https://www.multiresearchjournal.com/arclist/list-2024.4.2/id-2565 (accessed on 18 January 2025).
  32. Liang, Y.; Shen, J.; Hu, S.; Wang, H.; Pang, J. Effect of TIG current on microstructural and mechanical properties of 6061-T6 aluminium alloy joints by TIG–CMT hybrid welding. J. Mater. Process. Technol. 2018, 255, 161–174. [Google Scholar] [CrossRef]
  33. Bai, J.; Yang, C.; Lin, S.; Dong, B.; Fan, C. Mechanical properties of 2219-Al components produced by additive manufacturing with TIG. Int. J. Adv. Manuf. Technol. 2016, 86, 479–485. [Google Scholar] [CrossRef]
  34. Liu, P.; Wang, Z.; Xiao, Y.; Horstemeyer, M.F.; Cui, X.; Chen, L. Insight into the mechanisms of columnar to equiaxed grain transition during metallic additive manufacturing. Addit. Manuf. 2019, 26, 22–29. [Google Scholar] [CrossRef]
  35. Bermingham, M.J.; StJohn, D.H.; Krynen, J.; Tedman-Jones, S.; Dargusch, M.S. Promoting the columnar to equiaxed transition and grain refinement of titanium alloys during additive manufacturing. Acta Mater. 2019, 168, 261–274. [Google Scholar] [CrossRef]
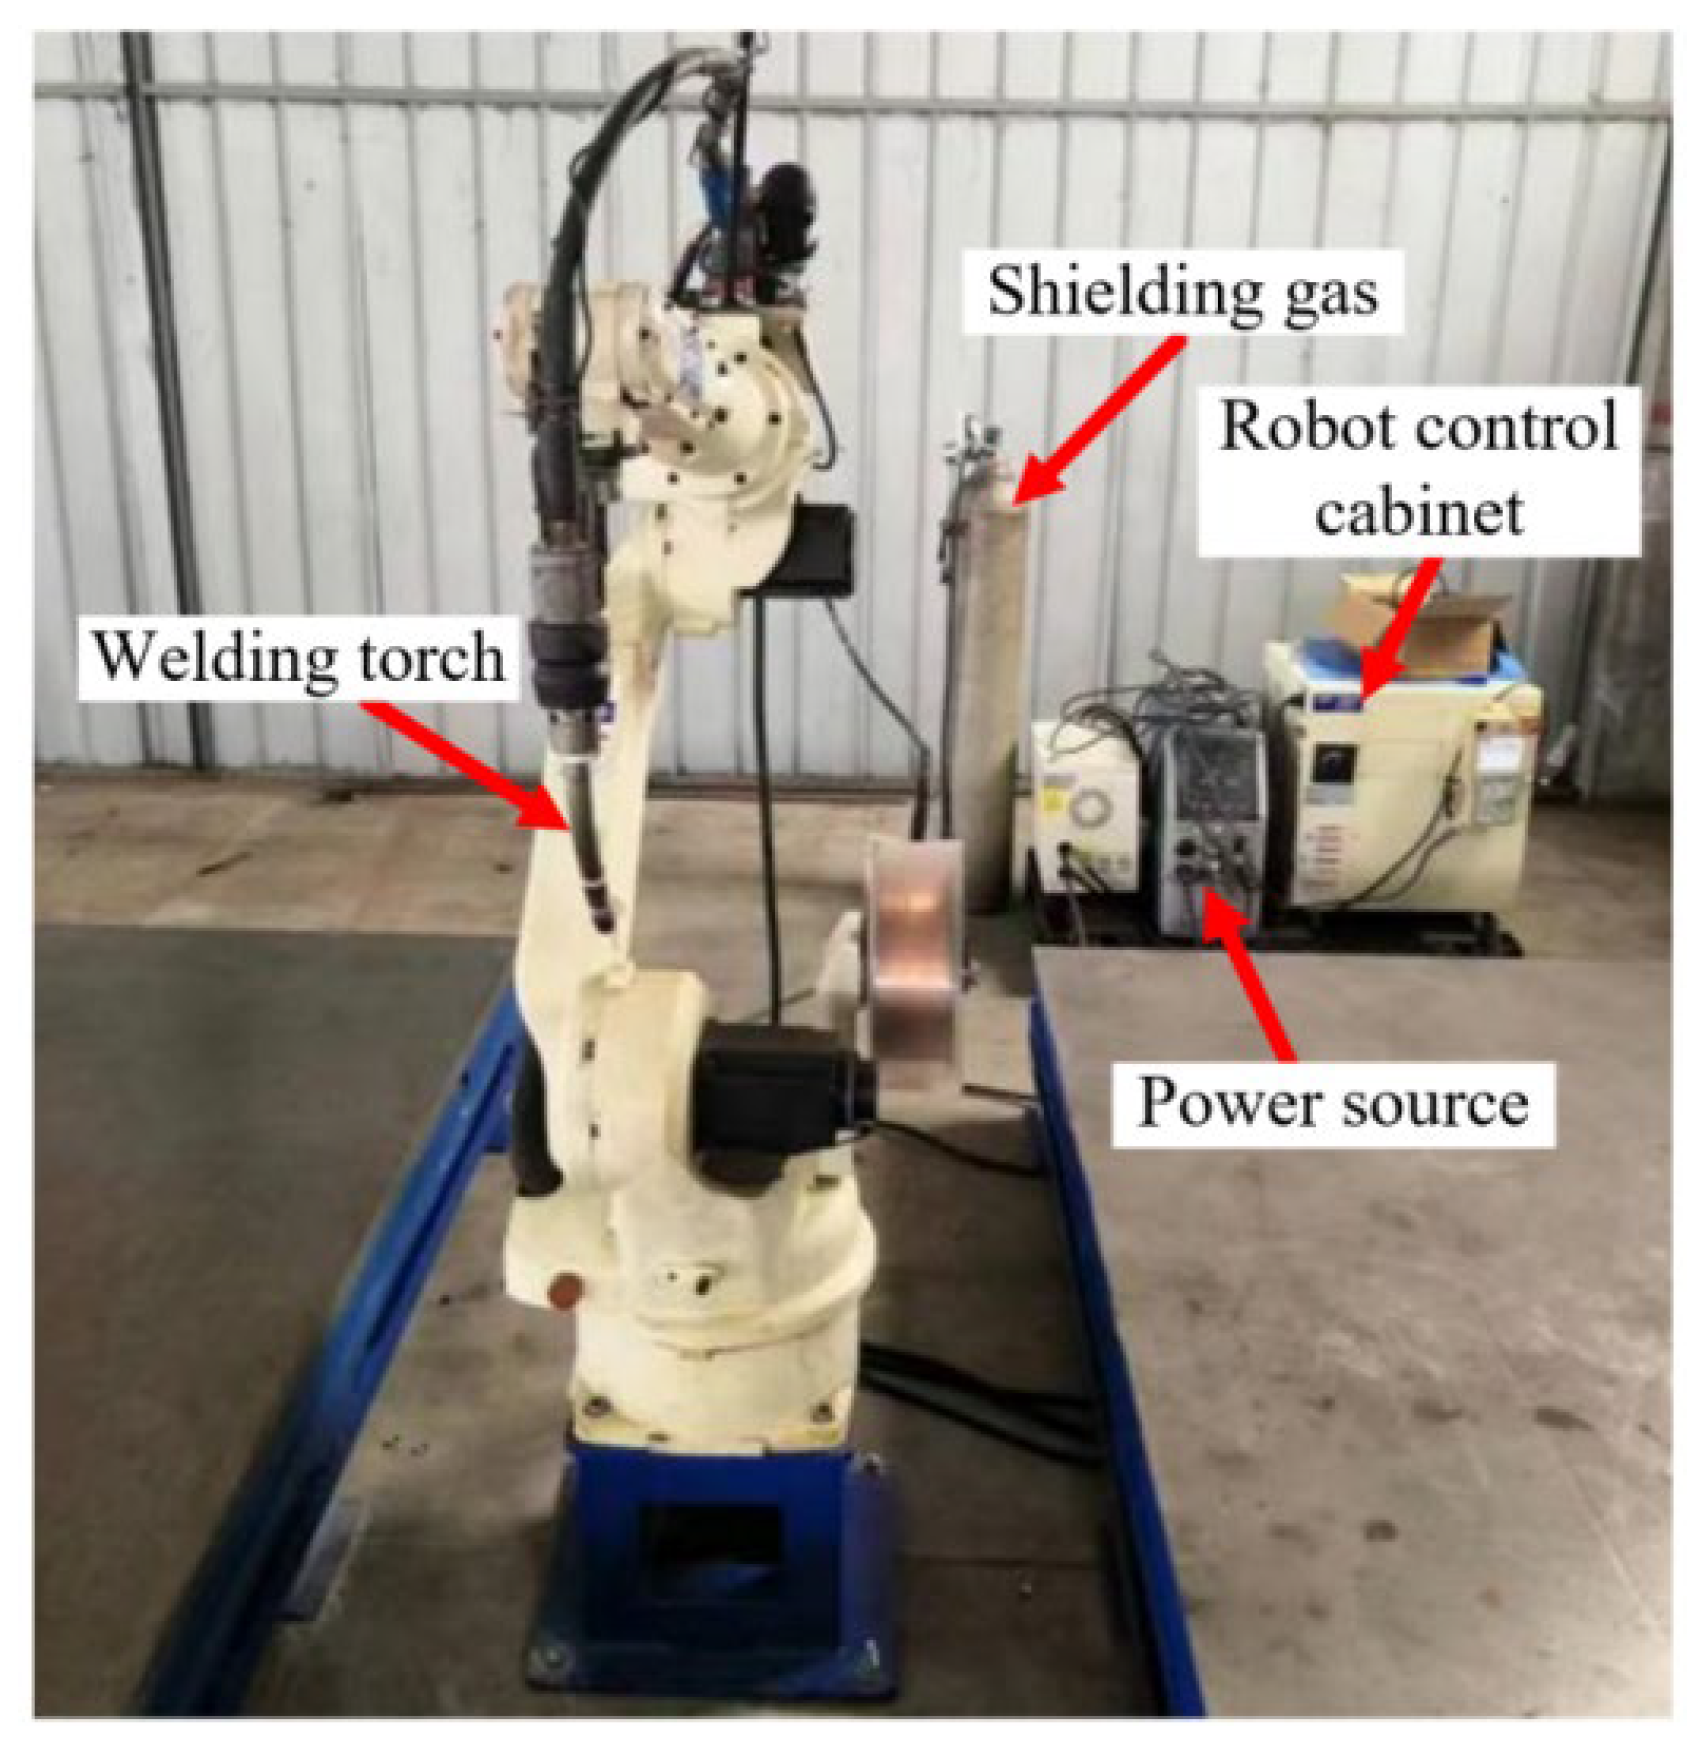
Figure 1. Schematic of arc additive manufacturing equipment.
Metals 15 00116 g001
Figure 2. (a) The reciprocating stacking path; (b) the molding effect on the substrate with and without preheating at 90 °C.
Metals 15 00116 g002
Figure 3. (a) A schematic illustration of the sampling positions; (b) the dimensions of the tensile specimens.
Metals 15 00116 g003
Figure 4. Forming effects of straight-walled specimens under different low heat input levels: (a) 87.5 J/mm; (b) 120.0 J/mm; (c) 154.2 J/mm; (d) 190.0 J/mm.
Metals 15 00116 g004
Figure 5. Variation in width and single-layer height of straight-walled specimens.
Metals 15 00116 g005
Figure 6. XRD spectrum of 5356 aluminum alloy WAAM specimens.
Metals 15 00116 g006
Figure 7. Microstructural morphology at different positions: (a) top OM image; (b) middle OM image; and (c) bottom OM image.
Metals 15 00116 g007
Figure 8. Microstructural morphology at different low heat input levels: (a) 87.5 J/mm; (b) 120.0 J/mm; (c) 154.2 J/mm; and (d) 190.0 J/mm.
Metals 15 00116 g008
Figure 9. EDS analysis of 5356 aluminum alloy WAAM specimens: (a) point scan EDS; (b) line scan EDS.
Metals 15 00116 g009
Figure 10. The microhardness of 5356 aluminum alloy WAAM specimens at different low heat input levels. (a) The hardness of the sample from the substrate to the top under different heat inputs. (b) The average hardness under different heat inputs.
Metals 15 00116 g010
Figure 11. Tensile properties at different positions.
Metals 15 00116 g011
Figure 12. Mechanical properties of 5356 aluminum alloy WAAM specimens at different low heat input levels: (a) tensile properties; (b) elongation.
Metals 15 00116 g012
Figure 13. Tensile fracture morphology of 5356 aluminum alloy WAAM samples at different positions: (a) upper fracture SEM image, (b) middle fracture SEM image, (c) lower fracture SEM image, and (d) vertical sample fracture SEM image.
Metals 15 00116 g013
Table 1. Chemical composition of material (mass fractions, %).
MaterialAlTiMgZnFeSiMnCrCuZr
5087 substrate92.15–93.550.154.5–5.20.250.400.250.7–1.10.05–0.250.050.1–0.2
5356 welding wire94.530.0750.010.120.050.140.070.01
Table 2. Experimental parameters.
NumberWelding Current/AWelding Voltage/VWelding Speed mm/sInterlayer Waiting Time/sPreheating Temperature/°CGas Flow L/minHeat Input,
J/mm
13017.5630901587.5
24018.06309015120.0
35018.56309015154.2
46019.06309015190.0
Disclaimer/Publisher’s Note: The statements, opinions and data contained in all publications are solely those of the individual author(s) and contributor(s) and not of MDPI and/or the editor(s). MDPI and/or the editor(s) disclaim responsibility for any injury to people or property resulting from any ideas, methods, instructions or products referred to in the content.