Article

On the Microstructures and Fatigue Behaviors of 316L Stainless Steel Metal Injection Molded with Gas- and Water-Atomized Powders

1
Department of Materials Science and Engineering, Southern University of Science and Technology, Shenzhen 518055, China
2
State Key Laboratory of Advanced Design and Manufacturing for Vehicle Body, College of Mechanical and Vehicle Engineering, Hunan University, Changsha 410082, China
*
Author to whom correspondence should be addressed.
Metals 2018, 8(11), 893; https://doi.org/10.3390/met8110893
Submission received: 22 October 2018 / Revised: 30 October 2018 / Accepted: 31 October 2018 / Published: 1 November 2018

Abstract

:
316L stainless steel samples are fabricated by metal injection molding using water-atomized and gas-atomized powder with different oxygen contents. The influences of oxygen on the microstructural evolution and fatigue properties of the samples are investigated. The oxygen tends to react with Mn and Si to form oxide particles during sintering. The oxides hamper the densification process and result in decreased sintered density. Moreover, their existence reduces the Mn and Si dissolving into the base metal and compromises the solution strengthening effect. The oxides lead to stress concentration in the tensile and fatigue tests and become the initiation sites of fatigue cracks. After sintering, the samples made from the gas-atomized powder have a much lower oxygen content compared to those made from the water-atomized powder, therefore, exhibiting much better mechanical properties. The tensile strength, yield strength and the elongation of the samples made from the gas-atomized powder are 560 MPa, 205 MPa, and 58%, respectively. Their fatigue lives are about one order of magnitude longer than the samples made from water-atomized powder, and also longer than those fabricated by powder metallurgy and selective laser sintering which were reported in other studies.

1. Introduction

316L stainless steel (SS), with the excellent corrosion resistance and mechanical properties, as well as the good weldability, is one of the best structural materials [1,2]. This material is commonly used in the chemical industries and marine industries [3,4,5]. In order to decrease the cost for post-processing, 316L SS has been produced by many advanced net shape fabrication technologies, including selective laser melting (SLM) [6], and metal injection molding (MIM) [7,8,9].
Metal injection molding of 316L SS is an attractive net shape fabrication method due to its capability of mass production of parts with complex shapes [7,8,9], which has been extensively investigated by many researchers. The effect of debinding temperatures on the microstructure and mechanical properties of 316L SS was investigated by Amin et al. [10]. The results illustrated that uniform microstructure and excellent mechanical properties had been obtained when the debinding temperature was maintained at 673 K. Manonukul et al. [11] and Setasuwon et al. [12] studied the effect of binders on the microstructure and the mechanical properties of injection molded 316L SS samples. Raza et al. [13] studied the effect of cooling rate on corrosion resistance and tensile properties of injection molded 316L SS. The results revealed that the samples with best properties were obtained at the sintered temperature of 1325 °C and with the cooling rate of 10 °C/min.
In general, the gas-atomized (GA) powders are commonly used in the MIM process because of their high sintered density compared to the WA powder [14,15]. In comparison, the WA powders are more cost-effective and can improve the shape retention during the sintering process [16]. However, the lower sample density and inferior mechanical performances of sintered samples of the WA powders were produced [16,17] compared with the sintered samples of GA powders (designated as WA and GA samples in the following text). Apart from this, the microstructural evolution of MIMed samples produced by gas-atomized (GA) and water-atomized (WA) has been analyzed by Suri et al. [17] and this study reveals that the presence of SiO2 can affect the densification behavior adversely of 316L SS.
In this study, two different kinds of powders are used in the previous researches of MIM of 316L SS [17], which are fabricated through water atomization and gas atomization, respectively. The WA powder has a much higher oxygen content than the GA powder due to oxidation of molten 316L SS alloy by the water used in the atomization process. It is well known that the sintering behaviors of many metals, including Al [18,19,20], Cu [21,22], and stainless steels [23] are significantly hindered by the existence of oxygen. Therefore, it is expected that the difference in oxygen content will result in different mechanical properties of MIMed 316L SS samples fabricated using different powders. Although previous studies revealed that the presence of oxides restrained the densification of samples produced by WA power [17]. Few studies have compared the sintering processes and mechanical properties, especially for the fatigue behavior of 316L SS MIMed samples using WA and GA powders. In this research, we investigate the influences of oxygen contents on the sintering behaviors and fatigue properties of the MIMed 316L SS samples fabricated using WA and GA powders and fathom the mechanisms behind the differences.

2. Materials and Methods

Two different 316L SS powders, fabricated via WA and GA, were used in the study. Figure 1 shows the morphologies of the WA and GA powders observed by a scanning electron microscope (SEM, EVO-10, ZEISS, Oberkochen, Germany). Both powders have a spherical shape and mean size ~10 μm. Table 1 lists the chemical compositions of the powders, in which the compositions of oxygen and carbon are determined using an oxygen and nitrogen analyzer (ON736, LECO, Saint Joseph, MI. USA) and a carbon and sulfur analyzer (CS744, LECO, Saint Joseph, MI, USA) respectively. The composition analysis indicates that neither powders contain carbon, and the oxygen content of the WA powder is much higher than the GA powder. In order to investigate the sintering behaviors of the GA and WA powders, green compacts (Ø10 mm × 10 mm) were prepared by cold pressing. Based on the results from previous researches [10,11,12,13], their sintering behaviors were investigated by a dilatometer (DIL, 402C, NETZSCH, Freistaat Bayern, Germany), where the samples were heated to 1390 °C at the rate of 10 °C/min and soaked at the temperature for 3 h before cooling down to room temperature at the cooling rate of 10 °C/min.
Tensile bars with geometric configurations illustrated in Figure 2 were fabricated via MIM separately from the WA and GA 316L SS powders. In feedstock preparation, 316L SS powder was firstly mixed with polyformaldehyde (POM)-based binders at 190 °C using a kneading machine (Greenlong, China). Both feedstocks have the same powder loading fixed at 63 vol% and their binder system are composed of 86 wt% polyformaldehyde (POM), 8 wt% high-density polyethylene (HDPE), 4 wt% Ethylene-vinyl Acetate Copolymer (EVA) and 2 wt% Stearic Acid (SA). Green samples were molded using an injection molding machine (Nex50IIIT, NISSEI, Aichi-ken, Japan) at 190 °C. After that, the green sample was debound in a catalytic debinding furnace (Sinterzone, Changsha, China) to remove the POM. The rest of the binders were thermally removed in a vacuum furnace (Hiper Vacuum, Xingteshuo, Shenzhen, China) and the debound samples were sintered in the same furnace at 1390 °C for 3 h under a flowing argon atmosphere. After sintering, the sintered samples were cooled down to room temperature at the cooling rate of 10 °C/min. The detailed parameters have been listed in Table 2.
The density of samples was measured by a balance (Sartorius SQP, Germany) based on the Archimedes drainage principle. Metallographic samples were polished and etched with a solution of HNO3 + HCl + H2O (1:1:1 in volume ratio). Their microstructures were observed by an optical microscope (OM, Axio Vert A1, ZEISS, Oberkochen, Germany) and a scanning electron microscope (SEM, EVO-10, ZEISS, Oberkochen, Germany). The element distribution was analyzed with energy dispersive spectroscopy (EDS, Oxford Instruments, Oxford, UK) equipped in the SEM. X-ray diffraction (XRD, D8-ECO, BRUCKER, Billerica, MA, USA) tests were performed to identify the phase compositions of the sample. The tensile strength and elongation of the samples were measured at room temperature on a universal material testing machine (5569, INSTRON, Canton, MA, USA) with the displacement velocity of 1 mm/min. The tensile-tensile (T-T) fatigue tests were carried out on the sintered samples using a fatigue machine (MTS 809, MTS, Eden Prairie, MN, USA). In the fatigue tests, the stress ratio (R) was set to 0.1, the frequency was 20 Hz and the stress amplitudes varied in the range of 90–193.5 MPa. After the fatigue tests, the fracture surfaces were observed by SEM.

3. Results

3.1. Sintering Behaviors

Figure 3 shows the dilatometric curves of sintered samples of the WA and GA powders. Both samples show expansion when they are heated from room temperature to ~800 °C. The slope of the dilatometric curves in this temperature range is ~19 × 10−6·°C−1, which is approximately equal to the coefficient of thermal expansion of the 316L SS [24]. Therefore, the expansion is caused by thermal expansion. However, when the samples are heated beyond this range, the expansion gradually slows down and finally changes to shrinkage due to sintering. The temperature of the expansion-shrinkage transition thus signifies the onset temperature of sintering and is defined as Ts. Ts for the GA and WA samples are about 900 °C and 1100 °C, respectively. The GA powder starts to sinter at a lower temperature than WA powder.

3.2. Microstructures and Phase Identification

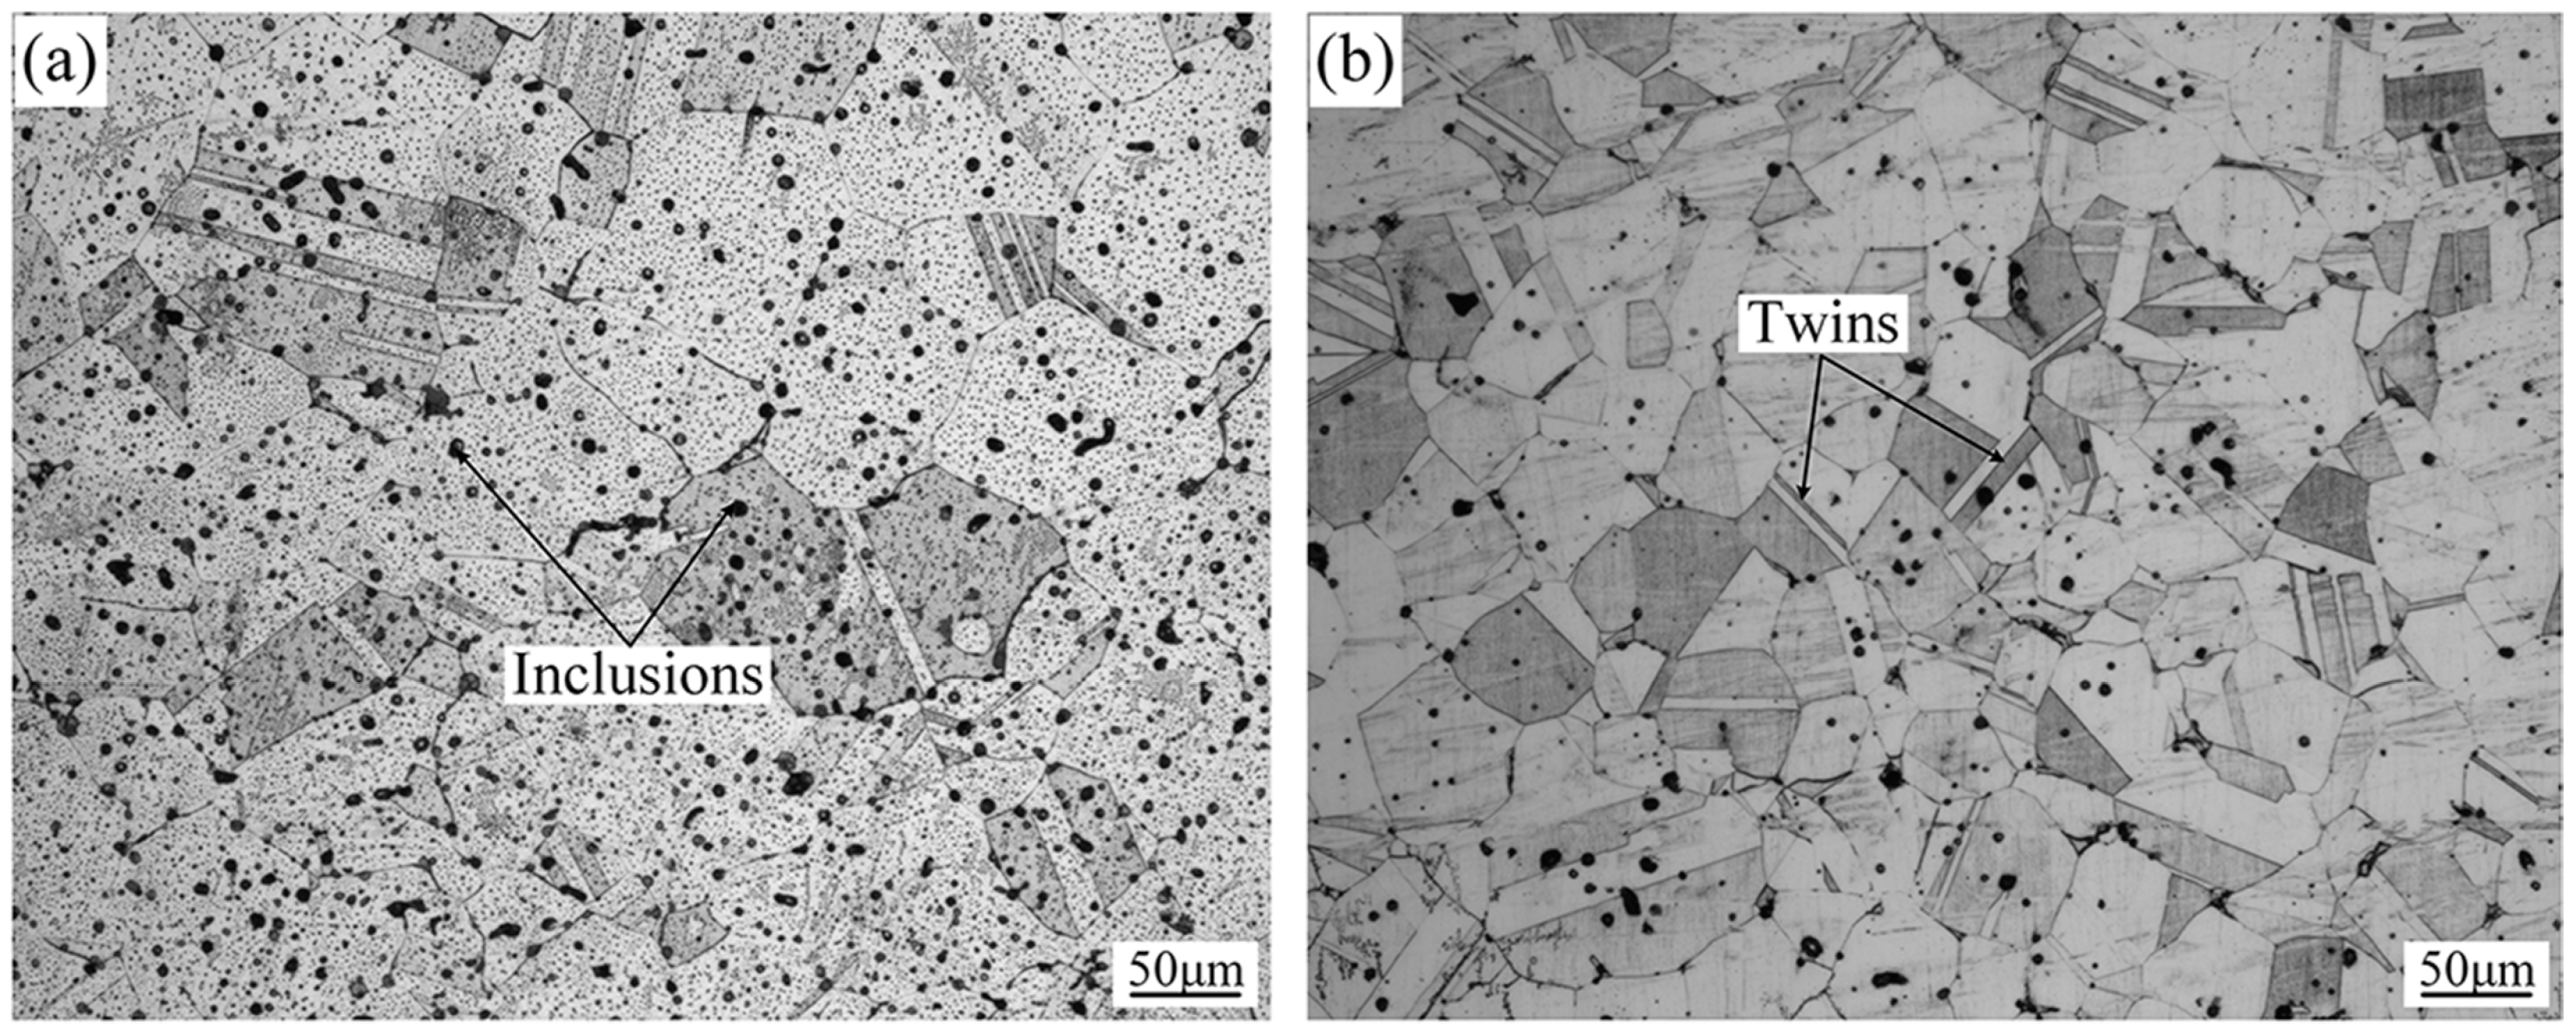
Based on the sintering behaviors of the two powders obtained from the DIL curves, MIMed parts are fabricated by using GA and WA powders. The sintered samples were observed by an optical microscope. Microstructures of the WA and GA samples are shown in Figure 4a,b, respectively. Equiaxed grains and twins, typical for austenitic steels, are seen in these two samples. Compared to the GA samples (Figure 4b), there are more inclusions in the WA samples (Figure 4a). In the meantime, the oxygen contents in the sintered GA and WA samples are ~600 ppm and ~2000 ppm (given in Table 3), both are significantly lower than those in the original 316L powders (i.e., 1600 ppm and 3000 ppm for the GA and WA powder, respectively). The residual oxygen tends to react with the alloying element to produce the oxides in the sintered samples. Since the WA samples contain more residual oxygen than the GA samples, it produces more oxide inclusions in the WA samples.
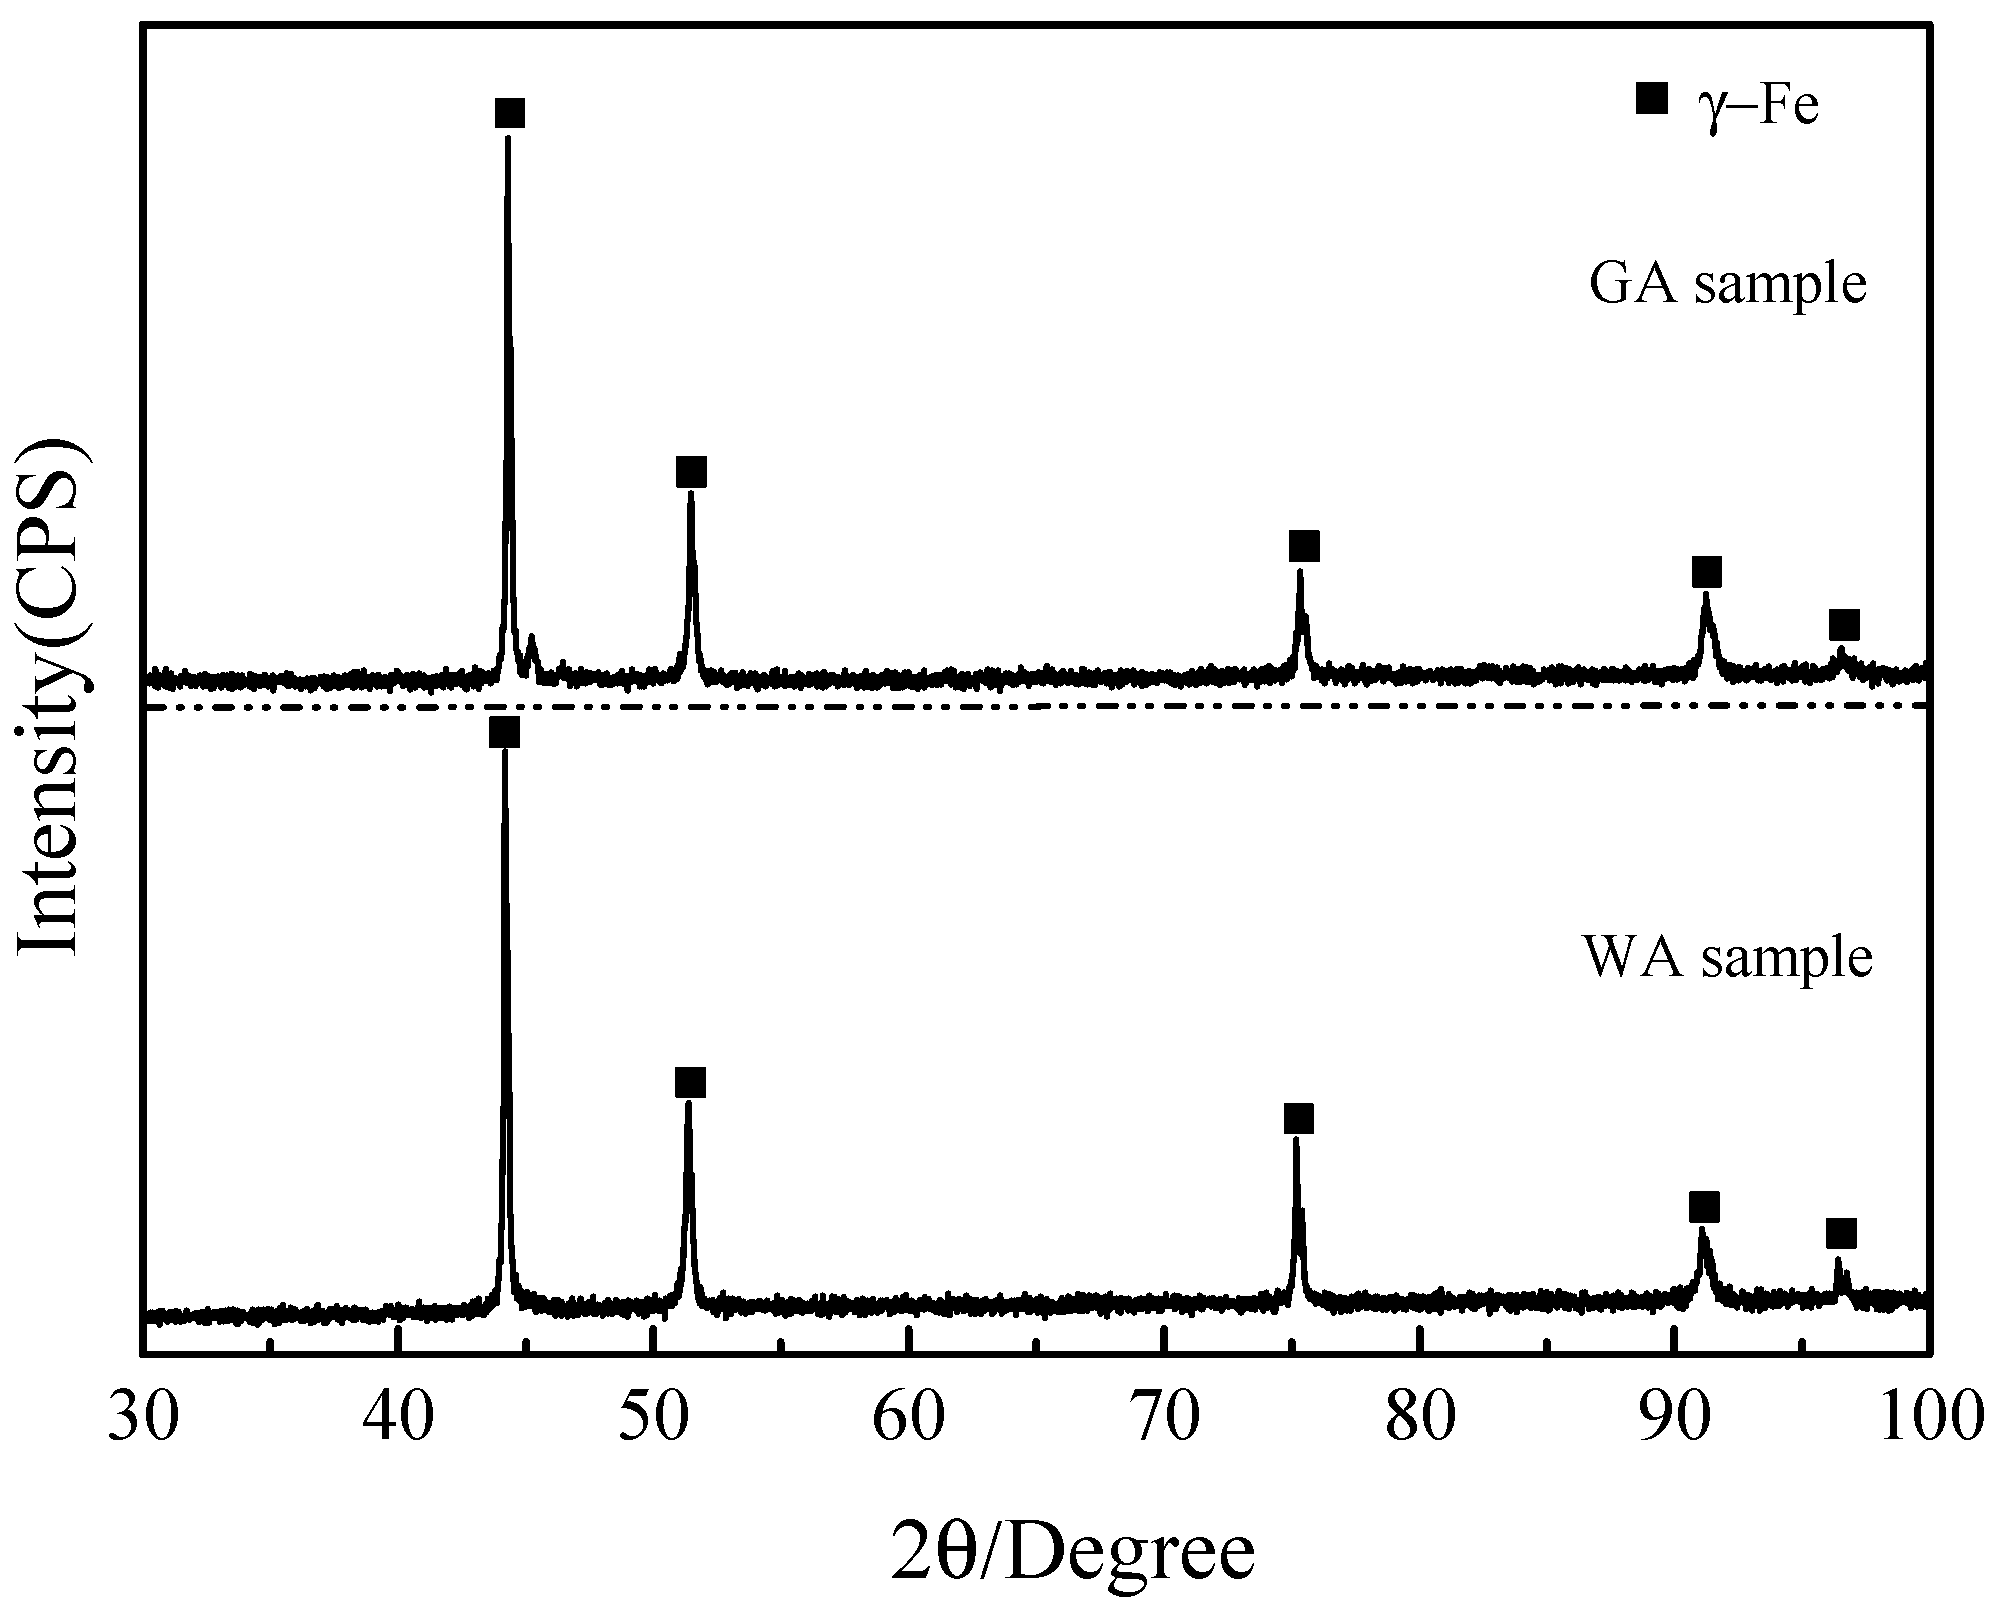
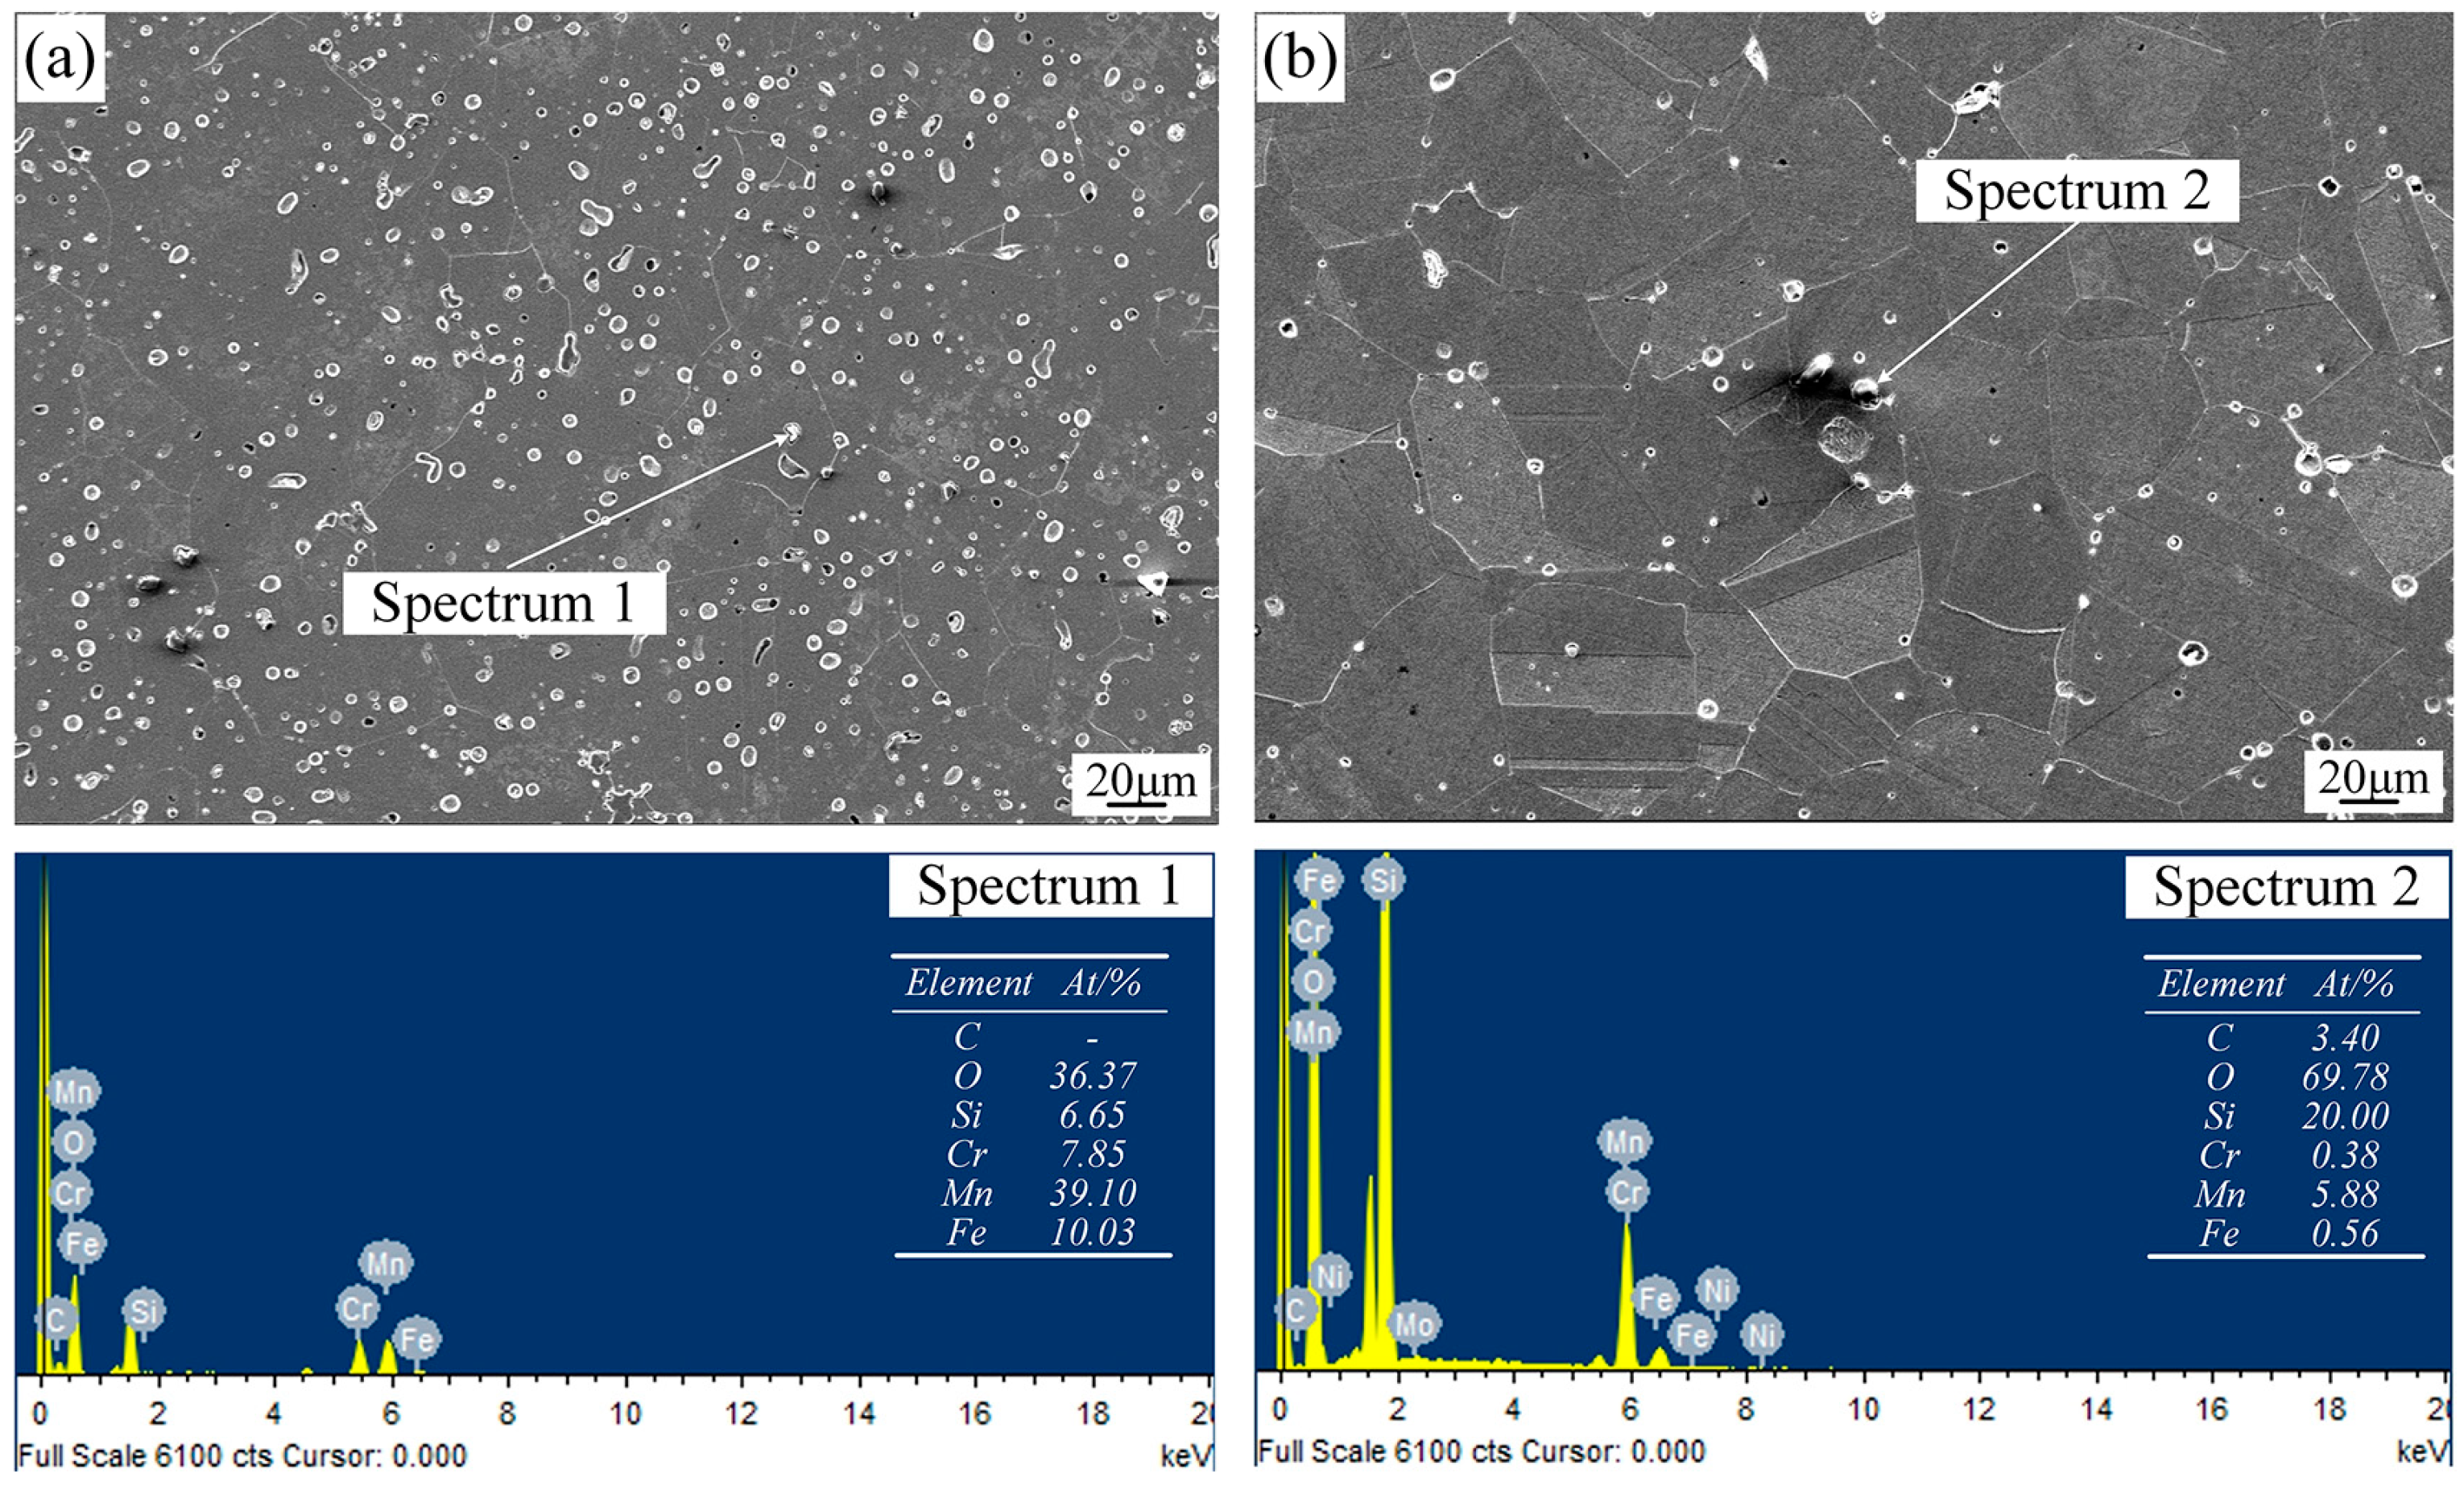
X-ray diffraction was carried out to identify phases existing in the samples. The XRD profiles of the sintered WA and GA samples are shown in Figure 5. Only the Bragg peaks of austenite can be found in either spectrum, the existence of the inclusions is not revealed by XRD. In order to study the compositions of the inclusions, the WA and GA samples were observed with SEM, and the compositions of the inclusions in them were analyzed by EDS. Figure 6 illustrated the microstructures of the WA and GA samples and EDS results of different inclusions. EDS results show that the inclusions are oxides containing Mn and Si and the compositions are closed to MnO and SiO2. This observation accords well with the previous researches conducted by Suri [17].

3.3. Tensile Properties

Figure 7 shows the stress-strain curves of the WA and GA samples from the tensile tests. Their tensile properties, along with the densities and oxygen contents, are summarized in Table 3. The GA samples have much better mechanical properties compared to the WA samples. Both average tensile strength (σb) and yield strength (σ0.2) of the GA samples (560 MPa and 205 MPa, respectively) are higher than the WA samples (460 MPa and 170 MPa, respectively). Moreover, the elongation of the GA samples can reach 58%, which is twice as high as the WA samples (29%).
The fracture morphologies of the GA and WA samples are shown in Figure 8. Both samples exhibit dimple structures which are typical of ductile fracture. However, careful observation reveals that the dimples found in the two samples slightly differ in size. Those in the WA sample are smaller and shallower compared to those in the GA sample.

3.4. Fatigue Tests on Different Samples

The fatigue tests were carried out on the WA and GA samples and their fatigue lives are listed in Table 4. The fatigue lives of both samples increase with decreasing stress amplitude, but the GA samples exhibit much better fatigue properties compared to the WA ones. Under each stress amplitude, the fatigue life of the GA samples is about one order of magnitude higher than the WA samples. Under an amplitude of 135 MPa, the WA sample fails at 7.61 × 10⁵ cycles. In comparison, the GA sample can endure 107 stress cycles without fracture. The fitted S-N curves of GA and WA samples have been displayed in Figure 9, which shows that the fatigue lives of GA sample are much higher than those of WA sample.
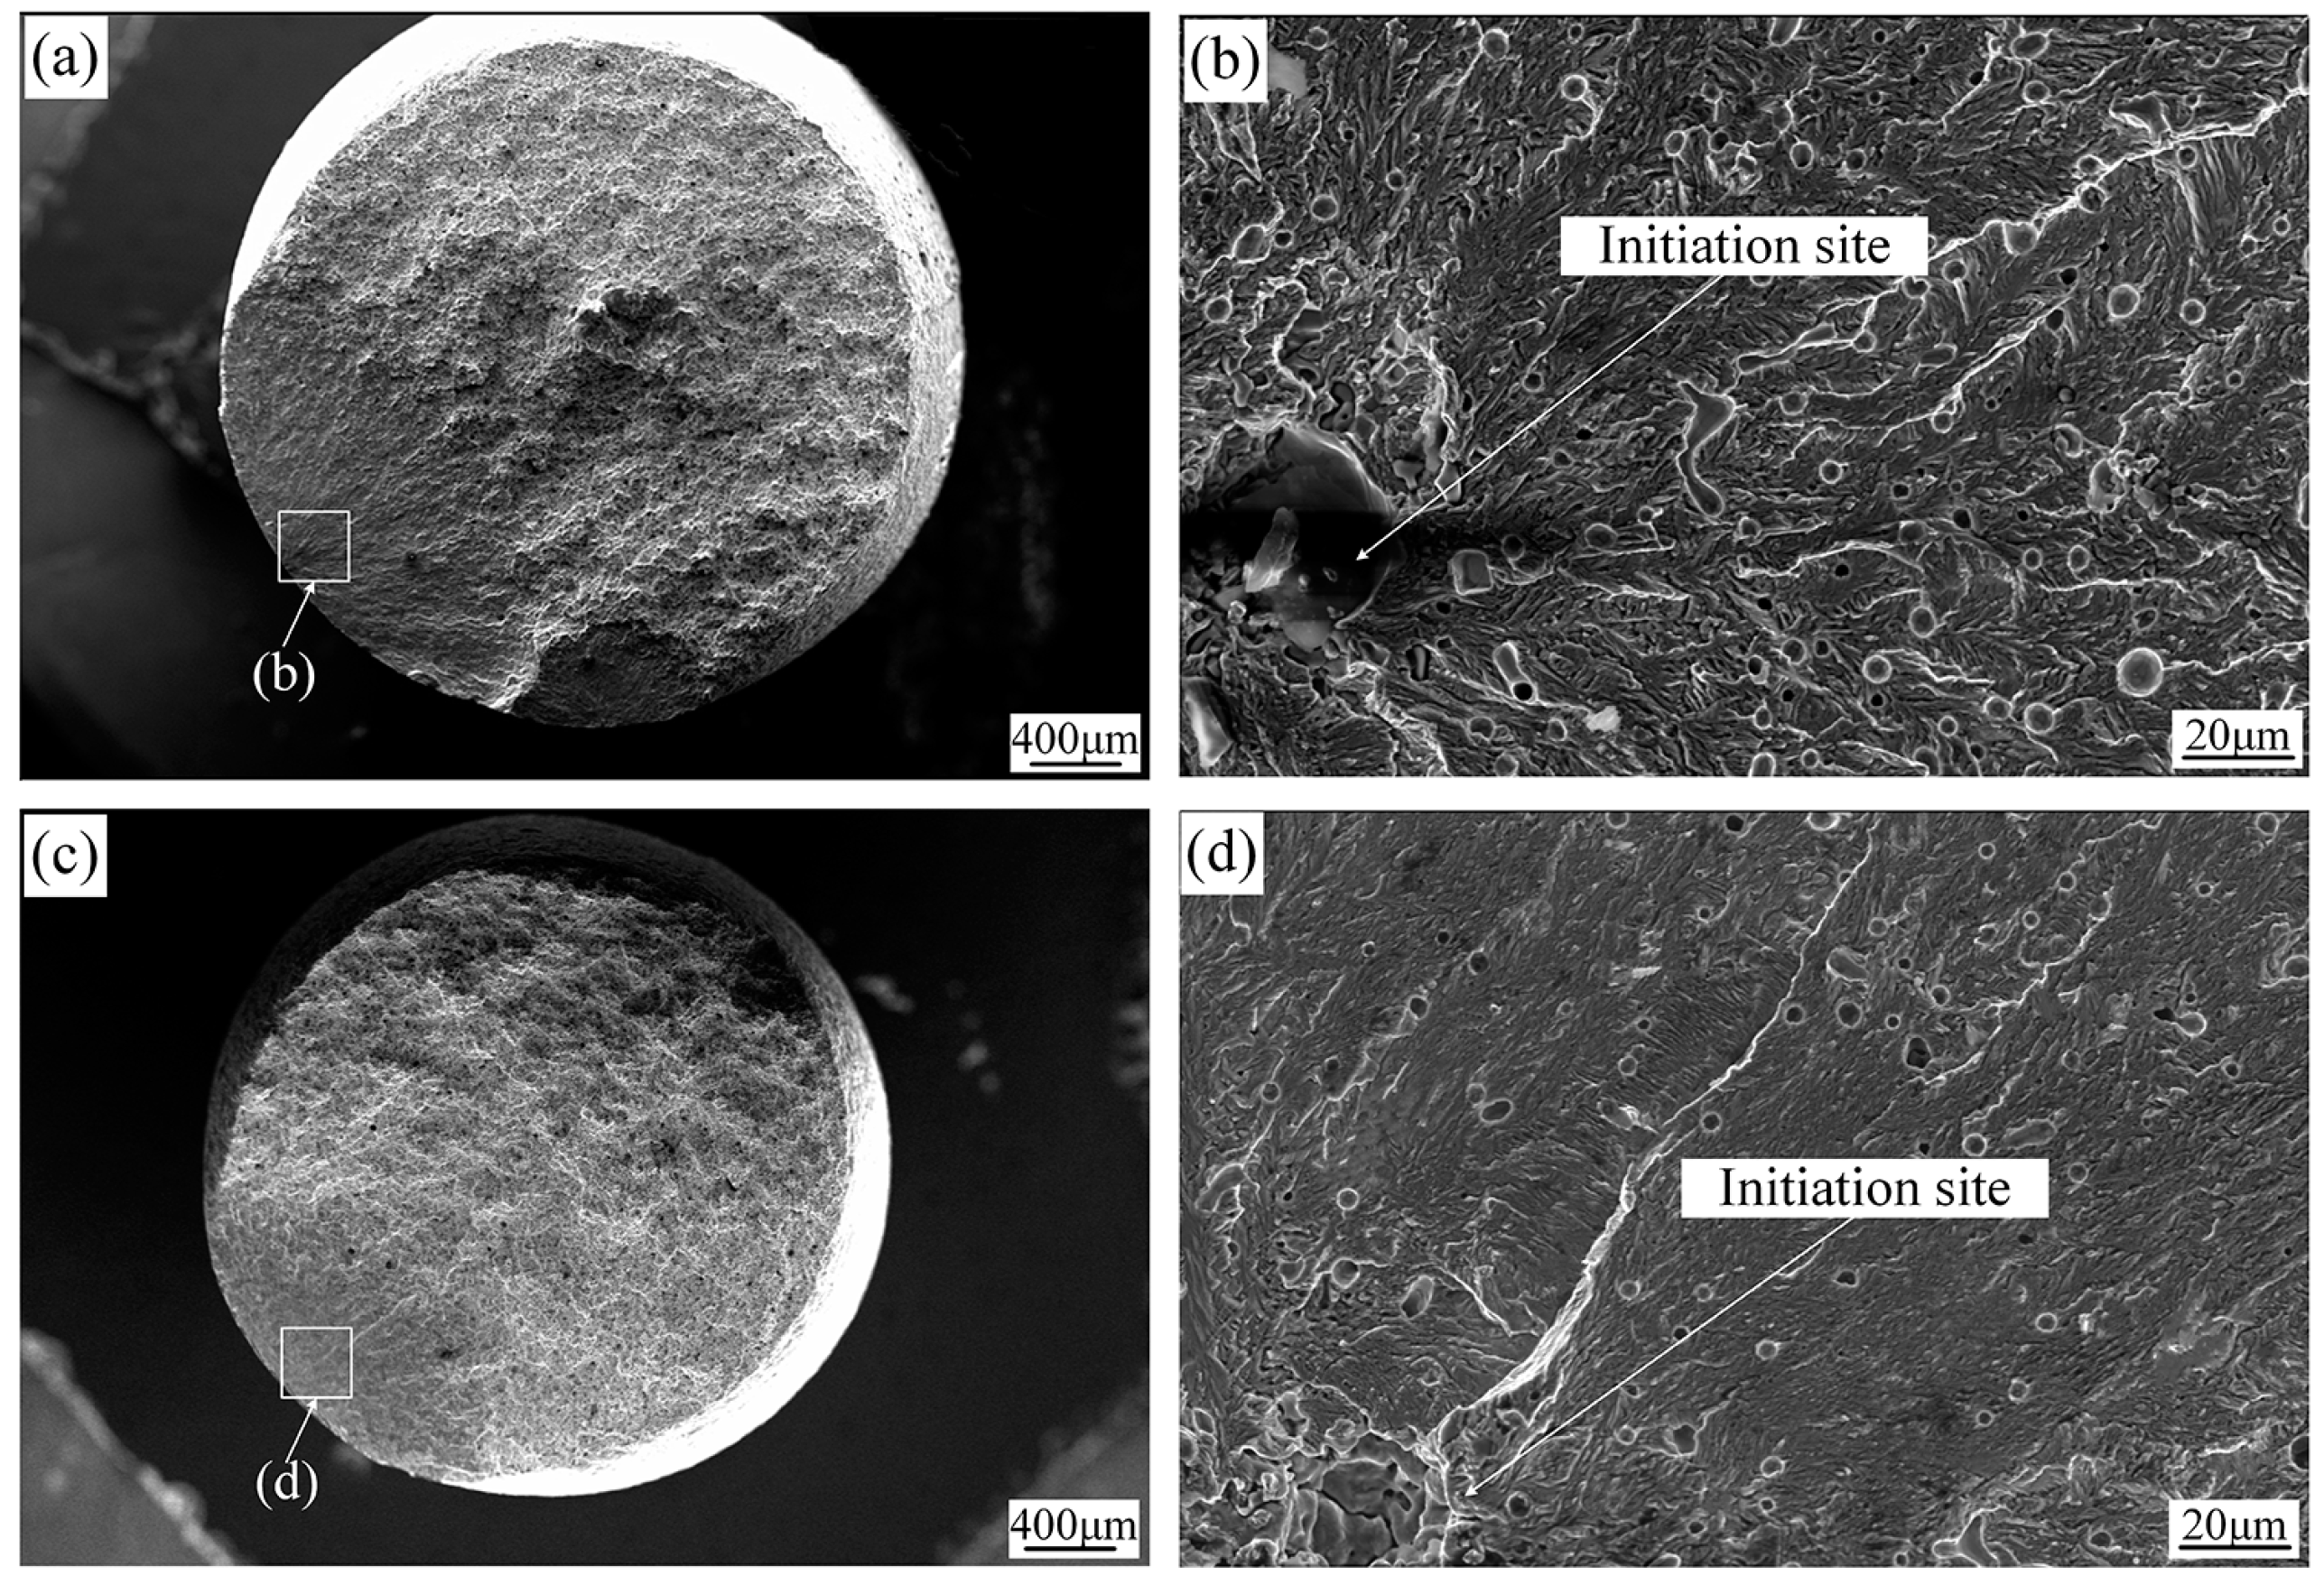
Figure 10 displays the fatigue fracture morphologies of different samples subjected to the stress amplitude of 193.5 MPa. Both samples show the fatigue initiation sites, fatigue propagation area and the fracture area. The fatigue initiation sites for the WA and GA samples are both located closely beneath their surfaces (Figure 10a,c). Figure 10b,d illustrate the morphology of fatigue initiation sites and the fatigue propagation area of the WA and GA samples, respectively.

4. Discussion

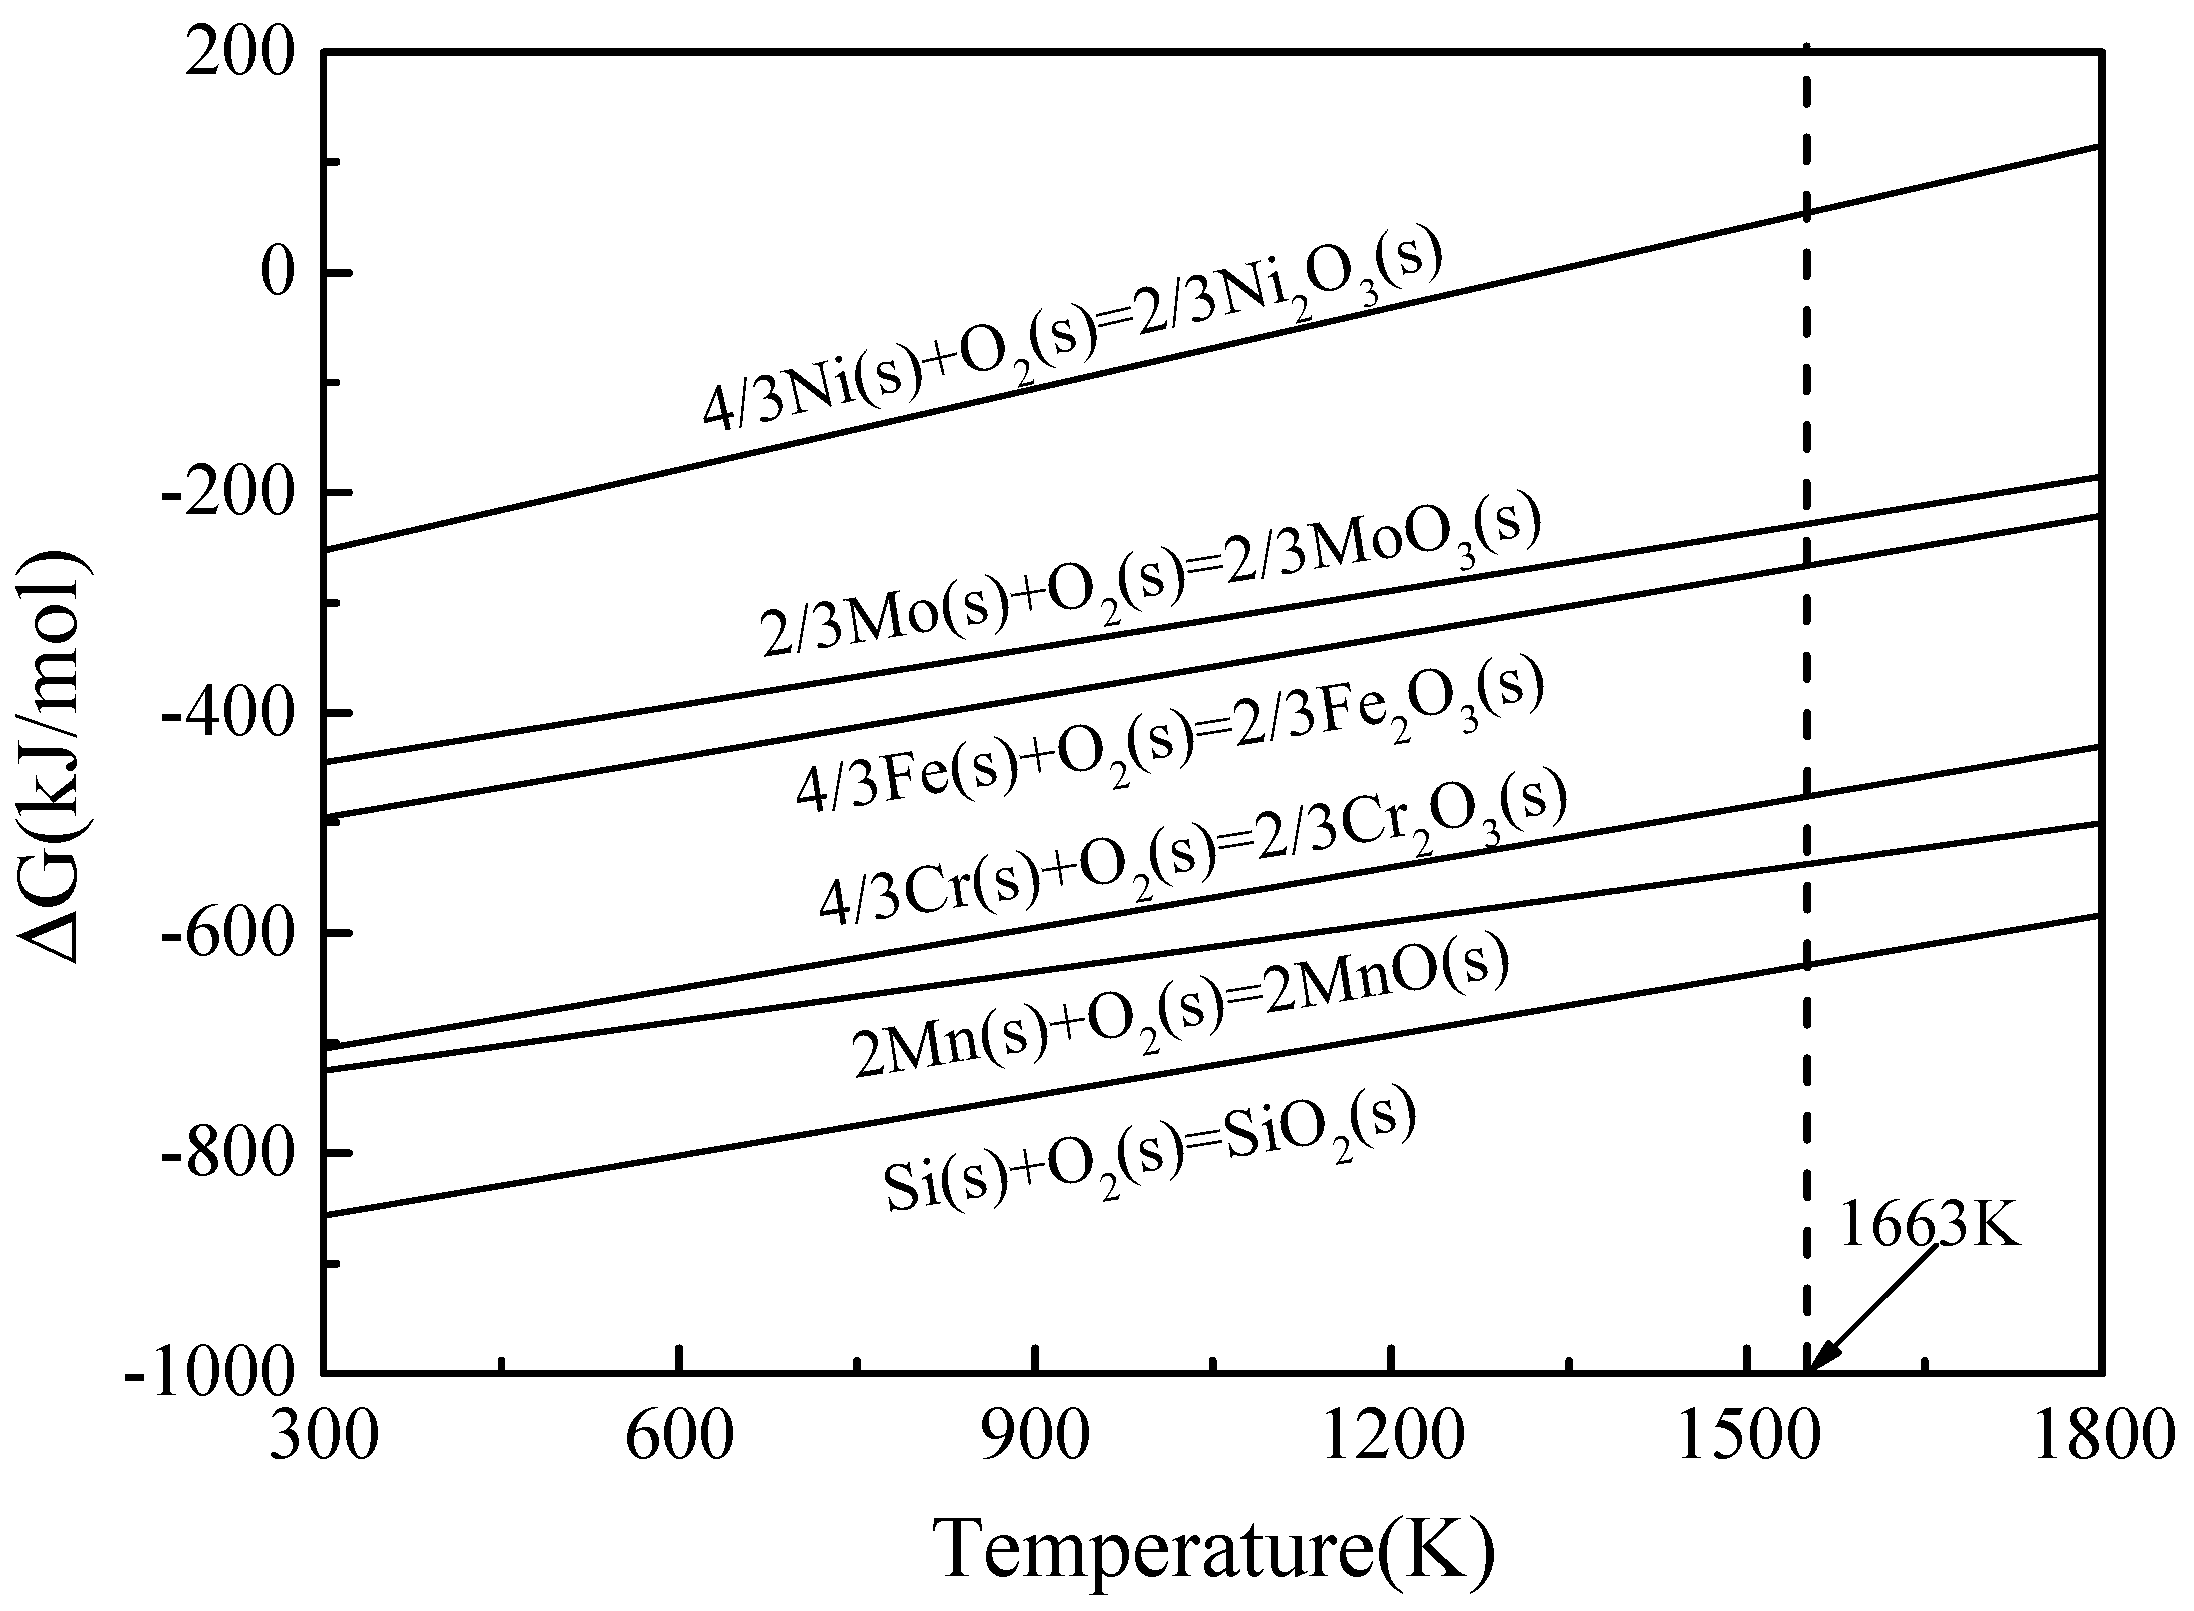
The different sintering behavior in GA and WA sample would be attributed to the different oxygen contents. Although residual carbon would be produced by an incomplete decomposition of binders after the thermal debinding process [25], the oxygen would not be reacted with carbon completely. The residual oxygen would react with the alloying elements to produce different oxides. The metal elements have a different tendency to react with oxygen to form oxides during sintering. Table 5 lists the changes of enthalpy (∆H) and entropy (∆S) of reactions corresponding to the oxidation reactions of Fe and different alloying elements in 316L SS, based on which the changes of Gibbs free energy (∆G) are calculated [26]. Figure 11 shows the ∆G of the oxidation reactions of these elements at the sintering temperature. It is clear that the ∆G of the oxidation reaction of Mn and Si is lower than the other elements at the sintering temperature (1663 K). Therefore, the driving forces of oxidation reactions of Mn and Si are larger than others [22]. When the higher oxygen content is present in the sample, MnO and SiO2 will be produced more preferentially than others. Since the oxygen content is higher in the WA samples, more MnO and SiO2 are produced during sintering (Figure 6).
The presence of oxides would affect the sintering behavior. Figure 3 illustrated that GA and WA samples exhibit different shrinkages in the sintering process. The differences in sintering onset temperature and shrinkage imply that the GA powder has better sinterability than the WA powder due to the lower oxygen contents [17,22]. The overall shrinkage of the GA sample is ~0.08, which is apparently higher than the WA sample (i.e., ~0.06). Therefore, it is expected that the GA sample having a higher sintered density than the WA sample. [17]. In general, the GA samples with higher density (7.88 g/cm3) would have better mechanical performance than the WA ones with lower density (7.65 g/cm3). Apart from this, the presence of micropores would also affect the mechanical performance adversely. The pores in the materials reduce the effective area for loading bearing in the tensile test, resulting in lower strength. Both the pores and oxide inclusions could be the sites for stress concentration and nucleation of cracks in the tensile test [27,28,29,30], thus further deteriorating both strength and ductility of the materials. The WA samples have more pores and oxide inclusions than the GA samples, therefore having lower strength and ductility. Furthermore, the high content of oxides produced in WA sample reduces the amount of Si and Mn solved into the base metal. As important alloying elements of steels, Mn and Si can contribute to solution strengthening effect [29], significantly improving the strength and ductility of steels. Therefore, the formation of MnO and SiO2 may offset the solution strengthening effects and lead to a relatively lower strength of the base metal in the WA sample than in the GA sample.
As for the ductility, it is well known that dimples normally tend to nucleate at the inclusions. Since the WA sample has more inclusions, it provides more nucleation sites for the formation of dimples than GA samples. The high nucleation rate in the WA samples dictates that large amount of dimples forms and propagates simultaneously in the material. They interact with each other and result in small dimples during deformation. In fact, the deep dimples are the result of the severe plastic deformation at coarse micro-voids under an elevated level of stress concentration. Therefore, the deep dimples found in the GA samples imply the material’s good ductility and high fracture toughness [31,32].
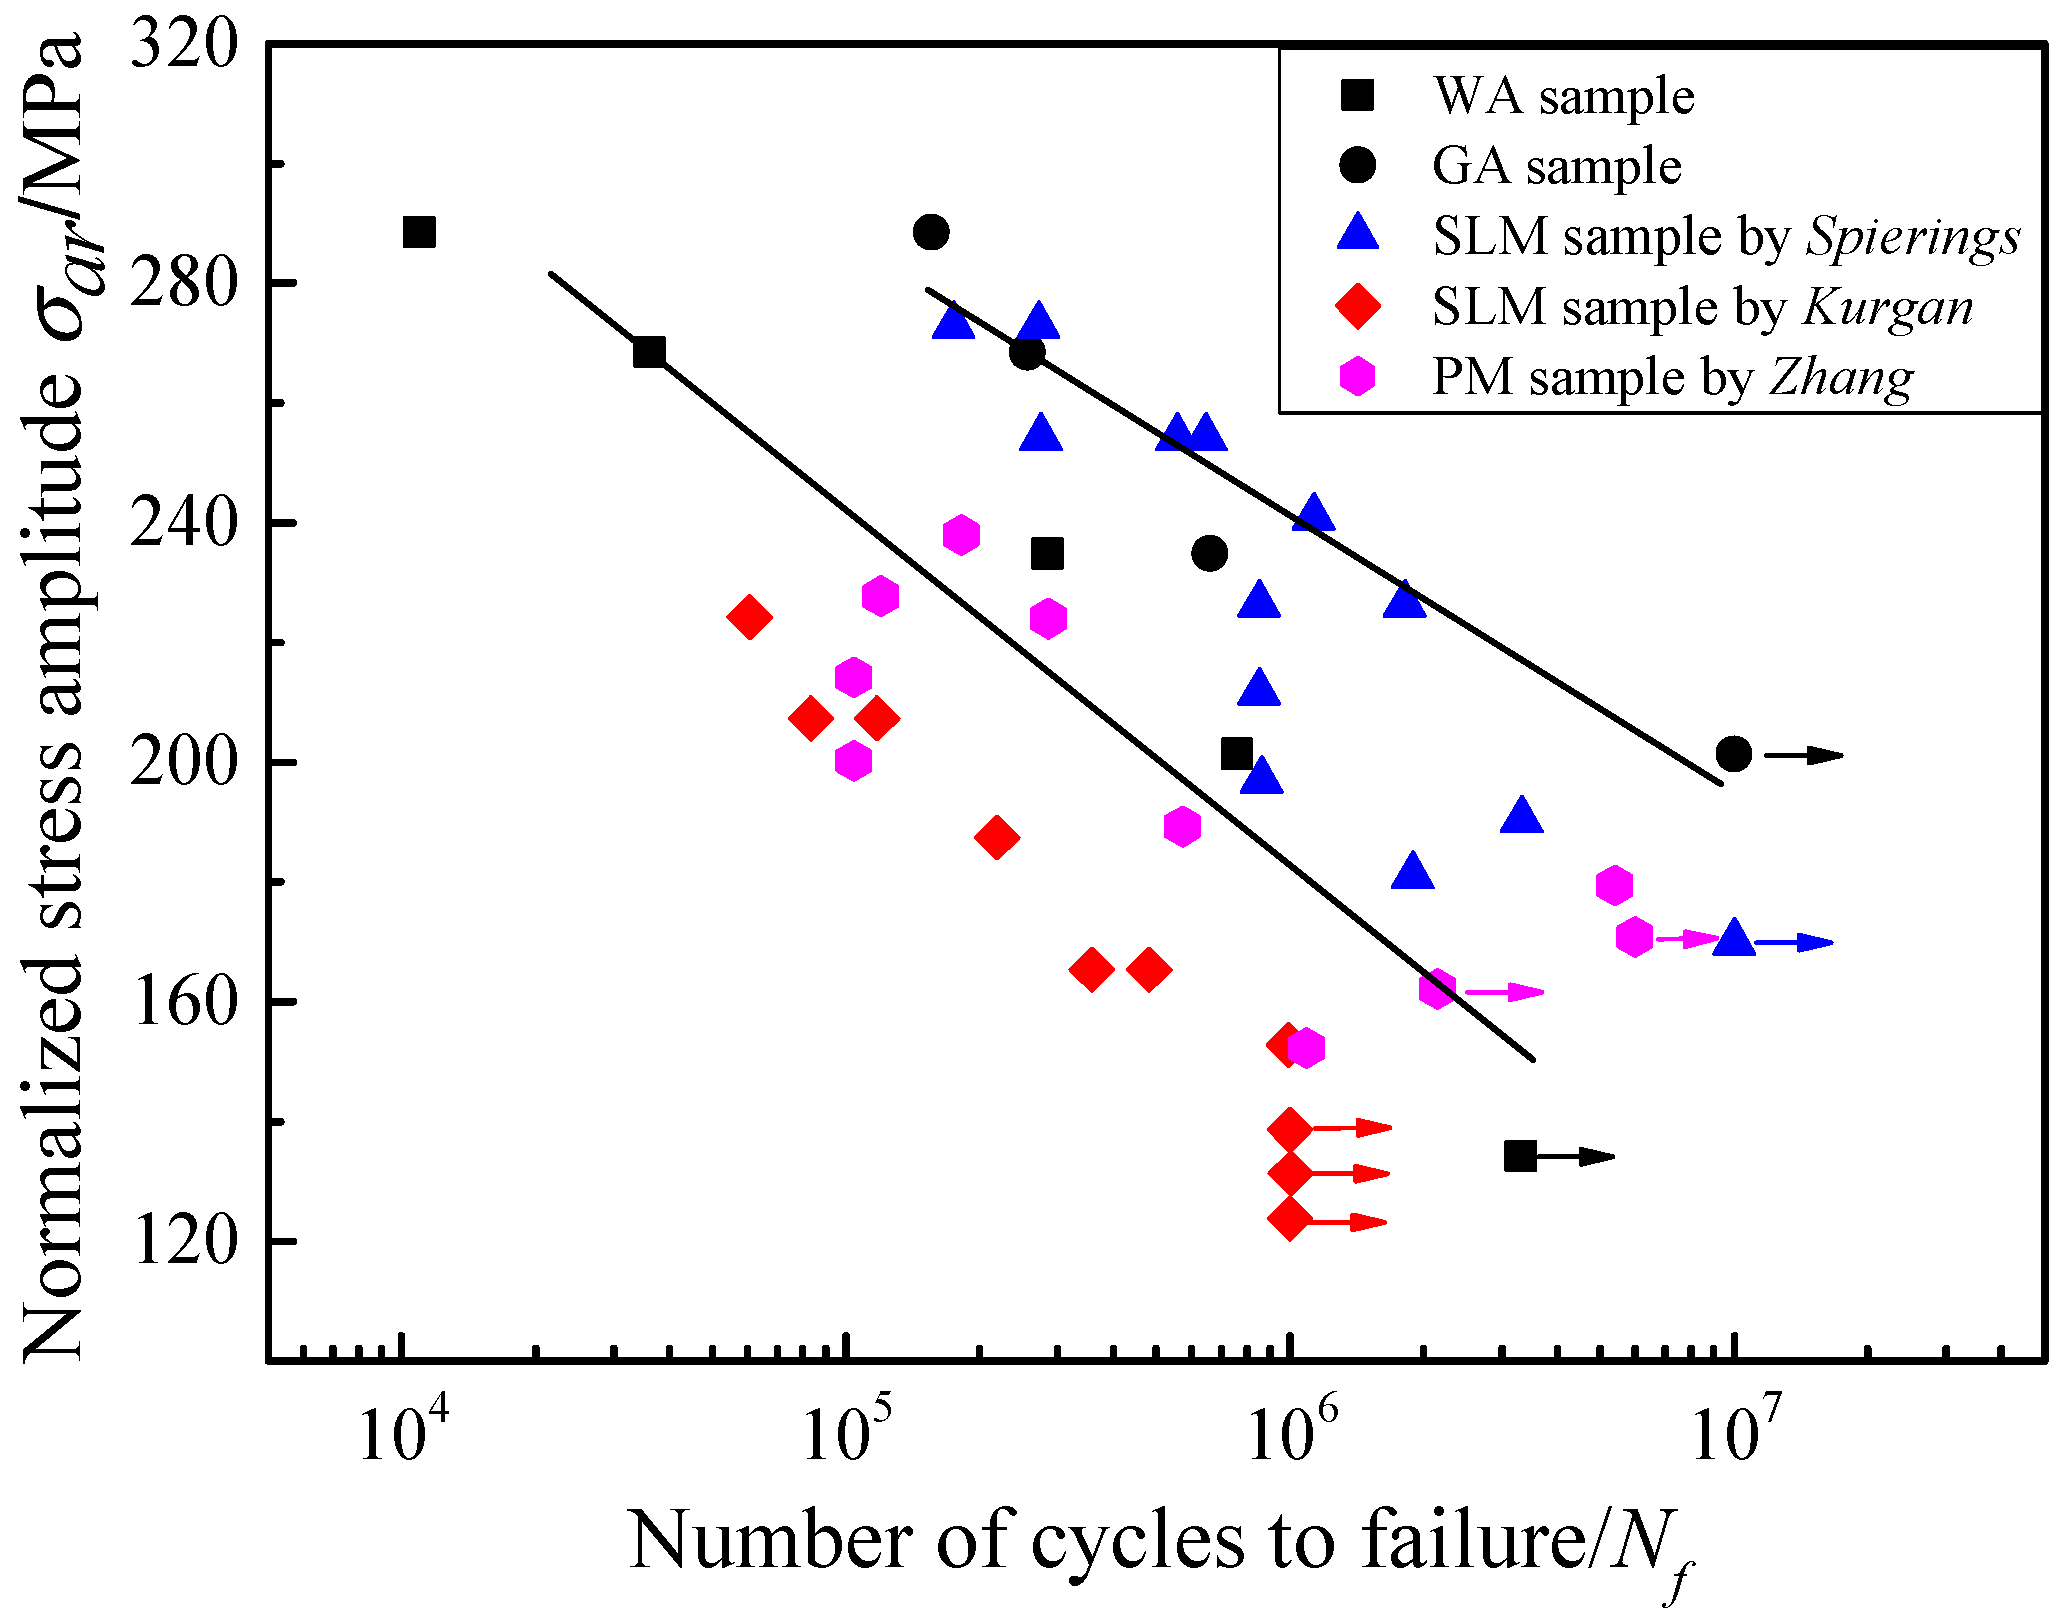
In general, the fatigue life (Nf) equals to the sum of fatigue crack initiation life (Ni) and crack propagation life (Np) on account of the very short time of the instantaneous fracture process. Oxide particles play an important role during the fatigue of the samples as well. In the fatigue initiation sites of both samples (Figure 10), oxide particles are identified. Therefore, fatigue initiation can be attributed to the stress concentration near the oxide particles. In the fatigue crack propagation area, more pores are found in the WA sample than the GA sample. Those pores are believed to form when the oxide particles are detached from the surface during the propagation of the fatigue cracks (Figure 6). This proves that the presence of oxide particles would interact with the fatigue cracks [33] and, thus, shorten the fatigue life of the material. Since oxygen content of the WA powder is much higher compared to the GA powder, more oxide particles are produced in the WA samples during sintering, as evidenced by the microstructures shown in Figure 4 and Figure 6. It is reasonable that GA samples have much longer fatigue lives than the WA samples. Figure 12 compares the fatigue properties of the samples in this research with those prepared through conventional powder metallurgy (PM) [34] and SLM [6,35]. In order to offset the influence of different mean stresses on the fatigue life, all the stress amplitudes from different researches are normalized using the SWT equation [36]:
σ a r = σ m a x σ a   ( σ m a x > 0 )
where σa is the stress amplitude, σmax is the maximum stress, while σar is the normalized stress amplitude which is equivalent to the amplitude of a periodic stress whose mean stress is zero. Figure 12 shows that the fatigue properties of the WA samples and GA samples as well as the samples reported by other references. The fatigue properties of GA samples are not only better than the WA sample, but also they are superior to those fabricated by SLM and PM as well. The fatigue properties of the GA samples are more prominent in considering that fatigue properties from some of the above references are obtained from the bending test. Compared to the uniaxial tension used in our experiment, bending is a less severe loading condition for fatigue, therefore normally resulting in a fatigue live ~50% longer than from a tension test [37]. The differences in fatigue properties may be caused by the density [16,17], which changes the tensile strength of materials [6].

5. Conclusions

316L stainless steel samples are fabricated through metal injection molding using two different powders prepared by water-atomization (WA) and gas-atomization (GA) methods. Their sintering behaviors and mechanical properties of the sintered samples are investigated and compared.
(1)
Due to the different oxygen contents in the WA and GA powders, the oxygen contents in the sintered WA and GA samples are 2000 ppm and 600 ppm, respectively. The presence of oxygen has a negative influence on the sintering process. GA sample starts to sinter at a lower temperature than the WA sample and exhibits smaller shrinkage in the dilatometry test. The sintered densities of the GA and WA samples are 7.88 g/cm3 than 7.65 g/cm3, respectively.
(2)
The oxygen tends to react with Si and Mn to produce oxide particles during sintering. Due to the high oxygen content, more SiO2 and MnO particles are formed in the WA samples than in the GA samples, which in turn decreases the amount of Si and Mn dissolving into the base metal of the WA samples. The different existing status of Mn and Si in the sintered samples have significant influences on their mechanical properties.
(3)
The oxides not only result in low sintered density and lead to stress concentration but also compromise the solution strengthening the effect of the Mn and Si in the base metal. As a result, the tensile strength, yield strength and the elongation of the GA samples are 560 MPa, 205 MPa, and 58%, respectively, which are much higher than those of the WA samples (i.e., 450 MPa, 170 MPa, and 29%, respectively).
(4)
In the fatigue tests, the oxides become the initiation sites for fatigue cracks and interact with cracks during their propagation. Therefore, the fatigue lives of the GA samples are about one order of magnitude longer than the WA samples. The fatigue behaviors of the sintered GA samples are also superior to those fabricated by powder metallurgy and selective laser melting, which were reported in other researches.

Author Contributions

Y.Z. and P.Y. conceived and designed the experiments; Y.Z., E.F., W.M., and Y.L performed experiments; Y.Z., S.Y., and R.M. analyzed the data; X.W. and P.Y. contributed reagents/materials/analysis tools; and Y.Z. and P.Y. wrote the main paper.

Funding

This research was funded by the Project of Shenzhen Science and Technology Innovation Committee in China grant number (SGLH20161212155758670) and the Peacock Plan of Shenzhen Municipality grant number (20130701226B).

Acknowledgments

The MIMed 316L samples provided by Shenzhen ElementPlus Co. Ltd. is greatly appreciated.

Conflicts of Interest

The authors declare no conflict of interest.

References

  1. Cherry, J.A.; Davies, H.M.; Mehmood, S.; Lavery, N.P.; Brown, S.G.R.; Sienz, J. Investigation into the effect of process parameters on microstructural and physical properties of 316L stainless steel parts by selective laser melting. Int. J. Adv. Manuf. Technol. 2015, 76, 869–879. [Google Scholar] [CrossRef]
  2. Aslam, M.; Ahmad, F.; Yusoff, P.S.M.B.M.; Altaf, K.; Omar, M.A.; German, R.M. Powder injection molding of biocompatible stainless steel biodevices. Powder Technol. 2016, 295, 84–95. [Google Scholar] [CrossRef]
  3. Fredriksson, W.; Petrini, D.; Edström, K.; Björefors, F.; Nyholm, L. Corrosion resistances and passivation of powder metallurgical and conventionally cast 316L and 2205 stainless steels. Corros. Sci. 2013, 67, 268–280. [Google Scholar] [CrossRef]
  4. Kamath, C.; El-Dasher, B.; Gallegos, G.F.; King, W.E.; Sisto, A. Density of additively-manufactured, 316L SS parts using laser powder-bed fusion at powers up to 400 W. Int. J. Adv. Manuf. Technol. 2014, 74, 65–78. [Google Scholar] [CrossRef] [Green Version]
  5. Manchoul, S.; Seddik, R.; Grissa, R.; Sghaier, R.B.; Fathallah, R. A predictive approach to investigate the effect of ultrasonic shot peening on a high-cycle fatigue performance of an AISI 316L target. Int. J. Adv. Manuf. Technol. 2018, 95, 3437–3451. [Google Scholar] [CrossRef]
  6. Zhang, M.; Sun, C.N.; Zhang, X.; Wei, J.; Hardacre, D.; Li, H. Predictive models for fatigue property of laser powder bed fusion stainless steel 316L. Mater. Des. 2018, 145, 42–54. [Google Scholar] [CrossRef]
  7. Sang, P.; Kim, D.; Lin, D.; Park, S.; Ahn, S. Rheological Characterization of Powder Mixture Including a Space Holder and Its Application to Metal Injection Molding. Metals 2017, 7, 120. [Google Scholar] [CrossRef]
  8. Berginc, B.; Kampus, Z.; Sustarsic, B. Influence of feedstock characteristics and process parameters on properties of MIM parts made of 316L. Powder Metall. 2013, 50, 172–183. [Google Scholar] [CrossRef]
  9. Ji, C.H.; Loh, N.H.; Khor, K.A.; Tor, S.B. Sintering study of 316L stainless steel metal injection molding parts using Taguchi method: Final density. Mater. Sci. Eng. A 2001, 311, 74–82. [Google Scholar] [CrossRef]
  10. Amin, A.M.; Ibrahim, M.H.I.; Asmawi, R.; Mustaffa, N.; Hashim, M.Y. Thermal Debinding and Sintering of water atomised SS316L Metal Injection Moulding Process. IOP Conf. Ser. Mater. Sci. Eng. 2017, 226, 12155. [Google Scholar] [CrossRef] [Green Version]
  11. Manonukul, A.; Muenya, N.; Léaux, F.; Amaranan, S. Effects of replacing metal powder with powder space holder on metal foam produced by metal injection moulding. J. Mater. Process. Technol. 2010, 210, 529–535. [Google Scholar] [CrossRef]
  12. Setasuwon, P.; Bunchavimonchet, A.; Danchaivijit, S. The effects of binder components in wax/oil systems for metal injection molding. J. Mater. Process. Technol. 2008, 196, 94–100. [Google Scholar] [CrossRef]
  13. Raza, M.R.; Ahmad, F.; Omar, M.A.; German, R.M. Effects of cooling rate on mechanical properties and corrosion resistance of vacuum sintered powder injection molded 316L stainless steel. J. Mater. Process. Technol. 2012, 212, 164–170. [Google Scholar] [CrossRef]
  14. Karatas, C.; Saritas, S. Rheological properties of mixed gas and water atomized stainless steel powder MIM feedstock. Int. J. Powder Metall. 2001, 37, 39–44. [Google Scholar]
  15. Cai, L.; German, R.M. Powder injection molding using water atomized 316l stainless steel. Int. J. Powder Metall. 1995, 31, 257–264. [Google Scholar]
  16. Nylund, A.; Tunberg, T.; Bertilsson, H.; Carlstrom, E.; Olefjord, I. Injection molding of gas and water-atomized stainless steel powders. Int. J. Powder Metall. 1995, 31, 365–373. [Google Scholar]
  17. Suri, P.; Koseski, R.P.; German, R.M. Erratum: Microstructural evolution of injection molded gas- and water-atomized 316L stainless steel powder during sintering. Mater. Sci. Eng. A 2005, 402, 341–348. [Google Scholar] [CrossRef]
  18. Yu, P.; Qian, M.; Li, L.; Schaffer, G.B. On the infiltration mode during fabrication of aluminium composite. Acta Mater. 2010, 58, 3790–3797. [Google Scholar] [CrossRef]
  19. Sercombe, T.B.; Schaffer, G.B. On the role of tin in the infiltration of aluminium by aluminium for rapid prototyping applications. Scr. Mater. 2004, 51, 905–908. [Google Scholar] [CrossRef]
  20. Homeny, J.; Buckley, M.M. Transmission electron microscopy study of an aluminum oxide fiber/aluminum-magnesium alloy metal matrix composite interface. Mater. Lett. 1991, 10, 421–424. [Google Scholar] [CrossRef]
  21. Mahmoud, M.M.; Link, G.; Thumm, M. The role of the native oxide shell on the microwave sintering of copper metal powder compacts. J. Alloy. Compd. 2015, 627, 231–237. [Google Scholar] [CrossRef]
  22. Hao, H.; Ye, S.; Yu, K.; Chen, P.; Gu, R.; Yu, P. The role of alloying elements on the sintering of Cu. J. Alloy. Compd. 2016, 684, 91–97. [Google Scholar] [CrossRef]
  23. Klar, E.; Samal, P.K. Powder Metallurgy Stainless Steels: Processing, Microstructures, and Properties; ASM International: Materials Park Campus, OH, USA, 2007; pp. 59–96. [Google Scholar]
  24. Sayman, O.; Sen, F.; Celik, E.; Arman, Y. Thermal stress analysis of Wc–Co/Cr–Ni multilayer coatings on 316L steel substrate during cooling process. Mater. Des. 2009, 30, 770–774. [Google Scholar] [CrossRef]
  25. Wu, Y.; German, R.M.; Blaine, D.; Marx, B.; Schlaefer, C. Effects of residual carbon content on sintering shrinkage, microstructure and mechanical properties of injection molded 17-4 PH stainless steel. J. Mater. Sci. 2002, 37, 3573–3583. [Google Scholar] [CrossRef]
  26. Lide, D.R.; Baysinger, G.; Berger, L.I.; Goldberg, R.N.; Kehiaian, H.V.; Kuchitsu, K.; Rosenblatt, G.; Roth, D.L.; Zwillinger, D. CRC Handbook of Chemistry and Physics; CRC Press: Boca Raton, FL, USA, 2005; pp. 6–187. [Google Scholar]
  27. Wang, T.; Li, X.; Zhang, Y.; Li, H.; Zhang, B.; Feng, J. Regulating the interfacial morphology of electron beam welded pure Ti/2024Al dissimilar joint. J. Mater. Process. Technol. 2017, 245, 227–231. [Google Scholar] [CrossRef]
  28. Zhang, Y.; Wang, T.; Zhang, B.; Wang, Y.; Feng, J. Microstructure Evolution and Embrittlement of Electron Beam Welded TZM Alloy Joint. Mater. Sci. Eng. A 2017, 700, 512–518. [Google Scholar] [CrossRef]
  29. Ramirez, A.J.; Lippold, J.C. High temperature behavior of Ni-base weld metal: Part II—Insight into the mechanism for ductility dip cracking. Mater. Sci. Eng. A 2004, 380, 245–258. [Google Scholar] [CrossRef]
  30. Misra, S.; Mandal, N.; Dhar, R.; Chakraborty, C. Mechanisms of deformation localization at the tips of shear fractures: Findings from analogue experiments and field evidence. J. Geophys. Res. Solid Earth 2009, 114. [Google Scholar] [CrossRef] [Green Version]
  31. Qin, E.W.; Lu, L.; Tao, N.R.; Tan, J.; Lu, K. Enhanced fracture toughness and strength in bulk nanocrystalline Cu with nanoscale twin bundles. Acta Mater. 2009, 57, 6215–6225. [Google Scholar] [CrossRef]
  32. Li, W.P.; Wang, X.G.; Liu, B.; Fang, Q.H.; Jiang, C. Fracture mechanisms of a Mo alloyed CoCrFeNi high entropy alloy: In-situ SEM investigation. Mater. Sci. Eng. A 2018, 723, 79–88. [Google Scholar] [CrossRef]
  33. Zhang, C.; Song, X.; Lu, P.; Hu, X. Effect of microstructure on mechanical properties in weld-repaired high strength low alloy steel. Mater. Des. 2012, 36, 233–242. [Google Scholar] [CrossRef]
  34. Kurgan, N.; Varol, R. Mechanical properties of P/M 316L stainless steel materials. Powder Technol. 2010, 201, 242–247. [Google Scholar] [CrossRef]
  35. Spierings, A.B.; Starr, T.L.; Wegener, K. Fatigue performance of additive manufactured metallic parts. Rapid Prototyp. J. 2013, 19, 88–94. [Google Scholar] [CrossRef]
  36. Dowling, N.E.; Calhoun, C.A.; Arcari, A. Mean stress effects in stress-life fatigue and the Walker equation. Fatigue Fract. Eng. Mater. Struct. 2009, 32, 163–179. [Google Scholar] [CrossRef]
  37. Manson, S.S.; Muralidharan, U. Fatigue Life Prediction in Bending From Axial Fatigue Information. Fatigue Fract. Eng. Mater. Struct. 1987, 9, 357–372. [Google Scholar] [CrossRef]
Figure 1. Scanning electron microscope (SEM) micrographs of (a) WA and (b) GA 316L stainless steel powders.
Metals 08 00893 g001
Figure 2. Geometric configurations of the samples used in the tensile and fatigue tests.
Metals 08 00893 g002
Figure 3. Dilatometric curves of GA and WA samples and the corresponding temperature profile.
Metals 08 00893 g003
Figure 4. Optical Micrographs of (a) WA sample and (b) GA sample.
Metals 08 00893 g004
Figure 5. X-ray diffraction profiles of the WA and GA samples, both showing the presence of austenite.
Metals 08 00893 g005
Figure 6. Scanning electron microscope (SEM) microstructures of (a) WA sample and (b) GA sample; the corresponding EDS results showing the existence of MnO and SiO2.
Metals 08 00893 g006
Figure 7. Strain-stress curves of the sintered WA and GA samples.
Metals 08 00893 g007
Figure 8. Tensile fracture surfaces of (a) WA sample and (b) GA sample.
Metals 08 00893 g008
Figure 9. Fitted S-N curves shows that the relations between stress amplitude and logNf of are SGA = −30.60logNf + 345.70 and SWA = −44.67logNf + 390.78, respectively, where the SGA and SWA are the stress amplitudes of GA and WA samples. R2 reflects the correlation coefficients of fitted curves of WA and GA sample which are 0.94 and 0.88, respectively.
Metals 08 00893 g009
Figure 10. Morphologies of (a) macro fatigue fracture surface and (b) initiation site for the WA sample; (c) macro fatigue fracture surface and (d) initiation site for the GA sample.
Metals 08 00893 g010
Figure 11. Gibbs free energy of oxidation reactions of Fe and different alloying elements at the sintering temperature.
Metals 08 00893 g011
Figure 12. Fatigue lives of the sintered WA and GA samples compared with those produced by other processes (to compare the results with different mean stresses, the stress amplitudes are normalized).
Metals 08 00893 g012
Table 1. Chemical compositions of two kinds of stainless steel powders (mass fraction, %).
PowdersSiMnNiCrMoCOFe
WA powder0.51.511.017.02.0-0.30Bal.
GA powder0.16
Table 2. The detailed processing parameters used in this study.
ParametersInjectionDe-BindingSintering
CatalyticThermal
Temperature/°C195120300/450/6001390
Time/min-24060180
Table 3. A summary of the densities, chemical compositions and mechanical properties of the sintered WA and GA samples.
SamplesO Contents (wt%)Densities (g·cm−3)Yield Strength (MPa)Tensile Strength (MPa)Elongation (%)
WA sample0.207.65170 ± 5460 ± 1529 ± 3
GA sample0.067.88205 ± 8560 ± 558 ± 2
Table 4. Fatigue life of the WA and GA samples tested with different stress amplitudes (stress ratio R = 0.1).
Stress Amplitude σa/MPaNormalized Stress Amplitude σar/MPaNumber of Cycles to Failure/Nf
WA SamplesGA Samples
193.5288.51.10 × 1041.56 × 105
180268.33.61 × 1042.56 × 105
157.5234.82.85 × 1056.63 × 105
135201.27.61 × 105≥1.00 × 10⁷
90134.2≥3.32 × 10⁶-
Table 5. The corresponding ∆G, ∆H, and ∆S of oxidation reactions of Fe and different alloying elements in 316L SS; data from [26].
Reaction∆H (kJ/mol)∆S (kJ/mol K)∆G = ∆H − T∆S (kJ/mol)
Si ( s ) + O 2 ( g ) = SiO 2 ( s ) −911−0.182∆G = 0.182T − 911
2 Mn ( s ) + O 2 ( g ) = 2 MnO ( s ) −770−0.150∆G = 0.150T − 770
4 3 Cr ( s ) + O 2 ( g ) = 2 3 Cr 2 O 3 ( s ) −760−0.183∆G = 0.183T − 760
4 3 Fe ( s ) + O 2 ( g ) = 2 3 Fe 2 O 3 ( s ) −550−0.183∆G = 0.183T − 550
2 3 Mo ( s ) + O 2 ( g ) = 2 3 MoO 3 ( s ) −497−0.173∆G = 0.173T − 497
4 3 Ni ( s ) + O 2 ( g ) = 2 3 Ni 2 O 3 ( s ) −326−0.245∆G = 0.245T − 326