Article

Deploying Geometric Dimensioning and Tolerancing in Construction

1
Innovative Design Lab, School of Art, Design and Architecture, University of Huddersfield, HD1 3DH Huddersfield, UK
2
School of Engineering, Western Sydney University, NSW 2751 Sydney, Australia
3
Krulikowski Consulting LLC, Bradenton, FL 34202, USA
*
Author to whom correspondence should be addressed.
Buildings 2020, 10(4), 62; https://doi.org/10.3390/buildings10040062
Submission received: 31 December 2019 / Revised: 8 March 2020 / Accepted: 24 March 2020 / Published: 26 March 2020

Abstract

:
No standardised approach appears to exist in the architecture, engineering, and construction (AEC) industry for the communication of tolerance information on drawings. As a result of this shortcoming, defects associated with dimensional and geometric variability occur with potentially severe consequences. In contrast, in mechanical engineering, geometric dimensioning and tolerancing (GD&T) is a symbolic language widely used to communicate both the perfect geometry and the tolerances of components and assemblies. This paper prescribes the application of GD&T in construction with the goal of developing a common language called geometric dimensioning and tolerancing in construction (GD&TIC) to facilitate the communication of tolerance information throughout design and construction. design science research is the adopted methodological approach. Evidence was collated from direct observations in two construction projects and two group interviews. A focus group meeting was conducted to evaluate whether the developed solution (GD&TIC) fulfilled its aim. The contribution of this paper to designers, to organisations involved in developing AEC industry standards, and to the scholarly community is twofold: (1) It is an attempt to develop a standardised approach (GD&TIC) for the communication of tolerance information in AEC, and (2) it identifies discrepancies between GD&TIC rules and some of the commonly used American and British standards on tolerances.

1. Introduction

Materials and components cannot be exactly dimensioned and positioned in the way that they were designed. Tolerances are defined as the accepted amount of variations of materials and components from nominal values or design specifications [1]. There are two types of tolerances: (1) dimensional tolerances, stating the permitted amount of deviation for a specific size, e.g., floor thickness; and (2) geometric tolerances, stating the allowed amount of deviation on a specific geometric property, e.g., the flatness of concrete slabs [2]. Construction projects are traditionally made up of an assembly of several different factory-made components and components produced in situ. Construction tolerances range from less than a millimetre for many factory-made components to several millimetres for many in-situ components [3]. Moreover, contemporary buildings have become lighter and more vulnerable to building movement and subsequent geometric changes [4]. The lack of uniformity of accuracy between factory-made and in-situ components, as well as the higher level of building movements in contemporary buildings are two major factors that affect the dimensional and geometric accuracy of buildings [5]. The conversion of a good design into a good product (e.g., a building) is a matter of keeping dimensional and geometric variations within tolerances that are predetermined at the design stage [6]. The acceptability of a product depends on whether its variations in size and geometry fall within set limits; thus, the bridge between design and production is tolerance. In other words, tolerances interlink design with construction because, without specifying the tolerances, it is not clear whether components and sub-assemblies (i.e., connections of two or more components) meet the design intent regarding the accuracy of the final product.
The exchange of tolerance information between design and construction teams is essential to ensure that components fit and function properly [7]. However, when designers are developing ideal assemblies of components within their drawings and models, they tend to presume that these components will fit together perfectly and they often do not take tolerances in to consideration [8]. One reason for this is that no standardised form of information exchange, particularly concerning tolerances, exists in construction design documents (e.g., drawings) [9]. In other words, design documents do not adequately include tolerance information and therefore do not transfer presumed tolerance information between parties involved in project delivery because of the lack of a tolerancing system (i.e., a system to communicate the tolerance information) in architecture, engineering, and construction (AEC). In this paper, tolerance information represents the permitted dimensional and geometric variations of a component or sub-assembly to ensure that functional requirements (e.g., water tightness, safety, serviceability, durability, constructability, the fit between components, structural stability, aesthetics, and energy performance) are satisfied [10].
The improvement of tolerancing is expected to reduce defects associated with dimensional and geometric variability, referred to hereafter as tolerance problems [11]; however, the existing literature do not offer any considerable actionable advice to improve tolerancing. As a result of shortcomings in interlinking design with construction through tolerancing, tolerance problems occur [4]. Tolerance problems may adversely impact functional requirements, considerably increase the cost of construction and maintenance [12], cause delays [13], and increase material wastage [14]. Those problems influence customer satisfaction and are often at the centre of disputes between consumer, contractor, supply chain, and client [15,16]. Hence, there is a clear need in construction to develop a tolerancing system when compiling design documents.
The system of geometric dimensioning and tolerancing (GD&T) is widely used in mechanical engineering as a common language to facilitate the communication of tolerance information [17]. GD&T is successful in significantly reducing tolerance problems in manufacturing [18] and reducing the number of ambiguous situations that arise when using conventional tolerancing approaches [19]. Though the potential application of GD&T in the AEC industry has been acknowledged before [20], it has not yet been thoroughly investigated.
The aim of this paper is to prescribe a new tolerancing system for AEC drawings by applying GD&T in construction, termed GD&TIC. GD&TIC is expected to improve the communication of tolerance information and reduce tolerance problems that occur due to the lack of a tolerancing system in the AEC industry. Unlike previous studies that have considered GD&T for tolerance analysis (i.e., the calculation of combined variations), this research applies GD&T in construction to improve the communication of tolerance information. GD&TIC communicate dimensional and geometric variations through a set of systematic rules and consistent terminology, as opposed to conventional tolerancing systems that only communicate dimensional tolerances [21]. In this research paper, first, the related background is presented. The research method used for this research is explained. The proposed tolerancing system, GD&TIC, is then introduced, and the application of GD&TIC is delineated through examples. The discrepancies between the proposed system and some of the existing reference documents (i.e., standards, industry guidance bulletins, and codes of practice) are then investigated in order to identify incompatibilities between the proposed tolerancing system and existing reference documents. Given that numerous reference documents addressing tolerances exist, the scope of the research reported in this paper includes the investigation of discrepancies between GD&TIC and American and British reference documents. The proposed tolerancing system is evaluated. The findings and contributions to knowledge are discussed. Eventually, conclusions drawn from the research, and suggestions for follow-on research are discussed.

2. Theoretical Background

2.1. Tolerancing in Construction

The ineffective communication of tolerance information is a perennial challenge in the AEC industry, and insufficient attention has been devoted to tolerancing [8,22]. Architects and engineers typically do not specify tolerances in their drawings and use chain dimensioning, in which all dimensions are connected head-to-tail as chains without any tolerance [23]. It is known that tolerance problems mainly occur in the connections between the structural frame and non-structural components (e.g., cladding, panelling units, pipework, lift wells, and stairwells) [6]. Designers sometimes use the term ‘HOLD’ or the plus/minus sign (±), as a prefix or suffix to distinguish between important and less important dimensions in connections between structural and non-structural components [24]. However, the exact amount of permitted variations is not stated or communicated in either of these approaches.
Tolerances can be communicated on drawings by using the conventional plus/minus system [25,26]. Figure 1 illustrates an example of the application of the conventional plus/minus system for a square hole [5]. The conventional system results in simplicity in the communication of tolerance information [27]. However, this system appears to not distinguish between different types of dimensional and geometric tolerances (e.g., flatness, plumbness, and clearance) [28]. As a result, designers and construction teams in the industry cannot become systematically aware of different types of tolerances and lack the vocabulary to communicate tolerance information [5,24].
The terminology for the communication of tolerance information in AEC is mainly defined by reference documents [24]. The terminology is currently inconsistent and fragmented across various reference documents [29]. This is because most of the existing reference documents are considerably out of date and have been developed by different independent organisations [30], and no thorough attempt has been made to harmonise the terminology [31]. For example, [32,33] use the term ‘verticality’, while [15,34] use the term ‘plumbness’; [35,36] use the term ‘alignment’, while [15,36,37] uses the term ‘parallelism’. Such discrepancies in terminology are confusing for researchers and practitioners, and, therefore, there has been a call to revise American and British reference documents addressing the communication of tolerance information [38]. It will be hard to introduce a completely new terminology on a worldwide basis even if it has enough expressiveness [39]. Rather, the terminology used in the existing reference documents should be considered as a basis, and any discrepancy between new developments and existing terminology should be investigated and refined to avoid incompatible developments that would cause even further confusion [40].
Since its establishment, building information modelling (BIM) has been expected to significantly improve the communication of tolerance information [41]. In particular, unlike previous Computer Aided Design (CAD) systems, BIM does not represent objects with fixed geometry. Rather, parametric modelling in BIM allows components to receive attributes such as tolerance information that determines the geometry of components [42]. Nevertheless, the communication of tolerance information in BIM is still limited to the conventional plus/minus approach for a single or group of similar components [43]. Despite the fact that customised tolerance annotations can be created, it appears that no standard tolerancing approach exists for the communication of tolerance information in BIM [44]. All in all, the current practice of architects and engineers regarding tolerancing, the terminology and tolerancing methods used in existing reference documents, and the current functions of BIM for tolerancing often establish an ambiguous and incomplete communication of tolerance information on drawings and models [19], which can result in tolerance problems [9].

2.2. Geometric Dimensioning and Tolerancing

GD&T was first developed during World War II and became part of the military standards [45]. It is a symbolic language [17] that communicates both the perfect geometry and tolerances for a component [46]. It specifies the permitted variation in size, form, orientation, and location of features (e.g., size or surface) on a component [28]. It also conveys the design intent regarding dimensions and tolerances, not only by defining the size and shape of the component but also by representing the relationship between components in an assembly [47]. The objective of this tolerancing system is to ensure that tolerances are established based on the functional requirements so that the components in an assembly will function as intended [46]. It should be emphasised that, in manufacturing, there is currently no other method than GD&T by which a component can be defined in the design without ambiguity [48]. Ignoring GD&T results in the acceptance of parts based on specifications that then fail to function [17], or the rejection of parts that are out of specification that still function properly [49].

2.3. Previous Application of Geometric Dimensioning and Tolerancing in the AEC Industry

After reviewing the literature, it was found that there has been an attempt to adopt GD&T in the AEC industry. An analytical method called tolerance mapping has been proposed to evaluate interrelationships between components while considering their geometric categories [20]. Though GD&T principles are used in this method, this research is concerned with using GD&T for the tolerance analysis (i.e., the calculation of combined variations) of a given design, rather than for the communication of tolerance information [4,50]. The use of GD&T in this research is not going into detail about how tolerance information for various components can be communicated using GD&T. In other words, the geometric characteristic symbols of GD&T have not been used to communicate the tolerance information thus far; rather, they have been used for performing the tolerance analysis [13].

3. Research Method

This research adopted the design science research (DSR) methodological approach. DSR focuses on designing an artefact and prescribing a solution to solve a problem in practice while also contributing to theory [51,52,53]. In other words, the key tasks of DSR are (1) to prescribe an artefact that will address the practical problems by its developed applicable solutions [54] and (2) to bring together the two realities of practice and theory [52]. This approach was originally developed in the area of information systems, but a number of authors, such as [55,56,57,58], have suggested that DSR should be used to develop solutions for solving practical and relevant problems in AEC. DSR is about prescribing and evaluating, which means designing and constructing an artefact and then ensuring that the identified problem has been solved [59]. The artefacts are created with the ultimate goal of solving problems, making changes in the application area, and improving performance [60]. The outcome of DSR, the artefact, has a prescriptive nature as it aims at solving a practical problem [61].
The focus of this research was not only on understanding and describing the problem but also on solving a practical problem and constructing a new artefact that can improve the existing practice of the AEC industry in terms of tolerancing. The proposed artefact of this research was GD&TIC. As discussed in Section 2.1, there is a need for further research in tolerancing from both theoretical and practical viewpoints. From a theoretical viewpoint, the literature has mostly focused on exploring the problem with communicating tolerance information rather than on proposing a solution to improve tolerancing; it therefore gives limited practical recommendations [25,62,63]. From a practical viewpoint, there is evidence that the lack of a standardised approach for tolerancing leads to ambiguous situations during design and tolerance problems during construction [4,5,9]. Therefore, DSR seemed appropriate for this research.
The following steps were taken in this research to undertake DSR [53,59,64,65,66]: (1) problem definition, (2) awareness of problem, (3) the development of solution, and (4) evaluation. The steps taken to undertake this research are presented in the ensuing sections.

3.1. Step One: Problem Definition

‘Problem definition’ is suggested as a first step for the development of an artefact [59,64,65,66]. The identified problem should have potential for research and should be relevant to practice [64,67]. In this step, a review of the literature was carried out not only in AEC but also in mechanical engineering and manufacturing to characterise the terms ‘tolerancing’ and ‘communication of tolerance information’, as well as to recognise the areas of concern for tolerancing in AEC from the earlier researchers’ point of view. The literature helped the authors to understand the underlying needs of the AEC industry in terms of tolerancing and the potential solution in manufacturing (GD&T). A summary of the findings of this step are presented in Section 2.1.

3.2. Step Two: Problem Awareness

The next step is ‘problem awareness’, which can arise from multiple sources including empirical studies [59,64,65]. This step in the research included exploratory empirical studies in two construction projects (i.e., case A and case B). The empirical studies were aimed at identifying tolerance problems that occurred as a result of the poor communication of tolerance information and then thoroughly understanding the reason behind their occurrence. Despite the potentially severe magnitude and impact of such tolerance problems, it appears that there is little documentation and analysis of tolerance problems that have occurred due to the lack of a tolerancing system in the construction literature [68]. Therefore, the empirical studies were essential to establish problem awareness. Those tolerance problems then were used as a basis to delineate the application of GD&TIC through relevant examples in Section 4.1. Details of the projects studied and the development stages of these projects are given in Table 1.
A non-probability sampling (non-random sampling), based on the authors’ subjective judgement, was used in this study to select cases. Among the non-probability sampling techniques (quota, purposive, snowball, self-selected, and convenience) [69], purposive sampling, which highlights the importance of conscious decision-making, was adopted. This form of sampling is used when working with a very small sample, such as in case study research and when the researcher intends to select cases that are particularly informative [70]. The purposive sample of this study was based on the following criteria: (1) the acknowledgment of the need for a better tolerancing system by the main contractors executing the projects, (2) the willingness to give the authors access to construction sites, and (3) the stage of development. Regarding the latter criterion, tolerance problems in the connection between the structural frame and other components could be identified during empirical studies. Such problems are amongst the most recurring and costly tolerance problems, as mentioned in Section 2.1. This implies that the selected cases were informative due to the type of tolerance problems identified. The observations of two cases led to the satisfactory achievement of theoretical saturation [71] because it resulted in a deep understanding of how the lack of a tolerancing system leads to tolerance problems on site and provided an adequate basis to the application of GD&TIC through relevant examples in Section 4.1. While two cases may appear to be a small sample, the sample size in qualitative research is directly linked to the quality of data in supporting the aim of the study. In other words, the purposive sampling in this study ensured that right cases were selected and theoretical saturation, which is more important than the size of sample [72], was achieved.
Data collection tools used included direct observations and two group interviews. Direct observations in this research were carried out to identify tolerance problems that occurred as a result of the poor communication of tolerance problems. The tolerance problems identified through observations were validated in two group interviews, one for Case A and one for Case B. In other words, the group interviews were used for the refinement of the description of the tolerance problems and the reason behind their occurrence. The multiple data collection methods resulted in triangulation that contributed to the rigour of the research [73].
In direct observations, the researcher does not become an internal member of the case being investigated [74] and only observes activities in the field [74]. The observations in Case A and Case B took ten and five months, respectively. The list of participants in each group interview is given in Table 2. The interviewees were suggested by the managing directors of the main contractors because they were engaged with the project from the beginning and were fully aware of all issues on site including tolerance problems. This ensured that the right participants were on board, which is more important than the number of those participants [72]. The participants were asked whether the tolerance problems and the reason behind their occurrence had been presented adequately. The participants confirmed that the main cause of the occurrence of the identified tolerance problems was due to the poor communication of dimensional and geometric variations between designers and construction trades.
The list of tolerance problems identified in Case A and Case B are presented in Table 3. Further details of those tolerance problems can be found in Table A1. After the completion of the literature review in step one and the empirical studies in step two, the importance and relevance of the research problem (i.e., the lack of a standardised tolerancing system) could be ascertained by the authors.

3.3. Step Three: Development

The ‘development’ step, for which creativity was an inevitable part, was then undertaken [59,64,65,66]. In this step, the proposed artefact (GD&TIC) was developed (prescribed) based upon the findings from Step One and Step Two. In Step One, the review of the conventional methods for tolerancing in AEC and methods for tolerancing in manufacturing helped the authors to understand the shortcomings of the conventional methods for the tolerancing in AEC and to identify GD&T as a solution to improve the tolerancing in AEC. In Step Two, the analysis of the identified tolerance problems helped to gain an understanding of how the lack of a tolerancing system in AEC leads to tolerance problems on site. In Step Three, the proposed solution was developed based on the configuration of the gained understanding from the literature review on GD&T and analysis of the characteristics of tolerance problems that occurred due to the lack of a tolerancing system. The application of GD&TIC was delineated in Step Three through relevant examples found in Step Two. Moreover, an analysis of the discrepancies between the existing reference documents and GD&TIC’s rules in Step Three helped to ensure the compatibility of GD&TIC with existing reference documents and avoid developing incompatible solutions with those reference documents. In Step Three, it was prescribed that how GD&T’s rules should be applied in the AEC industry. More specifically, this research proposed (1) a definition for the tolerance zone in AEC, (2) how a tolerance zone should be applied to construction component, (3) what characteristic symbols are more applicable in AEC, (4) how components should be controlled by each geometric characteristic in GD&TIC, and (5) how GD&TIC symbols should be inserted into drawings. The results of this step are presented in Section 4.1.

3.4. Step Four: Evaluation

‘Evaluation’ is the final DSR step [59,64,65,66]. Attention has been drawn to the focus group as a method for evaluating the utility of artefacts developed through DSR [75], and this method was used in this research. The principles of the unique adequacy (UA) requirement of methods was used to ensure the thorough evaluation in this research [76]. This approach is the most fundamental principle of ‘ethnomethodological research’, for which the focus is on a detailed study of directly observable practices performed by members of a local setting [77]. The action in this research was ‘tolerancing’, and the local setting was the ‘AEC industry’.
The UA requirement of method has two related criteria: the weak and strong forms [78]. In its weak form, the UA requirements demands to analyse the AEC industry setting adequately in a way that the researcher gains the competence about what any member in that setting would ordinary know about a particular practice [76]. This competence is referred to as ‘knowing how’; it consists of being able to perform relevant activities within that setting [79]. The weak requirement demands the researcher to become vulgarly competent in a more specialised practice [80]. In this research, the observations and group interviews in Case A and B helped the authors to gain the competence in tolerancing. The researcher then needs to develop a practical artefact that an outsider cannot develop without having the competence [81]. The practical artefact in this research was the GD&TIC.
The strong requirement demands the methods of analysis used to report on a setting to be derived from that setting [79]. This stipulates the application of a policy of ‘ethnomethodological indifference’, i.e., it refuses to evaluate the activities that constitute the setting by approaches that are not part of that setting [81]. In other words, the participants invited to the focus group must be the same as the participants attended the group interview by which the competency about tolerancing was achieved. As a result, the participants, who (1) are aware of the problem, (2) contributed to develop the artefact, and (3) would be the potential users of the artefact, are in fact confirming the final solution [82]. Note that potential users of the artefact are the main source of knowledge because they can adequately inform the evaluation of the artefact [61]. If a new participant group were approached for the evaluation, the level of understanding of the new participants from the proposed solution would have been by far lower, and the authors recognise the effort that would have had to place in order to explain the problem and introduce the solution [75]. In the focus group, the identified tolerance problems were reviewed, and then it was explained to the participants how those problems could have been avoided using GD&TIC. Overall and generally, as a result of complying with the weak and strong criteria, a realistic environment, in which the artefact is implemented, will be approximated [83], and this makes the focus group as strong as the implementation [82].
The evaluation should be based on appropriate criteria [54]. The criteria proposed by [54,84,85,86] were used to develop a framework to evaluate the solution developed in this research (Table 4). The framework has three hierarchical levels: (1) criteria, (2) attributes, and (3) corresponding questions. The criteria in this framework were usefulness and effectiveness. Usefulness addresses the capability of GD&TIC to improve tolerancing, and effectiveness addresses GD&TIC’s capability to achieve the objective of GD&TIC (i.e., a reduction in tolerance problems caused by the poor communication of tolerance information) while using resources [85]. Two attributes fall under the usefulness criterion, namely practicality [54,86] and applicability [86]. Three attributes fall under the effectiveness criterion, namely acceptability [85,86], efficacy [84,86], and efficiency [84]. The framework consisted of five questions, each question representing an attribute. A verbatim transcription from the recorded focus group was produced. A summary of findings is presented in Section 4.3. All quotations from the focus group are presented in italics and were improved for readability.

4. Results: Geometric Dimensioning and Tolerancing in Construction (GD&TIC)

GD&T is a comprehensive language [87]. GD&TIC is a simplified and refined version of GD&T and is a system prescribed for the communication of tolerance requirements in AEC. The main reason for using the term ‘GD&TIC’ (as opposed to ‘GD&T’) is to emphasise that this system is the refined version of GD&T and was developed specifically for the AEC industry. Four key terms used in GD&TIC are: (1) surface feature, (2) feature of size, (3) datum, and (4) tolerance zone. These are defined as follows. The surface feature and the feature of size are two specific types of features. A geometric tolerance can be applied to a surface feature or a dimensioned feature. The latter type of feature is known as a feature of size [88]. The datum is a theoretically exact point, axis, or plane from which the location or geometric characteristics of a feature are established [46]. The tolerance zone is a two or three-dimensional area within which all of the toleranced features are contained [45]. Depending on the type of tolerance applied to a feature, tolerance zones can have different shapes (e.g., circle and cylinder) [46]. Geometric characteristic symbols are the essence of GD&T [17] and, similarly, of GD&TIC. GD&TIC, in this paper, consists of three categories and a set of five symbols. A summary of the fundamentals of GD&TIC is given in Table 5. As can be seen in Table 5, these symbols fall into three categories: (1) form, (2) orientation, and (3) location. It is worth noting that GD&T has five categories and fourteen symbols [89]. According to [90], “it is important for researchers to exercise a certain level of selectivity when developing a formal research framework such that only conditions that are regarded as pertinent to the research are chosen from an infinite spectrum of other possible conditions”. Therefore, this research deployed only the most applicable geometric characteristic symbols and avoided the ones that could be indirectly controlled (substituted) by other symbols [91].
The fourth category is profile, which has two symbols. This category is not presented in this paper because it can be indirectly controlled by the form, orientation, and location categories, and, therefore, it is often ignored even in the manufacturing context [92]. The fifth category is the runout control that is applied to rotating parts [93], which are scares in the AEC industry. Even when buildings have rotating parts (e.g., a revolving restaurant), the tolerancing of those parts is expected to be handled by mechanical engineers and not the AEC people [20]. Hence, this category and its two symbols do not seem to have relevant application to the AEC industry. The other symbols, namely circularity (roundness) and cylindricity under the form category; concentricity and symmetry under the location category; and angularity under the orientation category, were excluded from the preliminary version of GD&TIC presented in this research paper. This is because they can be indirectly controlled by other GD&T symbols. More specifically, circularity and cylindricity can be controlled by straightness, concentricity can be controlled by position, symmetry can be controlled by a combination of position and parallelism, and angularity can be controlled by parallelism and/or perpendicularity. Moreover, no application could be found for those symbols given the nature of assemblies in construction and the purpose of the symbols based on the findings during the literature review and empirical studies.
Like GD&T, the GD&TIC system uses a feature control frame (FCF) to specify information for the geometric control of a feature and thereby clearly and to visually communicate how geometric tolerances are applied through drawings [93]. An FCF is a rectangular box comprised of compartments where the geometric characteristic symbol, tolerance value, modifiers, and datum references are placed [45]. The FCF in GD&T and GD&TIC are exactly similar. Figure 2 depicts the FCF and defines each symbol used. The tolerance modifier in FCF is out of the scope of this research.

4.1. Types of Tolerances and Geometric Characteristics in GD&TIC

4.1.1. Form

The form establishes the shape of a surface [88] and is described here by means of two geometric characteristics: (1) straightness and (2) flatness [89]. These characteristics never use a datum [89].

Straightness

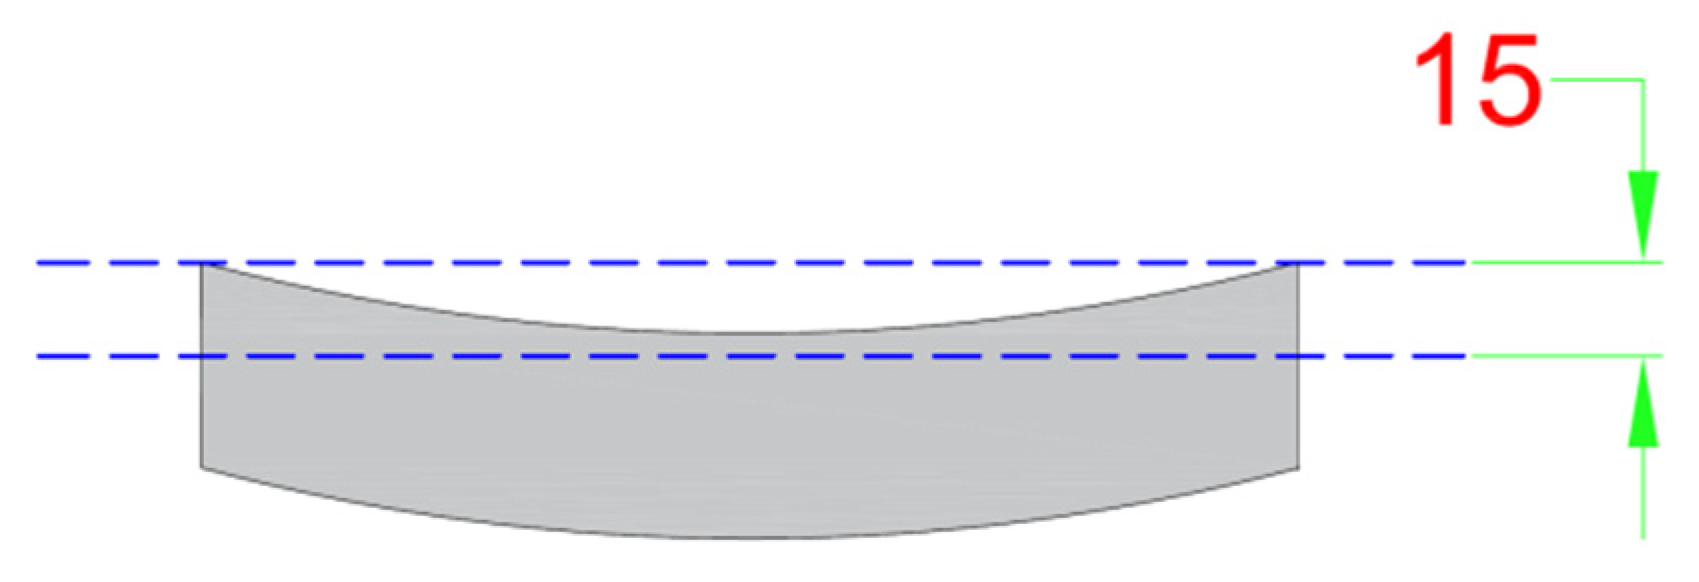
The straightness control can be applied to a surface [93]. Straightness is a condition where the line elements of a surface follow a straight line and satisfy the specified tolerances [46]. In simple terms, a straightness control represents how straight a surface is along a line. When a straightness control is applied to a surface, it demonstrates the permitted deviation of the straightness in each surface line element [17]. The tolerance zone for a straightness control applied to a surface is two-dimensional and includes two parallel lines for the line element of the surface [93]. The two highest points of the line element of the surface create the first line element of the tolerance zone. The distance between the two parallel lines of the tolerance zone is equal to the straightness tolerance value. The second line element of the tolerance zone is at the bottom of the line element of the surface, parallel to the first line, and offset by the straightness tolerance value. The tolerance zone for the straightness controls delimits a range of variation up and down in a Y-axis over the line element of the surface [17]. If the line element of the surface is within the two parallel line elements of the tolerance zone, then the feature is within tolerance [19]. Figure 3 shows the tolerance zone for a steel beam to which the straightness control has been applied (related to Tolerance Problem 3). The distance of 15 mm between the two parallel lines of the tolerance zone represents the straightness tolerance value.
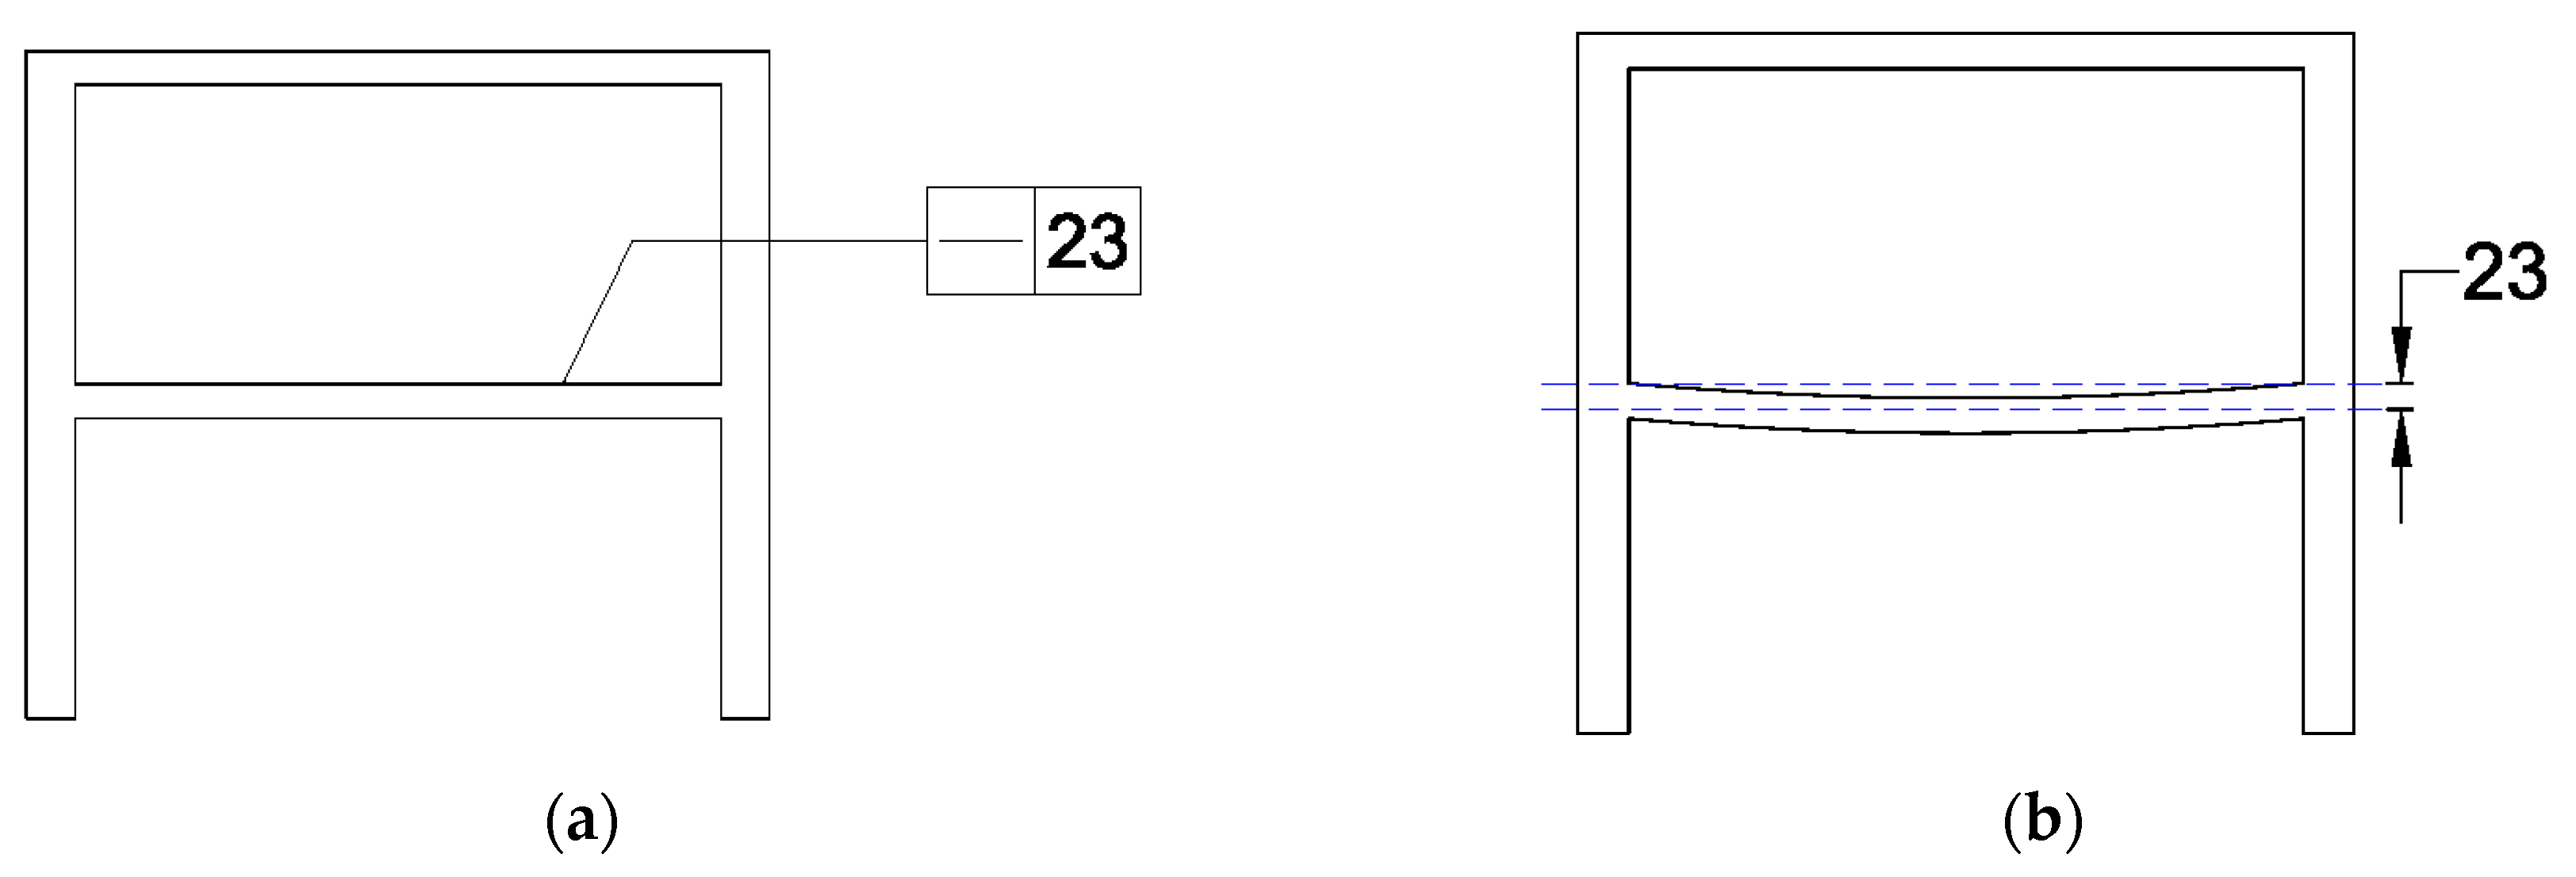
It is proposed that the straightness control in GD&TIC is used to control the beams and columns that are prone to deformation as a result of the dead and imposed loads. These deformations include beam deflection and column buckling, which can potentially result in the components being out of tolerance. Figure 4a shows a steel frame structure with the straightness control applied to its beam in the envelope, and Figure 4b shows the associated tolerance zone (related to Tolerance Problem 3).

Flatness

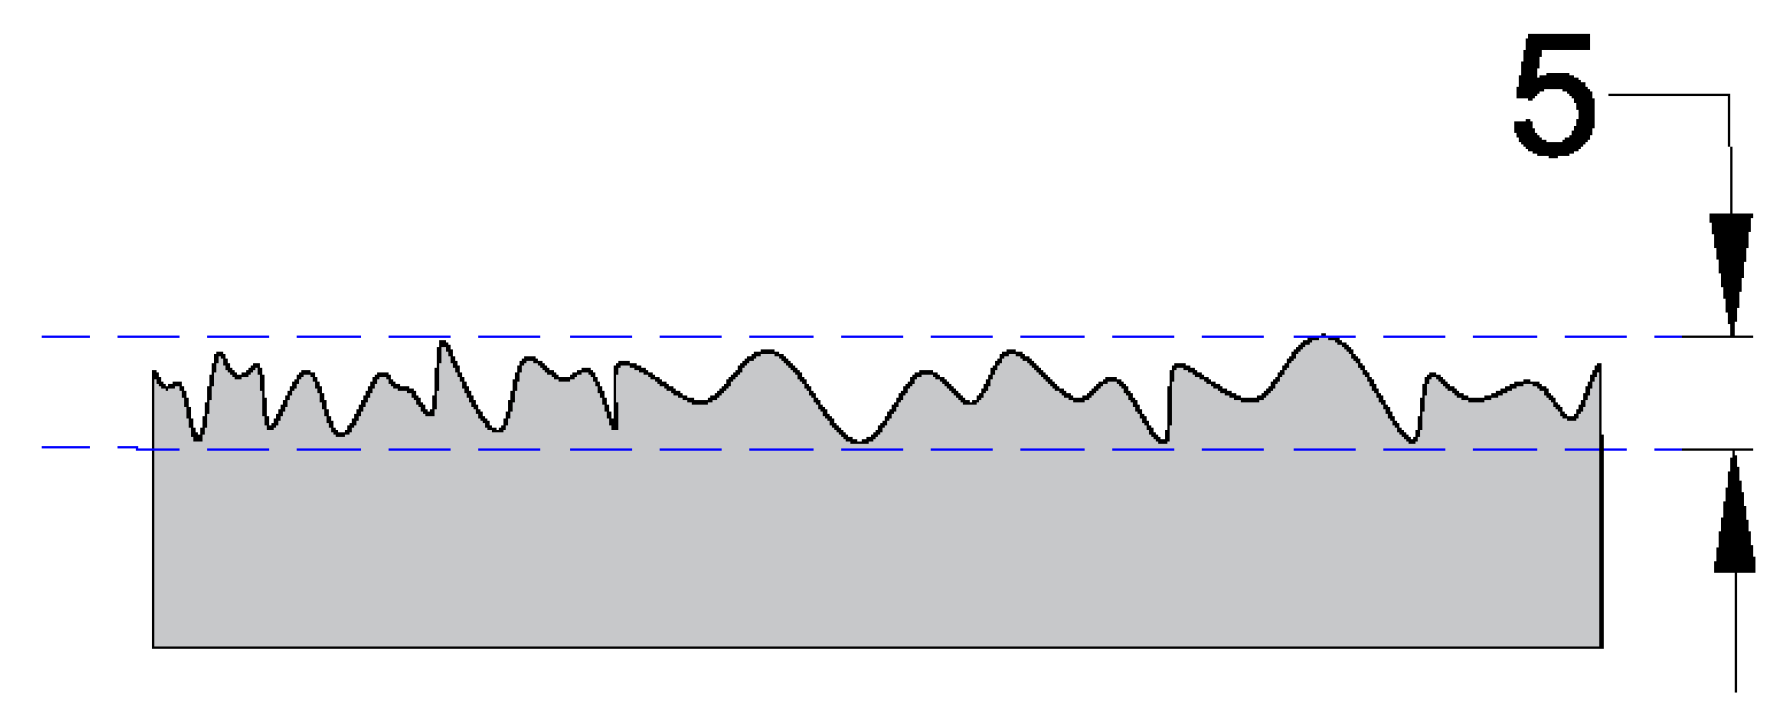
Flatness is a condition where a surface has all its elements in one plane [94], which indicates a condition of being completely a planar surface. When a flatness control is applied to a surface, it demonstrates the amount of deviation in flatness that a surface is allowed to have [94]. When the flatness of a component is critical, such as the whole or part of a floor surface, the flatness control is applied [92], regardless of the thickness, the size dimension, or other features that may also be specified [17]. When the flatness control is applied, the tolerance value for flatness is specified to ensure that the surface does not undulate beyond the specified limit [95]. Figure 5 shows a concrete slab containing a flatness callout of 5 mm (related to Tolerance Problem 1).
The tolerance zone for the flatness control is three-dimensional and comprises two parallel planes [19]. The elements of the surface being controlled must lie within the two parallel planes [93]. The first theoretical plane of the tolerance zone is created by considering the three highest points of the controlled surface. The second theoretical plane of the tolerance zone is parallel to the first plane [17], and the distance between the parallel planes is equal to the flatness tolerance value [93]. If the points of the controlled surface lie within the tolerance zone, then the surface being controlled is within the flatness tolerance [94]. The flatness control, like other form tolerances, creates a tolerance zone that is never relative to a datum [48].
Figure 6 shows a concrete slab with a flatness callout of 5 mm. The feature in this concrete slab relates to the top surface. The surface must stay entirely within the tolerance zone of 5 mm to be within tolerance. Figure 6 shows a two-dimensional cross section whose surface can vary by up to 5 mm within the tolerance zone (related to Tolerance Problem 1).

4.1.2. Orientation Tolerances

Parallelism and perpendicularity are the orientation symbols used in GD&TIC. These symbols describe the relationship between features and datums at particular angles [96].

Parallelism (Surface)

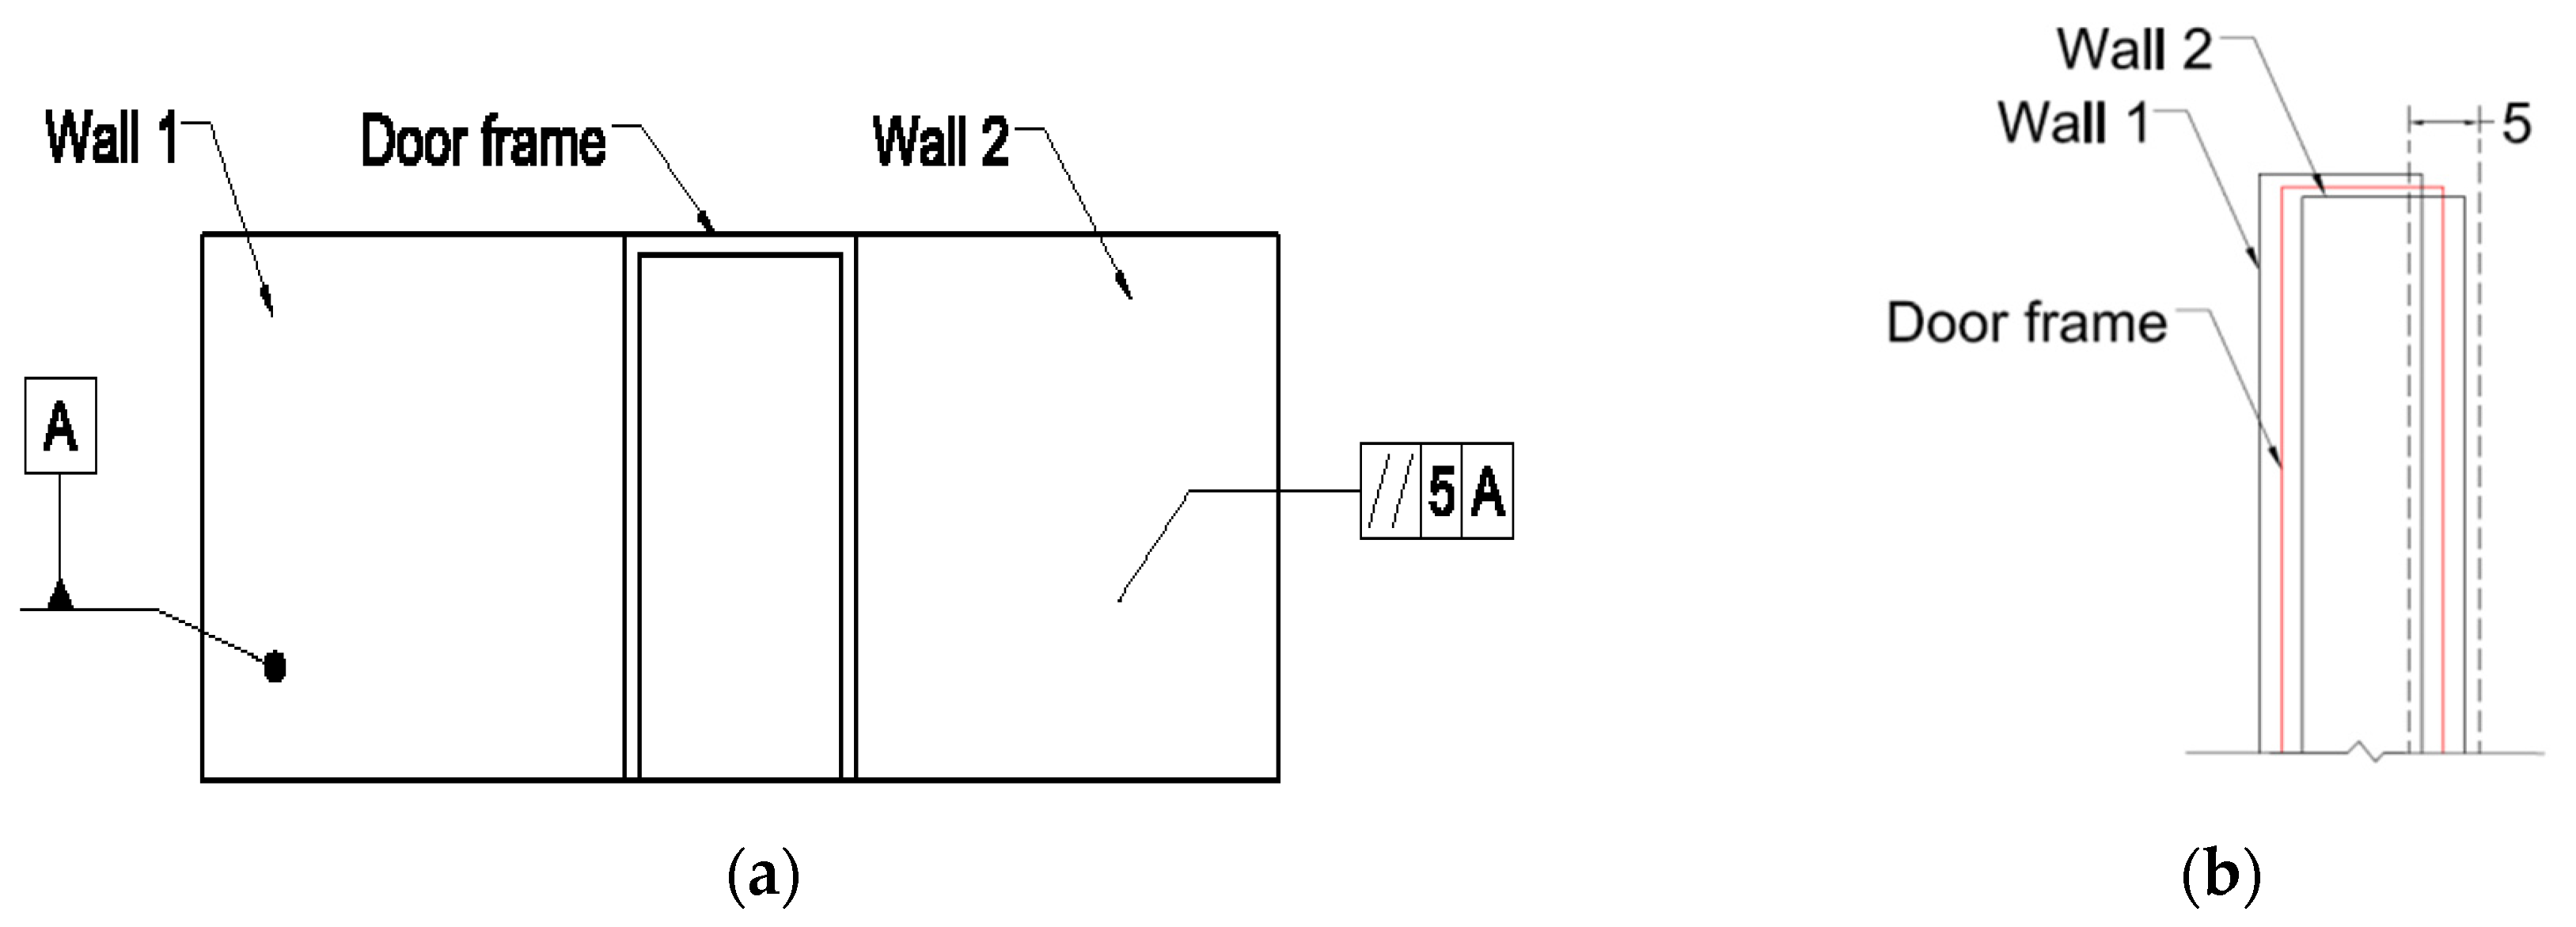
Parallelism is a condition of a surface, centre plane, or an axis that is equidistant at all points from a datum plane [19]. A parallelism (surface) control limits the amount of variation allowed over an entire plane, from a state of being parallel to the datum plane [87]. In conventional drawings, the size dimension between two surfaces controls the parallelism if those two surfaces are shown to be parallel on a drawing. However, this method has two shortcomings. The first shortcoming relates to the size requirement and the parallelism requirement as they are assumed to be similar, while in reality they may have different values in order to ensure the functionality [97]. Figure 7a shows a drawing of a doorway in an industrial building (related to Tolerance Problem 4). The posts at the two sides of the doorway may be within size tolerance, but the parallelism tolerance may need to be tighter to ensure that there is an adequate distance between the posts to accommodate the door whilst also ensuring that there are no gaps around the door (Figure 7b). Further to this, when the size tolerance is satisfied, it does not necessarily ensure that the two sides of the doorway are in a plane (Figure 8).
The second of these shortcomings relates to when parallelism is implied by using a size dimension, as the datum is not specified [96]. This can result in confusion, as the modification process is highly dependent on the measurement results and a lack of datum can cause different measurement results [89]. In Figure 8, the datum can be positioned to either side of the doorway and determines whether the right side or the left side of the doorway is out of alignment.
In terms of the application of parallelism (surface), when two surfaces should maintain a constant distance, the parallelism control is used. For instance, when it is a functional requirement that doorframes stay equidistant, the parallelism control is then required. This control specifies that (1) the surfaces of those components must be parallel with each other and (2) by how much the components can be offset relative to each other whilst still functioning properly (related to Tolerance Problem 4).
The FCF of the parallelism control contains a parallelism symbol, a tolerance value, and a datum feature [93]. Figure 9a shows two walls separated by a door. The drawing callout for a parallelism of 5 mm is applied to Wall 2 (similar to Tolerance Problem 4). In Figure 9b, Wall 1 is set as the datum, and, therefore, the front surface of Wall 2 is referenced parallel in relation to Wall 1.
The tolerance zone for parallelism is two-or three-dimensional, and it comprises two parallel planes that are parallel to the datum plane [91]. The tolerance zone for the walls illustrated in Figure 9a is shown in Figure 9b (similar to Tolerance Problem 4). The two parallel and dotted lines demonstrate the tolerance zone for Wall 2. The tolerance zone planes are offset by the tolerance value [98], which, in this example, is 5 mm. The datum is the plane on the front surface of Wall 1. The tolerance zone is parallel to the surface of datum A according to the definition of the tolerance zone for parallelism. The feature, which is the front surface of Wall 2, is within tolerance, providing that all its elements fit between the tolerance zone of 5 mm. Both walls fall within the tolerance zone, and, therefore, the front surface of Wall 2 is in tolerance and parallel with Wall 1.

Perpendicularity

Perpendicularity is a condition used to ensure that a surface or axis is exactly at a right angle relative to a datum plane [19]. It is herein indicated as perpendicularity (surface) and perpendicularity (axis). The perpendicularity control limits the amount of variation allowed over a surface or axis from the situation of being parallel to the datum plane [99]. This condition is used when a feature needs to be perpendicular to another feature [99]. It is suggested that the perpendicularity (axis) control is mainly used for columns located in the building envelope or other columns for which plumbness tolerances are a major concern. This control specifies (1) that the plumbness of those columns is of prime importance for the proper functioning of a mating component (e.g., cladding) and (2) how much variation of the columns can take place whilst ensuring that the sub-assembly (e.g., the sub-assembly comprised of the cladding installations and columns) functions properly.
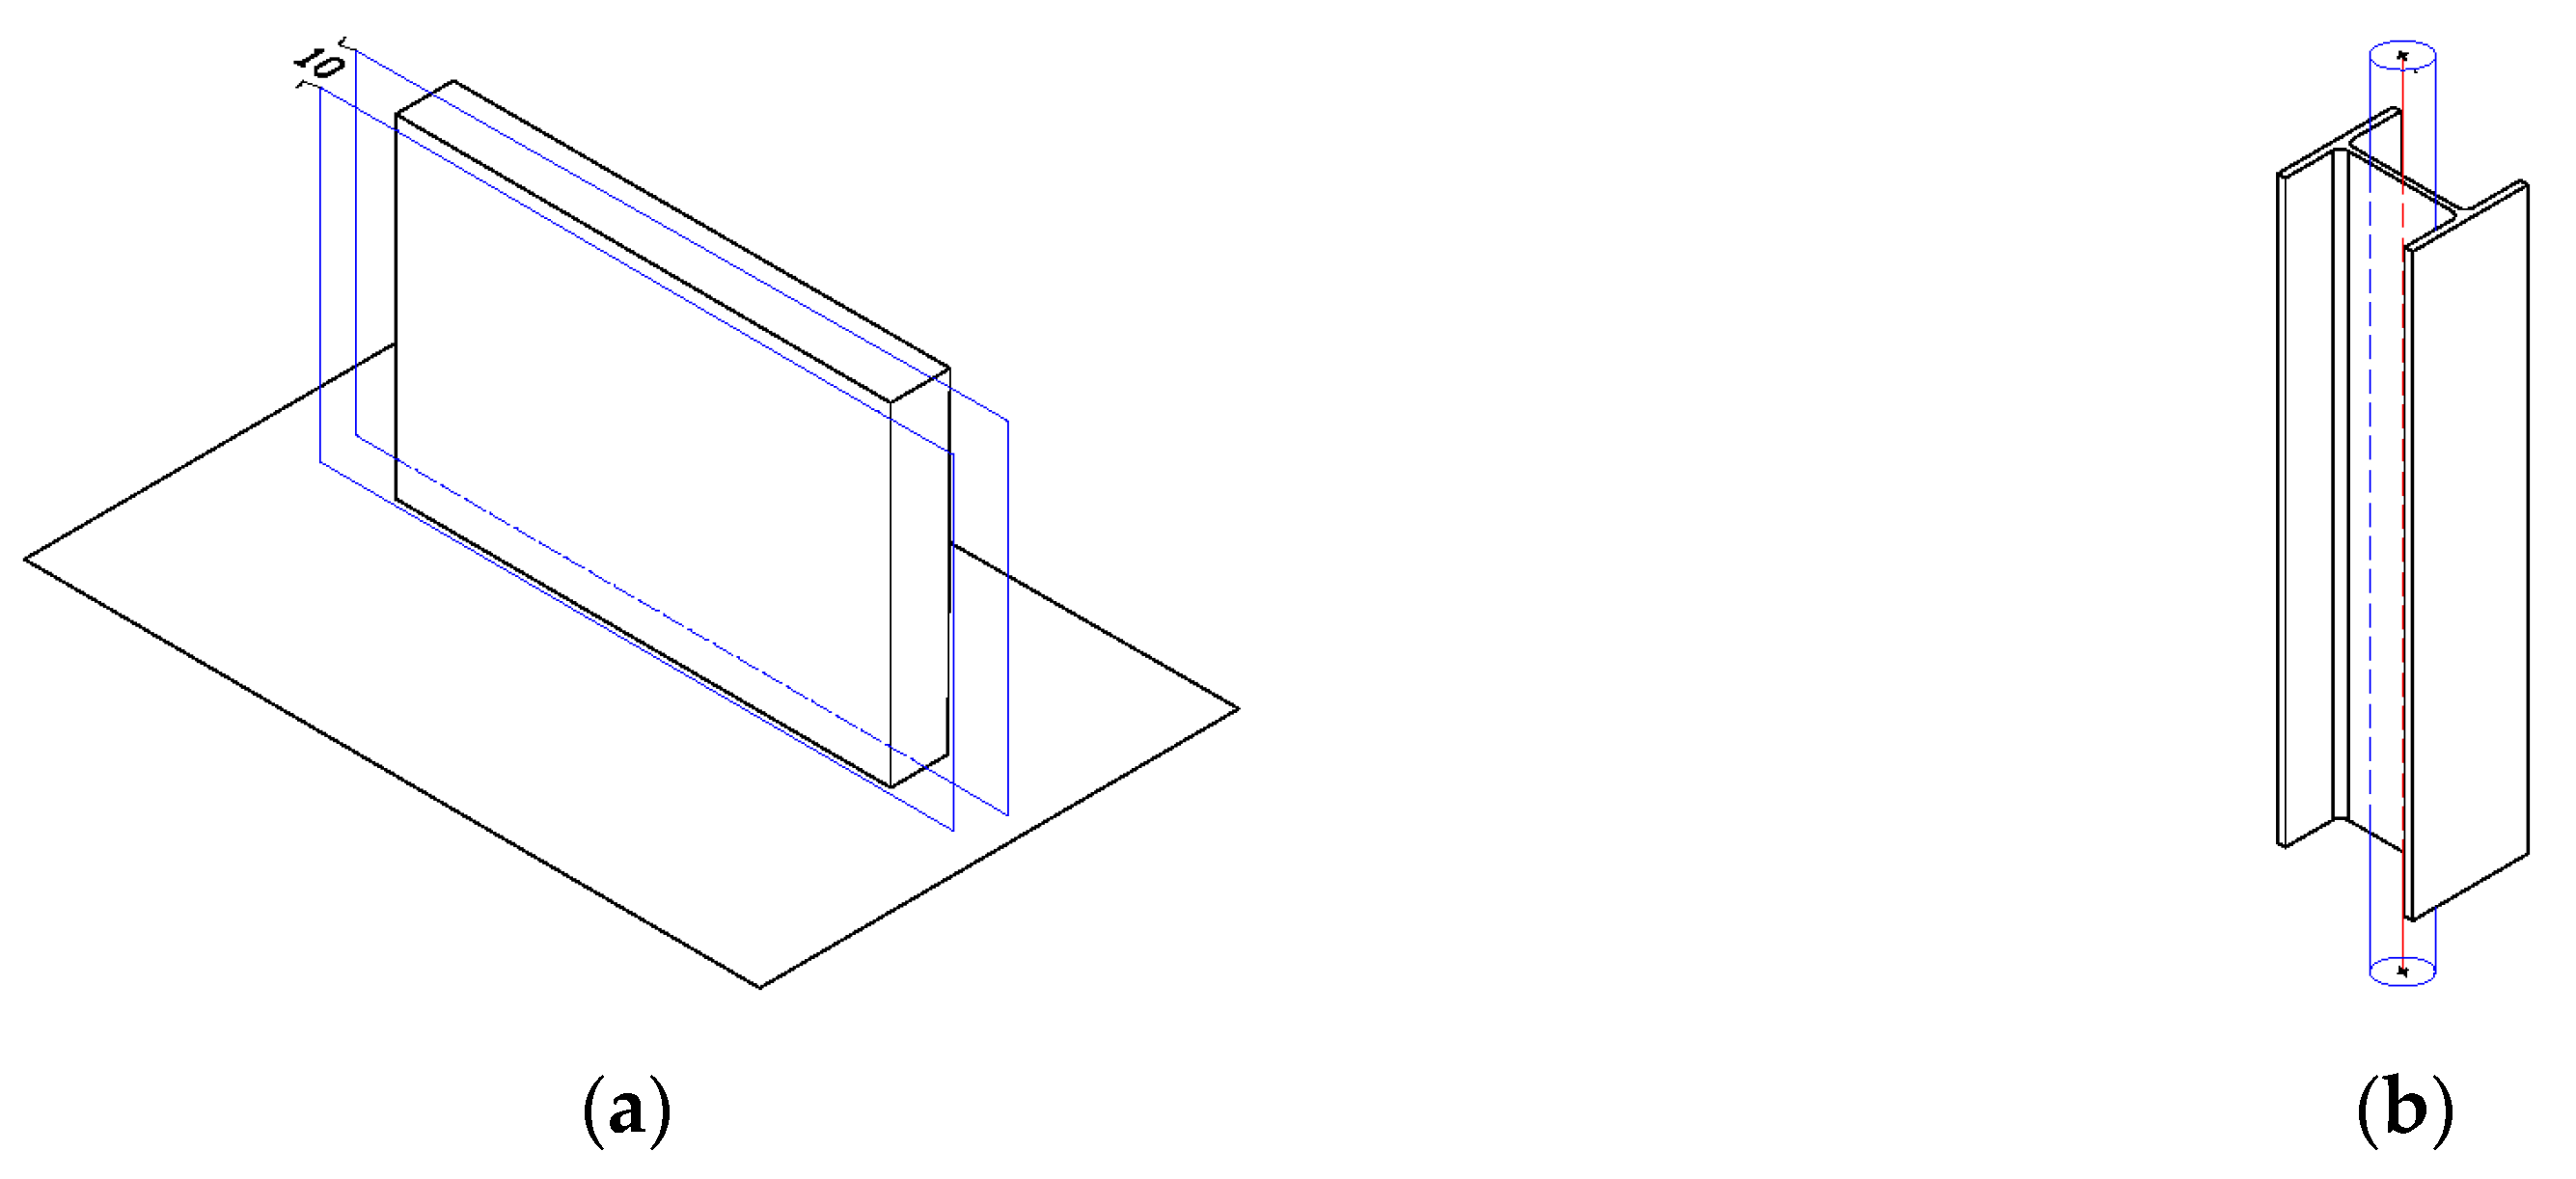
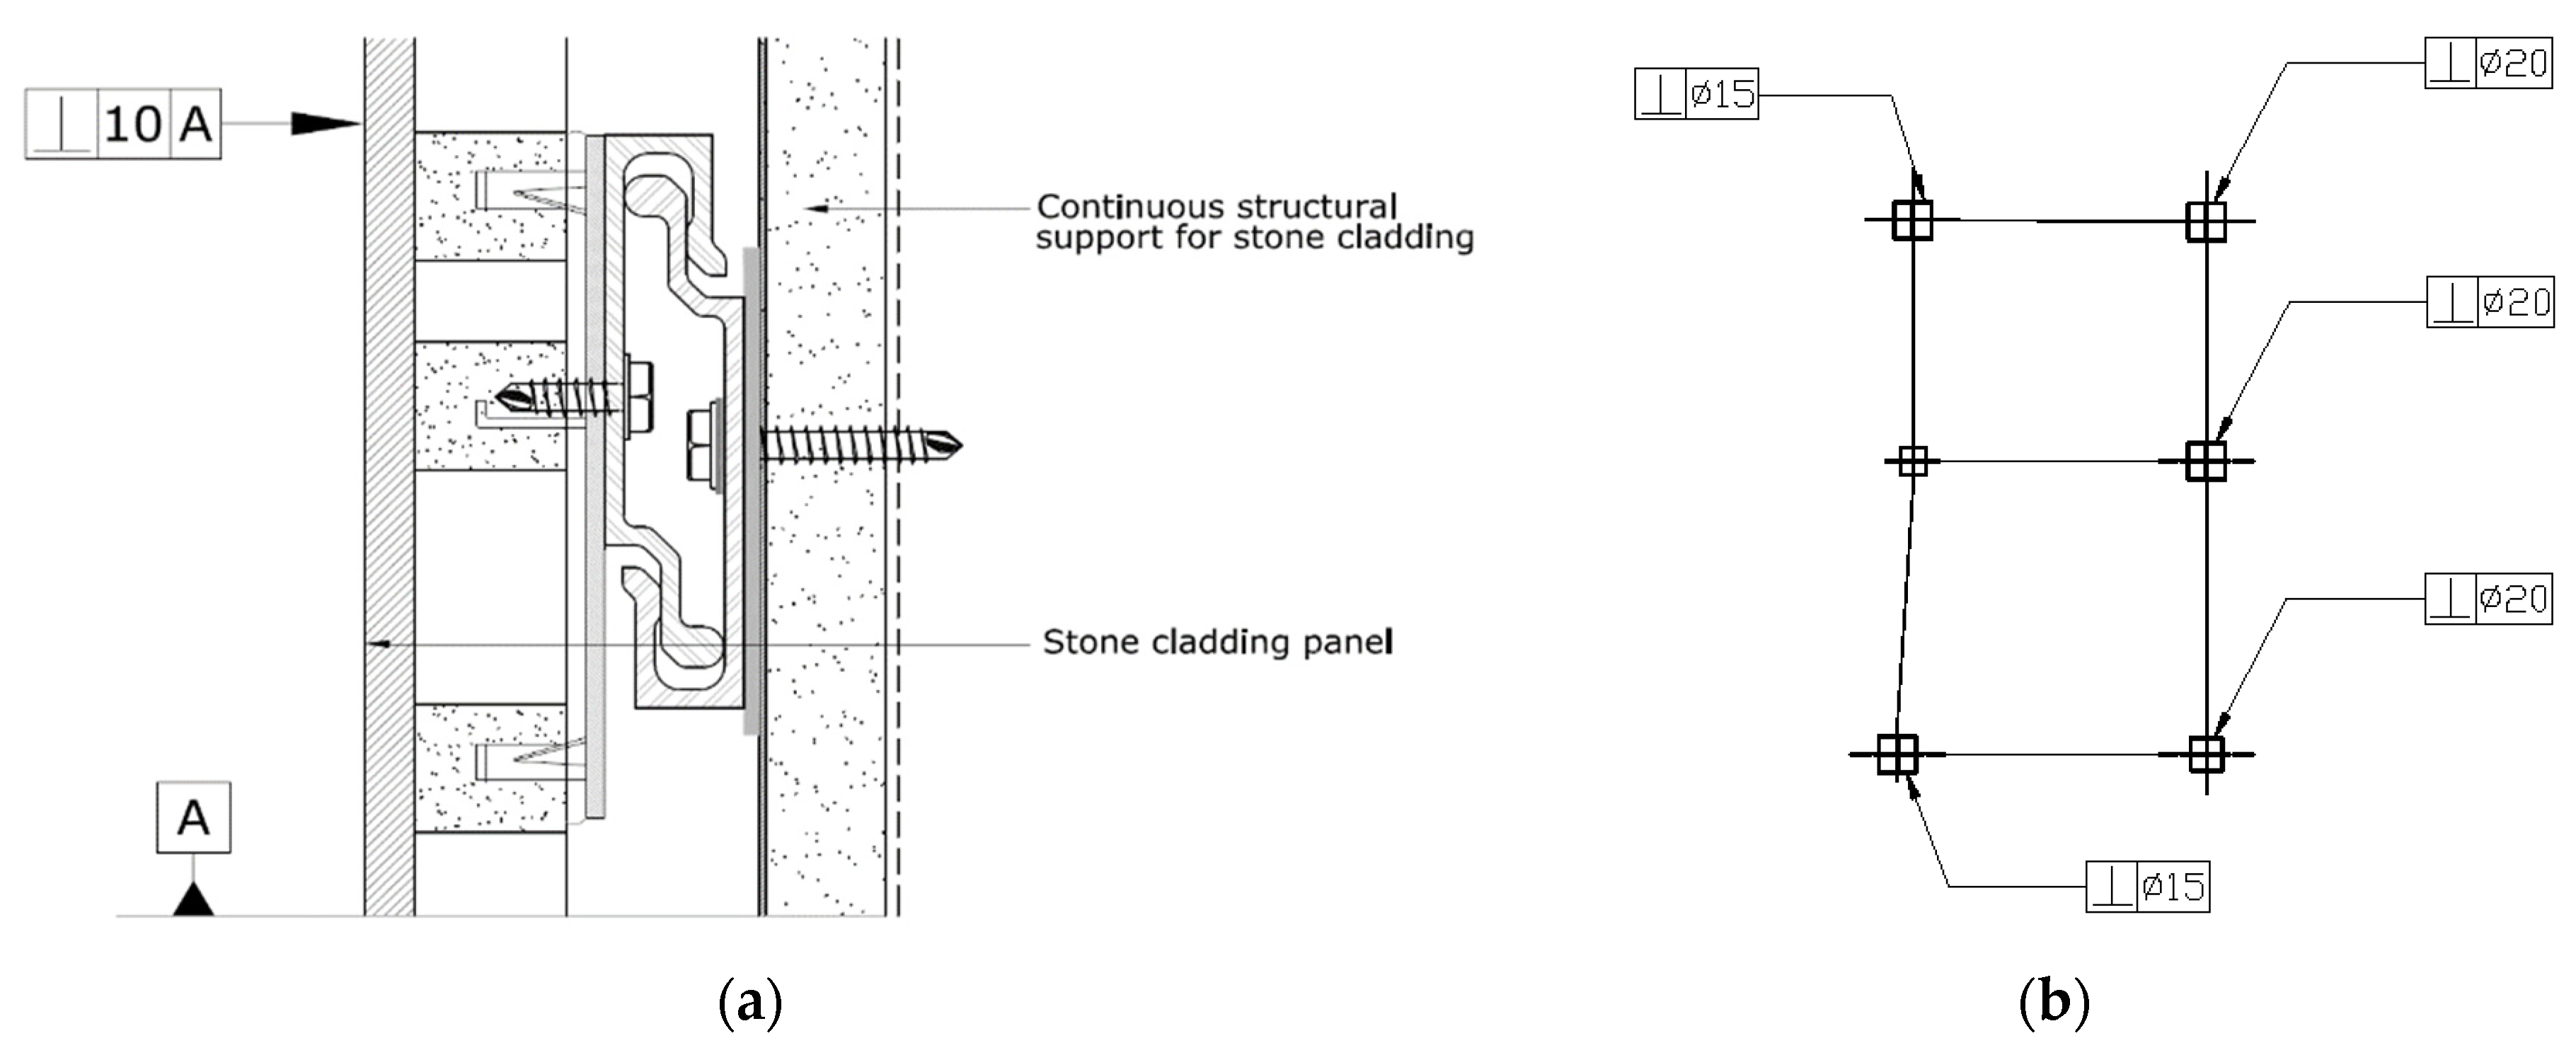
The perpendicularity (surface) control can predominantly be applied interior partition walls and cladding panels. This control specifies how much variation can be applied to those components and how much they can be out of the plumb relative to the floor surface, which acts as the datum. However, the application of the perpendicularity control is not limited to these two cases and should be used whenever appropriate. A perpendicularity (surface) control is a three-dimensional tolerance zone. It comprises two parallel planes oriented at 90° relative to a datum plane [19]. The distance between the parallel planes equates to the perpendicularity (surface) tolerance value [93]. Figure 10a shows the tolerance zone for a stone panel used in a cladding system to which the perpendicularity (surface) of 10 mm has been applied (related to Tolerance Problem 2). The tolerance zone is perpendicular to the floor surface, and the tolerance zone planes are 10 mm apart. The feature, which is the side surface of the stone cladding, is within tolerance, providing that it fits entirely in the tolerance zone of 10 mm.
Perpendicularity (feature of size) is a three-dimensional tolerance zone in which the amount of variation of a feature’s central axis, oriented at 90° to a datum, is controlled. In Figure 10b, the perpendicularity callout has been applied to a column (related to Tolerance Problem 2). When a perpendicularity control is applied to a column, it controls the axis of that column (feature) [100]. The tolerance zone for an axial control is a cylinder with the diameter equal to the tolerance [45]. The tolerance zone is perpendicular to the datum plane and the feature axis should lie within the tolerance zone of 5 mm.
To distinguish between perpendicularity (axis) and perpendicularity (surface), a correct FCF should be applied. The FCF for perpendicularity (surface) control must point directly to the surface [45]. The leader arrow can reference any view on the drawing because the entire side surface is referenced perpendicular. The FCF of the perpendicularity (surface) control contains the perpendicularity symbol, a tolerance value, and a datum feature [93]. Figure 11a shows a stone cladding where the perpendicularity (surface) control has been applied (related to Tolerance Problem 2).
The FCF of the perpendicularity (axis) control contains the perpendicularity symbol, a diameter sign, a tolerance value, and a datum feature [93], if necessary. The reason for the presence of the diameter sign in the FCF is that whenever a feature is axial and the tolerance zone is cylindrical, it requires the use of the diameter symbol (Ø) [100]. Apparently, the diameter symbol in the FCF of the perpendicularity (surface), for which the tolerance zone comprises two parallel planes, is not needed. Figure 11b shows that the perpendicularities (axis) controls of 15 and 20 mm have been applied to the columns in the envelope of a building (related to Tolerance Problem 2).

4.1.3. Location Tolerances

Tolerance of position (TOP) control is among the location tolerances. It establishes the position of the feature relative to a datum [92].

Tolerance of Position (TOP)

Prior to defining the tolerance of position (TOP) control, the definition for the perfect position should be established. The perfect position specifies the exact location of a feature of size in space. The perfect position of each feature is given on drawings by basic dimensions, and it is the exact location of the feature.
The TOP control is the location tolerance of a feature of size relative to its perfect position [17,46]. In other words, it determines how far away a feature’s axis can deviate from the perfect position, which is a theoretically perfect location. When the TOP control is applied to a feature of size, the basic dimension must specify the perfect position of the axis or centreplane of the feature of size [101]. This control indicates the tolerance zone surrounding the perfect position and it is centred on this zone. Hence, the perfect position refers to the exact point that it is targeted, while the TOP control refers to the area surrounding the point [89].
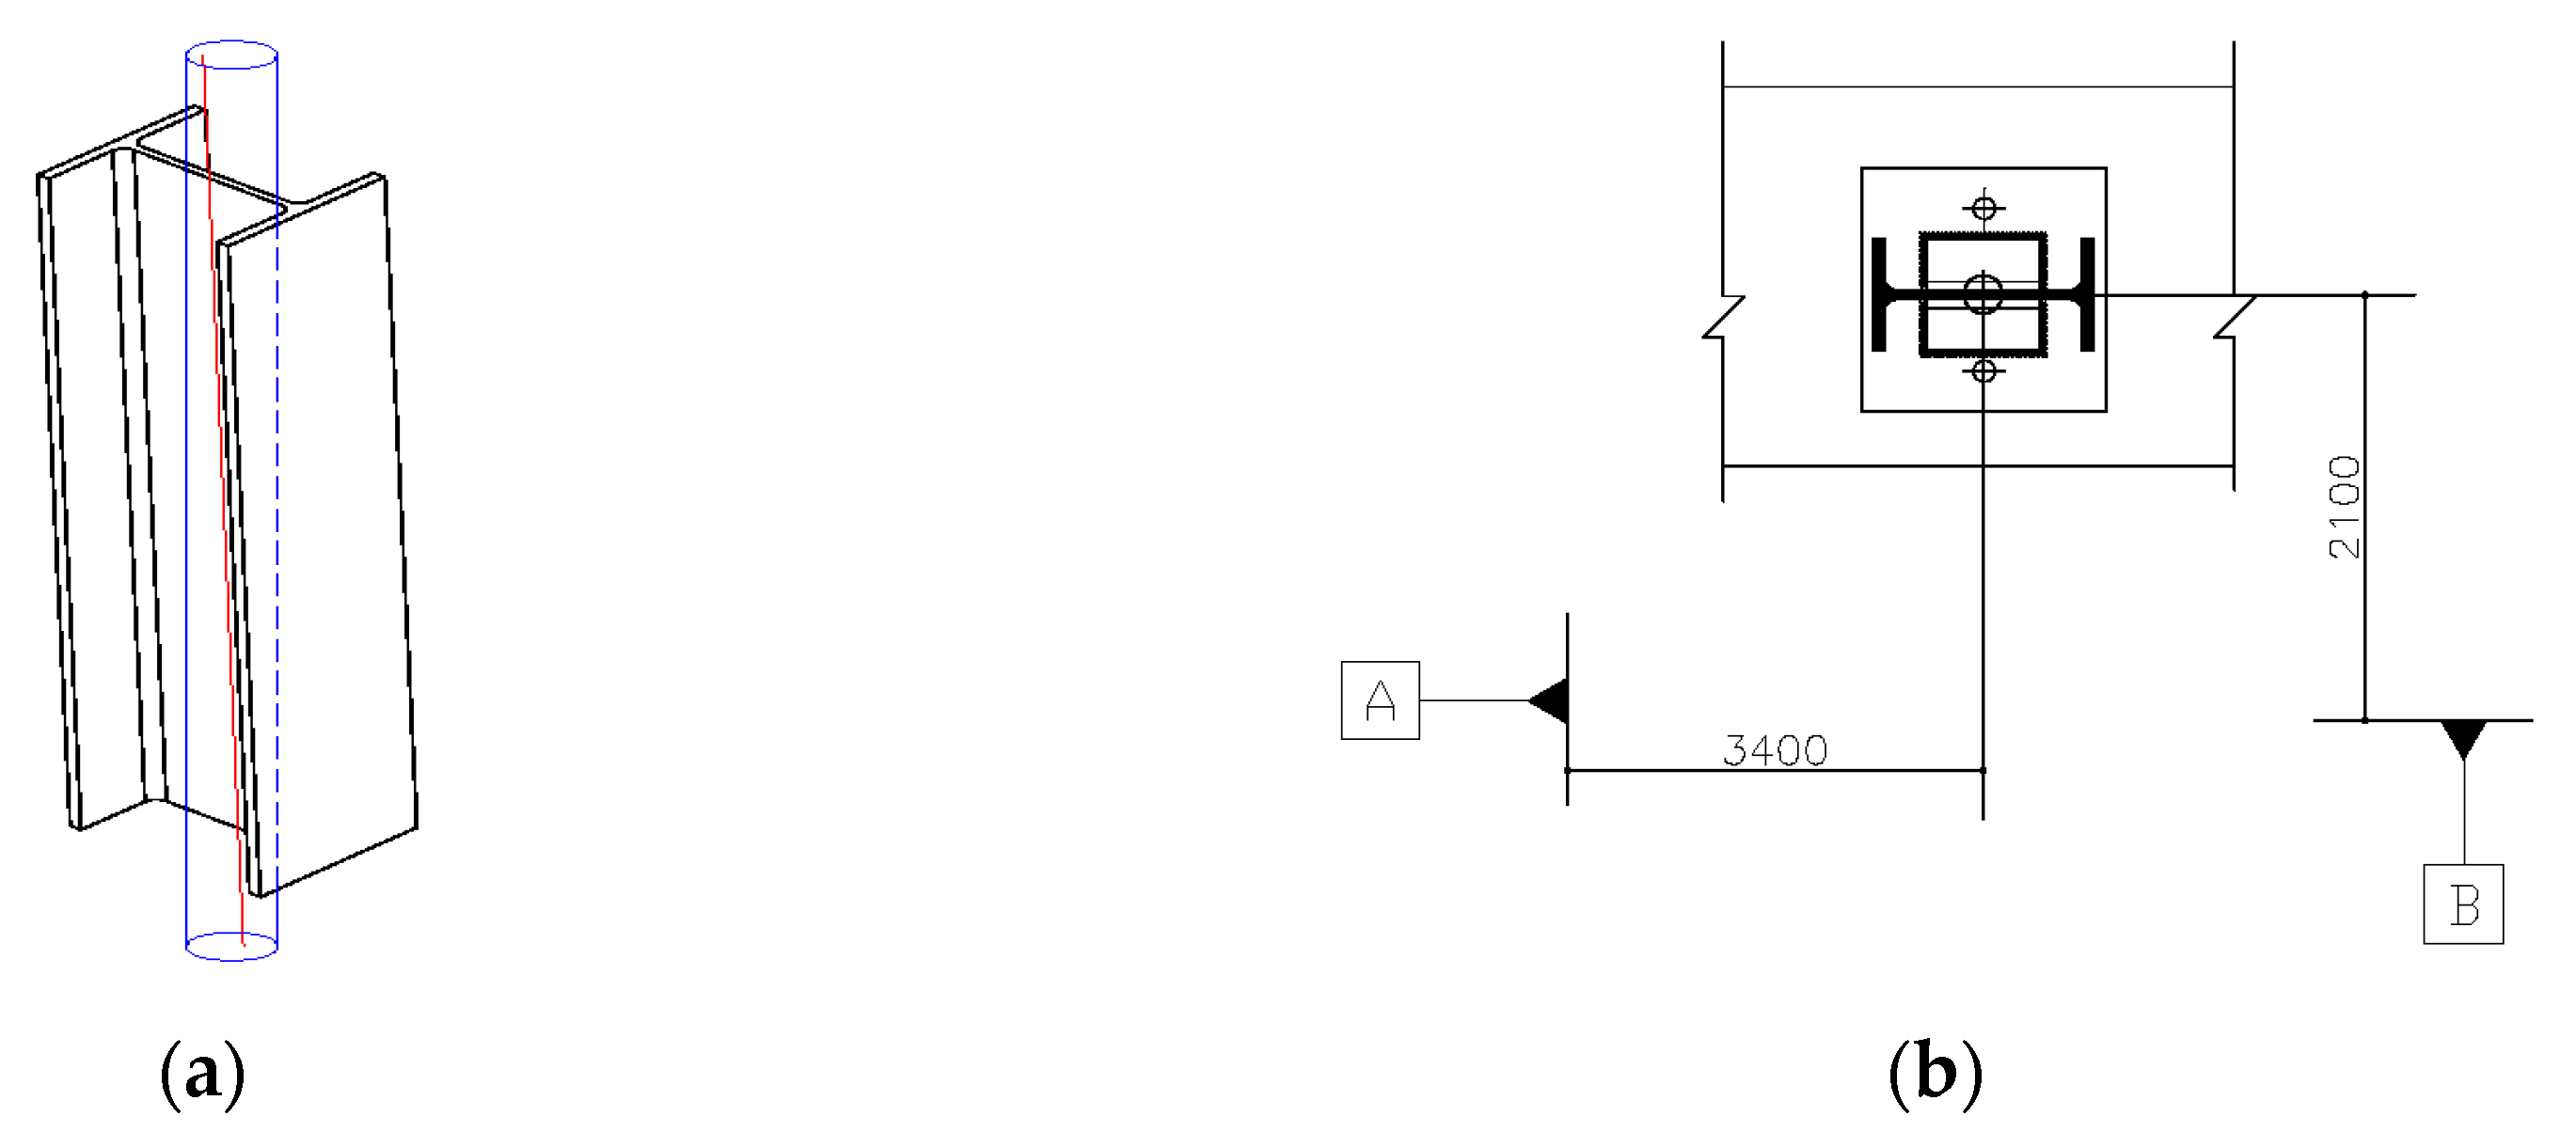
The tolerance zone of the TOP control is cylindrical [102]. Figure 12a shows a three-dimensional column where the TOP control has been applied (related to Tolerance Problem 6). The perfect position, which is the central axis of the column, can be seen going through the column. The cylindrical tolerance zone of the TOP control is centred on the perfect position of the controlled feature [101]; in other words, half of the width of the tolerance zone is on either side of the datum feature centre line. The feature is allowed to vary within the width zone from side-to-side. Hence, the tolerance zone exists around the central axis. The diameter of the cylindrical tolerance zone equates to the tolerance value assigned for the TOP control [103].
Unlike orientation symbols, the location of the tolerance zone of the TOP control is established relative to a datum. Figure 12b shows the same column in a two-dimensional view. The axis of the column is 3.4 m from datum A and 2.1 m from datum B. The tolerance zone is perpendicular to the surface floor and is located with basic dimensions relative to datum A and datum B on the sides.
It is envisaged that the TOP control in GD&TIC is mainly used for three purposes: (1) to control the location of the features of size (e.g., columns and beams) and (2) to control the distance between the features of size. When the TOP control is applied, the perfect position is defined with basic dimensions to specify either the exact location of the axis of a feature of size or the location of a feature of size in relation to another feature of size or surface datum.
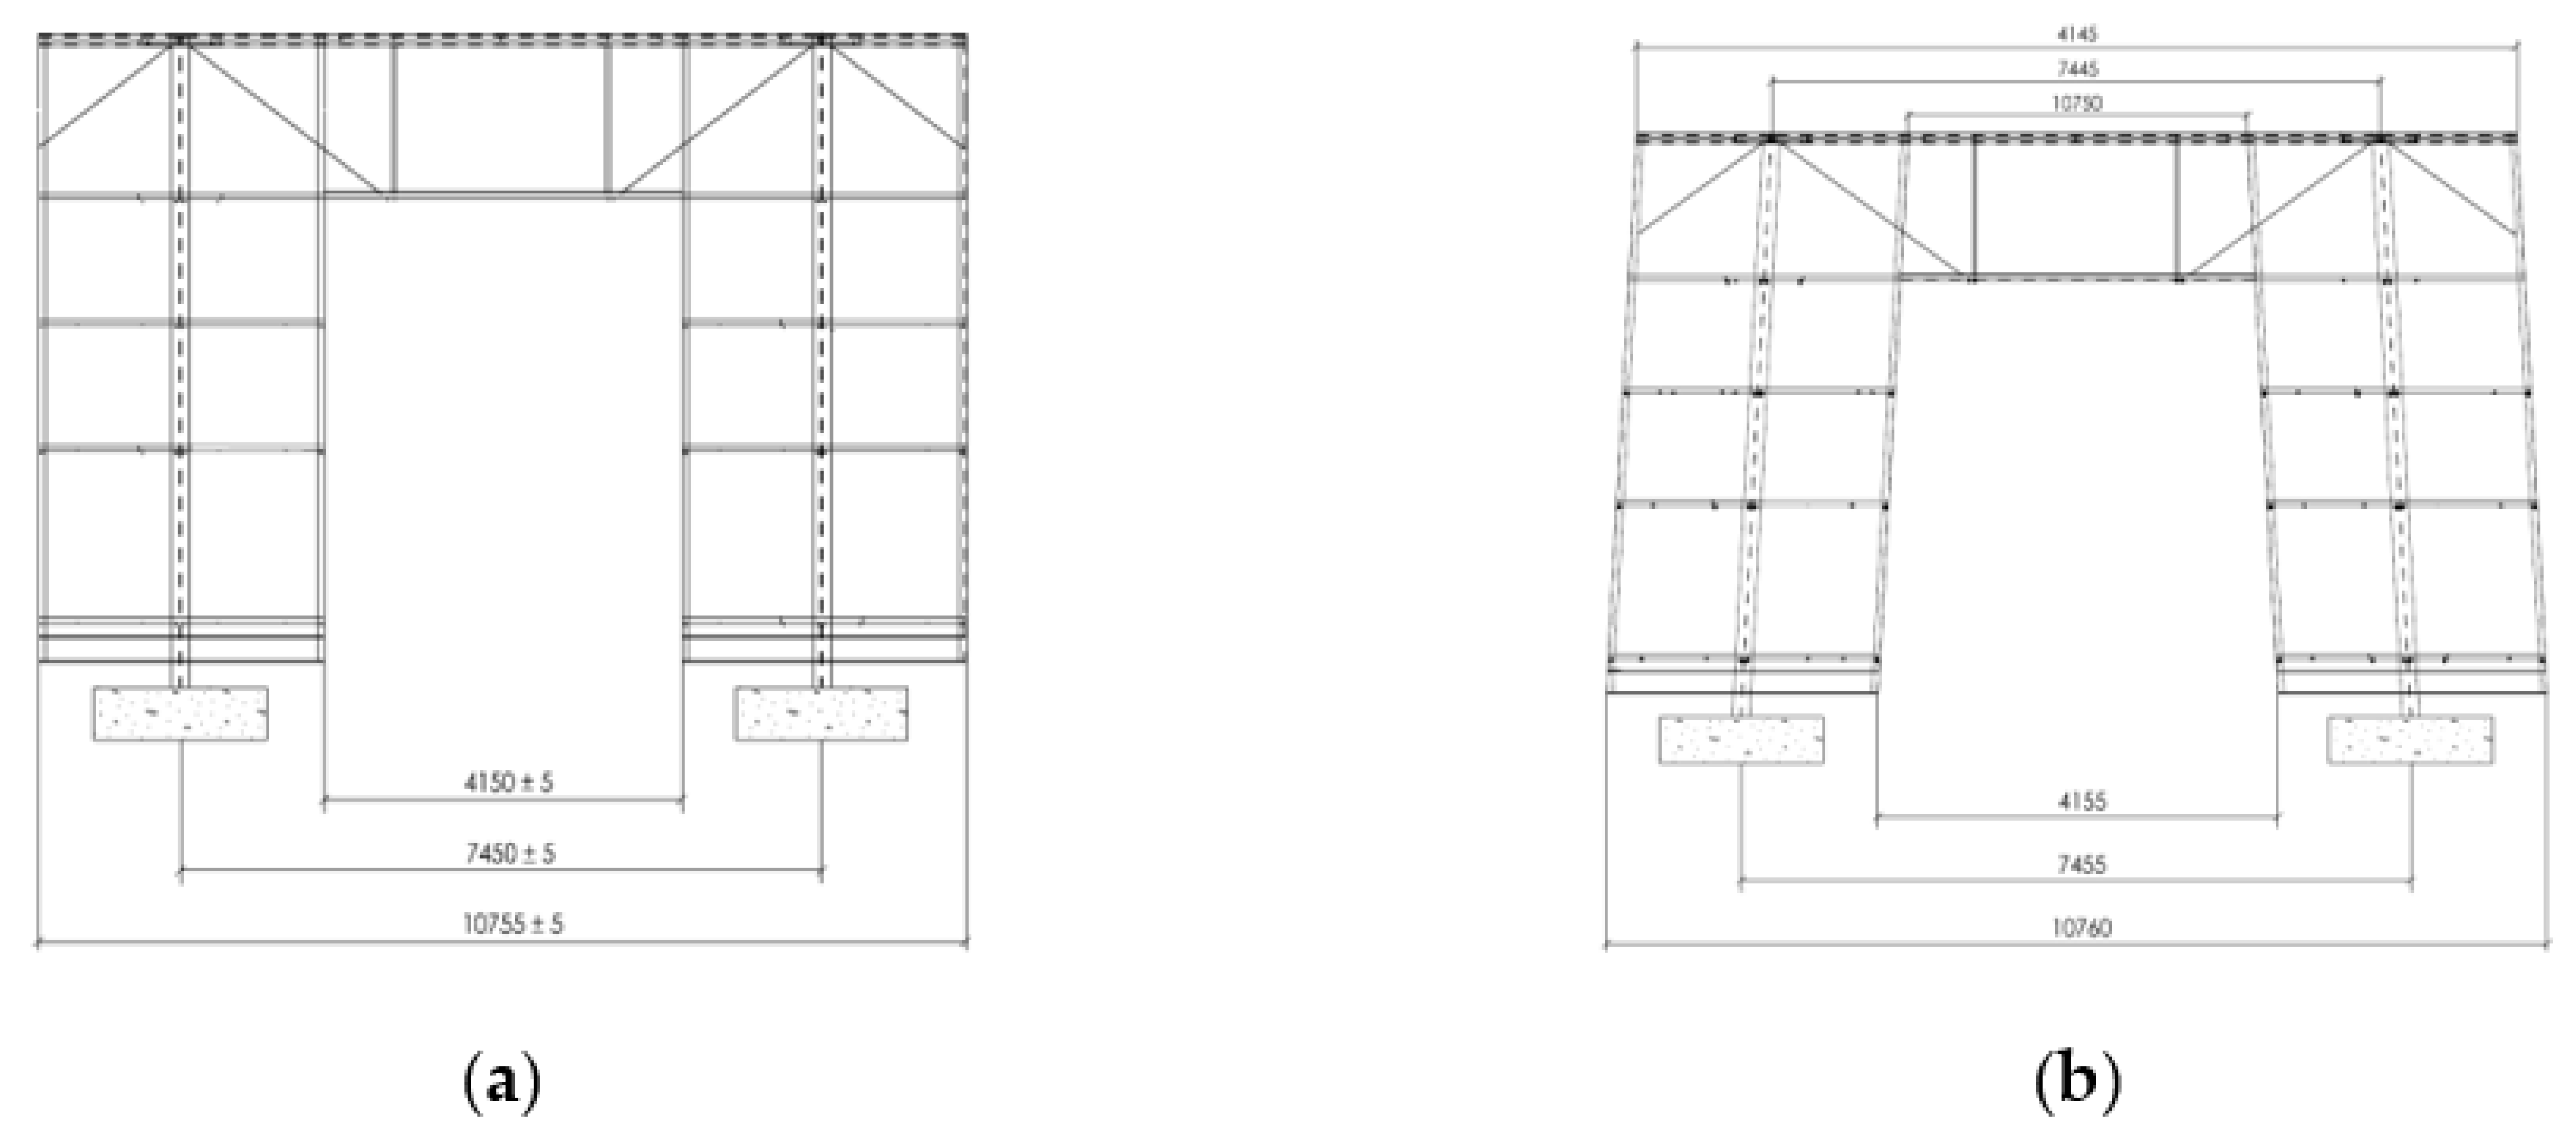
Figure 13a shows six steel columns (related to Tolerance Problem 6), and Figure 14a shows ten beams in a roof (related to Tolerance Problem 5). The TOP control has been applied to these two examples. The tolerance zone and the perfect position of the controlled features are displayed in the figures. Figure 13b demonstrates how to control the location of a feature of size, and Figure 14b demonstrates how to control the distance between features of size.
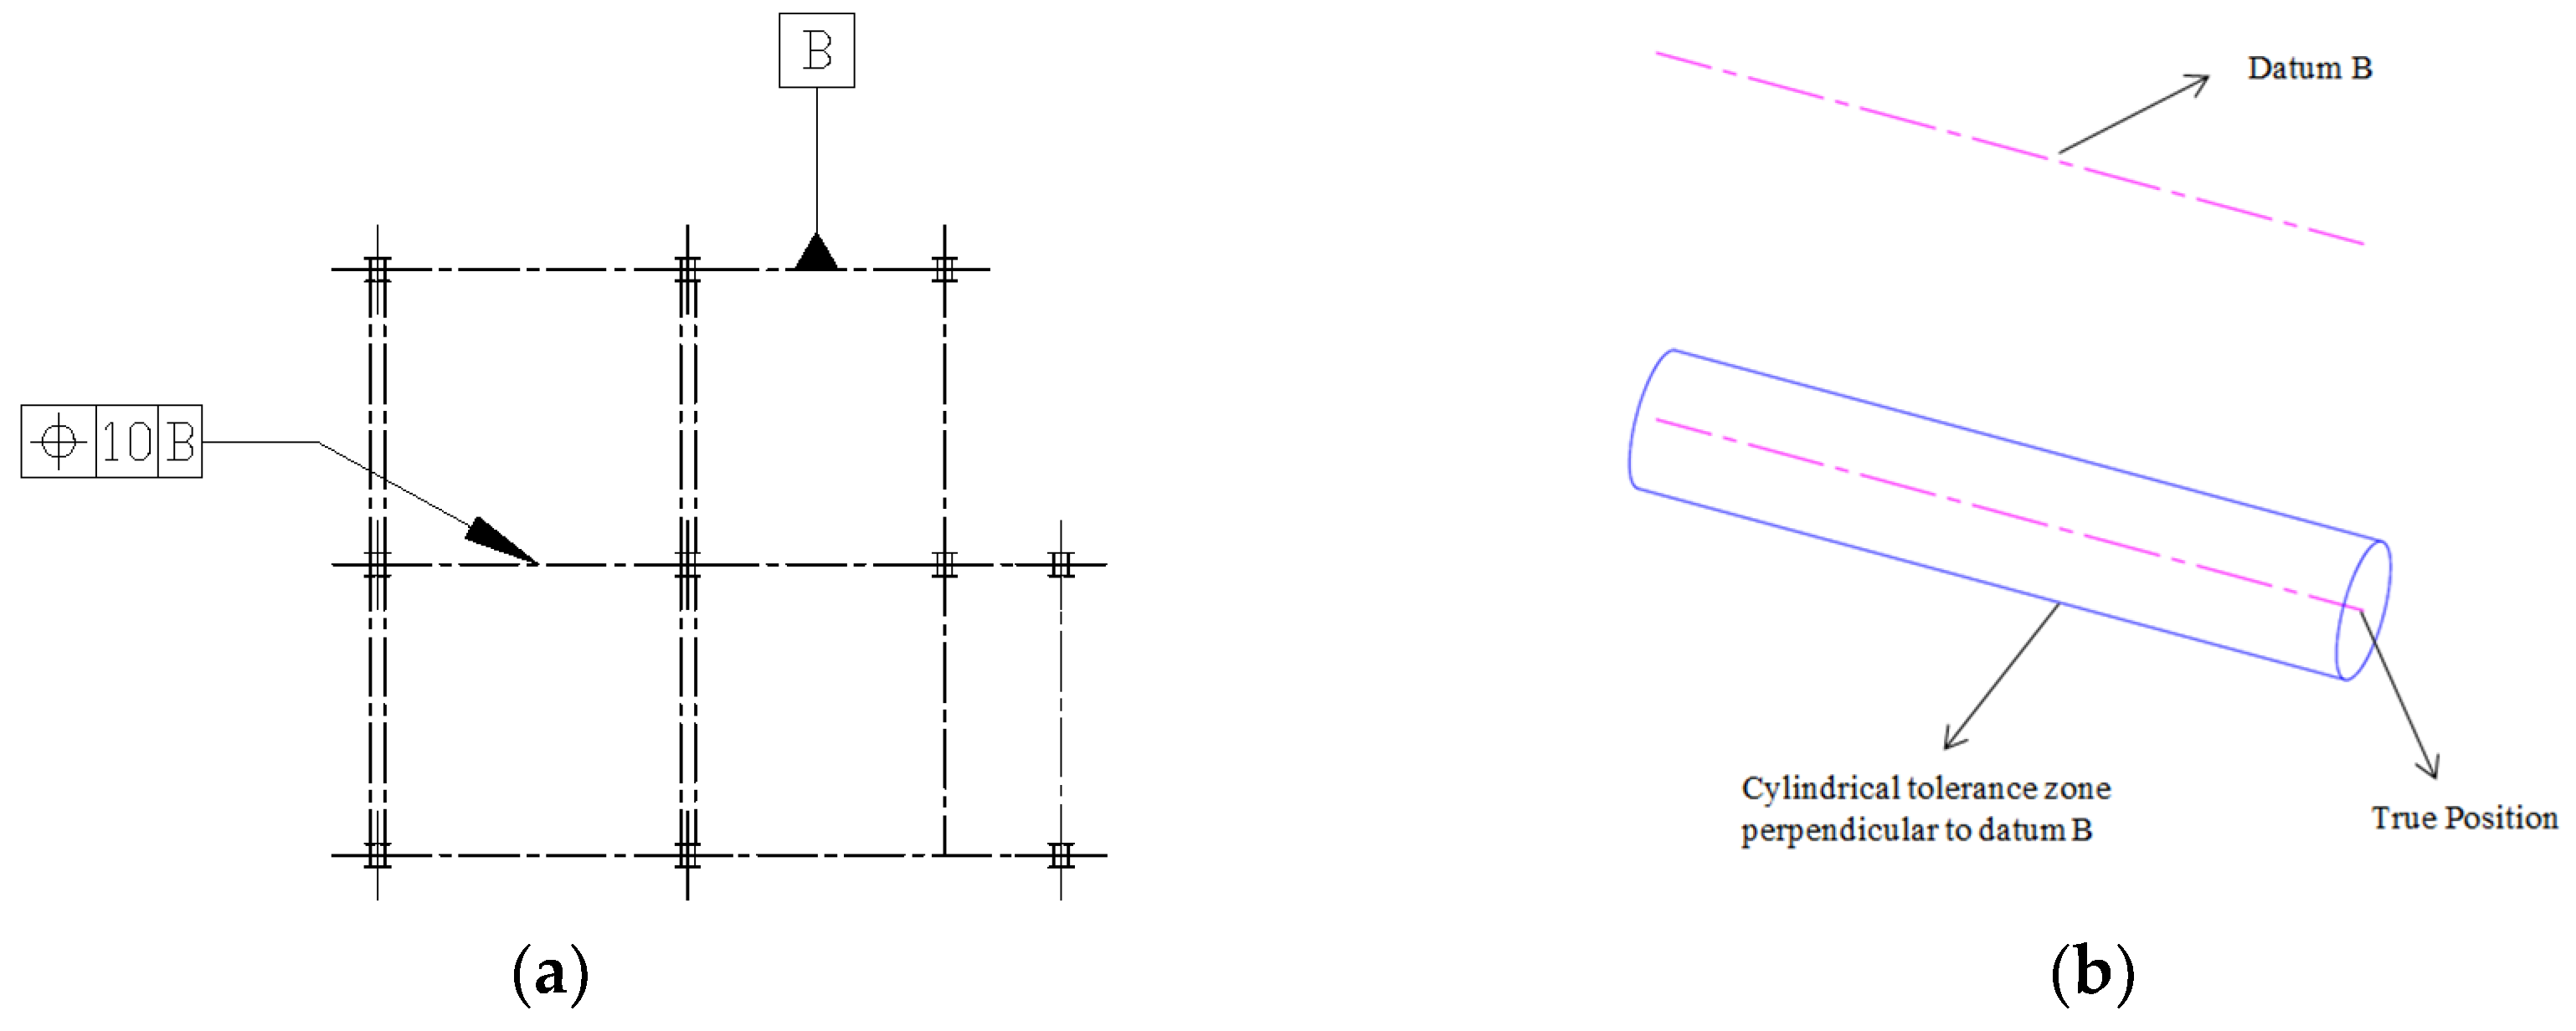
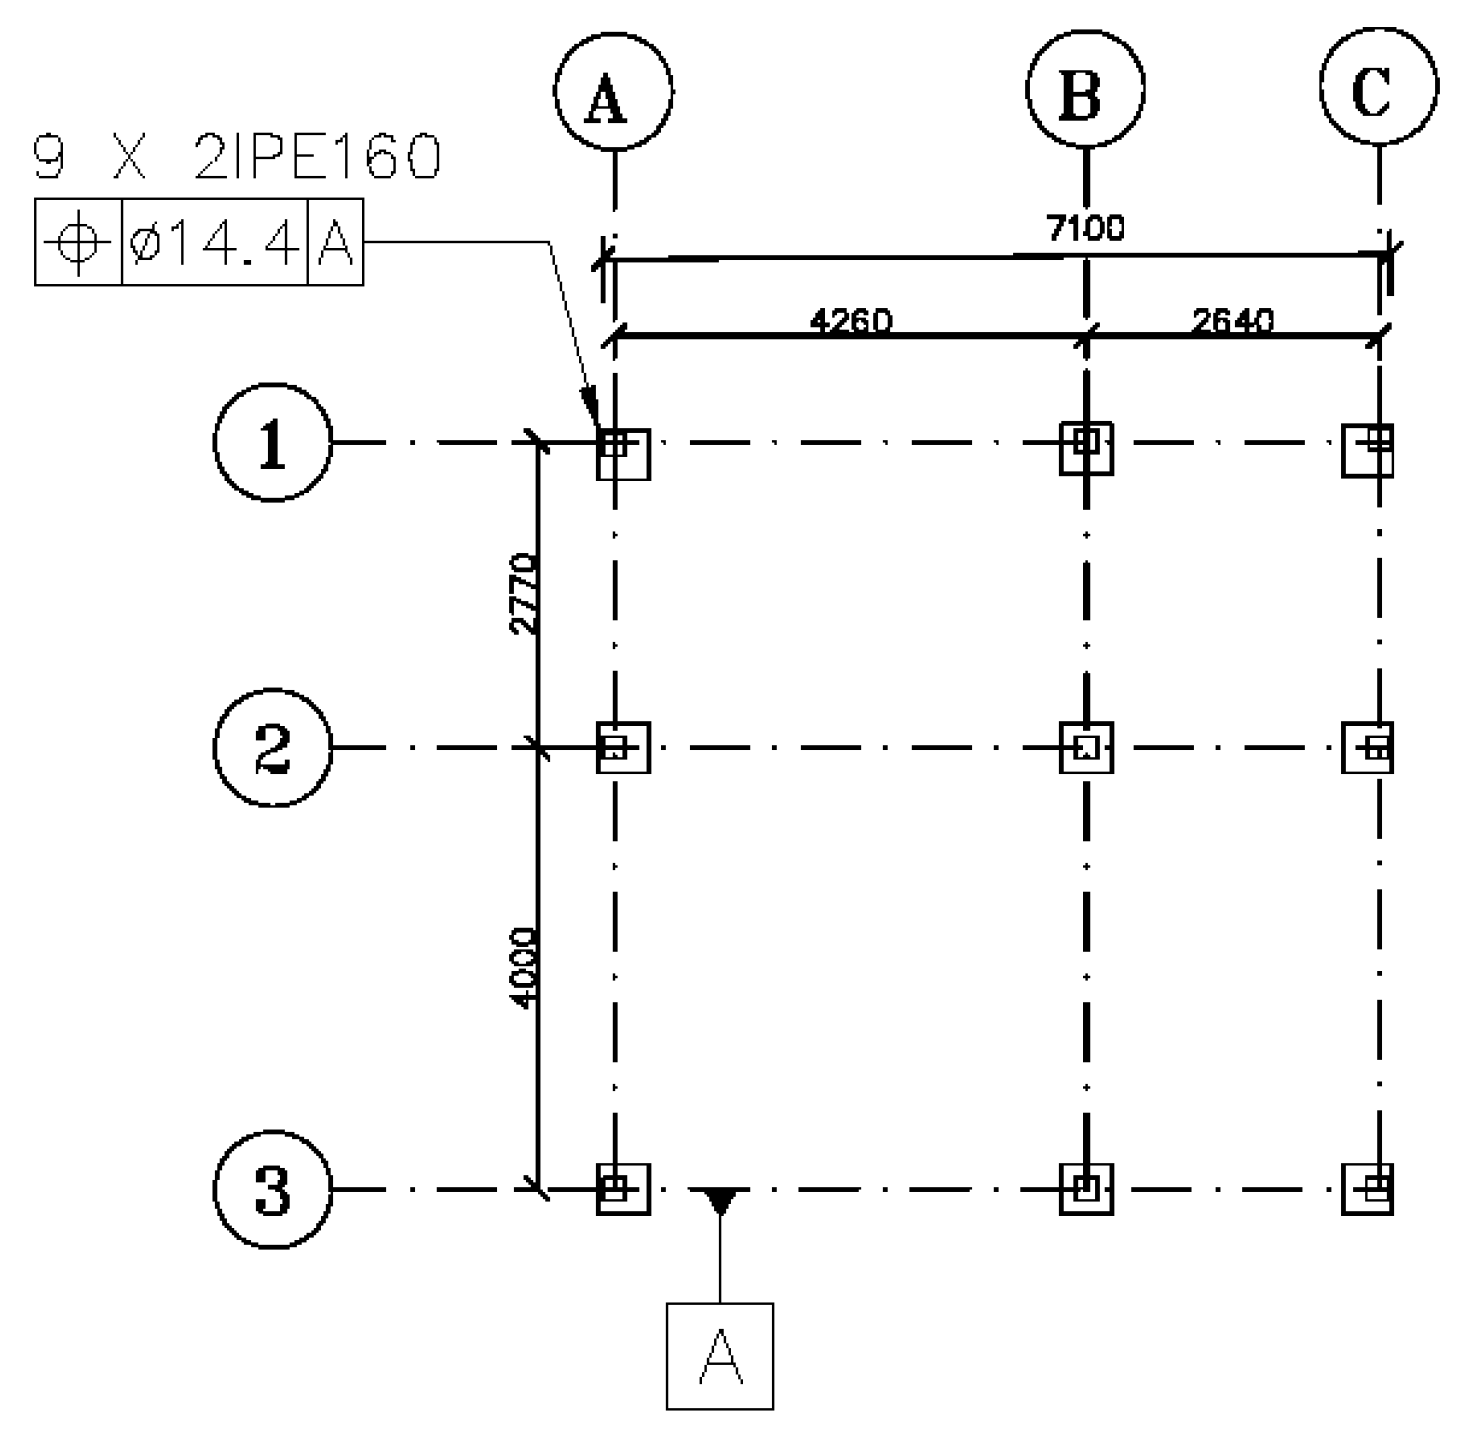
Figure 15 shows a drawing callout for the position of columns (related to Tolerance Problem 6). ‘15X’ inserted above the FCF implies that similar TOP control is applied to all the columns. The perfect position of the axis of the columns has been defined using basic dimensions. A datum has been used, namely datum A, which is the line behind the columns at the bottom. The feature is the axis of the column, and the tolerance zone for the TOP control is cylindrical [104]. Therefore, the diameter symbol must be used in the FCF just before the tolerance value [95].

4.2. Discrepancies between GD&TIC Rules and Some of the Commonly Used American and British Reference Documents

4.2.1. Shape of the Tolerance Zone for the Flatness Control

Flatness in the British system is specified according to the service regularity, which is defined as deviation in height of the surface of a flooring layer over short distances in a local area [105]. With reference to the service regularity requirement, the suitability of a floor in service is determined by controlling changes in height over short distances. Flatness in the American system is the degree to which the surface approximates a plane. Hence, both definitions imply that flatness is determined over an area.
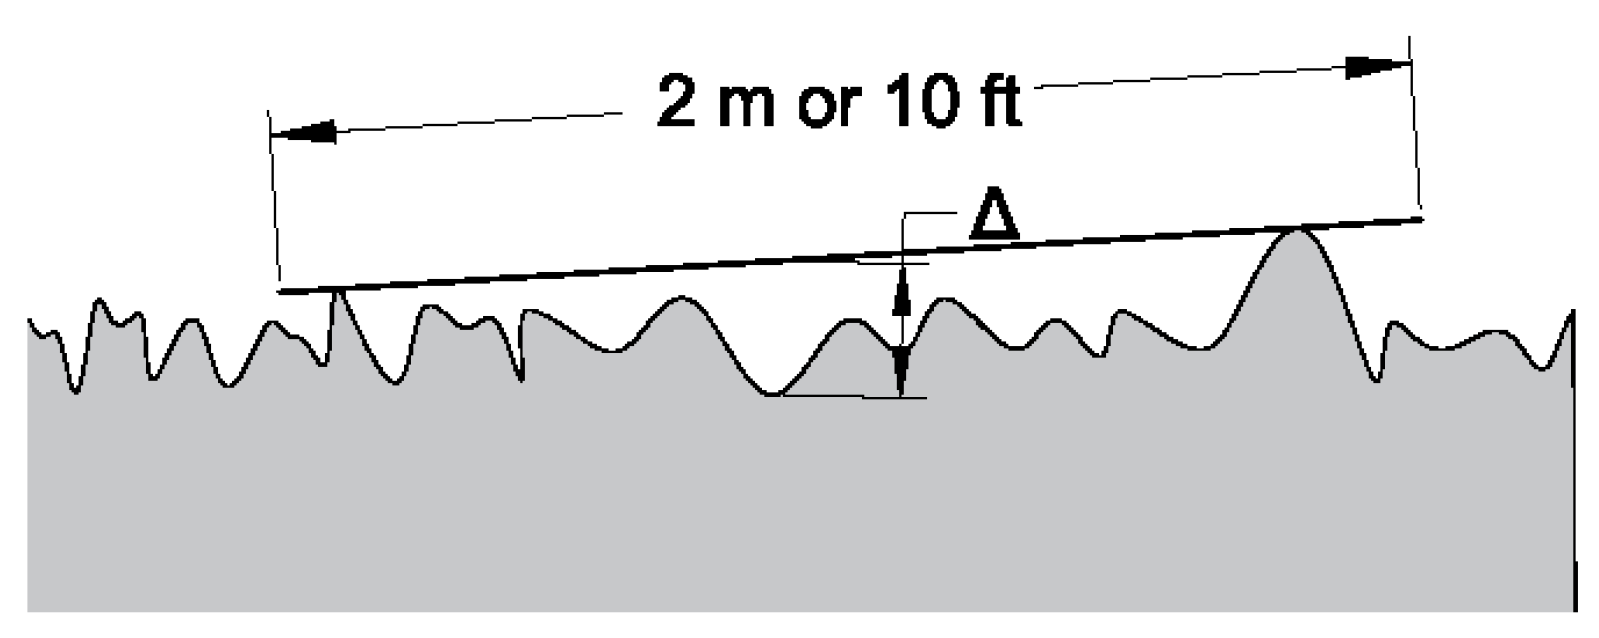
In practice, to determine the flatness of concrete and other types of finished floors, the straightedge basis is used in both American and British systems, especially for floors finished by conventional techniques [15,35,105,106,107,108]. Figure 16 shows the principle behind using a straightedge to determine the flatness of floor surfaces. The straightedge is placed on the surface and will, therefore, be placed on the two highest points along its length. The distance (Δ) between the lowest point on the surface and the straightedge is then measured and must be less that the permissible deviation for flatness. The 2 m straightedge in the British system [25,33,105] and the 10 ft straightedge method in the American system [15,36] are currently regarded as standard methods.
The definitions of the flatness control in GD&TIC and the flatness in the aforementioned standards do seem to be different in nature. The use of the straightedge method implies that there is a two-dimensional tolerance zone for flatness, whereas the tolerance zone for the flatness control should be three-dimensional.

4.2.2. Shape of the Tolerance Zone for the TOP Control

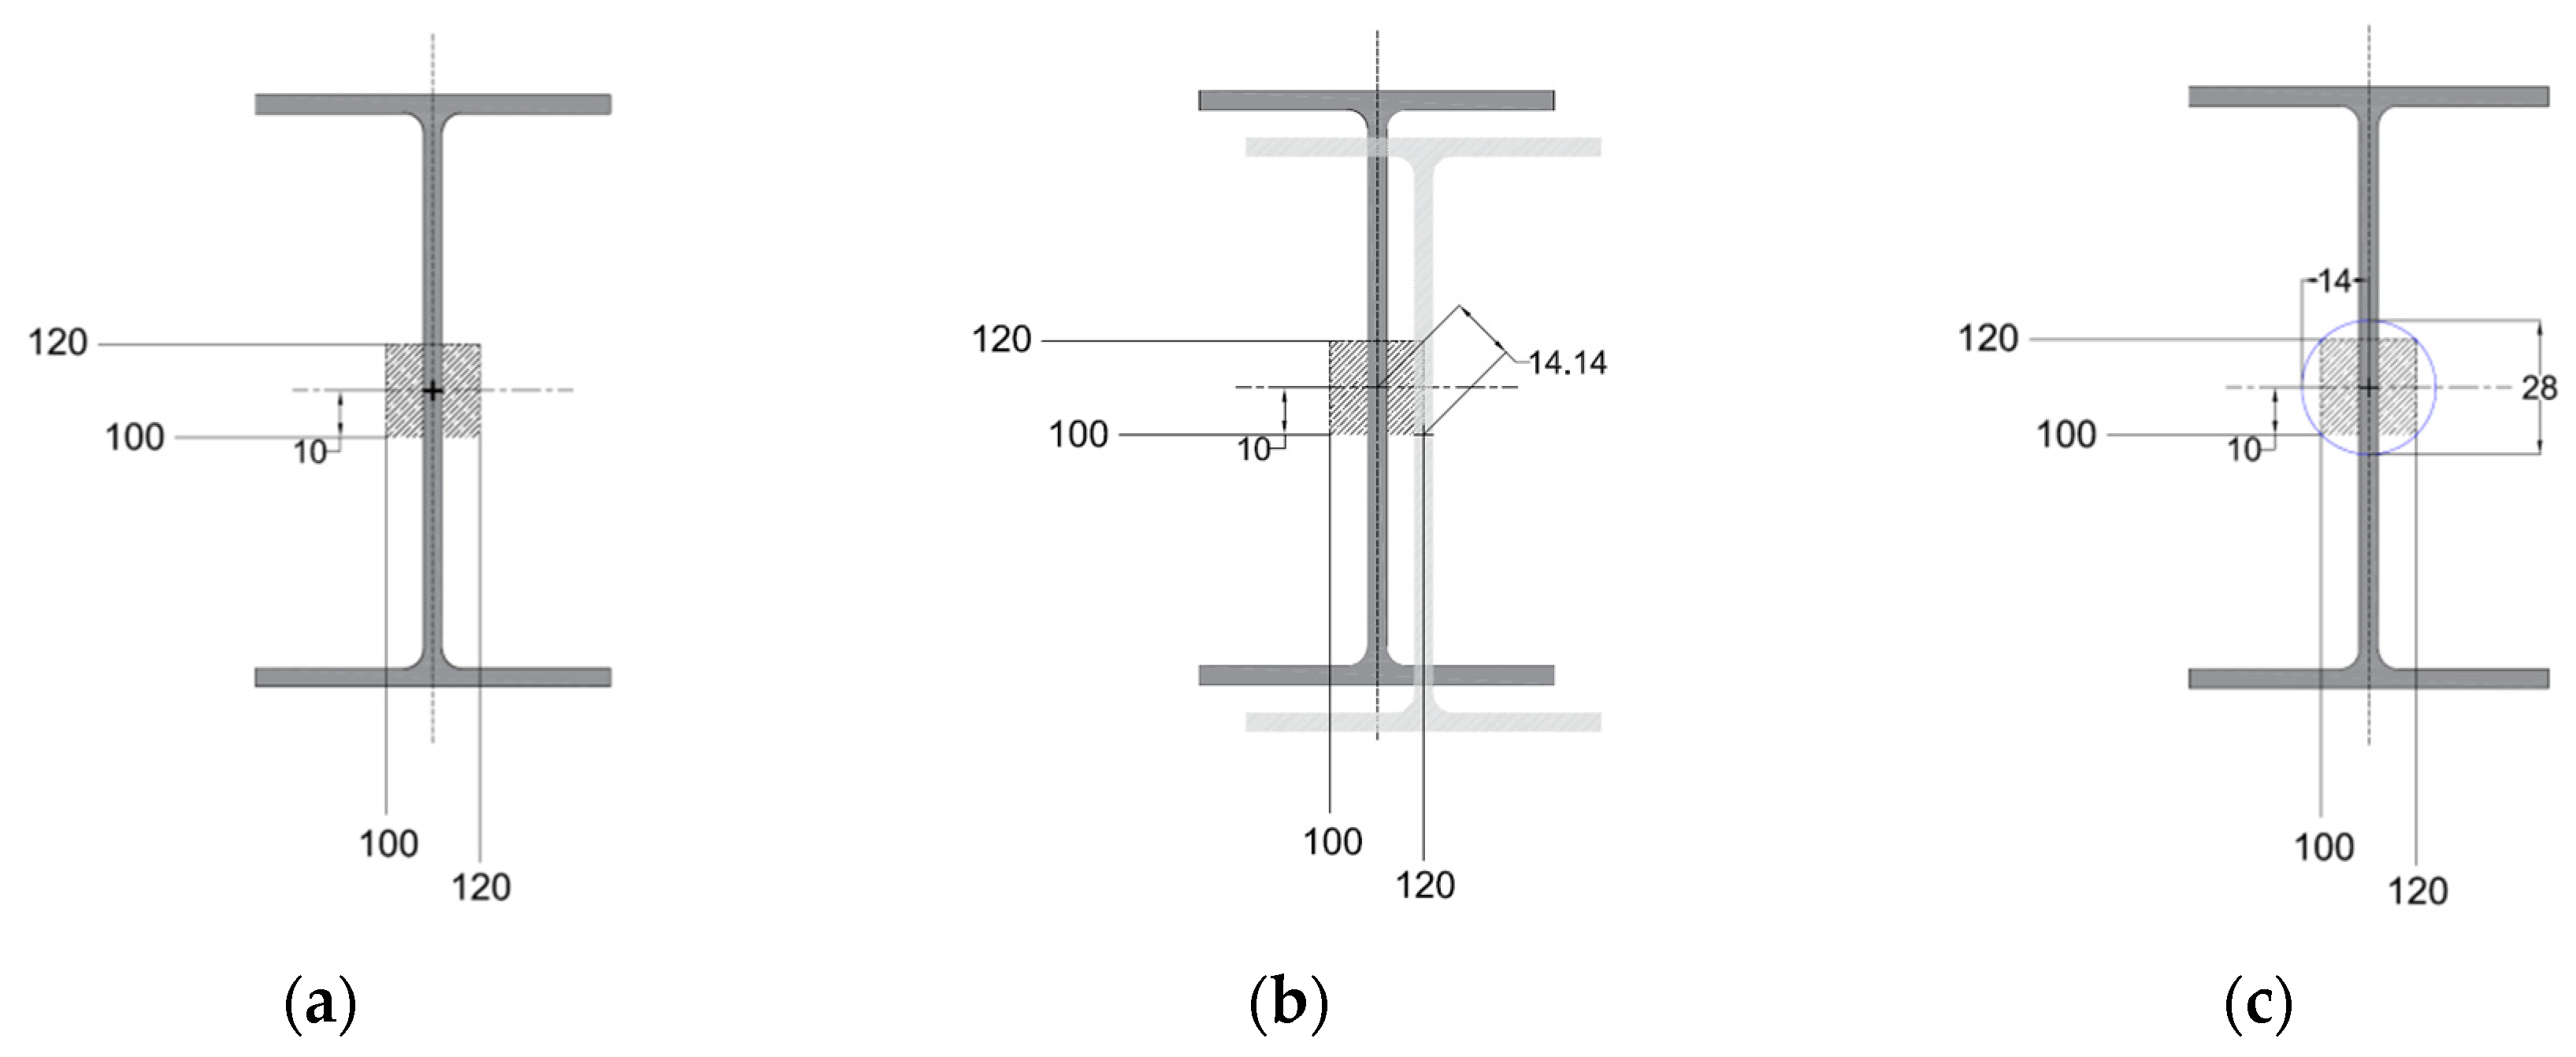
The reviewed British reference documents, e.g., [34,37,109] and the reviewed American reference documents, e.g., [32,36] for both concrete and steel elements assume a square tolerance zone for the perfect position. For instance, Figure 17a shows a tolerance zone for a column that is formed by the maximum and minimum of the horizontal and vertical location dimensions. The limits of 100 and 120 mm at the bottom side and the left side of the column show the location of the column’s centre line. According to the reviewed American and British reference documents, which are based on coordinate dimension, a square box is created around the centre as a tolerance zone. If the centre of the column can deviate inside the tolerance zone, it will still be within tolerance.
However, as explained earlier, the tolerance zone in GD&TIC for the TOP control is cylindrical. In this case, it was the authors’ choice to propose modifications to the reference documents, as opposed to adopting GD&TIC in the referencing documents. The reasoning behind this choice was that the axis of the column can be off the targeted location in diagonal directions, which means that it will be a greater distance compared with the vertical and horizontal directions (Figure 17b). In other words, the axis may be in the corner at a distance of 14.14 mm from the perfect position; however, it would still be within tolerance. It seems illogical to accept only this distance and not to accept the same distance in any other direction. It is more logical to allow the same tolerance of 14.14 mm for the axis of the column in all directions. The tolerance zone is diametric in a two-dimensional view and is cylindrical in a three-dimensional view (Figure 17c).
In Figure 17a–c, the tolerance zone is 20 by 20 mm. This leads to a tolerance area of 400 mm2. If the circle that envelops this square is considered with the Pythagorean theorem, the diameter equals 28.28 mm. Considering this diameter, the tolerance area will be 628.13 mm2. In other words, using the perfect position with a cylindrical tolerance zone allows for 57% of a larger tolerance zone whilst providing the same function. In short, GD&TIC will add 57% more to a tolerance zone by considering the cylindrical tolerance zone than the conventional coordinate systems used in the existing standards would allow.

4.3. Evaluation of GD&TIC

A summary of the discussions and comments made after each question during the focus group meeting is given next.

4.3.1. Efficacy

GD&T is useful in the sense that “it decomposes tolerance information into three geometric categories” (Quotation 1). Dividing the tolerance information into distinct comprehensible categories ensures that “they are more easily communicated” (Quotation 2). Additionally, GD&TIC improves clarity and consistency in drawings, as “it provides the same use of language for parties in a project when communicating tolerance information” (Quotation 3). Following GD&T ensures that all parties “are aware of tolerance information” (Quotation 4).

4.3.2. Practicality

GD&TIC is a “comprehensive tolerancing system” (Quotation 5), and, as a result, “its understanding is overwhelming” (Quotation 6). The comprehensiveness of GD&TIC “requires users for a great deal of training … [and, therefore], makes it more complicated to learn” (Quotation 7). Moreover, “sustaining the implementation of GD&TIC throughout the project and motivating designers to follow all rules is another hindrance” (Quotation 8).

4.3.3. Acceptability

“If the economic advantages are highlighted, then there is a higher chance that GD&TIC will be accepted” (Quotation 9) by designers and contractors. “yes, there is nothing that you have said today that we should not be doing as a standard tolerancing system. If we do not get [the work] right the first time, it costs us money” (Quotation 10). However, “terms and rules used in GD&TIC are difficult to understand for the industry” (Quotation 11). The participants recommended “tone down some of the academic language so it is in layman’s terms, [and then GD&TIC] would probably be more readily accepted” (Quotation 12).

4.3.4. Efficiency

The participants acknowledged that “we need to be more concerned with tolerances, it is an issue across the industry” (Quotation 13). Tolerance problems are costly and “they may cost contractors remarkably more than avoiding them proactively” (Quotation 14). GD&TIC can potentially “reduce the rework” (Quotation 15) that is caused by tolerance problems through improving the communication of tolerance information. The reduction of rework often leads to “the elimination of waiting time incurred by the modification of tolerance problems” (Quotation 16). To answer this question, the costs of incorporating GD&TIC into the design process should have a sum deducted equivalent to “the cost of tolerance problems due to poor communication of tolerance information and the cost of waiting time” (Quotation 17). Further investigation is needed “to explore the amount of savings as a result of GD&TIC” (Quotation 18).

4.3.5. Applicability

On the question related to the applicability of GD&TIC, the participants stated: “from the academic point of view, yes” (Quotation 19). However, in practice, “it requires all parties, from designers to operatives on site, [to] understand GD&TIC and its rules” (Quotation 20), which is “very difficult to achieve” (Quotation 21).

5. Discussion

In this paper, the current practice of tolerancing in the AEC industry was reviewed. It was argued that some of the existing tolerancing methods do not specify the exact amount of permitted variations. Despite the simplicity of the conventional plus/minus system, types of geometric variations have not been grouped into widely known and documented categories in this system. In other words, the conventional tolerancing system is not able to systematically communicate geometric variation [110]. Hence, designers and practitioners in the industry are not systematically aware of different types of geometric categories and lack the vocabulary to communicate geometric variations [4,5,17,24,25]. For example, currently, the size dimension between two surfaces controls the parallelism, while in reality, size requirements do not specify the tolerance for parallelism requirements (Parallelism (Surface)). The first improvement to the conventional plus/minus system is that in GD&TIC, the geometric variations of a feature are grouped into three categories: (1) form, (2) orientation, and (3) location [17,19]. Given that GD&TIC is a dictionary of words that are symbols and concepts, a designer can choose the symbols that most appropriately convey tolerance information related to geometric variations [93]. It was acknowledged during the evaluation that dividing the tolerance types and geometric characteristics into distinct categories ensures that tolerance information is more easily communicated compared with conventional tolerancing methods in which such categorisation does not exist (Quotations 1,2, and 4). Additionally, the use of the same language among parties improves clarity and consistency in drawings (Quotation 3).
Though the term ‘HOLD’ or the plus/minus sign can be used to distinguish between important and less important dimensions, designers cannot systematically specify the critical features (e.g., straightness, flatness, perpendicularity, parallelism, and position) on a component or in a sub-assembly. The second improvement to the conventional tolerancing system is that in GD&TIC, the feature control frame (FCF) helps to systematically communicate the permissible variation of critical features on a component or in a sub-assembly [4,5,17,24,25]. For example, Figure 11a illustrates how GD&TIC can communicate the perpendicularity tolerance of columns as a critical feature in an assembly.
When using conventional tolerancing systems, designers do not systematically specify the relationship between critical features of the components in an assembly [8]. The third improvement to the conventional systems is that GD&TIC overcomes this challenge by establishing datum to locate other features [17,19,45]. For example, in Figure 9a, the parallelism relationship between two walls separated by a door is established by the datum on one of the walls.
The typical tolerancing system used in the AEC industry does not systematically define tolerance zones. There is only a general consensus that tolerance zones start from the lower limit and go to the upper limit when using the plus/minus system [111]. The fourth improvement to the conventional tolerancing systems is that GD&TIC has a precise definition for each of the tolerance zones of the form, orientation, and location tolerances. All the points of the features must be within the defined tolerance zones. The width of the tolerance zones is determined by tolerance values [46].
Given the call by organisations involved in developing AEC industry standards to improve existing tolerancing methods (Section 2.1), GD&TIC can potentially be considered as a tolerancing system for the industry. The knowledge transfer from manufacturing into AEC must be treated with caution, and differences between these two industries must be taken into account [112]. In this regard, two discrepancies between GD&TIC rules, and some of the commonly used American and British standards on tolerances were found (Section 4.2). It was argued that the shape of the tolerance zone for the flatness control is three-dimensional, whereas the existing reference documents imply that there is a two-dimensional tolerance zone for flatness (Section 4.2.1). Moreover, existing reference documents assume a square tolerance zone for the perfect position, whereas it was proven that the tolerance zone of the TOP control is cylindrical (Section 4.2.2). Note that although the scope of this research was to identify discrepancies of GD&TIC rules with American and British reference documents, there is not any limitation to adopt GD&TIC in AEC projects of any country. Table 6 summaries the proposed application of each geometric characteristic in AEC.
During the focus group meeting conducted to evaluate GD&TIC, it was discussed that GD&TIC is expected to eliminate the rework caused by tolerance problems, including those encountered in Case A and Case B (Quotation 19), through the improvement of the communication of tolerance information (Quotation 15). The elimination of rework is a basic element of the reduction of processing time [113]. However, further investigation is required to understand whether the costs of incorporating GD&TIC into the design process outweigh the costs saved through the improved tolerancing (Quotations 17 and 18). If the economic advantages of GD&TIC can be demonstrated, then there is a higher chance that it will be accepted and used in the industry (Quotations 9 and 10). It was acknowledged that GD&TIC is a comprehensive tolerancing system (Quotation 5) and therefore that its understanding is overwhelming (Quotation 6). The difficulties in learning terms and rules used in GD&TIC and in motivating designers to sustain the implementation of GD&TIC throughout the project were raised as the major hindrances to the acceptance and practicality of this tolerancing system (Quotations 7, 8, 11, 12, 20, and 21). This situation is similar to when GD&T was introduced to manufacturing [17].
Organisations developing AEC reference documents, BIM, and training courses can play major roles to overcome the hindrance of widely implementing GD&TIC in AEC. It is suggested that organisations involved in developing AEC industry reference documents start reviewing and harmonising the existing terminology and replacing them with categories and tolerance characteristics used in GD&TIC. The out of date conventional tolerancing systems in current reference documents can also be updated with GD&TIC. Moreover, parametric modelling in BIM enables objects to receive GD&TIC symbols and rules to bridge the gap between design and construction. In particular, the concept of datum can be embedded in objects and the relationship between the critical features of objects can be described with tolerance characteristics. Designers can then systematically incorporate tolerances into building information models, and such models become the main tool for the communication of tolerance information. Regarding training courses, their purpose is to provide architecture and engineering students with an overview of terminology used in GD&TIC and to apply GD&TIC in a design setting.

6. Conclusions

The aim of this research was to prescribe the application of GD&T in construction to improve communication of tolerance information in AEC drawings. In this paper, an overview of the existing practice of tolerancing in the AEC industry was presented. It was discussed whether the lack of a standardised approach for tolerancing leads to ambiguous situations during design and to tolerance problems during construction. Despite the potentially sever consequences of those tolerance problems, the literature has mostly focused on exploring the problem with tolerancing rather than proposing a solution to improve it.
Design science research (DSR) was chosen as the methodological approach because its focus is on prescribing a solution to solve a practical problem (e.g., a poor communication of tolerance information), as well as on contributing to theory. DSR in this research consisted of four steps, namely ‘problem definition’, ‘problem awareness’, ‘development’, and ‘evaluation’. The ‘problem definition’ step helped to recognise the areas of concern for tolerancing in AEC from the preceding researchers’ point of view. In the ‘problem awareness’ step, six tolerance problems caused by poor communication of tolerance information were identified in two construction projects. Direct observations and two group interviews were used to collate data in this step.
Next, the proposed solution, GD&TIC, was developed based upon the configuration of understanding gained during the literature review and through the analysis of the identified tolerance problems. The terms and rules of GD&TIC and its differences, compared with some of the commonly used American and British reference documents on tolerances, were established. The preliminary version of GD&TIC consists of five geometric characteristic symbols that fall into three categories, namely form, orientation, and location. The remaining nine symbols were deemed to be less applicable and could be controlled by other symbols; therefore, they were excluded from GD&TIC. This research prescribed how tolerance information in drawings is specified through a feature control frame (FCF) by which geometric tolerances are applied to components and sub-assemblies. Two compartments of FCF are datum and tolerance zone. The datum is a theoretically exact axis or plane from which the location or geometric characteristics of a feature are established. The tolerance zone is a two- or three-dimensional area within which all the toleranced features must be contained. The application of GD&TIC was delineated through examples related to the identified tolerance problems. Though GD&T is widely used in manufacturing, none of its categories and symbols have been deployed in the AEC industry thus far for the purpose of communicating tolerance information. The existing tolerancing approaches are only able to communicate dimensional variations and do not communicate geometric variations by grouping them into distinct categories and characteristics. In other words, the deployment of GD&T in construction is currently missing in the literature and is a novel contribution to theory.
Eventually, a focus group meeting was conducted to evaluate GD&TIC based on five attributes set out in the developed framework. The attributes were acceptability, efficacy, efficiency, practicality, and applicability. The weak and strong criteria of the UA requirements of the method were followed to ensure that a realistic environment for the implementation of GD&TIC was approximated. It was acknowledged during the ‘evaluation’ step that GD&TIC is potentially capable of improving tolerancing and reducing tolerance problems caused by poor communication of tolerance information. This is to reduce the remedial actions needed to solve tolerance problems during construction. Therefore, this research contributes to practice because it demonstrates a solution for practitioners seeking to improve tolerancing and to reduce the number of tolerance problems. However, according to the participants in the focus group, it is difficult to learn terms and rules used in GD&TIC, as well as to motivate designers to sustain the implementation of GD&TIC throughout projects. These difficulties were acknowledged as the major barriers to the acceptance and practicality of GD&TIC in industry. Future works of this research include: (1) the further development of GD&TIC rules and concepts, (2) the incorporation of GD&TIC in building information models, (3) providing a guideline to facilitate the implementation of GD&TIC.

Author Contributions

Conceptualization, S.T., L.K., P.T.; formal analysis, S.T.; methodology, S.T., M.K., P.T., L.K.; validation S.T., P.T., L.K., visualization, S.T.; supervision, L.K., P.T.; writing—original draft preparation, S.T.; writing—review and editing, S.T., L.K., P.T., M.K., A.K. All authors have read and agreed to the published version of the manuscript.

Funding

This research is funded by the Innovative Design Lab, School of Art, Design and Architecture, University of Huddersfield.

Conflicts of Interest

The authors declare no conflict of interest.

Appendix A. Summary of Identified Tolerance Problems in Case A and Case B.

The tolerance problems identified in Case A and Case B and the reason behind their occurrence are explained in Table A1.
Table A1. Summary and illustration of the tolerance problems identified in Cases A and B.
No.Tolerance ProblemDescriptionIllustration
Case A
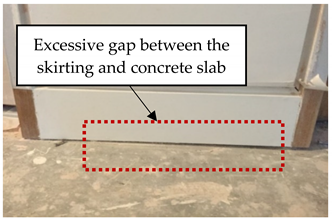
1Flatness of concrete slabThe deflection calculation in this project was based on slab poured to the constant thickness specified, and no account had been taken for any additional weight as a result of the deflection of the supporting structure. However, more concrete was poured to level the concrete slab and achieve the intended flatness tolerance (±5 mm) to a certain extent. Making the slab thicker overloaded the ceiling, and this eventually caused more deflection (30 mm more than the specified tolerance). As a result, the intended flatness could not be achieved. An excessive gap was observed between the concrete slab and recessed skirting. This tolerance problem (the excessive deflection of the concrete slab and the subsequent gap between the slab and recessed skirting) occurred because of the lack of communication between the structural designer, the architect, and the concrete contractor regarding the anticipated deflection and required flatness tolerances. Buildings 10 00062 i006
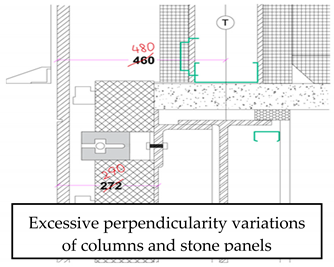
2Perpendicularity of columns and stone panels of the cladding systemThe cladding contractor developed a design in which the offset from the steelwork to the face of the stone panels was 272 mm. In that case, the cladding system could absorb 32 mm of deviations due to the inclination of steel columns and stone panels. The architect later increased the offset to 290 mm. This was to accommodate the installation between the steelwork and cladding. Given that the distance between the steelwork and cladding system increased, the brackets of the cladding system could only absorb 15 mm deviations. As the stone panels were being installed, the steel columns and, subsequently, the stone panels started to lean into the building up to 30 mm at the roof level. This problem occurred due to the lack of communication between the structural designer, the architect, and the cladding contractor about the anticipated perpendicularity variations of columns and the required perpendicularity tolerance of columns and stone panels. Buildings 10 00062 i007
3Straightness of beamsWhen the dead load, due to the cladding, was applied on the steel frame, the stone panels started to sag. There was a noticeable gap between the channel and the stone panels in some areas, and the gap was not consistent all the way through. This problem (the excessive deflection of steel beams and the subsequent gap in the cladding) was as a result of the lack of communication of the straightness tolerances of the beams between the structural engineer, the architect, and the cladding contractor. Buildings 10 00062 i008
Case B
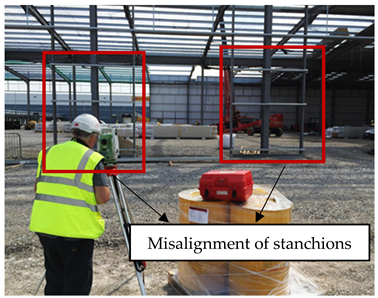
4Parallelism of the doorwaysColumns, parallel flange channels (PFCs), and cladding rails were misaligned for 30–40 mm, so it was not possible to fit the roller shutter doors without the adjustment of the columns and PFCs. This problem occurred because no information could be found to indicate that the parallelism of stanchions was essential to ensure that electrically operated shutter doors would fit in the doorways. Buildings 10 00062 i009
5Position of purlins on the roofThe purlins on the roof that support the cladding panels were out of the correct positions for 20 mm. As a result, there were no fixing points for the panels. This problem occurred due to the lack of communication between the steel and cladding contractors about the required position tolerance of purlins. Buildings 10 00062 i010
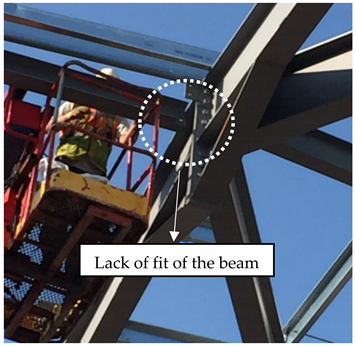
6Position of columnsThe building was erected in two sides; hence, there was an interface between these two sides of the structure. It turned out that most of the columns in the first side were out of the position between 10–15 mm towards the second side. As a result, the beam coming across the top and connecting two sides of the building could not be fitted. This problem occurred because the position tolerance of columns was not communicated to the steel contractor. Buildings 10 00062 i011

References

  1. Talebi, S.; koskela, L.; Tzortzopoulos, P.; Kagioglou, M. Tolerance management in construction: A conceptual framework. Sustainability 2020, 12, 1039. [Google Scholar] [CrossRef] [Green Version]
  2. Rausch, C.; Nahangi, M.; Haas, C.; Liang, W. Monte Carlo simulation for tolerance analysis in prefabrication and offsite construction. Autom. Constr. 2019, 103, 300–314. [Google Scholar] [CrossRef]
  3. Forcada, N.; Macarulla, M.; Gangolells, M.; Casals, M. Handover defects: Comparison of construction and post-handover housing defects. Build. Res. Inf. 2016, 44, 279–288. [Google Scholar] [CrossRef] [Green Version]
  4. Milberg, C.T.; Tommelein, I.D. Methods for managing tolerance compatibility: Windows in cast-in-place concrete. J. Constr. Eng. Manag. 2019, 146, 04019105. [Google Scholar] [CrossRef]
  5. Talebi, S. Improvement of Dimensional Tolerance Management in Construction. Ph.D. Thesis, University of Huddersfield, Huddersfield, UK, 2019. Available online: http://eprints.hud.ac.uk/id/eprint/35070/ (accessed on 30 January 2020).
  6. Liu, C.; Shirowzhan, S.; Sepasgozar, S.M.; Kaboli, A. Evaluation of classical operators and fuzzy logic algorithms for edge detection of panels at exterior cladding of buildings. Buildings 2019, 9, 40. [Google Scholar] [CrossRef] [Green Version]
  7. Krogstie, L.; Walter, M.S.; Wartzack, S.; Martinsen, K. Towards a more comprehensive understanding of tolerance engineering research importance. Proc CIRP 2015, 27, 29–34. [Google Scholar] [CrossRef] [Green Version]
  8. Savoini, J.-J.; Lafhaj, Z. Considering functional dimensioning in architectural design. Front. Archit. Res. 2017, 6, 89–95. [Google Scholar] [CrossRef]
  9. Jingmond, M.; Ågren, R. Unravelling causes of defects in construction. Constr. Innov. 2015, 15, 198–218. [Google Scholar] [CrossRef]
  10. Davison, B.; Owens, G.W. Steel Designers’ Manual, 6th ed.; Blackwell Science, Ltd.: Chennai, India, 2012; ISBN 9781405189408. [Google Scholar]
  11. Landin, A. Demands on the tolerances when industrialising the construction sector. In New Perspective in Industrialisation in Construction; Girmscheid, G., Scheublin, F., Eds.; International Council for Research and Innovation in Building and Construction: Zurich, Switzerland, 2010; pp. 197–205. ISBN 9873906800. [Google Scholar]
  12. Milberg, C.; Tommelein, I. Role of tolerances and process capability data in product and process design integration. In Proceedings of the Construction Research Congress, Honolulu, HI, USA, 19–21 March 2003. [Google Scholar]
  13. Rausch, C.; Nahangi, M.; Haas, C.; West, J. Kinematics chain based dimensional variation analysis of construction assemblies using building information models and 3D point clouds. Autom. Constr. 2017, 75, 33–44. [Google Scholar] [CrossRef]
  14. Gibb, A.G. Off-Site Fabrication: Prefabrication, Pre-Assembly and Modularisation; Whittles Publishing Scotland: Dunbeath, UK, 1999; ISBN 0470378360. [Google Scholar]
  15. American Concrete Institute. Guide for Tolerance Compatibility in Concrete Construction (ACI 117.1R-14); American Concrete Institute: Farmington Hills, MI, USA, 2014; Available online: https://www.concrete.org/store/productdetail.aspx?ItemID=117114&Language=English&Units=US_AND_METRIC (accessed on 25 March 2020).
  16. Rotimi, F.E.; Tookey, J.; Rotimi, J.O. Evaluating defect reporting in new residential buildings in New Zealand. Buildings 2015, 5, 39–55. [Google Scholar] [CrossRef]
  17. Krulikowski, A. Fundamentals of Geometric Dimensioning and Tolerancing, 3rd ed.; Cengage Learning: New York, NY, USA, 2012; ISBN 1285401972. [Google Scholar]
  18. Pathak, V.K.; Singh, A.K.; Sivadasan, M.; Singh, N. Framework for automated GD&T inspection using 3D scanner. J. Mech. Eng. Sci. 2018, 99, 197–205. [Google Scholar] [CrossRef]
  19. The American Society of Mechanical Engineers. Dimensioning and Tolerancing; The American Society of Mechanical Engineers: New York, NY, USA, 2009. [Google Scholar]
  20. Milberg, C. Application of Tolerance Management to Civil Systems. Ph.D. Thesis, University of California, Berkeley, CA, USA, 2006. Available online: http://citeseerx.ist.psu.edu/viewdoc/download?doi=10.1.1.308.5119&rep=rep1&type=pdf (accessed on 30 January 2020).
  21. Singh, P.; Jain, P.; Jain, S. Important issues in tolerance design of mechanical assemblies. Part 1: Tolerance analysis. Proc. Inst. Mech. Eng. Part B J. Eng. Manuf. 2009, 223, 1225–1247. [Google Scholar] [CrossRef]
  22. Gibb, A.G.F.; Pavitt, T.C. Interface management within construction: In particular, building facade. J. Constr. Eng. Manag. 2003, 129, 8–15. [Google Scholar] [CrossRef]
  23. Hayes, R.L. The Architect’s Handbook of Professional Practice, 15th ed.; John Wiley & Sons, Inc.: Hoboken, NJ, USA, 2014; ISBN 9781118174593. [Google Scholar]
  24. Ballast, D.K. Handbook of Construction Tolerances, 2nd ed.; John Wiley & Sons, Inc.: Hoboken, NJ, USA, 2007; ISBN 9781118260227. [Google Scholar]
  25. British Standards Institution. Design of Joints and Jointing in Building Construction: Guide; British Standards Institution: London, UK, 2013. [Google Scholar]
  26. British Standards Institution. Construction Drawings: Indication of Limit Deviations; British Standards Institution: London, UK, 1999. [Google Scholar]
  27. Singh, P.; Jain, P.; Jain, S. Important issues in tolerance design of mechanical assemblies. Part 2: Tolerance synthesis. Proc. Inst. Mech. Eng. Part B J. Eng. Manuf. 2009, 223, 1249–1287. [Google Scholar] [CrossRef]
  28. Fischer, B.R. Mechanical Tolerance Stackup and Analysis; CRC Press: Boca Raton, FL, USA, 2011; ISBN 1439815739. [Google Scholar]
  29. International Organisation for Standardization. Quality Management Systems: Requirements (BS EN ISO 9001:2015); ISO: London, UK, 2015. [Google Scholar]
  30. Construction Industry Institute. CII Best Practices Guide: Improving Project Performance; CII: Austin, TX, USA, 2012. [Google Scholar]
  31. Shahtaheri, Y.; Rausch, C.; West, J.; Haas, C.; Nahangi, M. Managing risk in modular construction using dimensional and geometric tolerance strategies. Autom. Constr. 2017, 83. [Google Scholar] [CrossRef]
  32. American Institute of Steel Construction. Code of Standard Practice for Structural Steel Buildings and Bridges (AISC 303-05); AISC: Chicago, IL, USA, 2005. [Google Scholar]
  33. British Standards Institution. Guide to Accuracy in Building; British Standards Institution: London, UK, 1990. [Google Scholar]
  34. British Constructional Steelwork Association. National Structural Steelwork Specification for Building Construction; British Constructional Steelwork Association: London, UK, 2010. [Google Scholar]
  35. British Standards Institution. Tolerances for Building: Recommendations for Basic Principles for Evaluation and Specification; British Standards Institution: London, UK, 1988. [Google Scholar]
  36. American Concrete Institute. Specification for Tolerances for Concrete Construction and Materials; American Concrete Institute: Farmington Hills, MI, USA, 2010; Available online: https://www.concrete.org/portals/0/files/pdf/previews/117-10web.pdf (accessed on 15 March 2020).
  37. British Standards Institution. Execution of Concrete Structures; British Standards Institution: London, UK, 2009. [Google Scholar]
  38. Love, P.E.D.; Edwards, D.J.; Irani, Z.; Walker, D.H.T. Project pathogens: The anatomy of omission errors in construction and resource engineering project. IEEE Trans. Eng. Manag. 2009, 56, 425–435. [Google Scholar] [CrossRef]
  39. Arashpour, M.; Heidarpour, A.; Akbar Nezhad, A.; Hosseinifard, Z.; Chileshe, N.; Hosseini, R. Performance-based control of variability and tolerance in off-site manufacture and assembly: Optimization of penalty on poor production quality. Constr. Manag. Econ. 2019, 1–13. [Google Scholar] [CrossRef]
  40. Price, C.; Goodier, C.I.; Fouchal, F.; Fraser, N. The Role of Standards in Offsite Construction: A Review of Existing Practice and Future Need; British Standards Institute: London, UK, 2019. [Google Scholar]
  41. Puri, N.; Valero, E.; Turkan, Y.; Bosché, F. Assessment of compliance of dimensional tolerances in concrete slabs using TLS data and the 2D continuous wavelet transform. Autom. Constr. 2018, 94, 62–72. [Google Scholar] [CrossRef]
  42. Valero, E.; Forster, A.; Bosché, F.; Hyslop, E.; Wilson, L.; Turmel, A. Automated defect detection and classification in ashlar masonry walls using machine learning. Autom. Constr. 2019, 106, 102846. [Google Scholar] [CrossRef]
  43. Sacks, R.; Ma, L.; Yosef, R.; Borrmann, A.; Daum, S.; Kattel, U. Semantic enrichment for building information modeling: Procedure for compiling inference rules and operators for complex geometry. J. Comput. Civ. Eng. 2017, 31. [Google Scholar] [CrossRef]
  44. Talebi, S.; Tzortzopoulos, P.; Koskela, L.; Poshdar, M.; Tommelein, I.D.; Tezel, A.; Antunes, R. A vision for the future of the computer-aided tolerance management in construction based on the lessons learned from manufacturing. In Proceedings of the CIB World Building Congress, Hong Kong, China, 17–21 June 2019. [Google Scholar]
  45. Puncochar, D.E.; Evans, K. Interpretation of Geometric Dimensioning and Tolerancing, 3rd ed.; Industrial Press: New York, NY, USA, 2011; ISBN 978-0-8311-3421-1. [Google Scholar]
  46. Henzold, G. Geometrical Dimensioning and Tolerancing for Design, Manufacturing and Inspection: A Handbook for Geometrical Product Specification Using ISO and ASME Standards, 2nd ed.; Butterworth-Heinemann: Oxford, UK, 2006; ISBN 0750667389. [Google Scholar]
  47. Miller, V. CAD Software. In Handbook of Design, Manufacturing and Automation; Dorf, R.C., Kusiak, A., Eds.; John Wiley & Sons, Inc.: New York, NY, USA, 1994; ISBN 9780470172452. [Google Scholar]
  48. Haghighi, P.; Mohan, P.; Kalish, N.; Vemulapalli, P.; Shah, J.J.; Davidson, J.K. Toward automatic tolerancing of mechanical assemblies: First-order GD&T schema development and tolerance allocation. J. Comput. Inf. Sci. Eng. 2015, 15. [Google Scholar] [CrossRef]
  49. Roy, U.; Liu, C.; Woo, T. Review of dimensioning and tolerancing: Representation and processing. Comput. Aided Des. 1991, 23, 466–483. [Google Scholar] [CrossRef] [Green Version]
  50. Milberg, C.; Tommelein, I.D. Tolerance and constructability of soldier piles in slurry walls. J. Perform. Constr. Facil. 2009, 24, 120–127. [Google Scholar] [CrossRef]
  51. Hevner, A.; March, S.T.; Park, J.; Ram, S. Design science in information systems research. Manag. Inf. Syst. 2004, 28, 75–105. [Google Scholar] [CrossRef] [Green Version]
  52. Van Aken, J. Management research as a design science: Articulating the research products of mode 2 knowledge production in management. Br. J. Manag. 2005, 16, 19–36. [Google Scholar] [CrossRef]
  53. Walls, J.G.; Widmeyer, G.R.; El Sawy, O.A. Building an information system design theory for vigilant EIS. Inf. Syst. Res. 1992, 3, 36–59. [Google Scholar] [CrossRef]
  54. Hevner, A.; Chatterjee, S. Design Research in Information Systems: Theory and Practice; Springer: New York, NY, USA, 2010; ISBN 1441956530. [Google Scholar]
  55. Koskela, L. Which kind of science is construction management? In Proceedings of the 16th Annual Conference of the International Group for Lean Construction, Manchester, UK, 16–18 July 2008; pp. 51–60. [Google Scholar]
  56. Jordan-Palomar, I.; Tzortzopoulos, P.; García-Valldecabres, J.; Pellicer, E. Protocol to manage heritage-building interventions using heritage building information modelling (HBIM). Sustainability 2018, 10, 908. [Google Scholar] [CrossRef] [Green Version]
  57. Voordijk, H. Construction management and economics: The epistemology of a multidisciplinary design science. Constr. Manag. Econ. 2009, 27, 713–720. [Google Scholar] [CrossRef]
  58. Schimanski, C.P.; Pasetti Monizza, G.; Marcher, C.; Matt, D.T. Pushing digital automation of configure-to-order services in small and medium enterprises of the construction equipment industry: A design science research approach. Appl. Sci. 2019, 9, 3780. [Google Scholar] [CrossRef] [Green Version]
  59. Van Aken, J.E.; Berends, H.; van der Bij, H. Problem Solving in Organizations: A Methodological Handbook for Business, 2nd ed.; Cambridge University Press: Cambridge, UK, 2012; ISBN 1280850213. [Google Scholar]
  60. Gregor, S.; Hevner, A.R. Positioning and presenting design science research for maximum impact. MIS. Q. 2013, 37, 337–356. [Google Scholar] [CrossRef]
  61. Dresch, A.; Lacerda, D.P.; Antunes, J.A.V., Jr. Design Science Research: A Method for Science and Technology Advancement; Springer: Porto Alegre, Brazil, 2015; ISBN 9783319356099. [Google Scholar]
  62. Ballast, D.K. Architect’s Handbook of Construction Detailing; John Wiley & Sons: Hoboken, NJ, USA, 2009; ISBN 0470381914. [Google Scholar]
  63. Talebi, S.; Koskela, L.; Shelbourn, M.; Tzortzopoulos, P. Critical review of tolerance management in construction. In Proceedings of the 24th Annual Conference of the International Group for Lean Construction, Boston, MA, USA, 20–22 July 2016. [Google Scholar]
  64. Kasanen, E.; Lukka, K.; Siitonen, A. The constructive approach in management accounting research. J. Manag. Account. Res. 1993, 5, 243–264. [Google Scholar]
  65. Alturki, A.; Gable, G.G.; Bandara, W. A Design Science Research roadmap. In Proceedings of the International Conference on Design Science Research in Information Systems, Berlin, Germany, 5–6 May 2011; pp. 107–123. [Google Scholar]
  66. Vaishnavi, V.K.; Kuechler, W. Design Science Research Methods and Patterns: Innovating Information and Communication Technology, 2nd ed.; CRC Press: Boca Raton, FL, USA, 2015; ISBN 1420059327. [Google Scholar]
  67. Lukka, K. The constructive research approach. In Case Study Research in Logistics; Ojala, L., Hilmola, O.-P., Eds.; Turku School of Economics and Business Administration: Turku, Finland, 2003; pp. 83–101. ISBN 9781615831463. [Google Scholar]
  68. Valdes, F.J. Manufacturing Compliance Analysis for Architectural Design: A Knowledge-Aided Feature-Based Modeling Framework. Ph.D. Thesis, Georgia Tech, Atlanta, GA, USA, 2016. Available online: http://hdl.handle.net/1853/54973 (accessed on 30 January 2020).
  69. Miles, M.B.; Huberman, A.M. Qualitative data analysis: An expanded sourcebook. Serv. Ind. J. 1995, 15, 366. [Google Scholar]
  70. Saunders, M.; Lewis, P.; Thornhill, A. Research Methods for Business Students, 7th ed.; Pearson Education: Harlow, UK, 2016; ISBN 9780273716860. [Google Scholar]
  71. Boddy, C.R. Sample size for qualitative research. Qual. Mark. Res. Int. J. 2016, 19, 426–432. [Google Scholar] [CrossRef]
  72. Brinkmann, S. Qualitative Interviewing: Understanding Qualitative Research; Oxford University Press: New York, NY, USA, 2013; ISBN 0199861390. [Google Scholar]
  73. Eisenhardt, K.M. Building theories from case study research. Acad. Manag. Rev. 1989, 14, 532–550. [Google Scholar] [CrossRef]
  74. Yin, R.K. Case Study Research: Design and Methods, 4th ed.; SAGE Publications: Southend Oaks, CA, USA, 2013; ISBN 978-1-4129-6099-1. [Google Scholar]
  75. Bruseberg, A.; McDonagh-Philp, D. Focus groups to support the industrial/product designer: A review based on current literature and designers’ feedback. Appl. Ergon. 2002, 33, 27–38. [Google Scholar] [CrossRef]
  76. Rooke, J.A.; Kagioglou, M. Criteria for evaluating research: The unique adequacy requirement of methods. Constr. Manag. Econ. 2007, 25, 979–987. [Google Scholar] [CrossRef]
  77. Lynch, M. Harold Garfinkel (29 October 1917–21 April 2011): A remembrance and reminder. Soc. Stud. Sci. 2011, 41, 927–942. [Google Scholar] [CrossRef]
  78. Rooke, J.A.; Rooke, C.N. From interpretation to action: Unique adequacy as a common standard for the evaluation of research in the built environment. In Ethnographic Research in the Construction Industry; Pink, S., Tutt, D., Dainty, A., Eds.; Routledge: New York, NY, USA, 2012; pp. 159–177. ISBN 0415603439. [Google Scholar]
  79. Garfinkel, H. Ethnomethodology’s Program: Working out Durkheim’s Aphorism; Rowman & Littlefield Publishers: Lanham, MD, USA, 2002; ISBN 0742578984. [Google Scholar]
  80. Morriss, L. Dirty secrets and being ‘strange’: Using ethnomethodology to move beyond familiarity. Qual. Res. 2016, 16, 526–540. [Google Scholar] [CrossRef] [Green Version]
  81. Garfinkel, H.; Rawls, A.; Lemert, C.C. Seeing Sociologically: The Routine Grounds of Social Action; Routledge: New York, NY, USA, 2015; ISBN 1317252276. [Google Scholar]
  82. Tremblay, M.C.; Hevner, A.R.; Berndt, D.J. Focus groups for artifact refinement and evaluation in design research. Cais 2010, 26, 599–618. [Google Scholar] [CrossRef] [Green Version]
  83. Kitzinger, J. Qualitative Research: Introducing focus groups. BMJ 1995, 311, 299–302. [Google Scholar] [CrossRef] [Green Version]
  84. Checkland, P. Soft systems methodology: A thirty year retrospective. Syst. Res. Behav. Sci. 2000, 17, S11–S58. [Google Scholar] [CrossRef]
  85. Tzortzopoulos, P. The Design and Implementation of Product Development Process Models in Construction Companies. Ph.D. Thesis, University of Salford, Salford, UK, 2004. Available online: http://usir.salford.ac.uk/id/eprint/26949/ (accessed on 15 February 2020).
  86. Khan, S.; Tzortzopoulos, P. A framework for evaluating an action research study on lean design management. In Proceedings of the 24th Annual Conference of the International Group for Lean Construction, Boston, MA, USA, 20–22 July 2016. [Google Scholar]
  87. Polini, W. Concurrent tolerance design. Res. Eng. Des. 2016, 27, 23–36. [Google Scholar] [CrossRef]
  88. Peng, H.; Peng, Z. Concurrent design and process tolerances determination in consideration of geometrical tolerances. J. Mech. Eng. Sci. 2019, 233, 6727–6740. [Google Scholar] [CrossRef]
  89. The American Society of Mechanical Engineers. Dimensioning and Tolerancing (Y14.5M); ASME: New York, NY, USA, 1994. [Google Scholar]
  90. Phua, F.T.; Rowlinson, S. Operationalizing culture in construction management research: A social identity perspective in the Hong Kong context. Constr. Manag. Econ. 2004, 22, 913–925. [Google Scholar] [CrossRef]
  91. Dantan, J.-Y.; Huang, Z.; Goka, E.; Homri, L.; Etienne, A.; Bonnet, N.; Rivette, M. Geometrical variations management for additive manufactured product. CIRP Ann. 2017, 66, 161–164. [Google Scholar] [CrossRef] [Green Version]
  92. Cogorno, G.R. Geometric Dimensioning and Tolerancing for Mechanical Design; Mac Graw-Hill: New York, NY, USA, 2006; ISBN 0071460705. [Google Scholar]
  93. Meadows, J.D. Geometric Dimensioning and Tolerancing: Applications and Techniques for Use in Design, Manufacturing, and Inspection; CRC Press: New York, NY, USA, 1995; ISBN 0824793099. [Google Scholar]
  94. Schenk, C.A.; Bergman, L.A. Response of continuous system with stochastically varying surface roughness to moving load. J. Eng. Mech. 2003, 129, 759–768. [Google Scholar] [CrossRef]
  95. Chiabert, P.; Lombardi, F.; Orlando, M. Benefits of geometric dimensioning and tolerancing. J. Mater. Process. Technol. 1998, 78, 29–35. [Google Scholar] [CrossRef]
  96. Das, P.; Chandran, R.; Samant, R.; Anand, S. Optimum part build orientation in additive manufacturing for minimizing part errors and support structures. Procedia Manuf. 2015, 1, 343–354. [Google Scholar] [CrossRef] [Green Version]
  97. Romero Subirón, F.; Rosado Castellano, P.; Bruscas Bellido, G.M.; Benavent Nácher, S. Feature-based framework for inspection process planning. Materials 2018, 11, 1504. [Google Scholar] [CrossRef] [Green Version]
  98. Zhang, H.-C. Advanced Tolerancing Techniques; John Wiley & Sons: New York, NY, USA, 1997; ISBN 0471145947. [Google Scholar]
  99. Schleich, B.; Wärmefjord, K.; Söderberg, R.; Wartzack, S. Geometrical variations management 4.0: Towards next generation geometry assurance. Procedia CIRP 2018, 75, 3–10. [Google Scholar] [CrossRef]
  100. Yan, Y.; Bohn, M.; Peters, S.; Heisel, U. Complementing and enhancing definitions of position tolerance for a real point based on ISO Geometrical Product Specifications (GPS). Manuf. Sci. Technol. 2018, 22, 107–110. [Google Scholar] [CrossRef]
  101. Qin, Y.; Lu, W.; Liu, X.; Huang, M.; Zhou, L.; Jiang, X. Description logic-based automatic generation of geometric tolerance zones. Int. J. Adv. Manuf. Technol. 2015, 79, 1221–1237. [Google Scholar] [CrossRef]
  102. Budinoff, H.; McMains, S. Prediction and visualization of achievable orientation tolerances for additive manufacturing. Procedia CIRP 2018, 75, 81–86. [Google Scholar] [CrossRef]
  103. Wahab, D.; Azman, A. Additive manufacturing for repair and restoration in remanufacturing: An overview from object design and systems perspectives. Processes 2019, 7, 802. [Google Scholar] [CrossRef] [Green Version]
  104. Stites, W.M.; Drake, P.J. Geometric Dimensioning and Tolerancing. In Dimensioning and Tolerancing Handbook; Drake, P.J., Ed.; McGraw-Hill: New York, NY, USA, 1999; ISBN 0070181314. [Google Scholar]
  105. British Standards Institution. Screeds, Bases and in Situ Floorings—Part 2: Concrete Bases and Cementitio us Levelling Screeds to Receive Floorings; Code of Practice (BS 8204-1:2003 +A1); British Standards Institution: London, UK, 2011. [Google Scholar]
  106. Concu, G.; Trulli, N. Concrete defects sizing by means of ultrasonic velocity maps. Buildings 2018, 8, 176. [Google Scholar] [CrossRef] [Green Version]
  107. British Standards Institution. Screeds, bases and in situ floorings. In Concrete Bases and Cementitious Levelling Screeds to Receive Floorings; Code of Practice; British Standards Institution: London, UK, 2009. [Google Scholar]
  108. American Concrete Institute. Guide for Concrete Floor and Slab Construction (ACI 302.1R-89); American Concrete Institute: Farmington Hills, MI, USA, 1989; Available online: http://dl.mycivil.ir/dozanani/ACI/ACI%20302.1R-04%20Guide%20for%20Concrete%20Floor%20and%20Slab%20Construction_MyCivil.ir.pdf (accessed on 14 March 2020).
  109. British Standards Institution. Execution of Steel Structures: General Rules and Rules for Buildings; British Standards Institution: London, UK, 1998. [Google Scholar]
  110. Sieber, I.; Yi, A.Y.; Gengenbach, U. Metrology Data-Based Simulation of Freeform Optics. Appl. Sci. 2018, 8, 2338. [Google Scholar] [CrossRef] [Green Version]
  111. British Standards Institution. Building Construction: Tolerances, Expression of Dimensional Accuracy, Principles and Terminology (BS ISO 1803); British Standards Institution: London, UK, 1997. [Google Scholar]
  112. Kagioglou, M.; Cooper, R.; Aouad, G.; Sexton, M. Rethinking construction: The generic design and construction process protocol. Eng. Constr. Archit. Manag. 2000, 7, 141–153. [Google Scholar] [CrossRef] [Green Version]
  113. Liker, J.K. The Toyota Way: 14 Management Principles from the World’s Greatest Manufacturer; McGraw-Hill: New York, NY, USA, 2004; ISBN 9797813770. [Google Scholar]
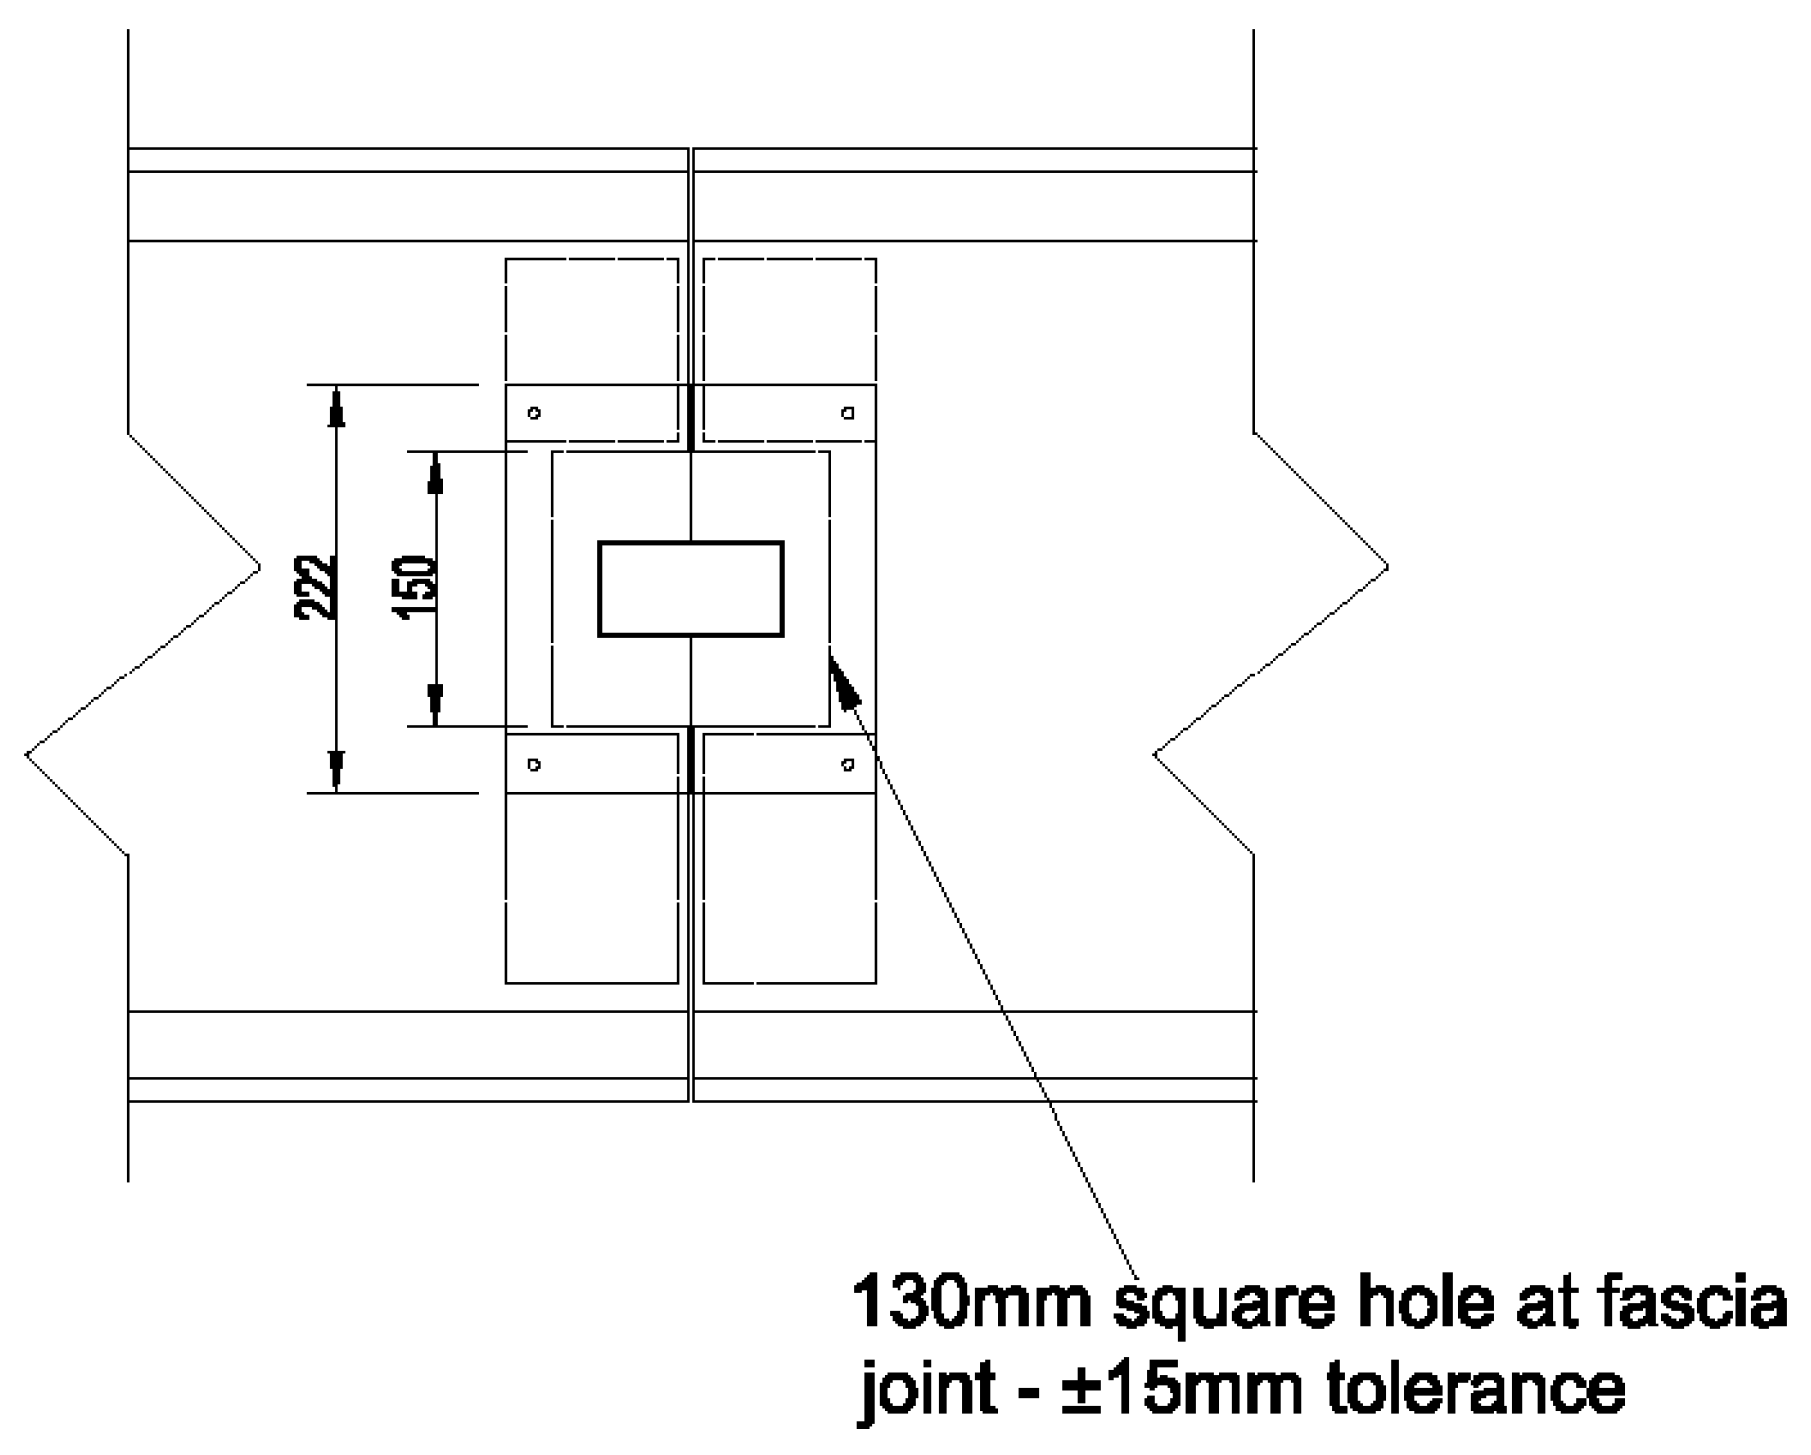
Figure 1. Example of the communication of tolerance information for a hole at a fascia joint using the conventional plus/minus system [5].
Buildings 10 00062 g001
Figure 2. Illustration of a feature control frame and definition of its symbols [10].
Buildings 10 00062 g002
Figure 3. Tolerance zone for the straightness control applied to a steel beam.
Buildings 10 00062 g003
Figure 4. (a) Straightness control applied to a beam in a steel frame structure; (b) straightness control and its associate tolerance zone.
Buildings 10 00062 g004
Figure 5. Flatness control applied to either view of a concrete slab.
Buildings 10 00062 g005
Figure 6. Two-dimensional cross section showing the tolerance zone for the flatness control applied to a concrete slab.
Buildings 10 00062 g006
Figure 7. (a) A doorway in an industrial building; (b) the doorway when its posts are at the extreme allowed distance.
Buildings 10 00062 g007
Figure 8. The lack of alignment between the two sides of the doorway while the specified size tolerance is satisfied.
Buildings 10 00062 g008
Figure 9. (a) Parallelism (surface) control applied to two separate walls; (b) cross section of the walls depicted in Figure 9a and the associated parallelism tolerance zone.
Buildings 10 00062 g009
Figure 10. (a) Perpendicularity (surface) tolerance zone applied to a stone panel used in a cladding system; (b) perpendicularity tolerance zone applied to a column.
Buildings 10 00062 g010
Figure 11. (a) Perpendicularity (surface) control applied to a stone cladding; (b) perpendicularity (axis) control applied to the columns in the envelope of a building.
Buildings 10 00062 g011
Figure 12. (a) Tolerance zone of the tolerance of position (TOP) control applied to a column; (b) position of the referenced column relative to datums.
Buildings 10 00062 g012
Figure 13. (a) TOP control applied to the columns; (b) demonstration of how to control the location of a feature of size.
Buildings 10 00062 g013
Figure 14. (a) TOP control applied to the beams; (b) demonstration of how to control the distance between features of size.
Buildings 10 00062 g014
Figure 15. Drawing callout for the TOP control applied to the columns.
Buildings 10 00062 g015
Figure 16. The principle behind using straightedge to determine the flatness of floor surfaces.
Buildings 10 00062 g016
Figure 17. (a) The tolerance zone for a column when the position tolerance is applied based on the reference documents; (b) the maximum distance between the axis of the column and the target location in the tolerance zone; (c) comparison between the tolerance zone for the position tolerance implied by the reference documents and GD&TIC.
Buildings 10 00062 g017
Table 1. Type of projects studied and their stage of development.
ProjectType of ProjectDevelopment Stage
Case AA circa 7500 m2 buildingThe installation of the building envelope and interior components
Case BA circa 2.30 ha terraced warehouse/manufacturing buildingErection of structural frame
Table 2. Role/position of interviewees in Case A and Case B.
Case ACase B
Role/position of intervieweeRole/position of interviewee
Project Director
Design Manager
Architect
Site Engineer
Quantity Surveyor
Senior Quantity Surveyor
Project Director
Senior Project Manager
Site Manager
Site Engineer
Table 3. Summary the tolerance problems identified in Cases A and B.
ProjectCorresponding No.Description
Case ATolerance Problem 1Flatness of concrete slabs
Case ATolerance Problem 2Perpendicularity of columns and cladding stone panels
Case ATolerance Problem 3Straightness of beams
Case BTolerance Problem 4Parallelism of doorways
Case BTolerance Problem 5Position of purlins on the roof
Case BTolerance Problem 6Position of columns
Table 4. Framework developed for evaluating usefulness and effectiveness of geometric dimensioning and tolerancing in construction (GD&TIC).
CriteriaAttributesCorresponding Questions
EffectivenessAcceptabilityDoes GD&TIC have the potential to be accepted by designers and contractors, and to be used in the AEC industry?
EfficacyIs GD&TIC useful in the sense that it will lead to improved tolerancing in AEC?
EfficiencyDoes the time and cost needed to implement GD&TIC outweigh the costs saved as a result of eliminated reworks, delays and poor quality?
UsefulnessPracticalityIn terms of clarity and simplicity, is GD&TIC easy to implement?
PracticalityCould GD&TIC avoid the tolerance problems identified in Case A and Case B?
Table 5. A summary of the rules and terms of GD&TIC.
Type of ToleranceGeometric CharacteristicsSymbolsTolerance ZoneDatum Required
Form: It establishes the shape of a surface.Straightness: It represents how straight a surface is on along a line. Buildings 10 00062 i0012D Tolerance Zone:
Two parallel lines
No
Flatness: It demonstrates the amount of deviation of flatness that a surface is allowed to have. Buildings 10 00062 i0023D Tolerance Zone:
Two parallel planes, where the entire surface must lie.
No
Orientation: It describes the relationship between features and datums at particular angles. Perpendicularity (surface): limits the amount of variation allowed over a from being parallel to the datum plane. Buildings 10 00062 i0033D Tolerance Zone:
Cylindrical boundary that is directly perpendicular to the datum plane
Optional
Parallelism: It limits the amount of variation allowed over an entire plane, from being parallel to the reference plane. Buildings 10 00062 i0042D or 3D Tolerance Zone: Two planes, that are parallel to the datum planeYes
Location: It establishes the position of the feature relative to a datum.Tolerance of Position (TOP): It determines the deviation of a feature’s axis from the Perfect position. Buildings 10 00062 i0053D Tolerance Zone:
Cylindrical boundary
where the central axis of a feature of size must lie, concerning the theoretically perfect location.
Yes
Table 6. A summary of the proposed applications of each geometric characteristic in GD&TIC.
Type of ToleranceGeometric CharacteristicsApplications
FormStraightnessTo control the beams and columns that are prone to deformation.
FlatnessTo control the flatness of floor surfaces.
Orientation Perpendicularity (surface)To control components for which plumbness tolerances are a major concern.
ParallelismTo control surfaces that should maintain a constant distance.
LocationTolerance of Position (TOP)To control (1) the location of features of size such as columns and beams and (2) the distance between those features of size