Article

Measuring the Weathertight Performance of Flashings

BRANZ Ltd., P.O. Box 50908, Porirua City 5240, New Zealand
*
Author to whom correspondence should be addressed.
These authors contributed equally to this work.
Buildings 2015, 5(1), 130-148; https://doi.org/10.3390/buildings5010130
Submission received: 25 November 2014 / Revised: 17 December 2014 / Accepted: 14 January 2015 / Published: 28 January 2015

Abstract

:
Residential buildings are now better engineered to manage rainwater following the leaking building problem in New Zealand. The next challenge is to improve the weathertightness of medium-rise buildings which often use joint details widely applied on low-rise buildings but are subject to higher wind pressures and surface runoff rates. This study begins to address this challenge by measuring the water leakage performance limits of the following common flashings with static and dynamic rain and wind loads to see how their performance might be improved: (a) Horizontal H and Z jointers between direct fixed sheet claddings; (b) The window head flashing in a cavity wall; (c) A horizontal apron flashing at the junction between a roof and wall. At this stage, water penetration resistances have been measured but the data has not yet been discussed in the context of wind pressures and rain loads on mid-rise buildings. All of the joints were found to resist water leakage to pressures equivalent to the hydrostatic head of the upstand, so long as there were no air leakage paths through the joint. When vents were added, or openings were present that might arise due to construction tolerances, then the onset pressure for leakage was found to fall by as much as 50%. Vents, of course, are essential for ventilation drying in rainscreen walls and even with vents present, the onset of leakage was at generally at least twice the 50 Pa wet wall test pressure applied in New Zealand. Opportunities were found to improve the way vented joints deal with runoff by enlarging the gap between the cladding and flashing. This prevented the outer joint volume from filling with water and occluding the vents. The apron flashing was found to cope better than a window head joint with runoff, because of the larger 35 mm vertical gap between the cladding and apron.

1. Introduction

Most water leaks in residential buildings occur at joints between claddings and components such as windows, etc. This is illustrated in Figure 1 using data from a survey of leaking buildings in New Zealand by Bassett et al. [1]. Over 60% of leakage sites were at junctions between claddings and other components and less than 40% were associated with roof and wall claddings. Contributing causes were found to include the omission of traditional metal flashings at junctions between components along with limited protection from eaves in newer building designs. A similar fraction “26%” of water entry points around window and door junctions with claddings were identified by Morrison Hershfield Ltd. [2] in a survey of leaking buildings in British Columbia, Canada. In that survey, 90% of water leakage sites were found to be at junctions between materials and components or at penetrations through the cladding.
Figure 1. Water entry sites in New Zealand leaking buildings.
Buildings 05 00130 g001
The Department of Building and Housing (now part of the Ministry of Business, Innovation and Employment) responded to the leaking building problem by modifying the compliance document, E2/AS1 External Moisture, of the New Zealand Building Code (NZBC) to improve the standard of water management in wall and roof designs (Department of Building and Housing [3]). Most of the changes were based on the 4Ds (deflection, drainage, drying and durability) approach developed in Canada by Hazleden and Morris [4] and incorporated a water-managed cavity behind the cladding. Additional important changes include flashings around the perimeter of windows and doors.
A new test procedure E2/VM1 “Verification Method” (Department of Building and Housing [5]) was also developed to apply the following tests and criteria to claddings and flashings on cavity walls:
  • Water should not systematically reach the dry side of the cavity during any of the tests (including above the upstand on horizontal flashings above cavity closers);
  • The first test in E2/VM1 is a static and cyclic pressure test of the complete wall system;
  • The second test introduces defects in the cladding around flashings to confirm that water is successfully controlled by drainage paths including the back of the cladding and flashings at junctions between components or different claddings;
  • Finally, the “wetwall test” applies 50 Pa pressure difference across the cladding and checks that water leaks through the cladding are confined to the drainage paths and do not bridge the cavity.
These tests apply the following criteria to flashings in cavity walls:
  • The flashing forms part of the drainage path for water on the back of the cladding;
  • The flashing must rainscreen the joint and prevent water from reaching the underlay with a rain intensity of at least 3 L/m2·min and a 50 Pa air pressure difference between the wetwall and the cavity.
Requiring the wall underlay to remain dry during testing is quite stringent and specific to New Zealand. It is the primary reason for this investigation of flashing upstand heights in claddings. There are many questions about the performance of flashings that are not answered by the E2/VM1 procedure and which this research is starting to address:
  • How far should the flashing upstand extend upwards behind the cladding to deal with wind driven rain?
  • Do the upstand heights of flashings need to be adjusted to cope with rain bouncing of a roof—particularly important for apron flashings between roof and wall?
  • Do cavity closers have a role in managing air and water entry through the joint?
  • How should cladding to flashing clearances be sized to control runoff?
  • Do hems folded into metal flashings improve the weathertight performance of flashings?
Perhaps the most pressing need for research on the leakage performance of joints is in support of timber framed walls above the height limit for E2/AS1 (three stories maximum but nominally 10 m above ground). Many of these buildings adapt E2/AS1 claddings and flashings to timber framed infill panels that are exposed to higher wind pressures and surface runoff rates than low rise residential buildings.
There are few scientific investigations of the water leakage performance of joints and how their design might be improved to cope with extreme exposure. One of the earliest investigations (Ishikawa [6]) measured the leakage characteristics of joints in a metal curtain wall and concluded that the key elements were a large external opening to prevent a water film from bridging the gap, and an airtight internal joint to support wind pressures. Further studies by Herbert [7] and [8] measured water entry rates through labyrinth type joints exposed to driving rain in field trials, showing that the important attributes of successful joints were an airtight inner wall and sloped drainage to deal with water entering the joint. A more recent study (Lacasse et al. [9]) measured leakage rates through specific defects in walls such as missing lengths of sealant, and used the leakage function of wind pressure and rain load to estimate the moisture loads that have to be managed by vapour diffusion and ventilation drying within the wall. Water leakage rates were measured as a function of runoff rates and static wind pressure and fitted to an empirical relationship that was then used to estimate moisture entry loads in a range of North American climates. A similar approach to developing water leakage functions for joints is followed in this study but the next step of comparing leakage rates with the capacity of joints to control leakage with drainage and ventilation drying is outside the scope of this paper. A future study will follow the procedures developed by Sahal and Lacasse [10] and determine the rain loads, wind pressures and runoff rate for claddings for taller buildings in New Zealand.

2. Measured Rain Leakage Characteristics

Equipment illustrated in Figure 2 was used to measure the water leakage characteristics of joints between building components. It consists of a pressure chamber connected to a fan and a fluctuating piston that together apply a steady pressure and a superimposed fluctuating pressure across the specimen. The pressure amplitude can be changed by adjusting the piston stroke although below 0.2 Hz there was simply not enough travel to reach large pressure amplitudes. In all of the fluctuating pressure tests described in this paper, the pressure amplitude was 2:1 as required in E2/AS1. The wall specimen measured 0.7 by 0.7 m (area 0.49 m2) and the length of joint under investigation was 0.53 m.
Figure 2. Equipment for measuring the weathertightness characteristics of joints.
Buildings 05 00130 g002
A range of water spray nozzles were used to wet the sample area with between 3.4 L/m2·min (corresponding to the minimum rain load called for in E2/VM1) and 0.08 L/m2·min. This is similar to the rain loads applied to large wall assemblies (0.02–3 L/m2·min) by Bassett et al. [11] and provides a wide enough range of rain intensity to develop rain leakage functions that include most rain events. In these measurements the runoff rate was found to be a more useful measure of water delivered to the joint.
The leakage rates measured through junctions using this equipment establish performance limits for joints rather than actual leakage rates that might apply in mid-rise buildings in New Zealand. In a later project will use these leakage characteristics to propose flashing upstands dimensions for these buildings.

3. Typical Flashed Joints Seen in Residential Buildings

There are a large number of joints described in E2/AS1 but the three junctions illustrated in Figure 3 capture most of the essential features of flashings and their application in walls with cavities or direct fixed claddings.
Figure 3. A selection of flashings used in NZ buildings and taken from E2/AS1.
Buildings 05 00130 g003
The three joints chosen for what is a preliminary study are:
  • A Z jointer between direct fixed plywoodwall panels;
  • A window head flashing in a cavity wall;
  • An apron flashing between a roof and a higher section of cavity wall.
Upstand heights in these joints have evolved from field experience although recent changes to extend the applicability of E2/AS1 to an “extra high” wind zone were responsible for precautionary increases to upstand heights in walls with cavities and direct fixed claddings −35 to 60 mm for window head flashings and 75 to 90 mm for roof to wall apron flashings. Another recent change required mandatory hems to the top of flashing upstands used in extra high wind zones. In lesser wind zones, the hem can be traded for an additional 25 mm of upstand height. These were largely precautionary changes ahead of applicable field experience or laboratory results of the type that this study aims to provide. Another significant change that came with more widely adopting cavity construction was the provision for vents in a cavity closer. Vents are potential air leakage paths and an entry point for air carried spray. This project set out to link cladding overhang and clearances in joints with the effectiveness with which the joint rainscreens against water entry.

4. Leakage Characteristics of a Horizontal Cladding Jointer

The leakage characteristics of a plastic H jointer were measured between two cladding panels fixed to cavity battens as illustrated in Figure 4.
Figure 4. Sectional view through an H jointer between two sheets of wall cladding.
Buildings 05 00130 g004
This is similar to the Z flashing illustrated in Figure 3 between plywood panels on a cavity wall except that it does not include a hem now required in E2/AS1 in the extra high wind zone. There are two main leakage paths in the H jointer as follows:
  • Leakage between the up-turned leg of the jointer and the cladding. In particular the significance of the offset space width (w), the height of the upstand and the presence or absence of a hem folded into the upstanding leg;
  • Leakage over the top of the lower cladding past the lower legs of the H jointer—not investigated here.

4.1. Significance of Offset (Air Gaps) between the Jointer and the Cladding
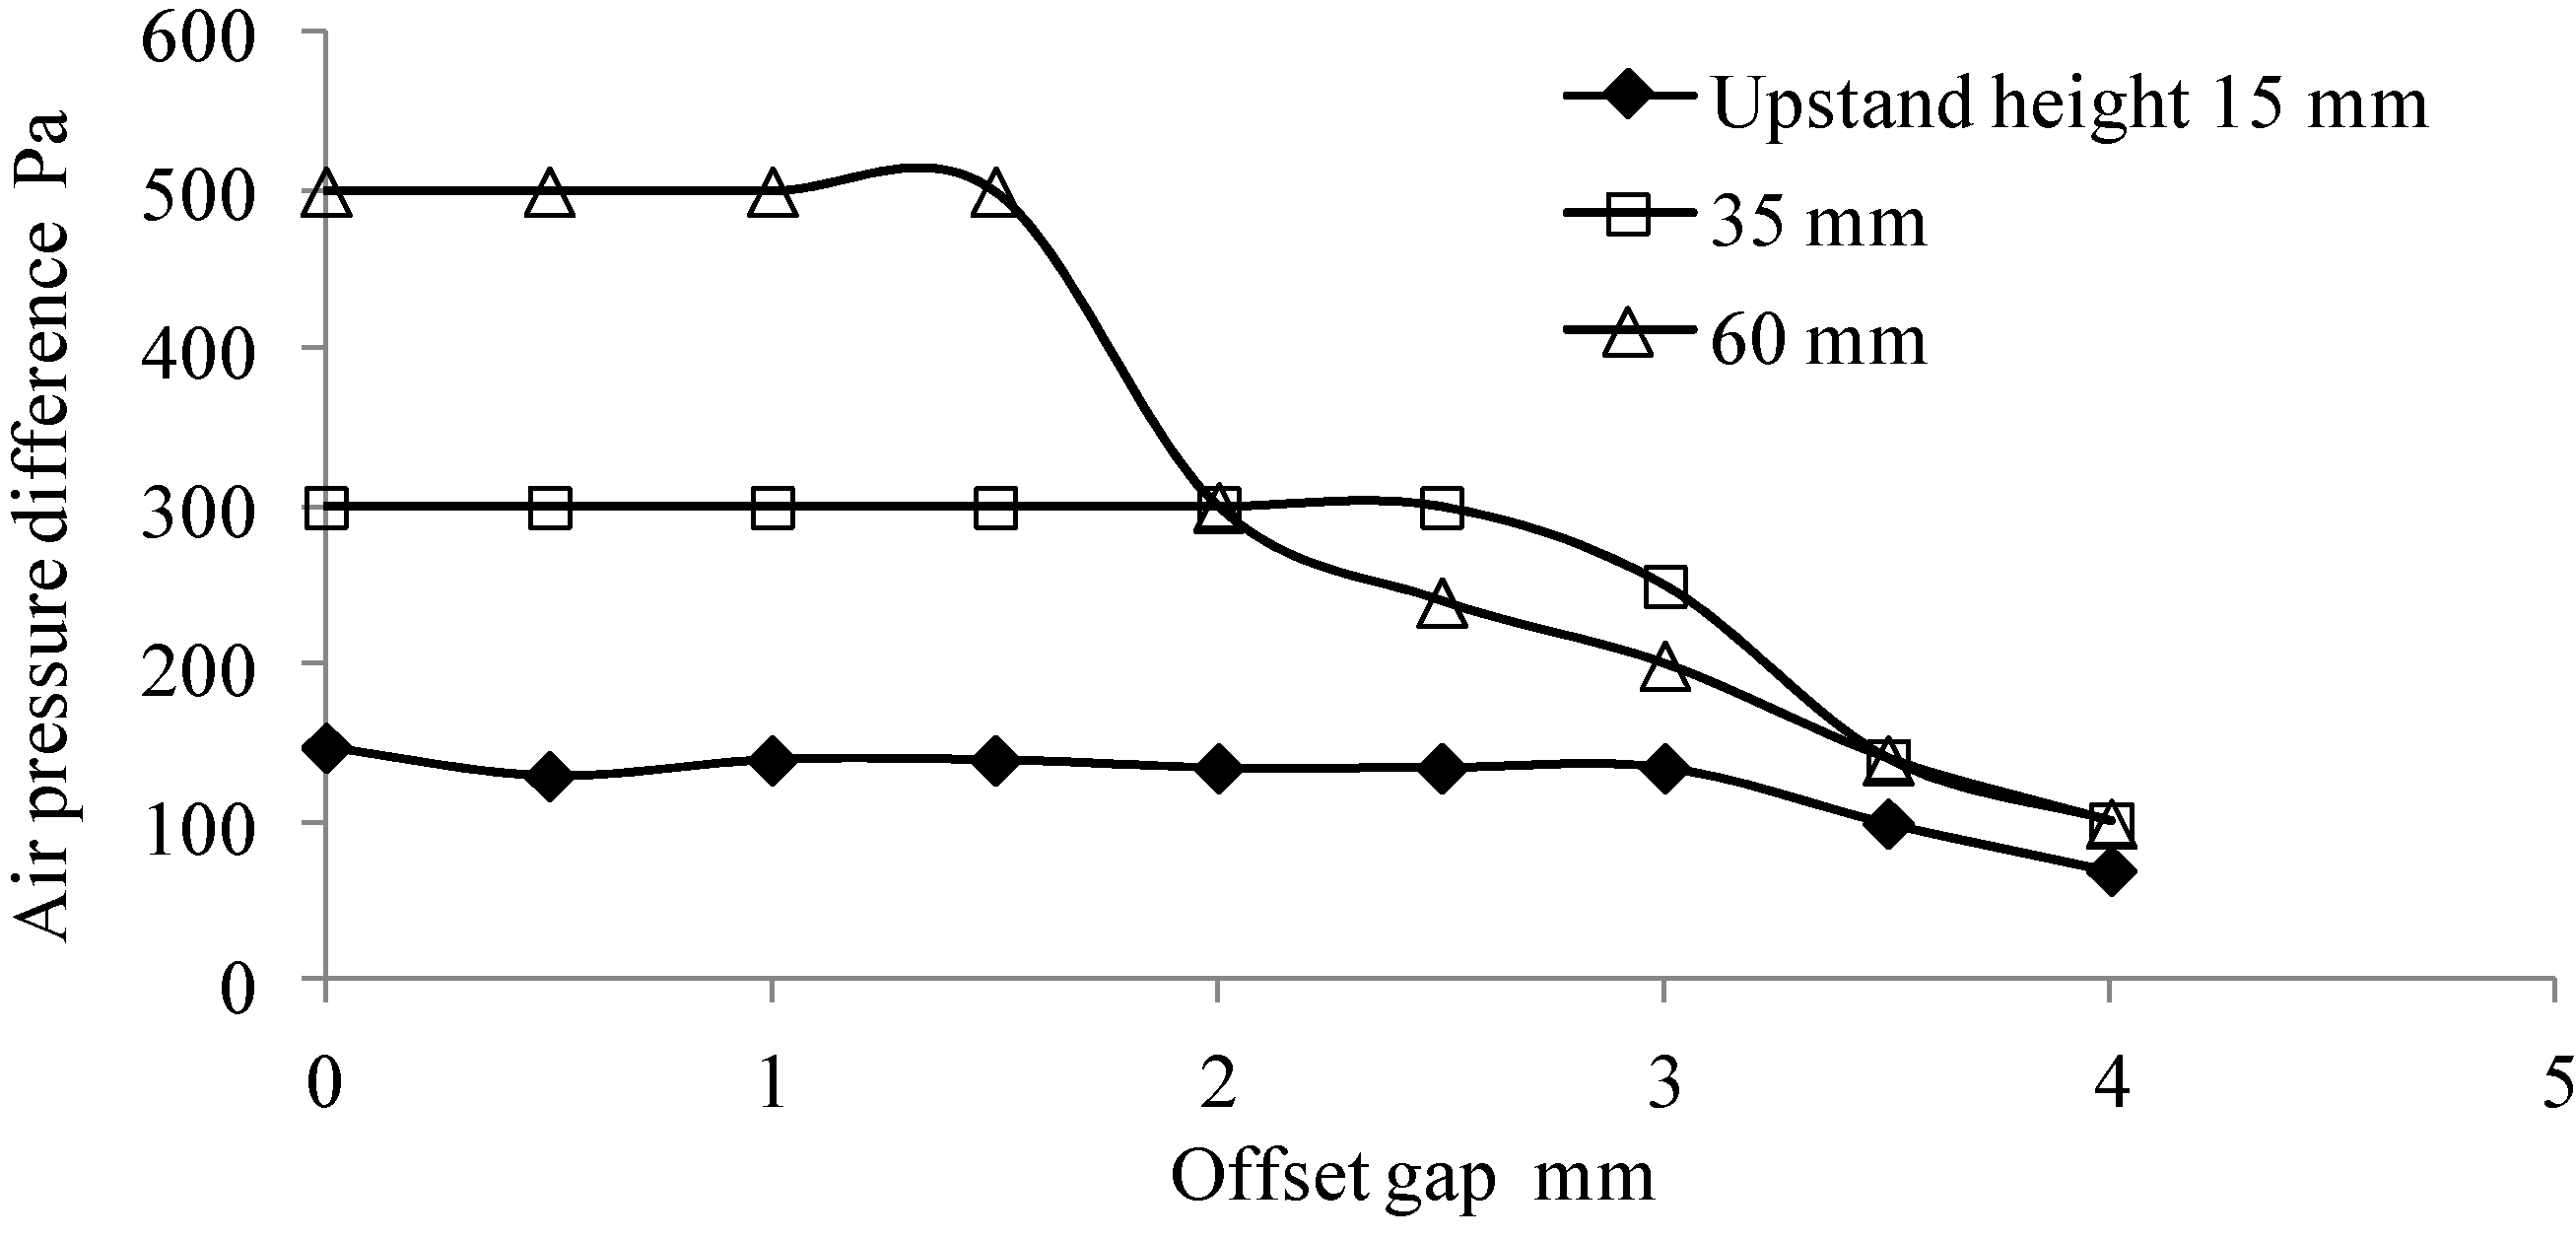
The air pressure difference corresponding to the onset of leakage through the H jointer was measured for a range of upstand heights by cutting down the upper leg of the jointer to 15, 35 and 60 mm. A 530 mm wide section of jointer (spanning between cavity battens fixed to framing) was sprayed with water at 3.4 L/m2 and the air pressure difference adjusted over the range 0–500 Pa until leakage was detected above the jointer. The pressure at which water reached the top of the upstand are shown in Figure 5 as 140, 294 and 500 Pa for the three upstand heights 15, 35 and 60 mm.
The pressures needed to spill water over the upstand were a little higher than this (147, 300 and 588 Pa) because of the additional pressure needed to overcome surface tension. When the offset gap w was increased beyond 2–3 mm, air carried water leakage was observed bubbling above the upstand. Figure 5 shows air carried water leaks occurring at lower pressures as the offset gap is increased for all three upstand heights.
Figure 5. Air pressures at which water leakage occurrs through the H jointer as a function of upstand height and the offset gap width.
Buildings 05 00130 g005

4.2. Significance of a Hem on the Upstand of the Jointer

The PVC H jointer was replaced with folded aluminium flashings having upstand heights of 35 and 60 mm and with and without a hem formed as shown in Figure 3. In this case water leakage rates were measured gravimetrically over a period of one minute by weighing an absorbent strip placed just above the flashing. In all cases the cladding was held against the flashing upstand (w = 0) although the flashings with a hem will have formed a 3 mm gap between and most of the flashing upstand and the back of the cladding. With a 1.3 g/m·s runoff rate over the joint, static pressure leakage characteristics for the 35 and 60 mm high flashings were as shown in Figure 6 to be similar to those measured earlier for the PVC H jointer with the onset of leakage at 300 and 500 Pa. The onset of leakage was found to be independent of the hem, but once again, it was possible to reach onset leakage pressures as high as 370 and 580 Pa by carefully spring loading the hem of the 35 and 60 mm high flashings against the cladding. Although these measurements were conducted using standard construction materials, it is likely that the tolerances achieved in the laboratory were tighter than would be seen in buildings, and that onset leakage pressures in the 100–300 Pa range indicated in Figure 5 for offset gap widths above 2 mm are more likely where no special care is taken to hold the flashing against the cladding. Higher upstand dimensions do bring weathertight performance advantages but only where air carried water leakage can be eliminated with a tighter fit between flashing and cladding. Onset leakage pressures of 100–300 Pa are higher than the 50 Pa “wet wall” test pressure applied in E2/VM1 to the field of the cladding and on this basis there is little argument for increasing upstand heights.
Results of a more detailed study of the 35 mm high flashings applying static and fluctuating pressures are presented in Figure 7. Here, the water leakage rate is plotted against the peak air pressure difference and appears to indicate leakage rates at lower pressures as the frequency of the applied pressure increases. In fact, there was insufficient adjustment in the stroke of the fluctuating piston to keep the amplitude of the applied pressure independent of frequency and so the following additional analysis has been required.
Figure 6. Steady pressure leakage characteristics of flashings with 35 and 60 mm upstands with and without hems.
Buildings 05 00130 g006
Figure 7. Dynamic leakage characteristics of flashings with a 35 mm upstand and a hem.
Buildings 05 00130 g007
Observations showed that water accumulating inside and relaxing out of the joint was in phase with with pressure fluctuations up to 0.7 Hz, suggesting that the leakage rate at any time in the cycle might simply be calculated from the steady pressure leakage rate function and the applied sinusiodal pressure as follows:
The applied pressure difference Δ p = A + B sin ω t
Where Δp = the applied pressure difference (Pa); A = the average pressure (Pa); B = the amplitude of pressure fluctuation (Pa); ω = the angular velocity of the fluctuating pressure (rad/s); L = the instantaneous joint leakage rate (g/m·s) and average leakage rate (Lav g/m·s), where the static leakage function is a function of the pressure L = f ( Δ p ) and the average leakage rate L av =   ω 2 π 0 2 π / ω f ( A + B sin ω t ) d t .
Calculated and measured leakage rates are plotted in Figure 8 for the 35 mm flashing with a hem. For these measurements, the hem was spring loaded against the back of the cladding to improve measurement repeatability, and average leakage rates were calculated numerically using the appropriate steady pressure leakage function.
The slope of the fitted line in Figure 8 is 1.06 with r2 = 0.75, indicating that leakage rates calculated on the basis of there being no significant inertia in the physical system agree reasonably well with measured data up to a frequency of 0.7 Hz. Higher frequencies than this tend to fall outside the power spectrum density of atmospheric turbulence (Kareem and Cermak [12]) and outside the range of frequencies considered relevant in pressure equalisation studies (Burnett and Straube [13]). Consequently the frequency of dynamic pressures applied in weathertightness tests is generally below 0.7 Hz, e.g., 0.2 to 0.3 Hz in E2/AS1. A model that factors in the supply rate of water to the joint, the inertia of water filling the joint and the relaxation time for water draining from the joint has not been pursued.
A similar dynamic pressure response was seen with the same height flashing (35 mm) without a hem. In this case, leakage rates were higher because it was less easy to clamp the flashing against the cladding over its entire length. Once again, there was no evidence for frequency-dependent leakage characteristics below 0.7 Hz.
Figure 8. A comparison of measured and calculated leakage rates with fluctuating air pressures and showing experimental uncertainties.
Buildings 05 00130 g008

5. Leakage Characteristics of Cavity Closer in a Window Head Joint

A window head joint was assembled as in Figure 9 but with the capacity to adjust the position of the upper cladding in relation to the window head flashing. This allowed for some variations in joint dimemsions, in particular, the gap between cladding and flashing (g).
Figure 9. Experimental window head joint with cavity closer and variable joint dimensions.
Buildings 05 00130 g009
There are four potential water leakage paths above the window flashing in Figure 9 as follows:
  • Between the head flashing upstand and the cavity closer which is similar to the leakage path examined earlier;
  • Up through vent openings in the cavity closer as examined here;
  • Past the stop ends on the head flashing—not dealt with here;
  • Under the flashing over the lower cladding (or window head—not dealt with here).
The upstand height of the head flashing above the base of the cavity closer is shown in Figure 3 to be 20 mm (45 mm in an extra high wind zone) but in practice, the upstand on commercially available cavity closers is around 75 mm, significantly increasing the effective upstand against water leaking through vent openings in the cavity closer. The 1500 mm2/m vent area at the base of the cavity closer was made up of a series of slots 3 mm wide by 13 mm long and exceeded the minimum vent area of 1000 mm2/m required by E2/AS1. Water leakage rates through the cavity closer were measured as a function of the steady air pressure across the joint and plotted against the distance travelled up the upstand. This was achieved by segmenting the absorbent layer into 9 parallel strips that could be individually weighed and assigned to a height above the cavity closer. The water spray rate was 3 L/min·m2 as required by E2/VM1 and Figure 10 plots deposition rates against height above the cavity closer.
It is clear that pressures above the 50 Pa wet wall test pressure were needed to drive water through the cavity closer and onto the dry side of the cavity although the leakage onset pressures are considerably lower than for the H jointers discussed earlier. In fact the onset leakage pressures for leakage above 35mm and 60 mm are in the range 100–125 Pa compared with 300 and 500 Pa for the H jointer, indicating that the airtightness of the joint and other aspects of joint configuration are important.
In practice, a significant proportion of wind pressure on a wall will lie across other components such as the internal lining and underlay, especially above a window which effectively partitions the wall cavity for pressure moderation across wet joints in the cladding. Secondly, it is important to acknowledge the value of ventiltion drying in both cavity walls and with direct fixed weatherboard claddings. While the vents associated with window head flashings might reduce onset pressures for water leakage, the pressures are still well above the “wet wall” test pressure of 50 Pa in E2/VM1. The potential for ventilation drying in cavity walls and behind direct fixed weatherboard walls is shown in WALLDRY-NZ (Bassett [11]) to provide the secondry water management needed to cope with even quite leaky claddings and to offset some loss in onset leakage pressures across window head flashings. For joints such as the window head flashing studied here, the water leakage measured and plotted in Figure 10 have yet to be compared with the capacity for ventilation drying and drainage from the joint.
It was observed that water leakage past the cavity closer depended on the runoff rate past the window head. High runoff rates tended to fill the joint, restricting the air flow into the cavity and allowing for wind pressures to carry water through vents in the cavity closer. This suggested that the water leakage rate may depend on dimensional factors that might be optimised to improve the water leakage characteristics of the head joint. The following factors that have been investigated in sequence:
  • Dependency on runoff rate over the joint achieved with a range of water spray nozzles;
  • The gap between cladding and flashing (g);
  • Whether the pressure was applied statically or dynamically.
Figure 10. Deposition rate of water as a function of height above the cavity closer.
Buildings 05 00130 g010

5.1. Dependency of Onset Leakage Pressures on Runoff Rate

The net water leakage rate into the cavity closer was measured at runoff rates 0.6–12 g/m·s over the window head joint (equivalent to surface flow rates of 0.08 to 1.7 L/m2·min on the limited wall area above the head joint). Figure 11 plots the steady pressure difference at which water first penetrated the cavity closer against the runoff rate over the window head joint. During these measurements, the joint dimensions were fixed at those shown in Figure 9 with a 5 mm gap between cladding and the head flashing. Two water leakage regimes were observed. Above a runoff rate of 2 g/m·s, water tended to bridge across the joint, partially filling the space below the cavity closer and allowing water to be carried past the cavity closer at relatively low pressure differences. At runoff rates below 2 g/m·s the joint drained out, leaving an unobstructed air path to the cavity closer. With the vent unobstructed there was some water leakage above the cavity closer at higher pressures due to air carried spray, but the leakage rates were much smaller than those that were measured when the runoff rate exceeded 2 g/m·s.
Figure 11. Pressure difference at the onset of leakage through a window head joint as a function of runoff rate over the joint.
Buildings 05 00130 g011

5.2. Dependency of Onset Leakage Pressures on Gap between Cladding and Head Flashing

The dependency on runoff rate in Figure 11 suggests that the cladding to head flashing dimension might be an important factor in the weathertight performance of this joint and a separate sequence of leakage measurements were carried out to investigate this possibility with the gap width g ranging from 1 to 9.6 mm. Figure 12 shows how the onset leakage pressure increased with larger gap (g) dimensions leading to the joint draining out more effectively. This could be worth exploring more in the context of taller buildings exposed to higher wind pressures and surface runoff rates. Below a gap width of 5 mm the leakage performance of the joint appears to improve marginally, but it has to be remembered, this is at the expense of free drainage from the joint.
Figure 12. Dependence of onset leakage pressure on gap width for the window head joint and the runoff rate set at 2 g/s·m.
Buildings 05 00130 g012
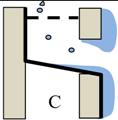
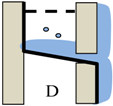
Table 1 gives a pictorial view of leakage through a window head joint with varying surface run-off rates and gap dimensions between upper cladding and head flashing. It shows that increasing the cladding to head flashing gap (g) improved the capacity of the joint to deal with high run-off rates, but this might also be achieved in other ways, for example, by adding a small kick-out to the lower edge of the cladding to deflect water from the opening.
Table 1. A pictorial view of leakage through a window head joint with varying surface run-off rates and gap dimension (g) between upper cladding and head flashing.
CaseWater Leakage Description
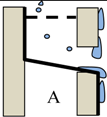
Buildings 05 00130 i001Case A: Gap width (g) = 5 mm and the run-off rate is less than 2 g/m·s.
The gap is not significantly occluded by run-off, and the flashing drains out effectively. Above a wind pressure of 200–300 Pa, air flow through the joint entrains small droplets, which pass through into the cavity.
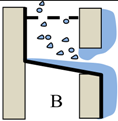
Buildings 05 00130 i002Case B: Gap width (g) = 5 mm and the run-off rate is larger than 2 g/m·s.
The gap is now occluded by run-off, and sufficient wind pressure is supported at the outer joint to drag water into the joint. Higher air velocities through the occluded opening drag water past the cavity closer at pressure differences around 100 Pa.
Buildings 05 00130 i003Case C: Gap width increased to (g) = 8 mm and the run-off rate is the same as Case A (below 2 g/m·s). The gap is no longer occluded by run-off, and the flashing drains out effectively. Beyond a wind pressure of 350 Pa, air flow through the joint entrains small droplets with leakage rates (0.015 g/m·s at 360 Pa).
Buildings 05 00130 i004Case D: Gap width decreased to (g) = 3 mm and the run-off rate is unchanged at 2 g/m·s. Now the gap is almost entirely occluded by run-off, and the flashing does not drain until both the wind pressure and run-off rate relax. Water leakage past the cavity closer is initially low but increases rapidly when the pressure difference exceeds the hydrostatic head distance (d) to the cavity closer.

6. Leakage with Dynamic Applied Wind Pressures

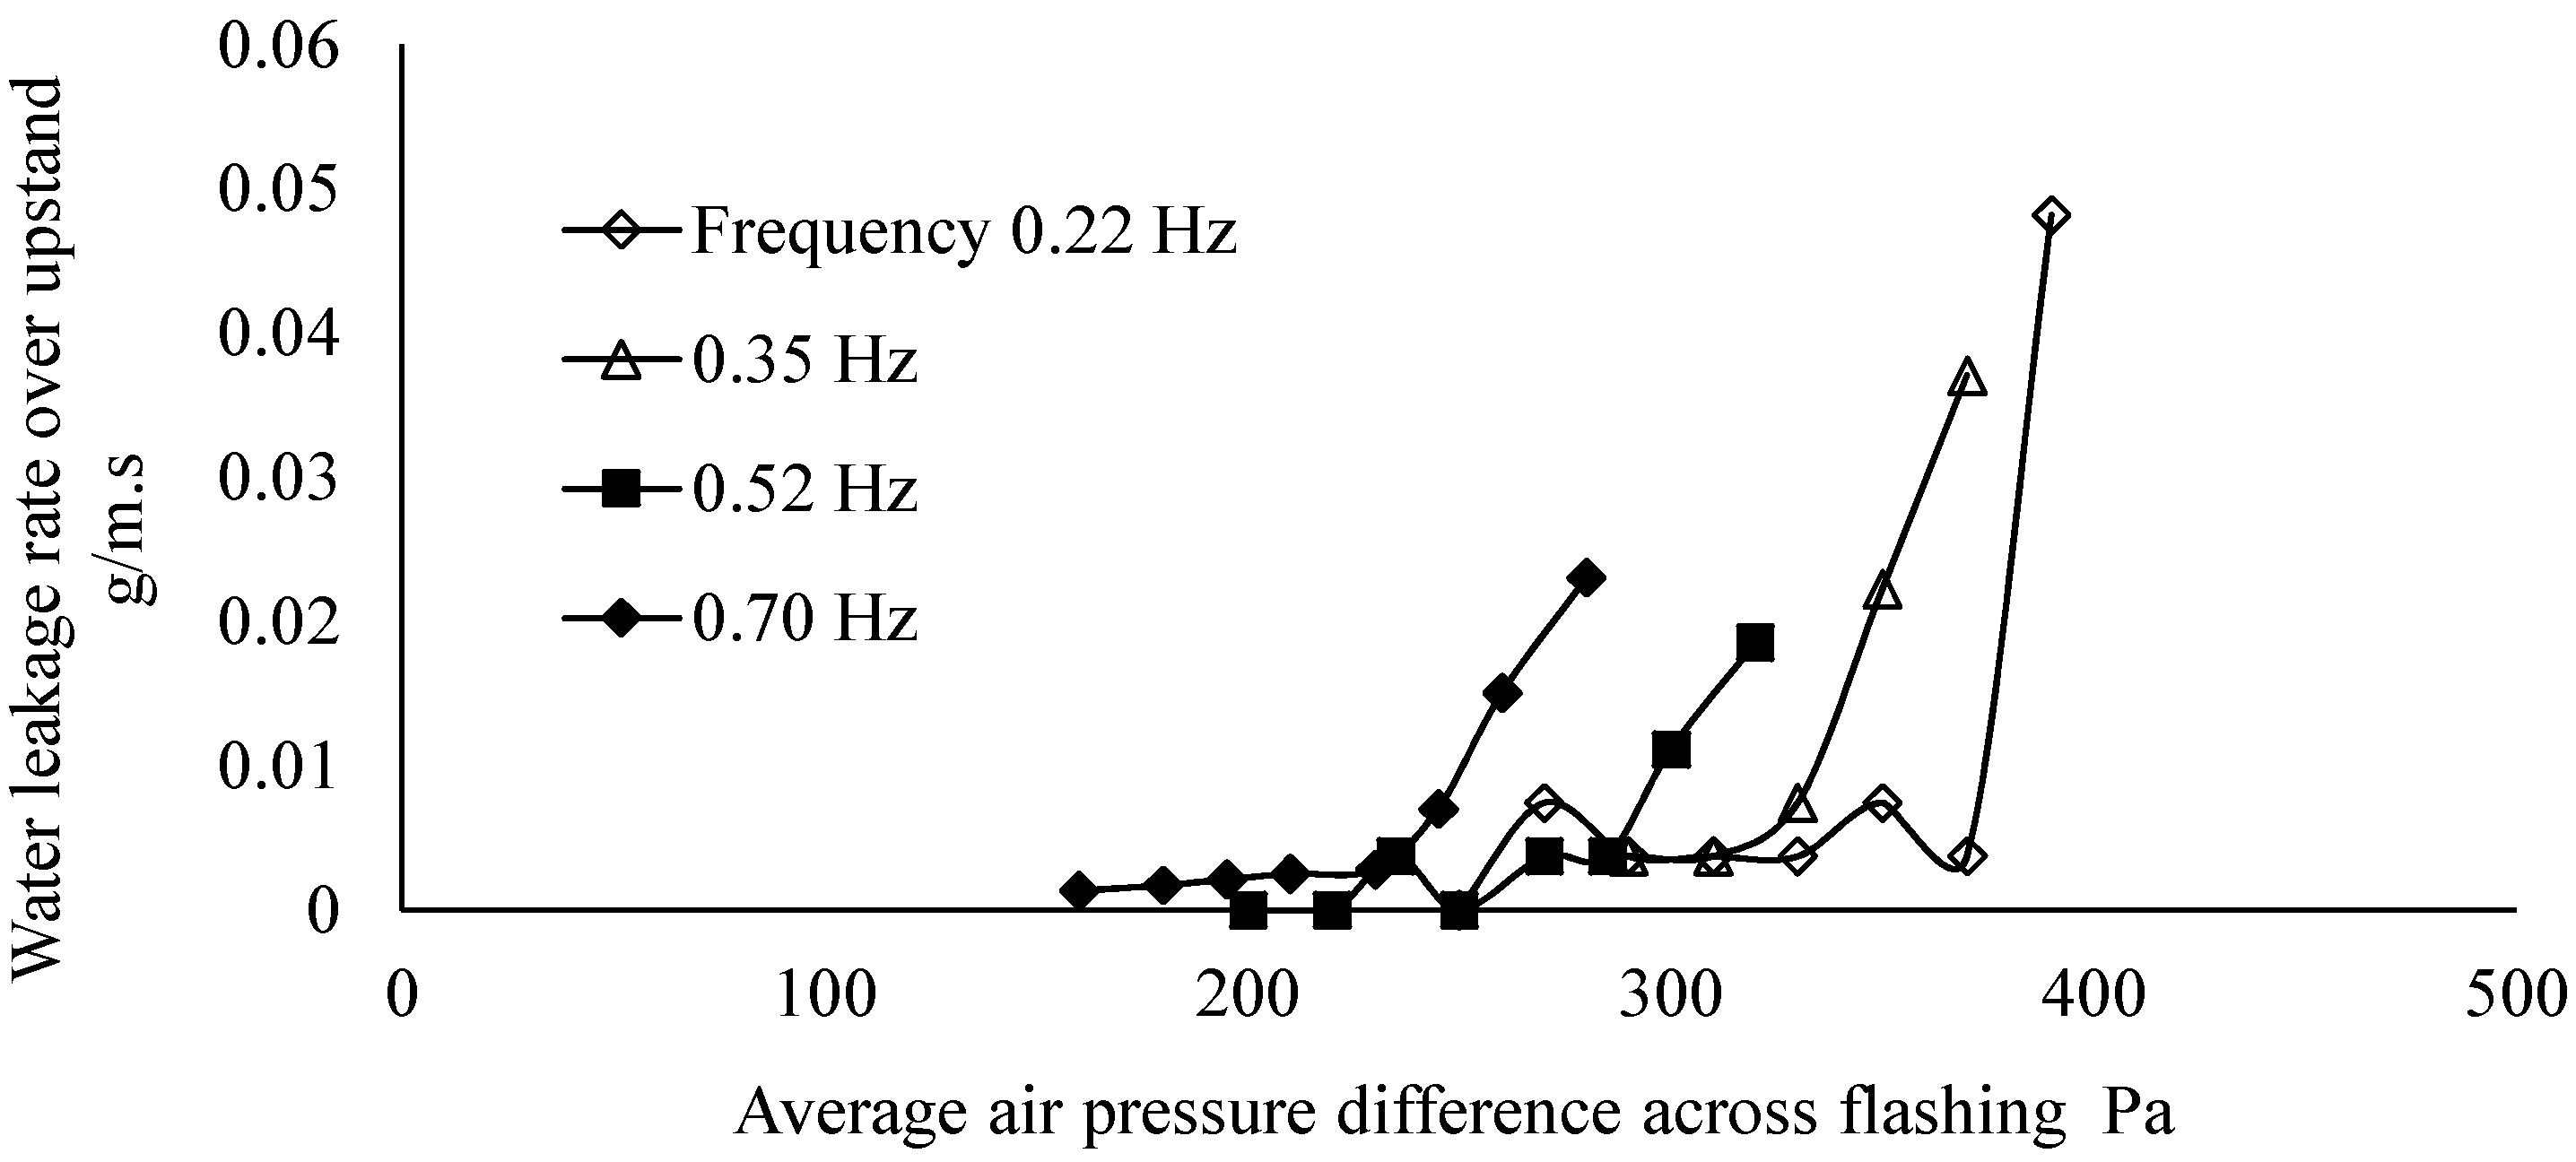
Water leakage of the window head joint was measured with dynamically applied air pressures in the 0–0.6 Hz range. During these measurements, the geometry of the joint was as shown in Figure 9 and the run-off rate over the joint was constant at 2.5 g/m·s. The pressure amplitude was adjusted to fall to a zero minimum where possible, but at low frequencies, there was not enough travel in the oscillating piston to achieve the full pressure amplitude. The water leakage rates into the cavity closer have been plotted in Figure 13 against peak air pressure for five frequencies in the range 0–0.6 Hz.
Figure 13. Frequency dependent water leakage into a window head joint.
Buildings 05 00130 g013
There is a clear trend for the leakage characteristic to converge on the static pressure result at low frequencies, but it diverges towards much lower leakage rates at higher frequencies. This is a different result to that for H jointers between direct-fixed wall panels. Here, the leakage rate appeared to be in phase with varying wind pressures and was insensitive to frequency sensitivity in the range 0–0.7 Hz.
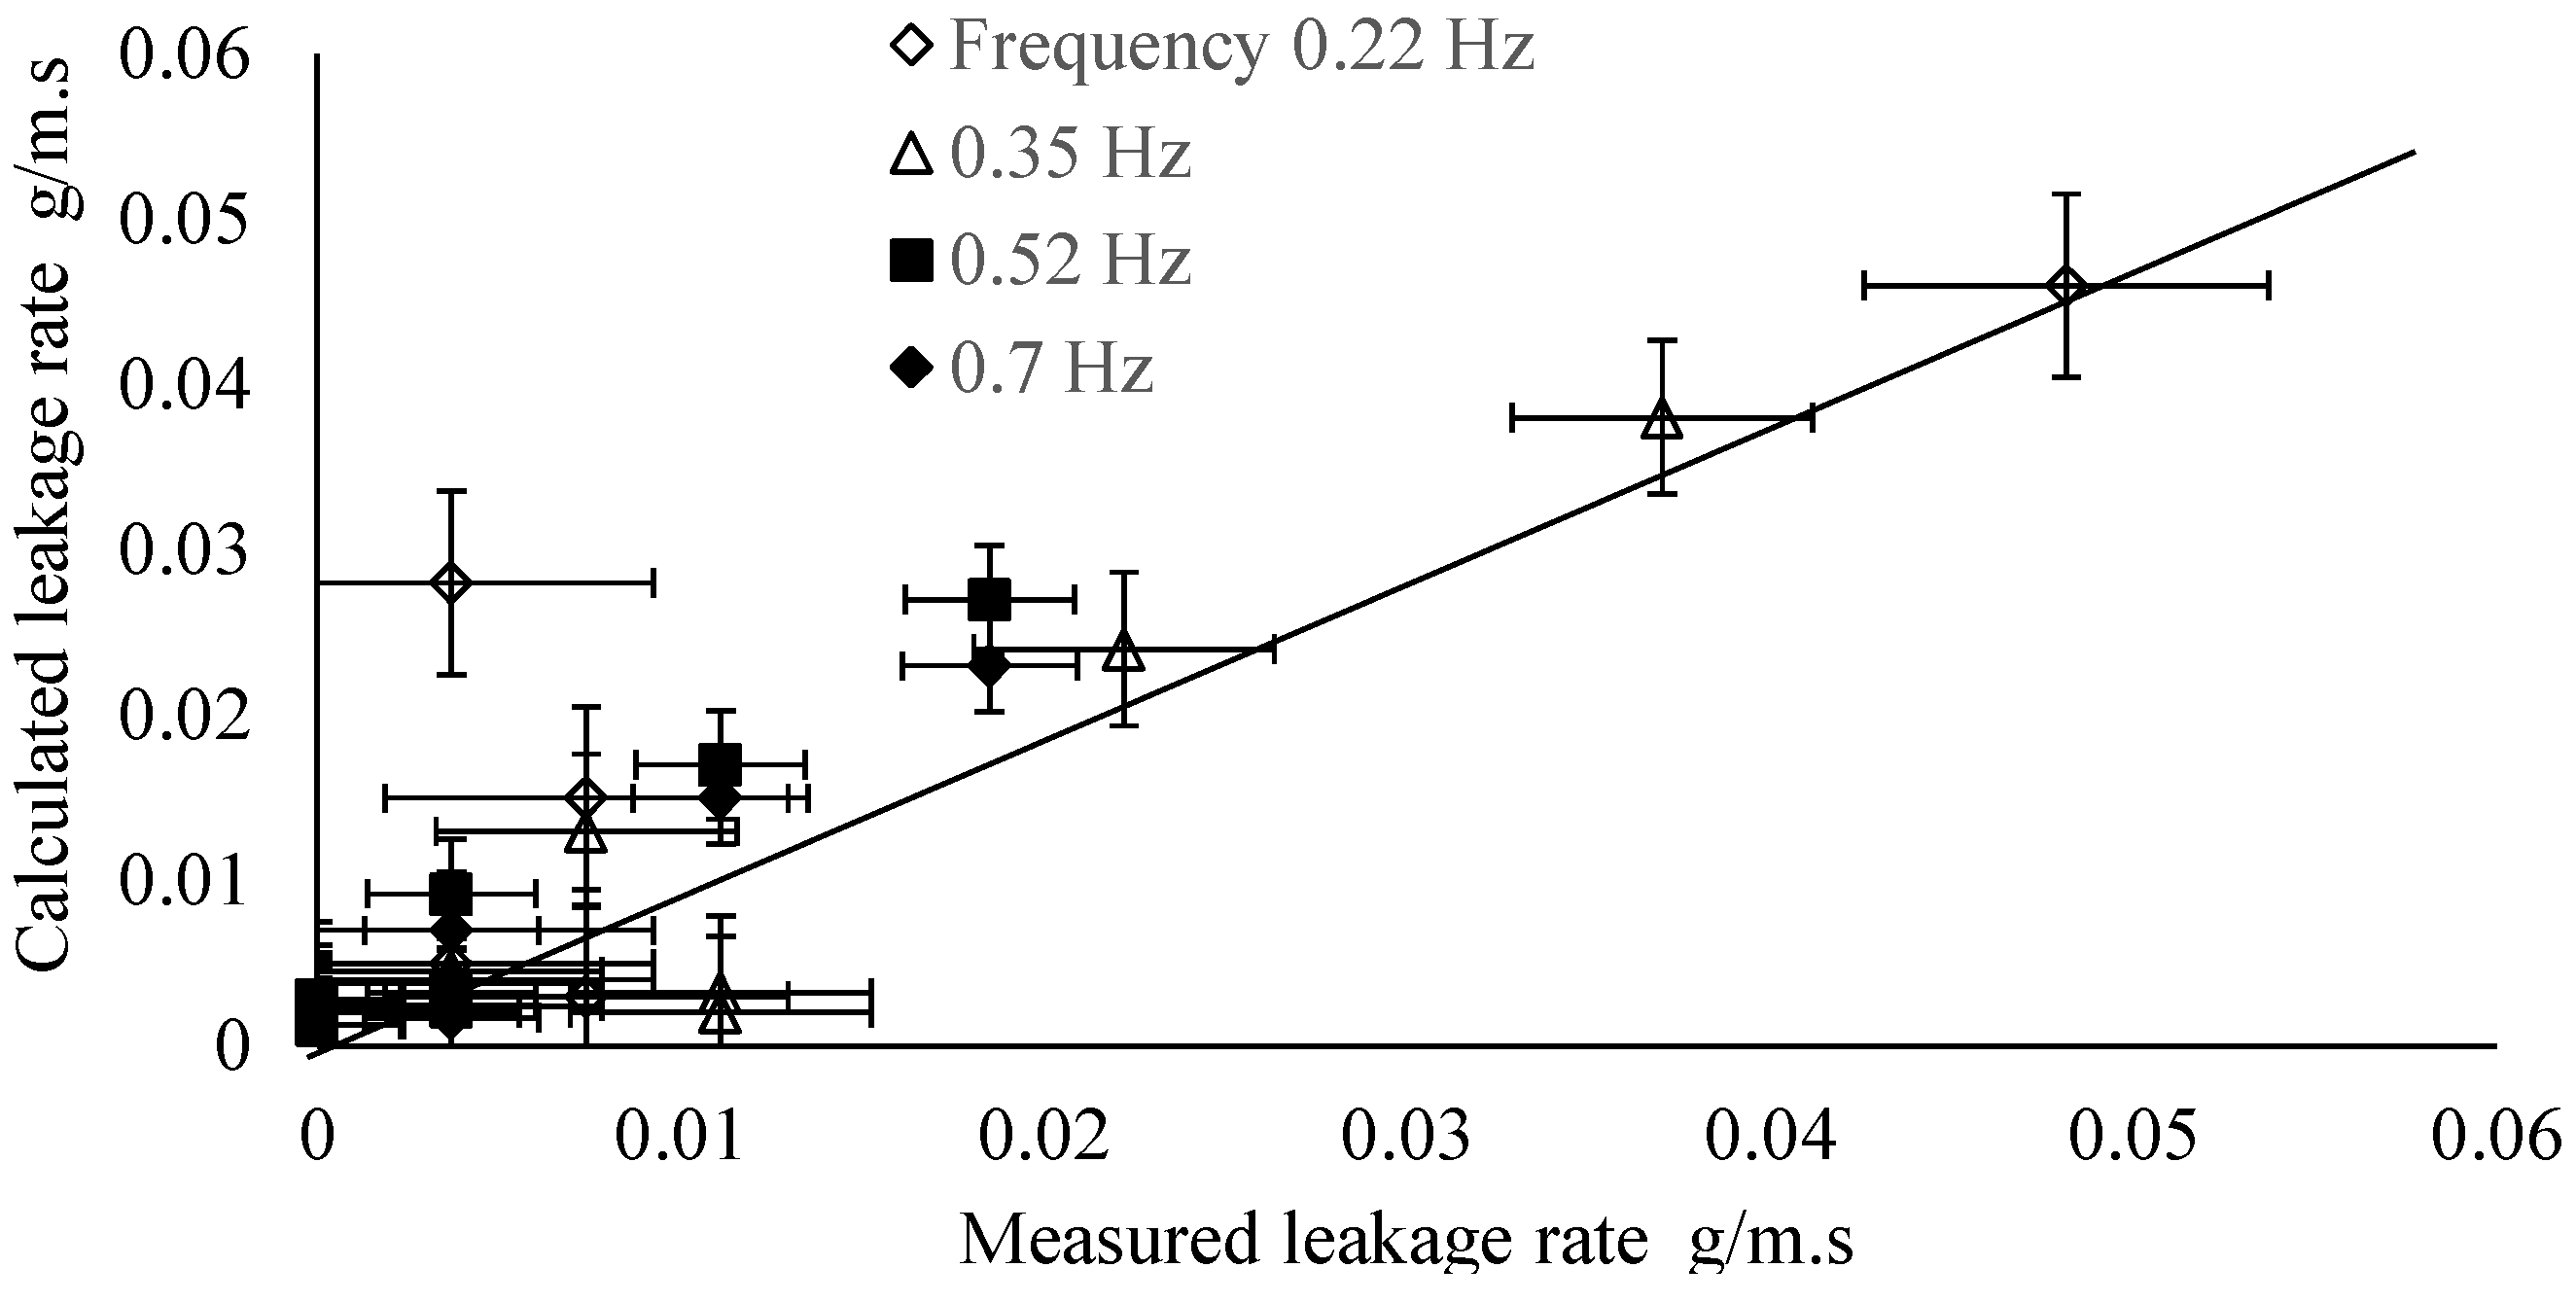
A two-phase flow analysis of the water leakage process in construction joints is outside the scope of this study, but the question of whether the leakage rates shown in Figure 13 can be derived from the instantaneous leakage rates as for H and Z jointers has been addressed in Figure 14. Here, the instantaneous leakage rates over a full cycle have been calculated from the steady pressure results as described earlier and the calculated values compared with measured leakage rates. It is clear that leakage rates for frequencies below 0.4 Hz can be calculated from the steady pressure leakage data, but at higher frequencies, inertia and the time constant of the joint cavity filling and drainage processes will have to be accounted for. There is room for further development of the leakage rate dependency on fluctuating pressures.
Figure 14. A comparison of measured and calculated leakage rates using a simplified model.
Buildings 05 00130 g014

7. Leakage Characteristics of an Apron Flashing to Roof Joint

An apron flashing was assembled as shown in Figure 15 with the cavity wall details given in Figure 3. The apron flashing was simplified to a single piece in folded aluminium with an upstand height (distance from base of cladding to top of hemed upstand) of 75 mm.
Figure 15. Experimental apron flashing joint between roof.
Buildings 05 00130 g015
The complete wall specimen measured 2.4 m by 2.4 m and a portion of the wall cladding was made removable to retreve and weigh the absorbent layer. The leakage characteristics of the joint were measured statically as a function of runoff rate following the methods used for the window head flashing. Then the static spray bar was replaced with a 1 m diameter fan capable of driving water spray at the joint with air velocities up to 17 m/s. This allowed the leakage due to wind carried rain to be compared from that due to runoff.
Four potentially significant water leakage paths past the apron flashing in Figure 16 are as follows:
  • Between the flashing upstand and the cavity closer;
  • Up through vent openings in the cavity closer;
  • Past the ends of the apron flashing—not dealt with here;
  • Under the flashing over the roof deck—not dealt with here.
Leakage characteristics of a 1.2 m section of joint were measured with a 75 mm flashing upstand, a cavity closer upstand of 75 mm against the flashing and a smaller 18 mm upstand against the back of the cladding. The vent area in the cavity closer was 1500 mm2/m made up of a series of slots 3 mm wide by 13 mm long. It was the same cavity closer present in the window head joint studied earlier. Runoff rates over the joint were in the range 3–60 g/m·s.
Water leakage rates were measured inside the cavity closer against the taller leg at the back of the cavity, and directly above the flashing. No water entry was detected above the 75 mm flashing upstand, due to the hem fitting tightly against the cavity closer and effectively closing off air leakage paths in this area. As with the window head flashing, water entered through ventilation holes in the cavity closer and leakage rates were measured at four runoff rates and air pressure differences in the range 0–1300 Pa and plotted in Figure 16. The joint behaved like a window head joint with a large gap between cladding and flashing that prevented the joint from filling up with water at even the highest runoff. The measured leakage rates were small compared to those measured into the window cavity closer and were entirely due to small droplets of spray carried by air flows through ventilation holes in the cavity closer.
Figure 16. Water leakage rates through the cavity closer above a saddle flashing.
Buildings 05 00130 g016

Wind Driven Water Leakage past the Apron Flashing

The specimen was positioned in front of the large fan and the static air pressure measured at the joint. At maximum fan speed this was 168 Pa (equivalent to an air speed of 16.7 m/s and well short of the pressures applied in E2/VM1 for buildings located in very high and extra high wind zones). The E2/VM1 test sequence does not simulate wind carried driving rain and so the measurements described here are at best exploratory. The sprays positioned above the fan outlet delivered 16 L/min or an average of 2.8 L/m2·min over the specimen.
The rate of water entry into the cavity closer was measured as a function of the air pressure difference across the joint and the height of water penetration on the plane of the wall underlay. As in the earlier measurements, there was no leakage past the top of the 75 mm apron flashing but significant quantities of water entered through vents in the cavity closer. The air pressure difference across the cavity closer was adjusted from the baseline 168 Pa in steps of 200 Pa to 1168 Pa using the second fan shown in Figure 15. Figure 17 shows the water entry rate plotted against height above the base of the cavity closer. This time, the water entry rate is plotted on a log scale to illustrate the large difference between water entering the joint and carried through the cavity closer to higher levels by air flows.
There were two processes at work carrying water into this joint. The first, involved rain drops bouncing off the apron flashing and carried by momentum into the base of the cavity closer. From here they travelled no further unless an air pressure difference greater than 100 Pa was present to drive water further into the joint. The second process involved smaller droplets entrained in air flows which travelled higher into the joint. The first process delivered large quantities of water and the second delivered much smaller water flows that were similar to those measured earlier with static sprays. It is clear that wind driven rain is a significant issue with apron flashings that will require further investigation in the context of tall buildings.
Figure 17. Mass flow of water reaching various heights above the base of the cavity closer of an apron flashing.
Buildings 05 00130 g017

8. Conclusions

The water leakage characteristics of three flashed joints from the New Zealand Building Code approved document E2/AS1 have been measured. At this stage, the leakage characteristics are in a raw form and have yet to be interpreted in terms of weather data for mid-rise buildings in New Zealand. Water leakage rates were measured as a function of rain load, air pressure difference (statically and dynamically applied) and, in one case, with the rain load driven by high wind speeds. In all of the joints studied, the water leakage performance limit was found to depend on the presence of air leakage paths, either in the form of vents in cavity closers or due to some misfit between flashings and claddings. For this reason, it is likely that field performance will be well short of the leakage onset pressures measured here for ideal joints. Bearing in mind this limitation, the following conclusions were drawn:
  • H jointers between sheets of cladding. With the flashing close fitting, the joint water penetration up to pressures close to the head of water equivalent of the up-stand height. In more realistic building applications where the gap between flashing and cladding might exceed 2–3 mm, air carried water leaks were seen at lower leakage onset pressures (100–300 Pa) with little dependency on up-stand height and the presence of a hem. Water leakage rates through tight-fitting joints were measured with dynamic pressure in the range of 0–0.7 Hz. There was no detectable effect of inertia, with measured water leakage rates agreeing with calculations using static pressure leakage characteristics.
  • Window head flashing in a cavity wall. The onset of water leakage through this joint occurred at 100 Pa as a result of air carried leakage through vents in the cavity closer. Leakage past the flashing upstand was much less significant when tightly fitted against the cavity closer. Both onset leakage pressures were much higher than the 50 Pa “Wet Wall” test pressure adopted in E2/VM1. The leakage onset pressure was also found to depend on the runoff rate over the joint and on the gap between the cladding and head flashing. In fact this gap might need to be increased to cope with runoff rates on tall facades. The dynamic leakage characteristics were quite different to those at static pressures, unlike the case for H jointers. Leakage rates at frequencies above 0.4 Hz were over predicted by the simple instantaneous pressure model and will therefore require a model involving the inertia of water in the joint and the filling and drainage time constants.
  • Apron flashing between wall and roof. The 35 mm gap between the base of the wall cladding and the apron flashing prevented high runoff rates from accumulating water in the space below the cavity closer. As a consequence, only very small air carried water leaks through the cavity closer were detected up to very high air static pressure differences. Leakage rates a hundred times greater were measured with rain driven at the joint by 17 m/s wind speeds. The new water entry process involved large droplets bouncing off the apron and entering the base of the cavity closer where water could be carried deeper into the joint by air flows. No leakage was detected between the apron flashing upstand (75 mm above the base of the cladding) while it fitted tightly against the cavity closer upstand.
This study identified opportunities to improve the leakage characteristics of joints to handle runoff and higher wind pressures for buildings outside the scope of E2/AS1. This is, however, only a start for more comprehensive studies that will be needed to include fluctuating wind pressures and wind driven rain into the water leakage functions for joints. These studies will also compare measured leakage rates with the capacity for drainage and ventilation drying.

Acknowledgments

This work was funded by the Building Research Levy. The assistance of Mark Hearfield, and Roger Stanford is gratefully acknowledged.

Author Contributions

Both authors contributed to the experimental work and the first author wrote the paper.

Conflicts of Interest

The authors declare no conflict of interest.

References

  1. Bassett, M.; Clark, S.; Camilleri, M. Building Weathertightness Failures—Associated Risk Factors. In Proceedings of the BETEC Symposium on Building Science Applications at Syracuse University, New York, NY, USA, 5 September 2006.
  2. Hershfield, M. Survey of Building Envelope Failures in the Coastal Climate of British Columbia; Report for Canada Mortgage and Housing Corporation; Morrison Hershfield Ltd.: Ottawa, Canada, 1996. [Google Scholar]
  3. Approved Document E2/AS1 External Moisture; Department of Building and Housing: Wellington, New Zealand, 2005.
  4. Hazleden, D.G.; Morris, P.I. Designing for Durable Wood Construction: The 4D’s. In Durability of Building Components 8; NRC Research Press: Ottawa, Canada, 1999. [Google Scholar]
  5. Approved Document E2/VM1 External Moisture; Department of Building and Housing: Wellington, New Zealand, 2005.
  6. Ishikawa, H. An Experiment on the Mechanism of Rain Penetration through Horizontal Joints in Walls. In Proceedings of the 2nd International CIB/Rilem Symposium on Moisture Problems in Buildings, Paper 2.3.1., Rotterdam, The Netherlands, 10–12 September 1974.
  7. Herbert, M.R.M. Open-Jointed Rain Screen Claddings; Building Research Establishment Current Paper 89/74; Building Research Establishment (BRE): Watford, UK, 1974. [Google Scholar]
  8. Herbert, M.R.M.; Harrison, H.W. New Ways with Weatherproof Joints; Building Research Establishment Current Paper 90/74; Building Research Establishment (BRE): Watford, UK, 1974. [Google Scholar]
  9. Lacasse, M.A.; O’Connor, T.J.; Nunes, S.; Beaulieu, P. Report from Task 6 of MEWS Project Experimental Assessment of Water Penetration and Entry into Wood-Framed Wall Specimens; Research Report IRC-RR-133; Institute for Research in Construction, National Research Council of Canada: Ottawa, Canada, 2003. [Google Scholar]
  10. Sahal, N.; Lacasse, M.A. Proposed method for calculating water penetration test parameters of wall assemblies as applied to Istanbul, Turkey. Build. Environ. 2008, 43, 1250–1260. [Google Scholar] [CrossRef]
  11. Bassett, M.; McNeil, S.; Overton, G. WALLDRY-NZ: An Educational Tool for Rain Loads and Ventilation Drying in Cavity Walls. In Proceedings of the 5th International Building Physics Conference, Kyoto, Japan, 28–31 May 2012.
  12. Kareem, A.; Cermak, J.E. Wind Tunnel Simulation of Wind-Structure Interactions. In International Instrumentation Symposium, 24th, Albuquerque, N. Mex., May 1–5, 1978, Proceedings. Part 2; Instrument Society of America: Pittsburgh, PA, USA, 1978. [Google Scholar]
  13. Burnett, E.; Straube, J. Vents, Ventilation Drying and Pressure Moderation; Canada Mortgage and Housing Corporation Research Report; Canada Mortgage and Housing Corporation: Ottawa, Canada, 1995. [Google Scholar]